Transcripts
1. 001 The Intro: Hello everyone. My name is Marcus and I'm a three-day outstanding
blender teacher with over a decade
of experience. In this course, we will
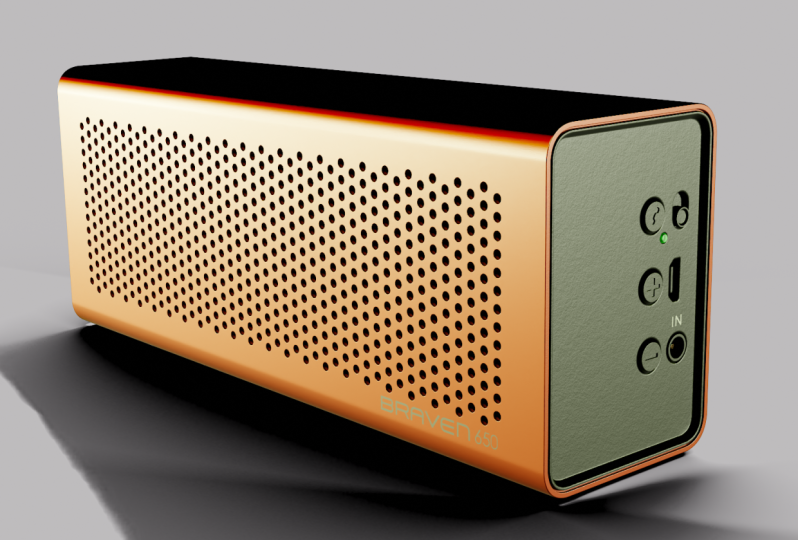
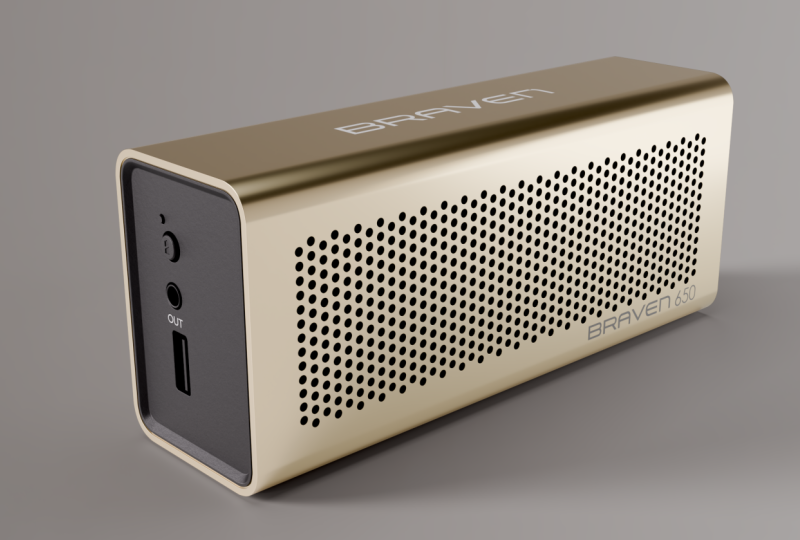
learn how to create the present 650 speaker device from start to finish
using Blender, we will learn how to
model from scratch, how to prepare the material, how to set up the environment,
how to render it. This course is for
intermediate and advanced blender users who wants to create highly unrealistic,
accurate product designs. If you like it, you can join me now and let's get started.
2. 002_Starting with the aluminum cover: Now we start with the new scene. I want to delete all of these. I don't want them. I will hit a. Before I do that, I just want
to activate the screencast. Okay, It's n. And now whatever
pattern I will oppress, you will find it right here. Alright, I will hit a to select everything
in the viewport, and I will hit X to
open the Delete Menu, and I will hit D to confirm that we'll start
with the front view. I will hit one and
add two plane here, Shift a to add in. I
will add the plane. After you add the plane here, a menu will pop up, just open it from here. And here we have an options
regarding the plane. Here we have the alignments. I will align this to the view like that. And now it's done. The size of this
device according to the USB ports we have are here. It's not so big. It's about
15 centimeter or even 20. So I will change this to be 20. I will go to the
unit setup here in the skin properties in our teaching this to centimeters because I want
to work with centimeters. Or if you like, you can
work with millimeters. And let's change this
to 20 centimeter. After scaling this
to 20 centimeter, I will take a Coby
maybe right here. And I will put this
in new collection, just hit M it from the
keyboard and hit New to create a new collection that
will call this device. After that, I will hide
that device for now. Let's focus on this
one. Alright, I want to start with these halls. So let's see how can we do it. I will tap to go to this mode, and I will add one H right
here using Control R. Yes, it's Control Alt and
hover over here. When you see this line here, just to confirm it and heterocyclic to live
this in the center. The same thing here, Control
R and do the same scenario. I will go after that
to the face mode, hit three from the keyboard
and grab these hit, I, make a small insect like this to get our
answer like that. Okay? Somebody like this.
Alright, after doing that, I want to use the Bowl Tool to convert the
secret to a circle. But if you don't
have this bowl tool, you should activate the
other one that comes with the blender because you go to the Edit and
then Preferences. And in the other section, search for pool tool. Sorry, notable to
loop tool L double 0 P loop tool and activate it. After doing that
in the edit mode, when you hit right-click,
you will see it here. Now I will use it. After
you select these faces, heterocyclic enqueue a circle. Now, that's all help to
convert this to circle x, f and delete this. We don't need those x to augment to access
the Delete Menu and F to choose faces to delete the phases. And now it's done. Alright, That's very cool. Now I will duplicate this
multiple times. Trying to create this pattern. I will start. I will change the
transform pivot point to the active elements
because I want to start with, I want to use the active vertices to help
me to create the pattern. In this time menu,
I will activate the snub vertex and I will activate the center for
that switch to the vertex. So I will make this
one the active. Just hold, shift and
click and click again. As you can see now
it's become brighter. That's mean it's active. Vertex. Hit Shift D to
duplicate. After you do that. And hold Control N star, this one right here,
as you can see now is duplicate
it and snap here. Shift up to be that
multiple times. And now we got this. Now
you can grab all of these. You can hit a and make
this swan active, heavy bleeding, a Coby. And I will snap this
one right here. Now, I got this after that. Grab those, all of them, and the X-ray mode,
that will be better. Then let's make this
one the active. So I can snap this here. Hold Shift to make
this one active. Click again, Shift T, hold control and
status bar right here. And now you can, as you can see, now we got this pattern. After doing that, I
will merge all of these vertices together,
activate automatic, or you can hit a to select
all the vertices and then hit M to open the marriage menu and choose American by distance. Let's will help to merge all
these vertices together. We have this vertex. You can get rid of it. Just hit X and then V
to delete the vertex. Okay, now I want to
select punch or vertices. And the selection should create a path from
when you duplicate it. So just be careful. I will link rob these faces, and I will include those who can go to
the face mode three. So let's include this here and include this one
and this one as well. And this one and this
one, this phase as well. Kay, like that. So now we got this shift D
to copy this one right here. So this is what we want. I will hit P to separate this
and then S to surprise us that P to open the separate menu and choose selection to
supply the selection. I will tap out. So
now we got this. Now, if you duplicate
this multiple times, you will create the pattern. And this is the easiest way to create a haphazard like that. Now if I e.g. if I tab and go to the vertex and let's select
club all these vertices. I will make this one the active, and I will activate
the automatic. So we can mark these. When you duplicate this, I will just shift the cobe
this to this direction. As you can see, I
have a battery. And if I grab all of these, and if I make this one
the active Shift D, As you can see, I can
shift our multiple times. And now we have the pattern. So this is the pattern units
that we should create. This. After that,
we don't need this. We can delete them
it real quick. Okay, I will put
this right here, and let's start from this point. I will tap to go
to the edit mode. And now let's create
our password. Hit a to select all
these vertices. Make this one the active. Just hold, Shift,
click and click again, and then have the hold Control to snap is
small right here. Now, let's duplicate
this multiple time shift R again and again until
you create these holes, you can count the
number right here. We have 13 holds.
Here we have nine. I will hit Shift D. Make
this one the active, sorry. Make this one active, share with d. Let's take another copy here. Or this number looks okay. I've started doing all of that. Hit a to select all of these. Maybe this one, the
active head heavy to their Coby hold control
and stab it right here. And then you can
hit Shift to add multiple time to
create this like that. Even if this become
long, don't worry. Okay, accepted. Now
we've got this. After that I will
unhide the device. And this is the size,
as you can see. Now we could scale this. Alright, in the front, grab this and hit S to scale it and
make it very small like that. Alright, so it's 20 by 20. I will scale this to the z. So let's kill this
to the z like that. I want this to take the
hip of the device and I think maybe we should kill that a little
bit more like that. And I think this will be
enough, something like this. If you want a numbers, that's okay, we can do that. E.g. you can go to this side
menu and go to the bottom. And here you can control
the x and y and z. So x and y, because it's 2D and the y, we can change this. Sorry, Let's see
what we have here. We change these two centimeter,
alright, centimeter. I will change this
to ten maybe or maybe ten or maybe eighths. Yeah, eight by 20. And let's move this
up right here. And now I will look it up
the same skill to even more. And he'd key to
align it like that. Maybe it's killed us a
little bit more like this. And let's put this
one right here. You can put the origin dots right here at the
corner so we can control this mesh
from that corner. To do that, just tap after
you select this pattern. And they grabbed this
vertex and hit Shift S to bring the 3D cursor over
here. And then tap out. After that hit
right-click and choose Convert to set origin, origin to 3D cursor. That's will help to bring the origin to the
projection of the 3D cursor. And after that we can scale according to their position
of that coordinate. Okay, just keep in your
mind to leave some distance from this point to this point because this area
should be beveled. As you can see, Pebble
Creek, this point. And we have this distance, so we need to get
something close. Well, that's mean
we should change the position of this corner. It should be e.g. right here, and it should be moved from this points
around here, maybe. Then after that
you can scale it. So let's kill this, like that. Something like this. I
guess it will be okay. After that, we should
delete some holes from here tab and we
are in the x-ray. Already. In the X-ray, I will grab these
vertices, I guess, and I will hit X to
delete the faces. And now we got this result. It's not so 100% accurate. I mean, there was, this holds the rectangle,
but that's okay. We can fix that later
or we can ignore it. Alright, Now we got this. After doing that, now we should grab these vertices
and extrude them. Alright, now I will hit Alt, click on these edges to
select them like that. This part, it's a little bit annoying, but
we could do it. So let's pick these
ages like that. Write something like this. For some reason. Blender
doesn't pick the edges. I don't know why it keeps selecting these. Just like that. There is
another way to do this. You can use the
cancer or method. Just keep holding control and that's will make the
process a little bit faster after selecting these
edges, as you can see. Now, I will make one of these H, the active edge, e.g. this one that
activates, and I will flatten all of these selected
edges to this Activate. Just hit S to the
Z and zero Enter, and that will help to do that. I will do the same for
the rest. Grab this. Rob these here. I've started that hit S
to the x is zero Enter. Now it's done. The same thing for this side as z zero Enter and now done. And let's start from here, or it can throw lane, sorry. Okay, let's do that. Rob these agents. Let's add, sorry. This here. Keep holding Control
and select this as to the x zero Enter. And notice that we have
an a problem here. I think we got
some problem here. Alright, so let's
avoid this GSA club is vertices hit J to
reconnect this here. And I guess I can, I think we can select these
edges and get rid of them. Just hit Control X and
delete this vertex. That's okay. By the way, most
of these vertices, you can dissolve
them or you can e.g. marriage at center
to get rid of these. Okay? Just set m and choose Merge and Center after you
select these vertices, okay? Something like that. Center, those as well. And for these right
here at the corner, just say key twice
in New York here. But make sure to
activate automatic. When I hit G twice, I will slide the H like that. If you Hickey alone, you
can move with budget-wise. You will slide. After that, push it to the next
vertex and it will be marriages because auto
America is activated. So let's do that here. M and merge and center. And here we have multiple edges with tried to get rid
of them like that. And I guess these vertices, they should be merged
here and get why is America more air crop those over here with M N
Merge and Center and heat wise turmeric
those right here. And on the other side, if you want to clean our result, Let's do that twice. Bookstores gateway is
push this as well. And the crop those AEM
center, center. Okay? And those as well. And this right here. Alright, now, G twice, sorry, c twice, Mary
Kate, why is marriage? If you want to do the same thing on this side, go
ahead and do it. Or if you like,
you can ignore it. If you aren't even
faster way you can use married by distance after you select all of
these vertices, e.g. I. Will grab all of these
vertices like that. Now hit the M2, open the marriage menu and choose
marriage by distance. But just be sure not to
select these vertices. I just made a
mistake right here. I just want to
exclude this survey, Alt Control and keep
deselecting these vertices. All right, Now it's
done. After that hit M and Jewish
American by distance and push the distance a little bit until you merge
all of these together. Four or maybe five. For me, it's worked
as very cool. Now I got to clean our
result and the same thing, it should be done on the site. Voltage of the endless add these the same thing and marked
by distance and done. Well. But now after doing that, I will select all of these edges on the
side and these ages. Because I want to put the
origin.in the middle. I want to put the
origin.in the middle because I want to center the pattern in the center of
the rectangle of the device. As you can see, I guess selected these outer edges and I will hit Shift S and two
is to select it. The 3D cursor will
be perfectly in the center after that
tab out and then hit right-click and set
origin to 3D cursor to move the origin dots from this point to the
center right here. Now I will align this to
the center of the device. Just select the device and hit Shift S and choose
color swatch selected. And now select this pattern and hit Shift S and Q is
selection to coarser. Now we just move to the
bathroom a little bit. After all of that, now we can select the pattern, the extreme mood, maybe tab. And now I will grab all of these ages like
that and start with this side key and extrude this up and snap
it with this corner. And I will grab these hedges, or maybe let's start
with this side as well, E and X through this and hold Control and
stamp right here. Let's focus on
this side as well, Alt click and rabbits, and it's e to x through
the 12th cancer. Let's stop this right here. Alt click here. E,
extrude hold Control. And now we've done the guy,
we don't need that anymore. You can delete facets. Okay. Let's exerts of the
X-ray mode just hit Alt X. And now let's take a look. In general, the
result is beautiful, but I think the holes are big. L little bit, maybe we
should make them smaller. I will tab and I will go to the selects up here, right here. And let's see what we have here. Here. We have in the selects, all by, here we
have non manifold, just love this so we can target the holes after that
hold Control N, Let's de-select this
ages like that. And after doing that, we could go here to the transform pivot point and we could change this
to the individual origins. So we can scale these to
the individual origins, hit S and scale those
together like that. It's just a little
bit, not too much. Right now after that I will tap and I will hit a to select
all of these faces. And I will hit Shift D to
take a Colby. Just move this. Colby a little bit on this side, and this will be
something like this. And now I will only cover up these edges and
grab those y here, and then hit
right-click and choose a break to break those. And the same thing on this
side, the color up this. Let's touch with
those right here. Hold control and grab this. And let's see, grab
those over here. After selecting these edges. The same thing,
right-click and break. You can hit Alt
click few like to cut up the a club and hit F
to create a big face here. And that's okay to do that. The same thing here, alt click and then hit
F to credit big face. After doing all of that, now is the time to bevel these edges like this and then hit control
V to bevel them. Alright, so as you can see, I'm trying to bubble this, but I'm getting something
weird as you can see here. Well, that's because of
the face orientation. If I tab out and go
to the overlays, and if I activate
face orientation, everything is blue except
for this one is sprayed. That's mean this
phase, it should be fixed to fix that tab, to go to the Edit mode a
to select all the faces, and then hit Shift and to
recalculate the normal. Now everything becomes blue. Tab out and then go back to the overlays and turn
off face orientation. Grab this and Tab again. And now let's pick
these edges again like that. Then this pebble them. Just be careful when
you build this can throw me to bevel. In Toby. I think there are T therapists
try 30 year 30 centimeter. I think this number is good, or maybe 35. 35 looks cool. And for the segment, Let's see how many edges
we could add here. Three or maybe four, maybe I think for OB, okay? Because we will use subdivision surface to
make this even smarter. Okay, this result looks cool. I will accept it and I will add Support H loops for these corners to get
even better results. These edges will
make the shading looks even more professional. Let's add one right here
and one here as well. Maybe one over here. And maybe one right here. Okay. Actually thing
we don't need these, face it for now. I guess we don't need them. Let's see what we
can do with this. Let's delete them, hit
x and then f to get rid of them, tap out. And now I will add a
subdivision surface. And that's we'll make
this nice and smooth. Right-click Hey, this mode
to make this events motor. That's very cool. I think we can increase the number to two to make this even smoother. But let's see if we
really need to do that. Oh, it's for close
shorts, we need that. So I will increase this to two. Okay, now it's
become super smooth. I will make some changes here. E.g. the mat cap, I will choose another one, e.g. this one. I think this
one looks better. And the options here
I will activate the cavity and the type I
will switch this to both. I guess want to see
the holes better. Now when you
activate the cavity, you can get better results. Maybe the rate, we don't
need this to be so high. Somebody like this point for this option right here
can define the edges, will highlight the ages. I don't want that. Now
this result looks better. Now, even if you zoom like
that, the results vary. It looks very cool. Okay,
So this is the first step. After doing all of that, I will apply the
subdivision surface just said can throw
light and light. And now it's done, it's applied. And I want to give
this a thickness. I will use solid
defy to do that. Go to the modifier as solidify. And now we have something here. Hit right-click into shelf-life. So we can see the
thickness here. Even thickness activators. And I just want the arm. Well, this option right here, it will delete the faces, the interfaces you can
see before and after. So I just want their ems. Thus it, the thickness
will be 1 cm. It looks cool. 1 cm. I will accept this and then
hit Control a to apply this. After that, I will tap and go to the edge
selection mode alt click on this edge loop. This a little bars will alter, you have to click
because we want to put these acres in a little bit. Okay, to do that. By the way, when you zoom, you will have this view cuts. If you want to avoid this, just open this menu
here and go to the view and the clipper start, just change this to 0.01, maybe make it very small. Now you can zoom
in, as you can see. Now I will slide these edges. I will hit key twice. And instead of pushing this, lack of that hit
Alt and push these and make this a
little bit thicker. Maybe something like
this. It will be okay. Let's take this side. Alright, I think the result is
flipped on this, so I will cancel
what I did here. I will, I will focus on
one side, k key twice. And let's push this
inside like that. Maybe even more, I guess key. And then Holton put this
inside a little bit. Okay, It looks cool. This result. Now I will
go to the right of view. I want to pick this, these edges and I will give
them the same Extrusion. I'll click and go to the
to the left, I guess. Yeah, left. And then
he key twice to slide this and hit Alt
and move these like that. Thank you. Them this same
thickness as a record. Now I will hit E to extrude
this inside like that. And the same thing
on the other side, I will hit Alt click to grab
this H and then a T and posters to the x-axis like this. Here I guess we
could I don't know. If this error should
be flat or notes. I think it should be flat. I guess we have another
level we should create here. I will hit Control R Total,
sorry you're not here. I want to hit Control R to add one H right here
and extrude these faces. Go to the face Alt click crop. These faces hit Alt E to
open the extra menu and choose extrude along the normal and extrude
these just a tiny bit. Let's do that again. Alt
E extrude this extra, these, a little bit like that. Maybe these phases, I can pick them and move them a little
bit here, E to the X. Okay. I think that's correct now. And then the same thing on
the other side can throw our to add an H. And let's move this a little
bit right here. Go to the face Alt click, and then Alt E and extrude along the normal
endless six through these a little bit.
Something like that. You can go to the right
to check the thickness. Maybe we need a little bit more, so I will change this to two. Maybe two maybe or 2.1, I guess. Sorry, 2.1 to 0.03. I think that's accurate. Record. And after that, we should create this
piece of plastic. Will select these faces. And I will hit Shift D to
take a couple of them like that in radical actually the
covalent sample is in there, we'll hit P and then
as two separate it. And now it's separated. Tab out the endless
cycle of the scene. You Coby and tab and
go to the H Alt, click on these edges, and I will hit F to create
a big face like that. And with this face selected, I will hit key to the x and moving these and hold
Control to snap these edges. Now these two
phases are aligned. Now switch to the
Face Selection Mode here the three and
the grab this face. I will answer this a little bit. I make a small sit like that. And I think we should we
should answer this again. I like this and I will hit Alt S tuberculous inside a
little bit like this. Maybe. It's something like that. If you want to fix the
distance between these edges, you can do that for the corners. E.g. you can focus on
these edges, I guess. Okay, to do that,
after you select this, right-click and choose space, that will make the
distance even. This is something optional, you can ignore it if you like. Let's focus on
this area as well. That's very cool. Okay, here
we have a lot of acres. We don't need them anymore because this egg is
straight and flat. And here we have a lot of ages. We can get rid of
them, gets sick. Most of them like that. Just be careful because
I will hit Select to isolate this and go to
the left or to the right. And let's select these edges. Halt have to enter
at least like that. The same thing on this side. Let's add those. After we select these just hits. It just go to the Select and
select loop and close loop. After we grab this, hit Control X and dissolve
them like that. We don't need them anymore.
Even these edges on the side, you can hit Alt. Shift click to grab this and hit Control
X and dissolve them. And those over here like that and hit Control
X to dissolve them. We got this nice and
clean result right here. If you'd like to mirror this. If you want to fix
one side and mirror, Let's go ahead and do that. That's something
nice and simple. And all what we need to do
is just to find the middle. The middle area here. Do that so you can e.g. sorry, you can crop this age and maybe this H right
here and bring the 3D cursor between
them in the middle of it. You have to SN to select it. And now this is the middle area. And if you'd like,
you can create an H in the middle
to cabinets to, to go to the right
or to the left. And then it's k to activate
the knife tool and make a cut hold Shift to make
the cut in the center and then C to cut through and
confirm the cat head space. And now we have a new
cuts in the center. After that, you can
delete half of this and the X-ray mode drop-off
except for get rid of it. And then after that, you have the ability
to fix one side and whatever you will
do here will be reflected on the
other side when you use then mural with the file. So now first let's
count the number of the vertices according
to the selection. We have 22. And let's see, oh, how many vertices
we have here. We have 22 as well. So that's mean. The
number is equal. Okay, in this case,
I will look up these edges like that
again and fix the distance between them to get even better results
of those over here, when you combine,
hit right-click into space to fix a
distance between them. And the same thing should
be done all this side. Grab this over here. Right-click it into space. Now whatever we did here, it will be reflected
on the other side. Just add mirror modifier. Alright, so now I will tap
and grab this H right here, and I will hit Shift S to bring the 3D cursor in the middle of this age tab
out and then right-click. And let's change the
position of the origin dot to the position
of the 3D cursor. Right-click insert origin,
origin to 3D cursor. Now we can add a mirror to the, I think, to the y terms of x. Here's y and lipids. Alright? Something. I think we should apply
the rotation first. Because, okay, let's go to
the objects properties. And here the viewport display, I will activate the axis. Alright, so this is
the y and the z. We should working with
the Z naught e to the y. But to fix this, you can hit Control a and apply
the rotation. That's well, fix
everything. After that. You can go to the modifier and use the y directly
without any problem. And now it's done. It's like to exert and let's make a comparison. Let's see. Everything is in place and I take the face orientation
before you go any further. So this piece should be flipped, tap it a captain, the fluids. Now the result looks better. After doing all of that, I will take another copy and
move it here on this side, just selected and then hit here with the n. Let's
move this over here. And mirrors. To mirror this, you can go to the object
and go to the mirror and mirror this to the
global x, I guess. Yeah. And then he can move this in the correct position.
Right here. You can go to the top and kick the can make a
comparison between them. Let's move this over here. If you want, gets
even better results. You can tap to go
to the add mode, select all the vertices, all the vertices you should
speak to the vertex mode. Then you can make one of these vertices that
active and stab. It's e to the x hold control
and stopped right here. Alright, That doesn't work. Let's go here and we should
choose actor, sorry, just switch this
to the active that transform it with zero point and make one of them be active. This one, e to the x hold control and
start with this one. And now it's aligned. Top ups facets. Now
it's perfectly aligned. Record. Alright,
let's check the site. It seems like we got some
problem with the mirror. Maybe some aqueous
should be moved. To avoid this, you can Alt click on this edge and hit S to the S to the y-axis. And then zero. And third, to flatten this H
to the Y. Alright, that's will help to fix it. And to avoid overlapping
claims, activity clipping. Now, after doing that, grab one of these Hs
and try to move it to the y. Alright, if you activate the clip, that's what prevents
have a gap right here. I will turn this off for now. When I hit key to the y, as you can see we have I can move this age to open the door, to close it or to close it, but I will have an overlapping. Now if I go to the wireframe
mode and move this, as you can see, we
have some overlapping. But when I activate
the clipping, this egg will snap to the
center of monkey and move. And as you can see, it
will be snapped like that. I want to do the same
thing for this side. So let's go here and grab
this top, grab this edge. And then it's, as you can see, we have some overlapping. First I will hit S to the
y is zero enter and I will activate the clipping hanky now and move this to the center. And now it's fixed. I think
that's it for this video. In the next videos, we will start with the details.
3. 003_Starting the left side details of the device: Hello again, we'll
come back here. Okay, Let's continue modelling
the brave 650. Proven. Proven. I found a new images showing us what's
going on on this side. That's something cool. So let's
see what's the next step. Let's focus on this
side so we could create these details here. There is something that I didn't realized until I
downloaded the new images, that the speaker is
not thin like this, it should be a little bit wider, as you can see
according to this, a image right here, it's almost like a square. That's mean we could fix that. Fixing this, that's
not difficult. It's very easy. Just
select all the details. And then you can go to the left or to the right, hit three, e.g. and just tap to go to the Edit Mode and
switch to the vertices. I will select half of this, go to the X-ray and
the top half of this. After that, just all these
vertices a little bit to the y. Alright, something happening here and we'll see
why that's happened. As I think we have mirror modifier still
here. Let's apply it. It can throw light,
just hover over here and hit control
a top lights, and thus will be now go back
to the right or to the left. And select all of these
pieces and tap to go to Edit Mode and switch to the x-ray analytic Rob half of this
and I will hit G to move. Let's move with, I think we could move these
vertices right here and I think that's
the correct size. Something like
that. Okay. And now tap out and anxiety
of the x-ray. And now let's go back
to this area and start adding these details. So here we have 32
holes or three holds, a small one, and we have
this rectangular shape. So let's start with
the rectangular shape. Inside the blender we have this tool we can use to create. This will help you
to create objects, to create a timber Lee ground
or grid on the surfaces. So e.g. I, a few. If you click and hold, you will find multiple
options here. I will choose the Add
Cube and hover over here. And let's click and drag
to create this box. It's like 3D mice. And credit cube goes like that. When you complete hit Shift with space and
go back to select box. That's it. Now let's,
let's check this. By the way, I can import
these images here and I think that will be more accurate if we bring this image. If you have an image like this, you can import it
and you can kick the proportion of the geometry of the result that you made. Now, I'm going to import this image right here
inside the blender. So let's go to the
left or to the right. I want to focus on this area. So this is the lift, I guess can throw a three and
yeah, that's correct. Now I will bring this image. Click and try again. Listen
ports right here is very big. It gets hit S and
scale it like that. Now let's make a comparison. All what we could do is just
put this right here, e.g. the scale, Let's until the edges are aligned with our geometry. And that's almost it. But I like to scale this according to the
position of the 3D cursor. Because if I scale now, scale will work from center out. And that will make the process a little bit difficult for us. So in this case, I will move the image, e.g.
let's put this right here. And I will put the 3D cursor
over here or here, e.g. is hold Shift and with
the 3D cursor here. And now I will change the transform we would
point to 3D cursor. And now when I scale is killed, we'll walk according to
the physical server. So let's kill this
at tiny bits until this area or this part of
image aligned with our mesh. Now we got the size correctly. Now if I hit Z to
go to wireframe. Now I can see where should
I put these details? As you can see now, our boxes small as compare
it with the image. That's mean we could
move it right here, e.g. and Tab to go to the
ethmoid endless, make it bigger or
a little bit by moving these vertices like that. And because now we have
the image already. Now let's create
the circle tab out. And I will put the 3D
cursor over here, end here. Maybe it's Shift a to add in. I will add a circle. After you add the circle, rotate the circle to
the view like that. And as you can see,
it's very, very big. So just zoom in here
and let's change the radius to 1 cm or
make it very small. And this increase the number of the vertices to 50 vertices, I guess to make
this super smooth. Maybe 16 if you like, and manually scale it like that, and that will be enough. Let's move this a
little bit like that. And you can take another
Kobe feel like right here. And I think this should
be bigger or what? When I scale this,
as you can see, scales still work according
to the 3D cursor. I want to change this
back to Bounding Box. Now let's kill this like that. And for the small
one at the end, Let's put this model here
and scale it like this. So we can see the positions
of these circles. Now, as you can see,
everything is cool. I will live image or
before we hide the image, let's focus on this area
because I just want to match the level with
the bevel of the age. As you can see, this is the
bevel tab to go to the end, I will select these corners
and I will hit Control B. To bevel this. Let's add multiple
edges right here. And let's go to the left, sorry, and let's
make a comparison. Okay, the results make sense. Here we have 0.14. Maybe we can add 0.13, would be, make it
smaller a little bit. And I think that's it. Now let's go back
to Solid mode and let's make this a
little bit taller. And I will use this
as a catheter. And by the way, when I
moved this face, this face, when I move this phase, I got some merging
happening right here. That's because of the
automatic is active. This option Sometime cause us some problems when you
remove some vertices around. So just keep in your mind
when you activate it, go to the option. And here we have the threshold
of the automatic king. The threshold to
something very tiny, like 0.01 becomes
very, very smooth. Now let's hit Control Z. Now when I move this again, these vertices
will not collapse. So let's make this
taller like that. And I think that's it. And the image, I think we can hide the timber
live for now. And let's put this deep inside, hit G and let's push
this maybe right here. Okay, Somebody like this. And I will cut the surface. So in this case, I want to use a new add-on. Let's activate it together. Go to the Edit and Preferences. Let's search for
bowl tool this time, be double 0 L. Okay, this is important
when it comes to train or make Union
or this stuff. It's fast, faster than added, modify or right here
and make the operation. So I will activate this end users to
access the Bowl Tool. You can open this menu and go to the edits and
open the poll tool. You'll find all of the
options right here, or you can hit Control Shift
B to access the Bowl Tool. And this case, I want
this to be the cutter and this surface
should be the targets. So select the Katara hold, Shift, grab the targets, and then hit control shift
P and QRS difference. And now we have this
whole after that. Let's tap and let's see, grab these edges
like that. Okay? And hit E and
extrude those back. You can push them back
to the x like this, and you can hit F to fill this
area with face and assets. What about this? Here we can use another scenario to
create these holes. I will look up these
circles together. Can go to the wireframe. We'll leave it as will be
easier for us to pick these. And I will move this out
just a tiny bit like this. And go to this,
go back to solid. And I will hit Control J to make them
one geometry and go. Maybe we can just take them
out so we can control them. Alright, I will select this and the surface and
tap today that. So now we are in the edit mode. And I will add these
hold control and pick, pick these circles, and
just pick correct view. E.g. I. Could choose
the left view. Because I want to project these on the surface so it can throw three to go to
the left of view. Now, take this out. Now go to the Mesh. And here we have
neighbor projects. Just choose this
option NEF project. Now we just have projected
these circles on the surface. And thus all after that tab
out, let's focus on this. And now I can go to the face, select these faces like that and putting them inside E and push these deep inside like
that as the key to the x. That's it. That's very cool. Okay, Now, maybe we can see, Let's start with
the easiest one. Maybe this button right here. So let's start with this. I only grab this circle, go to the H and
select the circle. And let's bring the 3D
cursor over here and I will add another circle. You can just copy
these vertices. Hit kept the end. Taking this right here and then hit P.
And then as two separate it, I think that's where
we fast or tab out. And let's focus on this one. I will bring the origin
dots to the middle of this. He says radical x so we
can scale it correctly. Set origin, origin to geometry. And now we have the
origin dot here. And I will turn off the gizmo. Okay, the axis. We don't need this. And from the left view I will scale
this just a tiny bit like Let's make it
smaller and then the whole somebody like
this, it will be okay. And I will tap and
select all the vertices or older ages and hit F
to create a big face. And then we'll extrude
this like that. And explore that
one more time like this and just scale
it like this. And I think this will be,
it's now go to the face. Silicon with Ecolab is hit
XF and get rid of this. After That's it. Control L after you select one phase to select
the linked faces, and then hit Shift
Enter to calculate the normal incus regard
problem with the normal. When you'll be satisfied
with G. And let's move this inside and it
should be like this. So this is the first part. We've finished with this one.
Here we have this button, we should take care of
it and create this. I'm going to do is
I will tab again and grab all of these
edges like that. Go to the H, Alt,
click alte optical. I can keep doing that
until you select all all the acres heavy
to take a copyright here, p and n as two, separate
it out to tab out, club this right-click again to geometric to bring
the origin right here and turn off the axis. And it should be smaller. So let's move this inside
and scale it like that. And let's make a comparison. You can go to the left, feel like maybe we can scale it a
little bit more like that. And that's what we do. Now. Tab and hit F to fill this. And after that we should fix through this a
little bit like that. Because through this again
like this and hit S to scale this are either very cold. Now is the time to create
this pattern right here. Thing is battery. Or
I'd go to the left. And let's see how
can we do this? I think we can use the
image itself in this case. But it is not clear image. We can see something here. Alright, to do that, I can cut up one of these vertices and hit Shift
D to put it right here, e.g. it's easy to throw
this over here. And maybe we can
extrude this over here. And here and stop
it with this one. They cut off this
with this hit F. And let's hit Control R
to add one vertex here. It can't hold Shift V to
the bolus to two like that. And I will look it up
this city to throw this up the curb, this hit X to delete the edge. And we should, I have
another H cutting this area. So let's see how can we do this. I will hit Control R to add one vertex y here and
one vertex here as well. And I will move this up here
and take this one down here. I will look it up
this with this hit F and I will hit Control
Shift V to Buffalo. These are sorry, you don't need to connect them to be and
Bevel them like that. Okay. Maybe those I can move
them down just a tiny bit. Now, I will grab
this, this edge. And this edge. Now we'll delete them, hit X
to delete the edges again. And now we've got
this with this hit F, This will this hit F. After that, I grab all
of these vertices. It can throw Shift V to bundle
them together like that. And let's increase the
number of the vertices. Make this smooth and nice. Alright, that will
cancel that because this area is the sharpest
area we have here. I will target those first. It can throw, you have
to be endless painful these now I will
select the rest. Can throw TFTP,
something like that. It will be nice. Now, hits P. And then as two separate
these assets, we've finished. I will take this out here. Let's move this out y here. And let's go back
to solid. Fill up this tab to go to Edit Mode. Just rotate the view a
little bit so we can grab these control and add
these. Go to the left. And then let's take this y here, go to the Mesh and
then projects knife. Now it's project,
as you can see, the top outs club this tapping with these
phases selected, just hit E and push those
deep inside a little bit. And now we're done. All
right. What's the next step? Now I will add a level of
modifier above this level. The scale in case
we got problem with this scale and increase
the number here. 23 vertices, if you like. I think we could
have a variation. I think this area should receive a smaller level as
compared with this and this. So we could take care
of that in this case. Here we have the limit to angle. I will change this to weights. We'll work with the weights, working with the wave. That's mean we should target specific ages and give
them a specific weight. So to do that, we should go to the
atom right here. And the edit mode when you
tap targets, the edges, e.g. these edges and those y here, we will pick them like that. And we should give them
a specific weight. So go here to the mean devil, wait, and let's add e.g. for these, how many we
should add maybe 0.3 for. Now for this area, 0.3, 0.3 is not going to work. Points to maybe one. Alright? Let's accept 0.1.
End the amount here. It's too much ten centimeter. Let's add one or this
add 0.1, 0.1, 0.1. Maybe. It's something not
make sense happen here. Let's try to fix it. The amount that I added
here is not good number, so I will reduce
it to 0.01 maybe. Now it's become
very, very small. 0.05, maybe. This number looks
fine for this area. Yeah, This one looks okay. What about these edges? Crop these edges like that and just select them
like the attendees. We could give them
a specific quotes, even those right here. Drop those and let's
add maybe 0.1, 0.1 for this arrow,
it looks cool. You can increase the
number of the edges. And this will be after that hit right-click and
choose hit auto smooth. And to get better heading, as you can see, the
heading is garbage. Go today heading and
activate harder than normal. And now that is, it
looks very cool. If you are not satisfied
with the results. Alright. I think we
should any phrase level of the level
when we bevel this. But okay, it's so
far, it looks cool. We got something here and not make sense and an OH
has gone on here. F then to recalculate
the normal line case, we got a problem
with the normal. Let's turn this off. I just want to see what's
going on here. Let's go here and activate
face orientation. Alright, see we have
some that shading. Let's see maybe that
could be fixed by the by moving this up for an
increase in the number here. Yeah, that's correct. We can increase
the number here to maybe one, maybe yeah, 31. Okay. Let's go back here and activate that level. Yeah,
That's very cool. That's nice. Now we can see that we are
finished with this button. Now I can put this inside. We have problem is
hide the image. Alright, so we can say that we are finished
with this one. Let's jump to this one because
it's easy to finish it. I want to copy the
level from this one. To do something like this. Select this first and then
hold Shift, grab this. Okay? And now we have the
boulevard here. You can open this arrow and
choose copy to select it. Now if I select this, I have the devil here applied. But as you can see, we don't see any result here because
we didn't add it. Waits for these,
for these objects. I will tab and go to the edge. I will select this
with this and go to the team here and
go to the mean, the volt with I will add 0.1. Hit Enter. We can see something.
This n increases. Alright? Maybe we
should apply the scale, I guess, yeah, we
should apply the skill. Tab again, endless ads, 0.1 or 0.05, maybe
somebody like that. Let's tap out sporadically. Kate auto smooth. And now
the result looks very cool. Maybe we should make
it even smarter. Tab, and this 0.0 hates maybe. Alright, now that is
how it looks better. The Odeo Jack, I guess. The same thing. Just tab and go to the age, Alt click, Alt Shift
click to club this hip. Move this out right here, maybe p and Ben is to
separate this top outcrop, this right-click or
kin to geometry. And turn off axis. I
don't want to see it. Go to the left scale, this just a little
bit like that. And then tab, select
all the vertices, hit F and then hit I for insert. Let's insert this a little
bit like this and then hit XF and get rid of this area. Can throw an art to add
two edges like that. It's rotate the
wheel and add to. And then I think we should drop this k and scale of I guess like that maybe
and Alt Click on this one. I scale this down like this. Alt Shift to crop
this and key to move this to the x-axis
out like this. When you complete this, hit E and push this deep inside, I'll click on this one and it's E and push the steam
inside as well. I will hit Select to isolate this so I can see
the result here. I will look it up those
together and hit the x is zero. Enter to align them together. And manual I will
move them like that. This distance looks cool. I guess. Let's make
a comparison here. Does that make sense? Or maybe I think we could
make it even thicker by, by selecting these phases. Alt click in the crowd the selection control
plus like that. And maybe I should
hit S to scale, but cancel the x. The x. And the scale is
two, the y to the z. Why? Somebody like that? I think it will be okay. Now let's hit slash
two isolated. And I will look up this area and it's f after you switch to
the edge mode to fill it. And this area as well,
just move it a little bits like that and you
can leave it by the way. I think we can scale
this up a bit like that. And right-click hit auto smooth. And now let's see. That's makes sense or not. I can't see the H right here. It's because of the Oh, the smooth number here, I will make the angle a little
bit smaller to 17 maybe. And now we can see
is I will apply or add assemble or you can add a new bevel
modifier if you prefer, just add Bevel like that. This two points, two centimeter looks okay and increase
this to three or four H's. And this activates harder than normal to get smooth
nice results. And I think that sets G. And let's move this insight. Maybe right here. I think we
should delete this circle. Let's get rid of it. This circle related
to this cover. Okay? Is there anything
else we could do here? Okay, Now maybe we
could focus on the USP. Well, in this case
we should create this small rectangle inside. I can tab and I can
take this face hit Shift D and move a
try here for now, and I will hit E to explore
this a little bit like that. Let's try to find another image. I just want to understand
what's going on here. Exactly. Right. I think it's simple. All what I don't want
to do is just to grab this face and then a tie, for instance like that
and move this out e to the x and take this out here. Maybe we can scale
this, make it wider. Maybe we can move this
back just a tiny bit. That's what we're
after, That's Control. L. Just detach this one, hit P and then S2 spreaders. And let's focus on this alone. And I will bring the
origin DO to the middle of this Geometry, right-click
origin trigonometry. And I think we could move
this inside g to the x. Let's push this deep
inside like that. From the left, I think it
should be a little bit thicker. So you go to the x-ray. And let's let's make this
a little bit thicker. Maybe we could move
it a little bit to this direction.
That's very cool. What else we can do here? Here inside we have some bends, I guess we could call them. And I guess we
could have an age, go around this area. I guess. I will select this and hit Control R to add one H.
Maybe you're right here. Should be, I guess. I will bevel it it can throw
be two pivots like that. And let's pivot to, to
maybe something like this. And I will go to
the face and then hit Alt D and tools
extrude along the normal. And let's explore these inside. And now we got this
result as you can see. And I think that's it.
That will be enough. What about these pens? For the pins? I can take
this face at the end, COVID like that, and then hit P. And then as two separate
this tap out to grab this Allison bringing the origin to the middle of this face, right-click origin to geometry as to the z scale
that's like that. Or that, or you can
leave it like this, tap it can throw off
to add three acres, I guess, and can probably
to bevel them like that. That makes sense. It Control I to invert the selection and hit
XF to get rid of them. Sorry, First you
should switch to the Face Selection mode and then hit Control I to invert
and then hit XF. And now we ended with this. I want to make sure that the
distance that we got right here between these
spins is correct. Well, here we should have
two server, not three. Lesbian, we should delete
this one for at least we can copy it or just
move it on this side. So yeah, let's stick
with this one. I will move this as
you go to the front. I think we can push these spheres like that. And I will look,
grab this and this, and I will hit S to z. But I want to change this to
individual origins so I can scale these four there. For their origin as
to the z like that. And I guess we could have an H right here
and one HY here as well. And the Rabbi's together hit you and let's move those
forward like that. And we could hit key, I guess, or maybe another age is
probably at least two to grab this with this head key to the
x and push this back. Rub this, and I will hit G and which these out
just a little bit. And move them back or just
move this back to the endless. This may be alright here. And after that maybe
we should give it a thickness or
before we do that, let's focus on this
area up this end, I think we should start. So let's put this right here. And it's heavy to take a Coby and let's
move this over here. You have 2 h to time. Now we got this result. We shouldn't have
the same thing. Can throw a lot
to add a here and here and here, one here. And let's scrub those together. It's key twice and let's
live is over here, control V to level them to two. And this select those key and move those back
maybe right here. And we could grab these
and just take them out. Key to their why. We should give them a
thickness all of them at a, select them all and then hit Alt E and choose Extrude
phases along the normal. Let's give these a bit
of thickness like that. Something like this. Let's focus on these Control L to
select the link to aqueous. And from the left, I guess we can move them
just a little bit lag, that's towards the surface. And maybe here we
can label them. With these egg is selected. I can hit Control
V and level them. Yeah, we can add the three, I guess, and activate
harder than normal. Now we got nice smooth result. And for this y here, we can detach
comparison, crop them, Control L to select the link, the edges, and then hit P and
then as two separate them. And now let's focus
on the salon. Maybe we should take them
out just a little bit to the y like that and then tap. Select all the edges, can't help it to move them like this and activate
harder than normal. Rights as very cool. Anything else we could do here? Alright, maybe we should
target this hand. We could hit right-click and choose auto smooth
and give this interval. And this one as well. So let's
focus on this one first. Let's add the VL here. And let's add 0.1.
Or maybe point to. And are the normal. Right-click hit auto smooth. Maybe it should be smoother, I guess so let's add 0.5
and make it even smoother. And for the, for
the copper here, we could have a double. Let's add another level. Let's add two acres
or three if you want. Let's change this to 0.1. I will hit Select to isolate
this because I think we got some problem here. Okay? What we can do here, Let's
change the amount 2.3 maybe. As you can see, even
if you go above 0.3, I can see end result. That's because the clamp
overlap, overlap here. Turn this off and you can go 0.5 if you'd like, or even more. But keep in mind, if f clamp overlap
prevents people to work. As should be, That's mean
we have some intersection, let's say, or overlapping
happening between the vertices. We could find this issue. Because at that point, That's mean we have an artifact. But it's not so quite easy
to find this, pardon me? I think it's right here. I guess the EQ is
right here, I think. So. What I mean is this
area is very close. To avoid that you
can Alt click on this face and hit X F
to get rid of them. Yeah, I think this
is how to solve it. And when you'll be
satisfied with the results, go to the shading and
activate harder normal. And now we got the spots. I just want to make sure that everything we did here is
makes sense and correct. Well, I think everything
is okay. Nice. Very cool. All right. I think that's
it for this video, and I will see you
in the next one.
4. 004_ Focusing on the right side of the Braven device: Hello again and
welcome back here. This jump to the side. We still have the
reference image there. I guess it was unhide it. And yeah. Alright, now I will
duplicate it or you can just move it and rotated. I think we can
move it and rotate it because we think here. So I will hit G to
move this right here, and I will rotate this, I guess. Do we need to rotate it? I think we don't go to the right and let's put this right here. And let's move this like that. And let's make a comparison. These patterns that
could be on the, on that site, the site. I mean, they could
be right here. Okay. Now let's see the
information of the image. That's mean we should flip it, can throw them to the syllabus. It can throw them to the y
integral M. That doesn't work. You can go to the
object and go Mirror, mirror this to the
y, and that's it. Now you can move it like that. Go to the right is Z, and go to the wireframe. Let's move this n value,
this. Let's align it. Just hit G and move this
until this be aligned with the object.
Something like that. That's, looks cool. That's alright. I think we can take the same circle
we created right here and move it there. So I think that's what
be easier and faster. Start selecting all
of these edges, hit Shift D and move
the senior copywriter. As you can see, it's
right here and now, and then hit P and then
as two separate this out. And I want to bring the origin.in the middle
of the circle, Right-click origin to geometry. And the same thing,
turn off axis. Let's go to the, alright, Seville and Z to go to F9. Key to move this over here, align it here, D to
take another copy here. And you have to have to
repeat the last sip, the copy ink to take another copy right here
and it should be smaller. So scale this a
little bit like that. Shift D to have another
one maybe right there. And let's kill this. Let's
move this over here. Maybe we could just
scale it a little bit. And maybe we can make tweaking here like extruding
these lag of that. And I will let grab these
vertices, including this one. And I will even this one will hit X to delete these vertices. And as you can see, I ended with these results.
And I think that's it. For now. Now we
have them tap out, grabbed them like
that, hit Control J, make them one piece. And then go to solid
color up this cover top. And then we don't
have mirror modifier. That's cool. Old can thoroughly grab this and go to the
riots in the project. Just go to Mesh and then add projects and our project,
as you can see here. After doing that, let's
focus on the circles. Grab this with this, with
this and hit E and push those insights like that. So here we have three buttons. Okay, let's see what
options do we have here? Alright, I will hit Shift
D to copy these out. And let's work with
them. Let's change that, transform both point to individual origins
so I can scale them. Their origin go to the, to the right end is killed us a little bit to make it smaller than the whole like that. And let's make the tweaking. We could extrude them like that. And we should
extrude them again, I guess just a tiny
bit and scale them. And this will be now these
phases on this side, we don't need them,
grabbed him like that, hit XF, get rid of them. Are these patterns now, they're already all what
we want to do is just adding these details inside. Alright, so what we have here. Yeah. I think the spot-on
for receiving calls, I guess, something
like that speaker, a speaker phone device here. So we could create this. Let's go to the right. I just want to see if
this MHC clear or not. As you can see, it's
not so quite clear. We want to create something
close to this one here. I will make this small. I don't know if I have
a better image here. I will just stick with this
one. This one right here. And I will jumped with a vertex and grab one of
these vertices at the end. Let's put this right here. This make us symbol e to make one extrusion
goes like that. And by the way, sorry, we can do something else. X V to delete this, and I will call up this, hit E to extrude it right here. So notice through the hip D to copy it, it will be better. I will hate to extrude
this. Maybe you hear. One extrusion goes like that. It may be one goes like this. And one goes like that. I guess. Now crop this, hit
E and extrude it, maybe right here and
this one as well. And I will move this leg that I'll try to create
some kind of curve here. So I will add two vertices here. And let's move this right
here and this one as well. Okay? Maybe I can move this
a little bit like this. Maybe this one, I should
put it like that. Or I should have a
vertex here as well. Alright, I will make this
one the active vertex, and I will check that
transform to the active. And I will hit Shift
D to Coby and then hits go to the machine mirror or a mirror or this to the Z. And now it's mirrored,
as you can see here. The select all of
these vertices and scale them like that and
rotate this a little bit. Before you rotate this. Let's make some tweaking. Something like this. Let's move this over here. And what you form beliefs, it's p and then as
two separate it. Now let's work with this. Alright, let's see
what we could do here. I will tab and select certain vertices like
this right here. And I will hit Control
Shift B to bevel done. I just want to make
this area sharp. And this area I guess crop these Control
Shift V to bevel them. And after doing that, Let's add subdivision
surface to make this mortar. And nodes become smooth, as you can see with level
one looks cool. I will hit Control
a to apply it. And they will tab again to
see if the result is 0. So far it looks cool. If you want to fix the
distance between the vertices, I think we can do that. Let's see what's going to happen if we didn't
like the result, we can and do that, right-click and to space. And now the distance
between the vertices, even in the results still cool. Go to the right-hand, rotate this a little
bit like that, and hit G and move
it into place. And let's make a comparison. Let's save the size. Looks cool or not. The size looks cool. I feel it is. Yeah, it makes sense. Now I will project
this on the surface. So let's see, grab this. By the way, as you can see this, these patterns still attached
to the, to the cover. So I will tab and crop them like that and the
X-ray mode and hit P and then as two
separate them and forget to activate the screen
casts. Sorry for that. Now I will, I will
project this on this one. Tap hold Control Acropolis. Go to the right and then go
to Mecca and the projects. And now it's all
connected, as you can see. After that, go to
the phase angle of this entity and push this
inside the relevant bits. And done. Now we have this
first icon done. If you want to scale it so you can scale it and displace hit S, but cancel the x-axis, hit Shift X and scale
it to the y and z. What about the next one? It's just the plus symbol to do. So let's go to the, let's go to the rights, and let's do that. So my thing, we could drop this vertex D and
let's put this right here. Maybe k. And I will hit E to
extrude this up here, and maybe this one I can
move it down like that. And what else we could do here? Alright, I think we can
extrude this and move this here and hit Control R to add one egg in the
middle and here as well. And I will look up these edges and hit Control V
to the vault them. Now I can delete
these four phases, hit XF, get rid of them. Now we ended with this one. I will put the 3D cursor
right here in the middle. And now I will select
these four phases. And a chef this and
course are selected. That's will collapse the result. After you will be satisfied
with these results, you can scale it and make it bigger or a little bit
and then take it out. It's p. And then as two separate
topic on this tab, or you don't need to
tap because we already have the 3D cursor here. I will bring the origin dot to the middle of this Geometry. Right-click origin to geometry. And now we just hit Shift
S and silicon to coarser, and now it's
becoming the middle. Alright, now I will use it to
project it on the surface. Club this tab controller
corresponding form the right if you just go
to the Mesh and projects, and now it's, it's projected. Go to the face. This hit E and put this inside
a little bits. And now we've done here the
third one, symbol as well. This key to the Z. Let's move this over here, grab this tab, and go to
the face club is phase. You have this cursor
to select it, tap out to grab this one. Shift S selection to coarser. And now it's becoming
the middle G to move this out
just a tiny bit, top and go to the feast and select
this face and this face, x f and get rid of them. Now we ended with this color up this tab hold
control the globe, this go to the right. And the same CNR, you
go to the machine, the project plan F projects. And now grab this and
extrude this a little bit. And the color of this one and delete three, don't
need anymore. All right, so now
what's the next step? Now we should hit right-click and hit the auto smooth
to make this smooth, and we just need to
add a bit of a Lloyd. I guess we can use the
same bevel weight. We add three here on
this one, I guess. So. Yeah, I think
we can do that. We add point 1 cm. So this can throw light, apply the scale in case we
have a problem with the scale. And I think it's flipped. Yeah, tab hit a to
select all the faces, shift and to
recalculate the normal. And now it's fixed. So with this one selected, go to the modifier
and add a bevel. And we added 0.1. And hardened normal
should be active. And I will control the the
bevel weight from here. For the edges. I just want to kick this back. How much we gave this? Well, this age, we added
0.1 here and here. And for the battery
we added 0.05. Okay, let's go here and let's
use the same numbers. Here. Tap, crop these edges like that. And let's add 0.1,
the same number. And here we could add. So let's turn this
off temporarily. 0.050, 0.05. Think that's too much. Something that makes sense. We have here k is 0.0, maybe one, make it
smaller. Zero-one. That's where pumping
must make sense. Let's see what's going on here. Sorry, sorry, sorry, I didn't
change the limit to wait. This is the problem. Because of this one. I
forget to three this to it. And now we should have a correct
result. And the ad does. Let's check if we have any
artifacts, any problem. Actually, we don't have
any problems here. Maybe this area, we
can manually Bible, it's this one and this one. To get even better results
with Control be like that. Maybe everything else
looks fine so far. Maybe this area and this area
can throw a B2B bullets. And maybe even this area. And this one can throw be. Everything else looks fine. Okay. What about this area? I will grab the sages
like that manually. Well, actually we should. Let's go to the
x-ray and lipstick. Love them like that.
This will be faster. Yeah, like that. And we added 0.05. Okay? And here we could 0.1, I guess. But I think this Eric
could be smoother. Okay, I will grab
those right here. And I think even these corners, we could drop them like that. By the way, if you
want a faster way, you can hold Control,
Alt and click. That will help to select
all of these edges. And I will hit can throw V2. The voltage is like that and
make this here as smooth. Now let's see what we
will get the results. It looks cool so far What's
humbling not make sense here. We could fix e.g. this East Acres Hi, can grab most of these
and dissolve them. And maybe I can kick the
direction of this age like that. I guess that will give
us better shading. So go to the vertex selection
mode and the club this for this hit K and
delete this edge. And I think the same
thing for this area. We can do the same properties. You can hit K to activate. And I've told Lending
Club this and you can stamp it there and
delete this age. Now let's scrub all of
these edges like that. And let's add 0.05 tensor. Alright, we have, we have an overlapping or something that makes sense
because as you can see, I'm I'm not receiving the correct amount that have
that I have right here. In this case, go to the geometry and turn
off clamp overlap. When you turn this off. Now you can see where
the problem exactly, As you can see the problem
is right here in this area. So all what we could
do is just kicking, kicking this area and
see why that's happened. I will hit M to select all
of its vertices and I will hit M to open the marriage
and marriage by distance. Or that's not going
to work because the vertices are very close. Let's change this to 0.01
to enter nothing marriage. I saw that we have
some overlapping. Let's see why that's been maybe because of the face orientation. Now we don't have any
problem with that. But for some reason
we this area is not it's not pivot correctly. Maybe if we have another
AIG here, it's J. Maybe this will
help. Let's activate the bevel and edit mode. And maybe a fly connect
this one with this one had k. Maybe this one with this one. This is 0.5. Select all of these
ages like that. And let's add 0.5. I don't know, maybe
the amount is too big. I will hit Control
Z multiple time. I just want to understand
what's going on here. I will grab these faces and
hit Control Plus to grow, and I will hit XF to delete it. Let's delete these
and let's start over. Let's see. Where's
the problem exactly. Okay. Let's go to the age and the
curb all of these acres and let's add zero here
is zero this area, I will hit E to extrude
this bag like this. As you can see,
this, these vertices marriage because
of the automatic. So the amount here should
be even smaller, 0.001. And now I will hit E to
extrude those like that. And now let's target this, these edges like that. And let's at 0.05, I guess. And now everything
looks cool so far. This tab and the
sick of this area, and I will hit F and
I will add 0.05. Alright, now the
result looks better. And I think we can say that we are
finished with this one. Let's jump to this one tab. And these ages, I think
we don't need them. Can throw X, just
grab the corners and hit Control V to
double them like that. And let's get better connection. Pull up this hit Control x. Actually this
connection looks cool. These TV piece right here. And grab these edges
like that and 0.05. And those over here,
as well as 0.0, 5.4, these edges, I'll click Alt Shift click and
those as well. 0.1. Alright, done. Now grab these and
move them in place. Okay. Now let's see what's
in this tab here. And I will grab this and extrude this n, maybe right here. And we could have another
circle templates right here. And I think we can take the
same circle we got here, e.g. these acres gets sick,
loved them like that, and then hit Shift D and move this circle right
here and go to the right. And let's scale. It's scaling working according to the active. Change this to bounding the
scale this down like this. And let's move this over here. And you can scale it a
little bit more and then hit P and then as
two, separate it out. And let's select this as
focused on this area. How can we create this? Spot-on should be
easy to create. Just tap, hits a and F to fill this E to throw this
back there, maybe. Now grab this hit I to insert this inside
a little bit like that and hit E to extrude this insight and S to
scale this after that. I think that's all
what you should do. Right-click k, This one. Sorry, autosomal. I think we are done with this. What about this one?
What we have here? I don't know. Maybe it is charging ports
or something like that. Yeah, I think this
one is for charging. So now let's select the entity and books this deep inside like that, e to the x. And this purpose even more shifted to take that
face COVID like this, go to the right and make
it smaller. Like this. Maybe. I insets, make an
insect goes like this. And then after that hit E to
extrude this deep insight, you can throw our two, add one H Control V to
the villa to lag this. And with this selected hit E to the X and take this
out like that. I think that's it. Now
we can grab this H, hit E and push this
back just a tiny bit. Moral rights. And
inside this we could have a beam that will
be easy to create, so Control L and then hit
P. And then as two separate it corroborated can move
this inside e to the x. But let's bring the
origin dot here. Right-click origin
to 3D geometry, origin to geometry. And
now we have it here. Let's move this one inside
like that. And done. Alright, now with
this face selected, I will sorry, tab and go to the Face
Selection Mode. Grab this. The 3D cursor over here, and I will go to the
right tab, right-click. And let's create a
new circle here. Align this to the view and let's change the size to point 1 cm, make it very small. And I think that's maybe we can make it smaller like that. And after doing that, I will tap and hits a to select all the vertices
of the senior circle. And I will hit F to fill it with face and E to extort
it after that. And can throw me to bevel
this to two like this. And I think that sets
up this edge with this edge it can throw be again to make this
even smoother. And on that side we have a face. You can crop it and hit XF to get rid of it
and the X-ray mode. And now we have this
P. It looks cool. Right-click, hit
auto, smooth end. We should give this above all, but this
one in the middle, we don't need to
give it a bubble because we already
beveled of this. But this one, we should give it a bevel and it will
be something simple. You go to the bevel
and add Bevel. And let's add points 1.1. And it creates this to two
and activate harder normal. And it's become nice and smooth. If you want to go beyond 0.1, you can add 0.3, maybe make it even smarter. Now becomes more threatened. Nice. But I feel we should make this thicker a little bit. And I think it's easy Alt click to grab these phases
can throw a plus. Yes, One time, I guess it's Alt. Sorry, IT S to scale
and cancel the x axis. Shift X to cancel the x axis and scale it and
make it a little bit thicker. Like this, I guess.
These phases, maybe we can move them
out a little bit. And maybe this edge I can a key twice and
just push it like that. And this one as well, twice
and push it like this. Alright, this result
looks better. Very cool, Very nice. Now with the cover itself, we should take care of it. Alright, I will rob to end. Sorry, we didn't created this. Okay, so sorry, this is
the charging upwards. But what is this volume down? I don't know what to do this,
so let's create this one. Okay, Let's see how
can we do that. It will be symbol go to
the right again and X-ray, I will put the 3D cursor over here and hit Shift a to add in. I will create maybe plane. Align this to the view. It's too big to meter. I will change this to 0.1. As you can see now
it's become small. Scale this a tiny bit like
that and move it into place. Scale this a little bit more
tab and go to the vertices, hit one of these vertices, this move those over here
and those over here as well. And the crop is vertex and
this vertex hit Control B, sorry, Control Shift
V to level them. Build them like that.
And that will be it. I will use this to trim this
area or you can project it. Tub, outcrop this tap and hold Control E
club the single plane. Go to the right end. Let's use the naval projects
mesh and I've project, and now it's projected
up this face, hit E and push this
deep inside like that. That's after that we should
add the details here. The question is, how can
we create these details? Versus C, grab this
one and delete it. We don't need anymore.
Let's go here. And here in this area
with this face selected, I will put the 3D cursor in the middle chapters and
coarser to select it. And I think we should have
a cube here in the middle, top out half-day and
let's add a cube. Let's change this to 0.1. And as you can see now
it's become small. As to the z scale like that. And heat to move this
maybe right here, I guess. Maybe we can move this back
tab and let's grab this face. Let's move this out,
maybe right here. With all of these
edges selected, hit a, select them all, and I think we should hit
Control B to befall them. But as you can see, bevel doesn't work correctly. Because we scaled
this 3D format tab. I can throw a scale
tab and try again. Now scaling working correctly. Let's get a result like that. And after that, Let's rebuild these endless add three
or four H's here. And now we got this
result as you can see, tab again, and let's
focus on this side. Grab this face hefty and
lists out as to the z scale. It's like that. Maybe. Let's move
this one over here. Let's move it here. It's P. And then as two separate this, and let's focus on this alone. Right-click and
bringing the origin. But here, I will add
one H right here. Ambivalence with cancer
would be to two like that. Maybe I think this
will be enough. Maybe we can add
another H right here, and I will maybe add
another eight here. I will look it up this face, this face, and he can
move it a little bit. It's a to select all the faces, hit Alt E to open
the export menu and choose extrude
along the normals. And let's give this a little
bit of thickness like that. With these faces selected, go back to the right
and let's move attain the align it with
the surface like this. You can push this to the
extra little bits like that. I guess we can go to the age. You select all the ages, hit can throw it in the vault
them nice purple like this. Grab this and hit Shift D to duplicate this down like that. And had to add multiple
times to read duplicate it. And the center these, let's try to put
them in the middle. De-select the cover.
I can select this accidentally and key to the z. And let's move this down here. With this selected here D to take these on the
other side like that. And just go to the object and then mirror or
a mirror or this to the y. Go to the right. And let's align this with this object like this. I think that's all base. Alright, so now we finish here. I think now we could focus
on the cover itself. Crop it radically, hit
auto smooth first. And let's give this a bevel. Alright, pivotal 0.1, I guess
with we can kick this one. We added 0.5 with four segments. We can do the same. Apply the scale first. And now let's add 0.5. And we added four segments and we activate the
heart, the normal. Because we apply the scale, the face flipped, we need to
flip this back and fix it. Tab hit Shift N.
And that's it done. Very nice, Very cool. Results
so far it looks amazing. Writes. One small thing here. We could create small lights right here is try
to create this. I will go to the right end. I can grab one of these circles, hit hefty, scale up like that. We can go to the wireframe so we can see the position of
this scale up a little bit. And then it's P,
S to separate it. I want to project this small
circle on the surface. Okay, so grab this top. Alte controller club is
fine. Go to the right hand. Let's do the same
thing. Okay. Go to mention to snap project. And now it's projected up this hit E and extrude
this inside like that. With this face selected hit Shift D. And let's
move this over here. And then a to B as two
separate tab article up this and right-click. Listen, bringing the origin
dot here in the middle. And now we have it.
Scale this a little bit. And then tap and select
all the vertices. And it's through
this packet, ie. Somebody like that I guess, and go to the age cannot be say just hit Control
V to the building. Just like that. And timeouts, we have already applied. Let's change this
to 0.1, maybe 0.05, maybe. That's still too much. I guess. This one is 0.01. Alright, this amount looks cool. After that, put this
inside, maybe right here. Tab hit Shift, Enter, recalculate the normal
because it's flipped. And I think that's
it. You can scale up a little bit to fill this area. Here I can see some artifacts, maybe because of this age
goes diagonal like that. Maybe if we keep the
direction to go like that, we can get better results. So let's see why
should we connect it. Maybe we can use ferrous, maybe we can conduct some
vertices between these hit gay. And maybe we can
connect the vertex from here and from here and k to get better results from this
one with this one hit J. And we can get rid of
this one actually. Yeah, that's all be it. All right. Let's see if there's anything else we could do here. The only thing that
we could do here is just grabbing these
acres and the Waldheim. Because I'm not so y
satisfy with this results. After grabbing these
aqueous just said can throw them LSL multiple edges like that and make this as
smooth and round like that. This edge is wrong to leave it. We don't need this. Here. We have this H,
We don't need that. We can dissolve this
and keep this one here. We can delete those together
and just leave one of them. Let's tap out. Now the
result looks better. And what else we could do here? Let's try to target these ages and maybe we can make
this a little bit less. I want, I mean,
the devil amounts, we can make it a
bit bigger here. So we are using the angle. The angle maybe we could
change this to wait. Yeah, I think I
will change this to weights and I will give
the specific weight. But with this one selected,
Let's start with this one. Let's give this may be 0.1. Okay, This amount looks
cool, smooth and nice. You could tap out as you can see the smoothness, It looks great. It's something like this. We can increase this to
four if you like, if you want to add more edges. Let's see what else
we could do here. But so quite cool, but
I think we can bevel these edges to get
even smoother results. Okay, I will grab
this end dissolve. It's what I should do. The same thing for
the rest of the ages. Feel like you can ignore this. This result is still
nice and beautiful. So we added points. One here. Let's target, this is as well. And let's add 0.1 as well. And this h goes diagonal, as you can see, we
could change it, just changed the direction. Let's create a new one right here and delete this
one. Get rid of it. As you can see now the
bevel, it looks better. The same thing for this circle. Let's add 0.1. And for these packages
you can add 0.01, make it's very tiny and small. The same thing for these edges. Point 1.4, those over here. Okay, 0.1. And for
this circle as well, Let's turn off clam overlap. So here we have problem. Let's see how can we fix this. I will hit slash
to isolate this. I want to work on this area a little bit. Let's see
why that's happening. That's happening because
of this h goes diagonally, a fully connected new one
here, it will be better. So let's see what's going
to happen if we do this, I will use then I've told it
can make cat goes like that, that will look like this
age after we switched to the edge selection mode and
hit Control X to dissolve it. And even this age we
created, one goes like that. It will be better. Use knife tool and
let's do this. Create one there and club this, hit Control X and solve it. As you can see, and I was fixed. Here we have something not make sense because of
this age as well. Okay, hit K activate knife, tool and red cat goes like
this and delete this. The same scenario for this area. So any diagonal line deleted
and create a new one. This one as well. Let's create one goes
like that and this, all this control X. Now everything looks
cool except for this area in the same
room as you can see, the same problem solver
to solve this tab. Anything else we have here? Something and not
make sense here. Maybe we can kink
the direction of this and delete this one. And for this small light, maybe we can give this 0.050, 0.09, 0.1. Sorry, we should activate this. And it is more, so is
0.05 will be okay. It starts to excite. And now let's check the results. Okay, it looks very nice. Now we should have the same
thing on the other side, but before we go there, let's target these ages as well. Alright, I will use the
control method called control and keep selecting
these edges like that. Let's add these hand we
should these as well. I'll click after doing that
lists at maybe 0.1 as well. That makes sense. Alright, 0.0. Hi, 0.05. It looks cool. Let's go to the site and let's
do the same thing, hits left to isolate this one. And let's change
this to weights. And I will tab and go
to the bottom here. Let's select these
edges like that. Include these over here. These are like this and
the selling this one. Let's add this one. And this one right here. And I will add 0.1. And the double amount was, I remember was 0.5 centimeter. Point 0.5. Let's check the
column overlap is of parts may be
because of the scale. Because of the scale
apply the skill. Let's isolate this
endless change. The direction of these lines. E.g. this one, we can connect it right there
and delete this. And with this one we
can connect it there. And you can delete
this one or leave it. Maybe this one we count
connected, maybe right there. This one we can connect
it right there. And here we have
something weird. Let's connect this
with this with us. We'll help. Maybe we can
connect this there, I guess. What else? We can connect
this one with this one. I can change the
weight here to 0.05, just make it smaller
and a shift. And to recalculate the normal
case, we got a problem. Something weird here happening. I don't know what this is. Right? Why that's happened. Everything else
looks cool and nice. Let's grab these edges. After you select them. Let's add this right here, and let's add 0.50,
0.05, I guess. Now let's focus on this area. Let's see why that's happened. Maybe we should, sorry. We could change this to 0.01. Let's see what's
going to happen. We still have the same problem. If that doesn't work, can throw, grab that face and hit Control Plus
to grow the selection. It's x f to delete
these vertices. Now we can start again,
but love them like that. And then it's E to extrude this inside this div and then
hit F to fill this. Now we got another result parts. All what we could do is just
maybe delete this edge. Maybe on Next and
your age right here, I guess that doesn't work. Or maybe we can
connect a new one, maybe here, and
dissolve this one. Something here should be fixed. Let's delete this face. I can slide this a little
bit there and there. Alright, we have
the same problem. Let's delete these control plus gets rid of them
and let's recreate them. The same problem. I
will dissolve this one. And maybe we can recreate one. They're still have a
problem like this. As you can see, whatever thing I'm doing here is not
fixing this issue. You can grab that face and
it can throw a place to grow selection and you
can hit I to insects. But when you insert, just hit 0 to invert
the selection outside to create a new
ordering goes like this. New circle and then tap
out as you can see now, we fix this area, what we moved the problem here. Let's delete this face. Maybe that's can help to fix and I will recreate this.
The same problem. Okay, let's use the knife tool to create multiple
cuts goes like that. Alright, That's helps a
little bit. Indiana is fixed. Now I can go beyond that and make this a
little bit bigger. 0.0, maybe three. And make this big us becomes, let's see what we can
do for this area. I will use a knife tool and
create categories like that. And that's, it's, it's like
to excite and there we go. Alright, I think that's
it for this video, and I will see you
in the next one.
5. 005_ Adding thickness for the cover and creating the Braven stands: Hello again, we'll come
back. On this side. We have two pieces of rubber. Let's see how can
we create them. I will use this icon to create a small
rectangle right here. Something like that. I guess. Let's go back to select box. And I will try to put this in the middle tab to this geometry. And let's see, where
is the middle area? Will, I think it's a little
bit difficult to find it or to define it
using these acres. But in this case
what we can do is I can hit sorry, lists. What they can do is I can pick maybe one H from here
and one H from here. Maybe this egg, I guess. Maybe this one. And I can put the 3D cursor in the
middle of these two edges. And this will be
the middle area. Tab out and cut off this hit Shift S and
cross out selected. And now we have this
box in the middle. Move this down right here. Let's move it here. I think
we should start from here. And we can scale it and make
it bigger or little bits, can throw a and
apply the skill tab. And I want to target these
ages of the four of them. Control Alt click to select
the age rank like that. Can throw me to the VL
endless bubble this, and let's smooth them like that. And after doing that, I guess we can trim this area. Let's move this a
little bit right here. So how can we trim this? Before I trim this, I will take another
Coby on this side. Maybe it should be right here. Grab this with
this hit Control J and make them one piece. And then let's hold Shift, grab the cover, and then let's go to the pool tool
and choose the friends. Now let's take a look. Let's see what we got so far. Everything here looks cool. After that, I will
select this and hit right-click and choose
hate auto smooth. And now we should add the bevel. So let's see how can we do this. Let's select this and hit
slide to go to the local mode. Just isolate it. And
before you do that, something it's optional to do. We gave this a thickness, but I think it should
be a little bit more thicker as compared
with this image. That's a little bit thicker. And what we got right
here is not thick. So in this case we can tap to
go to the edit mode and we can go to the select and go
to this option selected. Whereas it's, yeah, this one it selects
all by traits. And choose non manifold will help select all of these
ages. As you can see now. After doing that, we could make we could scale
them to the middle. But let's de-select
this, I guess first. These edges right here and
those Swahili as well. Alright? So when you'll be satisfied with the results, go to the right. And now I will scale
this to the middle, change the scale to bounding
box and hit S to the, to the y and kill those
together to the middle. And now as you can see, these holes, okay, It's
become a little bit thicker. You can hit S to the
y again, if you like. Something like that, looks cool. Yeah, that makes sense now. Alright. This tab again, and with these selected, I will hit can
throw blast to grow the silicon one time like that. As you can see it, Let's go to the Face
Selection Mode. And I got these agents selected, or sorry, faces selected. And after that I will go to select it and go select loop and choose boundary just to target the boundary to get
a result like this. And after doing that, I will add a level here. And I will choose
weights, not angle. Endless. Go to the ATM and let's
give the specific weight. Or it's so e.g. let's add how much? Alright, let's start with
0.1 or these faults. 0.10, 0.1 looks cool. Or maybe too much. Well, the amount
here is too big. I think we can
accept the summit, so okay to add ten centimeter, I know that's too much, but
we can control it from here. So 0.05 maybe, we'll be cool. Let's compare it with this 0.05. And let's add one segment,
two segment here. Alright, two segments auto
few won't go beyond that. You can add three to
make this even smaller. Alright, so now we got
some really nice here. This tab out and this
check the Wireframe. Everything looks cool. By the way, we can access
the wireframe from here under the viewport display
just activate wireframe. But we're not finished
here because we could target these edges and give them a bevel
weight as well. So let's see, grab
this and this. Let's select this over
here and maybe those here. You have to click. And let's add 0.0, maybe eight, or maybe
you can go beyond that. 0.1, maybe. Put entwined, looks cool to tab out.
That is what looks cool. Tab again. And now it's the
time to target these edges. This one and this
one. Those over here. Let's add 0.05 as well. Alright, what about this area, this tab here, and see
if we can do that. I'll click. You can use
the control methods. Select one H hold control
and keep selecting this. There is another scenario
if you want to try, you can go to the Face Selection
Mode and the crop, e.g. these, this face and hits. Let's include this one. And it can throw a place to grow
the selection one time. You can, by the way, you
can grab this face loop. Just hit Alt click and the
color of the face tool. Let's see if we can do this. All right, Start again, Club this salt here because this can throw a plus
to grow selection, hold Control and
deselect this one. And the syllabus as well. As you can see now
we just have this selected and now go
to select the end. Liu Bang changes to boundary. So we can, so we can
target these acres alone. As you can see, I will give them a specific level weights, maybe 0.1 as well. I guess we can do that. Alright, so 0.5 maybe here in the novel
properties and under the queue metropolis turn off clamp overlap so we can
see the final result. Here we have something
not make sense plus 0.10, 0.1. Looks cool. Parts. Let's see if we have
any artifact here. This tab out first,
and let's take a look. Alright, here's
some seems like we have some overlapping
happening here. Let's tab and let's try
to avoid this problem. I will hit G twice N matrixes for ethics right here. I
think that's what help. So I get twice and
marriage it here. And here as well. Keith wise analysts
marry this over here. This one as well. M
N marriage at last. America at last. This halting of the club,
this marriage at last. And now maybe we can
jump to this side. And this area is very, this is very close to
the bevel to the edge. So it's better to get rid
of it to give the bevel, the freedom to
work as should be. So I will let grab
this age or this one. And the same thing
for these edges. Hold control and the crop, this one, and this one hit
Control X to dissolve it. And now, Yeah, Now the
result looks better. After that. I think we
can get rid of this age. And maybe even this one it can throw likes
and dissolve it. Anything else we can do here. I think now the results, this makes sense and
even better. Okay? What else we could do here? By the way, these edges, you can delete most
of them if you like. And key can just keep this area. But I think that's now it's not necessary because
we are finished. And the surface looks
clean and nice. Right? Let's see what
else we can do here. We have some artifacts. As you can see here. Let's see what's, what we can
do here to fix this area. Maybe we can delete this age. For now, Control X
and dissolve it. And maybe this egg as well,
we can get rid of it. Control X and dissolve
this one as well. Alright. Now I will
grab this face here. Switch to the face, can throw plus to grow the silicon and
I will hit I for insert. Let's make some
insert like that. Hit 0 to invert the
inside outside so we can get a result like that and confirm
it. Now let's tap. This new age will help to make the shading looks even better. Some tweaking here
we should make. And let's see. How can we get even better results
may be by deleting this age. We can get something. Let's
see what's going to happen. Maybe even this edge
I can maybe deleted. Very nice. It's all
nice and clean. Let's jump on this side. And as you can see, we still
have the same problem. Tab again here. And let's go to the face, select this face in the middle. Let's try to grab this one. It can throw a blast
to grow selection. And now let's hit I for insert. Insert works inside,
hit auto inverted. I can't see any of the C1. That's heavy. Hitter I again. Alright, if that becomes a little bit
difficult to control, I think you can hit
Control Plus multiple time to grow the
selection like this. And I will hit Alt H two. Or you can hit Control I to
invert and then hit H to hide all of these phases so we
can stick with this one. I think that will be faster. Let's try and let's see
what's going to happen. I will hit I for insert
this over this bag. Just a tiny bit. Small amount of incidence. I think that's too much.
Let's make it smaller. I will extend this result. I think this results is good. I can see that we
have a problem here. So I think we can
get rid of this age. Head can throw X and
dissolve it after you select this one. That can throw X and C, we have any problem here. You can dissolve
this one, I guess. I guess we can do the
same thing for this. Here we have multiple ages, kids, get rid of them. Even this one if you like. And here I guess
we can get rid of this. Now let's tap out. Let's see what we got
so far. It looks cool. We have an artefact here. Let's see what's going on here. Alright, it's Alt H to
bring back the other faces. This see what problem
do we have here? What is this H or something
not make sense happen here? I don't know why
that's happening. It's tried to pick this
edge and get rid of it. Can throw X and dissolve it
so we don't need all of that. Tab out. And let's
see now the results. Okay. Activate hard, the normal. Alright, something new we got right here.
Let's try to fix it. Does dissolve this
one. And let's use the knife tool to
create ketones like that. And I will jump to the edge and the club
this ache and dissolved. It can throw likes.
Anything else. K on this side, I can grab this vertex over here and a key twice n marriage
this one there. I guess that will help. Alright. I will use, and I've talked to create
characters like this. That's very cool. I can see some problems here. This tab, and let's
see what that seven. Okay? Some tweaking here we
should make like merging these to make this area
even smoother and nicer. So key twice and marriage. This fine teeth wise marriage. Alright, now the
cumulative become heavy. So let's see if we have a
solution for That's what I suggest is we can tap and we can delete
most of these ages. E.g. if you go to the
edge selection mode, you can grab most of
these edges like that. Like this maybe. Now we can up, sorry, just switched to the age. First. Let's do that. They can call up these
edges like that. And after doing that,
Let's take this out. Let's go to Select the end, to select loop and loop. As you can see now
we got this result. Now, the front we can go
to the wireframe is z and de-select this hold Control and deselect these
edges right here. Just be careful
when you do this. Let's do that again. I can throw and de-select
this H like that. And after that, you can
dissolve these agents, hit Control X and
get rid of them. Okay, and now let's tap out
and let's see the shading, that swirl effect of the kidney. As you can see, the
headings taught coal and the geometry
become lighter. So you can use this
trick here as well. We have a lot of
edges we don't need, we can delete them. E.g. let's scrub
those over here and I will go to select
and loop and loop. And you can go to the front
and go to wireframe is z, hold Control and deselect this, sorry, de-select all
of these like that. And from here, I guess we can I think we can
de-select those over here. Like that. Maybe those as well. Let's see what's going to
happen if we delete this, hit Control X and
get rid of them. Okay, Let's tab now. How about still nice and smooth? Well, that's mean we
shouldn't do the same. We can do the same thing here on the side or on this side. So I will grab all of these ages or most
of them like this. Go to Select, end a loop
and go to the front. And let's de-select
this and the wireframe. Hold Control and deselect
these ages like that. Before this age. Before these edges. Reach this point,
before the novel area, you can select them
and delete them. Just want to make sure that
I selected the correct. Okay. I think we should do that and add these or
exclude these ages. So it Control Z to undo that. And I will go back
to the frontend, go to wireframe, hold control and select this
diesel like this. Okay, yeah, now I can hit Control X and dissolve
all of these ages. Now the the mesh become
a little bit lighter. Now let's see if we have
any artifacts here. Here, maybe we can
merge some vertices and I think that's what will help to fix the artifacts we have here. Key twice and lists
live is vertex. This one like that. And let's give this a bit
of time and now done twice here as well. Okay. Tap. It has very nice. That's cool. Now I want to copy these phases, starting with this one called his face bolt here they call this one as
well, have e to the z. And let's move this down.
After you move these down, just write them p and n
as two separate them. And let's focus on
these new faces tab, and let's go to the
vertex selection mode. And let's see if we have
any vertices we don't need. Okay? Because it looks cool after you select all of these
vertices, hit E to the Z. Let's extrude this up here, I guess. Something like that. Hit a to select all the
faces shift to enter the calculator normal
Tab key to the z. And let's move this
into place like this. But I think it
should be smaller. Or sorry, something
wrong we got right here. I will hit Control Z multiple
time to undo the extrusion. Let's go to the France. I will need to eat
to explore this up. Like that. Now hit a select all the faces, shift N. Now Tab key to this, and let's move this
up here like that. Now let's take a look. Now
the result makes sense. So this is the, the legs, let's say it's likes to excite and now we have
everything in place. One final thing we
should add right here, we should block the view here, just add plane behind them. So in this case, I will hit Shift a to
add and I will add. Maybe in the front
view, we can do that. Shift a and the side plane. Align this to the
view like that. And it's very small. As you can see here. Let me get to pick like
that keeps killing this. Let's put this e.g. right here and it should cover
as always, holds and gear. Let's move this here in the middle and is
killed this like that. And can throw, lay
apply the skill. Let's move this on this
side, maybe right here, one right here, and
one on the other side, I guess from the toe view
maybe we can see that. Let's take a covariant,
let's put one over there. If you'd like, you can
bind them together. We can go inside so we can
catch him, this one as well. That can hit Control J to
make them one geometric. Very nice, Very cool. And then just save the project. Alright, I think we are
finished with the modelling, so we should jump
to the text string. I will end this
video right here, and I will see you
in the next one.
6. 006_Creating the texts: Hello again and we'll
come back here. Now is the time to add
text and textures. And we could run the right. Okay, so let's start
with the private logo. Let's try to create this. In the Images folder. I have this text here, and I have the text
with the number. So let's pick one of
these images, e.g. I think this one looks cool. I will go to the rights or France and I will click
and drag them again, but try your scale it
because it's very big. Killed like that. And now
I want to follow the text. So you add the image
anywhere you like, go to the image properties. And here we have the opacity. If you'd like, you can reduce
the opacity a little bit. Go back to front end
lists at plane here. And let's activate screen casts. Have to add to the end. I will add plane. Okay, It's y here. So okay, let's move this over here. Well, before you move anything, just align this to the view to scale and this momentous right here and
scale it like that. The Zoom N G to move
and scale again. And let's start from
here. Okay? By the way, if you'd like, we can
use the image itself, just flip the colors and
you can use the alpha. We have a lot of multiple
options here if you like. So for me, I will stick
with the polygons way. So I will track the
letters here and let's see what we can get tab to go to the edit point and
they started doing that. Let's extrude this
y here on this, see this here and this one
right here. This right here. Or if you'd like, you
can stamp it with this E to extrude
this over here. And one works freaking
goes like that. Maybe this one we came up
with a little bit, sorry. And key to move
this not extrude. Maybe this one we
can take it here. Grab those City and
extrude those over here. And from this vertex to
this vertex we have, we should have multiple
edges here over axes. I will bring the 3D
cursor over here, Shift S and cursor to select it. And now it's perfectly in the middle of this that
we'll use the spin. And we want to rotate this to y, I guess, and just click and
drag to create the spots. As you can see, I selected the two vertices,
We don't need that. One of them will be enough. Click and drag like that. And you can specify the
angle from here, 180. And that's how we can reduce
the number of the steps. Maybe I don't know how
much we should add here. If you want to make this
super smooth, that's mean. You shouldn't add a subdivision
surface after that. E.g. if I increase, this tool may be 20. If I accept this result, that's being I will not add subdivision
service on this text. So just keep that in mind. I will accept that and let's see what we will get to
the end of the day. So I will accept this and I will look up this and
make this one the active. And that will kick this to
the active elements so I can cope it from the active vertex, have the end hold Control. And let's put this over here. It seems like we have
some distance here. Alright, that's simple to fix. It, make it this one
active and hit S to scale until this
vertex meet that one. Like that. And now you can make
this one and G hold control and stamped right
here and now it's marriage. After doing that, I will
look it up this and then hit Shift D to they have Coby like that and leave it
in the same place. But I will change the transform pivot
point, the 3D cursor. So I can scale this according
to the 3D cursor like that to have this results. And now you can go up this
hold Control and sorry, change this back to bounding key hold control
status over here. And we can do the
same thing here. Goes over here. And
before we do that, let's bring the 3D
cursor over here first. Grab these vertices. Change this to 3D cursor because I want to
scale this according to the position of the 3D
cursor Shift D to date, to COBie, S to scale, and scale it like that until this vertex for each this area. Or maybe we could make it a
little bit smaller like that. And manually I will
key and move it. But before you move with books, this bag, so we can
stop it correctly. Okay, make this one the
active interactive elements, sorry. And stop it here. And now let's delete
unwanted vertices in G hold Controls tab is right
here and delete the rest. Starting from here, hit X to delete the vertices and
those as well, the x, v. And now done. Alright, now maybe we can
grab this with this hit F multiple times to fill this
area with, with faces. And this with this, that's F multiple time to fill this area
with face as well. For this area, I guess we can
fill it randomly, I guess. Okay. Alright, we have this
triangle. Drop those, hit F. Let's move to the
next letter, D. Take a copy and let's
move this over here. And the crop this half d. And let's move this here as well. Now grab those, hit F, These hit E and X
through this theorem, crop those hit E
and X through this, overhear, those as well
E and extrude this here. Or I guess we can extrude
them right here for now. And again, and extrude
this right here. Alright, this one, we can move
it a little bit like that. Rob those, sit them down. And we should have a circle
right here between this, maybe we can Coby the
vertices we have here. And we can stop this
vertex right there. We'll make this one
the active and key hold Control stopped
here as to scale, but scale according
to the active vertex. Scale like that until this
one meets this one here. Now, manually classic love this G hold Control is
Sam's right here. Or this way, cool. And now we could duplicate this shift
D. Let's have €1 scale. Let's make it big. Like that may be an achy and
let's move it over here. And let's stop the vertices. So this one should
be right here. And this one, G hold control and stop this
one here, stop this here. And I will fix the
distance between these vertices Starting
from this one. Keep holding Control and D grab this until you
reach this vertex. And then right-click and space. And this one man will, I will move it, sorry. When you complete the
club this with this hit F multiple times
to fill this area. What about the a? You have to take a Coby and
let's copy this here. Here with D to take
this one right here. Those together,
Let's select those. He threw this right here. This one E through the whole
control of stamps here. And what else? So maybe I can club those hefty. And let's move this up here. Scale this like that, I guess those scalars. And we should have a care
of here and this area. Alright, How can we do this? Well, maybe we can grab hold of this HFT and let's
move those over here. Maybe somebody like
that, I guess. I will look up these
together, right? Sorry. It S and scale them like that. Hold can throw stamp
this one right here. Grab this with this hit F. And now we got this. If you
want this to be a little bit three lux crop these vertices,
right-click and choose. Relax, relax them a little bit. Shaft are to do that
again and again. Now it's relaxed a little bit. But I think that's
too much with AMA. So quite happy with this
group because we could move some vertices, okay, manually. I will do that manually. I don't have another choice. Let's move them like that. After you moving
the color of the ferrous and Ls and
realize them again. Shift R to repeat the
relaxed again and again. And I think now the
result looks cool. If you want to space, make the distance
even. That's okay. I'll do that. Right now. Shift
D again to take a Coby G hold Control stamp,
this one right here. And I will scale, It's a
coordinate for the active. Like that, I guess. And I can scale it to the x
until this meat is vertex. He hold control, stop it here. I will grab these vertices that have the Jacobi on
the other side like that, can throw em and mirror. That doesn't work control
and doesn't work for you. You can go to the
Mesh and mirror, and mirror this to
the to the x-axis. And make this one the active, if you like, key and
snap it right here. Alright, let's make this one the active and hit S
and scale to the x. That manual I will key and hold Control stamp
this one right here, the key standards
file right here. And I will fix the
distance between these. Right-click into space. And then maybe relax. Manually. We should move these the first one and the last
one and then hit relax, have to add multiple time
to get better results. And the same thing for these right-click
and choose relax. You have to add multiple
time to be relaxed. Alright, now grab this
with this hit F sorted. Before you do that, we could make these vertices like that. And the same thing here. This one right here
and hit Alt control. It snapped up this with this
hit F at multiple time. And the same thing here, sorry. Alright. These vertices, maybe I can just move them
a little bit like that. Okay? Okay, so far
it looks cool. This one should be easy. Alright, I will select all of these vertices and I will get m in marriage by distance in case we have any vertices
doesn't marriage. Now, as you can see, four vertices marriage today, can you Coby, and let's
move those right here. Drop those hips. Let's move
this right here as well. E to extrude this over here. Grab this one, G, and
let's move it here. Those together I get E analytics
through this over here. M of the spine, Keith
whites had alta events. Slide, It's like that. Okay, This one key twice. And Americans here, if you like. Let's see, create n letter. I guess we can grab this here. It's hefty to take a copy and let's put this right here in the corner of the city and
the small dose over here, this extra dose here, Shift D. And let's
move this over here, and let's move this down. Move it right here. And we could find the solution for
this Small care of, I guess we can club these vertices and let's make
this one the active one. Today will be hold
control and stamped here. And you can scale it like that. I guess. The smell good. This one. You hold control, stop this
here and this one as well. Hold Control,
establish one here. And maybe we can use
the same vertices or we can Coby new vertices from here. Make this one the active. Then hit the less time
it's right there. And the sampling just
kill it like that. Right? Club this with this
can throw X key, hold Control, snap
this one here. And let's see if we have
the same number. Here. We have 12 vertices and here we have 12. That's very cool. Now we can fix the distance
between these club, the first and the last cent. Maybe we can hit Alt S. Let's see what's going
to happen. That's not going to work anyway,
right-click and space. And now it's fixed. Let's pick this one here. Or it can throw sampled hold
Control stamp this one here. He stabbed here or something. The wireframe would, I will just delete these vertices
and hit m n vary by distance just to make any
vertex we got right here. Let's see what's going on here. So this one is not attached. Hold control and standards.
And now it's merged. Club this with this set of multiple time to fill
this area with faces. The number is not accurate. So here we have 12
and here we have, sorry, here we have 11. And here we have 12. Okay? That's mean
we could do that. And we should add
one vertex here. Let's fix the distance again. Right-click space, this with this at the F
multiple times to fill this. Okay, now let's
create the e letter. I guess we can take
these, grab them. And let's go to the Mesh
and mirror this to the x. And let's move this over here. I think we can make
this one the active. And here it's just
a little bit lag of add, just a tiny bit. Alright, now I will
rob those together. And let's move this over here. And mesh mirror or a
mirror this to the z. And let's move this
one over here. Something like this. I will look it up
this with this hit F. And I will hit G and
move this over here. And this one as well. Club this hit E and
extrude this over here. This would this e
and it's through this over here and then
hit S to the x zero. Enter. Grab this with this hits here and extrude this over
here is to the actual answer. Columbus together it
adds to the x is zero. Enter flattening this. And now let's check the size. I will create a guide, just hit Shift D to take
a vertex right here, and I will look through
the E like that. So now I have an h
and I'll look up this H hit Shift D to the Z and have another H right here. Now, all of these
letters should be aligned with this edge.
Let's start with the B. I will use the b as a guide
to the Z and the stamp, this one right here, and this
one is all already snapped. Now let's check the
arrow. From this side. We should move this
and snap them to the H. Just move them a little bit. This one as well as to the z zero Enter
and then e to the z. And let's move those
a little bit down. And on this side
everything looks cool. This one vertex, we could
move it down due to the z. And let's move this here.
And this one as well. Yes, a little bit. Grab those key to the z and
let's move this over here. For the e, everything looks
cool except for this area, I guess we can now. I can grab the e letter, all of it and make
this one the active and scale according
to the active one. The zoom here is S
and scale this here. What about the n letter? It looks cool. Then I will hit a select all
of these hits them. And American by distance, we have some vertices marriage. Now this guy, we
don't need them, cut up these edges after you
switch to the silicon mode. And I will hit X to delete them. Now the latter is finished. What about the number here? Maybe I can click and drag
and use this image here. But let's tap ferrous and
scale this, make it small. Let's move this over here, and now let's track the, track the letters here. Okay? I think we can take a
vertex or whatever thing. Okay, so let's start
with, with watts. Start with six or five. Okay, maybe we can create a circle and from
there we can start. So I will put the 3D
cursor right here closer and I will add
a circle and a line, the circle to the view and
change the size to point 1 cm. Now it's small as you can see, and listen increases
to 40 and G to move. And let's move this over here. S to scale the
scale up like that. And then hit Shift D, cobia and scale this new
COVID like this. And maybe we can take either
copyright for the five. And let's kill this a
tiny bit like that. Shift D again and scale
this inside like this. Okay, this process will
take a little bit of time, but the end of the day
we will get something. The secret of those
together hits this with this set up multiple times until you
reach this point. Gateways and this, sorry, G twice endless slide this year. For this area, I guess
we can club this with this, this with this one. It's F to create spaces here. And I will grab these
vertices like that, and it's X, V to
get rid of them. After that, I will hit E
to explore this over here. And let's throw this
here like that. Something like that. And I will look like
this with the set F. And what else we can do here. I think we can grab
those and hit F. And they called this one at
the Earth to create a face. And for this area, I guess we can cut up this vertex C to
E and extrude this year. One is switching
costs like that. And this was this hit F. Grab these vertices x and v
to delete the vertices. And I think that's, it's now
let's focus on this vertex. This vertex. Those that have problems with this hit at multiple
time to fill this area. And now we should find a way
to connect these together. This would this, I can
hit F. And maybe we can add one vertex here
and slide this F. We have 1234. Let's add
four vertices here. And the glove this for this hit F. And let's select
those together. When this hit F. What
about the zero? The zero? I think we can grab these
vertices for the zero, I guess the end. Let's take those over here. Arthur rotators. Maybe like that. 90 degree. To move on. And let's
move this over here. Let's kill this a little bit. Realistic. Another copy here, and let's mirror this to the z. Go to the Mesh and then
mirror or through the z. Let's move this up here. Grab this with this hits,
this one, this hit. Select all of these vertices
right here and then ship the ticker Copy and
then S to scale inside. But I will change
this to bounding box. And let's kill this like that. Let's do the z. Just
kill this a little bit. Grab these four at f, select this and keep
hitting F until you fill this area with faces. So now we got that number, that number key to move it. Let's put this maybe right here. You can align the vertex, something like that
and just move it. And I will make this one the
active so we can scale it, set coordinate to
the active vertex. And I will change the
transform to active element. And scared like that. If you want to align it better, you can use the annotate
whole d to draw like that. Aldi and hold control to create
straight line like that. And one here as well, Baldi. Click and drag and hold Control End creates
another line like this. After that's what this one
selected hit S to scale. And let's kill this until
this vertex hit the line. This vertex or the number. Maybe somebody like that. Now move them right here. And now we're done. Now. We
don't need these images, just grab them and delete them. All the hold right-click to
erase the annotate ends. I will hit G to move this text, then scale it down like that. And move it because
we could add one here and this area according
to the reference image. Alright, so the top view, maybe we could move it. And what's right here, I guess. And let's move this model here. Let's take this out
just a little bit. I just want to see if
we have any problem. I think some of these
phases are flipped, so I will activate the
face orientation so I can see it's like to isolate it. As you can see here, we have this right area tab and the
club is vertices like that. And then you can go to
the Face Selection Mode. Grab this first vertices
together and then all tend to open the normal mu and then hits flipped of lipids. And for this area, grab this face like that, hit Alt and to open their
normal and flip it again, the six should be
flipped as well, alta en and flip
them. Now we fix it. Let's go back and let's turn
over their face orientation. It's led to excite
from the local mode. Okay, now is really a nice Before you put this
near to the surface, I could take a copy up
right here and rotate this to the ninth
degree like that. Alright, X 90 degree minus rotates and the
correct way from the top, we could put this right here. And the scale, let's,
let's move this over here. And I think it
should be smaller, a little bit like that. And Tab to delete these numbers, we don't need them,
x, f, k, tidal them. We just need the
private key to the z. And let's move this over
here. On this surface. I think we can use the
shrink wrap modifier to shrink this on the surface. As you can see, it's above,
it's okay to do that. Let's go to them
with the fire and let's use a shrink
wrap modifier. And as you can see, I added the shrink wrap
modifier on the text. I've typed that the targets
would be the surface. And now it's aligned. But I just need a very,
very small offsets. And the offsets bar here, I will add 0.01
maybe as a distance, just a little bit.
And that will be it. For this one, the same scenario. Club this ends shrink wrap
modifier in reckless body. Let's add a small offset, 0.01. Maybe it will be okay. Okay, now we've
finished with this one. Now is the time to
add some texts, e.g. here we have out we
should habits texts. And on the other side I
think we have n yeah, I think just those. So in this case, I don't know if we could
model these are nodes. Let's take a look. Okay, I think we can take the n
for the EU and the t, it will be symbol
and the 0 as well. So yeah, I think we
can model it quickly. So let's take the n at the end. Let's move this right here
and lead PM then S to separate it and delete
the shrink wrap from. Okay, sorry, I will hit Control Z because I
should turn this off. Now, I've taught you it's PNS. Grab this and lead the shrink wrap and go
back here and activates. And I'll just focus on this. Please go to the front and
this one should be you. Okay. We could rotate it. And as I said, it should be, you know, you you letter. So let's go to where I just forget object
and then mirror, mirror through the z and t. It will be simple
just to grab this. And let's move this over here. And let's align it right
here. That's cool. In key. Grab this. It's E and extrude
this down here. You can stop it with this one. Grab this sixth right here. And this one. Or
you can grab this, make this one the active, the whole control to get even distance to make the
site similar to the side. And let's make sure
that these vertices are merged a and then m enriched
by distance and done. What about the 0? The 0? I can grab these
and copy them here. Take a copyright here, and let's go to the Mesh and
mirror to the y, sorry, x. To get this results. Now I will grab those together
and hit Shift D to the z. And let's go back to mesh and mirror or as the mirror and
then mirror it like that. Okay, Is that makes sense? Smoothness over here like that. Now let's connect them.
Rob these together. And before you grab this, Let's make this one
the active key to the z hold control and
standard here to align it. Now to seek out those
together like that. It's those over here at
f. And those here, F. Yeah. It's not so quite
similar to this one, but it's very cool. Alright, now I will use this G and let's move it right here. Let's put the origin.in the
middle, as you can see, it's far right-click and set origin to geometry
and now it's n. We here we have some
phases flipped. Well, in this case, let's activate face orientation. We need to flip the right area. These faces just
switched to face. Grab those right here. Faulty have to add those alt
N to open their normal man flip and turn this off after you complete the z and rotate this like
that ninth degree. And let's move this
close to the surface. Is smooth this out a little bit. And let's move this
maybe right here, scale it a little
bit, make it smaller. Now let's use the
shrink wrap modifier. And let's pick the surface
and give this small opposite, 0.02, 10.01. I guess. I think we should apply the skill
to get correct results. And I think it's a flipped tab, hit a and then all to n
and then flipped back. Okay, now the result looks nice. I felt that we could create
the N. We have that. Okay. Well, let's let's
turn this off for now. Kimberly, I will have detected a copy that will delete
this from the Coby. Let's activate it here. I will change this to n. What we need to do
is just grab these, hit XF, get rid of them, and they grab those as well. Hit XF, delete them. And let's use this one here
with the ticker Copy here. You have the iconoclastic
Coby right here. And it will hit Control R
to add an h goes like that. Now we'll look up this
age or this age and hit F. And if you want this to be thicker,
I guess we can. Okay. We can what we can
do about that, this case, I can pull up these
together and the z like that. Somebody like this. Alright, yeah, I think
that would be nice. Completes this. Put the origin.in the
middle right-click origin to geometry. To move. Let's move this on
that side. Like that. We should rotate it to the z hold control to
activate a snap when you rotate and rotate this to
1.80 degrees like this. And let's go to the right and let's put this in
the correct place. So it should be right here. And let's put it this close
to the surface like that. Let's use shrink wrap modifier. I can shrink wrap. And ofs is 0.01. And assets. I think that distance is big. We can add 0.003, maybe. Can throw light up
like this, kill me. Kids are very, very small. I think that's all
what we should add. Now it's the time to steroids. I will select all of
these parts like that. And then the fonts, I guess want to put this
above the ground like that. And maybe over that a little
bit towards the middle. It's also quite important, but let's do that. It's easy to do. Now maybe these images,
we can move them out. Alright, That's very cool. Now the result is finished. And I'm not going to start with the material in this video. Let's say that this video will be the last video
for the modeling. After that, we will
start with the material. I will end the video here
and see you in the next one.
7. 007_Adding lighting and maker the first render part 6: Hello again, we'll
come back here. Right now, time to render. I will put the 3D cursor in
the center of the world. Just hit Shift S and
closer to the origin. Shift a to add. Let's add
plane underneath this. Something like
that will be nice. And the object properties. After you select the plane, go to the display ads. And I will make this
displayed as bounds. That blends still there, but it will be
displayed like that. And I will render with cycles. So I will have three plus
two cycle and preferences. I will activate the system. I will activate my GPU. Present want to run the root
cube root will be faster. Okay, let's split
this view to two. And let's add the camera, Shift a and add a camera.
The camera is right here. I want to frame the camera
from specific angle, e.g. let's look at the
device from this angle. If you want to snap the
camera to the view, hit Control Alt zero
and it will be snapped. And after that you can control
the camera view section. You can go to the
navigation and you can choose walk navigation. If you activate this
option now you have the ability to control the camera like you
are playing a game. W for forward, as backwards, D to the rights, and a to the left. And you can hit Q to go up. And our sorry, e to go
up and Q to go down. If you want the
movement to be slower, rotate the wheel
of the mouse back, and you all got it, right. So let's put the
camera and could the place maybe somebody
like that. Yeah. And we could have some lights. Maybe this let's go first to the material overview and
let's start with the material. I will change this view to
Pedro editor and hit Enter. Get rid of this panel. And with this cover
selected, I will hit in you. And here we could
have a material. Alright, is there that again, at tenure case something
not make sense at all? See why that's Heaven. So we have this selected and we should have them hitting you to create
a new material. And new material
should be added bots. I don't know what's going on
here, why that doesn't work. It's wrong. That's weird. Anyways, now we have
a new material added. Let's go back to material and review and let's
make some change. We want this to be metallic, push them Italians to one. And let's bring back
the reference image. And you can make this off. And we want this to be noisy. We want to add something
in the normal. I will hit Shift a to
search and I will say for noise texture at the
Noise Control Shift Click to see that texture. These shortcuts comes with an add-on called node triangular
and the admin section, they searched for no
triangular or just type WR. And you will find this
node triangular activated. This node will give
you extra shortcut to users and the shader editor. Now we can review the, the noise texture.
Noise tickets. Sure, As you can see, it's not applied perfectly
on the surface. We want more nodes. I will grab this node
and it can throw tea when you hit Control
T. No triangular. We'll, we'll add texture
coordinate and mapping. I will apply the object to the vector to get
a better result. As you can see, after that, I will change the scale to maybe 300 and make it
smaller like that. And here we have the ability
to control the roughness. The detail, if you want
to add more details here. And see we have a lot of
stuff to control here. And after doing all of that now I want to block this
with the normal. I will search for bump map and the black of the normal
to the normal and block the factor to the height. Now let's see the result
in the principled. Or we should have something. And as you can see
now, we got something. But the result is very strong. Let's reduce this
to 0.1 and make a subtle, somebody like that. Looks cool. Yeah, That's result.
It looks nice. Okay. Maybe we can make
it to give a rough. Above this, I will
add another layer, hit Shift a to searching, and I will add a glossy be SDF. This is another layer
above this one. And I want to mix between
this and this one. I will use the shortcuts. Just hold Control Shift and
hold a right-click from this node to this node and Node. Wrangler will add
mix shader here. And now what we want to do
is I think we should reduce the roughness a little
bit and we should break the normal of
the normal as well. The glossy black
this year as well. And let's wait a little bit for the results. Right?
That's very cool. And I want to control the factor with the
friend L naught. Search for, for now. And let's plug the
front nail here. Well, if you want to see or understand what we'll do here, I will hit control, click on it. And as you can see here, e.g. this area is pointing
towards us and this area is pointing up for nail
will give us a mask, black and white mask. The area that's the
area in front of us. It will be dark in the far area, it will be white. Well, that's been for now. If I change this to blue and
change this to red or green. Now as you can see, we'll
make this glossy be SDF visible on the far area and the area that's pointing
towards us, make it blue. That's mean. Make the principle, the
SDF visible right here. And this phenomenon,
it's a realistic, and the final is a scientist who discovered
that phenomenon. I will give you another example so you can understand
what's going on here. Let's assume that we
have a lake water. And here we have a human
standing on the lake. So now we have one
standing right here. If he looked down and
he can see his fits. But if he looked at
a far distance, e.g. here, he can see what exists underneath the water because whatever
thing we have here, it will be reflected
on his eyes. But if he looked down like this, he can see what's going
on underneath the author. So this is the final effect. Alright, now let's change
this to surrealism in here, and let's take the saturation back to zero here
and here as well. Maybe we can make this a
little bit darker, I guess. Too much. Maybe even this
one just a little bit. Now we have something here. What about the plastic? Let's select this and let's
create a new material. Let's turn this. Let's change the color
to something dark. And roughness. For the roughness, K. Let's
add noise texture here. I can copy the noise
that I got here, Control C. And let's go
back to the plastic, hit Control V to
paste it right here. And like the normal
to the normal, we should get the same results. Now we got this. Increase the roughness. And let's see what
details can give us here. And maybe the scale,
we can change this to maybe 200, maybe 1,100.50. Let's see what's going
to happen if we do that. What about the strength? The Cen X3, the strength make
it stronger a little bit. Okay, 0.14 maybe. Okay, let's see what's
going to happen if we drink bag the details. Let's add ten. I think the result looks cool so far. And the roughness
amount looks cool. And I think we can apply the same texture
on these patterns. So the scrub these patterns, even this one and this piece, Alt Shift too big, the big piece of plastic. And then let's go to this era and COBie
material to select it. Now we have the same material
of light right here. That's really cool.
Let's go to the side and let's pick these
piece as well. This one, I guess,
this one right here. Hold Shift, grab this and go to this arrow Coby
material to select it. Alright, let's see
what else we can do. Maybe we can reduce
the strength to 0.5. Sorry, zero points, one. Make it very, very subtle. If that makes sense. Let's see, create
a copper material. Let's call this plastic. Or you can call this black
plastic M for material. And for this one we can
call it aluminum or aluminum at a here and
empty for material. Okay. Anything else
we could do here? Okay? So let's create
a copper material, select the spins and elicit
unity creating material. And let's call this copper. We want the metallic. So we want this to be metal. So I will crank
up this tool one. And I don't want this to
be tore off the color. We could change this to
something like that. Maybe. Let's take a look at
these one by one. Hold Shift, grab this copy
material to select it. The same thing for this side. Club this together. All three of the crop, this
Coby material to select it. And the same thing on that side, or maybe this one as well, multi-ethnic or up one of these. And then Coby material selected. Let's jump to this side. Let's pick this with
those over here. Hold, Shift, grab one of these, and then Coby material
to select it. Now we have material
applied here as well. What else we can
do here? Maybe we can make it a little bit darker. Something optional, and you can make it a
glossy if you like. And I think that's what
the result looks fine. Right? So anything
else we can do here? We could create a
rubber material here. I think we can use the same plastic material
quality of the crop, this and COBie
material to select it. And this planes we have here, I will isolate them. I just want to check
the face orientation. So here's Z to go to
solid and then let's, yeah, I want this to be blue and that side
should be blue as well. So I will flip this one
besides grab this face hits alt N and flip. Now it's blue on this side
and two on this side as well. Tap out and that's it.
Let's turn this off. Slack to excite. And now let's give this
a specific material, Robert, and let's
create new material. And you can call this, I don't know what
to call it dark empty because just
dark material. Make this black box
that often is to one and assets because we don't need to see
anything inside. Alright, now let's go to the camera and let's see
now what we got so far. I will change this
back to 3D view port and I will add a light source, the southern area light, like the key to this here. Let's move this up, see
to go to Orlando to see the result. Now we
have something. One thing that we
just forget to do, we forget to the text material and this will be something
fast and symbol. Let's change this
to Hello editor and hitting you to
create a new material. And I will call
this text material. And just make it white, something like that and
make it a little bit rough. And I think that's all bits. So after doing that, Let's pick this and I think it should be dark according to the
reference images. So, alright, this one is
wide and this one is dark. Okay, so we could create
the two material. For this one, I will
call this texts whites. And thus it's that
should be applied here. On the outs, are
on the in and out. All shifts at this one. And the color of this one
as the last selection and then Coby material, sorry. Yeah, coating material
to select it. Okay, That's very cool. Now this one should have
the whites. That's right. Very cool. This one, we could give
it another material. Let's call this dark
text empty or material. Let's make this dark. Let's take a look at
what we got so far. Looks fine and cool. I think we should
move to a little bit. Let's move this over here. What about the ground? Okay, Let's go back here. And because we are
working with cycle, I will make the
ground a chain to the ground through selected
to shadow catcher. As you can see here. And now you have the ability to change the
color of the background. If you are in the header editor, you can go to the object
and tweak it to or old. And you can control the
color right here to make the background
white and everything. Now it's white. Or if you like, you
can a dark like that. You will have multiple
options here. So now what we could do, I guess we could add another light source trying
to get a better result. Shift a to add, and let's add spotlight. Maybe you cannot
here, S to scale. Let's make it small. G to move it right here. And let's use this poll to
pointed towards our geometry. We can make clothes. Club the same point it
towards the geometry. Allison increase the power here. So we can see some lighting. Maybe 150. And maybe we can hit Shift
D to take another Coby on that side and use this ball and pointed
towards the device. And let's change this
to something blue. If you would like to get
or to add another color. I think we can add just 50-year, make it very subtle. And I will change the. Device and the renderer to cube. It will be a little
bit faster and activates the noise
in the viewport. Let's see, grab this one
and I zero out the power. I just want to see what's
going to happen if we do this. Alright, Very cool. I think
there is all this awesome. What else we could do here? Let's grab this and I think we can add 100
and it will be enough. Alright, let's take a look. Let's try to make
some changes here. I'm also quite happy
with the results. Maybe we can, I don't know, maybe we can reduce
the lights strength or manipulate the materials
are little bits. E.g. I. Can make this
darker a little bit because that's too
much, I guess. And here in the glossary
should make this wider. Something like that. And let's grab this. And I just want
to change this to 50 K, maybe 80. Secret love this slide and
let's increase the light. I just want to see
what's going to happen. Oh, that's too much. We can reduce it to five and we can add another light
source somewhere, e.g. this one, we can just move it up like that and pointed
towards the device. Somebody like that.
Let's move this away. Just want to see the
difference before and after. Let's grab this and
let's move this away. Let's increase this. Maybe we can change
the direction of the slide scale and make it smaller a little bit closer, hence, its closest one. I will click and drag these
two points, their device. Maybe. Maybe we can move it right in here
and scale it even more. I end with like that. Alright, what about this one? This slide is not make sense. I will move it and
put it right here and pointed towards the device. I think we should
change the strength to maybe this time to 20. Something like this. Can we duplicate this one? Let's see what's going to
happen if we duplicate this and point this one
to the device as well. Listen, increase the
power a little bit. That is delta is washed out. Adding a light right here
is not going to be good. If you'd like to
have more contrast, you can go to the render
settings and scroll down to color management and
activate the curve. And here you can
control the care of to get something
nice if you'd like. But we can do that in Photoshop or we can do this in the compositor that
comes with the blender. You will have two options. Either you use this here
or I don't know whatever. You can go to the
combustor if you like. I will ignore the St. I will make thunder. Let's take this
out and I will hit Z to the solid Z and
go to solid like that. And let's go to the outputs. I want to render
this width for k. So all what you should
do is just change this to 200 and that's it. In the setting, I will turn off noise
threshold. I will walk. With samples. And let's add e.g. 500s assembles. It will be okay for
this symbol projects. And I will run the key BU. I think that's, yeah,
that's what we faster. And when you'll be
satisfied to render it, to render this, go to
Render and Randall damage. When it's finished,
I will be back. Render is done. And this is the result. Okay, Let's exact from here. And what we have here. Okay, Let's close this one. And I will change this
to the composter. And I will change this
editor to image editor. Just choose the render
results from here. Here we have it. Okay, here we could
activate the use node. Now let's add whatever
thing we want to add here or we could add when
you hit Shift a, go to the color in here we
have bunch of options, e.g. color correction or cut out or bonds. You
can use this one. You can manipulate
the shadow area, make it darker a
little bit like that. Now we've got something nice, as you can see. It's very cool. Very nice, very beautiful. Let's see what
else we have here. What we can add,
the color secure, we can add writing contrast
if you'd like to control that or RGB care of you on
this to make this even darker. This result looks very nice. So this is a good way to
preview our products. If you want to make this
a little bit sharper, you can filter and the filter section
like this right here and change this
two-carbon box sharpen. And you can cancel the factor, can add 0.1 maybe. I think that's too much.
This reduced this to 0.01. Make it very subtle and we
can see before and after, just focus on the
age and the club. The note hit to M2 muted. Can see before and after. It is not so huge effect, maybe we can change
this to three. Alright, now the effect
become very subtle. But if you saw any dark
spots on the highlights, you should reduce the number. Okay, so far, now the result looks very cool and beautiful. So I will accept this one. And I think that's
it for this video. And the next video we
will take another. See you next.
8. 008 Taking another shot part 7 : Hello again, we'll
come back here. I want to take another shorts
from a different angle. Let's read this
to 3D view board. And before I do that, here we should have a lights. So we should have a source
of light right here. In the material section. Go to the shader editor. And I will create a
material for this. So let's go to the
material properties. And this material, I will
call it glass or green glass. And let's go to the render. I just wanted to see
the final results. This push the
transmission to one because I want the
light go through it. And that will change the
color to something green, maybe maybe consultative,
it's a hint of green. And I will tab here. Okay, and I will grab
this face and hit I to insert in the sense
of this maybe right here. Okay? Now, with this face selected, I will create another slot here. And this slot I will create a new material that we'll
call this light enter. And I will assign this load to the selected
face, just hit Assign. And now this new material will be assigned
guests on this area. For that tab out. That's it. Alright, That's very
cool. Now this material, I will change this to
lights or emission. You can hit Shift S to switch
this principle to emission, go to the texture and
change this to a mission, sorry, to the shader
and choose emission. That will change
something green. And crank up this to ten Maybe. As you can see now this become
emitting light to excite. And here we have something
nice and beautiful. Alright, so after that I will hit zero to
go to the camera. Let's go to solid for now. Hits. You can go to the View and then navigation and
walk navigation. After that, use the WASD to move the camera
and the most as well. And the small the
camera on the side. It's cute to go down like that. Or if you want to go up, just
go a little bit like this. And let's take another shot from the single Z to
go to the render. I just want to see the
result before I render it. We have higher reflection here on this because
of this slide, maybe we can kingdom position of the slide and rotate
it in the same time. We can change this
to 3D view port so we can see the result. This point, this
towards the device. And for this one I think
we can move it there. And three-pointers. Okay, something like that. And what else is
go to the shader. I feel we should
do something here like making this a little bit rough because it's
not reflective like that. The surface is not smooth
like that should be enough. Let's add 0.3 maybe
here to make it rough. Somebody like that tells
us we should do here. I think everything
now is makes sense. One more thing here, I
just want to do the solid. I noticed that this letter
right here is not perfects. Then we could scale it a
little bit to make it smaller. And I think we didn't
give it shrink, Rob no, we gave with but I feel it's not stick
to the surface. We could make the offset
a little bit smaller, zero point, add another zero, and let's change
the one to five, maybe make it maybe the
distance even smaller. You can change the five to four. Now the distance is very tiny. You can go further if you like. Now let's tick to the surface. Let's kick this one
before we render it. I think we don't have a
huge distance here, 0.003. Let's change this to two. And maybe the same thing for
the for the six, I guess. I think this one is stick to the surface, solid zero here. And that's perfectly, let's
stick to the surface. Let's go to render and let's
see if we can see it or not. We can see the full letters.
What about this one? Let's zoom in here. We can see the N letter. That's cool. Maybe the color of the letters, we can just make them a
little bit darker. Like that. A little bit brighter. Somebody lives, I guess. Maybe a little bit
more brighter. Okay, now let's go to
the camera hasZero. Let's see if we forget anything. Okay. It may be now we will take we
can take another shot. So let's I will change the
resolution to full AD. That's what be faster
and I will run that. Let's just go to the
right frontal damage. Now the render is done
and I got this results. As you can see, this
area is full black. And that's because the
because of the combustor. You can see the difference here. Okay, let's see how
can we fix this. Let's show you this
to the image editor. So this is the result of endless changes
to the combustor. Let's mute this set M. This one enemy with this. So we can accept one of these. You can make this a little bit brighter, Something like that. Now the result looks cool and the light looks
cool as well. So, so far, that is
how it looks nice. You can add a light source right here to
eliminate this area. That's okay, but in general, that is what it looks nice. Let's hide this
smooth, this, sorry. See the result before
and after this. This. Alright, so far is very nice and beautiful
about the lighting. You can do something
else for like. Let's try to use
another approach. Let's delete all
of these lights. And the 3D cursor
is in the center. As something cool. I will hit Shift a to add
and I will add a circle. Make it a circle big, like that. Something like this maybe. And tab go to the vertices. The vertices hit E to the
Z and extort them like that and hit S to scale those. Now we got this result, as
you can see, e to the z. And let's move this up here. Let's see, whereas the
red and the blue area, who is the fittest orientation. Okay, so the inner area is the blue area and that's
what we want here. Let's turn this off. And the shader editor, I will add the new
material for this. I will keep this to
the emission Shift S. And let's go to
the header and choose emission of small right here. It should be replaced by Antonio ways has ZL is
equal to the random. Let's see the result now. So I will use this
as a light source and I will encourage
this to maybe 25. As you can see now we have
lighting from everywhere. I think that's too much.
Let's change this to ten. I guess ten will be nice
and you can scale it and make it big. Key to the z. And let's take this up to the z, and let's take this up again. Zero to go to the camera and let's see what
we got so far. Okay, So this is another
way to eliminate the scene. That is
what looks nice. If you want, you
can delete some of these faces and
leave some of them from the top of your maybe I can crop the group from here and maybe caught
up from here, I guess. And I can delete
group from here, hit F to get rid of them. And you can leave the rest
is going up to the render. And let's see what we
got. If you'd like, you can go to the background or the world and
make this darker. Something like that. If you
push this to the dark side, carotid going to get
some nice results. But it's still an option. If you want to do that, try it. Let's go back to the object. And let's change
this to 20 maybe. Alright, now let's
take another one there and let's see what we got. We go to the Render
ends are under damage. All right, Now we can
go to the combustor. Sweetness to the image insert and this one to the compositor. Let's make this a
little bit darker. Yeah, it's very
cool. Maybe this one we can make this darker. Nice. You can change the
background itself through like, let's take another example. Let's go back to
the 3D view boards and hope you have properties. I will turn off the head or
catcher after I select this. And I will leave this plane, I will add a new one like that. And I will tap into crop this age and hit E to the Z
and X through it like that. Grab this, hit Control
V to the village. And let's make this
nice and smooth. Now about right-click Shade
Smooth to make this smooth. And I will go to the shader
editor and sweep to world. Let's make a change the
color to the default, just hover over here
and hit backspace. That's right. Or maybe
it should be like that. Something like that. Let's go to the Render Alice,
your typical data. So that maybe we can make
this bigger. I guess. We can control the
strength of the emission. Maybe we can take this to 15. And for the background, maybe we can give
it a new material. Something dark if you prefer. If you'd like to render this with dark background.
You can do that. Let's rotate this to the z, the camera, right? You can add some
reflection if you like. And what else we could do here, I guess we can. Let's make this the light source a little bit smaller by deleting some of these polygons. We can, sorry, Let's pick these two polygons
and the middle. Like that. Can throw I to
invert x f to get rid of this. And let's go to the window and now grab them and scale
them to the middle, not to the active elements. Let's go to the camera. Let's see what we got. Now let's change the strength
for a little bit. I don't want to illuminates
the whole area. Somebody like that, so
it'll be nice and cool. And one more thing here, I think we can change the
strength of the emission to maybe five because I think tends to match
or even three maybe. Okay, yeah, something
like that. I think this random will
be nice and cool. If you want to
increase the strength of these light source, you can do that. Maybe AT. Alright, now let's take
another short Alice here that results go to solid and go to the Render
and random or damage. The render is done. And
now we should go to the combustor again to
make some tweaking. So this is the final image
with the combustor effect. Okay, let's mute this hidden, this one as well.
Let's enemy with this. Let's tweak this one. Let's see what we can get. So here we have the mid tones and here we have the highlight. I can increase this up. Sorry, smooth enemy
with ferrous. So this is the shadow areas and it creates this
just a tiny bit. Now we got something
nice and the highlight, I think that, that's too much. Let's take this down just a tiny bit. Now let's take a look. That is how it looks.
Nice. Very cool. Alright, so I think
that's it for this video and that's
it for this course. And see you in future courses. Goodbye.
 Marwan Hussain, 3D Artist and tutor