Transcripts
1. 001 The course intro: Introducing the first
course ever teaching you how to create Abo Ken Bro Hi, my name is Mark Hussein and I'm thrilled to be your guide on this exciting journey into
the world of three D design. Throughout this
course we will unveil techniques of precision
modeling, rubbing, and realistic tekturing,
enabling you to bring the innovative Apple
Vicino Bro heads to live. Get ready to dive into the
art of precision modeling. As we recreate the Apple Vicino Bro with
incredible accuracy, discover the process of
rubbing and dive into realistic texturing to a depth and realism to your
creation and rule. Now in the Apple Vicino B, a blender masterclass, and let's bring your vision
to life together. Once again, my name is Ma Hussein and I
hope you are inside.
2. 002 Before you start: Hello everyone and
welcome to this course. Before you start, you should download the resource folder. I always put the resource folder at the last section
of this course. Just scroll down until
you find the last folder. It will be file just
exhibit and use it. So go ahead and download
the resource folder. After that, I would like
to talk about the rating. Writing this course is something very important for
me as a teacher. It will rank my course
if the rating was good. I have no problem if you
give me a bad review, because I deserve that. But it's very important to add a comment to understand
what's the problem. So I can't fix this
any future courses. If you are satisfied with the course and you would like to write
it with five stars, I want you to add a
comment as well and tell us why you give
this course five stars. Please don't forget
to write this course after you work the course
and learn from it. I hope you'll find this
course informative. And I hope this course add a value to your
learning journey. All right, my name
is an Hussein, and let's start creating
the Apol vision.
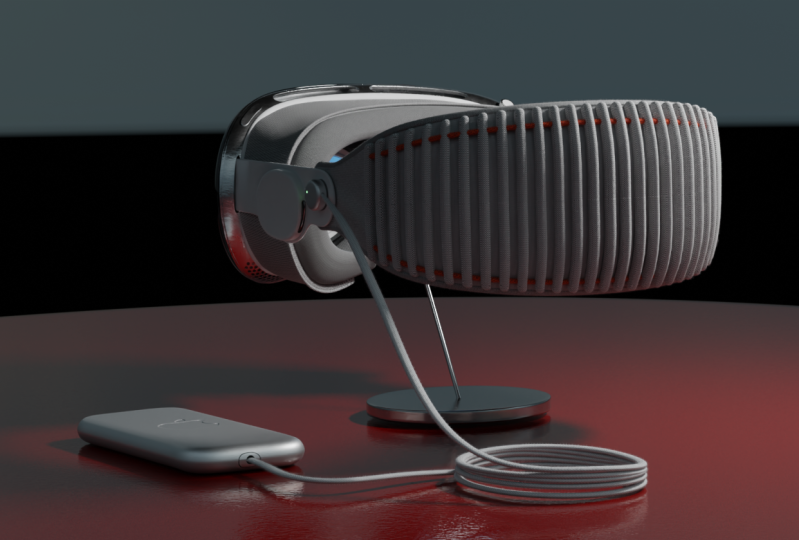
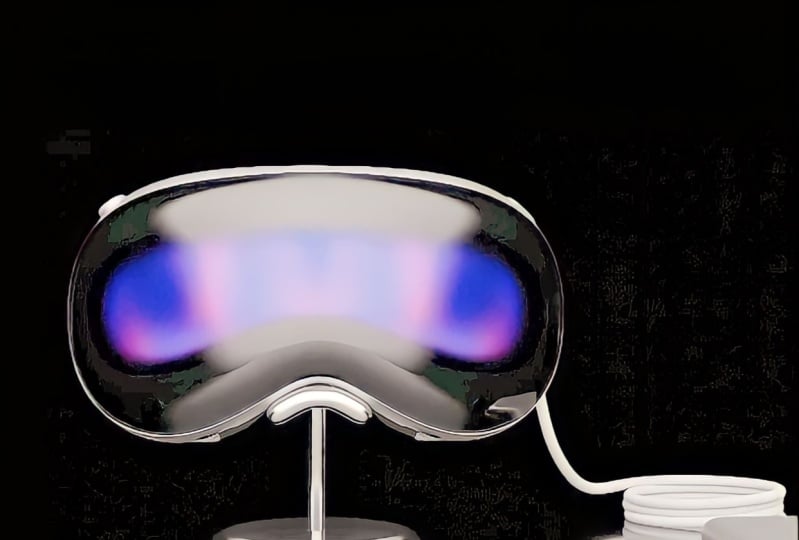
3. 003 Adding the reference images and start modeling the Vision pro: Hello everyone and welcome to the Apple Ob creation
master class. In this video, the first video, we will start preparing
the scene and start modeling the Apple Kob. As you can see, we have
camera light and cube here. I don't want them.
I will delete them. Just a ground like that and
delete from the keyboard. To delete them, I have some images in this
tool, it's called pref. It's very nice and
important tool to use. I added all of these images
here and you should find all these images inside
the resource folder. I'm going to choose
one of these images, maybe this one or whatever one, and use it as a reference image. So I can follow the lines
of the Apple Vision Pro. I have this folder, this folder, It will be in the
resource as well. This folder has all
the images as well. Let's see from
where we can start. All right, maybe we can start using this image here.
Let's open it first. Not this one. I think I have another option, maybe this one. I will put this in the front
view and I will start track the shape of this of
the Pole Vision B. Let's go to the front. To the front, if you
want to go to the front, hit one from the keyboard. And I just would like to
mention that whatever button I will use that should be
showed here in this area, you can use the tilda key
and you can front top, back, right, whatever
view you like. Or you can use the bat for
me because I have an M bad, I will hit one from the em
bad to jump to the front. This is the front view as
you can see right here, it's written front view. I will open the folder and click right and put
the image right here. The image is very big. Here you have two options. You can scale this down and make it small and work
with small model, or you can make it big, normal. And after you finish everything, you can apply all the modifiers and scale the model to
whatever scale you like. For me, because
it's a little bit annoying when you work
with small scale, whatever object you will add, it will be big when you add it. After that, you should
go to the setting and change the center to make it
small or you can scale it. I should do that every
time when I add an object. If I want to avoid that, I can create something
very huge, about 2 meters. I know that's too much
and it's not makes sense. But after I create everything, I can scale this down
and apply the scale. After adding the image, I want to center it and
put it in the center. It's very simple, just Alt
to reset the position. And that's it. Now we
have this in the center. You can put it above
the center if you like. That's okay. It's optional. After that, I will
this a little bit far from the creation area because I want to
create the model here. I don't want any intersection
happen here or Overlapping. Just put this a little bit
and this will be enough. Maybe a little bit
more like that. Here we have the ability to, in the option of the
image after you selected. If you go here, you can control
the opacity of the image. You can make this
visible in the front. In the both side, because
now if I look at the image, I can see the side in the side. But if I turn this or
speak this to front, I can see the front,
not the back. That's nice. I want that. Speak this to front. Now, maybe we can start do something
or create something. Before we doing that, I have one of these images. I think it's very
important to add here. Let's try to find it first. It should be right
here somewhere. Yeah, right here. This image is very nice
and good image showing us the vision bro from the
top with all the details. The most important thing for me, this part, I will unbod this
image as well and use it. All right, let's exit
and let's go to the top. I will bring this image
here and it all to reset the position I
want to this line. With this line, I want
to scale one of them. Either you make this
one smaller or make this one bigger a little bit. Well, in this case,
we need a guide. Let's add a guide. The
guide is very simple, just add an object. For example, you can add cube. And I can use this as a guide. I will put the edge of the cube, align the edge of the cube
with this edge of the, of the can bro. Let's put this one right here. You can scale to the Z, hit head to take
another copy like that. Let's align this with the
edge of the hits it here. From the top we can see
that we have a distance we could scale the
image a little bit to align this line
here with the box. Or at least move these
boxes a little bit. You can scale them
like that to the Y. Go up this image
and scale it until the edges hit the boxes.
And scale it like that. If you have any variation, make sure to put
this in the center. Now I could hit Key and move this a little bit
in the center like that. Maybe scale this a little bit more now it's
aligned by the way, it's no witness
necessary to be perfect. Let's go to the front
end. Let's see. All right, now this image
is not perfectly in the center because
as you can see, the, this is the middle area. This is the middle area and this is the
middle of the image. That's mean we could move
it maybe a little bit. I will hit Key to move this. Maybe right here. Something
like that will be nice. This is the center
point of the software. Now let's go to the top. Well, before you
do that, maybe we could move these
boxes a little bit, Grab them like that and e to
the x axis and realign them. Now for this image, I will go to the
top and realign, just focus on one
side and just move it like that and the
side will be fit. After doing that, you can move the image down,
put it right here. And you can turn on the front. We don't need to see
it from the back. The guide we don't need anymore. You can grab them and hit
delete to delete them. After that, drop these images, and then hit M from the keyboard to open
the collection menu. And I will put these images
inside the new collection. Hit and let's call these reef images just
to recognize them. Now we have them right here. All right, now we have to do something because
we have a cave here. If you grab this point and push it like that, at this point, it like that the headset
will be a little bit longer. If you draw a line like this, this is the size now. But if you open reach this
point, maybe like that. I will give you example. Let's assume that we have
a cylinder right here. This is one of the
point of the cylinder. This is the far point. This is the distance between
this point and this point. But if you open the cylinder like a tape,
it will be like this. As you can see, the distance
now become greater, the same scenario you have right here to determine the size. Let's go to the front to
create a guide for us. I will add, and I
will add plane here. And now we have
plane aligned with the ground like that,
but you can't see it. When you add the plane, go to this inu and open
it, the alignment here. Switch it to view. I, I just want to align the
plane to the view. That's it. Scale, make it a little
bit wide like that. Maybe after doing that, because we rotate and scale, some deformation happen
to the geometry, We need to reset the rotation because we rotate it and we
need to reset the scale, because we scale this
to the X control A. Control A, and
then it applied to the scale and apply
the rotation. All right, now after doing that, I will go to the top
and to go to wireframe. So I can see that my
plane, I will compare it. I will move this
maybe right here, because these points are the
first points we have here. As you can see
here, the plane is greater than the headset. I will scale the plane
until this point aligned with the gen bro as
you can see from this side. It's very close. Maybe we can move the image but
you can ignore it. Important for now. Roughly we got the size. This is the size
control, A scale. Because we scale this
now I will tap to switch to the edit
mode or you can go here and go to the edit mode. I will add multiple as here using control,
shortcut control. And you will have a review here, rotate the wheel forward to
add multiple cuts like that, make smooth something like that. You can add 22, you can control from here. Now we got this result.
As you can see, I a bend modifier. So I can bend this a little bit. Tab out, I will go
to the modifier and open the list to add
symbol deform. In size. Symbol deform. We have
multiple options. One of them is bend. I will use bend and change
the Z. I want to bend the Z. As you can see here,
we have some angle or bending. Let's go to the top. If I make the zero, the
size of this plane aligned, it fits to the size
of the vision bro, I will move this right
here and make this a little bit longer curves, a little bit like that
to follow the shape. Now it's following the shape
of the hit set a little bit. I want to make this a little bit longer tab to go
to the edit mode, scale this a little
bit to the x. When you do that,
you can see here, this line extended a little bit like that when I
scale the plane to the x, if that's a little bit
difficult to, to see, can see it from here in the perspective
when I scale this, you can see how that
can affect the result. You can scale it and you can
apply the scale after that. Or if you want to make
this a little bit taller, you can extrude vertices
or ages like that. Here we have two options. Maybe we can use the extrude, but before I do that, I will make some change here. I will control the
opacity and make it a little bit transparent. I will go back here
and t to go to mode grabbing these
vertices like that. And I will zoom here. This is the end of the X. As you can see, I will extrude the E to extrude
and then to the X. When I do that, as you can see, now it's become a
little bit bigger. All right. Well, that's
mean, this is the size. Okay, This is the size. Let's turn this off now. This is the size of the headset. When you open it, the idea
is I want to create this, the headset like flat geometry. After that, when I add
all of these details, I will bend it back. That's will make the modeling
process easier for us. That's what I'm going to do. This is our guide,
now let's use it. I will go to the front because
I just want these acres. I will delete. I will
apply the symbol, the form first, let's see
what's happened here. Or you can maybe delete it. Yeah, you can delete. And I will tab and I will grab all of these vertices and maybe
hit to delete these faces. I just want this guide and this one on the other
side. That's all. All right, tab out I will, you can add a new cube
tab to go to the eight. Hit eight to select
all the vertices. Hit one to speak to the vertex. Then hit M to open
the Mirage menu. Because I want to me or collapse all of these vertices
at one vertex, so I can use it when
you open the menu. Hit Merge at center.
And now we have. Just one vertex right
here I can't control. I will hit to the
Z to move this up. Now I'm moving this
vertex up here. As you can see, it's right here. I will start extruding this vertex to follow the
care that I have here. Just keep hitting to extrude and start following
the cave of the headset. All right, let's extrude
this a little bit here. Can increase the
number of the vertices in this area because
we have a strong edge. For example, I can add one
extra vertex right here. Start following this
curve in a good way. By the way, if you want
to add a vertex control, our put the mouse
in the middle of the edge and it left
click to confirm. Let's move this over here
to ex here, one extrusion. Maybe here, maybe one
here and maybe one here. All right, we started from
this point and we ended here. I want these vertices to
be aligned the center. I don't want this vertex to go far like that and this
one go to this dark. I don't want any
variation between them in this case, to do that, you can grab them like this, just these together, and you
can scale them to the X. In this way, you can align
them together to the X axis. Scale X to use the axis and then zero and then enter.
Now they are aligned. After doing that, maybe we can control the space
between the vertices. I grab all these vertices to, we have some variation
in the distance. I have a good add on here. Let's activate it together, Go to the add section after
you go to the preferences, and let's search
for loop tool L, O P. This add is very
important, at least for me. It can give you extra tools to use it when you
model something, just activate it
when you hit Rat. In the edit mode, you will find the Lot tool right here and
we have multiple options. I will select all
of these vertices, or let's say maybe
start from here, at end here, grab all these vertices starting
from here and here. And ignore these for now. I will hit right click and I will use this option right
here is called space. This option here will fix the distance between
the vertices. Now we got an even distance, and that's something
cool for this area. If you'd like, you can
grab these, for example, and fix the distance between them and this will be enough. All right, that's very cool. But because this one is flat, we should scale it a little
bit to this dark and align this point with this line
of the guy that we created. All right, let's
go to the front. And I will grab all
these vertices. I will scale this out
like that to the X. If you hit the scale, and if you try to scale, the scale will walk
to the center like that. I want something else. I want to scale from this point out because we have the
three cursor in the middle. I can use it as a point to scale this out from this point or you can use the
active vertex. You can make one of these vertex is the
active, scale this out. The easiest way is using
the three decursor. Go to the transformed vote
point and this 23 decursor. Then hit to the x. And scale this out until
this vertex hits the guide. I think that's it.
That's very cool. Now tab out. And I want to mirror
this on the other side. I want mirror modifier. Go to the modifier.
A mirror modifier. And now we have this
mirrored and perfect. Now we got this, and
that's something cool. After doing that, I will apply them or I
don't want it anymore. And I will tap to go to the mode I will hit to extrude this a
little bit like that. I want to kick the
thickness and align it with this guide I can grab the image
and move it a little bit. Align this point with
this point right here. I will start. Scaling this geometry until I align this point
with this point. Maybe I should go back
here and turn off the opacity so I
can see the details Better to move the
image and let's move it and align with the
geometry from the side. And yeah, that's very cool. Now I will grab the geometry
and tap the X ray mode. You can hit Al Z to
switch to the X ray mode. I will grab all these
vertices and it to move, and I will move them
almost right here. This is the thickness
of the heat. All right, that's very
cool. That's nice. And now we got the thickness. All right. After that, we need to give this a little
bit thickness to this direction because as
you can see is like a tape. I want another modifier here. But before I add any modifier, I want to check the
face orientation. Let's go to the overlays and
activate face orientation. As you can see here, we have
blue color and red color. All right, the blue color are the faces that could be
visible to the camera. The red colors, they
should be hidden. To fix that variation, you can tap to go to the mode, and then hit eight to
select all these vertices. And you can hit Heft
with N to recalculate the normal of Naw. Done. All right, so
now we have side, blue side and red
side. That's correct. All right, here in
the middle we've got some problem with
the mirror modifier, but that's okay symbol to fix. Okay. After doing that,
you can turn this off. Let's try to fix this problem. We have very close edges, grab vertices and rage at the center to these
vertices at the center. And A hit M. The same scenario for the gram merge
at the center and those we got the thickness,
we got everything. Let's make a quick test
to see what we got. I will, I will add a
symbol Deform again. I will choose bend to the Z
like that and go to the top. I will bend it like this. We should get close result.
See what we got here. All right, if that doesn't work, you can scale it a
little bit more until this fits to the guide. All right, let's see
how can we do that. All right, let's grab this, the geometry. Let's
go to the top. Maybe we can scale it just a little bit from the
center out like that. And hit control a
uplaated scale, And then activate this. As you can see now it's
become a little bit closer. Turn this off scale. This again like that
control a upldkeow, It's very nice and close. All right? Something
like that. All right. Now I will turn the
symbol deform of, or you can delete it for now. Now let's give this a
little bit of thickness. I will go back here and add a solidify to give
this a thickness. All right, you can
make a thick for now, maybe something like that
or maybe a little bit more. All right, let's bring the reference images here because I just want to
talk about something. If you compare this point here with this one
a little bit lower, that's mean this side, we could move it
inside a little bit. Just keep that in mind. Let's put this image right here. All right, let's move
this right here. For now. For now, the thickness is cool. I will accept it and I
will apply the solidify. I don't want it
anymore. I will tap to go to the eight mood
and stick to the edge. I'll click on this edge to grab it and I will hit two times. I will move these edges down
like this so I can create this tab something
like that again. Now we got something
close to this result. After that, we should find
a solution for this area. Because we should
have a curve here, we should have a curvature. I will add one edge
here in the middle. I will push this to
the old direction. To do that, you can hit Alt and push this edge
out if you like. You can go to the
right view to get a better result, right or left. All right, hit Alt. Let's move this out like that. I will add one here
and one here as well, and I will grab them. This one is already
selected for this one. You can hit Alt, Shift
click to grab it, and then hit Alt to Bush
these out like that. All right, now let's
compare the result. Let's see if we did
makes sense or not. All right, so far, the
result looks nice. Check this, but I
think we went too far. Maybe we could take one
of these images down. Maybe this one click and
let's go to the left. Alts. Just take this
down a little bit. Maybe this one as
well. Alt, move it down just at the end of bit. I think this result is close
to the reference images. Yeah, it's very
close. All right, so this is the first step. By the way, the guide, I don't want it anymore,
just deleted. Yeah, this is the first step. I will end this video here and I will see you
in the next one.
4. 004 Modeling the structure: Hello again and
welcome back here. I think this edge
too much inside, I think that's not correct. Maybe we should drop this
edge and push it out again. All right, To do this I will tab and grab
all of these edges. I'll click, I'll click and grab those control
legs to dissolve them. I'll click on this 1.2 times. Let's act crest, just forget
to do this, okay? All right. I will hit key twice,
key and again, and hit a, push this
out like that, okay? Something like that.
This result looks cool. After this, you can add new
edges and push these out. Or you can do something else
like grabbing these phases. After you stick to
the phase selection, just hit three from the keyboard and then hit X to
get rid of them. You go to the two click
click to grab those. Then right click and use
the Loop Tool and Lofts. And now we got the same result. But here we have this
window right here. We have the ability to add segment here to
add two or three. And you can control the strength if you want
to make this strong. The care, I mean,
if you want to make a strong or shallow, something like that,
it will be okay. But keep in mind
cubic, not linear. All right. Now I think this
result is makes sense. I will go with it. I like it. All right. This is the first step. After that, let's try
to find another image. All right, let's focus on
this area a little bit. Let's try to create
what we have here. These tips. All right, maybe we should add an
edge here and Bush. Or maybe let's see
what we can do here. I will grab this age and twice, and bush this out like that. Maybe maybe I should
put this inside twice. Let's put inside like that. Then grab these face, all of them and extrude
them for this side. You can do the same
thing, by the way, just to grab them twice
and put out like this. Something like that. Yeah,
something like this. Now go to the face, click
all of these faces, and then it out and extrude faces along
the normal to extrude these out to get this result. Now I can grab these edges and then it key twice to book these inside and then Alt
and take them out. I think this result makes sense. Maybe the next step, we can grab these faces again and
extrude them one more time. Alto extrude faces along the normal to give this area a
little bit of thickness. If you want, you can delete
these faces in the middle. The next step I guess
we can create the, the glass or we can
create this area. Okay, let's go to the front end. Let's see. What option
do we have here? I will coup one
of these vertices and copy them at KD and I
will put tomorrow right here. I just want to trace this line, this shape. Let's this vertex. And I will hit to extrude, I will this line like that. Let's keep doing
that. All right. All right, one more time now, I will grab this with this
and then hit to fill them. Just keep in your mind that the frame and this
line are very close. If I compare this
line with the frame, we have very huge distance. In this case, we should grab this new line that we
created and push it, or scale it to this direction. Let's try to push it first because that's
what we should do. Maybe we could put
it right here, I guess. Something like that. And then I will make this vertex the active vertex and scale it according to
the active vertex. As you can see, the color
is a little bit brighter. This indicates that this
is the active vertex. Go to the transform, both point and sweakes
to the active element. Now when you scale the scale, working according to
the active element, scale this to the x like that. Now that makes sense. This result looks okay. Maybe we can scale this bag
like that when you bend it. When you bend it like this, everything will be in place. Or let's say almost. Okay, this is the first step. After that, let's
try to find some way to connect these vertices with
those vertices over there. I prefer to grab these
vertices and then shift D to take a Coby like that and then right to leave
these in the same place. Then click to grab
those as well. And then is to separate them. To open the separate menu
and choose the first, the first open selection to select or to detach
the selected edges. All right, now you can tap
out and grab the nu lines. And I will tap to the mode. Let's see what's the next step. By the way, I can't
grab the image and can grab the line and the image, and hit from the number
to go to the local mode. Let's go to the front, and
let's have to go to the mode. And let's see what
we can do here. All what I want to do is I want to connect these
lines like that. First thing, let's
try to actual, I can delete half of these, grab these vertices like that, and then hit X v to
delete the vertices. And now we just
ended with the site. After that, maybe I
can grab this with this and then hit to
create a line here. And maybe we can add multiple
vertices right here. I guess something like that. Maybe we can add 1234. Let's add four. Okay, I'm not quite sure, but
let's accept four. It's a little bit difficult to see the vertices in this case. I will hit two times
to isolate this alone. I will tap to go to the mode. Count the number
here. Just click on this line, the outer line. Let's focus on this area. It's 25 vertices here, click we have 19. All right, we need
to add six vertices. Let's hit Control
to add one to 3456. I'll click again,
and now we have 25. And here 25. That's cool. All right, I added these
vertices in a random way. Don't worry about that. We will redistribute
these vertices. Just right click. After
you select the edge loop, I'll click and then
right click and choose space to fix the
distance between them. If you want to make this to
be a little bit smoother, right click to
relax a little bit. Again, you can right click
and fix the distance. Now we've got something nice. Now, maybe we can
grab these vertices together and then add those. Now I will up this with
this and hit multiple times to fill these faces. Let's see what we will get. All right, now we
got this result, but I'm not quite
happy with this, but I will accept it. Let's accept this results. I will to exit. And let's see what we got. All right, after that sit
control to maybe one G for now. That, I will this
first this loop. And it to push this out
at something like that, I will add an age loop here, something like this. Maybe we can do that later. Let's push this a
little bit more out like that. That's cool. I will use mirror modifier
to mirror this on the other side With
this one selected. Just go to the modifier
and open the list. And let's add mirror modifier. Now it's mirrored, maybe some of these vertices should
be moved out a little bit. Let's secarb these
together, and again, take them out. This one as well. A little bit like that. Maybe
we can move this one down. All right, now I grab those
together and merge them. Apply the mirror for now. And I will grab this
with this control to merge them control, and now they become one piece. I just want to see what's
going to happen if I add symbol deform. Add symbol deform and band to. Let's spend this. Let's see
what we will get to go to the front to wire frame and let's send
this a little bit more. Something like that. I guess we can compare
it with the tub. All right, it's very close. That's what we should
get after the bend. Then we should grab these vertices and move
them out a little bit. Because this open area, it should be flat, should
not be affected by the bend. Just keep that in mind. Let's go to the fronts. Okay, it's not quite close, but we can fix all of that. Let's turn this off. For now, let's focus on this
area. The front area. Maybe we can grab these vertices Ol use them D to take a copy like that and right click to leave
them in a same place. Then hit P and then to
separate this loop tab out and let's grab this new H loop
tahel, all these vertices. Then you can hit to fill
this face if you like, you can extrude this
out just a little bit. Let's bring back the
reference images so we can see what
we can do here. Okay, something
like this. Maybe we can move this face a little bit. All right, I will hit for int, int this like that. Maybe after doing that, maybe we can click on these edges. And maybe we can hit wise and push the inside
a little bit. Level them. After you do
this, you can be level them, it can't roll and
double this out. Let's see if that
makes sense or close. The result looks very nice, we can go with that. The result looks
nice for this area. If you like, you can hit X F and delete all
these phases here. And go to the, I'll click
to group this loop. You go to the phase
and you can use a grid fill to fill
this with Boly guns. I will manipulate the
offsite a little bit until I get something makes
sense, something like that. I guess maybe after doing that, maybe we can put
these phases out at as just these out at
ten, but not too much. If subdivius surface, we
can get very nice results. Maybe we can add one here, like can add one or you
can ignore it for now. All right, that's very cool. All right, now I will
select this piece of glass and it's like
to isolate it. Let's have to go to mode and let's see what
we can do here. All right, maybe we can hit to make another inst like this. Something like that.
And I will shift to the last action again and
again and again, like this. Maybe we can fill this area with the quats X first to
delete these faces. And then go to the Ge loop. And I'll click to
grab the G loop. Then you can go to the face
and use grateful money, believe the offset until we get something makes
sense, Like this one. That's nice, that's cool. It's like to exit, I added a
polygons on the other side so we can bend it smoothly
without any problems. Because as you know, if you don't add Boley guns, when you bend it, you
will get problem. Okay? Now I will merge those
together or grab them, hit control J and
make them one piece. And let's activate the symbol
Deform to see the results. All right, so this is
the result that we got. Let's go to the top
and let's convey. It looks cool, it looks a little bit thicker
because structure doesn't, has the glass healed. That's why it looks a
little bit thicker. If you look at
this from the top, you can see that we have very
distance between this side, our result, and the
reference image. We should fix all of that all. Let's step to go to the mode and let's see what options
do we have here? I will tab and grab
this area in the middle and hit control L to select
the linked vertices. And I will hit and then
separated and tab out. And now we got this result. Or maybe before we do that, let's just do something here. I will hit Control and apply the rotation and apply the
scale in case we got problem. And tab again with these
polygons selected, I will hit and then Est separated
when you separate this. As you can see, I have
some Gabright here, let's try to avoid it. All right, maybe we can hit
D and take a coby like that. Let's go to the Outliner. Okay, the coby is selected, and I will hit M to open the collection menu and
hit New Collection. Let's create a
temporary collection. I will call this in case I want to go
back for any reason, I just add this and temporary collection and
I will hide it like this. Let's work with
this one for now. All right. I will hit Control and apply the symbol Deform. And now I got this result. I will tap to go to the mood to see what we should do here. Go to the top and what's
the problems here? Grab these loops
and maybe we can hit to the Y zero enter and then it and take
this out. Go to the top. Let's see how close we are. Move the, let's go to
the transform point. Let's choose Individual
Origins so we can move these on their organs. That's not going to work. I'm not going to
get that I want. But maybe I can focus
on one side and then I can mirror
the other side. Grab this, hit control L to link select and then hold control
and deselect the side. You can go to the
face if you like, hold the X To delete
these phases, now we can focus on the side. The wire frame would
hit R to rotate this a little bit and align
it in a good way. We could scale at
an a bit like that. Let's see what we got so far. Maybe we should move this a
little bit inside like that. Maybe from the right of view, we should rotate it, I guess. Okay. All right,
something like that. All right, here we should
add maybe one edge loop. What else we should do here? This area looks flat,
but here we have a. Let's try to take
care of this area. Maybe from the top of you,
some of these vertices, they should be pushed out. Maybe I can delete this one. For now, let's focus on
this area a little bit. Go to the top and key, let's move these
a little bit out. Maybe we can interrupt this one and push this out a little bit, so we can have a care here. Now I can add an edge loop here. I can erupt these edges. Starting from this one here, maybe we can move this
a little bit like that. Maybe we can add
another edge loop here, one of these edges,
Maybe this one. Or we can take them out a
little bit more like this. All right, I guess this
results will be okay so far. All right, that's cool. Now maybe we can add mirror modifier to mirror
this on the other side. But now let's focus
on this open area. Let's see what we can do here. I think we can hit t then
skill to the adult sw. The transform o
point to bounding, extrude to scale and extrude and push this
inside a little bit. Then I guess to bring
back these images, maybe we sold the edges inside and extrude
this inside like that. You can accept this
result for now. After you add an edge
loop here to align, the alignment goes on
the opposite side. Just lit back. Let's add one loop here. I don't know, I think that's it. Let's add subdivision surface. I just want to see
what's going to happen with level two, all right? I think this curve looks cool
and close to the reference. I will accept this. All right. Now listid
with this H or vertex, select anything it control to
select the linked vertices. And then and then
to separate this out above this
subdivision surface, I will mirror modifier
could be above it and we could
mirror this to the Y. I think we could select this, delete the mirror, grab this and add mirror for
this geometry. All right, that's very cool. Let's go to the front and
let's see what we got so far. All right. I will select this and select
the image to isolate them. I just want to see if
that makes sense or not. Maybe we should push
some vertices around. For example these vertices. I think we can use
proportional editing activated And hit you to move. And you can manipulate the
effect, the circle effects. Just make it a little bit
smaller and push like that. Maybe we can rub the verti and just move these down ten bits, but just be careful. Maybe we can group to something like that. I guess maybe here we can these, let's make the effect
a little bit smaller. Maybe we can rub those as well
and just move them tenip. Try to follow or trace the
line of the reference image. Okay? All right, what else we can do here? Maybe we can move this down
a little bit. I don't know. Okay, let's take a look now
and let's see what we got. Okay, let's go to the top. I can see that we have
some waveness here. Let's go to the front again. And let's try to minimize that waveness by moving
some vertices around. Let's move this a little bit. Maybe we can this G
and move it inside. Keep doing that until you
get rid of the wavens. Now I think it's very nice
and we can accept it. It's going to the
top. All right, maybe this area, we
should take care of it. A little bit like grabbing this line in the
middle and go to the front. Turn this off as to the
X and then zero and then activate clipping
because if you hit key to move this to the X axis, we will have some
intersection with this side. To prevent that, you can use this opt right here
is called clipping to prevent the overlapping activate and then it key to move
these vertices to the X. Now the results I
think is better. Yeah, let's see what else we can do here. Can we move some
vertices around? It's stuck to excite and
now we got this result. All right, I think that's
it for this video, and I will see you
in the next one.
5. 005 Spending more time editing the structure: Hello again and welcome back. Here I can see that we
have some waving is here. I didn't fix this perfectly. Let's try to find the
solution for that. Let's table grab some vertices. After you turn these modifiers, go to the phase
click, for example, to select this
phase loop and then grow the selection with control. Then you can delete
these faces using x. And then after doing that, now I can grab this
H and then hit X and you can control
X to dissolve it. Now we ended with this one. I will go to the front
and go to the wire frame. Let's try to move these
vertices like that. Try to follow this line again. All right. I don't know which
line we should follow here. Maybe I can crop
the image alone and it's like to isolate it
and go to the front. I just want to focus a
little bit more on that. Maybe we can add another Ish and then tab to go to the eight mode and select all of
these vertices. Hit A, select them all. And then hit M to
open the Eric menu. Then hit Eric at center. Now we ended with one vertex. It's right here. I will hit
you to move this one vertex. You can put it anywhere. For example, here, just
try to trace this again. Let's start doing that. Try to trace the visible line. For example, I can see this
line, I can't track it. It again and again, keep extruding these vertices
until you draw this shape. Now I will look
up this with this and then hit to fill them. Now we got this. All right, maybe this one we could scale it a little bit
and make it bigger. Then maybe we could fix the distance between
the vertices. I will add subdivision surface. I just want to see the
results how close I am. Okay, It's very close to the reference. I
like this results. Now after that tab, and select all of these
vertices and hit to extrude them like
that, now we got this. Hit A and then shift to
recalculate the normal in case we got flipped faces. I will use this as a guide
tab in the Acho exit. And let's move
this a little bit. Maybe right here we
can put it so we can push these vertices
towards this new cinder. Okay, I will select this
tab to go to the mode, and I just want to focus
on this edge loop. Just hit Alt, click
and grab it like that. Then I will go to the
object data properties. Here we have this vertex group. I will put these vertices, selected vertices
inside the group. Let's secrate the group.
Plus, now we have the group. Now I should assign these
vertices to this group. When you hit assign, this
will be assigned with this strength or weight assign. Now they are assigned. All I want to do is I want
to use shrinkrobmdifier, but I don't want to shrink rub all these vertices
on the cylinder. I want to shrink
rub this vertices, the selected one on the
cylinder. And that's it. Now tab out and go
to the modifier. And I will add a
shrink modifier, whereas all right, now we have
the shrink from modifier. You can delete the mirror
or turn off mirror for now. And subdivision the shrink from modifier tells you where the targets, this
is our targets. Now, as you can see, everything is snapped to the cylinder, and that's not what we want. Now we should go to
the vertice group and choose the group
that we just created. All right, now as you can see, all these vertices
following this cylinder, that's all we want here. Now when you be satisfied, grab the ring from
modifier and hit control to light, grab the cylinder. And you can hit M and move it to the temporarily files and hide
it there. Now we got this. All right. Now I should activate the mirror and
subdivision surface. I just want to see the result. Do we have any waves? Let's go to the top and
let's compare the results. All the result is
not quite close to the reference and that's
okay. That's totally okay. From here, everything
looks cool. I will go with this result. Maybe we can tap again and
create some thickness. Hit to extrude it
and then to scale. Let's extrude this inside
a little bit like that. I will hit and put this inside. And by the way, you can do
that later if you like. That's okay to do it now. Maybe for any reason, if we want to delete these
will be easy to delete them. It can roll at one
edge and hit to flip the alignments or to activate it and then
flip it if you like. Now we got this, now
the result is better. And I don't see any
waveness. It's makes sense. Maybe here on this
side we can grow up some vertices and move them out a tiny bit,
but not too much. Just be careful.
Maybe we can grow up these vertices as well and
just these a little bit, some of these vertices as well. I can move them out. Key to the eggs.
Key to the eggs. Now we got something close our tell, see what's the next step. Maybe we can create the parts. See, do we have any image showing us this from
the top of you? We have some details
here as you can see. Okay, before we create this, there is an important
step we could do. I will show you
what I mean here. I just want to find, yeah, this image right here as you can see here,
compare the distance. You draw a line first like
that and one line right here. You can see there's a distance between this point and
this point right here. Well, that's mean, we should, the polygons on this side
from the bottom side, we should push it out this area, it should be pushed
out a little bit. That's very important
to get a result. Correct? Result. Okay. Let's see how can we do this with
this one selected. We have Mirror subdivision and here we have just
subdivision surface. We can grab all of them. For this one, we can apply
the mirror, we can applyight. I can grab those
together and then hit control to merc them and
make them one piece for now. Then I can go to the top
and create a lattice. Hit shift to add add
lattice lattice. Now, following the position
of the three dicursor, the position right
now is not correct. I will delete it and I will
select this, the organ dot. As you can see, it's right here. Then the three cursor here, I want to snap it to the
position of the three decursor, to the position
of the organ dot. To do this, grab
the structure and hit and choose
Coursor to select it. And now we have this back in the middle to add and
let's add lattice. Go to wire frame and let's
move this in the middle. And maybe we should scale
it at a bit like that. I guess we can scale
it like this as well. The idea is the lattice should
cover the whole structure. Maybe we should scale to the Y and key and
move this back. A tiny bit like that. Go to
the front and hit to the z. And scale this key to
the z and book to the z. And scale this out, key to this. Let's move it a little bit. I just trying to make
the distance here similar to the distance right
here on this side as well. That's all. Now I want to bind the structure
with the lattice. Grab the structure hold, have to grab the lattice. And then hit control to
open this parent menu. And sit parent to
lattice deform. And now they are bind. Now if I grab the
lattice and tap to go to the model, any vertex. Now if I hit key to move it, that's will deform
the structure. Go to the properties
of the lattice. Deformed, kick these axes to. I just want to add one
controller right here. Let's see if that's
the V, maybe the Yeah, just add one right here and
they grab them like that and just that's all what I want to do is just pushing
these out like this. But let's see what's the
correct way to do that. Let's see if that's correct. If I push this like that, what's going to happen if I had one here and they grab this
one and push that wall? Maybe I can grab this and
push this a little bit more. Now we got this result
as you can see here. Can we add one here? Let's see what's going
to happen if we do that. I don't know, but I just want to grab this vertex and
the key to move it, let's see how that will
affect the glass area. Let's go to the right
view, for example. All right, let's try to, maybe I can move these
vertices a little bit back. I think we moved this
too much forward. I will hit, let's turn this off. And move this back
just a little bit. And maybe this one as well. Okay, maybe now
let's go to the top. Let's see what we got. All right, we still have this
distance, you can see it. I will tap out and grab this. And turn this off to
see before and after. All right, we can go back to the lattice and grab these and push them back a
little bit more. Okay, This result looks okay. I'm going to grab
all these pieces and hit head to duplicate them. And I will hit M to open the collection menu
and put this in the temporally file
and hide it like that. For this, I can
apply the lattice. Deform or modifier. Just hover over here
and then it can light. And now it's plight. After that, you can grab the
cage and delete it.
6. 006 Starting with the face interface fabric: Hello again. Welcome back here. Let's start with the
interface fabric. This piece of fabric that
should be right here. Let's see how can be created. As I remember, I have an image
showing this from the top, but I don't know
where is it now. This one right here, this image, can help you to
determine the length of this, of this object. I will go back to the images
and try to find this. Yeah, this right here. I will put this in the top. Clicking in the dry, let's
put this right here. And then as to scale, scale, let's put it right here. Try to align it with the results.
Something like that. This size looks cool. Now what I'm going to do is I will tap to go to the
mode and I will grab, for example, these edges. Let's turn this off for now. I have this edge. I don't want this all right, by the way that I just created. But I didn't record
how I did that. But it's not important. Don't worry about it. Let's
select this edge loop. Will hit to take Coby like that and then rightly to
leave it in the same place. And then hit and
then separate out, and let's grab this and
type to go to moot. Hit eight to select
all these edges from the top, hit to extrude, and let's extrude
this almost right here, something like this. With these edges selected, I will hit Alt and Bucht. As you can see,
Altas is not working correctly because of
the phase orientation. Some phases are flipped. I will hit eight, select
all of these phases, and then hit
hefticcalculator normal. Then go back to the top
and click on this lobe. And then hit Alt to
these out like that. And then control,
I think that's too much out S and put the inside. And then control are to add two edges, for
example, like this. And I will hit outs again to
just carve it a little bit. Now we've got this result
as you can see here. Rice, see what's the
next step in the Ma. I don't need it anymore. You can delete or you can create
folder for the images. I will hit M and create
a new collection. And let's call this.
I have one here. Just hit and move this to the reframe iages, I
want to hide this. Okay, on the side we
have some tweaking, we could book these
face like that. Let's bring back the
reference images so we can see what
we could do here. According to this
image right here, you can see that the
distance here is short as compared
with the site here. Maybe we should use the lattice. Again, to tweak
that from the top, I will have to add, and I will add lattice
deform to move. Let's put this right here
to scaled like that. Maybe I can scale this to the x axis and move
it like that, maybe. Okay. And so to the Z as well. We should bind the interface
fabric with the cage, Grab this to grab the lattice, and the control to open
the parent and menu. And choose t deform.
And now it's connected. Now if you grab the
lattice and tab to go it, now you can deform
this piece of fabric. What I want to do is I
want to add one here. Go to the properties
and increase one of these until you
get what you want. For example, that's
almost what I want here. I will grab these together in a key to move them like that. All right, this G in the middle, we don't need the soles deleted. I don't know, where is it? Sorry, third one. Okay, Let's add one here. Do we need to add one here? Let's scrub this in key
and let's move this. Hey, this result looks cool. I guess maybe we can push this a little bit
back. Not that much. Maybe the divert is we can move them a little bit
to the key to the. Let's see if that
makes sense or not. Maybe we can it again and
move this a little bit here. This result looks cool.
What about this here? Or something like that. When you aombinatejt tab out and
degrb this geometry. And hit control and
apply visual geometry to me and delete cake. We don't need it
anymore on this side. We have, we need to
create this cut here. Let's go to the bottom control seven to stitch to
the bottom view end. I will tap to go to the
mode and I'm not quite sure where to put
from where to cut it. Maybe we can use this
he cut from here. Let's try to draw something. We can compare that to
see if that works or not. Okay, something like that. Maybe it will work. Yeah, I think
something like this. We can delete these faces and create what we
want to create here. I will use the knife tool to create some cuts here like this, and grab this with
this J. Connect those together to create
this care for this side. There's no reason
to worry about it. We can hit X, F to delete these faces and just
focus on the side. All right, Now I will grab
these faces like that. I will hit P and then
to separate them. Let's focus on this. All right? This area is not going
to work like this. We could delete some,
maybe I can delete those. Let's try to find a way
to get better results. I don't know what to do here. Maybe we can add,
goes like that. Let's add one here. Let's de grab this vertex heat wise and slide here.
And this one as well. Okay, that's very cool. I will use the knife tool to cut some of these
vertices because inside we have some
vertices pushed inside. You can ignore them
or feel like you can. Okay, let's select
those together and tap. All right, in the wire
frame we can grab them and we can move
them and stab them back. And Hotrolna for example, this one should be snapped
here to this vertex key. Hold control, snap it. Let's do that here as well. Hold control the
Tim. This one here. Don't worry about merging. They are not going to be merged because a different geometry. They are geometry hold control
and Tim, this one here. All right. This part is
a little bit annoying, but if you focus, you can do it. Okay? The key. All right. Key hold control stamps. What about this vertex key
hold control stamped here. And this one should be here. This one should be here. This one should be stapped
here. What about this one? Let's up this, I just want
to see the end of the. So this is the vertex. And hit key and
stab it right here. All right, let's focus
here a little bit. Key, hold control stamp here. I think we should do the
same thing for this as well. I will take this out
and snap them from, yeah, from outside like this. After that, we can use the
mirror modifier again. Tap out, and let's
focus on this. And let's go to the modifier, and let's add mirror modifier. Okay, that's nice. I just forget to grab this
vertex and move it back. So I will grab it like this
and ki and snabitsright here. Yeah, that's correct. Okay, Now it's a time to give
this a thickness. Okay. Let's see,
how can we do it. I will tap out first I will
apply the mirror modifier. We don't need it anymore.
Let's give this a solidified, let's give this a
bit of thickness. Let's spring this
up a little bit and make this something
subtle like this. That will be enough.
Let's step the mode. I would like to add
one edge here, okay? And maybe another one,
maybe right here. I just want to push some
of these edges out. I just want to create
a small bolt here. That's all what I
want to do. Maybe I can push this back
just a little bit. That's not going to give me a good result on the other side. But let's try to
apply the solidify. And I will grab these ages
and inflate them using Alts. As you can see, this result
is not going to be perfect. In this case, what we can do is controlling and just add the
ages and don't do anything. Apply the sodify now
and then go back and grab these edges And hit Alt to push
these out a little bit. Not too much, something subtle. Now we've got better results. Maybe one egg we
should add here. Let's try to find another. I just want to see
what we have here. We have a small
ball here as well. As you can see we
have small care here, let's try to take care of it. I will add another
egg loop here, and second one here, the crop. This hit Alt and push
this out like that. Let's add subdivision
surface to see. The result would level
two, radically smooth. All right, let's go
to the bottom view. I think we should move some
vertices, for example, these vertices dilate these, I don't know, but I think we should scale them
inside like that. We can focus on one side
and re mirror this. Let's make the process a
little bit easier for us. A grab the side it deleted. Let's fix what we
should fix here. Maybe this one I can rotate,
attained a bit like that. Grab these vertices. I just move them a little bit. All right, I think the
result now is better. Now, I can re mirror all of
that mirror modifier again, put the subdivision surface
underneath the mirror. This result looks better. I will end this with you here and see you in the next one.
7. 007 Modeling the face interface fabric frame: Hello again. Welcome back here. Okay, now's the time
to create this piece of fabric that should be
on contact with the face. Okay, this one here. Let's see, how can we created? I have this new image, this nice image showing us
how thick this should be. I think I will follow this
image to create this. That's the best
choice I have here. And maybe I can use this
put inside the scene, this. Try what's going to
happen if we do that. This is the image
we have right here. I will go to the front
and click any dry. And let's put this
right here to move. Let's move this over here. This is the image. Just
keep in your mind that this image is a perspective
image, not orthographic. Here we have some
lens distortion. It looks like a little bit big or bigger than our results, but because we are in
the orthographic view, things are different here. If I go to the perspective
as you can see, now the frame here become
a little bit wider. But if I go back to the
front, that will be smaller. Don't compare this
with this one. All what I want to do is just put it here, above it, maybe. And just kick the
thickness from this angle. Does it now let's see
how can we create it. Or at least start to
go to the mood end. Let's grab one of these
edges. Maybe this one. Select this Alt control and grab this until you
reach this point. Then hit Shift with D to
take a copy like that and rightly to leave
it assemblas and then hit P and then
is to separate it. Now let's grab this new H and Tap and turn off
subdivision surface. For now we go to the vertices
and let's go to the front and let's start these
vertices and exclude them. I will hit to exclude this down, grab these vertices and move them down a
little bit like that, maybe a little bit
more like this. I will grab this vertex
and exclude it like this. If you want to
make the process a little bit similar for
you can leave one vertex and the next one I will dissolve all of these. I just want to make it
easier for me to control it. Now I will grab this vertex
and I will hit through this. Maybe right here, I will grab this vertex and hit through this over
here like this. Maybe this one like that,
maybe this one like this. These vertices, I can move
them a little bit more. Let's grab this vertex, end through it over here. This one may be here, I guess. Grub this one and dissolve it. This end through this, up here. And now let's grab these
vertices like that. Hit and decb with this one. Hit the same thing for the. Let's check what we got here. Okay, there is a so far looks cool.
Check the thickness. In general, if this thickness
looks okay for me, I will grab these vertices and extrude them a little
bit more like that. Because if we go back to
the reference images, for example, this
image right here, you can see that this
piece of fabric, it's extended a little bit, it's not going to be end here. It would be extruded a
little bit like that. That's why I extruded
these vertices. And maybe we can extrude
them a little bit more and key to the y and move
the inside a little bit. Try to use the relax
option, right. Can relax to see if that
can give us something nice to artery that get the results. Is nice. Maybe some of these vertices, I can push them
back a little bit. Not too much. I will push this inside. Or before you do that,
maybe now we can retrieve these vertices,
bring them back. Let's create them like that. Just create them first and
then tap out to grab this and tab to go to it and turn
off subdivican surface. Now we will align
these vertices with these vertices of this piece. You will understand
what I mean here. I will grab these vertices like that and make one
of them the active, I mean this one because
I want to snabIill active vertex snap and
then it key to move and hold control
and snablrub this. Let's do the same
thing. Let's grab this to corrup this one. Let's do the same thing.
Alt control and snab here. Key, hold control in
this time right here. The same thing for
this key hold, sorry. Maybe we should slide
this a little bit like that and corrupt these
vertices, all of them. And relax one more time to
get even better results, you have to to repeat
the last action. Okay, now we got something nice. All right, let's go back
to the reference images. And here I can see that I have some solid frame above
this piece of fabric. We should create it. I will use this and I will push this back. Just a little bit like that. But let's see how far
we should push this. I think that's too much. Let's
push this forward a little bit like that.
Something like this. It will be okay. I will tap to grab this vertex
and key twice again. Slide this up here. Maybe I can slide
this here as well. Maybe move this a
little bit to the y. All right, I think this
results will be cool. Maybe we can move
these deep inside key to the a bit too much. I will hit to extrude them a little bit like this
to create the thickness. And then hit al them off
to recalculate the normal, to fix the normal direction. Now let's focus on this
a little bit more like adding support the loops. Let's Beivle this first. Grab this H with this one. And then it control to
Beivlet to make this round. Let's push the shape
back to 0.5 Maybe we can manipulate the width a
little bit. All right. This, yeah, I can
exhibit this one. Maybe I can grab these. Just pick a nice angle and just move these a
little bit like that. I can get even better results. All right, I can isolate this so I can focus
on this area a little bit. Grab these two edges, it K, to create a connection
between them. And the same thing
for these here. It maybe we can add two edges around this
from here as well. And connect these together. And this with the, the
same thing for the site. Hit. Maybe we can rub these and just slide them a little bit in those as well. All right. Rub these and just pick a nice angle and maybe
we could rotate them. All right? Something
like that. All right. All right. Now let's select all of these faces in the front. Let's take this out for now. Just scrub them. I
will duplicate them. Scrub them first like that. And then hit shift D to take a coby and leave it
in a same place. And then hit and then
to separate it out, tap out and scrub this Nuttall
hit, extrude it like this. Just small amount of extrusion, not too much. All right. Somebody like that. I will hit Alt S to push this
a little bit farther. Okay, this result looks cool, but here we have some phase. We need to push them back at. And push, because this area should be a little bit thinner. Maybe we should decubitus phat
is not going to work here. Let's move this to the Y, Okay, Maybe we can
rotate this little bit from a certain
angle like that kills across this vertex
key wise and slide it pack. And this one here, key wise and slide this pack
just a little bit. I will look up all of these
and push them back like that. Maybe this vertex
I can move out. And this one is
slided in this one, maybe we should push
it out a little bit. All right, let's add
another Ac look like that. And I will select these acres, this out, ignore this
one, for now, Alta. Push this out. For this one, maybe we can let Altas and
shrink this, this one as well. Maybe we can add another
edge loop like this. And let's pick some of these edges like this over here and I will
Altas to pok these out. Maybe we can these
edges as well. Alta push them out as well. Here, you can ignore the All right, these edges. Maybe we can just push them
out a tiny bit, not too much. This one and this one as well at least activate the subdivision surface
and they see the result. This one, okay? This one needs a little
bit of tweaking, like adding a support edge
loop and make some small inst. I will show what I mean here, Kel these faces, or let's
start with the hit for inset, then hit A to invert the inset. Get this result with this face still selected
it for insight. And again, to invert it insight, now we got nice,
smooth, sharp result. The same thing for this. We can isolate this first
and just focus on this side. Let's scrub the entire
age. Look like this. And maybe we can
bevel, it can troll. Now let's see what we will get. Okay, very nice result. Maybe this sharp area
should be smooth a little bit according to
the reference images. To do that, let's turn
off subduing a service. For now, let's rub these images
like that or ignore this. And this one, just the key
slide this, this one as well. Key, slide it like that. Okay, Now have become a
little bit smoother and n, All right, what else
we can do here? Maybe these vertices, we can push them a
little bit like this. For this side, I guess we
can do the same thing. Grab this key wise
and this one as well. Move it inside like this. These vertices we
can push them out. Those over here, just pick nice gold key and
move out like that. All right, now become a
little bit better but here can see that we
have some wavenska, I guess this area
should be pushed out. Okay. Let's see how
can we do that. Select these firs key to move and let's move
them out a little bit. And Gb and move it a little
bit out this vertex as well. Maybe we can move it
out a little bit. Now let's see the results. And if you are not so
happy with this result, you can use the sculpts. You can use one of these parts in the sculpt mood to do this. But let's try to fix everything
by moving the vertices. Let's see, grab these and
move these out a little bit. All right, now the result looks cool and nice. We
can accept this. Now let's see what's the exit inside this phase interface. We have this structure. If you notice here, we have something
solid here inside. And we should create
one more thing here. We need to try to find a way to eliminate
this gap we have here. Let's go back here. And
can we add an here? Quite sure what's going to
have it if we add this. What I want to do is I
just want to grab some of these vertices and
push them out. Okay, so let's see
how can we do it. Okay, With this new edge added, I will select some of them, not all of them, maybe
just these edges. And I will hit Alt to
push these out like that. Now, maybe we can call
this one, hit Alt, sorry, but that helps a little bit. Yeah, now the result
looks better. Very cool. Okay, I will select, it's tack to isolated. And let's see, how can we
create this structure? I think we can start with these phrases,
grab them like that. We can select some of them like this and same phrases from
here. And maybe, I don't know. Let's select this one.
Maybe those as well. I can grab them. I will hit head to take
a copy like this and trot to live with in sibs. And I will hit and
then separate. Now we ended with this
as you can see here. All right, without
doing anything, the result looks nice, but we need to
tweak this farther. I will go to the x ray so I can see the vertices key, Tise, end. Slide here, taper
this a little bit, slide this, slide,
this like that. Okay, I will hit twice
to grab this right here. Maybe we should
slide this a little bit and put this in the middle. You can ignore the rest.
I think that's it. Hit a Select all these
vertices and then hit Alt to open the extrude,
extrude Normal. And give this a little
bit of thickness. Now we got this result. As you can see, maybe we can grab the entire
face, look like that. And then hit for instance. And it all to invert the
inset suddenly like this. Then hit I again. And then oh, to flip the inset back
these phases here. We don't need them, just
grab them like that. E, get rid of them here, we should do something.
Let's isolate this. I will use an tool to
create cuts like that, and one cut like this. And just delete these edges. The same thing we can do here. Let's use an app to
create cuts like that. One more here and delete
these edges like that. Maybe we should crab
these key wise and push these Ts, push them like that. If you want to prevent the overlapping a
activated clipping in the mirror modifier Mr them, you can go to the
front if you like. Can hit to the, or flatten them and then hit
key and move them like this. Okay, that's very cool. Now the result become nicer. You can either
support the A look here and one here if you like. Maybe one here. Let's see what else we can achieve here. Let's turn off sub we can
surface for this area. Maybe it should be harbor. That means we can add one here and one here
as well. And there. Maybe we can egrab these faces, grab them like that. I will hit Alt to give this
a little bit of thickness. But here we should do
something in this area. All right, I want to delete
these phases in the middle. Go to the phase. And these phases in the
middle, we don't need them. Xf. Get rid of them. Maybe I can trim this like that and push it to the X axis. To remerge it, I will use
an F to create a cut. And hit A to make the
cast right and to cut through and then left
click and then enter. Now I can pick up these phases right
here, X, get rid of them. Call these vertices and
let's move them like that. And done. Now let's activate subdiviion
surface like to excite, you can increase the
subdivision level to three to make
this even smoother. Okay, I think that's
it for this video. I will end this video here
and see you in the next one.
8. 008 Modeling the nose pad: Hello again. Welcome back here. This video is focus on the nose pad, this
area right here. Let's see how can we created, let's bring the reference Ami
here and let's get started. All right, what we should
do is we could crop some of these vertices and move them starting with
this one key to the Z. And let's move this up here. Maybe this one as well, or maybe we should move them
down just a little bit. We want to create
a cave like this. Let's see here, Key to z. And let's move this up
here, and this one as well. Let's move this one,
and maybe this one as well, key to z. And let's move this up here, and this one as well. All right, maybe this
vertex I can move it down at any bit. What else we could do here? Let's try to find another image. Maybe these vertices, I can grab the key twice and
just push them back. Maybe this one as well. Let's add one here and
maybe one here as well. The idea is I want to grab
these and just move them forward because here
as you can see, we have small bulk,
maybe one here. We can set these together and
just move these like that. We can add another one
here and move this back a little bit if you like. You can fix the
distance between these. Click and choose space. These vertices as
well. Right click. All right. Something
weird having here. All right. Choose space. Maybe these vertices. I
can slide it a little bit. Let's add two acres
here as well, twice. And let's move this a
little bit like that. All right, these vertices, maybe I can grab these and
just slide them like this. Maybe this vertex I can
move it a little bit. You can use the scalp mode. You can grab one
of these brushes. After you switch to the salt
mode, the smooth brush, just select it and
reduce the amount of the strength you can hit and
move the mode to the left, to the right to control
the size of the ph. Just this area a little
bit to make the smoother. It's something like this. All right, now we've
got nice smooth result, as you can see. Now let's go back
to the object mode Now I think we can
add miramodifier. Try to avoid any overlapping. I don't see any
overlapping here. Rightly hit the smooth end. Maybe we can give
this a thickness. I will apply the
miramodifio, can't light. Okay. Now I will
thickness using solidify. Let's crank this up a
little bit like that. All right, I will apply
this as ball and tab again. All right, here we
have a small care, we can go to the bottom of, you can spleven
and add one here. And I can grab these
vertices and move them, put them in a place like that. Okay, that's very cool. Now maybe I can grab these ages. We can isolate this.
Let's grab these agrees. All maybe we can Vl them now. All right, grab these here. This one as well. You can V them. Before we do that, I think
we should do something. All right, let's slide to exact. I just want to check this area. I will add one egg
here and duplicate control or bevolet
to three like this. I will grab this one
in the middle and hits and push this deep inside. Now I will add subdivision
surface to this and increases to two in this area. I can sharpen it a
little bit like that by adding an E and
one G right here. Okay? Something like this. Maybe this we can etgofitski,
let's make it here. I think we can hit control are to add an loop
like that and then hit to align it and flip the
alignment to get this result. I can't connect this together. Turn off subdivision service for now and let's see
how can we do that. All right. I will grab this
and wise slide this here. Something like that. And
the same thing here, Keli. This right here and right here, because we made
some editing here. I will delete the
site and re mirror it just to grab the side like that
in the X ray mode and then hit x F
to get rid of it, you can add mirror
modifier again and put mirror above subdivision
service, all right? This result looks
cool, very nice. All right, here,
maybe we can make some changes on the side. Let's just like to isolate
this and I will turn this off. Maybe I should add these
faces to the structure. But before we do that, I
just want to make sure that we included these faces. All right? We didn't
include these faces. All right. Maybe now
we can include them. So, like that. And then if D to
take a coby like this and right to left in the same place and then hit
P and then to separate it, tab out and they go out this new piece with
the structure. And it's like to
isolate them all, but I want to do is
just adding this. Let's see how can we do this. All right. Make some editing. This book, this vertex
here and this one may be here like this. I will give this a solidify. All right. Apply mural
and let's add solidify. Activate the wire
frame for this so we can see what we are doing. Let's move this down
here a little bit. Something like that. That's very cool. I will
tab after you select the, and let's delete all these
faces at Xd of them. Because I will connect this
new piece with the old one. All right, now let's
go to the face and let's see what we did here. All right, we grab
these faces after you tap the Select selection mode. And let's select these faces. I can't select them because
solidify still exists. I will apply and tap again. We don't have any faces
in the middle now I will. Or you can go up
this face like that. Then you can hit for insets hit. I invert the inst hit. Let's invert it like that. Right now I can
delete this one in the middle of X,
I get rid of it. Now let's see what
else we can do here. All right, here in the middle, we should add two as. Let's add two like
this, connect some of these faces. All right. First maybe we could grab
these faces like that. All right. Don't cry
about this side. We can re mirror it. And I will hit out. Took up. Maybe now we can reconnect
these faces F and delete it. What else we can do here? I think that we can K between
these, let's grab this. We have subdivision surface,
and here we have mirror. Let's delete mirror and delete this one as well. We
don't need it for now. Grab this and let's delete half of it and the X frame mode. Grab this X aged of it tab. Grab this, this control
J, make the moon. Then let's go to the mode and let's R
these vertices together, Grab this spot control
and stab it here. The same thing for this one. Stab it here. Maybe
I can grab this. All right, but this one
selected keyhole control snab. And this one as
well? This one here. This one? Yeah. As well. I will use an F tool to
create a cut coat like this. Me those together it
M and Marc Center. Okay. I will create a cutco like that and grab the keyhole
control and stamp it here. We don't need it anymore.
This one hit and Ga center and the grab
this vertex wise. Light here, right here. Some vertices they should be merged and Ga center
with this one. This I guess they are merged. Control are to add loop right
here as a support loop. Maybe one here as well. Now maybe we can add
mirror modifier. Again, subdivision surface, the stern wire frame
to see the result. All right, here I think we
have a problem somewhere. These vertices are
not red problem. It M Merica Center, now the problem is fixed. Okay. Twice. Let's move
this a little bit. Right here. It's to exit. All right. Now I think
that result become better. Let's act to subdivikion
surface for this. All right, here we have
some tweaking we could do. Moving some vertices from the bottom view, I
guess we can do that. Grub, move them a
little bit like that. The, the else maybe these are sees, do we have a cap here? And let's move
this back as well. Okay, that's cool. Before I end this video, I just want to tweak
this area a little bit. Let's select the structure with the fabric and like
to isolate it. And let's glove this
tab to go to the mode. Okay, let's see what we could do here to follow this curve. Maybe by moving the
vertices, I can do that. All right, I think now
the result is cool And all right, let's select these vertices and let's
see what's going tab. If we move these down and
maybe these vertices as well and maybe we can increases to three to get even
spotter results. Something like that is very
beautiful. I will accept it. Okay. Now I think that's it for this video and I will
see you on the next one.
9. 009 Modeling the Speaker bar: Hello again. Welcome back here. This video, I want to start with the speaker bar. This
part right here. Let's see how can we created the images that we have
here? We don't need them. I will grab them and
just hide them here. Maybe I can use this image. I will rotate this to the 90 degree like that and
go to the right view two. Let's move this over here. Maybe we can scale
it a little bit like that. Make it bigger. What I'm trying to
do is scale this. Can this image be matched
with this result? Okay, let's kill this
a little bit more. And to move, and let's
move this above it. All right, now the result
is los. That's very cool. Now we can count on this. Now the size looks
nice and makes sense. And now we can design this. Let's move the image back here. And let's grab these details. And I will hit, okay, let's move to the collection. Maybe we can call, let's hit
the click on it and let's ching into maybe, okay. Now I can hide this while the image will
be hidden as well. I will grab this and
hit and move this to the images reference
images. I will hide. Now let's go to the right view. And let's see what
we can do here. Have to eight to add,
and I will add a circle. I can start with a circle. Let's align the circle
to the view like this. We have 32 vertices.
That's too much. I will change this to maybe 12. 12. Yeah, I think 12 will
be a nice choice to move. And let's move this over here. And let's scale this like that. Maybe a little bit
more like this. Maybe we can scale
it more like that. The images folder, I have this image, I
think it's better. I don't know if this
is better or not, but let's see if I
have another one. Seems. Yeah, I don't. Anyways, let's go back here. The idea is I just
want to see if this perfect circle or not. Because I feel it's like
this not perfect circle. Please go back and use a circle. Maybe we can move it
a little bit here. What I can do is I can grab these vertices and just kill them to the
middle a little bit. And choose bounding box and
it to Y and kill them ten of now I will grab these
vertices and then it FD to copy them and
push this new coy here. Now grab these vertices here, x, v to get rid of them. Grab these together it,
grab those over here. It, And now we got this. Now we select all these vertices and to create a big face. And to extrude this
out like that, bring back the reference
images to see you. All right. Do we have
any image from top? Page? From top. All right. We have this image right here. It can show us a little
bit how far we should go. All right, this thickness
looks cool. I will accept it. Maybe we can go beyond that
a little bit like that. Hit al them all. You have to enter, recalculate
the normal in case we got a problem but we don't. Now I will grab this face
and then hit for inst. To make an inset like that, I will grab this edge
and wise to slide it a little bit inside like
that to get better curvature. And I will hit control tub
buble, these 23 edges. Now we've got this round shape. And now I will grab this face. Maybe I can hit to scale
it inside a little bit. Maybe I can hit XF. Get rid of this face, and go to the H O click and use the face and
choose a grid fill. Yeah, I think this looks cool. One in the middle with control tobivalent to get even better results that
this one in the middle, you can delete or
you can ignore it. That's okay. Go to the
face selection mode, grab these faces, hit
XF, get rid of them. Now let's select
all of these acres. And then hit to extrude,
and then to scale. And scale them out
just a little bit. Now let's go back to the right. Maybe we should
scale this to the Z. Now we've got the results now maybe we can
grab this vertex, maybe that one and then it key to the Z.
And move this up. You can hold control
and snap with this vertex to align
them like that. Key to the Z. Yeah, now they are aligned, hit S to scale and put these
vertices away like that. Maybe I can select
these vertices and go to transform the vote point and change this to
the active element. The idea is I want to align these two
vertices with this one. Make this one the active, as you can see it's prior. Make the last selection and
then hit to the Y oner. The same thing here. Grab those to grab this as to the yer. All right, that's great. Okay, now I will select
these vertices like that. And hit to extrude
this over here. As to the enter,
flatten them again. Let's move this right here. Control R to add a
support loop here. Let's go to the x ray mood. So I can see the small care, I will group those together
to the z. Let's move this up. Maybe this loop, maybe we hit. Move it a little bit like that. We did the great here. Now let's grab those over here to extrude. Extrude this over
here to the Y zero. Enter control are
to add an H loop here and grab those Z angle. This here, I will grab those to the Z,
scale them like that. I just want more space so I can bizzle this and
get nice curvature. Or you can do something else
like get rid of these two. Gtlxowa. Grab those. Carol, shift to Z, maybe we can add four
acres like that. Don't worry about overlapping, except there is like this. When this menu pops up, go to the clam and activate it to prevent this overlapping. The number of the segments. Three, maybe we can make three. I think three will be enough. These vertices in the
middle grab them and then hit and merge by distance, or merge at the center. And now they become one vertex. I guess, yeah, I will grab this vertex with this one hits J to create an H loop here. This one hit K, maybe
I can grab them all and hit K to the Y and
just push these out. You can use the if
tool to create a cut. Goes like that. One cut goes like this. But we will get a triangle here. A triangle. All right, maybe we can dissolve this H. I think if we add
an extra vertex we can get rid of this problem. I will hit control are
to add one H here. Now I will select these
edges, all of them like that. And then hetticallyn choose space to fix the
distance between them. Now we've got another
result. That's very cool. Now what I should do is
I will make a new cut. Goes like this. One
cut goes like that. I will grab this H with this and then hit X and choose
limit dissolve. To dissolve this G without
deleting the vertex y here. I will grab this and hit X
control X to dissolve it. Yeah, now these better. All right, by the way, if you want, you can delete
this vertex as well. Because here we have an on
faced with five vertices, I don't have the ability to connect this vertex
to anything here. Because everything
here is quit unless I add a new edge and I
don't want to do that. Go to the vertex selection mode and grab the control
and dissolve it. And grab these vertices again. And then click and space
to fix the distance. And now we got something better
after doing all of that. Now I guess we can select these faces like that. Put all this over here, sir. I guess we get to
activate the screen cast. Let's put this over here. After selecting these faces, I will Ft D to take over here. Something like this. Maybe we can move this a little bit
more like that to the X, maybe a little bit more. And I will select one of these ages hit and the
grob, for example this one. And hit multiple times until you fill this entire face loop. Just hitting and that's it. All right, like that, Try to find another image
I have on this side. Let's try to create it. Let's see if we have the
ability to create it here. Well, I think we can, let's see, grab this edge loop and
maybe we could dice it. All right, I will leave it like that to create a giant phase. I will ints and I will invert the inst outside it to get an outer
edge like that. And that's now I will hit to extrude this
inside like this. Then hit for another inst flip
the int, this time inside. Hit again to create
this small frame. As you can see, we
have very tine frame, that's what I'm trying to do. And then hit again for
this inside, like that. Another inset hit. I like that, now we got this as maybe I can hit to
take this phase out. I can grab this X, get rid of it, and go to the, you grab the Gs again
and go to the phase. The result is awesome
for this phase. We can give it a thickness, trying to create this rub, Then hit to give this a little bit of
thickness like that. And this side, we don't
need it. Get rid of it. Let's grab this one here. I think we can. Eye for inst
like that and delete this. Get rid of it. Go to the edge. Click the same scenario. Face grit, fil this edge
and can throw to level. Let's pebble this 24
edges if you like. Add one support to, to prevent stretching to
go to this direction, we can push this any place. Okay, now let's focus on
this area a little bit, because this should be sharp. I'm going to add an edge
loop here and one right here and one here to
make the corner sharp. Maybe this one, I can give it a little bit space to make
this a little bit round. And nice control are here, and one here, right here. This one should be
sharp like that. All right, now let's see, Rob. These edges. All of them. You can go to the face. I'll click on this to
grab the face stop. You can bevel this,
but these faces, we don't need to include them. I will hit Xf and
get rid of them. I'll click on this faceto,
select them like that. I will go to Select
and loop boundary. Just to convert this
to boundary selection. Now I have the ability to level, but let's see what's going
to happen here to this pole. I don't know how V
will behave here. I will try it control to
see what's going to happen. All right, I got a problem. As you can see,
Bible is it's mass. That's not what we are
trying to achieve. That's because of the
phase orientation. We should fix the
phase orientation. To prevent that, if you try to Bible something and you've
got something like that, always keep in your mind to
fix the phase orientation. Catz to do that. And then a select
everything and then shift to recalculate the normal. To go back to the
phase selection. Click select, loop
boundary control. Be this time to bubble. I will add three. Let's
make this nice end round. Maybe we can add, that's too much actually
that's too much. All right, now we've
got nice round results. That's cool. All right, we have
in the middle, two edges not merged. You can hit out click to grab one of them
and hit Control, Solve it, and that will be it. One more thing here we could do. I want to add a support
globe around this to prevent the strike to go from the small
phase to the big one. When I use subdivision surface to get something like that, switch to the pace
selection mode end, grab these phases like
that include these phases. I think on this side
we should do the same. Include these phases as well. All right. But it
will be a little bit difficult when I
reach this area. All right. I think I can't
include this site for now. Do we have another option? Yeah, I will leave this site. I'm not going to include this, it's focus on this side. After doing that, hit
for insets to get an extra Ge loops that will help Carol to add an edge loop here to
support this corner, to make it sharp on this side. What I can do is trying to, if I control, I
can't get an edge. God, the selection, perfect edge. Go
around the selection. This is my problem because of, for example, this
he right here is changing the direction of
the edge to go like this. Not like this in this case. Maybe manually we can do that. Let's select these faces. Start with, maybe we can
include these right there. I will hit to make
a small insert. By the way, we got
a problem here. This is not makes
sense. That's mistake. Well, go like this, like this. All right. Anyway,
it's easy to create One cut goes like that
and go to this side. One cut goes like this. It space to confirm and grab this edge because we don't
need to control like disolvet. All right, let's grab
these faces like that. For example, maybe
those over here. Let's focus on this area. And I will hit for insert
to get this result. This time to prevent
this problem, you can hit to use the boundary. When you hit, you get
rid of this problem. Hit and try to get
the same amount of insert that we used on the
other side. That will be it. All right, but what
about this age manual? I will create this area. Go to the knife activated. Let's create an age goes like that until you reach
the site like this. Now I will hit it twice
to irk these like that. Let's do the same
thing for the site. Use a knife to align, create, goes like this one cut like that, one cut here and one here. I will hit key wise
to merge this one here and you can
group those together. Hit M and Mer at center, you can mersey this one
here, this one here. This extra, we can dissolve it. We don't need it
anymore like that. The same thing here, grub
twice and Rg. This one here. I guess we can slide
this like that. Maybe this with this
and mir at center. And select this extra loop,
we don't need it anymore. Now let's try to give
this subdivicion surface, and let's see the result. Level two, radically smooth. Yeah, the result
looks cool, smooth. I don't see any art fit. Now we can push this
boots in a place and the trade grab
faces I feel I can hit. And then to separate it out, endless side like that, maybe from the top we can tell
yeah, something like that. That's will be
enough. All right. Now I will bring back
the other pieces. The set me, let's put this in the correct place and
let's move this over here is go to the top. And I think we have an image
can show us where should we put this, But the question is, where is it should be somewhere here. Yeah, it is small, right here. As you can see, the distance
here is very small. So we could push this
a little bit more key, and let's move
this over here. Okay? Something like that. And all right, we got
very nice results. See what else we can do here. I don't have anything to
create here on this side, but maybe on the other side we should de create something
like this. A circle. Yeah, I think we
should do this now. Make some, Taking the lattice. Deform, because we should
deform it a little bit. Go to the top and I
will add a lattice. Where is this one to move? And I will put it right here. And let's scale it like that. Just match it with our design. Let's move this a little bit. Now as you can see, the lattice
cage is covering what I created here from the. Right of view, I think
we have no problem. Everything looks cool. I will select these two pieces, by the way I can merit
between these four. Now it control J to make
the process easier for us. With this one selected
called he get the cake control And choose lattice deform to parent the
geometry to the lattice. Now whatever change or tweak
you will do on the lattice, the h will be deformed by that. We need to add one H here. Go to the properties and see
we want to add one here. I guess we don't need to to
the something like this. Maybe another one to the
like this. Now let's stop. Okay, sure thing that
we should do here, we should de grab this
edge and move it like that to create some roundness here, because that's important. And then go to the top. Let's, where is the
image, this one. Let's try to push this out. Okay, let's move this out like that and delp the, push this in. Alright. Okay, let's try
to find another image. All right? Something like this. But I think we moved
these practices too much. Let's hit and move them
back just a little bit. The question is, does
that make sense? Maybe we could grab these vertices as
well and tweak them. Let's go to the
front, for example, and push these as well.
A little bit like that. Okay, something like
this. That's very cool. Let's tap out and
let's grab this. And tab in, I will
add an extra loop to support this, the curvature. Because I want round and nice
adding support E loop here, it will be a good option. Maybe another one here. This should be deformed as
well. Don't worry about that. After doing that, I will go to the face selection mode
and select these faces. I can create a
circle here, inside. After you select this face to make a small
inside like this. And then heal loop tool and
circle to create a circle. And the scale the
circle down like this. Let's go to find another image. So I just want to see, check the distance from
this point to this point. What I get here is close
and nice right by the way, I think we should grab this image and just switch
the side to front so we can see the model grab this tap to go to the mode
and go to the left view. I guess we should
rotate this a little bit to get better
result like that. Okay. Something like this. And then, all right, maybe I can now hit two through this turn off
subdivision service for now. We don't
need to see it. Okay? That's very cool. Okay. This, maybe I can move
it a little bit far from this area and I can go to the face and select
these faces, all of them. And hit control Blast
to grow the selection. I will hit to create an int and flip the inset outside it to create this support,
the edge look like this. Something like that. It will be okay. And go to
the Edge Selection mode. I'll click on this, it
can roll to Beivlet. Let's create nice round Bev. I can grab these faces, then maybe I can hit and then to separate
them, that will be it. Now we can go and activate the subdivision surface.
Now we got this. After that, we and
another video, we will focus on these details
to create something nice. All right. I think that's it for this video and I will
see you on the next one.
10. 010 Modeling the speaker bar clips: Hello again. Welcome back here. Let's come belive the
speaker bar details. I will select the K first and I just want to
make some what we can. I will grab these four
vertices and move them back. Go to the front for example. And I think we shouldn't
form from here. I will move the back
almost right here. The deformation should be
just on this area, let's say. Right. You can include these
vertices, That's okay. I mean, if you go to the front, you can push these out like
that. That's will work. It's not a problem. Okay.
Yeah, something like this. All right, let's see. Like this in new circle. And let's see what's
the next step. We want to create this shape. Let's see if that's
possible here. Okay, this is still affected by the lat form. That's okay. It's not a problem. Let's grab the face, all of them like that. And I will hit for. If doesn't work, let's
hit, hit otilibit. Hit P for boundary
sometime you should hit P. I will hit to create one giant face
and scale this like that. Okay? Somebody like this, maybe. All right, let's go
to the left view and let's see if this works. All right. I think this
geometry is not going to work. Because what I want to do, I want to have one cut
in the middle like this. This is not giving
me what I want here. Even if we rotate this, let's see if we can rotate it. Maybe if we rotate this, we can get what we want. Now we have one here in
the middle. All right. What I can do is I can
hold, hold to click, and draw a line like this. All right. Again,
hold and click, Hold control to
create right line. I will compare these edges
with this right line. As you can see, this edge is not aligned with the
line that I drew. Go back to the left and
rotate this circle a little bit, a tiny bit like this. This result is acceptable. I will grab those together, J. I will select these. And then, all right, let's grab these
two vertices and hit control to Bvd
them like that. Now let's select these
vertices like this and key, and let's move this up here. Let's sub those. Select this again, the key. Let's move this down here
like this, those together. And delete this extra. We don't need this
now we ended with this here. That's very cool. Maybe we can use a
knife tool to create an extra cut here.
Can we do this? I think we can do something
else like rubbing this vertex wise and ice
here and this one as well. And redistribute the
vertices using the space. All right, let's use the Ge will be better, right into space. These edges, we can just kill them.
A little bit like that. Not too much. Let's do
the same thing here. Probably heat wise mirror. This one here. This
one right here. Now I will go to
the selection mode, grabbing these edges and
rightly choose space. Maybe I can grab,
kill them like that. By the way, you can focus on one side if you like,
and delete this one. That's okay to do
this. Just this. Bring the threes right here. And I will put the origin dot
right here so I can mirror it on this side without
any problem. Top out. The right. And then set origin
to three de courser. And now we have the
origin right here. Okay, let's tap to
go to the modi. I will grab these
two phases and F, let's mirror this delete
from, we don't need it. Let's add mirror
modifier to the Z. I guess if you can see anything, just apply the rotation
and activate the Z. And now it's work. I think we don't need the mirror
anymore. Control. I end up light tap end. Let's grab the All right, let's make a comparison. Let's see if what we are
doing is correct or not. Maybe we should scale
it a little bit like that and scale to the Y and the corrupt
this site with this one. And use individual
organ and scale this to the Z like this. Okay, That's cool.
Now I will select those and then hit to the out. Something like that, I
think it will be okay. Now, the next, let's
grab these edges. And then hit to push this back. Maybe now I'll click
on these faces. And then hit for inset
to get nice inst, I'll click on this edge. I'll click to grab
this one as well. And I will hit Control to beatle them with three edges,
it will be okay. One support the edge, love
here to prevent stretch. And one here as
well for the side. I can grab these faces
and hit for Inst. Now I can go to the edge. I'll click and roll to
level this control out. To add an loop here, maybe one here if you like. For these phases you can
X F and delete them. I'll click to go up the
loop and use a Gretel. Let's see if that works here. Yeah, that's very cool. Then tab out in active subdivicn surface
to get this result. The result looks awesome. Let's put this in
a place like that. Yeah, that's good, Looks nice. From the top of you, I can feel that I have some variation. We can scale this to the x and make it perfect.
And this one as well. From here, you can
ignore this area. Yeah, I think that's will
be that's very nice. Okay. All right,
what's the next step? And we do something here. I can feel that the
distance here between these faces or edges
is not perfect. Let's see what we can do
here. Can we fix that? I will select these
edges like that, including these
as we grab all of these edges, of those over here. After you select them like this, you can use the space to fix
the distance between them. I think that can give
us better results. Might I think we can
include these as well. Let's include the edges then. Let's do that again.
Right click and space. That's, yeah, that's perfect. Now the looks amazing. Maybe we should increase the level to three to get a smoother result.
That's up to you. If you want to take close
shots, you should do that. If you don't, don't
worry about it too much. Yeah, I think that's
it for this video and see you in the next one.
11. 011 Modeling the head bond: Hello again and
welcome back here. Let's start with the
head bond first. I will select what I created here and I will
copy it on the other side. But first we could put the
three decossor in the middle. I will grab this part and bring the three decossor
here in the middle. Now I will select this
and go to the top. And to take a copy like
that, right click. To leave the copy
in the same place, I will change the
transform pivot point to three decossorca. We want to use the
three decossor. After that we de selected
go to the object, mirror, mirror to the x global. Now we have it perfectly
in the correct place. After doing that, now we
can start with the bond, the three cossor
still in the middle. I will it to add in, I will add cube
to move the cube, maybe right here and to scale. Scale is working according to the three D corosor
position king. This back to bonding scale. Align this age with this Ge. Keep scaling the cube until
you hit this point like that. Something like
this. So it will be okay on the side
should be perfect. Now let's go to the right view. I think now we can
have to go to the mode end the Xtra mode. I can grab these vertices and
just move them over here. Can rub these and move
them maybe right here. Okay, yeah, right
here, these vertices. Let's move those up here. Maybe those down here. I will add an loop. May be here and
those all of them. Or let's add one here in
the middle, the, the Z. And scale those down
like that to the Z. Again, something like this. We could put this in the
middle. I will hit eight. Select all these
vertices and move them down because
the distance between this age and this one is not equal to what we
have here in this area. I will grab them all
and hit to the Z and move them down a little
bit, something like this. It will be perfect. All right, maybe we
should have one here. I will grab these and hit
to Dz and scale those down. Something like this.
Another loop here. I think we can accept this
without any tweaking. Add one here, let's move this. All right. Maybe we can scale
them just a little bit. Not too much. Maybe
one loop here. And scale these down. By the way, all
the scaling is to. All right, now let's go here. And I don't want this for
now. I will dissolve it. Even this edge, I can dissolve
it temporarily because I want to level the and I
want to get round results. Grab these two
edges and then hit Control until the edge
hit the middle area. And then increase the number of the segment to maybe
five segments. Here we have two edges, we want to dissolve one of them. Just grab one of them and
hit control to dissolve it. Now we can go to
the right of view and make further tweaking, grubbing these in the x ray
mode or wireframe mode and it to the Z and scale this
one here for example, and grab those, hit to the
scale this more right here. This one to scale this one here. Those as well as the Zen scale, those up here like that. All right, I think we
can dissolve this one. Yeah, let's dissolve it. Maybe this one I
can hit to the Zen, push it down to the move. Yeah, just scale them
a little bit here. Maybe we can add three
edges like that. I think we can
delete half of this. Grab these faces, hit X, get rid of them, and
let's walk on the side. All right, let's
grab these vertices. I will make this one the active hold heift
and click and yeah, now it's become
the active vertex. Now after selecting these and
make this one the active, that transform point
to active element. And now I want to scale these
vertices to this direction. Using the vertex as a bot point, go back to the Y and move these
vertices like that and then to the Z maybe and
move them down like this. The idea is I'm just
trying to follow the care maybe these
vertices as well. We could declrap them and
make this one the active. It's a little bit
difficult to see it, but it's right here, the Y. Let's push these out a little bit and we got something nice. Okay, now I will grab these vertices
and just move them a little bit more
like this because, all right, yeah,
we should do that. All right there. I don't know, it
should be end here. But we need a, Before we do this, do
we need that distance? I think we do. I
will push this back. Maybe right here. I will move the verte down. I just want more space here so I can Vl this area and
get round results. All right, now I will select this G and go to the
right view again. And val hit control with three or four segments
and All right, something like this,
A result like this. It will be nice go to the pace, grab all these pass
and then hit XF. Get rid of them. And you can
delete half of the geometry. Hit F and delete it. I just want to
focus on one side. It's like to isolate this. Let's see what we can do here. Go to the right,
maybe this vertex. I can gate twice
Rx, this one here. Use the knife tool to
create cut like this. To make the cut
strike and confirm, maybe we can create another
cut. Goes down like that. Maybe one here. Okay. All right,
that's very cool. I will add extra G, one here and one right here. I will fix a distance between these edges to get
better results. Just click to grab
these edges like that, then hetraticlic space. Now I should put these vertices, maybe we can make this one the active vertex so we can use at just fix the curvature. Let's do the same thing for
these vertices as well. Put this to the Y. All right, I just made a mistake. I didn't push this to the Y, the first one. And do that. And let's go back
to the right it to the Y and push this out. Now let's segrab this here. And then hit to the Y. And let's do the same thing, make this one the
active story to the Y. I think we can delete this
G in the middle, like this. Let's redistribute these ages. So the idea is we got two
acres instead of one. After you select the
right click into space, I prefer this result. Now let's see what
we can do here. I will hit key wise
and mix this one here. Maybe book this
down a little bit. All right, what else
we can do here? I think we can slide this down or that's not
going to work. Let's sec these vertices
right click into space to fix the distance between them
to get even better results. Yeah, I think this
result looks better. Let's sell to the zero
enter to flatten these. Maybe we should
move them a little bit up and align
them with this one. We got this. Now let's segal
up these vertices and scale them to the zero, flatten them because later we
should add mirror modifier. And if you have any overlapping or some vertices up and down, you will end with
overlapping results. We should fix this later. Scale them to the Z
to get rid of that. Now maybe we can add mirror
mirror to the Z and to the X. The origin dot is not
perfectly in the center. I will go to the option
and activate origin. All I want to do is just grab the origin dot and put it
right here to move it. Control and snap it here. After you sw, snap
to the vertex, then turn over ginsu. This is the result. Let's take, and let's take a look.
Let's see what we got. Okay, the result is cool, but I don't know. I feel that we could, sorry. Think we could move
some vertices. Maybe I can select
these vertices and it key to the Z and just
move them down a little bit. Okay, okay, let's take a look. All right, cool. This
result looks cool. All right, after doing that, now we need to take the
frame of this shape. I will apply a mirror just if we have any
overlapping here. Take the vertices, I don't see any overlapping,
everything looks cool. I will accept what I got here. I will give this thickness to
the solidify and thickness, and it creates a level of
thickness a little bit, something like that, 0.033. Let's check the
reference images, and let's see if this
thickness we got here is enough or not
according to this image. As you can see, it is
a little bit thick. All right, we can go
beyond that Hold, shift ends and crank
this up a little bit. What about this results? Maybe a little bit more. 0.040 0.05 Okay. I think this amount
will be cool. But we lost something here. We lost this lips. All right, so 0.042 Yeah, I think this
amount will be okay. 0.045 I will accept this result. After doing that, I will
hit FTD to take a coby. And I want to work on the coby. It's like to isolate this. I just want to focus on the sin. I will apply the Slidifytrol. Don't forget I have another
will to grab this face with. I'll click and then
hit control to invert the selection and
then XF and get rid of them. By the way, for any reason, if you want to make this
a little bit thinner, you can't click on
this H for example and wise and you can control
that in the way you like. All right, now we could give
this a thickness or yeah, please keep ourselves
in the local mode. I will add another sordifIjust
tap out and add a new one. Let's check the other images. I just want to see how
thick this should be. Okay, let's hold and move this, 0.02 Let's change
this two centimeter. Okay, Go to the unit and
change this two centimeter. Okay, Go back. Two
centimeter. Two centimeter. Two centimeter is
not going to work. Let's use four, maybe centimeter. All right. Four. But I will do something here. I will grab these Gs
and key wise and Gs, grab them a little bit
and move them like that, make it thinner. I can exhibit this result. Okay, let's go to
the I will excite and compare it to
what I got here. All right? Yeah, I can exhibit this results without
any problem. That's will work selected. And again, All right, four
centimeter, 3.7 maybe. Then I will hit control
to apply this as well. And I will tab again
to go the mod. I will add two edges right here. And then hit Alt out like that. Maybe I can grab, then
move them down a ten bit, grab this one and hit
to move it like this. And then hit Alt and
take this out a ten bit. This one as well, Key wise, let's Alt and move
this out a little bit. We got nice round
results as you can see what else we could do here. I guess now we can grab this
and double them to three, or maybe three like that, it's like to exit. Now let's make a comparison. I don't want to
solidify anymore. All right, let's go
back to the right view and I want to copy some phases from here
and grab them like that. And then hit Shift D to take a copy like that and right
to leave it in same place. And then hit P and then
to separate tab out. And let's focus on
this new copy tab. To go to the mode, I
will use the knife to to create a quick
cuts like this. Hit A to make the cast right. And confirm. Go to the
pace and grab these faces. Hit Xf and get rid of them. All right, now let's see what's
the next step. All right. I will insert these. Maybe. Should we insert them? I will hit A and then
I will hit for Inst. Make a small insert,
maybe like that. But here we should do something. I will use the knife tool to
create cut cars like this. On this side, the same
thing and delete this age, but you can't hit control
X as not gong torque, hit X and then choose limit
dissolve to dissolve it. After doing that now I can grab these faces and then
hit Xf and get rid of them. All right. Now let's
go back to this. Let's give this
subdivision surface with level two.
This one as well. I can give the subdivision
surface just to see the final result for this one, maybe we can give this solidify, give this a thickness, okay? Something like that. It's like to isolate before you do this list and
increase the thickness a little bit because I
want this to wreak the other side before
you apply this, we could do something here. I will isolate this and tap. By the way, I don't want
that side to deleted, I just want to
focus on the side. I have this design
here I want to create. Let's see how can we do that. Go to the right view and maybe we can grab these faces
and use them to do this. Okay, I will hit four insets, then I will hit X
to delete these. Now I will grab these
vertices or turn off this. Now grab this entire loop. And then hit to extrude
this like that, I will grab the corners
and Bible the corners. But before you do this
sea or these edges, just scale them like this. But I will change
this to bounding, because I want to scale them
to the middle, to the Z. All right. You may ask
why I'm doing this? Because I want some space here. Because I want to bevel
this area if I don't push these edges to the middle
will stop at this point. I'm not going to get
the roundness I want. Scale the, move them
away a little bit. By the way, you can use the selection mode and
grab these faces. That's. Can give you the same result. Now we got nice space to
bivle this to get big Ival. After that, go to the edge, grab these edges like that. You can bivle them. Now maybe
from the right of view, catrol be bivle until you get something
close to this one. I think what we got now
is amazing these edges. Maybe we can get rid of them. Grub, delete them, even
these phases because we don't need them anymore
at X. Delete them. All right. Now go to the vertices and merge these
vertices like that. Key wise marriage. Make sure to activate auto
marriage, key wise marriage. All right. That's
great. Cool. Very cool. Maybe I can move them a
little bit like that, Maybe even this Like this. Okay? Okay. Okay. Let's
like to exit. Mm hmm. The position is not perfect. The size is small as well. I will hit key twice and
push the away a little bit. Make this a little bit bigger. I think I can grow the
selection controls. I think we can push this to
this direction a little bit. Maybe we can scale bigger. Okay. All right, I got
another problem here. Maybe these vertices,
they should be pushed to this direction. I don't want anything to
be visible on the side. If I leave this area open, I will have a hat share, and I don't want to,
I don't want that. So in this case, I will grab the side and just move it
a little bit like this. Maybe I can include these
two vertices and G, and move this a
little bit like that. All right, this
result looks cool. I can accept it, maybe I
can push this a little bit far. Still nice. Now tab out and activates solidify this amount of
thickness. Looks cool. Maybe we can go beyond
that a little bit, maybe a little bit more,
something like this. Some tweaking here we
can do like grabbing these edges or vertices
and just move them. Or if you want you can add an extra edge look to
get better curvature. I will hit Key and
move this like that. We can do the same
thing for this vertex. Just pick nice angle and just
move it to this direction. This idea key. Let's move this like this,
maybe a little bit more. And the same thing,
we can do it for this and this one maybe. Okay, that's nice. All right, I think the same thing for this vertex and this
one right here. By the way, I can hit
to isolate this and redistribute the S or vertices. Just keep selecting these edges like this and
radically into space. Even for these edges, we can do the same
thing that's better. After this solidify,
you can apply it, tab out and hit
control and apply it. We can work on this
a little bit like adding support loop like this
and support loop like that. This globe is not going around. In this case, what we can do is Click on the face and hit Control to
invert the selection. Or you can grab
these together and then hit control to
invert the selection. And I can hit for int. Let's make an int like that. All right, that's very cool. All right, can we
go beyond that? Increases a little
bit. That's very cool. Now I click on this to
grab this edge loop. And this one, and including
this edge here and this one, maybe now I can bubble them. Control would be to bubble
them to three edges. That will be nice. Like this, should be Hart,
something like this. Maybe Then it control
to support 1.1 here. Now we ended with this, maybe we can give the
subdivision surface. I guess we forget to
focus on this area. Clot these pebble as well, Carol would be all right with level two will be enough and
nice for this in the middle. I think we All right. Before we do anything, the origin dot is
still in the middle. Now I can add mirror modifier to mirror this on
the other side. Now it's done. It's mirrored. All right, for this one I can tap and hit eight
to select all of these vertices because
we created this part, we can delete some of this. But before you delete
anything tab and, and move this to
the temporary file in case we want to go
back for any reason. Now let's say grub this tab
and go to the right view. And I will use an F tool. Hit K to create a
cut, goes like that. Hit A to make the cast
right and confirm the cut and go to the x ray. Grab all of these by the way, the cut could cut that side. I will repeat that.
It controls again. Use an F tool to create a cut. Goes like this. Hit A
to make the cast right. This time to cut through the
left click and then enter, go to the face selection. Would hit three from the
keyboard and grabs vertices or faces and then hit XF to get rid of them.
Now we ended with this. You can redistribute
the distance or fix the distance
between the ages. Again, get out click and
the grab them like that, Right click into space
to get this result. Another result is awesome. After doing that, now I can box this in the middle, tap it A, and then hit Alts to put
this almost in the middle. Okay? All right, we
got nice result here. I feel that there's something
that makes sense here. Okay, This is not perfect. I feel this side is going down a little
bit. I don't know. But in this case, what we can do is we have
a support edge loop. Because of that, this
area looks sharp and nice to get a nicer result. As you can see when
you add one here, you can see the small cave, how this curve become better. When you push towards this direction, you can
see the difference. It's important to have
here, to fix that. Maybe one here and one here. Now, the result
should be perfect. Yeah, it is not quite perfect because we
should do the same thing here. We could add one here
and one here as well. But maybe that will
affect the curvature. Maybe we can dissolve
this. I don't know. Let's see what's going to
happen if we mir this one here. And I just deleted
the wrong edge. I should delete this
one to grab this. These edges can dissolve them. Maybe we can mir this
one and this one. And the same thing for the side. I know I got triangle here, but I think that's not going
to affect the shading. And don't forget this fabric, even if you got a bada's going to be visible because it's
rough and it's fabric. We should have a battering here smooth to make this smooth. And now let's hits
like to excite. I can see that I have some
overlapping right here. Okay, let's see how
can we get rid of it. I think we can click to
grab this entire edge loop. We can include this
one as we'll grab it. And let's activate
proportional editing. I just want to book this out. All right, let's try to
use another technique. I will go to the x ray and
grab the side like this. Yeah, this side. And I will take this
out, key to the x. Just move them out a little bit. What about the side?
This side looks perfect. I have no problem
with this, right? Smooth to make this smooth. This one As we make smooth. Yeah, I can say that
we're done here. Maybe we can fix the
face orientation. If we got a problem, we don't have any problem,
Everything looks cool. All right, just
save the project. And that's it for this video, and see you on the next one.
12. 012 Modeling the head bond clips: Hello, can we'll
come back here in this video on to
focus on this area, let's bring the reference image here and let's see
what we should do. I will select this, I will grab one of these edges so we can start with it. For
example, this one. I will take this out for now, and then part tap out. I will grab this tap
and maybe I can grab this edge and then
take this out here. And you can snap it, by
the way, if you like. And then hit and
then separatusllr. That's very cool. Nice. Now, I will grab those together and control make them one piece. Or we have a mirror
applied here. Let's delete or we
don't need it for now. Subdivision service,
we don't need it. This one as well. We don't need subdivision
services together. Control, make them one piece. Let's to go to the
eight mode and vertex. All right, let's count the
number of the vertices. Here we have 16 and
here we have 22. I will select and then it D
to take a copy right here, because here we have
another hole like that. Maybe we should select these
vertices and scale them up. A to Z and scale them like that. Now let's include these here at the Z and scale
those up like that. Now I can grab and
move those down. Now we've got nice
round results. We can grab those
together at them. We can grab these vertices at maybe those over
here we can grab them. And then F rub this
with this hit. Maybe this one hit
up those together. The same thing for
these vertices. Maybe this one
with this one hit, create a giant face here at K. Maybe I can select these. I think we can add
one vertex here, T. Let's move it here. Let's select all of these. Another vertex, maybe we can
add right here, Move it, Grubhub, these here, h, F. I think we can
delete half of this. And folks on the other side, these vertices here, h, x, v, get rid of them And
we can mirror this. Let's select all of these
and then hit this one. Hit create face here. Select those over here, at those over here at the rest. I can isolate this. I think we can grab a
guide for grab this. Grab this again.
Let's put right here. And then hit P. And
then to separate this, I will use this as a guide. Now I can grab this
together to delete. Delete the mirror modifier. We don't need to mirrors, I just want to focus on these. Let's go to the right view
or left to view if you like. Yeah, left to view, I guess. Let's go back here and let's
see what's the next step. So the idea is I want
to follow this care the guide and that's it, I will. Filling this one vertex we
should have right here. Before you add it,
maybe we can sit to the vertex selection
mode and hit. And let's create
maybe one cut here. You can hold, you have to
make that cut in the middle. Okay, if we add one here, we should add one here as well, because that's not
going to work. Maybe we can add one right here. What else? Maybe we can
add two edges here. And believe the cut
lets scalds together. K and I will use an tool
to create cat goes up like this. All right. Maybe one cat goes like that
in the middle. Confirm it. Maybe one Cthulhu, we put
it in the middle as well. Call make that cut here. Okay. Another cut. Maybe it
should be right here. Maybe we can. I don't know. Okay, let's redistribute
these vertices. Or first let's hit key wise and let's try
to follow this curve. Let's fix the distance between
these. Grab like that. All right, I think we can
grab those right here, right click and space. Let the wise, and let's move
those right here, key twice. Move this down and
this one as well and the grab vertices and then
space vertically into a space. Okay, I will push this vertex up here so I can
get nice and sharp results. Maybe this vertex
I can hit keywise, just move it a little bit
to get nice curvature. But I think we should grab
these vertices and redis, redistribute them like that. Yeah, now the result is better. Right, One here, we should
add similar to this one. Maybe this vertex I
can push it up here. This one I can move right here. All right, I will select these vertices and
have to ascend. And bring the three
decosor over here. And tap out then
traticallyn orgin, orgin to three decosor, to the three decosor
in the middle here. But something that makes sense, I will grab them again and then to zero enter,
flatten them first. And bring the three
decosor again back to the middle tab out tally
orgin to three decosor. Maybe this vertex, I should
pitch it twice and move it. Now I will mirror
these two z axis, like this apple mirror. I will tap it a ten in case we got a problem with
the normal index. With this back like this, give this a bit of thickness. Okay, What is the next step Now Maybe we can grab the
outer edges and level them. Select them like
that, and we can Bible them and include
these as well. Then hit control would be
to Bible, these, all right. The result is not perfect. As you can see,
Bible doesn't take the wrong right direction. It should go like
this. But instead of that, it's going diagonally. To fix this, I can seas these outer faces
and I can't hit for Inst. Invert the Inst
outside and invert it to create these loops. These globes will help us. Now I can grow up these edges easily and level
them without any problem. Now I can hit control would
be to rebuvel this and try to make it s
because it should be add support egilope here, one here and one right there. I think that's Now let's add subdivision surface
radically smooth. Now I can put this in place, key and move it and
decrease available to too. I think we can go with this. All right. Very cold, it's nice. What else? Maybe we should
make some tweaking here, like moving some vertices out and the X ray,
just this side. And the key to move
this outside here, maybe a little bit more. Okay. Yeah, and the guy we
don't need anymore, you can delete it
without any problem. And don't worry about
mirroring this now. We can delete that later. Do we have any problem here? Okay, because this
piece is fabric. Don't worry about
this small gap here. You can't ignore it. It's okay to leave
it for any reason. If you care about
fixing this isolated, rub this with this and then go to the right
view and the tap, all what you should
do is just rubbing these vertices and just
move them a little bit. Or you can select these, just move out there. Just be careful
when you do that. And this one as well. The result will be
nice and perfect. All right, I think that's it for this video and I will
see you in the next one.
13. 013 Creating the bond ribs: Hello again and
welcome back here. In this video, I
want to start with the bond p. Let's see
how can we create them. All right, first let's
focus on this piece. I just want to make
some adjustments. You can see the distance. If you compare the
distance here with this area, that's not equal. I want to make some
tweaking here, like grabbing some edges
and push them out. All right, let's
start with this one. Let's go to the modifier and activate this
octal right here, so we can see the final result. Let's push this a little bit
out, something like that. I'll click on this one and
then Alt to push this out. I'll click on this one, Alt, push this out, maybe right here. The same thing for this. By the way, you can crop this
and activate the wire frame so you can see where you
should align the surface. All right, this at. Let's push this
almost right here. Let's compare the results. For example, this one, we could move it a
little bit forward. This one a little bit. This one as well. Let's move
this at a bit like that. All this like that and this one. All right, now we should have
nice and accurate results. Because this surface
is not in the middle. As you can see, it is
not in the middle. I want this to be in the middle. I will have any grab
this and activate the wire frame so I can
see the middle area. I will grab the surface
and tap and hit eight. Select all the faces
and I will hit Alt to put this inside. And it could be maybe
right here, I guess. I think this is the middle
area. Yeah, I think that's it. After doing that, I will grab this and it's like to go to the
local mode and I will, Let's grab these
vertices at the corners. After you select them, just
go to the mean vertex crease. And let's add one here to
make this vertices sharp. And now they become
sharp, it's to exit. And I will grab this and
shift D for any reason. Let's take a coby and I
will move this new copy to the temporarily file now
with this one selected. All right, let's see
what's the next step. I have instilled a add. Try to find the name of
this add, Forget it. The addon is called rubbing
tool, it's free addon. I will include it in
the resource file. We will see together how
can we use It's very important to add
creator of the add. He has a patrion account. Keep in mind to support
him if you can. All right. What I'm going to do
grab the surface and we have the add and active. All right. Crank down the
level of the viewboard to one. I think the one will be okay. I will leave it to I will apply. After that, I will
select this eumetry, open the ad, and use this
option, create UV shape. When you do that, you can crank the shape control
and you will get this result. This ad will open this for you. This is what we want here. We want to open it like that. But what I want to do is I don't want to
work on this one. I want to take another
by and use it, because we use the V here in
the object of properties, you will find shape keys here. I will grab them
and delete them. Now we don't have any control, I will hit Shift to take a coby. This new coby, I will
rename it, for example, to UV just to recognize it. I will work on this one, on one of them, create V shape, and then let's put this to
one, and now it's ready. All right, with
this one selected, I will grab all of these
details except for this one. And the Select the
image as well. I will and put these
in the headset. All right. The image should
be in the reference image. Yeah, that's cool. Now, maybe I can hide this temporarily. All right, the number of
the reps are almost 32. Maybe we're going to create
one and we will duplicate it. Keep in mind I just want to
focus on something here. The first it should be
right here above this area. You know this surface is go a little bit deep
inside this metre. Well, that mean the
first rip should be aligned with the
surface like this, with the edge of the surface, the P will be exactly
in the correct place. All right, similar to
this one right here. All right, tap out
and let's grab this. Let's start creating
these strips. You can hide the headsets. And let's go to the top. Have to add, and I
will add a cube and maybe scale it like that,
make it very small. Get something like this. Let's put this one maybe
right here temporarily. And I will tap to
go to the mood. All right, let's see
what we can do here. I will add two acres here
and maybe two here as well. And scrap these edges. Just push them back a
little bit like this. I will look up this
and move it back, trying to create
something round. Maybe this face, I can move
this a little bit forward. I think we should grab these or these faces and scale them
to the middle, like that. All right, and I will grab these vertices and
the like that. I will select all these
vertices and make one of these. The active, I will scale this to the active elements to the Z and just scale
them like that. All right, maybe
these vertices I can grow them like that and just move them
back a little bit. I think we can select
these as well and just scale them to the middle. Like this. I think
that's too much. Let's push these
forward a little bit. Okay, these vertices, I can move them a
little bit forward, I can grab those over here, and then V to slide them. Or you can hit key
wise if you like. Just push these
down a little bit. I think we can grab
those over here and it, and slide those down Just at any bit I can hit key to
Z and just move them up. Maybe with this one I can move
it a little bit like that. Or at least move
this A maybe right here or maybe this one
I can move it back. And those as well. Maybe we can add
another edge lo here. Let's kill this a
little bit like that. For the edges, I can gum, kill them in a little bit more. And this one inside, like that in these phases. I don't move them, I grab them
like that and delete them. F and leave this area open. Maybe I can grab this. And then hit for insight
and B for boundary, as you can see the difference
to get this result. And then hit F to delete them. All right, so now
we ended with this. This is the hit of the P. You can edit this
farther if you like. Listen, like these ages, just kill them a little bit. This. I can move it
a little bit forward like that right now. I just want to see what's
going to having if I as subdivision
surface before that, I will add support, the
eculopy here and I will tap and let's add
subdivision surface. All right? The head looks cool, it's round and nice. I will accept this result. Turn this off for now. Let's put this in
the correct place. Let's put this, for example, right here as we say it. The head should be a little
bit far from this edge. We just need to keep
some distance here. All right, that's nice. Let's put this above its, maybe we should put this a
little bit above the surface. And I will go to the top
and top to go to mode. And I will hit D to
take a Cobi like this and control to mirror this. All right. You can mirror it or there's more
than one scenario. I will hit control
Z and cancel that. What I can do instead, mechanical these edges and
move this to the middle area. I don't know where
is the middle area? Tabutubse. I will open
the wire frame for this. I just want to see
the middle area. I don't know, maybe this edge. This is the middle area. After you find the middle area and Q scursor to select it, to bring the three decursor
here in the middle. And then tubut and
grab this p. And then that radically can choose origin origin
to three dicrosorow, we have the origin.in. The middle. After that, you can add M modifier
without any problems. There we go, very cold. Okay, that's nice.
What is the next step? Step, because it is moot. And I will add
multiple cuts here. Maybe four. That will be okay? Yeah, four will be
okay. Maybe five. Before you go any farther, you can coby one of these rips and compare it with the
image, for example. I can rotate this like this and go to the right and just put this one side by
side with the rip. The size is cool, we have no problem with
this for any reason. If you didn't get a close result and you want to scale this
to match it with the rip, you hit alt D instead of shift, because now if I
grab this to scale, when you scale this, this one is not going to be affected. Even if you type to
the mode to scale it, nothing will happen
to this one tab out if you hit all D instead of D. Now when I scale
this in the edit mode, you can see that this one will be affected,
they all be linked. Just put one rip close to the reference
image and match it. And if you want to scale it, hit all D and do
that X F to delete, sorry, you can do that. All right, Anyways, now let's go back here and let's see what's
the next step. I think we can rub this quickly. You can rub this, or
you can finish all of these pieces and
rub them together. You have this option, because at the end of
the day we should rub them because we want to add
a fabric texture on them. I think it's not a big deal. You can rub them now or
you can rub them later. The mirror modifier,
do we need it? I think we need it here. Okay, let's go to the top, and let's duplicate this. What I can do is I don't
know if this will work. Just try to check the
distance between these ribs. It's almost a quarter of
the thickness of the. It's very tiny. Okay, let's tick up this and go to the top. You can use the
array to do that. Let's add array and
zero out the x axis. And let's array to the y
at one here or minus y, nil a little bit. Just leave a small
distance like this. And you can add 32 maybe. But the problem is,
if you do that, you should grab them one
by one and tweak them. I think we need more rips and increase the number
until you reach this side. Okay, now let's compare this. All right. This one is exactly in the middle, but
this one is not. In this case, maybe
we can manipulate, just play with the
wire axis a little bit until we get the
correct results. And yeah, 1.25 it's
a correct value. After doing that, I
will apply the array. I will tap to go to the mood. I just want to then
speak to the x ray and grab these the heads. And maybe I can go
here and create a group in case I want to grab these Tics and manipulate them. And then assign to assign
these Tics to this group. I will put the three decosor in the middle of
the and tap out. Then to add, and I will add a lattice where this one.
Let's scale this like that. Scale this to the Y,
make it big, like that. To the Y as well to the Z. Now I want to bind
these to the lattice, grab them, help the lattice, it can throw and
choose lattice foam. Now they are connected
to the lattice, grab the lattice and go to
the lattice properties. I just want to pick
the vertex group that I assigned from here. Could be from here. From here, grab the group. Then I will grab the lattice and go to the properties here. And add some cuts,
maybe. I don't know. Let's try one. He
was going to heaven. I will tap and grab these
vertices and he key to move. All right, almost right here. We should grab
those and move them back because they are affected. This piece be here. We should deb this and move
this a little bit forward like that, I don't think. Or one cut is done. Young work. Maybe we can increase
this two like that. All right, let's declup those together and let's move those
a little bit right here. This one, I think it's cool, but we lost the
distance here, I think. All right, four, let's
add another one. Maybe another one, okay? All right, let's grab these. This one and this one. Let's move them forward. You can align the edge of
the lattice with this edge. And let's see what's going
to happen if we do that. All right, in this case, we can increase the number
of the cut to do this in as much as you want. Now we can do this now, I guess we can get the
accurate result that we want. All right, let's move these
like that and those as well. Okay, This one here. I think we can use the snap
to the edge and the closest. Now if I hit to move, I cannot control and
stab it quickly. Yeah, that will be faster
on E to the X and snabit. All right, now let's
check the result again. I will grab them all and then it key and move them
together like this. The result should be accurate. Yeah, it does, but the
problem is all right, here we have this
side is affected, I think because of
the Mormdifier. Let's grab this. Let's. Yeah, I think we can delete
it for now. We don't need it. Or maybe I should put it
underneath the lattice and Yeah, that's right, That's very cool. Now I will show you
why I did all of that first scrub the ribs and
I will apply the lattice, We don't need it anymore. After doing that, I will go
to the front, for example. I will covid to the Z and
let's take cover here. And I will mirror this
to the Z like that, the close to this
surface in the middle. And keep the same distance the frame of the bond should
be here in the middle. Just keep that in
mind. All right. After doing that, I will grab this and this if you would like. You can Mr them and make them
one piece. I will do that. I will hit control and
make them one piece. As you can see, the normal is flipped because we use mirror. I will tab and then hit A and they have to enter
recalculate the normal. Now I will select these ribs
and add a new modifier. Above all of that,
I will add surface. The form the target will be
the surface in the middle. I will grab it like that. I will choose to bind or link these ribs with the
surface, the lattice. We don't need anymore.
You can delete this. I will bring back the headset. Now if you grab the surface, if you push this back, you can see that we put these rips in the correct
place in the easiest way. The result, as you can
see, it is very beautiful. But we got one problem
here, the distance here. These edges, they
should be subdivided. Let's grab the surface. Let's push this
to one to open it again, I will isolate these. I just want to work with this. For example, we can
go to the front and I will have to go to the,
and go to the X ray. I will guess can see I will add multiple cuts after you
select these edges. Okay. After you grab
them traticallyubdivide, subdivide them and you can
subdivide these 23 maybe. Okay. I know that's too
much for the but all right. At least reduce this
to I don't know, Can we add two here? Yeah, two. It will be okay
to add two for this area. Manually, I will grab
this and dissolve them. Maybe we can grab the wise and just slide them
and put this in the middle. For the side. For
the side as well. All right. Grab this Carol legs, grab this with this key
twice or V and move this. All right. Now we
have enough acres to get better results. It's exactly now I will grab the surface and
post this back to zero. All right, we got
another problem because we added new Umetries. The result now has
become not perfect. Okay, All right, I will grab this and
go to the local mode, and let's go to
the throw on top, I will grab these vertices. And what I want to do is I
want to grow the selection multiple times until
I reach the heads. Okay. Something
like that. I guess. Control minus I want
to reach this area for the deselect these
vertices in the trade. I don't want to include them. This one as well
is deselect the. All right, that's very cool. I will hit to the rest now. I will select all of these edges as you can see in the front. Maybe go to the x
ray, go to the ankle. These edges like that, we
can see what I did here. I will go to the loop
and choose edge loop. Select the Ge loop, I
can tratlick and fix the space between these edges to get an even distance
using the loop tool. And I will hit Alter to
bring back the heads. Now the distance between these
rays become even and nice. And that's what I
want here, okay? Nice and cool. Let's like to exit.
And I will tap, this is the surface deform. We could delete this, I guess, and recreate
it. Let's pick this. Okay, I will do that again up
this surface and hit Pint. Now I will crop the surface
and push this back to zero. Now let's check
the results again. Okay, I can see this area. It's not perfect. We should move
this a little bit. But in general, the
result is very beautiful. But I will turn off wire
frame, grab them in. Let's turn off all
the wireframe. I just want to see
the final results. I don't see any gaps
and that's amazing. I will select this and activate the subdivican surface and put the subdivicion surface
underneath the mirror. I guess we can do that. Let's activate at, let's
see what's going to happen. All right. We will
do that later. If you activate it, you
will got a lot of problems. Maybe we can put underneath
the surface form, yeah, we can do that radically. It the smooth at level
one. That's all. Be okay. The result is
very nice and very cool. I think there's no
reason to go back. I think this result is perfect. Everything here is aligned
in a good way and realistic. All what we need to
do is just to fill this gap here
between the surface, the middle, and the
strips. I mean, here. Okay, this is the surface. We just need to duplicate
the surface and inflate it. I will show you
what I mean here. Grab the surface, the middle. You can use this one. If you're happy with this
result, you can plight. Let's try to duplicate this CFD and leave this in the
same place. Let's go here. Or you can hit control and
apply vital geometry to make. To apply everything
for this geometry, let's pick nice angle, tap and hit a Civic. All of these faces, then hit Alt to push
this out like that until the surface hit the ribs like this.
That will be enough. All right. We can't fix this. Don't worry about this.
The same surface. I will hit Shift D
again, for this side. I will hit Alts and
move this down. Okay. Something like that. I guess you can delete and
wanted faces, for example. This entire face. Look, maybe we don't need it. Let's try to pick it.
Yeah, this one right here, not this one. Sorry, for the inner, it's a little bit difficult
to pick it or I think I will delay all of that
for the next video. This video becomes
a little bit long. I will end it here and
see you in the next one.
14. 014 Modeling the Fabric reinforced cables with some tweaking: Hello again. Welcome back. Here. Okay. The surface
that I added here, I will grab them and I will hide them to grab
this one in the middle, the one that has all
the controllers. And I will put this to
one so I can open it. Because if you notes here, I have a wire we
should de create, we should put here. Before we apply this, apply the modifiers or
all what we did here. Let's see how can we do it. Maybe I can duplicate
this surface like that. And I can hit control and apply visual geometry
to make, to apply it. And now we've got this
surface as you can see here. You can put it here for no, temporarily this age, maybe before you grab it,
just hit Control out, click select the Ge ring, I think for Herat into space that will affect the
distance between these. All right? What I
will do is I will delete this phase loop. And maybe this one as well, XF. Get rid of them and grab this in the middle control
L to grab them, XF and delete them. Now we ended with
the Itrolltrolflick, the same thing here. And then Herat space to fix the distance between
these edges. And now what I want
to do is just grab this one D to take it as a copy, and move it down here
from the top view. Maybe we can determine
where should we put it. And let's move this. And it should be
almost right here according to the
reference image. All right. You can see
where should we put this. The distance is cool. Okay. All right,
that's very cool. Yeah, something like this. Maybe we can move it a
little bit more like that. All right. That's cool. I will hit to take another
copy on the other side. Or you can use the cop
that we got right here. Yeah, I will use that. Maybe
just grab it like that. And then All right, let's move this a little bit. Maybe right here. Move
it down to the Z. You can align it with that one using the vertex
snap control. When you move it to the
Z, grab these together, control I and X. And then to delete these faces, and as you can see now we
just ended with these wires. Grab them and go to the
front maybe and key. And let's move the over here in the middle or
something like that. Now we have them here, but let's see where should
we put them exactly. All right. I think they should
be moved a little bit down and I'm not quite
sure if we have the same thing from inside. I think we don't, we don't
worry about the other side. All right. You can give this
e thickness now if you like, you have this option,
all right, to do this. If we want to give this
a thickness right now, you can convert this to
curve and you can go to the cave properties and open the geometry and push the
depth, I guess a little bit. That's correct. All right. This thickness looks
cool. All right. Let's see what's the next
to maybe I can isolate the. Or before you do that, I
just want to make sure that the thickness of this
line is perfect and good. Yeah, I think it's
good. I will accept it, to isolate it and tap to go it. Mood. All right. I will hit control and apply visual tumetritom to accept
the Am. I will tap again. I will grab these loops
and those over there. Then when you do that, go to
the choose loop and loop. Just to select the
loop like that, I will hit click and subdivide
to subdivide this to do, maybe we can add
two segments here. Just make it smoother like that. All right, this result
will be nice then. It like to excite, you can merge it or you
can bind it if you want. Grab this. Let's
go to the modifier and let's add surface, the form. And pick the surface
in the middle. Now I will grab the surface and push this to one to bind
all of these together. Now we've got very nice results. Grab it right click smooth
to make this smooth. Great, that's very cool. All right, let's go back. Let's grab this and
let's put this to one. Because there's one more
thing here I can do here. I can duplicate the surface
and align it with these. Instead of using the, I will grab this
and hit and move to the timber and leave
this area open. And I will the main
guide, you can ignore it. Just duplicated heavy
tab and control. Apply visual met Tom and move
the coby up key to the end. Less move it and align it
with the ribs like this. The Bs should be
embedded a little bit. Maybe we can move this
a tiny bit like that. Delete these extra edges. We can add an edge right here, for example, and
delete the rest. Click on this side. The same scenario can Throllup click XF to
delete these phases. Now I will hit eight, select I will hit eight to
select all of these phases. And I will take another co
D. Let's take another coby. And let's put this
cov right here. Now we have two of them.
All right, let's call. All right, now I will
select this new surface, and I will give it
surface deform. And pick the guide.
And choose Bind. And now I will guide and
push this value to 20. Now the result should be better, as you can see, is perfect. Everything looks
cool and amazing. After that, you can
hide the guide, or you can apply it and
apply everything with it. One more thing here I
would like to focus on. You can see between these
we have some mistakes. You can add a ticket for that. But it's better to
add an edge loop for, for each rip, one here
and one right here. And the same thing for the rest. We can target this area and
apply a ticket Sure. On it. To get this result, I will grab the guide.
Let's take this out. Just click and click again
and tell you hit the guide. I will open this again. I will select, I
will add new edges. Maybe we can do
that from the top. Okay, as you can see we
have this G right here. Maybe we can slide
the tempt here, or maybe we can add a new one. All right? Tap to
go, the mode ends. Maybe we can do that in
the face control R to add one G here, maybe one here. This process will take time
from us to complete it. There's another
way, if you want, you can delete one side and focus on one side and
you can duplicate it again. I think that will be
easier and better. Okay, so let's add one G here. Maybe one right
here and one here, and one maybe right here, maybe one here and
maybe one right here. This is the idea,
just adding edges. All right, this one.
Maybe we can hit key wise and slide
it a little bit. One here, maybe maybe
one right here. Some of these edges
in the middle, you can delete them
or dissolve them. For example, this one I
think we don't need anymore, can throw hard to add. I think we can go
to the x ray mode. As you can see, the edges a little bit bended
and because of that, we are not getting the
result that we want. In this case, I think
we can grab these edges and flatten them first
as to the Y zero enter. Flatten this and flatten
this one on this side. As to the Y zero enter, maybe now we can grab
these edges like that and go select
and choose Loop. We can fix the distance
between them again, right click and choose space. I think that will
give us right edges. Yeah, it does. That will make the process easier for us
when we add these edges. Let's start with this one
at one edge right here. I'll click and let's slide this. Now the result is
perfect and aligned. Key, Move this maybe here, control to add one
here, I guess. Maybe here maybe
you are right here. As I told you, this
E in the middle, you can get rid of
it if you like. All right, this one, maybe I can key slide it a little bit. This one as well.
Let's add one here. Maybe one here, stroll R
and let's add one here. This one I will dissolve
it if we don't need it control R. And let's
add another here. I can keep wise and
slide it a little bit in this one as well, Ke wise and slide it, Carol R to add one. I will keep doing that
until I finish this area. All right. Now I just finished. I will hit A and select all of these faces
of the side and go, for example, to the right view. And I just want
to take a co head and let's put this coby
on the other side here. What else we could do here? Okay, tap it, unbind
and bind again. Now I will grab this
and unhide the heat. I will cring this back to zero. Now I have the ability to target these faces between
the ribs to give them a specific ticketure. That's amazing. I think
that's it for this video. I will end it here and see
you in the next month.
15. 015 Changing the inner ribs position: Hello again. Welcome back here. I just want to make some
tweaking regarding the ribs. I not here after I
did all of that. I note that for each ribs, we should have one
here in the middle. Let's see together, how
can we fix this problem? I will select I want
to select the guide. It should be here in the middle. And I will push this to one. And I will hide the
headset for now. Let's grab these ribs. And I will tap to go to the
mode and go to the front. The extra mode, I will
grab these like that from the top of you or
maybe the right view. I will move them like this key. And let's move these right here. Something like that. All right. This one I don't
want it, I will delete it. Xf. Get rid of it. Okay,
for the modifier unbind. I think that's let
tab out. All right. Now it bind again. Let's slick the guide, See
what's going to happen. All right, now let's unhie the headsets and
let's take a look. This result is better, and that's what we should do. By the way, everything here
looks cool. That's very nice. I will select this and
it's like to isolate it. Let's see what tweaking we can make here because I'm not so quite happy with the results. All right, let's, I just want to move these pass back to
get rid of this problem. All right, maybe if we add maybe two aces here
in the middle, maybe that will help to fix
what we want to fix here. For example, maybe I can, in the x ray mode, I can
these vertices like that. Let's see, crowd them first. All right, after doing that
maybe we can slash and go to the right of
view and just move those a little bit key. And let's move them like
that and hide them. And don't move them too
much from the top of you. Let's see what we got. Maybe we could move
these out a little bit. All right. Maybe key to
the Z just at any bit, maybe we can scale
them to the Z. As to the. Just scale them
at any bit, not too much. All right, I feel that
these vertices here, they should be moved
up a little bit. I will grab like that and
go to the right end key. And I will move it right here. Right now I don't see anything. And that's what I wanted here. And now the results
look maybe the surface. I can flip this one. I will alter end flip to
flip the normal of this. Now let's check the
face orientation and yeah, everything is blue. That's what I want. Let's grab this. And I
just want to turn of optimal display so I can see the result of the subdivision. It's a little bit jagged, but I think that that's okay. If you want, you can increase the number of, of the ages here. Okay. I will grab this tab to go
to the eight mode and I will add multiple egg is
here using control up. Maybe here as well, you
can focus on one side. And after that mirror's go to the top and the smoothest vertices that we just added, fix the curvature, the idea. That's what I want to do here. Okay? And let's move this a little bit like that. All right? Maybe we can
move this like that. Okay? For the other side, as I said, you can mirror it, the F and deleted. Okay. And now let's add
your modifier. Okay. This area is not perfect, so I think we can
go to the top end. I don't know, maybe we can just move these a
little bit like that. Okay, maybe these Oswald can just hit and move them
a little bit like this. And maybe those over here, maybe this one Js of maybe this one you can just move it a
ten, a bit like that. So far everything looks
cool for this side, I guess for this side as well, The subdivision surface
under need mirror and let's activated to see
the final results. We got another problem Now the frame is not
perfectly in the center. I should do is I should de grab all these vertices
and move them one by one and realign
them in this case. All right, by the way, I have two option here. I can manipulate the guide and tweak the guide to move
the ribs a little bit, or I can tweak the frame. I think tweaking the frame, it will be easier for us. I will grab this guide and just hit D to take a copy like this. I want this copy for a reason. And I will like to go
to the local mode and I will hit Control and
Ab Visual Geometry. Tom, what I want to do is I
want to grab these edges. This one and this one. This, and then hit two Z. Take this as a guide to the Z, zero inter flat in this two Z. And then hit Control I, and then hit X and get rid
of the rest if you want, you can fill this face. Let's fill this with faces. Just keep hitting until you
get this result. I did that. I can make the process easier for me because I want
a guide to align the frame according to a guide he's And now let's go to
the top and as you can see, how far we should push the frame to align
it with the guide. Now I will select the
frame and tap to go to the edit mode and we can
start with these vertices. All what you should do is just put these vertices
in the middle. The distance here should be equal to the
distance on the side. In the x ray mode, I will grab these vertices and
move them like that. And select those over here. And let's move this over here. Grab those here.
Let's move this one, maybe right here.
This one as well. Now let's take a look.
Let's see what we got so far. All right, perfect. Now the result is very
cool and accurate. We could grab these vertices, let's move them a little bit. Those can move them right
here. Those over here. Okay, Before you
move these vertices, just activate clipping to avoid any overlapping
and no se grab those and then it and
move them like that. That's nice. That's very cool. All right, maybe we should move some vertices a little bit more. Like starting from
the go to the top. Maybe we should move these
vertices a little bit more. Now let's take a look. All right, key to the y. Let's check the result again, maybe a little bit
more key to the y. All right, let's
go to the top of you and let's check the results. Now, maybe I should grow
this and move them a little bit more like what I did here. All right, that's very
cool. That's nice. Again, let's go to the top. Yeah, they should
be moved a little bit and move a little
bit like that. Now let's see if these vertices
now in the middle or not. Yeah, now almost in the middle. And maybe these vertices as well are everything else looks cool. Or maybe I think we can move these just
a little bit more. I think we are fine here. Maybe these vertices, we can move them a tiny
bit, not too much. Just hit key and
move them like that. That's will be enough.
Maybe those over here, we can just move them
a tiny bit like this. And now let's take a look. Okay, everything now
is accurate and cool. Let's see if there's anything
else we could do here. One more thing here I
would like to fix you. Remember when I
moved these aces and put them between the ribs, we lost that alignment
on this side. Let's try to find
a way to fix them. I will grab my guide and
put this to one again. I will this surface and tap to go to the mode and I will go to the bottom view
It control seven end. I will start moving
these edges again using key wise to slide them and put
them in the correct place. I will time lips the video. All right, now we are finished. Everything now becomes ready. I will hit Unbind, and I will bind this again
to save these changes. All right, this. All right, hit bind. Now let's select the guide. And let's bring
back the headset. And let's point
this back to zero. Let's take another look. Okay, that's cool. All right. All right, I think that's it for this video, and I will
see you on the next.
16. 016 Modeling the band Fit Dial: Again. Welcome back
here. This video, I want to create the fit dial. Let's see it together.
This piece right here, let's see how can we created. This piece is similar to one of these pieces
that we have here. I will show you, for
example, this one. I think I have a better
image. Yeah, this one. I'm going to take
these details here and a light on the foot dial. Let's put this image here
and see how can we do this. I still have the peripherce
images to match the size. I will turn this off for off. Let's go to the top of you and let's put the
three deco here. Let's add plane and I will
scale this like that. Or maybe I can start
with the circle. Let's start with the circle. Let's change this to 12, maybe. All right, 12. Let's try eight. I think we can go with
eight. All right, ten. Let's move this a
little bit right here. Just scale like that. I will tap to go to the
mode and I will grab these vertices X and then V
to delete these vertices, grab those and scale them again. I will select extrude
them like that. Let's select those to
create a big phase here. Let's select those
control to add two here. Grab this with the
J. With the J. Okay, now let's select tags. And I will hit to the Z. To extrude this up like that, maybe we can scale this scale is working according to
the active elements. I will change that
to the bonding, and from the Z, I can
scale this out like that. Right now we go to the Z. Just move this a little
bit. There we go. Now we got this piece.
Let's go to the Tb. Want to jump to the
vertex selection mode. I will move the
back key to the X hold control and stab it with
this vertex to align it. This is the idea.
I think that's it. After doing this, I will
drop these vertices and G and move those
over here maybe. All right, let's make
this a little bit longer. And I will hit
multiple cuts here. Maybe we can add ten cuts now. I will grab the entire loop. All right, maybe I can deselect these edges
for now and focus on and then to scale to the Y to get this result and just
kill them like that. Maybe now I can rub these edges or maybe I can
select those, Extrude them. Btn another to extrude
it and stab right here. I will grab this vertex key to move hold control tab here. And this one key, hold control tab here. All that's very cool. Then maybe we can exclude this. One more time like that,
maybe we can explode this. I will hit to create
a phase here. Here, let's fill
these triangles. And those will hit control are to add one
here and one here. And let's add, maybe, all right, one edge right
here and here as well. Go to the selection
mode, grab these edges, click and radically, and use space to fix the
distance between them. All right, let's deselect this radically and fix the distance. All right, now we
got this result. I think we can add
two edges right here. All right, now let's see
what's the next step. Can select these faces
from the top of. I will scale them to
the x to the y story. I will grab these
vertices and make this on one of these
active and I will change the transform
to the active scale these to the x axis. I just want to make this
a little bit thinner. Now is the time to add support. We can be Roble,
let's make it sharp. You can add three edges here
for the side I think we can. Let's go to the pace and I will select these
phases like that, that control plus to grow selection multiple times
until you reach this. And then hit for inset and then ought to invert
the inset outside. As you can see. Now we have one loop hit control are
to add one right here. Okay, that's great.
After doing all of that, now I will use mirror
modifier to mirror this. On the other side, I will go to the top and I
will activate the origin. Move the origin and
stab it here it key to the X sole
control tab it. Now we have the
origin.in the model, and that's important in case we want to add
mirror modifier. Turn this off and add mirror. I will apply mirror. I will add symbol deform. Switch the symbol to switch it from twist to bend,
because I want to bend it. And I will pin this
to the Z axis. As you can see, z
goes up like that. Bend controls, we have one here and one here pushing the
geometry to go like that. All right, if we
want to change that, I can change the
direction of the z axis. And instead of leave it up, you can change it here
to this direction. Okay, let's see how
can we do this? I can go to the organ
and activate it. As I say, this is
the Z axis, goes up. I will rotate it to go
like that, do this, all I need to do is just rotate
the gizmo to the X axis, to the X rotate night degree. And now I can bend
this and I will add 180 minus. Now we've
got this piece. All right, that's great.
Let's turn this off. That's cool. Tally, smooth. So far the result looks nice and beautiful, and
I will accept this. After doing that, we need to duplicate this multiple times. I will add a ray modifier. To do that, I want to
duplicate this to the x axis. I will apply the rotation
because we ***** that, let's accept the symbol Deform. First hit Control are
control control A as well. And apply the rotation
axis pointing up. And this is the X and
this is the y. All right? All right, let's check that
again. That's very cool. Now, I want to duplicate
this to the y axis. I will add the y factor. I will add one here and
zero out the X axis. I will add 60 pieces and
I will bend them. Or 62. Yeah, I will bend them. After that, I will apply the array because I
don't want it anymore. By the way, before I
apply the ray modifier, if you apply the modifier, you will not have the ability
to increase the number of the counts because that's it. You accept this number,
but in case you want, the modifier still exists and add above the bend
or symbol deform, you should change the
direction of the gizmo. Because we want to
bend like that. Z axis should be like this. The x axis should go like that. Now the z axis goes up. If I zoom, you can
see what I should do is I rotate the z axis to go like this and the
x axis to go like that. If I do that, I should
change the factor as well. I will turn this off
for now, it's active. I will rotate this to the Y, to Y and rotate this nine
degree is the first step. And then rotate to the Z. Z, rotate to the
local Z two times. Let's rotate this nine degree. Now I will activate the array
and I will change this. I will add one here in the
X axis and zero out of Y. All right, Now I can
add symbol Defam. I will change to bend. Now let's see what's
going to happen. I will choose the axis. Now it's giving me the
result that I want. I will add 363. Now we've got this nice result. As you can see here,
it's very cool. In the array, I will
activate me to merge all of these vertices together
because they are not merged. Yeah, this is the
first step after that, if you think that's
it, you can apply the array and you can
apply the symbol, the form without any problem. I will tap and kick
the middle area. I just want to see this one, this line where the first side and the second side meet here. Because of that, they are not merged yet, as you can see here. In this case I can
merge them or I should merge them by switching to the ray mood and rubbing
these vertices like that. Like this. After that hit M
and two is merged by distance and now we have 33
vertices merged. Yeah, that's cool. Now we're ready to
make some tweaking. Now let's hit right click and change the
origin to geometry. You can hit control and doubled the rotation to fix the
direction of the gizmo. And scale this, sorry, turn this off scale
this make small. Let's bring back the images. I will select the circle with the image and hit
slag to isolate them. And I will grab the,
send it to scale it. And I will hit to
move it right here. And I align it with the M and scale it down just
a little bit more. All right, so now
we got the correct size and we are ready to go. I will hit control
and apply the scale. And I will tap to
go to the mode. I will grab these
edges and then push them inside it and extrude
them e to the x axis. And push the deep inside
a little bit too much. Or I'm not going to do that. I will hit to fill this. I will show you what I
mean, why I'm doing this. I have white frame. I want to create
this right here. I have a better image. Yeah, this frame right here. Let's see how can we create. All right, after
creating this pick face, I will hit to make an int, ought to flip the inst inside. Now we got this as you can see. Now I will go to
the face selection with any grab these faces and hit to put this deep
inside like that. And it D to de coby. I will move the coby
right here temporarily. I will grab this face
control last to grow selection one more time and then hit X to get rid of them. I will grab these edges and then hit control
B to double them. Let's add three segments here, these phases, we
don't need them. X, get rid of them. For this one, I will
grab the outer ages and the inner hit. To explode them like
that to the x axis, I will grab these edges
and hit control as well. Let's add four or five segment here and make this
nice and smooth. You can see the width
0.09 All right, now I will tap and A control L to select the linked vertices and let
P and then to separate it. And tap out, grab
this, go to the top. And key to move, and
let's move this in place. Maybe I should push
this out just at any bit, key to the x. Let's push this out here. All right, after doing that, we still have the origin.in. The middle, I will
go to the right to add in, I will
add the circle. Align the circle. Or
before you align it, I will change this to ten
millimeter or something wrong. We go right here, the origin.in. The middle, I will
grab this or this. Click. Yeah. Have Ncrsor selected to put the three
cursor in the middle. Let's hit to Add, and I will add a circle here
and align this to the view. Let's 32 segments. I will scale this like that. Let's see what we got
in the perspective. Let's take this out t, then to extrude this to
the x axis like that, I'll click on this to
create a phase it to int x to delete this space. And then go to the, I'll click and go to the
face and grit fill. Let's go to the
right. Let's offset this to get better
results like this, maybe I'll click on these acres. Can troll be to bevel
these 23, maybe. All right, let's
go to the right or can troll L to select
all these faces. Let's hit Key to move. And let's move
these. Put them in the correct place.
Go to the right. Let's see if we need to scale
them or what we can do. Something wrong
happen here because of automerge is active, I will hit control Z
and turn this off. Or I can go to the threshold of the automerge and change
this to something small, 0.001 make it very small.
Let's go to the top. And now to move, and
let's move this over here like this, we
go to the right. And maybe we can scale
just a ten bit like this. I will a subdivision surface above it or before you do that, have to recalculate the normal
in case we got a problem. And as you can see they
are flipped back tab. And then let's add subdivision surface to
make this nice and smooth. Let's add two here. I can see some
stretching goes like that I will tab and it control
off to add the support, the edge here to make
this a tight and nice. All right, that's very cool. If you want you can
add more than that. Let's go to the right now. We can scale S at endits. That's very nice for the side. I can grab this, it D to take
a coby and put right here. Go to the object and
transform mirror and then mirror this to the global x
to move to take this out. Now let's go to the left. And I will scale this like that. Let's have to go to
the mode and let's grab these faces.
Can grab those. Control us to grow
selection multiple time. Maybe I can hit to
scale this like that, to extrude them like this. Let's turn this off now. Go to the click, or
before you do that, let's hit I again to insert this control minus to
shrink and then scale this. All right. Now go to
the election clutter. To add this control to Vl. It's not necessary to support G loops here since this area is not going to be visible to
the camera top outright. Smooth, active subdivican
surface, and that's it. All right, for this piece, you can add subdivican
surface to make it smooth. If you care. Yeah, we should care because
as you can see here, slowly, suban surface to
make it nice and round. Yeah, that's very cool. Let's hit two excites, or where is the hit set? Let's grab these and
go to the top of you. Hit Key, and let's
move this into place. That's very nice. The
result is nice and awesome. Okay, I think that's
it for this video. I will end it here and
see you in the next one.
17. 017 Making some tweaking for the band clips: Hello again. Welcome back here. I just noticed that we made a mistake when we
created the bond clips. This side is similar to
the bond from outside. The eclipse from outside is similar to the same
eclipse from the inside. We have a difference here as you can see
here from outside. This is, this area
is the visible area. It's small as
compared with this. And from inside, you can
see we have some extension. We did that, but from
outside, we didn't do that. It's not visible. You can ignore it if you want, but because we want
something perfect and nice, I want to fix this. I will put this image inside
blender so we can use it. Yeah, this one right here. I will go to the right and click any drug and
put damage here. Okay, I think I can hit
key and move this up. And I will put this one instead. And maybe we can move this back. I will it you to move the image and put this right here, maybe. All right, let's see
how can we align this. I will put the image, just align there, of the bond with the
care of our results. Let's maybe we can move at ten bits to
something like this. I'll put the three
decrossorright here and scale according to the three crossorch 23
crossor and grab the image. And scale it like that until
you get close results. Something close like
that. I think that's it. Okay. All right. Now, let's see how
can we create this, let's put this image here. The three decorsor,
we have it here. I will hit to add, and I will add the circle. Let's line this to the view
like that and maybe add ten. I will scale this key
to move this over here. Scale walking according to the three decrosor changes to bounding and scale
this like that. Let's put this
almost right here. I guess it's
something like that. I will tap and grab
these vertices. Hit and let's move
those down here. Grab these vertices. And then, and then I to inset, then XF to delete these faces. Maybe we can scale
these just at the end of it or I think we
don't need to do that. Okay. That's very cool. Okay. After doing that, now I will this edge in the middle and I will hit to extrude like this, just give small thickness. Or before you do that, I guess we can grab
these faces and then hit heavy to
take a B like that, I can grab these edges
and those over here. And the choose a break, H loop's go to the
right again and tap. And let's move this
one over here. Let's tap to go to the mode, and let's grab these edges. Go to the right, I will hit
E, extrude them like this. That makes sense. Let's go to the right again, and Z to go to wireframe. I think we should push this
a little bit more like that. Okay, somebody like this. Let's select these As. And I will hit to
extrude inside. Grab this as well. And then hit and extrude inside as well. A, and they have to enter,
recalculate the normal. What is the next step? Okay, the next step is to
create an open area here. Okay, let's go to
the right again, need to go to wireframe. Maybe we can use an
F tool to do that. Let's use an F tool and
let's create multiple cuts. Is something like this. We can make the cuts,
right, If you want. The secret. Something not makes
sense happen. Here we are, cutting the
wrong faces. All right. In this case we can
move the image. We can go to the left
view to go to wireframe. And let's do that again, tool, let's create, start from here I guess
to make the cat, right? Let's make one cut here. Maybe one cut here
and maybe one here. I guess in one here. All right. That makes sense. We have some distance
between these two. And I think we didn't, we did something close,
but not perfect. All right? Okay, maybe we can move
these edges like that, them all like this and key. And just move them
and put them here. Okay, let's move
this edge as well. I know I'm getting
something that makes sense, but we will fix it in this one. Let's move it right here. I can grab these key twice
and merge them here. Okay, maybe we can add
two edge loops here, and these to the Z. Maybe we can. All right, let's
align these together. Hit zero enter. All right, they are aligned. Can't roll to add a here. And maybe I can hit zero
enter and move these down. Maybe here we don't need these. Actually grab these zero
enter key to the Z. And let's move those over here. Something like this. After doing all of
that, now I can grab these face and hit
F, get rid of them. And if you want, you can connect these vertices
somewhere like this. What about this here? Okay, all right, cool. Now let's see what
is the next step. Okay, from the top of you, I will go to the x ray mode. And I will select
these vertices. All of them. Then I
will hit for Inst. All right, to create these
edge loops, that's very nice. I will grab this edge and then hit and push
this deep inside. Before you do this, I think we can fix the distance
between these edges. Just scrub them. And
then radically use the loop to choose space. Why? I don't see any results. Yeah, now it's working. The radically Can choose space control and Liz scale in case we got a
problem with the scale. Let's do that again. All right. I think grab these. Yeah, now the distance is even. I'll click and then it to
through those inside like that. I think we can fill
this hit right. Let's see if we can use grill. Yeah, we can use
it, that's great. Okay, that's cool. Right here, we got some problem. Let's go to the right, isolate
this and go to the right. This vertex should be here. I guess what's going on? Some vertices moved,
I don't know why. All right, I will hit key
and cancel the X axis. To move X to cancel the X axis, we can move the vertex
on the Z and on the Y. And then I will snap it here. All right, let's this Xt. Snap this one here, yeah. I think now the
result is perfect. Let's group this loop
and this one here. I think we can level them. Cantrollb with three edges. I guess I can grub these edges as well.
And then hit Control. I think we can support the
edge loop here and one there, maybe one here and one here. I'll click on this
carol to level it. Click on these edges
inside Control to level them, grab them all. Control support edge loop here. All right. I will
add one edge loop here and I will hit Control Shift art to
duplicate this edge. To add support edge loop
one here and one here. The same scenario on the side, add one and then hit
control shift art to duplicated to two. Use it as support
loop tab out and then radically it smooth And let's as subdivicion surface
with level two. I think this result
is more accurate. I think these Ge loops that we added need to be
tweaked a little bit. Let's kill them to the Z to
get round results like this. All right, let's see
if we can use this. I will hit key to the
Z and puts place. All right, let's move this out. For now, temporarily. Let's see, the new piece I will hit
to move it. And try here. Okay, so far
everything looks cool. Okay, what we did here is nice, but I think our result need to be skilled to the
Z a little bit. I feel that we
could skill this to the Z by grabbing these
ages, for example. I just move them up to the Z. Let's like to isolate and let's go to the left
or to the right. Let's move these
vertices in the middle. I think now the
result is better. Let's select this piece. With this piece, it's
to isolate them. I will turn off mirror
for now, Timberly. Let's go to the lifts. Try to put this in the middle. What you can do is you can grab, for example these vertices
here and those over here and, and bring the three
Decosor in the middle, you can grab this
piece and all right, first I think we put the
Organ in the middle. Let's grab this first these vertices and put the
three decosor over here. Right, set organ
three decrossorow. We have it perfectly
in the middle. And now I will this tab with the vertices and put the
three decrossor over here. Tapes select incrosor. Now we have this
piece in the middle. All we need to do is just move this a little bit
to this direction. After doing all of that,
we should tweak this. I think we should
do something here. I will slide two
times because I want to separate these faces and
I will show you what I mean. I will add one edge loop here
and the bullet like this, with these faces selected, I will hit XF, let them
and jump to the side. Click X deli ow. I will detach the side control L and then hit and
then separated. I just want to focus on the side before you subpatejt one thing here
I would like to do. I will select those again
and go to the left. I'm going to move these
vertices together. And align them with this new Echumetryt'sct
subdivision service so we can see the final result. Let's see from
where we can start, let's grab these vertices first, I guess, and move them up. Let's grab these and
scale them to the adult. Maybe I can group those
over here and then hit to the and just
move those at tendibit. Maybe I can grab those as well and just
move them like that. And grab the align them with the sinew
cumetryybe those as well. And move them maybe those here. Yeah, let's scrub these
ain't just move this down, let's move this over here. Cb those ain't just move
them a little bit like that. Okay, what about these vertices? I will take them out,
but not too much. I think we should delete
some of these edges. It seems like this method
needs a lot of time. Instead of deleting these edges, I guess we can do something else like grabbing the outer edges. Take a cove and then hit
and then to separate it. Let's focus on this age. Grab the first to isolated, because I think we can
delete some faces. We should have two pieces. Carve this as well and tap
and let's select these faces. Those here can,
plus multiple time. Let's delete these faces. All of them except
get rid of them. Now let's pick the sinew edge. It's like to isolate
them like that again, I will go to the Z and
move the sinew edge and put it right here, A lines. Let's delete the
subdivision surface. Let's grab those together. Control J make 20 piece. Let's tab and let's see now what vertices
we could connect. All right, the number here,
if you hit out click, you can see we have 22
and here we have 18. We could delete some
of these edges, for example those,
We can rub them. Now we have 20. Maybe we can rub them and
delete them for now. Now let's the number. We have 18 here and
18 here as well. Now I can grab
those together and then and choose a bridge. Now we got this result. After that, maybe the outer edges we can interrupt
them and delete them. All right, something
happened here. Let's see, Key wise maybe. Yeah, and I will make it here. What about this area? All right, what we can do here, let's make cut goes like that. And one cut goes like this. I think we can dissolve
this, this one. All right? We can
actually connect this here and this
one right here. It's okay. This one twice, and this
is mark this one here. We can interrupt
this with this J, with this J, and delete
unwanted edges like this here. I can connect this
with this one, and this may be with this
one. Okay, that's cool. That's very cool. What
about the other side? Let's grab the side and let's
see what we could do here. All right, I think we
can delete these faces, all of them X and
get rid of them. And I will grab these faces like that and then hit D and move
these here from the top. Just move these phases
a little bit like that. And then hit S to separate it. Tab Otic up this with the
new phase and then control J to make them one piece and tap the mode so we can mir these vertices and
put them in place. Let's put this one here and
just mr them one by one all. It will take a
little bit of time. Maybe we can use auto merge. Let's set and merge by distance. We have 19 vertices merged, some of them, they should
be merged manually. Like this here.
This one as well. The merge by merge at center at Cal bus Together, All these just maybe
we can delete them for now at a have to
recalculate the normal. Okay. So far the
result looks cool. I will, he slid to excite
and I will tap out and select this piece and
slide to isolate it here. We should make some changes like grabbing these vertices and just move them like that. Merge these vertices at K at
center, and those as well. Let's lay this vertex with this one and let's create
an edge between them. Hit J, and those over here
hit K. I think these edges, we don't need them anymore,
control X to dissolve them. I will hit K to
create a new cut. Have to make the cut
in the center like that until you
reach this vertex. This one extra vertex. We don't need it now
I can't this with this the idea is I just want
to get a cleaner result. All right, now I will tap
out before you taut time and I want to grab these ages and just hit
and extrude them inside. Like that, I will grab
these faces for inst, it's ought to invert the
inset outside like that, like this. What
else we should do? Maybe I can hit key and just move this a little bit inside. And add one here in the middle. And hit key and move this
inside as a ten pit. I just want to create
a small bolt here. Let's activate a
subdivision surface. It's like two exits. Let's take a look, G this piece. I will select this
top and go the top. Grab all of these pieces
and take this out. Right now, I think
the result is better. What about this sites like this? Let's to isolate it
and tap to go to the moot, cut off these ages. And then to push this inside, go to the face click. And then for inst, ins this out like that, write here in the middle. And cut off this key to the x. Let's push this a little bit. Active subdivision surface. Now let's see the final results. I will tab and go to
the top of you and grab these faces and just take this out. I think that's too much. Tap the key to the Xk
and side out of bit, I will select all
of these pieces, and this one as well. And I will tab to
go to the mode. Let's grab all these vertices. I will move them a
little bit forward like this. Then tab out. I will grab this vertex
with this vertex J and delete these two
ages. We don't need them. Fix the distance between
these vertically to space. That's very cool. Okay, all
what we should do now is just fixing this area and
get better results. I will grab this tab and grab one of these
edges like that. And then hit D to take a Coba. Let's put this cover
right here for now. And then to separate it, I
will grab to isolate them. Then hit to create a phase here, te, like that X. To delete this, Baca,
I'll click on these. Then let's go to
the left of view. And then hit to
extrude and to scale. Get this result. And maybe
we can scale like that. I will grab this H
in the middle and this one I will
bevle two like this. I'll click on the outer
hes and then right click circle to get perfect circle. I will scale it, turn of this grub, I'll click and then it
can't val this to three. And don't forget to add
support loop to align it, This align to the wrong side to flip it and move this
up here and one here. I'll click on these edges and hit Control to
double them as well. Control to support H loop
hit to align it in one here. As we get up this
face hit for inst. Hit to flip the inst
inside X to delete them, go to the H click
face grit fill. Let's spin this. All right? Something like
this will be okay. Talk control to Bible
control R support. Look here and one here as well. Radically it smooth, active the subdivision surface and delete this one,
we don't need it. This hit to isolate
them from the top view, I will hit and move
this in place. It have tend to recalculate the normal maybe from the top view. I can grab these faces and
just move this out like that. After doing all of that, you can activate the mirror for this piece and for
this piece as well. All right, to grab this
one and delete it. All what we should do is just grubbing this and move
it on the other side. Okay, To do this, the organ dot of the bond still in the middle. I will put the three
decorsor in the middle here. I will grab this piece and
then triticallyet organ organ three decursorow have
the organ dot of this new piece here
in the middle. And I will add mirror
modifier to it. Catroi, apply a rotation
to fix the rotation. And now we should
have a new one here. The same thing for this piece. I will grab it, mirror here. Just sit heavily to
the coby like that. And go to the mirror in
mirror to the global x axis. But we should do something here. Before we do that, I should work or deband on
the three D corosor. Change this 23d corosor,
and let's do that again, and now we have it in place.
All right. That's very cool. Okay, maybe one more thing
here I would like to do is adding a
supported look here. All right? Is that correct? I think that will
make the result nice. Yeah, now the result is
very cool and beautiful. I think that's it for
this video and see.
18. 018 Creating the Band Detach Handle: Hello again. Welcome back here. In this video, I want to
start with the orange handle. Let's see, how can
we create this. I found this image has a
good amount of details. We will add them as well. Let's focus on this area first, and let's see how
can we create this. This area needs a little
bit of attention. Let's start with this. I
will start to isolate this. I will turn off the
mirror for now. And let's go to the left Dt. I will grab one of these
sites, for example, I can grab the site but select these vertices
on the other side, we don't need to include them. And I will hit Key to move. And I will move those down here. Okay, this distance looks cool. I want to book these up
at the same distance. Okay? To do this, what we can do is we can
create a guide. I will start with the guide. To do that, just group this edge and this edge
before you move these down. And hit to put the three
dicosor in the middle, then we can grub
in that we want. For example like this.
I can grab this edge and mirror it on the other side using the three cursor that
transform vivo point. Switched automatically
to the three cursor. That's cool, I will hit 50 D
to take copy of this edge. And it is to scale,
scale it to the widest, make it figure so we can
recognize it like this. Then go to me and then mirror
and mirror to the global Z. Now it's become
here. Well, that's mean we want to move
these vertices. Sell this here. We should move them and
align this H here like this. Now we got the same
distance after you finish, just group this H, H, X, and then to delete the H, we don't need it anymore. Okay. After doing all of that, I will go up one of these G, maybe I can't sell these H. Then to take a Cobra here and then hit and
then to separate it, I can work with this and use it. Let's see how can we use this. I will tap and pick up
the vertices of this age, and from the top of you I can
hit to extruded like this. And then hit one
more time like that. All right, let's bring
the reference mage here. I can focus a little bit. Let's hit to move
this right here. Let's throw this one
more time like that. Maybe one more time like this. Something like that, I guess. All right, now we've
got this result. We can control this
further if we want. Maybe we could move these a little bit more and move them. Maybe right here, make this
area a little bit bigger. Maybe we can add one
look here and just take this out just at any
bit to the x axis. All right. I will grab
this and this right here, have to click and
go to the top end. I will hit to ext, something like this maybe. And hit them all
and go to the top. And let's put them in place. Let's see the result.
And move them like that. I think we should make
this a little bit taller. As to the Z and scale like this, some of these phases,
maybe I can push them. Just let's move them. All right. Let's include these two phases
here. Let's turn this off. Now, the subdivision surface, I just want to see the faces. Let's move them like that. Maybe something like this. And maybe now we can give this thickness a and then have to to recalculate
the normal first. And then you can go
to the phase and you can phase and solid phase to give some thickness. I'm not going to
use this method. Maybe solidify will be better. Solidify and reduce the
amount from the top of view. I can control these even further by grabbing these vertices and just move them a little
bit here and there, active, even thickness
to get better results. Maybe we can add one
vertex here in the middle. List this further, like
this and maybe this one or at least activate
subdivision surface. Let's make a comparison. Okay, I think it could be a
little bit thicker and round. Let's make this
thicker a little bit. And I will grab these vertices from the top and just move them
forward a little bit. Okay, let's hit Key and move these a little
bit like that. Maybe these vertices as well, I can push them like that. Maybe these vertices as well. We can just take
them out a little bit and push some of these. We'll now see what we got. Okay, this result looks nice. Maybe from the top we can focus on this area a little bit. Let's moving these a
little bit like that. All right. As. All right, let's go back here and let's
see what's the next step. I will put the solidifi as a first modifier and put the subdivision
surface underneath it. Maybe we can sharpen
this area a little bit and sharpen this as we'll add an extra loop that will help to give us
nice results like this, you can radically so to
get nice, smooth results. All right, let's
focus on this area a little bit. Let's
see what we can do. I will like to exit, and I just want to grab this
and see what we can do here. To get even better results. Let's turn off that
subdivision surface for now. I think we can grab this loop and then
Al and push this bag like this old click. And maybe we can include
these faces here. Maybe we can push
the Sat in a bit. Hit to the X a little
bit like this. We can add loops here to make
this area tight and nice. Maybe one loop here
and one here ball. Let's activate the
subdivision surface. All right, that's
cool, this areas will need some tweaking. Let's turn this off
for now and loop. And I will hit Control
X to solve it. I will hit Alt, Click and grab, and hit Control Tobi,
three ages like that. If you would like to
cancel the roundness, you can book this to one or tab out and activate
the subdivision surface. What about this area? Maybe if we add an extra
support edge loop here, that will be enough.
Maybe one here. All right, that's very cool. On the other side, we
should do the same thing. Let's turn this off for now. A push this like that. These edges key to the, just push this deep inside the up all of
these edges like that. Can't be to Bible
them all right now. Yeah, the result looks cool. One look here. Awesome. We got something nice and
sharp. The stab here. Maybe we can add an
extra support loop. We, maybe we can push this to
three and make it smoother. All right, let's
make a conversion. Let's see if this size
makes sense or not. We still have the ability to
make the figure by grabbing the vertices and
move, we should have. All right, where is the mirror? This active mirror For this
mirror. For this one as well. Can we have them on the
other side? That's great. All right, I think that's
it for this video. I will end it here and
see you on the next one.
19. 019 Modeling the speaker bar Diffuser: Hello again and welcome back. Here in the speaker bar, we have this small hatch. Let's see, how can we create it. I will grab these. Hit Shift D, Take a coby
in case we want to go back for any reason and leave
the coby in the same place. And I will hit him and move
this to the temporarily file. Now we have one there.
I will grab this and go to the modi file
and turn off the lattice. I don't want it for now. Okay. Now I will go to the mode. All right. Let's see
what we can do here. We have the subdivision surface. I just want to edges
to see the resolution, I will hit y, y, it's a shortcut I added. You can go here to the object properties and go to the viewboard display
and active wire frame. From here, let's go back to the modifier list in the
subdivision surface. We have this optimal display. I can turn this off so I
can see all the vertices. All right, that's too
much I will read, use this, I don't know, Maybe two or yeah, I guess two. We can go with two. I will accept this result and
I will app now we got this. After doing all of that, I will tap to go the mode, and I will grab, for example, this H old click
to select this H. And I will hit V to rip
this, to open it like this. Then tri click to leave
it in same place, I will hit control L to
select the linked vertices. To get this result, I can detach this from the
group I can focus on it. Just hit P and then for
now now it's detached. I will grab this and
grab the image and it to isolate them like that
and go to the right view. Let's bring the image
and align it with this. I just want to see
where I can put this to move the image and maybe we can
scale it from here. Grab the image and then
to scale and scale it. Make it big like that. Now we know where should
we create this? I will scrub this and I will tap to go to the
mode and go to the face. I will select these faces
that I want to focus on. Or before you do that, you can
go to the Material Review. Just go down to Material Review. You can switch from
here word shading. Let's go to the
material section. And I will create a material
for this bloss and tine, and now we have this material. I will create another slot and I will continue to
create another material. In the second material, I will change the base
color to something, right. To recognize this
material from this one, you can add whatever
color you prefer. I will go to the right view and then go to the solid
and x ray mode. Or you can go to the wire frame with this one selected tab and select the necessary faces. All right, maybe these faces, all right, let's grab these here and maybe those over
here and those here. Let's go to the
perspective and let's see if these correct phases
that we should focus on. I will bring the image here. I want to check
the other images, for example, this image. Or maybe we can
find another one. All right, this
image is good image. As you can see, it is
very close to the edge. What we picked here
is not correct. We could pick these
faces and cancel these, let's cancel these
faces like that. Let's pick the start
with this one. Hold control and any click
to select this area. I think the selection is
makes sense and cool. I think we can go with this. I will go to the material
here and hit a sign to assign the second material
to this area. Hit a sign. Now if I go to the
material review, I can see that this area is red. I want to recognize it because
I want to work on them. All right, now let's
take this out. After doing all of that, now I can go to this list
and use the wrapping tool. Okay, Let's see how
can we use this ad. Just go to this option here and create UV and it's created. Now we have this controller. We can't push this to one
to open this like that. If I go to the material review, I can see where I should
work on this area. All right. After doing that, I will hit FTD to take A, okay. Take a co like that and leave
the coby in the same place. With this coby selected. I will hit control A and
apply visual teumetry. Tom have one of these pieces still has the control and the
second one is not. All right. I will
grab the second one. Just a click on this
and click again to select the next one.
This one right here. I don't want to see this
because this is just a guide. I will go to the object properties and
scroll down in the display. As I will change
this to bounding. And it's become bounding and
still has all the features. Okay, as you can see here, but we want to work on this one. All right, let's go
to the right tab. Go to the Methaal Review. And now as you can see, we have all of these
faces right now. Maybe I can start
with the distance of these G. Maybe I can't fix
the distance between them. Grab these G and
then hetertlic and space to fix the
distance between them. And maybe those as well. Grab this hold control, Grab these right
click and Q space. After doing that, maybe
I can grab these faces. Grab this one. Hold control
this to select the area. And then hit X F to delete them. Now I will grab this vertex. With this vertex and heft to bring the three
decorsor between them. Okay. I will grab one
of them and I will use the spin tool to spin
these vertices. Okay? The axis is not correct, we don't need the Z, we
maybe need the X axis. After doing that,
grab this plus and move it like that to
spin them like this. After doing that, we will have this small
menu go to the angle, and let's change
this to 180 degrees. Let's reduce the number of
the segment to something. Makes sense. Like
for example, seven. I think seven will be amazing. All right. Seven.
Yeah, I will accept seven if you are happy
with this result, a hefty space, and go
back to select box. Now we should connect
these vertices together. Okay, let's see what's
the good way to do that. I will chin this back to
bounding and I will create, all right, I think we should
have one vertex here. I will grab those
together and click and to subdivide to add
an extra vertex here. Let's do that Again, subdivide. All right, let me this one here first. Grab those together. Again, subdivide here as well. This one as subdivide,
that's very cool. Grab this key hold control. And snub this one here. And the same thing for the rest. Active automerics,
important key hold control. Snap this one here.
K this one as well. Snap it right here.
Now we have nice case. You can see for
this we are taxi. You can use the knife tool, create a cut. Maybe like this. Maybe one cut goes, I don't know, Maybe here. I guess you can move this vertex a little
bit if you like. All right, now I can say
we are finished here. Let's go to the side,
grab this vertex. With this vertex S and course. Or to selected active spin tool, the two of them just
grab one of them. All right. Grab for example this one and spin it like that, 180 degree seven vertices
will be okay Ft space. And go to select box actively. I just forget to do that. I will grab these vertices and right click into subdivide,
the same thing here. Right click subdivide,
grab this vertex. Ehtrolakeyhltrolnap.
This one as well. Snap them like that. If you like, you can add
a cut goes like this. Maybe one cut goes like that. All right, that's cold. Maybe we can slide this
away just a tani bit. And maybe this one as well. I think we can
these, we need them. Mark this one here
and this one here. I guess if you like, you can add one extra edge here. But I'm not going
to do that now. Or at least see what's going to happen if we add one here. All right. I think if we add
one here that's will make the area sharp from
here. I will ignore it. Okay. After doing all of that now
I will grab these edges like this and then hit and
push them to the x axis. Like that. I will go to the face, click to grab the face. And then hit for inset. And then A invert the inset outside but just be
careful when you do this. Okay, that's very cool. With these edges selected, I can go to the face
and hit Tigrett Fill. Maybe we can use Spin
to get better results. Or offsets to offset them. All right, offset
them like that, it's not going to work
something like this. Just play with the options until you get something
makes sense like this. I think we done with this.
Maybe we should have one here. That's very cool. All right, after
doing all of that, if you are happy with the
result when you come belt, let's go to the modifier
and open the list. And let's use surface Deform. I will give this a target. This object should be the
target that we changed to the bounding box and then bind to bind this object
with this object here. Now if you grab this and
go back to this tool, you can get this result. As you can see here,
it slid to exit, and let's take a look. If everything makes
sense, that's it. You can accept this result, you can merge these
back together. All right, we still have the lattice exists.
I will grab this. If you are happy
with this result and there's no
reason to go back, you can apply this if you like. Let's go back to the difference. Let's see if we, if
we have some here, it seems like we
have a border here. It will be easier for us to
create these details before we apply anything because it will be difficult after that. Let's see, where is
our object? This one. We can push this back and them and it's
like to isolate them. Maybe we can add some extra details here
before we apply everything. For example, this border here, I think we can rub one
of these edges and use it just with this selected. I think we All right, don't rub these phases and use them for that control blast to grow a selection like this. Then it D to take a
copa outside like this. Then maybe for Inst hit
auto inverted inside. Maybe I can use this as a border hit X to delete this area in
the middle Control to add two edges like that, I think we can push these out. Maybe we can bubble
the hit control B. I will grab this inner area and hit
and push this inside. That's very cool. I will
add an extra Ge look here. I will grab this edge
in the middle end. I think we can go to the
face and use a grid fill and manipulate the offset a little bit until we get
something makes sense. Maybe we can manipulate
this as well. Okay, now we got the results. Now let's go to the
face selection mode and maybe we can
grab these faces. Let's see what's
going to happen if we fix the distance
between these edges. I just want to see right
click into a space. All right, is that
going to help us? I will grab the faces and
I will grow selection. Just one time. Or maybe I can include these
faces as well. I will hit for inset, create a small inset like that. And now I will grab
these faces in the middle or maybe
I can cancel these. I will push the out, can throw plastic gross
selection one more time. Maybe one more time I think I can push these
inside a little bit more to the x axis and add an extra clip here and
take these pass out. Right now, let's
see what's going to happen if we add
subdivicing surface. Maybe here we can
add an extra G. Look to make this area tighter. Grab this key tie and
lets move this over here. Control, or to add
another G here. We know this area
become nicer and round, but it's not quite perfect. Okay? I think we can
accept this result. Let's let's delete the
subdivision service. We don't need it for now. And I will tap, will control to select this and turn off automeric because if
I push this back, it will be merged
I will and move it right here and tap out. Let's go to the modifier
and unbind and bind again, because we made
some change here. I will go to the guide
and push this to 10. Let's take a look. Okay, this result looks cool. It's to excite and let's hide the wire frame and let's
add subdivision surface. Now we got something
nice and clean. Maybe I guess this area needs
a little bit of attention. Like adding an extra
loop here, I guess. Okay, Let's check it again. Maybe we can increase
the number of the subdivision surface
and let's help. All right. It's become
high resolution. I know, but that's nice. Okay. Something not makes
sense have been here because of these vertices or because of the tri angles
that we left here. I will tap and try to fix this. Let's turn this off now. How can we fix this? Let's push this vertex here twice and move it
right here and merge it. But make sure to active to
merge for now, for this. Okay. I think we can merge
this one here. Why don't we connect
them together, like rubbing this with this J. Let's delete those. Let's see if that works. Use an F tool. And let's great cut here and let's delete these. Can we do that here? All right, let's try and let's see what's
going to happen. Tab out, let's hit and
bind, and bind again. Let's rub the guide. All right. Sorry, I will hit control s because we should
bind it like this. Grab the guide first
and push this to one, then this, and bind and
bind, and then bind. Just be careful
when you do that. All right. Now let's act the subdivision surface
and let's take another look. Okay, now that is
what looks better. It seems like some vertices
merged here. I don't know. All right, yeah, we have this,
we should get rid of it. Let's see how to find it. Yeah, this one right
here it to delete it, X and then all right, let's grab the guide. Push this to one. Grab
this, bind again. Grab the guide. Push zero. Let's take another look, active turn of the
optimal display. All right, maybe with
shrink crop modifier, we can get rid of this problem and make the result
looks better. I will delete the subdivision
surface now and I will grab this with this one and
I will merge them. I think now everything is ready. Grab these and hit control
J and make them one piece. But before you do
that, I guess we could apply this. Apply vehicle. Mm. Now grab this, grab this one, head control
J, and make them one piece. All right. It seems like
we lost. All right. Before we apply them, grab those head control
J, make them one piece. Now I think we should mirror
these vertices together. Just head, and let's grab these two edges and
merge these vertices. Click, let's active this. Just hit Key and then Enter. They should be merged. Just hit key to move it.
Yeah, now it's merged. But keep in mind to make
the threshold very small, otherwise you will
ruin the object. I will detect this part or I will detect this,
let or maybe not. Now let's like to exit. I will grab this, hold
here to grab the k hit control and Q
lattice deform, this should be pushed back
to the normal position. After doing that, I can
tap and degrab this. Hit Control L tooling select and then is
to separate this, we can give it a different
amount of subdivision. Let's add for example here two. I guess one it
will be enough for this turn off wire frame. If you want, you can increase
the subdivision for this, but it will be sewer smooth. Hey, very nice. I will grab the guide
and I will go to the accute properties and
swag this back to texture, so I can see the final result. I will holdup the lattice
and head control and okctive still have
the lattice exists. And now it's in
the correct place. I will use this as a
guide to fix my problems. Okay. I will add subdivision surface
to this piece and make it super smooth. Maybe we can add
another two level, and as you can see now
it's become very smooth. I will hit two to
call this, okay. Speaker bar ring rob,
just to recognize it. After doing that,
I will grab this. Uma, Try and tab to
go to the eight mod. I will. All right, tab again
and I just want to select some faces from here. Okay, let's grab
these over here. Control plus to grow selection
multiple times like that. Okay? And then it control to invert
the selection like this. All right. I just want to
focus on certain area. So how can we do
this? I will hit Alt. Click on this H loop,
or maybe this one. And then hit H to hide them. And I will grab one of these, control L to grab them all. Or I can just select these right here and it can roll
last multiple times. In the head control, I, I
still have the same problem. I don't want to include the
face that I got right here. All right. In this
case, maybe manual. We should do this. I think
we can hide this as well. Grab these control plus
multiple times until you reach this H and
then hit H as well. Grab one of these
control L. And yeah, this is the correct
way to grab this. After doing that, go to
the object data Roberts. Let's create a new
group and let's assign these faces or
vertices to this group. Assign now they are assigned, after doing that, hit alt H to bring back
the other pieces. Now let's go to the modifier. Let's to exit, I will add
shrub modifier story. I will pick this object that we called Speaker
bar, shrink Rob. I will, in the vertex group, I will choose these
vertices I assigned. After that I can hit
H and hide this. I can increase the open the
subdivision service level. As you can see, that's help to fix the issue that
I got right here. Now if I turn this off, you can see before and after. You may say this
is a small thing, why we focus on it? Because we want something
and makes sense. I like to focus on this stuff. You can ignore them if you want. That's something up to you. But so far we did great and
we created something nice. Yeah, I think that's it. Let's see if there are
anything else we can do here. Okay. All right, I think that's
it for this video. I will end it here and
see you in the next one.
20. 020 Creating the Power Port: Hello again. Welcome back. Here on the right side
in the speaker bar, we have this power part. Let's see, how can we create it. All right, this piece.
I can delete it. I don't want it anymore
because I can mirror this one. This one It's ready
and we can mirror it. Put the three D
crosser in the middle. I will grab the bond and it, and cross to select it because the origin dot of
the bond is in the middle. Then I will lo, grab this
piece with the lattice. And all of these parts, I will copy them
and mirror them. It shift with D to
take a copy like that. After that coy the object
and then mirror and mirror this to a global x. But we could change the
transform to three decosor, because we want to depend on the position of
the three decosor. Go mirror and mirror
to the global. Okay, we got a problem. We could the, the object that we
called shrink, Rob. I will hit Alt to bring this here and then
hit to take a coby. I will mirror this
on the x axis as well, the grab this piece. And all what you
should do is just delete this object and
use the other one. Let's delete this.
All this piece should be affected
by the lattice. Let's see what we
should do here. This right? Let's grub this lattice, and now it's affected. I will select those,
both of them, and put them inside
the new collection, what we can call it, To open the collection, let's call this shrink. Let's call it shrink. Rub, maybe B key for object, the enter. Yeah, now we have these
pieces inside this. After doing that, the grab this and let's pick this new piece. Just be careful
when you do that. The group is already
selected. That's it. Now I can hide the sub,
everything is perfect. Now, after doing
that, now I can start creating the power parts. Let's see how can we do that. All right, maybe I can
start with the plane. From the top I will
hit to a plane. And let's move the plane
right here. You can scale it. Change this back to bounding.
Let's scale it like this. Make small, maybe you can
scale to the X like that. I will hit control and apply the scale and
tab to go to the mod. I guess we can add three
edges here and go to the top. And scale these to
the Y axis like that. And the cut off this
one in the middle end. Scale it to get something
to create a curvature. I will grab all of these. Pass and then hit for Inst. Then hit Alt to push
these phases out. Maybe add two edges
and grab these faces. I can hit one more
time for inset, grab this edge, Alt, click control to dissolve it, to create this taper shape. Okay, Now maybe I think
that will be okay. And I will add
multiple cuts here, like this. All right? After doing that,
maybe we can, okay. I want to duplicate
these for three pieces. I will hit D to take a coby. And let's put the coby
very close to this one. And then hit R to repeal this. To do that again,
and one more time, let's delete this one and this one because
we don't need them. And now we've got three pieces. All right, after doing
that, I will grab these three pieces and hit control J and make
them one piece. And I will tap to
go to the mode, and I will select these edges
and maybe those over here, And then tally and choose
a bridge to break them. And you can add
multiple cuts here. Control R, and let's add
multiple cuts like that. For some reason, Blender crashed and I
recreated all of that. Okay, now we should connect
the site with the site. I will grab these edges. And grab those as well, right? And choose a bridge control R, and let's add multiple
cuts, something like that. After doing all of that, we need another, we
need to copy as well, F, D, and let's take
a copy right here. And I will align this with this. Let's make this one
the active vertex. I will snub this vertex here. Let's change this
to the vertex and change the transform to active, key to multiple control. And snub it right here. And they should be merged
and yeah, they are. Okay. After doing that, I will control, I end apply the scale in case
we have a problem. What else we can do
here? All right. I will add symbol deform on this and choose bend because
we want to bend it. And I will bend to
the Z. I will active the origin so I can see
where the band is working. Okay, This is the Z axis goes. I will hide the
reference images. Why do I see this? I will let M and move this to the
reference images. All right, so the z
goes up like this. That's means the bend
should work like that. Well, we want the bend
to bend this eumetre. Grab it from this
point and this point and point and bend
it down like this. Well, that's mean we should
rotate the gizmo and align the Z to this
dirk X to this dicion, for example, the Y. All right. I will hit R to R to the Y to rotate the gizmo. I just want to rotate
the gizmo. All right. R, Y hold control and rotate this 90 degree
and rotated to the Z. Now the Z to the local Z. R, Z and z again. And rotate this 90 degree. And now we got, but we want, let's add 306 degree. Hm. All right, we got
the opposite result. Let's add minus here. All right, now we got what
we want. That's great. Maybe we could go
beyond that. Maybe 61. All right, 61.5 Alright,
that's very close. 0.510 0.53 maybe that's maybe we can change the 5354. Okay, that's cool.
Something like this. I can apply this. I can these vertices just to go up
this area like that, hit them and irked by distance,
they should be merged. Yeah, that's cool.
After doing that, I will grab these edges and I will hit to
extrude them like that. Something like this. I guess I will hit to
create a big phase. And then I for inst, let's insert this a
little bit like that. Maybe a little bit more. All right, maybe we should push these faces deep a little bit. Now let's grab this
facets to scale it. Not just that, maybe I can grab these edges over here and
extrude them like that. All right, now I will
grab this and then. I want to extrude it,
but I just want to make sure that what
I'm doing is correct. Because I don't want to go
back and fix these things to grab this and then hit
to extrude it like that. Maybe we can extrude this even more and maybe we could scale at ten a bit and then hit
four inserts this. Maybe I can bevel this area, it can throw and level this
to three or maybe four. And this control
to Bivlet Fosall, maybe those over here he can
throw and bifold them back that I'll click on these edges. Let's change this
to bounding box it to Extrude extrude skill. All right, now we've
got this result. After that hit and push
those back like that, I'll click control to Bevlese Maybe three
edges that will be okay. Or maybe I can grab those
together and beivle them. All right. I will add four. Right click it smooth. Let's put this in place. Let's go to the left. And then let's hit right click and set origin
origin to geometry. Let's turn off the origins. Then hit Key. Let's
move this here, Skill, Let's move
this over here. I think the size is okay. Maybe we can skill it a
little bit more like that. I will grab this intern
of the lattice for now, and grab the geometry with this. And it's like to isolate them. Let's move this right here. Let's have to go to the mode. And let's go to the right. To the left. Now let's
see what's the next step. All right, we should create
a circle right here. If C, these faces,
we can do that. Let's see how can
we cup these faces. Let's select these
faces like this. You can see to active
the selection. And P, this area like that. Yeah, let's add these here. Now we select all
of these faces. Now let's see what's
the next step. I think now we can hit for
sets, or before you do that, I think we should include these phases and maybe
these phases as well. Then hit ints. All right, after that I will hit to
create a big phase here. Then I will hit right like
circle to create a circle. And I will scale the
circle down like this. Let's move the sinew circle. I will align the circle
with the circle on the other side. Now
we got this result. I will stack two times so I can focus on this
area a little bit. Now I will grab
this face and it's Eto this deep inside and turn off subdivision
service for. But maybe we can move
it a little bit. It's something like
this, I guess. Then I will hit four
Inst and hit XF. To delete these pass, I will look up these
edges like that and those over here maybe we
can bubble them. Hit control and let's
bubble them to three. I guess he something like that. It's like to exit and
let's put this in a place. With this key to move. And let's move this right here, try to avoid any overlapping. I will accept the Ga
service for this geometry. All right, what else? I will, let's to isolate this because I think we
could do something here or at least se grab these faces that can trouble
us to grow selection. And I will hit four insects and ins this outside hits all. Okay, that's very cool. Maybe I can now delete
some of these ages, maybe this one and this one, and create this taper shape. And I will add a
support loop here. Or maybe I can crop this
one and hit control to bevalt to three edges like that, but make sure to avoid the overlapping that
could happen here. Just move this down like that. All right, Maybe
this one I can hit control and delete this
one in the middle. All right, let's select where, Where is this one? Them together now
let's see what we got. All right. I think
we can make some of. We can here like let's
isolate this piece. I'm not quite happy with
this Pubble actually. I can make it sharp and I can
club those and bubble them. I think that will make it more accurate and close
to the real objects. The same thing. We
can apply it here. Let's hit can trolbe
and let's pebble these. Let's add the support,
the loop one here and one right here, okay? Okay. This area becomes
a little bit sharper because we added, I don't know. Yeah, we gave this. All right. Maybe because of the
level amount. Okay. We have some differences here. Let's do that. Let's turn this off so we can compare
the two results. All right. Cantrol would be okay. This amount is makes sense. Can troll are to add to
board the edge loops. All right, this one is close. All right, so let's select it and let's select this piece. Now let's check the
results, E to the x. Let's move this a little bit. I think this piece is in place or not perfectly in the
place, but we can fix that. I will grub this. And so time to focus on it
and I will go to the node. I will it all click edges. I will put the three
decrosor here in the middle. And then T out. Let's
grab this piece. Isolate them like that.
Grab this to the left. Then with this piece selected the Ft selection to corosor
to move this a little bit. And now it's perfectly
in the middle, but we just need
to move it inside a little bit. Yeah,
that will be it. It's light to. Exactly,
Let's see if we have any overlapping coming here. Okay? This piece could be
affected by the lattice. I will grub this lattice and
control and latte deform. Now let's scrub this
and active lattice. And now we have
everything in the place. Anything else? All right, one more thing here
I would like to fix. I think this should be
a little bit taller. It's very simple to fix this. Just go to the vertices and decrop these vertices and just move them a
little bit like that. If you want to
control that further, you can add extra vertices
here if you care. Maybe we can add multiple cuts. All right, now this length is makes sense. I
will go with it. Now let's take another look. I feel our result is a little bit big as
compared with this one. Maybe we could scale
this at any bit, Okay, Let's hit and
scale it, okay? Let's turn of the lattice
and grab this one. And turn of the lattice deform, and let's focus on the geometry. Whereas this one and this one, we go to the left. Let's just a tiny bit
scaled like that. The same thing for
these vertices. All can roll last multiple
times until we reach this he. Then it to scale, cancel, cancel the x axis, don't scale to the x h and
then x to cancel the x. Let's kill a little
bit like this. All right? That's great. After that, you can active the lattice and everything
else like subdivision surface. Yeah. Now the result is better. I think one more thing here. We have a light here, I guess is to go
to another image. We have small lights right
here to see how can we do it, let's turn off the lattice. For now, let's go to the
left to go to the mode. And it should be
maybe right here. I guess I will hit for inst, then it ought to flip
the inset inside. But before we do that,
maybe we can just make small tweaking here
for the face like skill them like that and
skill them to the Z. I will hit eye this time. After that I will
hally into a circle. To create a circle, it's scat a little bit
more, make it small. I will grab all of these edges
of the circle, like that. And then traticlyto
subdivide, Subdivide it. Crabs faces, get rid of them. Robs ages as well, then traticlygaQcircle
and now become smoother. After that, I will
hit to extrude, and extrude this
inside like that. Let's turn off subdivision
service for now. Let's, so this a little
bit more like that. Click to grab these faces. Select loop and select boundary. Then control to povel
this side to two edges. I guess the grab this one or you can
go to the face click. Then you can go back to
the select loop boundary. Let's povel this control B. I guess we can add another loop, grab these faces can roll plus
multiple times like that. And then elicit eye for inst. Oh, to invert this out, this edge loop is important to prevent any shading issues. Now I will, again, I guess now we can grab one
of these edges like this one. This one. I will hit shift to take Coby
and leave it in same place. And I will hit P and
then to separate it, tap out, let's focus on this new tap A and
then hit to fill it. Then maybe we can hit
to make an inset hit, to flip it inside. I will hit Alt to push
these phases out like that. Just a little bit.
You can hit two. Time to focus on this area. I will grab this it and
push this inside like that. Grab this phase three, hit again X to
delete these phases, grab these and go to the
face and use the red fill. You can spin, spin this back, maybe use offset to
get this result. Now I will grab these aces
and bevel, then hit Control. You can add three for
this area I can hit. And then for inset, I can fill this area
with faces as well. And this uses offset. Grab the sided control
bit and bivalent. Maybe we can add the
support here, not here. Maybe one here that's very cold now is active the subdivision surface and
delete the sing modifier. We don't need to apply
to on this object. Radically smooth, it's likely to exit.
Now let's take a look. Let's go to this one and
active the subdivican surface. A result is very beautiful. What else we should
do? Let's active the lattice for this
and for this one. Now, everything
should be in place. It does. Anything else
here we could do. I think it should be
a little bit smaller, but maybe we can fix this later. You can't keep it like this. It's not a, a problem. I think that's it for this video and I will see you
in the next month.
21. 021 Creating the Light Sealed frame: Hello again. Welcome back here. This video, I want to focus on the light sealed this piece. Right here in front
of this piece, we got this frame. It should be connected to it. So let's see how
can we create it. I also like this and it's
like to isolate it first. Let's see from
where we can start. I will tap to go to
the edit mode and I will turn off subdivision
service in the edit mode. All right, that's very
cool on this area. I will add the support, the Ge loop to make
this area tight. Now let's take a look and
let's see the results. Maybe we should have
another Ge loop here. Let's take a look and let's
see what we will get here. All right, I'll turn this off because here we
should do something. This new age, I will dissolve
it for now, timberily. So I can fix the problem
that I got right here. This age is pushed out. I need to push it in again. I will turn off mirror for now. Let's see what's the problem. All right, this, get this Alts. Let's push this bag like
that, but not too much. All right, let's hit Alt. Push this bag key wise, maybe we can center
it. All right. I think we can delete
it and recreate it. Hit control, send, dissolve. It will be easier for us. Hit control are to add
this hit to align it. Let's move it like that. All right. Let's see what else
we can do here. Maybe an extra up here
to make this area tight and less active than you are with
subdivision surface. All right, in the middle
the stop and let's secure up all these
edges to the X zero, enter and activate
clipping and let's put these to the other side
to americ them like that. Another result is better. The frame that I want to create here is depend on
the other side. I mean this part we should
prepare the side as well. I will grab it and isolate it. I will tap to go
to the eight mode. Let's see what we
should do here. I will turn off
subdivision Surface for now and I just want to check the other images
because I think we should some faces inside. You can see the faces here
are going a little bit deep. You can see the reflection
of this hole here. We have a very big frame. We get something like this. All right, how can we do
this? How can we do that? I think we can go up this lobe and hit
control and dissolve it. I guess we can hit control or to add one support edge
lobe here maybe. Okay, one here. Yeah, I think that's
it. Now I can go up these faces and hit ex to cancel the extrusion. And manually I will hit to the Y and move the face
in face to the Y. Just push them a little bit
like that. That will be it. That's all what you
should do here. After doing that. Now
I should focus on this area by adding
support loops here. All right, maybe one here
and one here and one there. One support the loop
here and one here. Let's add one here
and one right here. Maybe another age here to
make this area even sharper. Now let's tap and less active
the sub we can surface. Now we got sharp result. As you can see,
it's like to exit. Now let's see what we got. All right, so this is
the result that we got. Now let's see how can
we create this frame. I will go to the mode and
I will go to the top. Maybe we should move some
vertices back at it. Not too much list were turn off auto marriage. Let's go to the top. Just
hit and move a little bit. I just want some space here. I just want to check this area. Just want to see if what I'm
doing is correct or not. This is a frame as you can see. We have a big bulk here. The bulk of the fabric
is not too big. I think my result
is not accurate. I think what we got
here is too much. I guess if we add one edge
here and deleted those here, I think that will help
to fix the problem. But I want to that okay, on the side before
we go any further, maybe we can add
another gel here. Let's see where this will go slash to exit, and let's
take another look. Okay, now's the time
to focus on the frame. I guess I will isolate this tab to go to the mode and go to the face
selection mode. And let's scrabse faces here. I think these faces will be okay to take a coby like that and
click to leave it in sale. Then hit, and then, but
let's frame tab and late obvious faces to extrude these forward like that,
just a little bit. Then go to the out, click on these aces,
the upper acres. And I will hit key twice
to move those down. All right, maybe we can
add an he look like that. It out and extrude along the
normal and out like this. Maybe one H in the middle. And then grab this out. Click we. And let's move this
down just at any bit. Maybe this one key tie. Slide this down as well. I'll click on this edge and
I'll push it like that. Right now we've got
nice ball here. Maybe this one I can push
it out a little bit more. But after doing all of that, check the other areas
like this area here, we should see and
check what's happened. All right, on this
side we can add an loop to make this area tight. If you have a faces here in the middle,
you can delete them. All right, we don't have maybe another loop here to make
this area even tighter. And this area as well. Now we got this. Let's
see if that makes sense. Increase the level
to three, maybe. Let's check this. Okay, so far the result is
cool and we can accept it. I just want to
check this further. Maybe here we can
make some tweaking. I'm not quite sure what we
should do here, but let's try. Let's move this a little bit
like that and then Altus, maybe we can add an extra. He. Does that make sense?
Let's check this area. I will look up this,
hits like to isolate it. Let's see if that's
correct. All right. This that we pushed, I think some of these ages
should be pushed back as I guess this age as well. Maybe this one, maybe this fund a little
bit n is active, the sub that we can surface. But now let's see
what we got so far. So far, the result looks
nice and beautiful. I think we can accept this. Everything here looks cool. Let's check it from
this area, All right? Yeah, I think that's
it for this video. I will end it here and
see you in the next one.
22. 022 Making some tweaks on the Faceplate: Hello again, Welcome back here. Let's go back to the
reference images. I just want to focus
on something here. If you take the headset
from this view, you can see that this area in the middle is a
little bit pinched. We have a variation
in the thickness, especially in this
area, it's very thin. We should focus on this and
see how can we create it. I will go to the bottom control seven and I will
grab this frame. I will tap to go
to the eight mode. What I want to do
is I want to grab these vertices and push them, can click to grab the age loop. I think we can turn off a subdivision surface and
hit to go to the local mode, I will make one of
these vertices. Let's change the transform to the active element so you can work to the active element
and make this one the active. For example, I will scale
to the active element, but keep in mind to turn off automatic because we don't
need to mir these vertices. After doing that, you can now scale these vertices like that. This size is okay,
you can compare. It should focus on one side and don't worry about the other side because
it will be mirroreled. Let's take up this and scale
all see any mirror because let's delete half
of this mirrors. Go to the bottom,
I'll click Make this one deactive to the
kill a little bit more. Those as well Make this one
deactive as to the till. This a little bit more
the same thing here. Maybe this as well. All right, now I think we got very cool results after
doing all of that. I guess now we could grab these vertices and
put them in a place. All right, grab this
key, hold control, And we could snap it
here with this one, with this verticltrol snap. And the same thing you
could do for the rest. Okay, that's very cool. Now, after doing that, we
could move the frame as well. Let's go to the bottom view and let's scrub these vertices. First, hit Key, and
let's move those. Or maybe we can grab
these vertices key. Let's move this like that. Let's keep this in place now. Maybe we can select
those over here to move. Let's move those over here. And maybe these vertices in the middle mechanical
of them and K, and just move them
like that leg as well. Let's move these at Eni bits and the Sigalse vertices
and move them as well, active the subdivision
service and put the mirror as first modifier and then active the
subdivision surface. And let's go to the bottom
and let's take a look. Far the looks nice and
maybe we can grab this, move these vertices as well
and put them in a place. Let's grab these here
first and key to move. And let's move those
over here like that. After that, we can
move these vertices. All right, these
vertices as well is verts. Now let's check them again. Just try to avoid any open area, We can activate the
subdivision surface on cage so we can see
the final result. But I think these
they should be moved. And maybe those over
here and those as well. Take a look and let's
see what we got. Okay, there's, that looks
nice and beautiful. If you'd like, you can
make this area a little bit sharper by adding
a support loop here. Actually, this area is. If you add one here,
that's something correct. Let's see what else
we can do here. You can add one here as well. What about adding one here? All right, let's
go to the bottom. That can throw
seven. Let's focus on this area a little bit. Let's move these
vertices like that. And maybe some of
these vertices, they should be pushed up. All right, let's
turn off one cake. I just want to see the result. Maybe we can add one age
here in the middle of that. I think that's will make
the result looks hard. All right. I can feel some waveness here happening because of these new
ages that I added. I can fix the distance between these ages to get
even better results. I will hit Control Control Alt, hept, click to add
these edges like that, but I don't want to
include this area dilate the after doing that or at least turn of
the subducan surface, I think we can include these
edges here, diesel, those. After doing that, you can hitt
space from the Loop tool. Maybe accidentally I just
moved one of these vertices, but I will fix this later. Right click into space, maybe right click into relax. Right now after
doing all of that, I think we can le, let's see what we have
done here from the top of. I just want to grab
these vertices right here and just move
them back in place. It seems like we pushed
the frame as well. It key and let's move this bag. Let's see if that
correct or not. I think these vertices, they should be pushed
back at any bit. Let, let's focus on
those right here key, and let's move this bag. Maybe a little bit more forward. Yeah, I think now the
result is correct. What about this area? Let's like to isolate this. I just want to see maybe
we can add one here. Now, we lost the waveness. Now the geometry become
nice and smooth. That's very cool. One more thing here,
maybe we should do. I don't know, maybe some of these vertices
should be voiced. You can ignore the
snows are important. I mean, the distance is
similar to the distance here, but maybe by grabbing some vertices and push them like that, we
can get something. Even if you want to do that, you should grab those
together and do it. I would like to isolate them
like that and tape it mode, we should grab them like that but make sure not to
grab the top area. I think we can turn off stbing
surface for both of them. It key to move and let's move this a little
bit like that. Now let's grab these over here. Go to the bottom view. Lets move these like that. Just be careful
when you do this. Maybe I can't go up these,
including these vertices. Go to the bottom. Lets
move these like that. Maybe I can select these and
just move them a little bit after the subdiviingion surface. I just want to see the result. Okay, so far the result
looks nice but the nose, but is not accurate. Some of the vertices,
they should be moved. Maybe these vertices I can
and move them a little bit. Maybe I can push these
back at any bit. The result is nice and smooth. I guess it's like to excite
and always take a look. Okay, so far the looks nice, but maybe I can rob this and focus on this
area a little bit. Control to select the lit faces. Maybe I can hit and then to
separate, to isolate it. T, this area should be harp according to what's
for example this image. You can check another one. As you can see,
this area is sharp. Let's try to find another image. We should find something big. Maybe these images, one of these images as you can see, it's sharp. In this case I will control are to add
support the edge here, one here, and maybe
one here as well. Let's add extra edges to make
this area sharpsm sharp. That's very cool. All right, I will end this you here and I will see
you on the next one.
23. 023 Focusing on the front part of the headset: Hello again and
welcome back here. In this video, I want to focus
on the front side, right? See, from where we can start, I will go to the
top and I will move these a little bit forward
until I see a gap here. Let's hit Key to
move to the Y, Okay? Don't include this frame. We don't need to include
it just like this key. Let's move this a little
bit forward like that. And now I can see a gap. It's very important
to have this, the reference images.
I think we have it. Okay, let's try to find one of these images to
show you what I mean here. We have a small gap here. We should get something
similar to this. I think we should move
these a little bit forward, e to the y. All right, we can't
do this from the top. Maybe we can zoom here a
little bit, e to the y. And let's move this a tiny bit, all at this distance. Looks cool. I will accept it. Now let's check
this from the top. I think the gap become
bigger a little bit. I will tab to go to the mode and I will activate
the clipping to avoid any misalignment having
here in the center. If you grab one of these
vertices and try to move it, you can move it easily. But if you active this option, now it will stick at the center. And that's what we want here. I will grab these vertices and move the back just to make the gap
a little bit smaller. We should do the same for
these vertices we have here, maybe these vertices. Everything else is cool. Think that's it.
After doing that, now I want to import this image. I want to compare my
result to this image. Click and let's put
the image right here. Let's put the three decossor
in the middle of the headset and cos selected the
Sl and decossor. Now we have the
image in the middle. What I want to do, I
want to align this area, this point with this point. Because I'm not going
to play with this area, but I can change
what's going on here. To do that, maybe we can
add a guide to help us to scale the image to the
size or the correct size. Let's hit Shift and let's add. For example, you can add
single args and scale it. Let's make it bigger. Align this edge with this point. Scale this a little
bit, and now we got it. Let's check the other side. Perfect. Now let's see
the sides of the image. Okay, the image is perfect
as well. That's great. Now what we need
to do, by the way, I thought the image a
little bit big and I should scale it like that,
that's why I did this. Anyway, after that, I should move the image back and align this point with this point
right here. Okay, do that. Maybe we should add
another helper. So let's go to the empty
and let's add play axis. And let's move this, for
example, right here, okay? And grab this with the image. And G, and let's move this back. I added this empty because
it will be a little bit difficult to see the image. Now after doing that, maybe we should scale the image with the e to the bosion of
the three D coursor. I will go to the
three D coursor, then hit to scale scale. This S at ten of
its, not too much. Now the result is perfect
after doing that. Now let's compare the reference
image with my result. You can see we have
some differences. These differences,
you can ignore them. And you can't
complete the project without too much about
what's going on here. And no one will notice
it, by the way. But because we want to
create something close to the real headsets, I care a little bit
about these details. Let's see how can
we create something close to the real headset. Okay, After doing that, I
will grab this with this, will hit Shift, a
copy like this. Then hit to the collection. I will create a new collection. I will call this T two. I will put the. Temp two, because I did this because we had
a lot of stuff in them. Temp one, and I don't
want to go back and open these objects and
pick what I want to pick. This one will be easier
for us to control. I will turn this off for now. Now we have a backup in
case we got any problem, for any reason we can't go back. All this is the first step. After that I guess, or at least organize
the scene a little bit. I will go to the visibility
and I will turn off the lads, the empties, and
leave the mis active. I will grab most of these or let's grab
them all like that. And hit and move them
to the head set. Let's move everything
to the headset. All right, that's great. And now let's go back and
active empty the lattice. I will leave the, let's
turn this on, It's okay. All right. I will grab this
and hit to isolate it. And tab to go to the turn
of the subdivision servers. For now we go to the Phase Alt. Click and I want to select this entire phase and
hit X to delete it. We don't need it for now
and maybe these phases out. Click, grab them. Control last multiple times until
you reach the corner, this corner XF and delete them. Go to the H to old click, click control X
and dissolve them. Let's activate screen cast. I always forget to do that. All right, and now we
got this resolved. Now we have the ability
to grab, for example, this H and hit outs
and move it in or out, And do a lot of tweaking. Let's go to the top
slash to excite. Now let's make a comparison. Let's see if this perfectly
aligned with the image. All right, so as you can see, this is the edge of the image. This is the start point,
and this is the end. If I compare this with my results, we have
some variation. Maybe we should grab these
vertices and this one and just move them a little
bit forward to match it. I know I will have a gap
here. That's correct. But I think it's easy to fix. We can grab these vertices
and just move them forward. Moving this forward is not something difficult
to do. All right. I will hit, I'll click on
these edges and hit to move. All right, so we
want to focus on this curve and this curve, okay? I want to group this
edge as you can see. Just move it a
little bit forward. That's all to move. And let's move this right here. Place these vertices here. Now maybe we can grab one of these vertices and
make it the active, the scale according
to the active vertex. This to the active, it is to the y and the scale
does reach this area. All right, that's a little
bit difficult to you to see. You can grab the image
with this part and hit and focus on them all. That will be a little bit
easier for us to control. Maybe we can select these vertices and then
hit H to hide them. Just to focus on this area that will make the
life easier for us. Let's grab these and make, or just hit to move
them like that, make this vertex active, and hit to the Y. And scale this until
you reach this point. All right, let's see. Like this as well, key to move. Let's align this here, make this one the active, that is to the y end. Let's align it like that. Okay? The same thing
here we should do. Okay, Before we do all of that, I just want to check something. I just want to check the
alignment of the image. Yeah, I think it's perfect. Yeah. All right, let's go
back and let's select. All right, let's up
the image and hit key. And just move this a
little bit forward. Okay, now let's up the key and let's move a little bit forward
to a Y like that. Let's make one of these active. And then hit a here as well. Make this one
active as to the Y. And scale this a little bit. All right, key to move. And let's move to
the y a little bit. You can grab this
vertex, by the way, it's not necessary
to use the scale. Always key to move. Let's move this a little
bit forward like that. Grab this vertex and move
it to ten bit like this. Okay, let's go back to the top. Let's movies like
that and let's move these as well as
well, like this. All right, now I will grab
these vertices and hit alts and these in. And just push them
forward as well, like this one out,
push them like that. And this one averages
something like this. Now let's take a look, let's
see what we got so far. All right, from this side, the result is very cool. But from here it is
not actually correct. Because the curve, you
didn't go like this. If you combat with
the reference images, let's see which
one in the image. For example, here
you can see that this edge is not bending down. Okay, well that's mean,
what we got here, it would be tweaked,
but for this area, everything looks cool so far. The question is, how
can we fix this? Well, it's easy. All what we could
do is just moving these vertices up a little bit. It's something like
that, one by one. All right, and maybe we can grab them like that and hetticly and use the relax option
in the Look tool. After doing that,
maybe we should grab these vertices
and just move them up, key to the Z to bring
back the Scurve. All right, I think that's cool. Okay, maybe we can grab
these edges again. Just push them up a little
bit, but not too much. Just be careful because we will have a lot of
variation here. Let's check this from here, and let's move these
vertices a little bit. Now when you come by, grab
these edges again and then tically choose relax
to relax them a little bit. Relaxation. Now I will hit at the edge to bring
back the other vertices. By the way, these vertices, they should be
moved a little bit. Maybe from the
right view I guess, or maybe from a view
like this key to the Y. Let's move them as a ten bit, maybe we should push
them back as a ten bit. All right, now the curvature
here looks nice and smooth. For these edges key to the Y, Just move them a ten bit, but not all of them ignore
these key to the Y. Let's move this a little bit. That should be enough, I guess, by the way. We should grab these vertices
and push them inside as well to get correct results. All right, I think we
can move the image down. All right, these
vertices as well. We can grab them
like that at these, a little bit inside like that. This part of the modeling
is a little bit annoying, but if you focus a
little bit on it, you can pass it and you can create something
very cool and nice. Let's go to the top. A
add extra edges here, maybe one here at book this out to fix the
curvature even more. And maybe this one control
to add one here at, to put this out like this, okay. Maybe we can fix the distance
between the edges as well. Catedtrol out, have
to grab the rest. Cut them like that. These
edges as you can see here. And then hetratically
go to the lot and choose space to fix the
distance between them. After doing that, I guess we can trato, relax, relax them. The curvecure so far looks cool, everything looks
nice and smooth. Let tab out and let's active the subdivicion surface.
Let's see what we got. Let's go to the top and let's
convert with the reference. It's very close the cure is
aligned without any problem. All right, this one
is aligned as well. Well, that's very cool. Let's check the curvature again. I just want to
spend more time on this area because
it's very important. All right, cool. Now let's bring back
the other pieces and let's see what we have done. All right? As you can see
we have some differences. We should scale some stuff
and move some stuff. Okay, for this, for
the light seal, I think we can cup all of these pieces and maybe move
them forward a little bit. I think that will
help. Let's see if we missed anything here. Let's move these like that. I think we corrupt all
the necessary objects, corrupt them like that. And then let's move this
here we have some gap. That's okay. It's not a
problem. A gap as well. Okay, let's see. Let's
move this at ten a bit. All right, here we have some
job to do from this area. Everything is aligned, I guess. Okay, grab the image
and let's go to the properties and
active the front side. I don't want to see
it from this side. And make it selectable by going to the filter
and active this option. Selectable and active this
option for this image. So we can't select it anymore. All right, everything here
is perfect except for this area. All right. As you noticed, when I work, I always like to work on this side and
mirror whatever thing here on the other side but this object and
the frame is not. I would like to apply
the mirror and re mirror them just to work on
one side, not two side. What I mean is I grab this
and go to the mirror. It can roll to
lights from the top. I can delete half of
this F and delete them. Now I can re mirror
this a mirror and active clipping and put the subdivision surface
underneath it for the frame. We can do the same thing. Just apply mirror to grab half of the frame F delete them, then tap out to grab the frame. And let's add mir modifier above the subdivicion
surface active clipping. Now's the time to move some vertices and
put them in place. Grab the frame, grab the light sealed endless to have
to go to the mode. And let's see from
where we can start, let's grab these vertices
and key. Let's move them. Just keep small gap
here, not too much. Grab these key to the Y ende
distance looks cool here, The distance is
good here as well. Maybe for this one I can these
and just move them at ten, a bit back for this area. I guess we can move these
back just a little bit. All right, let's move these
back just a little bit. This one as well. All right? I think in the
perspective we can control that key to the Y. And let's move this
a little bit up, these key to the Y. It's a little bit
difficult to do that here. I guess we can grub
these and go to the local mood and
select those again. And tab. Put up the
frame and the seal. Okay? Everything here is cool. Okay. What about this area? Okay? I think we should put
these Pac gas at any bit, but not too much, Okay? Everything else,
you can ignore it. The result here is very
cool and acceptable. I don't see any problem here. Still have the gap and
everything looks cool. At least check the frame. Is there any problem
with the frame? Any variation? I
don't see anything. Everything looks cool so far. Okay, the curvature looks nice. The curvature, I mean, this, it's too exciting and All right, that's very cool. Okay, I think now is the
time to focus on the glass. But I will end this
with you here and the next you will start doing
all of that. Ok, next.
24. 024 Focusing on the front glass and make some editing: Hello again. We'll
come back here. Okay, let's focus on the glass. We'll like to isolate this
and I will deselect this part grub one vertex from the control L to select the linked vertices. And then hit P and thes to
separate the selection Taborb. This hits two time. Let's have to go to the
mode and let's grab maybe the pass. All right. I think we either we detach
them or delete them. I think we can grab the entire H lobe and then hit V to
rip them like that. Then hit control L and then hit P and then
to suppres this as well, grab this and let's
hit and move this to the temper in case we want
to go back for any reason. Now let's grab this hit and
let's see what we can do. As you can see,
it's a little bit big and we have a
lot of edges here. Maybe we can corrupt
this edge with this one, with this one, and hit
control X, dissolve them. I will control control, click, control shift click to
corrupt these edges. And hit right click and choose space to fix the distance
between these edges. All right, that's very cool. Now maybe I can scaling these vertices according
to the position of the three decosorjtr,
maybe this vertex. And hit Shift. And let's put the three decurssor over
here in the middle. And we can change the
transform with 0.3 decrossor and grab these vertices and scale them to the three
decrossor like that. But let's see if
that works or not. I'm not quite sure but
just scale it like that. Let's make a comparison. At the end of the day, I'm not going to get a perfect result. But if the result is closed,
that's enough for me. I can move some vertices
around and tweak them until I get
something realistic. So far, this result looks nice. I think we can accept this maybe by moving this
a little bit forward, the result will be
nicer, I guess. Let's go to the
top and let's see. All right, maybe we
can scale this stabs. Let's go to the
right K, this area. All right, I think
can scale it down. I guess it's time to move
some vertices around. Okay, to do that, I stop out this frame with the glass
and step to the edit mode. All I need to do is just moving these vertices and
align them with the edge. You can go to the trans the snap and changes to
edge to snap these two, the vertices to the
edges to the vertices. Now I can, for example, put up this vertex and you can turn off the
subdivision service. For now, I think
for this geometry, we can hit the Y letter to
activate the wireframe. So we can see the edges. By the way, I say that before that I hit its
shortcut, I assigned it. If you want to assign
one for the wire frame, you can find the wire
frame togal here, tritically, can choose
assigned shortcuts, you'll find it right
here and then why? Anyway, let's go back and
let's take out this vertex. Let's go back to the modifier. Because I want to
move this vertex, I don't want to have this gap. I will actively
cleaving to avoid this. Now if I hit key to move,
nothing will happen. It key to move, hold control
and snap this vertex here. What's going on? All
that's vert control again. Let's try again. Key to move hold control and snap it here. All right, it's not working
because that transform that 0.23 D cours or change
this back to bounding key, hold control and stab it. And yeah, now it's
working. Key, hold control, stamp this one here. Grab this, fix this
one, and stab it here. This one. Stab it here. Okay, This one key and
snap it right over here, I guess. This one. Snap it here, key this, Snap it right here.
Grub, this one. Snap it here. All right. This one as well, I guess.
Okay, What about this one? We have some gotas. Okay, this key. And stamp this over here. Snap, this may be over here. All right, notes
here. In key to move, call, can'trol stamp here. Okay, Stamp this may be here. All right. Key stamp
this one here. Okay? The same thing here.
All right, that's cool. But we will have a gap
here because now if you tap out to act to the
subdivision surface, you can see we have some gap, but we will find a
solution for that. For now, let's focus
on the edges and the smoothness of this area because that's very important. I will tap to go to the mode and refix the distance
between these edges. Control, click Control out. You have to click here and here. Right click and use
space. Space. Just space. Just right click and relax
this time to relax these. One more time, relax.
Now we've got this. Let's go to the top of you and let's compare this to
the reference image. Let's see if that
makes sense or not. Well, it is very close. Actually, the result looks nice. Okay, maybe we can
just move some faces. I think that will
work. All right, so far it's very close. I think we can go with that. Let's see what else
we can do here. Maybe some of these phases, we can move them
out a little bit. Just push these a little
bit and just be careful. Let's check the reflection by using another mat
cap like this one. I can see we have
some sharp here. I guess we should try our best
to get rid of all of that. But let's see, what options
do we have here to do this? I think we move these phases
too much, push them back. And I think now the result
is smoother and nicer. Okay, even for this geometry,
I don't know why. I feel that the curvature
is not makes sense. Something, I don't like it here, but I don't
know what is it. Maybe we can grab these edges like that
using Control Alt, Click. Let's see what's
if we use relax. All right, relax. Maybe manual. We should move some
of these edges. Let's push these out a little
bit. Maybe these edges. This one, I'll click at Alts, and let's push this
out at any bit. And this one as
well. A little bit. Maybe now the result is better. Okay, so far we did great. All right, if you are
happy with this result, let's focus on this area now. Let's give this a little
bit of thickness to create this frame according to
the reference images. If you one of these
images we have here, I don't have something extruded out from this aluminum frame. Whatever thing I will. It should be pushed inside. An if I draw a line here, anything I should create, it should be pushed
inside like that. If you kick this frame, you can see it goes inside like this at this
point, goes inside. Let's take this out for now. Let's start to go to the edit mode and grab
these faces like that. I'll click and grab them. And I will go to the face and solidify phase to give this thickness We can
control from here. Turn off subdivision
Surface in the edit mode. I don't want to see it for now. Alt, put this a little
bit farther like that to get to create frame. All right, we can control
the thickness later. It's not a UK problem
from this side, just over over here. Alt decorrupt these faces
because we don't need them. F and get rid of them. All right. Something
that makes sense happen here. All right. First thing we could do,
I decrupt this phase. This one in the middle.
Hit F and get rid of it. I don't want to see it go here. I'll click, I'll have to
click it XF and delete them. All right, now we just
ended with this frame, and that's what I want here. This gap is simple to fix. Just hit key and move
this to the middle. And that's will
be it. All right, these new edges that
are already pushed in. If you want to push
these even more key', click and push the
farther if you like, this distance looks cool. I will hit and push
those back to the Y. I guess what else we
should do here, If I want to focus on this area, I guess we should tap it. Control to temper it like that. Maybe we can click
Alt, click and Ival. This area, it Carole's bible
it to three edges like that. I think it should be like this. It's like, let's take a look. Now as you can see
we have a gap. I will tab and then hit A, and then hit Alt to inflate this a little bit
and make it big like this. Okay, Now let's see if the
result is close, all right? It's close and nice, Okay? All right, I think that's
it for this with you. I will end it here
and see the next one.
25. 025 Starting adding holes for the aluminum structure: Hello again. Welcome back here. I want to focus on the
piece and this structure. I will grab them like that together and like
to isolate them. What I want to do is I
just want to tap and realign these vertices
to get better results. But before I start doing that, I just want to select
the face loop. I want to grow the selection control
until you reach all right, this phase and then
it to hide them. After that go to the vertex and Sycrobis vertex
starting with this one. Ages turn off automeric, we don't need to americ
anything, just snobs. Vertices like that use verte snap leg. This one stab this one as well. And this one should be here. Maybe this one and this
one can try stab it. The cycle of this and
stamp right here, a stamp, this one here. And this one could be stamp right here and
this one as well. After that, if you want, you can just move some
vertices around just to get a better result. I guess I think that's
not quite important. Now out. All right, now we got
this result, this stop. Hit A and then hit
Alt to bring back the hidden faces. Now
we got this result. As you can see, it's very nice. Now, after doing that,
I will grab those, both of them, and
hit F, D, and Tab. And I will move this Coby and the Timberly two file in
case we got any problem. We have spare there. Now I will select this and I
will tap to go to the mode. I just want to check
the Xs in the middle. As you can see here,
we have some problems. Let's grab them and
hit to the X zero. Enter the All right, I'm not getting the
result that I want. I will. Let's try again
to the X zero enter. All right? I will hit
you to move this to the x until they stop
perfectly at the middle. Everything now is perfect. Let's grab this object. And I will go to the edge. And all right, maybe we can apply the mirror or
I will leave the mirror. Now I will hit Alt click
to grab this edge loop. Or maybe control to corrupt
these edges like that. And go to the select end loop. Choose loop to corrupt
the H loop like this, just tally, subdivide this, maybe 234, maybe four times. Let's add five cuts here.
Okay? Something like this. Now I will out encrup
these edges again and go back to select end
loop and choose loops. I will relax, relax
these edges like that. Shift to relax this
again and again. Keep doing that until
you get something nice, something like that. I guess let's step out
and let's take a look. Let's go to the
front or the back. I don't see any
wavens, by the way. There's another technique
if you would like to use, If you like, I'm
just going to show, you can go back to select and
choose Loop and Subdivide. You can subdivide this
to two and relax it. Just click on these to
carve these loops in a. And then choose relax R to repeat the last
action, the relax. And now the result
is perfect with the right click
and two subdivide. Subdivide this,
the same scenario. Controls edges, loop and
relax again R two times, maybe now it's relaxed with
this selected right click. Subdivide. Let's
click select Loops. Right click and relax, right? And you have to rebut
that again and again. Now I think we got very
good results here. Now I will grab
these edges here, and I will go to the
select lube and Q ring. And rightly subdivide to
subdivide this, the same thing. Grab this, hold
control, grab this. We go back to select
lube and ring, right to relax, you
have to beat that. Now we've got very cool results. All right. What I want
to do is I just want to focus on this area. I want to grab some faces. And I just want to show you, I want to know how can I locate these holes in
the correct place. Let's see together, how can
we do that after doing that? Now let's check
what we got here. Do we have any differences? We got some differences here because we
added extra loose. But we will find a
solution for this. I will delay this letter. I just want to
focus on this one. For now, I will
apply the modifier. I don't need anymore
subdivision service. I will delete it, and if
I want it, I will add it. Now let's hit to exactly and let's see what's
the next step. I want to select this image. Let's like to isolate this. I can select, Let's go
here and active the image. I just want to locate,
go to the top. I want to see where these
holes should be exactly. All right, in this case, maybe we can tab, select
some faces for example. I can grab these. All right, maybe these faces. Don't worry about the care
of above these faces. We will add there. Okay. Yeah, I just want to select
these phases. But before we do that,
I just want to go to the material and
create a new material. I will call this base coupleace empty. Let's add another
material, this plus. Let's call this maybe a
red just to recognize it. That's it. The base material should be applied
on the surface. And let's go to the right and just change the base calc something,
right like that. Now let's go to the
Material Review. Now I can see the base, but I can't see the right. Okay, now let's stop. Go to solid, go to the top, and let's select these faces. All right? I think I can hide
the side to hide it. Now let's go to the
top. Let's go up. Okay, these faces, I guess control have to
crab this as well. Deselect, We don't need to
include the curve that yeah, I think that's it now. Let's go to the red and
hit assigned to assign the red color to the
selected faces now. And go to the material
review that you can see. Now we have the red color
applied on the selected faces. All right, I shouldn't
include the faces. I guess I will grab these phases and apply the
white material on them. Yeah, that's correct. Here we have the circle. For the circle, I guess according to the
reference I make, we should leave some
space from here. And from here, I don't see
what options do we have here. I just want to locate where
should we add the circle. I think it should
start from here, I don't know, Maybe somewhere. How much? I think we can leave two faces from here
and two from here. Let's scrub this area. Or at least select this area. We can add the circle here. Let's go to the top. Yeah, I think the
selection is perfect. Something like this. And I will assign the red
killer to it like that. Yeah, that's very cool. Something weird happened here. I thought I applied the mirror and delete the
subdivision for this piece, but instead of that, I applied the mirror
for this piece. But it's okay. I should apply to this humery, but I will ignore all of
that. It's not a problem. Let's see what's the next step. All right, now if I go to the material review,
we signed these. We could select some faces
for the speaker bar. Let's see if we have
any images here. Let's open the reference images. Yeah, we do. We have
some images here. I will grab this and
move this pack here. And select the same key. And move it. I will
select what is this? Let's move this down. We
don't need to see it. Let's grab this image
with this image, it's like to isolate
them and go to the right key to grab the image and move
it down right here. Maybe if you want to scale it, go ahead and scale
it a little bit. And I think it should
be scaled according to the three desert bit like that. To move and let's
move like that. I guess now we can see what
phase we should select here. I will tap at all to bring
back the other pass. And let's bring back
the reference image. As you can see, we just, we should leave a small
distance here, okay? All right. We should start
from where we should start. We should start
from here, I guess. Let's see three faces like
what we did here, 1234434. We should start from here, and let's see where
we should end. We should end almost
right here, maybe here. Let's select this
area like that. I guess now we can go to the material and apply the
right one on this area. A sign and apply, I think I should
cancel some phases. I just want to make
sure of something here. Okay. The end of the curve that should reach
this point like this. I don't want these phases and I don't want
these phases as well. So I will diesel like this and assign
the white material for this, for the rest. Now let's go to the
material review. And yeah, now we
got this result. Are anything else
you can do here? From the bottom side, we have multiple holes. Let's see how can
we locate them. I think they should
be in the middle. Let's try to find the
middle area. All right. I think this face
is in the middle, or these two faces A. Just leave some distance
from this point to this point and start
grabbing these faces. If you want to be more precise. We have this image here can
help us to achieve this. So I will tap out, grab this, and it's like to isolate them. Let's go to the front and
let's see how that could be helpful according to this image. I think the hole should
start from here. Okay, let's put the
three cursor here. And maybe I can add an empty
just to see the start point. And they should be,
and I guess here. And let's add another
empty scale it like that. And let's up this empty with
this empty and move them. Let's go back to the bounding. It has to scale them like that. I think they should
start here and ends here according to
the empty position. Right now, I will go up all of these faces until I
reach, maybe this area. I guess I think we should
add a new faces here. Maybe we should
include these as well. Include these face right here. Let's take another look. We should de grab this and leave two faces on the side
and on the side as well. Now, I will go here and
assign the material. All right. After doing
that, he was the next step. We have this oval shape. It should be to the hole. So I will leave a small distance and grow up multiple
faces from here. Maybe starting from this
one hold control shaft, got up this area like this. Maybe we should add more faces. The something like this. I think this area should be enough to create
this oval shape. I will go to the right and assign this material
to this area. Later we will focus on these
details because here we have this small hole. Maybe we can select these to face to use them or maybe this. All right. But I will
do that later or not now. All right. Now let's see what's
the next after colorize all these
phases Now let's see how can we create that, these holes I will tap out and I will go to the modifier and apply the mirror and delete
subdivision surface. I will tap again and go to
the front, maybe on top. And let's up this in the middle, I guess something like this. I just want to open this area control to level
this to two like this. Or maybe I can I
can these edges in this area just Pavelted can roll select these faces
and X to delete them. Now I got this area open. After doing that, I will
select these faces like this, then hit and then
to separate them. I just want to focus
on this area now. Maybe we can use the the
rapping tool to open this and up it will sub window, and I will change this
to the UV editor. What I can do is I can select go to the UV and now
it's up as you can see. But I don't want it
to be up like that. I want to get better results. I will select these
vertices like this. I will rotate this like that. I will select the,
you can go to the Ge, cut off this H height
click and choose at an to align this
and this one as well. This one and this one as well. Now we got a perfect rectangle. Now I want all of these
faces follow this one. I will Active, hit a
Select hold here to click. And click this again to
make this one the active. Now we could find it right here. This is the active face. I will go to the UV
and use this option. It is called active quote. All of these phases will
follow the active quad. I will get rid of
this RV Wav shape. Now go back to the UV
follow and hit, okay. And now everything is perfect
because now we have a UV. Now if I hit Create UV shape with this
option, use active map. I mean this map, it
should be right here. I will get a result similar to the result that I got
in the UV editor. Let's hit Create UV shape. Now let's push this to one. And now we got stride
line, as you can see. If I have to go to
material review, I can see all of these details. That's will be very easy for us to add all of
these details here. After doing that, maybe I
can hit to isolate this, I just want to
focus on this area. Maybe I can hit F D to copy this and hit right click to live it
in the same place. I guess we can change the name
of this piece to hit two. And let's to guide. Then hit Enter, and
then let's go to the object properties in the display as I
will King Pound. Now we just left with this
geometry, as you can see, this geometry and now
we have 21 of them is just an E because we
the display here, it still has all the features. Here we have the second one. I will hit control and apply visual matt this geometry.
The visible one. We applied the other
controls for this, but the second one I still
have the apple to controls. All right, now let's grab this. Let's have to go
to the moot end. Let's go to the top. And let's see from where we can start. Let's start with this area here. I will grab these faces, grab this one, hold control,
have to grab these. And then it X to delete them. And now they are deleted. We should create the curve here. Let's grab these two
vertices to bring the threes over here and
grab one of these vertices. And active spin, Ching the spin to I guess and
rotate this like that. Let's add in the
angle 108 degree. Let's change the number of the steps to something suitable. All right, this vertex
should be snapped here. This one is snapped
here. And we have two. I think eight is too much. Let's add seven or even
six I guess will be okay. Yeah, six. Let's stick with six. And then hit heft space
and go back to select box. Let's active this
option, auto merge. Now let's merge some vertices. Key hold control and
tab this one here and merge this one as well. Let this one may be right here, I guess I think we can use F tool to create cut
from here to here and I can grab this tab one here to create a cut from here to this
vertex hold control and establish right here now we've got this
result as you can see now after doing that I can erupt
these ages like that. And then had 50 D to take a
coby like this and rotate this 180 degree like
this and move it back. Use the vertex snap. Let's make one of
them the active, and this to the active element to move lntraltapsmre right
here and now they are snap. After that, some vertices
we could merge them, grab, grab this and grab this
one as a last vertex topic. Then merge at last. The same thing here,
merge at last. Now I can use the knife
tool to create cut. Goes like that and one
cut goes like this, Space America at last. And do the same thing. We could do it for the side. I will go to the phase and this one hold control and group this at
XF and get rid of them. All right? Something like that. Maybe I can all I think we can delete these faces here
and those here as well. I guess what I want
to do is I want to mirror this on the
other side and just wild it and to get a faster result. All right, there's
another option. I can select these
faces like that and decrp these face as well
and go to the vertex. Yeah, I think that's it.
Let's make this vertex the active and what else? All right, let's make this
one the active and then shift D to Covid hold control and
the stab it right here. Let's see what we got. All the rest is very close. We just need to move some
vertices and that's what is now let's go to the face. I will select these faces
X, F, get rid of them. Now we just need to merge
some of these vertices. The secl of these over here, make one of them
the active keyhole control snabit. Now
they are merged. This area and the wire frame mort them and merit
by distance to meric. The rest, they are merged
automatically for this area. We can rub these
faces like that. X, we ard of them. Now we ended with this
keyhold controls. Snaps here, Tim. This one over here. Let's coup these vertices, keyhol controls,
stamp them here. I think they are merged
perfectly perfect. All right, now what about
these faces? Grab them. Get rid of them. I guess we can grab one of these
edges and use them here. Grab them like that.
Take a coby and let's put this coby over
here to vertex, make this vertex as the active element or
active vertex Keyholtrol. And tab this one right here. If this doesn't align
skill it a little bit, maybe to the X axis, grab this keyhole control, snap it here and
now it's perfect. After doing that now maybe we
can some of these vertices, let Merica, Merica at
last, the same thing here. Use the knife tool and let's
create cat goes like that. We cut goes like this space
to confirm snap snap. That's very cool. Maybe now I can interrupt
these again by All right, mirror mirror to the Y I guess. Let's make this vertex
active keyhold control. Snap it here to the x axis, a little bit to the X and
scale like that Eric vertex. It's merc, automatically this Mira at last merica, at last. Use the tool again here as well. Now we finished with this. That's very cool. We should do the same thing on the side. I will put the X E.
Get rid of them. And select these edges like that to bring the
three decosor over here. And let's these
Vert for example, and active spin, and let's
spin this 18 degree. Okay, let's go back to select box. Let's
do the same thing. And here as well, this H, this one right here, right, can subdivide it to two. I think this is not
merged perfectly. Merge. This key hold
control is stamped here. This one key hold control and stamp right here,
grab those, do. Let's focus on this area, two vertices course, select it and spin,
grab one of these. Spin it like that, 180 degree. We go back to select box.
And the same thing here. This H right click, subdivide coated vertex
keyhold control snap. Key hold control snap. This K K. All right, that's very cool. Now I just want to see
what I got so far. Let's like to exit. I want
to grab my guide series. This guide is selected. I want to bind
this to the guide. I should grab this and go to the modifier and
add surface deform. And I should pick the guide
and hit bind to bind them. Now I will select the guide
and push this to zero. Now let's see what
we got so far. Let's check this area. Let's make some comparison here. I just want to if what I did
here is accurate or not. If I compare this
image with my results, this result is not
quite perfect. We could scale
these and make them smaller on the both side. You can't focus on one
side and mirror it. We will see how can
we do that later. I will end this video here and I will see you
on the next one.
26. 026 Adding more details for the aluminum structure: Hello again. Welcome back here. Can I see what's the next step? I will grab the guide and open this and
grab those together. It's like to isolate them. I will go to Material
Review and I think now is the time to create these holes. Let's see how can we do that. Let's go to the top. Before acculI do this, I just want to see
something here. All right? We should focus
on this side. That side. Now let's open it and see. Okay, now this is the side
that we should focus on. I will put the Ptcosor
over here and you can tap actual call up these vertices and put the pretcosor
in the middle. I will have to eight to add, I will a circle. The circle is 32 vertex
k, that's too much. Maybe 12 we can use. Or eight. I think eight. It will be okay. Let's
scale this down like this. Ske like this I think
is perfect choice. Let's move this right here. The size looks cool. I will kick if this size
makes sense or not. I will grab this with
this and ing this to bounding and then to take cove and R to
rotate them like that. All this one should be here. This one should be right here. Okay. This size looks perfect. I will stick with this
size. I will delete this. And now I will grab this to the cove and I will put
this co right here. Let's go back to the
reference images and let's see the distance. A small distance as you can
see something like what I got here after that
are multiple time. Let's create 11 hole
here. Let's count them. 123. 456-789-1011 12. Okay. We could delete one. Let's delete that one. Maybe we can interrupt
them like that. Just move them a
little bit like this. And I will deselect one
of them to grab ten, And I had heavy to
take Abby here, and then hit to move them here. Something like that. And just keep some distance
like this, I guess. But I want to put these
exactly in the middle. Let's see how can we do that. I will grab these out and hit control J
to make them one piece. Control J, all
right, doesn't work. Control K, right now they become one, um, three. After doing that maybe I can select this with this and then and coso selected to put the three
decossor in the middle. All right, before
we do that I guess we pick up this vertex to bring the three
decosor over here. Let's put the origin.in
the position of the three
decosorlgginree, decosor. Now we have the origin
dot right here. After that I will grab, I bring the three decosor over
here and then I will this. And then had to, and you
selected Decosor to put this perfectly in the middle due to move and let's
move those over here. And now we got very
accurate results after that because three
Decosor in the middle I will have D to by these and right to leave them
in the same place. And I will in the transform
to three decosor mirror this new B to the
x axis like that. All right, now's the time
to work here a little bit. Let's take, grab them like
this and decel like this. It's like two. Time to
focus just on this area. Here we have two options. We can merge these together and connect
all of these vertices. And after that, connect
them with the guide. Or we can trim the guide
and fix the vertices. If you'd like, you can focus
on a small area finish and reduplicated to
create the pattern. I will grab and hit control and make
them one tome. Three. Let's see what we can do here. I will tab and let's see if we can focus
on these vertices. I think for example, if we grab these like that, we can create a pattern. If you finish this you
can hit like this, you can create a
pattern like that when you hit he are
multiple times. You can get what you want.
Why don't we do that. Instead of spending
too much time to create or to americ
all of these pieces. I will delete these. Okay, Maybe I can include those over
here and delete them, X V. I will select
those over here, and then hit control I
to invert the selection. Hit X V again. Now we just end with this. All right, now let's see
what else we can do. I will change this back to bonding and hit to extrude vol, control and stand
this more right here. This vertex I think we can
go to create a phase grab. Those can create one side
in mirror if you like. You still have this option. Maybe I can grab this with
this it dose right subdivide. I will select this here. And the cards over here f this, with this subdivide those, I guess we can crop
this one with this one and it subdivide these, hit those, it, that's now I
can select this over here. This controls here, create
phase here and here. Here. As I said, you can mirror
this on the other side. I think that will be easier. Three decossorll here, I
will grab these vertices, I guess XV and delete them. And then tap out tab. We got up all of these
vertices and then go to Swag transform
to three decossor, because we want to debend
the three decossorn. Go to the mirror
mirror to the global, but after you hit D, to covid like that, hit A, and then and
marriage by distance to any vertex we have here. All right, now we
got this result. You can leave these as
a guide if you like. All right, now let's see
what's the next step. After that, I will make this on active and then hit to take a copy like that and stab here. And you can have
multiple time to duplicate this like that. I guess here, let's
count the number here, 1-234-567-8910, You
have to R again, because we could have 11. Now we've got 11 piece here, 123 456-789-1011 That's great. After that, you can get rid of these circles, we
don't need them. I think we can group the
vertex with this one and hit and subdivide them
like that and eric those. Or create phase as. Subdivide here. To create a phase in
here as All right, something not makes sense. Happen here. Sorry. Yeah, now it's perfect. Those subdivide, those subdivide loves gr up these hit and with this hit. All right, that's very cool. It's to exit now. Let's see what we have done. This, let's move
it away like this. Select all of these. It's
to excite. Close it up. All right. Let's see
what we have done here. Grub these pieces with this tab. Let's see what is the next step. Okay. I think we put the guide. I don't know. Maybe we should leave it
here Or move it all right. I will leave it here. Maybe I can just move it a
little bit here. I'm not quite sure. Let's unhide the wire frame for
this and for this one, so we can see something. All right, can we align
these vertices? I'm sure. I just want to see if we can align these vertices together. I will have to move
this right here. All right. I think
we can't align them, but maybe we can put it in the middle between
this H and this one. We will try to find a solution. To connect these vertices, I will have to go
to the eight mode, and I will select this
space starting from here, can this it's X F,
and get rid of them. Now let's count the number here, we have a 62. And here on the
side, by the way, it seems like some
vertices are not merged or at least group
just the outer vertices. We have 56. All right, now maybe we can grab this with the control
to make them one piece. Now we can tap again and
connect some vertices. Maybe we can grab
those together at, let's see what's going
to happen if we do that again and again. All right, Selyose at three, let's sly those over here at, those here at, and
those as well. And those over here. Everything
is still cool so far. Now let's select those over here and grab those together
to create a big face. Let's jump to the
side, grab those, all of them at se those here, those over here. The
same thing for the. Let's go to the site. Something like this.
Now, the scal of those all mi what about this area? Let's select those
here and those here, heat and cup the rest. Maybe we can connect
those together, head K or you can ignore them. All right, but now
we've got something great A and then have to end to recalculate the normal right before we get this area. Let's grab these in those, okay. Now whatever thing we did here, we could coby it
on the other side. I think that will be easy. I will go to the
face selection mode and delete these phases F get rid of them and I will corp all of these phases
that I got right here, you can't accurately
select them like that. And decel like this. To make it easier for you I will
go to the vertex and the change this to the active
elements and you can hit D to take a copy right here and just move it
a little bit here. And you can hit G to move hole cantroal and
stump right here and you get almost perfect results. No, it's not perfect. All right, It seems like we could ric
some vertices and move them. Okay, So yeah, key wise and key hold control
and snub some of them. Key control snap. And it seems like we
could do that and spend a little bit of time
to fix this area. I don't know if there's any
other technique to fix this, but let's try to
make this easier for us because I don't
like to do all of that. Let's secb all of these phases and I will let the
end move these over here like this. And I will up these
vertices as well to face, and then hit XF to delete them. I want to delete these as well. Now let's scrub all of
these vertices like that, Make one of them the active
and then hit key and hold control on this tabit
that's will be faster. Hit a and and merge by distance. Let's see there are
two vertices merged. That's cool. That's nice. What about the oval shape? Okay, we can see it right here. After that, we should
have a small hole here. And after the hole, we should have this oval shape. Let's see, what option do
we have to create this? All right, First, I don't know if
this shape should be bigger than this or smaller, but I think we can
focus on these faces, on these faces and
create it here. And create the curve after yeah, I think we should grab these faces and the curve,
it should be right here. I can delete these faces and
create the oval shape here. I will grab the
vertics with this one and bring the three
cursor in the middle. And then tort G up one of these vertices
and activate the spin. And let's Z and spin
this like that. Let's choose 180 degree. Let's see how many vertices
we should add here. Maybe ten vertices. Ten. This one will be connected here and I think ten is
not going to work. I think 12 will be
the good number here. Let's add 12 after that. I guess we can now go
back to select box and mix Homeric some vertices. You can actually delete
all of these phases, We don't need them at
exhibited of them. Okay, what else we can do here? Some of these we can them
keyholtrolnapkeyholtrolnap. Snap it right here. And
this one story, okay? This one could be
snapped here, I guess. This one could be
snapped right here. And this one, okay. I will Eric this
one here and use the tool to create
cut, goes like that. And All right, something
like this, key wise. And let's mark this one here. Can we, Eric This one here. I think we can do that. Okay. To get rid
of this triangle. Let's do that. That doesn't
work. We can do this. Okay. Let's mark this one here, and this one right here. This one right here. This
one should be Eric here. All right, I think
we need to add cuts. Key key control snap,
keyhole control snap. What about these edges? You can push them a
little bit like this. It's okay to do that,
keep some distance. It's very important to
keep some distance here. Or there's another option if you'd like to use just to
grab these edges like that. Don't say like this, this one and hydraticallyo
space, that's will be better. Now the question is what
about the site here? All right. I guess we can delete these two rows or maybe
those get out of them. And I think we can grab
these and use them, I guess, Or we can
include these as well. Let's, let's put this one right here and go
to the man mirror. This to the Y I guess. And then go to the vertex. Make this one the active.
And let's combre it, okay. It will snap it here. And it seems like we should move these vertices
and push them back. All control and stamp
them right here. It a, and then you have to
recalculate the normal. All right, But I think that's not going to work because we will have a problem. And I will tell you
why we can't do that. Because I don't want to
mess with these edges, ching them, because at the
end of the day we should connect them with the other
part of the structure. If you remember, we detached this table from the structure. But instead of that, I can grab the curve it and mirror and use it here at the end. It
smoothest over here. You can rotate it. Actually,
no, it's not going to work. Mirror, mirror to the Y. You can make this activerehole
control and stop right here and delete these faces. We don't need them. Grab
these faces as well. It's a time to some
vertices here. Keyhole control, snap
and stop this one here. Let's snap this one over
here. And this one as well. Snap it right here. Keyhold, cantrolstnap.
This one right here. All right, what else
we could do here? Keyhole controls,
stamp this one here, and this one as well. All right, that's great. Now we should have the same
result on the other side. All right, I will grab
these faces like this. I just want to coby them. I just want to compare these faces with
these phases here. All right, let's put this
close as you can see. There's a variation in the
distance of these ages. When we copy these phases here, when we these faces from this
area to move them there, that will cause us some problem. But we could fix that
later. All right. I will delete this and grab the, I don't know if we have
some vertices not merged. I will hit eight. Select
all of these vertices, and then hit M and
Merc by distance. Yeah, it seems like we
have two dozen merged. Now I will grab the
entire Ge loop. Okay, I will hit the Toby. Let's put it right here. Okay, Think we can cut these
phases XF and delete them. And let's see if that will work. I will make this one the
active key and snap it here. All right, it's very close. Just move some vertices
and merge them. That will work.
Ketron, this one here. Or actually you can
delete these edges. I guess I will hit control Z a multiple times to
do something else like grabbing these vertices, hit V to get rid of them. I ended with this. Now control and stop this one right here. That will be easier for us. All right. Stop this one here and stop this
one over here. This one, sorry. All right. It's snapped and merged. This one is snapped and merged. Okay. Now it's a time
to delete some faces. Okay, And me vertices here, Melos over here. And this one. And this
one should be here. And this one I know
maybe right here. The key hold control
stamp. This one here. This one stamp here, this one. All right, X delete
them, that'll be easier. Key stab this one here,
stamp right here. This with this X F. Get them. All right, what else? Hey, let's snap
this one over here. And this one as well. Hey, this one. Maybe we
can snap it right here in this vertex as will. Now let's delete these
faces. We don't need them. That's cool. I don't know. I feel the shape
is big and small. All right, now let's like to exit and I just want to see
what we have done so far. Let's hide the wire frame and
let's go to the modifier. The guide still exists,
that's very cool. I will add surface deform and pick the guide and
hit pine to bind them. And I will grab the guide
and push this back. All right. As you can see the holes stretched
out a little bit. We could tweak them and
this area become very big. We could tweak it as well. There's a lot of work
here we could do. But I will end this
you here and we will start doing all of
that in the next you next.
27. 027 spending more time on the aluminum structure: Hello again. Welcome back here. All right, let's fix the
stretch we got right here. I will grab the guide
and put this to one. And select this tab to
go to the mode end. Lets see how can we do that. Grab these holes. I'll click and
I'll have to click and keep grabbing these. Okay. And cells on the
other side as well. Something we're typing.
I will hold shift. I don't know what's
going on here. I think we have two
face here, right? Let's fix this area
before we go any further, because I think we got
something that makes sense. I will create a face here, and I think we got the same
problem on the other side. In this case, let's go here. And that's right,
that's totally right. To fill this with face. Okay, In this case I will grab
all of these edges and go select and go select
by non manifold. Start again, deselect
the unnecessary edges like these hold control
and deselect them. It seems like this
error is not merged, but I will merge it later after you select
all of these holes. Now should scale them to
the X axis, to the X. And scale them, but we should
choose individual elements, our origins to the X. Now we got this results. Now after that I will tap out, it's unbind and bind again. And now we'll see the result. This to one. All right, I think I can stick
with this result. This result looks cool for me. Yeah, I think that's
will be great. Let's put this to one. Let's tab to go to the
eight mode because I think we could merge
these vertices together. Let's grab them like
that. And then it, by distance, I think we
have double faces here. In this case, we can grab these faces
at F and delete them. Let's see what's going on
here, why that doesn't work. I will grab this with
the hit and grab this it multiple times until
you reach the last phase. And now let's see that works. Yeah, that's cool. All right, now what's the next step? Maybe we should focus on this a little bit
and make it smaller. The same thing for the site, I guess, let's grab
them like that, then change this to the
individual origin and just kill them to
the way like that. And tap out. Let's
push the guide. We could bind and
bind them again. Now the size looks
nice and close. I guess maybe we can
scale them to the middle. Like this, you grab the cake and This to one again, and
see what we can do here. From the top maybe let's move these a little bits from the
edge, center them like that. And I all scale them to the
X a little bit like this. Now let's take a look.
Let's see what we got. Tab out and bind, and bind again up the cage. And let's push this back to
zero. And let's take a look. I think we pushed this too much. All right, let's fix that again. Go to the top. This a
little bit right here. Bind and bind. I will hide the images. I don't want to see them. I will put this one in the
reference image as well. Let's this and pick
this back like this. We have small over lapping
here, but I don't know why. I don't see any results. We could see some results
actually here. All right. It doesn't take the effects. I guess after you tap, let's sit bind and
now take the effects. Now let's sit bind again. And now let's see what we got. Right now. We can
see something here. It's very close, I guess. I think that's it
for this piece, right? Let's try again.
Let's grab the cage and let's go here and unbind. I will tweak this
a little bit more, maybe just kill them to the X axis one more time like that. And I think we should
move them just at an, a bit like this and then
tap out and bind again. All right, I think this result is good and we can accept it. All we should do is
just make some tweaking to this piece speak. I
think that will be it. Let's check the side. We are getting the
same result as cool. The holes here are
nice and beautiful. Anything else? All right, maybe we should scale this a little bit
and make smaller. So put up the cake and put
this to one and coup the uma. Try it and bind,
click to grub this, all this one, we don't
need to include them. And I will scale them
and make them smaller. And I think we could
scale them to the Y as well as to the Y, and scale them, or at least do that again. Let's to the Y. No, sit, find somebody like this. All right, let's
open this again. I just want to do
something here. After we scale this, I guess we can add an edge lobe
here in the middle. In this case, what I should
do is real these edges like that, just like this. Then hits right in, subdivide to add
edge in the middle. I added this edge right here to make the result more smooth. When you rub it back. The same thing we
should do here, I can isolate this. Makes sense here. And two edges. Okay, if you would like, we can use the knife. Tool it K and then hold. You have to make the cut at the center and keep
cutting these edges. I think that will
be faster, right? And I think we have extra
edge here we don't need. That's very cool. All right, now let's see what's
the next step. It's like to exact,
I just want to see which one of these
should be the circle. Let's secure up the guide. And sorry, let's
bind this first. Bind and bind. And then let's grab the
guide and push this back. The circle should be right here. I will grab the cage
again and push. Yeah, it should be here. All right, let's tap to go to the mode and
let's go to the top. Let's put the three
decosor over here. All right, how can we
create a circle right here? I will add a, I
will add a circle and change the Des to ten
millimeter and change to, I don't know how much, 24 maybe vertex, I think
24 vertex a good choice. I guess we could scale. Let's check the images at this distance. I think it's going to work. I will accept it.
And then after that, let's grab some faces
and get rid of them. Now's the time to All right, I think we can do something here like grabbing
the circle to the Z. And I will then to separate it. Can I have option right here? I just forget we can cut the geometry
by using the circle. And I will show you what I mean. Just step to go to the It
mode and hold control. Grab this, the circle
and go to the top. And go to the mesh knife
projects to project. And now it's projected
as you can see. After doing that, you
go to the face I guess, and then X to delete the faces, you can delete this guide,
we don't need it anymore. And let's go to the top. Now
it's time to the vertices, but it will be a
little bit difficult to know which vertex, in this case, maybe
we need the guide. I guess it controls
the multiple times. And let's bring back the
guide, grab this tab. Okay. All right, I think I
should push this and C it merge this one
here and what else? All right. To make the
life easier for me, I will scale this a little
bit and make it bigger. Scale this to the bonding
box. What's going on? Let's bring the
origin dot con to geometry and scale
this a little bit. That's will help you to see which we should move and delete. Okay, now I should
grab this Merkt here, and this one markt here. I guess. This one
should be merged here. This one should be merged
here, and this one here. Okay. What else? Okay, this one should be Puta, I guess this one there, sorry. This one should be Maria. And this one here,
Marriage is one there. Okay, it's one here, that's very cool.
And this one here. All right, that's
great. And let's move some vertices around
to get better results. All right, something like that. Here we have triangle. Okay, let's move this
more right here. And I think we can dissolve
this. Do we need it? I think we can group
those together. Move them like that and
can scrub this with this. Hit K and merge them
like that if you'd like. You can fix the distance between these radically space,
move this away. Okay, let's see if we can
do the same thing here. I guess we can do it. Let's use the tool. Make cut. Start from here. Maybe here hold,
you have to make the cut at the center like that. Now, let's delete this with
this cat, dissolve them. Anything else we can do here? I don't know, I feel this. But if I do that, I will
have triangle here. I will ignore it,
if you would like, you can twice in market and merge this
one here and this one as well, or something like this. Right now, let's see
what we have done. Let's bind and bind. Cut up the cage.
Where is the cage? Yeah, let's move this bag. All right? It's not bad. The result looks cool.
I can accept it. I guess it's strange a little
bit, but I will accept it. All right. Now, let's see
what's the next step. All right, here we have, we have three holes for the
microphone, I guess. Okay, Let's see how
can we create them. Let's tickup the,
let's put this to one. Let's go here, let's put the reference mic here so we can understand where
should we put this. I think it should be in
the middle somewhere. This area we can put here, let's kill this a
little bit like that. And okay, maybe here I will hit control and include the scale
them like that. Maybe we can just move this
at an a bit like this, trying to put this
in the middle. And I will hit for inst, then click circle to
create a circle like that. Maybe we should scale like that. This size makes sense here. We should have 21 here
and maybe one right here. Let's change the transform to the individual
so we can scale those to their organs.
That's very cool. I think we can tweak these a little bit by
moving them like that. Now go to the face
to grab these. And then hit for inset the circle and to scale
something like this. After doing that, hit
F and delete them. All right, on the other side, we just want to
add in the middle. It should be right here. I guess that for insight and
then rightly can to circle. Let's kill this a little bit. Let's compare it with the size. Looks cool, X and delete these faces right now. Let's see the final result
tab out. It's like too. Bind and bind again.
Got up the cage. And let's put this back to, by the way, the
stuff, I don't want them in these
circles to eat them. They are stretch. I know
that we can fix this later. But yeah, we got everything in place practically it smooth. Right. Now's the time to
create this spot right here. Let's push this to one and let's go to the
material preview. The bottom should be right here. Let's t to go to the mode And let's bring back
the reference image. I just want to take
this 11 more time. Let's see this image. It's small, not that big. It's a little bit
bigger than this. In the width, I guess. Let's isolate this. I
just want to focus on it. All right, let's
pickure up these faces. And I think we can
include these. If we created here, I
think that will be it. Yeah, I will stick
with these pass and then hit X to delete them. I will look up this vertex
with this one and then bring the three decosor in the middle and got up one of
these vertices. And use the spin to spin
like that, 18 degree. Reduce the number
of the segment to, I don't know, ten
or what, Eight. I think eight will
be good number. Now let's see what
else we can do here. I can use, I have tool to
create multiple cuts like that. I can delete this
phase after that. Now I can hit key
and hold control and snap in the correct place. Love this vertex keyhole
can throw and snap it here. This one could be here.
All right, what else? Let's move this a little
bit or move it like that. Try to create the same
thing on the side. I guess we can go out
these edges and use them. D and Tab go to them and mirror mirror these to
the Y axis, go to the vertex, make one of them the active
key hold control puts we should change this to the
active element key hold control and establish one over here. Let's see if this vertex
in the correct place. And yeah, now use then I've
told to create multiple cuts. Zero, something like this, and one here. And let's delete these face,
we don't need them anymore. Xf. And get other them. All right? Now is the time
to marriage these together. All right, Sam? Marriage, now they are marriage. Let's take this out for now. Control snubs, all right? Now, let's see. Grab
those together. Hit M in Merica, Center Control
snubs one here and snap here at this at last. All right. Now, tab out
and bind, and bind again. Let's see what we got so far. That looks cool. I like it. The size is a little bit big. We can control that
and make it smaller. We have this option, just grab these
vertices. Or ages. I think some of these vertices
is not Cm me by distance. We have four vertices. I can grab all of these M. Yeah, now I think
everything is merged. I think I can scale this
and make it smaller. Something like that, I guess. Yeah, now I can hit pine again and we get up the cage
and push this back. Now the size becomes
a little bit smaller, actually, that's what we want. All right, What else
would you do here? I think we added
all the details. I think we just need to
add or make some tweaking, like fixing this oval shape and fix the other stuff
we have on this geometry. But I will end this video here and do all of that
in the next video.
28. 028 Fixing the deformation by using the shear: Hello again. We'll
come back here. After doing all of that, I think now's the time
to fix some problems. The oval shapes we got here and here some sit, some deformation. Let's see how can
fix all of these. I will start with this geometry. I will duplicate it like that. And Ratlick, we'll leave
it in the same place. And I will hit slide to
focus on the new coby. I will hit Control and apply
visual geometry to me. After applying this,
just to grab the circle, go to the edge and
then hit Click and choose circle to make this
perfect circle like that, you can grow the
selection one time and then hit control to
invert the selection. Sick to face, grow the selection just
one time. Like that. This, select these, then
hit X to delete the rest. And delete them as well. Now we ended with this, I
guess we can now grab this, Taka Cobi, and then hit control X V to
delete the vertices. And now we just ended with this. Now after doing that, I will bind this with the cage, so I will add a surface deform and pick the cake to
deform it with this. And I will head bind. And now I will grub
this and open it. Now we should have
a circle here. Let's go to the top now. And let's see what's
the next step. Okay, so this is our circle. It is deformed a little bit,
and that's what we want. Actually, we don't want the circle for now,
the original one. To get perfect circle, we should deform this geometry according to the
deformation of the circle. I will tap to go to the Mode, and I'll click to
grab these vertices. And I want to go to, so I can see what
I should do here. I will scale this to the X
and align it with the circle. And now it's aligned, and
I think now we should scale Y as well, but I don't want to get
any overlapping here. I will act proportional editing, and I will use it, maybe we can make the effect
a little bit bigger. And now I got my oval shape. All right, maybe some
vertices here we can move. I guess. Let's scrub
those over here. And maybe we can fix a
distance between them. Maybe we can include these here. Okay, And then right
click, I guess this one. Right click and Q space. All right, that's very
cool. And before you tap, bind, the tap binds,
grab the cage. When put this back to zero, now we got perfect circle. This is the way to
fix this problem. The circle is still affected by the modifier.
You can delete it. Now we don't need anymore, you just delete. Delete this modifier. And delete the circle as well. I'll see what's the next
step here, these holes. The result here is, let's try to find the solution
for that as well. As you can see, the
result is not perfect. Some of these goes
to this direction, the other side goes
to this direction, we have some deformation. We try to find a solution for that and fix it by using
maybe the here option. Let's see how can we. All right, I will
grab it and grab the controller,
open it like that. All right, but it will be a little bit difficult to know which side that you should here. In this case, I guess we
can make some change here, like grabbing some
face from here and just give them a specific killer so we
can recognize the site. Let's go to the material
section and grab the red and assign it here. Tab. And grab the cage
or the controller. Let's move this back. All right, the red killer
is on this side and I I should hear it to this darken. In this case, I guess
we can tap. All right. Towards this open area. Yeah. What about this side? I think this side it should
receive the same hearing. But let's focus on
this side for now. Let's sec up the controller
and let's push this to one. Now, I will go to the
top of you and grab this And go to the modifier
and bind it for now. And tab, let's, this
is a group of faces. Let's open the here as we say. We should hear it to
this direction like that. This is the idea. After the here, we should
get a good result. Let's go back here, tab out and bind this again, the controller which
is back to zero. I just want to see the result. Now you can see the result is better and more
beautiful and accurate. We should do the same
thing for the side. Let's tab here and all right, grab some face from here just
to recognize the direction. Let's go to the material and assign to assign
the right here. Now let's tab out now,
let's see what we got. We fixed this one. Now's the time to focus
on this. All right? We could, all right, we could hear it to
this direction like this to fix the problem, okay? All right. I put this
head here as indicator, so I can see where the
hearing direction, but the direction is not going to be like this, it
will be like this. Now, grab this and or
so grab the controller and push this to one and grab the Umetry in
the middle and unbind it. He slid to isolate it, go to the top and to
go to the edit mode. Let's select these
phases like that. The select these, we don't
need to include them. Let's open the here. This one right here. And we're going to hear them like that. Something like this. I
guess something tiny. The offset is -0.1 I guess. Something like that.
And now let's go back tab out and
find this again. It's to excite, let's secure
up the controller end. Let's push this back to one
end less, take another look. By the way, I just want
to mention something. It's not quite necessary to focus on the other side
because we still have the mirror modifier and we can mirror this area
on the other side. And we can finish it quickly. Don't spend too much time
trying to hear this to be perfectly similar
to this one right now. After fixing these soles, now's the time to focus on
this area a little bit. I think we should hear
this area as well. I will tap and let's add a guide for ourselves to see
where we hear this. All right, it seems
like we can control, let's use this option here. I just think that will
be easier for us. We can see the object here and add the color
in the good way. All right, We want to hear this to this
direction like that. We should create
something like an Or. I will grab and create, grab these face and give them a specific color and
use it as an indicator. It's a sign on the other side. We should hear this like that. Let's add something
like an Or like that. Then. A sign so we can
see where we hear this. Don't hear the holes. Just ignore them. And
now we are already. Let's go back to the
modifier and turn those off. Grab the cake. And
let's push this to one. All right, what else? Let's hit and bind and grab this tab to go to
it. Go to the top. And you can to isolate this, let's select these
phases like that. All right. Something like
this. Now we can't hear it. Let's open the here option. And as we say, we should
hear it like that. Grab this handle and
hear it a little bit. The proportional editing
is active. Turn this off. Let's hear this as a tiny bit, not too much. All right. 0.0 0.12 maybe 0.12 And
the same thing here. I think we gave this a sign, but where is it? Let's wear it. But I remember we
gave it a color. Anyway, let's go back. We can mirror, if
that doesn't work, we can mirror this piece
on the other side. It will be something
easy to do now. Let's see if they here.
Light. Yeah, it's light. Now we can hit bind
again in slash, go up the cage or the
controller and push this back. Now let's see the result. All right, now the result
is cool and make sense. Let's go to the bottom view. All right, maybe we can
hear it a little bit more, but so far it's close. Let's take another look. I just want to check
this area a little bit. If we scale this a
little bit like that, we can get better results. Let's work on that, and
let's see what we will get. Grab the cage and the same
thing, put this to one. Grab the geometry and bind it
tab to go to the edit mode. And let's grab these edges. Go to the tub. Try to scale this a
little bit like that. Now let's see the result of that works tab and it bind
to get up the cage. And let's push this back. All right, now the result
is perfect and cool. Yeah, now it's close to
the reference image. Now we can go with this, don't worry about this side, because we can mirror all of
these parts here as well. The only area that we couldn't
mirror is the circle. Yeah. All right, that's great. The final we do we need
to hear these holes. I should push it to
this direction and one should be pushed like that. I think we still have the guide. We should share them
against the guide. This all. That's cool. Now I will grab the cage
and push this to one. And grab the umetrbind tab. Go to the top of you,
grab faces like that. Now let's open the here and let's hear them
against the guide. That should be heard like that. All right, -0.12 I guess
that will be okay, because we test that number. Okay, let's see if what
we did is correct. Step out and then hit Pint. Then grab the cage. And let's push this back
and let's take a look. All right. That's terrible. We hear this to the
wrong direction. Yeah. All right. Let's do that again. This and bind. Go
to the top end. Let's select the, move them
back to the zero, like this. And let's start hearing
them again, like this. Let's add 0.12 All right, now let's see this shift space. And go back to select box bind, and grab the controller, push back to zero. Okay, now the result is even and nice. I
can go with this. All right, that's very cool. Okay, now I think it's a time
to mirror these details. On the other side, I will select this with the cage and
hit to isolate them. And I will grab my
geometry and hit Control and apply
visual geometry to me to apply everything. I will go to the mode and maybe we can go
to the right view. Sweet to the face
selection mode and hit x ray model, these faces. Let's hold shift. Let's add these as well. Okay, that's very cool. I
will detect these faces. I will hit and then is because I want to
focus on the side, not the top one. Now let's select this and
tap to go to the edit mode. And I will grab
punctual faces and then hit control L to select
the linked vertices. And I will hit XF
to delete them. Now I will tap out, all what I want to do is
just grab this mirror, it on the other side. I will grab this part. And I just want to put the three decoursor
in the middle here. For example, grab
these vertices. It bring the three decosor here, that will be it.
Tap out, That's it. Now select this and hit
shift with D to take a coby like that and change the transform
to three decursor. Go to the object, mirror
and mirror to the global x. Then grab this. With this, hit control J, make
them one piece. Tap a shift to recalculate
the normal after doing that. Now grab these pieces, all of them hit control J, merge them, and then
tab again, hit A. Now we could merge
the vertices H, m, and choose Merge by distance. And here we have 18
vertices merged. I think that now we
got perfect results. I know we don't have holes here. We can delete them easily. Don't focus on this
area after doing that. Now we can open this again
with the controller by going to the modifier and
adding the surface deform. And pick the controller
and just book this to one. It good work. A pint. Let's pok this to one and yeah, it does. That's very cool. It's to Exits. All right. I think that's it
for this video. I will end it here and see you.
29. 029 Prepare the structure to give it some thickness: And again, we'll come back here. Okay. Now, let's see
what's the next step. I think now is the time to
give this some thickness. Before doing that, these circles and fix the
deformation we have here, I will have to isolate
this humotry and start grabbing these
circles like that. Just them and listed like those. After doing that
triticallycus circle, now the result become
perfect and very nice. The same thing for the circle. Grab its and radical look
to circle and fix it. Let's fix those over here. I will grab these circles and just scale them down just
a hand bit, not too much. Change this to the
individual and then scale this a
little bit like this. All right, now the
result is perfect. All right, after doing that, maybe we can grab half of
the geometry and mirror it. Let's go to the right end. I will, okay, I will grab these phases like that and switch to the x ray
and go to the phase. Keep selecting these faces. K, D, select these, we don't need to include them. Let's add these over here. Those, make sure to
select everything. All right, go to
the right again, and I think we could
grab the other side. Let's go to the
front, for example. Let's hold, have to end, Add these as well, Include these and these two faces here. I will hit. And then to separate and tap out, let's
focus on this. Half tapscbt control
L X to get rid of it. Tap out the three D coursor, I guess still in the middle. And that's something rates
use mirror to mirror this. I will tick and set org
Org to three D cursor. I will delete this,
We don't need it. Let's add mirror modifier. Now we have modifier aid. I will hit control to apply this because I
don't want it anymore. I will delete the
modifier from here. For now, grab this with this and then hit control
to make it one piece. Now we suit Mic this area here. Now let's tab. Let's grab the vertic that we got right
here and right there. And I will hit M and
Mic by distance, we have 26 vertices
merged. That's great. Let's tap out now. The result is perfect and the circles are perfect as well. But on this side, we don't have two holes for the microphone. I will tab and go
to the face click. I'll have to click
F to delete them. Go to the old click, I'll have to click, or
let's focus on this one. Go to the face clickl. All right. Now the
result is better. After doing that, now
we can hit to exit. And now we can add the
service Deform with Defi. Pick the guide and now it
pine to bind it. All right. As you can see we got
some weird problem. Tells you that target contain veiled olly guns. All right? This problem sometimes having
because for any reason, maybe inside the eumetry we have some over
labbing vertices, over labbing faces or
something like that. Not vertices. To avoid that, you can tap, hit a grab all the
vertices and Ric by distance that does,
let's try that. If that doesn't work,
you can do something else like grabbing another
coby, for example. I can hit he D to
take another coby. And let's try the
cov, hit point. All right, the cov,
the new cov is working but the old covid. Don't work. Just the geometry. Grab this one deleted
we don't need it. Grabs and Q selection to corosor to bring this back
to the original position. Now grab this and unbind, and then it bind again. Now I will grab this
and push this to one, and now we got this opened. After that bind, I think we should apply the service
form and keep the guide open. I will tab and go to the front. Like to isolate this,
I just want to check if we have waveness. Yeah, we have some waveness
here to get rid of that. Just to the Is zero enter to
make it flat, that's bright. Now, after doing that, maybe we can make some changes here, like grubbing these
edges and dissolve them. Just make some quick changes like adding a new edges here. Maybe we can add more right
here. And delete this. And delete this one,
we don't need it now. We have quit here and quit here. The same thing, we can
do it for the site. These edges, what
I'm doing here, just cleaning them to
get better results. Maybe cut here and maybe
one cut goes here. Put up with this control
and dissolve them. Maybe we should do the
same thing on the site. Put up the same control
and dissolve them. Use knife tool to create a cut. Goes like that. Or maybe. I don't know, Let see
what we can do here. I think we have some option
here to rotate the edge. But where is it? It's in the edge. I guess. We have the
ability to rotate. Yeah, I think this one. Let's see if that works.
Go to the edge and rotate. Yeah, in this case. But it's not going to give me
the correct results. All right, anyway, that's
not going to work. Let's go back to the knife tool and make here control
and dissolve it. Maybe one cut goes
like that and one here, dissolve this one. Grab those over here and use
a knife tool to create cut. Goes like this. And maybe
one cut goes like that. Gruptrolx dissolve
it. All right, now let's tap out and let's add surface from one more time. And let's exit. And let's pick the guide. Let's hit Bind, grab the guide
and change the number 20. Now we got this
nice result, right? I think that's it
for this video. I will end it here and
see you in the next one.
30. 030 Adding thickness for the structure: Hello again. Welcome back here. Let's spend more time
on this geometry. Let's see what we can do. The timber ly file timber to. I got some object
here, by the way. I just want to mention, I just delete some of some of the old geometry
because I don't want them. But I got this one still here. And I'm going to use it as a guide for the
shrink crop modifier. I will select all of these
pieces with the cage, deselect the glass, and then I will like to go to
the local mode. I think we can change the color of this object
so we can recognize it. And you can go to the shading and change the
color to material. And then let's grub the objects and go to
the material review. If you have nothing here,
just hitting you to create a new material
and don't use the node, just change the
color to something, any color, just to recognize it. And now we have this guys ready. Let's grab our Umetry. Maybe I can hide this for now
or I can change this all. Let hide this for now. It seems like we have
multiple human rays here. All right, what about this one? I think this one I'm
not going to use it, so I will turn those off. All right. Now,
let's go back here. Let's see what we
got in the modifier. We have the surface Deform. I will apply this for now. I will add subdivision
surface to make this smooth. If you add subdivision surface, this area, it will
be smooth as well. But before we add
subdivision surface, I will merge this back
with this Umetray. Let's sec out them like that
and then hit control K. To make them one piece. I
will tap to go to the eight. To select all everything
one to speak to the vertex. I will hit M and merge by
distance to R, these vertices. All right, if you have
nothing king, this 2.1 maybe. All right, they
should be merged. All right, tap and let's one of these vertices are
still not welded, so I will grab these
vertices again, hit M and merge by distance. All right, 0.1 Let's
add 0.5 I guess, and now we have 642
vertices merged. Yeah, I think that's it.
Now, after doing that, I will grab these vertices. Maybe I can include
those over here. I just want to keep
these vertices sharp. I will go to the atom and use mean vertex create,
just push this to one. When you add
subdivision surface, this area is not
going to be effective and smooth as you can see. It will still stay sharp after adding the
subdivision surface. Now the result becomes
smoother as you can see here. But we need to sink the
results on our guide. Let's bring our guide back
with the objects selected. I will the shrink rob modifier. I will pick the guide like that. Now as you can see, everything is shrink robbed on the guide. I will grab the
guide and increase the subdivision level or
just activate the story. Maybe we can increase three
just to make it smooth. I think we can hide it.
Now let's take a look. You can grab this and see
before and after. All right. Now the result looks beautiful. Let's check the wire
frame, all right? Okay. After doing that,
now we can apply the subdivision with
the Sringcropll. That's mean we
accepted this result. That's very cool right now. After doing that, I will tap and select all
of these vertices like that and go to the
Opia data properties. And I will delete this
group, I don't want it. And I will create a new group. And let's call this all
just to recognize it. And it assigned to assign all of these faces or vertices
to the all you can. Yeah, let's assign these paces like that and now
they are assigned. Now if you want, you can
select them from here. When you select all of these
phases should be selected. All right, above that I
guess we can do something. I will go here and add solidify
to give this thickness. Let's pick an angle
like that maybe and increase the level to something. Makes sense, like this result. After doing that, now we can
activate even thickness. I will ignore it
because as you can see, some problems happen here. And I will choose all the M
because I just want them. I think now we can activate
this without any problem. Yeah, I think we can do
that. We just need them. That's all. When you conley control and apply
the solidify here, we have extra phase
we don't need. Let's see where they are. All right, this is the
pace that we don't need. We can delete them. Hit
Xf and get rid of them, and check the area
in the middle. Everything is still
nice and cool. Now after doing that, I will go back here and hit Select
to select these phases. But the problem is
everything is selected. I don't want that, but it seems like we could
manually grab these new phases and
give them a new group. Yeah, that will take
a little bit of time, but we will do it together. Grab these first these
phase right here. And maybe we can
include these over here, maybe those here. I will create a new
group and I will call these rims and hit Assigned
to assign the right here. All right, that's very cool.
You can't hit control to invert the selection and remove
everything from the rim. Just hit removed to remove it. Now, when I select this
area should be selected. That's let's grab
them one by one. Assign. Let's that's works. The assign. All right, now we have
the assigned click here. Let's assign these. The face as a sine. Those right here has a sine. And now let's kick that selects. All right, let's go here, grab these as a sine, maybe these holes as the selects. The same thing here for this one k. Let's see what's going to
happen when we grab these. Let's hit a sign. All
right, that's great. Let's the St. All right, let's select those over here and those here,
and maybe those here. All right, and these faces. And after that, let's
hit assigned to assign them here. All right. Now let's select and let's
see the result. That's great. All right, what else? Now is the time to
include these as well. After you select all of these, the same thing it
assigned to assign them. All right, now we got all of these faces selected, had ready, and now maybe we can
to make some insets. Yeah, let's do that. Let's
see what we will get hit for. Inst hit auto int
the inst outside. And let's have a small
rim, something like that. After you create this rim, just kick everything else because you will have
some overlapping. As you can see, we
have some overlapping happen. But that's okay. We can fix it. But the
problem will be right here. It will be difficult to control. Let's change this to maybe
15 centimeter. Okay. 1 centimeter. I think it will be okay. I'm not getting any
overlapping, just few. Let's add maybe 13. All right. I think
13 will be okay. All right, 13, I guess. Let's check the other places. All right. This area is okay and this one
is okay as well. On this side, I have no problem. All right. Now let's see what's the next step after accepting this result. All right. It seems like we
didn't give this included the thickness
was 13 centimetre. We should include
this one as well. You can do that, include
these faces, all click. Do that again, assigned
to assign these faces. Now I will hit I again. For instance, just add here 13. Let's see if we missed anything. All right. Okay. Now let's go to
the select and go to the loop and s boundary
to grab these edges. And I will hit
control to Vl these. All right. After
doing that I need to Vl these holes but
I don't want to include these circles right
here, either of these. I think we can go to the X ray, hit algae and dicilate. Because I just want to give
them a specific pivlecilg, those over here like that. Yeah, now we can
target the rest. Just go to the select end
loop and Qs boundary. And now we can bivle them. Hit control and let's
pivlese like that. Bivle them to two edges like
this, something like that. After that we can
rebivle these edges. After doing that, I
will go back to select and then select lube
and Q's boundary. Again, I will bubble
this as well. Control. And let's bubble
this a little bit to three ages, something like that. You can add 0.8 after
doing all of that. Now let's take another look. Let's see if what we done
here is correct or not. Everything here
looks cool so far, the result is beautiful. That's very cool. Okay. Now I just want to see
what's going to happen if I add subdivision
surface above this. The result so far is beautiful, but we need to
smooth it even more, so I'm going to add
subdivision surface here. As you can see, the
result is sharp and nice. All right, Even here,
the result is beautiful. But we need to spend more time here to make
this even better. Let's see, what options do
we have to achieve that? I will turn off the subdivision
surface and I will tap here and I will go to the
Oki Data properties in. Okay. Something happened here. Where is the groups? All right. We just have all
where's the room? All right, anyway, I will
reselect these faces. I'll click, I'll click, and I will keep doing that
and the grab them all. Now after you
select all of this, I will create a new group. And I will call this M again. And I will assign these to the M. Now if I select,
I can target this. That's weird, I gather
back, that's totally weird. All right, that's
great. Let's go to the x ray and
deselect the rest. Deselect those over here. We don't need them.
I just want these. All right. I will hit control minus to
shrink the selection. And let's check the side. All right. Everything looks cool. All right here you
can do something, you can Bible this area or
let's try to add edge case. Just go to the select
lobe and boundary and I will go to increase. I will push this to one, this area will be sharp. I will tap out and I will go to the modifier and activate it to
see the result. And now as you can see,
this is the result. All it's nice and sharp. You can accept this
result if you like. If you don't, you can bev
it or add extra edges here. We should include the. I just forget to do that. I will tap and I'll grab
these edges manually. Like this and this
one right here. This one on the other side. And I will push this
to one and make this sharp, somebody like this. And let's stick a look, I just want to see if there
are any bad heading so far. The result is beautiful
and I don't see any issues or big issues. I can accept
something like that. That's cool. I can
see that we have some waving here in this area
that's totally clear. You can get rid of that by using the Hearing Crow modifier
again, or you can ignore it. And by the way, it's
not so big problem. The heading is still nice
and beautiful. All right. I think I will end this
video here, and I will.
31. 031 Fixing the shading problems on the structure: Hello everyone and
welcome back here. Let's try to get
perfect results. We still have some
weavings here. Just like what I said
in the briefs with you, it's not a big deal. But if you want to get even
better result, that's okay. All right, let's
go to the material and I will choose one
of these materials. These materials, it will create or add multiple
lines on the Umetry. If this line have an issue or bad heading, it
will be revealed. And you can see it
clearly. I will grab this. Now if I orbits or move
the Uma just or the view. So just a little bit, you can see here we got
a lot of distortion. I'm going to use this
Tcb as indicator to see if I am going
to fix that or not. So le go back here and
let's read this back to this Mac. How can we do that? I will tap to go
to the edit mode and let's see what we have here. In the modifier, we have subdivision surface,
that's great. I will turn this off for now. Temberarily, I will go here
to select the must select. And now we got them selected. Let's switch to the
face selection mode. Let's see what we got here.
All right, that's great. I will shrink the selection just control minus and
just shrink at one time. To get a result like that, I will invert the
selection control. Now I just selected
the outer faces. As you can see, I will
create a new group here. And I'm going to call, you can call it any, you can call it out outside faces or you
can anything for me. I will call this flat. I will hit Assign to assign these faces and the group
now they are assigned. Now if I select, I will select these
faces. All that's great. I will, I will go back
here and add modifier. I should pick my guide. And I don't know
where it could be. Here it is right
here. That's great. Pick it like this. And I will hide the guide
because I don't want to see it in the vertex group. I will choose the flat group. All right, now we got this
result. As you can see. After that, I will act the subdivision surface to make the results
smooth and nice. I will go to the smart cap and let's see what's going to happen now when I
moved the view, as you can see, these lines still goes nicely
without any distortion. And that's what we did
here. It's worked. Now if I turn this off, you can see the difference
before and after. You can see we got a lot
of distortion here and now we have nothing
that's great. Everything else is great. I don't see any problem so far. Very cool. All right. I think now we got
perfect results. Very nice and very smooth. And I think now we can
move on to the next step. Very cool. I don't
forget this area. It should be merged. We can
do that later. It's nothing. It's a symbol. It's to exit. And let's see the other pieces. I think now I can
move this geometry to the Sp folder and move this to the shin crop.
Now we have it there. If you want to change its
name, you can do that. All right, let's go here
and open this folder. And I saw this is the object. Maybe we can change this to structure ring to recognize it. When you do that, yes, hide it. And go to the geometry
and check the name here. If the name changes
or not. No change. That means it's taking the
information from this object. That's great. After doing that, you can hide the
shop collection. We don't need to see it for now. Even the timber to, I guess After doing all of that, let's make some tweaking here. Like if I compare this
image with my result, I can see the thickness is, it should be deeper
here a little bit. I think we should do that here. I will grab this tab to go to the mode and I will grab
these edges like that. Click and then I'll click
to grab those over here. I will hit key two times and
hit to move these inside. Let's push the deeper to
get something close to the reference image, All right? I think something like that,
it will be more than enough. All right? I will
accept this result. If I want to go
deeper, I can do that. I think we should go deeper. Let's turn off let's subdivision Surface Key wise
and alt and smooth these a little bit, all right? I think that's okay. Maybe we can just
push them back a bit. Not too much. Something
like this. I don't know. I feel that they
should be scaled a little bit. All right. I think I'm going to
do something else. Because this now it's tab. If you noticed it's pushed
inside at the center. What we can do is to avoid this. I can turn off automic
for now and then hit get wise to push back and then head key to
the Z instead of this. That's will give
us another result. All right, this
result looks cool. I will accept it. All right, I will stop the progress here and I will continue
in the next video. That's it and see you
in the next video.
32. 032 Creating the top vents holes: Hello again. Welcome back here. This video, I want to start adding the details
inside the vision, inside this aluminum structure. I think this area is responsible
of casting the heat out. We have some visible stuff here. Let's try to create them. Let's bring the reference
images right here, and let's see what we can do. It should be something symbol, but let's see how
can we created. All right, let's make this
a little bit smaller. I think I can go to
the screen cast. And at the screen cast so I can see what I'm
going to pre here. Let's put this one right here. And let's see from
where we can start. All right. Maybe we can
grab one edge from here. Let's turn off Subdivision
Surface. It's all for now. And I think we can out
click to grab this. We can start with this. I will click to leave the Coby in the
same place and I will hit to separate out. All right. Now I will
grab this and I will delete the shrink from it
and the subdivision surface. I don't want them. Now
we have this. All right. Let's see what we
can do after that. I will tap hit to the Z and
extrude this down like that. Something like that.
Or maybe even more, I guess. I think. Yeah, we can do that. I will hit Control to add one
egg, maybe right here. And I'll click to
grab these faces. As you can see, I will hit Shift D to take a coby like that and right click to leave
the coby in the same place. And I will hit P in the
nest to separate this out, and tab out to grab this piece. All right, this piece, I will give it some
thickness, right? All right. Before I
give some thickness, I can see that this area, I don't know what's going
on here, it's pure black. But I think this area
is blocked or some kind of plastic thing covering this area goes to
this direction. I'm going to do something
like that to block this area. And after that I will
create these pockets. Okay. So to do that,
I guess we can tap here and I don't know. Let's see what
opportunity we have. Maybe we can grab this. Let's hit, like to isolate this. Maybe from the top of
view we can determine. Let's grab this
with this I guess. And hit, let's see
if that makes sense. I will hit multiple times. Yeah, this is good. All right, now we've
got this area covered. I guess we can it again. I think we can grab this edge
and that edge and maybe we can delete them or
detach them for example. What I'm going to
do is I will hit these edges like that and right click and control L
to select this part. And hit, and then
to separate it out. Now we have this separated tab. And I will grab this H and hit to create a
phase right here. I just salted this out. Then I will tap out to
grab this and I will add a solidify modifier so I can give this
some thickness. Let's see what's going to
happen when we do that. Let's give some thickness
inside like that. Right now, the
result looks cool. I will accept this and apply
the Solidify tab again. I guess we can hit control
to add an loop right here. Maybe we can add two here.
Something like this. I will have two times, so I can't walk on this area. I will have control
Z because I don't want to add edges in that way. I will grab this with
this and delete them. Or maybe we can grab this side. We don't need it. I'll
click to delete these. Do we need the side? I
guess we don't need it. I will add an edge, goes like that to make this
area sharp there as well. And I will control to a two edges like this and deselect the edges
here and here, and then hit alt S
to book this out just a little bit maybe. Or at least see what
we can do here at, just to get a re behave
or you can actually key to the Z if you like,
to get this results. I think we can hit
Control Alt and dec these edges in the middle
and deselect this over here. Or that's not going to work. I think, I thought I can scale them, but that's
not going to work. Or maybe if we go
to the tweak that transform to the
individual organs. I guess we can do that to the
Y. I think we can do this. Let's check the result, but we will get some kind of variation. We can scale this
and cancel the z at, and then the Z to cancel the z. Now we are scaling to
the x and to the Y. Let's see what we
got. All right. I think now we don't
have a variation. I think the result is
acceptable. Yeah, I guess so. Okay. After doing
that now I will tap maybe we should add subdivision surface to
make this smoother like this. It's exactly, let's
see what we got so far. All right. That's cool. Grab this radically smooth. To make smooth, Yeah,
that's very cool. What about this one?
It's like to isolate, it ends catrodlop like
that and support the Lore. I think now we can add
subdivision surface. Let's see what's
going to happen if we do that. All right. I'm not getting a good result. So I will delete this
for now and go to the phase and the grab
these phases like that. And I will hit four
inset in these, but I'm getting
overlapping there. All right? I think
we can accept it. Something like that.
I guess it will work, a subdivican surface. All right, but I want to add one goes like that, not
exactly like this. Let's delete this one for now. I will use the knife
tool to create a cut. Goes like this. To tighten
this area and make it. And the same thing on the side I will use to create another cut, goes like that. All
right. That's very cool. Now we can delete these as we got right
here, we don't need them. Now we can ask
subdivision surface to get nice smooth
results with level two. I guess radically smooth. Right now maybe we can
create the buckets. Let's see how can we do that. Lets you go to the
top of your end. Yeah, I think we can grab one of these edges and right here and start make some we can to
get a suitable results. Let's start with this. Let's move this one right here. And maybe it could be
right here like that. I can hit to the Z this
time and extrude this, Hit control L and then and
then has to separate it. All right, now I can grab and delete the
subdivicion for now. I don't want to go to the mode and grab these
vertices from the top of you. Maybe we can, I don't know, I think we can just
hit key to move it. Tilt it a little bit like that. I guess to get this result, maybe I guess we can grab this one key and
slide it in like this. And this one as
well. Kwlider here. All right, let's go
to the top again. And let's up this face. And I will hit Shift D again to create another
pocket right here. I will grab these two
vertices on the bottom end. Just till this a little
bit more like that. Now let's check the result. Let's see if everything
in place or not. Maybe this vertex I can hit key twice and move it down
just at any bit like this. All right, now let's
go to the top. And then hit Shift with
D to take another by. And let's put this
small right here. All right, something like this. I guess we can grab
these two vertices and just tiled them a little bit. Okay. It will be a little bit difficult to you to measure the distance
and get good results. If you've got a
problem like this, what you can do is
you can delete these and starts with another idea. I will tell you
what I mean here. I can grab these two edges and
from the top of you I can. To extrude them like that to get some thickness or just extrude
this phase. That's all. I will grab this
phase and get rid of it Now I just have this now. I will start duplicating this
to create these pockets. D to have one here. Now I can see the distance
and I can measure it using my eyes to add another right here that's will be easier for
me to control. And I will rotate
just a tiny bit. And then to add right here
and just rotate a little bit. All right. Now the
distance looks cool. Here we have 1234567. We have seven ribs. I will hit now we have 12345. Okay, Let's hit
authority this in a bit. This number six, this 17. Let's put this one over
here and let's sort this a little bit. That's great. Now let's take another look, and let's see what we got. I think the last one, it
should reach this area. I guess we can
redistribute these again. Let's grab this. And with
this more right here, I guess this one we can just move it a
little bit like that. We can rotate this
at any bit like this in case you want to find an idea to get
an accurate results. Or even better, you can
use this vertex to cov, put it for example, right here. And hit to extrude this one. Maybe here I will
show you a way to put the center of these rips
and the correct position. I'm extruding these vertices
and use them as a guide. Now I can grab all
these vertices and then Herat maybe relax, just to relax them a
little bit and the tally space to fix the
space between them. You can move these
rips and center them or align them with
these vertices because now these vertices take correct distance.
But let's count. Let's count them. We could
have seven. All right. How many vertices
we dropped here? We six vertices. We said we should have
seven rips on 234567. Yeah, we could have seven. This is the seventh. This
is the last one. All right. The number is correct. Now
we have seven vertices. Yeah. After doing that, now I can grab these and align them with the
vertices like that. Grab these here.
Let's move those over here. Those as well. You can rotate this a
tiny bit like that. And those right here, K, Let's move this over here
and rotate a tiny bit. Let's move this over here and rotate this a
little bit like that. And this one as well. Let's move this over here. All right, now everything
is makes sense. After doing that, I'll
click on the guide, hit E, get rid of it, because we don't
need it anymore. Now let's go to the perspective
and what else we can do. All right, now I will
tab and decrp this. It slack to isolate them. Now we take some of these rips and just move
them down just a tiny bit. Let's tap, let's see
from where we can start, I think we can start with the fronts or
something like that. The idea is what we should do, actually try to understand
the situation here. Let's rub this and
let's move it a little bit key to this. Let's move this down, maybe right here, and
let's check the side. What I'm going to do is
I will select this and show the wire frame so I can
see what I should do here. I will turn off the
subdivision surface so I can see this edge. I will align these ribs, the start point and the end
point of with these edges. Starting with this one, I can the vertices and key to the Z. And move this down here.
That will be enough. I can do this for this
side key to the Z. Let's move this over here. This one. By the way, you can
snap to the edge if you want something faster to the Z. Hold control and
snap if you like. That that's will work. Rub those over here.
Kz snap this one here. This one key to the zap over here to the snap. This one here. This one to the Z stamp,
this one over here. And the same thing for
this key to the zap. This one here, I
think if you snap the the vertices on
the side, that's okay. It will align perfectly
on the other side. Key to these, snub, this one over there
and this one. Key to the Z, stumped here. Perfect. Key to the snub. This one here and there.
All right, great. All right, now we've got
everything snapped and perfect. Now I will grab
them like that and then hit E to extrude them. And I will hit right to
cancel the extrusion and key to the Z to move the
extrusion manual like that. Now we've got this
result as you can see. All right, right now what's the next some of these vertices? We could move them a little
bit to this direction. Let's see, what option
do we have to do that? We can move them manually. We can grab them and push them to get the
result that we want. I think I'm going to do this. All right, let's start doing
that for these vertices. I will rub them and I think we can snap them with the
bottom of this held. Change this to active
elements so we can depend on the active vertex. And I will hit key and hold control and snap this one right here as you can see it snapped
and snapped on that side. And I will hit Key
again and keep snapping this on the edge and just tilt this a little bit. I'm going to do that
for these as well. I will hit key to
the Z and snap this, but I want to make this one the active, it's very important. Hit key to the Z It key
and hold control end. Just move it a little
bit and that will be it. The same thing for
the. Let's make this one the active
key, hold control. Snap it here. All
right, that looks cool. Let's select these
vertices as well. Make this one active because
I want to work here. E, hold control And
snap it on the edge. And move this a little bit. You can go to the Z
and see the progress. All right, I think this one, it should be pushed
a little bit. And this one a little bit more. Let's go back here and grab
these vertices like that. Make this one the
active and then it key hold control and move it
a little bit and go again. All right, that's cool. Grab this over
here. Make this one the active key, hold control. And move this a little bit more. All right, that's
something cool, we can accept this, I guess. What about the grab
them like that. Make this one active key, hold control and stab this
one, maybe right here. Let's go to the top. All right, I think we should move
this a little bit more key and hold control. And move this over here. I guess we can move them a
little bit more like that. All right, let's go back here. Let's move those a
little bit like this, all right? Okay, I think I will control them
from the top of you. That will be better for me. Let's move these a
little bit like that. And those, and let's move them a little
bit more like this. And those as well, move
them more these vertices, let's cook them even
more like that. Those over here rob them. Key. And let's move
those maybe over here we can rotate those just any bit. Yeah, now we got this. Let's see if there are
anything else we could do. All right, let's to exit and. I think we can accept
this, but yeah. Okay, let's tap to grab those. Let's go to the top of you.
Let's move these vertices. I guess we can rotate
them just at any bit, maybe a little bit more. After doing all of that, I just want to do
one more thing. I will grab all of these faces on this side and hit
Control plus two G, selecting just one time, and then hit X to
get rid of them. Now I will tab out, I just want to check
the phase orientation before we go any further. All right. I will tap a Alt
to open the normal menu. And I will flip them like
that because I want to add, I want the Soldify to
go to this darkion. That's why then I will turn of the overlay or
the phase orientation. Let's add soldify, give
this some thickness, and let's push this a little
bit to get this results. Now you can apply
them like that. After that, I what
we can do here, I think we can delete the
side faces to make it easier. You can grab these faces
in the middle like that. Just grab these faces
as you can see. And then it control to
invert the selection. I don't want to include
the F and get rid of them. Go to select and
select sharp edges. Go to the edge, fair. Select
and select sharp edges. Now I will bubble these. It can troll and bubble them. You get something nice
and round like this, result out rightly smooth
to make this smooth. And Nelits take a
look. All right. I think after doing all of that, you can block the view by adding some cover underneath all of that because I don't want to see anything
between these frames. I will grab this to isolate it, and I will tap to
go to the ethmode. Maybe we can hit
key Tise and slide this alter and move
this a little bit down. Now I guess we can grab
some edges from here. We can block this by cobying this edge tab to leave it in the same place and
then hit S to separate it. Tab out to grab this new
And tab to go to the mode, grab these vertices from
the side and the side hit. Now I will grab these
vertices and hit multiple times to fill
this arrow faces. Now we are done here, I guess, and it's like to
exact. And let's see. All right, one more thing
here I would like to do. I will grab this in tab I will
give this some thickness. Let's, let's put this on the
opposite side like that. And I will use all M because
I just want the room, as you can see, the room
is not applied outside. In this case, I can tap and hit Alt and choose Flip
to flip the results. See. All right,
that's what I want. I want them to be
outside. This is correct. Now I will apply the solidify
and delete these faces. I don't want them, I
just need these faces. And I want to Bible this area, this control would be to Bible this to four or five edges. All right, that's too
much. I just want to have one curve here,
right click smooth. Okay, I think that will work. Grab this radically smooth
to make this smooth. Now after doing all of that, I guess we can grab all
of these pieces together. We hit control to make
them one geometry. Now I guess we can mirror them on the other side using
the opposition of the three. The three decursor is
still in the middle. I guess I will hit right
click and then set organ organ to three decursor. Now we have the origin dot of these pieces right
here in the middle. Then I will add mirror modifier. All right, now everything is mirrored except for this frame. Grab this with the set
control J to meru them. Now it's mired on
the other side. Subdivision surface is active. We actually, I don't want it
to be applied on everything, but let's give the
subdivision surface a chance and let's see if
this applied in a good way. As I see here, the result is cool and I don't have any distortion
or bad result. Everything is okay. Maybe we can check
the face orientation. Everything is blue. And
that's what I want here. Yeah, I can go with this result. I have no problem. This area is not going to be visible
to the camera so much, so don't worry
about it too much. I think you have the ability to take this down if you like. If you want to take the
deeper, you can do that. But I think that
don't make sense. Yeah, I think that's it. I will end this video here
and see the next one.
33. 033 Modeling the Dial: Hello again. Welcome back. Here in this video, I want to create the dial that
we have right here. I think they call it
the digital crown, I'm not quite sure, but let's call it dial and let's see how
can we create it. You remember when I
created this one? And maybe I can cov it
and reuse it right there. Let's how can we do that? I will grab this ring
and take it here. All right, let's
move this up here. And let's rotate this
to the Y, Y 90 degree. Let's go to the top. And
hit to move this over here. And let's scale it. I think we can use the reference images. Let's go to the reference images and let's see what we got here. All right, I will move this over here and scale it down
just a little bit. This is the size, or don't
worry about the images, just align it with the circle that we got right
here, and that will be it. Now, sit this one. All right. Now, I don't want to
focus on the size, I just want to
make this piece D, because we need to
make some change here. Let's go to the right, and let's grab the middle
area. This is the middle area. I will hit Alt. Click
on these faces to grab them like that and
delete them, It XF. Now maybe I can grab the
side and delete as well. Because we don't
need all of these. But I think we grab
some faces from here. Let's see what we can
do. Maybe we can grab these faces. Include those. I will let D to take
a coby of that right click to leave it in same place P and then to celebrate it. And I will grab grab any phase control L and
hit X to delete the rest. And now we ended with this
result as you can see. But I don't want that side. You can grab the X
and delete them. All right, how can I
make this piece ready? Because I should
rotate it and make it looks flat so I can
use this Brightree. How can we do that? I
will hide the images. I don't see them for now. All right, let's tap
got the E mode and let's grab these faces are
to rotate them like that. Something like this, I guess. Let's delete some phases because we don't need all of them. For example, I can grab these can plus to grow selection
and delete those. I can delete the
subdivision surface for now because I don't want it. All right. What's the next step? What I want to do is I
want to make this flat. Let's go back to the front and let's put the three Cs here. Cursor selected after you move the origin dot to the
center of the geometry. And then have to add, and maybe we can add lattice. So let's add lattice. And it will be very big. Scale it down, make it
very small like that. All right, let's
move this over here. As to the z, I guess. Scale to the x, something like this as to the z. And scale this like
that. All right. Now I will grab this piece. You have to grab the lattice. And then it control and choose lattice Deform to link the
lattice to the object, will the lattice and
tap to go to the mode. Now let's move some vertices, but I think we can add
some cuts to the Z, open the lattice properties and go to the because
represents the z. And let's add, I don't know, maybe two or three
cuts right here. And let's grab the
first vertices. And let's hit Key, And
let's move them like that. You can use the
line of the grid to align this humetry with the line of the grid
or close to it. All this result looks cool. Maybe we can move a little
bit more like that. Maybe we can rub those over here and move those
back at any bit. Let's see, rub those over here. And let's move them a
little bit like this. Maybe we can increase
the number of the cuts. We can control it better. So far, the result
looks cool, I guess, but I think we can
use and move them. Let this a little bit like that, all right, Maybe can
move these back. When you add multiple cuts, you will have the ability
to control it better, keep everything aligned
with this edge. If that becomes a
little bit difficult, you can add multiple
cuts, for example. I can add ten here, and that will help to
control this even more. All right, let's move this
one here and the rest as well. All right, maybe I can move
them a little bit. All right, so far
the result is cool. But maybe we can move
the back at ten bit like that, those over here. What about this area? Let's move these back
and those as well. Right now we got
very nice results. I will tub this and hit control to apply
visual geometry to make, to apply all the modifiers. Now I can grab the
lattice and delete it. If you are not quite
satisfied with the result, you can grub these faces
that flatten them. Let's select those over here. And you can hit to the x zero. Enter and flatten them.
After flatten the, you can grab the rest. For example, let's
go to the view. Because I can go to the view, The clip start make it
smaller than 1 centimeter. For example, you can add
this 0.5 centimeter. Now we can zoom a
little bit more, but that doesn't work. Make it 0.1 Now let's
grab this edge here. And then hit to the zero, flatten this Click on this
edge to the zero enter. And you can do the same
thing for the rest. But I think we can grab these phases like
that, including these. And as to the X zero enter, we can grab this Xx0x0 enter. All right, so now let's
see how can we use this. Let's go to the right and
grab this key to move it. And move it to this area according to
the reference images. It should not go too far. I think we can reduce
from the length of this piece because I think
it should be shorter. Or maybe we can
accept this result. I think we can accept it. Let's grab those together
and let's isolate them. I think that's will be better. Tab and let's go
to this to the Z, zero, enter to flat
in this to the Z. All right, now the result
looks cool and nice. Move all of these
faces up a little bit, align it like that, you can
grab the G and G to the Z, All control in the, stab it
with this G if you like. I think we could make
some changes here, like aligning these vertices with these vertices right here. I will tag this and I will go to them with the fire to turn over the subdivision surface, will activate the wire
frame so I can see them. Now I will align these
with these vertices. All right. Now let's see what's
the best way to do that. Maybe I think we can. All right, let's grab
these vertices like that and make this
one the active. And let's change
the transform to the active element and
snap to the vertex. I'm going to sabe
this one right here. Let's try that again. Keyhold control. And tab
this one here. Yeah. Okay, now the result looks cool. I think we could tweak these
edges as well, this one. Let's move it a little bit. We can do the same on the side, group these vertices like that. Make this one the
key to control snub. Let's control the
keyhole control. Snaps one over here. Keyhole control, tab one here. The same thing. We could
align these vertices. I will grab these vertices like that and make this one the
active keyhole control. Tab one. Here, I think we can. Edges in the middle and key hold control stump
is one over here. And the same thing
for the stumps, one here, the same
thing for the side. Let's make this one the active
keyhole control stumps, one here and the same
thing for the side, the same thing for these edges. We can rut them from
here and align them ' I will select these
faces like that. I will make this vertex
the active and scale to the active limited X zero
enter to get this result. I think we can do the
same thing for the rest. For example, I can grab these edges and make
this one the active. And then as to the X zero enter, the same thing for
these vertices. Make this one the active
as to the X zero enter. All right, now the
result is cool and good. I think we can go with
that. All right, very cool. The same thing we should do for these vertices. They
should be aligned. All right, maybe
now we can erupt these vertices and make
this one the active. I can snap it right
here and scale this to the Y zero to flatten this to the Y
because that's important. And we can do the
same thing here. Gehl control, snub this right here as to the Y and
flatten this to the Yes, We can do it here, make
this one diactive. Align this here as to the zero, enter the side as well. Key hold control stamp this one right here as
to the Y zero enter. If you want to fix the
distance between these edges, that will be easy just
to grab them like that. And then right click in space. Don't worry about the rest. I think we can accept them as to the zero
enter to flatten the two Z. I think now the result looks cool
and now we are ready. All right, now we are ready
to duplicate this piece. I will select this, the
origin dot is in the middle. I will have to bring
the three cursor in the middle of the circle.
I will grab this. And then heterotic to king the origin dot
position hetticlic, set origin origin
to three cursor. I think that's not important since we're going
to use the spin. Spin is depend on the
position of the three cursor. Before I use the spin, I just want to do
something right here. I would like to
grab these faces. I will go to the
object data properties and I will create a new group. I will add these faces in this group just assigned
so we can assign them. Now if I go to select, I can select these faces easily. Now I'm ready to use the spin, grab the faces, and
active the spin. And let's spin this
to the Z like that. When you spin it,
let's use the angle. Let's add 360 degrees. I don't want to
stretch it like that. I want to use duplicate.
Use duplicates here. Just add the number.
Can increase or decrease the number until
you get something perfect, and now I got something perfect. After doing that,
grab this coby and move this out because
we don't need anymore. Hit X and get rid of it. And then hit space to
go back to select box, hit Select them all. Hit M and Merc by distance. Now we have 620 vertices Mer. After doing that, I'm going
to grab this D to the set, so we can pick a coby here. Then with these vertices, I will hit rate circle. And relax to relax them, because I want to use this as a guide to use the shrink Ram modifier
to get perfect result. Because I think the surface, it's a little bit wavy. Now hit P and then to
separate this out, tab out, grab this tab in two Z, and let's extrude
this up like that. Have to enter
recalculate the normal. Now with this one selected, I will ask Subdivision
Surface to make this even smoother and I will go to the object properties and change the display to bound because I don't
want to see it. Now let's focus on this tab
to go to the edit mode. Now let's go to the
object A Roberts and select so we can
select these vertices. That's what I want
here, the group still exists and function. Now I will tap and add
shrink rub modifier on this. I'm going to shrink this on
this page on the cylinder. As you can see,
everything is shrink, rubbed on the cylinder
and we don't need that. I will target the
group, the group. Now, let's turn this off
to see before and after. You can see now how this fixed the issues that
we got right here. Now we got very beautiful
results without any waveness. When you'll be
satisfied with that, grab the shrink rub and
hit control to apply it. Now I can grab this
with this and merge it. But before merging, I just
want to make sure that this length is makes sense and we don't have any
problem with that. If you have a problem with that, you can delete some of these
faces or you can scale them. I'm not quite sure if I
think it should be shorter. Lets try to make this shorter. I just want to see
what's going to happen. I will delete these and
move those up here. I'm going to move the up. Let's see if this will be
aligned or not as to the Z. As you can see, that's
not going to be aligned because we have
some variation here. I will cancel all of that. Instead of this, we
can do something else. I can keep these
vertices up here and we can dissolve some
of these vertices. I go to the x ray and grab these
vertices and move them up. That will be better. Something like this. All right. Yeah, I think that
will be better. Tab, you have to get
up this control J, make it one tab and hit
Select all the vertices. And marriage by
distance to marriage. All the vertices tab
on the the wireframe. I just want to see the results. Yeah, this is the result. Now I can Active subdivision
surface. All right. It's beautiful and nice. I can go with this.
Yeah. All right. Let's compare it. Yeah, I
think we can accept it now. After doing that,
grow up these edges. And by the way, I think we don't need these edges right here. We can get rid of
them up this one. Go to the front, for example. Left to the right. Let's extrude this down here. Let's have some length
like that, I guess. And then to extrude skill, but don't ski according
to the active element. Change this to the bounding
and then to scale like that. Turn off subdivicion surface, click on this control, you tobivalentvals three,
I guess that will work. Now we've got this. All right, now we need to add a cap here. Let's see what
options do we have. Click and let's put
the three cursor over here in this area. I guess we can use at
the circle, at a ad. And let's add a
circle right here. The circle will be very
big scale at 32 vertices. Can we go with 32 vertices? I think we go with that. Then tap it A and
then and scale, extrude scale to
have this result. And then let's go to
the face and ridle, go to the top and let's
see if that makes sense. Let's offset this. Yeah, something like
this. Just throw it a little bit. That will be nice. And now I will add
subdivision surface with level two and grab
everything and scale it. Let's align it
perfectly like that. Let's add three, now it's
aligned and perfect. Grab the edges to the Z. To extrude this down like that, grab this can throw to level it, you can add three edges. You can add a support
the edge right here to get even smoother
result, I guess. All right, now we got
this nice smooth. After doing that, you
can reduce this to two. That's will be enough and nice. Now, let's grab all
of these details. We don't need this anymore.
You can delete this. Grab those and let's put
these in place, All right? I think we let's see, what options do we have here? All right. We have
subdivision two applied here. I will add one and
apply for this piece. For the cup here we
have subdivision one. I can rik this with this
without any problem. Merce, both of them will receive one level
of subdivision service. Now I will grab this, click on this circle, and put the three decursor
in the middle. Rub this piece, and
then hit if selection decursorve right in the
middle. Go to the back of. Let's rotate this
like that, I guess. All right, now I want to move it like that
to this direction. Let's see, What option
do we have here? Let's open the gizmo. Move this to local. Yeah, now we can use the local.
Let's move this like that. And if the scale is not helping, you can scale this a little
bit and mixed smaller. I think we can rotate this as well to one
of these directions. But let's see how
can we do that. All right, can we
rotate it like that? I just want to pick the ice or the correct angle
and rotate it. All right. Now let's try to pick the nice angle and rotated. Let's move it inside like that. All right, maybe we can
move this a little bit more inside and selection to, to reenter this and
put it in the middle. But it's a little
bit difficult to determine and get
perfect results. Maybe we can move
it at any bit like that and go maybe to the back. Or we can pick a nice
angle like this maybe. And just take this out. Let's move this a little bit.
Okay, Something like this. I think that will work. All right, cool. Let's make a comparison here. I think it should go
deeper a little bit. I will move this
inside a little bit, and maybe we can
just kill it a tiny bit or that's too much. Actually, this result looks nice and I think we
can go with that. It's beautiful. I can't
accept this result. All right, now I think
I can end this video. I will end this video here
and see you in the next one.
34. 034 Creating the top button: Hello again. Welcome back. Here on this side we
have this button. Let's see how can we created. I select this and tap
to go to the mode. And I will grab one of
these edges like that and then radically to leave
the coby in the same place. And I will hit and then
separate this out, tab out and let's grab this new circle and let's
hit sect to isolate it. Let's see what we
have in the modifier. I don't want the shrink crop
in the subdivicion surface. Let's see what we
can do about it. Now let's focus on this area. Grab the extrude, and scale, and extrude and scale
inside like that. I think we can use the Gripil. The result is very beautiful.
I can go with that. All right, after doing that, now the hits to exist. As you can see,
the result is not perfect and it's not
aligned perfectly. But you remember this
guide we have here. If I take a coby, if I go back and display
this as a solid, you remember this shape. I'm going to use this
shape as a guide to grab this piece
on this guide. Let's delete this one.
And let's grab it, TD to take another coby and
leave it in the same place. And hit to isolate
it so we can use it. Then let's go back here and
this to solid so we can see it control and apply
visual umetrotomic. We don't need
anything from here, I just need this area. I will grab this
area and then hit control XF to get
rid of the rest. All right, it slit. All right, I can delete these faces and delete
this phase right here, X, Get rid of them. Grab this with this
control L XF and delever, That's all what we
want here. Tap out. Now let's grab this
nubs that we created. I mean, this one. I will
select this. All right? I will give this a ring crab modifier and
I will choose this guide. I can add subdivision
surface for this piece, for the guide to make
this even smoother, to get even better results. All right, that's very
cool. Now when you comblet grab this piece, and by the way, I
just want to hide this so I can show
you what I did here. Let's change this to bounding, so we can see the result. Now this piece becomes
perfect and nice, as you can see right here. All right, when
you be satisfied, hit control and apply
visual geometry, Tom. After doing that, now I
can tap and hit a select all these faces and Alt
to move these faces out. But I think they will
be scaled a little bit. Let's try to use
another technique. It's like to isolate this piece. And let's see where the blue faces I can I flip
this alt end to open the normal flip I guess we can add to give this some thickness. I guess I'm not quite sure. Let's make the thickness
smaller and turn on room because we just need the room and apply the solidify. All right, now
let's stop to go to the It mode and got up
these vertices like that and get wise at all to move
those inside like that. All right, that's very cool. Okay, if you want to push these vertices
out a little bit, because as you can see, we
have an angle right here. It should be 90 degree, but instead of that
we have an angle. Goes like that. You can
grab these vertices and hit Alt to push out. Now I think that's better. Something like this. Get wise
and hit Alt to move these. A little bit more like that. Now let's exit and
let's see what we got. All right,
that's very cool. All right, now we need to
take this out a little bit. We need to move to
this dark like that. So let's see how can we do this. Let's check the gizmo. Bring the organ.in the
middle organ to geometry. The gizmo is not going to help. Let's see what options
do we have here? Let's and make this
vertex the active. At least change this. All
right, to the normal. Can we grab one of these? I think this direction. Yeah, I think that will work. The normal looks cool. You can move to the normal or to the three
decsor will work as well. But you should put the
three decursor and align some way to
get that for me. I get this results. I
think that will work. It's to take these phases out. Something like that. I
think that's will work. Maybe we can scale
it as a little bit, make it smaller,
maybe even more. All right, that's very
cool. That's nice. After doing that now we can grab these aces and bevel them. It can throw to Bevl them, this with this and rebivls, you can add support edge here and one right here to get
nice and tight results. Now let's hide the wire
frame radically smooth. Let's add one
subdivision surface. Right now we've got something
very cool and nice. You can delete the guide. We don't need it
anymore, but I think we have some problem right here. I think we need to add
one edge in this area. There's something here. I don't like it so much. All right, So far,
that looks cool. I feel that we have some
shading right here. Let's see if we can get
rid of this. All right. To get rid of that, we
can go back some steps. Let's see what options
do we have here? I will grab this guide. Let's change this to
solid so we can see it. And I will tap and grab
all of these vertices, it out to inflate
this out like that. And I'm going to use it again. In this case I will, it's
like to isolate it and tap, grab these faces
control and then go to the obviate
data properties. And I'm going to delete all of these because we don't
need them anymore. Let's create one group and to assign these
faces to the group. Now when you hit Select,
you can grab them. Maybe we can add one here. Yeah, I think that's better. All right, it's to exit
now I will tap grab this piece and go to the
modifier to use shrink from Mudifiert's use this guide. Let's choose these vertices
or vertices group. Now it should be shrink, crop perfectly without any problem control
and apply that. Go here and change
this to bounding. Now let's see the result
vertically, shade, auto, smooth. Now it's perfect. I guess the same scenario can
trove these 22 like that. The grab this with this
troll again to three edges. Control to add B here, Cantroll add one,
H, love right here. Now we can add subdivision
surface with level one. Now we have no shading problems. Everything is perfect and cool. I saw this. How to
create this spot. I think that's it for this video and I will see you
in the next on.
35. 035 Creating the bottom camera sensors: Hello again. Welcome back here. Let's go to the bottom
side and let's see what we can create here. On this side, we have this ph of a glass to cover this area. And we could create
something like it. As you can see,
according to this image, we have a piece of glass
covering this area. Okay, let's see how
can we do that. I will grab the structure and tab to go to the edit mode and I will
grab one of these edges. I think we can grab this
entire edge. Look like that. And I will hit Shift
with D to take a Coby like this and right look to leave
it in the same place. And I will hit P and
then to separate this tab out and grab
this new circle. Let's delete the subdivision
surface. We don't need it. And this one I will
add this letter. By the way, I will tap and
it's to isolate this tap, to go to the eh mode and
grab all of these vertices. And I will go to the face and
choose the grit fil result. Looks very cool and I
think we can accept it. Okay. I think we can grab these eggs like
that, all of them. I guess we can fix the
distance between them. Let's try and let's see what's going to happen
when you do this. After grabbing these
edges at right click and choose Look to Space. Right now, the distance
between these edges looks better for these edges as well. You can grab this one or you
can control Alt and click. Then after that choose loops. Before you do that, actually
del this and that one. Then choose loops and the
right click to space. Right now, the distance between these edges are equal After doing that or a tab
out and hits to exit. And now we guide this result. I think we can change the
face orientation tab, hit A and then Alt and
clip to flip this. After doing that, I
will grab the guide and then hit shift
D to take Coby and right click to leave the Coby in the same place the
cobi isolated. Change the display
to solid control A. Apply visual geometry. I just want to grab these
phases that we have right here, tab and go to the face. Grab these here and those and hit X. And then grab this control L to link
select and this one as well. And delete the rest because
we don't need them. This is our guide. I will add subdivision surface to make this even smoother. So let's go to the modifier. Less and less
subdivision surface now. It's becomes smooth and
nice as you can see. Now I will grab this
piece as I created here and add shrinrom
modifier on it. I will pick this
guide that I created. You can king the guide
to bounding box. Now we get this result.
As you can see, it's nice and cool,
I don't know, but I feel there's something
not makes sense here. Or at least kick the side. I think I should push
this in a little bit. I will grab the guide and tap, select all the faces. And then hit at, and
push this deep inside. A little bit like that,
Something like this. And then tap out. All right,
so this is the result. The result looks nice and beautiful. I think
we can go with it. Then let's go back
here and apply the hearing modifier. We
don't need it anymore. After doing that,
it's like to isolate this piece and let's tap
again to go to the mode. Before you go to the mode, let's give this some
thickness using so deify. Let's increase the thickness
a little bit like this. That's very cool. I will
apply the soldi pick. Rub the side, it to hide it. Grab this control L
to select this side. And then hit Alt to
bring the side faces. By the way we don't
need the control minus to ring the selection. I just want to pick this side. And then hit FTD to
take a copy like that. Right click to leave
it in the same place. Then I will hit P and then to suppress this tab out
and grab this alone, hit A, and then hit for
inst, make some inset. Goes like that. Then hit control and
the rest of the face. And hits to scale them in. What I want to do is I just want to create this black rim. I think that's not
going to work. I will hit again to make
this a little bit bigger. The rim. Something like that. Control minus as to scale these faces control blast
X to get rid of them. All right, Now
we've got this rim. Grab the rim and I think we
can give this thickness. But before we do that, I just want to see if this frame aligned with the face
without any problem. What you can do with
this rim selected, you can use modifier
again and pick this Umetry and then
apply the hearing crop. Now you should get perfect
result without any problem. Right click, smooth,
auto, smooth. I will tap to go
to the eight mood. I will rub these
edges like that. I will beivle these
control to Beivle them. Let's add three. I will add a support loop
like that here as well. Above that you can add subdivision surface to
make this even smoother. And for the M, you can ask subdiviican
surface if you like. It's like too exact.
Let's take a look. The result is not
exactly what I want. I think there's
something that's weird. I think we led the acres, but I don't know why I see
nothing here that's weird. It's like too exact.
I just want to see, sorry, what's going on here. This is the M, and this is
the Uma tree. That's weird. Anyway, let's go back
and re Bible ages. I don't know what's
going on here. Yeah, that's right, we Bible, this doesn't go around
the whole cumae. Oh my God, why that's happened? I will hit control multiple
times to undo that bivle. All right. Can troll Z? I didn't notice that. All right. It's I will hit to grab the face loop and go to select and use boundary to
select these edges like that. And then there's
something else we can do. I'll click on this edge
loop and then hit for int. But this time I will
hit to invert the inset outside like that to create a rim that's important for
me to get Petro heading. And then I will go to select and loop and choose boundary. Now I can hit control to
bevle these and bel them. I think we can create two. Now I can go up these four of them and rebevle them with three edges
like that right now, let's see what's
going to happen if we add subdivision surface. The result is nice and smooth. I guess you can increase the level to two if you want to get super smooth
result like this. Very nice. After doing that,
you can copy this on the other side
without any problems. Let's change the position of the organ dots for this
geometry, all right? I think we don't
need to change it. If you want to put this in the middle, I think
you can do that. Because the headset we create, the headset in the middle. I will hit he set to bring
the three decorsor in the middle and grab this tally and set
origin to three cursor. Now I think we can
use miramodifier. We will get perfect results. If you compare it, the
result will be perfect. Let's grab the M, let's give them miramodifiers. But we need to
change the origin to the three cursor and now
we get very nice results. All right, that's very cool. Okay, I think that's
it for this video. I will end it here and
see you in the next one.
36. 036 Creating the bottom camera: Hello again. Welcome back. Here in this area,
we have a camera. Let's see, how can we created. I will grab this cover
and I will hide it. Just grab it and then hit H to hide it. Let's
focus on this. I think we could
push this a little bit up according to this image. I feel that we
have some distance between the glass
and this frame. Or maybe the glasses should
be a little bit thicker, but I'm not going to
make the glass thicker. I will grab this tab and select all the
faces and then hit as to move this a little
bit up like that. And then maybe we can give
this a bit of thickness. Let's go to phase, and let's solidify phases. And let's increase
this a little bit. All right? Okay, this
is a good result. I will accept this because
the phase is flipped. I will hit A and they have to enter recalculate the normal. All right, so this
is the first step. After doing that, maybe we can create the camera
using these edges. For example, You can
grab these edges and then hit to take
a copy like that. And right click to leave
the coby in the same place. And then hit P and then to
separate the sinew edge. All right, now after that,
let's grab the sinew ge, let's T to go to the mode, select all the vertices. Then I will hit
to extrude scale. To extrude scale like that, I will hit right
click and circle in the Loop tool to make this
like a circle and then Alt to move this up, maybe we can switch to the edge. It seems like there's some
kind of problem right here. Let's see what is it? Let's kale it a little
bit more like that. All right, now we
got this result. Then I will be right
and choose circle again to make the circle
looks more accurate. Again, let's push
this. All right. Again, right circle, that is also far, looks cool. Now maybe we can hit
and S to extrude scale to get this result. To create this frame. As you can see,
it is right here. What else we could do here? I will hit to create a face and then hit to
extrude it like that. Then I will hit, for instance, I will grab these edges, then hit Control will
be to level them. I don't know if I have a curve
here or it should be tab. I'm not quite sure, but I think we should
make it like a tabor. I will add one edge right here and delete this one control x to get a result like
that for this area, maybe we can bevel there's
no problem to do that. Something like
this will be okay. Now let's rub this
face and maybe we can sl and scale those a little bit more just to make this smaller. And then I guess we can to
extrude this like that and bevel the edges control
and bevel them like that. Something like that. I guess I think this should be scaled a little bit to grow the
selection at control. I guess we should
grow the selection. Let's make this phase active. Let's change the transform
orientation to the normal and active because we want to use the active phase. Let's towards this
phase like that. And move the, move
them up like this. Something like that. Maybe
we can scale this a little bit and move them up. Maybe we can get rid of this right here and
this one as well. I think we don't need them now. I will go to the
face and get this. And it can throw
last multiple times to grow a selection
until you reach this. And now let's move this
up again like that. Now I will add one here and maybe we can hit control Tb bullet
to maybe two edges. And extrude the hit. Alright? Al extrude along the normal and just extrude inside like that. Maybe we can rub these
two edges and hit control to buble
them to three edges. I guess that will be okay,
radically auto smooth. All right, this
result looks nice and beautiful and I think
we can go with it now. Let's grab the frame and
hit slide to isolate them. Maybe we can spend
some time here. I will grab the edges. These edges and I will hit
control you to level them. Maybe we can support the edge loops here
and here as well. Maybe we can add one right here. The faces on this side, I think we don't need
the It X D of them. Now maybe we can add
subdivision surface here to make this even smoother. Lets hit slave to exiter. What about this area? Maybe we can bevel
clicktrollet's bevel. This 23 acres or four
of you wants right now. The result is nice and smooth. All right, this is sharp. Maybe we can beveled control. Let's play two. I'll take to bring back the other faces,
This geometry it. All right. I guess this should
be in the timber to. So I will hit M and
move to the Tim two. Let's go inside the geometry. I just want to see the result. Whatever thing we
created on the side, it should be reflected
on the other side because mirror
modifier still exists. I think I think this
area is finished. Maybe we can go back to add a cover here
underneath this area. It will be something simple, just tap and grab
this edge loop. And then had to take a coby like that and
rightly to leave the coby in the same place and then
hit P and then to separate this tap out and the corp this delete the shrink and
delete the sub can serve, we don't need it. Tab. And then to create a phase and scale the pace a little
bit, make it bigger. That will be it, I guess. And maybe here we can
make some tweaking, like grabbing these edges and Bible them to create two edges like what
we have right here. I think we can include
these edges as well. Let's grab them together. This one and that one. And I will level them. It can tab, at
least Bible them to two edges, something like that. Try to remember the number here. We added 6.2 I will add six and then grab
these two edges. Or you can just go to select and then loop
and choose boundary. You can put the boundary in a quick forte trato quick over. Right now when I hit Q, I can reach it quickly. Now these edge is selected.
I will rebuble them. Hit Control, and let's
bubble these 22 as well. Make the bubble sharp like
that. And that will be enough. All right, one more thing
here I would like to do. I want to select these phases. Hit control plus to grow a
selection multiple times. It control Bls multiple times
until you reach this phase. Go here and end the flats. Remove these from
these inside the flat, let's say just remove them. Don't make them included
here. Removed like that. Remove them because we don't need these face
to be affected by the Shrink Rob
multifier. All right. Now I will go back
here and I will act Subdivision Service
and the Shrinb. All right, now the result
looks nice, I guess. Let's see if we can fix the heading a little bit by adding another H. Look here. Yeah. I guess now the
result looks better. If you want, you can do the
same thing for the rest. Let's turn off the subdivision surface
and hit Control are to add a here and
one right here. And Tablet's turn on the
subdivision surface. The result is nice and clean. We can do the same thing here. Just turn those off for now. And tab click Control
would be to Vl 26. We just need two
edges like that. And now grab these
two edges and hit Control would be to L these to something small and add three edges and one
edge right here. And now go to the
face click control plus multiple times until
you reach this face, go here and remove
them from the flat. One more thing here
I just forget to do. We can do it right now. Okay. I will grab these faces, click like that, and
include these as well. Okay. And thus over here. And I will grow the
selection again. What I want to do is I want
to remove the increase, just the increase here. I will add zero to
zero these edges out because we bet them
and they will be sharp. Let's check the side. All right. The result is nice and clean. Even when you turn on the
shrink from with the fire, everything will be
nice and smooth. As you can see here, I think we can do the same
thing for these edges. We should de grub them
one by one and level them and get results similar
to what we did here. But now let's focus
on something else. Let's grab these edges as well. Click Alt, Click, then it D to take a cobi like that radically to leave
it assemblies. And then hit P and
then to out grub circle A and then and
scale them a little bit, choose individual origins,
and scale them like that. After that, we will give
these specific material, rub the circle, and hit control J to
make the Mondeometry. I guess now we can go to this
side and do the same thing. Tab and Alita separated this tab at AF and kill this
a little bit like that. And I think that's it. All right, let's
see if there are anything else we can do here. Let's start fixing the
Bible on these circles. Let's grab these ages
like that, one by one. I think we can do
something faster. I guess if we go to
the phase and go here, we can grab the M
and select select the M. Let's see what we got. I will hit control minus
to shrink the selection. Let's see what else is selected. I will hit alt Z to
go to the x ray mode and select everything else because I don't want
to include these. Now we got these phases selected
and that's what I want. All right, that's very cool. After that, I will use the boundary loop to grab the edges and I will
control to bevel them, I will add two and here I
will add six centimeter. Now we have the faces
selected. All right. With the faces selected
will go back here to the select or you
can use a quick for variety chose
boundary again, I will rebuvlse add
three edges like that. Something like this. I will grow selection to get
this result control. Plus here we should
get the same result. And then I will hit for Inst to make a small
inst like this. Don't worry if you've
got an inset like that. If you want to get rid of this, just activate the boundary, it will cancel that from here. That's very cool. Now we got this. If you want to make this smaller two I guess. Or maybe we can increase
the number from 2.5 maybe even more. Three maybe. All right, three to be in the center. That's something cool. I will have control minus, with these face selected, I will go to the flat and
remove them from the flat. Not just that, I will
go to decrease and zero here to get rid
of the red edges. Now I will tab out, I will go to the modifier, activate the subdivision surface would shrink from with the fire, and now we should
see a good results. All right. The sea was going to have benefit
in increases too. That's too much. Actually. I think I will hit
control Z multiple times. I just want to fix
something right here. Let's see if we can do it. Just be careful
when you do that. All right, Now we back here, there's something
not makes sense. I don't know if we need rages right here or
something like that. With these faces selected, I will go here and
create a new group. I call it, I don't
know what to call it, let's call it holes.
Something like that. I will assign to assign
these to this group. I just want to recognize them. What I want to do is I want to insulate everything
and go to the flat. And select the flat.
All right, the problem. These phases are not
included in the flat. And this is a problem we
should fix in these phases. If I hit control, the selection will grow. I will get another problem. Because if I had control bots, the growth will reek these faces and I
don't want to do that. Maybe manual grab these faces and include them in the flat. I will spend time here just to grab these
circles like that. Or maybe there's
another technique. Let's hit control
in multiple times. Let's see if this
technique works. I will hit control blass to include these
edges like that. This edge, I should add these here as this one right here. After selecting all
of these phases, just go to the flat
and assign them here. I know they shouldn't be add to the flat because
we will get a problem. But after you add to the
flat at control minus to shrink the selection
at control minus, then remove them from the flat. Just remove the rest. Now remove these. All right. Now let's tap out. Now let's go back to the
modifier. Let's see what we got. Let's active the subdivision. The shrink crap. I will choose the flat
again. Let's, can The result is not perfect. I think it needs more editing. I can see some heading
problem right here. Let's turn those off again. Let's go back here and let's tap, let's deselect everything. Go to the flat and
select. All right. They are not included,
this is a problem. All right, that's mean we
should add the manually. I think we don't have
another option here. I will add these faces like
that, problem like this. Let's add them right now. We added all of these pass. Let's go to the flat end assigned to assign
them to the flat. Let's select the flat now. They are included or some
of them not included it. Assign Here, let's try again. Select, I think. What about these space
right here? It's assign. Let's see if we have
any problem here. Everything looks cool. I guess after doing that, let's move to these holes. Everything looks cool so far. That's great. Let's go to the
side and see what we have. Let's grab this one.
Assign to assign this one. And now it's assigned this area as we'll grab these
and assign them one by one as assigned. And yes, they are assigned, grab these here, Let's assign them it assigned. And now let's see what we got. I think there was
another technique. Let's try and let's
see what we will get. Let's go to the M. Let's
select the rims like that. That's very cool. I will hit control minus to showing the selection
two time like that. All right, let's
add this H here. Let's check the other area. Okay, that's very cool.
We should include this. So I will all click this
one. I have no problem here. Everything looks cool. Everything here looks cool. We can't check the rest. We need to add these edges. Let's zoom in here
and include this one. Include this, this right here. I will tell you why
I'm doing all of that. I know that's a
little bit boring, but will be faster. And
I will show you why. After you select all the necessary is just hit H
to hide them like that. And now select all the faces. Now you can go to
the flat and assign everything selected to the flat. Now let's check if
that works or not. All right, now it should
work. That's very cool. Now hit alt H to bring back
the other faces and tap out, and let's see if that's
fixed, the problem. Go here and active the
subdivican surface with shring from modifier. As you can see now we don't have any shading problem right here. Everything looks cool and nice. If you increase the
subdivican surface to three, for example, or two, you will get smoother
results and perfect. Okay, let's see
what we have here. The result looks nice. Let's check this area.
That's very cool. All right. I know we
spent too much time here just to fix
these small issues, but in the end of the day, we got very nice
and perfect result. And that's what I want here. All right, I think that's it for this video and I will
see you at the next one.
37. 037 Modeling the optical lenses: Hello again and
welcome back here. Let's cover the other holes, these right here and
those on the other side. Selection haslak to isolate and let's have to go
to the eight mode. I will switch to the
edge to I will go to select and select by
trait and non manifold. That's will help to select
every holes we have here. I will go to the
X ray and select these edges because we
don't need to include them. Let's see if you like and use the middle mouse to
desillate these edges. Okay, let's see. Again, decllse the middle mouse pattern
and desllateses. Now we ended with these
circles selected. After doing that,
I will hit F, D, but turn over the
subdivision and shrink crop at D to take a coby and right click to leave
them in the same place. And then hit P and
then S to separate them out and let's scrap the new circles and tap and
then F, create the faces. And I will choose individual
organs to scale them just at any bit. That's a bit, I guess. Oh, that's cool. Now we can go back to the ring me with Defi and I think that's it. Okay, one more thing here, maybe we can connect
these two edges. Let's grab this age look,
and this one as well. And then radically Q
approach. I think that's it. Let's see if there are
anything else we could do. Let's like to excites
not just that. I just want to make some
tweaking to the speaker bar. Maybe I can use the lattice
and make some adjustments. Let's grab the cake. All right, why it's selected? There's a problem right here. See what's going on here. All right, we could turn on
this opt here, right here. Now we can select, let's see what we can do here. I will tap in these
two vertices. Start with them and
let's move them. Just attend a bit like that. Try to put this in the middle. Maybe we can these two vertices
and just take them out. The key to the X. One more time, I will
grab these and key to the X and move these
inside a little bit. I think this result
will be nice. We can go with it now. We can the cage and move
it on the other side. Or we can tweak
the side as well. E to the X and move
this like that. Throw these two edges in
the middle and take them out to the G. Let's take a look. Looks nice on the side
and on the side as well. All right, now maybe we can
start with the optical. Lenses and create them. Let's bring a reference mic here so we can see what we could do. I will select this piece and I will like to go
to the local mode. Let's go to the tab and
let's see what we have. You can see we have
some wavings here. Some part goes and
some of them out. Let's try to find the
solution for this. I will tab and go to the face and click to grab these faces. Maybe I can grow the selection
like that and delete the rests X. I will choose these Xf
and get out of them. Click to grab this
H loop and bring the three cursor over
here and tab out. And I will add plant to the X
Rx 90 degree like this tab, subdividedvide this
multiple times like that until I get
a result like this. I will grab this vertex
and go to the top. Use the proportional
editing w to, for example, sharp sphere story. I will activate
proportional editing and I will hit to move
this a little bit, but I can't understand
it, I can't see. So I will hit slide two. Time to focus on
the plane itself, key to move and rotate the
wheel backwards like this. To make the effects bigger, let's try to create
something like this. Something subtle like
this. Let's take a look. All right, let's cancel
that. Let's try again. Maybe we can try
something else here. See this one? All right, this result looks cool. I think I can go with this. All right, that's
very cool. Let's like to excite and stab out. And let's grab these two. I will rotate this, go to the Z and let's rotate
this like that. Before I rotate this, I guess we can make some changes here. Let's go to the right, I
guess and active the organs. I just want to move
the origin dot right here. Key to move. And let's move this over here. I will tell you why I did this. After moving the origin dot
on the top of this bulge, I will hit S Q selection
decursor to book this back. I just want the tip
of the bulge to be aligned with
the three Dcursor. Now from the top of you, we
can rotate this a little bit and align with our results. Maybe we can move this
a tiny bit like that. Something like that.
Now let's take a look, let's see what we got so
far after doing that. Now I can tap and grab
these phases like this. And go to the fronts and
make some kings here, like Q's face nearest and
maybe Qs bonding box. And I will hit key both control to snub these faces
on the circle. Now these phases align
perfectly on the circle. After that I will grab this and hit Control
to dissolve it. And It control are to add a
new one and you can hit to align and to flip the alignment on the other side and accept a result like that. All right, after doing that, maybe we can hit slack to
time to focus on this, I can tap to go to mood. As you can see, now the result
looks very cool and nice. The curve is very beautiful. Now I will grab these, then
hit to create a big face. And hit Alt Q, extrude
along the normal true, these back inside like that. Hit X to get rid of them, I will add one E, maybe right here according
to the reference I. Now I will create this rubber or plastic border with
this ex elected. I will hit D to take a coby. Or you can do something else
like let's turn this off. You can grab these
phases instead. And hit by like that. And then right click to leave
them in the same place. And then hit P and
then to separate them. Tap out, and let's grab
this in your circle. Tap in, grab these edges. It, to create a big phase, let's hit for ints to create
an inset like that and then halt to extrude along the
normal. Extrude these out. Just a little bit like that, I will hit another
for another inset. Then I'll to extrude
this inside like that XF to get rid of the rest. Now I will focus on
this new border. It's two time to focus on it. I will grab these Gs and
control to Bible them, three edges, crop this one, make the Bible a
little bit bigger. You can add four here. This one it control. Let's bubble this a little
bit. Let's add the three. Maybe we can add the support
H. Now we've got this. I will add one edge right
here for the optical lens. Let's add the support
H right here. Now we can activate the
subdivision surface and now we've got the results close
to what we have right here. That's very cool. I will tab
and grab the sinew edge. Let's turn subdivision
surface off, grab these edges like that. And I guess we can do something like a least
see what we can do here. I will hit D to take a coby and talk to leave
the coby in the same place. And I will hit P and
then to separate this tab out and let's
grab this new circle. And then to create phase. And then it to make
an insult like that. And then to repeat the last action multiple time until you get
a result like this. All right, I think we can grab old control
click and Altro shift click to grab the rest. We can relax to relax the. Let's scrub these edges. And let's choose space to fix
the distance between them. Or maybe we can rub this and his circle. This one as well. Let's circle now. Maybe we can rub these edges and relax and have to our multiple
time to get a good result. Grub this space, get rid of it. Go to the O click and let's
choose if that doesn't work, just add extra ge anywhere. Letrub these edges like that and chop to fix
the space between them. Now I can grab this
edge and add or gritfl. Let's spin this a
little bit like that and use offset to
rotate this tiny bit. This result looks nice. I think we can accept
this and go with it After doing all of that. Now maybe we can hit to
exit, and use the guide. With this new tumetry, I will hit to the lens, hit a H to bring the guide, and select the guide as will
hit slack to isolate them. Let's go to the top.
And what I'm going to do is I will move
the guide a tiny bit towards the gear to move. And let's move it
like that. I just want to move it to
this direction. I can, I can tap and make
one of these phases, the active I use
the active phase, I will show you what I mean. For example, I can grab face and ching this to local and
active the Ge from here. Now when you go to the top
as you can see now I can rub the z axis and these
phases diagonal like this. Now move them like that until this or this
vertex hits this edge. You can hit key to
the Z, Key to the Z. That now the result is perfect. After doing that tab, this delete the mirror from now. Let's add a shtifier, not symbol the form story. Let's pick the guide. Now this nucumetry perfectly
aligned with the guide, you can active the
subdivision surface. Let's reduce the level
and accept this result. You sit control to apply
the subdivision surface. Now we got this and you can
apply the hearing from file. It's like to grab the guide to hide it and
let's see now what we get. Let's active the subdivision
surface for this one. For this one as well, I guess. Maybe we loop just to
make this sharper. Maybe we can add two g here. I think we can. At, just to move
this out just a bit, too much, radically smooth. To make this smooth at smooth, maybe we can give this a bit
of thickness or you can use, so give a bit of
thickness like that. All this amount looks cool. It's light to excite. I guess I can grub the border
as well to do something. I will or before you tap, just apply the
solidify and then tap. And I will grab these
faces like this. Go here. We have the remove whatever thing we have here
and assign these faces. Now let's select to remove everything faces.
Now let's check. Yeah. All right. Now we have these phases
assigned in the group tab out. And now I will grab this
and go to the modifier, and I will add
shrink Rob modifier. I will pick this, but I want to shrink rub just the selected
phases. Choose the group. Let's see the wire frame. Now these phases perfectly
aligned with the frame. Apply the shrink Rob modifier. That's it we don't need anymore. Let's bring the
reference images here. We can see the lens. We have a small taper. Let's try to do
something like this. Grab the lens and tab
to go to the mode. Let's secre up this
he and let's hit control tobivlet to
two hes like that. I will look up this
he with this H and hit control Tobavl.
This one and this one. I will add four hes with support the H lot just
to make the super sharp and smooth for the side. Since this side is not
going to be visible, I will hit control and
just pivlet like that. You can add four hes. You can add support the
glo as well if you like. Now, after doing
that, I will add subdivision surface to get smoother and sharper results
You can add to if you like, I will add mirror modifier to mirror this on
the other side. Let's like to exit and now
let's see what we got so far. Let's check the
face orientation. Okay, let's go here
and the overlay. And let's see, the frame should be flipped,
tap at a shift. I think the result is
perfect and beautiful. All right? That's very
cool. Nice. All right. I think that's it for this with you and I will see
you on the next one.
38. 038 Starting with the front glass: Again, we'll come back
here. Let's focus on the front side a little bit. The glass here, we
have multiple layer. This is the first layer. It's just a piece of glass. And here we have some stuff. I'm not going to focus
about these details since these details are
not going to be visible. Maybe this layer, it will
be visible a little bit. This one will cover everything
with the reflection. Let's focus on this one and let's see how can we create it? I will grab this piece. I will take a cobe of it. The I will move to the Timber file and
move to the Tim two, go to the modi file and let's
add subdivision surface. I just want to see
what's going to happen. All right. This is the
result that we got. It is nice. The result looks cool. I will apply the
subdivision surface. I will accept this result
according to this. As you can see, it has
a bit of thickness. Let's try to do that First, I want to align this with the G. We have small distance here. I will tap and hit A A. Inflate this a little bit and push it out, but not too much. Just be careful
when you do this. I will click to grab the
entire loop. All right? I'll click it at, push these edges
out a little bit. Something like that, I guess. All right, now maybe we
can give this a thickness. I will slash to
isolate this end. Let's go to the modifier
list and let's add a solid. I will tally smooth end. Now I can control the thickness. If you accept this thickness, the second layer, it will be
overlapped with the gumetry. Just be careful
when you do that. We should make some
change after that. Let's increase this
to three maybe. I think it will be a great option after
that you can apply it. After applying the
solid definer, we can tap to go to the edit mode and I
will grab these edges. I will go to the top
and key twice to slide these edges like that until you get something
flat like this. Now I guess we can to exit and let's see
what we got so far. All right, now we've
got this result. I will grab these two edges, this one and this one as
well. Throw them like that. And go to the item and
put the mini crystal one just to make these edges up when you add the subdivision surface. Now let's see what we got. We have a small gap
here as you can see. All right, let see how can
we get rid of this problem. I will select this edge loop and I will choose the face nearest. Then hit key to the Y, the key and hold control
to snap these faces here. Let's try again. Right now, these vertices snapped on
the geometry perfectly. Let's check the site, or kids like to isolate this. I just want to see
these ages as well. Problem like that, the key
twice them inside out. And move these out a little bit. All right. Now I think
the result is perfect. This increase the
subdivision to three. I think we should
have a small gap I guess according to
the reference I make. I will tab and let's
grab these edges. Go to the loop. I'll
click to grab this. All right. I just want
to check another image. I just want to
make sure of that. Before I go any further, I will wise and slide. Let's slide this a little bit. Or maybe we can do
something else like adding one loop here, I guess. And slide it a little
bit like that. All right, now I can grab these
and then it key twice and just push these out, grab this, it can throw the tubivalentletd
support, the G loop here. Now let's take a look. All right, I think
this result is beautiful and we can go with it. All right. Yeah, it's very nice. Let's check the site.
Everything is cool. I guess right now, let's grab this again, is Tab
and I will grab this edge. I think we should bev as well. You can actually can
ignore it and accept this sharpness or
if you like you can support the edge here. Ambivalent catro, two edges right
here and maybe one here to prevent the stretch. Maybe right here to get
even tighter results. Now I can grab this edge in the middle and zero
out the crease. Yeah, something like this. After doing that, now I can
grab the faces in the middle. Sorry, can rows to
grow selection. Let's see what we can select. All right, we need to
include these as well. I just want to take a cobe of that on the other
side. The same thing. I will hit shift D to Toby and drag to left it
in the same place and I will hit P in the
next to subprib this, I will tap out to grab this. All right, let's like to exact from the local mode now let's see what's the next. Let's like to focus on this. Let's tap to go to the mode. Let's see what option
do we have here. Now I think we can create these details on
the second layer. I guess I think the second layer is ready to use it to create all
of these details on it, but not in this video. I will end this video here
and see you in the next one.
39. 039 Adding details behind the front shield glass: Hello again. Welcome
back here in this video, I want to start
creating these details. They should be applied
on the second layer. If you hide the glass shield, we have this piece of glass and these details should
be created on it, or let's say underneath it. Let's see together, how
can we achieve that? The reference image, I have the same image in the
folder. I will use it. Let's open it. This image
right here, I will import it. Let's go to the age, and let's put this image
right here in the middle. If you want, you can
align with the headset. Just move this a
little bit forward. Or you can select those together
and put the image behind it and go to the bag of view. Let's try to align it
to get better results. Maybe we can move this
down like that and put the three crossor
right here to use it, because I want to scale this according to
the three crossor. Let's scale this alternative it until the edge of the image. With this edge of the image. All right, now we
got this result. After that, what
I can do is I can start modeling these details
and put everything in place. Let's go to the back of, I
will hit to add and I will, I will move the blend right
here and rotate this to the x nine degree rotation. Work according to
the three decosor. Let's change this Pat bonding
R X 90 degree like that. Now let's go to the front. Let's kill this mixed
small like that. It to move it and let's
put this right here. You can start with the plane. Let's bring the three
decosor right here. Or you can start with with the circle if you like
to create these circles. I see what's going to happen
if we use circle, circle. And let's align this to the view and this to 12 the vertices. And let's kill it.
Let's move this right here skill again and
again like that. It should be in the
middle key to the Z. And let's move this up here, Tap to grab these vertices. And move those down here. Now let's grab these vertices x, v. Delete them, Grab grab dot. Now we've created these. Maybe we can add another
circle for this right here. To put it right here.
Let's add a circle. Align this to the
view as to scale, to move, and let's
move this down here. Maybe another circle right here, and another one here maybe. All right, now we can start
following this design. Let's start with this vertex. Maybe we can extrude
it right here. Let's try to follow this like that from this point. I think we can extrude
this right here, don't grow about this frame. You can ignore it for now. Let's move this a little
bit more here and start following this
care like that. All right, now I think we can in these vertices right here and hit to create a
face it for inset. Let's make a small
inset like this. I just want to have this frame. I will grab these and
then hit key twice. And then it to move
these out like that, hit control to add
an X ray H here. The idea is I just want to create this frame in the image. After that, let's grab
these vertices and sit to connect them to
create a phase, a another to create
another phase here. And let's see what we
could do on the side. Let's set to create
one phase here. Let's try to find a way to connect the side with the side. You can add two edges here. By the way, you can delete half of this
and focus on one side. Because at the end of the day we will use mirror
modifier to mirror it. All right, now let's see
what's the next step. Let's try to find a way
to connect this together. I will look up this vertex, with this vertex and maybe
we can add three ages like that we can with this one. By the way, you can
do something else like grabbing these vertices
with those over here. And hit, then you can
add the loops here. We have one, maybe we can add
another vertex here and fix the distance between them here. We can add three cuts and start to find a way to
connect those together. Let's like those
like that to create a phase at multiple time. Maybe we can add one right here to create a
phase over here. Maybe another phase
here and here. Or maybe we can
slide this a little bit and put this
vertex right here. And grab this with this
to create a phase, another vertex right here. This with this it. All right, now let's see
how can we connect those together to create
a phase with this. To create another phase, I will add these ages
when I need them, so I will dissolve them for now. What else we can do? It's a little bit difficult
to see the vertices. Maybe we can go to the
properties of the image and make some change like changing
the opacity a little bit. Now let's go back and let's see if that, yeah, I
think that's better. Let's add one loop here. Grab this with this to create
a phase, another loop here. This, with this hit, maybe we need to add one loop
here in this area. For this vertex we can slide
it a little bit like that. Grab this with this, then it. All right, that's very cool. Now let's select those together. Maybe we can create a phase here and create phase here
as well. Maybe one here. And now let's select those
to create one phase here. All right, that's cool, let's sit it to
make one extrusion. And let's keep doing that. And let's go to the side. Okay, let's extrude this again and again. All right. It's a little bit difficult
to see where is the age, but I think the Gus
goes from here, something like that, I guess. Yeah, I think that
move these vertices. Okay, maybe this is the edge, maybe we can move this
a little bit more like that or something like that. Even these vertices, we can
manipulate them a little bit. Maybe we can use
the relax option just to relax these vertices. Grab them like that, right? Can use relax. You have to our multiple
times just to get. A better result. Something
like that will be nice. If you want to fix the
distance, try that. And let's see what's
going to being. The result is not cool,
so I will cancel it. Now let's create this frame. I can start with this vertex. Let's extrude this
maybe right here, and hit a multiple time.
Let's try to follow it. I know it's a little bit
difficult to see it, but just focus a little bit and you will understand
what you should do. Okay, let's sig up this
and extrude it like that. We can increase the
number, that's okay. This with this hit, if you
want to add more vertices, that's okay to do
leg up these edges. I just want to cancel these. Let's see what's going to
happen if we fix the distance. All right, now let's
silicate those face here, and maybe one face here, another to create a face
and face right here. Select those
together, and again, let's silicate those over here. Let's create multiple phases. Okay, that's very cool, face
here and one face here, one face here, and
here. That's very cool. Or try to find a way to
connect those together. As I say, that's okay to
add an extra vertices. For example, if you want to
add one extra here and here, that's okay just to grab
these vertices and fix the distance and
move some vertices around to realign them
something like this. All right, now maybe we can grab those together
and connect them. Select this with this
and connect them, maybe we should add two
edges right here, at least. Maybe one edge right here at F. To create a phase
after you grab these, let's slide this vertex a little bit right here and
this one here. Now let's slot again and again to create big phase. Use the knife tool
to create cut. Goes like that. Maybe we can add one right here and
connect this with this hit. Okay, what else we can do here? Love this with this
hit, silicose hit. And this with this hit, silos, hit multiple times. Let's move this
vertex a little bit. Maybe let's make
some kings here. Let's hit control to
dissolve this wise. And let's move this over
here and this one here. Let's go back to the site. I will hit to extrude, make one extruding goes like
that and one right here. So we can see the edge. Maybe we can move this vertex. Maybe it should be right here, I guess control art
to add a new one. Let's move it, add new one here. And let's move it as well. Let's add the new vertex
here. And let's move it down. Let's move this a little bit. You can use the
relax again, right? And use relax at multiple time until you get
something nice and smooth. Now let's see what
else we can do here. Select these at the cut
up, those, all of them. Dissolve this one at control X, or we can leave it key wise and slide this
over here first. And dissolve to create a phase. We can slide it a little bit, Maybe this one, we can
move it at any bit. All right, here we have
something. I don't know what. What is here exactly. But I think we have some curve. It's not visible right
here either on the side. It's a little bit
difficult to see it, but I think we can
create a curve. Goes like that. And that's
will be it, I guess. Don't forget something. This image is perspective. Follow this exactly, because
that's not makes sense. Because we have a
curvature right here and this shape is deformed. I mean, it should be like this. I guess if we want to create it should
be something like this. That's what we should do here. Let's move this vertex here. I will continue extruding
these vertices, and after that I will
focus on this area. Let's extrude this one here. Let's keep excluding
these like that. I just want to mention that I think it's wrong
to follow this curve. I think we should
leave some distance. I think it should be right here in case we want to
create a flat surface. Because don't forget this area. We have a curvature here and
the image is perspective. Moving these vertices like that, it's not a correct thing to do. So I will hit control to
dissolve these vertices. I will move this one here. Maybe, let's add one vertex
here and let's try to create. Yeah, just move it a little bit like that, Maybe
another vertex. Let's move it a
little bit like this. Try to fix the curvature. One vertex right here and
just move it a little bit. Grab the T choose, relax, relax this
multiple times. Yeah, something like that. To make big extrusion to focus. That will help to make it easier because if you extrude
at very close distance, you can't follow the easily and you will
create something way, just leave to get
better results. This one here, maybe
one right here. After you pass this area, now you can follow the care again to make one
more extrusion goes like that. One here I guess, and one here, and maybe one right here. All right, now let's see
what's the next step. Let's extrude these
vertices as well. As you can see, I'm not
focusing on the details, I'm just trying to
create the shape. And after that we will
jump for the details. All right, now let's go
back here and see what was the next step after extruding
these vertices like that. Maybe now we can continue
to finish this shape. Let's make one extrusion here. I think we can add one
vertex right here. And hit key and hold control. And snaps with this
vertex snap key, hold control and snap
this one over here, active automerge to merge them, you can grab those
XV and delete them. All right, what else
we can do here? Maybe we can add extra vertices
and fix the curvature. We can add two. All right, two here as well. Now I think we can
grab these vertices, all of them and
choose relax to get better results or
something like that. I guess even if you're like you can fix
the distance between them, you can add two vertices
here as well and grab them again and choose relax that you have to
add multiple times. The result is beautiful. Now let's try to find a way
to connect those together. I guess we can start
with this vertex. I can add one vertex
here and the grab those together and hit
to create a phase. And the grab those
together as well, or just these two vertices. And hit here, we
should have a circle. Actually, I will grab this circle and hit and
put this one right here. After that we should
find a way to connect it that's not young torque. Maybe three we can add. Let's grab these and here as well. I guess we can add
one vertex here. Let's select this
one key twice and slide it those together. You can select
those, all of them. And then hit cub,
this with this hit. And now let's go
back to this area. Maybe we can select
those and hit. Let's add two cuts here. I guess you can level
this to two if you like. Fix the distance between
them and let's seraph again. Okay, what else? We can grab this key twice. Slide it a little bit.
Let's try to find a way, or solution for this area. Maybe we can add
extra vertex here. And fix the distance and
make some changes here. Lose it with this cup. All right, that's very
cool. And this one as well. Hit, hit again here. I will look up this vertex
and make go like that. Then I think this should
go straight up here. We can ext this back like
this and move it up, or at least push these
a little bit like that, something like this. In general, we de decorate. You can select everything and shift and to
recalculate the normal. This is the result
that we got so far. It's not perfect yet, but need more attention
and we should work on it. At the end of the day, we will try to get
something perfect and nice. I want to mention when
you add the glass shield, the glass shield will
be highly reflective. Because of that, you're
not going to see all of these details that we
are creating right now. There's no reason to spend too much time on these details. If you want, you
can make a symbol. Okay, that's it for this video. I will end it here and see
you in the next month.
40. 040 Focusing on the inside details part 1: Hello again, Welcome back here. A lot of details here
we should create. Let's start again, let's
go back to the back of you and let's see what's the next step, what
we should do here. All right, now we
reached this point. As you can see, I think we should find a way to connect
this side with the site. Because of that, I will
add two vertices here and these four vertices
and hit to create pace. I think we can grab those
to create one more phase. And here I will add one here, second here, and third
one here, I guess. Let's select those together
to create a phase. And those, those as well. Now maybe we can grab
those. All of them. And then if you want you can use an F
tool to create cut here in the middle or if you
like I will accept that. Now let's move on and
grab these vertices and hit F. After doing
that, I guess we can. Now let's move those up here. And I will select this
to exclude it like that. Now let's select
those over here at, to create the face, let's
start following this line. Something like that. Let's
start following this shape. We speaking hero, is he following this
girl like that? Okay, and let's go back here and let's see what was next it at multiple
times to add edges, but I think that's not
going to work unless we add at least two vertices here and redistribute the
vertices using space. And now let's see the progress. All right, now the
result is better. What about this area? Let's try to find a solution. I will grab all
of these vertices and to create in phase here. Here as well, I guess. Okay, we have a lot
of details here. I will grab this circle and move it there and
scale this at ten. It like that. Let's
connect them together. Those maybe one
vertex right here, silt, maybe we should add one
vertex here, Ilse together. And this I guess here I will hit to
extrude this over here. Or maybe one here and one here. Cbgethh's add one
in this area and the sills, something like that. Now let's see what's next. I will select this in it
to extrude it over here. And make one Exc in
here to create phase. And let's select those together. Or I guess I can
extrude this like that. And now what about this text? Extrude this over here. Let's try to create this shape, the control ptuivalt
to three like that to extrude this over
here and one extreion here. And you can align this with
this if you like rub this, hit control ptuivalt like that. Now let's select those together. It maybe this hit to
create phase here, maybe those will one here. Now I will select all of these vertices together
and I will hit F. Let's make one is freaking
here on the globe, is freaking right here. Let's add one cut here. And maybe one goes like that. We should go like this. All right, let's ignore this. Let's add one cut
goes like this. This one it will be here. This one I can't connect right here and can make
one cut. Goes like that. All right, the result
is ad for this area, I guess we can add here. Maybe we can create cut. Goes like that and grab
those M and Meerkat Center. Maybe we can redistribute these vertices with this or at least try to find the
solution for this area. I think this, I can dissolve it, use an F tool to
create a new one. Goes like that. Let's
use an F tool again. And let's create goes like this. Maybe one cut goes like that. Don't know, I will
ignore this for now. Let's go back here and
let's see what's next to. We should have three edges
and select to create face. And now just take up
these two vertices and it at multiple times. I think we can use an F tool
to connect those together. This one I can connect
right here and this one. It's okay to use an apple again and let's
create one cut goes like that. Maybe this one I can, let's make cut goes like that. I guess one goes like that. Hold, have to put the
cut in the center. But the question
is we should go. But I will ignore
this for now as well. We're almost finish here. Let's delete these vertices
or these faces on the side. We don't need them. F get
them this one as well. Delete this now let's see what's the next,
what we should do here. Now let's try to give
these circles a rim. Let's start with this one. I will grab the circle and
hit to create a phase. And I will hit for Inst. I will insert this outside. Let's switch to the x
ray to see the results. I will push this a little
bit farther like that, try to avoid any
overlapping here. For example, in this area, I will move this H a little bit or this vertex just
to avoid any overlapping. So now we have a rim
around this circle, we have rim right here. And this phase, we
don't need the of them. And for this area, I guess we can grab these faces. All of them. All right, before you do that, just grab
this hit to create a face. And here as well. Now grab
this face with this one. And hit control plus to grow a selection and go to the x ray. And then hit to inside. And hit out to invert
this inside to create a second or to create
a rim. Now we got it. I should have a rim
right here as well. I will grab these edges
and hit to create a face, I will hit again
and then hit auto. Invert this to create a
room right here as well. Then to delete this phase because we don't
need it anymore, even these if you want,
you can delete them. The same scenario here
to create a phase. And then I, and let's
create a room right here. Just scale this edge
and just to move it a little bit
far away from the, from each other to avoid the overlapping delete
this space if you want. All right, now let's
see what's the next, what we should do here. It's not necessary to add all of the details
that you see here. You can just add a few of
them and that's will be okay. I just want to focus on
this area a little bit. I want to extrude some faces. I will grab these, I will to put those inside a little bit now get rid of them because
we don't need them. Let's go back to the bag view. Let's see what we can create. Right here, I will grab the, it's for insets, make
small inst, auto inverts. I just want to create this
geometry as you can see. By the way, there's another
technique, if you like, you can do it like adding a geometry H. Let's
add, for example, plane. Don't add plane, Grab
this one, copy it, and let's put it right
here. Scale it like that. Scale this to this a little bit to move it and move it here. Or like that scale to
the shape right here. Somebody like that, I guess. Now control. I apply
the scale because we scaled it and I will grab the vertices control
to bugle them to three like that,
that will be enough. Tap out and select this. Let's move this a
little bit like that. I just want some distance now. Grab hold control and select the scometry
to the back view. And I will go to the
Choose Knife project. Project this on my
surface now we have a project after doing that X to delete these
faces if you want. Yeah, I will delete
them for now for a reason because I don't
want to be destructed. Let's go back to the
bag if you want. And let's move this away tab, and let's try to find a
solution to this area twice. Let's Mr this one here. Active automeric.
Don't forget that. Let's move this one over here. Maybe we can reach
these vertices. This one I can irk it here and slide this here.
Props with this. Hit J and use the knife tool to create
cut goes like this. We cut goes like that. This dissolve it for this area. I guess we can use an F tool
to create goes like this. Maybe one goes like that and
put this edge, dissolve it. Maybe one goes like that. One goes like this. Here's delete unwanted
edges because that's it, we don't need them
anymore after doing that. Now I can rub this
and hit and I can extrude this a little bit inside or you can
hit I for inst. After the inst, you can hit
Alt and push this down. Just attend a bit like that. If you want to push this more, that's okay. Do it all. This frame should be
extruded outside. Let's go to the phase click
and then it to extrude this, delete these phases,
We don't need them. I think we can keep them. It's okay to do that. We
have a room right here. I will grab these.
Before I extrude these, I will add Mal modifier. I just want to see the results. Let's go to the mirror
and add mirror modifier. Go to the back of
you. All right, tap it F to enter
recalculate the normal. And here we have an open area. I will grab and make
this one the active. I want to scale to
the active vertex. To do that change
the transform to the active element and
it as to the zero enter. Right now let's see
what's the next step, what we should do here. All right, here we
have two holes. I think it's not quite necessary to create them if
you want to create them, if you want, it will
be something simple, just rub the hit for int
to insert them like that. And then rightly can choose circle to make a
circle from them. You can rotate this
a little bit and position, put this right here. After doing that for in, then it out to put
this inside like that. That's actually, let's go back to the back of view and we have another one
here in this area. Let's see how can we create it. I guess we can move this
vertex a little bit like that. Maybe we can add an extra here. Maybe I can cut this area like that and use an F tool again to extend this
line here like this. I think that's will be okay. Let's go back here and let's see if we can
grab those together. Let's hit for inst like that. And then hit radically
into a circle. Let's move this, scale it a little bit king,
This back to bounding. Let's move this one over here. All right? And then I will
hit high for insight. And then hit out and
put this deep insight. We will have some
differences here. This one will be smoother
as compared with this one. I can make some kings here
to get a result like this. So how many vertices we have? Here we have eight, and here we have six. We just need to add two cuts and that will be
its. Make it simple. I will delete the he,
I get rid of them. I want to do is just
one cut goes like that. Maybe. Let's see how
can we apply this cut. Where to put. Do
we need this edge? Well, actually we need it, but I will delete it for now. I will add one cut here. We have seven vertices, we just need to add one vertex. All right, one vertex to
go, one vertex to go. Maybe I can add one here and use an app tool to create
a cut. Goes like that. That's not going to be perfect, but I will accept this for now. Rightly, can a circle go to the back of you and move this
input in a place like that? I will hit, then hit, insists, push the step
inside like that. I can mirror this
vertex right here. That's okay to do. I think we
can connect those together. Hit K if you want. Even these vertices hit
with those as well. This one with this one,
hit K, that's great. I think we can grab
these faces and then hit a extrude
along the normal. Or there's no reason to use
extrude along the normal. Actually, here we will
have a face in the middle. We don't need it. Delete it. That's what is X. To delete this one. E, E. All right. Can focus on this area as well. I will grab these faces in it to extrude them a little bit. All right? Is not
going to the correct. That's why I'm going to use extrude along the
normal and see the results. All right? That's and maybe these as well out and
extrude along the normal. To extrude this a little bit, let's add subdivision surface. I just want to see what's going
to happen with level two. The results still not perfect. We could add extra cuts just to get a good result.
Let's work on that. I will turn off the
subdivision in the It mode. When I tap out, I
can see the result. Let's see what we can do here. I think we can interrupt the grow the
selection like that. And hit, for instance, to create a second H loop. To invert it to get a result like that, I
think that's too much. Let's make it closer. I think we can add one H. Goes like that and
dissolve this, I guess to get a Tabor shape. Now let's add one H here, and one here, and one here. The result now is nice, but this area needs
to be beveled. I will hit control to
bevel them like that. And I will change the shape, push this to one
just to get sharp. The result looks cool. Let's go back to the back
of you and let's see what details we could add. Right here, I will
to grab one of these vertices to take a co, let's put one right
here to this here in one ex and one goes
like that, I guess. Let's keep following this shape now Let's scrub the corners and hit control,
including this one. I will change this 2.5 because I want to
have a curve here. This one cantrolvlent like this. I guess we can interrupt this. Get a big face here and let's add multiple
cuts in this area. Maybe one cut goes
like that, I guess. All right, what else we can do? Maybe one cut goes like that. All right. After that I will stop here because I just
want to check something. Okay, after doing
all of that will un this to use the rap tool as we did in the
previous videos, I will use this Oper
to create a U V shape. Let's see what's the result that we got right here.
This is the UV. It goes like this, it
goes to the Z like this. What I want to do is I want
to rotate it to be like that. Something like this. The idea is I just want to
rotate this a little bit. All right. To do that we can
control it in the UV editor. Just split the editor to two. And I will change
this to UV editor. And I will grab this,
push this back. Now I will tap to go
to the edit mode for this geometry. This
is the results. When we use the UV shape, what I will do is I will
delete it to reset it. And I will rotate the UV like
that control and rotate it. I will try to put
it in the middle. This maybe scaled a little bit and move it up, for example, right here, that will be it out. All right, now I will create a UV shape using the active map. Means this map right here. It's very important to active this option after you
make your changes. Now let's create a UV. And now let's see what we got. Tab out. All right. As you can see now
the result is better. After that, I will
grab my new geometry. I will try to align it. I just want to see the result. I will take a copy right here. And go to rotate. Rotate to the Z like
that one degree, then rotate to the X like this
are to the X nine degree. All right, minus the
x, minus nine degree. Go to the top end. Let's try to align this with our geometry. And let's see what
we will get if I align this perfectly
with this geometry. Now when I move
that control back, I will get very
accurate results. This is the challenge
that we should do here. I will take a coby of this. What I'm going to do is I will
go back to zero like that. I'm just going to leave
one cover right there at D. Take another coby like this. Now I will grab
the second object and I will push this to one. Let's try to align
this with this. I just want to see the results. Let's try to find a way to
deform this a little bit. To match this shape, let's put the three
crosser over here. Maybe we can use the lattice. Let's add the lattice, and let's kill it like that. Make it pick and
kill it to the y. I'm here, I want to try and
see what's going to happen. Let's go to the right,
to the Z and skill this. Let's move this up
here like that. We go to the top. Maybe we can scale it a little
bit more like that. Now I will look up
this Uma three, hold to grab the cake. Head control and s lattice
to link this to the lattice. Now when I tap and
dep any vertex, I can deform it, as you can see. Let's try to deform
it a little bit until I get the result that I want. When you deform
it, these circles will be affected,
as you can see. But that's okay. Let's move
this up here and dep this. Let's move it like that,
and those as well. Maybe we can add multiple
cuts using the X and Y. All right, we can add
multiple cuts here. Let's grab these and let's
move them down like that. And grab these and scale
them to the center. Maybe scale these a little bit more or move them down ten bits. We can add one extra. Just fix the deformation
because that's too much. Actually, let's move
these back a little bit. You can focus on one side and after that you can re
mirror the other side, deform this area as well. The result so far looks cool. If you are happy
with this result, you can delete half of it. Tap and the coup this Caroll A. Go to the modifier. Delete the subdivision. We don't need it for now. Mirror for the mirror.
I guess we can. Let's see what's going to even I am not getting
correct mirroring. Maybe because I could
move the deform right here to get better results
And yeah, that's right. Maybe we can move the
cage with the Juma. Try a little bit like that. If you are satisfied with the
result, apply the lattice. And apply the mirror. I will move this new cape underneath the guide key
to the end. Less, move it. Put it underneath like that. Let's delete the cake now. I will bind this with the guide. Grab this humetry endless, a surface deform endless. Pick our guide like
that and to bind them. Now I will grab this
and push this back, and I will grab this to hide it. I just want to see the result. This is the result.
As you can see, the result is beautiful. But we got some distortion, as you know, because
we used the lattice. But in general, the
result is so beautiful. What I mean here is this method is working and it
will be very nice, especially if you use
subdivision surface before you deform it, it will be very
beautiful result. What we can do,
what we should do is we shouldn't add
all the details here. At this stage, we should create the shape and then deform it
and make a trod. After that, we should
fix the circle after the deformation and then use the guide and
get this result. Because in here you can edit these vertice circles to get perfect circle because we have a curve as
you can see here. I just want to check
something else. I want to excite.
Let's hide this. To hide it, I just want to
see how this applied here. Well, let's a light
in a nice way. I like it. I think it's cool. Let's circle up the
image and move it away. I think the result is so
cool and we can accept it. All right, I will end
this video right here, and I will see you
in the next one.
41. 041 Modeling the camera sensors behind the glass shield: Hello again. Welcome back. Let's pick up where we left
off in the previous video. I think we have more details. We should before we
deform this or maybe after you remember when I added multiple edges here
to make this sharp, that's not correct
to do right now. Be after adding all of this, we could deform, it
could fix these circles. Again, as I explained
in the previous video, I will delete these edges
and I just want to make a symbol and maybe now we
can create this border. Let's go to the
back of view end. I think we can grab, for example, this hit the
end. Let's take right here. And let's hit extrude
it like that, I guess. End. Now we can start extruding these vertices
and follow this care. Okay, but I think that
will take a lot of time. Let's see if we have
another option. All right, let's
start doing that. I will grab this vertex and hit, and I will follow
this curve like that. Okay. If I bush this vertex
towards the center. And beyond that you can see
we have an overlapping, to avoid something like that, just active clipping
option here. Now when I move this again, it will snap to the center. I will delete these vertices. Hit X V, we don't need them. Let's try to find a
good way to extrude these vertices. Grab
them like that. And I'm going to hit to
extrude them like this. Then hit A and
then have to enter recalculate the normal
with these phases selected this phase
click I will go to the Phallate Phil phase, Solidify phase. Let's go to the bag of let's give this a thickness like that. Yeah, I think that's it. When you come belt, let's focus on this area. I want to grab this face here, XF and get rid of it. And the middle end, this
one right here as well, F. Now I will grab this
face like that. Click and then hit
control to G one time. Hit X to dele. Now we
ended with the results. Just move this vertex towards
the center like that, grab this, its x
zero and flatten X. It key to move them back to
the X to snap them again. And maybe those as
well if you like. And move those, maybe
all of these vertices. And move them back just
to snap them better. Okay, right now let's check this area here. We have an overlapping
with a few key twice to. All right, I want to see
what's the best solution here. Just light these like that. And let's go back to, let's move this a
little bit like this. And that will be enough. These vertices, I can grab them and just
move them back like that. I will look up this and
dissolve this edge. I just need to have a cave here. Or maybe we can use the volt
control tools like that. Maybe we can scale this a little bit to the position
of the three decosor. Let's change the 23 decosor
and scale those like this. Let's put the three decossor right here and scale them again. Or maybe right here. All right, I think we have
multiple edges here. Let's bring the reference Mage
to see what we have here. We can see we have a rim. I guess we have more
than one level. Maybe we can create a stat, Let's make a symbol for now. If we could add any details
here, maybe that's it. Let's take a look. Let's try to create. Let's focus on this area a little bit. Let's go to the back. And what we should do is, I think we could
grab these faces and B and then put the three cursor,
for example, right here. And scale them towards
the three cursor. But I think if we do that, yeah, it will go far away. In this case, what we should do is I hit scale and cancel, I guess the y axis, hit S, Y to cancel the y axis to scale y and scale to the z and
X to get this result. Now I will grab these edges. Hit to scale Y to
cancel the Y and scale this a little bit more to
give this some thickness. And maybe we can fix the
distance between these edges. Do we need to do that? Let's hit you to move this a
little bit like that, and maybe this one as well. I'm not satisfied with
this result actually. But let's try to
find the solution, and let's try to fix it. Let's see. And let's
pull this over here, up these radically space. And those as well, maybe
those right here space and those over
here space, right? Something not makes sense. I will hit key. And
move this over here. And redistribute these twice. And let's move this
down maybe here, grab those together,
right, space. Okay, something like this. I think we can
accept this result. Okay, anything else
we could do here? All right, now that's it. Now let's hide this piece
of the glass and let's grab the guide and let's see, do we have a controller or not? All right. We don't have
the controller anyway. We still have the UV ready as we did in the previous
video option right here. The active means this map here. This is the active map. Let's tap out create UV shape. Let's put this to one like that. I will tab of this, I will move the Encarighttrol Applied Vehicle
Geometritom Guide. Still exists in the
controller still here, but I want to use
this as a guide. I will rotate this to the X and let's rotate
this nine degree. Just hold control and
go to the back of you. And I will move this
behind the sinew shape. You can put this in the center. And I should do this. I will to put the three
Questor in the center. And I will rub this. I
want to grab the middle. I think we apply We apply
the subdivision surface. Yeah. Actually, we don't
need to do that. All right. I will tap out
and I will delete this. I just forget that Chef
D to the Cob here, we don't need all of that
smoothness subdivision with level one will be okay. You can apply visual
humantumationowter x, rotate this net degree. Let's, let's grab
the middle edge and put the three
decosor right here. Let's put the origin.in
the position of the three Decorsor origin to three decorsor. Now
we have it right here. Then I will shift to put the three
decorsor in the middle. And I will grab this
shift and select decosor, put this perfectly
in the center. Let's move this forward and now let's try to align
these together. I think we can
grab them to go to the local mood control one. And now let's see
what's the next step with this one Selected
for this one, I will hit you to move this
up here, I will grab this. Maybe I can put the
three decossor over here to scale according
to the position of the three decosorIilh, this one scale like that. And that's it. Now,
after doing that, now we worry about this area
and see what we can do here. For the subdivision surface, I will change this to one because one will
be okay. For now. I will hit and I
will add lattice s, x and skills Y to the z, like that key to the z, and smooth this up here. I think that's it. Don't worry about the depth.
Don't worry too much. I will grab this, so have
to grab the cage control P and Q lets deform to
connect to the lattice. I will tab and grab
these together, I guess. Let's try to scale
them like that. I guess something like this, maybe we can start adding multiple cuts to
control it better. Let's see, let's try, will see what we will get after we move these up here like that. Let's move this down here. You can go to the X ray to
see the difference those hits and push them
far away, like that. All right, I think that's
not going to work. Maybe we need to add
more segments here. Let's add more to
control better in the Z. We should maybe multiple cuts. Let's grab this.
Let's move this down a little bit to align
this perfectly. What else? We should
add more cuts here. Let's move this down here. Let's grab this, slide it
a little bit like that. You can focus on one side
and that will be it. And all right, that's great, and let's movies like that, try to spend time here because this tip
is very important. Maybe we can interrupt those
together and move them up. Maybe just this one, I
guess something like this. Everything else is perfect. I think now we got a very
cool and accurate result. Yeah, that's, that's
really great. I know I have some
distortion here, but it's not going to take
too much time to fix we. After doing all of that, you can now go to the modifier
and apply the lattice. This area will be
fixed automatically. I, we still have some
variation right here. Let's spring back the
lattice and let's see if we can fix this. Fill up the lattice and tab. And let's move this just
a tiny bit like that. This, Let's move
this a little bit. All right. We have
some variation here. Maybe I can in up this one and move it down
just a little bit. Yeah, now we are getting
something nice and tab, and grab this geometry, apply the lattice, And let's see what's going to
happen if we apply it. Great. All right,
for the mirror, I guess, I don't know, maybe we should change the
position of the origin. Do well. I think so. Let's grab our guide and
let's put the three D course. Just align three dicursor to
the origin dot of the guide. Now I will select our me and tritically set origin
to three dicosorow. I just changed the position
of the origin dot a tiny bit. That's will help to get a perfect result here
similar to the side. All right, let's me
now this become ready. Maybe now we can just tab
and go to the tag view. Again, in the x ray we can grab these vertices it
to the X zero enter and then it key to the X to snap them perfectly to
get cleaner results. Now after doing that, now
you can add all the details. Now I don't have any problem
because I just get my shape. And now if I align this with my guide and use the rap tool, I will get something
very cool and nice. Okay, it's like to excite. I don't need the guide anymore. Everything now is perfect. Delete to delete it if you want, you can hit H to hide it. For this piece, I still have
the control and don't apply anything and don't play with it because you're going to run everything the Blatte can. Delete it. I don't anymore. Now let's go to the back view. And I think this
image is not useful. I can use this image instead of this image
inside blender. I think we can grab this
and hit to isolate it. Now let's see what's the
problem. Let's grab this. Hit right click, and circle
to fix these circles. All right, we have a
lot of job here to do, but let's try to do
with step by step. Let's scrub these
edges, all of them. Let's radically circle
this one as well. Just forget it.
Let's take a look. All right, we have some
overlapping right here. I don't know if the size
changed a little bit I, but I guess we can. All right, I think we need
to add a cut right here. Something that makes
sense happen right here. Let's use the tool and let's
see if we can cut this area. That's not going to work. To delete this. Just want to see
what's going on here. Let's delete this one as well. Wise to slide this here. Now I will grab this F. I will use an F
tool to create cut. Goes like that for now. Now let's jump to the circle. Let's grab these
edges like that. Let's select them. And
then radically can choose circle for the circle, the same scenario, go to the pack and let's
move this up a little bit. Everything else is okay, I guess for this shape. All right. I think we could
focus on this a little bit. I will take, just say I can take a coby
and I will scale it a little bit and
use it as a guide. I will move this here, Maybe we can hit and
thes to separate it. The idea is I just want
to use this as a guide. Now let's stop and let's
start moving these vertices. And align them with our
guide like that, I guess. Let's focus on this
area and let's move this a little bit.
Maybe this one. The same thing we
could do right here. Grab the guide, tap it, Avty and take a copy here. And the scale is a
tiny bit like that. Tap out, grab the Uma train. Let's start moving these
vertices in the x ray. Rub these and move
them right here. Maybe those, I can rub them,
and let's move them here. Maybe these as well. All right, let's see, is there
anything else we could do? Maybe now we can
focus on this border. Something not makes
sense happen here. Let's grab these aces. And from here maybe to here. And let's radically and relax. Let's see if that's will affect
the result a little bit. Have to to relax again, I think we should move
some of the vertices. I will use proportional editing. And I will hit you to move
and make the effect pick. But when you move,
everything will be affected. In this case, you can
choose connected only. And now I will hit
you to move and make the effect a little
bit smaller, not that big. Just move this a tiny bit, not too much G.
Let's move this a little bit. Let's
move this like that. Everything else looks okay. Maybe here. And let's
move this a and a bit. I think we can exhibit results. And let's move this
a bit like that. Maybe I can slide this at a bit. And the turn of the
proportional editing to grab these and to relax, maybe just these
and those as well. Grab the hit relax. What else? I will hit control to
add one right here and I will level hit control
Beivalent two like that. I think we should give this a thickness before
we do anything. Control to select this I
just want to focus on it. And I will go to the pace
and choose Solidify phase. Let's push this back like that. These phases in the middle, we don't need them except get
rid of them here and here. Now I will a grab these faces. And then I will hit for
inst, inst, outside it. Then with these selected faces, I will hit out and
push these inside. Then you can hit controller to add a support edge loop here. Maybe you can add one
here and one here, I guess right here. Now, when you tap out, you should get a
result like this. Now let's see what
else we can do. I will move this
vertex a little bit. I will grab these faces
and hit Control plus, and then hit for Inst. Oh, to invert the Inst
outside because I just want another extra edge loop to get harbor result
here. I will grab the. Then to invert the inset inside. Let's tab and see the results
radically auto smooth. The result is nice
and beautiful, especially if you
increases to will be nice. Let's focus on this side
control plus a gross selection. And then hit for int to invert. Create a rim like that. Grab the hit and
all right, cool. But I just forget to
fix the circle here. Grab them. All right,
like a circle, go to the bag and let's change
the position a little bit. We should do the same thing for the circle and for
this one as well. Maybe we can rub these and
just of them at ten bit. Right now, I will go to the
phase to select these faces, the control blast,
to grow selection. And then hit and to
invert and control minus. And then hit and make an insert like this.
Then let's tap out. Still cool, I can exhibit this. What else we can do here? Here, maybe we can
add an edge here. Right here that
is of the school. We can do the same. Thing on this side. Control. To add one here. We got up this control
x to dissolve it. Now I will. All right, I just want
to create a room. Okay, to do that, we could
select these faces first. Hit control blast multiple times until you
reach this point. And then hit for instance. And then hit to invert just
small room, it will be okay. Then control to add
up here, one here, one here, maybe one right here. One more thing here,
I will see ladies faces and hit P and then to separate it because this area should
be separated, I guess. What about this area? Click control for inst, create a rim like
that control to add the second here go to
the click control, dissolve control, a support, the Ge look to make
this area sharper. Now we got this result. Okay, this result is very
nice. We can accept it. Anything else we should do here? Maybe this area needs a
little bit of attention. Let's go to the back and let's
see what we can do here. I think we can
move these spaces. We can fix the distance
between these edges like that. Right click and choose space. I guess we can move
these as well. Okay, what else we should do here if you are satisfied with the result at extrude along the normal and extrude
this a little bit, these phases, we
don't need them. Actually hit ing
of them at click, then hit Create like that
control to add a second, grab this control, dissolve it. Control R H here and here, and one right here
and one here as well. You can actually,
I will leave this. I thought I can dissolve it. What about this? Uma three. I think we should give
this a bit of thickness. I will go to the
phase, solid phase. This thickness, it will
work. I can accept it. All right, grab these
H control to bevel them and the grab
these edges again. It can roll again. At least add three cuts here. You can delete this
one and this one. I'll click it Xf and get them. I think these faces, we need them, I guess. But in this case what we can do is I will hit to
Ins and then again. And to invert this insight what's, what's happening here.
42. 042 Adding more details for the structer behind the glass shield: Hello again. Welcome back here. Let's spend more time here. Let's focus on the details. Let's start with this piece. Okay, let's use an I have tool to create a
cut goes like this. One cut goes like that, cut from here to here
and one here, one there. It's space to
confirm all of that. If you have faces on the side, you don't need them at X, F. And get out of them. Now let's go to the
x selection mode. I'll click and I'll
click to grab the rest. And then control would
be to bubble them, but let's include these control
and let's bubble these. Now we've got sharp,
nice results. Now let's try to create
these three lines. Maybe we can add,
we can add actual. Let's see what we have here. You remember this piece? We still have it. I'm
going to use it. Rub it. It's key to move it. And let's put this right here. It to rotate it like that, maybe we can scale
at a tiny bit. Yeah, that's okay. Just kill it. Maybe we can rotate
a tiny bit like this and move right here. It shift to take
another by here. And I will scale this
to the z. To the Z. Or maybe I can activate Gizmo local just to see
the local direction, we should scale this to the Y. In this case, if I want to
make this a little bit bigger, I think we can go to the
mode and make this taller. Instead of scaling this, let's grab these edges. And so this like that, I need another coby
and maybe I can grab this and shen
put this right here. All right, now I
will grab this tab and I will project
these on the surface, but just be careful
when you do that. Okay, I will accept this result, but before you do anything, grab them like that control, make them one geometry and then grab this
tab. Hold control. Just rotate the view like this. Don't hold control and grab them and this
geometry behind them. Just rotate the view and move them away
from the geometry. Hold control and grab them. Control one to go to the back view and
then go to the mesh. And then knife project. And now they are
projected top out. Grab this and move them
away. Grab this and tap. Now we should make
some changes here, like merging some vertices
active automeric. Don't forget that. Maybe I can slide this here and this one
here and make some change, like marking this more
right here and right here. Maybe we can make it here. Okay. What else we can do here? Maybe this text, we can
make it right here. I will make a lot
of change here. Maybe I can mark this one
here and this right here. Okay? All key wise. And let's move this like
that, let's slide this down. Some of these areas, maybe
we can dissolve them and create them in another way. Here, I guess we can, I don't know what
we can do here. Maybe we can create
cut like this and key twice and move this up. All right on this side maybe we can create
multiple cuts. Use the knife tool
to create cut. Goes like that and
ke wise to emerge, this one here, use the knife
tool again to create cut. Goes like this. One
goes like that. Maybe one there use a knife tool again to
create another cut. Goes like this, folks on the side to create
an goes like that, one goes like this, maybe this, maybe another cut goes
like that, I guess. And one goes like that. I think we can redistribute
the distance between these. Let's see what's
going to happen. Maybe this edge,
I can slide like that wise and move this up here. And one cut in the middle, I guess, and another cut, maybe it should be right here. Let's redistribute
the distance between these edges starting
from here and end there. Let's see what's going
to happen if I do that. We still cool. Let's use the knife tool. Let's create another cut here. And maybe one right
here for this one. I can, maybe we can end it here. Let's fix the distance between
these edges using space. All right, n I'm
not finish here. Let's cut goes like this one. Cut goes like that. Maybe I can end it here. I think that's okay. This one, I can end it right here. And it could be connected
here, something like that. Or maybe this one could
be connected here, here. And delete this.
Age is always one. Cuts for this corner. You can maybe here, I don't, maybe here, it's okay to leave
this side triangle. Okay, Let's see if we
have another option. I create an H here, but where we can take it, I think we can end it
here and dissolve this. Okay? That typology
is not perfect. But I think it will work. Listen, like the faces. And let's hit for inst hit ought to invert
the inset outside. Let's include these,
I guess forget that, hit again, it ought
the inset outside. What else we can do here? I will hit again and it ought to invert
this inside this time. And strat the view, hit Alt and push these
a little bit deeper. Now, hit again for another inst. Let's make some connection here between these vertices
to get better typology. Call this with
this. This vertex. This K P, This on I guess. All right. Still nice and cool. I can feel that we
have some waves here. Let's try to use the bute, the vertices and relax. I guess that will help to
give us better result. Now let's stop. Now the
result looks smoother. Maybe we can include these vertices and use the relax to give us
even better results. Yeah, now the result is better. Anything else we could do here? Okay, let's start
creating these sensors. I just want to grab this, it's like to isolate them. Let's go to the back. And I will grab this
circle and use it. D take a copy. Right click to leave it
in same place and scale. Just a little bit like that. It to fill it with face and extrude this
just a ten bit like that. And now let's grab the site and all right wise I guess alter
and move back like that. Let's give this some thickness. I guess we can grab these edges and just
hit and push those back at a bit. What else? Let's go to the face and let's stick these inner
faces like that. I will hit four ins and hit at, invert the inset outside. I guess we should grab these
faces and just extrude them. I feel that we should have
a small extrusion here. Let's hit to extrude this
control to a grab, dissolve it. Let's make this a sharp, adding extra edge loops
around the corner. Just Pavle, that's here, we can do here. All right, I think
we need another Ram. I will this edge loop like that, it can blast multiple times until you reach this
area and then hit I. Let's make another inset
outside like that. Let's add an edge
loop here to make this area sharp. That's cool. Now I will this, I will hit for
insect and hit auto, invert the insect
inside like that at, to this deep inside. Hit one more time. Now I will grab these faces
and extrude along the normal. And put these faces
inside like that. Now I will grab this hit, to extrude this forward,
cantllt the bullet. Let's make this nice round,
something like that. I guess maybe we can
scale it and make it flatter and we can
push it from the back. I don't need this face or
I think I can keep it. That's okay to keep it. I
think we can pivle this. Hit control and just pavle S. I need a second
a sensor here. I will grab these edges
and hit the back. Don't worry too much
about this area, just grab this hit. And to invert the inst outside. Now just to grab control, ambivalent and try to get
something around and nice. After doing that, you can grab one of these edges,
for example this one. Take a copioatically
scale inside like that, make it smaller. Then to create a face this
a little bit and grab this, it and put this back, that control
beubivalent like this. Grab this face. To make
an inset like that, I guess we can to make another inst and another
or another inset. Let's push this deep using Alts. And then hit I again to make
another inset like that. Okay, to push this
deep inside like that. And then D to take a coby. Then I will move this
new by forward here. Maybe I will hit to
extrude like that and then hit control tobivlet to get
something around like that. Hit control L to lens or don't hit anything,
just accept it like that. Let's add extra edge loops
to make this area sharp. Maybe this area as we
control are to add an edge loop here and one
edge loop here and here, tap. And let's see the result.
Very cool result, but I think this area
should be covered by something like rubbing the E and then S to
extrude scale and put it like that
and cantro to Vl. This to three I guess
the same thing. We can do it right here and
then cantrol to bevel this. All right, now maybe here
we can add extra gel. It cantrolB, beuvle this, rub these like that, and
then cantrol to bevel them. Okay, very cool. The sensor. It seems like a
similar to this one. But I think we are
not finish here. I think we forget to do
something important here. I will D to take a copy of this to fill it with the phase and then it to make an insert like
that control L. And then, and then to
supp want to focus on this tab again and
the grab this phase. Then it extrovllet just active clam overlap to avoid any overlapping. After that, make sure that
we have one vertex in the middle at m and merge by distance to merge
all of these vertices. Now it can troubles
multiple times to grow a selection like
this and scale at mixed flat And let's move
this pack like this, but I think that's too much. I think it should be flatter. You can grab these edges and fix the distance
between them. Right click and space. That will give us
better results here. You can I guess,
grab these edges, control L and just move
this a little bit key to the Y then and push this back. Attend a bit, click, click control, and just
pile them with three edges. I think that will be enough. Or if you like, you give
this some thickness. I think that what we should
do here, I will cancel this. And it's like to
isolate this piece. I just want to focus
on it a little bit. This new exclusion
that we made here, I will cancel it X
and get rid of it. Let's give this some thickness. Using solidify, active even thickness to get better results. When you combinate
cant apply this, I can grab the important edges and bubble them control and
give them a nice bubble. Now you can tap out right click head to smooth. And that's it. I guess we can use this and this piece to
covid ambu right there. I will tap and control L. To select these, I just want to include this control L. This with this control L, go to the back shift, take a co of s. Let's put this y here, try to center bullet. I think that will be enough. Let's move this a
little bit forward like that, but not too much. Just be careful. Maybe
I can push back. Let's have to go to the
mode and now let's see, grab this ages and push this deep inside like
that and then it, and then and go up this
control to the bullets. It's very cool. Anything
else we could do here? I don't know what's
going on here. There's a lot of stuff. Maybe we can focus on
this area a little bit like rubbing this
face hit to fill it. And then I can hit to
make an insert like that. And then I will hit to extrude
this bag like this and control me to bevel it to the Z. And let's move this like
that skill it a little bit, maybe controls just
selection a little bit. Maybe we can make it flatter. But what I want to do is I want, I don't want the skill
to effect this face. For example, if I hit skill. These phase right here,
they will be affected. To avoid that, we can swing this to the
active element and make one of these edges and scale to the Y again to the local Z. You can change this
back to global if you like, and use the Y. The idea is I just want
to make this flat. Now, I guess we can grab these edges like this and triticale space to fix
the space between them. This area x deleted. Grab these edges and go
to the face and crit. Phil, I think we can spin this. Yeah, this result looks
cool. I will accept this. Maybe we can level
these with three edges, but push this to one because
I don't want any curve here. I want to make this car.
Before you do that, maybe we can grab the
and a little bit, it can roll at one here. Control to level
this in like that. I guess we can grow the selection and go to the face the selection
one more time. And I will hit for intends, or actually don't do this
first, to grab these faces. Grow a selection multiple time until you reach this point. And then hit for ins. Then hit auto invert. I just want a rim. I will grab this edge and this edge and hit
control, dissolve it. Now I got rim. Okay. Anything else
we could do here? Okay, after creating all of all of these details, we could give the
surface thickness, but I will do that later. Maybe we can focus on
this area a little bit. Let's see what we can do here. Let's grub, and I think we
can select these together. And just to create a face here, I will hit to make an inset. And hit ought to invert
the inst outside. Now I will grab these faces
and then I will hit to extrude this at a bit like that control to add
one edge right here. Grab this control
and dissolve it. I guess we can grab
this face controls multiple times until you
reach at this point. And I will hit I again and
it to invert the inset outside the X F and delete this face, we
don't need it anymore. Can roll out to add
an edge loop here. And maybe I can rub this
control to bivalent. Let's create an edge loop. I guess we can rub this
and exclude it back to create a face here. It to make an set to here. And I can, in this time it ought to invert this inside
before boundary. I want to get rid of this age. You can see it. Now we got this. You can create multiple
cats goes like that. For example, one cat goes like that, one
cat goes like this. Maybe one cat goes like that. I think that's it. Maybe
one cat goes like this. That will help to
get better typology, better shading when you active the subdivision surface
when you tap out. Okay. Anything else we can do here? I think that's it
for this video. I can't end this video here and I will see
you in the next one.
43. 043 Using the wrapping tool add one to put everything in place: Hello again. Welcome back. Let's try to finish this part. Let's activate the
screen cast first. Now let's see what's
the next step. Maybe we can start
with these pieces. This one, I just want to
give a bit of thickness. Let's see what we will get. Grab the control
L, I will hit Alt. I will go to the phase and
choose solidify phase. Let's give this a bit
of thickness like that. Maybe a little bit more. Hit a, have to to
recalculate the normal. All right, maybe now I can
grab these phases like this. And then hit for inset
and hit auto invert, the inset outside and
another for inset, hit auto invert again. I will grab this edge loop
like that and I will hit control tobi valet and the
grab these new edges again. And it control be
again to Vl them. Now let's now we've
got nice frame. I'm not going to spend
too much time on this. I will accept this result. I think we can
create a frame here. Let's try to make it quickly. When you go to the
faces like that. And then he take a coby like that to leave
it in same place. And then hit, and
then let's grab this new coby and just
hit Key to the Z. And let's move this down a
little bit and then hit Alt. I always forget just
go to the pace and solidify phase to give a bit of thickness and
something like that. That will be nice and cool. Now I will grab the sharp edges. You can go to the
select and select sharp G. Then just double them. Control, double it like that
can support the lobe here, if you prefer one, support the luber here,
something like that. And o, the result will
be nice and cool. Okay. Okay. Anything else
here we should do? We have multiple holes. If you notice,
let's see if we can create them that easy to create. We will create them. We have one right here. Maybe I can grab these two
faces and then hit in. Maybe we can scale
this a little bit. I guess we can
subdivide it like that. And then trac, create a circle. And I will scale, then hit
this back inside like that. And I think it
should be smaller. I will hit Control
the end scale this a little bit and then it
and push this back. After doing that, hit Control
plus to grow selection, and then to inset
and auto invert. Then I guess we can
grab this loop. And hit control would
be to bevel this to two like that and grab this with this control
again to rebivl them and add one
support loop here. Let's, let's see
what we will get. Very nice. Like can add support
loop here and the result. Still cool. Anything else you can do here? Okay, It's still big, but that's okay. All right. Okay. Now in the middle, I think we can create
a piece of glass. And I think it's important, not just that, I
think we need to add a second layer just
to hide everything. I mean, you can these like that, just to grab them like
this and then hit F, D and right to leave
it in the same list. And then hit and
then to separate it. Now let's focus on
this just for the new, grab this with this and hit F to connect
them in the back view. I will add multiple
cuts, maybe three. I will move these a little bit to realign them
in a good way. Something like
that will be okay. I guess, I guess he
created this line. I want to use it as a
cover to cover everything. Maybe we can redistribute
the vertices because That's too much actually. Right click and space, I think we can reduce the
number of the vertices just to. Okay. I think there's another
way to create this cover. I think we can corrupt
the same object we used and boot bag here. I think this technique
will be better. I can do that later. I'm not going to worry
too much about this. I will this, but
instead of that, maybe we can give
this a thickness. The outdoor edges,
Just select them all and just grab
them like that. And select these over here. Okay. After select all
the necessary edges, I will, I will hit
and push these back. Give this a bit of thickness. Now maybe we can target
these ages and Bible them. I will hit Control Blast to grow selection and then go to
the face selection mode. Actually the face should
be selected as well. Now they are all right. After doing all of that, I will hit for int and hit ought to invert
the inset like this. To get a resolve like that, just take a quick
look and see if you have any overlapping,
any problem. All right, I think that caused
some problem right here. All right, to avoid
the problem here, you can add these phases. The selection just
add them like that. Let's add the alto and
these phases right here. Let's see if there's
anything else we could do. I think now we're already okay. Now let's hit eye again. All right. Now the result
is better. All right? Now I think we can erupt
these acres and double them. But something here,
or not, makes sense. Let's see what's the problem like this. And make this one active and
scale to the active element. And make it flat like that. Just mirror them. We can do the same
thing for this area, grab these, make this one
active as to the Y zero enter. Okay, that's very cool now maybe we can
erupt these edges. Again, there's something
here that makes sense. I think we can
delete this phase, get rid of it, and let's see
how many edges we have here. X to delete this edge, and X E again to delete it, X. All right, let's
bring this back. I'm just going to
sell like this. And hit M and Merc by distance to see if there
anything should be merged. We can add one cut
goes like that. One for example, goes like this and the club put this hit F multiple times to fill this area with faces. There's another
technique actually that's a little bit annoying. We can delete all of
that and rebuild it, but if you don't want to
do this, that's okay. Let's Segal out these.
Hit and merc by distance, we have an extra right here. We don't need it.
Hit X to delete it. This one as well.
Now it's ready. Let's add one, cut. Actually, I think we
don't need to add any. Select these, I'll click Grab
the head to create a phase. Now select these edges. I'll have to click to
include these as well. Okay, this that we add here
will cause us some problems. So I will dissolve
it and ignore it. Let's grab these
edges right here. Those now let's try to be, let's see what's
going to happen. It's better to
focus on this area because everything
else will be fine. But here we have
very close vertices. That's mostly, we will
have a problems here. I think we can include
these as well. Then control would be to Beivle three to two edges
and you can see the problem. What's happened here, I will
ignore that ambivalent. Anyway, manual, I will key wise and modes like that and do the same
thing for the site, key wise and mood. You can merge it or I
know or you can just and move it back here. I see some problems I
think we can get rid of this age or even this one. Speak a symbol. Let's jump to the side and let's
see what we can do here. Maybe we can slide
this a little bit now. Let's see if we can
select these edges. Grab them like that. You
can include this. Okay. All I will select this,
the same thing here. Crop these edges. All right. I just want to move this edge, but if I selected, I will lose a selection. I will go here and assign these edges here so I can
rub them when I select. Let's move this
one. Let's go back, select de, select this one. Go to the face and
go to the loop. And choose boundary. De, select this. We don't need to include
it in this one as well. Let's see if the selection makes sense and include these as well. I think we are good here. What we should do
is just pivolet I will hit control would be to pivole these to three edges. Now we've got very nice pivot. Let's tap out and let's see
the results we should have. Nice, let's focus on this area. The result is nice, radically he smooth, or head
outer smooth, if you like. For this part we didn't give this loop grub val
two like that. Grab the outer edges, it control to val them with
three edges like this. Let's stab again and let's see if there are anything
else we could do. Maybe we can add a support
loop here that will help to make some stuff okay, radically head auto smooth. Is there anything
else we forget to do? Let's go to the right view. I just want to see if
there are any variation. Anything we push back so far, everything looks cool and nice. Now maybe we can open this and align the sew geometry with this to see the result. All right. It seems like we got
a problem right here. I don't know why
that's happened. Did we move anything
accidentally? That's too bad. Let's
move this back. I don't know what's
going on here, but some vertice seems like
posted back for a reason. I don't know why that's Let's
try to fix all of that. Let's turn off the automery, Grab this to create an H here, and grab these three
G to create a phase, use an tool to create cut like that and delete this
with this Carol. Dissolve them and grab this
vertex with this vertex, hit J to create a new line here. I think now we fix it.
I think that's it. Let's delete unwanted faces like these circles.
We don't need them. See, is there anything
here we have to detach? I guess we can grab
this control G and make them one geometry for now. After doing that, maybe we can grubhub the guide and
push this to one. And I will select this
and move it in a place. You can put the three D
cursor in place if you like. Right leg. I mean in the three crossor can
put in the middle right, set origin to geometry. If you do that you
will get a problem. In this case we can
go to the origin and push it manually like that,
and put it in the middle. You can go to the top. Yeah,
I will leave right here, It's very cool place. And then turn this off, Don't move it to the eggs, you will ruin the mirror. Now when you come
turn off the origin. And let's move this,
let's put it in place. I think we can grab
those together and focus on them. Grab this. And I guess now we
can rotate to the Z, like that. Health control. And rotate this 180
degree, rotates to the X, X. Rotate this nine degree and go to the top and align
this piece with this piece. Let's grab this piece first. What I want to do is I want
to find the middle area. I will grab guide
heavy to the Z. Take a copy control. I apply the visual matt. But before that,
delete the mirror. Apply vehicle matter to me. Now I'm doing this so I can grab this edge in the middle and put the
three decossor over here. Yeah, I just put the
three decssor over here. That's all what I
want to do here now. I will grab this and then
origin to three cursor. I just want to align this. Put the three
crossor'sf I do that, I think that will
affect the mirror. In this case. I will
add an empty here in the position of the three cursor And I'm going to use
the empty as a guide. Move the empty. Hold
control and snap it to move the object. And hold control and
snap it to the empty. Now it's perfectly in the
middle for this piece. I guess we can use it as a
cover behind it like that, because I want to
hide everything. Give to the Z. And let's
move this up here. I guess it will be a
nice result to do. Now everything is hidden. Maybe I can tab and grab
some face from here. Let's go to the top and
let's see if that works. I will grab this and it can
drop last multiple times. To grow the selection like that, let's grow the selection
one more time like that, I just want to include
these faces as well. You can hit Alt and
click to include these. All right. Recall now, these faces in the middle. I will hit to Active
the Ph selection and Slate the hit again. Select those over here. All right, after
doing all of that, I will hit to the Z. And take this up here, or at least see if that works. I will hit for insets and hit to invert the insets
inside like that. Even if you've got a
problem that's okay. Accept it control minus
to the selection. And hit to scale this. And you can delete these, we don't need them if you are not getting
a satisfied result. The idea is, I just
want to explain to you the idea behind that is just to fill this border with faces that has the
ability to be bended. When I use the tool, that's it. If this idea doesn't work, I can grow up the vertices from this and create
something bendable. Or there's another
technique if you want to do grab the vertices and move them one by one to
get the result that you want. Let's go to the top of you. There's a lot of vertices
actually we don't need or let's say
faces some phases, they should be
pushed on this side. The mission, it will be
simple because all I want to do is just moving some
vertices down And that's it. I will hit P and then
to separate this, I just want to focus on this. The border hits like to isolate
them and go to the top. I will tap here and now I can
see what I should do here. I can't grab one side and delete it at x v.
To delete the vertices, I can't focus on this. Let's grab these
vertices like that, G twice like them, like this. Let's move some of them like that, it's only like this. And this will take a little bit of time,
but we will finish it. It's not going to be
difficult to do here. We should take the
small right here. And maybe we can
add extra edges, but I will do that later. Let's focus on the P, let's put the small right here. Okay, from this area, I think we should
delete some phases, them control L to delete these. And I will push those one by one, Look like that. Let's put this one here, this right here,
and this one here. For this area, we can
add an extra eight loop. Hit control R. Let's use it
key to move this over here. Another control R to
add one more here. Let's move this one right here. And let's use an F tool to create a cut like
this. For example. Key needs a little
bit of attention. I don't like these
edges to be like that. Let's try to find
another technique. Or maybe we can
make it just flat and ignore that. All right. Let it controls it
multiple times. I just want to ignore this. Maybe I can just put the
back like that. All right. Now after doing all of that, go to the front, for example. And let's move this down here. To the grab these edges. All of them. And maybe
we can relax them. That's will help to
get better results after doing that,
grab these phases. It to extrude them and give them a bit of
thickness like that. These phases in the middle. We don't need them because
we will mirror this, grab them, get rid of them. I think we can grab
the outer edges, the outer edges, or select
these faces, the border. Then I will hit for inst hit, ought to invert the inset
to create a rim like that, I will hit again and ought
invert the inset inside. Now I will grab this
edge loop will be perfectly selected and I will hit control to bivalent
to two edges like that. And then I will grab
these two edges and hit control to reveal it to three. That will help to get
nice sharp results. You can a subdivision
surface after that, let's put the three decursor in the position of
the origin dot of this geometry and
cursor selected. Now let's grab this piece. I just want to align the
origin dot here with the position of
the three dicursor right click origin
three decursorow. I can give it a mirror
without any problem. Put the mirror above
the subdivision. Tab it ten to
recalculate the normal. The result looks
nice, too exciting. And let's see what we have here. We still have the guide. That's very cool, that's nice. Now we can up all the pieces and you
can go to the fronts. I just want to move
these down like that, underneath the guide, maybe something like that. After doing that, I guess we
can do something else here. I think I can merge
this with this. I think I can merge them
all. Let's rub this. We have mirror modifier, but we don't have a mirror
modifier for this one. I think we can tap and delete half of this
from the bottom review. Just these phases like that. Hit X to delete them, right origin 23 Cs. Now I will mirror,
I will this with this and hit control to make it one piece and I'll speak
them one piece in the crop, Sid, control G and make
them all one piece. Now we are dealing
with one solideumetry. After doing that, I will go to the modifier and surface
surface deform and I will pick my guide and
bind to bind it. I'm not getting the
result that I want here. For some reason that tells me Target contains
unveiled polygons. In this case, maybe we can detach one of these
surfaces, grab this one, control L P and then
as to separate this, let's see if that will
affect the result. I will move it right here. Now we g, let's delete this
and reselect this now. I think it's fined.
Yeah, that's very cool. Okay, the result is not correct because we
could flip this. They should be flipped. I think we should mirror them to the. Just go to the object and
mirror mirror to the Z. Okay? Something like this. In this case, I will grab my
object and put it above it. In this scenario to the Z, I just want to move this
a tiny bit like that. Something like
that will be okay. Let's unbind this and bind
it because we used mirror, and that will give us
a different result. Unbind it and bind it again. Let's grab this and let's
go back for this object. You can delete this.
We don't need this to be effected, The sit
edge to hide it. And let's take a look here. All right, this is the result. I told you that I want
this cover so I can hide all the details
behind the structure. This is why. But this result looks cool and I will add
this cover later. I can see we have
some deformation, but we can accept this result. And don't forget,
the reflection of the glass shield is not going to make all
of that visible. I will end this video here and I will see
you in the next one.
44. 044 Finishing the front part of the headset: Hello again. Welcome back. Here. Let's try to put
this in the correct place. I will put Alt to
bring back my guide. I want to hide the
held and grab this. And I think I can
duplicate it and use the other coby or lets open this that I just want to put
this in the correct place. It should be behind
it like that, At this distance maybe. Okay, I think something
like that, it will work. Let's add surface in the form. And I will pick our guide. This is my guide. Sit like this and pick this
one and it bind. All right, there's a problem. As you can see, I can't bind it. In this case, I don't know. Let's try to isolate
and let's see why that's maybe if we
apply the mirror. Let's apply the mirror. And I will isolate everything
M and Mirge by distance. Let's see if there are
any close vertices or any overlapping. Maybe I can go to the M
and remove the crease. Maybe that's happened
because of the crease. Just try to do something
before that doesn't work. Let's tap out and now let's
see what's going to happen. Now let's grab the guide. We still have the same problem. I will guide and this geometry. And I will cov them right here. I just want to see if we co, can we get something else? Select this, grab the
target as you can see now, you can bind it
when you coby it. I don't know what's
going on. Why that's Grab the guide and
move this back. Let's put it in the place. I will guide and another coby and right click
to live in the same place. I will go here and
change this to Bounding, and now I will
open it like that. This is a new cove
and I will re use it. I just want to see if that
will make any difference. Let's add surface tool
and pick the guide. Find or the same problem. I will duplicate this piece. Maybe put try here above this, or maybe close to it like that. Maybe I can erupt
this and delete it. Let's see if that can
affect the result. Let's scp the guide it, find now it's, find
it, that's weird. That's really weird. Anyway,
let's put this back. Why that doesn't work?
Let's delete these. We don't need them.
Let's go back here. All right. Now it
should be binded. All right. I will grab
this edge to hide it. I just want to see the result. This is the cover. I
think it's in the place. Or maybe we can make
some changes like bin I'm going to activate
this so I can see the result. Well, actually I can't do that. Okay, in this case I can't
grab my guide again. This one. This one. Let's move this a tiny
bit down, key to the Z. Let's take this down like that. When you move it, bind
and bind this again. And go back to the guide, and let's push this back. Now let's take another look. Now it's become, and maybe
we can this even more. Yeah, let's sub the guide
and let's push this to one. I think we can hit
key to this again. And move this a little bit down. And bind again. That's, I got the same problem. Let's move this up a little bit. Let's try again. Okay. Yeah, I think we can
accept this result. You can try something else
like applying the modifier. I guess let's see what's
going, why that's happened. Can't apply the cold
government's Fermi. But I will have control to see the subdivision
service. I will delete it. All right, why that's happened? The number of the vertices will be changed if you do that. Anyway, you can apply this
app vehicle Cumaru Ma, and push the faces. This is another way
to get a good result. All right, we have a gap here, but this is not a problem. I think it's okay to grab this. I will hit control,
Apply vehicle, fumatrmel, all the faces. I will, maybe I can put at, go to the faces
Alts and put out, pushed close to the border. Something like
that. Will be nice, but not too much.
Just be careful. Now, let's check the
face orientation. Okay, it's red. I will
grab this object tab. Hit a shift tab
back and grab this. All right, something
we are taping here. Hit a Shift. Let's see what's going on here. Do we have any problem
with the fertices? Last word. All right. In case we want
to go back for any reason, I will grab this alt
to have our guide. Let's hide the shield first. And this is the guide,
and this is the details. All right? And I will hit
D to take a V of them. I will hit to move these
to the temporarily to in case we want to
go back for any reason. Now let's grab the guide. I think we finished with this. I can apply, I guess
we can delete it. Don't worry about deleting this because we have
another by saved, you can hit to hide this up the geumetry and hit Control
Applied Vehicle Gumetrymx. Accept everything. Tab now hit
to recalculate the normal. I just want to fix and
focus on this area. Something weird, having
here what's going on? We have two faces or what? All right, Why? What's going on here? Control L. I just want to see
how many pits we have here. Troll L. I will hit X and delete them and get rid of them. I don't know what's
going on here. But anyway, I will
accept this results. And let's stick up this and hit and move
this to the team. To do we need these,
these guides. Let's move them there
as well, the object. I will delete them.
We don't need them. The empty, we don't
need it anymore. I guess this empty, we don't need it deleted. What is this? Delete this
one. We don't need it. This one. I will delete it. I don't want it now. Everything is in place and
the result looks so nice. That Alt to bring back the. It is very cool. We
almost finish here. I just want to kick
the face orientation. I think we need to flip these. Hit a T, n out and hit flip. That's better. Maybe even, I guess, Yeah, hit at n and hit flip this it all, And hit flip. Everything else is
nice and ready. All right, let's hide this
one, we don't need it anymore. I will hit and move
this to the team to Alt to bring this. That's nice. All right. I think now I can
end this video. And I will see you
in the next month.
45. 045 Making some adjustments: Hello again. Welcome back here. I just noticed something here
behind the glass shield. I can see that we have a dark
black order underneath it. I don't know what to call it, but it's right here, this frame. Let's see how can
we create let's, this's to go to the local mode. I will tap, let's see what we should pick
from here to create this. I think we can grab these
faces and maybe those as well. I guess this one will
be a perfect shield. Not so much, but I
think it will work. We have some variation
as you can see. Okay, let's include
these phases as well. In those, I will hit shift D to take a coby and
rightly to leave it in the same place and hit and
then to separate this, let's focus on this
stack to time. I will. Let's turn off
the subdivicion for now. Let's secb these for now. And I just want to make an
inset to get an equal results. I will hit for inset, the result should be equal. I know we have an overlapping, but don't worry
about this for now. Let's grab these pace. We don't need them Controls
to growl two time and delete. For this age, you can
grab it and dissolve it. I guess we don't need this. It can throw blows
and get rid of it. Now we got nice border
as you can see. Yeah, now we can work
with this and use it. Let's check the
face orientation. We need to flip it and
then at now it's flipped. Now let's active the
subdivicion surface. It's cool now I can use
it, it's like to exit. It is right here as you can see. That's nice. Let's see what else we can do
here from the side. I can see that the
gap here is too big. Maybe we can fix this, but let's focus on the
top area. Go to the top. Just hit you to move this
at ten, a bit like that. Maybe I can this and
all the other details. And go to the top again and
just move them at ten bit, something like that. All
right, that's very nice. Now let's go to the bottom to
see what else we could do. I still have, I can see the gap. In this case, I can grab
the vertices and move them. That's will help to
fix the problem. I think we could grab these vertices as well
and do the same thing in the perspective.
Everything looks nice. Go back to the bottom
view and grab this. And let's move it a little bit. Some vertices here,
they should be pushed, something like that. Let's go to the perspective
and let's take a look. All right, let's go
back to the bottom. I think we should corrupt
all of these vertices. I don't know, I feel we
have some waving us, but let's move them
together like that. Let's take a look. Okay, the result
looks nice to the y. Something like this. Now is better. And one more thing here
I would like to do. I just want to make this
a little bit smaller. I want to push it
like this area. I will glob this and
go to the sculpts. I will use the glob, move the side, but
just be careful. Go to the mirror and
activate clipping. Let's make the brush
a little bit bigger. Okay, something like that. I guess I think this
result is better. Now let's go back to option. So far, everything looks nice. This area, I can make
a little bit thicker. Let's see, what options
do we have here? I just want to move some
vertices but not too much. For example, I can interrupt
these and just move them a little bit like that area. I just want to make
it a little bit th stellate these vertices. And maybe we can move them
a little bit like that. All right, maybe these
vertices I can move them. Okay. And maybe we can grab these and
just moving like that, maybe those alible just at any bits or at least see
what fils we can do here. Okay, that little
so far looks nice. Maybe I can select
those together and make this area a little bit under by moving these
a tiny bit like that. Yeah, that's better. As I think maybe
I can slide this. Put it in the middle.
That's very nice. All right, I think that's
it for this video. I will end it here and
see you in the next one.
46. 046 Creating a platform for the headset: Hello again. Welcome back here. Let's see what's the next
what we can do together. I will select this and it slid. I just want to extrude
these edges inside. Let's see what we
have here. We have a Shrinrab modifier and
subdivision surface. What I will do is I
will tap to go to the edit mode and I
will grab this edge. I think I can make it a
little bit shorter by adding one edge loop here and delete the rest F and get rid of this. You can jump to the
other side and do the same thing by adding an extra he loop here just
to make this shorter. And delete this, maybe we can make this even shorter by adding another edge. And delete this one, XF. Let's jump to the other
side and do the same thing. Zoom in here, cut
this control R, and then go to the face. A click Xf and get out of them. Now I will the
loop, entire loop. And this edge loop on this
side as well, all shift click. Then what I'm going to do
is I will extrude these to the Y and push these
to the Y axis. That's all what I
want to do here. When you be satisfied
with the result, tap out and active the
subdivision surface active the shrink Rob modifier or shrink Rob is not taking
the information correctly. Okay, let's see
why that's seven, let's hide the timberally two, and let's see
what's the problem. Let's grab this H. To
hide it in this geometry, we need to be moved
to the shrink. All right, now let's
hide the timperly too. Now let's take a
look. All right, now it's, now it's taking
the information correctly. If you go to the zebra mat cab, you can see the result
is very beautiful. Now if you turn this off,
you can see the difference. Okay, now let's go back. Okay, after doing all of that, I just want to move the headset above
the ground. I think. I'm not quite sure yet, but I think we can
create an arm to hold this similar to
what they created. It will be very
simple to create, but actually I'm not quite
sure, do we need to do that? Okay, let's try to select
everything like that. And I will move them to the Z. I just want to see
what's going to happen here. We got some problems. As you can see, a
lot of problems. I think we should
include the P objects as they should be included,
selected as well. Let's see now, Kz. All right. Now we can move
it without any problem. I guess everything is great. Yeah, that's what we should do. I just want to move it up. But by the way, I just
want to mention something, Before you move anything, you remember the object that we hide in the temporally
two and all of this stuff. You will lose the position of these objects when
you move this up. But we're not going to use the temporally
two objects again, I think we don't need
them because we got what we want is already. I guess why would
we need to go back? All right, before
we move these up, let's try to create
this arm and let's try to understand what's
going on here. We don't have any platform. We just have the
battery and the wire. I remember we have
an image here. It's a good image to show us some details, but I
don't know where is it? Yeah, this one right here.
This image is very nice. We can create
something like that. Yeah, I think we can create
something similar to what we have here. Let's move this up. That's it. I will move it. I will hit eight to add. I just want to add a guide. And move this guide here. I guess I can put
right here, okay. If this hit the ground, I think this piece, it should hit the ground. And this one should be
bended a little bit. If you use this technique, we should make some
deformation here. All right? Or you can do something
else like make this beam a little bit shorter
and used it as a stand. Well, I guess we can do
something like that. In this case, there's
no reason to use that. I will delete it and I
will actively shrink objects and the Timber
one and Tim two, I just want to make
everything visible. And now I will hit eight to
select everything like that. Go to the right for example. And I will hit key to
the Z to move these up. Let's try again. Grab
them all. Key to the Z. All right, that's where why this object doesn't
want to be selected. All right, don't worry about it. Let's go back. Hit select, everything to the Z. And let's move this
up maybe here, or maybe a little bit
more. Maybe right here. All right, now I moved
everything with the set. I should have no problem to use the two or
one for any reason. I don't think I'm
going to go back. But anyway, let's hide this, and hide this one,
And hide the shrink. And now we are ready to do
something else, I guess. All right, let's see how
can we create this stand? Let's go to the right and maybe we can add
anything you like. For example, you can add Q and tap it AM and met at center
just to make it one vertex. Let's move this vertex,
maybe right here, anywhere. And I will hit to
extrude this over here. And again, this down here. And key to this. Let's move this up. Okay? All right, let's see what we can do after that. Let's go to the back. If you I will ecrob
this vertex and hit to extrude this like that. I guess maybe I think we can co this one control or
you can go to them and choose Miralmirror to X option. Make this to the active
elements and use the vertex snap key to move and control to snap
this right here. Okay, something like that. I guess I can select those, all of them and hit Key to this. Let's move this right here. I guess we can move these
vertices and the x ray. Let's go to the bottom
of view and hit key. Let's move this back here. And this vertex with this
one does not make sense. I think we should move
them right here and then across this vertex
with this vertex and just push them
back like that. Okay, now the result is better. I can go to the bag
of you for a reason. Maybe we can add to
vertices right here. I guess we can just move them to be adaptive
to the surface. In this case, I can grab
this in it to delete it and take another cobo
of this and use it again. Does that make sense?
Okay, that's very cool. All right, after that,
let's focus on this new H. I will go to the back, hit D tech copyright here, re mirror this to the X and make this the active vertex key hold control
in the stab here. And now the result is okay vertices and then hit
P and then to separate it. Now let's focus on this one
I will tapttrolP level this. Now let's Bible this like that. I just want to create
small curve here, then we can tap it. Try to click and
convert this to curve. Let's go here to go to the human tree and open
it and end up the Bible. Just give this a little
bit of thickness. Let's bring back the hisses
to compare the results. Maybe we can make
it a little bit thicker and we have a
lot of humans were here. Maybe we can reduce
the resolution to make a symbol like that. Because after that we can use subdivision service,
maybe thicker. Okay. Something like this. But I think that's too much. But anyway, now let's
focus on this one. I think it's like to isolate it. I just want to see if
these vertices merged. They are not merged.
The glove hold control and stab it here,
and now it's merged. Okay, that's very cool. Now, after that, I guess we can convert this to curve and
use the same number here. We added 18.3 copy
and let's go here. Let's piece this
number right here and change the resolution to
one. Let's take this to one. Now we have a new mission. We should connect
those together. After isolating these
to geometrilily, try to find a way to
connect them together. All right, what we can do here, maybe we can move this up
a little bit like that. Okay, let's move
this a little bit. Maybe we should
make some cuts here and try to find a way to
connect them. This is the idea. I will grab this in this
and convert them to me. I will tap to go to the eight mode for
this geometry and use if tool and creates
multiple cuts. I guess like that. You can delete half of
this and re mirror it. Let's grab this phase loop. It can troll last two
times X and get rid of it. Now I can grab this,
I just want to. Let's bring the three
decrssor over here and I will tap out
in radically And move the origin to the bojion
of the three crossor to use the mirror modifier
again, now it's mired. Let's tab and let's
see what we got. These phases, I guess we
can delete them for now, X. I just want to
make it simple. What else we should do here? All right, I will
apply the mirror. I will look up this with this. Hit control in make one
jumetrytap mod end. Okay? Maybe from the top I can use an F tool to create
a cut. Goes like that. It a sorry to make the cat try to cut
through and confirm it. Space. Okay, that's very cool. Okay, vertex should
be snapped to this H. I will hit twice and head out and
move this over here. You can snap it
using snap I guess. Key hold control and
sub small right here. This one, it should be snapped. Okay. What's going to
happen if we delete this H? Let's delete like that. I
just want to make it simple. I guess we can merge
these together. Vertex, vertex, I think we can grab them like that and
just move them here. Okay, I guess this vertex
we can grab it and move it, or actually I can delete this face loop
and get rid of it. All right, now let's count the number of the vertices here. We have six and here we
have a lot of vertices. Okay, let's mir this vertex
here and this one right here. I guess we can Mr. This one
here and this one right here. Now, let's see how many
vertices we have here. I'll click on the loop. All right, I know we have a lot. We have ten, that's okay. Let's grab this hit to
create a phase here. If you can't grab
those as well, hit, I guess we can do
the same thing here. Now we have six and here
we have now I can grab this side with this side and tally to break them like that. Delete these acres.
We don't need them. I or if you want to keep, you can keep them for a reason. You can add two edges
here and move these up just at a bit like that
and connect those together. J1j, you can, this one hit
control X to dissolve it. The same thing here, you
can use the tools like that that doesn't work
and dissolve this. Okay, for this, I can create
a new cutcat like that. I think that will be
better on this side. The same thing. You can
use mirror if you like. All right, this is better. Now I can interrupt
the side and the side and go to face and
choose a great fill. Let's try one of
them. All right, let's see what we have here. All right, let's go to the
side and do the same thing. If you want, you can
rotate it, that's okay. Okay. This area and this area. It should be like you
should get a round result, I guess Alt to extrude this
along the normal like that, just make it taller
a little bit. Maybe we can get
rid of these edges. Now I can coup this
face in this here and convert that to loop and control would be to level them and
get this result. Don't worry. If you
have an overlap here, you can use the clump and
reduce this to three, I guess. Yeah, three or I don't know, maybe two. It will be okay. Now these vertices
in the middle, you can grab them
like that and just hit and use Merc by distance
to merk everything. Now let's tap out
and let's ab the, we can surface, let's see
what's going to happen. All right, we got
nice, smooth results. Maybe we can just move it
down at ten, a bit like that. It will be nice. Maybe
a little bit more. Increase the level. I think there's no reason to
worry about this too much. Something like this.
It will be nice. But try to avoid
the overlapping. If you have an overlapping here, maybe I can move this
a little bit more. Okay, this result looks nice. Right click Kate smooth.
All right, cool. I think we should make some
kings here. Those together. And it's like to isolate them. I don't know, but
I feel that we. Like that because this area
should stand on the bibe, be on contact with it. Even if that does not exist
in the reference I make, I will do it all right. After that you can
create and the right of view you can go to the
right, cut this area. Use the knife to go like that to make the cat to
cut through and confirm. And let's grab these
faces it key of them. Let's grab this edge loop. I guess we can have detail coby and leave the coby in the same place and hit S
to separate this tab out, corrupt this new
circle that will tab again and hit to extrude and scale to create
a small platform. Okay. Something like
that. Maybe we can incorrupt these key
to this game this up or I'm not going to do that. But I can reduce the
level and I will accept it to make the resolution
a little bit higher. And I will grab the edge loop, or I can select them all. And go to the face
and choose solidify. Give this geometry some
thickness like that. And go to the right and tap out and put this
above the ground. I guess now we can make some
tweaking here like adding an edge loop right here and key to move it a
little bit like that key. Let's move this like that. I guess maybe we can add another loop and
maybe one right here. What else? Maybe we can make this circle
a little bit wider. Problem like that
and cancel the Z, Z and scale to the x and the y. But skill work according
to the active element. Go back swift to bounding Z and make this
bigger a little bit. Maybe now we can make
this like a curve. Something like what? Apple, apple like curves. Too much. Pile this area as
well and support love here. To make this area sharper here, we should focus a little bit and add a support lore as well. This area as well,
pivolet like that. You put this control again
and let's repivl them. I guess we should do
the same thing here. I think that will be
more interesting. I'll click all click it
control and let's pivle these like that and add
support control R and added. Now let's tap out, let's add subdivision surface
with level two, guess three, maybe smooth. It is very nice for this one, I think we don't
have any problem. Yes, the results still nice. Yeah, I can use this as a platform and it will be beautiful
actually. It's very nice. Now, it's a time to create
the battery and the wire, but not in this video. We will start doing
that in the next view. I will end this video here and
see you in the next month.
47. 047 Modeling the battery connector: Hello again. Welcome back here. This video start creating the
battery connector report. I think we can interrupt
this and isolated and tap and a circle. For example, I can rub
this loop and hit the, take a copy of it and radically
to leave it in simply. And I will hit and
then to separate it. Now this is a circle
radio right here. All right. I will delete the subducan
surface and leave the lats. And I will apply the lats for this because I want
it to be here. When I t let's go
to the top and. Okay, it's rotated a little
bit. Yeah, that's bad. Or let's say it's deformed. Let's hit to the egg zero. Enter flatten it. And I will move this out right here and it
slightly to excite. Let's see, how many
vertices do we have here? Well, we have a lot
of vertices actually, but I think that's okay. We can go with that hit to fill this and then
to extrude this. I'm not quite sure if
we have a good image showing us how thick
this should be. Let's try to find an image. All right. You can use
your eye, you can pull it. I think we can extrude this
a little bit more like that. And I think that will be it. Because keep in mind we should
have a cable right here. Yeah, just push this a little
bit and that will be it. All right, let's go back here and let's see
what's the next step. If you notice this area, it's flat, it, so be care. Let's say we should
take care of that. Let's see how can we achieve
something like this. What you can do is you can
grab these faces and then A, get rid of them and the grab the H and the
edges on the site. And hetticcuse a break
here in the menu. When you do that, we have
a lot of options here. The number of the cuts, you can create that
and the twist and the factor one of these option, we can use it to make
this like a curve. Yeah, this one right here, I think it will be affected
by these options here. Let's grab the sphere. Actually, I can increase the, I can increase the number of
the cuts to see the result. All right, yeah, that's right, I think it will be
affected by that. Let's go to the top
and see it from here. Anyway, I don't need
all of these cuts. I will reduce the
number to maybe three. I will push this a little bit to have a small care
like that, I guess. Okay, maybe we can
add one cut here. All right, that's very cool. This area, it should be beveled, so let's bevel these. All right, that's very cool. I'm not quite sure, but I think we can
select these ages and fix the distance
between them. Use the space. I think
that's will work now. Let's see what's the next step. Okay, after doing
that, maybe we can this face and deleted
and grub the edges. And we can go to the face and grid fill and go to
the right I guess. Try to use offset to
rotate these like that. I just want to get
a better result. You can spin it if you like. Okay, yeah, this
result looks nice. And even I will go with this. It's like to isolate this
because I think the side, it should be bivled as well with catrolbIillvle. This
to two like that. I will grab this
with this and hit control again to rebivle
them to three edges. I guess we can support the gel here for this one I can hit. Yet to have an inset
like that, I don't know, maybe we can extrude it, don't worry about the details in case you want this to
be in the same place. There's no reason to
add a lot of details. We can incres
something like that. That's okay. You can
delete this face in the middle and you
can select these, all of them and
control to bevel them. Bevel them to two like that. Then go to the face, select boundary and three bevel the control or that will make it nice and beautiful. Now I think we can create the cable. Let's see
how can we do that. Let's tap to go to the mode. I think I'm going to
take a coby KD and keep it and move this to the crop
in case we want to use it. Now I will tab and
go to the front. I just want to select
some phase phases. Let's go to the right and see if these phases are in the middle. Maybe we can dilate this. Now I can hit for int
to have this resolved, I guess we can change
the two circle. Okay, This circle looks nice and I think we can scale
it a little bit more. If you accept the circle, you should make some
deformation here. It's to's compare the
circle with the vision, I don't know, but
I feel it should be maybe something
like that, I guess. But I think it's
not going to work. If you accept it like this. That means we could move it
a little bit right here. Yeah, that's not going to work. I will hit control
the multiple times, and maybe we could
include these as well, maybe those over here and
these phases as well. And I will hit for insets and then convert this
to circle scale. This set inhibits, okay, now the circle is big and that's what we
want because the cable is thick and I guess we can
hit XF and delete the rest. Okay, That's very
cold. All right. Now let's go back to
the shrink rob objects. We still have our guide. Let's add sub weaken surface to make this
smooth and nice. You can hit slid to isolate it. Let's add two or three and make the smooth because we
need it as a guide. Let's grab our object and maybe we can use the
shrink Ram modifier. I will pick the guide. Okay, I will just
like to isolate it. I just want to see the result. This is before and
after. Before and after. Let's check the wire frame. See the differences before and after all. That's great. Now I can apply the hearing crab modifier and I can hide the
guide for now. Let's see what's going
to happen if I add subdivision surface on this one. I mean what level two? And let's hide the wire frame. The smooth. We can go to the madcap to
see if we have any flaws. I can see that the edges
goes around the circle. That's mean it's
not quite perfect. But if you add another
shrink ramudifier, pick the guide alt
to bring the guide. If you pick the guide like that, and after that you can
hide the guide again, you can see the now
become perfect. That's mean you can use
the shrink modifier again. Okay, but for now I will turn this off
and let's go back here. Okay, so the next step
after doing that, I guess we can extrude
these phases inside, grab them like
that, these edges, and hit and push those deep. I think that's
what we should do. I don't know if we need
to make a small inset, do we need to make
a small inset here? All right. Hit and extrude end pos
deep inside like that. I will turn over the
subdivicion surface. I will add one edge,
maybe right here, and group these faces
and then hit to scale, but I will cancel the y axis it Yale scale to the z and x. I just want to
small tab that's all. Go to the face
selection one time. And then hit and
then hit to invert. That's weird for in. All right. It's not working. All right, maybe
we have two edges right here and
yeah, that's right. We have two ages right here. That's why again. And then let's have
very small insets. Maybe we can heat
wise slide this here. Just want small room here. I will up this with
this hit control would be to bible
them to three edges. You can support the edge
loop here and here as well. Now let's active, let's
Active Subdivision Service. Now let's take a look.
Let's see what we got. The results were very cool and very nice and
we can go with it. It's like to. Exactly, let's
see what's the next step. Now is the time to create
this or actually can create a battery if
you like the battery. Before you create the battery, I think we have a
small LED here. Led lights. We could create it. I let's go to the
right or to the left. I select. All right. Let's see
what we can select. We select these faces, or maybe just these two faces. And I can hit for inst
and hit auto inverts, right subdivide to
increase the resolution. Right circle. Here we have an
option call regular. Let's rotate this a little bit. Yeah, that's important,
we should have that. By the way, if you
want to turn this off and get correct results, you can go up the
G again like that, and choose space to fix
the distance between them. That will give you
the same result. Now after grabbing these faces, maybe we should extrude this in turn off subdivicion service. We don't need it.
The size looks okay. But the problem is, I think
we made a mistake here. I will control the multiple
time and do all of that. I think we should
create right here. Hit two ints, right,
subdivide, right circle. Use regular rotate
this a little bit. You can manually fix it, make them something like this. And now it, through this insight before we extrude this, maybe we can hit again for
another inst, then true this. Now I can grab these
control with to bevle them. Now I will look this
carol again to bev these, you can add the
support he loop here. Now maybe we can a
circle from here, tab, rightly to leave
it in safe place. Nns to separate it, I just want to go up this new circle now tap
and F to create a phase. You can hit to extrude
this inside like that, it ten in case we got
a problem with the normal I will hit for inst, these two edges, this
loop control to bevel it, the two edges solve this. I just want to focus on it. This hit control and
this, it as well. Hit control to bevels, delete the hearing
crop from this. All right? Very cool. Very nice. That's very cool. Okay. I think that's
it for this with you. I will end it here and
see you in the next one.
48. 048 Srtarting with the battery: Hello again. Welcome back here. Let's start with the battery. Let's see how can we
create the battery. The images folder I have, this image is very
good to use it. Let's go to the top
to put the image. Let's click Trike. Let's put this image right here. I think we need to
rotate it a little bit. I will put the Three
Decosor right here. And I will use it as a bit, foot point and speak
transform to three Decosor. Let's rotate this like that.
You can create a guide. You can add for example, an empty and scale it like that and align the
image with the empty. As you can see, we
have a small gap here. When I Some here
is fit, I guess. Let's move the image and put
it, for example, right here. Now select the
image and hit hard to rotate it and align
it with the empty. This is the line of the empty. Now the result is cool. After doing that, now we could kick the scale of the battery. The battery is, I think we can, if we combare with this image, you can see the battery is
starting from this point. And here we could guess
something like that. For example, I can bring this point and align it
here and scale it until this point reach this area.
Let's start doing that. I think we can rotate this
one degree like this. And the key to move
the battery here, and I will put the tretsor
and use as a buffet point. After doing that, maybe we
can scale this a little bit. I guess this is the
size of the battery, maybe smaller, a little bit. Something like that, I guess. All right, I will bring the image down and let's
start creating the battery. I will hit eight to add, and maybe we can start
with the circle. And I think we can go to the option here and change
the vertices to 12. Maybe G to move and move the circle
over here and skill it. But change the transform to
bounding and scale this down. Let's put this small right
here or something like that. We could make some tweaking. I will tab and grab this vertex. And move this up here, I. This one we should
move right here. You can align it with
this Verticx if you like. Just use control and align it. And this one as well, key to
the Y and align this here. These vertices, we don't
need them anymore, It X and V to get rid of them. The test and fix the space
between the vertices. Now let's move
this over here and go to the mirror
mirror to the X. Let's align it with the site. And crab this together. Hits and control are to
add maybe multiple cuts. Now let's grab all of these T, and let's move those over here. And Chmor to the Y, K to move, and let's move those over here. Grub these vertices. And then hit control R to add multiple cuts like
that on the side. We add ten here, control R, let's add ten cuts here. All right, now they are aligned. Now after doing all of
that, we got this result. Now we should give
this e thickness hit to create a
surface like this. And tab out, let's add solidify
to give this eficness. I will zero out
the offset because I want the thickness to go
from the center out like that. Let's make this a little bit, let's see if we have any image showing us how thick
this should be. Okay, This is the only
image I have here. I think we can guess
the thickness. I don't have a good image showing us how can I
control the thickness. It should be
something like that. Maybe 90 centimeter or 95. This will be nice, or maybe 100, I will accept this and hit
control to apply this. After doing that, I will
tap and go to the edges and the p edges like that and
hit control to bubble them. Lets add multiple cuts until these edges overlap like
that. Don't worry about this. You can hit or activate the clam overlap to prevent
this overlapping, you can increase the number
of the segment if you like. This number looks cool, I think we can go with it. Very nice when you combolete Graba and this
one D x guard of them. And they start with the top
one to face and Q grid fill. The result. Looks cool. I think
I can accept this result. The same thing for the side. I'll click and go
to the fast fill. You can use Mifi if you prefer. All right, after
doing all of that, I think now we can add subdivision service to
make this one smooth. All the result is not quite perfect because we have some variation here in the thickness. If you compare this
face with this one, I guess we could
make some changes. But let's see how
can we do that. I think we could decorop these edges and fix
the distance between, between them after you select the tally to space. Now I think we can do the same
thing for these vertices. You can grab this
loop and hit to Y, that will help to grab
the edges easier. Let's deselect this
one, that one. Let's choose loop
after that, right? And choose space. The result is not perfect. It out edge. See
what we missed here? Yeah, I think we should
include these edges. We just, I don't
forget to pick them. I will hit H. I will
select these edges like that and then choose Loop. After that, I will right
leg and choose space. Now we can grab these edges like that and like
this and this one as well. And again, loop and space, maybe we can accept ourself
like this it out g to bring back the other
faces. Let's take a look. If that not perfect, I guess we can do something else like grabbing these
faces like this, including the those over here. And hit control blocks
to grow selection. Then I guess we can hit for Inst to create an act like that. And hit XF to get rid of these faces. Now
let's select these. Just turn off
subdivision Surface and let's choose a grid fill. Let's see what we can do
here. Can we do something? But it seems like we can't. This is the best
result we have here. All right, having this inset, we'll make the
result looks better. All right, now maybe
we can mirror this. I guess that's will be better. The origin dot is right
here in the middle. Because we used Vl, we have two edges
here at the center. We can delete one of them, grab one of them click and
the control X to dissolve it. Now I guess we can
go to the phase. Click, select one of
these phases on the side, head control to
grab the rest XF. Of them. And now we can add mirror modifier to the z axis. I guess we can apply. And let's turn on the subdivision
surface radically auto smooth or auto smooth if you like. The results so far looks
nice and beautiful, especially if you increase
the subdivision level. All right, after doing that, maybe we can turn
the optimal display and active the wireframe. I just want to see the results. I think I can take a copy of this result and put it inside
the shrink crop object. To use it, I will hit Shift
D, Take a copy like that, and then I will hit two to ching the name
of the senor copy, maybe I can call it H for
shrink, underscore for battery. And hit Enter, And
then hit to move, and move this to the
s, now it's there. After doing that, let's bring
back the reference images. And let's take a look, and let's see what else we can do here. All right, I think we can import this image.
Let's try to find it. It's right here. Go to the
front and click and drag. And let's put this
micre like that. Put the three decossor over
here, maybe in the middle. I think we could move
this a little bit. Skill according to
the three decosor keeps killing this
until this edge aligned with this one
like that keeps killing. You can add a
guide, for example. This empty, it's still here. We can move it
right here and see the result, the image scale. Now the result is perfect. I guess you can check
the other side. Very cool. All right, I did
that so I can see the size and where to
put these details. Now I think we can move
the image a little bit down here and see
what we should do. That's perfect, let's
go to the back. All right, now let's start
creating this oval shape. To do that first, maybe
we should go here and tab to go to the mode and the grab one of these edges
or this circle for example. Or maybe this one,
the inner circle. The inner or outer, actually, you can grab them, both this one and this one. As you can see, I will hit
and move those over here. And then hit P and then
to separate it, tab out, grab them and hit the sweep to bounding
right click or to, um, now hit to the Y
zero to flatten them. I'm doing that so I can see the size of the
circle in the middle. Go back to the front and hickey. And let's put this
one, the circle here. Let's take it out a little bit. Let's move this up here. That's pretty, the size is
perfect. That's very cool. All we need to do is just
to create this curve here. And the curve on the side, I will bring the three
decursor over here. Corsor selected. Now I will add a circle
and align it with the view ing the Gs to ten
vertices is 12. That will be nice.
Let's kill this like that and just align the ridges of the circle
with this oval shape. All right, it should
be a little bit. Well I want to tell
you something. We could grab the middle area. This vertex right here.
It's in the middle. I will put a three
decrossor over here and then I will grab my new geometry and selection decrossorow
we got in the middle. This size looks cool. I'm going to boot this
one here I guess. All right. Or I will tap and the grab the vertices and move the
vertices in the edit mode. I'm doing that because I
don't want to move the organ, do I want the organ dot to stay in the same
position to move? And let's move this over here, and let's take another Coby, or I'm not going to use D. I will hit control Z.
I'm going to mirror this, grab these vertices, it XV. To delete the vertices, let's add mirror modifier. To mirror. Like this control to apply the mirror tab again, this with this it. Now we got this shape ready. It's perfectly in the
correct position. After doing that
tab out and grab this sew geometric tab hit to create a big face
like that. That's it. All right, now after doing that, let's see what level
we should accept, level one or level two. Now we should understand
what's the easier for us applying this on this joint three with level
one or with level two. Let's go to the front end. Let's see what's better. Let's turn, let's
read this to two. It's become a little bit smoother, All right? I will I will apply
the subdivision with level one now I will tap to go to the It for this
Jomantree and hold Catal, go back to the front end. I'm going to use the project
to project this shape on the Humane Go to the
dams and hit Knife project. And now it's projected, as you can see,
after doing that, now we should mir some
vertices and move them around. Like this one, it
should be moved here. This one, we should
move it right here. Maybe. This one here.
This one right here. This one should
be here, I guess. I guess. This one
should be moved down. Okay? This one, it
should be moved here. This one as well. After doing all of that,
these phases in the middle, we can get rid of them. X, F and delete them. Now let's go to the
H and let's see, grab this he lobe like that. Before we delete these, I think we need the faces. I will hit for inst to
have a small like that. I guess we can
delete these faces. Get rid of them like
that. After doing that, I guess we can put the
circle in the middle. Let's go to the front end. The three still in the
correct position, I guess. So grab the circle and hits
and selection to course. All right. All right, now we should have another cut. Let's select this tab. Grab this face control L, to select the linked faces. And then hit P and
then to separate this. Because I want to work
on this separately. And I will like to
isolate it and go to the, or maybe we should include the circle. Go to the front end. I will add another
circle and align this to the view and maybe we can the radios to
something smaller. What's going on here?
Let's add maybe 55.15. 0.3 okay? Somebody like this. Maybe I can add 22. Make smoother, even
for this cumetory, maybe we can add subdivision
surface with level one. Now let's make a comparison. Let's see if that
works. All right. Now we have a lot of
disease, all right? I'm not going to do that. I will hit control Z multiple times. All right? It seems like we
should add the circle again. That's okay. Let's add 12. I will accept 12 and now
I will project this. This one, we don't
need it for now. Grab this and then grab to
go to the moot control. To grab this one,
go to the front and go to Dams And choose
Knife Project. Now it's project, as
you can see, grapes. Move it away. And to
get rid of these. Now let's smirk vertices. Merge. This one that should be merged, I guess right here. Maybe this one that
should be merged here. This one right here. And
everything else looks nice. Now I guess we can select
all of these edges. Let's hit a M and
merge by distance. All right, now I think
we can edges like that maybe extrude
them, push them inside. Or maybe we can hit
to create a face. And then for insert just to
have a small m like that, we can hit X to delete these faces and the this
before you extrude this, maybe we can use the ring crop. So I will tap out and I will go to the modifier and subiviicn surface to make
this a little bit smoother. Something here, not makes sense. Let's try to discover it. I will hit a and then have to end to recalculate
the normal. Maybe we can create cut. Goes like that.
And here as well, in the middle and on
the side as well, both. You have to make the
cut at the middle. I think that will help,
especially if you move this away a tiny bit. Maybe if we added an lobe here
and connect with these K, I think that will help as well. You can use an F tool and you have to make
the cut at the center. Okay, that's very cool.
And even for these H, I guess we can grab them
like that and these as well. And put the H or fix the
distance between these H, right click and choose space. Yeah. Now that the
typology looks better, now if I active the
subdivision surface, the result will be nicer. I will accept this
level one and then I will add shrink
Ram with the fire. And I will shrink rub, SHP. You remember it's the
shrink Rab battery. I can go to the shrink crab. I just want to make
some change here. Go to the raw battery and increase the level
of the subdivision. Make it four, make
it super smooth, because we want to
use it as a guide. All right, now the
result looks perfect. Apply the shrinker
modifier as it. Now let's stop and
I will grab this. Maybe we can delete
this. I guess we can grab this and hit and
push this inside like that. And grab this edge loop
or these faces I guess. And then hit for inside. And hit the auto invert to
create a room like that, but I think that's too much. You can control it from
here, make it smaller. I will add another room, maybe right here as
a support edge loop. Now I can grab to
bivalent two like that. It should be maybe 0.5 I guess. 0.5 0.7 Now I will look up
this loop with this one. Hit control bivalent 23, Maybe now we've got this result. If you add subdivision
surface above this result, the result will be
very nice and clean. Now I can again turn this off. I can grab these edges and hit and push
those deep inside. I will grab this loop and hit control bivalent 23 edges
or maybe four if you like. And try to create something
around and nice and add an loop right here
as a support loop. All right, cool. Now
let's slide to excite, and let's see what
we got so far. This is the result that
we got that looks nice. Yeah. Beautiful, very cool. All right, I think I will
end this video here and see.
49. 049 Adding some details for the battery: Hello again. We'll
come back here. All right. Now let's
see what we should do. Maybe we can start
with these details. I think we can increase the level of the subdivision surface to make the smoother. Let's add subdivision
surface with level one and turn of optimal
display. This is the result. Adding more faces will help
to make the modeling easier. I will apply the
subdivision surface and I will use modifier. The target will be H and
score, and it's right here. Another looks perfect and
apply the shrink crop. After that, let's
go to the front. Or before you go to the front, actually we can
grab these edges. Let's see what we
should do here. I guess we can hit and
then hit for inset. Auto inverts to have an inset like that,
but I don't know. I feel that we got some
variation happen here. Or at least cancel this. Hit F to delete this. Let's try to find a
solution for this. I will select this and
I will these faces like that and hit D, D tab. I will scale this, or maybe we can just
scale these to the Y. To flatten these
edges like that, I'll click to the Y. Zero answer to select. I didn't detach this
yet. All right. I'll click and then I will scale this a
little bit to the Y, but let's put the three
cursor in the middle. The three cursor rig. Right click origin to geometry. I'm going to book this inside. I'm doing all of
that so I can align these vertices or
this frame with this, this oval shape tab
and cub these edges. Okay, I'm going to open the O data properties
and I will create a new group and hit
a sign to assign these H to this group. Now let's tab out
and adding modifier. I'm going to choose
the battery ring. Battery. I should pick this one. Rub this guide. Yeah, and then just choose the group of vertices
that we just assigned. Now let's take a look. All right, now we've
got perfect result. Now all of these vertices aligned with this oval shape,
and that's what we want. Now after doing that,
apply this and let's add another shrink
multifier'ose the SHP, just to fix a small issue here. You can see before and after. Then apply this one as well. Now grab this and delete because we don't
need it anymore. And now I can tap, and I can select all the faces. And then hit for inside
to create this small rim. Now I guess we can grab these edges and hit and push
this deep inside like that. Grab these edges and
then hit Control would be to ambivalent
to two like this. We can add maybe,
I'm not quite sure. Maybe we can add 88 too much. 76. What's going on? Why is not taking the
effect? All right. It should be less than that. 1.9 All right. Or maybe one. I guess that will be okay. Grub these two acres and be
level them at control B. After doing that
I'd support right here T out turn off wire frame. And now let's see the result. It should be nice
and perfect this. Let's add subdivicion surface
with level two or a third. Looks nice. Now we can see that we are
finished with this area. Maybe now we can go
back to the front and see what's the next
step we should create this, the charging parts, The trees
are still in the middle. I will hit eight to add, and I will add another circle. But where is align
this to the view. Let's take the circle
here on the side. And I will scale this like that. Align the top point
of the circle, the bottom point with
the charging port. Maybe we should move it down. I think there's no
reason to move it down. Hit D to take another copy. And let's put this
one over here. Or grab this with
this control J tab. And let's grab these
vertices like that, x, v get of them. Go hit, hit. And then to create a face here. To move this over here.
Now I will select this. I will delete the
subliviion surface because I don't want it for now. I will tab to go to the model control.
And let's add this. Go to the front again. Let's go to the Meese knife project. Now we should have
something. Yeah, it does. After doing that, now
let's mark some vertices. Let's make this one active. For example, let M merge to
the last here on this side. Maybe we should grab this
he loop and get rid of it. Control X, Get rid of this. Maybe this one as well. The same thing for this he. Let's see what's the next
step, What we should do. Okay, let's make a new cut. Maybe goes here and I guess we can move this down and move this one
maybe right here. And do the same
thing for this one. Move this here and this one, maybe it should go there. For this area. Maybe
we can move this away. Let's see if we can mark them. I guess we can mark them. I will grab these
XF and get of them. Or you can do something
else like hit for set. And hit out to invert
the inset outside to create small m. Then
XF to get of these. Now I can grub this lobe, then hit to extrude this
inside like that and now I can grab this lobe again and hit
control would be for Bible, Devil does a cantrol again. Cantrol are to add one acre
here to get carba result. After that, maybe we
can try to find a way to connect these
vertices to maybe, I don't know,
something like this. Maybe one cat goes like that, maybe one goes here. If you want to get
nice round result, you can just slide these vertices like that to
make this area look sharper. And the same thing for the side. I guess you can
delete this here. Maybe we can move the
key wise and slide here, one here and one on this side. Let's isolate this K.
Let's move this over here. And you can move this a
little bit like that. And this one as well. All right, for this Verdi
I guess we can mice here. The rob this with
this hit and key 12 is one merkt there.
I guess we can do that. What else? This one
key twice Merkt. Let's tap out now
let's take a look. Let's add subdivision surface. All right, I'm not
seeing any bad heading. Everything looks nice. The
result looks beautiful. All right, let's
turn this off now. Let's create a small hole here. We can see it in the front. That should be
right here. I will select maybe, I don't know. Let's see how can we do this? I think we can grab faces and
then hit for into invert, the, I guess we can
scale them like that and right into a circle to
make this like a circle. Maybe we can rotate this for insight and to invert to
have this frame like that. And now I guess we can hit
to extrude this deep inside. Now we can grab these edges. Control to bivalent
two like that. With this control to
rebivalentlet's add three edges. Control to add
here, right there. Another hole we have right here. And it should be a
little bit bigger. Let's see how can we do it. Maybe we should grab these faces and including these
and those over here. I'm not quite sure. Maybe we should select those. But the faces on that side, maybe now we can hit
for in it auto inverts. All right, now I'm
getting this result. All right. I think that's
not going to work. Maybe we can do something else like grubbing these
faces and use them. All right. Something like that. Maybe start with these and just
kill them. Like that. And use these right click into a circle. I think
that's will work. May be killed like this. Then hit for int and auto
invert to create a rim. Then to ext deep inside the same scenario just
to grab these two edges. Pivl them like that.
Grab this with this, make them sharp
with three edges. Control out to add support edge. Click Shade auto smooth or
shade smooth if you like. And let's actively
subdivision surface. The result on this side
is not so quite perfect. I can see some waveness or
some bad shading happen here. I think we should find a
solution for this area. In this case, maybe we can rub these faces and shrink rub them. Maybe we can include these. Let's go here and I second group and hit assigned
to assign these phases. After that, let's tap out, let's go here and turn over the subdivision
surface and let's add hearing crab modifier again. Then I will search for the
SHP and select this group. Let's see, before and after. All right, we can see that we
have some small difference. I will apply the sharing crab and see what tweak
we should do here. Because as you can see, some faces moved that become a little bit
difficult to control. You can do something like deleting all what we did
here and rebuild them. I think that will be
easier for us to do. Grab these, I will hit F
to create a big face here. And then I will hit
for in hit to invert. Then I will hit, took this inside and grab this
edge and less pivoalts, something close to
what we have here. Let's hit control would be bivletllright 1 centimeter and the Cp is two edges like that. Hit control and rebivle them. All right. Again, not
makes sense happen here. I don't know how many
edges we have here. Let's deselect. Yeah, we just have one
here and one here. Control B. Let's add three cuts. And control are to
support the edge loop here and delete this phase, grab these, maybe we should push a little bit
deeper like that. Let's go to the phase and choose a grid fill at lets add multiple cuts here to
make the distance even. Maybe one cut here to
prevent the stretch. These phase we can push them deeper support edge loop
there for the battery. I guess we can do
the same thing. We can go inside this humetry, push this one deeper
and hit to the Y. Zero enter and now maybe we can go to the face and use grit. Fell and let's see if
we can rotate this. Let's use the spin, maybe let's spin this again. All right? Something like
that. This is very cool. Maybe we can add
one cut goes here. Now let's after that, let's active the
subdivision surface. Now we've got very cool results. One more thing here
I would like to do. I just want to add some
details here in this area. Let's select this up all the faces or the vertices and to bring the three
decor over here. To add in, I will add, just keep scaling this,
make small like that. And scale this to
the G to the Y. Maybe canty the scale tab. Grab all the ages
control to bevel them. Let's try to press something
round and nice like that for the side. I guess we can grab this and hit to turn those to one face. And then push everything
deep inside key. And move them inside like that. I can grab this and key and
move this deep like that. Then grab this radically smooth. Let's see what else
we can do here. Maybe we can scale
these to the z, C, this with this to the Z. What else we can do here? Maybe we can grab
these and then hit Eye For Insight and hit Alt to push this
inside a little bit. Or adding some details
that's not quite important. No one will see these details. But it's okay to add them. Yeah, something like
this. It will be okay. Now, maybe we can delete this. And delete all of the
stuff we have here. This is the battery. We
missed anything here. I think everything
is nicely done. And I think that's
it for this video. And I will end it here and
see you in the next one.
50. 050 Creating the battery cable: Hello Am. We'll come back here. Maybe now we can
start with the cable. Before we do that,
let's try to put the battery in the
correct position. Maybe in this case we
need to add plane. I will hit Shift to put the
three dicrosor in the middle. Then I will hit shift
to add and I will add plane and skill.
A tiny bit like that. After that, I don't know. Can we hide these
images for now? It H, I will grab the battery
and let's go to the front. Let's move this down on
the 00 level like this. We give you the Z,
something like that. Let's try to put it
in a good place. Let's move it right here. If you want to rotate
it, you can do that. Should we put this right here
quest? Let's go to the top. Let's put this maybe here.
Something like this. Now, let's see how can
we create the cable. I will go to the front end. I will shift to add in. I will add another plane
and swing this to view it. Key to move, this right
here, scale like that. Control A, apply the scale and tap to go to the move ends. I will hit control and maybe we can add three edges like that. Let's move this right here. For now, tap again. Now what I want to do is I
want to move these like that. But I want to align this
vertex with this 10. In this case, I will grab
these for five vertices. I will make this one the active. As you can see, the color is brighter and go to
the transform vote. Point speaks to the active
elements because we want to align the
active elements, the active vertex with this one. Then go to the snap and
active the vertex snap, then to the bolt control
and snap this one here. And there we go.
After doing that, let's add multiple
cuts like this. When you finish all of that tab out and
apply the rotation. Because you remember
when we added the plane, we switched the rotation
to the view and you know, that's will change
the gizmo direction. We need to rectify that. Just hit control and
apply the rotation. All right, now the Z is
pointing up like this. After that, let's go to
the, Where should we go? Yeah, go to the modifier list and let's assemble the form. And this to bend and use the Z. Now we can bend this like that. Let's add 360 degree and apply the modifier
we don't need anymore. Now, tab, as you can
see now these edges, we have a connection
here between the edges, hit A Select everything, all the vertices hit M and meerge by distance to
merge the vertices. Here we have four
vertices emerged. Now I will hit out click
to cut up these edges. Let's bring back the
reference images. I just want to see
we have 1234 rounds, maybe something like that. Maybe four rounds, maybe
we can add this one as well when you'll be satisfied with the
result that you have. Take Coba of these Clk, leave them in the same place. And then NNS the same delete. We don't need to anymore,
we just need this. Let's do the scales like that. Go to the top and move. Let's move this one over here. A little bit like this. I
guess the size looks cool. We can accept that. Let's move this down like
this. Let's make some. Maybe moving this vertex, maybe right here, maybe moving this as well.
Put the top end. Let's move this a little bit
to extrude this like that. Maybe one extreme thing
goes inside the battery. These two vertices,
I can move them, let's try to put them in
the center like that. Let's move this a bit, try to act. All right,
that's very cool. Not just that, we should
focus on this as well. I will just move them a little bit like that to the Z. Rotate them like this. Maybe I can key to the Z. And move this up
here from the top, maybe we can, to the X zero. Enter, flatten these to the X. Let's move those over here. And move them down a little
bit, something like that. For now, let's make
some tweaking. I don't know, maybe
moving this right here, move this a little bit down. We can add one vertex that, maybe we can add
one vertex here. Take this, let's move
this down a little bit. Maybe I can just move this down a little bit more like
that in this one. All right, something like
that. The result looks nice. Let's them all. Yeah, I think that's it for now. After doing that right click and then convert this to curve. Now let's go to the
curve properties. Scroll down under the Bible. Let's increase the
depth a little bit. Let's have some depth here. Can roll skill to
get a good results. Let's make a comparison here. How thick this should be. I think we can use
the reference image. It's got the top, it's a X. To bring back the other images, go to the x ray and let's use this image and
try to realign it. I just want to see or check
the width of the cable. I think our result is perfect. That's very cool. We have
a lot of H goes like that. I will reduce the
number 4-1 maybe. Let's make this a
little bit thicker. I guess we can go to the mode and get up
all of these vertices and just kill them to the Z at Z and make them
closer like that. You can go to the right key to the Z and move them down like that if you want. You can rotate them a
little bit key to z. Let's go to the
front and maybe we can add a bot point right here using the
three decursorlet's. Speak this to three decursor. Maybe we can just rotate
them a little bit like that because I want the cable to be attached with the
ground as to disease. Just kill them a little bit, not too much to
something like that. There is a so far looks
nice and convincing. If you'd like, you can make some variation using
proportional editing. Let's turn this
back to bounding. I will activate proportional
editing and I will try to, I will move but as you can see I'm dragging all the
vertices around. In this case we can
activate connected only. That's will give us
a different result. Now it's key to move. We can focus on
certain vertices. I will just key to move and make the effect a
little bit bigger. That will help me to take
the whole circle back. Maybe like that. Maybe I can prove this
one in the key to move, make some variation. This maybe that will make the result looks
even more realistic. Let's move this down a little
bit, something like that. Turn off proportional
editing, Now we got this. If you are satisfied
with the result, you can tap out
and you can go to the modifier and add subdiviicion surface to
make this even smoother. With level two, I can see
that we have a gap here. This gap, it could be solved by increasing the depth here to maybe nine or maybe ten. I think that's will be better. Everything here is makes
sense except for this area. I guess we can move some
vertices and get better results. Maybe we can take
this out at any bit. Something like this,
I guess looks nice. Now let's try to put the start point in the end
point in the correct place. I will tap out, for example, grab this piece and
tab and the go up the circle and
cursor to select it. And now we have
the three decssor, the center of the circle, tap out this top. This vertex hits and select
selection decrossor. Now we have the vertex
perfectly in the middle. After that I can hit
and this deep cut, this selection coursorow,
hit and move this back. Now we have this wire
perfectly in the middle. In this case, all that's mean, we can increase the
depth a little bit. We can at 10.1 maybe
at 0.2 maybe, I guess. But this number looks nice. It seems like we have
some overlapping here. Let's try to grow up this
vertex and try to move it. Let's see if that's will effect. I think that's well effected
with this one selected. I will zoom right there and I will hit key to
the X and move this. Now I can see the M and
that's what I want here. And for the. All right, I think we can move
this up key to the Z. All right. All right. Still still nice and cool. Let's go here and let's
see what else we can do. Tap out up this tab,
Gup the circle, cos select it and go up
this tab, this vertex. And selection to
courser, and then it and move this inside this one. Selection to course
and move this bag. Okay, the cable here is not
filling the circle perfectly. In this case, you can grab these two vertices and hit Alt. That will help to inflate the cable a little
bit from here, but don't inflate it too much. All right, now we're
getting something nice, but I think we got
small issue here. I think from this area the cable should be
connected with the ground. Let's tab and see
how can we do that. Let's active the proportional
editing, the key to the Z. And let's move this, let's
make the effect smaller. All right, that's
not going to work. Maybe we can grab this, hit key to the z and move
this down a little bit. Maybe a little bit more key to the z Until you see
here, well that's mean, this cable hitting the
ground from this point, maybe we can grab this
hit key to the z and make the effect smaller
and move down as well. Now I can see it
from this point, it should go up. That's totally okay. But we got a gap here, so let's try to get rid of it. Let's grab those
together and key to Z and make the effect very big. Let's take a look to see
if that makes sense. Well, the result
still very cool. The cable is it's on contact with the
ground and that's what we want and looks organic
and very beautiful. Torticlyn, then choose shade
smooth to make this smooth. Yeah, that's very cool.
Everything here is nice. All right. Amazing. All right. I think
that's it for this. Do. I will end it here and
see you in the next one.
51. 051 Making some small changes: Hello again. Welcome back here. Before I jump to the
texturing section, I just want to make
somewhat taking, let's start with this dial. All what I want to
do is I just want to grab this edge
and extrude it down. Because I want to create
a small curve here. I will slate this,
like to isolate it. Let's start doing
that tab to go to the mode and let's focus
on this edge loop. I'll click to grab it to
create a giant phase. And extrude this
phase down like that. After that, after extruding
this, you can delete this. Or you can do something like, let's look at the
face from this side. You can hit for inside, just to create a small
extrusion, something like that. And then I will hit X to
delete this giant face. Now I can switch to the H loop, I can grub these,
I can hold them. He control would be, let's
level them to three. That's okay. And let's focus
on this out Click then. He control would be to
level those as well. Maybe 24 cuts that we be okay. Now we can go back to
Active Subdivision Surface. Dunder. The subdivision
surface will app as two because here we
have two level inder. But in the viewboardust, if you want to make the
viewboard performance a little bit fast, you can swag this 20 and leave it to when
you're under it. Let's hit slide to exact. And let's see what
else we can do here. After finishing
the digital crown, this dial, one more thing
I would like to do. I will look up this cover
and hit to hide it. I noticed in some images that these holes are
covered with something. Let's try to do
something similar. Maybe we can use this
geometry to do that. By the way, I just want to
tell you about something. The shading section, I just
active back face calling to see the wrong normal of the geumetry to
make it transparent. For example, I can see
the Emet from this side, but there's nothing on this side that's
because of this option. Now if I turn this off, I can see it from both sides. So just keep that in mind. If you want to hide
the wrong side, we can turn this on. Okay, Now let's see
how can we use this. I will hit shift with
D to take of this. You can take a coby of this or maybe we can
do something else like going to the
Timberly two and open it. As I remember we got you. Remember the guy that we used? This is it. I think
we can use it again. Let's go here and turn this back to solid
so we can see it. Let's like to isolate it. Yeah, now we can see it. As you can see, the faces are flipped. Let's
turn this off. Now I will take a cop of this human because I want to use it and leave
it in the same place. And I will slide two times
just to focus on one of them. I will apply apply visual umm, I just want to apply
all the modifiers here or whatever thing I add to this
umatryhli to exact. Now let's hide H. Well, before you hide, just go
back to the Umatryhlet's. Take this out from
the timber ly file and let's put it in
the sets collection. Let's hide this again. Okay, now I got this I want to do is I want to
use this as a guide. I want to create a
eumetra here and shrink. Rub it on the surface. Let's grab this. Let's, let's
see what we can do here. We can this lo, maybe, or maybe this one here. And shift D, takoprightf to
leave it in the same place. And then hit, and
then separate it. Tab out, let's grub
this circle I tab. And hit A. To grab all the
vertices of the swicircle, I can go to the face and use. And now I got something
cool, as you can see here. After doing that,
now I can tap out and I can add shrink
modifier and hit Slide. To exit this guide, I will give it a specific name. Hit two, Let's call this maybe for a shrink underscore
lens just to recognize it. That's all. I think
we can hide it. Now let's secb this
intumetrytechHco lens. All right. Now this
is the result. As you can see, it's very nice. We can do the same
thing for the circle. Just select maybe this lobes and then it heavy detect copy, right click, leave it
in the same place. And tab out, grab, grab all the vertices and then go to the face in the crit fill. You can leave it like
this if you like. If you want you can
manipulate the spin. Let's see what's going
to happen if we do that. Let's use the opposite. In this case, all
something like that. Then tab out, and I guess we can apply the
same shrink from modifier, grab the spot, you
have to grab that one. And use this 0.0 coby
to select it and boom, finish tally smooth. And you can merge these
together if you like. That's all work as well. What else we can do here? I think we can use mirror modifier to mirror
this one on the side. Let's see, where is the
origin dot of this geometry, I want to put the
origin.in the middle I will tap for example
this vertex. And bring the three
Decosor over here. And grab this one right and origin to three decosor to
put the origin dot here. Then I can apply the crop
modifier. I don't need anymore. Tab, Let's go to the front or the back and let's these
vertices at XF to delete them. Tab out, and let's
add mirror modifier. Now we got very
nice, cool results. Not just that, I
just want to make some tweaking to this border. I will tab and maybe I can grab these edges and cheat wise and just
slight them a little bit. Turn off provocionalthint'sl
this at any bits, all right. Subdivision level three,
I think that's too much. Let's see the wire frame, all right? I will apply this. I want to make some change here and
using the knife tool just to go to the mode and create a cut here on this side as well. After that, I will grab
these faces and delete them F and get rid of them. See what else we can do here. Maybe now we can use
the mirror modifier. The organ dot is
still in the middle. You can go to the back
view and all right, the border, and half of
these vertices in the x ray. I think that's too much.
Let's deselect this here x and delete
half of this tab out, And let's add mir modifier. Right now we've got
perfect results at, to bring back the
other uometries. All right, I will hide this because the guide,
I don't want it anymore. Maybe we can move
it to the t two. That's very nice.
One more thing here, I just forget to add
small hole here. According to the
reference images, you can see that I have
a small hole here. Let's see how can
we create It will be something simple to create. We have the shrink crab still exists with the
subdivision surface. I will turn this off
and this one as well, and I will tap to go
to the E mode ended. I create this, maybe I can use these four faces to
create this tiny hole. After doing that
at the for inst, then rightly Q circles
to scale this. You can rotate this a
little bit if you like. Maybe we should scale it
a little bit more like that at the XF to delete them. Now I will grab this area and just these faces and I will go to the Opia data properties. And I will create a new group. You can call it
111 if you'd like, just to recognize
it from the rest. And it assigned to assign
these faces to this group. And now let's check it. Select. As you can see, just these faces
will be selected. After that, I will go back here and I will add another
shrink Rumi fire. This one will be temporarily. After that, I will delete it. I want to the
shrink Rum section. All right. The same geometry we choosed here, structure, shrink. We call it, sir. The same, the same object. Yeah, this one here and pickets
and choose the new group. Let's see, before and after
what's happened here. All right, small
change we got here. After that, you can
light the catrolight. After doing that, I think now I can grab
these vertices and erratically subdivide
them like that, erratically into a circle,
this like a circle. And hit to create a face. Then hit to extrude
this like that, you can hit key
twice and log this deeper if you like this face. I will hit and then to
separate this face like that, After that I will look, grab these faces and
hit for inset hit. To invert the inset
outside like that, then I will grab these edges and hit control
to be to two like that and grab this with this
hit control to rebival it, add a support look here
to get a better result. Let's tap out and let's
see what's going to have been active, this and this. All right, I will get some
problem because some of these faces still
in the flat group. In this case, what I could do
is turn this off. For now. I will grab these faces
and it can robles multiple times to
grow the selection. To this point, I guess I will
go here and go to the flat. And remove these
faces from the flat. I don't want these to
be included in the, in the flat group. Now, let's see what's
going to happen. That's cool. The results still
nice and cool, beautiful. I can see something
happened here. Let's see if we have the
ability to get rid of it. I will grab these
faces and add them. Just assign them to the flat. Let's see what that could be. Results. I will. I will accept this. The result
looks nice and beautiful. Yeah, very cool. After doing that, I will
select these faces again. I'll click as you can see and control
plus multiple times until you reach this
point like this. I want to mirror this
on the other side. I will hit Shift with D to take a copy of this and right click to leave
it in the same place. And I will hit P and
then Estate Tab out. And let's grab this alone, the three dicosor
still in the middle. I will hit Tick and go
to the gin gin to three dicosorowI will
go to the object. And then mirror and mirror
to the global x axis. Now we have it right
here, perfectly. After doing that, now
grab the surface tab and grab these four phases
X and get rid of them. Tap out and grab this with the geometry control J To make
it one geometry tap again. Just select these phases Lt, a head shift end to recalculate the normal,
and that's will be it. After that maybe
we can just merge. A group of vertices in the extreme would
just select these, then hit M and
merge by distance. Now these vertices merged. All right, maybe this one
needs to be emerged again. Let's change this to vertex, let's stop this over here. Or something that makes
sense. Let's try again. Grab these S, m and
meric by distance. Maybe we can reduce the number 2.1 I think now it's mercy. Let's active the subdivican
surface with the grab. The result looks cool. The cover, I just forget
to add the cover. You can create a new one here, the edges right here. And then it va cob right to
leave them in the same place. And then hit and then
to separate them, tap out cube circle A. Then you can kill
this a little bit and delete the sub from it with
the subdivision surface, that's a alt to bring
back the other details. All right, anything
else here we should do? I think we create all the necessary stuff
and maybe now we are ready to jump to the texturing
section for any reason. If we forget anything, we can go back and fix it. We still have the
temporarily file, a lot of geometry
that will help us. When I finish the project,
I will delete them all. All right, so that
will be it for this video and I will
see you in the next one.
52. 052 Unwrapping the Light Sealed: Hello again. Welcome back here. Now, before adding the texture, we should prepare the tumatry to receive the texture
in a correct way. That's why we should
rob the tumatry. Let's see how can we do that. Just keep in mind to
save the project to the different name in case we want to go
back for any reason. All right, let's
start with this piece right here. The light sealed. I will grab it and hit
to go to the local mode, the modifier stock, we have mirror and
subdivision surface. I will accept mirror over
over here and hit control. I just want to act the
screen cast to see the shortcut control to apply the mirror for
the subdivision, I will turn this off. For now, I will active the wire frame so I can see what I got here. This is the result. After doing that, I will
up this and make it ready. I will sublit this
window to two like that. I will change the editor of
this new window to UV editor. I will sublit this too
as well, like this. And I will change this
to head editor hit. And to get rid of this panel, I will minimize this.
Make it smaller. I mean, the window, in
case I want to work here, I will maximize it like that. All right, now we have this geometry and
we need to rob it. Let's see how can we do that. I will have to go
to the edit mode and I will jump to the
edge selection mode. Hit two from the keyboard. Let's start with this edge loop. Click to grab the
entire edge loop. I will hit right click
and mark Sam to mark this as to cut it from this
area or from this edge. The same thing we
can do on this side. Click on this loop,
right mark seam. But before you do that, we can add this one as well. A shift click, right
lick, mark seam. Now we mark them. Maybe we need one
seam right here, so we can open it,
right L, Mark Sam. After doing all of that,
I will hit a select. All the faces here, hover over here
and hit two time. Now we have this
up when you this. Here we have a small menu. You can open it and
cures the method of the arriving angle
based or conformal. I will stick with angle based. I think for a
geometry like this, angle based work better. You can switch it to
confirmal in case you want to check what's going
to happen after doing that. Now we need to add
something to see here like a checker texture. You can create a U Vigor, It here, use it as
a checker teesture. We can see the UV distortion. Just go to the new
button right here and you can accept the number right
here in the name and change this to
U vigor it and it, okay, and now we have this
uvigorate right here. After that, you can hue to
give this new material, you can choose this
image right here. Shift a search and let's
search for image texture. Put this right here and now
we search for this image. It's called entitled
plug this to the base lz and go to Material Review
so we can see the result. Here we go. Now we have
the checker right here. After doing that, I just want to scale the checker Tekesture a little bit and
make it smaller. I will grab the node
and I will hit control to add mapping and
Tekesture coordinates. If you hit control and you
got nothing that's mean you didn't activate nodrangular. Just go to the properties
preferences and go to the atum section and
search for nodrangularjust type R. And you will
find it right here. No triangular. Just activate this node will give
you extra short cuts. Very important shortcut to
make the process faster. Now after adding
these two nodes, I want to add something here. So to control the scale, I can grab them like that
and add the number, but. I want something faster. I will have 58 to search, and I will search for value. Let's put the value
right here at ten, for example, the scale. And block this here. That will help to
make the checker a little bit smaller.
This is the result. What I want to do is I want
the checker texture to be adaptive to the shape. For example, if you draw a line like that
following the squares, as you can see the
direction goes like that. It should go like this,
actually, something like that. That's what I want to fix. All right? It's not
going to be easy. But let's try together and
let's see how can we do that. The head here we have
an option is called UV. I will turn this off. Before I turn this off, I just want to tell you why
I want to turn this off. I grab vertices like that. As you can see,
these vertices on the side effects these
vertices on this side as well. Now for any reason, if I want to scale, they
will scale to the middle. But if I turn this of, if I grab the
surface, for example. I can grab a vertex and hit
control L to link select, I can choose just
activate the seam to grow the selection until it reached
the seam and it will stop. And now I got my UV. Now if I hit out click, that's not going to
affect the other side, by the way, you can
hide the other side. And that will work as well. Now what I want to do is I want to try to manipulate this a little bit to
get better results. I will minimize this and
let's see what we can do. All right, the best way
I think is to activate the live whatever king you're going to do here
that's will affect the UV. And I will hit P to add or to convert these vertices or the
selected vertices to pins. Just hit. And then I will hit to the X and scale this a little bit and try to
flatten it like that. Now I got this result. It's not so quite perfect, but it is a close, I can accept something
like that and we can test it when we add texture. One more thing here
I would like to do. I want to grab these and
hit to the Y zero enter. I just want to flatten this. I will grab all the vertices and hit Alt B to remove the pins. I will grab these over here. It to the Y zero enter
to flatten this. To flatten this one as well, that will help to get
a better result here. And trying to get
rid of the seam, because don't forget
we add the seam here. If you make this flat, you will get a result, something like that you
can see going on here. It's very important
to flatten this. All right? The ticketure
looks nice for this side. If you like, you can
do the same thing. I will grab one vertex from here and hit control L
for link select. Let's see what we
can do. I'll click to grab these vertices. And I will hit to bend them. And hit to the X. And try to scale it like that and make flat
something like this. It will be nice I can accept this result.
I think that's it. I'm not going to
worry too much about this side because it's not going to be visible
to the camera. And I will tap and now
let's see the result. After doing that,
you can activate the subdivision surface and you can turn over
the wire frame. Now is the time to
check the material. Let's see what's going to happen when we add
texture on it. Let's change the name
of this material to maybe check okay Enter. And then I will remove it
from this geometry to add a new one I will hit to
create a new material. If you don't see the material, just hit the home
from the keyboard to frame the material
in the center. In the material section, you will have all
of these materials in the texture folder. It's not necessary to
use all of these texture This folder. But I
will use some of them and I will apply
them on my project. Let's say for this
piece right here, I think we have this texture. Let's open it, let's see. It's all right. This one I guess it is. This one. I gave them a number
so we can recognize them. The result six, I
guess. Yeah, one. All right. Let's see
how can we apply this Ticat and use
it. It's very simple. Just click and drug and
put right here in the UV, inside the header editor just to block the base color to
the base color like that. Now we have something
as you can see, but the scale is too big and
we need to control that. In this case, we can
grab this node and control to add Tsc
coordinate and mapping. It is already connected
to V. And the cool I will control the
skill using value, circular value and
add right here. Plug it. Let's add 25. For now, all it's too small and the
direction is not correct. The direction of these nodes. They should be like that. We need to rotate them. I will use the Z rotation. Just add 90 degree here. That's almost what we want. Or maybe we should add minus. Yeah, that's correct. The scale, it should be a
little bit smaller. I will chan 25 to
ten. All right. Now let's see what we got. Okay, that looks nice. Now I just want to kick
this area the same here. Let's see if we have
the ability to fix it. I will grab this tab and let's
see what we can do here. Maybe I can these vertices,
not for the site. Carol, let's try to do something like
moving them. It key. And let's move this.
I just want to see what I can do here. All right. Maybe a
result like that. Now the seam is
not quite visible. Maybe if I move this
to the x or to the Y, I can get something cool here. Yeah, something like that. Okay, this is the first
step after doing that, now we can add the normal
map of the result six, this one right here, so
I'm going to use it. Just click and drag
and boot right here. I will add a node right here. Be between this node
and the normal. Just search for normal map, this one right here, because this texture is not going to
work without a normal map. Block the normal here and
block the color to the color. And keep in mind to
king the color space to O because we just
need the information. We don't need any coloring. Now after doing that, the scale as you can see is not perfect. So we could link the
mapping to the vector here. Now we got something. Now I can in up this and hit M
to see before and after. Now we have some depth here. You can reduce the
number 2.7 to make it a little bit less strong. It's to exit and let's
make a comparison between the pattern and
the size of the project. So far looks cool. Even if you compare the images, the result looks
nice for any reason. If I want to make it smaller, I can use the value right here for the roughness
if you want. You can increase the roughness like that or you
can do something else like using the diffuse map. You can co it right here and
put it inside the roughness. I will control, have to
click so I can review it. You can block this right here, so you can see the result,
the roughness slot. Just keep in your mind the wider the result
will be more rough. If the color was dark, the result will be reflective. So far, the result looks nice. Now I can use this
in the roughness, plug it to the roughness. That's quite enough because as you can see here
in the middle, we have this dark area and we can see some reflection here. Does not make sense.
In this case, I will add another note.
Let's add a curve. Curve. Let's put
this right here. I will take black value to the white to kill
this reflection. As you can see, now it's gone. Now I will have control click
so I can see the result. Yeah, this is
almost what I want. Something like that. And now the result become
rough and nice. Very cool. All right, very nice. Okay, I think that's
it for this video. I will end it here and
see you in the next one.
53. 053 Unwrapping the ribs and some part of the bond: Hello again. Welcome back. Here. Maybe now we can
start with the bond drips. I will grab them right here. Go ahead to the modifier stack
and see what we have here. Mirror, We can
apply it control A. All right. That's cool. Surface. Deform we need it. I will apply here. We have the subdivision surface. I will turn this off for now. After doing that, maybe we can activate the wire frame so
we can see what we got. It's like to isolate this. All right. You want to rub this? The R rubbing is not
going to be perfect. I will tell you why. All right. The head and
the bottom of each strip. It will be a little
bit difficult to be opened because as you can see
we have very strong curve. Blender will
struggle to open it, rub it unless we add
a seam here or here. But adding it's not perfect, you will have an
overlapping in the texture. If you add seams, what I think is we
can do something else like deleting some of these phases and that's not
going to affect the result. Just tab to go to the mode
and it at a to deselect. Don't select anything, go
to the selects and go to this option and choose non manifold to grub these
open areas like that. After doing that it can trouble us to grow selection
two time like that And now I can just delete
these phases, will be it. I don't need anything else after grab them X and
delete the faces. Deleting these faces will
help to up these easily. After that, now I can tap, I can hit a select
all the faces and go ahead here and hit a again to select the
face right here. And then hit, and again
to the angle based, because it will give
you a better result. Now I can go to the
Material review, so I can see the result. I can give this a material, go here and the checker
if you want to see the checker or you can add
this material that we created. Tab out, turn off the wire frame and
let's see the result. The result is very cool. I don't see a big distortion. Has a little bit of distortion
right here at the head, but that's not a big deal. We can accept
something like that. After doing that,
you can activate subdivicion surface with
level two or with level one. Now I can hit slide to
exit. Just take a look. Let's see if we
have any open area. As you can see, everything is embedded perfectly and
everything looks nice. What I can say now this
result is already after that, maybe we can grab
this wire and rub it. Let's see in the modifier
we have surface to form. I will head control
and applight. I will hit to go
to the local mode. I will go to the solid
just temporarily. Then maybe I can maximize this
and tap to go to the mode. All what I want to do
here is just adding here. I'll click click
to grab this edge. After that click and mark to mark the
selected edges as a Sam. Now I can go here, a select all the faces. Go here and select all
the face here as well. Hit you two times to rub them. Now they are up perfectly. The result is very beautiful. Now I can go to the
Material review and I can tap and give this a
specific material. Let's hit new creates
a new material. Maybe from here we can choose
this material number seven, I guess number four. Click any drug and
lets put right here. And let's block the base killer. And now we can see something control to add
mapping coordinates, the UV to the vector add
value, block the scale. Let's add ten here. For now, maybe we can rotate this to the z nine degree
to get this result. Maybe now it's time to
include the other materials. Number four. Here we have
the normal map, we need it. Click Drug right here. Normal map. Let's spock the normal to
the normal and the color. And change this to the
color space to non. Because we don't need any color. We just need the information. Block this to the vector, we can fix the scale. Now we have some
height information and that's something cool. After doing all of that, maybe we can add some roughness. In this case, we
have this white map, we can use it and
put the roughness. I will grab it and
boots right here, block this to the
roughness and block the vector to the vector
to fix the scale. And I will curve RGV curve. And keep in mind roughness is information as well does mean we don't need
the color space. Switch this back to non color. The only map that you don't need to switch it to non
color is the base color. It should be RGV. Now we should make
some tweaking. As you can see we
have some reflection. I will take the black value towards the white and
make it white like that. That's will give
us what we want. You can click the result, can have to click and
see everything is we. If you want some variation, you can control the care here. Anyway, the result
looks nice so far and I will accept it. It's to excite and
let's take a look. The skill is cool, I guess if I compare it
with this image looks nice. I still have the ability to control the skill in
the way that I like, but for now I think it's
nice and beautiful. Maybe I can grab this side. And to go to the mode, select all the phase like that. Hit a here, to select the
phase right here as well. Hit two, time to rub it. Now they are rubbed. Maybe I should wrote it
like that after doing that. Maybe we can, yeah, we should apply the same
material from the rip to this object to grab the rip control and
link the material. Now it's linked but
the UV is too big. I will tap and grab it and
scale it down like that. It down and fix the scale. You can align them like that. Now the scale looks nice. I guess maybe we can
make this bigger UV. Yeah. Now the result looks nice. Even for the side,
for the inner area. You can grab it and tap it A and here a two time and rotate this one
as well like that. And scale as well. Before scale, this, we could
give them the same material. Grab it, You have to grab this control L and
link in the material. I just want to go back and
see if this area darker, still white. That's cool. Now, I will tap and
scale this a tiny bit until the scale of the
side be similar to this one. All right? Something like
that now looks perfect. One more thing here, I just
want to mention the ribs on the side a little bit darker as compared
with the outside ribs. Put that in consideration. Let's see how can we make
this a little bit darker. Let's take the image out this tab to go to
the edit mode end. I will grab all the
ribs I got here, but I don't want to select
the sites in this case. Just be careful.
Maybe, I don't know, it's like to isolate
them. Go to the top. I think from the top we
can grab them easily to act selection and just
brush them like that. Hit C again and keep racking
these ribs, the inner ribs. After doing that,
just hit control with L to select these before
you go any further, just make sure not to
select the outer ribs. After doing that, I
will hit P and then to separate them and
now they are separated. Let's like to now control space to bring
back the other windows. And let's zoom here. Let's grab this side here. In the material section, as you can see
that this material is applied on five geometries. I want to control
this one alone. And I want to make this unique. Because if I make
any change here, this change will be applied
on the other geometries. In this case, I want
to make it unique. To make it unique, just
hit this number right here and now it's unique. Even the name here is changed. I will go here and RGB curve, have to search for curve, let's put the curve right here. After that, I can make this darker by taking
the wide value down. As you can see now
this side become darker and this one brighter. All this is how to rub the ribs and apply
the material on them. Yeah, I think we finished here. Don't forget to
save the project. I will end this video here
and see you in the next one.
54. 054 Unwrapping and texturing the light sealed frame and the nose pad: Hello again. Welcome back here. Let's see how can we rub
the light sealed frame. Let's rub it, and let's
give it a material. I will select it in
slack to isolate it, and I just want to see
what we have here In the modifier stack mirror, I will apply
subdivision surface. I'm not going to delete it, but I will turn this
icon off after that. Maybe now we can tap
to go to the mode. And now let's see
what we can do. All right, let's
start with this edge. I will drop this edge loop
and convert it to seam. So we can cut it from here. Right click and mark Semel, everything Come here
and hit U two time. Hit a select, everything. And here, hit U two time. Now it's all rubbed with
angle based. That's cool. All right, this is the result, But we don't need this.
We need something better. I want to make some
tweaking right here. This go straight like that. Let's see how can we do that. All right, to do that we can use an option right here is
called follow active quad. We want to choose
one of these quad, Try to fix the direction of the edge of this
quad, for example. As you can see, this rectangle is not perfectly
aligned with the grid. We want to fix that. If we use this option and
this goes to this direction, we're not going to get
the correct result. I will show you what I mean. For example, I will grab
the head control L, just to focus on this UV. And I will go to the face three and make this
one active hold. Click and click again. Now this quad is the active one. I want all of these quad follow the direction
of this one. Tally, follow active quad. And as you can see, the UV is not perfect and is distorted. You can compare this
side with this one. All of that because this
quad is not perfect. I will grab the
vertices of the quad and I will control Alt shift as to hear it trying to
align it with the grid. I will grab these two vertices
and trot auto, align auto. Align perfectly with the grid. And this one as well, align
auto and this one as well. Now this quad is red. Vertices control
L, go to the face, have to click and click again. Now right click and choose
follow Active quad. Now the UV is better, the result is perfect. I'm going to do
the same thing for this one just to core
up these vertices. After you set the vertex
auto align in those as well. Now go to the control L and make this one
the active right click, follow active quad. And now we got this ready. After doing that, now we
will give this a material. Continue to create
a new material, and you can go to
the Material folder. And I will choose this map. Click any Trig, and
let's put right here in the blankets block. The base color to
the base control to add mapping and coordinate. Uv is block to the vector, the cool add value block. The value. Let's at ten for now. All right, now we've got
something you can activate subdivision surface after that. Let's see if we have
end distortion. I can see that we have
distortor right here. I guess we can fix that by grabbing these vertices and try to manipulate them a little bit. Let's start with
this and let's see what's going to happen
if we move the. All right, maybe the
affected the side, I guess. Let's go to the side and let's see what's going to
even as you can see, I have the ability to move these vertices and that's
will affect the UV. I will move this right
here and grab those together and move
them like that. Trying to strate the result. Yes, a little bit to get better results.
Something like that. And maybe we can do the
same thing for the side. Let's jump to the
side like that. And I will drop these vertices
like that and move them. Maybe we can grab those
and move them as well. All right, that's will help. Now the result is fixed. I guess let's tap
out and let's go back here and change
the value to 25. Maybe make it very
small and maybe now's the time to bring the
normal of the result. Five, change this to non
add the normal here. Normal map, not pump. All right, let's
search it. Normal map, block the normal to the normal and the killer
to the killer. Let's block the mapping
to the normal as well. Now we should have
some normal chanic rob the node and hit empty, mute, mute to see the results. All right, the
result looks nice. Let's bring the reference image, and let's try to
make a comparison. As you can see, the line
is very small here. Let's try to get
something close to this. All right, let's change
this to something smaller. Let's bring back
the other pieces. Maybe 35. I got
problem right here. I can see some reflection
and doesn't make sense. This type of fabric
should be rough. Let's see how can we do that. Let's go back here and
let's see what we got. All right, so we have this. Maybe I can use this
again and change this to nine color block this to Ness and block this
one as well here. All right, the
result is not Tdt. I got another problem here. When I changed this
to nine color, this one effected because they
are sharing the same name. I just want to make
this one different. Just click this icon,
the number here, and you will make this
one unique and change this back to RGB. All right, now I want
to control this. I will add a curve, RGB curve. And I will control, you
have to click to review the result or at least try to
get rid of the black area. Now let's see what's
going to happen. All right, now the result is rough and nice as you can see. Let's try to use the same
material on the nose. Bad, Let's grab this piece and it to isolate and let's
see what we have here. Mirror, we don't need it. I will apply and
subdivision surface, I think we can apply level
one and accept this result. I will, I want to add
the seam here to Rob. I will grab this seam
at the middle age. Let's see what's going to have. I will hit radically
and choose Mark Seam. And I will hit a, select everything, come
here and hit a again. And hit two, time to
rob it. Nodes are bed. And I think that's it. I can see that we
have some distortion at the corners here, but that's not going
to be a big issue. Let's go back and try to
apply the same material we applied here on this
subject, this name. Or at least change
the name to lights, sealed frame empty for material just to recognize it. Grab this and for
this name, light. Now it's, if you want to make the texture
a little bit bigger, you can tap and grab
them and scale them a little bit and all. I think the size looks nice. And not just that the
color is different, it should be darker
a little bit. In this case, I will make this material for
this object unique. I will call this dark. To recognize it, lets try to control the base color
by using the curve RGB. I will take the white value
down to make this dark. It may be darker, all right, Now it's become darker and nice. All right, I think that's
it for this video. I will end it here and
see you in the next one.
55. 055 Applying multiple materials for multiple objects: Hello again. Welcome back here. Let's see what's the next step. I think we can start
with this piece with this border allright. I will grab it and it's
like to isolate it. Maybe we can go to the solid. Let's see what we can do here. We have mirror, I can apply mirror subdivision surface with level two. That's too much. Maybe let's go to the wire frame first and
let's see what we got here. Let's turn of the
subdivision surface. Can we rob it like that? Let's change this to one. Maybe we can rub it with
level one. All right. I think I will accept level one. Hit control to apply and
let's maximize this. Let's see how can we do it. I will tap to go to the edit. Maybe we can add one seam
here and one seam right here. After you grab these edges, just click so they are marked. After doing that, we can
grab this entire edge loop. And I guess this one,
there's another technique. If that will work,
we can just mark this one in the middle as
Sam and open it from here. But let's see what's
going to happen. If that works, I will
accept this result. That's not going to work. I will add two Seems here. I will hit a select
everything here, hit As, and then hit two
times. Now we got this. The result looks cool. Maybe we can use follow active quad to get
better results. You can target whatever
Bolygon you would like. For example, I can
target this one. Let's take grab
these two vertices and Y or to the X zero. Enter to flatten this
to the X and this one as X zero and this one to the Y, Y zero and this one
as well, Y zero. Enter. After doing that, grab this polygon control L to link select and make it the
active, right click. Follow active Q. Now we could
get nice perfect results. And yeah, does, let's go here and let's
do the same thing. Let's grab these two
vertices to the X, I guess. All right, to the Y, Y zero, enter Y zero, enter those as well as X zero, enter and this one X zero. Now go to the phase, make this one the
active control and now right follow active
ad, now it's done. After that I will give
this a specific material, let's continue to
create a new material. Let's go to the texture folder. I guess we can use this one. Maybe I will click
and draw again. Put this one right here. Let's plug this to
the base color drop. This control to add,
mapping and coordinate. Let's for value, let's plug
that value to the scale. Let's add ten for now and
go to Material Review. So we can see the result we need to scale it a
little bit more. Maybe we can add 40. Let's turn over the wire frame. Let's take a look.
Let's see what we got. Let's like to exactly, let's make a comparison. The result looks very
nice and beautiful. But keep in mind here, maybe we will have a seam. Try to find a way
to get rid of it. The seam is not quite
visible, we can ignore it. Actually, the result still nice. Increase the level a little bit. All right. Keep manipulating this until you get
something nice. Hold and move this
if you want to. Yeah, something like that. Just keep manipulating
this until you kill the Sam, the seam is not fully killed. Maybe we can add 0.8, maybe we can change this to six. Let's see what's
going to happen. All right, that's too much. Let's add 81. Maybe 8115. Maybe six. All right, maybe I can change this to. Eight, go to the 81, maybe we can reduce this to 75. Playing with this value until
you get something nice. Keep in mind that
you can go back to the Ticketre, move
these vertices. That will work as well. If you want, you can
do that if you like. That will work as well. By the way, you can
open it from one side. It's not necessary to
open it from two side. But if you open it, if
you add two cats here, that, that will help blender
to rabbits and a good way. So far the result looks nice and the seam is
not quite visible. But as I told you, you still have the ability
to control that. For example, the where are
these edges? Grab this area. It's right here. That's very
cool. Now I will hit A. Now I can grab these
vertices and it to move, and I can manipulate this until I get
something I can accept, like this result on this side. I can do the same thing, just we could manipulate
the side, I guess. Yeah, let's focus on the side. Grab the vertices right here, hit a select everything, Rub them all like that. Let's zoom in a little bit. I will hit you to move, maybe I could grab these. All right, maybe these vertices just move it a little
bit and that's it. All right, maybe I need to
move it a little bit more. Something like this. All
right, it's very close. Maybe I can move this
a little bit more. I think I can
accept this result. That result looks nice
after doing that, maybe now we can bring
the other texture. Let's call it eight. All right. Yeah, let's
bring the normal. Let's check for normal map block the normal to the
normal and block this here, change this to nine, color and block the
vector to the vector. Now, we should have some
height information. After that, maybe we can add
another subdivision surface. Make this bounder and nicer. All right, I think we
are finished here. Let's grab this and let's
see what we can do. This still curve, I
will convert to ish, just hit control A
and cure this option. Apply visual eumetryish. Now it's converted to mesh. After doing that,
maybe now we can add sub vision surface with level one and apply this one as well. And I will tap to go
to the edit mode. And I will grab, for example, this or maybe this
one right here. I'll click Get up the
entire edge loop and then Tlk Mark seem
to cut from here. I just forget to a crane cast. All right, now after doing that, hit Select all the boly guns and here hit A as well
and hit two times. Now it's all rubbed
in a good way. The result looks
very nice and cool. Let's see what's going
to happen conformal. It's not going to stick
with angle paste. You can use follow active quad and it's not going to
take time from us. Let's grab these right click aligned to the Y and those as well
aligned to the Y. Let's focus on one
Bolygon for example, This one align to the X and
those all aligned to the X. Make this one the
active control L, right click, follow Active. Now done, very cool. Now let's tap out and let's give this a specific material. Maybe we can call this cable
the score MT for material. Let's go to the texture folder. See where is the
texture for this one. Yeah, I think this one
rob it right here. Then it result seven, let's plug the base to the
base, the same scenario. Control to add, mapping and
coordinate with the value. And plug the value, and let's add, for example, 40. Let's see the result, if
that makes sense or not. Maybe we can add 60 or 60. Looks cool. Let's bring back the reference images and
let's make a comparison. All right, maybe we need to
scale it a little bit more. According to this image. It should be small. Maybe we can go beyond 62, 70. Maybe 70 will be nice for me. After that, maybe
we can bring them for this texture and normal map. Block this here and put
this in the middle. And vector to the vector. You can hit all click. You can use all click
to connect those in fast way and change the color space to non because we just
need the information. Now we can see that we have
some hight information here. If you are satisfied
with the results, rub this in a subdivision
surface again with level two to make this
nicer and smoother. Now is the time maybe
to check the seam. If we have any seam here. Yeah, it does seam. Let's see if we have
the ability to get rid of it. All right. How can I fix this problem? All right, that's mean we grab one side and maybe
move it a little bit. Just at any bit, not too much. Or maybe there's another way. I guess we can use the two decursltright click
and control to snap, snap it to this vertex. We should change
the snapping right click and control to snap it
here, to grab all the UV. And I want to scale according
to the position of the two. De cursor it to the X and keep moving the UV until
you get something close. Lets see if that works or not. If that doesn't give me
the result that I want, I can erase the side and move
it a little bit like that. Maybe just move it up. Maybe that will help to kill the seam or gets a little
bit better results. That's very cool. Now maybe
we can start with this piece. I will hit Stack to isolate it, and I will give this a new material in
the texture folder. I have a texture for this, it's called dark pattern. Let's put this one here and plug it to go to the edit mode. We have mirror exists. I will apply Tab out and apply this subdivision
surface with level two. I will ignore it four now. And I will tap here, hit a, select Everything, and here it A to group
everything as well. And then hit two, time to it. I think we can accept
this without any editing. Let's hit control to add
mapping texture coordinates. And now we can see that
we have something. All right, let's add a value to control the scale,
like this to the scale. And let's add five for now. After doing that,
maybe we can, yeah, I think we can bring
the normal for the dark pattern and the block, This here and for normal
map in between like this and the vector and change
the color space to non. After that we can
control the roughness. And this up to make
it rough. All right. Five is to two. May I think two will be okay. We can go with that active
the subdivision surface to make this smooth and nice. All right, that's very
cool. Maybe we can call this MT just to organize
it for this piece. We can't create a new
material and we can call this dark elastic MT. Hit home button to frame the
principle in the middle end. Try to something dark like
that, something like that. I think we can go beyond that. Let's add a noise texture. I will have control click
to review it and see it. Maybe we can manipulate
the scale a little bit. Texture, coordinate, coordinate. I want to block the
object to the vector. There's no need to
add the mapping here because we can control
the scale from here. Change the scale
to something small like that, Very small. And maybe we can
add some details and to make the up like that. All right. Something
like that. Now we can block this to the normal. Let's search for
bomb map this time. And block this to the normal. I used bomb because this node
here is not a normal map, it's just black and
white information. That's why I need to use the
bomb factor to the height. Now I will blog the principle
to see the results. Let's give this a bit of time. As you can see now we have a height information,
but that's too much. Let's change this 2.1
make it very subtle. You can change the scale
to something like ten, Maybe you can increase
the details to 15 if you like or something like that. I think that's will work. We can use the same
material and app light on this frame frame. Hold here to grab this control
L and link the materials. Now there are links and
the results still cool. Or right now let's see
what else we can do here. Let's focus on the dial
and let's give it a. All right, let's hit New to create a new material
for this piece. The color should be gray. Let's go to the color, and let's take this down
just a little bit. Not too much,
something like that. All right, 0.4 0.5 I
think that's okay. Let's call this gray
or plastic gray. And let's add empty
for material, maybe we can use the
same noise tick. Sure, we added here
for this piece. Just go here and grab the hit
control C and go back here. And maybe we can use them. Select this object and here, hit control V to use
the same noise block. This to the normal.
And let's give this a bit of time
to see what we got. Control to click on the noise, see the noise
ticket, the result. Cool. All right,
after doing that, maybe we can reduce
the darkness a little bit to see some reflection. Yeah, I think
that's it. We don't need to spend too
much time on this. Just make a simple, maybe we
can reduce the strength to 0.05 Make it smaller,
that's cool. After doing that, I will apply the same material I
used here to this one. Grab this and for plastic gray, and let's apply here. And after that, I will grab this and create
a new material for it. And I will call this
white elastic empty. Maybe we can change the
color a little bit. Not too much. And we can. All right, there's
another technique, by the way, we can
apply the same texture. I will show you
what I mean here. Let's delete this ring and
delete the material from it. All right, let's apply the
same material we used here. Control L, grab this, hold to grab this or
just select this and search for plastic gray. That's now I will grab this and give it the
same plastic gray. Search for plastic gray. After doing that, I will
make this one unique, just this number here. We can call this white
instead of gray. All what you need
to do is just push this up to make it
brighter, and that's it. All right, I think that's
it for this video. I will end it here, and I
will see you in the next one.
56. 056 Creating the chrome material: Hello again. Welcome
back here in this video, I want to create a
row material for multiple objects like this one and this one here in the stand. Let's start doing that. I don't want to play
with the UV, any UV, I just need to grab any object and just hit
to create a new material. And I will call this
Chrome MT for material. All right, after that, let's go to Material Review. And we are in the
Material Review, let's crank up the metallic
to one to make this a metal. And not just that we need to
manipulate with roughness. In this case, I will use
a noise search for noise. Yeah, I will add the
noise testure here. I will add coordinate
we got right here, block the object to the vector and control FT to
review the result, increase the scale
to see something. But we want, here, we
need some details. We need some roughness here. Let's push this and make
the scale very high. Now we have something,
some variation. We need that variation to
block it to roughness. That's all what we
want to do here. Let's block this to roughness. And now I will have control. You have to click to
review the result. Now we have some
variation in roughness. As you can see. That's very
cool. This is the first step. After doing that, I
want to add a new node and as maybe a glass SDF LoBSDF. All right, hit control, heft, click to see the results. As you can see it, just a roughness color. I will take the roughness back. This and now we have a
result like a mirror. What I want to do is I want
to mix between this and this. Just hold control, shift, hold, right click and move the
mode from this to this node. The node Angular add will
create a mix shader for you. That's very cool, but we
need to control the factor. All right, in this
case we can use nail, just search for fail and less block the frenal
here to the factor. And there's no need to play with the OR just
keep it like this. Now we have both nodes mixed here inside
this mixed shedder. You still have the ability
to control the base killer. If you want to make this
a little bit darker, maybe this one as well. If you want to reduce
the effect a little bit, you still have the
ability to do that. I think we can make
this a little bit darker, something like this. I think it will be nice and reduce the effect
of the glossy. Maybe we can increase the as
a tiny bit but not too much. Or 0.03 maybe
something like that. Now let's apply the same
material on this object. Grab this, and maybe
this one as Chrome. All right, here we
have a problem. We should detect this. I will tap to grab
this control L and then the separate tab out. Now let's focus on this and
let's search for Chrome. The same thing on the side, we can do the same skin. Are you grab this control L to select the linked vertices. And then, and then
is to separate out. Grab this and give the Chrome. That's very cool. The same
thing for this piece, the Circ four Chrome. And now it's plight. And for the stand,
the same thing. Grab the Circ four Chrome
and plight in this one. All right, that's amazing. All right, I think that's
it for this video. I will end it here and
see you on the next one.
57. 057 Adding the HDRI image and changing the scale of the headset appropriate size: Hello again and
welcome back here. In this video, I
just want to use the HDRI image to
illuminate the scene. All right, to do
that, we could jump to the world section. Now we are in the object mode, or yeah, let's call it mood. Object mode in the world mood. Let's switch to the world mood. And let's see what we have here. All right, we have the
background in the world output. What I want to do, I want
to port this HDI image, click Any Drug, and
let's put it right here. And I want to change the
node to something else. I will grab the
node and hit Shift, And let's search for
texture and choose environment texture to change
this to the environment. After doing that, I
can block this and link it to the color and
then I can go to the render. But before you go to the Inder, just go here and see
what we have, right. Narinder engine is EV. I will change this to
cycle and I will use the GBU to compute or
to render the scene. And I will active the D
noise in the viewboard. I will z to go to the render. And let's see what
we all got here. All right, now we have
this Todo HDRI image. I downloaded this
image from HDRI Haven. Now let's see, The results is, everything is makes
sense or we should do or tweak or fix
something here. So far, the result looks nice. I want the lighting
from the DRI image, but I don't want to see it. I don't want to see the image. In this case, we can
do something here. I will grab the background and hit D to duplicate
it like that. And I will hit Control
and right hold, right. And move the mouse
from this to this to create a mixed shader. In the factor of
the mixed shader, I will search for
bath light path. Just search for bath,
and here we have it. I will plug the camera way
to the factor like that. Now we have the lighting
coming from the ATRI, don't see the DRI itself. And we can control the color
of the background from here. If you want to make this dark
like that, you can do it. If you want to rotate
the environment, you can hit or story in
to open this side panel. And you can go to the
texture mapping and use the Z rotation to rotate
the environment if you want. Keep in mind that you control
the strength from here. If you want to the
color strong or weak, you can control from here. Don't forget that you can
add too many images and try them by hitting this
icon and search for the new images that
you downloaded from HDRI Haven or Poly Haven. So far, the result is nice, but I think the lighting
is too powerful. I will change this 2.5 to make the effect a little bit weaker. All right, so the
result looks nice, the texturing looks
nice and realistic, but I think we're going
to use another DRI. All right, this
ATI image maybe is not a good HDR to review
the three D model here, let's try to check
something else. If you don't like to spend time searching for
suitable HDRI images, you can add lights here in
the scene, for example. I can add area light and
move this up and kill it. I just want to remind you that, don't forget that the scale
of this object is very big. If I add a cube here, as you can see, is very huge. The size of the cube is
two meter for each edge. And you can see the
headset is huge. That's mean we should scale
it and make it smaller. If you do that, the lights will behave in a different way
when you make it smaller, I think we can work on
that and make it small. Let's put the three
dicrosor in the center. He. Let's see how can we do that. I can scale it now
or scale it later. All right, let's change the transform vivo
to the three cursor. And I will hit eight to
select everything here. And I will include the shrink folder and the timber two and the
timberly one as well. Just grab everything to grab everything And I
will scale them down. All right, scale them
according to the posicion of the three cursor is and
keep scaling these down. But before you go any further, maybe we should add a guide. I will hit A and add the cube. And let's change the size of the cube to maybe 20 centimeter. We can scale the
headset to the size, select everything, hold
control, and deselect this. And keep scaling the headset down until you mark it
with the size of the cube. It's about 20 centimeter. I think the size will be
perfect. Something like that. Yeah, something like this. It will be very nice when you come beole just grab
the guide and delete it. And delete, that's it. Maybe now we can hide
everything else. The timber two and timberly one. What else we got? Right? Here we go. This objects, the sing
yeah, you can't hide it. And I think we don't
need this one. Do we need it? Let's
check the modifier. All right. I will
keep it for now. Let's go here and
let's turn this off. All right. That's amazing. Now let's go to the meal review. I just want to see the
size of the ticket. Sure. Keep in mind, don't apply the skill. For example, if you grab
this and apply the scale, I think that will affect
the size of the thicketure. That's not going to affect it. All right, so far
everything is cool. Now let's go to the
render and let's see how the light
will behave here. As you can see, it becomes stronger because
the object is smaller. That's mean we should go to the strength and change
this to 0.1 maybe. Or maybe we can't
change the HDR image. Let's add 0.01 maybe. All right, y, that's too much. Maybe we should change
the strength of this slide. Yeah,
that's correct. Let's add zero here, because I just want
to check the HDRI. Let's add 0.3 Maybe
0.3 looks cool. Let's go back to this slide. Let's put it right here, and maybe scale it to the Y. Let's add five here. Maybe, let's move it
up a little bit more. Maybe I can take another coby. Let's change this
back to bounding. And I will hit heavy
Coby right here. And point this
towards the headset. Okay, everything looks cool. I'm not going to focus too
much about the lighting, because I just need this slide just to review
and see the results. And when I reach the end, I will spend more time to
get a good lighting set up. But for now, maybe we can
change this to three. Somebody like this or maybe two. All right. I think
that's will work or anything else
we should do here. Maybe I can just make someone taking to the material
of the chrome. Let's go back to the object mode and I think we should make
this a little bit brighter. Maybe we can control
darkness to 0.3 to 0.2 maybe in manipulating the
darkness here as well. In this case, maybe
we can use Curve RGB. And let's put this
more right here. I just want to take
the wide value towards the dark to make this a
little bit more reflective. And you can see how
will affect the result. When you do that, you can
see the difference all, maybe we can move this,
something like that. I think now the
result perfect and, and better, I guess. Yeah, this result is better. I will stick with this result. That's very cool. All right, let's focus
on these lenses. Let's see what we can do here. Let's create a new
material for them. And let's call this lens underscore empty
to recognize it. And here we should have some transmission crank up that transmission and we
don't need any roughness. It should be smooth. What else we should do here? I will grab this and it's
like to go to the local mode. And I will tab here
and I just want to grab some phases from here. Maybe we can grab these
phases or these in the middle can rob us multiple times to
grow the selection. All right, I guess grub these phases like that or you can grab this
one hold can Tro, you have to grab this
to select this area and the girl selection until
you reach this point here. And I will hit shift D to take a coby and right to leave
it in the same place. And then hit P and
then it's separated. Tab out and grab this new coby and Tab and select
all the pieces. I think we can push this
out or in it alters. Let's take this out. Just a time bit like this just
pushed out from the lens. That's now, I can give this
a specific material as well. Let's delete the
lens material from this surface and
let's create a new, and let's call this environment
empty for material. In the material section, I have this image in
this image as well. I downloaded these
images from the pixels. This is something optional. I just want to use it. I will block the
base color here. And let's go to the
material review or you can go to
the Dor you like. All right. I will
grab the new surface and tab to go to the
mode and I will it here two time to it shod
see something here. After that, maybe I
can review the image. Right now, we can search for the image and find it.
And it's right here. And put this in a good place, I think it's upside down. We can rotate it or you
can go, I think to the UV. And all right here we, we can mirror to the Y, I guess, and move
this down like that. I'm not quite sure. But I think we can
make some distortion here or not like that actually. Let's make the brush
a little bit bigger, hit big like that or this type of distortion
is not going to work. Let's try to do something else. Maybe we can use the
proportional editing. Maybe I can scale this. Let's change this to bounding
books and make the effects. You can see how that
will affect the result. Just small distortion
here for the lens. After doing that,
now I can go back here and use the same image in the emission to see something
here from the side. Now let's exit now. Let's take a look and
let's see what we got. All right, this is
something optional. You can ignore it if you like. You can grab the lens and
manipulate it a little bit. If you want to
make this a little bit darker, you can do that. If you want some reflection, you can crank up the
metallic a little bit, but not too much because you are converting
this to something like a metal or
something like this. I can tweak this
later if I want. All right. All right. I think I can end this video here and see you
in the next one. Just before I end the video, I just want to mention
that you still have the ability to control
the emission strength. If you want to add two
or three to make the Sp, you can do that from the slider here, the
emission strength. All right. See you
in the next video.
58. 058 Creating brushed metal material: Hello again. Welcome back here. In this video, maybe we can start with the
aluminum structure. Let's see how can we
create material for it. All right, let's go to the Material review
and go down like that. After that, let's
grab this piece and let's focus on it, All right? It's like to isolate it. We have subdivision surface
with the shrink crop, I will turn this off
and this one as well. I think we can rubbing this
is not going to be easy, but we will try to find
together a way to do that. All right, let's see
how can we do that. I think I will, I need to turn
the bag face calling off. Because if I look at the
geometry from this angle, I can't see, I see nothing
because it's the bag face. Let's turn this off or tab to go to the edit mode
and this is the result. As you can see, let's go to the edge and let's try
to grab the middle area. Actually, you can add one edge, I guess here, I'm not
going to do anything. I will grab this here
and then and mark. Now I marked this as just that. I will go to the select
and I will go to this ocular right here and non manifold just to
select the open area. As you can see
what I want to do, I want to exclude these faces because it
will be a little bit difficult to blender to rob
it, especially this area. As you can see, it's
extruded too much, it will be difficult to rob. He can throw blast to grow
the selection like that. And go to the face
selection three. And then go back here to select
and go to lose boundary. Just to select the boundary
then right and mark Sam. Now I marked the
same, that's me. Now these phases
are not included. We just need to focus
on the surface. After that, I will
grab one phase from the surface and hit
control L to link select. When you do that, a
minor here will pop up. Just open it and choose Sam. Because we want to grow the selection until the
selection hit the seam. And it will stop there. Then go back to the UV, hit a select everything
and hit U two time. Let's give this a time to be rubbed and now the
L rubbing is done. And this is the result. As you can see, this is the result. The result is cool,
but we got a problem. Here we have a curve. Let's see how can we fix that. What option do we have here? I will hit Alt. Click on
this to grab it like that. And I will hit to convert
these vertices to bins, I will go to the UV
and Active Live, because I want to fix this. I will hit to the X axis to
scale these to the X axis. All right, before you do that, one thing I just forget to do. I forget to turn the
proportional editing off. Turn this off, go back here, grab these vertices X to the X. Let's kill this to the X axis. Trying to make the UV look strike something like that
is zero. And then enter. Now we've got this. The
result so far looks cool. And maybe we can grab this as wall and then
hit P and then to the Y. Let's kill this to the Y. Let's see what we will get. All right, the
result looks cool. Now we can grab these as well. Out click, unless it is to the Y zero all. Let's try that again. To
convert these two binds to the Y zero. Now the result
looks perfect here. Now, maybe we can control here as we'll grab
them. And then hit. To convert these two
pins and all right, let's see what we can do here. All right, in this
case maybe we, let's try to scale them. And let's see what's
going to have been. I will hit to the scale, these to the x,
Let's accept that. Let's see if the
result looks nice. All right, as you can see
here we have some distortion. All right, let's try to grab these vertices and
then hit Key to move. And let's move them back. But let's move this
almost right here. I will use the two decursor. I will put the two
decursor right here and scale according
to the two decursor. Hit to the X and scale
these vertices away. Maybe now we can
deselect those and put the two decursor
right here and hit to the X to scale these
vertices away as well, or something like this, I guess. Let's check the side. I think
we got the same problem. All right, what I'm going
to do is I'm going to grab these vertices like
that and maybe put the two decorsor here
and hit to the x. Let's try to fix this problem. But keep scaling this like that. And now that looks
better, I guess. All right, It's not going to
be perfect, but it's nice. All right, now it control space. And let's go back here and maybe now we can add the checker material.
All right, where is it? See where is the material? I don't know if we
gave it a name or not. All right, maybe
now we can create a new material for this. Just to see the
result, I will go to Material Review and I will continue to create
a new material. And I will add
teturetro, add mapping. And coordinate with value
here and this one here. And increase the number here, UV to the vector
because we are this. Let's increase the resolution. All right, so far,
the rest looks cool. That's mean, this piece
is ready to tick shares. That's very nice. Let's
call this checker. And I will delete it and I will create a new
material for this. Let's call this brushed metal and hit the home
button tube frame, the N in the middle. I will add Noise ticket, and I will hit control to
add Mabbing and coordinate, or maybe we don't need or I will keep the mapping for now. Controls to preview
the noise scale the noise, make it
small like that. Maybe now we can use the UV because you remember
we erupt it. Let's increase a
scale like that. Maybe you can control
the roughness and the details if you want
to add more details. Now's the time to scale
the noise to one of these, direction to the X or to the Y. Let's see which one is working. X is working, as you can see. Now they are scaled, you can strate this to
the Y if you like. Like that. You can increase the scale to
the x a little bit more. To get a result like that, maybe we can add 0.1 to the y. All right, now we've
got this result. Now we can use this
in the normal bomb will help us to connect the black and white
color to the black. The normal here, the
factor to the height. And now hit control. Click on this to review it. Now we have something,
as you can see, change the metallic
to one to metal. To change this to metal
and change the strength to 0.1 Maybe you can manipulate
the distance if you like. All right, now we have
nice priced metal. All right, let's see what
else we can achieve here. If you want, you can block
this to the roughness as well. I think we can
control that using the curve, the RGB curve. Let's see what
this node can give us if we grab this
down like that. As you can see, it will
be more reflective. If you pick this up,
it will be more rough. All right, maybe we can just take it down
just a little bit. That will give us
something very nice, especially if you go here
and reduces strength to 0.05 Maybe I think we should
reduce it for any reason. If you want to make
the effect stand out and become a
little bit powerful, you can use it in the
base color as well. All right? You can, for example, this small right here and
hit eight to four curve, you can make this effect strong. For example, I can
take this one here, you can see how strong
the effect become. You can make it
bright like that. This is another way if
you want to use it. Let's see. Before and after. Hit empty mutes the node. Let's see if that will
make any difference. All right, let's cut
this and connected. Connected. Well, the result so far looks very cool and
nice and maybe now we can. Yeah, I think that's
it. If you want to manipulate that
a little bit more, you can do that by
changing this to 30. Maybe if you want
to make this scale to the X a little bit higher, maybe zero points, 05, if you want to situate
this a little bit more. All right. I like this
result. Looks nice for me. If you want to make the
effect a little bit less, you can take the black value, the white value down. You can delete this
one, by the way. And you can take the
black up to make, right. If you think the effect becomes strong or something
like that is very nice. But the problem is, we
have some striking here. If we got the ability to get
rid of that, that's cool. But if we don't, we
can accept that. All what we should
do is just moving these vertices and
put them in a place. All right, let's see
if that's possible. Let's see if we can do this. All right, what we want to do is we want to make
these vertices strike. And that's almost it. Let's grab these and hit to
the X scale, those to the X. Let's make this flat. All right, scaling
working according to the position of
the two decursor. I will put the two
decursor over here. And then with the selected
vertices I will hit to the X. And let's see what's
going to happen. Zero and now this becomes flat and you can do the
same thing for the rest. Let's put the two
cursor right here and let's grab this row. It is to the x and then zero enter to make
this flat as well, you can gird row, Okay, It seems like we
should spend some time here. This is the third line
and this is the third. You can hit to the
x and zero enter. All right, right click
and align to the X. Let's see what's going to
happen if we do that now. I guess it's aligned. Quite sure. I think we can grab
some faces from here. Let's add these as well. Maybe for now maybe we can deselect those
over here and hit Alt. All right, let's go back here. We want just to select
some of these faces. I will go here and
grab them from here. The area that I want to target, you can do something
like grabbing the middle area and it can troves multiple times that
G faces on the booth side, even like that as you can see. All right. I think these
faces are enough for me to fix control minus maybe to
focus on this area alone. Now let's see what
we can do here. I will turn off live. I will grab these edges and let's see what
we can do here. Let's align this to the get, keep in mind the two
decoursorre scale to the two decoursor because we don't need to change this point. I'll click on this one with the Tweedy Courser skills as well, and we could do that for the rest zero. Click the courser here, X zero. Enter. Now you can see
these edges become strikes. Now as you can see, the UV
becomes strike from here. And that's something amazing. Maybe we could fix
that on this side. If you do that, that will help to get better results here. When it comes to
the product tickure or the noise that we used here. Let's see how can we do that. We could spend some time
here to get a good result. Let's do that
together. Let's start with this egg, or
maybe this one. Let's put the two cursor here
and scale this to the eggs. And let's move the two
cursor on the next one here. I'll click to the egg. And let's keep doing that until we finish all of these rows. All right, now I've
finished everything. Now le, let's like to excite. Go back here and let's go
to me review tub outs. Now as you can see, everything
is aligned in a good way. That's what I wanted here. Even the scene
here, the effect of the scene become very weak. And the result so far
looks clean and nice. Very nice. All right. I know we spend too much
time editing these, to be honest with
you, is not quite necessary to spend all of
that time editing this UV. You can ignore it if you like. This is another option you
can use follow active quod. But if you do that, you will face a new problem
here and here as well. Because you will spend a
lot of time trying to align the faces or the vertices on this side with the
vertices on the side. That's why I skied all of the UV starting from this
point up to this point. And the UV editor now, it just like to excite
and let's take a look. Very cool. The
result looks nice. And I think that's
it for this video. I will end it here and
see you in the next one.
59. 059 Adding materials for multible objects wigh: Hello again. Welcome back here. Let's create a material
for this piece. Let's see what we
have in the modifier. We have solidify. I will apply, we don't need it. We have subdivision
surface with level two. Let's see, the wire frame. I will change this
to level one and I will apply mirror modifier. I will turn this off now. I will grab this and go to the local mode and tap
to go to the edit mode. What I want to do, I want to create a seam
here in the middle. Right click, mark,
seam. All right. I think I will delete
the Sam from here. Click cam because there's no reason to open it
from here. Hit a slate. Everything. And here hit A as well and hit two,
time to arup it. Now it's raped, as
you can see here. Let's see what's going
to happen if we confirm. Let's see. Confirmal works here. Yeah, I think it will work. All right, that's very
cool. Now maybe we could create a material
for this piece. Let's hit to create
a new material. And I will use this
texture right here. Click any truck and put right here the number
three, Knitted three. Let's plug the killer
to the base killer. And now we have
something control to add mapping coordinates for value. And let's add the value
here to control the scale. And let's add ten for now. All right, now we
have something. The scale looks nice. I think that we can accept
the ten, That's okay. I guess now is the time to add, drop the normal and let's
put right here and the lor to the normal
and change this to non calor between this and this. Let's check for normal map. Let's put this over here. Let's block the vector of the mapping to the
vector of this node. You can control the strength
from here if you like, for the roughness if you want. All right, let's see
what we can do here. I think we can increase the
roughness and make a tour of I guess we can
exhibit results. Whatever thing you will do here, it will be reflected
on the other side. All the looks nice. We can say that we are
finished with this one. Maybe now we can start with
this white plastic prop, this and eliciting change
the name to white plastic, White plastic, white plastic empty. Just to recognize it. I
added this speaker world. After doing that, what
we can do is because this type of plastic is a little bit handy and
you can bend it easily. It's like it's similar
to the rubber, the type of the
material that's mean. Or we can use subsurface
scattering here to give this translucency
or for the color, maybe we can make this a little bit dim, but not too much. Something very subtle for
the subsurface cottering. Let's start with 0.1 and let's see what's
going to happen. As you see, it's become
transparent a little bit. Here we have something to
change the subsurface radius. Here we have the RGB
red, green and blue. As you can see, the
higher value is the red. Well, that's mean, any color traveling from inside this
object will be reddish. But if you add one
here, let's add 10. If you add one here for the
red and green and blue, you will get consistent color. Now after unifying
these numbers, now I think we should control the subsurface value a
little bit more or less as 0.01 maybe make it a little
bit less or thinner. The idea is the lighting comes to hit the
surface of this piece, not reflected from the surface. They will go deeper
a little bit, then they will be reflected out to the viewer
or to the camera. When they go deep a little
bit inside this geometry, they will take the
color from inside. Whatever change you will
make here that will affect the color that
coming from inside. This is subsurface
scattering in the nodule. The little sulfa looks cool. Now, maybe we can add
light right here just to see what's going to happen here. Let's add a light here. As you can see, the
light can travel and go through this
piece of plastic. If you add zero right
here, you can kill this. Let's add 0.0 0.001 Just
make it very subtle. Or maybe we can go beyond
that. Let's add 55. That's too much, I guess.
Let's change this to two, Maybe a two maybe looks cool, it's transparent and nice. We can control that later
when we reach the rendering. That's too much.
We can reduce it. Don't forget, the light source is very close to the object. So far, the translucency
looks nice. I will accept this
result for now. One more thing here
maybe we can do, maybe we can control
the roughness and the normal as well. I will grab this plastic piece and I will grab these
nodes that I used. Let's go back here to use them. We control, okay, this. Grab the control C to cov them, go here and then hit control V and block the
normal to the normal here. Now we should see some
height information, especially if you zoom in here. Let's go to the material review. Maybe that will help to
see the result better. Anyway, the effect is very subtle and that's
what we want here. Above that, maybe we can
use the noise texture again to add some variation
in the roughness. I will duplicate this
or just keep it and block the object to the
vector. Now we got this. Let's increase the
details in the roughness. I want this to be rough like that and increase the detail. Reduce the scale if you want. I will block this
to the roughness. Let's see what's
going to happen now. Now, we should see some
variation in the roughness. But because this is why you, if you take to something
dark like that, you can see the variation
in the roughness. I think this result looks nice. If you want to control
that, you can control it. But so far it's cool. All right, maybe I
can the curve RGB curve to control the
ph a little bit more. Let's take this down
to make this dimmer. If you make this
dimmer, that's mean, it will be more reflective. You can see it from here. I think this result makes sense. Or maybe, yeah, just
push this up ten bit. Now let's take the color back to something
white like that. Let's go to the render and
let's see what we got. All right, it's not
going to be visible now, but when we add a
camera and render it, everything will be nice. The light source, I
don't want it for now. I will delete it. Yeah,
now we got something nice. And we can tweak this
later if we want. All right, now let's say that we are finished with this piece and do something else. All right, we could the same material on
this one and grab this. Let's search for white
plastic speaker. Now it's light,
that's very cool. And here we have a light source. Let's see what we can do here. Let's see what I added here. All right, It's better
to block this area, I guess just tab and
let's see where is it? It's not quite
necessary but I don't, I don't want the light to
travel and hit this side. If that's this side
will be illuminated. I think if I add a cup here that will prevent the light
to hit this side. I will hit Key twice
and just make this a little bit bigger or taller. And after that I will hit
and hit Control two bivalent 23 maybe something like
that. I think that's it. I will just hit tab out and let's grab
this to isolate it. Let's work on this a little bit. Let's, let's see
where it's all right. What I want to do
is I guess we can grub these faces and give
them a specific material. Let's go to the material second. And here we have two slots. If you don't have to
slot, don't worry. You can delete one
of them. All right. We should have the ability
to delete one of them. Actually, Yeah, we can
delete this one as well. Let's create a new
material for this. And I will call this
green light empty. I will change the principle
to emission shifts to Sweaklet's choose emission
from the shader section, I want to pick
something like green. Let's go to the
render and let's see the results. All right. What I want to do
is I want to tap, I want to apply the green material on
these faces right here. I will create a new slot
here for the material and I will pick this assigned
to assign this material, the emission material
to the selected pass. Assign and now it's assigned
for the next material. I will hit New to
create a new material. Here I will hit control Eye
to invert the selection and I will apply the next
one for the assign. And now it's assigned. After that, let's call this, I don't know, let's
call this light glass. Something like this. Maybe can call it whatever thing you like. Let's make this a little bit dark and let's push
the transmission. All right, now we should
have something like that. If this circle is not perfect, I think we can fix
that. I don't know. Maybe we can hit
radically into a circle. Maybe that will affect the result and give
us better result. All right, I'm not getting
a good result here. Let's grab these faces
again. Like this. And then hit for inst. Make a small inset
here and tap out. Yeah, now we have
something here. Let's go back to the light glass and let's see what
else we can do here. Maybe we can crank
up the metallic a little bit just to
have some reflection. You can go to the
green light and push the strength make stronger. Now let's sit to exit and
let's see what we got here. As you can see, the light travel beyond this area to
illuminate the area around it, and that's because of the
sub subsurface scattering. But so far the
result still nice. If you don't like that, you
can reduce the strength to maybe four, I guess. Or you can control the
subsurface scattering to 0.1 maybe maybe any
creases to seven. All right, so far the result
looks nice. Very cool. You can push this deep, or if you like, you
have this option. We can maybe we
can go to the top. And I guess we can grab this in the x ray
and push the deep. Let's see what's going
to happen if we do that to exit and let's see
what's going to happen. All right? I think I made
a mistake not like this. I will hit control multiple
times to cancel that. Let's go to the top and
let's do that again. We should grab
this side instead. Yeah, let's push this back. All right. Now, let's
see what's going to happen. Maybe we can. Increases to 20 the sea. All right. It's hard to see it because of the light glass. Let's change the metallic. Take this bag at any bit, maybe we can make the
sprit something here. Not makes sense.
It's not because of the lights or
the metallionis. I think we could push these
faces back a little bit. Something like that, I guess. Or maybe you can tweak this
surface a little bit more. This control blast to grow
the selection and move this like that. I
think that's it. Now let's go to the
render and let's see what we got. All right. Now I can go back here to the lights or to
the emission and change this to maybe
ten, maybe seven. I think this result is better. All right, let's break pull. Very nice. All right. I think that's it
for this video. I will end it here and
see you in the next one.
60. 060 Creating aluminum material for the Battery and MagSafe: Hello again. Welcome back here. Let's create a material for the max save and
for the battery. Let's start with this piece. And I think we can
use the Chrome. Maybe we can cob it and
make some manipulation. And use it again,
I'm not quite sure. But I think we can grab these nodes and hit
control C to copy them. After we select this hitting
to create a new material, let's call this
aluminium ALU M alum. I think it should be written
like this. And then it Mt. Then hit control V to
paste these nodes here. Let's go to the Material Review. I just want to focus on this. I want to check
the noise texture, how this noise texture will
be behave on this object. The size is very small. Maybe we can change the
scale a little bit. All right, to something
like that, I guess. Now let's like this
to the roughness. Let's see the
results. All right. Now we can see something less
than metallic up to one. All right? We can take the white value
up to get a result like that. Maybe we can use the same noise to have some height
information in the normal C for bomb
map and the block, the factor to the height. Now we have some
height information. Let's reduce the strength to 0.01 maybe make it very subtle. Let's see, before and after at least change to maybe three, I can't see anything. Let's change this, 2.8 Right
now I can see something. I think eight too much. Let's change this to five. All right, five will be nice. Maybe four for the roughness. I think we can control
that a little bit more by taking the dark value
up a little bit. Maybe this down. I think we can
accept this result. It's like to exit. And I will apply the same
material to this group. This ends for the aluminum, it's right here, applied
for this geometry. Maybe we can do the same
thing for this piece inside. Maybe we can create a dark
plastic empty for the, maybe we underscore parts. Maybe we can type and
hit the Home button. Let's take this
down, the roughness. Maybe we can take it
back a little bit. I think we can
accept this results. All right, that's very
cool for this piece, I think we can create
a light here tab, and I think we can take
this back just a bit. Maybe we can add support
loop here and here as well. All right, let's go to
the material section. I think we can use the
same material that we added to this object. Grab this and then hold
here to grab this one. Hit Control, and let's choose link materials to isolate this. Let's focus on this. Face it for inst. And now let's go to
the green light. Assign to assign to this area
that control eye to invert. And let's choose
the light glass and assign this to the rest here. Maybe we should
make some tweaking like hitting eye to time. All right, let's
go to the render and let's see what
we will get here. All I can't see anything
here because of this object. We need to make some tweaking, like taking these faces
and put them deep inside, turn of the subdivision
surface for now and let's grab these
faces and from the top just hit Key and
move those deep inside. If you'd like you can grab the outer edges and
just level them. We can add four cuts. All
right. Something like that. And I think that's it
now we can turn this on. It'd like to excite and go to the render And
let's see the results. All right, I can see that
we have some depth here. The result looks
very nice and cool. That's very cool. All right, maybe the button, we think we could apply the same material
we used here on this one, Olgrab, this material
and it control L, and choose Link Material. And now it's linked. I guess we could make some
tweaking here like T, maybe right here, grab
this right click and mark. Now it's marked Am, hit a, come here, hit A again, hit two, time to rob it. Now it's up for this tape. I think we can am am, hit A again, hit two, time to re rob it. Maybe this one we can tweak
it to pin these vertices and active the live I will hit to the X
zero to flatten this. And you can move it
a little bit right here if you like,
you flatten these. But this time I will choose
bounding box because I don't want to scale these to
the position of the three. Cursor to the X zero enter. And now the result is perfect. Maybe we can move these
down just a little bit to align this verticx
with this one here. Everything looks nice. After doing that, we
should see some crutch. All right, let's tab and
select these two pieces. Maybe we should scale them or let's go to the
Methaic Review. I just want to see what
we should do here. Maybe we should scale
these down like that. Yeah, now we have something. We have something here as
the result looks nice. All right, what about
the digital crown? Spring back the reference images and let's see what
we can do here. All right. The diketo crown. All right. We have
two colors here. The middle area
should be white and this one should be
the outer area. All right. Let's grab this tab and let's
select the middle area. It control L, I think I can detect this P.
And then to separate it, tab out and let's
grab this one alone. I think we can apply the same
material we used here on this grab control L
and link materials. Now this material should be applied right here
for this piece. Grab the structure at control
L and link the material. This one is applied
as well. All right? I'm not quite sure if we have
the ability to rub this, but maybe we can try and
see what's going to happen. We have the subdivision
surface here. I will turn this off for now, and I guess we can add the seam somewhere
actually anywhere. For example, here. After that I will
mark this as a Sam. I just want to see what's
going to happen here. Hit a and hit two time to it. And let's take a look. All right, after doing that, maybe I can't grab these
vertices and hit to bend them, the live R still active. I will scale these to the eggs
and zero to flatten these, maybe I can flatten the P to
them and to the zero enter. All right. All right, the result
become wavy a little bit. Maybe I can't grab
these vertices to zero enter to
bend them first. And scale them like that is zero enter or at least
desalate this vertex. And I guess now we
can move these down. Let's see if that will work. All right, that will
ruin everything. All right, I will control the
multiple times to cancel. Maybe this tip I can't use follow active quad because that's not
going to work. But maybe I can pin these and I can grab this side and put the three decursora here,
the two decorssory. And then hit two,
be these vertices. And I will change the transform. We point to two decursor
and scale these to the two decursor to
make this flats. Let's see what's going to happen if we do this on this side. Put the two decursor here. These vertices as to
the Y zero enter. All right, the
vertices become flats. After that I can grab the
side and hit to pin them. And put the two crossor right here and scale
those to the X. Maybe I guess pin them. Put the two decrossor
right here and hit to the X zero enter. All I think that's helped. Maybe we can grab
this one as well and put the two decrossor here
and scale these to the X zero enter to bend them. All right, here we
got some problem. Let's grub these and
key to move them like that, all right. The UV now becomes strikes, let's say almost these and move them as
well a little bit. Or if you'd like you can put the two decosor here and scale these away from the x
axis, including these. Maybe I can see that we
have some distortion here, but I think we can accept that. Now I will tap and
let's take a look. Let's see the results. Well, actually is not bad. Let's grab everything and
scale it down if you'd like. You can give this a
specific material. Just hit this patter right here and let's change the ph metal to proch metal, underscore D dial. Maybe we can reduce the effect of the roughness
to make the effects settle. Let's take this value down. Maybe not like that.
Let's take this up. Or that will make some differences
and I don't want that. I will control Z multiple times. But maybe we can
control the bomb map. Let's change this to 0.01 Maybe. Let's cut this from here, Let's see what's
going to have been. All right, is not
so huge difference, but maybe we can manipulate
this just at any bit. Let's remove this, just to grab it and its
x to delete it. Let's like to exit and
let's take a look. All right, that is,
that looks nice. We can accept
something like that. Maybe we can make this smaller to make the
approach effect bigger. Yeah, so far looks nice. Let's go to the render and let's see what's
going to happen. I can see that the effect
is a little bit strong. Let's try to tweak that
a little bit more. Let's select this
material, this object. Let's go here to the roughness, and maybe we can
control it just a bit. Can this be the care
that we got here? Let control C and cov it and
go here and let's use it. Let control V, let's
plug it right here. And control x to dissolve this. Well, that will make the result
very close between these. Okay, I think that's
it for this video. I will end it here and
see you on the next one.
61. 061 Adding materials for the front shield glass and the details behind it: Hello again. Welcome back here. Let's focus on the front side of the set, the healed glass. I will call it the healed glass. Okay. Or if you want, you can call it the optical lens or whatever
thing you would like. Let's create a new material and let's rename this to Heal. Let's go to the render. Let's see what we can do here. Maybe we can start
with the base kill or make it a little bit
dark, not too much, and crank up the transmission to one to make this transparent. All right, maybe we can
push this up just at any bits. All right? I think something here, the roughness. Forget
the roughness. Take this back to
make this reflective. I just want to this area, I just forget to take
the roughness down. I just forget that, well, actually it should be like this. If you want, you can control
the transmit roughness here if you want to
make this a little bit rough, all right? Yeah, you can control
this if you like. Anyway, let's go back here. This is the first step. We
did it all after doing that. Now maybe I can hit,
just to hide this. Now we can start with this area to see what modifier
do we have here? All right, we have
nothing. That's very cool. Let's go to the solid. And I just want to suppress
some of these geometries. I will tap to go
to the edit mode. And let's start with this
grub, whatever vertex. Hit control L to select the linked vertices
and then hit P. And then to separate this
out for the camera, I will tap and just grub these pieces and those
on the other side, maybe this one and this one. Hit control L to link select and then hit P and then to
separate those out. All right. I think that's all
we should do here. We will give this
geometry one material. All right. I think we can grab the same material
that we added here. The plastic material
that we applied here. We call it dark plastic empty. Let's grab this enter
for plastic empty. Now it should be applied here. Let's go to the render and
let's see what we got. All right, that's very cool
and the cover in the bag, we can give it the
same material I guess for dark plastic MT. All that's amazing for
these pieces as will drop them to grab this control
L and link materials. What about this object? The same thing. I think
something here makes sense. I will tap in control L that
will affect everything. It seems like this piece in the middle is connected
with the rest. Yeah, that's something bad. I will grab this and
grab this control L to select the links
face and maybe I can include these
control L again. And then hit P and then
is to separate those out for this area. I guess we can do
something like grabbing this vertex and then move on on this side,
grab this vertex. And it control last multiple
times to select like that until we reach a point. I will tally points. I just want to go in. Let's see, girl
selection one more time. Something like that.
Yeah, now I can see something like that. And then hit and then
to separate this out. Now I can give the
camera the same color. Up this hold here to get up this one control
L link materials. All right, for these pieces, I can give them a new material. And I think I can call this camera lens empty
just to recognize it. And I think we can make
something like a metal and take the darkness down and make
this dark and reflective. All right, Maybe we can
give it a specific color. I guess something like that. I think that will work. Reduce this a little bit. I think we can apply the same
material for these as well. So search for cameras. Great, not just now. Let's start with this one. In the ticker folder,
I have this image. Let's see how can we
use it up light here. I will grab this to isolate it. Let's go to the solid. What I want to do is I want to add this image up
light right here. I will tap to go
to the edit mode. I think we can grab
maybe this edge loop. And then click and mark this As. And then hit a hit as well. And two times to up this. But it's not fully Arb because I guess the stuck at the points. All right, we have
a mass here. Why? That's seven maybe
because of the middle. Maybe you have a face
here in the middle. I guess we have
something like that. Let's go to the face
selection mode. Let's see if we
have face inside. No, we don't. But something that makes sense
happen right here. I'm not quite sure
why that's seven, but let's see if we have
any way to go around it. All right, let's go
here to the view and let's king the clip start to 0.01 because I just
want to zoom more here. That's weird, that's
really weird. If that's not
working as we want, we can create a
new geometry here. Or maybe we can delete these
phases and rebuild them. I will grab this
entire phase though, and let's see if we can select
everything I think we can. I will hit XF to delete these
and up the site and hit control L just to focus on the side because I will
delete and rebuild it. Hit XF and get rid of it. And now we ended with this. After doing that, I will
give this some thickness. Just tab out and let's add a solidify to exact
from the local mode. Just want to see what's
going to happen. Let's give this
epitove thickness like that or something like this. And I will apply and tap again. I will grab these
faces like that and hit Alt and cues extrude
along the normal. Just to extrude these
like that, maybe. But that doesn't work and
give you undesired result. You can ignore it. All right. I think that's all work for now. Then I will grab
this entire edge and control to dissolve it. And I will grab this one. Hit Control to wibble this
to two edges like that. And now I'll click Alt. Click on this one, hit
Control be to revival those, to add three or four
cuts here, if you like. All right, now let's take a look and let's see what we got so far. Right now. I think we fix the problem. Let's see if we really
fix the problem. Something we are happening here. I don't know what is it
why that's happened. I will hit controls multiple
times to undo all of that. It seems like we have some
overlapping he right here. I will control again to
bring back this edge. We deleted this edge. I guess we can delete
the next one as well. And this one now I can grab this and it can
be tobival this to two like this group. This edge with this edge can trobvle it with
four cuts, I guess. Check this again. All right, now I think the result is good. Now we can move on.
Let's check the site. All right, grab this, Hit slack. To isolate it, I will tap
to go to the edit mode. I'll click to grab the
entire clube here. And then let's mark
this right click. And mark, hit A and here it as well and hit U two time to this. And now we got something. You can rotate the U like
that and move it like this. What I want to do, I
want to use this image. Let's create a new
material for this. I can call this just
to recognize it. See secrine empty for
material underscore empty. Let's bring this image
and use it here. I will block it and the bakler, I will you to go to
material review. I will grab this side control L. I will align it with this. The name of the texture
is blue screen. Let's search for blue screen. Search for blue screen.
Now we have it. The UV will be strict
according to the image size. You can control that. It's not going to
be difficult to do. Let's change the
transform to bounding. Maybe we can scale this down at any bit and key move this down. Now, I think we got
something for the site. It control L, we don't
need to do anything here. Just move it down and put it in the black
area and that sits. Teri can add two material if you like. I'm
going to do that. Let's add a new slot and to create a new material
and I will diablic to key the into screen
glass mtonizes. What I will do is I
will apply this just on the site assign
now it's assigned. All right. Now after doing that, let's push the transmission to one and the roughness
back to zero. It's to excite. Now let's take a look and
let's see what we got so far. All right, now we've
got this result as you can see, if you like, you can go to the screen
material and block this to the emission to
have some lighting. You can hit Alt H to bring
back the other pieces. And now we got this. If you are not quite heavy
with the sharp edge here, you can select the
Umetry and Tab. You can grab the other
Uv, this Uv right here, and scale it and make it big. A little bit bigger
than the image. You will have this
gradient effect stub out. The result looks very
cool, not just that. Here we have the small frame. Let's take care of it, let's create a new material for it. And let's call this frame
empty to recognize it. Let's push the metallic to 1 ", the color to something
bluish, maybe. And dark at the same
time. Like that. Roughness. I think it should be reflective a little
bit, not too much. I think that's it. Maybe
we can make it through. All right. This is nice. You can control this material
even more if you like. If you want to make it
right like that or darker. I just want to add a
light source here. I just want to see going to
happen, this increase above. If you add a light source here, you will have the ability
to see something here. I think this white area, it could be targeted and
covered with something. I will grab the
healed and hide it. I just want to see
what's going on here. What's happening here is delete the source because I
think it's too strong. I can't see it. Let's go here, grab it. Deleted and let's go back to the endo alter H and bring back this piece. Okay, I think now we can create
material for this piece. Grab it and it to
create a new material. And I won't call this cover MT. We can control
that transmission. Let's put this to one and take
the darkness back to zero. Now we should see
something here. Like to isolate this,
I just want to see if we have any thickness
here. And yeah, we have. That's very cool. All right, I will
hit to hide this. I want to grab the camera and
see what we can add here. We can go to the
material of review. All right, I think we can
grab this and hide the cover. And grab the ground
and hide it as well. Let's see what we apply here. It is one unit, as you can see. I will tap and grab this, Hit control L, and
everything is connected. It can robles multiple times until you reach this
point, for example. And then it and then has
to separate this out. Then I will grab the cover hold, grab this control L
and link the material. Now, grab this to grab this one. Hit control L and link
the material as well. We can do the same
thing for the site. Yeah, because we have ormodifier,
everything is applied. What else we can do here? Let it at bring back
the other pieces and to go to the render
and let's see what we got. Or at least add a
light source here. I just want to see what's
going to happen if we do that. Right now I can see
something that's very cool. Maybe I can control this, the lenses a little
bit, make some change. Or at least see what's
going to happen if we use the emission with low value. Now I can see something. All right? But I
don't want that. Lucille is not going to work. So I will add one here
and zero out this. All right, that's very cool. Let's delete the light source. I think we did great here. One more thing here
I would like to do, let's grab the
ground and hide it. Let's select circles and let's
give them a new material. Let's call this, I don't
know what we can call it, maybe can call block
because I want these circles to block everything
inside or if you like, we can call them
the vents cover. I have nothing here, just the material and tarps
to one and that's it. That's all what I want to
do here for this piece. I guess we can grab it with
these here and merge them. After you select all of these, just hit Control, It control
and make them one geometry. After that you can give them a specific material. Hit A here. Let's delete this. Hit as well and hit two time.
Now we have them here. Take any texture from
here and apply there. Let's see which one
is going to work. Maybe I can use this,
you can use this, or you can try this one as well. After you grab them,
create a new material. And let's call this the Mic
vents enter to recognize it and bring the
image right here and block this here to isolate them. And go to material review just to see what we've got here. Now we have something,
if you like, you can push the metallic to
one to make this reflective. If you want, you can use the normal if you like to add
some height information. This is the normal
of the texture. Just grab it, changes
to non color, block it here and add normal boot between here and now we should see
some height information. Now let's, let's take a look. All right, now we
have something. You can grab them if you want and scale them,
make them smaller. But I think that will
work for this area. I guess we can create a
specific material or maybe we can take the same
glass material that we used here or here. Yeah, let's do that. We call it plastic empty. All of these details and dark
plastic empty here apply. And I think that it Let's go to the material,
to the render end. Let's see the result together. Yeah, I think that's very cool. Everything now makes sense. And the result is very nice and we are almost
ready to finish it. Okay, now I can end this video and see
you in the next one.
62. 062 Creating the Stitches: Hello again and welcome
back here in the bond, we have stitches here
between the ribs. Let's see, how can
we create them? You have two directions. You can create this
as three D geometry, or if you want, you can use a texture and alpha map
to create the stitches. I will go with the geometry
and let's see together, how can we do that? All right. I will go to the front and I will add plan.
It's very big. Let's change the
size to 1 centimeter and I'll line this to the view. I'm going to you to bush this up here and type
to go to the edit mode. I just want to make
some tweaking. Let's extrude this like that and let's move this
edges right here. Maybe I think we can add
one segment in the middle. And maybe we can move
this a little bit like that and scale this to the Z. Let's put this
right here for now. Maybe we can move this
like that, all right? The idea is what I want
to do is I want to create something close to what
we have here in the front. Maybe we can scale this to the Z and maybe scale this
one to the Z as well. To get a result like that. I think these vertices should
be pushed back like that. And this one as
well from the top. And let's move this
back like this. This one, I think it
should be in the middle. After that, maybe we can cup this vertex and scale this
to the Z a little bit, and extrude to create
a simple curve, something like this, I guess. All right, let's move
this a little bit like that and scale those to the Z. I think I can grow up the side, hit XF to get rid of it, and group these vertices, hit X, V to delete them. Now I got this result. As you can see,
we can make some, moving some vertices around and maybe pushing these
just a little bit. Get this. Now after doing that,
I will grab these. I will put the three decosorust, snap it here to this vertex
and then it D to take a copy like that and then go to me and mirror mirror
to the global Z. But I need to mirror it
according to the three decorsor. Don't worry, I can move it and snap it here if
you want to work. If you change this to
the active elements, snap it here will be it. Maybe these vertices,
I can grab them and delete them and move
those maybe right here. All right, this is
the first step. After doing that,
what I created here, I created this shape. After that, I need
to create two lines. Goes like that. Maybe one
line goes like this here. All right, let's see how
can we do that together. I will look up this
vertex and hit D to take a coby and put the
coby over here. I will hit on extrusion here
and one extrusion there. What else we can do? I will grab everything and select to go to the local mode. Let's go to the top and
let's move this vertex here. Maybe hit to extrude like that, maybe I can hit key to
move this over here. And this one hit key
and let's move it here. Now I got this result. As you can see, I will select these vertices D or
don't worry about that, Don't copy it because
we can use more. Or later I will grab
this vertex as well, hit D, move it right here, and hit extrude and make
multiple extrusion. All right, this vertex should be aligned with this
one. Key to the Z. Key to the Z. Paul can troll and snap it
here and now it's aligned. Not just that, I think we should move this
forward a little bit, and this one forward
a little bit, and this one should
be pushed backwards. All right, let's see what
we can do in the top. Maybe we can add one vertex here and just move this a little bit. Maybe we can move
this star like that. All right, somebody like this. Maybe we can take this down. Maybe this one I can hit and
push it farther like that. All right, now let's go to the front and I will look
up these vertices at x v, I will mirror all
of these spots. I want to put the three D cos here to mirror to
mirror modifier. Or if you like, you can make
this one the active and then it to and keep that
transform pivot, what is called
transform Ot point. Switch it to the
active elements and then go to mirror
mirror to the global Z. And now we have this
mirror perfectly, this vertex should be merged. You can to move it or
I think it's merged. Yeah, it's merged.
That's very cool. After doing all of that, maybe now we can go
to the next tip. Okay, before we go
to the next tip, I just want to move
those a little bit. May be those over here.
You may go to the Z. To bonding, something like that. All right, now after doing that, maybe now we can
convert this to curve. Just sit right and curve and
now it's converted to curve. After that go to the
Robert is under the level, go to the depth and let's
give this some thickness. All right, I think
that's too much. Let's add 0.3 Maybe
0.3 looks nice. The resolution is too high. Let's reduce this to maybe zero. Yes, something like that. After doing that, let's add subdivision surface and
let's see what we will get. We will get a result like that. Let's tweak this farther, like grabbing these
and just move them a little bit from the top. Maybe we can just
move them like that. Maybe a little bit we can
move them like this here. Maybe we can make some tweaking, like scaling these away and
moving these a little bit. All something like that.
Maybe I can those hits to the Z, maybe those As. Will hit As to the Z and push them away from each
other like this. If you want to give
this some thickness, you can choose a right. Let's cho this to 0.35 I just want to make this
a little bit thicker. The result looks nice but
it needs somewhat tweaking. I guess I can grab these TE and extrude
them further like that. Something like this
will be enough. All right. I think that's
all what I want to do. Everything looks
nice and beautiful. Let's go to the top. And I guess we can grab
these vertices, All of them. And
move them like that. All right, that's very nice. After doing this, I don't know, I feel that we could
grab these vertices and extrude them and hit Z
and skill them like this. Now maybe we can grab this, just kill them like that. Yeah, now the result
looks better. Maybe I can grab them. Just skill them to the center. If you are satisfied with
the result control and apply vialeometrm, all right. Well, got a problem
here, but don't worry. Even if you've got a
problem, that's okay. Because we can go back and add subdivision surface and we
will get the same result. If you are happy
with this result, you can apply the
subdivision surface and we can delete some
of these geometries. Because we don't need
all of these faces, we just need the faces that will be visible to the
camera, For example. These faces not going to
be visible to the camera. That's why I'm going to grab them like that and delete them. Those over here as well.
The same scenario. Grab these and delete them. Maybe I can select these phases over
here and delete them. Maybe I can add
this. Deselect this. Something like that. After grabbing the faces that
you would like to delete, hit X and get rid of them. And keep those open like that. Now let's slit the view
to two, all right? And then go to the UV
editor. Select everything. And here it as well
and two time to it. It will be with conformal
to angle based, it's wavy, it's e tweaking. In this case I will use follow active quad after one of these. Let's start with this
one for example. It will be easy for us to
maybe this one those right click auto auto align, then go to the face. Make this one the control L, and then right
click active quad. Done the same thing
for this one. Auto align, auto
align control L. Make this one active, right
click, follow active quad. Maybe we can use this. All right, I hope they add some feature here to grab the ball gun and
just put one paton. Fix everything
because that's time consuming to grab each
and hit auto align. That's not perfect anyway. Control, right this one as well. Maybe we can grab this
switch to the vertex. Hit one then right
click auto align. All right, grab this, Make this one the active
control L, follow active quad. And now we are done here. The UV is D, everything is cool. One more thing here I would
like to mention is I want to make sure that
these vertices are perfectly aligned to the Z. I will tell you why as to the Z, because after finish everything, what I will do is I will use the array modifier
to the x axis, I guess, to get this
result as you can see, and I can duplicate it to
create the pattern like that. Just keep in mind that these vertices here are
perfectly aligned to the Z. I will delete the
array because I don't want it for now in
the texture folder. Let's see which Tetun think we can use this
one and apply here. All right, in this case I
will sub two and change this two header editor hit I
will create a new material, maybe we can call this stitch. After that, let's bring the
texture and let's put right here and block the base to the base. And now
we have something. Don't forget to make the
smooth right click and smooth. I think we need to make
some tweaking to the UV. I will hit Select all the UV, and here it A as well.
Let's kill the UV. Make small because I want
the texture to be big. Because these stitches
will be very small. Yes, something like this. It will be very nice. I think the result is
very cool, by the way. For any reason, if
you want to inflate this and make the
stick looks thicker, select all the
faces and then at, you can do that like this. All right, that's very cool. Maybe now we can
add the normal if you want to add the
normal, the knitted seven. All right? So this is the
normal or the knitted seven. It's already Sk to non
color. That's cool. Block this here and
let's add normal map. And let's put the
normal map right here. Everything is aligned. And the result looks nice. Right now, let's hit slash two exits. Now we
got this result. All right, now after doing that, let's go back to the
bond and if you remember the rubbing tool
that we used here, you remember that we have a guide still exists right
here and I can't catch it. What I'm going to
do is I'm going to the review of the
guide to bounding. I can catch it easily. Now if I open this,
as you can see the. Faces still connected
to the guide. That's very cool. I will grab this and go
to the modifier. Or don't do anything, just hit
control A and apply velum. Now, this geometry is no
longer affected by the guide. Now if I open the guide,
nothing will follow it. I did that because I want
to grab this and I want to select these faces and mark them and give
them a specific color. Let's go to the material, and let's create two slots here. One, I will leave it like this. The second one I will
give it a red color. If you want, you can
call this guide. This one you can call this. We guide. I think we could
add letter here. Yeah. All right. After that, I will tap to go to edit mode and
switch to the face. I will start grabbing
these phrases like that and assign the red killer for them so I can
recognize them. Keep doing that. Keep
selecting the faces. And give them the killer. Okay, assign. And then assign
these faces as well, the same scenario. Assign. Now they are assigned,
on this side, the same idea faces. All right, and then hit assign. Unless include these as well, right? And then hit a sign, sorry. And then hit assign and assign. Now I just assign the red
killer for these rows. After doing that, I will tap out and I will go to the modifier and add the
same surface deform. And I will choose my guide
again and hit the bind. To bind them, I will grab the guide and
push this to open it. Now it's open as
you can see here. You can grab those together.
Let's hide the ground. The ground maybe I can to bounding go here and
this to bounding, that will be easier for us. All right, and I guess now
we can do something like deleting any necessary
edges. For example this. We don't need this one. We can get rid of it because
all we want is a guide. Now I will grab this like
that and delete them. It control X to dissolve them. Let's take another look,
and let's see if we missed something on this side. Maybe we can do the
same thing here. We have multiple
edges we don't need. All right, that's very cool. After that, one more thing here, I would like to do
some of these faces. I don't want them to be assigned with the
red color, for example. I don't want the sticks
to reach this area. It click to select
the entire face lobe. I will assign the white
material for just the faces. Maybe here I will grab this
face lobe and assign to assign for as cool,
the same thing here. I guess we can grab the and assign the right here
and here as well. All right, my guide now
become ready and yeah, I think now we can
go to the next step. All right, the same scene. Let's go back here. And it's unbind and bind again. And sorry, I just
made a mistake. I don't want to bind it for now. I want to push this
back and grab this. Bind and bind again, And I'll grab the
guide and open this. Now it's open and ready. The stitch is ready
as well and we can. Now we have the
ability to distribute these sticks and
put them in place. Let's move this a little bit. This rotated 90 degrees like
that and rotate to the Y, Y and rotate 90 degree
as we go to the top. And let's put this in place,
scale it down like that. Key to move. And scale
this down as well. Let's put this maybe right here, maybe we should move
it down like that. Something like this. Yeah, we should put it above the surface, something like this.
Go to the top. Let's move this a
little bit right here. And now we can
duplicate the stitches, but the stitch is too big. Let's scale it a little
bit more like that. Let's scale it a little bit more to get a result like this. This result will be nice. I guess we should
rotate it like that. Nine degree, 180 degrees. Sorry. Let's put this
one here, is that right? All right, sorry. I
think we shouldn't rotate it. Yeah, it
should be like this. All right. After scaling the
stitches and make everything ready now we can start from this point
and duplicating this. Can't roll to apply the scale. Now I can add the
array to the Y. I guess zero out of the
X and add minus one. Now I can increase the counts, increates a count until
I reach the points. Maybe I can add
another one like that. When you'll be satisfied
D to take another coby. And let's put the
coby over here and see how many stitches
we can add here. I'm going to grab those as well. Move the stitches here as well. And increase the
number, a little bits. All right. I think for this one we can
scale it just at any bits. It's okay to have
some variation. Because we scale this, we can reduce the number
of the stitches. Fift D to take another coby. Maybe we can put right here and increase the
number of little bits. I'm going to do that until
I fill all of these throws. All right, now we are
finished with the side, and now we've got this result. As you can see, the stitches
are ready and maybe now we can jump to the other side. All right, let's see
how can we do this. I think we can select all
the stitches like this, maybe from the front, Just scrub them like that and
everything will be selected. After doing that, I will have to the Z to take a coby and
mirror this to the Z. Go to the object in mirror,
mirror to the global z. Like that. And now
they are mirrored. You can go to the
front, for example. And key to move,
and move this up here, something like that. Maybe we can move this
a little bit more. Something like this. And we need to offset them just at any bit. Let's go to the bottom
that control seven. And let's start moving
these to one of these. Direction to the left. Yeah, to this dark or this one. Let's see if that makes sense. At the bottom,
everything is aligned. I guess the result is maybe
this. We can delete it. Let's move this a
tiny bit like that. All right, let's
grab them one by one and try to put them in
a correct position. Maybe this one I can
move it a little bit and increase the
number of the sticks. And this one as well, I guess we can just
move it through right here and increase the
number of stickers. All right. It will
be increased on the other side.
Yeah. Now it's fit. Is there anything else? I think everything
is in a place. All right. That's very
cool. That's nice. All right. Now after doing that, I will grab the
stickers like this. I will hit shift D to take
a cob for any reason, and I will to move
to the temporarily to in case I want to go
back for any reason. And now I will apply those control A and
apply vehicle tumetryr. It seems like we can do that control J to
make them in tumetry. Let's see if we can do that. Can we do this? All right. It seems like we should
apply the array for each, Let's grab those together. Control J, you can do
that. All right? Yeah. All right. That's weird, why? I can't apply o geometry to me. All right. This,
Ali, That's cool. Let's go back, let's
see if we can do that. Yeah, that's cool. We can apply. All right. On this side we can't do that, but why that's happen. All right, that's cool.
We still have it. The grab control plio geometry mag and control J to merge
them and make them, we tomate. Let's group those. Control A, apply umattomae, control J, make
them in geometry. The same thing for
the other pieces. Apply umm, control J,
make it one piece. Now let's group
the other pieces. Control J, make one
piece in geometry. We go to the front. Group them like that. Can
J make it on geometry? And now it's become
one sold geometry and I guess we can grab those. Control J make a 20
geometry and those as well. Control, grab those. Control J. That's very cool. Now let's grab one rows and let's see what's going
to happen, right? We can move it. All
right, that's very cool. Now, after doing that, now I can grab the side with the side and merge them as control
J and merge them. And now they are merged
after doing this, now let's add the surface deform and let's pick the guide. And let's hit pin to
bind it. Now it's pind. I will grab this, the guide, and push this back to zero. Now we should have nice
stitches around the bond. Everything is nice
and beautiful. And here we have
multiple stitches. There are not any place. All right, let's see if we
have to fix anything here. It seems like we should
make some fixing. All right, let's grab the guide
and put this back to one. And what we can do here, let's go to the right. We have some distance here. What I'm going to do is I will tap to go to the edit mode. And I will, in the x ray mode, I will grab one side like that, select everything and now it
key to the Z and move those down. Something like this. That's too much key to the Z. Again, something like that. It will be nice. The distance looks
okay and makes sense. And let's go back
here in the x ray. Let's grub the bottom rows
and hit key to the z. And let's move them
close to the surface. Yeah, that's perfect. Now I can tap out and we can now grab them and hit
bind and bind them again. Now we can grab the guide
and add zero enter. Now let's take another look. Now, these stitches
are almost any place. You can see that we missed
some stitches right here. And you can see we
have some open area. And that's not quite important
to fix because when you switch to render the
results will be make sense. If you want to fix these,
that's not difficult. Just grab the guide and then the stickers and you can duplicate it and add one right here if you
want or if you'd like, you can bend it and bed it like this inside
the cumetory if you like. There's a lot of
ways to do that, but I don't want to spend too
much time on something like this since that's not going
to be visible to the camera. Now, if you go to the render,
everything will be nice. Let's give this
some time to see, especially if you delete the
guide at say, let's hide it. All right. Something like
that. Let's go to solid. I just want to see if now
we are in the solid mood. I just want to grab the guide and it G to hide it as well. And let's go back to the render. All right, not just
that we could grab the stitches and we
could make some change. Here I will add curve RGB. I just want to make the color of the stitches looks a
little bit darker. All right? Yeah. Now
the result is correct. Don't forget to increase the roughness because we shouldn't have any
reflection here. All right? I think that's it.
I think we did great here and the
result looks awesome. I will end this video here
and see you in the next one.
63. 063 Adding hair particles for the fabric of the bond: Hello again and
welcome back here. In this video, I want
to add something for the bond or for the
fabric in general. When you pay close attention
to a piece of fabric, you can see some fine threads protruding from it, for example. As you can see here
in this image, we have some flying or something comes out
from the fabric itself. I want to create an
effect like this, but similar to this image, I just want to add tiny hairs
comes out of the fabric. Let's see, how can we do that? I will take the mice right here. And I think, by the way, I think we have something like that. When you pay close
attention here to this mic, you can see something
comes out of the fabric, for example, this one or these images right
here, for example. You can see some tiny hairs. Well, this effects will
make the result look smre, realistic and
beautiful together. We will learn how to do that. But before we actually
start doing this, I think I just forget to add
a material to this border. Let's go to the ender and
let's see what we have here. All right? Yes, we
don't have any material here. Create a new one. Or maybe I can take the
same material I used here to grab this hold
shift, grab this one. And then hit control L to link the material
and link materials. Now these two objects, sharing one material after
doing that, grab this. Because I think this one
should be a little bit darker. I'm not quite sure, but
let's check that again. I think the color is
not perfectly white. You can make a
comparison here between the fabric and the
color of this border. Okay, Yeah, we should change
the color a little bit. Grab it and let's make this material unique because it's applied on three objects. Just hit this bottle right here, make it unique like this,
and give it specific name. We call it white
plastic speaker. Maybe we can call this lights light sealed, light sealed, Lame and
empty for material. Now after doing
that, all we need to do is just changing the
color just a little bit. Take it down, that will be it. We don't need to
change anything else. Maybe the subsurface scattering is too high for this piece. You can, you can add
0.5 maybe if you like. All right, now let's start
doing what we wanted to do. So maybe we can start with, maybe we can start
with this frame. I will grab it and it like
to go to the local mode. And after that I will hit control and create a
small window like that. Because I just want
to render this area. I don't want the whole window
to be rendered because that will affect the performance of the computer a little bit. After doing that, go to the particle properties
and let's hit this plus. To create a new particle, you have two types. The emitter in the hair, we will work with the hair, changes to hair immediately. You'll see something
after doing that. Now we should make some
change here for the segment. I will leave them five.
Now for the hair length, I will add 0.5 centimeter. Make them short like
that, and now they are. We have multiple lists you can the hair shape to control
the shape of the hair. For example, here we have
the diameter of the tip. And here we have the
scale itself, the roots. Let's change this
to 1 centimeter and let's see what we will get. As you can see now
it's become very thin. You can add maybe five, make it a little bit thicker. Something like this. Or
maybe a little bit thicker. Let's add ten maybe. Let's see what's
going to happen. All right now. 610. Yeah, that's maybe for the Demeter roots. You notice here we have this
option, skull advanced. When you active, you will
unhide multiple options here. Let's do that after activating
the advanced option here. Let's go to the physics. Let's make some change. Here we have the Prowning give
the hair some randomness. Let's change this, 2.01 Let's
see what's going to Heaven. As you can see, now
we have this result. Let's increase the number of the mass and let's
see what's going to. He at ten, for example, will make the hair a
little bit shorter. As you can see, the
randomness looks nice. Maybe we can increase
this, 2.303 Okay? Now let's zoom back and
let's see what we have. Okay, now we have something. Maybe now we can go back
and increase the number of the article or the hair. Let's add, for example, 100,000 Right now
we have something, but I think that's too much. Let's change the ***. Or maybe we can control
the hair length to a 0.1 That works less
as 0.01 All right, maybe we can add
another zero here. You can go to the
mass and increase the number of the mass
as, for example, 30. That will affect the length
of the hair as well. All right, maybe now
we can go back to the, we can go back here and the
diameter to maybe five. That will make the hair a
little bit thinner and softer. But the hair still
have some length, we need to control that. Let's go to the mass
and let's add 50. All right, now we have the
ability to control it. The result so far looks nice, I guess, but I think
that's too much. Maybe we can make this
a little bit thinner. Let's add, for example, three and make it thinner. Maybe we can change the mass to, I don't know, maybe 100. Let's see what's
going to happen. This length looks very
nice and beautiful, and now the result looks nice. When you take a shot like this, it will be beautiful
and realistic, but don't forget
something You remember when we scaled the headset
and make it small, we didn't apply the scale. Maybe applying the scale
makes some differences. I will grab this and
hit control A and apply the scale. What's
going to happen? As you can see, this will affect the thickness
of the hair. Maybe now we should go back to the diameter and change that. Let's add 0.1 in this case. Maybe now we can increase the
number if you want to 200. All right, now the
result looks nice. We need to do is just
and based what we did here for the other objects. Let's go back and hide the
other geometry from that. And bad now I want to apply coby and based the particles that I used here to this object, Grab this, hold
here to grab this. And then go to this arrow and co active to
select the object. Now we should see something on this can go to the local mode. Let's see together what we have. You can apply the scale and
I think that's important. All right, now we have it. But just keep in
mind if you want to make some change that will, that will affect the border, as I will show you, whatever change you
will make here, that will affect the
results that we got here. To avoid that,
just make this one unique by hitting
this icon here. Grab this, and hit this. Now we have the
ability to change whatever thing we need here. So far I didn't see anything. Let's go back to the modifier. Let's apply the mirror. We don't need it anymore. All right. Now after
applying the mirror, now I can see something. Well, that is looks very nice. I think there's no reason to make any change. It's very cool. You can accept the
same result and just coby and paste it for
the other objects. Let's slash to exit and let's com base the article
for the other objects. All right, maybe we can co them, apply them on the ribs. To grab the ribs and hold, you have to grab this
object. The same thing. You can go here. And B to select to selected. Now, it should be applied here. Gusts go here. Yeah, let's make
this unique I guess. Or before you do that, just
apply the scale first. Let's see what's
going to happen. Let's give this a bit of time. Now, we have something
on the ribs. All right. Further, Maybe we can increase the number
a little bit to, I don't know, maybe 300. All right. I will
accept 300 for now. All right. What else we can do? We could apply them
for the inner area. We have Mira modifier, Apply it. We don't need it. Hold, gift, Grab this and
apply this. Covid selected. I will grab this and
go to the local mood. I just want to see
what's happened here. Can throw and apply this scale. Maybe we should apply it. Yeah, now we can see
something. That's very cool. Okay, now maybe we can apply the same particle on this cable. Grab, grab this
one to grab this, and then go to the modifier
and b to select it. After that, just zoom in
and then apply the scale. First, let's give this some
time to see the results. All right, now let's
make this one unique. Go back to the article and
this pattern right here. Here, we can make some chains to make this looks
realistic and nice. I think we could increase
the number of the hair. The results so far
looks very nice. Now we can see some flying hair that will make the result
looks more interesting. Maybe here we can
change the diameter to 0.4 maybe let's
make it a little bit, yeah, now it's become
thicker from close distance. The result is not
so quite pretty. But when you zoom out, I think it will be nice. All right, maybe we can
change this a little bit. Let's add 0.3 0.3 or 0.23 n number to choose. I will stick with
that. Everything here looks nice and beautiful. Okay, that's very cool. Let's see if we missed
anything here on the side. All right, I'm going to add
this for the battery cable. Just grab this to grab this one. And then go to the
modifier and co, co, to select it. Now, apply the skill
for the cable. I felt that we could see something here and
yeah, it does. Now we can see
something, um, in here. All right, now we have
something that looks very nice. Maybe we can go back to the properties and the
diameter a little bit to 0.16 or you can
add 0.2 if you like. All right, 0.2 that's very nice. I think we forget
the inner ribs. Let's rub them, bolt
the outer ribs. And let's go to the
modifier and coby to select it after them and
control up of the scale. Now we could see something
make the window a little bit smaller like this just
to render it faster. But let's take up
the inner ribs, and let's go back
here to the modifier. Let's make this one unique. I think I will make
some changes here. Let's change the
diameter to 0.3 maybe. Let's see what's
going to happen. Or if you'd like, you can increase the number
of the hair if you want. But I can't do that now
because I'm recording. But if you'd like, you can
go beyond this number. You can even add
1 million if you want, above this number. Okay, So far this
looks very nice. Yeah, I think I
will stick with it, but let's see if we forget
anything else here. We should add, maybe
we can try something. Let's add a camera make
quick render. By the way. Something here I would
like to mention, if you've got a
problem like this, for example, the particles
couldn't cover this area. To fix that, just change this. For example, you can
grab this vertex with this one and
K to connect them. Meant we have this face right here and it
has four vertices, 1234, that's mean
this one is qu, this one is quad as well. But for this one it's
ingone y because it's a face with 1234566 vertices. That's mean it's not quad. You can cut this from here
to make this one quad. This one as well.
Grab this vertex with this one in
the K to fix that. Let's see if we
have any quad here. Thing we don't. Let's
jump to this side. And let's do the same thing. Grab this with this K, this one with this one. Hit and hits to exit. And maybe we should do the
same thing for the side tab. Let's go to the modifier, Turn off subdivision
surface for now. This can isolate it if you like, grab this one, hit K. This one with this one, it seems like we have
quad here as well. All right, how can we fix this? You can, if you'd like,
you can add one here, but does will make some
problems if we do that. All right, in this
case, maybe we can rub those and hit K,
connect them together. And hit K here as well. Okay? And what else? All right, let's
tap out and let's see the triangle.
It will be covered. But the ones you should avoid, the ones that's all. All right, on this
side, we don't have any problem.
That's very cool. We can say it's fixed. Make quick render just
to see the result. I will add a camera. Shift it to add
and add a camera. Let's delete this one, control all to remove this, let's frame the camera
here, for example. Just pick a view like that
and then control a zero. To frame the camera like this. We will learn how
to do all of that, but for now I want to make a quick render just to see
what's going to heaven. Now let's go to the properties. All right, now I'm rendering HD. Let's change this
to 200 to render it like four K, I guess. Four K. And what else? Let's go to the render setting. And the device will be BU. And here the render
in the render, I will work with the samples. Just add the number here for me. I will add 400. Let's make quick render to see
what we got so far. After that, go to the render
and hit Render image. And when the render is finished, I will be back, the render is finished and this
is the results. Yeah, it's very beautiful. The red color you see here is
comes from from the guide. I just forget to hide it. But in general,
everything looks nice. Speak the cable here
looks nice and realistic. I think that set for this video. I will end it here
and see you next.
64. 064 Adding materials for the speaker and fix the battery texture: Hello again. Welcome
back here in this, do I want to teture the speaker? We forget to create
texture for this area. And on the battery we have Apple logo as you
can see. Try here. We want to try to create it. Let's see how can we do that. Okay, let's start
with the speaker. I will grab this
and it's like to go to the local mode and I think this is affected
by the lattice and the subdivision
surface. All right. I will turn this off for now. Timberly, maybe we can tap to go to the mode and
let's see what we have here. If you don't like what we created here,
you can change this. I don't know, I feel that
I want to change it parts. I think that's not
quite necessary. You can ignore it and
accept its results. Maybe we can just make some small tweaking here
like moving these a little bit or maybe that's
not quite necessary. All right, let's
make some changes. That will be very easy. What I'm going to
do is I will grab these phases like that and it can row plus two, grow
selection like this. I will delete all of these
get of them after doing that. Now I can these faces like this and go to the face grid fill. You can spin its if you like. Yeah. Spins to have
a result like this. Now after doing
that, maybe we can hit Alt and extrude
along the normal. Extrude these like that
and then hit for Inst. You can push these out at now, you can grab these and
control would be to bevel them, all right. I just want to supply this area. I will hit control Alt to A, right here and I
will bevel this. Hit control B, it's
something like this. I guess I will hit and exclude this,
all of the normal. All right, that's very cool. After doing that,
grow up this loop, I'll click and then
hit V to it like this. And then hit control L, just to focus on this
area in the middle. And then hit P and
then to separate it. Now I can give this
one specific material. Let's group the ultra frame and let's active the subdivision
surface and the lattice. Maybe now we can create
a material for it. I can feel that we
have some lagging. When I select things, the selection is not fast. Maybe that's because of the
stitches that we have here. Because we didn't apply
the service deform, maybe we got this problem. So I will grab them and hit control A and apply
equal geometry to Mike to get rid
of this modifier. And now I think the
selection become faster and work instantly. Now I will grab this
and create a tick. Sure for it, I'm not
going to create a tick. Sure. I can copy one of these
ticterials, for example. I can co this one
and light on it. Select this one. I just
want to see the name. Dark plastic empty. All right, let's go back here and
let's pick this one. And let's search for
plastic. Empty and plight. And that will be it for
this one in the middle. Where is it? It's right here. You can activate the lattice and the subdivision
surface for this as well. For this one you can create a new material for it or you can do something else. I think we can make
some tweaking. I don't know, I feel that
we could do something here because this
area in the middle, it's not flat To fix that, I guess we can interrupt
these edges like that, them and then y the loop tool and stretch that's flat in the edges and
give you a flat results. We can do the same thing
for these edges right here. Turn over the subdivian surface. I just want to see
those over here. All right, that looks nice. The same thing we could do here, grab those radically,
and key strike. All right, that's very cool. Now tab out and activate the subdivian
surface with the lattice. Now the result looks very cool. You can the material
that we created here and alight on the speaker, the dark MT, we call it. Let's grab this for the dark MT. I think we go to the Material Review
just to see the results. As you can see nothing here because this piece
is not a rub tab. To go to the edit mode, hit a Select everything, and here grab all
the faces and hit two Time to rub it
with angle based. You can choose confirm
all that works. The difference is not huge. I will stick with angle based. Now we should see
something stab out. Let's go to Material
Review and let's see what we have here. We, all right, let's see why that I
can't see anything here. Maybe because of the
scale. I don't know. I'm quite sure. But did
you go to the Lindor? This is the diffuse and
this is the normal. I will control to
click on the normal. I just want to see if
there are any details, but maybe we can scale
this down a little bit. That's weird control Db scale. Let's go to the object
data properties. I think the problem is because of the UV shape key
that we created. I will delete this one
and stick with one UV. And I will re this just hit a, select everything
here, hit U two time. Now we should see
something in A. Does you remember the UV that we created here for this
tool, the rubbing tool? Just keep in mind to delete the extra UV or
you can ignore it. Just select the first
one and work on it. Or you can delete it if
you don't need it anymore. Okay, let's go to
the second one. And I'm going to delete this because I don't want it anymore. I will mirror this
on the other side, but just make sure to put
the origin.in the center. All right. To do that, maybe we can grab the aluminum structure. We still have the origin dot perfectly in the middle I guess. Or maybe the light sealed. Yeah, I will stick
with the light sealed. I will put the three
decursor the position of the sealed origin dot just
chose. Coursor selected. Then you grab this piece and
origin origin 23 decursor. The same thing for this one. Grab this origin 23 decursor. I will give each one
a mirror modifier. Add mirror for this and
mirror for this one. It should be mirrored
on the x axis. All right, there's a problem here because of the rotation. To fix that, just apply
the rotation for each one. Control A and Ali rotation
for this and for this. Now the result
should be perfect. It does. After doing that, now the time is to
focus on the battery. I will tap to go to the mode, and I will go to the top. To this area of faces, for example, this area, something like this.
And that will be it. Grab it and hover over here. Hit a, select the
faces in the UV, and hit U two times
T B, this UV. And now we have tried, you can
use confermal if you like. After doing that, I will tap and let's make this
figure a little bit. And then let's go
to the Tixr folder. I will leave this M right here. You can use it. Click drag, and import it right here. Let's take the output node, just one, some space. Let's search for displacement. Put the displacement here and block to the displacement here, and block the color
to the height. After doing that, as you can
see, now we have something. Let's tab and let's
see what we can do. Fair thing the texture
is set to repeat. If you scale this, it will be repeat like that.
Clip it like that. Just to clip the image, you can tweak the UV
to get a good result. Just scale the UV like that until you get a perfect result. You can go to the
top to see that. Until now, the
result is very cool. All what we need is just to
move the UV a little bit and center it like that.
That's very cool. After doing that, we need to do something else like
flipping the information. Let's change this to
non color because it's not a color, it's
just information. Now eight to search for, invert, and put the inverse right here to invert the
black and white color. Now we got the correct result, but we have some
nasty shapes here. This comes from
the resolution of the image because it's
not high resolution. We can see some artifacts
here to avoid that, you can reduce the scale to 0.1 Maybe you can go beyond that. You can go 0.05 if you like. That will give you a very nice, beautiful result as
you can see here. All right, that's very cool. After doing all of that, I think I will give the
light sealed a particle, hair particle, the
particles from this frame. I guess select this
whole skeptical of the frame and go to the modifier stock and open this by the modifier to the selected. Now we have tiny hair
applied on this area. I will switch to the render. I just want to see the result. All right, now we have something
here that's very cool. Maybe we can increase the level or apply the scale first to get a correct result. Control A and apply the scale. All right, now we
have something else. As you can see, the
result now become better. You can go to the
particle properties and increase the number to 300,000 or feel like we
can add for the result. Now looks very
nice. We can apply the same results on the
frame of the sealed Rob. This hold, you have
to cut up this one, go to the modifier and covid the modifier to the selected. After that, rob the frame
control, apply the scale. Now we have something here. The result is very cool and you can
increase it if you like. Okay. I think I will
stick with this. All right. I think now we
are ready to render it. We did everything.
Now. Everything is ready to make the final shots. But before we do that, I think we let's
go to the solid. I just I need to hide
the guide we have here. I will hit out edge to bring
the back, for example. This one, we don't
need it. I will hit and move to the timber two. Timber two is not going to be visible in the render,
so you can keep it. Okay. Let's see what
else we have here. We have this guide as well. Just hit to the timber two
and keep this area empty. And now I think it's
empty. Nothing here. Yeah, that's very cool. Now
we are already to render it, save your project. And I will end this video here and see
you in the next one.
65. 065 The Final Render: Hello again, Welcome back. In this video we're going
to render the Apple Super. All right, we have
two source here, let's grab them and delete them. I don't want them in the
environments in the world. The GRI image, I'm not
going to use the R image. I will zero here and ignore it. If you like, you can
zero out as well. Now when you go to
let's go to render. And let's see, everything
should be black because there's no light information as you can see nothing
here. All right. I will put the three crosser
in the middle and I will add a circle and now
we have a circle. After doing that, I will tap to go to the
eight mode of the circle and go to the face and
secret fill from the top of. You. Feel like you can spin this or offset it just to
get a good result like this. Right click subdivided
if you want. Artery, that subdivision
again and again. And now we've got this result. As you can see, I will tap out. Let's go back to the object mode and let's create a new
material for this. Will add a new node
here, call gradients. Let's check for
gradient and add one. Here we go to the Material Review just to see the circle and if you like chanic gravity and it slack
to isolate it, Click Control. Click just to
review the results. I will change to, you
can choose circle. I will hit Control
to add mapping and coordinate and block
this to the object. Just to put this in the middle, like this, now we have
a gradient color. As you can see here, the
result looks nice and cool. All right, after doing that
here you have two option, you can tab and go up
this vertex in the middle and go to the
proportional editing. I just want to make
it like a dome. After you select this vertex
in the middle to the Z and make the effect big like
that's smooth, this like that. If you do that, you're not going to get the rest
of that you want. But we want here, we want this area in the
middle still white. The age is still dark. That's not going to have been
if you use the node itself. That's why I'm
going to bake this. All right, let's see how
can we bake this together. I will delete this one and keep this one connected
like this and tab out. This is the result that we got so far and we
need to bake it. If you want, you
can add Rum color. Rum right here to control that. If you want to increase the darkness a little
bit, I will do that. I just need some dark color. There's also our looks cool. All right, after that, rub this tab to go to the
edit mode here in the UV, hit a select all the pace
here, and here it eight. Select the UV as well
and hit U two times, just to rub it here. Now the UV is ready. Tab out, let's go back here to create or to add a image tick. Sure. Let's hit to create a texture and less increases to two K. Just add
two here and here as well. I think you can keep
everything as is and hit. Okay. To accept this, I just forget to
change the name. I can call this
Dome and hit Enter. After all of that, go to the red and change
the render engine to cycle because you can't take it
unless you cycle in the device. You can work with CBU or B. I will stick with this one because this one faster for me. I think that's all what
you should do here. After that, maybe we
can grab the bake. I think I will put it
right here and open it because we have black
and white information. I will change the emission. I don't want all
of these options, but I just want them chose
the emission that's after. Grab this node and just hit and let's
give this some time. All right, now
baking is finished. All right, now I
have the ability to disconnect these
and use this image. Let's block it, and
let's see the results. Let's recall, now
we have something. After doing that, I will grab these and move
them away like that. And I will add emission shader to make this circle emit light. We can control the
strength from here, and if you'd like, you
can add color Rum. Just set for Rum. And you can right here to
control the transition. You can change this from linear to blind to make
this even smoother. You can push this
like that, all right? You have, you can control
this or something like that. Keep in mind that you can grab the texture and
you can scale it. And if you want to control
that even farther, all right. Something like that. It will be nice and cool. I will move this up right
here and to excite now, I will tap to go to
the ith mode and I will grab this vertex
in the middle. And active proportional editing, I will hit key to the Z and move this and
make it like a dome. If you like, you
can use this one, this sphere and key to the Z. Just try to create
a dome like that. All this, it should be
above the head set. You can scale it,
make it small or big. The transition we have here, it will give us a
smooth lighting or smooth reflection
on the headset. After that, let's
go to the render, and let's see what we will get. As you can see
here, the lighting is very nice and smooth. You can see the reflection here is very smooth
and beautiful. You can grab the dome and you can increase the strength
to, I don't know, ten maybe if you want to make the light a
little bit stronger. As you can see now the lighting surrounding the hits it and give us very
nice smooth results. I think I will stick
with this one. It's need any further editing
Ok. After doing that, let's focus on the
ground a little bit. Grab the ground and this is
the material of the ground. I will change this
to ground empty. For material, I will
add noise ticker. Sure. And I will control to click on the
noise just to review it, put the roughness
up in the details just to have some details and roughness and now
it's become rough. And as you can see, after doing that, I will
this to the roughness. Let's plug the principled
control click. All right. And now we have
something. It's too rough. I want this to be reflective. I will search for, let's
add RGB curve here. To control that, I will
take this down like this and maybe curve
down this a little bit, but I think that's too much. Not just that, I
will make this dark, I just want to see
some roughness. I will take this up
just at any bit. All right. Now we
have some variation. You can feel here,
that's what I wanted. After doing that, you can, can go to the solid if you like. And this, you remember when
we swak this to bonding. I will go back here to
the object properties. And underneath the
Viewboardsplay, we can Swasplayslid
to go to the edit. All the vertices
control to level them. Control shift to
bubble the vertices. Let's make this like a circle. You can choose a clamp
over lab and push this until these vertices
meets at the center. Hit eight, select
all the vertices, and then emerge by distance
to M, these four vertices. And now they are merged,
as you can see here. After doing that, we can hit four insets. Let's
make a small inset. Goes like this. And maybe we can rub the outdoor edges and hit to the Z to make small
extrusion like that. Turn off proportional editing. And hit to scale this, grab this control just to have nice small
bubble like that. If you want. All right. I think that's it. I guess
that's all we want to do. Maybe we can add a support
H lobe here and tap out shade smooth and let's add subdivision surface
with level two, all right? If you like, you can scale this even more and
make it huge and big. If you are satisfied
with the result, you can change this
back to bounding. As you can see, the result
looks very nice and beautiful. I will grab this and go back to the properties and change
this back to bounding. All right, because I don't
want to select it and see it. After doing all of
that, now we are ready to add the camera, hit shift to add and a camera, and now we have
the camera ready. Pick a nice view like this. Hit control old zero
to frame the camera. I always forget to
activate screen for that. All right, control at
zero to frame the camera. And now we can control the camera as well as
you are playing a game. You can go to the view
and go to the navigation. And choose Work Navigation. All right. This
option will help you to control the camera like
you are playing a game. If you hit the ASD, you can see what
these patterns do, will move the camera forward, backwards, left and right. And D, if you hit, if you hit, you can
go up, go down. If you want to make the
movement a little bit slower, you can rotate the wheel
of the mouse backwards. This will help to make the
movement a little bit slower. After doing that, now we can
pick the angle that we like. For example,
something like this. I guess we can take a shot. Let's grab this and make
it smooth, The dome. Let's go to the render
just to see the result. So this is, the result is
very beautiful and nice. The light is soft and beautiful and ground
reflection looks nice. If you don't like it, you
have the ability to control. It's very easy, I think. Now we can take a shot
if you like, by the way. You can take the dome down if you want the reflection to hit
the glass a little bit. Something like
this, if you like. When you do that, the light will be a little bit stronger for me. I will move this
up. This distance looks cool. I will
stick with it. I think I can make small
tweaking here for the ground, like taking this down
a little bit more. All right. Something like
this. That looks nice so far. All right, if you already
now we can render it. Let's go to the
properties of the camera. I grab the frame of the camera like this and then go here. All right, nothing here to add. Maybe we can k the focal
length if you would like. Okay, you can that, you can add 80 or 120,
something like this. If you want to use
depth of field, you can use it for now. Let's take a shot with, let's add 88 and hit Enter. And I will go back
to the View and then navigation and
Walk navigation. You can add this to the Quick
For Variety if you like. Just hit Q now and choose
it now let's zoom back. Hit the button and
go back like this, try to take a shot. All right. Now let's go
to the under setting. All right. As I told you before, I'm not going to use
the noise threshold. I will use the samples. I will add for the render, I will add 800. You can 1,000 if you like. For me I will use the viewed. I think that's all of it.
I will activate D noise. This option will eliminate the noise after the render being finished here you can increase
the resolution for me. I will multiply this number
to get four K resolution. All right, I will
render this image and when the render is finished, I will be back to render this. Just go to the select sorry, Go to the render and render
image or you can hit 12. The render is
finished and this is, the result is very beautiful. If you noticed, I didn't
use the combined. The combined means the
result of the noise. Instead of that, I will
use the noise image. That's not going to
affect anything because you remember we
increased the samples. The result so far
is so beautiful. All right, after you
render this image, I'm going to use the cup cut to edit this image and make
simple post processing. Let's see how can we
do that together. Let's open the cup cut. It will be open like this
and just save the image. Go to the image and save, save us. And just save it. After that, open the
image and save the cup cut to open the image, just click and drag the
image and but dry here. And it will be opened. After that, grab the image
and the time slider. And that's it. Now we need
to make some editing. Go to the adjustment and hit this plus to create
a new adjustment layer. Grab the layer and you can go here to control
the brightness, the contrast, and all
of these stuff here. I don't want to make
it complicated. The image doesn't need
too much tweaking. You can control the brightness. If you want to make this
a little bit brighter, go ahead and do that contrast. I think there's no reason
to manipulate this. The result looks cool. Maybe we can add some sharpness or shares
something cool and imported. I guess you can see how
these small hairs stand out. The result looks very, very beautiful and realistic
as you can see here. All right, It is
simple post processing because actually we don't
need to do anything here. Everything looks cool and nice. We just need to
some sharpness and feel free to manipulate
these sliders. Maybe you will get something
you like from here. You can make the image warm or cold by pushing this to
the left and to the right. For me, I will leave it as zero. When you comb, just go to this three line icon
and use this option. Export steel frame. And you can export
the destination and give its specific name. Leave everything as
is the resolution four K and just hit Export
and it will be exported. All right, so this is the
final results of this render. Is very nice and beautiful. Let's exit, let's try
to take another shot. Let's change the
position of the camera. Something close, for example. I can put try here. I just want to take close. But maybe we can focus on this area and select the frame of the camera and
active the depth of field. Now it's active.
After that I want to cure the focus object. I just want to focus
on specific area. To do that, I have a method
I always use with the empty. I will the three coser
over here on the surface, and I will create a new empty. I will use this empty
as a focus point. Let's go back to the cameo. And here in the Focus object, pick this empty like this,
and now it's selected. Let's go to the Material
Review to see the results. As you can see the focus. Now if I grab the
empty and move it, the focus will be
affected by it. Let's put it right
here, for example. It should follow it. Let the Viewboard, because I just want to
control from the top. Let's move this right here. You can see how can I change the focus points
by using this MP. All right, this method
will be very nice and helpful and easy to use
focus on this area. Maybe after that we can grab the frame of the
camera and control the epitope. If you want to reduce the
effect of the depth of field, you can increase
the number here. For example, I will add ten. As you can see, it's reduced. Maybe now we can
take another render, but I will make
some changes here. For example, I will render
it with full eight. Let's go back to the
original number 100, and for the samples I
will change to 500. I think that's it. Let's
take another render, and when the render is finished, I will be back Thender
is finished and this is, the result is very beautiful. The depth of field gives us very nice results as
you can see here. Feel free to ching the angle of the camera and
take multiple shots. I think it's for this, it's for this course as well. For now, I will end
this video here and end the course here and see
you in future courses.
 Marwan Hussain, 3D Artist and tutor