Transcripts
1. The intro: Are you ready to take your Blender skills
to the next level, introducing the Rode NT
Microphone Masterclass high in Marwan Hussein. Today you can join me on
this extraordinary journey. Learn smart modeling
technique for creating a high-poly clean model of the
iconic Rode NT Microphone. Master, intricate mesh topology
and lifelike materials. Craft stunning visuals that
bring your creation to live, harness the power of Cycles
for breathtaking renders. Enroll now to the Rode NT
Microphone Masterclass. And I'll look, you're a
true creative potential. Once again, I am or
Hussein and see you inside
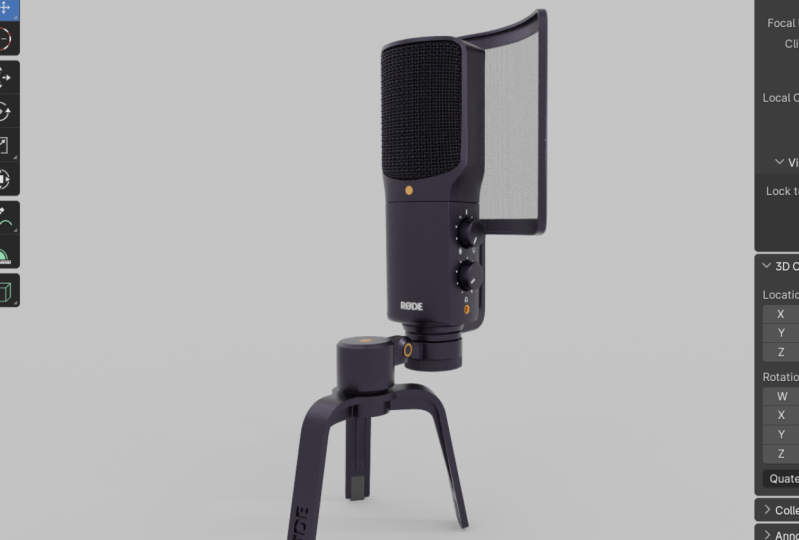
2. Starting with the structure of the mic: Hello everyone. My name is Marwan Hussein and welcome
to this new course. This course we will
learn together how to create this microphone. We have all of these images, and I think these images will
be enough to create this. And let's get started. First. Let's start with
preferences here. I just wanted to hear with you what changed that I made here. The interface you can kinda
resolution if you like, if you have problem with
the size of the icons. And the fuel board may be, let's see what
what we have here. We don't have anything here. And then navigation. Navigation. We have this
objects orbit around selection. I think you equally, this should be off. I turn this on because this will help you to orbit around
the selected objects. What I'm doing right
now it's all putting this off you can to orbit
around the selected object. So keep this one on. This option right here.
Zoom to the mouse position. If your mouse right here. And if you rotate the wheel, you will zoom through this area. If you put your
mouse, for example, here and rotate the wheel, it will sum to this area. This is very important. So keep this on the K-map. We Of we have the tab
for the time minium. This option is called, for example, a by Z, I can toggle between the
solid and wireframe mode. But if I hold Zn, move the mouse, I can
access the pie menu. So this time in you will
be visible on it, right? When you drag it,
it will be visible. The same thing for the
pie menu and the tab. When you tap just tab and drag and you will
access like that. Okay. So activate this
option right here. And the system, I will keep
the the GPU active here. You can activate. We can use that when it comes through render the end of step, increase this to 60 or 100. But keep in mind that all of these tips will
be stored in RAM. So if you've done, if you don't have good rums and
your computer, so don't go beyond the
50. Alright, let's see. Now, after doing all of that, just go here and say
preferences to save everything. For the other and section. I think we need the Bowl Tool. Just search for the bull, be double or L. Activate the Bowl Tool and we need the
loop tool held double 0 P. Look tall. I think these all the odd ones. Maybe the Node Wrangler, just search for the
video are Node Wrangler. This other one is very
important when it comes to material that will
give you extra shortcuts. There are very useful, so activate this as well, and then Save Preferences,
and that's it. Alright, now let's get started. The resource file, I will
or leave some images. As you can see, he
could find them there. And I would like to
start with this one. This opens for us
and let's see it. This is the Rode Microphone from the front view or I don't know if this should
be the side or the front. Anyways, let's excite and let's put this
inside of Blender. I don't want any of these. I will aggravate them like
that and delete them, but I will leave the
cube for one reason. This delete those for now. Just grab them and hit
Delete from the keyboard. Let's activate the
screencast first so we can see the patterns
that I am hitting. Whatever thing I will appraise, you will find this right
here in this area. And now I want to
re-scale this cube and I, maybe I can rescale it and
make the height of this cube. Maybe we can make it ten centimeter or
something like that. Because the mic I think that's the mic size
or maybe it should be 20. I'm not quite sure, but
I will make it small. You can do that after
modeling everything. This is something optional. Let's go to the scene properties
and let's open the units and the unit system
here we have, sorry There the length. Let's
change this to centimeter. I like to work with centimeter
or you can work with millimeter. Here in the atom. After we select the cube here we have the size for X, Y, Z. Let's change this to 15 cm. If you'd like to work
with millimeter, you can change this
to millimeters. Now we have the guide. Let's go to the front. Just hits one from Dan and bad. And let's embark one
of these images. This one just click and drag. And let's
put this pie here. As you can see, it's
very big S to scale. I'll tell you important. And let's put this side-by-side with the cube and scale it. And just align the
top edge of the mic, the top of the cube. And the same thing for this, for the bottom area. But you can do is you can
go here to the front. So you can put this, for example, right here. And it's killed
from this points. All what you should do
just hold Shift and right-click to put the
3D cursor right here. And I'm going to kick the transform B would
point to 3D cursor. So we can scale according
to the 3D cursor like that. Now if I scale, I will scale according
to this point. Hit the scale until the end of the microphone
hits this age of the cube. That's, that's right. Now I will put the
3D cursor bag and the central sulcus hit
Shift C, and that's it. Now we have the bag,
delete the cube, we don't need it anymore. And I will put this
in the center. Just hit Alt V to
reset the position. And now we have
this in the center. Now let's start the
Modelling journey. How can we do this? I think we can start
with the cylinder. Hit Shift a to add, and let's choose a cylinder. And now we have the
sender is very big. Go here and let's
change the king, the radius to maybe
100 millimeter. The depth to 100
millimeter as well. Maybe 25 millimeter. Less will be better. I'm going to increase the
vertices to 62 maybe. And what we could do
is we could scale this cylinder and align
it with these ages, or maybe a little bit bigger because this
area who would be trimmed up the cylinder
and skilled like that. And the scale is a little
bit more, as you can see, I guess lifts a small distance right here because I
want to traumatize. This size looks cool. And after that you can tap to go to the ith mode and
hit Z to go to wireframe. Rob this, these vertices key
to move those right here, the Grob those and
just move them above the mic because
this area I will traumas. And let's focus on this
error first because this area could be beveled just to grab
the vertices like that. And it can throw all, be
filled them like this, and rotate the wheel to
add extra edges like that. And now we have
this area beveled. As you can see, the
bevel looks nice. You can increase the number
of the segments if you want to make this a little bit smarter,
go ahead and do that. And I think that's, it's for the for the cylinder.
After that. Now I want to create
something to trim this. But I can do is I can hit Shift D intake one of
these vertices, this one. And I can start from here, extrude this vertex like
that so we can create an H. And I think that's it for now. I will hit P from
the keyboard to open the separate menu and separate
this small EKG right here. So P and Q is the first option, or you can hit S for shortcuts. So PS, and now it's separated. Tab out. And let's
focus on this age tab. And I will hit G to move this vertex and put
this vertex right here. And I will starts
tracking the microphone, hit E to throw it
and keep doing that. And keep following
the microphone. Like this. Let's explore this down E
and move this down and key. And let's move this
almost right here. And now, let's start extruding
this again multiple times. When you reach this area, don't follow this age, you should follow this one. Rob the city and
let's extrude this. That. Now let's hit the, I can extrude this all the
way down like that. Alright? Alright, this vertex,
we don't need it. So I will let X and
V to delete this. So now we ended
with this results. And now I want to make
this even smarter. I will add a
subdivision surface, and I will activate the
subdivision surface and the edit mode so I can see the result as you can see
now before and after. Now let's track it
and let's see if that's exactly what
we want it here. I don't see any stretching. Everything is cool so far end. Now the lines still following the the microphone age and
that's what they want. When you will be satisfied, hit Control a and apply the modifier and
the Object Mode tab out and grab this and applied. Now, let's see, grab this, our age. Either way. All what we did here is
just create this age. As you can see. Let's go
back to the front int1. From that, I'm bad.
And I will tab again, I will look a lot of this
vertex and extruded like this. And extrude this like that, and extrude this
maybe right here. And I want to align
this with this one. I mean, I want to
align this vertex, this vertex using the snap activate start vertex because
I want to work with vertex. And let's change that transform. We put 0.1 the box to move and hold Control and stomates right here.
Now they are aligned. Yeah, I think that's it. I can focus on one side or
I can mirror this, mirror this tab out and the origin dot
still in the middle, as you can see, it's right here. I will add mirror or to mirror
this on the other side. After adding the mirror,
it can throw a end up light and assets.
Now we got this result. This object, I will use
it to trim the cylinder. And before you do that, let's go back here and I want to take another
Coby and maybe this one, I can just move it
a little bit down. I will look wrap
this hit Shift D to take a copyright here. And I will focus
on the inner area. This extrude these
vertices like that. Keep following this in
our area like this. Alright. Let's do that. Alright, That's very cool. By the way, the mirror
modifier still there. Sorry. We apply the mirrorless or this, or maybe we can
detach this new line. Anyway. Now we got this new line. As you can see, I will go up one vertex from this new line and I will hit Control L. Just
to focus on this slide. And I think we could. Before I do anything, let's go back to the front end. I will make one more extrusion and hold Control and this snap, this unit vertex with
this one like that. And the same thing for this. It should be aligned, this one should be
aligned with this one. Just move it G to move it to the X hold Control
and stomach right here. Now they are aligned.
Can throw L to select the link two
vertices and hit P as two. Separate this out rabbits. And let's give this
mirror modifier or sorry, subdivision surface, make it smooth and
activate it and edit mode so we
can see the result and let's see the results. Everything looks cool
and fine so far. Apply the subdivision
surface and let's give this a mirror and you
can apply it as well. So let's work with
the first Qatar. I will tap and select
all the vertices. Just hit a and hit F to fill it. And now we've, as you can see, we have the surface
and I will hit E to give this a
thickness like that. As you can see now
we got this results. Before you make the trim. Just make sure that
we extruded this to Right direction. Because if I go here to
the face orientation, as you can see, it's blue. But if I hit G to move
this on the opposite side, that will be read. So when you extrude it, go ahead here and kick the
face orientation of this blue. Everything is correct. So that's for this
first object, tab out. And now I will select this
as a first object hold, Shift, grab this cylinder. Now let's make it a trim. Hit N to open the sidebar and
let's go to the edit tool, acts as the Bowl Tool, and then it's difference. Now we got this error
trimmed. As you can see. The same thing. We could do it for this, tap. It a, select all the vertices F to fill this, E to extrude. And extra dislike that. Tab out and go back and
check the face orientation. As you can see, it's red. That's mean. It
should be corrected. Grabbed this, tap it a to select all the vertices
or phrases again, and then hit Shift with N
to recalculate the normal. And now it's fixed, it's blue. Let's go here. Turn off face orientation. And now let's make
the second shrimp. Select this as a catheter. All shifted cropped
up mic as targets. And its difference. Now we got this. If you didn't fix the
face orientation, the tremor is not young torque. Now we got this as you can see, when you will be satisfy. Grab the microphone and hit Control a to open
the applying menu. And I will apply this, the visual geometry to me. Now as you can see, everything
is applied right here. And these cutters, we
don't need them anymore. Just hit Delete and delete them. Grab the image and move
it back like that. And now we got this
result as you can see. Alright, now after doing that, now I can tab and let's
see what we have here. Let's see where's the
middle area it should be. I think this one, this
is the middle vertex. I will select some vertices
holding Shifts like that. Maybe I can grab this, maybe this, and these
vertices I guess. And maybe I can grab
this, this, this store. Let's keep selecting
these vertices. Is leave some vertices and
take Rob the next one. Right? This, rob this, this maybe. And maybe we can
select this or this, yeah, something like that. Alright, so now as you can see, we select these vertices. I want to copy them, you said D. And let's move
those a little bit right here. Now we've got this result. With this selected, I want
to grab these vertices. I can hit F to connect
them like that. As you can see, I'm
selecting this with this hit F to create
an edge between them. This would this hit F and
the same thing for the rest. And go up those together. And this would, this hit F.
The same thing for this. And now I will grab them all, just scrub one of
them it Control L and then hit P and
then S to separate it. And I will push this bag exactly
in the same position. K. Now, grab this tab. Select all of these. And I will make this
vertex the active, because I will stop
to the active vertex. To do that, go here to
the transform pivot 0.3, this to the active
element, and go here, active the vertex snap and choose center
or not the closest. And let's move this back. Gi, the Y hold Control
and snap it back here. And as you can see, it's not. After doing that, I will hit
E to extrude this like that. And now we have
this extra phase. And then I will
flatten this to the Y, S to the Y zero Enter. Now we got this G to move
this to the center like this. Now we got this result,
as you can see. And I will mirror this But I want to put this
exactly in the center. Alright, don't worry too much, too much about the center. We still have their origin.in the middle and that's
what all what we need. I will move this right
here, Timberlake tab, go to the modifier and let's
add mirror to mirror this. On this side. Now
we have the mirror, this mirror this to the Y
terms of the X for now. And let's see, grab one side, tap with these
vertices selected. As you can see, I will move them like that on the,
on the other side. But as you can see, I have some
overlapping happening. To avoid that overlapping
gets activated clipping and now put these vertices. And now everything is great. Alright, now let's check
the vertices distribution. You can add extra vertices
and snap them to the age. For example, I added
two new one right here. So let's take this area. I can add maybe to one or two here and snap them to this H. Like that. I will
activate the egg snap, and I will do this. His head key, hold Control, snap this to this edge and
this one G hold Control, snap this to this age. These vertices. For example, this one, it's all z2. Go to the X-ray, you can
see them or you can hit Z to go to the wireframe.
So you can see them. This one selected
hit key hold Control and slab here on the surface. Sorry, Sarah, is it hold
Control snap this one maybe right here.
Yeah, that's cool. Maybe we can move
this up. This one. G hold control
standards as very cool. And B, we can still add those
together like that. Anyway. Alright, that's nice. After doing that, I will go up the cylinder organic
and I will tab again. And I want to select
some of these vertices. Grab this with this glob, them all like that. And then hit Shift D to
take a cobra of this, a right-click to live within assemblies and hit
P and then S to some brackets to tab out
realistic obvious age. The senior age.
And let's see glob the senior tumor tree at the slides to go
to the local mode. And let's work with these. Okay, Now let's see, grab this hold Shift ticket up, this hit Control
J to merge them. And now they are married. Tab here and less married these two vertices
because they are not married. Activate automatic. From here, he'd
key to move one of these vertices hold Control, and this time it's right here. But as you can snap
working on the aqueous, we could change this to the vertex G hold
Control and stamp it. And now it's marriage. I will look up these
edges starting from this hold Control a club that I will hit E to
explore this are over here. And hold Control to snap. It's an old control snobbish. And again, snap this over here. As you can see. And I will hit E to
extrude this up here. Okay. Let's go to the front or less its life so we can
see the microphone. We moved these
vertices too much. I will hit key and
move those down. They should be aligned here, I guess. Alright,
That's very cool. Here we should have an H and here we should
have an edge as well. And I think we can move
this a little bit. As you can see, it
snapped in America automatically because of
the threshold is too high, one 1 mm or listing
this to 0.1 millimeter. And let's shrink this
back to age. Snap. And I will stop all of
these to this edge. If you can't see the edge. If it's a little bit
difficult to see it, you can make some things here. You can activate the cavity and manipulate these
to get a results. I will grab this, hold Control and snap. This is vertices to
the edge like that. K, G and G to move
this over here. And G to move this up here
and stop it's on this age. And the same thing for this one. Stamp this row right here. Alright, so that's very cool. Okay, now I will grab
one of these vertices. What I want to do is I
want to track this age. Let's see, grab this one. Maybe we can start
with this one. I will hit E to extrude
endless extrude this here. D or Control N stamp
is Marwan's here. And I will keep extending
these vertices. And whatever vertex I extruded, it should be aligned with these. To get better topology. This vertex should
meet this one. At least for now, hit E and extrude this
model right here. Let's get better view like this. And let's explore this over here and maybe this
one over here. Let's see, grab
those. For example, it's F to create a face. Craft this with this set F, F. And let's extrude this hit E hold Control to snap this here. Again, explore this here and
grab this with a set F. F. That's very cool. What else? Let's extrude this E to the Z analytics
through this right here. One time here, E to the Z
and extrude this up here. E to the Z again and one here. And I was a time to
follow this age. Extra, this world
can throw snap. And let's start from here. Grab this with this hit F, F, F and F again. And until you fill this area. Alright, I think this one should be connected to this one. In this case, I can
slide this key, hold control and move
this Marwan here, make the extrusion here. This would this hit
F and done is go back to this vertex E
and one extra one here. Again on x-ray camera
here to be underneath. It's again one. It should be almost right here. Through this again here. This vertex not aligned to the egg that we once again
and extrude this one there. K E again to reach
the middle area. If you want to align
this with this, you can change this
to the vertex snap and move this vertex here to the X hold
Control and savage. And now they're all
lined up this with this hit F multiple time
to create faces there. Alright, this area needs a
little bit of attention. Or maybe we can, I don't know, maybe we
can move this vertex, hit key and snap. It may be another place. Be here. I guess we can add
extra H right here. Hold Control to snap this. Sorry. We could go back to the H snap key and this
tab, this over here. They are, sorry. Stop it from this view. Here we have an edge, as you can see, it's hidden. Hit G to move it and stop it up. Now we got this here as well. We could add an edge loop. This same scenario. Gee hauled can
throw snapped here. Club this in key, old cancel. Some thrive here. If you'd like, you can snap this one here, I guess this one as well. Let's go back to solid fuel. Like you can stop this one here. Alright, That's very cool. If you want to add
extra a guess here, go ahead and add if you want. Alright, so this
is the first step. Let's see if we could
do anything else. I think we should focus on
this area a little bit. See how can we do that? I will slide some of
these vertices like that. Maybe this one, I can
snap it on this edge. Maybe we can add three maybe. And let's scrub this with this hit F to create
face and other F. Maybe another F and F Again, it's like to isolate
this geometry so we can see what
we have done so far. So that's all what we did. All right, Very nice. Let's try to use the
loop tool right here. I want to make the distance
between these vertices even. Starting from this point
to this point right here. Grab the first point, hold controller
garb the last one, and then hit right-click
enqueue space to fix the distance
between them. Now the distance become even. We can do the same thing
here if you'd like. Let's see what's
going to happen. We do that here. I think that distribution
is better and nicer. So I will stick with that. Okay, Very nice. You can add one H right
here if you prefer. I can do this optional. Let's focus on
this area as well. I will start with
this hold Control and grab the last go to the right. Hit E to extrude
this onetime here. But I want to extrude these according
to the active elements. I will hold shifts to and
click to deselect this. And then hold Shift and click again to make this
one the active. As you can see, it's upright or as compared with the rest. And I will kinda stamp
to vertex and King the transform to the
active G hold Control. And this time this here E to extrude hold Control and
snap this one right here. After you make this
one the active. If you'd like, you can
add egg is right here. The problem like that. And just move these
out a little bit to fix the curvature. And
the same thing here. Grab these vertices
like that and push them out a little bit to
fix if the curvature. Now we got this, as you can see. After doing all of that, now we can mirror this
to the x-axis as well. And the result looks
very beautiful. Very nice. Alright, so this
is will be the first step. I will end this video here
and see you in the next one.
3. Finishing the modeling of the main structure: Hello again. We'll
come back here. Okay, Now listen,
bring the images of the microphone. She
was an excellent. The next step is to
create this area here. Let's make the size
of this tool smaller. By the way, this tool that I'm using wire to browse the images. Let's call it pure ref. You can download it
from the internet. Okay, Let's tap to go here. As you can see, we're still working
with the mural. I can apply the mirror for
now and let's tab again. Now we got this result. As you can see, I want to
create a circle right here. Want to make this area open. I will go to the face and select some phases from here, maybe. By the way, before
you do that, we can, I guess two edges right here. Because I'm don't
to tell you why. Let's go back to the
Florence and it's got this area of the microphone that's
pushed out a little bit. I mean, here we
should have very, very small care of. We could take care of it. So let's fix this area. Now. Don't worry
about the other side. We can add another
mirror modifier or we can hit Control Z multiple
time to go back to the mirror. And with this geometry selected, halt healthy crop the image. And it's like to go
to the local mode. And now let's select
this and tab again, it can throw off to add
two agents like that. And whatever thing you
are going to do here, it will be reflected
on that side because mirror modifier here. So let's start with
these vertices may be robbing those over here. And I will go to the front
and hit key to move. And I'm going to move
these vertices like that. As you can see, some
of these vertices, vertices, they could
be pushed back. For example, this one,
it can move this back here. This one as well. As far right here. As you can
see, there's a lot we got. Now's the time for
moving these vertices, grab them like that, and go to the France and hit G to move. And let's move those right here. Maybe just keep our lives
small distance here. We are trying to
create small carrier. That's all what we are going
to go to the front end. Let's move this vertex back. Maybe right here. And
this one as well. This one should
be here, I guess. Just leaves small distance. And always you can go back
here and kick what you did. Now it's time to grab those
and just move those a little bit key to the X and push
those out like that. Now we have very
Small, nice character. We can go beyond
that if you like, you can grab these again
ended key to the X. Just push these
out a little bit. Now let's fix this
error because we have some variation
happening right here. And I think we could take
this out just a little bit. It will be is to fix. Just give this a bit of time. And if you will fix
it here to the Excel, smooth this out like that. Maybe these vertices,
this one for example, it should be poached from
the front view like that. Yeah, this one, it
should be right here. And let's grab this
one next to it. And let's go to the front again. And let's put this one
as well right here. And let's focus on
maybe this one. I mean this one. Okay, Let's go back to the front and
let's put this like that. I can catch this because
it's behind the first one. So now we have it. Let's move this cast a
little bit like that. Now let's check the result
and the perspective. So far everything looks cool. Maybe this one, I can move it a little bit to the X-like that. What's in general, the
result is nice and smooth. Okay, after doing
that, by the way, you can scale these and flatten them. You
can ignore them. Let's go here. After
finishing with this area. Now, let's move to the top area. I just want to create
this smaller frame. But before we do that, I just want you to
notice something here When we created the
structure of the microphone, we followed this
line right here. And because of the camera lens, this area, it's
curved a little bit. It should be flats. So we could move some vertices
and make this error flats. The care of the flat area
should start from here. I guess this is the
end of the curve and the flat areas
should start from here. We could align all of these
vertices with this point. So it's will be easy
to fix this tab. And let's do that together. Let's start with these vertices. Make this one that active and tinnitus to the active elements. And he'd key to the Z and
stamp as well right here. And not just as vertex
hold the line always vertices make this one the active to keep to the Z
hold cancels and I'm smart, I hear the same
thing for the rest. Make this one that active. Key to the Z. Snap this one
to the next vertex here. From those over here, make this one the active key to the Z hold Control and
stamps file right here. Maybe this one that
active in the same thing. And make this one the active key to the Z and it's timeless. Alright, so this is
how it should be. After fixing this. Now we can, I guess we can apply them. Your tab out, can throw
a end up light tab in. And now let's select
some phases from here. Let's grab this face and the middle can throw plus two times to grow and selection. And let's scrub those as well. Maybe. Even these phases if
you like, problem like that. I don't know if we
should include these. And maybe those over here. Alright. And I will
hit I for insert, to insert these insights. We got this results. And I will hit control minus to shrink the silicon and scale these to
the middle like that. And then cantaloupe
plants to grow again. I did that to move these edges from these ages right here to avoid
the overlapping. In the, after doing this, I think we can create
a circle right here just to try to access
the loop tool and to circle, make this like a circle.
That's a little bit vague. Maybe we can scale up like that. And I guess we can always go to the right view and let's see what
we can do here. I think we could move
it down just a little bit and snap it
with this vertex, E to the Z and
stamped right here. That's very cool. One
more thing here we could fix if you go
to the right view, we can see that these vertices
is moving down like that. We should align them
with this vertex, I guess, or maybe this one. And that's what
we re easy About. Go to the vertices, and let's select all
the necessary vertices on this side and on
this side as well. Hold Shift to make this
one the active and then go to the yeah, it's on the app development, IT S to the Z, zero Enter. Now there are skilled and flattened and aligned
with this vertex. Let's go to the fronts.
Everything is cool. And one more thing
here, wrong with it. We scale these according
to the active elements. And what we scaled is pushed
towards this direction. And that's wrong.
We should fix that. Let's go back just a little
bit before the scaling. And let's change this back
to the bounding box for now. And let's go to the right view. And let's move this down again. Key to the Z, hold Control. G to the Z, or Control and
establish smart right here. Or maybe we could
flatten this to the Z as to the Z zero Enter. Go to the right now. And let's alignments
with this vertex. This above it. I think
it's perfectly aligned. Kill this, make it
smaller a little bit. I think this is
the correct size. This make this one even
smaller like that. Alright, and then I can
hit E to extrude this down or just hit XF
and get rid of them. Okay, Now let's fix
the vertices here Yes, I grab these
vertices like that, fault shifted crop
those over here. And let's change this
to the active elements. And let's make this
vertex to the active one. And hit S to the
Z is zero Enter, and now they are aligned. After doing all of that, we could take the
face orientation. Now if I go here and activate
the face orientation, as you can see, we have a lot of problem.
We should fix that. It's very easy. Just
tap it a to select all the faces and
then hit Shift and to recalculate the
normal and then tap out. Turn this off after
you complete. Okay, That's very
cool. Nice. Now is the time to give this
Microphone epitope thickness. I will go to the
modifier and solidify. Apply the scaling case. We got problem with the scale. And let's change
the thickness to maybe 5 mm. That's too much. Maybe two millimeter. I think two millimeter
or maybe even smaller. Maybe 1 mm. 1 mm will be okay. I will stick with this number. I don't want faces here
on the other side, so I will turn off or
turn on all the room. I just wanted the rim. And even thickness is
very important to make the extrusion even
when you be satisfied, it can throw light and applied. Now here we just need to
move some vertices down, starting from the middle area. Okay? Robbing these,
these vertices, you can focus on one side and after that you can
mirror everything. And let's do that. Now. Just go to the
X-Ray mode, a wireframe. And let's see, grab this
middle area like this and then hit X to delete this. And go to the right. And let's see, grab these vertices at XF
and get rid of them. Now let's focus on this area. Just want to make the
process easier for me. What I want to do
is I want to grab these vertices and go to the front and just move
them down a little bit. Keys with a Z. And the small
dose, maybe I'll write here. And let's grab this vertex and move this down
as well like that. Just fix the curvature. And this one maybe I can keep
with the Z and move this down just a little
bit. Let's go here. And I guess we can move these vertices
starting from here. And maybe, yeah, maybe those
go to the front or so. Maybe we can ignore
these and just move these up E to the Z. Let's pull this just a
little bit like this. Or maybe we can start
with this one alone. He to this e-mail right here. The same thing for those
is something like that. You can create a guide for this. Feel like I think
that's will be enough. As very nice. Now if you like, you can bring back
the mirror modifier. I guess wanted to focus on
this area a little bit. I feel this error is
a little bit flat. So the fronts maybe or
maybe in the right. I can move some vertices down. This fine, just take it a
little bit down and maybe those over here like that. And this one as well. Like this. If you want a better result, you can go back to the to the guide mesh and align these
vertices again with this. Let's grab this one. All tear the club this, and let's snap this vertex to this age to make it the
result perfect in key, hold Control and establish
smart right here. And let's do the same thing
for the other vertices. I just want to get
even better results. I think this one is aligned and everything is
perfectly so far. That's very cool. Let's
check that again. If you zoom and if you have
any clipping like this, you can go to the
view and change the clip starts for maybe 1 mm. And now you can go farther. I think we can snap this
to the guide like this. Maybe even these. This one Maybe this go here and let's see if we have
anything else here. We could fix it. Okay,
everything is cool. This check this error
before we go any farther. Let's write nice. The Siggraph, the
guide, and I will hit M to move this to
the new collection. Let's call this guide
Enter, and let's hide this. Now let's add the
mirror modifier. Mirror this to the X and Y. Now we got this result. After doing that, we should the scale this to get this result. So hit S to scale and
let's kill this like that. So this is the shape of the microphone. It
should be like this. Nice. One thing here, we just forget to
fix and it's easy to fix is to move these
vertices and align them. I will let grab these vertices
down here as to the Z, zero Enter, go to the
right view and stop them. For example, this vertex key to the Z hold Control and
stab them right here. Now we got this result.
Maybe these vertices, I can just push them
a little bit like that. And that's
what we as for now. Let's talk about, and
let's take a look. Alright, so far the
result is very cold. Let's take a look here and let's see what else we could do. Ok, here on this area,
we could have a line. Let's go to the
front and let's see. It's as you can see here. I will tab and it can throw
our to add one H right here. So we could sublet this area. Would these vertices selected? I will hit Control
before level and I will level this
just a little bit. Rotate the wheel of the most to add three edges like that. As you can see now
we got this result. Now I will speak to the
age mode, hit to Alt, click on the middle
one to select it. And I will hit Alt S
to push this insight, Alt S and put this
inside like that. As you can see, you
can see it from here and see what we did here. And now we got this. Let's see what you would
3D here thing else. Now let's add a
support a globes. Let's hit Control R to add
one H right here to support. Okay, this age. As you can see, the direction of
this changed because of the polygon flow. But don't worry about this. Let's add another one here. On this side. Let's connect
those together from here. Club this vertex
after restrict to the vertex of this
with this hit the J. And now it's time to
delete these alt. Click Control, Alt
click Control X. Grab this edge, hit M and
marriage at the center. To make it like this.
I will add another, a club here as a support, a club for the corner like that. Let's follow it and let's see. As you can see, the direction
is changed here as well. I will add another one here. And let's connect this
with this hits J. And now I'll click on
this one can throw X Alt, click Control X
to get rid of it. And maybe this egg, I can slide it a little bit, key twice to slide it like that. That will look up this hit M to Americans at the center
to get this result. Now this area becomes sharp. Now I add subdivision surface. This error becomes
smooth and here we should make this age sharp as well by adding
an EQ loop control. And to align this H
better hit E to align it. If the alignment, the
alignment flipped on the other side
hit F to correct it. Let's move this one
or maybe right here. And maybe one again from
this side, I guess. Maybe this, these edges, we could extrude them back. It's E and let's fix through
them again like this. And I will, I'll click
on this edge and Can throw be to level
it's two or three, maybe that's will be enough. It may be this area I can
add one support a cube right here to prevent this trait
to get nice curve here. This area should
be fixed as well. The direction of this
H should go like that. Okay, in this case, I
will add one H here. And I will use an F tilde to
create a close like that. Alt click Control. Alt click and dissolve this one as well. Sorry, just this age. Deselect this control X. And now we got it,
should be like this. And this edge. I think it should go to this direction.
I'm not surprised. Sure. Actually, I can
leave it like that. It's okay to leave it like this. Tab out and radically, hey, the smooth hairless add
subdivision surface. I guess forget this area. Alt, click on this one and
I will hit Control V to the wallets like that. And now let's add subdivision
surface with level two. And now we got this
nice and beautiful. Some vertices, marriage dicuss
here, something like that. That's because of
the auto marriage. Maybe we should change
the threshold to 0.0. Maybe 1 mm should
be even smaller. The automatic, it's very
annoying sometime American, some vertices causing
problem like this one. So we could fix this. Now. Okay, to fix this, maybe we can crop
this with the set J. We do this, rob this, but this hit K. I just want
to create an edge right here. But anyway, let's turn
this off for now. Let's see why that doesn't work. As you can see,
there are merged. I will use an app
tool to create. Cat goes like that. And I will drop this phase
after we switched to the face, hit XF, get rid of them. And rob this phase. And this one, I guess, this one right here.
Let's take this out. Let's XF elites and
this one, deleted. Turn off subdivision
surface and edit mode. I just want to focus on
this area a little bit. And maybe this one with this
one had XF, get rid of them. And maybe we can create
another cuts from this. Maybe here and then here. Grab this XF, get rid of them. Now this new vertices we added, we should align them with the other acres
or sorry vertices. For example, this
one. Get to the Z. After you change the
snap to the vertex, give to the Z, hauled can throw stamp this one right here
and this one as well. Keith to the Z and stopped here. Now let's build
these phases bag, grab this when this hit F, F, and then F again and assets. And now we should bevel these edges and make them
sharp, them like that. You can control V to do this, swivel these 23 acres, that H you can level to feel like cancer or being in this privilege laborers.
Very tiny bubble. How about now? We've fixed the problem
and now it's becoming very nice. Very cool. I can't feel that I have
some some artifact here, are some vertices pushed out. We could fix them. I will use the relax option
that exists in the loop tool. Select the egg is that
you want starting from the swan and maybe just
select these for example, and right-click
and choose relax. That's will help to
relax these vertices. The same thing for these. Relax. Now I think
we've fixed that. Maybe the same thing
for these vertices. Right-click and relax as will help to smooth this
area and get better results. See it from here. So far the result looks better. And nicer. This area as well. I think we should make
some tweaking here. Let's go to the front and select this tab to go
to the head modeling. The vertices is Z.
To go to wireframe. These vertices, I just
want to take them out. Just keep lists,
align them like that. This one as well like this. This one that should
be right here. And the same thing I
guess for the rest. But the else. Right now
the result looks better. Cool. I think that's
it for this video. And
4. Fixing some shading problem using ShrinkWrap modifier: Hello again. Welcome back here. Let's see what's the next step. I noticed that this area
is not so quiet perfect. By the way, I just
changed the mat cap. You can do that from here. Open this arrow, the
Viewport Shading and I switched to the mat
cap from a C22 mad cap. And here we have
multiple mockups. Some of these mockups are not shipped with the new
version of Blender. You can search them in the
Internet and download them. Anyways, I just use this one. And this mud cap. It can show us any. It's exist in the geometry. That's why I always use this. For example, this area
is not quite perfect. I feel that this
arrow right here, it's a little bit post up, pushed out like that. And I want to fix it. I want to make
some changes here. I will tab and I will delete
these faces at Alt click. Go to the face mode, alt
click to select these faces. And I will agree with
the silicon to time-like that and then hit XF to
get rid of these phases. We will rebuild these later. I will see how can we do that? How can we fix this area? I will grab these edges
that I have here. I will select these
edges right here, as you can see, until
I reach these points. And I will hit Shift D to
take a Coby like that. And I will hit S to the Y zero and tends to
flatten this video why? I want, I don't want to
mirror this on the Y. It's still attached
to the geometry. I will hit P and then as two separate with ferrous have outs. And now let's select
the center line and turn off the mirror to
the Y end up lights. And if you'd like, you can
apply the subdivision as well. Now we got this, as you can see, tab go to the vertices. As you can see.
It's very smooth. I will hit E to extrude
this like that. And I will hit a to select all the phases and then Shift Enter,
calculate the number. Because keep in mind, when you extrude the line, some of these phases will flip. Now I will use this
as a guide and I will shrink wrap all of these phases of the geometry on this guy. Let's make this smooth
ferrous right-click, create a smooth,
smart like that. And you can call this, Let's call it, for
example, shrink. Just to organize it. You can create a
ShrinkWrap folder. And with this there I feel like let's turn
this off for now. After that, I want to
ShrinkWrap some of these phases on this senior
geometry birth thing. Let's apply the mirror modifier
on the Y, turn off the X. And I just want to
work with one side. I will hit Control a and I will add another
mirror modifier to the X and put this above the subdivision.
And now we have it. Now we are just
mirroring the x-axis. And now let's tap and
let's select these faces. I want to focus on these faces. So I'll select them like that. And let's add these right here. And these weights as
well and those as well. After selecting these
necessary faces, I will go to the object data properties and add these phases
or these vertices. Group, create the group
from here and assign these faces to the cgroup
by hitting assign, assign unless it now
they are assigned. After that. How about and go to the modifier list and let's
add ShrinkWrap modifier. And now ShrinkWrap tells me what's object
you want to pick. I want to pick this
object right here. As you can see, this one. We call it shrink.
We call it shrink. Well, that's me. Now I can search from here. It's right here. When I do that, I do
that as you can see now, everything shrinked
on that geometry. But I don't want
to hearing all of these vertices ShrinkWrap
them here on this geometry, I want specific vertices That's why I use
the vertex groups, so I will choose my group. Now we can shrink these
specific vertices on this. Now we got this result. As you can see, it's
very small thing and this area fixed. But we got a new problems
here, as you can see. But the result is
perfect and very nice. But it is okay to
have this problem. We can't fix it later. Let's take this area. This
area looks very cool and nice. Everything else looks okay. If you like, you can use other ShrinkWrap
modifier or if you want to ShrinkWrap these faces on new geometry,
you can do that. All of these things
are optional to you. For me, I used the ShrinkWrap modifier just to focus on this area
and to fix it. Now as you can see, it's giving me a good results. Let's go to the modifier and
let's see what we have here. If you go to the mesh itself, this makes, You can
make it smoother. When you do that, you can get even better results. Let's see what's going to
have enough. We do this. So it's right here,
still selected. I will add a subdivision
surface on it. And I want to see the effect
here on this geometry. As you can see, I guess, smooth this object even more. And that's helped
to fix this area. Now if I turn it the
subdivision surface, you can see before and after. And if I go beyond that, I can get even better results. And now it's become
super smooth. As you can see here.
That's very cool. So keep in your mind to smooth this geometry to get
even better results. Alright, so after
doing that, now what? Now we fix this area? Everything looks cool. And now maybe we can extrude
some phase from here. Let's tap to go to the ethmoid. The end, I will hit Alt
click to select the H loop. Okay, but if I do that, if I exclude these, I can't kill them to the
center because as you can see this the halls of
the geometry that's been, we should apply Vimeo or
in this case, to do that. I will apply them euro, it's okay to apply the
mural tab out and the club, this control I end up light. Now let's tab and again, I'll clip selected as
a globe and I will hit E to extrude and S to
scale extrude them scale. And as you can see now, but I think now is killing working according to
the active element. As you can see, I will hit Control Z and
changes to bounding. So he again and as
Tyvek suit and skill, now we have this result. And after that, maybe we can
make this, scale it back. And he gets to the Z
and move this down. Okay? But as you can see, the phases are still
affected by the ShrinkWrap. Well, that's mean
these the senior age I should excluded
from the list here. Just go here and it's
from wolf to move this, we don't need to
exclude this one. I will add an edge loop here. It's E to align it and push it. Today, this scenario
should be assigned. So assign this one. This one, I guess it should be assigned. And let's add another
eight right here. Something like that
and hit remove to remove this one.
Let's tap out there. Let's take a look. Now we got very nice result.
As you can see. We have tiny problem here. Let's see How can get over it. As you go to the modifier unless activates the subdivision and editable so we can see
the final results. And with this age selected, I mean, this one right here. I will, sorry, I only get
wise and slide it down. Let's see how that can
affect our results. And others of this fixed. We can see before and after
one a high key twice. You can see what's going on. So slide this down a little
bit and that's what we its top out and
let's take a look. Everything looks nice. After creating the structure Let's focus on another things. Let's check the bottom
side of the microphone's. Right. Let's go here and
let's focus on this area. I will tab and Alt
click on these edges. Let's see, grab them and
I will hit E to throw it an S to scale to
get this result. And I will make this a circle. Yes, it right-click
into a circle. Because we scaled this lag that we didn't apply the skill. That's why the circle
is not perfect. I will hit Control Z, tab out, control a
and apply the scale. Now I will top in again
with this selected, I will right-click
and choose circle. Now we got another result. Scale this down like that. And I will hit, I can go to the front, I guess I can track it here. I just want to move this. Alright, I think it should
be scaled a little bit. I move this down. I guess want to check the the circle that I got
is aligned with the circle. My circle reached this point. I think we should scale
with a little bit more. So in this case I will
extrude it ferrous. Think that's will be easier
to mean to control it. I will hit E to
extrude like that. And I will go to the
face and Alt click to grab all of these
phases in that will scale. But if you scale like this, you should cancel the z-axis because I don't want to scale this to the Z. I want to
scale this to the X and Y. Hit S to scale to
the old Archean, then hit Shift Z to cancel the z-axis and the
scale this a little bit. And now it's fit. I just forget to activate a
screencast with active. Alright, after doing that, Let's grab this
aka can Alt click. And I will move this
down just a little bit. Maybe. Let's see
what we can do here. Alright. I think we are, I will hit E to throw
this one more time. E. And let's hit E again to
throw this almost right here. And I will hit S to
scale those like that. So now we reached this point, as you can see,
sorry, this points. And I guess we can hit key twice just to go
up Class a little bit. And hit E to the Z and
extrude this down like that. The scale this inside. Alright, so now we
got this result. And I will hit E to the throat
and S2 through the end. Post this inside. Let's
go to the front again. And let's see. It is a little bit difficult
to me to see the edge, but, but to make life easier or I will extrude
this edge so I can see the size of this age and comparative and
absolute that I can scale it and get even better result after extruding the
H. By that total, the phase Alt click. And then scale and
cancel the z-axis. At S to scale to
the old Archean, have the Z to cancel the Z
isozymes, careless like that. And then go to the
age at number two, I'll click get to the Z and
let's move this over here. I mean, over here. And let's extrude
this one more time. Hit E to the Z. Scale
this inside like that. And now unless it's E again to extrude an S to scale,
something like this. Now let's focus on these areas. Let's see what we
should do here. I will turn off the, sorry, the subdivision surface and the edit mode so I
can see the edges. And let's add a
support HE loop here can throw up to add
one E to align it. If the alignment flipped
on the wrong side. F to flip this back. And let's move with right here. I want to tighten this area. It can throw out to
add one here as well. Alt click on this one
key twice to move with just a little bit
more like that. Alright, so this area
should be extruded in all connect to grab
the face loop like this. After you switch to the
Face Selection mode. And then I will hit Alt E To open the extrude menu and I will extrude
along the normal. I will put these phases
inside like that. Alright? These phases, I want
them to be sharp. So in this case I
will use the crease to make these edges
sharp and not smooth. You go to the age. Alt click, Alt Shift click to add this one. After selecting
these two edges like this, I will increase them. You can open the
panel from here and go to the atom and push
that mean increase to one. All you can use the
shortcuts shift with E, hit hipped with E, and move the mouse until the
color change to purple. And when you release, you will have this
menu right here. We can control it, this
factor. So leave it at one. Now if I tap out, as you can see, this era, still sharp and
that's what I want. Ok, now let's focus on what's
less, what with this here. And let's tap, Okay, this error should be hard. So I will hold click, Alt Shift click to
grab this one in a, Bevel them together. It can't told me to build them guys a little bit
with three edges. It will be good. And make the
devil very small or tiny. And you can add a support, a loop to get even
sharper result like this. As you can see now it's
become nice and sharp. Now, setTime to
focus on this area, we stop all to click
Alt Shift Click can throw be to Vivaldi's. The same scenario. Let's
add support a globe one here, one here. Tap out, nice and sharp. Okay, this area as well, Alt click can throw
be the violet. Support the H loop,
one here, one here. To get even tighter results. Alt click, Alt, click,
Alt Shift click. Cancer will be controlled up, support a loop here, support a globe here. And if you'd like
to add one here and go ahead and add one here and one here as well.
Nice and sharp. Now let's take a look. Very cold. Bots,
I think this area is I think it should
be fixed a little bit. I mean, I think we should move these phases up or
take this down. One of them. What's the easiest
way to fix this area? I guess we can grab these faces. Less thick rod,
maybe this phase, this phase right here. It can throw a plus
to grow selection, to select these, and
then get to the Z. Let's move those down here. Yeah, That's better. Now we reached this point. Let's go to the front, hits one from the numpad. But keep in mind to select these edges first and go to the front and hit E to
the Z to X through this. And as you can see, it's bigger. So I will go to the face. I'll click S to scale, Shift Z to cancel the Z and
scale this to the X and Y. Somebody like that? Go to the age Alt click key to the Z and let's
move this over here. One extrusion again hit E and extrude and S to scale this. And then it's E to extraordinary S to scale
to get this result. I will, uh, now I will
add an H here, I guess. And I will go to the phase Alt click and I will
extrude this up, hit E and push
this up like that. I will have this inner
edges, that's one, and this one beside
it, alt, click, alt, click, shift E, and move the mouse to
get to edge crease. These agents are too crazy. Agents. Alt click here
to select this one. I want this to be sharp, so I will control the to
make it sharp. Like that. Maybe. Now let's focus on these. I'll click, I'll click Control
V. And I support a loop to get even tighter results.
Now let's take a look. How about now we got this. Very nice and cool. Alright, if you compare it with this
result is very close. I think that's it
for this video. I will end it here, and I
will see you in the next one.
5. Creating multiple circles for the dial button: Hello again and welcome back. Here. In this video, I want to focus on the dials I have here.
We have two of them. Let's see how can
they create these? This is the images
folder and it can, I think we can import
this image and use it. Just lets go to the right view. And now I will click and drag and with
the small right here. Or maybe we can, I think
we have another images. I just want to check. I think this image is better. But this one is bigger. I mean the resolution. Alright, I will use
this model right here. Click and drag, and
let's put this image here after that scale. Let's make it small. And we could resize this. Let's fit this line
with this line. Just move the image
a little bit. Maybe right here. And I will put the 3D
cursor, this area. And I will scale according to the position
of the 3D cursor, go to the transform
and choose 3D cursor. Now I will scale out
according to this point. This and scale this. Right. Now. The result is cool. You get
to move this right here. Okay? Something like that. Alright, Now we got
this into place. Go to the wireframe, and now
let's create these circles. Okay, I want to select
this and then bring the 3D cursor back to the
middle of this geometry. Just hit shift S anxious
cursor to select it. And then half-day to at the end, I will add a circle. And I'm going to align
this to the View. And I will change the radius
to maybe five millimeter. And for the vertices
maybe I can choose six site or I think
that's too little. Let's change this to maybe 12 or maybe 88. It will be cool. You to move. By the way, you have this option. You can use the circle and you can project this
circle on the geometry. To create this. You have more than one option, but let's try this and
let's see the other option. I will move this circle
right here in the middle, and I will scale it like that. But scaling, as you can see, it's working according to the
position of the 3D cursor, changes to bounding and
is killed this like that. Maybe we could move this
a little bit up here. Scale this second
key to this here. Let's move this down
and yeah, that's it. And after that I will
take this out maybe right here and go to the right. And then I will
select the geometry. We go to the solid,
as you can see. After that tab to
go to the edit mode and hold Control to add
the circle like this. And when you do that, pick the good view. For example, forming
the right view, and go to the Mesh
tools, knife projects. If you do that. Now
with the shape, this shape at will be
projected on the surface. Be like this. And
that's what I want. So let's go to the right. And by the way, if you
project this from this angle, this shape, it will be
projected right there. And if you project it like that, this shape, it will be
project to the right there. So it's very important to choose a nice angle as you
go to the right. And now I will go to the Mesh
and choose nine projects. And now it's projected, as you can see here. After doing that, I want to add, or it's important to add one H right here and maybe
one here, one here. So let's see how can we do this. Go to the right again. And let's use the knife tool. Hit K will make Academy
because like that, make your first click and hit
a to make the cast right. And I want to cut through the
whole geometry to do that. Hit C and then left-click
and then Enter Now we have this trim, the MH. Maybe we can take it
back to G and move, push this right here. Let's see, grab this and tap. Now we have this H padded and maybe we can
add another H right here. It can throw out, maybe with the sea of control art can help. Well, yeah, it can be
helpful like that. And after that we can connect
some of these vertices. So grab, for example, this one. Gateways and marriages
get twice like that. And omega-3, you're
about to make sure to activate automatic spheres, key twice, push this kit. Why is that? And the
same thing for this. Let's add one here. Maybe we can just move
it up a little bit. Grab this with
this said k and j. This would this hit J, J. And now I can maybe
grab this one, G twice n mercury, this one
down, this one right here. Maybe I can slide this to
get better technology. Alright, After that I can activates the
subdivision surface. After I delete this. Alright, I will use
the projects method again to create that.
The next circle. Let's go to the right and
go to the wireframe is z, hit Control R to add
maybe one HY here. It can throw off to
add maybe one here, maybe add one right here. There is another method, if you like, you can, for example, you can select
the important phases. For example, I can select
that, go to solid. And let's select these faces. After you select this, you
can hit I for insects. And after that you can go to the right. With this selected. You can hit right-click and
use a loop tool and circle. And that's this is another
way to create the circle. But the problem was
with this method. It will ruin the floor of the
polygons, got little bits. This area now become flat. And we love and we
lost the curvature. So just be careful when
you use this method. I prefer to use the project. I think it will be a
little bit easier. And go to the right and
go to the wireframe, move this circle g to the z. And let's put this
one maybe right here. And listen, project this again. Select this tab, hold
Control to add this. And go back to the right. And then go through the
mesh and choose a project. And now it's projected. After doing that. Now let's try to align these vertices and
merge some of them. This one may be, can make
it there, this one here. And maybe I can just lie
those right here and slide those over there and
mark this one here. And this one may be right here. And maybe I can grab these key twice and let
slide this up here. Z twice miraculous
America, is there. Maybe this one I
can make it here. And I guess what we can do here is get rid of this service. Maybe I can grab this with
this k. Can we do that? Can have this with
this ID K. Alright, let's delete these
faces in the middle because in the end of the day
I don't want them cut up. The Sandy's over here, It's XF, get rid of them. And now let's see what
options do we have here. Maybe this guy can
dissolve it with this one. And I guess we can slide
this down just a little bit. So far. Everything looks cool. Do we need this edge?
Let's dissolve bits. Do we need this one? Maybe we can dissolve this one as well. I think now this results
is ready, I guess. Okay, now let's see
what's the next step. We have a small hole here. Let's take care of it
and go to the right end. Go to the wireframe. Maybe
we should add one H here, maybe one here as well,
maybe one in the middle. And I will look up these faces. This one, these here, hit I for insert. And let's see if
this method helps. Helpful here, go to the rights, right-click and choose circle and is killed a
circle like that. Okay, let's kill it like this. And I think that will work except to get
rid of these faces. And key twice. Let's
move this up here and this one, and
this slide this year. Yeah, That's what walk Alright, now I will
select these edges. Alt, click out here to click
and maybe this one as well. And hit E and push
those back like that. And the edge is maybe
we can bubble them. Alt click, select these edges. Just to let you see,
I just like that. And this one and
this one right here. After doing that, bevel them. It should be sharp,
so don't worry, you can make it sharp. Just hit Control V and
level them like that. But just be careful. When you use bevel.
Bevel automatically will care of the results. It should be like that, but that will make it like this. Here we have the shape. You can push this to
one to get rid of this. I want this to be hard. And I want this to be
sharp in case I don't like the result and
I want to go back. For example, maybe
I want to delete these agents for any reason. I don't know. So far the
result is called tab. And now we have something
nice. Very cool. Everything looks nice and cool. Alright. If you want to make
this even smarter, as you can see, I can, I have some steps here. You can go beyond the tool. We can increase this to three to make it
super smooth like that. See if we have anything
else here we could do. I just want to check
what's going to happen. If I delete this edge, I will hit Control X
to dissolve percent. I think that will give us
a smoother result here. So yeah, let's get rid
of this one and see if there anything else I can do here to get even better results. I don't know. Let's take a look and let's
see what we can do here. Maybe we can reduce some of these vertices here are aqueous. For example, maybe this one, I can dissolve it, and that
can dissolve this one. Let's see what's
going to happen if we do that. Let's tap out. Well, that is still amazing. It's very beautiful.
What about this age? Do we need this? I think we can fix the distance
between these edges. We see what's going to
happen if we do that. For example, select this, and maybe we can
include these as well. Let's see what's going
to happen if we do that. Let's select those over here. Maybe these edges
and maybe, alright. Right-click endless space. Alright. Now the result of this
perfect Alt click on this one can throw
extra resolve it. And now it's very beautiful. Stop outs. Very cool. After I fixed the distance
between the edges, I got this shading
right here, this line. That's happened because
of the shrink wrap. Lets try to fix this. I guess if we add one H
right here, for example, if we executed this
area, let's see, grab these faces and
those over here, and I will remove
them from the group. Yes, hetero mode. I think
that will help to fix it. And the AI does, as
you can see now, it's smooth and nice. Let's go back here.
Everything now is perfect. Started that maybe we can create the small circle
we have right here. You see how can we do it? It should be almost
and this area. Let's go to the fonts
and go to the wireframe. And it should be in the middle. The middle area, as you can see, the diesel ladies
faces on that side. And maybe we can add another
edge loop here in this area. Or I don't know, I'm
not quite sure about I guess we can slide these edges up twice and let's
put this up here. Or you can, if you'd like, you can crop this aqueous and those white here
and right-click and space to put this
exactly in the middle. Let's go to the France and
let's select these faces. Sorry. We can do that in solid mode and then hit the
I for n sets and right-click and choose circle and scale the circle.
Let's go back here. Got the wireframe. Scale this a little bit
more, make it smaller. Alright, this size
looks nice, I guess. So we can use it. I will hit E to extrude this bag and x f to
get rid of this. And now I will look
up these edges and double them with cancer
or cancer will be. And the beliefs like that. And push the hip to one. And maybe we can
support the a loose by adding extra edges right
here and here as well. For the senior age, I can hit E to align it and
move it to get this result. Now let's tap out and
let's take a look. All right, very cool. If you got any hating problem, I feel that we have some
waviness happen here. You can fix that with
the with the help of the shrink wrap
modifier if you'd like. Let's see what we
can do with this. I will tap again and I will take maybe this age
starting from here. And keep selecting this
edge and grab this one. Hold control the color of
this one until you reach, sorry, this one until
the ureters age. As you can see, that's
what I did here. I think I can include
this here, sorry. Alt Shift, add this with this. And on the other side, you have to add
this one, this one. And I will hit Shift D, z like that and then hit P. And then as two
separate this tab out. And now we ended with this. I will hit S to the z zero
Enter to flatten this. And now we got this guy. What I can do is I
can use this guide to crop this area on this guy. I will tap and select all of these vertices
over this guy. And maybe we can
redistribute the vertices, right-click and choose space. We have some overlapping
happened right here. I will have to slice
to isolate this. Let's see how can
we fix all of that. Get wise to merge some vertices. Alright, on the other side, Let's do the same thing
twice this marriage, some vertices like this. Now it's a select them, all right-click and space. We have any problem
here, AB. Alright? Let's see if we have any
problem right there. Twice and this marriage, some of these vertices at a, select them all
right-click into space. That's weird. Control X, dissolve some of them. And those can throw legs. Again, a right-click
and choose space. What's the O&M? Can throw
a, apply the scale. And now right-click the first and the last
click into space. Okay? Tab again, let's hit slash to excite, and
let's see what we got. Tab again and hit E to the Z to extrude this
up here like that. And the club those, maybe
we can move them down here. And let's grab this side, t to the z. And
let's move this up. Maybe we can push this a
little bit key twice and hit Alt and move this out
just to cover this area. And on the other
side, the same thing. This key twice, hit Alt and
push this out like that. Hit H, select all the faces and fix their face orientation. Hit Shift M to do that,
and now it's fixed. Alright? So now we can grab the corners and
give them a vertex. Whereas its mean vertex crease because I want to add
subdivision surface on this. And I want this, I want the
corners to remain sharp. Tab outs delete the shrink
wrap modifier from this one. And let's smooth this
with level three. I think level three
will be awesome. As you can see now it's
become super smooth. Now you can use this, you can shrink or are most
of these phases on this. And you should get Very good results. I can change the
name of this one. If you hit F2, you can
change this to rank, maybe to just to recognize
it, and you can hide it. Now I can tap and select
the necessary phases. Alt click for example,
on these faces. And these are like this. We don't need to include
these. These either. Sorry. Okay. Now let's add those
and those here. And maybe these phases,
Alt click, include them. And maybe we can
include these as well. Alright, I will select
them like that. Alt click and let's
add those over here and grab those here. And maybe, I guess the sake
we should include this. Go to the front end, go to the wireframe, hold Control and deselect this. We don't need to
include these faces. This one as well. And
here and the same thing. Alright. That's very cool.
After selecting all, all the important
faces are vertices, we could put these
integral parts. Let's add these as well. Now there already. Let's go here and let's create another group, another group. And let's assign all of
these phases to the scroll. And now they are
assigned tab out. And I will add another shrink wrap
modifier for this geometry. So let's go here and let's
add another shrink wrap. And by the way, the problem
that I about to fix, it will be fixed on this side. And I think that's will be it. So let's add another
drink rum with the fire. And let's pick the
hearing to, I guess. And let's choose the group 001. And now all of these faces
shrank dropped on this guide. I mean, this guy is right here. Now we got something else. As you can see, the result
is super smooth and nice. But we got some
problem with that. See, what solutions do we have here to get rid
of these problems? I will grab this N tab
and I will hit Alt. Click on this, a try here. Let's see what's
going to happen if I remove this from
the selection. Let's go here and hit Remove
or sorry, just this ache. Maybe I can't remove
it from the selection. And hit Remove. And let's tap. Now the result is better after
removing these ages. Let's see what else we can
do here. Maybe we can. Let's, let's activate
the shrink wrap and edit mode so we can
see the final result. I only get wise to move this
back and this one as well. That will help to make this
area a little bit smarter. Maybe this area I can, I can go here and I
can reduce the effect. When I assigned these edges, I assign these with
the weight one. But if I reduce the
number and hit reassign, that will make the effect a
little bit less, I guess. But let's hit Control Z because I am getting
another result. I will hit E to the
Y and push this. If I can do that. Artless tab. And let's see what we got. Maybe we can push this back and this one as
well a little bit. And maybe these edges, Keith wise, and let's
push this away. It's e to align them
like that and push this curve the spine key twice, and let's push this as well. That will help to
make that assaults smarter. And that's
what I want here. Alright, now I will go
back to this age because I think I will reassign this
with half of the weight. Let's see what that will give me But sorry, not all the aqueous because that's what
cause some problems. I will hit Control Z because I don't want to include
all of these edges. Okay? When I hit Alt click as
you can see the edge, the selected agent will go
around the geometry like that. So to avoid this, what I can do is I can
select this area from here. By deleting. Maybe this age. Alt click gets hit
Alt click to select the entire edge loop and
then hit V to grab it. And then hit right-click,
and now it's selected. And if you'd like, you can leave some distance
between these ages. Let's hit G to this here. Let's move this maybe
just a little bit. Or that's not going
to work because auto America is active, it will cause some problems. Turn this off for now. Now if I hit Alt click, now the selection will end right here because we
ripped or opened. That's age. Now let's try to reassign this
maybe with 0.3. Now we are getting
nice result I guess. But here we have some, something that makes sense. Let's see why that's happened.
Let's go here and activate the shrink wrap modifier and the edit mode and the
subdivision surface as well. I just want to see why that's seven happens because of this h. Alright, I'm not getting
any good results, so I will type in alt, click on this age and removed. How abouts? Okay, that
is all still nice. So far, it's very beautiful. Let's try to just
focus on these edges. Let's see what will work. I will just add these here. That's will give us bad
shading. I will ignore it. Yeah, that's giving
me bad shading. On this side, the heading is
perfect butts on that side. It's not. Delete these edges, hit Remove. I'm not going to put
them right here. Sorry, removed from the
group to another group. One. This one. Okay. Let's try
to use another technique. This case, I can put the shrink wrap modifier above
the subdivision surface. That's mean shrink Rob and
then it will be subdivided. That's can give us
another result. It's not so it's not
perfectly clean, but I think it's acceptable. Let's check this area. Okay. We have some problems right
here regarding this error. Let's see what's happening here. Let's hit Assign. I don't know. We could sorry. This hit Assign or remove this tab
and it should be removed. Let's go here and
it's activated this. Now the result looks cool. So far. I will accept
this. It's nice. Vehicle. Alright, so
that's pretty nice. Okay, I will end this video right here, and I will see you
6. Creating the dial buttons with the mic grill: Hello again and we'll
come back here. Create buttons,
the dial buttons. I think we can select
these circles. And kobe, VCE ages. Acropolis hit Shift
D, take a copy, right-click to leave it in the same place and limit
P. S was the brightest. About them. Sakalava circle. I don't want the ShrinkWrap. I don't want the subdivision.
I don't want this one. Or maybe I want the subdivision
surface, but it's okay. I can add this later. Let's go to the right and I just want to scale this a little
bit, make it smaller. But scaling, working through the 3D cursor
changes to bounding. And sorry, it's not working to 3D cursor or the
origin dots up there, right-click and set origin to geometry and then S
to scale this like that, maybe Alice add a
subdivision surface to see the results and creates
this two to four now. And let's check that. Let's see if that correct or not will actually
have some distance. So since it looks okay, we can step on this. Alright. And now after that, I can tap and select all the aqueous entity to extrude this right here
you can go to the frontend, see how much we
should explore this. And as you can see
this H is a little bit carry as to the X is zero
Enter and this one as well. Alt click as to the X ureter,
flattening this to the X. Now we'll grab this, move
this a little bit right here, and then you can hit F to
fill this area with face. With this selected, I can
hit Control V to level them to get some nice
pebble like that. And other support at
lobe if you like. For these edges, I can't
push them inside key to the X handbooks
this deep inside. You can see it from here. And when you complete, let's add the support
H club right here. So we can grab the next
one and extruded out, hit E to extrude them as to
scale this out like that. And let's add another
edge loop here. And if you'd like to Canvas
killed his father. Tab. And now we got this. Rob this
right-click, Shade Smooth. And I was become
nice and smooth. Alright, maybe we should, maybe we can grab this face
and hits another I for insert to get smoother
result like that. This area in the
middle, if you like, you can change it to cool, too quiet because
it's sending gone. It's faced with
multiple vertices, not four vertices X, F to get rid of it. Then go to the H Alt click. After selecting this age, you can go to the face
and Q is grateful. And after doing that, we have this window right here. You can control the span
if you want to rotate this to get a result like that, it can just try to spin this
to get an S results for me, this result looks very cool. Tab out. And now we got
something nice and sharp. You can add another level
to make this very smooth. I guess we could flip it. I don't know. I feel it's
not flipped correctly. If you go here and
activate the face, as you can see, it's right. Tab hit a shift and
to recalculate. And maybe now it's flipped
or no. No, it's not. Tap it a shift N rights. If that doesn't work, hit Alt and instead
and hit Flip. Now the result is correct. What about this area? I will tap to crop these edges. Alt click as you can see. And hit Shift S to bring the 3D cursor right
here in the middle. I will tab outs, rob this hit Shift D to take
a cobalt like that, or right-click to live within
the same place and then hit Shift S to access the
3D cursor time in you. And this time choose
selection to cursor, to move the new Coby. The position of the 3D cursor. Go to the rise. Great
pool, land, awesome. What about the headphone? Jack, Let's try to
find another image. Maybe this one I just want to enter stand
exactly what's going on here. I will grab this and tap again, and I will select these
edges here of detail. Make a copy right-click
to leave it in the same place
and then P and then is to separate this out
enlisting Columbus Circle. I don't want the ShrinkWrap. I don't want this
one as well cube the subdivision users go to the right and maybe we should scale this chest a little bit. But before you scale with
the 3D cursor, or sorry, the origin.in the middle, right-click origin to geometry. Now scale this like that
and tap F to fill this. And then it I2
instant dislike that. And another I to
answer this and hit Alt S to push this
inside alphabets. You can turn over the
subdivision for now. Now I will extrude this phase, hit E and put this deep inside key to the X
and keep pushing this. I will hit Slack
to isolate this, I want to focus on this page. I will hit E to extrude
this bag as well like this. I don't know. Maybe here we
should add multiple levels. We'll look, grab this and
move this maybe right here. And I will hit I
for insects like this and just push this a little bit like
that and then E to extrude and maybe
add another level. I don't know what's
going on here, but let's add multiple levels at the end, extrude this right here, and
then hit I, for instance. Now let's focus on these
edges, carved them like that. And let's level them. Even these right
here, craft them all. And then it can throw
would be Vivaldi's 23. And let's add extra
subaortic loops to get even shovel results. For example, I can
add one right here, one there, and don't worry up too much about what's
going on here. I just want to
focus on this area. How about and activate the
subdivision surface radical, aka the small, become
smooth and nice. I guess that's sets. Let's go back to the
reference images. Should we take this out? A sequential but I
think it's perfect. I invariant is, I can
leave it like this. And I'll write this. I don't know what's
going on here. What's this part? Let's create this
small piece of copper. Rob this alt click
crop this age, and then hit Shift D, take a Coby right-click to leave it in the same
place and then P as two separate tab out and delete
the ShrinkWrap modifier, sorry, Control Z to time, the circle alone and delete
ShrinkWrap modifier from it. Tab, and then it's
F to fill this. And then E to extrude this and extrude this bag like that. And delete the back face
XF and get rid of it. And this focus on this face, I guess we should take this
out just a little bit, see to the Y and then hit control V to
bubble this to three. The middle area I can grab it
and then it's I2 innocence. And maybe we can add to support the loop just to make
this area tighter. Right-click K, this model. Now we get something
nice and sharp. Let's try to find another
image I just want to see of this should
be smooth or sharp, will actually to be sharp. And I think we
shouldn't take it out. And let's move this
wall right here. And I think the face
orientation is not perfect. No, it's okay. Even
this one, I guess. Yeah, it's blue. That's very cool. Now
let's focus on this area. This is create this grill. I will tap here and
let's see what Jake is. We could pick I think this
one, we should select it. D take a copy of
this right-click to leave it in the same
place and then P as two separate tab out and grab this edge and delete,
ShrinkWrap and delete. Yeah, just keep the
subdivision surface and turn off the subdivision
surface for now. Tap and let's go
to the vertices. I just wanted to see the
distribution of the vertices. I think I can
redistribute the edges. Let's add multiple
vertices here. And maybe right here, just increase the number. And maybe to here. And after doing that, maybe here on this side as well. We should add three here and
maybe three here as well. And to hear after that, alt click on all these
vertices and then hit right-click and
choose space to, space to space out the
distance between these. But if you do that,
you will lose the, the curvature here. I will hit Control Z. And I think we should add more vertices to
get better results. I will add two here, maybe to here, to here. Just increase the number. Maybe I can add, or here, maybe for your as well. Alright, now I'll click
Crop all these vertices, right-click into space. Now, the result is a
little bit better, but I think we can
go beyond that. We can add, for example, let's add multiple
vertices right here. And don't worry, the loop
told, fix everything, Right-click into a
space like this maybe, alright, maybe
something like that. After doing that, I will
go to the front end. I will look rob this vertex
and this one in the middle emits F. Handy
grab the next one. F of this, that correct or not. I will hit P to
activate the ruler. And let's convert that. Alright, I don't have a
vertex and donate this one. That should be fixed. Okay, let's see how
can we do this? Maybe if we add one more
vertex, maybe that's will help. Hit Control Z, cancel
that connection, add just one vertex Alt click. So let's delete this H here. Add one vertex Alt click, and let's choose Space. Odyssey club this with
this one in the middle, hit F, hits B. Now the line is perfect, I guess the line not perfect. We can grab those and
flatten this to the X. And now it's perfect. And you can grab
these vertices on this side until you 40k this and fix that space
here on this side. Sorry, we thought we'd, we don't want to include
this edge and the middle. You go to the H,
deselect this one space. Now let's focus on
the other side. Right-click into space.
Now the distance, even for both sides. Now I will grab these vertices. It's a little bit
difficult to see. But you will understand
what I'm doing after I connect these phases. Now we've got this
vertex with that one, this one, with this one. And keep hitting F to create multiple
faces here. Alright? Now, I think we could
multiple edges right here, but before you do that, I just want to count the
number of vertices here. I just selected these vertices
and here we should have the number is 26 vertex. That's mean we could
have a 26 age this area. So the first one and go
here and Canvas to two-six. Now we have 26 H, as you can see now we can
on neck, some of these. Let's count the number. 25. Alright, let's
stick with this number. Grab those four. It's going up this multiple times and reach. Alright, It's fits. And this one at F2
times, Perfect. We should get the same
thing on this side, will, in this case, I think we can use mirror modifier and
that's will be faster at X, V 3D these vertices, and I will mirror this
on the other side. How about and let's add mirror. And now it's me. Now tap to select
all of these faces. And let's take a look. I will select all of these phases and hit
control minus to shrink. Or maybe control minus. Sorry. These can throw minus.
That doesn't work. We can select this vertex and select an area starting
from this one. Hit Control Shift and click
this one to select this area Maybe we can use
another technique. I will hit Control Plus to grow selection and I will
hit I for insert. This make small
incident like that. I know that we have some
overlapping Kevin right here, but we will find a
solution for that. I will cancel the insert and because I don't want
to insert this area, this case, to avoid that, I can apply the mirror and then I can tab and select
all these faces and hits. It can, for instance. After that, when
these faces selected, Let's see what's going
to happen if I relax. Relax is not going to give
me a perfect results. So that's not young to work. Right? Maybe I can
grab this egg. Bolt, can throw all,
maybe select this one, can throw an extra dissolve it. Maybe, sorry, I was trying
to control X to solve it. And maybe you can connect
this one, the set J. And I think that's will help to fix the problem a little bit. And this same thing we
should do here on this side. Grab this and go up here. Hold can thoroughly grab
this one, maybe Control X. And yeah, after doing that, go to the phase Alt, click on these faces. It can throw all I to
invert the selection. And with these faces selected, hit Alt S and push
these out like this. I just want to get our results similar to what we have here. Maybe a little bit more at
Alt S and push this out. I just want to make sure that that correct to
push them like this. Or maybe I don't know, maybe
it should be like this. I think this is the
correct result. I think they should
be pushed like that. Alright, That's very cool. Maybe a little bit more. Maybe we should have a
support, a loop here. Right-click here, the smooth. And maybe we should have a subdivision surface
with level one. That's very cool. And
maybe these ages, maybe we should push this back. The key to the, to the zygotes are
why the white. Alright, now the
result looks very cool and smooth and nice. And I think this one, we should
be two on the other side. Because I post this bag, the origin dot has
moved as well. In this case, I can
hit Control Z, sorry. This, except this. Go to the right. And if the origin dot still in the middle,
it's not in the middle. As you can see, when
I select the object, this is the position
of the Oregon dot. And if I select this
will be a little bit. But I can fix that. I will look, grab this, the structure and hit Shift S to bring
the 3D cursor here. I will select this and it right-click and change
the origin dot position to the follow. The 3D cursor. Just go to the set origin
and origin to 3D cursor. Now it's moved. Now I can use Miro modifier
to mirror this. Here. Just add mirror
modifier for the Y. And that's it. Now it's fixed. And let's
focus on this area as well. Tab and let's grab these acres, maybe the to take a copy, right-click to leave it in
the simplest and then hit P. And then there's two
separate this out. M is focused on the circle. Delete the ShrinkWrap,
delete, ShrinkWrap. And I will tap and select all of these vertices and hit F to create a big face. And I don't know, maybe we should kill
this class a little bit. Maybe I can leave it. And I will hit I, for instance, like that and hit Alt S to
push this out like this. I think three level,
that's too much. I will reduce this and I
will add an H right here, and I will look crop
this middle area and I for Insert tab. If you want a better, better shading, you can tab
and delete this middle area, hit XF and go to the
egg is Alt click, and then go to the
face and great fill. You can spend this to
get special results. Spin this and see
what we can get. Right. That's not going to work. We can use the offsets
maybe from the top. Alright, I can
extend this result. Yeah, just spend
this again. Yes. This is very cool. Very cool. Right-click, hey, the
smooth to me this morning. But is that correct? Let's check the other images. I think it's acceptable results. We can accept that ZL, the smallest down here. Very nice. I think this phase is not perfectly aligned to
the Z. I will select it and grow the selection
onetime and go to the right. After you select this
S with a Z zero Enter. And now it's
flattened. Now there is always better than this
ache if I isolate this, even this age should
be fixed as to the Z, Enter this EKG right here, I can dissolve it and three
creators to get nice results. And now it's perfect. Okay, I think that's
it for this video. I will end it here and
see you in the next one.
7. Starting with the tripod stand arm: Hello again and
welcome back here. I want to create this
piece, the stand arm. I think they call
it Masterclass you. But let's see how
can we create this. I have this image. This
image is very nice. And this image right here, it can show us the
side view details. So let's follow the image
that we have here and our eyes will watch the
details here as well. Okay, so let's get started. Let's go to the right view and the 3D courts are
still in the middle. That's something cool.
I will hit Shift a to it and I will add cylinder. And before I do that, let's activate the screen cast. And now it's active. Okay, shift a to add
endless cylinder. It's very big. Change their radius to
maybe five millimeter. And this to five millimeter
make it smaller. So okay. And the vertices, maybe
we can start with 16. I'm also quite who are of 16? A good number, but
I think we can, we can start with 16. Let's hit G and let's
move this right here. Should be here, and less care. Let's hit S and scale
and make it big like that. Something like that. Maybe even now with the skill, It's okay and tap to go to the Rode Z,
to go to wireframe. And let's see, grab
these vertices E to the ZL small
dose, for example, maybe right here and those, maybe I will leave
these vertices here. Something like that, I guess. For any reason if that's, That's didn't work, I can
scale it's back. Okay here. I think we should have
an H here and maybe one HY here to
create this shape. And by the way, it should be created on the
opposite side, I guess, create this here, but on the sidewalks we can't
rotate it. It's very simple. As you go to the wireframe. Anyways. So now after that's this
area in the middle, we could extrude this in
this any caries on number, this encouraged and
R because I think 16 is not going to be enough. Alt click on this
altruistic lake, on this one and this
one and this one. After you select these
edges like that, hit right-click and choose, sorry, subdivided,
subdivided like that. Suddenly, I think
one it will be okay. After doing that, you can
grab these edges again. And you can hit right-click and choose, and they look tall. You can choose relaxed. Relaxed will give
us what we want. Or maybe you can use the
circle. Yeah, circle. It will give us what
we want as well. As you go to the front
and less selects specific faces of this
one and this one. We're going to
extrude this hit E, and let's extrude
them like that. And after that, Let's move
this back just a tiny bit. Maybe we should have
0.8 right here. And let's Acropolis
with this move those a little bit forward and scale
them like that to the X. We get our result like this. And I can hit S to the Y zero and start to
flatten this to the Y. That's to make this flat. And then I will let
E to extrude this. Let's go to the right again. And I guess we could extrude
this may be right here. And maybe this arrow
should be flat, but this one, these vertices, they should be moved up. So let's have two
vertices for now. Grab these key to the Z and
let's move those up here. And this one, E to the ZL
is small, this right here. And for these vertices, maybe I can move them and
put them here in the middle. And the end of the day, I
want to create a circle here. Alright, let's see
if that works. Maybe I can move those
casts a tiny bit and put these in the middle. Maybe here. And I think it will be
a good circle, I guess. If you will, like you
can add one H here. If you do that, just take all these vertices and just
take them out like that. Because we added
one vertex here, the distance now becomes
smaller as compared with this. Well, that's meaning
we hit, we could add an egg right here as well and call this erotics with this one, it's easy to fix the curvature and here
as well can throw it up, come up with this, with
this hit S to the Z To get this. And if you want to be sure of the
circle perfect or not, you can hit shift S after you select this is vertices and then bringing the 3D cursor
here and you can add a guide at circle. Let's change this
to ten millimeter. And let's align
this to the view. You can scale up like that
and use this as a guide. Now I can move these and
align them with the guide. For example, this
one I can move, it can move this with
this says to the Z, move them down like that. You may or may be, I
can take this one, I would like this. And for moving those
as well like that. And I think it'd be
I think that's work. I think that's will
work. After doing that, delete that guide, hit X to delete the
vertices of the guide. And now we got this. Now let's check the
thickness after doing that, because this area should
be thin, not thick. I will add another
edge loop right here and I will hit Z to go to wireframe throbbing
these and hit S to them to get
arms up like that. And maybe I can timber only delete this
control X and recreate it. It can throw our
and add this here. And now the result looks
very nice and cool. After doing that,
maybe we should have a support edge loops. My guess. Let's see what's
okay in this area, I think we should maybe we could sets like to isolate this or maybe I
can leave it for now. Grab this face and
hit I for instance, Let's inserts this phase
right about there maybe. And then hit in again to
make another insights. I think we could
scale this a little bit more like that and
hit another insert hit, I guess, like this. And then I think we can
extrude this. I'm alright. Let's try to find another image showing us what's going on, on the other side. So quite sure I have an image
showing us what's there. But let's try. Alright.
Let's go back here. Yeah. We have some information. Is go to the, okay, So this one should be the next. This shape right here.
After creating this, we could create this one. Well, that's me in this area. It could be flat, I guess. And because we have a
hole here in the middle, I prefer to, to grow the selection like
this and hit F to go back. Alright, now we are back, will insert this hit I to
insert right about there maybe. And I again like this. And one more time, if I to get this result
right after doing that, now with this face, with this one selected, hit right-click and
choose a bridge. Now there are appraised,
as you can see. Now I will. If we have a face here, I think it's not necessary. I can Alt click on this and dissolve them and just
focus on this area. So I'll click on
this 1.10 books, this deep inside like that. Something like this. Alright, the results
so far, it looks nice. Now I think I said time to the support a globe
so we can add subdivision surface to
get a sharp results. And let's start
adding H right here. And as you can see,
this edge is not taking its way around the shape. This case what we can
do, I will undo that. I can. By the way, let's
delete half of this. Maybe we can use mural later on, glob this hit Accept,
get rid of it. I can select all of these phases like that, like this. And I can hit I, for instance, hit I to insert, but I want to look at
the results from here. So now I'm making it
miss it like that, but I don't want this error
to be answered as well. I want these faces to be
like that. To do that. When you hit eye. You can hit B to
activate an option. I think it's called boundary. Yeah, it's called Bob boundary So hit P and insert
this like this. I think that's what we want. Somebody like that. Alright. And what else
we could do here? Rights? What about this area? This area, and I think we
can add a support, a loop. And a normal week is it can throw our and ads for take look. One there, one here, Control R, one here, and one right here. Like this. You can isolate
this geometry to focus on it. One here, and one H loop. It should be here and on the other side,
the same scenario. One here and here. Alright, one maybe
here and one here. Alright, That's very cool. We should have a support
group, I guess right here. And why it goes like that. But it's wrong to leave
this age to be like this. We should delete the
rest of this age. I think, I don't
know, but I think we can wrap these faces
and hide them. Just hit H and hide them. And let's add a new age. I don't want this to go
around. The geometry. Hit Alt H to bring this back. And now we got this. Alright, I should have
one acre as well. And I want this to go like that. Just take these
images out for now. I will add another edge here, but I will hide these faces. H, another H right
here and hit E at, to align this plethora hit
E. And that's very cool. These egg is will
cause some problems when when you add a
subdivision surface, let's add the mirror first. I think the American threshold is too high. Yeah, that's right. It's too high. Let's check this. 2.01.
Make it very small. Okay, Now after that I will
ask subdivision surface, and that will increase this to to right-click Hey, this month. After the subdivision surface. This is the results
we got in here. But the problem is
we have this line, as you can see, it's
sharp because of the egg is here are very close. We want to avoid that. So let's see what options do we have here to get rid
of this problem. I will grab these vertices
and hit M N marriage center. Or if you'd like,
you can crop this with this key twice
and mergers like that. But make sure to activate the automatic and key hotkey to times this one with
this one G twice, and make this one over here. The same thing for this area. Sorry, I should the
crop those together. And this with this. Alright, now let's tap out. Alright, so this is
what we got so far. We still have some
shading problem. Here. The result is
not so quiet Perfect. We have in some strokes
happen right here. We want to avoid that. And I guess this error should
be a little bit smoother. I mean this and this line. What I'm going to do is I
will delete these together, this one and those
edges here as well. And I will wrap this all to
have to click to add this, and I will rebuild them with
Control V. So let's add three or maybe for
ages here to make this area nice and
smooth and round. That will add a support H2
here and maybe one right here just to make the
curvature looks even better. Maybe one here. For this area, we could
add a support Acho. You can see before
and after when I move this towards the center out, That's effect the results, even this one you can see. So it's very important to add extra aqueous to
get better kidding. I know this era is not
going to be visible, but if you want a good results, we could do that twice and less. Light this up here. Now
let's talk about this. Try to find a solution
for that. Together I will tap to go
to the edit mode and let's hide these faces. I want to add the
ShrinkWrap modifier, but I don't want these vertices are right
here to be included. Because if I create an object or something
sits right like that. And if I use ShrinkWrap, these vertices will be
based on the surface, and I don't want that. So I'll click on this face
loop and hit H to hide it. Alt click on this
one I guess because, yeah, this one is right. And they kept start here, alt click on this one
and hit H to hide this alt click here on this face loop and hit
Control Plus to grow silicon, guess one time and then
hit H to hide this one. Now I will select
one of these phases, hit Control L to sell, to select the link two vertices. Then I will go to the
object data properties and I will add group,
create a new group. And I will assign all of
these vertices to the cgroup. Guess it, assign, and now they
are assigned all of them. And that's it. For now. Let's tap out or before we
talk about hit Alt X to bring back the other faces. Now I will grab one of
you say I guess maybe this egg, this one exactly. And then hit Shift D
to E to the Z today, uh, kobe like that. And then hit P and then
as two separate this out or detach it and
select this one. And let's go to the modifiers. And I will apply the
mirror or it can throw a and apply it and tap, select all the vertices, hit E to the Z and
extrude dislike that. Maybe these, I can move
them down right here and maybe this one,
something like this. Hit a to select all the faces, shift into recalculate the
normal in case we have problems and increase the
number of the subdivision, make its high
resolution and then towards radically caters
more to make this month. Okay, So I will hit M to create a new
collection and let's call, alright, let's call
this ShrinkWrap. And hits Enter twice. And I will move all
of these objects, the shrink over here that
we call them a shrink. I will move them
here and put this, put them and this
new collection. So I think I can
hide this for now. And now I will add ShrinkWrap
modifier to this geometry. Go to the list and
let's add shrink wrap. And you should
choose the target. The target will
be this cylinder. You can twist from here. I think this wants to
endorse years or nine. Yeah, This one. We don't want to run crop all the
vertices on the cylinder. We want just specific vertices. Let's choose the cgroup. And then as you can
see, we've fixed that. Now the result looks
clean and beautiful. As you go to the rights. And I just want to check, I think some of these vertices, we could move them up
like this, Marwan here. I think it should be like that. And I think everything
else is perfect. Yeah. Now the result looks
better and beautiful. Alright. Everything
here looks cool. Maybe this edge, I can hit Keith whites and
put it like that. Maybe this F9 key
twice and push it like this to get even
sharper result here. Alright, something like
that. It's likes to anxiety and let's see
what we got so far. Go to the right hand,
maybe we should. Yeah, I think it would
be for now right here. Because we have this
geometry should be above it. Very cool. Alright, I think that's
it for this video. And I will see on the next one
8. Modeling the tripod stand lock: Hello again, we'll
come back here. Let's create this part. Let's go to the right, the
3D cursor, we have a tear. I will put the 3D
cursor in the middle, select this shift S and
torso to select it. Shifted to add and
I will add plane. And let's rotate the
plane towards us. Changes to two millimeter,
make it very small. Something like
that. Get to the Z. And let's move this over here. Let's kill this like
that and make small. Maybe I can move this one right here and tap and the crop, these vertices,
move this up here, I guess maybe I can take
these down just a little bit and then crop those
and move them right here. I just want to focus, just want to see
what's going on here. Do we have an image
showing us the details? This is another type, I guess. Alright, its symbol. Maybe we can make it wider, cast a little bit like that. And I will add one edge. And what Control R, by the way, you can throw me two bullets
to two edges like that. Then I will take this
face in the middle out, just a little bit
like that. I guess. That will look rob this vertex. This hit F and the crop, this would, this
hit F to the face. And I will grab these vertices and hit S to the Z,
scale this to the Z. This results tab out. And let's take this
maybe right here. So that's what we did so far. Maybe I can move
this face a little bit more tricky to
the X like that. And then maybe we can
scale up like this. Let's move this down
just a tiny bit. And let's add the
array modifier. And you can EROI this to the X as much as you want
to get this result. So let's add, for example, 20. Start 20th. I'm not 20, maybe 60. And after doing that, I want to bend these to get
something like a circle. To do that, we can add deformed symbol deform and kink the symbol deformed
from twist to bend. And I will hit Control a. Apply the rotation to
fix the orientation. Alright, and we could
rotate this to the Z and less or something not make sense happen here.
Let's see what is it? Maybe because of the scale can throw light and
apply the scale. Now we're cutting something. Because I apply the rotation, I got a different results. I will turn over
the symbol default for now to fix this issue, all what I want to do is
ching the factor from X to Y. So I will add one
here and zero out the X after finishing
with the array. Now let's go to the symbol, the form and activated. But before we do
that, I just want to kick the scale here. Okay, let's apply
the scale cancel. I apply the skill
by the rotation. Just apply the rotation. And let's activate
the symbol deform. As you can see, I'm not getting that is all
that I want here. So let's see how
can we fix this. I will reduce the
number of the counts. I just wanted to understand
what's going on here. Let's choose, for example 20. And let's change
this to maybe 15. I just wanted to see what's
going on here exactly. And how can I fix this? So now we are getting this results inside
that band modifier. We have something is
called working access. For example, I want to bend this around the
z-axis like that. But Ben modifier role
of a controller, one here and one right
here and 12 catch the geometry and bend it from this point and from
this point like this. Because of that, I'm getting this stretch because it's scrubbing with
geometry like that. And this one is point and
this point like this. And trying to bend, pushing this age
to this direction And that's why, as you
can see this point, it's right there,
it's pushed inside. It's a little bit
tricky and I think they should change the
algorithm of the symbol deform. We are artists, we
shouldn't waste our time in some mathematical stuff
or something like that. We should get the point that
we want in the easiest way. So we can focus on the
geometry and how to create it, and how to perfect it. Let's try to go around that and let's try to
find the solution. What I want to do is I want
to change the working access, as I told you, the
working access points, one here and one right here. I want these points to be
one here and one right there to grab the whole
geometry and rotated like that. So in this case, maybe if we rotated the z-axis, the gizmo, like this, like that. And by the way, I
just activated the, this option right here
so I can see the Gizmo. If I rotate this
around the z-axis, I can kink this point and puts one here and
one right there. So let's do that. So verse, the first thing we could do is going here
and activate the origin. And I will hit out with a
Z and rotates like that, hold Control and
rotate this 90 degree. And now I got this result spots, I have another problem. This case, we can fix
what we changed here. For example, put one here
and puts you right here. After doing that, now we can rotate this and
get what we want. Let's rotate this to 360 degree. And let's increase
the number from here. Let's go to the bottom.
Can throw seven so we can see what we have
done so far, less. Sorry, let's increase the number here until we get what we want. Alright, I think
this number is cool. And now let's turn this off. And let's make a
comparison here. Let's see if that
makes sense or not. Alright, so far
everything is cool. After that, Let's go to
the American option here. Alice activated. But keep in mind touching
the distance to something little like 0.1 millimeter. Now there are merged and
become one solid geometry. Alright, so now let's see what else we can
do. Maybe we can. I think now is the time
to apply these modifiers, the array and the symbol deform. And accepting this results. And I will put the
origin.in the middle of this right-click and
origin to geometry. And now we have
it in the middle. And we need to realign
this with the geometry. For example, club this, the 3D cursor is in the middle. So I will grab this hit Shift
S and selection to courser. I just want to make sure that
this exactly in the center. Let's move this over here
and that's what we, it. Alright. After that, Let's hits like to isolate this
so we can focus on it. And let's see, grab these edges. I think we have an
open area somewhere. As you can see,
it's right there. Okay, this age,
it's very simple. Just go to the vertices, have a select all the vertices, hit the M and choose
Merge by distance and make the American distance very small and now
it's perished. Now I can go to the age, Alt click on this side and Alt click on
this side as well. You can hit or less
focus on this side. Alt click hit F. And
this one as well, Alt click hit F to
create a big face here. Grab this face, hit
I for instance. Let's create a smallest. I don't know if we should
extrude this a little bit. This hit I for instance. Or if you like, you can
insert those together, cropping this with this hit I. To insert those like that. Maybe we could scale
this like that. I'm going to sell quite
sure that's correct or not. Try to find the length or Mh. I think what we got
here so far is correct. Okay, Let's extrude this
like that, or sorry, just push the, scale
them to the z-axis. After doing that, maybe now is the time to
move all these. Let's hit I to make
another insert like that. And let's try to understand what's going
on from this side. Let's see which image we
can use, maybe this one. So here we should
make some extrusion. Let's kill this
alphabet like that. And then I to insert Alright, so this error
should be opened. Just keep that in mind. I can to make another
instance like this and then hit Alt S to push this
deep inside like that. Alright, something like that. I guess it will be okay. Hit I again to make
another inset. And now let's focus
on this side. I will hit XF to delete this face and I will occur
have this hit XF to delete it. And I will add up these edges in the middle and
hit E to the Z, extrude them and
hold Control and stab them with these vertices. And now if you'd like, you can make it up just one. You can hit Alt, click on this alte optic click on this one and right-click
and choose a bridge. Break those likes to exert. And let's see what
we have done so far. Alright, it's looks
nice and cool. We can use this. Let's look again and let's
see what's the next step. Right-click, Shade, auto smooth. And maybe we can go here
to the normal section. I just want to reduce
the oldest most. So we can bring back the H
that we have right here. Just take this back,
something like that. Maybe a total work. And let's add the will
modifier above this. Let's go to the
modifier and add Bevel. And let's change this to 1 mm, or even point 1 mm,
make it smaller. Or even 0.01. I don't know. Maybe we
should apply the scale. Maybe. Let's add to segment
and in the heading section, activate the heart to normal to get perfect shading like that. I think we can change
this to three, maybe, make it even smarter. And now we got this results.
Okay, It's very cool. You can increase the number
of the segments to get better results to form,
maybe it's optional. Slash to excite. And
let's check this. Yeah, it looks nice. If you like here
we have an option. The geometry, skull meter outro. If you change this too sharp, you can make this
area looks smooth. Tombstone sharp or two, sorry to the ark. And as you can see
now it's smooth. And if you activate
the wireframe, you can see that this edge is
not affected by the bevel. And that's because
of the angle here. It should be like this,
like this, 12424. Sorry for and now
it's as you can see, it's affected by the bevel. Another is of looks better. I will accept this. I think that's it for this video and
I will see you in the next
9. Modeling the tripod second arm: Hello again and
welcome back here. Let's start with this piece. Let's see how can we create it. Now. Alright, let's make this a
little bit smaller like that. And let's go to the right view. And let's go to the
wireframe is Z. Let's try to create
something similar to this. I want to start from this area. I think that's easier
to ask to create this. Whereas the 3D cursor, I don't know if it's right here. Let's select this and tap. And I will look,
grab these vertices, these vertices like that, and hit Shift S and bring the 3D cursor over
here and type out. I just want to put the 3D
cursor here. The a to add in. Maybe we can start with plain and change the size to two millimeter,
make it very small. And I always forget to
activate the screencast. Okay, now it's active. And now we have the plane. I will tap to go
to Edit Mode end. Maybe we should have
one H in the middle, just said can throw up. I just added one here and
Control V to look like that. And assets go back to the right. And let's grab these. Let's move them up here. Okay. Let's kill those to
the center like that. And let's grab those over here and scale them
to the central as well. Key to this here, let's
move those down here. I guess. There's so many here so we can understand what's
going on here. Maybe we can scale, sorry, scale those to the middle and the crop dose and scale
them like that. I guess. I will hit E to extrude
and S to scale. But scaling now is not. Sorry, I hit this to there. Why does kill those
from the center out? Like that? To get a result libraries. Okay. Again, maybe something
like that, I guess. Okay. All right, Now after doing that, Let's add a ray modifier, this tab out, and
let's choose array. And the that right now
is working or duplicate. So object towards the x-axis. I want Y this time
is zero the X. And let's increase
the count to ten. For now. The origin dot is right here. I think it's better
to move it up. So let's take this up. I'm moving this origin to avoid any problem when it comes
to use the bend modifier. And I think we can stop it here. Let's see. I think that's
it. I'll just turn this off. Now. That's what we got
so far as you can see. And I've talked atlas, add the symbol deform. And let's choose bend. So we can bend this. As you can see, we are not
getting what we want less, shrink the access to z-axis. And let's try to understand
what's going on here. When I change this
to the z-axis. Now the band it creates, one can control are here
and one right here. It's spending the
opposite like this. As you can see now I'm getting this weird result.
I don't want that. I want these controllers
to be one here and one the right there to
bend the geometry like that. That's what I want. Well, that's mean we should rotate this. If you grab the gizmo and
rotate the keys more like that, you will change the position
of these controllers. So if we rotate gizmo like this, you will put this one there and you will put
this one right here. And that's what we want to do. So let's try doing that.
Let's see what we will get. Let's go to the gizmo, activate the origin and
rotate this to the Z. Z, like that hold Control. And let's rotate this 93. In this case because I, because I rotated the gizmo, I got the problem
with the array. I will add one here
is zero out this. Okay, So this is the
result that we got. Now we have one
controller right here and one right here bending
the object like that. Alright? But the geometry
now is not bending Towards the direction,
but I want, I want something else. I want to rotate the
keys more and more time like making the z-axis
goes like that. So I can't rotate
this like this. I will rotate the keys
more towards the y-axis, hit RY and rotate it like that. 90 degree. And now we cut what we want. Now I can rotate this 360 degree to get this result go to the right
and Z to go to wireframe, turn off the origin and
let's increase the number. It's something like that. I think that's will be
okay and let's move. This may be at right here. Maybe 18. Any quizzes to 25. And I think we can scale, Let's say this number looks cool so far we
can start with it. Now we got this result. As you can see,
I've started doing that now I will hit Control a and apply this and
apply this one as well. Top hits a to select all
the vertices hit them. And let's hits marriage by
distance to merge all of these vertices together to
make it one solid geometry. And now I will occur up these edges right here
and I will hit E and then S2 extrude and scale
like that to get this result, as you can see, and I will hit right-click to make
this perfect circle. Go back to the right
Z to go to wireframe. And scale is like this. And I think we could extrude this just
one time like that. And extrude this
again like this. And scale this again, go to the right Z to go to
wireframe and the scale, this company like that, I guess. Alright, tab out and let's
put this in the middle. I guess it should be right here. The size looks cool and nice. And maybe I can grab
this edge and just push this deep inside like that. And I think we can know
maybe we can extrude this. Alright, now it's a select
all the face and he can move this towards
the middle area or towards this line or H. Now we got this,
That's very cool. Alright, now maybe
after doing that, we should the crop
some of these faces here and extrude them
towards this direction. So let's go to the right view
and Z to go to wireframe. And let's see, come
up half of this. I think this is the half. And let's deselect
these right here. Go to the face. Now, I just selected these
phases as you can see here. Let's see what's going to
identify X through dislike that through them like this, and then hit S to the Y zero
Enter. Now we got this. Go to the right-hand. See how far we should push this. Go to the wireframe. I don't know what's
going on here. I will push this all
the way to the end, maybe right here, I guess. And now we got this,
as you can see. Now after doing all of that, I will, with this
phase is selected. I will hit XF to
delete this face here, and I will grab
this phase is over here and deselect this
one and then hit F2, change this to one
solid phase like that. The same thing on this side. Grab these, deselect that one, and then hit F to
create one phase. Now let's see, grab
this by the way, here we have a lot of vertices. So I will occur up them, all of them and just deselect the first one and the last one. And then hit Control
X to dissolve them in the same thing for this side, grab this may be this K before
the last and hold Control. Sorry, sorry. I'll
control a club. This one right here. It can
throw X and get all of them. Alright, now from the
toe fewer maybe we can see what's the next step. I will put the 3D cursor, maybe in the middle here. Okay, Let's see why
should we put this. I just want to
create a guide here. I will hit Shift D to take this wrap text
maybe right here. I'm doing this just
to create a guide. And I will put the 3D
cursor over here and then it X V to V disrupt X. Now I have this 3D
cursor here, this area. So after doing that, this top This tab and let's see, grab these two vertices and
all this age, if you like. Crap it, go to the top. And this H still selected. Then I will use, this option is called spin. And I will spend this
slag that 360 degree. But I think 306 is not correct. So sorry. Let's hit Control Z just, I want to this may
be something like that, something like this. And I will increase the
number of the segment. As you can see, this is
the result that we got so far as you go to the right
and let's save that corrects. Alright. This is not correct. I should
move this a little bit, so let's move it like that and match this line
would the reference image, this area is mic. That's okay. And now we got the correct side. And don't worry about the side, maybe we can use the mirror
modifier and the end. I will change the number to make this Harris smooth and nice. Let's go to the top. What I want is I want one
vertex to be right here. So let's try to
increase this tip. Sorry. Alright. I think we lost the controller. Let's go to the top and let's
see what we got so far. Alright, anyways, it's
not a UE problem. We can call these
two vertices and he key twice and move
this for example, right here in the iconic club, the first vertex resemble this
one fault can throw a glob this and that one. And I can redistribute
the vertices, right-click and choose pace. And I can do the same thing
for this one glove this hold Control and select
these vertices until you reach this
one and the tricyclic. And to space now fixed. After that you can go to the top and go to the
x-ray and delete this half X V, get rid of them. And now we can go
to the select box. After doing that, we can
use the mirror modifier. But we should put the origin.in the position of the 3D cursor. Tab out, hit right-click
and then sit origin, origin to 3D cursor.
Now we have here. After that, we can use
Moodle mirror to the x-axis, can throw a and
apply the rotation. Maybe we have problem, yeah, we have problem with that. With axis itself. So apply the rotation
to get correct results. And now this is the
result that we got. Okay, Now after doing that, Let's tab again here. I just want to crop
these vertices and hit E to extrude
them, maybe one time. But this activated clipping to prevent any overlapping key. And let's push this
to the medulla. That's will be, It's
okay, That's very cool. This error should be
like a care of this. Is there anything else
we could do here? I think we can apply
the mural now. Yes, it can throw all I end up light is tap again
and let's go to the age copy sages hit F to create solid phase
here and one here, alt, click and then hit F. And let's go to the rights. Alright, here we
could grab this face and let's see how can we
get a correct result here. I will add two H's here
and maybe two right here. And maybe I can grab
this and develop control be like that. And let's try to select
all of these edges like that and redistributes orcas to circles he was
going to happen. Alright, now we got very
cool accurate result. Let's see if that will
work here as well. Right-click and choose
circle. Pretty cool. Now let's look at the
humerus from the top. Let's see is that we
have any variation here. Alright, we don't
have any variation. But this egg and skills
slightly to this direction And we could fix that. I guess. We can
change that later. I don't want to
focus on this one. After that's Lisa grab this face and then it's
E to extrude this up. Just a tiny bit like that, maybe a little bit more key
to the Z and then scale this like bats and then it I, to make an insert
to get this result. This is something like this. Hold on, like this. And after that you
can extrude it down it an deep a little bit. On this side, we should get
something similar to this. Hit I to make an
insect's something like that, that will be okay. And then it's E to box this up. Yeah, I think that sets. Now let's go back to this error
to fix what we have here. Well, the best way to
fix that, I guess, is to take these
vertices and move them. I guess. Let's see, create a guy, the guy that I'm
going to create a, just grabbing this H
and E and extruded like that and align these vertices
with this guy does all. Grab this and hit G to move. And let's move them like that. Now it's aligned, I guess. And you can I guess. Right, let's see what else. After fixing the side, Let's jump to this side. And before we fix this, I can feel that we
have some variation between the vertices on the top and the
vertices on the bottom. Let's go to the right view. And I will look Bobby's vertices on this
side and go to the top. All what I want to do this yet, just rotating these
vertices like that and match them
again like this. Now it's fixed. And after that, Let's use the same
way just to create a guide to grab this
vertex focus in only ten. Let's move this over here. And the club this one, E. And let's throw this
over here as well. And now we should align these
vertices with the guide. This one, the side, for example, it's
aligned, I guess. Let's move this over here. Has to the zero and throw flattens to the zinc is
it's rotated a little bit. And now the site G and
move this over here. And by the way, there is another technique, if
you would like to use, you can use mirror modifier
to mirror this side. On the side. Maybe we can use me
or maybe it will be a little bit faster
and more accurate. So I will zoom in here. When you add mural, this side, it should be should be the same side and this
one should be changed. I mean, I want this
site to be there. Let's go to them with their
firing less Admiral modifier. Now it's mirrored, but now you're not understand
what's going on here. To make the life easier, activate the by
six because bisect will delete half of the
geometry automatically. Now as you can see, bisect deleted this
side and replace it with the site, and
that's what we want. I mean, this side now
is reflected there. If you flip this, you will get the old results. So this is the correct result
that we are, that we want. After doing that
applied the mirror. And here in the middle
we will have an extra H. We hit Delete. Alright, something
wrong happening here. I just wanted to explain to you the American amount is
tomorrow is too high. Let's change this two points. One, and let's apply the
mirror modifier because the marriage distance here may married two
vertices in this area. So reduce the number
role I end up like this. I think that's still too much, as you can see, a lot of
vertices married here. Alright, Control Z again. Let's change this
to 0.01, right? I think the distance
as well as 0.01. Yeah, I think that's accurate. Can throw a and apply this tab. Now this egg in the
middle we don't need it, can throw X and disorders
with the solvents I don't know. I feel
that some edges here, marriage, something like that. But anyway, you can even
if you want to leave it, you can leave it or
even if you like, you can delete it's
starting from here. And grab this here, and grab this one and hit Control X to get
accurate results. And let's delete
this one as well. You can throw legs. And
now we got this results. We have one problem
though, is try to fix it. This geometry. Let's go to the vertices in the wireframe
and maybe these vertices, they should be pushed
and like that. And this one as well. Maybe we have another race for the H loop here to this
area and Alice tab. This is more accurate. And not just that. We have these acres
that guide we created sweep to the
edge, selection mode, to the crop is right here and then hit V to
get rid of them, sorry, X E to delete the
edges, just the agents. Okay, That's very cool. Now after doing that, we could level this geometry. Before the beveling.
I guess this area should be beveled visa
it gives right here. I feel that's found
vertices here. They should be
married on my soap. Why shore? Let's see, grab this H and
this one and I will hit Control B so I can get
round area here and the middle is somebody like that, I guess. But that's will cause
some problems here. Maybe we can create
something else like having an H here from the right view
is go to the right. And it's got vague, sorry. I will hit K to activate. And I've told create a cat
goes like that at omega can strike C to get through and confirm the cut
here and hit space. Now we have a new edges
here and this area. After doing that,
maybe we can grab these faces and it's
XF to get rid of them. And now I can grab
this edge with this age and then
hit F to fill this. And maybe I can have
two H's right here, and can have this hit F, F, F to fill this area. The same thing here. This hits, sorry, K. Let's see what's going on here. We have this aqueous
should be deleted. Now call this F and F again. Do we have any guide here? Yeah, we have this guide. I didn't delete it X
E to get rid of it. Alright, now, I
think when are we can bevel this area
and I can get a clean our results controlled
BY somebody, libraries. Before your bevel these
properties maybe, maybe you can kill them. It towards the
middle, can throw be. Now we got a nice
round the results. Something like that. And you can dissolve
this AQ feel like, and dissolve that one.
Okay, something like this. You can change the direction
of the connection like this. And maybe one like that. This would this have cancer
likes and dissolve it. And maybe even for these ages, we can change the direction.
Delete this with this. I'm avoiding any sharp
line or any angle. The angle here will be
too sharp parts here. No, it's not going to be sharp. Sharp angles sometime causing some problems when
you add the modifier. That's why I'm doing that. These edges, maybe I can grab this one key twice and
miraculous one here. Sorry, I didn't activate it. The automatic key twice. Make this one here, Keith wiser and make this one over here. And we can do the same
thing to this area. Okay, let's see
what we have here. This a controlled likes dissolve it sense
when the solvent Use the knife tool, create Katko was
maybe like that. And cut goes maybe like this. And this one may be it can
comes here and this one here. Grab these unwanted vertices, Control X and dissolve them in. Now it's clean up. After doing all of that. Now I think it's the time
to add the bevel modifier. And I guess we can
label these as well. Alright, let's tap out and let's go to them modifier
and let's add the will, save the project
before you do that. Rival. And now we have tiny bubble
up light right here because level is not working at this moment because we
have very close vertices, for example, this area. And we, we have some overlapping having this area
because of that level, we'll talk at a point. Unless you really
sets if you go to the geometry and
a few tips level, that's okay. That's okay. I have no problem with
the overlapping just released the devil from here by deactivating
the clam overlap. But the Ahmad stupid, let's change this to 1 mm
and let's released this. As you can see here, we
got a lot of problems. Tab hit a and then
shift the end to recalculate the normal to avoid any problem with the
normals and tap out. Let's change them all to 0.01, maybe make it very small. 0.03 maybe. Maybe, I don't know, maybe four or five. This amount looks cool, but we still have some
overlapping happening here. Let's see how can we
avoid that, this tab. And let's see what the
solution that we got here. Let's turn this
off and it's moot. So this, the problem. Maybe if we have one H, Let's add one HY here. Maybe we can connect
this with this hit K. And maybe we can have
three edges like that. And the club is key twice and cut off this
with this hit J, connect those together I, J. Now after connecting
these edges, maybe I can merit to
this one with the same, maybe this one with this
one key twice emergence. I know that's will ruin the
circle that we have here, but we have no choice because bevel here is not
going to work correctly. Maybe this one, I can
just move it up a little bit like that.
And let's tap out. And by the way, I just sent
increase the segments to two. And you can go to the hair, the gatt activate harder, normal, and the crop that
humor three, its radical. I can choose auto smooth. Okay, So we have very
tiny artifact here. And we should do the same here. I will add one H. Maybe
it should 30k this point. And maybe to here. This would this, or you
can merge them directly. Club this activates marriage. Snap to vertex, key, hold Control stamp,
this one here. Hold Control stamps. Alright, here of this, with this hit J, maybe this one, I can slide it a
little bit like that. Let's tap. Okay. Maybe I can just slide this
a little bit like that. Alright, let's will help to fix this error and
maybe we can do the same for this area. I got these key twice. This one, G twice. Alright, on this side
the result looks cool. Now let's jump to
the other side. Tap and let's have
one H right here. And throw out to add
three maybe here. Craft these, hit J and then K, when K and those
assaulted K key twice. To marry this here, this one here, this one. You can push this a little bit like that and slide this
a little bit like this. And that's will be, It's
maybe this one as well. Carve-outs. And another is, it looks
better. On this side. Control Hard to add
one H right here. And let's move this over here. Can throw out to
add three acres. This with this hit J, J, and K in those as well. Key twice married to this same
slide, this a little bit. You can slide this
off of old movies vertices away to avoid the
overlapping and stopped. We still have some overlapping happened here to this area. Maybe we can slide this Hawaii. Maybe we can push this to the Z. Something like that.
Maybe this vertex, I can move this to
this ECS a little bit. Alright. Now grab this and hit
Select to isolate this tab to go to the ethmoid. And now maybe we can grab
this entire edge loop that we have here
and hit F to create a big face here as well. Crop these edges, Alt, click and create pick phase. And now I will include
this phase and this one and I will hit F to make
them one giant phase. Alright, now we
got this. So far. It's beautiful bots. This is our problem. I can go around that. Maybe if we use the some
modifiers here like that. Whereas it's very mesh, maybe with some
smooth corrective, I can get another results. Maybe two will be nicer, but if we do that, we will make the Lumetri
very high-resolution. I don't want to do this. This result looks cool
In that can accept it. Okay. It's likes to excite.
Let's take a look. Yeah. Now I can say that
we are finished here. I will end
10. Modeling the tripod handle: Hello again, Welcome back here. Something I just forget to do. This area, it should
be extruded down just a little bit
less work on that. Just select up
silicon and then tap, select the faces and
go to the right, and then it's E to
throw those right here. And what else? The sobering thought
reference images here. Alright, now after doing that, let's select these faces here. Alt click, and
then hit here with D to take a Coby
and right-click to leave the kobe in the
same place and then SPM then as two separate
this out tab again. And let's see, grab
this new copy. And I can hit slide to
go to the local mode and tap to go to the age
or to the edit mode. Hit to, to speak to the age. Alt click and then
F to fill this. After that, hits a select everything shift
and to fix the normal. And now it's fixed. And you can leave the, the Volta bubble, this a little tab again. Drop this face, hit I4 and sets. And listen to this like that. Right-click and choose circle and S to scale this,
maybe right here. And then hits, he
took through this. And you can hit XF to
get rid of this area. All you can hit P as
two separate this. Now I will focus on this
area or this circle inside. You can hit G and take
this out to the X. And you can put the
origin dot here on the middle top and grab the vertices and then
hit E and extrude this. The signal of this
phase as well, gee, to the X and this book, this maybe right here a
to select all the faces, fix the normal with Shift
M. And this face inside, I think we don't need
to hit XF angular it over to tab out. And always done. Maybe
the bevel here I can encouraged a
little bit to 0.08. Right? Something like that. Or nine if you'd like to add. It's like to excite. And I guess we can grab
those together, a key to the X and move those a little bit inside like that. And that's albeit, Alright. What else we could do here? Maybe we can start with the
handle we have right here. We can create. Now. Let's go to the right. And I will put the
3D cursor over here, just hit Shift S and
course are to select it. Then half-day to add the end, I will add a circle. It's very big. I
will change this to five millimeter and I will change the view to
the align to the view. After that, I think the
number of the acres is good, but before we go any further, I just want to understand
what's exactly happening here.
What we should do. Alright, so this one is better. I will exhibit some bar
and I will hit key. And sorry. Let's move this
up here and maybe we should the scalar
just a little bit. And then tap to go the ethmoid, go to the vertices
and let's see, crop. All of these vertices hit E
to F through them like that, down, maybe right here. And these vertices,
you can delete them. Yes, it can have them hit the X, V and add these vertices. And now we ended up
with this results. After doing that, just make sure that what You Will
did here is correct. Right? Now, I think we
can I don't know. Maybe we can. Let's go
to the right. I guess. I think we should put this
exactly in the middle. So to do that, I will add one vertex
here and one vertex right here to determine
the middle area. Grab those like that. And let's put the 3D
cursor over here. You have to essence course
are to select it and tab out, and then right-click and
origin to 3D cursor. Now we have the origin.in
the middle of this geometry. After doing that, you can select this and that bring the
3D cursor right here, Shift S and coarser
tool selected. And then it grabbed
this and 2s half this, hit Shift S and choose
selection to coarser. Now this perfectly
in the middle. Let's move this on this side And less tab to go to the mode, select all the vertices
and maybe we can hit F to create a face and
then E to extrude. This may be here, and then hit I for insets. Let's make a smallest
set like that and maybe E to push
this deep inside. Not too much. Somebody like
that will work a to select all the faces and
I will hit Shift and to recalculate the
normal, always do that. And now it's flipped.
That's very cool. Now I will grab
this face and then I will hit I for
insert like this. And then alpha is to
push this out like that. And let's see what
else we can do here. Okay, so, so far looks nice. After doing that, I guess
we can copy this one. Just hit D. And let's move it to on the
other side like that. Right there. Maybe we can scale it. As you go to the right end. I just want to see how
much we still the scale, that scale length
right about there. Maybe I will hit up and
grab this face to move, and I will move this face
and align it with this one. Like this. Now we got something that's almost all
what you should do here. Alright? Now maybe
we can connect some of these vertices to add, to add a subdivision
surface crop. This hit gay club,
this with this hit J. And how many acres
we could add here. Let's check the number
of these acres. We have 13 vertex selected. I will add, sorry, I will look like
this with this hit K and Harold hit
Control R to add one H here and the number
of cats you can add 13. And now maybe we
can connect these. Hit K. If you want. Fast, faster way you can
crop this hit XF deleted. You go to the age, Alt click, and go then to the face, and Q is grateful. And the same thing here,
regardless face deleted. Go to the age Alt
click, and go here. Critical. Okay,
That's very cool. Here we should do for this area, you can hit I for
insert like that. And you can hit XF, get rid of this face. Go to the HER2 Alt, click on this edge loop, and go to the face and choose. Grateful. Let's see what
we will get. We do that. I will hit Control Z
and do that again, face grateful because
I want this menu. And let's rotate this. It was Cheng, the offsets. Don't worry about
this error to match. You can accept this result. This try to spend
this one more time. Yeah. This one is perfect. Yeah, this one will work. So I will accept this. After doing all of that, select these edges
and develop them. Alright, so for these
phases that we have here, I will rob them like
that and select them. And I will hit I for insert. Now rights, just trying to
move these edges from here to get one clear age
so I can crop it ambivalence for this area. Don't worry too much about it. Alt click, sorry, got the
Alt click called haptic. Like to add these together. I'll have to click again
and here again in there. And I will level them to gather. It can throw the envelope. Let's add three here. I think that's what we'll do it. How abouts right-click hit, auto smooth, ER, the smooth. How do you can hear
this most fabulous as subdivision surface?
That's very cool. You want to can add a
support H2 right here to fix the curvature of this
area and this one as well. Perfect and very
beautiful. That's cool. Maybe here we can
add another support, a loop to get even
better result as you can see before and
after when I tried this. Maybe here as well. If you'd like, we can
add one right here. I still have some
something not make sense. Maybe we can add
another edge loop. Or I've, and don't
forget we are, we just added level one. You can increase this to
get even better result. Here as well. We
can add one, end, actually two, that's too
much. I will delete this. Okay, maybe here we
can add a support, a globe here and here. Maybe one here as well. All of these acres we
are adding will make the geometry looks
very nice and smooth. So we created this and I think
it should be thicker at, will be a little bit difficult
now to make this thicker. So we will accept
this results for now. Something here. Let's create it. Let's tab and maybe we can grab this face hit heavily to the Z and let's
move with up here. He to extrude and
extrude this down like that to the Z and
then Control L, P and then as two separate tab out and he to the
Z and let's pop, sorry, the salon key to the Z. And let's move this down here. And let's fix the
normal tab hit Shift M. And let's change the bill amount to
something bigger like 0.1. Why the skill in case we
got problem with this girl. And now we got something nice. I think that's it
for this video. I will see you in the next one.
11. Starting with the tripod legs: Hello again, we'll
come back here. Let's start with
the tripod legs. Less you can recreate them. Alright. I think we can start with one leg and
create part of it. And after that, we can
combine them together. And maybe we can use
this MHz to do that. So I think we can embark on
this and the top of view. Let's go to the top and less. And bought this image
points right here, scale it down, make it
small, and Q to move it. And align this point
to this point here. Key to move this one. Go to the wireframe. Let's try to put this
in the middle here, and let's put the
3D course area as well and king this to 3D cursor. So we can scale from here. And let's kill this
down like that. That gets something like this. Alright, now I think
the size is makes sense compared with
the size of the mic. Alright, so let's
start doing that. I will hit Shift a to the LSAT. Plane, changes to
five millimeter or make it small like that, do to move and let's kill this list changes to bounding
and scale this like that. That's all what I want for now. Alright, let's go
to the right and let's take our new plane. Let's put this right here. I don't know this kick
the other images. Maybe we have a good MH. Yeah. Maybe this one is yeah, I think this one
will work with go to the Florence and I think
we can use this one, but as we'll click and drag, maybe this one will
work as well. Alright. Maybe, let's check
the other images. Alright, let's try.
It looks cool. Click and drag,
and let's put this here and scale it like that. Make it small G to move. And let's put this right here. I scale this again. And the else. Let's align the head of the
mic with our mic so key, and let's put this
over here with the 3D cursor there and
Kayla's to 3D cursor. And let's kill this. Right? Let's take this
behind the microphone. Right? I think now
the size is, okay. Let's move this over here. Alright. Now I will look prop plane and let's
move this over here. Tap to go to the ethmoid. And I just wanted to
take two vertices of the plane and just
move them down key to the Z. I
just wanted to kick the size, something like that. Maybe these, I can
move them up here. So this is the length
of the of the lake. Alright, and the wireframe, what I can grab those and just push this a
little bit like that. And after doing that,
these vertices, I can extrude them like
that towards the Y. Let's change this back
to on the Pope's. Alright, so now I
will grab this a can, it can throw me to
the bullets to three. Maybe. You can change
the curvature. Should be, let's increase the
width maybe a little bit, but not too much. I think something like
that that will work. And I don't know, maybe it should be thicker. So I will hit key end. Sorry, tap out, sick club. This may be right here. And scale this. It's make a thick like that. I think what we got
here is makes sense so we can accept that. And let's try to understand
that geometry and And let's find out together, how can we create this? Let's take these images. I just want to see what's
going on. From inside. Maybe we can focus on one leg, creative and finish it
and duplicate it later. I think the strategy works. So let's give this a
thickness using solid define. And let's change this
to 1 mm and make small maybe two millimeter,
two millimeter. I think that's will
be great for this. And after that I can hit Control a and apply
them solidify. Let's try to find another EMH. Okay, This one looks
cool, I guess. Alright, after, after that, maybe we can tab and we can add two edges like that in the
scale them like this, I guess. And what else we could do here? I think we can grab this, these faces and hit Alt E and choose extrude along the normal
enforce these phase bag. But we will have a problem here, this EKG right here. There was another
way to do this. Alt E extrude manifold
to avoid this problem. Our next weekend doesn't work
like we want in this case. So I guess we can add
one here and this area, we can do something
else and that's, will be a little bit difficult. I will select all of these
faces and I will delete them. It can throw blood
scroll selection and then hit Accept,
get out of them. And I will add solidify again. So let's add solidify in. Let's add one. I will accept one for now, tap. And now let's select some of these phases and
extrude those again. I will hit Control R to add
maybe one H right here. We could have one here, I guess. Before we do anything, I just want to grab
these phases like that. And hit Alt S and push these
back a little bit like this. Or maybe I will leave, I will accept this
result because I want some thickness for the
text in case I want to subtract the text from
the geometry itself. Anyways, now, let's
add another egg here. Okay, What else maybe
won't ache in the middle, hit Control V to
bevel it like that. And now let's select
some of these phases, starting with this here. And those over here,
including these. And now I will hit Alt E and
choose extrude along the normal through these
out like that. Something like this. And
now we got this results. After doing that,
now I will grab these edges and a key
twice and slide this up. Okay, here we should
have a piece of plastic. And let's see what
else we could do here. Maybe these faces,
they should be pushed down Alt S. And let's
push those down, maybe like that. Not like this. Let's start with this
one, alt S and push. This may be right here. And maybe in the right of view I can hit key to move
those maybe down here. And I can start with these. Go to the rights and key twice. Been enslaved those
down like this. Maybe we can move these
down a little bit more. Slide these two vertices down. Or simply like that? Alright, so this
one of the next. Alright, so after doing that, I just wanted to check if
the origin.in the middle. And yeah, I think it's
perfectly in the middle. I will delete half of this. I will add one H
here and the middle. And the X-ray mode, I will look rob this halt and
hit X to delete the faces. And I will add mirror modifier. That's very cool. Let's
change the marriage to 0.01. Make it very small
because as you can see, some vertices marriage,
not the result is correct. I will select this, these faces and hit Shift D
to take a copyright here. And I will go to the front. And I will make one
of these vertices. The vertex, for example, you can make this one active, gets to click and
click on it again. And cavers to the
active elements. Shift D to take a
Coby like that. Then go to the face. Sorry, Let's go to the mic. Because Mirror, mirror
to the, to the x-axis. To get a result like that. Then hits a select
all the phases, Shift Enter,
calculate the normal. And now we got this,
as you can see. Let's select this. And from the front, I want to get our result like
that by moving these phase, lag that and rotate them G. And let's put
those may be right here. I think. I think these legs
a little bit wide. I don't know. I'm not so quite
sure, but I think there's something
that make sense here, but let's accept that. And let's rotate this a
little bit like that. Maybe we can create a circle. Let's bring the 3D
cross over here, and let's create a
circle in this area. And I will add key to move this maybe right here
in the scale-up like that. Alright, I think
the size is okay, and maybe we should the
scale a little bit more. Now I will align these
legs with a circle. Grab these vertices
and hit auto rotate. And let's hit G, and let's
move those over here. Alright. Does that make sense? Let's take a look here. Let's tap out and the sacral up the whole geometry and
let's move it right here. Maybe it should be taller. One of these legs and
I think these legs, we should move them down. For some reason. I know
why these moved up. Let's make this one the
active deselect the circle. By the way, I don't want
to include the circle X, V to the Livy's. Grab those over here
and go to the right. Make this form the active. And let's change this. Showing this to
the active element and snap with the center or
a G to the Z hold Control. Snap this one right here
to align them together. Rob them, hit key to the Z. Let's move those down
just a little bit. Maybe we could make this
a little bit taller. And key to the ZL
is move those down. Like us. Go to the Z
and let's take a look. This kick the images I can, I just want to see
if the flux should be white. Now, alright. Maybe we could scale
them a little bit less. Make some things. I
will select this leg, hit XF, get rid of it. And let's focus on
this one a little bit. Let's see what, what can, we can make here? Let's go to the front end. I will select these and just hit G. And let's move those
a little bit like that. I will accept this
thickness and I think we should have a small
curvature here. Let's grab this edge and I will hit Control
X to dissolve it. I'm going to dissolve this H and I will
create this letter. I want to select these edges
like that and push them out at all this and push this out just a little
bit, not too much. And maybe this egg as well, iconic Robert and hit Alt S, just a tiny bit like that. And that's albeit now I will hit Control R to rebuild this
edge that I deleted. You can put this in the middle if you like that,
so it'd be better. And now we can reconnect these, hit the K. And the
same thing here, rob this with this hit K. Okay? The same scenario. I will select all
of these faces, it to a, select them. Have D to take a copy here and make one of
these the active. And then it's heavily
to take another copy. Sorry, don't move the new Coby when you hit here,
don't move it, leave it in the same place, and go to the mesh NQS
mirror to the x-axis. Hit a select all the phases you have to end to
fix the normal. Now we got this from the top. He and let's move, sorry. Just select these key. Let's move those here are
to rotate them like that. And let's put those
maybe right here. Maybe we should rotate this
a little bit like that. Align them with procure. It's not necessarily
to be perfect for now. Alright, maybe I can, I think this result looks
cool and I can accept it. Yeah, I think we can
accept this one. Hits like to isolate
them and go to the top. And let's create a circle here, somewhere in the middle. Okay? Go back to this image. And I will tap to
go to the mode. And I think we can do
something here like deleting these faces at
XF, get rid of them. And for this one, I guess we can do the same
thing except get rid of them. And I will select
these vertices, go to the top and let's
try to create something like a circle like that. And now we could connect
those together and club these bright right-click. And do we have procure? Alright, go to the
H enqueues bright. And let's fix the
distance between them just to let these
necessary ages. And then hit
right-click and choose space to fix the
distance between them. If you want to relax them, go ahead and do that. Shift Arturo, be the last step. And now I think
they are relaxed. And for this area, I guess we can club
these vertices and It's E2 through
this multiple times. And to avoid the overlapping
that we have here, you can activate a clipping and then it can move those
to the middle like that. You can fix the distance
between these ages. Same thing. Right-click
into space. Now we got something, but it's not perfectly
similar to this results. Let's see if we can
make any change here. Alright, I guess we can. I'm also quite sure, but
let's move this a little bit. Let's see what we can
get after doing that. Just make sure to select all the vertices and
let's move those away. Lag that, I guess. Now maybe these vertices, I can move this one right here. And those, alright? And maybe we can
redistribute these vertices. Let's move some of
them like that. Now let's see,
grab these agents. Right-click into a space to fix the distance between
them and those as well. Right-click to space. Alright, That's very nice. What's the next step? It's like to isolate this and
now I guess we can. Can we apply the mirror
now or maybe later? I will apply the mirror now. It can throw like a end up
lights and the occupant mode. Tab again, Alt click to select the entire globe and
then hit have to create a giant phase here.
I for insert. And I can, I think we can hit right-click it into circle
to change this to circle, but we're not getting perfect circle here because of the scale tap out can
swell up like this. Kill tapping again,
right-click came to circle. From the top. Maybe we
can scale this input. That's what's in the middle. Like that. I think we can push
this out or up. Sorry, just a little bit. Something like that. I just want to find the
middle area between these acres after
we select these had kept to ascend and bring the
3D cursor in the middle. So this is the middle area. Alright, should we put this circle in the
middle perfectly? I mean, like that. I
think that's not correct. I think we can scale this
a tiny bit like this. Now let's focus on this side. Let's see what we can do here. I just wanted to
find this image. Yeah, I just want to see
what's going on here. Okay. I will hit Shift D
to copy this circle. And Let's go to the
right key to the Z hold Control and
established right here and scale, It's like that. Until the circle
hits these parts. This one, this one, That one. I think this scale or
the size is perfect. I will hit I for insects to answer this like
that and then hit E to extrude this to
get this results. Now let's try to find a way
to connect those together. For example, I guess
we can I don't know, maybe we can create a new
AKS here or do something. Let's move this one. Good, hold Control and stop this one right here to America. And I thing we can
slide this key twice. Grab this key, hold Control and the stamp, this
one right here. And maybe we can
hit key twice and Yuki hold control is not this one here to
America, to them. Maybe we can do the same
thing here in Key Vault, can throw all stop
this one here. Slide this maybe right here. And let's move this over here. And this one twice. And American swan here. Rob this American,
this one here. Slide, this slide last one here. Okay? For somebody like that, then maybe we can grab these edges and
those on this side. And even though, sorry, it's E to the Z and extrude
this up. That's very cool. Something here is not correct. This circle should be small
because as you can see, it's also quite big Let's see how can we
do that. I will select this face and Douglas selection. Like that or like this. Maybe I will hit S to
scale and cancel the Z, Z to cancel busy. And I will scale up like
this, make it for a small. Maybe we can do that again as Z and scale this again to make
it very small like that. And for these phrases
that I extruded, I can easily delete them. And three, 3D extrude them. So grab this XF,
get rid of them, and now let's do that again. Alright, can we
create a face here? We have the ability
or is that correct? The last not going to
oh, that's not correct. Let's see, crop these edges. And let's start with Los here. And maybe let's see, grab these edges as well. E to the Z, and let's
throw those up. Key to the Z, sorry, Z. And let's align those here. Alright, maybe we can hit G to the Z again
and stop them there. Let's select this
edge with this one. Hit Alt click here
to create face here and this area a. And maybe I can grab this one with
this one and hit F and create face here as well. This same thing. Grab this with the set F, Alt, click here, hit F. Glove this
with this hit F, and here at F. This egg as well. Alt click F. And this one right here. Okay? Now I will have can
throw out to create an H lag that I will duplicate
this H D to the Z. Let's align this
in your AIG here. That will sweep to the vertex. I want to select these
vertices and create a new faces here
at multiple time. Let's start with these
vertices as well. The F club this when this
hit F multiple times to fill these to
create faces here. And let's jump here. This F. Now starting with this
half multiple times. And F again. Is
there anything else? Alright, some of
these vertices is, I think they should be
deleted. Let's see, grab. Alright, let's select
these first set F. Maybe. We could create a face here. Now, I will look
up those, hit X, V to delete the vertices that we have here
and grab this one, this hit F, this hold
Control and grab this one, hit the X, V, and select
this with this hips. The same thing here. Select the salt
can throw a glove. This hit X to delete vertices. And I think we can add
one H here, I guess. To put this in the middle
column, this would this hit K, and this would this
head K. Again, I will delete this
diagonal line. And I will do the
same here as well. Use an app tool hold
Shift to make the cut in the middle and the crop this with this head K and this would this hit K
and go to the edge. Dissolve or delete these. Let's add another edge loop. I think it should be right here. Grab this, hit F. And
the grabbed this one. Before you do that, to slide this heat wise
light, It's right here. Maybe. I'll stick around
these two vertices, hit F to create a
face and this area. Do the same thing here. Use the knife tool, hold, Shift mic cuts here on the middle J and this
would that one hit J, go to the edge, crop this with this hit
Control X and dissolve these. And let's lie this
a little bits the key twice like this, like that. Maybe this one as
well slided can throw our to add one H here. Crop the crop These here at F. And
maybe I can hit key, key, and let's move this guy, hit Shift Z to cancel the
z-axis and let's move. Those are your
ethics a little bit. Maybe we should slide this, hit Alt and move it like that. Alright, so one H
here and grab this with this hit F and the
club this for the set F. And now let's see
what's the next step. Alright, What else
we could do here? Maybe we can select these
vertices and I will hit E, took through them to the Z and hold Control
snap those here. And let's see if we have the
ability to fill this area, the area with faces. Wrap this with this head. That's not going to work. I'm not going to get a
correct result with that. Maybe if we add extra
acres on the both side, maybe we can get something. So in this case, let's try to use, maybe we can, let's see, grab these vertices and
create one phase here. And let's create one
phase right here. And maybe that's will help you, but that's will give us
a different results. Okay, maybe even now we can, alright, maybe now we can
connect those together. The scrub this
with this hit F to create a phase and the crop those together at F. Let's do the same
thing on this side. Alright, before you do
that, I guess we can. Before you connect this one, I think we can add
extra edge loop here. And from the top maybe we can
focus on these scientists. Move this a little bit like
that to fix the curvature. And now I can select this vertex with this one
and hit F and F again. And that's will help to
give us a better results. And let's do the same
thing here on this side. Can throw off to
add one H here and the X-ray grab this and just move it like
that a little bit. And now I guess we can I
think, Rob these vertices. And then it's E to the Z to extrude this E to the Z hold Control
and stamp them here. Now let's select this with
this hit F to create a face. Problems with this
at multiple time. And now I guess we can, what we can do here, maybe this vertex as well as
should be extruded. It E to the Z. Hold Control to
snap it right here. Now let's the club
is four vertices. Hit F to create a phase. Alright, now maybe I can
grab this vertex for this rhetoric set F to
create another phase here. This would just
hit F and F Again. What about this
area is sick grab these vertices and
the same thing, E, to extrude them to the Z. Old can throw a snub them here. Grab this with this hit F. This would this hit F. And club this with the
setup multiple times. Let's see if that will work. I think that's what I think
we can accept this results. Alright, so we create a
structure after that. Maybe we should start
with support at loops. Let's focus on this
area a little bit. Before I end this, visually
see what we should do here. So after creating the circle, maybe we could extrude this
just a little bit like that. And let's compare this
with with this area. I think it should be smaller or something like
that. Let's go to the right. I will hit Control Z
to cancel that in that will scale this
makeup bag like this. I will hit E to explore
this a little bit. And let's go to the top and let's see if this
perfectly in the middle. Let's move this a
little bit like that. Maybe we can hit key and move this a little bit like that. Let's tab again and let's
extrude this one more time. Or let's say less inservice
lag that, I guess. And maybe after that we should extrude this E and extrude this. Something like that. Alright,
I will accept this results. Maybe we can hit I
again like this. Now we're cutting this. Alright. Some problem
here we could fix. We should distribute the the
vertices in a correct way. After you grab these acres, just sit, right-click
and choose space. Alright, now this result
is correct and make sense. And even here, if you like, you can redistribute these
edges, right-click and space. And here as well. Crop these edges like that
and radically can into space. And maybe even these
those overhear space. Alright, so far,
the result is nice. We got something cool. And I will end this video here and I will see
you in the next one.
12. Adding more details for the tripod and modeling the Rode logo: Hello again. Welcome back here. Let's see what's the next step. Let's select this and let's
go to the top of view. I just wanted to see if
everything is makes sense. Okay? I feel that we could move
this a little bit back. Something like that. Okay. And let's see what
else we can do here. Maybe we can grab this circle. I can throw control plus
multiple times like this. And I will maybe move this and put this
in the center here. Okay? What else we can do here? It's a and then Shift
Enter to calculate the normal ink is we
got problem with that. We're now maybe we can starts with over the
subdivision surface. But before we doing that, I guess want to see I
want to kick this area because what I'm getting
here is a sharp results. Maybe we should add
a sport H loops like that to make this
era round and nice. Something like that.
If you'd like, you can bevel it like this. But I think we don't
need to do this. The subdivision
surface will take care of this era and that
will make it round. All what we should
do now is just targeting the sharp edges and give them a support, a globes, we can use
another technique. We can go to the Select
and select sharp edges. So let's see what's a gives
Blender picked for us. Let's select these acres
with this egg is selected, Let's include this here. And I will tell you
why I did this. And maybe we can include
those over here. Let's try to use
another technique. Let's see if that's
will work here. I don't want to include
these edges here. And I don't want to include
those here as well. So decent lactose. And let's see what else. These acres, this
decent like them. Maybe those over here, maybe this one here and
this wall right here. And the same thing here. Deselect those. Okay. After doing that, after
selecting all of these ages, I will open this panel
and go to the midterm. And I will give these mean crease purchases to one to make this error sharp. Right? Don't worry
about this, Eric, keep this sharp for now. Are a few like you
can focus on these, just select them like that. See those over here. And zero out, this is zero. We don't need to include them. And after doing that, let's add subdivision
surface with level two, I guess, radically,
hey the smooth. And now we got this
result, as you can see. But we will get some problem
of we didn't take care of the geometry tab
and I will add that support the edge loops here
to get even better results. So let's add one here. As you can see when
I add this age, you can see how that's
will affect the results. And this focus on this arrow
to see what's going on here. Maybe by grabbing these acres
and if we add one here, that's will help to fix the problem and it
does as you can see to that here. One and throw us, we'll call this with
this hit one, sorry. One, enter. Like that That's very cool. Now I just want to see this
error should be smooth. We don't need to include this. So I will zero out this. Zero out these edges
here. Zero Enter. And this one as well. The crop them has zero Enter. Let's reduce the level to one. And I just want to
see the wireframe and turn of the optimal so I
can see all the wireframe. Now we got this result
is very nice and cool. And now above that I can add, I can add Bevel to bevel this. So let's add Bevel modifier and let's change this to 1 mm may be applied the scaling case, we got problem with the scale. So let's add points five, maybe 0.110, 0.2, 0.2. It looks cool. Let's integrate the segment tool three or four. And let's activates
harder normal. Let's turn over the wireframe. And maybe let's see
what's going to have enough will
increase this to two. If we got any
artifacts somewhere, we will undo that. Some problem we have here. Maybe to fix that. I guess we can grab these edges and give
them mean crease. That's will help to fix this. We could do that for the rest. Let's select them all like that. And let's see, grab this here. And let's add one
here and enter. Everything else. Looks cool, I guess. Cool. This see the wireframe. I can see that we have some strike happen
here for the legs. I think we can add
multiple edges like that to make the segments. It looks even in case we
want to add the texts here. Alright. Now, that is what looks better. You can reduce the
number here if you like. If you'd like, you can add subdivision surface
underneath the bevel. That's can give you
another result. By the way, we could kick
the, this result works. As you can see, we have some
problems if we do that. So I'm not going to do this. Or I think if you want
to make this works, I guess we can change
something here. The geometry like
King, this to ARC. That's, can help a little bit. But we still have
some problems here. We still have some issues. So I'm not going
to do that adding subdivision surface
underneath the level. I think Belleville should be
the last thing to add here. Okay. It's like to anxiety and less. This circle in the
middle of this, I will grab this end, the Alt click, and bring
the 3D cursor here. And I will grab this
and grab the circle, and sorry, less than bring
the 3D console here first. And I will change the origin
door to the position of the 3D course from the origin dot of this geometry right here. Okay? Now I will
grab this one in tap and put the 3D costs
are there in the club. This have to S
selection to coarser to put this exactly in the
middle. Now we got it. There may be in the right view, we can make some
changes like grabbing these and hit Q to the
Z and move those up. And not just that, maybe we can grab these faces. Let's delete this one. Dissolver. Turn this to grab
this phase key to the Z, and let's move this down here. Crop, these faces hit S, and then I want to scale
this to the middle. Let's turn off the
active because it will scale to the active element,
changes to bounding. And then when you scale
turn off the z-axis, because I don't want these
to be skilled towards the z-axis at S to
scale and to the, to cancel the Z, hit Shift Z and the skill
dose like that. So let's focus. Let's check the
scaling from here. See somebody like that. Yeah, now there's all this. Perfect. Okay. It looks cool. I don't know why I feel
I should the scale. It's maybe we can make
this bigger a little bit. Even if that doesn't match
the reference image. Don't worry. You can scale up and make trigger apply the
scale after that. Because I did that, I will reselect
these faces and hit S HEVC and make these bigger. Like this. Something
not aligned perfectly. I don't know. Let's go to the top and
go to the wireframe. I can see I can understand
what's going on here. Okay, Let's look at the
results from we have some variation when
I rotate around this something not make sense. Okay, the skill is not. Okay. I will delete these
faces, can throw, bless, can throw glass again and then hit F to
create one single phase. And I will hit I to answer
this to the middle. And let's focus. And I think that's what sets maybe we can
hit S to scale this a little bit and then
hit E to throw this up. And that's will be, it's,
now the result is perfect. Alright, let's see
what's the next step, what we can do. Here, we have piece of plastic we could
create and distribute. So I will select these
faces like that. And let's see, grab
those over here. Can isolate it. These faces. And let's wrap those as well. When you complete, had
heavy D to copy them and right-click to leave them in
the simplest and then hit V and then separate them out. And let's focus on
these new pieces. And now let's see,
grab these edges. Get wise to slide this and take these out
just a little bit. When you do that, tab again, hit a select all the phases
and then hit Alt E and choose extrude along
the normal analytics through these out like that. Now let's check the other. Everything is cool and fits. Tab out and I guess
we can isolate them. And let's tap your,
let's add some support, a Clubs here and here. And this one as well.
Maybe one here. You can increase the
level of subdivision. I guess we can
increase this to 0.3. Or maybe I can even delete
it and I can delete. The mean increase from
here is zero. Enter. Okay, hit a half to enter, recalculate the normal in case we got problem
with the normal. And maybe we can
grab these edges. Guests, Sorry, Just tab and then go to the Select and
select sharp edges. That's will be
easier for us. Okay? Maybe we can bevel them here. It can throw them
like that, I guess. Now we have something
nice and smooth. So yeah, this result looks cool. Very cool. Okay, here we got some problem. I don't want to include
these H's here. I will hit Select
to isolate this. I just wanted to focus on it. And let's turn this off as well. Kay. So grab this one. And let's zero out these acres. I don't want this
error to be sharp. Now let's turn this
on in this on as well. That's very cool. Okay. That's nice. Loveless. What else we can do? Now? Maybe we can start
with with the text. So I will put the 3D cursor over here and I will hit Shift a to add plane. And let's move the plane up just a little bits and
Tab to go to the ethmoid. And he to move this and let's
align it with the letter. I just want to track the text. And let's move this
one maybe right here, and maybe this one
should be here, up those together I to II. And let's explore this here. 1 mol extrusion and
one more right here. You can go to the
wireframe if you like it to E2 explored
this maybe right here, this one, I think it
should be moved there. And what else we could do here? Maybe I can take off
those at the end, this move this here, and grab those key and
a small dose there. This one maybe we
can take it down. And this F9 key hold
catalyst stamped here. You can leave small
distance if you like. Now let's track this care of E and less extrude
this multiple time. Like that. This, with this hit F and I thing we can, okay, I can make grab these vertices and hit Control
Shift V to Belleville, these like that and
redistribute that. The vertices right-click and choose space and right-click
and choose relaxed. Hit Shift R to repeat the last action that
relaxed multiple times. To make this nice and round. The same thing here,
grab this and let's hit E to extrude this. Like that. This with this hit F. And
let's grab these vertices, right-click into space
to fix the distance. And I will select
these control Shift V to be able like that. And let's select this again
and fix that distance. And Q is relaxed, kept out to realize
that again and again. And now we got nice
round results. Let's check the number
of the vertices here. We have 20 vertex here. And let's see, grab
those will be here. We have four teams. So we need to create, we need to increase the
number of the vertices so we can connect
those together. Well, 14, that's me, that's me. We need six vertices here. I will hit Control R
to add to 33 here, and three here as well. I will grab this and
this vertex, I guess, and I will redistribute the
distance between these. And now I guess we have
the ability to hit F multiple time to
create face it here. Yeah, it does. Okay, what else we can do here? Alright, maybe
here we have five, and here maybe we
should have five going up this with this, sorry. This with this F, This with this hit
F. That's very cool. Maybe one vertex here, we should add up this
with this hit F. Sorry. Yeah, I think
we completed the R. And now let's take one vertex
hits E to extrude, sorry. The, I guess to
extrude one here. E to follow the OH, letter. Like that. And let's hit E to extrude
this multiple times. Keep doing that until you, until you American
this vertex for this one. I've
started doing that. Maybe we can hit E to
extrude a new vertex here. And this illustrates
the inner line. Like that. I guess.
This one, this hit F. This one hits he to
extrude one here. And let's follow
this line as well. This, with this hit F. And maybe here I can
create face. Cool. So let's count the number. Let's redistribute the distance here between these vertices. Right-click into space and right-click and choose realize. Or maybe we don't
need to relax this. After doing that,
maybe we can bevel, these can throw be Control Shift P. Maybe like that will be okay. And let's redistribute
the vertices again. That's, that looks cool. And now let's see
the number here. We have a 12. Okay? I guess we can grab
this with this and hit F. Now let's check the
number of the vertices here. We have nine,
right-click and space. And they should be devoted
Oswald Control Shift V. And I think we
should increase the number here to make
this smooth and nice. The number here has increased. What don't worry, to space. Number now become 23. You can see here down, okay. I will increase the number here. Now if I count the
number of with the vertices here
we have 12 will. And here I just
forget we have 23. That's mean we need
11 vertex here. So let's add the three
here. Three here. And now we have nine. And now I guess we have 11. So let's check that
again, we have 24. Alright, I will delete
one of these Control X. And now we have 23. And here we could
have 23 as well. Okay? Now I will
select those and redistribute the vertices and choose relaxed to get
even better results. Now let's select these at F. Cutoff this with this
hit of multiple time. Lag that now we think
with this area here, maybe we can add two
edges and here as well. So let's grab this with this hit F. And this will just hit F. Maybe. I think we can connect
those together. So okay, to do that,
the secret of those. And come up this with this at F. Now let's focus on this area. So let's increase number
of the vertices here, Control Shift V. And after that, Let's grab all of
these vertices, right-click and choose space. Sorry, I think we could go to the at this time
to deselect this. Alright, so and
after that choose relax shaft are multiple time to make this nice and smooth. Now we got this result. That is count the
number we have 26. So this one should be
connected with this one, I guess so hit F. And the
number of the vertices here, they could be 26 as well. So can we do that? I will let Control Shift
V to Vivaldi's vertices, and I will redistribute
these vertices. Right-click came to space. And then relax if you like. Now let's check the number. We have theta2 and
here we have 26. So we could delete some
of these vertices. Let's delete tool. Now we should have 30 and
after that we should delete. For now let's count
the number again. We have 26, alright,
right-click space. And now I will occur up this, hit F and then a glob, those right here at multiple time until
you fill this area. And now it's filled. Alright, here we have to
add two vertices here. Grab this with this hit F, and let's add two here as well. Let's look like this,
where this F, F, F and now the same
thing up those together hit F and F2 time. And now it's time to focus on this area and grab
those Control Shift to be able dislike that. Glob this with this
space and then relax. Shaft are multiple time, make this nice and smooth. So how many vertices
we have here, we Of aids vertices. Here we should have
eight as well Control Shift V. But will this, this, will this space relax, kept our relaxes even more. And here we could have
eight as well, right? That's cool. I'll stop this for this hit F. Let's fullness. After doing that, now we
can call these vertices and choose relaxed to relax them all and don't
include this age. Just deselect this relaxed. Something happened here. Let's see what's going on. I think we, the selected
this age are multiple time. And I think now we can include these edges, relax them all. And yeah, that's
right. Now maybe we can crop these edges. Relax and then have the R. Alright, That's very cool. Now we fixed end. We finished with the, OH, now let's jump to the D. I will look, grab one
of these vertices, have the, let's move
this over here. K. And let's hit E to
extrude this may be here. Galapagos hit Control R to add one H here and throw
law to add one there. And the crop, those hit E. Like this. Maybe we can move this
a little bit like that. Those City I can stop this for this in key to move
this novelists with that and hit E multiple
time to follow this line. Like that. This will this hit F. And let's choose relaxed. Redistribute the distance. Relax again maybe. And let's select these vertices, can throw shafts
be to below them. Okay? Now let's redistribute
these vertices again. And then have to are
less focus on this. Now. Keep following this line and
then hit F to connect those. Let's select these vertices,
right-clicking into space. And let's count the number. Here. We have 26, and here we have 13. So 13-20, we could add seven. So control our add
one to three here. And here. Now we have six and
now we have seven. And above that we
should have six. So here we have three, and here we have three. Now let's check the number
again. We should have 26. After that right-click
and choose base and relax them again. Grab this with this hit
F. Keep hitting F until you fill all of this with faces. The E will be easier to create, healthy to copy this. And maybe I can crop these
and move them down here. It's E, the icon. And again here, let's
select those together. It's a and push those here. Those something like that. Tub outs. And now we finished
with the text. Maybe we can add multiple
edges here to omega this smarter if we want to
use the ShrinkWrap modifier. So let's add four here. And here as well. For the D, Maybe we can add
multiple ages here. And maybe to here, to here as well. Anything else? Maybe to here and there as well. And multiple cuts here. And for the, are
the same scenario. Let's add multiple cuts. Maybe three here, and
maybe 123456 cats here. And here we should
have six as well. Here maybe we can add four. And for the, oh, maybe we
can add multiple cuts. Okay. And for the D okay. Tab hit a shift then to
recalculate the normal. Or you can go here to
the face orientation. So the OH is flipped, grab one vertex Control L, select the linked, the
vertices ALT N and then Alt. And to open the normal menu and choose flipped of
lipids tab out. And then let's turn off
that face orientation. Alright, so now we
created the logo, and I think that's it. For this video, I will
see on the next one
13. Applying the Rode logo for the tripod legs and for the handle: Hello again, we'll
come back here. Okay, Now let's put the
logo and the place. First. Maybe we can put
the origin.in the middle. Tragic mic and
origin to geometry. And I think we could
draw it like that, that RIN hold Control
to snap it to ninth degree like this and go
to the front heat to move. And let's move this over here, Z to go to wireframe so I can see the size and
scale like that. And let's put this here
skeletal little bit. And yeah, somebody
like that, I guess. Take this out and I
will take another Coby. I just want to focus on this one and this one I will
use it for another. I don't know. Let's keep it as a backup. And let's move this close to the surface. Whereas
the surface. And now I will use the
ShrinkWrap modifier. With this one selected,
I will add ShrinkWrap. And who is the surface. And now it's done. Now we got this result is very
cool and nice. We just need a
very tiny offsets. So I will add 0.01, has a distance here, are offset. And I think that's
will be enough. It's very, very close. Like Hey, the smooth,
make the smooth. And the result looks nice. What else we could do? I think we should use the
the Rode logo here as well. What I'm going to do is I will
grab the logo at the end. Take Coby there. Maybe right here to this
yellow smooth over this down and our to the Z to rotate like that hold Control and
rotate this 90 degree. And maybe we could rotate
this to the x-axis, Hard to the X, and rotate
this 90 degree as well. Let's put this in the
middle, like this. And I will grab those together. I'll just this one, I will hit Shift D to take a Cobain case. I want to go back and I will hit M to move
this in new collection. I will call this extra in case I want to go
back for no reason. I will turn this off in the render and in
the view boards. And let's put this in
the correct place. I will grab this together. I hit Select to isolate them. Here we have subdivision
surface we added. I think let's
reduce this to one. I guess wanted to
kick the wireframe. Alright. I think wanted
it will be okay. I will apply the
subdivision surface and I will grab the logo and hit
E to extrude like that. Something like this maybe. And hit a to select all the vertices at the end
to recalculate the normal. And I think that's sets. Now. Now I will use the
Boolean to cut this. So grab this as a
caterer and hold Shift. Before you do that, we have this egg is very
close to the text. That's will cause some problem. I think if we tap and if we
grab this edge to delete it, I think that's will be better. This one and I think
this one as well. Yeah. Yes. Clean this
area a little bit. And I don't know, maybe I think we can see if we can grab these from
the from the lefts. Can we grab this
and delete them? This, grab these,
all hit Control X. Yeah, I think we can do that. Anyway. Now with this selected all three
of the grab this, and then go to the edits
and choose the friends. And now we have this
result as you can see. After doing that, now we, we want to use level again. The VL modifier. Let's add the will,
save the project. And then let's add Bevel. And listen, increase the
number here to two or three. And let's activate
our the normal. And let's turn off
the wireframe. Right-click hit auto smooth. And now we got very cool, nice result as you can see. And I don't see any
artifacts here. Everything looks cool. Well, I can accept this result
and there is no Reason to us, anytime here, this looks cool, and
that's it for this. Alright, what's the next?
Okay, the next step is to use the same logo
and what's right here? Let's go to the front. Let's move this down here. K. And let's rotate this like that, ninth degree and the scale
of negative bag like that. I think it should be
rotated again like this. I don't know. In
key to this here. Let's move this over
here and let's try to put this the middle. Let's go to the right end
gate to move this right here, and let's rotate it and align it with the leg like that. I guess. Let's hit G and dislike that. I will select the ligand logo and it's like to isolate them. I just want to
focus on this one, which is close like this. And let's shake the alignments. So far the alignment looks cool. I will tap it to a,
select them all. And I will hit E to extrude six through this inside that little
bit like that. Alright. A shift N a to select all the faces have done to fix them the normal orientation. And now we got this. And let's see, grab the leg. And I will increase, by the way, I will hit here deep to take
a Coby and hit M to move this Colby to the extra in case incase we got any problem. And let's keep it
high that there. And I will look rob this
and from this spot, keep just check the other side. Try to avoid any
overlapping and we don't we don't have overlapping. Grab this and let's apply the subdivision surface
with level two, I guess we can do
that and apply this. And now I want to
kick the wireframe. So this is the wireframe
as you can see here. Okay, tried to avoid any
close edges like these here. You can just slide
them away from the text to avoid any problem
when it comes to add Bevel. For example, this age, we could delete it to
give the Bible freedom to bevel the texts edges may
be this edge as well. I can include, dissolve it. Maybe this one as well, I can delete it. Alright, anything else? Maybe this age I can hit key twice and move it
here in the middle. Alright, this egg is
very close to the arm or maybe I can, yeah,
I will delete it. Like that is office. Okay. I think I
can keep the rest. Yeah. I can keep the rise. After doing that.
Now, grab that takes hold the leg and just
choose difference. But this time don't use
this option because if you choose the difference
in the auto Boolean, you will apply, that level will be applied and
you will lose it. But if you choose this one, you will have the result
and you will have the Boolean modifier here
and you can control it, end up light cues difference. And now we have it and we
have modifier here as well. Let's turn off the wireframe. By the way, you can turn off
the wireframe from here, from the viewport display. Okay, I just added a
shortcut for that. Over here. Let's
right-click and choose, Assign shortcuts and hit whatever button you would
like, you can assign it here. Anyway, let's go back here. And after doing that, I guess we can apply the bowl
and we can go back to them. Modifier, right-click,
hit the auto smooth. And let's see how the
bubble will behave here. Let's turn off the lamb overlap. And as you can see, we have a lot of artifacts here. We have a lot of cleaning. So let's see how can we do
that from where we can start. See if there any way
we can go around that Okay, We don't need the
text, you can delete it. That's it. Let's
spend some time here. Cleaning these
vertices, merge them, activate the automatic end. Now let's start merging some vertices to get
rid of this problem. We fixed this and maybe
I can slide this away. Heat wise marriage this one or I can go up the sake and hit
Control X to dissolve it. So we fix this. What about this area? This looks clean and
maybe here, I don't know. See what we can do here. Maybe this one, I can
slide it and move it back. Like that. We have some overlapping
capital, I hear it. Maybe if I move this a
little bit, I can fix it. Alright? Even if that doesn't make sense, it's okay, you can accept it. And what's going on here? Maybe I can merge
this vertex with this one to fix
the problem here. So it's all about mergers
of vertices here and there. And move whatever age comes
in the way of the Bible. This one, I can delete that
as you can see now is fixed. This one and this one
you can delete them. Okay, This one you can
delete it as well. Maybe this one I can milk
it here to the corner. And I can move this
away from the novel and merge those
together, I guess. And I think we can move this
here and this one here, and I can respond there. What about this area? Maybe I can take this back. Some of these vertices
key twice and merge them. Okay? Let's write it here. Yeah, now it's fixed here or up those system in
marriage at the center. And I guess we can club
them and make this one the active and it MAN married
to the last exam like that. Alright, here, the same thing. I guess we can grab this and make this one the last letter, M inverse to the last key twice. Get rid of this K. Plop those make this
one last M marriage to the last twice. And let's make this
one over here. Maybe I can delete the sake of this H causing some problem. Any problem here, maybe
this one I can delete it. And this one I can make it here. We get better results. This one I can make it there. Here we have a lot of problems. Let's make this one, the last one and then hit
me in America at last. What about this area? Let's delete this. Can throw legs. What else? Slide this a little
bit. And that's when. And what about this area? Maybe I can merge this one
here in the small right here and Keith wiser
than this one here. And this one it should be here. And I guess this
one should be here. Keith wise. And let's slide
this and merchants and this egg, I can dissolve it. I don't want it.
What's going on here? Maybe this one I
can move it back. That's will be it.
For this area. I guess we can decide
this a little bit. This one maybe I can
slide this, this one, I can rearrange it,
I guess heat wise in marriage it this way. And for this one,
I can delete it. I can delete as well
to get better result. And this one, okay, This part is annoying
a little bit, but that's what we should do
to get nice correct results. And I guess we can
increase the number of the segments if you like. I think we can connect
those to get better corner. Can we do that? Let's see what's
going to happen. Now. So quite important,
you can ignore it. Feel like Keith wise to mark this K. Maybe that doesn't
work to delete edge. It's wise to make this with
this. We have problem. Twice turmeric, this one
with this one here as well, key twice and miraculous. Save the project.
Don't forget that. And maybe this achy I can delete it to get better results. And this one is very close so I can't grab it
and dissolve it. And maybe the sake as well. Key twice and this
merited, get rid of it. And maybe I can merge
this with this. Everything Here it looks okay, maybe this edge,
I can delete it. And this one as well.
And maybe I can, I don't know, maybe I
can move this away. The I think that's it
for their II tab out. And let's check the results
of this amazing, Very cool. We still have some
artifact here. Maybe I can just move this edge away from the, from the bevel. That's very cool,
Nice, nice and smooth. Let's like to anxiety
and let's take a look. Let's select these
images, all of them, grab them and hit M, and let's create
a new collection. Let's call this images. Enter twice and
let's hide them and the render view-port,
delete this. We don't need it anymore. And let's see what
else we can do here. I'm not going to focus about what's going
on here because it's not visible. That's very cool. I think else here we
could do. Very nice. I noticed some problems here and this area,
let's try to fix it. All what we could
do is just moving some vertices or maybe deleting some edges,
maybe these edges, I can delete them that will help to fix the bevel
here in this area, we still have some overlapping. Let's turn off the bevel
modifier and three, this edge and Alice activated
now is of this better. I don't think that we have
any problem anywhere else. Seems like we forget to
deselect this H from here. And that's, as you can see, make this error sharp. As I remember, I,
I, I fixed that. But anyway, it is tried to find the solution that
select the sense. I don't want these
edges to be hard. Okay, Let's go to
the atom endless. Zero out these K in this case. See how can we fix this area? Maybe manually, we
can move these acres. I don't know. It's so let's go to the wireframe
and I just want to focus on these vertices. So let's move those like that. It's not going to be perfect. Like this one. But I think
that's will work a little bit. Cantos over here
and those as well. Alt S and less, less thick, nice angle. Even if you go to the right, you can cancel them. And ALT is not
going to work here. Let's go to the orthographic
hits five from denim bad. And let's just pick
nice view like this. Then he key and let's move
this a little bit like that. Activates level. Okay? I think we still have
a way to go around that. Let's try to find a
solution for this problem. Let's unhide the X-ray end. I will choose the old one. And let's duplicate that again
in case I want to go back. Alright, I will hit
slide to isolate this. I just want to fix we have here. So this aqueous and zero out, this is your answer. Now they're become
smooth and nice. As I remember, we used the, we apply the subdivision
own level two. So we're going to
do the same thing. It can throw a and apply this. And now we should have
the same results. It's like to excite and I
will hide this and this one. Just keep this with
this one selected, drop the leg with the Rode. And what I want to
do is I want to tap and grab this edge. Like that. I guess. I will hit the V two robots
and hit right-click. And after that it grabbed this. Just Control L, X F, get rid of them like this. And after doing that, I will tap out and grab the leg with the
Rode logo tab again. That will look up the same age here and then hit V
to rub it like this. And hit right-click and select the ages of overt Control L, X, F to delete all the faces. And now all what
we need to do is just merging these together. Article obvious for this hit Control J and make
them one piece. And after doing that tab again, and let's focus on this line. Okay. I think we can focus on this area in the
Cloud them like that. Then it M N varied by distance. And as you can see, most of these vertices or all of them are merged, hop out. And now let's take the results. Let's activate the bevel
and turn off clam overlap. I don't think that we
have any problem here. I can now these legs
become nice and smooth. That's why I created the extra folder as a backup as very important,
just keep that in mind. Well, we are back
to this problem, so let's turn this off and
let's grab these edges, dissolve them, control
lights, and turn this on. Now it's finished.
It's nice and clean. Let's take a look. Yeah, and now the
result is way better. I think that's it
for this video. I will end it here and I will
see you in the next one.
14. Creating the mic grill: Hello again and we'll
come back here. And this video, I want to
start with the mic grill. Let's try to create
this pattern. Alright, it's fair
thing I just want to make some organization here by grabbing all the
parts and move them to the, I guess create. Here. I changed the name of the
collection to the mic. And I will move all of
these to the collection. Okay, here we have guide. I think we don't need the guide. Let's turn this off for now
and let's see, let guide. We don't need this. I can delete that sets. This one. I can delete this. The shrink. We need to
turn this in the render. The extra, maybe you, after we finished the project, maybe will delete all
the extra, the images. The images, we will
delete them as well. Okay, so now let's see, create one of these
patrons and let's, let's use the array
to duplicate them. So in this case, I will go to the top and it's
kept in this ad plane here. Let's change this
to five millimeter. Make small, and let's
move this over here. Let's focus on this one. I will talk to go the
more than hit Control R to add four acres like that, saying one H here in the middle. I will look prob those over
here. It's key to this here. Let's move this up here
like that to create this. As you can see, like this one. Alright, so after doing that, I just want one of these
acres and that's it. But I will add one H
here and one HY here. And I will delete
these vertices. Club those over here at X, V to get rid of them. Because this one should
be replicatable. One the site meet the side. This area will be
longer and it will be, the length will be
similar to this one. And that's what I
want. Because of that I deleted half of this. This, the this. Okay. Maybe I can add won a
here and the middle. And now I will Alt click on this a lobe and then hit
Shift D to take a Coby, and then hit P, S
to separate it, tab out and the crop this and delete it. We
don't need it anymore. Now let's focus on this one
tab and let's see what's, and I've tried doing that. Now, let's see, grab
this and I will have D to take a Coby and right-click to live
with and assemblies. And I will rotate this to the Z, the Z nine degree to
get a result like that. And I will flip this to the Z. The Z and minus one. Hit Enter, sorry. As to the Z minus one. Now we got this result. And I want to align these
vertices with this. Make this one of the
active and change that transform to
the active elements. Get with a Z hold
control standards. Now it's aligned in perfect. So this, the first step
should be like this. And I will grab this one and I will hit Shift
D to take a Coby and our to the Z and throw
it at this time degree like that and get to move hold
Control and stamps right here. We could have one, I guess, right here. I've started that alt
click on this one. D to take a copy our
to these E9 degree. Let's move this one key hold cancerous type, this
one right here. After doing that now we
have a duplicates Patreon. Now if I make this
one the active in the phase shift and
snap it right there. Now I can duplicate it. When I hit Shift
R multiple time, I will hit Control
Z to get back here. And I will use the
array to achieve that. So let's add the
orientalist see the result. As you can see,
it's replicatable. So let's add six here, and let's add another
array modifier. And I will alright
this to the Y. So add one here and
zero out the X. The second array modifier. And seamless as six as well. Now we got this pattern,
as you can see. In this case, I will
increase the number 6-40 and increase
this to 40 Oswald. Now we got this great. Maybe 60, I don't know. Here as well. And after that, I will take a copy and move it there
in case I want to go back. Now, I want to make this motor. So with this one selected, let's collapse the array and let's add subdivision
surface to make this smooth. Now as you can see, this
becomes smooth and nice. Part after doing that, I will let cancer all a and apply visuals,
humans written mic, but I don't want to use the subdivision surface for
now. Let's delete this one. Apply equally to apply visual too much information
to apply the array. And I will change
this to maybe curve. I changed these two
curves so I can give them a thickness and go to the carrier properties and under the geometry, go to the depth. And let's add 0.5, maybe. Go to solid. And now
we got this result. As you can see, the
resolution is too high. I will reduce this
to one maybe or two. I think one which will be okay. And leave very small distance
to avoid any hemorrhaging. And I think this will be
a good point to start. And now we got this nice
pattern as you can see. And after doing that
now I will occur up the battery and move
it close to the mic. I just want to convert the size. I will kill this and
make it small like that. So let's zoom in here and let's compare the size of the pattern
to the size of the mic. And I think we can scale
this and make it bigger. I think now the size is makes sense and beautiful
so we can use it. Let's Hickey and let's
move the small right here. And now let's go back
to this geometry. Here. We have the mirror and we
have the subdivision surface. I don't want the mirror deleted. Subdivision surface
with one. That's okay. I will accept it
so it can throw a and apply after applying
the subdivision surface. Now, let's introduce
a new add-on here. So this is a new add-on
I'm going to use. It's a free add-on and
I think it's called, let's try to find it. Let's call rubbing tool. I will put the add-on
in the resource folder. And the creator of this add-on, this man is called
oriC, called Born. This is his channel and
I hope you support him. He created a very amazing and beautiful add-on and you can support them from
here on patreon. Alright, let's go back here. What I want to do is
let's try to understand what's going on here and
how can I use this add-on? Would this object selected? I will rub this using this
add-on if I hit Create UV. Now we have a UV
created for this. And if I push this slider, I can make this flat. And if I push this back to zero, I can have my geometry back. So let's push this to
one and make this flat. And let's align the
path ran with this. And let's hit shifted to
duplicate this one here. Maybe we can move
through here for now and go to the
front Z to go to wireframe so we can
see this edge and I will put the pattern underneath
this, hit Q to the Z. Let's put this one underneath. It's to get a better results. And after doing
that, if you'd like, who can delete some
of these vertices? Because I think that's too much. For example, I can tap here and I can go to the
x-ray or wireframe. Little bit difficult to
see what's going on here. Alright, go back to solid. Alright, before you do anything, I will apply this or
change this back to mesh, right-click and convert to mesh. And now it's converted to make. You can go to the front, I guess, and go
to the wireframe. Alright, so I guess we
can delete some of these. Let's go to the top.
From the top view, it will be a little
bit difficult T12 choose or to see. So I will tap and tap to
the nth mode and less. I can't grab some of these vertices and maybe
I can grow the silicon. It can throw a plus multiple
time to grow selection. I think that's will be slow.
Yeah, that's will be slow. So let's see, grab this. Resuming. Something like that. Okay, let's try again. Let's go to the front. Maybe we can deselect
some of them like this. Go to the top. And let's
delete these vertices. Hit X. To delete them. We don't need them. And on this side we can
do the same thing. Maybe we can just
isolate those together. It's like and let's go to
the top again, tab again. And let's see glob part of this. And now we can go to
the throne to add, hey, maybe we can
add those as well. Let's see, Where's the edge? From the top, we can see it. Alright, we are very close. It's X to V2, delete
these vertices. And from this side
we can grab this. Let's go to the right view. And maybe we can include these
vertices, sorry, all TFT. And let's add those X, F, or G to D, the vertices. And now let's scroll
up those over here. Go to the right and less and
include those X if you like. And now we get the
correct sides. Alright, now let's
fit slide to excite. Alright. Now everything
is cool and ready. Let's go to solid. Sorry. Alright, I will hit
Slack to isolate this because I just want
to do something here. When you tap to go to the modes. Some of these vertices
or nodes, marriage. For example, right here, it's a and then hit M, N, choose merged by
distance and change the American the threshold
to something low. And now all these vertices
are married to excite. And now with this
cigarette selected, I will add a modifier is
called surface deform. And I will pick our
requirements right here, and I will hit bind. This modifier creates
a relationship between this object
and this object. If you deform this object,
this one will follow. Now if I grab this and
push this back to zero. And if I crop this
N high, that's, and you can see I got something very nice
and beautiful here. The result is
amazing. Great, Nice. And after that you can, as you can see, we have the 3D cursor still
in the middle. So I will look, grab this, and apply the modifier
and hit right-click and choose sits origin to 3D cursor to put the
origin dot here. And I will add mirror modifier. And curious why to
mirror this with a y-axis and get this pure
horizontal as you can see. After doing that. Now I can a subdivision surface to make this nice and smooth. So let's add the modifier. Let's see what we will get. Let's give this a bit of time. Alright, radical,
aka the smooth. And now it's more than Nice. Very cool. You can go beyond
that if you like, you can add two here. Become very, very cool. What about this one? I'm going
to use the same technique. I will take a Coby
and then hit MAN, move this to the extra. And I will grab this and reduce the subdivision
21. And I will apply. And let's create a UV
using this add-on. And I will push this to
one. That's very cool. Now I will drop this grid and
let's move it right here. What this underneath it. Go to the wireframe is key to
the Z. And let's move this Maybe right here, I guess. And let's move this a little bit lag that
L is deleted and wanted vertices right
top to the edit mode. And by the way, I just forget to
change this to image. Right-click and then
converts this to mesh. And after that topic and hit a select all
the vertices and then the M N marriage by distance to marriage
all of these vertices. And now it's become ready. So after doing that,
Let's go to the top. Or maybe I can just to grab those
together and it's slash. Now let's go to the
ethmoid, go to the top, and I want to grab most of
these vertices like that. Let's go to the France
and type thing. We can include those here. So go to the front so we
can see what we selected. Alright, let's see, grab all
of these vertices like that, maybe something like that. I think that's too close. Let's go back to the front Alt Control and let's deselect
some of these slag bath. And then hits, alright, and then hit X F. To delete this. As very cool, we go to the top and Let's Alt Z to go
to the X-Ray mode. And let's see, grab
those over here. Go to the right this time. Let's include those. Xf to delete them. Go to the top again, and let's focus on this side.
Let's take this out. Go to the front and let's
delete hotness, include these. Hit XF is very cool. I think that sets. Now tap
out and we are ready to go. Okay, now I will
select this and I will surface the
forum and I will pick the geometry here and hit
bind and hits like to excite and grab this and
push this back to zero. And now we got our
result of this and hit H. Let's take a look. Very cool. Now I will grab this with the structure of the microphone. Can throw a and apply
visual geometry to mesh, to apply them with the fire. And I will have to go to
the ethmoid N is C to activate the circle selection
and go to wireframe first, you can go to the X-ray. What I want to do is I
want to select some of these vertices and delete them. Let's rotate the view
like this, hit Z again, and let's start pricing
these vertices. And let's go here. It's CA, can and Sprite fees. Somebody like that. And less price these
as well over a year. When you completed XF. This and maybe this area
as well as see at XF. And what else? What else? I think that's sets. Let's go to the throat. Maybe. Club this tab to
go to the ethmoid, hit C to activate
the price endless. Grab these like that. Then it's X V to
delete the vertices. Now we ended with this result. Let's check it before
we go any farther. Now I can grab this
and I think we didn't know if we merge
the vertices or nodes. Yeah, we merged the vertices. And now I will add
subdivision surface to make this nice and smooth. Right-click here the smooth. That's very cool. You can
increase this to two slash. And I will go here to the
filter and activates a lot. Sorry, I think that's it. I will turn off the extra
I don't want to see it in the images and
the ShrinkWrap. Alright, I will hit Alt, maybe Alt H, I guess, to want to see these pieces And I will push this
underneath the Great, For example, I will grab this. I will take either
Coby and then hit me, move this to the extra. And I will grab these vertices, hit Alt S and push
these insights, the current like this. Let's take a look and let's
see if that makes sense. Maybe I don't know if
there's another technique. I think we can push
this back like that. Okay, let's take a look from inside G and let's move this leg that what I want to do is I
just wanted to create some kind of way
to block the view. I want to add a cover
underneath the curve. That's all what I want to do. So let's try to find a way, nice way to keep this lesson. Bring this back here. And let's hit tab. Go to the face Alt S, and let's push this like that. Again, all this. And let's take a look
here from inside. I will add up these edges and
hit S to scale those out, but not to the active element. And now maybe I can move these ages key to the Y and
put this inside like that. I think that's will work. Okay, Yeah, I can use this. Now after that I can
add mirror modifier to mirror this on the
other side to the why. And for this one, I can tap and let's go to the face Alta S and
put this inside again. Let's go here. Alt S, I can, now I can maybe rob this. A can hit scale, has to scale. It, gives you the Z. And let's move this down. Maybe I can scale
this a little bit. People are busy. And if you want to
smooth this out, you can use this smooth
modifier, I guess. Like this smooth, this geometry. You can apply it and sorry. Alright, It seems like you can apply the modifier because we have some some shape keys here. I will hit Cancel
a and apply for you-all too much
rhetoric to avoid that. And now I will tab
again and I will hit S to scale these and hit Q to the Z to move
them down like that. And let's take a
look from outside. Now we have something
very nice and cool. Nice. Okay, now let's see,
grab a cigarette and move this to the extra,
we don't need it. And now we got very
beautiful grill. I think that's it
for this video. I will end it here and I will
see you in the next one.
15. Creating the Mic filter: Hello again, we'll
come back here. And this video, I
want to start with this cover. Less
you can recreate. I think we can start
with the structure of the mic by taking
these vertices here. Alt click on these deep to take a Coby Radcliffe
to live within assemblies and then hit P. And then as
two separate tab article up this in your circle and delete the ShrinkWrap
modifier from here, and even delete the subdivision
surface due to the Z. To move this up and right-click to both the origin
and the middle Oregon dot. Now we got this from the top Iwill scale
this a little bit and make it bigger than
the mic like that. I think something like
that, that will work. Let's go to the France and maybe we can convert
this with this results. Even if this not
much. That's okay. Now I will I will hit Control a and apply
the scale and tap Dakota, it moves from the top. There is some of these
vertices, C club, for example, those
hit X to delete them. Now we will work on this one. Alright, I've started
selecting these vertices, hit E to the Z to throw this
down and go to the right. And let's convert the
extrusion with this. The result looks flawless. Maybe these vertices
and the top, we can just move them a
little bit down like that. And maybe those over here, we can just move
them down as well. Now we got this result,
as you can see. Now let's try to create this
circle that we got here. So let's see how can we do that. Alright, I will tap out and grab this and tap
to go to the mode. And I will grab the circle at here D take
a copy, right-click, leave it and assemblies PM
then as two separate tab out, cut up the senior circle
and delete are applied. The mural delete the subdivision surface
and the ShrinkWrap. We want things to be simple that will tap
to go to the mood. And let's select to
isolate it, go to the top. And I think we can grab these vertices right here and hit E to extrude
them like that. And then as to the Y zero Enter. To get this results, I want
to create this this part. I think it could be a little
bit longer like that. I guess if this length
is makes sense, so we can, except that after doing that I will hit E to the Z to
extrude this up like that. And it should be connected
to this key to this year. And let's move this up here. That's close to reckless a and then ship them to
recalculate the normal. And I will look up its
vertices and Bevel them with Control V to get
something nice like that. Can somebody like this,
or maybe can throw, be again, maybe smaller. Something like this. Alright. After doing that,
maybe we can rotate this Taobao to grab this
and hit out of the Z. This a little bit
like that. This part is a little bit tricky. I'm not understand. This exactly could be squash
or it's perfect circle. I don't know, maybe
it's a perfect circle. I'm also quite sure. Maybe we can just kill this
to the middle like that. And maybe that's will
help a little bit. Or maybe from the top of view. We can scale this to the y-axis. Now let's rotate it.
Alright, somebody like that. Let's rotate this like this. Now let's see how close
this to our geometry. I will scale the set S and Z. After rotating this, I can scale this to the X
and Y and cancel, cancel the Z, S and Z to cancel the Z.
And let's kill this. You can go to the top, maybe. We can see the results as
HEVC. Suddenly like that. I guess it will be okay. That's very cool. Maybe we can rotate this to
the Z a little bit. Maybe something like that. I will grab those together. It's like to isolate them. And now let's see
what's the next step. I will tab and hit a select all of these faces and I
will hit I for insert, to insert this like that. Or I think we can his faces. And instead those the eye. And let's check the results. If instead doesn't work in this case because we
will have an overlap, we can add the
support, the loops. Okay, let's, alright, I will include these.
Let's do that. They can let I, for instance, this result
is that will work. But I should miracle
this age key twice and activate automatic
in America like that. And maybe this one as well. Now we got nice clothes results. And I will grab these
outer vertices. And maybe I can hit Control
Shift V to level them. But a few people
dislike that will be a little bit
difficult to handle it. So maybe we can do something else like grabbing
these phases in the middle, or maybe grabbing
these acres and Bevel then Control V to get
something around like that. Alright, what we got
another problem, we didn't get
something round here. So let's see how
can we fix this? Maybe we can. Alright, let's see what young to happen if we delete these eggs right here. Maybe that will
help a little bit. So and I will grab these
corners and I will get cancer. All will be. Now we
got another results. So this result is okay,
we can accept it. I feel that we have some
kind of strike high will apply the scale and
the crop is again and it can throw be
somebody like that. I will select these
faces and then hit P and then S
to separate them. Now let's try to find a way
to connect those together. Kl grab this with this
hit Control J omega one minus geometry, Control J. And I forget to up
to a screen-cast. Alright, now let's see
what's the next step. I will delete these edges. Timberlake, it can throw legs. And now let's make this
vertex here. This one. Or maybe this one
should be married here. And this one, we
could make it there. Okay, Now we got this. I will add one edge
in the middle. I just wanted to create a guide. In case I want to use
ShrinkWrap modifier. To create a guide. I think we should reconnect
these faces to the, with this, with the frame, the middle area with the frame. Okay. Let's reconnect.
Those are less, re-marriage them it
Control J and the crop, all of these vertices after you tap M enriched by distance. I'm married. So I can
create a line here in the middle C to cut through and hits a to make the cast
right and confirm the cuts. I did all of that. So I can get this line here V and use it as a guide letter of Ioannidis. And now I can reselect these phases and then it's
P, S to separate them. Alright, now let's
see what is the next, what we should do here,
maybe we should give this a thickness or maybe
we focus on this area. Let's select these
vertices and hit F2, fill this and then hit
I for insert like that. And then hit Accept
to delete this. And now I will give
this a thickness, tap it HF then to recalculate
the normal incase, we got any problem
with the normal. And then I will give this a solidify or add
solidify modifier. Let's add the solidify and
let's change the thickness. 23 millimeter, three millimeter Alright, maybe, maybe
four millimeter. Even thickness. Maybe five. I think five will be nice. Yeah, five I will accept five. After doing that. I will hit Cancel
a to apply this. Before I apply the solid defy, I guess want to do something. I created the guide. I will hit Shift D to take
a copy of this and tab. And I will hit E
to extrude these down a and then kept them
to recalculate the normal. I think now's the time to
use like guide because I want to ShrinkWrap these
vertices on the guide. So first thing, let's grab the guide
and he came to the Z. Let's move this up for now. And let's add these
vertices here. Grab this with this
hits K. Connect them. And if you like,
you can add egg is here in the middle to get a better results
and even results. Because I want to avoid
any shading issues. That's why I added
these vertices so I can get results similar
to what we have here. We could do that as well. That's very cool. And
maybe one a here around this will be okay to others. And now I guess we can select
these vertices at eight, select them all, and
deselect those right here. We don't want to include these. And let's go to the object
data or LCA Data Properties. And let's delete these groups. We don't need them. Let's
create a new one and hit assigned to assign these
vertices inside this group. Tab out to grab this. And let's move this right here. That will tap to
focus on the corners. Because I want to make these, I want to create them. So after you will crop them, just go to the mean vertex
crease and push this to one. And if you liked, can
add multiple edges here to make this area
divided evenly. And now tub outs,
right-click Shade Smooth. And let's add a
subdivision surface with level three to
make the super smooth. And I will grab this shape and ShrinkWrap modifier and pick this guide and choose the
group that I created. Now we got perfect results in the sea before and after. You can see the difference. After that, you can move this
to the shrink or you can apply the the modifier, ShrinkWrap modifier bit
control. I end up light. And you can grab
this and move this up in case we need this later. Now the surface is
nice and perfect. And now maybe we can give this a thickness
less at solidify. And let's add five millimeter
activity with thickness. And five millimeter, It's
good number to start with. After doing that, I will apply the solidifying tap to
go to the eighth mode. And I want to select these faces and including
those right here. And those overhear
going to grab those. I've taught you select
all of these faces, hit I for insert. Make an insert like
that. Like this maybe. And hit Control R to
add an H2 like that, maybe should go around
the whole geometry. Alt click on these acres
and I will hit key twice to slide them,
enrich them like that. Alright, so now we
got this result. So let's see if
that makes sense. Alright, that's cool. I will stick with
this result is nice. And it seems like
we made a mistake. We should make the thickness
a little bit smaller. So we can extrude this to
create this area inside. I'm not so quite sure
if I can fix this now. But let's try to select
these faces like that. And I'm going to hit Alt as the CFO of we can put
these back normally. Alright, now let's check here. The result looks cool.
Let's try that again. I just want to make this a
little bit thicker like that. And after doing that, I guess we can hit
I, for instance, to get this result
and maybe I can grab these outer faces like that and I can hit Alt E and extrude along the
normal to throw this out. To get this results.
Alright, now I will select some of these
vertices and leave to here. Or maybe leave it three. And I will hit Q to the Z and
take this down like that. To get our results
similar to this one. Let's see. Anything else. Maybe we can add a
support, a globe here. And this error should be flat. So I think we can grab this face with this
face and he tried dedicated choose key stretch. Okay, maybe we can see which
one of these is working. Alright? If you want to get a good
result using keystrokes, you can select the vertices
and do that like that, and select those as well. Alright, let's do
that again here. Okay, this option,
as you can see, it's create strike straight
line between the vertices. That's all. Now we
get something close. It's not perfect and
similar to the smart, but yeah, we can accept this. Meant if you like, you can slide this up.
That's okay to do. And you can maybe slide these little bits
as well like that. And you can use
keystrokes again. Start with a far vertices. Maybe this one is
better and closer. Let's see what else
we could do here. Well, it's like
to focus on this. And I will add an edge
loop here in the crop these key twice and push
these to the middle. Some of these vertices
maybe we can merit to them key twice. And next dose over here, and this one as well. And this one. And we can crop those here G twice
and make them all up here. Keith whites and maximum. Keith wise me auricular, I was here. That's cool. This area who would be nice and round maybe if we add a
support, a look here. That's will give us
what we want as to this easier answer,
flatten this to the Z. And what else we could do. Maybe now I can select
certain edges like that. Let's focus on these acres. And maybe these here. Alt click to grab them. To select all the
necessary aqueous. Maybe we can use the use the crease technique
to make these sharp. So let's work on
that and let's see. The result is jackets. Maybe we can include this here. Okay? Not so quite happy
with this result paths. I don't know. Let's give
this a cancerous and go here and let's push
them increased to one to make this a good sharp. And I will tap out and I will ask subdivision surface
with level two. Just wanted to kick
the result ferrous, right-click Shade Smooth. Alright, let's see
what we have here. Maybe three. You add three level
that's will make it. That will make the result
high resolution and you can't add Bevel modifier. So I just want to fix
this area because I have very close eight here
and that's all junk to work. Let's turn of the
subdivision surface for an hour and I will grab
these vertices like that. And after selecting these, I will hit G to the Z, just to have more space here, Something like
that, it will work. Let's go to the
right key to this Z. Because I moved this up, I should fix this vertices. The line is not
straight anymore. So let's use this trick again. It's very cool. What
about this area? Alright? I don't know about
this area becomes smoother. Or maybe we can slides some of these edges key twice and maybe we can just
push them like that. I want to get either results. I forgot to include this edge. So let's push this one. The meaning crystal
one for this age. And it seems like I forget
to add this one to include. So let's see, grab it like
that and books this to one, will reduce this to two. Let's see if we have any kind
of solution for this area. Maybe we can develop manually. And I guess want to get
rid of this problem. Because if you want
to make this more to add three-level and
that's too much actually. Let's go to the front.
Let's make a comparison. I don't know, but I think
this one is higher. We'll hit P to
activate the ruler. Yeah, this one is higher.
But why that's happened? All right. I don't
know, for some reason this one become
lower a little bit. So I will create a
guide. Creating guide. I mean, just to grab one vertex, hit E to X would like that
and use it as a guide. Now I will grab all of
these vertices, I guess. And all what do I
should do is moving this up to the Z.
I think like that. And maybe those I can
slide them up here. And then crop the age or the
guide hit X to delete it. And now I will Alt click on this edge loop and Alt
Shift click on this one. And it can throw bit
to the oldest 23, I think that's will be okay
three, something like that. Grab this with this, hit
Control X and dissolve them. The crop this with the set J. And this one with this one is J. Marriage them like that. And the same thing here. Dissolve this,
dissolve this graph, this with this at J, this J. Now I will grab these edges and push the
mean increased to one. And here as well. Sorry, I made a mistake. Okay. Now, yeah, I was correct. Now the result is better. Alright. After
doing all of that, maybe now we can add double
modifier above that. Let's add the bubble
level should target the sharp edges K. Let's
change this to point 1 mm, so I can see what the
will exactly that. Okay, maybe I can add 0.07. And let's add two here. And as you can see, novel targeting this
area and this one, I think bevel now it's worked
exactly like what we want. So let's check the resulting
can URL and let's see. Okay, I can see the
devil hear exist It's exist here and
here as well, I guess. Yeah, that's right in
here. That's very cool. I can see the devil here
and here, on the corners. And here as well. Very cool. Alright, but we don't want the bubble to
target this area. As you can see, bevel the
targeting of this area. So as you can see here, with the angle limits, the limit method with angle
is not going to work. I will change this to wait and I will target the specific ages, the same Hs that we have here. And let's turn this off. And let's reselect
these edges again. Let's scrap piece over here. Maybe these edges, those here. I will push them mean
the will wait one. And now let's take another look. I just wanted to see if
we miss anything here. Those we miss those. Let's push this to one. And we don't need
to include these, crop them and push
this back to zero. I want to Sara to be smoothed out and let's activate this. Look. Let's see
what we got so far. This area is beveled.
It's beveled. Maybe we can add, I don't know, can add three to get
even smoother results. What about this one here? I think that will
target this area. So quite sure about
our mean increase. Yeah, let's push this to
one. The result is better. In general, everything
is cool so far. That's mean, yes, I can extend this results without
any problem. You can increase the
subdivision 23 buckets. If you do that, you should
check the parabola again. Because any creating this, you will push some egg is close to the bevel area and you will have some overlapping. One more thing here
I would like to fix. Maybe I can crop this
egg and move this down. I want to get a
smoother result here. Something like that. And if this technique doesn't help
me to get what I want, maybe I can level
these manually. I'm integrable office
acres and double them. And after that we can use ShrinkWrap modifier off
to do what we want to do. It gets wanted to see if
that make any difference. Let's dissolve this edge. Maybe I can, I don't know. Maybe we can create a
new heart goes here. And I guess we can
grab these vertices and Huike twice and merge them. And the club this one and the key twice and make
this one here. And does all this. Let's turn
this off. This one as well. Let's make this symbol a. And I can dissolve this with
this N mark, this one here. And all what we
should do is just fix the distance between these. Or maybe we can go to the front, I guess, or whatever view. We can grab them and just
move them down a tiny bit to fix the curvature. Maybe take this out I guess we can do
the same thing here. I will grab this face and this face right here
and hit H to hide them. Then hit Control
R to add one H in this area are not here. Maybe we can put this here, so I will grab this edge. Then it can throw off
to add one H here, this with that key twice
and push this one here. Now, grab this H with this H, it can throw legs
and the Soviets. Now let's fix the distance
between these edges. Right-click into space. And this pushes
through one and level 21 alt-text to bring
back these phases. Let's activate this. With this. The
result looks better. Maybe we can fix the distance between
these acres as well. To get even better results. Base. We have the same problem here. There is another technique, I guess it will work. We can grab these phases. These phases like that. I don't want to
include these faces. This case, maybe we
can then crop them manually. All of these. And maybe we can include
those. After doing that. Now we can hit I for instance, to get extra line would be selected zero how these,
but now let's tap. I think that's will help a lot. So now the triangle become here. In this case, I can add one
line here and that's will help to change the
triangle to quiet. Stop. We still have something
you're not make sense. It twice in the slide this Sarah become nice. Maybe we can slide
this one as well. A key twice in
slide, this slide. We still have some
artefact here. If you want to get, to get better curvature here, you can add to support a loop, to support the
corners like that. Until now I didn't get
the result that I liked. So let's try to use
another technique. I will zero out,
everything ends manually. I will rob these ages, enable them to take
a bit of time, but let's do that together. It can throw a B2B level. And let's add three edges, but push the shape to
one because I would don't want to care of it. Okay, you can see
the difference. You can do bullets
with 0.1, I guess. I, 0.1, I think it will be good. And let's grab these edges
here, those over here. And listen, include this
in DSHS, maybe even those. Let's select those and see if we forget anything else. To include those here. I think we selected all
the necessary ages. And now I've started
doing that lists. It can throw be, and let's
bevel this would a 3.1. And maybe we should
support the E-loop here. And here as well. Maybe we can add one
here. In one right here. This activate the
subdivision surface, and now it's activated. But if we will add one H here, That's will ruin this
curvature that we have here. I will dissolve it. Let's try
to find out or technique. From the front I can I
can use the knife tool, hit K and then a to make the cast tried sit
back through and confirm to get this line and now I can move
it down like that. Alright, Let's try
do that again. I will slightly this
time T twice and hit E to align it and
flip the alignments. And let's move this
down like that. Or that will help a little
bit to get sharp. Hey, here. For this area, we could
do the same thing. Go to the right view
and use the knife tool, hit K, it's mic cut
goes like that. Cut through with
this selected key twice or just the key
and move this like that. Now, after doing all of that, I will select the
necessary faces. And I will ShrinkWrap than grabbed these faces here in the middle.
You can hit C. And price the slag that
the Galapagos over here. Listen, include this or
deselect this here for now. Because I'm about to
grow the selection. And maybe these as well. After you select
these two can ***** the selection onetime can throw plus this automatically
will be selected. Now, I will put
these and new group, delete this one and hits
assigned to the suit new group. And as you go to the modifier and let's
add another modifier. Let's shrink wrap and
let's pick our guide. This is the guide,
we have it here. And select the group. And let's see the result now. Okay, now there is much better. Now this becomes smooth and
nice, as you can see here. See if we have any problem here. I think we shouldn't
include this. So go here and remove
them from the selection. Yeah. Alright. I think that's it for this video. I will see on the next one
16. Finishing the microphone filter and creating the dial button stickers: Hello again, we'll
come back here. We still have some
problems here. Let's try to fix them. We could rotate this and I think we got some
overlapping happening here. Maybe we could move
some vertices down. And let's finish
with this pattern. We should have the pattern here. So I will tap to see
what we got here and maybe we can coordinate
these two vertices with Jay. And maybe those overhear it J. Maybe we can add two edges
right here just to make the distance even
between these vertices. Maybe one right here. And maybe I can connect
with this one so we can what phase here. And the same thing can do it right here
regardless, but this hit J. And even this one with this
one had K to connect them. And this were the set J. Maybe one here,
one H right here. I will slide this down just to avoid any type of
stretch going up. So I will add this as a subordinate group
next to this one. I'm going to do
the same up here. Alt key twice,
slide this up here, and let's hit up the face
orientation looks cool. If you've got problem with that. Tab a, select everything
shifts now recalculate. And now let's add the
subdivision surface modifier with level to right-click
here, this mode. Let's take a look. Something
here and what makes sense to vertices
are very close. This marriage them
twice in marriage. And I guess we got
the same problem here and here as well. Now let's tap out. All
right, That's very cool. Now I've started
doing that. Tap it a and then Alta is to book
this inside like that, Something like that.
So it'll be okay. Let's check if we have any gap. Okay, maybe just a
little bit smaller. Maybe in this case, I can crop the vertices
and all of them. It's like to isolate
them and go to the egg, grab all the vertices
with Alt Shift, click and scaled and gets
killed them a little bit too, can go to the front. And let's take this error. I hit S and scale this just
a little bit, not too much. By the way, it's
better to select all the phases S and
scale them like that. Alright, after that we will
apply a texture on it. And I will hit Alt H. I just want to unhide
the shrink objects. I want to link this all back to this one so I
can't rotate it. Because now if you
rotate this piece, this one is not going
to follow a ten, you will get shading problem because we still have
ShrinkWrap applied here. Grab this hold Shift
regardless it can throw me and sit parent and
keep transform. Now it's connected. Now if I hit Q to move, this one will
follow it normally. And that's what I want.
Now let's turn off rank. And by the way, I just moved this cover or the guy
to the rank folder. Now I will grab this and I still have the
origin.in the middle. And that's something cool. And I will look it up
this one as well. Hit R to the Z and rotate this. I think it should be rotated
to on the side, I guess. And now we got something
cool is check this area. We have some problems here. See how can we fix these
problems? I don't know. Maybe we we got problem
with these ages. Maybe they should be they
could be moved down. So I will grab all these edges on the side
and on that side as well. Go to the right end,
HD key to the Z. And let's move those down here. And let's see what's
going to happen now. And now it's fixed. The result become better. And I think we can accept that. I think that's as
you go to the right. I don't have any
overlapping having here. Everything looks
cool and beautiful. Somebody like this,
it will be amazing. Will. The final thing that we
could do here is let's bring back the images because I think is a time to create the
stuff that we have here. And I think it's only dunked
to take time from us. So let's go to the wireframe
and let's start with these Pieces Shift a to
add and I will add plane changes to 1 mm,
make it very small. And outlined is to the View
tab to go to the ethmoid. And I will try to put this
in the middle like that. And scale it gets a
little bit like this. Grab these Hikida, the Z, and let's move those up here. You can throw Shift V
to level this, okay, except the bevel and push this
back to a 0.5 and increase the number here. Alright? And so that make sense. We can control this. I think there is no reason
to manipulate this. Six vertices at will be nice. After doing that, maybe we can, I guess we could select all the faces and hit F
to create a face here. And I will use an F tool
to create cut here. A to note to make the
cast right and confirm. Grab this face. I for insert lessons of
this inside like that. Then he came to the Z
and let's move this down as to the Z, scale, this to the Z, and let's move this up here. I already did this
a that I created. I don't need it anymore. And let's keep manipulating
this until we get something, a nice XF to delete this in the middle,
we don't need anymore. For this side, you can
grab these vertices, hit X to delete them. And I will look up these, have the to the Z and
then go to the mural. Whereas the mesh and we're to Z. And just scrub those
overhear key to the Z hold Control
and estab this one. Something have in here. I don't know what's going on to the Z or Control N. Stop them right here and
now they are merged. And after that, I can grab these vertices at F to create a face and go to the face and
include these right here. Just the Cloud them like that. Then gets hit F to convert
these to one-phase like that. And now done. And what else we could do. Hear about this? All right, I will hit Shift D, or maybe I can grab
these edges like that. And then hit D and
right-click to live with and assemblies and
hit S to scale this up. Something maybe like
that. Too busy. And let's move this
down here and then hit E to throw the end
S to scale like this. Now let's do Club this vertex, this vertex hit Z to the Z. Hold Control. Establish
smart right here. Grab them all key to the Z, which slows down here. Control Shift V to bevel
this pebble dislike that, reduce the number of the
vertices to get this results. Except that, except
the overlapping. As you can see, we have overlap. We can't fix that by
activating the clamp here. When you be satisfied, club is vertices because here we have two vertices, not one. As you can see, you can hit
Control X for each one. And now they become one. What we can merge them
in the normal way. And now I will have
gov this E and move those down here
and I will hit E. I can to look through the OCR up these vertices with those
audio can go to the edge, this edge with this
age, hit E and S and take these out like that. And I guess we can can throw be Control Shift V to be able
them somebody like that. Okay. Let's go to the now we got the
microphone. Move it out. Because nights, as you can see, but we have some phases flipped. Let's go here. Let's
see what we got. Tub got all this face hit
Alt N and flip the essence, done this off. Top outs. And we have the TV. So let's
go to the right again, Z to go to wireframe. And I can copy one of these phases that
we got right here. Anyone resemble this one? Feel like the end. Let's move this over here.
Let's start from here. Okay? Now I will go this
is to the zero, enter, flatten them and love as
well as to the zero anthro. As to the Y zero enter, flatten these two, the
Y and those as well. Let's move this on this
side and these vertices G, and move them here. And those up, those should
be moved down here. Got up all the vertices
Control Shift V to bubble and double them Well, before the
bevel, I guess we can. Can we do that? Alright, should we answer this first,
or benevolence? I will add one here and
the violet fairest to, to lag this saying that I will
love the city. And again. And now I will switch to the age of this E and M S to the Y. Grab these vertices,
can talk about them to five. Now we got this. Now let's focus on
the monitor itself. I will hit I for
insert this like that. And the end. If I build will these vertices, I will get a problem. Control Shift V will get this. But I think I will accept that. I will accept that.
Go to the face, select all of these phases. Make these one face at F.
And these feeders right here at F. What these things
right here at the F. And just connects, by the way, I think we need more vertices here are these
vertices are not enough. I will hit Control Z
multiple times just to go before the bevel command. K can throw, have to be. Let's increase the number. Let's go to the face and
let's pick up these faces. I will hit F, and I will
connect one of these here at J. And this focus on this
area equal to the face, Gabi said F. And the club
this with one of these hit J. The same thing, go to the phase. Sick of these hit F for this hit J. Alright, simple to fix it. J. Here in the middle
we have phase. We don't want them. Xf, hatred of them is
called the perspective. Yeah. Finish. Let's go to the Aren't they can
and go to the wireframe. Save your project. And let's see what
else we can do here. Maybe we can take these
vertices, all of them. Have D, take a Coby like that. And then right-click and choose circle to convert
these to circle. Let's move this one right here. To see how many vertices. We have a lot of vertices here. I will select some of them
with Control Shift plus. Alright, it doesn't work anyway. Maybe manually we can
get selects randomly. Ethics from here. Or maybe
here we have an option. We can try it, go to the Select
a checker, select sugar. If you go here to select, we have Checker Deselect, Select all the vertices
first and then go to Select and hits checker deselect. And now, as you can see, we have some vertices selected and some of them not control X. To dissolve these, I
just want to make this simple, something like that. I will accept this and then
hit F to create phase, and then hit D to, sorry, sorry, I don't
want to include this. This hit F. And now grab it sit, you have D. They can copy and let's put
this one right here. And here, D to take a copy here. You have D to take
copyright here. D to take another copy here. And another cavity
to take FOB here. And D to take a copy maybe here. I feel something
that makes sense. I don't know what it
said. Let's go back. The file, become a
little bit heavy. I always kill this down and it can put this
in the middle. And let's scrub half of
these vertices like that. I think this is valve
does not the half. Maybe we can, I don't know. Can we rotate them? So grab this hits, have D take a copyright
here E to extrude it, I will use this as a guide
and rotate this like that. Yes, I tiny bits. And then K to the Z. And let's move those
down a tiny bit. I want to align these vertices, would this lion, that's all And now I will look up
these here and hit E and move these up here and select these at F. Sorry.
And they can up those here. It seems like we made
the mistake, hit F. What's going on here on this, it's like to isolate this. Maybe we can call these
vertices and dissolve them. And this egg as well. Xy, we don't need
this and effects. And let's try to grab these two faces and
then hit F. Now is watch this go to the right end. X-ray and what else
we can do here? Grab the circle, hit
Shift D to take a Coby. And let's put this copy here. Key to move this over here, S to scale it like that. Have D to take another
copy right here, and it should be smaller.
This one as well. A sense chelates. Let's put this one
right here and scale it. Scale this one. If D and let's take one
here is Caleb as well a little bit shifty. Sql this down. And after that I will look
up this hits here of the kobe here for this one, for the dial button and
just make it longer. Have the I can. And let's put another
one right here. Alright, so now we've finished, I guess the last
thing that we should do is creating the headphone. And let's start doing that. Let's see from
where we can start. Maybe I can, I don't know. Can we grow up these agents have D and data Coby and
let's move those over here. Though is equal to the
mesh and mural to the Z. Let's move this over here. I think that's not going
to work in this case. I will look it up, this hit X. It can throw X to
dissolve them and make this like square at the
S to scale this like that one of the city
and move those up. And let's start with this. Control can talk TFTP
to bevel these rights. And now we have to invert. This is very close. Can throw X4, one of them. And now we got this. You can focus on
one side and after that you can use mirror
modifier, can do that. I will hit E to explore this and I will keep doing that
below this shape. This one here. This one
should be in the middle. So key to the Y hold Control
snapped here to align its. Alright, WHO many, how many
vertices we got right here? One. And we got six and
here we got six. I think we can merge
between these two, create a face at multiple time after you
watch these two vertices. Something like that, I guess. What else we can do? Maybe one vertex I can add here, it lists like this here. As to this easier
Ansar to flatten them. F, F, F and F Again, you can take up those
old at F to create a big face key twice
this slide this up here. Can throw it out.
Maybe we can to here. Maybe one of these here hit F, F, grabbing them all hit F. And those as well. Okay?
Grab this X, V DB them. And this mirror, this
on the other side. But don't forget that these phases are
connected with the other, so it will detach this hit P and then as two separate
tab out, club is alone. And let's tap to
go to the ethmoid. And let's select this, these vertices and make
this one the active. And hit Shift D to take
a cobra like that, change the transform
to the active and less mirror according
to the active vertex. I mean this one right here, go to dementia and
Mirror, mirror to the Y. And Shift Enter, calculate
the normal anomeric. These vertices hits M
N married by distance. Now they are merged about. And let's take a look.
After doing that, Let's, let's like
to isolate these. I just wanted to
kick of the face. Orientation is cool or
incorrect. Alright, tab. And we should, sorry, this tab. We should select these, all of them like that. And those here as well. That's ALT N and hit
flipped a flip them. Now it's fixed. Maybe those
all over here as well. Let's crop the faces. I think that's will be better. Alt N, N. That's very nice. Detach some of them. Vce, for example, hit P and S. And let's select this
one in detach it. Pmn is K. That's great. Now let's turn
of the face orientation. We don't need it. And let's insights and let's see
now what's an extra. I will use ShrinkWrap modifier
to best be on the surface. With this selected. Make sure that everything is in
the correct place. We missed something here. Some of these become
inside of the mesh. Yeah, now I will
select this and I will use the
ShrinkWrap modifier. So the ShrinkWrap modifier and select the surface and done. But I just want small distance
here using the offset 0.01 maybe will be enough. For these pieces. For example, this one, just take this out. And right-click, listen,
bring the origin dot here. And the same scenario,
ShrinkWrap modifier. And let's pick this 0.01. Just leave a small distance. And the same thing
for this parts. Move this out here. And let's add
ShrinkWrap modifier. The same idea as you are 101. That's great. Alright,
so right-click, Shade, Smooth. Smooth. To get better results. And yeah, that's very cool. I think. Yeah, we
are finished here. You can connect
these with the dial. And you can, by the way, you can apply the
ShrinkWrap modifier for this faulty of the club. The dial can throw a
link and keep transform. And the same thing for this one. Can throw all I apply
the crank hold, Shift, grab this control P, link them like that. Now when you move this, this one will follow it and
the same thing for this one. And even if you
rotated to the X, as you can see, for the rest, you can just leave
them like that. We forget maybe the headphone. The same thing just by the
way, you can make club. You can grab this hold
skeptical of these because we applied that modifier
on these objects. I can copy it for
this one as well. So select this one as a first object holds
the integral of this and then go to the arrow
Coby modifier to select it. Do we have here? Seems like, yeah, we have here
and done acids. Maybe this one we can a little
bit more with right here. Yeah, that's great. And right-click, Hey, this mode. By the way, if you'd like
to make this even smoother, you can add subdivision surface. I think that's what
will be better. Alright, that's great. I think that's it
for this video, and I will see you
on the next one.
17. Preparing the scene for the render and starting the materials: Hello again, Welcome back here. Time for the render. I want to put this
above the zero level. First, I will go to
the shrank and hit right-click and select the
object inside the shrink. Okay, right-click
and select object. And I will add these as
well and go to the front. For example, the key to
the ZL, the smallest up. After you move this up, just kick the geometry in
case you got any problem. For example, when I moved this, I guess we got some
kind of stretch happen. Well, that's mean we got some something here.
It should be selected. I don't know what is it, but let's check the extra as well. I will select the occupant
and the extra as well. Alright, I will unhide all of these first. Let's
unhide them all. It's a select everything, go to the front, you to the Z and let's
move everything up. Let's see if we
have any stretch, any problem or something
happened here, maybe no one I think having
everything is cool so far. Go to the front key to
the Z and let's move this up here and just align the plastic or rubber
pieces above the zero level. And now they are. Maybe we can move this
just a little bit down. Yeah, I think that's it. I will hide the shrink wrap
folder with the extra. And now let's check
the microphone again. Everything so far,
it looks cool. We have no problem with anything and hide
these and the render. That's very important because
we don't want to see them. Yeah. What about these? These should be in the
mic. That's really cool. Images. We don't, we don't want to
see the images and hide them. And Arthur, alright,
the mic less. Yeah, I will add plane, but first, for the 3D
cursor in the middle, Shift S and closer
to the origin. And then now let's hit Shift a and let's
add the plane here. It is very, very
smallest change. These two 2000s. Scale it a little bit more. Yeah, I think that's Very cool. Alright. Let's add
a light source. Let's go to the light and
let's add area light. You can scale up,
make it smaller, and maybe we can add one here. Just rotate towards the
mic like this for now. And let's go to the render
and changes to cycle. And this week that
device to give you. If you don't have this option. And the preferences just go to the system and coda and activate the NVIDIA GPU from here, Z. And let's go to the render. And let's see what
we will get there. The render setting here
we have the de-noise. Let's activate it in noise. For the background. You can make it one solid color. I will sublet this to, sorry. I wanted to sublet
this to two like that. And I will see this,
I mean the editor. I will see the editor
to the shader editor. I want to work with the
environment triggers to world. Here we have the environment. You can change this to something quite like
that if you like. And I want to blend the
ground with the background. Select the ground and go to
the object properties and the visibility here we have
hello capture, activate this. And now it's blended
with the environments. And after that, maybe
we can add a camera, Shift a, and let's
add a camera here. Alright. Now the
camera, It's big. Iwill scale, if it the same
scale that make it small. And I want to frame it's to the view that I
want, for example, I would like to look at the microphone from
this angle to do that, hit Control Alt zero. And now the camera framed here, you can after that, go to the If you, and navigation
and walk navigation. If you choose this option
now you have the ability to control the camera like
you are playing a game. W, forward and backwards. A to the left, D to the right. And you can hit Q to go down. You can hit a to go up. If you rotate the wheel back, you can make all of these
movement a little bit slower. So let's put the
camera right here. And now we got this. The light looks cool, the background looks cool. Maybe later we can
add another light, light source, but for now
is focused on the material. Let's change this back
from world to object, and let's grab the structure
of the microphone. And I think this is not plastic. I think this is aluminum. Let's put this right here
or anywhere you like. Okay. After you select the
body of the microphone, I will continue to create
a new material and I will call this like metal. Empty for material. This one should be dark. So let's take this to
something dark and I think it should be a
little bit bluish. I feel that we have some
kind of blue color or read. I'm not sure quite sure what's, let's zoom in here. And I will king this
to something bluish. I just wanted to see
what's going to happen. If I do that. I think now this color is
close to what we have here. And let's check if we take
this to something, right? Yeah, I think the blemishes. The blue color is
the correct objects. So just push this
toward the blue. Or you can control, control that from here. Something like that. Alright,
I've started doing that now let's apply this material
for the other pieces. This one, this, this I guess, and the tripod hold, Shift, grab the first material. And then let's take this out and go to the
material section and open this arrow Coby
material to select it. Now, this material should
apply for these pieces. The handle as well.
You can grab it. This piece right here, halting. Have they got up the body? The same thing, kobe
material to select it. And this one as well, saltiest body copy
material to select it. And the dial. Hope this kobe
material to select it. So far we did a great. Alright, after doing that, I will push them
metallic to one. And let's try to find a way
to cancel that softness. Alright, let's see
what we can do here. In darkness. Maybe we can use noise texture. Let's search for noise. And I will hit control shift click so I can
preview the noise. As you can see, the
noise is distorted. We want to add extra notes here so we can get
better results. Because I have no
triangular activated. I can hit Control T to add
coordinate and mapping care. If you can do that, that's mean you should activate the Node Wrangler in
the admin section. Just search for WR and you will find this
right here, no triangular. This will give you extra
important shortcuts. You can use it and
the header editor. And to fix this
trait we have here, I can use the object's method, this node right here, that will determine
how the texture will be applied on the object. So I want to apply
the texture by using the object's method. And now as you can see, the texture is fixed, but we should think the
scale go to the scale and less changes to
100 maybe for now. And as you can see,
we have something. After doing that, I will put it the roughness to
something high and pick the details to get even more
details here to ten maybe. Now we got this. When you do that, change
the scale to maybe 500. Make it very small. If you can go beyond
that, if you'd like, it can go 1,000. And let's see what's
going to happen if I crank this up to 15. Adding more details
here, maybe 20 I want to try to kill this
variation that happens in the color between the white
and dark color we have here. If you'd like, who can
add another zero here? And now, it's become very tiny. Alright, Now after
doing all of that, you can blog this
without our furnace. And I can hit Control Shift, click tool, blog that principle. Now when you resume, you should have some variation here happen if you can see it. Who can reduce this to 5,000? As you can see here, we have
something happened here. And that's will help to give us a close results what we have. And we can control that even
more by adding another note. So let's search for cure, see EUR, and add this
outer cubic curve here. By adding this, I can take this down to make this
a little bit reflective. See the results. But don't make the
variation too high. I will take the white
spots and move this down to make the white area
here a little bit darker. And by the way, if you make
this darker, that's mean, you will make it more
reflective, not rough. Maybe this one, I can take
this up just a tiny bit. As you can see right here. I make the variation subtle. Let's say that can
throw Shift-click here. Let's take a look. This, zoom back a little bit. All right, above that, we can use the noise temperature
in the normal Oswald. Hit Shift a to
search for Bump Map. And I will plug the normal of
the bump would the normal. And I will block the
factor to the height. So we can have some
height information here. Now we have some
height information. But that's too much
one I will add 0.1. Make it very subtle. Okay, now we have something, we have some variation. We have something here that
will make the results. It looks even more better
and more realistic. Maybe we can increase
the level of the lights to maybe an
unknown, 25, maybe 50. Let's make it a
little bit stronger. Alright, Now there is
all looks fine so far. Alright, so what's
the next step? Before we go to the next step, let's check this area as well. It looks cool. Now let's
focus on these parts. Let's give this a
rubber material, go to the New and I'll put
call this black rubber. I think it's a thing of
the spill is correct. And let's type here
empty material. And I will change the base color to
something dark like that. Maybe a little bit darker. And this peculiar, maybe we can take it
back a little bit. And maybe we can add
subsurface scattering. Well that's not important, but if you want realistic
about maybe we can use it or if you'd like you can't
ignores subsurface scattering. Let's add 0.01,
make it very small. Even 0.01 is too much. Let's change this to, let's
add another zero here, and not just vats here in the, in the subsurface radius, we have the red and
blue and green. And as you can see, the
biggest number is the rate. Well, that's will give
us some reddish color, as you can see here. Can feel that we have some reddish color
happening right here. And that's because
of this number. Now if I unify these numbers, I can make, make it even. Just add one here
for all of these. And now the result is even. And you can kick this to, you can add another zero. Right now the result looks nice. And we got what we want. Now it's can give you the feeling of the Arab
or if you want to control the roughness you can make clean or you can
add some kind of rough. By the way, you should
add some some noise. So I will grab this and I will Coby the noise information
that I have here, hit Control C multiple time, grab this one and
it can throw V. And now we have these nodes
like this to the normal. And now we should have
some height information. But I think we should change the scale to something
smaller, like 1,000. So we can see something here. I don't know, maybe maybe 100. Yeah, now we have some texture
and that's what we wanted. What else we can do here? Here we have this
Kober material. Listen like this. No, this one should be plastic
or metal, black metal. Halt, have to grab this. And let's covariates Coby
material to select it. Now, so K is become dark. I will select this one end. I will call this, or I will give it
a new material. And let's call this
copper empty or material. And let's change the
color to something yellow, something like that. And radiation the same way
you can copy these values. If you want to make this mental, just crank up the metallic to
one to make it this metal. And let's see what
else we have here. And maybe we should have some, something in the normal. I guess we can Coby
this information again, it control C. And
let's grab this, hit Control V. We'll
apply this to the normal. And I will change the
scale to maybe ten, make it very small. And I will increase
the strength to 0.5. Maybe. I just want
to see something. Now we have something but
I think that's too much. I want to kick the noise,
decrease your first K. Let's add 5,100. Now let's go back here. But let's reduce this to
point to make a subtle, I don't want to
make this strong. Even the scale, I think
the scale is too much, so I will change this to five. I just want to see
you the difference. But we will get, let's try one. The CEO is going to
happen with one. No, one is not going towards K. Let's change this to three. I just changed the scale to ten. As you can see,
the whole area is affected by the noise texture. I want to make some variation. I want some error to
be smooth and some of them to be affected
by the noise. I can add another node
here is called colorRamp. Just search for ROM,
RAM, pea, color ramp, hit Enter and plug
it right here, and just push the black value and increased a
little bit like that. Let's take a look and see
what's going to happen here. Okay? Maybe a little
bit more like that, but don't go too much. And according to the color ramp, now, some error in
a become clean. Some of them effected
by the noise. Maybe we can push the, the whites value
towards the black, like that just to increase the contracts between the
black and white color. You can see the result here. If I go here you can see
was young to happen. If I push this, for example, that's will increase the
level of the white here. Okay, so hit Control
Shift click here. And maybe the The roughness we
can cancel out with massive grave textured soils add mass grave, grave texture. I will hit control
shift click so we can see them as grave,
how it will work. And I will like the victor
to the victory here, so I can take the information that we got right here
and apply it there. I will change the scale to maybe 100 plus to see what's
going to happen. Maybe, I don't know,
maybe more than, yeah, Let's change
this to 1,000. Now we have something here. Let's change this
to maybe ten K. Let's add another zero here.
I think that's too much. Let's change this to eighths. Or maybe 55 will be cool. Now I will increase
the detail so we can have some details here. And diminishing, I
think it's called, we can take this down. Now as you can see,
become, has become sharp. And I can throw all this
and this with care, RGB care of search for care. And then let's add
this one right here. I will take the wide
value down like that and take the
black value up. So I just want to make the two colors close
to each other. Something like that,
I guess, and I will use this in the darkness. Let's see the result here. See what we got so far. Okay, Now the result
become two are off, but I can control the outcome
of the up with another one. Search for our care. And I will take this down just a little bit to make this a little
bit reflected. By the way, I think
we should have a light source on this side so we can see
what's going on here. I will put the 3D
cursor right here, and I will add point lights. And I will hit key to
take it right here. And it's very strong
list add to maybe here. Let's zoom in here.
Alright, let's add one. Okay, now we have something
like copper. I guess. We can cancel it even more. I think this result
looks nice and close to the reference
image so we can accept it. Yeah, let's accept this one. I will apply the same
material on this object here. Grab this hold,
Shift, grab this one. Can throw L and sorry, go here to the material land
COVID material to select it. And now it should be
applied here as well. Very cool. What else? Maybe we should
add it to this piece as well. Hold here to grab this one and this covalent material
from it to the new one. And what's about this one here? All you have to grab this
copy material to select it. Anything else we can do here? Now let's zoom in here. I just wanted to
see the material from far distance. It will be very
nice and beautiful. This piece, we forget
it, hold, Shift, grab the black one end will
be material to select it. Nice and awesome.
Let's move this away. Alright, so far it looks cool. And I think I will
end this video here, and I will see you
in the next one.
18. Finishing the materials and make the mic ready for the render: Hello again, we'll
come back here. Let's focus on the grill. Less switched with our render. And let's create a
material for this. I will try to copy the
same material that I added for the body. And if that works,
I can accept it. So grab the that grill halting. He picks up the body, go to the materials section
and copy material selected. And let's see if that works. Let's give this some time. Well, that's works perfectly. It's very beautiful.
Yeah, I will accept it. The same thing for this one
and grab this hold Shift, grab this copy
material to select. Amazing. Alright, so we've
finished with that. What else we can do here? Now maybe we could create a
material for this inner area. Because I want to hide all
the details from inside. How can we do this? The resource file, I have three textures
here we will use. This is the diffuse color. I will use it, end up light
on this face is insights. So after we select this object, hit the annuity,
create a new material. And now let's go to
the texture folder and click and drag, and let's use this texture. I will block this
to the base color, like a bat and let's zoom
and it gets wanted to see. Alright, It's not
applied in a good way. In this case, I quit. I can do is I can hit Select to isolate them and
kick what we have here. We have Marad light. Alright, I will apply me or
it can throw an up light. You can't apply it
for some reason, maybe here because
of these stuff. So delete these and delete these as well, and go back here. I hit cancel all I have life. And quickly I will rub this and it will
be easy to our up. Just tap and go
to the edit mode. And now we are in the edit
mode, hit the eighth, select all of these faces, and now we have them here. Well, I think there
are all wrapped in a good way before
you are obvious. I guess wanted to go to
the material and review. I want to see what's
going on here exactly. If you can't see anything, hit Control T to
add texture mapping and mapping and
texture coordinates. So I can't see anything. Let's check the UVU. We have any UV map
here. We have this. I don't want this, I
want to delete it, so I want to stick
with this one. Alright, I will, or rabbits. So select these faces and let's go to the UV and
hits a rock to our up. And now it's aurochs
right here and the texture is applied
perfectly as you can see, that's great. That's cool. Here when you rub, rub it with the angle method, you should find this
closed lag that open it. And I think the default angled base lipid
lagging this tab out. And as you can see now
we have something cool. I will change the scale
to the X and Y and Z. And it is a little bit slow to goblin together
to change them. I will add a note
here is called value. Value. We will do that for us
and just add one here. And like this here increases
to three if you like, to duplicate the
texture multiple times. We have some seam here, but it's not going
to be visible. So don't worry too
much about that. And notice it's like to excite and let's see what
we got so far. Very nice and cool. And I think I can make the
texture a little bit darker by adding care of here, search for Carol, cubic
care of and delegates. That will take this down
just to make it darker. We could apply the same
material for this one as well. Rabbits all TFT grabbed this and go to the material
and Q is kobe to select it. And because this one, it should be 4-OPT. So let's hit cancel. I end up live equal to
humans for to make, to apply everything here and delete this stuff.
We don't need them Delete the UV here,
we don't need it. And let's go here to the, sorry, just tap and select
all the phases in here. And go to the UPN are up to
our arbitrary and now it's our hot tub outs and assets. Let's push this up
just a little bits because I think that's too much. If you want the scale
to be even grab this killed them down because it should be small as compare
to the texture because these pieces where small as
compare it with the Sure, I mean, if I grab these
two other and tap, as you can see now
the size of this, it's almost similar
to the size of these. And that's what we want here. Now is the time
to focus on this. And we didn't.
Alright, let's see, create a new material
for this object. And let's shrink the name
to what's to fabric, maybe just to recognize it. And I will do the same thing. I will embark this Fisher and
I will embark on this one. As you can see, I made
this with Photoshop. Click any track and
with this one here. Okay, so plug this to
the base and this piece, it should be dropped as
well to get better results. Tab hit a and then go
to the up arrow up. And now it's all
wrapped as very cool. Tab out and zoom in. Very cool. Now the
result is nice. And after doing that, I'm going to use
this in the Alpha. So plug this to the Alpha. And you should get this result. Now if you go to the render, this area should be opened. Let's give this a bit of time to render to see the result. And now it's working. And I think I'm also quite sure I think it
should be smaller. And maybe we can increase the roughness a
little bit and King the specular, take it down. Maybe we can increase, make it a scale smaller
here it can throw all tie to add mapping and
tickets for coordinates. Let's change the XY Z22. I think this result
looks better. I can feel that we have some kind of
distortion right here. That's comes from
the texture itself. So let's see why that's
happening less broad, this endless tab we can do here. Alright, let's
activate the sink. And notice from this vertex, I guess wanted to see where as it's and why that's happening. I will move this vertex
key and take this up, maybe down. Let's a. And then I will
reabsorb this hit UV, or we can hit U twice. This time, I will use note the angle I will
choose confirmable. I think confirm, you can
give us another results. One more thing here,
I just forgets we have subdivision
surface exists. I will tap out, end
up lights and I will re Arab this with the
subdivision surface of light. So tap again and us become high resolution
as you can see. And now we got the problem. So it's you two times. And now the result is better
and perfect, I guess. So let's see what else
we could do here. Nice and cool. And you can
do something else like changing the scale for the fabric if you want to
get even better results. D to take over here and
plug this to the vector. And you can change the X, Y, Z to maybe five. And you can make the color a little bit darker
of the fabric. Shift a. And let's hear for Cara Ellison block
this one right here. Just push this
down a little bit. Let's will help to make
it a little bit dimmer. And after doing all of that, maybe we can use
the texture itself and the normal soulless
search for bomb. And listen blog this
wall right here. And I will like the texture
to the height information. I just want to see
what's going to happen. Let's change this to point to Alright, maybe we can add a
ramp kilogram circular ramp. This up like this one here, so we can control the color, can throw,
you have to collect. So we can see here, I will put the white value just to make a stronger a little bit so
we can see the effects here. And let's go back
to the material. It should be stronger.
Let's push this to one. It's 0.5, 0.4 if you like. That's cool. Let's zoom
out. Let's see the results. All right, above that we
could do something else. We should add the texts of the Rode gravity and let's
put this right here. This mix between these
halt control here, right-click from this to this. And now we will, we
have the Rode applied. I will put the root
fixture in the factor. And I will put the
texture itself, the fabric can the a and
leave the before the Rode. Now if I click the color of the B to whatever color
this text will be affected. After doing that,
we could create another UV for the
same objects so we can throw to have the ability
to control the text. Now if I select this and go to the object data properties, I have this UV, I can create another one here. And with this one selected, I will go to the UV and
tap to go to the ethmoid. And I can rewrite this, so it's up to time
to rewrite this. So to control the root, I will add a UV set for UV. The block, the UV here. We are telling this ticket sure. That we are telling this the Rode texts that you will take the information
from the second UV node, the first few weeks,
the first few V. Let's for the fabric
and for the Alpha. And the second UV will
be just for the text. Now, I should choose the UV from here so
I can control it. Whatever thing I
will make to the UV. That's what effect that takes. And it's not going to affect the UV of the fabric
of the Alpha. For example. Now I can scale this and
make the text smaller. And I can rotate it. As you can see, we have some repeating happening right
here to get rid of that. Go that go to the
texture and change this from repeat to clip to clip it. And now I will rotate
this like that. Both cancel. Alright, we should draw
it like this, sorry. And scale it. And let's
check the results. Let's see if that's correct. Something like that. So let's yeah, I think that's that's cool so
far. Let's tap out. Very nice. Very beautiful. Nice. You can leave a thread or you can change
this to something light. Feel like you can
add some green. Can do whatever thing. You can add the texture right here, if you'd like. Very beautiful. I think now we are finished. That we miss anything else here. It's not quite necessary
to give this a material, these texts because the
results so far looks nice. Let's go back to the camera
and maybe I can take glucose. So just go to the
render here, I think. Yeah, I just going to turn off the noise threshold
and it will change. I'm not going to render this
using the noise threshold. I will render it
using the samples. So let's add, for example, for hundreds assemble or
maybe 400 will be nice. After that, I will
render it and let's see together what we will
with what we can get and maybe I can
rotate the camera. First. Let's go to
the camera setting and I will change this to H5. Okay. Let's go back,
gets a little bit. And here I can switch
between those. So let's kick this to, okay, I think we should
change this to 110 at. Now the result looks called. Let's zoom in like that and
let's take a quick show just I want to see the results and I will be back
when you combine, it, can go to the render, I hit Render and assets. The render is finished and
the result is amazing. Very, very, very cool. Imagine if we take this to Photoshop to make some
color correction. And manipulating the level and the staff to make more
contrast to will be beautiful. Alright, I think that's
it for this video. And see you next.
19. Post processing the final render: Hello again, Welcome back here. I'm going to use cup
cut to color correct? Our final render, this one. Curb cut, is a free software. Usually we use this
software for video editing. What you can use it for
images thing as well. I mean, changing the
color correction and add extra stuff on the
image or extra effect. So go ahead and download the software and let's see together
how can we use it? I'm not going to
explain how to use because I'm going just to teach you how to put
the image and how to add the effects and
render the image out. So after you download that
software and open it, you will find an
interface like this. And usually you will not find anything here and the
middle, it should be empty. Hits a new project to
create a new project. And now It's opened. After that, just click
and drag the image and boots right here that
Oakley in the timeline. So this is a timeline. Okay. Don't worry
about the timeline. Don't move the time
slider, just leave it. Here we have the
effects and the texts. You can add whatever thing for you, if you will,
like from here. I just want to work
with that adjustments. So go to adjustments. And here we have this
little blast just hit this. And now we have this
adjustment layer above this. Here we have all
the effects that comes with that
adjustment layer. I will hold Control and rotate the wheel so I can zoom
a little bit here. And when you hit space, you will play this part. We don't need to play anything. Click and hold them
middle mouse button to ban, to move the image. And maybe we can make this a
little bit bigger like that. And let's see what
we can do here. Alright, brightness, maybe we need a little
bit of brightness. Okay? Maybe we need a little bit
of contrast like that. And highlights. I think we don't need to
manipulate the header. Let's take this bag
just a tiny bit to make the dark area a
little bit darker. I think that will make the
result even more interesting. I think that's it for
this, maybe harp, I can just make this a little
bit to harbor the result. You can add 1210, Maybe. That's very cool. And after that, you can use the vignettes less
boisterous to maybe 14, just add hello around the image. I think that will
make the result even, looks even more interesting. You can hear, control
the curve if you like, can manipulate this. So you have this option. You can hit right-click on
it to delete these handles. And here we have the color, the color wheel for the bro. If you are subscribed
with the problem, you can control these, but we don't need
to miss with them. Okay, now I will maximize
the image and seeds. As you can see with just
a little bit of touching, we got something very
cool and very nice. Now the question is
how to render this? Let's see that from
the maximized view, you can go to this little three lines and
hit Export, still a frame. And here you can choose
the destination. And after you choose the
destination, give this a name. For example, I can
call this a curb. Cuts render just
to recognize it. And you can choose
the format from here. I will leave it being
key and hit Exports. It will be exported. Now let's open the image and
let's take a look. Alright, so this
is me right here. Double-click 12 min. And let's zoom in a little bit. Very nice. Very beautiful. You can use cup cut to color, correct the images or the video. And you can get very beautiful
result like this one. Alright, I think that's
it for this video, and I think that's
it for this course. My name is Mara Hussein and
see you in future courses. And if you made an example
like what I did here, if you followed
me to this point, please share with me your
results in public kits so I can see your result because
that's very important for me to see my students
what they can do. Alright, take care and see
you in future courses. Goodbye
 Marwan Hussain, 3D Artist and tutor