Transcripts
1. 001 The intro: Hello everyone. Marwan Hussain is here and welcome to my
new blender course. In this course we're going
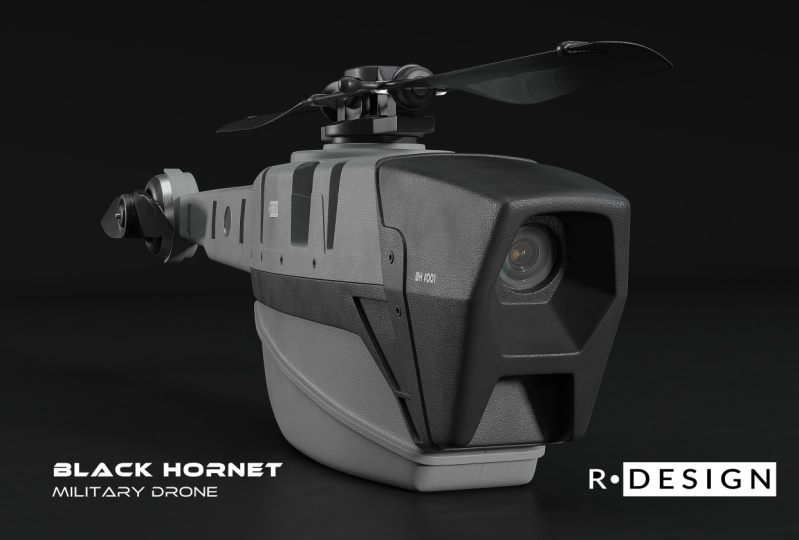
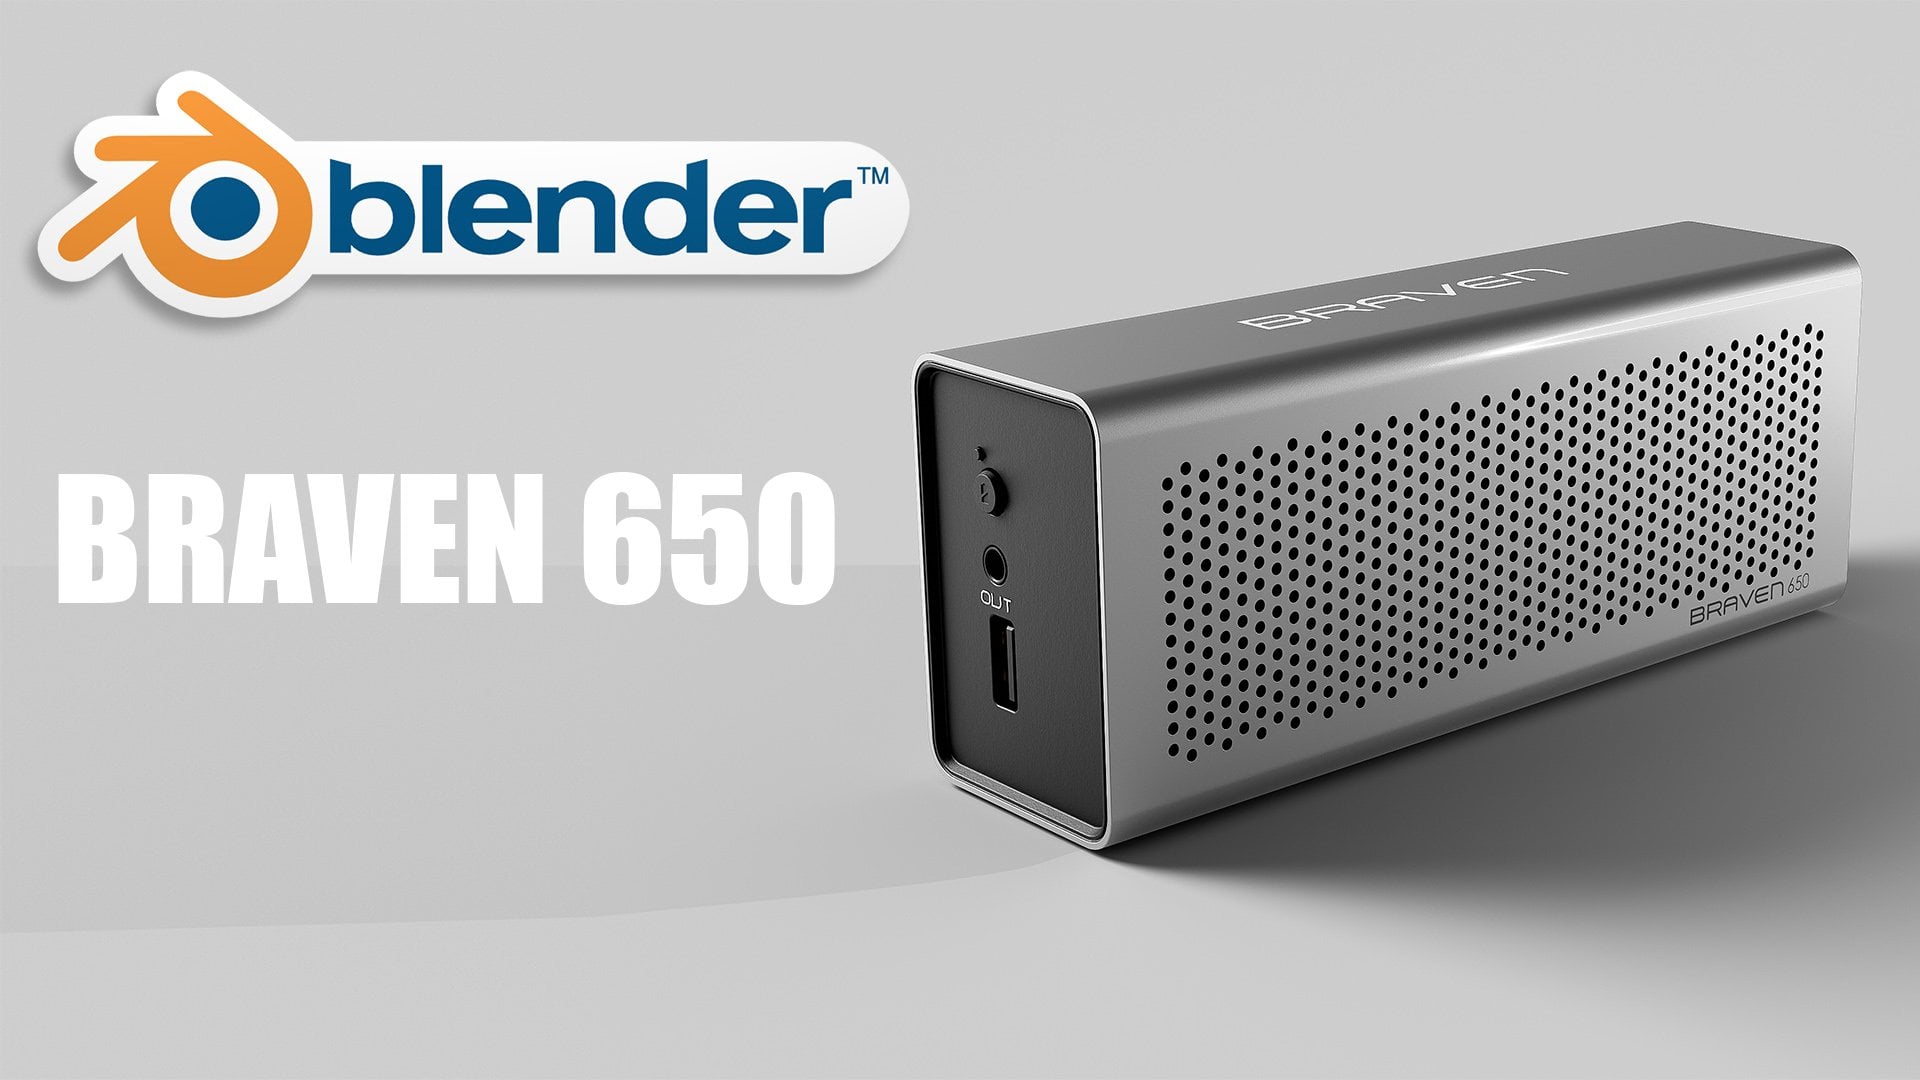
to create this nice, beautiful nano drone. I saw this nano drone in a movie. in the beginning, I thought
that this is not realistic, but I made a search in the
Internet and then I find out that it's really exists. This Drone is used for military
purposes. They use it. to spy, to scan the area, see where's the enemy location. And it could be used
for a lot of stuff. It is very nice and simple. After that, I decided
to create a course. teaching you how to create it. This course. We're going to learn
modelling, creating material, lighting, illuminating
the scene, and make the final render. There are a lot of
things in this course, we're going to learn a
lot of techniques in the modeling in the
lighting, in the materials section. this course
is full of fun. Listen, browse there,
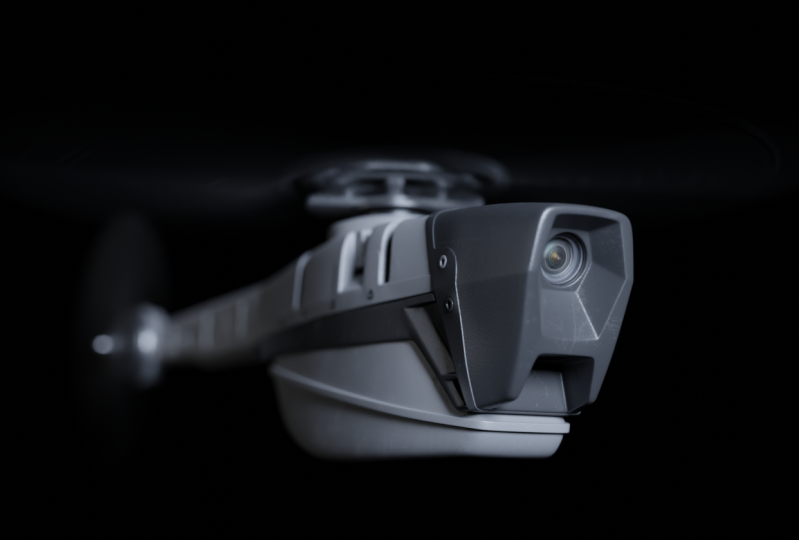
there are images. Let's see what we got here. As you can see here, we got a lot of details. We're going to
cover all of that. The lighting, how to
create a nice contrast. result like what you see right here, by adding the light
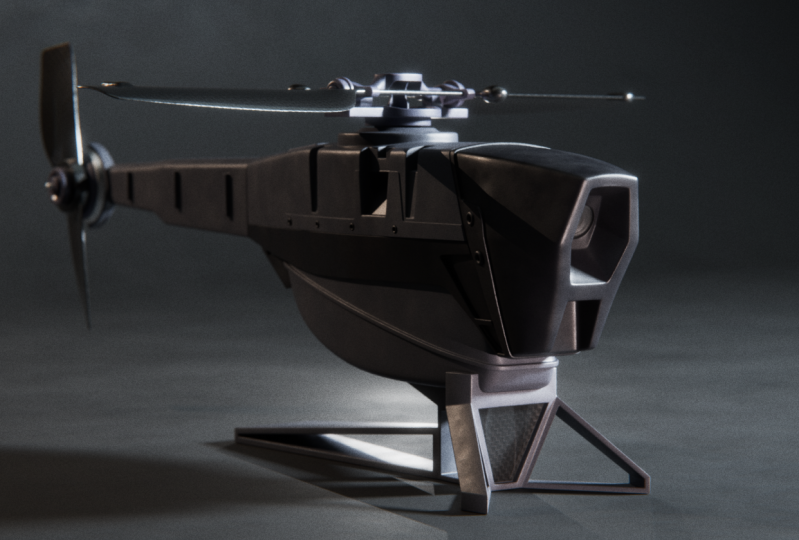
in a specific area. And we're going to cover that. We're going to learn how
to create the depth of field and the motion blur. As you can see here, we have
motion blur and rotors. There are a lot of
fun in this course. There's something important
I want to mention here. This course is not
for beginners, it's for intermediate
and advanced users. If you are a beginner, I advise you to watch my other courses might
begin our courses. If you like this results, you can join me today and I'm going to show you how
to create all of that. And how can you
create a project, nice project like this. Al right, so Marwan Hussein is here. And I hope you like the intro. I hope you like the results, and I hope you'll join me
today to learn something new. Okay, so that's it.
See you inside.
2. 002 Before you start: Hello everyone. I'm saying here before we start, I just want to
mention something. Before you start, you should
download the resource file. I will leave this file. In the last section. I will call it e.g. the project folder. Inside this folder, you will
find all the resource. The final render, I will
leave all the images here. The reference image that I'll use to model the
Black Hornet, I will leave it right here. The textures. All the textures will be here. And the 3D model. And reference images. I will put all the reference
images inside the tool. It's called PureRef is very
handy and nice tool to use. Let's open the PureRef and let's browse the images. As you can see now, I can browse all the images here using this PureRef it will be always active and on top
above all the windows. You can use it when, when you model the, the Black Hornet and you
can browse the images easily. So as I said, is very handy
and useful tool to download. I will show it how
can you download it. Just go ahead to a PureRef.com and then go to
the download section. After that, choose
your operation system? For me, I will choose Windows. Just scroll down. And here we have the pricing. You can pay for them. If you can. If you don't, you can go through
that costumer mount here and zero out this section. just add zero and hit enter. After that, you can
download the tool for free. And when you do that, now you have the ability to open that pure folder inside
the project folder. Alright so this all what I
wanted to mention here. And yeah, see you
in the next video.
3. 003 Start modeling the head of the black hornet drone: Hello everyone and
welcome back here. Alright, now let's get started. Let's see how can we
create black coordinates. Then another one, I have these reference images inside a tool let's call a pure rough. It's very handy. Handy tool and nice. I collected these images from the Internet and you can find them at the last section
and the projects folder. Alright. If you hit double-click, you can frame the image so
we can see the details. This is the black coordinates. Now neutron. This is another image. We can see some details
here to understand. How can we model it. We have this parts and we
have the body and the tail. Alright? We have this image, but I think this one is a little bit different as
compared with this one. I mean, the front area. Right. Let's see what
else we have here. We have this one as well, but this one is not
realistic or this fake, but the shape is so
close to the real one. Alright? Alright, this MAQ,
have this one as well. We can see the details,
the front side. And we have this one as well. But the academy right here is no similar to what
we have right here. So just keep that in mind. This nice image, we
have some details here. Alright. And I have this left view image. We will use it as a guide when we model the black hormones. All right, so now I will take these images out of
my screen for now. And now let's get started. I don't want all of these stuff. I will hit a to select them all, and then hit X to open the Delete Menu and
then hit D array. So it is just a d. And let's go to the lit review. If you want to go
or if you want to switch from view
to another view, you can go to the view section here and go to the View
board and choose whatever, whatever view you want. And here we have the
shortcuts for the views. Alright, so for me
I'm going to hit Control with the three from the lumbar to
sweep to the left view. And as you can see here, we got the left view,
left orthographic. After that list to bring
the image right here. Just click and drag and
put this right here. It's very easy. Don't worry about the size of the black
coordinates for now. Let's put this MH. Maybe we can move it
just a little bit. You can go to the Move Gizmo
and activated the end. Use like that. And let's e.g. right here, or if you prefer, I can hit G and just
move it like this. And just keep in your mind
whatever button I press, you will find it right
here and this area, okay? Alright, so now we
have the image, and now we can go to the
setting of the image. It's right here. Alright, let's open this menu
and see what we have here. We have the opacity. Maybe we can reduce the opacity
a little bit like this. And here we have Show and orthographic and
perspective are activated. I don t want to see
this other perspective. I mean, as you can see now, I'm in the left orthographic. If I tumble around, I will speak to perspective as retinal right here if
you noticed this area. So I don't want to see the
MH, the perspective view. And that's very easy
to turn it off. Just turn this off
and you will hide it for any reason if you want this bag, just
activate perspective. Now listed control 32
is week two. Left view. And let's see how
can we model this. So now we have the
side if your image, I don't have the top of view. Alright, so that's fine. I, for any reason, if I want to create
everything from the tub, we will analyze the
images here and we will get it and see
what we can do. Okay? All right, so let's hear
from where we can start. So maybe we can
start using cube. And before that maybe we can look the image so we couldn't
move it accidentally. So in this case, you can go to the
filter right here. And activate the
selectable option here. Now, we have the selectable
icon right here. If you hit this, now you can know it can't
move that image anywhere. That's very cool. I will hit Shift a to open the Add menu
and I will add cube. The cube is the size of the cube is two
meter for each side. It's very big. I know, I know the the black hornets drawn
is very, very small bars. We will model it at this size. And after that, we can always scale it to whatever
size you want. So let's scale this
down just a little bit and maybe we can
hit G and move it. And let's throw out here. By the way, the scaling gets hit X and move the mouse,
you will scale it. But keep in mind to keep some distance between the
origin and the mouse. If you put them all as very close to the
origin and hit S, you will have some difficulty
to control the scale. But if you have nice
distance like this, e.g. it's very easy to scale it. So hit G and the smoothest
right here, it can move it. Now we have this right here. Now I want to show you
though to the wireframe. You can hit Z from the keyboard to speak
to the wireframe. But if you hit Z and you've
got these four options, that's mean you need to change
something in the setting. Go to the edits, and may go to the
Preferences here. And let's go to
the key map maybe. Here we have this nice option is called Pie Menu on a trike, just activate this
one right here. Alright? Without this option,
if I turn this off, if I hit Z, I will get the
pie menu when I hit Z. But if I activities
option now if I hit Z, Z button will help us to sweep this tool,
solid or wireframe. Alright? But if you hit Z and make
a little bit of dragging, you will have the
pie menu again. They're very nice option, just activate it and then go to the burger icon and hit Save
Preferences. That's it. For now. So this is the, the cube. Here, we got it. Now, we need to go
to the sub objects. We need to move some vertices
and make some editing. You can go to the
Edit mode from here, or you just need to hit tab from the keyboard to switch between
objects from one to n. Let's start with this vertex. Maybe we can hit G and move
it right here temporarily. Maybe this one we can move it and let's put it right here. Maybe this probably
came over at the end, was here, this one as well. We can move with
inputs right here. The idea is we need
to take the hay, move these vertices and follow the cave over
the black correlates. Until now, we got this
very simple shape. And now we have a lot
of anything here. Let's hear from
where we can start. The submarine, the reference
images and the front of us. And maybe we can make this smaller just a little
bit like this. Let's see. We can, we can pick, let's try to see this image. Maybe let's try to
pick another one, e.g. let's see what we can use. Maybe the smile right here. As you can see, if you
try to analyze it. This area or this line is a little bit big as
compared to this one. It should go like this if you want to see it
from the top view. Alright, It's almost like this. This is the head. Alright? And the front. It should be almost like this. Something like this. So let's try to make some
editing to this shape. Trying to achieve
something like this. Let's keep this image right here and let's say from
where we can start. Alright, so first thing, let's go to the lips of view. It can throw and three. And here we have a few noticed, we have some layer right here. It's almost right here. Let's try to make it. I'm going to hit Control
R to add an H right here. It's almost go flats like this. So I'm going to move these
vertices up just a little bit. You can hit G to this
and take this out, but you will break. This line is not going
to be straight anymore. If you want, you can grab these two vertices and
hit G twice. And GnG. Slide this up just a
little bit like that. That's what would be enough. And don't forget, I'm
in the wireframe mode, not in the solid model using Z. All right, Let's go to the left. I can at least see what
else we can do here. Maybe we can add two
edges right here. You can hit Control
R to add a club. Alright, don't forget
the shortcut right here. Hit Control R. And now I have a
preview of a line. If I rotate the
wheel of the mouse, I will have two. And if I rotate this more, I have three, et cetera. So let's add two
edges right here and hits left to click
to confirm it. And then right-click
to leave those two, Hs and the middle. Grab those four
vertices and hit G. And let's take this
up just a little bit. Following the image, that
reference image like this. And if you notice right here, we have very small
care of here as well. And our edge, it's flat. So we, maybe we need
just to push this, these two vertices just
a little bit forward. Maybe like this for now. Also in the perspective
we got this. And we have further editing. As we said earlier. This area is small as
compared to this one. So we need to scale the tip. Let's go to the solid has Z and then it's raised
to the edge mode. Just hit number two. You can tweak the age moods from here using
these three icons. Let's take off
this one and maybe we can ask Kelly Justin
ultimate like that. So now you can compare this
with this using your eye. If you want to
scale this farther, just check the image
and check your results. For me. I think we can grab this and maybe scale it just a
little bit and make it big. And this one make it
a little bit smaller. And use this one and
this chelates like that. I think this result
is fine for now. We can debate on this. Maybe we can scale this just
a little bit more like that. Alright, what about this one? The scale of this
edge almost should be almost similar to
this one right here. So maybe we can go to the
fronts and the scale. There's just a little
bit like this. And this one as well, we can scale it
just a little bit, not too much or
something like that. I think this will
work. This a as well. We can scale it like this and this one, the same scenario. And this h. Now we got this results.
Let's try to kick it. All right, maybe we can
grab this edge right here. And maybe this one
and scale those out. Just hit S to the x. Scale this just a
little bit like this. Maybe even more, just a little bit or maybe a little
bit more like that. So yeah, something like that. It's all rock. From the top. If you noticed we
have some bold here. This error goes up
just a little bit. Well, to do that, we need to
add some edges right here. So let's hit Control
R to add the loop, put your mouse right here, e.g. at this age and hit Control R. Rotate the wheel to have two edges and hit
left-click to confirm it. And then right-click to
leave those in the center. After that, you can grab these edges and take those
up just a little bit. Hit G to the Z and
move those up. Something like this. Maybe it will work. Because we moved these acres up. We got some problem right here. These vertices, these
two vertices goes back just a little bit
because this line is diagonal not strike. Now if we go to the left, if you can throw three from the numbered and his
Z to go to wireframe, you notice that these
vertices now they are off. So we just need to move
them just a little bit. Hit G and move those right here. Align the edge with
this edge like this. All right, now Perfect
His Z to switch to solid. So this is the overall shape. Now we got this results
for any reason. If we want to edit this farther, we can do that. We have all the ability because the shape is a low poly and
we can control its right. Maybe we can come out
of those sayings, kill those down just a
little bit like this. Maybe this one and this one, we can scale those out. And it will be okay. Alright, so that's
it for this video. We want to create the head. The next videos we will
focus on the details and we will give these sharp
edges some Bevel tool, make them smooth, like
what we see right here. Alright, so that's
it for this video and see you in the next one.
4. 004 Modeling the head we will use subdivision surface: Hello again, we'll come back. Okay, this is what we got
in the previous video. Now let's see what we can do. Let's bring back the
reference images. And let's take a look here. Let's see what we can do. Alright, here in this area, I have this care of, and I think maybe we
can make some king here by moving these vertices
a little bit down, right? Let's tabulate it and
we'll just hit tab and then grab these
two vertices. Hit G to there. You can hit Keith wise
Achilles, try that. And slide is just
a little bit dark. That's what B. Okay. Now let's see what's
the next step. What else we can do? Let's try to find another image. Let's see which one,
maybe this one. Alright. Alright, maybe this one. I just wanted to see the
front area here. Alright. I noticed that we want to make some change as well on the side because this
area is almost flat. And when I got here is no
similar to the reference image. Now, we can grab these four vertices and maybe we can scale them
just a little bits. Put them inside like that. Alright. Something like this. I think this will be better.
Yeah, something like this. Maybe this one and this one, we can scale them around like
that and it adds to the x. And this kelvin
gets a little bit. Maybe those as well. All right, that's what
would be called. Hardly see how can we create
this area right here. I will add an H
almost right here, hit Control R, and
let's add eight. You can move it e.g. something like this. And this area. And let's go to the face mode, hit number three
from the keyboard or you can activate this icon. Let's see, grab
all of these face and let's see what
we can do here. You can now make some inserts. You can hit I and myxedema
insert and after that, try to move these phases down or before
making any insights, we can take this edge and put this down
just a little bit. Maybe, sorry, not this one. Maybe we can grab this
one and move it down. Let's see which
one we could move. Let's kill this a bit. Grab this H and S and the
skill It's right here. Let's scale this one
as well like that. Maybe this one can
move it like this. All right, let's
hit Control R to add another age,
maybe right here. And the C clubs finance
killed like this. I think this result
is, looks okay, Cool. I will grab these
two faces and hits. I'm going to extrude
this inside. It's Alt E to open
extraordinary Alt. And then choose
extrude face along normal and move them out just a little bit down
to book this insight. Like this. Maybe get something like this, and then hit S to scale
this, something like this. And then hit here
and take this up. Maybe we can scale it even more like that
key and take this up. Alright, this result looks okay. Let's put aside the view
heads can throw three to go to the left and then hit
Z to go to wireframe. This should be striped, not like this, it
should be like this. So I'm going to switch
to vertex mode. Number one in the
club is vertex in G. Let's move with n mixed. Try it like that. Alright,
you can eyeball it. Has Yan good, solid
or I guess his ZL on. All right, now I
got this results. It's almost similar to what
we have here in the image. And thus looks cool. I'm going to hit Control R to add another
edge right here. And let's see what else we
can do here in this area. I will grab these vertices and
hit S and scale those out. Something like this maybe. And Ecolab those here
and maybe we can, I don't know, maybe
you can scale them just a little
bit like this. Go to the face mode with
number three and let's select this face and those here hit X to open the delete menu and choose
face to delete the phases. Or you can hit X to
delete these faces. Now I got a hole right here. We need to fill it. And that will be easy to do. Alright, let's go to the
H one-third number two, and let's select this edge, e.g. I. Will extrude this edge
up to extrude this egg, hit E to extrude and Ben
Zhi to take the alkene. And let's move this up.
If you want to align the senior edge with
this vertex right here, the height, you can use a snap. Alright, so let's see
how can we do that. Let's you go through this menu and let's change the option from an increment to a vertex. Rice. And yeah, just like that, After that, it grab this edge, hit G to the Z and to activate a snap
temporarily hold Control, and just snap this edge to
this vertex right here. All right, so hold control
and status right here. And that says that I want to make some connection between this edge and this
edge right here. So select this one, hold, Shift, grab this edge. All right, now we have
two edges selected. Hit right-click and choose
a bridge edge loop. Alright, right-click
and then a loop. We predict these two edges. Now I want to fill this
area with the face. It's very easy. You just hit Alt, click to select the
entire edge loop or you can crop them
manually one-by-one. Grab the first one, hold, Shift, grab the rest like this, and then just hit F to fill it. Let's use the Alt
technique, the Alt click. And that has to be faster or I. So now we got this results. It's very nice and cool. Let's see what's farther
editing we need to do here. Let's try this time
to below there, just go to the edge
mode and number two, and let's select these edges. Grab the first one
hold can throw AND grab the last one
to select the edge, this edge between them. And let's select the
New Age hold Shift, grab this, keep holding
Shift and select the rest. We want to target this one as
well. This one right here. Hold can thoroughly
grab this all to have to grab those rights. And the same thing on this side, alt Shift and Control and
capitals here or here. Alright, we just selected
these necessary acres. Now we can give them
above all, a few wants. It can throw be to
activate bevel and just move them off just a little bit to give them less bubble. Rotate the wheel to
add another edge. And this, except this result, something like this,
almost about points 1 m. By the way, you
can see this 2 cm. I think that's what
would be better. So as you go to the units using this click on this
icon, go to this menu, and then open the
units and change the length of from
meters to centimeters. Alright, so it's
about ten centimeter. Alright, That's very cool. Let's see what else
we can do here. Maybe we can hit Alt click
to select this entire globe, and maybe we can bevel it. Let's de-select these edges. We don't want to select them. All. Hit Control V to bevel
this and give them very small bubble because
this error could be sharp. As you can see
here in the image. It's sharp as compare to this, to this Hs here. Alright, one more thing here. This area should
be sharp as well. But before we do that, what I'm going to do is
I will hit Control R to add maybe two
years right here. And I will look up this edge and hit key twice and slide this up. I just want a small
curve here in this area. You can do something
else if you like. You can make some connection goes from here and ends here. And the authorities, e.g. I. Will use the knife tool, hit K. And make a cut, start
from here and ends here. And then hit right-click. And let's start again. Click here to here, and then hit space
to confirm it. Now I have a new age. I've told us it's
Alt click, Alt, Shift click to grab the entire loop and then hit
Control X to the solvers. After that, this edge crop, these edges hold shifts that
God, this one hold Control. A club is one hit
Control X because of it. I think now with this
better, and if you like, you can use the natural
again hit K may cut goes from here to here.
And it has right-click. Start again from here to here, and then it's space
to confirm it. What about this edge right here? And this one we have a
triangle right here. And because we want to use subdivision
surface modifier here, I tried to avoid the
triangles as much as you can and keep
everything quiet. Alright? If you understand what I'm
saying here at this point, What's quad, What's triangle? You can go to my website, modern painter.com and I have a free course talking about
these fundamentals. Alright? You can email me and contact me to send you
the link of the course. Let's select this edge
and this one right here and hit Control
X to dissolve it's, hey, let's keep it
like this for now. By the way, it's wrong
to keep it like this. Because this face right here, it's not quite quiet. Phase has four vertices. That's what we want. And we have a triangle, has three vertices and we
have in, gone, in gone. It's a face with more
than four vertices. So this one is called gone. Because here we have five
vertices and gone could be, could have aids, vertices, ten vertices, whatever vertices. If this goes beyond
four vertices, it will call in gone. Anyway. So now we got this
result so far. And let's see what
else we can do here. Maybe now we can
grab these edges. I don't know, maybe
we can pull them. All right. We can try that. Let's hit Control V. And the bolus. If you
Google this or this moment, we will have some
overlapping here. As you can see, the bevel reach this vertex and we
will get some overlap, okay, to avoid that, we can go to the edge mode. Select these edges, hold shift, and grab those as well. Hit Control X to dissolve them. Now I can hit Alt, click. This edge hold can throw, keep holding Control and select the entire
edge loop like this. And now you can bevel it again. It can throw be two bullets. Now we don't have any problem. Everything looks okay. Alright, That's very cool. Alright, now let's see
what's going to happen if I add subdivision surface. Let's tab out and let's go to their modifier second and
open them modifier list. And let's choose
subdivision surface. And let's change the level
22 and make it smooth. So this is the result that we
got so far. It's not cool. We need to edit
this even more to get a sharp shape similar
to what we have right here. Bots. I will end this video here
and see you in the next one.
5. 005 Adding more edges and make the mesh sharper: Hello again and
welcome back. Here. In the previous video, we used a subdivision
surface modifier. And this is what we got so far. The result is
smooth according to the subdivision
modifier here we used, but we need to make
some further anything. All right, as you
can see right here, this area, not care, we like what we have right here. So we need to make
this area a little bit tight and maybe this area
as well. So let's try it. Let's see how can we
can throw all of that. I will turn off
subdivision surface, Timperley, like this. Let's tap this mood. Or at least see from
where we can start. Let's start with this edge. Maybe let's select
these edges right here. And let's bevel them. Alright, I think before is
not going to work right here. A few it can throw be the volvulus top because
we have two H right here. So we need to find
another way to do that. I will go to the face mode and I will select all
of these faces. I will hit I to insert. Let's make small
insects like that. And now let's grab
these vertices. All right, and
let's hit M to open the marriage menu
and choose center. And just do the same thing
for those here as well. Hit MAQ center. And now let's grab these
edges and hit Control V to provoke them.
Something like this. It will work. And
then if you like, you can connect this one to
this one and call this vertex and this vertex and
hit K to connect them. Let's do the same thing for
the site syllabus vertex. Halt here to grab this one, hit K to make a
connection between them. That's very cool for now. What about this H right here? We can give it a small
amount of beveling. So let's go to edge
mode and number two, and let's select this edge hold control and grab this one. You have to grab
this hold Control and select this one as well. And maybe we can bivalent, so it can throw be two bullets. Let's put four to
three edges like this. That will be okay, fine. Okay. That's about six centimeter,
something like this. Or you can select this, hit Control X to dissolve it. And this one as well. It can throw likes
to dissolve it. And if you like, you can select this vertex and this vertex and make
connection between them. Because here we have an Incan
and we say that earlier. We said that the ingoing is a face with more
than four vertices. So this is the face and we
have vertex number 123456. So this one is England. Try to avoid in guns. Alright. So let's grab this vertex
with this one and hit J to make a connection
between them. The same thing here. Grab this with this hit J to make a connection
between them. Now we have coauthored this face has four vertices,
has made it's quiet. This phase as well has
four vertices, 1234. This one is acceptable, right? That's very cool.
Now unless you guys can happen if I activate subdivision surface
for this area. As you can see this
area, it looks cool, but we need to. That's even more. Let's turn this off and
let's go up to these edges. Let's select this one
or maybe this one, hold control and grab this. And hold here to grab this hold Control,
click on this one. And let's put those right here. It can throw off
with a bevel them. Something like this. Maybe. I'll write it as very cool. We have very close
vertices right here. It's better to weld them. So go to the vertex mode, hit number one,
silicon is vertex. I will just lie this
vertex to this one. But I need to activate
nice up here, right here is called
auto American. This icon right here. This icon. It's helped
me to marriage vertices. When you pay, when you push
one vertex to the other one. So let's activate
this auto marriage. I will push this vertex
to this one right here. Hit sheet wise and push it, and now they become one vertex. Let's do the same
thing for this one on besides Keith wise and
push IP addresses. And I know that I have a triangle right here
and that's not okay, but I will leave it for now. Like this. Let's see what we got so far. Let's activate subdivision
surface or those very cool we need to
this area as well. Let's go to the edge, and let's select
all of these edges. Alt click, Alt Shift, click and select this
between holding shifts. It can throw me to
reveal those and give them small
amount of beveling, something like
this. It will work. All right, after that, let's go to the face. Select these faces like this, and then it's i2 will make
some insects like this. It will work for now. Tub outs. Ellis activate
subdivision surface. As you can see now this error
become hockey and nice. And maybe now we can move to
this side, the bottom side. Alright, let's see
what we can do here. Let's turn off
subdivision surface for now, tap to edit mode. And Alright, this corner, we need to, we need
to make it smooth. And this corner, it's a little bit sharper as
compare with this one. The outer edges are sharp. So let's see how
can we keep this. Let's go to the H
node number two. And let's select these edges. Select, you can
start with this one, hold control and select this. Keep holding Control
and select this one. And till the oriC, this one. Hold Shift, grab this
and this and this. Now you can level all of these edges and
this one as well. Don't forget this. I love
them like that it can throw the analyst will then
make the bevel sharp. When companies now hold Alt to grab this
entire edge loop, hold, hold Alt, Shift to
select this one as well. And we'll them hit Control V and make the bevel a
little bit bigger. All right, so now we
got this results. I can grab this edge, hit Control X to dissolve it, and this one as well.
And this office. And I can make some connection
using the knife tool, hit K and make cut goes
like this if you prefer. So, sorry. K again. Make cut goes like this. Hits right-click to make a new cut right here and then
hit space to confirm that. And now I have quad here
and quiet here as well. Feel free if you want to move some vertices around like this. If you want to make
somebody think twice and slide the vertices will be okay. And I can use mirror
modifier to mirror one side. But maybe we can use this
later, not right now. All right, so now let's see
what else we can do here. Let's see what's
going to happen if I activate subdivision surface, we see what's going to
happen to this area. Alright, let's activate us. The result is called, but we lost these corners. We need to support
these corners with Edge Loop to have nice corner. I will turn this off. Alice, Yep, Can we do that? Well, I think we can make
some connection goes here. Maybe some connection
goes here and goes here. Let's see how can we do this. We can use an f
tilde k and respect. Cat goes like that. Alright, that's will be okay. Maybe cut goes like this
and then hit Enter to confirm that this
edge and this one, we don't want them hit
Control X to dissolve them. And now we have this
corner, this one, with this one, maybe we can delete this edge right
here in the middle. We can delete it.
We don't need this. Here. If you go to the vertex mode, number one, we have two
vertices, right close. Alright, I can mark this one
with this one like this. So to do that, grab the city
twice and move it like that. Now, the result is
better and cleaner. But we have this vertex and we have an ink on this face angle. We can make a connection
goes like that. It's not clean, but
it's better results. Let's go to this site and
let's do the same thing. Activate that I've told her to K and let's make a
cat goes like that. And let's make a
cut, goes over here. And maybe cut goes right here. Alright, maybe cut goes
right here as well. Let's delete the
unnecessary edges. Go to the edge mode, and let's select this
one with this one. And these edges hit Control
X to dissolve them. And now the result become clean. Alright? Alright, that's really cool. Now let's see what
can happen if I activists of the weekend
service tab out. As you can see now the result is better and sharper as well. Alright, until now, the result
looks cool from the bag. It's bad. Let's see
what we can do there. Until now. The result is close to
what we have right here. But we need to create a
circle right here and this area and a circle
right here as well. See how can we do this? I will activates an add-on. Comes default with Blender
is very important add-on. When it comes to
model something. Let's go to the Edit
and then Preferences. And let's go to
the other section. Let's search for
loop tool, L WOOP. Loop tool, just activated, and then Save Preferences. Alright, The question is
where to find the loop tool? When you go to the Edit mode, Let's turn off subdivision
surface temporally. If you were to
right-click, you'll find the loop tool and the options
that comes with alloc tool. So let's see how can we
use the circle option? Because now we are, we want it. Let's go to the face mode. You can hit number
three and let's see, grab these faces and hit
right-click and choose. Let's move this image just
a little bit right here. Heterocyclic enqueue a circle. This option help you to change to make any syllabus
face is like a circle. As you can see now we have
a nice circle right here. I will hit S and scale it down. This circle is a
twisted a little bit. And we need to fix this
parts from any angle. If I rotate this one, I will have some problem. Because of how I rotate
this from the wrong angle. I will lose the surface. The surface will not
be flat anymore. So there's very nice
tip. You can use. I want to frame this
face to the camera so I can't rotate without making
any distortion to the face. All to do that, hit Control
Shift and number seven. And now I just have framed
the face towards the camera. Now if I hit Z to
go to wireframe, now this phase is 100 per
cent a frame to the camera. Now if I hit, if I
hit R to rotate this, I can rotate it and
I can reposition it. Hit Key. Kelly, just a little
bit if I wants. And after that, Let's hit number one to
go to the front of you. Because if you're doing, if
I tumble around like this, as you can see, it's difficult
to control the orbit. So to receive the orbit, just said number one, to
go to the front view. And we are good to go. As you
can see, it's still flat. So now we get the
circle that we want. I will extrude this inside, hit Alt E to the extraordinary, extraordinary face
along the normal. To extrude this to the, to the normal of the face
or normal of the faces. And let's move the
mouse down just a little bit and let's
put this inside. And there we go. Now
we got what we want. I can delete this face or you can dissolve
it if you prefer. So I will detach this face from these
faces from this group. If you want to detach it, just hit P. To open this separate menu
enqueues selection, I mean the selected faces. Now this is phase is no longer connected
to the whole mesh. After that, this area, I want to make this error tight. I need to add the
support a loop, support a loop to this edge right here to
make this error at height. So in this case, I can go to the edge
motif number to hit Alt, click to select the
entire edge loop and just hit Control
V to the bullets. Just a little bit like this, and thus will be okay. Tab out. And now this actor
subdivision surface. And now as you can see, is very sharp and clean. So I think that's
it for this video. And see you in the next one.
6. 006 Using mirror mod and creating the side holes by using the loop tool: Hello everyone and
welcome back here. Let's complete creating the head of the black coordinates. Alright, I think now I can create this small
age I have here. Let's see how can we achieve it be I can see it and
they lifted view of hat. If I hit Control. Three from that, I'm bad. And if I go to the wireframe, I can see the habe right here. So let's try to create this. All right, I noticed that my result is not matching
the reference image. We have a little bit. Vertices need to move
down just a little bit. And that's easy to do acutely if I tried to the Edit mode. Let's go to vertex mode. Just hit number one in the crop, all the, all these vertices. I can grab those as well. I guess I can ignore them. I will grab the top area, just those maybe
and hit P to the Z. And let's move those down
just a little bit right here. And this will be enough. I guess. That's very cool. One more thing, these vertices, I can move them like this and align these vertices
with this edge. That's the idea. So let's hit G and let's move
this right here. And this one as well right here. And this one maybe we came up with just a little bit forward. All right, now let's see how
can we create this shape. I will use the knife tool, hit K to activate it. And maybe we can
start from here. Make a cut goes here, maybe in another cat goes right there and hit Enter
to confirm the cats. And the perspective,
I got this result. Let's go to the
solid mode, hit Z, and this creates
this a here as well. I'm going to hit K to use the knife tool and make
a cut goes like this. All right, Something
like that. Yeah. Alright, and let's make
the cut there as well. Maybe I can make a
cat goes like this. And maybe it goes there for now. This age, I don't want this
control X to dissolve it. And the area right here, it's wrong to leave
it like this. It's better to make a
cut goes like that. That's what helped me when I, when it comes to make some
before to make this curve. So I prefer to activate
the knife tool, hit K and make a cat goes
like this temporarily. I will leave it like
this and let her, I will see what should
I take this edge. But now we have these vertices. Are these edges, we
don't want them. I will grab these and hit
Control X to dissolve them. And now I have this edge. If you'd like, you can dissolve this one
and solve this one. And you can mark this
with this if you prefer. But for now what I need
to do is I need to take this edge and make the cuts all the way
right here for now. And maybe we can slide these just a little bit
and move them back, or maybe I can leave
them like this. I think that will
be enough for me. Alright, so the question is, what about the other side? I'm not going to make the
same cut on the other side, I prefer to use mirror modifier. So let's go to the modifier
list and let's add mirror. Okay, so this mirror
modifier, now we have it. And let's put this mirror and
definitely the subdivision. I want the mirror and
after that subdivision, well now mural work
on the x-axis. I need to activate bisect. Bisect will help me to delete half of the
geometry automatically, so I will activate it. Alright, now I just
activated the bisects parts. But because I'm in this mode, I can't see the result. I will tap out and I will activate the wireframe
for this geometry. I can go here to the object
properties and go to the viewport display and
activate wireframe from here. As you can see now mirror
modifier, mirrored, mirrored the wrong side. In this case, I can activate
flip. And there we go. Now I got what I want here. That's very cool. All right, now the, the mirror
modifier is working fine. Let's see what's the next step. I will apply the mirror
modifier for now, and I can add mirror
modifier later if I want. Just hit Control a to apply it, or you can go to this URL right here and then hits
apply modifier. Okay, now let's
tap this mode and let's go to Face
ID number three. And let's select these
faces. All of them. Hold control and select
those here as well. Keep holding control and
grab all of these phases. And now I just need to give them very subtle extrusion, right? To do that, just hit Alt E
and then choose this option, extrude face along
normal and just give them a little bit of
extrusion like this. That's what we'll be. Okay. Alright, nice extrusion
we have here. After that. Now I want to make a care
right here on this side. And for the other side as well, I can create one
curve right here. And for this side I
can use male modifier. So let's grab this head, can throw it will be
to make a bevel here. Maybe we can add two edges here. That will be okay. Something
like this. It would be nice. Well, this achy, I don't want it hit Control X to dissolve it. Something like this.
It will be okay. And this egg goes like
that and then comes back. Maybe I can make a
cut goes like this. So use an f tilde k m. A cat goes from there to this point and then hit
space to confirm it. Alright, and club
this with this, this whole can throw, when the club is to select
these edges between them. Then it could hit Control
X to dissolve them. Alright, what about this
one right here? Right? We want to fix
this area as well. Maybe we can add point cards, maybe right here. Alright? And make a connection between
this vertex and this one, or maybe this vertex and
this one right here hit J. Maybe we can use the knife tool. I think this will be better
or hit K and activate. And I've told and make
cut goes like this maybe. And delete these two edges.
I can throw it likes. Alright, That's very cool. This edge right here, I
can dissolve it and use the knife tool and make the cut goes from here to here. Maybe. We have this area here as well. I will use an actual emic
Katko was maybe from here to, I don't know. Maybe I will leave it
right here, Tim early. Alright, let's see
what we got so far. All right, we got this shape. Now let's see what can
happen if I activate subdivision surface or
this is the result. I will turn off wireframe, go here and turn off wireframe. Alright, so the result is not similar to what we have
here because these acres, I need to make them sharper. So let's go back to them modifier and let's turn
off subdivision surface. And let's see how can
we make this Java. I will tap to date It's mode and see how that could be done. What I can do now I can grab the entire edge loop
and I can develop. And don't worry
about the other side because we will use around
with the fire again. Alright, by the way, I just
forgot something here. This area is a little bit. I can add a bevel here
as well if I want. Alright, so you can
double it or you can add to support ages
to support this area. So let's try to bevel it. So let's see what we have here. Let's call this egg, has all of them had
Control V. And let's bevel this area to three ages. I think this will be enough. Something like this. If you'd like, you can make a connection between
this with this hit J. Because here we have
acquired 1234 vertices. That's me in this
phase is quiet. So it's okay. This face, It's quite as well. 1234. Yeah, That's very cool. Or a tab again, go to
the edge mode, alt, click to select this
entire edge loop, Alt have to click to add
these edges as well. And this one here. After you select
all of these edges, now you can't give them very
small amount of beveling. Can throw it will be to make some level or
something like this. It will work already.
That's cool. What about the next line? This one listed like
this line as well. Alt Shift and the crop. The egg loop. Make sure to select all the
age and the ambivalence. Kids will be in this
bubble is like this. Alright, so you can be
valid for three ages. That's okay. Now
I got sharp edge. Let's see what else
we can do here. We have a circle right
here and this area. Let's see how can we create it. Alright, let's go to the face at number three and let's see, grab this face, hit I to
make some inserts here. Alright, and then hit
right-click and choose circle. And now I got a
circle like this, but I think it's a
little bit twisted. So I want to frame
this phase to towards the camera so I can
rotate it a little bit. I will hit Control shifts
seven and then hit Z to go to wireframe and make
some rotation like this. Alright? And then tumble around. If that's a little bit
difficult to you to make objects aligned correctly. I mean, the orbit is
not working fine. You can hit number one
from the number to go to the front view and then orbit again. Let's see the result. Actually, I'm not sure quite
happy with the results. So I'm going to hit Control
Z to cancel what I did here. And instead of that, I will add maybe two edges right here. I think that would be better. So now I have four edges here. I have two from this side. Hey, maybe if you like, you can add tool
from here as well. And let's go to face,
elicit this face. Let's make another insert it. I now right-click
and your circle. Now the circle is better. As you can see. I will scale
this down just a little bit. Something like this. Let's convert. The result. May be even more,
something like this. It will be okay. And then after that maybe we can
extrude this insight. So I will hit E to
push this inside. Something like this. And these edges, I
want to make them sharp because if I activate subdivision surface, as
you can see, it's not. So we need to support this age. This egg is, so let's
go to the edge mode. Hit number two
from the keyboard, hit Alt click to select
this entire loop, hit Alt Shift, click to
grab this one as well. And then just hit Control V to the bullets and this parabola 238 years. Something like this. It will work. Now let's see what's going to happen if I activate subdivision surface. As you can see, the result
is cool. Until now. I have another hole right here. Let's see how can we
created this tablet mode? And let's see from
where we can start. Maybe I can grab these faces and turn off so that we can serve
as for now Kimberly, and then hit I to make some
inset inside like that. And then right-click and choose circle and scale the
circle like this. Alright, maybe I should move it just a little bits
through this direction, a little bit. I guess. In this case I will hit
Control Shift seven to frame this towards the camera
and Z and go to wireframe. And we could move its hertz. It should be almost right here. Something like this. When you're finished, you
just go to the front view at number one and then
go to the solid. If you hit Z and
switch to solid view, the position now is not
perfect, but it's okay. You can move it manually. Let's see what we will get. E to the y just a little bit. Alright? Something like this. And
the size is okay as well. So now I will hit E to
extrude this insight and hit XF to delete this face because I
think it's empty. Alt click, Go to the edge mode, alt click, select this
entire edge loop. It can draw it like that. Alright, it's almost okay. Before you bevel this, if you'll notice that
this h goes like this, it should go like that. That will be better, but the
angle is very sharp here. So this one as well, It's better to go like
this, this one as well. It's better to go like this. So let's see if we can find
any solution for that. I will hit Control R
to add another edge. And listen to add
this edge right here. I will hit right-click and use the loop tool and
use space to make the space between these
edges similar or equal. Now I got this result. As you can see here.
In the same time, I will make this circle. Now I got this. I will hit Control Shift
Seven and go to wireframe. And now I can rotate this
circle just a little bit. After rotate, like that. It keeps them over
just a little bit. So maybe right here. You can scale it
and make it small. Well, by doing that. Now, as you can see now, I don't have a sharp
angle goes like this. Now, the result is
better to make a bevel. So if you're happy
with this result, you can now go to the front
and tumble around his E to go to again to solid wood, Alt click and grab this edge and hit Control V to make some bubble and developed
for three ages, as we'll be fine. Tab out. And now let's
activate subdivision surface. Another result is almost
cool and beautiful. Alright, but we
are not finished. We're not finished here. We have the side as well. We need to mirror it,
but we will do that. Alright, I will end this
video, the next video, I think I will start here and create this whole guy
here and make some tweaking. So yeah, that's it for this video and see
you in the next one.
7. 007 Finalizing the head modeling: Hello again, we'll
come back here. Okay, let's see
what's the next step. Let's turn off
subdivision surface and let's see what we can do here. Maybe we can start
with this area. Maybe we can create this circle. We have right here. And let's see how can
we accomplish that. Alright, so we have three acres on this side
and this had as well, but we don't have
much vertices here. Feel if we want to make some inserts and
use the loop tool, maybe I can add
some support acres on this side and on
this side as well. So maybe knife tool
will be helpful here. So I'm going to hit K and
activated and make e.g. a. Cat goes like this, maybe. And on the other
side, the same thing. Here's an f tilde k and
make a cut goes like this. All right, maybe this age
I can use it as well. Here's an F2. On the other side. Same thing. You can use to
make the cuts at the center. All right, That's very cool. Now let's see what can happen
if I go to face mode and select these two faces and
hit I to make some insects. Now I have this inserts. And let's change
this to circle it, right-click and choose
circle from the loop tool. Or if I got this result, I will scale it down just a little bit. And maybe I can move it just a little bit to
the y, e to the y, make it bigger. Alright? Maybe smaller just a little bit. This results is very nice. So I'm going to hit E
to extrude this up and hits PS2, detach this face. I just hit P to open the spreads menu and then hit S to choose the
first option selection as it's going out to the
eighth month number two from the keyboard and the siliceous entire
edge loop it alt click. And we need to bevel it. Alright, so let's parabolas. We have some sharp edges. We discussed that
earlier, but it's okay. The angles is not extreme. So I will accept this result. It can throw B2B bullets,
something like this. All right, actually I'm
quite happy with the result. I hit Control R to add
another edge right here. And I will hit
right-click and make this like a circle. And
let's kill it. And that's what would
be better, I guess. And let's see what can
happen if I choose space to correlate the
space, the same thing. Or at least hit G
to the wireless move this just a little bit. So I just wanted to center it. Or somebody like that, or
at least bevel this edge. Hit Alt, click, select the entire edge loop and then
hit Control V two bullets. Three edges will be okay. Now I got this result, tub house and this activist
subdivision surface. That is of those very nice. Let's turn off
subdivision surface and let's see what
else we can do here. This tablet is mode, and let's see what further
tweaking we can do here. Alright, this area right
here, I don't like it. Let's try to find a
solution to this. I will use the knife tool and
maybe a cut goes like that. And cuts goes like this, maybe. And maybe one cat
goes over here. And then hit space to
confirm all of that. And let's delete
unnecessary edges, e.g. those, I don't want them. And maybe those as well.
I can delete them. Let's us can happen. And maybe we can move this vertex
and puts it in the middle. There's nice tool
we can use here. We can select those
two aqueous and hit right-click
and choose space. And there we go. That's very cool. What
about this edge right here? Well, this one, I will
leave it like this for now and decide I can ignore it because I
will use normally to fire. Alright, so maybe this egg, I can extend that just a little bit and
take it right there. I think that's what
would be better. And delete this
one and this one. Because if I leave this
triangle right here, this area, because this area
has a little bit of care. And if you have a
triangle in this area, the heading will be bad. Because of that, I prefer
to extend this age. Make their triangle here. On the flats. On flat face. You can move it right
here, or if you like, you can you can activate the auto marriage
and gateways in market with those that
will work as well. What about this area? Maybe we can make
someone speaking here. Let's see what we can do here. Let's see how many vertices. I think we have more
than one vertex here. Yeah, that's right. We have more than one vertex. If you've got a
problem like this, you can go to the wireframe
and select the area, e.g. these three vertices. And you can hit M and choose
American by distance. As you can see here,
three vertices moved. Now. Now we just have three
vertices, not six vertices. Let's go to the set as well. Go to wireframe has z, and let's see, grab
those here as well, and hit em and choose
Merge by distance. And there we go. We marriage these vertices. All right, That's very cool.
Now let's make our cuts e.g. goes from here to here and
hit Enter to confirm it. So this our new line. And what about this line?
We don't need that anymore. And this one, the old one, hit Control X and dissolve it. Hit K and make the cut goes
from here, maybe ends here. And let's delete our old line. And maybe we can do the
same thing for this one. Alright, I'll click Control X. I think this result is cleaner as convertible
with the old one. So let's do the same thing here. Hit K to activate the knife tool and just
make cocktails like that. Alt click on the old one, Control X to dissolve it.
And let's do the same thing. Here. My rights maybe here. Alt click on the old one and hit Control X to dissolve
it. Knife tool again. And let's make a
calculus like that. Alt click on the old one can
throw legs to the solvents. And by the way, there is no
need to, I guess forgets. There's no need
to fix this error because we going to do
is mirror modifier. Now let's see what
else we can do here. I will target this
edge and Bevel, let's select this edge. I'll click here as well, select the entire edge loop. And let's bevel, It's
alright, let's hit Control V. And unless you actually
got the violet for two or three edges,
that will be okay. I just wanted to
make this sharp. And yeah, that's very cool. Now I think it's the time to you as mirror modifier, I guess. So let's do that. This
egg in the middle, I guess we don't need it. You can incompetent and hit Control X dissolve if you like. So okay. Oh, no, we can't because I
will ruin this circle. So I will keep it at, let's see what else we can do. Alright, for the side, maybe I can use the knife tool. I just want to extend these
two edges right there. And for this area, I've tell you,
confirm that cuts. I think we can hit G twice
and slide this right here. And marriages, that's
what would be better. Or maybe we can do
something else. I can use the knife tool
and make a cut goes there and delete this
egg we don't need, It's actually not right. Let's see what else
we can do here. Let's see if everything is okay. Maybe these edges as well. Let's make a card goes there. It's spaced or
confirm that cuts. What about this edge right here? Maybe we can use the knife tool again and make cut goes there. Something like this? I think I will leave
it like this for now and see what I can do after
I add the mirror modifier. And I think the time is come to add mirror
modifier tab out. And let's activate wireframe
so we can see what's mirror, what side is mirrored? Go to the viewport display
and activates the wireframe. And now let's go back to them
with the fire and let's add mirror modifier with the
subdivision underneath. It's alright, activate bisect. That's not what we
want you to hit. Flip to flip the
results, and that's it. I think I will
recreate the circle because I have a lot of
edges comes to this area. And as you can see, I have
almost unmatched here. So it's better to recreate it. But let's check the results. Everything looks okay
and cool. Until now. Let's go to the movies, hit tab, and let's use the knife tool
and let's pick a catalyst, extend this edge
almost right here, and then hit Enter
to confirm it. And maybe we can make a new edge goes from here
and take this out oxygen, hit K to activate
then F tool and make a cut goes like this. And goes like that as well. And then ends here. Something like this. And this aqueous don't need it anymore. We can hit Control
X to dissolve it. Alright? Alright, maybe this edge, it should go like that. Something like this. And this one and this one we don't
need this anymore for now. This one we don't need it. After that, let's
go to the face mode and let's select this
entire face loop. Just put the mouse on
one of these edges, hit Alt click to select
the entire face loop and then hit control and the blast from the
number to grow silicon. Grow the selection
until your ache this, and then at x f to delete
all of these phases. Alright, this circle
in the middle, we don't need this for now. I will delete that as well. And this tab out and
this activity lists, apply them here
I'm with the fire, gets it can throw a top
light and that's it. Now, everything looks cool. I will tap again and
three create this area. Go to the edge mode, hit Alt, click to select the
entire edge loop. But we got some problem here. We have some weird face here, had heat wise and America
this up and this one as well, the key twice and
making this up. Alright, now it's clean, I guess. I'll click. And then you can hit
F to fill this area. And then you can hit I to
make some inserts like this. Alright? And then you can hit right-click
and make this a circle. Scale this inside. Something like this, I guess. I think that circle, it needs to be rotated
just a little bit. So I will affirm this
to the camera control. Shift seven, go to wireframe. And let's rotate this
just a little bit. Right now is very cool. Now with number one to go to the front and go to
solids. And there we go. I will hit Alt E to open the extraordinary
ensures extrude along the normal and store this inside
just a little bit like that. And then hit P as two
separate this circle. And I will just hit
Alt click to grab this entire edge loop and hit
Control V to the bullets. Alright. Now I think the
result is a little bit better. I will turn off
wireframe and go back. And activists
subdivision surface. One more thing here I can do. I can grab these edges, hold, Shift, and select those as well. I tried to click into
space to make the space between these ages equal. Let's will make the
result even smarter. Nicer. After that, yes, he tried to
click and choose here the smooth to get rid of
these jagged lines. Alright, That's very cool. Cool. I think we are finished here. We don't see any distortion. The result looks okay, cool. Alright, clean. So yeah, I guess that's
it for this video.
8. 008 Starting with the body learn how to use bool tool: Hello again and
welcome back here. Alright, let's see what
we can do to the body. Let's go to the left of view. It can throw three. And we want to create this part. This, how can we do it? I think I can start from here. Lets taps it. It's more than maybe we
can Coby some edges here. We can start with like
taking these edges. Alright, so hold control
and select those over here. Until here. I think. I want to copy this egg. Maybe I can Coby
that side as well. Take these edges, hold
control and select this one. So from here to here, or I guess hit Shift D to the y and then hit P as two
separate this line, tab out. And now we have the signal light hit G to move this just
a little bit right here. Keep the close to the body. Somebody like this and turn
it off subdivision surface. We don't need it for now. And let's talk to the ith
mode and go to the vertices. And let's see what we can do. We have a lot of vertices here. He grew up with vertices
that we don't want and then hit Control
X to dissolve it. So control x here. We don't think this, maybe this is going to happen if I delete this
or it, nothing will happen. So all of these and delete them. And maybe this find the middle. We don't need it for now.
All right, That's very cool. Now what I'm going to do
is I will select all of these vertices and go to the left if you
hit Control three, and I'm going to extrude those, hit E to the Y to extrude this. As you can see, the line is
diagonal is not straight. So I want to make, is
to try it like this. To do that, you can
use a scale to a queue that a scale this to the y-axis. This is the way that
it can goes like this. So then hit S and Y
and then zero Enter. And now we got hit G. And let's move this over
here and go to wireframe. Let's see what else we can do. Let's bring the
reference images. This is a reference image. Let's try to understand
how can we achieve that. At this point, the body
should become very thin. And then at this point, I think, is the full width here. The body should reach the full width at this
point or at this point. So, I mean, it's right here. In this case. We
can add an edge. Right here. I can
throw our head. Let's add an H right here. Somebody like this, the
egg is goes like this. We want it to be
straight like this. And this case you can rotate, but if you rotate it, you will have some issue. You will ruin the body. In this case, you can hear it. If you hit Control Alt Shift S, you can activate the hero option and just hear it a little
bit like this and that's it. Alright, let's move this
right here for now. Oh, that's really cool. And these vertices, maybe
we should take them down. Just a little bit tricky. Let's move those here. Alright, So maybe
we can add to it, I use like this and
maybe hit G to the Zn. Let's take this just a little
bit up, make it curvy. Or that's nice. Or maybe I
can do that later, not now. Alright, now let's see, grab
the side and let's scale it. Alright? You can scale
it or you can move it because if you scale this
hit S to scale lets, you will lose the care of
here because of the scaling. In this case, you can
move this side like that. And besides like this. And don't worry
about both of them because don't worry if there's not accurate symmetry because
in the end of the day, you will use the
mirror modifier. So don't worry about that. Let's move this. And
maybe these two edges, we can take them down
just a little bit. Keep the z. Hold control and align these two vertices
with this vertex. Using the vertex
is not activated. This one. This one if you want to keep it
close, That's okay. Keep it close like this. And later we will delete this half and odd
mirror modifier. So now we got this result. Until now writes
something like this. It can throw off to add
two edges right here. These two years, we can scale
them just a little bit. I just want a small curve here. And in the left view, we can club those, hit P to the Z and put them up just a little bit, not too much. And now we got this result
and the solid mode, we got this result,
as you can see here. That's very nice. All right, Let's see what
else we can do here. Let's go to the left. And let's go to the
wireframe. We have a big cylinder right
here, we need to add. So let's add this right now. As you can see, this is the
3D cursor in the middle. Whatever thing
you're adding here, it will follow the position of the 3D cursor. Just
keep that in mind. What I'm going to do is I will
select these two vertices, and I will bring
the 3D cursor in the center between
these two vertices. To do that, just hit Shift S and choose this option
cursor to select it. All right, as you can
see now, 3D cursor, it jumped to go there between
these two vertices. Right? Now, tab out to add
something new here, hit Shift a and let's add, let's add a cylinder. And now we have cylinder. The cylinder is very
big and we have a lot of vertices here. From here, we can control that. Let's add 16 edge here. And let's go to the left view. And let's kill this. By the way, when you
make scaling are moving, you will lose the
information here. So try to choose whatever you
want and then do the scale. So it's S and let's kill this. Again. Let's move this over here. And let's align this with the shape that we have.
And that's very cool. As you can see. It's aligned. Let's move this image just
a little bit right here. And let's see what's
the next step. Let's tell it to its
mode of this cylinder. Lsa glove this side here and this moves
up and they go up. The side, hit G. And let's
move this almost right here. Alright, let's go to the perspective and let's
see what we got so far. Let's compare the results. Maybe this face, we can
take this up just a little bit. Something like that. It will work. Alright. I think the belly
of the of the Hornets, it's a little bit
wider from the center. Well, that's mean we can
grab the body tab and hit Control R to add some
support groups here. I can add two for now. And I can scale this
out from the top. You can understand that I should have a curve
goes like this. Not straight edge. But keep in mind to
make it very subtle. Care. That's very cool. Alright. I think we can manipulate the head just a
little bit and make it wider. Let's see if we can do that. Is you go to the left and
then let's go to wireframe. And let's try to
choose the Lasso. Select lasso here. And let's try to pick these
vertices here on the side. Those over here. Then what
I'm going to do is I will activate proportional
editing and then I will just kill
this from the top view. Just a little bit it as but the proportional editing
when I hit the, the effect of the
circle is very big. So in this case, I will
rotate the wheel of the mouse forward to make
it smaller like this. And then I'm going
to scale it to the x-axis just a little
bit. Not too much. Something like this, maybe
this will be enough. Let's see what we got so far. Alright. Keep in your mind when you will make some
movement or scaling, just remember to turn
off the automatic because this option
makes some problems, especially if you have very close distance
between two vertices. So I'm going to turn this
off and when I need it, I will turn this on. Alright, so now I made
this a little bit wider. And by the way, I think we can cancel that just a little bit. I just wanted to hear something. I will deselect these. Vertices because I want, I don't want to make them wider. So let's go back to the top
and then hit S and make the effect a little bit bigger
and scale this out just a little bit like this.
That will be enough. Tab, article up the body
tab and go to wireframe. And let's see, grab
these vertices and scale those
pods will lay that. All right, something like this. Now the result is, I
think it's better. I guess. Yeah, it's still okay. Everything looks cool. I can only see what's the next step. Now I got this, I got this shape here. And let's see what else
we can achieve here. And this area, the circle we got here is a nice,
I mean the size. And we can now make
the circle with this shape here, I guess. So let's do that together. What I'm going to do is
I will use a bowl tool. It's an add-on. You
should activate it. Go to the Edit and
then Preferences. And let's go to
the admin section. I'll search for bull, be double oil bowl tool
activated m assets. Let's save this,
save preferences. And then the LSE site. To find the Bowl Tool, go to this section. Open the arrow and
you'll find it right here under the edits. Alright, so here we have
some options we need to use. I will marriage this object
with the body of the Hornets. Grab this faulty of
the crop, the body. Alright, so grab this and then hold, shift
it up the worthy. And then let's choose union. And let's see what's
going to happen. As you can see, we got some problem. The operation doesn't
goes like what? Like what we want. By the way, I can go from here
and extrude this up. But we'll be okay. I mean, if I accept this result, I can tap to edit
mode and I can, I can go to the edge
mode and grab all of these edges like this. Okay? It, I can hit E to the Z and extrude this up and
then S through Z. And let's turn off proportional
editing has to disease, you'll enter and then
F and there we go. I got the same result.
I can do that. That's this option is working. Let's go back. But if you want to
merge this with this, you need to fill the body. Alright, let's see, grab
those two together and let's hit slash to
isolate the objects. Or you can go to the View. And I think we got to see
where is it? Local view? Yeah. Slash numbers
and the lumbar, the Toggle Local of you. And just tap to x
mod N, Just cup. These. Make a bridge. E.g. a. Club, these two Hs and then approach them like this. I like this cup, this area, I'll click and then hit F. And maybe we can
select this with this. Let's right-click and the
alt click and then hit F and kept this one alt
click and then hit F, and then tap out. Now let's select this one with this one and let's choose union. It's working. If you go inside. Now, as you can see, it's done. That is others. Okay.
That's very cool. So now we'll hit slash to
excite of the local mood. And I think that's
it for this video. And see you in the next video.
9. 009 Using the bool tool to create the side body holes: Hello again and
welcome back here. Okay, Let's see
what else we can do here is to break
the reference image and maybe we can start
creating these false. Alright, I think I will use the bulk tool to achieve all of that. So let's
go to the left. If you hit Control Z
to go to wireframe, I will hit Shift a to
add, I will add cube. The cube is very big,
as you can see here. I will scale it down.
That's very cool. Let's kill this even more,
something like this. And let's put this
right here for now. Alright, now let's
tabulate it, It's mode. And let's control the vertices. Go to vertex mode, just hit number one, endless. Alright, I think I need to
see this tool select box. That's what would be better. Let's pick up those,
hit G and let's move those to the y-axis, GYE. And maybe this one I
need to move it just a little bit like that. Maybe those I can take
those up over here. Maybe Let's see what we
got with the perspective. Let's take this out. And let's take this out. Oh, that's very cool. Let's go to solid. And let's make some
tweaking here. Alright, let's tap
it. It's more than endless hit Control
R to add in a club. And maybe we can add
one agent right here. And let's see crop this
phase hit E to extrude, this extruded,
something like that. I think that's what
will work for now. And let's take those
up key to this heat. Maybe we can call
this phase and scale it just a little
bit down like that. And I will use this piece as
a cutter to cut this area. So let's take a call
before we do that. At the end of the
day, it could be e.g. right here of Timberline. Alright, select this
one and let's move it inside just a little
bit, maybe, like this. And I will use the Bowl
Tool to achieve this shape. So this is the Qatar and
this is the target object. Alright? Select the catheter has a
fairest object and then hit Shift and add the
object, the body. And then q is There's
chores, difference. But use this section,
not this one. I will tell you why.
If you hit the France, now, you'll get what you want. But it is done. You lost the cape. Alright? If you choose
an option from here, you will lose the control. I will hit Control
Z, but if you hit difference using the
brush Boolean section, you will achieve
what you want to achieve by the cable
still exist here. You can control it and move it. If you want to push it deep
inside a little bit and do whatever thing you want to
do. All of that is possible. And even you can talk to
the edit mode and you can club the vertices e.g. like this and hit G and move. And you can do a
lot of tweaking. So just keep that in mind. All right, so now
we got this result. All right, maybe we can
grab all of these vertices. Maybe you can scale them
just a tiny bit like this. Well writes something like this. Maybe you go to the left and let's see
what we have done so far. Okay, This Acropolis
and the smoothness just a little bit like that. And maybe we can
come up the side and hit can move it to the
right just a little bit. Alright, I'm not going to
confirm that. For now. Let's create this than next
object. Let's go to solid. And the shell. Can we do that? Maybe we can use this object
had here the Alistair Coby. Let's put this e.g. right here. Let's go to the left. If you hit Control
three and tap tablet mode and Z to go to wireframe, lets you grab the side and let's move this side just a
little bit right here. And let's see, grab
the side as well. He can just move this
one almost right here. Something like this. I totally okay. Okay, let's turn it around and
let's go to solid. Alright, so these vertices, we don't want them. What I'm going to do is I will merge them, push them back. Let's activate
automatic Hickey twice, and let's push this back. And now they're Americans. Okay, we got a lot of tweaking. Let's hit Control R to add
another edge loop right here. And let's move these two
vertices, this one and this one. Maybe we can move
them like that. Okay, something like this maybe. Right? Now, let's put this
inside, gets a little bit. He can push this here like this. Hold Shift, grab the body
and let's choose difference. And now we got another cut. Now, let's push this even
more, just a little bit. Smoother this almost right here. Okay, the result
is close, I think. And we need to make
another cut right here. So in this case, I will tab and I will call this vertex and
this vertex and hit Shift S to bring the 3D cursor right here between
these two vertices. Tab out and then hit
Shift a and let's add herbicides cube.
The cube is very big. I can go to the
option of the cube. The size is two
meter for each side. I'm going to change this to e.g. 20 centimeter for each
side to make it small. And skill is just a
little bit and the CG, and let's move this
right here, e.g. scale this to the
set S and then sets. And let's scale this
a little bit more. Let's move this like that.
Something like this. Hold here, take up the
body and Q is difference. Maybe we can move
this just a little bit down and key to the z. And let's move this down
just a little bit harder. That's very cool. That result is almost close to
what we have here. Alright, maybe we can take
this out just a little bit. What I need to do is I need
to align this with this one. So they are almost
aligned pairs. Very cool. We need to create another one right
here in this area. So in this case, what I can do is I can select this
one and tablet. It's more to hit a, to
select all the vertices. Hit Shift D to the y
and take another Coby. And you will have the
same cat automatically because it's a copy of
this joint right here. But keep in mind to
do that invaded mode. Let's move this just
a little bit in the y. And there we go. Now we have another
cat right here. Right? Maybe we can put this
inside a little bit. Move it away. As cool. Maybe these vertices,
I can take them back. Because I just need
room here in this area. If I want to make the vault or whatever thing
that you just need the room. The result is not bad. Maybe these vertices, we need to crop them and take
them up to the z. Something like this, I guess. The same thing
over here as well, Mr. club this with this,
it's key to the Z. Let's move this up
just a little bit. Now we've got the cuts. Alright, to confirm
that tab out. And e.g. a. Scrub this object, just hit, apply a brush,
it will be applied. Now if you grab this and move
it away, thus it is done. You can select this one
and hit Apply price. And you can move it out. That's okay. I can
grab this one and hit the blob brush and
you can move it away. After that, we can grab them
and delete them if you like. All right, That's very cool. This one, we don't
need it anymore. You can delete it. Okay, now we got a lot
of gap to do here. Because if you add
subdivision surface, not going to get any results. And I will show you how I should go now to
the multifarious. I can open the modifier list. Let's add a subdivision surface. It's smashed. As you can see. We need to add a lot of
edges and support edge loops to make this clean and
smooth like the pit. So this is our job right now. It's turned off
subdivision surface and let's see how
can we do that. Let's tap of the ethmoid Elisha
from where we can start. We have these some vertices. We don't want e.g. this one right here. We don't need it to be here. Activate automatic, and he'd key twice and merge it with this
one that will be better. The same thing here of the spine key twice
and make it here. This orphan vertex
is in the middle. We don't need them, grab them, hit Control X to dissolve them. E.g. this one key
twice and move it up. And Mercutio this one as well to get wiser
anybody get up. So what I'm doing right now is a cleaning process hit Control
R to add one HY here, e.g. and connect this with
this and grab those hit J to make a
connection between them. Because this with this hit J. Right, That's very cool. Okay. Listen, add an HY here. That's not going to work. And that's not going to work because this area right
here is not supported. But if you add an egg tempera or Legos like this and
one goes like this. You can now add an H here on this area,
and I will show you. Let's use then I've told hit K and make cut goes like this, and this will be enough.
Now hit Control R. As you can see, it's working. Okay, Let's see what
else we can do here. E.g. this one, but this
one, you can vary them, hit K. This one with this one, you can mark them as well. The j, if you like. You can make cut goes like this. It's okay for now, Kimberly. You can hit Control
R to add two H's here and make some connection between those head
k, If you like. This one with this one
had k. And these ages, we can scale them just a little bit because I want this age. This is the corner,
head is the edge. It's wrong to add a
new H goes like this. It's better to have to be in the middle.
It goes like that. That's really better. Avoid any 90 degree angle here. Okay. I mean, it
should be like this. But if you make it
like that, it's wrong. So let's kill this
just a little bit. That's very cool. You may ask and see
why that's wrong. Because after that, if you want to be volatile,
gets bad results. E.g. if I Control Z couple of times in the fight before
this h and this h hit Control V to bubble up this
cutthroat be two bullets. Sometimes when your
Bible, for now, the bevel works fine, but sometimes when
you before the bubble goes in the wrong way. So to avoid that, just avoid the 90 degree
angle here and this area. They can throw
sake of time here. Let's kill those like
this. And that's it. Okay, Let's see what
else we can do here. Let's make a card
goes like that. Hank cut goes like this, e.g. for an app support this. Maybe a cut skills like this. Handling cat goes like that. It's space to
confirm these cuts. Rights. And let's work here. Let's do the same thing.
It k, Let's make cuts. It goes like this. I like cut goes like this. Can throw our list, add
two edges right here, and let's connect these ages. Those hit J, K. It's very cool. What about this edge right here? I think we can grab these
vertices is right-click and choose space to make
this. Put this in the center. And we can do the same
thing for these edges. Right-click and space to
put this in the center. Alright, maybe we can hit kn make sits right cuts
goes like that, and hit Enter to confirm it. Alright, I just want to put this in the center
that will be better. What about this edge right here? You can hit K and make cut
goes from here and goes down if you prefer,
and enter alt. Click on this one.
We don't need us. Okay? This hold Control a, Control X to the Soviets. Alright. If you activate
subdivision surface, we still have mass, but
it's a little bit better. But we got a lot of
you have to do here. Let's tab again today this mode, and let's see what
else we can do here. Okay, I think this
will take a huge time. And if I do all of these steps, this video will be,
will be a long video. So I will end this video
here and the next video, we'll finish all of these steps and we will try to make
it nice and smooth, like the head of the
black coordinate. So that's it for this video
and see you in the next one.
10. 010 Modeling the body, adding edges to make the shape sharper: Hello again, we'll
come back here. All right, Let's come
believing their body. Alright, let's see
from Oracle starts, maybe we can add Bevel here to the circle, to the cylinder. Let's go to the edge mode, and let's select the entire
edge loop like this. If you can level up now
or before you do that, just make a quick
connection here. Club this key twice in America, this right here and
this one as well, gateways and make it there. Let's go to this side and
let's see what else we can do. Club this with this hit gay
to manage them quickly, can throw out, maybe we
can add an H right here. But before you do that, delete these often vertices, those because, because
of them, I'm not, I'm not able to hit
Control R to add a loop. So crop them, hit Control X to dissolve them,
cover this one. Control X covers key twice
and slide here and hold it. E.g. this one, you can do the same thing key twice and
through all this right here, same thing here on the site. Can throw like C Control, C Control X key twice, while this here, key
twice and all the sphere. And don't forget to
activate auto America. It's very important. I hit Control R to
add H club here. And let's move it just a
little bit right here. Grab this with this gay. And that would be great. Hit K to activate knife tool and this mic
cut goes like that. And hit Enter or Space
to confirm that cuts. Maybe this we can add in a club right here a couple this
with this hit J conduction. And make a cut goes over
here if you prefer. Something like this,
will be enough. Now let's go to the
edge mode and hit Alt click to select
all of these edges. I guess forget this one, just to grab this key twice
and make it here. Okay, Let's go to
their age moods. But obviously I just
Alt click or if you want to use that
can throw methodic club this hold Control keeps
selecting these edges like this. And don't worry about the
side because we going to yours mirror modifier later, it can throw me to
pivot and let's give it a very small amount of beveling. Thus we're working with here. I got an issue to avoid this. Hit Control Z to undo, and then hit Control R
to add one H here in the middle and just make quick
connection between them. Use the K button, hit J, and that's it. So now let's go back and let's
select all of these edges. All right? By the way, I will get the same
issue right here. So I'm going to avoid
it. Just add one H right here and make connection
hit J. That's it. So yeah, I think
that's it. Okay. All right. That's how we select
all of these. I guess we've tried
to pull them now. It can throw a pebble them. Just give a small amount of beveling literature
that results. Alright, that is all,
that is not cool. We got a lot of issues here, especially here in this area. Okay. And we need to fix
that's alright, just keep in your mind
if you use bevel hand, if you've got a
problem like this, always keeping your mind to
kick the normal of the face. Kicking the normal of the
face is very important. And to do that, go to the
viewport overlays and go to the face orientation and activate this option right
here, face orientation. Alright, these faces,
the 3D we have. The face has two
direction. Alright? We want one direction. One direction should be
visible to the camera and another direction or the face should be not visible
to the camera. As you can see here,
we have blue and red. Red is bad. Blue is the face or the
direction that we want. So if you've got a
problem like this, just select all the faces
at a and then just hit Shift N to recalculate the
normal Shift N. And that's it. Now it's fixed. After that, just go back and turn
off face orientation. Now what we can do
is we can select the entire edge loop,
like this one as well. Okay. And the vault, and it can throw me
to pull them in. Our bevel is working fine,
as you can see here. Give it a subtle bevel
here, as you can see. Now, it's working. Alright, let's see what
else we can do here. Let's say grab this e to the z. Let's move this up just a little bit ambivalent and Control B. Alright, let's make
a big bubble here. Something like this. I
think this will work. Okay, now let's
switch to face mode, hit number three and
deselect this big face. And let's make some insect hit. I. Push this almost right
here, something like this. It will be okay e to extrude it analytics through
this just a little bit. Maybe we can scale
it a tiny bit like this and other insects. And maybe we can hit E to X
through this down like that. And, and other insects at I extrude this
insight like that. Now let's go to the edge mode. Let's see crop these
edges right here. And I think here, I don't know, but I think we have a
curve goes like this. I'm also quite sure,
but let's do that. The speaker like I care of. Before we do that, actually
let's select this face and let's say grow the
selection, hit Control blas. And let's move this up just a little bit
bigger right here. And then let's go to the
edge mode, hit number two, UltraTech event bubbled
can throw be this bubble, this tool for eggs like this. I think that will be enough. Alright, That's very cool. Maybe this edge and this one, we can make it sharper. It can throw B2B wallet, two or three edges. And this one as well,
Alt click Control be the equivalent to
three edges like this. And maybe this one as well. We can crop it and it can
throw a bit of a violet, pick a sharp like this. Maybe this one. We can hit
XF to delete this face. We don't need this. About. Now let's activate
subdivision surface, and let's add a level two. And now we can see that
we got something here. We're not finished,
but we got something. Let's turn this off. Let's start with asthma. They can end. Let's see what else
we can achieve here. Let's write it to a
finished this one. I will go to the edge mode and select the outer
edges, club them all. Let's see how many
vertices we have here. Alright, yes, one,
alright, Alt click. And keep selecting these edges. And select those as well. Select those over here, and let's pivot dose. It can throw them, give them a small
amount of bubbling. You can eyeball it, something
like this. It will be okay. Alright. As you can see here, we
have some variation here in the distance, the fill here. And this area is not similar to the people that
we got right here. This area, this area
will become bigger. That's a problem. And this happened almost
because of these two edges. If you hit Control
Z to cancel that, and if you grab these two
edges and move them away like this secret with them
and scale them away. Heartless here that way
that's not working. This one, I'm going to scale
it to the white mixed, write this one as well as to the why is your
intermixed right? And let's move this
one e.g. right here. Slightest hold
Control and aligned with this vertex to crop this one Hickey and a
length with this vertex. Now let's see, grab them
and scale them like this. Kimberly. And now let's
reselect these edges again. Alright? So a lady said yes. And
that was over here. And let's rebuild them. Now it can throw
be to bevel them. Now the result is better. Alright. I just forget to add
the vertebrae here, so I'm going to cancel that and select this edge as
well and hit Control V. I can write the two centimeter that should be okay to go
into something like this. The result is okay, but we still have some problems, some distortion
here and this area, and I don't like about it. I want to fix it. This case. Select this edge, those two, and in the spirit of them, let's select those and push them
away just a little bit. Avoid any 90-degree age goes
like this because this case, your bevel is not
going to work fine. Something like
this. It's better. And now let's re-select
all of these Hs. Alright. Select them again,
right, That's very cool. Now I think we can
double this again. Hit Cancel orbital bubblegum. Something like this. Now the result is better. And don't forget something
here inside the VL option, we have the meter after. Now it is switched to sharp. You can change this to arcane. I will show you the
difference here. Check this air,
e.g. this corner. As you can see, this is
the result of the bevel of the sharp option. And if you switch this to arc, you will get this result. So for now, I will
show you this to arc because I think this
is the best option here. And the suitable
to the situation. When your company,
you just select these necessary vertices
and make some milking here. E.g. I've got those CKA and maybe we can add,
it can throw off, we can add two vertices here and make some
connection between those. Hit J and maybe with
those as well hit G. Alright, so let's see
what we have here. The spec, this over here. It can throw our alright, maybe manually we can make
a cut goes like that. I don't know.
Something like this. Let's enter and that's it. Alright, That's very cool. Maybe we can add two
edges right here as well and make some connection
between these vertices. Because if you don't, you will have some distortion. Okay? Now we have quad, quad, quad, and we say
that earlier quiet. It's a face with four vertices. Here we still have in England, because we have this
vertex right here. I will leave it for
now for the site and later I will try to
find the solution for this. If that's possible, you can
make cut goes like this. If you do that, you will have another triangle
here in this area. But maybe we can, I don't know, maybe we can dissolve this
one and the club is edge, this vertex and the teeth
wise and merge it here. I think this is better, I guess. Okay. Now let's see what can
happen if I activate subdivision surface are at now this error
becomes smooth and nice, as you can see here. And we need to do the
same thing for the rest. But we will do all of
that in the next video. So that's it for this video
and see you in the next one.
11. 011 Finalizing the body and adding mirror modifier: Hello again. Okay, Let's
complete this area here. Okay? All right, first
thing Maybe we can do is make some marking here. Okay? I don't know, It's better
to take this egg to this direction. I guess. So maybe we can move
this vertex down. First thing this,
maybe we don t think that for now I will hit
Control X to dissolve it. And this one, I will hit U
twice and move it right here. Okay? Can throw off
to add one H here. And maybe we can
use the knife tool to make a card goes like this. And use the knife tool again to make cut
goes right there. Let's see God this age can throw likes and go to vertex mode, hit number one and
hit key twice, and take this down here as well. Okay, something like this. And let's see what
else we can do. Maybe we can move these
vertices a little bit like that. Move them away. We have some overlapping right here happened
and that's wrong. But I'm not going to worry about this side because we're going
to use mirror modifier. Alright, for now let's maybe we can double
these sharp edges. So let's see, grab
all of these edges. And let's pivot them. So let's select this. Select those here as well. And select those here. And this one, don't
forget those. Alright, That's very cool. Now I think we can bevel them, give them the same amount
of people that we add here. You can eyeball it
hit control V. And this prevalence get something like this will be
told okay, be okay. 1.1, boy, nine. Or maybe we can add two
here if you'd like it to. Alright, as very cool. Let's check that the
velocity of the result, the result looks fine and okay, I have put up any problem here. After you do all of that. Now these edges, we can grab them and
American them accurately key twice and take
those down right here and don't forget to
activate automatic. But I got one problem here. Maybe manually I can fix this, hit P to the Z and fix this. Okay, something like this. Hey Keith wise, and let's
move this up over here. And this one as well
key twice and move this over here. Right? Maybe this edge, I can
move it up a little bit. Key twice. Slide this and this one as what Gateway's end slide is just a little bit. Okay, Now this is
better. I guess. You can select these edges
and those over there. And use the loop
tool right-click and choose space to fix the
space between them. Okay, That's very cool. Maybe we can make some
connection goes from this vertex to this
one like this. I think that's what
would be better. So hit the K to activate, and I've told, Let's do that. Let's do the same thing
for this side as well. Alright? Is there anything
else we could do? Well, maybe this vertex, this vertex we make, we can make some connection
between them. It's better to add an H right here because the algorithm of the subdivision surface will push the face is
towards the origin. And to avoid indicating a hue, it's better to
support the corner by adding some edge loop like this. I can show you before and
afterwards can happen if I remove this and let's
activate subdivision surface. So this is before and let's
activate the knife tool, hit K, make cart goes
here and hit Enter. As you can see, the
result is better. So yeah, it's important thing. Alright, Let's tab out
and let's see the result. The result is okay, a nice, this is a good
example right here. If you compare this
corner with this corner, if I tap it, it with mode. Because here we have. A subordinate group. The corner is nice and cool, but here we don't
have any support. He loop the algorithm of
subdivision surface Bush, the surface towards the corner and we got this heading
here as you can see. So if I make a small
cut goes like that, as you can see, I guess
minimize the effect. And I can make a
cut goes like this. And another card
goes like this, e.g. now it's, it's better. Alright. So, yeah, just
keep that in mind. All right, Let's see what
else we can do here. Maybe we can make
a cut goes like this and goes there, hit Enter. Alright, Very cool. Let's turn off subdivision
surface for now. Alright, now let's see
what else we can do here. Maybe we can select this, the body and hit
Select to isolate it. Because I want to
make this area sharp. So I will go to the
edge and select these, all this entire edge loop. Okay, let's select all
of these edges and maybe even these edges right
here, we can select them. And don't worry about this side. Then let's hit Control V to
bevel them had cancer will be very small or motor
beveling, that will be okay. Alright. Now let's see. The result was
subdivision surface on. The result is okay, don't
worry about the site. Maybe we know we can move to this area where there's
tried to fix it. Top. And fair thing we can do here. Let's see what can happen
if we build this area. You can throw away just tastes. Alright, it's working. Let's see what can happen
if we bubble this area. Can throw be. Yeah, we
have some distortion here. Well, that's mean
we need to move these vertices a little
bit far, like this. Or maybe gateways
and slide this right here and you twice and slide this year,
that will be better. Now let's go back to these edges and let's
try to build them. And let's see what's
going to happen. Can throw be, Yeah, Now there is always better. So let's mean we already, let's see, grab all
of these edges. And these edges here as
well and those here. Okay? Can throw be, something
wrong here we got skin throw be here. Well, to avoid that, I will
hit K to activate the knife, tool and timber early
I will add a cut that goes like this and delete
this one Timberline. So let's go back and
let's select all of these edges. Okay? Alright. I think we just selected
all the necessary ages. Notice it's Control B again. The result is
cleaner and better. Let's add two here. And now let's mix
some connection. Because without any connection, if you activate this, as you can see here,
we got some problem. All of the faces goes through this document to the corner. So we need to add some edge
loops, goes like that. Okay, It goes like that. The surface area and the
same thing here as well. So e.g. let's go to the vertex crop, this one e.g. and this one is J. As you can see, let's fix
that here just a little bit. Grab this e.g. with that
one a K. That's helped. Club this maybe
with this one aka and can throw or maybe to add one right here and the
club this with this hit J, maybe one right here. You can add the club this with this hit K to make
connection between them. What about this area?
Hit Control R to add two eggs here if you prefer, and crop this but this had k. This one with this one had K to make chronic in-between them. And if you'd like, I can make the distance equal for
all of these edges. Crop them, right-click
and choose space. Okay? Maybe this vertex, this vertex we can hit J, makes some connection
between them. And what else? Let's see what else we can do. Let's turn this off temporarily. Maybe a clinic
club, those here at j. And this one with this one. Maybe this one, Let's
hit Control R right here or this ad and
the H goes like this, this coordinate, those together. Maybe those here at G. And that's very cool. Maybe I can take this down. Okay, maybe we can use
the knife tool it, kay. And let's make cart
goes like this. Maybe it's winter. I think this will be enough. Maybe those I can hit it twice and American
them right there. Those here I can hit key twice and merge them here as
well. That's what B. Okay? Alright, let's see
what else we can do here. Alright, now let's see
what can happen if I activate subdivision surface. The result is okay and
nice. And it's smooth. Maybe now we can add a mirror
modifier to this object. So let's turn this off for now. And yeah, let's do that. Let's open the modifier list and let's add mirror modifier. And let's put this above
the subdivision surface. We won't smear. And after that, the smooth subdivision surface
mirror is working, but it is working
in the wrong way, is flipped the wrong direction. So let's activate bisect. Bisect, as we said. It will have, it will delete half of the geometry
automatically. So let's do that. And Alyssa flip the results. Now. Perfect. Okay,
That's very cool. Now, let's activate
subdivision surface and the result is cooled. Very nice. If you hit right-click
and create a smooth, the result will be smooth. Alright? Alright, I think that's it for this video. And see you in the next one.
12. 012 Extruding some faces on the side of the mesh: Hello again and welcome back. In this video, I
just need to create this frame if you can
see it right here. Alright, Sunday, like this. I don't know if I have another
image to see this frame. It's not visible right here. Alright, I think is
visible right here. As you can see. This,
how can we create those? Let's go back to
this image is the best one. This one,
this right here. And let's turn off
subdivision surface for now. Let's go to the left,
can throw all three in tablet mode and go
to wireframe busy. Let's see how can we do that. Let's try to analyze
it and understand it. Starts from here and then we have some variation here and there is
off, but that's okay. It's not a big deal. Okay, So the perspective, we can use the knife tool hit K. And let's start e.g. from here, I guess. Something like this. Maybe. Then we could go up almost, I don't know, maybe right here. And confirm the cuts. Let's make this sits rights. Hit S to the Z and zero
Enter, and now it's better. So now we have this cuts. And I think this
should go inside. I'm also quite sure, but I guess so let's use the knife
tool and make another cut. Goes like this. Okay, and Van Gogh's here. Confirm that cut the cake and to use an app to align this, make a cut goes
like this, maybe. And it should goes like that. And then break this area
and then go down, I guess. Okay. According to this image,
yeah, that's right. Heartless. Use this egg here. This one. Alright, let's, let's see
what else we can do here. Let's activate the knife tool. I can, maybe we can
make our cuts or no should goes from
here, I guess. Alright, maybe from
the left view, that will be better
for us to do. It can throw three. And let's make the
cuts from here. Starting from here. You can hit a to make
the cast. It's right. And let's make the
cuts here as well. Tab sorry, hit space
to confirm the cuts. And now we got this. So now let's see what we
have done so far. I have these three acres. I don't know from where
we got those lists. Delete them it Control
X to dissolve them. In. Now let's select these
faces and new faces. We can select all
of these races. Alright, so we have
these two vertices with tried to make a connection
between them, hit J. Here we did the
same thing as well. Now let's go back to
select the faces. All of these faces. And those here, or something like this, I guess. And let's extrude those
hits Alt E to orbit the extraordinary enqueue
is extruded along the normal and push those out just a little
bit, not too much. Something like this. You
can control that from here. 0.6 centimeter, 0.8. Maybe. I think this will work. Let's try this again. I'm not so sure of
this answer here. Like this or not. Maybe it goes like that.
I don't know actually. But if I if I include
these phases, I think it will
be easier for us. So I think I can grab these phases as
well and extrude them. Solely seek love
those here as well. And then it's Alt E to open the extrude menu and choose extrude face
along normals. Alice extrude this
out just a little bit and choose Offset even. That will make the offsets even. And 0.8, I think
a totally better. Yeah, I know I got this result. Now let's see what
else we can do here. For this area here, we can go to the bevel
and bevel this edge Pelosi hub of a little work
here, it can throw me. Alright, so I think it's better for us to make a quick
connection goes like this. For now. Just to bevel this area to get a
bevel that control B, Alice bevel this
tool maybe four. I just wanted to make
a careful right here, similar to what I have
here in this area. And this area we have
a curve here as well. So let's make a cut
goes like that. To make better bubble. And this bubble,
this, it can throw be something like this. I think it will be nice. And what else? This edge. I'm not going
to use that anymore. So maybe we can delete it. I can throw likes to solve it. All. Let's see if there's
anything else we could do. This EKG right here, we
need to bevel it as well. It can throw, be two
bullets like that. It can throw X to this
egg to dissolve it. Alright. What about
this corner right here? Let's pull this
kid can throw be. Alright. I will accept this is
not quite correct, but I will accept it later. I will change the
direction of these edges. I will hit Slack to
go to the local mode. Okay, I've turned
that now is the time to make this result sharper. Because if you go to the subdivision surface
and if you activate, as you can see, the result is not sharp and it needs a little
bit of tweaking. So let's do that together. Let's turn this off
and maybe this image, I don't want it for now.
Let's take this out. Let's talk to the ethmoid
LSE from Eric can start, let's start from this area here. Let's see what's further
editing we can do here. Let's go to the vertex and maybe we can make
a cut goes like that. Something like this. Because I think we need to
move these vertices just a little bit forward or
link those with this area. So maybe we can select these
faces and delete them. Let's see what can
happen if I do that. Let's clap those. Hit XF. And I will select these three vertices and hit F to create a
face between them. And go to this area and do
the same thing, grab those, hit F and this edge
was open area, I can crop it and
hit F to fill it. Okay, This result is
a little bit better. And maybe, I don't know, maybe we can move this just a little bit and alignment with this. Something like that. Even if you leave it
like this, it's okay. Maybe now we can do the same
thing, the same scenario. We can grab these
vertices, these acres. We can drop them all like that. Hold can throw lane keeps
selecting these edges. And even this one. And now I can slide
those down a key twice and slay those and merge them right
here with those. Let's check the result. Let's try to track it and see, we got a problem. Alright, What is this? Let's try to delete it. Can't relax. Do we have any
overlapping had been here? Yeah. Because of the
mirror modifier. Sorry. Let's check
this area as well. Let's see what we
got here. Alright. We don't have, we don't need this control X to dissolve it. Hey, there now is, I
think it's better. I will leave this
triangle for now. Now let's see what's
going to happen if I add a bevel to the outer side. So let's see, grab
all of these edges. You can hit Alt, click
to select all of these. And let's select
those here as well. Okay? In the early select
all of these H's. Are those very cool? We
don't need this one. We don't need those here. That's will be enough for now. I will hit can throw
the LOCOS can happen. Just added three acres. That will be enough. All right. That's cool. Alright. For this area, I just need to make
sandwich weekend. I don't like this result. I just want to make just
one cat goes there, e.g. Kimberly, this age. Now I can delete this for now. Because somebody like this. Alright, cool. Now I need a support, a clue for this egg here. Maybe I can grab it's like this. Maybe select the second line. Like this. Keeps electing this page. Unless you guys
can have in a fib of 22 acres, maybe not three. Because somebody like this. Right. Let's see. Do we need
to include this a here? I'm not quite sure, Achilles, let's see what's
going to happen. And then maybe we can decide. So I will hit can throw me
to bevel this to two H's. I guess that's what
we'll be. Okay. Let's kick the result. If we have any
problem to this area, as well as he was
happening right here. Alright, for now is okay, we have double,
double check here. Let's see why that's having
these two aqueous goes here, maybe we can change
the direction. Let's use the knife tool. It k, Let's make cut
goes from here to here. And this edge, I
can dissolve it. And what about this area? You can make a cut goes like
this is not a big deal. There's somebody like this. Or even if you prefer, maybe we can call this
vertex E key twice. In America there. A few like, Hey, maybe we
can club this with this a j. And maybe we can delete this edge and maybe
delete this one as well. And let's see what's
going to happen if I married to this one here. That's too much key twice and let slide just a
little bit right here. And let's use the knife tool. Maybe we can make a
cut goes like this. Maybe a cut goes like that. Something like this. And if you make a cut goes
like this will be okay. Alright. I just, I don't want to spend
too much time here. Let's ignore all of that. And this can happen if I
activate subdivision surface, I will fix all the
problem when I see it. Alright, now, everything looks fine except this
arrow right here. I got a lot of mass here. So yeah, let's see
how can we do that. Let's go to the left view, and let's go to wireframe
and activate the knife tool. And let's pick a
cut goes like that and keep in mind to
hit C to cut through. Then had lifted click to confirm the cat and then
Enter to accept it. Now this new edges
and you're a globe, you can hit key twice, just slide it like that. Alright, so let's do that again. He gateways and sliders. And let's hit E to activate
the event and then F2 flip the alignment and let's push this and make it
close to the edge. Right? Keith ways, maybe we can move it just a
little bit more here. And the CEO is going to have
to face subdivision surface. Alright, so this is
what Elizabeth regards. Maybe we can add an a. It goes like this that will
help to fix the cubits. Let's see where this
will go. We'll end here. Okay, That's very
cool. Maybe we can add another edge right here to
support this side as well. It will ends here
for the heading. That's not going to
cause any problem. Well, that's been yeah,
we can accept it. Let's see if we can do any further editing
here and this area. Let's use an F tilde. Maybe
we can make a cut goes there, maybe dissolve this edge. Hey, maybe make a card
goes from here to here. And the color of this one and
this one and dissolve it. It can throw our two add one H right here to support
this area and the club this vertex with this one hit J to make a connection
between them. Can throw art to add
one edge right here. And let's make a connection between this and
this one. Hit J. Maybe we can slide it down
yourself a little bit. That will help to get better hitting this area.
I don't like it. Let's try to get better results. E.g. Let's turn off
subdivision surface for now. Let's use the knife
tool had K to make a cut maybe goes
from here to here. And delete this age. And what about this HY here? Let's use the knife
to let K and let's make a cut goes like this. Maybe handling this
aqueous don't need this. Maybe one cut goes here
and this will be enough. Or I don't like these
ages to go like that. So let's see what
we can do here. A key twice, and let's
move this right here. Let's talk about a list. Activists have the
weekend surface and let's see what
we got so far. All right. We got a little
bit of the story here, right here, or this area. It's very easy to avoid
this if you hit Control R, if you hit Control R to
add support a globe here, that will help too, get rid of any distortion
happening here. And this area. If you're like, maybe if you make some
cut goes like that, maybe this will
help a little bit. Let's delete this edge
and keep it like that. Let's activate
subdivision surface. And now the result is
a little bit cleaner. Already that's very
close to the other side. Okay. Now we got something
similar to what we have here. And yeah, it's very cool. The mission is still
clean and nice to now. We just need to add
some holes here, as you can see here, we have 24 roles here we need
to distribute k. So yeah, let's do that in the next video.
13. 013 Adding holes to the side of the mesh: Hello everyone,
Welcome back here. According to the
reference image, here we have four holes here. We need to create this start, create these holes here. Okay, maybe we can go
to the left of view. It's Control three
from the numpad. And now we are in the left view. Smaller tweaking here we can do. Okay, If you compare the height of this
line with this one, this one is a little bit lower. So maybe we can take
this up just a little bit. To do that. We can tap into it
more then go to the vertex and switch to wireframe. So we can call up all
of these vertices. And it's very easy,
just move them up. And that's it does
hit E to the zero. Let's move those up
almost right here. I think that's what will work. And I think they
are aligned almost. That will be okay. Let's go to Salt and let's see
what we got so far. Do we have any hitting here? We don't have. That's great. Let's go back. Alright, so let's add
a cylinder right here. Start from here. Maybe we can put the 3D cursor over here. We just hold shifts and told right-click and move the
mouse on the surface. Now with the 3D cursor, is it snapped on the service? We want to put the
3D cursor over here. As you can see, it's
snapped on the surface. Let's hit can throw all
the three from that. I'm about to jump to that
lifts orthographic view. Now let's hit Shift a to add
and let's add the cylinder. Now we got our cylinder already. Let's go to this setting. We have 16 vertices,
that's too much. I think. We can use 66 sides and we can manipulate the radius
of the cylinder, e.g. five centimeter, it will work. And the depth or height, the same thing for five
centimeter. That's all for now. And the direction of
the cylinder goes up, I need to rotate the
cylinder towards us. So in this case, here we have a line option. If I switch this to a view, as you can see now is
aligned to that view. And I can control the vertices from here
as well if I want. After that, we can
scale it just a little bit so we can go to the
wireframe to frame it. That S and skeletal and smooth as it should
be almost right here. Something like this. Let's timber around Elisha
what we got so far. So now we got this
ferrous slender here. Okay, Let's hit Shift D to take a COBie to
the y, and then y. And hit Shift D again
and move this to the y. And another shift to move
this over right here almost. Are others record. Okay, let's start with this one. Let's go to the modifier. And we don't want the mirror and subdivision
for now temporarily. Let's turn those off for now. Let's try to make a hole
right here on this area. Using the Bowl Tool. Select this piece as a
cutter to cut this area. Then hold Shift, grab the body. You can access the Bowl Tool if you go here to the
edit, It's right here. But if you like, you can hit Control Shift
V to access the Bowl Tool. So let's choose the France. Now we got this, okay. This with a boy, the control shifts b and choose the France. And the same thing. Grab this, maybe we can move it just a little bit
inside of the cup. The body control shift
P cures difference. This one as well as smoke this n side a little bit right
here, hold Shift, grab the body control, GFP, cures, difference,
and there we go. Now we got our halls ready. If you go to the
modifier stack here, you will find all of these
bull tools exist right here. Okay, Now you can apply
those one by one. If I go to the first one, it can throw a totally up light, can apply them one by one. Now, you can move away. The Katara itself if you like. There was no problem because
their job is that right now. The question is, what
we should do next? Now is the time of adding
edge loops and make tweaking. This case, we can touch it, It's mode and see
what we can do. E.g. by the way, I don't want those. That's enough. I
can't leave them. Just go out with them and
delete them like this. Let's start with this area tab and let's see what
we can do here. If you activists
subdivision surface, as you can see, there's nothing. Just don't make sense.
Because these vertices are not supported with anything. There are go inside like this and as you can
see, it smells. So we need to make it somewhat tweaking
here and this area we need to make some
connection with these vertices to
get better results. The same CNR for the wrist. So let's turn off
subdivision service for now. And let's see what
we are capable of. This activate automatic,
this icon right here. And then we need to
mark these vertices. Grab this key twice, GnG, slide this right
here, and marriage. But what about those? Maybe we can move those just
a little bit right here. And the crop is vertex key twice and this mercury
this over here. Okay, That's very cool. Maybe we can crop this vertex
with this one had K make a connection between
them and make any cuts. Maybe right here and connect this vertex
with its vertex at k. And this line we note
we don't need it anymore. It's Control X to
dissolve a few, fair? That's okay. All right, so maybe
here we can make a cut using a knife
tool goes here. And this one, we
don't need this. And maybe we can make
another cut goes there, e.g. and yeah, that's nice. And maybe one cut goes e.g. right here, right now so that we can grab this entire
edge loop by using alt, left-click on one of these edges and then just
hit Control V two bullets. And let's see. We use the 0.6 I
think, or as 0.6. That will be enough and cool. So we just need to memorize this number so we
can use it again. And yeah, I think
that's it for this one. I guess. Let's see what can
happen if we activate the subdivision service
tab out and activated. As you can see now
it's smooth and nice, but we just need to
make some tweaking here inside tab again and turn off subdivision surface
and the secret police in our faces just give them a small amount of
beveling can throw be something like this fuel, like to give it a
number, 0.5, maybe 16. Okay. But keep in mind, this is not going to be visible
to the camera because we're going to put something
here on this area out. And I will Secretary
subdivision service. And as you can see, super cool. Let's see what we can
do to the next one. Tablet mode. And let's see how can we
support this new circle. Fair thing, maybe these edges, we can slide them right here
and use the right tool. Or maybe you can go
to the vertex mode. Club is vertical key twice and Americans like this will work. Use knife tool, hit K, make cat goes like there. And maybe we can use and
I felt like Ken to make a cut goes e.g. like that. Maybe a new cuts should go e.g. like this, maybe
something like this. One cut maybe can
go bright there. So okay. And one cat goes here. And now I get supported this. What about this one? Maybe we can hit key twice,
America, right there. Okay? But Kimberly, we can delete
this edge after we add, before we can bring this Pe because as you can
see this edge, we have this line and this line, this line goes to
this delicate can. And here we got a
sharp angle that's maybe maybe effect the bevel when we make on me when
we add a bevel here. So I prefer to delete
temporarily and keep this one. And after I finished
a buildup of all, I will connect it. So it can throw legs. Go to H, Alt, click Alt. You have to click, grab
those together if you like. It can throw B. And this 0.6. And that's what would be enough. Alright, let's see what's
going to happen if I act through a
subdivision surface. Super cool, nice, very nice. If you like now, you can use the knife tool and bring the connection back,
e.g. right here. It's okay. Alright, let's go to the third one thrown
off so that we can service. And let's see what
we can do here. Alright, so let's go to the vertex mode and see
how can we fix that. Maybe we can add
an H right here. We can use it to K to
make connection now. And maybe we can slide those
just a little bit right here and grab this key twice
and American listed there. Or maybe even we can crop those two vertices and
praise between them. Let's will work as well. If you like. Something
like this will be okay. Alright. What about this area? Let's see, grab this one. He kicked twice. Another slide that
just a little bit. Let's put these vertices above this one and hit
K to make a cut. E.g. goes like that, maybe. And this egg, we don't need
that anymore, actually hit K. And let's make cut goes
like this or this triangle. We don't need this, I guess. Maybe this one we can take this vertex down
and key twice and the smoke test on something. Maybe I can merge it
and delete this age. Actually. Just delete those
and let's connect this one right here and
this one up, I guess. And deliveries, I kill you
don't need them that much. Grab this key twice slightest. Americans. Are this very cool. Now I guess if I add Bevel for this side and this side is
what's going to happen if I hit can throw be. Alright, let's add 0.6, 0.5. You're like TVD activist
subdivision surface. It looks cool and smooth. Yeah. What about this one? Alright, so maybe we can
add one H goes like that. Just this will help me
to make some connection. Alright? And it will be easy. Let's go to top view and
a Z to go to wireframe. So our H would be right here. To do that, use the knife to let K and let's make a
cut goes like that. If you want to make it a, try
just hit a and that's it. And then hit C to cut
through all hold geometry. Confirm the cat and
then hit Enter. Alright, so after that you
can hit G twice and slide. Sorry, I'm so glad
this one alone key twice and slide this just
a little bit right here. And scale up just a tiny bit. Not too much, right? That's very cool. Let's go back to solid. And now maybe these two edges, I can move them
just a little bit, slide them, do twice. I mean, let's mark this one up. Keith, why is take
this up, tails down. It's better than I leave
this ACO, this distance. It's better to add
an H right here. Okay? And what else we can do here? Maybe we can add
another edge right here and move this
one Keith wise, just a little bit right here and make a connection between them. It's like one here as well
if you prefer, it's okay. And let's add one
connection here as well. For this one, we can
use the knife tool. Make a cut goes there. And what else? This aqueous. Don't
think that anymore. Club, it's delicious. Anything else we can do here? I think the result is nice. So these two acres a loops
and let's give this 0.6. This year is going to happen. In fact, if it's
subdivision surface. Alright. I don't see any problem. But the result of the jacket, as you can see here,
it's very simple. Just hit right-click
and hit smooth again. And now they become smooth. If you're activates
the mirror modifier. We have everything
mirror at the end. Nicely done. Very cool. I guess that's it
for this video. And see you in the next one.
14. 014 Finalizing the body mesh and make some tweaking: Hello again, welcome back. Before we go to the next step and create
any other geometry, I just need to
make some tweaking and make some fixing
to this geometry. I will hit slash to
go to the local mode. I mean isolate this
geometry and here we have mirror modifier and
subdivision surface. This is the result of
the mirror modifier. I want to apply the
mirror modifier. I just want to see
what's going to happen. I want to accept the results. I will hit Control a, and now it's done, it's applied. And let's turn off subdivision
surface Timberlake. Let's start with go
to the Edit mode endless check the area. Let's take this
side and this side. Then let's see. Do we have any problem? Do we need to add anything here? E.g. you can see these
edges goes like this. Maybe we can make
them ghostwrite. Alright. It's not a big deal, but I like to make the
results a cleaner. You can hit key
enslaved this and align it with these vertices
to get to, to be better. And if you want to
get a fast way, you can cut up the
entire loop, e.g. this one or maybe
this one and hit Control X and reconnected
crop this with this aka. That's what rock as well. And let's see what
else we can do. This edge, e.g. we can
connected with terrorists. Or maybe e.g. this
edge right here. Maybe we don't need this. We can crop it and delete it. I'm not going to worry about the other side because I will use mirror modifier
again. So e.g. I. Can hit Control X
and delete this one and maybe quantity
this part right here. That's what rock this age. Maybe I can delete
it again and maybe I can let see why should
we move this fully. Like maybe we can, I don't know, maybe we can connect this
edge to this one right here. E.g. I. Can club these vertices. He can move those up like that. And maybe we can. Now, let's go to the face. I just want to make a quick
insert right here, e.g. i2 insets. And let's answer this
just about here. Now let's connect
this with this acute k. The sake we don't need it. Delete it. Alright? And this one as well, we don't need this actually. We just, we just want this side. And because it works
for all sites, we will delete this manually. So let's see, grab those, hit Control X to dissolve them. And before we do that,
let's cancel this. And let's hit K to make
a cut goes like that. And delete this with this,
we don't need them anymore. If you'd like, you
can hit get wise. Move this up if you want
to move this forward, just hit Alt to move this to
the same darker like that. Let's go to the left
of view. I can, maybe we can move this
just a little bit. Copies vertices because
here we could have a curve, so we can move these
vertices here. So to bring the care back. Alright, so taking this line to this action is
better. I guess. Maybe we can move this
up, e.g. right here. And if you'd like, you can make cuts
goes here down if you like this option
or if you don't, you can merge them up
Keith wise and take those up if you want to merge them. All right, let's see what
else we can do here. Maybe we can make
some connections between these two sites here. In between this vertex zero, That's what we have here. We have three vertices. Alright, well, maybe we can
grab those three of them and hit M to open
the American menu and choose center to
merge them like that. And let's see what can
happen if we do that. That effect the heading. Actually nothing spin. Yeah, that's a good idea to
make them. For the size. We can club those and hits
ME, choose other center. And now we can make a connection between
these two vertices. Crop them like that
because he'd k indices. What about this one right here? We can do the same thing
called this vertex graph. This one had K to make a
connection between them. Graph e.g. this
one, and what else? With this, and hit K to make
a connection between them. Alright, That's very cool. If you'd like you can, you can just support this vertex to get better hidden and you can
move it right here. Maybe you can take it
down if you prefer, or you can leave it there. That soil plus will be okay if you want to take it
and connect it here. That's what we walk or maybe
can live with right here. Or this will work
because of this phase is flat and not
visible to the camera. So I'm not going
to worry about the heading if it will be good
or not because this phase, as I said, is not
visible to the camera. So let's make a
connection right here. What about those? We can hit M and choose marriage like that in the same scenario here
we can call those. Here. Was America Center using the married menu when
you hit M. And that can club this vertex
with this radix right here to make a
connection between them. Alright, maybe this, with this
I can make them like that. It will be okay
and working rice. Alright, so let's see
what else we can do. Maybe we can support this
vertex right here as well. So let's move it there,
maybe like that, and maybe this vertex we can add key twice
in brackets phi there. Alright. Let's see if there
are any vertices, needs any kind of supports. What about this
vertex right here? I will have K and go and
marry this one right here. Just to support this,
this vertex right here. And I think big data
sets, maybe this one. Let's see what we
can do to this. Maybe I can copy
that one and hit K. And supportive as
will be better. This one I can call
this and supported. Well, I will have a
triangle right here, but in this case I can hit
K and take this there. You can use cancelled to make the cut at the center, sorry. Grab this hold Shift to
make the cut on the center. Control is connected over there. That's very cool. What about this era? Like maybe we can use the knife tool and make
a cat goes like this. It's better. Alright, let's see what we can do here. Maybe we can use the knife tool again from here and make
the cut goes like that. And delete these edges. And even delete this
one and this flower here are, That's very cool. What about this one
here and this area? Okay, let's delete this one. And let's delete this one. Kimberly, hit K to
activity E and F tilde. Maybe we can connect
this one right there. See if that works. And maybe this one we
can connect this e.g. right here. We have triangle
right here, That's wrong. I know that, but because
this area is flat, It's not going to affect
the healing that much. What about this
vertex right here? Maybe we can take it. There are, let's see
what we can do here. Alright, maybe we can
leave it right here. This area is almost flat. If you like, you can e.g. take it there and use that
tool and move this one, e.g. like this and delete this edge. We don't need it anymore. If you want to make
the distance even between those gifts,
select these edges. Heterocyclic, go to the
loop tool enqueue space. This egg. I don't like
it to be like this. Maybe we can hit key twice and activate automatic
in market like that. And don't worry, we don't
have a triangle here, we have a quiet here. Vertex number 1234. Let's see what we can do here. I think everything
now is become better. Now let's activate
subdivision surface and let's see what
we will have here. I think we get now
petrol shading. I think we got very subtle
hue happen here in this area. I'm also quite
sure. Alright, Any, we can ignore it because
it's not so quite visible. Okay, I think now
we are ready to add the mirror modifier again. So let's turn off subdivision
surface and let's activate wireframe so we
can see the wireframe. Let's go here and go to the viewport display
and activate wireframe. So we need this site and
we don't need the site. Lists, use this area as a mark. And let's go to the modifier
list, endless hours. Sorry, let's add the mural, put them above the
subdivision surface. Let's activate bisect, delete half of the
geometry automatically. And as you can see, Mirror, mirror the wrong direction. Let's hit flip them. Now let's turn off
the wireframe. And this activates
a break in service. Everything is clean
and nice to go. Alright, I think that's
it for this video. See you in the next one.
15. 015 Starting with the tail part 1: Hello again and
welcome back here. Let's see, create the tail
or the black coordinates. Let's bring the reference
images. Alright. I have this image and I
have a lot of images. I think I can stick
with this one for now. And let's go to the left. If you hit Control
three from the number. We have a little bit of EQ here. It's not a big issue,
we can ignore it. We can go from here.
Company the tail. Let's see, grab
this body analysts have more than maybe we can select these
vertices to start with. So let's see, grab those and then just hit Shift
D to take a copy. Because we have mirror
modifier resists. The other side, it will
be dropped automatically. When you duplicate this layer, just hit P and then S two separate this out
of the subgroup. Ok. And then tap out. Now, select this one alone and
let's go to the left view. He can keep the close to
the body like this maybe. Or you can move it
even more, e.g. right here. Except the
mirror modifier. For now. I don't know, maybe I
can accept it or not. I'm also quite sure
Alice tablet it, put n. Let's see
what's vertices. We can do it for now. We don't need these
vertices for now, I guess those as well. Or maybe we need them.
Let's start from here. It's a select all
of these vertices go to the side of you and then hits he Analytics for this
turn off subdivision surface. And the wireframe to
say grab these vertices E to extrude those
down, about like that. And the crop, the whole vertices and smooth. I was over there. Somebody like this. It can throw off to add a globe
here IN one here as well. And maybe now I can
grab these head, can move those up and up
those e.g. the key to the z. And let's move those
just a little bit up. We just need a little
bit of room here. Maybe those we
can't grab them and move them up just a
little bit like that. And maybe these vertices Hickey and move those up as well. That's where B, okay? And now we cut the
tail, I guess. Alright. Let's see of the
tail goes thinner when it 30k there, the end. Alright, maybe the
semi-truck can show us a little bit of what's
going on there. Maybe I'm just go to
the top a few here, and go to wireframe. And maybe we can put these vertices just output like this and make the tail thinner. And maybe we can
move those just a little bit as well, like that. And this one as well. All right. E to the x. And move those. I think not the
results make sense. And we can accept it. All right, what about
this side right here? I'm going to select these
vertices, these edges, sorry, and hit E and
move this to the x-axis. And what I'm going to do
is I will hit S to scale It's kill this a to the
x because I wanted to skip the activists, right? Because if I had heat or more of its meets at this points, but it's not these. We got a gap here. So I guess the egg is no strike. I don't know if this hit S
to the zero Enter and hit he now to move it and now it's better if
you move it farther. It can go further in this case, to avoid that, we have
a nice option here. Inside the mirror modifier
is Karla clubbing. If you activate the clipping
and if you move this again, it will stop at a point. So this option is
nice to use here. Alright, maybe now we
can scrub this this site and fillets if you
prefer. The side as well. I guess. So. Yeah, I guess we can do this. I will tap out and grab the mirror or it can
throw a tube light. And the unlisted slide to go to the local mode
sludge from that, I'm bad. Ellis tab and let's see
what we can do here. I will hit Alt, click to select the entire ACO and then
hit F to fill this. And on the other side we
can do the same thing, alt click and then just
hit F to fill all of that. So you go to the vertices
if you'd like to make a connection
between those sets, will be okay and nice. Alright. You can ignore it for
now and you can make this connection when you want to activate the
subdivision surface. Okay, let's see
what's the next step. What we should do after that. Let's try to find
another reference image. Right? Maybe this one
right here, it's okay. Or I don't know. C. We can we can use, I don't know, maybe this one, It's
nice ohmic here. We have a cylinder right here. We need to add this, go
to the link to view. And it's like can
throw all three. Alright, so we need to add a
thick cylinder right here. Let's see, do we have any, as you can see here, with just a cylinder
we can add here. So in this case, maybe we can bring the 3D
cursor here and this area. So I will grab these vertices, all of them and hit Shift S and bringing the 3D cursor here
and this area and tap out, Shift a to add and let's
add the cylinder here. Align the cylinder
towards the camera. Just who was a view. We have six psi. That's not enough for,
Let's change this to 12. And lists kill their ideas. I think 12 will be
okay. Let's go to 16. She was going to happen. I
think 16 will be enough. And let's move this just
a little bit right here. Something like this. Let's see what we got so far. So now we got this result. And maybe we can tablet mode. And you go to phase and move this phrase just a
little bit right here. Let's try to find
another I matrix so we can understand what's going
on here in this area. Yeah, as you can see here, we have a small age as me
in this cylinder could go a little bit out of the tail. And we got the same
result, I guess. Alright, That's very cool. What about this area right here? I don't know, but maybe we
can move this slightly here. I just wanted to see
what's happening here. Yeah, the tail goes to
the end of the cylinder, as you can see here,
according to this image. And here we have something here, the area here it become not all n here, a
little bit wider. So we need to count that to see how can we
achieve something like this. First thing, let's tap out and
disciplining the tail tab. And let's see, grab this side. Let's see careless
move it to the end. Somebody like this, maybe. Maybe we can move this back
a little bit right here. Alright, the tail. The tail
is not aligned with with a, with a cylinder correctly. I mean, as you can see here, the distance here is not similar to the
distance right here. Let's see how can we fix that. I think we can do that manually by moving this cylinder
down just a little bit. And that will be enough for us. That's very cool. Alright. As you can see here, we have
something in this area, some extrusion we need to make. Maybe we can do that later. But for now, let's
focus on how to position this cylinder
in the correct place. Right? We can move this just
a little bit right here. And I think we are
good to go here. One more thing here
maybe we can do, I think we can grab
these vertices and hit S to the Z and
just scale them like that. Little bits. Rights is try to
find that image. I just wanted to see
what's going on here. Or something here I just want to make this area from the top. We got a little bit of care, but here it's sharp, so I think it's smooth
for the both sides, this side and this side. So let's try to fix this issue is very easy to fix just to grab these two edges and
then bevel them. Hit Control V and
this bevel them, give them the same
amount of babbling. Alright, I think this will work. And how they become smooth. One more thing here, it's a little bit weird
why this goes like that. And maybe we can hit S to the x zero and throw
it and fix it. Or maybe we can isolate
this just for now. And we can do the same
thing for this side. So the x here and make sure
everything makes sense here. Before you go any farther. Right? Now I think
we can mirrorless with would the
cylinder, I guess. Let's go back to this image. Maybe, that's, maybe
this one right here. See what else we can do here? I don't know, but I feel
that we got a little bit of care of here and this
water. I'm not quite sure. I don't know if this
router goes like this flat or we have a smoker. But I guess we got
a small k here. K to achieve
something like this. Let's see, crowd the
cylinder here on this tab, and let's grab this one as well. I can hit I for insert, and we can make some inserts
and hit Alt S to move this towards it's normal to
get that smoke care of. And then hit I can fuel, I can mix small
incident like that. Hit Alt S and push
this even more, just a little bit
more with this one. Yeah, I will accept
this result tool. Make the process a
little bit difficult for me when it comes to
connect these vertices. But I will accept
this challenge. And I just want to
make the result looks realistic and close
to the real black hornets. Alright, so yeah, let's take a copy of this
one right here, timber or live, maybe
we can use later. But for now, let's make a
list, join those together. So I will look up this whole
tier of the club, this one. And I will hit Control Shift
B to open the Bowl Tool and just use union to American them and now
they are married together. A few go inside e.g. as we can see,
everything is merged. Alright, That's really cool. Now if you tap the ethmoid here, we have a long journey of connecting vertices and
do a lot of stuff here. Okay, because now if you
grab this and if you add subdivision surface to
this, it's mass, nothing. We got nothing here. As you can see, the
geometry is stupid. But yeah, we just need to make a lot of connection here between these vertices
to make this make sense, but not right now. I will end this video and we will do that in the
next videos. See you next.
16. 016 adding some edge loop and fixing some problems part 2: Hello everyone, welcome back. Let's see what's the next step. Let's start with
this rotor here. I will have to do it more than
maybe I can take a copy of this phase to broadly
and boots right here and maybe we can hit E to
extrude this like that. Okay, This upbringing
that reference images I just wanted to go over, I do this. And this area. We have this geometry here. Maybe we can see it better. And another image,
it's right here. And let's try to find
another image here. Or it's visible here as well. So yeah, because of that, I just copied this phase and give it a bit of
extrusion like this. But this extrusion is too big. Actually. We can hit G
and make it thinner, something like this
and even this one, maybe we can make it
closer like this. But this geometry is still
related to this one. I just want to detach it. And this case I can hit Control L or Control L.
You will select all the, all the polygons that are
connected to this one, e.g. hit Control L
because I just want to select this and
then separate it. Just hit P to open
the surprise menu and hit S to choose the
first option selection. And that's it. Now, it's done. Tap out and listed
like this one again. Alright, what's anything
we could do here is try to see as Joe toilets
more than maybe we can take this back a little
bit right here, right? So maybe we can push
this even more. Because this shape that
you can see it right here. It's another layer. Alright? And we need to, we need to create a view. E.g. if you, if we go
back to this image, as you can see here, we have this layer one and
this one they are two. And this age of the first cylinder or
is aligned with what? The tail, I guess. This one, it goes over, it's a little bit I mean, similar to what you
see right here. This layer tool goes beyond the tail, I guess a little bit. So you can see that we
have some distance here. You can ignore that actually
now on will not start, but lists created. I just like to challenge myself and see how
can we do that. Actually, we can use this, I guess, to create it. So let's take a copy of the, I don't know, maybe we
can use this later. Let's put this where
I have Kimberly and let's kill this just a
little bit. Make it bigger. Maybe we can make
this bigger as well. Yes. A little bit like this,
something like this. And this will be enough. And lift tap it is more
than Lucy grab this face. Let's move this almost right
here, something like this. To work. We need to delete half of this one according
to this image. I guess. Yeah, we can delete
half of this. So let's go to the top
view and go to wireframe. And I just want to cut up
half of this geometry. But to do that, It's better to hit Select to
go to the wireframe mode. I don't know if I selected
the right objects. Let's go back to solid. And this one, it's
like to isolate it. And we got small boat here. What I will do is I
will grow selection, hit Control X to delete
all of these phases, we don't meet them.
My colleagues. And I will rub this vertex, this vertex here, the
k two matrix, sorry, okay, to make a
connection between them. And the same thing
for this side k. Now I have the ability to delete half of the geometry if I want like this XF to
delete and keep this one. Let's hits like to see
what we got so far. My alright, now we
call this results. Maybe we can scale it
just a little bit. Okay? We need to scale this according
to the origin dot here. Okay, to keep that. Phi skill. This skill
is not going to work at the center
of this cylinder. This case, we can use 3D cursor, hit Alt click to select
entire a club and hit Shift S. And then
bringing the 3D cursor here in the middle
of this cylinder. And let's change. This option is called
transform pivot point. Let's read this to
3D cursor because we want to depend
on the 3D cursor. And then just scale this. Tab out and scale this. Alright, something like this. Alright, now I can cut this edge Alt click
select the entire loop. Alright, like this, and then
just hit F, this isolated. I just want to show
you what I'm doing here and then hit F
to fill this great. Hit Control R to add one here
and the middle if you like, and if you want to
make a connection, I mean connect all of these
vertices to the center. That's all be okay. But for now I'm not
going to do that. And that will cancel this h. Right? Now I will merge this. I guess I should be out to
this with this cylinder. Club, this one with this one and then hit Control Shift B. And two is, let's choose Union. And now we got
something cool here. Are Atlas. It's like to isolate
this one so we can see what we are doing. Before you made that union. Acutely, we can do
something here. Let's hit Control Z couple time. Maybe we can, we can cut it. Actually, we can use one of
these cylinders as a cutoff. So let's move this
one right here, hit Shift D and this ticket, and let's put it like this. I want to cut this
just a little bit. I want to cut this a little bit. So let's use this piece
as a guitar hold, Shift, grab this one, hit Control Shift V and
just choose a difference. I think you've got the idea
what I wanted to do here. Alright, after that, now you can union this object
with this one. So sit like this, e.g. hold here they call this
Control Shift V and Q is union. Now done. Alright. Now let's hits like to isolate this geometry and let's
work with this one. Let's tap the ith
mode and let's see what's fair that we can do. Maybe I can grab all of these edges and smooth them
just a little bit like this. Make it bigger. I guess. Maybe I can
grab those here as well. I will leave those. And maybe we can
connect these vertices. I think they are
connected automatically and from here as
well, the same thing. Yeah, That's very cool. Nice. What else we can do here? Maybe we can do this one down just a little bit
and connected here. This often vertex, we don't need it twice and connect right here. This one maybe I can pick
it up and connected there. Right? We got some weird things happening here inside actually. And we need to clean this area. They are not quite
visible for now. Maybe I can grab this face, hit XF to delete it temporarily so we can see what's
going on here inside. Alright, we got some mess here. We need to clean G twice and
endless miraculous here. Alright, that's
not going to work. It control Z. This
is good to face. Maybe we can target these faces, hit XF to delete them one by one or something we
are tapping here. Let's start from here and let's see where is the
problem exactly. This Hickey twice. And this miraculous more
right here, He Qi. And let's make this
power here as well. We got something
weird here, haven't? Alright, maybe these vertices, we can move them had
key twice and lists. Alright? Without sliding, you can
make to try here directly. And we can club those Hickey and grilled them right here and
maybe those here as well. And let's see what we have here. Club those Hickey and
marriage, this right here. And this one. We are good here. And this one, Hickey and marriage
right here as well. Let's see what
else we have here. Maybe this one I can move within Medicare throw out there, and maybe this one. Let's make it there. This one as well. What about this? This marriages e.g. right here and then
take this one in mega. They're the same thing for this. All right, what about this
one? Making this over here? And let's do the same
thing for this one. All of that comes from a
problem I made because I just pushed to the caterer
objects inside a little bit. What now? We just fixed the problem. Now I guess if I hit
Alt click, alright, I think here we got two vertices because
when I hit Alt click, the loop tool doesn't
goes beyond this vertex. That's being we have
two vertices here almost, I guess. Yeah. Let's move this one. To avoid all of that. You can hit a and then can hit M And she was
married by distance. Will help to marriage any
closed vertices, e.g. here we have seven
vertices are removed. Now let's try again.
Hit Alt click. Now it's working. Now I can hit F and fill this
area without any problem. Volcano, let's select
these vertices. Hit J to make a connection between them
and those here as well. And here, the same
thing Could K, this one and this one or
this one or this one. Sorry, j. Okay. Listen, bringing the reference that
make your game here. Maybe I can grab this one here, gateways and just
move it a little bit. Spec. The same thing for this side. Keith wise, and let's move this. Gets a little bit. Here. We got a lot of work to do. Let's say gateways and let's
make this part right here. Maybe we can have an egg. E.g. I. Had Kimberly
N1 here in the middle. I just wanted to
connect this vertex with this vertex u, j. The same thing for the site HA. And heat wise, it's
miraculous right here. And this one, maybe we
can take it twice here. What about this vertex, the summary of this
part right there, and this one, the same thing. Alright, so for this
one we can mirror it right here and this
one as well here. Something like this. We don't need this vertex. We can hit Control
X to solve it, or miracle to avoid any problem. Okay, what else we can do here? Let's hit Control R to
add one H right here. And let's grab this
with this, okay? All right, maybe this
vertex with this one, this hits to make
connection between them. I made a, making all of these connection to
avoid any ink on faces. And it's very important
to make these cuts to, to prepare this geometry for
the subdivision surface. This other cut here. Let's add cut here as well. Maybe we can hit Control R to add one H
right here and this area. Let's hit U twice lists
like this right here. And maybe we can make a
connection here as well. And I think we can book this
edge and mercury there. And maybe this one as well, we can make it right there. Maybe this one as well. I will leave this. Maybe we can do the same
thing for the site. I mean, meriting this one, he kept y in this
bag, this here. American, this one as well. Can throw off to add
one H right here maybe, and another H right
here and connect those. And connect those here as well. Right? So now I need to
make this edge sharp. So I'm going to select
all of these edges. And I don't know, maybe we can. I will add one H right here. Timber only this area because I need to include this
edge and give it a bevel. Hit Control R. Or maybe what I can do, I will cancel this, controls it. And I will go to the left or to the right and
use the knife tool, hit K to connect
to a wireless mic. Cut goes like this. Hit C to cut through, left-click to make the
cut Enter to confirm. And now there we go. Alright, that's wrong. Let's go to the left
and use NFL again. Let's cut it from here. Just
keep some distance here. And his c to cut through
making the cut and enter. And now I will hit key twice and push this just a
little bit right here. This one ultimately get wise and let's move this a
little bit right here. Now I can add Bevel to this age and maybe even
these edges right here. But I think I will do
that in the next video. Because this video is become
a little bit long video. So that's it. And see you in the next one.
17. 017 Making the tail ready for the subdivision surface part 3: Hello again, welcome back here. Okay, Let's add Bevel
here and this area. I don't know. I'm not quite sure, but I think we need to make
some tweaking here before we add Bevel
B, we can add it. First thing, let's delete
this one. We don't need this. And maybe this vertex, we
don't need the key twice. And this bucket right here, even this one, gateways. And let's put this right here. And this a timber liters thetas. Sorry. Alright, yeah, let's
do this for now. And let's go to the edge, and let's select
all of these edges. And I want to select
these edges as well. But let's see what can
happen if I double dose. Yeah, bevel is working. But let's check
this area as well. No, it's not working right here. There are some kind
of problem here. Maybe if I make a
cut goes like this, maybe this will help to form the two solve the problem. Let's
see what's going to happen. All right. Something weird happened here. Let's check their
face orientation. Yeah, that's
happening because of the the normal of the face. So it's easy to fix. Just hit a select all
the faces and then hit Shift with N to
recalculate the normal. Now we are good to go. Let's
turn off face orientation. Now let's select these edges. And this yours can have it
if I double dose alone here. Control V, I just wanted to kick is working.
There's no problem. Maybe this area, we will get some problem
right here. This one. I guess it's working
as very cool. So now let's select all
the necessary edges. And let's give them. Unless bubble here, right here we got some something here, some overlapping, I guess. Yeah, that's right. Let's try to use
American by distance. Hit a and then hit M and Q is American by distance.
That's not going to work. So that doesn't work. We can move this vertex has a
little bit and hit G again, hold control and snap it
right here to marriage it. But don't forget to
activate automatic here. Okay, Now we can start
over and go to the edge, and let's select these edges. Right? That's very cool. And what about, Let's see what's
going to happen if I hit Control V for now. Okay, let's kill this area, I think yeah, bubbled
works correctly. I guess. That's me. We can add those as well. Holding control and keep
adding these edges here. I'm also quite sure
of the vole will work here and this
area, but let's try it. It can be. Yeah, it's working. So that's me. We can
call this one as well. That's very cool. Hit Control B, typical dose. Let's give them nice
amount of beveling. Something like this. And
let's see what we got so far. Everything looks okay
except this area. We can see that we have
some distortion here. This include, this one
is going to happen. There's not going
to work correctly. It can throw before
now and later we can find the solution for
all of these problems. Okay, first thing we
got some here I hear. Okay, to avoid this, maybe
we can use the knife tool. I make a cut goes like that and use or move this vertex
and hold Control. And we'll just write here, what about these vertices? Let's try to grab
these vertices. Maybe we can hit key and
move them like that. Okay, Some flavors. And let's try to create this small extrusion
that we got right here. Maybe we can use the We can add an edge
loop right here, hit Control R should
be almost right here. Okay? The same, almost the same
distance here we have. Then let's go to the face
and let's select the faces. I think these phases, we can select
something like this. I guess. Maybe we can make
it a little bit thicker by adding two
edges right here. And the club, all
of these faces. So let's do that. Let's, you
can have all of these faces. The same thing for the site. Now what I'm going
to do is I will hit E to extrude this
right here and then hit S to the x and scale
to the x and make it flat. But I just forget to three
this back to bounding box. I can always hit S to
the x squared to the x, and here's zero Enter. Now it's working fine. Alright, one more thing here. If I go to the top view. This shape could cause
diagonal like this. But now it sits right. So we need to make
some changes here. To do that, maybe I can bring the the 3D cursor and align it right here in
this area. So let's do that. Hold Shift and right-click
and move the mouse and hold control with that and align the 3D
cursor right here. Now what I want to do is I want to rotate this
just a little bit, but I need the 3D cursor
to be the anchor. This case, just read
this to 3D cursor. Now, you can hit
R to rotate this, as you can see.
So let's do that. Something like this. I think it will work.
It will be nice. And I've taught that
maybe we can add up these four acres are. Or maybe we can go from
the top view and grab these vertices and hit key
to move them like that, maybe something like this. And tried to align all of these. Let's see how can we do
that from the top view. Maybe we can move those just a little bit forward like that. And maybe those here,
something like this. Club, those agentic, those back, maybe this one as well. Let's see what we
got so far here. Yeah, Now, I think it's cool. I guess. Even these edges, maybe I can move them just a little bit. The start, e.g. with this one, hold Control key twice and
let's move this right here. Is saying Hey key twice and
listening to this right here. For now. That's very cool. Alright, So maybe we
can now select all of these sharp edges and give
them nice amount of bevel. We can select those
here as well. Alright, executes the dock. And let's select
those here as well. Maybe those here. And let's add some bubble here. Can we include those here? I guess we can do that. Let's prove a lot
of these edges, even this one and this one. Let's see what's going
to happen if I do that. Right. I think we forget to include those or maybe we
don't need to do that. I thought I can include
this one here as well. With the bevel. I will hit Control
V to bevel those. Let's keep this nice
and mother beveling. Analysts see what's
happening here. Okay, so cool. We have some variation here
happened, but it's okay. We can, we can fix it. So they're huge problem. We can do is we can club
is vertex and hit e.g. Keith wise to take
this back and then had told to move this forward. City twice and slide
this right here. The same scenario
for this one and key twice to get us back hold
Alt and push this forward. Club is fine. Qt by
status back hold, hold and push it forward. This could be my
solution for this. And let's see what
else we can do here. Maybe we can call these
vertices, and I don't know, maybe we can move this just a little bit forward like this. And the club those here as
well and move them like pads. Create something like a care of. And maybe I can
select those here. I think it goes back to
see if that makes sense. I'm not quite sure. All right. Maybe I can hit G
and move this one forward. Hits he had this, more of this a
little bit as well. And the smile right here,
maybe we can move it. And this one here as well. This one just a little
bit towards the y-axis. Rights. Clearly see
what can happen if I add a subdivision surface.
Let's add two here. Alright, now we
can see something, but from this side, we got a lot of page to add to fix this area here
as well actually. Alright, let's turn this off. And let's go back. Let's tablet mode and let's
see what else we can do here. Maybe I can grab
this face and hit I to make some
incidence. I like this. Let's will help, that
will help a little bit. What about this area? Maybe I can do something here like hit key and move this
down just a little bit. Or even maybe I can
rewrite it like this. And maybe we can add one H
right here and support those. Hit K. And do the
same thing here. This equal to this one,
but this one had kay? Rights. Maybe I can grab
this with this one. He came, make a
connection there that can add even one H right here if I like to connect
this one with this one, because if I don't, I will
have a big angle right here. So now I have quiet, quiet, and here we still
haven't even gone. Killer. We can
delete these edges. We don't need them
to avoid the income. And here we got some ugly edges. I don't know why
that's happening, but just delete this. Right. Even this actually
I can mirror it. I mean, I can take you
twice and move this up. That would be better.
For those right here. I can vary them as well, key twice and take
those up like this. Maybe can have some distance here by moving to the scales
a little bit right here. I didn't take this
up a little bit. Right above the
smile right here. I can delete it. We don't need this.
Maybe I can add one H right here to get rid
of this big ink on here. So let's grab this
with this hit K, make some cuts it covers
with the cij. In Alberta. Have quad, quad, quad. What about those here? How cool I can take it twice and move them
up, marries them. Maybe those I can make some
connection between them because we have a big ink
on here, as you can see. So let's cut this j. Here we have an ink on. So let's cut this
area like this. Club, this one with
this one had J. Let's add an edge,
goes like this. And I will merge those key twice in America
because I need this edge. I want to connect this one
with this one directly. So this one, this age, don't need this one. I can slide, it gets a little
bit and maybe I can add an H club right here
and connect this with this to avoid any gun. And add one H right
here to support this. I mean, connect this
one with this one. No rights. Maybe I can slide this
just a little bit. This senior eight that I
added. I can delete it. We don't need this, I
guess wanted on this side, but not on the side. This is the idea here.
What about this area? All right, let's delete this one and it grabbed the whole acre. We don't need it from the side. And now I can grab this one. And he'd key twice and
merge this part right here and make this one
right here a hint, use the knife tool to make
a card goes like this. And I can delete these edges
to bring back the cape. And maybe we can just
grab these vertices, all of them and move them
back just a little bits. Let's go to the,
to the left view, and let's move this
back just a little bit. Maybe right here, not too much. Let's take this back. Alright, I move this bag
because before I move this, It was right here. And this egg, because of that, I have this h goes back. And instead of more of
these vertices for wrote in drawing the shape
of the cylinder, I can move this back just
a little bit to fix this. It had to fix this issue. What about this
vertex right here? Maybe we can hit q twice
and marriage those. And what else we can do here? Alright, this face is wrong. To leave it like this, we
need to do something here. In this case, I think we can drop this vertex
with this one and make a connection between
them and delete this one. Okay, We can do the same
thing actually here. Okay, So let's call this u twice and this
mercury, this over there. And this one right here. It's right. And now we cut this results similar
to what we have here, is delete this one. Yeah. Notice what's going to
happen if I activate this. All right, now we have
something but still not clean. We still have some
tweaking here to do. First thing. Now I can target these
H's, all of them. I guess. Altruistic lake to select goes
over here as well. And let's see what
can happen if I target those and build them. Okay, The select those and
even these edges right here. And even those here. See what we can do
here. On this side. We can club those here as well. Maybe even though it's
just the two of them. Let's will help to make civil works better
if I include those. And maybe here as well, because here we have
difficult angle here. So maybe this, well, I'll click, hit Control
BLS, yours can have it. I think it's working. Alright, so maybe here we
can grab these vertices, edges and hit em
enqueues marriage at the center to make them. And let's see what
else we can do here. Even though it's
actually we can club those and hit em and
choose marriage. And get rid of this vertex key twice and push it
forward if you like. Let's see here what
else we can do here? Maybe I can grab those here, or maybe I can call this runner. He keeps wise and
move it forward just a little bit.
In America there. You can support this area by
adding one here if you like, and support this hit
K, make connection. And the latest one to
avoid any three angle. Or at least the club those m and curious center and connect
this one with this one. Now I have quiet
here quite hear. Alright, now let's see what's gonna happen if I
activate subdivision surface. The result becomes sharper. We got some artifacts
right here. Let's see where that's
happened. Let's delete this edge to make this quad. And lists hits K
to make a corner. Kinko's there and
cuts right here. Now I have quad right here, quite right here
and here as well. Alright, let's
activate this again. We still have some
here, right here. I don't know where
that's happened here because I have one
vertex right here. Alright, let's make it
tick the cave again. Yeah, I think it's better. But it's not that much. Alright, I think now we need
to work here at this area. Let's see what we can do here. I will use the knife tool, make a cut goes like
that, and delete those. We don't need them. And what else here? We have some edges
we don't want. Alright, maybe I can take
off those and delete them and make a cut that goes
from here to here, a k, k, sorry for this, maybe I
can move these vertices, Keith wise and slide
them just a little bit right here and
connect them there. Jay price. Or maybe I can almost
not quite sure, but I think we can use the knife tool and hold
Shift to make it a cutoff, the center and make
cuts right here. Somebody like this one, a look here in the center. To support this air
here on the middle. This is vertex j. Now let's go to the right
of view and let's see, grab those and let's move them just a little bit
forward like this. If you're not happy
with these edges, you can actually delete them. It's not a big deal. I guess you can delete
the whole lake low because it's not going
to affect anything. Even this one right here,
candidates for this area, maybe I can bring back the connection
between these edges. And you said I feel
like it may cut goes like this and
delete this one. Delete this one. And
maybe I can select those. Hit M and Q is a center. And delete this, I guess. I'm also quite sure Let's
check what's going to happen. This activates,
and I still smoke. I don't see any big issue here. If I choose Shade smooth, the result will be
better, even better. Right? That's very cool. I've told that maybe we
can go to the left view and go to wireframe top. And I don't know, but maybe
we can grab these vertices. And those over here and
hit S to the z, sorry, turned three, there's two bounding box
because if you were to scale, now is killed, goes through the position of the 3D cursor. So let's bring this back to
bounding box as to desert. And let's kill this
inside just a tiny bit to bring back the shape of the circle
and make it better. Alright, That's very
cool. All right, one more thing here we can do. I can crop this area, the entire edge loop here
and hit Control V two bullets to three acres
maybe if you prefer. And you can hit Control R
to support this area by adding an egg lobe
close to the end, like this to make
it even sharper. And for those you can hit Alt click Automatic, look for those. And it can throw me to
make this area Harbor. Because if you just go
back to this image, maybe I don't know, maybe this one is CRO, Is that alright, so it
should be harmed from here. Now we got it. We
are not seeing here. We got some tweaking to do it. We'll do that together. I know this part is a
little bit annoying, but this is 3D modelling. Need a lot of time and work
to make something looks nice. Alright, so, yeah, I guess that's it for this video and
see you in the next one.
18. 018 Working on the back rotor: Hello again. Welcome back here. Okay, let's
see what's the next step, what we could do
here and this area, notice that the
heading is not nice. Maybe by adding an
edge loop like this, maybe can help a little bit
to eliminate the problem. Maybe I can switch to live to view and add the hair
using the knife tool. So let's say liga the tail
and tap, sit and listen. But let's see what
we got here so far. Yeah, Let's go to the left again and let's use the
knife tool, hit K. And let's make a cut
goes e.g. like this. And hit C to make the cut, to cut through the geometry. And then left-click and
then Enter to confirm it. Now I can hit G twice. Enslave this a little
bit right here. Alright, something like this. One more thing here. Let's see, how can
we clean this error? Maybe I can delete these acres and I don't know this you always can happen if I delete those here. All right. Let's turn off
subdivision temporarily. Maybe we can use an F tool
to make a cut here, e.g. the DD circles. And even delete this one maybe. And maybe we can merge this one. He kicked twice omega there. Alright, let's see,
grab this for the CKA. Do we need this edge?
I think we don't. We can delete this. Let's turn this off temporarily. I will add an H
here and this area. And I will connect this
one with this one. Just to support the loop. Maybe I can take this one. Let's hit Control R. Or
that's not gonna happen. Let's use the knife tool, hit K and let's make our cuts. It goes like this. And needs this one. On the second tab. You can delete those and
make some marking here, like crop this one
in nugget here. Maybe even this one
we can make it there. Let's turn on the
subdivision surface. We still have some problem. Let's see how can we fix this
area to get better results. We have a lot of triangles here. Maybe we can delete this. Kayla select this vertex
may be n. Maybe you can make a cut there
and leave those. Let's see what's going
to happen if we do that. That's helped a little bit. Okay? Alright, Now maybe we can see what we can do
for the, for the rotor. Okay, Let's try to find another reference
image, maybe this one. Let's take this one and let's move with
yourself right here. This one, I don't
think that I want to delete, to delete this. And let's select this. Maybe you can scale
it just a little bit. The origin dot is a little
bit far away from the object. In this case, I can
hit right-click and set origin,
origin tool geometry. To bring this back
to the middle. I can tap the More than
go to Face ID here. Let's take this back
just a little bit. We want to create this, this piece right here. Our assembly like this, I think it makes sense. Maybe you can scale it
a little bit like this. Writes. Try to find another image. I just wanted to understand
what's going on here exactly. All right, now I
can hit Shift D to take this face just
a little bit here and hit E to extrude it like
this and maybe scale it. And it's item make some
incidents I'd like that. And the club this and
hit Control V to bevel, It's Lisbeth volatile
for just this month. What about this face? I can hit Control L
to link select, and Subway this face, I will
hit P as two separate this. And now I can go
back to this one. It's like to go to the
local mode isolated. I just need to work with this. I will grab the acres, Alt click, click, click,
and then bubblegum. It can throw me, give
them very small amount of beveling three and
just make some insert here and here to support this bevel to get better results when I act of
subdivision surface. So I will hit I and
I think that's it. If you like, you can hit
Control R and support this area and support
that one as well. Let's see what's going
to have to factor this to two and right-click
here the smooth. And I was becomes more.
What about this piece? The same scenario. I will tap into it and
would grab this edge, can throw the bullets like this, can throw our support
a globe right here. And I think that's it. Let's activists
subdivision surface level to shade, smooth. It looks fine. Alright, let's try to
find another image. I can't see what's
going on here. I don't know if we have
an extrusion or not. But I feel that I
have some extrusion. I will hit a to make
some Insert and then Alt S to put this inside
just a little bit. You can turn this off Timperley, all this and let's move this inside a little
bit like that. You can grab those and
it can throw them. Maybe this h I can
level up just a tiny bit to make this area
a little bit sharper. Okay, somebody like this. And for this piece maybe
I can go to the next. If you are in mixed
some tweaking, like a grubbing this
area of vertices. And maybe those here
as well. I don't know. Let's try that and
scale them to the z. The z. Let's see
what we got here. Let's see before and after. As to the z. Okay, somebody like this, I think it will rock. That's too much or that it
will keep it like this. The idea is, I don't
like this area. I think it's goes
up a little bit because of that I tried to
move these vertices and down. Maybe we can go
back a little bit and just select those here. And the same thing, even the tip mechanical
habits, I guess. And on this side,
mechanical up those. Let's see what can happen
in the solid view. Acidity little bit. I think this result is
better, so I will keep it. On this side. We just need
to add some details here. Tried to find a
suitable limit here. Let's try to find a good image. Is not good. Maybe this image can
help us a little bit. We got some circuit right here. We need to make this. How can we achieve that? Maybe by group, by taking
these phases, I can do this. Let's turn this off
temporarily and Alright, let's maybe I can hit I to make some Insert and then
right-click and choose circle. Something like this. Let's
go to the right of view. Hit number three
and let's hit R to rotate this just a
little bit like this. Something like this. Maybe. Now I can hit E to extrude
this out like that and hit I to make
some insects like this and E to push this insight. And now it's the time to add
some verbal link for all of these edges. It can throw OB. Alright? We can add an H right
here as supports a loop. And I can hit right-click
and choose circle to make it looks like a circle. So much we got here, Let's see what we can do. I will cancel this edge. Maybe I can move this
one just a little bit. Moving this vertex a little
bit far off this area so I can cancel the new atheist. I want to add here
something like this. It can throw out to Add New Age. Hit E to activate
even, even distance. There we go. I added this edge as a support. A club does it here, or maybe we can bevel
these edges as well, but Control D and
this pebble them. And let's see what's
going to happen if I activates subdivision surface. Let's go to the left
of you because here we need to make sure that this one is exactly
in the center. Well, to do that, I think
we can use a guide, e.g. from here, we can hit Shift D to take this
surface right here, scale it like this, and hit P as two, separate it. And then a club it. Top hits eight, select the
face or just select the face. And then hit E and push
this on the other side. Let's turn off some
of your service. Now you can see where
you should move this extra thing that we created in the right view
or maybe we can understand. Let's go to the vertices and signal up all
of these vertices. Right? Now I need to align this
one with this new cylinder. This, again, Let's move
this inside just a little bit. Yeah, a little bit more. Okay. Now is almost a line. Now I can delete the guide.
I don't need it anymore. So it looks okay. I have
some problem right here. I don't know, maybe Bible
doesn't target all there. All the edges. Or maybe that happened because
of the automatic here. So I will hit Control Z just to cancel the movement
that I made here. And turn off auto marriage. And now I can do this again. Let's go to the left of view, right view, and go to wireframe. It's a little bit hard to tell. How can we move this down and align it with
the new cylinder. But if you switch to solid mode, that will be easier for us to do after selecting all
of these vertices. Now I can move this
down and frame rates, you don't need to be so quite
perfect. Result like this. It will work. This
vertex maybe we can move with a little
bit down like this. So because this guide, we don't need that anymore. Now I can delete it. I get this. I got this new cylinder and
the correct place. And this one I can move with
just a little bit and they grab them and move them
like that will be perfect. All right. Let's see. Do we have
anything else to do here? And this area, I can grab
one of these acres Alt. And click Shift D to take
a copy of this and hit P as two separate this
tap out and let's see, grab this scenario
shape that we got. This rubric, the oracle dot to the center of this shape,
Right-click sit origin. Origin to geometry. And in the left view
and the right of view. Yes, it is. And
scales like that. Let's put this
inside a little bit. Maybe right here. Turn off subduing
service for now, tap it a and then F to
fill it. Like this. And in the wireframe, I will hit eBooks
through this insight. Alright, so let's go back. And now we have this face and we have another
phrase inside. After doing that, now I can
hit I to make some inserts. Insert this like this. Let's hit Select to isolate us. I will hit Control Z, just
to bring this face back. I will look up those together and then hit I to
make some inserts. Sorry. Grab this face, it, I guess something like this. And let's see,
between these phases, you can hit right-click or you can go to the edge and the brake
loop, and that's it. And before you do that, let's add some level to
the edges. It can be. And that's will work. Activist subdivision
surface. And there we go. Right-click here, this
mouth to make the smoke. Here we have a beam. Maybe we can create as
well. So let's tap. And maybe we can grab one
of these edges as well. Articulate key of D, let's
say a cobra right here. P as two separate tab out, garbage senior Coby tab, hit a, hit E, sorry, hit F to fill it and then it's E to serve that
just a little bit. You can push this
face inside if you prefer or hit G and
take this inside. Alright, let's move this one a little bit, almost right here. And it's slice to isolate it. And let's see, grab
these sites and it can throw be to give
it a nice bubble. And that's it. Right-click, Shade,
Smooth, activate subdivision surface for this one and for this one as well. Or I guess this area should
be beveled even more. So in this case, I can go back and I can
maybe grab this face and hit Control Plus to grow
the selection to time and hit Control X to dissolve this face
and bevel this again. But let's give it a big bubble. Something like that. So to rock. And it can throw
off that edge loop here, maybe as a support to this one. Okay? And that's we'll do
It's really cool. All right, So I
guess that's it for this video and see
you in the next one.
19. 019 Making some adjustments to the tail: Hello again, Welcome back. Here. We got a lot of details here we need to create and
see from where we can start. Maybe now we can
add the stuff here. I don't know what they are,
but let's try to create them. Right? Maybe we can go to
the left of view again and k the reference image. Yeah, we can use the
reference image, select the tail end tuplet is more that can throw our two, add one H e.g. right here. I can slide it Hickey twice and slide this patch
will be better. Let's add one here, e.g. and one H right here. One H right here.
It can throw law. But this ache, as you can
see, it's not straight. So I'm going to hit
S to the y and then hit zero Enter to make
this line perfect. Hours, I will link
up this new lines. This one is already selected. I will hit Alt. Click. Sorry. All theoretically to
grab this alt here, to collect, to grab this one. And I will both of them hit Control B is
equivalent to two H's. Somebody like that and turn off subdivision surface.
Okay, That's very cool. Okay. Now the next
step is we need to make some extrusion. And e.g. this one should reach
maybe this area. And here as well. In this case, maybe I can go to the left again
and go to wireframe. All right, let's go to the
edge of this. I don't know. Maybe we can grab this
page and take us up e.g. right here. And
let's see what else. Maybe this edge as well. We can hit G twice and maybe
we can put this right here. It's S to the z to
make the stripes. Let's see another
perspective. What do we got? So this is an option,
or if you prefer, we can add another extra H here. But let's try this. I will hit E two extra days, or you can prepare
all of these lines. E.g. this one. Alright? We don't need to
select this one. And this one as well. Let's see what we got
here. Listed that side. We don't need this. Or maybe we just need to
make some tweaking here, like adding a new egg, e.g. or let's add a new ATP
synthesis can happen. If we do that. Let's go to the solid mode and let's
see where there's a will go. If I added. In this case, I prefer
to move the H down. So let's move this one, hit S to the z first
and has zero Enter to make this stripe and this
take this almost right here. And now let's go to solid more than elicit, grab these faces. So now we got these
faces. Alright? Something like this. All right, here we just need, we just need to
make some tweaking because this edge is not
aligned with this one. I think we could take this
down just a little bit. So I'm going to grab this edge and e to the z and hold Control and stab
it with this one. But make sure that
snap to the vertex. And he created a z hold control. And yes, Now it's snapped. And now let's select
these phrases again. And I have some variation here. Alright. I will take this
down and align it right here. And I will select
this area, all of it. The same thing here. And then I will extrude
them just a little bit like that. And facets. Okay, now we just need to select the unnecessary edges
to give them a default. So I'm going to select
all of these edges. As you can see, all you have to click and keep
selecting these edges. That's very cool. The
same thing right here. Sorry, let's see, grab this one. And this as well. And be sages as well. We don't need this one. I think we just selected
all the necessary ages. Let's check that one more time. Before I extrude this, I just want to make
sure of something. I don't know why
they didn't kick of this exist on the other side. So let's check. There are exist here as well. So we need to sort it
on this side as well. I did not start, so let's do that quickly. I think this one is
not aligned with this. So I guess I can take this up key to the Z and
alignment with this. Okay? Or if you want a good result, you can move this up and down
and align it with this one. So I'm going to take e to the
z and align it with this. Yeah, now it's okay. The same scenario for this one. I will align it with
this vertex e.g. to keep the level one, you hold control and habits
and now it's aligned. What about this one right here? Let's see what I got here. Or take e to the z hold control and stab. It
smells very cool. What about this one? E to the z hold control
and snapped as to the z, zero and Turtle make this flats. Alright, let's see what we
have so far. All right. I see now everything is ready to to make some
extrusion, I guess. Yeah, We did include this
one and this one as well. Let's go back and let's check. Alright, now, cool. So from the top view I
will make the extra again. I just want to make
sure that the site had the same experience that I did here on the other side. I mean, on the site. So hit E and let's eyeball
it or something like this. It will work. Right, cool. Okay, Now is
the time to add the bowl. So, yeah, let's select
all of these edges again. Alright, so I think we've
finished with this one. Let's jump to the other,
to the other side. Let's select those for ages
and those here as well. And on this side the same thing. Let's go here. Alright,
secret up here. And those here as well. Hold here the club, Those same thing here.
Grab those here. Alt Shift, right-click. Let's jump over here. Alright, and there
was over here. Cool. Now let's give them nice
bevel, it can throw B. We can add three ages,
as will be nice. Let's check if we
got any problem. Yeah, we got the
problem right here. We just forget to pick this edge. And let's
do that again. He could control the
endless people this again. Let's check the
result in case we got any problem here,
shading problem. We forget this one. This included Control
B again and bullets. Right? Now I think I just
select all the edges. And now let's see
what's going to happen if I activate this. Alright, that looks cool. I have no problem with it. I don't see any hitting a hue, just a little bit
of something here. I can avoid that by adding
support a club e.g. I. Can hit Control R, or that doesn't work. We can use the knife tool it K and just make cut like that. You can hit a to
make the strides in acetyl-CoA through
and confirm the cats. I've taught a bath. When you slide this, like this, it will
eliminate the problem. Now, as you can see, it's fair. The same thing here. We can use the knife
tool tab and hit K. Make a cut like this. See the cut through
and confirm the cuts. And listen, you're a Keith wise Angeles slide
this right here, e.g. can add one here as
well if you prefer, you use the knife tool again. See to cut through. Confirm that gets grabbed
the senior age wise, if you like, and move it just
a little bit right here. Alright, let's see what's
going to happen now. We got, alright,
That's very cool. I think if we delete
this edge in the middle, maybe that can
help a little bit. I'm also quite sure, but we
can kick this this one, e.g. it can throw an extra
insolvent LLC was going to give us this one as well. Actually, we can mark
these ages if you prefer. I mean, you can
select those e.g. he kept wise and mitigate butt activate automatic
soon. Don't forget that. If you have a lot of acres here, we can get rid of them. Sorry. Let's use a
vertex, cover this. And let's make it the
smile right here. Make it one line. And the same thing
here if you like, you can do Keith wise,
endless Maggie, this one. You can delete one of these. I just feel like
we don't have any. Alright, so what
about this side? I can grab these acres. He gateways in America to the center and the
club side as well. Alright, or maybe I just
want to hit Control Z because I don't want to
include this edge right here. It's won't be enough to grab
those and just married them. And select those here over here. The same thing for this side. I'm doing all of that just
to get better heading. And now I can
delete these edges. The same thing here. Key twice this over here. And let's delete this
and the middle H's. Alright, now the shading, I don't have any kidding
a hue now it's better. But we just have something
right here, if you notice. So let's do the same thing
for this side, I guess. Right? Let's grab those over here. Let's delete those because here we have triangle
because of that. And defeating these edges can throw likes to dissolve
them, and that's it. Now, the result is a
little bit better. Okay, Let's see what
else we could do here. We have a hole
here on this site. But some of them
they didn't have. So yeah, I think we
should this small cover. I don't know what,
what is this part? I think we should add this here. And let's see if we can extrude. Those are what we can do here. I'm not going to
extrude those because that will make the
process a bit difficult. But I can add a small shape or map here on the surface and push it and make it
very close to the surface. And that will work, I guess. But for now I will
end this video and see you on the next one.
20. 020 Finishing the back rotor: Hello everyone, and
we'll come back here. And this video, I just
want to start creating the backdrop and add
all the details. So let's see how can we do that. First thing I will
select this and tablet mode and go
to the face mode. Hit Number three. I will select this
face and they bring the 3D cursor right here because
I want to ask something. So I haven't gone to a DFS and choose,
crosshatched selected. And now I gotta three-day course are exactly
in the center. This tab out. And
let's go to the left. If you hit Shift a
and let's add e.g. circle. The circle is very big and here we have the the
setting of the circle. We need e.g. 12 maybe vertices
and align this to the view and make this radius
five centimeter maybe, or maybe even bigger because I just wanted
to see it for now. Let's make it 12. Yeah, I think that's
what we're working. So let's start with this one. Let's kill this. Something like this and
take this out for now. Almost like that, I guess. Alright, there according
to this image, the radius of the
feather could be maybe something like
this, or even bigger. Alright, let's make it that big. And after that I
will hit Control. I end up like scale because I just made some scaling here. And let's tap the ith mode
and go to the vertices. Let's see, grab the site. Endless, extruded it
E analytics with e.g. right here. This should
be the length of this feather and the scale this to the y and zero and
talked to make this right. All right, here we can add some acres, something like that. And I want to move
some vertices up. I guess wanted to create this
curve, something like this. And let's move some
vertices up and let's try to create
that care of. Don't put a lot of edges like this because it will be very difficult for
you to control them. Just add e.g. five or four
and that will be enough. Write something like
this, maybe this one. I can scale this a little bit. And from here, I guess
we can, I don't know. Let's move some vertices a
little bit, not too much. Yesterday inhibit,
that will be enough. Let's move this one inside. So I got this curve almost
close to the image. Alright, and now we just need
to make some twisting here. Alright, I will grab this, this side and I will go to proportional editing
and activated. And let's rotate this to the Y, hit RY and let's rotate this. I can make the effect
bigger a little bit. And maybe I can keep the effects to smooth
it out with a y. Write something like this maybe. And manually, I guess we can
move those to the x-axis, but make the effects smaller. Alright, smooth in
this case is not going to work if you want to
move these vertices to the, to the z-direction, a smooth
is not going to work. So maybe I can just
read this too sharp. And the club this
vertex e to the x. Let's move this manually. Alright, in this case, that doesn't work, but we can, let's say grab this
one again and let's go back to smooth
and hit R to the y. And let's make the
effects Perfect. Okay, let's hit R to the y. Alright? This angle is almost okay. And after That's actually we
could manually move this. But before we do that, maybe I can grab
this side as well. And it's out with a y and rotate this just a
little bit like this. Alright, so just adding
small curve here. And then I can grab these vertices and
manually move them, but turn off
proportional editing. Alright, this part is
a little bit annoying. I know. But we can do it. Alright, maybe this one we can move with just a little bit to the x. Alright, And when you move vertices, cake the cake, the
care of the feather. Okay? Maybe we can move those
just a little bit. Tx. Not that much. Maybe this one we
can move it just a little bit less. You what's gonna happen if I
add a subdivision surface? Let's go to the left of view. I think it's close to
what we have here. Let's say almost this
add two level here. I think we can accept it. Let's tab again to this point and let's see, grab this side. And I will hit Shift
D to take a Coby. And after hitting Shift D, I will hit R to rotate. But if I do that, I just want to take a cobra. And on the other side, this new Coby will rotates. Depending on on the mic itself. Will take the center of the
image as a pivot point. Well, actually, I don't
like that and I don't want that I will hit
Control Z couple tend to consult I did here. What I will do is
I will want to use the 3D cursor as a
center to rotate, to copy and rotate this
further on the other side. So let's shrink
this to 3D cursor. Let's transform it was point. And then let's do that again. I will adhere to
take a Coby and then hit R. And as you can see, I got another results. What I want to do is I want to align the vertices
with the vertices. Somebody like that,
that doesn't match. You can hit the rotate
this a little bit fuel like at least see what we got
here and the perspective. Well now we got this result.
As you can see here. Now I will select this
circle and the center. And maybe we can extrude it's E analytics through this
darken and then hit S to the, to the x and make it flat. But if I do that, Let's kill will go to the, to the 3D cursor. I want to switch this back to bounding box and
it s to the 0.0. Now we got this and now
let's scrub this side. Go to the local mode, hit
slide from the Numbered Lists, sick grab this handle
as well. Of the circle. Maybe you can scale this
E and make it flat. All right, let's see
what's going to happen if I play this back. I just want to make
some cuts here. Let's hit Control R and
let's add one H right here. And now is the time to
merge some vertices. I will look love this Hickey, hold control and marriage. These vertices G hold
Control endless. Maggie, this file right here. Okay? And let's marry this
one right here. And this one is already married. So in this case, now is the time to list those as well. Okay. This is married to this
as well right here. So now these two further, our marriage to the core.
That's what I want here. And Kimberly, I will detach this core from the father because I just want to
add some thickness to it. There. The father. Okay. Before that, I just want to put this in the center,
almost right here. Now let's go to the
face, Alt click, hold, Shift click, and then hit P, S to separate this. Now I got this one alone. And let's turn lists, delete subdivision
surface for now, and let's add solidify
to give this thickness. Here we have the offset zero
out the offsets besides zero to make the
thickness in the center. And let's make this
a little bit thick. Give it a suitable thickness. Or I think that's too much. Maybe we can make the
thinner and even thickness. You can activate it if you want. For this piece, Let's
do the same thing. Let's add solidify. And that's what we'll be. Okay. Alright, let's
make the thickness even more, something like this. For now, we can
control that later. Now, I guess I can now grab this and scale
it just tiny bit. I just want to embed this side of the feather
and say the core. If I make, if I scale
this image small, as you can see, I
will have a gap here. But if I scale this
and make it bigger, bigger, I will achieve
what I wanted here. After that, maybe we
can merge them in, make some cuts or I can
use bowl tool to do that. And I think both will
be easier for us. So I'm going to grab
the feather and the core and q is a union. Now, sorry, I will
choose this one, this option because I don't want to control the
thing or anything. I just want to accept
the operation. So I've gone to choose
union on this side. And now done after that, when you finish all of that, now is the time to, to make some cuts here and
hold some vertices. All right? And it will be easy, not that difficult and annoying. Because these vertices are
very close to each other. This get rid of this
one and this one. This marriage, this one, e.g. right here, and move
this file right here, e.g. let's mark this here. That's okay. Let's figure this side. Okay, and let's see what
we have here. Youth wise. And let's move this here. And let's move this
one e.g. right there. Can slide it a little
bit like this. And for this one I can mark this one here and move
this bar right here, e.g. key twice. And I can grab
this hits K and let's make the cut goes from
there to the site. And maybe this one I
can move it like this. We got very close vertices here. I can hit key twice
and merge it. And actually I can eat a n choose m n
marriage by distance. Maybe that's will help. Little
bits doesn't help acutely. This one does down
twice and move this up. And don't forget to
activate the auto married. It's very important. Let's
move this up right here. And what about this one? It should go on the site. Right? Let's use the knife tool is
make God goes like that. And let's fix this side as well. And this one as well. And this vertex. And what else? Maybe we can marry
this man right here. It's not a big deal. And I guess this one as
well, we can make it here. I'll write anything else, maybe this one as well we
can make to try there. And this one, the same scenario. Let's hit Control F to add
support to a clip right here. Or if you like, you can
use the bevel technique. So let's select all
the necessary acres. Or maybe before that, let's see, grab these edges on the corners. Let's give it them. Specific Bubble Model bubbling. Because somebody lays
the total work, I guess. Notice the club them all like this and maybe even
those here we can grab them. Status outs for now. I think I just made a mistake because they can
throw a couple time. I lost the selection.
Let's do that again. And check the face orientation
in case we got a problem. Because if we have any problem with the
face already taken, I can do any bill. And let's turn this off again. Now let's select those, I guess, those here and let's
give them the whole body. So those side, and this side, this damping, this
one right here. It can throw all be the same Ellis he was going to happen, make it very smooth like this. Alice check the results. I think I will speak the murmur, the meter outer two
arc. Sorry to help. This time. Let's see if
we have any problem here. I think we don't.
Novelistic club those and maybe we can hit, can take this back a
little bit right here, those as well on this side. We can grab them in Hickey and
move them back right here. I just wanted to
make it something here. In the reference image. We don't have a hole
here in the middle. Mean I showed the closest area. First is delete this
edge in the middle. We don't need it. Control X and let it go to
the phase number three, Alt click X, F to delete this. And you can crop this, hit F to fill it. And this one as well, you
can hit F to follow it. And you can now, or at least see what
else we can do. Maybe now's the time to
give these sites are bevel, it can throw a bit of a violet. Something like this. Maybe. This hits like to exercise. And let's see what
we got so far. Alright, so now we've
got this results. Alright, this one goes
back a little bit. We can go to the top view
and see how can we do that. It should go a
little bit forward, I guess, something like that. And we should have some
connection between those. Let's add a subdivision surface and let's crank this to two. And now the results looks
okay, Let's make this smaller. All right. We got some straight
here have been maybe you can ignore it. Or if you like, Let's try to smooth this area. We can go to sculpt mode and
use the Smooth bright e.g. and make it a strength. Subtle, and start
smoothing this area. This will work in case you
apply the subdivision surface. I mean, if I hit Shift D
and take a Coby right here, and if I hit Control a to apply this and go to sculpt point. By the way, you can switch
to sculpt mode from here, object mode and Sculpt Mode. Now a few smooth this area, maybe you can get something. Alright? This will help to smooth
this area if you prefer. Or you can leave it. So it's up to you. To adjust this area, Let's hit Tab and speak
back to object mode. And let's delete this
one. We don't need it. And I guess this result, it will be okay for me. And we just need to create
something between them. Let's hits like to
go to the local mode and let's work on the site. Club, this faceless scale it
a little bit, make it big. And let's explore this
a little bit like that. And the Supreme bag of a heap. Alright, so we can hit Alt S
to push this even further. And maybe you can scale. Let's make it smaller like this and add bubble to the necessary edges.
Let's turn this off. Timber only. Pull up this hip can
throw be endless bullets. Tiny bubble and
this one as well. Tiny bubble. If you like
mechanical obviously I can hit Alt S and over
it inside a little bit and make this sharp in
case you want some edges. And interesting looking. Now if I activate this, I got some AQI here, right? And let's bring back of
their reference and make it because I got some details
here I need to add. I can use this. Let's go to face and let's
select this face for this scale it a little bit and hit Shift E to take
a copyright here. It's E to extrude this new Coby, turn this off temporarily. And let's move this one
just a little bit forward, this face and hit I to insert. Alright, maybe
something like that. Make another insects. And let's move this inside
and then extruded it e. And I guess that's it. So maybe I can grow the
silicon and scale this a little bit even more likely that the growing of the
selection hit Control. Plus. Let's move this insight
just a little bit. Now let's go to the edge, cut up this, and
let's make it smooth. Control V. We can add four a's right
here, something like this. The total work. Kennedy call this
one. It can throw the two bullets like this. And we can, it can
throw be here as well. And people this can throw
off to add Control R to add a support edge loop here for
this one. And what else? This area or this side, we could devote as well, but give it a small amount
of volume, not too much. Make it sharp. And what else? Maybe here in the center, we need to add a whole it i, something like this and push it inside the little bits
and delete this face. Our, something that
makes sense here we got the circle is not accurate. I guess. If you've got
a problem like this, like what I got right
here is not perfect. I can go to the edge
and hit Control Alt and grab one of these ages
to select these figures. Alright, let's call it a drink. And after that you
can go to the Select and select loop and choose a loop to grab all
of these edges and then right-click and two circle
to make the result butter. And let's go back. And
let's select this. Hit I to insets. And now it's perfect. Somebody like that hit. It
works for this insight. And XF to delete this face, we don't need that n.
Let's make it a sharp B. And maybe we can go back to
the faces, grab the spaces. We can hit here D
to take those out, MPS to supply them. And let's work on this one. Let's make some of the thing tab go to the edges. Number two. Let's hit F to fill this, it can throw me
to the valets and the crop these edges key
and take those back. And don't forget to
it a to select all of these phases and then
hit Shift Enter, calculate the normal case. We got a problem
with the normal. Now let's add a subdivision
surface to this one. And this one lists
the crop them. Sorry, this one we didn't, we didn't it detaches. So it's very easy. Just crop it like
this and hit P S, and that's it. Now
I can move it. Take it back. And this one as well, I can
take it back like this. This pull those other
bit g to the x. Something like this. Yeah, I think now
we got the rotor. Okay. I think that's it for this video and see
you in the next one.
21. 021 Creating the battery holder: Hello again and
welcome back here. This create together or
this hub right here. I don't know what to call. It puts some kind of hill or cover here
we'd need to create. I have this image. It's a nice image. I can see the details, but here, I'm also quite
sure what's going on here. Maybe later we can see if there are any image can heal us a
little bit osteon here. It seems like that I don't have a nice image to
understand what is this, but we will try to create
something close to this result. Let's go back here and they
started creating this. We can go to the left of view. I can see a little bit
over the shape here. And maybe we can bring it a
3D cross over the middle, hit Shift S and Q is coarser
or to the world origin. Let's hit Shift a
and let's add plane. The plane is very big. I will alive the plane to the view and scale it to
make it small like this. And I will hit can move it e.g. right here, alignment here. We came up with a
little bit up e.g. right here. And maybe we
can start from this point. Maybe from here. I will take this plane out
and aligned with the age. E.g. maybe you hear
something like this. And let's go back to
the left of view. And let's switch to wireframe. And I'll tap to edit mode and go to the vertices
with number one. And maybe we can move these vertices
right here, align them. Okay. Let's move those focused on
ballpark almost right here. Maybe. Something like this. And I will hit E to
throw this down almost right here and move this
vertex close to the shape. And move this one as well. And the crop, those here, It's e to extrude them. Something like this. Maybe here and move this vertex and align
it with the shape. Maybe we can move this, this bag just a little bit. And let's add an H right here. Or maybe later.
Realistic Rob those, hit E to extruded through
this hormones right here. And I can hit S to the y is zero through to
make this H flat. And now let's go
to the perspective and let's see what
we got so far. All right, now is attempt to push some vertices and put
them in the correct place. Let's hit key to the
exhale is more with those close to the surface. And maybe I can grab those and Hickey and move
this a little bit. Right here. Club
is vertex as well. I'd maybe those, all of them hit G and move them to the x axis. And let's move those as well. Let's go back to the left of your airless.
Move this vertex. Hold Shift and move it to
make the movement slower. And let's move this
one right here. And let's make another extrusion
it e to x through this. Let's move this one
as well right here. Alright, let's hit G to the X and take this
out a little bit. Maybe those key to the x. And the small dose a little
bit right here. All right. I will hit G and move this down. Because I think I can use, alright, now let's hit E to extrude this
towards the x-axis. And let's move this right here, because after that angle
to use mirror modifier. And now maybe we can grab
this and the voltage control V. Now I got the care. Alright, so on this side,
Let's take this out. This H e to the x, and even this one e to the x. Something like this. This
go back to the lifting view and let's go to wireframe with the Z enlisted club is aqueous. And let's hit E to explore this. Maybe right here and let's say grab this one and
let's move this up. And let's make another
extrusion hit E. Let's look through this. I
don't know, maybe right here. Let's take this up as
well, almost here. And let's see what
we have done here. The smoke dose,
maybe a little bit, keep the x, something like that. And let's see, grab
those over here. E to the x. Alright, now let's align this with
the shape of the tail. I want to take this vertex
out, something like this. And even this one, we can
take this out a little bit. And now let's add extra edges. Maybe we can add two here. And let's take those out. Alright, Just be careful here. And let's hit Control R to
add two H's here as well. Hit E to the X. And let's take this out almost right here and this one as well, e to the x. Right?
That's very cool. Okay, Let's go back to the left to view. And let's try to
create these holes. Here Z to go to wireframe. And maybe I can use the
knife tool to achieve that. Hit K. And let's make
a cut goes like this. Maybe it should read this area. And let's see what else we here, I will move this vertex
and welded with this one. Just hit G twice and
activate auto married. I can learn just like this. And after that, I need to
add edge, two edges here. For this one I can decide I
can move this down a little bit and add a new edge
here and this area. And move it down a little bit
like this, will be enough. And let's delete
these two faces, hit XF to delete them. And let's leave
those here as well. I guess we could
delete them all. Yeah, I think just those
hit X to delete them. And let's extend the cuts
at K. And let's hit C to get through and confirm the cuts and Ss and the perspective
we got this result. And now it's the time to
make some tweaking here. To make this Friday. Maybe we can add h right here in
the middle to support this one because I don't
like this angle here. So it's better to make
cut costs like that. I will look up this
with this hit J. And for this age, maybe I can hit Control, likes to dissolve
it or delete it and move this one up twice. And the smoothest
small right here. Right now is the time to
give this a thickness. Using solidify, I will tap out. And before you add the solid defy you remember when we added the plane and scaled
the blame after, after the scale and you
could apply the skill, okay, if you open this menu
and go to the ATM, as you can see here, where
the skill is not one. The number here
it should be one. Just always keep that in mind. So let's hit Control
a and go to the apply manure and apply
scale. That was done. Let's add solidify. Handless can throw the thickness and it activates even thickness. And let's check the result. Everything looks okay. We don't have any problem. Yeah, we don't have
any involvement. Okay. Now let's apply the solid. If I just hit Control
a and applied. And let's see what's further
tweaking we could do here. Alright, so here in this
area with I'm going to do is I will make some
mixture region. First, Let's move these
vertices a little bit. Let's go to the left
and go to wireframe. I just want to move
these vertices and align them with those. Somebody like that. All right, that's cool. Now, I will grab these
faces and extrude them. Gets hit E, extrude. We'll go diagonally. And I will hit right-click and manually key and move the new face,
something like this, and then hit S to scale it, scale it to the x axis and then has zero Enter to
make this flat. And this face in the
middle, we don't need it. I will hit X after the liters. One more thing here
we need to do. I want to make sure that
these edges in the middle, because I want to
add mirror modifier. So let's do that. To do this, I can tap
out and select this bar, the anti-hero, the wireframe. I just want to kick the edge and the
center of this image. So let's activate wireframe. And then let's go back
to this tab and move these vertices g
to the x and hold Control and aligning them
with this edge in the middle. And that will be enough. Even for the side if you prefer, you can delete these faces. We don't need them. Xf and alt. Click and move those key to the x hold
control and stop it. I deleted this
face in the middle because when you add
mirror modifier, this phase will be in the
middle and they are not useful. They will causing
some Hayden Hughes. Alright, now is the time
to add some support a globes to add after that subdivision
surface to make this smooth. So let's start doing that. Let's go to the aqueous
and let's select all the unnecessary edges
that we want to target. Because I will just
want to add Bevel. And let's see, grab those. Even this edge, I
will select it. And this edge are
all the sharp edges. You can pick them. And let's pick this. According to this image. I can see that I have some care of a little bit
of carbon in this era. So before you beveled
those and make them sharp, just pick these areas and
give them nice pebble. Hit Control V and
let's bevel this e.g. something like
this, a total rock. And maybe this one can throw,
be analysed by bullets. And this one as well, it can throw the
endless bullets. And the same thing for this one. I will hit Control R to
add one H right here. And in the live
preview I can move this new age to bring
back this care of. And I can marry this vertex
with this one if you like. And marriage this one with a K. And I think that will work, or if you'd like, you can bevel that make it up the vole and
then make the connection. Because sometime when you leave, an eight goes like
that diagonally, you will have some problem
when you add double. But the list is going to happen. Alright, this error,
I don't like it. Let's make some cleaning. I will club these vertices here, k and club those
and delete them. Club is deleted. We don't
think that this one, I can slide this down. Maybe right here. I can add one egg here in
the middle maybe. And use the knife tool I
make cut goes like this. Sorry, this vertex. And it gets put to move with key twice and both right
here and this one you can delete, right? Or if you like, you can add
one H right here, e.g. a. Key twice and mark this
up and delete this. There's another option. And if you want to
make the squad, It's okay if you like. But for now let's
leave it. And let's do the same thing for the site. Control X to this. And use the knife to let K and this makes
cat goes like that. All right, about this area here, I will delete this edge, this edge and use the knife
tool make cat goes like this. And another cuts goes like
this and confirm this. Alright, here in
this area we have a curve as well
according to this image. So let's hit Control
V to bevel this. And let's add four eggs. Maybe that's will be better. And now our geometry
is ready to develop. Alt click to cut out all
the unnecessary ages. Right before you make the bevel, I just wanted to kick this area. I want to see what's going
to happen if I double it. I have no problem. Alright, That's very
cool. Good in here. So let's move on. Let's see, grab those over here, club those, and select
all of these edges. And the sickle up
those over here. And let's see what
else we could do here. You can grab those. And I have this a, I want to include it
as well as very cool. Alright, now I think
we just picked all the unnecessary
acres to level them. But we have this one. We don't need to pickets. And we have this aqueous,
don't need to select it. So let's de-select those. We don't need them
to be included. Alright, now I will hit
Control V to make that bevel. And let's pivot list
with three H's. That will be enough. Now let's check.
What is salt again. I think we get
forgive this side. So let's add those as well. And then it can throw me
again. And let's pivot. Let's do something
a little like this. And let's check the results one more time because sometimes we miss some edges. Okay? Alright, Now I will add
subdivision surface. I just wanted to see
what can happen. So let's go to the modifier list and
our subdivision surface. Let's add two here
to make this motor. And let's see if we
have any problem here. Indicating a hues. Right-click here, the
smooth few, like. Let's see what's going to
happen if I bring back the body and turn the wireframe of everything looks cool except this area we have
some shading problem. Here, we need to fix. So let's go back
and turn this off. I just want to add
some support, a loop. Let's take this
out a little bit. And here we just need to
make some tweaking rights. I think we can use
the knife tool and just make cut
goes like this. And when cat goes like that, maybe and confirm that. And maybe this vertex,
we don't need those. And maybe this vertex, I can merge it twice. And listening to the small right here on this file right here. Let's move this up. Let's go to this side as well and try
to do something similar. Use the knife tool I
may cut goes like this. And maybe I cut goes like that. And let's delete some
vertices, some edges. Let's mark this and maybe
this one right here. And maybe we came up with
to the center like this. And I think this will work
if I activate this one. I don't have any
overlapping covered here. That is how it looks clean. Now this is eight and
I guess now we can add the mirror modifier, but the orange dot is not in the correct place because now
if I add an arrow modifier, as you can see, the mirror is not going to work correctly. In one more thing here, the geese more or let's say the axis of this
mesh is not correct. I need to reset that location. So hit Control, I
apply location, and now it's correct spots. One more thing here
we need to do, sorry, I think we got some mistake. Sort of rotation.
The rotation is not correct. Apply the rotation. And now the location is correct. If you didn't understand
what I did here, I will turn this off Kimberly. As you can see, the z-axis
goes up like this and this y, and this is the x-axis. I am now in the global mode. Alright? If I switch this to local, the local is not accurate. In the local mode. The z-axis goes through this
darker and that's wrong. This dark line is
for the x axis, the z could go up. If you ready to set the rotation,
you will fix the issue. That's why. Now it's correct. I
will activate mirror. But one more thing we need to, we need to move the
origin dot to the middle. And this case. To do that, I can go to this option, option menu and activate origin and move this
man really hit G and move with men will
like this and hold Control and snap
it to the middle. And that's it. It's done. After that, turn this off. And now the result is already and I think we don't
have any problem, I guess. Right, That's very cool. If
you've noticed that we've got some variation here and the surface we can
move some vertices. Turn off automatic.
Don't forget that. Hit G to the X and the
smooth some pieces. To get better and
accurate results. G to the x. And let's move this a little
bit like that, right? Somebody like this. All right, one more thing here. We just need to correct the care of this era is sharp as
compared to the tail. Alright, so we just need to move some vertices and bring
back of this curve. Okay? Like he grabbing these vertices and
take those up twice. And let's move this up and take these vertices right here. E.g. and he kicked
twice, sorry, key twice. And let's move this right here. Maybe we can make up
those two key twice, sorry, one by one
of those key twice. And let's move those away
a little bit right here. And this one as well, key twice and smooth
this right here. Now we have a little bit of
care of here and this area. After that, I can move this
those up maybe right here, and then move them, push them to the
x-axis, g to the x. Alright, Maybe we can take those down a little bit to bring back this care of and let's
see what we got so far. Alright, so now I've
got this curve, but we just need to make
some tweaking here. Let's add another edge. It goes like this. Maybe this will help to make
the result of the harbor. Use the knife tool
to cut this area. Right? I think that's better. It's like to isolate
this geometry after you select the geometry. Let's top. It is more than
just want to see. Because here we need
to make the cuts. Has wool and conference. Alright. Has very cool. So yeah, I think that's
it for this video.
22. 022 Starting with the battery: Hello again. Welcome back. Let's see, create the belly
of the of the black hornets. I mean, this
cumulative right here. I think this is a battery. So quite sure. But
let's read together. I just wanted to make sure that the 3D cursor in the
middle and the writers, and the smoothest right
here for now, hit Shift a. Let's add the cube. And
let's move the cube, e.g. let's put this, I don't know, maybe we can start from here. It will then go to wireframe and let's start moving
some vertices. Let's move those over here, e.g. let's move this vertex, e.g. right here, starting from
this area and the city. And let's move this e.g.
right here as well. It can take this up, hit E to make some extra region, something like this.
Let's move this e.g. right here. And this one here, maybe it's e to
extrude this list, probably this one here and
maybe this one right here. And another extrusion head key. And let's move this right here
and this one, maybe here. How rights are. Now, I will select all
of these vertices. And this extrude this up. Something like this. Handle is small dose like
that hit us to disease here. And let's make this flat
and let's take this down. Something like that maybe. All right, what
about this one here? Before we make any
tweaking lists, go to the perspective Alice,
you what we got so far. Alright, lists care
about one side and we will see what we
can do to the other side. Let's select this one,
Hickey, endless smoke, this. Something like this maybe. And let's try to find. Alright, maybe we
can use this image. I guess this omega
is good as well. And let's start
moving some vertices. Okay, let's move those. E.g. right here. Those hit here, and let's move those over here. And the same thing for those
here. And those as well. Okay, This small dose,
just a little bit to the edge, e to the x. Let's move those,
maybe right here. And what about this area? I will hit Control R to add
when H right here as well. And the Secret Service
vertices. And let's move them. Maybe another control RY here and maybe we can
move those as well. Right. Something like that. Did you go back
to the left-hand? Let's see what else we could do. Alright, let's hit
Control or two, maybe we can add a here and this area handless move
these vertices like this. And maybe this one as well. Try to make something
like a care of and also quite sure accurately
what's going on here. But I think it's like this. And maybe this one we can scale. It gets a little bit like that. Alright, what about this side? Let's go to the front and
go to wireframe crop this. It S to the x zero
Enter to make this flat and delete decided X F. To delete this
side, we document it. And let's go to the exits
to grab this edge loop. And we can hit G and move
it and hold Control N, snap it to the age
and the middle. If you don't see it, you
can grab this and go to the wireframe and activated
to see the egg in the middle. But because I know I have an ache in the
middle when I stopped, but it will be in
the correct place. So let's turn this off. Alright, maybe I can
add mirror modifier, have no problem to add this. So let's add me
on with the fire. Where is it? It's right here. And let's make some
tweaking after that. Let's tap it. It
would end this area. I think this error should be thinner as compared
to this area. Well, that's mean
we need to move some vertices to the middle. E.g. we can start from here, moving some vertices like this. And let's move this one as well. Let's see what else
we could do here. Maybe we can hit Select to
isolate this geometry and we can add some bubble. I guess so let's select these sites and it can
throw be Ellis add Bevel, we can add four edges or
even five fuel like Okay, I think somebody like that
at all work, I guess. Alright. Let's see what's going
to happen if I add subdivision surface level to tab out, right-click hit smooth. All right, now I got this shape. This here with this shape
similar to what we have here. Okay, let's recall. The bottom of view of
us can throw seven. We can see the geometry
from the bottom view. I don't know, but
maybe we can go up some vertices
and I don't know. We can move them a little bit. Let's see what can
happen if I remove some vertices like this, maybe. All right, something like this. And let's turn this
off temporarily, handless tablet mode because I just want to make
some between here. Let's grab this age and
maybe we can bullets hit Control V to two acres, I guess. And let's see, grab his phrases. And let's give this an
extrude to create this age. So hit Alt and extrude
face along the normal and give it
a nice extrusion. Let's hits like twice. So this geometry and let's
turn off mirror modifier. Because I gave this extrude, I will have a face
here in the middle. I don't want it because it
will cause some problem. Hit XF to the details. And this one as well
hit X to delete it. And let's make this
sharp Alt click, Alt Shift click to grab
this and this age. And it can throw
me to the bullet. Let's pivot this to
three ages maybe. And obviously club
this outer edges and this pebble them as
well. It can throw me. And let's tap out. And let's activate mirror now. Subdivision. Now we
got this result. Somebody like this. Maybe here and this area you just need to make some weekend. Let's see how can
we achieve that. Let's go to wireframe
and sorry to wireframe. And let's pick some vertices, is a club is vertices. And those here. I just want to move this a little
bit forward. Turn off. Auto marriage and forget that. And let's move though
is maybe right here. Or I de-select those endless taking those
out, maybe right here. And if you like, I guess we can say quite cool, but let's try to
do something here. I guess I can't grab those e.g. some vertices and merge them. Alright, let's see
how can we do this. First, let's delete those and delete those
over here for now. Temporarily. And let's see, grab this with this hit
Control X to delete it. And let's see, grab
these edges now. And it can throw
me to bevel this. For ages maybe you feel like, and let's compare
this with the hip here or something like that. And maybe we can add an H right here and support this vertex,
this vertex here, the j. Have this one with
this one hit J. We can delete this ache. We don't use anymore,
and this one as well. And for this edge right here, we can grab this vertex, this vertex, I guess. Or even if you want to create a new cut, that's totally okay. It k n, Let's make
that goes like this. Maybe. That's what rock as well. We can grab this achy twice and slide it a
little bit fuel, right? I feel like maybe
this one as well. All right. Maybe we can add an edge right here. See what we got here. Let's move this
one a little bit. Maybe I can dissolve those. Do we need them? Let's make
a new cut goes like this. Make some tweaking it. Let's move this down
maybe right here. And this one we
can move it down, say club this with the cij. I created this H right here to support this corner
to get better heading. Antioch kidding.
That's a club this, with this hit K. Alright, so now I have quite
clear and quite here as well. That's very cool. All right, so now what
I can do is I want to support this age with an H goes to this
direction, I guess. So hit K to make a cut
that goes like that. And this cut, who'd go maybe
right here, maybe, I guess. Alright. Let's confirm it. Alice, move this
one, slide this. And let's use the
knife tool as well. If k and this may cut
goes like right there. And now we can call this
vertex or this vertex hit J. Right? That's very cool.
Let's bring in this one. We don't need this
and this one we don't need it because we added
the support edge loop. Alright, let's try
to do something else like a grabbing
this vertex. He kicked twice m over there. And this one as
well, move it there. I think that's well.
Fix everything. Alright, this vertex hit
Alt S and let's move it to the middle, I guess healthiest again. Alright, that's cool. Let's tab and let's activate
subdivision, a mural. And by the way, Let's put the subdivision and
during the mirror, we want the mirror and
then subdivision surface. Okay, let's see if we have
any Heather who are here. And actually we have this, these vertices, these vertices, they could go down a little bit. Go to the left, or to
the left. Key to the Zn. Let's move those, scrub
them from here, e to the z. Okay? Maybe these
vertices as well, we can do the same thing. We can grab them
and move them down. Something like this. All right. We have some
heating problem right here. Maybe if I connect
this one to the side, I think I can avoid
this just a little bit. Now let's hit slide to jump
out of the local mode. And let's check the result. I still have some
problem right here. Yeah, because we have
multiple vertices here. Okay? If this case I can grab all of these vertices
in this area and hit em. And she was married by distance. And here we have two
vertices removed. Now the results cleaner. Alright, I think that's
it for this video. And let's see what we
can do and the next one. Okay, Goodbye.
23. 023 Creating the Battery lock: Hello again, welcome back. In this video, I just want
to cover this area here. I have an open area and I want to cover it
with something. Okay, Let's go to
the left of view, hit Control number
three from Dan and bad. And let's make sure before that, let's make sure we
have the 3D cursor in the middle. And
there we have it. I want to shift a to add
and maybe I can add cube, maybe get and move it. And let's put the right there. And let's tap to edit
mode and go to wireframe. Let's move some vertices around. Let's scrub e.g. those. And
let's put those right here. Moving these vertices, maybe we can move those up right there. And Hickey, and let's move
this one, e.g. right here. And this vertex may
be game over there. Unless you what we got
here on the perspective. I will hit a to
select all the faces and I will scale this like that. Maybe we can scale it
even more like this. And let's take
these four vertices and this killed those inside. Something like
this. Maybe, maybe we can scale those even more
to the x axis a little bit. And from this side
of the upper side, I think we don't have it here. Problem with this,
we can accept it. Does go to the left again in
his Yan go to wireframe and let's add some edge loops here. E.g. let's move this one like
this, hold Control endless. If you like, it's not so quite necessary,
but if you'd like, you can follow the
shape of this battery. I think if you don't, you can hit control that
and cancel this age. And or maybe we can add
couple of acres just to I just want to
cover the battery. So I'm going to
grab this and hit S and scale them like that. Something like this.
If that's too much. Let's check if we
have an overlapping, we don't have any overlap. Maybe just these vertices, maybe we can scale them
again to the x Sx. And let's move those a
little bit inside our eye. So this shape, it
will work as a cover. Now this hits like to
go to the local mode. And let's select this edge. With this edge, I just
come up to bevel them because I just want
a small curve here. I will hit Control
V to bubble dose to three Hs. That
will be enough. Suddenly like this. And then let's select all the
necessary edges in this. Give them nice bubble.
Something like this. Kid control being
respirable dose. Maybe we can make some
connection here because I want a big quad here
and here as well. So I will grab this vertex, this vertex, and he'd k. And now I have a quote
here and I have gone here. But I can fix this by adding
another h goes like this. Let's go to the other
side and let's select this vertex with
that one and hit J. And if you prefer, you can hit Control R to
add one edge or maybe two. And we can grab this key twice in the slide is right there and manually crop this G
twice inside of there. Something like this. And let's make a quick check-in here. And here as well. The same scenario here. And here. K. Now let's add a
subdivision surface. You can add level one, okay? And then right-click here. This would lead to anxiety. And now we got this results. We just covered this area. And that's awesome. One more thing here, I
just wanted to tweak this area they are care
of here is not correct. We have some strike
goes to this direction. If I activate the wireframe, maybe we can understand
what's going on here. And maybe we can go
to the modifier list and activates optimal display. So we can see the edges. As you can see, the vertices
citrate to this direction. In this case, to bring the
curve back, I can tap it, hit Control R and add one, support a globe right
here to fix that. And maybe the same thing
for this area as well. Okay. Let's turn off wireframe. And for this era, I think we don't need because
everything is already. Let's go back. And some vertices maybe
I can move around, like taking those and move
them a little bit forward. And those here as well. But make sure to turn
off auto marriage. And maybe this new hip, I can crop these
vertices over here and Move them forward a
little bit, hit G, and let's move those a
little bit right there. And I think that's it. Alright. Now we
have another shape. If I bring the reference
images here and e.g. let's check this image. I have something right here. I think this one is
the battery holder k. Let's see how can we create something
similar to this one? Let's go to the left
of you and maybe we can start with a cube, you. And let's move this
cube right here, e.g. the corner of the cube at
the corner of the shape. And we can hit Z to go to
wireframe mode n. Now, let's start controlling
these vertices and put them in the
correct position, e.g. this one, we can move it up. Those here, we can grab them
and move them like that. Maybe. And maybe we can make another
extrusion goes like this. Because somebody like that, it can move this down
and this one as well. So now we've got shapes, something similar to what
we have here in the image. The C and the perspective. We can scale it down. I guess. I think this shape, it's not all from this area
and thick from this area. I'm also quite sure, but I guess we can leave it like that or we can actually make some scaling like this a little bit. And let's go back to the left
view and it can throw off, maybe we can add
one H right here, maybe one here as well. And Control Alt and H over here. And let's grab this vertex and let's move it
around a little bit. Something like that. So maybe those here as well, we
can move them around. Alright, here we have faces. Delete all of these faces, and let's make some new faces. I can grab those four
vertices and hit F to add the new face
here and grab those four, hit F and grab those
four vertices and hit F. Now if you go to
the perspective, you can see that I
have is right here. As you go back to
the lifting view and let's move these
vertices up a little bit. And maybe those like that. Maybe those we can take
those down a little bit. Something like this. Now, I will go to the local mode to select all the sharp edges. And let's give them a bubble. I guess we have an
option right here. We can use it. All right, here we have
selects the zeros. It's maybe this one, sharp. Know it's not this one. We have an option here to
select the curvatures. Yes, this one select
sharp edges, de-select. Let's go back here
and select cabbages. This option will
help you to select any age, has sharp angle. And maybe we can include
this one as well. And I think now we are ready to give this
above all my guess. Or maybe we can include those here because I want the ball to include this area as well. Because I want to add
a subdivision surface. So let's grab those two as well, and let's hit Control V to the bulldoze. Give
it a nice purple. I think this one will work. Maybe we can add a support, a globe here to prevent the smoothness to be
straight to the zircon. And let's see what else. Maybe we can add another HY here and hit E to activate even. And let's move this one down. I guess. That's really cool. Let's see what's
going to happen if I add subdivision
surface over here. Let's go to the modifier
and open modify list, our subdivision surface
to a level two. And let's hit right-click here, the smoke cigarettes from here. The result looks fine. Let's tap again and let's add
another HY here because I have a blue color
right here. Circle. Let's see how can we
create this key twice? And let's move this over here. And let's see what
else we should do. Throw out maybe we can
add one here as well. Let's see, grab these faces. Are there. You can add one H right here, because I just
wanted these faces. I want this air to have the
same number of segments, three on this side and
three here as well, because I want to
make a circle here. So let's grab those and let's
scrub those here as well. And let's hit I for insert and right-click
and choose circle. And I will scale those
in their origins. I will say this to
individual origin and scale, those are the same position. And I guess we just need to make some tweaking, some rotation. Somebody like the subtle
rock. Let's kick this area. Actually we can go to
wireframe and see. Yeah, everything
looks cool. I guess. After selecting these vertices, are these faces hit
right-click and choose. We have, sorry, you can go
to the edge and curious, break a face loops. Now we got it. All right, now I just want to
select the outer edges. You can select them manually
or you can go here to select and select
slope and select. All right, Let's see where's a slip boundary, this one right here. And then guess it can
throw me to bevel this. Let's pivot. Looks
like that. Right? Oh, that's cool. Now, let's see what can
happen if I activate this. Looks nice. I think I will save this result. I think that's it for this video and see
you in the next one.
24. 024 Starting with the big rotor: Hello again, we'll come back. Let's see, crave, the big rotor. Right here. The reference images. I got a lot of images here, but I think this one is best. I got between those because e.g. if I zoom in here, I can understand what's going
on here because it's dark and the same thing goes
for all of these images. So I can start with this
one, even this one, I don't understand what
exactly right here, but we'll try together to
create something close. Or its first, let's see, grab the body and maybe
we can start from here. I just want to crop
some edges from here. I mean, e.g. this edge loop, you
can go to the edge at number two and hit Alt click. I will hit Shift D to the z, take a copy up and
then hit P to open the separate menu and then hit S to pick the first option. Then tap out. I will select this
circle and I will bring the origin dots in the center of the circle because as you
can see, it's right here. It's very easiest.
It's right-click and set origin to
accumulate tree. And there we go. After That's
a mirror, I don't need it. I will hit Control a to apply. Or you can go to this
ROI and hit Apply. Maybe we can scale
it a little bit. But I need 23, these two bounding box
and hit S to scale this. Okay. Let's take this
maybe right here. Something like this for now. And let's turn off
subdivision. For now. I will tap the it more
than hit a select all the edges and
hit F to fill this, and then hit E to explore
this a little bit. Extra this, something like this. Maybe somebody likes to be nice. Maybe we can move
this up a little bit. And I will hit Control R to add one H plus
maybe H right here. And maybe we can add
another H right here. And let's select these faces. I will hit Alt E to open the extra menu and choose extrude along
with the normal. Let's extrude this
a little bit like that in the secret of the spaces and the Alt E. And let's extrude those as
well, something like this. We can go to the lifted you
and see what we got here. Or something close. After that. Let's see how can we create
this shape right here. I think we can grab this
vertex with this one, hit J to make connection
between them and here as well. And now maybe we can grab these four faces
and hit Shift D to the z. Let's take a copy here, MPS to separate it out any crop this inner
shape to tablet mode. And let's see, grab these
faces or before we do that, let's kill this a little bit. So let's kill this
almost like that, maybe. Something like this. And let's see, grab this
for ages and it can throw me to bulldoze them. Nice bevel. It'll be satisfied. Can throw I to invert the
selection and then hit x and then f to
delete the faces, hit a to select all
the faces and hit E to extrude this
up a little bit. And in the left, if
you hit Control, three, go to the vertices, have number one and Z
to go to wireframe LLC, grab those and let's move those a little bit
down like this. And what else we could do here? Maybe we could scale this even more as N scale this
up a little bit. Tab and let's see,
grab these vertices and let's move this up. Something like that. I don't know, but
I feel like I have some care of here.
So quite sure. Let's try to create it. I will hit Control R to
add one H right here. And then it can throw
off the top of all this. Let's put all this about
like that, like this. And then let's go to the edge
mode and Alt click to grab this a globe and then hold
Alt Shift and click this one. And this again,
something like this. Now let's see, grab
those and abuse can scale it down and
then hit S to the z. Scale those up to get the hip something similar
to what do I have here? Alright, now listed. Out and grab this
tap to edit mode. And maybe we can select
these four phases. Have the enlisted Jacobi
to see almost right here. And let's check the
reference images. I just want to see
this from the top. It's not a circle. Okay? We just need to create
something like this. It's like a capsule of
something like this ellipse. So let's see how
can we create this. In this case, let's tap
out and Lisa bringing the organ door to the
middle of this geometry. But first we need
to separate it. So I will tap it mode and
the club that these faces, and then p has to
supply this tab out. And let's let this run along. Right-click over
again to geometry. And then I will tap again
and delete half of this, hit XF to delete it. And let's see, grab this half here and let's move this
a little bit like this. And I can use mirror
modifier to me or this side on this side, two mirrors, right here. Something like this. You go to the modifier
list and let's add the mirror modifier and let's see which axis we could pick. We can just read this to the local so we can see the axis. Alright, we need the
y-axis. And there we go. That's very cool. Right? Now I got this. Let's make some comparison
because I think this is big. We can scale, let's
make it smaller. Right? That's very cool. Now I can apply them here on modifier. I don't need it anymore. It can throw a and let's tap the
secret of these edges. And let's go to the edge
and let's choose a loop. Right? That's very
cool. All right, let's go back to this image. Let's see what else we could do. Let's pick the outer
or aqueous and hit E. And let's explore this down
a little bit like this. And maybe we can
grab one side and work with this. Alright,
let's go to the left. I guess we can move
some edges down, maybe those I can
focus on one side. I have no problem. E.g.
I. Can focus on this one. And when I complete I
can mirror this again. So let's grab those
sick e to the z. And let's go to the face. And the secret of these phases, it iterates through this,
something like this. We can go to the left and then a key and let's
take those down. I want to create
something like this. Okay? And then we could extrude this
to this direction as well. I guess. Partly see, grab these. You can enlist, move this
a little bit like that. We can move this one
right here and hit S and make this flats. Hit S to the y and f is zero enter and maybe this one as well as to
devise your answer. However, that's very
cool. After that, maybe we can make
this like a circle. So I tried to click
into a circle. And the same thing for this one, right-click into a circle. The circle. Let's bevel this one because we want this
angle to be hard. It can throw to my sharps
something like this. It will be okay. And that
will do it, I guess. Alright. Let's go back
to the left if you will. Let's see what else
we could do here. Alright, let's add the
bubble right here as well. It can throw up in this
bubble, this area. And maybe we can
hit Control R to add a support HE
loop here as well. And for this area we
can hit F2 fillets. All we can go to the
face and you can't use receivers, It's
the grid fill. And here we have an option
if you want to spend something to get better results. All right, so let's go back. Because this result
is the best one here. That's very cool.
Alright, after that, maybe we can, Let's see
what else we can do here. Let's take those down a
little bit tricky to the Z. This one and this one. Something like this. I will hit Control R to
add one H right here. And I will select this edge and hit P to the Z or gateways
to slide it G two times. And take this up. Because that's very cool. And maybe I can grab the side and the vallate
to make this shower. It can throw the endless
bevel this a little bit. All right, let's see
what we got so far. I will activate the
subdivision surface and let's see the result. The result looks fine, but we need to target
the lower area as well. This tab again, and
let's go to the edge. Select unnecessary edges. Right corner up those over here. And maybe, maybe we
can add anomaly. I'm not sure quite
sure. Can we include those are not listened,
include those as well. And pick those, elicit
control beak, the bubblegum. Smaller model beveling,
that's all work. Or by the way, you can do something
else if you prefer, you can crop these faces. All of them. It's not necessary to
fill this area actually. But you can hit I to make
some insects and hit E to bucket this insight and
acceptor delete the rest. That will work as well. And you can now grab
this entire edge loop. And it can throw be. And you can double
the outer edges as well. The same thing. It can throw be,
Let's bevel dose. Unless you what can happen if we activate subdivision surface? Let's hit right-click and
choose, hey, this month. And now we got this result. Alright, That's very cool. Alright, one more thing
here we need to do. We need to make
some tweaking here. And I will hit Control R
to add edge right here. I will grab these two faces and I will hit E to
extrude those down. And it's s to this easier
answer to make this flat. Maybe I can turn off subdivision surface term
broadly and go to the edge. You want a number two
from the keyboard. And let's select these
edges over here. Hold control and keep
selecting these edges. We don't need this 1 h. That's very cool. Now let's
put all those it can be, or maybe we can
include those as well. Alright, and then hit control
V to bubble all of these. And let's see what can
happen if I activate subdivision service.
I got this result. But in case you want
to get better results, you can add these edges as well. It can throw be this time. And now the result is better. Alright, I did that
because here in this area, I guess we have some
extrusion phases comes from here and goes down.
Something like this. It should be connected with
an arm, should be right here. I mean, in the 3D, it should be here.
Something like that. And we need to make it to create at the end of this piece, you could connect with
something here on this side. Alright, let's grab
this and let's tap it out. Let's do that. Now, there's a club, these two faces here and these
phases here as well. It's called a and let's choose an extrude face
along the normal. But don't push this
too much because you will you will strike this from the top or the tip of the senior extrusion
will be very large. In this case, just hit
right-click and then manually it as to the why
and scale this like this. Somebody like that. Then it's three, there's
two individual origin because I want to hit S
to the Y and Z Enter. Well, that's not going to work because I selected
the two sides. This to individual,
individual origin and it has two the Y zero
Enter to make this flat. And now let's go back
to the bounding box. Let's make this smaller, somebody like that.
That's very cool. Well, now let's go
back to the left. Let's see what else we could do. Alright, this one, it
should be thicker, I guess. I mean, we could go to the wireframe and go to the
vertices, a club the site. And maybe we can take this
up almost right here, and maybe the side
we can take it and move it up as well,
the key to the z. Let's move this
almost right here. Okay, key to this a little bit. Alright, now let's go back
to this tab and let's see, grab this side and
a key to the z. And let's move this
down a little bit right here. That's very cool. Alright, that's nice. I'm not finished
here, but I don't want to make this
video very long, so I will end it here and let's
complete in the next one. So see you in the next video.
25. 025 Creating the rotor joint: Hello again, welcome back. Let's start with this geometry. I just want to add Bevel, sorry, add mirror modifier to this from the modifier
listless or the mirror. And let's choose y of
x, activate bisect. And we need to flip the
results. That's very cool. And let's put this
underneath the subdivision. We want them, they mirror works. And then after that,
the smoothness. Now I got this,
That's very cool. And this area I think we need to remove some vertices down because it's like light goes. I'm not quite sure, but I think we need just to
move some vertices down. This area that should be almost like this,
something like that. By moving these vertices, we can solve that. Let's
try and list your two. You will get k. I can
grab those first. And maybe those overhear
those and these vertices. And he key to the
z, but turn off auto America had e to the
z. Let's pull those down. Something like this. And let's see, grab
these vertices. Maybe we can take those
down a little bit. We can go to the left or to
the right and I don't know, but maybe we can rotate those and he can move the
manual like this. Now let's see what can
happen if I activate this or this results. It's not so quite similar to what I have here,
but it's working. Cool. Okay, so this first step, alright, let's see what
else we could do here. The length between this
shape and this shape. I think it makes sense
according to the image. I think it's okay and working. So I'm going to stick with this. But here we need to make
some which we can gloss top and Z to go to wireframe. I will move those up right here. And those lists move
them like that. Those here or again,
let's take those up. Something like this. Let's work with this one. I will isolate it, hits
like from that and bad. And maybe we can
give this above all, targeting the car area. So to pick the sharp edges, Let's go to the Select
and select curvatures. That's what make
the process easier. And I will grab those as well
here and those sulfur here. Rights and maybe
those edges as well. Because I want bevel
goes like this as well. And then goes up. If you didn't include these edges possible will
just work with this edge. And this area. Or this edge is not
going to be supported. Because of that, I pick these edges and listen
to those over here. Almost we select all the edges. Alright, let's hit
Control V to the will this give a small amount of beveling,
something like this. It will work out right? Because this phase is very big and this one is very small. When you add a
subdivision surface, the algorithm will push
the faces towards the big, will move the vertices or the
edges towards the big face. In this case, we can make a cut like that and
make a cut like this to prevent any
citric from happening. So hit Control R to add
one H here in the middle and it can throw me to
bevel it like this. And even if you'd like, you can add it here in the middle. It's okay. And now let's add a subdivision
surface radically. Kid's mouth. Looks cool. Even if you didn't. Subdivision surface
calculated total rock. But let's keep it
like this for now. Let's excite. And let's see
what else we could do here. According to this image. I think this arm is
not so quiet long. Maybe we can take this, these vertices right here and push them back a little bit. So let's start with this one. And let's circle of
those over here. And then hit S to the y and just shrink
them a little bit. The same scenario for this one. I guess we could do that. All right, before we do that, maybe we just need
to create something. Some circle above.
Should be right here. Something like that should be
here and one on that side. So to create this, I will tap and maybe
I can grab this one. These two phases hit Shift D, take a qubit right here. If AMP is to separate it out. Let's start with this one. Right-click, bring the
origin dots the geometry, and then let's apply them. You're doing it to apply
the mirror. We don't need. Let's delete this.
We don't need this. And here we have
the subdivision. I will just read this to one, not two for now, and
I will apply it. And then let's kill
this a little bit. And let's move this maybe right here and scale it
even more. Sorry. Something like this. The top hit a and then hit E
to X through this. Maybe put here
something like that. Maybe we can grab these
faces on the side. Alright? And we can again, let's move this a
little bit right here. Now let's see, grab
the outer faces, It's Alt and choose
extrude along the normal. And let's extrude those outs. Alright, let's see,
grab these vertices. And maybe we can
make this thicker. Because I think it's
thick a little bit. And at the end we have some
edge we need to create. I mean, it should be like this. So we have some extrusion here. To do this. I can move this a little bit back and it can throw our two, add one H over here. And the club, these faces go to. Face mode is number three, Alt click to grab the
entire face loop. It's Alt E to open the extraordinary
enqueues extruded face along the normal. Alice extra those a
little bit out like this. And that was a time
to add some beveling. So let's target these edges. It's likes to excite
if you prefer. And after you selecting
all of the necessary AKS, you can hit Control
V to bubble this. So let's put bullets
or this area. I'm not going to
include it because I guess we have some
very candid level. So I would look up those
tourists and then it can throw, be ambivalent like
that, make it smooth. And this one, we need to
give it a big offsets, big bevel offsets, or big bubble amounts or
less developed like that. Maybe. Right here, we can grab these phases and
the phases on this side. And we can hit right-click
and choose approach faces. After that. We can go to select and select
loop and choose boundary to grab the boundary
and just bevel this hit Control V
and this bubble, those as well to three achy, that's all, that's all work. Now let's see what's
going to happen. If I add subdivision
surface again. You can add level one
or you can add little too if you want to
make this more smooth. So this is the result
of that I got. It's a little bit big. We have some gap. I can crop it
entered as n scales. That's what we'll be.
Okay. The distance between this shape
here and this one, almost similar to
the distance that we got right here.
Well, that's me. We are in the correct
direction, I guess. But I think my result
is a little bit small as compared to
this one, I guess. Because if you make
some comparison between this and this shape is very big. It's almost similar to
the hub of this one. Well, maybe I can
scale it, I got here. So let's grab this and
let's kill it like that. This killed even more like this. And then we can grab, let's see what we can do here. Let's go to the Edit Mode. Then wireframe, quite
obvious ciphers. And maybe we can move
this back a little bit. And then we can grab
the inner faces. Alt click, hit
Control Plus couple of time to include those. Sorry, alt click can
throw a plus two time, I guess you have to time. And then I will
scale those faces. Insight. Or at least how can we do this? A few skill is to the x
that's not going to work. If you scale this to the
y does not go to work. You need to scale this
to the x and the y. So if he was killed
us to the old darken, it will go to the center
and we don't need that. The correct way is to scale this to the older
can and cancel. Cancel the y-axis, hit Shift Y and gets killed
us to the end of the z. And now it's okay. Now the result makes sense. And maybe we can make so much, we can actually here
as well by moving these vertices back, I guess. A little bit. Something like this maybe, and maybe we can make
this a little bit wider. The CMDB perspective. Yeah, somebody labours. Okay. Alright, Now I've
heard that it's a time to create the feather. This feather should be
connected with this. But I think let's try to
see this from other area. Yeah, I think here
we have two holders. This is one and this two. They should be
grabbed the feather. And here we have a hole
here in the middle. So let's try to create
something like this. I will select this
and tablet mode and I can grab these acres at the end. Let's take move them
maybe right here. And actually I can hit
E to extrude this e.g. this direction and go to the left of this mix
some more tweaking, like moving those over here. Okay, let's move this side
a little bit like that. One, it will be satisfied, gets hit Control L tooling, select, to select these faces and hit P as two, separate them. Ps to separate them like that. There we go. Alright, now, I will hit right-click and set
origin to human tree to bring the origin toe to the
middle of this geometry. Tab, I will select all of these faces and hit Alt and
extrude along the normal. Let's take those
out a little bit. And let's see, grab
these two phases from here and those over here. And let's kill those out. Alright, proportional
editing is it's on, I will turn this off. I accidentally turn this on. So let's kill this like that. Something like this, I guess. And maybe we can hit Alt and extrude this along
the normal little bit and scale those again, writes Esterhazy, because
they are vague a little bit. So I will scale those
down as soon as you. And I guess that's it. Now we just need to
add some bubbles. So let's scroll up these
edges and those over here. And let's take off those edges. And let's give them some bubble. Or maybe we can just hit
slash to isolate this. Maybe we can include
those as well. Alright. Now hit Control V to
bulldoze a little bit. And even these
edges here control V slash to excite and less yours can happen if
I add a subdivision surface. Alright, to make
this area better, I will hit Control R
to support this egg. To make this better. And on the other
side it can throw off to get cool results. And you can crop these edges here and those overhear and you can scale
them up a little bit. Okay? Alright, so this
result looks cool. Right-click kids with malware. That's very cool. Okay, I think I
will end this video here and see you
in the next one.
26. 026 Making some tweaking and starting to create the feather: Hello again. Welcome back. Before we go further, I just need to make some
tweaking right here. According to this MAI got here. This circle. It's bigger than the
hole that I have here. I mean, this geometry, maybe I should just
scale it a little bit, or maybe delete and rebuild it to have a resource
similar to what I have here. So let's try to do this. I will grab this and I
will go to the layer. Let's go to wireframe and The select all
of these faces, e.g. can you grab those at x
f to delete them all? And they are very
easy to create. And let's go to the left view and let's see what editing
we should do here. Because I'm not so quiet
satisfied with this result. Let's go through the vertices
and go to wireframe. Maybe we can take these edges, vertices a little bit down, and maybe those as well. We can drop them here. I guess. Handless hit E to
take this up to the z-axis and go
to the face Alt. Click to grab this
faced little bit, Alt E to open the extra menu and choose extruded
along the normal. And let's make this
big like this. Right? Let's go back and let's
see what else we could do. So now until now we've
got this results. I will grab those and let's
extrude them like this. Let's move this
down a little bit. And I will equal up all
of these phases hit Alt E to extrude
those like that. Maybe they could
have these phases. It can drop large just to grow selection a little bit endless. Move those down. Write something like this. Almost. And now I can grab these faces and hit
Extrude, extrude them. And don't worry
about the other side because you can use
the mirror modifier. It's easy. I can be I can
take this down a little bit. I mean bag. And let's check the
reference images can hit Control three. And let's take this
back almost right here. And maybe now we should
give it a thickness. Right? According to this image. I think we have a variation
in the thickness. I mean, this area, I think this area right here, I think it should be thicker. As compared to this area. We can take these vertices and move them up a little bits. And those as well. And make this one thicker. So let's try to achieve this. The scrub those
and move those up. And maybe we can scale them as well to the
x-axis like this. And we can crop. See what we could do
here, maybe even those. We can move those a
little bit up like this or something
like that, I guess. And for these details, I don't want to take this up. I think that's its box. I can grab those and move
them down a little bit, even if that doesn't match the reference
and maybe that's OK. So now we've got this results. We have the origin.in the
middle, That's something cool. I will use mirror modifier. And I want to mirror the
y-axis because as you can see, the white goes like this. And if you want to
be 100 to 100% sure, just transform
orientation to the local. Okay? So that's mean we could pick y and turn off x because
we don't need it. And if you want to delete
half of the geometry, activate bisect and
flip the results. So now we've got this. Alright, now let's go back here and let's see what
else we can do. I will, uh, grab these faces
and hit X to delete them. Go to the edge, Alt, click, grab this entire edge loop, and let's hit F to fill it. Alright, something like this. If you like, you can hit
I want or if you like, you can hit X to delete this face and the
crop these edges. And here we have an
option if you'd like, you can use it. It's called grateful Schwann to fill this with the growth. That's okay. Alright, let's see
what else we could do. Maybe we can grab these vertices and E to the Z and move them
up just a little bit. Something like this. If you want to add
an H right here, you can do that accurately
by moving some pieces, by taking some phases and
extrude them if you prefer. Let's turn off mural for now. Or actually, I will I
will accept the mirror, I will tap out and
accept this result. So I will apply mirror modifier. And if I need it, I can
add something easy. And maybe we now we can select these faces and hit
E and take those up a little bit like this
and this side of edges, we can move them up. Alright, let's see, That
makes sense or not. Yeah, I think we can accept it. It will be beautiful when we
add a subdivision surface. Now, maybe we can grab
this edge and 23, and even those here we can hit, can throw beyond the
volatile like that. And let's see what else. This side, I guess we can
label it as well. We can. It's like to go to
the local mode and grab all of these necessary
edges and Bevel them. Give them nice amount
of bubble link. Let's select those edges. Rights, and the same
thing for this side. Grab those as well. Alright, let's see what
else we could pick. Alright, I think we can grab this entire
edge loop as well. All right, now
let's try to bevel this and this he was
going to happen. I just forget to
pick those here. Rights listed can throw
me to bevel this. Because suddenly like this,
now let's check the result. Alright, looks cool. Let's see what's going to
happen if we activate subdivision surface. Right-click here this month. Okay, there's all
this beautiful, but we got some shading
if you have been here. Okay, I think I will
ignore this for now. And I will accept this result. Let's turn this off and
let's start with mood, and let's pick the other edges
and let's make them sharp. So let's select all of
these acres and it can throw me to give
them nice bubble. In other sectors,
subdivision surface. And let's see what
we got so far. Alright, That's very cool. And now maybe in the
middle we can grab these faces and then hit S to scale it down and
hit E to extrude this up. Something like this. And now I can grab these acres
and fulfill them as well. Hit Control be
something like this. Now the result, I
think it's nice. Alright, now maybe I can mirror or the species
on the other side. But before that, let's bring the 3D cursor right here in
the middle of this geometry. So select this geometry and
then hit Shift S. And US courts are to select it to bring the 3D cursor
to the middle, the origin dot of this geometry. And then I will mirror those on the other side right there. Okay, to do that, I just need to change some option here and the
transform pivot point. Let's read this
too. The 3D cursor. And then let's grab those
over here and I will hit the detector Coby and
they're already linked to leave the new copy
in the same place. And then I will hit Control
M to activate mirror. And then just choose the axis. I want to mirror those to the y. So I'm going to hit
Hawaii and then Enter. There we go. All right, now let's see what
else we could do. How can we create the feather? All right, It seems
like we have something like ellipse goes like this. We need to create
n from this shape. The feather comes out and everything will
be connected to this. Okay, let's try to check
this image right here. As you can see here, we have this shape and the feather
connected with it. So let's see how can we do that. Alright, maybe we
can start from here. I will tapped it mood and
maybe I can crop this, sorry, this entire
edge loop, I guess. Or maybe these faces here, e to the z and the second
Coby when they hit P, S to separate it out. And now we just need to
grab the edges. That's all. If you want to pick the edges, you can go to the face, the club all these faces I, to make some insects and hit XF to delete this face in
the middle and then go to the egg Keith
wise and push those out and merge them. Tab out. And let's turn off subdivision surface and let's
see what we got so far. Alright, so now we've
got this shape. Let's go to the top view and let's see how
can we do this. I will select all the vertices
and scale this U-shape, something like this, a line this edge to the center of this area. Because I will give a thickness to this one
and this one should go inside this shape
or this geometry. So somebody like that, I think it will work. Alright, now let's see,
grab this part and hit G, and let's move it
almost right here. Maybe. Let's see what we got so far. And let's move those down. Even if that doesn't match, it's not a huge problem because
we can edit this later. Okay, So this is a first step. We created this
shape and now what? Alright, now we need to maybe we can fill this
shape and start from there. I mean, let's apply
the mirror modifier. We don't need it anymore. Let's tab hit a and then
hit F to fill this and then hits maybe scale to scale
up a little bit, sorry. It's after fillets and then hit S to scale
this a little bit. And then hit I to make
some insect like that. And hit XF to delete these. And then middle. And now with this selected, I can hit E to X through this and grab all of the
vertices e to the z. And let's move this
over here for now. And from here we can start. So this is an option. And I think we can start
from here as well. Before you give
this n thickness. Let's see how can we
create these feathers? Alright, maybe we can grab these vertices and
start with them. Let's extrude those
a little bit. And maybe from the top view, we can understand that. Let's go to the left and see
how far we could put those. Almost right here,
something like this. And let's go to the top view. And let's make this flat
head as to their, Sorry, let's read this two
boundary box at as to why MME zero, etc. Before that, the option this the transformed points
was on the 3D cursor. If you hit S to the y, the scale will work
according to that, towards the 3D cursor. And that, I don't want that. Alright, maybe I'm not quite
sure what's going on here. Do we need to rotate this
or do whatever thing? Alright, for now,
let's add some edges. Maybe one edge. Let's add
one H right here for now. And maybe we can hit G. And let's move
this out like this and hit Control R to
add another edge. And maybe we can hit G and move this one a little bit like this. And maybe we can add
another edge over here and can throw shape. All right, Let's see if this
idea makes sense and work. Manually. I will grab these
vertices and move them down. E.g. this vertex, I
can move it right here and these vertices
should follow it. I can club the first one
and the last one and hit F to make connection
between then and now. After that, I can move
this one to a new age. Following this diagonal. Age. As a guide, you get
something like this. And we can do the same
thing for the rest. Let's see, grab those,
hit E to the Z. Just keep watching the vertices. By the way, you can use a proportional editing
if you prefer. Or at least see what can
happen if I grab this, these vertices and choose, relax that shift,
are capable time. Alright, This option is
nice if you want to use, and I can do that. Grab all of these edges now and hit right-click
and two or three legs. And then you can hit Shift
R to repeat that again and again until you get something
nice and round like this. Or I guess we need to move
these edges down even more. Something like this may
be a club these vertices. Now let's select these edges, all of them and hit right-click
and choose relaxed. Had a couple of time. Write something like this maybe. And now let's grab these edges. All, you have to
click all of them. And then right-click
and choose relax. And then you have the archival
time. Something like that. It's nice. It's good idea. And what else we could do? Alright, this egg that we created as a guide,
we don't need it. I will let x e to delete edge. And now we just created
the first feather here. Maybe, but by taking these
vertices and move them back, I can get some, a little bit of curve here. Alright, That's very cool.
Shape. If you prefer. You can see that I have some, some, something wavy here. If you'd like, we can grab
this vertex and this one using the hips and hit F to make some connection
between them as a guide. And now you can go e.g. to the left or to
the right and move these vertices
towards this edge. Alright. I just forget, sorry to activate
the screencasts. Let's move this right here, and that's very cool. All right, so now we can use
that relax option again. Here. Right-click enqueue is relax. Shift out to repeat
that again and again. Now we got something cool here. And delete this guy and
this guy x and then E. Now the result is
even better, I guess. Now I think we can use
mirror modifier again, the x F to delete this one. And let's add mirror modifier. And let's choose the
y-axis and turn off X. And let's activate
flip and bisect. Actually don't need those two active to activate
those because we delete half of the
chemistry. But that's okay. Make keep enormous that not
make sense because we need to grab the side and flip
it to this direction. But I'm not going
to do this now. I will end this video and
see you in the next one.
27. 027 Creating the big rotor feather: Hello again and welcome back. In this area, the tip
of their further, we have some editing,
we tried to do it. Let's tap mode. I just want to move some
vertices up and the front view. Because if you notice here, I have this care of these egg is like a carrier
and this one flat. I want to move some
vertices up little bits. That will be better. So let's
go to the front view and go to their various
disease or less severity, smooth, endless. Grab those. Alice, move those
up a little bit. And I guess that's it. We don't need to
do anything else. If you're not so quite
satisfied with the results. In case we have something goes up a little bit farther down, you can grab those and
just relax them and then shift the RFQ like S1 time and that's will fix the problem. Okay, This result is cool, but it's not correct here. I mean, this one is further, it should be flipped
to this darken. Okay, so before we do that, let's try to see what else we
could do here in this area. Alright, we have this
weird shape piece stuff. I don't know, maybe they
are just weights to stabilize rotation or I
don't know what is it? We have something
here at this area. Alright, so we need to
create them as well. Okay, let's start with those to see how can we create them. They should be on this side. Okay, so let's hit Control R and less support this area with the new
age. And maybe we can. Let's move this a
little bit. Key twice and the slide here, and let's call this
AKT to extrude it. Something like this and another extrusion.
Somebody like that. And I think it's because I've heard that I
can give this a thickness. And then from there we
can create this shape. So now I will apply
the mirror modifier. It can throw light
and the blade just hover over on the modifier
and then it can throw light. And I will tap it, it, it's more than they will
grow up half of this one. And I will hit P as
two separate us. And I will mirror this
geometry on the other side. Yes, it can throw
em and choose X to mirror this on the x
axis and then hit Enter. And that's it done. Now I can grab those together
and I can merge them, make them one geometric
acid Control J, and now they are become one. But these vertices
in the middle, they are not marriage, yes. So tablet mode. And let's see, grab
these vertices, hit number one, go
to the vertex mode, any club those enqueues, m and American by distance. You can see here four
vertices removed or Marist. Alright, now I've
turned that maybe we can clearly see what
else we can do here. Let's check the face orientation in case we have
any problem here. Alright, we have some
phases we need to fill up. As you can see here,
we have this area, alright, and this one
blue, and that's wrong. This case I can grab
the federal tab, hit Shift M to
recalculate the normal. Now we have one side
blue, one side red. And for these pieces actually, I can crop them all. Tap it a heft to recalculate the normal
for all of these pieces. Alright, when you finish, go back and turn off
face orientation. Now I will grab the
feather and tap. You don't need to tap.
Just add solid define. Solidify will help me to add
a thickness for this piece. This increase the
thickness a little bit. Something like this.
I guess it will work. All right. And when you will be satisfied as
apply them modifier. We still have the
subdivision surface here. Now is the time to
make some tweaking. And keep in your mind, you still can edit one side and ignore the other side and use
them with the fire again. I'm in whatever change
I will make here. It's not necessary to go
here and do it again. I can delete one
side and use mirror. That's, that's what work. Alright, so let's
tap here and let's see what we can do to this area. Maybe we can make this
error thicker a little bit. I guess we could do that. By grabbing these
faces and even those over here. And those here. And let's see what can
happen if I hit Alt S, M, make this thicker. Let's see if that makes sense.
I think that's too much. It Alt S again,
something like this. Maybe even marked a little bit. But I think this will work. Now let's scrub these vertices and let's scale
them to the center. But the scaling
work towards the 3D coarser because we forget to switch this back
to Bounding Box. Now as to the why somebody
like this and as I said, ignore this or you can actually delete the site and don't
worry about it at all. Alright, so let's see
what else we can do here. I will grab these four phases, hit Alt V and Q is extrude along the normal
and extrude those. And now I can grab these acres and hit S
and scale those down. And we can take those back
a little bit like this. And this killed those up. And hit key and move
those like that. And we can actually
move all of them. Suddenly like this, right thing. It will work. Let's add one H right here to prevent the strike to
go beyond this edge. Because we will use
subdivision surface. Maybe we can add one H right
here or just as a support, a club to support this
a here and this area. And now we can add or
activists subdivision surface. I added this edge
right here to prevent this truck to go farther
to this direction. So I added this as
a support, a globe. I will activate
subdivision surface. And let's see what I got so far. If you are not so quite
happy with the size of this, you can tap and you can grab all of the faces
and the wireframe. What is z? And you can hit Alt pests and flavors
and make it bigger. Alright, if that us too
much, I'm also quite sure, but I think the
size makes sense. And I think we can
move it forward. And maybe we can take
those inside a little bit. That's okay, that's cool. Now, let's check that is
off the CO2 because so far. All right, It's nice result. I guess. Let's turn this off timber or let's see
what else we can do here. How can we create the
weights that we have? It should be right here. Maybe I can grab this H and hit
Control V to the bullets. Like this. Maybe it, I can grab these faces. Or maybe I can add one more face and hit Alt D and extrude this
along the normal. And as you can see,
the extrusion is not quite correct
because of the offset. Just go to the option
of the extrude and activate offset
even to fix that. And I will hit
Control off to either support a clue here
and here as well. And maybe this one, we can move it a
little bit forward. This age and this age to time. And let's move this forward
a little bit. Rice. Okay, let's see what's
going to happen if I activate subdivision
surface here. Alright, maybe we can make some tweaking by
taking these vertices and move them up a little
bit, scaled them up. And even if I take
those forward, maybe that will
make sense as well. Now we've got this
shape, right? It's nice. Yeah, it's cool. Right-click
here this month. And that is very cool as nice. Alright. This circle here is
not so quiet round. To fix this, you
can go to the edge, right-click and choose circle. That's will help to fix it. And you should do
that for actually at, for this edge and for
this side as well. The secret of those, and
right-click to a circle. Alright, you can fix the angle because we cuts very subtle rotation
when we made that. So let's rotate this
just a little bit. And maybe this one we can actually go to
the, I don't know, to the tag of view
it can throw can throw number one and then just rotate this a little
bit and make it flat. Alright, It's not a big issue actually. You can ignore it. Now I can use mirror
modifier again. I will turn off this and add the mirror modifier and
use the Y and assets. Now, you can apply
the mirror modifier. It can throw all I end up lights and the
crop, this tablet, it moved from one side and hit P S to separate
it from the side. You can mirror it, it can
throw em to the answer. Let's check the
face orientation. I just want to see
what's happening. Very cool. I have no problem. Grab
this with this hit Control J to make
them one piece tab. And let's see, grab these
vertices in the middle. It's N to open the
marriage menu. Choose marriage by distance. Let's see if these perished. Hornets. I, they're not marriage because we have
some subtle variation, as you can see right here. So to fix that, you can grab one
side or to the y, I guess hands rotate this
tiny bits and alignments. And you can do the same thing for this side, the club, this, it's up to the Y and
outline it as well. Now let's try again and grab those hits em,
married by distance. And now I think we
are in the safe side. This to their face orientation
in case we got a problem. Yeah, we have one red, one blue, hit a has n. And let's turn this off. Activists subdivision surface. And now we got this results. Alright, it's close
to what we have here, and the result is nice. One final thing I can do here, I can grab all of these details and just move them inside. All right, let's turn
this to a three, That's two global, not
local key to the z. Let's move those
inside a little bit like this to hide some details. Alright, Very cool.
Very nice care of. Good stuff with details here. Let's see if we missed
something here. Okay. Alright, It's very cool. So I guess that's
it for this video. And we, by the way, we have some editing here. If you'll notice here we got some tweaking here
we need to do, alright, actually, let's
do that. Let's tap. What we need to do is adding H look just to
support this area. And one edge loop on
this side as well. Let's will help a lot. And maybe take this further and move
it down a little bit. Hit G to the Z and
puts it in the center. Yeah, I think now
we are good to go. Now I can say that I will
see you in the next video. Goodbye.
28. 028 Adding screws and creating the barcode base with some editing: Hello again, welcome back. In this video, we need to
complete the modelling section. I have some stuff here to add
to accommodate this model. If I bring the reference images, I have some sucrose
here. I need to add. And maybe we can start
with those. After that. Maybe we can make some
adjustment here to this area. Alright? Even if you ignore this
is not a big issue, can be okay to
leave it like this. But I think I can scale it just a little bit to
make it make sense. Let's see what else
we can do here. Let's start with those stuff. Let's create something
similar to this one. I don't have close image to
see what's exactly this, but I will create something
close to what I see here. Okay, let's select this and
let's tap to edit mode. And maybe we can
grab these acres, hit D to take a copy. Let's take this copy out. Ps2, separate it, just hit P and then has antibiotic
grab the sinew. And let's turn off the
subdivision surface for now. Lists of bringing the origin dot here to the middle
of the circle, gets its right-click and
set origin to geometry. And now we'll start tapping mode and select all the edges, vertices and then
hit F to fill this, and hit E to make some
Rican back like this. And let's grab this
face. Number three, hit I to make some inserts. And maybe after that we can
hit E to extrude this inside. This activates face orientation. I just want to see
what I got here. It's right. That's me. We need
to flip. It, hits a select all the faces, and then Shift Enter,
recalculate the normal. Let's turn this off,
face orientation. And now let's make
some beveling club. This hit Control V.
Let's add three maybe. And here Oswald Control V. And let's do that.
For this side. Maybe we can grab
this big face, hit X, this face, and then delete it x and then f. And
let's go to solid. And maybe we can grab this face and the
bullet hit Control B. Let's add three-eighths
right here. Alright, now we got this result. Now I can tab out and activists subdivision
surface and then take this back and
puts them Position. Right-click Hey this more. And maybe we can take this and take a cobia of this hit Shift D and the
tech Coby right here. If you want to be precise, you can take this. Kimberly and they grabbed this. You can go to the
aqueous Alt click select this circle Shift S corps are selected to bring the
3D cursor over here. Tab outs, I grabbed this
heifers, silicon to coarser. And now this object moved to the position of the 3D cursor.
And that's what we want. Maybe we can take
this a little bit. Very cool. Let's go to the left, hit Shift D to take
a copy over here. And we can take this out. For now. Let's go to the
left, hit Escape. Let's make it small. And let's put this
in the center, something like
this, and move it. Alright, so let's take her Coby heavy and let's put
this right here. Alright, it looks
cool. And I can, Let's take another
cube over here. Alright, let's centroids are either have the detailed
come over here. And let's put this one
in the right position. And maybe we can give it
a little bit of rotation. Maybe from the top, hit R and rotate and align it
with the surface. And now maybe we can move
it a little bit here. The same scenario for this one. The smallest one inside
and from the top view we can adjust the rotation. Go back to the left side. Let's reposition. It's great. Alright, now we can select
all of these pieces. And we can hit Control J
to make them one piece. And now we can mirror
it on the other side. Alright, we need to bring the 3D cursor bag in the middle. We can grab the body and put the 3D cursor in the
position of the body. If you like. Hit Shift S and
course are selected. And there we go. Now
we have it there. After that, I tried
to click Set Origin, origin to 3D cursor. I just want to move
the origin dot. What I've got right here, to the position
of the 3D cursor. That's all. So right-click set origin, origin to 3D cursor. And now I can use
mirror modifier. Now I got those on
the other side. One more thing here. This hits like to
isolate this piece. This piece is closed, but I have a hole right here. Maybe I can close it. So let's touch it.
It's more the end. Let's turn this
off Kimberly crop, these edges hit F and then hit control V. And
this purple them. I just wanted to close this. And maybe this holds as well. So grab those. And maybe I can
push those inside just to put the camera here. So I'm going to hit G twice and move those back and then hold
Alt and move those again. By this, Let's put those
inside a little bit like that and then hit F and it
can throw me to bevel, this. The same thing we're
going to do here. I can take those up by using
the Move it g to the z. Take those over here, hit F and then can throw being in this bubble,
those authors like that. That's it. That's very cool.
This area as well. F can throw me to
give a small bubble. Now it's ready. Let's hit slash to anxiety and
let's go to the left view. One more thing here
we need to do. We have a small gap here. We can see something that through this
does not make sense, so we just need to make
somebody being here. I will tap in the
graph, the vertices. And before you move
these vertices, because we have
very close distance between these vertices. Any movement that will make some welding because
automakers activated. And that depends
on the threshold. If you go here you can
see the threshold. So I will turn this off temporarily to move those just a little bit in
the wireframe mode. And now let's hit G to the Y, and let's move those like that. And let's see what
we got so far. Maybe we can move those
a little bit forward. Starbucks, and let's
see what we got. All right now the
result, it looks cool. The same thing for
this cover tab and go to the wireframe. And let's move
some edges around. Alright, hit G to the Y. Let's trace this and
see what we got so far. Tried to avoid any
big overlapping like this one right here. Let's see what we got over here. Maybe we can take
this right here. And let's kick this area, this area looks okay. Now if I go to the
solid view and zoom in, the result looks cool, except for this one. I can grab these vertices. And I think we need
to add some support, a club in this area. It can throw our Hello, This Ad Age lobe right here, just as a sport loop. And let's move those to the y. Just a little bit like this. Alright, maybe those
here as well now under their site, e to the y. Now the result looks cool. You go back on this side and
let's go to the right view. Hit number three and
let's tap the ethmoid. Go to wireframe and
maybe we can club all of these vertices and
scale them a little bit. But before you make any
scaling, if you scale, this scale would go inside
and outside as well. Because we are
scaling in all the, all the sides are all
the direction they want to do is I want to
use the 3D cursor as, as a pivot point. In this case, I will grab the outer edges and hit Shift S and the bring
the 3D cursor over here. And this relates to 3D cursor that transform pivot points. Then let's go to the right view is Z to go
to wireframe and is a club. All of these vertices,
including this one. Now I will scale according
to the 3D cursor. Let's turn off
subdivision surface. I just want to see
what's going to happen. I just wanted to make this
picture a little bit. Now we got it. Now it's big. But we will get some
problem over here. I will hit key twice to move this one down and
take this one up. Let's will help to
solve the problem. Actually, maybe we can delete
this age. Do we need it? Alright, that's really cool. But I want to do is I
want to take this beam, take a cobra of this e to the x, I guess want to make
sure that this one is exactly in the center. Let's go to the right of view. And it's looks in the center.
Everything looks cool. I guess. Maybe we just need to make
some scaling here to this one. Scale this make it, this, make the size of
this one similar to the size of an European. Or actually if you want, you can do something else. Can I get up this beam
and tough? It is smooth. And the club besides
hit G and move it on the other side like this. You can hit F and it can
throw me to the bullets. Hit Control R to add a
support H2 part here. And that will be great. Now this one, we can go to
the right view and the scale a little bit less activists subdivision
surface for the tail. And let's scale this
inside a little bit. Maybe we can make it bigger. And I think it needs a little
bit of free positioning. Or that's cool. Now I will just tap and grab the outer vertices
manual like this. And now what I need to do
is I need to scale those. But I need to ignore
the x-axis killing. Because if you scale
in all direction, you will get a problem. But if you hit S and cancel the x axis by using the Shift X, now you are scaling
to the z and the y. So let's go to the
right of view, hit S and then Shift X
to cancel the x axis. And the skill this a little bit. Now, we got correct results. But this one, I think
it's a little bit tall. I will go to wireframe
and the crop those and hit G and move
those inside a little bit. Something like that. And I can delete the old one. I don't think that
anymore. Right now the results make
sense and accurate. Alright, let's see if we
can do anything else here. In the reference image, I have this bar code here. We just need to add something
on the back of the body. So let's hit slash
to isolate this one. In the top view, I will tap to go to the edit mode
and I will look it up. It's vertices in the middle. Shift S to bring the
3D cursor over here. And I will tap out entity
Shift a to add plane here. The plane make small,
something like this. Maybe we can make it taller. A little bit tense killed
down to this here. Let's take this up a
little bit like this. All right, so maybe we
can rotate this tiny bit like that and achy
and move this down. Let's read the spec
to bounding box. And that's very cool. I can throw light of life skill. Now let's add some edges to make this smooth
tab hit Control R. And maybe we can add 36 eggs here and maybe four
edges on the side. And let's see what
else we can do here. Maybe I can grab
the corners and it can throw Shift V to
bevel the vertices, okay? To get something like that. And maybe now I can grab
these vertices, hit J. And this one with
this one had k. And k. I did that because without
that I have big in Gone. Alright, and we said
ingoing is a face with more than four vertices. So this one is ink on 123456. But if you add an
edge like this, you will have quad
here and quite here, and that's what we want. So to say, grab this one
with this one hit J. And now I think
we're already this hits a to select
all the faces are. Before we do that, I will add a subdivision surface to this one to make it smooth. And now it's become smooth. After that, I will use the
shrink wrap modifier to, to shrink this on the shrink
wrap this on the body. So it tells you here
and then modifier, we need to pick the target. Our body will be the target. So I will be the
targets and that's it. As you can see now
we got this result. Alright, keep in
mind to put this underneath a subdivision surface because we want to
smooth the surface farther and then use the
shrink wrap modifier. If you're satisfied
with the results, you can apply the
subdivision surface. And now we got this. You can apply the
shrink wrap modifier. And that's great. After that, you can go and use solidify
to give this a thickness. On the opposite side, a little bit like
this, it will work. And you can apply it as well
and tab and go to the edges. You can call up the outer edges just to grab the outer edges because we want to level them. So to say crop them like
that and then hit Control B. Let's give them nice bubbling. Can use for as many as you want. Somebody like this,
it will be okay. Right-click, Shade Smooth. And now we got something
nice like that. Alright, for any reason,
as you can see here, we got some shading problem. This area is dark. If you want to get better results, you can. It's like to isolate this
piece and tap and you can grab the bottom side. Actually go to the face and maybe we can cut up
some face in the middle. Maybe those and it can throw up last couple time to
go to the selection. I think this time we need
to pick this manually. I will hit C to
activate circle select, and just use the right
lifted click button and select these faces. And then right-click to, to excite of the tool,
and then C again. And let's pick this and then hit X to delete all of these
vertices or faces. Tab out slide to excite.
And there we go. After that, we can add a
barcode image above this area. There. I thought actually just
made a mistake here. This piece should be bigger. Let's make this a
little bit bigger. And because we scaled this, we lost, we lost the shrink wrap modifier,
but that's okay. It's not that big a deal. I will repeat that. Again. That's a, that's
something fine because repeating this operation that will help you to understand they shrink wrapped
with a fire even more. So, yeah, let's do that. What I will do is now we'll grab these
faces and it can throw a couple of times until I reach this area and then hit Accept
to delete all of those. And I will use the shrink
wrap modifier again. So let's do that. Tab out and then
shrink wrap modifier. And let's pick the body. And there we go. Now
we can apply it. And now we can solidify. And let's give this a thickness on the opposite side a little bit. Not too much. I think something like
this, a total work. Let's sit rhotic liquid plots so we can see the thickness. The thickness looks cool. I can throw a and
apply this tab. The lab, the outer edges. Alright, let's go to the ages and listicle of the outer edges. Let's hit Control
V to bubble this. I think this time I will add the three H's and after that, I don't know, but maybe we can use subdivision
surface again. But keep in mind to delete the other half, the other side. Alright, to do that so
I can hit Control R to add an H right here, maybe twice and take this
down to select, sorry, this activates automatic
and he key twice, and let's take this x down so
we can select these edges. And may, you may
ask why I did that? Because if you use the
alt delete method, the egg will stop at
a point and you'll need to pick those
again and again. The easiest way is to
add one edge right here. I hit key twice and take
it down and merge it. And then it says, sorry, H, it will be
selected automatically. And I want to separate
this face from the other. Would these edges selected, I will hit V to grab this. And as you can see now, it's separated after that hit Control L to target this phase, then hit X to delete this tab, I'll try to collect,
hey, the smooth. Let's excite. It's turned on
subdivision surface with level one and
that's will be enough. Alright, now it's
looks better for me. It makes sense. Alright. One more thing here.
I want to tweak. I just want to fix this area by moving some vertices back
a little bit, hit G. And before you do that,
Just turn off automatic. And let's move those over here. Tab out to grab this face, these faces, and let's
grab these vertices. And let's move those
back a little bit. To close this gap here. Maybe these vertices from the top just so we
can move those back. Or maybe that's because of the tail key to the y m,
all those other bits. That will be enough, I guess. Yeah, that's very cool. Alright, then I think we did
all the unnecessary stuff. And maybe one final
thing we can do here is to add a cap here. Let's scrub these edges and hit F and then
it can throw them. I just want to close everything. Then turn on subdivision
surface. That's very cool. Alright, so I think
that's it for this video. And I think we just finished
the modelling section. And for any reason, if we
want to add anything later, we can do that or fix anything. We can fix that. So that's it for this
video and see you next.
29. 029 Illuminating the scene with an HDRI image: Hello again, we'll come back. Okay, I think now we can
start with the material. We've finished the
modelling section, and we add all the
unnecessary stuff here to make this looks cool. Now let's jump to the
material section. Before you do anything. Just save the project, go to File and Save As
and change the name. Alright, And after that, I think now is the time to apply some modifiers because
I want to scale this. And I prefer to apply them. You can ignore them if you like, and you can apply them. The size of this black
ordinate is very big. If I add a box with
two meter size, Let's put the 3D
cursor in the middle, fairest Shift S and
closer to the origin. The end add cube, as you can see, is very big. The black curve is very big
as compared to the cube. This cube, for each edge, the length of each egg
is about two meter. So I'm going to make
some tweaking here. Let's change this
to 20 centimeter. I know that black current
is smaller than that, but I will scale this
to 20 centimeter and I will accept that size. If you'd like, you
can make it smaller. But for me I just want to
make it about 20 centimeter because That's will make
the workflow easier for me. Even with the parameters are numbers and the
material section. So let's make this small smart, similar to the
size of this cube. Let's scrub this cube and
let's make cuts and selectable by hitting this icon right here. If you don't see this icon, you can bring this
out from the filter, gets activated from here. And let's scale the block coordinate to the position
of the 3D cursor. And before you do
that, after you save, after you saved the
project with another name. Alright? Now we can apply
all the modifiers. The easiest way to do this, you can grab everything
like this and it can throw a and hit, Apply visual
geometric, geometric. But for some reason, I can't see this
option right here. Alright, if that doesn't work, maybe we can grab
some geometries. Not all, not all the
black coordinates. And let's see why
that doesn't happen. Alright, so maybe in
this case we can do this for each apart. Let's grab this one and I
will accept this results, apply for you-all geometry
to mesh and grab the body. I apply a big old
human transformation. And let's do the same
thing for the rest. Rights and pick up
those all of them. And let's see. Yeah, that's very cool. All right. Let's pick this one alone in the document automation.
And what else? Maybe this one. And this one can throw light and apply because too much
inflammation now, let's see, grab them
all as very cool. All right, let's
see if we missed anything or this piece as well. Now let's see what's
going to happen. Yeah, now I just applied
all the modifiers. Now after that, I will look up the whole black
coordinator into scaling, scaling this according to the
position of the 3D cursor. To do this, just go to the transform pivot point
and its sweetness to 3D cursor because we want to depend on the 3D
cursor after that. Scale this and make it smaller. Something like this.
It will be okay. And then you can
delete the cube. I don't think that anymore. So to see where is it? I think this one. Yeah. Just grab it and hit
Delete to delete this. After this killing the
club everything and hit Control a and apply the scale. Alright, as you can see
here in the bottom, with zeros, as you can see here, the scale is very small. We need to bring you this
one. This is number 21. To do this, Jessica
everything and hit Control a and
apply the skill. And now everything is
cool and ready to go. All right. Okay, After that, Let's bring
the reference images and let's see what else
we can do here. Let's make this bigger and
let's check the colors here. We have two type of
black coordinates. We have one with black and gray, and we have one with fully gray. And we have one full black. For me, I prefer to
choose this type, this one, black and gray. I think this one is beautiful. So let's try to create material similar
to what we have here. Let's make this smaller. And let's put this right here. Alright, it's fair thing
I would like to do is I want to eliminate the scene. I want to see some lighting. And before I do that, I will grab all the
geometries here and hit M to create a
new collection, just hit New
Collection and let's call this black hardness. And hits Enter. And now we have all the
humans trees inside this collection. All right, now let's start. Alright, to add some lights, you can simply hit Shift
a and use the lights. Lights here from
the last section. But I prefer to use HDRI image. I want to eliminate the scene by using image is
called HDRI image. I will leave and that
tickets your project folder. I will leave there a folder for that texture inside the
tickets shared folder, you will find an HDR
image you can use. I prefer to sublet this
window to two windows. So I will put my
mouse right here at this corner and
click and drag. To simplify this
to a two window. I will leave this window for
the 3D object and this one, I will change that it
is for type two shader editor hits and to get
rid of this panel. And now we are in the object
mode of the shader editor. I will see these
two environments or to the world
because I want to make sandwich week
into the world. Lighting there. Just read this
more to the world. And from here we can
control the lighting. After that, I will hit
Z and go to the render. And if you go to the
render properties, I'm working with E
for now, that's okay. All right, after that lists
or the hero image here, I will hit Shift
a and let's go to the texture and cures
environmental sharp. Let's put this node right
here and go to Open. And let's open. The texture is called
old industrial. Open its end, open
there, EX, our image. And now we have it. Now you can be like
this to the color. And immediately
when you do that, you can see the environments, can see the image, HDR image. We can see, we have some lighter care comes from this image and that's
something cool. Okay, Now, the next tip
that I would like to do, I want to hide the image and keep the lights that
comes from the image. Okay, to do this, I can duplicate the
background image, hit the end, thicker
copyright here. And I want to mix between those. There is an add-on. It's very important to
activate. It's cool. I will go to Edit and
then Preferences, and let's go to the other. And so can add list search
for node triangular, just type WR and you'll find it. It's right here, just activated. This node is very important
when it comes to material. There is very nice
shortcuts here we can use to make the process faster. Because I activated this node. Now. Now I can mix
between those quickly. I will hit Control
Shift and keep holding the right-click and move
the most from this node to this node, node triangular. We'll create a mixed character
for me automatically. Alright? And after that, let's
search for light path, hit Shift a, and let's
search for just type path. And you'll find it in the blank. The first option, camera
array to the factor here. Now as you can see, I highlighted the image
and I can see the lights. I've started that you
can control the color of the background by controlling
that color right here. Let's take this down just a little bit to make this darker. Alright, so now we
got cool result here. Okay, so now we've finished
with the lighting. You can create a strength from here if you like, there's
something optional. I can make this 1.3, maybe make this light stronger. This works to the EVM cycle. If your speed this two cycle, we can see some
lighting here as well. So let's read this back to
E V. And now I can go back to object here to start
creating my materials. Alright, so I think
that's it for this video. And see you in the next one.
30. 030 Creating the first material: Hello again, welcome back. All right, let's start
with the materials. So bringing the
reference images here and let's see what we can do. I will start with this geometry
and if you want to add, I will apply a material
on this geometric e.g. you can just select it and hit the menu button right here. It can go down here
and hitting you. Want me, I will use this
one, hits you knew. And now I have
principal P, S, D, F applied on this geometry. Alright, first thing we
need to pick the color. So we can go to the base
color section here. And let's change this color. You can click on it and take
this down a little bit. Alright, suddenly like this, you can cope with these numbers. My rights, or you can
cope with this number. I choose three, this
to a key x. Anyway. So this color looks cool for me. I can stick with this and for any reason if I don't
like it, I can change it. So that's the first thing. Choose, pick the color. That's looks cool. Let's say that after that, we want some, let's
say some roughness. Here we have this option
is called roughness. If I take this back to zero, as you can see, I will get a result
like a mirror. And if I crank this up, I can make this rough veer off. So this can throw
out is very cool. But image and if I
add a variation here, a black and white image
with a variation. And making, making lists can get what's going
to happen here. Let's give that a try. I will hit Shift
a and I will hit, by the way, Shift a to open the Edit menu and just
click on the search. Let's search for mass grave. Just type MUS and
the old findings. I want to preview this node. I just want to see what was this node does when I
applied on the object. When you activate Node Wrangler, now you have the
ability to preview. Then I'll just hit Control
Shift and left-click. And now we can see a
preview for this node. Now whatever changes
you make here, you can see the
preview of the change. Alright, first thing, let's increase the details
a little bit. I just want to see some details. And let's take the
diminished one bag, e.g. 2.5, maybe somebody like this. And let's increase the details even more, something like this. And if you like,
you can manipulate this object and see
what this does. Alright, so now we
got this result. I will make the scale a
little bit to pick. Maybe. That's very cool. Now I will, I will
hit Control T to add a texture coordinates
and the mapping here, because I want the tickets. Sure. I mean the magic ray, if I want the magic rave to be applied on this
objects by using the object mode or object coordinates as Zotero
here because of this node is called
texture coordinates. This is this node. It will help you to apply the texture on
objects in different ways. So let's grab this
and let's apply this to that, the vector. And as you can see now
I got this result. Different results. So I will crank this
forward to make the scale smaller. Alright? Somebody like this may be. Alright, now imagine
what can happen if I plug this into the roughness. Let's apply this to Varennes and let's see together
what's going to happen. I will activate the principal, PACF gets hit Control
Shift and left-click. And now we got this result. This result is not enough. We need to make more tweaking. Let's move these notes
a little bit here, and let's add another
node here in the middle. So let's search e.g. curve, just search
for curve, RGB curve. And let's put this right here. We have the white value
and the black value. Let's take the white value down. And let's take the black
up to make it white. And as you can see by
moving these 22 vertices. I made the variation,
I made this variation. Now if I hit Control Shift, right-click on this one. Now you can see the white
value and up lagged value. If you take this up, you'll make the
results more rough. Like this. You guys can
have it if I take this up, Let's take this out as well. Alright? If you move this vertex up, you will make, you will give
priority to the white color. And that's means that
results will be more off. Okay, and if you take this up, let's, let's, let's
take it down. So it's going to have a list of blog of the
principal, the SDF. And let's take this one up. As you can see, we
have a variation here. Alright, keep manipulating
these two vertices until you get the result that you will likely
that you'd like. For me. This one looks cool. We have a nice variation here. And let's say this is
it for the roughness. Let's move this a
little bit right here. Okay, Now, the next tip, I need some bumpiness. This phase should not
be smooth like this. I need some, some
height information. For that. I will use
the noise texture. I will hit Shift a
and let's search for noise. Noise texture. I just want to see the
preview of the noise. I will hit Control Shift click to see the
result right here. And I prefer to plug the objects coordinates of that vector to
apply the texture, or sorry, to apply
the noise texture on the object through this option right here, it's called objects. Alright, now I will
crank up the scale. And when you do that, you
can see the change here. Let's crank this up to
maybe 800, maybe even more. Let's crank this up to 1,500. Or maybe 2000s. I think we need more. Let's crank this up to 4,000. I just want to make this
a little bit small, so I will take the details down. Maybe 0.1, maybe. Alright, Now I need
another note right here. I can use the bump
bumper naught. Let's search for
bump and apply the normal to the normal
and blog that factor to the height and less. Black, the principal, the
SDF can throw left-click. And now we should see something if we give this a bit of time. As you can see here, we
have height information. But the effect is extreme. I will take the strength back to point to maybe make it settle. And the scale as well as notes. Cool. So I will crank
this up to maybe 6,000. Alright, maybe seven. Maybe even more. We can crank this up to nine. Now, the result looks nice. Maybe we can take the
strength back to 0.1, maybe make it even subtle. Alright, it's 0.15, maybe make
us stronger a little bit. The results looks cool, nice. We have variation
and the roughness. We have some bumpiness, and we still can
control all of that. All right, Let's make
this a little bit rough. That's very cool. Now, I can apply the
same material to this parts according
to this image. As you can see, the black color applied on this one as
well, this object here. So let's do that. To achieve this, you can grab
this object and hold shift and select this one because we applied the material
already on this one. So select this hold here, they grab this and go through
the materials section, go to this arrow and just hit
copy material to select it. Let's see, grab
this one as well. Hold Shift, grab this
and COBie material to, sorry, COVID material
to select it. And now we apply
the material will all setting on these
objects as well. And maybe I'm, unless
you're quite sure, but maybe we should
apply here as well. Let's try to find another image. Maybe this one,
yeah, that's right. We need to apply
it here as well. So select this hold, Shift. Hey, grab this object and
coping material to select it. All right, That's very
cool. Now whatever change you will make or you would like to
make to this material, it will affect all
the objects here. Just keeping that in mind. By the way, I think
we need to add the same material
to some Barthes. This one inside this object selected hold here,
the club, anyone? And go to the row and COBie
material to select it. And there we go. Even these screw is
you can club them, hold hefty club this object and COBie material to select it. You can make those give
those the black color. I'll rather than so. Yeah, I think that's it for this video. And see you in the next one.
31. 031 Creating material to the body and the rotor: Hello again and we'll come back. Alright, let's recreate the
material to this objects. To be honest, I'm not going to create a material to this one, but I I will copy the material that I already created here
and best right here, and make some tweaking. So first thing I will do here, I will select the black
material and give it a name. So let's go to the, to the header here
and go to the name. And let's call this black
just to recognize IT. Assets. Now I will select this
object and hold, Shift, grab this one because we need to copy the material
from this to this. And then go to the arrow and just Coby material to select it. Now this objects,
as you can see, it has the same color. And I want to make
tweaks to this one, but whatever tweaking
I will make, it will affect the radius. So I want to make this material as a COBie or let's say unique. To do that, here we have a
small object right here. If I hit this one, will make this material unique. I will click this
option right here. And as you can see, the name change to 001. I will call this gray
just to organize it. And now I can make whatever
change I like to do. It will be simple because I just want to change the color to
something brighter. So let's change the color
to something brighter. And I think this
result looks cool. Alright? I guess this year
is going to happen. If I make this even a brighter or something
like this, it will work. Now I will apply the
material on the battery. Alt Shift, grab this. And the tail as we'll grab
this one, hold, Shift, grab this and copy
material to select it. And this piece, maybe we
can do the same thing. Halt here, the club this and
COBie material to select it. And now we just copied
the same material to the to the other objects. All right, Let's see what
else we could do here. Alright, these pieces,
they should receive the black material
and the feather, the big one and the small one, we could create carbon
fiber material for them. So first let's just
start with those. Let's see, grab
this hold, Shift, grab this, add this
piece as well. I guess. Maybe this one. We could pick it and hold Shift, grab this, and then go to the ROR and COBie
material to select it. And maybe this piece as well. And this one, hold Shift, grab this and copy
material selected. Let's see what we got so far. Alright, here, I think we
should make some tweaking. So I will change the name of this material
and make it unique. So let's hit this
number right here. And let's call this e.g. black or just organizes. And here I just want to
make some changes here. This kill looks
big. The bumpiness. So maybe I can change
this to maybe to me, I'm not sure quite
sure this time 15 and let's see what's
going to happen in maybe we can change
the strength to 0.1 and make the
affected very subtle. Horse suddenly like it's
like this looks cool. Now I will apply the same
material for the rest. So let's select
this all TOP club, this, this object, this object. And then scrub this one as
the last object to select, and then go to the outro and
COVID material to select it. Alright, maybe we can
replace the strength 0.5. Maybe make it, sorry, 0.05. Make it very subtle.
Suddenly like this. Looks cool. And even this object and that's one hold
here to grab this. And by the way, you can
hit Control L if you like, and you can hit Link material. This object is working as well. And maybe I can apply
the same material, the black rotor to this one. This one. So select this
one, hold, Shift, grab. The serum material, can
throw L and link material. That's very cool. Now as you can see, this material give you the
plastic looking or feeling. And it's looks cool. Alright then, so I think
that's it for this video. The next video we
will start with the feather and we will try to create that carbon
fiber material together. So see you in the next video.
32. 032 Creating carbon fiber material for the rotor feathers: Hello again, welcome back. This is create
carbon-fiber materials for the, for the feather. Okay, let's maximize
this a little bit. And let's pick this
geometry and I will isolate it and go to
the solid mode for now. So let's go to the wireframe. I just want to see or I can tap to edit mode to
check the wireframe. So this is the result
of the wireframe. I will arrive this and use the UV coordinate to apply the new ticket secure
on this feather. And let's see how can
we do that together. First thing we need to speak
the editor to the UV editor. Now we are inside
the array, the term. Now if I select anything, I could find something here. As you can see, this is a human trait and as a
result of the ovary, it's very small right here. Right now is the
time to rub this. First thing. We need to use the same technique to add some
seams to specific places. Let's start with this stuff. By the way, because we make this small the blog coordinates. Now, if I zoom, I can see some clipping. To avoid that, you can go
to the side panel here. And the view section. You'll find start clipping and clip the start taking
this back to 0.1. And that's all. Do it. Now, if you zoom,
there is no clubbing, just a few, few b extreme
close to the object. Alright, so Let's
add some teams. I will hit Alt click
to grab this edge. By the way, I didn't seems like you have a CSR and
cut this area. This is what seems to us. To pick the egg that you would like to
convert it to steam. And then just hit
right-click and mark seam. Now it's become right. That's me and we have
a seam right here. And the same scenario
for this one. Alt click, right-click magazine. And I want to open this shape. So I'm going to add
seam here as well. For now I will grab this
one and hit H to hide this. And I will let
grab, I don't know. Let's see where this goes. Alright, goes from here. I will have grabbed
this one, hit H to hide this. Just Kimberly. Because if you didn't hit
H to hide this edge, e.g. this era, if you hit Alt click, the edge will go along
the whole geometry. And actually it's good
idea to be honest, because in the end of the day
we need to calculate that. So yeah, I will hit Alt H
to bring back the faces. And I will hit Alt click here
to cut the whole geometry. Let's follow the
edge and let's see what we got here so far. The result looks cool. I don't have any problem with this. I will convert all
of that to see mark scheme from the middle. The same scenario here, grab this area and boxing. Now we made a seam here. That's mean, if I drop this, it will be open to two
pieces. Let's try that. I will hit a and here and the officer
can you can hit you. Let her two times u and
you again to our robots. And it will be a wrapped
right here and the UV, because we have a
lot of polygons here to take a little bit of
time to around this. But now it's ready, as
you can see and erupt. In the Arab menu here we have two methods that
angle and confirmable. The angle is more accurate
but needs more time. And a confirmed model for almost for the
hard surface hips. Let's try confirmable unless
you what's going to happen. So this is the difference
between those. Both of them. For this piece, they will works fine. I don't see any difference
here. What about these pieces? You can leave them like that, or if you prefer, you can delete the seam
that we add right here. Because I de-selected the faces. I can't see anything right here. If you want to see the UVU
can activate the sink. You rethink silicon to see that. To see that UP here.
And if you prefer, you can grab these edges
and you can go to the UV. And we should have an
option here or Scholastic. This will help you to,
sorry, not this one. Yeah, now it's
working. That's right. So this option helped her to bring these pieces to the
original place, God this, and go to the UV and hit Alt
V. Right, That's very cool. Hello, today we'll pick some
vertices from here and hit Control L to link select three, this tool face so we
can move this one. I will move this a little bit
right here, this data Kim. And let's take those. Let's go to the edge, Alt. Click on this one.
Let's try vertices. Yeah, Alt V. And let's take this bag. That's wrong, shouldn't
be here, I guess. Alright, let's pick this one. Alt click. I've used vertices highlighted.
I don't know why. Let's pick this one. And you have another option
if you'd like. You can move it
manually if you prefer, using the face mode and hit G. And let's
put this right here. If you want to scale
it down a little bit and move it right here, put the clothes and even if you ignore that, will work as well. So this is how to Arab
the feather and this way. There's another scenario
if your professor, e.g. you can delete this edge, this edge right here. Clear, seem mechanically
are the same and clear this one as well. This one here. Clear. Sorry, Right-click Clear scheme. And we can re or rub this. I will hit a and
hits you two times, u and u again. And let's give this
a bit of time. All right, so I
just rewrite this. This result looks better for me. Alright? Yeah, I
will accept that. If you want to
kick your results, you can go back to that in a second or you can switch
to material preview. And you can, you
can sublet this, actually 22.3, this
together editor. Let's add a new material
right here for this one, let's call this e.g.
checker. Checker. And let's hit Shift a list
search for kicker, texture. Blog this to the base color. Alright, after that it Control T to add
coordinate and mapping. And let's plug that UV
because we are up to this. Now we have UV already. And let's add a value
to this scale to control the scale because I want to make the
texture smaller. Solid search for value, shift a to add and hit Search
and search for value node. I use this node because this node can control
the x and y and z. Because if I use the x, I will have some
stretching here. And the same thing for Y and Z. So I will, can throw all the
three axis by using the, the value or not here. Alright, now, when I applied
the checker texture, as you can see, all the
squares looks cool. And that's me if the result
is very nice and acceptable. So let's maybe we can
move on from here. Literally the image,
the material. Now this one is ready
to add material to it. So Alice add a new
material to this one, and let's call
this carbon fiber. And from the texture folder, I will leave there. A folder for the carbon fiber. Alright, inside that
folder you will find all the necessary images. Alright, so first thing, let's see grab the base color and let's
put it right here. And you can blog. It's like at the base
to the base color. Now we should see
something right here. It's very big. Alright,
let's can throw the scale. You can hit Control T to add coordinate and
mapping and block the UV. And the same scenario
will control the scale by using a value shift
AND search for value. Like the value here. Crank this up a little bit. Now we have something, as you
can see. Right after that. Let's go back to the folder and let's see crop that roughness. Let's put that
reference right here. And let's obliged the
victor to the roughness. And let's change the
RGB color to none because we don't have any color here is just
information, a black and white. And the black color to
the roughness slot here. And now as you can see,
we have some roughness. And this roughness is
something controllable. We can control its. Alright. So I will hit Shift a to
add curve cubic care of n. Let's plug the arguably
curve right here. And let's take e.g. the white value down. Let's see what can happen and the black value up to make
it whites a little bit. We can control that even more. You can flip the
result if you like. The CO2 we got here so far. So the middle ear
and now become dark. And that's what I
want to actually end. The the black area. Now become white. Yeah, okay, something like this. I think it will work. Let's hit Control Shift. Click on the principal
to see the result. Alright, this one looks cool. If you, if you want, you can control that even more. Let's move those a
little bit right here. Let's take this bag. I just want to see some of them here. Alright, let's move
those a little bit right here and maybe we can add another color. Curve note. Let's see what's going
to happen if I push this up a little bit to
make it a little bit rough, this result looks cool. Now is the time to
use the normal. Grab it and click and drag. And let's put this right here. The same scenario changed
the color space to now because this is
just information. We don't need any color. And lists of like the the mapping to that to the normal naught
here to the image. Alright, so there is an
option, it's nice option. Save the layout is
called a railroads. I will use this is
just a note or dots. I will put this right
here and I will connect the mapping to this one and
this one to that vector. That's what will make the, make the notes more organized. All right, let's move those
little bits like that. Okay, now what I
will do is let's add a normal map CRA for normal map. Let's put this one right here, block the normal to
the normal and black the color to the color here. And let's see what's happening. As you can see now we
have some bumpiness. That too much you can crank
this back to point to maybe make bumpiness something subtle, something like this. Alright, now the
result looks cool, but I want to add another reflection
layer above this layer. So this is the final result
of the carbon fiber here. I will add another material here and mix these
two materials. Let's hit Shift a lit search
for in-class, glow CBS, df. Let's put this model right here. If I hit control
shift, click on this. This is the results of this one. I don't want any
roughness and assets. After that. I want to mix
between this one and this one, this material and this material. To do that, I will hit Control Shift and right-click and move the most
from this to this. And because we activated node or angular
node, triangular, we'll create, will it create? We'll mix between those and
create mixed together here. All right, After that, we need another note to control
the factor here. So if you take
this back to zero, I will see the
principle, the SDF. I mean, I will see
this material. And if I crank this one, it will give priority
to this one. Alright, I want to control the factor by using a note here. So let's search for, for nail hit Shift a, and let's search for
F here, this one. And less obliged the
factor two factor here. And now I have extra, extra layer above
the original one. Alright, if height
Control Shift C, left-click on this one. A funnel is very cool nodes. At the extreme angle. It will show you the
reflection from this. I just want to explain
to you what this does at the extreme angle. By the way, this node, it will give you two value, black and white and transition between
the black and white. So other extreme angle a tool or tool gives you
the whites value and the area that's the area or the polygons that
faces the camera. They will be black. It's like someone listed
draw an eye here. So this is a human eye. Alright, so here, e.g. we have a plane like that. As you can see this plane, we have some angle here. Because we have some angle. A friend Neil will show
me the white value here. But if I put the plane in
front of the eye of a human, female will show me
the black value. As you can see, this one
is extreme angle here. I can see the white
and this one, it's almost in front of the
camera, comes towards me. I can see the black here. So it's like a mask. Now at the white area, you will see this material, the reflective
material, this one. And the close distance or the face in front
of the camera, you will see this material. Now if I plug this
control here to click. As you can see, in this area, I can see that flexion. I can see even the
carbon fiber material, but at this area I can see something of the form
the carbon fiber. All right, so now we
can see that we are finished with this piece here. Let's hit Select to excite
and less risk to the lender. And an EV or under
looks cool and nice. All right, Very cool. Alright, now it's the time
to add material to this one. But I will do that
in the next video. So that's it for this
video and see you next.
33. 033 Creating a chroom material to the back rotor: Hello again, welcome back. Let's apply that carbon
fiber material to that back. Retro, illicitly this geometry first is go to solid because I just want to
make some Arabic here. And let's hit slash to
isolate this geometry. And let's work with this. Alright, let's see from
where we can start. Maximize the UV editor. I think this one is
UV editor editor. I don't want to see
this image right now. I can delete it
from the UV editor. And let's start adding some
themes here to our app. This space. I will tap to edit mode. And maybe we can start
with this edge Alt click and cut this area
by adding seam here. After selecting this edge, I can hit right-click
and then mark scheme. Now we have a seam right here. Alright, after that, maybe I can pick this edge over here, this edge loop and
convert this to seem the same thing
for this side. I can e.g. pick this one and
convert that to see him. And what about this area here? Let's cut this area mark scheme. And maybe we can, let's see, let's pick this edge and
this U is going to happen. Or maybe this one. Same thing. Alright, let's mark
this one I've seen, but I don't want
to include those. So I will deselect these edges
here and those over here. Right-click mark scheme.
That's very cool. After that, we want to add
scene for the feather itself, for this side and
that one as well, we need to add seam
around it like this. To help this to
open to two-side, almost like this.
Something like this. Let's add the same. We can hit Alt click actually, and we can eat. Yeah, this looks cool. But before I convert this to seem I think I can
deselect this area. I don't want to include it. Alright. The same thing for this side. Something like this. I've told you doing that. Mark this as seam. Now we're almost
ready to arab this. Let's see what's going to
happen if we rub this. Come here, hit a
select all the faces, and come back here and hit
U two times, u and u again. And I was robbed and I
think it's ready now we can apply the texture on it and let's see what's
going to happen. Let's tab out and this excites
from the oscillation mode. Let's hit Z and
go to the render. I will grab this hold, Shift, grab this feather, the big one hit Control
L to link the material. And let's choose link
materials option. Alice, you what we got so far. The results are cool, but we got one problem. The scale. We need to scale this a little
bit, make it smaller. I mean the UV. So after selecting this one, just tab qualia
list tablet mode, and let's kill those down. If you scale this
and make it small, these geometries are, these UVs, will be small according to the
image of the carbon fiber. Because of that, we can note that the
image become bigger. So let's kill those
a little bit. Alright, I just
want to find a way to make some comparison here. Let's look at this results. Let's compare it with this one. It's almost close, actually. Yeah, Let's close ankle. Alright, so after that, Let's bring the reference images and see what else
we can do here. These details over here, maybe we can give them
the same material that we used. And this area. So let's select this whole thing here to grab this
one that can throw L and link their
materials and this beam, we can give it a
specific material. Before that, maybe I
can grab this one. Hold here, the club this, it can throw the tail
end link material. All right, Let's
start with the beam. Let's give specific material. That's very cool. Select this and let's go
to the material section, eliciting you to
add a new material. And we can call this
chrome material. And I need my talionis
crank abdomen talionis at this are
off a little bit. I will take that off in
this bag a little bit to make it more reflective. Something like this. Alright, yeah, I
think that's it. I don't want to make
it complicated. And maybe I can apply the same material to
this object as well. So I will select this
hole here of the Gallop, this beam, and go to this arrow copy
material to select it. There we go. If you want to make this
like a brushed metal, we have a trickier we can use
by using the noise texture. I will hit Shift a
and let's search for noise. Noise texture. Let's put this small right here. And I will hit Control T and not wrangler will add texture coordinate
enlightening for me. All right, let's hit
control shift click to see the results of the
noise texture over here. As you can see this result. Here we have the scale option. Now I can manipulate
the scale and scale this one to get
to citric the effects. As you can see, the z option, it's helpful to achieve that. So just push this a
little bit forward. Now as you can see, we have priced metal or
price effect here. After that. Let's move with those a little
bit right here. And you can now plug a factor
to the roughness and let's see the effects after
applying the material. Now we have priced metal effect. You can control that even more by adding some
care of noise e.g. shift and necessary
for curve, RGB curve. And I can put this
right here to control the roughness if you satisfy
with that. So that's fine. If you don't, you can just make some adjustment here to the
care of and see what you get. Or something like
this looks cool. Yeah, very cool. That will affect
the beam as well. If you want to avoid that, make the, give the beam
a unique material. Okay, so let's go over here, grab that beam and
hit this number. Because this material now
is applied on two objects. This one and this one. Because of that, we
can see number two right here and this area. Now if I hit this button, I will make it unique. Just for the beam. After selecting the beam, just go here and
click this and change the name to Chrome beam. Sorry, could, I could add
a here. Alright, Colombia. And you can, if you like, we can push this
farther if you like. Something like this. Maybe five hundredths. Somebody like this. Yeah. It looks cool. All right. Let's take this area. Yeah, it looks fine.
Alright, let's see what else we can do. Alright, the next video, I will start with the lenses. Okay, so that's it for this video and see
what the next one.
34. 034 Creating the camera lenses material and the glass shield: Hello again, we'll come back. Now it's the time to
work with the lenses. Okay, Let's say like
this first and see it. See what we've done here? Or does it just plain? All right, let's let's
give this a thickness as tablet mode and select the face and just hit
E to extrude this, Alice extrude this back a little bit,
something like this. And let's see what we got here. Alright, so maybe we can grab the outer
edges and perform them. It can throw being given
them a nice purple, three acres, if you prefer. That's looks cool. Alright, so I am
not so quite happy with with the normal
or the heating. We say the wireframe is
activated for this object. Let's turn that off. Go to the object properties and underneath I viewport
display, turn off wireframe. After that, to make
the result better, I can go to the
modifier and open the lists and use
weight and odd ball. This modifier to fix
the normal issue, as you can see
here in this area, you can see some
dark color here. And it feels like
it's pumped out slide that feels like that we
have some bold here. So to kill that, just use this modifier. And don't forget to
activate the auto smooth. And now it's very cool. This exact and let's
see what we have now. If you like, you can
scale it a little bit to get rid of these
jagged lines. But first let's put the
origin.in the middle. So I tried to click Acid
origin or your TQM a tree and less so weak that transform
pivot 0.2 bounding box. Because as you, as you
can see now they use more is sticked with 3D cursor because of this option suite to 3D cursor lists three this
back to bounding box. And now let's hit a little
bit just to scale it. And that will be enough. Alright, so this piece
should be like a glass. I will create a
new material here. And if you don't
see it, you can hit home from the keyboard to bring the material
front of you. And let's call this glass
just to organize it. And what I need here,
I need transmission. I need the light goes
through this material. Let's hit Z and go to Render. And lot else. I don't want any roughness. That's very cool. So now it should. Now what? I could see something behind it, but because I'm inside, I'm using the EV or under I can. Now if I sweep is to cycle. Now the tool work,
but it will be dark because we don't have
any lighting inside. Okay. Let's respect
to EV. Alright. If you want to see
through this one, e.g. listed here, if
they take a copy of this one and I just
want to scale it. As you can see. I can't see through it. But if I go to E v to cycle, I can see throw it's
because cycles now know how to calculate this
stuff. Now it's working fine. But in EV does not happen. We need to make some
tweaking to the material. So we can see through
this piece of glass. To do this, let's go to the material section
and scroll down to the setting here and here we have the blend
mode and the shadow mode. And we have the alpha
option right here. As you can see, the blend
mode is turned to opaque. We need to spray this two alpha a blend so we can control
it by using the Alpha. Alright, so now if I
take the alpha bag, I can't see any difference because the blend
is Rick too opaque. Now if I switch this
to alpha blend, now I have the ability
to control the Alpha. And she throw this. Alright, let's check the as you can see here. I can see something if I
take this even further. Now we have the
ability to see more. And we have this option for the shadows readers
to alpha height. Alright. This is an, this will help to see some
shadow comes from the glass. Okay? So don't leave it to none or opaque three, this two alpha. All right, now I
got this results. Now I will delete this
one. I don't need it. And now we can see
something through. Alright, so this
is the first step. Let's apply the same
material to this one, and let's fix the
geometry as well. Let's hit Select to isolate this right-click
origin to Geometry. Tab. Hit a, E and give
it a nice extrusion. All right, It's not around. I will grab these two
faces, this face. And those overhear it can
throw me to devote them. Sorry, you don't
include this one. You can go to the
egg if you prefer. Let's will be better. I guess. Let's do something else. Is it grab those two hit
can throw a blast to grow the selection and then hit
X F to delete the faces. Hand towel hours, I will add a subdivision modifier would level to just hit Control tool. And that's we'll add the subdivision a
cookie and then modify. Let's just hit Control
to now he's become cool. After that, apply the
subdivision surface. Tab, hit a. Alright. Alright, let's hit
E to extrude this. And now let's go to the
edges, the outer edges. If you have any problem
when you hit Alt click to select the edge loop. You can use another way. You can go to the face, hit Alt click to grab
the face loop and go to the Select and select loop. N2 is boundary
loop and acids hit Control V to bevel this a
little bit to three H's. Alright, it looks cool. And now let's apply the
glass material to this one. Let's go to this arrow and let's check for the glass
we have right here. I just added. Hey, there. Now
we're finished here. We added these materials are at now is the time to
add the lenses behind these glass pieces are
behind this healed. Okay, let's see how
can we do this. First, let's go to the
solid mode and let's tap. I just want to grab this face. I can start with this. Hit Shift D to take a Coby and right-click to leave
it in the same place. And then Alt S just to move it a little bit back,
something like this. It will be enough and then
hit P is to separate it. That's very cool.
Now I will grab this piece and isolate cell alone because I just want
to work with this one. I don't want this
modifier for now. And I can make this a
little bit smoother by adding subdivision surface and it can throw light of light. Alright, now is the time to
go to the texture folder. And the texture folder, I have this lens image. I will use it. This. How can we use it? Let's first, let's
unwrap this piece. Let's bring back the UV editor. Alright, and tab. And here, select all the faces, just said a and here
at TU two times. And now it's all
wrapped and worthy. That's very cool. This closest one, we
don t think this. Afterward. After that, Let's
bring the lens image and let's drag it and drop
it right here. Tab out. And let's go back here and the crop is fine.
Let's put it here. As you can see
that last material applied here, we
don't need that. I just forget that I will delete it and start new material. And the Grab the lens
and put over here, blog the base color to
the base color over here. And here's the n
equal two material preview to see if the result. As you can see now, I can see the lens. And alright, let's recognize the name of the image is
called camera lens. We can, we can find
this right here. Camera lens, just open it. And now we have it
in the UV as well. Just tab now. And now let's align
the cave of the UV with with the image. All what I want to do is grab the whole UV and just scale it a little bit
using the S letter. So let's kill this
tiny bit like this. And here you can
see the result when you make it a scaling. Something like this tab out. And let's see. Alright,
it looks cool. After that I will tap mode and I will hit I to
make some inserts. This may be alright, So maybe somebody like this. I will hit E to extrude
this back a little bit. Maybe. Make some other insights here. I can see a small problem here, valence that the image of the
lens is not quite perfect. To avoid that you can go
to the UV and the crop, the area that you
would like, e.g. these faces. And maybe I can move them
a little bit too dark can. Because as you can see here, I feel that we have some
variation in the thickness. This area, as compared
with this area as well. Maybe if I move
this a little bit. B, that's can help us. And you can see the
difference. And real-time. Here. I'd maybe I can hit another
eye to make some insert here. Alright, and maybe we can have another E to
make some extrusion. And the idea here is just
make some levels here. That's what I wanted to do. I can crop these
faces by the way and maybe extrude those
a little bit forward. Make some variation here that will make the
results more interesting. And even for those
the outer acres, you can extrude those
bag if you like. Maybe we can't grab them and move them back a little
bit or extrude them back. But if you hit Extrude, the new extrusion will go on the freeway and you
can't control it's NP, perfect taking this back. But there's a trick you can use after selecting
all of these phases. Just hit F and to create
a big face here and just hit E to extrude
this face bag and then XF to delete the face. And that says, maybe
we went too far. Gateway is endless. More with those, those back. If you prefer, you can
now add some bubbling. If you like. Cancer all be
endless, had some babbling. Make it a small,
something like this. So it'll be cool. And yeah, this is the lens. And let's see what's
going to happen if I excite of the isolation mode. Now it's looks very
cool underneath the heeled like a vehicle. Check it again, see if
we have any problem. By the way, I think we can
scale it a little bit. By the way, if you
want to scale, sorry, if you want to
pick kind of objects. A hidden like this one. As you can see, we have the
healed in front of the lens. If I selected, I will
select the heel. Note that ends, but if you
hit another click and click, now you can select the lens. I just want to scale
them in a tiny bit. Something like this. And let's go. Alright, I feel, I'm also
quite happy with the results, to be honest with
you, I don't know, but I feel that there's
some kind of problem. Let's isolate this again and I'm quite happy with the rim. Let's tweak that. Let's jump back
to the edit point and let's see how can we
can throw that and fix it. Alright, so this is the UV. And the secret of these faces. Grow the selection and
to leverage this area. Okay, let's see what's going to happen if I scale this down. Let's kill those
down right here and now I will grab
just these edges. All right, let's see,
grab the manual like this, something like that. Alright? And then I will
hit S and scale those out. Alright, so this is
before and after. And let's see what we got. Right thing. This is a better, I guess. Now let's see XYZ. Yeah,
now it looks better. All right, now let's
go to the left. Let's go to Wireframe. Let's see, grab
our new lens here. And I just wanted to take a Coby and I bought another
one right here, this area, hefty
D to take a Coby, R to rotate it and
just try to align it. Can help wallets to be something
easy and simple to do. And just move this down
a little bit right here. And let's put this
try to boost in the center and then
scale it down. Alright, let's move this a
little bit down like that. And let's go to the render mode and let's
see what we got here. Alright, it looks cool. The result looks cool. Very nice. Let's see the result
in the cycle engine. Alright, we can see
something here. By the way, if I
add a light here, is put the 3D cursor right here, and let's go to their
life and lists, e.g. use a point light key and
let's move this over here. Can see the details. After adding this light. As you can see, the lens is visible and
everything looks cool. Alright, now let's delete this source of light.
We don't need it. Yeah, now we just add all the necessary materials
for all the pieces. Now we just need to render it. It's ready to render actually. So I will end this video here and see you
in the next one.
35. 035 Creating a stand to the Black Hornet: Hello everyone and welcome back. In this video, I want to create a stand for the black hornets. And it will be something easy. I don't have reference
image to this one, but it will create it together. Alright, maybe we can
start with the cube, hit Shift a and let's add
a cube will be a very big. Let's change the size to
maybe ten centimeter. And what else? Let's activate screen-cast. Alright, so this
number one here, and let's move this a little bit right here and the closest one. That's very cool. Let's kill this
cube a little bit like this and the scope, maybe you can't
scale it even more. Let's go to the left here, this Hickey and put
this right here. Let's make some tweaking.
It will be something easy. Go to wireframe and
stricter vertex. Let's move those maybe
right here and maybe those, we can move them
almost right here. We can move those
something like this. And we can with this vertices to the ground like that,
close to the ground. Let's starts with
adding some edges here. Let's add to e.g. and maybe we can add one H
right here as well. Let's see, grab those and
the small dose of paths. And maybe this vertex,
I can take this down. Maybe we can take this back a little bit harder,
move those forward. Okay. You will understand later
why I did all of that. Let's move this one
looks a bit like this. And maybe what about this area? Maybe we can. Alright, let's grab this
vertex and move it right here. And this one, maybe we can
move it down a little bit. Okay, Now let's see,
grab these vertices. Maybe we can move
this one right here. And I will add, it
goes like this. And hit S to the y is zero
Enter to make this flats. And let's move this one
a little bit like this. And let's go to solid and
let's see what we got so far. I will grab these faces and
hit E to X through this. Something like this. It will work. All right. Let's take this back. Hide it inside. Something like this. I will leave it like that
because I will cut it. Let's move these faces
slightly inside. Right about here maybe. And maybe we can grab
those and take those out to align them with
the help of the battery. Okay. And what about
these phases here? Let's take those out as a lake. And maybe we can take this down. And for this area, we can extrude this face bag. Let's go to the left. Maybe we can push this even further and take this egg
and move it down like this. Alright, if you'd like, you
can scale it up a little bit. Let's see what else
we can do here. Rice. Now let's add mirror modifier to mirror
one side on the other side. So tap out. And let's add the
mirror modifier and activate bisect
ended floods. All right, cool. Let's make more tweaking. Like you're grabbing this face selected and move this forward. And maybe we can make
some cuts goes like this, it j and delete this
edge. We don't need it. We can do the same
thing for this area. Can crop this vertex,
this vertex hit J to make connection
and delete this edge. Alright? This one maybe, I don t
think this can delete it. Let's see what else
we can do here. All right, That
looks cool. I guess. Let's go to the left and I
just want to cut this area. Alright, I don't want
all of the face inside. So let's see how can
we achieve this. I can use this shape as
a Katara to cut these. But before we do that, I will add another cube
here, and it escalates. And let's put this right here. Maybe. And maybe we can scale
it like this and move it and scale it like that
as well, to cut everything. E to the z. Let's move this down a little
bit, maybe right there. I will use this big box as
a cutter to cut this one. Hold, Shift, grab this hit Control Shift B and
cures difference. And there we go. Right after that, I will use this geometry as a
cutter to cut the rest. Alright, to cut this area. So select this one, had
to have the ticker Colby and right-click to leave
the Coby and assemblies. So now we have COVID
above Coby with this COVID selected hold
Shift, grab the target, thus tenth, and then hits Control Shift B and choose
difference with the price. Before you accept the
result, Let's check it. It looks cool. So after that the Cloud this
hit Control a and apply visual geometric
image and delete cutter. So now we ended with this
geometry as you can see. Alright, it looks cool. Let's hit Select to isolate it. And let's see what further
tweaking we can do here. First thing, this egg, I don't want it because
as you can see, this area is very close. When I add the vault, this will prevent people to
work correctly. So I will hit Control
X and dissolve it. And maybe I can
now keep the rest. I don't have any
problem with arrest. Maybe this one I can delete it. I don't want it. Maybe this edge as well right
here, I don't want it. I can delete it because
it's very close to the edge, to the corner. And that will prevent
people to work correctly. So I will delete it. And maybe we can make some
connection goes like that. That will be better. Even if you ignore that, It's not a huge issue. This edge over here,
I can delete it. Now it's a big deal. And what else? What else? What else? All right, this entire a
clue. I don't want it. I can delete it as well. Now it can keep the rest. This age, I don't
like it so much. I can dissolve it to control
x and this one as well. All right, what else
we could do here? Okay? Well this age and maybe this
one, we don't want them. Okay, this result looks cool. Now we can add bevel modifier and let's
see what's going to happen. How about let's go to the left. This check is
everything correct? I think yes. So let's add Bevel modifier
above this level, this one. And let's change the amount to something small as 0.02 maybe. And there are some kind of problem prevent the whole
torque and the correct way. And yeah, I got this right here. We have sieve tube. It's a here it is deleted. And on the other side, I think we have
the same problem. Yeah, it does. This
one as well. Alright. Anything else? Hey, do we need this age? Can throw X, actually, we don't need it, and
this one as well. And now let's see
how bevel works. Alright, there's something else. Prevent the vote
to work correctly. Let's go to the vertices
and I will hit a, select all the vertices
and then hit em. In America by distance. In case we have very
close vertices. We don't need this one
dissolve, it's this one. The C and I was having this The turn off clamp overlap
because clam overlap prevent per volt to go farther if
the oval faces any problem. So let's turn this off and let's check what is the problem. Let's increase the amount. Sorry, I think we need
to apply the scale. I just forget that. I guess we need to
apply it and yeah. It can throw light
and apply the scale. Because of that, I can't see
any effects from the bevel. Now I can see
something this cranky, this back to 0.01,
makes it a little. And let's increase this to two. And let's see if we have
any further problem here. All right, everything looks
cool except for this area. If I move this vertex
a little bit up, Let's will help bevel
torques and better way. So I will push this up
a little bit like this. And maybe those, I can
move those forward. Rights. We have this angle. Alright, so moving this egg to this action to help
Bevel tool works better. The same thing here. And for this age, I don't want it. I can delete this. This with this. I can throw likes
and dissolve it. And what else we could do here? Maybe we can grab
these vertices. It can throw shift B to prove all the vertices
to something like this. I think that's more
beautiful. I guess. You would like you to give
us if you don't ignore it. Okay, I've done
that. Let's shade smooth, tragically
killed smooth. And go ahead to the bevel setting and open
the heading section and activate hard to normal to get paternal shading I've taught are activating the
harder normals. Now we could see better results. But as you can see here,
we have a warning. It tells you that you should activate auto smooth as
well to get better results. Okay, so now the result is
smooth and cool, right? That is, it looks very cool. I think I can just make
some final editing here. I think that's what will make
the result looks better. I just want to move
some vertices around. Maybe we can grab
those and move those back. Something like this. I feel that's what I did now give me the shape
looks more cool. Even if you grab this
aqueous and move those back a little bit,
that will make it better. So it looks better, I guess. So yeah, I will skip this. But I just wanted to
make some between here, like making a new
cat goes like this. And on the other
side, the same thing. Let's grab this edge. And those over here, we
don't need them anymore. Integral x and dissolve them. And let's see this new results. I can't see this EKG right here. To do that, I can see
the egg here or to make the vowel targeted
this area or this edge, I can go to the setting of the buffalo and take
that angle BAG. And be careful 20. It's cool to see this edge. And this result is
cooler and nicer. So I will stick with this. Yeah. Let's see if we have any
problem here with the face. Here are the results. It looks cool. I don't see any problem
with anything here. So I will accept this. This, see if we have
any issue here. Maybe we can scale this up a little bit to the
x. I don't know. I feel that we have some
kind of problem here. Yeah. I will accept that. That's it. All right, everything
looks cool. I will end this video here
and see you in the next one.
36. 036 Unwrapping and adding carbon fiber material to the stand: Hello again and welcome back. Let's create a material
to with stand. I will create a carbon
fiber to this one. And let's start doing that. Let's split the view or the window to two
windows like this. And let's read this to
UV editor because I want to wrap the stand. And after that I will
give it a material. So let's start doing that. We have the velocity
will exist here. I will apply hit Control a blank the bevel asked me and I accepted the result
of the bevel. So let's see how
can we arab this. I will use the same
technique to us, some seem to specifics places. Let's start with this one, let's say Club entire face loop. Alright, so as you can see, we have the blue lines. I can't see quite clear. This case. We can go to the
this area and turn off. Here we have some
optional services, the creases and the labia. We can turn off that sharp
edges so we can see better. So I will seem like this and I'll rub this area
first, is do that together. And let's maximize this
first control space. To do that, let's see, grab this H right here. And that's why right here. And this one, this one. And by the way, there's
another technique, if you would like to do, you can grab these phases
actually hit C, e.g. and the price these
faces quickly. Okay? Something like this. Alright, something like that. And you can hit Control
Plus to grow the selection. After that, you can
go through the select and loop and choose boundary. And after that ad seem, so right-click and March seem. Now we have seen in
the correct area, but we have some
problem right here. Let's select those
edges, Maxime, and let's grab those. We don't need to add
seam right here. Clear seem. Alright, That's very
cool. Let's see. Where should add seem. Let's go to the face and lyse club all of these
faces over here. Maybe those over here as well. Sorry. It listen, include those. And it can throw up lost
just one time to grow, to grow the selection. Right after that, let's go to the Select end lobe
and choose boundary. And let's add seam here as well. Right-click and mark scheme. Alright, the same
scenario for this side. Go to the face. Select, select
this area as well. Can throw a plus just one time
and then the speed is two. Boundary and right-click
and mark scheme. Alright, what else we could do? Maybe we can cut this area by adding seem right here
as well, arcsine. And what about the base? Alright, let's go to
the face and let's say clap all of these phases
and those here as well. Maybe we can include those. Can throw blocks just one time
to grow the selection and then convert this two loop, three loop and
right-click marching. Alright, What else
we could do here? Alright, I think we can grab this edge and this one
right here and mark scheme, click Maxime, and delete
this seam right here. Because I want this phase to be calculated with this
one, with the big one. So clear This him
from this area. And let's do the same
thing for this side. Grab this one. Alt Shift, click, crop, this mark scheme, and it
cleared the same from here. Alright, we have this area here. We need to see how can
we add seems here. It lists out of this LC
what's going to happen. I will hit a and he come here and hit U two times, u and u. Again. I will use the
confirmable method. I can see that I have some
overlapping happening here in this area,
as you can see. So let's begin. We need
to add more seems here. Alright, so let's maximize this. I can just go to the face. I will grab this
area, all of it. And the grow the
selecting just one time and other scheme here. So let's go to select and
convert this to boundary loop. After That's actually we can go back and include
this area as well. I guess can throw bless now and go to Select and
boundary right-click Maxime. And yeah, Now I think
that is so it looks cool. Let's go back, hit a and come
here and hit U two times. And I think now everything looks cool
except for this error, we can see that we have
some striking here. Sarah says, it's right here. Alright? And this case, maybe we can open this area by adding a small team,
goes like this. Or we can cut this
area if you prefer. So maybe we can grab this
face hold here, the club, this phase, it can throw up, Let's just one time to grow
the selection a little bit. And we can add the
new seam right here. Let's convert this to boundary. And now I can add
a new symbol here, right-click mark scheme for the side and this side as well. Now hit a select everything, and let's go back here. Hit U two times. And now we should. Alright, yeah, it's fixed. Alright, now let's go
back and let's see that all the isolation
mode Ellis apply the cemetery all the
carbon fiber to the side. So silica sand Hold here
to call the Federal because we apply the
texture right here. And let's go to the
material section and COBie material to select it. I will select the stand alone and isolated and
go to the render. Let's see the result here. Now we should see something. And yeah, it looks
very cool and nice. All right, It's very cool. Let's see that all the
isolation mode Ellis convert the feather with, with the sand. The size looks cool and the
result looks very nice. I like It's actually alright, so yeah, I think that's
it for this video. And yeah, see you
in the next one.
37. 037 Adding the Barcode: Hello everyone and
welcome back here. One thing I just forget to do, adding a barcode
here and this area, according to the
reference images, I have a barcode I
should add here and I just forget to others. So together we will
add the park code. Let's see how can
we achieve this. First, I want to pick this surface and
let's isolate this. Let's go to the local mode. Just hit slack from the numpad
to jump to the local mode. And I will sublet this
window to two like this. And I will change the chart
type to shader editor. And now I have this material
that I created to the body. I want to make this
material are unique. And I want to specify this material to this
piece of geometry. To do that, just move the
head or I guess a little bit. And here as you can see,
we have number four. That's me in this
material is applied on, for a geometry is I will hit this number
to make this unique, and I will give this a name. Maybe I can call this
barcode and hit Enter. Alright, now lists. Now we have the ability to
make some kinks here and whatever change you will make
here that's not young to effect the rest
of the materials. Now let's go to the
Projects folder, to the ticket secure
folder and listen, bring it about code
image analysts, drag and drop it right here. And I want to rub this piece
to add this image points. Let's split this
window to two as well, and let's move the
head are a little bit. Let's bring back the editor type and let's read this
through UV editor. And now all what I want to
do is just tap to jump to the edit mode and
then hit Eight, select all the faces, and just hits you two
times right here, you, and hit you again. And now it's a rough and
ready. That's very cool. Now I will move this UV and
put it here on the barcode. I want to see the barcode. If you want to see
you too can hit control shift click
on the barcode. And now we have a view to understand what's
going on here. Now if you make the UV small According to the
bar code that's been, the barcode will be big
and that's what I want. Alright, now the park
could become big. And one more thing I want to do, according to this image, as you can see here,
that big squares, I have pixel squares
on the top area here. And for my example
that pixie quasars, I mean this one and this
one on the bottom side. So I just want to flip this. Alright, to do
that, just go here, select the whole
UV and go to UV. And as you go
through the mirror, mirror on the y-axis,
and that's it. Alright, so now uv is exactly
on the correct place. The barcode is, looks nice. Maybe we can just move
the way a little bit. I just want to center it. That's all what I want. All right. Now I can't say that I
finished with a UV side. I can move this down into clusters like that and
stick with the material. Alright, I will
plug this material, material and I will bring
the emigrated here. I will use this as a mask. And I will create
another principle, the SDF material right here. So hit Shift a to search and
let's check for principle. Just hit P, Hi, and you'll find it, hit
Enter to choose it. And now we have
another material. I will mix between
this material and this material. Mix between them. The easiest way is to
hit Control N health and all right-click and move the most from this
node to that node. Alright, Node Wrangler will automatically create
a mix shader for us. And I talked about this earlier. So now we have the mix shader. All what I want to
do is use this mask, the barcode image,
and the black thing, the factor like this. And now we have something
right here as you can see. But the problem is now the mask is showing me the wrong results. Alright, to fix that, I can switch between
these two materials. And let's give this
a bit of time. At least he was going to happen. Alright, now I can
see the barcode. I will tap out, and now everything looks cool. Alright, so now the
result is okay, nice. In case you want the color
or the barcode to be black, you can go to this
principle of material and just take this down
and it will be black. And I'm also quite sure maybe I think there are some images
with black bar code. Let's check them because again, alright, I think all
of them are white. Yeah, let's make this white. Right now. The barcode
is already listed. Slag to excite that everything
makes sense and cool. So yeah, now I can say that
it's for the texture section. And see you in the next video.
38. 038 Link objects to the Empties: Hello again, welcome back. In this section we will
add some bonds here. It will be a simple, It's not going to
be complicated. So let's see how can we do that. I have two options here. I can use the empty
technique, adding empties, and make some
relationship with the empty to make a symbol. Or I can use the
armature system. Alright? This one, I
can add an armature and starts from
using the arbitrary. So for me I will use both. I will add the empties and
link these geometries to the empties bones and link
the MTS to that bonds. It will be told
me something easy and let's do that together. So first thing, let's bring the origin door to the center, Shift S and bringing the
origin dot at the center. And let's see, crop
this geometry. And I will hit F2 to
change the name of this geometry to
maybe base or stand, just to recognize it. And I will go here to
the outliner and I will hit dots that I'm bad
just to find the stand. I will hit em and move this to new collection
and call this tenth. Hits Enter. And now I got this
tiny new collection. After that. Let's close this. And I just going to hide
the color of the sand. And now you can pick
whatever if you like, you like or not. Right now, let's add
an empty hit Shift a, and I will add e.g. a cube. This is empty. It is very big. I will change the size to maybe ten centimeter
and make it very small. I mean, maybe you can scale it even more, something like this. Let's go to the left
or to the right, and let's move this
empty maybe right here. I want to use this empty as, as a way to move the whole
a black coordinates. So I will grab all
the details like that and hold Shift and the
crop the empty and make it the active one and
hit Control V to open the parents menu and NQS sets parent to object
and keep transform. Now all these pieces now
parents to this empty array. So all what we did now is just we added a
controller to move. The whole geometry is, now if I move this empty, everything will follow it. Okay, Now the next step, I want to add an empty
for their author, the big one, so we
can control its. Okay, let's try to find
the center of this rotor. Let's go to the top
view and let's go to wireframe and let's see where that see where the
center exactly. Alright, maybe by
grabbing this, okay, maybe by picking one
of these circles, by hitting Alt click. And I think this one is
the center, the robot. So I will grab whatever
circle you would like, maybe this one or this one. And I will hit Shift S and bring the 3D cursor
right here in the middle. I moved the 3D cursor right here because whatever thing you
add inside the blender, it will follow that,
but you can alter it. The 3D cursor that will excite. Now, I will hit
Shift a to add in, I will add plain axis. And now we got it. Alright, now I will scale
this and make it small, something like
this. It will work. Maybe I can move this
up a little bit. Maybe right here. Now I will
link Rotter to this one. E.g. this piece, it
will be rotated. This one as well.
This one as well. And the feather and the stuff. I don't know what they are, but we will connect them to the empty and then hold Shift, make the empty their
last object to select and then hit control V to open the appearance menu and to sit parents to object and keeps
transformation or transform. Now let's hit G to move this. As you can see now
everything follows there. Empty Our to the z to rotate the rotor and
now it's rotating. As you can see.
That's very cool. Alright, I've tried that. Let's add an empty bag, Rothko. Maybe I can use the beam, this one in tablet mode and
select whatever age, e.g. this one, and bring the 3D cursor over
here and then tap out, Shift a to add, and let's add an empty scale and
make it small. Like this. And if you'd like, you can move it a little
bit to the center here. That's okay. And now let's select this geometry and this
one and the beam as well. I think. What else we could pick? I think just those and then
hold Shift, grab the empty. It can throw be n choose r
objects and keep transform. And now let's rotate this. As you can see, it's following the following the
MTR to the x-axis. That's very cool.
Alright, so now we added all the unnecessary empties and we link the unnecessary
object to that empties. So yeah, I think that's it for this video and see
you in the next one.
39. 039 Creating simple rig to the black hornet: Hello again, welcome back. Right now is the time to add
some bonds list of bringing the 3D cursor in
the middle, right? Or you can put it
in the position of the base at this and
cursor to select it. Because I just selected
the base empty and less. Hit Shift a to add and
let's add armature. Now we have this big
bone right here. Alright, it is big in
now I want to scale it. It's wrong to scale it
in the object mode. You will face a lot of problems. But it is right to
go to the edit mode and now hit a to select
all the parts of the bond. And now I hit S to scale it. Now we can scale
without any problem. One more thing here, just
keep it in your mind. When you want to work
with bonds or armatures. Keep in mind to change the transform pivot point
to the active elements. Because when you hit a to select all the
peace of the bond, this one will be the active
piece automatically. So now when you mix kill, it will be scaled according
to the base. But e.g. if you switch this
to ban the box, it will scale from the center
and that's not what I want. So let's read this
too active element it is and make it
small like that. You can hit, can
take this down a little bit if you
prefer, that's okay. I can put this ball right here. That's okay. Okay, now we add the bone in the right position and
the scale is okay. And now we can give it a name. So this tab out and let's
go to this section. It's called bone
properties and zeros. It's alright, now let's
change the name of this bone. Let's call this maybe
baseball for resemble. And hit Enter. And there we go. Now we have this point already. Okay, now we need to copy this point and
add one for the rotor, the big one for the smaller
author as well of the tail. And I will use the
empty as a guide to use it to both the bone and
the position of the empty. Alright, first let's see, grab the empty analysts
to bring the 3D cursor over there at EFSA NGOs
cursor to select it. And then let's go to the
bone and had tapped to go to the Edit mode and
selects the bone. And by the way, if you
want to see the bone, we can go to the
properties of the point and the Viewport
Display and queues in front to keep the bone
always reference. Let's go to the right or to the left hand lists the
cropped up on his hair with D. And let's take a
copy of this point. And let's put this
one e.g. right here. Okay? Now, I need to put this exactly at the
center of the rotor. And I want to be precise. Okay, to do this, I can select the bar and hit Shift as a tool
selected to coarser. And now the bone is exactly
in the position of the Mt. Okay, So this bone now is responsible to
rotate the big auto. And when we need now another
one for the small water, I will go to the top
view at number seven, a problem, the known bad. And I will have d to take a copy and move to
new copyright there. And I just want to rotate
this to tie our y-axis. Hit RY, hold Control to snap the rotation and rotate
this 90 degree like this. And now I need to put this one
in the position of the Mt. Alright, let's tab out, say grab the EMT, have this and core
surface elected. And then let's go
back to the bones tab to go to the Edit mode. Select a bone and hit Shift S and Q are
selected to coarser. And now we have this one exactly
in the correct position. So now we copy these bonds. We just need the three bones. I think that's, it's, now let's try to create a relationship
between these bonds. Okay, now we are
in the edit mode. Into edit mode, we can scale, we can move bones. This point is big. I will scale it and make
it small. Maybe that one. Because well, maybe I
can scale it and make it small and the size
now it's cool for me. And yeah, that's it for the, for the scaling or copying. And now let's create a
relationship between these bonds. Okay, to do that first, I need to switch
to the Bose mode. As you can see now,
I'm in the edit mode. And here we have the pose mode. Inside the boys mode, I can create some relationship
between these ponds. So alright, now we
are in the Boss Mode. Now let's connects the
big rotor to this bond. All I, what I want to do is just connect the
empty to that one. Because I'm in the bus mode, I can select the
empty because I want, I want to make some
connection between them. I want to link the
empty to the bone, but now I can select the empty. If I switch this
back to object mode, now I have the ability
to select very empty, and at the same time I
can select the bone. But what I want to do
is I want to select the empty while I am
in the Bose mode. In this case, to do
something like this, I will switch back to Bose mode. And here we have an
option inside the edits. If I turn this off, I will have the ability to select object while
I'm in the Boss Mode. So let's turn this off. Now. I'm still in the boys mode. If I hit Shift, I can select. Or if I click on any other
object, I can select it. So now I will select the
object and then hold Shift, grab that bond, and
then hit Control. P and Q is born. I went to set its
parent to bond. And now if I rotate the bone, just select the one
at the Arthur, the Z. Now the EMT is
following the bone and all the objects following
this one as well. So let's repeat that here. Do the same thing.
Syllabus empty, hold here, they
cut off the bone. It can throw a B and link
the empty to the point. Now let's rotate this
bond to the x-axis. Our x now is working. That's very cool. Now I will select this big empty and I will link this
amplitude to this bond. So all you have to get
up this Pawn Control V and Q is born. Now if I move this
bond, alright, now with the ability following this point and I
want something else. I want this point and
this point as well, following the big point. Okay, so let's see
how can we do that? Alright, to make these bones, I mean, this one right here
and this water or air. To make those
follows, the big one. We need to switch back to the edit mode because we
can do that in this model. So let's switch
back here and now select this bone halt here to grab this and make this one, the last one. Hold
here to crop it. It can throw be
and make parents, but choose, keep offsets. Now let's go back
to the Boss Mode. Analysis. Grab this one had
key to move it. As you can see now the whole
body follows this point. And this one, the
horopter follow this one. The same thing for this one. Takes, as you can
see right there. So this is it, this how to add armature and is how to link or
object to the bones. And this is the difference
between editing and pose mode. In this mode we are copying
the bones and scaling them. And kingdom was he can hold the bone spot inside
the bow is mode. We create a relationship
between the bones and we linked objects with the bones inside of
the bowl is more. Alright, so I think
that's it for this video and see
you in the next one.
40. 040 Adding constraint to small rotor: Hello again, welcome back. Okay, now let's create some relationship between
these two points, the big rotor and the
smaller author as well. Let's select the bond and
let's go to the post mode. Three, this back
to the postmortem. And let's start
with the big one. Here I have a section called
bond constraint properties. By using the options that
I have here in this list, I can create some relationship
between these points, any that I can give these points some abilities, Let's say e.g. I want to add I want
to rotate this point. I want to rotate this bone. And I want this bone follows
this one when I rotate it. But first thing, I just want
to make sure of something if I hit R without specifying
that error can, as you can see, it could be rotated
to the old oxygen. I don't want that. I
will open this arrow, this panel and go to the ATM. And I will look down all of
these axis just to click and drag and go to the rotation second and keep the
z gets activated. And you may ask how I know that the z-axis goes like
this, not like this. To do that you can go to the barn property to end a
few boards and you can see, whereas it's here we
have an option to, we have the ability
to see the axis. So this is the name of the
bone and this is the axis. Activate the axis. Now you
have the ability to see, whereas the z-axis, exactly. Alright, so now I need to
turn off the white notes. Turn on the y naught z axis. I locked everything. Now I just come to activate
the y to prevent the rotor to rotate on any other
unnecessary access. I want to do the same
thing for this router. Grab this spawn, check
which axis we want to pick. The Y goes like this. So I will lock everything
in a will keep y hoping. And now it's working as recall. Okay. Now I want to create a
relationship between them. I want this bone to
follow the big one. All right, to do that, I will select the small
bond and add a constraint. So go to the constraints
section and enter. Keep in your mind something. Here we have two
constraint menu. We have this miniature
and we have this menu. This menu is specific
for the armature, and in this one is for the
normal object or empties. So don't use those. And this menial keep
that in your mind. Use those right here because you are working
with the armature. So let's go here and
let's add Coby rotation. And it will ask you
what is the target? The target is the armature
because we using our material. So q is the armature
and now it tells you where the bone so we
didn't give this a name. And that's something
okay and easy to fix. Let's select this
one and let's go to the bone properties, I guess. And let's change the name
of this one to the big, big rotor, just to recognize it. And this one I will
call this small. Alright, so now we
gave those a name. We can organize them. So let's go back
to the small one. That is go to the constraint
and we need the tools. We need this bond, we need this bone
to follow this one. So in this area, I will put this bone right here. So this circuit is
called big Arthur. Alright? And as you can see here, we have some option. We don't want to work with
a log with walled space. We need to treat those
to the local space. This one as well,
look all the space. And we need this, we need this bone
to follow that. Just the y-axis. So turn off x n sets. So now when I grabbed
this and it R to rotate, as you can see, we have some relationship
between these points. You can see, alright, now he's working for any reason. If you want to make the rotation of the small
feather a bit slower, you can control that by
using the effluence. If you take the influence down. If you rotate this one,
it will be slower. So this is just extra notes. Just keep it in
your mind already. So now we can say that
we are finished here. And now the trick is
almost completed. We just need one more thing. We need to give these bonds. Alright, so let's start with the base bond. Let's
give this a shape. First. Let's go back to
the object mode. Just ted tab and go
to the object mode. Alright. And Lissa, bringing the
3D cursor in the middle, Shift S and Q is closer
to the world origin. And Shift a, and let's
add e.g. a plane. It's very big, hit S
and scaled mixed small. Maybe we can make
taller a little bit, can throw a apply the skill
because we want to add Bevel. And if you don't apply, the skill level will not be will not apply
in the correct way. So tab and now let's see, grab the corners
and hit Control, Shift V to bevel the corners,
something like this. And assets hit a and
make this small maybe. So this will be the base, but now I will hit Tab and grab the face and it's X
and delete to delete it. So it gets the
crowd the face at x and open that delete menu
and choose Delete only face. And keep the AQ like this. Alright, so now we
have this H ready. And maybe I can put
this right here. And I can put this inside
the new collection gets hit em and hitting
your collection. And let's call this
shape. Hits Enter. And now we have a new
color can for this shapes. So this one will be the base. Alright, so let's see how can I change the shape of
the bone to this one? Select a bone. And let's go
to the bond properties here. Alright, One properties and
open the viewport display. And here we have an option
is called costume objects. I will use this eyedropper
and I will pick the shape. As you can see now, we changed the shape of
the bone to this shape. But we are not finished here. Alright, so as you can see, we need to scale it and make it big and we need to
rotate as well. To do all of that. I can grab this one, sorry, this shape in tablet mode
of this shape and rotate. It's whatever kinky will
make here to this one. This one will be
affected as well. So if I hit R to the x and
rotate this to the x-axis, as you can see that one, it will be affected. So rotate it and scale it, make it big like that.
And there we go. Now we have this can throw out ready to tab
out, and that's it. Let's move this a little bit. Try there. If you want to
scale it and make it small, That's okay if you prefer. Let's put it right here. So if we finished
with the first one, Let's go to this bond as well, and this creates a care for it. I will hit Shift a and
maybe we can use a circle. Let's kill the circle and
make it small like that. It can throw, I end up
like SQL if you prefer. Let's move the
circle almost right here, something like this. Now let's go to the bone crop. It's, and let's change
the shape of the spawn. Ok, now, just notice something. We still have the plane
zero-zero to exist here. And I lost the eyedropper
and if I hit X, I will lose the habe, the first one that we created. I will hit Control Z
to bring this back. To give this a specific case, you need to go to the boys mode. So lists redis to the Boss Mode. And I will select this
point alone and scroll down as you can see now
you have the ability to pick the next shape, collaborate endless, a circle. And let's zoom in a little bit right here, and let's
see what we got. Alright, we need now to
grab the circle and tap, hit a, select all the vertices, hit S and scale it. Make it big. Make it bigger
again, something like that. Tab out and scale
it, make it small. So it will be affected when
you switch to the edit mode. Alright, now let's tab again
and hit R to the x axis. And let's rotate this 90 degree. Alright, Now degree,
now we have this ready. And let's move this to
the y because I just want to push this whole
skeletal without, alright, so now they can
throw is already here. That's very cool. I felt that you can tap
out and now you can use this one to
control this point. Now if you rotate it,
it will be rotated. That's very cool. After you complete with these shapes, you
can occur with them. Go to the object
mode, crop them. Or you can go to the, sorry, I just want to put
the circle and the shape collection just
hit em enqueues shapes. And now let's hide those. All right, now,
everything looks already. Maybe even the empties, we can grab them if you want. If you don't want
these to be visible, we can hit M and
move them through the hips as well.
You can hide them. And this point as
well, you can hide it. You can go to the
pose mode as well. And the crop, the spawn. And you can hit M and move
this one to that new layer. To hide this just hit M and Q
is the layer that you want. And if you want to
bring this back, you can go to the object
data properties and go to the layer or this one and activity that hold Shift to inactivate it to
see if this bond. Alright, so now we are ready. We made a simple trick to
control this nano drawn. Yeah, I think that's it for this video and see
you in the next one.
41. 041 Setting up the environment and make a quick render with Cycles: Hello again and
welcome back here. Okay, Let's render the list. Let's render this scene. Okay, first thing I want to do, I want to add some white to
add the ground underneath. Black Hornet with some care
of maybe it goes like that. Alright, so let's see
how can we do this? It's very easy. I'm just
going to hit Shift a to open the Add menu and I'm
going to explain scale. It may be mixed small, something like this,
and apply the scale. And maybe we can tap so to go to the edit mode and hit number
two to six to eight mode. I will grab this edge and
extended a little bit and hit E to the Z to extrude
this to the z-axis. Like obviously I can
hit Control V to pivot. And let's rotate the wheel on the mouse to add more segments
here and make this smooth. Because somebody
like this to work. Okay? Okay, After that, I will have
to radically again to us here this morning to get
rid of these jagged lines. Right-click it smooth, and
now it's become smooth. I will hit slash to
isolate this alone because I wanted to add
a material to this. So let's apply this to two
and the three of us to hate or editorial hits and
to get rid of this panel. And this hitting your material to add the new
material right here. I will hit Z to go to
material overview, to preview the material
and start from here. First thing, I want
this to be dark. So go to the base color and take this can throw our
down to make this dark. It's become dark. And I just want to add
some roughness here. I'm going to use noise
texture to achieve that. So hit Shift a to
omit the Add menu, and let's search for noise. Just hit NOI. And here we got
the noise texture. Let's put this right
here and block the hope before
you plug anything, I was just going to hit
Control Shift and click on the noise texture to
see the result here. And now we have the result. This makes some thing here. Let's make this a
little bit vague. Almost 20 maybe details, maybe we can increase the
details and roughness as well. We just want to make
this a little bit rough. Somebody like this. After that, I will
plug this tool with roughness right here
and hit Control Shift. Click on that principle
to review the results. And now we have some variation. If you want to
control that farther, you can hit Shift a and
let's search for curve C. You are choosing n. Let's plug it right here. After that by manipulating
these two handles, you can get nice results. So let's take this down
a little bit and maybe we can take this
up a little bit. Okay? We can take this up
a little bit more. Variation subtle. Alright, this nice results. If you want to make
this reflective, you can take this
a little bit down. If you prefer. If you don't like that, you can grab this point and
go to this expert all right. Here to delete it. Okay, Let's bring back
the black coordinates. It's like two sides
of the local mode. There we go. Okay, after that,
let's add a camera. I will hit Z and
go to Solid View, and hit Shift a. And let's go to the camera and choose camera, or
as it's right here. And now we have a camera
aligned with the view. Let's pick a nice view. E.g. bliss. Frame the camera right here. To do that. I'm not going to move
the camera manually like this and rotate it and
do all of this stuff. But I will choose the
view that I would like. E.g. this one from
distributes very nice. And I will hit Control Alt and zero to frame the
camera to disappear. Okay, I've started
that. I want to control the frame of the camera. I want to go forward, backwards to the left, to the right, go up or down. I will use the Tilda key. It's beside the number one
baton to control the camera. If you hit that button
and that doesn't work, you can go to the View. And I think here we
have some oxygen, just wanted to find
it. Where is it? Navigation? And here we
have woken up navigation, I think it's called. Let's go back to the view and less vacation, walk,
walk navigation. And now you are, you can control the camera
like you are playing a game. If you hit a, you can use the WASD
to move the camera. If the camera moves fast, you can rotate the
wheel of the mouse to the bag and make the
movements slower. So it is very nice way
to control the camera. If you want to go
up, you can hit E. If you want to go
down, you can hit. Q. So Allison, frame that camera. Okay. Maybe something like this. Alright, after that, I want
to rotate this account. So select it, hit R to the Z and rotate
this a little bit. And I think we can scale it a little
bit and make it white. And then hit Zero to
go to the camera frame and hit out of this yet to rotate this a little
bit like that. Now let's after that. Now we can go to
the Render Settings and I will use cycle
to render this. So three plus two cycle. And I just wanted to see what will happen if I hit
Z and go to the Render. Don't forget, I'm still
having the HDRI image. Still hear exist. But the lights, It's a bid them, we need to add more light to
make this make more sense. So in this case, maybe we can switch
this to 3D view port. And from here we can
add some lights. Let's hit Shift a and let's
go to the light second here, and let's add e.g. area lights. I will hit key
to this. Yan take this up. It's very big. I can scale it like that. And let's put this in some ways. Maybe we can go to the top view. Alright, something like
this and hit G to move the light maybe right
here, something like that. And I will click and hold this ball and push
it towards that. That's wrong, like that. And now as you can see now the lights pointing
towards this electron. So now we have some
lighting. It's nice. After that, you can go to the setting of the
light and control the power and some stuff right here and the
color as well. And you can change the
lights if you like, for whatever type
from these options. Okay, Now after that maybe
we can duplicate this slide and put it in another
direction if you prefer. So let's go to the top view and hit Shift
D to take another copy. And let's put that
code right there. And it's a glob, this ball. And let's move it towards
the drawn like that. And let's go to the
perspective and the CO2 gets, alright, So maybe we can move this
a little bit farther over this bag and
reorient this slide. Maybe we can move this
down a little bit. Let's see what can
happen if we do that. Let's change this color
to something bluish, subtle color. I think that will make
that more interesting. The Render Settings here
we have an option in the viewport render section. We have the denoise
if you want to activate it to get
rid of this noise. That result looks cool, I guess. Alright, I will his Yan go to solid view because I want
to do something else. I will select the camera and go to the camera
setting right here. And let's activate
depth of field. I want to isolate
the background, and I just want to focus
on the nine, it's wrong. So let's activate
depth of field. And now it's activated. As you can see right here. Here we have the focus objects. I want the focus working just
on the black coordinates. So in this case,
maybe we can use empty to cancel the focus. A point. Let's say that. So in this case I will hit
Shift a and let's go to the empty list. Choose e.g. if the plane and axis scale it, make it small,
something like that. After that, Let's
change the name of this new empty to maybe focus, just to recognize it. Just hit F2 and
change the name to focus. And then hit Enter. There we go. Alright. Now with this. We go to the camera and
let's pick the senior empty. If you can't select the empty, gets his view and go
to the wireframe. And now let's pick it again. Now it's easy to
select the empty. And there we go. Now the
depth of field of this camera will depend on the
position of this empty. E.g. I want to I want the camera to
focus just on the head. To do that, just move it empty and align
it with the head. But e.g. right here, like bats and assets, if you want an easy way to control the empty and
snap it on the face, you can go to the snap menu
and choose snap to face. Alright, and almost assets. After that, you can hit G to move the MTA and when
you hold control, it will snap on the face. So I will establish
it, e.g. right here. And now that the
camera will focus on this area and this go
back to the camera hasZero. And I will hit Z and
go to the Render. As you can see now the focus is just working on this area. You will not see here. This area is blurred out, but this area is a clear. And if you hit a key and hold Control to snap this
on the bag water. As you can see, this arrow now become clear and this one
become blurred out. So this technique is very nice and fast technique to control the focus of the camera. And here we have the f-stop. Okay, you can control the focus. If you crank this out, e.g. to five, you will make the
depth of field settle. Let's take this e.g. to
ten. That's become settled. But if you change this
to a small number, e.g. one, the depth of field
will be very strong. So keep in your mind to
control this the correct way. Alright, now I will have
R over here and hit the backspace button
to bring back the ordinal number of the stop. After that, I will pick the
empty and King the position, change its position to another
place, e.g. right here. The head so key and hold Control to snap it to
the head like that. And if you want to make the depth of field a
little bit subtle, just select the frame of the
camera and go back here. And let's change
this to maybe ten. And make a subtle, you can go beyond this
number if you like. Maybe we can see what's
going to happen. Alright, now let's go back
to that render setting here, and let's render this scene. I just want to see
the final results. Alright, ferrous here
we have the render, the final render setting. They are right here
and this area. I don't want to use
the noise threshold. I will turn this off. I just going to use
the samples here. For me. For this C may be 200 symbols. There will be okay
to under the scenes. So I will add this number if you if you want to go
beyond that number, it's okay, but keep in your mind that will
take more time. Now as you can see, ground is isolated and that's
exactly what I wanted here. And the lights, the
environment is simple, the lighting is simple and
the result looks cool for me. I can see the details
in the lighting. Looks nice. So I will accept this result and
let's give this a shot. I just want to see the final results to render
this Ferris his ear and go to the Solid View and go to the Render and hits are under image or you
can hit number, I can hit F2. So hits are under our image. After the rendering is
finished, I will be back. Alright, As you can see now, the render is finished and I
got this result. Looks cool. By the way, this is item
of the render view. I rendered this MHC with wood. This would this resolution
1920 with 1080. You can change that as
a weekend from here. And if you want to
view that under bad, you can go to the
other second here and hits a view on there. Alright, let's look nice. And the depth of field, it's subtle and cool. The background is
completely isolated. In this era, it looks cool with a bumpiness that we have here. Alright, so now we can
change the position of the camera to another position. And let's see what we can
get insights from here. And by the way, if you want to save the MAQ can go to that
image and save as, and you can save it. So let's save this e.g. to render one or underscore one. And his save us. Alright man, so that's
it for this video. See you next.
42. 042 Fixing the ground Roughness and make another render: Hello again and
welcome back here. Now I want to make
another render. And I want to move
that camera to a new position and make
render from there. Okay, to move the
camera, I have there. The easiest way is to use. They'll walk navigation. You can go to that after we select the camera
or you can go to the View and go to Navigation and
curious walk navigation. The shortcut for this
option is to tell the key. The tilde key is next to
number one in the keyboard. So I will use a shortcut and move the position
of the camera. Alright, let's maybe I will
hit E to go up a little bit. Somebody like that. Maybe we can put that
comment on e.g. right here. Take a short form here. And the focus point is
still here on this area. Maybe I can hit Key
and width here in the center above the drawn here. And maybe I can sit like
that camera and go to the setting here and
maybe make some kings. I will increase this number to 30 to make the depth
of field subtle. Because I want the
depth of field to include the tail as
well a little bit. And yeah, I think that
sets we can make a render. Okay. Fair thing. I will
his Yan go to render. I just want to see the results. Already. The lighting looks cool. The angle of the
camera looks cool. It's covers everything. Maybe we can make her under. So I will his Yan go to solid. And after that, let's go to
render and make a render. Before you do that, Let's go
back to the Render Settings. Here we have this option
is called de-noise. This option is nice option
to activate a tool, kill any noise in the image
after our render is finished. So keep in your mind to activate this up
here, right here. If you want to
increase the number of samples, that's cool. That's okay. Maybe we can
add 300 for the scene. But keep in your mind, if you make this
number or big effect, the render time,
it will be bigger. Okay, so let's go now to the renderer
and hit Render Image. And before that, I just wanted to make him
something here. If you go to that view or under here we have
the last render. You can go to slot number two to or under the new empty
right here and keep number one Swiss Re the C2 and less anxiety and let's
hit Render. Render Image. Ellis. Wait for that
until it's finished. As you can see now
the render is done. Alright, the result looks cool. The overall look. It's cool, but I don't
like the ground. In this area. I should see some kind
of a roughness here. It's it's, it's too much
blue or to the ground. I just want to see
some details here. Just in this era, e.g. so maybe I can make some tweaking to the ground
to make it looks better. So in this case, I will excite and I will select the ground and
hits like to isolate it. Or before I do that, I guess coming to add an empty, hit Shift a and
let's add an empty. Let's add cube empty, and let's hit S to scale
it, make it small. Something like this. I added this empty because I
want when I hit, if I hit, if I select the ground, It's like I just
want to see where is the area that I want to fix it. Or let's say that's
because if you e.g. if you fixed the area at a distance like this,
when you excite, you will discover that the drawn is a small and you'll need
to adjust the scale again. So I will use this
empty as a reference. I will select it and
select the ground. And it's like to isolate them. Now, I know how
much I need to zoom in and how much detail
I need in this area. Alright, so let's hit Z and let's go to the render or let's go to the
material preview. As you can see, is blurred. And I can see, I think
just some details. There are little bits of Lords, so let's try to make these
details more visible. This week. This editor to Heather
editor analysts, changed. Type two objects, materials. And let's see how
can we do that. All right, so this is the
noise texture that we added. I will hit Control Shift, click on it just to see it. And let's increase the number of the details and maybe
the roughness as well. 0.8 maybe. And let's see how that
will affect the roughness. I will hit Control Shift click. And maybe I can take
this down a little bit. Let's see what's gonna
happen if I take this up. Alright, now I can see
some details here. Alright, now let's zoom in. Let's go back to the
noise texture and maybe we can increase
the scale, e.g. 100 and maybe 300. Something like that. Or I think that's too much. Let's decrease this to 200. Alright, now it looks better. Maybe I can change
the number to 150. Something like this. It's a better. All right, Now listen, bring back
the black coordinates, hit Select to excite. And now we can see
something on the ground. Okay, I've taught
that maybe we can change the position
of the camera again. I will select the frame
and hit shifts entail that key to control the camera and activate
work on a vacation. I will hit Q to go
down just a little bit and use the WASD to move the camera like
you are being a game. And let's put the camera e.g. right here. Something like this. Right? Let's go back just a little
bit and let's move the camera again. Let's take a cue. From here. I felt like maybe we can
change the focus, empty. This one, I will hit
G to move it and hold Control and snap
it, e.g. right here. Okay. This position is it okay. I will accept it. And
I just wanted to kick the ground if I don't like it. After the rounder. If the results
doesn't looks cool, I will use image to gesture
to control that roughness. So let's go to Solid
first is Zn solid? And let's go to the
Render and open a view or under fairest and
less sweet, that slot 23. I thought that let's go to
render and hit Render Image. Alice, wait for the render
until it's finished. Alright, now the
render is finished and the result looks very cool. As you can see right
here in this area, I can see some
roughness effect here. And the background is blurred, but it's not so quite blurred. I can see some blockchain is, to be honest with you, I don't
like this result so much. I want the background
to be dark, black. It will be more beautiful
and maybe we will find some way to make the
background dark. But in general, it looks cool. And yeah, let's save this. Save as to render a three, maybe I were to
hit Save Image As. And by the way, just want
to make him something else, forget to do that. From here you can change
the format of the image. I'm saving this image as a PNG. You can change this
to whatever extent, you know, like that's, it's alright, so I think that's it for this video and see
you at the next one.
43. 043 Adding a Gradient node to make the background darker: Hello everyone, welcome back. In the very few surrender, I mean this render, the background was I can see some roughness
in the background. Some blockchain is, and that's
not so quiet, beautiful. You can get better
results if you make the whole area black,
the background. So let's learn together
how can we do that? Let's go back to a blender. Alright, let's select the
background, this big plane. And let's hit Slack
to isolate it. And this is the material
that we applied on this. Alright, that's sort of
that. Let's hit Z and go to material preview. Okay, let's go back to
the material section. And I have this
principal P is d f. I will take a Coby, just said shifted
to take a Coby. And let's put this right here. I don't want any kind
of roughness and the specular and the color, I will make it full
dark like this. And I will mix between this material and this material
or using mixed together. If you activated the
anode triangular, you can use the shortcut
to do the To-Do, that's w, All of this node
triangular or just activated. So I will hit Control
Shift and hold, right-click and move the mouse from this node to that node. And as you can see, triangular give me a mix shader. So I just mixed between
this material and this one. That's very cool.
Alright, now I want this material right here. I want this to be
visible on this area. And I want the old material
to be visible on the ground. I want to add some mask here and some transition colour from black to white to achieve that. Okay, Now let's create the mask. Fair thing. I want to
use the gradient node. I will hit Shift a to open the Add menu and let's
go to the search. Let's search for
gradient, just tab key. And you'll find it
a gradient texture. Let's put this right
here. Okay, after that, I just want to
preview the anode. I will hit Control Shift. Left-click to see if the result, as you can see, this is
the result of this node. It gives me a dark color and white color goes
to this alkyne. I want to change the direction. All list select the grindy
and texture and I'm just going to hit Control
T, node triangular. We'll create texture coordinate
and the mapping for me. I will oblige the objects here. Okay? And I will rotate the color. Maybe we can use the z-axis. So in this ad here, 90 degree. And there we go. Now we
just changed the direction. After that, we can
use the location to change that farther or
you can do something else. You can add an empty right here to control
all the gradients. I will hit Shift a and I will. Maybe you can add an empty or you can add whatever
hope you get from here. Let's go to the Mt
SAC and endless. Use the cube empty hits a scale. Let's make it small like that. And let's go back to the plane. And here and the
texture coordinates, I have this object place. I will use the eyedropper and I will pick the senior
empty that I added. As you can see now, I have the ability to
control the gradient. By moving this empty. I will rotate this to the
Z a little bit like that. And maybe I can change the transform orientation
to local to make the good, make the gizmo direction similar to the cube
direction like that. And now I can move this
forward or backwards. Okay, so that's the first
thing listed like this. And let's go back here and
let's see what else we can do. I've tried that I want
to cancel the gradients. As you can see, it's
a little bit harsh. If you go to the scale, you can control the y hold, can throw hold, shift and
move the scale a little bit. Let's make it smaller,
as you can see, that will affect the
gradient of color. So 0.01, 0.02 is
cool number topic. And after that, you can
still have the ability to control this gradient
using this box. Let's change this to 0.03. Maybe it'd be better. Something like this. And now I just want to see what will
happen if we plug this. I will book the factor for one and a will block
this to that factor, the mask, and I
will hit Control, left-click on the mix
shader to connect it. Let's give this a
time. I just wanted to see what's happening here. Alright, I will
change the color of this one to something
great. Just to organize it. I just wanted to see
what is the effect or the effect goes
to this direction. This way maybe we can flip these between
these two materials, swap them like that. Alright, That's very cool. After that, I can grab this
box and control the gradient. I will hit G to move it. When I move this, I can see the effect of
the second material. I mean, this one right here. So let's move this back a
little bit by using the, the empty that we added. Maybe we can go to the
top of you and align the MTA little bits that
aren't. Align it like that. And take this back
just a little bit. Maybe we can change the scale a little
bit or we can use another controller,
e.g. color ramp. Let's hit Shift a, and
let's search for rum. Let's plug this right here. Alright. And let's control
that a little bit. Yeah, now I can control its end. Maybe we can move this a
little bit to the y-direction. Now I got this result. That's very cool. I've started that. Let's change the color to something dark. Take the saturation back and take it back down,
something like that. And let's hit slash to excite of the local mode in his
ear to go to the camera. And let's see the results. Right? I'm also quite
happy with that. Let's can throw all that
color ramp a little bit. Maybe I can accept the
result of the color on, but at the same time I can move the position of
the cube that we added. Let's go to the top. And let's pick the cube. Move the cube parts. Put your eye here on this
view to see the result. Let's move the
cube a little bit. Right now I have something
here. After that. Maybe we can, can throw the Rumba little width.
Because something like that. Now the background
become dark and nice and that transition is looks cool from the dark area to the, to the, to this area. Alright, so now we'll
see how they're under will look when we
take other shots. Let's select the camera and let's change the position
of the camera a little bit. Maybe I will hit the tilde key or Shift tilda key to move the camera a little bit. Something like this maybe. And I will call up
the focus empty. This yours is small right here. Hit here. Maybe we can move it a little bit up right here. And now we can make
another render. Alright, so let's go
to Orlando and run. There are emic. I will keep all the sitting
300 for sampling. And yeah, that's it. With the noise activated. Let's go to render
and render the image. Alright, so now the
render is finished. The results looks
very beautiful. I like the dark background and I liked the transition
between the two colors. Maybe we can make
just one thing here. Changing maybe the color, not the color or the
effect of the roughness. Maybe we can make
this more subtle because it's very quiet,
clear and visible. If I make this less, maybe that's the result,
be more beautiful. But in general, that is, it looks very cool. The depth of field looks nice. And the results. I like it so much. So, yeah, I think that's
it for this video. And the next one.
44. 044 Adding motion blur and making the final shot: Hello everyone. Welcome back to this video. This video I want to create
the motion blur effect. When I rotate that
big and small rotor, we should see some motion blur. Let's see how can we do that. Alright, first thing we
need to make some rotation. I will select the armature, and let's go to the Boss Mode, open this menu and Zwicky
this toolbox modes. After you speak
this to Bose mode. Now if we, if we hit R to the y, we can make some rotation. We can rotate this. As you can see. The problem is when I rotate
the leg that's in the y. Second here, you will
notice that the number, let's start with a positive and then flip back to the negative. If you give some attention
to this area while I rotating the further you will
see that hit R to the y. And notice what's happening. Start with the positive. And then this week
two negative numbers. I don't want one
that to fix this. Just so we get this from
quaternion to X-Y-Z, Euler. That's all. Alright, after that,
now if you rotate this, there is no problem with that. Let's hit R to the y. As you can see,
everything looks cool. I've talked about,
I just want to add a symbol expression here
to achieve that rotation. So go to the y in this cyclic. And then let's type hashtag. And then frame, multiply by e.g. ten, and then hit Enter. As you can see now the
color change to purple. That's being here. We have
some separation here. Now if I hit play, as you can see, I
have some rotation, but the rotation goes to the wrong data or
candidates goes like that. And that's, that's wrong. The rotation could be like this. Same time the rotation
is no, so quite fast. So Alyssa, bring
back this to zero and let's go back
here just to click after the multiply
lists or the minus, and then hit Enter again. And now let's hit play, just hit space, or you can
hit this button right here. Now we flipped the rotation and here you can
keep that embarked. We want to multiply this by one. You can do that as
you can see now the rotation become faster. So yeah, this is one of
the ways to achieve that. Alright, now if I go to
the Render Settings, I'm in cycle, Stirling cycle. And here we have this option
is called motion blur. I will activate this. And let's go to the
camera is zero. I will change the
position of the camera. Just hit the Shift
and tilda key. And let's hit E to go
above the drawn like that. And now we have some rotation. Let's hit Z to go to the render and the
CO2 will got here. I can't see anything here. But if we, if we
render the image, we can see some effect here. So what I'm about to do here, I will hit Render. And let's see what we will get with these default settings. Let's go to render, and
let's render that image. Alright, before the
render has finished. This is the result
of that I got. Okay, the result is cool, but it's not like what I want. The motion blur is
surrounded in this area. As you can see. I want the
motion blur create a circle. Okay? And let's see how can we
achieve something like this. Let's examine it from here. And let's go to the Render Settings under
the motion blur section. Here we have the
time of the header. If we make the time
of the shutter big, the emotional bluer
effect will be strong. The hetero speed become fast. The motion blur will be less. E.g. this is a time
of the hetero. I will make this e.g. 0.1 and hit Enter. And let's make another render. Hit F2. As you can see, because of the shutter speed, the shutter speed,
that the time of the hetero speed is very little. We almost losing
their motion blur. But let's try to increase the time a little
bit and let's see what kind of having
this excites from here. And let's go to the header and let's increase the time. Four. E.g. five hit Enter, and let's hit F2 again. Before I finished the render. As you can see, the motion
blur now created a circle. When we increased the time we got the motion
blur that we want. Now's the time to
take another shorts. I will cancel this render
analysts exact from here. Let's manipulate the position
of the camera a little bit. Okay, Let's hit Tilde key and let's move this a
little bit down like this. And for the groundless, make some anything there. I just want to reduce the
effect of that roughness because I don't like it so much. It will be something
easy and fast. I will select the R.
You just need to go to the material preview that sets the zoom in a
little bit right here. And let's take this down. And maybe take this up. Okay, Somebody like this and
make the effects subtle. Maybe we can increase
this a little bit. Alright, something like this. And let's close this
panel right here. And let's see what's
going to happen if I add another source of light. I will have three
this to 3D viewport and I will hit Enter
to close this panel. Alright, so I will hit Shift
a and go to the last second. I will choose this
time spotlight and hit G to move the
spotlight e.g. right here. And let's, alright, let's leave
this 13, this to a solid. I thought I can sweetness to the lander,
but I will do that later. Let's point this slide
towards the anode drawn. Just use this small ball here. I've typed that. Let's go to the setting of this. And lists can throw all the lists can throw the
cone of this sorts of light. Alright, this is
the sports size. Let's make it small like this. And I will hit zero to go to the camera and his
youth to go to the render. And let's see what we got here. I will change the
color to something, right, just to recognize it. And after that, maybe we can
create a bar to maybe 100. Let's see what we will get here. I will hit Control V to choose small area to render a
small area like that. And let's increase
the power to 1,000. Alright, now we can see
some red color here. That's mean it's working. But the question is, where should we put this light? I just want this to be as a rim. So maybe we can go to the top view and we can hit G and move
it e.g. right here. And point they can tour
the drawn like this. Maybe you can change the color from red to something blue. Alright, so let's
render this result. I just wanted to see the
effect of the light. I will hit Control Alt V to get rid of this
window that we created. And I will hit Z to go to that solid view and then go to the Render
and render the image. When the render is finished, I will be back on it
now the render is done. The result is very cool. The motion blur is very nice. The rim light that we either the blue color
of this new light, it gives me a very nice effect. As you can see here. You can change the color to something, read something green. Whatever color you will choose, you will get nice
results, I guess. Alright, That's very cool.
This excites from here. And let's move this
maybe right here. And let's go to that. It is our type and I will speak
this to imitate the Torah and the search for the render results.
This one right here. And let's change the
editor to compositor. Alright, let's
activate use notes. And now I have
this final render. And this is the outputs. Whatever thing you will add
right here in this area, it will affect the final output. So if you hit Shift a
here and the compositor, you will find this menu
and the color section. You have a lot of options
here you can use e.g. we can use color
balance if you want to control the balance
of the colors, e.g. here we have, you put
your mouse right here. You'll see some
information about this. What is this? Okay? So the first one
is controlling shadow. The second one is
controlling them mid tones. And the third one's
controlling the highlights. Let's go to the shadow
and maybe we can make the hurdle a little bit blue. Let's move this one a little
bit towards the blue. If you move this
one towards green, as you can see now, the header become green. But we want to make
the effect very, very subtle,
something like this. In the same time, if you
take this can throw down, you will make the result dark. So you can control all. You have nice option here
took to control highlights. You can pick this up and you can increase the
highlights a little bit. Something like this. I
think now it's become cool. Ris. And let's hit Shift a and let's see
what else we can do. This search for filter. Hit Enter, and let's plug
this right here and go to this list is
regulars to cirrhosis. Whereas the sharp, alright, let's choose the box sharpen. As you can see now
with the result become sharper, that's too much. Let's reduce that number
to maybe 0.1 and make, make it a little bit. Let's hit M to mute the node. And just want to see
before and after. As you can see here, we
have some, some friends. When I turn this off and on, maybe I can make the
effect more subtle. I can type zero points. Zero, maybe five. Let's hit M2 muted. Yeah, it's very subtle and nice. If you want to cancel
all that even more, you can add e.g. a. Curve and lists of
like this right here and this area. Alright? The n half days. So she curve, sorry, shifts a cubic curve. If we add a controller,
controller right here, maybe we can move this
down a little bit, make it darker and add another
controller right here. We can control the contrast. I think that's too much. Alright, the result looks nice. Let's take this
back a little bit. Yeah, maybe something like this. Yeah, It's very cool,
very cool result. The bumpiness here. It gives me pretty elastic. The result here, the
roughness that we got here and this area and now
they become more clear. And the roughness on the ground. It's subtle and nice. The lighting is cool. The rim light is nice
for me, I guess. All right then So yeah, I think that's it
for this video. And a very cool
result we got here. All right then, so that's
it for this course. I hope you enjoyed it and I hope you'll find this course useful. Just don't forget to
rate this course. And it's very important to add a comment and
give me your opinion. If you don't like
anything, you can type it. If you have any advice for me, you can type it. And that's definitely will help to improve the
future courses. Don't forget to go
to my other courses. I got a lot of Blender courses. I made almost 13 courses, all of them teaching
you how to use Blender. Alright, so that's it
smarter on Hussein was here and see you
in future courses. Goodbye.
 Marwan Hussain, 3D Artist and tutor