Transcripts
1. A Brief Intro: Hi. My name is Jx. I'm a designer in a self-taught calligrapher based in Manila. Today I will teach you Gothic calligraphy or blackletter calligraphy, in Textura Quadrata script and in this lesson, you will learn the minuscules. This class is suitable for beginners and for experienced calligraphers who would like to learn a new skill. Here is the outline of the class. First I'll discuss with you the brief history and other forms of blackletter. And then we'll discuss the characteristics of the script to help you understand how to build the letters. Then, we will do the drills where you will practice along with me to help you get familiarize with the strokes. And finally, we'll do the minuscules one by one, where I will guide you with detailed instructions and show you some of my techniques. We will also have a mini-test where you can track your progress at the beginning and at the end of the class. And as for your project. You will create a masterpiece, writing your favorite quotes in Textura Quadrata script. I am so glad that you are taking this class with me. So grab your pen and paper and let's get started
2. Gather Your Tools & Materials: Hi and welcome. Before we start, please gather your tools and materials that you'll need for this class. Pencil, ruler, Eraser, a broad edge nib pen with ink, preferably Pilot Parallel pen 3.8 millimeter or 6 millimeter. The pdf workbooks are formatted on these pens. If you don't have a Pilot Parallel pen, any broad edge pen that is available with you that has almost the same size as 3.8 mm or 6 mm will be fine. Sizes such as 3.5 mm for mm or 5 mm will do A watercolor paper or a thick paper in A4 size or larger that you will use for your Project. 80 GSM paper to print the worksheets on and for you to do the drills and exercises. Before printing, please choose your paper and ink carefully and make sure that the ink will not feather or bleed on your paper when you write on it. In case you don't have a printer, you can manually create your own guidelines to practice the drills and letters. A good option is a paper with grid or dotted grid as well as lined papers. I will show you a short demo how you can easily create your guidelines on these papers, But again, please test the paper and inks and make sure it will not bleed or feather. - We'll discuss the brief history of blackletter or Gothic calligraphy. We'll know the characteristics off the script, the different writing tools and materials, parts of the litter and guidelines. Then we'll proceed with the drills to familiarize you with the Strokes. Lastly, I'll show you how to write Textura Quadrata script, minuscule and at the same time you will practice along with me.
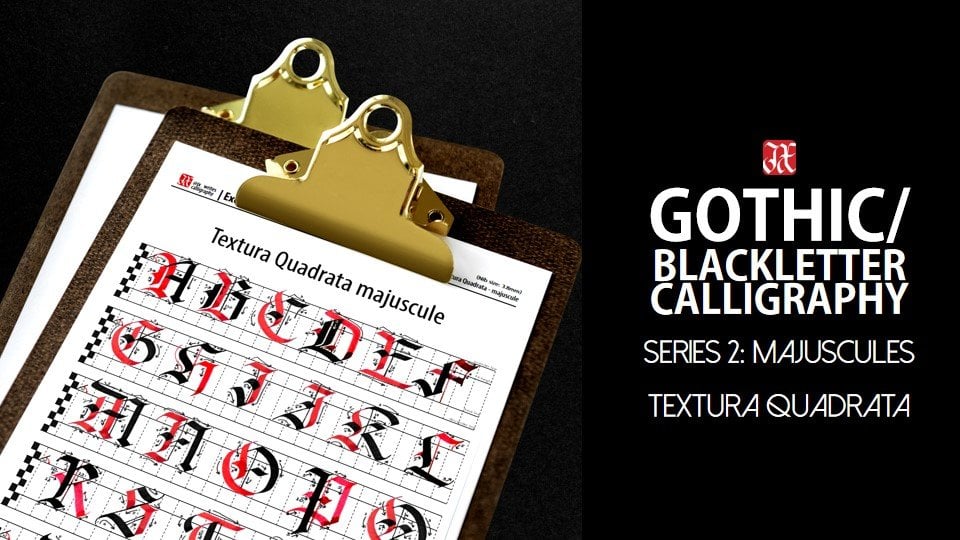
3. Introduction to Blackletter: UH, black letter or Gothic script was a direct descendant of Cardinal Engine Minuscule, which was invented in the rate of Charlotte Main. And in the 12th century Europe, there was a rice in literacy, and higher production of books are needed. Carl Engine minuscule, then evolved to a smaller, thinner and thence letters as a method of saving space. This developed what we call the Early Gothic script describes were able to fit more words in the line, and more lines can fit in a book. This made the possession of books to become more affordable, which brought decent income and more jobs for describes an illuminator. According that time. And by the beginning of the 13th century, early Gothic script had evolved into a non cursive, angular hand known as the extra Cuadrado name indicates the woman appearance off the lines off text take Studer meaning and even effect in Leaving Black Leather is a comprehensive term used to describe the scripts off the Middle Ages, in which the darkness of the characters overpowers the whiteness of the page. The term Gothic was first used to describe this script in 15th century Italy because Renaissance humanist believed that it was barbaric. Black Letter is sometimes referred to US old English, but it should not be confused with the old English language. Now we move on to the forms of black never or Gothic scripts. The 1st 1 is text to Ali's or text to address. This is the one that we're going to learn today. It is the most calligraphic form of black letter. This is the most associating with Gothic script. Next, if sticks Wallace Francisco us. This is almost identical with text Wallace. Main difference between them is the absence of the food diamond next s petard, or bustard secretary thesis a manuscript hand, and it is mostly confined to documents, the term denoting a mixed cursive. And thanks to a parentage, Chua Becker and Factor was much used in Germany. Factor is quite popular with modern calligraphy now, and its name is derived from the broken curves that distinguished many letters
4. Tools and Materials: materials used for a Gothic script. Calligraphy did pence with broad nips. You can find them with speed, Will brands Mitchell, Lenard and so on. Automatic pens are more than pen studies designed for writing bigger letters. Holographic fountain events. They usually comes in set to a different nib sizes. They haven't in cartridge, which is quite handy for everyday use. However, the sharpness of the letter will not be as evidence. That's when you're using depends. Acrylic paint markers are popularly used for refugee or calligraphy T, and he disused for a large khan versus fire. It depends. It is a handy tool and comes with a wide range of colors. Another traditional tools are flat brushes. You can use different types of paints, and by using the brushes you need to build your skill in creating confident and steady strokes. Thanks to be used for fountain pens, I recommend to use fountain pen inks and watercolors. Inks never used liquid acrylic inks, assessable clogger pens. As for the depends, you can experiment with different inks and paints such a sumi ink, liquid watercolor and guac. Of course, you will need papers. You can use watercolor paper, dextrous paper or card stocks. But always test your papers with the thinks that you're using. You don't want them to lead on your paper. Don't forget your ruler. Pencil and eraser. This is for creating your guidelines.
5. Characteristics: and now we will discuss the characteristics off tech Student Cuadra Proportion Proportion gives character to your letters. The height of the letters should correspond to the name read off your pen. Here's an example of different ratios to show you how proportion effects the look off your levers. For this workshop, we will use the ratio off to his 252 We will have to niblets for the center line and to the words for the center line. And for our X height, we will use five niblets. XTO required data are usually dance and compact. There should be uniformed distance between the strokes and on the negative space. The space on the inner letter is equal to one neighborhood and space inter letter is equal to to nip with things to avoid inconsistent spacing between letters. Encounters you're spacing are either too narrow or too white, consistent upright vertical strokes and angular strokes. Curves are minimal or oftentimes eliminated, especially in minuscule. The repetition of consistent vertical in angular strokes gives appearance off a big defense . In order to achieve these, always prepare your guidelines before practicing, even though it is a tedious activity. This will greatly help you improve your stroke consistently and finally diamond shaped heads and Pete. This is one of the most in the characteristics of extra.
6. Parts of a Letter & The Guidelines: in this section, we will discuss the guidelines and parts of a letter for the guidelines. You can see here on the illustration the Ascender line, X height, baseline dissenter lying and the vertical guidelines. On the left side, you can see the dimwits depend. Angle is usually between 35 to 45 degrees. The parts of a letter. Here we have the shoulders, the hairline, the counter split, the centers and the diamond shaped heads and feet. I will show you how to repair your guidelines first. Know what racial you will use on this example. Way will use to is 252 Using your new Create the X height by marking five Gidwitz on her paper. Now draw your guideline, redrew pencil and ruler. Create your ascender line, and this underlines by marking two dimwits above and below your X height. Draw your horizontal guidelines. Sweet pencil and ruler Finally throw your vertical guidelines
7. Mini Test: Let's test your skills. Choose from the words shown below and write them on the before space. Use exemplar on a screen or on page 19 Astra guide. And before we end this workshop, right the same word on the after space. This way you will see and compare your improvement. You can also pick your own words instead. But be sure to write the same word on the before and after. We'll give you five minutes to do this exercise. Time's up. Police Return to your meaning test after you finished the minuscule and before proceeding with the project.
8. Drills: drills to familiarize for hand with the strokes, trace them first several times and then do the strokes on your own to practice your free hand diamond or quadrant strokes. Do this with your pen at a 45 degree angle. Lozenge or Elon Gated diamond with repented 45 degree angle. Create a longer diamond stroke has shown on the video down Strokes with your Bennett 45 degrees. Use the vertical guideline to keep her stroke. Street horizontal stroke with the repent at 45 degrees. Used the horizontal guideline to keep your stroke straight down . Stroke and heart is on the stroke with grief with repented 45 degrees angle. Start with a hairline stroke, using the angle of the new and ending it with the same hairline. DIA goes true. Stroke should be straight and avoid making the stroke, waving over curve and under curb strokes with your planet 45 degrees angle. Create the curves without changing the angle of your pen. The agonal stroke. Wade repented 45 degree angle. Start by creating a short hairline stroke and continue with a thick stroke. They agonal e ended with a short hairline day ago. Stroke hairline strokes. You can use the theater side off your new or just use the edge of your name for paddle opens. Keep this strove street and use the guy lines for consistency. Combining strokes. Once you've created your diamond stroke, place your name at the center of the diamond to create a down stroke. Next, place the ash of your name at the center of the doll stroke to create your diamond stroke.
9. The Minuscules: Group 1: We will now start to learn the Gothic letters, which I divided into five groups. The Alfa Better Group according to the similarity in strokes, so that it's easier to learn. We'll start with the basic letters in end with a challenging ones. Let's begin for every page of her hand out. There's a space provided for drill work to help you practice the strokes and easily feel the letters one by one. Use them as needed. Group one better. I create your diamond stroke below the X height. Place your name at the center of the diamond to create a down stroke stop before reaching the baseline. Next, place the right edge of your name at the bottom center off the down stroke. To make the foot diamond. Make a flick movement with your pen to dock. The letter I It's your turns or right, using your handout trace so that our first and then do a free hand on the space, provided if you need more time to practice, please boss this video Group one letter are create your diamond stroke below the X height. Place her name at the center of the diamond to create announced role stopped before reaching the baseline. Next, place the right edge of your name at the bottom center off the dollar stroke. To make the foot diamond, make a diamond stroke next to the head diamond. Use the edge of your new to make the hairline stroke. This stroke is optional. Now it's your turn to practice. Group one Letter C. Start a little below the X height and make a down stroke stop before reaching the baseline . Next plays the right edge of her name at the bottom center of the down stroke and make a lozenge. Use the edge of her name for the hairline. This'll stroke is optional. Make a short lozenge next to the first stroke. Here's a small tip that I got from B A scribe. Create the mark below the X height and you will see where to start. Adult stroke for this letter. It's your turn to right. If you need more time to practice, please boss this video, Uh, Group one there. E. Start a little below the X height and make a down stroke. Or you can do the tip that I showed you a while ago stop before reaching the baseline next . Place the right edge of her name at the bottom center of the doll stroke and make a lozenge used to edge of her. New for the hairline again, this stroke is optional. Make a diagonal stroke and pull your pants. You create the hairlines. True. Now it's your turn to practice Group one letter O. Start a little below the X height and make a down stroke. You can do the tip that I showed you before. Stop before reaching the baseline. Next plays the right edge of her new at the bottom center of the down stroke and make a lozenge. Create a small hairline. This hair line is optional. I do this stroke as a guide. Make a lesson stroke but trying not to make it too low or too short. Move your hand a bit to the left before you make your down stroke. This'll away will create the shoulder of the letter. It's your turns, right? Uh, we have two variations of letter A. We'll start with a single story. Eight. Start a little below the X height and make a down stroke. Or you can do the tip that I showed you before stop before reaching the baseline. Next, place the right edge of your name at the bottom center of the down stroke and make a lozenge, Then a small hairline. Make a lozenge and trying to make it too low or too short. Move your hand a bit to the left before you make your down stroke. Then make a foot diamond in a hairline stroke once in a while. Checkers Spacing off your counters. It should at least measure to one name with it's Your turn to practice the second variation of a double story. A start to nibble words below the X height and make a short down stroke. Next, Place the right edge of her new at a bottom center of adult stroke and make a lozenge and create a small hairline. These hairlines just a guide, make 11 stroke, but try not to make it too long or too short. Create the down stroke until you talk to the small hairline. You created thin makeup with diamond in the hairlines. True, it's your turn to right. Uh,
10. The Minuscules: Group 2: moving on to group to for every page of her hand out. There's a space provided for drill work to help you practice the strokes and easily build the letters one by one. Use them as needed. Group two Letter M Create the first few strokes similar to let her I make a lozenge stroke next to the head Diamond I just your hand a bit to the left before you make your down stroke stop before reaching the baseline. Create the foot diamond. I will repeat the same steps. Make a lozenge or an over curve next to the lozenge adjuster. Hand a bit to the left before you bake your dance room and then stop before reaching the baseline. Creative Foot Diamond. Now it's your turn to practice. Uh, Group two Letter end. Create the first few strokes similar to let her I make a lozenge or an over curve next to the lozenge. Adjust your hand a bit to the left before you make your dance troupe and stop before reaching the baseline. Create the foot diamond. It's your turn to practice Group two that are you. Create the head diamond below the X height place renewed at the center of the diary to create a down stroke and stopped before reaching the baseline. Next, make a lozenge in a short hairline. For your guide, create another diamond stroke in a down stroke and stopped before reaching the baseline. Make a foot diamonds room. It's your turn to right. If you need more time to practice, please boss this video Group two Letter B. Create your head Diamond The loaded X height. Place your neighbor the standard of the diamond to create a down stroke and stopped before reaching the baseline. Next, make a lozenge in a short hairline for your guide, using the thinner side of your pen at 45 degrees slightly slide the pen to create a service and continue to a dance troupe until you reach the hairline. Died another often for the letter V is to make ahead diamond. Instead of a down stroke with sheriff, it's your turn to right. Group two Letter W Create your head Diamond stroke below the X height. Place your neighbor the center of the diamond to create a down stroke and stopped before reaching the baseline. Next, make a lozenge in a short hairline for your guide. Do a sailor set of strokes using the thinner side of your pen at 45 degrees, slightly slide. Depend to create a serif and continue to a down stroke until you reach the hairline guide another often for the letter W is to make ahead diamond instead of a down stroke with Sarah . Now it's your turn to practice, Uh
11. The Minuscules: Group 3: we're now in Group three for every page of her hand out. There's a space provided for a drill. Work to help you practice the strokes and easily build the letters one by one. Use them as needed. Group three Letter J. Create your head diamond below the X height Place renewed at the center of the diamond to create a down stroke and passed the baseline and lifting the right edge of your bent. Who ate the curved hairline at the flick stroke to dot the letter. Practice. The second stroke to get the right hand movement for this stroke. Uh, Group three Letter G. Start a little below the X height for your down stroke stopped before reaching the baseline . Next, make a lozenge in a small hairline for your guide making over crew. Move your hand a bit to the left before you make your down stroke and passing below the baseline. Snyder pants or, worse to write created a agonal hairline stroke. Another the agonal hairline stroke from the corner off the lozenge, then on under curved connecting the two hairline strokes. It's your turn to practice Group three Letter P. Create your heads. I am a strong below the X height. Place Rene by descended of the diamonds to create adult stroke and passed the baseline and without lifting your pen slider. Been a little bit to the left, creating a Syria. Create the short hair line to build the step and feel the gap. Create the lozenge beside the head diamond and a down stroke, stopping before you reach the baseline. And, lastly, who ate an under curved and be mindful to connect the strokes. It's your turn to practice. UH, Group three Letter Q. Start a little below the X height and make a down stroke stop before reaching the baseline . Next, make a lozenge in a smaller hairline. For your guide, make an over curve or a lozenge. Move your hand a bit to the left before you make your down stroke and passing below the baseline slider pen towards the left. Create a serif. Create the short hair line to build the stem and feel the gap. It's your turn to ride if you need more times or practice, please. Boston's Video Group three Letter Y Pray through had diamond stroke below the X height. Place her name at the center of the diamond to create a dance troupe stop before reaching the baseline. Next plays the right edge of your name at the bottom of the center of the down stroke and make a lozenge a short hairline as a guide. Create another head diamond, a gap away from the 1st 1 Make your dance troupe passing below the baseline and without lifting your bend slightly slide. Repent towards the right. Created the agonal hairlines troop another the agonal hair nine stroke from the corner off the lozenge, then on under curved connecting the two hairline strokes. Uh uh.
12. The Minuscules: Group 4: we are now in Group four, Group four. Letter L, starting from the center line, created a stroke with service stopped before reaching the baseline. Create your foot diamond with the same technique. To complete the split Ascender, use the edge of your Ben to draw a hairline stroke for the left spur. Now it's your turn to practice. Group four Letter T. Start above the X height. Make a down stroke and stop before you reach the baseline. Creator Foot diamond with the same technique below the X height. Make a heart is on the stroke. It's your turn to right. If you need more time to practice, please boss this video Group four Letter B Starting from the center line, create a down stroke with Sarah. Stop before reaching the baseline. Create your lozenge in a short hairline with the same technique from the previous letters below the X height, make a lozenge and then a dance troupe connecting here to your hairline guide. To complete the split ascender, use the edge of your pen to draw a hairline stroke for the left spur and then feel the gap . It's your turn to practice. Group four Letter King starting from best underline. Create a down stroke with serif stop before reaching the baseline Creator Foot diamond with the same technique coming back to the X height. Create at the agonal of fixed room, followed by a hairline stroke, keeping the 45 degree angle. Then create a horizontal stroke or a lozenge. Continue with a down stroke and then the foot diamond. To complete the split Ascender. Use the edge of a pen to draw a hairline stroke for the left. Spur filled a gap. Now it's your turn to practice. Uh, Group four H, starting from the center line, created out stroke with Sarah Stop before reaching the baseline. Crazier Foot diamond with the same technique coming back to the X height. Create a lozenge. Continue with a down stroke and then the foot diamond. To complete the spit ascender, use the edge of your pen to draw a hairline stroke for the left, Spur and feel the gap. It's your turn to right. We now move on to the last word off letters
13. The Minuscules: Group 5: just a reminder that the Knicks for the next group are different from the previous groups. Don't be discouraged if you didn't get it at your first try. Take your time to practice and you eventually perfected Group five Letter s start a little below the X height and make a short diagonal stroke, then started the quarter of the previous stroke to make a lozenge a short down stroke, stopping before reaching the baseline. Now go back to the other corner off your first rope and make a high under curve. Keeping eye to connect this stroke to your down stroke and at the X height, create a lozenge. Try to keep this section lined up. When you finish the letter, it's your turn to right. If you need more time to practice, please boss this video. Uh, Group five. Letter. The start a little below the X height and make a down stroke, stopping before you reach the baseline. Draw a lozenge and a hairline to be used as a guide. Next from the center line. Draw diagonal stroke, but create a short hairline at the beginning and end off the stroke, stopping it just below the X height. Make a nostril connecting it to your hairline guide and lozenge. It's your turns or practice group. Five There. X. Create a slightly stretched diamond below the X height and continue with a down stroke stopping before the baseline. Take note. You should end the down stroke slightly higher than what we did with the other letters. Make it the agonal stroke and a hairline stroke from the stem. Create the horizontal stroke with serif. Note. Another variation is to make a short curved downstream from the middle of the stem. Create a down stroke. Curving. It's slightly towards the left. Make a horizontal stroke at the middle of the stamp to finish the letter. Now it's your turn to practice. Uh, the first variation of letters E starting below the X height. Draw a lozenge, make it a regular hairline stroke with the 45 degree named angle, then horizontal stroke and continue with a down stroke until before you reach the descendant line. Create an over occurred to connect the strokes. Lastly, at the agonal hairline stroke towards a body of the letter, it's your turn to right. The second variation of letters E start from the excited to create the hardest on the stroke. Make a hairline stroke with their pen at around 55 degrees, create the same hairline stroke parallel to it. Create the wavy horizontal stroke, finishing with an upward stroke. Make the hardest on the stroke until the first hairline stroke and continue the heart is on the stroke from the second hairline stroke. Now it's your turn to right. There you have it. You're able to write black that her. Hand me the skills. I added an extra page with the ligatures. Ask your homework. You can practice them with the same principles and tactics as the individual letters. Now let's move on to the project and get your new false heels into use.
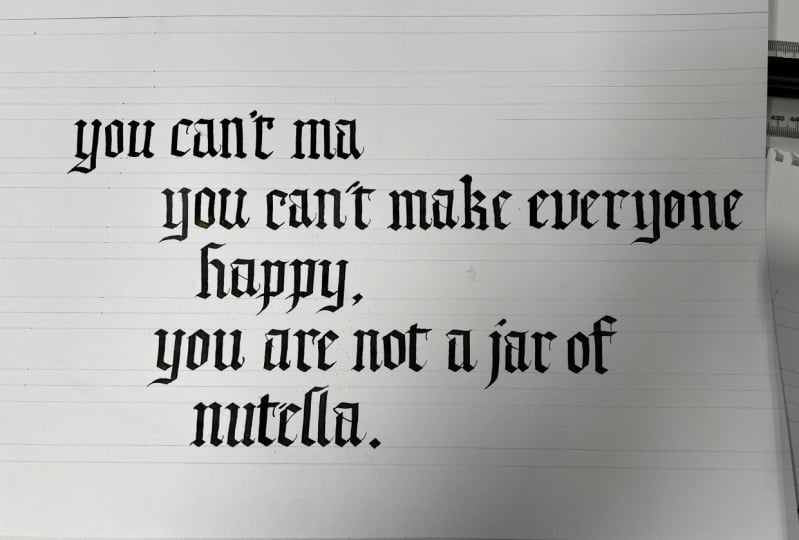
14. The Project: project. You see you watercolor paper or the special paper of your choice. Choose a poll burgers or code that we have prepared for you to practice writing. But before you proceed, joy, our margins and guidelines first, start and enjoy the process. Start writing in black hand. No. Yeah. First, create your margins on your paper. This will define where you will write your texts and you give a pleasant appearance is your overall word and then ate the guidelines according to the ratio that you want to use. You can use the ones that we practice to is to five Institute. Otherwise, you can also use another ratio that you want to experiment with for your project. No, there are the horizontal guidelines and then the vertical guidelines. This is a very important step, so never skip this part. Vertical guidelines will help you to keep your stroke straight and consistent. Come now that all the guidelines are in place, you are now ready to write. Remember to use the vertical guidelines to keep your stroke street and consistent once in the wild, check your species in our letter and the Internet keep in mind and tried to achieve the characteristics of the script while writing the letters. Remember to use the vertical guidelines to keep your stroke street and consistent. You should also achieve consistent spacing as this will give a great impact in your work. Don't forget to breathe, keep in mind and tried to achieve the characteristics of the script while writing the letters. Congratulations. You concluded. Extra record data script. I mean a skills. I hope you learn a lot from this past. Once you're done with your project or your meeting tests, police upload them in the gallery so you can share it through the other students. I hope to see you on my next class. Be sure to check my page for updates. Thank you. And God bless.
 Jacqx Studio, Designer | Calligrapher