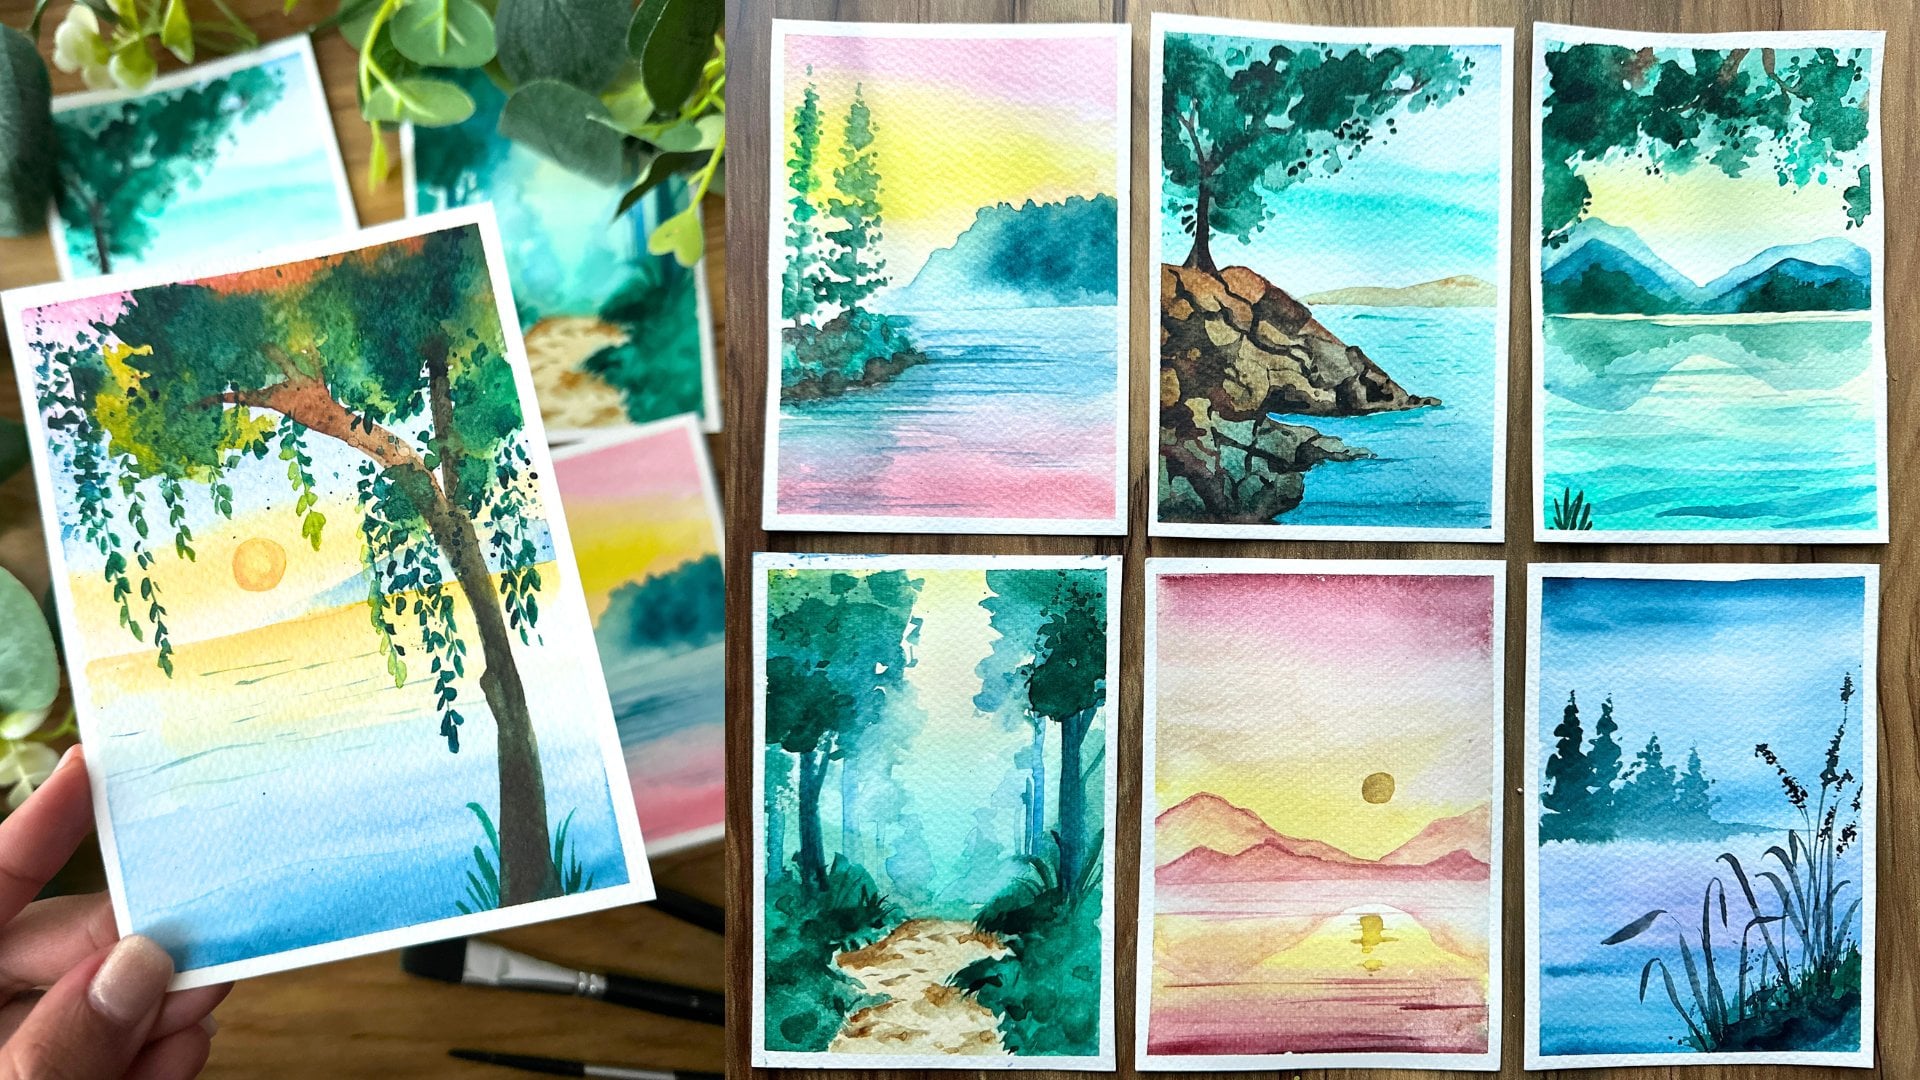
Transcripts
1. Introduction: It is autumn. I am so excited for this season. I love the colors. Beautiful. And there's just
so many beautiful elements. So in this class, we are going to be trying
out different elements and then putting
them together to create some
interesting projects. I'll start with the
different materials that you would need,
the color schemes, going over some simple
elements that you can try and then moving on to some
more complicated projects. This class is all
about pacing yourself. You can try to do
all the elements together. You can
take your time. It's really relaxing, and
it's perfect for beginners. Let's give ourselves this
time to paint, relax, create something beautiful, and just tune out to the
stresses of the world.
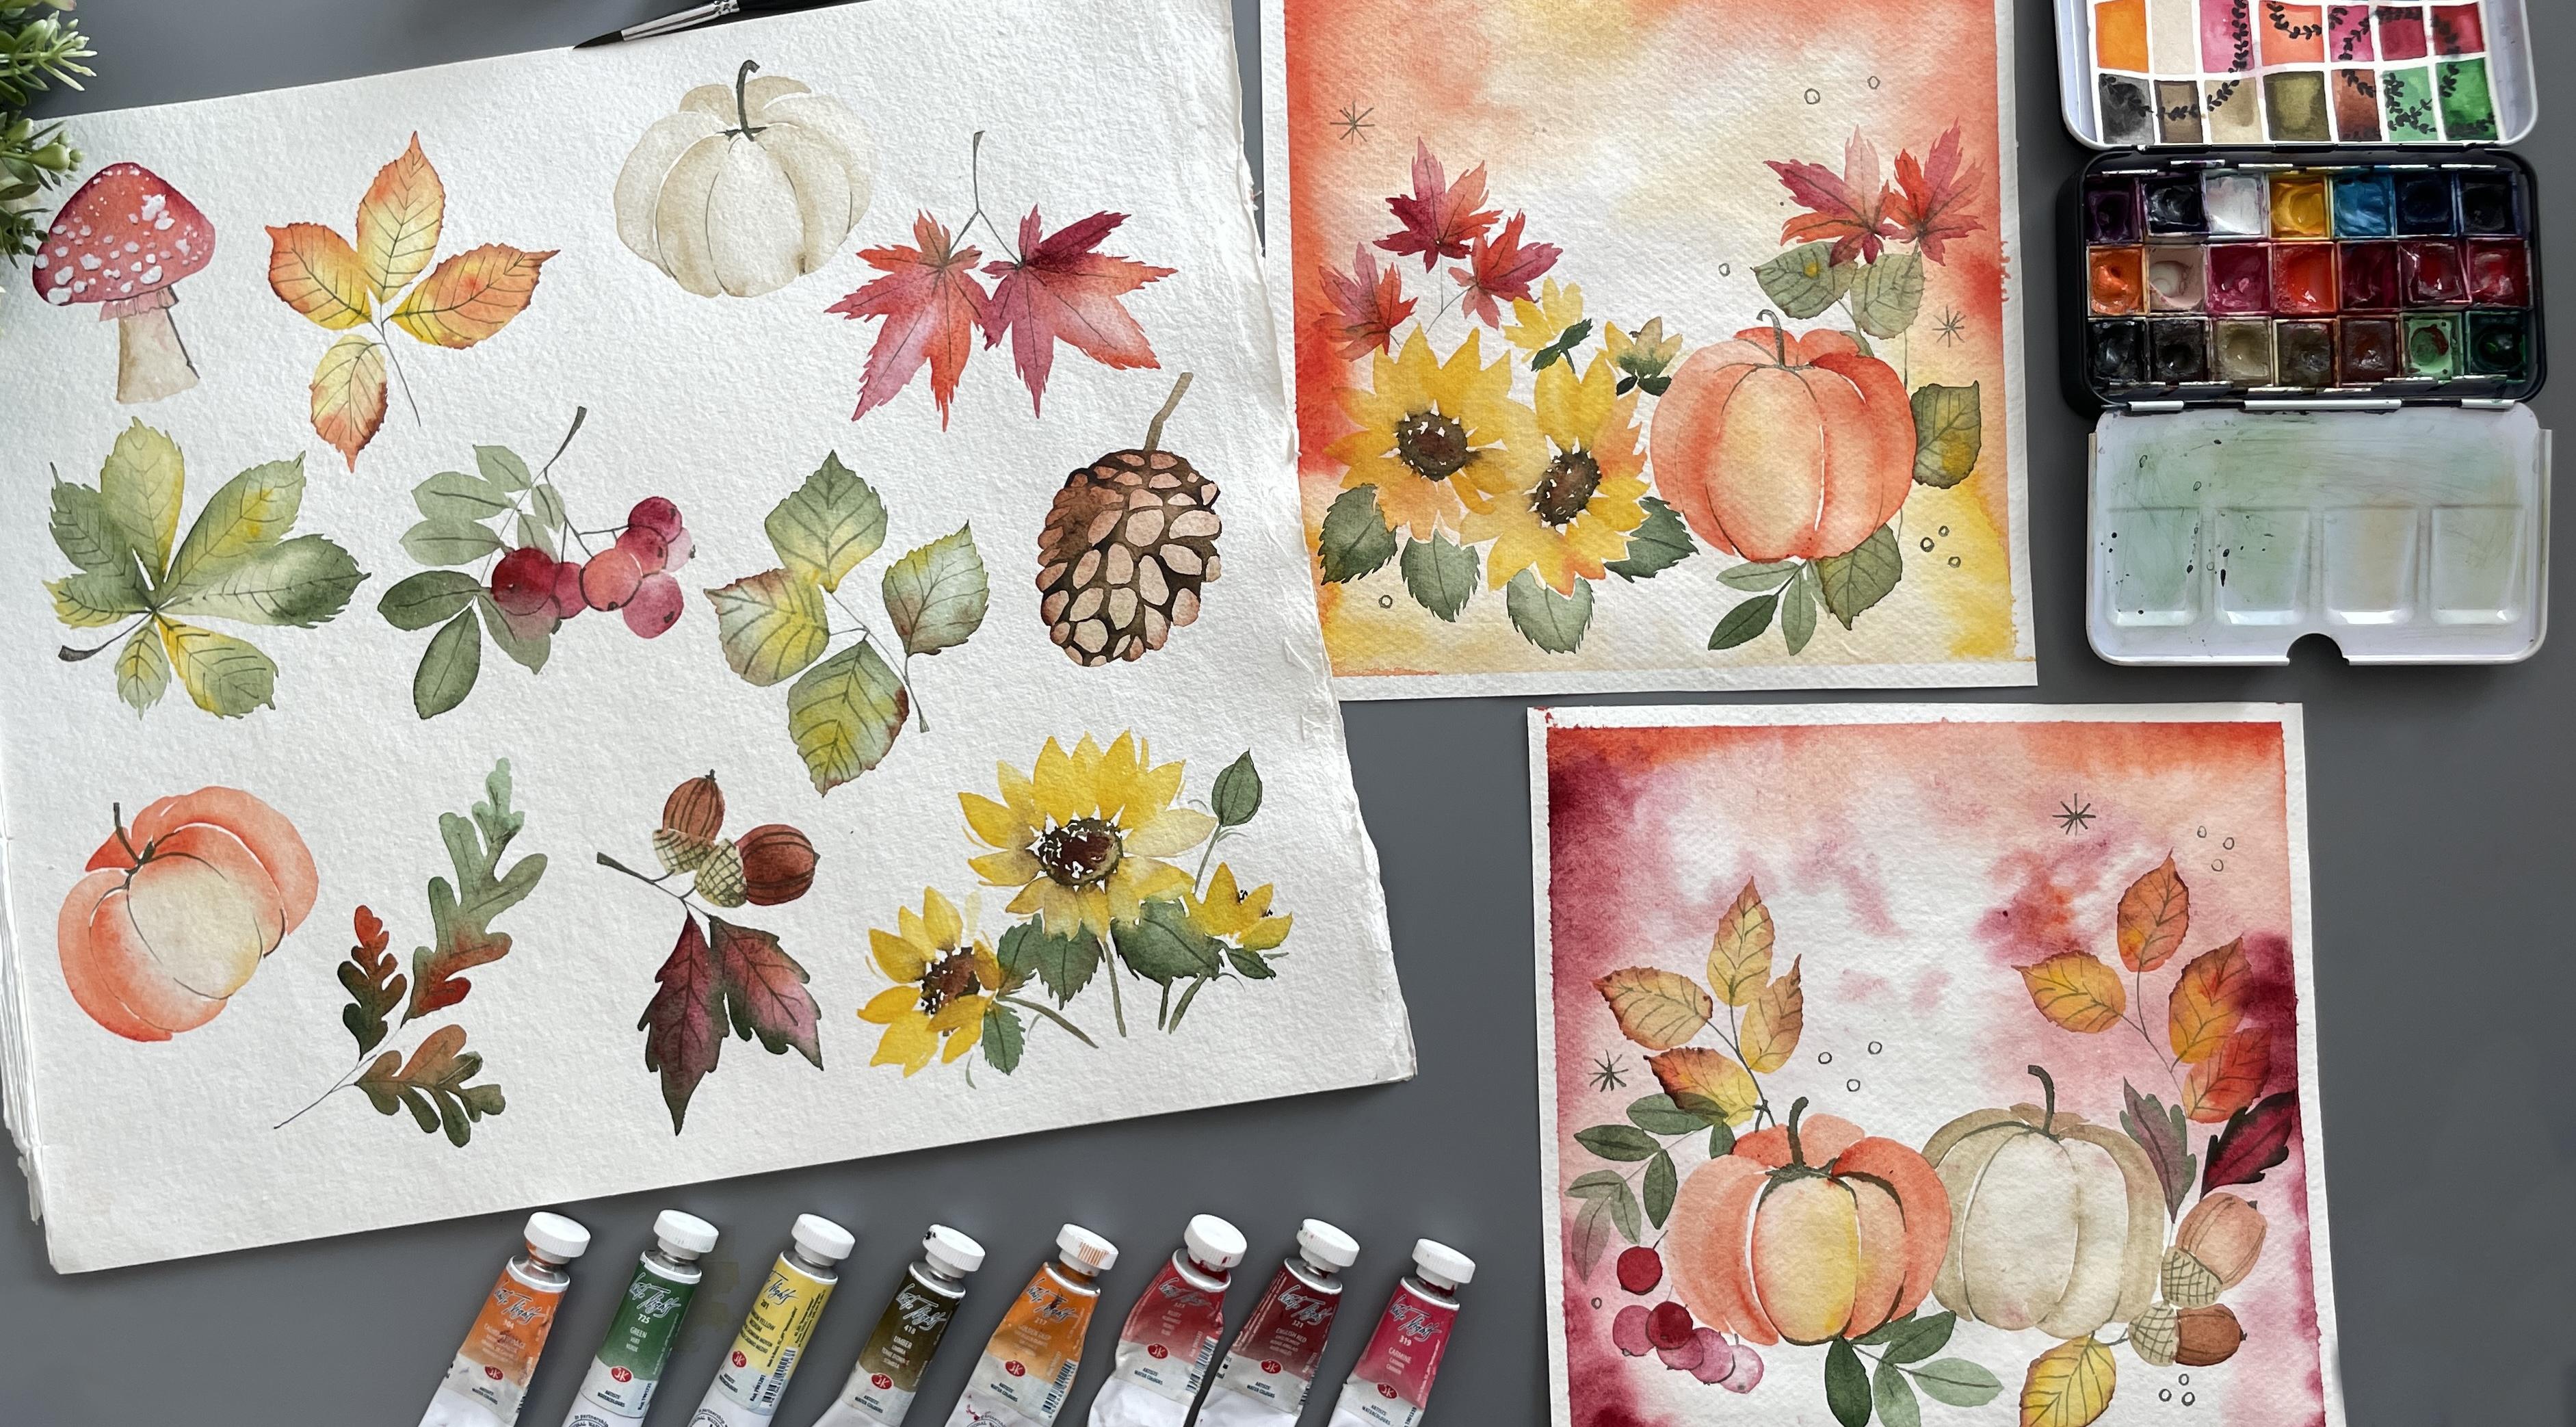
2. Materials: Let's talk materials. So the first thing we would
need is our watercolor paper. I'm using a rough paper, 300 SM, 100 person cotton, so it has a beautiful texture
that's going to go really well with our
projects for today. We also need two different
sheets of paper. So the practice paper, you can pick whatever size. I'm using 14 by 12 inch, and our art or our final
paintings are 7.5 inch by 7.5. Don't worry, all the details
are mentioned below, so you can have a
look at descriptions. After that, we're going
to need a round brush. I'm using a simple round brush. This is size four
from golden maple. Make sure that the
brush you get has a very nice thin shape, which is going to be great
for thinner details, as well as holes oh water. To add into some of our details, we'll also be using an ink pen. You can just use a normal pen, but I really like the way
an ink pen looks and feels, and you can also load in the
color ink that you want. So my set is from
Ferris wheel press, and they have beautiful set of inks that have a little
bit of shimmer in them. So I'm using the
brilliant beanstalk. It's a green color
with a silver shine. Uh, I love this set. It's a beautiful
color and really works well with
our autumn theme. You can see the ink
bottle and I've loaded it up into my bell. Next, we move into our paints. I'm using white knights. So the first one
is cadmium orange. It's a really deep orange color, perfect for our autumn theme. The next is our green, again, a very deep green color
from white lights. The next colour we're
going to be choosing is a yellow cadmium yellow. Followed by our umber. So a deep brown color. Mm. The next we're going to go for a
lighter orange. This is our golden deep. We now move into our reds. The first one is our ruby
is a bright red colour. M. Then we have English red, it's a slightly
brownish, reddish mix. You can see that color. It's really nice for your tree branches and goes
with our autumn theme. And finally, we have carmine has a slight
pink color to it, which is going to be, again, a great addition to our
autumn color palette. In addition, you would need either white gouache
or acrylic paint. Now that we have
our main materials, you would also need
some white tape to hold out the borders. You would need some water. So make sure you have all of your materials ready
before we get started, and some tissues, pencils, eraser, just the basics. Once you have all
your materials ready, let's get started
with our projects.
3. Pumpkins, Beech leaves, Mushrooms and more: We are going to explore
different autumn elements, starting with the
simplest one mushroom. For the head of the mushroom, we're going to do
a semicircle using carmine as we blend
it with water, add a little bit of cadmium orange to give the mushroom a little of
an interesting shade. Continue adding water
and blending it out. Add in more cadmium orange
to this splendid mix. And you can see I'm adding
it only to the right side. Using clear water,
we're just going to add the details for the stock. Using our umber, we can begin adding just thin
lines for the base. Once the paste has dried, we are going to be adding
the scales for the mushroom using white or uache
or acrylic paint. So you can see how I'm just kind of lumping
them together. And what I'm going
to try to do is have them more closer and
bigger at the bottom. And then as I move up, it's going to get
smaller and smaller. Now, using our ink pen, we can begin adding details. The first thing I'm
going to do is add a line for the edge
of the mushroom. Next, we're going to paint
the bottom of the scales, and this gives it dimension. It looks like the shadow and also makes it look like it's not just on top
of the mushroom, it actually is
lifted up a bit. H. We're going to then
add some lines along the ring and some more
details for the stem. Mm. Our next element is horse chestnut leaf. Very interesting shaped leaf. And so we're going to start
with our pen to outline where the different leaf
sections are going to go. And you can see how I'm
created a star shape. And this is going to
be the basis of where we paint out each leaflet. So switching to your round
brush and taking in green, we can start by painting
out some tear drop shapes. Use water to blend out, and at the tip, we're going to give
a little point While it's still wet, we're going to add cadmium yellow for a wet
on wet technique. Now, let's add some
quick strokes along the edge to show the
edge of the leaf. Move on to the next leaflet, using a lot of
water so that it's very diluted at the beginning. And then as we move to
the edge of the leaf, we're going to use our green with less water to
deepen up the color. The next side, following
a darker green, and then adding yellow
to blend it up. Now, all three have been the
same length, same height. But as we move into the
different leaflets, we're going to change
the length of them. For this one, we're
going to use yellow, and we're going to make
it slightly shorter. Mm. Dropping some green at the edge for a wet
on wet technique, you can use a dry brush to just blend it out a bit better. Let's follow the same
length for the other side. And this time taking green and adding more deeper shapes to it. The next leaflet is going
to be fairly small, so keep in mind, you can see how short that
is compared to the rest. And we're just keeping
it very light in color. Yeah. Let's follow the same length for the other side using yellow and then adding
a little green. So you can see how I keep
switching colors between, and that gives the leaflet very interesting shades of colour and just makes
it very unique. Mm. Mm. We're going to let
this dry for a bit, and once it's dried, let's add in our details. So using my pen, I'm going
to do the stem all the way from the top to the
bottom for all of them. Next, add in the
curves for the leaves. Again, just bring
it all together. M. Mm hmm. Mm. Mmm. Mmm. Mmm. And we've done this leaf. Let's move on to our next leaf, which is beach leaves. I like them because there's
a lot more color blending that we can really play
around with for autumn. So starting with my pen to plan out where my
leaves are going to be, it's just such an easy process, and then we can start painting. So I'm using my round brush
and taking in cadmium yellow and beginning
with the first leaf. As I move upward, I'm going to use
cadmium orange to deepen up that color and
give that autumn wipe. For the edge of the leaf, I'm using English red. And you can see how that color
actually adds a little bit of that brown tinge to
the edge of the leaves. Let's continue
playing around with each leaf in a similar manner, starting with a cadmium yellow, using water to blend it out, and then adding
some cadmium orange to deepen up that color. And then once it's done, using English red for the edges. Mmm. Mm. Mmm. Mm. Mmm. Quick tip for the next leaf, what I'm going to do is I'm
going to bring it downwards. This brings movement to the leaf and just makes it
so much more interesting. So just paint a downward
leaf where the edge is pointing down and follow the same steps
with the yellow, water, cadmium orange, and
then the Anglsh shred. Let this try, and then
we're going to use our pen to just
mark out our lines, starting with our nerves. Is it called nerves? I've been painting for so long, but I still don't know
the parts of a leaf, which is so funny, and I google it
every single time, just to make sure that I
get the right name for it. So yeah, the apex and the
veins, that's what we're doing. And it's so easy to do them with the pen compared to trying to, you know, use a paintbrush. I just is easier to control
and it looks so nice. To switch it up, we're now going to
do a white pumpkin. Now, 'cause it's white, it's hard to pick out the color. So what we're instead
going to do is use a very light brown umber, very water down, and that is going to be our pumpkin design. So starting with
an oval shape for the middle pumpkin part we're
going to do the next one, again, with our
umber, watered down. And you can see how I'm doing a little bump and then just
filling it up with water. Let's continue the next one, making it less
reducing the width. So same umber, watered down, giving a little bit more of a curve along the edge
and reducing the width. Following the same technique
on the left side as well. A pro tip here is to leave a thin gap between your layers. And that looks very interesting because it makes it look like it is highlight and very, again, very interesting so
you can keep a small gap. Continue adding the
pumpkin details for the back of the pumpkin
just painting out curves. Now, as a striic, we're just going to add
a little bit layer of umber along the edge
just to show the shadow. I love your painting to dry up, and then using our ink pen, we're going to add in just some of the lines for the pumpkin. You don't need to do
all of them, enough. And the stem, which is
very, very important. How fun are these? So the next one we're going
to do is maple leaves. We're gonna start again with
our pen to mock it out. So the first thing I'm
doing is our stem and just planning out how our
leaves are going to be. Because, again, with maple, you just need to make sure that they are placed correctly. After the middle one,
you have two along the sides in the
form of a downward. And then we have one just
perpendicular and then upward. So it's I don't know how to like I don't know
how I would call it, but you can see the
shape, you understand it, and that's basically
the shape for maple. We're going to wash
on our brush and then take in our Ruby, so red color start with
a very long leaflet. And you can see I'm
using a lot of water to just blend it out and add in some cadmium orange and then just mix it together. Adding some lines along
the edge for the details. The next one, again, going with our cadmium orange, very long and following
similar step. Now, we're switching
back to our Ruby, our carmine, but
show one you want. And these ones are
going to be shorter. You can see how that's much more shorter than the
first one we did. Adding a little water and
then doing the shortest one. And there you go. That's
half of the maple leaf, following the exact same
steps to the left side. Et's repeat the same thing on the other side for
the other branch. And then allowing it
to dry completely, we're going to use
our pen to just add the stem and the
veins for I don't think, in this case, you
actually need to add in the veins because it's
not going to be ispilt. You just might as well just
do the main the main vein, and that's enough. M. Can we really have autumn
without some berries? So we're going to do some
red muscous rowing berries and starting off with our stem, and we're going to just plan out where our
berries are going to go. It's just gonna be easier
once we get to painting. Just do a straight line and you can see how I'm just
doing tranches from that. And this where each of the berry is going
to be connected. Using carmine like to our first bury. While it's still wet, adding in cadmium orange
for bytont technique. And the next berry is
going to be a half. You can see how it's just
peeking through in orange. Let's go back and
take carmine again, and we're going to
do the next berry. This is three fourth with a little bit of it going behind. Here, we can switch
to ruby just for a deeper red color. Four. The next berry
using clear water, we're going to just
drag out some of that paint for a
berry at the bottom. Want to stil wet, add in some shruby and
continue painting it out. Take in carmine, continue
with another berry. Mm hmm. Mm hm. Mm hm. Mm. Mm hmm. Mm hm. Mm hm. Mm hm. Mm. Mm. Mmm. Once we're done
with the berries, we're going to add in our leaf. It's very simple.
So using green, we're just going to
do a curved leaf. Very simple. Use clear water and
blend out the rest. With the berries, the leaf basically is the
same on either side. So you'll see me doing this. It's the same shape. You're just going to
make sure that you do them on both sides,
right and left. Once it's dry, let's
add in some details, outlining the main
berry that was on top. And then we're just going to add our small green area just to show the
bottom of the berry. You don't have to
outline everything, but just some of them that have completely blended through. Okay. And next adding in the
main vein for the leaves. M.
4. Maple, White Oak, Acorns and more: Mm hmm. Now let's paint a
simple orange pumpkin. So this one is fairly easy. You're going to use
cadmium orange to make the center and then drop in a little bit
of cadmium yellow. What this does is give
a beautiful shade to the pumpkin and just make
it more tree dimensional. Add a lot of water to just
blend out the colors. Once that's done, we
can go ahead and add the next section of the pumpkin with a
deeper cadmium orange. Mm. Mm. As I move to the
back, I'm making it even more deeper in color. And you can see how I
left those tiny gaps between the layers
for the outlines. And it's that simple. We're going to let
it dry for a bit, and then we're going
to use our pen to just outline some of the
details and add in the stem. M. Mm. Another common
autumn tree whit ok, and we're going to do
the leaves for this one. Using the pen to just
draw out our stem, we're going to have three
different leaves for it, for the shape of it. So we start small with a small, and then we make the
length of it longer, and then again go back to small. You can see what
I'm doing there, and this is just
going to make it easier when we get
into painting. To start off, let's use green to start painting
out the outline. All I'm doing is following the
length of the line that we just drew and adding a
gentle curve at the top. So you can see we're basically
doing waves in a way. And that's an easy way to
paint out these leaves. Now, as we come
down to switch up the color so we get
a nice autumn shade, we're going to go ahead and
add in a different shade. While it's still
wet, let's take red, ruby red, and just drop it in along the bottom
for our autumn effect. Following the same step
for the other two leaves. This time we can change
around the color. So it's really up to you if you don't want to do the
entire thing green, you can start with the red, add a little bit of green, can really play around with it. The main thing is
to get the sheep right and to get
the autumn colors. Mm. Once you're happy with the
final leaves, let it dry. And then using our pen, we're just going to
go over the lines just in case they blend it out and just making them
a little bit more clearer. And Now, let's move on to our acorns. So I picked one of the basic acons with
a couple of leaves, and we start with
the stem again. It just gives us
such a good baseline of where everything goes. H. Starting with red ruby red, I'm going to do a long
line for the leaf. And then using cream, adding in the side
details for the leaf. So the extensions
following a scallop shape. And you can see because
it's still wet, the wet on wet technique
produces beautiful results. M. Now, acons are so easy to paint. When I first thought about it, I thought it would be difficult, but it's actually much more
simpler than you think. Just go ahead and
with your umber, a very lightened down
water done umber, draw paint out the
caps of the acon. And we're just going
for a semicircle shape. Next using our brown, which is going to go
ahead and paint the acorn with a U shape. Once this is dry, we are going to use our pen
to mark out our details. So thin lines across
the curve of the acorn, adding a little
dot at the bottom, doing the same thing for
the other one as well, curves along the edge. And then at the bottom. For the caps, we're just
going to do crosses. So you can see how
I'm just doing palern and then crossing it out. And that gives the texture
that you need for acorn. That was so simple. So now we're going to
move into the next one, which is our Birch. Sorry. Birch leaves, yes. Okay, so the birch leaves, the reason I wanted
to do this is because the shape of the leaf
is a little bit different. So what tends to happen is sometimes all of these
leaves just look the same. And so when we paint it
out, it all looks the same. So we want to have
different varieties and shapes going on. Also the placement
of the birch leaves, you can see how one stem has just brought out
two different leaves. And so the placement
also matters. So we're going to start off with our green and we're going to do a wide shape that just
connects to a tip. You can see how that goes. It's like a diamond
shape almost. Use some clear water
and blend it out. And while it's still wet, we're going to add
in some nice colors for a wet on wet technique. You can truly have
fun with this. I'm just keeping it very simple. So using the burnt umber to add some deeper
prawns along the bot. Continuing these steps
for the remaining leaves, an extended V shape
like a diamond, and then just using
water and plenting it out with the wet
on wet technique, adding multiple colors to the leaf to just give
it that autumn feel. M. M. Mm. Mm. Once the leaves have
completely dried, we're going to take up been and just add a couple
of more details. So adding the main vein and then some extended
veins along the edge. Mm. Mm. Mm. Mm. Mm. Mmm. So this is our second
last painting, and I think this is the
most interesting one and I think the most
important in a way, we're going to do sunflowers. So I started off with our deep brown color to do
the circle for the center. Gonna have a big circle, and I like adding it as dots because it gives
it a little texture. In the middle, we're going
to add our English red. So it's a slight tinge
of red coming through, which looks really pretty. Wash out your brush, and then we're going to
take our cadmium yellow, and we're going
to start painting out our petals one at a time. Start with a thin line and
then just gently pull it across in the form of
an elongated diamond. Continue this all the way. As we move to the
bottom of the flower, we're going to go
into shorter petals. And as we move up again, going into longer ones. So this makes it look
like the flour is bent, which is a little
bit more realistic. M. Now, let's try sunflower that's turned a bit
towards the left. For that, we are going to do the back part of the
sunflower and then the front. So doing our diamond
shapes for the petals, You can see I've
done a semicircle, just the top half. For the bottom half or the
front that we can see, I'm just going to do
a couple of petals. So just three of them. I've left that
space in the middle for the center of our flower. Using Ingles shred, we're just going to
fill up the center. In case you have
paint coming onto your petals and it's just merging a bit
more than you want, just wash on your brush and
use a dry brush and just lift back that paint,
the unwanted color. Et's do another sunflower bud. This is going to be a
very close sunflower, so it's not fully bloomed
yet. In the process. And for that, we're going
to just do a couple of petals right on
top, and that's it. We can use a little bit of brown to show that it's
just peeking through, but it's not completely opened. Using cream, we're going
to add in our leaves. What I like to do
is make sure that the leaves are connected
to the flowers, so just keeping them really
close to the main flowers. Mm. Mm. Add a bud, which is
fairly easy to do, an extended line
and then a circle, slide bump for the bud. Gonna let it dry and
then using my pen, I'm just going to make
some outlines along the bud to give that texture. M. This is our final painting, and it took me a while to kind of figure out how I
would want this to look. It's our pine cone. So for the pine cone, I'm going ahead with umber, just using a very light
layer with a lot of water mixed in and just
painting out egg shape, an inverted egg shape. You can see what I'm doing here. It's a little bit obvious. Go ahead, adding a
little bit of English had as we go towards the top. Now for the edge,
we're going to do scallop like a
very scallop edge. You see how I'm doing that, adding some shapes
with our English red. Let's allow this to dry, and then we're going
to do another layer, and that's going to outline
our pine cone details. Taking a deep brown. We're going to
make these shapes. You can see how it's kind of, I don't know how
to describe them, but kind of like patches. So along the edge, it's just going to poke outside. But in the center, we're going
to have it more prominent. They're not proper circles, just very irregular shaped. And this really works with
what we're going for. When it comes to the edge, you can just extend it out. You don't need to
outline the whole thing. Continue adding them. And as we move upwards, we're going to make it shorter and much more smaller in size. M. Mm hmm. Mm. Mm. Mm. Mm. Mm. Mm hm. Mm hmm. Notice, as we're going up, we're just making it
smaller, as I mentioned. Now, let's extend it and
paint out our branch. And this is our
completed pine cone. These are our beautiful,
fun autumn elements. I hope you really enjoyed them. And next, we are going
to combine them and play with them to create
some interesting projects.
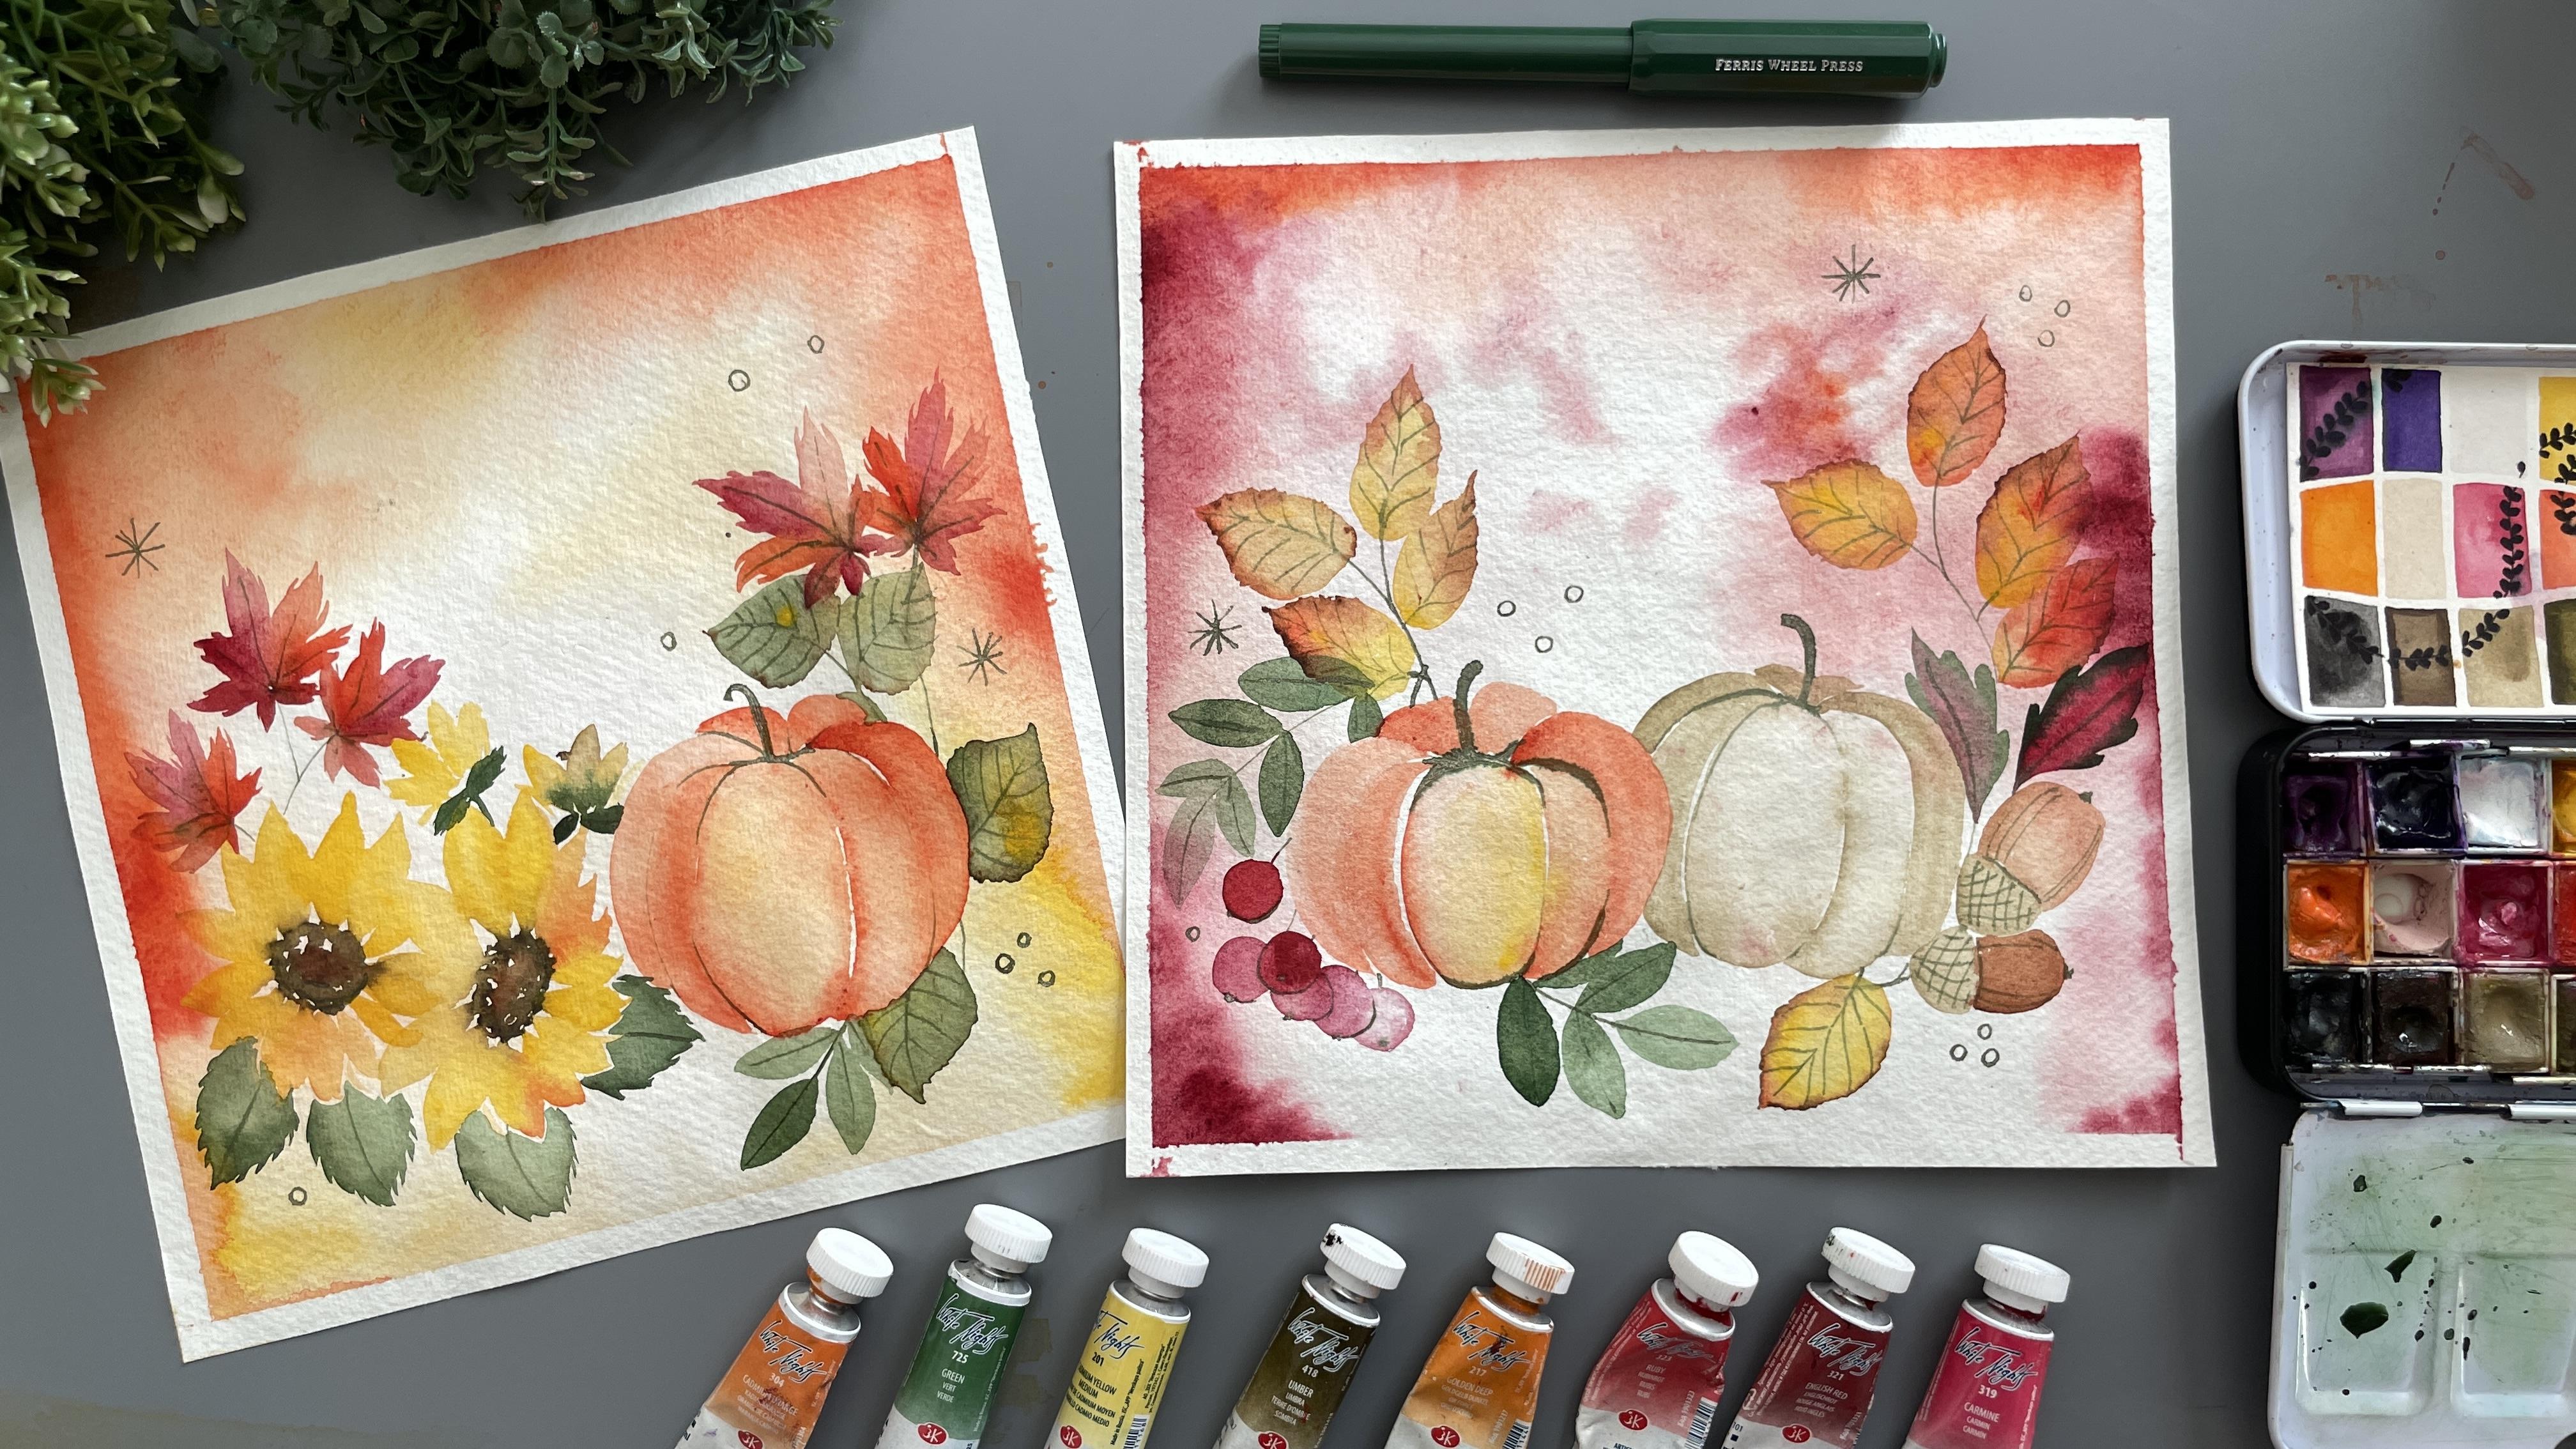
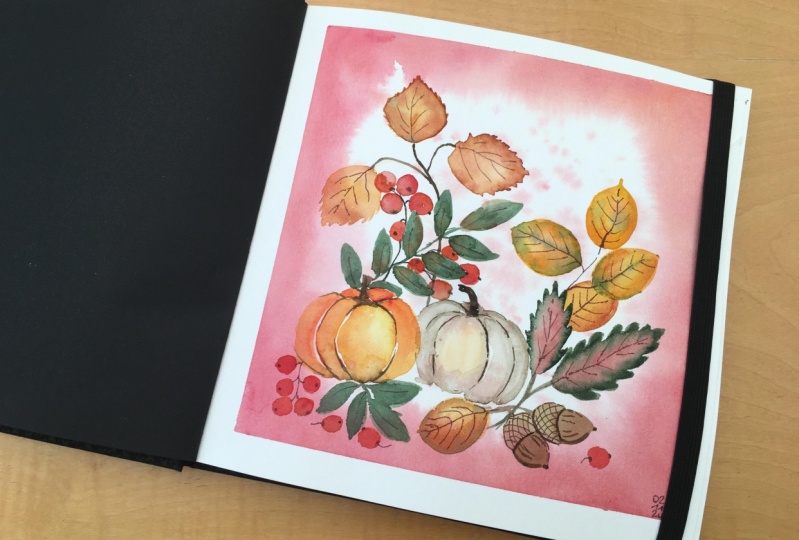
5. Project 1 - Pumpkin Magic: For our first project, I've taped down my sheet
all the way through, and then using a
really big brush. I'm adding in water to paint
out a beautiful background. So we're starting with
a wet on wet technique, making sure that the
paper is really wet. So when we add in our colors, it blends really well. Once you go back and
forth and make sure that your paper has
absorbed in the water, we can begin by
adding in our color. Now, I know at the center, I am going to have my elements. So I'm just going to make sure
when I add in the colors, I add them to the
edge of the sheet. So using that big brush, you can use a smaller brush. It's fine. I just found that this was a
little bit more easier. I'm going to start by
carmine and then a little of cadmium orange
along the edges. You can see how I'm
trying not to get it to the middle just to avoid, you know, the center elements
from getting ruined. Gently tap your brush so
you can get some splatters while the paper is
wet because when it blends and dries up, it's going to be much lighter, and you can see how that looks. Very interesting. I've switched
into my thinner brush, and I'm just going over the
edge with the dark colors so that they are going to
be much more wispul when we remove out our tape. So just go over it,
make it very rough. It doesn't need to
be really fixed, and play around with the sheet. While this is drying,
let's kind of think about ideas of what we
can add to the center. Maybe we can add in two
pumpkins, some birch leaves, and acorn, or pine cones, or maybe we can do
some sunflowers. Just brainstorm some ideas
of how you want it to look. Generally focusing
on one main element. So if the sunflowers are
going to be the focus, everything else around it
is going to be smaller. If the pumpkins are
going to be in focus, then everything else around
it is going to be smaller. Just keeping that in mind
and creating some ideas. You can even plan
around placements, maybe not having everything to do just at the bottom,
but to bring it, like, midway through the sheet
with write ups and stuff, if you want to say
happy Thanksgiving, happy happy autumn or a
court, anything like that. Mm hmm. Once you have decided on what your details
are going to be, make sure your sheet
dries completely. You can allow it
to dry overnight just so it really
blends through. And then we start
with our elements. So I'm going to do pumpkins for this one as my main focus. I'm starting off with
our orange and yellow, exactly how we
practice and going about and painting
out my main pumpkin. I've kept it a little
bit to the left, so I have space
for a second one. Mmm. Mm. Mmm. Mm. Mm hmm. Mm hmm. Mm. Mm. Mm. Mm. Mm. Mmm. Mmm. I'm going into the next
pumpkin with the umber, so making it a white pumpkin. Mm hmm. Mm hmm. Mm hmm. Mm hmm. Mm hmm. Mm hmm. Mm hmm. Mm hmm. Mm. Mmm. Mmm. Mmm. Mmm. Now, for some smaller elements, I'm going to go
ahead and do acorns. I think that would be a good
addition to what we have. Mmm. Mm. Mm. Mm. Mm. Mmm. Mmm. Mmm. Mm hmm. Mm hmm. Mm hmm. Mm hmm. Mm. Mm. Mm. Mm. Mm. Mm. Mm. Mmm. Et's add in some berries
to the left side. Mm hmm. Mm hmm. Mm hmm. Mm hmm. Mm hmm. Mm hmm. Mm. Mmm. Mm. Mm hmm. Mm hmm. Mm. Mmm. Mmm. Mmm. Mmm. Mmm. Mm. Mmm. Mm. Mm hmm. Mm. Mm hmm. Mm. Mm. Mm. Mm. Mm hm. Mm. Mm. Mmm. Looking at the paste, I feel like there is some empty spaces that
I'd like to fill. So a little bit on top, there's a lot of empty areas
as well as the bottom. So I'm thinking if I should do some beach leaves or play around with some of the other leaf elements
that we have. I think that would be better instead of adding
something different. So let's plan out our leaves and then we
can begin painting. Mm hmm. Mm hmm. Mm. Mm. Mm. Mm. Mm. Mm. Mm. Mm. Mmm. Mmm. Mmm. Mm. Mmm. Mmm. Mm hmm. Mmm. Mmm. Mm. Mmm. Mmm. Mm. Mm. Mm. Mm. The fun part with
knowing the elements is you can play around with
them as much as you want. You can really add
in the details. You can add in different
type of leaves. So I did the birch. You can add sorry, I did
the beach leaves. You can do the birch, as well. You can play around with
the horse chestnut leaves, or you can add in a mushroom. So just different things. They're all under
the same theme, so there's just so
much of flexibility. I'm going to add in
some stars with my pen, some circles to just
complete the look. Once everything is
completely dry, just using our tip and drawing it out,
being very careful. Yeah. And this is our final painting. Look at how fun that was. Now that you know the elements, just putting them together.
6. Project 2 - Sunflowers: How about another one of experiencing and experimenting
with our elements? Starting with our base,
using clear water, just adding a lot of water, letting it soak into the paper before we start with
our background. For this one, I'm going to go
in with our cadmium orange, so very deep orange color, just going over the edges
with this Let's now dropping some cadmium yellow to again bring in that autumn feel gently tap your brush with the yellow so that you
get some nice textures, details going into
the background. And now I'm going to
use my thin brush and just over the
edge again with the yellow just to
make sure everything just brightened up a
bit more once it dries. We're now going to let
this dry completely. And once it's dry, we can get into
painting our elements. So for this one, I'm going
to be adding pumpkin and sunflowers as
our main elements. These are going to
be our focal pieces, and then we have other
details around it. So starting with
our orange pumpkin, Mmm. Et's now paint in our
sunflower to the side. We're going to do a
set of sunflowers, so we have one that's full, one that's a half,
some buds going on. Mmm. Mm. Mmm. Mmm. Mmm. Mmm. Mm hmm. Mm. Mm. Mm. Mm. Mm. Mm. Mm. Mm. Mm. Mmm. Mmm. Mm. Mm. Mm. Mm. Mm. Mm. Mmmmmm Mmm. Mmm. Mmm. Use your green pen and add in your details for
the pumpkin once it's dried. Now that we have our
two main elements, we can get into
adding some details. Maybe we want to add
a leaf or a mushroom or an acorn or anything
that is very autumn. Mm In this case, I decided to go with
maple leaves so we could have a set of maple
leaves on either side. Mm hmm. Mm. Mm. Mm. Mm. Mm. And then some birch
leaves as well. So it's a variety
of leaves going on, and that's going to
give a really nice look to our painting. Mmm. Mm. Mm. Mm. Mmm. Once you add in the veins for the leaf, we can add in some
simple circle, some stars to finish
off our painting. If you want to add in a
coat for you to frame, that's also a really nice idea. I kind of wanted to keep it simple just to have it autumn. But I think eventually, I would like to actually
have a coat written on top and then just
have it framed. And I think that's such a great, even autumn gift to someone, a very nice Thanksgiving gift, something special
that they can keep. The watercolor effect just makes it lighter
and more special. H.
7. Thank you for Watching: I hope you enjoyed this class. I wanted to give you
something quick, fun, bunch of elements that
you can play around with, and you can really enjoy and create so many
pieces this autumn. Drop in your projects
in the project tab. I'd love to see them, as well as your reviews
and testimonials. It means a lot to
me to have a look. Stick around for my
upcoming classes.
 Femvisionary / Madhu S, Watercolor Artist and Instructor