Transcripts
1. Welcome: Have you ever wanted to paint a beautiful handmade
Valentine card, but felt watercolors was
too hard or unpredictable? In this class, I'll
show you how to create easy watercolor
Valentine pop up cards, even if you're a
complete bigner. Hi, I'm Madhu, a
watercolor artist and a Skillshare teacher, and I love helping big nurs feel confident with
their watercolor, especially when it
comes to creating meaningful gift worthy art. You'll learn simple watercolor
techniques for big nurse, how to paint soft florals with romantic details
step by step, easy pop up card construction
with minimal supplies, and how to turn your painting
into a handmade card. By the end of this class, you'll have at least one
finished Valentine pop up card and the confidence to
create more on your own. So grab your brushes, relax, and let's paint something
heartfelt together.
2. Materials: Let us talk about the materials you would need for this class. We have a wide
variety of materials, starting with our paper, you would need coal press paper, 180 GSM or 100 LB, coal press that we're going
to be folding into carts. The width of the card
is 17 centimeters with the height being 12
centimeters after being folded. Additionally, keep
aside some more papers for our pop ups. Next, prepare a set of
your watercolor paints. I'm using Art
Philosophy terrain set, which has a lovely mix of reds and greens that we would
need for our projects. Once you have your set prepared, we're going to need
a round brush, a basic round brush size four. Once you have your brush, the next thing we're
going to need is all the materials required for gold foiling from the
glue that you would need. It's a specific glue, along with the gold
foil leaves and flakes. Or alternatively, you
can use a gold pen or even acrylic gold for our projects to add a
little bit of that shine. If you're using gold foil, keep aside an old brush
to dust off the excess. Next, we would need our
standard pencil, ruler, eraser, also a nice
thin black pen. Next, we would need
double-sided foam tape. So it has a little bit of foam, as well as glue to stick down our pop ups and then a set of either paper
cutter and scissors, as well, and a bowl of
water for our painting. Once we have all our materials
gathered up, we can begin.
3. Gold Foiling: This is a mini tutorial
on using gold leaf. The first thing you
need is a specific glue that is meant for gold leaf. You can go to your local
art store and just ask them for glue that can be used. I found this at PBO. I don't know how you
would pronounce that PBO. Anyways, so find the
glue that works. I got one with a thin tip just because I can add in
a lot of details, and you'll see
through the projects, I use this to create flowers, to do outlines, to do circles. Next, we let it dry completely
till it is fully opaque. That is super important. It has to dry completely, so it should be clear
by the time it's dried. If it's still wet, you're
not going to be able to stick, unlike other glues. So once it's completely clear, you can just place your gold leaf and
gently pat them down. I decided to use a tweezer just to lift up the gold leaf because
it's very thin. If you have gold leaf sheets, you can use that, as well. Or if you have the flakes,
it works really well. I'm using a mix of
colors for this project, so it's bronze and gold. If you don't have gold leaf, you can just use a gold
pen or even gold paint, acrylic gold paint
for the results, so you'd get something similar. Once it's completely dried and you can wait for
about 5 minutes, and I do that just for
the sake of it using a dry brush and use one that you're not going
to need for anything else. So keep it aside just
for the gold leaf. And gently remove all the
excess gold leaf foil. You can actually save
these for the future, and you end up with your design. It's so pretty and gives such an incredible look
with your paintings, your card making, the
shine really shines.
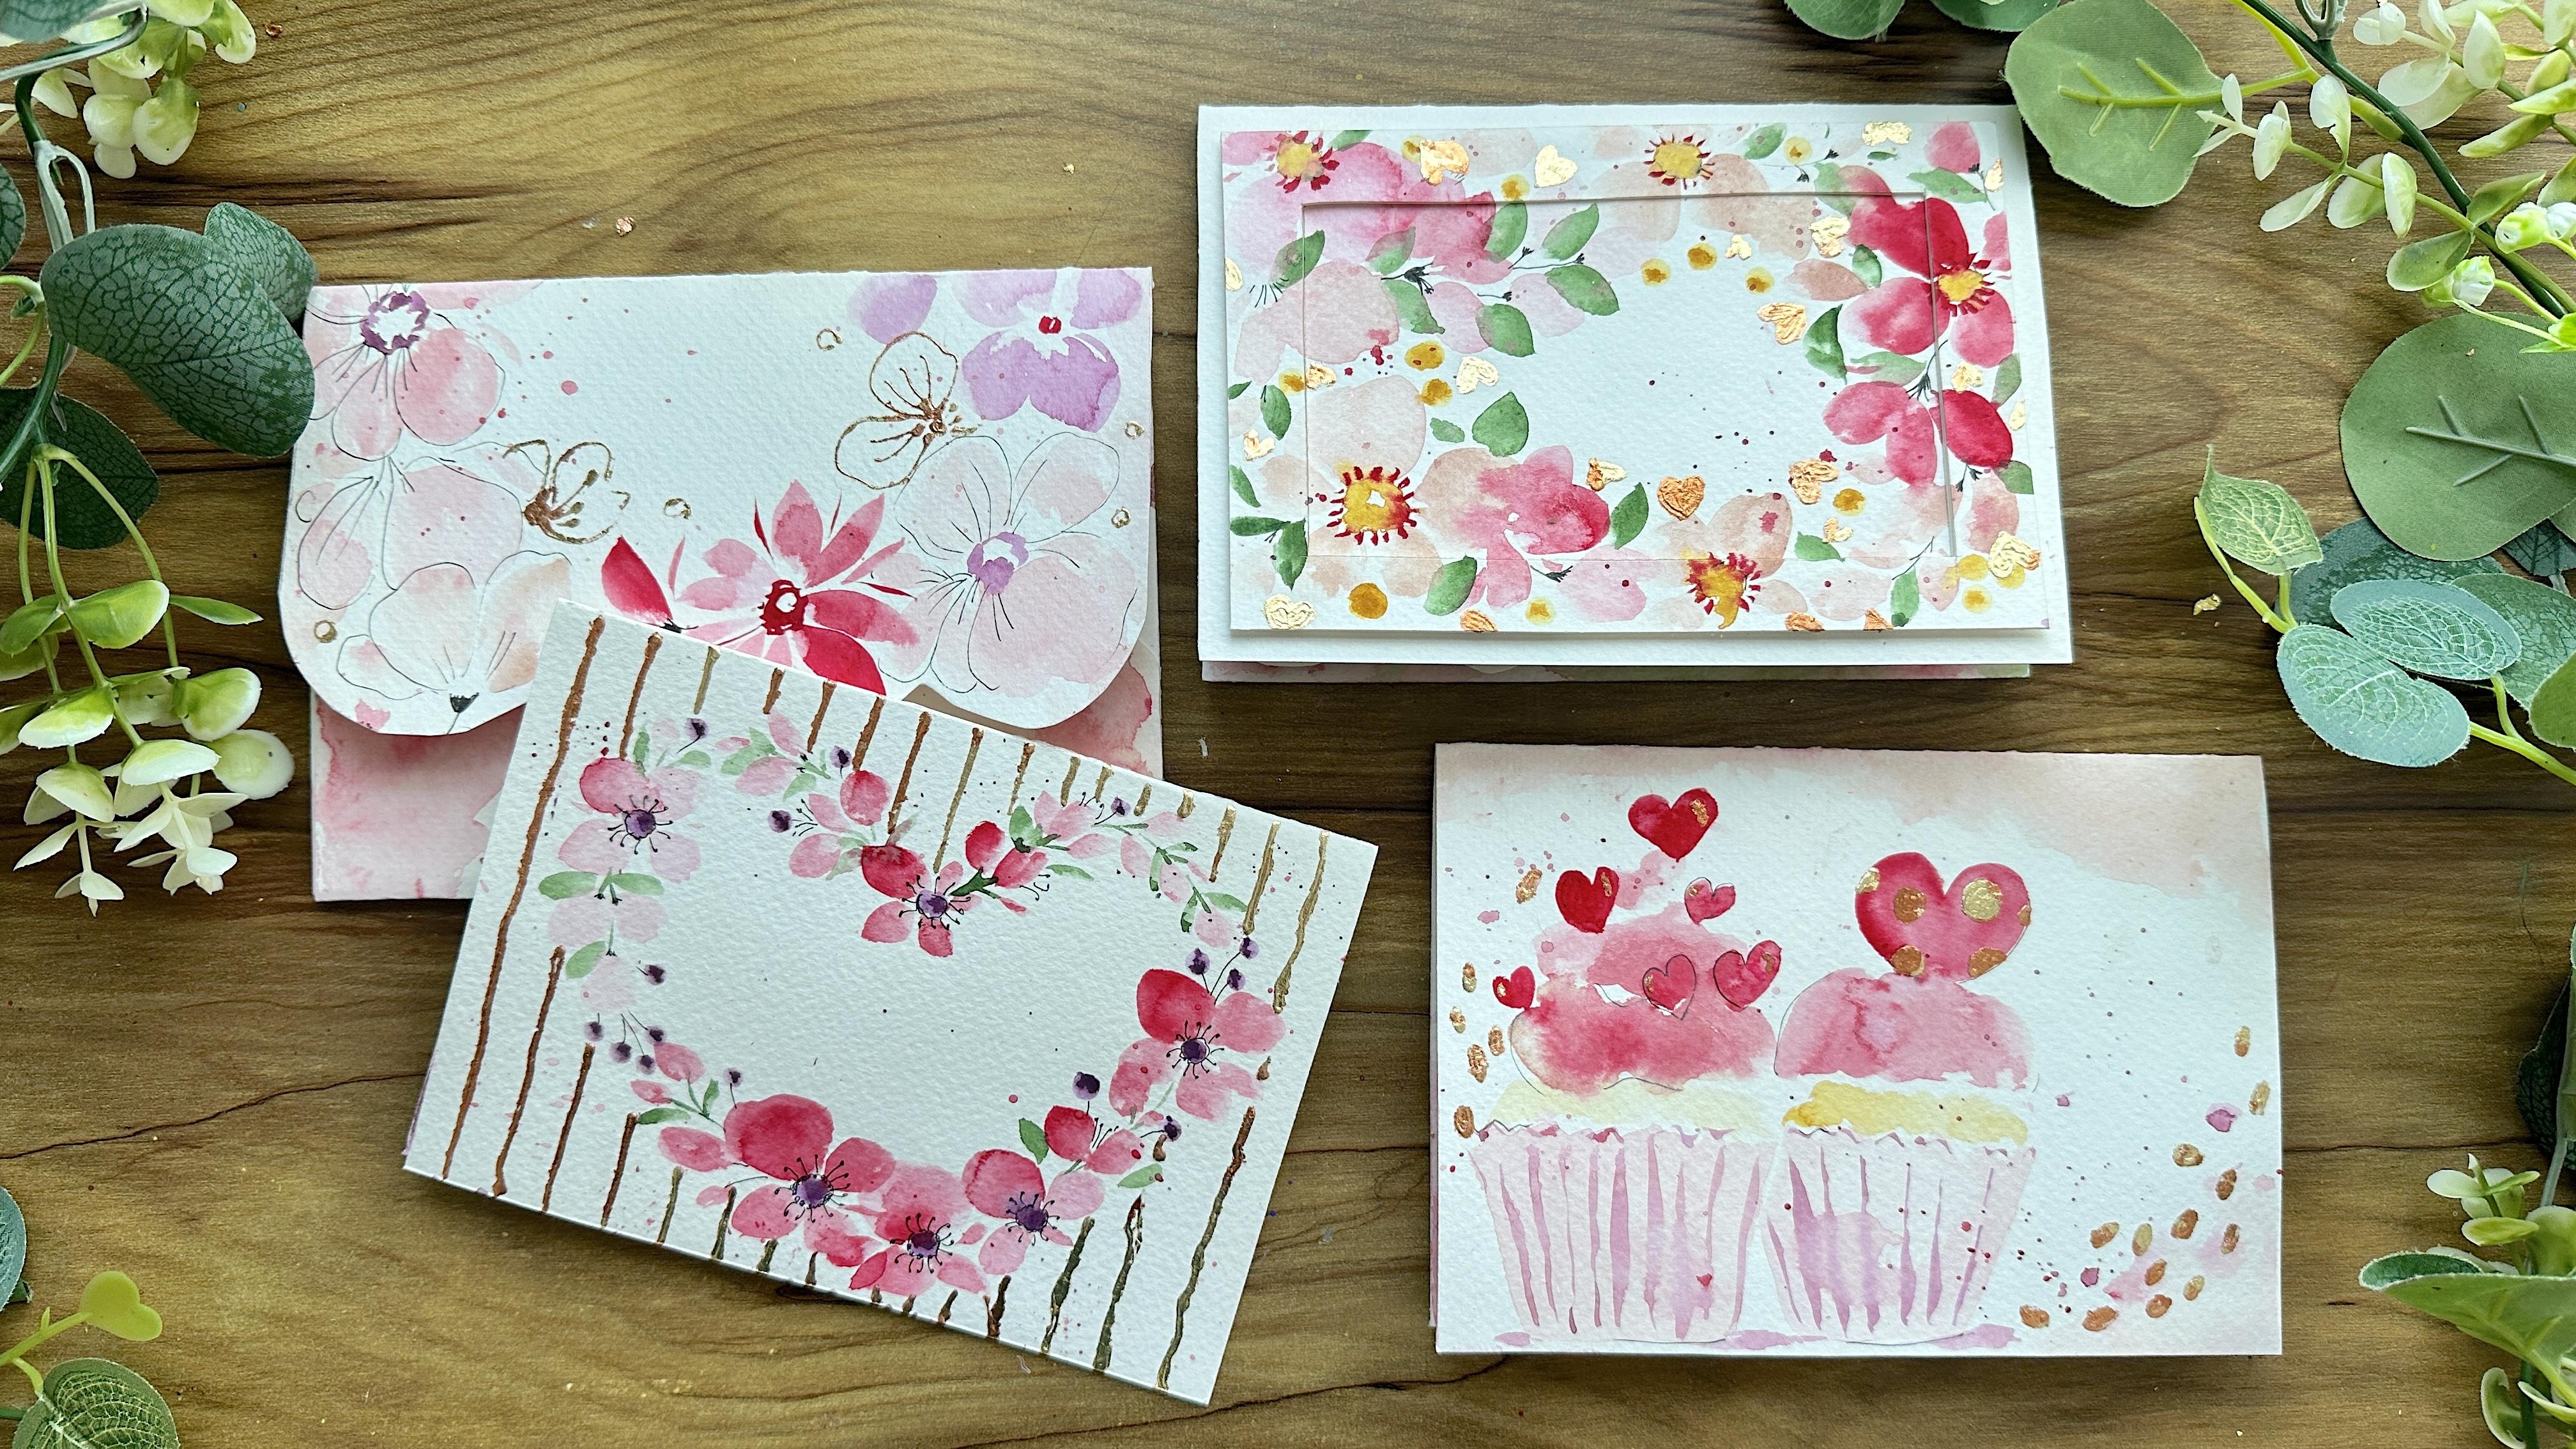
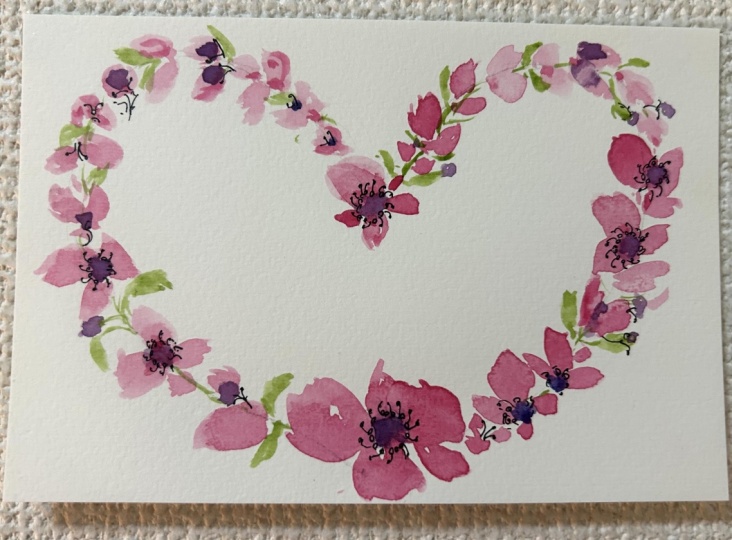
4. Card 1 - Heart of Hearts: Are you ready to
get started with this fun card? It is so pretty. I am so obsessed with it, love it. Love the heart. Perfect for gifting. Whether it's a loved one, it's a family member, a
friend, Valentine special. It's so pretty. Let's start by actually taking our card and drawing
out our heartship. We're going to have our simple pencil mark around
the heart shape. We're going to add a lot
of beautiful florals and then some gold leaf to add
some sparkle to the card. Keeping the flowers
really simple, I'm taking my round brush, and then we're going
to go ahead and add in some simple petals by just pressing down a little bit
of that red onto the sheet. Don't worry if your
petals are off shape. They're not perfect. It
all adds to the appeal. So you can see how I just added four to five
petals together, adding in a half, just two petals, some buds by just adding
one petal at a time. Let's do another set. This is a full flower, and we're just
wearing it around. So having some full flowers, some that is just two petals, some that's just one
to represent a bud. The main thing to remember is your main flour
should be bigger than everything else that you paint a bud is usually smaller
than the flower itself. You can add as many flowers or as few flowers as you'd like. It's all about the playfulness, adding in some mix by
some small flowers and then side view buds and
just creating a variety. We're going to continue
with this process through the entire
heart outline. If at this point, you want to switch around colors, you can. So you can see how I just
added a lot more water, so it became more lighter
on the left side. If you want, you can even
pick a different color. If you don't want
to use just red, the options are endless. So don't really limit yourself and just
enjoy the process. Now we're taking in green
and just connecting the stems and quick
little leaves. You can connect as many
flowers as you want or just keep them as they are using
leaves along the way. Once we're happy with
the overall look, we're going to add the
center of the flowers. I found a fun new trick, which is using a cotton bud and tapping the
center with paint. I feel like it's
a little bit more controlled and
looks really nice. Using the cotton bud, we can also add in some
berries along the way with the same purple just adding more details
to our floral wreath. Have fun with this. It's all about just
playing with your art. It all turns out beautiful
and fun and exciting. And the most important
thing is you're gifting or creating
something for a loved one, which itself makes
it so special. Using a black pen, just going around the purple dots in
the center of the flower. I'm adding in some filaments
to create some movements, using the pen to
add in some stems, we're really going mixed
media with this card. Aren't you just thrilled to
see how this has turned out? We now move on to
my favorite part, which is adding in
the gold leaves. Using my glue, I'm adding in thin lines outside of the heart. If you have a different
type of glue, you can use a brush for this process and then
wash out your brush. Again, a brush that
you don't usually use, or you can use a gold
pen instead of golfoil. I think goldfoil the metallic
flakes look so pretty, and it really shines. So I've let my piece completely dry where I can't see
the white of the glue. As I mentioned in the
gold foil tutorial, if you have any questions, please ask me the discussion
tab so I can answer them. I'm trying to be as
thorough as possible but I also know that maybe I wouldn't think of some of the questions
that you might have. So feel free to ask me
any of the questions. I'm using gold foil and just gently placing it
along those lines. You can tap in your foil a bit after you've laid
everything out using your finger. Can see how that's looking. It also looks really cool, even though this is
not our results, it's fun to play with. I Have a quick look at your art and just make sure that you've added
gold leaf everywhere. I like trying out the
mix of gold leaves because I thought it would
create an interesting effect, which it did, and I think
that was fun to look at. Gently tapping
down my gold foil, so it really sticks to the glue. And then using an old brush and just dusting off
the excess foil. Continue the process of
dusting off the extra. You can even move your
sheet around so that you really get to all the edges. The first time I tried golfoil. It was a new experience for me. I had no idea what to expect. I applied my glue, and then I put my goldfoil
and it wouldn't stick. It kind of came up in pieces. I didn't look nice, and I just ended up having
blobs of glue around, and I was so confused. After years when
I tried it again, I understood what
my mistake was. I hadn't let the
glue dry enough. So the most important
part with gold foiling is to make sure that your
glue is completely dry. It should look transparent. So usually the glue when
you apply is white, and then it needs to
become transparent, which means it has dried
and ready to be like, it's sticky enough to
hold the goldfoil. So nowadays, I apply the
goldfoil, walk around, maybe have some tea, come back, and then I'm ready
to apply my foil. And look at how pretty that is. I'm excited to dive into
the inside of this card. We're going to create
a fun little pop up that's just gonna make
everything pretty. Add in some splatters
if you'd like. Any other details you feel
would add to your card. This is the point to go ahead if you want to add a name
in the center or just write Valentine's or
Valentine's Day or I heart you. So many lovely messages
that you can add to the center portion of this card.
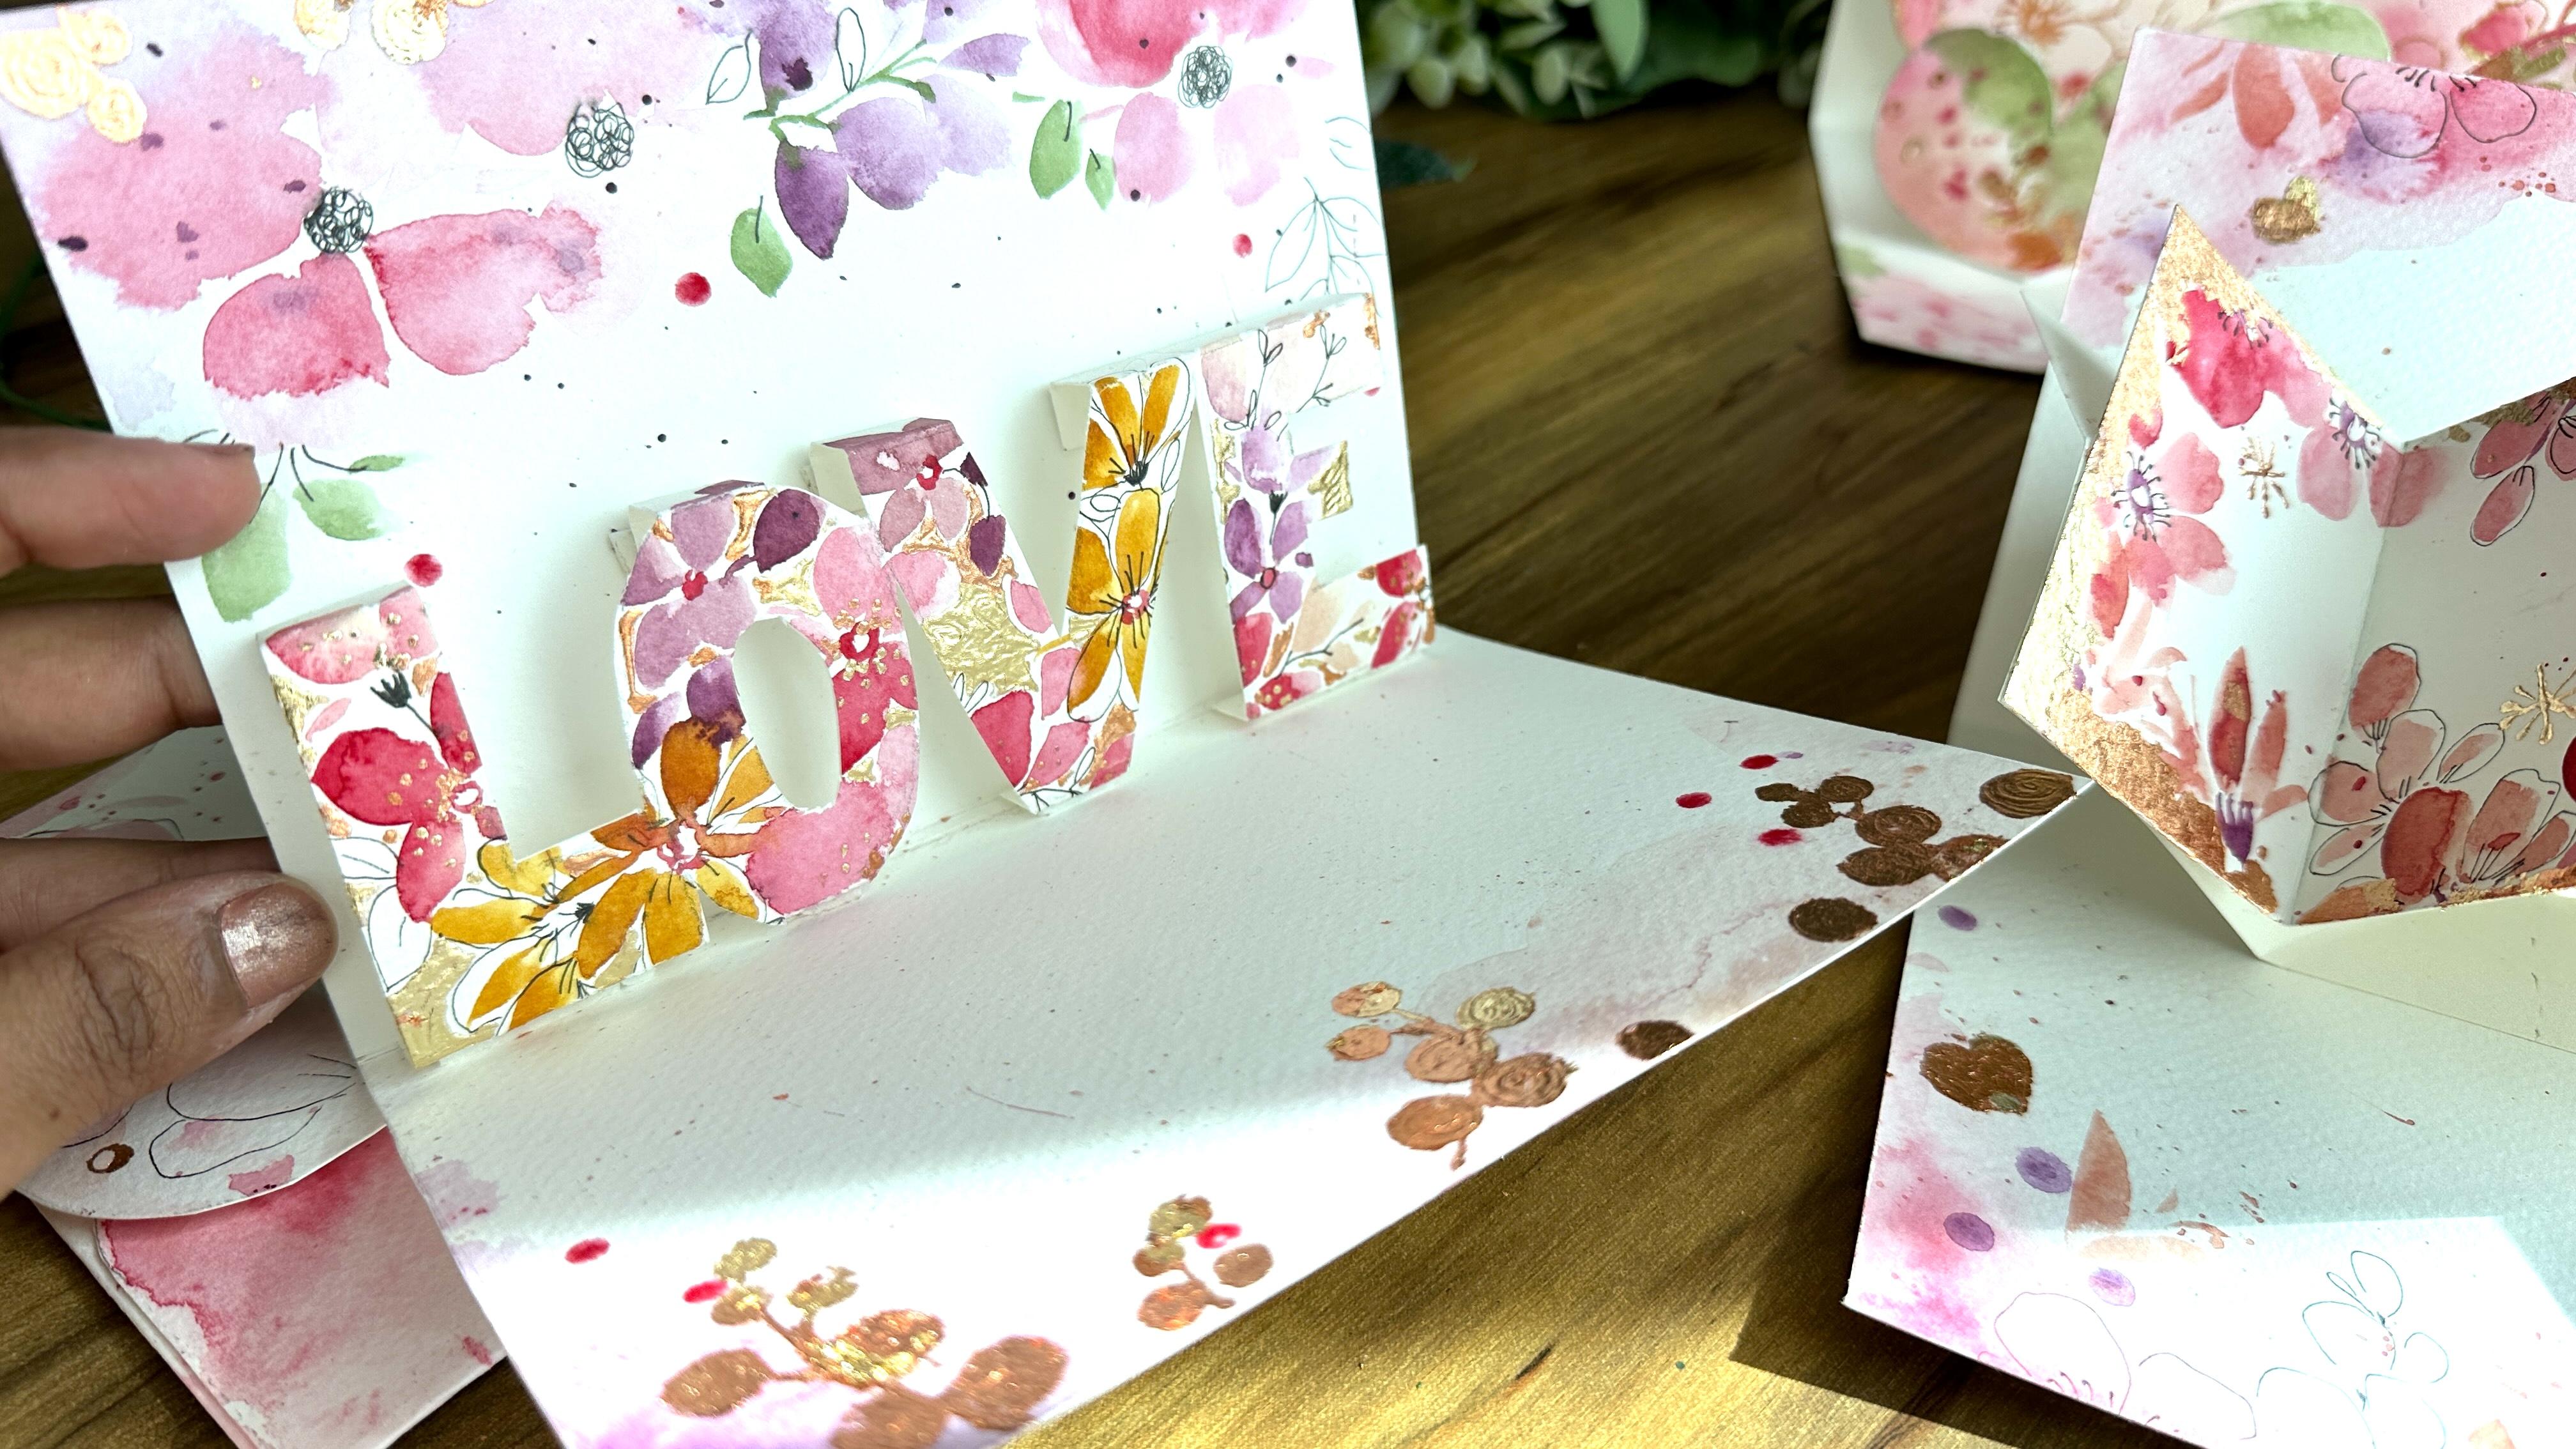
5. Love Pop-up: For this card, we're going
to try a really cool pop up. This is going to be
the easiest pop up off the list because I really wanted to try something different. We're starting with actually
doing the word love. You can choose any
word that you want. Before we begin,
let's prep sheet by making a really
pretty background, something cool, something we really like to add
to our pop up. I'm using purple to just add a nice base coat
along the edges, we can add in some really
pretty flowers to mimic our theme and also to mimic
the front of the card. We want everything to look
very similar for it to pop. Moving on to purple to add in some smaller flowers
and other details, we can add a final
flower to the end just to form a nice
border on top. I think flowers are such
a great thing to paint. It's so easy and it's so fun, and just small variations
in the size of the petals can create
different flowers. Once you have that ready, let's connect the
stems with our green, add in some leaves. Always nice to do that. And then we can use our black
pen and add in some of the details like the
middle of the flower, adding some leaves
with our black pen. You can use a crayon
if you'd like. Just think mixed media. You are not limited to just
the mediums I suggest. You can really play around. Sometimes you use
colour pencils or pastels for details like this. It gives a little
different effect. Add in as many leaves
as you'd like. Some along a stem or
some individually. Gently tap, tap, tap to add in some
splatters right on top. Now we can move to the bottom. Again, in the bottom, I was
thinking of doing berries, so something a little different to create a little variation. However, if you want
to keep it blank so you can write a
message, that's fine. Using a lot of water
along the step, so it really merges
into the paper. We're going to use our
cotton bud and then gently add in our
berries using red. Eventually, as you
move to the end, you'll see that I've added in some gold leaf berries as well. Di is your choice, and it depends on how you
want to play with it, if you want to add a lot of details or you want
to keep it simple. We now move on to our pop up. You can choose a simple word like love or if you want to put the person's name or if you
want to use anything else. The length of the entire thing needs to be 15 centimeters, so it's smaller than your card. For the height, you're
going to use 1 centimeter. This is going to be
stuck onto the card, and on top, you again have 1 centimeter and then an
additional 1 centimeter. You can see how I've also
cut out the silhouettes. So they're not just flat, but they also are connected to the words, if that makes sense. We can cut out the whole thing, and then we're going to
move on to the next step. So let's do this
with our main paper. I've taken my watercolor sheet. I'm marking out the length, so I know exactly how big
the word needs to be. And once I do that, I can
mark out the height so I know how tall the words
or alphabets need to be, and then I can write it out. I think a really cool thing would be adding
the person's name or if you want to
use special word, like if you want to mention gals and then in the writing
mentioned Galentines, you can really play
around with it. A quick side story. So this scale is in the
worst condition ever. If you look at it,
it looks broken, and it is really broken. But it's something
that I got when I was in college I
studied fashion design, and I've had it for so long that it's become
part of my past, and it's also like a memory. So I find it so hard
to throw it away and definitely harder to not use it because
it's my go to. I've used it for quite a while, even with the bumps and
bruises that it has. So continuing with our little
word that we've added in, make sure that you choose all the letters are
connected to each other. That's very important. And we also want to make
sure that it's a solid word. It's not like a calligraphy
style which could, you know, not look as
great with this technique. And the next thing to
remember is we want something that's also small,
not a big word. Like, you can't really
write Galanines or Valentines because
that's too big a word. But if you want, you
could, let's say, do just a little tab and
then write it there, but you can't do the
individual letters. So if you're trying to
experiment with this, do a little bit of testing before you try
something with this. As always, if you have any questions regarding
measurements and details of that, please ask me the
discussion step, and I'm happy to answer. I've extended quick lines
form the word up and down, erasing out anything
that doesn't look right. And then we're going
to paint the love. We're going to have
some fun with this. Yes, we're going to do florals, but we're going to
really use gold leaf to create something really nice. Let's begin with
our simple florals. Adding in some half
and some buds. Don't worry if you kind
of overlap the words. Maybe the flower extends to
two alphabets. That's okay. It looks really natural, and that's kind of
what we're going for. Add in some buds all the way. Let's switch to a
different color. And this time, we're going
to again use simple flowers, some buds, Switching to yellow. Let's add in some
multi petal flowers. And we're gonna keep doing
this adding more flowers through the entire alphabet, through the entire word. Using black pen, let's
add in some details. I'm connecting the stems,
adding more leaves, maybe even outlining
some of the flowers. Just trust your
intuition in this step. If you want to add
in other elements, maybe you don't
want to do flowers, maybe you want to try something
else, you can go ahead. I just chose flowers
because I feel like it is such a nice thing to paint. I really enjoy painting
flowers. It's my favorite. Let's tie something different
with the gold leaf. This time, instead
of just adding dots and circles and
things like that, I'm going to actually add
goldfoil along the background. So there's a lot of empty space in the florals, if you notice, and I'm going to add in
glue in those sections that are empty and then use
gold foil between it. So it becomes the backdrop or the background for our word. I think that's going
to turn out really cool. What do you think? Time to let it rest. And then once it's clear, which became evening for me, so it's a little darker. And then I had to
use the lighting. And adding in the gold leaf. I've even tried
allowing my glue to dry overnight and then adding
the gold leaf the next day, and it's still worked,
which is so interesting. I always thought
it was fixed time. I had to be short term. But no, you can just
have fun with it. And once you're done
with the whole thing, use your brush and
dust off the extras. I feel like this is going
to turn really, ly cool. Like, I have a lot
of expectations, and I think this is going
to be a very unique pop up. Y Ready to continue. Once you remove your gold, we're going to cut
off the letters, whether you need a scissors or if you want to use a cutter, whichever is more
comfortable so that you get the template. Remember to look down in
the PDF guide I've added in the templates with
measurements for all the cards. Oh, this is looking so nice. We're then going to fold
our little flaps upward. And then the top flaps, we're going to fold
them downward. Each shark, but it
wasn't just one. Chamber more
substantial as well. Sharks. It's full of
sharks. Up onto his chair. You can see sending sharks into a frenzy beacon that there were humans so they
could never be fire and acid, both of which consume flesh,
leaving very little behind. But there were
other ways to make sure that flesh was consumed. Full stop, full stop, full stop, running up to the ton and
leave in the streets and towers the interning with
quickly resolving inton people. We're running in every
direction. Which way to go. But certainly that everyone
was going the wrong. Through doors going
downstairs in the hotel. They're going to do
the same thing for the topmost flap
the 1 centimeter Okay mo the double side. And you can see how it's
just right in front. Fold it and press it down. You can see how that looks, and when you fold it, it actually gives you
a little bump. Press down your greeting card. And then we have the reveal. How cool is that? Do it a couple of
times to really make sure that it stays flat.
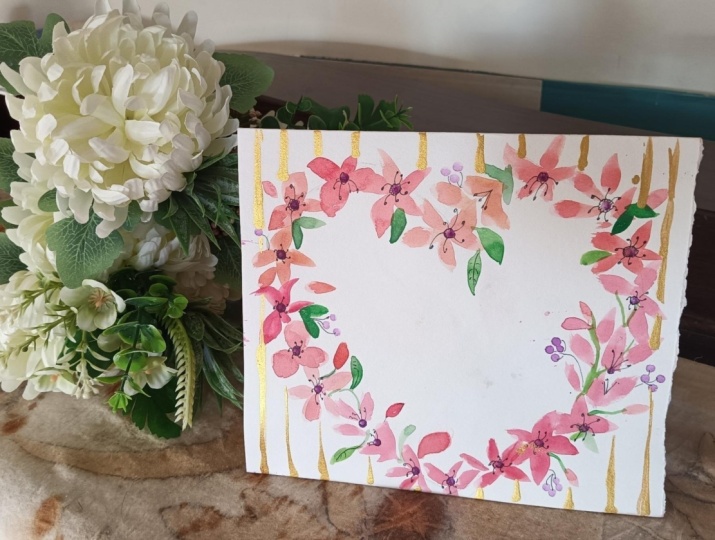
6. Card 2 - Framing Hearts: How excited are you to create
another interesting card? This time, I'm taking my watercolor sheet,
a secondary sheet, and just cutting out the
corners a little bit, so it's slightly smaller
than the front of the card. Let's keep our card aside, and we're going to
get into painting some pretty flowers all
through this piece. Et's begin at the bottom, adding in flowers using red. We can add a side flour by just painting four petals and some buds by just adding
single petals at a time. Mix a little bit of
the red with either a white or a beige to give pink. So we can add some soft
pink flowers to our card. Again, adding some
half flowers by just painting three petals, as well as some buds. There is no wrong cure. It's about just playing
and enjoying the process. Add as many flowers
as you'd like. If you want to add
some smaller details, smaller flowers, go ahead. You can make them
as big as you want. I decided to go for
big bold flowers, really making those
petals stand out. But if you want to go
for smaller flowers, something cute, you can do that. I'm also adding a lot of water, so it truly softens
up into the sheet. Adding bold red to create
a lovely contrast. Continue this process
through this entire paper. Using a cotton bud, I'm going to take yellow and add in dots for the center
of the flowers, as well as maybe some buds or
berries through our paper. This little yellow adds a pop
of color to our painting. Using a black pen,
let's draw out our remaining
details from adding little details around
the center flower circle to adding the stem
for the flowers, connecting the buds and any other detail that we feel would really add
to our painting. Time to switch up to our green, and then we're
going to add leaves wherever it makes sense. I usually like to add leaves
connecting to the stem. You can make bigger leaves
because I felt like the smaller one was too small. So you can make some big leaves, some of them connected
to the main flowers. And just playing on the variety. Some small leaves,
some bigger leaves. Nature is all about variety. Let's add in some
splatters using red, creating a more
watercolor effect. We want these cards
to feel hand painted. So perfectionism isn't required. It's all about just having
fun and sharing how you feel. It's a little part of
yourself that you're giving, and there's so much of meaning
to giving handmade cards. I think it's so special, and that's what matters. O Time for our gold foil. Once everything has dried, we're going to take
our goldfoil glue and just paint out some hearts. When I decided to do a
project for Valentine's, I decided that I had
to use goldfoil. I love goldfoil. It's such a perfect
touch to uplevel your art to make it look
special and very professional. So I had to add it in was part of my thought process when
I was planning this class. We're going to add
little hearts around. You can have some of them
pointing outward towards the edge of the sheet and we're letting it completely dry. You can see right now
you can't even see the glue because it has dried
up where it is transparent. Then we can take our foil
and place it on the hearts Sometimes the glue dries so clear that I
can't even see it, and I have to move my paper around against the light to
actually see where it is. Placing a foil through
each of the parts. I'm trying to create
some varieties. So some of the parts
are not fully gold. They have a little
bronze in them and just having some playfulness to this. Skipping ahead. I like resting it for a bit, maybe just a minute
or two and then using my old brush and
scraping out the excess. And Isn't this so pretty? We now take our scale, and we're going to
leave a little gap along the edge of the sheet, maybe a 1 centimeter
gap on all four sides, and then we're going to use
a cutter and cut it out. So you're going to have
two sheets of paper, a frame and the main painting. Are you curious
about the next step? Well, let's separate
out our two sheets, and then we're going
to take our main card. The first thing
we're going to do is tape down our first painting, the bigger sheet in the
middle of our card. You can use a glue or
double sided tape, a flat one and press it down. To make sure I press
it down in the center, I usually first mark
it with a pencil, then add the glue and
then place it exactly. So that way I'm not placing it while my glue is still there and then trying
to adjust the position. This ensures that I
get the perfect spot. Press it down, and then
once you're happy with it, we're going to take our frame. Now, the frame, we're going
to add a little bit of that foam double sided
tape and lift it up. So it creates a
three D frame look. A a Time to place the frame right on
top of our previous layer. It's going to give a
little height to our card. And I also love
the three D effect because it gives a
lot of interest. And because the flowers
are from the same sheet, it looks like it's part of it, but it's also higher. Definitely interesting. Look at that little height. You can also add
a secondary foam, so you have two
layers of foam before you attach it to the main card. So it gives even more height.
7. Heart Pop-up: A of all the pop up cards
that we have worked on, this is definitely my favorite. It's also really easy to do, which is so great. We're going to start by
painting our background, and I'm keeping it simple
by adding in berries, using your bud to add in
our little dots with red. Add them however you want. If you want a lot,
you can go ahead or if you want to add a few, it's really up to how you're feeling and what you
think makes sense. Then we connect everything
using our round brush. And then using green to add in some leaves and
other details. I decided to keep
this super simple because the next things that
we're going to add into our card are going to be really
detailed and I would say, are going to stand
out a lot more. So let's keep this super simple and just focus
on a couple of berries. So there's some painting. At the same time, it's not
going to take away too much. Once I started
doing pop up cards, I got really excited about
experimenting with them. I've been trying a lot
of different styles, and this one took me
a long time to do. I actually had to redo it multiple times because
I wanted something that was slightly more advanced but also not that
difficult to follow. It took me out of trial error, and I hope you enjoyed it. And if you have any questions, please feel free to ask me
in the discussion stab. So using my gilding glue, I'm adding cute
little rose sorry, hearts along the
border right on top. If you want, you can very
easily turn this into a different style card if you want to make it
a different theme, and all you would do is just substitute the hearts
for something else. I thought the little addition
of the shiny golden flakes is going to be perfect for
this card and this project. Letting it dry completely
till it's transparent. And then using a gold leaf, you can use a mix
of colors or if you want to use one, that's good. I'm really enjoying
using mix of colors because I think it's giving
a very interesting look. Again, you can add as many
or as few as you want. I'm sticking to the
top part because when the hearts come in
for the pop up, they're going to be more on the lower side towards the fold. Dust off the Xs and
our bases ready. You can also paint the bottom as well with a little bit of color really up to you so that you get a really
fun looking card. I've even tried adding text using my Gilding glue
and then adding gold. That works really well. Or if you just want to use
gold acrylic paint, that's also a fun
mixed media concept. A little shine is great
for cards like these. H. How are you doing so far? Look at what we're
going to end up with. I'm so excited. I've added in the PDF below
for you to look through, and this is the basic guide. So we're going to have
three different hearts of the sizes mentioned, and then we're going to
have three little papers of these varying distances. Let's start by adding our heart, taking the measurement,
and drawing it out. We're going to make
three of them. If you want to change the shape to something else, you can, but just make sure
that it's within that heightened width
that I mentioned. For the hearts, I
wanted to show you a couple of different
techniques you could use using the gold foil and also different ways you can go about decorating
your hearts. I'm using first a base color, just mixing around the reds, a little bit of the blush, and then just really
filling up that background, making it very textured. So I'm making sure that I don't move my brush
right to left. It's more if you see, I'm pushing it down and kind
of smooshing it around. So it's more uneven and
forming a cloud like effect. This texture is much more
soothing and more softer. You can add much red or as
little red as you want. Let this be the part where you play around and just have fun. Once you're done with the base, let's tap our brush to
get a little texture, a little splatter
onto our sheet, and then we can add
in some flowers. I'm actually letting the paper still stay wet while
I add these flours, so they really merge
into the background. This way, there's no
specific formation or, you know, fixed. It's more loose and flowy. Let's use black to add
in a couple of details, and then we're going to
let it dressed for a bit, or you can use a blow
dryer and blow out your painting before moving on to some details
with our cold foil. With the gilding clue, I decided to go really detailed, and I'm adding outlines
for all of my flowers. So just the outlines are going
to have this gold shimmer. If you have a pen,
you can use that. I really wanted to use foil, as I had mentioned before, because I really
like the look of it. It's a little solid
compared to what I noticed from gold paints
or gold markers. But I think it still
gives a nice effect. It really depends on
what you're going for. You can make the lines as thin or as detailed as you want. Because I have the liner glue, it's a lot more easier, so I highly recommend it. But if you don't
have the liner glue, then I would suggest
using a pen as it is, or using a little bit more of a bigger detail instead
of just outlines. It's so interesting as artist, we end up with a supply of so many items just
sitting with us. I have draws of paints, oil pastels, things
that I don't use. Like, I have texture paste that I've never used. I've
never tried it out. But I've been very curious, and going to a
stationery shop is like going to a candy shop for me. It's just I can't wait to
buy everything in there. And so I just end up with so many things that I don't use. Gold foil itself is
something that I've had for years. I've had it for Since I started, I
think even before that, I think even when I
was working before, I still had it like,
five, six years back. And even then I just had
it and I never use it. I tried it out, as I mentioned, and I didn't know how to,
like, get it to work right. And so it just stayed with me
as a crafter, as an artist. So this is something
really, I think, unique with all artists. And anytime I meet an artist,
it's always the same thing. They've just bought things
that they don't use, or anyone who even
loves art just ends up having either supplies or papers or brushes
just sitting at home. Are you one of those
people? Because oh, my God, going into a stationery shop is so difficult because I just want to buy
everything. Right? Like, everything
looks so interesting and everything looks so fun. And yeah, it's it's interesting,
letting go of that. And then after a
couple of years, looking at your collection
and going like, Oh, when did I buy that? So moving on to the
next two hearts, and you can see I'm just
doing a very fun base, adding a little bit
of green to add a pop of color using the
same splatter technique. This time for the glue, you can actually fill
out some flowers, and this works really well if you don't have a glue and like, you don't have such
a thin tip and you have something a
little bit more thicker, you can actually use an old brush that
you're not going to use and just paint out your flowers exactly
like we did before. So take a little bit of
that glue on a palette and then take your brush
and use that to paint. This is going to be really great because it's also
going to give us patches of flowers instead
of just an outline. In this project, since we
have three different hearts, it's nice to have a little bit
of variation between them. This time around, I decided
to just start the next day. I let it completely rest through
the entire of yesterday, and then I started
fresh adding in my little leaves all
through the hearts. But continue the process and then just dust everything
off all the extras. So you end up with a
really fun looking heart. Cut the two pieces separately. So we have three hearts
all ready to go. Now the next step
is going to be a little tricky because
we are making the pop up element. The PDF is below, so
you can have a look. I'm just going to show it to
you on the screen right now. So you can see the three little tabs that are right on top. That is what we're going to
be using for our next step. So we want to have
three little tabs. You can pause this
video and have a look. And I've mentioned the
center measurement. The two top and
bottom measurements is about 1 centimeter. So you have just enough
so that it folds over and the width is about
1 centimeter as well. A Once you've got the three pieces ready, we're going to move
on to the next step. Pay close attention because this is going to be
a little tricky. The first thing we're
going to do is fold the two ends top and
bottom of these pieces. Then you're also going to fold
the second top line again. You're going to
see this in a bit. So here you go. You can see
how I've kind of formed a little table with paper, and this is how we're
going to keep things. So first thing we're
going to do is make sure that we add our heart. We're going to fold
it a little bit. And then we're going to
keep a 1 centimeter gap, form the main card fold, and just stick it down. I've made sure that my sides of the heart are perfectly
fit as well as the height. So the heart fits perfectly
into the cart at this point. Now, using that small
piece, I've added in, and you can see
how I've glued it up so that it's
stuck to the heart. Let's do the second heart. And this one obviously
comes a little bit higher. We're going to mark it
at 5.5 centimeters. And placing it in such a way
that it again doesn't jut out or go outside of
the edge of the card. Again, adding a little bit
of glue, sticking it down. If you leave it flat, it
should actually touch the edge of your
fold, the card fold. Then we have the tiniest, cuest heart folding it a little bit and sticking
it onto the paper. This one is going to be
at 7 centimeters from the crease or fold
of the main card. Make sure that the edges
of this heart as well do not extend over
the greeting card. So I've marked the 7
centimeters from the crease. Remember that, and
then place the heart. You can take your little strip, see how I'm adding glue
to the one side folded, and then go all the
way to the edge. You can see how you have
these now three hearts all moving to the edge. And when you fold it,
it all lays flat. Now I'm going to use
double sided tape. If you have a basic
tape, that's good. If you have sponge, it's fine, or you can use glue. I felt like double
sided tape works well, and I had sponge one or foam
with me, so I use that. But ideally, just a
basic double tided tape would work perfectly. So stick it out on those three little
taps on the last edge. And then once that's done, remove out your
tape for all three, and then you're
just going to close your front cover over the card. So you're just closing the card, and that'll automatically
let everything stick. You can see how I'm
just doing that. Just close it, make sure
everything gets stuck down. And then when you lift it up, you have your three hearts popping right out of the sheet.
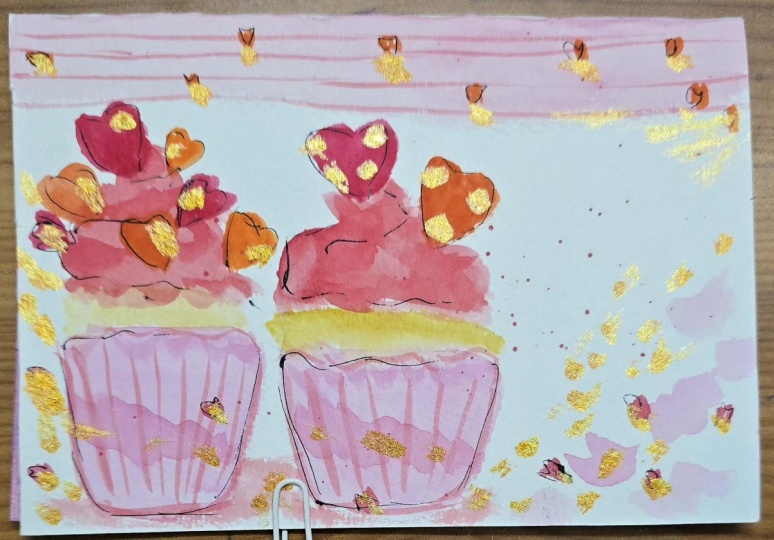
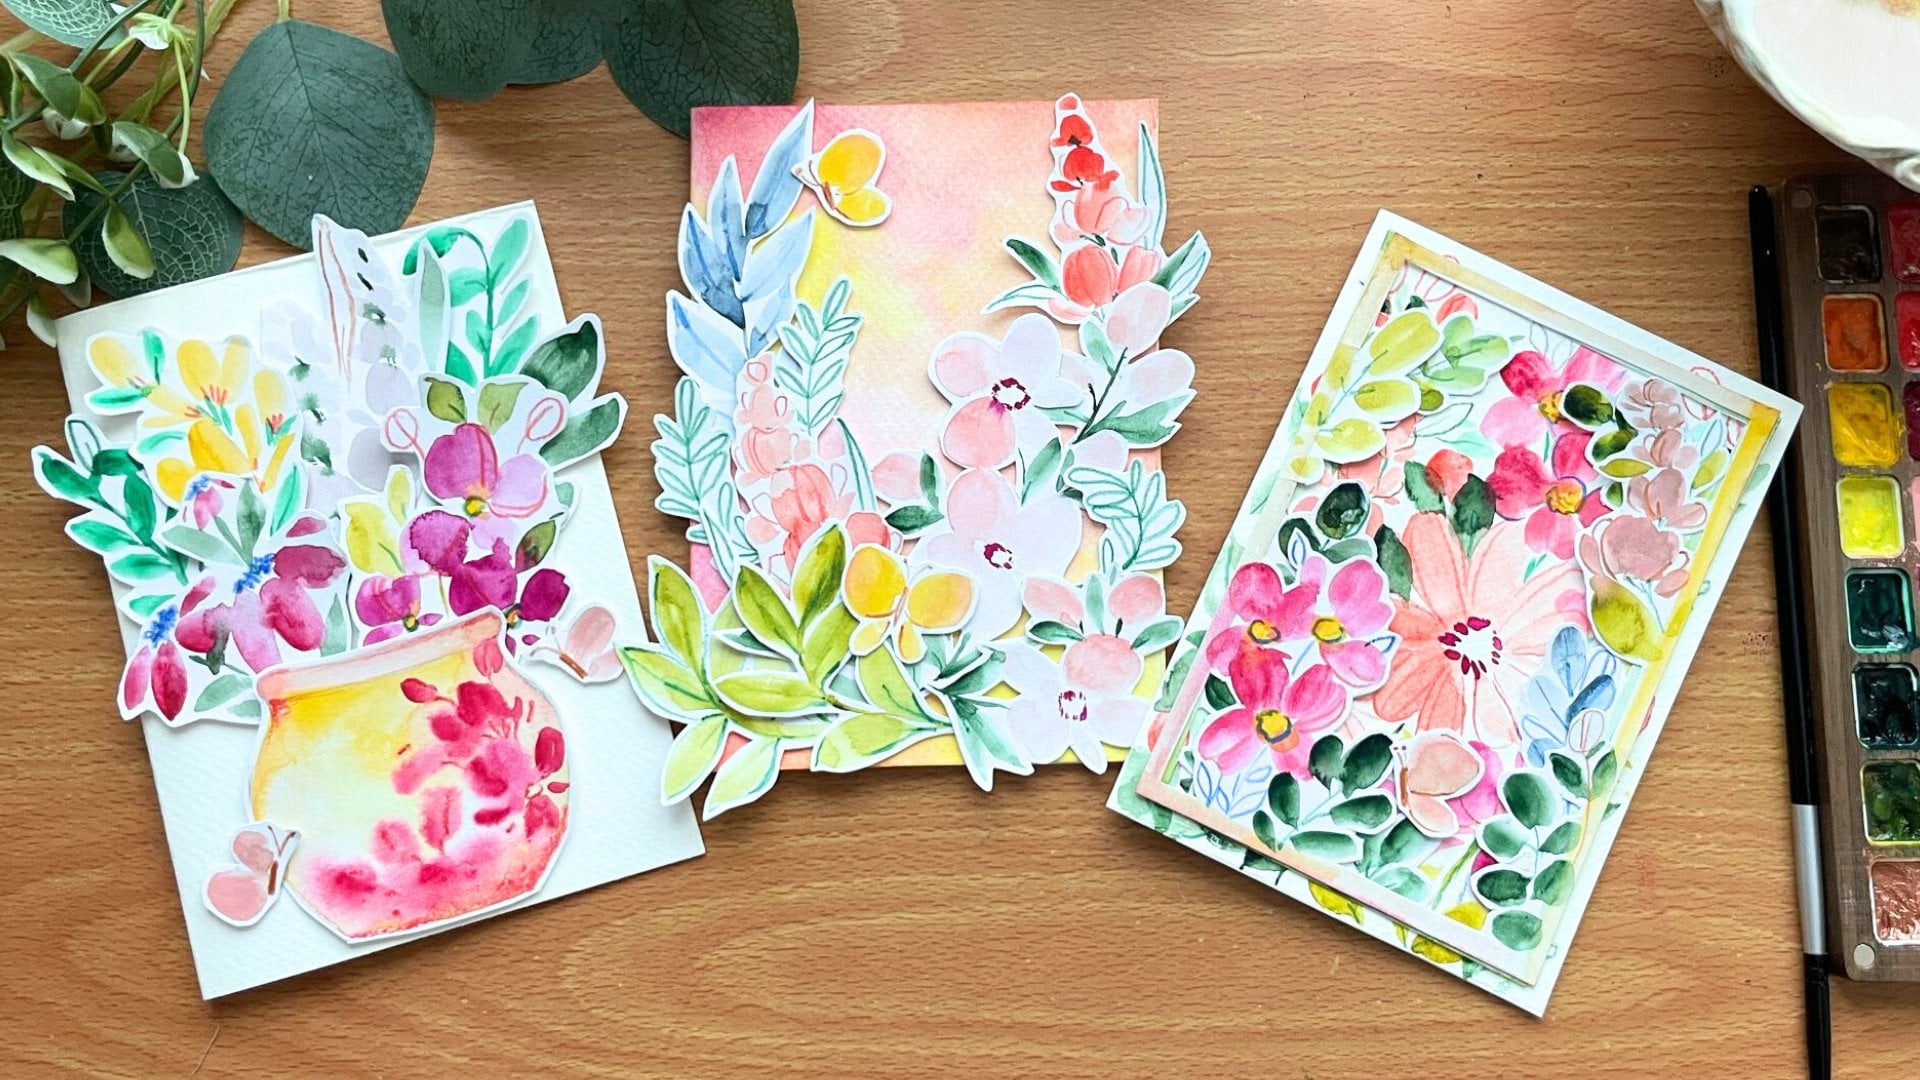
8. Card 3 - Cupcakes: Now let's move on
to our next card. This is going to be so adorable. Cute little cupcakes. Keeping it very simple,
let's paint cupcakes. This is so easy to do. I can't believe I made food painting bigger than
it needed to be. It's so easy. So start with your base
for the cupcake wrapper. We're going with a subtle pink, following the theme
of Valentine's, keeping a rough jagged
edge at the top, and I'm creating a simple shape to represent the cupcakes. It's always important to
have multiple elements. So let's add another cupcake
little smaller in size, right behind the first one. Happy with the overall look. Let's add a little bit of pink, create a little texture, and then we move on to
our cupcake batter. Okay. Using a soft yellow
for the base, cause why not? We are creating our cupcakes so we can make them
whatever color we want. And now for the juicy
icing, using blush pink, let's add in our
icing in layers. Kind of like stacking
them on top. We can do another one. This one, we can just keep it one layer instead of having it stack up. So this way creates fun little
variety in a quick step. Let's add more details to our cupcakes using
a deeper pink, adding the folds
along the wrappers. It's a little bit of detailing
that is going to make your cupcake look
fun and playful. I think this card is
perfect for someone who loves a sweet treat like me. I love sweets and cupcakes, so this card would be the perfect one to give
myself, apparently. But yeah, someone
who loves sweets, you can even have your kid
draw this or paint this Time to add in some hearts. Let's start with a
big heart that's sitting on our cupcake, and then we can have some
little hearts along the icing. Isn't this adorable? Et's add some splatters, and we are caught ready. The next step because I am so obsessed with gold leaf foiling, let's add some gold leaf
and perk up our card. The first thing we want to do is use blush pink
along the edges, to create a nice background
that merges into the sheet. Et it rest for a bit, and then we're going
to use our black pen and just add in more details, especially around the
side of the cupcake, giving it a little
bit more definition. It also adds a little bit of playfulness and
highlights the cupcakes. This is adorable. In just five, 6 minutes, we
created a cute card. This is a bonus step because
I really am enjoying adding gold foil using the glue. Adding a couple of polka dots on the heart to create
some curly fun. You can go ahead
and add the glue in different places that
you feel like gold foil will just add that little
touch of sparkle and shine. Let's add in some circles
in the form of a curve. This is going to give
a little movement to the painting to our card. Allowing everything
to dry till it becomes clear and
the glue is ready. We then move on to the next
step of adding our gold foil. Gently add your gold foil into the different
areas of the heart. Continue adding gold leaf. Tap it down gently
to make sure that it sticks well to the paper. You can go really crazy with
this and add, let's say, foil all over the background or kind of pick and
choose places like I did. There's so many
endless possibilities. If you want to write a
message with gold foil, that is really a great idea. So think about what you would like to share and how you would
like to share it. Using a dry brush,
gently dust out the s, and you can save all
your s to use later on. I like how this is
coming together, and then we have the
final look of the card. Now we dive into the
inside of a card and try a fun little pop up to
share with your loved ones.
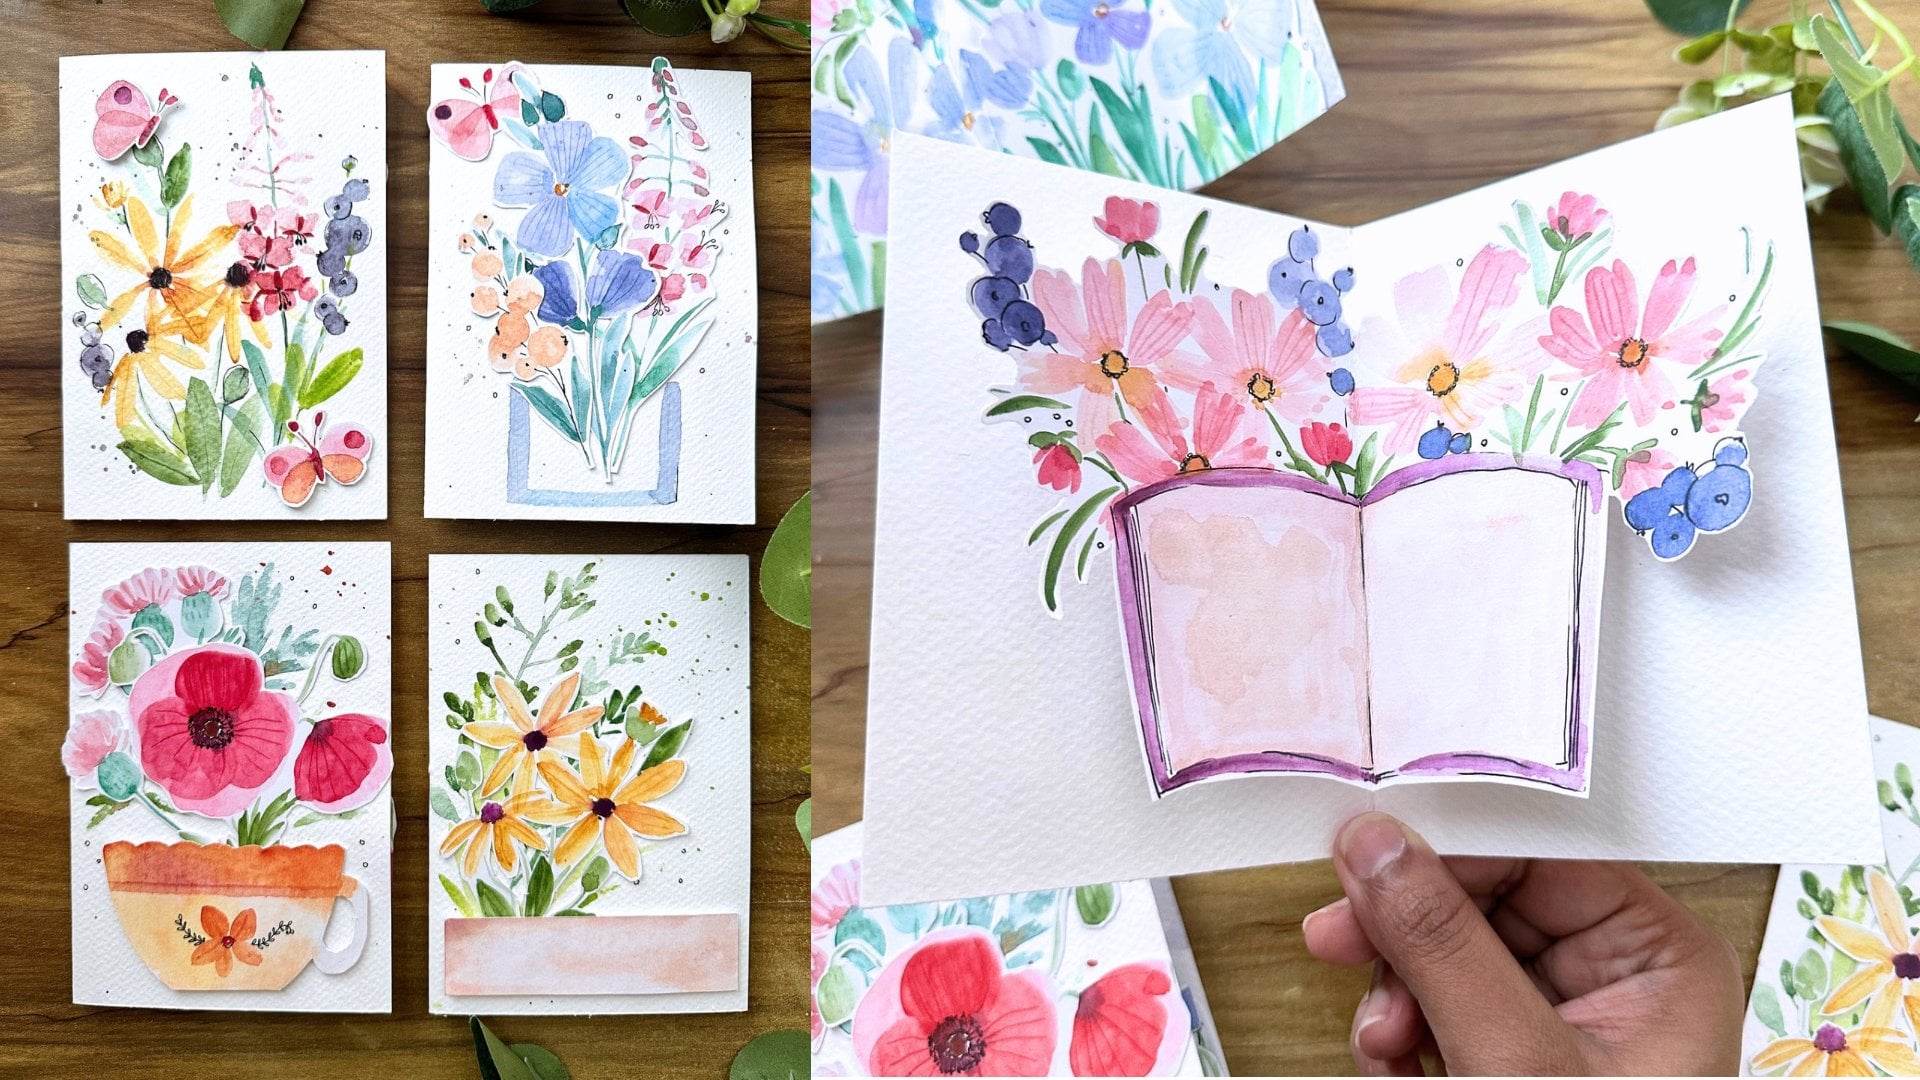
9. Message Pop-up: Now we move on to the
inside of this card. We're going to begin by doing the base as we did with
all the other cards, using a little bit of red and purple to create a really
fun wash around the edges. This one I'm going to
keep a little simple, but just focusing on getting
colors to the edges, creating a really nice
backdrop for our pop up. While everything
is still drying, we can take our year bud with purple and just tap
it along the edges, adding a little bit of
movement to the piece. Once we have that, we can
begin with our pop up. Now, obviously, if you want to add more details,
you can feel free. Over time, I ended up adding
in some different elements, like I added some flowers and things like that, but
it's really up to you. And now we begin with
our main pop up. So I'm taking actually
a regular paper. You can use watercolor paper, but this part in any way, is going to be painted,
so it's really up to you. Following the instructions
that is in the PDF below, we're going to be taking 8
centimeters for the width, and then the length is
going to be 20 weight. I remember it was
21 centimeters, but I just wanted to make sure. So we're going to use 21
centimeters for the length. Now, I have mentioned in the PDF guide the same
measurements in inches. So make sure to have a
look at that as well. Now, what we're
going to do is we're dividing out this paper. So we're going to split
the 8 centimeters by half, so 4 centimeters and 4
centimeters and draw a line. We're also going to divide the middle portion
of the 21 by half, so we get ten points something. And then from there,
we're marking out 4 centimeters
on either side. So creating a little
bit of a box. I know this is a slightly
complicated step, and that's why I
left it to the last, but the results are going to be incredible and you're
going to love it so much, so it's definitely worth it. The PDF does mention all of the measurements,
so don't worry. Just have a quick look at that. After you prepare your
piece, let's cut it. This is a very important step. So first, I take my paper
and I fold it inwards along that line that I just drew that divides the
8 centimeters by half. Make sure you make this
line really crisp, pressing it down all the way so you get a really nice crease. Now, open it up,
and we're going to fold along the diagonal
on the reverse. Again, press it down. Right on that diagonal
that we drew. Let's do the next one
because it forms a little multiplication mark
a cross mark at the center. Now, you would be
able to easily push those little flaps in to
form this little triangle. You can go back and
watch this again. But basically, it
would just immediately flop into this little piece. Cut the top part of it, and we have this ready to go. What we're going to
do now is just add glue to the triangles. On either side. Next,
we're going to open it up and place this in the
center of our card crease. It needs to be right
in the middle, and that's why you have that little square in the centers, you can actually see
where it's being placed and just make sure
it's right in the middle. Press down those two triangles, flatten them out onto the paper while keeping
the flaps as is. Once you've done this, you can just gently fold your sheet, your card, and you will see
that it easily folds in. Press it down a bit, and we have our pop up ready. This is the first step. And now we move on
to the next part. For the next part,
we're going to take our watercolor sheet, 25 centimeters length and 10 centimeters or even
8 centimeters width. We're going to fold
it four times, so it forms a little zigzag. Once you have that ready, we can actually paint this out, and we're going to play with
this a little bit using the gold leaf to create
a really fun note. This is a part you can actually add text if you want
to add some notes, if you want to add a message, anything that you would like
to pop out of the sheet. I'm going to begin by
adding in some flowers using my red with a
little bit of yellow. So we're forming peach, so you're going to
see me create that. So a little bit of red, a little bit of yellow, and a lot of the blush pink. Or if you have white, you can use white as well. So we have this
beautiful blush color. Let's do red and just
different shades, keeping the red ready with
a little bit of yellow. And then taking a lot
of the blush color, or you can use white. You have a lot of different shades of
pink that we're going to use for our painting. Et's begin at one corner. We're going to
start by adding in some really fun flowers, keeping it really simple, like we've done before, building out each petal, assuming that there's a
center in the middle. Let's switch around the colors, and this time, we're going
to take a different pink, and we're going to add just
buds in the form of a line. We're going to try a lot
of different flours, some big ones, some small ones. I wanted to try some
that have a lot of petals, creating
different varieties. I wanted the focus
to be on the pop up, so there's not much there's not many different flowers
that I'm exploring in this because I wanted to keep it simple and so you get
the best results. Time to tap your brush
for some splatters. And then we're going to use purple to paint the center
of all the flowers. And P with a look. I think it's coming
along. We still have a little bit more to add. Using black, I'm going to add in the filaments
for the flowers, maybe add in some
outlines for some of the flowers because
they're kind of fading into the backdrop a bit. And Time to take
some gold foiling. I first wanted to add in some stars because I thought that would
be a good addition. We've always been doing
hearts and things like that. So maybe something different
would really look nice. Doing a eight point star. And then we're also going to add in the glue at the edges. That way, the edge of the painting is going
to have cold foil. I think that's going
to turn out so great, and we're going to create
something very, very unique. Tapping a lot of glue
along the edges, and then I'm just going to take a either you can
use your finger, which I felt like
wasn't working as much and I didn't want
my finger getting dirty. So I decided to use a scale or, like, if you have a spatula
or anything like that, and then just spreading around
the glue along the edges, keeping it really flat so it doesn't take too long to dry. That is another tip
that I realized is that if you really put
a lot of glue in a spot, it takes longer to dry, and then you have to
wait for much longer. So it is better to
just use thin layers, and that still works
really well in terms of sticking the foil. Let it dry, make sure
it's transparent, and then you can go ahead with
your foil and place them. H I'm going to skip ahead from this process because it's going
to take a while, and then you can just gently dust off the s from
all the sides. Once that's done, we go into the most important
part for the pop up because we do need to have this stuck onto our main card. So let's look back at our
base that we had prepared. And what we're going to
do is we're going to add glue to the two
corners of our flap, exactly where I've
added in the arrow. Just make sure you do only that spot and not
the whole thing. You can use a little bit
better adhesive glue if your normal glue
doesn't work as well. Then we're going
to take our paper that we just painted our pop up and we're going to place
it at these two points. You can use a different glue, as you can see if you Now
that we've prepped the sheet, let's take our ready pop up
card and then just press down the edges stretching it
out from side to side. It's okay if there's a
little bit of a fold. And that's going to
look really great. Now, gently close the card. You might at the first time
have to bend it a bit. But once it happens
a couple of times, the card gets used to it. So just gently press
down your card, and you will see that
you might have to tilt the watercolor sheet a bit. But then it flattens out. Next time, you pop it out, you have this surprise
right out of the card. Do this a couple of
times so that it gets a little bit more used
to the direction. And so it gets more
comfortable as you use it. This is such a great
card and such a good pop up to give to anyone to gift. You can have messages
written on either side. I wanted to add in a little
bit of splatter with red all across the edges just
for a little fun. And we are done with
our third card.
10. Create your own Envelope: We have made all
these lovely cards, so it's time to make
an envelop for them. I know that the cards
that I've chosen are custom size because they're
using watercolor paper, and I was trying to
limit the amount of wastage as much as possible. So now we have our envelop. Take a measurement
of the actual card and add a little bit to it. So starting, we keep a small space at the bottom
to fold over the card, and then the actual space
of the card itself. Then a little bit
above for the fold up. Here's my measurements for the card based on the
size that I used. We start with either
side using 2.5 centimeters and in
the middle 17.5, which is the width of the
card plus 0.5 centimeter. Next, for the
height of the card, we have our base, which is 6 centimeters
followed by 13 centimeters and then 10
centimeters for the fold over. If you have questions based on the dimensions you
used for your card, please feel free to add it in the discussion so I can give you the general measurements. Now that we have this,
we're going to cut it up. We're also going to cut
the spaces and the edges, and you're going to
see the final look. Additionally, I'm also
adding a curve to the edges. Again, you're going to
have a look once I've cut everything out so you
can really understand it. I'm just using my tape along
the edge to get the curve. I found that that's the
easiest way to do it. Now that I have that ready, I'm starting off with
a curve at the bottom. And you're going to see
me do a final look. I've additionally also added a PDF template below so you can have a look
at the measurements. Are you excited that we
have our template ready, and now we can paint our en
love. Really it's up to you. I wanted to paint it before I stuck everything down
because I felt like I could get to the corners that if I painted after would be harder. So because I used
watercolor paper, everything can be painted on, and I'm playing around
with the similar florals, keeping it super simple, and also on theme of everything that I previously
did for this class. Keeping it very soft and
subtle using light pink, which is basically
just red with a lot of water and adding
in some florals. This is the top part
of the envelop. It's where it folds down. So I'm adding in more flowers there because it's
going to be visible. I can add a little
bit of variation so that we can have a
really interesting edge. And you can see how
I'm doing that, just a really quick flower. Adding petal by petal, maybe adding just half of the petals for a
three fourth view. And then we can
also cut the edge, and you'll see me
do that in a bit. For now, let's just paint and complete our envelop
using different colors. If you want to use
different shades of red, you can really depends
on the palette you have. With the terrain set, I have purples and
the blush pink, which I thought
is really pretty. I'm just using that
to create a lot of different colors so that
the envelop as well pops. Let's go to the top of
the envelop, the flap, and I'm just going
to cut it very close to the flowers
that I painted. This is going to give it a
bit more of a rough edge. And I wanted to do that
because it's handmade, so we get to really
play around with certain details that if
it was a fixed class, sorry, a fixed envelop, ready made enlop you
wouldn't be able to do. You can see how cool that looks. It's kind of like a
fun, interesting edge. Let's continue painting. You can add in some colours,
maybe some splatters. Use a black pen to
doodle out leaves. Isn't it so fun
being creative and just letting yourself
enjoy the process? Now, I'm going to be shifting to the gilding glue and then using the glue to
do outlines of flowers. Then I'll add the foil to create very interesting outline
flower for the nlp. It's fun technique, creates very fun, interesting details. You can make this as detailed as you want
or keep it simple. I'm just adding easy lars, easy petals with
different outlines. You can add in some dots, some circles if you'd like to. There's infinite
possibilities with this, or if you have a gold pen, you can just edge out the
edges of the envelope. Just have fun. Remember this is something that you're
creating special, it needs to have your
special touch to it. Once that's done,
we're going to let it completely dry but it dries clear and
is ready to be used. We can take in our gold
leaf and just gently place it along the
different lines. Wait for a minute
or two and then use the old brush to
dust away the extras. Now for the final review. Overall, I really
like how this looks. Let's now create our envelop. Folding the two edges, you can flatten it down with
either a scale or any tool. We have the edge flaps, and then the bottom goes up
all the way, flatten it down. And then the top fold. How cool is our lop looking. I like the colors. I like the shades, the little shimmer
of the gold foil. It looks handmade, but
also high quality. I think that's what
the gold foil does. And now we're going to
just mark out the curve of the bottom flap and then add
some glue and stick it down. Press down the
section and we have our envelop ready to
use for our cards. A
11. What Come's Next: Hi there. If you're
watching this, it means you've
completed the class, and I really hope you're feeling proud of
what you've created. Making a handmade
watercolor card is such a special experience, especially when you realize
that even as a bigner, you can create something
beautiful and meaningful. If you enjoyed painting
this Valentine pop up card, you may love exploring some of my other watercolor greeting
cards here on Skillshare. In those classes, we
focus on soft florals, simple compositions and
interesting techniques. All thought step by step
in a bigner friendly way. Each class is designed
to help you build confidence and enjoy watercolors
without any pressure. I'd love for you to upload
your class project, whether it's finished card
or even a work in progress. Seeing everyone's work
is such a big part of learning and inspiration
here on Skillshare. If this class helped you feel more comfortable
with watercolors, leaving a short
review would help other students
discover the class too and help me as well. Thank you so much for
painting with me, and I hope this is
just the beginning of your greeting card journey. I'd love to continue
creating with you in my other classes.
See you soon.
 Femvisionary / Madhu S, Watercolor Artist and Instructor