Transcripts
1. Welcome to Handmade Love: Are you ready to turn simple paper into
something truly magical? Well, in this course, I'm going to show
you how to create four beautiful pop up greeting
cards using watercolors. Whether you're a beginner
or season crafter, these designs are
super easy to follow, and each card blooms with
your personal touch. We'll blend watercolor
florals with pop up elements
for a wow factor. That's surprises and delights. And the best part, no
fancy tools required. So grab your brushes, paper, and let's paint our
different elements, starting with the
basics of florals, going into some fun detailing,
using color pencils. Each lesson covers
an array of card making techniques
to create a unique, interesting front cover by layering, adding
different elements, creating those three
D details that all of us love in a pop up
card from birthdays to thank yous or just because these cards are
perfect for any occasion. So grab your brushes, and let's
start painting right now.
2. Materials Required: Let's stak materials. We're going to need the basics. Starting off, we're going to
use our watercolor pencils. This is going to be such a
fun addition to our projects, a basic watercolor set. Then we have our paper. For the paper, we're
going for cold press, 300 GSM, folded into
two for our card stock, as well as an additional
paper that is 180 GSM that is going to be useful for our thinner
pieces or additional elements. Next, a Filbert brush for all our florals and to
make it super easy. Next, you'd need your glue
and double sided tape. Additionally, we would
need bowl of water, pencil and scale, paper cutter, scissors, and tissues
for card making.
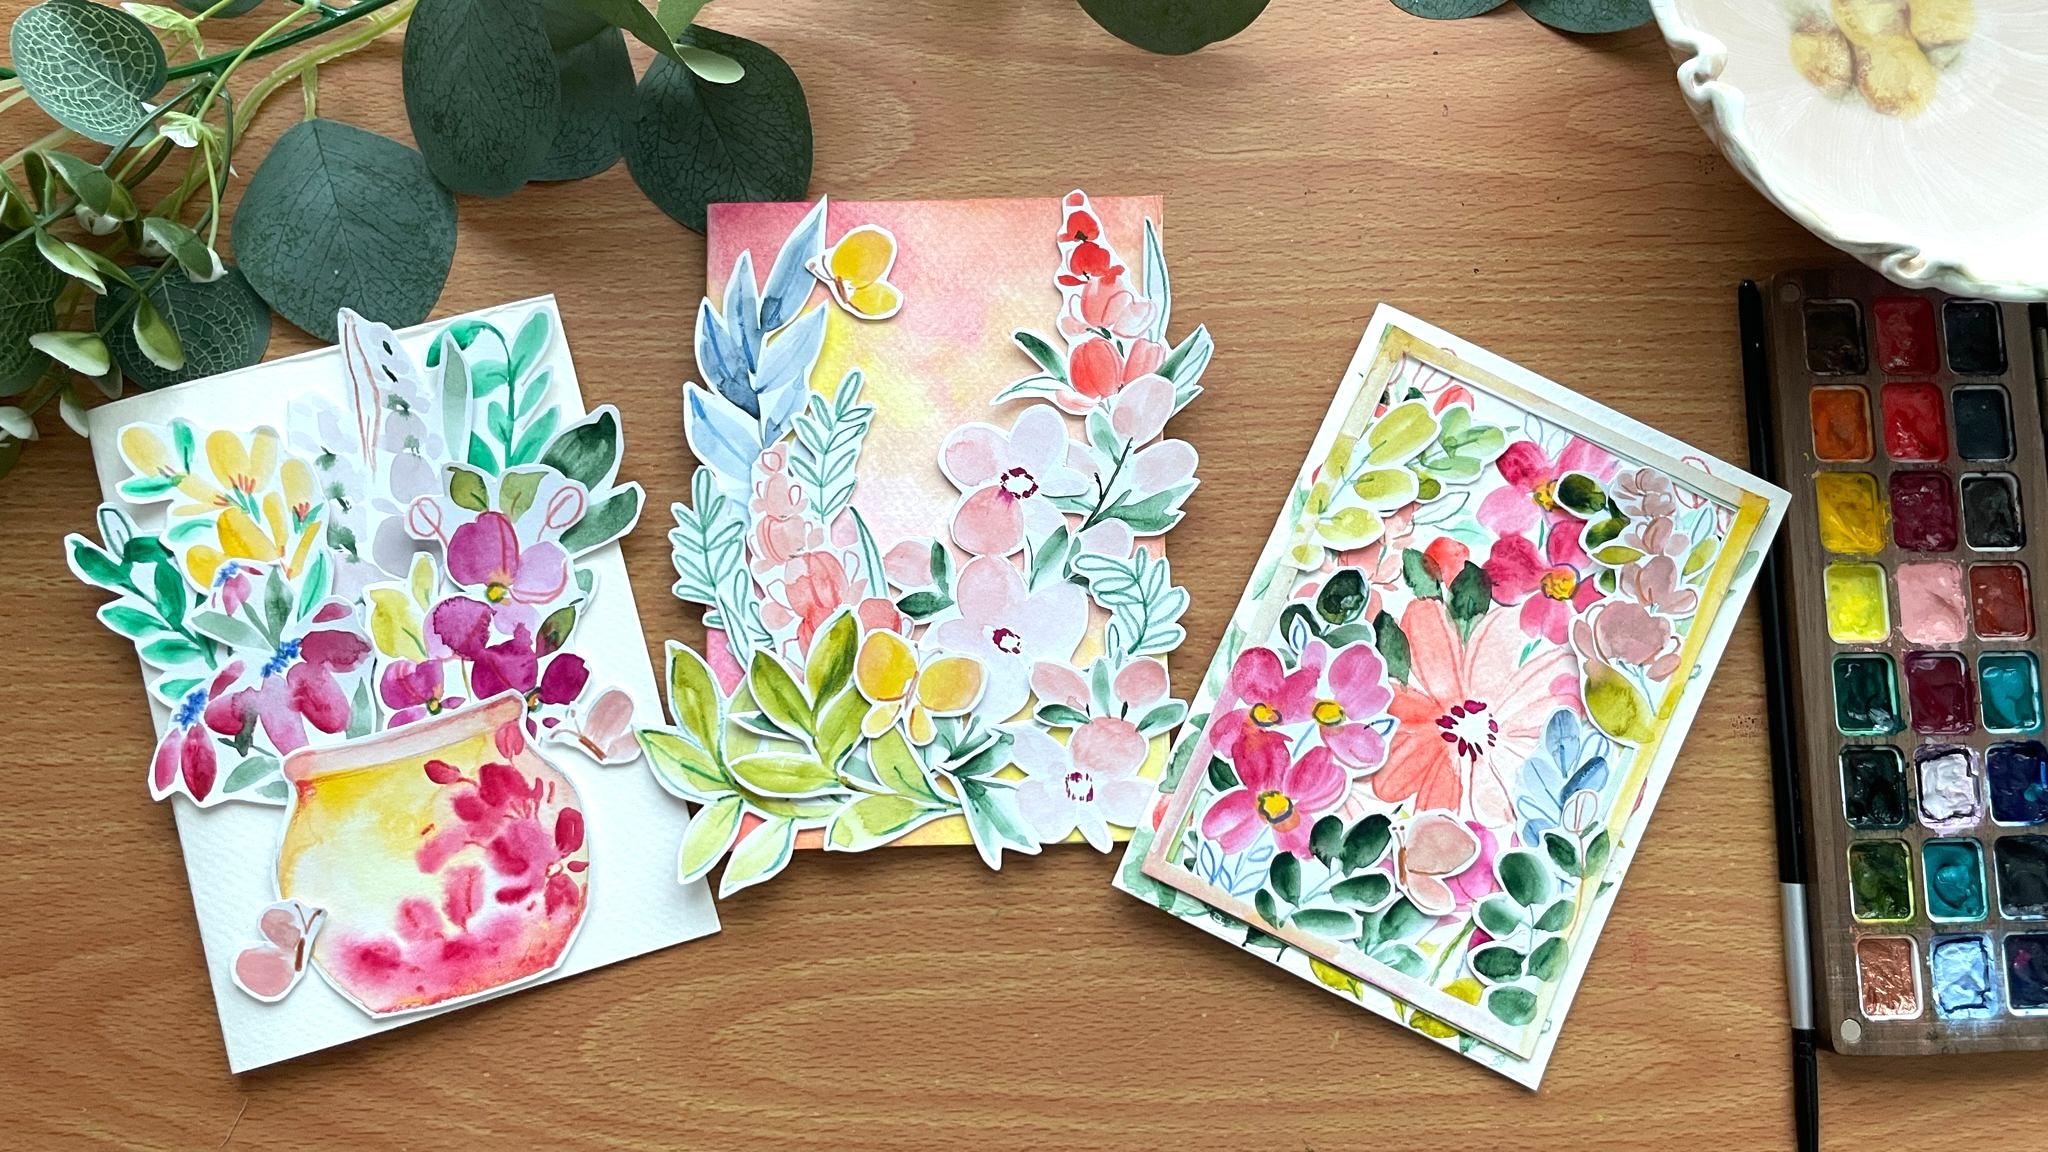
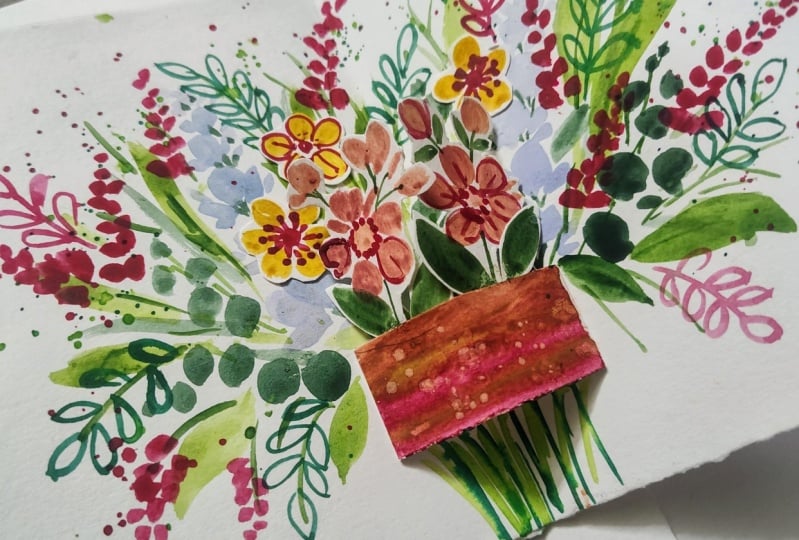
3. Card 1 - Let’s Make It Shine: Let's now begin with
our first project. You can see this beautiful
card that we have, and this is what we're
going to create right now, making sure that we have our
paper ready and our card stock all in hand before we can start painting these
beautiful florals. So starting with our
main card stock, using that for the base, we're going to take
our secondary paper, as mentioned in the materials and start painting our flowers. We're using a subtle pink to build each petal at
a time beautifully. Once you have five cute petals, let's add more
flowers to the mix. It's always such a great idea to add some buds when you're
creating a floral bunch. It gives it movement and
makes it more interesting. Time to take some pink. And then we're just going to tap the edge of the brush along the center circle to create
beautiful mix of colors. We're going to use the same
pink to connect the buds to a main stem all using our brush. I mainly use round brushes, but for this exercise, it made sense to use a filbert
brush because it's much more easier to handle for the design that
we're going for. Try to make your leaves
a little bit curved, allowing them to
maybe turn downwards, swing with the wind. I et's leave a gap and add a couple of more
elements that we can then cut and use for the
front of our card. Following the same step of using pink to build
out our flowers, adding some buds, you can get really creative and
just have fun with this. We're leaving gaps between each element so that
when we cut it, it's going to be a
lot more easier. We can really enjoy this
process of adding leaves, and it's so simple just
drag them gently moving them to the side and gently linking them
to the main stem. How about some more elements? We're going to switch
our green and we're going to try a different leaf. And this is going to
be a nice addition to our existing elements. So here I'm adding the
leaves along a main stem. Letting the stem be the
guide for it and using some watercolor color pencils to give an outline for this. You can see how
this actually lifts up the color and just
makes it a little bit more fun and quirky and gives a little more of a childlike feel. It's more playful, and that's what we're going for
with our greeting cards. Add another leaf punch. We're just playing around
with elements at this point. We're going to add some
flowers that are a little bit more longer in length to give a little variation from
what we did before. And you can see how I'm stacking
up each flower petal at a time till it becomes
almost a point at the top. Let's do another one. So we have two of these cute
little elements. I Time to use our green and then just add
a brush add in your leaves. Sorry, one at a time. This time going
for longer leaves, so just dragging it a little further away from our flower. I like making sure
that the stem is a little curved and it's
not just straight lines. It gives a little more
flow to the flowers. Using an orange color pencil. This is a watercolor pencil, as mentioned in the materials. We're just going to outline
some of these flower petals. Basically florets, we're going to add a couple of more
details if needed, and just bring it all together
with this subtle line. A My favorite part, we're going to add some
cute little butterflies to add to our piece. Butterflies are so easy to do. We're just doing two circles, one peg, one small, and then we're going
to connect them to the body and the antenas. It's that fun. You
can pick any color. I chose bright yellow
because I thought that pop of color would be perfect
for what we're looking for. Making sure that all of your
elements are quite small and cover basically
the size of your card. If they are bigger than the size of your card all put together, it's going to be a lot of s, and you may not use a
lot of the elements. Good news is if
you do have extra, you can always use
them in your art, and there's no real wastage. But stick to trying to get as many smaller
elements on that page. So it's all used for this beautiful card that
we are playing around with. Time to get our cutting mat, and we're going to
cut all the different elements one at a time, leaving a little bit of a
white space along the edge. I've got all my elements ready, and we can start
with our card stock. The first thing I'm going to
do is add in a base using the same colors that we painted
our floral elements with, and that is going to help create a nice backdrop to
our various elements. We can play around
with our elements, making sure that they're placed maybe on top of each other, underneath each other,
just having fun with them and bringing them all
together in the process. Take some time to arrange
all of the elements. You have an idea of how
they're going to look, so you can accordingly
choose your backdrop. What I'm trying to do is get as many elements as pots built towards the
bottom of the sheet, leaving a little bit
of that space on top, and that's going to look
really interesting. You can see how the
curved elements just make it a lot more interesting and gives
movement to your card. I've got some smaller
elements that I've added in simple lines with my color pencil
just to add that tweak. To the piece. You don't have to use
all the elements. If it's too much, you
can remove some of them, and we will use them in future projects getting
our butterflies ready, and they're the pop of color
that we need for our piece. Take a picture of this so you have an idea of where
you placed everything, and let's paint our backdrop. Having placed everything,
I know that my top part of my painting is going to
be visible, more visible. So let's make sure that we add some beautiful
colors right on top. A Adding a mix of colors all around
the sheet, having fun. There's no right way
to do this is just filling up your page
with a pop of colour. Use lots of water so you get
a nice soft, subtle mix. And that's what we want. We don't want bright bold
colors for our cards this time. I love adding yellow. It's such a bright drop of
sunshine to your piece. It's such a great
color to add in, especially in the summer that bright yellow
is so beautiful. Once you're done, let's allow the piece to
dry completely. Once our card is completely dry, we can place back our elements, and then we're going to stick
them down one at a time. To stick them down, instead
of just using basic glue, you could use double sided
tape with a little bit of sponge so that it
lifts up the piece. You can see the double
sided tape that I'm using. It's perfect because it's
got a little bit of height, and that's going to
make all these elements pop right out of the page. I've sped up the process a bit, but you can see how some
of the elements I've tucked inside or underneath, making sure that they
underlap some of the layers, changing around the placements from what I decided initially, which happens and just adding up butterfly maybe at the point where all of these
elements are meeting, so it all just comes
together beautifully. I always leave the
butterflies to the last because I can kind of place them in areas that make sense. This is a beautiful
front of the card. It's so pretty, vibrant, perfect for any occasion, and we're going to
have that ready and work on the inside in a bit.
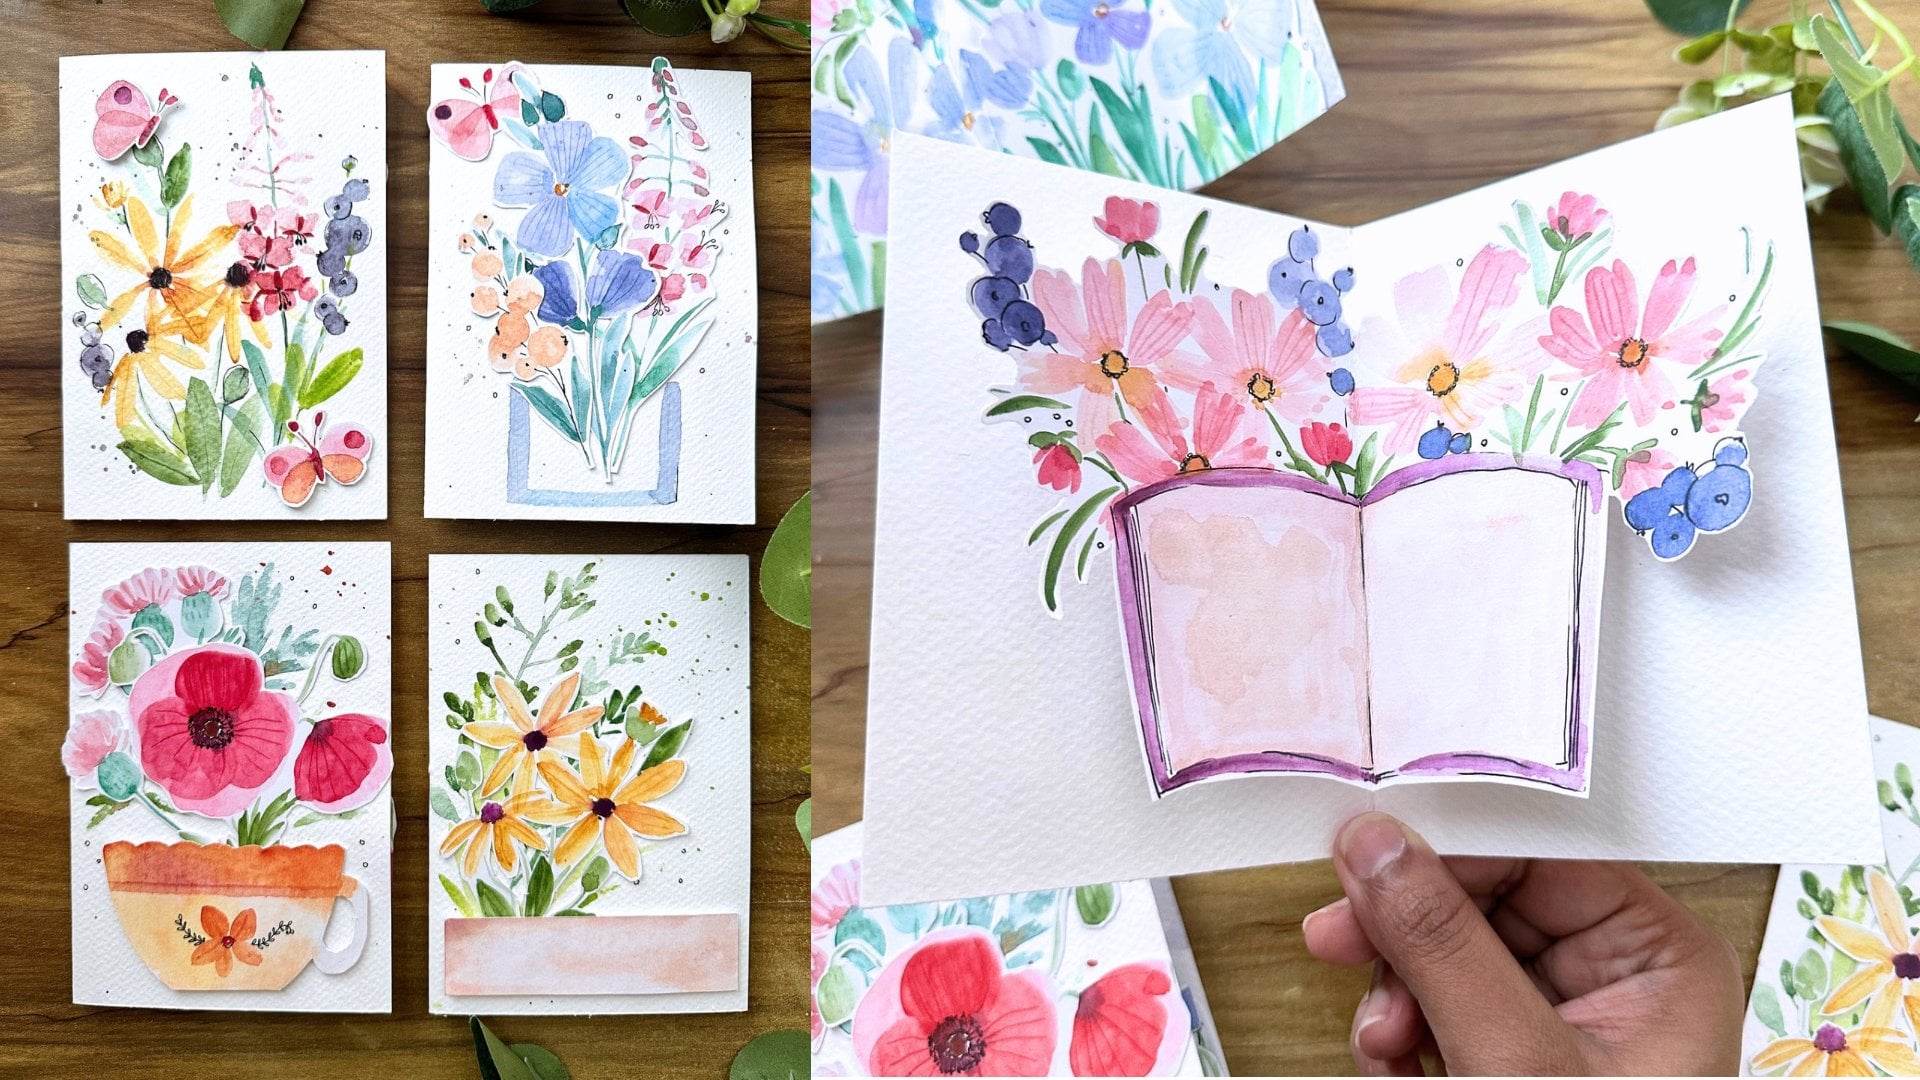
4. Card 1 - Peek-a-Bloom!: For the fun part
of our tutorials, let's create our pop up. This is gonna be
really, really cool, and we're going to try
some fun experiments and create something
really interesting, like a beautiful window
looking into the garden. How do we do this? Let's start step by step and create each element
one at a time, follow along, and let's start. So the first thing we want
to do after we've completed our beautiful front cover is to open up a sheet for the inside. We're going to take
a secondary sheet. This is going to be a thinner
paper for the same height. Taking our main card, we're going to paint up beautiful florals that
are in the garden. Filbert brush is going to be really easy to use
for this process. Painting two petals at a time, creating a heart shaped
petal with our oprah pink. And clustering them together. Switch pinks and let's try some longer flowers going
bigger at the bottom, and then smaller and smaller
all the way to the top. Try not to load your
brush again with paint because as you go upward, you can see how it becomes
softer and lighter in color. Now we can use our shell pink, and let's add some different
flowers to add to the mix. These are individual petals
just coming together. We can have them go all around or just do some of
the side view flowers. Now taking cadmium yellow, we're going to begin adding
some more long florets. Stack together, going
all the way to the top. It's a beautiful color. It's going to add that pop of vibrancy that we
want for our cuts. Now for orange, more summer
colours to suit our theme. We're going to add in
different flowers. You can see how these ones are. Just very simple,
dabs of your brush. Filling up all of the
spaces in between. I've left caps the end of the card because
we're not going to be using those spaces anyways. We're going to be sticking
down our brick wall. Paint the center
of your flowers, and then we can begin adding
our leaves and stems and all those fun little elements
to bring together our card. Starting off, just adding
some simple stems, connecting all these
different flowers to the bottom of our card. Drag your brush to add in
leaves, some big leaves. For some of the other flowers, we're going to do smaller leaves and we're going to
play around with this. Finally, we're going to use
our color pencils and just add out some of the
outlines for our elements, starting with the
center of our flowers, adding a little drop of
blue to highlight it, adding a little bit of
that blue as filaments or dots and then connecting them
to the main center circle. All of this creates
movement to the piece, and that's what we're
trying to have fun with. Using green colour pencils, I'm also going to add in some
more leaves to our piece, 'cause it looks a
little empty and we want more of a
playful, fun look. This is such an easy and fun way to add elements without really filling up the space and still keeping the white
negative space present. For the fence, we're
going to use dark brown, van **** brown and dragging the top of our filbert
brush all the way down. We want to keep it equidistant. So if you can measure
out, that's great. Or just take a rough idea
to make sure that it looks, you know, realistic. Adding those sumps
one at a time. Drag your brush across, and we've got our fence ready. Now for the next step where
we add our brick window, so that this beautiful
garden peeks through, taking a sheet of
the similar size, as I mentioned, the first
thing I'm going to do is I'm going to fold it
half to match our card. Make sure you don't
leave any gaps and press it down so
that it's really flat. Once we have that and
it matches our card, flipping the paper, we're
going to create our pop up. Now, the ends of the paper are
going to be folded inward. Creating a little flap, and then when you stick it down, this is how
it's going to look. Let's test it out just
closing our card, making sure it
doesn't peak through. And then we can start by painting our window and just
planning everything out. In the center portion is where our window
is going to come. You can have a nice ledge, add that circle semicircle, and continue adding
your beautiful window. This is where you
can get creative. If you want to get very, very intricate with your
design, that's fine. I kept it very simple because I wanted the focus to
still be on the flowers. Adding in some window bars, making sure that everything is equidistant and looks accurate. Let's begin painting. So we're going to start
with our window sill using a mix of black and Van **** brown
to paint out that section. Just be a little careful
because we want straight lines. Blending the two
colors together. Now, let's paint
around our window with our orange and then we're going
to add our brick details. A Let's use pencils to add a couple of more details, especially for the window, couple for the brick. It's going to get that
fun, colorful element. Allowing everything to dry, we're going to use our
cutter and cut out the gaps in the window,
the glass section. Be careful when you're
cutting it out. Use a cutting mat so you don't completely
damage your table. Very important. I
forgot the first time. Yeah, it happens. So once you have
this beautiful look, we've got our setup. We're going to use
glue and stick down the two sides of our wall. And that's going to unveil a beautiful, beautiful
greeting card. This is so cute. If you want, you can write a
message on the top of the flowers so that someone
can read through it. Or when you're trying
and experimenting, you can even make
the flowers a little shorter or the window
even more bigger. There's so many ways you
can play around with this pop up card
as you go around, and you can make it even more interesting in terms
of changing the color. I love the summer theme. It's perfect for
a greeting card, especially if you're
doing a happy birthday. It's so great. And that's exactly what we're
creating here. We've just glued down the
two ends. Remember that? And now you can
see our beautiful card opening up super fun.
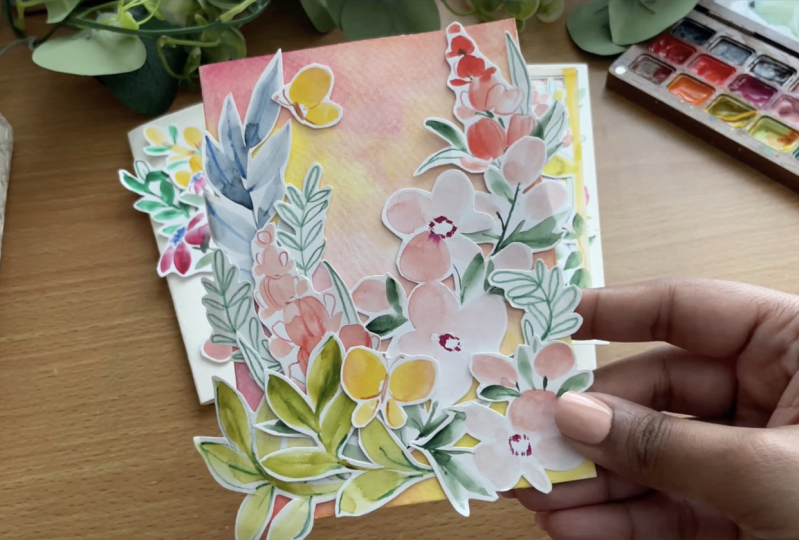
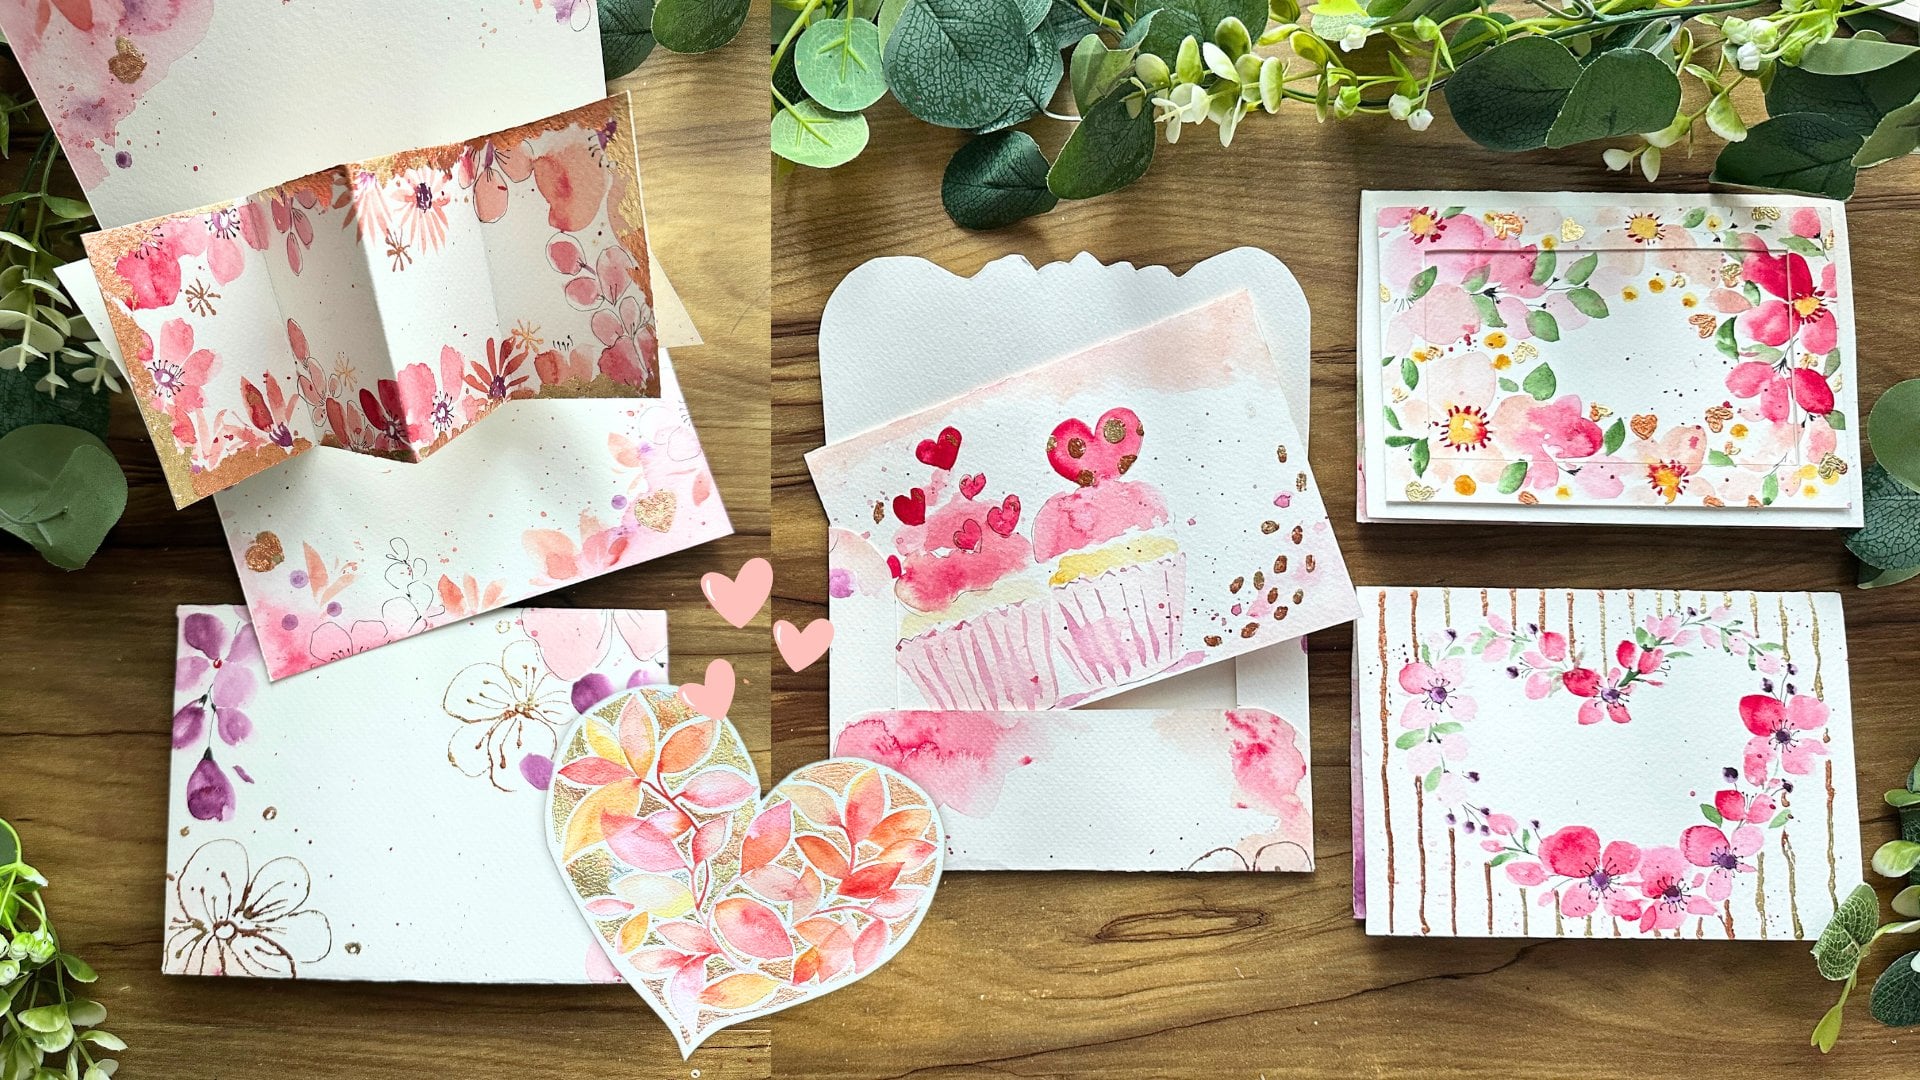
5. Card 2 - Frame It with Florals: I ready to start with
another fun project. We're going to be diving into this stunning greeting card. I'm so excited about it. It's so fun. It's so summer. It's perfect for any occasion, and I'm so excited that we try something fun, enjoy ourselves. And yes, a perfect handmade
card for your loved ones. So the first thing
we're going to do is take our card as usual, and we're going to prep it. So we're going to add multiple
layers for this exercise. It's gonna be
really interesting, and we're going to just
stat and dive right in. Let's paint the
base of our card. I'm going ahead and
adding a bunch of fun florals that are super easy to do using
the fill bud brush. Using orange, I'm just
dragging my brush to the center and building out
a beautiful bright flower. Let's paint another
flower right below it, taking a carmine pink. Let's add some longer flowers, reaching to the top, becoming smaller and shorter. Taking oprah pink,
we're going to add some cute little florets. By dragging our filbert brush
to form hot shaped petals. Let's add a collective of these. So it looks really great. Adding some of them at
the bottom as well. It's just a beautiful
garden of flowers. Just by moving your brush
and changing the position, you can create a wide
variety of petals. I'm really filling up the
page, adding in buds, and just making sure that
there's so much to work with when we go to the next
step of layering them up, adding the center of our flowers with a
bright cadmium yellow, and then we can go into
adding our stems and leaves. Switching to our color pencils, we're going to outline
our flowers at a couple of more outlined leaves. So pseudo leaves, maybe some buds and just filling
up this entire page. Fully, we don't want to
have any white spaces, and we're trying
to cover them up with different elements
as much as possible. Step two. Let's take
a secondary sheet. This is maybe a little
smaller in size. So reduce the width and other
details a little bit more. And we're going to cluster
out some of the flowers, similar to what we did before, the same flowers repeating, we're just going to cluster
them to the bottom. Because these are
going to peek through. Let's add in leaves. And we're building a beautiful
frame for our layer one. Be careful in this process. We are trying to keep a lot
of space in the middle. So we're just making
sure that we add these details to the
edges of our frame. Not too much, just enough for it to peek through and to
be beautifully subtle. Adding another beautiful flower, curving it so it gently
glides into the piece, framing our artwork using green and adding our details
and beautiful leaves. Next using yellow, I'm just
pressing down my brush and adding a thin layer for
the border of this layer. You can switch around colors. I've used cadmium yellow. I've used shell pink, and
I'm going back and forth with the two to create
an interesting effect. When I started painting with watercolors and pursuing art, one of the things I loved doing
pretty instantaneously is gifting my friends and family custom gifts
that were handmade, whether they were cards,
whether they were paintings. I always loved giving them
a little bit of myself. And it felt so nice, and it was definitely much more special than buying
a store bought gift. It makes it unique, and that's why I love the
process of gifting cards. And some of these are just fun. They're fun activities. They're great practice. And also, they're just a memory. So when the person
gets this card, it's not just, oh, I got this store bought. It's Oh, this is
something special that I can maybe save with me
and keep for years. It's so it's so important
and so personal, which is why I love doing this, love experimenting with them. Card making itself is
such a fun activity. There's so much online. There's so many different
ways to go about it that it's Uh, very creative. I love sitting in the morning, just creating my set of cards. Sometimes I make bigger ones, if there are special occasions. Sometimes I go doing
gift cards or gift tags. And yeah, they just add a
little bit more to my art, and to my journey, and my friends and
family get to enjoy the perks of having an
artist around them. As you can see, I'm using my color pencils to
add in some outlines, complete the stems, connect
everything together. As I mentioned, we're
making sure all of these elements are
towards the frame, maybe coming in a bit,
but not too much. And this is very, very
important for this layer. Once you're done with
this, we're going to cut up this layer
using our cutter, leaving a little bit of a white
space around our elements and making sure that we
keep our border clear. You can see how that looks. It's so pretty already. Now, I'm marking it out on
the second sheet of paper, making sure that I
can kind of plan out where I want newer
elements to peek through. And that way, I can plan my
second set, second layer. Based on that, I'm making sure
that I add simple leaves. We don't need to go
too complex with this layer because it's
going to go below, and it's just to make sure
some of the elements pop up, peek through, and
look very pretty. I love making sure that all the stems are
slightly curved, so the leaves are
slightly curved. And again, that
frames your artwork, giving it movement and motion. Following the similar
step as below, dragging your brush to
the edge of the paper, painting out our border. We're next going
to cut this frame, leaving a little bit
of white space between the elements so that it's easier and we're not getting
too close to the edge. I think the cutting
part is maybe the most difficult
part of card making, but it's also very peaceful. I love taking my time and just going each
section at a time. We can leave certain areas
that are not important. But some of it, as
much as possible, it's good to cut them off. Don't forget to use
your color pencil and add your outlines and other details to give a little
bit of whimsy to our card. Time to cut off frame,
and now we have two beautiful frames that are going to layer up
on top of each other. Using our glue, let's
stick down the first layer flat on top of our main card. You can see how it looks
kind of interesting. There's a little bit of
those leaves poking through. It's a little three D element
that's coming across. The next set, if you want, you can actually add a little
bit of double sided tape, or you can use glue based
on what you prefer. We just want to be right on top of the previous
layer to give it, again, that pop three D element. Try to decide how
you want to do that. We can add a couple
of butterflies from some of our
previous projects to add to those beautiful
fun greeting card. And this is our
completed front cover.
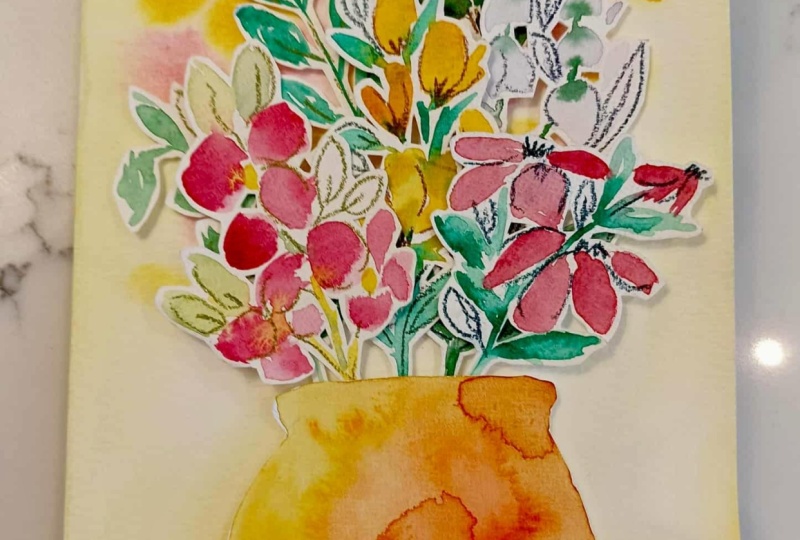
6. Card 2 - Mini Masterpieces Inside: Time to attempt the inside
of our greeting card with a little I
wouldn't say bouquet, but like a vase of flowers. That's so cute, so fun, and it's a little
pop up to your card. The first thing
we're going to do is take our greeting
card and open it up, and let's plan our flowers. Taking the secondary sheet, we're going to add a small set of flour with a little bit
with maybe a couple of buds. We're keeping this
very, very small, so the whole thing should
come up to maybe two to 3 ". So keep that in mind because it's going to be really small. These are the ones
that are going to pop up from the page. Let's add in some fun
three D elements, just a group of flowers. I've chosen yellow
because I think it's such a nice bright color and definitely perfect for
our greeting cards. Just going to do three
to add to our piece. And once we have that, we're going to
complete our flowers, adding the center,
using colour pencils, adding some leaves,
and making it very fun and just really taking this
process one step at a time. I making sure to leave
spaces between elements. We're now going to do a vase. I'm keeping it at 7 centimeters
by 2.5 centimeters. In inches, that would
be 2.5 centimeters, sorry, 2.5 " by about
four about 1 ". So we want to keep
it quite long, and you can play
around with colors. I've used a mix of pink and orange to create a
very fun effect, leaving space on either
side for the folds. Time to cut our elements, we're leaving a 1 centimeter or 0.25 inch cap on either side, and this is going to be
folded in to our sheet. You're going to understand
this a little bit more when we get into that part. I hope till now you're
enjoying the process. It's really interesting creating these different elements and seeing them all come together. Cutting up all our
different elements, and then we can start
with placing them all together into our main card. The first thing we're
going to do is fold our bars into two, and then we're going to
fold those little flaps on either side downward
towards the inside. Oh Now place it flat at the center of our sheet. Glue the two ends, and then you can see how it opens up with
a little pop up. Before we proceed
to the next step of sticking down
our other elements, we're going to paint our vase. I'm using a shift of colors, but following some of the fun, simple florals that
we've experimented with before, the long, loose, flowy flowers moving all the way up just taking them
one step at a time, we can add some circular
leaves using forest green. The filbert brush makes
it so much more easier to add these circular
elements, which is perfect. Let's add another one of our rounded
eucalyptus, basically. We can add one more set. And then we can add a lot of different leaves of
varying designs. So long, some short, maybe different greens
that you have in your palette form verdant
green to your sap cream. Beautiful mix of colors. We're going to add some
berries to add a pop of color, just playing around with the different elements and
creating a fun bouquet. Are you ready to see
what happens next? Well, we're going
to take our pencils and we're gonna add in some
lines and quick little details to our flowers and
to our beautiful leaves. A Time to add in our flowers. What we're going to do is use our double sided tape with a
little bit of sponge or gel, and we're going to stick
a smaller yellow flowers in between our bouquet. Just adding that pop
element to our card. And this is going to
create such a fun vibe, making it a lot more three d, adding more of these details. If you can cut up more
elements, feel free to do so. It's your card, and it's your creativity and how you
want to take this forward. Now, the two little flowers
that we did that flower sets, we're going to stick
them to that base. So notice, I'm going
to be adding glue, and we're going to
stick it actually to the front of our flour. So the front of it gets
stuck to the back of the vs. I'm making sure to keep
one on the right side before the fold and one on
the left side after the fold. So we want to center
them a little bit better so that they do not fold on each other or
collapse on each other, and they open much more freely when we open
our greeting card. Great. We're done. Let's test this out
to make sure that our card goes flat
when we fold it, press it down a bit,
and let's open it up and unveil the fun pop up. This beautiful pop up of
flowers just bright and bold. Now, looking at my piece, I felt like there
was a lack of color. It's very green and subtle. So I thought a pop of
pink would be perfect. And instead of adding
a huge detail, just a couple of dots to create a berry like effect was
the perfect way to go. Gently tap your brush, and let's add some splatters to our card to give a little bit
of fun movement and play. And we're done with
this fun greeting card, this interesting pop up. You can add some details. You can change up the colors. There's so much possible
with this technique. And with this beautiful
floor watercolor, look, it's so much more
serene and joyful.
7. Card 3 - The Wow Before the Pop: Time to move on to another fun card. And this time, we
are playing around with beautiful set of
flowers like always, and we're playing with placement and creating
something different. I'm excited about this one, and the pop up is
especially unique. Let's take our second sheet, and we're going to start adding our different elements
to cut together to create our bouquet of
flowers in our vase. Using a subtle lavender color, more of white, if you notice, I am stacking together the
petals on top of each other, moving smaller as we go higher. Trying to chew a couple
of these sets together, so they really look pretty when we bunch them into our vase using forest green to add our thin stem by just flipping our brush
and using the edge, connecting those little florets together from the main stem, and then we can add in
our really long leaves. I Moving on to another flour. This time, heart shaped petals, just dragging our Filbert brush together to create those
heart shapes one at a time, let's bunch together a couple of them to create a nice variety. I like doing at
least three because they look really,
really pretty together. Following the same step of filling out the
center of the flour. You can use yellow or
something nice in contrast. And then adding the greens
and completing this element. You can go so creative
with these elements. I like doing flowers just
because they're so pretty. And also, these ones, I think, are much more simple to
paint and to recreate. You can kind of play around
with this a little bit more, maybe adding some more
different varieties of flowers. I personally like the
variation of shapes. It creates a little
interest into the painting and
especially card. I love a little
yellow to the mix. And here we're going
to drag our brush, and we're going to create some
long petels half of them. So just a few to show a side view instead of having
the whole flower present, maybe adding in some
buds just by gently dragging the brush and then using green to
connect all of it. Variant green is also very, very beautiful fun green and gives a little
snap of color. A bouquet isn't done
without some corn flowers. So this time, we're dragging
our brush from down and moving it upwards so that
they all connect topside. We'll add in some details
after we finish that. Let's add a couple more of these flowers where the petals are just falling downwards, can add some smaller ones by reducing the
length of the petals. Once we have that, we
can take our green and connect all of these
beautiful flowers together, add in some leaves, Time to paint out
some filler elements using Viridian green. Let's add couple just a
few branches of leaves. This is going to be
great in filling up any of those empty spaces
between the flowers. After creating a
few more of these, we can add cute
little butterflies by adding a big circle
and a smaller one. If you want to do the butterfly open, like it's flying about, you can have the same circle
repeated on the other side. If you have more
space on your page, let's just paint out
different sized leaves. A good variety
makes it look even more better in terms
of the greeting card. Take your watercolor pencil, and we're going to add
a couple of details, adding the top of
the cone flowers with that beautiful blue colour. If you want to add in some
details for the leaves, making it more playful, more fun, giving a little bit of that joyful feel
to our elements. With any extra space, let's add in butterflies. So we have quite a few. We may use all of them in
our card or we may not, but it's good to have all
these different elements, especially since there's
so much of space between. Remember to keep space between each of the
elements so that it's easier to cut them
separate separately. Y. Now for the next part, we're going to do our vase. You can use a cup to get the curves of
the edges of the vase. And once we have that, we're going to paint it out and move on to the next steps. After laying down the
base of the vase, we're going to do
something really cool while it is still wet. We're going to add
in our flowers, which is going to blur out, and that's exactly
what we're going for. We want to have a little bit of a blurry look when it
comes to the vase, something different
that pops on our page. Switching to our color pencils. We can then add some
of the outline, some of the details, make it
a little bit more complete. Now that we have this, let's cut all of
our elements out. The flowers, the
butterflies, the vase. We're going to cut
everything out, leaving a little bit
of that white space, so it's easier and
it looks better. Once you have all of that, let's place them onto our card. You can see how I've
done a rough placement, having the butterflies kind of peek through at the bottom. Take a picture of this. You have a reference before you have to paste everything down. It's good to have
a mix of elements all clashing together to
create a very full vase. Now, for pasting them down, we're going to use our
double sided tape, so it gives a little bit of
height and a three D effect. Finally, adding in our boss at the end of everything,
placing it in the middle. We're gonna add in
our butterflies, and we're done with our
beautiful front cover for our greeting card. I
8. Card 3 - Hanging Blooms: Are you ready to step
into another project? Well, now we're going
to be experimenting with our beautiful card. I think this is one
of my favorites because it's so different
and it's so pretty. It's very unique. First thing we're
going to do is take a secondary sheet and make sure it's the same height and
width of our card paper. We want to make sure it's
the exact same measurements. Now, from the top,
we're going to measure out about 7 centimeters or 3 " and create a nice
rectangle border that we're then going to
paint with beautiful florals. Now, gently fold your sheet so you get the
crease of the card. And basically, we're
going to flip this paper, and that is what
we're going to be using for our final pop up. Are you excited? Because
now we're going to go into the fun part of this
project, which is painting. I personally love
painting all of my handmade cards because it's
so special and so unique. Card making has been
such a fun experience, and there's so much more
to experiment with. This is one of the
Big ner friendly, I would say, tutorials, but you can
experiment even more, and there's so much
out there from advanced techniques to folds and just a lot that we can do. And I'm hoping to
cover all of that as we go ahead with
upcoming classes. Now using my shell pink, what I'm doing is adding
some simple flowers. We're playing around with
a mixture of flowers. Using yellow, I'm going to just do some side view flowers, and you can see how I'm just
playing around with this and creating a beautiful
border that's really full and
bright and vibrant. Moving ahead, we can go ahead
and use our bright yellow, and we're going to add
in some simple florets. Moving to carmine, I'm
basically taking out all the pinks that
I have in my box and I'm using them
for this piece, adding some of
those longer petals that stack up on
top of each other, creating a length to our piece, taking another pink and adding
our heart shaped flowers. For this project, I think
I've used all the flowers that we kind of played around
with in previous lessons. Adding some buds. And once we're happy
with the overall look, we're going to use our orange, fill the center of our flowers, and then go ahead with green
and add in leaves and stems and really fill up our border so it's bright and full of color. Let's now switch to
our color pencils, and we're going to
go ahead and add in some lines to our leaves, adding some more shadow to our flowers and basically
going for that playful effect, adding a little bit more of
a hand touch to our car. I'm really trying to
fill up the space. And once we're done
with that top border, we're going to add three
different potted plants that were then go to allow them to kind of fall
from those borders. So they're going to be
attached to the border. So again, same technique. Let's have some fun and create some really
pretty florals. I'm using pink to dab around my brush and create a very simple flour that
I use right on top, adding in some buds to create
more fullness to the piece. Then using green and
connecting everything together to a center point, adding some cute little leaves, and then we can add a vase. Have fun with this pot. Whatever colour you choose, there's no mistakes here. This piece, as you can see, card is just pop of color using color pencil to
add a couple of more details. We're going to do the
same thing and create two other pots with the
similar techniques. So now that we have our
different elements ready, we're just going to cut
them into different pieces, and we're going to put all of it together into our stunning card. Are you excited? Because I'm ready to create our
beautiful piece. So now we're folding
up our main border, and we're going to stick
down the two flaps, and you can see already it's
popping out of the sheet. We're going to take our vars, and we're going to connect
them to this pop up area. Just sticking the
top of our pots. Now that we have this ready, if you have any remaining
elements from previous cards, we're going to stick them
together, use them up. If they make sense, otherwise, you can just skip this step. I just had a lot of the
butterflies and flowers, and I decided to use all of
them and bring it together. Sticking our final pop up, and we're almost
done with our piece, our beautiful greeting card. And there you go, I
love how that looks. Make sure you just stick down so that the glue stays flat, and we've got our fun
little pop up card.
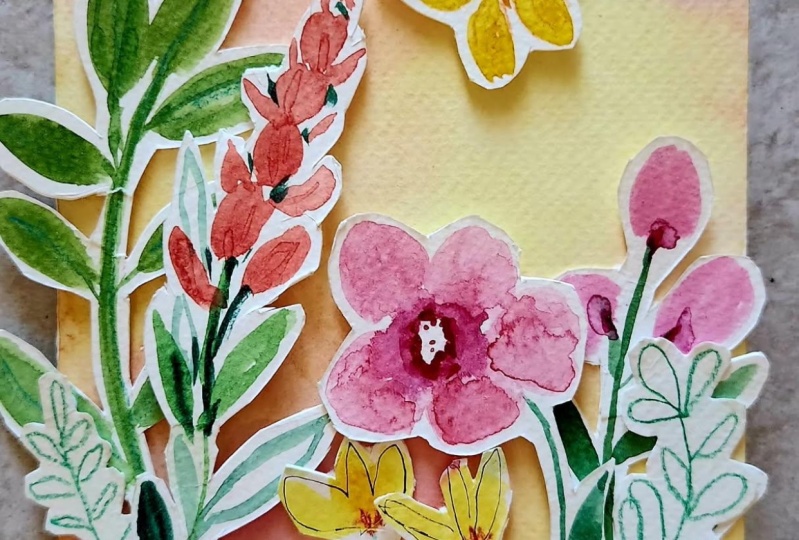
9. Card 4 - Front & Flourish: How about a little
bit of sunshine? We're going to create our
last card with a pop of color vibrant and
full of sunshine. So starting off, let's
take our card stock, and we're going to begin
with the front of the cover. Keeping it very simple. I'm just going to paint the
base using a mix of colors. You can go ahead and add in any of the pastel
shades you love or any specific color that may be a favorite to the person you're going to give your
greeting card to. Don't hold back. Just
swish your brush around, using a lot of clear
water to dampen your paper even more and
to lighten up the colors. Using a mix of cadmium
yellow, shell pink, little bit of bright orange
to all blend together. While painting
projects like this, I like to give
myself a little bit of time and a little bit of space to just create and not worry too
much about the results. There are no mistakes
in something like this because it's
completely handmade by you, so you don't have
to get it perfect. A little imperfection is
what makes it special. Dabbing in spots of the
cadmium yellow along the right side is going to give a nice platter effect when we go on to add our
different elements. I'm also gently tapping
my brush to add some more speckles to our sheet. We're going to let
this dry for a bit. Meanwhile, let's take
our secondary paper, our thinner GSM paper, and we're going to
start painting out some floral elements that
we can then cut out. Using Filbert brush, I'm just painting each
flower petal at a time, dragging the brush, and
building the layers. Taking a secondary color, a bright pink let's fill the
centers of these flowers, maybe even adding in some
leaves and other details. This pop of color is
perfectly what you need for your greeting card
for it to just stand out. Time to cut the
individual elements using a paper cutter
or a scissors, whichever you find comfortable, leaving a little bit
of white space around. Let's go back to our
main card stock. Let's gently tap in some pink to get that
splash of colour. And now we're going to layer up our different flowers
on top of it. I'm using double sided
tape with a little bit of height for this so that it
pops right out of our sheet. Layer them on one at a time, let them overlap, let them
be on part of the process, and they're all clustered
together towards the left, kind of forming a
border in a way. It also gives you enough
space on the right to write a little cute
message to your loved one. Y. For a fun little touch
using colour pencils, I'm just adding
in some leaves to our beautiful florals to
complete our front cover. Revealing our simple
greeting card cover.
10. Card 4 - Lift the Surprise: Ready to create a fun pop up? Well, we can just start right away with
our secondary paper, which we're going to paint full of florals and butterflies. Let's begin with a little
bit of measurement. We're keeping about half
1 centimeter space. Then we're going to be
leaving 8 centimeters, 3 centimeters, and then
one centimeters again. So one, eight, three, and then one again.
So mark that out. We're going to draw our line
from that last 1 centimeter, bring it all the way down
for the height of our piece. We're going with a little
bit more than 13 centimeters or 5 ". So that's the height of
our piece our pop up. Once we've done
that, draw a box, and let's cut up our piece, and we're going to paint it with some fun florals for our pop up. How about some basic florals? Taking orange. We're going
to do simple round flowers. Very easy, very simple. Filling up our page with
a lot of these blooms. Now, using oprah pink, let's add some longer flowers, stacking each petal
on top of each other, making it shorter, softer
in color as we move upward. Another flower, this is
going to be cone flowers. So having your petals just move downward falling to the ground. And once we have a
couple of these details, we can add some more buds, some fun little details, and then we're going
to use green and connect them all
together all the way to the bottom of our paper, adding leaves when required. All of this just adds a pop of color to our greeting card. Stack in more leaves together, bringing them all into
a beautiful stem. And now that we've got that, we can add a couple of
leaves just on their own. Along a nice stem, creating a little
bit of movement by curving the main stem. It's almost like these leaves
are dancing in the wind. Time to take in a
secondary color, and we're going to add the
top of our cone flowers, adding a couple of more details, painting out all our stems, adding some long leaves, just really filling up the page, having fun in the process. We can use our colour pencils to add a couple of more details, some lines, making it
really interesting. Taking another sheet of
paper and let's add in some butterflies that we're then gonna cut and paste
onto our pop up. Let's get back to
our main sheet. We're going to fold
the different points that we marked,
the 3 centimeters, 0.5 centimeters, just
pressing it down and folding them all and making sure that we have a nice crisp crease. And then we're going to
paste it onto our card. While placing it, what we're trying to do is make sure that the left side is 3 centimeters
plus 1 centimeter. So 4 centimeters from that center middle crease
of the greeting card. I hope that makes it a
little bit more clear. I've mentioned the measurement
on the page as well. Using glue, we're going to stick down those two little flaps. And then using
double cider tape, we're going to stick down
our different butterflies onto our pop up. You can see how the pop
up is standing out by just pasting those little
flaps onto the sheet. You can see how adorable
that is looking. And this is our cute little pop up handmade watercolor card.
11. Conclusion: Well, we're done with
our fun workshop. I hope you enjoy this and try to experiment a lot with it. I love teaching, and you can
go through my Skillshare for the list of classes that I have thought on various
different techniques. If you want to check
out my Instagram, you can see more
of my inspirations and some of my
artwork displayed. Don't forget to leave a review and add your information or any details or any questions you have into the
discussion folder. Looking forward to seeing all your final projects.
Happy painting.
 Femvisionary / Madhu S, Watercolor Artist and Instructor