Transcripts
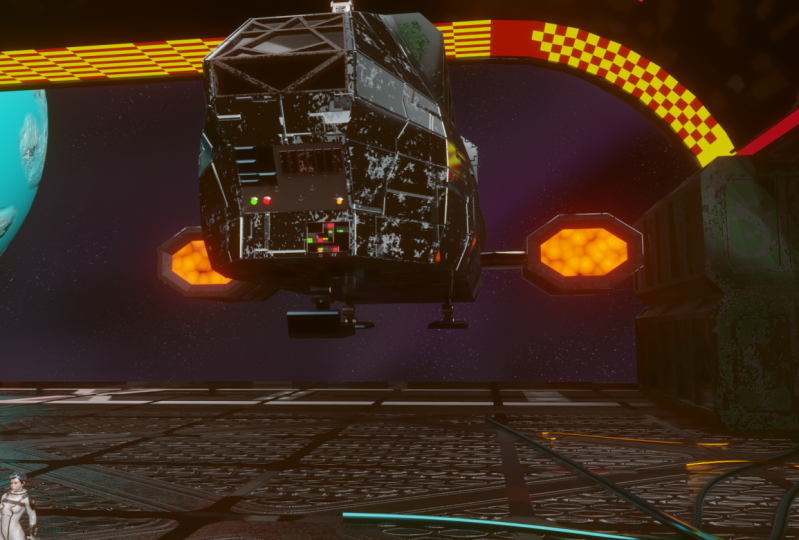
1. Promo Video-Learn Animation Production with Blender 2.9: Hi, I'm Darrin Lile and welcome to this course where you will learn animation production with Blender 2.9. In this course, we will create an animated scene solely in Blender from the first polygon to the final render. And here is that final render of a spaceship landing and a cargo bay. We will begin by bringing in and sending up reference images in blender that will help us create the 3D model of the ship, the cargo container, and the landing bay. We will then use blenders note editor to create the materials and textures for the objects. And once that is complete, we will begin working on creating the star field, the planet, and the cloud layers. To prepare the ship for animation, you will learn how to create the rig for the landing gear so that we can animate the legs and control the ships bounce when it lands. You will also learn how to use blenders graph editor as we animate the ship coming in for a landing. And we will have some fun animating a texture to create the plasma dr engines, creating a jet exhaust animation for the rear of the ship. You'll learn how to import characters into the scene and how to render a final animation. We will then bring in music and sound effects and mix the audio to picture in blenders video sequence editor. And lastly, we will render out a video clip with both picture and sound. If you've ever wanted to create your own animated scenes in Blender, then this course is for you using only free open-source software. You can create anything you imagine. So join me for this complete course as you learn animation production with Blender to 0.9.
2. 001 A Brief Introduction to Blender: Hello, Welcome to learn animation production with Blender 2.9. I'm Daron Lyle, and in this course we will be creating this scene. We will be doing it all in Blender from the beginning to the end. And ultimately, our final goal will be a rendered animation to an MP4 video with both picture and sound. Now let's take a look at that. Here we go. It's bring this up. So the scene is the ship flies in and lands, and we've got music and sound effects. We've even got a couple of characters here. And ultimately that is our goal. And throughout the course you're going to be learning about 3D modeling in Blender, about animation, rigging, about how to create jet exhaust and animating textures. You'll also learn about how to use the Node Editor here in Blender to create materials and textures. I'm just going to zoom in here and let's turn on the render view. So you'll learn how to create things like edge where using blenders, texture paint tools, you'll learn how to create sci-fi panels using the node editor as well. We will light the scene and blender and create the star fields here. And the planet all here in Blender will do everything in Blender. This amazing free open-source animation software from the first polygon to the final render. So if you are new to Blender, that's okay. What we're gonna do for the rest of this video is just to go over some of the basics of Blender. So what I'm gonna do is create a whole new scene and we'll begin there. So let's go over to File and New. And I'll create a general layout here. I'll go ahead and save this. And here we are with a brand new scene in Blender. Now when you first install and open up Blender, this is what you get just a cube, a camera, and a point light. And throughout this course, you'll see my mouse clicks and keyboard shortcuts appear near in the bottom right of the screen. Now let's first talk about just moving around here in the 3D view in Blender. To tumble around, you just click the middle mouse button and drag the mouse and you can tumble around the scene. To pan you hold the Shift key and middle mouse button, click and drag. And to Zoom, you can press Control middle mouse button and push the mouse forward and back. And also to zoom, you can scroll the mouse wheel in or out as well. To select an object, all you have to do is just click on it. Whichever object you want to focus on at that particular time. There are a couple of ways to move and rotate and scale objects. You can come over here to this sidebar and click on the move, rotate or scale tools here. And then you can use the arrows to move the objects, say in the x-axis, the red axis, you can move it in the y, move it in the z, up and down. And if you ever want to frame an object up within the 3D view and have that be the center of your tumble. You can just hit the period key on the number pad and that will zoom in. And now when we click the middle mouse button and drag will tumble around that object. Now you can also use the Rotate tool here. You can rotate it in any axis like this. Or you can use the scale tool as well. Click and drag on one of the axes. And you can scale it in any axis. Now as you're doing this, you're changing where the object is, how big it is, et cetera. And you can see that if you press the Enter key, you bring up this sidebar here over on the right. And you can see that it's got all the information about the location, the rotation, and the scale for the selected object. Now if we wanted to move this back into the center of the grid, we could just click and drag on these three fields here, type in 0 and enter. And it would take it back to the center of the grid. We could also click and drag on these three fields type in 0 and it would take away all the rotation. But the scale we would need to type in one. So if I type in one and enter, it will take the scale back to its original default settings. I'll hit the period key on the number pad, and now I can tumble around the object once again. You can also adjust the transformed by clicking and dragging and any one of these fields. So if I clicked and dragged, say in the y-axis, it will move in the y axis just like that. So all of these fields here are just representations of where the object is, how big it is, and how it's rotated. Now regarding objects, they have a couple of different modes that you can use to work with them. Currently we're using object mode. You can see that here for this as we move and scale and rotate. But we can also use edit mode to actually adjust the components. And you can see that now that we've changed to edit mode, we have a whole new selection of tools here. And if you want to see the names of these, you can click and drag out like this. And then you can see the names there. So now any polygonal object, any object with polygons is basically made up of three components. Vertices, these small points here, edges, the lines, and faces here. Now you can select between any one of these with these buttons up here. Vertex select allows you to select vertices. Edge mode allows you to select edges. And face mode allows you to select any of the faces. Now you can change from one to the other on these by just pressing the one key on the keyboard, the two key or the 34 vertex, edge and face modes. And you can also switch between edit mode and object mode by just hitting the tab key. So I'll hit the tab key and go back to object mode. Now lastly, I just want to mention two foundational modelling tools that are great to know right up front. These two tools are the extrude tool and the loop cut tool. So if I tap back into edit mode, you can see the loop cut tool here and the Extrude tool here. But I'm just going to be using the shortcut keys. So if I select a face here, I can hit the E key for Extrude and then pull up with the mouse and then click. And now we've created a new area for the object. Now I can select this face here, it E, pull out, and there's another new piece of the object there. The other tool is the loop cut tool, and you can see that the shortcut key is Control R. So if I press Control R and hover over an edge, it will allow me to place a new edge loop in the object. So I'm going to click here, and then I can drag the mouse back and forth, get it just where I want it, and then click again. And that creates yet more new faces that I could press the three key, select the face, it e, and extrude that up. And there we go. So those are the things I just wanted to talk about right up at the front. Blenders, navigation within the 3D view, the move, rotate, and scale tools, object mode and edit mode with the Tab key components of the object within edit mode, vertex, edge, and faces, and also the extrude tool and the loop cut tool. All right, so now what I'm gonna do is save this scene. I'm gonna go to File, Save As. And I'm going to call this just like all the others here, learn nm production 000 001, and then I will choose Save As. Here we go. All right, In the next video we will look at how to import the reference images so that we can use them as guides while we do our 3D modeling.
3. 002 Reference Images and Project Scale: Before we begin modelling anything, Let's take a look at the reference images. I've done a couple of drawings here of the spaceship that I want to create. I've got a couple of different views, side view, top view, front, et cetera. And in addition, I've gone through and split these out into their own individual images. So we've got the top and side and the front, et cetera, that we can bring into Blender individually to use as reference when remodeling. So let's work on bringing these images in. I'll come back to Blender here and let's just hit a and delete everything out of the scene. And let's begin fresh here with Shift a, and I'll go to Image and reference. Now we can browse to the reference images folder here in our project folder. And let's begin with the top view. Now, currently if we brought it in like this, with this aligned to view checked, it would align itself to where the camera is. And I don't want that. I want that to be flat on the ground plane so we can see it from above. So I'm going to uncheck this and then click Load reference image. And there we go. There is our first image in the scene. And then I'll just turn on the move gizmo and maybe just move this down and the z-axis so it's below the ground plane here. We can also hit the M key to bring up the sidebar. And we can say, maybe move it down negative one. We can just type in negative one and a z field. And that'll take it down to there. Alright, so we have one in, and what I'm gonna do is kinda create a box of these images. So from any direction we can see that particular side or view of the ship. Alright, let's try this again. I'm going to this time hit the one key to go to the front orthographic view. And let's press Shift a image reference. And this time let's choose the front image and load. And notice what happened. It just brought it in flat on the ground plane again. Now we could turn it in the x-axis, that would be fine, but let me just show you, I'm going to press Control Z and go back to that front view. And if we press Shift a and image reference and we choose a line to view, now, I'll select that front load image and there it is. So now it's in the correct orientation. Alright, let's get it up on the ground plane. I'm just going to click and drag and bring it up. So it sits right on that x-axis, right there, right about there. So what do we have here? 0.9 in the Z. Let's go ahead and just type in 0.9 so it's clean. And now when we bring in the others, we can just type in 0.9 as well. So let's move it back. Move it back to about here. Let's move it back three meters in the Y. Type in three and the y axis, and there we go. All right, Let's hit the three key on the numpad. Go to the right orthographic view and press Shift a image reference. And with this aligned to view, still check, let's select the ship side view and load that in. Now we know from the previous one that we can type in 0.9 in the z, and that'll bring it up on that y-axis there. And we also know that we should be able to type in negative three here in the x negative three and put it right there for the side view. All right, now let's take a look at the back view. If we go to the back view port here in blender with Control 1 on the numpad. We can see the front view from the back. For now what I'm gonna do is just select that front view and I'm going to hide it. I'm just going to come over here and hide that in the viewport over here in the outliner. Now let's go ahead and bring in here in the back view. Let's bring in that other image, shift a image reference, and choose the back load. Now we know once again we can type in 0.9 in the z and that'll bring it up. Now let's bring it in this way toward the front. And let's type in negative 3 and the y. Okay, so we have those in. Let's bring back our front view here. So when we're looking toward the front of the ship, we can see the front image here, but we can also see the back image and we don't want that, right. Same with the back here. We can see the back image, but we don't want the front. So what we can do is we can select these and turn off their visibility from the back. So let's come over here with this selected. Let's come over here to the object data properties for the image. And here in the side field, Let's click front. So we can only see it from the front. Now if we tumble around here, it's invisible. There we go. So let's try this one here. Let's select the back view. And let's choose front here and see what happens. There we go. So we have it visible in the front, but not in the back. Let's try this one here. The side, front. Yeah, that looks good. And we might as well get the bottom one here. Just choose front there. There we go. Alright, so we have our images set up here in the viewport. Now, you can see that currently this image is only five meters long and that's really not going to be big enough for the final ship. We're going to probably want that, I don't know, 25 meters long. And we could do that here. We could type in 25 for each of these and then arrange them just like we have here. Or we could model the ship as is the way it is here. And then when it's all done, scale it up all at once. So it's really up to you how you want to do it. And frankly, for different projects, I do it in different ways, but I think for this, I'm going to go ahead and scale this up now. And once we're done with it, once we're done with the modelling, we can of course scale it up or down altogether however we want. But let's go ahead and get it a little bit closer to the size that we want. So I'm going to take this bottom image first here and I'm going to type in 25 meters. And that's how big we want that to be. That's pretty good. So let's do that with these others as well. I'll take that side view. Type in 25. It is. Now we need to move it out, right? Let's move it out here. And we could probably type in negative 14 here. And let's bring it up in the z again. I'm just gonna bring it up, drop it right on that y-axis. See where we are. We're at 4.5 and the z. So I'll go ahead and type that and just clean it up. So now we know we can take these type in 25, type in 4.5 and the z, right, right over here, 4.5 and the z. And we can probably type in 14 in the y. Alright, let's do that again. Here. Type in 25, type in 4.5 in the z. And let's type in negative 14 in the Y. Alright, so there we go. Now we've got our images to approximately the size that we want this to be. Now how do we know that? Well, I've done a little research and found things like the space shuttle I think is 26 meters long, things like that. But what we can also do is create a reference object just to see. So let's press Shift a mesh cube here to create a cube. And for this cube you can see the dimensions are two meters by two meters. If we took the z-axis and typed in, say, 1.8 meters, That's kind of the height of an average human being, I think. And then we took the x and the y and typed in 0.4 for each of these 0.4 here. Then we could bring this up onto the grid like this and see if this is about what we think this ship would be. So I could move this over here. Yeah, so I think this is about right for me because I wanted this panel right over here. Let me just show you what I mean. And I wanted this panel to be about the height of a person. So once it's landed in the landing bay, they could come over here and push buttons and find out the status of the ship or whatever. So it's just kind of a an access panel that they can punch in things and control things from that panel there. So it seems to me that this is about the right height, about the right size for this ship. All right, Now lastly, what I'm going to do is go through and select each of these and give these a name over here in the outliner. So that's the side view. This is the front view, the back view here, and the top view here. I can get rid of that cube. I'll just hit Delete. And then I can change the name of this collection here, call it reference images. And there we go. Now the last thing I wanna do is make sure that I don't accidentally select one of these and move it around or scale it and throw it off out of position. So what I'm gonna do is come up here. And with this restriction toggles area, I want to turn on the selectable toggle. Now if I turn this off right here for that collection, I can't select any of these. These are not selectable at all in the 3D view. I can still come over here and select them here in the outliner and make any changes down here. But while we're in the 3D view, I won't accidentally throw anything out of position. All right, so now that we have the reference images in place, in the next video, we'll begin blocking out the basic shapes of the ship.
4. 003 Beginning the Cargo Container: All right, Let's begin modelling. I think I'd like to begin with this cargo container. So if we build this cargo container and then kind of build everything around it, that might be a good way to go. Let's give it a try. I'm going to press Shift a to bring up the Add menu and go to Mesh cube. And if we bring in this cube, if we add this cube and then we try and select it, we can't select it. And that's because look where it came in, came in within the reference images collection because I had something selected in here. It just went ahead and automatically created it there. So what we can do is just select that cube over here in the outliner and just click and drag it up to that scene collection at the top. And now it's outside of the reference images and we should be able to select it. Now. In fact, what we could do is create a collection for the ship itself. Let's do that. Let's come up here and right-click new collection. Here it is. Collection too. Let's double-click that and just call it ship. Now we can take that cube and drag it in there, and there we go. In fact, what I'll do now is change the name of that. Let's just double-click that and we'll call this cargo container. And then we go. All right, now let's hit the three key to go to the side view. And I'm just going to bring this up and move it over. So it's kind of in line with this corner. Let's say you can do any corner, but I'll just put it there. And then I'm going to tab into edit mode and hit the three key to go to Face Select. Now if we tumble around, we can select this face here. Now hit the three key again. Turn on our move tool. And I'm just going to click and drag, and drag this all the way back to here. Let's say something like that. Now it's going to be helpful for us to be able to see through the object is we create them. I'm going to press Alt Z to turn on x-ray mode. You can see that up here. I click this, it turns it off and click it, it turns it back on. So that's just all z. So I'm going to click on this top face here and just drag it up. And there we go to the top of that. Now if we tumble around, we can see it's not quite wide enough. So let's hit the seven key to go to the top view. And up here we can scale it in the x-axis by pressing the S key and then pressing the X key. And now we're only scaling in the x axis like this. However, let's take a look, look at what I did. I only scaled the top. Let me press Control Z with select this face and this face here. Now let's go back and do that again. Press S x, and we'll scale those two sides out so they're about the same width as the cargo container in the drawing. Now you can see that we're slightly off during the top. But if we hit the three key, we're on in the side, that's going to happen and that's okay. These are really just guys to help us get things in place. Alright, so if we tap back into object mode here, we've got the general size and shape of that cargo container. However, you can see here, right here that it's got kind of an angle to it. And in fact, we may want to bring in those three-quarter views from the design drawings just so we can see it from yet another angle. So to do that, I'm just going to create a new window over here. I'll just bring this up a bit. And then I'm going to hover over this corner until it turns into an x and click and drag down. So we create a new window. And then I will change this window from a properties window here to an image editor over here. There we go. And now maybe I'll bring this out just a bit. And now I can click on this open button. And let's browse to the reference folder. And I just want this one, this ship design drawings. I'll click Open and here it is. If I scroll the mouse wheel, I can zoom in or out and I just want to bring it in O to maybe this view right here. Yeah, something like that. Just so we can kind of see the angle of this. So now if we tap back into edit mode, we can hit the two key to go to edge select mode. You can see the buttons up here for each of them. There's edge and face select and vertex select. And of course you can press the one key too, three key to choose between them. So I'm going to hit the two key and select this edge here. This is the one I want to create that angle here. But if I do that, I'll also have to do this other side as well. And before I do anything that's going to be symmetrical on both sides, I should probably split this and add a mirror modifier to it. So whatever happens on one side also happens on the other. So what I'm gonna do is press Control R to turn on the loop cut tool. And I can click once and then drag this back and forth like this, but I want it right down the center. So what I'm gonna do is just click the right mouse button and it'll pop it into the center there. Alright, so now that we have that, I want to delete one side so we can measure the other one over. To do that, I'll press the three key and then I'm just going to click and drag and drag a selection over one side of that. You can see here that the select box is turned on. And that's how I was able to do that. All right, with these faces selected, let's hit Delete and choose Delete bases. There we go. So now we just have one side of that box. Now let's come over to the modifiers Properties panel. And we'll click Add Modifier, mirror. And there we go. Now we have it mirrored over to the other side. So we can see the wireframe on that mirrored side. Let's turn this on right here, the on cage. And I'm also going to turn on clipping so that each point of this is clipped to the other. If we turn that off, let me just show you what happens if we turn that off and select one of these center points? I can pull them apart. And we don't want that. So in the press Control Z. But if I turn on clipping, I'm going to deselect and then select it again and try and click and move it. It won't do anything, it'll stay clipped together in the center. All right, let's work on putting an angle on this edge here. So I'll hit the two key to go back to Edge mode, select this, and now you can see that the other side is also selected. So what I'll do is just add a bevel to this. You can come up here to the edge menu and you can see that bevel edges is Control B. So let's go to the front view. Press the one key. So now let's press Control B to turn on the Bevel tool and I'll move the mouse out and just pull this out just a little bit like that. And click. And there we go. Now we can take a look at this bevel properties panel here and we can add some segments like this. But I think we just want it with one segment. So it's just one angle there. Alright, that looks pretty good. But I think I also need a bevel right down here on the bottom. Let's look at that. I'll select this edge down here. And if we go to the side view with the three key, we can see how high or how far up that bevel goes. So let's once again press Control B and move the mouse out to right about there. Let's see how that worked. So I'm going to press Alt Z to go back solid view. And there we go. If we tap back into object mode, that's the beginning of our cargo container. All right, well now that we have that, we can begin to create, say, the front of the spaceship and everything around that cargo container. So we'll begin doing that in the next video.
5. 004 Blocking In the Front of the Ship: To begin on the ship, I think I'll begin once again with a cube. So let's press Shift a to bring up the Add menu mesh cube here. And if we hit the three key to go to this side view, I can hit G and bring this up. And maybe I'll put it right about here, kind of right on that corner, right there. And now once again, because we had this cargo containers selected and it was in the ship collection. The next object came into that collection as well. I'll rename this object, I'll call it ship main. And before I do anything, let me split this in half just like we did with the cargo container by tab into edit mode, I'm going to press Control R. And now another way to ensure that that loop is right down the center. I'll just hit the Enter key twice. There we go. Now that's directly down the center. So if I press Alt Z and the three key to go to face mode, I can click and drag and select these faces here. Hit Delete and delete faces. Now let's come over to the modifiers panel, add modifier mirror. Once again, we turn on, on cage and clipping. Okay. Now if we go back to the side view with the three key on the numpad, we can begin moving the points around to get this in the right shape. So if I hit the one key, I can click and drag this point here, which will then also select this point in the center and the other one on the other side. So then I'll take this and just drag it up to here. Let's take these points here. I'll click and drag and drag them out to the very end right here. And let's take these points, hit G and move that two right there. So we've got that generally in the right shape. I think if we tumble around and take a look at it, you can see it's not quite the right shape from the top view. So let's hit the seven key on the numpad. And from here, we can click and drag and grab that point and move it out. It looks like we could take this point here and move it out as well like this. But it kinda looks to me like we're going to need another edge right along in here to move this out. So let's take a look at that. I can tumble around here and press Control R. And I'm just going to click two times right there, just to put that in there. Now we go back to the top view. And it looks to me like this point I think could come out to here. And this point could come to right here. Let's try this. Let's see, Let's tumble around and press Alt Z and see what we think. Well, I don't know. One thing we can do is use the Quad View here in Blender to be able to see the scene or see the model in multiple views at once. So to turn on quad view, Let's press Control Alt Q. Now we've got several different views here. We've got the front view and the side view, the top view and a perspective view here I'm going to hit the End key to close that panel there. All right, so now let's take a look at it with this. Let's press Alt Z and see what we can see here. So now from the front view, it looks like we've gotten this point in the wrong place, right? So maybe we can take this point and move it in like this. And this point as well up here. So we take this and move it in. So it can really help to have multiple views open here as we're doing this. Well, let's take a look at this one here. Maybe we could move that into there. And then let's go take a look at it from the top here. So it looks to me like this is a little bit better. Let me press Alt Z to go back to Solid mode. Yeah, it looks like this is a little bit more in line with the way the drawing is. The only problem now is that this point right here seems to be kind of out of alignment. I'd like it to be in-line with these other points. So what we can do is just slide that point down or even actually pull it out, see how it's bent down some. So let's press all Z. There we go. Yeah. Let's just bring this straight out like this. There we go, right in line with bad. All right. I'll z. Yeah, that's looking a little bit better. Let's press Control Alt Q to go back to our perspective view. And yeah, that's looking a little bit more like our drawing here. So you can see how having multiple views open can really help. So let's go back to that Quad View Control Alt Q. And let's now select a couple of bases down underneath here, say this face and this face. And of course the other side is selected as well. Once we choose those, well, we can do now is just hit the E key to extrude those faces down. So I'll hit E and I'm going to pull down to right about here, right there. Now let's press all z. Let's hit the one key to go to vertex select. And I'll just click and drag this point here and move it back like that. And let me move this forward just a bit. There we go. Okay, so we've got that now. Let's do that again. Let's hit the three key and select this face and this face. And then we'll need to extrude down again. But, oh, take a look at this. Look how this is off here. So once again, a good reason to have this multiple view open. Let me select this point and pull it out. And grab this point and pull it out just to pet like that. This looks okay. We might even be able to pull these out just a little bit like that. Maybe might be able to bring these in some. So even as we move forward, we might need to just go back and take a look at where we are, make sure everything's in the right place. And on that note, look at this. Once again. If I select these points, I think they should probably be angled back like this. Yeah, sure enough. So instead of pulling that one forward, I should have pulled the other two back a bit. All right, so now let's select these faces on the bottom once again. And let's extrude down one more time. I'll hit E and pull down to right about here. Hit the one key to go to vertex select, select that point and move it back. And from the front view it looks like we once again need to grab this point and pull it out. And in this point we could probably move out just a bit like that. All right. I think the next one could be just one extrusion all the way down to this point. And then another one for here. So let's hit the three key. Select this face and this face. Let's now hit E and pull down to this point right here. Hit the one key, select this point, drag it back. All right, I think this is in line, pretty good here. Now let's select those faces one more time. Now, we could also, I guess we could also come over here and just click and drag these points and that sticks those faces there as well. So we could just do that. Get E bowl down. So it looks like we're inline here. But over here I feel like we need to move these n like this, Something like that. So once again, we're not all the way down here in the front, but we are here in the side. So I think that'll work. I can move these down just a little bit more like that. All right, let's take a look. I want to press Control Alt Q, and then I'll press Alt Z to take a look and let's tap back into object mode. And there we go. So we've got least I think the beginnings of that front part of the ship. Now in the next video, we'll begin extruding this back like this, and create the back of the ship as well.
6. 005 Blocking In the Engines: For the back of the ship, Let's just select this and tab into edit mode. And we should have a few faces here that we can use to extrude back. Let's select these and then hit the three key on the number pad to go to the side view. And let's just hit E and extrude this back all the way to here. Let's go to there. And then from here we just need to add an edge right along here to create a face that we can extrude up. So let's press Control R and click and drag this just right about here I think. And then if we hit the three key and select that face, Let's once again go back to the side view and hit E and extrude up to the top right about there. All right. Let's take a look at that. Yeah, I think that's pretty good. Now, once again, we've got this kind of angle here. We've got a bevel right here. So let's hit the two key to go to Edge mode and select that edge. Let's go to the front view on hit the one key on the numpad. Let's press Alt Z to go to x-ray. And then let's press Control B. And let's pull this out down to right about there. Let's try that. I'll tumble back around, press Alt Z. And yeah, I think that's pretty good. That's what we want from this angle here. Now before we go into any more detail on this ship, let's add the other major components here, the engines on the side and this thruster in back. So for this, I'm going to tab back into object mode and let's create new objects for this. Once again, I'll press Shift a to bring up the Add menu. And let's create a cube. And let's bring this out here. And this is going to be the engine here. Once again, let's go to that Quad View Control Alt Q. And let's see if this can help us put this in place. Yes, so let's press Alt Z here and then hit the G key and move this right into here. I'll scale it out in the x-axis with S and then x. Let's scale this out like this, out like that. And then let's scaled in the z, S, z, bring it up. So it's about like that. Maybe move it up just a little bit. There we go. Now we should move it back. Let's grab it and move it back here in the top view. And then press S and Y and scale it out in the y-axis here. Like that and move it back just a bit and we go. All right, so here it is in the 3D view. Let me press all z again so we can see it in solid mode. All right, now let's tab into edit mode, and let's hit the two key and select these edges. And let's bevel these as well. So once again, all z. And with these edges selected, let's press Control B. Ring the mouse out like this. Kind of bring it right down like this. There we go. Okay. That's looking pretty good. There it is there. Now let's extrude in around the edges here you can see how in this drawing they go in a bit. So let's select this face here on three key and select this face. And I'll press Alt Z again. And let's now inset this face. And an inset is kind of like an extrusion and a scale all at the same time. So we could press E for Extrude and then S and scale it in, or you can just hit I and then move the mouse in like this. Yeah, let's give this a try like that. Now, when I did this, it looks to me like I'm going to press Alt Z. It looks to me like these edges here are a little bit wider than this here. And the reason could be because we scaled this cube in a certain way. So let me press Control Z and go back a bit. And then I'm going to tab into object mode. Now. Here in object mode, Let's hit the End key and bring up the sidebar. And if we look in this scale, you can see that the scale is non-uniform. In other words, we don't have uniform values in here. And I think that's why we're getting a non-uniform inset. So to make the scale uniform, we need to apply the scale. To do that, we can press Control a. And here in the apply menu we can choose scale. Now look over here, we've got all ones. These are all uniform, all the same. So if we tap back into edit mode and select this face here, let's try it again and see what we get. So I'll press Alt Z and then I'll press the I key. And let's scale in just a bit like this. Now let's take a look at this. I'll press Alt Z. Yeah, that rim now looks a lot more uniform. So there are several tools like the inset tool, even the Bevel tool, that looks at the scale as a reference as to how to apply the tool. So sometimes if you see some strange behavior, check and see if that scale is applied. Alright, so let's tap back into edit mode and all z. And with this phase still selected, let's press the I key again and move this and like this. Now we can maybe pull it back. You can see here it's kinda pulled back. So let's just take it and pull it back like this. There we go. I'll z Yeah, I think that's pretty good. All right. Let's spin around and do it on the other side. I'm going to tumble around here and select this face. Now, I don't really want to change the front view to the back here in the quad view. So what I'm gonna do is press Control Alt Q. And then I'm going to press Control 1 to go to the back view here. And then all z. And I want to bring this in to match these edges here. It looks like in my drawing, I brought this in a little bit more, but I think I'd like him even so. Let's go ahead and with this face selected, let's press I and bring this into right here. And then I, and bring that in as well. And then we can come over here. And I'll go to the three key here. And maybe we can just bring this back in like this. All right, all z. Let's take a look. Yeah. That looks pretty good, I think. Now we can also put that over on the other side. We can take this and mirror it over. We can use that mirror modifier again. But the thing about the mirror modifier is that it mirrors around the origin of the object. When we, we're mirroring the ship or the cargo container, you can see that that origin is right in the center of the grid here. This origin is not. So we need to move that origin to the center of the grid and then apply the mirror modifier. And to do that, we can use this 3D cursor. Now, usually at least when you first opened Blender, the cursor is in the center of the grid. Now it could be that it may be off somewhere. We could select cursor here and just click and move that cursor out. So to get it back to the center of the grid, we use the snap menu and you can just press Shift S to get that. So we can say move the cursor to world origin or the number one. So I'll click here and there it is. Now to move this origin to the 3D cursor. We can come over here and go to Object Set Origin, origin to 3D cursor. There we go. Now you can see that orange dot has moved into the 3D cursor. So from here with this selected, let's go to Add Modifier mirror. And here we go. Now we have it over here on the other side. Now I realized that earlier I mentioned I didn't want to change a view in the quad view, and I just want to go back and show you how you can do that if you want to do it. So I'm going to press Control Alt Q. And if you wanted to change a view, say this front view to a back view. You could come over here to view in the sidebar. And right down here, there's a little thing called Quad View. And if you turn off the lock right here, you can then hover over one of these and press say control numpad 1 and switch over to the back orthographic view. I'll hit the one key here. Or you could change, say, from the top to the bottom with control numpad seven up here. So you can change. I just like to keep them locked because it tends to confuse me as to what I've done and which view should be what. So I just wanted to show you that you can do that if you wanted. All right, so in press Control Alt Q again. So in the next video, we'll work on creating these braces that are holding the engines and will also work on the thruster in the back.
7. 006 Creating the Rear Thruster: Now let's add this brace here that holds the engine. If I tried to select the engine, now if I click here, you can see I still got the cursor on and whatever I tried to do, I'll just move the cursor. So let's switch back to the move tool here. And then I'll press Shift S and move the cursor to the world origin. There we go. Just to get it out of the way. As an aside, if you ever want to hide that completely, you can come up here. The viewport overlays and turn off 3D cursor here. But I find it pretty useful sometimes, so I'm going to just leave it out there. Alright, so what we can do now is press Shift a and bring in a cube, and let's slide it over. Bring it up, and let's put it in place here. I will once again bring up the Quad View with Control Alt Q. And then let's move the windows around or zoom in a bit, I should say. And let's try and get this in place. So I'll press S Z and scale it here in the front view, in the z-axis. And let's move it in the y axis here. In the top view. Sy, move that out a bit, something like that. And I'll press Alt Z just to be able to see it a little bit better. It looks like over here I could scale this in the Z s. Here we go. All right, so we have that generally in place and that's okay. But the way I drew it over here, it has just a bit of a curve to it. So I think I want to add a bevel. Now recall what we said about scale and applying the scale when using a tool like inset or bevel. So let's press Control a and apply the scale actually before I do them at, let me just hit the End key and take a look. Yeah, see, since I scaled that down in object mode, it has non-uniform values in the fields over here. So let's press Control a and apply the scale. Now we've got all ones. And so the Bevel tool will work a little bit better on this. I'll press Control Alt Q to come out of the Quad View. And let's now tab into edit mode. Hit the two key for edges. And let's just select these four edges. And then let's press Control B and pull out like this. And then I'm going to scroll the mouse wheel. To scroll the mouse wheel up like this or down, just to add a new edges to this. And I think maybe we want to do is something like that. I'm trying to get that middle part about the same width as the other segments that I can click there. Now if it isn't quite right, you can always come over here to the Bevel settings panel that pops up once you use the tool and you can increase the segments here, right? Or decrease them. You can increase or decrease the bevel amount with the width. So I can bring it out like that back and forth, whatever you think. And also you can hold that shift key down as you slide the mouse cursor in here to kind of slow down the change. And there we go. All right, I'm going to tab into object mode alt a. And there we go. Now we've got that curve there. Ultimately we're going to want that a little bit smoother. So we're not seeing the polygons. And the way we'll do that is just go up to Object and shade smooth. And we'll be doing this more with the rest of the ship as we go forward. But if we click here, that helps with the smoothness a little bit. Yeah, that's pretty good. But also we can come down here and go to the Object Data Properties. Click here and let me twirl these up here. We go to the normal section and turn on auto smooth. Now we can click and drag in here and drag that degrees value up. You can go all the way up to 180 and all the way down to 0. And what that's saying is anything under any angle less than this is going to get smooth. So that's pretty good there. And let's, let's do that. Alright, now let's look at the thruster back here, this part back here, this is just kind of a big rocket engine on the back of the ship. So let me zoom out here and take a look at this. This is kinda what I want it to look like. And for this instead of a cubed will begin with a cylinder. And also, we could take, say, this edge right here. Let's click this. And we could move that 3D cursor to here so that the next time we created a new object, it would pop into this place instead of in the center of the grid. So with this edge selected, you can see its origin there. I'm going to press Shift S and say cursor to select it here. I click that and the cursor moves to there. Now I can tab back to object mode, press Shift a mesh and cylinder. And here we go. Now in the settings panel, we can choose how many sides we want on the cylinder. Currently it has 32 sides. I think that's just fine. It's one meter wide and two meters tall. And also we can change the kind of cap villain has. So we can choose to not have any top or bottom. Or we can choose to have an in Gabon which is a polygon with more than four sides. Or we can have it create the top, the caps as a triangle fan. Currently, I'll just leave it as an end gone. I think it's fine as it is. So I'll hit the period key on the numpad to zoom in. And let's rotate it around the x-axis here, the red axis in the worldview. So to do that, I'll press R x 900 to turn it in the x-axis, 90 degrees. Okay, so now let's go back to our Quad View Control Alt Q and a. Let's zoom into this area right here. Yeah, I think this is pretty good. Let me hit the End key to close that panel. Now Alice do is get it in place. I'll hit G and kinda move it into the center here. I'll hit the S key and scale it up. So it's about the width of the base of the thruster here. And then I will tab into edit mode and select that face here. I've got to hit the three key to go into face select mode and then click that. Now, bring it back right here. You can see it here as well. And then I'll hit the S key and scale out to get it about the right size there. Now, if you wanted to, of course, as I said, you can hit the End key. Go to View, turn off the lock for the Quad View and hover over here and press Control numpad 1 to spin around to the back view. I'll hit the N key to close that panel. And then let's press all z. And now we can see the drawing here. So what Let's do is with this face selected, let's go ahead and press that icky and inset this just a little bit like that. There we go. And now let's extrude back into the object. So I'll hit E and pull it in. And I think I wanted to go about to hear, I don't want it to go all the way and I wanted to maybe come to right about here, let's say. And then I'll hit the S key to scale in that we get to about right here in the drawing, right about there. Now I'm going to want to extrude in a little bit more. So maybe I better bring this back out just a little bit more like this. So I have a little bit more room. And then I'll hit I and bring that in like that. And then here's where I want to extrude a little bit more, bringing that back to here. And then let's hit the S key and scale and like this. There we go. All right, now let's take a look at it. I'll Z Control Alt Q. And there we go. Okay. Yeah, that's about what we want now. All right. We've got two more pieces in, I think in the next video, let's work on the landing gear and maybe we can work on some of these clamps here as well.
8. 007 Adding Detail to the Cargo Container: Well, that's I'm thinking about this. I realize I'm probably going to need to create these indentations in the cargo container before I create the clamps because I won't know how far the clamps go in until I have those indentations. So let's work on those. I'll go ahead and select the container and let's tab into edit mode. And I'll hit the three key and all z so we can see through it. And I think I just need to insert a few edge loops here to define these different faces that we're going to inset and extrude. So I'll press Control R, and let's scroll the mouse wheel to add new edges. There we go. I think that's all we need is for cuts here. I'll hit the Enter key twice. And now let's press the three key and select these faces here. And we're going to want to inset these just a bit before we extrude them. So let's hit the I key. And as an inset, it, it insets as all one selection, all one area. And we don't want that, we want them to be individual faces. So at this point here, I can hit the I key again and it'll switch to individual faces. So let's coming in right about there, I think. And then let's hit the E key and extrude in just a bit like that. There we go. Alright, so we have those now. Let's also get these three indentations up on the beveled corner there. And let's select this face, this face, and this face. Let's hit I and set these. And then we'll hit E and extrude those in just a bit. All right, for these little panels here, let's insert a few more edge loops to create those. I'll press Control R. And how many do we have there? We've got five, so four cuts should do it. That control our scroll, the mouse wheel, I'll hit Enter twice. And there we go. And you can of course also click twice. So now that we have those, I'll hit the three key. Select all of these bases here. And then if I hit the I key, the inset is still set to create individual insets there for each face. So that's good. And then we can hit the E key and extrude this out. There we go. So we've got those basic elements now. Let's also do the top and the top indentations. R square. So I didn't put any rounded corners on them. We'll just be able to keep them square and that's good. So we'll also come back and do the bevels on these corners here in just a bit. Let's tab into edit mode and let's select these faces here. If we tried to do all of these, we'd get individual insets for each of those and we don't want that. So let's just select these first. And now we may need to use the extrude tool here because we have a mirror modifier on this object, right? So if I hit the I key, this is what we get. And even if I hit I again, it isn't gonna do anything because It's seeing these as two different objects, two different faces. So that's not going to work. Control Z here. So instead of using the inset, remember I said that an inset is really just like an extrude and a scale. We can use that here. So if we get E and S and scale in, we get this behavior. They stay as one unit, right? The two selections. But they're just moving in towards each other. They're not scaling in the way it is in the center. So that's not gonna work Control Z. What we can do instead is come up here to this Transform Pivot menu and change from median point, which is the default to individual origins. And now we will see each one of these selections as individual units. So if we hit E and S and scale in now, you can see we can do that like that. All right, now let's select these faces as well. Here, here, here and here. And then once again, E, S. And let's scale in just a bit here. So sometimes you need the inset tools, sometimes you need extrude and scale. They do similar things, but they can have a different effect depending on the situation. I'm going to go ahead and select these now. And let's hit E and extrude this down just a little bit like that. Alright, so now we've got our insets, but as I said, I want these to be curved here. So we need to go in and select those edges and beveled them. Tab back into edit mode. And let's come over here. And I need to select this edge loops. Let's hit the two key. I need to select this edge and each of the four edges all the way around. And if I go down here, I can select this and then I can spin it around. And but that gets kind of tedious. There is a better way. Now, if I press Alt and click an edge, it will select an edge loop from that edge, right? But that's only if they're connected into end. How do we do that with these parallel edges? Well, what we can do is press Control Alt and click one. And now it selects this loop of parallel edges here. Alright, so we can do this a little bit quicker. So to add more to that, Let's press Shift Control Alt, and click here. Now it's going to select these and that's okay. We're going to come through and de-select those here in a minute. Shift Control Alt, Shift Control Alt, and then Shift Control Alt. Now we can deselect these. You can go through and press Shift and click to deselect, but you can also use the circle select tool. Now, it's over here. Here you can see it circle select, or you can also just hit the C key. C key. And now I can scroll the mouse wheel and increase in, decrease this size of this circle select tool. It's kind of like a brush almost. Now if I click and drag, it'll select things, select components. But if I middle mouse button click and drag, it'll de-select. So I can just middle mouse button click and drag these. And then I'll hit Escape and move over here. And then hit C again, middle mouse button click and drag these here to deselect. And then you can hit Escape or right-click to get out of the circle select tool. All right, Now that I've gotten those edges selected, let's use our Bevel tool with Control B and pull out a bit like this. Now, I don't want them to connect all the way in the corner there. I want to keep them apart from this pole here. We've already got enough edges going into that. We don't need anymore. But I'm going to scroll the mouse wheel about like that to create those curves. And then click. So now we have those. Now also I wanted to have a little bit more realism. I want the edges to be not quite so sharp and perfect. And for that, as you've seen, we can use the Bevel tool, but there's also a bevel modifier. And if we come over here to the modifiers panel, Let's select that container add modifier. You can see there's a bevel modifier here, so I'll click that. And what it did is it just added a little bit of a bevel to every edge. And if I come down here to the bevel panel, I want to increase the number of segments. I'll just increase it here to maybe three. Now they're going to be some little issues here like this. Let me tab into edit mode where that pole happens, where these multiple edges come into each other. And that happens. But honestly, I'm not too worried about that because we're not going to see this very close. We're going to see it back like this. So I'm not too worried about that. Now, we could also try and smooth this object. Remember we smooth this object to get those polygons from being so sharp. We could try that over here. If we select that go Object, Shade Smooth, and then come down here to our object data properties and turn on auto smooth. We could increase or decrease the angle here, but ultimately it's not doing much good. And look at what it did. It really gave us a few artifacts here where that bevel happened. And I don't really like that. I think from this distance we might be able to see that. So my point here is that sometimes the smoothing, the Shade Smooth works and sometimes it may not be applicable. So I'm going to come back here to object and go to shade flat. And I can even turn this off. That really doesn't matter there, but I think personally that it looks better like this than it does with Shade Smooth on. However, this over here looked better with Shade Smooth. So they're going to be some times when you may need to make a decision as to what needs to be smooth and what doesn't. And if you've noticed, I've been creating a lot of this ship as multiple objects. And when I do that, I can choose to smooth this, but not smooth this add a modifier here and not there. That's the beauty of being able to create the object in multiple pieces. You can kind of pick and choose what tools and processes you're applying to each piece. And ultimately, we're just going to parent all of this to a rig for animation. So it isn't going to matter how many pieces we have here. Alright, so in the next video, we will work on these clamps as well as we should go in and do some work on the landing gear as well.
9. 008 Modeling the Side Clamps: All right, For these clamps here that hold the cargo container down, Let's go to this side view with the three key. And instead of all z, we can also use wireframe view. If we hit the Z key, you can choose what view you want, and we'll just choose wireframe here. Now, the same things are up here as well. Wireframe, solid material and rendered up here. But I think just for what we're doing here, Let's try it with the wireframe. Now, I want to move this cursor over to here because I want the cube 2 come into this spot right here. So I'll go over to the cursor and then click right here. Alright, now let's press Shift a mesh tube and there's our cube. Then I'll hit S and scale in. So we get the cube about right here. I'll go back to the Move tool and move this over just a bit. I'll move it down into here. And then let's tab into edit mode. Hit the one key per vertex select. And then I'll just click and drag and select these points on the top and pull this up to about here. Alright, now let's tumble around and we can see it here. We need to pull it out. Back into object mode. Pull this out a bit. Maybe go back to our solid view with the Z key. And it looks like it's a little bit thinner here. So let's hit the S key and then X to scale on the x-axis and maybe bring that in some like this. Maybe right about here. And then I've got a little bit of extrusion here. So what Let's do is let's move this in to about where it's going to be right next to the container. I'm going to hit the period key to zoom in to this selected object. And if I move it over right about there, I feel like it's a little too tall. So maybe I'll tab into edit mode and just pull this down some. That's not quite what the drawing on the side view had, but I think it's okay. I think sometimes we got to do our own thing and not be completely slaves to the drawing here. Okay, so now what I'll do is add an edge loop so we can create a face that we can extrude. So I'll press Control R, click and drag up here. Maybe a little bit higher, something like that. And there we go. And then let's press all z, the three key and choose that based. They're all Z again and then hit E and pull this out at about two there. Then what Let's do is add a bevel here. You can see I've got this kind of curved here on the top. So let's select this edge and let's press Control B. If I pull this out and scroll the mouse, we'll look at how that bevel came out. It isn't quite even between the two edges, right? It's kind of flat. And I think once again, applying the scale will help with that. So let's press Control Z. Go back into object mode, hit the N key and sure enough, our scale isn't uniform because we scaled that cube to get it the right shape. So let's just press Control a and apply the scale. That gets that back to all ones. We tap back into edit mode and press Control B again and pull that out. Now that bevel is centered on that edge, and it looks a lot better. Yeah, let's do that. I'll select this edge controlled BY and pull that out like that. There we go. Now, if we need to, we can of course, pull that up or down. Say I wanted it to be a little bit taller. I could go to vertex mode and click and drag and select these points up here. And then I could just click and drag, move these up or down depending on what we need. There we go. Now let's create one of those trays here. One of these things that this, at least what I'm imagining is that these things slide out for the container to drop in and then the little clamps slide in and hold it there. So what I'll do is I'll just press Shift a again with this cursor still in place and create a cube and scale this down. And let's scaling the Z with S and Z and bring this over and let me center it a little bit better here. Scale it out Some. There we go. So I'm going to bring this down to about here. I'll bring it out to the edge because it needs to slide out. And then I will press Alt Z tab into edit mode and hit the three key to select this face here. And then I just want to bring this in right about here. And then I want to grab this edge right here and just drag this in as if it's kind of angled to wear that supposed to sit in. Once again, I'm going to tab into object mode and make sure my scale has been applied here. I'll press Control a, ply the scale so that when I inset this face, it'll be even, I'll instead it to about right here. And then I want to scale or extrude that down a bit. Let me hit E and pull down, but it's not really wide enough, is it? So I need to take this whole thing right here and just scale it out in the Y, S Y. And maybe move it over just a bit so it fits around that clamp just a little bit better. All right, There we go. So now we've got this in place. I think I also want to add a bevel around the edge here. If I added a bevel modifier to this, it would bevel all these edges as well. And I don't want that, I just want these on the sides. So let's just go through and select an edge mode. I'll select this edge and alt, click this and Shift Alt click this and this. Now, I don't want this one. I'm going to Shift click that to de-select that. And then Alt Shift click here, here, here. And then de-select that with. Shift click. Okay, now I'll press Control B. Pull this out a bit. Probably don't need that many edges. Maybe just two in here. And click that. Let's see how that's looking. Yeah, I think that's pretty good. And then maybe we need some bevels down here. But down here we might be able just to use the bevel modifier. Let's see, let's, with this selected, let's come over here. Click Add, Modifier and Bevel. And then let's increase the number of segments to three. And let's see how that looks. I don't know that looks a little bit too rounded for my taste, so I don't think I want that. Let's try beveling on our own here with just say maybe these edges here and maybe these around the top. Let's try that. Control B and pull out a bit. And then click. Let's see how that looks. Yeah, that looks a little bit better to me. So once again, you've gotta kinda maybe try one way of doing things. One type of bevel, try the other, see what you think. So now that these have the same kind of bevel on them, I can join them into one object. If, say I use the Bevel tool on one and the bevel modifier on the other. I'd have to keep them as separate objects, but let's just take these two and join them together. You can come up here to the Object menu and click Join. Or you can see here that the shortcut is Control J or Control J. And there we go. Now that I have this, let's duplicate it and move it over for the other one, I'll press the three key it z, go to wireframe. And now let's just press Shift D to duplicate, and then the Y key to slide it over in the y-axis right here. And click. Now let's hit Z, go to Solid mode. And here we are. Now what we can do is take these and join these two together, Control J. And we can mirror this whole object over now to the other side. But we have to move that object origin into the center of the grid. Now we don't have our 3D cursor in the center. So Let's press Shift S and choose cursor to world origin. Then let's come up here, go to Object, Set Origin, origin to 3D cursor. And then we can come over to our modifiers panel mirror. And there we go. We have over on the other side. All right. We've got our clamps holding the cargo container down here. We're also going to need them up on top. So we'll work on those in the next video.
10. 009 Creating a Top Hinge Clamp: All right, now let's start working on the clamps here at the top. Actually, before I do that, I see now that I didn't apply Shade Smooth to this. So let's come up here to object and Shade Smooth and then come over here to the object data properties, normals, and let's turn on auto smooth. Yeah, that looks pretty good. All right, so for this clamp up here, I think I want to begin with a cylinder to create this hinge. I have the idea that these things kind of open up. And then the container comes down and then they flip down to hold the container in. So I will tab into edit mode here and go to vertex select. Let's then press Shift S and two cursor to select it. And then I'll tab back into object mode, hit the three key, and then let's press Shift a and create a cylinder. There we go. Now, I don't think I need 32 sides for this, so maybe let's cut that in half and give it the 16. And then I want to rotate it in the y-axis here. So I'm going to press RY 900, and then let's press Alt Z, scale it down with the S key and hit G and move it into place here. Now let me scale this down quite a bit and get it right about there. Let's see how that works. So I'll press Alt Z and let's spin around here. So there it is. Let's take a look at it from the front view, I'll hit the one key on the numpad and Alt Z. And it looks like it needs to be a little bit wider. So I'll press S and X and scale out just a bit like this, something like that. And let's go ahead and split it in half, just like we've done before. I'll tab into edit mode, press Control R, and then I'll hit the Enter key 2 times 2. Drop that edge right down the center. Let's then click and drag to select one side. And I'll hit the X key or the delete key and choose to delete faces. And there we go. And now if we tap back into object mode, go to our modifiers panel and let's choose the mirror modifier. And it didn't do anything. We don't see it here. And that's because if you look over at the sidebar, you can see we turned the object 90 degrees in the y axis. So just like the scale, sometimes blender looks at the rotation of an object to apply a modifier or apply a tool or whatever. So Let's just press Control a. And this time let's choose to apply the rotation and the scale. And there we go. So we have zeros here and ones here. Alright? Now Alice do is let's insert an edge loop. I'll come over here and turn on the cage. And in addition, I need to turn on clipping here so that once again, those points clipped together. Now I want to create kind of an inset in the center here. I'm going to press Control R to insert an edge loop and move that over to here. And then I want to select all of these faces here. So to select a loop of faces, you press Alt and click an edge between two of the faces, and that selects the whole loop. Now I want to extrude it and scale it in, but only in the z and the y-axis. I don't want to scale in the x. So to do that, I'm going to need to press Shift X after I hit S. So here we go. I'm going to hit E to extrude. Then the S key to scale. And then I'm going to press Shift X to turn off the x axis and then we can scale in like this. So I just wanted to maybe come in about like that. There we go. Now let's select this face here. And let's hit I to inset, e to extrude. I to inset. And then E to extrude and I'll pull out kinda like that. There we go. All right, now for this piece here, and if you look at it over here, it kind of turns down. It's the similar kind of shape to these clamps here. So with the cursor still here, I'll press Shift a and select a cube. And let's scale this down and put it in place here. I'll hit G. Scale it down a little bit more. This bring it into that cylinder. Let's take a look. Wow, we're going to have to scale it down a bit more, aren't we? So I'll press S to scale it in the z-axis and let's bring that in like that. Alright, and then let's scale out in the x, s and x. And then if we tab into edit mode and select this base here, I'm going to hit the three key to go to the side view and then I'm gonna move this out like this. And I don't think I need it to be quite that far in here because we only needed to go to here. I'll press Control R and create an edge right here. So we can then choose this face, all z, 3, choose that base there. And let's extrude this down E and pull it down till it just almost touches that. There we go. Now, I feel like maybe we should pull this out a little bit more, something like this. There we go. Alright, now that we've got this, I want to give it a few bevels, but once again, our scale is off. Control a. Apply the scale. Now I want to select this edge here, Control B. Let's pull that out. Scroll the mouse wheel like that. And maybe I want to select this edge here and this edge here. And let's try beveling knees. And we go. Yeah, I think that'll work. And what about this here? We could maybe add a bevel here. Let's try that. All right, I think that works. Okay. Now let's add one more cube in here. Shift a cube, scale it down quite a bit. And let's put it right in here as the base of that joint there. So let's press S and Y and scale in like this. Let's scale out with S and X. And then I will go ahead and bring this down just a little bit further like this. Maybe bring this up a little bit like that. Alright? And once again, control a scale. And let's add a couple of devils right here. Okay? Now let's combine all these together into one object. I'll select this, this and this. And let's press Control J. Oh, and look what happened. We lost our mirror. And that's because the other two objects didn't have that mirror modifier on them. So let me press control Z. And what we need to do before we combine these is to actually apply the mirror. So I'll come over here, pull this arrow down and choose Apply. Here we go. Now it's all one object. Now we can take this, this and this Control J. And there we go. Now it's all one object. Let's smooth it and see how that looks. Objects Shade Smooth. And we'll go over here to the object data properties and turn on auto smooth. Yeah, that looks pretty good. Let's go with that. Now, I realize that if we're going to do the same thing over here, the way I have it drawn. Let's take a look at this. You can see the way I have it drawn. The joint that this would rotate up on is hanging out over the container. And if this were actually the case, the container wouldn't be able to slide down or be pulled up. So this particular design may not be exactly what we want to do. So in the next video, I think we'll take a look at maybe cutting into this part back here to drop that hinge clamp into it. So we'll work on that coming up next.
11. 010 Using the Boolean Modifier: Well, I think for the clamp at the back here, I can just use this duplicated and move it back. But then we're going to have to deal with cutting into that object. So let's first grab this. I'll just select it and press shift D and Y and bring it out like this. And then I'll spin it in the z-axis with our Z one 800 to rotate it a 180 degrees around the z and then Enter. And then let's bring this back and kinda put it where we think it should be. I'll hit the period key on the numpad to zoom in. And so there it is, That's kind of where we wanted it. It could go up a little bit more. You know, it could come up like this may be in this could extend down just a little bit more. But let's work on cutting this. So to do that, I'm going to use a Boolean modifier over here in the modifiers panel. You can see that here. But what we need for that Boolean modifier is a cutter object, an object to actually cut into this object here. So what I'll do is I'll create a cube. If I press Shift a mesh cube, it's going to pop in over here. And that's fine. I'll just move it over. And then so that we can see what's happening. I'm gonna come over here to this object properties panel. And right down here under view-port display, I scroll down all the way down here. We've got a display as pull-down and it's currently at textured. So I'm gonna pull this down and select wire. Now we can see through it. And I like to do this just so when I'm using the cutter object with a Boolean, I can see what's happening a little clear. Alright, so I'm going to scale this down, bring this over here and kinda put it right in here. Now we'll do is let's give this a name so we know what it is within the outliner here. I'm gonna come over here and change the name to cutter. And this is just a temporary object that we're using for this. All right, so now I'm going to select this object here that we want to cut into. Go to the modifiers panel, and I'm going to add a Boolean modifier year. Now, if we come down here and in the object field, I'm going to click on this little eyedropper here, and then I'm going to come over here and hover over that cutter object and click on that. And there we go. You can see what's happening here. And you can see that the cutter has been put in the field, in the object field over here in the modifier. Now if we select this cube here, we can move it around. And we can see the cutting happening as we move it around. So I can move it here into the center. Let's say I can scale it in the x, right? I can move it back. And this is why I changed this to wire view so we can see what's happening here. All right, so I can bring this down like this, let's say. And then I can maybe move this. Into here and yeah, I'll probably want to bring that down. So we're just getting kind of a good sense of what's happening here. I'm going to select that cube and I'm going to type in 0 in the x just to be sure I keep it right down the center. Since this is a mirrored object, we want the same thing happening on both sides. So how is that? I mean, what what do you think is that? And of course, you can do whatever you want here. You can have yours be how ever you like. But I think I'm going to go with this right here. So what that means for me is I'm going to take this face right here, hit the three key and select, select this face right here. And I'm going to bring this down. So it just almost comes in contact with that. So it's a little bit longer on this side than it is over here. But I don't think I'm mind that. Now that I've got this, What am I gonna do with it? When hit the period key here? Because if I select this object here, and if I try and apply this Boolean now say, Okay, I have it the way I want it. I'm going to click Apply to make that cut permanent. If I do that, pull this down, hit Apply and look what happens. That's ugly, right? We don't want that. So I press Control Z to undo. Now as a general rule, when you apply a modifier, you usually want it to be up on the top of the stack. So we could take this, we could grab this and drag it up to the top and look at that. We get the same thing again. So the combination of the mirror modifier and the Boolean modifier isn't working real well. Alright, let me take this down. So the only other option we have, I think is to apply the mirror modifier before we apply the Boolean. However, I've still got work to do here on this main part of the spaceship. And when I do something on one side, I'm going to want it to happen on the other side as well. So I don't want to apply this quite yet. But just as a test here, Let's apply this mirror here. And we can always press control Z and undo that. I'm going to apply this here and then apply the Boolean modifier as well. And there we go. So now it's permanent. We could delete this here, x and delete, and now it's permanent. However, as I said, I still want to create details on this main part of the ship and have it mirrored over to the other side. So I'm going to press Control Z, bring everything back. There's the Boolean modifier, there's the mirror. So what I'm gonna do is I'm just going to take this here and I'm going to come over to the outliner and I'm going to hide it. There we go. Now we can see how it looks with that cut there. And also we can continue working on the ship and still have our mirror modifier there. We just need to remember when we're all done that we've gotta come over here, apply the mirror and apply the Boolean to make that permanent. All right, In the next video, we will start working on the landing gear.
12. 011 Modeling the Landing Gear: All right, let's take a look at the landing gear. I'll begin with this front one here. And if we take a look at it, I didn't really draw much detail on this now, did I? We may need to add a little flair to it or just some extras, something just to give it a little bit more visual interest. But first of all, let's begin with this foot here. We've got the 3D cursor up here. So let's bring it back into the center of the grid with shift S1. And I'll press Shift a mesh cube. And if I hit Z and go to wireframe, we can then bring this over so we can see it. I'll hit the period key on the numpad and let's scale in the z with S and Z. Bring that down about like this. Move it up. Something like that. I'll bring it in and the Y S and Y, something like that, just to begin with, now we'll do this curve up in just a bit. But for now let's also work on these things. Let's once again create a cube, mesh cube. And I'll bring it over here. And maybe let's scale it down. And then we can scale it up with S and Z, Something like that. I'm going ahead and bringing it quite a bit up into the ship. We're going to create holes at the bottom of the ship for the landing gear to come out of. But for now, let's just have that go up into the ship. Now for the circles, you know, what we could do is we could select this right up here, this hinge, and use this for those hinges down on the legs as well. So I'll tab into edit mode and I'm going to hover over this piece and press the L key. And that will select all linked components for that part. Now let's just press shift D and bring this all the way down here. And there we go. Now, it's still part of this object. We need to split it out from that object. And what we can do is use the separate menu for that. To bring that up, you just press the P key and then will choose to separate by selection right there. Alright, now if we tap back into object mode and select this, now it's its own object. However, that object origin is still sitting up here, so we need to move that down to the new object. Let's come over here to the Object menu set origin and origin to geometry. And there we go. Zoom in with the period key on the numpad, and let's scale up a bit. And there we go. Okay, Now let's go to the front view with the one key. And I'll hit Z and go to wireframe. And it looks like we could bring this in just a little bit. I'm going to hit S and X and bring these in some like this. And then also I want to make that center part a little thicker. So let's tab into edit mode with this. And, you know, we don't really need that edge here anymore. I'll just Alt, click it, press, Delete, and choose dissolve edges. So we get rid of that edge. And now if we click on an edge between two of the faces in face mode, we can select that whole. Loop. And then once again, we're going to scale this up with turning off the x axis. So I'll press Shift X. And now we can scale this up. I'm going like this. And we go, all right, Now that we have that in place, and let's take a look at it from the side. I may want to move this over just a bit. And for now, I'm creating these up and down or vertical instead of angled in a tilted like this. And like this, I want to just get the pieces in first, straight up and down, and then I'll kind of bend them into place. So I'll just take these two pieces and just press shift D Z and bring them straight down like this. And maybe bring in right about here. I'll select this one and let's grab these points right up here and bring these straight down like that. All right, we have our pieces in place. I think now what we can do is combine them. So I think this piece and this piece need to be one object. So I'm going to press Control J. And then I'm going to select this one and this one and press Control J as well. So we get those all one object. And then what I'll do is just to turn these into place, I'm going to move the cursor to this origin right here. So Shift S to cursor to selected. And I'm going to come up here and choose to have the pivot point at least temporarily at the 3D cursor. So we go back to our side view here I can hit R and it'll turn it at that joint. And then I can also hit R here and it'll turn it at that joint as well. All right, so we've got those pretty much in place. Let's think about a little more detail on these pieces. Feel like we could maybe select these faces over here. And I will change back to median point here. And let's hit the I key and bring these in some like that. And then let's hit E, S and hit the X key. And that will allow us to scale in the x here like this. Yeah, like that. And then let's do a similar thing on these sides here. I'll hit I and bring these in. And I guess I'll do these individually since they're angled here. I'll hit E and bring this in just a bit. And hit E and bring that in just a bit. There we go. So we have just a little bit of interests. They're a little bit of a little bit of detail there. Let's take this and I'll go ahead and do them all at once here. I can hit I and let's hit one more time. And there we go. Now we can do them as individual faces. And then if I come up here to individual origins, I'm going to hit E and extrude all of these in kind of at the same time. There we go. All right, so we've got those two pieces with a little bit of extra visual interest. I'm going to also maybe add a bevel to it. How about that? Let's press Control a and apply the scale here in object mode. And then I will select these four edges on around like this. And then just press Control B. And let's bring those out just a little bit. Add a couple of edges. And there we go, something like that. And I'll do the same thing down here. Select all four of these edges, bevel and bring those out just a little bit. So that's all, that's all I'm trying to do is just add little bit of extra interests there. We can then select these and go ahead and smooth them again because I don't believe the cube part had been smoothed. Get, there we go. Alright, so now let's do is let's take this whole thing and let's duplicate it and take it back to the back of the ship. So I'll hit three key. And let's press shift D and Y and move this back to here. Let's go to the front view and let's drag it over like this. And then we could select this and scale this and ha, s and x like that. There we go. Then we could take all three of these objects, press shift D and X and move these over to here. Now, I haven't done this one yet, have I? Let's take a look at that. I'll go back to the front view and hit the Z key and wireframe and S and X and bring that in a bit like that. Then let's work on that little curved piece. We can keep it really simple. We can just insert an edge loop here like this. And then we can take this face here and extrude it up it e and pull that up like that. Then we could turn it, hit the R key and turn it some, maybe scaled in the y SY, bring that back out a bit. And then we could take these edges right here, this edge. Oh, we could do this edge. And we could put a bevel on those. Now, how's our scale if I tap back into object mode, yeah, our scale needs to be applied. So control a, apply the scale. Now let's just press Control B and bring these out like this. And we may be able to bring these out as well. Let's maybe tilt this forward just a bit like this. And we could maybe grab one of these edges and bring them forward a bit. And I like this. Here we go. Maybe grab these and bring him back. So I'm just trying to do it in a very simple kind of a way. If we wanted, we could also grab these two edges and bevel these. And we could also grab this edge back here and go to a bevel there. See How about Looks. Yeah, so something like that. I will smooth it. And let's turn on auto smooth here. Looks like we may need to drag that percentage up just a bit. I'll click and drag in this field. There we go. Anything else here? Well, there's a couple sharp edges here. Let's just drag it up a little bit higher. There we go. That cleans that up. And what about these back here? We wanna do anything with these. Well, we could maybe add a bevel along the top here. Well, let's apply the scale, Control a and choose scale. And then let's select these edges here, and let's just press Control B and maybe put a bevel on that. Yeah, that's nice. So let's add shade smooth and auto smooth over here. I think I want to drag it up just a little bit more like and we go, That's not too bad. And then I guess let's just delete that one and just duplicate and bring this one over again. Shift dx and bring that over about like that. There we go. All right. We have some landing gear now, in the rigging portion of the course, we will go through how to rig the legs here and the landing gear so we can fly the ship and move the landing gear at the same time. But for now, in the next video, let's go through and add a little more detail to the rear engine here. We've got some tiles here on the outside and a few details on the inside that we can work on. So that's coming up next.
13. 012 Adding Detail to the Rear Engine: All right, what needs to be done with this rear engine here? Well, first of all, I think I'd like it to have some tiles. We've got this kind of tiled look on the outside. And then on the inside we've got some panels here. And it looks like maybe some indentations here. So let's see if we can get those basic details in here. So first of all, let's see how many edges we need to put in for these tiles. I will go to the side view and then let's hit the Z key and go to wireframe. And if we tab into edit mode and I press Control R, we can insert edge loops. Well, look at this. We can insert edge loops both on the inside and on the outside. So we, so we don't want to do on the inside, Let's do it on the outside and let's scroll the mouse wheel here. And it looks to me like if I put five cuts in there, that's going to be about right. So let's do that. I'm going to click and click again. And then let's see how we can create those tiles. Now, the issue here I think we're going to have is that I want these tiles to be kinda two squares long, kinda like this. But we can't really use our inset trick because that'll just do one square root of time, one face at a time. So if we had multiple squares here and I hit the I key, I could either do it all one like that or hit the I key and do it individually like that. And even over here on the inset faces panel, I've got individual here. I can turn that off and on here, just like we're hitting the I key. But I don't have any way to say I just want it with two faces and not one. So let me press Control Z here. What I think then we're going to have to do is select edges and then bevel those edges to split these out into two base segments, right? So let's give that a try. I'm going to get the two key and I'll press Alt and click this edge. All Shift and click these edges here like that. So I know we want those selected. But then we want every two selected. So I'm going to press Shift and click here and here, right? We're going to want these all the way around like this. And that's going to get tedious. But honestly there's not a real good way to do this. Well, there may be one way here. Let's, let's take a look. It's just going to go on around here. So I've selected every other edge along this. Now, since I want these kind of offset from each other here, what we may be able to do. And let's see. Yeah, you know what we could do? We could press Shift. And click and go in a diagonal like this. So I've got this one selected. Then I go here, here, here, here, and here. And then I've got this one selected and I go on down like this, like that and I think that's gonna do it. That's going to give us that alternating pattern. I should probably turn off the move gizmo, let me click over here to turn that off so we can see a little bit better. So now with this selected, I need to go at an angle, diagonal down like that. And if this one selected a diagonal down like this, and then this one down like this. And this one. So it's still tedious. I will say that it's still tedious, but it's at least a pattern. Oh, looks like I missed one here and let's add that. So once again, here's a selected one and then angle it diagonally like bad year and diagonally. So it's just, I don't know if it's any easier to do it like this than it is to do it one row at a time. But this is the way I have begun, so I'm going to stick with it on around. And sometimes selection is really the hardest part. If you're doing something like this. Here's the selected one and then add an angle like this. And we go here and here. And here. This may be the last one. Let's see, did we get them all? It looks pretty good. Yeah, let's give this a try. Okay, I think I've got them all selected now, what I'm gonna do first of all is tab back into object mode and apply the scale. It is uniform, but we've got some rotation here, so I'll press Control a and apply the rotation and the scale tab back into edit mode. And from here I'll press Control B. And I'm going to pull out just a little bit. I better hold that shift key down so it moves a little bit slower. Maybe about like this. There we go. Now we've got Our to face panels defined by the beveled edges. Now we need to go into face mode with the three key. And what I wanna do is now select these panels instead of the in-betweens. So I think we can just invert the selection to do that. We can come up here to select and choose Invert, or we can just press Control I. And there we go. Now we've done that. However, we've got all of these selected so we can use our circle select tool. If the C key and middle mouse button click and drag to de-select all of these. And I'll come up here and carefully de-select these. Now if you accidentally de-select an area that you didn't want to, you can always just hit Control Z. All right, so there we have all of our tile selected in face mode. Now, we've also got individual origins still selected and that's good. However, I think there's one last thing we need to do. If I press Alt Z, look at that. There's a face back here that we need to de-select. So right back here I'm going to press Shift and click. There we go. You need to de-select that as well. Alright, all z. And there we go. Now, with that individual origins still selected, I'm going to hit E. Woo, look at that and I'm going to pull out, just push out just a little bit like that. And click. And there we go. There we have our tiles. I'm going to de-select, tap back into object mode, and there we go. Yeah, I think that's probably going to work pretty well actually. Once we smooth it and everything. And we could even throw a bevel modifier on that as well. Let's now do this interior part. I want to tab back into edit mode, go to face mode, and I'm going to hit the C key and click and drag and select all of these here. Then I'm going to hit the I Key, bring that in, hit the I key again. And there we go. There. And then I hit E and bring these in just a little bit. I'm going to press the shift key again. So I have a little more control over it in there. Okay? Now, Yeah, we're getting there. Now we want these little holes here. So to do that, Let's tab into edit mode and I think let's insert some edge loops. I'll press Control R. Scroll the mouse wheel here, and click right about here. And then let's select these faces. Every other base in this, all the way around, like this. And then let's hit E. And let's bring these in a bit like this. Okay, so now we've got all the basic pieces in. Let's try and smooth it and see what that does. Object Shade Smooth. Whew, that's bad. Let's turn on auto smooth. And hey, that's not bad. Look at that. And as I mentioned before, let's go ahead and try and throw a bevel modifier on this. And we go. Now it's beveling these center edges as well, which is making them more visible. I don't really want to see those. So what we can do is instead of having it be like this with the offset, Let's choose a limit method of angle. There we go. And now we've got this 30 degrees, we can bring that down and up. Let's try that. I can also increase the number of segments from one to three. And that's looking pretty good. And let's see what else we want. Let's look inside here. If I drag that angle up, how does it look? That's not bad there. If I take it up to 55, What does it do to it out here? Pretty good. The only thing I don't like now is this right here. You can see little, little artifacts. And honestly we may never see the back of the ship and our animation. But if we wanted to clean that up, we may need to add an edge loop or to through there. And now that I've done all this extruding here for the tiles, I don't know that we're going to be able to get an edge loop through here because you can only insert an edge loop through quads, through four-sided polygons. And these polygons like that, they've got a little extra edge there because of what we did with the beveling. One I could probably do though, is select all of these and then use our inset tool to insert a couple of edges. So let's try that. I'm going to have to go through and just click on all of these because I don't believe I'll be able to. Now I can't alt click between two of the faces to select whole loop because once again they are not quad. So that always throws a wrench in the works. So let's now with all of that selected, let's hit the I key, and let's bring this in. And then let's hit the I key again, so they're all connected. And then I'm just going to bring this in about like this. There we go. Let's try that. Yeah, that clean that up just a little bit. All right. There we go. We've got the rear thruster now that looks pretty good. In the next video, Let's begin thinking about how we're going to create the panels on the ship, on the frontier and on the side engines.
14. 013 Adding Panels to the Ship: Now I'm thinking about the design of this ship. I kind of pictured that these were panels, those kind of sci-fi panels you sometimes see on spaceships or space stations or something like that. So I'd like to try and work on that. And to do that, I think what I wanna do is tab into edit mode here and select all of these faces here. Because I think I want the panels to be here, but not on the back. And I also think I want panels to be on the side engines here as well. But let's take these panels and let's duplicate this and kind of pull it off from the main part of the ship. So let's press Shift D and then I'm going to press Enter and let's go to our move tool here. I think I just want to pull this out just a little bit like this. If I click and drag on the x and then hold the Shift key down, I can move it a little slower. So something maybe like this, just pull it out just a little bit. And then what I wanna do is split the panels apart from each other. So there's just a little bit of a gap in there. So if I go to edge mode and I press Alt and click here, Alt, Shift click or these here. Let's now bevel these lithium tab back into object mode and make sure my scale is all ones here. And then I'm going to press Control B and pull out a bit. Now I don't want it too much here, so let's come in here to the bevel panel and let's type in 0.01 and see how that works. That's not bad. Let's try 0.005. Let's try that. That may be a little bit too small. All right, so let's go with 0.01. And then I'll make sure I'm in face mode now. And let's just delete these. Let's hit Delete and delete faces. And there we go. So now we've got these panels that we can kind of see through in-between. But one thing I didn't do is I didn't split these out as their own objects. So let me just go back and choose these and then hit the P key again and choose to separate by selection. There we go. I'm going, I'm a tab back into object mode, de-select everything and select those panels again. Alright, now let's tab into edit mode and see what we can do with this. First of all, I don't need the Boolean modifier on this since this is a new object. Now I can take that away. Second of all, let's add some thickness to this. Because currently you can kinda see that it's just a flat piece of paper. So let's come over here to add modifier and let's choose solidify. And then you can see it's happening just a little bit there. Let's click and drag on the thickness field here. Bring those in and out like that. I just want to bring them in just enough so they intersect with the main body of the ship there. Then I want to turn on only RIM, which means it won't have a back face in there. And then I'm going to choose even thickness just for good measure. And I'll turn on cage here. Okay, so now let's go back. Here we go. If I tap back into object mode, That's what we get. So we're hopefully what we can do is make the inside of this a little bit darker than the panels so we can kind of see through those edges there. Hopefully that'll add a little bit of visual interest again. Now, in addition, if you want to, you can always come over and add a bevel modifier. Let's try that. I'll click Add Modifier bevel. Let's increase the number of segments. We can also smooth it object Shade Smooth there, right? So you could do that as well. It increases the width between the panels. So here it is with the bevel and then we turn it off. Well, let's turn on auto smooth and we go. So we have it there without the bevel. And here we have it with the bevel. I don't know. I kind of liked them both actually so well, let's leave the bevel modifier on here. And we can just keep it off and see what we think as time goes forward here. All right, let's try that on this over here on the engine. So I'm going to tab into edit mode and I'm going to Alt click between two of the faces and select that whole loop of faces around the engine there. And then let's press shift D and Enter. And now I'd like to expand this out just a bit. Kind of like when we scaled in the z and the y and we turned off the x-axis with Shift X. We could do that here, but in addition, there is a tool we're right over here called shrink fatten. And you can see that the shortcut is Alt S. So with these selected, we can press Alt S and pull out or push in just a bit and that'll bring it out like that. So it's really kinda the same thing as turning off one of the axes when we're bringing these out. And we go. So maybe I'll do that there. And then let's split it off. I'll hit the P key and separate by selection. I'm going to tab back into object mode, de-select everything, and then select that one new object. Now let's tab into edit mode, and I want to add a couple of the edges here just to here. Let's do that. Control our scroll, the mouse wheel, click and click again. So we've got those two now. Let's now go through and press Alt and Shift and select these edges here. And we'll go through the same process we did with those other panels with these edges selected list press Control B. I'll pull out a bit. Let's click and then come over here. And what did we do? We put in 0.01, right? Alright, now let's hit the three key and de-select these bases here all the way around. Like that. Then we delete these, hit the Delete key, delete faces, and there we go. Now what we can do is once again add a solidify modifier and we can click and drag that in just a bit. Maybe something like this. Now we may get some overlap in here. We may have to deal with that. And I'll choose only rim and even thickness. And then we could also add a bevel. Let's try that here. Let's take this up to three. And then let's smooth that object. Shade Smooth. Come down here, turn on auto smooth. All right, so what do we think? Now that one, I'm not, I don't like that quite as much if I turn it off over here. Yeah, that may be the way I want to go without the bevel, especially for the engines here. To get rid of some of this Z fighting, meaning that we've got two polygons in the exact same place. I could maybe scale this in the y here just a little bit. Sy, and I'm going to hold the Shift key down and scale in. Oh, it's, it's pulling it toward the object origin here, so I don't want that. So I'll tab into edit mode and select all of these. And now it'll scale from the center of it. Sy, hold the Shift key down and scale in just a little bit like that. There we go. Yeah, that helps. Okay. So we have our little panels on the front and on the engines. We can always turn on the bevel modifier if we want at any stage in the process. But for the next video, what Let's do is let's work on some of this front area here that we've got. This area here that looks like it needs to be extruded in. We've got these up here, these insets, this panel, and also the window here. So in the next video, we'll begin working on these.
15. 014 Modeling the Window Frame Details: Well, let's begin with the front part here with a couple of these insects are extrusions here like this one looks like we should push that in a bit. So let's grab this part of the spaceship and select this face here. And then let's just inset this. No, we can't do that, right? We have to use the extrude and the scale because if we get i, even if we hit eye again, it's going to break it into two sections. So we can't do that. Let's undo that. So we need to do e and then S scaling like this. And then we can hit B and extrude that Anna bit like that. There we go. Okay, so we have this this up here. I think this could be a, an inset is well, let's go ahead and see about that. Let's grab this face, get e, s, bring this in. And it looks like this side isn't coming in as quickly as this, mainly because it's rectangular rather than square. So let's just press S and X and scale these and just a little bit like that. Alright, and then let's hit E and pull that in. Okay? What about these up here? Let's try these. Let's select this face here. Let's go to the top view and press all z so we can see those. And then here I guess would be a good time to use the icky, right? We can inset these individually. Bring these in about like this. And then to create these angles here, we need to use the Bevel tool again, but we need to use them on individual vertices and edges. So just like we have bevel edges under the edge menu, we also have bevel vertices here with Shift Control B under the vertex menu. So let's do that. Shift Control B. Let's pull out a bit, and there we go. Let's bring it out to about right about here. Alright, now let's hit the three key. Select that face and let's extrude and push that in just a bit like that. Okay, so now we've got those basic elements. What about the windshield here? We've got this kind of cross-sectional design on the window. Let's work on that. For this, I think we're going to need to split this area off, say this area right here. We should probably split this off into its own objects so as we work on it, We don't affect the rest of the model. So to get the part that we want to pull off here, Let's extrude and scale this. But because we've got this angle, we might have a bit of a problem. When we scale, it's going to scale around this point. So here let me show you what I mean. If I hit B and S and I scale in looking at how it pulls it in. And I don't want it to pull it in like that. I want it to be even. So we need to do something else with that, let me press Control Z. What we really need to do is change the place where it scales. And to do that, we can use our 3D cursor if we. To vertex mode and select this point here we can move our cursor to that point. Shift S2, right? Cursor to select it. And that moves the 3D cursor to that point. And then we need to ensure that we're going to scale around the 3D cursor. So up here we need to change our transform pivot point to 3D cursor. Now, if we select these faces here, that point of pivot or scale is here, the 3D cursor. Now let's try it again, E and S and pull that in a bit. And there we go. Something like this. Yeah, so that's a lot better than before. Now we may need to move these edges a bit. You can see how this part up here of the frame is thicker than this down here. So we can use our slide tool for that. If I hit the two key and select that edge, we can hit the G key two times. And that will move and slide that edge along this existing face. So we'll just bring it up maybe about like that. And we can slide this one back as well. Get G2 times and slide that up. Just a bit like this. Yeah, let's go with that. That's fine. Now if we select these two faces, we can extrude these n, hit E and push in. Now we're extruding around that pivot point around that 3D cursor. Is that okay? It doesn't look bad, but let's try it. Let's hit Control Z. Let's go back to median point. And let's see if it's any different. I'll hit E and pull in like that. And no, it really isn't any difference. So that's fine. Alright, now that we have that frame setup, let's go ahead and take these faces, duplicate them, pull them out, and split them off into a new object. I'll press Shift D and Enter. And then I'm gonna just grab the y-axis and pull it out here. All right, let's split it off with the P key and separate by selection. And now if we tap back into object mode, There it is. We can of course come down and take the Boolean modifier off of that. We don't need that. And let's take a look at how we're gonna do this. I'm going to hit the one key on the numpad to go to the front view and press Alt Z. Let's tab into edit mode. And what we're gonna do is use the knife tool here to create this pattern. So I'm going to hit the one key so we can see the vertices. And then I'm going to press the K key right here. And now we have a little knife tool that we can then click on one vertex, hover over it and get it right there. And then bring down to here and click there and hit Enter. And that will create an edge between those two points. All right, let's hit K again. Maybe put one right here and drag across to here. And click and enter. And then let's hit K again, and I'll select this point. And this point. Hit Enter. We need one here, k right from here to here, let's say Enter and then one down here, K here, and here. All right, I need to make sure that I didn't add any extra vertices when doing this, it looks like I may have done one here to zoom into this point. Another handy shortcut is Shift B. And you can border select this area and it'll zoom in. Oh, look at this. We do have quite a few here. So what are we going to do here? Let's merge these points together. I'll select these points here, and then I'll select this one last. And then press the Enter key to bring up the merge menu. And we want to merge all of those to the last one selected. I'll click that and there we go. Alright, let's see what else we have here. Shift B. And I'll zoom into here. That looks fine. What about this one down here? Now it looks okay. Shift B. Yeah, I just want to make sure that I didn't accidentally add any extra vertices here. I think they all look fine. So that's good. Okay, Now that we've done that, let's go ahead and apply this mirror modifier. Because ultimately we're going to want to get rid of this edge down the center, right? We don't have a frame or a bracket piece down the center of the window here. So we're going to want to get rid of that. And we can't do that yet until we apply the mirror modifier. So let's go over here. Click Apply. And then we can select this, this, and this, hit Delete and dissolve edges. Right? Now. How do we create the thickness of these cross braces? Well, we could use the Bevel tool, but it's going to push the edges of the object out. So if we, let me just grab these real quick. If we went through and selected all of these edges just on the inside here. And we press Control B. Let me do that. See how it's pushing the frame and it's changing the shape of the object. So we don't want that. What we can do though, is we can go at it from the faces and we could use our inset tool again to create those frames. So if we select all the faces, now if we hit the I key and push in, I'm going to press the Shift key again. We can push in like that and get it something like that. Alright, so now we've created those frames and now we want to extrude them out. So to invert the selection, once again, we press Control I. And then I'm going to press E and Enter. And then I'm going to grab the y-axis and just pull them straight out. And I'm gonna pull them out quite a bit because we're going to want to have plenty of room to insert this in. Now once I've got that, I can go back in and select all of these faces here. And we can delete these delete faces. There we go. Alright. Now, let's move this origin to the geometry object, set origin to geometry. And then let's bring it on back. See how it, see how it works. Alright, so if we bring it back into there, That's not too bad. Kinda like to bring it up sound let's bring it up a little. How's that? Yeah. Fits in there pretty well. I kinda like that. Yeah. All right. So we've got our cross braces here on the windshield. In the next video, Let's start working on this area up here. And maybe these panels down here as well.
16. 015 The Discombobulator Add on and the Array Modifier: All right. Let's work on some of these front panels. There's not a lot of information here. Let's go to that front view and zoom in here. And this is what I wanna do. I want to create something that's kind of like this, but just some sort of business or detail as if there's things going on here in this little panel. As I said, I think I said earlier, I'd like to have this just as a panel that like a person could come up and punch a few buttons and get the status of the ship or, or something like that. So let's begin with this here. And if I went into here, let me tab into edit mode and select this. And if I began inserting edge loops for this, because I think I would like a couple of edge loops here to use a particular ad on. And if I began inserting edge loops here it is, begin going through the whole ship and I don't need that. I don't need to do that. But let's do is let's take this and let's duplicate it once again, create a new object from it. And then let's work with that. Then no matter how many edge loops we insert onto it, it isn't going to affect the rest of the ship. So what I'll do is first of all come over here and go from global to normal. And that changes my move manipulator to point in the direction of the polygon here so that when we press shift D and hit Enter, I can then just pull it out directly here in the z-axis. It's z-axis, the local z-axis of this polygon. Alright, now that we've got that, let's press P and separate this by selection. I'll tap back into object mode selected. Let's hit the period key on the numpad to zoom in. And there it is. Now, for this particular piece, we don't really need a Boolean modifier once again, and I don't really need a mirror modifier either. So let's just click here and click Apply. And now we have just this singular object with and polygons on it. So if we look at this, it looks like it's kind of off-center here into one corner. So what we could do is just create a couple of edge loops. I'm going to create an edge loop here and an edge loop here. And let's say it's about this big. I can move it over just a bit like this, something like that. So that's how big this is. And then also I'm going to take another edge loop and just put it right about in here for this. And then let's get one here. I'll press Control R and get one here. So you can see what I mean. It, it really doesn't matter how many edges I put into this because they aren't going out into the rest of the ship. So now to add this little bit of detail, I'm going to use a fun little blender add on that comes with Blender. It just isn't usually enabled. So let's go over here to the Edit menu, go down to Preferences. And in here, Let's search under Add-ons for discombobulated. So let's type in D SCOM. And there it is. Discombobulated are now you can spin this arrow down here and you can see that it's going to be under the Add menu, under Mesh. And you just need to add a checkmark here to enable the add-on. And it'll be in the Add menu. So let's close this. And if I tap back into object mode, we can first shift a mesh and there it is, down at the bottom. But what I wanna do is I want to apply this to these particular faces, right? I want to add some discombobulated tooth he's faces. And you may be wondering, what does this do? Well, let's give it a shot. I'm going to press Shift a and choose the discombobulated. Now we get this panel. I'm going to go ahead and click OK. And there we go. So it's creating these kind of sci-fi greebles on the faces that we choose. So I'm going to take this down to now let's try 0.05 for the minimum height. And actually I'm gonna take it and the point 0, 1 and maximum height I'm going to put at 0.05. And there we go, that's getting there. And now these are the different possibilities that it can do. So we've got four faces here, and if you look at them, you can see that in this face here it made two panels. In this face, it made three and this face it made for, and in this phase it made three. We can change what it does here. I can turn these off, so it only makes for little panels per face. We can do it, so it's only 43, so we've got three here, four here, 33 to 34. So you can just kind of play with this and see what you like. This isn't bad here. I'm going to well, let's see. I'm going to try a one. Well, that's not bad. I turned one on but I didn't get a one in here and that's just a random occurrence. So if you turn it off and turn it back on, you may get something different. See there's a one there. So I'm going to turn off the one. Turn back on the two. Yeah, That's kinda nice. I like that. All right. So there is the discombobulated or add on. We'll use it more here for this panel. But let's continue working here. These little pieces, I think just, we can use cubes for these. And what I'll do is I'll tap back into edit mode. And maybe if I just select this face here and press Shift S2 to bring the cursor to that. I can then create a cube, shift a mesh cube. And let's take this cube down to about o instead of two meters, 0.25 meters. Let's try that. Yeah, that's a little bit better. And then what I'll do is I'll just kind of shape this to match what we have. So let's just press S and X and bring this in, maybe something about like this. And then we can tab into edit mode and grab this face here and just bring this down like a bat. And then we go. And then we can press S and Y and kinda scale that in. Now I'm still in normal transformation orientation, but I can change back to global. There isn't a whole lot of difference for this particular object. But let's go to the side view. And I'm going to just turn this. Let's set the origin to the geometry, so it's in the center of the geometry and I'll just hit R and turn this so it's kind of in line with this angle here. And then let's just move it over. Kinda put it in place, and see what we need to do. Now, look at what I've done here. I've changed the transform orientation back to global, but we could really use it in local mode here. So I'll change this back to local, and now we can move it in line with the object and it still doesn't look quite right. You're like I need to turn it in the x-axis, so RX, let's turn it just a bit. There we go. Move it back in. And yeah, let's put it right about here. Okay. Now, we could just duplicate these on over, but we could also use a handy modifier called the array modifier. So with this selected, let's come over here to the modifiers panel, click Add, Modifier, and choose array. There it is. Now you can see it's added an extra one on here. Let's pull it apart. Here. It's currently aligned in the x-axis. So let's take this factor X and click and drag in here, and let's open that up some. There we go. So I'm at about 1.3. Now we can increase the count. I'll just increase the count here. And let's see how many we think we need as that, That's not bad. 1238. Yeah, we've got 8 over here. This is 1, 2, 3. Well that's seven. So yeah, that's pretty close. You can always bring it back down like that to seven and then click and drag and the factor x and move him in and out of bed. So got quite a bit of leeway as to how you want to put them in here. There we go. All right, so we have that now. Let's add these things. These are little warning lights or something. I'm not exactly sure. I didn't really put them in here. So I don't know, I kind of liked them from the front view here. So let's go ahead and add those. I'm going to select that panel once again, and I'll select this face and press Shift S2. And now let's bring in a sphere at the cursor here I'll press Shift a mesh UV sphere, and we go. So I'll move this out a bit, and let's turn it in the x-axis. I'll press RX 900, and we'll turn it a bit. I'll go to the side view and tab into edit mode. And let's then go to X-ray with all Z. I'll click and drag and let's delete half of this right here. X delete faces. Oh, looks like I missed one up here. There we go. And then let's scale this in just a bit. Let me change back to global and let's scale in the y SY and I'll flatten it up, get a little bit like that. All right, let's go back to the front view and I'm a little off as to where I'm going to put it, but I'm going to scale it down. So it's about the right size, something like this. Now let's bring this in. Hit the period key on the numpad. And from here I think what we can do is just begin extruding edges. So if I Alt click this edge here, what we can do is I want to make the light bulb and the housing here. So I'm just going to hit E y and move this back like this E S and scale out EY and pull forward a bit the S and scale out. And then let's hit EY and extrude back. Maybe just one little more piece here with E and S UI and pull that back like that. And yeah, we've got something kinda like that. Let's scale it down a bit. I also don't think I need it this far out, so I'm going to select this point here. And to expand a selection on an object here, we can press control and the plus key on the numpad. So Control plus and expand. I'm just hitting that plus key and expanding the selection out like this. So then I can grab that and just move this back like that. And we go. All right, let's smooth it and see how it looks. Shade Smooth. Yeah, looks like we need to come over here to the object data properties and click on Auto Smooth. There we go. That worked out. Alright, now let's press Shift T and X and move this over a bit. And then let's press Shift dx and move it over here. And this one looks like it's quite a bit smaller. So let's hit S and move it in. Maybe move it down a bit. Like this. Alright, I think that'll work. Let's see. It'll be interesting to see once we begin putting the materials on it. There we go. So we've got our panel here. I think well, it's due in the next video is also work on the panel down here. And we can begin working on the details up here as well.
17. 016 Adding Details to the Front of the Ship: All right, Let's add this panel right here. If I go into edit mode, I could grab this face and move the cursor to it. So I'll just press Shift S2. And this time now just once again, bring in a cube. It's pretty small, That's fine. Let's zoom in with the numpad period. And what I'll do is go into X-Ray mode and the front view. And I'll just move this over here and I'll scale it up about like this. I'm just trying to get a rough estimate here on about how big this is going to be. So let's say it's something like this. Now it's probably not in the right place. Let's take a look. So yeah, we could maybe move this up a bit. And I will scale it in the y with x and y. And let's move it over. So something about like this, going like it should be a little bit smaller. Anyway, we can adjust it to our heart's content here, but for now, I will go ahead and get this kinda like a frame around this. So let's press Control a to apply the scale and see here now we have ones. I'll tab into edit mode and select this face. And I'll hit the I key and kind of scale in like this. And then we'll hit E and push in a bit like that. Alright, so now that we've got that, let's add a few edge loops here. Think I'll press Control R and add. Let's try six cuts here. I'll do that and then Control R and maybe five cuts here. Let's do that. Now we can do is just go through and kind of pick faces that match this rough designs. So maybe I could select these faces here like this and go over like that for this piece. Maybe I could grab these down here for this piece. And maybe these over here for that. And then maybe we could add a few. Maybe i'll, I'll put one here and one here. There we go. Alright, let's run that discombobulated or add on. I'll press Shift a and choose that here. Now I'll click OK and let's see what we get. Well, that's actually not too bad. I'm going to turn off too, so they end up being a little bit smaller. And also I don't want them quite this high. So maybe I'll change the max height to point 0, 3. Let's try that. Yeah, that looks a little bit more like a panel with buttons that you could push. Yeah, let's do that now. Keep in mind these are completely separate objects from the original object. It actually creates a whole new object. So what I can do is I can select this and then shift click this, and then press Control J to combine those all together. And I think I'll just Take it back to about right there. Yeah, let's go with that. Now for up here, we're going to want to work on this. But for these up here, I feel like there's something else we can do up here. I think I'll tab into edit mode and just select this face here. Now I don't want to just run the discombobulated add on with just this one. So I'd like to split it up some kind of the way we did down here. So I'd like to add some edge loops, but if I press Control R, You can see I can't get an edge loop through here because this isn't a quad, this isn't a four sided polygon, It's an N gun. So what I need to do is somehow make this four-sided. And one way I can do that I think, is if I just hit the one key to go to vertex mode and NAN, I'll hit the KCI and let's knife and edge through here like this. And then let's do another one down here. Okay? And I'll go here. And here. Let's try that. So now this should be a four-sided polygon. If I press Control R, Yeah, I can add an edge loop through here. And then maybe let's do three edge loops here for four different segments. So then if I take this, this, this, and this, let's run the discombobulated are on that shift a. Here we go. Click. Okay. Alright, let's see how we're doing here. I'd like to add all of these. Let's do all of these. That's not bad. Maybe I can bring this up just a bit. Let's bring this back up to 0.05. And let me turn off one. Yeah, let's go with that. That's fine. So if I take this new object and I add it to the main ship object because it has a mirror modifier on it. If I press Control J, it'll add it over to the other side as well. All right, so I just wanted something there somehow. Now for this piece here, I think what we can do is once again create a new object from this. So if we select this and tab into edit mode, if we duplicate this off, we can add our edge loops and our design elements without affecting the rest of the ship. So actually I think I'll pull this down a bit. I'll change to normal transformation orientation and pull that down a bit. Then I'll press Shift D and duplicated and pull the new and backup. So it's bad here. Let's hit P and split that out as its own object. And then if we select it, we can once again get rid of the Boolean and apply the mirror. So there we go. Now, I want to add a few edge loops here. What's press Control R and I'll add. Here. And I'll do the same thing over here to here. And then let's add some horizontal ones. About seven cuts for eight segments there. I'll hit Enter twice there. Okay, so now we've got these edges that we can work with in trying to create this design. So first of all, I think what I'll do, well, let's go to the top view here with all z. So I think if we select these edges here and these edges here, I'll go back to global orientation. And we scale these in the x Sx, pull those out like this. Now let's take this entire edge here and here, and let's add a bevel Control B. And let's pull that out so there's that we can extrude those up bad. All right, so we could take these and we could extrude this up E, and I'll pull up like that. Now we can also take these edges right here and pull them down a bit. I will once again go to the normal transformation mode and I'll just bring those straight down like that. And they kind of angled down there. Okay. Now let's go back to the top view, all z and what else do we need? Well, we should probably move these edges n, but we need an extra edge here. Like the way that's moving there that's angled like that. So I think what we should do is let's take, let's take all of these here that's in here. And let's inset the let me make sure I have all 1's here. Yeah, I do. Okay. So let's hit I and inset these. And then let's just bring them up like this. And we go. Now if we go back to that top view, kind of got that. So we could maybe take, should we just take these here and scale them in SY and scale them in like this. So they're straight across there. And then what should we do now? We've got there isn't a whole lot more information here for us, is there I didn't do a whole lot of work on the drawing, but what we could do is we could emphasize this particular structure. Let's try this. Let's, let's take some edges, Let's take these edges and maybe this edge here, and let's bevel all of these and then bring them down. So first of all, let's press Control B and bring these out a bit. And then let's just hit E and go straight down like that. Yeah, Let's go with this for now and we can always add other details, but I think that's probably pretty good once we add some materials, some textures to this. I think that Majors work fine. All right, so we've got our detail features for the front and top of the cab here of the ship. In the next video, Let's begin working on some of the details in the back as well.
18. 017 Adding Details to the Back of the Ship: Now let's work on adding some details back here on the ship. We can see in the images we've got some designs here and I've done these designs really based on inserting some edge loops here. So I'll show you what I mean when we get to that. But on the top here we've got looks like for cuts we can put in here. And then we've also got this little detail which is very similar to the one on the front. So let's see if we can work on this. Let's go to the top view with numpad seven and I'll go to x-ray mode with all z. And you can see here we've got these four edges here. Let's go ahead and add those. So I'll select the back here tab into edit mode. And let's add four edges here. And in addition, up here, I'm going to add a single edge loop right along here so that we can pull it out to get that design. So if I press Control R, Let's take this and move it right here. And then we can just grab this one edge. I'll go back to global here. And let's just take that one edge and it will pull it out this way. Alright, so let me go back here so we can see it. I'm just gonna take this, bring it out to here. And there we go. Now, if we take this edge right here, we can once again use the Bevel tool and press Control B and then bring that out like this. Something like that. There we go. Now we can take this and extrude it up. So I'll hit E, pull it up. And there we go. Now for this inside part, I don't have much drawn here, but in the same way that we did this piece up here. Let's grab these faces here, and let's extrude or scale in and then pull it up. So once again, we can't really use our inset tool here over the mirrored side, but we should be able to use E and S and scale this in like this. And then we take this and just bring it straight up like that. So we just add kind of a similar detail that we had in the front. Now for these side pieces here, I think I want to create panels here and extrude these up. Now, we've also got these parts right in here and we need to think about those. My guess is, is that I want to use a Boolean to cut into these as well. So let's see how that would work. I'm going to tab into edit mode here for this. Here we go. I'll grab this edge and I'll bring the cursor to it with Shift S2. And then let's create a new cube, shift a mesh cube. And for this once again, I will change it to wired view. Let's come over to the object properties and down here under display as let's change to wire. So we can see that a little bit better. I'd like to change the name on this, so I'm going to press F2 and you can change an object's name here. So I'm going to call this cutter too. There we go. And then let's bring this down and let's add a Boolean to this object here, just like we did before. So we've got our one Boolean here for that centerpiece. And let's also click Add Modifier, boolean. We'll click the eyedropper here and we'll hover over cutter to and select that. Now, let's grab this and let's bring it down. And there you see it there. So how big do we want this to be? Well, we want it to be fairly shallow, so I'm bringing it up some. And then let's scale it out S and X. And we wanted to be about like this. I think it looks like I've got the drawing going all the way over to the edge, but I don't know that I want to do that. I think I want to keep it fairly inside there like that. Maybe a little bit farther down like this and bring it down just a little bit more. Okay, so we can see that there. And what I'll do is once again, I'll add an array of cubes, just like we did up front here. I'll add an array of cubes. Well, I don't even have it drawn here now, do I? But I do have it here and I kind of like that detail there. So I'll add an array of cubes to that just like I did on the front. Now to get this over on the other side, what we can do, we can be a little sneaky here. We can move the 3D cursor into the center of the grid with shift S1, we can move this object origin to that 3D cursor. And then for this object, and we can add a mirror modifier here. You see how it brings it in over there. So now we're getting the cuts on both sides. If I select this ship object again, what we can do is wait to apply this, just like we did before. Wait to apply this until after we've applied the mirror modifier. Kind of like this one. If I just apply this real quick, Let's just apply it here. You can see that they're still there. So I'm going to press Control Z to bring that back. So let's take this and let's hide it. We can hide an object with the H key. There we go. Now we've got those cuts in there. We can see how it's going to work. And we can add our cube objects in there now. But once again, we won't apply that Boolean modifier until after we've applied the mirror for the object. All right, So let me tab into edit mode here. And you can see that this cut does not go back as far as the edge here, right? And that's good because we're just going to create some panels along here. I'm going to select all of these. And these are going to be panels just like these here. But what I'd like to do is have this whole thing be a panel. Once again, if we hit the I key and then the I key again, that'll split those up, right? I'll press Control Z. And even here, if we tried to do E and S, it would do the whole thing. Or even if we did individual origins, it would still do the individual faces. So what I'm gonna do is do them individually, but I'm going to do them with a set amount of inset. So if I hit the I key and bring this in and then hit the I key again, there'll be all one, right? Then I'm going to click. And now over here in the thickness panel or excuse me, the inset faces panel here in the thickness, I can type in, I don't know, point 0, 1. Let's see how that's a little bit too much I think are excuse me, too small. Let's try 0.05. That's a little bit too much. Let's try 0.025. Yes, something like that. 0 to two. Let's try points 0, 2. So what I'll do then is take this one and this one. And as I instead it, I'll then type in 0.02. So I'll hit the I key and then 0.02 and then Enter. So you see in setting these in the exact same amount, i 0 to enter and I to enter. Also, I'm gonna do this one here. Points to enter. There we go. So now I can take all of these and I can extrude them up. But I want to extrude them so they don't just go in one direction. They go, the top ones go up and the side ones go to the side. So let's come back to our individual origins here. And then when we hit E, you can see everything's going in their own direction. So I'll just pull those up just a little bit like that. And there we go. Now we've got those panels. So there's always a way to get these tools to do what you want them to do. You just sometimes have to do a little planning ahead. Alright, so there we've got those panels. In the next video. Let's work on the design here on the side.
19. 018 Finishing the Back of the Ship: For the designs on the side, I think we're going to use the edges here that we've already created. So if I hit the three key on the numpad and press Alt Z, you can see that I've kind of design this with that in mind. So if we put an edge here and an edge here, and one here and one here and one here. We should just be able to pull these around to get that basic design. So I'll press Control R, and I'm going to scroll the mouse wheel till we get, yeah, five cuts should do. And I think I'll hit the Enter key twice. Now, the first thing I'd like to do is actually create some sort of a inset here. I'm going to select this edge with onclick and then Alt Shift click this. And that should get it all the way around. Okay? So I'm going to bevel this and then create an edge in the center of the bevel and then just kinda scale it in just to provide some sort of differentiation between the bottom area here and the top here. So I'm just going to press Control B and move this out just a little bit like that, let's say. And then I'm going to add an edge in their number of segments to right. And then I want to select this edge that I just created, that. And it should go all the way around there it is. And then I'm just going to scale in, hit the S key and pull in some. And that should just kind of give us a ridge detail there. I may bring some of these up because you can see, since I did this at a corner, these are a little bit lower than the one up front here. So maybe I'll just take these and I'm gonna move you that just ever so slightly like that. Just so it's more in line. Yeah. So that's more straight. That's all that's all I wanted was just this edge. So it kind of looked like there's some sort of a separation there. Alright, so let's go back to the side view, all Z tab into edit mode. And here we go. So now we've got these edges, we can begin pulling around. So I'll grab this and just pull that up like that. And I can grab this may be in, pull it over like this. I could grab this and move it over to here. And for this, maybe I could just grab this and move it like this. Someone could move over like this. Something like that. There we go. So we've got them all kind of inline. Okay, so now we want to select all of these edges. All of the edges along this basic design here. And I'm going to bevel these and then extrude the men. So we get a little bit kind of a design line for these alt Z. Now let's press Control B and pull these out. And I don't need two segments for this, so I'll take that down to one. And then let's just hit. E and push in. You know what I'm gonna do. Before I do that, I'm going to press Control Z to go back. I'm gonna come up here and change back to medium point. Shouldn't make a difference because all of these faces are pointing in the same direction. But just in case I'm going to switch back to median point, I'm going to pull him back and like that. So there we go. Now we've got those elements and then I'm just going to extrude a couple out. Let's maybe select these and this. And well, I'll go ahead and get all of this in here too. And let's just extrude these out now. Just for some sort of design element here, that's all I'm going for is just some sort of visual element here. And I'll pull out just a bit. There we go. So you, so you see it's just kind of a design on the back of the ship there. All right, so with that done, let's come back up here and deal with these things, the array that we want to make up here. So I will once again select an edge, bring the cursor to it with Shift S2. And then I will press Shift a mesh cube. Let's scale it down quite a bit. And let's see if we can put this in here. I'll turn on my Move Gizmo here, and let's move this in, SX, move that in. And let's bring this to hear a little bit too much. There we go. Kinda put it in place here. And then I'll just take this and move it all the way back. Here we go. And then I'm gonna go ahead and press Shift a and apply the rotation and scale. I will come over here, click Add Modifier, choose array. And let me in the x field, I'll click and drag asymptote like that. So I've got 1 point 2, and then let's increase the count. So with 10 goes a little bit over, let me click and drag in here and see if I can get this evenly distributed here. Yeah, that's pretty good. Actually, I'd like to take this and move it up just a little bit like this. There we go. Yeah, so there we go. And then what we could also do is move the cursor back to the center of the grid width shift S1, move that origin to 3D cursor. Then we could also add a mirror to this, and it'll pop it over there. And there we go. All right, well, we're pretty close to being done with the ship here. I see an issue down here that I think these aren't quite long enough. Let me go to the side view. Yeah, let's press S and Y and scale this up just a bit and move these forward so those are a little bit bigger. Yeah, Those look a little bit better now. So that is the modelling for our ship. Now, in the next video, what list do is let's go through and clean this up a bit. If you look at the outliner under the ship container, it's just got a bunch of cubes. And what we should do is go through and rename a lot of these. And also we can combine things. We can join things together. We can apply the mirror modifiers, Booleans, all that kinda stuff that'll just help us clean up the ship and get it ready for the next phase of the project. So we'll work on that coming up next.
20. 019 Naming Objects and Organizing the Outliner: Well, as I mentioned before, our ship container here is quite a mess. We need to clean this up, rename objects. So we have a better sense of what's what. Now I had said some time ago with these panels here that maybe we could come back to the bevel modifier just to see how it might work. Let's take a look at that. If I turn the bevel modifier back on here, this is what we get. And I didn't like how far apart these were here. And I'm not real sure about the connection on the edges here either. So what Let's do is let's take the amount in the bevel down from 0.1 to 0.01. And that really tightens up those edges in here. And I think I like that. But let's bring these edges together just a little bit more. So I'll tab into edit mode and I'll hit the one key to go to vertex mode and all z for X-ray. And let's just drag select these and then press S and Y and bring these in just a little bit like that. And then I'll drag select these SY, and let's bring those in just a bit. There we go. Let's try that. See how that looks. Yeah, I think I like that a little bit better. That's pretty good actually. Now over here on these panels, let's try the same thing. I will turn the bevel modifier back on here in the viewport. And then let's, instead of 0.1, Let's take it down to 0.01. See how that works. Yeah. I kind of like that. I think I'll go with that. So now what we can do is we can apply these modifiers. Now. We could leave them here. There's really no reason why you couldn't leave them while you're animating the ship. The problem is sometimes it can slow down your computer because these are adding extra processing for every frame. Now with newer computers, they're faster than ever. It may not be an issue, but I might go ahead and apply the modifiers just so you can see the process. Now, before you go through and apply all the modifiers, you may want to save a new file. If you've noticed, I've been going through each file here, each video, I've been creating a new scene file. And the way I've been doing that is just pressing Control Shift S. And then you can see the current file here. And then if I hit the plus key on the number pad, it'll increment that file and then I hit enter and I have a new file. So as you're working on a project, it can really be helpful to just increment the file numbers as you go. Maybe every day. I don't know, every hour, whatever you think, whatever's appropriate to the project, save a new file. At the end of a project, I'll sometimes have dozens of Blender scene files. So I can go back to any point in the project and make changes if I need to. So just a suggestion. If you're gonna do a major change, like go through and apply all the modifiers. You may want to save a new scene file. All right, so I've already done that. This is file number 19, and I'm gonna go ahead and begin applying our modifiers. And to do that, you usually want to apply them from the top down. So for these front panels, I'll apply the mirror and then the solidify and then the bevel. There we go. All right, so we have those. Let's now change the name for this. To do that with this object selected, you can just hit F2. And that'll bring up the object name field and we can call this ship panels front. Let's try that. All right, what about the panels on the engine? And let's do those. But once again, we can apply the mirror modifier here, apply these, solidify, and apply the bevel. There we go. And then we also have the inner part of the engines here. We could go ahead and apply the mirror to that. And what about this? Well, we've got these here. This one looks like I need to mirror over. Let's do that. I'll take this, move the origin to 3D cursor in the center of the grid. And then let's apply a mirror modifier. Here. There we go. So we know we have those. Apply that modifier. And then let's just combine all of these. Select all three of those Control J. And there we go. So now we have the engines on the side here. Let's give those a name. F2, ship engines side. And we go. Now the back here we could give this a name, Let's select it, it F2 and call this ship back engine. Or maybe ship engine back kinda keep a consistent naming convention there, right? So we've got ship engines side and ship engine back. Okay? Now we can also apply the bevel modifier to this. Let's go ahead and hit apply there. Now let's take a look at the cargo container. I'm going to isolate this with the division key on the numpad. And you can see here we're in local mode. And now we should probably apply this mirror modifier here. I will come over here and click Apply, and we go. And I may want to leave this bevel modifier on if I apply this, Let's see what happens. I'm going to click Apply and then tap back into edit mode and look at what it did. It added a bunch of edges here down the center and I don't think I want that. So I'm going to. Control Z back out of that. Now we could limit the bevel by angle. So it's only going to bevel angles that are more than 30 degrees. Now if we applied it again, click Apply. Now we don't have that problem. So we could do that. Let's now go ahead and work on this here. So if we selected this face and this face, and then this face and this face, we can then extrude these n to get these little details here. But I'll also do is come over here and select individual origins so that whatever we do on one side happens on the other. Now I'm going hit the I key and scale in just a bit or push in, I'll hit the I key again to close that up. There we go. So I want to bring it in like this. And then I'm going to say that these are extrusions out. This is an extrusion out. So what I'll do is I'll hit E and pull out. Let me go the other way. There you go. And you can see as I'm pulling out here, it's also pulling out in the back as well. I'll come out to about right here. I'll hit I again and bring that in. Like that. Let's say I'll hit E and let's bring it in just a bit. I'll hit I again and bring that in. And then we'll hit E and bring it back out. Just a little bit like that. All right, let's see how we did. Here we go. So that's all we really need. I think I'll hit the division key again. And there we go. We've got those details in there. Now, what about the ship here? Let's go ahead and add or apply these modifiers. So apply the mirror, apply Boolean, and then apply the Boolean again. And now all of these should be all baked in the tab into edit mode. You can see they're all part of the mesh. And we can take these now, apply this array modifier here. And then the mirror like this. And then take this object and Shift-click this and press Control J. And there we go. Now that's all one piece here. Now, here's one thing I might have should have taken care of when I had the mirror modifier on. Let's take a look at this. This right here, this face right here, you see how it's kind of angled down a little bit more than the others. And that's because it didn't have that top part when we extruded it, like they do over here. So I think what I'll do is just do a little bit of tweaking here. I think what I wanna do is just move it up and move it in just a hair. Let me change to normal transform orientation. And now I can move this and see how I can move it just in or out like this. Move it back and then move it down. Just a hair. So it kind of is in line with the others like that. All right. Let's try that on the other one on the other side because since I applied the mirror before. I did this. I've gotta go back and do each side individually. So I'm going to pull that up to here. Pull that down like that. There we go. So now this should look a little bit better. A little bit more even along here. Yeah. All right, What else? Well, we can go through and name the objects now, so let's do that. Let's hit F2. Well, this is called ship main. That's good. How about up here? Let's take a look at this. We could call this ship Panel Buttons. Do those since those little buttons that a person can press. This panel here could also be joined together with these objects. Let's add this array modifier or apply it. Then we select this and then this panel. And we can press Control J. And this is a panel of greebles. I'll just call this I'll hit F2 and we'll call this ship panel greebles. And we'll just do that. Now. This, we can call this Light large one and this one can be quite large too. And this one can be light, small. It'll do that. This year. We can hit F2 and call this ship window frame. This up here we could call and call this panel top. These have already been added to the main ship group or object. This could be called ship clamp front. Let's call this ship clamp back. And these we can call ship clamps side. Let's do that. Alright. We're beginning to get some things properly named here in the outliner. What else do we need? Well, how about the legs? Let's hit the period key on the numpad and go down here. This, I think the naming convention is going to be, let's call this leg F for front D21. And I will go back and highlight these and press control C to copy that. And then we can hit F2 Control V to four leg front two. And this one F2 Control V for lakefront. Three. There we go. We've got those there. Back here. Let's do a similar thing. We'll call this leg back, left dot one. I will highlight these press control C. Now let's select this F2 control V2. This F2 control V3. Alright? This one can be called leg back, right? Dot one. And then we once again Control C, F2, control V to F2 control V. All right, now we've got just about everything named here. Let's scroll down and see how we're doing. Yeah, I think we've got everything pretty well named. We can bring back the cutter objects and just delete these. We don't need these anymore. Get rid of those. And now we can go through and kind of combine these within containers, within the main ship containers. So let's take this leg object and shift select this one. Now we can create a new container for all of these. I'll hit the M key and then select New Collection. And let's call this ship legs. Here we go. And that was created outside of that ship container. So let's drag it back in. We can take the three light objects and once again press M. And now since we've put that collection in, the ship collection, we can come in here and create a new collection in there. Again, new collection. We'll call this ship lights. We go. We can take the clamps and put those in their own container. M ship new collection ship clamps. What else? Well, we can do the engines would do that, hit em, new collection ship engines. And we can do panels here. Let's do all the panels. M, new collection, ship panels. All right, there we've got all of our objects named and organized into collections. We can come up here and turn off the reference images. And if we ever need to select all of this, we can just go up to the ship container and right-click and choose, Select objects. And we can select everything there. And that'll be helpful when we begin to rig the ship and need to parent everything to the rig for animation. All right, Well, I think we have the ship pretty well in hand. In the next section, let's begin modeling the landing bay.
21. 020 Beginning the Landing Bay: Well now we can begin modelling the landing bay that this ship is going to fly into. And to do that, we're gonna be dealing more with how it's going to be seen within the camera, within the frame of the camera. And I think what I'd like to do is get a camera in this scene now and frame it up for the last frame of the animation so we know what we can see and what we can't. Because if we begin modeling a landing bay here, where do we where do we end? I mean, how big do we make it? What's going to be seen, what isn't? So at this point in time, I really like to get a camera into the scene, so I don't waste effort on creating things that are not going to be seen through the camera. So what Let's do is let's just press Shift a and come in here and create a camera. And here it is, here. Now it came in in the ship container. Let's just click and drag that out and put it in the scene collection here. And also, I'm going to take this ship container and I'm going to turn off the select ability, so I don't accidentally select it and move it around. All right, so with that camera selected, let's kind of frame up our ship the way we think it should be at the end of the animation, right after it's flown in and landed. How do we want it to look? So I think I want it to look kind of kind of like this. So we're kind of looking up at it. Something like this and we pulled back some yeah. Something kind of like this. Now, we're still not looking through the camera here to move the camera to this place where we have our viewport. I'm going to press Control Alt 0. And that'll bring that camera to this position. Now it isn't quite right. Let's hit the End key. And if we go over to the view tab, we can turn on, let me pull this out. We can turn on camera to view. And once we do that, you can see there's this little dotted red line around the frame. And as we move our viewport around, our camera is locked to that. So I'm just going to move the camera around until I get it about the way on one at something like this, I think, you know, however, I'm not liking the actual focal length of the camera. And what I mean by that, if I come down here and choose this camera tab right here, you can see we've got a focal length of 50 millimeters. And I think I'd like to change this. I'm just going to click and drag on it and change this. Maybe I'll just type in 25 millimeters. Now with camera view still on, we can zoom back in and it gives us a little bit more of a wide-angle feel. Yeah. So I'm thinking something like this. So let's go with that for now. I'm going to hit the End key and turn off camera to view. And now when I tumble around, I, I tumbled out of the camera view. And if we want to go back into the camera view, you can just hit the 0 key on the numpad. And there it is. Now, we can also take this view here, and we can make this a 3D view and put the camera in here. So let's change this from an image editor to a 3D viewport. And here it is. And then hovering over this, we can hit the 0 Qi, and that's our camera view. Now we've got a lot of other things in here, all of this, if I middle mouse, button, click and drag and move this over, we can turn off the overlays and we can turn off the gizmos. So there is just our camera or just what we're going to be seeing through the camera. There we go. All right. So now we can always keep an eye on how it looks through the camera over here. Now that we've established kind of where the camera's going to be at the end of the animation. Let's also frame up the landing bay as we model it. So to begin, I'm going to, first of all create a new scene collection over here. I'm going to come over to the scene collection and right-click new collection. And here for collection 3, I'm going to change this to landing bay. And I'll put the objects that we create for this in that container. And let's just begin with a cube shift a mesh cube. And I will scale it up pretty big here. Something like this. And I'll tab into edit mode and take this face and this face, and let's delete those delete faces. And then let's move this up. So it's sitting on the grid and actually, I don't think I need it to be quite that big. Let's now looks like I have normal transformation orientation on, I'm going to change back to global. And we go and also I've got individual origins still on all change back to median point as well. And I'm just going to scale in the z and begin to get this kind of in-place GZ. Move this down to the grid here so it's sitting on the floor there. And now we can just begin moving this around to kinda get a sense of how big this needs to be. So flying in. Oh, I would think you'd need quite a bit of room for these ships to go in. So let's just begin like that. And as we model, we probably want to mirror this. So whatever we do on one side happens on the other. So I'll just press Control R up here and hit Enter two times and control are down here and enter two times. And once again, that just ensures that those edges go straight down the middle. And then I'll delete one side. And let's with this side selected, let's add a mirror modifier here. And then I'll turn on clipping and the cage. And we go. Now, what do we want this to look like? Well, I think I want kind of a bulkhead look to it up here. So if I just bevel this control be like that. And then maybe let's do a smaller one down here, Control B. And I'll pull that out like that. All right. And then let's also have kind of an area out here as well. So let's create for edge loops here. And then I'm going to scale these out just a bit. I'll press S and Z and pull those out and then I'll take these and pull these out as well. And then can we take this kinda pull it out like that? Yeah. So we've got kind of a, I don't know, a sci-fi kind of a shape there just a little bit. And then we want to move this over. I feel like we want to be able to see the whole opening here, something like that. Let's see MY scale in the x. I'm going to grab these here and bringing them in just a bit like this. And then move this whole thing over just a little bit. So I'm keeping an eye over here on the camera just to get a sense of what it's going to look like. Ultimately. Something like that. I want to be able to see out and have a planet kinda right back in here. So we see, so there's a planet right in here. Let me hit the 0 Qi to look through the camera. So I'm thinking that there's a big planet right out here. We see kind of a part of a planet here. So let's see how this is going to work. Now that I've got this, I'm going to select the landing bay and go back to Edit Mode. And I want to click on this edge and I'm going to bring this in. So we get kind of a rim around here. I will hit E and S and let's see how this work. Bringing that in a bit like that. And then also let's extrude it back as well. I'll hit E and y and let's bring this back like that. So we have a little bit of thickness there as well. All right, let's hit 0. See how we're doing here. Yeah, I think so far That's pretty good. I feel like this is a little too high that they'd want to be able to come in here a little bit easier here. Let me grab this. So we're just trying to figure out the basic composition of this environment. And as I said, when you bring in a camera like this, it really helps you model for composition and also helps you not waste time on things that aren't going to be seen. All right, In the next video, we will continue on this and we'll begin working on creating sci-fi panels and the flooring, et cetera.
22. 021 Modeling Sci Fi Panels in the Landing Bay: Before we go any further with our landing bay, I think I'd like to give it some thickness because ultimately, we're going to put some lights out here on the outside. And if we're not careful, because this is such a thin surface here, we could have some problems with light leaks along the edges and shadows not rendering properly and things like that inside the landing bay. So I think we need to give this some thickness to do that, let's go ahead and select the landing bay and let's go over to Add Modifier and solidify. And then I'll just click and drag in the thickness field here. And let's go out this way like this. Also, if you notice what's going on with the ship right now, look at these kind of artifacts. And that's really nothing to be worried about. That's just a viewport thing. We can fix that by pressing N and going to the sidebar, the View tab. And under clip start, we could change this from 0.01 to 0.1. And that clears that up. And the farther you get away, the bigger the objects are, the higher this clip start can go to clean up those artifacts. In addition, if you have the same issue with the actual camera that we're going to be rendering from. You can come over here to the camera panel and here too it has eclipsed start and a clip end. So adjusting these for either camera can help with some of the artifacts here in the Viewport. Alright, I'll hit the End key to close that. And now that we've given this sum, the thickness, Let's begin working on the interior for the floor BY select this and tab into edit mode. I feel like I'd like some panels that could seem like they could be lifted up and access machinery or cables underneath the floor and that kind of thing. So I'm going to press Control R. And I believe I want, well, let's try five segments going this way. And then let's try eight segments or seven cuts going this way, like this. There we go. Now we can go through and choose each one of these faces, and we can use these to create our panels. So I'm gonna hit the C key and just use that circle select tool and paint the selection here. Now with all of these selected, I'll hit the I key and oh, we've got some issues with the solidify modifier. We should probably apply that solidify modifier before we do anything else. That would be a good idea. Let's tab back into object mode. Come back over here to the modifiers panel, and let's go ahead and choose even thickness. And I will pull down the menu here in the modifier panel and choose Apply. There we go. Now if we tab and edit mode, we can see that it is all one object or one mesh. So now we can go back to face mode it that C key. And let's once again paint our selection here. Psych, I got a little bit more than I wanted back here. See middle mouse button, click and drag everything. Okay, back here, yeah, it looks like we got all those de-selected. So now with all of these selected, let's hit the I key and push in just a little bit. So we have just a bit of a border between these something like this. I think. There we go. And then I went to bevel these corners so they're a little more rounded. And instead of using the edge bevel, I'm going to use the vertex bevel, so I'll hit the one key to go to vertex mode and recall that the vertex Bevel tool is Control Shift P. And then let's pull these out a bit. And I'm going to add quite a few segments to this. I'm going to scroll till I see about six segments about like this. And we go. And then I need to go through and select all these faces. Once again, that's not going to be as easy as before because I gotta go through and select and click on each one of these. But that's okay. It won't take too long. And I'll tumble around over here. And let's get these. There we go. Now that we've got all these, Let's once again use our inset tool. I'll hit the I key and pull in just a little bit. And then once I get just a small border for these like this, I'm going to click and come over here to the inset faces settings panel and choose this select outer. I'll click that. And now we've just selected that thin rim we've created for these. And now I can just hit E and extrude these in. And there we go. So now we've got, you can see over here a nice system of panels for the floor of the landing day. Alright, let's look over on the sides here. What do we wanna do on the side? Well, I'd like to do a similar thing. I think. Maybe we could select these faces along here. Let's do that. And we could inset these again, let's hit I and inset these. And now that select outer is still selected there, but I don't want it quite like that yet. I'm going to turn that off. And then we're gonna do this again. I'm going to hit I and bring this in again like this. And then I want to select outer. And now I'll push these back in the and bring those back like that. So we've got those in a similar kind of way up here. And let's think about what we might want for up here. Let's add something a little bit more vertically oriented. We've got these that are kind of horizontal. Let's switch it up a bit and maybe add two edge loops in each of these here. Like this. All right, There we go. Now, we can go through and select maybe every other one of these. Let's try this. And then maybe I'll hit I, and let's bring these in a bit like this. And then I'll turn select outer off E, pull out a bit. It, I push in a bit, and then hit E and pull in a bit like that. So we've got kinda of these panels like that. Maybe that'll work. How about up here? I think I'd like some sort of lighting up here along this panel. And what Let's do is, well, let's add some edge loops here. How many do we think we need? Well, let's go to six cuts. Let's try this. I'll hit enter there and then we can select rows of these for the lighting. Let me go to face mode and I'll just select like four or five of these faces here. And these will be light panels. And we can add an emissive material to these so they kind of glow. And then we can turn on Blum and maybe they'll give us some, some nice effects. Let's try that. I'll go ahead and select all of these here. And yeah, let's do that. Now once again, I wanna do something like we did down here. So what Let's do is let's just hit the I key. And let's bring these in a bit. Oh, I need to hit the I key again, so they all, So it is all one selection there, like that. And I'll do that again. Let me bring them in one more time like this. And then what I'll do is I'll use select outer, and then I'll extrude those n like this. There we go. So those will be lighting panels up here. All right, In the next video, we'll add a few more modeling details, and then we'll begin to think about our materials and textures.
23. 022 Using the Path Tool to Create Hoses: Well, let's add a few more things to our landing bay. Let's maybe add a bevel to this opening here. It looks a little harsh with that sharp edge there. Let's tab into edit mode and I'll just Alt click this edge. And let's press Control B and pull that out. Some will also scroll the mouse wheel to add some more segments to that, being like that. Now, so let's add one to the outside too. I think you can probably tell from the inside if this is beveled or not. So let's select that edge controlled BY. And let's pull that out as well. Let's do a little bit like that and we go, all right. We've got those. What about just a couple of things inside here? Feel like we need something over here along the wall. Like maybe we could just take this cargo container here o that I can't select because I've turned off select stability. There we go. So what if we took this cargo container and just duplicated it and put a few extra over there. Let's try that. I'm going to press Shift D and X and move this over. Let's bring it down to the floor here. About like that. Um, let's move it over. I'll drag it back and I'm just watching over here as I move it around. Maybe if it's like maybe if they've put it over here and let's have another one as well Shift D Y, we could move that to there. Maybe bring them back. Yeah, so we've just got something extra here. Maybe one more shift DZ. And I'll bring this up. And, and what we'll do is we'll just make these different colors with slightly different textures. Grab this and move this one out just a bit. That How's that? Yeah, so it's just a sense that there's more going on over here. Also. Maybe there's cables are hoses or something on the floor here too. We could work on that to create hoses and cables. We could use the path tool. So I'll press shift a curve and path right here. And then let's just take this and move it over here like this. And there it is, on at the period key. And there's our path. If we tab into edit mode, you can see it's just got a couple of points on it. And if we take one, let's say we take one of these points and I'll turn on my move manipulator. And we could just take, say, this blue plane right here. The blue plane turns off the z, the blue z-axis and just slides in the Y and the X. So if I click that blue, I can take that over like this. You can see how it just begins to create a curve with these points. So we can just move these around however, we want to get a particular curve to get like a hose or a pipe or a tube or something. So let me just move this into frame here. If I Over here and turn gizmos back on. You can see here's the gizmo or the path. We can turn on overlays and we can see it there. So we can just begin adding a few tubes and pipes and hoses and things like that out here. Just to give it a little bit of visual interests. And once again, we can use our camera frame here so we don't try and create more than we need. I'll let the 0 key over here. And also one thing I'd like to do is make the outside of the camera a little bit darker in this view here. So if we select the camera, come over here to the camera tab, go down to Viewport Display. And this passive part 2, we can click and drag this up, maybe take it up to like 0.95. And that makes the outside quite a bit darker. And I think it's just easier to see what's in the frame and what isn't. So we've got this hose right here. We could take this now and duplicate it. Shift D. And I'll grab that little blue plane and move it over here. And we could spin it around our z. And if we go, and then, oh, we could maybe get another one over here. Let's press shift D y. And then I think I want one kinda going through here in an angle. Let's try this, maybe move this back. I'm just trying to compose them within the frame of the camera. We're also going to have the camera moving throughout the shot. So it'll maybe begin here in the center and then move over and finish here as the ship is coming in. So we'll want to be sure that these extend to somewhere. But me move this r z like this. I think I want another one too. I didn't hear like that. Alright. So that's generally how I'd like these hoses to be. Now I can begin extruding them. So we can say take this one tab into edit mode, grab this point and then begin extruding it out so I could hit E, Shift Z and slide it around like this. Let's move it over here. E, Shift Z, and I'm just turning off the z-axis, so it slides along the x and the y here. E Shift Z and move that over there. So there we've got a hose there and I think with the camera here, that'll still be out of frame. And then let's take these here. I can tab into edit mode and hit Shift D, E Shift Z, and on back like this. And then maybe this one here, E shifts the, begin getting this out of the way over here, back like that. And then this one here, maybe we can take this and move it this way just a bit. And then E Shift Z and move it like this. That and this over here should go back as well along here. So E shift D, shift D, and I'll take that back like that. Alright. So you can just kind of create hoses and tubes however you want here. But of course, they need to have some sort of a thickness now Dante. And maybe for this one instead of ending, I think I'll have this one end here with a coupling or a connector on it as if you kinda drag it over and plug it into the ship. But this one I think I will extend and have it earn back and go this way. So the shift Z and I'll take it across here. This one, here we go. Okay, so now let's begin adding some thickness to these. First of all, let's work on this one here. I'll come over to this object data properties for the curve itself. And we want it to be 3D here. But we want to first come down to the geometry section. And we want to click and drag on the depth. So if I do that, you can see it begins to create a tube or a hose or a cable, her whatever we want to call it. And so how big it should be totally up to you. I don't really know, so I'm going to just going to go like this here. Keeping an eye on the camera view over here, we can also hit the 0 Qi. So there's that one. I'm going to bring it up so it sits a little bit more on the on the floor here like that. And then let's do a couple of others. So let's grab this one here, right here. Let's scroll down into the bevel section and click on the depth field and drag that out a little bit like that with this one. Maybe move it up as well. And we go. And this one too. Maybe we make this one a little bit bigger. Bring that up there. Now if we wanted, we could take this hose right here and kind of bring it over these two. So if we tab into edit mode, we could select this point right here and bring it up a bit like this. We could bring it up to here, I guess, and then we could add more nodes here to get them to bend down. So if you select this one and this one, you can right-click and choose sub-divide. And now we have a point right here. We can bring that down a bit if we want. Maybe we could take this one and slide it over some like this. And then this one can come back and a little bit and see maybe we could add one more point between these two. So select these right-click sub-divide, and grab this one. We could pull that down a bit, please, or you can just move them around even once they have thickness to them. I think that's pretty good. What I need to do now is add thickness to this one here. Bring that out like that. And then this one said, I think I'd like this one to be like a fueling hose. So we'll need to add a coupling there at the end of that. Now I haven't done a whole lot in terms of terminating these anywhere, and I won't unless we happen to see the ends of them from the camera view as we move the camera over here and animate it in this way. So they're just here kinda for decoration. And we'll see if we need to do anything more once we get the whole path the camera in when we're animating. All right, In the next video we'll create a little coupling here, and then we'll smooth the whole thing and see how it looks. And then maybe move on to our materials and textures.
24. 023 Finishing the Modeling and Organizing the Scene: In this video, I'd like to just finish up the scene, finished the modeling, clean up the outliner mixture. All of our objects are named and in the right place, just kind of finish up the modeling before we move on to creating materials and textures in the next section. So one of the things that I think I'd like to do is just looking at the framed image over here. I feel like maybe we need one or two more containers over here. If we hit the 0 key on the numpad, we can go to our camera view. And I think I'd just like to take, maybe take this and press shift D y and move it over like that. And while we're here, maybe I'll just do that. Same thing here. I don't know. I've I just feel like we need a little bit more over there. And maybe as the camera moves from its beginning spot over here, we may see more of this area, so we'll just add a couple of containers there. Another thing I'd like to do is just smooth the landing bay. You can see the polygon faces here along this beveled edge. So let's just go up to Object Shade Smooth. And then let's come over here to the object data properties and click on Auto Smooth. And that should do it at 30 degrees here. Click and drag and take it down and then up. And I don't think I want to take it up quite that high. If I take it up too high, you can see I lose these edges here. So watch those. You can see they just kinda go away. And even here in here, so I don't want to go that far. I want to keep those edges, so yeah, around 30 degrees is probably about right. And one thing I noticed about the landing bay earlier, as I was preparing for this video, I realize if I tab into edit mode and go to face mode, and I press Alt Z, take a look at what we have here. Right in here we've got a row of internal faces. You can see them right along in here. And you can see them right up here. And that's a problem. You should really never have internal faces. And this is because in the modifiers panel, I applied a solidify modifier underneath a mirror. And if you recall, I'd said some time ago that the order in which you apply, the modifiers can make a difference. And this is one case in which it did. Probably what I should've done is taken away the mirror, run the solidify modifier, removed these faces and then added a mirror modifier again. But these things happen and we have to know how to fix them. So Let's go in and just remove all of these. I'm going to press Control and click and drag all of these to de-select those on the sides. And then it looks like we've got base right in here. Yeah, one more in there. And one more up here, it looks like right there. So now let's just press the X key and choose to delete faces. And there we go. Now we've got those cleaned up, so we don't have any internal faces. That's good. And this can cause a problem when we're trying to UV map the object. A texture of the object, light the object in the scene. They're just a lot of ways that you can get little artifacts from internal faces. And then if you were to add other modifiers like a subdivision surface modifier, you'd also see problems there as well. So it's good to clean those out. Also, I had mentioned that I wanted to create an object like a connector or a coupling or something to go on the end of this hose as if it's going to be plugged into the ship somehow for refueling or something like that. I will go into the outliner and I will just hide the ship, hide the landing bay. I can hide the camera to, I guess. And I'm going to select the scene collection at the top for this to go into when I create it. So I'll press Shift a mesh and cylinder. Let's hit the period key on the numpad to zoom in, I'll take the number of sides down from 32 to 16 and hit Enter. And then I will also change the cap fill to nothing so we don't have anything on the top and the bottom. I'll go to the front view and scale it down a bit. Let's move it up to maybe the ground plane here, that x axis. And I'll just click and drag these points up at the top. And let's just begin modelling a simple cylindrical connector piece here. Let's just hit E and then the S key and scale out a bit. And then I'll hit E and Z and pull up. And I'm not really sure how I'm going to do this. Let's just see how it works. I'll hit E and S again and E and Z. Well that up like this. Maybe actually I'll add kind of a ridge here, extrude and scale n and then extrude and scale up like this. And then let's get that top piece E, S, scale out like this, extrude and pull up in the z like that, and extrude and pull up like that. So we've got this kind of a connector object. I'll hit E and S again and pull in to about here, E and Z again and pull down extruding scaling again. And then let's pull all the way down to here and then I'll press E and S and scale in a bit. And then I'm just going to close this off. I'll hit the M key to bring up the merge menu. And then let's just choose at center. And that collapses all those points down to one. All right, so we've got a basic connector there. Now let's smooth it. Shade Smooth, and go over to the object data properties. Click on auto smooth. Any yeah, that looks pretty good. Let's do that. All right, so let's bring everything back and let's put it into place. So let's turn it in the y-axis, 90 degrees RY 900, it's turned the wrong way. So let's hit the Minus key and that flips it around. And then Enter. And let's bring it over here. Scale it down, hit the period key to zoom in, and let's put it right in here. And actually I'll bring it up to the top or to the floor. Are there And then let's bring it over here. And I think I still need to scale it down a bit. Alright, let's move that into here and then let's grab the hose and tab into edit mode and grab that 1. And let's move this up. And I'd like to add one more point in here. So let's select these two and right-click and sub-divide. Now we've got this 1 that we can pull around a bit like that. We'll go back to the connector here. I'll rotate it just a bit and bring it down like that. And let's get this in place. And then we could take this piece here. And once again, we could do a little bit more with this. So let's scale it down a bit. Maybe pull it back. And then we can hit E and S and scale in like that. Just to close that off. And there we go. Now we've got our connector piece. Let's hit 0 to go back to the camera view to see how it looks. And I think that's looking pretty good. This hose I don't know, this hose to me just looks like it's too big. Let's go back down here to the depth field under bevel and click and drag and take this down just a little bit like that. I don't know why it it just looks too big. And now let's take a look at the outliner and make sure everything's the way we want it to be. So if we twirl the ship down, well, we've got some things we need to pull out of here. I'd like a little more room here in the outliner. So I'm going to right-click between these two windows, choose join area and then drag this arrow down to here. So that gets rid of that window. And then I think I'll take these containers that we created over here. And they're currently in the ship container. So let's drag them down into the landing bang. And also these nerves paths which are our hoses. Let's drag these down into the landing bay. And that pretty much takes care of all of that. So let's draw the ship collection backup and let's create a new collection in here. Right-click on the landing bay collection and select New. Let's change this new collection here to cargo containers. And we'll just take all of these and drag them in. Here. There we go. Now we can select all of these hoses, the NURBS path, and we can hit the M key. And now that we've created that cargo container collection, we can create another new collection in the landing bay here. Let's call this just hoses. And okay. That we go this is the landing bay actually the landing bay main. And this here, oh, that's our hose connector. So let's call that pose connector. And we'll drag that into the landing bay collection as well. All right, Let's hit the 0 key again. And here we are. Now we've got all of our objects in place. There may be some changes or additions we might make as we go forward, but I think we're ready to move on to the next section, where we'll begin with creating the materials and textures for the ship.
25. 024 Creating Sci Fi Panels with the Node Editor: Let's now begin our materials and textures by working on the ship. Let's do that. Let's come over here to the outliner and hide the camera and the landing bay. And so we just have the ship here. And then let's come over here to the shading tab. And here in the shading tab we can see our model lit by an HDRI, a high dynamic range image. And you can see it here on the ball as we turn around here. So what this is doing is not only providing light to the object, but it's also providing reflections. If I come up here and pull this down, you can see we've got the HDRI here. We can click on that sphere and choose other ones. And in addition, we can change the rotation, we can spin it around so the direction of the light changes. We can change the strength. We can blur it and more or less so we can see it here. One of the things I like to do is take this world opacity all the way down. So if I click here and drag, it just takes it all the way to a gray. It's still providing all the light and reflections to the model. It's just for me, not as distracting as being able to see that image there, even blurred. Alright, so I'm going to pull this up. This is a shader editor window. You can see that here. And over here, I'm going to change to the material's property window. So let's begin this with the main part of the ship here, this part that goes all the way to the back. I'll just select that and let's create a new material for it. We can click here in the Materials panel or here in the shader editor. It's the same thing. So I'll just click New. And this creates a new principled be SDF shader. You can see the same settings and sliders here. I'll change the name to ship panel's main. So we're going to use our shader editor and the nodes that come with Blender to create sci-fi panels on the ship here. So the first thing we can do is just turn the metallic all the way up. Since this is going to be a metal part of the ship here, I'll just click and drag all the way up to one. We can take the specular all the way down and the roughness all the way down. And now you can see we've pretty much got a mirror. You can see the reflections of that HDRI. But the interesting thing about metal materials isn't so much the color as the reflection. How much it reflects, how much it doesn't really give us a sense of how that metal would feel if we touched it. So it's the reflections that really matter here when we're dealing with a metal material. So the way we're going to create these panel lines on the material here is we're going to use a texture called a Voronoi texture. And to do that, to add a new texture or new node to the shader editor. Once again, we just press Shift a and we're going to bring in. A texture, voronoi. And there we go. Now, since this is a texture, we're going to want to set up a texture coordinate and a mapping input. And we can do that manually, of course, by pressing Shift a and going to vector mapping here. And we can also choose a texture coordinate node by coming over here to input and here texture coordinate. However, I have turned on great little add on. Let me go to Edit and Preferences called Node Wrangler. So let's just come over here in the add-ons here, go to the search field type in node, and here it is Node Wrangler. And if we twirl that down, we can see that in the node editor you can get to the features of this through the toolbar or through Shift W. So I've gotta do to turn this on is just to add a checkmark there. And then you can come over here into the shader editor and press Shift W. Then you have your Node Wrangler tools here. Now, the one I like is this control T add texture setup. And what that will do is if we select that node and press Control T or that a mapping node and a texture coordinate node instantly. So that's kinda nice. Drag select these and hit G and move them over. So now what Let's do is change our Voronoi texture type from 3D to 4D. And I'm going to change this right here, that distance metric from Euclidean to Chebyshev. Now, I don't really know how to pronounce that, but I just like to say Chebyshev circle. I hope that's how it's pronounced. I'm going to press Shift D and duplicate that and bring it down here. So we have two of them. And I'll also click on the little vector socket and drag and connected up to that vector socket as well. So this is the beginning of our node setup for our panels here. Now I'm going to click and drag these and hit G and move them over just a bit more. And if we selected one of these and press Control, Shift and click, you will take that and put it to the material output directly. And you can see what it's doing here. It's kind of giving us these squares, these panels. If I click and drag on the scale, you can see we're getting a little bit more. So you can kind of see what we're beginning to do. We're beginning to create these panels here. I'm gonna take that back down to five. Now, we're going to need more control over these. So a node that is great for controlling things is the color ramp. So I want to press Shift a converter colorRamp right here. And I'll drop that right on that connection and it'll automatically hook it up. Now, watch what happens when I drag these in. I can make them darker and sharper. I can click and drag over here so you can see what's happening. We're kinda cleaning it up a bit, making them a little bit more distinct. Maybe I'll move this over like this and move this in like that. So we don't really know how exactly it's going to be yet. We just want to get these in. So with this selected, I'll press Shift D and duplicate this and connect it from the distance node. Factor there. And then we need to somehow combine these. And what we're actually going to do is subtract them, take the difference between one and the other. So since we have color sockets here on knees, Let's press Shift a, go to color and go to mix RGB. And here in this node we can change from mix two difference right here. Now we can take these colors, drag this down into here, and this over into here. Now let's press control shift click, and that will hook it up directly to the output there. Now we can play with these a little bit more. Let's take this deer and let's bring these pretty close together and I'm going to change the color of one of these. Let me select the color swatch of the one on the left and I'm going to bring this up. It's a little bit more of a similar color. There we go. And maybe this one too, I'll select this one and let's bring this one down so the colors are, well, I'm gonna go back to this when I make this one just to a little bit darker, I think. Yeah, like this. Okay. Now, how about this one down here? Let's take this one. And let's move these around and see what we get. And as we move this around, you can see since we're taking the different subtracting one from another, there is some bleed over or overlap and you can see we can extend that out or tighten it up a bit. And I can bring this one out and N, So we can really create a thinner line around those, something like that. Let's try that for now. So now we need to make these a little bit smaller. These are pretty good, but they're a little bit too big. I think the scale is off. So let's come back over here to that mapping node that we put on. And let's just click and drag in these three fields. Let's try type in three and enter. And there we go. Now we've got more panels. I like that, That's a little bit smaller. Let's now come over here and play with this stuff. See if we can adjust these a little bit better. Now what if we go like this? Really kind of tighten those up. And then what about here? If we can maybe change the color, Let's drag this down. Yes, so we can get a little bit. Let's try this. Yeah, something like that. Here we go. Okay. So let's just say we've got our panels like that for now. That's the way that we want them. Now let's add them to that principle be SDF shader. And we want to add it to both the base color and the normal, which will give us some bump and make it look like it's pushing out or in from the surface of the object. So let's first of all use another one of these mics, RGB nodes shift a color, mix RGB, and I'll drop that here. And then I'm going to take that into the base color here. I'll then press Control Shift and click that principled be SDF to send it to the material out. And instead of a mixed node here, Let's change this to multiply to give a little more strength to it. And I'll drag this up all the way. And then let's come down here and add a bump node with Shift a vector and bump. Let's do that. Now let's take that color, go into the height and from normal to normal. And there we go. Now look at that. That gives us really a sense that these are panels on there. That's kinda nice. Now we can of course, reduce the strength of that if we want, maybe take it down, Let's try 0.5. Something like that. Yeah, So that looks pretty good. I think that gives it a nice feeling that we've got some sci-fi panel type things on there. However, it's a little too shiny. And we could come in here and bring the roughness up some like bat, but it's still pretty clean. I kinda want it to look like it's been around the block a couple times, like it's dirty and beat up. So what we'll do is in the next video, we'll work on adding some custom roughness to give it a little bit of dirt. And where.
26. 025 Adding Grunge to the Panels: To create some dirt and where I think I want to use a grunge texture. And a great place to get grunge maps is from the blender Cloud. So I'm going to open up the blender cloud here. And this is at cloud dot blender.org. And I'm here in the libraries and I'm going to go to textures. And right down here is grunge. Here we go, Look at all those beautiful grunge maps. There's nothing better. I think the one I want there's a grunge dirt or a grunge wall dirt that I saw not too long ago. Here it is right here. Let's take a look at this. Yeah. All this is is just some random patterns that kind of look like dirt or grime that we're going to use to plug into the roughness channel of that principled BSD SDF shader. Now notice that it says the download is locked. I'll need to login to my blender Cloud account, and it is a paid subscription. However, all of these textures are Creative Commons, open source, so you can use these have you like. So I will include the ones that we use with the project files that come with this course. All right, I've logged in now and click download and I'll put these in a Textures folder here in the project files and save it there. All right, let's go back to Blender now. And here in Blender, Let's begin a whole new node tree feeding into the roughness socket. Now I'll move this down a bit so we can get to it. And up here I've browse to that project folder and I've got my textures folder here. So let's open that up and there's that grunge map. So I'll just take this and drag it over and drop it in, and there it is. So now it's become a new texture node with that image inserted into it. Now once again, we can select that and press Control T. And that will add the mapping and texture coordinate nodes. And then we can just feed this straight in, but we want to control it a little bit better. So once again, let's add a color ramp. I'll press Shift a, and this time I'll just come up here and click on Search type in ramp. And there it is. All right, so now let's take the color into the factor and then this color into the roughness right here. Now we can't see much happening here. We could take these and drag them in like this. Yes, but we still can't see a whole lot happening. And I think that's because currently our texture coordinate is at uv. Now we haven't UV mapped this object yet. We could try and change it to object. And we can see something happening there. And we can try and change it to generate it. And that's still not quite what we want. You can see what we're kind of going for up here on the top, right. Some sort of grunge and dirt, but it's really not working well here on this side. It's kinda of smearing along the side. So if we go back to our UVs. And let's UV map this object. Let's come over here to the UV Editing Tab. And currently we have our grunge map in here. We can click on the X at the top of the window and remove that. We have are selected object here it's already been changed into edit mode so we can hit the a key to select all of that. And here's that original UV map that was created when it was brought into the scene as a cube. But since then it's changed quite a bit as we've modeled the ships. So the UV map needs to change now to, to UV map the selected faces. Let's just hit the UK key on the keyboard. We've got a few options here, but this smart UV project is a good one to use for situations like this where we have an object, the exact placement of the seams of the UV map isn't that important as just getting it mapped. So let's choose this smart UV project. And then we'll click, Okay, just accept the default settings here. Okay, now we've got our object UV mapped. Let's go back to the shading tab and see how we're doing now. Yeah, So now that grunge map is being projected onto that object in a little bit more even way, right? So what we can do is we can come over here now to the color ramp, and let's move these up and see as we move one side to the left or to the right, it changes how that grunge map is being applied here. So I'm going to bring this pretty far over to the right here like this. And then I'm going to change the color of that black node there. So I'm just going to click here and move this up. And what that does is it changes the reflectivity. And like that, Let's try that. Okay, but now I also want to change the scale. So back here in the mapping, let's change the scale. And let's try to see how that works. Well, that's a little bit better, isn't it? Yeah, So we're just changing what is shiny and what isn't. By the use of that grunge map piped into the roughness socket here. You can also come down here and in the location or the rotation, you can click and drag and move the dirt around a bit so you can kinda place it where you want it. Maybe move it in the x sum. Yeah, I like that. That's pretty good. I like that. So you can use the scale and the location and the rotation fields in the mapping node to rearrange how you'd like that grunge applied. All right, I think that's pretty good. Now one problem I do see here is that we've got the panels in the windshield and that's not the way we want it. Let's tab into edit mode and hit the three key and select these faces here. And then let's give them a new material. Let's come over here to the materials panel. Click the plus right here, so that we add a new material slot to this object. And in that material slot, let's click on New, and let's call this Windows. And now we can click a sign here to assign that material to the selected faces. And then let's change the color. I'll just click over here on the base color. Let's bring this down a bit. And I think I'd like to push it over into the blue. So it's kind of a kind of a dark blue here. And we could bring down the roughness here like this, bring up specular. So we get a little bit of reflection in there. And there we go. And then we could also add a grunge map to that as if it's been getting dirty, flying through space or something. I guess space wouldn't be all that dirty, but we could do that just to give it a bit of character. I'll go back to the grunge maps here at the blender Cloud. And there's one down here, grunge, rough material that I think I'll use for the window. Let's download that into our Textures folder. There we go. Let's go back here. I'm going to go back to that Textures folder. There's the new one. Drag that in. And let's do the same thing here. Let's hit Control T. And then let's bring in a color ramp, search ramp. And let's hook these up here. And this can go in to the roughness. And yeah, we're already getting something there. Let's take this up to to say that may be a little bit too much. Let's see. We could drag this up right back like that. So it's just getting a little bit in there. That now let's change the color of that black one. And that'll make things not quite as shiny. There we go, something like that. Alright, there we've got the window. Well, in the next video, Let's continue the process of creating these kind of panels. But up here on the panels for the front of the ship.
27. 026 Adding Sci Fi Panels to Front and Side: Now to create the textures for this front part here, we could probably use this ship panel's main. We could just add this to this object here. However, if we wanted to modify it in some way, then the changes would also happen back here. So what we can do is basically duplicate the texture so that any changes to one wouldn't affect the other. So with this object selected, let's create a new material slot for the object. And then in this new material slot, let's add that ship panel's main. Right? Now. This is what we get. And as you can see, it's not working quite as well as we had over here. And it's mainly because of this curved angle of that object. So if we began to make changes here, to try and fix this, it would probably throw off what we have here. To avoid that what we can do is come over here to this material area here. And you can see here it says two. And that is displaying the number of users is what it's calling, but it's really, the number of objects is the way I like to think about it. Basically what this is saying is that this material has been assigned to two different objects. And if we want to break those apart, we can just click here. And now it's created a new material with this 000 001 here. And you can see here that that ship panel's main is still here. All right, so now we can take this 000 001 and let's give it a new name. Let's call it ship panels front. Let's do that. And you can see that that number is gone here, meaning that it isn't applied to any other object. Now if we hover over this again, you can see it's called fake user and it says save this data block even if it has no users or if it's assigned to no object. So if we remove this panel or this material slot from the object here, that material would be hanging out there on its own without being assigned to an object. And you can see that signified by a 0 here. And what that means is here in Blender. If we closed out of this scene, even if we saved everything we've done, that material would just go away. That's just the way blender works. If there is a material that isn't assigned to an object, it's just going to go away. So what we can do is if we click on that and bring it back, we can assign a fake user to it. We can say to Blender, pretend like it's been assigned to an object so that when I close Blender, it won't go away. And that's what that's for. But we don't need to do that because it's been assigned to an object here. Alright, so how do we take care of this smearing problem? Well, let's try and figure out what. Part of this material is doing that. It may be the grunge down here, right? We could change this from generated, from UV to generate it and try that. And sure enough, that helps sum. We could try and change it from generated two object. And that helps quite a bit. But I think there are other issues to these panels here are kind of angled right there, kind of angled down. Some are triangular and that's because of the way these are shaped. And I don't think that's the way we want to do that. I want to try and get these a little bit more like everything else on the back, which I think is going to mean we need the UV map, this object. So once again, to do that, we can always tab into edit mode and hit a to select all of the parts of the object. Now, we can do our uv mapping here we could go to the UV Editing tab, of course, but we can also do it here. This right here can be a UV editor, so we can come over here and change it from an image editor to a UV editor right there. And when we do that, we see that texture again. Let's middle mouse button click and drag, move that over and get the X to remove that from this view. So what I'm gonna do is just once again hit the UK key on the keyboard and I'm going to choose Smart UV project. Let's try this again. I'll click that. I'll click OK. And there we go. Now, it isn't filling the whole UV space here, this square. So what I can do is open up this panel and uncheck this correct aspect. And it'll move those out to be a little bit more like what we have here. Now that we've done that, let's come over here and change these texture coordinate nodes to uv. Let's take this one and change it from generated to UV. And look at that. Now we have panels that are much more square, more like we had back here. And then let's also change the nodes feeding into the roughness socket to UV as well. It's changed that. All right, So there we go. Now that looks quite a bit better, but I think we can do a little bit of adjusting here. And once again, as we adjust, say the scale here or the grunge over here, it isn't going to affect that original material that's applied to the rest of the ship. So let me, I'm going to take the scale up to four. Let's try that. Okay, that's not bad. And then maybe down here with the roughness, maybe I'll try and put the location back to all zeros. Just click and drag through all those fields and type in 0. And let me change the scales to one. Let's see how. Yeah, I think I like that a little bit better. I'm going to click and drag on the x and kind of move this around until I get something I kind of like, let's think about adding panel to this area over here to the engines on the side. So first of all, let's add a material. Let's just click New here in the materials and let's call this ship side engines. Let's do that. So that's just the main material for all of that. Let's now apply a material to just the panels. So I'll tab into edit mode and let's create a new material slot here, right there. And we want to bring in. Original panels materials. So I'll pull this down and select this ship panel's main. There we go. And then I need to select all of these panels. Now, I can go through and I can hover over each one of these panels and press the L key, and that selects all the linked components for that object that you're hovering over. So I could go through and select all of those. But I think an easier way to do that is just to hover over this, it, the L key here and the L key here. All right, and then let's go over here and do the same thing, l, l, Now that we've got those selected and that was a whole lot easier, Let's press Control I to invert the selection control eye. And there we go. Now let's click Assign. Here we go. Now, I want to make some modifications to this, of course. So what I need to do is click on this to, to make a copy. Now I can't do it by click there. You can see I can't click it. It's grayed out. That's because I'm in edit mode, so I'll tap into object mode. Then click here. All right, Now let's call this ship panels side engines. Let's do that. There we go. Now, how do we like that with seems like these top ones are a little bit stretched compared to these others. So once again, let's tab into edit mode. And with these selected, let's hit you and smart UV project. Uncheck all of this, click OK. And there we go. Now, what Let's do is come over here and change from generated to UV list. Try that. Tab back into object mode. Yeah, that's pretty good. Let's now take the scale. Let's try it at 5. Well, what do we think? It like? It's a little too small. Let me drag select all of these and change it to four. Yeah, I kinda like that a little bit better. What about our grunge here? Let's take all these back to 0. And let's maybe click on the eggs and move it around and see what we can find. Yeah, I kinda like that. Alright, there we go. So now we've got our panels for all the places that we want them on the ship. Now that I look at it, these might be a little bit too small up here, so we can always come back and changed from scale for to scale three. Well, let's try 3.5. We can do that. Yeah, that looks a little bit better to me, I think. So. You can play with the scale and position of any one of these. But I think what I'm gonna do for now is move on to the next part. In the next video, let's work on the material for the rear thruster engine. And maybe these front panels and frames as well.
28. 027 Texturing the Rear Engine and Window Frame: Well, for the rear engine here, Let's begin with a brand new material. I'll just select that object. And let's come over here and click New. And we'll call this ship rear engine. And for this, let's just take that color down pretty far. I'm going to click here on the base color and bring it down. So it's more of a black. I don't usually like to use full black. I don't know that anything in the world is actually completely black, so I always like to give it just a little bit there. We can play with the specular, which increases and decreases the amount of highlights on it. And we can play with the roughness, which does a similar thing but, but in reverse. So the combination of these two can be really good for like a non-metallic materials. I feel like this isn't quite metallic. It's more of a, I don't know, like a tile or or something. And it can of course be anything you want it to be. But I think maybe something like that for mine. And then what I'd like to do is add a bit of dirt again through the roughness channel. So really me dragging the roughness up and down here isn't really that beneficial because we're going to plug something into it anyway. But let's go over here and I've downloaded a couple of other textures from the blender Cloud. Let's, let's grab this one here. I've got it. Let me see what the name is here. It's grunge miscellaneous 001. So lets just grab this and drag it into the node editor. It automatically creates an image texture node with this selected list press Control T, and that will add the mapping and coordinate nodes there. Now it automatically comes in using UV coordinates. So what Let's do is let's just tab into edit mode here and hit the a key to select everything. And although this looks pretty good here, let's go ahead and hit the U key on the keyboard and choose Smart UV project. And then I'm going to deselect this and click Okay, and that's what we get. So let's see how that works. Let's see what we think. I will come down here and let me just grab these, hit the G key and move it over. And then I'll press Shift a click on Search type in ramp to get our trusty color ramp. And I'll connect this up to the roughness socket. Alright, let's tap back into object mode and see what we have. Well, that's interesting. I think it has promised, but let's drag this up just a bit. Drag this down. Yeah, I think this is going to be good. I will select this black node here, and let's change this once again. The more we bring this up, the less shiny that part of it is, right? We can bring that up. Adjust the roughness there. And in addition, we could also select this one and click here and bring this down some, you can see as we get towards Grey, towards a similar color, they kind of disappear into each other, but I just wanted to come back, maybe right around in here, something like that. So we get a sense that it's been used, right. There's some grunge, they're just a bit. And then maybe I'll come over here to the mapping node and let's change the scale just a bit, maybe from one to two. Let's try that. Yeah. So that reduces the size of that just a little bit. Yeah. All right. I think that's looking pretty good. Now let's do similar things up here. Let's come up here. And for the window frame, Let's create a new material here. And once again, let's just begin from scratch. And I'll just click New. And let's call this. Just call it window frame. There we go. And for this, I want it to be a metallic, so I'm going to take the specular all the way down and the metallic all the way up. I'll click on the base color and let's bring it down toward black. And once again, not all the way. And then in the roughness field, once again, let's bring something in. How about this here? This is grunge rough material. Let's bring this in. Drop it in. Control T. With this still selected, I'll tab into edit mode and hit the a key to select everything. Let's hit you smart UV project. Click OK, and there we go. Now we can come over here, press Shift a, bringing in a color ramp analysts once again connect this up to the roughness channel. And let's see what we have. I'll hit the period key on the numpad to frame that up. And I think let's once again bring this up. And let's make it so it isn't quite so shining on this node by clicking here and bringing it up from the black, right, the further it comes up from the black, the less shiny it is. And then let's click this and let's bring this down from the white point where we kind of like it, something like that maybe. And also maybe I'll take this from one to three. Let's see how that looks. Yeah, I kinda like that now, one thing I'm noticing here is that these angles are really sharp. And I'm wondering if we can just add a bevel modifier to it to make these edges just a little bit more realistic. Let's give that a try. I'll come over here to the modifiers panel here. Let's add a modifier, bevel. And let's take the number of segments up. Let's take it up to say three. And let's take the amount. You can see we've still, it's pretty big here. Let's take the amount down to say 0.01. And let's see how that looks. That's not bad actually, let's also go to object Shade Smooth. And then let's also come over here to our object data properties, normals and turn on auto smooth and see what we think. Yeah, I kinda like that quite a bit better. It just has a little bit more realism to it just because no edge is really that sharp. In the real-world. What I will do though is maybe take this node here. Let's see if we can play with the shininess on this. Down and up. So it's not quite so shiny here like that. And then let's take this one and bring this back toward white. So we get a little bit of differentiation there. You can see it there. Yeah. Something like that. So we just give it a little bit of ohms. That's, that's a technical term. Just give it a little bit of extra something both in the roughness channel and with the bevel modifier. Now if you wanted to, just like we did over here with a bump map here, we could take this, we can take this color ramp right here and feed it out into the normal socket and see what that would do. Let's try that. I will bring in a bump node with Shift a and we can click on Search and type in bump. And there we go. Let's also grab that out of here, bring it into the normal, and then drag it into the normal here and see if we get anything interesting. Well, not really with that, but if we take that color and instead of normal, we take it into the height. That could be interesting there. Look at that. We've got some bump going on in there. So maybe I'll take this scale back down to two. And there we go. We can reduce the strength just a little bit like that. Now that's kinda nice like that. There we go. So once again, you can just kinda play around and see what you can get from your node tree. You can really very quickly add some interests to just about any material. Now that I've got it that way, I feel like I want to take the color up away from black, just a little bit more like this, and then bring that shininess. Let's see if we can do anything with that shininess there. Yeah. Like that. There we go. Yeah. That's that's kinda nice. I like that. Alright. So in the next video, we will continue with this and we'll continue on with the front panels and also the clamps for the cargo container.
29. 028 Materials for the Front Panels: All right. Let's work on this front panels, maybe this one right here. I'll just select it and hit the period key on the number pad. And for this, I think I want a material that isn't quite nettle, maybe not plastic. I don't know. I'm not exactly sure. Maybe you can tell. And this is an invitation to do things the way you want. I mean, take the tools that we're using here and begin making this yours. So I'm going to click over here in materials and to create a new material for that object. Let's call this top panel. And I think I'd like it once again to be kind of a black or leased, a dark gray like that. And let's come down here and we can play with the specular and the roughness here. But I think until we get some sort of differentiation on here, we're not going to be able to see a whole lot. It's pretty flat at this point in time. So what we can do actually if we wanted, we can come over here, click on the window pane. We can drag, select all of these and then press control C to copy them and go back to this material. And then here in the node editor, we could just press Control V. And there we go. I'm going to hit G and move it over just a bit. Now from here, just like we've done before, we can take this color, go into the roughness, and take this down here and go into the normal socket here. All right, we're getting something a little more interesting now. However, remember that this coordinate mapping is coming from UV, so we should probably UV map this right here. So I'll tab into edit mode, hit the a key to select everything. And let's press U. And I'll choose Smart UV project. I'll uncheck that and say, okay, alright, Now if we tap back into object mode, yeah, we're getting something a little bit more, even a little bit more evenly spaced here. And that's actually kind of nice. Let me take it up just a little bit more. I'm gonna take the scale up to three, which will reduce the size of this of each little individual bump. And that's not bad, that's actually pretty good. So what I should do is take this specular down a bit. I'll do that because I don't want it to be quite bright. And yeah, I kind of like that actually. Let's play with the strength here. Maybe we could take it down or up to see how we like that. Yeah, maybe right about in there. That's where I had it, I guess. And now what we could do also is maybe bevel a couple of these edges because it's looking a little too perfect here for me, a little too, too sharp along this edge. So I'm going to press Alt and click this edge. Alt, Shift, click here, here and here. And now let's add a bevel here. I'll press Control B and pull out a bit, scroll the mouse wheel, some. And let's try this. I'll just click. Let's see how that looks. Yeah, I see that looks a whole lot better to me. It just feels a little bit more believable, I think. All right, so now that we've got this, let's maybe put this on these little things up here. Let's select this object and tab into edit mode. And maybe we could just select, now let me hit the three key and select all of these faces here for these little things. And all of them over here. And then I'll just need to expand the selection with Control Plus on the number pad. So Control plus and that expands those. All right, so now let's add a new material slot to this right here to this object. And for this texture slot, let's go ahead and grab that top panel material that we just created and hit Assign. And we go, Let's see how that works. Tab into edit mode. Yeah, that's pretty good. However, let me tap back into edit mode and you don't. What we could do is we could hit you and smart UV project these. And click Okay. And now if we tap back into object mode, yeah, look at that now. I'll hit the period key. Now, it looks a little bit better. Yeah, let's, let's go with that. That's pretty good. All right. We could put that down here as well. If we wanted, we could just select this piece, and let's just hover over this and press the L key. And that will select all of the linked components here. And then we'll create a new material slot. Pull this down and choose top panel. Now, because we didn't have anything assigned for this object, it put this on the whole thing. Okay, so now what we have to do is invert the selection here, Control I. And I'd like to put something else on this, so I'll come over here and click the plus to add a new material slot. Is there another material that we could use here? Well, we could try that material that we put on the rear engine. We could try that. Just put that here and click assign. All right, try that. Well, it's not too bad, but look at this. This is smeared. So I think we need to UV map this whole thing as well. So let's tab into edit mode. Hit the a key, you smart UV project. And okay, now let's tap back into object mode and take a look. Yes, so that's looking a little bit better. I'm not real sold on having it be this particular material. So what let's do, I've got that ship rear engine materials selected. Once again, we've got two objects here using that material. I'm going to split this off, basically duplicate the material. So we have one on this object and the other material on the rear engine. And I will change the name to front panel. What are these? These are greebles. Let's call them greebles. So now I can play with the material a little bit more. Get it the way I want it. And in fact, I think what I wanna do is make this metallic and take the specular down. And then I'd like to bring this up a bit like this. So it's just a little bit different than the other things we have here. And once again, you go with something that you want. If you have an idea here you go for it because this is your world. You know, I'm just here to try and show you tools that you can use to bring your ideas to life. So if you have ideas that you want to use, go for it. Alright, so now I think what I'd like to do is just deal with these here. I'll hit the period key to zoom in. And let's just call this, I'll create a new material. Let's call this lights base. And I will bring the color down like this. I want to bring up the roughness, some thing like that. Okay? And then I want to add a new material slot, and this is going to be light red. And we will add that to this. Oh, this is already selected. That's nice. We can just press Control and plus, and then click Assign here. Now we can change that color down to read and maybe pull this down so it's not quite as bright, something like that. Let's also bring down the roughness here, something like that. And we go, okay, so now let's do the same thing for this one. And really all we've gotta do is just select it, Shift-click this one. And then to transfer or to link to this material, we just press Control L and choose material. So it's brought that same base material over for this. So now we can tap into edit mode. We still got that selected. But if you don't, you can just go to face mode and Alt click between two of the faces and then press Control plus and expand this out to here. And then select the light red and assign. Okay, now let's do this one over here. I'll select it. Shift-click one of these Control L shoes material. Now if we just zoom into here, tab into edit mode, I'll Alt click between two of the faces, Control Plus on the numpad and expand that out. Now we need a new one. Let me create a new material slot, a new material there. And let's call this light orange. I want this one to be orange. Click Assign. And then let's tab into edit mode. And I'll change this to orange here. That bring it down a bit so it isn't quite so bright. And let's bring down the roughness. There we go. So it's a little bit shinier. There we go. All right. Now, I feel like I can move these. I'm going to open this panel up right here. Or you can press the T key to open that in and close it. I'll select the move tool here and I just want to move that over. I feel like I want to move these up a bit. Something like that. Yeah. Okay. So there we have that front panel. Now for this one down here and let's take a look at this. I think I'd like to use that top panel material for the back of this. So I'll just merge that top panel here it is. Let's just bring that back. Let's UV map this. I'll tab into edit mode, hit the a key. Let's hit you and smart UV project. And we go. And then now what I wanna do is just select this on it, the L key for the back panel and then press Control. I, and I want to create a new material for these guys here. So let's create a new material slot. The new material, we'll call this buttons red. And we're also going to want a material called buttons green. And I'd like a material called button's blue. So I just want some different colored buttons for these, but I also want a black material as well. Buttons, black. All right, so let's do that. Let's take this one and let's hit a sign here and sign that to those. And then let's click on the base color and bring these down a bit like this, right? And there we go. So we've got those two a little bit too shiny. So let me take this specular down. The roughness up here like this. And there we go. Now for the others, what I'd like to do is let's select the red one. And so let's just start selecting a few of these. I'll just hit L on some of these here, kind of randomly distributed. And we will click Assign here. And then this is red. Let's take that down like that. And there we go. All right. Now let me make it a little bit darker there. Yeah, that's pretty good. Now let's do that again with the green tab into edit mode. Let's just hover over some of these and add a green to it. Click Assign. Let's change the color to green and drag this down like that. And there we go. Okay, how about blue? Let's do that. Maybe this one. Once again, I'm just hovering over these and pressing the L key. Here we go. And click Assign and change him to blue. Bringing that down quite a bit. Whenever we go. So now we've got a panel that people can, I don't know, type in infor mation or get information or something like this thing. I feel like as a little bit too shiny for this panel. So let's split this out. Once again, we'll hit this right here. Create a material of its own. And we'll call this button's panel. And I would like to reduce the shininess of this. So I'm going to take the specular down quite a bit like that. Let's try that. Yeah, I think that's a little bit better. In addition, Let's also be like I'd like to do one more thing here. I'm going to Alt click and Shift, Alt click and Shift-click. These corners here, like this. And let's add a little bit of a bevel controlled BY will lose out. And we don't need that many edges on those. Maybe I'll just take it down to three. Let's try that. Let me go. Yeah, that feels a little bit better, so it isn't quite so sharp around those edges. All right. Well, there we go. There we've got our front and top panels. In the next video, Let's maybe work on finishing up the engines, the landing gear. And then ultimately we'll work on creating the textures for the cargo container.
30. 029 Finishing the Materials for the Ship: What I think I could probably create the same material pretty much for the landing gear and the clamps on the container. So let's let's begin with this one up here. I'm just going to hit the period key on the numpad and zoom in. And let's just begin from scratch on a material here. I'll click New and I'll call this metal clamps. I'll call this metal clamps for now. And we'll see if we use it for the landing gear. And for this, of course, Let's go ahead and bring down that color. And I want to take the specular down and drag the metallic all the way up. Alright, now of course, since we've done that, I can move that color back up a bit. And the roughness, Let's create a new set of nodes to feed into this. I think I'll maybe use this grunge wall here. Let's click and drag this in. And then I'll press Control T. And I'm going to change this from UV to generate it just to see if we can get it done without UV mapping it. And if we need to UV map it, that's fine. Let's just feed this in to the roughness and see how we're doing here. Well, it's looking kind of smeared on the sides, Isn't it? Up here on top? It isn't bad. I actually kind of like that. But let's try the object socket. Let's drag that over and see what we get. Well, a very similar thing. So that's fine. What Let's do is go ahead and just tab into edit mode, hit the a key. Select you smart UV project, and I will uncheck that correct aspect and let's hit okay. And then if we switch back to UV here, you can see we get a much more even kind of thing and that's actually kind of good. I know I sound surprised, right? Let's drag this scale. I'll drag in all those fields in the scale and just change it to two. And let's see how that works. No, I'm not a fan of that. And we're getting some lines here because it's repeating and it isn't a repeatable texture. Repeatable textures have to be square. Not all square textures are repeatable, but all repeatable textures are square. So we could change this. We can try another one, like we could try this one here. We can drag this down, drop it in here, and we could just take this, drag it down here, and take this and put it here and just try that. That's kind of nice too. And you can see we aren't getting those edges because it is a repeatable texture. It will repeat without causing horrible seems in the texture. Now let me take this back to one. And we go, well, now I'm not a fan of that. Okay, Let's go back and let's try three. That's kind of nice. I don't mind that. So let's delete this and let's bring a color ramp into here. And let's see if we need that to make any adjustments here. I'll drop that right in there. And then let's bring this forward. Let's bring this back to here, say and I will in the black, Let's bring this up so it isn't quite so shiny in that part. And maybe. Yeah, Let's click on the white swatch and bring this down a bit. Alright, that looks pretty good. So let's transfer that to these. We can select these and then Shift-click this here. And then we can transfer this material to the ones we previously selected by pressing Control L and choosing materials. And there we go. Now these are probably going to need to be UV mapped. They don't look too bad, but let's go ahead and do it. Tab into edit mode, hit the a key, you and smart UV project. Now let's see how we're doing here. I'll hit the L key and zoom in with the period key here. Yeah, that looks pretty good. The only thing I would say is that I might want to bring this down just a little bit more or excuse me, bring it up just a little bit so it isn't quite as shiny. They're something like that maybe. Yeah, I think that kinda blends in with the gray of the tiled area. All right, now let's transfer this material to the legs. So it looks like we have them over here in the outliner. So let's just select this one. Shift-click this one and that selects all of them. And then we can shift click one of these, press Control L and transfer that material. And there we go. Now it looks like once again, we're going to need to UV map these. And one of the nice things about blender with 2.8 and newer is that I think I mentioned this before. You can tab into edit mode with multiple objects selected. So with all of these selected, I'll hit the Tab key and then I'll hit the a key. Then if we hit U and smart UV project, that'll UV map them all at once. So then we could go in and let's take a look here. Yeah, that's looking pretty good. So now we have that material on all of the legs as well as the clamps. So I think I'll change the name of this material to clamps and legs. And we go. Now for the engines. I think what I wanna do is extend this panel feature or material onto this part of the engines. So if we tab into edit mode, I currently have these UV mapped and that's fine. Let's select this and this over here. And let's UV map this. I'll hit you. And smart UV project once again. And then let's assign this ship panels sides to this as well. I'll click Assign. And now let's take a look at it. That looks pretty good, but I feel like those squares are a little too small. And what we can do with that is we can come over here to the UV editor and then we can hit the a key and select everything, all those UV islands. And if I hit the S key and scale them in, it makes them bigger, deal them out, make them smaller. So we're just kind of adjusting the size of these. Maybe it's something like that. And then also we can get the G key and move them around to get it to a place where we'll recap. Like it's maybe something like that. Let's take a look on the other side. Yeah, we could do that. So if I hit G, you can see we can move them over here as well. Maybe I'll make them a little bit bigger like this. There we go. Okay. So we have that panel material on those pieces of the engine kinda those engine braces. Now, for this part, ultimately I'm going to have a, an animated material that's kind of like a plasma engine for the. So all we really need to do for now is just give these a color. What I'll do is just create a new material slot here. Click New, and I'll call this plasma engine here. And we can click assign for this. And then I'll just kind of as a temporary thing, i'll I'll make that orange there. So we're just going to have like a plasma engine here and back here as well. So I'll just, with these over here, I should select this face and this face, and click the plasma engine and click Assign to assign those. And also ultimately, we're going to want to have that here. I think I'll just create a new material slot for this object. Go to the pull down menu and let's scroll down and click on plasma engine. And click Assign. Here we go. So that puts that in there as well. All right, so we've got that, but I feel like since back here we've got this material around the plasma engine. I'm kind of thinking we need that same material on the trim around the engine here too. Like that's the only kind of material that can handle the I don't know the heat or the force or the energy or whatever of the plasma engine. Let's just tab into edit mode here and I'm going to select these. And also I'll select these. And let's come over here and do these as well. Alt Shift click these here as well. There we go. So now we've got all of those selected. Let's once again create a new material slot here. And then let's find that rear engine material here it is, ship rear engine. And let's click that. And let's click Assign. Now let's take a look at it as it look. Not too bad actually, but it is using a UV coordinates. So maybe we should just UV map these things here. I'll hit you. And smart UV project. Let's do that. Now. Let's see how it looks. Yeah, okay. I think that's probably pretty good at least for now. Let's go with that. I just liked the sense that that same material here is also on these. All right, oh, we've got one more. Right here. Let's select this Shift-click this Control L and material. And I may need to UV map that. Let's go in and take a look. Yep, sure enough. Let's tab into edit mode, you smart UV project. And there we go. All right, so now in the next video, Let's begin working on texturing the cargo container. And we're going to use blenders, texture painting tools to kind of paint some edge where on this as well. So we'll begin that coming up next.
31. 030 Setting Up the Materials for the Container: Now for the cargo container, what I'd like to do is really create two materials. And one material is going to be the main one that we see here. And then the other material we're going to reveal as we texture paint along the edges of the indentations in the panels and things like that. So it's going to hopefully look as if the edges have been worn and we're kind of peeling off or wearing off the paint to reveal the metal underneath. So let's give this a try. First of all, I'm going to create a new material for the cargo container and I'll just call it cargo container. There we go. And for this, I'm going to take the specular all the way down and the metallic all the way up. And I want to change the color here. Let's change it to a green. Kinda want like a dull green. And see what we can do to find like a like a green that's been kind of worn for awhile, maybe something like that, at least for now. Let's go with that. And the roughness I'm not going to worry about because once again, we're going to create a node Jane here to feed into the roughness channel. And for that I'm going to use this grunge wall here. I kind of like this one for just general dirt across an object with this selected list press Control T. Now I'm gonna move this over here. And since we haven't coming in on the UV channel here, let's go ahead and UV map this. I'll tab into edit mode and hit the a key. And let's press U and smart UV project. Turn off correct aspect. And I want to add an island margin here because as we paint, it's going to kind of bleed over the edge. And if the islands, if the UV islands are right next to each other, we're gonna get some bleeding from one part of the object to the other. So let me, let's try 0.5 here. Let's see how that works. And I'll click Okay. And that's not what we want. That's a little too much of an island margin there. So let's try 0.1. Let's try that. Now. Still too much, 0.01, getting better. There we go. So as you can see, we've just given some space here between the islands. Now, you can of course go in and try say 0.005 and see if that's good enough. That might be good enough. As we paint, we'll see if there's any overlapping, but I think that'll probably work. Alright, now that we've done that, let's come over here back to the node editor, and let's bring in a color ramp, Shift a. And we can go down here to converter and color ramp, or we can click in the search type in ramp and choose Color Ramp. Let's do that. Bring this to here, and I'll bring this to here. Alright, so let's tab into edit mode and see how we're doing. Not bad. That's giving a nice kind of overall grunge kind of a look. Let's. Reduce the shininess of some of this grunge. Let's click on the black here, click on the swatch, and let's bring this down quite a bit, maybe something like that. Let's see how that works. Pretty good. Right? Now if we wanted to, we could of course, try the different coordinates we could try generated. And if we do that, we get that smearing. Sometimes what you can do is change the method of 2D projection here. So we can change that from flat to box, and that looks pretty good as well. So just depending on how you want to do that, once again, you could do UV, but you'll have to switch back to flat. Or you could do generated with a box here. All right. I think that looks pretty good for just a general overall grunge, dirt and grime. So what Let's do is let's create a whole new one of these. Let's just, I'm going to take this material output and drag it over here. Let me drag this up some. We can see this. And I'll just click and drag all of this and press shift D and move it down for a whole new one here. Now for this new one, Let's change this to whatever color we want the metal to be underneath this that we're going to reveal that's been peeled, are worn off. I'll move this back into the center kind of maybe toward the brown just a little bit. And yeah, actually something like that's not bad. Let me move it right into there. Yeah, I kinda like that. Now we need to mix these two. And of course there is a mix shader node. So let's press Shift a go to shader and mix shader. Or of course we could search for it here. I'll just choose it here. And then let's take these and bring them into the shader sockets here and here. And then let's take this out to the material output right here into surface. Now, you can see the color has changed because we're actually mixing half and half between these two. So if we take it all the way down to 0, we're getting this here, the green. And if we take it all the way up to one, we're getting the gray brown down here. So how do we just reveal it when we paint there? Well, the way blender works in this instance, black is going to be seen as opaque and white is going to be seen as transparent. In other words, if we created a black texture and fed that into the factor output, we painted white, we would reveal this color down here. So let's give that a try. I'm going to come over here and click on create new image. And I will call it edge where let's make it a 2k image, 2048. By 2048, we're going to keep it as black. We're going to keep alpha on. It's going to be blank and we'll just click Okay, and there it is. That's all we need. Now we need to save this somewhere. We come over to this little menu button and pull down. We can go to Image Save, and I'm going to save it right here in that textures folder right here. And we'll call it edge where. And it's a PNG. We have it set as a PNG over here. So I'll click save. And there we go. Now if we come over here and hit Refresh, there it is. So now let's bring it in over here. Let's just click and drag, and there it is. Now what we can do is take these, let's move these over a bit. I'll bring this down into here. And let's go just from the color into the factor slot. And there we go. Now, we can't see this color anymore, right? But what we can do is we can come up here and change from object mode to texture paint. Now we have this brush cursor here. And if you notice we're painting white. And if I just click and drag again that it reveals the color underneath this color here. So what Let's do is in the next video, let's work on adjusting our brush settings and then we'll begin to paint some edge where on the container.
32. 031 Painting Edge Wear on the Container: Well, we've seen how we can paint onto the object here with our texture paintbrush, and it will reveal the material underneath here. You can also see what's happening over here on our edge where image, we're actually painting white on to that image based on the UV map. So if we changed from UV editor to say image editor, you can see the UV map here. Change back to there. Now I don't think I want the strength at 100% here. I think I want to bring that down a bit and I press Control Z to undo that. And then I'm going to bring the strength down to, I don't know, let's go around 0.8. Let's see how that works. Now you also have the radius of the brush here or the size of the brush. But you can adjust these with shortcuts as well. So if you hit the F key and move the mouse, you can increase or decrease the size of the brush. And if you press Shift F, you can adjust the strength of the brush as well. So I'll just put this back to around eight or 0.8. And then if we click and drag here, like this, That's okay, but it's very clean. It's very, I don't want the edges of the stroke to be that even because we could go in and paint little bits like this and make it uneven and kind of do this manually. And that would be fine. You could do that and it would be a whole lot easier with a graphics tablet. I'm just using a mouse here. But what we can do is actually use some of the stroke settings within the brush to give us more of a jagged edge on the stroke. So we don't have to go in and paint every little detail. So let's come over here to stroke. And I'm going to change from space line. And what that'll do is it'll allow me to click and drag and draw a line like that. However, that still doesn't take care of the evenness of the edge there. So if I go back to stroke here and under jitter, let's increase this to say 1. Let's try that. Now if I click and drag, you can see it kind of disperses the stroke in a random way. And that's pretty good. We're getting there. But let's take that jitter down to, I'll just click and drag and let's take it down under 0.3. Let's see how that works. I'll click and drag. Yeah, We're getting there so you can see how that edge is a little more random there. So let me press control Z and maybe I'll just bring up the jitter just a little bit more like 0.35 or something like that. Now we can do is just come over here to the edges, click, drag and release. And it will create that edge where in a random kind of way. So let me hit the F key and shrink that down just a bit. And then click and drag here. Yeah, that's pretty good. Now, the last thing I need to do is come over here and turn on symmetry so that whatever we do on this side happens over on the other side as well. I'll press Control Z to go back and then let's turn on the x-axis here. And then if I click and drag, and click and drag, Let's go see how it looks on the other side. And there it is, there too. So that just makes our job a little easier. All right, So now I think we're ready to go through here and add some of this edge where. So I'll just click and drag once again and get that one there. And then I'm going to go through and just try and do each one of these. Give each one of these just a little bit of edge where it'll take a little time, but certainly not as long as it would take if you had to go through and do each individual stroke manually to get that sense of a ragged edge. So this I think is a little bit quicker. I'm just going to reduce the brush size just a little bit with the F key and go on around these. Bad. So now we should see this over here as well. Yeah, so it just helps give a little bit of wear and tear to the object. I think it's kinda nice and it's really not that time-consuming either. I'll hit the F key and increase the size of the brush just a little bit for this. Bring that around like that. And then for these, once again, I think I will reduce the size of the brush just a bit since they're a little smaller. And of course you can create however much or however little edge where you want on these. And you can put scratches and Nick's wherever you want on the object too. Alright, I'm gonna come over here and increase the size of the brush just a bit and do this like that. And then I'll begin on these end. To begin on these, I think what I'm gonna do is press Control Spacebar. And that will just maximize whatever window you are hovering over at the time. So I'll just click and drag over here. And you can just press control and space bar once again to, toggle back to the way the screen was. So I'll go over all of these and just give each of these edges just a little bit of where. And notice that it didn't paint on the clamp because we're only working on the container here. And lastly, this one here. And once again, this all should be being duplicated over on the other side as well. Yeah. See it there. Now the top. And since we're mirrored, I'm going to hit the seven key. Since we're mirrored over a should just be able to paint just one side like this and the other will come along like that. That seems a little bit. Let me press control Z and undo that. And I will reduce the size of the brush just a bit and let's try that again. That just seemed a little too much. Yeah, there we go. And let's do this one here. And I'll just go ahead and finish these up. There we go. And there we are. Now I'm gonna go ahead and press Control and Spacebar to go back to this screen layout, I'm going to press Control S to save. And you can see over here what I've painted on that edge where image, to be that it just comes through onto this image based on the UV map. Now as you can see, the black is pretty much opaque and the white allows things to come through. Now if you wanted to make any changes, you can of course, then go in and paint black to erase some edge where. So we could click here, drag this down to black. And then if I hit F and I'll make that a little bit bigger, and I can click and drag. And that will delete that stroke there. So now I can go back and maybe do it the way I wanted it to. Maybe I wanted to do it a little bit bigger or smaller. I can click and drag and drag that over there. And you go. All right, Now the last thing we should do is this area in here. And I can't really get to that area because of the ships. So what we can do is hit the division key on the numpad and that will isolate just that selected object. You can see here what the selected object is. So when we hit that division key on the numpad, that's what gets isolated. So let's come back here. I'll press Control and Spacebar. And let's work on this area here. So we've got a couple of edges here that we should work on. It's kind of hard to see right now. So what we could do is come over here and under viewport shading, we could rotate the lights, click here and rotate the lights. So maybe I can see it a little bit better like this, just where the paint stroke should go. So let's try this. I'm going to click and drag over here. That's a little too big. That control Z brought back all the other items. So I'll hit the division key again. And then I'm going to shrink that brush down. I'll hit the F key and shrink it down just a bit like that. All right, let's try this again here. Here. Yeah, that's, that's better. Let's do that. So I'm going to go through and try and add a little bit of edge where to each of these here. And down here. And then we can do it back here. Now we, what we should've done is turned on the y-axis mirror. And we could have done both ends at the same time, but this won't take very long. So I think that's probably good. Let's hit the division key again. And there we go. Control Spacebar. And there we've got our cargo container texture didn't ready to go. I'll turn off the X mirror. I'll come back into the viewport shading and take the rotation back to 0. And there we go. Now the last thing we need to do here is save this image. If you come over here to this menu item again, this little menu button. And if you click here you can see the image menu has an asterix. And what that means is that this image has not yet been saved to the hard drive. It's still black. Blender hasn't yet save these white strokes to the edge where PNG. So there is a very good chance, even if we saved this scene, if we close this out and came back all of our edge where a painting could be gone. So we need to be sure and save this so that there is not an asterix here when we close out our scene. So you can see here in the menu, the shortcut key is Alt, S, which of course is different than control S, right? You can press Control S here to save the scene. And yet this is still not saved. Now if we come over here and press Alt S, Alt S. Now if we come over here, there is no Asterix. And if we come up here to refresh, you can see we have our paint lines on the image, so you need to be sure that what you're seeing here is also here. So you know that it's saved to the hard drive. We can go back to the layout tab here. Now we've still got our texture paint mode selected over here. So I'll go back to object mode, and then let's click on the material preview right over here. And there we go. So we've still got work to do on the engines, but we're actually going to animate that. So I think we'll keep that until the animation portion of the project. In the next section, let's begin working on the materials for the landing bay.
33. 032 Adding Materials to the Landing Bay: All right, Let's start on the landing bay now let's come over here to the outliner and bring that back. But also bring the camera back just so if we want, we can hit the 0 on the number pad and see the rough framing there for the end of the animation. But let's go over to the shading tab here. And let's see what we can do with this. I think first of all, let's go ahead and just give the entire landing bay just a general color, a general material. And that's probably going to be like a dark metal. That's kinda what I have in my head. But let's come over here and click New. And we'll call this landing. They main, like that. Okay? And for this, once again, I think it's going to be a metallic. So it's bringing the metallic all the way up and the specular all the way down. Let's change the color here. I'll just bring it down to kind of a dark gray. And then let's add a node chain to the roughness socket here. So let's, let's bring this grunge wall in here. I'll just click and drag that in Control T. And it probably be a good idea to UV map this. Let's tab into edit mode and hit the a key. And let me close out this edge where I'm just going to click the X here, which will just clear that image out of the UV editor. And here is our UVs currently for the landing bay. So let's press you smart UV project and turn off correct aspect. And I'm going to type in 000 five. I think I'm gonna do that right there. All right, so now we have that done. Let's now bring in our trusty friend, the color ramp. And we will connect these up to the roughness. Now we're getting something here, but that's not quite what we want. I'm going to bring this up into here. Bring this over maybe right about like this. And then let's adjust how shiny or rough it is by first clicking on the black and let's click the black swatch. And let's bring this up some palette like this maybe. And then this one, bring down, bringing the white down some. Just a little. Let me bring this color down some so it's a little bit darker. All right, let's take a look that still seems to be a little bit too shiny. Let me bring the scale from one to two. Yeah, I think that's a little bit better there. Okay. And I'm looking at it over here on the walls because these panels, we're going to use our material from the ship to apply to those panels. But just want to get something, let me get to 0 key again. Yeah, that's not bad, but there's still a little too much going on here. Let me click this and bring this up a little bit like this. I'll bring them so they're pretty close together. These two, the color of these two nodes. Let me tumble around and take a look at that again. Yeah, So we're just getting a very kind of a, kind of a subtle differentiation here. Let me try the scale at three just to see what I, thank you. All right, Let's hit the 0 key again. Yeah, let me go with that. For now. I might bring up the color over here in the shade or just a little bit kind of like that. I'm just looking up here kinda what it looks like on that frame. All right, so let's go with that. Now that we've done that, let's work on these panels here. And as I said, I'd like to take the material from here, this ship panel's main. I'd like to take this and apply it to these panels here. So let's do that. Let's tab into edit mode. And I'll press Alt a to D select, and I'll go to face mode. And let's just begin selecting these panels because these are what I want to apply that material too. All right, we've got those selected. Now let's create a new material slot. Here. Let's pull this down and find that ship panel's main. Let's do that right there. And then let's click Assign and see what we get. Tab into edit mode. All right, so it's not quite what I want yet. But that's fine. It's this is a whole lot easier than beginning from scratch again. So let's split this off so we can modify it. I'll click here and then I'll change the name to landing bay panels. So there are several things I'd like to change here. Well, first of all, I think maybe just the size of these. Let me try and change the scale from three to four. That shrink that down just a bit and it's good. Let's go down here to the nodes that are affecting the roughness and take a look at those. So right down here, I'm going to take this and move it over. I'm going to grab this one and move it over a bit. And then move this one. Yeah. Let me bring this one up just a bit. Just trying to right amount of shininess here. And then what I'd also like to do is change the color. I'd like this to be quite a bit darker. And to do that, we could probably come over here to this color swatch right here on the Multiply node. And if we brought this down, some might be able to get a little bit more kind of a dark panel like that. And then take a look at, maybe I'll actually take this scale from four to five. Let's bring that down some. And then let's think about the edges of these panels here. Click on the white here, and the black might be able to tighten those up a bit. And then also here, maybe be able to tighten these up just a little bit. Drag this down. So I'm yeah, here we are getting a little bit more defined here. About like bat, let's say. And then we could play with the factor on the difference node. Kind of get those so they're more the same color. Let's do that. And then that shininess is still a little too much. Let's come down here and click here, and let's bring this up. Some not quite as shiny. There we go. Alright, I think we're getting there, and let's hit the 0 key on the number pad. Now there are a couple of other things that we can do just to see how it's going to look ultimately when we render this out. One is we could come back over here to the render properties. And here we could just turn on a few of these settings that we're going to be using when we do the final render. So like ambient occlusion, we can turn that on and bloom screen space reflections and you can see what happens there. We get a more realistic reflections in all of these materials. Motion blur we're going to use, but probably not gonna see any difference quite yet here because that's really for animation. I'm also going to come over here to the shadows and let's begin to work with these. This probably won't do a whole lot currently, but I think I'm going to change these shadows both here to 4096. So as we add light the scene, I think that's going to make a difference. All right, let me change this here. It looks like we could put 0 back in the location. That might help a little bit. Now let's move these back a bit. Let me change this white here. I'm going to drag this down. Yeah, I kinda like that. And we go and then the strength of the borders we could play with that. We could bring that up, some are down and maybe up just a bit. Let's try like 0.7. That gives us more definition there. Let's hit that 0 key and see how we're doing. So we're not seeing a whole lot of it there, but I think we're going to begin up higher at the beginning of the animation and then kind of move the camera over this way. So I think that's pretty good at least for now. I like, I like where that's going. May come back over now to the scale and change from five to four. And let me move it around a bit. And that's kind of nice. I can move it around a bit like bad. All right. So we've got the cargo bay pretty well set up. There isn't a whole lot to it, of course, because it's just kind of a black metal cave-like thing, but we can still give it a little bit of interest here. Let me move that up like that. Let's see. I'll go back here and yes, so we can change the color here so it's not quite so dark. Maybe something like that. And maybe I'll change this scale here for the grunge mapped to three. Let's try that. Yeah, And that's kinda nice. Alright, so we have the materials for the cargo bay. In the next video, let's work on the materials for the light panels up here, as well as for the cargo containers and the hoses.
34. 033 Finishing the Materials of the Landing Bay: Well, for the cargo containers, there's a couple of things we could do here or a couple of different ways that we could set up the materials. So one way of course, would just be to transfer this material to this object. So we would select this one, Shift-click the cargo container here, and then press Control L, and choose to link the materials. And there we go. Now if we select this one and hit the period key on the numpad, you can see that our texture painting is a little off here, right? It's not in the right places. So what we're seeing here is a difference in the UV map. Because if we tab into edit mode here and hit the a key and select everything, you can see that this UV map is not the same as the one over here, right? You recall that this one here looks like that. And when we painted on the 3D model, it laid down those paint strokes according to this UV map layout. So when we transfer the material over here and the UV map isn't the same, we have a problem. And what we can do here, since we just used smart UV project, we could hit the U key and then click Smart UV project. We could ensure that correct aspect is turned off because we use that or we turned it off previously and also we put the island margin at 0.005. So that's all the same as it was before. So if we click Okay, it should all come out to be exactly the same. And sure enough, our paint strokes are back where they belong. So that's one way to do it. But also what we could do is we could just delete these and then duplicate this original textured object and just move it over and put it in place, right? So you can really do it either way. What I'll do though is I'll go ahead and select these here, and then I'll select this one last and press Control L and materials. Now I'll just need to go through and read UV map, each one of these, which once again, isn't that big of a deal because all the settings are here in the panel and I can just tab into edit mode for each one, hit the a key, you smart UV project. And okay, so this isn't a big hassle either. Smart UV project. Okay. You are UV project. Okay. So now our extra cargo containers are the way they should be in terms of the UV map. But the problem is, if you get the 0 Qi and look at this, it looks too similar. Everything is green. All the little grunge marks on them are all in the exact same places. So it isn't looking too good. What we can do is give each one of these a slightly different look. So let's say for this one, we want to change this a bit. Maybe we could move the grunge on the object and change the color. And that's great, but we have to remember to come down here and click this little data block button right here to split that off. Alright, so now I'm going to call this cargo container. Red, because this is going to be a red container, right? So let's just come over here and change it from green. Spinning around here to the red, maybe something like this. So it's kind of faded as well, kinda like the green. And then let's move the grunge a bit. We can go to the node chain where the grunge images. And let's move this around two in the x and the y. Let's click on the Y and move that around, right? So we can move it like that. We can click on the X. Well, that's not doing a whole lot about the z. Yeah, we can click on the Z and move that like that. Let's say, there we go. So that doesn't look exactly like all the others. Alright, so let's try this one here. Let's click here, change this one and let's call this cargo container yellow into do a yellow color for this. I'll click here and spin this around toward the yellow. I don't want it to be bright yellow, just something kind of like that. There we go. And then we can move the grunge just like we did before. Let's try on the x. Now. We can't really do it in the x. How about the y? Yeah, let's do the y and the z. So it's the Y and the Z, I guess that's it now we could also change the scale as well. So maybe changed from one to two. There you go. That switches that up a little bit. All right. So we've got red and yellow with a little bit different grunge. Let's try this one. Let's make this one cargo container blue. Like that. Let's change our color here. I'll spin that around to the blue. Maybe something like this. And then let's move that grunge as well. Maybe in the z. Leave it like this. We could even try changing the scale of just one of the axes here. So maybe if we change the scale of the y, maybe change the scale of this. D and C can play with that. See if you can come up with anything interesting. Well, let's take a look at this one. You know, we could keep this one green. There isn't anything that says there can't be another green one here somewhere, but we ought to at least change the grunge patterns. So once again, let's click here and let's then call it cargo container green. And then let's move the grunge around a bit. Maybe I'll change the grunge to three. Let's try that and maybe move it around in the z. Yeah, we're getting a little bit more of a repeat there with the smaller scale. So let's change the scale is try 0.5. Let's try that. Yeah, that's just a whole other kind of look. Maybe this one here could be another red one. Let's take this and pull it down and choose cargo container. Read. Then we could click here to make it its own material. And let's do a cargo container, read number 2. And we go. And then for that, we could move the texture around a little bit like that. Let's try that. All right, so now if we hit the 0 key, you can see that we've got a different set of containers with different colors, different grunge patterns, et cetera. All right, let's take a look at these hoses. If we select one of the hose is let's just go with this one here. I'll tumble out of the camera view and hit the period key. And let's zoom in here. For this. Let's just begin from scratch once again, let's come over here to the materials panel. We can click New here or new here either way. And let's call this hoses. And for this, we can just change the color here and it down a little bit darker like that. And then also, I'm going to de-select this just so we don't have that orange outline. I'm going to press Alt a. And then let's bring this specular down and up like this. And then let's put something into the roughness channel here. Let's, let's grab this grunge rough material here or excuse me, a texture Control T. And for this, we don't need a UV map because this is a curve and it really doesn't have to be UV mapped. We can leave it here at UV and see what it does. Let's connect this up to the roughness and see what we think. Well, it's kind of pulled there. So let's change that from UV to generate it a little bit better. Let's try the object coordinate. That's a little better. I kind of like that. We could also take the scale up or down. I'll try to maybe three, Let's try that. And then let's bring in a color ramp, shift a search ramp, and I'll drop it right here. And then I'll bring this in. Bringing this in some, let's see how that works. I'll change the color here, bring it up so it isn't white, so shiny there. Let's grab this and bring this down a bit. Something like that. Let's see how that works. I'll hit the 0 key again on the keyboard. Yeah, we're getting a little bit of information there, lying press Control and Spacebar. And let's take a look at it fairly large here. Yeah, look at that. We've got little bit of dirt and scuff marks on that. Alright, control space. So let's just take this, this and this. Select this one last, the one with the material, and then press Control L up here in the 3D view. And material. Let's take a look. Yeah, So now we've got those hoses there. We can of course, take the material up or down. I might bring it just a little bit lighter so it doesn't blend in with the floor quite so much. And we go and then let's take a look at this right here. I'm just going to hit the period key and zoom in. Let's create a new material for this. This is going to be a metal materials, so I'll take the metal all the way up, the specular all the way down. We can make it very shiny like this or something. Maybe I'll bring it in a bag. And then let's once again adds some interest or grunge to that. Let me try this one, this grunge miscellaneous. And of course, if you want to create or download other grunge maps, please do. I'm just using these just kind of for efficiency here. I'm going to press Control T, and then I'll drag this into the roughness. We've got this setup with UV. We could try generated, we could try object. But generally speaking, I think we better just UV map it, tab into edit mode, hit the a key you and smart UV project, and we go, let's try this. So actually, I think that's gonna be kinda cool. Let me take this two, maybe three. Let's try that. Shift a search ramp. Let's drop a color ramp in here. Move that in some of that in. I don't want it quite that much. But now let's pull the black up this. And we'll take the white down just a bit. Maybe about like that. So it has a little bit of extra detail in there. Let me bring that shininess down. Take this up away from the black. Because once again, the farther into the black, the shinier it is. And let's take it over like this. We go, Let's see how that works. Is it too much? Now? That's pretty good actually. Now we could also come over here into the base color and drag this down a bit to make it a little bit darker. Like that. Let's zoom in again and see how that is. Yeah, So that's pretty good. Let me bring it back up just a little bit. I don't want it quite that dark. There we go. So it's just looks like a very basic metal material and that's fine. 0 Qi, and there we go. And lastly, let's take a look at the lights up here. This is a very simple material right here. Let's just select this panel. I'll do it over here. Okay. Let's select one of these panels and just add a new material to this. I'm gonna come over here and add a new material slot. New material. Let's call this light panels. And I will click Assign. And then right over here, right down here. Let's take the emission color up like this all the way to. And I'll take the Emission Strength up. And you can see with that bloom on, with this bloom on here, you can see what it's doing. It's just giving us a nice kind of a bloomed out kind of a light fixture. So I'll just put this at 5 there. So then what I'm going do is just go through and select all of these. And we'll just assign this emissive material to all of these faces. Just select all these. And then now that we have these, let's just come back to the materials. Click on the light panel material and click on Assign. And there we go. So now we've got the light panels in there too. Let's hit 0, and there we go. Now they aren't really providing any actual lighting in the scene. If you come over here and go to here, you can see that they don't provide a whole lot. It's kind of a fake. But it is kind of nice, I think, to have that bloom happening from those panels. All right, I think that takes care of the materials and the textures for the cargo bay and the ship. In the next section of the course, we're going to begin working on everything outside of the landing bay. We'll work on creating stars and the planet. And then we'll add the lights for here in the cargo bay. And then in the last section, we'll work on the animation.
35. 034 Beginning the Star Field edit: Well, now that we have our landing bay and our spaceship, we're going to need some space. We need a star field and maybe some space gases. And we need to be able to see it through here, through this landing bay opening. So I think now what Let's do is let's begin working on that. Let's go over to our shading tab here. And I guess we could go ahead and just hide all of this for now. Let's do that. Let's I'm over here, hide the ship, hide the landing bay, and I'll hide the camera as well. I will come over here and go to the rendered viewport shading here. And when we do, we still have a gray background. There are no lights here, but we still have this gray background. To find out why Let's go over to the world properties. And you can see that we've got that gray color here. And I want to change that. And in fact, I don't even need these nodes here. We can take a look at them. If we go to this menu in the node editor, we can pull this down and go to World. And here we have it. Here's our back ground shader and the output here. But we don't need this at all. So what I'm gonna do, let me go back to object here. What I'm going to do is just turn off, Use nodes here in the world properties. And then I can just click on this color swatch. And let's just drag it all the way to black. So there we've got the beginning of our space and we're going to need a little bit more than that. So what I'll do is come over here to the scene collection and I'm going to right-click and choose new collection. And here we're going to call this stars and gases. And there we go. And this is where we're going to put the objects, that will be the stars and gases. And to do that, I'm gonna go back over here to the Layout tab. And I'm going to do is just create some spheres. So I'll press Shift a mesh UV sphere, and I'll hit the period key. Now let's go back to solid modes so we can see the polygons. And I'd like to first of all, add a modifier, a subdivision surface modifier just to make that a little bit smoother. And then also let's come up here to object and shade smooth. All right, so this one is going to be our star's outer. That's going to be the stars on the outside. And I want to make this a lot bigger. So I'm going to hit the End key. And here in the scale, let's just click and drag these three fields. And I'm going to type in 0750. And let's scroll the mouse wheel and zoom out. And you can see there's this kind of strange thing we're getting here. I'm going to keep going and then we can't even see it, right. We can just barely see it there and then it goes away as we zoom out. And that's because of this clip in setting here in the View tab. Let's change the 100 meters to say 5 thousand meters. Let's do that. And there we can see it a little bit better. So that's our outer. Stars, I'm going to hit Z and go to Wireframe. There's that. Now let's duplicate this. Let's press shift D and enter. And instead of 750, let's type 250. And this will be our inner stars. So let's change the name here. Two stars enter. And then we need one more on like one more here I'm gonna select this again, shift D Enter, and this time I'll make this 500, 500 meters. So it's sitting in the center there. And we'll call this gases middle. There we go. So these are the three objects in which we're going to put our stars and gases. So we'll be able to see them out through the landing bay. All right, back to the shading tab. We'll select the star's outer. I'll go ahead and hide the other two. And let's begin by creating a material. So I'll come over here. Let's go over to the materials panel here and I'll just click New. And when we do that, we automatically get a principled be SDF shader. Now, I'm going to do this without one of these, I'm gonna hit the X key and delete that. And let's bring in another type of shader. Let's bring in a transparent. I'll press Shift a shader. And let's bring in this transparent here. And also let's bring in an emission shader now, before we use the emission channel on the principled be SDF shader for the light panels in the landing bay. But here we can also shift a shader, bring in an emission shader that does a very similar thing, but let's just click that and drop that here. Now, we need to feed both of these into the material outputs. So we're going to have to mix them. So let's bring in a mix shader, shift a shader, mix shader right here. And we'll just connect these up to here, this up to here, and this two here. So that's what we're going to be using. For our shaders. However, we need to create something to feed into the factor slot of this mix shader. And that is what is going to give us the star field effect. So first of all, let's come over here and we're going to create a Voronoi texture, shift a texture. Voronoi. Here we go. Now once again to see what it's going to do, we can press Control Shift and click that. And you can begin to see there's some little blobs in here. We can increase the scale and I'll just click and drag on the scale. And you can see as we do, we've got these little cells and these little dots here so we can click and keep going and make them smaller and smaller and smaller. So you can see where we're going with this. We're gonna make a lot of small little dots so that we can use our emission shader to make them bright. All right, so let's, let's take the scale up to say 500. I'll just type that in. And then if we bring in once again, our handy-dandy color ramp, I'll just type in our AMP here. We can drop that in. And then what I wanna do sense, we're going to want these to be white dots on a black background. We can come over here and pull down this little menu arrow and choose flip color ramp. And now you can see we've got little white dots. And if we click and drag here, there we go. Now we're getting something that we want, right? So that, let's bring that down to here, let's say, and I'll click and drag this up a bit so you can just find a nice amount of stars here to begin with. Maybe I'll bring this, we can bring him back. So maybe I'll begin to right about here. Right about there, let's say. All right, well, let's do this again. Well, Let's do is just take these two shift D, bring these here, and then let's modify them a little bit instead of scale 500, L2, scale 200. And let's press Control Shift, click here. And now you can see because we have it at 200, they're a little bit bigger. So we'll have kind of a collection of big and small stars here. So I'll grab this and just bring it a little bit closer to the black. You can see as I do, they get just a tiny bit bigger, a tiny bit brighter. So I'll kind of bring this up like this right into here. Let's say, There we go. Now, let's mix them together. I'll press Shift a. And now we want to bring in not a mix shader like we did before, but a mix RGB. So this color, and here mix RGB. So let's click that and drop that here. Now I'll take this, put it into here. Take this, put it into here, and let's press Control Shift click, and there we go. So now we can mix between these two. There's all the big ones and all the small ones. Now I don't think mix is going to be quite enough. Let's try add. If we drag this down to here, we begin to add the larger stars in like bat. And we can do it a slightly different way if we actually take this and put it on the bottom like that, right? And then when we go all the way down, we have only the big star. So now we can bring the small stars up to little bit like that. Yeah, Let's try that. Maybe let's try 0.7. Let's do that. All right, Well, it's looking pretty good. However, I think what I want is some random differentiation in here. Let's see if we can kind of create some open areas. We have a few, these kind of little open areas here. But let's see what else we can get. I'm going to press Shift a and bring in a noise texture. Let's do that right here. I'll drop that right here. Let's once again create a color ramp. And I'll connect the factor socket here. Okay, Now let's press Control Shift and click here. To see what we have. And this is what we have. Once again, it isn't very defined. Let me zoom in to this node here. And what I'll do first is flipped these blip color ramp. There we go. And when I'm bring this down just a bit and you can see how it's beginning to define those blobs there, right? Something like that. And then what we can do is begin to play with say, the distortion and the detail and the scale. So let's just click here and the distortion and play with that like that. That's kinda fun. I don't want it quite that prominent, but let's make it bring it well, we could try, we could begin with it. Let's see what happens. Take the detail down like that, right? Maybe the scale that down quite a bit. Maybe something like this. We can play around and get these different blob patterns here. And then once we do that, let's see how it looks once we plug them in with all this. So what I need to do is maybe move all of these. I'll hit the G key and move these over a bit like that. And then let's add another mix RGB node. Let's press Shift a color mix RGB. Let's drop that in here. And maybe I want to bring this down to the top one here like that. And that's not quite working. What we'd want, I think is a multiply node. So let's come over here and choose multiply. And we go and then let's increase the factor. And you can see as we do, we get those empty areas that we got from this node down here. So what Let's do is let's go back and let's play with these to get a better distribution of stars and empty spaces. So let me take this, I'm just going to move this back and forth like that. Play with the distortion a bit so you can see, you can just kind of get different levels of randomness in here like this. And we go maybe the detail a little bit and pull that down. Scale. Maybe I want the scale to come down a little bit like that. So yeah, you can kind of get a sense of what you can do with these three nodes. Now, of course, we're going to need to plug all of this into here. So I'm going to take this color into the factor slot on the mix shader like this. And then I will press Control Shift, click this one here. And then finally, what we need to do is actually make this fear transparent. And the way to do that is down here at the bottom of the material panel, we have this settings area, so I'll come in here and under the blend mode, we should turn this to Alpha hashed. And now we'll be able to see through it into the black behind all stars. Now, we can adjust our strength. We can adjust our random empty spaces like this, right? So you can come through and do a little more tweaking now that that sphere is actually transparent. So let's come back over here to the Layout tab. And I'll come here to rendered preview. And now you can see, as we tumble around, you can actually see through that sphere. So this is going to be the outside of our star field. In the next video, we'll come in and we'll work on the sphere for the inner stars and for the gases.
36. 035 Finishing the Star Field: All right, For the next part of the star field, Let's go back to the shading tab. And what I wanna do is just transfer this material. Oh, look at this. I didn't name them tutorial, so let's call this star's outer. Alright. Now I just want to transfer this one over to the stars Enter. We'll just unhide that one. And then let's come over here and pull down the menu. Scroll down, find our star's outer. And let's add that. Now we need to first of all, split it off, right? We need to click here and then change this to stars. Enter. Then I'm going to spin it just so they aren't exactly the same because you can see we're getting this kind of, oh, it's kind of a more a pattern of a repetitious pattern here that we don't want. So what Let's do is select that stars Enter and I'll just, well, I'll just hit the End key and let's come over here to the z-axis and I'll type in 90 degrees and we can spin it like that. And you can try, you know, 45 or whatever you'd want. But I'll just put it at 90 degrees there. And I have the strength of that original star's outer it three deer on the inner one, we could take this down if we wanted. We could take it up or down. I'll just type in one to bring that down and maybe I should bring that down here as well. Let's type in one and then grab the inner and bring those down just a little bit maybe to 0.5. Let's try that. All right, so now we've got our inner and outer stars. We can go back to the Layout tab and take a look. And we can see them there. If I scroll in just a bit, you can see in kinda go into the middle here you can see our star field beginning to take shape. And I'll zoom back out here. Now let's work on that center one, the gases middle. Well, let's go back to our shading. Will bring that one back, the gases middle and we're going to only be able to see that inner one currently, let me turn off these two so we can't see anything here. And if we choose that gases, metal, now let's create a new material. We will call this one gases. And let's now once again take this principled be SDF and we will just hit the X key and delete it. Let's move this over and I'll bring in a transparent and an emission. I'll search for transparent. And here we go. And I will also search for emission. There it is. We can bring in a mix shader and plop that down and connect these two. And now let's just bring in a, a noise texture, shift, a texture noise. Here, and of course, a color ramp. Let's do that. So let's plop that down there. And now what we need to do is we'll connect this will control shift click the Color Ramp 0. And we should probably put a, a mapping note on this just so we can adjust the scale and location if we wanted. So I've selected this, I'll press Control T. And let's change this to the object coordinate system. Now, I don't want to mix this with the emission shaders. So let's create a color mix RGB node right here. And we will feed the color from the noise texture into one of these sockets. And then the color from the mixed node into the emission. And then let's hook it all up. I'm going to press Control Shift, click that mix shader. And now take a look at what we have. You can see there's some color happening in here. Now we still have the blend mode at opaque. So let's change that to Alpha hashed. And then let's bring that color ramp right into the factor socket of the mix shader. All right, now we're beginning to get a little bit more of what we want. First of all, I'm going to take the strength down just a little bit, maybe down to, I don't know, 0.4. So we can also change our color here, maybe to more of a blue. Let's do that. Maybe kind of a blue like this. So we begin to get some darker color in there. And in the noise texture, we've got this 3D pull down here. If we pull this down, we can actually change this to four dimensions. Let's give this a try. So if I click here, now we can begin to play with the scale a bit, maybe take that up just a bit. And the distortion and the detail, we can begin to move that around a bit. And let's also come back over here to the strength. We're going to have to take this down pretty low. I think. Let's go down to 0.07. Let's give that a try. And then let's work with this factor slider and bring this down quite a bit. Yes. So you can see we're kinda getting now just a little bit of bluish color in there. Alright, we can even change this maybe taken a little bit darker. So I just wanted just a little bit, so all right, let's bring back our stars here and let's see what we have. So you can see we've got kind of just this little. Now let me take this back down to one. Just this kind of hint of gases kind of mixed in with the stars. And you can play with the color ramp a bit to kind of reduce or increase those. So if I bring that up some, it'll kind of reduce the amount. Once again, we can play with the strength of it. We can bring that up more. I'll hold the Shift key as I drag. I can bring that up a little bit. Maybe I can play with the color here, bringing that up. So you how it makes it a little more diffuse around the edges so you can play with that, can bring this in. Now there's just a lot of tools that you can use to kind of play with how you want the gases to be. Now I kind of like that, but I feel like I'd like a little bit more color in there maybe if I brought this up a bit, yeah, you can see just there's a little more color as we take the factor slider up. So I just wanted a little bit more color besides the blue. Maybe something like that. Yeah. So of course it's totally up to you how you want yours to look. But let's go back to the Layout tab and you can kind of see what we have now. You've got the outer and then the gases, and you can see that inner ring or that inner sphere of stars in there. All right, so now we have our star field. I will bring back the ship and the landing bay. Let's just click on the ship and hit the 0 key on the numpad. And there we go. We can see that star field out there. Now I may need to go back. I feel like those big stars are a little bit too big. Let's just see if we can deal with that real quick. I'll go back to the shading tab, hit the 0 key on the numpad, and here's the outer. So the bigger stars are here that 200 scale. We could play a bit with this. Remember this made them a little bit brighter and bigger, so we can pull that back a bit. We could also just increase the scale here to say 300. Try that. And we could also go to the inner stars and make them 300 as well. Now let's go back to the Layout tab and yeah, that's a little bit better, at least for me. I I like the largest of the stars to be a little bit smaller. All right, So now I think we are ready to work on the planet. So in the next section, we'll do that.
37. 036 Beginning the Planet: Well, we've created our ship, our landing bay, and our star field out here. The last component I'd like to add is a planet. And I like it just kind of hanging out here. So we only see part of it kind of off in the distance as the ship comes in for a landing. So let's begin working on that. I will switch back to wireframe for a moment here and let's go ahead and just hide all of our objects. I'll just come through and click on the I icon here and just hide everything. And now let's create another sphere. I'll press Shift a mesh UV sphere, and there it is. It's very small compared to everything else. Of course. Let's now at the End key and let's take the scale up. Let's take it up to a 100. And there we go. It isn't quite as big as everything else, like the star spheres, but I think this is a pretty good size to begin with. Let's do that. So now let's go over to our shading tab here, and let's begin working on this now. We've got it here in solid view, which reminds us that we need to add a subdivision surface modifier here. And let's do that. And I'll increase the viewport level to, to, to match the Render level. And let's go to Object and shade smooth. All right, so now we have our planet ready to go. In addition, I think I'm going to take away these windows because I'd like a little bit more room for all the nodes we're going to create. So I'll just right-click on the border between two windows and join and do the same down here and click. So we just have these a little bit bigger. So I will this up like that. Okay, so I'll go back to the Materials panel. I'll click New. And let's just call this new material planet. Now, we're going to use a lot of noise textures for this to create the continents and the oceans of our planet. But the problem is blenders noise texture doesn't really give as much output is we're going to need for this. So we're going to need to add to the output of the blender noise texture. So I'm just going to press Shift a texture and bring in a noise texture here. And then I'll press Control T to add the texture coordinate. Now if we press control shift and clicked here, and then came over to the material preview. This is what we'd see. So just the beginnings of a little bit of noise on the planet. And if we clicked and dragged, you can see we can change the amount we have with the scale and maybe the detail, the distortion. But we're going to want more than this. So let me reset these values by hitting the End key and coming over here and click Reset node. And if we just duplicated this with Shift D, bring that out. And drop that in here. We could do a little bit more with that. We could get a little bit more happening here, right? And a little bit more happening here. So we're kind of multiplying or adding one on top of another. I'm going to press Control Z and Control Z to take these back to their default values. And this is pretty good. But the problem is, if we say do this, increase the scale here, everything travels across the sphere, right? You can see it kinda traveling down in this direction. So what I'd like to do is just keep it from doing that. So when we change our scale here, it won't travel across in that way. To do that, we can bring in a couple of mics, RGB nodes. So here, color mix RGB, we can drop one here, and then we can duplicate this with Shift D and drop one here. Now we're going to change these. This is going to be a subtract here, and this is going to be an Add. All right? But we want to make a couple of changes here. I'm going to bring this up. And I'm going to bring this down to the color to socket. Now if we drag the subtract all the way up and then take our vector out here into that color one. Now if we drag this, you can see we can change this without it traveling across the sphere. Now of course, if we come down here, it still does that. But now over here we get a lot more bang for our buck without that noise traveling across the sphere. Alright, so I'm going to click here and reset. And now we want to take all of these and we want to create a group that we can use again and again in other places in our node tree. So what Let's do is click and drag these four nodes. And then I'll press Control G. And that will create a group out of those nodes. Now we're inside the group now it's kind of like tabbing into edit mode. You can tab out of it. And there's our new group and you can tab into it to work on the individual nodes. Now, if we tap out of it, you can see we have these inputs and outputs and we can change that. So for the inputs here, what I want to do over here is create the sliders for this node that we can use to change its settings. First of all, what I need to do is take this vector and bring it right over here. We don't need this, right? We just need to take that vector socket here and over to the color one. Now if we come over to the node tab, we can see here we've got inputs and outputs. So I can take that color and remove it. So now we only have that one input, but we want a few more things. I want to take this factor slider and drag it over here. And this one is going to be the noise boost. So we'll add that one there. Now we also want to create sliders for all of this and all of these as well, combined together. So what I'm gonna do is just take this scale and drag it up like this and this detail and drag it up. And this one, and this one. Now if you can see back here, those sliders have been put on the node if we tap out of that and you can see that here. Now I also want those to affect these as well. That's going to add that extra boost. So let's take this scale and drag it to this scale and detail to detail, roughness, year, distortion. There we go. Now actually, as I think about it, I probably want to disconnect this particular scale node right here. Because if we leave that on and let me tab into here and I click on Scale, it'll still slide. You can see it's still sliding like that. So let's tap back in and I'm just gonna take this scale and disconnected. So we have it to here, but not to here. So let's see how that works. Tab into edit mode. Let's pull this out and let's hit that scale. And yes, so now the scale doesn't really travel, right? And we got the detail and distortion here. That's looking pretty good. And the boost, right? So the I, I think that's going to work pretty well. So now let's take this and let's give it a new name, noise boost. And then I think from here we're going to want a color ramp. So I'm going to press Shift a converter color ramp and drop that here. Now as we drag this up, you can see we can get some very nice detail here. And I'll drag that back like that. And now we can use our new node here to create our continents and oceans. So I can move that back, drag the scale down. You can get an, a nice sense of kind of continents here like this. There we go. And that's, that's looking pretty good. Distortion here. Maybe something like that. Reduce the detail or increase it, right? So we can begin to see how we can use this node here to create continents and oceans on our sphere. And then we'll just need to add color to it, add some details, and we'll begin to have our planet.
38. 037 Adding Color to the Planet: Well, we're not going to really know if this is quite what we need until we get a few other things here into the node tree. But to keep us organized, let's create a frame around this. You can see if we come over here to the node menu, you can join in new frame here or Control J. So if I click and drag these four, I can press Control J. And it creates a new frame around that. And we can select that frame and hit G and move it around as a single unit. So let's give it a new name instead of just frame, let's call it, I'll call it continents. And we go. And then also it's kinda small. If we twirl this down, you can see we've got a label size here. Let's just drag that all the way up to 64 so we can see that a little bit better. Alright, So there is at least the beginnings of our continents frame. I'll move this and these out. So we have a little bit more room. And now let's create another one of these for each of the different components, the land and the water. Once again, we'll begin with our noise boost node there. So we'll press Shift a and sends it to a group. Now we can come down to group. And here it is, right here we just click and there it is. I'll expand that out just a bit. Let's duplicate it, Shift D and bring that down. And then once again, of course, we're going to need a color ramp. Seems like we always need one of those. And Shift D and duplicate that. Now let's connect up the sockets here. And what's also give this a texture coordinate node. So right over here, we can just grab that, press shift D and move that down and that extends that frame. But we can also break it out of the frame by coming over here and saying removed from frame or Alt P. So if I press Alt P, that'll pop it out of that frame and we can use it over here. So let's connect this up to the generated coordinate output. And there we go. And also we're going to want to mix these. So let's do that. Let's press Shift a and I'll just type in mix and we'll use a mix RGB node. So let's connect these two up here and here, and we go. And then let's do that again. Let's just create a whole new one of these. I'll just click and drag all of this. And then to duplicate this and keep it connected to this coordinate node. Instead of shift D, We can press Control Shift D and then move it out. And it keeps it connected there to that coordinate node. All right, so now we've got two of these here. Let's now create frames around them. I'll click and drag this grouping, press Control J. Let's call this land. And we'll bring up the label size. And for this one, Let's click and drag control J. We'll call this one water and bring up the label size as well. Okay, so now what we wanna do is combine this up here and these two down here. So since we've got color sockets coming out of each of them, we want to mix color or a mix RGB nodes. So Shift A Search, mix and mix RGB. Let's pop that down right there. Now what we wanna do is connect the color to this color, this one to the other color or colored two, and then this one to the factor socket right here. Now let's Control Shift click this one, and see what we have. I'll go ahead and turn on clamp right here. And now let's play with these and see what we can get. We can come over here and bring this down or excuse me, this up or to the right. Same with this one here. We can do that there. And you can see we're just getting a little bit more kind of interesting details in there now maybe if I bring this on and that's too much. Kinda wanna bring this when this way like that. Yeah, and maybe bring this this way. Let's try that. And yeah, that's kinda, that's kind of nice. Let's try that. Now it's come down here. And we can bring this up. Or we can bring this, this way at this one kind of brightens the white there. Let's bring this one up, see what it does. Bring this one down here like that. Yeah, so we can kind of get some interesting patterns there with those. Now let's add a bit of color. For that. We can come down here and we're going to mix between the color of the land and the color of the water based again, on this continent output. So let's come down here and let's once again create a mix RGB node here. Maybe we'll create another one, Shift D, and a third one here. So for these, we want to bring out the color from this, maybe into the color one, color from the water into the color one here. And we can mix between these two like this. And then we want to bring this output from here. Now if I click on this and drag and drop it into the factor, It's kind of a mess here, right? It just goes straight through this one here. I mean, we could move it around a bit, but what I'd like to do is kind of angle these or create a joint for them a, what's called a, a reroute. Now if I wanted to disconnect this here, I can press Control and right-click and drag, and that will delete that connection. But Press Shift and right-click and drag. It creates a little reroute. Alright, if I click and drag on that, I can then hit G and move it up like this or move it over so it's out of the way. And what's also cool is if you zoom in a bit and click on it, you see it has a label here. So I can actually call this continents like that. And it puts the label out there. So if it's a ways away from this panel, I can still see what it is. All right, so now I'm going to press Control Shift and click this. And let's take a look at what we have here. So what we can do is we can change the color here. Maybe I'll make it kind of a brown and bring this down a bit. And maybe this one, I can make kind of a blue and bring it down a bit fat, but we need to bring these up. And this one up. There we go. So this is going to be our water. And once again we can go back and readjust this. But I just wanted to get the colors in this to get a sense of what we're dealing with here. Let's try that. We can bring this over towards the green, maybe kind of a greenish brown, a little bit like that, something like that. And then let's also add an RGB curve here to be able to control the colors a little more. So I'll press Shift A Search RGB, and here it is, RGB curves, and drop that in there. Now, let me move this out of the way here. For this, we can click and drop a point in there. And then as we move it around, it changes the quality of our colors. So I think I'm just going to bring it up a little bit up like this to make it a little bit brighter. So this grouping is going to be our color. I'll just click and drag this control J. Let's change the name to color and label size up. And there we go. Well, we're beginning to get there. There's a couple of more panels we want to create, I think, but we can come back here and begin playing with our noise boost node up here. We can play around with the scale. So you can see it a little bit better now as to what's going to be what, right? We can adjust this a little more. So this now's a good time to go back and begin working with the patterns now and seeing what you can get. Maybe I'll play with the color ramp a bit. You can increase the amount of oceans here like that. Brighten the landmass a bit with this color ramp like that. Maybe play with the noise boost again over here. Yeah, you can just kind of play around and see what you can get. A kinda like that actually. That's not bad. Alright, well for now, let's go with that. And in the next video we will work on the bump and the roughness for our planet.
39. 038 Adding the Roughness and Bump Information: All right, let's see if we can add a little more interest to this. I'm going to move the color up here, and I'll go ahead and connect it to the principal BSD F right here into the base color and Control Shift. Click that. So we can see that there. Now let's think about the bump next. So now we're going to use this mix node for the roughness and the bump. So for the bump, Let's begin with a color ramp. Ramp. And there it is. Drop that in there. Now we're going to bring this node right here into the factor socket there. And this node, we could even rename this. We could call this land and water right here. And then let's create a mix RGB node here. And we're going to want to bring the color into here, but also we're going to bring that continents channel into here as well. And we'll also want a bump node, it's under vector and bump. We can drop that in and bring this color into the height. So let's go get that continent connection hooked up. We have the continent connection here. We could just click and drag this off of that reroute down into here. So let me move that so we can see it. There we go. Click and drag and drag that into the factor. Now once again, it's going through our color panel here. We can shift, right-click, create a reroute, and bring that over here. And then we can shift and right-click and create one and bring it over here. That, and then we could click on this one right here. And we could call that continents. And we go. And then let's take this into the normal socket here and see what we get. All right, well, first of all, the problem is, is that the oceans are higher than the land and we don't want that. So we can come over here and just click Invert. And that helps with that. Okay, So we're getting something that's a little more interesting here. Let me bring this up sum. And we could bring this down a bit, the white here. You can see our changing that just a bit like that. And we could bring down the strength. Let's go ahead and create a frame around this. I'll click and drag around all of these, including those little reroute joints. And then I'll press Control J and that will add that to a frame. Let's change this to thump, and we'll hit Enter and bring the label size up. Now, we can take these two here if we want and hit G and bring him down like this. And I could take this and bring it over a bit so we can see that a little bit better. All right, so there's the bump. And what we're going to, I think C is that it's just going to be easier to get all of the settings adjusted the way we want once we get everything in. So now let's work on the roughness section here. And for that, once again, we need a color ramp. Search for that there. And another mix RGB node we'll put that there, will connect them up. And in a similar way, we need the land and water to come in here. And we need that continents connection to come over here. We could shift right-click here, add one there, and then drag it over into here. And then shift and right-click and G and move that over like that. Let's once again give this one a name. I'll call that continents again. And we go, let's now click and drag on all of this Control J. And let's change this to roughness. Let me go and bring up little label size. Maybe I'll take this node here and just move it forward or back. Let's move it back. So I'm like this so we can see that there we go. Now we can take this and drag it into the roughness socket. And what this should do for us is this should allow us to make the oceans reflective and the land much less so. But currently look, we've got a lot of reflectivity on the land. So let's take this, start dragging this down here and like this. We can bring this up a bit, this down. We can also change the color. Here in the mixed node. We can drag this down like this. I think what we could do is actually swapped these. We could say come over here and say flip color ramp. And there we go. I think now we've got a little bit more of what we want. We want that ocean to be reflective, but the land to be a little bit more rough like that. Alright, I'm going like that we to also play again with the color here in the mix. You can take the color up and have it be less reflective and bring it down and have it be a little shinier. You could do that. So now we've got our continents protruding up a bit. We've got the ocean kind of shiny. That's good. But what we also need is just more detail here in the continent. They're just kinda flat. And to do that, I think we're going to need more output from the continents frame to get detail on the continent, to get a little bit more than just this flat surface. So let's add a couple more nodes to this. I think what we can do is use some RGB curves, kinda like we did here in the color to really boost the output. So I'm going to take this and I'm just going to hit G and move it up here. And then let's press Shift a and RGB. Search for RGB and bring it in RGB curve. I'll drop that here. And also we want to take that, take that off there and drop it into here. All right, There we go. Now we can do is add a point here. And if we click and drag down like this, you can see we can change a bit of the definition of the continents, and I'll also change it. I'll pull this menu down and choose vector handle just so these are completely straight. And then I'll drag this down like this. So it's pretty tight around there. And then let's do that again. I'll just press shift D and move this over here, drop it into there. And let's once again take this out and add it yet again like this, back down to here. And now let's take this and bring it up to the top like this. Let's just bring that up here like that. All right, so that gives us a little more output happening here. We can drag this down a bit and see it a little bit more like that. Alright, so now even though we have this really defining the output, we need even more. I'm going to come in here and add a mix RGB node here. Like that. I'll duplicate this shift D and bring this out to here like that. And there we go. So now these are going to feed into here, into the factor like this. All right, now we're getting a little bit more interest actually in the continents, right? We're getting a little bit more going on other than just kinda flat surface there. Now, we can drive this a little bit more with value nodes here and Shift T here and take these two and duplicate them and move them over to here. Now Let's have this be 0 and this b1, and this be 0 and this b1. And now we're going to feed each of these into the color of these mics, RGB nodes in to here. Now we can use that slider and you can see what we can do here. We can really kind of drive this a little bit harder. And maybe I can take this up, take it down some, so you can kind of play with these to see what you want here. But ultimately what we want is a little bit more information within the continents. I should add this to that frame. We can bring that in here and then hit G and bring it back out like that. And then we can move this whole thing around. Oh, look at this, I just need to click and drag. And now that should be in there. There we go. Now once again, we can come in and use our noise boost to change the shape of the continents, et cetera. But what we should do now is come down here and let's see if we can make a difference down here with our color ramps and our noise boost here. And you can see as I changed the color ramp now, it's beginning to give more information within the continents right here that how it's kind of adding information in there. Maybe I'll come in here with the noise. And let's play with that some detail so you can see what we're getting now. We're getting kind of hills, mountains, rivers, things like that. Roughness. There we go. Bring this in here. Scale. That's a little too much there. That's scale in here. Yeah, I like that. Kind of valleys and things like that. All right, That's kinda nice. Bring the scale down. So anyway, you can play with this sum. Now you can see we're getting some information in the continents as well. And that's what I was hoping for. Alright, so in the next video, let's work on creating some clouds around our planet.
40. 039 Creating Cloud Layers: I think the next thing we should do is work on some clouds. We're going to create a couple of spheres, kinda like we did with the stars and gases. And we're going to create Cloud swirls to sit up over the planet. Now, before we do that though, I kind of feel like that these colors are all just a little too plain. Like we just have one color here for the land and one for the ocean. Even though we're going to get some clouds in here, I feel like we need a little bit of interest or some sort of difference in color for both the land and the water. And I think to do that, one thing we could do is just instead of using these mixed RGB nodes, we could use color ramps. Well, of course we always use color ramps, but they're just so good at doing all kinds of things. So let's just press Shift A Search ramp and I'm going to plop it right in here. And then I'm just going to take this and drag it and drop it into here, take this and delete it. So now you can see already, even with just white and black, we've got some differences in color here. So let's now take this black and let's bring this up, and let's move this to a brown. Let's say something like this maybe. And then also the white. Let's change this to kind of a green. I'm just going to pull that over here like this and bring it down some. And there we go. So now you can kinda see what we're doing here. We've got just a little bit of brown and a little bit of green. And we can drag these toward each other to make it a little bit brighter or more defined. So it's really once again however you want to do it, but I think that just helps give it a little bit of, as we've said, differentiation here in the colors. Let's try that with the width the oceans to. I'll press Shift a ramp. Let's drop a color ramp in here and then I'm just gonna take this and drag it over here like that. Delete that one, and let's move it over here. And then let's change our colors. Let's for the black, Let's change it to a blue. Maybe like a dark blue like this maybe. And then for this one, let's make it say a light blue, something more like this, and bring that down just a little bit. Now we can drag these toward each other and get a little bit of kind of a sense that there's currents or different patterns in the water here. Yeah, So I'm going to move it like this and then I'm going to take this color and bring it down some let me do that. It was just barely different. And I like that. There we go. Alright, so that gives it just a little bit more interest, right? Rather than just the plain colors. Now also we could come over here to our principled be SDF shader and bring this specular down some so the oceans aren't quite so. Reflective. Okay, like that maybe. Alright, so now that we've got that, I think that looks pretty good for now. And keep in mind, we're not really going to know exactly how it's going to look until we get it into the scene with all the lights on it, compose the way we want it. Then we can do some final tweaks to this when everything's in the scene. But for now, let's go ahead and work on the clouds. Let's change this to planet from sphere, and we'll right-click on the top Scene Collection and select New. And then let's call this planet. So this is going to be our planet and our clouds here in this collection. So I'll select that collection and then let's create a new sphere. I'll press Shift a mesh UV sphere. I'll press the Z key and go to wireframe. And here it is in here I'll hit S and pull that up quite a bit. Scale it up. Well, it's a little bigger than our planet now let's, how big was our planet? Was that? That was a 100. So maybe the clouds, I'll call this clouds 0, 1 because we'll have two of these. Instead of 106, I'm just gonna put this at 101. There we go. So it's just barely bigger than the planet itself. If I go back to Solid mode, we can see that we need to add a subdivision surface modifier here. And I'll take that up to two. And I will also come over here to object and shade smooth. Now, we're seeing some artifacts here, mainly because in our view, our clip start is pretty small. We could take the clip startup to one meter and that would clean that up pretty well. Alright, so with this now let's begin creating a new material. I'll come over here to the materials panel. Click on New, we'll call this clouds 001. And let's first of all set up our shader here. We're going to need a transparent node and a mix shader in here. So let's go ahead and do that. Shift a shader transparent. Here we go. And let's mix these two with Shift a shader. Mix, shader, drop that there, and I'll drop that in and put that there. Okay. That's the beginning of it. Now I think we're going to want a noise boost. Let's go to shift a group noise boost. Here's our custom node that we created earlier, Shift D, and we'll put two in here. Course. We're going to need a color ramp. Let's put that in here, Shift D and drop that. They're now also we will want texture coordinate node. We could select one of these and press Control T. And since that wasn't a texture, I added a texture here, so we can just delete that and hook this up here. And here. And I think we're going to want our texture coordinate to be object. Let's connect the object socket to the vector here. And then we can of course connect these. And we're going to need to mix these together. And since we have color nodes or color sockets there, we can bring in a mix RGB node to mix the colors. There we go. And now let's see what we have. What's press Control, Shift and click that node. And of course to see what we have, we're going to have to come over here to the material preview. So let's do that. Alright, so you can begin to see that we've got something beginning to look like clouds here. Let's bring the black up here like this. Maybe do the same down here. Bringing the white. And you can see we're beginning to get something that looks kind of like cloud swirls. Just a little bit. We can then come over here and begin playing with our settings here. I'm going to take the boost for both of these up fairly high. We can begin bringing the scale down here like this. And we can begin bringing the scale down here too. We can play with the distortion and the detail maybe. All right, so we can get some interesting things going on here, like keep the detail up in one and take it down in the other. And it kind of looks like we've got multiple layers there. Yeah, so you can kinda see where we're going with this. Now. In addition, we can add yet another color ramp here. I'll do that and drop that in here. And with this, we can use it to kind of tighten up the result of these two. So now we can come in here and like that we can increase the white. And also we can reduce the amount that we have. We can bring in another mix, RGB and drop that here. Now I'm going to take this all the way down to 0. And if we take this to black, now watch what happens. We can click and drag and it just kinda fades it away. All right, so that's just a little slider for us to kind of adjust the opacity of the whole thing. So now what we can do is we can take this into the factor of the mix shader and then press Control Shift and click that. And this is what we have so far. The problem is, is once again, we can't see through it and we need to go to the bottom of the material panel again and change this blend mode from opaque to Alpha hashed. And when we do that, now we can begin to see through our clouds. Alright, now we can play with it a little bit more and see what we can get. So maybe I bring this down a little bit and then let's work with this particular color ramp, right? So we can do that. And actually that's not too bad, That's looking pretty good. It may be a little bit too thick here. Let's see if we can adjust the individual color ramps to kind of tighten these up just a little bit. Something like that maybe. So you can see what you can do. You can just kind of play with the color ramps until you get something that looks kinda like clouds over a planet. And as I said, we're not going to know exactly how it's going to look until we get it all in the scene. But you can kinda get a sense here of where we're going with it. So feel free to play around. It's actually kind of fun to play around with this. And I'll be doing more as we go. But now that we've got this, what we can do is we can duplicate this. We can just create a new one. I'll just press shift D and Enter. And now let's come over here and call this clouds 02. And now we can just take it and spin it. We can press R, z and spinning around so they don't quite match up, right? Our z, let me spin it around the other way here. And we go like a bat. But will also need to make this a little bit bigger now too, you can kind of see some artifacts. So let's in the scale, it's click and drag all of these and type in 102. So it's up a little bit higher. And there we go, It's beginning to look like clouds. So feel free to play with each of these. But remember, this is still the same material on these two objects. You can see here that we have two objects using this material. So with 02 selected, I'm going to click this and change this to 0 to now when we change one, it won't affect the other. So with 0 2 selected, and maybe I can take this up a bit so it isn't quite so opaque, something like that. And you can hide Cloud one to see what we're getting on Cloud to. I'll press R z and kinda spin it around a bit like that. Then we can bring back Cloud one. So you can just play with it. Maybe for one of them you want more swirls and the other one you want more kind of diffused clouds all over, however you wanna do it. But I think this is good for now because as I said, we aren't going to really know exactly how it's going to look until we get everything in all the lights and all the objects in the scene. So what let's do in the next section is begin adding the lights to the landing bay and a sunlight to the planet so we can begin to see how it's going to look. So that's coming up next.
41. 040 Adding Lights to the Landing Bay: All right, well let's now go back to the Layout tab and let's begin kind of arranging our scene. We've got our planet here. I'm going to turn it off here in the planet collections. Just turn that off. And let's bring back the ship and the landing bay. And I'll also bring back the camera here. So if we get the 0 Qi, this is what we see. I'll go to the render view here, and this is what we have. So, so far, not a lot in terms of lighting. So I'm gonna go back to Solid mode and tumble around. And so here we are. Now I want to be able to see the rendered view. So what I think I'll do is just create a new window over here. I'm just going to hover over this corner, click and drag down. And I want to change this to a 3D view port. And then in this view, I'll hit the 0 key and that will bring up the camera view. Now, I'm going to middle mouse button click and drag this, and I'll turn off these overlays here. We don't get that 3D cursor, and I will turn off all the gizmos here so we don't get all of that over on the side. So now it's kind of a clean image. And we can come back over here to the rendered preview, and there we have it. So as we add our lights will be able to see what effect they're having over here. In this view, I guess I'll hit the Z key and go to wireframe. And then I'm going to press Control Alt Q to go to our quad view. So as we place our lights, we can see them here in the side, front and top views. All right, So first of all, let's just begin with a light kind of near the camera. From the camera point of view. I will press Shift a and go to light and area light. And there it is right there. And let's just pull that up and then we can pull it back like this. And there it is. If I hit the period key here, you can see it's just a square, just a flat plane with the light coming out of one side. And we can come over here to this panel, the object data properties, and that has the properties for the light. You can see here we have an area light. If we want, we can change it from area to spot or son or point. But for now I think I want an area light here. You can see that the power is 10 watts. Let's see if that's enough to do anything. I'm going to hit the R key here and rotate it up. And then maybe move it to this side over here in the front like this. And maybe from the top view hit R and move it like that. So we kinda point it at the ship like that. You can see it here. But that's really not doing much at all, is it? So first of all, I think I'd like to make it a little bit bigger. You can see that the size is only one meter here. Let's Maybe ten meters into there. That didn't really help. So let's take the power up. I'll take the power up to say 100 watts. Not a thing. How about 100 watts? You can see just a little bit of a hint of light there. Let's take it up to 3000, 1, 2, 3, Three, 3000. And here we go. We're getting a little bit of something there. Okay. Let's now put a light. Let's put one overhead up here at the top of the landing valence also create another area, light, shift a light area. And I'm just going to take this here in the a front view and hit G and move it all the way up to here, to the very top. And then let's just make it a lot bigger. I can hit the S key and scale it up, or I can come over here to the size field and just click and drag and make this bigger like that. So maybe we want to make it like 45 meters here. Like that. We can bring it up to the top. And did we get anything from that? I don't think so. I don't see much of a difference here. Let's once again take this up to what was the last one? 3000. Let's do that. Yeah, we're getting a little bit more there. Okay, that's good. Let's now put another light kind of over here, kind of on this side pointing at it. We have one here, right here. Let's put one over on the other side and let's try and make that one a spotlight. Let's see how that works. I'm going to press Shift a light and spot. There we go. And then let's move this up. And here in the front view, I'll move it over in the x-axis. Oh, I tumbled around here. Let me hit the three key, so we have it back to the side view. I'll hit G and move this up to the front like this. And g and move this over here like that. I'll hit the R key here in the side view. And now in the top view I'll hit the R key and move it like that. We can just kinda point at where we want it in these individual views. All well, we need a little bit more light from that one as well. We've got the others at 3000. Let's try that here. Got a little bit of light and not a lot though. Let's try 5 thousand. It's a little bit better. How about ten? Not a whole lot. About 20. Well, we're getting there. Let's open this up so we can come down here to the size and it says 45 degrees. And if we click and drag that, we can kind of make that a little bit wider. You can see it here in this view. Watches I make it narrower and then wider. You can see it there. But what if I made that a little bit wider? Something like that. Yeah, Let's take it up to let's try 22. Okay. I think we're getting a little bit more there. That's good. Now, the last thing. Let's try something from behind, giving it a little bit more light from behind. So let's just create another spotlight. Shift a spot. And for this one in the top view here, I'll hit G and move it to the back. In the front view, I'll move it up sum. And then here in the side view, I'll hit our turn that here in the top view I'll hit R and kinda angle it toward the front of the ship there. And okay, so also you want to be sure that none of the lights are intersecting with any geometry. You want to be sure that they're out away from any of the objects. Let's take this up to what do we have? We had 3000 for the others and to do that, yeah, so that's giving us a little bit more light there. Let's pull it back a bit. Maybe something like this. Alright, I think that's pretty good. Let's open it up. Sum, we get a little bit more light on the floor here. I may want to move it back some even let's do that. Yeah, That gives us a little bit more light around the around the frame there. Let's take a look at it fairly big now I'm going to press Control Alt Q to go back to that single view. And then I'll hit 0 to go to the camera view. And let's change it to the rendered preview up here and see how it looks. Now a couple things I feel like now that I'm seeing it a little bit bigger, I'm feeling like it's a little bit too much on this side. Let's make this a little bit bigger over here. So I can see it. And then we'll go back to say the wireframe here. And of course you can go to the solid view if you want to do that, if that helps a little. But I feel like this one right here, maybe a little too a little too bright. Let me also move it over some. And then you can, in this 3D view, you can grab this little circle here and click and drag it and drag it onto an object to kind of angle the light a bit. So there's that and I also want to maybe take it down some. So instead of 3000, let's try to maybe something like that. Let's hit the 0 Qi rendered preview. Yeah, I feel like that's a little bit better. Let's turn off the grid here to see how it looks. I'll click here. All right, that's looking pretty good. But now in probably need to go through and adjust some of the materials for like the floor. I don't like the way it's exactly looking here. So this is the process, you know, you'll need to get the lights in. You'll need to adjust the materials, adjust the textures, things like that. You need to have it all in before you can really know how it's going to be exactly. So now let's bring back the star field. Let's click here to bring this back. And there we go. Yeah, that's kind of nice. We're getting there. I think we're getting there. There's some tweaking that I'd still like to do with the lights, but I think this is pretty good. Now if we bring that planet back, of course it's going to be everything's actually inside the planet here. Let me tumble out of this. And let's go out here. And I'll go back to wireframe. And so you've got the planet here. Let's take a look over here how this is going to be once we pull the planet out. Now the planet keep in mind is multiple objects. So if we want to select them all, we can come over here to this collection and right-click and choose, Select Objects. Now all three of those objects have been selected, so we can now just move them all at once like this. Now you can see it out here. Let's move it over. It looks like our inner stars here needs to be expanded out some. So let's hit the S key and expand that. Move that out a bit. I'll then right-click on the planet, select objects, and then let's move this around. I'll press Control Alt Q. And now we can see him in the side front and top views. So here in the side view and let me hit G and move this around. I'll hit G and the front view, and you can see it here in the rendered view as we move it around. So I'm going to want it something kind of like this. Alright, let's be sure it's inside here. Move it a bit inside here like this. And we go. All right, so in the next video, what we're gonna do is begin adding some light outside here outside of the landing bay as if there's a star in this solar system that's giving light to the planet. So we'll work on that coming up next.
42. 041 Adding a Sun Light for the Planet: Well, for our planet, I think I want a sunlight. We've got one of those here in Blender. I'm going to press Shift a and go to light and sun right here. And then if we take that and move it up, we can see it here. Now, one thing I did do is turn off the overlay, so I need to turn that back on to be able to see it. But the interesting thing about a sunlight is that it really doesn't matter where you put it. It only matters what the rotation of it is, which way it's pointed. Because the sunlight assumes that all the light rays from the light are coming from an infinitely wide area and all the rays are parallel. So since it's infinitely wide, it doesn't matter where you put it. It only matters how you rotate it. So we could leave it right here directly above the landing bay and we could then turn it. We could say rotate it in the y-axis. Actually, let me press Control Alt Q and go back to our view here. Now, watch what happens out here. If I press RY and tilt it like this. You can see we're getting some light on the planet here, but not a lot. But if I turn it, say in the z, r z, you can turn it this way or this way. Still not getting a whole lot there. Let me turn off the landing bay and the ship. And now let's take a look at it here. We've got kind of an issue here. And the problem is, is I think we're casting shadows from these spheres here. Keep in mind, even though the lightest down here, it's coming from an infinitely far, infinitely wide area. So the light from that sunlight are actually coming from out here. So I think we're casting shadows here. Well, let's do is let's go back to our stars and gases here. And if we turn these off, look at that, we can see now the effect of the light on the planet. Now it's pretty low. The strength is just 1 O. We could take this up to say 10. That may be too much, maybe let's try five. But ultimately we're going to have to figure out this problem here. So let me turn off all of these. And as we turn one of these back on, say the Enter, we get this shadow being cast. So how do we solve this problem? Well, one thing we can do is select that object and go to our materials panel. It's come down here to the material panel. And if we scroll all the way down, we have this shadow mode. And if we take this and change it from opaque to none, I get that. Now that shadow goes away. So all we really need to do is turn off all the shadows here. Let me select this one. Let's turn off this shadow none. And let's do that. Outer one as well. Shadow none. Okay, now let's give this another try. Let's come in here and select that light. Now where is it Here it is here, but we don't see it in here. Now Dewey, Let's hit the period key and the outliner. And that brings it up here. It's in the planet collections. So we could just click that and drag it out into the scene collection there. And in fact, what we should probably do is create a new collection for all of the lights. So why don't we just select this and Control click this and this, control-click this and this. And now that we have all the light selected, we can come out here in the 3D view, press the M key, select New Collection, and let's call this lights. There we go. And there we have them all in their own collection. Okay, so now let's bring back our other objects here, the ship and the landing bay. Now we can see it there. Let's select the sunlight and let's begin moving this around. So I'll press R, z. And we can move that around like this. You can see how as we turn this, well, let me turn off the ship and the landing bay again. But as we turn this in the z-axis now we can get that line of shadow across there like that. There we go. So I think I want to take this planet and right-click select objects, and let's move it around and see if we can place it a little bit better in our scene here. Kinda wanna maybe move it like that, like this. But then I don't want to see the stars down here. So maybe if we make it a little bit bigger, like that, move it over a bit so you can see what I mean by you're going to need to get everything in this scene to be able to get a sense of what you want from this. We can take our sunlight here like that. Maybe rotate this again in the z-axis, r, z. And also now as I turn it, I'm getting some light into the landing bay and I don't think I want that here. You can see that right over here. As I turn this RZ, it's coming into the landing bay and I don't think I want that. So what we're going to need to do is actually block that. And to do that, we can just create a whole new object. If I press Shift a and create a cube, Let's bring that up and let's just make it really big. I'll hit the Enter key. And under scale, Let's take the y up to be maybe 50, and the scale in the x 50 as well. And then we can begin moving this around until it blocks out the light there. You can see how it just casting a shadow there. Now. If we pull it too far, we'll be able to see it right out there. But we wanted to bring it back just just out enough so it's blocking that area. All right. Yeah. I think something like that is about what I want. Let's take a look at it here. I'll hit that 0 key again and the render preview. Yeah, I think that's pretty good. Let's in our planet, Let's Spend the clouds around some I'll hit R and Z with that clouds one selected. Maybe I'll just turn them a little bit like this. Maybe clouds to our z. You can turn those a bit like this. And we can go back to our shading tab and play around with there as well. So if I come over here and then hit the 0 key, Let's change to the rendered view. And actually, that's not bad there. But with the sun lamp, we can adjust the strength. Maybe I'll take this down to three and see how that works. I kinda like it at five actually. And while we're here, let's take a look at these floor panels. I will select the landing bay, go to the materials and let's change to the landing bay panels. And for this, let's try the roughness down here. I feel like I can make one side of this a little shinier, maybe pull this down in the black like this. And then let's try this one here. I pull that one down. Yeah, so it's a little bit darker, a little bit shinier back here. Feel like this light back here could do a little bit more for us. I'll press R and X and let's just turn that down just a bit like this. So we're getting a little bit more here. And what about this slide up here? Let me pull this down just a bit. See if we see that here. All right, so we've got our general setup. We may need to do a little more tweaking as we work on the animation. But I think this is a pretty good place to work from. So in the next video, what Let's do is we will begin working on rigging the ship so that we can animate the ship flying in. So that we can animate the landing gear coming down here. And also when it comes down, we wanted to kind of give a little bounce, just a sense that it has some weight. And that even though we are on a spaceship here, it kinda has some gravity and some weight to it. So we'll begin working on that in the next section.
43. 042 Beginning the Landing Gear Rig: Well now I think we're ready to begin working on the animation of the ship. And to do that, we need to really think about what we want the ship to do. Let's first rearrange everything. I'm going to close this window here, join these. And let's also hide a few things. Let's hide the planet and the lights and the camera, the stars and the landing bay. And then we can just hit the a key and then the period key on the numpad and zoom in here. I can also turn on the overlays again here so you can see the grid. And so what I think I'd like the ship to be able to do is, first of all, just fly into the landing bay as a unit, all one unit. And while it's flying in, I would like the landing gear to come down out of the body of the ship. Now I think I'd probably like to use the Boolean modifier to kinda create some polls that these things can go up in. But in addition, once the feet of the landing gear touch the floor, I'd like the whole thing to kind of bounce a little as if the landing gear is taking the weight of the entire ship and then it kind of settles. So that's really three different things, right? Flying and as a whole, the landing gear coming down and the bounce. So to accomplish these three things, we're going to need to use a blender, armature. And an armature object is just a collection of bones. And we usually use an armature object when we create a character, the bones of the armature are used for the legs and the arms and the head to control everything. But we're going to use the bone structure in a little bit different way here for the ship to create an armature object. All we have to do once again is just press Shift a and then select armature. And there it is. Now if we hit the period key, we can zoom in and there it is. It's just a bone. And in a similar way as when we create an object with an armature, you can also tab into edit mode here, right? You can tab into object mode and tab into edit mode. And in edit mode, you can extrude, you can move, you can edit just like any other object. And in addition, when you move the bones in edit mode, the origin of the object remains in place just like any other object. So we want to keep that origin in the center of the grid. And so what I'll be doing is moving and adding bones in edit mode here. Alright, so let's go to the side view. And for this first bone, I'd like it to be the main control object of the entire ship. So when we select it and move it around, the whole ship is going to come along. So I will hit the G key and move it up into here. But when I do, We can't see it. If we come over here to the viewport display and twirl that down, we can click on in front. And then we can see it through the object. Now, in addition, we can also hit the Z key and go to wireframe here either way. So with this here, I'm just going to turn it 90 degrees. I'll press R 900 and hit Enter. And then I want to move it. So this base of the bone is in the center of the engines on just hit G and move it right around in here. And what that's gonna do for us is ultimately, that's going to be kinda the center of gravity and the main pivot point as we animate the ship. As we rotate the ship to one side or another, or up and down, it's going to pivot around that point. Alright, so that's the main ship and control. Let's also duplicate this shift D, and let's move that down here. And this one will be that bounce control. This will control the ship, but not the landing gear. So once the landing gear is on the ground, we can use this control to move the ship up and down and give a little bounce. All right, so we've got those two in. Let's now think about the landing gear. Let's tab back into object mode now and let's select one of these. I'm going to hit the period key. And recall that for these, we made sure that we've got this and the cylinder as all one piece. And this piece and this cylinder is all one piece. So each of these pieces are going to be parented to a bone and the foot as well. So let's go back to wireframe here. And I want to move this cursor to the top of this object here. And let me zoom in with the period key, I'm going to tab into edit mode. And if I hit the one key to go to vertex mode, Let's then border select, just click and drag all the points up at the top. And you can see that the origin of all of those selected points is right there. So let's move that cursor to that. Let's press Shift S cursor to selected. There it is. Now if we go back to object mode and select one of the bones, we tab into edit mode. Now, when we press Shift a, a new bone will pop into where the cursor is. So I'll press Shift a, and there it is. Now, we need to move this part of the bone right here, that tip. I'll hit G and move that down into the center here, right into the center of this object here. Now we can kind of eyeball it and get it pretty close. But what we can also do is tab into object mode and select this object tab into edit mode. I'm going to de-select everything and then hover over this and press the L key. And then that will mean that that center point is right in the center of that object. So let's press Shift S cursor to selected. And now if we select the armature again, tab back into edit mode, we can now snap this selected tip to the cursor. So Shift S selection to cursor. And there we go. Now. Snapped in there. All right, so let's hit E and extrude this out like this, down to the center of this one here. Now we can do that again and we can tab into object mode, select this object tab into edit mode if the L key Shift S cursor to selected. Now if we go back to object mode, select the armature TAM back into here. Now this one once again, Shift S selection to cursor, and that pops that right into the exact center of that object. Now, let's hit E again, and let's extrude this out right out to here. All right, so we've got these three bones now. Let's give them each a name so we know what they are. If we twirl down the armature here and twirl it down here. You can see we've just gotten bone 123, et cetera. And that's really not very helpful at this point in time. So let's select, say this top bone right here. And we can press F2 on the keyboard. And that will bring up the name field. And this I will call leg front 01. And then I'm going to select all of that press control C to copy it. Hit the Enter key. And then let's select this one, F2, control V to paste that and change that to two and enter. Let's do this one here. F2 control V three. And we go, now we're going to need two more bones here. Let's first of all create a new one down here. I'm just going to press Shift a and it'll pop into where that 3D cursor is, Shift a. And then I'm going to select the bone here and let's turn it 90 degrees. Once again, our 900. And then I'm going to hit G and bring it right down onto this green axis right here, and hit the S key like that. And then we're going to need another bone right up here as well. So with this selected, I will just extrude out here. Let me turn on our Move Gizmo, so we can see this is the y-axis. If I hit E and y, we can extrude out like this and we just need one like that. So these are going to be our control objects. These are going to be the object that we'll use to control the foot of the landing gear. And the object up here that we're going to use to bring the entire landing gear up and down out of the body. So this one, we're going to call its press F2 leg front. Let's call this top control object CEO. And then I'm going to copy this Control C and hit Enter. And for this one down here, we'll hit F2 control V. And this is the bottom control object right there. Okay. So we have our bones for one leg. And in the next video, we're going to set all these up to work in just the way we want. And then what we'll do is we'll then copy or duplicate this for the back legs as well. So that's coming up next.
44. 043 Setting Up Inverse Kinematics: I noticed in the last video that I forgot to name these two bones. So let's do that. I'm still in edit mode here, so let's just select one, hit F2. And this I'll call ship main. And this one, Let's call ship and bounce. Let's do that. Alright, so we have all the bones that we've created so far named over here in the outliner. That's good. Now we need to come over here and set up what's called inverse kinematics. In this joint chain, you can control a chain of bones, whether it be like for a leg or an arm of a character or for a landing gear here. In two different ways. You can control it using inverse kinematics, and you can control it using forward kinematics. Now, forward kinematics means that we're going to adjust the limb beginning at the base, adjusting this joint and then maybe rotating this joint and rotating this joint until we get the end of our chain in the proper place that we want it. However, inverse kinematics means that we create a control object for the end of the chain. And when we move that control object, blender automatically adjust the rotation of the joints so that the end object, the control object can be wherever we place it. It's like if you're shaking someone's hand and you grab their hand and you move that hand around. It's also moving their wrist or their elbow and their shoulder. And those joints adjust automatically depending on where that person's hand is. So we're going to be using inverse kinematics so that we can control it with an object at the end of the chain. So first of all, what we'll need is an IK object and IK control say right down here at the end of the chain. To do that, I'm just going to duplicate this bone here, this leg, front three. So I'll press Shift D and hit Enter. And now you can see that name now has a 000 001 on it. So let's hit F2 again. And instead of leg front 3 000 001, Let's change this to leg front IK for inverse kinematics. And there we go. Now that we've done that, Let's break this out of the parenting hierarchy. So as we've created this, an extruded these bones out. This bone is apparent of this bone and this one is a parent of this one. And therefore, the leg front IK is also a child of that leg front 02. So we need to break this out. So it's not part of that hierarchy. To do that, we can just press Alt P. Now if you come up here to the armature, you can see that we've got parent here to create a parent or to make apparent relationship. We can press Control P, and to clear it, you can press Alt P. So with that leg front IK selected, I'm going to press Alt P and I'll choose Clear parent right there. Now you can see that object has been broken out of that chain of bones for the leg there and it's out here under the armature. All right, now let's create that IK chain. Let's switch to pose mode instead of edit mode. If we come up here to this Edit pull-down and we can change from edit to pose mode. And now if we select that leg front 003, I'm just going to click here again. So we've switched to that 03. We can come over and apply a bone constraint. I'm going to click here. And if we add a bone constraint here, we can choose Inverse Kinematics. And we go. Now, the first thing we need to do is create a target. And for this we're going to select armature. And then we want a bone. And the bone we want for this is that IK bone that we just created. So I'll click that there. Now we need to tell it how many bones in the chain they're going to be. So we're actually going to want to bones in the chain that lag 1 and lag 2. So for the chain length, I'm going to increase that from 0 to two. And then you can see that we've got this leg three bone attached to the tail. Well, we can come over here and uncheck Use tail. And that will put that bone back where it originally was. And also I'm going to uncheck stretch. We don't need that here for this kind of armature. Alright, so what does that done for us? Well, if we come over here and click here again to select that IK bone. And then I hit G. Look at what happens. We can move that chain around. Just like if I were shaking someone's hand, it's moving their forearm and upper arm around automatically as the hand moves. So I'm going to hit Escape To go back to there. Now, another thing we're going to need is a rotation constraint because as you can see, if I select that IK and hit G, the actual leg three bone and the IK bone do not stay together. And I'd like those to stay together. So what I'm gonna do is once again select that leg front three. And let's add another bone constraints. So I will click here and I'm going to add a copy rotation constraint. And then once again, we want to choose for the target, the armature, for the bone, the leg front IK. And there we go. Now let's give it another try. I'll click here, choose the IK bone, hit G and looked at it, stays clamped to the IK bone. Now, we can always pull it away. But that's not really a problem here. We just want to make sure that the rotation stays the same. All right, I'm gonna hit Escape again. And now we want to create a control object that we can select to control the foot of the landing gear, as well as the top of the landing gear to move it up and down. And I think I'm just going to create a simple circle object that will then use as a control object. So let's. Move this cursor back to the center of the grid. I'm just going to press Shift S cursor to world origin. And then I'll press Shift a and let's go to Mesh and circle. And there we go. Now we've got a circle there. Let's call this circle underscore CEO or control object. There we go. So this is just going to be an object we're going to use to create those control objects, it's ultimately going to be hidden away. So let's come back over to our armature. I will go back to pose mode, and I'll hit the period key and zoom in over here. Now, if we select this object right here, come over to our bone panel. We can come over here to viewport display. We scroll down, we see this section called Custom Shape, and here's where we can apply that custom object. Now actually what I do need to do is select that leg front IK bone. And we're going to basically change the shape and look of this bone to that circle. So first of all, with this selected, I'm going to change the custom object. I'm going to click here. And I can type in this search field, I can type CEO. And here's that circle control object. I'll click here. And there it is. So it's basically replaced that IK bone with that circle object, but it's at an angle and I want it down here at the base of the foot, and that's why we created this bone here. So what we're gonna do is use that as the override. I'm going to click here and let's choose leg front, bottom control object. And there you go. And now that snaps it to the base of that foot. Now we can click and drag on the size and maybe make the size of the control object a little bigger. So mine here is at 1.9 and I think that looks pretty good. Now let's do the same thing up here. Let's select this bone right here. Let's come over to the custom object. We'll type in SEO. Here's our circle control object here. Once again, it replaces the bone but it puts it at the same angle. And we don't quite want that. So I'll come down to the override field. Click here, and let's choose that leg front top control object. And there we go. Now I can click and drag and the size field and bring that down. So maybe right about here. So minds at about, let's type in 0.6. There we go. Okay, so what have we done here? Well, now if we take this control object in pose mode and hit G, and I'll move that whole chain around. And likewise, if I click here and hit G, I can move this whole thing up and down. Now, notice that when we move these, if I hit G again and move it up, the control doesn't come along. So if I grab this right, that control stays on the ground. So we need to actually parent these bones to the bones that are actually moving around. To do that, let's go back to edit mode over here. And what I'll do is I'll select this bone. And then let's select that IK bone, which is right here. I'm just going to press Control and click that. Now let's parent this to this. So the IK bone is going to be the parent of the control object bone. So Control P. And I'm going to parent it, keeping the offset here so that it stays in the same place rather than snapping over here and connecting to that bone. Let's do the same thing up here. I will select this bone, I'll shift click this one, and then I'll press Control P and keep offset. There we go. So now if we go back to our pose mode, now if we select this and hit G, Now that control moves along, right? And if I select this one up here and hit G, that one moves along as well. All right, In the next video, we will duplicate this joint chain over here, and we'll move it back to here. Then we will parent the actual objects of the landing gear to the rig. So that's coming up next.
45. 044 Continuing the Landing Gear Rig: The next thing we should do is duplicate this joint chain, this hierarchy, and put it back here for the legs on the back of the ship. Now, to do that, we should first of all tab into edit mode so we can see our bones in edit mode because we don't want to duplicate the entire armature, we just want to duplicate these bones. So if I click and drag these here, Let's zoom in a bit. And let's actually take a look at them over here in the outliner. This is the bones of the armature that we have so far. We've gone through and we've named these, so that's good. Let's go ahead and click and drag all of these. Let's go to the side view. And then we'll press shift D y and move them back over here. Now I'll zoom in with the period key and let's try and get it right in the center here. We could go through and snap all the joints, but I think we can get it pretty close right in there. All right. It's here in the center now. So let's go to the front view and let's just drag it over in the x-axis and place it right there. Okay? So now we need to go through and change the names of these things because you can see what they are here. You can see we've got leg front 123, but with that 0000 one because it's a duplicate. So let's go through and rename these. I'll select this one and hit F2. And instead of leg front, this is probably going to be leg rear on the left side, so dot L. And then let to get rid of these here. So this is leg rear dot L 001. So let's copy this Control C and then hit Enter. And you can see that over here. Now let's select this one, F2, I'll press Control V to paste. And then let's change this to two. And now this one is leg front I k. Let's click it again real quick. Here we go. Now we've got that 3. So let's do this one, F2, control V, and three. All right, now let's do the IK. Will click this one. You can see it here. F2, I'll press control V and paste. And then let's just take away that 0001 and put in IK there. Alright, so now let's go back up here to this one, F2 control V. And this is going to be the top control object. I'll copy all this control C and then press Enter. Now this one down here, F2 Control V. And this is going to be bottom control object there. So now we have all of these. We've got the leg rear dot L12 and three here. And we've got the top control object, the IK, and the bottom control object. All right, that's good. Let's do that again. Let's click and drag all of these. I'll go back to the front view. Shift D to duplicate hit the X key and let's move it in the x-axis over to here. And we go. Now let's go through this same process here. Let's select this one, get F2. Let's change this to rear dot r and this will be 000 001. Let's select it all control C and then hit Enter. Let's do this. F2 control V. Change that to. Let's select not the IK, but the third bone here. So let's select that F2 control V, and we'll change that to three. Now we can select the IK F2 control V, and we'll change this to IK. Now let's go up here to this one, Control V, and this is going to be the top control object. Select all of that control C, enter this one, F2 control V, and this is going to be bottom control object there. Okay, so now we have all of these. Let's see what we have here. We've got the leg front 123, leg front IK, leg rear dot L 123, the leg rear leg, rear dot r, 0, 1, and IK. Alright, so I think we have them all here. If we go back to pose mode, There they are. So now we should be able to take one of these, hit G and move it around, grab one of these, and move it up and down as well. So okay, so we have those in place. Now the control objects down here for the rear feet could probably be a little bit bigger, I think. So let's, with this selected scroll down. And in our scale for our custom object, we can take this up a bit. How does that look? Yeah, that's pretty good. So 2.7, Let's select this one and we can type in 2.7 here and we go, all right, so we have those in place. Now. The next thing we should do is parent these objects, these landing gear objects here to each of the bones in the chain. And we want to do that here in pose mode. However, when we're in pose mode here, we can't select one of these objects. We'd have to tab out of pose mode or actually come up here and go to object mode to be able to then select one of these, because we can't select objects of multiple types currently in our view port. However, let me switch back to pose mode. You can come up here and go to Edit and uncheck locked object mode. So if I uncheck this, then I come down here, I can click on this object, say, and now I can select an object in object mode and one in pose mode. So this is going to help. Let's select this. And we want to parent this one to that bone in here, but we can't see it as a bone because recall, this is it here. Now if we came down just for visual purposes here, just kinda temporarily, we can get rid of this, this circle underscore control objects so we can see the bone there. All right, okay, so now let's just take this and then we can come in here and Shift-click that bone right there to choose it in pose mode. So we've selected an object in object mode. A bone in pose mode. And remember the parent is always the last one we select. So now we can press Control P and parent that object to the bone. So I'll select Set parent to the bone. And there we go. Alright, let's do that again. Let's select this one down here. And then I'm going to Shift click this bone right here, the leg front two, and then press Control T. And click bone. There we go. Now that should be parented to that. The next one we want to do is this one, the leg 3. However, we do not want to parent it to the bone. That is this control object right up here. We parented to the bone. That is also the control object. We can put this back in here. Now, I'll search for SEO. And there it is, circle control object. So up here we parented this object to the bone that has the control object or that is the control object right down here. However, we do not want that. We want to go with the bone, that's this leg front three. Alright, so let's select this one. Shift-click this bone, and then press Control P and bone. All right, so what have we done here now? Well, if we select this bone here, we can hit G and move that whole thing around. You can see there I can hit the R key and rotate the foot as well. And then we can also click up here, and we can drag this up and down as well. All right, So we have kind of control over it in a few different ways. Now, when we're in pose mode, when we're dealing with an armature, it's sometimes not a great idea to undo things, press Control Z, to go back to put things in their default position. A better idea I think, is to actually use Alt G, Alt R, and Alt S. So all G, I'm gonna hit the a key here to select everything. All G resets the location. We'll press Alt G. And then Alt R resets the rotation R, and there we go. Now alt S resets the scale, but we're not dealing with scale on this rig here, so we don't have to do that. But Alt G and Alt R will take you back to the default position of the rig. Okay, so we are pretty much done with this front leg of the spaceship. Now, if we select here, all right, We can move that around. And once again, if we select this, we can move that around. So Alt G, and there we go. But I'd like to hide these few bones so we don't see them. We only see our control objects. So to do that, we can select these. I'll just go through and select the ones that we can see. And then over here in the object data properties for the rig, we have layers. You can see that all of the bones are currently on this one layer. Well, we can take these selected objects, press the M key, and move them to another layer. And there we go. Now you can see there over here, if I click here, we can see those. If I click here, we can see those. Now you can also Shift-click to see everything. But there we go. That's how we're going to hide away the bones that we aren't going to be using when we're animating our right. I'm gonna go back to object mode, press Alt a to deselect everything. So in the next video, we will continue parenting the objects to the rig and also will then begin parenting these joint chains to the ship bounce and the ship main. And then we'll also need to parent all of the ship as well.
46. 045 Finishing the Rig for the Ship: To parent the rear landing gear to the rig. Let's go back to pose mode for the rig. I'll select this and hit the period key on the number pad to zoom in. And now we need to go through and parent these. So I'll go back to wireframe here. And first of all, this one, right, we need to parent this to that bone in the center here that we're not seeing, but it's actually up here, right? So with this selected, then press Shift and click that control object. In that control object is the bone. And then let's press Control P and parent bone. All right, there's one. Let's do this one here. I'll zoom in. And where is that bone hits? Here it is. Shift-click this bone right here, and then Control P parent to the bone. And now this object, and once again we're going to parent to the bone here and not to the control object here on the bottom. So I'll shift click this one, Control P, parent to the bone. All right, now let's select this object or this control object here hit G, and there we go, we can move that around. And then this one up here. Yep. That one pulls that up too. Okay, that's good. I'll hit the a key to select everything and press Alt G. I'll hit Alt R just to be safe. And then let's go over here and do this one as well. So select this object, hit the period key, and then Shift-click this control object, controlled P.sit, parent to the bone. Let's select this and this bone Shift-click that control P parent of the bone. This one here. Shift-click that third bone that rear 003, Control P and parent to the bone. Now if we select this control object, it g, that'll move that around as well. All right, so we're getting there. Now what Let's do is select these bones here. Get all of these selected. Like this. Oh, I selected this one instead of this down here, I need to select these bones. And these bones. I accidentally selected that ship main so we don't want that. I'm going to press M and move them over to layer two, and there they go. So once again, if we go over to layer 2, we can see all of these bones. And if we go over to layer one, we can see the control objects. All right? Now this one here, this is still that original circle object that we created. If we come over here, we can see it here. So we can hide this. I can click that and just hide that away. We don't need to see that. We may need to also hide it in the render view. And to do that, we can come over here and add a new column to these toggles here so we can come up to this menu. You can see we've got other toggles that we haven't enabled. This one here is the Render. If I click on this, it will then create a new column. And this is the visibility when we do the Render. So this circle probably won't be visible in the render since it's just a singular edge in a circle, it probably won't be visible, but just in case. Let's go ahead and turn that off. So we're sure we aren't going to see it in the render. All right, so we've got our landing gear, legs rigged. We can select any control object and hit G and move them around. However, we can't yet move this ship, as well as all the landing gear. And to do that, we need to use these two bones here. Now, I'd like these also to be control object or to be circles rather than bones. So let's do a similar thing for these. Let's, I'm gonna hit the Z key and go back to Solid mode. And let's make these circles by coming over here to the bone properties panel and scrolling down. And let's in the custom object, Let's type CEO for control object. And here's that circle underscore CEO. We can add that here. Now we don't need a transform override because I've put the bones in the position I already wanted them. That's why I turn them 90 degrees when I put them in, when I created them. So that this circle would be in the right orientation. So for this circle, I think if I hit the seven key here, I'd like it to be big enough to extend beyond the engines here on the side. I think that's about how big I want that control object to be. And then this one, the ship bounce. Let's select that one. Let's also add that circle control object here. And for this one, I think I just want it to be as big as this area right in here. So I'm going to click and drag on the scale over here, and let's move that up. So it's about like this. Let's see how that looks. Yeah, So that's about what I want there. So we can kind of get a sense that this is the main control that's going to allow us to fly the entire ship in, right? We'll select this to animate the entire ship. And then we'll select this to give us that bounce of this ship when it lands. And then we'll select these here to move the entire landing gear up and down. And these here we would select once again to move these. But ultimately we're not going to really be animating these. Those are basically going to be the place where the feet of the landing gear stick. They're going to be where they don't go down anymore. And then the ship kinda bounces. And this will become clearer as we go on through the animation. But I just wanted to mention that. All right, so now that we have those in, how do we get it all to work together? Well, we're going to need to parent things. So to do that, let's go back to Edit Mode. And we're going to need to figure out what needs to be parented and what doesn't. Let's come over here to. The data properties and let's shift click this layer here so we see everything. Now. Ultimately we know that this ship bounced bone is going to be parented to the ship main. It has to follow along with the ship main, right? So with this bone selected lists, Shift-click the main. So that's going to be the parent. Let's press Control P and choose to keep offset right there. So we've got the bounce as a child to the main and we can come over here and see that here, right? We can see that the bounce is a child to the main object here, to the main bone. Okay, so now we've got that. Now we also know that when we move this up and down, it needs to control these up here, right? It needs to control these and push them down and up. So what Let's do is let's take this bone here and then shift click this and press Control P and keep offset. And this one here, Shift-click that control P, keep offset. And this one, Shift-click Control P keep offset. So we've got the top bones of each of these parented to the ship bounce. So what does that do? Well, if we come back over to pose mode and select this and go like this, There's the bounce. Okay? So we have the bounce and we have the bounce parented to the ship. But if we select the ship main and hit G and go like this, it leaves the control objects for the feet on the grid. So let's hit Escape here. And now we need to parent these two, the ship main. So let's come back to edit mode. And let's now select that IK bone. I select that one time to get the three, and I'll click it again to get that IK. And then Shift-click the main right up here. Control P, keep offset. Do that over here. Click it wants to get the three. Click it again to get the IK. Right up here. Ship main control P, keep offset. Once again down here, click it wants to get the legs 003. Click it again. And I'll try one more time, trying to find a place to click on it. There it is, the IK. And then Shift-click that ship main control P, keep offset. All right, now let's give this a try. Let's see what happens. I'll come over to here, go back to pose mode. Now. We've got the bounce Up and Down here, right? Oh, gee, the ship main g. Now that moves the whole thing around like that, right? That's what we want to hit escape. So now all we need is the ship objects to be parented to. What should we parent the ship objects to the main or to the bounce? Well, sense when we do the bounce, we want the ship to come along. We should parent everything else to the bounce. And this will work because the bounce is parented to the main and ultimately will use the main to animate everything. So now since we are going to be parenting objects to the rig, we're going to have the rig be in pose mode. Now we're going to go and try and select everything. So let's now twirl the ship collection down here and let's begin selecting objects. We want the ship window frame and I'm going to control click the ship main and the cargo container. We also want the panels control click each one of these. We want the engines control-click each one of these. The clamps, same here. And the lights, all of these control-click all of those. And then legs. No, we do not want to select those because those are already taken care of by being parented to the individual bones of the landing gear. So let's not worry about those. But now that we have all of those selected, let's shift click the bounce, control P and parent to the bone. Now, let's de-select everything. I'm going to come over here to the outliner and press Alt a. Then I'm gonna come over here and turn off the layer here. Shift click that. Now let's take this and let's hit G and move it around. There we go. We can hit R and spin it around like this. I can hit R2 times, R2 times and go like this. But kinda tumbles around at that pivot point. Now let's take everything back down to the default position with all G, R, and there we go. Now let's also test our bounce. So once it comes down and the feet touch the ground, we then use this and go like that. And then I'm going to press Alt G as it's flying in, as it's coming in. I'm going to want these to be up into here. And they're going to want to come down like this. And then when we land, we do a little bit of this, right? So there we go. I'm going to hit the a key, press Alt G on r. And that's the rig for the ship. So in the next section, we're going to begin flying this in and landing it in the landing vein. So that's coming up next.
47. 046 Starting on the Animation: Well, all right, I think now we're to the point where we can begin animating. I think let's set up our interface here a little bit better for animation. First of all, I'll twirl these up. We don't really need all of that. But actually, I think what we should do is maybe come over here to the animation tab right up here. Let's click here. And now we've got this 3D view here. And then we've also got this view over here. And we could hit the 0 key over here to set up our view here. So we're seeing through the camera. Let me go back to object mode here. And in addition, this view turned off the overlays and the gizmos here. So we don't see any of those and that's good. Let's keep those off so they don't clutter the screen. And also down here, I think what I'd like, we've got a dope sheet here, which is good. This is going to show us our keyframes as we add our keyframes. But also, let's come over here and grab this corner and pull this down a bit. And let's change this to a graph editor right over here. Let's change this to a graph editor here. And actually, you know what I think instead of a dope sheet, Let's change this to a timeline. Let's do that. Then we have these play buttons here. So we'll be able to see our keyframes coming into here, but we'll also be able to see the graphs down here and that'll be, I think that'll be useful. All right, so let's pull that down now let's also think about what we want to see in our frame here. I think what we want to see is first of all the while the landing bay, so let's bring that back. So we have that here. And also we could bring back our planet. Now, we're not going to turn on the render view at this time, but just to see how the planets going to frame up here in the viewport. So we could do that. Yeah, so we can kind of see everything like this. Now there are going to be times, of course, where I'm going to hit the 0 key over here and take it a look at it from the camera view. But when we play our animation, It's kind of nice to have a dedicated view port for that. Alright, well, let's now think about what we want to happen here. I'm thinking that, well, we've got 250 frames here. And at 24 frames per second here, that's just over ten seconds. And I don't think that's going to be long enough to get everything I want done in one shot. I want the ship to come in from the side and then turn and come into the landing bay and then settled down onto the ground. I think that's going to take more time. So why don't we change our end point, our animation from frame 250 to frame 500. And let's do that. Now if we wanted to view all of these frames here in the timeline, we can always click here and drag like that. You can also hover over this and hit the Home key on your keyboard, and that will frame everything up. I'm going to scroll the mouse wheel here and move over. Well, let's hit that home key to. There you go. So now we can see all 500 frames here in the graph editor and up here in the timeline. So how long do we want this to happen? What, what's our timing like? Well. It's really hard to know at the beginning of an animation what the timing is going to be, where things are going to happen. So what I like to do in this kind of situation, Let's say I've got 500 frames. Well, let's say maybe at frame 400, the ship touches down onto the ground. And what we're doing is we're just kind of putting anchors down. We're going to say temporarily, I'm going to put the keyframe for everything on the ground, say at 400. I'm going to put the key frame for the ship moving into view around 100. I'm going to have it turn at 200. And so we're just going to kind of put keyframes in, not really knowing what the timing is going to be. And then once they're in, we can slide them around to get a better sense of what we need and what the timing should be. So first of all, let's just go to frame 400. And here in pose mode, let's choose the armature over here, right? And let's change to pose mode. And now I'm just going to select everything. I'm gonna hit the a key and select all of those control objects. And this is one of the reasons why I wanted to move things over to another layer is that I can turn that off. And when I hit a, I select only what I want these control objects and don't accidentally select any of these bones. All right, I'll go back to here now. I see we still have relationship lines here, so let's turn those off. We can pull this down and turn off relationship lines here. Let's turn those off. Yeah, that just cleans that up a little bit. So now that we have everything selected, let's keyframe everything here because we know that this is going to be the end point. It's going to fly in and come down right here. All right, so let's just hit the I key on the keyboard to bring up the Insert Keyframe Menu. And we're going to create keyframes for location and rotation for everything. So I'm just going to click here. And now notice what that does. That puts a keyframe. Let me bring this down here. That puts a key frame for all of these objects, right? All of these control objects. So now that we know that those are there and that's good. I'm just going to select this one, ship main. And I'm going to twirl this up here. So we just have one keyframe here. Now, you're going to see graph and curves come into here, and that's fine. We'll be dealing with this here in just a little bit. The graph editor is really good for tweaking fine movements, right? But we're just going to block in general placements for now. And I'm just going to work here in the timeline up here. So now that we have a keyframe here, let's go back to frame one. All right, for these kinds of animations, it's good to work backwards in a way in that we begin with where the ship ends up. And then we go back to frame one and move the ship from there. So now we've got this selected. I'm going to open this up right here, or you can press the T key to open this panel up. I'm going to choose my Move Gizmo, and then let's just put this out here somewhere. I don't really need this right now, so I'm just going to select it and hit the H key and hide it. And then let's grab that there. And let's just move it out. I'll hit the seven key, go to wireframe. And let's just move this out. I'll hit G and move it out here. Let's turn it. I'll hit our 900 and hit Enter, so it's turning this way. All right, let's hit that one key and I'm going to move it up. Let's kinda flying in and then it's got to come down there. So let's give that a try. Let's put a keyframe there. I'll hit I and choose location and rotation. And there we go. Now we have a keyframe here and a keyframe here. And look at what happened down here. I'll scroll the mouse wheel out a bit and look at what happened. Let me move this way out. Now, you can press the Control key and click and drag the middle mouse button and rearrange kind of your view here so you can see things a little bit better. So what we've got now, let me twirl this down here, is we've got the x-axis here and the y-axis here. And the z-axis here is this blue. And of course, right, the blue is z. So you can see what's happening now with the x-axis. It's beginning over here. It's moving this way. With the y-axis, it's beginning here and it's moving this way. And with the z-axis, it's beginning here and moving down as it goes through the animation. So let's just hit play and see what happens. Well, you can see it's just kinda sliding over and turning and moving through the wall of the landing day until it comes to a stop there. So that's not real impressive in terms of animation. We need to work on this a bit. Let's go back to frame one and then let's just kinda move it forward until we get to, let's, let's go to frame 200. And right, we've got 400. Let's go to frame 200, and let's move this. I'll hit the seven key, and let's hit G and move this over here. Let's turn it a bit. I'll hit the R key like that. And let's also kinda tilted as if it's angling in. I'll come over here and change from global to local transform orientation. And then if we go to the rotate tool, I can click on this y-axis and kinda tilted. And maybe if we go back to global and pull it up a bit like this, so we can kinda see it here. Let's try that. Let's hit I and location and rotation. And now you can see the graph editor change right? Here's the y-axis, Here's the x, and here's the z. So now let's take a look at this. I'll go back to frame 1 and hit play. And here it goes. So now it's moving. Now we can kind of see it here. It kinda tilts and slows and turns and comes in almost like it's going to crash, right? Watch out. And there we go. So we've kinda set up our anchors now, right? We've kind of got it. So it begins outside the landing bay. It comes in, we can see it here and then touches down on the ground here. The timing still isn't great. We still need to work on that and we can now begin to move these around to get a sense of what we want. So if I selected the keyframe at 200 and hit G and let's say move that back to 100. What would that do? And I'm watching over here now, over in the camera view here. So let's see, I'll hit Play. All right, It comes in, it really comes to hard, stop there. And then it begins to move in very slowly. All right. Well, I think I want it to move in here a little bit quicker, right? We wanted to maybe come in to around this point here and then, so it's hovering above where it's going to land and then come down. Let's try that. How would we do that? Well, we could of course, grab it here and just move it up. But I think what I'd prefer to do is let's grab this keyframe right here. And let's press shift D, and let's move it back to 340, right there. Now let's take that z-axis and let's just move it straight up about like that. Maybe to about here, kind of at the top of the frame there. Now let's press i, location and rotation. And let's see how this works. Go back to the beginning. Hit Play. And here it comes in. It's turning. It's a little better. All right. And then it comes in right there and then come straight down. Okay. And I think after it lands here, it's going to have a little bounce to it right in here. As if once again, the landing gear is kind of taking the weight of the ship. All right, well, we've got a good rough beginning here. In the next video, Let's continue to tweak our keyframes and see if we can get the timing of it flying in a little bit better.
48. 047 Continuing the Ship Animation: All right, let's play through this again and just see where we are. I'll click play here and I'm going to watch over here in the camera view, comes in pretty fast. And it kinda pauses and turns very slowly, painfully actually. And then it just kinda eases down onto the ground like that. So not very good yet, but we can certainly improve it. And one of the ways that we can improve that is to kind of see the path that this particular control object is taking. So with this selected, we can come over to the object data properties here. And under motion paths, we can come down here and our path type can be in range. We can change it to around frame, but I'm going to keep it in range. And the range that I like is this fold 0 to 500 or one to 500 year. So let's change the end frame to 500. And in terms of the steps, Let's change this to 24 frames. So we're getting basically one step per second. All right, Now that we've got that, Let's just come down here and click Calculate and see what we get. We click that and then OK. And there we go. Now we can kind of see the path that the ship is following coming in. So there's a couple of things we can see just right off the bat. And first of all, I feel like this turn this angle is just too sharp. So I think we'll need to round off that. Turn. If we back this up, let's say back this up to here. Let's go to here. And instead of having just one keyframe here, let's see what happens if we move this around or even add another keyframe. So what I wanna do is maybe let's add a keyframe. Say right in here, I'm going to hover over this and press I and location and rotation. And then I think maybe writing here. I would like this to maybe move in and move over just a bit. Let's try this. I'm going to hit eye location and rotation, and then I'm actually just going to delete this keyframe. Let's try this. I'll hit X and delete keyframes. Now, let's come down here and click Update path. And you can see what happened. We've kind of curve that just a little bit more. We've rounded off the curve. Now let's just see how it looks up here. So it comes in and turns and then eases in a little bit more. So that's actually a little bit better. It's not great, but it's a little bit better. So we're getting into the part where it's really going to be trial and error. We're just going to be moving keyframes around and really trying to get a sense of what we need. What I'd like to do is have this go from here and move in a little bit quicker. So currently, it's traveling all the way from this keyframe to this keyframe. And that's what's taking so long. So let's have it move from this location to this location a little bit quicker. And to do that, we just need to move the keyframes a little bit closer. So let's maybe move it to 300 and try this. Still moving a little bit slow. So let's try this. I'm going to move it into 260. Let's just see what happens. Alright, now it kinda speeds up, right? As it comes in. Let's move this to here. Let's see what happens. Right now. It's slower between these two keyframes, but moves quicker between these two. All right, how about we move this back to here? Let's see what happens. That's actually a fairly nice movement. Once again, it isn't perfect. We're not getting too perfect quite yet. This is just some trial and error moving keyframes around to see what we can get. I'm going to move this back to 60. And let's see what happens to it. Comes fly and n and then really slows down quite a bit. So let's take these two now. I'm just going to select these two and hit G and move these forward. Let's try this. All right, We're getting there. I'm going to move this to about 140. Let's try that. So it comes in right now at around 60 or 80. Ok. So I think yeah, I think I'm getting to the point where I'm beginning to see possibility here. Once again, it's, we're not looking for perfection right up front. All right, so now that we're to this point, it's just a little bit better. It isn't great. Just a little bit better. What I'd like to do is animate the camera. Let's put the camera move in and see how that affects the motion of the ship. So to animate the camera, I think I'm going to come back to the layout view here. And what I'll do is hit the 0 Qi to go to the camera view. And once again, just like we did with the ship, we know that this is the end point. This is where we want the camera to end up at the end of the shot. So right here, what did we have before? I'm going to hover over the timeline and press the home key. We had frame 400 being the end of the ship animation. So let's at least for now, make that also the end of the camera animation. I'm going to come over here to the camera, unhide it. Here we go. So we have it selected. Now, I'll hit the I key and create a keyframe for location and rotation. But look what happened. No suitable context info or active King set. What does that mean? Well, what that means is that we were still in pose mode. So let's try that again. Let's come over here and choose the camera. And then hover over this and press I and location and rotation. And now we can do that. Because we came out of that other view with the ship being in pose mode. And if one thing is in pose mode and you're trying to key another thing in object mode, it can get confused. So now that we have this keyframe here, we can go back to frame one and we can figure out where the cameras should be at the beginning of the animation. Now, if I tumble around, we come out of the camera view and we can't see through the camera. So let's hit the 0 key again. And the way to move the view while still looking through the cameras to hit the End key. And then come over here to the View tab. And then we can turn on camera to view. And if we click this, you can see that there's just this little red dotted line around the camera. You can see that they're right. That means that if I move the camera, I will stay in the camera view. And what I'm doing is I'm not just moving the viewport, I'm moving the camera. So what I'd like to do is put the camera kind of looking straight out of the landing bay, kind of up here, maybe something like this. Looking straight out like that. So let's try that. This here. Now I'm going to hit I and location and rotation. Now I'm going to hit N and turn this off. And we go just so I don't accidentally move it around. Now let's hit the Spacebar and see how it looks. Alright, so you can see the camera kind of moving. Here comes the ship. It's looking, it's not looking great. But you can kinda get a sense of what we're after here. Now. There we go. Okay, let's do that once again, I'm gonna go back to the beginning. Hit Play. Now as we move, I kind of like when the ship comes in, I feel like it's angled or tilted too long. It's taking too long to come up straight again. And I feel like the camera really could be moving just a little bit more beyond when the ship lands. So I'm going to take this keyframe here and hit G and move it up, say 25 frames. And let's just see what happens here. So we've still got a lot of work to do, but I think we're getting there. This is kind of the camera move. I was thinking about. The ship comes in, straightens up, touches down here, and then the camera kinda settles like that. One of the problems I see now is that when the ship is coming in right here, right about here, the ship is kind of off center. I feel like I need to move the ship toward the center of the landing bay. However, what I think might be easier is to move the landing bay. So what I'm gonna do is take the landing bay and these cargo containers over here. And I'm just going to move him over a bit. Like this. And this is what I mean by it's hard to know exactly where things should be, how things should look. Until you get to the end here and begin looking through the camera during the animation. All right, so I've moved that over there. Let's continue playing and see how it looks. Now, I didn't move the hoses. So the hoses are still where they were? Yeah, I think that's not bad Now, I don't have this part in frame. Is that going to be a problem? Is that a problem with the framing here? I don't think so. I don't think that's too bad, but I could take these now and move him back a bit. Maybe moving back to here. And let's go forward again. Go towards here. Now, let's come back to the original frame. And sure enough, this isn't centered, right? So let's hit the End key. Turned on camera view. And let's move everything over. So it's kind of centered in frame. That's kinda the way I wanted it. All right, now let's try it. I'll hit Play. Oops, I didn't set a keyframe to just see the camera jump. I didn't set a keyframe, so let's try that again with this red dot around, I'm going to move the camera. Get it centered where I want it. There we go. And then with the cameras still selected, I have to hit I and location and rotation. All right, Now let's hit play. When it comes to the ship. Okay. Still a wonky term, we need to work on that. But now I kind of like the way it's coming in like that. And how our framing now is like this. Yeah, that's not bad. That's not bad. I think I, I think I like that. So I'm going to hit the End key and uncheck this so we can tumble out of the camera without it moving the camera now. All right, Let's go back the animation tab and let's take another look at it here. Let's find the ship. Here it is. I'll select the rig and switch to pose mode. Again. I'm going to update the path just in case I've changed anything. Yeah, I did. Okay. Also you can see some artifacts over here. If you're having problems with that, you can always come over to the View tab and change the clip start. Currently mine is 0.01. Maybe if I just type in one. Yeah. That helps quite a bit. All right. Let's just take a look at it over here and the camera view and see how we're doing. I'll hit the space bar, and here we go. So the ship comes in once again, it turns awkwardly and it tilts too long. It doesn't straighten up quick enough. But generally speaking, between the camera move and the landing timing, that's not bad. All right, so in the next video we're going to work on how much the ship tilts as it turns into the landing bay. And I think we should think about having it come to a stop a little bit easier and kind of ease down until it touches the floor.
49. 048 Using the Graph Editor: Alright, let's take another look at this and see what we need to do here. I'm going to click Play. Now this is just the end here. It'll loop back to the beginning. Here we go. So the ship comes in, it tilts to turn. It kind of pauses and slides, it looks like and then it kind of comes to a stop there. So there's a couple things for me I'd like to work on. First. First is this kind of slide in like this. I don't like that. And the nose feels like it's pointing down too much. I feel like here it should be tilting up a bit. And then right here I'd like this to kind of maybe pull up just a bit kinda come in and pull up and hover and then come down like that to hit the ground here. So let's first work on this. Turn here at the beginning I'm going to click play just to see how we're doing. So right in here. It isn't too bad right in here. It looks like this keyframe got moved off a frame 100. I'm, as I'm working here, I'm trying to keep things on kinda even frames as much as I can. I'm just going to move this to a 100 just for ease of use, just keep track of things and then we'll begin splitting things out as needed. Oh, you know what? Look at this over here. And I'm just going to this got moved. Let me just move this. O the things that happen as we're trying to move things around, I must not have selected that when I moved the landing bay. So all right. So there we go. I'm going to select that again, the ship main. So now let's see, This comes in. I feel like writing here. Let's try and adjust this how we think it should be here. So for this, I'm going to go back to the Rotate tool. And then instead of global, I'm going to switch to local transformation mode. I tend to like to rotate in local mode and move in global. There are exceptions, but that's generally the rule for me as I, as I work here. So for this, I'm going to move it in the y. And I feel like I can maybe move it in the x. Sum like this. A little too much there, something like this. Let's see how this works. I'm going to hit I and rotation and let's see how this works. Putting it in. Okay, So it feels like in here it's kind of sliding. So let's turn it in the Z. Turned into why bring it up in the x just a bit here at 180. And I'll hit I and rotation. Try it again. So you have to, it's makes it worse or better. Okay, so it's pulling in, it's turning a little bit better, but it's doing it kind of quickly. Let's take these and move this to here and move this back like this. Let's try this. And once again, this is just kind of trial and error. You're never going to really know exactly what you need until you begin moving things around a bit. Alright, that's not good. Let me try this. All right. And pull that back like this. They're feels like it went a little bit too fast from here to here. So let's I'm just if things are going too quickly, I pulled the keyframes apart, they're going too slow. I can push them together. So it feels like this kind of slid a little bit from here to here. Do you see how it's kind of sliding? So let's take a look at that. Let's go back to global here. And let's take a look at what's happening in here. So from here to here, it feels like it's kind of sliding. Let's see what we can do with that. So it could be the rotation, let me update the path here. But it also could be we just need to take this and maybe move it forward just a bit. Let's try this. I and location update path. Let's try this. Then it might have made it worse. Let's try that again. So right in here, Let's see if we can find where that's doing. That it seems to be kind of jumping from one place to another. Right there you see how it kinda, it feels like it's kinda jumping. So what Let's do is come down here to the graph editor. And before we begin working too much down here, Let's synchronize the graph editor and the timeline we can make it. So when we zoom into one, we also zoom in to the other. So we can come over here and go to View sink visible range, click that, and then view sync visible range here as well. Now when we zoom into one, we zoom into the other. Okay? So here we are at our keyframes and I'm thinking these are the location keyframes. Let's see, I'm going to open these up here like this. So the location keyframes are x, y, and z or curves, I should say, I can disable all of the rotations for now. And let's take a look at the location curves. And if I play this, it looks to me like in the x seems to slide just a bit, you see that in the x. So let's come down here and take a look at the x. I'll select the x over here. Here it is. Now we could even hide everything else. So all we're seeing is the x. Alright? So we can come down here. And right in here it looks like it's kind of sliding a bit. And if we select this keyframe, you can see it has handles. There's one handle here and one handle here, and here's the key frame. So if I select this handle and hit G, I can move it in and up and down and change the shape of the curve at that keyframe. So let's just play around for a moment and see what happens if I turn it like this. Let's see what happens. I hit play and it wo, slides way over like that. Wow. All right, if I take this and move it like this, Let's see what happens. Move it in and slides that way. All right, So the more the curve is up and down, vertical, the more it affects the movement in that axis, right? So we play it and it goes, Whoa, like that. Alright, so that's not of course the way we want it. Let's here I can press Control Z and let's go back to where we had it here like that. So what it seems to me is that this area right here where it's going down seems to make it seem like it's sliding. So what we could do is we could take this handle here and kind of extended out like this maybe and try and even that out. Now it's pulling it down here. But let's see how that affects it. I'm going to click here. Not as bad. Let's hit that. Let's try and make it a little bit straighter in here. Let's see what happens. Now. See it's got this down here. So what Let's try now is I'm just going to take this keyframe, this X key frame, and hit delete. Let's just see what happens. Well, let's try this. Yeah, see how that really kept it from sliding there. So let's now take this one and hit this handle and we can maybe move it around a bit to get it to where we want it to be right there at that. Yeah, that's actually kind of what I'm looking for here and let me tilt that a little bit more. Yeah. So that's that's getting there. That's I think a little bit better. Okay. So sometimes when you have a problem and it's kind of jumping or sliding, you can come in here to the graph editor and isolate that keyframe. Use your handles and sometimes even delete a keyframe to smooth out that curve. Oftentimes the smoother and what I call prettier your curve, meaning with a very smooth curve, the better your animation is going to look. It isn't always the case, but oftentimes if you can go in and really kinda pretty up your curves, It's amazing how much it helps your animation. All right, so let me just going to bring all of these back now, all of these curves. And let's continue on. Let's see what else we can do here. So it comes in, it turns, and right in here, I feel like it's not right angled the way I'd want it to be. So let's come over here and turn on the rotate tool. And we can change from global to local by hitting the comma key on the keyboard. And then we have this little pie menu and we can change from global to local. Here we go. So at this point, I think I would like it to face the camera a little bit more. Kinda like this. Rotated in the y just a bit and maybe even tilted up in the x2. Asked a little like this. So it looks a little bit more like this. So. At each portion of the animation, you can play with it to get it to look just the way you want it. So it's composed well in the frame. So they're at frame 200, I'm going hit I and choose rotation. There we go. So let's try that again. I'll come back. Watch it here. It's turning. Little bit better. A little bit better now I feel like, Gosh, I feel like it should be a little bit more, even a little bit more. Turn like this and the y, let me try this. I rotation, hit the space bar. Better. I'm not like in this, let me hit G and move these just a little bit. And you can see him move in the graph editor to move these back a little bit. Now, Control Z. I'm going to move it this way now. Try this. Whoa, now. So right in here I feel like there's something that I'm not seeing that I want to see. I feel like it needs to turn a bit towards us. Right here. Let me try that. I'm going to turn a little bit more. Maybe tilt a little bit more and then tilt a little bit up. This. Let's try this. I and rotation. And once again, I'm trying to keep on these keyframes for now so that I can easily move them around. If I come up here, we can twirl these down here and you can see the same thing, the location and the rotation. And currently they're all inline in a column. Now ultimately we're going to begin say, moving one or more out, right? But for now I'm trying to keep them in a column so I can move them around easily. Let me bring this back down here. Alright, so let's try this again. Yeah, that's actually not bad. Okay. I think we're kind of getting there. Let me take a look at the y-axis here. And if I put 0 in here, now it's a little bit tilted from the angle of the camera that looks a little bit tilted. So I'm going to bring it back right about in here and hit I and rotation. So I'm keeping an eye on it here because I want it to be composed a certain way at different parts of the animation. All right, let's try this again. Think it about 200. I'm going to tilt this backup just a smidge like this. And we're going to be animating the landing gear here pretty soon, but Just trying to get everything to come in and settle in a believable way. Let's bring this down to here. And now at this point, I think I want to bring this up some. So I want to kind of have it come in, up, pause and then come down. It comes down a little bit too fast, all in one curve, I think so I'd like it to come up a bit here. Let's go back to global. I will get that comma key and go to global transform. Let's move this up, kind of up to the top of the frame here and hit I and location. Let's just play it real quick. Comes up to the top and then begins coming down. But with our graph editor, we can adjust that. So we're dealing with the z-axis, right? So let's hide everything else. Choose that z-axis. I'm gonna hit the home key. And here we are. Now we can see, oh skews me, that's the rotation. Let's go to the z-axis location. I'm sorry, let's do that. Now I'll hit the home key and here we go. This is what we want. So currently it's just kind of curving down like this. And you can see that here. What I'd want it to do is kind of come down pause. Pausing is of course horizontal, and then begin again to come down to the ground. So what Let's do is just take one of these handles and let's just hit G and turn it like this. I could take this handle and pull it in like this. Let's just see how this works. So once again, we're moving in the z axis. And then when we go horizontal, we pause in the z-axis. And then when we go vertical again, we're moving in the z-axis again. Alright, so let's hit play and watch it here. Kinda pauses and then comes down like that. Yeah. Okay, that's pretty good. So you can see that here, over here, it kinda comes in and pauses and then goes down. Alright, so I think that's pretty good. The thing I also need to deal with is the y-axis. I feel like it isn't coming in quick enough. Like it's it's easing up and slowing down a little bit too much in the y-axis for my taste. So let's turn off the Z, turn on the Y, select that, hit the home key. And we're seeing that here. We're seeing that it begins to turn horizontal, which means it slows down, right? So if we take this handle here for this keyframe and we try and turn it, look what happens. It affects the other side as well. And if we do that, watch what happens. It comes in, goes forward, and then it kind of backs up a bit here. Let me update. You can see it here. It goes forward and then it backs up. And we don't want that we don't want it to come forward and backing up like that. I don't want that. So how do we not do that? I'm going to press Control Z here. So what I wanna do is I want to affect this side without affecting this side. And to do that, we can select our Keyframe, come over here to CHI and handle type. Currently it's at aligned. We can now change it to free. And what that will do is allow us to change one side at a time without affecting that other side. But let's say we put it like this. Let's try that. So it's all here. Let me update. So now it's very angular. Let's see how this works. Coming in. Watching over here. Boom, it just kinda hits. Yeah, we don't want that. So let's see if we can change this a little bit. Maybe like this. So it still has a bit of a horizontal curve. Yeah, that's a little bit better. Now what we could also do is turn this down a little bit more, but that would speed it up. So I don't know that we want to do that. Let's just take another look here. Yeah, that's actually pretty good. So now the last thing I'll do here before we stop this video is I'm just going to bring it back to here. And I want to tilt that up a little bit like this. So it's just a little bit up like that. I and rotation. So it kind of tilts up just a little as it's coming in just a little bit more. I wanted just a little bit more. That turn it seems to be a little bit too much or that tilt back straight. Yeah. So it kinda comes up and then goes down and settles. All right. We're getting there. In the next video, I'd like to do a few more tweaks on the entrance and the landing, but then we'll deal with the landing gear coming out and the bounce of the ship when it lands.
50. 049 Animating the Landing Gear: Before I begin working on the landing gear, let me just go back and take a look at how it turned back up right after it banks into the landing base. So let's just hit play and watch over here. So that's not bad. I like that bank, but I feel like it I don't know. I feel like it comes back even a little bit too quickly. So this is the y-axis here, that green one, of course. So we have the y axis here. So it looks like, well maybe this keyframe. And actually if you take a look at this, let me just select this curve here. Look at this here, just this little kind of, there's a little bit of an angle here. It isn't quite what I would call a pretty curve, right? It's just got a little bit of a, of a bump there, I think. So what Let's try let me take another look at it here. Yeah, right here to there. It feels like it's coming around to quickly maybe or leveling off too quickly. Maybe. What Let's do is let's just delete this keyframe. I mean, we could play with the angles or the handles here. But let's just delete this and see what happens. And look at that. That's prettier curve, I would say, let's take a look at it. So over here as it comes in, it tilts and then it comes back over. You know, I feel I like that a little bit better. So I don't know. It just seems to me that that's a little bit smoother as it comes in. Right in here. Yeah. Okay. Well, let's go with that for now and we can now turn our attention to the landing gear. One problem I have is that the landing gear has no place to come out of at this point in time. Let's go over to the layout tab and let me go back to, let me go to the end here. I'm going to go to frame 500. And I want to hide the landing bay. And I'm going to hide the planet. And let's just zoom in here. And what I mean by that is there's no holes here for the landing gear to be up in to come out of. And I think I need to create those. So what let's do, first of all is let's just take this and press Shift S cursor to selected and just to move that cursor there. And then I'm just going to create a few cubes to use the Boolean modifier to cut into this. So I'm going to press Shift a mesh cube. There we go. And let's just make this cube about the same size as the foot of the landing gear. So let's press Sx and bring this in some. And let's go to that front view here. There we go. X and bring this in and putting this in about like this. And then go to the side view SY, and I'll bring this in and move it so it's just about the same size as the foot of the landing gear. So now that we have this one, Let's press Shift D X, and let's move this over here. Let's scale this out in the x to about right here. Let's hit the three key and then let's move this back to these gear. And I just want these to be about the same size as the feet as well. Sy, and we go, and then we go back to the front view shift D X. And let's put this one over here like this. Okay, so now we have our three objects that are going to cut holes into the bottom of the ship. Let's make them all the same object. Let's select them all and press Control J. And then let's give them a name. I'll hit F2 and I'll just call this cutter landing gear. And we go. So now let's select the ship. And in our modifiers panel, we will add a Boolean modifier. And once again, we're going to use difference. And let's find that cutter object. We can just click on this and type in cutter. There it is. And we can also select these things here and go to our object properties viewport, display and change this to wire. So now we can see through them. And then as we pull them up, we cut into the object here. Now, if we pull this too far up, will be able to see the top of the landing gear there. And I don't wanna do that, so I'm going to bring it back down right about here, Let's say. Right. So we have these holes where the landing gear can go up. And then if we take these, let's change to pose mode. Grab all of these controls here at the top of the landing gear. And if we click and drag up and the z-axis, we can drag those right up into those holes there and that's where they'll live until they begin coming down as the ship comes into the landing bay. So let me just hit the a key. I'll press Alt G to bring everything back down. Let's now go back to the ship. I'll switch back to object mode, select the ship and in the modifiers panel, Let's go ahead and apply this right here. Now we can get rid of our cutter objects. Just hit Delete, and there we go. Now we've got holes in the bottom of the ship. And if we go back to, let's go to our material preview here just so we can see. That's what it looks like. And I think that'll be fine. It's really going to be very hard to view those at all, but I think it's good to have at least them there. So it looks like the landing gear is coming out of something. Alright, alright, so let's go back to the solid view will bring the landing bay back. And let's go forward here. Or excuse me, back in the animation, I guess we better go over to the animation tab now again. So I'm gonna hit the Home key here so we can see everything. And what I want is I'm going to select those and go to pose mode. So let's now select, I'm going to bring it into here, and let's select these control objects here. And I'll switch back to the Move tool. And let's at frame 400, Let's go ahead and give these a keyframe. Let's press I and 2's location and we go. So now let's we know they want to be here when it lands. But when did they want to come out or at what point I should say, should they be all the way out? Let's maybe make it 250. Let's try that. So at this point, we're going to once again press I and location. So they should be the same here. Now let's go back in the animation on the timeline and maybe these things begin coming out. Oh, I don't know, maybe around 150. Let's try that. So at this point they should go up. Let's change our transform orientation to local this time. And now we can just take these, move them up, see if where they should go here. Let me hit the period key. How far up should they go about right here I think. And then let's hit I and location here. And let's do that. Now let's take a look at how they look as they come out here. Let's hit the space bar and they come down like that. And then they come down and then the whole ship comes down there. Now, I feel like they should come out a little bit earlier now. Let's see. So we see it like this. No, not earlier. Later. I feel like they should be all the way out here. 280 I'm going to take. So let's do that. Let's take these two keyframes, get G and move it to to 80. Let's do that. Now let's take a look. Here they come. So right here, and that's when they begin coming down. Yeah. I like that. They may be able to come down even a little bit or finish up a little bit later. Let's move this one keyframe to 300 and see how this looks. It's coming in and as it kind of levels out, that's when those begin coming down. And it finishes up right about there. And then it comes down. Yeah, I kinda like that. Okay. I think that's pretty good for the landing gear coming out. In the next video, let's work on the ship coming down a bit and maybe bouncing just a little. Just after the feet hit the floor, it can kinda come down and hold the weight. So we'll work on that next.
51. 050 Finishing the Ship Animation: To work on the bounce of the ship after it lands, we're going to need to go to this control here, that bounce control. So with this, we've got it keyed on frame 400. Recall that we selected everything and put a keyframe there at 400. So now we just need to give it a little bit of a bounce. And so as it's coming down, it's going to go down first and then spring back up above this point right here in the z-axis. So if we hit the End key, we can see the z-axis is at 0 here. So let's say that we go forward. I don't know, let's say six frames. Let's just hit the arrow key here and go to 400 six. And right here we just need to bring it down. And I think what I'm gonna do is just type in something in here. Let's type in negative 0.1 to begin with. And then I can hit the I key and choose location to insert a keyframe. Now, as we go here, I'm going to want to make adjustments a little quicker than having to hit the I key each time. And what I can do is I can come over here and turn on auto keying. If I turn this on, then every time I make a change to anything really, It's going to create a keyframe. Now, I didn't do this before because I really wanted to make sure that all of the keyframes were in those columns. And if I made any changes between those, it would get pretty messy. So I tend to not want to do that up front when I'm just doing those main columns of keyframes. But here is we work. This is a pretty good opportunity to use that auto key-frame functionality. So we've gone down to negative 0.1. And then if we go forward some, so we went forward six, Let's go forward. 1, 2, 3, 4, 5. Let's go to 411. And instead of negative 0.1, let's bring it up past the zero-point, so we're at 0.05. Let's take it to 0.02 here. And notice it created a key frame as soon as I began moving anything. So that's five frames forward. Now let's go forward. Four frames, 1, 2, 3, 4. And let's go down to say negative point 0, 1. Let's try that negative 0.01 enter, and that creates a keyframe. And so we've gone 6, 5, 4, Let's go forward three frames, 1, 2, 3. And let's take it back to that 0. We can type in 0 here, or we can come out here and press Alt G, and that will pop it back to 0 and also create a keyframe because it moved to the zero-point. Okay, now let's take a look and see what we have. We're going to have to do some adjusting here, but Let's take a look at what we have. Comes down and does a little bounce, but the timing of it is pretty bad, right? It hits the ground, stops, and then it does little bounce things. So that's not quite right. What if we took these here, these keyframes, and let's move them forward. Let's hit the G key and let's just move them. Let's move him five frames up here to 395. Let's try that. Little better. Let's move him up one more frame. So this second frame, when the ship initially goes down, let's put that at 400. Lets try that. A little better. But still the speed at which it bounces doesn't quite match the speed as it's coming down, right? Right. It's it's slowing down. And then we got that little bounce there. So we can do two things. We can play with the timing of this. In other words, we can take these and maybe move them back or forward to kind of redo that timing between here and here. We can try and move these around a bit. But I kind of like the timing of the bounce just as it is. Right. So what if we went back and tried to adjust the timing of the ship at this ending point here, to try and match that with our keyframes, it's worth a try. Let's, let's give it a shot. So I'm going to come back here to the ship main and we're dealing with the z-axis. So let's just turn off the y, turn on the z, select that, and let's hit the home key and see what we have here. So here is the curve that we're dealing with. So at angles down here, and that's the speed of it coming down and then it curves a bit, which means it's getting more horizontal, which means the movement in the z-axis is slowing down. So we could adjust this keyframe a bit. And one thing we can do again is with this selected, we can go ahead and go to q0 and handle type, and we can change this to free. And now when we select this handle, it'll only move one side. So now we can change the speed or the timing of this like this, let's say. So it stays at the same speed longer into its descent. So let's give that a trial. Come back here and I'm going to watch over here. It comes down and bone. Not bad, but it begins a little bit before it hits, right? Let's go back and take a look. Let's maybe look over here. Yes, So I think maybe let's grab the bounce control and let's select all of these. I'll click and drag and select them all. And let's hit G and move them this way just a bit. Let's see how this works. That's pretty good, That's not bad. Let me hit G and I'll move it one frame this way. Again, that's pretty good. I like that actually. So let's take a look at it. Fairly big. I'll hover over this and press Control Spacebar to make it full screen. And then I'll press Shift and the left arrow key to go back to the beginning of the animation and then press the space bar and let's take a look at it. So the camera begins moving, the ship comes in and that's looking pretty good. The landing gear comes out and then yeah, I think that's actually pretty good. Let's sum, try that again. Let me press Control Space bar and let me go back to the layout. Hit the 0 key, and let's take a look at it here. I'll turn off the overlay so we don't see the controls there. I'll press Shift Left Arrow key. And once again, let's just hit Play. Yeah, I think that's looking pretty good. Yeah. So I think a couple of things what I'd like is let's see where the camera finishes. The camera finishes writing here 120 or 423, 425. Let's let the camera go until here. Let's try that. So I'll select the camera. There's that keyframe, I'll just select that one. Hit G, and let's move it out to here. Let's try this shift left arrow and spacebar. All right, so here it comes. There's something a little weird about that turn about how it tilts. I might want to take a look at the curves there. I like the way the landing gear comes out. I like the bounce. And then it comes to a stop right there. Yeah. That's pretty good. I'm going to try it. Hit G and move it to 460. Let's try that. Yeah, I like it just so the camera kind of comes to a stop just a little bit beyond where the ship lands. I kind of like that. As I said, that turn as it banks in toward the landing bay, I'd like to take a look at that. All right. Let's go back to the animation view. And as I said, let's take a look at what happens. As it comes in here. I'll just drag and right in here, Let's see what's going on here. I'm going to select that ship ME and I'll select the armature and then go to pose mode, select that ship main. I think it has to do with the rotation. Let's select the rotation curves and I'll hit the home key. So we see these. Let's go back here and take a look at it in here. Let's see what we can see. Right? Let's play it right there. What's going on right there? Not sure. Let's What is this? That's the z-axis. So it's spinning around in the z-axis here, I wonder if this keyframe is causing us any problems. It doesn't look like it is, but how about this one? What is this? Oh, well, this is the quaternions w, This is kind of an extra rotation in quaternions space. I don't know that this is really going to be it. Let's delete this keyframe and see what happens. And we'll play. Well, it's actually not bad. That may have been it. Okay. Yeah, I think it was also right in here. I think in the y-axis it kind of evens out a little bit too quickly and too distinctly. I'd like it to kind of ease into that a little bit more. So let's take a look at the y-axis. I'll select that. I'm going to hide everything else. I'll hit the home key. And right in here, right there. First of all, let's just take this keyframe and delete it. I don't think we need it there and let's just hit Delete. And yeah, that just didn't do much for the curve at all. So why even have it there, right? Let's see what we can do it that comes in and right there. So what if we take this and we just move this key frame over to the right. And remember when I said, we may begin taking keyframes and moving them out from the column. That's what we're doing here. So if I select this keyframe, I can hit G and X and just slide it over in the x like this. Maybe let's go to say to 40. And you can see how that's been pulled out of this column here. So let's see how this looks now. Let me bring this down to Mount just a bit. Here we go. Alright, here we go. So now as it comes in, it's going to tilt, swing around, and then it's not going to even out. Tell around in here. That's interesting. Okay, So that actually kind of works. I feel like it's a little bit too much though. Let me hit G and X and I'm going to slide it over to maybe 220. Let's try that. Yeah. Oh yes, I kinda like that. I also like how since we've moved the end point of the camera animation, the top of the ship does not get cut off anymore. I kinda like that too. Just a little added bonus there. Yes. So let's I think this is pretty good. Let's go with this. And there we go. Okay. Alright, well in the next video, there's one last piece of animation I want to do, and that is to create some sort of a kind of a plasma dr animation for these side engines, as well as kind of flame exhaust type of animation for the rear thruster. So in the next part of the course, we will begin working on those.
52. 051 Animating a Texture for the Plasma Drive: So what I'm thinking in terms of these engines here is some sort of kind of moving texture and animated texture on the engines here that makes it look like there's something happening inside something kind of plasma drives science fiction need something that's happening. So let's work on that over here in the shading tab. And let's come over and select one of these engines here. Select, say this engine here. Let me hit the period key to zoom in. There we go. And for this we've got a material called plasma engine, and currently it's just an orange color. If we go to our material preview, we see it here. We go to our rendered view. We've got all the lights turned off here. We could bring that back, I guess. And the planet objects to, to kinda get a sense of what it might look like. So we don't have everything set up exactly the way it's going to be in the end, but we can get a sense of it here. Now I'm going to go back to material preview just while we're working on this. So what I'd like is some sort of texture, as I said, animated texture. And I think I want to begin with a Voronoi texture, the one that we use for the stars. So I'll press Shift a and good a texture. Voronoi, there it is. And then let's give it a texture mapping with Control T. And instead of generated, Let's try object. Let's go with that here. All right. Now, if I press Control Shift and click that Voronoi texture, That's what I get. If I change this from 3D to 4D, that's what I'd get. And I think I kind of like that. Let's see how that works. Now we can of course change the settings here. We could take the scale down or up, right? So maybe we take the scale down to say, I don't know, Let's try 2.5. We could take this field here, the W field. And actually this is the one we're going to animate. So it will change over time. But I'll put it here at five for now. And we're getting something, but it's a little undefined. So of course, let's bring in our trusty color ramp. I'll go to Search and type in color ramp. And let's drop that in here. And then we can click and drag and make these a little more defined in here like this. Now we're going to need coloring here. I want this kind of color right here. So we can come in and add some extra nodes to the color ramp here. We can come over here and click plus. And there's one. We can click Plus again, and there we go. So now we've got two that we can use to kind of adjust the look of this. And so if we change the colors on this, I'll take this, I'll grab this eyedropper and come over here and sample that color because I think that's kind of what I want, at least what we can begin with. And I'll do the same thing for this over here like this. Now we need to differentiate between the two. So maybe I'll take this one and make it a little bit redder. Let's try that. And you can see now we've got some differentiation in there. And also I don't like the white in here in the background. So let's just take this node and let's change this to black as well. So I think that's looking pretty good. I like how we bring this up. We get little black in the center. That's kind of nice. That take this, we can really kind of make it a little more interesting. I think something like this. Now that's kind of nice that it feels like there's kind of a depth to it. Alright, so now let's take this and take it into the emission channel. Let's just take this right into here and then control shift this and see how that looks. That's not bad. Let me take this color down. Well, that's interesting. We can take it up to white. Let me take this to white and see what happens. Okay, that's interesting. Let me take this down to black. All right. So you can play with the color here just to see what you want. I kind of like it, so it's down here a little bit like this. And I'll bring this down. And we can of course play with this to our heart's content without have to settle for what we get now. But let me take the emission up to three, that gives us some brightness. I like that. And if we go back to the render view, you can see it gives it some glow. All right, now let's add a little bit of bump to it. Let's press Shift A Search and type in bump, and let's bring that in. I'll drop that here. And from this, let's just take this right here and drag it into the height and see what we get. And then take this into the normal. And let's take a look at that. Yeah, that's interesting. It really gives it the humblest, an organic kind of a look. That's interesting. We can take the strength down, we can take the distance down like that. It's, I mean, it almost looks like it's organic. That's interesting. All right, so let's go with that for now and see what we think. We can come back here to the render view just to get a sense of what it might look like. But let's go back to the material view and let's work on the animation. I want it to move around, kind of like this, kind of like this, like that. If I click and drag in the W field here, in the voronoi texture you can see it kinda move like that. So that's what I want it. I want it to move over time. So what Let's do is I'm just going to grab this corner and drag it all the way down to here. And let's change this to a timeline again, right here. So we have this down here. Now, what we can do is take this node right here, and we can animate this field. So let me go back to frame number 1, and I can just right-click on this field. And choose Insert Keyframe. And there we go. Now you can see them here. I'll go to frame 500. And let's change that field to, well, let's change it to 25. Let's see how that works and I'll right-click and choose Replace keyframe. Now, keep in mind you can see when I made this change that it created a keyframe automatically. And that's because I still had auto key-frame on. I'm gonna go ahead and turn that off. Let's make sure that we've got a keyframe there. Replace keyframe for 25. Okay. I just wanted to turn that off because I might change things periodically and I don't want to accidentally put a keyframe in where I don't want it. All right, well, let's see how this works. I'm going to go back to here and let's just hit Play. And let's see how it looks. Yeah, look at that. So it's kind of this, I don't know, strange organic plasma dr going on there. That's interesting. And then it kind of comes to a stop here at the end. Let's see it come in here again. It's coming in. It's animating as if it's kinda driving the engines here. And then it comes down and then it should begin slowing down. There we go. So I could take that. Let's come down here. Let me select that engine again. Here. There we go. Now we can see the keyframes. I can take this key frame and hit G. Let's maybe move it back to 460. And let's see how it slows down there. I'd like it to come to a stop a little bit sooner is all let me hit play. So it's coming in. We've got the plasma dr animating there. And then it comes down and kind of slows down right about there. Yeah. That's pretty good. I'm just going to take it up to maybe 470, something like that. Just a little bit more. Yeah, there we go. Good. Okay, So there we've got that animated texture now we should have it back here as well. Let's see. Yes, we've got it back here. I had put this plasma engine material on these faces back here as well, so we should get them back here. Now we're probably never going to see the back of the ship in this particular animation. But I just wanted to make sure that those were there. All right, so we've got our plasma drive. We can of course adjust this if we, if we would like, say we could take a little like this or take the color into white to change that a bit. But in the next video, what we're gonna do is work on a jet exhaust for the back engine here. So we'll work on that coming up next.
53. 052 Creating the Rocket Exhaust: Now let's work on creating a jet exhaust coming from the rear engine here. Let's go back to the Layout tab and I think I will hide some of these. Let's hide the landing bay and the planet and the lights for now. And let's focus on this rear engine. I'll just hit the period key to zoom in all turn on the overlays over here. So we can see when an object is selected. And what Let's do is let's use blenders, mesh to Volume feature. And what that will do is that will take a mesh-like an object and convert it into a volume that we can then animate. So I think I want kind of a cone shaped volume coming out of the back here. So let's press Shift a and let's create a cone, mesh cone. And here it is. Let's bring it over here. And let's turn it in the x-axis. I'll press RX 900, and it's turning in the wrong way. So I'll hit the negative key and spin it around, and then I'll hit Enter. And let's get this right in the center here I'm going to press Control 1 to go to the back view. And I'll just bring this down and kinda get it right in the center here. And then let's move this origin of the object to the base. I'll tab into edit mode and select this face here, press Shift S cursor to selected. And then once we tap back into object mode, we can go to Object, Set Origin, origin to 3D cursor. And also you can right-click to get that same thing here, set origin. Now I'll bring this back a bit and hit the S key and scale it up. And we'll also scaled and the y s. Why I wanted to kind of stick out a little bit like that. And so let's say that's the kind of the shape that we want our jet exhaust to have. Let's organize things. Let's go over to the scene collection and right-click new collection. And let's call this rocket exhaust here. And this cone will call rocket cone. We go and drag that up into that collection. Now what Let's do is take this mesh and from it create a volume. So with this selected, I'm going to press Shift a, go to volume and empty. Now here it is. If we hide the cone, you can't really see it. There isn't a whole lot there. I'll change the name here, call it rocket volume. But once we have this object, the cool thing about it is we can add modifiers to it. And if we go to the Modifiers tab and choose Add Modifier, we can see that we only have two options here for this volume object. So let's choose mesh to volume. And then let's choose the eyedropper and hover over the cone and click that. Now something kinda happened, right? Let's come over here and hide the cone in the viewport and in the render because we don't want to see it in the render. And now we've got this triangular or volume that we can begin working with. Now first of all, I'm going to take this exterior band. This is how much it extends beyond the cone. And I'm going to take it down to 0 because I only want it to expand about like that. Then the voxel amount, That's how blocky it is. So let's take this up to, let's try 64. That's not bad. It's still seeing some blocking this here. How about 80? Yeah, that's pretty good. Let's try that. Now we need to parent this to the engine. Let's come back here and parent the cone. I'll select the cone, shift, select the engine control P, and parent to object. There we go. Now if we hide the cone again, will it stay parented? Sure enough, that volume is a part of that cone, so it'll stay parented there. Now let's think about giving it some sort of material. Let's go over to the shading tab here. And I've got material preview on. Let's take a look at it in render preview. And I don't have any of the lights on currently, so let's come over here and enable the collection for the lights. And there we go. Now I can kind of see it a little bit better. Let's give it a new material. I will call this rocket flame. Let's do that. And notice once again, since that object, that volume object is a little bit different than other object that we've dealt with. We get a different kind of material. It's a principled volume material. And so what we need to do is deal with this density. And we need to be able to control this attribute. Now, this density isn't really going to work for us. We need to be able to control this attribute here. So what we can do is we can press Shift a and come over here to input and choose attribute right here. And then we can hover over this density attribute and press Control C, and then hover over the attribute name and press control V. And we can paste that into there. So now that we've got this density attribute here, over here, we can feed it into another socket. So we can't really take it out of here and feed it into the emission strength. But we can take it from over here into the emission strength. Now it's pretty bright there. So what we can do is add a math node in-between here to control it. So I'll press Shift a converter, math and drop that in here. Let's change this from add to multiply. And now we can control this like this. So I'll just leave it here at 0.5 for now. But now we can take this emission color and move it down into the orange to try and match it a little bit better to these here I think. Let's try that. Spin it around towards the red just a little bit. Now it's a little too cone like. So let's come back to our modifiers panel and let's add that other modifier here, the volume displaced. And here we're going to change it from local to object. And also what we wanna do is create a new texture. So I'll just click New here. And I'm going to call this once again rocket texture. And we go. And now that this texture is created, let's come over to the texture properties. And here with this texture, Let's change it from type, image or movie to clouds. And now we can play with the size of this a little bit. Maybe I'll take this down to 0.1. And then we can come back over to our modifiers panel and we can bring down the sample radius a bit. We can bring up the strength if we want quite a bit. Let's take it up. Well, let's take it up to something like three. Let's do that. And then it really applies that cloud texture there to give us something that isn't quite so uniform, right? And you can take it up higher if you want. But let's go ahead and leave that at 34 now. Oh, and one thing I forgot to do is since we've got the density attribute coming in from here, we don't need this 1 here. We can take this down to 0 and get quite a bit more color there. Now let me now adjust that color back. Something like that. Yeah, That's why we weren't getting so much color. All right. So as this moves, it kind of looks like it's moving here as we move this around. But ultimately, it isn't going to move like that. Once we render it frame by frame, It's just going to stay a solid thing like this without any modulation or movement as if it's flame and exhaust. We're going to have to animate that ourselves. And so in the next video, what we're going to do is create a new object. We're going to put that object right in here in this field. And then when we animate that object, It's going to animate the texture as if it's flame and exhaust. So that's coming up next.
54. 053 Animating the Rocket Exhaust: To set up our object to animate the flame. Let's go back to the end of the animation right here. And let's go to the Layout tab, and let's work on it here. Just to clean up the view, I will hide the lights so we don't see those. And all I wanna do is just create a new empty object. So if I press Shift a and go to empty, we can create an empty in any of these kinds of shapes. Let's do one that's an arrow right here. And I will take that and move it up. And let's move it over here. We can scale it up. I'll just hit the S key and scale it up so we can see it a little bit better. And then let's turn it once again in the x-axis, RX 900, and it's facing the wrong direction. So I'll press the minus key and that'll flip it and then enter. Okay, So now we have an arrow pointing behind the ship. And let's call this rocket arrow. There we go. Now, we want to parent this as well to the engine. We've parented the cone to the engine, right? We also want to parent this. So I'll take this Shift-click the engine control P and parent the object so that now wherever it goes, the arrow goes as well. Okay. Now what we can do is go back to the rocket volume object. And in this field here we went to put that rocket arrow. I can type rocket into here. Choose the arrow and there we go. So now if I take this, move it, I click here. You can see as I move it, it actually animates the smoke or the flame of the volume. So Control Z. Now that we know that we can throughout the length of the animation from 1 to 500, animate this going backwards in the y-axis. And the way we can do that is to come over here to this object properties panel. And under transform, we can change this y. We can add a driver to it. If I right-click this, we can see we've got add driver. All right, if I choose that, we can add an expression into here. Now I'm just going to hit escape and then right-click and choose Delete drivers because I just want to show you this cool trick. If you click into this y-axis and type in hashtag frame and hit Enter. Now you can see if we right-click again and go to Edit driver, that frame has been added into the expression field. And so what does that mean? Well, what that means is if I click on frame number one here, let me do this. I'm going to click on frame number one. Watch what happens to the arrow. Do you see it there? Let me go back here. I click and drag on the frame here. The arrow is just automatically going back in its local y-axis here. And it just keeps going and going and going all the way to frame 500 and beyond if we wanted. But all that's doing and keep in mind that won't be visible in the render. We won't be able to see that an empty is invisible in the render. So what that's gonna do is just animate that flame continuously throughout the animation. All right, so let's now bring back all of our objects here. Landing bay stars, planet Lights. Let's bring that all back. And then I'm going to go to frame 500. And let's come in here to the camera. I'll press the 0 Qi so we can see through it. And what we need to do now is take a look at our animation, our lighting, do some test renders and see what we think. So we can get a sense of how this is going to work before we do the final animation. So in the next section of the course, we will begin getting ready to render out the animation.
55. 054 Final Adjustments: Well, before we begin rendering the final animation, I think there are a couple of tweaks and a couple of fixes I'd like to do. Some examples of this are like the clouds here seem a little bit undefined. Maybe there's a few too many stars out here. We've got this light bleeding in here over on the side. I feel like the light panels here are a little bit too bright or blooming too much. I'm not sure. There are some things that I'd like to just see if I could tweak and make a little bit better. First of all though, I think what I'm gonna do is split scroll around to frame AD. And let's take a look at that flame that we put on the back. And as the ship comes in here, we don't really see it a whole lot and also it's kind of bleeding through the engine. So I feel like we need to take care of that. Let's go to the N frame here. And I'll tumble around and let's take a look at this. I'll select that engine and hit the period key. So I think let me turn on the overlays again right up here. I think what I'd like to do is select that cone right here. And let's just pull this out. Now I don't want that, I want the cone. Here we go. Let's pull this out some so it doesn't bleed through the engine. The closer that we put it, the more it's going to bleed through. So I'm going to pull that out a bit. And in addition, I wasn't seeing a whole lot of it as the ship came in. So I'm gonna press S and Y and scale this out quite a bit. So we can see more of that flame. All right, let's see how that looks. I'm going to get 0 Qi to go back. And now let's go and let's click and drag here and see how that looks. Yes, See we're seeing more of it here as it comes in. And it isn't bleeding through quite as much, although we still have a little bit there. So let me go back to 500. Let's bring that cone back one more time. And I'll just pull this out just a little bit like that. All right, let's try it again. And click and drag down here, and let's see how it looks. So we come here, let me de-select this ALT a and hide the Coleman. I've had to do that. All right. So here it comes. Yeah. So it isn't bleeding through quite as much and I don't mind just a little bit just to get the sense that that's heating up, but that's hot there. And then it comes in, it turned comes down. And when it lands, do we see it at all? No, we do not. That's great. Which means I don't have to turn it off. So I'm going to just leave it as is. Okay, so I think that's pretty good for the flame. I like that. The next thing is let's work on this light bleed here. Now, I had attempted to fix that by using a cube here. Right here to shadow that. But I think what I'm gonna do, I'm gonna take that away for now. And let's try and adjust this with just the sunlight. Can I rotate the sunlight to get this out of here while still keeping the sun on the ship as it comes in to the landing bay. So let's go to the lights collection. Click on sun. And what I'm gonna do is here in this view, I'm just going to press R, z. And let's see if I can rotate this and we're going to move the mouse a bit and tell I get that sun right, just barely out of there. Now, almost had it our Z one more time. Move it right about there. Just so it's just out of the landing page like that. Okay. Now what I wanna do is try and rotate it so I get more of a shadow along here. So let's try RY. Let's move that so you can see the moving off of that and then moving it back up. So that's kind of nice. I kinda like that. However, I feel like that composition, I think, I think I'd like to move that down some. So let's come over here to the planet collection and right-click select all the objects in that collection. And then I'm just going to click and drag and move this down. And once again, I have the auto key turned off. Because if I had that turned on, that would have animated that and created a keyframe at frame 98 here. So we would have had the planet moving down from one to 98. So we don't want that. Now I think something about like this. Okay. And then let me try the sun lamp again and let me try and rotate in the x axis, RX. And let's see if that does anything. Well, it brings it back into the landing base, so I don't wanna do that. So right about there, I think it's probably not bad. The planet and the clouds. I'm not real happy with that at this point in time. So let's see what we can do with that. First of all, I'm gonna hit the End key and let's select the planet right here. It said the scale 128, 0.8. Let's change this to 129. I'm just going to click and drag on all of them and type in 129. And then Cloud one. Let's make this 130. And Cloud to let's make this 132. Let's just see how that works. So I think that's a little bit better. Now the clouds, I'm not liking that. Let's take a look at it. How it's actually going to look in a render. So I'll hit F2 on the keyboard. And there we go. There is an actual render of the scene. You can also come up here to the render menu, render image or Control F2, render the entire animation, but we'll deal with that in just a minute. So the clouds aren't doing too well here. And I've also got motion blur turned on so you can see the moving ship is kind of blurred. That's over here. If we wanted to deal with that here, maybe I'll take that down to 0.25. Let's try that and hit F2. Yeah, that's a little bit clearer there. It doesn't blur it quite as much. All right, so now the planet, I'm going to hit Escape to come out of that. And let's go over to the shading tab. Now over here I'll hit 0. Go to the Render View. And let's see what we can see here. Now. Once again, I'm going to hit F2 just to get a look at it. And yeah, I don't like all of this, that's just too blurry to blobby and, uh, like that. So let's begin by, I'll hit Escape. Let's begin by coming over here to the planet. I'm going to select Clouds one. Now, the problem is if I render this, even if I hid one, it would come out in the render. So let's come up here to the Filters. Turn on the render toggle, and there we go. Now we can say turn off clouds to in the viewport and in the render. Now let's hit F2 and see what we can see here. So this is what clouds one looks like and I'm not liking that. So let's come over here. And let's take a look at this. I think I'd like to add a little more distortion, so I'll click here. Yeah, you can see that swirling there. I like that. Kinda like there are wind patterns are something there. And then maybe the roughness up here. And maybe the detail as well. Let's take a look at that. I'll hit F2. I'm not liking that. So let's see what else we can do here. Let's work on the detail down here. The scale we could bring up some down here. Okay? And then let's increase the roughness so it kind of blurs it out just a bit like that. Now let's hit F 12 and we're getting there, although I don't know what's happening here. One thing that we can also do maybe is turn off the shadows for each of these clouds. Let's come down here to the material for this Cloud 1, down into Settings. And let's take the shadow mode from opaque to none. And I think that helps. Let's hit F2. That helps a bit, I think. So. I'll hit Escape. And this time I'm going to bring the distortion up a little bit more and hit F2 again just to see how that looks. So you can see what I mean by we're just going to have to tweak until we get things the way we want them. That's not bad. I feel like that's okay. Let's now. Turn this off and take a look at number 2, Cloud Number 2. I'm going to turn the shadow mode. I need to click it here in the outliner. So we switched to Cloud two. And I'm going to turn the shadow mode to none. And then for this one, let's bring up the distortion just a little bit. Remember we go, Let's take a look at that F2. Okay? All right, let's try this. I'm going to hit Escape here. And then let's bring clouds 12 back together. And I'm going to go back to the layout and hit F2. But let's see what we get. If you like, it's a little too much, but I feel like we're getting close. So I will go back. And for let's say for Cloud to, let me bring this up or down and we see that that's a little bit more. Yeah, I'm going to go with that for right now. That just looks interesting to me. And let's hit escape and get out of that. So it's just a matter of going through and tweaking your settings while taking a look at it in the render, hitting F2 and taking a look at it. And you can of course go to any frame and hit F2. So we go here and hit F2 here and take a look at it there. Now, I feel like as I said, there's a little bit more I'd like to do here. I just hit Escape there. I think let's go back to the Layout tab. And under color management, in the render properties, you can see that we've got this view transform filmic, and that's good. But for the look, we can choose these various contrast and I kind of like this medium high contrast. So I'm going to click this. And it makes everything a little bit more contrasty. If I hit F2. See it here. And I may need to go back and adjust the clouds now that I've done this, great, But that happens. But what I'm gonna do now is find that area light overhead. So let me turn on overlays again. And let's find that area light here it is. But I think I'll do is just increase the intensity of this light here. So maybe from 3000 to 5000. Like bad. There we go. I think that adds a little bit more light to the scene. There we go. Alright, so now let's take a look. I'm going to scroll back here. We can see our flame. That's good. We can see we've changed our clouds a bit. The last thing we could do is adjust the number of stars here. I'll go back to the shading tab. And under stars and gases, Let's work on the Enter. I'll just turn off the gas and the outer in both the viewport and the Render. And here we are. I'm a select that. Now we can adjust. Let's try this one down here. I'm going to drag this back and you can see we can reduce the number of stars here. And we should be able to do that here as well. That increases, this should decrease a bit, something like that. Now let's work on the outer. I'll bring those back. And let's select the outer in the outliner. And then I'll bring these back as well. And we don't have quite as many. Maybe up here, something like that. All right, so now let's bring them all back. And the gases. And we've got slightly fewer, and I'll hit F2. Here. There we go. We've got slightly fewer. We've got a little more of the gases here. So it's really up to you about how you want to adjust these, what you want it to look like. The last thing I will do is select the landing bay. And you can see that here I've selected it here. Go back to the materials and for the light panels, Let's go to the end frame here. And for these, Let's take the mission down to maybe three. And then let's go back to the render properties and take a look at the bloom. And under this intensity we can take this up or down. So I feel like maybe we take the intensity down, but the bloom up L2, 0.06 is try that, something like that. All right. Well, there are of course, lots of other ways you can adjust your scene. But I think in the next video, what Let's do is begin working on a final render of the animation.
56. 055 Creating a Test Render: Well, we're to the point now where I think we can do a test render just to see where we are. If I go back to the render view here, and I just want to make sure that everything's the way I want it before we do a test. And I think right here, look at this. There's a, the ship comes in and blocks the light, and then goes through the light. So there's a problem right there. We need to take a look at that. And I don't think that's the sunlight because we angle the sunlight so it wouldn't come in here. So this is something else. Let's take a look at that. It's right there. Right there, it's blocking that light. So let's go back to our solid view and let's tumble around. And oh, I don't have the lights in here. Do I have them turned? I haven't turned on in the outliner, but oh, I don't have the overlays turned on, so I need to turn on the overlays and now we can see the light and look at what's happening here. It's actually clipping into the light, isn't it? So you can see it actually going into the light and then coming out of it. And that's where we're having the problem. So I think what we should probably do is just take this light here and let's just move it forward. Once again, I've got auto key turned off or else if I had that turned on and I moved the light, it would just animate it. And I don't want that. I'm just going to move it forward so it's out of the way just a bit and let's see now, go back and forth. Does it clip in there at all? No, I think we're fine. All right, let's take a look at that. The 0 Qi back to render view. And then let's just rub this and see if that casts a shadow there. No, it does not. All right. Okay. That's good. So let's let's go with that. I'm going to hit Control S and save that. I'll turn off. The overlay is again, I feel like one of the cloud layers over here is a little too big. You know, look at that. Let's come over to Cloud one. I'm going to hit the End key. So we've got the planet at 129, Cloud one at 130, and Cloud T2 at 132. Maybe I should take this back to 131. Let's do that. Take a look at it now. Yeah, I think that's a little bit better. Let's hit F2 and render that real quick. Yeah, I think that looks better. Okay. I'm going to hit Escape. Okay. At this point I think I want to do a test render just to see how the engine and the rear thruster flame is animating how it looks during animation. So it looks to me like it's really just between, looks like AT and T are 160. I think I'd like to go back a little bit further. Let's have it go back out of frame, say to frame 50. Let's, let's do a test render from frame to frame 160. All right, so let's do that. Let's come over here to the output properties, and right here is the frame start and end. So currently it's from 1 to 500. Let's change this to 50, tab to 160. Enter. So that's just what our test renders going to be. Now, what it's gonna do is render one image per frame. And currently if we come down here, you can see each image is going to be of file format PNG. And it's going to go into the temp folder on our C drive. Now, I'm going to click here on this folder so we can see that here's that C tymp. If I click on See, there it is. So that's where it's going to go. I'm going to click Accept. Let's come back over to the render properties. And currently we've got a sampling render sample size of 64. I think that'll be just fine. Let's go ahead and go with that. We've got ambient occlusion turned on, we've got Bloom. We've taken our intensity of the bloom up to 0.06. That's good. We've got screen space reflections turned on. I've just got half red trace turned on. I don't think we need full refraction. There isn't much of a change happening here. I've got motion blur enabled, but I've taken it down to 0.25. And I think that's good for shadows. Remember, we took this up sometime ago to 4096 or four K for both the cube size and the cascade size. I think that's fine. And if we go down to our color management, I've got this set at medium, high contrast. So I think all of that looks fine for a test render. Let's come back over here. We've got 24 frames per second, 50 to 160. I've got the standard HD resolution here at 1920 by 1080. You can always change that by clicking here on the render presets. If you wanted to render out it for k, You could choose this 4k, UHD TV 2160. If I click this and move over here, you can see that it's 3840 now. But what I'll do is I'll just click this again. Go back to HDTV 1080. And there we go. 1920 by 1080. So I think we're ready to render the frames out. However, I'm going to set up the screen a little bit differently here. And I have two monitors here at my desk. So I usually put all of these windows over two monitors. But what we're gonna do is we're going to set it here on one monitor. So I'm going to go to the rendering tab and I'm going to click here. And what I've done is I've brought up the Task Manager now, to get to this on a Windows machine, you just need to press Control Alt, Delete, and then choose Task Manager. And once you have this up, then click on the Performance tab. Now in this tab we can see the GPU. You can see it running here. We can also take a look at the CPU and the memory, the disk drives. But what I like to look at is the GPU because since we're going to be rendering with the EV render engine, it's basically going to be using GPU, the graphics card of the computer. Now, let's also bring in. A window here that we can see into our Temp folder here. So currently you can see that we do not have any files in here yet. This is where we're going to be rendering them into. Alright, so now that we've got this all set up, I'm gonna come back over to Blender, and I will just either go up here to the render view and click on Render Animation or press Control F2. So here we go. Now it's begun rendering frame 1 or frame 50. You can see here that the frames are taking about 3.5 seconds each. And as they are created, you can see them pop into the temp folder over here. I currently have this folder setup so that the newest file, pop Santa on top here. You can see that there. And you can see how the GPU is doing up here. You can see that it's basically going up to 99 or 100 percent for each frame here. So it's working pretty hard actually. All right, So with 3.5 seconds per frame, this is going to take a few minutes. So I'm gonna go ahead and pause the video. And when we come back, we'll take a look at the test render. Okay, the render is done. Let's take a look at it. I'll maximize blender again. Now that we have it rendered, how do we take a look at it? We can't really play it here. We can't really play it here except through our viewport. To view our rendered frames as an animation, we're going to have to create a new tab up here. We can come up here and click plus right here and create a video editing tab. Video editing right here. Now here is our view where we can see the frames and here is our timeline where we're going to put the image sequence of our frames. So I will go back to the beginning point of our render, which is frame 50. And I'll press Shift a and choose image sequence. Then we can go to C temp. And here are all of our frames. Now, we can come over here and our start frame is at 50. We can put the in-frame at 160 if we want. And also, we need to select all of these. We need to hover over this area, hit the a key to select all of these frames. Now we can click on Add Image Strip, and there we go. And there it is. Now if we just hit the Spacebar, it'll play at less than 25 frames per second while it caches the frames. And then it'll kick into 24 up here. So there it is. Yeah, that's looking pretty good. Actually, we don't get that shadow. Dear. We only get a shadow on the ship as it's coming into the landing bay? Yeah, I think that's pretty good. I think that's okay. I'll Spacebar again. And now before we do our final render, I think what I'd like is if we go back to frame 500, let me come over here and put frame, start one in 500. And we go and go to the end. One problem I think I have with this is that it's difficult to see or get a sense of scale. Mean how big is this ship? Is a human being this tall? Is it this tall? You know, what, what's the size of the ship relative to a person? And I think what we could do is we could add a couple of people right over here standing and waiting for the ship to come in. Maybe they're waiting for whatever's in the cargo container. But ultimately, I think having that sense of scale and the frame is really going to help give us a sense of what we're looking at here. So in the next video, what Let's do is let's go out, find a couple of free 3D models of people. And we're going to bring them in and put them here and even maybe have them animate an idle pose and idle animation as they're watching this come into the landing bay. So that's coming up next.
57. 056 Importing Characters Into the Scene: The final thing I'd like to put into the scene is a couple of characters just for scale, so we can tell kind of how big things are in the scene. To do that, I'm going to bring characters in from Mixamo.com. If you go to Mixamo.com, you can create an account, a free account, and you can download characters and animations for your scene. I think what I want is some sort of sci-fi characters, maybe a male and a female. And I'm seeing this one right here, this X0 gray under characters. And let me just click on that. Yeah, I think that looks generally kind of sci-fi ish. I think that would probably work for this. So let's now find an animation for this. I'm going to come over here to animations. And here are all kinds of animations that we can apply to this character. I'm just going to search for idle animations, see what they have here. There's a lot of fight animations that we don't really need for this disguise. Just going to be watching the ship come in. I don't think that's quite right. Let's look at this one. Does breathing idle? Yeah, I think that one might do because all we really need is just the animation they're running while the ship comes in. It doesn't need to be anything special. Just give them a little bit of movements. So they're not just statues in the scene. So let's go ahead and download this character and the animation I'm gonna come over here to download. And we'll download this as an FBX, will choose 24 frames per second, since that's what we have here in Blender. I want it with the skin or with the character mesh. And I'll choose know keyframe reductions. So with that list, just click download. And here in my project folder I've created a folder called characters, so I'll just open that up. And instead of breathing idle, Let's call this one male idle because we'll be bringing in another one. All right, there's one. Let's go take a look at characters again. And this time let's search for female. And I saw a pretty good sci-fi female character here. Here we go, called Astra. So I'll click on that. And there we go. And now I don't want the same idle animation that will look a little strange. So let's go over to animations again. Type in idle. And let's see what we have here. So this is the one I just used, that breathing idle. Let's take a look at this idle animation here. I'll click there. Yeah, I think that's sufficiently different from the other ones. So with that, let's just click on download here. And once again, FBX 24 frames and with skin, click download. And let's also change the name of this one. We'll change it to female idol. There we go. Alright, let's go back to Blender and let's bring these characters in. So first of all, in the outliner, Let's create a new collection called characters. I'll right-click choose new collection, and we'll call this characters. Now with this selected, let's bring in one of those. I'll go to file import and we'll choose FBX, since that's what we brought it in as I'll browse to that Characters Folder and let's bring in the mail. I'm just going to leave all of these settings at their default, and let's just click import. All right, There it is. So I'm going to click on the armature here. And with that, I'll just begin moving this into place and just drag this forward. And there he is. I'll hit the 0 key to go back to the camera and just see if we can kind of frame it up. If we turn on the overlays, you can see the bones of the armature here. I'm going to hit our z one 800 and spin them around. And maybe let's put him right about here. I'll hit R, z and kinda turn them a bit like that. All right, Let's bring in the other one. I'm going to select the characters collection again. Go File, import FBX, and let's bring in the female idle. Import. There it is. I'm going to click on the armature 0, 0, 2. And let's bring this one over. To. Bring that over here. I will hit the period key to zoom in. Let's bring this here. Maybe like that. Our z1 800. Let the 0 Qi to look at it from the camera view. Our Z. Maybe just spin it a little bit like that. Let me spin this one, r, z, little bit like that. So to turn them and move them around, it's easiest if you just choose the armature. All right, let's take a look at it in the render view. And there we go. I'll hide the armature is over here. And there we go. Now, it's like we've got a bit of an issue here. Let me select this one and hit the period key. And if we tumble around and look at this particular character, these kind of inside out, That's not going to work. So let's take a look at his material. And this happens sometimes if you import a commercial or third party character or object, sometimes this happens. Let's come over here to the material panel and let's scroll all the way down. And sure enough, we've got our blend mode at alpha blend and let's change this to opaque. There you go. That helps a little bit. It appears that we've kind of got that same problem with her hair. You can kind of see her scalp underneath the hair. So let's take a look at that. Sure enough, we've got alpha blend here. Let's go to opaque. And also it looks a little too shiny. I'll scroll up here and let's take the metallic all the way down there. Yeah, I still kinda shining but I think that'll be fine. All right, Let's hit the 0 key. Okay, we're doing pretty well. I'm going to turn off the overlays here. The problem I have with it is that they're a little too bright and that the overall composition, the frame here with them seems a little strange. So let me grab this light year. So this light that's pointing down at this part of the ship, Let's change how big that cone is. So I'm gonna come up here and click on a corner and drag down. So we have a, another view. And then down here I'll hit the 0 key so we can see through the camera. I'll turn off the overlays down here. Now with this light here, it could be that we've got too much light bleed coming down here. I just feel like these guys are too bright. So with this selected, let's come over to the light panel. And here in the size, that's the angle, it's 86 degrees. Let's click and drag that down until we get, yeah, you can see the shadow coming in. I want to move that shadow so it isn't, so the light isn't shining on them but shining on the ship. So I'll click on this little yellow ball again and drag it over and put it down on the ship. Here. There we go. If I expand that out again, there you can see it just beginning to go over the characters. So I want that block like that. So I still want it on the ship, but not on them in fact. But lets do is with this selected, let's change it to local transform orientation. I'm going to just grab this z-axis. I'm going to push it in some so that we can then expand that angle or make that angle a little bit bigger without getting it on them. I'm right about there. So I've got it up to 51 or so without getting it on them. So we get a little bit more light on the ship here. All right, I think that looks pretty good. Let's see how it looks is the animation plays. I'm going to right-click between the two windows. Click Join area, and do that. Now let's go back and see where they come in. So they come in right here at this point. All right. So we won't see them at all until here. So what that means is we can move their animations toward the end of the frame range. Currently, if I bring back the armatures here and turn on overlays, if we select one of the armatures, you can see that the animation for this character ends at 240. Well, we went to end back here at 500. So down here I'm just going to hover and hit G and just move all of these keyframes all the way down to 500, like that. And then let's select armature two for the female character. I'll hit G down here and move these to 500 here. So what I'm thinking is we're not going to see these characters till this point right here. All right. So I think, yeah, we've got plenty of animation for both of these, for the last part of the frame range. So that's good. I think that'll work fine. Now let's go ahead and play through it. Let me go to the beginning of the frame range here and hit play. And we're only running at about six frames per second. Let's pause this and go back to Solid View. I'll turn off the overlays and let's try that again. I'll hit Play. Here we go. Oh, let's see. If I turn on the overlays. We can see we're running at 24 frames. That's good. Okay. So here it comes comes into frame. And you can see him moving here and lands like that. All right. I like it however. Now that we've got the characters in, I feel like our framing is off. And I feel like everything's kind of over on this side. And we've just got some empty space over here. So, well, let's do is let's choose the camera and move back to 460 here. And I'll hit the End key, go to View and go to camera to view. Now when we move the view, we also move the camera and let's try and get it placed where we want it here at the end of the animation. So I'm going to move it like this. And once again, Auto key is turned off. So it only applies a keyframe once we've put it in place and we hit the I key. Alright, so let's, I'm going to move in some. And I kinda want the whole door to be in frame here. Something like this, maybe let me look at it through the render view. Yeah, I think you'd like that's a little bit better composition. We've got the full door here, and I've got the ship kind of in the center. Let's do that. And then let's move these characters. I'll do this. I'm going to select the armature here and go back to global. Let's do that. And maybe I'll move him over a bit and back. And now let's choose armature to move her back. And I'm like this. Let's do that. Let's try this. And our z. And I wanted to turn a bit like this. Armature 1 r z in turn him a bit, something like that. Let's see how that looks. Just compositionally speaking. I like that the ship is kind of center frame here. And then we can see the whole door. Let me turn this just a bit. Well, let's try this. I don't know about this hose going through that seems a little big now. Let me tilt up. There we go, something like that. Let's try this. I'm going to hit I and location and rotation for the camera here. Alright, so now that we've done that, let's go back to our solid view. Let's go back to the beginning frame and let's hit Play and see how this works. So here it comes, the camera's moving. All right. Well, okay, So a problem I have with it now that we've moved the infimum and I like the in-frame, okay, this is pretty good, but back here as it's coming in, it's kind of off center, right, right in here. Let's say frame to 60. Let's say this is off-center. I feel like the composition here now is not quite right. Let's see what we can do with this. Let's select the camera. We've still got that camera to view on. So as we move the view, we're going to move the camera. And I'm going to bring this over like, I don't know, something like this. So it's just more in the center of the frame. Just the composition here. I think it was just a little bit off. Alright, let's try here. I'm gonna hit I and location and rotation. Now let's go back and take a look. But let me go back to here to frame 1. Hit Play, to try it again. Alright, it comes in like the composition of this a little bit better. And now we just kinda begin to see the characters as the ship comes down. So let's see this again. Yeah, I like this composition. I feel like it might go up a little too high right here. And to fix that, this right here, we could maybe bring the camera up a bit right here. So let's try it like this. If i and location in notation, Let's try this now. Hit Play. We're getting there lies in better composition. To the top of the frame there. Yeah. And now as we move down, we see the characters revealed. Okay, Let's go with that. I kind of like it. Let's take a look at it through the render view. Let's now hit the End key and turn off camera to view so we don't accidentally move the camera. And there we go. So in the next video, we'll actually work on rendering out our final animation.
58. 057 Rendering the Final Animation: All right, I think it is now time to render out our final animation. There is one thing I want to show you here that can be kind of confusing. If I go here, say I'm at 460 away from that test range that we rendered out earlier. So if I hear hit F2 to render it out the frame, you can see that nothing happens. You just get a blank frame. And that can be confusing. Sometimes I'm going to hit Escape. What that is. Since we have a strip and image strip here in the video editing timeline, it defaults to this. Let me, let me go back to the layout and under output, if I scroll all the way down here with this post-processing, by scroll that down, you can see you've got pipeline and you've got compositing and sequencer. And compositing just means the renderer here when we hit F2 L, or Control F2. And the sequencer means this area here. The problem is, is when they're both on, they tend to default to the sequencer. So if I turned off the sequencer here and then hit F2, now we would get an image. Now, you can also do the same thing if you come over to the video editing and just take this trip and delete it like that. Now you get the same thing if this is on. You hit F2 and you get a render. So I just wanted to show you that these two things can kind of battle against each other and then cancel each other out. If you have both an image strip in here and you're trying to render frames out here. So just a warning there. All right, So since I've deleted that image strip, I can go ahead and leave these on and render here. Now if I go to my Temp folder again, I'll click here. You can see we've got the test frames here. I'm just going to hit the a key and hit Delete and delete all of those frames out of that folder. I'll just click Accept here, and then everything else should be pretty much the same. I liked, generally speaking, all of the settings that we had, so I don't really see a need to go through and change too much here. A couple of ideas. If you're willing to wait a little longer for the render, you can increase this to say, 128 or just a higher render sample to get a better image. You can also, over here, under the output, you could change the render preset 2 for k. So that's just an idea if you wanted to improve the render quality, but of course, improving the render quality increases the render time. I'm going to go ahead and leave it at 64. And I'll leave it at just normal HD resolution of 1920 by 1080. And once again, the file format is PNG, or go into the temp folder, got 24 frames per second. And our render region is from 1 to 500. So I think we are ready to go. What I will do once again is bring this in here like this. And I'll bring up the Task Manager using Control Alt Delete, and then choosing Task Manager, I'll go to the performance tab. I'll bring in that folder, that Temp folder here, right here so we can see the frames being rendered. And now I will go ahead and just press Control F2. And there it goes, I'll just scroll out a bit so we can see the whole frame here. And there we go. We can see the frames going into the folder here. We can see the GPU doing its job. And at any point in time, if there's a problem or you need to cancel or stop the render, all you have to do is come back over here and hit Escape. And that will stop the render process. And you can see here in this folder how many frames you've rendered. So we've rendered frames 1 through 11. So let's say there was a problem with frame nine or something. Let's say we open this up and we see a problem. What we can do is we can delete, say, 9, 10, and 11. And then we can just come back over here and change the frame, start to frame 9. And now we can continue on with the Render Control F2, and away we go. So rendering the animation out frame-by-frame allows you to stop at any point, fix a problem, or pause if you need to, and then begin again at that exact same place. Well, all right, I'm going to let this render out for awhile. And then when it's all done, we'll come back and look at how to turn the individual frames into an MP4 video file. All right, the render is done. Let's put it in the video sequencer. Now, we're hearing the Layout tab, so I'll just hit Escape. And let's go ahead and maximize the blender window here in the video editing tab. Of course, let's come back here and here's our timeline. I'm gonna hit the Home key to zoom out. And then let's press Shift a image sequence, and let's browse to that C Temp folder. Here's our rendered images. Let's hit the a key to select them all. I'll put a start frame is one, and in-frame is 500, and we'll put it on channel one, Add Image Strip, and there it is. Now if we go back to the first frame, I can bring this down some and make this a little bit bigger like this. Let's go back to frame 1, 0. We can't go back to frame 1 because we have a Start Frame of frame nine here. So let's go back here to our window here. And we do have frames one through eight. Recall that we did do those, so that's good. Let's now change our start frame here to one. And there we go. We go back to frame one there for our frame range. All right, so I'll hit the Spacebar and will play. Once again, it's going kind of slow before it caches all the frames into memory. We'll see if it speeds up once it plays through this. All right, so let's see if it'll play full speed. It isn't playing full speed here. Well, one way we can get it to play a little quicker here in the video sequencer is to actually render it out to a video file. So let's do that. What I'll do is come over here to the output again under the Output tab. And instead of a PNG, Let's change our file format to FFmpeg here. And then under encoding, we want to change the container to an MPEG-4. I've got it at H.264. I like that particular video codec. And we've got it at medium quality. You can change it to high-quality if you want. I'll go ahead and do that. And encoding speed as good, that should be fine. Now we have no audio on our video currently, so we don't need to deal with that. And then let's tell it where it needs to go. So instead of C temp, I'm gonna come over here and let's go to our project folder. And I will create a new folder here, and let's call this renders. And I will put it in writing here. Let's call this Render Test 0, 1 and accept. And now once again, we can come over to render and Render Animation. Now this should go a little quicker. We could change this back to video sequencer. And here we go. And once this is done, we can press Shift a, bring in a movie. We'll browse to our project folder. And in the renders folder here's that render test. It's going to change the name here, rename and we'll just call this. I'll just take off the frame numbers here like this. Let's put the start frame at one and put it on channel 2. And there we go, we'll select our file, add movie strip in there it is. Now we can delete this old one here. And let's give this one a try. I'll go back to frame 1. Hit the space bar. And now we're going at 24 frames per second. Yeah, so it's flying in. The landing gear, comes down. It comes in a little bit, a little bit fast. I think I might want to go in and adjust that just a bit. Also, I might want to take it from medium high contrast down to medium contrast. So even at this point in the game, there could be things that you want to change a bit, and that's fine. That's what it's all about. But I think the last thing we really need to do is go in and add a bit of music and a few sound effects. And then I think our shot will be complete.
59. 058 Adding Music in the Video Sequencer: Well, since the last video, I went ahead and re-rendered the animation. I changed the color management from medium high contrast to medium contrast. I just felt like the other was a little bit too dark. And then I exported an MP4 out just like we did before and called it render test2. And I've put it here on the timeline. So I went through the same process, rendered out the frames, then brought the image sequence in here, and then rendered out with FFmpeg to an MPEG-4 and then brought that in to the timeline, just so it would play a little quicker. So we would play more at 24 frames per second. Alright, so now what I'd like to do is begin adding some sound effects and some music. But first, let's just talk about navigating the timeline here. When we have a video clip selected with that thin white line on the top and bottom, we can hit the G key and we can move it around to anywhere that we like on the timeline. I'm going to move this back. You can see on the left side of the clip is the start frame and at the end on the right is the in-frame. So I'm going to put it one to 500 and then click. Now if I wanted to change where it began or where it ended without moving the whole clip. I can just select one side or the other of the clip here. Say I select this and then I hit G and move it. And now that trims it to say frame 190 here. So I'll press Control Z. So you can move the clip and trim it depending on where you click. If you click in the center, you can move the whole track. If you click at the ends here, you can trim the head or tail. Now to add a fade in and fade out, I can select this and then right-click and choose fade and fade in. And you can see here in this panel right here that it's a 1 second fade-in. Now I can change this to two. I can make it a 2 second fade. So now if we hit Play, you can see it, pay it in like that. We can also come over here. We could do the same thing at the tail. Right-click, fade out. And we can change our bade here if we want. Alright, so we've got a fade in and fade out. But if you look at it, it's kind of an Alpha channel. It isn't really black, it isn't really fading up from black. Now, most video players will see this as black. But just to be sure, we should probably put black there. To do that, we can just come to the timeline, press Shift a, and bring in a color strip. I'll click color. And there we go. Now we have a black. I can click on the tail end here, hit G and move it. So now if we hit play, hit the Spacebar, it'll fade in from black. We can do the same thing at the end. I'll just select this clip, press shift D and duplicate it and bring it all the way back here to frame 500. So now we have a fade to black. All right, now let's bring in some music. Here is my project folder that we've been putting our textures in Blender scene files in. I've also created a Sounds folder here. If we open this up and go into the music folder, you can see we've got a sound file here. Now if I click here to display mode, you can see it's a piece of music called the return home, bye miranda Lyle. So proud father here has to use a bit of music from his daughter. So she is a very talented musician and has composed a piece of music for us here. I can grab this clip right here and drag it down and put it right on track 3. Now if we zoom out, it's quite a long piece of music. It's probably two minutes long and we're only going to use the last 20 seconds or so. So I can come over here, I can bring this, I can click and drag and bring this here. And I can bring the cursor to this point and to trim it, to cut it here, I can come over to strip and choose Split or hit the K key. So here I can just hit K and that will split this. Now I can take this end and hit Delete. And there we go. Now it would be helpful for this piece of music to be able to see the sound wave. And if you want to do that, you can just come over here to the side panel now you can hit the End key if you don't have it up. And you can click on display a waveform. And there we go. Now you can see the waveform here. You can also adjust the volume. Right here. It's at 1. Oh, I'm going to take it down to 0.5 and let's just play it and see what we have. So we can see coming in with the music. That actually looks pretty good already. All right, so we've got a little bit of work to do here. What I wanna do is move this up some, there's a piece or a piano note at the end. Right there, that little note right there. I'm going to take that and I want to move it to where it fades out. Just click and drag and move it to about right here. Now if I click and drag here, we don't hear the audio. I'd like to enable scrubbing. And to do that, we can come over here to playback and scrubbing here. Now when we click and drag, you can hear the music as you scrub. So that kinda helps when you're placing audio. Now also, I'd like to be able to see my frames a little bit better. I can see frames down here as I'm going through. But if I come down here and take this playback window, this playback bar, and just click and drag up. And we can see a timeline here. You can kind of see, if I zoom out some here. There we go. You can see the timeline or cursor moving along the timeline here. So I can click and I can drag to where I want it to be. Let's say that I want it to be at 495 or so. There's that little piano note there. I can press Control and middle mouse button and make those tracks a little bit bigger. And then I can click and drag and move it to its roots right there. And I'm going to have that there. I need to extend this out. So I'm maybe I'll take this out to 550 or 575. Let's do that. And I can click there, hit G and move that in just a bit like that. Alright, so let's see how we're doing here. I'm going to press Control middle mouse button and collapse those down just a bit. And I'm also going to take this black and extend it back to 575 as well. Alright, so let's see how we're doing here. Okay, that's kinda what I want to now let's go back to the front and see how we're doing here. Yeah, I like that little swell of music as the ship comes around the corner there. That's kinda nice. Yeah, I like that. That's nice. Yeah, kinda like that. Okay. So I'm gonna take this edge right here and hit G and move it in to frame 1. I'm also going to fade this out. I'll right-click choose fade out. And what do we have here? We've got a 2 second fade out. Is that going to be okay? Yeah, that'll be fine. How about the front? Let's put a fade in up here and let's make this only 1 second up front. Let's try this. Yeah. Pretty well. All right. So we need some sounds of the ship coming in. We need some sounds of the ship kind of decelerating and landing. And I think we need a sound effect or two for the ship when it touches down. So in the next video, we'll begin working on that.
60. 059 Adding the Fly In Sound Effects: All right, let's work on the sound effects. If we come back up one folder here in our Sounds folder, you can see I've got a sound effects folder. If I open that up, I've got five different sound effects in here. And the place where I got these is called freesound.org. So let's go there. Here we are. And if you create a free account, you can download any of these sounds for free. And you can also upload your own sounds if you want to share any audio recordings for people with their own project. But even though they're free, I can't distribute these to you. You're going to have to go and find your own sound effects here. But all I've done is just go to Search sounds. And like I typed in ship landing here. And if I scroll down here, this spaceship landing is the one I'm using here. We just move this over. This spaceship landing here. That's the one I downloaded. So if we just click here and play, this is what I'm going to use as the ship comes down onto the ground. So that's all I've done. I've just gone out to freesound.org and I've found a few sound effects. You can take a look at the names here and type in the exact names if you like, into Freesound and come up with these very same ones. So I'm going to grab this spaceship landing here, click and drag, drag this down and drop it right here. Now it of course comes in where the cursor is, but I can click and drag and move it. And I will turn on the waveforms here. And I'll click here, hit G and trim it back to about here. And also, I don't know that I need all of this. I'm going to zoom out here. Well, this may be it. I'm going to mute this, the music. I'm just going to select it and hit H. And then to unmute, you can press Alt H. So I'll just select that hit H, and now that's muted and I can just play it in here. Yeah, so I think that's what I want. Let me know That's the takeoff, so I'll hit G and trim it back to here. I don't need all of this back here and I'll hit G and trim all of this. And then I'll also turn it down a bit as well. I'm going to maybe put it at 0.5 for now just to be able to play it and edit it without it blowing us out here. So where does this ship began coming down? I'm just going to play it. So maybe right about here. Let's grab this and bring it in. And I'll bring it to about 250 here. And let's try that. I think maybe I'll also sync up the timeline and the playback timeline as well. So let's go to View sink visible range, and view sync, visible range here as well. So as we zoom one out, the other one also zooms. That's going to make it a little bit easier, I think. All right, so let's just play it. I'll hit the space bar. All right. That's pretty good. I don't need it to go much beyond the end of the video now, do I? So I could probably set that here. I could maybe give it a 2 second fade-in. Let's try that. Let's type in 2 over here. Let's also fade it out at the end. Let's give it a bait out, and let's give it a 3 second fade out here. Maybe even more. Let's try 4. I'm just taking a look at the curve here. You can see it kind of fading out there. All right, Let's give this a try again. Spacebar. Yeah, I think that's pretty good. There's a couple of things I think we can probably do here. I think I'd like it to be a little bit louder up front. And if you've noticed, as I create the fade in and fade out, we've got keyframes here. Alright, let me expand this up a bit. I'm going to click on this little arrow right over here. That'll bring out the summary. I can twirl that down. And if we take a look at this, got a row of keyframes for that volume, for that wave file right there, I'm going to twirl the armature up. We don't need that, but I'm just going to middle mouse button click and drag and bring that volume up so it's right along the top so I can see what keyframes are for this particular audio clip. And if I choose the music, you can see the keyframes here as well. So what I can do is maybe go to this key frame right here, and you can see it says 0.5. And I could take this up, I can take it up to like 0.7 and Enter. And then I can either hover over it and hit the I key or I can right-click and choose Replace keyframe. So I'm just going to hover over this and hit the I key. And there we go. We've got a new keyframe. So now we've got this up to seven. And this one here, if I move the cursor, we've got this one down to five, and then it fades out here to 0. So let's try that. We play it. Then. Coming down like that. Yeah, I think let's go with that. Okay. Now I need something coming into this scene, a sound for the spaceship coming in. So this other one, I have this spaceship cruising. Let's try this. I'm going to click and drag and bring it to here, drop it in. So now this one, let me turn on the waveform here. And if we zoom out once again, it's pretty long. I'm going to select this audio clip and hit the H key to mute it. Now there's a little sound effect in here. And I wanted to use as it's coming around the corner. Let me see if I can find that. Where is that? That's it. Actually, that looks pretty good, didn't it? All right, let's take the sound. I'm going to take the stand down 0.5 here for now. And yeah, that's not bad. And then, okay, so I'm not going to want this whole thing. I'm going to want to bring this in and I'm going to kind of fade this one out as I bring this one in because I wanted to transition from the flying into the landing sound effect. So let's see how that works. I'm just going to go back to the beginning, hit the space bar and let's see how this works. Okay, so what I want is I want it to begin to be a little bit louder right in here. So right in here, I think we're going to need a frame. Let's come over to the volume field and just hit the I key and that'll create a keyframe here. Then as it comes in all the way to year, I wanted to get louder. And I think I want it right right in here. I'd like you to get louder right there. Let's just say 285 is where we're going to have it be up to one, have the volume go up to one there. And I'll hover over that and hit the I key. And then let's bring this out a bit from here. I'm going to drop it down quite a bit pretty quick. Maybe right in, let's say 300. I'll take it back down to 0.5. This and hit the I key and we go. And then from here I want to take it on down to 0. I don't know by about 360, Let's say, let's try that. I'll come over here, type in 0 and then hover over it and hit the I key. Okay, so let's try that with this one. I'm going to select this press Alt H. Let's go back to the beginning and let's try this. Sort of comes in. We've got that strange little noise. Gets louder down on the lambs. Yeah, I think that's pretty good. Let's bring in the music Alt H for that. Go back to the beginning. And let's try this again. Yeah, actually, that's kind of working for me. I think. The only thing I can see as I might want to move this forward a few frames. Let me, which would mean I may have to move all of the keyframes back a few, but let me see, I'm going to hit G. And the first frame says it's 54, so on and move it back to say frame 50. And let me just play here and see when it comes in. Well, I don't know. Let me go back to 54 here and let me try that again. Actually, that's kinda I like it because it comes in just as that engine comes into frame, so okay. All right. So I think it was okay before let me try it one more time. Yeah. Okay. I think that works pretty well. So in the next video, we will work on adding the sound effects for the landing gear. Touching down on the floor.
61. 060 Editing the Landing Sound Effects: The remaining sound effects that I have over here are for the landing gear when they hit the ground. So let's work on this. I'm going to Control middle mouse button and kind of collapse those down. So we have a little more room here to add more tracks. And I think let's scroll forward and right about here is where the landing gear touches down. I've got well, a 100. Yeah, that makes sense. That's where we put it, right. So let's grab one of these. I'll grab the low metal hit two and bring that in, drop that in right here. And let's see how that works, how it plays. I'll hit the spacebar. Actually, that looks pretty good. Kind of believe that that's actually pretty good. Okay. So let's go with that placement there. Let's bring in the other one. And what I want, It's kind of a chunk, like they all don't come down exactly at the same time. So let's grab this low metal hit three, and I'll put it here and let's bring it out like this. Let's see if this works. So we've got basically four hundred and four hundred four. So i've, I've got them about four frames apart. So let's see how this works. Pretty good. First of all, they're a little bit loud. Let me take this one down to 0.5 and I'll take this one down to 0.5. Let's do that so we don't blow out our ears and I'll move it a little bit closer to 40 to let's see how that works. That's a little bit better. I like that. Okay. Now they're kind of tinny. I mean, it's a good metal sound, but I found this stretched canvas bass drum sound too. So they drag this and, and drop it right here. And then let's bring it. So it's right in line with this one too. We could go through and turn on the waveforms here. Why don't we do that so we can see these a little better. And I'll middle control, middle mouse button click and drag to make them a little bit taller so we can see M. And let's try this or let me turn this one down. Well, I'll leave it at one just to see how it sounds. Alright, so let's play this. All right, I wasn't really hearing that. Let me press H on these two just so I can hear this. Okay, It's pretty low, so let's bring that up to and see how that sounds. All right. I like the quality of it, that's what we need. So let's see how the sound together again, I'll select this Alt H, H, play it again. Yeah, that's pretty good. Let's. This first one, let's take this down quite a bit. Point 2. And this one Let's take down to maybe point 3. Let's try that. I'm just trying to get a decent mix. It just feels like these are standing up out of the mix just a little bit too much. Yeah, I kinda like that. I'm going to take this to 0.152.2 and this one is still at 2. Let's see. That's kinda nice. Yeah, let's try that. I'm going to stretch these down a bit and move them. And then let's go back to the beginning and let's play this through. Okay, I think there was a little bit off here because the computer was trying to catch up, but let's just play this year to make sure. Yeah, let me take this. I'm going to hit G and move it forward two frames in these two, I'm going to move forward two frames to 400 there. Yeah, I'm gonna go with that. Now for the sound of the engine kinda trailing off here. I feel like it kind of hangs around a little too long. Here. Let's go back and let's take a look at where that fades out. So you can see, let me control middle mouse button. You can see the curve here. And as it comes down, it's not coming down straight. I think I wanted to come down straight. So right here to 0.7. And at this key frame, it's at 0.5. And then over here it's at 0. So we could just delete this one keyframe and have that curve kind of flatten out a little bit more. Let's do that. Let's just hit Delete, and there we go. You can see it's just kind of flattened out some. Let's take a look at that. Yeah, it fades away a little bit quicker. I like that. Now also the music, I feel like the music could be just a tad bit louder. And to do that, I can't just select it and change the volume because we've got keyframes here. We need to go in and change each one of these key frames. So this keyframe here at frame 25, where it fades up from 0, that's at 0.5. So let's change that to 0.6 and then hover over that and hit the I key. And then over here, where it fades out, let's select this, change it to 0.6, and then we'll hover over that and hit the I key to change that keyframe as well. So now let's go back and play it through one more time and see what we think. I'll go back to the beginning. Hit Play. Now once again, the sink was a little bit off there on the pits, but I think that's just because the computer wasn't able to keep up. Let's play it here. And I think that looks good. All right, I think we're there in the next video. Well, Let's do is go ahead and render this out again with our audio and take a look at the final render.
62. 061 Rendering the Animation with Audio: Well, the last little bit of work we need to do is to render this out with our audio. We rendered it out once to an MP4. But this time what Let's do is come down here below the video settings. I still have H.264 and high-quality here. And the container is mpeg 4. But right down here under audio, we need to tell it what audio codec we're going to use. And for this with an mpeg 4, it's probably a good idea to use AAC here. And we've got audio channels, stereo, 48 K for the sample rate. This all looks pretty good here. So once again, we have our file format at FFmpeg. And this time I will change the name from renderText 0 2 to render final. Now of course, once we do this kind of final render, we may play it and see things that we want to change, and that's fine. But ultimately this will be the final step in the process for that shot. All right, so now that we have all of this setup, we can now come over to the render menu here and choose render animation or Control F2. So here we go. And as before, we're going a lot quicker than we were rendering out the whole frames. But still this is going to embed our mixed audio in with that video file. All right, the render is all done. Let's bring it over here it is. Let's open it up and take a look at it. And there we go. Our finished animation.
63. 062 Conclusion: Well, thank you for joining me with this course. Learn animation production with Blender 2.9. I really love seeing an animation from beginning to end. I think it's an amazing process and I hope you've enjoyed this to know to artists are the same and no two artists have the same process for creating their art. I hope this course has given you some ideas and tools that you can use in your process. In the end, what specific tools you use isn't what's really important. It's really about you getting your ideas, your visions out there, and communicating the stories that you have in your head. I really hope to see your animations out there soon. Thanks again for joining me and take care.
 Darrin Lile, Blender Foundation Certified Instructor