Transcripts
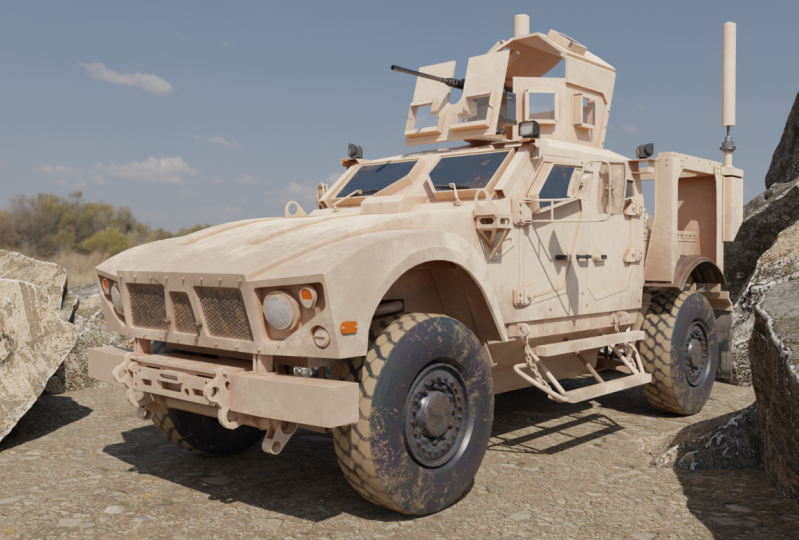
1. 001 Introduction to the Course: Hi. Welcome to Blender 2.8. Game vehicle creation. I'm Daryn Lile, a Blender Foundation certified trainer. And in this course, we're going to create this bad boy here. This is on Osh Kosh em all terrain vehicle and we're gonna use Blender 2.8 to create all of this. We're gonna go over blenders, modelling tools. It's modifiers. And also the techniques and processes that are used when working on a complex project such as this will talk about bringing in reference images, breaking a complex model into manageable pieces. And when we're all done, we will also hear in blender, UV map this entire vehicle. So in our UV editing tab here, we can see the UV map for the vehicle and will be going over How you create this as well. Now, once we're all done here in blender with the modeling, the UV mapping, and will also be creating a color i d map here in blender using vertex paint. But once we're all done with that, we're going to export this out as f b X files and take it into substance painter to do the texture ring here in substance painter will build all of our textures will add a bit of dirt and scratches and things just to give the model a little bit of interest. And then, from here we will export all of our textures out to texture maps. Included in that will be the texture map for the tire will bake a normal map to capture high resolution texture from, ah, high rez three D object. And we will bake that into a normal map to keep our poly count fairly low. Now, once we're all done here, we will export our model out of blender and export our textures out of substance painter. And then we'll take all of that into unity. Karen Unity will bring it all together, will add the materials and textures to the vehicle. And then we will use unities, vehicle tools, rigging system to rig the vehicle and set up the controls. So weaken, drive it around over all kinds of terrain and really just kind of have some fun. So this course will take you from the very beginning to the very end of the vehicle creation process for a game vehicle. Now, because we're going over so much information here in this course, I do assume a certain level of knowledge of blender unity and substance painter. This is still a beginner's course, but I do expect you to have at least a passing knowledge of the programs. We will begin slow, but probably about halfway through the course. We will begin picking up some speed and moving along at a pretty good clip. But I've made a point in this course to not skip a thing, to show every detail throughout the entire process, so you'll be able to see every step along the way. All right, well, I'm looking forward to getting started here. I hope you are, too. In the next video, we'll bring in the reference images so that we can start on the modelling process that's coming up next.
2. 002 Importing Background Images: before we begin modeling. Let's take a look at the reference images that we're going to use for the project. When you download the resource files, you're gonna have a reference Images folder here. And this is just a collection of things I've found on the Internet, just images of the Oshkosh M A TV in various angles. And there are even a couple of pictures in here that are of scale models. Yeah, here's one kind of like toys of the vehicle as well, and my purpose for these is just to get another angle on it. So I tried to find as many different angles as I could. Some of them have accessories on them, like this sign and this down here and the chain that I'm not going to worry about for this project. But generally speaking, it gives us a pretty good collection of angles that we can use as were modeling different parts of the vehicle. In addition, um, I've also here we go. In addition, I've also downloaded this collection of Ortho graphic views from a website called the blueprints dot com. Let's take a look at that here at the blueprints dot com you can see that it's just a website full of blueprints. Ortho graphic views drawings of all kinds of things, everything from cars and motorcycles to iPhones and helicopters and everything else. So what I've done is I've just typed in Osh kosh em Dash a TV, and I've chosen this one that says M R A. P, And this is the image that I've downloaded now. It was free. I just had to create an account. And then you can download any free image you like. There are higher resolution images that you can pay for, of course, but for this project, we didn't need anything more than this. So once I downloaded these, what I did is I went into Creed A, which is a two D paint program very much like Photo Shop or Carell or Gimp, and you can download it at create a dot org's. So if we go to create a you can see, all I've done is I've cut these images out here. Let me turn off the background here. I've cut these images out from the main image. Here's ah, the top view and the front in the back. So I've cut each of these out and put them on top of each other in layers. And then what I did is say I took this front image here and I tried to scale it up and down so that the tires would align and accessories like this piece up here would align and maybe the roof would align. So each of the images is about the same size as the others, even though their different views and then what I did is for each of these. I turned on the plain white background and then just went to file export. And I exported these out as J Peg images. And here they are here. So then let me just cancel this. And if we go into that folder, I'll go into our resource files here. And I have a folder called Background Images, and this is where I've put those individual images and these will be used within the three d view of blender itself. So let's go ahead and add these. Let's go back to Blender and here and blender. I think I'm just gonna hit the a key and hit, delete and delete everything in the scene. Now let's work on bringing in those background images. To do that, I'm gonna press shift A and that will bring up the ad menu and I'll come down here to image and background. And if I click this and add an image, let me show you what happens. It actually aligns to the camera that you're viewing it from. So let me load the ah ah, load the side view here and I'll click here. And if I tumble around, you can see that it's aligned toe wear my view Port Waas and we don't want that. Let me just select it and hit Delete And what I want to do is actually go to the View port through which I want to see that particular image. So I'm gonna hit the one key on the num pad, and now when I place it here, it will be aligned to the X and Z axes here. All right, so let's press shift a good image and background and let's bring in the front line here. So now we have this image in our front view. That's good. But what I also want to do is bring the wheels up so it's sitting on this X axis as if that's the ground plane. I'm gonna go ahead and change this name of the empty that we just brought in here and call it front view. And right down here, this object data panel right here, I'm gonna click on that, and we have some properties for our reference image. So what I'm gonna do, first of all, is turned on the Alfa so we can see that X axis through the image. And then I'm gonna click and drag on the Y field here on the Y axis and just drag it up straight up. So those wheels sit right on the x axis. Something like this. There we go. All right, Now notice that display perspective is turned off. So if I then tumble around here, you can see it's not in the perspective. You What I can do is Aiken, turn that on for just a minute, and then I'm gonna go to the move tool and just move this straight back. And maybe, um, I'll hit the n key to open up. The sidebar and under item may be in the y Axis Aiken type in ah, four and hit Enter, and that will put it four units in the Y axis there. So there we have our first image in the View port here. The next thing let's do is maybe hit the three key and go to the right Ortho Graphic view. Now what we want to do is press shift, a go to image and background. And here, let's bring in that side view. I'm gonna click there and there we go. So there's the side view in the right Ortho graphic view. Let's go through the same process here. I'll turn on use Alfa. I'll click and drag and the Y axis and kind of dragged us up. So those wheels sit right on the y axis there. And you may be wondering why the Y axis here is taking it up when the Y axis here is going from left to right. Well, this is assuming that there's just two axes that you have just a necks and a Y field and nosy. So it assumes ex and why going up and down? All right, so now we've got If we tumble around here, we've got our one image. What happened to the other one. Well, it's because display perspective is turned off, so we'll just turn that on for now. And ultimately, I'm gonna have this off because I like to be able to model without any of the background images in the perspective, you But when I hit the one or the three key, then I'll be able to see them. But for now, as we're setting them up, I'm gonna turn this on so I can see what I'm doing. So we can move this back in the X axis and even over here in the X Weaken type negative four and hit Enter, and that'll place that right there. All right, so we've got two of our images in. Let's now put, um, the 3rd 1 in the ah top view will put it down here on the bottom. So toe, look down onto the grid. Let's press the seven key on the num pad and from here, let's press shift a image and background and we will choose that top view right here. There we go. We tumble around once again. We can't see it. Let's turn it on when we go and this one will pull down in the Z Axis kind of like this and down here we could type in. Maybe, Ah, negative one in the Z And there we go. All right, well, let's do one more. Let's do the back view. So if we're looking at the front view from this angle, we want to be able to look at the back view through here. We hit the one key to go to the front view. Let's hit the control and one key to go to the back view. Now let's press shift a empty and background and let's bring in the back image. Here we go. Once again, I'll turn on use Alfa. Let's bring it up in the UAE. Tell those tires sit on the X axis. There we go and I'll turn on display perspective for now. And let's take this and move this this way. And maybe let's type in. Ah, negative four in the UAE there. So there we have all of our image is set up and ready to go. The last thing I'll do is just select them in Turn off this display perspective Over here. There we go. So now we don't see any of them Now we can hit the one key and see and see the front view the three key and see the side view the seven key and see the top view and control one and see the back view. All right, so in the next video, it's actually begin blocking in our vehicle.
3. 003 Considering Scale: I see now that one thing I forgot is to actually give names to these three images as well. I called this one front view. I need to give these names too. And I can't really tell what they are, so I'm gonna have to choose them and bring them back into the perspective. You just so I can see what they are. However, one neat trick is if you select all of these, I'm just holding down the shift key. If you hold the Ault key down while you click a check box, ault click, It brings back all of them. In other words, if you want to modify a property of multiple objects, you can usually use the Ault key to do that. All right, so now let's go ahead and clean this up. So this would be the, uh, back view here, right? This would be the side view. And of course, this is our top view. Okay, so now that we have these named Weaken, select them all again and then all to click this display perspective and hide them all away . All right, I'll press all to a to de select and there we go we are ready to do something put what should we do first? Well, let's hit the three key and go to the side view. And I think what I'd like to do is just bring in at least some temporary cylinders for the tires. Just toe. Get a sense of how big it is in our seen here. Now you may have heard before that you should model to scale. In other words, create the models that you're building to re a world scale because of things like modern lighting and text oring techniques, as well as creating particle effects and dynamic effects and things like that. Those are all based on real world scale. So, as I said, you may have heard people say model to scale. Well, you don't really need to model to scale, but it needs to end up that way. In other words, it really doesn't matter what size you use while you're modeling the object, because in the end you can select it all and scale it down toe however big you want. So if you were modeling, say a ladybug, trying to model that RIA world size from the very beginning is gonna be very difficult because of camera clipping and some of the tools working on such a small scale. So I like to model big, and then, when it's all done, select everything and scale it down to the size. It should be all right, So let's go ahead and create some cylinders for the tires to create any object. You can just come up here to the ad menu, and you can also in the three d view press shift A to bring up the admin you as well. So I'm gonna go to mesh and cylinder and the cylinder here. If we click right here to open this panel up, we can see that it has 32 sides that it has a one meter radius and it's two meters tall. It also has a cap Phil here, oven in gun. You can see if we pull this down. We can have a cat, Phil or a top and a bottom of a ningun a triangle fan or or nothing at all. A ningun is any polygon that has more than four signs. Currently, since this cylinder has 32 sides here, the polygons on the top and the bottom have 32 sides as well. So if we change this to, say a triangle fan now, we're gonna have triangles up here on top instead of just one big polygon face. If I tap into edit mode, you can see that here. That triangle fan. Okay, so if we tap back in the object mode and I go back to that side view with the three key let's now turn this cylinder in the Y axis, you can see the Y axis is going to the right and left here. When we're in global orientation, you can see the Y axis up here is well, so to turn something around the Y axis, we have a couple of options. We can come over here to the rotate tool right here and then if I'm tumble around, we can see it here. We can click and drag on that green access. Since you can see the Y axis is green, I can click and drag on this and turn it. You can see up in the upper left hand corner, the rotation in degrees, right? If I hold the control key down, it'll snap it in five degree increments. So there's 90 degrees. Now. Let me just hit control Z and under that, just for a minute. Let me show you another way. Weaken. Do that. We compress are for rotate press. Why? For the axis that we're going to turn around and press 90 and that will be the number of degrees that will turn it. And then, of course, we have to hit. Enter. So there we go. It's two different ways of doing the same thing. All right, I'll hit that three key and to scale this down, I'm gonna the s key. Scale it down to about the right size and click with the G key. And just bring that right over here. I can't see through it right now, so let's go to wire frame mod. I'll hit. I'll get the Z key and got a wire frame. And I noticed that when I hit the Z key and we have this white background, we can't see the shortcut key here in the three d view. Right? If I get the n key to open that panel, we can't see it very well. So maybe I ought to reduce the opacity of these images. Yeah, let's do that. Here, let me just go. I'll hit Z and Goto wire frame and now I'm gonna hit s and scale this down a bit. I'm just gonna try and get it about the right size. If the G key etcetera, scale it down a little more geeky. I'm just trying to put it in place and it even doing this, it seems like this white background it's just a little too bright to be able to see things easily. So now that we've done this, I'm gonna tumble around and you can see it there at the Z Key and go back to solid mood. Now let's bring those images back again And let's adjust the opacity so I'll click on the back view front, side top, all to click on display in perspective. So there they are. I'm gonna all to click on use Alfa. There we go. And then I'm gonna all to click and drag on the transparency. You can see if I drag. They'll all change the opacity or transparency as well. Um, at the same time. So let's some maybe take it down. 2.25 There we go. so we can still see it. But it isn't quite as bright in the view port. Maybe that will help us both with moving objects around and seeing the shortcut keys here in the view port. All right, so let's go to the front view, Hit the one key. And now we can maybe scale this thing down in the X axis here by click. Here you can see the X axis is the red one. So I can hit s and X and scale this down. And now let's move it to one side over here. Yeah, there we go and hit S and X. And maybe I'll scaled out just a little bit more like that. And these are just temporary tires. Ultimately, we're only gonna bring one tire or one wheel tire combination into unity because that one tire is gonna be used to be parented to all four of the wheels for the vehicle rig. But for now, we're gonna use these is temporary pieces. Now let's duplicate this. Let's put the other tire. And over here I'm gonna press shift D. And then I'm impressed The X key and now I can slide that over in the X axis right over here. All right, so now let's like these two. I'll go back to the side view with a three key and let's duplicate thes all press shift d to duplicate and then impressed the Y key. And now we can only move it in the y axis. They win a little too far. There. Here we go. Right about there. Okay, let's see how that is. So there we have just the beginnings of our vehicle were just kind of blocking it out, getting a sense of what shapes we're gonna use as we flesh this out. So in the next video, let's start working on the front part of the vehicle, the hood and the fenders.
4. 004 Beginning the Hood: as we create new objects were going to get Mawr and Mawr clutter here in the outline. Er, it isn't too bad right now. We can pretty much pick out what things are. But as we move forward, we're probably gonna want to organize this a little bit better. So let's do that. Let's maybe click on this scene collection here at the top, and I'm gonna right click here and choose new collection. And now let's call this new collection. Let's call this, Ah, reference images. There we go. Now we can take all of these. I'll just once again hold the shift key down all of these background images and let's drag it into this collection right here. There we go. Now Weaken, twirl this up and collapse. That so it isn't taking up is much room in the outline. Er now these air Just our wheels. That's okay. I'm gonna leave Those is just cylinder for now. But I'd like to change the name of this. Let's, um, change this to ah vehicle Maine. We'll just have this be our main collection for the objects that we're going to create for the vehicle. Now we may create Mawr and split them up and organize them in different ways. But that's the great thing about this new out liner and blender 2.8. It's very flexible, so we can use it as we go to stay organized. All right, so just twirl this up here. I kind of want to hide these images again in the perspective, you. So what I'm gonna do is this collection I can right click it and choose select objects. And then I can come over here and choose Ault and click, and that will hide those away. So you can select and de select objects here by right clicking on a collection in the Outlander. So I'll just choose de select objects And there we go. Let's go to the top view. Now I'll hit the seven key on the number pad, and here we are in the top view. What I want to do now is create the hood and the fenders. Currently, the tires air overlapping that so we can't see all of the hood. So I think I'll just grab these and I'll just hide them in the view port by turning off the eyes right there. That just temporarily hides thumb. Now what I want to do is create a polygon plane here in the center of the grid and use that to begin extruding up and back to create the hood. Now it doesn't look like to me that this image is quite in the center yet. Can you see how it looks like? It's just a little bit off. So let's adjust this image before we do anything else, I'll go back to our outline, er, select our top view and in the X axis for the image. I'm just gonna click here, and that moves it over just a little bit when you think. Is that pretty much down the center there? I've just clicked on the arrow over here to move things over just a little bit. Let me go up here. There's really nowhere else to see. If it's exactly down the center, this gun could be off center, but this piece here looks like it's right down the middle, and that's pretty good right there. Okay, so that's good. I'm gonna go back and choose the vehicle. Maine seen collection so that the next object I create will pop into that collection. So it's press shift a again and let's go to mesh and plain. And there we go. So you can see that here. I'm gonna go ahead and change that name and call it Hood. Now, here we have it again. This time I'm gonna get the Z key. And now we can see that Z key. That's good. And I'm gonna go to wire frame and I'm gonna hit the s key and scale it down quite a bit. Maybe something like this. And then I'm gonna bring it forward and put it right here on the edge of the hood right here. The front edge right there. And maybe I want to scale it down a little bit more. Maybe something like this. Okay, so I've got that now on the front edge. What I want to do is I want to begin extruding this edge out along the width of the hood and then extruding these edges back toward the windshield. And as I do this as I extrude and model the hood on this side, I want the other side automatically match what I'm doing. So to do that, we need to add a mirror modifier. So what I'll do is split this down the middle, delete half and then add a mirror modifier so that whatever happens on this side will also happen on the other side as well. So let's tab into edit mode. You can see him here in edit mode. I fit the tab key, and I'm gonna insert an edge loop here. To do that, I can press control are and that's the loop cut and slide tool. You can actually see that if I hit the escape key, you can actually see that right over here and that the shortcut is control are all right. So if I hit, control are and then I hover over an edge of this plane. You can see it's going to try and put on edge down the center of it, perpendicular to whatever edge I hover over. So what I want is I want an edge going this way. So I'm gonna hover over one of these edges and then I'm gonna press enter and there we go. So now we have an edge right here that I can slide around and put wherever I want. But what I want is that I want it to be right down the center. So what I'm gonna do is I'm just gonna hit the escape key here. And now that pops it back into the centre. Right? If I had wanted it in place, I would have clicked the left mouse button. But because I wanted it right down the center, I went ahead and hit escape and it defaulted to the center. I'm gonna hit the period key to zoom in, and there it is. So now what I'm gonna do is go to face mode with the three key you can see up here. We've got Vertex mode, Ed, select mode and face mode here. We can also choose these with the 12 and three keys right there. So I'm gonna hit a three key to go to face select, select this particular face and I'll hit the delete key. When I do, it pops up a menu asking what I want to actually delete because this one face is made up of edges. It's made up of Vergis is But I just want to delete the face so I'll click faces. And there we go, Tam, back into object mode. And there it is. There's are one measly polygon plane. But from this, we're gonna be able to create that hood. So let's go to the side view now Will hit three Key. And there we go. And here is our polygon plane, but we just need to move it up to where it needs to be. Right up here on the hood we go. Now, it looks like to me either the side view of our vehicle here is too small or it's moved back in the Y axis too much. Because if you recall, if you hit the seven key, we've lined this up right on the front of the hood, right? Right up here So that Ed should line up when we had three key right there. But it doesn't. I'm gonna go ahead and move this in the Y axis moved this image. So let's go to the side view and I'll just click the X. I'll click the left arrow here and just move this forward. Just a smidge. There we go. Now I'm gonna slick the hood, see how we're doing. Ah, still not quite there yet. A little bit more. Maybe right about there. Let's see. Good. Yeah, that's pretty good. And maybe even just a little bit too much. So let's bring that back. Just a smidge. There we go. Something like that. All right, So we have that right on the edge. I'm gonna hit the r key to turn it. Let's hit the G key and move it up right there. So now we've got it in line with the hood, and we have it matched up to our top view as well. Let's now add that mirror modifier. I'm gonna go ahead. And with this selected an object mode, I'm gonna go to our modifiers panel right here. And then I'm choose add modifier mirror. And there it is. So we're mirroring in the X axis, and we should choose clipping so that any points in the center are automatically emerged together. All right, so what does this do for us? Well, if we hit Tab again and we go to edge mode right here or push the two key now we can select an edge. And if we extrude this over, I'll hit the e key to extrude, and I dragged the mess you can see as I move One side, the other side comes along as well. So that's how we're going to create this hood. We're gonna use our multiple views, and we're gonna extrude this up and back toward the windshield. So in the next video, let's work on that.
5. 005 Extruding the Hood: Let's go back to that top view with E seven key on the num pad. And let's just begin extruding out to about right here where the hood ends and the fender begin. So with this edge selected, I'm here an edge mode. I'm gonna go ahead and hit E, and I'm just gonna slide this over and I'll hit you again and maybe I'll do it one more time, right here. Looks just like that. All right, now, we could clean this up a bit. We could take this and hit G and kind of move it and kind of make thes a little bit mawr uniform if we want. Well, it all to a to de select. Now I can press the one key to grab this Vertex to go to Vertex mode and hit the G key and just move it at an angle. Kind of like that. So now what we're gonna do is gonna select this edge back here and extruded back. So to select this edge, Aiken, click this vertex and then press control and click this Vertex and it will select everything in between those two selections. Now the problem, we're gonna have is we're gonna need to see both the top and the side view at the same time . Because let's just say I hit E and pull this forward like this or Polis back. Now I can bring it out or Aiken, bring it straight either way. But let's just say if I did this like this and then I could grab this for tax and move it over like that. There we go. OK, so now we've got this in place. However, if I hit the three key, you can see that I've actually just gone flat. I've just extruded along the y axis there, so we don't want that. We should really do this while we're looking at the two views the front and the side. So we could come up here to this corner right here of the three D view and click and drag and pull out a whole new screen Blender is very adaptable. In this way. You can create and arranges many windows as you want. If you want to get rid of this, you can hover over the border between these two windows and right click, choose, join areas and then just move the mouse in the direction you want to expand the window. So I want to expand this one to the right. So there we go. Now we're back to just one view. There's also another way to do this. Of course, as we've seen, there's always a few ways to do any given things. And blender. We can also open up the quad view. And to do that, you press control Ault Q and that will open up this quad view. So what we have here is a top view, a front view, a side view, and the view you were in when you hit control on cue and we were in the right Ortho graphic view. But I could just use that middle mouse button to tumble around and see it in perspective here. Okay, so now I'm gonna click here to minimize that window. Now we see it from the front and the top and the side, and that's what we want. That's gonna help us a lot. So I'm gonna click on this here and control, click that Vertex on the end. And now here in the right Ortho graphic view. I can hit G and just move that up. So it's in line with the hood there from the side view. In addition, I'd like to make this a little bit more evenly spaced again. So if I take this when I can make kind of move it out like this g moving out like this or kind of space, the's a little bit better as we extend it back toward the windshield. These two I could I could also move these over a bit like this. Kind like that. So it's just trying to keep things fairly neat, fairly organized, fairly uniform as we bring it back toward the windshield. Now we've got this thing right here, this indentation on the top of the hood, we should probably take this into account. So what I'd like to do is just grab this edge here and just move it up back like this. And I'm just pulling it out to the side just a bit as I do to keep it in line with this part of the hood right here. So I think something like that, right up to the tip of there. And then maybe I'll grab these as well. Control, click here and kind of Bring these out to there. There we go, so it just makes it a little bit more even. But now that we've done that in the top view, you can see we're off a bit down here in the side view. But that's why we're doing this. That's why we're doing it this way. To select all of these here, I can once again click here and then control Click here, or I can also hit the Beaky for Border Select and then click and drag all of these right here. There we go. And now I'll move that up. There we go. Let's now extrude again and pull this back. So what I'll do with these still selected I'll hit E and I'll pull back and I'll kind of stretch out just a bit like this. I don't know that we need this stretched out quite that far like this and move that one. And now, of course, we need to hit border Select at the Beaky borders like these up. I still have this one selected. I better press shift and click that to de select it. Now I'll hit G and move them up here in the side view like that. Now there are a couple of things I need to keep in mind, as I do. This one is how this indentation goes straight back along the length of the hood and this part over here kind of angles. So what I want to do is kind of match the geometry of what I'm doing here to this, so that I can just select these faces and extrude them down. So I'm going to hit the Z key and go toe wire frame here so it can see through the polygons to the image below. So I'll take this vertex and kind of move it over here and this Vertex and move it here So you can see I'm just trying to build the edge of that indentation as we go. Now. This one could move over here, I guess. And this one over here, we're gonna lose our uniformity over here. If we do that, we could also insert a new edge. Loop in here is well too. So if we take this and control, click this and hit G two times. Well, it geeky two times. And what that does is now it allows me to slide that edge along the existing edges of the hood here so I can select that, Let's say and this and I can hit G two times and slide that over. You can see how you can kind of reorganize the geometry as you go here. So now to insert one right in there once again, I can use that control our shortcut, and then click. And then I can slide it around right about here. And there we go. So now we have an edge that we're gonna be able to use to follow that line up the hood. So let's now do that. Let's let's go ahead and see if we can extend this on. I'm gonna move this in like this, trying to keep it fairly uniform as we go. Okay, Now I'm gonna hit the Beaky border, select thes, and you see how they're kind of jagged here. We could straighten that up a bit to do that to kind of flatten that up. What we can do is scale it in the axis that's perpendicular to the edge. So the axis that's perpendicular to that is the y axis, weaken, select all of these, it s And then why? And now see how they kind of flatten up there as we scale them toward the edge right there . So that straightens them up some. Okay, let's go ahead and keep going here. I'm gonna hit E and pull forward or pull toward the windshield like that. We need to expand these out just a bit. So what we can do is select these from here to here with control, and then I can scale these out all at once. Let's give it a try. What I'm gonna do is move the three d cursor to this point, and then I'm gonna scale from that point outward toward the side of the vehicle. So I'm gonna click this one Vertex, and then I'm gonna come up here to mesh and choose Snap and now, weaken, snap the cursor to the selected Vertex. We can also do this with shift s as well, but I'll click here and that moves that three d cursor to that point. Now, what we can do is select all of these points, so I'll click here and select all of those. And if I switch to this move tool. You can see that the pivot point or the center of this selection right here happens to be right here. And if I scale, if I hit s and scale this out, you can see it's gonna scale at that point. But I can change this to be at the cursor by coming up here pulling down this menu and say , Make the pivot point the three D cursor. So I'll click here and now you can see that pivot point has moved to where the three D cursor is now. What we can do is scale in the X, and it'll scale from this point. So I'll hit S and X. And now look at this. See you, weaken. Scale it from that point. But now we can move this out and in as needed. And it looks to me like I went a little bit too far out right on this line here. So what? Let's do it. Let's do that again. I'll take that point. I'll go to mesh snap cursor to selected. Now let's select all of these points S and X and weaken Scale those in and out there as well. Right? So you can go through and do that for any of these. If you want to get these in line. So let's say we do it one more time. I'm gonna press shift s this time. And now I get this pie menu cursor to selected or the two key. Now I'm gonna control Click this press s and X And there we go. All right, so in the next video, well, let's do is finish this up and then we'll use the extrude tool to push that inset down into the hood, so that's coming up next.
6. 006 Finishing the Hood: Well, I need to come down and selected these points and move them up to match the blind of the hood here in the side view. So press the Beaky and border, select all of those it g and moving on up. There we go. All right, So let's try it again. This time, I'm gonna do it from this side here. Let's see how this works. If I hit the e key, I can extend this on up like this and maybe go right about there. Let's see how it worked up here. That wasn't too bad, now, was it? We could maybe move this a little bit more in a place like that. Take this one and move it into place like this, and then slide these over just a bit as well. There we go. Now select all of them. Control. Click here, press s and why, and scale it in. But look at what happens. What happens is the three D cursor is the point of the scale. So if I hit s, you can see it's scaling down toward that three d cursor, so our flattening technique won't work like that. So let's go back to having the pivot point at median point. Now you can see it's here. Now we hit s and why? And now it works a little bit better. You can see it flattens it up there. There we go. I could probably select this one point here and move it over some like that. So just constantly updating as you go to get things the way you want them to be. Here we go as you extrude up. All right, So let's try this again. I'm gonna slick this control Click this. This may be a little bit too far out. All do that. Okay, so now that we have these, let's try it again. I'm gonna hit E and pull back like that. I'm tryingto line this point up with that edge, and in fact, it looks like I may be able to just move it on back to the very back of that indentation. So let's do that. Let's just hit g and move it back to here, and then I'll select this whole row. I can do that by pressing Ault and clicking on that edge, and it'll select everything along that row. So I moved that back a bit like that. Same thing with this all to click. I move that back and we go. Now, let's do our little expanding trick here. I'm gonna select this one. Move the cursor to it. Shift s cursor to selected or the two key. I'll just press two now. The cursor snapped to that point. I'll press control click to select all of those and then press s and X and scale amount. Now look at what's happening. Why is that happening? I didn't change my pivot point. So let's come up here. Change to the three D cursor. Now, one thing we can do instead of using this menu is we can also use the period key, not the one on the number pad with one on the keyboard with the letters. If I hit the period key here, I get another pie menu. And here is the same things in that menu we just saw. So I can choose three d cursor here and that pops it over to there. So once again, that's just the period key is the same menu as the menu up here. All right, so when a press s and X and scale that out a bit while we still have these select. And I'm also going to come over here to the side view and press G and move that up just a bit. However, look at what I've done there. I need to select this one more point right there. Now we can hit G and move them all the way up. There we go. Okay, so now we've got that. Um it looks to me like I might be able to just extend that all the way back cause it looks fairly flat from here on out. Let's see how it works. I'll hit E and just move this straight back like that. Now, what I've done here is I've moved it to this edge right here to the edge of this antenna. But it looks like that antenna right here is in front of the back or the edge of the hood. So even though I've moved it to where it looks like it stops here in the side view, it looks like it continues on past that here in the top view. So I'm just gonna switch my pivot point at the period key. Go back to median point. I'm gonna extend this on back like that. Now we have a problem over here and that there's kind of a cut in right there. We'll deal with that here pretty soon, but for now, I'm just gonna move these out like this. There we go. All right, That's looking pretty good. Let's now switch back to a solid mode. I'll hit the Z key and go to solid. Now may go ahead and turn off the quad view for just a minute of press control. Alta que and that will go back to our main view here. Now what I need to do is these faces here. I just hit the three key. The's faces here are the ones that I think we're going to extrude in just a bit to get that indentation. Let me just make sure I'll hit the one key. Now I better get the seven key and then hit Z and wire frame. Let's just make sure that that's what we want. Yeah, that looks like it is. So I'm gonna extrude those down. And it also looks like that this part down here is a little bit farther down in this part up on top. So we're gonna try and reflect that as well when we extrude down. So let's try this. I'm gonna get dizzy again and go to solid. And I just wanted to go straight down here in the Z axis. So since this is angled is at an angle like this, when I hit E, it's going to go perpendicular to that angle. And that's not what I want. I want it to go straight down now. If you wanted to go like this, that's fine. But I'm gonna try it so it goes straight down. I'm going to hit the escape key and nominate drag straight down with this tool right here. So it goes straight down instead of at an angle. All right, so I just want to go like that. So now what I want to do is tilt this piece, this selected area down just a bit so that it is a little bit deeper and angles up toward this area here. So what I'm gonna do is use that pivot point again. I'm gonna hit the two key to select an edge, and I'll click this edge and then I'm gonna press shift s and cursor to selected right there. Now I'm gonna move the pivot point to that cursor period key three D cursor and then, oh, hit the three key and select all of these faces again. And I can go through and just do one at a time like this. Or I can also hit the sea key and use the circle Select tool. And then I can paint the selection like that. And when I'm done, I hit the right mouse button, and that gets me out of that tool. Now, with all of this selected, the pivot point is up here, three d cursor. I can come over here to the rotate tool, and I can actually tilt this down like this. Okay, so there you go. I can make this, and I'm gonna press the shift key just to make it move a little bit slower, so I have a little bit more control over it, but maybe I do something like that. There we go. So now you can see it's down a little bit deeper here than it is up here. It's a small thing, but I kind of felt like I wanted to do that. Now, The last thing before we move on for this is because we're creating this in a fairly low polly way so that we can take it into a game engine. We're getting these kind of blocky areas on the mess. You can actually see the edges of the polygons here, and that may not be what we want for this. We want it to be kind of a smooth hood, a smooth surface. So what we can do is we can actually use the shade smooth tool, and I'll get to it right over here with object. And we can click on shade smooth. And now take a look at it. It looks, well, terrible. I understand that. But before we do anything else, take a look at the area in here. You don't really see the blocky lines of the polygons anymore. It's actually pretty smooth. We've got all this stuff and that's and we're gonna have to clear that out. But you can see that it looks fairly smooth here. So how do we clean this up? But what we can do is come over here to this object data tab right here. If you click on that and then twirl down the normals section here now. Well, let's do is turn on auto smooth, and that already helps clean it up quite a bit, right? You don't see the ah blocky polygons there. But we can also take this angle if we take the angle all the way down to zero. Now you can see again those blocky lines. And as we click and drag on that field and dragged that angle up, you can see them disappear around what, around seven or eight degrees, right? And if we keep going on up past 70 into the eighties, you can see we get a little bit of an artifact of here. And then on past 90 that's what we were seeing before. So it's just using the angle of the polygon, trying to figure out where to smooth and what to keep sharp. So I'm gonna bring it down. It looks like it's pretty good, right around 60 or so. That's looking pretty good for now. We're gonna have to adjust this as we go as we build other parts and stuff. But for now, this is looking pretty good. All right, let's go back to the side view and take a look at this. What we can do in the next video is work on the front and the side of the hood, and then maybe we can begin working on the fenders, so that's coming up next.
7. 007 Modeling the Fender: All right, let's work on the fender. Now, if I tumble around here, I think what we can do is tab into edit mode and selected these edges here. So I'm currently in edge mode. I can also get the two key to go into that. And if I select an edge and then control, click this edge over here, that'll select all of them. Now what we need do is go back to our side view with a three key. You see, there's just a little bit of a lip here that goes down before the fender begins to flare out. So let's try and just capture that first. So with that edge selected, I'll just hit E. And I'm gonna pull the mouse down. Kind of like this right around in here, I think. And then what let's do is hit the one key to go to Vertex mode. And now I'm gonna click out here to de select, and then I congrats these points and just begin pulling them down like Beth around the fender there. So if I've got it like that, then I should probably bring these down as well like this. So I'm keeping in line here. And I think for this I should maybe bring it out like that. Okay, So now if I hit the two key again and grab these two edges and hit e and extrude, Aiken, bring these down and I guess I'll bring it straight down so that this point right here is in line with this. I'll hit that one key again and select this vertex and move it over and select this vertex and move it over here like this. There we go. Something like that. Now, how do we get this area from these two edges here? Well, what we can do, maybe is take this edge right here. Let's go ahead and hit E and extrude this down like this. Here we go. And then hit the one key again and let's move this up. And now, if we put this right in place, maybe we could grab this edge again. It e and bring this down right to that corner there. And then I'll move that edge up like that. There we go. Now we've got this basic outline of the fender and this all we really need to do is just select these edges here and hit the F key. There we go and F is for Phil or create a face. So now we've got that whole area filled in here. That looks pretty good. And I'll just align these up here like this. There we go. OK, so now it's tumble around and take a look at it. I'm not sure if it's correctly aligned yet. Let's go ahead and hit the one key and take a look at it here. That actually doesn't look too bad. It looks like it's going back toward the windshield toward the side of the vehicle pretty well there. Yes. So let's go with that. And we'll go ahead and extrude the fender out here now and then. We'll extrude down in the front. I think, as we continue, I'd like to see thieve, Vergis ease and edges and faces as we're seeing it on this side over here is well, And to do that, we can just go back to the mirror modifier. So over here to the modifiers panel right here. What we can do. Let me just widen this out just a bit. Is weaken. Turn on the edit cage right here for the mirror geometry, so I'll just click this, and there it is. So now we kind of see it in the same way on both sides. All right, Now what we can do is select this edge. I'm gonna all to click this edge right here. And that's the one that's gonna be the fender, right? If we hit the three key, that's the outline of the fender. So what we should do now is from here, go ahead and just extrude out to the edge of the fender. So I'll hit the e key. Just move the mouse out and I'm gonna move it out to about right here, and it looks like it kind of angles up a bit. Let's see if I'm correct. I'm gonna move this out to about right here. Here we go. And then I'll hit the one key and let's begin moving these out as well. So I'm just gonna move these out kind of like this with the G key. Move these out. So they're in line with the rest of the fender here, the rest of the geometry. And now I'm just gonna grab it in the X axis and move out like this and movement like that . OK, so now let's take a look at it. Yeah, I think that looks pretty good. Something like that will probably need to add an edge Loop or two in here with control are . But for now, I'm gonna leave it like that. Let's go back to the front view and let's take a look at extruding this down. I think we're gonna have to close the gap here before we extrude all of this down. So let's just go to edge mode with a two key and then press control and click here and that will select that whole edge. And now I'm just gonna hit the e key and then click. And then I dragged down in the Z annexes just right down to their Now let's take a look at this. What I want to do is combine these together. So it's all one piece. If I hit the three key and take a look at this, you can see it kind of angles back just a bit. So if I take this and pull it back a little bit, that'll get us part way there. Now what I can do is go to Vertex mode and take this point. And I better turn off the manipulator here. I'm just going to click on the select box button. Now I can get in here a little closer, except take a look at this. Remember when I was talking about modeling big and then scaling down? This is one of the problems that you get into if you try and model to small is camera clipping. So as we get a little too close, it clips into the geometry itself. See? So what I need to do if I want to get any closer here, is actually reduced the clipping distance for our view Port camera here. To do that, I can press the end key to bring up this panel here on Goto view. And right up here you can see we've got a clip start of 0.1 meters. So any time I get this camera closer than 0.1 meters to the object, it's gonna clip the geometry, so I can't see it. So what I'm gonna do is reduce the clips start, and I'm gonna take it down 2.1 and let's see how this works. There we go. Yes. So that's a little bit better. And I can get really close in here. That's good. All right, so that's all we needed to do there. I'll hit the in key to close that. Then I'm gonna press shift and click that Vertex right there, and then I want to merge these together. Now we can go up to Vertex and merge Vergis ease. But the shortcut key is all too m. So I'm just gonna press ault em, and then I'm gonna merge these at the last one selected There goes it moved that 1st 1 to the position of the last Vertex. There we go. So now that's connected there. So now what we can do is click this Vertex and then I could control click this vertex right here, and that will select all of that edge all of those edges, and I'll hit E and I'll click. And then I'm gonna go back and turn on my move tool right here. And I'm just gonna grab that C axis and pull it all the way down like this. There we go. Right about there. I'll take this point and I move it down like this and there we go. So now if we tumble around, we've got that basic shape. I also feel like this fender right here kind of angles back. Let's take a look. If I hit the three key, you can see it kind of angles back right here. I feel like we need to pull those back to here. But before I do that, look at this. I need to grab all of these points and pull them back here. So let's do that. Let's get the Z key and go toe wire frame and then I'll hit the B key and border. Select all those points, and that selects all of those. Now I'll grab them and just moving back and let the G key and let's move these back like this. Yeah, about like that. Okay, so now that we've got those, I'll grab those two points again here in here, and let's move these back as well. So I think I move these back to here. That might work. Let's give it a try. It's kind of hard to see here exactly where these should be, but if I tumble around, let's take a look. Good. A salad view. Maybe I could bring this one down a bit, but it g and bring that down a bit like this. And maybe this 12 looks like this one's a little too high as well. Yeah, it looks like these are a little bit too high. So I need to pull these down like this. I mean, grabbed this one right here. There we go. Pull that down. Yeah, it just looks like when I extruded them, they all became or extruded out a little too high. So I'm just gonna go through and bring these down to where? The reference images, that's all. And this happens. You just have toe keep checking your model from all angles and make adjustments along the way. All right, so there we go. That, I think is a good beginning shape for that hood fender connection there. So in the next video, we'll begin working on creating the insects for the headlights and the grill.
8. 008 Finishing the Front Fenders: Okay, Now let's take a look at these headlight insets here. If we go back to the front view with one key and I'll hit the Z key and go toe wire frame again, let's take a look at these right here. Now it looks like I should be able to insert an edge loop for the top, decide the bottom here, and then we could extrude end to get this inset here. Actually, let's take a look at a reference image. Kind of a 3/4 view to see if we can get a better sense of this. I'm gonna open this up just a bit and I'm gonna click right here and create a new window just pulled down and create a whole new window here. And then I'm gonna change what kind of window it is with this menu right here. And we've got a lot of options here, But what I want is this image editor right here. So let's click that. And now I'm gonna go to image and open. And if I go to my Reference Images folder right here, I've got all the reference images that we're gonna use for the project. But If I click this right here, then I can see each of the images. Um, let's take a look at this one. Maybe let me open this up and yeah, let's look at this. So here is that inset right here. This is what we're going to try and get. I'm not going to get that curve right there and some of these curves around the edges because I don't want to add that much geometry to this being a game vehicle. I'm gonna keep it pretty low, Polly, But we're going to just try and get these basic shapes. So well, let's do is go ahead and press control are over here, and I'm gonna click and move up and kind of get this top part right in here, and then I'll press control are and let's ah, click here and move it over. So we get this right here. Let's do that again. Control are going to bring it right over to there. So we've got that part right there and then over on the bottom here. I'm the press control are and put this right here. So what I've done, let's go back to the salad view so we can see what I've done here. All I've done is just created edge loops to kind of block out a rectangular shape here where the headlights are going to go. That's all I did. So I inserted this edge, this edge, this edge and this edge. So what let's do now is create kind of an angled piece. I just want to create a Nedum going from here to here, and I can't really do that with the control. Our loop cut tool. It only goes perpendicular to selected edges. I can't do it diagonally to do it diagonally. What we need is a knife tool. And, of course, blender comes with a knife tool. So if I hit the cakey, I can just hover over an edge and you can see where I'm gonna place this and I'll click. And then I'll bring it up here and find a place on this edge. Maybe right in here and I'll click. Here is Well, now all I've got to do is hit the enter key, and that creates that edge. All right, so let's go back to the salad view now, and there it is. There's that edge that we just created right there. So now what I want to do is take this face right here. I'll hit the three key and select that, and I'm just gonna extrude it back. I'm gonna get e and click, and then I'm gonna drag back in the Y axis, and there we go. So there's that insect. The next thing I want to do is create these insets for the grill and the grill. We're not gonna model all of these pieces. We're gonna use a texture. We're gonna go into substance painter and find a texture that we can use for this. But let's go back to that front view and let's take a look at it from here. Z key got a wire frame, and it looks like we've already got I'm gonna hit the one key here. It looks like we've already got the edges for the top and the bottom here, and even some of these pieces here. So if I take this, I'm just gonna grab the X axis and move it like this. I can kind of create that angled piece like this, and maybe I could even take this and just slide it over, and I get kind of that angled pieces. Well, there, in addition, maybe I could grab this and move this over here and grab this and move this over here to kind of block out that as well, just using existing edges and then maybe limps. Let me try this. If I took this edge and just moved it straight down, actually, instead of using the Z axis here, I'm gonna hit G two times so I can use that slide tool and maybe just move this down like this. So it kind of blocks out that shape there. Yeah, let's give that a try. I'm gonna hit Z, go back to solid, and there we go. So now if I hit the three key, you can see that's the shapes that we're going to get from this. And I think that's pretty good. I think that's what we want. So what let's do once again, is just hit the e key and then I'm gonna click, and then I'm gonna drag straight back in that y axis like that. There we go. All right. Actually, that may be too much. It looks like I don't need to go that deep now, do I? Let's Ah, let's press control z aways and get back to there and then I'm gonna push thes back forward . We really don't need to go that far in for these. Okay, There we go. Now, we're getting a little bit of artifact ing, um, around in here with these edges. I don't know if I could maybe come back over here to the object data panel and play with the normals degrees to get this any cleaner. Well, if we go down to 55 that cleans that up pretty well. Yeah, so that's not bad. Okay. In addition, I'd kind of like to change the view port display here. It's beginning to get a little bit difficult to see some of these extrusion ins. So what I'm to do is come over here and pull this menu down, and there's a couple of things that we can try. We're currently using this studio lighting, and what we could do is come down and click on cavity. And that kind of helps us see the edges a little bit better. Not quite what I'm looking for, though We could change the type of cavity from screen to world. And that's not bad, Aiken. See these extrusion? Is these insects a little better now as I tumble around? That's not bad. Let's see what else we have. I'm gonna turn cavity off and let's go back up here and go to Matt Cap. We'll do that. And yeah, that's not bad either. We could select this sphere icon here and try another Matt cap. Good try, though. That's the one we already have. How about this one here? Who? I don't like that. Yeah, I'm not sure about any of these. I don't think I like any of these others. We could try this. No, I don't think I like those. I'm gonna go back to studio and I'm the turn on cavity there. I'm gonna use that for now. It may slow down our view port a bit as we continue to add more geometry, but at least for now, I think that looks pretty good. All right, well, let's go ahead and work on the side of the fender here. If I tab into edit mode, let's just all to click this edge. Let me hit the two key and then all click this edge. Now they hit the three key. We can begin extruding this in to get this area right here. So what let's do is just hit the e key and then click. And what I'm gonna do is scale in toward this pivot point. So we'll hit the s key and then scale in just a bit like this. Not too much, something like this. And then I'm going to the G key and move these down event like this so you can see I've kind of aligned this point right here, and they could scale in a little bit mawr and do that again and move it right there. There we go. Now, what I can do is hit the one key and come in here and begin moving individual points around to match up with the image of the fender. So maybe help bring this up in D here like this. And it this and that there, like this so I can just begin rearranging these vergis is to get the curve of the fender. Maybe bring that to their grab this one. Bring that to their something like this just to get the basic shape of it, that's all. All right, let's tumble around and see how we did. Yeah, that doesn't look too bad. It looks like we've got a point here that's kind of sticking up a little too high. Let's see how this looks. Yeah, so maybe I could grab that and pull it down some. And if I try and click that point right behind the gizmo there, I have trouble with that. You can't select a point through the move gizmo, so sometimes I have to click on that select tool and then click there. Let me try this. Yeah, there we go. That's looking pretty good. So now we have that fender area. If we zoom out over here going to see that there's kind of a flat edge right there. So it's kind of flared out just a bit. And then there's that flat edge right there, so we don't really have the flare out currently, and I think we're going to need another edge there to be able to flare this out. So let's go ahead and press control are and add an edge right in here and maybe pull it down. I don't know. Somewhere in here. I could also take thes points here and hit G two times, and then I'll be able to slide them along the existing geometry. Same with this G two times, and I can slide that down like that. Okay, so now if I select this and control click this. Yep. That did it. Okay, so now I go back to my move, tool. Let's just take this and move these out. Just a bit too kind of player. That out? Just a little. We could also hit the seven key to see how we're doing up here. You see, if I flare this out, there's that flared offender right there. Okay, It's kind of difficult to see, but it looks to me like this part down here isn't flared. So maybe we shouldn't be flaring these down here. So let's take these and bring him back in. Go back to that seven key and begin bringing these in a bit like this. Yeah. You can actually see it here too, from the top view that it kind of flares out there. Yeah. So let's try the front view. Let's bring these in just a bit. Here we go. Let's try that. Okay, that looks a little bit better. Now let's get that flattened Ridge right there by tab into edit mode. Let's see what we can do with that. I'll all click this edge. And what? Let's do Well, it looks like I've got these off a little bit. Let me put these back before we do anything. It's a whole lot easier to fix it now than to do it after we've extruded. So what let's do is now Let's hit E and click and then I'm gonna scale in again. And then I'm gonna pull this down like this. That may be a little bit too much. Let's try that that all right now I can come in and just thes points and get him or evenly spaced all the way around here. Here we go. Let's try that. Yeah, we've got a little bit of an edge there, but I feel like we need it to be a little bit sharper. So what let's do is let's select this edge. All click this edge and let's make it a little bit sharper. What we can do is actually press control e to bring up the edges menu. And we also have that up here, the edge menu here. And then we can choose Mark Sharp, so we'll click that. And then if we tap back into edit mode, you can see that edge now is pretty sharp compared to the way it waas. All right, so now that we've got this front part of the vehicle in the next video, let's work on some of the pieces up here in the bumper.
9. 009 Beginning the Front Bumper: Well, before we go any further, let's go ahead and bring these wheels back. I'll just click on the I icon over here in the outline, Er and let's bring those wheels back, and Okay, well, we can kind of see where we're headed. There. Let's now work on the bumper here on the front bumper. And this particular image has this black piece here, and I don't think I want that. I think there are other images that we can look at that don't have that. So I'm gonna click image and go toe open. And, um, let's try this one here. Lets see how this one look. Yeah, that one looks pretty good. Um, as a reminder, I'm blocking this out with very basic forms You can see here. And I think I mentioned this earlier that I'm not getting this curved part or this curved feature of these insets here. And ultimately we may. It very well could be that as we take a look at this once we get all the pieces in place, then we can go back and add little details that we think we might need. So, for example, like this, um inset here we could select these edges and then bevel these edges. We could then right click, go to bevel edges or control be so I'll just press control be. And we could drag these out, scroll the mouse wheel, ADM or edges to it and curve these edges a bit, so it has more of that rounded feature to it. But I don't think that's something we're going to do quite yet. And that's because you can see it adds polygons to it. So currently we're down here at about 14 almost 1500 tribes. But if I press control Z to go back and undo that, then if we tap back into object mode, we can see that were down to 1200 tries. So just adding those little curves really adds quite a bit of polygons. So what we want to do, I think, is get everything in place and then see where we need it targets specific areas that we really think it's gonna add to the overall effect of the vehicle and add our extra polygons there. So if I began adding Bev als Teoh every edge along here, we would get way up into the millions of polygons very easily. And I don't want to do that with this particular object. I'm gonna keep it as Low Polly as I can and be as efficient with the poly count as I can be . So we're gonna keep blocking this in and tell the very end. And then we'll begin adding Bev ALS and other little details as we think we need it. All right, so let's work on this bumper here. First of all, I'll just block in the two sides of the bumper, let me hit the one key and go to the front view. And then I'll hit the Z key and go toe wire frame. And so we've got this piece here in this piece here. So let's let's block the's in. What I'll do first is move this three d cursor to the center of the grid. And to do that, I can press shift s and then right here we have cursor to world origin, and that's the one key. And over here is cursor to selected. And that's the two key. So shift s one and two is a great shortcut combination to remember. So I'm just gonna hit the one key and that'll move it to the origin there. All right, so now let's press shift a mesh cube, and I'm going to scale down and bring this up. And let's kind of put this in place right over here, so I'll just hit G and move it over here. And, um, let's scale it up about like this, and then let's see how we're doing on the side. We need to move it forward quite a bit and it looks like my tires, my wheels air still, um, back where they were when we first created them, and we've moved the image up some. So what I'll do is I'll just grab these and let's just adjust this and this is this is gonna happen as we do this. We're gonna continue to readjust as we go, going to move this forward at the period key, and I'm just gonna move it right about here, maybe scale it down a little bit more and it looks like it's pretty thick here, but I don't think it is. I think what's happening is we've got a bend in the bumper here cause look at how thick it is here. But look at how thick it is here. So I think we need to add an edge for a bend. Let me show you what I mean. Here. First of all, it's tab back into edit mode and in three Key And just select that. And I'm just gonna drag that over. Tell about that long there. And I think what we have here is this bend right here. You can see that edge. So we need to add an edge right there so that we can bend this back and then we'll get that thickness. So I think the bend is right here on this side of this piece. So I'm gonna press control are and add an edge right here. Okay, So now that we've done that, what we could do is select this face right here, go to the side view, and now we drag that back like this. So now we get that thickness, but we're moving it back. Were angling it back like this. I think it's supposed to follow the line of the headlights there. Right? So I think that's what we want. Now I'd like to mirror it over and to do that We need to move the origin over to the center of the grid. Now, we've been moving the three d cursor with the shift s key combination. But to move an origin, we're going to need to come up here to object, go to set origin. And now we can move the origin to the geometry to the three D cursor. And let's go ahead and just move it to the three d cursor here. So there we have it there. Now, if we mere this object over it will mirror around that center point and hopefully pop up over here where we want it. So I'll go to add modifier mirror, and there it is. Okay, So what else do we have here? It looks like we have kind of, ah, box in the center here, So let's go ahead and create that. I'm gonna go in press shift, a mesh cube, what's it s and scale that down. And now let's move this forward year and bring it kind of into place. I'll hit the period key. Now I think it needs to be a little bit smaller. Let's go in and hit the one key and bring it up to here. I think it needs to be about, like, this. Hard to know it really is hard to see exactly how big this should be. But what we're doing is we're trying to just put in just enough pieces here to kind of fool the eye into the thinking. There's more than there is. We're not creating an engineering drawing or a detailed, exact replica of the vehicle. We're just trying to get enough pieces in so it sells it to the eye. That's all we're doing here. And in doing that, we're gonna hopefully keep the poly count fairly low. All right, so we've got this piece in, I'll move it up. So it's about like this, you know, that looks pretty good. Um, I may want to bring this up. Some like this. Maybe even like this. It's really hard to know, but I think I want to take this face here and this face and delete thes. I'll hit the X key and choose delete faces. And there we go. So now we've got that piece in. I need to add edge loops here so that we can extrude in this piece. There's kind of an inset here. You can see that the cut outs are in. So what let's do is let's press control are and I'll scroll the mouse wheel to create. Well, let's create three. Let's do that and I'll click twice there. And then I'm gonna press S and X and scale these out to the edge like that. Impressed, control are and create a horizontal hedge like that. So now what we can do is take these faces here and push them in just a bit like this. E push in just a bit. And there we go. Now we have these extra faces here. Let's get rid of these ex delete faces. So there we go. Now we've got that inset right there. All right, so we have that generally blocked in. What let's do in the next video is go ahead and create this piece and these insects or these ah cutouts here. And then we'll also create this piece that sitting right below it kind of in front that has cut outs as well. So that's coming up next
10. 010 Continuing the Front Bumper: to create these cut outs and this extruded piece here, we're gonna need to first add a few edge loops. So let's come into here and I'll press Control are and I'm trying to figure out how many we should have let me hit escape there. It looks to me like we should have 1234 on each side. Let's give it a try and see if that will work. I'll press control are again and then I'll scroll the mouse wheel and let's add four edges on this side and then I'm gonna hit enter two times, and that will ensure that I don't move those around with the mouse when I click it, control are over here and the same thing. I went four edges and hit Enter twice. Now let's press control are and let's put two here horizontally. And maybe I'll bring this up about like this here. And then I'll press Ault and click here to select that whole edge and maybe move that down just a bit. Okay, so what is that done for us? Well, I think what I can do is all Click this and shift. All click this and I'm gonna scale them in in the Excel press s and X and kind of scale that in. And in addition, these here need to be a little bit bigger. Soil, press s and X Move that. And so let me go to face mode and selected this in this and that's these two over here. And then this in here is gonna be that opening there. But I think what I need to do is go ahead and use these ongoing extrude this out. First, I'm gonna hit E and just pull out. And then at this point, I could probably take this face and this face and scale it in the Z. So I hit S and Z and scale that in like that. You can see it's got this little angle here, right? So let's try that. And then let's take these faces here and let's extrude these in, or we can also use the inset tool. So instead of hitting 80 to extrude, we compress I to create an insect. Now, over here, this is extrude and this is inset, so you can also use the buttons over here. We're gonna use the inset, which is the I shortcut key. So I'll hit I and move the mouse in. And I'm probably going to go about two here and that'll press s and Z and scale in just a bit like this. Yeah, something like that. And then we could hit E and just push back in there like that. Now that we've done that, it looks like it's empty in there like you can see through it. So let's go ahead and delete those I'll hit X and elite faces and there we go. So now we've got that piece, and once again, it's just a general block out of the piece. It isn't an exact replica. So now these pieces over here, we should take these and we could just extrude these straight back. We hit E and push back, and then we could delete these as well X and faces. There we go. Now we've got this part open back here, and I don't think that's gonna be a problem. I don't know that we're ever gonna see into here. At least for now. I'm always gonna opt for fewer polygons, and at the end, when we're looking at the whole thing as one complete peace will Then go back and see if there's anything we need to tweak. Let's now work on this piece down here. It looks like this is just a cube scaled. So what I'm gonna do is press shift a create a cube, press s and scale it down quite a bit. And let's move this up and here into place like this. And then here, let's go ahead and press s and y and scale it in like this. And Ah, it looks like it fits right under this piece, so I'll just bring it right up here at the period key to zoom in and then place. It may be right in, dear. It's very hard to tell exactly where things should go, but we'll do our best here. Um, that height looks pretty good, actually. Now, let's go ahead and scale it out in the X so S and X and scale out like this. Now it looks like we've got several cutouts to put in here in the same way we did before to make our lives a little easier. Um, I'm gonna go ahead and delete the face on the back here. This one right here, X and elite faces. And, um, I'll leave this one on the bottom. Then what let's do is go ahead and add our edge loop. So it looks like 123 on each side. So maybe six. Let's let's try this. There's 456 There we go. Is that gonna work for us? It probably will if we make a few modifications. So let me scale this out. Not like that. And maybe Ault, click and shift. All click these two and skill these out in the X with S and X. And these two as well. So we get it about like this. Okay, so now let's go ahead and create the horizontal edges. It looks like the bottom edge is in line with the top edge. This one's a little bit bigger. I don't know. It's hard to tell, but let's go ahead and go that route. Um, one edge here for the center. One and an edge here for these. And then what I'm gonna do is put one edge down here for all of them. So something like that. All right, so this this and this could be extruded back. Mm. pull it back like that and then let's go ahead and hit X and delete paces there. So we've got those in place. It also looks to me like there's, Ah, cylinder behind all this for the winch. So let's go ahead and add that I'm gonna create a cylinder here and ah, let's reduce the number of sides or Virtus ease with. Take it down to say 16 here and I'll change the cap Phil to Ah, let's go with a triangle fan. Let's do that. Are why 90 to turn it 90 degrees and let's bring it forward and scale it down and put it into place that the period key to zoom in and let's kind of put it where we want it to be. I think that maybe is a little bit too big. Let's scale it down some and move it back, skilled in the X. So maybe it's something like this. Let's try that, and also it looks like there's, Ah, rim on, and it's kind of it's very hard to tell, but let's ah, let's maybe let's try it. Let's, um, create to Angelou. Oops. Scrolling the mouse wheel here and then s and X and scale out to here. And then what I'll do is hit the three key go to face mode and I'll ault click between two faces to select that whole face loop. And then I'll press shift in Ault and do the same thing over here. All right, so we have those. Now, let's now press E. And then I'm gonna immediately press the s key to scale this out, and then I'm gonna turn off the X axis. So to do that, I'm impressed. Shift X. Now, if I pull the mouse were only scaling in the Z and the Y axes. So now I can scale out just a little bit like this and we go, All right, So once again, what I did is I hit the S key and then to turn off a particular axis. You can press shift in that axis. So since I didn't want to scale in the X axis here, I pressed Shift X and that turned that access off during the scaling. Okay, so we've got that in there. What we could do also is we could probably go ahead and smooth this. I'm gonna come over here and go object shade smooth and, ah, come down here to the object data and let's turn on auto smooth. And that's not bad. Actually, I bring it up to over 90 degrees. That's what we get. If I take it down to zero, that's what we get. So looks like anything between 30 and 90 will be fine there. Yeah, I think that's OK. All right, so we've got those pieces in place. What let's do in the next video is work on these pieces right here. These kind of connection pieces where we've got a cylinder connected to another cylinder and even it looks like another cylinder up here. So let's work on these in the next video.
11. 011 Front Bumper Details: to create these pieces with the cylinders in it. Right here. We're gonna need to use a couple of new tools we're gonna use Thesis, Elif. I modifier toe add thickness to a cylinder, and we're also going to use the bridge edge loops tool to connect these two. So let's start working on that. To do that, I want to begin with an empty view here. So I'm gonna hide this vehicle. Maine seen collection that we've created right up here. And then I'm gonna create a new cylinder. And I want to point out something here with the scene collection. Now that I've turned this off and one of the objects within that scene collection is selected here, if I press shift A and I go to mesh and cylinder, we can't see it here. You can see that's been created inside that scene collection where we had a selection. So just to warn you that if you ever create an object and you can't see it, check the scene collection and maybe you have it inside a collection that's been hidden away. So I'm gonna take this cylinder five that we just created and drag it up to the very top seen collection heading and that will get it out of that group there and out here on its own. I'll also twirled the reference images back up there. So that's the cylinder we just created. However, since we've done that, I've lost my settings panel down here. So I'm gonna go and create a new one. I'll just hit, delete, and let's create a new one. So with that scene collection selected at the top, heading here now I'll do this again, Cylinder. And there it is. All right. So what I want for this is maybe, um oh, let's try 12. Let's try 12 sides and I want the cat filled to be empty, so I'm just gonna choose nothing for that cap field there. Um, we need to spin it in the y axis, I believe. Let me turn the vehicle back on. Yeah, let's spend it in the y axis. Are why 90 There we go. And I'll scale it down and hit the period key. Now for this here, it looks like it's quite a bit thinner. So hit s and X and scale in like this. And, um what I'm gonna do is begin with the inside sold. It s and kind of scale in. So what I'm doing is I'm creating this part of the cylinder right here. Now what I need to do is give it thickness about this much here. So what let's do is use that solidify modifier. So let's come over here to the modifiers panel. Click, add modifier and let's choose Solidify here and you can see it just barely added a little thickness. If we click and drag in the thickness field, weaken, add thickness Here. However, what I'd like to do is apply the rotation and scale that we've created for this object and then adjust the thickness there because I feel like we're gonna get a more realistic setting here. So if I hit the n key, let's go to the item tab and you can see that. Of course it has rotation because we turned the cylinder 90 degrees in the Y axis, and it also has scale. We've scaled it down quite a bit. We can apply the scale and the rotation So these air zero and ones once again telling blender that this is the default size for this particular object. So to do that, we can just press control A and control A brings up this menu, We can choose to apply the location, the rotation scale, but I just want to apply the rotation and scale here and watch what happens to these over in the sidebar. So control a apply the rotation and scale, and now you can see these are ones and zeros And that thickness, that negative 0.16 meters. Turns out it's a lot bigger than we thought right now that we've applied that. So what I'm to do is hold the shift key down, click and drag in the thickness field, and I'm gonna bring this back down to about where it should be. So if I look at the image, um, thinking right about here, maybe I'm looking at this now. What we can do is duplicate this to create this piece, appear so well, What I'm gonna do is go to the side view and I'm hit the g key and move this over to where this is supposed to be. And then I'll scale it down like this, kind of put it right in here. Scale it down. So there we go right about there. Now the other one. It's hard to see. We can't really see it here, but I think it's right in here right there. So what let's do is let's hit shift d to duplicate this and bring it up here and then I'll hit s and scale. However, if I scaled this down in all the axes X, Y and Z here, when we go to the front view, it's thinner than this one. And that's not quite what we want. We want him to be about the same size, and in fact, it looks like it needs to be a little bit thicker anyway. But to make sure it's the same size, let's press control Z and remember Weaken turn off one of the axes. So I'm gonna turn off the X axis while we scale in the Z in the UAE. So let's go back to the side view. I'll hit s shift X and scale it down to about like this. Then if we hit the one key, they're the same width. Now, if I select both of my concealing back out on the X because it looks like it's a little bit thicker. I'm just looking at the reference image there. So maybe about like that, let's try that. Now we need to connect them together. But remember that we've still got the solidify modifier on each of these we can. Now, with this one selected, let's just select this new in here. We can press, shift and click in the thickness and weaken, increase or decrease the thickness there as well. Something like that, Let's say and now we need to connect them together with this part right here. However, if we try and join them, weaken, select both of the objects and press control Jay to join the objects into one. So let's try that Control J. Well, this changes because it defaults to the setting of the one we chose last. So let's undo that controls E. And we need to apply the modifier for both of these objects before we join them together. So let's just select this one here. First. I'll hit, apply then this one and hit Apply Now, If we select them both and press control J, they become one object. You can see it here. Just one object still called cylinder, but it's just one object Thes two are now, all right. So now it's tab into edit mode and hit the three key to go to face mode. And let's bridge the edge loops between this one and this one. So what I'm going to do is choose these two faces here. Shift, select these two and then let's bridge these edge loops. To do that, we can press control E, or we can come up here to the edge menu and bridge edge loops. But let's go ahead and press control E and click bridge edge loops. And there we go that connects those two pieces together and kind of like to pull this in and pull this out. So if we select this, maybe I can go back to the side view and pull this out of No, actually, it's this one I want to do, isn't it? So let's do this. I'm gonna pull this out and kind of rotated just a bit. Just so we get this kind of flat part right in here. That and then I'm gonna insert an edge loop with control are so I can grab this edge right here and Let's bring this in. I'll hit G and bring that in a bit. Let's see how this works. Something like that. All right, Now what we need is this piece up here. And for that I think we need yet another cylinder. So let's go ahead and do that. I'll press shift a mesh cylinder, this one, however, we need cat fills on the top in the bottom, so I'll change it to triangle Fan. And now what let's do is turn it R Y 90 scale it down and let's bring it into place. We'll hit the g key and bring it up. But the period key to zoom in and let's place it, what do you think it should be? Maybe right in here. You know, now may be a good time to bring back that vehicle. Let's go and do that. So there's that, um I think we're gonna need to move this and this. Let's slide these over to where they should be right around in here. Um, it looks like it should probably come out just a bit, or I've pulled that face out just a little too far. Let's tab back into edit mode, and maybe we should select that edge in there. I can kind of grab that edge there and maybe let's bring that back out like this. Maybe we can grab the head edge here. Let's bring them both back out. This there we go. So it's probably better to make those kinds of adjustments before or after I bring the vehicle back. But that's okay. Let's now take this and put it into place. Let's scale it in the X two about the right size. Scale it down. Yeah, let's put it right about year. Let's say like this. Now weaken bridge, these two edge loose. But first we need to join them together. So I'll select this in this and press control J. There we go tab into edit mode. Go to face mode and let some select this face this face and, ah, let's do this and this. I'm not sure that's gonna work real well. Let's do this and this and this in this. Let's try that Control E prejudge loops. Let's grab this one edge here and move it out a bit like this. There we go. So I think that's the basic shape that we want. Yes. So what we can do is maybe smooth this. Let's go toe object shade smooth. And then let's come down here to object. Data Turn on auto smooth and I'm gonna click and drag this up and tell Kind of cleans up a little bit and over 90 is too much. But I think around 60 is pretty good. Yeah, let's try that. And then I think I'll move it over to the other side as well with Shift D and hit the X key and slide that over like that. There we go, So we've got those pieces generally in place. There's more we can do, of course, but I think what let's work on next is let's talk a bit about Boolean ins. Creating this circular inset for this piece is gonna require something more than just inserting edge loops and then extruding in. We're actually gonna have to use a cylinder as a cutting tool to cut this circular hole into this object. So let's work on that next
12. 012 Booleans, Ngons, and Tris: so to cut a hole in this object here. What we need is a cylinder of the size of the hole we want. So let's go ahead and create a cylinder with shift a mesh cylinder and we've got 32 sides. Let's go ahead and take this down to 16 and we've got our cat fill at an inn gun. Now briefly, a ningun is any face that is more than four sides. A quad is a four sided polygon and a try as a three sided polygon. I tend to default putting tries or a triangle fan on the top and the bottom of a cylinder just because for me, it's easier to extrude in an insert edge loops and things like that with will do more of that as we go on. But I just wanted to point that out. It really is a personal preference for choosing a triangle fan here, but let's go ahead and move this forward in the Y axis right here and ah, let's scale it down and I'll turn it in the X axis because we want it perpendicular to the object we're gonna cut. So I'll press are x 90 and turn it there and then the enter key. And let's ah, see if we can figure out how big this is supposed to be going to bring this into here. Um, can we see it from the front view? Let's see. Let's get that one key. And if I hit the Z key and go toe wire frame, can we see it here? No, we can't because it's got one of those pieces, that black piece in front of the object that we're creating. So we can't really see it here. That doesn't do it a whole lot of good. So we'll hit Z and go back to solid views. So we're just gonna have to eyeball it, Which is fine, Yes. Why? To scale that out. You don't bring that up. Um, let's scale it down a little bit more. Try and put it right about in here. Let's say something like that here. Let's try that. Okay, so what I'm gonna do is bring this out some. So it's on Lee intersecting with the peace that we want to cut. And then what we'll do is we'll use the Boolean modifier just like we use thesis Elif, I modifier, we'll just use the Boolean. So what we want to do is select the piece that we're gonna cut. We'll go over here to the modifiers panel, will add a modifier, choose Boolean, and now this is gonna be a difference. Operation we have intersect. We have union. But this one we want to go ahead and use difference for because we're actually trying to subtract one thing from another were trying to subtract the intersection of these two objects from the main object. Now we need to tell blender what the cutting object is going to be, and we could type it in here or we could even click and try and find it in the menu. But since I haven't been giving these things any reasonable names, it would be kind of hard to find in the menu. So what we can do is just click this little eyedropper and hover over the object we want and click that and that will then add the object there. Now, it didn't look like a lot happened, right? We don't see much of a difference here. However, if we click, apply and then take this object and move it out of the way. Let's see what we get. Move that down and that's what we get. So you can see we've cut that object out. We've cut that whole. We need a little bit of thickness. There's kind of a bit of thickness in there. So we need to select its object and then tab into edit mode and then select this edge so oppressed the two key press, Ault and click and then all to shift and click. There we go. Now we can extrude that edge back just like we did with these other ones. So I'll press e and why? And then I'll pull this back straight like that. There we go. So now we have that piece cut in there and this piece here Weaken, go ahead and just get rid of all hit X and delete because I don't think we have another hole over here. So I'll just hit X and delete and there goes now you could do mawr. They're all these holes in here, but I don't think I need to get that detailed at least a this point in time because every time we do this, we're gonna create quite a few polygons. Let me show you what I mean. Here, I'll hit Tab and what we've done. Now remember, we talked about in guns and polygons greater than four sides. We hit the three key and choose this face. You can see that this polygon now has quite a bit more than four sides. All of these edges now have been added to it. And in fact, we can come down here and we can see we've got 15 edges selected. So if I just selected this face here, look down here, we only have four selected. So if I select this one, we've got 13. So these are definitely in guns and you may have heard that you should Onley use quads, four sided polygons or tries when you're dealing with an object for a game. And that's really only kind of true. I think in that First of all, you need quads. Any time you're going to sculpt, any time you're going to actually sculpt high resolution detail on an object, the sculpting tool is gonna want to see a quad. It's it. It can deform and sculpt on quads a lot easier than anything else. The other reason you would need quads is if you're going to actually animate it. If you're gonna actually deform, it's so if you have a character in your bending the arm at the elbow, at the shoulder, at the knee. In those areas, you're gonna need quads to be able to get predictable bending or deformation. So you need quants. For animation, you need quads for sculpting, but in a video game engine beyond any of that, it's gonna take every polygon that you have in your object and converted two tries anyway. So it's going to take this face here, and it's going to convert it to tries. You can see what it might do if you right, click and come down here and choose triangulate faces. So if we choose that this is probably what you're gonna get in unity, it's probably going to do this automatically. Same thing down here. It'll probably do something like this once you get it into unity. In addition, it will do all these others. It'll take all of these, and it'll create triangles out of all of this as well. It's just easier for a video game engine to deal with polygons when they're at their smallest based level. But I'm just gonna hit control Z. We don't have to do that currently. Weaken, let unity do it. We don't know exactly how it's going to break that up. We can convert to tries here if we want to specifically tail unity. This is the way we want our tries to be. But generally speaking, you can just leave it like this, and unity will just do it the way it wants to. All right, so we've added some good detail to the bumper area here. What we can do now is begin to add a little bit more detail, like bolts and connecting pieces. But I don't really want to do that quite yet because, as I said, I want to get all the pieces in. So what let's do for now is let's move away from the bumper and let's come back up here to the rest of the vehicle, begin working on the actual cab as well as the doors, the windows, etcetera
13. 013 Blocking Out the Cab: toe work on the cab. I think I'm gonna need another reference image over here. So let me just go to image and open and let's see what else we have. I need more of a view of the cab. Maybe this one. Let's take a look at this. Yeah, that looks pretty good for what we want to do here. In addition, let's take a look at it from the various Ortho graphic views. Let's hit the three key and take a look at it. It looks really like it's a cube, right? Um, with the sides pulled in and it looks like this part is separate from this down here, let's Let's take a look over here. Yeah, it looks like the part on the bottom is a cube, and it angles down to the bottom of the vehicle. Well, let's take a look at the front view here with one key. And over here, let's ah, hit the Z key and go toe wire frame. And let's take a look at this. In fact, to get all of this out of the way. For now, I'm just gonna turn off the vehicle. Maine seen collection there and it looks like here. It kind of angles this way just a bit. And also, we've got this angled part in the top. Let's take a look at that over here. Yeah, it looks like it kind of angles in upto where the turret sits on there. So I guess what we need to do is begin with the Cube. Let's go ahead and do that. I'll press shift a mesh cube and let's bring this up and I'll go to the side view first and let's line it up here. But the s key to scale in some and kind of move it. And I guess what I'll do is maybe line it up with the top right here. I'm just gonna line up this corner and you can really begin anywhere. I'm just kind of trying to find a place to begin with this tab into edit mode and hit three key and choose the face on the bottom. And let's move that to write year. All right. It looks like there's this angle right here and we've got an angle here is well, so let's hit the one key and I'll hit the Beaky and border selective these two points. All right, so then I'm just gonna bring that back to here. I guess what I could do is bring this back to here as well. So this is kind of where we're going to begin right in here. Now it looks like this corner and this corner pretty much lineup. Let's press control are and click and drag down here. And maybe I'll line it up right here. And then I'll grab this one with the border. Select tool hit G and move it right over to that edge right there. Okay, so now it looks like we need one right in here. It's gonna come down and go straight down. So this press control are And let's just grab this one right here with the border Select Tool G. And let's move this over here like this. Okay, so we're beginning to get that basic shape. Now, let's ah, take a look at the front view, okay? It looks like it's just too wide. That's gonna be an issue. Let's go to the top view and see what we can see here. Okay, Maybe we can do a little bit more here, so I'm gonna tap into object mode and hit S and X. And if I scale in well, it's really hard to tell. But if I scale in the year, maybe, let's see. Although I think that's that step there. So maybe I'll scale in just a little bit more like that. Yeah, let's try this right in there. So if we've got it like that, then if we look at the front view, we can see it's gonna have to angle in here. But where is that line? Let's take a look at another image here, see if we can find that line. It's kind of hard to see exactly where that line is. I feel like there's an edge in there that allows it to bend inward. But where is it? Let me hit the three key. Let me go to the back view as well. With control one. Well, we can't see much there either, can we? So I really need a view as to where that bend is. I feel like there's a that it tilts in there. I guess what we can do for now is go ahead and grab the top here. Let's grab these pieces or these points right up at the top with the Beaky, and I'm just gonna move it in like this for now. Right like that. Now what I need to do is mirror this other side, so I better put on edge right down the center. Let's see if we can do that. Control our and it's angled here. So let me undo this. And then let's press control are. And now that line is going to go straight down the center now, a trick we can use and let me show you this actually a tool that you can use to do that. I'll bring this point back in. So instead of undoing that, so it's straight. What I can do is press control are. And then once I click now, I can hit the e key and notice how it straight now and then. I can press the F key, and it will flip back and forth between conformed and straight up and down so that e and F key, when using the loop cut tool, can be pretty handy. So let's go ahead and put this straight down the center aisle, hit, enter two times, or actually enter once there because we'd already clicked. And now what I'm gonna do is get the three key and border select with the Beaky, this whole side and hit X and delete faces. Now I can mirror this over. I can go over to the modifiers panel, click add modifier and mayor it over to the other side. So whatever we do on one side happens on the other. All right. So I'm gonna go ahead and go back to solid views so he can see it here. And let's bring back that vehicle. Maine Collection here. Yeah, that's looking pretty good. So that's just blocking it out. Just getting the basic shapes in there. Now let's work on the bottom part right down here. It looks like, as I said, a cube that we're gonna need to then extrude and push in as it goes toward the bottom of the vehicles. So let's go back to the side view and let's press shift a and mesh cube and let's scale this down and put it in place. So let's say we want it right about here and then, Ah, let's grab this face here and move it up right about two there and we'll grab this face and move it over to about here. Now, I'm gonna move that up. Some here, Right? Right into here. Now what let's do is grab these points right here. Hit the one key and border, select these points and drag them in border Select. Drag these in like that. Now if we hit the three key. Actually, it's Goto object mode and and see how we're doing here. Actually, that's a pretty good size. Let's let's try and scale out just a little bit here. Well, that's pretty good right in there. Yeah. Okay, so now what we should do, it's select that face down there and let's extrude this down. So now let's just take this hit e and go straight down. Now with that face selected down there, let's scale in the X axis and scale that in quite a bit. Looks like it scales and quite a lot there. And maybe a little bit mawr here like that. And then let's go back to that side, view it the e key and pull straight down again like that. So we're gonna have to see how that works. I think that'll fit in pretty well. All right, So for the next video, what we need to do is let's work on the doors. We also have that angled piece up on the top that the tour it sits on. So in the next video, let's go ahead and work on those pieces.
14. 014 Creating the Front Door new: I think I may have found a reference image that will give us a better view of this angle here. Me Open up the images again. And I think it's this one here, this number 12 of an open this one up and, yeah, if you can see here, there's an edge to see that edge right there. That's the angle that I need. And it looks to me like that edge is in line with the bottom of the back window. So maybe if we go to the side view here and we tap into edit mode and with one key to go to Vertex mode, we should be able to hit the B key and Border selected these two points here and just dragged them up. So they're in line with the bottom of the back window. Kind of like that. Let's try this. So now if we tumble around, go back to salad view. Yeah, so there's that angle. I think that's gonna work. All right, so now that we've got that angle there, how do we get the doors in here now? Because we've created kind of an odd angle and odd surface here on the cab. These doors need to mold to that surface as well as be kind of oddly shaped in their outline to. So how do we do that? Well, I think first of all, what let's do is let's create a polygon plane and get that basic shape in line here. Then let's worry about molding that polygon playing to the shape of the cab. So first of all, let's go ahead and press shift A and go to mash plain, and we've created a polygon plane here. Now let's turn it with our why 90? And then let's bring it out to the side about like that. Okay, now, if we go back to the side view, let's bring it up, shrink it down and let's line it up. Say this corner here with this corner. Let's just do that first and then we'll get the other corners in line as well. So tab into edit mode, and I'll just select at this point right here at the G Key and move it to this corner there . And then let's grab this one, Move it to this corner, grab this one hit G and move it to this corner so we just kind of blocked out that basic shape. Now, if we select this edge here, a press shift and click that point, so we select that whole edge and I'll hit E. And let's bring this all the way down to here. Line up this point, grab this one here and move it to that corner right there. All right, so we've got that basic shape now of the door. The problem is that we're gonna need to mold it to this shape here. And there's that edge. There's that angle that we just put in place. We need to reflect that bend in this door here, right? We need to have this edge right here. So let's go back to the side view here. And let's rework these points to get that. I think if I grab this point and hit the G key and move this up, let's just kind of move it up to here. And then let's go ahead and add an edge loop with control are no. Add an edge loop right here and drag it right up to this point right here, Some lining this point up with that edge on the cab. There we go. And I'll grab this one and line this one up with the edge on the kabas. Well, because we need that edge there If we're gonna bend that door to match the angle of the cab so I'll go back to Salad View and there we go. That's the edge we needed right there. Okay, so now that we have that edge so the dork unb end, How do we now make it bend and mold to the cab? Well, Blender has a modifier called Shrink Wrapped and I think that'll do it for us. So let's try that. Before I do anything, I'm gonna go ahead and apply the rotation and scale of this object. I'll press control A and apply the rotation and scale. And then I'll come over here to the modifiers panel and let's choose add modifier and shrink wrap. I'll click that now. We need to give it a target. What is it going to shrink wrap to? Let's click the eyedropper and we'll click on the cab right here. And there we go. That shrink wraps it to that cab. However, it kind of shrunk it down as it did that. So if I click and drag in the offset, you can see that as I bring it back out. It kind of expands to its original size, so I'll just type in zero here again. So we're gonna need to adjust that a bit. Let's go back to this side view hit Z key and go toe wire frame. And what we should do is realigned the points as best we can to the reference image. I'll tab into edit mode with one key and notice that the shrink wrapped object here is different than the original object here. You can kind of see that if I choose this point. That point is actually this kroner right here. So what we can do is come over here and turn on this adjust edit cage button like we did when we were doing the mirror modifier. So click this, and now those points a line to the shrink wrapped form. Okay, so now that we have that, let's just hit the g key and let's start moving these up back to the corners where we wanted them. And as we do, they should stay fairly aligned with the shape of the cab. So let me grab this one and will hit G m gonna move this up to here? And I'll kind of move this one back up into the middle here, like best. Something like that. All right, let's see how we're doing here. It z solid. Yeah, I think that's looking pretty good. This flickering were getting is called Z Fighting. And what this is is, since we've got two objects in the exact same location, they're fighting with each other as to which one should be presented in the display first. So it's just a display error. It isn't a problem that will have to deal with once we get this all completed. All right, let's tab back into object mode and let's go ahead and apply this click apply. And now let's just drag it out. And there we go. So that gives us the basic outline and the angle of the door. The next thing we need to do is create that hole that the door sits in. So let's do that. First of all, my move this origin to the object, I'll go to object and choose set origin origin to geometry. There we go, and I'll move this out a bit and let's give it some thickness so that we can then use it as a cutter to cut the hole into the cab using the Boolean modifier. All right, so let's come over here and go toe. Add modifier, solidify, and that'll give it some thickness. Ah, click and drag in the thickness field to give it a little bit more. There we go. Then I click. Apply. Now let's drag this in So it's intersecting with the cab about like no about like that. And then let's use that Boolean modifier. I'll click the cab and we want to cut into this so all click add modifier. Boolean What's scroll down? And we need to give it the cutting object So I'll click on the eyedropper here and let's choose that door. There we go. Now Let's click. Apply and let's see what we have. Click the door blew it out and there we go. Now we've got that hold that the door sits in. So let's bring this back in and put it right about in there. See how that works? Yeah, that's actually not too bad. We could maybe scale this door in just a smidge. Maybe just press s and scale in just a bit. Give it a little bit of breathing room there, and I'm holding that shift key down as well. When I'm doing this, let's try that again. There we go. So just something like that. Just so there's a little bit of breathing room in there. There we go. Okay, so there's our first door in the next video. Let's work on the back door and maybe we can begin on the windows as well.
15. 014 Creating the Front Door: in looking at the reference images again, I found one that I think will show us where that angle is. Where that edges. So right along here, it looks like the cab, the top of the cab angles in at this edge right here. You can see it in this angle, and it looks like it's in line with the bottom of the back window. So what we could do, I think, let me, ah, go to the side view here and let's go toe wire frame. What we could do is grab this point right here and just drag it up. So this edges in line with the bottom of the window right there. So now we take a look at that. Yeah, so now you can see that's that angle. I think that's the way we want it. All right. In addition, that top part, let's take a look at that. You can see that it's angled back here. It goes pretty much straight up there and in the front view. It looks like it angles in here, so let's go ahead and work on that real quick. Well, tab into edit mode and select this face here now the other side. We're not seeing the edges and polygons of the other side. Let's go ahead and come over here to the mirror modifier in turn on this so we can see the edit cage happening over here is Well, there we go. All right, So let's go to the side view and lets it e and drag straight up. And, um, you know what we should have done? Let me ah, tumble around here. And I think if I have this face selected and I hit the g key, take a look at what happens. Look at how we've actually created or extruded two faces instead of one mirrored face. So that's gonna be a problem. We don't want to do that, right? So let's press control Z and go back a ways. I mean, hit g. And here's the problem. If I had G and pull out and push in, they act is two different units and we don't want that. We wanted to act as if it's all one unit to do that in the mirror. Modifier weaken, Turn on clipping right here. And then if I hit G and pull out and then you can see that center line, those center edges clipped together, merging the point together, creating a single unit here on the top. So now if we go to the side view and hit E and pull straight up now, let's hit G and do that. And now you can see it's all one unit. That's what we want, All right. So I'll hit the two key and all to click this edge right here. Now we can drag this back so it's in line with the reference image right here. And then if we select these faces on top here with one key now, we should be able to press S and X and scale in like this. Now let's take a look. Yeah, so I think that's a little bit better. All right, so now let's talk about the doors here. The door's air kind of an interesting thing in that there's a couple of issues. One we've got the doors in and of themselves or kind of inset into a hole, which is the shape of the door. And also the doors are molding to this angled cab as well. So we've got to both cut a hole for the door or somehow get them in the whole of the same shape and we've got to mold them to the angles of the cab. So how do we do that? Well, I think we're gonna need to use a couple of the modifiers that we've already used, as well as maybe a new one or two. So let's see what we can do. First of all, what I want to do is create the shape of the door here, right here. And I'm just gonna use a polygon plain and just create the basic shape. And then what I'm gonna do is take that plane and mold it to the cab. Once the plane has the same angles as the cab, then I'll give that plane thickness with the solidify modifier. And then I'll use the Boolean modifier to cut that whole. All right, so let's see. Let's see how it works. I won't press shift a and go to mesh plane. Here we go And let's turn listless Press are Y 90 There we go and let's move this out of it . And then let's hit the three key and let's bring it up. Scale it down and let's get it kind of in place here. So I'll come up here and I'll kind of begin right here. I'm just gonna begin with this corner on this edge right there that'll tab into edit mode and hit the one key. Now let's begin just placing these points where we think they should go. So the I'll hit the G key and kind of move this like this here. And then I'll take this point and hit the G key and move it right over to there. Then this one, I'll select and move right over there So you can see I've got these points now lined up with the corners of the door There. Now, let's take this edge right here and let's extrude it, it e and I'm gonna bring it down and maybe line it up with this corner right there. Grab this point g and move it over here like this. Okay. All right. So now let's take a look at that on it the Z key and go toe salad. So we just have a polygon plane in the shape of that front door. But if we try and put it on here. You can see it isn't angling the way the the way the cab is, and we need it to do that. So how do we do that? Well, we need Teoh. Give it an edge that is in line with this edge that we created on the cab. So if I come over here, we take a look at it. This corner is not quite where we want it to be, So let's just gonna move this up. So we have room to create an edge right along here. So press control are and click, and I want to bring it up in line with this edge. You can see I've put that point right there and then this point here all hit g and move it . So it's right along that edge there. So it looks to me like, Yeah, it looks like that edge goes in line with that edge of the door. So I'm just gonna put it right there. All right, so that now we have an edge that mirrors or that lines up with the one on the cab. Now, if we hit the Z key and go to solid mode, let's take this thing and shrink wrap it to the cab so it molds to its shape. So before I do that, I'm gonna go ahead and apply the rotation and scale, control A and rotation and scale. And then I'm gonna come over here to the modifiers panel and click add modifier right here , Shrink wrap. I'll click that now. We need to give it a target, which is gonna be the cab. I'll click on the eyedropper, click on the cab, and there it goes. So now it's moulding to the shape of that cab, and that's what we want. Now click. Apply here and then let's drag it back out. And there it is. So now we've got the shape of the door with the angle of the cab. Now let's create the whole that the door is gonna sit in to do that. Let's go back to the modifiers panel, add modifier and we'll give it some thickness with a solidify modifier. There we go. I'm gonna click and drag in the thickness field, give it some thickness there like that. Now I want to move it in and cut into the cab with Boolean. But before I do that I need to hit. Apply. I'm gonna apply this solidify here. I want to take this. Move it in. Not like that. Um, I guess I don't need it that far in Aiken. Do it about like that. Now, let's select the cab. Click. Add modifier. Boolean. Let's go down to the Boolean modifier at the bottom. Click on the eyedropper, Select our door, and then click Apply. All right. Now, let's take a look that out. And there's the whole that our door will go into. All right. So let's moving in about where we want it like that. Maybe. And then I want to shrink it down just a bit. I want to bring it out. Just a hair, and I'm gonna hit the s key, and I'm gonna hold the shift key down just so it moves very slowly and I'm gonna scale in just a little, give it a little bit of breathing room there and move it down a bit. Maybe move it over some. I just wanted to have a little bit of room in there. There we go. Something like that. So now you can see we've got the actual door in the hole, and we've got the door moulded to the shape of the Kabas. Well, all right. In the next video, let's go ahead and do that again with the back door, and then we'll begin working on the windows.
16. 015 Modeling the Back Door: All right, let's try the same thing with the back door here. Let's go to the side view and wire frame again. And once again, let's go ahead and press shift a and create polygon plain. And from here, I'll just press are y 90 and turn it and I'll hit G and move it up into place. And let's go and scale it down and match up one of these corners about this one right here . Let's just go ahead and match that one up there, tab into edit mode. Select a point and let's just start moving these points into place again. I'll grab this one and let's move this up to here and this one. I'll move right to there. Okay, that looks pretty good. So it's selected this one. So we have that edge selected and let's hit E and pulled down, and I'll just line up this one right here, and then I'll grab this one G and move it so it lines up with that edge on the cab again. And if I select these two weekends like that, edge it be. Bring it down to about right here and move this one over to there, man. Looks like we just need one Maurel extrude down and match this one up here. And then I grabbed this one. Hit G and move that over there. Now, let's take a look at it. I'm probably gonna have to move it to the side here. Let's do that. Yeah, I think that looks pretty good. We have our edge there where it's gonna mold around the cab. So now I think what we can do is go ahead and press control a and apply the rotation and scale. And then I'll go to the modifiers panel here, add modifier and let's go ahead and choose shrink wrap again. And then we need to click on the eyedropper and select the cab. And there we go. And this time it's shrunk up quite a bit. So let's go back to the side view with wire frame and let's try and move these points back to where we think they should be. We'll hit Tab, and once again, let's turn on the Edit cage here So the points coincide with the shrink wrapped version and I'll hit G and start moving these up into Place E and Let's bring this up right up. That one kind of pops a bit. We may have to adjust this one after we've applied the shrink wrap modifier, but it's going to get this one in place right here and this one in place. There we go, All right, so let's take a look at it. I'll go back to solid mode and go to object mode, and that looks pretty good. It's just that that one point right there isn't quite aligned with the reference image quite yet. So what let's do is let's go ahead and click. Apply over here and now let's go back to that sign view and see if we can get that point Maurin line. So just Graham that and let's just move it right down here. There we go. All right, so now if we take this and we move it out, here it is. Now that we've done this, we can go ahead and add the solidify modifier. Let's do that. Add modifier. Solidify right here and then I'll increase the thickness just a bit. Something like that. And now let's bring it back in. So slide it. Banking like this. Oh, something about like that. Now it's cut it with the Boolean modifier. Let's select the cab and click Add modifier, Boolean And down here we'll go ahead and click the eyedropper and select the door. Now let's hit, apply and let's move that out. Select the door. Let's move it out and see how we did. Yeah, that's not too bad. All right, so let's go ahead and bring it back in just like that. And maybe, just like I did before. I'll shrink it down just a little bit like that, maybe and maybe grab this and move it over. There we go and let's push it back in. Now it looks like I've got an edge right there. That's just a little bit off. I could maybe take this and c, we can pull that out just a bit too kind of. Flatten that up just a bit like this. There we go. Sometimes you got to do that and that's fine. And also, we can still see that edge here. So if I selected it and went Teoh object and shades smooth Oh, I don't think I selected it. Let me select it again. Shade smooth. Here we go. OK, so now let's grab this with auto smooth and take it down until we can just see that edge, but not the one above it. There we go. So I had to go down below 12 degrees there? Yeah, that looks pretty good. All right, so now we have the two doors. If I spin around over here, we don't have him on the other side. We could combine these two se, select this one and then this one in press control J. And then what we could do is mirror these over. I could take this origin, put it down to the three d cursor in the center of the grid, go up the object here and then set the origin to the three d cursor. And then I could come over here to the modifiers panel. Oh, I never applied that solidify. Modify her now, did I? Ah. Well, let's undo aways until we get back to here and let's go ahead and apply this. Ah, click. Apply. There we go. And then let's combine these control J and I need to redo this auto smooth Here. There we go. And then let's move that origin to the three D cursor. And now let's add that mirror modifier here. There we go. So now we have him on both sides. There we go now. We had talked about working on the windows here, but I think maybe what we should do is try and get these border trim details around the door. Let's see if we can do that for. So if we go to the side view again, it's these things. I'm interested in this right here. And to do that. I think what we need to do is is select these. And what I'll do is I'll tab into edit mode and go toe face mode with the three key, then, actually, I better go toe solid mode for this. So I'm gonna select these faces here and let's try and just used the inset tool to create that trim around the door. So once again, I'll go back to a wire frame here and with these faces selected, what I'll do is I'll just press the I key and let's try this. Let's just drag in a bit like this, and that doesn't look too bad right there. Let's try that good back There we go. So, yeah, that looks pretty good. Now what let's do is all to click between two of the faces right there and that selects that whole border around the door there. And now let's just extruded out just a tiny bit. Well, it e and just pull out tiniest bit like that. Let's try that. Yeah, so that's I think that's what I'm looking for. They're just that little bit of a rim around the door. Let's try that with this one over here. Once again, Tab and edit mode. Select these faces on the front. We'll go back to the side view Goto wire frame. And now, once again, let's press the I key. And then let's move the mouse in just a bit until we get about like, not like that, I think. All right, so now let's go ahead and go back to solid view. Let's all to click between two of the faces and let's just extrude out just a little bit. Once again E. And I'll just pull out just a smidge like now. All right, let's see how we did. Yeah, I think that looks pretty good. And, ah, since we had him mirrored over. It should happen on the other side as well. The only thing I see right here is this point right here. Should probably come up because we want these to be in line right there. So let me zoom in here and select these two points, and all I want to do is just slide these up just a bit. So I'll hit the G key two times and just slide those up like that. There we go. In addition, we could take these two points to me. Click over here so I can select that. And then let's go ahead and slide these down Salt hit G two times or edge slide. I'll slide that down and kind of get him in line there. Yeah, there we go. All right. So we didn't get to the windows in this video. Let's go ahead and work on those in the next
17. 016 Creating the Windows: for the windows I think we can do. A similar thing is we did for the doors. I'd like to begin with a polygon plane and then extrude out to get the depth and then bring them back. An angle, um, onto the door here. So let's begin with the front window. Here. I'll go to the side view and wire frame and let's take a look right in here. So let's create a polygon plane that kind of matches the shape of this window and then we'll extruded out and put it in place. So let's press control a and create a polygon plane. Oppress our Why 90 to turn it. It's it, G. Bring it up and we'll scale it down and begin getting it to the proper shape. So maybe put it right in here. And it looks like my door here is a little bit wider. See how it's just a little bit wider here. That's okay. I'm just gonna put mine right down here. I'll I'll have that window be a little bit lower, but what I can do is, for the time being, go ahead and match it up the way it's supposed to be and then move it down when I need to. So I grabbed this point and put it here. Looks like this can move back like this. Yeah, and then this could probably move over here. This could go right down here. And then it looks like we're gonna need another point to match up right here. So oppressed control are create an edge. And then I'll just select this point here and move it out to here. There we go. OK, so let's take a look at what we've done here. Um, I'll go ahead and bring it out. So there it is. That's what we've got so far. Now, the trick is to go ahead and extruded out. So it looks something like this. Um, I think I want to go ahead and add this little edge right here. So begin with that. And to do that, I think what I'll do is just hit the I key to create an inset and then begin extruding this out like that. All right, so let's go ahead and tab into edit mode. Hit the three key for face mode and I'll select these and then let's go ahead and press I and let's Dragon just a little bit like this. Let's say I felt like that. And then let's press the e key to extrude out e and all pull straight out like this. So maybe something about like that, let's say okay and then I'll inset again. I push in just a bit, and ultimately we're gonna have, um, a piece of glass that we're not gonna be able to see through here. We're just gonna have it kind of bluish and reflective because this particular vehicle isn't going to have an interior that you can actually go into and see. So I think what I'll do is just maybe extrude in just a little bit. Push in and then I'll hit I again. Then maybe I'll hit E again and pulled out just a bit. Let's see how that works. Yeah, just to give us some definition between the window and the frame here. All right. In addition, I think we also need a little bit of a lip here on the back. So let's go toe edge mode here, and I'll go ahead and click that all to click that and let's hit E and Ah, click. Let's go over to our move tool here. And I'll just pull back in the X axis like that just Well, you know, I'll go ahead and pull back like this. Just so we have plenty to work with, because now we need to actually put it on to the door to do that. I think I'm gonna move this origin point so I can tilt it and move it based on the very back edge. So if I tab into edit mode again and select that edge now let's move the cursor to the center of this selection shift s and cursor to selected, which is the two key. So shift s too. Now it's tab back into object mode and move this pivot point to the three D cursor. So object set origin origin to three D cursor. And there we go. Okay, So now let's go and move it back. I'll go to the front view and let's just pull it back like this. And I'm gonna hit the r key and tilted a bit. And I'm also going to switch from global toe local, and you can see when I do that. The move gizmo changes. So when I changed to local transform orientation, the move gizmo is in line with the object. And that's kind of what I want. When I'm trying to do this here, let's do that. Let's move it down. Some. As we said, we need to bring it down just a bit and then maybe bring it into the door a little bit and rotated. I think I want to rotate it around. Well, first of all, I want to rotate it around the x axis, the local X axis here solely it our X. And then I'll hold that shift key down and just slowly rotated back like that and we go. So that's kind of in line with it. And then, um, let's move it back a bit. So it's not intersecting here with that edge. Maybe down a bit. S so I think something like that. That looks pretty good. Okay, well, I've hidden these away, didn't I? Let me bring that back. Okay, so there's that front window. I think we can do pretty much the same thing with the back window. Let's give it a try. What I'll do is once again go back to the side view and wire frame and let's create a polygon plane and get it to the shape here that we want. Now it looks like this one has kind of a cut off angle here. But if I zoom in here, it doesn't look like it has that cut off angle here. So it's really kind of up to us what we want to do. Well, let's get the Polygon playing in and see what we want to do. The three D cursor is over here right now. Let's put it back to the center of the grid temporarily. I'm gonna press shift s and hit the one key for cursor to world origin. And then let's go in press shift A create a plane are y 90 and Lynn. Let's hit G and move it up into here. Scale it down on. Let's put it in place. Um, I think I'll begin over here. Let's try this and then let's tab into edit mode. Hit the one key, and let's select these points and get him into place. Maybe I will just make it a sharp edge. The way it appears to me here, let's try that I move that to here and I grab this point and move it down here. All right. With that done, let's go ahead and tumble around. Go back to object mode and I'll pull it back out to the side here and now, let's work on trying to extrude it out a bit. So once again, let's get that, um, inset or that edge here. So tab into edit mode selected in face mode and will hit the I key and lit push in just a bit like that. Yeah, it's about like that. Looks like I have it a little bit more. Let me hit the S key and scale in just a little bit like that. Okay. And then let's extrude out. Now I'm still in local mode, and theoretically, it should be okay, since it's probably still aligned to the global access. I'm gonna go and change it back to Global just in case, and I'll tab into object Modem. Let's hit the n key and let's take a look. Yeah, it's still pretty much aligned to the global access. It's just zero and zero and 90 degrees that we turned it into. Why, so that should be fine. I'll tab into edit mode, hit the three key and let's just extrude and pull straight out and about like this. Now let's see how much we did it over here. Is that about right? And I'm just kind of eyeballing it here. There we go, something like that, and we could once we get it on, we can always select that front and pull it out a bit to get the same whipped or depth. Um, so now we have this. What's it I and create that inset again? Well, hit E and push in. Well, hit I on. Take that in just a bit and then I'll hit E and pull out again like this. There we go. So now we've got that window in place. So we need that lip around the back of don't we? Still, it's hit the two key. Let's press Ault and click that whole edge, and I'll hit E and X and will pull it back in the X axis. Maybe something like this just so we have plenty to work with. And once again, I want to move that object origin to the center of this selection, right here so again will press shift s to tab into object mode and go toe object set origin origin to three D cursor. There we go. So now let's spin around in the back, view a press control one, and that spends us to the back view, and then I'll bring it in, are and rotate it kind of get it in line here, something like this. And then I'll switch from global to local. And let's push it in and we go. All right, let's see how we're doing here. Um, we need to go in a little further. Something like that. We probably need to rotate in the local X axis are X, and I'll hit that shift key to slow down the movement. Something like that. Looks like we're gonna need to rotate it in the Why? Oh, it looks like it's off. We may have a little bit of trouble getting this in line here. Let's see. Yeah, it looks like back here is a little off now, doesn't it? So right up here. Probably because of that point that we created, You know, that we had to move up here, But what would we have to do. Let's see. Well, everything looked Oh, see how this kind of ghosts in like this? Maybe we could pull that out a bit to put it more in line with, um, the rest of the door. So let's try that. I'll, uh, go to edge mode, press Ault and click, and we don't need it all the way across. Let me do that again. Here, I'll just select this one, and ah, One way to look inside of here is to press all disease press All too easy. You can see kind of a ghost image of it. It's kind of wire frame, kind of solid. So that's gonna help us take a look at this. So what I can do is just press control and click this edge right here and that. Just select those edges. Now I confess all Z and go back to solid mode. I'm gonna go to Global here, and then I'm gonna pull out just a little bit like this, okay? Because I want it in line with this. See how this has pulled out here? I want to do this similar thing right here like that. And then let's go and get this one here. I will grab that edge and this edge and let's pull this one out just a little bit more, too. So these three edges and let's just pull this out and see if that helps at all. All right, let's go back to object mode and let's take a look at it. Here we go. I move. The cursor shift s one that takes it down to the center of the grid. And there we go. We've got our windows. We can always take thes and join them together with control J. And then move that origin to the three D cursor object set origin origin to three D cursor . And then we can mirror these. Let's do that and modifier mirror. And look at what happened. They're down here. Why did that happen? Why aren't they over here? Well, we've got the X axis turned on, but we haven't applied the rotation and scale to these yet. If we hit the n key, you can see that the rotation is non uniform and it's this rotation that's making the mirror go down below the grid. So to fix this, what we can do is we can actually just apply the rotation. Let's try that. And while we're doing it, let's go ahead and apply the scale to press control A. And I'll just do the rotation and let's see what happens. Here we go now we've got the rotation at zeros and there are the windows, so that's that's all it waas. We can also apply the scale here. But honestly, it's not gonna matter a whole lot. We're gonna be combining and recombining things before we're all done with this project, so I'll leave it like that for now.
18. 017 Beginning the Back Storage Area: I think now I'd like to begin blocking in the area in the back of the vehicle. Although now that I look at the top, it looks like I never finished off that top part that I was going to extrude up. So let me do that real quick. I'll come over here and turn on the edit cage for the other side. And if I select this face here and remember, I need to make sure that clipping has turned on here. So let's do that. Now If I extrude up on, go to back to the side view here and I'll just hit B and pull straight up think that then I want to grab this edge, remember? And let's pull that back. So we'll go to wire frame here and just pull that back like this. And then from the front view, I will need to select the face on top like that again and scaling in the X s and X and maybe scale in like this. So now let's take a look at what we have here. Yeah, I think that's what it was missing there on top. All right. For the back. I think we're gonna need a couple more reference images. Um, I kind of want to see what's inside here. I want to leave this open the way it is here, but I want to see what's inside. So what let's do is at least for the time being, let's change this window right here to an image editor. And let's click on Image Open and let's go to our reference images. I'll click here so I can see the images. Um, it's gonna be kind of tough to figure out what it looks like inside. Well, there is one view here from the top. Let's take a look at this. I'm gonna press control space bar while hovering over that window to make it larger. And even though this is kind of a toy or a scale model of the vehicle, I think this is gonna help us a bit. Here. What I'd like to do first is create this piece right here, and it looks like it's pretty much a cube, except for this part that curves over the tire. You can see it here. I'd like to create that part and then also this top part right here. So Let's see what we can do with that. I'll press control space bar again. And, um, do we have enough information here to do this, or should we bring one more in? Maybe we should bring one more, and I feel like, Ah, I don't yet have quite enough information to proceed yet, So I'll click here and dragged down to create a new window. And let's switch this once again to an image editor. Good image open and let's see. But we have here. Um, how about this one right here? Let's take a look at this. This has a pretty good angle of what we're trying to do right here. I like that. It gives us a sense of how deep this is here. So let's begin with these Now. Um, I think what I'm going to do is begin with a polygon plane once again, and I'm going to extrude to get the curve over the tire the same way we did the fender in the front. So let's go back to the side view and I'll goto wire frame again. And let's press shift a and I'll create a polygon plane oppress our why 90 determinant. And let's move that right up in here. I'll hit s and scale this down quite a bit, and I kind of want to put it right in the middle of this fender like this. And it s and Z and kind of scale it up a bit. So I want to place it right about here, I think, And then what I want to do is set it up. So it's mirrored around this point. So as I extrude out here, we also get it happening on the other side. So if I tab into edit mode and press control are and create a vertical edge in the middle there and I'm gonna hit enter two times to make sure it's right down the center and then I'm gonna press the three key go to face mode and delete 1/2 of this. I'll hit X and delete faces. All right, so now there it is, an object mode. Let's come down here and click Add modifier and at a mirror modifier. And we don't see anything happening here because we're mere ing in the X axis. If I turned that off and turn the y axis on now we can see it here. All right, So if we tap into edit mode, go to edge mode and select this edge Weaken, begin extruding this out. So let's do that. Let's hit e And I'm gonna press the y key and extended out in the y axis like this that will hit one and grab this vertex and move it down. Maybe I'll move this one down a bit too. So I'm just gonna then grab these two and hit e and why? And pull out and then bring that one down so you can see what I'm beginning to do here. I'm just extruding out while trying to follow the outline of this fender here. If you don't move those up a bit, let's grab this again. And E, why pull out? Bring this one down. Looks like I could bring that one down just a bit too. So just continuing to adjust as we go, E, why move it out? Grab this one, Move it down. Once again, he and why like this down like that? Let's see how we doing. It looks like it goes all the way down to about here, so let's go ahead and keep going. All right, grab this again, E. And why move it out. Move this down. This and let's go. Well, if I move this out to here, Yeah, let's see how it works. I'll go ahead and do that, move that down like this. And then maybe I could grab this one here and move it out just a bit, and then this one down. Okay, so I think that's about what I wanted here. All right, let's tumble around and take a look at it. Let's move it out in the X axis and we gotta figure out where it's gonna be. It looks as if it's inside here like this. Well, let's look at it from the back view. So instead of the one key for the front, let's press control one for the back. But the wire frame here. And so here's the inside of that box that we're creating. So maybe if I move it out like this because it looks like it may be just on the inside of this main cab like this. Well, let's give that a try. So I'll put that there for now. There we go. So now we need to give it some thickness, and we know how to do that. Now we can come down here and add a new modifier. We can click, add modifier, solidify. I'll choose even thickness and let's click and drag on the thickness field and move this in some like this. And let's go to that back view and figure out how deep it should be. Once again, I'll click on the thickness, and I'm to move it out to about right year. It looks like that's about how thick that is. Okay, so we've got that piece now. What about on the top here? This this piece right here, I feel like we need to work on that. Let's, um, create a new piece for that. I'm gonna tab into edit mode and, oh, we should probably go ahead and apply the modifiers that we've created here before we go any further. So what I'll do is I'll apply these modifiers, but it's usually best to apply modifiers from the top down because let me show you what happens if you do it from the bottom up. If you hit, apply here, you're going to get an error that says things may not be going the way you hope they're going. So I'm gonna press control Z here, and I'll begin from the top. So I'll apply the mirror first, and we do not get an error. That's good. And I'll apply these solidify right here. All right, so now that we've done that, we can see our polygons, and I want to choose the top faces to find the center of this piece here. So I'm gonna press 34 face mode, and then I'm gonna paint my selection here. I'm gonna press, see? And that turns on the circle. Select tool or the brush and ah, click and drag and just paint the selection right in here. And then when I'm done, I'll right click to turn off the tool. And there we go. So now we've selected all of those faces, and what that's done is it gives me a centerpiece right there, or a center point that I can move the cursor to Saul. Press Shift s two. And that moves the cursor to that point. Now, I want to create a cube for this thing here, so shift a mesh cube, scale it down and then I'll scale it in the Z S and Z and let's then move it up right about like this. And let's put this in place. Now let's scale it up. But I want to scale it in the X and the Y, but not in the Z. So remember how we turn off an axis we hit s to scale and then shift Z to turn off the Z axis. And now I can just scale in the X and the y and I'll bring it out. So it's a little bit bigger in the X there, and then I'm gonna press s and why, and scale it in the UAE. So it's just a tad bit bigger like that. There we go. Now what I'll do is tab into edit mode and hit the three key and select this face here. And I'm gonna inset this to get a rim around the edge. But when I do here, let me get I and take a look at what happened here. Look at how this side is really thick and this is really thin. We didn't get an even inset on this and that's because once again, we didn't apply our scale. So I'll press control Z to get out of that. And then I'm gonna tab back into object mode and let's apply our scale control A. Apply the scale. Now, if we tab back into edit mode and select that face again, let's try the inset tool again. Well, hit I and push in. And now look how much more uniform that inset is. So just remember that applying the scale can really help when using all kinds of modifiers . Now I want to select that outer rim and extruded up. So what I can do is come over here into this inset faces settings window and choose select outer. And that just selects that outer edge. Now I can come over here and let's extrude this up. I'll hit E and pull it straight up about two There. There we go. All right, so now we've got that piece in the next video. What let's do is create these little holes all the way around this trim
19. 018 Using the Array Modifier: Well, we've used several blender modifier so far in this project. We've used the mirror modifier solidify Boolean shrink wrap. I think for this piece here, we can use yet another one the array modifier. So to do that first list, create an object that we can use as a boolean cutter toe cut these holes and then we'll use the array modifier to multiply the number that we have. So I'm gonna press shift a and create a cube again and let's scale this down. And then this time let's try and get this about the size that we want for these holes here , so it looks like I'm gonna press s. And why here? Maybe something like this. Let's give this a trial hit s and X and scale this out and then I'll bring this down. And maybe something about this big. Um, maybe I'll shrink it down just a little bit. And maybe we can do it about like that. Let's try that. So I'll take this and I'll move it over here now. And what I'd like to do is just use theory modifier to create several of these going along the top here and then we'll use those as Boolean cutters. All right, So with this selected, I'll come down here to add modifier and let's choose array and notice it added it here in the X axis and let me Ah, move this up here so we can see it a little bit better notice that right here we have a 1.0 , in this field and these fields are X, y and Z here. So currently we're using the array modifier in the X axis. Let's take this down to zero. Here, I'll just type in zero and then let's type in one here in the Y, axis, X, Y and Z. So there we have it there. Now it's one right next to another. So we should change this relative offset here, or click and drag on and we can move it out or in like this. So maybe I'll move it right about here. Let's give this a try. Well, maybe a little bit more oppressed. Shift in, click and drag in that field. There we go. Something like that. So now we have over here in the count. We have to. If we just click here, we can increase the number of objects in the array. And maybe let's, um Well, let's try 12 here. That went a little too far. So a couple things we could do here, we could take this and hit the S key and scale in a bit. We could do that to make him a little bit smaller, and also we could take this and move it a bit. We could change the relative offset like this. So there's quite a bit of ways that we can adjust this to get an even distribution of these . So I think that looks pretty good. Let's try that. So with these now in place, what let's do is let's just add a Boolean modifier to this piece here. All right? So we select that and modifier Boolean and once again, we want the difference operation and I'll click the eyedropper and select this array object . And there we go. Now let's hit, apply and see what happens. What I'll do is I'll just bring this up and we can see it there. Oh, let me undo this Control Z and let me select the array first and I'll bring that up. There we go So now we can see there are the holes in the object and that looks pretty good . Let's now do the other side. What let's do is let's press control Z to take it back down to where it waas. And then let's turn it in the Z axis suppressed rz 90 and spend that around and then let's bring it over and set it up for this side here. I'll bring it down here so we can see it a little bit better. And what let's do is press control one, and we don't need all 12. All click here and reduce the number down to Well, let's try three. Let's do this. I'll bring this over, kind of get it in line, and maybe I'll increase the offset. You do that kind of spread them out a little bit more and then bring it in like this. There we go, and then let's tab into edit mode. And when we do that, you can see here. Is that main one? Here's the actual object that we're using the array modifier on. And if I select this face here, Aiken, drag it all the way down, have it intersect this side here. There we go. Now we've got those three in place and let's do it again. Let's select this piece here. Let's add yet another Boolean modifier and let's click the eyedropper and will select that array Object. There we go. Now it's hit. Apply. Grab that array and let's move it up. And there we go. Now we've got those holes in place on that trim. Now we can just delete are arrayed object here, I'll just hit delete, and that will take care of those. Now we can do is just mirror these over to the other side. So I'll take this one here and let's move our cursor to the center of the grid. Shift s one. Now move that origin to the three D cursor set origin origin to three D cursor, and now it's add a mirror modifier here, and once again we have that same problem. So let's just press control a and shoes to apply the rotation. And there it is. Over there. Let's do the same thing again. Set the origin to the three d cursor, add modifier mirror and there we go. All right, so in the next video. What let's do is begin working on these panels here, or these pieces here on the corners and also the cross bars on the top.
20. 019 Creating the Vertical Supports: Let's first work on one of these corner pieces. Maybe this right here. This is the front one. So this is it here. This is it from another angle, and this is it. From more of a top angle, you can see that it's got a little tab coming out of it. Here. It angles down at the bottom, and it's got this curve here. So once again, because this is a relatively complex shape, I think I want to begin with a polygon plane just because it's easier to extrude and move points around when it's just a two dimensional object. And then once we have that shape the way we want it, then we can add thickness to it with the solidify modifier once again. All right, let's give this a try. So once again, let's go to the side view and lets it Z key for wire frame. And I think what I want to do is just create a polygon plain and begin shaping it to this right here. So let's do that. Let's press shift a polygon plane. Once again, I'll press are y 90 We'll hit the s key to scale down and Let's bring it here and try and figure out where we want to begin. How about we begin right in here like this? Something like that. And then we can extrude up to get this piece and extrude down to get this area here. Now this right here looks kind of curved in the drawing. But I'm really seeing in the reference images here that this is more of a squarish piece, which is good. That'll help us use fewer points there. That's good. So OK, let's come back up here. Let's have into edit mode. Hit the two key to go to edge Select. And now let's just begin extruding this out. So there's a couple of ways to do this. I think what I'm gonna do is just extrude straight up well, hit e and click and then extrude straight up to here. And then what leads to is let's add an edge right here and let's try and just move this out like this to that right there. Now that we have that, let's create a few edges and then pull these in to kind of get a rounded shape there so I'll press control are and then I'm a scroll The mouse wheel. Ah, To maybe get three edges here and that will hit the one key and that we can take each of these and kind of move them back to match up the reference image. Kind of like this. So we get just kind of a hint of, ah, curve there. Now you can, of course, ADM. Or if you want it to be, more of a clean curve there. But I think that's probably a good balance between detail and poly count. So now it's come down here and select this edge unless extrude on down to maybe right here , I'll hit E and click and then drag in the Z axis on down to Well, let's go on right down to here. I guess like that and then lets it e and click and drag down to here. And then I'll just grab this point right here and just move this all the way into here. Now, is there a curve there? Does it seem to curve? It really doesn't. It seems to be a straight edge right there, so I'm just gonna go ahead and leave it there. It kind of seems like it curves in the drawing, but in the views over here I'm seeing a pretty much straight line. So now let's get this here. I'll insert an edge loop right here and pull it down to right there. And then we should just be able to hit E click and drag out with the Y axis, and I can't tell if it it looks like it might go in a bit. So let me press S and Z and scale in the Z axis and just kind of bring that in just a little bit like this. There we go. All right, let's see what we've done here. I'm gonna tumble around and let's bring it out and put it somewhere out here. Let's try and figure out where it's supposed to be. It looks like it's fairly far out. Um, and it looks like the whole piece. Well, it's difficult to tell from this angle if this hides behind there, but it looks as if the whole piece is pretty much outside of the cab. So let's take a look at the back view. All press control one, and I'll hit Z key and go toe wire frame and it looks a Ziff right about here is where that is. This is another piece right here to see if they have one of these. Yeah, this thing right here is this. So we don't wanna line it up with that. I think this right in here is what we want to line it up with right there. Well, let's see. Let's tumble back around. Go to salad mode. It seems a little far out, but let's see how it works. Um, now what do we have to do for this piece? Oh, here we go. Let's take a look at this. This is a good view of it. So now we have to take it and extrude this edge back toward the cab, and then it has this kind of angled shape here. So let's work on that tab back into edit mode, and I'll press Ault and click of this edge and that will select that whole edge there. And so now let's extrude and pushing the x axis sold hit e and click and middle Click this X axis and dragon in about Like this, I think, and then it angles in like this and How do we want to do that? It looks a Ziff. It angles right here below that backdoor top hinge here. So let's go to the side view and take a look at where that is. So there it is. Here. If we add an ange loop right underneath here, control are and click. And maybe right there, that's maybe where it's going to angle out. Okay, so if that's where it's gonna angle out, what we could do is move our pivot point for this object in edit mode. We could move it to this point right here and then just rotated in the y axis out. We would have to pull the bottom point down a bit to get it to be flat on the bottom. But let's at least try this. So with this selected, I'm gonna move the cursor to their with Shift s in the two key. Now I'll change my pivot point right here from median point to being at the three D cursor . So I'll click three D cursor. And now let's select thes points down here. Let's go to Let's go to the back view again with control one and then we can press are and why or just are now, since we're in the back view, it's only going to be able to rotate in the y axis anyway, since we're here in a North a graphic view. So I'll just push our and tilt this out a bit like this. Like that. Let's give that a try. Now. This is curved up a bit because we're rotating from this point, so I would need to take this point now and dragged down a little. I've got the cursor up here recall, so I'm just gonna move the cursor back to the median point, and there it is. And then I just dragged this down so it's kind of parallel with the ground plane there. It also looks like there's just a bit of a lip there, too. We need to extrude that out, So let's do that. Let's select this point and then I'll control click this point and then I'll select all the points in between. And now let's extrude and pull out in the Why So e why? And I'll pull straight out like that. Maybe like that? Let's try that. Okay, now that we have that we just need to give it some thickness. So once again, let's use that solidify modifier. But first, before we do, let's apply the scale. If we hit the n key and open up the sidebar, we can see our scale is uniform. But it isn't ones. Let's ah, press control a and apply that scale here. Now you can see those are all ones. Now let's come over here. Goto. Add modifier and solidify. There we go. You can see the thickness there. I'll click on even thickness. And then I'm gonna hold the shift key down and click and drag in the thickness field. And I want to make it pretty thin. I mean, these air pretty then pieces here, maybe something like that. And if I go to the side view, let me just make sure it's where we wanted to be. Yeah, it's pretty much in place there. Okay. Well, then let's just, um, mirrored over to the other side. Now, once again, if we open up the sidebar we see there is rotation here in the Y axis. So what does that mean when we add a mirror modifier? Well, let's try it. Let's go over here, add modifier mirror and look at it there. That's not exactly what we want, is it? So let's press control a and also apply the rotation, and that kind of gets it in the same place. But look at what I've done. I've left the origin here in the geometry instead of moving it down to the center of the grid. So let's first of all, move. The cursor shift s one venal. Let's move that object origin with set origin and origin to three D cursor. And now that piece pops over here. So there we go. We've got that first corner piece of the back in the next video. Let's start working on the back corner pieces. Well,
21. 020 Continuing the Back Storage Area: for that back corner piece right here. It's kind of hard to see how wide it should be. We can see it a little bit here, Um and maybe if we go to the back view with control one and go toe wire frame, maybe we can see it here on the other side. So we can't really see it here because of the tire. But we can see the whip here, and it also looks like it's two pieces. It doesn't go all the way down here. It looks like this is just one piece up here. And then there's another piece that kind of fits underneath and below it. So we're will work on this one a little bit later. But that corner piece, let's go ahead and work on that. Now I'll go to the side view and you can see it pretty well here, this piece going right down to their and then back up here. So let's basically go through the same process that we did for the front one and get that in place so I'll create a polygon plane. I'll go ahead and press are Y 90 and spin that and scale it down and let's move it over and try and find a place where we can begin. Um, I would say something like this again. Let's try this. I'll scale it out just a bit and put it right in here. And we could then scale this down to here, I guess. But I think there is an angle here. So I'm seeing this kind of jagged line here is actually an angle end. So if we just take, say, this piece right here, this edge and just drag it straight down like this, then this it looks like, comes in a bit, and maybe this comes out of it. So you've got that angle in like this Now, once again, we could take this edge appear and extruded up. I'll hit E and just pull that straight up. Actually, why don't hit the Z key and that will constrain it to the Z axis and pull that up like this . Now it looks like I've got this edge in the wrong place. It looks like it goes all the way over to here, so let's just pull that straight out like that. There we go. So I'm just looking at the width here. I think that's what we want. Now, Once again, let's add another edge. Loop with control are and I'll put it right there. We'll select that edge now and slide it over. Here we go. Now, do we have much of a curve here or is it just a Nangle? There really isn't much of a curve. It really is just kind of an angle there. So why don't we leave it like this for now, that looks fairly straight. And then see if we need to add any more detail to it as we move on. All right, so we have the side piece now. What we need to do is select these edges here and then extruded into the X axis for the back side. So let's press control one and go back here. Oh, I'm in the wrong area, aren't I? So let's go into object mode. And which way should I pull it here? Which, which side of we've been working on what we've been working over here. So let's see if I can place it right about here. Let's say let's try that. And then if we tap into edit mode, we still have that edge selected. So let's go here and, well, tab back into edit mode, hit E and X and that'll extrude in the X axis. And let's take it right over toe here. Let's say all right, so let's go to solid view. And that's what we have so far. I think that's gonna work pretty well. Let's go ahead and add a solidify modifier to it so it can have a little thickness the way these do up here. Actually, before I do look in here, it's got a little bit of, ah, lip or edge extruding back into their It's really hard to see, but I think that might be good. Just to add that little bit of a detail, there's Let's go ahead and do that. I'll just hit E and why it's pull that out just a bit like that. Let's try that. Okay, now we can use that solidify modifier here and let's choose even thickness, and I think I better apply the rotation and scale cause it looks like we're not getting much there. So let me just press control a and let's go ahead and applied to scale. Let's just do that. There we go. See how much that change that once we apply the scale, now I can click and drag in the thickness field and get it about the way we want it there. Yeah, something like that. All right, so we have that. Let's go ahead and merit to the other side. Remove the origin to the three d cursor in the center of the grid. I will add a modifier and choose mirror. And once again, we're not seeing it here. So let's press control a and apply the rotation now. And there it is, over on the other side. Okay, so now that we've got those, let's think about thes crossbars up top. Um, there's quite a bit of detail on the top and all these things on it, But just for now, let's work on on Lee the crossbars here, so I'll press shift A and this time will create a cube and I'll hit the S key and scale it down quite a bit. And let's go to the side view. Let's get this in place, move it up to here and I'll scale it down and let's say it's about like this about this big . Now we can take this all the way over here like that tab into edit mode, Hit the three key for face mode and, Ah, go ahead and select this face and just drag it straight over to here. I think to try that. Let me look at it in solid mode. Yeah, let's Ah, go to the top view and wire frame and let's pull that over until we get it right about here . Now what we could do is merit over and then connect it. So if I move the origin to the center of the grid to the three D cursor and Eimear it over there, it is over there now. If we insert an edge loop and extrude between the two pieces, I think we can connect them up. So let's give that a trial. Go back to the top view to Goto wire frame. And now what let's do is tab into edit mode and press control are, and I'm gonna add an edge loop and drag it right up to about here. So it's in line with that crossbar up here at the back. Now let's go to face mode. Select that one face there that we just created. There it is. And what I'm gonna do is I'm gonna extrude this forward or extrude this toward the center, and it will then meet up with its mirror. And when we do that, we want the clipping setting to be on so that when they join each other, it clips together. But there's one thing we need to do before that happens. And we need to delete that face because what's gonna happen is if we extrude this and have it meet up with this other side here, I'm gonna hit E and X, and I'm extrude this and pull this and you can see they're coming toward each other. The problem is, when these two clip together in those points merge, we're still gonna have a face inside of here. And that's something you do not want to do. You do not wanna have internal faces to your objects. That's called a T polygon shaped there. You don't want any teas inside your objects. Let me just show you what I mean. If I take this and go ahead and drag until it clips right now, if I try and pull it apart. I can't. Those are merged together. And if I hit the Z key and go toe wire frame, you can see right inside of there. There's that extra face. And when I say a t, I mean this face and let me, ah, turn on the edit cage here and this face, you can see that t pattern and part of that T pattern is inside the object. And you do not want that. That is just something that is not going to work. If you ever try and smooth it, if you ever try and add a subdivision surface modifier, if you try and UV map it, it's gonna college your problems. And if you try and sculpt on it, it's going to cause your big problems. So this T pattern of polygons is something you do not want it all. So what I'm gonna do is just select that one face and hit X and delete faces. There we go. So in the future, what I'll do is if we're going to come across that problem, I will delete that face before I even pull it in and clip it together. All right, so that is the back panel and the top crossbar. In the next video, let's begin adding some of the pieces onto the back of the vehicle, like this piece here and some other pieces down into here, so that's coming up next.
22. 021 Modeling the Back Container: I think I'd like to work on this little container at the back of the vehicle. Now that looks like could be kind of fun. So let's try this. Ultimately, I think it's just a cube that we can move into place and then begin shaping to fit the reference image. So let's do that. Let's press shift a and then let's create a cube and I'll scale it down. Let's go to a wire frame and let's go to that side view and start putting it in place. So I think right here I'll just kind of put it in place like this. So it's the width of it right there and then I'll move it up to here and, ah, let's then tab into edit mode and grab that face on the bottom there and just pull it down to where that angle is, where angles in. And then from here we could just hit E and extrude straight down like that. And then if we hit the one key de select everything and then I'm just gonna press the B key and border, select these two points here and then dragged them straight in like that to get that angle there was tumble around and see what we've done here. So there it is. Now let's press control one to go to the back view and I'll just drag this over and tell it kind of is in line with this right here. And then if we go back to edit mode and just border, select these points, we can then drag them over to here. There we go. So that's the general width of that piece. Now we just need to bring this in just a bit. So once again, let's just border select these points and drag it in the X about right there. All right, let's take a look at it. What do we have here? Yeah, I think that's generally what we want now for this top piece. It really looks like this Top pieces, a completely separate object. And then this piece that we just created goes up and connects to it. So let's just create this piece now on the top. Once again, Shift Day Cube and let's get it in place here at the G key and move it up and let's scale it down. And I just want to get it about the right size here at the front, something like this. And then I'll just tab into edit mode at the three. Key to go to face mode and then just drag that back, and it's hard to know how far I'll bring it for now. I'll bring it back to right year to kind of connect up with this. There's a lot of other things going on here. It's kind of hard to see in the reference image what needs to be done, But let's try this Here. Uh, looks like I need to bring it over now. Don't let's go this way and I'll just line it up with this side. And then once again, let's select that face there and then slide it over to match the width of the first object there. So there we go. We've got that basic shape down. It looks to me like that Gap is a little too much. Let me just bring that down some like this. Let's try that. Now that we've got those basic shapes, we can go ahead and begin adding a couple of other details, like this little flap that goes up to connect to that top piece. Let's let's put that in place. So actually, if I take this and move it back a bit and also I'll grab that base and go ahead and move it on back to hear what I can do is select this piece and press control are and let's create an edge right here on the end like this, and then select that one face that was created and let's hit E and drag it up and kind of put it right there. Okay, so now we've got that. And once again, we are just blocking things out. We're not putting all the little details of all the bolts and screws and connecting pieces at this point in time, because, frankly, I'm not sure yet. If I want to do all of these bolts here as geometry or his textures, I really want to see once we're all done blocking all the pieces in what are poly count is , then I can kind of decide whether I want to create geometry for these and place it all over or created as a texture as a normal map. So we're still going to have to think about that as we get farther along in the project. All right, so let's now think about connecting back here. It looks to me like there's a piece right here that comes off of this and connects to that brace. So let's do that. Let's let's work on that. I think all I need to do is select this and we need to insert a couple of edge loops and also use that edge loop flipping trick with the E and the F key. So let's do that. Let's press control are and then I'm gonna click and drag this over, and you can see how it's kind of angle there toward the bottom. Let's now press the e key and then press F and toggle between those two. So I want it straight up and down like that, so I'll just move it into place and click. And then let's do that again. A press control are click, and now I want to hit E. And let's toggle this. We want to straight up and down like that. There we go. So, as I said, I'm hitting the E key after I click the mouse to lay down that edge and Then I'm pressing the F key to toggle back and forth between that edge, being straight and being conformed to the angle of the object. All right, so I'll hit the three key and now select these two faces and I can hit E and pull that out . There we go. So now we've got kind of ah ah, connecting edge there as if it's been kind of bolted to that support peace. All right, what else do we want to do? Well, you know, what we could do over here is add these things. So they're these cylindrical pieces on the top of this particular container. Um, and it looks to me like they're just kind of connecting pieces that you can put anything onto, like, this appear, Has one of these put on it, and over here, it doesn't have anything, So I kind of like this thing right here. Let's let's maybe add one of these. That might be kind of nice. So what let's do is select this and I'm gonna select this face and then move the three d cursor to it with shift s too. And then all press shift a and create a cylinder at this spot right here. Um, I think I'm gonna change the number of Vergis ease from 32 to say 24. So it isn't quite so dense. And then I'm gonna change the cat feel type from in God to triangle fan. All right, so now let's scale it down. There it is. And let's see if it's about maybe that big with the period key to zoom in and then press s and Z and scale it down a bit like that. So there it is. So it's maybe about like that. Now, I just want to slide it over here into this corner. And of course, I could do that by pressing s and then shift Z, as we've done before to turn off the Z axis. So we're only sliding it around in the x and y, But also, that's what these little squares air for as well. So if I want to slide it in the X and the Y axis here, I can just click and drag the blue one, which coincides with the Z axis. So basically clicking the blumen here turns off the Z axis so I can click and drag and it just slides in the X and the y. So I'll put that right about here. And then let's go ahead and extrude up to create these pieces here. So let's tap into edit mode and I'll hit the three key to go to face mode on Let's press the sea key for the circle, Select tool and weaken paint our selection right click to get out of that and then let's hit I to inset, and we'll just bring that in just a bit like this. I'm working on this right here, It e and bring that up some. Now it's ah hit e to extrude and then s to scale out like this And then I'll hit E to bring that up by two inset then e to extrude up. And I think I'm gonna It kind of looks like it angles and I don't know Let me try it. I'm gonna angle it in just a bit like this. Why not it? I and skill that in just a bit Now I'm gonna extrude up and it looks like there's something a little bit extra here. It's really hard to tell with all the pics elation. But I think what I'll do is I'll hit E and move that up and then I'll hit E again, move it up and then hit s and scaled out just a bit. And then let's extrude back up again. Then I'm gonna hit E and s scale out. Don't bring it up some because it looks a little bit angle there on. Then I think I can just hit e and bring it straight up like that. Must try that. Yeah. Okay, so there we go. It's kind of blocky. I'd like to smooth it out some, So let's goto object shades smooth. And then let's also come over here to our object data panel right here and let me twirl these up and we go to normals. Turn on auto, smooth. And it looks like we could maybe bring this down with Take it all the way down to zero, and then we'll drag up and see how it smooths out of it. That's not bad. Something about like that. Maybe it's still kind of having a problem around in here trying to find the best dragon way up. Then we get problems there. So what? I could do. Maybe is just go up to say 16 or 17. And then we could come in here and select these edges. Say this edge in this edge and maybe these. Let's try this and let's press control e and let's use the mark. Sharp tool here will click that. And there we go. That sharpens them up quite a bit. Yeah, so I think that works pretty well. In the next video. We'll continue working on the back of the vehicle.
23. 022 More of the Back Details: All right. Let's see if we can add a few more things here in the back. Um, I think we're gonna need some different reference images here. So let me, um may grab this. I'm gonna go to Image Open. And I think there's a back view here of this. That's pretty good. Think we can use this? And Well, I guess I just ah, opened over the one. That was also pretty good, didn't I? Let me just open that again. So thes two, I think, will help us out quite a bit. This Ah, Let's see how this one looks. Well, that might help A little. Maybe not. All right, let's see what we can do. First of all, let's go to the back view and goto wire frame here, and then let's, um let's work on this piece here. It looks like it's very oddly shaped. Um, but that's okay in that we can use our trick. Teoh, begin with a polygon plane, get it in the odd shape that we needed to be and then use the solidify modifier. So there's this strange kind of curve in indentation here, but it really isn't. It's just that this part is angling out. You can see that up here. It's angling out here, and that's where the Mudflaps connect to. So we don't really need to worry about this strange, curved piece because I think it's just a non optical illusion. If we look at it from here, you can see that this is it here. So what? Let's do, first of all, is go ahead and bring in a polygon plane. The three d cursor is up here. We could actually move it to where we want it to be by clicking here on the cursor button and then coming over here and just clicking somewhere in here. There we go. So now free press shift A and create ah mesh plane. There's are playing there. Now we need to turn it and, of course, move it back. But if we turn it, we want that top part to be facing out. We don't want to deal with the back side of a polygon. So what I'm gonna do is press are X and hold the control key down and I'm gonna move it. You can see in the upper left hand corner of the screen. I'm moving it towards negative 90 degrees right there and then I'll click. So there we have it. Rotated. Now what? I'm gonna do it. Just drag it back here and kind of put it in place there. So let's go back to the back view. We'll scale this down and I'll go back to wire frame here. Okay, so now we can do is scale it down and put it right in here. So it's about the same size as this part right in there. Now it's kind of hard to see with everything else here. So what we should do is maybe hide everything. Let me a tumble around here and let's go back to our solid view just to take care of this. What I want to do is let's change this back to an outline, er so we can see what we're doing. And currently we have two seen collections, and then some objects here kind of outside of those two. So the vehicle Maine has all of these the reference images has actually quite a lot of of the geometry as well. And of course, it has the top view. The side view, the front view etcetera. So what we need to do is get all of these objects up into the vehicle. Maine. Keep the reference images where they are, and then I'll be able to hide the vehicle. Maine seen collection. And we'll just have this one object here that we're currently working on. Now there's a couple of ways to do this. We can, of course, go into here and choose a few of these objects and just click and drag them right into the vehicle. Main group. That'll work. We can also grab some of these here. And if we're just in the three D view here or we have the outline or closed, we can also with object selected, weaken right, click and choose move to collection. We can also use the shortcut t m. So let's go ahead and do that. Let's hit em and we can move to collection vehicle Maine or reference images. We have a list here of all are seen collection, so all click vehicle Maine and that moves them up into their. So now we have our reference images. Here are objects in here. We could also select these other pieces down into here like this and just click and drag them up into that vehicle. Maine seen collection as well. Now, here's that object. Oh, no, it it isn't. This is the object. So look at what I've done here. I've actually taken this object and moved it up into the vehicle. Maine, when I wanted it to be down here. This object here are the doors. So I'm just gonna move that up there like that. So how do I find this in all this clutter? One way to do that is kind of like in a three d view where you can hit the period key. I'm gonna come up here, hover over the scene collection and press the period key on the num pad and that will open up the scene collection and highlight the one that I want. So what I want to do is put this back up in the main heading seen collection. So it's outside of the vehicle. Maine. What I can do is come back and right click here, say, move to collection and choose that scene collection at the top. And there we go. So now we've got everything in their proper seen collections and this one new object outside of it, so that now allows me the ability to hide everything except the object I'm working on. So it kind of goes without saying that it's good to keep the outline er fairly organized and cleaned up so you can do these kind of things. You can hide away groups of objects while you work on a new one. All right, so I'm gonna go back to the back view here, got a wire frame again, and let's work on this. So if I tap into edit mode and go to edge mode, I can slide this over to maybe right about here. And maybe I can take this out just a little bit further there. And then what I'd like to do is press control, are and at an edge loop here and then take this edge and hit E and Z and drag it straight up. Maybe all the way up to here. Could you can see it up here coming out from underneath that piece that we've already created. So then what let's do is let's add an edge loop right here, and then select this edge and this edge and Let's extrude this over here. So I'll hit E and X and drag over here and then it right about here. It kind of looks like it then angles down. So it's it e and ex again and pull out here and then I'm just gonna hit s and scale in a bit like this. Something like that. There we go. Now for this, I could insert an agile loop right here and take this edge and extrude it down in the Z and then scale in like that. There we go. So let's take a look at what we have now. So that's what we have so far. What we need to do is cut these holes in here and we could, of course, go through and use the Boolean modifier again. But I think I'm just gonna add a few edge loops and do the trick with that. So let's just at an edge loop here at an edge loop here. I will also add one right here. And then I think I'll add one right about here. And then there's this angled part right there. So what I want to do is just use the knife tool to cut that in right there. So I'll press K click right year on this edge and then bring it right up here and click there and then I'll hit. Enter and there we go. So now the last thing we need is one Mawr edge, right year, right? And we go. So let's go do wire frame or excuse me face mode and I'll just select these faces here. There they are and hit X and elite faces. There we go. So there's that basic shape. Let's go ahead and put it in place. Now I'll bring the rest of the objects back and let's just pull it back. Look at the side view here and maybe put it right about here. Now what we can dio is maybe bend this right here. So how would we do that? Well, I think let's take a look. If this edges right where we need it to be, I'll press all to click. There we go. Now let's go to that side view and it looks like it's right there, kind of where we need it to be. So what we could do is just take this edge right here and just pull it forward like this. Let's try this. And I think that's what we're getting right there. Now let's go ahead and add a solidify modifier. But before we do, let's go ahead and press control a and apply the scale. And then let's go over to the modifiers panel. Add modifier. Solidify. There we go. That's not bad. Let's take a look at how we're doing here. Yeah, that's actually pretty good. I think I may want it to be just a little bit thicker. I'm gonna click on even thickness and click in the ah, thickness field like that. There we go. Then there's this little piece right here. Let me open this up. You can see it right here. It goes down where the mud flap actually attach is to it. So let's go and create that now. Since the thickness here is the solidify modifier. We can't just choose a face here because really, it doesn't exist. So what let's do is just select that edge and hit E and Z and pulled down Well, let's go all the way down to about right here. Let's see how that works. Is that too much? Yeah, That may be too much, huh? I'll select that edge again and pull it back up like this. There we go. What let's do now is quickly just mere it. Over. Let's ah, move our cursor into the center of the grid with shift s one. Then we'll take that origin of the object and move it to the three D cursor, and then we'll go ahead and come over here and add a mirror modifier. And there it is, over there. All right, so in the next video will work on a few more of these details back here.
24. 023 Beginning the Tailgate Area: I guess what we should do is begin trying to fill in some of this area in the back of the vehicle. It's almost like a new area of a pickup truck where the tailgate is, and it's really hard to see what it is we want to put in there. Let's let's go back to another image here. Um, maybe something. This is the only top view we really have, and it doesn't give us a whole lot of information, but I think we can just put some pieces in to kind of fill the space and see where we are once we do that. So let's go to that back view with Control one and go toe wire frame again. And let's take a look here. It looks like there's kind of a platform here, and it kind of looks like that. This is it here. I think I want to put that in. In addition, now that I'm looking at this, it seems like this piece here extends all the way across that This here is all one piece we could go ahead and add that in before we put in the platform, I guess. Let's give that a try? Let's tab into edit mode and I'll hit the one key to go to Vertex Select. And I'll press the Beaky and Border Select these points here. So I'll come over here and turn on the edit cage for the mirror so we can see the other points on the other side. And I think what I want to do is get this curve here. It isn't over here, but I think that's okay. I think I like this here. So what I'll do is I'll just press E and X and I'll move these in and then I'll scale of it s and scale in and then I'll bring these up just a little bit. So I'm kind of bringing that up. Now you can see that there. Then I'll hit E and X and move this way. And what I want to do now is kind of bring this down like this. I think it's really hard to tell, but I'm just trying to get that basic shape. So then, from here, I'll hit E and X and slide it over to here like that right there and then what I'll do is press e and X and slide this way like this. Now, when I do this notice, these don't clip together. So I'll just click and I'll come over here into the mirror panel and I'll turn on clipping . Now, if I take this and drag, it will just clip together and merge those points. Okay? So now when I just need to do is kind of hold these points up. To do that, I can change my pivot. Let me go to the solid view so we can see this a little better. What I'll do is I'll select this point here and I'll move that three d cursor to it. Shift s too. Then what I'll do is change the pivot point, the actual place from which we will scale from the median point of the selection to the three D cursor. So now whenever we scale or rotate, it'll happen at the three d cursor. Now I'll hit that Beaky and Border select these. And then if I press s and Z to scale in the Z axis, those will come up like this. See how it's scaling from the three D cursor? All right, so let me just go back to a wire frame real quick and just take a look at this snz. And maybe I'll just pull it up to about right there. I'm just getting once again the basic shapes. I know this is very blocky and angled compared to what is in the reference image, but that's OK for now. We're just trying to get in the basic shapes, all right, so I think maybe I'll grab these two points. Let me switch back to the median point here. Now there is a shortcut key for this menu. Here. You can press the period key on the keyboard as opposed to the period key on the NUM pad, the period key on the keyboard, and that will bring up this pie menu. And you can choose median point or three D cursor here. So I hit the period key, and we can choose six or eight are the shortcut keys. So once again, I'll hit escape to get out of that. And now I'll hit Period eight. And that will pop that back to the median point of the selection. All right, so now I can bring this down. Maybe something like this There we go. All right, let's take a look at it. Okay? It's a little blocking, as I said, but let's leave it like that and just see how it's gonna work. As we put in these other pieces, let's put in this, um, main platform here at the bottom of the tailgate. So to do that, I'll move the cursor back to the grid with shift s one. And then let's go to that top view and wire frame and let's create a cube shift a mesh cube , and I'm going to scale it down and bring it back. And, um, I think I want it something like this Opus s and y and kind of scale out like this and then bring Well, we're just a bit something like this. Maybe let's see how this is gonna fit in there. And then I think I just want a press S and X, and I'm a scale into right about here, right there. All right, let's tumble around to see what we've done. I go to the side view with three key, and it's bring this up and, ah, let's go to the back view with control one. And I'm gonna put this right there, see where that platform is. I'm gonna put that right there. Let's try that. And then I'll tab into edit mode at the three Key for based, select and drag that base up. Well, I don't know. I don't know where it's gonna go. I'll put it right here. For now. It's really hard to tell, So let's take a look at this now. All right, so there's that piece and it looks like it's difficult to say, but it looks like there's a little rim there. So what I'm gonna do is select this press the I key and inset that just a little bit. Oh, it looks like I since I've changed this scale, let's control Z out of that and back to object mode and all control A and applied the scale . Now let's try this again. Let's hit the I key and inset, and that border looks like until a little more even in uniform. Now that we've applied the scale, let's extrude and push that down just a bit like that. All right? It looks like we're kind of bumping up against this. Some me push that back. There we go All right, so we have that in place. Um, it looks like this thing is, you know, it's it's too bad we only have this one picture, but I think we'll be ableto make it work here. This part right here looks kind of like a toolbox. Let me go to the top view and show you what? I mean, if I got a wire frame, you see how it has this handle here and the top is kind of curved. I think this is a toolbox, although I'm not sure. Ah, but that's what I'm gonna say it is. And that's what I'm gonna make it as. So we can do that when we're creating our own things like this. Let's create a toolbox here. I'm gonna press shift a and create a cube and let's scale that down again, and I'll move this up and into place over here. Let's scale it down. Can I get it? So it fits right in here. And I think I wanted to be back like this. I want this face to come in, so let's like that face and drag in a bit. And then I like this face to go this way out to about here. And maybe this can come down a bit because we kind of see the tire wealth through there. So I think I wanted to come down a bit like this. And then what let's do is make that curve there. It looks a Ziff. What I could do is maybe add some edge loops and then pull them up with the proportional editing tool. So let's do that. Let's go ahead and press control are and add a few edge loops here. I'm gonna scroll the mouse wheel, and if you look in the bottom left hand corner of the screen, you can see how Maney cuts I'm creating here. I think I'm gonna need to five cuts here and then I'll click and click again. So there we have those edges that we can use to pull up. I'll select this one edge, and then what I'll do is I'll change to proportional editing so we can turn this on here. This is proportional editing. Shortcut is the okey. Now, if I just pulled this up like this, you can see I only pull that one edge up a press control Z. I'll turn on proportional editing, and I'll also come in here and choose connected Only now if I hit G and then the Z key to move only in the Z axis, I scroll the mouse wheel forward. I can change the area of influence that the proportional editing tool has. You can see how it moves it around a bit. Now Aiken drag upward and then scale or scroll the mouse wheel, and you can see how it changes the shape of that top of the object. I think if I go like this, maybe that might be a fairly nice curve to it. Yeah, let's go like that. We can, of course, come up here and go toe object and shade smooth and then go down to object. Data turn on auto smooth. And that cleans that up pretty well. So that's a nice, curved top for that. We can't really see what's going on on the other side here, so I think what I'm gonna do is just put a cube there as a filler and see how it works. As we move along here, I'm just going to create a cube, move it back, and let's place it in here. Just toe. Fill the space. So scale it down a bit. Move it down a hair like that and I grab that face over here, and let's move this in. Azaz. Well, so move it in. But I still have the proportional editing to alone. I better come up here and turn that off. What I can do is just press the okey and that'll turn that off. All right, let's move that there on. Grab this face here and move it back to their in this face and move it to here and we go. Oh, it looks like I could grab that face and move it back out. Tell it just almost connects with that. Here we go. Okay. Now, we could maybe come down here and select these and get them kind of the lined on the bottom as well. I'll hit the sea key and circle. Select those, and then move those down in the Z. Tell about right there, I guess something like that. Okay. All right. So there we have just the basic block out of those shapes in the next video. What I'd like to do is maybe add this piece here. I'm not sure what it is, but I like the way it looks inside there. And also, I think if we go back to that top of you again, I think we saw that we had a handle here. I'd like to create this handle. Maybe used the path tool to create that handle just to give it a sense that it's like a toolbox or something. So we'll work on that in the next video.
25. 024 Continuing with the Tailgate new: since the last video, I noticed that this piece here does not come down. An overlap are mudflaps piece down here. The way it does in are images, so I just haven't pulled these down far enough. So let's just do that real quick. I'll go to the side view and in the wire frame. And if I tap into edit mode, maybe I can just go to Vertex, select and use the border Select Tool with the Beaky and Border. Select these points and then let's just move them down to right here and it looks like it angles in. Then let's see if we conf find that here. Yeah, it looks like it angles in right there, and you can see that here, too. So what we need to do, I guess, is just hit e and extrude straight down in the Z axis to about right here. And I think what we can do is just border. Select this point here and move it in like that. There we go. So let's give this a try. Let's go back to solid view and take a look at it. Well, it's pulled it down over that piece and that's good. However, this is kind of sticking out, and this is the point where we're gonna have to kind of begin making some decisions as to how and where these pieces air gonna fit together. So you can see here that this piece is on the inside here. So if we go to the back view, we can see that if I take this piece here and move it in, then this piece won't be all the way out to where it should be. So what I'm gonna do is just grab these points right here and move them in just inside of that piece. So I'm gonna tab into edit mode, go to the border, Select Tool. I'm just gonna drag these in like that and see how that works. There we go. Yeah, so I think it's more important that this stay outside or this Stay where it is on to the reference image than this piece. And I don't know that I want to change where these pieces are at this point in time. So to get it all the work together, I just brought in those points just a bit. All right, now let's create that odd little piece in here where I don't really know what it is, and it doesn't really matter too much, but I just want to create this general shape just toe have in here. So let's go ahead and press shift a and create a cube and I'll scale it down and I'll bring it up into here and kind of fitted into place here, right in here. And, um, maybe I'll bring it over like this and let's set it right down in here and maybe I'll go ahead and select this face and bring it in just a bit like that. And also, I think we could maybe scale this and I'm gonna hit s and why and scale that in a bit. It doesn't look like it fills the entire space there. All right, And maybe bring that down. Or actually, what I'll do is I'll just select that face and bring that down like this. Now, I just want to take this edge right here and bring that straight down like that. Well, let's just bring it down like that. Oh, actually, no, I don't want to do that, do I? Let's undo that. I need to create one extra edge loop right in here. Toe. Hold this flat space right there. So his press control are and maybe ah, put that right there. And now, if I select that edge, I could bring that down like that, and it gives us that basic shape. All right, so maybe scale it in just a little bit. Mawr. And then what I'd like to do is put this little thingamabob on the top. Um, it looks kind of like a cylinder, So let's go ahead and call it a cylinder. All press shift s to to move the cursor there and I'll press shift a and let's choose mesh cylinder and maybe I'll take it down to, ah, 16 sides And let's change the radius 2.1. And let's change the depth 2.1 as well. And that just brings it down. So weaken see it at least, um, I'd also like to get rid of the faces on the bottom. So zoom in with period key and let's tab into edit mode, and I'll just select that face there and hit X and delete faces. Now notice that I didn't put a triangle fan on this and I usually do. But for this, let's try it like this. I just want to see if I can get it to have that kind of curved field to it on the top. Here, let's see what we can do. So what I'll do is I'll just tab into edit mode and select that face. Then I'll hit the I key and pull in, and then I'm gonna pull up a bit and I'm gonna hit the I key again and do that a couple of times just to see if I can get something that's kind of like a curved top. Kind of like that. Now, if I wanted a triangle fan on here, we could do that. I could delete this and then merge the points together, and that would create a triangle fan. Now, what about creating tries from this in gun here from this multi sided face? Well, if we right clicked and choose triangulate faces, you click that that doesn't really do it for us. That does it. It just kind of gives us a random collection of triangles, and that's really what will happen once we take it into unity. so all press control z and undo that. What we can do instead is hit X delete faces, select this whole edge. I'll go to edge mode and press Ault and click that. And then what I'm gonna do is I'm gonna press the e key and then enter, and that will extrude these edges and I can bring him in. And then what let's do is merge those points together. So this press old M and then choose to merge at the center and there we go. All right, so let's just choose that one point there and kind of bring it up just a little bit. There we go. So that gives us that kind of a curve on the top. Now we can do is go ahead and smooth it and turn on auto smooth. And there we go. That looks pretty good for now. All right, I'm gonna click on that little blue square and slide it over here, scale it down a bit. So there we go. Now we've got that general shape. Ah, Maybe I'll make that a little bit bigger. Yeah, Let's try that. Okay, Now, let's see if we can create that handle and for the handle. Let me take this piece and move it up into the vehicle. Maine. Ah, actually, we may have some pieces in the reference images again. Sure enough, I Sure enough, I had the reference images collection selected when I created a few of these things. So let me grab these and just drag them up in the vehicle. Maine. There we go. Now, what I can do is I can go ahead and just select the vehicle, Maine, and hide it here. Now move that cursor to the center of the grid with shift s one. And let's try and create that handle in here. I think what I'm gonna do is go to the front view and I can go ahead and hide the reference images collection as well. Now, let's use a path to create that handle. I'll press shift a and go to curve and path. If I click here, we don't see it because it's in the vehicle. Maine. Let me undo this. And then what I'm do is click up here in the ah seen collection. Now let's try this again. Shift a, uh, path there. We can see it there. If I move it up, you can see there's our path. And all this is is just a collection of points and you can see them here. If I click this and it g, you can see how these points defined this curve this path. So what I want to do is mirror this over so that as I work on one side, it does the same thing on the other. So all border select these to get, delete and choose delete. Vergis is now. If I tab into edit mode, I can come down here to modifiers and add a mirror modifier to the curve. Hi, Tam. Back into edit mode. Now I can take this and you can see how it's moving that on both sides. Okay, I want to take this and I wanna bend it kind like this, but I don't bend it that much. I wanted to stay fairly straight here, so let me take this point. Move it this way. It's still not doing quite what I want. I want to add a point between these two so I can select these two and right click and shoes subdivide. What that does is it adds a new point, right? They're going to take this. I mean, de select and grab that one point only. I'm kind of moving like this a little bit more like that. And then I can take these two here and do the same thing, right? Click subdivide. And then I'll grab this one point and move it this way just a bit, so you can see how I'm kind of sharpening that curve just a little bit. Then I'll take this and I'll move it straight down to about there. Let's try that. Now we have our curve, but that doesn't do It's a whole lot of good unless we and some geometry to it. So what? Let's do let me ah, right click and join area and move up to here to join this? No, actually, I moved down like that to keep this image here, and I'll bring that up. Okay, so now if we go to the Path Tool or the object Data tab, I'll select here. Now, we can add some geometry to this, so I'll come down here to the G AAMA tree section and twirl that down and we can use the depth toe increase that like this. And it looks like I've got kind of my transparency on. I need the press all z to turn that back to solid mode. There we go. And, um from here I think I'd like to reduce the resolution a bit. If I hit Z and Goto wire frame, you can see how many edges will be created once we convert this to polygon geometry. And that's just too much for our low polly vehicle. So what I'll do is I'll bring the resolution down some maybe to to and also ill go back up here to this resolution, preview you and begin scrolling this down with that arrow on. Maybe that's a little bit too much. Maybe something like this. Let's see, Go back to solid. Yeah, that looks okay. I think Let's go with that. So now we need to convert this two polygons because at the moment, if I tab in tow edit mode, you can see that we're still able to grab this and move this around like this. We want to now turn this into polygon geometry. So I'll right click and choose convert to mesh. And there we go now. If we tap into edit mode, we can see the polygons there. All right, so I'll grab this. Let's go to that front view. Maybe I'll turn it a bit like this, maybe move it in just a bit. And what I'm gonna do is e and pulled down and I'll flatten it a bit too. I'll hit s and Z and that'll flatten it up some. You can see it there. Let me try that again. There we go. Then what I'll do? Is it e again? And I'm gonna hit s and scale out. Now I want to make these kind of rectangular, So just grab these to impress s And why scale those in Don't grab these two s and X and scale those in There we go. Now, um, I'll select a mall and press s and wide to make him a little bit more rectangular like that , and then we'll just bring it straight down. Maybe I'll actually go like this and then hit E and dragged down on the Z. And there we go. All right, so we didn't get that on the other side, But that's OK. We'll go ahead and hit the border, Select tool and select all of these polygons. Delete the faces, then will come back over here. Go add modifier mirror. Well, then choose clipping. And there we go. Now we have our handle. Um, I think I'd like to move it in a bit. Let me Ah Goto wire frame. And I think what I'll do is take the Beaky and just move it in a bit like this. Well, let me grab these. This move these in like that? Yeah, something like that. All right, now let's apply the mirror modifier. Let's move the pivot point down to the three d cursor object set Origin three D cursor. Now let's bring everything back and try and put it in place and we go, I'll turn it in the Z our Z 90 turned in the Why are why 90 We better do it the other way. Are why negative 90 And there we go. We'll scale that down and go and put it in place. I'll go ahead and go to that top view and wire frame and let's see if we can put it in place. Based on the reference images I'll turn them back on and let's g and bring that in here will scale it down about like that and maybe put it right about there. All right, Now, let's go back to our solid view and let's see how weaken place it right here. Kind of move that up like that. And C is that, But that too big, It kind of feels a little too big. Let's scale it down some. Yeah, something like that. All right, well, there we go there. We have our handle for our toolbox. It's beginning to come together.
26. 024 Continuing with the Tailgate: since the last video, I noticed that this piece here does not come down. An overlap are mudflaps piece down here. The way it does in are images, so I just haven't pulled these down far enough. So let's just do that real quick. I'll go to the side view and in the wire frame. And if I tap into edit mode, maybe I can just go to Vertex, select and use the border Select Tool with the Beaky and Border. Select these points and then let's just move them down to right here and it looks like it angles in. Then let's see if we conf find that here. Yeah, it looks like it angles in right there, and you can see that here, too. So what we need to do, I guess, is just hit e and extrude straight down in the Z axis to about right here. And I think what we can do is just border. Select this point here and move it in like that. There we go. So let's give this a try. Let's go back to solid view and take a look at it. Well, it's pulled it down over that piece and that's good. However, this is kind of sticking out, and this is the point where we're gonna have to kind of begin making some decisions as to how and where these pieces air gonna fit together. So you can see here that this piece is on the inside here. So if we go to the back view, we can see that if I take this piece here and move it in, then this piece won't be all the way out to where it should be. So what I'm gonna do is just grab these points right here and move them in just inside of that piece. So I'm gonna tab into edit mode, go to the border, Select Tool. I'm just gonna drag these in like that and see how that works. There we go. Yeah, so I think it's more important that this stay outside or this Stay where it is on to the reference image than this piece. And I don't know that I want to change where these pieces are at this point in time. So to get it all the work together, I just brought in those points just a bit. All right, now let's create that odd little piece in here where I don't really know what it is, and it doesn't really matter too much, but I just want to create this general shape just toe have in here. So let's go ahead and press shift a and create a cube and I'll scale it down and I'll bring it up into here and kind of fitted into place here, right in here. And, um, maybe I'll bring it over like this and let's set it right down in here and maybe I'll go ahead and select this face and bring it in just a bit like that. And also, I think we could maybe scale this and I'm gonna hit s and why and scale that in a bit. It doesn't look like it fills the entire space there. All right, And maybe bring that down. Or actually, what I'll do is I'll just select that face and bring that down like this. Now, I just want to take this edge right here and bring that straight down like that. Well, let's just bring it down like that. Oh, actually, no, I don't want to do that, do I? Let's undo that. I need to create one extra edge loop right in here. Toe. Hold this flat space right there. So his press control are and maybe ah, put that right there. And now, if I select that edge, I could bring that down like that, and it gives us that basic shape. All right, so maybe scale it in just a little bit. Mawr. And then what I'd like to do is put this little thingamabob on the top. Um, it looks kind of like a cylinder, So let's go ahead and call it a cylinder. All press shift s to to move the cursor there and I'll press shift a and let's choose mesh cylinder and maybe I'll take it down to, ah, 16 sides And let's change the radius 2.1. And let's change the depth 2.1 as well. And that just brings it down. So weaken see it at least, um, I'd also like to get rid of the faces on the bottom. So zoom in with period key and let's tab into edit mode, and I'll just select that face there and hit X and delete faces. Now notice that I didn't put a triangle fan on this and I usually do. But for this, let's try it like this. I just want to see if I can get it to have that kind of curved field to it on the top. Here, let's see what we can do. So what I'll do is I'll just tab into edit mode and select that face. Then I'll hit the I key and pull in, and then I'm gonna pull up a bit and I'm gonna hit the I key again and do that a couple of times just to see if I can get something that's kind of like a curved top. Kind of like that. Now, if I wanted a triangle fan on here, we could do that. I could delete this and then merge the points together, and that would create a triangle fan. Now, what about creating tries from this in gun here from this multi sided face? Well, if we right clicked and choose triangulate faces, you click that that doesn't really do it for us. That does it. It just kind of gives us a random collection of triangles, and that's really what will happen once we take it into unity. so all press control z and undo that. What we can do instead is hit X delete faces, select this whole edge. I'll go to edge mode and press Ault and click that. And then what I'm gonna do is I'm gonna press the e key and then enter, and that will extrude these edges and I can bring him in. And then what let's do is merge those points together. So this press old M and then choose to merge at the center and there we go. All right, so let's just choose that one point there and kind of bring it up just a little bit. There we go. So that gives us that kind of a curve on the top. Now we can do is go ahead and smooth it and turn on auto smooth. And there we go. That looks pretty good for now. All right, I'm gonna click on that little blue square and slide it over here, scale it down a bit. So there we go. Now we've got that general shape. Ah, Maybe I'll make that a little bit bigger. Yeah, Let's try that. Okay, Now, let's see if we can create that handle and for the handle. Let me take this piece and move it up into the vehicle. Maine. Ah, actually, we may have some pieces in the reference images again. Sure enough, I Sure enough, I had the reference images collection selected when I created a few of these things. So let me grab these and just drag them up in the vehicle. Maine. There we go. Now, what I can do is I can go ahead and just select the vehicle, Maine, and hide it here. Now move that cursor to the center of the grid with shift s one. And let's try and create that handle in here. I think what I'm gonna do is go to the front view and I can go ahead and hide the reference images collection as well. Now, let's use a path to create that handle. I'll press shift a and go to curve and path. If I click here, we don't see it because it's in the vehicle. Maine. Let me undo this. And then what I'm do is click up here in the ah seen collection. Now let's try this again. Shift a, uh, path there. We can see it there. If I move it up, you can see there's our path. And all this is is just a collection of points and you can see them here. If I click this and it g, you can see how these points defined this curve this path. So what I want to do is mirror this over so that as I work on one side, it does the same thing on the other. So all border select these to get, delete and choose delete. Vergis is now. If I tab into edit mode, I can come down here to modifiers and add a mirror modifier to the curve. Hi, Tam. Back into edit mode. Now I can take this and you can see how it's moving that on both sides. Okay, I want to take this and I wanna bend it kind like this, but I don't bend it that much. I wanted to stay fairly straight here, so let me take this point. Move it this way. It's still not doing quite what I want. I want to add a point between these two so I can select these two and right click and shoes subdivide. What that does is it adds a new point, right? They're going to take this. I mean, de select and grab that one point only. I'm kind of moving like this a little bit more like that. And then I can take these two here and do the same thing, right? Click subdivide. And then I'll grab this one point and move it this way just a bit, so you can see how I'm kind of sharpening that curve just a little bit. Then I'll take this and I'll move it straight down to about there. Let's try that. Now we have our curve, but that doesn't do It's a whole lot of good unless we and some geometry to it. So what? Let's do let me ah, right click and join area and move up to here to join this? No, actually, I moved down like that to keep this image here, and I'll bring that up. Okay, so now if we go to the Path Tool or the object Data tab, I'll select here. Now, we can add some geometry to this, so I'll come down here to the G AAMA tree section and twirl that down and we can use the depth toe increase that like this. And it looks like I've got kind of my transparency on. I need the press all z to turn that back to solid mode. There we go. And, um from here I think I'd like to reduce the resolution a bit. If I hit Z and Goto wire frame, you can see how many edges will be created once we convert this to polygon geometry. And that's just too much for our low polly vehicle. So what I'll do is I'll bring the resolution down some maybe to to and also ill go back up here to this resolution, preview you and begin scrolling this down with that arrow on. Maybe that's a little bit too much. Maybe something like this. Let's see, Go back to solid. Yeah, that looks okay. I think Let's go with that. So now we need to convert this two polygons because at the moment, if I tab in tow edit mode, you can see that we're still able to grab this and move this around like this. We want to now turn this into polygon geometry. So I'll right click and choose convert to mesh. And there we go now. If we tap into edit mode, we can see the polygons there. All right, so I'll grab this. Let's go to that front view. Maybe I'll turn it a bit like this, maybe move it in just a bit. And what I'm gonna do is e and pulled down and I'll flatten it a bit too. I'll hit s and Z and that'll flatten it up some. You can see it there. Let me try that again. There we go. Then what I'll do? Is it e again? And I'm gonna hit s and scale out. Now I want to make these kind of rectangular, So just grab these to impress s And why scale those in Don't grab these two s and X and scale those in There we go. Now, um, I'll select a mall and press s and wide to make him a little bit more rectangular like that , and then we'll just bring it straight down. Maybe I'll actually go like this and then hit E and dragged down on the Z. And there we go. All right, so we didn't get that on the other side, But that's OK. We'll go ahead and hit the border, Select tool and select all of these polygons. Delete the faces, then will come back over here. Go add modifier mirror. Well, then choose clipping. And there we go. Now we have our handle. Um, I think I'd like to move it in a bit. Let me Ah Goto wire frame. And I think what I'll do is take the Beaky and just move it in a bit like this. Well, let me grab these. This move these in like that? Yeah, something like that. All right, now let's apply the mirror modifier. Let's move the pivot point down to the three d cursor object set Origin three D cursor. Now let's bring everything back and try and put it in place and we go, I'll turn it in the Z our Z 90 turned in the Why are why 90 We better do it the other way. Are why negative 90 And there we go. We'll scale that down and go and put it in place. I'll go ahead and go to that top view and wire frame and let's see if we can put it in place. Based on the reference images I'll turn them back on and let's g and bring that in here will scale it down about like that and maybe put it right about there. All right, Now, let's go back to our solid view and let's see how weaken place it right here. Kind of move that up like that. And C is that they're not too big. It kind of feels a little too big. Let's scale it down some. Yeah, something like that. All right, well, there we go there. We have our handle for our toolbox. It's beginning to come together.
27. 025 Adding Detail to the Back: All right, let's work on a couple more things here in the back of the vehicle. But then I think I'd like to move up to the top to work on that gun turret. I don't want to try and fill up too much in the front in the back yet I want to get kind of all the pieces in and then begin thinking about how to connect up and fill in the bottom here. So let's go and work on the back. Just one or two more pieces. Let me change the image here. Let's go, Um, and grab this one here. That looks pretty good. So I like these things. This is interesting thes pieces with the holes in them. There's quite a bit mawr that we're going to do a little bit later, but, um, let me work on these for now. Let's go to the side view and let's take a look and see if we can see them in here. So I think this is this part. This is the, ah, larger circle, and maybe this here is the smaller circle. So let's see what we can do with this. I think instead of beginning with a cube or even a polygon playing. I think we should begin with cylinders, put one in here and maybe duplicated and put it in here. Then add a solidify modifier to get the thickness and then extrude out of the cylinders to get Ah, the rest of the peace here. This piece back in here. Well, let's see if it'll work. Let's see. All right, so let's goto shift a and create a cylinder. Um, I will change the vergis ease to 16 to try that, and then I'll just Oh, and I'll also put, um, nothing as the cat, Phil, because we're gonna want that open here for those circles. No hit s and scaled down. Let's turn in the y axis are why 90 And then let's hit the G key and move it over here to put it in place. I'll scale it down just a bit. I think something like this Maybe we'll even hit r and rotated so it kind of fits against the side there. Or at least what I'm perceiving to be the side. It's kind of hard with these pixelated images, so Okay, so we've got that in Let's go ahead and go with that. What I'll do is go to the back view with control one and let's scale it down in the X axis with S and X and, ah, let's move it over. I think this is it over here. So I'm gonna move it over here and Oh, let's scale it back out with snx Just a little bit like this. It was about like that about that with their Okay, So we tumble around, go back to that side view, and then I'll press shift d and move it to duplicate it. And I'll put it right here, scale that down and maybe put that right about there. Okay, so we have these two pieces. Let's tumble around and see how we're doing yet. So there they are. Um, let's add a solidify modifier to each of these. So I'll go to the modifiers panel and modifier and solidify, and it looks like we've got a problem with our scale. Let's press control a and apply the scale. There we go. So that looks a little better. I'll choose even thickness and I'll click in the thickness field and drag. I'll hold the shift key down to move a little bit slower. Maybe bring it down to about like that. Okay, now let's grab this one here. Same thing. Add modifiers, solidify. Same problem. Let's press control a and apply to scale. There we go, even thickness. And let's move that thickness in just a bit. Like, ah, let's to about like that. So now we have that. I think what I'm gonna do is turn this. I'll just select and hit the R key and kind of turn it so it matches up with the faces of the other one right here. Um And then let's apply the solidify modifier because we're gonna need to join these two together and when we join them together, if we still have this solidify modifier on it, it'll apply the thickness of the last one we choose. So we're gonna need to apply these first. So I'll hit. Apply here and let's click. Apply here. All right, So now let's choose these two press control Jay to join them to, to make them all one object. And then let's tap into edit mode and I'll hit the three key. And now let's select this face this face and this face. And this one, This one and this one. Now we want to bridge these edge loops. We want toe bridge these faces together to connect them up like here. Right. So to do that, we Actually, even though we've chosen faces, we actually need to go into the edges menu. The edge menu is right up here, and you can see bridge edge loops here. We've also got the faces menu and the Vertex men. You know, we can also get to these by pressing control e for the edges. We can press control the for the Vertex menu and control F for the faces menu. But let's press control e and go to bridge edge loops. There we go. That looks pretty good. Um, I think what I'd like to do is maybe grab this one edge right here, and let's drag this out, maybe move it down. Some like this. So it has this kind of a curve there, something like that. Okay, now we need to somehow connect these up back here. I think what I'll do is maybe extrude the top one back and then bridge edge loops from the bottom one. Let's see how that works. I'll go back to the wire frame view and let's press the three key to go to face Select and maybe I'll choose thes three. Here, let's try this. I'll hit the e key and then I'll click and then I'll just drag straight in the y axis here . Um, let's now think about how we're going to connect these up. So what we're gonna do is we're gonna bridge edge loops up here, so I'm gonna need some edges, um, to connect up. So, actually, what I'll do is this. Let's move this out unless press s and why and scale on the y axis, and that'll just flatten that up. Let's take this base here and let's just move it up like this. So it's kind of flat on the top. We'll take these faces here, and we'll just bring them all the way back about right here. Okay? So if we go back to solid view, this is what we have. Let's, um, hide the vehicle. Maine away for the time being, There we go. And this nerves path. What is that? Oh, that's that handle. Let's just grab that and move it up into the vehicle. Maine as well. Okay, so now we have this. What we need to do is create a couple of edges, so weaken bridge these up so we can once again select faces on either side of the gap and bridge those edge lose. So I'm gonna press control are And I'm gonna scroll the mouse wheel. And I think all we need is these two edges here. So if I put him about like this Well, maybe we need three. Let me do three m a scroll. Oh, I can't do that. Let me hit escape, And we just press control Z and then I'll press control arm. Let's do that again. So I think I'll get three in here. That's gonna be good. Let's do that. So the reason why I did three. Let's go back to wire frame with the Z key. The reason why did three is because I wanted 123 faces to line up like that. Okay, so now we have those three faces and we actually need these faces to connect as well. All right, now remember that t pattern that inside face that we talked about with the ah crossbars. Well, we have one here that's gonna happen to right there, and I could go ahead and delete that first before I bridge edge loops. But I just want to show you this. Let's go ahead and bridge this and see what happens. I'll press control E and let's choose bridge edge loops. And there we go. OK, so let's de select everything and take a look. You can see that one face inside there, and that's once again what we do not want. So in creating these kinds of objects where you're joining objects together and then bridging edge loops and things like that, you can sometimes get these interfaces. So you really need to be careful with this. I'm gonna hit X and delete faces, and that cleans that up. All right, Now, if we go back to the side view, we can go ahead and begin. Maybe, um, moving this back or maybe hitting the R key and kind of rotating it like that and then hit G and move it back. There we go. Something like that. And, um, I think that looks pretty good. I think that's kind of what we want there. Maybe let me grab this edge and pull it out just a bit like this. Yeah, So I think we're gonna want something like that. All right. Now, the problem is, we've got these blocky polygons there. What we can do now is go ahead and smooth it. Let's ah, come up here to object and shades smooth. And of course, that looks absolutely awful. Let's go over here to the object data panel. Click auto. Smooth. And that looks pretty good there. All right, so once again, it's a blocky version of the piece, but I think that's gonna be okay. We're gonna see it pretty small in the scene, and it's gonna be pretty far away. We've got a bit of a problem in that. We've got this thing is much narrower than this, and I'm not exactly sure how that happened. Oh, I bet when I scaled it, I didn't turn off the X axis when I scaled it down to put it in place, right. I should have pressed s and then shift X to turn off the X axis when I was scaling. So what we do? Well, we can do a couple things, I guess. Let's hit the three key and go back to our side view and wire frame. And we could maybe just hit the Seiki now and border select all of these things. I'm just gonna click and drag in here and ah, we went ahead and extruded these. I'm gonna select all of these on the top and inside and all way around here like this. But now we If we have all of those selected, can we just scale that back out to the width of the other one? Let's give it a try. I will. Press s and X scale this out some Ah, let's try it like this. Let's see how that works. Yeah, There we go. Alex. Quite a bit better. Okay, so let's bring everything back. There we go. And, ah, let's put this in place over on the other side. So I'll press control one Z and wire frame. Let's press shift D and X to duplicate it and move it in the X axis. Ah, it looks like it's this right here, right here we go. And lastly, we could just put this block in. There's kind of a block there that these air up against, we could go ahead and just put that in. I think I'll press shift a and let's create a cube. Let's scale it down and hit S and Z and scale that. And then let's put this in place. I'll go to the side view and wire frame. Let's just hit G and move it up to here kind of up against this. Then let's go to the back view with control one. It looks to me like it maybe should be scaled out to here. And also let's scale it in the Z S and Z. But it about like this and then do we also see it from the side? Let's see, Maybe we could select this base back here and pull it back toe. You're maybe it's hard to tell. Let's try it. Okay, so we have that piece in there, All right? I think that is, at least for now, pretty good for the back. We're gonna have to do more for both the front and the back. But as I said, I'm just trying to block in general pieces to get a sense of the scale and proportion and then We're gonna have to figure out once we get everything in. How maney connecting pieces we're going to need and how much we're gonna need Toe fill in around the fenders and underneath.
28. 026 Beginning the Gun Turret: I guess now that we're working on the back here, just one more thing. Let me add the ah Mudflaps here. That should be easy that I think that's just a cube scaled to be a rectangle there. Solicitous press shift A and cube. Let's scale it down some and will may be scaled in the Why with s and y. And let's then bring that back and kind of put it in place back here, we'll go to a wire frame and ah, it's just scaled in the x with X and X and bring it over here. I think right in there. Let's see. Kind of hard to see here from the back. Maybe. Maybe I'll tap into edit mode and just select the face. Here, bring that up to there and maybe this side. Where should this go? Probably right in here. Let's try that. Okay, so let's bring it out. It's me tab into object mode and bring it out. Uh, let's scaled in the why s and why. Maybe something about like that. Yeah. Okay, so let's then put it over here on the other side. Shift D X and move it over. And there we go. All right, They're the mud flaps. So now let's go up to the top and let's take a look at this gun tour. I think this looks interesting. How should we go about this? Do you think? Well, it looks to me once again, like we're gonna use polygon planes and get them in shape and then add a solidify modifier to that. So let's see what we can do with this. We go to the sign view and go toe wire frame. Here it is Here, it's kind of hard to tell exactly what's going on. I think I need a few more views over here, so I think what I'll do is come appear to the outline. Er and, um, let's take all of this stuff that we just created and let's drag it into the vehicle. Maine right here. Okay. And then let's select the scene collection so that any new object that we create will be dropped into the scene collection outside of the vehicle Maine, and that will allow us to hide things away if we need to. All right, so now that we've done that, let's go ahead and use this window here as an image editor for the time being. At least that's actually not a bad view. Let's go ahead and use that one and kind of see it from the top here. Ah, let's also do one from the front. Let's grab that corner and create a new window here. Let's change it to an image editor and will open up a new image in our reference images here about this one right here. This first image. Let's try this. See what we can see from here. Yeah, so that's a pretty good angle there. So we've got three good angles, kind of back, 3/4 front, 3/4 and top there. All right, so I think to begin with, let's create this piece here, and then we'll put this on top of it. You see how it's kind of bolted onto it, and then we'll create that top piece. I'm not gonna worry about the windows quite yet. I just want to get thes polygon planes in and see what we can do with that. All right, so let's go ahead and press shift a and create a polygon. Plane operas are y 90 to turn it s to scale it down and let's bring it up and put it into place right up here. Um, let's maybe begin right year right on this corner. Maybe I'll come out about their then if we tap into edit mode and hit the two key. I can select this edge and kind of bring it down like that. Maybe this end will go out to Well, where should it go out to? Um, it looks like it turns a little bit in front of this, so maybe I'll just bring it out to about right there and we'll say it turns inward from there. And what I mean by that Let's go to the top view with B seven key and it looks like it turns. Yes, see how it turns in right here? So what? We should probably do what we still have that selected. But let me hit the tab key and go back to object mode. And in the top view, let's grab this and just move it over on over here so it's in place to where it needs to be . And then if we tap into edit mode and selected this edge now, we can hit E and extrude and bring this over to about right there. You can see I've just extruded this edge and brought it in like that, based on the image from the top. U All right, so we've got that. Let's go back to this side view but a wire frame. And if we get the one key to go to Vertex select, I congrats This Just drag it straight back like that. All right, so we've gotten that piece on the top right there. That, of course, will be mirrored over. But let's not do that quite yet. Let's work on this piece right here that connecting peace between the side of the gun turret and the top. So for that peace once again, I think what I'll do is create a new polygon plane. Here. Press are y 90 scale it down and bring it back up here. But let's now scale this down pretty far and put this in place. Maybe right here like that. And then if we go into edit mode, ants like that edge, Um, it looks like it angles. You can see it here kind of angles in, so we'll need to extrude that from the front. But for now, let's take this and drag it all the way back to about here. So that point is right there. And then let's take this point and just drag it straight back like that. There we go. So now this edge right here, we want toe extrude this edge and angle it in just a bit. So let's go to that front view and oh, we need toe. Move this, don't we? Let's do that. Let's take this and move it out. So it's about like that. So it's fitting over this piece, right? And it has a bit of thickness here, so let's kind of go like this right there. Let's try that. I'll grab this edge that still selected go to the front view and I'll hit E. And let's angle it in about two there, I think. I think that's what the image is telling us right there. Okay, so we have that now. Now there's this piece here. Let's work on that. I'll go back that side view and what we should do, I guess, is create an edge loop right here. So it's press control are but I'm not in edit mode here, am I? So let me tap into edit mode. Press control are. And now let's grab this and move it right over here, right there. Because I need this to be this wide right here. All right? And then if I hit E and click now, I can hit G and dragged down to about right here. If the one key and grab that vertex and drag it over like this. There we go. Now select those to dislike that edge and lets it e and bring this all the way down to here . That Okay, let's see how that worked. Yeah, I think that's OK. Don't know if it's quite in the right place yet, but we will know soon enough. So let's work on the top one now for the top it angles in. So we're gonna need to do part of placing from the front view here. But for now, let's go to the side view Goto wire frame and let's create another polygon plane are y 90 Let's scale it down quite a bit and move it up into place. Now this one looks like it should be right up in here like this, right? Well, actually, let me bring it and put it right back here. I'm gonna put it right here like that. And then let's grab that edge right up here and bring it down to align with the top. Then we'll grab this and pull it forward to about right here. Now, let me go to the front view, and I'll drag this over like this till it's right on top of here. All right, let me do that. That's right. On top of that. Now, what I want to do is take this edge right here and lean it in and take it and drag it straight over when maybe move this up to here. So now that I've done that, I can come back and add those edges. So control are Grab that and drop it in right there. Now I can take this. Move this back. Right here. Take this. Move this back to here. And this back to here like this. Now we add those three edges. There we go. Grab these points. Moving back. All right, That Okay, Now let's take a look. See how we did. All right, So we've got those polygon planes in. In the next video, we're going to add a solidify modifier to each of them, and we're going toe. Mirror them over to the other side, so that's coming up next.
29. 027 Continuing the Gun Turret: before we had thickness to these. Let's go ahead and take this one and mirror it over and connected on top the way they have it here. So with this selected an object mode, I'll go ahead and move it to the three d cursor. All move the origin to three D cursor because the cursor is here in the center of the grid . And then I'll come down here and let's go to the modifiers panel. Add modifier and mirror. Now it's way down here, which tells me that the rotation needs to apply, so I'll press control a and apply the rotation. There it is over there. Okay, also, let's go ahead and turn on and clipping here. And then let's grab this edge right here, this one and will extrude it toward the center so they'll clip together. Let's go back to that front view, and I'll go ahead and turn on the edit cage here with this button here and so we can see it on the other side. And then I'll just hit E and let's extrude over and then I'll grab this and just drag it straight in like that. So now they're clipped together. I can't pull them apart or across the ex. Excuse me. The y axis there. So that's good. We've got that in place. Now it's began adding thickness to these, so I'll take this one. And let's twirl that up and add a solidify modifier here. Um, we're not getting much thickness there, so I think we need to apply the scale. Let's try that. Control a apply this scale. Yep. Sure enough, that gives us some thickness. And then let's do that with this one here, lets go ahead and add a solidifying modifier here. Yeah, let's go ahead and click even thickness and apply that scale again. Control a scale. There we go. And I don't think I gave it even thickness. There we go. Let's turn that on just in case. And let's do the same with this ad modifier. Solidify, even thickness. Um, and it looks like I need to apply the scale Control a scale. There we go. Okay, so this one looks like it could come out just a little bit farther. I'll grab this and move it out like that just so we don't overlap too much. This one here, it looks like maybe I could grab that edge and there you can kind of see it there, maybe move it down just a bit, so it's more in line with this. Here. You see how it's kind of at the wrong angle. So I'll hit G and just move this down. Well, that's the wrong EJ or it isn't enough of the edge. I guess I should say so. Press shift and click and select that whole edge there. There we go. Now if we hit G and dragged down there we go. We can kind of line it up with the angle of that top piece there. Okay, so let's take a look at what we have so far. Yes, So we've got those pieces in and and the thickness applied. Ah, let's go ahead and mirror these over. So for this one, let's move that object origin to the three D cursor and then let's come over here and click Add modifier mirror. Um, once again, we've got a problem down here. Let's press control a and apply the rotation. Let's do that again over here and mirror. Um, let's also press control a Apply the rotation and oh, and look what I've done here. I didn't move the origin to the center of the grid now, so let's go ahead and go toe object said origin origin to three D cursor and that pops that over there. Okay, that's got those in there. We've also got a piece in the back. It looks like that just connects the two. I wonder if we could extrude this piece here to connect the back. What if we tried that? If we, um if we took, say, this edge and this edge and extruded it in, would that do it? Let's give it a try. I will go to the front view goto wire frame, and, um, let's make sure clipping is turned on. It is not so it's turned that on. And then if I hit E and hit the enter key or click and just dragging the X like that until they clipped together, let's see what happens here. Yeah, I think that's pretty good. Since I've got that edge there, it's not quite straight. Um, I could maybe move it in or out. Try and flatten that just a bit like that. Yeah. So that gives it a little smoother effect there. And also, I could, um, apply the ah shades smooth tool to that. And I may in the future, but I don't think I need to right now. So how are we doing here? I think we're doing okay. There's an interesting part right here, though. Let me, ah, press control space bar and make this bigger. And there's ah, like an indentation here, right in here. You can see. And it's got this, um, angled piece right there. I think that's kind of nice. Um, and it looks like there's one here too. So I think that's an opportunity to use a tool that we haven't used yet. Let's press control space bar to go back and let's try and get this piece right there. That indentation that inset. Now, we may not actually use the inset tool on this because we have this mirrored. So let me show you what I mean by that. So if I select, say this face here and I'm gonna go ahead and apply the scale to this control a scale, because I don't recall if I had yet or not and remember when we were having a problem with these two sides extruding individually and the way we solve that was to turn on clipping so that it would extrude as all one piece, right as all one region. So if we use the insect tool here to get this kind of an insect watch what happens? I hit I and inset this and look at that. I get those two pieces again. It isn't staying together even though I have the clipping turned on. So if we undo this control Z right and go back to here now, what let's do is try it again with extrude If I hit E and then hit the s key in scale and it does stay together as all one piece, right? So even though we turned on clipping the inset tool didn't give us quite what we wanted. So I'm gonna hit s and X and kind of scale in just a bit like that. All right, so there we have that region that we can now extrude down like this E. And I'm just gonna drag straight down in the Z axis like that just a little bit right, So there we have that. Now we need to get this angle here. This Ah, what would you call it? It's a bevel. A champ for, um, an angle. Whatever. I don't know exactly what to call it, but what we're going to use to create it is the devil tool. So if we tap into edit mode and go to edge mode, what I want to do is select these edges right here and one. Right, dear. These edges right there and what I want to do is bevel those edges. Let's try this. With those two selected, I'm gonna press controlled e to bring up the edges menu and you can see here bevel edges. Now it too, has its own shortcut key. It's control. Be. So let's go ahead and try that. I'm gonna press control be, and then I'm gonna move the mouse just a bit and pull out like this. There we go. Now we've got that edged there. Click. And we get this bevel settings tool over here and we can increase the number of segments if we want. I don't think we need to for this, but just for demonstration purposes here I will click these and you can see how we can add the edges and create that curve. So I think I did that earlier just to show what we might do later on after we've already blocked all of these in. But I think this tool is a good one to create these angles here on this inset well, tab back into object mode. And there we go. Now we have those pieces in there. It seems like this back edges a lot thinner than that front edge. So what I'm gonna do is ah, Tab back into edit mode and go to base mode and select that face there. And I'm just gonna drag back just a little bit like that. There we go. All right, we're coming along. I think what I'd like to do in the next video is work on this front panel, this back extrusion box kind of thing here. And also this turntable part right here. I think this is where the turret turns. There's kind of ah, circular piece underneath here, so I want to work on that as well
30. 028 Adding more to the Turret: well, it's now work on this front panel. I think all we really need to do is once again create a polygon plane and let's turn it in . The X axis are X 90 and we go and let's move it up and we're going goto wire frame and let's go to the side view and I'll scale it down and let's just try and put it in place here. We'll scale it in some hit the R key, turning a bit and maybe about like this. Now, if it's not quite in the right place, we can, of course, just tab into edit mode and with the Beaky slicked thes two points down here and move that to there and these two points up here and move that. Okay, so there we have that polygon plane angled for that panel. Now, if you go to the front view once again, our front and side views are a little off, but that's OK. We'll hit s and X and scale out, and maybe you'll move it up just a tad like that. Now, the trick is to get this cut out here. And there are, of course, many ways we could do this, we could use a Boolean. We could actually create an object that is that shape and cut into this. But I think all I'm gonna do is just use some edge loops and then delete a few faces. So what I'll do first is maybe press control are and I'm just gonna create an edge right down the center and hit Enter two times to ensure that it's right in the center. And then I will select this face over here and hit X and delete faces. And then let's mirror this overall, go over to the modifiers panel and mirror it over. Oh, and a better turn on clipping. Okay, now, if we tap into edit mode, all press control are and let's at an edge right here. It's also add an edge right down here, right here. Let's say so. If we go back to solid mode, this is what we have. I'm gonna go ahead and turn on the edit cage on the other side right here, and I think all we need to do is just select this face and hit X and delete faces. And so we have that basic cut out there now. What we need to do is just shape it a little bit. So it has a bit of a curve to it. Um, And to do that, I think I need to see the polygons a little better, but still be able to see through the object. And to do that, we can press Ault Z right there. And so we get kind of ah, transparent view. It isn't exactly wire frame, and it isn't exactly solid, but it's somewhere in between. So I think this will help us see where we need to be. So I think I'll create one mawr edge loop right here and actually, maybe one more right in here. And then if I go to Vertex mode, I can begin pulling these around. But actually, I think maybe I want to take this edge and slide it. So if I just begin moving things in the global access were in global transformation orientation here. If I just begin moving these around because it's at an angle, it might throw things off. So let's just say I, um I took this point here. Let's just say I took this point and hit G and move this like this to get that curve lovely tumble around. You can kind of see that it's been pulled out from the rest of the object because I was moving in the global Z axis instead of the local angled orientation here. So let me press control Z to undo that. If we go from global to local transformation, then we can move things around in the axis of the object. But even though we're doing that here in the front view, if I do that again and then go to the side view, it still happens because I'm moving it in the orientation of the view and not of the object . When I'm here in the front view, so press controls he again. So we need to move locally in line with the object and or slide these along the object so they don't get pulled out. So an example of that is, if I select this edge here, I can slide this one way or the other by hitting the G key two times. So if we tumble over here, let me just go back to ah salad. The oh, I just need to hit all Z. There we go. If I hit G and tried to move this, you can see I move it like this. But if I hit G two times, then slide it. You can see it stays in line with the object so I can move that like this. There we go. Now, if I want to move this point in line with the object, I can't exactly use that slide trick. Because here, let me if I hit the one key, it's like that point. If I hit G two times, Aiken, slide it just fine in this direction. But once I come over here, it's gonna slide down along one of these edges, right? So I can't extended in by sliding. So that's why I need my transform orientation changed to the local access So I can do that . You just slide that in this as well. If I need to slide this down, you can see I can slide it in the y axis of the object, keeping it in line with all of the rest of the points. All right, let's see how that looks. I'll go to the front view all dizzy, and yeah, something like that and I've gone down just a little bit here below the reference image because we're below the reference image up here. All right, let's take a look at that. See what we think. All right, there we go. I think that's gonna work. So I've got the mirror modifier on with clipping. So let's go ahead and click. Apply. And now let's some add that solidify modifier. I'll go back to the side view. Here I'll click. Add modifier, solidify, and we're not getting too much thickness here. That could be because of the scale. Let's try it, control A and apply the scale. Well, that didn't do a whole lot. Let's also choose even thickness and then we'll click and drag in the thickness field and bring that out event like this. There we go. All right, so we've got that piece as I mentioned before. We've got the windows to do here, of course, but we'll get to those. The next thing I want to do is work on this box at the back of the turret Here. You can see it, dear, and you can see it here. So let's take a look at that. Sure, enough. Here it is in the side view. So I think that's just a cube. Let's just press shift and create a cube and let's scale it down. Let's bring it up here and we'll go to wire frame and I'll tap into edit mode and selective that face there and let's delete it. And then let's move this down here and scale it down and put it in place. So I think something like this, perhaps about like that. And then we'll tab into edit mode and grab that face and move it over, and then we'll grab these points here and pull them back. Now, we could also grab these points and pulled them back like this as well. There we go. And then if we go to the back view with control one and we can press S and X and scale out like this about like that All right, How do we do there? Yeah, I think that will work just fine. Now, Another thing I had mentioned was this Ah, circular piece underneath the turret as if that's the pivoting mechanism that turns it. So let's get something in there underneath that turret. I think the best primitive object for this would be a Taurus. This press shift a and create a mesh Taurus. And here we go. So now we can adjust the size and shape of this toe, Maybe match this thing here. Let's take the major segments down toe, say, 16 and ah, the minor segments to eight. Let's try that. And then we could take the major radius and click and drag and bring that down quite a bit . And then take that minor radius and bring that down as well. So it isn't quite as thick. There we go, something like that. Maybe I better bring it up just a little bit. Here we go. Let's see how that works. So now let's just bring it up and put it in place here and see how this will look. Um, actually, before we do anything, let's delete the bottom half of this. Let's go ahead and go into a wire frame and I'll go to face mode and let's just border select the bottom half of this like that, it X and delete faces, so we just have the top part. We don't need that bottom part. It isn't going to be seen. So let's just put this in place here and then, um well, I think we need to just scale it down. Let's hit s and scale it down quite a bit here. And it looks to me like that 16 is a little bit choppy. I know we've been doing things pretty low, Polly, but I feel like this is a little bit too angled here for this. So I think I'll try this again. I'm just gonna press shift a and tourists again. And this time instead of 16 let me try something like 24. Let's do that. I'll zoom in with the period key and just take a look at it. Yeah, that feels to me a little bit better. I think so. Let's go ahead now and delete that bottom half just like we did before with that and X and delete faces. And now let's bring it back up and put it in place. There we go. Yeah, that's just a little better, I think. Okay, so now let's move it in, scale it down and it looks like it's just kind of goes around that edge, so maybe that's not bad. right there. Yeah, I think that'll probably work pretty well. All right, In the next video, let's start working on the windows. How are we going to create thes?
31. 029 Creating the Windows of the Turret: All right, let's think about thes windows. As I look at these, I see that the, um scale models have to windows here. But the actual photographs have one window. And if we go and take a look at our reference image here, it too has only one window. So I think I'm gonna go with one. Seems to be a little bit more realistic. If we zoom way in here, we can see. I think I think what I'm seeing here is that there's Ah, glass block. I guess it's so thick it's bulletproof for the window and then they're these almost clamp type things, just bent pieces of metal that hold that glass block in. I think if we create one of these, we can then duplicate and move them around. In addition, since thes glass blocks will have a transparent material on them, in the end, we're gonna need a hole in the actual turret to be able to see through a swell. So we're gonna probably need to use the Boolean modifier to cut holes in there. So I think we have our work cut out for us. Let's go ahead and give this a try Um, first of all, I'm gonna switch to the three D cursor here and just click right in here so that when we create a cube, it'll be created right here. And so a press shift, A mesh cube handled it the S key and scaled down a bit. Here, let's try and get this the right size and position. So I'm thinking maybe about this big here, all right? If we tumble around, we can see that there it is. It's going to need to be scaled in the x here, but should we go ahead and use our Boolean while we're here? We have it in place. So maybe let's, um, go back to solid view. And let's select this part of the turret. And, um, I'll go ahead and apply this solidify modifier here. And then let's try and add a Boolean to this. So I'll add modifier Boolean. And then let's choose that cube. I'll click the eyedropper and then select that cube. All right, And now let's just click. Apply. Okay, So it happened over on the other side. So I think it happened here as well. That's good. I'll select that Cuba gin and hit s and X. Let's scale it in and bring it just outside of that hole there. Is that about the right thickness? Let's go to our front view. And well, we might be able to come out just a little bit more. Maybe if I brought this out like this and we girls try that Is that Ah. Well, that seems to be a little too far out. Let me bring it back in right about there. Okay. I think that looks pretty good in terms of the thickness of the window. There. Now, let's go ahead and build these bracket type things. Um, I think what I'll do for this is select this edge and move the cursor to it with shift s two. And then I'll create a polygon plane mesh plain and we go, Let's turn it in. The Y axis are wind 90 And let's scale this down. Let's pull this out to about there. Yes. Why? Let's scale it in. Maybe put it right about here so it doesn't go all the way. I mean, do that. Oh, I'm still in local mode Here. Let me switch to Global. That's why I was having to hit Snx to scale it in the Z axis. So there we go. That's a little bit better. So maybe something like this. Then we tab into edit mode and select this edge and let's hit E and X and pull out like this. And then, um let's press Ah e and why, and move it over like this. Nothing like that. Now I think my edge over here's a little bit to wine, so pull that in like that. Let's now give it some thickness. I'll add a solidify modifier to it. Ah, press control A and apply the scale and that helps. I'll click even thickness, and that also helps even that out. And then I'll drag in the thickness field. I feel like this could come out just a little bit more like this. Let's try that. And if that's going to come out that I better move this back in like this, try this. Okay, there we go. So that's, I think, looking Okay, um, we've got a slight curve here on the inside. We also have him on the outside here, but I don't think we need that. But that slight curve might be kind of nice. So what let's do, first of all is apply our solidify modifier. I'll come over here and click, apply. And now let's grab these edges right in here, this one and this one. And now let's bevel these edges again with control be and I'll drag the mouse with the shift key held down there. And then I'll add a few segments and that will kind of around those out just a bit. Okay, good. So now what we need to do is create the other four to do that. Let's select the Window Cube here. Let's move the cursor to it, shift us, too. And then what I'll do is from the side view all duplicate this and then rotated at that three d cursor to put it on top and on around. But to be able to rotate at the three D cursor, I need to move that pivot point to the three D cursor. Now, I can actually do that up here, of course, as we've been doing when we mayor an object. But we can also do it temporarily by just changing the pivot of our object from the median point or the center of the geometry to the three D cursor. So if I click here, you can see this orange dot right here the origin has still stayed within the geometry. It's just that the pivot point has changed. All right, so what I can do is press shift d and then press enter and then a press are and hold the control key down, and I'll rotate it so it moves up here. 90 degrees. There we go. So now we can press shift E r. Control and bring it down like that, shifty our control and bring it down like that. There we go. All right, so we got that one done. That's pretty good from here. I think the next thing we should do is move this over and put it here and put one up here so we can duplicate it, move it and place it where we need to. So let's move that cursor or that pivot point back to the median point of the object. I could move three d cursor back to the center of the grid with shift s one. And then let's take these objects here. All of these and that Center Cube and press control Jay to join it all together because it's just gonna be easier to move around at this point in time with it all. One object. We may break it up at a later time, but for now it's just gonna be easier. So let's press shift e and only enter. And then we'll just move this over and let's go to that top view. Let's just try and put this in place here. Will hit the R Key and rotate in G and move it over here. It's like we need toe rotated a little more. Here we go. Let's try that. All right. Um, is it in the right place? Let me go to the side view here and take a look at it. It's kind of hard to tell. Um, I would like to, I think, move it forward just a bit. So it's more centered on that panel to do that, I can slide it over. I can change the transform orientation to local again, and that will change that access so we can kind of slide it over like this. All right, now, let's take this one and move it up. here. So shifty. Enter. Let's drag it up and we'll go from the front view. This time we'll move it up. Here they are rotated a bit. There we go. See how that worked? Well, we're a little bit off, aren't we? Let's go to the side view and see where it's supposed to be. Ah, we need to move it back this way, don't we? Here we go. Okay. So now we have all of those windows in place. But we only have the whole for one of them. We need to create the holes for the other two panels. So if we take this one here and to do this, I'm gonna go ahead and split this up again. Thes objects by tab into edit mode. And let's go to face mode. Now I can hover over this cube here and press the L key and that will select all linked components for that piece. So, Onley, that cube has been selected. Now I want to split it out into its own object. And to do that we compress the peaky which brings up the separate menu. And we can choose to separate the object, separate this piece from the object by selection. There we go. So now it's its own object. I can use that for the Boolean. The tab into edit mode. Go to face mode, select that face at the back of the object and pull it through. There we go. Now, if I select that at ah Boolean. So like the cube and then click apply. And there we go. All right, So now I can take that face back in like this and place it right about there. Okay, let's do the same thing on the one on the top. Here. I'll select the object tab and edit mode, go to face mode and hit the L Key to select just that piece that will hit the peaky to separate by selection. And now, if we tap back into object mode and just select that one cube tab back into edit mode, select that one face and pull it through. Okay, Now we select the top panel. What we have here, we've got a mirror and a solidify. I think we better apply that solidify before we do the Boolean. Let's go ahead and click. Apply here. Now let's go add a Boolean click the eyedropper. Click that cube and then click Apply. And there we go. Okay, so let's move this back up into here. And remember, I'm in local transformation mode so I can move it in line with the angle of the object itself. Okay, let's get this back up in here. Here we go. Now, what we can do is mere these over to the other side. And to do that, I'm gonna go ahead and combine all of the windows and frames together, and then Miram all as one object. Once again, we may break him apart at a later time. But for now, this is probably going to be easier. So I'll just select that window and this window and then this one and the frames there. Okay, So that now selects all of them. Let's press control J to make them all one object. Let's move that origin down to three d cursor. And then let's mirror this over to the other side and we get a mess. Let's Ah, try and apply the rotation, and that does it. Good. So there we go. Now we've got all the windows and frames for the turret. So in the next video will work on the windows for the front panel, and maybe we can also take a look at the windows here for the windshield as well.
32. 030 Modeling the Front Panel Window: for the wind is on the front panel. It looks like we could probably go through. A similar process is the ones we did back here, but it's a little bit different shaped, so let's take a look at this. Yeah, it looks like the block the window block is this whole l shaped thing. So, actually, let's let me switch back to an outline or here and, um, join this area here and we can maybe get a better look at it like this. So it looks to me like there's this bracket here and it almost looks like it extends up like this is all one piece. And then I would assume that there's a bracket here in this extends down and also over here , this extends down and this one extends up. So I think it's similar, but slightly different. So let's give this a try. Before I do anything, though, I think let's move these up a bit. Um, the extra pieces we have in the outline our let's take thes and ah, let's move these up into the vehicle. Maine. There we go. And then I'll select the scene collection to be sure that any new objects will get put into their. So first of all, let's create the window block and then put them brackets on around it. Maybe I can select this edge and press shift s to to bring the cursor there and then create a cube with shift day. And it will pop into that point where the cursor is and let's scale it down and maybe move it out a bit. We can scale in the y axis here with s why and maybe bring it into about like, this would say about that thick. We can always make that thicker or thinner. Um, once we get it in place Now let's go to the side view with the NUM pad three and all press are and let's rotated a bit And let's move it right into here. And I'm gonna try and get it right aligned with this piece like that. There we go. I think that's pretty good. And since we're still in local transform orientation, you can see that the move gizmo is aligned to the object. And that's good. That's gonna help us as we do this. So I'll go to the front view and, um Let's go ahead and press all Z so you can see it. And let's move it over to here. Um, it looks like I need to adjust it a bit. I think I've pulled it out from that piece when I'm moved it Let me pull it back, and I need to be more careful when I do that. So let's tab into edit mode and go to face Select. And I'm just going to take this face and move it in line with the local axis. So with his Z axis here, I can take that. I can move it down and up, and it'll stay in line with that other object. In addition, I could take this and move it all the way over here. And I can't really tell if this needs to go down further. I think it's OK right there. Right. So we should still be aligned with that object? Yep. Were doing pretty good there. And, oh, add an edge loop right here with control are there? We go select this face and then extrude that up so I can get E and just dragged that straight up. Oh, until about right year. I guess because I think this is probably that top bracket. Well, but the bracket overlaps here, so maybe I better take it all the way up like that. There we go. All right, So let's see how we did all press all Z and Tab back in object mode. And there is our first glass block. Now let's see if we can get these brackets on to do that. Once again, I'll go ahead and select this edge down here and press shift s to to move that cursor there . And then let's ah, this time create a polygon plane. And let's turn it in the X axis Rx 90 There we go. Scale it down and let's try and get this in place to begin shaping that bracket. Um, I'll pull it out here some and scale it down a bit more. Well, it's skilled down quite a bit more about like that, and then I'll take it in, turn it and let's move it into place right about here, cause I wanted to still have some thickness. So I want to bring it out just a bit like that, all right. And then we need to scale it out. So press all disease so we can see again in here and I'll tab into edit mode and go toe edge mode And let's select an edge and move it over here and maybe this edge and move it over here. Okay, So now if it's like this edge, we should be able to extrude it e and I'll go ahead, hit, enter, and then I'll grab this and pull it out. And then let's, um, press E and enter, and then I'll just drag this straight up like that in the y axis. The question is, is, has it gonna look once we add a solidify modifier? Actually, before we do that, let me just bring this up just a bit here. Before we do that, we should go ahead and add this piece that's curling around there. And to do that, I think we're gonna need to go ahead and extrude Well, it even enter and then pull this out in the X axis and then once again, bien enter and I'm gonna pull up in the y axis like this. Now I think I need to take this down. It needs to be inside or not quite as wide as the block there, and it looks like it probably needs to come out. Some me pull it out a bit like this. Here we go. So let's take a look and see how it looks With a solidify modifier. I'll go ahead and add a modifier. Solidify. Um, let's press control A and apply this scale. Ah, let's choose even thickness and our click and drag in the thickness field to kind of pull these back just a bit like that. Yeah, I think that's okay. Let me pull this up here, maybe pull it in here like this. So we have this kind of strange thing here. Ah, we'll have to see how that's gonna play out once we apply this solidify modifier. In fact, I guess where you go ahead and do that, let's go ahead and hit. Apply. Even if we tap into edit mode, let's take this point here. Let's see if we can just kind of bring it down some as well as this point here. Just gonna bring it down beneath their I'm probably nit picking. This is going to be such a small part of the overall model so that I don't know. That's really going to matter. Now, one thing I realize I've done is I've applied this solidify modifier before. I created this piece over here. So let me undo that. Just gonna undo until we get back to the point where we have the solidify modifier here. And then I'll go ahead and extrude this one out here too. So sometimes I get ahead of myself. But at least now I know that's going to work out. Okay? I think so. Let's go ahead and hit extrude and enter and will pull out of it here and then, Ah, let's hit Ian Enter and then I'm just gonna drag up like this. So I guess this goes all the way up to here, huh? It does. I don't know if it turns and goes on top. I don't think I'm gonna do it unless I can find another view that tells me it actually works that way. But at least for now, I'm not going to do that. I'll pull this out just a bit. Here we go. Okay. So now I could apply this solidify, modify and pull those points down. But I'm gonna wait just a little bit more before I do that and get the other one in up top . So to do that, I could actually use this now. I could duplicate this, move it up and spin it around. Let's do that. Let's press shift D and enter. I'm going to drag it up and I'm gonna spin it around in the Z axis, the local Z axis. I'll press RZ 180 and we go. And now let's put this in place, kind of slide it over here, maybe get this one in line. Let's see how this works and bring this down until it's just about let me press all disease so I can see it a little bit better. Yeah, you can kind of see where it's supposed to go a little bit better like this. Something like that. Let's try that and then I'll grab this edge here, bring it up all Z and no, let's bring this up. This this looks like it's too tall. Let me bring this down. I felt like that and then I'll bring this one down to here, just like I need to bring that in just a bit we can select multiple different kinds of components so we can select faces. And then we can also come up here and press shift and click edges, and that turns on edge select mode as well. So we can now press shift and begin selecting edges to. So now, if we move this end, it'll move all of that in like that. And then maybe I could grab this face now and pull it in like this. There we go. And then, um oh, this one here still needs to be brought in like this. Okay, let's spin around and take a look at it. It looks pretty good, actually. Um, the only thing I would say here is I do like those curved edges here. So let's work on that in the next video, as well as creating a Boolean cut into this panel and mirroring these over
33. 031 Creating the Windshield: now we need to do a similar thing that we did with these is used the Boolean modifier to cut the hole. And also I think we're gonna need to chop this in half and mirror it over again because we don't have a mirror modifier on it. So let's select this one this Ah, glass block and let's just tab into edit mode. Go to face mode and select that back face. Oh, it looks like it has several back faces, so well, let's do is press all disease so we can see through it. Select those back faces and then let's just pull this through. Now we can go ahead and use the Boolean modifier to cut this hole. So let's select the panel here. I think what I want to do is apply this solidify modifier before I try and cut it with a Boolean. So let's go ahead and click. Apply. Oprah's all busy to go back to solid mode, and then let's hit add modifier. Boolean will click the eye droppers like that glass block. My operation is still set to difference, and then our click apply. Now what we can do is tap back into edit mode. Well, no for the glass block. Let's like that and tab into edit mode. And now if we pull this back, we can see we've got that whole cut in it. Let's move that back to about right there. All right, that's good. But as you can see, the problem is we don't have it over here on the other side. So let's cut this in half and mirror it over. Well, press old C and tab into edit mode and then with the B cheol border, select this side. And then let's press X and delete faces. Okay, so, naff, we tab back into object mode, we have just 1/2 of it. Now let's go and add a mirror modifier. There we go and was turned on clipping. All right, And now, if we click apply there it is. So now we just need to mirror the block and the brackets over. Before I do that, though I think I want toe round off some of these corners. And to do that, I'm gonna need to apply to solidify modifier. So let's work on this one First, I will ah click. Apply here and then remember we had some points down here that we need to deal with. So let me grab these and kind of pull those down, all right? And over here, let me do the same thing. I'll just pull these down as well, just to make him look a little cleaner. There we go. Now let's, um, select these edges here and here, and I think I want him up here, too. So let's go and select these edges up here and also over here. Let's do that. There we go now to bevel those edges. Let's press control be and I'll hold the shift key down and drag the mouse out and kind of pull those out. Devil those corners. And we'll also add a few extra cuts. Just a curve that a bit. Yeah, that should work out. OK, we could also smooth those. And of course, that looks terrible. So let's come over here to object data and turn on auto smooth and that looks a little bit better. All right, let's do that for these two. Let me go to Vertex mode and let's see if we can select these points in Hero Press. All Z and Ah. Oh, Well, the problem is the reason why I can't see the points in there is because we haven't applied this solidify modifier. So let's go over here and click. Apply now. If we tap into edit mode, there they are. That's what we want. Let's pull this up and, uh, pull this up. There we go. And over here, let's pull that up into here and we'll pull that up into here. There we go. Now let's select these edges again, just like we did before. All right? So we have all of those selected no press control be and once again pull out like that and we already have three segments in here still, so that gives us that rounded effect. I'll also smooth that. And all this smoothing I'm doing may change once we begin joining things together in the final product. But at least for now, it makes it look a little bit better. All right, so now that we have those in place, let's go ahead and mirror these over to the other side. And to do that, I think just for ease of use, I will go ahead and select all of these and press control J. So it's all one object. And then let's move this pivot point to the center of the grid. To do that, I need to move that cursor first. So all press shift s one to move the cursor to the center of the grid. And then I'll come up here and click objects said origin, origin to three D cursor. All right, so now let's go to our modifiers panel and add that mirror modifier here and there we go. There it is. Our next task is gonna be to figure out how to do these front windows, and I don't think it's gonna be two different than what we did for the side windows. I think what we need to do is begin with a polygon plane and set that in here right in here , and then just begin extruding and scaling and extruding out until we get this basic shape. So let's take a look at that. I'll select this cabin and select that face and let's move the cursor to it with shift s too. Now, let's go ahead and create a polygon plane with shift a mesh plane. Here we go. I'll turn it in the X axis with our X and 90 Here we go and I'll scale it down. And at least for now, what I'm gonna do is go to the front view and let's go toe wire frame here. And I want to make this about the right shape before we tilted. And then we're gonna adjust the edges once we tilt it. But at least for now, let's see what we can do it. I think it looks a little bit angled here. It's kind of hard to tell. Maybe I will, um, place this right in here right about here, and then let's tab into edit mode and grab this and move it up. We could maybe move this to the side of a year like that and maybe think weaken, pull that in, like best just a bit. Let's, um, hide the vehicle. Maine. Let's do that. And, yeah, it looks like it's angled there. Let's go ahead and add an edge loop here. And then if I selected that edge and pull it over, it kind of gives me that basic shape, right? So now, though, let's go to the side view and Let's rotated this press are and rotate it and try and get it in here, aligned to that front part of the cab. Um, I believe I better bring this bank so we can see this. We're still in local mode, so I'll bring this down like this. There we go, something like that. And then let's go to tab into edit mode. Go to Vertex Select and I'll border. Select these points and pull them down in the local access like this. Maybe something like that. And then up here, let's grab this and pull this up in the local access. Something like that. Let's see how that looks really difficult to say. I think I want this to be out a little bit farther, so it matches up with the actual border here like that. So from here, what we should do is extrude in scale and pull out. So let's tap into edit mode. I'll go to face, select and select these two faces. So now I'm gonna go ahead and use that inset tool like we've used before. I'll press the I key and let's inset this just a little bit like this. Are we doing with the border. Yeah, that looks pretty even all the way around, so that looks good. Now what let's do is go to the side view and let's extrude up, pull it up some well, hit E and just pull straight out and let's see how we do here. Maybe something like this. Let's try that. Yeah, I think that looks pretty good. And from here we could select these edges here. I'll press Ault and click this edge and that will select the edges all the way around. And then we could extrude back into the cab. So if we hit E and then enter and then drags straight back into the cab like that, that will give that that little bit of, ah, rim around it. And now we gave it just a little bit of an extrusion around here to kind of separate that glass from the rest of the window. So let's try that. Let's see how this works. And once again we're just blocking in the basic shapes. Some of this may change as we begin to UV map or texture. We're not going to really know how well we're doing until we actually begin to UV map and texture the thing. But we can do the best we can hear by just blocking in the basic shapes. So with this selected, I'll hit the I key again and scale in just a bit. And then I'll hit E and pulled in just a smidge. Then I'll it I and Insect just a little bit and then hit b and pull back out just a bit like that. See how that works? Yeah, something like that. Okay, now let's go ahead and merit over to the other side of Graeme That move the cursor with shift us one that takes it to the center of the grid. Move the origin to the three D cursor at a mirror modifier. And there we go. Yeah, we're getting there. I'm gonna go ahead and save our work. And remember that I'm saving inversions here, and I think you should to be sure as you're working, as you do any major part, save a new version. And to do that, you can just press control shift s. And if you have a number at the end of the file name, it'll just increment that number. So currently, Ahmet version 31. I can press control shift s and then hit the plus key on the num pad. And it'll incriminate to 32 and then hit Save. And now we have a new version. So I'm doing this for each of the videos. But I also do it any time. I'm working on a complex project. Anytime you create a new piece of the project, go ahead and save a new version.
34. 032 Starting the Vehicle Steps: now that we have the turret pretty well blocked and let's take a look at these steps on the side of the vehicle, I kind of like the way these look, we need to create these loops here, I think, on the side. And then the two steps, the support bars here. And, you know, I'm not sure about the chain. Um, that would be cool. It would add a lot of Polly's, but Ah, something like that always looks pretty cool, though, so let's ah, well, wait to make a decision on that. Um, first of all, let's do these little circular pieces here. I'm gonna grab the things that we've just created were still in local transformation mode. So let's change that to global, and I'll grab these and I'll move them into the vehicle. Maine Collection. Now that I've done that, I'm gonna once again select the scene collection so that anything new that we create is gonna pop out here and I'm gonna hide the vehicle. Maine and the reference images for now, just so we can work on and kind of isolate this here. So to create that, I think I'm gonna once again begin with a cylinder. So shift a mesh cylinder. Um, I don't need a cap, Phil, so I'll choose nothing. And, um, let's take the sides from 32 down toe 12. Let's try that. I'll rotate it around the X axis with our x 90 Let's scale it in the Why s why I don't know about like, bat, Let's say and um, I think what let's do now is go ahead and add thickness to it. Let me get that down a little bit narrower there. OK, now I'll add a solidify modifier here. Let's press control a and apply the scale didn't do us a whole lot of good. That's increased the thickness about like that. Maybe let's give that a try, and then what we need to do is extrude back to create this piece back here. So to do that, we could select a couple of bases off the back and extrude back. We could do that. So let's go ahead and apply this solidify modifier or click apply. I'll tap into edit mode in his three key and then what let's do is this. Select these faces here all the way down like this Well, I don't think we want him that high. We want him like this. So I've got 1234 faces selected here, and now we want to do is just extrude them back. So I'll hit E and X and pull him straight back. Ah, let's grab these faces here. Press the one key to go to the side view and let's press s z and scale these up a bit until they're kind of flat on the top and the bottom that Then let's select these guys back here and will flatten these out by pressing S and X. And I don't bring the mouse in. That kind of flattens those up there. Okay, good. So now we need to extrude out What let's do is press control are and insert an edge. LaPierre Ah, click once and then I'll hit the e key. And now I can hit the f key and toggle back and forth between the two. So maybe something like this. I wanted it flat. So about like that. All right. Now, if we select these faces here and thes faces here, we could extrude and scale out so well, let's do is press e Than s. Then why? And now we can scale straight out on either side like this. Something like that. Okay, now let's come back here. We're not gonna need these back here, are we? So let's just hit the sea key and circle. Select these faces. Let's delete them and we go. Okay, so now we have that basic shape. I let smooth it object shade, smooth home. It's not looking great. So object data auto smooth. And maybe if I scroll up just a bit, I can clean that up just a little. That'll work. Fine. I think it's gonna be pretty small on the vehicles. So, um, now, let's select this whole edge with all click all the way around and let's move the cursor to it. Shift s too. Now, let's move that object origin to the three d cursor set origin to the three d cursor. There we go. Now we can scale it and move it around pretty easily and put it in place. So let's bring the vehicle back. I'll also bring the reference images back. Let's to that. And let's go to the side view wire frame and I'll scale it down and let's put it over here . I think this is it. Here. It's kind of hard to tell sometimes. Um, let me scale it down. Pretty small. Something like this. There we go. And then maybe I can select these faces on the sides here, whips too much, lets it be and just select thes be and just like these, and then we can scale him out s. And why pull them out like that? All right, let's see how we're doing. We're pretty far out, but we're, I think, in the right place. Let's just bring it back in the X here and put it right about there. All right? Yeah. Let's try that. Let's go to the wire frame again and I'll press shift D and why? And then move the duplicated object right there. Okay, so now we have those two pieces. Now, let's put the actual steps in here. Um, it's really hard to tell exactly what they are on the top. Is it just a block or is there some sort of a grid pattern? How wide are thing? So let's some let me bring in a new image here up. Didn't mean to do that. Let's grab that corner again and bring this down this kroner again. Bring this down and I'll switch this back to properties. There we go. Um, and these two images, this one I want to keep like this. And this one. I'd like to try and find something else that would help us figure out how big these are or what they are. Um, there's this. Let's take a look at this press control space bar and wow, that really doesn't help us at all. It is pretty clear that these aren't real wide or riel deep. They're pretty narrow. So okay, that tells us that all press control space bar again to get out of that the civic and find another one. Um, yeah, that's really not a whole lot of help, is it? How about this one? Not much there, either. Okay. So I think we're just gonna have to punt and do the best we can with the information we have here. So what? Let's do it. Let's go ahead and move the cursor to the center of the grid with shift s one. And then let's press shift a and create a cube and let's scale this down and kind of get it the right size and then we'll put it in place. So in wire frame here, I'll just move this up to say this top one and ah, scale it in the Z s and Z and get it about that big scaling the why and bring that out like this. There we go. And then, um, if we move it when we can move it out some, let's take a look at the top view. Yeah, here we go. We've got a view of it here that we could use. So let's press S and X and scale this in a bit and then move it. Put it in place right about there. There we go. Okay, so that's that's pretty good. Now let's put it down one below that. So let's ah, just grab this one here and then press shift D and I'll move it out in the X. Put it right about here. Now let's go to that side view. Bring it down and let's scale it in and a y s. And why like that? Okay, so there we go. OK, so we've got those two steps now we'll just leave them as cubes or blocks like that for now , until we figure out what we want to do with the tops of them. Now let's create thes three support bars here. It looks to me like if we go to the front view or excuse me the side view, they go from the back of the bottom step. They go up to just below the top step right, right into there. So let's just see if we can place something like that with, say, a cylinder. Um, I'll keep it a 12 sides. We don't have a cat. Fill it all here. That's good. We'll scale this down and, ah, see if we can get it in place, at least, and then begin angling at the way we need it. So it looks like it's about this, uh, thickness like this. Then let's go to the front view and, well, we're not getting a whole lot of information here, are we because of the tires in the way. But even so, we could move these over and I'll go in turn off the reference images for just a minute, and then let's turn it and try and just at least get it in place. So just below that top step would be right around in here. And then maybe what we can do is just turn it a bit. This something like that. So let's say that's kind of how we want to place that from this view to go to the front view. Now let's turn that reference image back on. And now we've got that there. Let's just duplicate thes shifty why? And bring that over here. Shift d y. And bring that there. All right, let's see how we're doing. Yeah, so I think that's just getting those in place. Now What we need to do is work on these angled support bars here. We've got it. It's kind of an L shape we need to create thes, and I think the best way to do that is with that path tool we use to create the handle. So in the next video, let's go ahead and begin working on that
35. 033 Continuing with the Steps: all right to create this l shaped tubing here. As I said, I think we're gonna need to use a path. So I'll press control a and go to curve. Yeah, and here it is. Here you can see it there. Um, let's go and scale it down quite a bit. And what I want to do is place the end points where they need to be, say, right here against this tube and then right here against this step and then begin shaping the L here. So let's go ahead and try this. I will move this up and, um, I think I'll move it up to where that l meets with the support tube here. Something like this. Let's go ahead and see if I can tab into edit mode, and then I'm gonna take this point right here, and let's place it on the tube here. I'll just take it and move it right over here. And let's say it, um, meets it right in here, right in there. And then I'm gonna press control I to invert thesis election control I And now that selects all these other points. I'm gonna move it over here and maybe move it back a bit like this, and then I'm gonna take this point here and put it in place. We'll just hit G and move it and bring this over here like this, and I'm trying to get it right in here. Right in there. Yeah, something like that. So it's right in there. Now I need to just kind of arrange everything else so it matches the shape I want here. So, um, it looks like this Congar. Oh, straight out like that. Maybe come up. Right. And, um, this could then go out and maybe come up or about like that. This I might be able to actually just get rid of completely. Although there is this slight bend here. Maybe I'll keep it. Maybe I'll keep this. Move this down to here and move it over. Move it out like that. So we have that slight book. So we have that slight bend there. We may need more points now to get this turn a little bit sharper. Stole? What weaken do is we could subdivide these segments. So if I take this point in this point and I right click, I can choose Subdivide in this curve context menu. Now we also have a curve menu up here, but it doesn't have as many options in it. This curve context menu is really kind of a combination of these. So you've got your subdivide here so we could click there and at a point, all right, let's see how that looks. That's not too bad, but I feel like we need one more point in here to kind of straighten it out. So it's like this point in this point. This time I'll right, click and choose subdivide and let's see how this looks getting better. Maybe I'll take this and move it down some like this. Yeah, it looks like they need to go a little bit more like this to get it kind of flat. So you just need to kind of tumble around and see what you can come up with in terms of the shape that you want. And we will bring these up just a bit like this. Let's try this. Now that we have the actual path, we can now create the geometry that's gonna be that tube. And to do that, we can come over here to our object data panel right here. And as we did before, let's go into the geometry section here and go to bevel and depth, and I'm gonna click and drag on the depth and kind of bring that out like this. So it's about the same width as those tubes we created earlier. Something like that. Looks like I could maybe bring this in a bit, huh? Maybe I should take thes three and move them up a bit. Trying that? Yeah, that doesn't look too bad. I think it could be a little bit smaller, though, in the depth. So let me click and hold shift in a train, bring it down just a little bit more like that. I could also, while we still have this, I could also bring this up just a bit. There we go. All right, Now, ultimately, we're gonna have to convert this to a mesh two polygons the way we did with that handle. But before we do that, we really ought to take a look at the resolution And how maney polygons we're gonna be creating. So first of all, let's go up here. I'm gonna get the Z key and go toe wire frame. Now, when you can see all of these polygons that this is going to create and we should really bring down this resolution preview you. If we click on the arrow here, we can begin to reduce the number of polygons that will be created when we convert this. Now, that's probably too low there. Right? But if we bring it up to maybe, I don't know, three might actually do it. That doesn't look too bad. There we have some pinching here, but honestly, I think we might be able to adjust that once we convert it to a polygon. I don't know that that's going to be a tremendous problem. All right, so we've got that. Also, we need to change how many sides it has all the way around. So if we take a look at it here, how many signs it has here? Let me come back over to the object data panel and scroll down. And this resolution here. So if we increase that, you can see it increases the number of polygons along the length of it. If we bring that back down, maybe to ah, well to maybe too little. Let's try it, though. Let's see. Let me go bit back to, ah salad mode. Actually, two is not bad. Let's go ahead and go with that. So with those settings in place, let's go ahead and right click and choose Convert to mesh. Now, once again, we can also go upto object up here this object menu and go to convert to and convert to mesh from curve. So either way, I'll click here. And now if we tap into edit mode, you can see there the polygons and we could if we wanted to take these edges here and just hit s and scale them up just a bit to kind of clean up that turn their if we wanted to. I don't think it's absolutely necessary, but we can do that if we want to. Now what let's do is go ahead and mirror this over and put it on the other side. So I'm not gonna mere it around the three D cursor or around the center of the grid. What I'm gonna do is just merit around itself. And to do that, I can go ahead and duplicate the object shift D enter and Then I'll press control em, and we will mere it in the y axis so oppressed, why? And then enter. And there we go. So now I just take this and drag it over and let's put it over here, right there. Okay, Now we have those in place. Let's also take these three and join all these together. So select all of these and press control. J and I should smoothies. So I'll go to object shades smooth. That helps clean that up. Um, and then I guess what we could do is go ahead and just select this and these steps right there and join him. Control J. Move that object origin to the three d cursor and we can go ahead and just mirror this over add modifier mirror. And there we go. So now that's over on the other side as well. Oh, we'd need these guys. Let's do that. A press controlled J. And you know what we could do is just add this object now to this, the one we've already mirrored and that will just mirror it over as well. So if we have these selected and press shift and click that now that object will be added to the last one that we selected Saul Press Control J. And there we go. It went over to the other side. But the problem is, is the smoothing here isn't quite the same, right? You can see that kind of artifact ing there. So let's go over to the object data panel. Normals turn on auto smooth again, and that will clean that up. And there we go. All right, So, um, in the next video, I think we need to add some pieces connecting the top step to the vehicle to the cab here. But also, let's take a look at creating these chains now. Ultimately, we may not use them. They may just be too high, Polly, but I think they look really cool. And actually, they're kind of fun to make. So let's also work on those chains
36. 034 Beginning the Chains for the Steps: well with the understanding that this chain may not go on to the final vehicle in the game engine, Let's just have some fun with it and ah, see how we might create a chain to go on these steps here. Now I'm gonna press a control space bar. I have noticed that in the scale models here, they don't have the chain simply because I think it's just too small of a detail to deal with on a scale model like this. And it may be a similar thing, Um, putting it into a game engine there. Just maybe too many Polly's. But as I said, that doesn't mean we can't have a little fun here. So what we do is take ah, the steps here in the scene collection and drag him up into the vehicle. Maine. And I'll choose the scene collection then and let's go ahead and hide the vehicle. Maine and the images. And let's just work on creating the links of a chain. And there are several ways to do this. Please don't think that I'm saying that this is the only way you can create chains in blender, but I think this is kind of a fun way to do it. So let's begin first with a tourist. I'm just gonna press shift a and go to mesh Taurus. Here we go. And then once again, let's, um, adjust thes segments. The major segments I don't know. Let's try 12. Let's take it down to 12 and then the minor segments. Let's take this down to six. Let's try this. Yeah, that looks pretty good. And then what we need to do is split these two sides so they look more like a chain. Um, I'm gonna use the x axis here to the left and the right. It isn't necessary. But when we create the curve because we're going to create a curve path, it will come in aligned with the X axis. So what I want to do now is split this right down the middle and extend it out to create the oval of the chain link. So I'm gonna tab into edit mode, and maybe I'll even go into a wire frame here. And let's, um, Ault, click this edge right here and all shift, Click this edge right there. Now I want to split that so that these two sides are their own pieces. So I'm gonna press control e to bring up the edges menu, and I've got this edge split tool right here. So if I click that not a whole lot happens. But if I d select those and then hover over an edge and press the l key and select all linked components, you can see that they are now two separate pieces. And Aiken, drag this out like this and maybe make a chain. I don't know what you think about like this. Let me go back to that top view. Um, maybe something like that. All right, so now we need to connect these so I'll press all to click for this edge All shift click for that edge and then once again, bring up the edges menu with Control E. And now let's choose bridge edge loops. And there we go. So let's do the same thing down here. Control E and bridge edge loop. So there is our changeling. Okay, so now we're going to use the array modifier to extend these out. However, we can't really do it. Based on the origin of this object, we're gonna need another object so that we can move it and adjust it fairly easily. So what I'm gonna do is create an empty and an empty is just a location in three D space. It has no geometry. It has no polygons. It's just a place in space. So I'm gonna press shift a and go to empty, and I'll choose this plane axes. And once I do that, you can kind of see right here. I'm just gonna drag it in the X axis. There it is and put it right at the end of our chain link right there. So now what I want to do is create a new array of this object with this object as the offset. So let's come over here to the modifiers panel and let's click, add modifier and choose array. And currently we're creating the array based on the original object. But let's change that by coming over here and turning off relative offset turning on object offset and then clicking on the eyedropper and then clicking on the empty right there. Now we can grab this empty and just drag it back and forth wherever we need it to be. But as you can see they're not aligned in the proper direction. We need to turn one of them 90 degrees. So let's go ahead and do that with this original piece right here. Let's turn it around. The X axis, 90 degrees soil press are X 90 And there we go. So now we've got our chain link here. We can move this until it kind of sits right around here, a the very tip of their. And now we can come over here back to our modifiers panel. But of course I need to select that original object. Now, over here we can increase the count of the array. So I'll just click and look at that. They just pop in one after the other rotated 90 degrees every other one. But there we go. So there's the beginning of our chain. That's great. But what we now need to do is be able to turn it and move it based on a path. So to do that, we're gonna need to create a curved path. So let's go ahead and press shift. A go to curve and path Now. There it is. It's in there. Let me hit tab, and you kind of see it there. So what I want to do is reduce the size of the chain to gonna fit along that path, at least for now. So I'm gonna select this main link. Actually, I could choose any of them, I suppose. And then I want to choose this empty as well. Because if I hit s and try and scale this now, look at what happens. That's not gonna work. So what else do is select the object and the empty together, And then I'm also gonna move this pivot point. So I scale around the three D cursor here in the center. So I'm gonna change my pivot point to three d cursor and I'll hit s and I'm the scale is down quite a bit like this. Okay, so now we have our nerves path here, right? And I'm gonna tab into edit mode, and you can see it there. All right, So now let's go ahead and attach this to the curve tab back into object mode. Select the chain link, and let's now add another modifier a curve. Modify RL click, add modifier and under deform. There's this curve right here. So let's click that I will choose the Eyedropper and then right in here. I can choose that nerves path. And there we go. OK, so it's popped over there. But let's take a look at what it's done. Now. I'll select the nerves path again right there. Tab into edit mode. And what we can do now is grab one of these points say like this and hit G, and it begins to move that Shane based on the path that we've created here. All right, so, um, let's add a few more of the links here. I'll click the chain links and let's add a few more in the count. I'll just click out here. There we go. Let's choose the nerves path again, Tam into edit mode. Okay, so now if we take this, let's just grab this G move that you can see. We can move our chain. Kind of cool, huh? Now, let me switch back to a median point up here. I'll hit G. And there we go. So and also, it kind of slides along the path as well. So if I move this down here, say, and I move this Ah, up here, and then I tab into edit mode and I move that path. I'll just click here and move it. You see, it just kind of slides along it. That so? That's kind of cool. All right, let me undo that. I will undo these moves here with control Z. Now we need to take it and put it in place on our vehicle. So let's bring back the vehicle. Maine. Here. There it is. And we can see we've got some work to do. What I'm gonna do is select everything. I'm going to select the empty, the nerves and the tourists everything and move it over and scale it down. Now I want to make sure Let me switch to median point here again, I think when I undid that, I change that back. So let's move this up and over. And we can kind of put these in place in the same way we did that l shaped tube there. Let me turn around. The why are why like this. And remember, I'm moving everything. I've got all three of our object selected over here. All right, so I'm gonna move this over here, and let's get this? Um, kind of in place right about. Where was that? Let me see. It's right inside of this loop. So let's go ahead and do that. Bring it up. Um, it looks like it's gonna need to be smaller now, doesn't it? So scale it down quite a bit. Something like that. Yeah. Let's try that. That may be too small to do this. Okay, All right. Now, what let's do is let's go ahead and just grab that nerves path tab into edit mode and will just begin moving this around. So what I'll do is I'll take this and move it. It looks like it needs to go down to the back of that step there. So I'll just hit G and move this down like this and let's move it down and try and get it in place here and now we can begin to move all of these so I'll just grab, say, one of these and move it in one of these. Move it in. But you see, I'm just moving these in one at a time. Now we can, of course, ADM. Or here remember, we can select two points and right click Choose, subdivide, and we've got an extra point in There we go. Well, we can move these back now too, huh? Let g and move these back like this. So it's basically the same process we did with that. L tubing support peace. Same thing just now, using all the points of the path to get things in place the way you want it. Okay, Now I'll go ahead and tab back into object modes like the chain links. And then let's ADM or on the count, We just bring that down here like that. And how many more do we need? Well, maybe one more. Let's just do one more like that. All right? And there we go. We have one of our chain links. Now there's more. Of course we can do. We can add a piece of JAMA tree up here for it to connect to. And of course, we want to duplicate this mirror. It may be and move it over here, but let's work on that. In the next video
37. 035 Finishing the Chains: before we had the chain to the other side. Let's make sure it looks good from all angles. I feel like it kind of bows out just a bit. Let's take a look at it from the front. Yeah, so I think it's kind of curving out a little too much. Let's Ah, go back to that nerves path and tab into edit mode, and I'll just take individual points here and kind of move them back just a bit, just to get it a little bit more straight like that, like there's some tension to it. All right, now let's take a look at moving it over to the other side. To do that, we're going to need to select everything once again. So I'll just come over here to the outline er, and select all three of these objects. And then what let's do is let's press shift D and why, and I'll just drag it over here and then I'll mirror it over. So with this still selected, let's press control em, and then why? And that'll mirror it over and then enter. Okay, so now it's put these in place. I think, um, this looks pretty good right there. Let's see if, um well, let's get a better view of this. Let me, um, join this here to make this a little bit bigger, and then let's get another image. Let's, um, about this one here. Yeah, this has a pretty good image of where that Shane is supposed to be. So it's once again on the right side of that loop piece here. And then it looks like it kind of bows out a little more than this side. This side looks like it's straight. This is kind of curved, so we're gonna have to do a little bit of work with the path points here. So let me go to the side view and let's select just this new path. Now the old path is nervous. Path 001 This is 002 slits like that tab into edit mode. And then let's begin pulling these around. So maybe l select one. Yeah, we're gonna have to do quite a bit of moving here. So, um, let me hit the Beaky toe border, select all of these points and just kind of move them this way until we get this point down here where it's supposed to be. Yeah, something like that. Now, let's Ah, move these out individually. So I'll grab this and move it out a little bit more. And Ah, this one here, lets move that out some. Yes. And we just want this to be a little bit more curved out like this around that step. So let me grab this and pull these out just a little bit more. All right? Let's see how that looks. Um, I feel like this is curving too much. Let me slick that path again and grab this point and move this in. So it looks like it's got a little tension there. There we go. Okay, let's take a look at that. Was tumble around and look at it. Do I also need to adjust it from the front or the back? Let's take a look from the back. I'll press control one and let's go toe wire frame. And, um, do I want it exactly in line with the other one? Probably not. Let's let's move it back a little bit, and I know I'm being a little bit picky for something that we might not even use. But It's fun. Why not have some fun with it? Here we go. Okay. Let's see how that looks. Yeah, I think that looks pretty good. No one thing about it, it seems to me like these pieces here maybe should be flat against the vehicle. They're kind of poking out like this, and I feel like if we had let me see, Well, this has got kind of, ah, nail head or ah, Bolt that it's connected onto. So, yeah, it would need to be turned, wouldn't it? And it's gonna be a lot easier to turn it to turn something like this when it's still part of a path rather than just geometry. So let's go ahead and work on this. I'm gonna select this path here and let's zoom in here. And if I tap into edit mode with the path I can select this point. And if I changed this from global, not local, but toe normal. If I click normal, you can see the move Gizmo aligns itself with the path right with the curve path. And if we then use a tool called Tilt, we can actually rotate the path around this Z axis and you can find the tilt in the curve menu. Let me go appear to curve. Well, let's go to control points cuse me. It's control points and here's your tilt control T. Also, if you right click, you can see tilt here under the curve context menu. Once again, they've kind of combined several menus in tow one here. So if we press control T and move the mouse, let's see what happens. Control T And now look, I can kind of spin that around, but look how it's warping the chain link. Low it. We don't want that. So what let's do is let's extend the curve down to the next control point here. Let's try that a press controlled tea and let's try this. Let's turn this like that. Now that curve is a little bit more distributed. You can see it's happening. See the twisting here so you'll never really get rid of it. Let's press control Z and let's add one more point to it down here and let's see what happens. Control T and let's twist this around like that. Now where's that twisting happening? Well, the twisting is happening right around in here. It looks like and that's not too bad, actually, because it's kind of hidden by this step, so that's pretty good. Let's take a look at this other one. Now we come over here, Click that path Tavon Edit mode All slick. This point. Let's zoom in with the period key on the num pad. And once again, if we hit control T and turn this, say I turn it this way or this way. Either way, we get some serious warping of the chain links here, right this press control Z and undo that. Let's try and grab this point here and see if we can distribute that warping a little more So with those two selected lis Press Control T. And I'm gonna kind of turned this way like that. Try that. Yeah, we've got a little bit of warping here. That's not too bad, though. Let's press control Z and extended on down to hear and see what happens. So now press control t again and let's try and do this. That's not bad, actually. So let's do it this way, dear. Okay, and the war pings happening well, it's hard to even see where it's happening. It looks like it's happening right down here, and that's not too bad. I don't mind that too much at all. Yeah, that looks pretty good. We could maybe grab this point and move it out just a bit. And also, we could maybe take one of the points down here like this and try and use that tilt tool to adjust for the warping a bit. So let's press control T and see if we can do that a little bit. Weaken, maybe reduce some of that like that. That's not too bad. All right, so we've got our chains pretty well in place. Now, let's say that this is the way we want them. We like the way they look. Now we want to make sure that we have no modifiers on them because ultimately, we're gonna have to apply all the modifiers that we have on here because when we take it into unity or any game engine, we're gonna lose the modifiers. They don't transfer from blender into a game engine. So let's go ahead and begin applying these. I'm gonna select this part here, the actual chain links and we've got an array modifier in a curve modifier on here. All right, so let's go ahead and apply the array modifier here. And then let's click. Apply for the curve modifier. And you may wonder, why do we need that? Now that we've applied the array, we could just turn it off here and you can see that it goes back to straight. So we do need that curve modifier, but we want to apply it well hit, apply. And now, if we choose the original Empty and the nerves path 001 right here. Now we can just hit, delete and get rid of them. There they go. All right, let's do the same thing over here. Let's select the chain links. Let's click, apply for the array and apply for the curve. And then we come up here. It's like the empty 001 and the nerves paths years, you're too it delete. And there we go. Now I'm gonna go ahead and combine these two. Select these two objects and press control J. Now, let's see how maney polygons this has added to our object here to our project. So down here you can see that we've got currently 20,000 tries. All right, let's come up here to the outline er, and hide the tourists. It's actually the chains. Let me just rename that. So let's hide this click here and now we've got 13,000 tries, so it adds a significant amount of tries to our project. If we turn that back on and let's select it and let's move this origin to the three d cursor, I'm gonna go ahead and change back to the global transform orientation. And then let's go toe object set origin. An origin to three D cursor. Now let's come over here and add a mirror modifier, dear. And it looks like we need to apply probably the rotation. So let's press control a. Apply the rotation and sure enough, there they are there. Okay, so now let's see how much we've added down here now is 27,000. We hide this 13,000 so we've more than doubled the amount of triangles in the scene just by creating these chains. It's pretty cool, though. It looks good, but it's probably too much. I'll go ahead and click, object and shade smooth, and there they go. Now I think it looks really cool, but as we've said, it's probably gonna be a bit too much for our final vehicle
38. 036 Extending the Hood: I think now I'd like to go back and kind of clean up this hood and fender. This happens to me quite a bit in that. The first object I create on a larger project like this, I go back and take a look at it, and I don't particularly like it. I don't think it fits in with the rest of the models. I feel like it's a little too choppy. It really doesn't connect well with the cab. Often times that first object or to within a project is kind of, Ah, warm up for me and I'll sometimes wind up going back and completely redoing it. But I don't think we need to do that here. I think we can do some tweaking and get it to fit the cab a little better and maybe even clean up some of this block Innis around the curve of the fender. So let's do a little cleanup here. Think what I'm gonna do is tap into edit mode. And first of all, before I do anything, I'm gonna align these a little bit better to the cab. I then went toe extend this down to ah, right down here I want to extend this part down to finish out the fender. But before we begin on that, let's try and align these a little bit better. I think what I'll do is grab these edges here and maybe this edge here. And I think I'll use the proportional editing tool and kind of pull them out a bit. So I go to the top, view me take a look here. Let's bring back that top reference image and see what we can see here. Yeah, it looks like it just needs to come out a little bit here, and this needs to align with the cab there. Let's Ah, go to the bottom view with control Numb pad seven. And here we can see this right here needs to be in better alignment. So this needs to come back and just connect with this right here. So, actually, this is a pretty good view to begin with. I think so. I'm gonna come up here in turn on the proportional editing tool. You can use the shortcut. Oh, and I'm gonna make sure connected only is turned on. Now what I'll do is I'll hit G and X and Let's then move this out. Some like this and then I'm gonna expand this a bit like this. I don't want toe see how the outside of the fender is moving as well. When I go too far, I don't want to move that. Just want to kind of move that like this. All right, let's see how that worked. I'll go back to Salad View and we're getting there. That's good. But see how all of these air kind of out of alignment now, too. So let's begin by just grabbing a couple of these and pulling them out. I'll go back to the bottom view, control numb pad seven and wire frame. And let's begin by pulling some of these out. So I think I just want all of these to align a little bit better. Well, hit G and X, and I'll kind of pull this out, maybe expand these just a bit like this. And maybe this one g x. Maybe we can pull this in a bit so you can see what I'm doing. I'm just grabbing these, using the proportional editing tool to kind of align these a little bit better. This G X maybe line that a little bit better like that. Yeah. So I'm just trying to get a straight line here, that's all. Using this proportional editing tool. Something like this. Let's see how this looks now Tumble back around and, yeah, we're getting there. Um, I think, Ah, I might want to pull out one of these. Like this one here. G and X. Pull this out of it like that. This one could probably come back in now that Yes. So we're getting there. Let me Graham. They grabbed this one here. There we go. All right. So I think we've got that a little bit better lined up now. Now, what let's do is grab this edge and begin extruding down. So I'll go to the side view here, and I got a wire frame and let's let me grab this and kind of let me turn off the proportional editing. Teoh, I'll hit the okey, and I just want to bring this one straight down like that. Okay, so this is a good straight line we have here. That's what we want. We've got that seem right here. You see that right there? That's what I want to create. Um we don't need all of these appear for now. So I'm gonna hit the sea key and middle mouse button, click and drag to de select those points up there. So we only have these edges on the sides selected, and then I'm gonna begin extruding down to create this. Once I've got this all extruded down and in place, I'm gonna come back and split that edge. All right, so let's it e and I'm gonna click and I'm gonna hit G and move it down to say here like that. And then I'm gonna scale in the Z SZ and flatten these up. Kind of like that. Here we go. I'll move this back up to this corner right here, right here. And then I want to begin scaling these in and maybe extruding these down as I go. So I want to scale from, say, this point inward rather than from this point here. Someone select this and move the three d cursor here. Shift as to na minha border. Select all of these points here, and then I can change my pivot point to the three d cursor. Now, you can also get the period key on the keyboard, not period key on the num pad, but on the keyboard to get that same menu. And I'll go to three D cursor here. Now it's scale in the Why with s and why bring that in like this. So I just want to look at this right here, this curve, Then what I'm gonna do is de select this point right here and scale in some or s And why like that And then de select this point in S and y and scaling like that so you can see what I'm doing. I'm trying toe match these curves, these lines here as I go, maybe something like this, and then de select this one. That's why putting this in like that. There we go. So we've got these aligned right here. All right, all right. So now what I'm gonna do is border select thes, and I'll hit e and pulleys down to say right about here and let's do it all again. I'm gonna select this point. Shift s too border. Select all of these and do it again. S why? To there? Yes, Why? Maybe in just a bit. These actually look pretty good here. So I think I can just extrude down again. I'll border select all of them e maybe come down to about right here once again. Moved that point. Shift us too. Border select. That's why pull in de select. That s why. Pull in, right. And it actually looks like if I select just these, I kind of need to push this out. So s y, and I'm gonna push it back out like this. Then we go and then one last one, I think t bring it down to here like that. Move the pivot point shift. Us too. At the beak. Ito Border Select s Why scale in just a bit. And I think that just about lines it up, let's see how we did. Yeah, I think that's pretty good. Let's see how it looks from a distance. We may need to get this piece lined up just a little bit better. Maybe I'll grab this switch The pivot point again. I'll hit the period key and eight. There we go. I'll move this in. Move this in. There we go. Something like that. Maybe even move this in a bit. They're just kind of tighten that up
39. 037 Cleaning Up the Fender: the next thing let's do is move this back. So if I go back to the side view and wire frame, let's grab these edges here. All click this and I don't need all of these. So I'll hit the sea key and middle mouse button, click and drag to de select all of those. But I do need this one there. There we go. So I've just got these selected here up on top. Now I'm just gonna extrude these back. That's it, E. And I'm just gonna bring these back kind of like this. Try and keep this in line here like that, and then go to Vertex Select and just drag these straight back like this. And this one can probably come up some. Let me move that up here like this, and maybe this one can come up. Okay, so we've got that in place. No, let's create that Seymour or that gap here. So to do that, let's go ahead and select this edge right here. All to click this. Let's go to that side view here and we go. Now let's bevel this with this selected I'm gonna press control be and pull out with the mouse just a little bit. Something like this. Just a very tiny amount. There, There we go. And I'm gonna keep it at one segment, because all I want to do now with all of these faces, I'll go to face select mode, and all I want to do is just delete them. So I'll hit X and delete faces. Here we go. Yeah, that pretty much cleaned that up. Now there's one little bit right in here. Look at this. We've got this extra bit here. I think we can collapse all of these. So if I go to my select tool and slick thes three, I'll press ault em and I'll choose to merge at the center. And that brings that all down to one. Now, I can kind of move this in place again. Like that. All right, let's take a look at it. How we doing? Yeah, that's pretty good. Now, the next thing I had mentioned is I want to kind of clean this up. This is a little bit too jagged, and I could go ahead and recreate it, but if I did, if I recreated it, what I do is I just ADM or Edges as a extruded back, so they'd be more edges here to make that curve. What I can do instead, maybe let's give it a try, is just go ahead and add some edges and then relax those curves. So let's give this a try. I'm gonna press control are just add an edge loop here, one here, one here and oh, this one goes on, this one goes off in the wrong direction. So, um yeah, we can do this. We'll just use the knife tool to connect them back up. So what I'll do is I'll create an edge here, and then I'll just select these edges right here and hit X and dissolve edges. And then I'll create an edge here and we go and then I can connect these up. So let me just slide this over with G two times, slide that over, and then let's use the knife tool here. I'll just hit the k key and weaken. Select this point here by clicking and this point here and click. And now we can just hit enter. And that creates an edge between those two. All right, so now we've got Mawr edges to smooth out our curve but are curved, really doesn't look any smoother. So what we need to do is relax thes points, and what we need is a tool called Relax. That's in a group of tools called the Loop Tools. You can find that up here under the Edit and Preferences. And then if you go to add ons right here, you can search for that and on its called loop tools. There, there it is right there, and I'll stroll that down, and this allows you access to some extra tools that you can use when modeling. It's found under the edit mode context menu or right clicking. So let's go ahead and turn that on. If you do not have that checked, just click here and check that I have it set to auto save my preferences. Be sure that's turned on. And then if we close this, what we can do is say, press Ault, click this edge right here that looks like that whole curve, and then we can relax these to get a smoother curve, so I'll right click and right up here on top is the loop tools, and we can choose. Relax And there we go. Now, I don't know if you saw what happened there. Let's do it again with the next one here, I'll press Ault and click here and right click and loop tools and relax. See how that's cleaning that up? It's kind of nice. Let's do that again. Relax. Yeah, There we go. I think that's gonna help and let's go ahead and do these appear to now, if I won't click this? Oh, I think we have a problem right here. It pull this back. Let me undo this. And the problem is, is these got selected right here as well. So I need to de select thes and then right, click and relax. There. There we go. That help. Now, this one here, same thing. I'll de select this. Right click, Relax. Yeah, let's do this one here, De select that point and relax these and then Ah, maybe this one right here. Let's do that. It didn't go all the way down because of this cut, so I'll press Ault shift. Click there and then relax, Thes. Yeah, that's nice. Okay, So we could also do these down here. The ones that are separated out from the rest of the fender here. And then if we tap back into object moving, See? Yeah, that curve is a lot smoother now. Oh, also, we should probably go ahead and extend this sharp mark here. I'll press Ault and click, and then let's go ahead and press control E and choose Mark Sharp. There we go, and I'll grab this one and move it out. So I'm just trying to get these aligned a little bit better. So they're a little bit cleaner and closer to the actual outline of the vehicle here. Something like that. Maybe. Let's give that a try. And ah, these points down here could probably come out all right and thes down here. Let's try and get these in line as well. All right, There we go. Yeah, I think that helps get the hood mawr in line and consistent with the rest of the vehicle.
40. 038 Beginning the Wheels and Tires: I think now I'd like to work on these tires. I'd like to get the tires in place before we begin working on the underneath part. Underneath the hood, the fenders, the cab, etcetera. So let's go ahead and work on these tires. I think these air pretty cool. These have some really interesting details to them. But let's see if we can find another reference image. Um, looks like maybe this one might help. Yeah, this has got some nice contrast between the treads and the tire here, so we can really kind of see what the shape of their is. So it looks to me like we've got, um Well, it's a repeating pattern. So we've got this piece in this piece and it repeats all the way around the tire. And also, it's mirrored and flipped 100 80 degrees and copy it all the way around the tire as well. So it really looks like we only need to create two pieces. These two pieces here for the tire treads. In addition, we've got these bolts here. We're gonna use the same trick we used for the, um, brackets around the window blocks here. We're just gonna duplicate and rotate around the center object. But we're gonna use Honore to do that. And I think we can use an array for the treads as well. Let's see if we can do that. I think first of all, I'm just gonna take this tire and I'll just build off of this. Let me first move it out of that scene collection. It looks like we're in the ah vehicle Maine here. So I'll take this and right click, and I'll say move to collection and will move it to the actual main seen collection up top . So there it is. Here, I'm gonna call this tire so we know what that is. And then I'll go ahead and hide the vehicle main, Um, and the chains, we don't need that. And also, I think we don't need the um Capt. Phil's here on either side, so I'll go to face mode and I'll hit that Seiki again for the circle Select tool and just click and drag all of these hit X and delete faces and I'll do the same thing over here. I don't think we need those right now or at least we want to rebuild them. In addition, I wanna add a mirror modifier, so whatever I do on one side happens on the other. And to do that, I'm gonna need to split it in half. So let's press control are and add and edge loop down the center, and then I'll hit enter two times to ensure that's exactly down the center of the object. Now, if I go to face, Modi can all to select between two faces to select that whole face loop hit X and delete bases. Now let's go ahead and add a mirror modifier to this right here. Not much happens. Which tells us that it's probably the rotation. Let's try it, control A and apply the rotation. Sure enough, there we go. I'll also turn on clipping because we want the points in the middle to merge together. And all right, so here we are. Um, I'll turn on the edit cage on the other side so we can see it. I won't go into edge mode and all to click this edge, and now I'll began right about in here. So this is where we're gonna begin creating that tire. Let's go to the front view here. And so we wanted to be about this with so something like this, we need to extrude out and kind of curve the top in the bottom of the tire here. So let's go ahead and press e and X and pull out just a bit. And I'm trying to keep the polygons roughly the same size as I go here. And I'm gonna hit E and X and pull out just a bit. And then I'm gonna hit the s key and scale in just a bit too kind of curve the tire just a bit. And let's do that one more time E x, pull out and then we'll hit the s key and scale in just a bit like that. So we've got that basic shape of the tire there. Okay, Now we need to get all this in here. So what we should do is go ahead and hit E and s and scale in some. Maybe like this. Maybe I'll pull out just a smidge it a little bit. There we go. And then let's see where we need to go. Let's go to the side view. And it looks like we need to go all the way. And here that's where that rim begins. I think right in here, Right there. So with this selected still I'll hit E and s and I'll scale in just a bit like this. We go, we should probably push in some, right, since it's kind of moving in toward the rim there and then let's do that again e s and scale into about there and also push in just a bit like that. Okay, lets see how we're doing here. Yeah, I think that's a pretty good shape for the tired. Let's bring back the vehicle. Maine here. And let's just take a look. Look at it. Yeah, I think that's working pretty well. Okay, So hide that vehicle, Maine again. And now we wanna work on the wheel and the wheel, um, begins with this small ridge here. I could create a new cylinder and try and fitted in there, or I could just extrude off of this and then split it off as its own object. Let's take a look at doing that. I'll tap into edit mode and let's all click this edge, and I think we just need to pull out so e and X and pull out some and then Ian s scale in a bit. And then we want to get this. It looks like it kind of curves in or push is in a bit before it comes back out with this rim where all the bolts are. So let's press e and X and push in. And then let's hit s and kind of scale it in a bit. And then, um, let's it e and s just give it a little bit of ah indentation there and then let's begin, bring it back up So I'll press e and X and pull out. But I'll also scale in with Es Ki can like that. See how this works about like that maybe. All right, then let's get this piece where that first row of bolts are. I'll go back to the signed view and ah yeah, I think this is pretty good. We can see that first row of bolts there, so it's hit e and s and scale into about here like that. And then it looks like it pushes in again. So it's it e and X and push in about like that and now we need to get that place where the inside bolts are. So let's go ahead and hit E and s and scale into about right there. And now it's pull that centerpiece out, E x. I don't know How far do you think it goes? Something like that. Okay, now let's it be and s scale in and I'm gonna do that one more time. I'm hit E s and scale in And then I'm emerge these points with this still selected on the press Ault em and choose to merge these points at the center And there we go. Okay, so we have that. I think that looks pretty good. We've also got it over here on the other side. However, I don't think it looks quite like this on the other side, cause if we take a look at it kind of underneath here, it's not exactly how that looks. So I think it needs to be a little bit different on the inside than on the outside. So we're gonna have to do a couple of things to be able to edit that inner part of the wheel. As I mentioned, I think I want to split this out. So tab into edit mode, and I'll just go to this edge right here all to click that edge. So it's all the way around there like that, and I'm gonna edge split that. So it's two pieces of the same object. So let's press control e and go to edge split right here. Now, those air, two different pieces. So if we go back and now select this part with the L key, you can see that its own peace. All right, So let's now press the peaky and split it out for its own object. Choose selection there and now. So I think we could maybe grab that edge right here. Yeah, there it is. We got a wire frame, we can see it there. And then I'm just gonna hit e and X and just push this in like this. That's about all we need. We don't really need them to connect. So now let's go back to solid view tab back into object mode. And there it is. So now it's it's own objects. We could call this. Ah, So this one is tire. This one could be wheel. It's call it wheel. And now we can go in and modify this, but we have to apply that mirror modifier. So I'll click. Apply here. And now if we come into here, let's, um, grab these faces here with a circle select tool and press control plus on the num pad. And I'm gonna extend this out to about here and hit X and delete faces. Now, we can take this edge right here whenever that inside edges. There it is right there. And we can kind of work on this. It looks like, um, it may go back a bit and scale in some and maybe, Ah, let's push it in and I'll hit E and X and push that in, maybe scale in a bit. And then I think I'll just close it up here. So e s skillet in like that. Push it in. Yeah, let's just try that. I'll hit E and enter all to em at center. So there we go. We've just closed that off. All right, All right. I think that's OK. We may have to alter it once we get it in there, but I think that'll work for now. So in the next video. What let's do is let's begin working on all the bolts we'll need to create a bolt, put it in place, then used the array modifier to duplicated and rotated around the front of the wheel here, so that's coming up next.
41. 039 Creating the Bolts of the Wheel: let's create that bolt first, and then we can put it in place and use that array. Modifier was press shift s one to get the cursor into the center of the grid. And I'm gonna go ahead and hide the wheel on the tire for now while we work on this and I'll click on the scene collection of top to make sure that it pops into this area here when we create a new object. So it looks to me like it's just ah, cylinders. Um, it's kind of hard to see, but maybe the bolts here are six sides. Let's try that shift a mesh cylinder. Let's change the number of Verte sees 26 I'll change the cap to triangle fan. However, we don't need it on the bottom. So I'll just grab these once again with that circle select tool and delete those faces. Um, let's scaled in the Z with S and Z. So maybe about like this, um, maybe a little bit smaller. Let's try this. Okay, so now that we've done that, let's create another cylinder. And for this one, let's make it, um, let's do 12 sides and we'll scale it down. Once again, we'll get rid of the faces on the bottom here like this. And then let's put it in place. So let me just bring it down about right here and let's scale it down. It looks like maybe about like this a little bit more that about that. Let's give this a try. There we go, So that will be our bolt that will then place all the way around the wheel. Here. Let's combine these together with Control J, and then I'll call it Bolt and let's move the origin to this bottom edge. So let's all to click that edge shift s to to move the cursor to it. And then we tap into object mode and move that origin to the three D cursor. I think that will just make it a little easier to move around and place. All right, let's bring back the wheel and I'll go and bring back that tire, too. Let's turn it in. The Y axis are y 90 but its scale it down quite a bit and let's come over here and try and put it in place. So if we go to that side view with three key and go toe wire frame. Let's see if we can find where to place this. Maybe we can put it right over here about this big like that. Let's try that. Let's go back to solid mode and then see where we are, OK, so I think that's a little bit big. Let's try this. Yeah, I think that's right. Maybe a little bit bigger. Try this and I'll go ahead and rotate it in the x r X and just kind of put it like that. Let's try that. Okay, so there's that bolt. Let's also put one inside there to bring this up a little bit more like that. It's also duplicate this and put one inside here like this, something like that. And then I'm gonna take it. I'm gonna move it up just a bit like this. It would have spend. So it isn't exactly like the other one. All right, so now that we've got those, too, let's figure out how to use the array modifier to create all of these in a fairly simple and efficient way. The first thing let's do is move this three cursor into the center of say the tire right in there. That's really kind of the center of everything. So let's move the three d cursor to this shift s too. Um And then what Let's also do is let's create an empty we're gonna need, just like we used an empty with the arabe modifier for the chain. We need an empty or another object that we can turn and rotate the array around a center point. So that's what this is gonna be. So, with the cursor there in the center of the tire, I'm gonna press shift a and create an empty plane axes right there. So there it is. Now, in addition, I want to take the pivot point or excuse me the origin of this object that little orange dot right there and move it into the three D cursor. So let's go to objects, set origin and origin to three d cursor. There it is. Now we also need to make sure that our rotation and scale are applied here. If I hit the n key, you can see that we have quite a bit of rotation and scale here. So let's press control a and apply the rotation and scale. There we go. Now we've got zeros and ones there. So now we need to do is just add an array modifier to this object. So with that selected, I'll go to add modifier array and let's bring this out to I don't know, account of six for now so we can see the array there. Currently, we have it set to relative offset and we don't want that. We need to turn that off and we need to come over here to object, offset. And once again, we can use that. I drop her to then select the Empty. There we go. Now if we select the Empty and I'll go to the side view here now, if we slick the empty and we hit our let's see what happens, I'll hit our and rotate and you can see the objects rotating around that center point. No, how many do we need? That's a good question. Um, so if we kind of go, I don't know. Around 15 I'll press the control key and now we'll snap to five degree increments. So let's say we put it at, ah, 15 degrees for the rotation. Now if we go back to the bolt object and began playing with the count. I'll increase it from six. Let's just keep going on around here. 2 24 So I rotated the empty 15 degrees and then I brought the count up to 24 that seemed to work pretty well. Yeah, there we go. OK, now we need to do that again for these here for the inside bolts, but I don't think we can use the same empty object here. We're gonna need a new one to be able to rotate independently of the outer layer. So what I'm to do is just hide this one here. I'll just hide it. And then let's create a new one shift a empty plane axis. So now this is empty zeros. Here one. Now let's do this all again. I'll select this one. Let's take a look at it. Oh, it's got rotation and scale again. So let's press control a and apply the rotation in scale. Now let's move that origin to the three D cursor objects, said Origin three D cursor. Now let's add an array modifier to it. We've got account of Let's go six again here Let's turn off relative offset. Turn on object offset. And with the eyedropper, let's choose that Empty 001 Now, if we select that empty, let's take a look at how we do this. Let's press are and rotate this around like this Now. How far should we go here? We went 15 degrees before. What if we go 30 degrees? We'll try that. And then let's select the bolt and increase the count. I'm thinking 12 maybe. Let's try it. Yeah, that looks pretty good. Something like that. So we've got 24 of the outside bolts and 12 of the inside. Yeah, let's let's go with that. All right, So what we can do now is go ahead and apply these array modifiers and then join all of the bolts to the wheel object. So with this, I'll select Ah, this row of bolts and I'll click. Apply, and then I'll select this row of bolts and I'll click. Apply here. Now we can just select thes two empties right here and hit X and delete. And there we go. Let's now combine these. I'll take this road bolts and that row and shift. Click the wheel Now let's join it all with control J. There we go. Let's see if we can smoothies a bit, too. Um, I'll come upto object and shades smooth. That looks awful. So let's go over the object data and turn on auto smooth and it looks a little bit better. So here's with no smoothing whatsoever right here. Let's bring it up until we kind of have something that we like here. Oh, I don't want that far, so I kind of want it. Well, it's kind of hard to get exactly what you want for everything, isn't it? We may have to use Thea Sharp tool here. Let me add a little bit of, ah, bevel to this right here. What's tab into edit mode and select that edge and then I'll press control be and pull this out just a bit. And then let's add a few edges here. A few segments. There we go. I think that helps some. Let's bring it up. Well, that's not bad in terms of the bolts and the smoothness of it. Um, I feel like we need to add a sharp edge on the outside here. Let's try that. Let's tap into edit mode and all to click this this edge right here. And let's press control e and Mark sharp there. All right, And then let's also do it here. Let's try this. See how that looks. Does that give it a little more definition? It kind of does. But maybe we don't need that one right here. Let me take this one off and see. I'll choose. Clear sharp. There. Let's try that. That's actually not bad. Yeah, I think I kind of like that. All right, so in the next video, what we're going to try is to use the same kind of trick using the array modifier to create the treads on the tire.
42. 040 Beginning the Tire Treads: All right. Now for the tire treads. Let's take this tire and I'm gonna go ahead and smooth. It shades smooth just so we can see how it looks there. Okay? And I'll also apply that mirror modifier. We don't need that own right now, so I'll apply that now. How are we going to create these pieces here? What's interesting is we really only need to create two objects this and this. And once we do that, it's just a matter of duplicating, repeating, mirroring, etcetera to get all the rest of the treads. So just like we've done several times before, I'm gonna go ahead and just use a polygon plane to get that basic shape. And then we'll apply a solidify modifier to that. So I'll maybe grab this point here and press shift as to to move that cursor there. And then let's press shift. Day mesh plain. And here we go. Here's our polygon plane. I'll turn it in the X axis are x 90 Let's scale it down and I'm bringing out just in front of the tiger there. Okay, so now that we've got that, let's go to the front view and I'm gonna scale this down with the s key and then let's try and figure out about how big it's supposed to be. If we look at the reference image, it really doesn't give us much information there about the size of the treads. So we're just gonna have to kind of eyeball it here. And I'm thinking maybe about that size, really? Let's kind of go with that. And then let's tap into edit mode and grab this edge. And, ah, I'm gonna move it in like this. What's it? E Move this up. It s scale in. Rotate a bit e and move that up like this. Let's try this. Something like this. Let me scale this down a bit. We'll scale that up a bit. So you may have to do a little bit of tweaking here to get to shape the way you want it. And that's fine. Okay, so now we've got let's say we've got that shape in place. Now we need this up here or this right here. Let's say right here. So to do that when it looks like it's about the same size coming off of there, so I'm just gonna hit extrude and pull this off like this. Tell us about in this center. Let's ah, goto wire frame and see if I can see that center line. There it is right there. So I'll move it up to here just almost to the center and rotated a bit like that. Okay, now let's take this and let's split this all press control e and edge split right here. Now, if I d selected and select this, I can move that off. There we go. So let's say we've got that, Yeah, let's go with that for now. We can adjust this quite a bit even after we apply the array to it. Let's, um, press control are and bring this down about right here. And then if we slick this edge, we can hit E and pull out just a bit like that. And then I will so like this and this point right here, and press all to m and merge at last right there. So that creates that basic shape. He looks like it just has kind of an angle coming out of that right there. So I think that's doing pretty well. I think maybe, maybe I'll move this back some in this down like this. Kind of hard to tell, but weaken play with it till to our heart's content, that's for sure. Um, maybe move that up. All right, So let's say that that's the basic shape of our tire treads here. And OK, let me move this up. I think this needs to be a little bit farther apart. There we go. OK, so there's the basic outline of our tire treads. Now what I'm gonna do is use a shrink wrap modifier to take this and mold it to the tire a little better. So with this selected well, then come over here and click, add modifier in shrink wrap and then in the same way we've done before. Let's click that eyedropper and click on the tire, and there you can see it's been conformed to the shape of the tire There. Now let's click on this offset and drag and pull it out some so we can pull it out about two where we think the tread would be. Maybe like that. It's hard to know exactly how far the trade would be out at this point in time, but once again. Once we get everything in place, we can do a little more adjusting. I'll go ahead and smooth this object shades smooth. Okay, I'm gonna press control A and applied to scale just to make sure that that's done. What let's do now is go ahead and apply that array modifier and see if we can get this tread all the way around the tire. So once again, I'll select that tire and let's move the cursor to it. Shift s two will create an empty shift. A empty plane axes. There it is. Now, if we take that tread and we come over here to add modifier and array there, we can see it now and then. If we increased the count, perhaps Let's ah, click here. Increased the count. Maybe I'll bring it up toe six again. There we are. Now. One thing I didn't do is move this origin to the three d cursor. We need to do that. So let's go to object. Set origin to three d cursor. There we go. Now let's turn off relative offset. Turn on object, offset. And let's select that empty object. Now you can see what happened pretty quickly. It went ahead and added a few around the tire. Let's select that empty and let's rotate in the x axis, suppress our X and let's rotate around like this. So I'm gonna rotate it back like this and kind of get the right spacing in here. At least I hope. Let me try this R X and I kind of want to get it right about I don't know right about there . Looks like could be okay for the tread, for the spacing between the treads, Right? And then now let's go back and select that and increase our count. So let's just click. We're gonna increase it all the way around here and let's see if it comes out relatively. Even no. So let's go back to 36 and then let's select that empty object and lets it are in X. And then let's There we go. I just moved. Now it's a little bit right there. There we go. Yeah, that looks pretty good. Okay, so now that we have that, let's go ahead and do a little more adjusting on the actual original tread object. Um, for the shrink wrap, let's click on edit cage here so we can see it now. It's good of Vertex mode. And let's just start moving this around a bit because you can see when I move it around, it moves everything around for all of the pieces of the array. So I think like this. Yeah, I'm just kind of moving these around, tweaking these a bit until I get it kind of the way I want it. Let's zoom in here. Do you like? That's pretty good right there. Now I think the next thing we can do is let's try and add a solidify modifier to this. So let's come over here to the ad modifier and let's choose solidify. And that gives us some thickness to those treads. Um, let's come over here and choose Onley rim so it doesn't have any back faces and, ah, click and drag on the thickness and move that inner out to kind of go into the tire there like that. Okay, we're getting there. Let's go to object data and let's turn on auto. Smooth. All right, that helps. All right, now that we've got the treads pretty much in place now we need to think about how to get them over to the other side, so they're in line all the way across the tire, and we'll work on that in the next video.
43. 041 Finishing the Tires and Wheels: to mere this over to the other side. We're just gonna need to take the original geometry and rotated around the Y axis. So if we tap into edit mode, you can see here is that original geometry. If I take this and I duplicated shifty and enter and then I take away this array modifier, I'm just gonna hit the X here to take that away. You can see there it is selected. That's our duplicate. It's over here called Plain 013 What to do now is just rotated around the Y axis. So all press are why 180? And there it is. It's over on the other side. Now that I've done that, it looks to me like these aren't going out far enough. There's too big of a gap between these you can see here. There's a smaller gap. So now is the time to come in here and adjust this. So I grabbed this edge here and just hit G and begin moving it out just a little bit. Maybe like this, something like that. Let's try that. So I'll take this and delete that duplicate. I'll grab this original object again I'll press shift D and enter. Then I'll remove the array modifier and there it is right there. I'll spend it around the Y axis are why 180 And there it is now is that that almost looks like it's too much like it's too close. So let's try this again. I'm gonna grab this and just bring it back. So it's just a matter of tweaking is all, and you don't really know where it's supposed to be until you go ahead and spin that around so duplicated again. Get rid of the array. Are Y 180 and let's see how that works. Yeah, I think that's probably pretty good. Let's go with that. So now we need to go through the same process with a new empty for the array. So take this empty. This is just called empty and I'll hide it away. And then let's go ahead and bring in a new one because I don't want to turn this old one because it will affect the original treads. They're so oppressed. Shift a and bring in an empty plane axes in there it is. So this one is empty 001 Now I want to take this and apply the rotation and scale control a rotation and scale. Now I want to apply or add an array modifier to it, bringing the count up to six again. I'll turn off relative offset. Turn on object, Offset. Click the eyedropper and select the empty. There we go. Now, if we select that empty it R and X. There it is. We can see it going there. Now, let's see where we need to put it. Um, I'm gonna go to the front view, but I'll press R and X awaken Rotated so and kind of line it up with that original tread. So I think something about like that. Um let me bring it back just a bit. Lips are X. I'm gonna go with that. There we go. I think that looks pretty good. Let's try it. We can always adjust it a little bit more once we've added more of the count to it. So let's select that tread. And over here in the array, let's increased the count all the way around. I think we had 36 the last time would see how we do here. There's 36 it comes out being just a little bit off. So let's go back to that empty hit are in X and I'll try and match this up. Yeah, there we go. There we go. That worked pretty well. Okay, so there we have our treads. Now, I think we just need to do some adjusting here, so I'll select the original treads. And I think I'd like to apply the shrink wrap. I think we have it in the right place in terms of how far out from the tire it should be. So I'll click. Apply there, and then this Solidify. I think we can apply this. We've got Onley rim turned on. So I'm gonna take this to the top of this stack and click. Apply here now, free tab into edit mode and go to edge mode. I can select that edge right underneath here and begin pulling this inner out like this. So let's go to that front view. And if I pull this out some, maybe I can also pull this out of bed like this and then go to the side view and maybe we can pull it in just a bit like this, so I'm just trying to get it to kind of blend in with the tire there. Yeah, something like that. And then let's do the same thing over on the other side. If I selected the other side and tab into edit mode, there it is. So let's go ahead and apply that shrink wrap and will apply this solidify and we'll tab into edit mode and select that edge there inside the tire and pull that out. I'll go to the front of you and will pull it out. So it's more in line with the edge of the tire there. Monogrammed this one and pull this out like that. All right, Now we can pull that back, maybe bring it in. So I'm just trying to blend it in with the tire here, that's all. All right, I think that's looking pretty good. Let's now bring back the vehicle. Maine here and take a look at it. Yeah, that looks pretty good. Now, one last thing before I apply the array modifier. I'd like to take this edge right here, and let's bevel that I'd like to press control, be Let's just pull out level that and a couple of segments there. Just toe round that out of bed. And let's try over here. This just looks a little bit too sharp for me. Let's do this one over here. And a bevel there too. There we go. Yeah, I think that works pretty well. Let's now combine all of these into one object so we can place it for the other tires. So we need to first apply the arrays. Let's apply this one and apply this one here. Then let's select both of those treads there and the tire and press control Jay to join them together then will come down to the object data and turn on auto smooth. And if we bring it up to about Oh, I don't know, 30 to 35 in there. That looks pretty good. Yeah, I think that looks OK. Um, in here, I feel like I kind of want to put a ah, sharp edge right along in here. Let's say control E. Mark Sharp would see how that looks. Yeah, I think that helped there. Okay. And so now this is all one object, right? Well, not yet, because we have to join it with the wheels. So with the tire selected oven, select the wheel and let's press control J there. Now we may need to play with the auto smooth again. Let's bring this down. So if we adjust this smoothness over here, the angle we really can't get it the way we want it for both the tire and the wheel when it's all one object. So that's fine. We can We can just take the wheel and split it back out, or I can just undo it. There we go. So what I can do now is move these in conjunction with each other to the other parts of the vehicle. Let me select this empty and delete it, and I'll grab this empty and delete it. We can clean that up a bit now. What let's do is take these two objects here and let's move the cursor to the center of the grid with shift s one. Now we need to move the origins of these to the three d cursor salt, go to objects, set origin, origin to three D cursor. And then if we add a mirror modifier. So we do that we have the wheel. Let's select the tire and modifier mirror, and we have the tire over there as well. So let's grab that temporary wheel and delete it. There we go now Weaken. Take Ah, this tire and this wheel. Let's go to the wire frame and let's just duplicated and move it over here. So shifty. Why? And I'll just drag it over. But it right in here. Let's get rid of those temporary ones Year delete year and delete this one, too. There we go. Yes. Oh, that looks pretty good, I think, as we ah, texture these they're going to look pretty cool with all the treads. Now, one last thing we could do is take this and duplicated and put it on the back. If we go over and take a look at, ah, one of the back views. Oh, let's take a look at this one here. Yeah, we have it on the back. So to do that, let's grab the tire in the wheel. Let's duplicate it and bring it out here like this. Let's take the mirror modifier offer there for the wheel and the tire. Let's move the pivot point or the origin back to the center of these guys. I'll select both of them and go to object set origin and I'm gonna try Ault. Click Origin to geometry. Let's try that now. If we select the tire and the wheel, the origin has been moved to the center of each of the parts. So let's select this and let's turn it Ah, in the Z axis rz 90 and we go and let's move it up into place. So maybe if I go to the top view, I can see it here and move it right to there. And ah, let's take a look at it in the side view. Let's move this up to there. How's that look? Yeah, that looks pretty good. Actually, it looks like it's spun around, so let's grab both of these objects and spin it around in the Z axis. Let's press rz 180 like that and see how that works. So in the next video, what let's do is let's begin working on building up the underneath part of the vehicle to kind of fill in the space while not adding a massive amount of polygons
44. 042 Filling In Underneath the Vehicle: Well since the last video. I was looking at a few other of the reference images and I found this one here and you can see that that center of the tire is hollow. That wheel is hollow there, So I really need to kind of clean that up over here. We don't need all of these bolts and polygons here on this side of the tire, so let's go in and clean this up. What we can do is we can actually isolate this. Hit the division key on the NUM pad, and that will isolate that. We've got a few other things here, but that's okay. I'll just crab thes blitz. Um, figure out how many we need to delete out of here. I'll go to face mode, hit the Sea Key, and I'll circle selected these and then I'll press control plus and will expand our selection out to I don't know to about here. I'll go all the way out to that outer edge and let's delete those. And then for all the bolts, what we could do. Well, I'll tell you what. Let's do. Let's select all of this and all of this right and Then let's just invert the selection, less press control. I And now we've just selected all the bolts, so it it x and delete faces there as well. Then I think what we could do is delete this part here with Seiki and Control Plus and expand that out to there. And let's delete those faces as well. Now, if we go to the edge select, you can pull this out. And then I think we just need to bridge these edge loops together. So let's select this edge and all shift. Click this edge and then press control e and will bridge edge loops. There we go. So now we've got these connected. Um, I feel like we need to do it a little bit more with smoothing here. Let's make sure that it's all smooth out. Select shade smooth there. Yeah, it's all smooth. So let's just drag up a bit for the auto Smooth and we clean that up some, but I also want this kind of an edge. So maybe let some tab into edit mode and select this edge and this edge and let's press control e and will mark those is sharp. There we go. Yeah, let's try that. OK, so now let's hit that division key on the num pad to bring everything else back. And now we've got that hollow wheel for the back tire. Yeah, so that's I think that will work pretty well. Now, let's talk about underneath here. We need to start filling in some of this area so it isn't just empty under here, but we don't have enough information into the reference images to really know what's going on there. And we don't really want toe devote a lot of polygons to it either. Generally speaking, this car is gonna be seen from up here as we drive around in our game. Um, it may flip over every once in a while if we go over rough terrain. But generally speaking, it's gonna be seen from above, and the bottom really isn't gonna be that important. But we do need to fill in here. Eso Let's begin doing that. So let's find a reference image that we can, um, use here. It looks like this one here gives us a pretty good view of underneath the front fender. Let's press control space bar and enlarge this so there's a lot going on under here. It's true. And we're gonna I would like to put in these big spring shock absorbers in there. I think those are pretty cool. So we'll work on those pretty soon. But for now, I think I just like to put some blocks underneath here just to fill in. Um, and then this kind of a plate here. I like this plate with a little turned lip there at the bottom. So let's see if we can work on those press control space bar again. Toe, bring that back to its normal size. And I guess what? We should do it. Just go ahead and create a cube. Let's just begin with the Cube and to see what we can do with it. I'll, uh, scale this down and let's bring it up into here. Um, underneath here. So it looks to me like it's gonna want to be about up to here. See this right here. That kind of looks like it where it should be right there. Um, if we tap into edit mode and go to face node weaken, select this face, maybe and then we could border select thes points and bring these up like that to kind of have them underneath there like that. So we still have this visible. We don't want that visible. So if we select that edge and maybe bring it down just a bit, Okay. Now let's see what else we need to do here. I think this whole part could come back. So if we go toe vertex mode and selected these, maybe we could bring this whole part back like this. Maybe line it up with this right here and let's add an edge loop in here and bring these points back like this. And then maybe we could take thes points and bring them back like that. Let's try this. Something like that. So we're getting some coverage in there. Let's take a look at it. Yes. So we're getting a bit of coverage in there. That's good. Um, it looks like we could maybe scale it out a little bit more. I'll press s and X and kind of bring him out just a bit. I also think we should extrude out to get this piece. I kind of want to fill in here a solid block in here Um Before we do that, let's go ahead and split this in half so we can add a mirror modifier to it. Oh, added edge, loop down the center. And then let's go into face mode and I'll press all Z to see it. And then B for Border Select and select that whole side there. Delete those faces and then let's go ahead and add a mirror modifier to it right here, okay, and I'll turn on clipping as well. Now, whatever we do on one side will happen on the other. So if we come in here and add an edge loop se right in here, let's Ah, click. That's it, E and f And then we can kind of change how this looks. It isn't really going flat because neither of the edges on either side of it are exactly flat. But that's okay. We can work with that. I'll bring it to about right here, and then let's grab these points and I'll just bring these down a bit like this. There we go. Now we congrats on that face right there that we just created. And let's extrude this out in the X Axis e And I'm just gonna pull straight out like this until it meets with that fender right there. Just so it fills in there. That's what we want. Okay, it looks like I went a little bit too far. We could maybe angle it up here. Let's try that tab and edit mode. Grab that edge and let's see if we can angle it in. There we go. Okay, so I think that's gonna help fill that area in a bit. Let's now work on this panel right here. Um, that looks to me like just a polygon plane. Let's begin with that mesh plain. And then let's turn it in the X axis Rx 90 and I'll scale it down with the s key. And let's just move it up here and into place and see if we can arrange its point so that it kind of fits the shape we need here, Um, me Bring it over here, bring it forward a bit. And let's bring it up into here like that. And then what we need to do is let's tab into edit mode and grab this edge, and I'm gonna bring this edge down now what we should do is just kind of bring this back. So it has kind of a similar angle. Here is this piece like this and we go and I think we're gonna have toe move that top piece up that top part up. So let's go to Vertex mode and up here. It's all the way up here. I mean, grab this and move this forward here and we go. All right? So let's take a look at this. I'm just trying to get that panel in there, so it's kind of in the right place angle just bit. And then I could grab that point and bring it down. Kind of have it be in line with this angle here, right? So we've kind of put it in place like that. Now, what we need to do is get this little turn, this little edge or lip right here. So what I'll do is I'm gonna change to local transformation, and I'll grab that edge and that's not aligning with the edge. So let's try normal. There we go. Now what? We've got our move gizmo aligned to the angle of the edge there. So let's pull that down just a bit. And then let's hit E and I'm gonna press enter now. We need to go back to our global and pull it back like that, right? Pull it back along the bottom of the vehicle there. All right, so now we have that turn in there. Let's go ahead and add a solidify modifier to it. Come over here and click. Add modifier, Solidify. And it's not doing a whole lot, which tells us what we need to apply our scale. There we go. That's good. Let's click on even thickness, and I'll bring the thickness down a bit like that. All right, so now we've got that. Let's move that pivot point into the center of the grid. Object said Origin. Origin to three D cursor. And let's add a mirror modifier. There we go. So now we've got that piece over there as well. All right, so the next thing we need to do is think about filling in the back here. Let's see if we can, um, figure out how to do that. Let's hit the three key and, well, it looks like we could fill in right down here. Well, let's come over here and take a look. Oh, that's the toolbox. We don't want to deal with that. Let me select that centerpiece and it looks like it's extended all the way out here. So if we tap into edit mode and go to face mode, if we select that and I'll change back to global transformation, maybe if I just bring this all the way down to here like this, how does that work? That's kind of close it off pretty tight. That so that's gonna help us just fill in that space. Um, it's gonna be hard to tell at this point in time how good that is until we get other parts in there. And since I mentioned those springs, why don't we do that next and put those in and then see what other things we need to fill in because I think those, once they're in, are going to be pretty interesting. In other words, draw your attention to them. There's here's a pretty good image of it right in there, so let's work on those next and then we'll place them and see what else we need to add
45. 043 Creating a Spring for the Shock Absorbers: before we create thes springs. Let's do a little bit of housekeeping here. I think. First of all, I want to take thes tires and wheels. Let's just select these and we'll create a whole new scene collection for these guys. Let's ah, right click up here in Click New Collection and we'll have toe re select those to bring those in. So let's say wheels. And then let's get all of these guys and bring them up into the wheels. Seen collection right here. And also, um, these pieces here we created these to fill in on the front. Let's ah, drag these up into the vehicle. Maine as well. All right, so now we can go ahead and hide these. We'll just hide all of these here, select that scene collection. And now let's think about how we want to create that spring. And if you haven't guessed, the modifiers are a pretty powerful part of blender and and we can use another modifier that we haven't used yet to create thes. And just like when we used the array modifier, we're gonna need the actual thing we're going to apply the modifier to and an object to tell it how to modify, like the tire treads and the empty axis that we used in the center of the tire. So for this, we're going to use a screw modifier. And let's just create first of all, a mesh circle and this will be the actual round part that's spiraling up for our spring, and we need to change some of these here. We don't need 32 sides to this. Let's just do 12 and let's turn this so I'm gonna turn it in. The X Axis operas are x 90 and then I'm just gonna just move this to the side here. Now, this is the one we're going to apply thes screw modifier to. We also need something for it to twist around. So let's create just an edge for that to happen. So I'll press shift a and I'm gonna create a polygon plain. And once again, I'm gonna press Rx 90 to rotate that around the X axis. And then we'll tab into edit mode, will select these two points and will hit X and delete Virtus ease. And that leaves us with just a line right there. So we'll tap back into object mode, and I want to move the origin to that geometry. So I'll go to objects that origin origin to geometry. And now I want to put it right in the center here. So what I can do is press shift s and Aiken snapped this selection that line to the cursor . So I click this and there we go. So now it's right in the center. So we have two objects now, one we're gonna add the modifier to and the other we're gonna spin that circle around. So let's go ahead and add the modifier. Let's click, add modifier and screw right here. Now, just like before, we're gonna take this axis field and click on the eyedropper. And then we'll click on this one right here and you can see it did go around that object, but not quite in the way we'd want. Right? So what let's do is let's change the axis from Z toe. Why never getting something a little bit mawr like we want. Let's now play with some of these options and see if we can get it to look a little bit more like a spring so over here. Weaken, click and drag on the screw field right here. And that'll open that up event like that. That's good. That's what we want. Right? Um, how about iterations if we click and drag on that, Sure enough, we get several iterations there. Now, we kind of wanted to be a little bit thinner, right? It needs to be a thinner tubes. So there are a couple of ways to do that. One you can just in object mode hit s and scale this in, and that will make it thinner, but it also collapse it. Now, if we, however, tabbed into edit mode and selected that circle in edit mode and hit s, it'll reduce that radius that circumference, I should say individually, right? So we could maybe bring that down like, say, like this. And then we could take this the screw field and bring this down. Yeah, And then take the iterations up again, and we're beginning to get something kind of like that. So it just takes a little bit of playing with the settings here in the modifier to get it the way you want it. Um, let me tap back into edit mode. here. Oh, I'm still there. Let me shrink that wine. Need to shrink that down any I'm not. Let's try that. And then I'm just holding the shift key while I click and drag. Maybe something like that. Yeah, that actually doesn't look too bad. All right, so it's tab back into object mode. And if we think that that's what we want, You know, What I'm gonna do is I'm gonna add one more iteration under there. There we go. Something like that. Just in case. I need a little bit more now. I want to move this into place. I want to shrink it down, put it in place. But the origin of the object is right over here. And I don't think that would be really good to try and move it around. So let's move that origin to the three d cursor first. Let's do that. All right, So now what let's do is bring that vehicle back and maybe everything else and I'm gonna hit s and scale this down and let's see if we can put this in place here. So we're looking at We're looking at the front tire right here. Okay? So if we grab this and move it forward. Ah, that's not good. Look what Look what happens. So the problem is, is we're still just moving that individual circle that we created originally. And we need to apply the modifier so we can move it around as a whole unit. So let's go ahead and click. Apply here. And now if we click and drag on the why, we can move it all together there. All right. So I'm gonna move it over here, and it looks like it's really hard to tell here. Let's see if we can find another image. Let's look at this one. How does this look? Yeah, this looks a little bit better, so we can kind of see that that spring is near the bottom of the wheel there. It's not exactly in the center. All right, so if we move it up, say, let's move it up to right about here. And now let's shrink it down. It s and scale it down a bit, all right? I don't want it Toe overlap with the tire, okay? And it looks like we were gonna have to move this in a bit, and that's fine. We're always gonna have to be doing some sort of readjustment every time we add anything, and that's fine. That's to be expected. I'm gonna put this right in the center here, and I'm gonna hit s and scale this up. So it goes, I think, to the top of the tire, we're pretty close to it. To try that. That looks a little It looks a little too big. Scaled down a bit. All right, I'm gonna grab this and just maybe grab these two faces here and pull him in for right now to try this. So there we've got that shock absorber pretty much in place. That's that's not too bad. Maybe could be a little bit smaller. Let's try it. Yeah, something like that. Okay, so now we need to begin connecting this up. We need to begin building the pieces that's going to kind of hold it in place. And once again, we don't wanna fill this with a lot of detail. We just want to fill it with enough detail. That kind of tricks the eye into thinking there's things going on down there, You know that. We've got machinery and parts down there. So let's see what we can do by just kind of placing some of this. It looks like there's kind of this crossbar here. Let's let's work on that. Let's see if we can see that in the front view here. Yeah, it kind of looks like that's what it is right there. And we have that going to the bottom of the spring. So let's try this. Let's let's add a cube here and let's scale it down. Let's bring this up and maybe try and kind of put this right in here like this. All right? So I'm gonna tab into edit mode and add an edge right down the center. And then I'm gonna grab all the faces on one side and delete them. And then let's add a mirror modifier. Can we go? I'll turn on clipping. And now if we take this and move it out, it will also move on the other side as well. So let's kind of bring this up like this. And then I'm gonna hit e and click and G and kind of bring this down like that. Maybe I'll scale it down a bit. Snz kind of like that. And then let's bring it straight out E and X and straight out like this. Try that. All right, let's Ah, we're gonna have to bring that up and that's going to go right in the middle of the tires, isn't it? May go to the side view and kind of place it in the center of the tires like this. All right, take a look at it. Okay, so there's that first piece. I think that will work pretty well. Now. What let's do is let's get some of these other pieces in what's maybe add this plate right here. I'll press shift a and let's create a, um, let's create a polygon plane and I'll scale it down and we'll move it forward up into here and let's see if we can kind of get this. Oh, I don't know. It's let's go to the front view. I can see it right there. I think so. Let's just scale this in the X like Bess and, um, Then let's go ahead and create this right here. So I think we just grab that edge, go easy and bring it up. Actually, I'll bring it up to right here and then e and C again and we'll bring it up and then scale it in. So it goes like that. There we go. All right, then let's go ahead and give it a little bit of thickness with the solidify. Apply the scale, even thickness. And I'll bring that down a bit like that. There we go. So we've got that. Let's say right here, okay? So you can see what I'm doing. I'm just beginning to build piece by piece, some parts under here and just see how much we need before. We can just kind of fill in with blocks. And many of these blocks that air filling in are gonna be a dark color, almost black, so they don't really draw attention to themselves. All right, so what let's do in the next video is let's continue building this area out, but I could probably do is go ahead and duplicate this and move it over. Let's let's do that Shifty X, and I'll just drag this over and we'll put it kind of in here like this. Here we go. Let's just try that, All right, So in the next video, we'll build some more of these pieces and try and continue filling in
46. 044 Adding Details to the Front Axle: Let's add a few other things down here. Um, he can probably add these things right here. Those pieces air kind of prominent. I think we should do that. Um, and also, I like this piece here, this bar across here and these pieces here, I think those are nice details. Let's go ahead and work on those. So, for these pieces here, let's see if we can see them in the front view at all. Um, not really. No, we can't. We can see that main bar right up front here, and that's good. That will service well, but for these pieces, we're gonna have to just kind of wing it, I'm afraid. But that happens. Let's pull this plate out. It looks like thes things insert between that axle and that plate. So let's maybe, um pulled this plate out some like that to give us some room. And then what I think I'll do is just create a cube and let's bring it up and kind of put it in place so we can begin extruding these out. Something like this would get it pretty small. And, ah, maybe I'll scale in the why with s and y and kind of and get that about that size and then maybe expand that out just a bit. All right, so if we go back to that front view, it looks like we're gonna insert it just right here on the very edge, right? It looks like it's right aligned with the edge there. So let's get this May be right in here. Looks like I'll have to pull it back a bit. There we go. And in fact, it looks like I may have pulled that played out a little bit too much. Let's bring this back and put it about in here. And then let's take that plate and slide it back right into their okay. So now if we tab into edit mode for this guy and grab that face on top now let's think about how this should look. It appears like it goes up and then curves outward. So let's give that a try. Let's Ah, just kind of bring this up to here. Let's say maybe extruded and I wanna just bring it up with the G key and maybe rotated just a bit and let's scale it out. I don't want to make it any thicker in the why, but I do want to scale it in the exhibit. I believe S and exa scale that out a bit. Then let's hit extrude and I'll hit the G key and move this out like this. And then let's scale it out in the X again. And then let's extrude one more time. Let's pull it up into here. Let's scale on the X. Ah, the only thing I don't like about it is that, um I feel like that edge should be a little bit straighter. So let's just pull these out just a bit like this, Something like that. There we go. So I think that's kind of what we want in there. How far up that should go is anybody's guess. Um, we could probably take this whole piece and move it down a little bit Mawr to kind of fill in this area here, and we could bring these up to meet that. So let's try that. I will just grab this one edge and bring it in just a bit. All right, so we've got that in place. Let's now duplicated, shifty enter and let's merit on a merit in the X axis, So control him X and enter. And then I just want to slide this over and get it in the same place over on the other side here, like this. All right, so we have those in place. Let's also work on this bar here. I think that's probably pretty prominent in terms of everything that's going on here. It also looks to me like there's more going on down in here like beyond these things that we just created. So I'm not sure if we want to extrude down from here to kind of fill in, That might be a good thing to try. Let's let's at least try it and see. And as I said, this whole part of building this area down underneath the vehicle is something that you're just gonna have toe work with and test and try out and see what works. So it's tab into here and let me turn on this. There we go so we can see the edit cage on the other side and, ah, let's maybe put this right around in here and, um, grab this and I think we can just extrude down like this. Let's try this. Yeah, that kind of fills that area in a little bit better. I think it also looks like there's. As I said, there's some parts back here that we could maybe take this and just move them back. Let's duplicate and hit why and move them back like that. And that may work out okay like that. Well, let's try that. Let's see. Um, now this bar here, let's go ahead and create a cylinder here. And, um, we probably don't need 32. Let's go with 12 and I'll put a triangle fan on the caps. Let's turn it around. Why are y 90 and let's shrink it down and put this in place here so it looks like it's right right in here. We'll shrink that down. Let's extend it out in the X and where we going to go with it? That's Ah, looks like maybe out to here, you can see it may be here. Let's go out to about right here, and then we ought to grab it and move it forward. Let's do that. There it is. Move this forward and where do we move it forward to? Well, That's a good question. It looks like it's just beneath these pieces here, so maybe I could move it up right into right into here. Let's say Let's try that. We could smooth it. We could turn on auto. Smooth, increase that just a little bit. There we go. That looks pretty good. Um, Now these things, What are we gonna do with these? It looks like these are a couple of cylinders connected together with bridge edge loop. I think that's what it looks like. Let's let's give this a try. So before we do anything, let's ah, clean up a bit here because I wanna hide everything away. Let's take this guy this, um, edge that we used for the springs. Go ahead and delete that. We don't need that. And, um, out of all of this, look at all of this. We could probably hide all of this away. I'm gonna press the b Keown border. Select all of these parts here. I don't need that. Yeah, let's let's just grab all of these and dragged them up into the vehicle. Maine, Right up here. There we go. And so now we could hide these away. Let's go ahead and click on these and hide all that away. There we go. Now for those cylinders. Let's go ahead and create a cylinder here. We don't need anything for the cat, Phil. We could ah scale it down in the Z with Ethan's E maybe about like this. And then we need to create this smaller one here, right here. So let's Ah, press shift E and excellence. Move this forward now. I want to scale this down some. Let me go to the wire frame. I want to scale this down, but I do not want to scale it in the Z. So what I should do is press s shift Z to turn off the Z axis. And now if we scale it in like this, we get that though. Maybe something like this. Those look a little bit too thick. Let's scale them down like that. Now let's join them together. Controlled Jato, make them one object tab into edit mode. Now what I think I should do is let's insert to edge loops and then I'm gonna hit s and Z and scale them in the Z like this and the same thing over here snz and scale them up like this. So they're about the same width on each one. Then I want to grab these faces here and these faces here and I want to extrude them. I'll hit E and I'll hit Enter and then I want to scale them out without scaling in the Z again. So hit s shift Z And now we scale out in just the X and the y Like that. Try that. Let's do the same thing over here. Extrude Yes, Shift Z And I'm just going to scale that out like this. Okay, now what we could do Let's give this a try. We could ah select, say four faces over here four faces over here and we could bridge edge loops. Let's give this a try. I will press control e bridge edge loops To do that down here is well like this on and lips . Let's grab four faces down here. Let's bridge edge loops Control E bridge edge loops. Okay, now it's grab these edges right here like this and let's scale them out in the Why So s And why bring those out like that? Let's try that. Okay, so We've got that now, uh, the last thing we need. I think we need to fill in these pieces, don't we? We need toe go to edge mode and all to click and all shift Click that control E bridge edge loops. Same thing over here. And I better do him down here to just to clean him up. And lastly, I like the little edge around here. So what I could do is maybe take this edge here. I'm gonna add an edge loop right around here, and I'm gonna selective those faces and just extrude straight up like that. Here we go. So I've got that little bit of an edge there on the top. Okay, so now let's go ahead and select it and will smooth it here. We'll turn on auto smooth and will drag up a bit, see where it smooths out of it. Yeah, that'll work. Okay. Also, I'm gonna move the, um, pivot point into the three d cursor there. Let's go ahead and do that. So that pivot point is there for the object. Let's, um, bring everything back. Let's bring it forward. We need to spend it in two directions. So Let's, um, spinning in the x r x 90 and then will spend it in the Z our Z 90 Let's go the other way. Rz negative 90 like that and let's scale it down. And then what we can do It's come over here and select this one point right in here and we go and move that cursor to it with a shift s too. Then I can grab this and I can pop this object to that three d cursor. So let's press shift s eight and there it is. Now we can ah scale this down quite a bit. I could even move it out some, I think, Let's go ahead and move it out and put it right up against there. There we go. And then we could rotate it down just a bit. So our X and I'll just rotate it down like this. Move that cursor back to the center, and then we can take this and duplicate it and mirror it so shifty. Enter control M X and let's move it over here and put it in place over here. So, in the next video, let's go ahead and work on adding some more details up here around the front axle
47. 045 Adding Detail to the Front Bumper: Let's take a look at what other kind of details we can add to the front were already building it up pretty well. It's beginning to look fairly detailed, at least from a distance there, but I think there's more connecting pieces we should add. And what I mean by that. Any press control space bar. And let's take a look at this full screen here. I feel like there's more that weaken do with this this, um, dual cylinder piece that we created some time ago like it goes back. We could maybe extruded back into the bumper here and also give it a connection. So it has some sort of ah, loop or bracket connecting to that tube. You can see it over here. I feel like we need that. In addition, there's this piece here, and this also seems to connect with that Borras. Well, so just some connecting pieces. So that bar isn't just floating out in space. In addition, I think, I don't know. Maybe this right here, I think, is a nice connecting piece in that it kind of grounds this piece to that part of the bumper as well. There's, of course, lots of things we could add here, but I don't want to just go ahead and add a bunch of things that we don't need. I want to just add it piece by piece and see if we have enough visual interest to call it good enough and and move on because we're still having to think about Polly. Count here. All right, well, it's see what we can do here. I think also, actually, now that I look at it, that piece we've extruded down here isn't quite in line with the other parts of the cab here. So let's let's before we go any further in the front, let's just fix this. And as I said, this happens. You're going to try and fill in one space and then have to adjust to connect it to another part. So let's just grab this edge and move it in. So it's kind of in line with this edge right here, and then maybe I should go ahead and add an edge loop in here. Grab that edge and let's then move this in and move it up so it kind of mirrors that angle there, something like that. So you see, what I'm doing is I'm just tryingto fill in the space in some areas trying to do it without drawing attention to it. And in other areas, like up here in the front. We do wanna have the visual detail that draws the eye. So we're kind of balancing the two things here. Ah, let me grab this and just move it down. Just a smidge. Since we moved this in to make room for the shock absorber here, I feel like we've split it apart from this panel. This panel by recall needs to go all the way in. So I'll click this edge and and push this in like that all the way in there. And now we've gotta readjust these. So you see what I mean? It's just kind of a constant filling in reconnecting, re adjusting here. So I'm gonna pull this down about like that, and then maybe this one here we can Ah, yeah. We can pull this back up like that to kind of get it in line. There we go. Yeah, so that kind of fills in and connects that part there. Yeah, so we'll just keep doing that as we go building out the details, filling in where we need to. So let's work on this piece right here. I think that's this. And I'm gonna go ahead and work on this side since we're viewing it from this side in the reference image, and then we can just duplicate it and move it over. So it looks to me like if we grabbed faces on the back back here, I think we could then just pull back or even extrude. Let's try it. I'm gonna grab these right here and let's just pull back like this, something like that. It's kind of even these out of it. And then what we should do is try and extrude back, I think, or at least pull back. Let's see if we can. Maybe I'll just pull back. I'll graham thes faces in here like this and this and this, and let's just try and pull back into the bumper there. So there it is in there. It's kind of ugly, but that's okay. I'll select all of these faces and delete them because we don't need them since they're going to be unseen in there and ah, I'll just grab this edge and maybe pull it up just a bit. So it kind of completes the shape there. So that's what I'm trying to do There. You can see it just kind of goes into the bumper. It's what I'm trying to get. Although now that I look at it, it also looks like all of these pullout as well. And then that's where the bracket comes down from. Well, let's give this a try. So what I'm gonna do now is grab faces and we'll extrude out of here, here and here. And let's try and extrude out of here. Me, Ah, Pit E. And then I'm gonna drag back in the UAE. And let's do that in the mail. Press s wide flatten them up a bit like that. There we go. So I think I just wanna pull those back into here. There we go. And maybe I'll grab that edge right there, right in here and pull it down. So yours may be a little bit different than what I'm doing here, and that's fine. What we're doing is we're just trying to figure out how to fill the space, how to connect the objects. So one we don't have empty spaces. And two, we don't have objects just kind of hanging out in space. All right, so now that I've got this part, it looks like I shouldn't have it intersecting with that pole quite as much as I do, but I don't think that matters. Let me see what we can do. Here. Grab that. I don't think I mind that, actually, um, yeah, I don't think I really mind that we could We could just move these up a bit. But generally speaking, I think that's OK. There we go. Okay. Now, what let's do is just create a little bracket right there underneath that. To do that, we could ah, be kind of clever here and grab this thing. And let's just use the polygons of this to create that bracket. Let's just all click this and press shift D and X and will move it around over here, so we're gonna kind of cheat a bit better. Well, it s and X and kinda bring that in. And then let's split it out as its own object. All kind of scale it up just a bit before I do something like that, And then let's go ahead and hit P and choose separate by selection. Now it's its own object and we can select it. I can tab into edit mode and take a look at some of these faces here. I don't think we need these faces inside here. I can delete those, and then we could maybe grab an edge or two and move them around. Although let's take a look at it. I don't know that we need to. We can move that up a bit. Yeah, I move it forward, Maybe take this edge here and move that in like that. So it just kind of connects up. And then we could add a solidify modifier to it. Control a scale, even thickness, and we'll just reduce the thickness just a bit there. There we go. Let's combine it with this object here, but before we do that, we need to go ahead and apply that modifier. I'll just click, apply over here and then select that and control J. And that'll add that to that object. Now, let's go ahead and just duplicate this over to the other side. What we can do is just delete this and then grab this duplicated and hit enter. And then if we hit the n key, we can come over here and just change location in the X. So currently it's a negative number. Aiken. Take away that negative there and hit Enter, and that'll pop that over to the other side of the X axis. So this is yet another reason why it's important, I think, to model around the center of the grid. There are just so many helpful things that you can do like this and using the mirror modifier, etcetera. It just makes sense to model your objects around the center of the grid. Okay, so we've got that in there. What let's do now is add this little piece. I just feel like this is a nice connecting piece right there. Let's let's try and add that real quick. I'm gonna tab into edit mode and just select that face and move the cursor with Shift us, too. And then let's go ahead and create a cylinder real quick cylinder. I'll take the sides down to 12 and I'm gonna reduce the size of it here. While I'm in the settings, I'll change the radius 2.1, and I'll change the depth toe point one as well. And so we have this. It's just a little more manageable. And I'll change the cap. Phil to triangle fan. Okay, so now let's press. Ah, are Y 90 I'll scale it down, and I'm trying to get this thing right there. Can we see it over on the other side? Yeah, that thing right there. Ah, I'll scale it down. I want to Ah, create this little piece. Orvis. It'll part that's expanding on the back there, just like we've done before. I'm gonna select four faces here and hit e. And I'll just pull straight out, um, off latinum with s. And why, Oh, scale them up in the Z like this from that, I'll delete them here because we don't need those. And then I'll just slide this back in like this. Now it's even get this the right width with S and X. And then let's put it in place about like this. Yeah, it looks like it really should come out. Let's take these two. Well, I don't want to really pull him out because I've got those braces, so I'll go ahead and just scale this down just a little bit. And let's bring it out. I'm gonna go to the wire frame in the side of you, and let's kind of put it like this. And maybe we could take this whole thing and move it back. Just a smidge like this, right? And then that gives us a little bit more room for this guy. Okay, Now, let's put a bolt on there. So to put a bolt on there, I don't wanna have to make another one. I could actually come over here and steal one off of this, couldn't I? Me tab into edit mode, and I'll press the l key and grab these two duplicated. I'll move it out just a bit. I'll press the peaky and separated. Now, if we tap back into object mode, there it is. I can move the origin back to the geometry. And when I do, I realized there's a mirror modifier on it. So let's take the mirror modifier off and there it is. All right, so let's move it up, and I'm gonna look at it from the side view here, and let's kind of move it into place right up here. And then let's go to the front, you and move it into place over here. Like this. Right? So we're getting that bolt right there. And then what let's do is duplicated. Spend it in the Z axis rz? No, we want ah, rz 1 80 And then let's bring it over here. So there we have a bolt on either side. I could maybe grab this one here and move it in a bit like that. And let's ah, take this and this and this, and let's go ahead and join them together with control J. And let's make sure smoothing is on. There we go. Yes. So we've got those in there now. I feel like these bolts could be a little bit smaller. Let's do that real quick like that. I just want him a little bit smaller like that. There we go. All right, move that cursor back. And so now we could Dio is put that over on the other side as well. So let's take that whole object and duplicated and move it over. We're gonna need to do some spinning around here. So first of all it spend it in the Z our Z 1 80 and then let's spin it around. Ah, the X axis our x 1 80 And we can do that. Now Let's put it in place. Oh, no. I need to spend it around in the Why let me do that. Are why 1 80? There we go. Now let's put it in place like here, and then I'll take this and yeah, let's just move that in just a little bit like that. There we go. Okay, so we've got those connecting now, those pieces connecting to each other. I still want to make a bracket or something here that connects to that polled or or that bar. But I think we're getting pretty close. I think if we add that we've got a nice amount of detail in there, let's add that and take another look at it and see where we are.
48. 046 More Detail to the Front and Side: All right, let's add a couple more connecting pieces. In addition, I realized I haven't put any connecting pieces over here, So this step is kind of floating out in the middle of nowhere. So we need to put some things coming out of the cab onto this. I don't know if we can see them here. Yeah, these pieces right there. So I need to add those. There's always something, isn't there? All right, let's go back to the front here, and I'd like to do this, and I don't want to get all this detail. I don't need all that detail. I just need something to connect right in here. So I think what I'm gonna do is just create a cube first and and then scaled down and let's bring it forward. And ah, I think what I want to do is just scale it in the X, make it pretty thin. So it's about this thick here. And then what I want to do is delete some of the faces here and then add a solidify modifier. So what I mean by that is I'm gonna delete these faces here, right there And then what? I'll do is I'll add a solidify modifier to that once I get everything in place because, as we've seen it, sometimes just easier to get the shape you want when you're just dealing with a two dimensional object, just a flat plane type of thing. So let's put this kind of where we want it looks like it's Ah, let me scale it down. Kind of put it on top of here like this and we will put a bracket coming off of this as well. It looks like it's kind of over this way. Maybe a scale it back out a bit. Yeah, So it's something like this, and it looks like it should connect back up. Well, it's grab this and kind of move it forward. So it connects into their and we'll grab this one here, a press all dizzy and grab this and let's ah, move this one forward as well. Like that. So they're kind of angled. It looks like this is kind of angled. Will, we'll see. Um all right, so we've got that in place. Let's just call that good for now. Let's go ahead and add a solidify modifier. I will press control a and apply to scale. And then let's come over here and click on Solidify, even thickness and that all pull this back just a bit like that. Let's try that. So that's kind of what I wanted. Ah, let's go ahead and apply this click apply. And then I feel like maybe I should drag this up if you like. We need more meat to this or more. Ah, uh, thickness. And I think I just like to hit the g key and move this up a bit. So they're kind of even like Pat. Let's try that. Yeah. So it just has mawr thickness on the bottom there. And then I think we could just grab this guy that, um, bracket that we created here. We could just grab that duplicated and move it in the x axis. Bring it over here, and then let's split it out with the peaky and choose to separate by selection. There we go. Now we need Teoh. Connect it to that bracket. So what let's do is maybe move that origin, um, to this piece right here. Set origin, origin to geometry. There we go. And then what? Let's do is maybe just spin it around in the x o r X, and I'll just kind of turn it like this so we can get it connecting a little bit better. So maybe if I slick this and let's move it up like that and weaken, delete that from inside there. And, ah, there's this one here. We can move that one up like that and delete that from inside because we don't need those. Okay, so yeah, I think really, That's kind of all we need. I just needed something kind of in their toe. Fill that space toe. Give a sense that it's being connected. Let's join these two together ups. Let's grab that and this. Okay, Controlled J. There we go. And it looks like we may need to play with the smoothing a bit and also this right here. Let me select this and just move it forward a bit. There we go. And then the smoothing Well, let's come over here and turn on auto smooth. And then let's drag that up just a bit to clean that up. There we go. Okay, Now let's grab this and let's move it over to the other side. Once again, we can duplicate it and hit Enter, and then we can maybe come over here to the X location field and take away the negative sign. Let's just do that. And it should pop over to the other side there. Okay, so we've got those pieces in. Yeah, I just feel like that's kind of a nice collection of things in there to say. There's things going on in there, but we don't really need to see exactly what they are. Um, let's take a look. Is there more that we could do? I may want to do one of these loops here. I'm not sure if we need it. There's more going on up here. Ah, One thing I am interested in is this right here. I feel like that could be a nice piece to add right in here. It looks like I don't know if I want to cut that, but I think that little piece right there could help connect these two and fill that space . So let's just work on that real quick. Um, I think what we need is a cube. I'll just grab that a cube will scale it down pull it out front here. Let's scale it in the Z. I'll scale it in the Why with s and why. There we go. And then let's create these two little pieces going up. I think all we need to do is add some edge loops. We can maybe add four edge loops here like this. And then maybe we could grab this edge and this edge and we could scale them in in the X like this. And maybe we could take all of these then and scale them out in the X just a bit like that . There we go then. I think all I need to do is grab these two faces here and let's just extrude straight up like that, right? So we're just getting that piece in there. That's all we want to do. Let's go to the front of you and I'll scale it down. Let's move it up here and let's try and put this Oh, somewhere around in here, maybe You think that's kind of it Looks like it goes just to the edge of that front grille . So maybe something like this, and of course we need to move it in Let's do that, grab that and move it in. It looks like we can see it right in here. Let's move it in right there, all right. And then let's move it over to the other side, just like we've done before. Let's ah, duplicated and let's take the negative sign away and there we go. All right, so those were just very simple pieces that we can put in there. Maybe I'll move them forward just a bit like this. We don't want out too far, and I think we're also gonna need to put a rim or a lip on this underneath. We may even have to add a solidify modifier to the whole thing because they're going to be times when we may actually see up underneath here. Um, like if the car flips over or something, so we'll have to look at how much geometry that's going to add. All right, let's add some very basic pieces like we did here. Let's let's add those over on this side here. We just need these pieces. There's more detail in here than I want to deal with. All I want is just, say, a cube, scaled and placed in here just to connect that. That's all we need. So I'm going to go ahead and create a cube and scale it down and ah, here all scale it in the why with S and y and then in the X axis like this. And then let's scale it down and put this in places. Well, just once again, trying to connect the pieces, make sure they're not just floating out in space. So we'll move that here and let's move it into place. Oh, I think it needs to connect up in here like this. This and we want it to looks like it connects to the very back of that post right in here like that. And then it also goes up into the back of the step. So maybe if I grab this face here and let's move it up and ended there, let's go ahead and delete that we don't need that. And then this edge back here, I feel like we may be able just to angle this like this, so it stays in line with that tube right there. Let's try this. So I'm gonna go ahead and just take that and duplicate this for the other two. Duplicate, shifty why? And move it over here. So I think that's all we need for those. We may need to grab these now and join them with this actual step here, so I'll select that, and it looks like all of that is already mirrored over. So if I add these new objects to that object control J, it should then mirror them over to the other side here. Yep. So that's good. All right, Well, what other details do you think we should put in? I mean, there's so much to do in here, but I think what let's do next is instead of adding more detailed down here, let's come up and add some detail for the headlights will create the main headlights and this and maybe these pieces on the side, and try and get some or visual detail visual interest here in the front and see if that'll maybe be enough for us to then, ah, move on to the back of the vehicle.
49. 047 Modeling the Headlights: for the headlights. I think all we need is a couple of cylinders here. We can see him here. If we tap into edit mode for the hood and select this face here, we can move that cursor to it with Shift s too. And then let's go ahead and just create a cylinder right here. I will take it down, Teoh. Let's take it down to 24 Vergis ease and I'll go ahead and type in 240.1 and 0.2 here just to shrink it down a bit. Now, I could leave it here as an in gun just while we're doing the modeling. So if I pull this out a bit and let's hit our X 90 determine it. I can get rid of this one face back here. This in gone right there. Delete faces. And, ah, I could scale this in in the why s and why bring that in like this, Then what let's do is go ahead and begin extruding in. So I'll select that one face and I'll hit I and inset in just a bit like this. Then e and pull out and then I and push in. He and pushing like that. And I'm just getting that rim around the headlight there. And then if we press e and pull out, I'll go ahead and scale in quite a bit and e and pull out just a little bit and scale in. And then I'll go ahead and press E and enter and then merge all those points together with Ault em and choose at center. There we go. So that brings all those points together there. And maybe I could move that out just a little bit like that. So that's generally the shape we want. Let's go ahead and smooth it shades smooth, will turn on auto smooth over here. Yeah, that's doing pretty well. Okay, Um, I might also want to put an edge on the back here, let me do that. All click that edge and then hit e and then I'll hit s and scale in. And then I think I want to just grab this edge and press control be and just bevel that in just a bit. Although it doesn't look like the scale has been applied. Let's go back to object mode and apply the scale with control A and Then let's bevel that. There we go. That looks a little bit better. I just wanted that. They're just appears to be a curve there at the back. And I just wanted to be ableto get that. Yeah, something like that. In addition, we could maybe put a curve right here is. Well, while we're at it, let's try that. Okay, So now let's go ahead and take it back and try and fitted in there. Put it in place. I'll scale it down and, ah, maybe something like this. I think we'll have to angle it a bit because if we bring it back like this, it's gonna intersect there at the top before anything else and over here on the side. So let's press rz and turn it a bit like this. And then, ah, maybe we could also turn it in the X as well. It's just hit our X and tilt it just a little bit like that. Let's see how that works And let's bring it in. Yeah, let me turn it in the X a little bit more. There we go. Something like that. All right, So with that there, let's go ahead and move the cursor to the center of the grid with Shift s one. And let's move that origin to the three d cursor. And let's give it a mirror modifier. Here we go, and we're not getting it mirrored over, which means what probably need to apply the rotation, right? So let's press control a and rotation, and sure enough, there it is. Okay, so we have our headlights in. Let's try and work on these things here. Let's begin again with a cylinder shift, a mesh cylinder, and we should have everything pretty much in line over here in the settings. Let's press are X 90 and spin it and then let's bring it out here. I'll get rid of that back face here, and then let's go ahead and hit S and Y and scale that in a bit. Now this has got a little bit more of, ah, elongated shape here, so let's see if we can work on that. I think what let's do is maybe going to a wire frame first and tab into edit mode, and let's just border select these points at the bottom, and let's use a proportional editing tool that okey. Let's turn on the proportional editing tool with, Oh, right up here. And then I'm just gonna move down in the Z. So gz and we can see the area of influence here. Let's kind of move it down to here and then maybe scrolling in a bit or scrolling out, we can get chest kind of an elongated shape there like that. I'll turn off the proportional editing tool with the okey again and I'll bring those two points down just a little bit further. Something like that. Let's let's see how that works. Okay, so we've got that. Let's go ahead and select this face here and I'm gonna press control a and apply to scale cause I want to inset this. I want to hit the I key and inset about like this. And then what I want to do is flatten up these edges here. So maybe this one and I'll press control click, and that will extend that selection on. So there we go. Something like that. Now let's flatten these with S and Z, and I'll just flatten him like that and then bring them up here like this. So maybe something like this. Let's try this right about here and then Snx to scale out just a little bit. And there we go. So now we've got that basic outline that we can then take this now and extruded end hit E and push in, and then I'll begin doing the little yellow part there. So let's hit I and kind of scale in a bit or inset in and maybe pull out just a bit like that. Maybe we don't need it that big. Nothing like that. Yeah. All right. So let's go ahead and put this in place. Now, let's just hit G and move it over here and scale it down until it's about the right shape or size. Maybe something like this. Yeah, maybe a little bit smaller. Let's try that. Yeah, and we go Never gonna have toe bring it all the way in. So let's take it into here at that period. Keep zoom in and let's see how much we're gonna have to spend this There is just intersecting with it there. So let's hit Ah, rz And spend this around like this, Okay? And then, um, the X axis is well our x and maybe tilted just a bit like that and let's see how it's going to intersect there. Not too bad. I mean, just tilted a bit like this. We'll see how that works. All right, so we've got those too in place. Once again, I'll move that origin to the three D cursor and let's Adam mirror modifier to it. Or I could just add it to this object here. Why don't I do that? I'll shift, click this headlight and then press controlled J. And that'll pop that over to the other side there. All right, so we've got our headlights. I'm thinking that I'd like to maybe work a little bit on the hood again. Now that we've got these in, it's drawing more attention for me to the fact that the housing for the headlights isn't curved like that. We've got these sharp edges on the corners and here they're more curved, and I feel like I'd like Teoh work on that just a bit. And if I work on that just a bit, I feel like I've gotta work on some of these edges up here on the hood. We're now getting to the point where I think that's, um reasonable to go ahead and add that. So let's see how it works. First of all, I'll select the hood and tap into edit mode. And if we go to edge mode, let's select this edge right here and all to shift. Click this ed right there and then let's press control be and just pull out just a little bit and I've got four segments in here. Maybe let's take it down to three and let's see how that looks. Actually, that doesn't look too bad. I feel like we might be able to actually remove an edge right here. Let's just try this and see. Dissolve edges, and that helps clean that up just a little bit. In addition, we could come up here and select this edge right here, and we could try and bevel this edge. Let's give this a try. Control be pull out right here. There we go. Yeah, those I think those help, um, and lastly, let's take a look at the inside of this headlight housing. So let's go here year here and select this edge here. And then let's press control be and pull these out as well kind of like this. And then maybe we ought to go ahead and add another edge in there like that. So you have those housings are a little bit more rounded there. And now that I've done that, I'm looking at these grills here and those air pretty much the same kind of thing. So let's go ahead and grab those. So now we're to the point as I as I mentioned a long time ago, we're kind of beginning Teoh see the whole thing and realize what it needs in terms of extra details. And so I think these little extra details could help kind of attract the eye and be and really add to, ah, overall detail. So let's grab these now and you see how these air kind of curved belong. The grill. Here, Let's try this control be And let's pull these out like this. Yeah, something like that. There we go. Yeah, I think that helps. I think those just overall help sell that. There's, you know, detail there. I think that could work. All right, Well, before we do any more around here on the side or anything in the next video, let's go ahead and work on the back of the vehicle. Try and do a similar thing. Kind of fill in back here, see what we need. And then we'll take a look, see where we are. And from there we may move up and work on the machine gun up on top. So we're getting close. We'll keep at it.
50. 048 Finishing Up the Front Undercarriage: Well, I may have gotten a little head of myself when I said we could move to the back here. I think there's still a couple more things we should do up front. And one of them is this spring, the springs here, just kind of floating out in nowhere. They're not really grounded to anything. So I think what I'd like to do is work on this. I'm gonna move this over a little bit. So it's right up next to the engine block here, and I feel like we need some things on the top and the bottom to kind of connect them to the rest of the vehicle. So what I'm gonna do is move the cursor with shift s, too. And then I wanna create a cube and let's take this down Lis, type in 0.2 to shrink it down quite a bit. And I want to scale it in the Z. So it's just kind of right here. Maybe I need to scale it out just a little bit more. Yes, something like that. And I Then I think I just want to bring it up to the top here and let's put it up on top right here. So it just kind of caps that off right there. And in addition will use that same cube shift DZ and move that back down here. And let's use that same cube to create I don't know, something on the bottom that kind of connects to the actual I don't want it to be exactly like this, because we just be using up too many polygons. I think I think we can do something a little more low, Polly, but still have it connected. So I think what I'll do is go ahead and apply the scale of this and tab into edit mode. And if I select this face here, I can hit the I key and inset this and take this in pretty small. And then if I add two edge loops right here and scale out in the why with s and why, then I can kind of drag these out like that. Oh, when I've been saying the local transformations here, I'll switch that to Global. All right, so let's grab these two faces now, and let's just extrude them straight down and maybe even scale them in S and X just like that. So it kind of connects it to that actual peace. And I know that's not exactly the way it is inside there, and that's fine. I'm just looking to try and connect things up here and, of course, to connect it to the wheel. We're gonna need Mawr inside there. You can see kind of in here. There's more going on inside the wheel. I think we're gonna need another piece in there. So I'll select that wheel and tab into edit mode and select, Say, an edge there. So I get the pivot point in the center and then move the cursor to it with Shift us, too. And then I'll create a cylinder right here. Um, let's make it 24 sides and I'll go ahead and type in 0.1 and 0.2 here to shrink it down quite a bit. Let's maybe, ah, take this face down here and let's delete it, delete faces and then let's turn this around the y axis. So all press are why control and I'm just gonna turn it till it hits 90 degrees right there and click. And then let's scale it in the X s and X and about like that, and then I'll scale it up. Just it s and extended out or scale it out to about the size here. That's a little too much. Let me scale it in about like this. Bring it in just a bit. And then I just want to add a few more edges. You can kind of see some edges in there. So, um, I better apply the scale here If I'm gonna inset well, hit I and bring that in a bit e and push in i e and pull out of it. I again. So you can see I'm just adding a few edges to try and add some visual interest to it. And then I need to bring this whole thing out. Kind of connect with that Axl piece right there. There we go. All right, let's smooth it and we'll turn on auto. Smooth here. Okay. So you can see I've just got these pieces that air. I'm just trying to connect them up. So as we see them from a distance or kind of catch a glimpse underneath there as the car is turning, we just see that things aren't hanging out in space. All right, let's go ahead and mere this over. I'll take this one and delete that. And let's grab these pieces. All four of these here and let's join them together. Control J. That will move the cursor to the center of the grid with shift US one and we'll move that origin to the three D cursor and then we can mere it over here. I hope there's a bit of a problem there. Let's try and apply the rotation right here, and that helps. Okay, so we've got that, um I think that connects things pretty well down there. The other thing we need is something up here. So this is just kind of hanging out. Um, I believe that this can come down and kind of rest on top of here, and then we could maybe extrude again to get this piece coming out right here, because this piece was ultimately this. But I think we also need something right here to connect with that. So let's take a look at that piece, that engine block kind of peace in here. I'll selected and hit the division key on the num pad and that will kind of isolate that. We've got a lot of other pieces in here. Let me hit the division key one more time and one more time. And there we go. Now we can take a look at this. So if I brought these faces down, I'm afraid it would kind of intersect with this edge here. So let's get rid of this edge old click that X and dissolve edges. There we go. I don't think we really needed that. Um, so now let's grab these faces here, and these are the ones we want to bring down. Let me hit that division key again. And let's try and bring this down to meet up with the top of the spring there. Um, let's just go and bring it down like this and we do in a re hitting that. Yeah, so right about in here, let's say and then maybe I could grab that edge and bring it out just a bit. Well, me try this and I'll grab this and I'll bring it out as well, too. So it's kind of in line with that, like bad. Okay, now let's go back and take a look at it. I'll hit that division key again. Um, it's looking pretty good. It looks like this could probably come back in line with this again, right? So maybe I could just drag that edge back. So it's kind of in line with that. We might be able to take this edge up here and move it up a bit. Let's see like that. Let's hit the division key and take a look at it, Okay? It hasn't come through. That's good. Let's see how far we can pull it up before it comes through. Ah, there it is. So maybe we could pull it up to there. Now. I think what we need to do is go ahead and add an edge loop and extrude this out just a little bit. Now I feel like, Well, there's a couple things going on. I feel like that this is a little too far out, so if we select this edge here right there, I pressed all Z to be able to see through it just a bit and let's let's bring this in some . So it's kind of in line like that and ah, then we can add that edge loop Let's do that. So control our Here's that edge loop. I'm gonna hit E, and then I'll hit the f key, and I want it flat. So I'm gonna go with this, and I'm gonna bring it up to about right here. Okay? Now, let's take a look at this. So if we grab these two faces here now, can we extrude these out just a little bit? Pull that out. So it kind of goes right to the inside of the fender there. Let's go ahead and hit the division key again and take a look at it. Yeah, it looks like we haven't overlapped anything or thrown anything completely out of alignment these air. Strange. But frankly, there, inside here. So it doesn't really matter too much. We could select thes and slide this along that edge with the geeky. Slide it down like that. We could grab this and hit the geeky two times and slide it down like that. So you have the g key to times slides along an edge. All right, let's hit the division key, and yeah, I think that helps fill that space. Helps clean that up. All right, so in the next video. What let's do is go ahead and begin working on filling in underneath in the back of the vehicle.
51. 049 Beginning the Rear Axle: Okay, One more thing before we move to the back. I just want to take this piece right here. And we've still got a solidify modifier on this so I can take this one edge and move it back. And I think I just want to move it back, kind of inside the back of the tire here, and then go ahead and apply this solidify modifier. And then I just want extruded up just to connect it to that other piece. So just gonna insert an edge loop right around in here, something like this, and then just grab that one face there and extruded up and just connect it right there and then I can delete it X and delete faces. There we go. So that just closes that up some. All right, now for the back. Let's take another look at the reference images here. I'll go ahead and open that up. I've added a few because we're gonna work on the gun pretty soon. At least. I'm staying optimistic that we're kind of finish this up sooner or later. Um, let's take a look at the back. Let's say this one here now there is Ah whole lot going on with all this tubing, and I don't think we're going to be able to do all of this. Um, if we can work on just adding enough of this here to fill in, I think will be okay. Adding this kind of tubing, I think would just be committing to too many polygons for the project. So I don't think I'm gonna do that. But we've got these pieces here. Um and also, let's go back to the back view with Control one and let's hit the Z key and let's take a look at this. So it's kind of hard to see this piece here, but I think this is it right there, and we have one over here. We have a flat panel on the bottom the way we do in the front, and we may be able to pull this axle vac. The problem is, where's that spring? I think the spring is here right there, but we also have these other cylinders here. These other kind of ah shock absorbers here. So once again, we aren't going to go for all of this detail. We're going to go for some and just enough to fill in, so it doesn't look empty underneath. But that's a tall order. With all of this going on, trying to figure out what we need and what we don't need can be a little difficult. So what let's do, first of all is let's bring some of the things that we've created on the front, back to the back. So I think what I want to do is grab this and the shock absorbers. Let's at least try and pull these back and see if we can use them in the back here. So I'll goto wire frame and let's go ahead and press shift D and why? And let's move this back here. Let's try and get this in place. I'll hit G and why? And let's kind of move it until we get it right about here. Let's spin around and go and look at it from the back here and see how we're doing. Is that pretty good? That looks pretty good, actually. OK, so now we need to create. I think this piece here, let's do that and then we'll create some of these cross pieces as well. So for this, let's go ahead and go back to that back view. And let's just create a cube and fit it right in here, inserts, um, edge loops and then extrude up and over. So I'll press shift A and Mesh and Cube. It's a little big, so let's go ahead and scale it down and I'll hit G. And I'm gonna move it right over here like this and kind of put it right in place. Maybe right here like that. And then if we tap into edit mode and weaken, maybe move this over to here. And then if I hit the one key and select these Vergis is, maybe we can kind of bring that over like that. Now let's grab this and bring it down because it looks like it's it begins its split off right there. So maybe that's where I need to have those points. Be right in here. Let's say now it's insert. Two are actually just one edge loop. I think could probably be fine right here and now we've got these two faces that weaken begin extruding up. Let's go grab that and bring it forward or bring it back. I should say to the back of the vehicle. Let's, um, make this a little bit narrower with s. And why? Because I think it looks like it's narrower there. And then let's go ahead and put it right. Well, it looks like it's on this side of the axle now, doesn't it? Now, how far in front? Oh, is anybody's guess, But, um, weaken, begin right here. I guess so. Let's grab this face and I'll begin extruding this up. So really, we could just hit e and go straight up into here, I think. And then this face here, I think we could probably hit e and click and hit G and kind of move that up like this. Let's try this. All right. See how that looks, So something like that. Yeah, we've got this now. It looks like it kind of fills in in the center there, doesn't it? So we could go ahead an insert a few edge loops and connect those up like we could insert an edge loop here and here. And maybe another one or two. Actually, we couldn't insert to edge lives up here and grab this one and move it down to about there and we could insert to edge loops here and let me grab this one and hit the geeky two times to slide it like this and like this. All right. And then what we could do is we could go ahead and take this face and this face and press control e and bridge edge loops here. And then we could also do that same thing up here. It looks like I didn't bring this part of the edge back down when I grabbed it. I didn't press all click well enough. Let's ah, select this. You know, this one and this one. Press control e and bridge edge loops there. So we've got just that kind of basic shape with, ah, the V shape and the holes in it there. So let's take that over to the other side. I'll take the origin to the three d cursor in the center there, and let's go ahead and merit over. There we go. We've got that. Let's also, um, create. Looks like it's got a plate on the bottom of the same way we did in the front. Although I don't know that we need a lip on it. Let's just create a cube, then Cube, Let's scale it down. But the Z key and let's make it pretty thin there. And let's bring this back and put this in place so it looks like maybe right about here. And let's ah s and ex scale it in. Let's scale that into about right there as well. All right, so then let's move that back right about there. And we don't really know how far back this is gonna need to be. At this point in time, I can at least bring it forward to about here. For now. We don't know how we're going to connect these things up yet. All right, It looks like there are a couple of cross bars here. Let's see how that looks from the back view here. So it looks like we've got crossbars going connecting these pieces. Let's just go ahead and add a cylinder. So maybe I'll take this down toe. I don't just take it down to 12 and ah, I'll scale it down quite a bit. Skilled in the Z with S and Z, let's ah, spin it around. The why are y 90 and let's bring this up and put it kind of in place up here. Looks like it needs to be a little smaller. So will kind of do that. And then I want to keep it that width. But I wanna scale it in the Z in the UAE. So s shift X and that will turn off the X axis while we scale. So there we go and let's duplicate it and move it up to here. And we lost the cylinders in there. Let me go grab those. Here they are and we go Let's bring him back. Analysts just put the's right in here. Let's say yeah, let's do that. Maybe we should smooth them. Here we go. OK, so we have a couple of pieces in place now in the back. It's looking pretty good, but I think we're gonna need mawr. I think there's gonna be more that we're gonna need with these cylinders here. And if we go to the back view weaken, take a look. There's this here. Um and I think that's probably the transmission, but it's hard to tell, but either way, we're gonna need to get something in there, so we'll work on that in the next video
52. 050 Continuting with the Rear Axle: Well, what we have so far is beginning to fill that area. And but let's take a look at the back view again here, and it's this that I think will really help kind of fill it in. We don't really have another image of that. If I go over to this other image, um, it's hard to see here were at an angle, and it's got this big chain over it to I don't know if they're trying to hide that area as well, so we don't have a great image of this within the references here. But, um, I think we can go ahead and give it a try. So what let's do is let's create a cylinder, and for this cylinder, I'm gonna give it maybe. Ah, let's give it 24 sides. I wanted to be fairly rounded, and I'll go ahead and take this down 2.1 and 0.2 just toe. Shrink it down a bit and let's rotated around the X axis are X 90 and let's bring it up and put it in here. Um, let's scale it, and it's really hard to know how big this should be of course, But let's let's go with this and I will grab it and bring it forward and try and place It may be right behind here behind this bar and maybe right in here. Now we need to get some of these details on here, so it looks like there's kind of a triangular extrusion, and maybe we could do another one here. Let's give that a try. I've gone ahead and left. The cat fills as an in gun. Um, I thought maybe that might be a little easier to deal with. Let's see. Well, let's do is, um, press control A and apply the scale. And then let's grab that face and let's hit I and scale in a bit. And let's go back here and let's take a look at this. So if we scale into about here and then maybe grab some points here so I'll just grab this point and control, click this point and control. Click this point to kind of extend those around there like that, and then maybe let's scale these in. I'll hit S and X, and let's see if we can scale this in and then maybe we can begin bringing some of these in just a bit like this. And this I'll press s and X and bring these in a bit. And maybe these here. So I'm just trying to get some sort of a shape here that can kind of sell the idea that there's on extrusion here, some sort of detail going on. So if we select this now and let's go ahead and go back to our solid view, if we selected that and extrude this out, that's it e and pull this out a bit like this. And then let's also scale it in some like this. Okay, so I think that's going to give us what we want here. I'm just gonna a just a couple of things here like this. If we take a look at this, I'm gonna extrude it and kind of bring it down here. So or I should say in said it. So I'll hit the I key and bring this in like this. I don't want to overlap things like this, but I'm just bring him out like this and then bring it down and maybe I'll hit s and scale it down a bit. Bring it down a little bit more. And then what let's do is let's extrude this one out as well. So I'll just hit E and pull this out and then scale it in some like this. So hopefully this is going to kind of hint at that particular shape and those particular details. Let's go ahead and smooth it, shade smooth. And let's turn on auto smooth over here. And I think we probably want it. Yeah, about like that. Although I would like to maybe let's move it up some like this. And then what we can do is select edges that we want to actually stand out. So maybe we could grab this edge and mark this one as sharp. And maybe let's try this edge here and mark that as sharp as well, see how that works. I'm not too pleased with that. Let's try this. See how that works? Yeah, that's a little bit better. I'm not real fund of this edge here, though. Let me ah, grab this edge and clear that. And then I'm gonna get control. Be and bevel this out just a little bit. Well, before I do that, let me press control and apply this scale. And then let's press control be bring that out and add a couple of edges there. Yeah, so I just wanted to be a little bit softer there. All right, let's see what else we can find in there. Um, it looks like there's something up in here and there may be something down here. Let's see if this is in the proper place. I feel like it could come forward some. Maybe. Well, it's Maybe we should take this whole thing and move it back a bit like this. Let's do this and then grab this and move it back here like this. There we go. Okay, well, let's put this piece in. I feel like, um, let's just put a Cubin and extrude the edges or the sides out a bit. Here, let's just do that Mesh Cube. Let's scale down and let's bring this up into placed up here. It probably should be just behind this. Just kind of on top of that cylinder there, in here, let's say and then, Ah, well, let's scale it down. Bring it into about there like this, and then let's go ahead and insert an edge loop, maybe two right in here. And then we congrats this face in this face and extrude this out. So let's press e s ex kind of scale this out a bit like that. So it's very basic. We could add more detail if we wanted. We could do something like add to edge loops here and then grabbed this edge and this edge and kind of pull it up a bit like that just to give it a little bit more visual interest. Now let's take a look at actually moving these parts around or extruding off of them to kind of fill in. This one right here could probably go back toward the cab here. We could take this and move it back toward here. We could also take it all the way if we wanted to to connect it, we could try that, and then we could extrude down. Now we should probably scale out to connect with the ah Springs here. So it's hit s and X and kind of pull that out a bit like that. Then we could go ahead and insert an edge loop. Let's do that. Ah, tab into edit mode first and let's insert an edge loop right here and let's see what happens if we grab that face there and bring it down. So let's it e and bring it down. We could bring it all the way down to here and just see what happens like that. That looks a little bit too much like we need to be able to take this in line with this angle here, right? So let's go ahead and add another edge loop right there and grab that face and just move it in like that. See how that worked. Now it isn't mirrored over. We're gonna have toe mere it. Let's see how that looks in the back. That helps fill in some back there. All right, so let's go ahead and grab that and mirror it over. I'll isolate it with the division key, and so now we can see it. Let's go ahead and give it on edge right down the center. Here. Let's click and then press E and then weaken. Do that with the F key. I'll hit enter, and that looks pretty well down the center. So let's go ahead and hit all Z and go to face mode and all border. Select all of the's on this side and get rid of those. Then let's go ahead and add a mirror modifier and turn on clipping. There we go. We've got a problem there with the edge. Let's take a look at that. I'll turn on the edit cage on the other side and let's Ah, select this edge with all click and let's kind of move it and slam it into the center there so that it connects and seals up. And we were able to do that because clipping is on here, so that seals that up. Now let's hit the division key on the num pad to bring everything back and OK, so now we're getting somewhere. I think we're gonna have to do a little bit more connecting with these pieces. This is kind of hanging out. Um, and of course, this is still hanging out here, but I think we're getting somewhere that's beginning to fill in in this area down here in the back, and that's what we want. So in the next video, we'll let's do is let's work on these cylinders and see if we can begin connecting everything up
53. 051 Adding Rear Shock Absorbers: Well, I think this is already beginning to fill in pretty nicely here. But I would like to go ahead and add some of these cylinders here. This 123 cylinders as part of the rear tire. Well, I think that fills in that pretty nicely. Um, like when we're looking at it at kind of an angle like this or like this, I feel like there's too much empty space in here, So let's see if we can place some cylinders in there and get that area filled up a bit. So let's go ahead and press shift a and create a cylinder here. I'll take it down to 24 sides and maybe, let's take this down 2.1. And, ah, maybe this could be like 0.5, something like that. So it gets us in that general size. Um, let's move it over well, before I put it in there, let's add, maybe this top and bottom it. It looks to me like it's got kind of ah, connecting post up top. I mean, I'm just imagining in this, I guess because there really isn't much there to see. But you can see that here there is this kind of post there. So let's go ahead and add that I'm gonna scale this up a bit and ah, let's see if we can add something like that so appear at the top. If we grab this will go back to object mode and apply the scale. And let's, um, hit I and inset this pretty far in like this and then, ah, extrude this up and I feel like there's something else going on up here at the top. Um, let's see if we can just hit Ian s and scale out and he and bring it up Hi. And then bring that in and then e and bring this up like that. So something kind of like that. Um do we ever see the bottom of these things? It's It doesn't look like it, but I feel like we should probably have something on the bottom as well. So let's go ahead and do that. Um, maybe Justus, a smaller one, something like this. And just like this, let's try that. And then also, although these don't have it, this one has kind of ah, trim on top here. Well, I'll wait and get these in and then we'll take a look at that. So what I'm gonna do is go ahead and place thes. I guess I should smooth it first. Let's go ahead and do that. There we go. And then let's ah, maybe try this one here, so I'll bring it in and let's try and scale it and get it in place. Gale it down quite a bit. And it looks like this one kind of comes up into here. And of course, I'm gonna have to put some sort of ah top connecting piece on, but it looks like it kind of comes in there. And that may be a little bit too tall or go down too far because I'd like to be able to take this piece right here and extend it out so that this piece can sit on that on its on the base there. So what I'm gonna do is scale in the Z and bring this back out. And maybe I'll scale on the Y in the X just Teoh make it a little bit bigger. So let's hit s shift Z to turn off the Z axis and all kinda make this a little bit bigger. Nothing like this. Okay? And so that means that if we select this and tab into edit mode, we're gonna have to go over here and turn on the edit cage so we can see this. There we go. And grab that face there. We should be able to pull it out. Kind of have it connect up like that. All right, so I just wanna have it be able to connect up, and then we'll create something up here on the top as well to connect that. All right, so let's say we've got that in place. It looks like it kind of angles, but, um, I don't know. Do we want to do that? Let's press are and why? And kind of tilted a bit. Do we want to do that? All right, we might be able to do that. And then let's duplicate this and start working on these here, so I'll just take this and then on press shift D why? And move this over here. And these look like they actually angle the other way Now on a scale it down a bit. Move it down and press are wind kind of tilted out like this. I think it needs to be a little bit longer. So let's go over to local transformation to turn that gizmo in line with the object and lets it s and Z and kind of scale that out a bit. Let's also take that and ah, extend this out. Let's do that. Pull that out a bit like this, Okay? And then maybe I'll move that in and let's duplicate it and move it over here. That one looks like it's a little bit taller and a little bit narrower. So s shift Z, and I'm gonna skill that in just a bit like this. Have you not quite that tall? And it looks like I will need to extend this out just a little bit more, so let's try that. Okay, so now we need to add these top pieces, and I may need to actually delete these top stems here on these, but we'll see. We'll see how that works out. So what I could do here is this kind of looks like it all connects together. I don't know if it actually does or not, but we could take this guy here and pull it back some and then inserted edge loop right in here and take this up. So I'll hit E and extrude this out. And then I could just maybe take this and extruded over like this, so just e. And pull that over like that. Now let me get the plus key and extend that selection and let me do you select these here like that and maybe I want to move those down a bit like this. And yeah, I think I will want to remove those stems there, so I'll work on that. There we go. So we've got that just kind of covering those. Maybe we could actually bring them out a bit, go back to Global and slide those toward the tire just a bit like that. Now, let's go ahead and remove at least the top part of the stems here. So maybe I could select this face here in press Control plus and then hit X and elite faces we could then grab this said right here, Collapse it all, Tim at center. We could then select all of these faces with the Circle Select Tool with C key. Let's go back to local transformation, and I'll just drag this down until it goes inside there and I'll do the same thing over here. Just get rid of this piece on the top and for this guy over here. I feel like we need something separate coming out of this here. So let's go ahead and just create a cube and let's shrink it way down, scale it in the Z. And let's bring it up here and just kind of see if we can extend this out. I'll take this base and kind of move it out. Let's just see if that kind of sells it at all. Well, it's kind of simple, and I don't know that it sells it quite well enough. So maybe we could scale in the Z here and bring this up. Something like that that feels a little too simplistic in there. There isn't, um, enough going on. So I think we'll need to figure out something else to put in there. But let's just take a look at this for now. I think the shock absorbers in here do work out pretty well. Let me move this over just a bit. What? I think I may try is taking this and extending this over and extruding this down. Let me try this and see if this adds any visual interest to it at all. Here we go. We'll just hit E and pulled down here. It helps. It adds a little bit of visual interest in there. Let's give that a try for now and see what weaken and see how it works. So I think what I'll do now is take all of these pieces that I've created and add them to the spring and wheel object here. Shifts like that, and what that should do is mirror it over to the other side. So a press controlled J and there we go. It mears it over. Then we have all of that in there, so I feel like that's getting there. But there's mawr that needs to be done right up in here, like this is just kind of hanging out if you like. We need another piece in here to kind of fill that in while I'm here, though, I could take this and smooth it. Let's go ahead and give this a try and turn on on a smooth over here. That's a little better. All right. So how we doing? I think we're doing pretty well here. That's beginning to fill in pretty well. Um, the last thing. Maybe I feel like we need in the back. Well, there are a couple of things. I think we need this piece here, this kind of trailer hitch thing that's going on here. Be like, we need these braces here that are holding this spare tire. Let me press control space bar here. And so this piece right here and this piece right here seems to be holding that spare tire . We have a strap here that we could add. And then also there's this. It looks like a flip down foot ladder like you can just take this and flip it down and then use it to climb up into the back. That's kind of a nice little touch there. I like that. So maybe in the next video, let's begin working on these few things, So that's coming up next
54. 052 Adding Parts to the Back: Okay, as usual, there are a few more things I'd like to do before we turn our attention to these things on the back. I realized maybe what I could do is take this platform here and I just want to move it back into here. And then I can maybe at an edge loop here and then take this face here and extruded out. And what I feel like that does it just adds a little mawr to that there and kind of opens that up. So it isn't just an empty piece sitting out there, So I want to try that. In addition, I want toe maybe bevel these things right in here. So this edge right here and this edge right here just to add maybe a little bit of interest to this, something like that. Okay. Just kind of adding that there. And also I had mentioned some time ago that maybe we could take this and say, add and Anjali poets over on the other side. Let me go over here and add an edge loop. Say here and bring this up. And remember how there was that little piece right there. That little trim right there. Maybe I could just, ah add to edge loops here, select this ring, and then it e and I'll hit Enter, and then I want toe kind of fat in that up a bit. And to do that, we can use this shrink fattened tool. You can see that the shortcut is Ault s. So I'm just gonna press Ault s and then move the mouse and you can see it just kind of pulls that out in the direction of the faces there like that. There we go. So I just wanted something like that to put that in there. In addition, now that I'm looking at this, let me do one more thing. This is the problem. You just keep seeing things that you want to dio. Let me try this and this almost like these two edges and just press control be and pulled out a bid here. Let's try this. I'm not sure if that will work. Yeah, that just adds a little bit more to it there. Okay, so now let's work on the things that I said we'd actually work on. Let's ah, go to the back view and goto wire frame and take a look at these here. So at least in this image, it looks like this piece goes up right into here. And this piece begins here and curves and go straight like that. So these air coming off of these Luke pieces here on either side so we can begin with that . What I'll do is I'll just create a new cube and scale it down and let's bring it up here, put it right in here. We'll scale it down something like this. Maybe like that. And then I think we could just tap into edit mode and go to face mode and select that one face on the top. And we could just drag this straight up. Let's just try that. And then also, what we should do is inserted edge loop right around here and let's take this face and extruded straight down like that. Now we're gonna have to bring that back to the back of the vehicle here. Let's see if we can see it over on this side. Um, it looks like maybe here, let me go back and take a look at this. Yes. So it looks like that fits in fairly well there. We may need to go back a bit and also maybe scale in the why s and why bring that in like this. There we go. All right, so there's that piece. Now let's go back to that rear view and let's take a look at this. It looks like this piece now comes in front of this, so it's a little bit further out on that loop. Let's try this one shift day and let's create a cube and let's scale it down and bring it up into here and begin this one. So for this, it looks like we could scale this in the X and bring this right up here and then once again tab into edit mode. Let's select that face and then what we can do. Let me actually bring this forward so we can ah see it when we're in solid view. Let's let's put it in place. And then I want to use the extrude, the cursor tool for this. So let's press s and wine kind of shrink this up a bit and I want to bring it in and put it right in here. Something like this. I think. And then let's go to the rear view again. Wire frame. Okay, so here we have it here. Now, what I can do is I can actually curve this by using a tool called extrude to cursor. So once again, if we tab into edit mode and I come over here, if I click here and hold an open this menu and go to extrude to cursor now what we can do is actually click to extrude this curve. So if I click here dear, dear, And here you can see it begins to turn and make that curve. Now there's more we need to do here. I'm gonna go back to my move, tool, and just take this and kind of move this in and take this and kind of move this in. So these need to come in just a bit. Maybe I'll turn him some and adjust them. But that's a nice way to make those curves. Now I can switch back to extrude region here, and it gives me this little tweak gizmo here. So if we click on that and pull out, you can pull all the way up here and maybe I'll ah hit the G key and move it down just a bit like this. There we go. All right, let's take a look at it. I'll go to Ah, solid mode. And there we go. They can see that. Just helped get that curve there. Now, we do want it to go in front of this, and I think we've got that pretty well. I would like to maybe scale it in the why s and wind just gonna shrink that down a bit, Just a little bit like that. And then we can pull it back into that crossbar while still keeping the front of this one in front of the other one like that. So we kind of have it crossing in front there. There we go. So let's go with that. And, um, what else were we gonna do? Oh, this. Ah, step right here. Let's work on that. This looks like it's a similar thing, but on the other side, like, we just need to create a cube and then extruded at an angle out. Let's see if we can see that coming out. Well, we don't have that in this view, Dewey. So we're just gonna have to wing it, and that happens sometimes. That's fine. Let's go ahead and create a cube and scale it down. Let's go to the back of you and wire frame and put this in place so it looks like it goes or it would go over on the other side here like this. We'll shrink it down, scale it and let's put it where we think it would go. I think maybe right about here, Okay, And then let's bring it forward to So it's bring it out and put it in place right in here. So I think it looks like it's about the same width as that piece. So it's kind of go like this. And then it looks like it comes upto where this bins. So let's grab this face here. We could click and drag on that gizmo and drag it up just a bit like this. And then let's go ahead and use that extrude to cursor to turn it. Let's go to the side view, and then we can go to extrude to cursor, and then I'll just click here in here and let's see how that works. It looks like we could go back to the move tool, go to face mode and we could probably just move that base in just a bit like this. And maybe, let's just take this face now and let's just extrude that straight out, see where that gets us all hit e and pull that out like that and that may be too angled. I think we need it a little bit more May bring it up like this. There we go, Oprah's Ault and click that right there. And then let's just hit G and move this up. In fact, we could even remove that. Let's hit X and dissolve edges and that'll just straighten that up. There we go. It looks too thick to me. I'll go ahead and press S and X and skill that in just a bit. All right, now I think we just need to add two of these tubes right here. We could once again cheat just a little bit and take one of these things and duplicate it. Let me switch to global mode here, and I'll just press shift e and why? And move this out and let's bring it up and put it in place here, G, and I'll bring it now. Put it. Ah, right about here on. Let's scale it out just a bit. And then let's go to the rear view and pull that over right about there. And that looks like it's about the right width, I think. And then let's shift D and bring this up here like this. There we go. It looks like the smoothing is causing some artifacts here. I'll select both of these and, Well, why don't I go ahead and join it with this? I'll press control J. And then let's come over here and let's turn on auto smooth and do we not have it smooth? Let's go ahead and click that. There we go. And then let's drag this up just a bit like that. There we go. Okay, so I think that's pretty good. That gives some nice visual interest to the back there. All right, I think, uh, then in the next video, let's go ahead and work on this trailer hitch piece
55. 053 Modeling the Trailer Hitch: to create this trailer hitch kind of thing right here. I think we can begin with a tourist once again. We did that earlier when we created the rim up here. So let's do that again. However, I think what I'm gonna need to do is organize. Something's up here in the outline. Er, um I can take all of these things here and move these up in the vehicle. Maine. But I think when I hide this here, yeah, we've still got ah lot going on. That should probably go into that vehicle, Maine. And the problem is, it's here in the wheels. So let me control space bar this and open this up. So it's a little bit bigger. And I think if I just hit the Beaky and border, select all of these here down to here, I think I can just move all of this up into the vehicle Maine And that leaves the tires and wheels. Well, let's try control space bar and, yeah, almost. There's this and this. So let's just right click here and go to move to collection and then we'll choose vehicle. Maine. There we go. All right, so we have our tires and wheels in one collection and our vehicle, Maine in another. That's good, because I think I'm gonna need to hide everything to work on this. So let's hide the vehicle Maine and the reference images and the wheels. And then let's begin working on this thing. So let's just create a Taurus shift. A mesh Taurus. Now look what I've done. I forgot to select the scene collection so it would be created out here outside of those hidden groups. So let's see where it dropped in. There it is. All right, I'm gonna say, moved to collection, seeing collection and then go back and hide the wheels. And there it is, all right. And the problem is, now I've lost my settings panel, so that didn't do me a whole lot of good. So let's go back up to seen collections. So, like that press shift, A mesh tourists and here we go. All right, I'm gonna take the major segments down to 24 maybe the minor down to eight. Let's try that. And also I think I need to make it a little bit thicker. It looks like if I grab the minor radius. Let's change this a bit. Something like this. Let's try that. Okay? And then let's turn it in the Y axis are why 90? I think I like this little part that kind of goes up straight here a the back. But this still curves, and then we need to expand this out. This, to me, looks like it's the shrink fattened tool like we could select these and kind of baton that out. We'll have to try that. And then also back here, we've got this part extruded off of the back. So a couple things, Let's let's try this. I'm gonna go ahead and do it from this side. The right Ortho graphic view. We may have to spend it around once we're done, but that's okay. I'll tab into edit mode and let's go toe wire frame and in face mode. I think what I'd like to do is get rid of these faces right here and let's remove those. And then I'll ault click this edge and let's just extrude this straight up easy and I'll pull this straight up like that. Okay, so we've got this part right here. I think the next thing to do is maybe grab this and extrude this back E Why back to here? Let's do that. I'll put it right about there, and then we need to connect him up. So I think what needs to happen here is we need to insert a few edge loops. A ah, one edge loop for this line right here, Right. And then another edge loop up top here and another edge loop down here. And this is just so we can connect this part with the back vertical piece here, and then we're gonna need some faces to be able to extrude it back as well. So maybe I'll add an edge here and that will give us this edge, this edge in this edge to extrude back. And we got these three to connect up to here. So let's try this. I will go back to salad mode. And so for this, let's see if I am remove this face here. These four faces. Let's try this. I'll remove this and then if I alter, click this edge right here. Let me do that. It says down here we have eight edges. Select Identify. All click Here we also have eight edges, so I should be able to bridge edge loops between these two. So let's select those two edge loops, press control e and choose bridge edge loops. And there we go. So now we've got those. I think maybe we should probably take this point in this point and scale them out in the X like this. Okay, now let's work on the back. So back here, it looks like we could select these faces here and extrude these back. I could even say grab this and this and scale these out like this a bit and maybe grab this and this and scaled these out. So we're kind of mirroring the shape of the tourists there. So what I'll do is grab these faces Hamlets, extrude them back e. And why? Here we go. And then I'll flatten him up s why and pushing like that to kind of flatten that up. And then let's delete thes X delete faces select this edge, and if we pull it back, I don't know about how far do we need it back like this? Maybe. And then we need this panel on the back, so I think What we can do here is just hit E and then s and scale out. And then maybe we could just hit Snx and scale out this way like that. Let's try that. I go grab these two and scale them in the Z. There we go. So we've got that panel on the back and then we could take that and extruded straight back like this. So there you go. There's that panel on the back there. Now. I do like this part right here. I think that gives it a nice bit of detail. So how should we do that? Let's come over here. And, um, let's go toe wire frame and I'll go to face mode and let's select Well, let's just select all of this right here. And then let's come back in and press the Beaky and hold the shift Key down and borders like this to de select it. All right, so let's take a look at that. So we've got these faces selected. Oh, you know, what I ought to do is close off that whole up top, but let's try this. First, let's see what happens. So I will hit E and then I'll hit Enter. And now I'm gonna press Ault s and let's see what happens here. Yeah, so we can kind of book this out of bed like that. That's that's pretty good. So maybe I'll grab these two edges here and pull that in a bit. Yeah, I think that's the kind of thing I was wanting. Just something to kind of book that up. Now, we could take these edges up here and all click these and press ault m and merge them at the center like that. So that closes that out. Um, and then let's ah, smooth it. Let's see what we get when we smooth it and I'll turn on auto Smooth. And let's just drag that up just a little bit. Yeah, something like that. That's fine. All right, let's Ah, put it in place. I'm going to move the pivot point or the origin of this object to this point right here. So let's move the cursor with shift s, too. And then move the origin to three d cursor. There we go. Now let's bring back the ah vehicle and the reference images. And sure enough, we're gonna need to spin this around. So rz 180 we go will scale it down. Let's go to that back view Control one. And let's, um, see if we can put this in place. It looks like head up here right in here. Something like that. Let's take a look. We probably have to do a little bit of work to get it back here on that. There we go. Yeah, I think that kind of adds just another bit of detail to it. We could also maybe grab a couple of bolts off the tires again and put them here. Why don't we try that? Let's ah, come over here and tab into edit mode and let's ah, grab say this and this and let's duplicated and move it off like that. And then we'll hit the peaky to separate the selection. And now let's select that one bolt. And of course, we need to get rid of the mirror modifier there. Let's move the origin to the geometry here, and then let's bring it out spenders around the ZR z 90 And let's ah see if it it all works here. I'll go to the back view with control one and let's ah, goto wire frame. Yeah, that's okay, I think. Let's just move it right in here like this. So maybe spend it a smidge and then let's move it on back into here, All right? Ah, let me move it down just a bit. And then let's duplicate and move it over here. I'll spin it again so it isn't quite exactly the same. Then we come. Yeah, all right, So that just adds, as I said, an extra bit of detail back there. You know, while we're here, it looks like there's just kind of an extra extrusion in these mud flaps. We could do that pretty easily, I think. Let's just grab this. Let's ah, apply the scale with control. A. Let's select that one base there. And then let's just hit I and inset into their and then hit E and pushing just a bit like this. And that just gives us another little extra bit of detail. Yeah, let's go ahead and mirror that over to the other side. Let's move the cursor to the center with shift s one. Move the origin to that three D cursor and then mirrored over here we go? Yeah. So that just gives us a little bit more detail on those mud flaps. All right, I think we're looking pretty good in the next video. What let's do is let's work on creating this strap that seems to be holding the tire onto the back frame here.
56. 054 Modeling the Spare Tire Strap: Well, how should we create this strap here? All we really need is just a polygon plain wrapped around the tire and that frame. So I think the way to do that is well, remember when back here when we were creating these things, we used a polygon plane and then a solidify modifier. I think we can use a similar tactic here, basically using a circle just around edge to get the basic shape and then extrude off of that to get the width and the thickness to Well, let's give it a try. So I think for this, let's go ahead and choose that scene collection group up there. So it pops out here. Let's go ahead and create a mess circle right here. And what we need to do is move this back and get it generally in place. So all press are why 90 We'll go to that side view and let's bring this up, and I want to scale it down and get it generally in place. So we're gonna go around here, we're gonna go right at the top of the tire like that. Maybe I'll press control three to go to the left Ortho Graphic view and let me go toe wire frame here. So if we scale it down, I think this is the cross bar. We wanna wrap it around. And then here's the tire. I think we want it to be kind of like this. All right, so that's generally the right place. Now, how do we get the right shape? What we can do is let's press control three again and go back to a wire frame and let's tab into edit mode and hit the one key for Vertex Select. And now what let's do is use that proportional editing tool again with the shortcut. Oh, and what I'm gonna do is just begin selecting these points, getting G and moving the point about into place and then scrolling the mouse wheel out a bit kind of move those points down. All right, so let's try that down here, too, G. I'm gonna scroll in a bit and move it. I think up to here. Let's try this about like this. Okay, let's take this one as well and move it in about like this. Now here. We could probably move it in like this to get kind of more of Ah, more tension here. Let's pulled this one out, and this went out like this. All right, so there's the basic shape. I don't think that's quite right in that. This goes down too much. Let's Ah, grab this again and move this back up. All right, let's see how we're doing here. Okay? Let's go to solid mode and just take a look at it, all right? It looks like we're coming through on the bottom here. This doesn't look too bad back here, and it looks like we could come up a bit here. Okay, so let's do is select a point here. And I'm gonna hit G and Z and pulled down a bit. And then scroll that mouse wheel out just a bit like that. It looks like we could add more tension back here, So let's maybe grab this one in, press gz, move it up and expand the selection out like that. All right, so let's see how this looks Now. I think it's looking pretty good all the way around. Maybe right in here. This could come up some. Let's try that. I mean, you just pulled up in the Z Let me do that. There we go. Yeah, So let's say that that's about the right shape. Now what let's do from here is Tab back into edit mode and go toe edge mode, and I'll just all click this edge. And what I'll do is just extrude. I'll hit E and X and extrude this way. And then I'll select that edge again and hit e and X and extrude this way. Now, while we're here, we should probably do just a little bit more. I can all click between those two faces and hit G and Z and let's pull this down. And I could expand or contract the influence there. Now let's come over here. Looks like I could maybe bring down this right here. Jeezy, bring that down. Just a hair. How we doing over here? Looks like maybe we could bring this one out just a bit. We pull out like that, Um, appear, Let's grab this and move this up. All right? I think we're getting there. Just a couple little ah, adjustments around there and let's see how it looks. All right, I'm gonna go ahead and smooth this just to see shade smooth. Yeah, that's actually looking pretty good. So from here, what we can do. Well, there are a couple things when one thing I'd like to do is take this edge and dissolve it. We don't really need that. So I'll press X and dissolve edges. And then the last thing we should do is maybe give this a solidify modifier just to give it some thickness. So it's come over here to the modifiers panel, choose solidify. Let's selected and apply our scale control a scale. Yeah, that helped just a bit. Okay, And then let's choose even thickness and we'll click and drag in the thickness field here. And probably that's all we need is something like that. Let's also go down here and turn on auto smooth. And that helps there. And, ah, let's give it a little bit more smoothing. Let's see. Weaken. That looks like a pretty deep angle, though I don't know if we're gonna be able to get rid of that very easily. All right? Yes. So let's go ahead now and take this and apply that solidify modifier here and there we go. Yeah, I think that adds just one more bit of detail to the overall back of the vehicle. I think that's pretty good. In addition, I had seen something on one of these. Well, this one has some extra pieces on the Banik. I'm not gonna work on that. I'm not gonna do that. But if we open up, um, I think this one this is one of the scale models, but it has some details on the back here that I might try and replicate. Um, let's just see, I think this isn't gonna be perfect by any means, But if I select this and let's select this down here and I think all I want to do is just extrude out and then scale in, okay, I still have my proportional editing to alone, So let's turn that off. There we go. That should help. So let's hit E and pull out of it. And that will hit s and scale in something like that. And then I'll do the same thing up here, and I just It just hopefully will give it a little bit of detail in the back here and scale in like this. I don't know. Let's try it. What do you think just kind of gives? Ah, a little bit of extra back there. I'm not sure and were to the point now, when we're just gonna have to begin kind of testing things out and seeing what works and what doesn't. So this may not work, but I thought I'd try. I'm just gonna scale that back out just a bit. There we go. Yeah, I actually kind of like that. So you, of course, can make your own decisions as the what needs to be done there. But I just thought I'd try that. Add that piece of of detail there. So I think what we're going to do is call the back of the vehicle pretty well done now. And what I'd like to do is now turn our attention back up to the turret and work on the machine gun up here. So that'll be coming up in the next section.
57. 055 Creating the Gun Support: toe work on the gun here on the top. I feel like we need to ground this piece onto the roof. This is just kind of floating in air at this point in time. And I'd like to maybe get that connection on there before we put the gun on it. So let's take a look at that. Maybe I could find on image up here. Let's Ah, take a look at this. When this image 13 here, I'm gonna press control space bar. And if we take a look at it here, I mean, zoom Lee, and we've got this post that it looks like it holds that shield type thing up front. And also, I think you put the gun into it as well on the top. Here, let's see what else we can find. I'll go ahead and grab here and create a new window and let's bring another one in and see if we can add to this one here. Um, well, I do think this one is actually pretty good. Let's go ahead and open this one. And we can kind of get a sense of how that post connects with that plate here. So you've got these brackets coming out on either side of that post. Let's press control space bar and take a look at that. Yes. So we've got these brackets coming out and connecting to the shield there. All right, so let's work on that. I think we have a good amount of information toe work with here If we go to the side view as well, and I'll goto wire, frame, weaken. See this post here? Hear those brackets right here. That air coming out, it looks like we've got a piece coming out the back right here. And also, we've got this part that's kind of holding it on. It looks like that's this, and it looks like it's kind of a triangular shape, so we'll have to try and put that in there as well. Now, these things right here, these brackets go into that cut in of the windows there that we tumble around here. So these things right here that cut in or that space right here where the window is cut. It looks like that's where those brackets go. So we've got to kind of fit those in there. All right, So I think we have enough information to begin. Let's go ahead and go back to the side view here, and what I'll do is I'll just switch to the cursor tool here and just place the cursor. Just click right there and place the cursor there. Then what let's do is go ahead and create a cylinder. And for this, well, let's go with 12 sides and I'll go ahead and bring it down smaller with 120.1 and 0.2 here so we can see it a little better. And let's just scale this and put it into place. Ah, about. And if I scale it down a little bit more like this and scaled in the Z with S and Z, let's kind of place it right about gear. Let's try this. And what I'm gonna do is extrude out a bit for this part right down here. And maybe I need to move it just a bit closer like that. There we go. So I think what I'll do is first work on this piece right here. So down here we go to edge mode and all click that edge. Maybe we can hit e and scale out E n s and then e and Z and skilled or extrude down. And then let's hit Ah e and s again and then e and straight down like that. There we go. Now I think down here we've got face is that we don't need. There's that one in gone base down there. So let's just hit X and delete faces down there. Okay, so we have that done this up here, we've got ah, this edge right here, that little piece. So let's let's go ahead and create that all press control are and scroll the mouse wheel to get two edges and then click and then let's press snz and scale in to about there. Then we can go to face mode and all click between two of the faces. What's it e and enter to extrude? And then I'm gonna use that Ault s shrink, fat and tool again. Ault s and I kind of pull out like that. There we go. So let's see what we have so far. So there's what we have so far. I think that's pretty good from here. Let's try and build up that plate or that bracket there, and it looks like it's got bolts back here and it looks like it's got a plate and then the bracket. It's kind of hard to tell, but let's let's see what we can do here. I kind of feel like there needs to be a plate here and then the bracket. I'm not sure why, but let's give it a try. I want to create a cube and let's take the size down, so I don't know 0.1, and I'll go to wire frame and let's put this in place right here. Try that and I'll scale it down. And I think I want it just like this, like that. Just a plate that we can kind of connect the bracket to. We'll scale it out in the X, and let's try and figure out how wide it should be. It looks like it's really hard to tell here, huh? It looks like it should be Well, it looks like the bracket should be about that big. Maybe the plate should be a slight bit smaller. Let's try this. I'm going to go right about like this and then I'm gonna duplicate this. I'll just press shift e and why? And bring this out some, and then let's scale this back out in the X like that. There we go. Now let's take a look at this. What I want to do is insert to edge loops here so that we can extrude the brackets out, extrude these pieces out toward the shield. So if I press control are and scroll the mouse wheel and put two edges in there, I'll click twice. Then I'll press S and X and scale out to about here. Now we can extrude those two out. However, now that I'm thinking about it, we probably want to split it down the middle and mirror it so that we just have to deal with one side. So let's do that. Let's let's create one edge loop down the center here, and then I will go to wire frame and let's border select these and get rid of these and then we'll just mere it over over here with a mirror modifier. And, of course, turn on clipping. Okay, No, let's go back to edit mode. Hit the three key and I think we can select these or excuse me, this one face because of course we have a mirror modifier on it. We could turn on the edit cage so we can see it over here. And let's just hit e and extrude out like this. Now, where should it go? Well, I should probably go to about right here, and then we're gonna pull that forward. But I get the sense that we may have an issue here. Yeah, this is what I was afraid of. So we're going to try and connect this up in here, but we're way too low here, so let's pull this up to where we think it needs to be. I think it needs to be about like this, right? So that this can connect here on the bottom. So we need all of these pieces to just be higher. But that's gonna throw off where we are on our reference image here. So, um, I think what I'm gonna do is cheat just a bit. Um and it's not exactly cheating. I guess I shouldn't put it like that. But sometimes you just need to make a few a few adjustments, and what I'm gonna do is go ahead and bring this up here. I'm gonna grab these edges right here and bring this up. So this is kind of where we need to be. So what I'm gonna do is actually come over and in the reference images go to the side view . And if we scroll down over here to the object data panel, I can click and drag in the UAE field and bring this whole thing up. So it's about like that. So I'm just bringing that up. So it just matches this area up here. I know it's off down here. That's OK. If we're gonna work on things down here in the future, we're probably going to bring it down a bit. But for now, I'm gonna keep it up here simply because I need that to fit onto this plate a little better . All right, so we've brought that up. Now let's do is connect this part here. So for these, I think what I want to do is just move this back straight and move this forward straight, because these are at an angle here, right? You can see their flat against that plate, which means it's it's at an angle. So then if we take our insert edge loop tool and insert and edge loop right about there. Now we should be able to grab that face there, then extrude out, just hit E and extrude out like that. And then we'll put some bolts in here to connect these up. So let's go steal a bolt off of one of our tires again. Maybe we can come down here and select this and weaken, come down and I'll hit the L Key and, you know, also hit the L key here. And then we can press shift e and ex and move this out and then we'll press P and separate by selection. There we go. And, of course, if we then select this an object mode, we should move that origin to the geometry. There we go. So now let's move this up and use it to connect those brackets. I'll just move this up here and I feel like there's a bolt or something back here. So let's go ahead and do that. I hope I've still got the mirror modifier on it. Here, let me Ah, If we take a look at it here, yeah, I've still got the mirror modifier on it, So let's take that away. There we go. That helps and let's press rz 90 and that spins it around. And I think that's the direction that we want here. And, yeah, we just wanted to go right in here. And if we go to the top view and hit the period key now, we can slide it over into here. Do we want it that big? Let's see. I'm not sure if we want it that big. It's not bad, but I'll, I'll shrink it down just a little bit like this. There we go. And then let's go ahead and press shift E. X and move it over here and I'll maybe spend it in the why are why and just turn it just a little bit like that. Just so it isn't perfect. You know, Um, and then it looks like there's a couple here on this bracket, so let's let's go and do that. Go ahead and press shift e and ex and move it out here. I'll scale it down a bit because I think he should be a little bit smaller and then let's angle these so it's in the right place. Let's bring it up to here and kind of angle it like this and move this to here. And then let's change the transform orientation. We can change from global to local, as we've done here with the menu, but you can also press the comic e. So if you hit comma, you get this time in you and you can change it from global to local here, or just hit the six key. And there we go. So now let's press shift d and Z and move that down. All right, let's see where we're that we're doing here. Um, we could probably move those in just a bit like that. Yeah, And then let's go ahead and do the same thing over on the other side. Well, just ah, duplicate and move shifty. Why? And move that over about right here. There we go. All right, so we've got that. Maybe we should smooth this just to see how it's gonna look. And I'll come down here and turn on auto. Smooth that we get that and it looks like we need a little bit more. Let me increase the degrees there. Yeah, that's all we needed. So now that we've got those pieces in. We need to ground it. We need toe, connect it up with a piece down here, and what I'll do now is go ahead and select that side view again and bring this down again like this. So we we need to connect it down here somewhere. So in the next video, we'll go ahead and work on this piece and we'll bring in some reference images for the machine gun and will begin blocking that out as well.
58. 056 Beginning the Gun: all right. The first thing I'd like to do is go ahead and ground this post to the top of the vehicle before we work on the gun. I'm not sure exactly how to do that, because I'm not able to find really any image that shows me what's happening inside here. So I'm gonna have to kind of make something up here. Um, I think what I'll do is used this piece to duplicate and extrude out and make this kind of triangular piece here that's holding the post. So let's see if let's see if this will work. I think what I'm gonna do is select, um, these faces along here se four sections, um, and I'll duplicate, thes and create a new object from them. And then I'll extrude forward to get that triangle piece. So first of all this, just press shift d and enter and then I'll go back to the move to and kind of lift this up just a little bit like that. All right, so I'm gonna separate it into its own object by pressing the peaky and choosing selection. Now let's tab back into object mode and select that object. There a move the cursor to or the origin to the geometry right there. And then I feel like I just want to ah, take these edges right down here, this one and this one, and maybe just extrude them down. Let's try this. So they go into their all right, and then I also want to close these up. I think so I'll select this edge, and then what I can do is press the F key and that will fill that with a face and come over here and do the same thing f and that will fill those edges with the face. And then we gotta figure out how to get, um, this up here. So I think what needs to happen? Maybe I need to bring it up just a bit like this. There we go. And then yes, so I can take these faces and extrude them forward. So maybe I'll grab. Let me go to this select tool here. I'll grab these and ah, all of these as well. All right, so now that we've got those, I'll go back to my move tool here, and I'll hit E and they'll hit. Enter, and then I'll just grab these and pull them forward, like to about here now to get that triangular shaped there. Let's press s and X and kind of scale in like this. Yeah, we're getting there. And then let's go to the top view and take a look at it. So it's actually not bad, but let's press s and why and kind of curve it just a bit more like that. Let's see how that works. All right? I think that works pretty well. And then, um, it looks like we should probably either take this top face and raise it up or move this down. So actually, I think what I'll do I think I've got more leeway here. I'll just take that edge and move it down like that. And I think I know the reason why I'm having to readjust all this. I think the reason why is because if you look at the windows here, they are right down at the bottom of that shield panel. Whereas I've put mine up a bit and because they're up a bit, the place where the window cut out is is higher, Aziz. Well, so even though this panel is in the right place here. It's the windows. You can see them here that have been moved up. Now, I could go back and re arrange this and get it all correct. But I think we're gonna be OK if we just do a little bit of adjusting of the reference image working on this area. I'm not too worried about it, actually. So that's probably why we're having to do a lot of this readjusting. I'm gonna grab this now and ah, smooth it in, turn on auto. Smooth. And yeah, I might drag it up just a little bit. Kind of smooth that out some. There we go. Something like that. So it's connected? Um, it grounds that post. It certainly may not be anything like what's actually going on in there, but I just can't see it, So I'm gonna go with this for now. All right, So let's now take a look at the gun. So the top of the gun is in alignment with the top of the turret panel here. Now the bracket is off, and therefore the post is a little bit tall, but this is all lining up down here and the gun will be lined up on the top. So because of the issue here with the window, I've adjusted here, But everything else is going to be in place. And frankly, sometimes this happens. I just don't feel like that. This particular placement of the Windows warrants the work to go back and change this. I think adjusting this is gonna be just fine. So let's go. And ah, work on the gun. Now I'm gonna bring the cursor over to here and just kind of place it right there and go back to the move tool. And then we'll just create a new cube right here. I'll bring the size down 2.1, and then let's put this in place. I think we can just scale it down and move it so we can place it right about here. And I think what we need to do is bring in a few more images of the gun. So let me open this up and bring in, say, this one here. Well, it's, uh get this in our view, and then over here, let's bring in. Um, we've got two pretty good ones here. How about this one Let's bring in this one. Yes. So we can kind of see the basic shape and everything in these two images. Okay, so now that we've got this here, I think this site right here is this piece right there. So I'm gonna put that right there, tab and edit mode. Go to face mode and let's drag back. Now, this piece right here looks to me to be this right here, and there's a little bit beyond that. So I'm gonna pull beyond that right there, and we can't see it because of the shield on the turret there. I might move that up just a bit there. All right, so we've got that. Let's tumble around and take a look at the width of it. Do we have anything in the front view that will tell us what the width is? Well, I think we do weaken scale into about right there, so that's helpful There. Now, let's go back to that side view and let's move the cursor again into here. So right into about here. And we're going to create a cylinder for this. So go back to the move, tool and press shift Day and we're going to create a cylinder and let's take it down to, ah 12 sides. Um, go to, ah, 0.1 and 0.2 there, and I'll go ahead and remove any of the cap fills so we don't have anything on the top of the bottom, oppress our X 90 and turn it. And let's scale it down to about the right size here, maybe something like this. Now, this has got a kind of a cut out here that these do not you know, it's hard to see here, but I'm not seeing this part here. So I think what I'll do is move this out to here like this. And from here, I'll go ahead and tab into edit mode and go to Vertex Select and let's border select these Vergis ease and just dragged them back into the Cube back here. Now, what I'd like to do is go ahead and use this edge here to create these pieces. So I'm just going to begin by hitting E and S and scaling in. And then E and Z looks like we're still in local transform orientation. So I'll come back up here and click on this menu. Or remember, you can always hit the comic E and go to Global here. Now let's press E and s and scale in a little bit more and then e And why now? And bring that out. Let's bring that out to about here. So I'm looking more at this than I am the actual reference image. So that's why I'm kind of off here. All right, so now press E and s and scale in some more And then let's go ahead and hit e and why? And just drag all the way out here. Let's then hit the period key to zoom in and let's create this part right here so e and s and scale out e. And why push forward and I'll go to about here e and s and scale in. Now let's ah, go to solid view and take a look at this so it looks like I could scaling a little bit more . You can see that here and then what I'd like to do is go ahead and extruded back so e y and just pull it back into here. And then if we take a look in there, we can see those edges. I'm gonna close him up. I'm gonna hit E and enter and then alter M and merge at center. And there we go. So that kind of closes that up. All right, so that is the very basic shape of the gun, Really the most basic of shapes there. But I think that's a good beginning. And in the next video, we'll begin by adding some of these pieces, like the handles in back. Also, we've got a handle here, and we're gonna have to connect it to that post somehow as well. So we'll work on that coming up next.
59. 057 Modeling the Gun Grips: the next thing I'd like to create is this handle here on the back of the gun. What first jumps out to me? When I take a look at this, it's just expand this with control Space bar. What first jumps out at me is this bracket. I think that looks interesting. I'd like to create that, but as I look at it, I notice it's coming out of a cylinder. So I need to create a cylinder and then extrude this out. So if I'm gonna create the cylinder for this, I might as well create the cylinder for that handle. A swell. So I think what I want to do is create the handle first and then extrude this out. So my point is, sometimes the thing that looks most interesting isn't exactly the thing you should begin with, if that makes sense. And I also see that as I work on this, this top is the same as this bottom. So as I work on the handle, I could use the mirror modifier. So as I work on the top, the bottom is automatically created a swell. And then once a, then extrude this out, I could apply that modifier at a new modifier in the X axis and get the other side. So I think that sounds reasonable. Let's Ah, give it a try and see if it actually is. All right, So, first of all, I may need to do a little bit of housekeeping here. It looks as if I've got these pieces that I just created outside of the vehicle. Maine. I think what I'm gonna do is just hit the Beaky and border slick, these objects in the outline, er and then dragged them up into the vehicle Maine right there. So they should all be in that group. Except look at thes. I've got the ah bolts hanging out on their own here. So let's go ahead and borders like these. It em to move to collection and will choose vehicle Maine. And down here is Well, let's go ahead and hit the Beaky and border. Select these him vehicle Maine. OK, so now we've got things cleaned up a little bit. Let's bring back the vehicle, Maine And what I want to do now is just select a few of the parts that I want to see as I create these. I think what I want to do is create is just have these things available here. Maybe this this, this this. See what else we can see? Um, maybe this bolt here. I just want to grab a few things that will help me. Kind of get a sense of how big this should be, where it should be placed, etcetera. Maybe I'll grab the windows, too. All right, so now that I've got all those selected, I want to hide everything else. And to do that, I can press shift H and that will hide all the unsolicited objects. All right, so now that we've got just this part, what we need to do is create a cylinder and put it in place here. So let's go ahead and do that. I'll move the cursor to the center of the grid with shift s one, and then shift a cylinder. Let's, um, give this 12 sides. You know, I go ahead and take it down 0.1 0.2. So it's pretty small. Oops. I missed that 0.1. There we go. And then let's bring it up and put it in place up here. So I'm thinking about right here. Maybe we may not know for sure until we actually create that curved bracket. So let's no spin around over here and let's hit S and Z and kind of scale it up a bit. Man, I feel like that's a little too thick. So let's press s shift is he to only scale in the X and Y axes? And maybe I'll do that down a bit and I think that's about right there. Let's give this a try. No, what I want to do is split it. I want to be able to edit the time up and have the bottom being mirrored in the Z axis. So let's go ahead and press control are and create an edge right down the center aisle. Press all too easy to see through it. And let's border select this part down here and delete faces. Now let's go ahead and add a mirror modifier to it. I guess I could bring this back up here, huh? And if we go over here, let's add the mirror. Let's change it from X to Z and there we go. And let's also turn on clipping analysts turn on the edit cage on the other side. Okay, so now here we go. We could probably take this edge right here and maybe scale it out just a bit because we have kind of a curve out kind of bulges out there. Let's also add an edge right up here. And maybe we could hit s and kind of scale that out just a little bit as well. So we get that slight bulge. All right, so now let's do is tab into edit mode and I'll go ahead and go to Vertex mode here just so we can see the edges as we extrude and I will border. Select this and let's create this top piece here, these two pieces. So what I'm gonna do is hit e and s and scale in a bit. It be and pull up a bit e and s and pull out of it e and pull up like that and then e n s scale in extrude again E n s and scale out. Now I want to create that kind of top curved part. So what? Let's do, is it e and pull straight up? And then I'm gonna press e again pull up just a bit and then scale in e pull up and then hit s and scale in nothing like that. And then if I recall, I think, Yeah, I created this with an in gun. So what we need to do is collapse this. So I'm gonna press e and enter and then own press Ault m and merge these all at the center . And there we go. Now, I want to take that one point and just pull it up a smidge like bad. So we get kind of a curve there, Okay? It's a little too tall. I think we need to have it be a little smaller than the height of the gun. So maybe I'll just scale it down like that. And then what we need to do is think about how to extrude this piece out. So to do that, let's kind of make sure we're in the right place here. I feel like maybe around here, let's give this a try. And if I select a few faces up here, let's just select these right here. Then what we should do is extrude them forward. Let's just do that. I'll go to the top view and I'm going to extrude it in the Y axis so e y and just pull out a bit and then I want to flatten. This s why. And just flatten that up. Okay, so now that I've got that, what I want to do is extrude this and turn it right into there. And to do that, we can use a new tool. Actually, we can use this spin tool right over here. And if you look at the description here, it says extrude selected vergis ease in a circle around the cursor in indicated Vieux port . So what we need to do is move the cursor to kind of in here. So it'll curve around that point. So let's click on our cursor tool here. And then let's maybe click right in here, and it doesn't have to be perfect because we can then do some adjusting in the settings panel once we activate the tool. Alright, so I've still got those faces selected, right? What let's do is come over here and click on the spin tool right here and then what we can do is click and drag here and it'll drag that out into a curve like that now, Clearly, that's not quite the way we want it. But we have all these settings over here that we can use to adjust the curve. So first of all, I'm gonna make it 90 degrees. Let's do that. And second of all, we can adjust thes Center X and why we don't need to adjust the Z. But we can adjust thes things here. If I click and drag on this, you can see I'll hold the shift key. We can adjust where that center point is, and also in the why as well. We can kind of bring that up a bit like that. So that's getting to be a little bit more like what we want. I'll reduce the number of extrusion zor steps, and that's looking pretty good. Let me adjust this ex a little bit year and let's adjust the why again. I just want it something like that. That looks pretty good to me, actually. So if we tumble around, you can see there it is all right. I think that's pretty good. So we'll just click on another tool here and there we go. So now what we need to do is married over the other side and connect this up in the center . First of all, let's go ahead and apply the mirror modifier for the Z axis will come over here and click, apply, and then what we can do is move this origin to the center of the grid. Let's move the cursor. First shift s one. And let's move this origin to that cursor set origin to three D cursor. And then let's mere this over in the X axis. So mirror X, let's turn on our edit cage. Let's turn on clipping and there we go. So now what we can do is take these faces once again, Let me hit the period key and zoom in, and we can extrude them into the center so they merge together. Now, remember that if we have these faces here and we merged these together in the center, we're going to get those interior faces. So what? Let's go ahead and do is let's just hit X and delete faces. And then let's go to edge mode and press Ault and click here and alter and shift click here so were only connecting those edges up. So now we can go to the top view and it looks to me like actually, before I do that, it looks to me like this one is a little bit out of place. And let's grab this edge right here. Here we go. And let's move this down just a bit like this. Yeah, So it's a little bit more in line there, and I guess we could also grab these points here. Oh, they're a bit out of alignment. So why don't we go ahead and undo this and grab these again like this and move them down? And I grab these here and move these out just a bit like that? There we go. So I just wanted to prepare that before we did any extruding. And then what? Let's dio is extrude it e and X. And then we'll just bring that over and slam them together and they merge because we have clipping turned on. All right, so there we go. I think we should apply our mirror modifier. And then let's ah, move this a bit. Let me move the origin to the geometry, and then I'll move it down a bit. and into the back right there. Let's smooth it, See how it looks. All right. And let's come over to auto. Smooth. Turn that on and we'll drag it up just a bit. See how far we can go A little too much there about something like that. Well, I like that there. Yeah. All right. So there we have the handles at the back of the machine gun. We're going to need to connect it up here with some pieces. But in the next video, let's add a bit more detail to the sides and the top.
60. 058 Adding Details to the Gun: So let's add a few pieces here to say the top. Maybe let me press control space here. Let's add this piece here. Ah, this piece. I mean, there's a lot to these, but we're gonna make him very simple and put him on here, since it will be pretty small compared to the rest of the vehicle. And also, I think what we should do is maybe add Ah, this brace here and we'll see if there's any other things. Ultimately, we're gonna have to do this part over here. But for now, let's just work on the pieces on the top. So for this piece right here, I'll just work on it down here at the center of the grid. Let's create a cube and let's ah, maybe I'll just drag in the size field and bring that down like that. Um, let's scale in the Z to make this kind of flat panel here. Ah, scale in the X with s and ex scaling the why s and why. And then maybe let's insert some edge lives toe extrude these two pieces up. So let's, um, press control are and scroll the mouse wheel and add these two s and X and scale amount of it. And then let's also add, Ah, tomb or here like this. Maybe I'll scale these out of it with us and why? And then I could just select this face in this face and hit Ian extrude up that then we should probably apply the scale. Grab these edges here year and here and press control be and will bevel. These had a couple of edges there. There we go and maybe some on the edges to Let's just go ahead and do that while we're here . It's probably a detail that no one will ever see. Yeah, but let's go ahead and do it and see what we think. All right, so there's that. Let's go ahead and take away the faces on the bottom. Since no one's ever going to see those. I'll just use Thesis Urkal, Select tool with the sea key and click and drag and then get rid of those. Um, we should probably just put a a cylinder through here, I think. Let's do that. Shift a mesh cylinder. Um, let's take it down to 12 sides, maybe. Ah, 0.1 and 0.2 so we can work with it here, oppress our Why 90 to turn it. Let's go to the side view and let's scale it down and kind of put it in place here. Um, how about right year like this? Let's try this. And then we'll scale out in the X. And there we go. So just a very basic form there just to get a piece on top there, that looks kind of like that. There's more to it here that's flipped up. Um, I don't think we need that. So I'll take this in this and join them together with control J. Um, And then let's go ahead and smooth it. Turn on auto. Smooth. You may be able to drag up a bit. There we go. All right, so let's take it up and put it on the gun. Ah, should go somewhere back in here, right? And ah, he looked down a bit and maybe let's just drag it down to right about there. All right, so there's a piece there. What about this? Over here? Let's do the same thing with this. That's Ah. Create this down on the center of the grid and then we'll move it up and put it in place. So for this, let's begin with a cylinder and we've got 12 sides. We don't need a cap feel, so I'll choose nothing. I'll turn it around the x r x 90 And let's, um I guess we should delete faces down here. Let's select these faces in here like this, and let's delete those. And then we can select these edges here and maybe extrude them straight down because it looks like they go straight down from that curve. So it e and Z and pulled down like that. All right, um, let's also give it a solidify modifier. All press control A and apply the scale, and then we'll give it a solidify right there, even thickness and that looks pretty good. Let's go ahead and apply that. And then what? We can do it to get rid of these faces here because we can create a new cube here, maybe click and drag and bring that down quite a bit. And let's ah scale in the Z and kind of just create this little base that sits right there on the gun itself, right? So we just have that very simple piece. I'll select the two and press control J and merge those together. And let's also grab this one face down here and delete it. All right, let's take that up. Let me, ah, smooth to do that. And then we could go ahead and let's spend around here and let's take this up and put it on top of here and let's scale it down and put it right up here. What else should we do? Well, we could maybe add a couple of edge loops in here and extrude these out along the sides. Let's try that. I'm just looking for very simple ways to kind of add a little bit of detail to this. Maybe we could select these two faces now and press E s X and scale out with that extrusion in the X axis. There we go. And maybe we could do the same thing down here. Let's try that. So if I added an edge loop right down here and maybe another one, right, I don't know right in here. Let's say we could maybe grab these two press e s X and scale out just a bit like that Here we go, all right. And it also looks like it's got an extrusion here. You can see that kind of peace coming out there. I don't want to do that whole thing, but we can at least add a couple of edges here and move that in and just grab these bases here and extrude those out as well. Kind of like that. Then what we should do is maybe create this piece right here that's gonna fit on the bottom there. That's gonna connect this tight or or this poll to the gun itself. So let's work on that. I think all we really need to do is take this face right here and move the cursor to it. And then let's create a cylinder. We've got 12 sides here. Let's give it a, um, a cat, Phil Oven in gun. Let's scale it down and let's move it up and scaled in the Z axis. So it's something like this. It's pretty thin, so we want something like that. And then what we should do is grab this face right here and in set it. And before I do that, let's go ahead and apply the scale and then press I and bring these in just a bit so that we can have something to extrude up here. And by that I mean this face in this face and this face and this face here. So if we hit E and extrude those up, we've got something like this. And then we could grab this edge and this edge and kind of move that up just a little bit like that. There we go. All right, So once we put that in place, how big does that need to be? Let's maybe scale it out a little bit like that, Yes. So we've got that. Let's go and smooth it and see how it looks, all right? And then what let's do is add a bolt to that. We need a vote right here. So what if we just once again grabbed one of our bolts here? Let's tap into edit mode and select this one here, duplicated. Let's move it out and split it out with the peaky. Now we can move the origin to the geometry. Let's turn it, let's press rz and I'll hold the control key and turn it in 90 degrees there and then we can hit G key and move it up to hear. Now, does it need to be that big? I guess it's It's okay like that, I guess, and I'll move this in about like that, maybe make it a little bit narrower by scaling in the X. And then let's put it on the other side. Ah, duplicated, shifty Enter. Then I'll press control em and hit the X key to mirror in the X axis and hit Enter and then let's just bring it over the other side. And there it is, and then we can move it in like that. All right, so now let's go ahead and add these to this object Control J. And there we go. Yeah, and we're looking pretty good here. Let's tab into edit mode on this and let's move this up into this piece like that. And then I guess we could delete that in gone face up at the top there. All right, so we're getting there once again, just trying to get the pieces in place. These really don't have to be highly detailed. They just need to be in place because, as I said, they're gonna be really small in the overall vehicle in the overall project. Let's go ahead and bring everything back with all T h just to see how we're doing. Yeah. See, I think those are going to kind of work together with everything else. Yes. Oh, in the next video, What let's do is work on this ammo box here and maybe will add a handle right here. So that's coming up next.
61. 059 Creating the Side Crank: Well, let's see if we have another image of this handle here on the other side. Maybe I'll open this. And I think I've got this one right here. Yes, we can kind of see it from another angle. I think this would be really good toe have on their, um, it looks like it's on the right side of the gun, so let's come over here and work on it on this side. But it also has this kind of panel, this slide in panel here. There's a lot of detail here that I don't think we need, but what we can do is just put a plate on here, maybe with this groove in it, and then put the handle on that. Let's try that. What will do first is just select the gun and let's find a place to put the cursor. Maybe right in here, shift us, too. And then let's create a new cube with shift A mesh cube. Um, let's take the size down toe. No 0.1 Let's try that. Oh, that's very small. Let's try a 00.1. Let's do that. There we go, Um, and then let's go ahead and take the face out of the back right here. We won't need that. So weaken it X and delete faces there. Let's scale this down a bit. Move it in. Scale it in the X and let's place it right on here. There we go. And it looks like it goes all the way down to that part down at the bottom, and then maybe we can bring it up. Well, I don't know, right about to hear Take this and bring it just about all the way back. And it looks like it goes up just beyond this bottom piece right here. So I grab this and move it forward to about right here. It looks like it's got this kind of angled part of bevel may be here, but before I do that, I need to insert the edge loops for this group. Because once I add a bevel to these edges, it will make this face a ningun. It won't be a quad anymore. And edge loops can only be inserted through quads. So if I'm gonna insert some edge loops along here, I need to do it before I do the bevel. So I'm gonna go ahead and press control are and scroll the mouse real. And let's get to in here and I'll and bring that down like that. And then let's add a couple of edge loops. Ah, vertically Here. Maybe I'll take this one and move it. Kind of back to here. And this one, I'll leave fairly far forward. It looks like the groove kind of stops here. I mean, the handle is part of that group. I get that. But just the way it looks here, it looks like the groove ends there. So I'm gonna go ahead and grab that face and inserted in just a bit like that. And then let's go ahead and add those devils. I'll Ah, grab these edges here, rips and let's then, um, apply the scale with control a an object mode. And then we can press control be and devil those back like that. And it looks to me like they lay out a little bit flatter than that. Actually, let me insert a couple of edges here. What we can do is a justice profile to get it to extend back a little bit farther. So I'll shift click in the, um profile field here. And if I drag that back like that, I can kind of angle it. You can see you can even turn it inside like that. But maybe I'll kind of angle it like that and maybe take the width and bring that Bacchus. Well, maybe something like this. There we go. All right, Now let's see if we can place that handle in there. And I think that handle, at least for this one here, looks a whole lot like the handles back here. So I think I'm gonna cannibalize one of these and use it to create this handle. So I'll tab into edit mode. And let's just select this row of faces and all shift, click this row and then press control plus and move these this selection up like this So we get it all the way up to the top, and then I've got to come in and de select all of this. I don't want all of that. So I'm gonna press all Z and then a press, the sea key and middle mouse button, click and drag and de select all of this stuff here and also all of this stuff down here. Let me get that right there. Can we go now? We can take this and duplicate it and move it off of here and split it out as its own objects. So I'll press shift D and I'll just hit. Why toe? Move it forward here. Now let's press the peaky and separated by selection. And then let's tab back into object mode and selected that one. I'm gonna move the origin back to the geometry objects set origin, origin to geometry. And then I need to fill these holes here. You see that? It's from that curved bracket. If we tab into edit mode and go to edge select, we can all click these edges. And if I hit the F key to fill a face, it'll fill it all with one big in gun. So if I hit F, you can see there. It doesn't have any edges to match the rest of the object. So under that controls E. Now I can also press Ault F, and it will fill it cult F, but it will do with tries, which isn't a bad thing. That's one way to go, but then control Z. You can also fill it with Grid Phil and that you can come up here to face and grid Phil and that will fill it with quads. And that's what I want there. All right, let's do that same thing down here. Don't click and let's use our face grid. Phil here and there we go. All right, so we've got that. Let's turn it in the Y r Y 90 And I think I'll probably want to shrink it down a bit and let's move it out here and put it where we think it's gonna go. I think it's gonna go right about like this, and I feel like it's too long and the exile press s X and kind of scale it in just a bit like that. Okay, so that's kind of where it's going to go. I think, Well, I better move it back a bit. Maybe right into here, and maybe a little bit higher like that. Okay. And then I think I need to create a cylinder here to connect it with and then be able to extrude off of that cylinder down into here. Let's give that a try, See if that works. so I will tab into edit mode. And I'm just gonna select that one point there in the center something like that, and move the cursor with Shift s two. And that's where that new cylinder is gonna be. So shift a mesh cylinder. Um, let's take the cylinder down to 12 sides and let's try. Well, let's try 0.1 and 0.2 Yeah, that's pretty good. And then, well, we could leave it with Annan gone. Let's do that. I'll spend it in the Y R Y 90 Scale it in the X with S and X and let's move it back. Ah, something like this. I'm working on this piece right here. So I think maybe that's OK. Let's now grab this one face and let's inset it. I better apply to scale here. And then let's hit I and inset this like that. What's then extruded out? Put it into their and then let's delete that face X and delete bases. Okay, so we've got that there. Now we need to extrude it down. So if we tab into edit mode and select these faces here now, we can begin extruding this down to get this shape here. So I think all I need to do is just extrude and pulled down in the Z that I'm gonna scale in the why like this. And then I will extrude down again in the Z and scale back out in the why again like this just to give it that kind of play around. And then let's do that one more time down here and s and y and scale that out like that. So, yeah, we've just got that basic shape. I think that's all we need there. And then we probably need some sort of a cylinder in their to ground it to the rest of the gun. I feel like it needs toe come up just a bit. Let me bring that up just a bit like that. And then let's ah, find a place in here. Let's just grab this edge and move the cursor to it. And then let's create a new cylinder. And with this I will spend it around the why are y 90? Let's scale it down and let's ah, scaled in the X, bring it in there. And then I feel like they're just needs to be one little thing out on the end here just to give it a little bit of visual interest. So it isn't just a plain cylinder. Maybe I'll bring it up a bit to like this. So if we select this may be what we can do is ah, extrude and hit s and scale out extrude and pull forward and then hit I and inset in and then extrude forward like that just to give some sort of little detail there. So it it doesn't look quite as plain Ah, I think that's probably pretty good. Let's now combine all of these. Let's take this and this and this and this. Join it to the main gun. Let's shift click that press Control J and that will add that. Then, with all that selected, I'm gonna go ahead and hit shades smooth and turn on auto smooth. And I think that's looking pretty good. We could probably scale up just or increase the degrees just a bit like that. Yeah. There you go. All right. So we've got that piece in there. I feel like that this piece right in here needs to be a little bit higher. Right in there. There we go. Okay, so we've got the handle. We should probably turn it a bit. It's a little bit too perfect. Straight up and down there. Let's move the cursor to here. And then what let's do is just select this in this and this. And let's change our pivot point. I'll hit the period key and change to the three D cursor. And now we can press are in X and kind of turn it one way or the other. I kind of turn it board like that. I kind of like that. I feel like this could be a little bit smaller here on top. Let me hit the period key and go back to median Point. Let me scale in the X. Bring that in just a hair. Yeah. Okay. And also, we could add this. I'll select Thies to impress control. Jane, add that it shades smooth. Yeah, that looks pretty good. Me drag forward just a bit like this. Did that ruin anything else? No, I think that's pretty good. All right, so we've got that handle on. Now what let's do is work on this ammo box in the next video
62. 060 Modeling the Ammo Box: for the ammo box. Let's see if we can find another image in there again. Um, we really don't have another one DUI. It looks like that's about the only one we have. So this is the side. It's supposed to be on on the left side, but all we see is that connecting piece. So we're gonna have to going to go from this and kind of wing it. So let's do that. Let's see if we can kind of wing it here. What I'm gonna do is extrude this piece out of these rims on the on the post here, so this could be one of them here, go ahead and take these faces and press Ault s and kind of move those back in. And then let's create another one of these things. I'll create to edge loops here and let's move it up. And let's say the other rim is gonna be right about here. So if we all click between two of the faces and then press e and enter and the no press ault s and kind of pulled out just a little bit like that, Okay, so now we have those two rims there. Now we need to extrude out and get this rectangular piece right here. So let's try that. I'll select some of the faces here, maybe four, and these faces here. Then let's extrude those out. Well, press Ian X and bring those out a bit, and then I want to flatten them s and X, And let's flatten those like that. I'm gonna need another edge loop for that. So what I could do is just extrude these out. So I'll bring them back a bit and then hit E and X and then bring these out like this. Let's flatten these up S and X that and then let's go ahead and bridge these edge loops. So if we select these faces up here like this and these faces down here, then we can press control e and bridge edge loops. And there we go. So we've got that piece now, that part right there, we've got a problem with this bolt, and I don't think we're ever gonna fix that problem. So let's just delete it. Here we go. And then we need this little piece coming out right years. Let's see what we have for that we don't really have anything for that. So let's go ahead and create too edges here. Maybe one up top like that. And the other one I'll pull down in the Z to about right, dear. Something like that. And then let's just grab these two faces here and extruded them out. I'll go ahead and delete those faces there. All right, so there we've got that piece. Now we need this kind of box holder here. This thing here. So I think what we need to do is just create a cube and then cut out the parts that we don't want. So let's try that. I will ah, select this edge right here and move the cursor to it. And then I will go ahead and create a cube right here. And I think what we need to do is just, um, scale it in the while. Let me. Actually, I'll bring it back to where it should be right around in here. And let's scale it in the why, yes. And why then? I think maybe I'll make it a little bit wider than that post there, and ah, Then let's grab a face here. And let's pull it out like this and it needs to come down Oh, about like this and maybe come out a little bit more like that. All right, let's give that a try. Now we need toe insert some edge loops to be able to cut this out. So let's tap into edit mode, and I'll insert an edge loop right down here for this part. I'll also insert an edge loop kind of up here. I see a a place here where it kind of goes in front there. And, um, what let's also do is go ahead and split it in. Mirror it. Let's do that. I'll add an edge loop right down the center here. And then let's press all to click for these and let's select these faces as well. And let's delete thes, and then we can mayor this over at a mirror. Modifier here will merit in the Y axis here, and we'll turn on clipping and turn on the edit cage on the other side. Now we're kind of intersecting with it here. So maybe what I should do is grab this face and pull it back just a bit. And once again, this is just us adjusting things as we ADM or Objects MAWR details, and that's fine. So now with this, like in tab into edit mode, and I can use the knife tool to cut this basic shape out so we can remove that. So I think what I'll do is hit the K key to go to the knife tool and then I'll just hover over this edge and click and I'll come down here and hover over this edge and click and then I'll hit, Enter and there we go. There's one edge right there and since we've mirrored it over, it's the same on the other side and in the front. I think what we can do is hit the K key again and go maybe from here. Here, let's try that. There we go. Now we can do is take all of these faces here and let's just delete them thes up top as well. Ex delete faces And there we go. So that's the basic shape of that. Now let's go ahead and add a solidify modifier to it. I'll go ahead and apply the scale and let's come up here solidify, and, um, it looks like I should turn on even thickness and let's click and drag in the thickness field. I'll try and make this a little bit thinner like this. Maybe something like that. There we go. It looks like I could take this and move it back in rights like this edge and kind of move this back and here, like that. Okay. And then we just need to add kind of a cube into here to sit in the box. So maybe I will take ah, on edge down here. Maybe maybe I'll select this edge and move the cursor to it with shift us too. And then let's create a cube right here. Let's kind of put this in here. That skilled in the why scale it in the X and we go and let's bring it up a bit. Think I need to bring this up So it's just above here, maybe something like that. And then also, what I could do is just add a little bit to the top, as if there's a lid on top. You see that edge right there? Maybe What I could do is just do this and then what we could do is bevel this We could press control be and bevel this this we don't need all those edges. So take it down to one. And then with these faces still selected, we could hit B and enter, and then we could just scale in. So I'll hit s shift, dizzy to only scale in the X and the Y and push in just a bit. It looks like I could scaling the y a little bit more like that. There we go. So we have kind of an edge there. And lastly, what let's do is put a handle on it. Let's come up here on top and let's select that face and move the cursor to it. Let's create a cube. And for this I think what I want to do is just get rid of this face, this face and this face this man, let's just scale it down. Bring it down here, get s and y and bring that in like this. Ah, let's scaled in the Z, even the ex a bit. All right, so we can put it there. Ah, let's go ahead and apply the scale because what I'd like to do is grab these two edges and press control be and devil these out like this at a few that let's take the profile of back 2.5 and then let's also add a solidify modifier to it. Give it a little bit of thickness and I'll bring that back like that about their Let's say , there we go. Okay, so now we can take that peace, that peace that this and the gun join them all together. Control J Oh, look what happened. Let me tab into edit mode. When I did that, the mirrored part of the box holder went away as well as the solidify modifiers for the handle and that piece. So let's undo this. Well, let's go apply those before we join them together. So for here, I'm gonna bring this solidify modifier up to the top of the stack and then I'm gonna click , apply here and then apply the mirror. And for this, I'm gonna go ahead and apply the solidify their Now we should be able to take all of these pieces and let's join it to the gun control J. There we go. Now let's go ahead and smooth it and yeah, that looks pretty good there. Okay, so let's go with that. There we go. I feel like this side is kind of empty. We need something in there. Maybe we could add a slot here, and that might help. And maybe a piece over here. Well, at least let's work on this here. Let's just add a slot here. Um, looks like we've already got an edge there that we can use. Let's maybe at an edge over here and let's had to right here. What's scaled down in the Z and just grab that face there and extrude in. There we go. We've got something. They're of interest. All right, let's take a look at it here. What do we think? Yeah, I think that's looking pretty good. We've got some details that give it a little bit of visual interest up there. I think maybe we should put something like this down there in the back. It feels a little empty to me back in here. So maybe in the next video, let's work on creating this brace here. And then hopefully that'll be enough for the gun. There in the turret
63. 061 Beginning the Gun Support: So, as I said, I feel like there's a little bit missing in here like it's kind of empty, and I think I'd like toe try and recreate this thing, and I don't really have another picture of it. Let's press control space bar to enlarge it. And there's a lot of detail that I just can't see and that we don't exactly want for a low Polly model like this one. But I think we can put in just some basic shapes and once again kind of trick the eye into thinking there's more detail than there actually is. So I think I want to create this plate here and maybe some sort of cylindrical thing going through here on the bottom. I need this with this cylinder here, and I need these braces on either side. That's kind of triangular brace thing and this cylinder here, And I think if I get all of that in there, it will maybe fill that space and be at least kind of believable. Let's give it a try, Um, so first of all, I think let's go ahead and create this thing, this plate, since it's connected directly to the gun there. So once again, I'm gonna hide. Um, the things I do not need some to select. Ah, all of this. These. Oh, what else do we need in here? Looks like the's air. Still their own piece. I could grab these. So I'm just kind of bringing in the things that I feel like will help me get a sense of the scale and proportion of these things. Oh, I think maybe this here. There we go. All right. And then let's press shift h to hide everything that is not selected. And let's begin with this. So right down here, I'll Ah, bring the cursor to this area right there. And let's create a cube shift a mesh cube, and we don't need it. Two meters have outpoint one. Yeah, that helps. And let's ah, scale this down and put it in place. Maybe we need it, Um, about like this. Let's try this. We need to scale it in a bit here, So s and X like that. Um, I think I want to move this back just a bit. So it is about the same length as that piece that we extruded off earlier. All right, So there's that basic piece down here. I think we could maybe bring this down like this. Bring that face down. And then if I extrude to get some of this shape down here, Sophie, it e and pulled down. Now let's do is go toe wire frame and Vertex Select and all Border Select. Save these points here and pull him in. You can see how there's kind of an angle here at the back, so I'm trying to get that. And then there's a bit of an angle up front, I think. So. Let's pull that back like that. And then now that we're here, we could probably bring in these cylinders right here. Let's try that shift a cylinder year. Let's take it down to 12 sides. Um, maybe we want it to be. Well, let's try 0.1 and 0.2 There we go. Yeah, that's pretty good. And then let's spend it in the why are why 90 And let's put this down. What do you think down here like this? All right, let's see how it looks in solid mode. Um, the the size actually isn't bad. Maybe I'll bring it over here and put it about like this. Now the question is, do these holes go all the way through? And if they do, do I care? Well, let's go ahead and select these two faces here and delete them. Yeah, let's go ahead and add a solidify modifier So the whole goes all the way through even thickness. And let's drag the ah thickness field to something like that. Let's do that. And the problem with that is I've got this year. So with that, I need to move it out. Some like that. There we go. So then we can just take this and move it over to the other side. Ah, here we go. Shifty X, and I'll move it over about like that. Okay, so we've got those in. We go back to solid view there. Now, we've got a little bolt here, and usually I wouldn't worry about that kind of thing with this kind of peace. But high C one right here. I mean, it's right there. Why don't I just grab this duplicated and hit why and then hit P and separate vice selection? Now it's grabbed that and move the cursor to it. There we go. Or the origin I should say. And then let's hit control three. To go over to this side and let's move it over and kind of put it in place right in here. So I mean, it's an easy thing to do, since it's just right there. So I'll go ahead and do it. Let's Ah, duplicated and move it over to get a sign, then will spin it around with RZ 1 80 And we'll put this right over here like bad. Okay, so we've got those pieces. I feel like there's ah, piece right up here that we could kind of extrude out. Let me Maybe if we took this right here. Let's just take this base and this face and let's extrude that out just to give it a little bit more detail. I'll hit E s ex and kind of pull those out just a bit like that. Yeah, just to give it a little bit more there. Okay, Now, what we should do is place this cylinder and kind of maybe try and put a bracket around it or or something. Let's Ah, let's see what we can do here. Um I move the cursor to here and let's bring in another cylinder. I'll turn it in the why and let's take a look at it from the side here. And if I bring it down well, it looks like it's back here. Bring it down and put it right in here. Let's say and then Well, I kind of want it right in there. I think, Yeah, let's put it there. And then let's scale it out S and X and it goes kind of outside that area there. Then what we need to do is put some sort of bracket on it to ground it to this piece. So let's select this and take a look at what we might be able to do. I think what we could do is insert to edge loops here and scale these out like this, and we've got an edge here. Maybe if we added one more edge right over here like that, then we could take this whole thing. I mean, select all of these out here. We could take this whole thing and extruded down, Let's do this, E. And I'm just gonna pull it down to about here and then we could use the bevel tool to kind of round it out. So it's kind of the same shape is that cylinder? And actually, what I realized is I don't want all of this in here. Let me undo this. Let me undo this back to here. And what I want is just these. I don't want everything in the center there. I just want those two. So let's do that again with these two like this. There we go. And then let's apply the scale. And now, if we select these edges here like this now we can go ahead and hit control be and bevel these so I'll press control be and I'll move the mouse and then I'll scroll the mouse wheel . We can add some edges to that by scrolling the mouse wheel. And maybe we could do it about like this. Let's try that. Yeah, so that gives us a nice kind of bracket around that cylinder there. Okay, so now that we've got those in, let's work on this kind of triangle bracket here. I'm not sure what that is. Kind of a brace that seems to be connected to this post here and I think this thing is just to help the soldier move it around easier. Since maybe all the weight is back here. I think that's what that is. Um, so it needs to be connected to that post. So if we take a look at that, it looks like it's got kind of ah, an angle and flat pieces on the front and back. So let's take the cursor back down to the grid with Shift s one. And then I'm gonna create a cube down here and I'll hit the period key to go down here and let's scaled in the X and let's scaled in the Why with S and why Something like this. And then I think what we need to do is add a couple of edge loops and pull the front in the bag. So what I'm gonna do is all add an edge loop right back here, like, Say it like this. Then what I can do is maybe press all Z and I'll hit the three key to go to face selected on border. Select all of these. Now what I'll do is just pull him this way like that. All right, Now let's do that kind of again up here. But this time, well, let's do is just take this edge loop and let's just pull it back this way like that. All right, so we've got that basic shape there feel like it needs to come out a little bit more down here. Let's do that. Maybe bring it this way. Some. All right, so there's that piece. It looks like it has, ah, curve at the bottom here. And maybe there's one in the tops because it's gonna go up and down or hinge at that point . So let's go ahead and come in here and select these edges right here. Oh, I better apply the scale. Let's like those edges and these edges here. And once again, we'll do the same thing. Will hit control be, will move the mouse. And then we can also scroll the mouse, wheeled, add or subtract edges to that. There we go. All right. That looks pretty good. So let's take that up and see what we can do with it. I will, uh, g and move it up here. Let's scale it down quite a bit. What about the right size maybe, And let's put it here. And then I think we need moved to one side. Maybe something like that. Let's see, Let's take this and spin it down. So if we grab this face here, looks like I couldn't move the cursor to that point there. And then I'm changed from median 0.3 d cursor with the period key changed a three D cursor , and now free press are and exit will rotate at that point. So maybe down like that is that Ah, it looks like it may be too big, though I think I need to scale it in some. So let me undo this, and I'll just hit s and scale in and then our necks and let's bring that down like that. So it's gonna angle it still doesn't it seem like it's gonna angle? Quite right. So let me undo this. It s and scale in S and Z and make it a little bit thicker. Now, let's try this our necks and all Spin it down. Yeah, I think that looks pretty good. So that will be angled like this. I think that will be OK. All right, let's go ahead and mirror this over. I'll move the cursor to the center of the grid with shift s one. And I'll change my pivot point to the median point. A move that origin now to the three d cursor. And I'll come over here and at a mirror modifier. So there we go. There's that peace there. All right, so in the next video, what we want to do is create this piece here and the cylinder here, and then we're gonna have to create some sort of connecting piece to kind of ground it to that post. We'll work on that coming up next.
64. 062 Finishing the Gun Support: to figure out where we're going to put this still under here. I think we first need to create this one and place it here. So let's go ahead and do that. I'll hit the three key to go to the side view and let's tab into edit mode. Oh, let me turn on the Edit cage here so I can select this face here, move the cursor to it, and we'll create a cylinder. Here. I'll press are y 90 And then what let's do is bring this. I'll press control one. Let's bring this into the center here and I'll press S and X and let's scale it out now This, too, seems tohave. Is that a bolt yet is so There's a bolt there that we could use that same thing again. To do that, though, let's go ahead and delete these faces over here. We won't need those right to do that. And then let's, um, scale in the X and bring these inside so we won't see that. Then what let's do is bring in that bolt. I feel like that cylinder is a little bit thick. Let's, um, press s shift X to just scale in the Z in the UAE and I'll make that a little bit thinner. There we go. And then let's grab that bolt. Here we go. There it is. Duplicate and pull it out and bring it down and put it in here something like this. Maybe scale that up a bit And let's move it and put it right in place here. Yeah, so that I think that it worked. Let me make it a little bit bigger. And then what let's do is just press shift d x and move it over to the other side rz 1 80 and we'll put it right over here. Okay, so now that we've got those in place, we can now create this cylinder that kind of angles from here down to their So let's give that a try. I think I'll place the cursor up here right here, and then let's create a cylinder up there. We will probably need to make it a little bit bigger, right? S and Z, maybe I'll scale it down so it's a little bit thinner and then let's bring it in here and let's turn it. Then I'll change to local transformation orientation. I could do that with a comma key, so I'll just change to local here. Now I can scale in the Z and it'll extend out like that. I kind of want that right up in there, right up, actually in that cylinder there to do this and then we need to turn it so it then rests right on this cylinder here. So I think what I should do is come up here and move the cursor one more time. I'll press all Z tab into edit mode and select that one face there. Move the cursor to it with shift test too. And now what we can do is pressed period and change our pivot point to the three D cursor. Now we can rotate it around the X at that point. So if I press r and X, I can rotate it up and down and we can move it until it just almost intersects with that cylinder right there. There we go. Actually, I may need to pull it out just a little bit more, because now that I take a look at it, it looks to me like and I could be totally wrong on this. But it looks to me like this part down here is thicker than this part up here. Somehow, somewhere, this gets to be a little bit thicker. And if I do that, I'm gonna need a little bit more space there. So what I want to do then is maybe tab into edit mode and create on edge right in here. And then let's press Ault and click here and then also selected this face there. And what I want to do is hit e and enter. And then I want to fatten it out a bit. And to do that, remember, we press Ault s I kind of a little bit too much there. I don't want to that in that out just a bit like that. Yeah, something like that. Okay, so now that we have that, we need to kind of connect it. So we need to connect this piece to this post here, and we also need to connect this up here to the Post. I think what we can do is grab this cylinder and move it over here or duplicated and move it over here like this, maybe scale it down up. I still have my pivot point at the three D cursor, so I'll hit period and eight to change that back to the median point. Then I'll scaled down a bit and kind of put this in here like that. So how are we going to get Thies to connect up? I think what I'm gonna do is basically do the same trick I did up here. So if I select this piece and I insert a couple of edge loops in it, let's say I tab into edit mode and press control are and let's do to edge loops here. I'll go back to global orientation with the period key on global no press s and X and kind of move this out like this. Now, I'm not exactly in the center here, but that's OK. I can kind of move these over like this. There we go. And then what I'll do is take just two faces. Maybe something like this. Yeah, and let's just extrude these out it e and pull him out like that. And then what I want to do is once again bevel these edges. So I'll press control a and apply the scale. Then I'll select this edge and these edges here. And then let's press control be and move the mouse and scroll the mouse wheel to add edges . If we need. And maybe something like this. Let's try that. Yeah, so that kind of connects that up there. Now, the next thing we need to do is figure out this guy up here. This thing needs to be connected to this post. And I could try the same thing that we just did offer that post. But I kind of remember that we did this. Ah, sometime before. So let's bring back the rest of the vehicle here. All press Ault h two unhygienic anything and then, yeah, right down here. There's this guy me tab into edit mode and slicked this thing here. There that I could use this on that post. So let me select this loop of faces and then press control Plus, and we'll extend that out to there. Now let's duplicate this and hit ex and move it out. There we go. Now it's hit p and separated by selection. And then if we select this, we also need to remove that mirror modifying right so we'll do that. And we can move the pivot point or the origin back to the geometry. Let's do that. Now we can take this piece and move it up and put it in place and see if it'll work. Ah, let's press rz 90 and let's ah, bring it up here, see if this will work. Scale it down. Put it right there. And now where did it go? There it is. So we need to bring it in from the top over here. Let's grab that and move it over. And I think we could maybe move it right about two there. Let's see how it looks. So there we go. We've got that in there. It's connected with the poll here. Let's also scale out in the X kind of make it a little bit thicker there and maybe even scale it up. Just a hair like that. Yeah, I think that it probably work now. The last thing I can see here that we definitely need is this little piece right here. That cylinder. I think we can just extrude that off of this. So let's press control are and create two edges here um I feel like we should move these up , so I'll hit G two times to slide that edge up. All click this edge and G two times even slide that down like that. Maybe about there. So then we have this loop of faces that weaken extrude it e and enter, and then press Ault s to kind of bring those out like that. Something like that. Let's say yeah, I feel like it needs to be a little bit thicker, though. So maybe what let's do is grab these faces down here. And if I then changed to local transform orientation, they'll hit the comma key and go to local. Now I can pull it down in the axis of the object itself and maybe we want it. I don't know, something like that. Let's try that. So I think we've got the pieces in there, just the basic pieces that we need. I feel like now that I've been tumbling around this for a while, that this ammo box just feels too small. I don't know. Somehow this just seems bigger than this. Um, what I can do maybe is tab into edit mode and just select the box and the bracket and maybe the handle. And let's just scale it up and see what happens if I just scale it up like this and then bring it out. Um and then maybe I could move it back. So it's kind of in line with the front, but it kind of sticks out the back. I don't know. I'm not sure. I just felt like it needed to be a little bit bigger for some reason. So let's let's give that a try. Yeah, it just makes it a little bit. Be fear for some reason. Yeah. Okay. Now what let's do is let's add all of these pieces to the gun object itself. So I select this and this this and these bolts and just going to go through and select everything here, This piece, this thes the's small bolts here, just everything we've added so far. Oh, and this piece right here now I'm just going to select the gun shift. Click that and press control J. And look what happened. I forgot to apply a modifier. We lost our mirror there. So let me press control Z and he disliked that. Apply the mirror And now that I think about it, I also had modifiers up here, didn't I? This solidify. Let's apply those two. Yeah, let's get those done. Is there anything else that would need a modifier applied? I think that's it. So I'll go through again and select all of these and then we'll apply or join all of that to the gun control J. And let's go ahead and apply the shades smooth again. And we can play with the auto smooth here and see if we can get anything any better. I think that's pretty good. I can move it down like this. Let's see how that works For everything else. Yeah, I think that kind of works like that. There we go. All right, so now we've got the gun kind of placed in there. I think what we should do now is begin working on the surface details of the cab. So if we go over to I don't know, one of our reference images here. Maybe this one. Let's say let's take a look. Control space. What we have is we have a lot of pieces here coming off of the cab. So the rear view mirrors here. The hinges. This I don't know if we want this camera thing. This this piece right here. These these pieces which look like lights to me. This here, this cylinder with the extrusion coming off of it. All of this. We need to kind of figure out how much we need. I mean, we need the door handles. We probably need the hinges. We need the rear view mirrors. Um, and we need to kind of figure out how much more we need of the details on the cab here. So in the next video, we'll begin working on that.
65. 063 Beginning the Rear View Mirrors: probably the most prominent detail on the cab here on the exterior of the cab is the rear view mirrors what we work on these. I'll see if we can find another image of this. This is pretty good, but let's see if there's a at least one more that we can work with. How about this one? This. Ah, number 13. Let's try this. Zoom in here. Yeah, that looks pretty good. So I think these air two good examples of it, this one's probably a little clearer. So maybe we'll use this one the most. There are some details back here that I don't think we need. But generally speaking, the tubes here and the two mirrors and then these cylinders here, I think all would be good to have here on the vehicles. So let's first clean up the outline, er, a little bit. Let's ah, see what we have here. Well, not a whole lot. You could take thes and move them up into the vehicle. Maine like that. There we go. And then So let's see what we have. We've got the wheels, yet they seem to be in the proper place, and the vehicle Maine, right, And the chain. So, yeah, I think we got everything in place there. Let's click on the top seen collection here. And ah, I think we should probably begin this with a path and create a tube from this the way we did the tubing down here on the steps. So let's go to the front view here. And I don't think I need the reference images right now. Thes air good. But they're at an angle, and I'm afraid that will kind of throw me off. If we take a look at the top view, you can see they're here at an angle. So I don't think I want him here while I'm creating it when we go to place it. This, of course, will be useful. But I think for now, going to turn off the reference images here. So now Well, let's do is just press shift a and let's go to curve and create a path. Now let's take that path and just move it up. And I think I'm just gonna move it up kind of right over here. And what I want to do is use this right here as the bottom of the tubing here, and then I'm gonna extrude up and over and back for the rest of this shape. So let's tab into edit mode and I'll de select and I'll just select this point right here and let's extrude up. I'll just hit E and Z and will pull up a bit and you can see the curve happening there. That's gonna be this curve here. We can take this point and kind of move it in like this and used these two points to get the shape of the curve that we want here. So from there, let's go ahead and continue to extrude up. I'll hit E and Z and pull up here, and it's we're not going to really know exactly where we want things to be until we get all of this in and then we can select points and move them around. But for now, let's go up Teoh to about here, and I'll hit E and Z one more time because as you can see down here, this curve is really created with three points. So if I create the two points here, then I'll extrude off in the X axis This way. So it's it e and X. And then let's move it over here so something like that. So we get kind of a nice curve there for the top here. Then let's hit E and ex and move over here. Then I'll hit Ian Expo more time and then Ian Z and pulled down for this curve right there . Now this is at an angle, so I better kind of pull this out. Some like this and then let's hit E. And I'll just pull this in this direction here like that. That's hit E and pulled down to here and then e and I'll go this way and then let's hit E and X and go ahead and pull all the way over here. All right, so how did we do? Well, not too bad, but I feel like there's some places that aren't exactly proportional to what we're seeing over here. First of all, I think I want to grab this entire thing here and pull it up a bit, right? So we have a little more space between these, and then let's take a look at it here again in object mode. I think we could probably grab this point and move it over a bit. Maybe move this one down a bit. There we go. Then maybe, let's try Border selecting these points and maybe moving them over just a bit in the X like this. Let's try that. Yeah. Okay. I think, um, I think that's pretty close. I think that's what I want. So now what we need to do is actually make a tube out of this path. So we're gonna need to get to this panel down here. Let me kind of scrunch these up just a bit here so we can see this panel a little better. Um, let's scroll down and down here. Under bevel, we need to increase the depth. So I'll click on this and maybe hold the shift key down. And let's try and get it about the size that we want. Felt like that. Maybe. And maybe a little smaller. Let's try that about that. There we go. Now we need to deal with the resolution. So currently, if we come over here, let's see how Maney sides we have here. We've got quite a few. If I hit the Z key and go toe wire frame. You can kind of see how maney sides we have. I take the resolution down to zero. We've got four signs. If I take it upto one, we've got six. And if we take it up to, we've got eight and I think eight looks pretty good. In addition, we need to deal with all of these edges in here, and that's just too many. We don't need all of this. So that's controlled by this resolution preview you up here. So let's start taking this down and see how far we can get before it completely breaks down and quits looking like a curved object. And, well, here's Ah, here it is at one. So at one that's too much or that's not enough, I should say so let's take it up to two. Still could be a little bit better on this curve. Here. Let's take it up to three. So you know that's probably about the minimum we could do and still have it look fairly good. Yeah, let's let's let's go with three on that particular field. When we actually convert this to a mesh weaken, go in and remove some of these edges just dissolve edges the ones that we don't actually need in between the curves. So we can do that too, to reduce the polygon count. So let's go ahead and convert it to a polygon and and work on that. With this selected, I can right click and choose convert to mesh and that will change it from when we hit the tab key here, change it from a path two polygons. So let's go ahead and right. Click and click. Convert to mesh. Now, if we hit the tab key, we can see we've got our polygons here and here is where we can go in and begin removing some of these edges. We don't need all of these, so let me just ah, maybe grab these and see how this works. I'll hit X and dissolve edges. Yes, so that's pretty good. We could probably dissolve some of these in here. Let's try this and I'm trying not to get too close to the curve because I do want that full curve and that transition into straight there and in here it looks like we could take a few out here. So let me grab this one. This um I think I'll leave the rest there. Yeah, All right. So there we have that main tubing. Let's also go ahead and add this tube right here. So if we, um, tab into edit mode, I think I'm gonna need another edge in here ultimately. So I'm gonna put an edge right there, and then I'll go ahead and select this edge. Turn on my move, gizmo. And then let's put that cursor right there between those two. Now, we should be able to create a cylinder right here. And what do we do? We did eight sides on this tube, didn't we? So let's go ahead and just create a cylinder with eight sides and let's make it so it does not have a cap Phil here, and I'll take this down 2.1. And there we go. OK, so now we scale this down a bit. We could probably go something about like this, I think. And get this piece right here. So is that in the the right place, though? I feel like it needs to come over this way a bit. Yeah, something like that. So now if we take this and shift, click this. And then we can press control J and join them together. Let's go ahead and smooth. Yeah, that looks pretty good. All right, so we have the basic tubing there. What I'd like to do to is get this piece right here. It kinda goes from tube to flat. I think we need that for the connection to the hinge. We aren't gonna create all this detail for the hands, but I think we do need that little flat piece to kind of connect it to that. So what let's do is take Ah, these edges alters, click and all shift, click, and let's move them over here. And what I want to do is take these edges here, moving back just a bit and then collapse him down. So if we tumble around here now, if I hit S and Z currently, this is what happens, right? We don't want that. What I want to do is collapse them flat individually. So to do that, we can come up here and go to individual origins. Or, of course, we can hit the period key and choose individual origins here. Now, when we get SNC, they each individually flatten up like that. And then what Weaken Dio is extrude amount e X like that Now we've got those pieces that can be connected onto that hinge. So what I'll do here, we probably will need to close these up. So let's take this edge and this one and this one and this one thes four edges here. And let's use that grid Phil again, Let's go to Face Grid, Phil and that will grid feel that whole thing giving us four sided polygons? So that's kind of nice. Let's do the same thing down here and we'll take thes four edges. Go up here to face grid Phil. There we go. All right, so now that we have that tubing, what let's do in the next video is work on creating the mirrors here, and these little cylinders that connect them to the tubing
66. 064 Continuing the Rear View Mirror: to create the larger of the rear view mirrors. Let's Ah, go back to that front view myth. The one key and what I'll do is just select this loop of faces and then I'll move the cursor to it. And let's bring in a cube at that point. So I'll go to shift a mish cube and let's now maybe scale it in just a bit. Um, until we get it about the right with maybe about like that, and then let's press S and Z and move that up like this, and then it looks like it's a little bit higher. So I'll just move it up a bit like that. Yeah, maybe something like this. All right, so maybe it's about that big. And now we want to come around and make it a little bit thinner in the Why s and why. And we go and let's move it forward. All right, so I think that's the general shape of it. We're gonna need to bevel the edges. But before we do that, let's bring in another image here I saw a little bit ago, I think in this number seven here, let's take a look at this and yeah, here we go. So it appears to me that there's kind of a slight curve to the mirrors here. You can kind of see it there, so I want to get that. So let's go to this side view here. And if we tam into edit mode, let's insert maybe three edges right in here. And if I grab this edge loop and pull it out some like that and then all to click this edge loop and all shift, click that one and pull those out not quite as much, but something like that and get kind of a curve in that mirror. And I wanted to do that before I beveled the edges, because once you bevel the edges, you lose your quads, your four sided polygons and recall you can only insert edged loops through quads. All right, so now that we've done that, let's go ahead and do those devils. And to do that all, of course, apply the scale and then let's tab into edit mode and select these edges right down here and here. So the four edges and what let's do is let's press control be and pull the mouse. And while we're doing that, let's also scroll the mouse wheel so we can kind of add a few edges in here. So I think I think I like something like that and then trying to find the right wit for these kind of pull back and forth and for mine. I think I'll kind of go like that. Let's try that. And then what I'll also do is select these edges here. And I'm gonna scale out in the X with S and X and kind of pull out just a bit. And then I'll take these and I'll pull him back in just a hair. I just want a little bit of a bulge like this. You can see the curve around the sides there. Something like this. Just a tiny bit. All right, so we have that basic shape. Now let's work on the mirror. It looks to me like we've got a bit of ah, rim here and then the mirror part. So to do that, I think what we should do is select these faces here, and we've already applied the scale. So I think if we hit the I key Teoh inset, it'll give us a fairly even rim there. There we go. So now let's extrude in. I'll just push in just a bit. Oh, and while we're extruding, I see that we've got the local transformation orientation on. It's pretty much the same as the global. But I'll go ahead and switch to global here, and then what let's do is extrude and push back out just a little bit like this. And then I'm gonna scale in hit s and just kind of scale in like this. Now it's also work on the back. And as I said, I'm not going to get I don't want to try and get all that detail in there. That's a little too much for such a small item on the vehicle. So I'm what I'm gonna do is I do wanna select these and inset thes. I don't want to add extra edge loops through here because because it's gonna throw off the shape of it a bit. But what I will do is inset this kind of to this point, although that we may have crossing edges. If we go too far, we may have to insect and then scale. So let's try it. Let's hit I and you can see if I go too far. See how it begins to kind of collapse over itself. If I go into about all going to about year, let's say then I can scale in. I'll hit s and kind of scaling like that. You can see even though I go away in, they won't collapse over themselves. So maybe I just want to go toe here. And then I think I want to flatten this. So I'm impressed s. And why flatness up just a bit and we go and then I'm gonna extrude out and scale in. So let's hit E and pull out. And I'll maybe scale in like this. Let's try this. All right, let's see how we're doing here. All right, So let's go ahead and smooth it. Object shade. Smooth. Let's see what we can do with it. I'll turn on auto smooth and let's drag up and down and see what we can do with it. So there it is with no with, um, zero degree angle there and then let's bring it up, bring it up a little higher and just see what happens. So if we go over 90 degrees, we get kind of a nice feeling of a curve around that trim. You know, there's kind of a curve there about back here back here. It's kind of ugly, though, so I'm not sure I want to do it that way. Let's just try this. Let's take this edge and let's try marking it sharp right here and see what happens. All right, that's interesting, but I'm not sure I like it. Let's Tab back in and I'll select that edge and press control E and clear the sharp. And another thing we can do is kind of used these points to get a circle here. I don't know if this is gonna work, but let's try it. I'm gonna click on these edges, select all of these and let's make thes circular. If you recall, we added the ah Loop Tools package here, or the add on weaken, go to Luke tools and go to circle and click, and that will create a circle out of those points. Now we can scale this back down, so it's kind of like this. Let's see what happens there. Yeah, I'm not crazy about it. Let's move it down below 90 degrees and see what happens. Actually, that's not too bad. It's not bad. Actually, I think I may go with that. I kind of feel like this would be a nice thing. Toe have bore the circular pieces, the things that are gonna connect it to the to the post. We could also try sharpening that edge and see what happens. Actually, that's pretty good. That gives a sense that there's something going on there on the back without having to create a whole lot of polygons for all that detail there. I may try that I may I may go with this. Let's take this up above 90 and see what happens. Yeah, I don't like all that, but if we keep it just below 90 like that, that's not bad. So, as you can tell, you don't always know exactly what you're gonna need as you create an object. And as we've been moving forward in this course, I've taken to experimenting mawr here on camera rather than having it all planned out. Every single video and my hope is that this will encourage you to do that as well. You aren't going to ever know exactly what you need to do for every project all the way through. But that doesn't mean you can't just begin and test and try and see what works and what doesn't. So in the next video, let's go ahead and work on this other rear view mirror and the two connecting pieces.
67. 065 Finishing the Rear View Mirrors: to create this smaller mirror. I could just duplicate the larger one and move it over. But I think if I scaled it in that way would look a little strange. And it doesn't really have the same detail on the back. So I think I'm just gonna begin fresh and create a new cube for this one. So let's just press shift a and bring in a cube. And of course, I've somehow placed it in the vehicle. Maine. Let me bring that out and I'll hit em and move this up to the scene collection here. Now hide that and select the scene collection again. All right, so now let's Ah, go ahead and scale this in the UAE down like that and let's move around back here with the one key and I'll just move it over and it looks like it's ah placed right about Oh, a third of the way down here. So maybe I'll goto wire frame and let's ah kind of place it where we want it and then scale it in the Z and maybe the X and just kind of get it where we think it should go. Maybe it isn't quite that big, actually. I mean, bring it down. Some like this, it looks like it's Ah, a little closer to the big mirror than the tubing here would suggest. I may be able to tap into edit mode here and grab this part of the tubing and kind of move it over just a little bit like that. That might help some. So then we can now place this here and now. It's a little bit closer to that mirror. Yeah, I think that'll work. All right, Let's Ah, see if we can make it about the right width here s and why, and I'll pull it forward. And then let's pretty much go through the same kind of process we did for the other one. This 12 I think, has a curved to it. So I will tab into edit mode and insert three edges here like that with these selected Still, I think I could maybe pull out of it and then all to click this edge loop and pulled this one out some to we've got just a bit of a curve to it. I'll go ahead and apply the scale and then let's work on the corners again. If we tap into edit mode and go to edge, select and let's just get these four corners and in the same way we did before, let's just press control be and move the mouse and then scroll the mouse wheel until we get it about the right curvature there. Let's try that. I could also grab these edges and maybe scale them out a bit in the why. Excuse me? The X And maybe now this one could go out just a little bit more than the others just to give ah, little bit of a curve there. All right. And now the front. Same thing. I think we just grab these if the I key and in set that and then let's hit e and push in will hit e and pull back out and then scale in like this. See how that worked? Yeah. Okay, um, for the back, I don't know that we need a whole lot here. There's just kind of looks like an extrusion at the back. So let's, um, grab these. I'll hit e and click, and then I'll scale in with the S key like this, and then Maybe let's just extrude this back straight back, and then we can kind of scale in just a bit. So it looks like it's maybe skilled in more in the X like this than the Z. I don't know. Let's give that a try. We could try it, at least. And then, um maybe I should actually grab these faces and flatten them a bit so they fit onto the back of that tube a little better. All right, so now what let's do is Ah, let's try and smooth this. I'd like to maybe join all these together as one object. Let me just see if I can add it to this object here. I'll press control J and add that so they're all one object. And then let's go ahead and make sure it's moved. And with the same smoothing angle as the other one. Yeah, I think that should be fine. I feel like now that I've done that, I feel like I could, um, scale this up in the Z just a little bit more like that. Okay, Now, what let's do is go ahead and add those cylindrical pieces. I think what I'll do is go ahead and just bring the cursor to where the origin is there with shift s two. And then let's create a new cylinder. Ah, we certainly don't need 32 sides. Have about 12. Try that. Let's ah, go with no cat fills for now. And then let's take this down. 2.1 and ah, point to here, Let's move it back. Spin it in the X axis with our X 90 and it looks like from the side we need to place one in here like this and it looks like it's a little bit farther out like this. Yes, So I could move it out like that, and then this one could go about like that. And ah, it looks like we should go ahead and close off the front here, so I'll select that edge loop press all Z to be able to see through it here. And to close that up, we could do a couple of things. We could hit the f key and that will close it up with an in gun there. And then let's go ahead and just select this whole thing with the Elke and all press shift d y and let's move this out like this. Um, we're gonna need to close up the back of this one as well, aren't we? So let's go ahead and just hit the F key there. And then if we select this and scale it in and the why with s and why we can bring that down, move it in. They're fairly close, aren't they? And then what we can do is go ahead and bevel this edge just a little bit. We don't need a whole lot here. Let's press control be and pull that out like that, maybe scroll the mouse wheel. Let's just go with that like that. And now we can take this and move it over to the other one. Let's hit shift D and X and move it over here. And are those big enough? That's what I'm wondering. I feel like its not quite big enough. Let me delete this. And let's scale this up to scale this up a bit. And I feel like I could grab this edge and pull it forward some just so it isn't gonna cut through. There we go. And let's scale this up. Just a little bit more. Yeah, something like that, I think. There we go. Now it's duplicated. Hit ex and move it over here. And this one feels like it's a little bit out of center. Let me, uh, kind of try and put this one in the center like this. There we go. And then, ah, let's go ahead and add these two our mirrors group and see how it looks Will press control J. And then go ahead and smooth again, maintaining that same angle there. It still looks pretty good. Let's go ahead and add this as well to this main group Control J. There we go. All right, so we have that whole piece. Now, let's go ahead and try and put it in place and see how it looks to do that. I think what I'll do is grab these points over here. Maybe grab. Oh, actually, maybe I'll grab this face loop here, all click between two faces, then and then all shift between two bases and that puts that pivot point right there. Now I can move the cursor with shift s to to that point. And then if we tap back into object mode we can move our origin to the three D cursor now when we move and place it, it'll move and scale and rotate from that point. All right, so let's bring the vehicle back. Will bring the images back and the wheels. Let's go to that front view again. And now we can use that front view. Tha kind of put this in place. So let's say it needs to be right about here on the door and then I'll hit s and scale that down. Maybe we better move it out just a bit like this. And let's scale it down a little bit more, and it looks to be like it may be a little bit long in this area. However, we are gonna turn it, So let's not panic quite yet. I'm gonna move this and kind of scale these up so they fit the image. Kind of like this. There we go. And then let's put this right about here. And now let's go to that top view with the seven key. Let's move this forward and well, kind of rotated back like this. Yes, so we're getting fairly close to that. So maybe if this is like this and we're turning it like that. Yeah, that's that's getting there. That's getting a little bit better. So let me scale it down a smidge and let's take a look. All right? Yeah, actually, I think that's a pretty good size. Let's take this. Now let's move the cursor with shift s one to the center of the grid. And, of course, what's moved that origin to it, and then that will allow us to add a mirror modifier. Over here. We've got some issues. So let's try and apply the rotation. Control a rotation and there we go. All right, So those, actually, I think, look, to be a fairly good size here. I think that works pretty well. What we need to do now is work on the actual hinges, connecting it to the vehicle. And it looks like the um, rear view mirror here is actually connected to the door, not the side of the cab. So let me tap into edit mode and select everything and move this back a bit like this. Yeah, it looks like it's connected to the door, because if I recall in a couple of the reference images, we can see the door open and the rear view mirrors kind of rotated forward as the door is opened. So let's go with that for now. And in the next video, we will begin working on the door hinges and this connecting piece for the rear view mirror .
68. 066 Adding the Door Hinges: I've been looking at the images of these hinges, and there's just so much going on in here. There's just no way I want toe devote this money polygons to this piece right here. So I think it's gonna be pretty simple. And hopefully just the basic shapes here will help sell that. These air the hinges of the doors. So let's give it a try on a fairly low polly basis here, I think. First of all, what I want to do is create, um, the hinges down here thes and then use one up here and modify it to connect to the rear view mirror. So let's let's begin on one of these. If we go to the side view, here's what it looks like. And I think we can just create an object that is at least the same basic shape and give that a try. So if we go over here, um, Weaken, take a look at these. These aren't really good angles. How about this over here? Yeah. This is a pretty good angle to kind of get a sense of the basic shape of it. So let's work on this. I think before I do. I will, um, kind of put everything in its place here. It looks like we've got, ah, the rear view mirror still hanging out on their own. So let's just select them and press the M key and then choose thieve vehicle Maine, and then I'll make sure and choose the scene collection over here. And let's work on building one of these now. So I'll go to the side view and I'm just gonna build one here on its own and then place it on the vehicle afterwards. So let's go ahead and create a cube here, and I'll scale it down. And I think I want it to be about like this. So I'm working on this part right here now. So let me tab into edit mode, and, um, I'll press all dizzy and selected that face right there. And if we extrude out to get this right here, let's do that. Let's hit e and pull out to there. Or so it's kind of hard to tell. And then if we grab these Vergis is right here, and maybe just kind of move them up a bit like that, and then we grab this face again and extrude out like this. Then what we need to do is just have this angle straight out, I guess. And I guess to do that, what we can do is tumble around here, go to Ed, select and just select that edge. And then what we can do is dissolve that edge. So if I press X and then choose dissolve edges, it'll get rid of that edge completely. And give us that angle there. All right, so let's see how we're doing here. I think, um what let's do is maybe move this up a bit. All right, so we've got this now. Well, let's do is get rid of the back of it. I'll just use the C key in a circle select to select those and then hit X and delete faces . And then let's ah, scale in the X and kind of bring that in like this. Okay, so now we've got that. What? Little very low Polly details. Can we add to kind of sell this? I think I think maybe I mean, this is all cut into the actual vehicle, and we could do ah, Boolean again the way we did with the doors. But I'm just not wanting to add that many Polly's for this small of a piece. So I just want to try and sell it with very basic shapes. And it looks to me like we could maybe just create this little extrusion back here and see what we could do with that. So maybe if we, ah, took this here and also there's kind of a split there. I wonder if we could add one of those. Let's try that. Now that we've created this edge, let's press control be and pull this out just a bit like this. And then I'm gonna hit E and extrude those faces and then I want to press all to s to shrink it down. So Ault s And now I'm gonna kind of shrink it down like that. Well, it looks like because I haven't applied this scale that I really didn't get the kind of thing that I was hoping for, so but that's OK. And then I want to take these faces and delete them out of there. So I'm just trying to get kind of ah, rim between the two parts. Now that I realize I haven't applied the scale. Let's go ahead and go back into object mode and press control A and apply the scale there so that as we inset things and maybe Devil Cem edges, things will be a little more even. So let's take this face here and hit I and move this in like this and maybe scale in the Z with S and Z. And now let's just extrude out. Let's just pull this out like this. And it's not exactly like this, I know, But I'm just trying to get something that suggests this kind of detail over here. We could maybe do a similar thing. It the I key and kind of inset in like this and maybe scale out in the why s and why kind of like that. And then let's ah, move this over here. And let's extrude this out as well. Like that, something like that. Now I feel like we could bevel a couple of the edges at the very least just to kind of try and sell the curvature around here. So let's press control be and kind of devil that out. Scroll the mouse wheel to add a few edges maybe something like that. Yeah, Let's see if this will work. Let's go ahead and add this to the vehicle and just test it out. So let's bring back the vehicle, the images, the wheels and, ah, let's pull this out here and let's try and put this on. I'll goto wire frame with the Z Key and let's scale this down and move this over. You know, I should really move that origin to this part back here, so let's go ahead and do that. I'll select these edges all click all of these edges and press shift us to to move that cursor there. And then let's move the origin to the cursor. Just so we have kind of a nice place to move and scale from there. All right, so now let's take a look at this. Well, the first problem I see is that it's flipped over. If we just rotated this, that really wouldn't do it, would it? We're gonna have toe mere it. So let's merit in the Z axis, this press control em and then Z and then enter. And that and that will mirror it over. So its proper orientation. And let's kind of scale it out. Maybe I'll scale in the Z a bit and put it in place right here. Now, let's Ah, tumble around and get it actually placed on the vehicle itself, right in here to zoom in with the period key, and I'll just pull it in about like this. All right, so let's now grab this and let's put this one in place up here. Shift DZ and we move it up to here, okay? And then let's take this and let's move it over to here, so let's Ah, press shift, E Why? And move this over. Now, we do need to spend this one around this when we can do without mirroring weaken. Just spend it in the X axis. Solis Press are x 18 zero. There we go. We can spend that around and put that right in there. Yeah, Okay, so now we need to deal with this one up here. So let's take this and duplicate it. Shift easy and move it on up. Well, uh, check it out in wire frame here just so we can get it in the right place. There we go. Now. I think we're probably gonna have to make it a little bit thicker. Um, we could move this in a bit. Yeah, I think that's pretty good. We could maybe, ah, widen it out with s and X and kind of pull that out and then put it in just a bit like that . There we go. Now, this is cutting into the window. We don't want that. So why don't we grab these faces over here with the border select tool and just delete faces? And then what we can do is select this edge all click this edge right in there if you can see it, and then I'm gonna hit the f key, fill that face and move it back just a bit like that. All right, so we aren't cutting into the window now, but we do need to create some sort of a panel piece right here for the rear view mirrors to go on. So let's go ahead and just create a cube right here, and I'll take it down to maybe like, point. 01 Something like that. Well, that's a little too small, isn't it? Once again. All right. So let's ah, fill this out press s and X and kind of scale it down. And then let's, uh, scale it in the sea, and we'll scale it in the Y with X and y. So I'm just creating this plate right here. So if I move it over here and move it back something like this. So what let's do is tab into edit mode and let some create four edges here. I'll just scroll the mouse wheel and then let's take this one and this one with all shift click and scale in the Z. And let's move it out to about right here. And then these two. Let's do the same things S and Z and scale these out. All right, so now that we have those in place, I can select these bases here and it looks like they are on the inside of the rear view mirror. That's good. That's where we have it. So let's go ahead and just hit E and pull out some. And then what we can do is scale in the why s I and bring these in and then let's go ahead and apply the scale here. Now it's grabbed these edges in here right there and let's give those a little bevel control be and I'll pull out some and we'll give those a little devil to kind of round that out. All right, so now what we need to do is just apply or add a little bit of, ah, bolt here and I feel like those rear view mirrors actually need to come forward a bit. So what I'm gonna do instead of moving them in object mode Since we have a mirror modifier on them, I'm gonna tab into edit mode and I'll turn on the edit cage over here. Now we can select all of those and move them forward. The gizmo is over here, but we can always press G and y so press g. Why just kind of move those forward until they're kind of in the center? Now it's just add a cylinder in here. Um, I'll select this in this face right here, and let's just move or create a cylinder right in here. They congrats on the rear view mirror to this plate here, so let's create a cylinder and I'll take it down to just six sides and let's take it down to a 60.1 and 0.2 and let's scale it way down and I'm gonna come up here and try and put it right in the center. This and then maybe we should move this again. Let's do that G and Y, and I'll move it back a bit like this. There we go and we take this and let's gale it in the sea like that. And then let's duplicate it and move it in the Z and bring it down like that, all right? And the last thing we can do is take all of these pieces. I was just select all of them and join them together with Control J. And then let's move that origin down to the three D cursor and let's give it a mirror modifier here and there we go. So now we've got the hinges and something to connect the rear view mirrors to the cab as well
69. 067 Beginning the Antenae Supports: looking at this piece right here. This antenna support this looks very strange in in that we've got several pieces that have kind of tea extrusion is out of them. Or, um so if you notice here, this particular part has a panel or a top part going across here, Let me press controls space bar. So we've got this top panel going across, and then we've got thes extrusion out of the center of it here, and and that's kind of a no no. In three D modeling is ah, having these t shapes in your models. That's one way to get those internal faces that we've seen before. And let me just show you what I mean real quick. Um, if I hide all of this Oh, let me move these to the vehicle. Maine. Now I m vehicle Maine. There we go. If, um, if I create a polygon plane and then I add an edge to it, say, like this and then I take this edge right here and I extruded down in the sea, that's a T pattern, and that's not always advisable. You can get into some problems with this with internal faces and also with smoothing problems as well. And also, you don't wanna have this be a part of a mess that you're deforming like a character say on their elbows or their knees. So this kind of pattern could be problematic. And those are the red flags that go off when I see something like this. So let's take a look and see how we might go about this. I think what I'll do is just build it in several pieces and then kind of put it together. So we're not actually extruding out of a T pattern in this way because one of the strategies that we've seen is to create polygon planes and then Addis solidify modifier. And for this that might not work. So let's go back and, um, take a look at where we should put these. So I think what I'll do first is kind of find where it needs to be here and actually these to look a little bit different, they don't look exactly the same. You can see here and here. So So I think we may have little leeway in how we create this. I'm gonna move the cursor to this point right here and then I'm gonna press shift a and create a cube. I'll Ah take the size down to say 0.1. And there it is. And then I'll just kind of scale in the Z. Until we get it. About the right size may be scaling the why something like this, and then maybe I'll tumble around and make sure that it's in the right place. Let's go ahead and pull it out a bit. Say, like this. Now, instead of having the top and this cube all, um, as one piece extruding one out of the other, I'm gonna build it in probably three or four different pieces to get that hollowness in the cube here. I'm gonna go ahead and delete faces on the top and the bottom. And then what I can do is use a Boolean to create these holes here. So let's go ahead and I'll ah maybe create another cube right here and pull it out. And let's scaled in the X here, and I'm gonna bring this down so it's gonna be our cutter like this. So this is gonna be our cutting object through our main object here, and I'll also grab these edges right here and give them a bevel. You can see we've got some curved edges there. Of course, I need to apply the scale and then I'll go back and hit control be And let's, um, do something about like that. There we go. So in addition, I'll go ahead and apply the scale for the main object. And for this main object, let's go ahead and create a Boolean modifier, and then we'll click on the eyedropper and select that tube Number 44. It looks like, at least for mine, and we have the difference operations selected, and then I'll click. Apply now, let's take this and let's spend it in the Z axis rz 90 like that and let's do it again. So select that main object. Add a Boolean modifier, select the cutting object and hit. Apply now, let's take a look at this. All right, so that's what we have there, kind of ugly. It's true, but if we select the object and tab into edit mode, that should all be pretty well selected. There. We can hit X and delete faces there and looks like we've just got a couple more here that we need to get rid of, delete bases and let's delete faces here. And we've got this strange thing right here. Look at that. We need to get rid of that. Let's ah, delete edges and looks like we have a couple of faces left over in here. So the Boolean wasn't really clean. I probably could have made that a little bit smaller, so it would be a little bit cleaner. But I think that's pretty good. Now I probably need to go ahead and add a solidify modifier to this. Let's do that even thickness and I'll click and drag in the thickness field and we'll bring that down about like that. All right, so we have that piece now. I haven't gotten rid of this yet because I feel like it might be useful one more time. I'm gonna bring it up here just out of the way. Now what let's do is work on this part here, and I feel like this is just, ah, thin piece. It's hard to see. Well, we can see it here, I guess right there, and it's got to billions in it, a circular and this kind of squarish oval one. That's why I kept this piece here. So let's go ahead and create another cube shift a cube and I'll move this over here and I want to make it pretty thin. I'll scale it in the X with S and X and make it pretty thin like this. And I kind of put it in place here. I feel like it needs to be just barely on this part of the vehicle like this. And let's go back over here. Now let's take this and put it up here and I'll tab into edit mode and maybe go to Vertex Select and let's border select all of these and move these down to here. And maybe we could take these and move these back to here. And then we could switch to face, select and then extrude out like this. Maybe bring this down to that corner right here and bring these up like this. Then we could take this face again, extrude out, maybe take these points and move them up to this corner. Maybe take these points and just hit G and move them down to here. Just a basic shape, like that, All right, Now, before we do anything with this, I feel like we ought to go ahead and extrude out to get ah, this piece here. So instead of using this as our peace to extrude down, we have a solidify modifier on this. And even if I applied this, I'll just hit apply This face here has angled edges. Sophie extruded this down for this part. It might look a little odd, but if we take this and maybe move this over and as you can see, I'm just placing pieces instead of trying to extrude one from another. Let's go ahead now and insert an edge loop and move it up here. An insert, an edge loop and move it over here. And now, if we take this face right here now, we should be able to extrude that out. So I'll hit e and just pull that straight out to here and then take this edge right down here and just move it back in like this. There we go. So you can see what I'm doing. I'm just kind of building it in multiple pieces and frankly, a lot of these parts when they're manufactured in the factory are multiple parts welded together. So we don't always have to assume we have to make a piece like this. All one unit. All right, so now let's think about how we want to use Julian's on this on this particular piece, Let's see what we have here. We've got a circular cut and, ah, oval ish squares cut. And this is the one that I saved that other piece for. Here it is. So let me turn this in the Z axis RZ 90 and, ah, if I move this down here, let's kind of scale it up. And ah, what I may be able to do is grab these here and scale them in the sea like this. And then let's take this whole thing and turn it and kind of put it in here like this. I think that's generally the kind of thing we want. Yeah, let's give that a try. So I'll select this one here. I'm gonna go ahead and apply the scale, and I'll add a Boolean to it. And then I'll select this cutter object and I'll hit. Apply, and let's take a look at that. All right, I think that's pretty good. And then let's do that again for that circular piece, I can go ahead and delete this one now. And maybe if I create a cylinder, um, take the sides down to maybe 16. I'll take it down 2.1 and 0.2 again. Let's scale it down and scale it in the Z alternate in the Y axis are why 90 and let's go toe wire frame. And let's place this in here. So think about like that. All right, so now let's go back here. Select our main object. Add a Boolean again, select the new cutter object and click apply. How did we dio? Yeah, pretty good. All right, so I think we're getting there. Let's while we're here before we go to the next video, let's go ahead and bevel this corner right here. Let's just do that control be and I'll pull that out like that. There we go. I think that helps. Yeah, so in the next video, Willis do is work on creating a Boolean for this piece as well as creating this over here. Now, as I said in different images, this looks a little different. So I think we have some leeway to create this. Maybe in whatever way would be most efficient for us. So we'll create the top and then this piece in the next video.
70. 068 Finishing the Antennae Supports: for the top. I think we can just once again create a cube here and let's take it down in the Z axis with S and Z And let's scale it weighed down. So it's really thin, and I may have made that too thin. Well, I think that's OK. Let's bring it out just a little bit more and then I'll put it up here and let's kind of scale it to fit this with s. And why like this? And then I think we can tap into edit mode and grab this face right here. And let's extrude this out. Actually, before I do it looks like I have Ah, a little bit of an issue right here. Let me grab these and pull these up. There we go. And then let's go back to this one here. There's that face and then what let's do is hit e and just extrude out and then hit G and kind of pull it down to right about here like that. And then it looks like it just goes, well, pretty close to the and I think I can just grab this corner right here and move it right in there like that. There we go. And then this right here could come out. I think we could extrude this out because we can see a little bit of ah extrusion out here on this side. Let's hit E, pull that out and then maybe let's just hit s and X and scale that in like that to kind of get that piece there. All right, now we need this other part. So this one, it looks like this piece goes all the way down this when it looks like it goes only down half way. Um, and it's hard to tell exactly where it inserts into their Let's, um, let's kind of do what we think would be easiest for us since, as I said, we have a little bit of choice there. What I'll do here maybe, is just select this face right here. And if we then well, this one here has it coming down to here. You can see that in the reference image here. So let's just hit E and I will click and then hit G and pull this over here. And when I do, it really makes it. Then let's rotate this like this. There we go. And then we should probably just grab that edge right here and pull that in like this with see how that works. Yeah, and we could grab those points there and pull them up or down. However, we felt we needed to. So if we just border selected these points, we could just move them down to here, move them up to here. So wherever you think is appropriate for years, I'm gonna go ahead and leave mine there for now and then, Ah, looks like we need a couple of more. Boolean is we need, like, a triangular Boolean here and on this side as well. So maybe we could just create one that will do it for both of them. Let's try that. That's once again create another cube, and I'll pull that out to here. Um, and I guess the easiest way to make a triangle like that is just a select an edge here and dissolve it. So let's hit X and dissolve edges. And that's an easy way to do that. We should probably go ahead and select these edges and press control be and pull these out like this and we go, and then let's kind of move it over here and put it in place. So if we put it in here like this, we may have to take these points in here and kind of move them down like this. Okay? Yeah. And then we'll pull it over here and do it for this one here will just shrink it down a bit . Now, the good thing about this is we've got to pieces. So this part, this object is still separate from this object here, so we won't be cutting both at the same time. That's good. So let's select that main object at a Boolean, select our cutter, it apply, and then let's like this and move it away. All right, so there's that one. Now it's shrink this down a bit. Put this in here. Let me turn it. Let's press are and turn it a bit like this, and it looks like we could move it around a bit. Let's change from global to local transform orientation. So our move gizmos are in alignment with the actual object. And then maybe we could scale it up a bit like this. All right, let's try this. I'll select this main object at our Boolean slicked our cutter. It apply. And now we should be able to move that out and we go. Let's delete that on. Let's take a look at it. Yeah, I think. Ah, I think that'll work. Okay, let's go ahead and combine all these objects now. So we've got that. That and that. Let's pressed Control J. And then what let's do is merit over to the other side. Ah, I'll move the origin to the three d cursor and then let's add a mirror. And there we go. All right, so we've got that in 10. A brace there. Let's now add some of these pieces up front. Uh, these things up here, let's see if we can find another image of that something in front here. Is this the same as we have? No. I think this will give us a little bit more information. So this little piece right up in here, I feel like we need that the thing that, um, the windshield wipers come off. So I believe all that is is just a cube that we can kind of modify here. So with shift s two. I'll bring the cursor to that point and then let's create a cube. And what we'll do here is kind of turn it and maybe scale it up a bit and kind of put it in place. So it connects right around in here. Um, I think it needs to turn a little bit more like this about like that. See how that works. And then if we get S and X, we can move these out like this. There we go. Let's just leave that there for now. I went a little bit too far. Bring that back. There we go. So with that there, let's now work on these pieces right here. These little cook pieces, it says lift here. I imagine maybe if they have to lift these up onto a boat or something, they can hook here and pick the whole thing up. I'm not sure, though, I don't really know, but ah, that's what I'm imagining. But once again, it looks like one of these things. So I'm just gonna cannibalize this, select this and press control plus on the num pad duplicate and move this out and then I'll press peaky and separate by selection. I'll go back to object mode and select that one piece and get rid of the mirror modifier. And then let's move the origin to the geometry there so that we can bring this up and put it up here and use it once again. Ah, let's go ahead and scale it in the why I wanted pretty thin here. And to turn it we probably need to turn it in the lie axis. Let's try this. Are why nine note that's going in the wrong way, isn't it? Alright, How about our Why negative 90 that helped. Oh, and I'm in local transformation. So let me change that to Global. There we go now is turn it in the Z axis rz 90 And let's put this in place. Bring it here and let's scale it up and fit that circle the way we want it. Probably about like that, right? So now we could tap into edit mode and work on this piece right here. See it? How it kind of angles back like that. You can see it right here. So we need to kind of turn these to the angle back. What let's do is maybe grab a point here or even just border select thes, and I'll move the cursor there with Shift s too. Now, let's change our pivot point to the cursor. I'll hit the period key and will change from median point to three d cursor. And so now, when we take all of these, if I take all of these here, I'm gonna flatten them up. I'm gonna press s why and scale them in the why. So they're flat like that and then I'm just gonna hit are and we're gonna rotate at that point, kind of like that. And then we can also scale out s and just scale out like that and that'll pull it down there like that. There we go. Now, we should be able to grab these points down here. But I missed this one right here, and I'll change back to median point and let's pull these straight down like this. Now it looks like this one should continue this way. So let's bring that over here. All right, let's take a look at what we've actually done here. Not bad, but let's bring it in tow there like that Yeah, so that's that's pretty good there, I think. Ah, let's married over. So it's in the exact same place Opus. Shift us one to take the cursor to the center of the grid, move the origin at a mirror and let's press control a and apply the rotation. And there we have it over there. Okay, so we've got those pieces. Now, let's also add this piece right here, this thing that the I don't know what it is. A camera sensor, whatever. Sits on. Now this one doesn't have it. But it does have that base there. So let's go ahead and create that once again, I'll move that cursor. Ah, to this point to a point right here. Let's do that. And then let's create a cube and I wonder if we can see it from the front here. Looks like we can. So maybe if I move it up to here and scale this out a bit like that, let's see if we can put it in place. Now, um, it looks like I could scale in the why a bit. And if I come back to here and I feel like it really wants to come up a little bit more. So maybe if we grab that face and pull down some, let's try this. All right. Now, what let's do is just take this edge and will bevel it to get this kind of flat part right here. Let's press control a and apply the scale. Select that one edge right there. Press control be and let's pull that out. And we don't need any of those edges there. We just want it flat. Something like that. Maybe I can even grab that edge and pull it down a bit. Yeah. So we've got that piece in the center that could hold that sensor if we want to put it on. Yeah, there we go. So we're beginning to add a little more detail to the cab in the next video, Will take a look around and see what else we can add on this
71. 069 Modeling the Door Handles: in looking around on the vehicle here, I think we should probably go ahead and add these door handles here, Um, there three on each side and they've got some holes in him, some billions. And I'm wondering, should we go ahead and do that? I think that might be a nice touch, actually. So let's see if we can find a better image of this. Let me, um I think I saw that number seven here was pretty good. Yeah, this is pretty good. So let's begin with one of these here like this. So once again, let's go ahead and hide what we have here in these collections. We should go ahead and grab these here and move them all press m and choose vehicle Maine. Then I'll come back up and make sure I click on the scene collection. And let's go ahead and create this. Now I think what I'll do is create a cylinder and then once again extrude off of that cylinder for the rest of the handle. So let's begin with that. Go ahead and create a cylinder here. And, um, I guess I'll just go with 12 sides. I'll scale it down and ah, let's begin with something like this. I won't need this bottom face here, so let's delete that. And, um, I'm just looking at this little rim here, right there. That's where I want to begin. So I'm gonna scale it down in the Z axis. Here, let me scale it down a little bit more like that with this, let's tab into edit mode and select that base there. And then let's just hit I and inset that in a bit. And we're working on this here. So then I'll hit E and pull up. Um, how much is sometimes? Hard to tell. But maybe, um, let's go like that because I'm trying to think how thick this handle is going to be and how much room we're going to need underneath the handle here. So I'm thinking maybe something like this, But if the I key again to in set in, and I just want to make that little washer, that little rim right there, I know that maybe a bit too much, But let's go like that now What I think I'll dio is let's create another cylinder real quick, and for this one, I'm gonna take this down to six sides here. Maybe I'll type in 0.1 and 0.2 and then this one. I'll Ah, delete the bottom faces. Well, and I just wanted this one to kind of place on top for that bolt. That's all I really wanted. Let's see if we can get this on here like that. Yeah, something like that. That's all I really wanted there. Let's go ahead and combine these. I'll select them both and press control J now for the handle here. What I'd like to do, it looks like there's just a little bit of, um, yeah, right here. Let's take a look at this. So there's this little bit of an extrusion off of the main cylinder before we go into the handle itself. So let's see if we can get that. Um, once again, knowing how thick that handle should be is a little bit difficult. But let's go with this, and then I will select these faces here. Let's go to the top view with the seven key, and I'll extrude straight out in the lie axis here, and then let's flatten them. This press s why and flattened that up like that. Now, if we bring that back in now, we've got something to extrude that handle off. So if I hit I and kind of inset in just a bit, let me hit snz and pull that in some. So now we can extrude that handle off of there to do that. Um, before I do that, let me bring this down to the Currid. I just want to bring it down to the grid right there. Okay, Now we've still got those faces selected, and I'll hit E and let's pull out to about here, right? Well, it's difficult to know exactly how long that should be, but I think probably about like that now, let's go ahead and use that spin tool again. I'll go to the cursor tool and just click maybe right in here. And then let's go over to the spin tool. Let's just click here. Then I'm gonna click and drag like this and bring this around about two here, and maybe we could just type in 90 degrees. We don't need this many edges, so I'll take the number of steps down quite a bit. That may be too little, maybe like that. Let's try that. And then I'll just go back to the move Tool and hit E and Z and pull straight down like that. And then we could delete these faces. Here is, well, X delete faces. Okay, so we have the basic shape of that. Now let's do is go ahead and create the circles there. The circle cuts in it to do that. Of course, we're gonna need a new cylinder. So let's go ahead and press shift day and create a cylinder here. Let's take this back up to 12 sides now, and I'll move it. And let's scale it down about like this. Let's scale it up in the Z. So it's about like that. So now that we have that, I want four of these. And as we've seen, using the array modifier is a pretty good way to do this. So it's type in one in the UAE field here, and maybe, um, we need negative one. So I'll click and drag and bring this back like this. And then let's increase the count from 2 to 4. Now let's move it and adjust the relative offset until we get him about the way we want him Looks like that's probably pretty good there. All right, let's see how we're doing. All right, I'm gonna go ahead and apply the array modifier, and I'll select the main object and then goto Boolean use the difference Operation Click on the eye droppers like the cutter object and click Apply. Now, let's move these aside and see how we did. Okay, Go ahead and delete those. Let's go ahead and smooth it. Ah, shade smooth here. Looks kind of terrible. That's to be expected. Will turn on auto smooth. And let's drag up until we kind of clean some of this up. Maybe something like this. Yeah, I think that's probably about as high as we want to go for that. I'm gonna move the origin of this object to this point right here, shift us to to move that cursor. And then let's move the origin to the three d cursor. Okay, so now that we've got that, let's go and bring everything else back and let's try and place it on the vehicle here. Um, let's turn it in the Y axis are why 90 There we go. Let's go to a wire frame with Z key and then, ah, let's move this up. Kind of put this origin right there and scale it all down to be about the size we want. There we go. Now let's move it into the vehicle here. Eso it just sits right in there and maybe I'll pull it out just a bit like this. Okay, so we've got that there. Now, let's go back to wire frame and let's do the other one. So let's select that shifty. Why? I'll move it over to here. Let's spend it in the x r X 180 and then let's just move it down right about there. Okay, let's see how that looks. Yeah, I kind of believe that. Okay, uh, next this guy right here, the guy in the center, that one, um I think should be pretty simple. Let's go ahead and, um, go down to the center of the grid here and work on this to create this middle handle. Let's begin with a cube here, and I'll scale it down. And I think what I'll do is just may be scaled in the Z a little bit. And let's use that spin tool again. Let's try that. I just want to select this one face here and maybe I'll scale in a bit in the X while I'm here. Let me do that. There we go. Let's select that one face and let's just pull it out like this, and I'm just only dealing with half of it for now. So I'm gonna pulled out about like that. And then let's move that cursor again to about right here and then let's come over and click spin and then I'll click and drag and kind of move it about their once again. Let's type in 90 degrees and I'll reduce the number of steps here, too. Ah, what? We think something like three. Yeah, let's try that. And then I'll just extrude out in the Z, E and Z and pull that straight down like that. Now it's delete this face here and from here. What I should do, I guess, is just, um, at a mirror modifier to this. So let me just, um, grab this one face here and I'm gonna pull it to this side and recall we want to avoid internal faces. So let's delete that one face there. And then what I'll do with this origin still in the center here. I'll go ahead and just add a mirror modifier to it. Here we do want a mirror in the Y axis and not the X. I'll turn on Edit cage and I'll turn on a clipping so that when we grab these points here and dragged them in, it'll clip together in merge those points together. So I'll just dragged those in and slam them together, and there they are. Now. I shouldn't be able to move them apart, because once I release the mouse, they've merged together. All right, so now we can do is just grab this side and we can move it in or out, depending on what we need and how big it needs to be in everything. So let's say, um, say something like that. Yeah, I think that's OK now let's go ahead and apply the mirror modifier. Let's Ah, move the cursor back down to the center of the grid and let's move that origin to the three D cursor there. Let's turn it in. The Y axis are lined 90 and let's bring the vehicle back and let's put it in place. So if I go over to the side view again and let's go to wire frame, I'll scale these down and let's move it up here and ah, maybe right about in here and let's scale it down about like this. Now I feel like it's a little bit too thin. Someone scale it in the Z with S and Z, and it's, um let's try that. So we're gonna need toe. Push it in now, push it into their let's zoom in with the period key and then just push it ride into their okay. From here, we can combine all these objects. Just select them all like this. Press control J. And now let's move the origin into the center of the grid and let's mirror them over. There we go Now. I think I would like to play with the smoothing a bit. Let's see what we can do with this. Um, I'll go to object and shade smooth. And over here in the object data, let's make sure auto smooth. It's turned on and I'll just drag up Ah, a little bit too much There, maybe something like that. Yeah, There we go. So I think we needed those handles on their to complete the doors, so I think that looks pretty good. Now, in the next video, I think what I'll do is work on these things here. These supports or platforms for the lights. Um, and also, we've got this, um, box like tubing here. Let's see if we can find a better image of this. Let's take a look at this one here. Yes. So let me press control space bar again. So this part here, we've got this here and then this here. Now this one is wider then in some of the other images. So I don't know that I want to do this one per se, but anyway, there is this piece here and this piece here, so let's work on that in the next video.
72. 070 Creating the Front Light Platforms: So let's focus on one of these things. I'll press control space again. And this looks like a great candidate once again for creating a polygon plane, shaping at the way we want and then adding a solidify modifier. And as it turns out, yes, this one over here on this side is wider or longer than the one over here on this side. So I don't think I'll make him all that much different. I think maybe we can just kind of extend this one out a little wider than this one. But let's focus on this here. And also we're gonna have to create this kind of cubicle tube here. It looks like it's kind of Well, let's see if we can find another image of this. Maybe let's take a look here and yes, So this is what we're after. I don't know that I'm gonna worry about these things connecting, and I think I'm just gonna create the tube right here and then attach this part onto it. So let's give this a try. Um, let's go ahead and create that cube first. Maybe I will select the cab and let's just ah, maybe select this edge and move the cursor to it with shift s too. And then from here, I'll go ahead and make sure that scene collection is still selected. And let's create a cube right here. I'll scale it down quite a bit and let's move it over till it's about in the right place. It looks like it's gonna have to angle a bit, since the side of the cab is kind of leaning in here. But let's go to the side view and rotated a bit and try and get it. So it's kind of in line with this particular angle right there. Now it's changed to our local transform orientation with the Kama Key and choose local. And now we can press S and Z and scale out in the Z belong that angle. Ah, let's give it a little bit mawr and move it up some so it looks like it goes above the window a bit, but is kind of in line with the bottom of the window. So maybe Elko right about there and looks like it needs to be turned just a little bit about like this. There we go. OK, so how we doing there looks good. We just need to turn it. And what? What is that? That's the Y axis in the local y axis. So let's press are why? And we'll turn it are why again and I'll to kind of turn its to it. I'm trying tow line it up with the very edge of the cab here, and that looks pretty good. Maybe I'll move it out just a bit like this. Are why, again and something like that. Okay, so we've got that. It looks like it's hollow. So let's go ahead and do that. I'll, Ah, tab into edit mode and let's select this face and this face and let's delete them. And then let's apply the scale with control A and let's go ahead and add a solidify modifier. Maybe I'll move this out just a bit like that. Add modifier, solidify even thickness. And let's click and drag on this to kind of make it the right thickness. Maybe something like that, Okay, and I'll go ahead and click apply. So now we've got that piece. Now we just need to create one of these and connected to it. It looks like it's got an odd twist to that. I'm not sure exactly how to do that, but we'll never know until we begin to try it. So let's go ahead and select this edge and move the cursor to it. And let's just, um, create polygon plane here. Shift a mesh plane and I'll scale this down. And it looks like at least in this angle, the top of that platform is about right here. Let's see how that lines up over here. Yeah, are front and side views are a little bit off. We could maybe move that front view down a bit. Let's try that. I'll select the front view. And if we go to the object data panel again, we can maybe click and drag and hold the shift key down and move that down just a bit like this. So it kind of lines up with what we're doing here. I'll blinded up with the roof of the vehicle, All right, so let's go back over here and see how we're doing. Well, it's still not quite there, but that's OK. We'll just kind of split the difference. And let's get that about right there. Yeah, I think that's pretty good. So now what we need to do is extrude this down on either side. So I think first of all, what I'm gonna do is grab this side here and I'm looking at this part right here. But see if we can see it over here. Yeah, we can see it a bit, so I'll go ahead and hit E and Z and I'm gonna pull down to about here. And then let's hit eensy again and I'm pulled down to about here. And then this one can maybe go over here like this and then on this other side, let's see what we can do here. It looks like we just need to hit E and Z and pulled down. And then I think we can just hit s and why and kind of just scale in and fit it right in here. Let's do that. Now. We need to somehow bring it down and connected to this piece here. And I think what we should do is just add a couple of edge loops in here and move it this way. Let's then grab this edge and I just want to extrude it down just a bit and scale it in. And then it looks like maybe I could just turn it. So let's ah, turn it here like this and then extruded in the X axis. Let's go back to the global orientation. Yeah, that's still X. So let's hit E and X and go back in like this. Now what I want to do is extend this down. So let's go to the side view here and I'll just hit E and enter and then hit G. And I kind of want to move this out like this and like this. Okay, so now that it's in line with the vehicle, maybe what we can do is just extrude this down like this. So I'll hit E and just pull like this. Maybe we need to pull that back out. There we go. And maybe that's all we need. Maybe I can hit E and pull this out as well. So now I would need to do a little bit of point pulling to kind of get these things in line here, kind of get the's a little bit more blind up now. Do we need to pull that up and get it connected to the actual box here that we may want to do that kind of like this. All right, so I think that's pretty good. Ah, there's always gonna be some adjusting to do here and there, but I think I'll just move that in and put that right about in here. All right, so I think that's pretty good. We could probably go ahead and add a solidify modifier to that. Let's try that. I will. Ah, apply the scale with control A. And then let's come over to the modifiers panel and click, solidify even thickness and let's go ahead and click and drag in the thickness field and see how we can do here. One thing we can do sometimes if we see this problem here where it's thicker on one side than another, Sometimes if we turn on high quality normals, yeah, that kind of fixes that there. So now what we can do is put this in the proper place. The wider one seems to be over here on this side of the vehicle, and the shorter one that I just created seems to be over here. So what let's do is apply the solidify modifier here Then I will move the three D cursor to this center with shift s one, and I'll move the origin to that three d cursor and let's go ahead and add a mirror modifier here. Now what let's do is apply that mirror modifier. I'll just click Apply now if we tap into edit mode and say, Select one of these, let me go to the front view and wire frame and then we select one of these here like this. Now weaken, drag that whole thing over and make it a little a little bit wider like that here, like this. So just to give that slight differentiation between the two sides, also, we need to move this. Let's go ahead and move the origin down to the three D cursor and then let's add a mirror modifier. It looks like we need to apply the rotation. So control a and rotation. And there we go. So now those are on that side, and this is on that side. Yeah, so there we go. So we've got some extra detail now with the handles and these pieces. What let's do is turn our attention to the platforms on the back back here, and then we can just create one of the light fixtures and duplicate them and put him on all four, so that's coming up next.
73. 071 Modeling the Light Fixture: for the little light platforms on the back of the vehicle back here. Let's Ah, just begin with a polygon plain and shape the plane. Or actually to polygon planes, get those into shape and then add a solidify modifier. So I'll select the vehicle and tab into edit mode. And I think if I select this point in this point and then move the cursor to that pivot point there, we can maybe add a polygon playing here hand. Let's scale it down and let's try and get it about the right size. It looks like maybe oh, something like this is it square? It looks like it may be pretty squarish there and looks like it's pretty far up up here like this. So let's move it up and get it pretty close to the side there. And also it looks like it's pretty far back, so let's go ahead and move it back like that. Now what let's do is just duplicate this. I'll just press shift D and Z and move this down something like this, and then I'll scale this in and then let's move this back to kind of be in line with that other one back here. Yeah, so it's kind of in line with back of it, but a little bit smaller in the front. And then what we can do is just extrude these to get these pieces on the side here. So maybe if we tap into edit mode and select that one edge there, we could hit E and Z and pull down a bit and then pull out like this. There we go. And then kind of the same thing here. We could, um, tab into edit mode and grab that edge and hit e and Z and pull up, and it looks like it goes up fairly high. So pull it up like this, and then back That looks like we've got a little bit of overlap. So I grabbed this edge and pull it out, and we go and maybe pull this one out like this. Okay, so I'm just trying to get it in line without overlapping. There we go. Okay, So now we've got those pieces. Let's create this piece going up now. So if we grab this edge right here, I think we could just hit B and Z and move it straight up. We can always tab into edit mode and just select that face and move it in or out. Depending on what we need there. It may need to be a little bit bigger overall, I mean, just, ah, grab these two pieces and just hit s and just kind of scale him up a little bit more. So now let's do is go ahead and add a solidify modifier to each of these else like this one . And let's add a solidify modifier here. Oh, well, I think we probably ought to apply. The scale was press control a and scale? Yeah, there we go, and it's a little bit uneven. So let's click on even thickness and I'll click and drag in the thickness field and get it to be about Well, it's Let's do that. Alright, let's try this one. Now I'll go ahead and press control a and apply to scale. And let's add that solidify, choose even thickness and click and drag and the thickness field like that. Yeah, I think maybe this one's a little bit, too. They could see if I can get it a little bit thinner. There we go. So now we've got those two pieces. Let's Ah, go ahead and apply the solidify modifiers on them both, and then select the two and press control J. And with our three D cursor in the center of the grid. Let's go ahead and move that origin there, and we'll add a mirror modifier just to see how it's going to look here. Ultimately, we're gonna have to join a lot of these pieces together into one object and will have to apply the mirror modifiers. But if there's a knob jek, like any of these that have a mirror modify or any other kind of modifier on them that I feel that I can keep, um, I'm gonna try and keep it until the very end, because if I need to somehow adjust this, change it in any way with the mirror modifier on it, it updates on the other side as well. If I applied this and then had to come back and make a change, I either have to make the change on the other side as well, or delete the other side, reapply the mirror modifier, etcetera. So I'm just trying to make it as easy as possible. to modify pieces until near the very end. All right, so now that we've got those on there, let's think about creating these lights. Um, we may need a couple of different images here. Let me see what I confined. I think there's a ah, a fairly good image here in this number three image with C. Um, maybe I'll create a whole new window right here. Just create an image editor. And this was not bad either, but it has one of those caps on it. I don't want a camp on any of mine. Kind of would like one that's more straight on. What about this one here, Number seven. Yeah, that's kind of straight on. I like that. Okay, so maybe these three images will be able to get us what we need from this. So let me ah, pull these up a bit. And before we do that, let's go ahead and hide these collections, the vehicle, maine, the images and the wheels. And then let's take all of these and move them into the vehicle. Maine. Let's hit em. And vehicle Maine there. All right, so we've got those organized. How should we begin? One of these lights. Well, it looks to me like there's a cylinder on the bottom. Let's go ahead and begin like that. Let's create a cylinder and let's take the sides down to 12. I'll take the size down 2.1 and 0.2. Um, we're not gonna need the face on the bottom here, so let's get rid of that. And ah, maybe I'll just scale in the Z until we get it fairly thin cause it looks like this down here is fairly thin. Something like this. Maybe Now it also looks I could be wrong, but it also looks like there's this kind of flare out there. So if we grabbed this edge here and hit s and kind of scaled a doubt, maybe like that I don't know, I'm just I feel like I'm seeing that there. Let's take this and made moving down a smidge. And then let's if the I key and inset in about like this to get this now Sylhet it e and pull that up. I think we're gonna have to do this in separate pieces. I don't think I can efficiently continue to extrude up and get this shape without just a whole lot of polygons. So let's now Ah, let me move this cursor to this point and let's create a cube. Um, I could probably go ahead and delete this. Let's do that. We don't need that. So now with this here, let's go ahead and create a cube and I'll hit s and scale it in, and we need it to be just slightly bigger. Then that cylinder there. So, um, it's kind of bring this down like this. Don't go to the side view. And from the side view, it looks like this side right here would be a little bit longer like this. And it looks like we could get rid of this faces. Well, looks like we're gonna put a cylinder on there. Yeah, let's do that. And also, let's grab this edge and let's devil this. I'll press control be and I'll pull this out and then we can scroll the mouse wheel and maybe kind of do something like this. And then up here on the front, I feel like we could move the cursor to here and let's bring in a cylinder to put up front right here. Let's see If we can do that, I'll press shift a and let's create a cylinder. Oh, I'm in edit mode. So if I created a cylinder here, it would come in in edit mode, as part of the same object is this And I don't want to do that. I'm gonna tab back toe object mode. So at least for now, it's gonna be a separate object. So a press shift a and bring in a cylinder, it's got 12 sides. I think that's fine. I'm gonna change to a triangle fan here. And let's press are why 90 like that? Now, if I move this up to here, that looks like it's a little tall. Let's scale it down some, and it looks like the bottom of the cylinder is right at the base there. And then it kind of goes a little higher. Kind of like that. I think that's gonna be okay. Let's scale out in the X like that. And now if we tab into edit mode, maybe we can. And this is why I created a triangle fan so it would be easy to border select these faces here. So let's hit X and delete faces. And then maybe let's, um, grab these edges up front here like this. And I think what I like to do is just extrude those forward a bit. So let's hit e and why? And just pull those Ford a bit like that. Now that we have that. Let's go ahead and create the actual light here. So I'll hit e and S and let's scale in a bit. And then let's hit e and why? And scale or and push in like this. And then with these edges selected, we should just be able to hit the F key and fill that with a face. And we go, I feel like I'd like to try and devil these edges right here. Well, not the ones down there, but maybe, ah, from here down to here. So a press control and click and that will select all the edges between those two selections and I'll press shift and click here and then control and click here. Let's try and bevel this. I'll press control be and pull this and see how this works. Maybe we don't need quite a Zeman e l scroll the mouse wheel and let's ah Let's try this. Something like that. All right. And also, can we bevel these edges as well? So they're a little more curved here. Ah, let's try it. I'll click here and then I'm gonna press control and click here and let's try and get all of these. So in a press shift, click for that and then control. Click for that shift, Click control click and one more time down here. All right, So with those edges selected, let's give this a try. Control be. And let's expand that out like this. Yes, so that kind of rounds that out just a little bit now. Are we going to be able to smooth that? Or do we need to go ahead and extend that devil all the way around? Maybe we do. Let's press control Z and go back and let's go ahead and select these edges here, all the way around like that and press control be and pull out like that. Let's try that. Yeah, I think that works a little bit better. All right. So in the next video, will this do is join all these pieces together and then bring back the vehicle and put these in place
74. 072 Finishing the Lights and Starting the Fender: continuing with the light here. Let's go ahead and select all of these now and press control J. And let's try and smooth it. I'll come up here to object, shade smooth. And let's go over in turn on our normals. Over here are botto smooth and this looks pretty good, but I think I could maybe drag it up a little bit more. Yeah, to just over 35 it looks like, and that gives us some semblance of having those kind of rounded edges here on the back. All right, let's, um, take it in and put it on the vehicle. Now, let me move that cursor to this point right here. Shift just to and then we'll move the origin set origin to the three D cursor. Now we can use this toe, pop it into place a little easier. So if we bring back the vehicle like this, what I can do is actually come up here, select this piece tab into edit mode and maybe select that face. Then I can press shift s two and move the cursor there. Now that that cursor is there, what I can do is select that light that we just created and snap it to the cursor. So let's press shift s and we can choose selection to cursor Now that will pop that light right into place. And from here, all we've got to do is just scale it down. There we go. Now let's tumble around and see how it looks that may ah, take a look at these others and kind of see how big they are compared to everything else. E I closed this. I'm gonna join that. And yes, so this looks pretty good. I feel like it's probably a little too small. Let's see if we can make it a little bit bigger like that. Maybe push it down. Just a hair like that. Let's see how that works. The only problem I see is that this looks a little more square and this looks a little more rectangular. So I think maybe if I tab and edit mode and just select this part of it right here, can I scale it in the X just a bit and maybe scaled in the Z just a bit. Bring it down some like that, and then maybe pull it out and bring it down like that. Let's try that. Because sometimes you can't really see the scale in proportion of something until you put it with everything else. Yeah, I think that's a little bit better. That feels a little bit more in line with the rest of the vehicle and with the images here . All right, So with that in place, let's go ahead and go to the top view. And instead of mirroring it over, I'm gonna go ahead and just press shift D and X and move it in the X axis. And I'm doing this because I want to be able to turn them individually because it looks like they're all turned in different ways here. So I want to take this now and move it forward, shifty. Why move it up to here and then I'll move it onto this platform, and I believe it's gonna be a little too low. Yep. So let's move that up to there and then go back to the top view and press shift E X and move this and this looks like it's kind of in the center of that longer piece there. So let's go ahead and move that to there. Now, I can just turn these as I'd like. So I'm gonna press rz and turn it like this and maybe this one all press rz and turn it out . This one, Maybe it's pointing behind them rz like this. And I don't know if they have individual control of these, like from inside. But still, let's go ahead and turn him like this. Yeah, so they just don't all look the same here. Yeah. There we go. Okay, so we have the lights on. Let's take a look at what else we might need to put on here. Well, I think the other thing we can do is work on this rear fender. That's Ah, pretty prominent piece that we haven't worked on yet. I think we could begin with a cylinder, delete what we don't need and then apply a solidify modifier. So let's try that. I'll go to the side view here and let's ah goto wire frame and I'll create a cylinder. And for this I think we're gonna need more than 12 sides on this. In fact, I think we're gonna need something similar to this. I'm gonna go ahead and give it 32 sides. That's quite a lot, but I want to make sure it's smooth enough or has a nice, smooth curve to it. My press are why 90 and let's bring it up and put into place over here. Let's try this. I'm gonna scale it up. And if we put it right about here, it looks like it's a slightly squashed cylinder. If I put it like this now, let's press S and Z and let's kind of squish it a bit and then move it up a little bit more S and Z and something like this. Maybe even. Let's give it one more squish and let's try that. It looks like that's pretty close. So from here, we need to do a little bit of deleting. Let me tab into edit mode and go to face mode. And, ah, let's just hit the Beaky and border. Select all of this and let's delete this X and delete faces. And then I will also get the sea key and kind of paint the faces on the interior because I still had that triangle fan in there. So let's delete these, all right? And now we have this here. So I think we could probably delete this face here and this face here. Then if we select them all, we can see them here. Let's go ahead and go to Vertex mode, and what I'll do here is just scale out in the why just a bit. And then scale in the Z a little bit mawr and it looks like we're gonna have to use the proportional editing tool to get this a little bit closer to the curve that we want. So let's go up here and turn on the proportional editing tool and also like these points here. And maybe these points over here because recall that this is a longer piece here. So, actually, if I turn or tab back into object mode and move this out, let's go and scale it in the X. And let's go to the top view and see if we can see how wide this is supposed to be. It looks like it comes out to about here. Let's try that. Yeah, that's looking pretty good, actually, we do need to still use the proportional editing tool to kind of mold it into place, So let's go back here and tab back into edit mode. And with the proportional editing tool on, I'm gonna press G and Z and let's see, I can pull these down and expand these out of bid. And as I expand these out, you can see them kind of flatten up a bit and mold a little bit better to the image. And I'm not looking at the three D object there. I'm trying to look at the image. Let's kind of go like that. And this and this. Well, let me hit the B key and border select thes and then border selectees, and I'll turn off the proportional editing tool with the okey. And then let's scale out in the why, like that pushes that out just a bit. All right, let's take a look at it in solid view. All right? I'm gonna grab this edge here and let's move it out. Yes. Yeah, so I think that's pretty good. We've got this coming out just a little bit further then those braces and that's what we want. Like that. Yeah, I think that'll work. So what we have to do now is do a little bit of extruding Will insert some edge loops and extrude these pieces up and get this general shape. And then once we do, we'll apply a solidify modifier, so that's coming up next.
75. 073 Finishing the Modeling: to work on the back fender. I've added this image number 13 here, and let's zoom in with the period key. And what I'd like to do is just add some edge loops to extrude out two of these grooves here on the top of the fender, and then maybe do it a little extruding to get some of this on the edge. Let's see what we can do all tab into edit mode. And if I press control are and scroll the mouse, well, maybe we can add four edges right here. And then, um, it looks like it comes down pretty close to the edge. So maybe I'll add on edge loop right here and an edge loop right down here. And then what we can do is in the face mode, weaken, select this face and then control. Click this one and that will select everything between those and then shift. Click that one and then control, click that one, and that will select all of those as well. Now, I think we should probably extrude these up, but I think we're gonna have to scale them out a bit too. They appear toe come out in alignment with the surface here because if I had extrude here, let's just do this. I'll hit E and pull up in the Z axis. You can see how it kind of polls toward the center, and there's a little bit of that going on. But I think what I'd like to do is maybe scale out in the why with s and why. Then I'll hold the shift key down to kind of move it out a bit like that. And then I'd like to move these in the X. Let's see if we can change to individual origins here and then scale in the X S and X and then individually, you see those will scale together rather than moving all of it all into itself. So let's maybe bring it in about like that. Let's try that, Um And then if we go to edge mode and all click this edge out here, maybe we can do a little bit of extruding just to kind of hinted this kind of an edge here . We've got a couple of grooves here, so maybe if we hit E and pulled down in the Z now it looks like we're gonna have to scale in the why? Because thes air going straight down. So let's hit s and why? And kind of pull those in a bit like that. There we go. And, ah, maybe we can pull them out a bit in the X. Let's try that. Um, now, maybe if we bring it back up, So let's hit E and I'll try and pull it up a bit and out. And maybe let's scale again in the UAE to bring these back out. So s why hold those back out like this? It's kind of hard to tell if it's actually working. I think it is. There we go. Yeah. Okay, So now we've pulled that up. Let's pull another one down, let's hit e and click, and then let's pull down in the Z and pull out in the X. And maybe that's all we need there. Let me scale in the why Just a little bit more s and why? And I'll bring those in just a bit like that. Maybe a little bit more. Yes. Why? In like that? Here we go. So we've got something like that. We've got just a little bit of a hint of, um, some ridges here and we've got those too. Extrusion is coming up in the middle Now let's add a little bit of thickness to this. Let's ah, just come over here to the modified his panel and let's click on Solidify. I should probably apply the scale to this. So let's press control a and apply the scale, and that helps a bit there. And then let's click on even thickness and click and drag in the thickness field until we get it about the way we wanted. It's pretty thin, so maybe something like that. All right, let's try that. And then let's go ahead and smooth it. I'll come up here to object. Shades smooth. All right, let's go back down to our object data and turn on auto smooth. And let's drag up and see what we can get here. So we get it pretty smooth like that. That may be a little bit too much. Um, let's bring it back down and see if we can, maybe about in here, something like that. But then also maybe we could grab these here and maybe bevel these. So let's try that. Let's go to edge mode and press Ault and click this edge. And this one in this one Here, here, here, and also these on this side. So this one and this one right there I was trying bevel these. So control be and let's bring these out and maybe scroll the mess. Well, one time to get that kind of a curve. Yeah, that gives it a little bit more of a curve. That air coming like that. All right. I think I can live with that. Yeah, let's let's do that. So let's come over here to the modifiers panel and let's go ahead and apply this Solidify a quick apply here. And then if we take this, move the origin to the three D cursor in the center of the grid set origin three D cursor. And then let's go ahead and add that mirror modifier here. Well, it looks like we need to apply the rotation, Control a and rotation. All right, so there we have the rear fenders. I think that's gonna work. Yeah, that looks pretty good. Let's now work on this front piece right up here. There's ah, a piece, right Just on one side and let me zoom in. Here we go so we can see it here. This and this right here. That's what it is. We don't have it on the other side. So if we're going to create a Boolean and do this, we're going to need to apply the mirror modifier before we do it, because whatever we do on one side happens on the other. And, of course, for this it isn't on the other side. So let's go ahead. And with this hood selected, let's apply the mirror modifier. Now we need to make sure that clipping is turned on. Let's click, apply. And now let's go ahead and find a place where we can create this cylinder to cut that whole . So if we go to the front view and hit the Z key and go toe wire frame, it looks like it's right about here, right? So let's go to that cursor tool. Click right in here and now it's create a cylinder. At that point, let's press shift a cylinder and we don't need 32. Let's make it 24. Let's make it fairly smooth, so it isn't really jagged around the edges and then let's Ah, take this down 2.1 0.4. Maybe something like that. And let's turn on the move gizmo and let's rotate around the X axis are X 90 and we go and let's scale down and kind of put it in place here. So it looks like, at least for the image it's about right here. We may have toe move it a bit on the three d model itself, but let's try that. And then let's go back to solid mode. And let's take a look at how deep this should be. Um, I think that's a little bit too much. It doesn't go in quite that far. Maybe about to here. Let's try that. And also it looks like it's pretty close to the edge here. Being this close to the edge with a Boolean could be a little bit dangerous. Let's move it out from the edges here, so it has a little bit more room to work. Yeah, something like that. All right, so let's select that hood and fender object, and then let's go to add modifier and create a Boolean, let's click on the eyedropper and click on the cutter right there and then let's click, apply, and then we go. So now let's grab that cutter and let's pull it out and see how we did. Yeah, that's pretty good. So if we select that, we may be able to smooth that up some more. Because when we create this, those new faces don't have the same smoothing as the rest of the objects. So all we need to do is just come over here and just add shade smooth, and that will clean that up some. Okay, so now we need to add something in there, That little cylindrical thing there. We can use this for that. We can just go ahead and use it for the interior piece. So if we tap into edit mode and grab that face, we should be able to delete that. And let's, um, scale in the why quite a bit s. And why? And then also we just need to scale it down some. So let's just scale it down a bit so it can fit in there easily. Let's move that in and zoom in with period key, and maybe it just needs to go in about that far like that. I'll push it in just a little bit because I want to extrude out to get this little rim here , whatever that is. Time to bring it in just a bit. Having to edit mode. And what I'll do is I'll hit the I key and in said in just a bit. And then let's just extrude out like this just out of it like that. So we get a little bit of, ah, rim there and then we also need to deal with this thing. Now it looks like from this angle, it's got kind of a curve on the top, so okay, we can work with that. Let's, um, tab into edit mode and let's select this part of the cylinder with control. Plus will just expand that selection. And then I'm gonna duplicate shift D and enter. And then I'm gonna pull this out like this, and that's gonna be our new piece right here. Let's go ahead and split that out into a new object to make it a little bit easier to work with. And then let's select it. Now we're gonna need to take at least half of that out. Aren't we So if we go to the front view here and I'm gonna go to wire frame and let's tap into edit mode and go to face mode, Weaken, select that face in the center first of all and get rid of it. Let's press X and delete faces. And then let's border select these faces like this and get rid of these X and delete bases . And now, if we take a look at it, we just have this here and we may not even need all of those. So let's just get rid of maybe these, like this X and delete faces. And then this is all we need. So let's move the origin to this geometry and let's just bring it down, maybe scale it out in the wind just a bit. Let's bring this in and let's put it here and then we just need to fill in there. So what let's do is tab into edit mode. Grab this edge and this edge, and then with those two selected list press control E and bridge edge loops right here. Metal. Create a face there, and then we can select this edge all the way around the front and hit F, and that'll fill that as well. So now I think that's what we want. I'm gonna press S and Z and kind of flatten it just a bit mawr and scale it out a bit like this. Let's make sure it's kind of in the center there, something like that. And there we go. So now we have that piece. It looks like it's out a little bit further, so I'll bring it out like that. Now let's join. It must like this and press control J and then all shift. Select this the actual hood and fender and press control J and that will join it with that whole object. And now it's smooth, it shade smooth. And there we go. All right, so we've got that. I think we're pretty close to being done. There is, of course, a lot more that we can add to this, but I think it's time for us to move on to the next part of the project. And that is we need to begin combining all of these together in a strategic way, of course, and then begin UV mapping it because we're gonna need to apply to D textures. We're gonna take this into substance painter and create textures. But of course, before we do that, we need to create our UV maps and in the next part of the course will begin doing that.
76. 074 Preparing for UV Mapping: Well, as I mentioned in the last video, there is a lot more to do here. We could just geek out to our heart's content. With all this gear on this vehicle, we could really just add every little thing. But I don't know that that's really feasible for a game object. And honestly, it's time to move on in terms of this course. So please feel free to add anything else you'd like to your vehicle. Really, there isn't any other pieces on here that don't involve some sort of technique or tool that we've already covered. So if you've come this far, you have the tools and the skills to add whatever else you want. But as I said for this course, it's time to move on to the next part of the process, and that is UV mapping. But before we do that, let's of course, do a little housekeeping. Let's go ahead and join these together. I'll just right click and join these here. Um, it looks like we've got some extras out here, so let's hide our collections here, and then let's select all of this, just the lights and the fenders, and then let's press em and move them to the vehicle. Maine. All right, so if we bring back the wheels and the vehicle here, this is what we want to UV map. And there's a lot to this. But we can break it down into its component parts, and I think it can go fairly quickly now. One of the reasons, again that I kept the mirror modifiers on a lot of these pieces like, say, the doors here is Of course, if I wanted to do any changes on one side, the other side would automatically update, but also for the UV mapping. We can actually make our textures a little more efficient by just UV mapping one side and then duplicating it over to the other side. And that will actually save space on our UV map. And I'll show you what I mean as we go along. But just know that we're going to be using the mirror modifier in the UV mapping process as well. So, first of all, let's begin with the actual cab here, this main piece in the center, and let's go over to our UV editing screen layout up here. There we go and maybe I'll move this over a bit. And it looks like when we came over into UV editing, it switched us into edit mode. And what I would do is tab into object mode again. And I'm gonna hit the division key on the NUM pad right here and that will try and isolate that piece. There are a couple of pieces still hanging on, so I'm gonna hit that division key and hit it one more time. And there we go. That kind of cleaned it up so we only have that one piece that were working on. Now, if you want to bring everything back, of course, we just hit the division key again. So let's hit that division key one more time and tab into edit mode. And if I recall, we have a mirror modifier on this is well now. Yeah. So we're gonna need to apply this. We can't apply it and edit mode. If we hit. Apply here. We get this error. That modifiers can't be applied in edit mode. So well, tab in the object mode and hit. Apply there. Now there's some things that weaken due to kind of clean this up there are things that we don't need here. Since much of this is gonna be hidden, we could, for example, all click this edge here and get rid of it completely. So let's hit X and dissolve edges, and that will reduce the poly count on this just a bit. Um, also, we could get rid of these faces here. Behind the doors were not gonna need those. So let's delete those. And I go around to the other side and do the same thing. Here we go. Ah, what else do we not need? Let's, um, hit the division key again and well down here. We don't really need the polygons on the bottom there. So that the division key and let's select this face here and delete that. So as we're UV mapping, we're just going to keep an eye out for polygons that we can remove and make the mesh a little more efficient. All right, so let's start UV mapping this now. If I just hit the a key and hit you, I would bring up the UV mapping menu and I could just click unwrap, and that kind of works. But there's a lot of problems. Here's there's some stretching going on. There's some overlap here. You can see these kind of polling areas here. We need to do a little bit better with UV mapping this. And in fact, we can take a look at the problems if we create a new window up here. And I'll change this to a Shader editor and I'll hit the N key here, and what we can do is create a new material for this object. Let's just click new up here now. You can also come over here to the materials panel and click new here as well. It does the same thing, and when we do, we get this principle be SDF shader, and what I'd like to do is add a checker pattern onto this so that we can tell if there's stretching happening in the UV map. And if there's stretching happening in the UV map, there's gonna be stretching in our texture that we apply to the UV map so we don't want that. We want to reduce the stretching as much as possible. So let's create a new note up here with Shift A, and I'm gonna create a texture image texture right here. And with this, I'm gonna create a new texture, a new image right here. And let's call this, um, UV test texture. And I'm gonna keep it at 10. 24 by 10. 24 which is fine. And instead of a generated type of blank, I'm gonna choose a UV grid. And let's see what happens if I click. OK, there's our UV grid. You can see it there. I don't really want it here. I want it over here. So what let's do is take this color right here, drag it over to the base color there and nothing yet. But if we middle mouse button click and drag over here and change to the look deaf now you can see that texture there. And look how stretched and worked. It is here. That's not what we want at all. So we're gonna need to work on this a bit down here. I'm gonna come over and just click on the X to remove the UV test texture. From this view, it's hard to see the UV islands with the texture in there. So I'm just gonna click here, Okay? Now, what are we gonna do about this? Well, what we need to do is actually create seems and tell blender how to split it apart, so it'll lay out flat a little better. It's like a piece of clothing, like a shirt there seems in it, that allow two dimensional patches to be sewn together to cover a three dimensional figure . Right there seems on a shirt along the side, around the shoulders, maybe underneath the arms. And all of those seems are just connecting flat two dimensional panels that ultimately are shaped into a three D object. So that's what we need to do here. So I'll go back to my solid view here, right here. So I'm not looking at that test, texture, weaken, switch back and forth easily, just to see how it looks. So what let's do is let's start creating. Seems we can come up here and go to edge mode with two key and begin selecting edges. Say, let's just say we select these edges right here and let's press control e to bring up the edge menu and you can see right here is Mark seem so let's click that. And now we've got these red highlights along those edges. And that means that's where Blender is gonna break that out into its own UV island when we UV map this So let's just see how that looks. If I hit a to select everything and then press you and unwrap there it is right there so I can click this well were in Vertex mode here, let me ah, middle mouse button, click and drag and drag that over. We can change this to Island Select and click here, and that will select that whole island. We can hit G and move it around. We can it are and turn it. Let's go back over here to the looked of you. And now if we take a look at our checker pattern on that piece that we just split out, it looks pretty good, right? It's not stretched, it's pretty flat. And even all the checkers air evenly sized. That's good. That's what we want for this whole piece. And that's what we're gonna be doing. We're gonna be assigning seems to our objects and UV mapping it so that it will lay out flat in the UV editor over here and allow our checker pattern to be even an unstrapped. So we'll continue that in the next video
77. 075 UV Mapping the Cab and Doors: All right, let's add more. Seems to this to clean some of this up. Let me move this over and go back to our salad view. And if I select, say this edge and I'm gonna run the edge up like this and down and over. So we break out this whole piece here like this control e mark seem. And then I think we should select this seem in the center of this inset. So instead of going in and trying to select every little edge in there, what I'm gonna do is just switch to face mode, select it, and then switch back to edge mode. And now all those edges air selected. So now let's press control. E and Mark seem and we've got those in there. Let's take a look at the sides here. What we can do is Marcus seem all the way around. Each of these doors was press Ault, click there and that selects all of that. We're probably not gonna want the ones in this center there, but let's go ahead and continue. All shift, click, all shift, click all the way around here and all shift click all the way around there, so that gets all the edges around the door. Let's now press shift and click these edges to de select them like this. And then let's apply our seems to that control. Lea and Mark seem, um, on the inside here, this loop around the inside of the door, we're probably gonna want to select edges up at the top and at the bottom. And Marcus seem there so that this row of faces here will break out into its own UV island . And this row of faces here will break out into its own. Let's come over here and do a similar thing with these control E Mark seem. And we go and let's go around and do that same thing upon the other side, all to click all shift, click all the way around there, Own shift. Click there and then let's press shift and click and de select these. There we go. Control e mark seem. And then let's add a seam on the top and the bottom of each of these doors Here, Mark, seem here and down here. There we go. Now I think we're ready to at least try and UV map This Oh, however, I haven't put an edge along the back of here. Let's try this. Let me add an edge or add a seem along these edges right here, Mark seem. And let's do that over here. Ah, right here. This, this and this. Let's Mark thes seems and maybe I'll also add a seem right in there to break these two out . What that's going to do is break this panel out on its own as its own UV island and this panel out on its own. So let's try that. Okay, so to UV map this let's press the a key to select all the faces and then let's press you and unwrap and let's see how we did Well, that's looking quite a bit better. If we switch over to our look Dev. Now you can see that it's mainly taken care of most of that stretching. There's a little bit of warping up here. We might be able to work on that by adding edges in there, but I think that's going to be OK. It's generally going to be a uniform color up there, and yeah, I think all of these look pretty good, too There's one thing that's concerning me, though. On let me switch back to solid. And that's these things right here. You see how we've got this kind of stretching? They're stretching to try and connect edges that don't have continuous connections. Like, um, this one here. See how that edge really doesn't have a connection over to the other side. Ah, this one too. So oftentimes, when you have these edges along and in gun like this. So this face right here is an end gun because it has more than four sides. This is just all one face here. And sometimes when you have a ningun like this, you can have this kind of stretching. So how do you fix that? Well, you could go through an ad edges along here and to connect this edge and this edge up right . You could add edges using the knife tool toe cut edges up to here. But that's really adding mawr polygons. One thing that we can do is instead of adding more polygons is just triangulate the face that's here. So I think we talked about this back when we were creating the hood and the front fender. We can convert this in gun two triangles by right clicking and choosing triangulate faces. And when we do that, that's what we get. So it seems like we're adding a lot of geometry to this, but in fact we're not. If you look down here at the bottom of the screen, it says Number of tries 246. If we de select those you can see that's how many tries there are on this whole object. If I undo this press control Z and undo the triangulation, take a look at it here. It's still 2 46 So when we triangulate this, we're not adding any extra faces. We're just triangulating it in the same way that unity is going to be doing that when we take it into the game engine. And when we do that, if you noticed before it cleans that up so we can just go through here, triangulate thes faces and clean our UV map up. So if I select this one now and right click and triangulate faces, you can also press control T that cleans that up. Let's select everything and see how we're doing. It looks like we've got some down here on the bottom. So that's come down here and select this face here yet. Sure enough, this press control t cleans that up and let's press control. T. There we go. Let's hit a and see how we're doing. Yeah, I think that looks pretty good once again. If we come over here, we can see our texture. I think that looks pretty good. All right, So let's hit that division key. And there's what we've UV map so far. Let's go back over to, ah, solid view. And what else should we work on? Well, we could work on the doors here. Why don't we do that? Let's hit the division key. And there they are. And let's also come over here and remove that mirror modifier. We don't need that on there. For now. Let's tab into edit mode and see what we can do. Well, in terms of removing edges, there is one thing we could do. We had extruded this out, and when we did, we created this edge right here so we could select this edge and get rid of it. Let's do that. Hit X and dissolve edges. Same thing over here. So once again, as we're UV mapping, we're just looking for ways to make the model a little more efficient. Let's now select these faces on the interior weaken, select thes here and then press control. Lea and Mark seem The problem is it's also selected those so we can just select these two edges right here and press control Lee and clear scene so we don't have those. We don't need those selected. I'll do the same thing here. I'll go to face mode, hit the sea key, select thes faces at the two key. And then Mark seems now I can go toe edge mode. So, like thes three and remove or clear those seems there. All right, now, it also looks like there are faces here on the back that we just don't need it all. Let's go ahead and delete those there. And, um, we could also maybe select some of these edges here on the corners so that as this lays out flat, these kind of pull apart a bit like tabs on a construction kit. I'll show you what I mean. Here, let's press control E and Mark seem and I'm just going to hit the l key and select Onley this door here, get you and unwrapped and you can see how they're kind of breaking apart here like that. So they lay flat a little better, right? So let's do that Over here is Well, I'll select this edge. This edge. Oh, it's like these two, this one and maybe this one here. Let's go ahead and add Seems there now if we select everything and hit you and unwrap, that's what we get. If we come up here to our look, Dev, you we can apply that material that we just created to this object. So let's come up here to the material, pull down select material and there it is. Now we should probably change the name of this material. It's called this UV test pattern and we go so we know what it is as we continue working on this and there we go. So that looks pretty good. Let's go back to our solid view and let's press the division key to go back to the vehicle . Now you may notice that we don't have the doors over here, and that's fine. This is the way I'm going to be working as we go because ultimately I'm gonna want to UV map and place the UV islands before I add the mirror modifier back onto this and you'll see why, as we go forward. But in the next video, what let's do is go ahead and work on the windows here and the door handles.
78. 076 UV Mapping the Door Handles: All right, let's take a look at the door handles here. I'll go ahead and hit that slash key on the number pad to isolate this. Um, I can get rid of the mirror modifier for now. Let's do that. And, ah, let's tap into edit mode and take a look at it. Now let me move this up some. I feel like I'm on a little bit more room here. Let's begin here. I'll hit the L key for this and zoom in. And this is a fairly complicated piece to UV map here. And look at what's happening here. As I tumble around, I'm clipping into the object, and that's a little annoying. Let's fix this. I'll hit the N key to open up the sidebar here and let's go to view. And in the clip start, it's beginning to clip the object at 0.1 meters. So let's take that down to say 0.1 meters, and that helps. So we're not going to get that clipping when we zoom in real close here. All right, um, for this, let's begin by breaking this piece out from the cylindrical part. So let's just all to click this edge all the way around here and let's press control. E and Marcus seem here. Now we know this is gonna be broken out from this. So now let's come in here and maybe select this edge and this edge. Actually, I'm extending it all the way to here, and I don't want to do that. I can just go ahead and shift, click and de select these right here. There we go. And then let's Mark seem here, control e Mark seem. And I don't think we need these faces in here. We're never going to see those, so let's not worry about those and just delete them now for these circles. We're gonna have to select the edges all the way around each of these. Um, and when we do, the interior will be split out on its own. But we want the interior to lay out flat. So I think we better add a seam. Say, at the top of each of these, like this control e mark scene and the reason why I'm putting them up at the top used to try and hide them. So we're probably going to be seeing the vehicle from a more top down view. Most of the time, I would say so. If I put this seems up top, that's gonna hide them away. All right, let's all to click this edge here and this edge. And let's do that for all of these. Like this. Make sure I didn't open. I did select an extra one in there. All right, let's Marcus seem here and let's ah, do the same thing over here. I'll Ault click these I'll shift. Click. There we go. And Mark seem here. Okay, so we've got that part of the handle. Done. Let's now come over here and work on this cylindrical part. Um, I think we could probably break the base out from the rest with a seem right here. Let's do that. And how should we do the rest? Well, let's take a look at it and see how it does once we UV map it. So I'm gonna take this, and I'm just gonna press the l key. Oh, and I'll hover over that bolt and press the l key as well. And let's just test u v mapping it and see how it goes. I'm gonna hit you and unwrap when there we go. So there are a couple things here. First of all, we could come down to this unwrap settings panel and changed from the angle based method to the conform ALS and see if that helps any and it doesn't really help any. And you see this kind of oval shape to a circular piece. That kind of tells me that we don't have our scale applied for this object. So let's tap into object mode and, ah, press control A and apply that scale. And then if we tab back into edit mode and with this still selected lis press you and unwrapped and you see how much more even those are, so that's good. This, I think, is gonna be this piece over here. But this this is what I wanted to see. This is still kind of a mess, and that's this part right here. I think we're gonna need to redo that and also take a look at the Circle's. We've got this overlapping areas here once again, just like we saw on the cab of the vehicle. So we're probably gonna have to triangulate those faces as well. Well, let's go ahead and do that. Let's select this face and this face and less press controlled T and that will triangulate those. And you see how that cleans it up pretty well. And let's select these two and press control T. And there we go. Okay, so we've got those done this over here. This this thing right here is not real good, because you see how small this is in comparison to the rest. That means we're gonna have quite a bit of stretching. And we can check that by applying that UV test pattern material to it right here and going over to the look. Dev right here. Yeah. You see how much stretching we've got these squares really tiny here and then up here. We've got these huge squares here, and that's that's just too much. We can have a little bit of warping here and there like here, but this is just way too much. So let's go back to our solid view and let's see what we can do with this. I think first of all, what I'll do is maybe just select, not this edge right here. I'll begin by selecting this edge and then maybe control. Click these edges on around like this, and then maybe let's also select this edge along here and kind of split this whole thing out. Let's Marcus seem there and then let's kind of do the same thing over here. Let's Ah, select this edge with Ault. Click and then I'll all shift. Click this all the way around here and let's mark a seam here. And if we're gonna have this cylindrical piece right here, we probably better give it a seam, so it'll lay out flat. So let's add a seam right down here. And I guess we should go ahead and extend this on around down like this as well. Let's try this. Okay, so we've got those. The last thing I see here is this piece right here. Let me go to face mode. So this piece right here, let me tumble around and we go like this. This piece right here is still all one piece, and it's going to try and lay this out in a in a circular pattern. So to get it toe lay down flat, I feel like we should add one edge right here. Okay, so let's let's hit the L Key. And with the bolt there, too. And then let's press you and unwrap over here. Now, what do we see? Yeah, So you can see how now these pieces are more proportional to the rest of the object. We've cleaned up the areas with the circles, and this area over here is laying down flat as well. If I come over here and click on U V Sync now, I can come over and select these faces here, and you can see how they're laying down in a row right here. This part right here. Now, what we're seeing here, the overlapping as all these other pieces over here. So we need to deal with those as well. Let me turn off UV sink here. There we go. All right, so we've done this piece here. I think one last thing I want to do is maybe just split this out. Um, with a couple of edges, Let me just Ah. So, like this one, This one, this one and this one, I'm just gonna split this out like this. Probably not necessary. But let's go ahead and do it. And then let's hit you and unwrapped and see how we do. Yes. See, that splits that out there. All right. And we can also switch from angle based to conform Alaa and see if there's any changes here . Angle based. Yeah. I mean, I think I like angle based a little bit better for this particular object. Alright, let's try the next one here. This thing right here. Let's, um, maybe just select this edge in this edge and let's Mark seems there and let's see how that works. I'll hit the Elke and let's press you and unwrap. Yeah, that looks fine. All right, so for this one, we could go through the process of UV mapping all of this. But you know, what we could also do is just select this and delete it. We could kind of cheat here. We could delete it, grab this, go back to reference images. And if we go over here, let's actually go back to our layout and let's go to wire frame here and now what we can do is tap into edit mode. So, like this whole thing and let's just duplicated Let's move it over here, put it in place right there. Now we could spend it in the X with our X 1800 the the bolt didn't come along. So what let's do is let's de select this part. A press shift. L to de select that bolt. And then let's just move this over in the place right here. Right? So we're just ah, kind of cheating a bit. But if we've already you ve mapped one. Why go through the process of UV mapping the other? Okay, so we've got now the doors and the door handles. Let's ah, in the next video work on the windows here and maybe on the hinges as well.
79. 077 UV Mapping Windows and Hinges: Now, you may be wondering why, If we go back to the U. V editing screen layout here, you may be wondering why, If I hit the a key, why am I leaving all of these UV islands overlapping? That's really a no no. And we shouldn't have overlapping UV islands in our UV maps. Well, we're gonna be taking care of this, ultimately, kind of all at once. What I'm doing is just going through and UV mapping piece by piece, all the parts of the vehicle. And ultimately, we're gonna begin combining those into one object all these pieces into one big object, and then blender gives us some tools. These ah, pack island and average island scale to organize or UV maps. So let me just show you what I mean here, in kind of a smaller example, and we'll redo this as we go. But I just wanted to show you what I mean here. So if we select all of this and this is all one object, if we select all of these faces, you can see we've got overlap here. So what we can do is we can hit the aching and select all of these UV islands. And as I said, you can see that that these air overlapping, you can see UV islands over overlapping each other, and that's not good. So let's select them all and go to the UV menu and then let's click on Average Island scale . And what that will do is make sure that all of the UV islands are proportional the same relative size as all the parts are here in the three D object. And then what we can do is we can come over here back to the U V menu and click on Pack Islands, and it will pack them all into this 01 space, right? So ultimately, this is what we're going to do for the entire vehicle. I mean, I might make I'm thinking about making three different UV maps, three different texture maps for the vehicle, one for the tire and wheel, one for the overall vehicle and one for the machine gun. And those three UV maps will be used to do our text. Oring in substance painter. Okay, well, that's just an example of what we will be doing soon, But let's continue our work. Just UV mapping piece by piece. I'm gonna hit the division key on the num pat again. And let's, um let's select the windows here, isolate those with the division key. Take away the mirror modifier. There we go. And let's work on these. So for this, um, once again, we could probably split out that base piece with a seem right here, control e mark seem weaken. Do that. We can also select a couple of edges and, ah, kind of split thes out a bit, you know, open them up. So it'll lay a little flatter. We can do that, and we go, um, we also want to split out the window part from everything else. So I think, um, right in here is the window part. Let's take a look at it in wire frame. Yeah, I think right in there is the window. So let's go ahead. And Marcus seem there. We could also break these pieces out here and here and here. And let's try this. Let's add seems along those corners as well. Let's see how this works. I'll hit the l key and let's hit you and unwrap. Yeah, that actually I think looks pretty good. Let's give it that test material right here. And let's go over to the look, Dev and see how we're doing. Well, we've got some stretching here, a little bit of warping on the front here. The sides actually don't look too bad. But this part warping on the front is a little problematic. Maybe we could also do a similar thing and select these edges for the window and mark seem and see if we can open up the corners just like we're doing for the other parts. Let's try that. And Mark seem there. All right, So now if we select everything with the l key and if you're hitting the l Key and you aren't selecting everything, say it looks like this, right, it's because you've got the delimit by region here with the seam on. And that just means that when you hit the Elke, it's only going to select the faces within that particular seem. You can press, shift and click on the button and turn that off if you want. All right, So let's try this again. I've I've got that whole thing selected. I'll hit you and unwrap and yeah, you see how that allowed those corners to open up a bit right in here and here. And when that happened, it smoothed out or even doubt the stretching here on the front. And that looks pretty good. Okay, let's Ah, go back to solid view and let's do a similar thing over here. I'll hit the l key and hit the period key up. Let me just hit the l key for this one on its own and then hit the period key. Now we zoom into that one. Let's ah, select this edge just like we did before. Let's select these corners. So it'll break out and lay a little flatter like this. Let's split out the window from the rest right here. Let me see if I I got that. Yeah, it looks like I got it. Mark, seem, there we go. And, um, let's go through and select these edges as well, so those corners will open up and we'll probably need to go in and do this in the window part too, huh? Well, we can do that. It's gonna be kind of difficult to get in there, but we can do it over here. Get this one. And then let's get this one right here. Right there. That's what we want. Okay, so it should look like this. Okay, let's give this a try. We'll hit the lt press you and unwrapped. Yeah, I think that's okay. Let's, um, take a look at the look deaf here. Yeah, I think that's pretty even. That's pretty good. Now, if we want, we don't have to at this point in time, but if we want, we can select the whole thing, press you and unwrapping that'll lay it all out without any overlapping or anything. We can change from angle based to conform all. Actually, I, like, conform a little better for these. All right, so there we go. We've got those. Let's, um, hit the division key on the num pet. And you can see here in looked of the pieces that we've already you ve mapped. Let's go back to solid view and let's choose something else. Um oh, how about those hinges? We had talked about those. Let's get those going. So let's hit the division key. Turn off the mirror modifier. And here we go. So let's start with something a little bit easier this one looks a little more complicated , but still, it's maybe let's work on this one. And once again, we might be able to do one of these and then just duplicate it for the others. Um, it looks like we might be able to select this edge and this and this and he's all the way around here. Let's try that. We could also come on around to say this edge and add a seam here and maybe let's add a seam here. So it breaks this part completely out. Maybe we should add a seam down here, too. All right, let's go ahead and select it all and hit you and unwrap and give it a try. All right. You can see where we are so far, switch to angle based. This doesn't look too bad, except for this piece right here. We got to split that out. And this is looking pretty ugly and stretched because if we come over here to are looked of right here Oh, let me add the material. Yeah, you can see that this is stretched right? You can see that there and you can see that this is stretched and in fact, if we want to, we can come over here and go to view and then under overlays Weaken, scroll this down and right here is stretching. We can click on this and we can see our stretching. So anything that's blue isn't stretched. Anything that goes into green and orange and red is probably stretched a little bit more than we want. All right, so let's work on this piece right here. Let's select this edge all the way around here and mark this seem. And then we could also select these edges so they open up so the corners open up and it lays a little flatter mark. Seem there. Let's give this a trial hit. L impress you and unwrap. All right, so we've got that a little bit better now. This has been broken out from this and it's blue. That's good. Let's come over here and take a look at this now. We could do a similar thing here. We could select this edge all the way around here and right here. And let's Marcus seem here. We should probably also select the edge around this extrusion here and even take the edges year and opened them up like that. Now let's press L. You and unwrap we're getting there, right? So we've broken the extrusion out. And here's that front panel that we put edges around. Now this part here needs a little work, right? We could maybe take this edge and Marcus seem there. Let's try that. No, you unwrap. Well, that certainly helped quite a bit, but we still got this thing. What is that? Well, that's this in here. And ultimately, I don't know that we really care how a whole lot about this. But I think we should probably go ahead and split it out here. So it's it's own part. Let's take a look at it now, you and unwrapped. And here we go. So that's it. They're right on the inside, and ultimately it doesn't really matter a whole lot because that's really not gonna be seen . But what let's do is go ahead and clean it up by just adding edges along here. One there. And let's add one down here and let's see how this helps if it helps it all. All right, so now let's hit L. You unwrapped and there we go. That looks pretty good. Yeah, And if we go back to the looked of, you can see that the UV test pattern is pretty much all squares. We're not seeing a whole lot of stretching. It looks pretty good. So in the next video, what let's do is let's begin working on just taking this and duplicating it to these two. And then what we'll do is we'll work on this part right here, and as you can see it, it needs some work, so that's coming up next.
80. 078 UV Mapping the Hinges and Steps: Well, let's work on this part in two different sections. Let's first deal with this one. I'm gonna switch to face mode and hit the l key and select that that I'm also gonna select thes ah cylinders here. And let's just work on this So toe, isolate this beyond what we've already done with the slash key on the num pad, I'm gonna press shift h to hide everything that isn't selected. So now we just have this one piece. I'll go ahead and go back to solid mode here. And I think what we can do is maybe just split this out. Well, we know we want toe create seems on these corners. But first, actually, let's Ah, let's get rid of these faces on the back here. Let's delete those. Yeah, there we go. And then let's grab these corners. I'll go ahead and Marcus seem here and let's mark Seems eras well, so we have those corners there. Now let's do is break thes extrusion out. I'll just ah, select this and this and this. And let's Marcus seem here. We're gonna need a seam up here, But maybe what we could do is just create a scene right here and that will break out the bottom part and leave the top in the sides as one piece. So let's try it. Um, I'll go ahead and do the same thing down here now, selecting all of these. And let's, um, it's like this. There we go. So it's Mark thes. Seems now for the bolts here. What we could do, actually is just select, um, one edge somewhere along the side like this. And then what we could do is select edges around here all but one. And so it will break all of that out and kind of open it up at that point. So let's try this. Let me show you what I mean on this one. Ah, let's just select thes and then I'll break these out like that. And let's just select that one bolt. I'll hit the l Key and let's press you and unwrapped and see what I mean. This is still connected here. It's just kind of open that up while still being all connected. It's not completely necessary, but it's a fun little trick. Um, let's go ahead and select that as well and hit you and unwrapped. That looks pretty good. Um, yeah, Let's just go ahead and do the same thing with this bolt. In fact, what? Let's do it. Let's just take that and delete it. And then we'll just grab that and will duplicate it and move it in the Z axis down to here like that. Now let's select everything rescue and unwrap. And there we go. So that's everything we need for that. Let's now press all to age to bring everything back. And now let's go through the same process with this. Let's just select this and let's press shift. H. And, um, I can kind of remember what we did here. We we selected these edges all around here. This is fairly similar to the ones we've already done. Um, I selected these. I believe all the way around here. Let's hit Ault and click there. Mark. Those seems, um, let's get this and this mark those And then let's also let me turn off that move gizmo and then let's get all these and let's get all these here. Oh, and also I got these edges in here. Oh, I will all click thes and add seems to those like this. Now let's try this. Let's hit L. You and unwrap. Yep, that looks about like it. All right, So let's press all to H to bring everything else back. And there it all is now what we can do. Let's go back to this layout view. What we can do is go ahead and just duplicate this and use it for these instead of going through and re UV mapping. All of this, I'll just hit L and L. Here. Let's delete those here and let's just duplicate. Sometimes it's just easier to duplicate than toe recreate the UV mapping. I'll duplicate here and let's spend it around the X Axis Rx 180 And then let's just move this into place right here. Okay, so we've got those. Now what else? Well, while we're dealing with things on this side here, let's go ahead and work on the ah steps and these hooks here. So let's go back to our UV editing screen layout. Let's hit the division key to bring everything else back, and now we can do is with this selected let's go ahead and hit the division key again, and that isolates this. All right, So now what let's do is go ahead and get rid of the mirror modifier and let's work on this . So if we tap into edit mode, um, let me hit the l key and hit the period key to zoom in. So for this, I think we just need to add our edges here again. We already have the back removed. That's good. So I'll just add some seems on the corner edges again. And then I'll just split this piece out right here. Let's just break this off completely like that. Um, Let's also on the inside, Let's ah, select this edge in this edge And let's Mark seems here and that edge right up there so that it will lay out flat instead of circular. So all Mark seem there and then, um well, I guess we could just go ahead and do this weaken. Add Seems here and here. Right here. Okay, let's try this. Now let's hit the l key. Press you and unwrap. All right, well, let's try conform all and we're not really seeing any difference at all. And when we have this kind of oval shape here, what does that tell us when we have a round shape here. It tells us that we need to apply our scale, right? So let's press control a and apply the scale. Let's come back and try that again. There we go. That looks a lot better. And ultimately, what we'll do is we'll just delete this and duplicate it and move it over. But first, before we do that, let's work on this other part of the object here, Um, for the steps, I think what we could do is just select edges on the back here like this and mark that seem . And then we'll get the seams on the corners. Oops, I marked him sharp. Let's mark a seem instead. There we go. And here and let's do the same thing on this. I'll just select that face and Marcus seem for those edges, and then Mark seem over here like that. All right, let's test these out. All hit l and L and let's hit you and unwrap. Yeah, those look pretty good. Okay, so now for Well, let's look at these things. Right Right here. Um, it looks like they've got faces in the back, and we don't need those there. Let's get those out of there because once again, we don't wanna go through the trouble of UV mapping something that isn't going to be seen now. Did we delete the faces on the front here that go into the steps? Let's see. I'll just hit G and move that up and, yeah, we did. So that's a hollow thing. Well, that's good. So if we hit Control Z to go back there, what we can do then is just create one seem right there. Let's just try this. And what that should do is just open it up at that seem and lay it out flat. Let's see if that worked. I'll select these three, hit you and unwrapped and sure enough, so that just lays them out flat like that. All right, so we can also do that with these tubes. Same kind of thing if these are actual tubes that are hollow in the center. Did I do that for these? Let's see. Let me hit the period key and let's just move this down and see. Yep, sure enough, that's hollow. So let me control Z and move that back. So what we should be able to do is just select an edge here at the bottom. And let's just Marcus seemed there, and that should allow us to open those up as well. Let's let's give it a try there and let's hit you and unwrapped. Yeah, there we go. So if I select one of these, you can see there it is. Now, can we do that with these tubes as well? We could probably just select an edge, all click right here and select an edge on the bottom. And I bet you that at work, let's give it a try. So let's do that. Let me just select one of these and give it a test. Was hit you and unwrap. Yeah, that works pretty well. There's a little bit of stretching here on what I assume is that bend there. We could try conform all. Ah, I actually like angle based a little bit better there. Yeah, All right. So we've got all of those. Let's go back to our layout. And, um, let's go ahead and duplicate this piece right here. So let's get rid of this with the Elke X and delete faces, and then What we can do is just grab this duplicated with shift D and why, and drag it over here and put it right there. Okay, Let's Ah, just make sure this is all the way we want it to be. Let's hit a you and unwrap. And there we go. Yeah, I think that we're except pretty well. All right, let's bring everything back. Let's hit the division key again. And in the next video we'll is Do is begin working on these pieces here and the windows and this up here, so that's coming up next.
81. 079 Smart UV Project and Optimizing the UV Map: Well so far we've created UV maps by telling blender where we want to break the object apart. Actually, assigning seems ourselves so that we know exactly how the model is going to be broken up and laid out in our UV map. Now, for more complex objects or objects that we don't really need that much control over, we can let Blender make the decisions about where to create the seams and how to break up the object. So I'm thinking something like this, this particular object in tennis supports. I'm thinking that these are a little bit too complex and a little bit too small in the scene for us to spend time going through and marking seems on this. This could take a while, and it's just not that big of an object in the scene. I think we would do better by just allowing Blender to make the decisions about how to break this apart. So let's take a look at how that would work. With this selected, I'm gonna hit the division key on the num pad, and then I'll take away the mirror modifier and zoom in with the period key. And so if we tap into edit mode. This is what we have here. It's of course, a mess. You can see the original cross pattern here of the UV map that came with that original cube when we began this object. And then all these other pieces and cuts added, ended this, and it's just kind of a mess, and that's why we need to go through in UV map thes. But as I said, this may be a little bit too much for us to spend the time in the effort on. So what we can do is with everything selected here in edit mode, we can hit the U key and go to Smart UV project, and this will just allow Blender to give it a try on its own without any input from us as to where the seams should go. Before I do that, though, let me go back to object mode and go ahead and press control A and apply the scale. Let's just go ahead and get that out of the way and then back into edit mode. Let's press you and we'll click smart UV project, and we have this settings panel that we can adjust angle limit and things like that. But ultimately, I think all we really need to do is just hit. Okay, here. So let's do that. And this is what we get. So as you can see, Blender went through and just did it on Sewn. It said. I think the seams should go here or there, and it broke it out on its own. It's still having some problems here with these in guns, as you can see, and we can go through and clean that up. Of course we can. Just with this whole thing selected, we could just press control t and triangulate the whole thing, and that will clean that all up. So control T. And there we go. So that's it. That's our whole object. And you may think, Well, why don't we do that all the time? That was easy. Well, blender or the computer doesn't always make the best decisions as toe wear seems should go , and sometimes it will put a seem right in the middle of, say, a character's face, or for our particular project right on top of the hood, and it makes it very visible, and it could be an ugly break in the texture. So when we can and where it's needed, we really need to control where the seams were going to go. But for this, this is fine. I think this is a small part of the project, and I don't think it will be a problem. Let's go ahead and hit the division key to bring everything back. And here's where I think we should also talk about what I'm doing with the mirroring here. As you know, as I'm creating the UV maps for each of these objects here, say the windows. I'm removing the mirror modifier so there isn't a duplicate on the other side. And there's a reason for that. And I think maybe it would be good for us to talk about, say, these windows here in relation to what we're doing with the other Windows here. So the reason why I'm doing this is to try and make our texture space or make our UV maps a little more efficient to use up more of this 0 to 1 space here in the UV map. And what do I mean by that? Well, let's let's go ahead and UV map thes front windows and maybe I can illustrate it as we go. So let's go ahead and hit the division key here and for this object. I have a mirror modifier on it. So let's go ahead and take that off and let's do the UV map for this. And it shouldn't be that hard because we've done the other windows. We know that we want probably a seam right here. We probably want to break these edges out like we did before, right? Weaken. Select all of these up. Me, Get this one and we can Mark seems there. In addition, we can go ahead and Mark seems along these corners as well. We did that for the others. And, ah, we shows this edge right in here to break the window out from the rest of the frame. So let's press Ault click and select that edge all the way around the window. And Marcus seem there. It is in there, and also we want to go ahead and get those corners on the window, Part two, because that helps that break those corners apart and lay the rest of it out flat. So let's go ahead and do that. And this one and this one here. Okay, so we have Those seems in place. Now let's go ahead and select everything. Oh, we should probably tab back into object mode. Press control A and apply to scale. Then let's tap back into edit mode. Select everything, press the U key. And this time let's go ahead and choose Unwrap. Since we've gone to the trouble of applying, our seems here. So we'll click unwrap and there we go. That looks good. We could switch from angle based to conform all to see if we like it any better here. I think I, like, conform a little better. Okay, so now that we've done that, let's talk about this mirror modifier. So if I applied the mirror modifier back to this, let's go ahead and bring everything back with the division key. If I applied the mirror modifier back to this, let me show you what happens. Let's go ahead and click, add modifier and mirror. So let's come over here and I'll click. Apply. Let me tap back into object mode or click apply, and then if we tap back into edit mode, you can see nothing has changed. However, here in UV Island select mode, I'll click here if the g key and move and take a look. The other window has been placed right below the existing UV islands. So in other words, when I put a texture on here, when I take this into substance painter and we apply a texture to this area, it will also be put on the other one as well. Now, what that means here is that if I create a texture that has a big splotch of mud or dirt or something here on the window here, it'll be in the exact place over on this side as well. So it will be there will be visible duplicates, because when the piece of dirt is on here, it's also on the one below. So what I'm counting on is to be able to use these windows here in that way so I will mirror these over ultimately, have the UV islands one on top of the other. So they take up less room in the UV map here, and you'll never see both sides. At the same time, you'll only ever see this side, or you'll only ever see this side. So if there's a piece of dirt or something here, you'll never be able to compare it side by side to the other windows, as you can hear. So when I can optimize the UV map by stacking UV islands one on top of the other, like for one side or the other, I'm gonna do it because it will increase the amount of texture space that I can use here by cutting in half the number of U V islands that I have. However, for something like this, I need to go ahead and apply it and then go to the UV menu here, right here. Let me hit a and select everything. Go to the UV menu and choose pack islands. It'll pack them all individually, not on top of each other. So the textures will be unique for each one. Whereas for these I'm going to wait till the very end to apply the mirror modifiers. So what will happen is here let me combine these here. I'm gonna press control J and I'll combine all of these. So what will happen is I will average island scale. I will pack islands for the whole thing, right for the whole vehicle. And only then will I come back. Grab these, split them out, and then mirror these over individually. Right? I can then mirror. There they are. Apply now, if we come back and we join all these together again, control J and go back into edit mode. So now if I select this and say this, you can see there one on top of each other. So I conflict this one hit G and move it out and you can see it's one on top of the other. So I'm using less texture space in my UV map by having the mirrored objects one on top of the other. Well, I hope that makes at least a little bit of sense as we move forward here, you're going to see how it works as we go, because we're gonna have a lot to do with mirroring objects over. But my point was, we've got to kind of make a decision sometimes, like this year, we've got to make a decision. We're gonna go ahead and mirror it over and apply the mirror before we pack islands. Since we can see them both at the same time. And over here, these were going to mirror these over after we pack islands so that they remain one on top of the other. All right, well, that has been a long winded explanation here. My apologies. I hope it makes a little more sense as we move forward here. So I'm gonna grab these over here and split thes out and get rid of these for now. I'm just gonna press X delete faces, and there we go. So now we've got these windows together. There we are. And we've got these windows here that we will mayor over after we pack islands on the entire vehicle. All right, so in the next video, let's continue working on UV mapping, say these objects and this maybe these and this. So that's coming up next.
82. 080 UV Mapping the Cab Details: for these pieces here. We should be able to use our mirror modifier after we pack island. So I'm gonna go ahead and hit the division key, take the mirror off and then hit the division key here. And how should we do this? Let's go ahead and press control a and apply to scale so we know that that's done. And I think for this we're gonna need to maybe all to click this edge and this edge and go ahead and Mark seems for these. And also we'll go ahead and add an edge right up here at a seem right there, so it'll break out and lay out flat. So actually, let me undo this real quick. And let's just select these faces right here. Let's just select thes. Let's press you and unwrap, and that's what we get. You can see that circular now if I select that edge and add a seam there. Now it's select all of these and hit you and unwrap and let's compare what we get. There we go. So just adding that one seem, breaks it apart and allows blender to lay it out flat. All right, so also, let's go ahead and select this edge in this edge and mark seem. Oh, it looks like we need to grab these two here. Let's do that. All right. Um oh, and these down here, let's go ahead and grab these. There we go. So there's our seems. Let's select everything, press you and unwrap. And there we go. Now we can switch from conform all to angle base and see what we get. Yeah, I kind of like that a little bit better. So that looks good. Let's go ahead and go with that. I'll hit the division key. And let's, um, Selek something else. What else should we do? Well, let's try this one here. That's it. The division key. And take a look at it now. I think we can go ahead and get rid of these faces here. I don't think we're ever going to see those, which makes our life a whole lot easier. Now, let's go ahead and apply the scale and let's select, say these edges and these edges and that'll split those out and kind of fold it out at these edges that we haven't selected yet. So let's Mark seems there and Let's press you and unwrap And there we go. You can see it's folded it out at these seems here. We can switch from angle base to informal. We don't see any difference whatsoever, so that's fine. We'll just leave it like that, All right, we're done with that. Let's get the division T and move on and see what else we can do. I met this thing right here. Let's Ah, isolate that. Remove the mirror modifier and let's zoom in for this. You know, we may be able to just allow Blender to break this out. Using smart UV project. It's a fairly simple shape. It may be able to do a pretty good job with this. Let's go ahead and apply the scale in object mode and tab back into edit mode. Let's select everything, Let's press you and let's give smart UV project a try. Let's click OK and yeah, that looks good to me. So each of these pieces here has been broken out like that. So with that done, let's go ahead and bring everything back, and I think these are gonna be pretty obviously in frame at the same time. In other words, you'll be able to see both of these at the same time as opposed to these on the side that you can only see one side of the other. So let's go ahead and add a mirror modifier back to it. And then let's go ahead and apply it so that that'll make that so that when we pack islands , those will split out. So let's tap into edit mode again and you can see here, say, with this one, I hit G. It's right on top of that other one over on the other side. So ultimately, when we pack islands, it'll look like that or it'll break apart into its individual component pieces on both sides, and that's good. That's probably what we want, because we can see them both at the same time. Alright, what about one of these things here? Um, these things. I think we should go ahead and use that smart UV project. Let's isolate them. Let's apply the scale tab into edit mode and let's ah, take a look at this one here. Let's just hit L. And as I said, this one is thin enough and complex enough and small enough on the vehicle that we can just use smart UV project. So let's just press you smart UV project. OK, great. That's fine. Let's come over here and do the same thing with this, You smart UV. Okay, all right. And if we select them both here, there they are. And we can at least temporarily pack islands so we can see them. As I said, this is just a temporary thing. We'll be doing it all at once for the entire vehicle. All right, so those air good, let's hit the division key. And, um, what else should we do? Well, we should probably get this done right here. Let's figure out how much we're going to see of this. Looks like we can delete these faces down here. Let's go ahead and do that. Let's try that. So let's isolate this. And once again, no, let's go ahead and apply the scale and, ah, we could probably just select this edge and this edge and mark the seams and then let's hit you. And let's use unwrap here, and that just breaks that out. Kind of folds those parts out at that edge right there. Yeah, so let's try that Let's try conform all angle based, don't see any difference. So that's good. All right, let's go back. And what else can we do? Well, we could go ahead and work on one of the lights, and then once we get this, you ve mapped, weaken, then just delete the others and duplicated back toe where they are. Let's go ahead and do that. We'll hit the division key, and here we go. Let's tab into edit mode. And I think ultimately we've got a couple of parts here now by recall this part and then this part and then this part. So we've got a couple of different pieces here that we can work with. So first of all, let's hit the L Key and let's press shift h to isolate it or to hide all the UN selected parts. For this, we could probably go ahead and just insert an edge or a seem right here. And then, since this is once again one of those circular pieces, if we selected this and hit you and unwrap, it would make it circular, and also take a look at this. It's a little bit oval shaped, which once again tells us what that we need to apply our scale. Now if we hit you and unwrap now it's a circle, but we don't want it to be a circle. We want it to be laid out in a flat strip. So if we select one edge here and Mark Aseem now, if we do that there we go. So those air good. All right, let's press all to H and bring these back. Now, let's select another part right here. Shift H to hide the uninsulated. And let's try this now for this. I'm curious as to what this would look like if we just unwrapped it as is. Let's just try. I'm gonna hit you and unwrap and that's that's it, huh? Well, that's ugly. Okay, so we can't really do that if we switch to informal makes it even worse. Okay, so we can't do that. We could Ah, break this out right here. It's like this edge and Marcus seen there. Now let's try this. Let's see if we get any better results with this a little bit better. A little bit. Um, we could switch from confirmed the angle base. See what we get I'm still not liking the stretching we're getting with the light blue here . In fact, if we go ahead and add that material to it and go over to the look deaf, here's what we get. Um, and we've got some pulling and stretching here. I think maybe what we could do. Let's go ahead and add a seam here and here. Now those seems there going to be fairly visible. But I think it will be okay because this particular object is just gonna have a uniform texture on it. Just, you know, a black plastic kind of ah, kind of a texture. Let's give this a try. Let's hit you and unwrap and let's give that a try. That's a lot better. Actually, everything's a lot more square and uniform. There's still a tiny bit of pulling around here, but, um, I think that will be fine. Let's go ahead and press all to H and bring everything back, and now it's select this part. Endless press shift H. I'll go back to solid view and we know we want to break out the light part of it here, so let's go ahead and add a seam there and we could probably break this out right here. Let's try this all shift click here and let's break that out into its own peace. And let's just try this. Let's see what happens. I think it's gonna have some stretching, but let's give it a try. Yep, it's still got quite a bit of stretching. Um, a couple things we could maybe select an edge here and an edge here and split thes out. Let's try that. It l I'm gonna hover over one of the edges and hit Dell, and then you and unwrap. Well, that broke those out, so it looks a little bit better. Um, we've got quite a bit of stretching in here. I wonder if we, um, selected an edge in here and broke these out. If that would be helpful. Let's try this. I'm just gonna break. He's out here. Oops. I marked sharp again. Let's try that again. Mark. Seem, there we go. Ah, this edge or these two edges and maybe two edges here. Let's try this. All right? I'll select it all you and unwrap a little better. Let's go ahead and take a look at it in Look, Dev it may be better to add seems along this curve. Instead, let's take a look at that. Let me tap back into edit mode, and instead of putting the seams here, let's ah, clear the seam here and clear the seam here instead of putting them here. Let's try it along here. I'm gonna press control click to extend that selection and let's put him along here and maybe along here. Make that. Let's try this. And sometimes this is what you have to do. You just have toe, give it a try and see and see what works you unwrap. Well, that's interesting that it didn't break it out over here. Did I not apply that edge? I did not. So let's go ahead and do that again. I'll go ahead and grab this and let's Mark seen. There we go now. We've got those seams on both sides, so let's hit you and unwrap their Yeah, I think that's a little better. Let's take a look here. Yeah, that seems to be a little bit better. Let's go ahead and go with that. So now what we can do is bring everything back and I'll turn on solid mode again. And then what we can do is we can select this. Move the cursor to it with shift s, too. Delete it, select this duplicated with shifty and enter. And then press shift s and eight or selection to cursor. And that will pop over there. Now we can do is press rz and spin it around. And there we go. Same thing over here. Shift us too. Delete. Select here. Duplicate shift US eight. And there it ISS rz Over here. Now let's do it one more time. Weaken! Slick, this shift. Us too. We can delete it. Come over here. Duplicate shift s eight and that'll pop it over. There are Z spinning around and we go. So now all of these have been UV mapped, and it just saves a lot of time if you just UV map one and then duplicate them around again .
83. 081 UV Mapping the Gun Turret: Well, now let's move up to the gun turret up here and let's work on some of these pieces. If we select this one here, we can see we've got a mirror modifier on it. And how do we want to use this or how do we want to do this? Is it something that we're going to see all at once, Like the front windows? Or is it something that we're only going to see from the side? Um, it's kind of difficult to say. I'm gonna make an executive decision and say, It's, um, like the front windows in that we're gonna need to, ah, apply the mirror modifier because I think we'll be able to see both sides, Um, from this kind of you. So let's go ahead and do it all in one. Um, I'll go ahead and hit the division key on the num pad. And let's for now at least, Take away the mirror modifier. Let's go ahead and press control a and apply this scale. And for this, let's tap into edit mode and take a look at it. Um, we could test it by just trying out smart UV project. We press you to in smart UV project and click OK, and that's not bad. We can also scroll the angle limit here. If we click and drag and the angle limit, you can see that as we do, we get different organizations of the U. V. Island so it can go from one year up to 89 degrees. So this isn't bad If we take it up to 89 and hit Enter, that's what we get once again will probably have to triangulate these in guns. Um, I don't know. Is there a better way to do it? Could we Ah, select these edges and give this a try? Let's give this a try. We can always go back and use the smart UV project, but I think I want to try and ah, just select these edges all around here. There's that 1 may go ahead and mark thes and I'm just gonna go and select these Mark these , um Then I guess we should go ahead and grab the corners here like we've done before this one in this one and this one. Let's go ahead and do that. We should probably grab these two. That's enough of an angle that we want to probably break those out and then, um, on the inside of the windows to we're gonna need toe do that. So I'm not sure if it's going to be radically better than the smart UV project. I just thought I'd try, and this is kind of the way I do things. Usually ill. I'll let Blender have a shot at it, and then I'll give it a try and see which one works a little bit better. Apps. I hit the wrong thing there. Let's right this again. There we go. All right, so now that we've got that, let's go ahead and select everything. So there's the UV map we have currently with smart UV project. Let's, um, now press you and unwrap and see how we did here. It looks like that may just be better to go with the smart UV project. So let's just select everything with a let's press control e and clear the seams right here . And then I'll go back to you. Smart UV project. Okay. And there we go. So sometimes you just gotta give it a try and see a press controlled T to clean that up and all right, let's go ahead and tab back into object mode. Let's go ahead and add a mirror modifier. Let's go ahead and apply it. There we go. So now we've got all of this UV map. Now, this will split up into the UV Islands for both sides. It will ultimately look, Or at least it'll break out something like this. If we go to pack islands here, it will break out more like that. And that's fine. All right, So let's hit the division key. And let's take a look at this one here. Now, this does have a few modifiers on it. So let's hit the division key and isolate it. This one here has a solidify on it. So we should apply that. And then it also has a mirror, and we should probably go ahead and apply that to because we're gonna see it. It's all one piece, and we'll be able to see it in one view there. So let's go ahead and apply it. And let's tab into edit mode. One thing I should do. Let me just check this If I press all to see Yeah, look at this. How did I know? Here are some internal faces Here, let me. It's like this and this. So when I mirrored this over or connected these together here, there were faces on the inside or on the edge of those, um, those parts that came together. And so we still have those internal faces and that, Ah, that would cause a problem. When we UV map, let's go ahead and delete thes hit X and delete bases. There we go. So that cleans that up. So just keep an eye on that we GNU mirror objects over. That's that's something to keep an eye on. And now that we've done that, we could select this whole edge and we don't need that there so we could just press X and dissolved edges. But there we go. Now for this. This is just complex enough and oddly shaped enough where I'm going to try smart UV project right up front. Let's go ahead and press control and apply the scale and you and smart UV project. Um, it's at 89 here. Let's go ahead and leave it there and see what it does. Not bad. Let me take it down To say 66 for one one is not bad, either, but it breaks it into MAWR. UV islands, the lower the angle limit, usually. So let's take it back up to 89 see how how that is. Yeah, let's let's go with that. That'll be fine. I'll hit the division key and let's see if we can do something else. Let's go ahead and work on this one here. Once again, Let's hit that division key and isolate. It looks like we have a mirror modifier on it. Um, so let's tap into edit mode and let's take a look. No press all dizzy and go to face mode. And sure enough, there's another internal base right there. I gotta quit doing that. So let's hit X and delete that base. There we go, that's better. And then let's go back to object mode and apply the mirror. And for this one, let's just see what happens when we use smart UV project again. Let's hit you and smart UV project. Okay? Yeah, that's pretty good. We've got some issues with Ah, the in guns here. So here and here we've got in guns and ah, here and here, so let's go ahead and press control, T. All right, so we've got that done. It's hit the division key. And what else should we do? Well, how about these windows here? Um, I think these are gonna be able to be really only seen from one side. Granted, we can see through, but it's going to be glass. So that's gonna be a glass material that will see through to the other side. So there's not gonna be much of a difference between those, and we're not gonna be able to see the brackets on the other side here will only be able to see one side or the other. So let's keep the mirror modifier off of these until after we pack island. So I'm gonna go ahead and remove the mirror modifier. Let's hit that division key. And, um, let's think about how we want to do this. We tab into edit mode to go to face mode and the l key. And then I'm gonna press shift h toe, hide all the un selected objects, and now it's just work on this. We need this back face because it's a big chunk of glass. So we need that. We can't delete that. But what we can do is, um, split this out so we could select this edge right back here and Marcus seem. And then we could just select these corners. Let's do that. And then let's select everything with the A key. Press you and unwrap. Let's go to conform away Angle based. This tells me this this kind of worries me because look how differently shaped the sides are as compared to the front like the front here is square, sure, but the sides are rectangular, but they're square here. So that tells me that we need to go back and press control a and apply the scale. Let's do that, Tam. Back into edit mode. Let's hit you and re unwrapped this. And sure enough, there we go. Let's change to conform away. Same thing. Okay, so that doesn't matter. So let's press Ault h to bring these pieces back and let's test this. That's I'll press shift h to isolate it. And once again, this is kind of an oddly shaped piece. Let's see what we can do with using smart UV project. Let's try this. Okay? We're at 89. If I drag it down, not much happens. So let's just keep it at 89 all the way up there, and that's fine. I think that'll work. So let's press Ault h to bring everything back. So what that tells me is I can just go through, do the same thing to these other two glass blocks and then smart UV project, all of the clamp pieces or whatever the braces around the windows. So let's just go ahead and do that real quick. Let's just shift H. We will select these edges here. The's edge is on the corner and this one here and then we'll press all to H to come up here . Let's do that same thing shift H, period. And let's select these edges here. These corners and these corners. Okay, so we got that called H Um, so let's now select. Ah, this glass block and this glass block with the l key and you and unwrap. Okay, so those air good. And this when we've already gotten right? Yep. And I'm just gonna go around and, ah, select each one of these now each one of the brackets and hit smart UV project and then these as well, and I could. Maybe the problem with smart UV project is if you select him all, they can do a different thing than if you select them individually. But those look pretty good. Let's go ahead and go and go with that. So now if we select everything we can hit you and average island scale, So let me select everything here first in the UV editor. Then let's go to the UV menu Average Island scale and we go. So it averages all the sizes to be proportional to what they are in the three D view here. And then let's go ahead and go to UV and pack islands, and that packs them all in there. Okay, so we've got that. Let's go ahead and tab back in object mode and hit the division key. And there we go. We've got the tour it in the next video. Let's work on this front panel and will begin on the machine gun as well
84. 082 Beginning to UV Map the Machine Gun: for this front panel. Let's go ahead and take a look at this. We selected and hit the division key. Um, this seems kind of oddly shaped. Let's see how smart UV project does with this. Let's hit you and smart UV project. Um, that's not too bad, actually. Let's make sure the scale is applied control and apply the scale. Then let's go back and try it again. Here we go. Yeah, so now those are a little more proportional. Let's clean this up with control. T triangulate those faces and yeah, I think that's fine. Let's go ahead and go with that. I don't think we're going to get a whole lot better than that if we do it ourselves. So let's now hit the division key and let's work on these here. These also are like the front windows were gonna want them all in one. But for now, it's work without the mirror modifier, Um, in a similar way that we did before. Let me apply this scale here. Let's work on the glass block first. So if the Elke dislike that press shift h so in the same way we did before, let's ah well It's Marcus. Seem back here like we did on the other glass blocks, and ah, then let's just mark the corners so the corners will split out like this. And then let's take a look at Let's hit a you. And this time, let's use the unwrapped tool, and that looks good. But it looks like I missed selecting a corner here. Let's take a look at that. Yeah, right here. Let's try that and let's try it again. You and unwrap. Yeah, that looks a whole lot better. How about if we try Angle based? Could formal. No change. So that's fine. Let's press all to H and bring the brackets back. I'll select this and this with the L key is pressed Shift H to isolate that. And you know what? Let's use smart UV project here. This is just that's just too much to to work on. There we go. Um, we've got some pulling here, not sure what it's There we go. If I just drag it down to, like 80 degrees, that cleans that up quite a bit. All right, So his press ault h um, let's tab back into object mode. We could add that material onto here and check that out. Yeah, that looks good. Okay, let's go ahead and mirror it over. Add modifier mirror, and we'll apply the mirror here. There we go. All right. So let's hit the division key. We can see what we've done already by the checker pattern. Now, I haven't applied the material toe all of these pieces that we've UV map, so we could ah, select those. And we've UV mapped this and this and this and this and this so we could select all of these. Oh, we've given that this and then to apply the checker material to all of these. All we have to do is at the end of all this selecting weaken, shift and click One of the pieces that does have the material on it, like the cab. And then what we can do is press control. L And that brings up the make links menu and weaken link, the material of the last one we selected to all the other ones that we selected. So let's click material. And there we go. Oh, it looks like I didn't select this one. Let's go ahead and add the material to that. There we go. Seeing kind of see what you've done as you're going through the process here. There we go. Ah, what else? So we've also done this year, Why don't we go? All right. Um so let's work on the machine gun, actually, before we work on the machine gun, let's do this one here. Let's go ahead and get this done. Let's hit the division key and go back to solid mode. Let's press control a and apply the scale. And then, since we don't have a face here, we should just be ableto select these edges here, Mark seems and hit you and unwrapped. There we go. We can try angle base, but no difference. So I think we're good. Let's hit the division key. Okay, Now let's go. Um, but we've done this. We've done that. Let's take a look at the machine gun. So I'm gonna spin around and let's try and figure out what all we should isolate. So let's like that and we've got those selected. How about this? And this tumble around. And maybe there's a couple of bolts of here. Here we go. Looks like we've got the ammo case here. All right. I think we've got just about everything. Let's give it a try. Let's hit the division key and isolate that. Did we lose anything? Did we bring everything along here? Yeah, I think we did. Let's now take all of this. Let's just select everything and let's just join it all together, all in one object, this press control J up and look what happened. Looks like I had a couple of modifiers on here that we need to deal with. Um, it looks like, Ah, there's a mirror modifier here. We're gonna need to apply that. So let's hit. Apply, and let's go check and make sure I don't have any internal faces here, and it doesn't look like I do. That's good. Okay, we could however, go ahead and get rid of this edge. X dissolved edges. We don't need that. Okay. What else is there another modifier on here somewhere? No, I think that's it. Let's select everything. Press control. J. Yeah, that looks good. Okay, so now everything is all one object here, and that's I kind of wanted that so that we can select an object like this or apart and we can isolate it further cause we've hit the division key to isolate all of these. Now, I want to isolate it even further by pressing shift H here. So now I can just work on that. So for this, let's, um maybe add an edge loop right up here, right in there to kind of split the handle out right in year. Let's do that. It's gonna do that on the other side as well. Year and right down here. All click mark seem OK. There we go. Now, In addition, I want to, um, ad seems here at the back. So if I zoom right into here, I think, yeah, if I select that edge right there, just below the seam that's existing there and then control, click here to extend that down and then control click here. I want to Marcus seem there and over here as well. Um, I want toe say mark that edge right there, Control click to extend it on down and then control click to extend that down to their Let's mark that seem. And also ah, let's hit all to click here All shift click here and let's get this edge all the way around on the top and maybe, Ah, let's break it out on the bottom as well. Let's do that right here. All right, let's Mark thes seems and we'll do the same thing down here. And Mark Thes seems, um, I think that's about what we want. So let's get this here. I didn't get this. Let's see how this works. Let's Ah, make sure that it's all that the scale is applied to everything. Just tab back into object moment. Apply that scale. Then I'll hit the a key, you and unwrap. And it's not bad, actually. Ah, let's go to conform all it's a little better. Yeah, actually, I think that'll work. Let me and this real quick to this. Yeah, we've got a little bit of warping back here, but I think that will be just fine. These are gonna be kind of ah would grip handle, I think when we begin to texture. Okay, let's go ahead and go with that. I'll press all to H and bring everything back and ah, let's see what else we can do. Let's work on this one right here. I'll select thes two pieces with the l key press shift h And let's go in here and see what we can do. We don't have any faces on the bottom. That's good. We're probably gonna want to split thes out. I would imagine Go ahead and mark thes and the edges on the bottom of these, like this and this and this and this. All right, so those should split out. We could also, um, break out the corners on this piece just like we've done before. Like this. Now, let's take a look at that. Let's Ah, grab that it you and unwrap. Yeah, that looks pretty good. We've got a little bit of pulling here, but I don't know that. That's a terrible thing. I think that'll be. Okay, Let's go ahead and take a look at it here. Yeah, I don't think that's gonna be a problem. That's just Oh, that's just where we've pulled it out or split it out here at the corners. I think that's fine. Let's take a look at this. We've got some stretched squares here. That's not quite what we want, so let's ah, select this. Let's press shift. H t even select that even further. Um let's select this seem. And let's all to click this and then de select one of these edges and so that'll stay connected to the cylinder and fold out at that point at that edge. So let's give that a try. Let's hit you and unwrap so you can see how it stayed connected and just folded out at that edge. That looks fine. Balt h Let's take a look at this. I'm gonna hit l and L for this. Let's press shift age and isolated again, you and unwrap. Yeah, I think that will be just fine. All right, let's go back Cult H and will begin working on the next piece in the next video.
85. 083 Continuing the Machine Gun: Well, how about we work on this one right here? This piece right here, Let's take a look at this. I'll just select these two pieces with the L Key Endless press shift H and isolated and, well, it looks pretty simple here. Actually, we could, um, just split the corners out like we've done before. Let's go ahead and do that. Let's just control E and Mark seem. And then let's just give this a try. Let's see what happens. Do we have faces on the bottom of these things? No, we don't. So let's just see what happens. Will press a and you and unwrap. And yeah, that's pretty ugly, huh? So that didn't quite work. Let's go ahead and press Ault. Click here and shift. All click here and let's Marcus seem and let's see what we get with this. Yeah, that's a lot better. Okay, we could change from conform well to angle based, but looks like conform. ALS doing a little bit better there, so I think that's fine. We've got a little bit of stretching here, but it's still blue. It's it's not bad, and it's once again going to be a very small part of the overall vehicle. So let's press all h and bring everything back and let's see what else we have. I'm gonna switch back to the solid view here. Ah, what about this thing? This handle here, Let's Ah, let's check this one out. Let's press the l Key and select thes three pieces and then I'll press shift age to isolate them. And all right, let's take a look at this. So it is three pieces, so we should be able to select an edge. Maybe down here. Let's just press Alton click here and Marcus seem there. Let's see what happens if we just select this and unwrap it. Let's just see what happens. You unwrap. Well, see, it's pulling pretty hard at these polls right here, This single point where everything comes in together that's pulling a little bit too hard. So what if we d selected these edges here, control e clear seem. And then we say, Mark to seem right here. Let's try this, Marcus seem there. And before I do the other one, I'm just gonna test it out. Let's hit L. You unwrap. That's looking better. I think maybe if this one split out, That might be a little bit better. So let's try it over here too. I'm gonna go ahead and press shift h again to hide those. And then let's select these. And what did I do? I d selected this, Didn't I control e clear seem and then at an edge or a seem right here? Alright, let's try this. You and unwrap better conform ALS angle based. Oh yeah, that looks pretty good. Let's let's go with that. Okay, so now that we've got that, let's press Ault age, that's gonna bring everything back. And now let's select. Ah, this piece here will press the shift h and let's take a look at this now for this, we're probably gonna have to split this out right into a strip that will lay flat. So sends its cylindrical weaken at an edge here, say, on the bottom mark, those seems and that will break that piece out and lay it out flat. In addition, let's go ahead and Marcus seem all the way around here like this all to shift click mark seem. And then we may want to break out the corners here to, But when we get. Ah, this one here. Let's Marcus seem there. And, um, should we split one or a couple out up here? Let's try a couple. Maybe I'll try this one. And let's try say, this one here, lets do that. Let's just see how this works. So let's select everything you and unwrap. Not bad, actually. Let's go to conform. All Ah, we don't see too much of a difference here, do we? Actually, that's probably a little bit better. All right, let's go with that. We can, of course, go to our look, Dev, Just to take a look. Okay, so let's press all to h. And then we've got this thing right here. Right? Let's Ah, press shift H and work on this for this thing. Um, well, we're probably gonna want to select an edge down at the bottom right there. And then can we just split this out and and let it be? Let's let's just see. Let's Ah, Marcus, seem right there and let's see how it splits out. It's like a you and unwrap. And now that doesn't quite work now, does it? Oh, I see. It looks like we've got this piece here now do we need that piece? Do we need this face right here? I don't think we do. I think that's gonna be in the gun. So let's go ahead and delete that base. Yeah, sure enough. See, it's in in the gun there. So let's go ahead and unwrap this and I That's a little better. Now we've got this almost green part here that's stretching quite a bit. I don't know that that's really going to matter much. Let's go over to the look deaf and take a look. Yeah, this is just gonna be pretty much a metal texture, although this is what's causing the problem right here. So let's go ahead and split that off. All markets seem here and ah, what let's do is let's just, um, select an edge down here, Marcus seem. And then I'm gonna select this whole ring and then maybe, ah, de select this one. And let's Marcus seem there. Let's see how this works. Well, that broke that out and clean that up, but we still got that stretching around the edges, but I don't think that's gonna be a problem back there. This is so small, and it's gonna be hidden away. I don't think that's gonna really be an issue. All right, so let's press Ault h and go back And what else? Well, let's come out here and Ah, work on the barrel of the gun. Here. Let's Ah, select this piece here. Press shift. H and ah, what should we do here? Well, ultimately, I think we're just gonna want to seem right along the bottom. Here. Let's just do that. I'll click that well in here. We might be able to clear a seam here. Let's do that. And then we might be able to select this and add a seam here. Okay, so we've got all that. Now. What let's do is break it out at each of these pieces. So maybe here. Let's Marcus seem there and ah, in here. Let's do this. I mean, Marcus seem here, here and here. Let's do that. And now let's see how this works. Let's hit a in you and unwrap and not bad, Actually, let's go to conform. I m not as good. Let's go back. So that kind of splits it out pretty well. Actually, if I select this one, let's go to u V Sync here. And then let's select. Ah, face select, and I'll hover over and press the Elke. So that's this part here. That must be the internal part. So let's split. Um, this out right here. Let's select this and Marcus seem here. There we go. Now, let's try it once again. A u unwrap. Yeah, that splits that out a little bit better. All right, I'm gonna turn off UV sink and let's go back. Cult H, what else do we have? Well, while we're up here doing this part of the gun, let's go ahead and get this piece right here. This this and we have a bolt over here. Yeah, let's do that. Shift H for this. Let's, um let's see what smart UV project has for us on this one. Let's hit you and select smart UV project. We'll click. OK, I've got it at 66 for the angle limit. Let's see how that does. Okay, Breaks it up quite a bit in tow. A lot of pieces. Let's go up to 89 let's see. Yeah, that reduces the number of pieces there, and it doesn't look too bad, so I think. Let's just go with that. Okay? All h And what else should we do? Well, how about the main body of the gun here? Oh, well, there's this plate. Well, I'll come back. Let's do that main body of the gun. I'll press shift H and let's take a look at this. I'll turn on solid Vieux Port shading. And, um, how should we do this? Well, we could probably begin by just going through and getting all the corners here. Let's just try this. Just go through and select all of these corners. There we go. And let's Marcus seem here and then, um, let's split it off on the bottom as well. It's add a seem all the way around the bottom. See how this works like this. Let's just see how this looks now and see what we need to concentrate on press the L key, you and unwrap. All right, so this is angle based. Let's look it conform. All all right. I think what's going on is we've got some pulling in here and some pulling in these things as well. These extrusion is here. Let's first deal with this thing right up here. Let's ah, maybe break this out some way. Maybe we could even select this whole edge right down here and markets seem underneath. Here. Let's try this. Okay? I'll select a you and unwrap. And that's interesting. That's a little bit better. Yeah. Look at conform, Aled. That's pretty good. So now, really, our main problem is thes things right here. We've kind of cleaned up this area. There's still some stretching, but it's pretty small. All right, so let's work on this Syria, which are these things? Right here. So how should we do this? Well, we could maybe Ah, take some of these edges like this. Let's try this and add this. Let me just try one side here. L you unwrap. And what do we think? Well, we've kind of opened that up. That's not bad. Let's do one more seem here. Let's unwrap this. Yeah, so? Well, now we've got overlapping UV. So this could be a problem, too, if you we go to Ah Vertex or UV Select. You can see that this vertex right here is underneath or on top of the other U V s here so that that's a problem. We don't want overlapping U V s. So let me go ahead and de select. These are clear these and let me mark the ones on the other side. And let's see how this is gonna work if we have them both selected here, let's try this. There we go. Unwrap. Now let's take a look at it. Well, we've still got that pulling with the green. Let's take a look at it with in look deaf and see what we can see here. Yeah, we still got some pulling here. So I think probably the best thing to do is to break this piece out completely. Um, I don't think we're really going to get a whole lot better here, So let's go ahead and take these and clear this seems. And then let's go ahead and just take this whole piece off by having a seem all the way around here. And also we want to break out the edges, right? Since it's it. Since it is a block like this, a cube. Go ahead and break that out. And now let's try this. You and unwrap. How do we do here? Yes, So we just basically broke it out so it's open there, and I think that'll be fine. Let's go ahead and do that. So Ah, what I need to do is de select the's or clear. This seems from here, clear. This seems from here. And then we can mark thes all the way around here. So, yeah, sometimes you just got a break something out completely to get it to lay flat. So let's hit you and unwrap And there we go. All right. I think that looks pretty good. All right, let's go back with all th and, um, in the next video, we're gonna maybe try and clean up the rest of this. It looks like we've got the ammo box, the bracket, this piece down here and the post, So we will work on those coming up next.
86. 084 More UV Mapping the Gun: continuing on with the machine gun. I think I'll go over here and grab this little plate right here. Let's Ah, press shift, H. Let's try that again. Shift H. There we go, period. And for this, I think, Well, it doesn't have a back to it. So we should be able just to select a couple of these corners like this and kind of split thes out again. Also, let's grab these two here, mark, those seems Let's go ahead and select it. You and unwrap. That doesn't look too bad. Let's go toe angle based. That kind of spreads thes out a bit, whereas conform will kind of hides them behind the UV. So let's go over to look, Dev and take a look at it. Um, it doesn't look too bad there. It's a little more stretched there. Yeah, let's go with conform. Well, I think that'll be fine. All right, let's press old h. And how about this piece right here? Let's select this. Oh, and while we're here, we could go ahead and select this piece in this and these over here. Let's go ahead and work on those. I'll press shift H again and um, Now, let's say so. We've got these down here is well, so let's Yeah, let's go ahead and select these edges here all the way around to kind of split these guys out from the main part of this. And let's control E mark seem. And then let's grab this and this and this and this edge and will Mark seems there now once again if we wanted these to stay connected, we could always select these seems and clear I'm here. And then if we select it, let me turn on seem here and just select that piece. If we hit you and unwrap, it will stay connected to it will just kind of open up like a butterfly there. So it just depends on if you want your U V s your UV islands to stay connected. Um, we can always do that as well. Well, there's one here that didn't get Mark. So it's grabbed that and then I'll do that again and then hit you and unwrap. And there we go. So you can see how just these two they they stay together and open up like that. All right, so Ah, this piece right here. Let's grab this and all press shift age. Just isolate this on its own. For this, we could select that edge all the way around down here. Let's do that like this. And then maybe we could ah, open these up here at the corners like this and down here and down here. Let's try this so I'll press l u unwrap that. Oh, I just grabbed the top because I had seemed selected. Now let's go ahead and grab the whole thing. I'll hit a U and unwrap and see how that works. Ah, we can switch from confirm all to angle based. And we still got some pulling here on the bottom. We could just like the top select the corners and break these out like this. Try that, See if that helps. Well, hit l o I've still got seemed selected. So let's press shift and click that to undo the seam Delimit there. So now let's hit you and unwrapped and you have that just opens that up. All right, so that looks pretty good. Let's press Ault H and I didn't ah yet do these. Did I? Let's grab these here. Shift H and these look pretty basic. So for these, we could just maybe select edges like this and break thes out like that and do the same thing over here. So let's select these two and test those out. Ah, Looks like I'm missed something on one of them. Let's see. Ah, yes. I didn't grab these control. E Mark seem there. OK, so now let's try these. I'll just hit the l key and select them again. There we go. Those air opening up pretty well now for these, Um, what we could do is select an edge here and on the inside. And then we could Mark seems around the edges here. Let's go ahead and mark seem here and let's just select that one. Hit you and unwrapping. Let's try that out. Yeah, that'll be fine. So I'll just go through and do the same thing here. So let's press all to h and bring everything back. Let's see what we can do with the ammo box. I'm kind of curious how this would work. Let's hit the l key here and the l key for the handle and shift h. And now, um, I don't think we need this face down here. It all. Let's get rid of that, right? We don't need that. Um, also, I think we could split this out right up here along this Seem right underneath here to kind of hide it away with Mark, this one. Did we get that whole thing all around? Yep, we did. OK. And then let's just grab edges all the way up here like this. Actually, that will break those out these out to too much. Let me assure you what I mean. I think I think that might not work like I want it to. Well, we could undo this. I mean, just select the box here. So it looks to me like it split it out into individual pieces that I don't think we need to do that. What I can do is just keep this top part with the edges and maybe I'm let me hit the tab key. Let's high to seem right back here, so let's keep this seem. But let's de select or clear the seams here. So right up into here, let's clear these like this. So I'm just gonna clear three sides, so it'll open up from just one corner. All right, so it's clear this one. Now we've just got that one corner here. Let's see how this works. You and unwrap. Oh, that didn't quite work, now, did it? Let's then grab this edge here. Let's mark this one at the back, all right? And then let's select it again. You and unwrap. Well, that's better. Let's try conform. All. Yeah, I think that'll work a little bit better. So for this, though, let's try this one. Um, looks like we've got faces here on the interior. So let's select these and delete these. And then let's just grab this edge in this edge, mark the scene and give it a try. Yeah, I think that will be fine. Angle based now couldn't formals a little bit better. All right, old h, There we go. Let's take a look at the look, Dev, Just to make sure. Yeah, that looks fine. Let's now look at the bracket or the holder of the ammo case here. Let's select that whole thing and press shift age. Now for this piece, it looks like it's just complicated enough where maybe we can just let Blender give it a shot. with the smart UV project. Let's let's try that. I'll hit the A key you and let's go to Smart UV project and let's click. OK, it really didn't do a very good job now, did it? Look at the smearing here, and if I dragged down, it's a little bit better, but it really does smear. Once I get up over 80 now, the smearing is making me think that there may be an issue. Let's go back here. Let's go to face mode and let's press all Z and yeah, look at that. Here are internal faces once again. So let's now get in here and select these internal faces and get rid of them. This is what happens when I mirror these over, and there's a face still on the internal edge. So now you can see one of the problems with internal faces. It can really mess with your UV mapping now that we've cleared those out. Actually, we might even be able to select this edge and remove it now, or dissolve that we could press X and dissolve edges, and that will clean that up, too. So, yeah, now we're able to do that Now let's give it a try. I'll select everything, press you and let's try Smart UV project. Once again, let me go back to the look, Dev. So up to 89 all the way down to one. The UV map changes, but the checker pattern isn't smearing. And that's good. That's what we want. All right, so we want it. I'll go ahead and put it something like this. All right, that's good. So his press ault h to go back, and we're almost done with the machine gun in the next video. We'll let's do is work on this bracket here, the Post and this bracket here that holds it to that front panel.
87. 085 Continuing with the UV Map of the Gun: the last few pieces of the gun here is really this post the bracket, and then this thing right here, So let's just select the post right here and press shift h And let's take a look at this. Let me turn off the looked of here. I'll go to solid view just so we can see it a little better. And it looks to me like we could split the cylinder out from this part. If you recall, I just kind of extruded everything off of the cylinder. And I think we could just go ahead and select this and this and get these edges here broken out like this. Let's crab all of these control e mark seem. And then, um, I think I'll add a scene back here. This is I believe where the gun is. Yes. So this seemed back here will probably be the most hidden. We'll go ahead and grab this one as well. So then I'll just come down here like this and grab these. So there we have those. Those are gonna be broken out into strips sent, So let me click. Seem here, and I'll just select these pieces right here. so we can just see how those were going to do. And you can see they're already in strips here. But let's hit you and unwrap And there we go. So these are our pieces here. You can see them now Let's work on Ah, this stuff down here. Could we map this just as a cylinder as is? Let's see. Let's hit. Ah, l too slick. This with seem delimit turned on, Let's hit you and unwrapped and it's a little too much. I don't think that'll quite work. I thought I'd try. I always like to try. Um, let's go ahead and grab this seem here and see how this works mark seem. And then I'll just select that once again. Let's hit you and unwrap, and that's better. Let's go back to angle based. Actually, I don't mind that too much. That's pretty evenly distributed like that. So we can probably leave that like that, Um, for this part up here, we could go through and try and map all of this. But, you know, I'm thinking if we just select this with seem turned on here, it'll just select that part. And then, even though this is still just a piece of this overall object. We could use smart UV project for just this part. Let's try that. Let's hit you and smart UV Project and let's hit. Okay, And there we go. Now we can drag this up. We're down and see how we're doing here. That's not bad. Let me ah, click on this and see, this is one thing I don't think we should do. This is kind of a waste of space. We should probably break this apart. So it is several strips instead of just a frame like this, because ultimately, when we pack islands, when blender packs islands, it's not smart enough to take small pieces and put him in here and use this space more efficiently. It'll just leave this blank, so we should probably split this up to figure out what this is. Let's go over to the ah you v Sync mode here. Let's then select just this piece. But I can't hit the Elke unless I'm in face mode here. So now we can come back and click that. So that's it There. What we should do is break this out so it isn't all one piece. Let's go ahead and maybe add. I seem to this and here, and I'm just gonna leave the other parts as they are. I'm not gonna re UV map. The rest of it just this part. Let me select this and this. OK, so now what we could do so we can select just this part here. I'll hit the l key up. Let me go back to face mode, Elke. So now we can do that. Now we can hit you over here in the UV editor as well. I'll hit you. And that. Will UV map those pieces there so you can hit the U key over here in the three D view and select from the menu or over here in the UV editor. You can just hit you and it will re UV map What you have selected over here. All right, let's move on to the next part. All press Ault h to bring everything back and, ah, let's work on this. It looks like this piece right here. Let's take a look at this all press shift. H and ah, it looks to me like we could get rid of this face, right here. Go ahead and do that. Yep, because it's right there against that bracket. So then let's just grab these edges. And once again, we'll just mark seem and split those edges out there and wrap. There we go, All right. Anything better with conform? Allnut? No difference whatsoever. So that's fine. Let's press Ault age to go back. And now let's grab this thing here. Shift H and let's take a look at this now for this. We could try are smart UV project and see what it does. Let's try it. I'll hit you and choose Smart UV project. And there we go. That's actually not bad. Let's take a look at it over here. We've got some strangeness up top here. It looks a little stretched, so let's scroll this down yet. I'm not sure that that's gonna quite do it for us, so let's try and do it ourselves. How about if we select this edge up here all the way around like this? Here we go. It's Marcus seem there and then what I'd like to do is go in and go ahead and Mark seems in here. Let's see how this works. I feel like we might need. Teoh, break this out completely. Here. Let's do that. Let's at least try it. I don't think anyone can ever know exactly how to UV map, every single object right up front from just looking at it. Um, but you never know. There may be someone who can, but for me, I think it's a matter of kind of testing it out and seeing what we can get. And I hope that's come through here as we do this. I hope when we're done here, you feel more comfortable going through and just testing seem arrangements out and seeing how they work. All right, well, this one didn't work, but, um, I feel like here we may need to split. Say something like this out. Let's try this. Let's just grab these to see how this works. And, ah, down here on the bottom as well. Let's just split these two out on each side. Let's see how it works. You and unwrap. Yeah, that's a little better. Let's change to conform will see if that helps at all. And it kind of does. Let's go back to are looked at here. And you know what That's not too bad. I'm not Ah, really upset about this. These are connected. So maybe if we could split this out, it might help a little bit. Let's go to our UV sink. Let's go to edge mode and select that edge and then I'll go to wire frame and see if we can see where that it is. It's right there. So it looks like I just forgot to mark that. Let's go ahead and do that, all right? And then let's go ahead and select everything and try it again. There we go. I think that's probably a little bit better. Yeah, let's go with conform all and let's take a look at it. Yeah, I think that'll work. All right, let's press Ault h to go back here and what we have left to do. Well, we could ah, maybe select these guys here. Looks like we need to get those and these and these. Let's get those. So let's press shift H And let's take a look at these now for these. Um, not a lot needs to be done here. I don't think we could Ah, let's go back to salad mode. Let's Ah select an edge, select this edge and maybe de select an edge. Along here is well, so it stays together. Let's try that. And then for these we could maybe just brakes, um, edges out like this. Just every other one. So let's do that again. Here, here and here. Perhaps. There we go, Mark seem. And let's just do every other one here and I'll just go through and do this for each of these. I could go through and do wan and then duplicate, but I think it's moving pretty quickly here. I'll just do this and let's do this last one here, Mark, seem here. Marcus seem here unless grab three edges on this guy, Marcus seem okay, so we got those. Let's just go ahead and grab them, get you and unwrapped. And I think that will be just fine. Let's go to angle based. Really? Not much of a difference. We can go to our look, Dev, and there they are. That should be fine. They're so small. This really isn't going to matter a whole lot. All right, let's press all th bring that back Now. I think in the next video what we need to do is work on these pieces here and see if we can finish up UV mapping the machine gun.
88. 086 Finishing the UV Map of the Gun: Now, you may be looking at the mess of UV islands over here in the UV editor and wonder what in the world have we done? But be patient. We're going to deal with all of this soon with the pack islands and average island scale. But we're gonna do it for the gun as a whole were going to do it for the vehicle as a whole . And we're also going to do it for the tire and wheel combination so ultimately will have three UV maps and therefore three sets of texture maps to take into unity. But before we do any of that, let's work on this here. Um, it looks like we could select this all of these pieces and let's press shift h and let's take a look. All right, so I think we can Ah, for something like this. Let's go back to our salad moon for something like this. Let's ah, select an edge down here on the bottom where it's fairly hidden. Let's select Ah, this and de select one of these. Let's select this and de select one of these and we go. So let's take a look at that. You and unwrap. That looks pretty good. Let's turn off UV sink right here so that we can see it individually. So there we go. And as we've said, because we left that one edge un selected, this whole pieces connected together. All right, so let's ah, look at this piece right here. This I'm gonna press shift h one more time to isolate it further. This I think we can split out right here. And right here. Let's go ahead. And, Marcus seem there we can split the top out, But is that hidden away? Let me press the tab. Key? Yeah, the top is hidden away, so we really don't need this at all. This will just cause us issues as we try and UV map. Let's go ahead and delete that face. And now that we've done that, we can just select on edge back here right here to go ahead and lay that out flat. So if we just select that with seem on here to compress you and unwrapping there it is. All right. Um, we could do a similar thing for this piece right here. We could slick this edge, Marcus seem, and then we could select this edge and mark that seem and naff. We just select this right here with the l Key and unwrap that same kind of thing. So that's good now for this. We do need to keep this face down here, so let's go ahead and break this out. What I can do is once again just de select one edge to keep it connected there. And then let's select this edge and, well, let's go ahead and try this. Let's grab this. And now it's select that one piece press you and unwrap. Yep, that looks pretty good. We've got a little bit of pulling here because we've got this right here. This angle right here, we could switch to conform will and see if it helps. And actually it does quite a bit. So I think that will be fine. Now for this up here, we should probably go ahead and select these edges and then maybe de select these here. Let's try that and Mark seem and let's see if that will split this out and lay that flat. Now we're probably going to need a Anek stra seem here. Let's let's do that now. Let's go ahead and press the L Keys like that whole thing. And then let's press you and unwrap. So, yeah, that just laid this strip out right here, right here. And then it also opened these up once again like a butterfly at these edges. Right here, right there. So I think that will work just fine. All right, so let's select the whole thing and let's come up here to UV average island scale. Oh, I need to select everything. Let's press the a key. There we go. You ve average island scale and pack islands. And let's just take a look at it. Yeah, I think that'll be fine. All of that looks fairly evenly laid out. We could ah, come over here to our look, Dev, take a look at it. See if we see any problems. I think generally speaking, that's gonna be pretty good. All right, so let's press ault age to bring everything back here. And what else should we do? Well, we've got, um, this piece here. Let's take a look at this. I'll press shift H and we'll hit the period key. Um, this piece looks like it could be split out on its own right here. So let's select this edge and these all around here like this. And let's select this edge in this edge. Maybe de select these two here and Marcus seem Now we can hit the l key, press you and unwrap and test that out. That looks pretty good. There isn't too much of a difference there. Now, let's ah see if we can split this out. We don't have any caps on the ends here, so I think we can just select this whole edge here and split it out there. Let's try this. I'll hit L U and unwrapped. And yeah, that looks pretty good. Let's liked everything. Select everything over here. We can average island scale and pack islands just to see how it's going to look. So those air proportionally the same size as they are over here. All right, let's press Ault h and, um, about these things right here. Let's select these two. I'll press shift H in the period key and for this, How should we do this? Well, we could try are smart UV project and see what happens. I think it's probably not going to do what I wanted to do. But let's give it a try. I'll let you and let's choose smart UV project and let's click. OK, well, it's not too bad. Actually, we could drag in the angle limit here to change the configuration, but I think I like it all more connected like this. The only thing I'm not really Fonda viz toe have these thin pieces kind of out on their own . I'd kind of like to have them still connected to the larger pieces. It may be quibbling, but I think I'm gonna go ahead and do it on my own here. So let's go back. And I'm gonna select this edge all the way around here on the outside like this. Mark Aseem and I'll come back and I'll do this here is well, and as I said it, this may not be absolutely needed, but I just feel like I want these things to be connected to the main UV islands of this. So I'm gonna select a couple of edges around here like this, and Marcus seem here. Let's do a similar thing over here like this Mark seems here and here. That and then appears well I'm going to get this in this. And let's do this in this and over here on this side, these and these, And let's just see how this works. Maybe I've done all this work and smart UV project would have been the way to go. But let me just try it. I can always undo it, right? Let's hit you and unwrapped. Yeah, see, I like that a little bit better because it keeps everything connected. And in our final UV maps here, there's gonna be a lot of islands, and it could get confusing as to what is what? So let's go ahead and go with that, all right? All h to go back. And Ah, I guess what we need to do now is well, we need to do the bolts here and then the cylinder here and this piece right here Let's let's do these real quick shift H and period. And, um well, these look fairly simple, So we could maybe just add an edge or select these edges and Addis seem here, and we need to extend these on back to here. And for this once again, we could just select the edge on the bottom these around here and de select one like this. There we go. And yeah, I think that should be good. Let's hit a U and unwrap. Well, this is a problem. What did we miss here? Let's take a look at this. Let me isolate this. Just this piece and let me de select seem here. So we just select that part and let's press shift. H ah, there's an internal peace to this. I see. Well, we don't really need that, do we? Because we've got that cylinder going through there. So let's just delete that. Let's just grab these, select these here, press X and delete faces. So now do we really need that? Let's press Ault h and let me grab these again here. Like this. Yeah, I don't think we need those at all. Do you select the seam and I'll press shift age? Now let's take a look at these. Yeah, I think we could just go ahead and select all of this. Let's try this again. Let's press you and unwrap. There we go. That's a lot better. So now it's also grab this one, too. Let's see how that all works There we go. That makes more sense. All right, one more. Let's go back to here and let's grab. Ah, these bolts here, this and this I think these air the last pieces that we need to do on this least I think so . It's Ah, sift age and let's just go ahead and work on these. So we've done this kind of thing before, so I think it's just a matter of selecting maybe every other edge. Let's just do that here, here and here and just allowing that to split out to lay this flat. I mean, zoom in with period key here and here. All right, let's select them. You and unwrap looks good. All right, shift H. Let's now bring everything back here like this. And let's take a look at it in the look, Dev right here. So I'm gonna hover over this screen and press control space bar, and that will just make this full screen temporarily. And let's just make sure that we've got everything with the checker pattern on it here. I think we dio. So what Let's do now is try and create a unified UV map of this. Let's press control space bar to go back, and what I'm gonna do is just select everything. And then I'm gonna come over here to the UV editor and I'll select everything as well over here. Now what let's do is go to U V's and let's average island scale here. So now these should all be proportionally the same size as the various objects here in the three D view. Now let's come over here to UV and let's go to Pack Island. Let's see how we did here. I'm depressed Control space bar and let's press all to a to de select that. So there is our UV map. There's a lot going on there, and the good thing about it is, is ultimately we're going to be a signing. Vertex colors a color I D map to our objects here, to the machine gun to the vehicle to the tires, and Simpson's painter is going to be able to pick out what you ve s go with what part? And therefore what materials should go on it. Based on that color, I d map those vertex colors, so control space bar. So even though it looks like a mess, tow us. We're going to set up the model with Vertex colors so that substance painter will be able to see what is what.
89. 087 Finalizing the Last of the Cab: now I wanted to mention about the checker pattern here on the gun. Notice how all of the squares now in our test pattern are pretty much all the same size. And that's what we want. If we tab back into edit mode here When we went into U V's and average Island scale, that's what it did. It made all of the pieces here the same proportional sizes. They are here in the three D view. Now, if we take, say all of these UV islands and scale them down, notice that the squares get bigger or scale him up and they get smaller. It doesn't really matter how big or small the squares are on that test pattern. What matters is that they're all the same size. Okay, so I just wanted to point that out. Now let's go back to our layout view and there's the gun there. Let's ah, change to the look, Dev and see what we've missed here. Well, we've missed a couple things that looks like we've got the rear view mirrors and this ring here. Let's take a look at this. Let's maybe work on this real quick. I'll go back to the U V editing and let's press the division key to bring everything back. And then here we are with this ring here. I'll hit the division key on the num pad to isolate it, and it looks like for this we might just be able to hit unwrapped and be done with it. Let's give it a try. I'll hit you. Unwrap. And there we go. Not a problem likes. There really isn't a difference between conform a land angle based. I think we're good. That's Ah, Tab back in object mode. Hit the division key. And let's take a look at this piece right here. This is Ah, a little more oddly shaped. If I remember correctly, I'll hit the division key. And for this, I'm wondering if we really need the faces on the bottom. Here, let's hit the division key and take a look. Um, we can kind of see the bottom here. Yes, that we should keep that. We should keep those. Um Do we need this face down here? Well, let's take a look here. Um, Probably wouldn't be a bad thing to keep it, so Okay, so I was hoping that we could delete a few things here, but I guess not. Let's let's go ahead and do the UV mapping for the whole thing. Um, I'll go ahead and select these edges on around here. Let's do that. And we'll split this out. And, ah, maybe we need these edges along here. Let's split that out. And, ah, let's get this over here on this side like this. And, ah, what else do we need? Well, we should probably split this out right here. Go ahead and select all of those and get those selected. And, ah, what about up here? We should probably break this out from the top. Well, we may not need to its Ah, let's see, Let's hit a and you and Unwrap. And yeah, I don't think we need to. That spreads out pretty nicely. Let's go to our looked ever were already in the looked up. But the problem is, we haven't given it that material yet, So let's come up here and just pull down the menu and select that UV test pattern. And yeah, that all looks pretty good, actually. All right, so let's hit the division key and go back and we haven't put a material on this one yet either have we. We can go ahead and pull that menu down and grab that. The last thing for just the cab area, it looks like is the rear view mirrors. So let's work on this. I'll hit the division key. Let's take away the mirror modifier for now. Oh, it looks like it's over here on this side, okay? And let's tap into edit mode and take a look. So for this, Um, well, I know this is a cylinder piece on its own right here, so we could probably just add on edge or a seem right here, and that would take care of that. Let's hit you and unwrapped. And there we go. That's fine. Likewise, we could probably just select an edge all the way along the back of this tube and Marcus seem there, and that will actually go all the way around and split those in two. Let's see how that works. That's it. L. You and unwrap. And let's switch from conform alto angle based. But those air awfully long pieces. Maybe we should ah, think about splitting them up. Maybe, like this edge right here I'll just all click this edge around that corner and then let's maybe do it up here is Well, what to try this. So then, if we select this and hit you and unwrap yeah, that breaks him out into smaller pieces. I think that's probably what we want. Yeah, I'll go ahead and go with angle based here and then for these pieces on the back of the mirrors. Let's grab one of these press shift H and then the period key, just like we've done before. Well, let's select this edge here. Mark Aseem, Let's grab this edge and Mark Aseem Oh, we could also de select one of these were clear This seem from one of these, Maybe right here. So it stays connected. Um, let's do the same thing here and let's mark a seam right down here. Now we could probably go ahead and select this and maybe de select that and let's see if this works here Weaken, fold the front and the back apart at thes seems Let's try that. Well, hit a U and unwrap And sure enough, those split out like that. What if we change to conform? All know I like angle based a little bit better. All right, let's hit Ault H and ah, let's grab this one over here a press l and shift H to isolate it, period key to zoom in and let's just go through and do the same thing. We just ah selected these like that. We selected these and we selected this minus that. There we go. Yeah, that looks pretty good. Ah, angle based doesn't look quite as good for this one as the other one. I think it may be because I put the edge in a different place here. We could try it. Actually, let's just test that out. If I take these and put a seem back on him and move here and clear these seems, let's just see how it changes it. So if we select it, that's how it looks. Now let's hit you and unwrapped, and that's how it looks, moving the seam down there. Oh, let's do this here. Let's grab this year. You know, sometimes it's just fun toe test these out just to see the difference between these and it's just fun toe. Learn about this kind of thing. I think I think At least I think so. Ah, let's get you and unwrap and you see how that changes the organization of it. Depending on where we leave the cleared seem that's interesting. All right, I'll press Ault h Let's go back to here and, um, for the mirrors. I think we could break out the seam right in here. We could mark a seem right there and break them mirrors out from the rest of the frame. Let's do that and let's see how that works. Let's see if that really gets us close to oppress you and unwrap. And actually, that gets us pretty close. That's not bad. Let's over here. Oh, we are on. Looked of still. Let's add the material here. All right, let's take a look. That's actually not bad. There's some stretching going on around the corners here, as you can see and here, But it's really not bad at all, actually. Yeah, let's give this one a try here. See if we get lucky with this one as well. Unwrap. Yeah, not that I'll be done. OK, so now let's just grab all of that, select everything, and I'll just go ahead and average Island scale and pack islands. And let's just see what we get. Well, we've got this one long piece here. Let's open up this pack islands setting window and let's uncheck rotate and see what we get . Not a lot of difference there, huh? So if we select this, this can always go, you know, over here. And when we pack it for the final time, thes will move around and hopefully be laid out a little more efficiently. But I think that looks pretty good. All right, Let's ah, tab back into object mode and hit the division key. And I think we've got pretty much the cab done. Except for this part right here. Let's do this bottom part. And I think we may have the cab pretty well done. Now, didn't we do this one? Let's take a look at this. Let me, uh, tab and add a mode. Yeah, we did this one. So let's go ahead and add the material here. Okay? If that division key again Now, I don't recall doing this, So let's let's give this a try. Yeah, I don't think we did this one. So what I want to do for this is. I think I want to keep this face just in case we looked down into this. I don't want to accidentally see through into the back of polygons, so I'm gonna keep this face on the top. But I am going to select it and then press control E and Mark seem and we're gonna Marcus seem all the way around that. And then can we just take these seams and split them out like we've done before on other cube like objects? Can we do that? Let's see. I'll just select all of these and mark those seems and let's get you and unwrap. Well, that actually doesn't look too bad. We're still in. Looked ever. I just need to add the material. There we go. Yeah, that looks pretty good. Okay, so let's hit the division key again. And there we go. I think we've got the cab area pretty well. You ve mapped now. I don't want to select it all and combine it all until we get the rest of the vehicle. You ve mapped as well as I said. We're going to have the gun, the vehicle and one tire as our three objects and are three sets of texture maps. So I don't want to combine all of these quite yet until we get Mawr of the front and the back done. And for the Tired and the wheel were only gonna need one of these because when we taken into unity, it will use instances of that. One object to place the four tires of the vehicles because it's going to control that as it turns and moves up and down as it goes over hills and things like that. So it's going to create our four instances of that object in unity itself, so we'll only have to take one in. All right, so in the next series of videos, I think what let's do is begin UV mapping the front of the vehicle.
90. 088 UV Mapping the Hood and Fenders: All right. Well, next up, I think we should maybe work on the hood here. The hood fenders combination. I realized that if we ever flipped the vehicle over like this, we're gonna be seeing up into here and back. Here are the backs of the polygons and in a game engine, the backs of the polygons are invisible, or or you can see through them. So we need to maybe add thickness to the fenders here on either side so that if the vehicle is up like this, we don't see up through that. All right, so if that's what we need to do, how should we do that? We could add the solidify modifier, but one of the problems I think is gonna be that we're gonna add a whole bunch of polygons in here as well. Here, let me hit Thea Division Key on the num pad, and up in here will add a lot of polygons that we don't necessarily need. So what we need to do is figure out how to just add thickness to maybe this area right here and this Syria over here without adding thickness to all of this. So how do we do that? I think we can use some of the tools we've been using with UV mapping to help us with this . We can't really mirror this over. I mean, I could delete half and just work on one side and then mayor it over, But then we'd mirror this part over to the other side, so we can't do that. We have to deal with it as one whole piece. Um, I could get rid of this. I could say take this piece right here and split it out. So let's just press the l key here and let's press P and separate by selection. And then if we tap back into object mode, weaken, select this. And now we can get rid of this so I can select the hood again and hit that division key, and it won't come along. So now if we add a solidify modifier, it'll just apply to this. But it'll apply to the whole thing, and we're gonna have to figure out how toe select all these faces under here and delete them. It's actually quite a big task. But as I said, we can use one of the tools that we've been using to help us. We can use our seems so. First of all, let's do is come over here and add a solidify modifier. Let's do that and then we need to make some adjustments here. Let's turn on even thickness and maybe we could reduce the size of it. May be down to something like 0.7 at least for me here and then now that we've done that and we've applied that to this whole thing here. Now let's click apply here. So now we have this whole thing with thickness. And as I said, we don't want to add this money polygons to our vehicle. We just want to add some along and here so we don't see through it if it flips upside down . And as I said, what we can do is use our seems to block off certain areas, and then we can just use the l key to select within an outline of seems so let's go ahead and begin by selecting edges all the way around this part of the vehicle. So I'm gonna go all the way around here like this, and then we need to come over here and continue. Those seems on around here like this and this. Oh, we should come up here. There we go. So we're just trying to connect all of these together. Let me go ahead and press control. Lea and Mark seems we can see what we have done and what we need to do. Let's come around here. So I need to add Seems here. There we go. And so I'm just trying to get the top edge of everything here. Like that. Um, do we see anything else that needs to be done? Probably over here. I'm sure I missed something. Here we go. Let's do this, Mark. Seem, let's grab this and mark seem and let's do this. Looks like I need one more right up here, too. Right here. Okay, so now we have that seem all the way around. So we should be able to hover over down here and press the l key, and it selects everything on the bottom. Okay, that's good. Now what we need to do is split this part out. What we need to keep on the inside. So what we need to keep on the inside is gonna go right in here. Slits! Ault, click all shift. Click this area right here and this right down here. Right. So let's mark that. So now, if we select this, I'll just hover over this and press the Elke. This is what we want to keep right in here. Now, it bled out here to the front, so I need to figure out where that's happening. Oh, it looks like I haven't done an edge right here, So let me ault click here. Marcus, seem there. Okay, So now if we hover over this area down here and here, that's what we want to keep as part of this thickness that we've created with the solidify modifier. All right, let's do that on the other side. Here, let's old click here, Ault shift. Click here on around here and then, Ah, let's go ahead and mark that Seem all right. So now if I hover over here and press the l key Well, that's that whole area. I need to figure out why it's bleeding over. Oh, it isn't. Okay, so we've got that. That's good. And then if we hit the l key here, what do we see? Well, it is bleeding over here, so I think the same thing probably is the other side. Yeah. I'll all to click this edge. And Mark seems so. Now what I want is I want to see that this and this has been split out completely. Yeah, and I want to see that this and this has been split out completely. Yeah, so we can select those, and it isn't going to bleed over into any other parts of the object here. Okay, so that's good. So what we need to do now is select the faces on the bottom that we want to get rid of. Now, if I hover over down here and press the elder Qi had we do Is that everything that we want to get rid of? I think so. Yeah. Let's take a look at that. I think that's good. So now what we can do is just get the X key and delete faces, and there we go. Now, let's take a look here. We should have this area down here split out, and we could also delete this to hear now, couldn't we? So we could ever over impress the Elke and we don't need this part right here. We just need this part in here. So let's delete that and Ah, look over here. Yeah, let's grab this and delete that. So all I have done is just keep these faces here on the inside. That's what I needed to do. I just needed to keep the inside of the solidified faces in here. Now, let's go ahead and work on the UV editing part of this. Let's ah, come over to our UV editing tab and I'll go ahead and hit the division key here and now we've got quite a few edges on here already. Um, we could use some of these, but some of these we don't need. Here, let me clear. These seems here up front. These happened when I selected the edges on the bottom. Let's clear those. All right, So now if we still like this up here, that's just that area right there. That's not a bad area to UV map there, but I think we ought to go ahead and extend edges along here like this and also go ahead and select or create. Seems right along here is well, but we don't need them all the way down here. Yeah, let me undo that. We don't need them to go all the way to here. We just need them to go like this. And maybe like this here and we go. I never did get thes. Let's go ahead and grab those. And let's go ahead and grab these here and will all click this. Yeah. See, that extends that all the way down. And I don't want that. Let's begin over here and just select him individually like this. There we go. And thes edges right on the curve. We need those. All right, let's see how this works. Actually, we could maybe just select the whole thing and press you and unwrap. And it's not bad, actually, um, the headlights are a bit problematic. We should probably break those out those air, pulling a little bit too much. So let's all to click that Marcus seem in there and let's do the same thing in here. There we go. And we can break those out now. This could probably be broken out as well. While we're at it right in here. Let's do that. All right, let's take a look at it now. Well, hit a U and unwrap. There we go. It's broken these out from the front, but they're also on the inside here, and that's okay. That doesn't matter to us in here. But maybe we should do one more thing out here with the grill. Here. Let's maybe select everything around the grill like this. And let's Mark seems here. There we go. All right. Selected All hit you and unwrap. Yeah, that's pretty good. So that broke out those pieces as well in here. What we can do now is ad Are you ve test pattern. Go to our looked at and see how it looks. Yeah, I think that looks pretty good. Those are all pretty evenly spaced. I think that's good. Let's hit the division key and go back. And in the next video, we'll begin working on this area up here with the front bumper
91. 089 UV Mapping the Front Bumper: Okay, let's now start working on some of these pieces up front. Maybe. Ah, well, let's begin with the headlights here. Let's take a look at these now. We've got a mirror modifier on them, but I think we are going to be able to see them both at the same time. So we need to apply the mirror modifier before we attack Islands in our UV editor. But for now, while we do this, let's go ahead and just remove this here. I'll hit the division key and let's take a look. We tab into edit mode. Well, we don't have anything in the back here, so that's good. Um, we should probably break the lenses out or the part that are the lights out first. So if we grab this edge here, wrest Control E and Mark seem, let's add a seam there. And let's also do that over here. Let's all click here control E mark seem so we've got those two selected. Well, let's try that. Let's, um, hit a U and unwrapped. All right, That doesn't look too bad, you know? Let me Ah, make sure that our scale is applied. Well, it's all uniform but it hasn't been applied per se. So let's press control a and apply the scale. And now we're back to all ones, and that's what we want. So let's try that again, just to be sure. Yeah, not too much of a difference, but still, I think that actually looks pretty good. Um, conform away. No, let's go with angle based. Yeah, that looks pretty good. All right. So if we tap back into edit mode and hit the division key looks like we've got our origin here, so let's go ahead and apply the mirror modifier once again, and then I'll hit. Apply. Okay, so we have that over here now. Good. What about this guy? Right here. Let's take a look at him. Ah, hit the division key. And, well, we could Marcus seem right in here. I suppose, since this is kind of two different pieces and ah, we could also mark a seem kind of down here to break this out, I bet. Um well, let's try this. Let's see what happens. You unwrap. Do we have the scale applied? Let me check in. Yeah, we do. OK, um, that doesn't look too bad. Actually, you know what we could do, though, is grab this edge here and break this out. Let's see how that works. If we get a little bit better layout here, unwrap. Yeah, that's not bad. That's that's kind of nice. Okay, so let's tap back into object mode. Hit that division key. What else do we want to do? Well, I think we should begin working on the bumper and all of these pieces. Here. Let's grab this and hit the division key and see what we have. Um, we've got a mirror modifier on it, but once again, we're going to see them both at the same time. So we're gonna need to apply the modifier here once we're done. Let's go ahead and ex out of that. Let's zoom in. It doesn't look like we have the scale applied yet, So let's do that. Control a. Apply the scale. And then we could just probably split the back part out like this. Let's do that. And then we select these corners. Open those up. Let's do that. Yeah, let's hit a you and unwrap. Ah, Tricon Formal. Really? Not much of a difference there, So that's fine. Okay, So we've got that. Let's hit the division key and let's go ahead and mere it over. Let's go to add modifier mirror. There we go. And let's hit. Apply. Um, this piece right here, the division T it looks like the scale has not been applied again. Control a and scale. Let's tap into edit mode and see what we have here. Um, I think we'll probably want to break this out right here. This piece that kind of jumps out at me at as something that we probably needed toe break out from the rest of the peace. Um, it looks once you break it out, it looks kind of like a cube. So we could split the edges out like that, right? And then, well, I think I guess what we could do is so, like this Edge and Marcus seem all the way around. So that breaks this piece out. And then we could lay it out flat. Since it's a cylindrical piece. Now we can add one seem and lay it out flat like that? Yeah. Let's see how that works. I'll hit. Um, El, let's turn on seem and let's try this. You and unwrap. Yeah. See, that's the kind of thing that we want, I think. Ok, um, what else do we want to do here? Well, we could probably do a similar thing here. So if we selected this edge all the way around here, right like this, then that will split this piece out. And now it's kind of a cylindrical piece. So we could just select one edge. And Marcus Eamon. Now that strip will lay out flat. Let's go ahead and do that over here like this, and then we'll grab that one scene. There we go now for this stuff over here. I think we could probably break. Get out along here. So we're kind of breaking this panel out from the frame control remark. Seem we've got that there. You can see that there. Then I think we'll probably need to maybe break these out. So let's now add a seam here and here and here. Let's try this and then I want to break it out like this so these pieces don't stay in one angled piece. Let's try this right here and right here. Okay. And maybe this will all lay out flat. All in one piece on the top here and the sides. Let's see. So a you unwrap? Not too bad. Okay, so this success gets its own piece. Yeah. Yeah, I think that at work. Okay, let's do that. And the division key Now to go back, What else would have this one right here? Let's kind of it looks like we can pretty much do the same thing on this one that we just did. So if we select, say these edges all the way around, right, and then one edge that'll split that out and lay that interior frame out flat. Let's do that. And over here like this? No. And this thing right here, let's I get this and all shift, click this. And now it's Marcus seem here. So that gets that whole ring around there. And now we can select one edge up in here. All right, Now, this piece is kind of like a cube once again. So let's grab the ah corners and mark those seams and the back isn't here. We've left the back off, which just makes our life easier when we're trying to UV map. And, of course, it reduces the poly count as well. All right, so let's go ahead and all its tab into edit mode. Sure enough, our scale hasn't been applied yet. So let's press control and apply that scale. Now, if we select everything, hit you and unwrapped, all right? Not too bad when we've got that overlapping problem here around this Boolean, which we've seen before, we could just select those faces there and press control t to clean that up. Yeah. There we go. That looks good. All right, Tab back into object mode. Hit the division key. How about that cylinder in there? I remember creating that a long time ago. Let's hit the division key and take a look at that. We need to apply our scale. So control a and apply our scale. That's tab into edit mode. And, um, for this well, I think we want toe break this out. Have this be a UV island all on its own as well as this over here to do that, Um, we also want to probably break it out here and also here. Let's do this. And then, um, if we go down to the bottom, we'll want to select this edge I think we want that. But also, I think probably we want to select some edges along here as well. Let's do this. What? Select this one and this one here. So those will split out and lay flat as well. All right, so we have our scale applied. Let's hit the a key and you and unwrapped what we have here. Well, this is interesting. These air kind of this kind of arc here, let's ah, change to conform all not great. But once again, it's kind of a hidden piece. It's fairly small. I don't know that. We're really going to see much of a problem there. Let's go ahead and add that test pattern and take a look at it. Got a little bit of pulling around the edges here. It's true. I mean, we could add another edge in there and clean that up, but I don't think we need to. I think this is probably gonna be just fine. Yeah, let's go ahead and go with that. I'll go back to a solid view, hit the division key, and we've got another cylinder right in here. Let's do that. Um, this looks pretty basic. We need to apply our scale. So for this, I think we just select this edge, this edge and this one down here like that. Now, if we want to keep him together once again, we could select an edge and clear it and select an edge here and cleared. If we wanted to do that, keep them all connected. Let's try that. You and unwrap. There we go. Yeah, I think that'll work. All right, let's go back with the division key. And I think we've got a few other pieces to do for the next video. So let's work on these pieces. They're a little more complex. These pieces, this this and even these Ah, bolts up here. So that's coming up next.
92. 090 Finishing the Front Bumper: If we select this piece here, let's Ah, hit the division key and isolate that. We can see that the scale hasn't been applied. Yesalis Press control A and apply the scale. Let's tab into edit mode. And, um Well, this is an oddly shaped piece, isn't it? Let's go ahead and select these edges here on either side of the cylinder. Holes here would select thes get seems on those. Let's also add an edge on the top of each of these kind of hide that away in there. All right. And, um, I guess we just need to break out each side here of this strangely shaped piece here. Let's go ahead and add a seem all the way along here. And then let's, um, also add one. Oh, right along on the other side as well. We don't really need it there, do we? So let's add that. Okay. And now with this, I'm gonna have this really long strip going all the way along here. I think I'd like to split that out somewhere, and I think maybe this looks like a pretty good place to split that, so Well, Marcus seem there. All right, so Now let's Ah, hit the l key press you and unwrap. And that's interesting that we're getting some overlap here. Oh, I bet it's because Well, it looks like we're still getting some connection. We're still having a connection here, like right in here. Let's go over to U V Sync with Select that one point. Let me turn on Vertex Select. Let's select that. Let's press all Z and then let's hit the period key and see where that is. Ah, there it is right there. You see that? I didn't get that edge. That's the problem. So me so like that Control E and mark scene so educate. See, that's the way I tend to try and find problem. Children like that is to turn on you v Sync and see if I can then find it over here in the three d view. Let me turn you V Sync off. Let's press all Z now. I just want to select this whole thing right here. That's it. You and unwrapped and see what we can see. Yeah, I think that's quite a bit better. I think that will work pretty well. Now let's come down and take a look at this guy right down here. Press the L key. Let's press all Z and take a look at this. Is there a face on the inside here? I think there is. Yeah. So let's select this and this and let's delete those. There we go. And then what we could probably do is just select one edge. Let's try this Mark Aseem and see if that'll lay out flat like that. You and unwrapped Pretty close. Yeah, there we go. So if we selected everything and hit you and unwrap, that's what we get, that's not too bad. Yeah, all right. So if we hit the division key to go back, let's hit the one key to go to the front view. And now this one hasn't been UV map. So let's go ahead and delete this grab. This. Moved the origin to the three D cursor and add a mirror modifier, and then we'll just click, apply. And now we've got our seams on both sides. All right, how about this guy right here? Let's take a look at this. Get the division key and it has not had this scale applied yet, so let's go ahead and do that with control A and apply the scale. Let me select it first. There we go. And I think for this this one is an odd piece. Yeah, We bridged edge loops and then extruded out of this piece. It's a little bit odd, so I think, Ah, smart UV project is going to come to the rescue here for us. Let's press you and smart UV Project click. OK, I'll take this up to 89. Let's take it down to one so we can see. Yeah, that's just too many small pieces. Let's take it back up to 89. Yeah, I think that's gonna be fine. Um, from here, I guess all we need to do is just go back and go to that front view and let's just mirror it over to the other side. Here, let's delete this one and move the origin to the three d cursor. Mirror it over and it looks like I the rotation hasn't been applied. That's why it didn't mirror over. So let's press control a and applied the rotation that pops that over there you can see the rotation is zeros here. So there we go. That's that one. Let's go ahead and click. Apply. Let's take a look at this piece. Now, this one right here, we'll hit the division key. And, um, this one is oddly shaped enough. We may want to just do smart UV project. Let's try it. I'm gonna grab these two faces here first and delete those. Um, our scale has been applied, so that's good. Um, if we just select everything here and hit you and smart UV project, that's what we get. Okay, that's all right. Um, and it is a small piece. I know, but I feel like we can do better than that. I really do. I think we can do a little bit better. Let's let's just select this edge here. And then let's Marcus seem. And then let's also select, um, these edges right along here like this. It's Marcus seem here. And then let's also split thes corners out like this. I just feel like I think we can do a little bit better than that. Let's hit the a key. You and unwrap. Yeah, see, I think that's yeah. I think that's a little bit better. Let's let's go with that so I'll hit the division key. One key. Let's delete this X and elite. And then let's merit over moving the origin to the three d cursor mirror modifier. There we go. Okay, we've got those three pieces. What about, um, this piece right in here? Let's try this. It the division key and Ah Oh, it looks like it's got ah faces on the bottom here. So let's get rid of these. We don't need those. Make our life a little bit easier and get rid of these delete faces. And then if we ah, take a look at it, we can see the scale hasn't been applied. So let's press control and apply the scale. Now, let's maybe split these pieces out first. Like this. Get these offer. Here, let me have this and this and Marcus seem they're all the way around there. And then once we do that without a face up here and without a face down here, it's kind of like a tube, which means we could just ah, select one edge. Now I'm gonna tab back into object mode so I can see which way is the front. So this is the front here. Okay, so the Y axis is going back, All right? So that means we could then just select an edge back here and mark that seem now, down here, this is just a cube kind of thing again. So let's just grab these cloners and split them out. All right? So let's select everything, hit you and unwrapping. Yeah, that's fine. I like it. Now. We just need to put it over on the other side. So let's go back. If the division key, let's delete this one. There we go. And then let's mirror this over to the other side. Let's move the origin to the three d cursor. Add that mirror modifier and there it is. Okay. Oh, there's these little bolts in here. Let's take a look at this. We'll hit the division key, and I'm gonna go ahead and split it out on its own like this. And then, um, we could maybe split it out like this as well on this side, that let's just select this one piece and hit you and unwrapped and take a look. Okay, that's fine. Now, if we wanted to Teoh keep those together, we could maybe choose a couple of edges, maybe down here and clear these seems. Let's try that. Just ah, keep those connected. Ah, I don't really like that. Maybe if we moved that seem up a bit. Maybe up to here. Let's try this. Hell, you unwrap. Yeah. See, that's a little bit better. Okay, um, now, these things, once again, we, ah, could select on edge here, select on edge down here. We don't need that one. And then de select an edge up here for this. Then we could grab every other edge along this piece right here, there, and we could go over and do the same thing over here. So we select this in this de select that mark seem and then every other corner edge here This All right, So let's get the A key. You and unwrapped. And there we go. Informal. Pretty much the same. So there we go. We got those. Now let's hit the division key. And I guess we need to mirror these over to. So let's go to that front view. Let's grab thes over here. Know that one? There we go. Delete that. Grab this move to the three D cursor mirror it. And there we go. Unless apply the mirror there. All right, We've pretty much got those taken care of. Let's go to the look deaf here and just go through and select all the things we've UV mapped here. This and this. And this and this Thies this and this. And then let's select something that has the material on it, and then we'll press control l and link the material to it. There we go. All right. I think we've done all of those. 01 last one here, control L There we go. And, Ah, what about this in here? Let's take a look at this. Ah, Before we finish up this video, let's take a look at this one. Let's hit the division key. And this is just the piece that fills in inside there. So we don't see through the thing. Um, the scale hasn't been applied, So this press control and apply the scale, it's tab into edit mode. And it looks like, Oh, this is kind of ugly. We really don't want this. We've got this point coming together here. I must have moved that around when we mirrored. So what? Let's do it. Let's just fix this real quick. Let's grab this point and let's hit G two times and slide this down like that. And then over here, let's use the knife. Tool lets, um, get the K key and over over that point and click. Come over here to this edge and click, and then let's hit the in turkey, and that creates an edge there. Then we can take this edge and dissolve it it X and dissolve edges. So that cleans that up. Yeah, there we go. Now, we could probably go ahead and apply that mirror modifier here. And once we do now, we probably don't need that center edge so we could select this edge right here and hit X and dissolve edges here as well. All right, so now this is gonna be pretty much hidden away underneath everything. It's just going to get a dark texture, so it doesn't really draw attention to itself. So I think what let's do is just use thes smart UV project right here and OK, And there we go. We could take this down some. Yeah, There we go. I think that'll work. Yeah, that's that's fine. Let's let's go with that. All right, let's tap back into object mode. Hit the division key and go back toe. Look, Dev. Now we could take that and add the material to it. And there we go. That's everything. We've UV mapped so far we're getting there. It looks like we've got one more piece right in here to do. And also we need to work on the pieces down here. Kind of the axle in the springs here. So in the next video, let's begin working on that.
93. 091 UV Mapping the Front Axle: So let's get this mud panel right here. I'll go ahead and hit the division key on the num pad, and it looks like we've got a solidify modifier on this as well as a mirror. So let's go ahead and apply that solidify and let's remove the mirror here. So we're just dealing with one side and I'll also go back to the ah solid view here, the solid Vieux Port shading and it looks like we've got our scale applied here. We've got all ones, and so we can just tab into edit mode and select some of these edges all the way around here. Let's say and just Marcus seem here and then maybe we should once again grabbed these corners like this. Maybe this one, too, since we have an angle there, let's do that here and here and one up year. And then let's Mark seems there now. It's select everything, press you and unwrap and yeah, that looks pretty good. We could go ahead and add the UV test pattern to it and go toe look, Dev, And there it is. All right, let's hit the division key and go back so we can see everything here and Ah, Now let's work on this front, axle. We've got a few different pieces here, so why don't we select them right in here like this? Let's get all of these and even this axle piece right here. We'll wait to work on the springs here for just a minute. So let's go ahead and hit the division key and isolate those. Now, we've got a mirror modifier on one of these. We need to figure out which one it is. It isn't thes it isn't. Is it that No, that's it There. OK, so let's go ahead and apply this with clipping turned on. There we go. Now we should be able to go through and combine all of them into one object. So it's just a little bit easier to work with, at least for me. I like to use Thea Shift H Ault h hide and then hide while we're isolated here. Um, now, let's go ahead and get rid of these faces here. I don't think we're ever going to see these so we can get rid of these. Um, in addition, I think we have faces on the bottom of these So let me press shift H and let's take a look here. Yeah, we can get rid of these, which makes our life a little easier when it comes to UV mapping these because once we get the faces offer here, these really just become tubes. So we can just select these edges would say, And these and let's just mark a seem. And then we've just got tubes that we can open up at one edge and lay out flat. All right, let's press old age to bring these back. Now for this piece, I'll press shift h again here. This has faces on either end as well, but I don't think we're ever going to see these. So let's get rid of those. And also we can then take this edge right here, Marcus seem and that will hopefully open up like a cylinder as well. Yeah. All right. So we've got that This press all h and go back here. Now this piece here, let's take a look at this all press shift. H. And, um, we could just go ahead and press smart UV project here and see what happens. Let's let's do that Smart UV project, okay, and that's all right. But it's actually quite a lot of pieces. I'd like to have a little bit more joined together in the UV map. So maybe what? Let's do Let's just split it out here so that this is its own peace. Let's do that. And once we do that, we can maybe select just one edge and break that out. So if we take a look at this, let me turn on, seem, let me try that again. I'll press l year, so we just select that and we unwrap this. So that's just one strip there. Now it looks to me like, Yeah, sure enough, we don't have this scale applied when I unwrapped this, This just looked too thin compared to these here, which made me think that this is non uniforms scale here. So let's just press, um, control a and apply the scale. And let's try that again, you and unwrap. Well, it's a little bit better. These now here are more proportional to the ends here. All right. We could also maybe select these edges right along here and split this piece out on its own . Let's try that and Now, let's just select everything, press you and on unwrap. And how we doing? Well, pretty good. I mean, these little edges here are stretched a good bit here. We could maybe, um, split thes corners out here like this. Let's try this. Now, let's try and unwrap that again. And yeah, that splits that open just a bit. I guess we could also add these here. Let's try that. You and unwrap. Yes. See, that opens that up just a bit. Back here on the back. We've got some pulling here. Okay? I'll go ahead and add these you and unwrap. Yes. So that breaks that open and reduces some of the stretching there. All right. I think that looks a little bit better than what we had with the smart UV project. So let's go ahead and go with that. I'll press old age. Here we go. Let's go ahead and add that test pattern and take a look at it in Look, Dev, And it looks to me like this part is stretched a little bit too much. In fact, I think maybe it's because I applied the scale after we UV mapped this part. You can see how these are a little more rectangular. So let's go back real quick and let's just select everything and hit you and unwrap. And there we go. Now we've got them more square, so I just need to go back and re UV map. That piece after we had applied the scale. All right, so let's hit the division key and go. Go back here. Now let's take a look at these springs here. If I select Ah, this right here and hit the division key on the num patio. We get these now. All right, so let's go ahead and remove the mirror modifier. For now, I'll go back to a solid view and ah, it's tab into edit mode. And I think for this we could probably just UV map this whole thing as is, Let me tab in object mode and okay, we do have our scale applied. That's good. So let's just select this one with the l key and hit you and unwrapped. What about angle based? Yeah, that looks pretty good. I'm gonna go ahead and go with that. Let's just take a look at it real quick. Yeah, I think that will be fine. All right, um, for this piece down here, let's grab this. And Ah, we should probably I guess we could just split these things out here and here. Okay, Let's do that, Mark, seem. And we could also select all of these edges right here, so that will split. Open those corners. Let's add Ah, this edge right here, we'll add a seam there. And just like the smaller pieces, we will add those corners around the edge to split those out. That All right, let's take a look at this isle de. Select the seam down here, you unwrap. Looks pretty good. All right, up here. Let's Ah, select the edge all the way around the bottom here and mark that scene and then these corners. Let's split those out as well. You and unwrap. Okay, that looks good. And now this thing, the coil, the spring Let's take a look at this on a fest shift age. And probably I would say probably the easiest way for us to do this is just to take on edge right down here. And once we hit Alton, click that will select it all the way up to the top. And let's just Marcus seem there and give this a try. Elicit a you unwrap. There we go. So there it is. It's just this very tiny strip right there, but I think that will be fine. We bring the others back, and then we go to our look deaf here. There we go. You can see this is really big. Those, Ah, that square pattern is really big on the measure. And that's because it's so small in the three D view here. So we can, of course, take this weekend scale it up like this so we can see it here. But ultimately, it will be a lot smaller in this 01 space so we could select everything. We could select everything here with the A key, go to UV average island scale and then pack islands. And you can see now all the squares air pretty much the same size. But everything's all squished down in here, and that's that's fine. If we wanted to, we could split it halfway along here. We could come in here and maybe select one edge right here and split it so it wouldn't be so long and skinny we could try that we could go you and unwrapped there and you can see now it's two of them here in there. So it's however you want to do that. That's fine. All right, I'm gonna hit the division key and we'll go back and let's go ahead and mirror this over. Add modifier mirror and I'll go ahead and apply the mirror cause we may be able to see them both at the same time. All right, well, I think that's pretty good. We've got those pretty well taken care of around the front axle in the next video. Let's go ahead and begin working on the back of the vehicle as well.
94. 092 UV Mapping the Storage Area: for the back of the vehicle. Why don't we begin right down in here? Let's Ah, let's go ahead and isolate this one. And let's take a look at this. What is this? Well, it's just the bottom of that storage area. Do we see the bottom down here? I wonder. Let me ah, get the division key again. Once tumbled down around here, and it doesn't look like we ever see that. So let's go ahead and remove the face on the bottom. Here. Let's do that. We don't need that. Um, we have our scale applied. That's good. So I think maybe we could just split this ah panel out from the rest right here. And then we could just grab these corners like we've done before on cubes. And I think that should work. Let's try it. I'll press a you and unwrap and Yeah, that looks pretty good. We've got some stretching in the rim of the panel there. Let's go to conform. All Yeah, that looks a little better. All right, let's go with that tabac and object mode. Hit the division key over here. Okay. And, um, maybe we should work on these things right here. Let's take a look at this. Let's isolate it and we do have a mirror modifier. We're gonna need to apply this since we can see both of them at the same time. But for now, let's remove that mirror modifier to work on it. And this thing, you know, can we remove this bottom panel? Let's hit the division key again and and we've got some hand. It's kind of hanging over there. I mean, we could change that, but no, I think I'm gonna leave that bottom face on there. Let's go ahead and do that. It's just one face, so I don't think that's taking up a whole lot of polygons. It's not gonna increase. Our Polly counts a whole lot, But for all of this, there's a lot of pieces in here that we'd have to try and do manually, and that would take quite a while. Let's go ahead and give smart UV project to try with this one. Let's press you and smart UV project okay? Yeah, I think that'll be fine. We can go ahead and press control t to clean up the overlaps, but I think that will be just fine. Let's go ahead and hit the division key and go back. And so we should go ahead and apply that mirror modifier. Let's do that. There we go and hit. Apply. All right, so let's also take a look at this toolbox. Let me Ah, zoom in and I think the handle is a separate objects. So let's go ahead and grab that hit the division key. And if we combine these two, let's go ahead and do that. Let's press control J and we lose our smoothing on this. So let's take a look over here under normals. Weaken. Maybe drag this up a little bit. Yeah, something about like that. I think that's pretty good. If we tap into edit mode and grab this with the L Key, we can isolate it with Shift H. And, um, I think all we need to do here is grab this edge around here right there. We can also grab this edge over here and maybe, um, this said right back here over. We don't need thes or the's here. Let's de select those. And then let's marker seem here. Let's press the a key and let's see how we did you and unwrap? Well, we've got some stretching here. Probably better with conform. All but this is such a small piece of the vehicle. And that's just gonna be a uniform texture there. Pretty much just all one color, so I'm not too concerned about it. Let's keep moving on all h. And let's, um, take a look at this. I will go ahead and select these edges on the bottom here, and, uh, we'll just grab these corners and add Seems to them and then select it. You and unwrap. Yeah, I think that'll work. Fine. All right, there we go. We can also, um, average island scales and pack island just to make sure everything looks OK. Oh, let's select them here. Average island scale and pack islands. There we go. All right. I think that looks good. Let's go back. And what else back here can we work on? Well, there's this piece. It's just a cube. I think just a filler piece could go ahead and pretty much do the same thing we just did on the toolbox that seems on the bottom. And then this seems on the corners like that selected and unwrap it there. Yeah, that looks good. Oh, our scale is uniform, but it hasn't been applied. Let's go ahead and apply that just in case. Endless. Unwrap it one more time. Yeah, OK, now let's go back. And what else should we do? We've got the toolbox. This thing. We haven't done this thing yet. Heavily, let's grab these two items and let's hit the division. King. Let's Ah, joined them together and we go. We might have to turn on auto smooth here and this piece. All right, let's take a look at this. Let's select this with the l Key press shift H and the period key. And let's just, um, select this edge and this edge and maybe weaken de Select one of these and let's see how this works. Um, it looks like it might need to have its scale applied, So it's tab in object mode. And sure enough, the scale needs to be applied here. Let's press control a and apply the scale. That's good. We have all ones. Now, let's try that again. You and unwrap. That looks better. Okay, I'll h And for this, um, do we need the bottom of this Let's hit that division key and tumble around and see. Yeah, we do see it. Right. So we're gonna need to keep that. Okay. So even though we need to keep it weaken still, go ahead and grab all of these edges right here and mark, those is seems. And then these corners here, we could grab and mark these and break these out like this. Alright, let's try this. You and unwrap. Yeah, that's kind of at an angle there, but I don't think that's a problem. There we go. Yeah, that looks good. If we get the division t weaken, go back and take a look at what else do we need to do? Well, well, there are these things right here. Let's work on those. So if we hit the division key, we've got a mirror modifier. Let's go ahead and remove one. And, um well, I guess we could ah, do a similar thing that we've been doing here. Let's grab the corners and then let's break out the bottom part here, like this. Let's see how this works. So we'll hit a you and unwrapped. Yeah, that looks good. Okay, let's Let's go with that I'll go ahead and add the mirror modifier and let's click. Apply it the division key and we're back here. Let's do one more thing here. How about this right here? These rear fenders. Let's isolate him and remove the mirror. And ah, what should we do with this? Let's take a look. Well, it's a very thin piece. Um, it's so thin we may not even need to select these corners and add seems to them. So let's just try and select the top edge all the way around here like this and like this. And then let's Marcus seem there, and maybe that's all we need. Let's try it. Let's select. So let's look at the scale. Okay, those air, all ones. That's fine. Let's select it all, Hit you and unwrap. Oh, well, not too bad. Let's try conform. All might be a little bit better. Let's add the ah test pattern and just see how's it look? It's a little bit warped like this, but I don't think that will kill us. I don't think that'll causes too much problems. Yeah, so let's go ahead and add that mirror back and apply. And then let's bring everything back. And now let's go ahead and select everything we've already done. Now it's like this in the toolbox and that and that. This and this. Right? And then let's shift select this fender here, since that has the material on it. And then let's press control l and a link to the material. There we go. So now we can see what we've done. All right, we're moving along in the next video. Let's begin working on some of this in the back.
95. 093 Continuing with the Storage Area: Well, it looks like we can use many of our same tools for the objects on the back of the vehicle here we could Ah, let's begin with this one here. I'll hit the division key and tab into edit mode. And let's take a look at it now. I recall yes. Now I recall I just extruded these pieces out of this cube like shape. And in doing that, it made it ah, little bit complex toe, actually, UV map. So I may once again gives smart UV project an opportunity to prove itself. Here, let me tap into edit mode and look at the scale. It's uniform, but it hasn't been applied. So let's go ahead and press control A and apply the scale, and I'll just select everything here and hit you. And let's choose smart UV project and I'll click OK, and there we go. That's what we have. I think that'll be fine if we take the angle limit up to 89. That maybe reduces the number of U V Islands a little bit, but I think generally speaking, that will be fine. Let's go ahead and give it a material. Yeah, that looks pretty good, Okay? And let's hit the division key and go back and let's grab this guy right up here. And, um, once again, the scale has not been applied. So let's go ahead and do that control and apply the scale we have into edit mode. We could probably split out the bottom part like we've done before and go ahead and grab these corners and split those out as well. There we go. So now let's hit a U and unwrap, and that looks fine. So let's give it a material. How does it look? Looks good. I think that'll work. Let's hit the division key. And what else should we work on? Well, how about the thing right behind it? Here? Let's hit the division key here, and for this it looks like it's got both a solidify and a mirror modifier. So let's go ahead and apply this Solidify here. Let's remove the mirror, at least temporarily. And now let's take a look at this. It looks like the scale has been applied, so that's good. Let's hit the tab key and let's select um, let's select edges all the way around the front of this right along here and down into here , all right, and it's pretty thin. So I don't know that we're gonna need to select thes corners all the way around. Let's some let's give it a try and see. I'll hit the a key you and unwrap. And yeah, that's pretty good. Let's take a look at angle based. Oh, yeah, that's not gonna work. That polling is from us not selecting and splitting out those corners. But it looks like as I said, it's thin enough so that conform. ALS really does the trick for us here. I think that'll be fine. All right, let's tab back into object mode. Let's go ahead and give it the material. Yeah, and, um, if we hit the division key to go back, let's go ahead and mirror this over add modifier mirror. And there it is, there. And since we can see it on both sides at the same time, let's go ahead and click that apply button and get that mirrored over. All right, um, we've got a similar thing here. Let's go ahead and look at that. Weaken once again. Apply the solidify modifier and remove the mirror modifier temporarily. the scale has been applied. So it's tab into edit mode. And let's just do the same thing. Let's just select that front edge all the way around like this, and it looks like we're gonna need to grab the's here and mark the seam there. There we go and lets it a in you and unwrap. Yep, looking pretty good. Let's add that material. And there we go. Yeah, I think that that works out pretty well. Let's go ahead and mirror it over again here and apply it. And then we'll hit the division key and go back. All right, So what about this guy right up here? This thing, let's hit the division key and it has a mirror modifier on it. But since it's connected, I don't want to remove it and UV map it like that. I think what we need to do is go ahead and apply it, and then we can just remove that edge. So let's hit, apply and then come in here and all. Click this edge X and dissolve edges and let's take a look at the scale. Yep, it's uniform, but it hasn't been applied. Let's press control and apply the scale there. Now. I think what let's do is select that edge all the way around All shift click. And I'm going to select the one on the bottom all the way around here like this, and we can apply a seam there. Now we are gonna need to go through and so, like the corners of this so we can split those corners apart. Let's do that. And if we could a and you and unwrap, that's what we get. It's not too pretty. Oh, we probably need to select the corners on the inside as well. Let's check the angle based. Yeah, I think what let's do is go ahead and select these edges in here, right here and now. Let's try it again. Let's unwrap it. And yeah, that looks a whole lot better so we can apply our material with the test pattern, and that looks pretty good to everything's all squares and fairly uniform. All right, let's hit the division key. And, um, maybe we could take a look at this piece here, too. It's a little oddly shaped, so I'm not sure how we want to do this. First of all, we should apply the solidify modifier. Let's go ahead and do that. And then if we removed the mirror modifier once again, we'd be breaking it in half. And let's not do that. So I will apply the mirror modifier. And if we tab into edit mode, we can't really remove this edge in the center the way we've done with others, because this is giving us that shape there. That's holding up that angle. So we can't really just remove that center edge, and that's fine. We don't need to. Now for this, I think we would need to select edges all the way around, then select edges all the way around on the other side, then go through and select all the edges around each of the corners. And it's not impossible, but it is a little time consuming. So I think What let's do let's give smart UV project to try and see how it works. So if I look at the scale, yeah, okay, that it is applied. Now we can hit you and press smart UV project. And okay, and this is what we get. It just doesn't look quite right now. Why would that be we could go ahead and scale this. We could hit s and why and scale this up so that our squares on our test material are actually square. And that would be good. We could get that so our texture wouldn't be stretched. But since the UV map is kind of squished even when our scale has been applied, there's probably something else wrong here. And if you recall, what is it that I'm having trouble remembering? To do that is remove internal faces and sure enough looking here, look in there. We've got a few internal faces, so let's go ahead and delete those. And let's try this again. I'll go back to salad mode. Actually, let's go to look death here. And now If we select everything, hit you and go to smart UV project, let's see what happens. And guess what? It's still having that problem. So those internal faces air. Probably not the issue here. We can go ahead and hit s and why here and scale that up, get them more square like this, and then we can go ahead and pack UV islands here. But sometimes an object is just oddly shaped enough. Where you may have to do a little bit of scaling just manually in one way or the other. All right, let's go ahead and hit the division key. And for our next video, let's go ahead and begin working on some of the pieces right back here around the bumper and the back axle.
96. 094 UV Mapping the Back of the Vehicle: for the back of the vehicle. Let's, um, let's begin back here. There's, Ah, piece right in here. Let's take a look at that. I'll hit the division key and isolated that I can see right up front that we haven't applied to scale here yet. So pressed control and applying to scale. Also, we have a mirror modifier on it. So I think we're gonna need to apply this. We've got clipping enabled. So that's good. Let's click apply. And now that we've done that, we don't really need this center edge, right? We can all to click this and hit X and dissolve edges, so that reduces the poly count a little bit. Um, next, I guess we could. We'll begin breaking out the bottom pieces again. So let's just, ah, grab these edges here and Mark seems, and then the's down here. Let's do the same here. And then we just ah, let's grab these corners that we have here and let's split these corners out again. And, ah, this one, probably this one and these up front, or I guess, in the back of the vehicle, right. Um, all right, so let's try this. Let's hit a and let's hit you and unwrap. Yep, that looks pretty good. Let's some add a test pattern to it to see how it looks. It all looks pretty good. So let's go ahead and hit the division key and keep moving on. Uh, what else? Well, about this thing right here, let's hit the division key and work on this. This two needs its scale. Applying Sillas press control A and apply the scale we tap into edit mode. Um, we have to keep these pieces. I think the in caps on this, but we could go ahead and split thes out like this. I mean, this is going to be a fairly uniform color for the texture. So I don't think putting seems down here would be a problem. Also, if we hit Altar and click this edge, let's maybe Marcus seem here, and then I'll just hit l and, well, let me turn off. Seem here and then let's just try this. We'll try conform away. Maybe a little bit better, but that's actually pretty good. All right, so for these things here, let's just grab these edges at the bottom and then ah, weaken, Grab the edges around the ends here and even de select one of the edges like that. So it'll stay connected to the tube. And then let's move around here. I won't click. They're all shift. Click there and then shift. Click here just to de select those. All right, let's go and select the whole thing and press you and unwrap. I think that will work pretty well. Let's go ahead and add the material onto it and take a look. Yeah, that looks pretty good. All right. Hit the division key and go back. Um, what about these things? Let's work on this. Hit the division key. So for this, it looks like we can do just about the same thing. We need to apply to scale control A and then, Ah, well, looks like this is already selected. Solicitous Mark seems there. And then I can select that face and press control. Lea and Mark seems and it'll grab all those edges and then let me tap back into object mode here and hit the division key just to make sure which is the back and which is the front. I think back here this edge on the bottom here is probably what we want. All click here. We'll still in face mode. So let me hit the two key and an altar click here. Let's add that seem. And then let me hit the division key to go back. All right. I think we've got all those in place. Let's select everything and hit you and unwrap looks pretty good. Does angle base give us anything better? Maybe a little bit better. Our detail. But I think that's pretty good. All right, we've got that. That looks OK. Let's hit the division key And this thing right here. Well, this is pretty basic, but I think it's, Ah worth going head and adding seems to it, Let's apply the scale controlling. Let's select these up here and mark, those seems I missed the's. Here we go. Now, down here. We've got this kind of to level thing going on here so we could split out one year and one here. But I think probably what would be better is if we split it all along here is if this was a continuous bottom of the object here. So let's let's grab these edges along here like this Mark those seams and then we congrats say one seem or one edge along here and mark the seam there and that'll open that up at that point there. So let's try this. It's hit a U and unwrap. Yeah, so I think that looks pretty good. Let's add that material and yeah, let's ah, take a look at something else. So you know what we could do? I'm gonna wait to do the tires to almost the very end, but let's grab this thing right here. The strap that's holding the tire on it looks like the scale has been applied. So that's good, I think for this what I'd like to do is just select these seems or these edges along either side on the top and apply. Seems there and then maybe select this entire edge loop here to apply, or Mark seems and, ah, split those out. So it's kind of all one piece. So let's take a look at that. All us. Select everything at the A key, you and unwrap. And there we go. Yeah, so that basically splits it into two pieces. The outside and the inside. Let's go ahead and add a test pattern and see how it looks. Yeah, I think that'll work. Okay, the division key and what else? But let's take a look at this oddly shaped trailer hitch. Let's see what we can do with this. I'll hit the division key. Um, let's go ahead and apply the scale and let's tap into edit mode. And I think what I'd like to do is split out this top from the bottom because we've got seems right down in here that are kind of hidden away so we can split that out from the bottom here. And also, I may want to split out the main hook here from the back panel. So let's go ahead and select this and get that seemed done. So we know we want that these down here, I think. Let's mark those and these in here. Let's mark these now. Did I get all of them? Let's take a look. Um, I'll press all Z and no, they didn't go all the way around so well, we could go ahead and select these here and press control E mark seem. And these look like they're a little bit too low here. Let's just grab these. Let me go to the move, gizmo, and let's just bring this up just a little bit. So those air not quite overlapping that as much. All right, so impressed. All Z. And so if we do this, we've got this thing, which is a tube. So we gotta open this up at a seem so it lays out flat. So if we selected this edge right here, all click this, it'll go all the way around here, So yeah, and this is a tubas. Well, so we need to open that up that seem as well. So Okay, this will work, I think. Let's Marcus seem there, and if we're going to split it here, we should probably split it here as well. Let's do that. And then, um, if we're gonna split this there, we should probably extend it up into here too. Let's do that. And Oh, there's one right? Right down here. Let's grab that mark seen. Okay, so I think we've got seems here. So each of these tubes will lay out flat, will open up at thes seems and lay out flat. So let's take a look. I'll hit the a key. You and unwrap. Yeah, that's not bad. Let's Ah, look at conform. All. Oh, that's a little better. Yeah. Now we could also split. Um, Cem seems out here. If we wanted just to lay that a little bit flatter. Let's try it. Okay. You unwrap. Yeah, that looks a little bit better. And these, you know, they don't look too bad, actually, I mean, there's this green part, but I think that's underneath here or here. So let's let's add the test material and take a look at it. Um, it's not great, but it's not bad. We've got some stretching in here and back here. I don't think anyone's ever gonna see this hidden away back here. We could split out that seem on the top, but I just don't think it's worth it. I think this is gonna be okay. So let's go ahead and go with this. I'll hit the division key to go back and let's Ah, while we're doing this, let's go ahead and grab one of these. Let's work on this. This is very similar to the one up front. Our scale has been applied. Go ahead and tab into edit mode and select edges along here, and Ah, well, I think we'll probably need an edge or a seem right here is well, so let's go ahead and mark thes see what we get. Okay, We're almost all the way around. Let's go ahead and press all to shift and click these and Mark, these seems all right. Now, let's ah, work on the circles in here. Let's go ahead and grab this and this and we'll grab these edges on the top of the cylinders there. And let's break these out as well here. All right, so we've got those. Seems there. It's gonna break this strip at that. Seem there. So maybe that'll be. Okay, let's hit you and unwrap. Yeah, that looks pretty good. I feel like this is a very long piece. Like we don't need that long. I think this seem here is gonna be hidden fairly well. So let's go ahead and add that and it'll break this strip into two pieces. Let's see if that helps at all. Yeah, a little bit better. Okay. I think that'll work. Let's go ahead and add the material and Ah, that looks pretty good. They're all fairly even. They're all squares. Yeah, I'd buy that. Okay, so let's hit the division key and Ah, Weaken. Delete this. Now, over here. And ah, mirror this over. So I'll move the origin to the three D cursor in the center of the grid and merit over, dear. And it's way down here. Which tells us Ah, the rotation is off. We need to apply the rotation. Control a, apply the rotation. There we go. All right, So in the next video, Willis do is come down here and work on this area around the rear axle.
97. 095 Finishing the UV Maps for the Vehicle: Well, let's start this section off with something fairly simple. Let's grab these Mudflaps here and I'll hit the division key. And let's go ahead and remove the mirror Modifier. Looks like our scale is applied. Zoom in with period key. And if we tap into edit mode, we could probably just select the edges on the back of these here and then go ahead and grab the corners all around here and add edges to the excuse me. Add Seems to those Let's do that. Let's select everything, press you and unwrap. And that looks terrible. So what did I forget? Oh, I didn't actually apply the seems to the back edges, So let's do that. Here we go. Alright, let's try that. Once again, I'll hit a U and unwrap, and that looks quite a bit better. All right, let's apply that test pattern. Let's take a look at it. Looks pretty good. We can hit the division key. Go back and apply the mirror modifier here and click Apply. All right, we've got those done. How about these right here? Let's hit that division key once again. Remove the mirror modifier. Let's apply the scale. We don't have uniforms scale here. So let's press control a and apply the scale we tap into edit mode. Weaken, select the edges all the way around the back like this. And also in the cutouts here. Let's go ahead and select these edges and these edges here. And let's also grab an edge. Maybe up at the top. Just one edge on the inside of those because then that will allow it to lay flat if we grab these edges on the other side right here. All right. Um oh, I guess we should do the corners. Let's get those. And then I believe we'd be ready to try our unwrap. Let's press au and unwrap. Yeah, that looks pretty good. Apply the test pattern and we can see how it looks. All right. Yep. Let's hit the division key. Let's apply the mirror modifier and click. Apply here. Good. How about these? Ah, crossbars. Right here. It looks like we can't see the ends of him, so if they have in caps, we can remove them. Let's hit the division key. Yep, they do have in cap. So when we also need to apply that scale control a apply the scale. Let's go into edit mode and get rid of the caps on the ends, which will make our lives a lot easier in terms of UV mapping. This because all will need to do is just grab one edge here in one edge. Here, Mark seems, and I think we can just then hit the A key you and unwrapped. And there we go. Yeah, those look pretty good. Let's apply the material. And now why don't we see the material on the other one? Well, that's an interesting question. So in the newest version of Blender, you can go into edit mode with two different objects selected. It used to be that you couldn't do that, that you could only have one object selected to go into edit mode. In Blender 2.8, you can select multiple objects, hit the tab key and go into edit mode at the same time. Which seems like it's a good idea. However, there are other tools, like applying a material that only works with one selected object or another. So I'm not exactly convinced that this is a step forward, but it is something that you can do now in Blender 2.8. Ah, let's go ahead and press control J and combine the two and now we can see the material on both of the tubes. All right, let's hit the division key. And, ah, about this thing right here. If I recall. Yeah, I never really finished this, did I? Um, it's just kind of hanging open here. So what let's do is real quick. Let's just go ahead and finish this up. I will bring this back to here. And I think I'd like to insert an edge loop here and maybe bring it up to there and then select this face right here and extruded up. I believe this is what we did for the other one. And then let's just delete that face there. Let's hit X and delete faces. And so there we go. I believe that's pretty much done. Let's hit the division key and take a look at it. Yeah, it's very much like the other one in the front, so we can just select edges all the way around here and Mark Aseem and I guess, edges all the way around here and break this piece off. We can then select an edge here to split that out into a one long strip. And we can also select the corners here like this. Let's just do that. And then do we have our scale applied? No, we do not. So it's press control A and apply the scale it you and unwrap. And that looks fine. Let's add the material. Yeah, I believe that will work. So let's hit the division key. And, um, how about this piece right here. Take a look at this guy. We should apply the scale. Let's do that. We don't really need the faces on top, so let's delete those. And I think I'd like to just select the edges on either side of this cause this is gonna be underneath very small. We're not going to see it, but I do need to UV map it just so we can apply a texture to it. So what I can do, actually is just all click between two of the faces here, and then I'm gonna switch to edge mode and press the sea key, and I'm just gonna middle mouse button, click and drag. Oh, here, let me first press all Z Now I'm gonna hit the sea key Middle mouse button, click and drag and just diesel ect all the edges down the center. And that leaves or should leave all the edges on either side. And now it's just Mark. Those seems select everything, you and unwrap. And there we go. All right, But there's that. Let's go back. And this guy, this drum here. Can we see the back? No, we cannot. So let's first of all, delete that face in the back right here. We don't need that. And that makes our lives a bit easier once again, because we can just select this edge, this edge, and ah, well, actually, no. I'll select this edge up here and then maybe we could de select an edge down here. Let's do that. Okay, So if we selected all it you and on rap, that's what we get. Not too bad. That'll work, and let's apply the material. There we go. Looks like we need to work on thes things. Oh, let's do this right here. Let's grab that axle. That's very similar to what we saw in the front. So if we hit the division key, I believe We just need to apply the mirror modifier with clipping turned on here apply. We can get rid of this edge right here. And, um, we can also get rid of the faces on the end. Can't way. Let's get rid of those, dear. And then we just select an edge right up here, Marcus seem, and then unwrap here. And that should be fine. Yeah, that'll work. Okay, let's now work on these things, Okay? It looks like it's all been mirrored over. So if we hit the division key, there's that. Okay, So now let's just remove the mirror modifier and well, look at this. So what I did is I created individual objects and mere them over from different sides as I was going. So that's kind of interesting what we can do here, let me press control Z and bring that back. What let's do is let's apply the mirror modifier, because what I want to do is get him all on one side. So if I apply the mirror modifier here and then tab into edit mode and maybe I'll go to face mode, press all disease so I can see through it and press the Beaky and border, select all of these and just delete faces and that will get rid of that one side. Now we can work on this one side, and when we're all done, we can mirror it over all in one piece, over to the other side. All right, So if we tap into edit mode, let me press all dizzy and two to go to edge mode. Ah, we know how to do this coil. We've done this before so we can press shift H and then select and edge right down here on the bottom. And maybe we also want to select an edge right here in the center to just so it isn't such a big, long strip. What's Mark seems there, you and unwrap and I feel like we maybe need to apply the scale. Let's take a look. It's giving us some weird things here Tab into edit mode. Well, our scale seems to be applied. Let's take another look at this. Oh, it's because I didn't apply once again. I didn't apply that scene. Let's do that again. Control E and Mark seem I did get that when they're so. That's why that was an oddly shaped thing is cause I hadn't marked that seam on the bottom of the tube there. So let's hit you Unwrap. And there we go. That's beginning to look a little better. Yeah, I think angle based works good. All right. So let's press alter h to go back and let's select this thing here. Shift H. And I think all we did here was just hit you and unwrap, right, And it just flattened it out. Yeah, that's all we did. Okay, Ault age to go back. Now, we've got this piece and this piece and this piece, and we went through and Mark seem on the front piece like this. But you know what? All of these things Let's just try smart UV project. Try and save a little time here. Smart UV project. Okay, I think that's gonna be fine. All right. Let's Ah, take a look at this one here. It looks like we can delete whatever's up in here and down in here as well. So let's press shift h. So down here, we've got a face here. Let's delete that And up here, we've got Oh, look at this. We've got a whole little piece here. I don't know if I meant to do that or not. Let's hit the period key and zoom in. And ah, whatever I meant to do, it didn't work. So let's press control. Plus and let's hit X and delete faces because we don't need those now for this. I think if I hit the division key and go back, we can see that are main view of this is gonna be here on the inside. So if we go to the outside here like this, it looks like I deleted part of this. Let's press control Z and go back here. Let me de select these. Let's make sure I don't delete what we don't want to delete. OK, there we go. And if I go back out here Aiken, I think just select this one edge here and then if we unwrap this Yeah, I think that will be fine if we take a look at the test material. Yeah, I think this will be fun, because we're gonna be seeing it from this angle. We aren't really going to get a very good view of it over here, so I think that will work. Let's press all to h to go back to hear press L for this. And, um, it looks like, Well, let's take a look at this all press shift H and let's hit the period key and zoom in. And for this can we just select another edge back here like this and do this again? Will it work well, We need to get rid of this face right here to be able for this to work. This is open, so that might work up there. Let's give it a try. Let's press you and unwrap and it's a bit stretched here where the seam is. It's true. But once again, the ah tires should be blocking our view of this. So in here is pretty good. All right, so if we go back, let's give a try to this one here, Ault age to bring those back with the l key Shift H. And let's take a look at this. Now we have another face down here. Let's delete that. And I think we're gonna need to keep this up here because we can see it if I hit the division key and tumble around over here Yeah, we'll be able to see it up here, Taman object mode. And yeah, we'll be able to see that there. So let's hit that division key again. And I guess what we can do is just split it out here, Marcus, seem. And where is gonna be our main view of this? Is it gonna be underneath? Well, we're not going to see it a whole lot. We're going to see this side, maybe. Let's see. Well, we'll see this sign. We won't really see a whole lot here, and we won't really see a whole lot in here. So I guess what we should do is put our seem along in here, kind of hide it in here. So let's go ahead and do that. Mark the seam there and Oh, let's also de select one of the edges here so that it stays connected. There we go. All right, was press a you and unwrap. And then if we press Ault h and take a look at it here, Yeah, it's gonna be hidden behind that spring. The seam is all This looks pretty good. All right, so let's now hit the division key to go back and will mirror this over now. Looks like our origin is over here. Let's put it in the center of the grid just to make sure it's where we want it to be. And then let's add a mirror modifier and apply that there. All right, I think there's just one last piece right here. We should go ahead and finish this up. Let's Ah, hit the division key. Let's apply the scale. That's tab into edit mode. Let's find a place where we can add a seem maybe on the inside here and ah de, selected here will add this seem up here and maybe clear one right here. Okay. And then we should probably add Seems maybe right here and maybe one right here. And we could break this out right here and this out right here. And we really don't need these faces down here. So let's grab those and delete those. Let's see how we're doing. It's ah, got it. Scale applied. So let's select everything and unwrap. And then let's apply our material and let's give that a try. So there we go. I think we've got the entire vehicle UV mapped
98. 096 UV Mapping the Wheel: well before we combine all of the objects of the vehicle here and organized the UV map, let's go ahead and work on the tire down here. I think there may be a part that we need to move from the vehicle to the tire, but let's do a little bit of organizing here, at least in our seen collections. Um, I'll go ahead and hide the vehicle Maine here so we can only see our tires. Um, I don't think I need these right here. Let's add those to the vehicle. Maine. I'll press M and choose Vehicle Maine. So that hides those away there. I don't think I need these at all right now. Ultimately, we're just going to take one tire wheel combination into unity. And as I mentioned before, Unity will do the work of creating instances of that object and put it where the four tires should be. It will then control how that rotates and moves up and down, so we're really only gonna need to deal with one of these. Let's delete this and this, and then for this here, let's just turn off the mirror for these two objects, the wheel and the tire and there we go. So now let's work on UV mapping what we have here. All right, so let's begin with the wheel. If I open up the wheels seen collection here, I can hide the tire right there. And then let's work on this. I think, however, what we probably need to do is bring in that piece that we created as part of the spring and the axle. I think that's gonna need to be part of the wheel so it can turn and move up and down with the rest of the tire wheel combination. So I'll bring back the vehicle. Maine here just for a moment. And it's this piece right here. So if I select that that spring wheel combination here and tab into edit mode, what let's do is let's just select this right here with the L A key and let's split this out from the spring object. Let's just press the peaky and choose selection. Now we can tab back into object mode, and this piece now is a new object all on its own. With this selected, we can now shift click the wheel and press control J now that adds that to the wheel object here. So if we hide the vehicle, Maine seen collection again. There we go. All right, so now we need to UV map all of this. But there's some parts in here that we're just not going to see now that this is here. So we could do some deleting here. Maybe if we went to face mode, all click between two of these faces here and press control. Plus, we could begin moving up and let's see how far we can get before we begin to bleed out onto here. So there it is, right there. So you can see that selection there. If I hit control minus now to move back Now, that's in there. So we don't need any of this. Let's just hit X and delete faces. So we didn't need any of that. Okay, Now we can UV map all of this all at once. So maybe let's tab into edit mode and take a look at our scale. Yeah, we do need to apply our scale. All right, I'll tab back into edit mode. Let's select this piece and just hit you and unwrap. And that looks pretty good. Let's do the same thing with this piece here, you and unwrap. Okay, that looks pretty good. And what about this back here? Let's just select. Ah, this right here. You and unwrap. Okay, Now all these pieces, How are we going to select all of these pieces? Well, what we could do is just select these other parts right here and then just hit h and hide those away. Now, if we select all of these, we can hit you and unwrapped. And there we go. Now, these air kind of stretched, but frankly, I think that'll be fine. I'm not gonna go in and apply. Seems to each and every one of these what we should have done originally before we use the array modifier on this is we should have just UV mapped one and then created the array. And those UV seems would have been copied to all the subsequent ones in the array. But I think this will be just fine. I don't I don't think that's going to be an issue. So let's press all to h to bring everything back. And then let's select everything here and select everything over in the UV editor. That's good. A UV and average island scale U V. Pak Islands. And there we go. All right, I think that'll work. Let's hit the Z key and then go to look death. And there we are. Now, one thing I do see here is this part right here. The squares air actually quite a bit bigger than the rest. And I'd like them to be the same size. Everything else looks OK. So maybe one way to do that is just to select this edge all the way around. Just all click that. And let's Marcus seem here. Now we can do is hit the l key to select this one part again, hit you and unwrap, and that breaks it into two pieces. So, yeah, Now you can see that those squares are a lot more similar in size to everything else. Okay, so, weaken, select everything here, select everything over in the UV editor. Let's once again average island scales and pack islands. There we go. That'll work. All right, so we have our UV map for the wheel. What about the tire? Here, let me hit Z and go to solid Vieux Port shading. Now the tire is a different thing. We've got a lot of these individual pieces here, right here. And I'm thinking that we could actually reduce our poly count quite a bit by creating a low polly tire and then baking this detail this kind of high resolution information to a normal map. And instead of having all of these polygons, we would have just a texture, a normal map. And I think we could save quite a few. Polly's doing that. I'm gonna first come over and hide the wheel. Now let's do that. Let's just look at the tire. And if we select the tire, we can see down here that the number of tries is 4700 the number of faces is 2100. So 4000 tries is actually quite a lot. And if we tap into edit mode and just select this inner part of the tire, that kind of lower Polly version there we can come down here and see that were at just 448 faces or if we double that for tries that be 800 or about 900 tries, so we'd go from 4700 down to 900 tries. If we just used a low Polly object and baked a normal map, we'd save almost 4000 tribes. And that's not bad. That might be worth giving it a try. So what I'm gonna do is with this selected, I'm gonna come over here into the collection and just rename this tire underscore High for the high Poly tire. Then I'm gonna tab into edit mode and select just this part of the tire and I'm gonna duplicate it. Shift D and press enter. Now I'm gonna split it out as its own object. I'll hit the peaky and choose to separate by selection, and then I'll tab back into object mood. Now, here's that new object right here. So let's rename this to tire Lo. There we go. So what we're gonna do is bacon normal map so that all that tire tread resolution, all that detail is gonna be baked to a texture map that will then apply this to the Lo Polly object. And hopefully it'll kind of trick the eye into thinking there's more polygons. There's more detail here. Then there actually is. So in the next video we'll begin working on that
99. 097 Using Follow Active Quads: to UV map. This let's tab into edit mode, and I think we're gonna want to create a scene. Ultimately, this thing is going to be turning. So anywhere we put seem is gonna be seeing it at some point. But I'll go ahead and just add one down here at the bottom. It's press control. E and Mark seem. And let's check if the scales been applied, it has not. So let's press control a and apply to scale. So now let's just hit a U and Unwrap. And here we go. Well, it's OK, but not great. Let's change to conform. All that's a little better, but I'm not really liking the warping we're getting, especially at the seams. Let's put a, um, a test pattern on there. I'll hit Z and go toe Look, Dev, and right down here you can really see that we're getting that warping around the seams at each of the ends here. Now we can go in and we could straighten each one of these. We could go to edge mode Ault click an edge here, and we could straighten this by right clicking and choosing a line X and that'll straighten that right So we could go through and do each and every one of these all the verticals and then all the horizontal. But that really doesn't sound like all that much fun. So let's control Z back and undo those. Now there is another form of UV unwrapping that we haven't tried yet, and it's called follow active quads. So what it does is it actually looks at the last polygon selected. So any time you have a selection of multiple things in blender, the last thing you select is called the active. So if I selected, say, years, let me go to face mode. If I d selected a face here and then re selected it, you can see it's kind of a different color. That means that's the active quad. So now if I press you and go to follow active quads, you can see that it says it follows the U. V s from active quads along continuous face loops. Well, that kind of sounds like what we want Here. Let's give this a try. Click here and click. OK. And wow, that's really not at all what we'd hoped for, huh? So the unusual thing about follow active quads is that it doesn't look at this active quad here in the three D view. It looks at it over here in the UV editor, so it's press control, Z. And if I d select this and turn on you v Sync and select this again. Here it is. And as you can see, it isn't exactly rectangular, and it's kind of turned right. It's kind of at an angle. And so what it's doing is it's taking the shape and angle of this one quad and then extending those properties through the whole thing. And that's why we got that weirdly shaped angled thing. What we need to do is figure out a way to get this quad to be more rectangular, the way it is here in the three D view. So what we can do is let's turn off UV sink here and here's that one quad that one face. Let's hit the a key and let's just UV unwrap this here in the UV editor. With that selected, I'll just press you, and there it is. Now that looks pretty good, right? That looks fairly rectangular. Now, if yours isn't if If you say? Maybe it looks like this or like this, right? That's okay. We can go ahead and use that A Line X that we looked at before we can right click. And well, since this is a horizontal one, let's use a line. Why? And we can select this and align why? And then we can select this edge here and a line X maybe. Let's do this one as well. Here. There we go. Now, if we select it all and select U V and pack islands, it'll pack it into that 01 space so we can use our the line X and line. Why, it's just we're just doing it on Onley one face only one quad rather than the whole thing. So now that we've got this one face mawr uniformly laid out now we can do Let's select everything over here. I can press shift and click that and shift and click it again to make sure that that is the active quad. Now let's press you and choose follow active quads and click OK. Ah, now we're getting something a little bit better. It doesn't try and put it into that 0 to 1 space here, but it does lay it out very nicely. So let's get the a key and go to UV and pack islands. And then I'll hit the period key. And there it is. So now let's take a look at these. These look a little bit better. They're still gonna be a little squished here on the sides. But our main concern is up here where the treads are and those look pretty good. So what have we done here? Why have we done this? Well, we're going to take this and apply the high poly information here. I'll unhygienic that right here. We're going to apply this high poly information all this detail to the low Polly object in a normal map. And I'd like to do that in substance painter. But before we do that in the next video, let's go ahead and organize all of our UV maps and get them arranged within the 0 to 1 space here, just like we did with the machine gun. So what will be doing is will be coming back to the vehicle Maine here and organizing all of these and cleaning these up. So that's coming up next
100. 098 Organizing the UV Mapss: all right, We're getting close here to moving on to the text Oring part of the course. But first we need to organize all our UV maps here, and we've already organized the UV map for the gun here. If we tap into edit mode, we can see that there we average diamond scale. We packed islands for that whole piece, so that's already been done. Let's move that out of the vehicle. Maine. Let's hit the M key and move it to the scene collection and let's give it a name. I'll call it a machine gun and let's go ahead and hide that away for now, just to keep it safe there. Now, in addition, we've got this tire back here. We're going to use the tire that we've already UV map for this. We're just gonna duplicate it. But we're also going to use the normal map for this for all the treads, so we can at least hide this away. For now, it's with its selected this press em and go toe seen collection. And for this, let's just call it Ah, spare tire and we'll hide that away as well. So now that we've done this, we can see that there are a few things we still need to do. We need to UV map. This it looks to me like I forgot to UV map. This, um I noticed a while ago that if I select one of these and tab into edit mode look at that , the base disappears. And that's because I never went back and pressed Ault h to bring that back. So I've gotta go through and do that for each one of these. Have all to H. And I'm not sure how the UV map looks Here, let me average island scale and pack islands. I should probably do that for each of these. Let me go through and do that. So this one here, I'll tab into edit mode and all to h to bring everything back selected. All select everything over here. Average island scale and pack islands. So I'll do that for each one of these little lights on top of the cab. All right, now that I've got those taken care of, we've cleaned that up a bit. Now, let's take a look at this. I need to UV map these things, So let's hit the division key once again get rid of the mirror modifier. And for this, I think I could probably just select edges along the top here. Once again. It's so thin that I don't think it will really matter that we don't have seems along the corners. So let's give this a try. Um, we need to get up into here. Let me press all Z and select that edge right there. Okay, so now we can make sure that the scale has been applied. It has. Okay, so let's liked everything you and unwrap. That looks good. Okay, so let's apply that mirror modifier again and click apply. All right, so we've done that. We've gotten those cleaned up while we're UV mapping. Let's go ahead and grab this wheel on the back for the spare tire. Um, the scale has not been applied, so let's press control and apply the scale. Um, for this, we could maybe select an edge here and selecting edge here. Mark seem. And maybe we grab an edge up top and let's try that. Okay? Select everything. You and unwrapped. Well, it's kind of curved here. That may not matter that much. Although Now that we know how to fix this, we can go ahead and do that. We can select a face here, get the a key to selected over here and hit you to unwrap it here. And then you can tell that the edges air a little bit off, and that will only become more prominent as we use the follow active quads. So let's go to edge mode and select each of these edges and maybe a line. Why? For the horizontal in a line X for the verticals. Now we can come back over here, select everything shift. Select that shift selected again to make sure it's the active. And, oh, what we should do actually is only select this interior part. Let's all to click this area and then shift, click and shift click there. We don't want to do follow active quads for the edges here. I think they're just fine, So let's just do it for this. Let's hit you and follow active quads. There we go. So let's select everything. Pack islands right into here. So there it is. Now let's select everything here, and then we can average island scale and pack islands And there we go. So there's the wheel for the spare tire. Let's hit the division key. And what else do we need to do here? Oh, we need to clean these up, right? We need to select these. And let's hit the Elke disliked this and delete that because we have this piece on the back of the wheel itself for the tire we're gonna use. Right? So let's hit L X and delete these. And also we want to delete this one. Here. Let's grab this with L X and delete faces. Okay, Now it looks like we've got everything you ve mapped. Everything mirrored over that we want to mirror over. These haven't been right, but we wanted it that way. Same with the windows up here and the rear view mirror here. Those still need to be mirrored over. But we decided, since you're only going to ever see that on one side thes pieces on one side, we can save a little bit of texture space within the UV map and have the UV islands one right on top of the other. All right. So let's, um, go ahead and hit the a key. Disliked everything. And now let's press control Jay to join everything together. Now, if we tab into edit mode, we can see that here is the big mess of U. V s. Let's hit the A key. Disliked everything over here. And then let's hit the A key. Disliked everything over here and you have. That's a mess. But what we want to do now is average island scale right here. There we go. So now noticed that all of the checkers on our UV test pattern are all the same size. And that's good. It doesn't matter once again how big or small these things are. It only matters that they're all the same size. That's what we want. And now that we've average their scale to be proportional to what it is over here in the three d view, they're all the same size. All right, so now that we've done that, let's go ahead and pack islands U V Pak Islands and there we go. There it is. Now we can hit the rotate check box here and spin it and see if we like one way better than the other. I feel like I don't know why I feel like this is a little bit better. Let's hit control Space bar. Let's kind of zoom in all press all today to de select and there it is kind of a mess, but they're all there right now. Let's press control space bar to go back, and now we need to have these things right here. The doors, the windows, the hinges, etcetera mirrored over to the other side. And instead of using the mirror modifier here, we can do a little trick with the mirror tool with control M. So if we were to use the mirror modifier, we would have to split this out as its own object, mirrored over, apply the mirror and then bring it back into this main object. But we can also mirror these over while it's still all one object. To do that, we first need to move the pivot point of the objects. So if I click on the move tool here, you can see the pivot point is right here. We can't move it into the center as an object because it's part of an object. It's it's a component, so we we don't have that object menu up here. So let's move the pivot point from the individual origin to the three D cursor here. Now that that pivot point is at the three d cursor weaken merit over. Let me press all Z just so we can see through this. And what I'll do is with that door selected, I'll press shift D and enter to duplicated and then to mirror it over to the other side, all press control em, and then press the axis on which we want to merit, which would be the X axis. And there it is. And then enter. Right. So there's our door. Let me, um goto solid viewer toe a little easier to see their right. So there is our door now, if we select these two doors here. But when they grabbed this here, we select these two doors like this. Now we come in here and take a look at this. If we go to Island, select and click on this with these two doors selected, I can hit G and move it aside and you can see that the two doors are one right on top of the other. And that's all we're doing. We're just trying to save a little bit of texture space by mirroring needs over after we've packed islands. So now we congrats these other parts and weaken do them all at once. We can do multiple pieces at one time. So if we say select these with the L key like this and that handles on the door and the window in this window Oh, we could get these pieces here and thes so you can just go through and select all the pieces that are gonna need to be mirrored over here just with the L key. You can do them all at once if you want. So let's grab all of these. And now that we've got these selected, that pivot point is in the center of the grid. You can see all the UV islands over here. Let's press shift D enter and then control em X and enter. And there we go. Now they're all over on the other side. Oh, we should also do this rear view mirror, right? Oh, it looks like I forgot to get this guy right here. You can see I don't have the top. So did I already duplicate that? No, So let's press shift. E enter control in X. Enter. There we go. So that's now over on the other side. Let's do the rear view mirrors here. I'll press the l key to select all of these pieces like that. Now, let's press shift. E enter control em X, enter. And now that should be over here on the other side. Are there any other pieces that we need to do that with? Oh, how about the windows up here? We figured we'd mirror these over at this time as well. So let me hit the three key so I can select these in face mode. Here we go. And get these up here as well. Okay, so now we have all of those. Let's do it again. Most press shift e and enter control M X enter. How'd we dio? Good. All right. So is there anything else we need to do here? There's probably something I've for gotten, but hopefully will catch it before we get too much further. One thing we could do is adjust our smoothing. You can see some of the polygons here, so we select our object and come back over here to the object data panel. Maybe weaken, click and drag our smoothing angle up. I don't know. Let's see how far we can go. Looks like about 55 is pretty good. So maybe we'll go with that for now. Yeah, I think that looks pretty good. So we could bring back our Ah, hi, Polly Tire and our wheel. There we go. So, believe it or not, we're to the point where I think we can begin text oring. So in the next section, what let's do is talk about exporting each of our items out here the machine gun, the vehicle and the tire wheel combination. But before we take it into substance painter, we're gonna have to work on organizing our materials and creating a color i d map using blenders, Vertex colors. So in the next section will begin working on that
101. 099 Beginning the Color ID Map: to begin texture in our model, we're gonna first have to begin to think about materials. And the interesting thing about materials is that when we create a material in blender, apply it to our model and then export that model and take it into substance. Painter substance painters sees that material as a texture set and for every texture set you have in substance painter. When you export your texture maps out, it will automatically export texture maps for each of the texture sets. And for each texture set, you're probably gonna have at least four texture maps like the color map. Normal map, metallic roughness. Um, there are others, but mainly those air the Ford that you're probably going to be exporting out. So if I go through here in blender and add materials to each and every piece of this object , say I add a material for the windows and a material for the main chassis of the vehicle, and maybe another material for the headlights, etcetera, on and on. For every one of those materials, substance painter will create a texture set, so if you have, say, ah, 100 materials on your object here, then when you're exporting your textures out in substance painter, you're gonna have 400 texture maps, and then you'll have to in unity or any game engine. Go through and apply each of those texture maps to your materials. Drag them into your texture slots. So it's really beneficial for us to reduce the number of materials that we apply to the model here and blender. Okay, that's great and all. But if we're going to say only have one material for the entire vehicle here, how are we going to differentiate between, say, the glass on the windows and the black plastic on the lights and the metal of the hood and the rubber or plastic of the fenders? How are we going to differentiate those parts in substance painter if we aren't going to use materials? Well, what we can do is use a color I D map, and we can create those colors here in blender using vertex paint and vertex paint. You confined right over here under the object menu. Pull down. You can change to protect paint, and here we go. Now it doesn't look like a whole lot has changed. However, if we come over to the face selection masking here and turn that on. Now we can see the edges of our polygons here in Vertex paint. And what we're gonna do is apply a different color for each of the areas that we want a different material to be on in substance painter. So bear with me here. I think it'll make sense as we go forward. All right to do this, though, I think what I'll do. Let me go back to object mode. I'm gonna hide the things we don't really need. And I think I'm gonna clean up the outline er here. So we don't need the machine gun right now. I'm gonna turn that off. We're going to deal with that after we work on the vehicle here. Um, our wheels, We could go ahead and hide that and hide this wheel here up in the vehicle. Maine. Well, if we've still got our model labeled as that original plane that we created when we began the hood. So let's change this. Let's call it ah, vehicle. There we go. And I think I'm gonna take this and drag it out into the scene collection and this side view here somehow got moved into the vehicle. Maine. Let's drag that into the reference images, and we can hide the reference images as well. So the vehicle Maine doesn't have anything in it anymore. Let's go ahead and delete that. I'm thinking maybe we should go ahead and just bring these objects out into the scene collection as well. And maybe let's delete that collection here, that wheels collection, the chains weaken enable the chains here those air cool and all. But I think that's just too many polygons. I don't want to deal with that. Let's go ahead and remove those delete that. So I'm gonna select the object and let's go ahead and tab into edit mode. And then from edit mode, I'll switch over to Vertex paint. And what that does is when I hit the tab key. It'll take me from Vertex paint to edit mode back and forth. So in Vertex paint, let's come over here and choose this top tab, the context tab, and that will give us our brush tools and our color picker. I think to do this, I'm gonna need a reference image. So at least for now, I don't need the outline, Er, so I'm gonna change to an image editor up here. And let's see if we can find an image that at least gives us a general feel of the different materials and colors on this. Um, maybe I'll go with this one right here. Let's let's take a look at this. Okay. So what we want to do is tell substance painter through the use of vertex colors. Which parts of this is what kind of material? So the main material here is, you can see is this kind of tan desert sand color body, and let's now create the vertex color for that. Now, it doesn't matter what color it is. Substance painter doesn't care about what color it is. It only cares about the difference in colors. So if we, um, say tab into edit mode and I'm gonna press the l key right here, number turn off. Seems for now, right here. So we select that whole hood object, and then I'll press l here. Endless press l here and now. Up here, the grill is a different color, a different material. We're gonna want to put a different material on the grill than on the hood. So let's come through here and go to base mode and d select these. Let's do that, de select those. We don't want those to be the same material. So with this highlighted, now let's tab back into Vertex paint. And now, with this selected, you can see it's a different shade than all the rest. We need to choose what color we're gonna create here. I think maybe I'll just come over here and in the color picker. I'll just drag over for a green. Now I want to be able to come back to this exact color because any difference in color will be seen in substance painter as a different material. So I want to be able to come back to this exact color. I'm gonna scroll the color palette down and create a new color palette so that all I've got to do is hit the plus key here, and that adds that color to my palette so I can always come back to it. So with this selected, I just need to fill this selected area with the color and to fill you press shift K. And there you go. So now we've got this particular color signifying this particular material here on the hood , and we want to go ahead and add it to really almost everything else. So I'm gonna tab back into edit mode and I'll de select that. And I'll just use the L Key to begin coming through and selecting objects in here. So let's grab these here and I'll press the tab key to go back to Vertex Paint shift K tab back into edit mode. And there we go, so you can see what we've done so far. Tam. Back into edit mode. Let's select some Morris like these in this and thes hinges here like this tab into Vertex Paint Shift K. And there we go. All right, so that's how we're going to tell Substance Painter. What material is what? So let's say, um, the rear fender here, right here. Let's select those. If I tap back into edit mode, I'll hit the L Key just like that in the l Key to select that now for these, let's tab back into Vertex paint and let's create a new color here. I've been just gonna drag over to the blue and that to my palette and then in here all press shift k. And now that blue is gonna signify a different material on that rear fender. Okay, So if I tap back into edit mode and go back up here, say and begin selecting thes parts here, these are gonna be the same thing as the hood and the cab, so I can tab back into Vertex paint, and then I need to go back to my green here, shift K, and a sign that color to those objects as well. So that's our process. We're going to go through and a sign colors to all of the rest of this, so that even though this vehicle will be one material will have different colors to signify in substance painter what it should see as different materials. So if I tap back into edit mode and I'm gonna go back to object mode here, let me go over to the materials panel here. Currently, this has just one material on it. The UV test pattern. We, of course, don't want to use that particular material. So what we can do for this object is removed that here with the minus key here and then click new and we'll call this new material will call it vehicle when there we go. So that's what we need to do we need to assign are different colors in vertex paint so that even though we've only got one material in there for one texture set on this object, we're gonna have multiple materials within substance painter based on the different colors of the color I D. Map. So in the next video will continue adding our vertex colors.
102. 100 Continuing the Color ID Map: All right, let's continue adding our vertex colors. I think it looks like everything down in here is gonna be the same color. So I'll tab back into edit mode and with the l key l just begins selecting some of these things down here like these. And this all of this kind of front axle stuff. I'll tap back into Vertex paint and let's go back to our context have here. I've got the green selected. Let's go ahead and press shift K. And that will add that there. Um, we could get these here, tam back into edit mode and press the l key to select all of these. Go ahead and grab all of these. And these as well. Tab into Vertex paint Shift K. All right, Um, what else do we need to do? Well, this here, let's go ahead and do that. Select the's with the l key shift K. There we go. Let's go around the other side here and get these. What we have here to do Well, we've got all these down here that we could do, just like on the other side. Go ahead and grab all of this. And these little pieces right back here. Tabin, Vertex Paint and shift K. Let's grab these and shift K. There we go. Um, about a frontier. Oh, we could grab these here. Let's do this. Let's grab this and this in this in this in this and this piece here. All right, Shift K Now for the windows. We don't want to select the windows for the green color. So what let's do is just select these here and then shift, Click the windows here. Let's make sure we're Oh, we can't do that because we've got to seem all the way into here. Okay, So what let's do then is go ahead and select this whole thing right here. Let's tab into edit mode and let's press shift k. And then if we tab back into edit mode and if we select these again, but turn on seem it will just select it to that point. So hit L over here as well. Now, if we tap back into Vertex paint, we can add a new color to this. So this is gonna be the windows for the cabs. Well, we've got a blue. Let's go down here to a red Let's do that. We'll create a new palette color for it so we can come back to it if we need to shift K. And there we go. All right, So while we're working on the windows, let's go ahead and come over here. Tab into edit mode will hit the l key. I'll turn off. Seem for now. Let's just ah, grab all of these here and let's go and select the green. Now Shift K to get all of that. Now we can come back and select this turn on seem. And now weaken. Just grab the windows on both sides there, so tab into vertex paint. We want to go with the red shift K, and there we go. So those are signifying the materials for the windows on the cab, and these are gonna be kind of a dark color like this, so we can't see into them since there isn't anything in there. And then the windows up here are gonna have to be yet another color of vertex paint because we're gonna be able to see through them, so it will be a different material. Let's some grab the borders of these windows while we're up here. Let's Ah, select all of this here, these borders and all of these, and let's go ahead. That's okay. It doesn't hurt to add the color again to the same object or the same part. There we go. And then I'll select these brackets around here and these around here. There we go. OK, and then tab into vertex paint. Select that green and press shift K to fill that color as well. Okay, um, we haven't done the rear view mirrors here. Let's do those but hit the L key here. I'm gonna go ahead and turn off, seem shift. Click that and let's ah, select everything else. That's part of the mirrors. And let's press shift K here to give it that green. Oh, we've got these little guys right in here. Let's grab those shift k. There we go. All right, let's go around the other side and do that same thing. And Oh, look at this. I don't have those bolts on the other side. Ah, so what are we going to do about that? Well, we can use the same process that we did form mirroring over the doors with control. M weaken. Just use that same process. It won't add any extra UV islands to our UV map. It'll just put the's right underneath the current ones here. So if we select, let's ah, zoom in here. If we select these two bolts and then if we make sure that that pivot point is here in the center of the grid, we can once again me spin around here so we can see it happen. We once again press shift D and enter and then control em and ex and enter in there they are. So we may find a couple of more pieces like that, and that's fine. It's easy to fix. So let's, um, select these pieces here with the L key as well. Let me go. Let's tab into Vertex Paint shift k. There we go. Now, one thing I realize Here, let me ah, select this and zoom in is we need the mirrors here. We need those to be a separate material. So let's ah, select this with the l key and click seem and this is Well, let's go grab these over here. L and l. So these are gonna have to be wholly new colors for our vertex paint. So its tab into Vertex paint let's create a whole new color. So how about, um, how about an orange? Let's do that. I'll add that to our palate, and then I'll press shift K, and I'll add that color there. All right. Um, well, we've got these pieces here. Let's take a look at what these are If we zoom in here Oh, we've got this black material here and then we've got the normal tan of the body here, So all right, let's some tab into edit mode and let's just zoom in here and what we can do is go ahead and just select this. Let's select this whole thing right here and then else, like this whole thing here and let's add that green color to it for the ah tan color. Those slick green shift K like that. Now, if we tap back into edit mode, we can then select this part right here. I'll turn on the seam and then we'll need to come in here and select these pieces here and on the inside here. Now we've got that selected. Let's give it another color so that we can use black material for these. So it's tab into edit mode. Let's create yet another color. Um, how about a yellow? Let's try that. And let's add it to the palate. Shift K. There we go. Now, we need to add that to this. Over here. Turn off the seam shift, K, Can we go? And this over here, Let's turn the seem back on and add these pieces right here with the l key. And here now we need to press shift k there. Okay, so that's now that yellow is going to be that black for that handles. Let's go around. Do that on the other side real quick. I will select this turn off the seam. This will be the yellow here. I will select this with zoom in. And you know what I'm thinking? I don't think we had one of these bolts on the other side from he just see. No, we did not. So we're gonna need to add those bolts to the other side. Okay, we can do that. We can do that. So I get the sense there's gonna be a few of these smaller pieces that I didn't get mirrored over that we can pick up as we go. So I'm gonna select these two and the bolt and let's go back to the green here, Shift K. Now, let's do is select this again. Turn on, seem. And then we're gonna go back through here and select just this part right here, and we're gonna use the yellow. There we go. And over here, it's like, this and all of this and then Ah, the back of it. Here. Now we want to add that yellow, and there we go. So now we've got those. Let's real quick. Deal with those bolts that shouldn't be too hard will select these two. And since our pivot point is still a three D cursor going to see those down here, let's just press shift, E enter control M X, enter. And now we should see them over here. And if we tap into Vertex paint, they're the proper colors because this already had the vertex paint on it. All right, let's work on the back back here. Oh, it looks like I've got a piece here that didn't get mirrored over as well. So Yeah, we're gonna have to do that a few more times, though, I'm gonna hit the l key. Turn off seem and we can go through here and select all of this, I believe, and maybe even all of this, because all of this is that tan color. So with all of this selected, let's tab back into Vertex paint. Select that green shift K. And there we go. We've got all that. Ah, let's go ahead and tab back into edit mode. And let's select all this stuff. All of this here. No, we don't need that. That's a different color. Those mudflaps are a different color. Okay, so all of this in here, though we need all of this, go through and select all of this with the l key. This is what we need over here yet. Let's Graham that. Okay. With all of that selected Ope, let me grab the little bolts here. Can't forget about those. There we go. All right, Now, with all of that selected, let's go back to Vertex paint. The green is still selected. This press shift k and that'll add it all to that. All right, well, we're coming along here. If we go back to our vertex paint. We can see this is what we have so far. We're coming along in the next video will continue adding our vertex colors to this and see if we can finish up the main part of the vehicle here.
103. 101 Finishing the Color ID Map for the Vehicle: before we go any further, Let's go ahead and mirror this one over here. This piece right here, let me hit the l key and I'll de select seem and that will select that whole piece. So we've still got our pivot point at the three D cursor right up here. So now we should be able just to duplicate in mirror over so shifty. Enter control M X, enter. And there it is. And if we tap into vertex paint, you can see that it already has the color on it. All right, Well, while we're back here, let's give some color to the mud flaps. Um, these Do you think these should be the same material as the fender? I feel like the Mudflaps. Maybe a little dirtier than the fender, at least the way it is here. Yeah, Let's give it another color. So I'll tap into edit mode. Select this one in this one, and then let's create a new color. How about if we grab this and drag it over to, ah, purple type color here? Let's give it a new color in the palate, and then let's press shift K. And there we go um, this up here. We should probably give Vertex colors. Did these things? What color should we give that wheel? Is it the same color as the wheels? Here, Let's see if we can find a picture of the back of the vehicle. How about here? Yeah, it looks like it's the same color. So we just need to be sure whatever we put on here, we need to then put on the, ah, wheels here on the tires. So let's, um, tab into edit mode. And let's just grab this whole thing to go back to Vertex Color. And we need yet another color about if we swing up into ah even, maybe I'll begin pulling him out that like this. So it's a little bit lighter about right there and let's add it to the palate. Shift K. There we go. This thing right here. Ah, it's so like that. And let's give it a another color. How about a lighter green like this? Shift k? There we go. Oh, it looks like this piece needs toe. Have that green color on it. Let's do that. I'll go back to the original green and add that the box at the back of the turret there. All right, Let's, um let's go up to the front and add some of that green up here. Got quite a few pieces that need this, and it looks like Now look at this. I've got this piece here, but not over here. And ah, any other pieces? Well, it looks like this piece here, right there. And this That isn't over here either. So we've got to do some mirroring of those. But let's wait to do that until we add the color to it. So with that selected there, I'll go ahead and continue selecting all of these. We're gonna need that green color on all of these in this and this, um, and this piece here and the bolts, of course. Let's get all of these taken care of. So with all of that selected, let's tab back into Vertex paint, Press shift K. And there we go up. I'd better grab this stuff here. Let's get this and that cylinder on the inside there, too. All right, Shift K. There we go. Now let's duplicate thes things over. What did I say? We needed this thing right here and this. Let's grab these. So let's press shift. E enter control M X and enter. There we go. And this piece here, we'll select it. Same thing. Shift D. Enter control M X enter. Okay, so we should have all of those now. That's good. Ah, we need this piece right here. Right. Let's go back to the front view. Which here, with this one? Yeah, we're gonna need toe add that color to this. So let's tap into edit mode and grab these two pieces. Yeah, that's what we need. We've still got the green selected here, so Shift K. Okay, Now the headlights and this piece, we're gonna need to first apply the green color and then come back in and select for the lenses of the light here. So let's, um, select all of this and all of this with the l key up. Trolls E. There we go. Now let's tap into a Vertex mode and press shift K. All right, now we can select this and turn on seem, and now we'll just select these on the inside. So I want a material the same for these two here, So I guess we'll need to create a new color now, won't we? So let's bring Ah, Let's bring it right into here. Let's add the color to the palate. Shift K. And there we go. Now we've got to get these guys right in here. Grab these. And we need yet another colors. Those swing around, right? Maybe right about here at a color. Their shift K. And there we go. Now, we also need these inside the grill. Right? Let's Ah, select these here. Get all of these bases here, tab into vertex paint, and let's just swing over and get a I don't know how about how about something like this? Let's grab that color there added to the palate shift K. And there we go. Alright. What else? Well, looks like we've got most everything on the bottom here. We've got that grill the lights. Oh, speaking of the lights, let's work on these things Here. It looks like I haven't done this piece. Let's grab this zoom in with the period key. Turn off the seam selection hit l there and ah, I think over here is well to do that. Let's go back to the green Shift K there we go. All right. So these things here are black on the outside, and then we've got a lens on the inside. Well, here they're covered. But I think I'd like mine, As I said to not be covered. Let's see if we can find another image of that. Oh, here we go. Here we go. So you can kind of see the difference there. All right? So once again, I think we're gonna need to select everything and then come back in and select the lens. So if we tap into edit mode, let's select these pieces here, go back to Vertex paint. We're gonna need a whole new color. Let's Ah, maybe grab something like this right here. And that to the palate. Shift k. There we go. Now, go ahead and do the others, too, And then we'll come back and grab the lenses. Let's just grab these and grab these here back to Vertex Paint shift K. OK, we've got those. No, we could probably select this and turn on. Seem so we just get the lens of the light here like this and like this Now, let's go back to Vertex paint. Find us yet another color toe work with. How about this one? Right here. Added to the palate. Shift K on. There we go. Ah, the windows. Let's give these things a color. Ah, let's hit the L key. Oh, let me Ah, turn off. Seems so. We get all of it. Let me make sure. Yeah, There we go. And, ah, let's grab these up here. Right here. Let's give it a new color of what we want. Let's swing over here. See, we confined over here. Well, I could go way up into the light colors here. Now let's do that. Add it to the palate shift K. There we go. And, um, it looks like, Oh, well, I need this thing here. This kind of intent, a thing on the back. Let's see if we can find an image of this. What different materials do we need for that? Well, I see one here. This has got a material here the same. It's on the top, and it's got some different materials in the center there, So OK, so what? Let's do Let's grab this. Let me turn on. Seem here. Let's grab this and this. The's parts right here and although they're a different color here in this, I think I kind of want him to be the same color as the rest of the body of the truck. So let's tab into Vertex paint and let's go back to that green and let's hit Shift K. So I think I just wanted to be the same color. And then this part in here is just gonna be its own thing. Who knows what kind of material we're gonna put on here? I think I'd like just a black material for this, but let's ah selected Go back to Vertex paint and ah, let's give it a whole new one. Maybe we'll just go right about like this. Add this to the pilot and press shift K. So that will just be a material on its own. All right. I think we have everything colored for our Vertex map here for our color. I d Did I get that handle? No, I did not Let me get that. Let's select that de select seem and we're gonna need a new color for this. Let's swing over here. Maybe something like this and to the palate and shift K. So there we go with that? Anything else? Well, I'm sure we're gonna find something along the way. Um, as it happens, sometimes when I get it into substance painter, I realize Oh, I forgot one more thing. But that's okay. We'll catch it one way or the other. All right, so in the next video, what let's do is let's bring out the machine gun and will do the same thing with the gun adding vertex colors for a color i D map for that.
104. 102 Creaing the Color ID Map for the Gun: All right, let's move on to working on the machine gun. Let's go back to object mode here and oh, I'm gonna need to bring it back. So let's go over to this panel and change it back to on out liner here. And OK, so we've got our vehicle here. Let's bring back the machine gun and hide the vehicle and frame it up with the period key. And let's add some vertex colors to this. To do that, I think we probably need another reference image or to toe work from. So let's ah, switch this back to an image editor and let's go find a good image for this. How about this one? Let's take a look at this. Yeah, this is gonna tsum good color differentiation here. Looks like we've really only got 123 for maybe five different colors here. Yeah, so let's work with this one here. I'll go ahead and tab into edit mode and let's then go over to Vertex paint. Yeah, we've still got all of our colors here in the palate, so let's tab back into edit mode. And with the l key, let's begin selecting some of these let me turn off. Seem here and we want all of this, I think, or this green color here. Ah, Looks like we probably want this. Let me zoom in here. I think we want this and these. It looks like this bolt here can be a different color. What about? Well, this is a different color, and this to looks to be a slightly different color. So let's not add that quite yet. Let's get these over here. Press the l key and get those and yeah, let's go ahead and add this. Now I'll tab back into Vertex paint. Let's turn on face selection here, and so we have that selected. It's like we need to add a new color to this. So, um, let's bring this down. To make everything a little bit darker and weaken, begin to choose colors here. So for this, maybe let's begin here with a brown. Let's press shift K and oh, we better add this to the palate. There we go. So it's there. All right, let's get a different color for this. Here I Let's just select these with the l key and tab back into Vertex paint. Let's ah swing this around to another color here, Shift K. All right. Oh, I better add it to the palate. There we go. This down here looks like it's it's own color. So this the post, the brace and this all looked to be about the same color. So let's apply the same color to all of that eso we've got that in the brace. Let's get all of this here and here. And this one here. Lets try that tam back into Vertex paint. And, you know, I think I'd like that post to be part of this, too. Let's let's go ahead and get that there. And then let's tap back in. Let's swing around Teoh a different color. Maybe one like this added to the palate shift K. All right? Yeah, let's go with that. Um, how about the ammo box here? Let's come over here. It looks like we could do at least two different colors here. Let's hit the L key there. Have into Vertex paint. Let's spin this around, Teoh. Another color here, Shift K o. Let's add it to the palate. I I don't want to forget that, Um, let's select this and this will be yet another color. How about something like this and that to the palate shift K. Ah, the handle. Here. Let's do that one. That should probably be another material. That swing down here and this one, Shift K. All right, um, this up here, I feel like this should be the same tan color is all of the rest of the body of the vehicle . Like, since it's connected to that plate year, I feel like it should be that tan color. So what I'll do is I'll just come through and select all of this like this, and let's get this, okay? And then let's just use that. Ah, use that green tab back into Vertex paint. Grab that green shift, K. There we go. Okay. Um let's ah, pick up those bolts real quick. Let's do that. So this bolt and this bolt here, let's go back to this color here, and I'm gonna spin around. I'll come down here like this, and let's press shift. K o padded to the palate. There we go. And this stuff back here, let's take a look at these handles. I think we're gonna need a new image toe do this. What about? Well, let's take a look at this one here. It looks to me, Well, it's awfully dark there, but it looks to me like that handles are a different color than or even like a wood material. Let's take a look at this here. Yeah, see, it's kind of a wood thing, so I think everything but that handles could be that same color as this part here. So what let's do is let's just with the Elke. Let's select that whole thing. And then let's grab this brown color here that first when we created in press Shift K. All right, so now let's go in and get thes. Would materials all go to, ah, face mode and select these and then press control? Plus, And let's expand the selection up to up to right about here. Yeah, right in there. And, ah, I'll tab into Vertex paint. Let's create a new color here about something back in here and that to the palate shift K. Yeah, And then let's get this over here. Control plus toe, Add that. Okay, shift K. There we go. Now we need to do the same thing for this over here. Ah, let's zoom in here and this. Looks like it's, um, gonna be similar in that it's just that would in the center there. So, while we're here, let's Ah, grab this brown shift k. OK. And then let's grab these faces and control plus and expand those out to there. Yep. And then let's switch over to this brown here that we just created and shift K that There we go. Yeah. So that'll work, I think. And yeah, I think that's got everything here on the gun now. All right, let's go back to object mode here. Let's go back to the outline. Er here, let's bring back the vehicle and let me just make sure that we've got everything, um, with the vehicle, I'll go back to Vertex paint right here, and it looks pretty good. No, wait. What's this? Ah, look at that. All right, let me grab that bolt and zoom in on. Let's see what we got here. I think. Yeah, look at that. So I can hover over this piece and just hit the l key here in face. Select in Vertex paint. And we need that green here. Shift K all right. Anything else? We can see that it's gonna be a problem here. Oh, it all looks pretty good. All right. So we've got the main vehicle here and the gun with our vertex paint. Let's now take a look at the tire. Let me go back to object mode. Let's bring back the, um, tire low and the wheel. Now these, I think, can just be all one color. So if we tap into edit mode here, that's all selected. We can go to Vertex paint here. Ah, let's create yet another color here. Maybe something like this added to the palate shift k. There we go. Then let's go back to object mode here. Let's like that wheel we can tap into edit mode and looks like that whole thing is selected . That's good. Goto vertex paint. Let's find another color here. How about a a dark purple shift K? And there we go. All right, Now let's go back to object mode. Um, I think what we could do We have this spare tire over here right here, but we don't really need that high poly one there. Let's, um, call this high. We're probably not going to use this, But let's just call this the high Poly one. And with this selected, what let's do is move the cursor to it. We've got the origin right there. Shift s too. We've got the cursor there. Let's hide that away. And what I want to do is take this and duplicate it and put it right back here. So with this selected, let me change the ah pivot point to the median point, and that brings it to the center of the grid. We don't want that. Let me move that to the origin right here. And now what let's do is just create a new spare tire low Polly objects. So I'll press shift. E enter. Let's call this. Ah, spare tire low underscore low and we go. And then let's pop it over here to the cursor to do that, let's press shift s and then we can choose selection to cursor. And there it is. And then we could just spend it in the Z axis rz 90 And there we go. We've got our spare tire. All right. I think we've got all the Vertex colors in place. Now, let's just go through and make sure we have all the materials set up. A swell. So for the vehicle, we come over here to the materials panel. We have a material called vehicle. That's good. If we select the gun, we've still got that UV test pattern. Let's get rid of that here. Let's create a new one and let's just call it gun and ah, then down here with the tire. We still got that test pattern. Let's get rid of that. Create a new material. Call it tire. Let's select Thea Wheel. Let's get rid of the test pattern. Create a new material. We'll call this wheel and, um, I think that's it. Let's take a look. We've got the gun, the tire, the vehicle on the wheel. Yeah, that's I think that's the only four materials we really need to take into substance painter . All right, I think what that means is in the next video will deal with getting this to its proper scale and will begin exporting it out so that we can take it into substance painter. That's coming up next
105. 103 Exporting the Models as FBX: Well, we're just about ready to export this out. But as I was looking at it, a couple of things came to mind. First of all, if I pulled down the material menu here, you can see the UV test pattern, and when a material doesn't have anything attached to it or it isn't applied to anything, it'll have a little zero here, and this one does not. Which means there's still something with that material on it, and I realize it's probably this, so I need to give this its own material. Ah, I'll go ahead and remove this material from it. Let's create a new one and I'm just going to give this its own material, the spare tire material here and now if we pull this down, you can see this has a little zero, and that means that none of the objects in the scene have this material. And that's good. All right, so we've got that in place. The next thing I want to do is make sure that the textures will be applied to all of the objects properly, and what I mean by that is we need to make sure that all the polygons are facing outward because in the game engine, the back of a polygon is going to be transparent is going to be invisible. So we don't want to be able to see through any of the objects here. And one thing we can uses this little menu over here. Let me tab into edit mode here, and I'm gonna pull this menu down right here. This view port overlays and way down here at the bottom is normals. And what I want to do is I want a view, the normals of the polygons of the faces. So I'm gonna click this button right here and look what happens. It looks like it's growing hair. But what this is is a visual display of all the normals of every object or of every face within this object. And a normal is just a ah perpendicular line coming out of the front of the polygon. Right? So let me actually make these a little bit smaller. So instead of point one, let's maybe make it 10.5 Let's try that. Okay, so you can see here that we've got a normal here coming out of this face, a normal coming out of this face, and that's what we want. We want to be ableto have these coming out of the object and not going in if they're going in. That means we're seeing the back of the polygon on the outside and we don't want to do that . So if we let's take a look at this over here, well, it's kind of hard to see this kind of a mess here. Let's, um, make thes a little bit smaller. Let's take these down 2.1 and let's take a look. Yeah, take a look at the Ah spring here. You can see that all of our polygons here, let me, uh, select this whole thing. Zoom in. And I'll also press shift age to hide it to hide the rest of the vehicle here. And then let's hide the spare tires and the machine gun. OK, so we just have this now and you can see that the normals are going inside. They're going in. And if we hit all dizzy, we can't see the normals at all. They're just on the inside here. You right up here. So this is what we do not want What this means is that when we take this into unity, it's going to look like this. It's going to look see through, and we don't want that. So how do we fix this? Well, let's press all to age to bring everything back. And the way we can fix this is to re calculate all the normals. So they're on the outside of polygon. So let's select everything here with the A key and then go up here to mesh normals and re calculate on the outside. There we go. Now, if we come down here and look at this spring, you can see there on the outside. That's what we want. All right, let's take a look at the other parts here. I think the other parts are probably okay, but let's Ah, let's take a look when we hide the vehicle here tab into edit mode. Yeah, these look fine. They're all going out. I mean, we could go ahead and just select them all and hit normals, re calculate outside or shift in just as a matter of course. Here. We could just do that when he grabbed the ah tire low here tab into edit mode and here we go. We can see them here. Let's just hit shift in to re calculate the normals. Um, we should probably get that spare tire. Let's do that tab and edit mode shift in and there we go. All right, so we've got all of that taken care of. Let's bring the wheel, the vehicle and machine gun back. Oh, we didn't actually do the machine gun. Let's do that real quick, Uh, tab into edit mode. Select everything and I'll press shift in. And that looks pretty good. All right Now, another thing that occurs to me is not really a blender issue or a unity issue or even a substance painter issue. It's my computer issue, and my computer is a pretty good computer. But it's not the highest end. And when we go into substance painter and try and create a transparent glass material for these glass blocks from past experience, it's gonna bog the system down, and we won't be able to move around in the three D View port very well. Even if we save them to the very end, it'll slow us down trying to export textures. I've just seen this before, and I should have thought of it earlier. So what I would like to do is actually create the glass material in unity rather than in substance painter. And to do that in unity, I'm gonna need to split these out as their own object and give them their own material. So I'll have to have an extra material or so more than I had thought. But I think that will be for the best. I think, um, you and me and my computer will appreciate it. So let's, um, select the vehicle and tab into edit mode. Oh, weaken. Turn off the normal view here. I'll just click the button here again to turn those off. And then let's go to face mode all that Pielke and make sure seem is turned off. And then I'll just come through here and select all these Windows year and then let's split these out into their own object. I'll hit the peaky and separate them by selection. There we go. All right, So now if we select them again, here they are will call these, uh, we'll just call him glass. There we go. And in addition, they're gonna need their own material. So let's get rid of the vehicle material. Create a new one and we'll call this glass. Okay, so we have 1234 56 different materials. Which means we're gonna have six different texture sets in substance painter. And that's okay. That's not terrible. That's better than 400 right? So now we should begin thinking about exporting this out. We're going to export this whole thing out. All of this here as well as the tire high and the spare tire high. We're gonna export all of these out two and fbx file or to FB X Files. And that's how we're going to bring them into substance painter. All right, so let's just first of all, well, I'll just hit the a key here and select everything. And then let's go over to file and export. We'll choose Fbx. And here the only thing we really need to do is make sure that selected objects is checked . Otherwise, everything that's hidden will also come through. And we don't want that. We only wanted things that we've selected here. Let's go to our export folder here. I will give this a new name I'll just call this vehicle 01 And if I hit enter. It'll add Fbx to that and let's click Export. All right, now also, as I said, we need the, um tire. Hi, Polly Versions. Let's Ah, hide everything here and bring back say, the tire high here. We need to export this out because we're gonna use this with the low Polly tire to create a normal map in substance painter. So with this selected let's come over here to file an export, choose FB X. This is still selected over here. And let's give this a name. It's called this tire 01 and will export this. Okay, now let's come over here to the spare tire high. Here it is. Let's select that. And then let's once again go to file export Fbx. That's still selected. Let's call this spare tire No. One Fbx and export. All right, so I think we're now finally ready to begin the text oring process. So in the next section, what we'll do is we'll open up substance painter. We will bring these FB X Files in and we'll begin assigning are textures that's coming up next
106. 104 Importing Files into Substance Painter: all right. Here we are in substance painter, and, um, I think the first thing we need to do is bring in those FB X Files. So let's begin by coming up here to file and new. And then we need to choose select to browse to our FB X Files so I'll choose the vehicle. 01 fbx. Let's go ahead and work on the main vehicle right up front here. Let's click open now When I work in substance Painter, I usually just set all the document resolutions to 40 96 to 4 K, and that ensures that everything's at a good resolution here. While you're working and moving around in a three D view port here and then when you save your textures out, you can save them to any size that you may need for your particular game project. So if you need your textures to be a 10 24 or 2048 you can export them out at the very end as those specific resolutions. But while I work in here, I try and keep everything at 40 96. It just tends to look better, so I'll click OK, and here we go. So the navigation in substance painter is a little different than blender. If you've used it before, you know that it's just the altar key. You push the ault key and left mouse click to tumble all key middle mouse to pan and the Ault key, right mouse button to zoom. Or you can, of course, scroll the mouse wheel. So this is really the same navigation that you'd find in unity or Maya. So it's just a little different than blender. So periodically you may see me hitting the wrong key here when I'm tryingto tumble her pan . All right, so now that our vehicle is here in substance painter, you can see what we're talking about with the texture sets that each one of the materials that we created in blender now has come through as an individual texture set. And even though we haven't created any textures yet, let me just show you what I mean by if we export the textures, you get a collection of textures for each texture set. Now there are quite a few here will eventually change this to ah, unity, metal unity. Standard metallic here, and you can see that each one of these has three or four textures per texture set. And that's what I mean by trying to limit the number of materials in blender because you're gonna have a lot of textures to deal with if you don't. All right, so I'll go ahead and cancel this because we're not gonna be exporting textures for a while . But let's begin work on just the vehicle. First, I'll turn off all these other texture sets and just work with the vehicle. Now the first thing we have to do in substance painter is to bake are textures and substance. Painters will then use all of the baked textures to create the look of the material the the dirt or the ambient occlusion or whatever. It will use all of the texture maps to build that specific look for the texture that you're trying to create. So we need to bake all the textures first. So I've hidden everything here, but I want to show you a little quirk here with the ah with baking the texture maps. So, first of all, we we want to come over here to this texture set settings, and in this tab here. We've got bake mesh maps. So we want to open this up. Click here. And of course, I want to change my output size while we're working here in the substance painter to 40 96 . But here's what I wanna show you. Look at what it says. Bake glass mesh maps, but we've got the vehicle enabled. The problem is it depends on which of the texture sets you actually select over here. It doesn't matter which one you have enabled or visible. It only matters which one you select. And personally, I think that's a little, um clue gy. I think that needs to be fixed, but you need to be sure and select the proper texture set as well as making it visible. All right, so now that we've done that, let's click bake mesh maps. Change this to 40 96 and there really isn't anything else we need to do here except maybe turn on anti alias ing. This will help clean up some of the corners. Um, and the higher you get the cleaner, it'll be, however, the longer it will take, um, I'm gonna go ahead and go with this four by four. It's gonna take a while so I may have to pause the video here and then come back. But let's give it a try. I'll click bake vehicle mesh maps now because we have the vehicles selected over here. Let's click that. And here it goes. So it's first gonna create the normal maps, the vehicle and the world. Then it'll work on the color I d map the ambient occlusion in the curvature, position and thickness. I just want to show you what it does with the vehicle I d. You can see now it's building that color map that we created with the Vertex paint in Blender. So that's why we went through all the trouble. So that substance painter would have that vehicle I d would have that color i d map to use while we built our textures. All right, this is still going to take a while, so I'm gonna go ahead and pause the video and come back when it's done. All right? The maps have been baked. Let's go ahead and click. OK, And there we go. It doesn't look too much different than it did, but if we come over here to this texture Set tab and scroll down a bit. You can see all the maps here that's been created. Now, what let's do is begin building our textures in the layers panel. Here, let me move this down some. We don't need this initial layer. I'm gonna go ahead and click the trash can to delete that the way I usually work. It's I create groups here in the layers stack and each of those groups I assign a different color from the color i d map that we created. So initially, let's work on that main tan color. I'm gonna create a group here by clicking this at a folder will call this vehicle. And now we need to drag something into that group into that folder down here. Um, I'm gonna look for what I've got for metal here. I've got a coated metal. This actually might work pretty well. It's already fairly close to the color that we want. I'm gonna take this someone drag it in. Now let me also mention that this may not be a standard color. This may be one that I've downloaded from substance source, and in fact, it has a little icon here, which tells me that, Yeah, that's what I did. I downloaded this from substance source. So let's go ahead and open that up. Come over here to this button right here and click. And this is substance source where you can download all kinds of new materials for your projects. And it looks like I went ahead and searched for metal gear and then scrolled down and found that coated metal in here. However, look at this. We've got car paint, Metallic, Matt, Dusty. That may be what we want. I mean, this is kind of Ah, a desert vehicle. Let's click this and see what we can see here. Yeah, See, I kind of like that. That's not bad. Well, I'm gonna go ahead and click on the download button here, and let's go ahead and load it in and see what we can do with it. All right? I'll go back to substance Painter. It has it highlighted here. Let's go ahead and drag that in right into here, and it will think a minute and then apply it to everything. And that's not exactly what we want. We don't want it applied to our headlights and black plastic and things like that or the windows. So we're gonna need to split this up based on the color i d. Map. To do that, what we need to do is come back to the group here and right click it and then come up here and choose add mask with color selection. And if we click that now, we've got this color selection layer right in the middle there. And if I come over here to the properties panel that says color selection, we've gotta pick color here. And as soon as I click that we get our old color map that we created in Blender. Now I can choose it by a color. I can choose the red, the green, the pink, the blue. But let's choose green here. I'm just going to click on the green and there we go. So now it isolates it to just that part. Now, I'm not sure that this is gonna work. Let's ah, go to the actual material here and in the properties panel for the material. We've got quite a lot that we can do here. Let's scroll down and see what kind of properties we have. We've got dust intensity here. Got the color of the dust? No. So I think what we should do is work with the color here, The main color. So, first of all, what let's do is let's find a color for this main color. What I've got is a couple of images that I want to sample the colors off of. And they are right back here. I've just kind of put him right back here so you can see this paint color here. And what I want to do is just sample this sample a color off of this here, Right in here. I'm gonna go back to Substance Painter, come into this color of Swatch here and click. And then I've got an eyedropper here. And if I click and hold, I can come over here and you can see it change as I hover over colors in the photo. And I think maybe I might want Oh, I might want a color kind of like this, I think. Let me try this. I let go of the mouse and there we go. The dust here. Then maybe we could ah, reduce the dust intensity Some see what we get with that and move this down a little more. No, I don't think I like where this is going right now. I think we're gonna have to do ah lot of work to get it to be like this. So what I'm gonna do is just select this and I'm going to delete it, and I'm gonna try that other one that we looked at. Let me click the trash can. Here. Let's, um, come back down here, type in metal, and I'm gonna try this coated metal now gonna drag it right onto the group here and drop it . And now it's being affected by that color selection layer. So we're getting it only on the body of the vehicle here. So now for the color, let's once again open this color swatch, click on the eyedropper and come over here and let's find a color like this. Let's do that. And then let's work on the parameters for this. What do we have here? Well, we've got the scale right here. Let's bring up this UV scale and make that a little bit smaller. Here. Let's maybe take it up to Ah, let's try eight. That's pretty small. OK, and then let's scroll down and we could reduce the flake intensity. Let's try that. Let's bring that down some. Yeah, so it just gives it a little bit of texture in there. Yeah, I think that's pretty good. I was just afraid that we'd have to work too hard to get to this point on that other material. Maybe I'll even, ah, bring the value down in the color just a little bit. Maybe something like that. All right, well, I think that's looking pretty good so far. That's a good beginning. In the next video, what let's do is let's use a generator to create some dirt and dust around the corners and in the nooks and the crannies of the vehicle.
107. 105 Beginning the Textures for the Vehicle: Okay, well, now let's add a little bit of dirt here to this. Not a lot. Just a little bit. I don't want it to look like it's been through the mud or anything. Just a bit of dirt in the nooks and crannies. So what let's do first is we need to create a mask. We need to create a black mask hero. Just right. Click and choose. Add Black Mask dear. Then what let's do is right. Click on this black mask and we want to add a generator to that mask. So let's click here and now we can choose what kind of generator we want by click Here you can see a few different kinds. We've got dripping rust here. We've got ah, metal edge, but I think what I want is this dirt generator right here. We can adjust the amount of dirt that it's giving us, but I think this is what we want to add a little bit in the crevices and edges here. So let's click that, and there we go. So now you can see it's adding the dirt in the edges, and we can adjust that, but what it's done is it's done it a little bit backwards from what I want. I want the tan color to be the main one here. So let's just come over here and click Invert right here. So we turn that on and now that inverts it's so that the dirt is in the edges. Here, Um, let's go ahead and reduce the dirt level just a bit. Maybe something like this and we could increase the dirt contrast a bit if we wanted. But what we really need to do is give that dirt some color currently is just a white that showing through there. So what let's do is let's create a new fill their right here. It's just click here and dragged this over here. I'm gonna drop it right on that dirt layer there. And then let's give it a color Here in the base color, I'm gonna click. You're just to open up those images again and I've got Here we go. This image here has got some dirt on it. So what I want to do is click on the color swatch, click and hold on. The I drop or not is going to come down here and find, I don't know, color about like this. Yeah, There we go. Now we've got a color to the dirt, and we can adjust the value of it. We can adjust the amount of dirt here in the dirt layer. So we could maybe, um, come down here. We could say, Ah, bring up the grunge amount would see what happens there. Yes. So we add a little bit of dirt there. We could then maybe bring it down a bit in the jerk level. So maybe like this, we could increase the contrast again so you can just go through and kind of play with the settings here to get the look that you're after. I think, uh, this isn't too bad, although maybe I've taken the grunge amount up just a little bit too much. Let me bring that down a bit. Something like this. And then maybe take that dirt level up just a little bit like that. Eso and we can adjust this as we go. But generally speaking, that's kind of what I'm looking for. Now, over here, we can't really see it very well because the light in the scene is pointing at the other side. So what we can do is we compress Thea shift button and then right click and drag, and we can change the lighting here in the scene so we can kind of rotate the light around so we can see the other side. Okay, well, let's add another material. How about the grill appear on the front? Let's do that. I'll press shift and right click and move the light around here and then let me close up that group. So it's all in there. Let's create a new group. I'll click here and we'll just call this grill and we go. Now. We need to go find a material for this. I think what I'll do is go over to, ah, substance source and let's Ah, go to the search field and just type in grill and see what we have here. Well, we got some good wins here. How about, um, well, let's take a look at a reference image to see what we should do with this. We've got plenty of different choices. We could maybe try this. That's kind of nice. Let's go see what we have in the reference images I opened this up here. Let's take a look at this. Oh, yeah, This one's more of, Ah, triangular kind of thing. Let's Ah, yeah, look at that. So let's see if we can find something like this. Ah, well, that looks pretty good. There. This looks more of a black grill. We could do either. Ah, stainless steel or metal grille. Let's do this. It looks like I've downloaded this before, But let's go and do it again, just in case. So these are the different options we have? Yeah, I think this will work. Let's do this. I'll click download, and we should have it now. Here, Right here. Okay. So let's go ahead and drag this into our grill group here. And it, of course, covers the entire vehicle. We We don't want that. Let's select the group and let's isolate it to that color I D. That we chose for the grill. All right, click choose add mask with color selection. Let's click. Pick a color click there and there we go. So I think we're gonna need to do some work on this to get the right size. It looks way too big here. Let's select that material in the group in that folder and in the properties tablets. Ah, let's work on the scale first, let's try and bring this down. Well, I should say Take the scale up, which reduces the size quite a bit. Let's try this. Maybe I'll just type in. Ah, 65. Let's try that. Now it's going the wrong way, right? If we go back to here, it looks like it's more horizontal. So let's change the rotation here. We can click and drag here and turn it, but let's just type in 90 degrees and we go. Okay, that's good. It looks like it's a little too big. Still, let's maybe type in 70 to do that. Now let's see if we can work with the color here by scroll down. What happens if I increase the roughness here? Does that do any good now? It really kind of goes the opposite way that I want. What about if we scroll up to here? Here we go. This parameters the preset. Let's see what we have in here. If we pull that down. Oh, here we go. We've got a black painted grille, silver painted chromed. Let's try the Ah, Black painted. Let's try that. Oh, yeah, That's looking a little bit better. That's about what we have, isn't it? Yeah. We could increase the roughness here and see what we get with this. Let's do that. Let's try this. Yeah, I think that's pretty good. Yeah, let's go with that. I like that. All right. Ah, what else can we do here? What about, um Well, how about the lights on top? At least Thea Black plastic parts. Let's take a look at those. What kind of material can we find for that? Let's go back out to substance source and let's type in plastic. So we've got grain. Plastic, plastic. We've We've got quite a lot of choices here. What about, Ah, plastic sand green, thin or medium? I kind of like the thin Let's take a look at this. Um, if we scroll through these Yeah, I think that might be a good choice. Let's try this. I'm gonna click. Download. There it is. Right here. I'll go back to Substance Painter. Now that we have it here, let's go ahead and create a group. Ah, let's click year to create a folder. We'll call this plastic lights and we go and then I'll take this and drag it into that folder. It's going to apply it to everything. Oh, and look at the height. Look at the ah, the displacement that it brought in. I'm not a fan of that. So maybe we could turn off the normal map. Let's try that. Yeah, that cleans it up quite a bit. All right, so now that we've got that, let's isolate it to those lights. Let's select the group and right click. Choose add mask with color selection. We'll choose pick, color, and let's select one of the lights right here. There we go. What do you think? Yeah, that's not that. I'd kind of like him to be a little bit, um, shining Here, let me press shift and right click here. Yeah, I'd kind of like them to be a little bit shy near. Let's, um, select that material. Come down here into the property's and let's scroll down to the roughness here. And I'm just gonna bring that back. Some like this reduce the roughness just a little bit. So we get a little bit more of Ah, a shine on it now. that. That may be too much. Let's see. Well, it's not bad. Maybe I'll bring it back up just a little bit. Yeah. There we go. Yeah, those look pretty good. I think so. That is our process. We're going to just create groups that will allow us to isolate the material to a particular color on the color i d map. And then we can go through and make specific adjustments to the materials as we go. So in the next video will continue adding the materials.
108. 106 Texturing the Handles, Fenders, and Windows: All right. Well, moving on. What else should we deal with here, let me shift right, mouse button and drag to rotate the lights a bit. And as I do, actually, I'm noticing. Look at here. We've got this spring right here, this shock absorber, and it's much darker than all of the others. So we take a look at these two right here. You can see that this one's kind of that tan color, and this one's got a lot of dirt on it. And in addition, we come back over here. We can see that. Ah, these are the light color as well. So what's happening here? Where? Why is that happening? Well, it's a function of these texture sets once again, so recall that when we first baked, even though the vehicle was the only thing visible, we had another texture set selected, and it wanted to do the bake for that texture set in a similar way. Even though we have the vehicle selected here and it's the only thing visible, it's still baking the textures as if these things are visible in the view port. It bakes the textures across all the texture sets, so it's assuming that these things are still here. And that's why we've got that Ambien inclusion in here. And that's why we've got the dirt being put in there as well. So how do we make all of these shock absorbers look the same? We're doing this in kind of a strange way, bringing in one wheel here, and it's making this area look a little different. So how do we adjust that? How do we fix that? Well, it's in the texture big process that this happens. So what let's do is let's go back over here to the texture sets settings. Click on the bake mesh maps here and in here if we go down to ambient occlusion. We've been in this common parameters area here, but if we click on ambient occlusion, weaken, go down to the settings that just deal with the ambient occlusion. And down here we've got this self occlusion, and currently it's set toe always, and that looks across all texture sets when baking the ambient occlusion. Now we can pull this down and choose only same mesh name, and what that will do is when we select the vehicle it's on. Lee going to bake the textures for that vehicle. Or I should say it's only going to bake the ambient occlusion for that vehicle. Other textures will still bake across the texture sets, but Ambien inclusion will stick with just the one we've selected. So let's try that again and see how that works. I'll click bake vehicle mesh maps and there it goes. Now, what I also wanted to show you here is that even though we've got some materials and textures in here in our layer stack already, it's going to go ahead and redo all of the bakes and then reapply all of our textures to that. So re baking isn't going to hurt your textures that you've already put on here. All right, I'm gonna go ahead and pause, and I'll come back when this is all done. All right. The bake is done. Let's go ahead and click, OK, and there we go. Now we can see these. Ah, shock absorbers are pretty much the same color all the way around, and that's what we want. Yes, so you can adjust for the well what I would call kind of quirkiness of the texture sets when you do the baking. But anyway, what can we work on here? Well, we could work on these things right in here. Let's take a look at these. Um, I think if I recall, these are kind of a black rubber plastic type of material. Let's work on that. If I create a new group here, a new folder and we'll call this door handles. Let's see if we can find a black rubber in here. Let me type in rubber. We've got plastic skin grain. We've got, um, rubber vulcanized raw. That looks pretty good, actually, that that might work. Let's drag that in, and it's going to apply it to the entire thing. So we don't want that. Let's right. Click on the folder on the group will choose add mask with color selection. Go back to our properties to have here. She was picked color. And let's grab that yellow right there. There we go. Well, that looks pretty good, right? As is. I might just leave that like that. That looks pretty good. Let me ah, go around the other side here. Yeah, I kind of like that. All right, Well, what about these things back here. The rear fenders. Those were kind of a black rubber as well. Can we just use the same ones? Oh, I move this out of the ah folder here. So let me take away that color selection again. And I'm also going to remove the mask here, and then I'm gonna take this and move it into this boulder here. OK? So now what I want to do is be sure and do the color selection to the folder and not the material. So All right, click once again, add color selection, pick color. We'll grab that handle again. There we go. So this is the way we want it. We want it within that group. Okay, so let's select that group. And let's add another one right here. We'll call this, um, rear fenders, and let's add this same material, but let's ah, change it just a bit once we do. So I'm gonna try and get it right in that group. There again. There we go. And then select this group and right click. Add mask with color selection, pick color and will grab that blue there. Okay, so we have that same material on there, but Let's try and adjust it a little differently, so I'll select the material itself right here. And then let's, um, come down here and let's take a look at what kind of parameters what kind of settings we can play with here. We've got a judge. I wonder what age would do. Let's give this a trial. Bring this up Some. Not a lot. It really doesn't do a whole lot for us. We can reduce the roughness. That makes it a little bit shiny. Er, we can increase the roughness. That makes it a little bit dolar. And there we go. We're beginning to see some of that age there. Yeah, that looks pretty good. We also have these presets. We could take a look at these clean blue, rubber grey, rubber brown. Yeah, I think I think I like it the way we have it here. All right, let's take a look at something else. How about the windows here? These windows remember, we want to be kind of a dark, shiny color, so you can't see into them as opposed up here, where we're gonna create the material in unity so we can see through them. But for these. I think I'm gonna begin with a plastic Ah, let's type in plastic here and we've got this plastic glossy. Let's let's see if this will work. It's It's a strange blue color, but we can change that. Let's select this folder and I'll add a new folder on top. We'll call this, um, Windows, and we'll take this plastic gloss and drop it on that group. Well, then add a color selection mask to that choose pick color, and we'll click on the red right here. OK, so now we've got this. That's not quite what we want, is it? So let's ah, select the plastic material here. Click on the base color. I think I wanted it. Kind of, Ah, pretty dark blue. I kind of feel like maybe we need to sample that color just to get it a little bit better. That's here. That's not bad. Let me let me do that. That's kind of what I was looking for. Their Yeah. Okay, yes. So we've got a bit of a shine to it, and that's good. We could add a little bit of dirt to that. We could come over here and click on the material right click and add a black mask again. And then we could right click on the black mask and choose add generator. And then we could add just a fill their in here and add a color again. In fact, we could even grab that color from the vehicle. Let's take a look here. If we come down here to this fill their here that we used for the dirt we could right click copy the layer, and then we could go back up to the Windows Group. Select that Ah, glossy plastic glossy and we could paste here. We may have to move this around a bit. Let's drag it down here and with his generator, we need to select that and add a type of generator. So let's click on that. Choose the dirt, and then we want toe. Invert our selection here or invert the way this is happening. We want the window to be the main thing and the dirt to be the secondary thing so we can come over here to invert and turn that on. And there we go. Now we've got our windows with a bit of dirt on them. That's pretty good. I think that's maybe a little bit too much dirt, at least for me. I'm gonna bring this down a bit. There we go. Something like that. Just a little bit of dirt is all I really want. All right, That's pretty good. I feel like they're a little bit too shiny. So what we can do is go back to that original material right here and we can bring up the roughness. So if we click here and dragged that up, that'll make it so it's not quite as shiny. I bring that up some and then hold the shift key and right, click and drag. We can move that light around to see a little bit better. Yeah. So there we go. Got our dirty windows on there. All right, we're moving along. So in the next video will go ahead and work on maybe some of the lights here
109. 107 Texturing the Lights and Mirrors: well, the texture, the lights. Here, let's go back to substance source and see what we confined for these. I've got some reference images over here. I'm just going to click here so we can see them behind. And I don't really know that we can find anything exactly like these, but I think we can get close. Let's give it a try. I'm gonna open that back up and let's click substance source here and let's type in Headlight headlight. Well, here we go. So if we scroll down here, what do we have? What? We've got some nice orange reflector materials here, So let's go ahead and grab one of these. Let's get this. I'll just download this and there it goes, Um and then maybe let's use this for both the headlights and the cab light, so download that as well. All right, so let's go back to a substance painter and let's create a new folder here on the top will just click here to create a new folder. Let's create Ah, that reflector there. So let's type in reflector and I'll go ahead and right. Click and choose. Add mask with color selection. Let's I click on the pick color and let's just grab that color right there on the reflector . There we go. All right, let's zoom in a bit here. So let's grab that reflector. I think it's it looks like I have to hear, so let's just grab this one. I'll click and drag and drop it right here. And there we go. So now we've got that It it doesn't have the pattern on it. And I think that we can adjust that here in the settings. We probably want to increase our scale. It's drag and drag the scale up. Well, that doesn't really do much for us. So if we scroll all the way down, let's see what else we have. Well, we've got this MDL. I bet you that's it. Let's grab this in here and drag that up and see what? Yes, so we increase this here, this normal setting here, we can see our texture a little bit better. Let's increase that. We can also increase or decrease the tile. That kind of shrinks it a bit, but I feel like we need to turn it. I feel like it's ah, 90 degrees in the wrong direction here. Let's go back up to the rotation, and maybe I'll just type in 90 here and let's see how that works. Well, that's pretty good. But I think I've still need to go back and do a little bit of adjustment down here. Maybe let's reduce the tile some and let's see what we can get with the normal. Yeah, that's not bad. Well, maybe I'll bring that tile back up just a bit. Yeah, I think that will work pretty well. I think maybe we should make it so it isn't quite so glossy there. So maybe we come back up here and increase the roughness a bit and then maybe increased the roughness variation. Let's try that. So it looks a little bit like there's dirt or something on there, and we can do that, so that looks pretty good. It's a very small part of the whole vehicle, but I think that will work pretty well. Let me press shift, right mouse button and kind of move the light around. And if we do that, yeah, that looks pretty good. All right, so let's go with that. For those for the headlight, let's create a new group right here. Let's call it headlight. There we go. And then, um, once again, right click, add mask with color selection, pick a color and will grab the headlight color there. Now, I think we wanted Well, that's kind of cool, but no, I think we wanted this one. This is the one I think I just downloaded. So let me grab this and drop this on here. And once again, we can't really see the ah texture. So let's scroll down here in the properties and this MDL section again should help us with that. Um, it's it's not helping because we need to increase the scale on the UV. So let's come back up. Increase the scale in the U visa. Yeah, there we go. Now we're seeing that a little bit better. Let's bring this up to maybe 20. Let's try this. Looks like we need to turn it, slide the rotational a little bit. I personally just kind of wanted straight up and down like that. And then let's go back down to that MDL. And let's play with this a bit. So if we increase the tiling No, I feel like I want to decrease the tiling. Yeah, that There we go. OK, and let's increase the normal just a bit. Yeah, something like that. I think that's fine. Um, let's also once again play with the roughness. Maybe let's increase that roughness variation. Let's try that. Maybe a little bit more. Yeah, something like that. And then I'll increase the roughness just a bit. So yeah, we can kind of see that it's there's some smudges or something on there. All right, so we got the headlight there. Let's kind of do the same thing with this cab light up here. We'll move the light around so we can see it a little bit better than we go. And let's create a new group. But call this cab light and once again, right click, add a mask with color selection and select that color. And then let's drag this on to that group, and we've got a similar thing going on. So we need to increase the scale. What? We have it. 20. Maybe. And then we go down to MDL down here and increase the normal. Yeah, you can begin to see that there. Okay, so we've got that. That actually looks pretty good just right there. Let me increase that just a bit. All right? And then what let's do is, um I want to increase the roughness variation a bit. Yeah. So we have some kind of smudges on there. All right, So do we get all the others? Yep. Looks like there they're Okay. All right. So we've got the headlights, the reflectors, the cab lights. Um, now, let's come up. And, ah, work on those rear view mirrors that it occurs to me that we could use the beginning of this without the MDL settings as a rear view mirror. Here, let me rotate the light around so we can see it a little bit better with shift right mouse button. And once again, let's create a group will call this rear view mirror, and I'll add a mask with color selection again. Picked that color. We've got an orange there will pick that. And let's drag this onto that group once again. And there we go. I mean that maybe just fine. That may be all we need. Let's ah, scroll down to that MDL or know that not the MDL the ah parameters here and Let's just increase the roughness variation here. And there we go. So now it's more of Ah, mirror, but it's got some smudges on it. Yeah, that's kind of what I want. Like that. There we go. Okay, So we've got our headlights and the reflector and the cabin lights and the rear view mirrors. What do we need to do next? Well, I think maybe we should do the's back here. The mud flaps, the wheel and this strap. Let's see if we can find a material for that strap. Ah, if I click on substance source and what do we search for for that? I mean, if I type in strap Well, there isn't anything with that keyword. Okay. How about, um Well, I think it's a canvas type of thing. Yeah. Here we go. Um, what about this? Or even a pattern like this? Maybe have at this kind of like this, actually, we might be able to make this Ah, military green tan kind of thing. Let's try this. Let's download that. And there it is. There. Okay. So what let's do is Oh, well, let me talk about this real quick. Look what I just did. I clicked on it while this was selected, and what it did is it replaced our mirror with that canvas. So you do need to be careful. You can add things to selected materials or groups by just clicking over here if it's selected, and that's what I did. So watch out for that. I want to press control Z. When There we go. Now we have our rear view mirrors back. All right, so for this strap, let's come over here and take a look at this. We want to put this on this strap here. So what Let's do is once again select, this top group will add a group. On top of that, we'll call this tire strap, will, right click, add mask with color selection and will pick that color there for the strap. Let's now grab this and drag it right on top of that group. And OK, we've got some work to do here. Let's first of all, increase the scale so we get it to look a little bit more like canvas. So looks like I'll just type in 50 here. I mean, ah delete thes type in 50. So there we go. We've got that now. I'd like to change the color a bit, but come over here and I want this to be more of a green. So let me pull it into the green just a bit. Drag the value down so it's a little bit darker. May be dragged the saturation down some. So just trying to find, ah, military type color. And if we scroll down, is there anything else that we can play with that would make it a little bit better? I kind of want to change the color year. So what I'd like to do is click on here, click and hold on the color picker and then pick this color right here. There we go. So I've got it a little bit closer to the color under underneath. So let me just drag this down just a little bit. So it's still it's a little bit darker, but it's still that similar color. All right, I think that's about what I want. It might be and might bring it down just a little bit darker for this color here. Yes, something like that. There we go. All right. Well, I think we're doing pretty well, let's some in the next video. We'll work on the mud flaps, the wheels, and we'll also take a look at, Ah, the wheel over here and maybe begin working on the gun, so that's coming up next.
110. 108 Finishing the Textures of the Vehicle: All right, We've got a couple of pieces back here We should probably take care of. We need to deal with the mud flaps. The spare tire wheel. Oh, in this piece right up here on the antenna type thing and then also right down in here. We need to deal with this handle. Let's go ahead and deal with this while we're here. Once again, let's go ahead and create a group. I'll call this Ah, toolbox handle. And, um, I have, ah, metal in here somewhere. I think it's type of metal and something like this. What is this? Steel Rust and wear? Yeah. OK, let's Let's try that. I'll drag that on to that group. It applied it to every thing cause I haven't isolated it by color yet, so let's right, click color selection, pick color, and we'll grab that color right there. Here we go. Is it a little too dark? Let's scroll down and see what we can do with the metal color. Maybe we'd bring it up just a bit. Yeah, something like that. Um does the scale help here at all? Does it give us a little more texture if we bring that scale up a little bit? Not really. And that's fine. Once again, it's a very small piece. I think that will work pretty well. Okay, um, how about this wheel? I have some reference images that we can use to maybe sample the color off of this. Let's take a look. I'm just gonna click here to view these behind here, but let's go ahead and create a new group here. We'll call this spare tire wheel. All right. Click color selection. Pick a color. And let's grab this one here. Now. What kind of I mean, it's ah, metal. Should we do this kind of steel rust here, or should we do well? No, that's iron chain mail. We don't need that. Um, we've got steel painted. I don't think that's quite it. Maybe we do use this steel, rust and wear, and then we increase the roughness on it. Let's try that. So this is our groups. Let's drag it into that group. I'll increase the scale of bid. There we go. Yeah, that looks pretty good. And then let's reduce the shiny nous on it. Let's come down here. And in this material, the roughness is here, So let's just drag this up like this, something like that. So it isn't quite so shiny, and we could play with these, but I think the dirt's and rusts level is pretty good for me right there. I think that works. Okay, let's take a look at the mud flaps. I think these would probably be a rubber. So let's, um, open this back up and let's create a new group for this. Let's call this mud flaps and isolated to that color. And then let's take a look for a rubber here and let's see what this is. Rubber vulcanized raw. I'm gonna click and drag and drag that right onto that group. And then from here. What let's do Let me move the light a little bit like that. Let's add some dirt to this, the way we did before, because if there is going to be any dirt, it's gonna be on the mud flaps. So let's right. Click and add a black mask. And then on that black mask, let's right click again and choose a generator and we'll add a generator and choose dirt. There we go will invert it. Here we are Let's turn the invert on. Yep, there we go. And then let's go get that dirt color that we had originally for the vehicle. Let's go all the way down here. What's open up vehicle again? And let's just take this and right click and copy that layer. Let's bring it all the way back up here and go back into the mud flaps and let's go ahead and right. Click and paste. Well, here we go. Let's bring it down into here right in the year. There we go. So now it's being influenced by that dirt generator. All right. A little too much, I think. Let's select the dirt generator and bring the dirt level down a bit. Something like that. Let's tumble around here. What do you think about in here? Let's shift in right Click and move the light around like that. Let's bring that dirt level up just a little bit more. Yeah, something like that. What else do we need to do here? Oh, this piece right up here. We auto add something to this, and this looks like once again kind of Ah, black metal. Maybe so. Let's create a group right up here, we'll call this antenna and, ah, let's isolated by color. You got that right there. And let's go back to that steel that we had before this thing. Or do we want a plastic? Maybe it's kind of plastic. No, we don't want that diamond texture on it. Maybe it's a plastic. Let's try this. Let's Ah, let's type in plastic and see what we have here. Well, that doesn't look too bad. Let's try this plastic grainy. I'm gonna click and drag and drop that right there, and it looks a little strange. It looks like we may need to increase the scale here. Let's try that. Let's go back after the top here and increase the scale, and that's a little too bumpy for my taste right there. So what we can do is turn off the normal map. That's what's giving it its displacement. So let's turn that off and there we go. That doesn't look too bad. Yeah, let's go with that. All right. I think we're about done here. The dirt on the mudflaps seems a little too much compared to everything else. Let me come back to our Mudflaps here and open that up and the dirt generator here, Let's reduce the dirt level some about like that and reduced the dirt contrast. So we've got a little bit there, but not a not a lot. Not a tremendous amount here. I don't want a whole lot there. All right. It looks like we're pretty well done with the main body of the vehicle. I think the next thing we should do is come up here and work on the machine guns. So let's go ahead and bring that back right here. There it is. And let's hide the vehicle right here. So now we can just focus on this. And once again, even though we have the gun visible and the vehicle hidden, we're still seeing all the textures for the vehicle because we have that texture sets selected. So let's select the gun. And here we go. So now we've got this one layer here. I'm gonna go ahead and delete that. So what let's do is in the next video, let's bring up the reference images for the gun and will begin adding our textures to this
111. 109 Beginning to Texture the Gun: well, the first thing we need to do before we begin the machine gun is to actually bake the textures. If we come over here to the texture sets settings, we can see that the textures haven't been baked yet. So let's go ahead and click on bake mesh maps. And just like we did before with the vehicle, let's go ahead and go into the ambient occlusion and let's turn on this only same mesh name under self occlusion. And that should be the only thing we really need here. So we can click on this bake gun mesh maps and make sure, of course, that that gun texture set is selected. So we'll click here and we'll wait. So I'll pause the video and come back when it's all done. All right. It looks like the bake is all done. Let's go ahead and click, OK, and here we go. I've got a couple of reference images here behind substance Painter, and I think we can get some good colors off of this and this main color here. I think we could use this, so let's go ahead and create a group for that main color. Let me go back to my properties here and pull this down and let's go ahead and create a group. And let's just call this gun main. And if we right click and choose add mask with color selection. We can pick our color here, and I'll just click this brown for the main part of the gun here. And what we need is a metal, I think. Let's see what we have here by search for metal. We've got this steel rust and where here we use that on the wheel, didn't we? But what about this steel painted? Let's try this. This looks like it may get us pretty close. That's drop that on the group, and we need to change the color. So let's go down to our color Swatch here and click here. Click and hold on the eyedropper and let's move over here and see what kind of colors we confined in here. That seems to be a little bit too light. Maybe if I move the eyedropper to here. Not bad. How about maybe if I move it to here? Yeah, that to me looks pretty good. Let's try that and then maybe let's work on this scale. I feel like we could maybe increase the scale a little bit here, although it looks pretty good when you press shift and right click and drag to move the light around. Yeah, that really doesn't look too bad. But if we go up here and we increase the scale and that may be a little bit too much, yeah, let's let's keep it, um, about 1.5. Let's just type in 1.5 and see how that works. Yeah, that's that's pretty good, I think. All right. Um, what about this post here? Let's work on that. Let me come around here so we can see it a little bit better and I'll shift and right click and move the light. Here we go like that. Now let's create a new group. I'll click this one, create a new group on on top of it, let's call this gun support and let's right click and choose color selection. And let's pick this color here. Now let's think about what material we should use for this. I feel like this is somehow a little bit different, and maybe, well, maybe let's try this painted metal here feel like there's a little bit more wear and tear on this. So if we use this painted metal, let's try this. I'll click and drag and drop it on the gun support folder. All right, that gives us that. I kind of like what's happening there. We've got a bit of wear and rust built in here. I don't know if we need that much rust, but I like what else is happening here. Um, let's go ahead and deal with the color. Let's come down here to the paint color. Let's click this and click and hold on the eyedropper and let's move that over this color in the image right here. That's not quite right. How about if we move it over here, Okay. And there were getting a little bit better. That actually looks pretty good. I feel like, um, we could maybe bring it down a little bit darker. Let's click on here and bring that value down just a little bit. Yeah, that's pretty good. So now let's maybe reduced the amount of rust that we have here. I don't think I want that much. I'm gonna click the rust amount and drag it down a bit. There we go. So it's really just more wear and tear rather than rust. So I think that's good. Pretty good. Let's, um, also increase the paint coverage. I want to cover up some of this. Let's ah, grabbed the paint coverage and move it up just a little bit. See if that helps us. Yeah, I think that's a little bit better. And then how about paint cracks? Was drag this up quite a bit and see if that does anything for us. That does. But I'm not liking how big they are. Let's go back up to the scale and let's drag the scale up just a little bit and all right, something like this. And then I'm gonna reduce the paint cracks back down just a little bit like this. That may be a little bit too much wear and tear, so I'm gonna take the paint coverage back up a hair. And if you're not exactly pleased with the way things are arranged on the object, you can always come over here to this seed and click on random, and it'll just randomized the placement of all the of all the attributes. So If we click this, you can see we get a different layout of the attributes. And now that we've done that, I'm gonna bring those paint cracks down just a little bit more. It seems to be a little too much. All right. I'm good with that. Okay, What else do we have here that we could work on? How about this bracket here? Shift right. Click. Move that around. Um, how about this? So let's, um, create a group for it while collapsed. These groups create a new folder. Let's call this. Let's just call it bracket. Can we go? And, um, for this, it looks like it's kind of a darker material than the post. Let's go ahead and select it with the color selection here. We'll pick that color, and it almost looks like we could maybe use that steel rust here and make it a little bit lighter. Let's try that. I'll grab that and drop it here. And then let's come down here and make this a little bit lighter like this and see if that can work for us. Let's ah, increase the scale here, see if we get any change with that. Not much. I would like to come down here and see if there's any Ah, surface imperfections, dirt intensities. Things like that weaken give just a little bit of, ah, interest to it. So it isn't quite all the same. Okay, that looks pretty cool. How about a little bit of rust? Here is Well, let's dragged that up. Yes, so that gives us just a little bit mawr interest in there. A little bit more things happening in the material. Okay, um, how about Well, how about the ammo box? Let's take a look at that. Once again, I'll create a new group. Let's call this ammo box and, ah, let's add a mask with color selection. Let's pick that color. We got that purple right there. Let's select that. And for the AM a box. I think that's gonna be the ah, let's try. Well, we could do that Steel painted. Let's try that. Let's let's drag this over and drop that there. And then let's change our color. We'll click and hold on the eyedropper and come over here and select that. There we go. And then, um, maybe I'd like to drag it down just a little bit in the value just to make it a little bit darker. Like this? Yeah, I think something like that would be okay. Do we want to bring up that scale, See if there's any. Yeah, something like that. Maybe. So there's a little bit of variation in there, and then, um, is there anything else we could do to play with this? Well, we've got a rest parameter here, so let's drag that up and see what happens. Just a little bit. Yeah. Okay. I know we're not seeing it on there, but I kind of like having a little bit of something here. Maybe bring it down just a bit. Yeah, I kind of like having something there. I'm gonna hit random just to see if I could move the rest around. Yeah, I like that. Okay. All right. That's looking pretty good. So in the next video, what let's do is let's continue working on this getting the, um, ammo box support peace here as well as this brace. And those would handles back here. So that's coming up next
112. 110 Finishing the Gun Textures: Well, let's continue working on the gun by seeing what we can do with this ammo box brace. Here, let me bring back the reference images here, and it looks like the ammo box braces Pretty banged up. I don't know if I'm gonna get it just like this. I think I want to maybe add a bit of rust. Aziz. Well, so let's see what we can do with it. Um, I'll select this group and add a new group. Let's call this, um, ammo box brace and let's right click add mask with color selection. Pick a color and will select that blue now, since it's got quite a bit of damage on, and I think I'll use that painted metal cause it has quite a few settings in there for different kinds of wear and tear. So there's that. It's not, um, of course, the right color that we want. Let's go ahead and click on the eyedropper and drag over here and let's see if we can find a color that's at least close. Okay, that's pretty good. Let's not drag down the value and maybe bring that down just a bit, okay? Yeah, I think that's gonna work now for the wear and tear on it. Let's, um, try and increase the scale. And maybe that'll kind of distribute the effect across the object a little more. Let's click here and drag. Yes. So you can see it kind of dispersing it across the object. And that's that's kind of not bad. That's kind of what I wanted. Let's see if there's anything more we can do here. What if we ah, let me see what this large dense does? I haven't played with this. Let's increase this some and see what happens. Well, not a lot. Oh, I can see. You can see there's kind of this dent happening here as you move the light around. Yeah, you can kind of see that here. I kind of like that, actually. Okay. I'll go with that. Um, it's amazing what you can find in here sometimes. How about the ah dust amount? Let's increase that. See what that gives us. We can also increase the grunge. Oh, yeah. The desk gave us a little bit Mawr there. How about grunge? If we increase that, what does that do? A little bit? Not a lot. I think that's probably pretty good. I think I don't wanna I don't know that. I wanna beat it up too much more there. All right, let's Let's go with that. I think I kind of like that. Um oh, these little bolts right in here. I forgot about thes. What if we, um well, let's take a look over here. Yeah, it's just a steel kind of, Ah, silver steel thing. What if we used, um, steel rough? Let's try that. I'll just create a whole new group here for this, and we'll just call these bolts. And, um, let's select that color right there. And I'm just gonna take this steel rough and drag it onto that group. There we go. Let's, um, increase the scale, See if it does anything there. Yes. So we get just a little bit of interest there. That's all we need. Maybe will increase the roughness so it isn't quite so shiny. Let's try that. Yeah, there we go. OK, that should be fine. Um, what about that handle? It kind of seems like it's a similar thing. Toe well, to the bracket, maybe. Or it's really hard to know exactly what this is. Maybe frankly, I don't need a different material for this. Maybe what I should do is just, um, create a new group here will call this ammo box handle and let's go ahead and select that color. I went ahead and added a different vertex color at the time because I thought maybe I wanted a different color to that. But if we scroll down, I might just want to grab um this right here, this steel painted copy it and put it up into here. Let's do that and paste Oh, it went above that group, so it applied to everything. Let's drag it back down into here. There we go. So it's just the same thing for the handle, that's all. I don't think I need anything else for that. I got a little ambitious applying the Vertex groups. I think for this here the ah brace that connects to that front panel. What we really need is just the same material as the vehicle and weaken do just the same thing we did here. We could just copy that whole thing and bring it in here because let me ah, pull this menu down If we scroll down and choose I d Under the mesh maps, we can see our colors here. And if I copy that main vehicle group from the other texture set and paste it into here, it'll then find this green color sent us this same as the vehicle and it'll apply it to this here. So let's try that. I'm gonna go back up to the material here, and then let's go over to the vehicle. Now. I don't even have to unhygienic here. I can just select the vehicle and then let's scroll down and find that ah vehicle group right here. Now we can just right click copy layers. And now let's go back to the gun. I'll select Ah, the top group here and let's just right click and choose paste. And there we go. It applies that material to that brace, so it'll be just the same as the vehicle. So if I unhygienic vehicle and tumble around a bit, there we go. Now you can see that brace is the exact same color. All right, let me turn off the vehicle here and let's go in and work on these handles here. Think this is the last thing we need to do. Let me turn the light around here like that. All right, So now let's select that group. Create a new group, call it handles, and we'll add a color selection. Picked the color. Do that. OK, so now what we want here, we've got would I think, here on the handles. So let's go ahead and type in, would down here and see what we get. We've got, um, what we have here. We've got planks. Well, we don't want that rotten wood, which actually looks kind of cool. Ah, we've got would rough. That's kind of good to what is this? Would walnut? I mean, that has the right color, but I don't know if it's that Ah, pretty in that pristine let's try would rough. And then what let's do is let will try and make the color a little bit darker to see how that works. So let's click and drag onto the handles here, and then let's come down here and increase the scale. Let's do that. Okay. So what do we have here? Well, we got a couple of issues here going on. First of all, it's going in the wrong direction, right? It's going horizontally. And we wanted to go vertically. So let's come over here to the U V transformations and under rotation, what's type in 90 degrees. And that helps that. So let's drag here. But look at what we're seeing. Right? Right here. What is that? That is a UV seem. So I guess I put a UV seem right here where it can be seen by everyone. And that's probably not a good thing, right? We don't want our seems to show that prominently on the object here. Right there. All right, you can see those. So what can we do with that? Well, there is a very nice little setting right down here under Phil Projection. When you can see here, we've got UV projection. But what it can also do is this. Try plainer projection. And if we click on that, check this out. That cleans that up. And then if we adjust the scale some more Yeah. So now we've got a nice, clean texture there. Without that, you ve seen. So not only do you want to hide your seems and blender, but if you do have a problem, you can come over here and choose. Try plainer, and that usually cleans up problem. UV seems all right. Let's take a look over here. Well, how what have we got here? Here's a problem. We have turned this 90 degrees so that the texture works properly on the handles. Right. But once we did that ah, we've got the texture going the wrong direction on this handle. And we've given these the same vertex colors, so they're gonna apply to everything at the same time. That really may not be what we want. Um, so we're gonna have to deal with that. Let me first of all, come over here and drag this value down to make thes a little bit darker. Maybe something like this. Also, if we turned off the height right here, we don't have ah, normal map on these, But we do have a height map. If we turn this off, that'll clean that up some. So it isn't quite so displaced there. That makes it a little bit smoother. And that's probably the kind of thing we want. Yeah, something like that. All right. Those were good, but as we said this right here, we're gonna have to figure out a way to turn this texture without turning these back here. And to do that, we're gonna have to go back into blender and give this a new vertex color. And in doing that, we can create a new group and give it the same texture. But turn it a different way, turn it 90 degrees. So how do we do that? How do we go back to blender change of Vertex color and then bring it back in? Well, substance painter has actually a pretty nice process to do that. So in the next video, we'll go over that.
113. 111 Reimporting a Mesh Into Substance Painter: so to turn the wood grain here for this particular handle. So it's going this way. As I said, we're gonna need to go in and give this a new Vertex color in Blender to do that. Let's go ahead and go back to Blender here. Let's go up to the gun, Zoom in here and let's tumble around and take a look at that handle. We'll look at the Vertex groups here, so let's go to edit mode. Let's tab into edit mode. And then from here, let's go to Vertex paint. And as we can see here, these colors are the same on all three of the handles. We need to change this one here. So let's go over to our context tab here and let's find ourselves a new color, Um, about Oh, I don't know. How about something like like this? Let's give us, ah, kind of a strange green here about that. I'll go ahead and add that to the color palette, and then what let's do is tab into edit mode and go to face mode. And let's just select this area right here, and I'm gonna press control plus and expand that selection So it just goes right to the edge. There, right there. Okay, so that's where we need the new Vertex color. Let's tab into protects paint and with this still selected list, press shift K. And there we go. Now we need to take this whole thing back into substance painter. So let's go back to object mode. Let's select everything. I'll just hit the a key, and that selects everything. Here. Let's go back to file and export and let's choose Fbx and let's check selected objects. And then let's go into our exports. And in here, let's call this, Um, well, let's call it vehicle color, I d. Let's do that. And then let's click Export And there we go. Now let's go to substance Painter and bring it in there here in substance painter. I'm gonna go ahead and bring everything else back. Let's bring the wheel, the vehicle, the tire, all of this back in so we can see this happen here, this press shift and right click and move the light around here. Okay, so now the way to bring in that new fbx file is to come up here to edit and go to project configuration, and here we can bring in a new mesh object. So under file here, let's click, select, and then let's select that vehicle color I d. Right here. I'll click open and then okay and let's see what happens. So it is now brought in that new FB X, that new mesh object, and on that new mesh object that one new Vertex color. So what? Let's do it. Let's go take a look at that. If I hide all of these, that's now come over here, spin around over here and take a look. Well, the problem is, is the would still on here, and it's still the same way it waas. Let's go to the ah gun texture set. But here's the issue. We've brought in the new model with the new Vertex paint, but we haven't baked that texture yet, So what let's do is come over here to the texture set settings and let's click on bake mesh maps. So in here we have a section for the color I d. Right here, and really, this is all we need to bake. We can go ahead and turn all of these off. In fact, we can come up here and click on none and turn everything off and then click on the I D. And now we have just that I d selected and that's all that's going to bake. So let's give this a try. Let's come over here to bake gun mesh maps and let's see what happens. And there it goes, so you can see there's the original color and it's added that new color there Now. All right, there we go. It's all done. Let's click. OK, and look at that. Now we've got this separated out from that texture group, right? Here's that texture group hero. Let me turn down the brush size here. Here we go. Here's that texture group, and now we need to create a new one for this. So with this selected, let's go ahead and create a new group. We'll call this Ah, side handle and then we can right click add mask with color selection. Let's go back to the Properties tab here, click, pick, color and let's grab that new color. There we go. Now we can take that would rough that we put in here. We can take that and right click and copy. And now let's select this group. Let's paste it here. We're probably gonna have to drag it in yet. It's up there, so drag it down into here and there it is. Now it looks pretty much the same, but that's because we need to come down here and in the rotation. Let's take this back down to zero. And there we go. So now our handles are properly aligned. We have the wood grain going up and down for these and side to side for these. So that's a good thing to keep in mind as you go forward here. If there are problems, if you've added Oh, are or haven't added a Vertex i d, um Vertex color. In a certain place, you can go back and fix that and reimport the model back into substance painter and use the project configuration to reimport the model. It's a good trick toe have up your sleeve, just in case you ever get to a point where your color I D map isn't quite working. All right, well, I think that takes care of the gun textures. Let's ah, bring everything back here. Bring back the tires the vehicle, the wheel, and here we go. So what we need to do next is work on these tyres and wheels. What we're going to do for these is we're actually going to bake a normal map here in substance painter There will allow us to apply the high resolution information of those tire treads to these low polly tires. We're gonna need to go back into blender and export those high poly tires, and then we'll use them to bake the normal maps here. So that's coming up next.
114. 112 Baking a Normal Map in Substance Painter: Well, our next task is to work on these tires. And as I mentioned before, what I'd like to do is bake a normal map that captures the high resolution information of the tire treads but still use this Lower Polly tire. So let's start working on this. I think what I'll do is I'll go ahead and select the tire here and I'll hide everything else just so we can focus on this for now, We don't really need this layer here right now, so I'll delete that. And if you recall, we haven't baked the textures at here. If we go into our texture set settings, you can see there aren't any texture maps here in this panel. So what we're gonna do is use Thebe ache, mesh maps, feature here. I'll go ahead and turn on all of these here. So they're all checked and what we'll do is we will use this field right here. This high definition meshes and we'll bring in our high poly objects for the tire and the spare tire and will use those to bake the normal maps. So before we can bring in those high poly objects, we first need to export them out of lender. So it's first of all. Go do that. Okay, Back in blender here, what let's do is let's bring back the tire high, let me hide everything first, and then I'll bring back this tire high right here. And if we take a look at it, if we select it, we can see that the origin is still over here. Let's move that into the center of the object. We're gonna need that when we take it into unity. Let's go and do that now. So here we go. We've moved it into the origin of the object. We have only this object selected. So now what let's do is let's go to file and export and will export another FB X. We will go to our exports folder here and, well, let's call this Ah, tire underscore high and will export it as an FB X here and there we go. Now, remember that we labeled the Low Polly tire tire underscore low. So we're gonna use that naming convention in substance painter as we bake our normal map. And while we're here, let's go ahead and export out the spare tire high as well. Here it is. Ah, it looks like that origin is in the center of that object. So let's go ahead with this selected and export this as an FB X. Oh, you know what I didn't do? I didn't choose selected object. So we're gonna need to go back and re export that tire object while we're here. Let's go ahead and select that will type in. Ah, spare tire. Underscore high and we'll export that FB X. There we go. And now let's go back to that tire high here. Let's do that. Let's be sure and select that selected object because if we don't, it will bring in everything in that one fbx file and we don't want that. We don't want all of the vehicle and the high Polly's all in one object. So let's go ahead and come back to here and go to file Export Fbx. We've got our tire high selected. Let's now make sure selected objects is checked. I'll come back. I'll go ahead and select tire high and will export this over. The old one will just replace it. Export. OK, so now we've got just the tire and just the spare tire exported out as fbx. All right, now let's go back to substance Painter. So here in substance painter, we just need to go back to our bake mesh maps. Window here will click here and let me turn on all of these. So they're all checked because we need to. In addition, we need to take all the other texture maps as well. But here in the high definition meshes area right here, we're going to click on this icon and then we're going to go to our export folder and we're going to find that tire underscore high right here, and we'll click on open now. Here it is, right there. And since we've done that, let's scroll down and make sure we actually use these suffixes. Thea underscore High and underscore Low. And to do that, we need to change this from always to buy mash name. So now it's going to look at the mesh name and see if it can find the underscore low and underscore high also just like we did before. Let's choose ambient occlusion. And under this self occlusion, let's choose only same mesh name. Okay, so now that we have all of that in place. We've got our tire selected here. Let's come down and choose baked tire mesh maps. Here we go. All right. It's going to go through all of the maps here. And as you can see, it's beginning to give us that high resolution information from that high poly object. But keep in mind, it's just a fake. It's just a non optical illusion, as it were, we're still using the low Polly tire in the model itself. Also, we're getting an error here that says Tire I D. I think I know what that is, and it's something I always do. It isn't a problem. It's just something I did and I'll, I'll show you what that is, all right? We are all done and you can see here. It says one baking process failed. See log and let's go ahead and take a look at that click, okay? And hey, there's our normal map at work there. You can see the treads. Now that's great, But let's come down here and click on this right here. This and that will open up the log window and you can see it says could not find Vertex colors in mesh tire high, and what it does is when it has, ah, high resolution object toe bake from it looks for the color i D. Map from the high resolution object. Well, if you recall, we put or I put the color I D or the Vertex paint on the low Polly object. And generally speaking, that's what we wanted from the vehicle and the gun. But for this I should have put the color I d on the high poly object. But since there's just one color, it really doesn't matter all that much at all. So it's OK. In fact, as I said, I I always do this, so it's never been a problem. But now that we've got this done, let's go ahead and add some textures to it. We probably want a rubber material here. Let's go ahead and use this rubber vulcanized. Let's just drag this straight over into the layers. And since there's only one Vertex color or, frankly, no vertex colors here on the low Polly object, I don't need to create groups and then add a masked by color selection. I just can drag it straight over here all right. That looks pretty good right there. Um, let's add a little bit of dirt to it. Let's right. Click and choose. Add a black mask and then let's right. Click on the black mask and choose add generator. And for the generator. Let's choose the dirt. All right, there we go and we can invert it. I'll just click here. That helps. Okay, and let's give the dirt some color. Let's come over here and create Ah, Phil, Layer right here. Well, we need to drag it over into the dirt. There we go. And for the fill lair, let's scroll down and change this color. Here, Let's bring this up. What we have here, let's, um, bring it down into the brown here, something like something like this. Maybe let's bring this down some. So I'm just looking for a nice brown color that we can use something kind of like that, I think, And we could always sample colors again, but I think that will work just fine for now. And then let's go back into the dirt generator. I'll just click here and in here we can increase or decrease the dirt level. Aiken, bring this back up. Maybe just a bit like that. Ah, I'll shift right click and bring the light around here and we go and, um, dirt contrast. Maybe I'll bring that down some. Let's try that. If we were having problems with our seems here, we could turn on. Ah, try plainer here. Let's Ah, let's take a look at the grunge amount. We can increase that Well, that maybe a bit too much, huh? Bring that back down. All right. I think that's OK. Ah, let's add that wheel back on here and let's create the textures for that. And then we'll bring the vehicle back and do some adjusting then. So let's select the wheel texture set. And I think I'll just use that steal again. Let's, um, just type in steel down here. Here's that steel rust and where I'll drag that on here. And maybe we wanted a little bit rougher. Maybe we wanted a little bit lighter and ah, maybe we want a little bit more wear in there. Let's ah, maybe increased the dirt intensity. There we go. Maybe bring up the dirt scale. Just a bit rust intensity, maybe up a hair. Yes, so something like that looks pretty good. OK, so now let's bring the vehicle back and let's see how it looks here. All right? It looks pretty good. I think it needs to be a little bit more warn. So I'm gonna go back to the tire, select the color of the tire itself, and I think I want to bring that color up a little bit lighter. Like this? Yeah, something like that. So we've got some some dirt, Some high resolution detail on the treads. Yeah, I think that looks pretty good. All right. So in the next video, what let's do is go through the same process with the spare tire and then also will begin thinking about doing some hand painting to create some dirt. Maybe around the front, cause dis looks pretty clean compared to all of this back here. So I think we're gonna need to add a little bit of hand painting up here on the front. So that's all coming up next
115. 113 Texturing the Spare Tire: Let's now go through that same process once again, but with the spare tire, just spin around back here and let's take a look at this. This time I want to leave everything visible, and I want to just show you what it does. So let's switch from the tire to the spare tire here, and once again we can get rid of this layer. We don't need that. Let's go over to our texture set settings. And as you can see, we don't have any texture maps here yet. I'm gonna go ahead and click on the bake mesh maps and in here we need to change that high definition mesh. We still have tire underscore high here. Let's select this. Hit the minus button here and remove that. Now let's open this up again and let's go find that spare tire high. Here it is, right here. Spare tire, underscore high. We'll click open and there it is. So now we've got that put in there. Let's scroll down here and make sure we've got by mesh name selected and we've got Underscore High and Underscore Low. Let's also go back to the ambient occlusion because look at what happens where as many of these settings stay in this panel when you close it, this one always changes back toe, always. So you need to come in here and click on only same mesh name to get that back to that setting. Now we've got the spare tire selected. We've selected only same mesh name. Let's come down here and click this big spare tire and let's see what happened. Now it may look as if it's re baking all of these other textures, but it isn't us. This is what I wanted to show you. It's actually changing this menu up here, changing the view each time it goes to a new map so you can see it doing it here. But all these others have still already been built, right? So it's just going through each of these different views. So I've had some questions about Is it re baking all of these other things as it's doing this? And it isn't. It's just doing the ones that we've selected. And once again, I didn't put the Vertex color on the high poly object. I put it on the low poly, which means we're getting this error once again. And here we go. It's all done. Let's click. OK, and now we can see that normal map on the spare tire as well. Okay, so now we can add some texture to this. Let's go back to the rubber materials here. And this vulcanized one is the one I used before. So let's just dragged that straight in. Now this one is gonna be a little bit newer and not as dirty. Is this one here? Right? I mean these air on and being used. This one is up here, so I wanted to be a little bit shiny, er, but I still want a bit of dirt. So let's go ahead and add a black mass and will add a generator. Go back to the Properties tab here and click on the dirt generator here. Now let's invert it here. Turned that on. And now let's go grab that dirt color we used on the first tire. Let's click on the tire texture set and let's right click copy and let's go back to the spare tire and paste this in here paste. I'll click on the mask so we can see that dirt generator and all. Select this and then drag it right into here. There we go. Now we can see it there, and that's that's a little too much. Let's click on the dirt generator and let's bring that dirt level down quite a bit. Because, as I said, I want this to be a little bit newer than the other one. Maybe not quite that much. Maybe something like this. As if some dirt has gotten on it just from being here. But it hasn't been used a whole lot. There we go. So something like that. But I mean, look at the two. So Ah, this is pretty good. Although maybe I'll select this color here, the tire color and let's come up here and increase the roughness just a little bit because it isn't brand new. All right, And then let's come over to the tire again. And I'd like to work on the color here. I feel like this is now not light enough. I'm gonna bring this up just a bit. Bring that value up so it's a little bit lighter. Maybe something like that, that may be too much. Uh, I think it is too much so I'll bring it back down a hair. So I'm just trying Teoh, compare the two. This one here because it's been used is gonna be older and a little more dirty. And this one is going to be newer and a little cleaner. That's all I'm trying to do here. So maybe I will come back into the dirt on this. I'll select the mask, select the dirt generator. Let's bring the dirt level up just a bit. And maybe I'll even bring that grunge up just a bit too. Yeah, so I'm just trying toe compare the two, That's all. All right? Yeah. So I think I compare the two now. That's kind of what I'm looking for. There. Yeah, one's a little bit. Newer ones a little bit more used. Yeah. Okay. All right. So now what we need to do is think about adding some more dirt up here. I think because we've got this dirt here. We've got this dirt in here, but there isn't a whole lot upfront. You'd think there would be more dirt up here if we've gotten turned back here. Right? So what let's do is in the next video, let's work on creating a few paint layers and coming in here and doing a little hand painting. In addition, if we scroll way down here or zoom in, you can see this piece right here. And this piece over here has no color. And that sometimes happens when a piece is really small on a UV map. It can miss putting the colors on it. And to fix that, we can go in and actually hand paint this color on these pieces and clean that up. So those are the two things I think I'd like to do with a little bit of hand painting. Add some dirt and do a little touch up here, so that's coming up next.
116. 114 Hand Painting the Dirt Textures: to paint in some dirt here at the front, we're gonna need to add a couple new layers. So let's go over to the vehicle texture set. And I think before I do the dirt, I better do the touch up right down here. This piece and that piece over here. So let's begin with that. Since I'm gonna be painting on the vehicle part, I'm gonna go down to the vehicle layer right here. I'll select it. And when I add a new layer here, So we've already created a group. We've created a fill layer. Now I'm just going to create a normal paint layer and it'll pop up right on top of that vehicle right there. Now, let's let's call this touch up just so we know what it is. And then we're gonna add the dirt on top of that so you can see here in the properties of the paint layer, we've got a material and a paint stroke for the material. I'm gonna come down here and change that color right here, that base color and I wanna make it the same color as this right here, that main vehicle tan color. So I'm just going to click here, Click and hold on the eyedropper. I'm just gonna come over here and sample that color right there. Now we've got it to the color that we want. We've got just a basic brush here. In fact, if we go over to the brushes shelf right here now we can see a list of all our brushes and there's quite a bit here. But I don't really need anything else except this right here. That's what this is, I believe so. Let's just ah, come over here and begin painting. Now the paintbrush is way too big. Weaken. Use the slider here to increase or decrease the size of the brush. Or we can also press control and scroll the mouse wheel here, too. I'm using a mouse for this simply because it's just very basic stuff. I'm not do anything with a lot of detail. If you are going to do something with a whole lot of detail. A graphics tablet is a really great investment, a pen and tablet for this kind of thing. But for this course for these few things, I'm just going with the mouse. So I'm gonna control and scroll the mouse wheel. So we get maybe a paintbrush about this size here. We've got the stroke capacity at 100. The flow at 100. Something's going to click and drag and paint this part right in here. Just clean this up a bit and Ah, right over here. Now, you may be able to see that as I paint. We might get some display. Strangeness here going on will see that here in a minute. And what that is is just because we're recording video at the same time that I'm trying to do this. This is very memory intensive. And so you may see a few, um, issues like here. You can see white coming out here white here, So as we do this Oh, and over here. Right, So those aren't real. Those air just display errors. If I come over here and hide the layer and then enable it again, it goes away. So it's just, um, an issue with my computer. Not really the software. And as I said, the main reason is because I'm recording as I'm trying to do this. So All right, so let's go and paint this in here. get this all done. Now I would like to do is paint a bit more dirt here on the front of the vehicle. I feel like since the vehicles going forward hits going to hit dirt Mawr up here on the front than it is back here. And since we have this much dirt here, we need probably at least this much appear on the front. So having said that, let's go ahead and create a new paint layer. Click here and let's call this dirt. We go now. I want a different color here. I'd like this color here that we used for the dirt generator. So once again, I'm gonna click here, Click and hold on the eyedropper and sample this color right here. Now what we should do is find a different brush. This brush is pretty plain. We've got dirt, one dirt tude or three dirt splash. We've got quite a bit of dirt here, so Well, let's just begin with dirt one and see what happens. Um, here's the size of the brush. That's not bad. Maybe I'll bring it down just a little bit like this, all right. And I've got it still at 100% opacity and flow, and I'm goingto leave it there for now. And then when we've done some painting, I can maybe play with the opacity over here of the lair itself. So let's give this a try. Just going to click and add some dirt right along here. And there's those display errors I was talking about. So my apologies there. That's really just because I'm, ah, recording video while I'm doing this. It actually doesn't usually do that when I'm just working without recording here. So let's kind of I'm just clicking around here to add some dirt. Maybe along here along the bumper, maybe some underneath here. Probably be a good idea to get some down here on the ah shock absorbers and on the axle down in here. So just playing around, trying to put some kind of random splotches along here and to see how it looks, I'm gonna have to go ahead and turn off that layer and then turn it back on again. And there we go. Taken. See what I'm doing there. Alright, so I've got a bit of dirt in there. What I can do is if I think it's too much. I can come over here to the opacity of the dirt layer and kind of bring that down. Some faded out, faded in a bit kind of like that. We could do that. Maybe I'll add a little bit more in there. And if you want, you can come back into here and add some in the tire wells. Um, maybe we want a bit of dirt here, where they're climbing into the vehicle in and out. Maybe they get dirt from their boots on. Thes things here is they're going in and out. So we could maybe put some right down there and remember that this was mirrored over. So it should come over here as well, right? So we could do that if you want. Um me. I'd and re enable that. There we go. If we're getting dirt when it's going forward on the front part, maybe we'd also get dirt on the rear view mirrors here, too. Let's try that. Maybe. Ah, let me shrink that down. Control scroll the mouse wheel. Maybe. Let's try another kind of dirt brush, maybe. Ah, something like this. And let's try this. I mean, scroll down and I'm just going to click and drop some on this. And maybe here, too. Something like that and maybe a little bit along here. Here we go. OK, let me turn this off and on again. Now, I got a little dirt from the rear view mirror onto here. It kind of went through to their and that's probably fine. But if you wanted to remove this, you could come over here to the erase brush. Click on that. And here we go. Weaken, control, scroll and click and erase that. All right. Uh, bring that back so you can use the erase brush to, ah, pull things off if you want. Now, you can also change the brush for the erase tool. And so you could come over here and begin pulling some out with a different kind of brush here, too, right? So you could do a little bit of erasing and kind of erased some splotches, but with splotches. Or And you could try that that, um and also I think I'd like to get a little bit of dirt on the mudflaps to sense. Ah, the back tires are probably gonna be spitting up dirt onto these things. Let's add some dirt there as well. So let's scroll up to where the mud flaps are. Because I want to put the dirt just right on top of the mud flaps. So let's add a new paint layer here, let's call this one dirt as well. And I kind of like those splotches that we just had. Let's switch back to the brush tool and go to the splotches and be sure we're on dirt three here. All right, so now what let's do is go ahead and add some of these splotches in here like this. There we go. Did we mirror that over? No, I think this is Ah, yeah. This is its own peace here. We didn't mirror that over to. Maybe I'll add some splotches here, and I'm gonna hit the f key to frame up the entire thing. Let me come back in here and add a few more here. Now, I'm gonna take the opacity of this layer here and bring it down some. It wasn't quite so prominent there. There we go. All right, so now we've got mud on the mud flaps and on the front, so I made play with the opacity a little more for the front. Maybe add a little bit of dirt under the wheel wells and things like that. But generally speaking, I think that's really kind of all I wanted, just adding a little bit of visual interest up there to the front as well. All right, I think we're well ready to begin exporting our textures out of substance painter so we can begin bringing them into unity. So in the next video, we'll begin working on exporting our textures.
117. 115 Exporting Texture Maps from Substance Painter: Well, since the last video, I've gone ahead and done a little more painting up here on the front, in the tire wells. Um, I added a little more dirt in the back here, but one thing I realized is that the grill here is very clean. If if I'm gonna have all this dirt on the front here, the grill needs some dirt as well. And I was clicking and dragging over the grill, but we're not getting anything there. So what I realized is if we scroll back down to the vehicle group right here, I've put the dirt on top of that vehicle group, and therefore, whatever we paint will go on top of these colors. However, the grill is right up here. So what I can do is just take this dirt layer and just drag it right up on top of the grill . And there we go. There's the dirt on the grill. So I had been painting over that the whole time. It's just that we couldn't see it because the grill was on top of the dirt. All right, so we've got that taken care of. I think, um, I think we're ready to begin exporting our textures out. So, first of all, what we need to do is just come up here and go to file export textures. And in here we can configure the export settings for our textures. Now, first of all, we've had this glass Texas that turned off the whole time. But it's on here, and we don't need this on. If we twirl this down, you can see all of the texture maps that could be exported out with this. We don't need that. So I'm just gonna turn that off here. They could see in there that there are a lot of texture maps that are gonna be exported out if we leave it in this configuration. And I don't think we want this particular document channel normal ao configuration. There is a configuration down here. Four unity. Right down here. Unity five standard metallic. And I think that's what we want. And there are different configurations for all kinds of systems. Game engines. We've got, um, Amazon Lumber Yard. We've got cry engine. We've got key shot. We've got unreal. So there are all kinds of configurations that we might want to choose depending on our project. But for this, since we're gonna be going into unity, let's choose this Unity five standard metallic. All right. And when we do that, if we twirl this down, we see it changes the type and number of textures that we're gonna output now. We never created a texture that had a glow to it, a shining light or something like that. So the emission isn't going to be used here. But now we also need to think about what size of the textures we're gonna need to export. And as I said, I usually create everything at four K just because it gives you mawr resolution toe work with here in substance painter. But your project requirements will probably require another size. So I'm going to say that in this project, what we need is the vehicle to instead be at four k going to pull this down and choose to K 2048. Now, if the vehicle is a 2048 the gun is quite a bit smaller, so we may be able to get away with having it at one K or 10. 24. Same with the spare tire. We could probably have that be one K and the tire. We could make it 10 24 as well. Now the wheel is even smaller than the tire and the spare tire. So maybe the wheel could go down to 5 12 We could try that now. Thes smaller texture sizes may not give us as much resolution as we need, and we can always come back here and re export if we think that this isn't the proper resolution for a project. But at least for now, let's go ahead and go with two K and one K and 5 12 for the wheel. Let's go over here into configuration. In here we can see Ah, unity five standard metallic here as well. So let's choose this. And I wanted to show you this. Now let me go back to just another configuration because I usually use unity. Five standard metallic and the work I do. And because of that, I've got these set up just the way I want them. Let me show you another one like this Amazon lumber yard. So it's got this dollar sign mesh underscore here where, as you can see, the unity five does not And that's because I've removed that. I've taken out that dollar mesh underscore from the texture names here and what that is. Let me just I'm gonna grab this and copy it. Let's just do that so we can see what it is. And I'm gonna press control V and paste that in. So what this will do is it will give us. There we go. This will give us for each of our textures. This will give us the name of the mesh. And if you recall when we last imported our object in, we called it. Ah, vehicle color. I d. Right. So what this will say is it will save vehicle color. I d underscore. Maybe gun or tire underscore Albita transparency. Okay, so that's what it will say when we export the file. And I think having a mesh name on convivial little confusing. So actually, let me go ahead and ah, we don't have it. We don't have the mesh name. Here, let me ah, click off of this and go back to unity. Five standard metallic. And this is what we're going to see. So we're going to see vehicle color. I d underscore gun underscore Alvito, and that, to me, is a little too much. I just wanna have it be the name of of the texture set and of specific texture map that it's going to be. So let me go back to configuration. Make sure that unity five standard metallic is selected. And then I'm just gonna delete these here. And you can configure these however you want, but I just find it's a lot more convenient tohave just the texture, set and texture Map name. Okay, so now that we have that, let me go back to export and you can see nothing has changed here. So I'm gonna just click on something else and then go back, and there it is. All right. So now we have all of these the way we want them. Texture, set, name and texture type. And keep in mind that these texture set names come from the materials that we created in blender. So when we bring our exported model from blender into unity, it's going to see those materials and have the same name. Okay, so now we've done this to get the name configurations the way we want the texture, size is the way we want the proper configuration here. Now we need to find a place to put it. So let's click up here and what's go to our exports folder. Here we are. Let's go ahead and choose Select folder. And so we're gonna go into that exports folder that we've created for the project. All right, I think we are ready to go. Let's come down here and click Export. All right. The export has finished. Let's go ahead and click. OK? And there we go. Now you can see down here that it says the map wheel emission can't be generated for the texture wheel. And we probably got one of those for every one of them. Yeah, And that's because we didn't create une mission texture because, as I said, we didn't have any shining or glowing lights in our seen here. Now, if we go to our folder where we created all of this, let's do that. Here we go. Let me click type to sort by type here and now you can see we've got gun albedo gun. Metallic gun normal. Now we've got spare tire. Three of those tire, vehicle and wheel right all albedo, metallic and normal maps. And if we opened up this vehicle here, you can see there's our texture map. All right, so we've exported all of the texture maps that I think we're going to need in the next video. Let's go back to Blender, make sure our model is really a world scale and then export the model out once again in the proper configuration for going into unity.
118. 116 Exporting FBX Files from Blender new: all right, back in blender here. We need to export this out one more time for unity. Now, When we exported it for substance painter, I went ahead and added or included the tire and the wheel. But we're gonna need to keep those separate when taking it into unity. But before we do any of that, we need to make sure that this is really a world scale. And that's because in unity, the lighting and the physics all expect riel, world scale riel, world sizes. So what we need to do is figure out how big or small this should be. And what I've done is gone to Google, and I search for Osh kosh m A TV dimensions. And right here we've got the length, width and height. We have it in inches and millimeters, so if 6270 millimeters is going to be 6.2 meters, so let's create a reference object of these dimensions, and then we'll scale the vehicle to fit those. All right, so let's come over here. And I guess first of all, what I'll do is I'll just hide all of this right here, and I'll choose the scene collection and and let's just create a cube. Here we go and I'll go to the side view and let's goto wire frame. All right, so let's take this cube and let's get it to the correct dimensions. If I hit the in key to open up the sidebar we can see over here, we've got dimensions, and we can plug in the numbers from Google into here to get the proper size. So let's see. We've got ah length 6.2 meters, so the length is the y axis. Still, it's type in here in dimensions. 6.2 enter and there we go. There's R 6.2 meters. All right, um, let's tumble around. Let's work on the width. So the width is 2.49 meters. Let's do that X 2.49 Here we go. And then the height 2.7. So the height, of course, is going to be this Z axis. So what did I say? Two point seven. There we go. Let's make sure 2.72 point 496.27 I could do 6.27 to do that 6.27 There we go. OK, so now if I bring this up and said it on the grid right there, that's how big our vehicles should be. So let's bring everything back and let's take a look. Um, I'll bring back the wheel, the vehicle tire, low spare tire, low machine gun and glass. So all of these need to be this size, and as we can see here, they're too small. So we need to scale this up a bit. I need to select all of these. So what I'm gonna do is take this cube and I'm gonna call this ah, reference size, and I need to make sure I don't accidentally select it. When I'm scaling this up to do that, I'll come over here to the outline er, and pull this down. And I want to enable this, um, selectable ta go right here and what that will do. It'll give me this icon. So Aiken de select this. So now I can't select the Cuban all. All right, So what that does for me is I can select one of these like the a key without selecting that cube. And now let's um, to scale this up. We need to scale from the grid here from the center of the grid. So let's move this origin of everything that's come up here to object set origin and move that to the three D cursor here. Now that that's there, let's go ahead and scale this up to fit our cube here. So I'll just hit the s key, and I'm going to scale it up. And I believe this cube or these dimensions are for the main chassis here. I'm just gonna scaled up right about two there so that that cube encompasses the main body of the vehicle. We've got these extras the machine gun, the tour, it things like that kind of sticking out. But I believe the dimensions is really just this part in here. All right, so now we've got our vehicle the proper size. I'm gonna go ahead and hide the Cube here, hide that. Let's go back to solid mode. And now that we've scaled this up, we've got a problem with our scale. Over here it is uniform, but it isn't all one. So we need to really have that applied. Let's do that. Let's press control a and apply our scale to everything. There we go. So we have that applied now. And I'm gonna go ahead and press control s and save our seen here. All right? Now, let's Ah, work on exporting this out. We do need to de select everything and hide the tire. For now, let's hide the tire low and the wheel here. And so everything else is going to go into one fbx file that we're gonna export for unity. But we're gonna need to reposition this or at least reposition the origin of all the objects. And then, yes, we're gonna have to actually reposition it down to the center of the grid. And this would usually be okay, this kind of thing, where it has an offset from the center of the grid that would usually be okay for most objects. If you're importing into a game engine, say if you have a building a block away and it's offset from the center a certain distance , then when you take it into unity, it will still be offset from the center, that same distance. But for this working apparent the vehicle directly to the default cube of the vehicle tools . It has a cube and four wheels that we're gonna parent everything to. So we need to get the pivot points or the origins in the proper place. So if we select everything with the a key, we've got the origin here. Now we really need to move it up into a different place. Um, I think we need to move it up into here. So if we were to say, maybe change to the cursor tool here and kind of click, I don't know, somewhere around in year, we're gonna have to do some adjusting anyway, once we get it into unity. But for this, let's just see Well, that's not quite in the center, is it? So what we can do is come over here to the View tab and in the X axis, we could type in zero and move it into the center of the grid there and then So it's kind of in the center of the grid along the X axis, but I just wanted it kind of at the bottom of the cab here. So now I need to change back to the move, tool the transform tools. If we select everything else, like the cab and hit the a key. And now let's move the origin of all of this to that three d cursor. I'll come up here and go to object. Set origin to three D cursor. Okay, there it is. So now what we need to dio is move this to the center of the grid and to do that weaken first, move the cursor with shift s one and then snapped the vehicle to that. So now we can press shift s and we compress the eight key or select this selection to cursor, and there we go. So that's the way we want to export the vehicle. All right, let's give that a try. With all of this still selected, I'm gonna come up to file export and FB X, and I'm gonna be sure and choose this selected objects. All right, let's go to our exports. And let's call this. Um, well, what should we call this? I'll call this vehicle final. Let's do that. That'll be, hopefully our final export. There we go. Now the tire. Let's take a look at that. Let me, uh, turn these off me de select everything and turn these off and let's turn the wheel and the tire low back on. All right, So with this, um, it looks like our cursor or our origin is right in the center of the gentry for the tire. That's good for the wheel. However, it's still over here, so we really need the origin of the wheel and the tire to be in the same place. So what let's do is like the tire and press shift s and move that cursor to the origin of that object. Then we'll select the wheel and let's move the origin to the three D cursor there. So now both objects have the same origin point. All right, Now we need to move it in the center of the grid list. Press shift s one to move that cursor and then with both of these selected list press shift s and choose selection to cursor. And there we go. So now we've got that in the center of the grid. But here's here's an issue I have is that I'm not sure which way this needs to be turned If it needs to be turned in the positive acts or the negative x for it. Toe work in the vehicle tools. We only need one tire, but it needs to be facing in a particular direction. And I don't remember which lay that hiss. So what will do then, is we're going to do to We're gonna export two of these. Um, we've got our scale at ones in our rotation at zero. That's good. So I'm gonna export one facing this way, and then I want to spend it around 180 degrees and export it the other way as well, just to make sure we have our bases covered. So I'm gonna go to file export and FB X once again, make sure that selected objects is checked And let's call this a wheel final, and I'm gonna call this underscore L because it's facing toward the left side of the vehicle. Let's do that. So my export that now with all of this selected list press um, rz 180 and spin it around the other way. We've got rotation in the Z, so I'm gonna press control a and apply the rotation. There we go. Then I'm gonna go to file export Fbx and we'll call this underscore are because it's basing toward the right side of the vehicle. So let's export that. Oh, in selected objects is still checked. That's good. Okay. And export that All right now, I think we are able to go into unity and began setting up our project so that we can bring our vehicle and our textures and put them all together, so that's coming up next.
119. 116 Exporting FBX Files from Blender: all right, back in blender here. We need to export this out one more time for unity. Now, When we exported it for substance painter, I went ahead and added or included the tire and the wheel. But we're gonna need to keep those separate when taking it into unity. But before we do any of that, we need to make sure that this is really a world scale. And that's because in unity, the lighting and the physics all expect riel, world scale riel, world sizes. So what we need to do is figure out how big or small this should be. And what I've done is gone to Google, and I search for Osh kosh m A TV dimensions. And right here we've got the length, width and height. We have it in inches and millimeters, so if 6270 millimeters is going to be 6.2 meters, so let's create a reference object of these dimensions, and then we'll scale the vehicle to fit those. All right, so let's come over here. And I guess first of all, what I'll do is I'll just hide all of this right here, and I'll choose the scene collection and and let's just create a cube. Here we go and I'll go to the side view and let's goto wire frame. All right, so let's take this cube and let's get it to the correct dimensions. If I hit the in key to open up the sidebar we can see over here, we've got dimensions, and we can plug in the numbers from Google into here to get the proper size. So let's see. We've got ah length 6.2 meters, so the length is the y axis. Still, it's type in here in dimensions. 6.2 enter and there we go. There's R 6.2 meters. All right, um, let's tumble around. Let's work on the width. So the width is 2.49 meters. Let's do that X 2.49 Here we go. And then the height 2.7. So the height, of course, is going to be this Z axis. So what did I say? Two point seven. There we go. Let's make sure 2.72 point 496.27 I could do 6.27 to do that 6.27 There we go. OK, so now if I bring this up and said it on the grid right there, that's how big our vehicles should be. So let's bring everything back and let's take a look. Um, I'll bring back the wheel, the vehicle tire, low spare tire, low machine gun and glass. So all of these need to be this size, and as we can see here, they're too small. So we need to scale this up a bit. I need to select all of these. So what I'm gonna do is take this cube and I'm gonna call this ah, reference size, and I need to make sure I don't accidentally select it. When I'm scaling this up to do that, I'll come over here to the outline er, and pull this down. And I want to enable this, um, selectable ta go right here and what that will do. It'll give me this icon. So Aiken de select this. So now I can't select the Cuban all. All right, So what that does for me is I can select one of these like the a key without selecting that cube. And now let's um, to scale this up. We need to scale from the grid here from the center of the grid. So let's move this origin of everything that's come up here to object set origin and move that to the three D cursor here. Now that that's there, let's go ahead and scale this up to fit our cube here. So I'll just hit the s key, and I'm going to scale it up. And I believe this cube or these dimensions are for the main chassis here. I'm just gonna scaled up right about two there so that that cube encompasses the main body of the vehicle. We've got these extras the machine gun, the tour, it things like that kind of sticking out. But I believe the dimensions is really just this part in here. All right, so now we've got our vehicle the proper size. I'm gonna go ahead and hide the Cube here, hide that. Let's go back to solid mode. And now that we've scaled this up, we've got a problem with our scale. Over here it is uniform, but it isn't all one. So we need to really have that applied. Let's do that. Let's press control a and apply our scale to everything. There we go. So we have that applied now. And I'm gonna go ahead and press control s and save our seen here. All right? Now, let's Ah, work on exporting this out. We do need to de select everything and hide the tire. For now, let's hide the tire low and the wheel here. And so everything else is going to go into one fbx file that we're gonna export for unity. So I'll select one of the objects, then hit the A key to select everything. And now with all of this selected, let's go to file and export and export fbx, we need to be sure and choose this selected objects because we don't want to include the tire of the wheel or anything else. I'll, uh, come up here and let's go to our export folder. But this I think I'm gonna call this vehicle final. Let's do that. And our click export. All right, so there's that now it's de select everything. And what let's do is bring that well, entire back. Bring the wheel and the tire. Here we go. Now, let's, um, take a look at the origin of these objects. They're still over here in the center of the grid because we needed to have the origins there when we scaled to get the proper size. But let's select both of these and let's move these back to the origin of the geometry right in here. All right, so now that we've got that, lets export this out as well. Let's go file Export Fbx. We wanna have selected objects checked there and for this let's call this tire final Fbx All right, and let's hit Export And there we go. So now what we can dio is weaken go into unity and bring these objects in as well as our textures and begin configuring the vehicle in unity.
120. 117 Importing Assets into Unity: Okay, I've opened up the unity hub here, and I'm gonna go ahead and create a new unity project. The newest version is 2019.2 point 14 years is probably going to be a little different. And that's fine. All I'm gonna do here is just click New and we'll call this project. I'm gonna call it Unity so we can tell it from the other folders in our project. And I'll just call this vehicle. I'm gonna put it in that folder where we have our project right here. I'll choose three D because we want this to be a three d project and I'll click create, and here we are. The first thing I want to do is import a couple of projects or assets from the Unity Assets store, things that we're gonna need as we go forward here. First of all, I just want the standard assets. I'm gonna come over here to the asset store. It's going to connect, and then I'm gonna type in standard assets. Here we go. I'll click on that. And here they are right here. Now, I've already downloaded this. So the button here just says import you may have a button that says download, and once you click that, then you'll see import. So I'm gonna go ahead and click import here, and this is everything that's going to be imported into our project here, and we don't need the vast majority of this. However going through and trying to figure out what we do and do not need is gonna take a long time. So I'm just going to click import and just bring it all in. It'll take a few moments here, but once it's imported, will be able to take a look at the folders that it brings in. All right, here we go. We've got this new folder here called Standard Assets. If we look in here, we've got things like vehicles. We've got, um, cameras, characters, environments. There's just a lot of great things in here that can really help as you're beginning a project. So, really, the main thing we're gonna be using from this are the cameras. So we're gonna use one of their cameras here in the pre fabs. We're gonna use this multipurpose camera rig. All right, so we've got our standard assets in here now. Let's also bring in the vehicle tools. Let's do that. Let's Ah, close this. That's type in vehicle tools. And here we go. This is what we want right here. This, too, is a free unity asset package. Once again, I've already downloaded this, So I'm gonna click Import, and it's going to say that it's gonna overwrite current project settings. And this is why I'm importing this at the very beginning. I want to get this into an empty project. So whatever changes it's going to make its going to do up front and not cause a problem as I change things on down the road. So I'm gonna click, import and install and once again here all the assets within this vehicle tools package. I'm gonna go ahead and just import everything. And it's saying that the open scene has been changed once again. That's why I do this up front. I'll go ahead and click, Reload, And there we go and you can see it's created these materials, folders, models, pre fabs, sample scenes. It's got a lot of assets in here, So once again, we'll be using some of this and not all of it. But the basic configuration tools are in here, and we'll be using those, all right? And the last thing we need is a material for the glass. If you recall, I didn't create a material for the glass in substance painter, and we're going to need to do that here in unity. So one of the free glass packages is this in K glass. So just type in NK glass and we've got a paid version which is on sale here or a free version here. It's it's a good product. So if you do want to spend the money on it, I I do recommend it. But for our purposes here, we only need the free version. So I'm just gonna click import and then import again. And here's that M K glass folder here. All right, so we have all the packages imported that we're gonna need. Let's go back to the scene tab here and now. Let's go ahead and create a vehicle tools system here in our project. And to do that, we can come up here to this vehicle's menu item. When we imported the vehicle tools package, it created this menu up here, and we can go up to vehicles, say, create skeleton and then we can just click, Generate. And this will create a template with two axles and the default mass and other settings here so we can just click, generate and then modify things as needed. So I'll click, Generate. And there it is. That's it. Let me hit the X here. And if we scroll this down, we can see this is what it created that car route. If I select it, you can then see the tires. There's the default cube and the tires that we're going to then parent each of our objects to now we're also gonna need a ground plane, something for this to sit on and roll around on. So let's go ahead and create a plane here. Let's go up to game Object three D object and plain. Let's do that. It is the position. Is it 000? That's good. The scale. We could probably increase the scale here. Let's take it up to 50. Um, and then 50 in the Z. Here is Well, there you go. So that's kinda big. That'll be plenty of room. No. One thing I should mention here is that in unity, the navigation is a little bit different than it is in blender To move around, you really just used the all turkey, whereas in blender you use that middle mouse button for everything. For this here in unity, you used the Ault key. So you press Ault and left click to tumble Ault Middle Mouse button to Pan and Ault right mouse button to zoom. And you can also scroll the mouse wheel. If you want to center up on an object, you can just hit the F key and that'll frame it up. So if I select this car route over here in the hierarchy like and then hit the F key and it'll zoom into that, all right, so let's with this car route selected. Let's bring this up and sit it on the ground plane here. Maybe something like this. Now let's bring in our actual vehicle objects. I'll go over to the Models folder that the vehicle tools created. We've got other vehicles in here and these air for the, um, test scene, and I'll show you that here in just a minute. But let's bring in our model first. What's ah here in the project. Window lifts, right click, Choose import new asset. And over here in our exports. Let's find that vehicle final and are two wheel finals, the l and the R. Let's do that and import when Here we go. So you can see we've got the wheel, the wheel facing the other way and the vehicle here all right, in the next video will begin setting this up.
121. 118 Configuring the Vehicle in Unity: Well, let's bring our vehicle up here into the hierarchy, which will then put it into our seen here. So I'm gonna grab the vehicle and Dragon Emma, drop it right on top of that car route. And what that will do is it will parent it to the car route. From there we go. So now we can see the vehicle, and it looks like it's pretty well situated. Actually, it's, um, parented it to the origin of that cube. And that doesn't look too bad. We can disable that cube or hide it in this view here. If we select the Cube here, we can come over and uncheck this in the inspector and that will hide that cube so we can't see it. The lighting is a little odd, so let's work on that real quick. We've got that directional light here in this scene. You can see it here. If we select it now, we can see it here. We've got the transform or the move tool enabled, and it's kind of at an angle here, right? That's because we have local orientation turned on. Let's click this and change it to global. Now you can see it's there in the global axis. So let's just grab this and pull it straight up like this. Just bring it up so we can see it. And then I think I want to rotate it a bit. Let's some come over here to the rotate to all click here. Now we can see the rotation gizmo and I'll just turn that around like this. We can kind of see it a little bit better, at least on this side here. This side's still kind of hard to see, So what we should probably do is put another light in here. Let's go back to the move tool, and I'm gonna move it to one side over here, and then I'm gonna duplicated and move it over to the other side's Let's press Control D, and now we have two of them here. A directional light and address Inal light one. So let's just move that new one over here. I'll go back to the rotation tool and let's rotate it over, so it's pointing toward that vehicle like that. Now it's a little too bright. It's a little too much. We've got two shadows, so that's not really gonna work. So what let's do is take this second light and let's take the intensity down instead of one for the intensity. Let's type in 10.4. Let's do that. So what isn't quite as bright? Weaken. See over here a little bit better? Maybe. Let's take it up. 2.5. Yes, we can still see over here, but it's in the shadow now over on this side. We have a shadow here, but that's not really what we want out in the sunlight. We just want one shadow. So with this still selected, let's come over here to shadow type and let's turn this off to no shadows. There we go. So we've got one main sunlight, all right, but we've got some Phil here on the other side so we can see what's happening over here. All right, so we've got those taken care of. What let's do is let's put them in one group here. Let's come over to the hierarchy and right click and let's create on empty, and this empty game object will be kind of like a folder for us. So let's call this lights and then we'll take the main directional light and drag it into their right there and we'll take this one and dragon into their. And now we've got a folder with our lights. So now meaning to figure out where the tires need to be. And once we do that, we may find we need to move this vehicle up or down a bit. So let's work on the tires. Now. To do that, I'm gonna bring the tires in, Um, temporarily. I'm gonna parent them to these objects here. But this is only a temporary thing while we're getting them in place. Ultimately, what we're gonna dio is over here. We're gonna drag our wheel object, whichever one we are going to use over here into the wheels shape slot right here. We're gonna put that in there, and it's then going to do the job of parenting and controlling them based on where we put these wheel templates. But to figure out where the templates need to be, we kind of need to put the tires on them. So let's do that first. So this a zero l That's this tire over here on the left. Let's go ahead and dragged the wheel left tire right onto that object. So it parents it right there. There it is. Okay, let's not do that for the other side as well. Take the right wheel. Grab that and drag it right on top of that. And there it is. Okay, let's do the same thing back here. Here's the left rear. I'll grab that. Drag it right on top of that and the right rear. Drag that on top of that, a one are. Okay, so there are our tires. They're not exactly in the right place. And that's fine. What we're gonna do is select both this, a zero l and a zero r and let's move this up until it's about where it needs to be. I've got the move. Tool enabled. I'm just gonna drag straightforward. Tell us about where it needs to be. Now I can go to the side view if I click on this X axis, the red one here. That and then I want to click on this and change it from perspective to isometric or Ortho graphic. Whichever you prefer. All right, so I'm gonna take this. I'm gonna move these forward a bit like this. That looks pretty good. OK, so now let's do the back. Let's select this one and this one. And let's move these back to about right here. Okay? That looks pretty good. How is Thehyperfix of the vehicle? I wonder. What do you think about that? Should it come down some? Let's tumble around and see if we can see inside. Here. Um, let me change back to perspective. Right here, Colonel. Scroll out some. And now let's take a look under here. Well, first thing I can see is it's there to close in. So this is the right side. So let's do the A one r and a zero r Let's do those two. And let's pull these out. Some like this. I must do the same thing on the other side. A zero l and I'm gonna control Click a one l and let's pull these out until they're in the right place. Right about there. Okay, Now I feel like that's pretty good. Actually, least we could try it and see how that's gonna work. Yeah, let's go ahead and try that and see, and I mean, click on the X changed to Ortho Graphic, and I want to move this down to just this line right here. So maybe I'll select that whole car route and just pull down just a smidge like this. Well, we'll see how that's gonna work in just a bit here. All right, Go back to perspective. And there we go. Now, what let's do is go ahead and put the materials on here. So I'm gonna select the vehicle first and let's take a look at this. I'll scroll this down. And here the objects that came from blender, the vehicle, the spare tire, the machine gun and the glass. Let's work on the vehicle first. If I select that, you can see over here there's a material here, but it's all great out. We can't get to it. And that's just because unity has created kind of a default material based on some of the information that it received from Blender. But we can't really use the blender materials in here. We have to create new materials. So there's a materials folder right here. I'm gonna go ahead and create that in here, and what I'll do is I'll create a new folder. All right, click and go to create and folder. And let's call this well, which, let's call it Ash kash. I m a TV, That's what it is, Right? So in here we're gonna create our new materials. So I will go to create and material, and this will create a standard unity material. You can see it here in the Inspector. I'll call this Oshkosh vehicle Main. And then let's do that again. The next one we have is the spare tire. So let's create a new one again. Create material, Oshkosh. Spare tire. We go. The next ones the machine gun. Let's create material. Create the Osh Kosh machine gun and then glass. We're gonna deal with here in just a minute with that M K glass asset package that we imported. So now that we have these, let's go ahead and click on the vehicle here. All right, here's that dummy unusable material here. We're gonna click on our vehicle material right here and just drag it straight over into there. And there it is. All right, now, let's try the spare tire. Let's click on that. Here's that material that came in with it. Let's grab the new standard unity material for the spare tire and dragged that in. All right, And now for the machine gun. Here it is, right up here. Let's select it and let's drag the machine gun material right onto it. Then we go. So we've got those materials hooked up. That's good. Now we can do is we can actually apply our textures. Let's do that. Let's come over here to our textures folder. Where is it? Here we go. Here's our textures folder. Let's create a new folder here and call it Osh Kosh textures. And let's open that up and right click and let's go to import new assets. Now in here, I can sort by type. This is our exports folder and all these PNG files is what we want. The gun, the spare tire vehicle. Well, we want all of this. So let's just like this shift. Click that and let's just import all of these. And there we go. There they are, so you can select him and you can see them over here. So the first ones here are the gun. So let's select that gun object. And we have our new gun material over here and noticed that these air no longer grayed out . That's because we've got that unity material in there. And let's begin dragging these ends. So we've got gun. Albay dough. Here's the albedo right here. Slits. Grab that, drag it right into there and drop it. Next. We've got the metallic. Let's grab that and drag into the metallic. And next, the normal map dragged that right onto the normal map slot. And it says the texture is not marked as a normal map. So let's click fix now. Here we go. I'll hit the f key to kind of zoom in here and there. We can see the textures on the gun. Right. Okay, That looks pretty good, actually. So let's now. Ah, do the same thing with the vehicle. Let's select the vehicle object over here. Scroll this down here and under vehicle will take the Al Baidoa and drag it into their the metallic and the vehicle normal right into here. And click fix now. And there we go. Now we can see the textures of the vehicle. All right, let's do one more. Let's Ah, do that. Spare tire back here. Let's lengthy object in the hierarchy turned down the material here And where's the spirit tire? Here it is. Let's grab that into this slot. The Al bayed Oh, the metallic into here and the normal map right into there and click fixed now. And there we go. Now we can see the tire. The normal map isn't really strong on this, is it? So we can actually come over here to the normal map slot and come over and instead of one, we could just type in two, and that gives us a little bit more normal intensity there. That's that's pretty good. So we've got a few of our materials on so far in the next video, we need to set up the tires and the glass, so that's coming up next.
122. 119 Configuring the Vehicle Controls: for the wheels. Let's choose one of these. I'll just choose this wheel final L. And I'll hit the F key to zoom in and let's tumble around over here. And for this we need to twirl this down right here and select each of the objects. Now the wheel object here has one of these grayed out materials on it as well, so we need to create a new material for this. So let's go over to the materials into our Oshkosh folder and let's create a new unity standard material and we'll call this Ah Scots Wheel. And we also have a tire object here as well. So let's create a new material for that material. Oshkosh Tire. Here we go. All right, So if we select the real object, let's drag that wheel material onto it. And there it is. And then for the tire. Let's drag that Oshkosh tire right onto that. Now we can go grab our textures and dragged them in. So let's come down to our Textures folder right here and in our ascots folder. We'll select the real object and here's the wheel textures right here. So let's grab this one. The Al Vedo, the metallic and the normal. All right, And then let's choose the tire. And right here we've got the tire, Albay dough, the tire metallic and the tire normal right here and click fix now. And there we go. Now it looks. It's difficult to see how that looks right now in the shadow. So let's work on one over here. We just did the, Ah, front left. Let's do the front right here. So once again, let's select that wheel and what we can do is go back to our materials here and weaken. Just select the we old material that we've already created. Let's just drag that right into there, and it already has. The texture is loaded in, and that's good. And let's like the tire and dragged the tire end. And there we go. So that's what we want for our tires there. Now let's work on the glass. So you recall that we didn't do the glass in the substance painter, mainly because it would have just really bogged down my computer. We can create the glass very easily here, using that M K glass asset package here. Let's go ahead and open this up and we've got a demo folder here and in there. It's got materials and we've got this glass. 123 This glass zero is probably gonna be just fine for what we need. Let's just choose the glass dragged that glass zero over and there we go. So there are other ones here. Weaken Dragged the glass one. You can see glass too. How they changed glass three. So there are other ones here that you can play with, but honestly, this glass zero is just fine. Now, I'd kind of like it to be tented just a bit. It's just a little bit too clear. So we'll twirl this down. And in this color, I want to change it to just a slight blue. Move it over to here. But we can't see it yet here, And And the reason why is this Al Baidoa is is it zero? So let's just click and drag that upto one. Actually, I'll just type in one here and now you can see that the color actually affects the material . Now that's a little bit too much less bring it right over to maybe something like this. There we go. Yeah. So there's just a little bit of attempt to it. That's all I wanted there. All right, so we have our vehicles set up with our textures. Now we need to do is create pre fabs. And a prefab is just a game object, like our vehicle or the tires that have all the settings. Kind of pre done, all set up. And we can save the object and all the settings just the way we have them as a prefab. So to do that, when I'm gonna do here, is just let me, ah, close all of these up and we've got a pre fabs folder here that came in with the vehicle tools. And I'm gonna create a new folder here, and I'm gonna call this Oshkosh pre fabs. There we go, and I'm gonna open that up. And the way you create a prefab is you just dragged the object from the hierarchy into the project panel. That's it. That's all you got to do. So, for this, I want a prefab of this vehicle here, So I'm just going to click and drag and it says, Do you want to make original prefab or variant and I want an original. So we'll just click that. And there we have it, and you can see now it's got all the materials on it, right? That's what we want. Now, I also want one each of the tires, the L and the R. So we've put the materials on this one and this one. So I'm gonna just say, click this one and dragged down to here create unoriginal prefab there. It's like this one and dragged down to here. And there we go. So now we've got pre fabs of each of our objects with all of the materials and textures on them. So what I'm gonna do is remove all of this. All of these pieces So the wheel delete the wheel, delete. I want to leave everything that's part of this car route. But I want to remove all the wheels that we've parented here like that, and I'll go ahead and remove this as well. We don't really need that. Let me bring back this cube so we can just see where we are. Right here. This is where we are currently, we've got this all set up. We've got a pre fabs. In fact, I think I'm gonna come down here and change the name to prefab here. Vehicle prefab. Well, prefab underscore l cause I still don't know which one we're gonna use here. Here we go. I just want to be able to see that these air pre fabs. There we go. Okay, so now it's actually begin to configure the car. What I've done so far is just kind of place the objects and add the materials and textures . Now, let's configure the car. So once again, I just want to take this prefab here, the vehicle one and drag straight up onto the car route. We want to do that. Uh, I'll hide that cube again. There we go. Now, if I select the car route, I can see over here. It says wheel shape in the inspector and it says there's no game object here. What I'm gonna do is I'm gonna drag the wheel prefab. I'll begin with the left one, and I'll drag it and I'll drop it right into here. Now nothing really happened. But now that object is going to be associated with each of these wheel objects. And when we hit the play button. They'll be parented as soon as the game starts. So to be able to see that we're gonna need to move this camera. I'm gonna select its camera here. You can also select it over in the hierarchy and I'm gonna click right here and kind of drag it over. And then I'm gonna go to the rotate tool and click and drag and rotate this around Kind of like this here so we can kind of see those tires. All right, So now that we have this, let's go ahead and click play and see what happens. I love it. Look at that. So what's our problem here? Let's click play again to turn Turn this off. So what we need to do here is get rid of that cube because it's bringing its own box collider with it, and that's causing some problems, as you can see. So what let's do is delete that cube with its selected over here in the hierarchy, I'll just right click and click delete, and now in the vehicle, prefab, this vehicle object. We need to add another collider to this. So let's come over here and click on add component and we want to go to physics. And then, instead of ah, box collider, let's choose this mesh collider, and what this will do is it will actually create a cage around the entire thing. So if we click on this convex right here, you can see the mesh collider and how it's been formed around the object. And when you turn on convex, that just means it's gonna be able to collide with other colliders as well for other objects. All right, so now that we have that in place, let's give this one more try. I'll click out here to de select everything and let's click play, and that looks a little better. So if I hit the W key, you can see it moves forward and weaken. Turn the tires here. The tires are going into the plane into the ah, ground plane. We're gonna have to deal with that, but also when we turn it off by hitting the play button there and let's turn it back on and take a look. The wheels, they're backwards. We we we are looking at the inside of the wheels on the outside instead of the outside with the bolts. So what that tells me is I have chosen the wrong object. We need to choose the wheel Prefab are so okay. I'm gonna come back up to the car route and instead of wheel prefab l. I'll grab that wheel. Prefab are drag it right in there and let's hit the play button again. There they are. There, the bolts. Okay, so we have the tires positioned correctly. That's good. The last thing I think we should try is sizing up the wheel objects a little bit more, so these aren't going down into the ground plan. Let's work on that. So if we select these guys, if we select, say this one here, so let's take this up a little bit bigger. So this'll won the scale. Here is one. Let's take it up to maybe 1.2. Let's try that. I'll type in 1.2 for all of these like that, and let's do the same thing for all of them. Let's try this 1.2 and 1.2. Okay, so we've got those. Now let's select that car route and make sure this thes air above the ground Yet they are. All right. So with those now in large, just a bit, let's go and click the play button and let's see. I can hit the W A S D keys and go forward and turn. You can see they're rolling so you can see how the vehicle tools kind of takes care of the tires rolling in turning right, Perricos. All right, I think we're doing pretty well. I'm gonna hit the X key toe, put on the on the brakes and let's turn the game off. So in the next video, we'll deal with setting up the camera and then maybe taking it into a test environment and playing around.
123. 120 Testing the Vehicle Controls: Well, now we need a camera to follow the vehicle as we drive around. So what we can do is use the standard assets for that. Let's come down here into the Assets folder and right down here under standard assets. Let's go into cameras and then we'll go into pre fabs. And here's that multipurpose camera rig. So I'll just take this and drag it up into the hierarchy and drop it there. And you can see that when I did that, it added a new camera. The problem is, is within unity. You can really only have one camera in the scene at a time, So let's take this main camera and let's delete it, right click and elite. All right, now for this. If we select this, we have a target right here, and it doesn't have an object in it currently. So what we can do is take this car route and drag it into there and drop it. Now that camera is going to point at that object, so let's give it a try. Let's hit play and see what happens, and there it is. So if we hit the w key, you can see it kind of goes, and we're following it now. It's hard to see because we don't have a texture on our ground plane. But we're following the vehicle now, so I'll hit the X key to come to a stop and let's go ahead and hit the play button again to turn it off. So if we select that camera, we can maybe get it a little bit better. Let's let's bring it up some push it back a little. Maybe we could turn it down a bit, too. Let's click on the Rotate Tool and rotate down just a bit like that. There we go. Let's hit play and let's see how that works. Still not quite right, is it? Let's maybe tilt it down a little bit more here like that, and I'll hit play and there we go. So now we can see it on the ground. And if we hit W, you can see it moving around, turning, all right, so let's go ahead and turn off the game there. Now that we've got this generally in place, let's bring in an environment to test it. And to do that, I'm gonna grab the environment out of the test scene that came with the vehicle tools. So what I want to do? First of all, let's be sure and save all of this. So our current scene is this sample scene right here. I'm gonna press control s to save that sample scene. And then I'm also gonna click file and save Project, cause I want to do that as well. All right, So if we go into our scene's folder here, we can see here's thesis Ample seen were in now And here's this test track that comes with the vehicle tools. So I'm gonna click on this and let's open this one up, and here we go. Let me zoom out a bit so we can see it. And what you can see here is a whole big test environment. I'm gonna click on the track here and hit the F key. And then let's zoom back in here. There we go. So we can see this whole big environment weaken drive around in now. It has these vehicles in it that we can play with two. So if I let me select that vehicle and hit the F key so you can see this one here it is set up in a very similar way. It's got the collider cage. It's got the wheels and everything in there. Well, let's click the play button and see what happens. Let's just click this and here we go. We can hit the W S Di Buttons or the arrow keys. We can just hit bad and go forward week in turn, weaken. Just drive around. We can hit if the X key to come to a stop and then we can hit the R key to reset. We can also change vehicles. They have scripts in here so you can change vehicles. I can hit the K key. You can see that here and changed to a race car. You can hit the cakey again and change to a truck and again and back to the little family sedan here. So this is a great project to kind of see what all the settings here in the vehicle tools do. This easy suspension script, the wheel drive script. You can really get a sense of what it's doing here, but ultimately what I want is just the environment. I'm gonna turn this off right here. What I want is just this whole thing's to bring into my project so that I can drive around with the car that we've set up. So to do that, I'm gonna create another prefab. I'm gonna come over here to the environment group here and let me go down to pre fabs. Where's our pre fabs? Here. Here we go. Now it's got environment. Rock ramp, things like that. These are all the individual items that you can drag in here. But what I want is this whole environment right here. So I'm just going to click and drag and drag it right down here and there it is. So now if we go back to our other scene, I'm gonna go to scenes and go back to our sample scene that we've been working on Double click that and I don't really want to save what I've done here in this scene. So I'll click, Don't save. And here we are, back in our seen here Now I could take this ground plane and delete it. Let's just right click and elite. And now in this pre Fabs folder right down here, where is it? There it is I want to take this environment prefab. Just drag it right up here and there we go. There it is. So now we can play around with this in here. Let me choose the car here. And I'll also control click that multipurpose camera rig because we want that today with our car. And I don't know if you can hear this, but my computer is really working hard. The ah fans turned on and everything, and that's because it's trying to bake all the lighting. And I don't need that. I'm gonna come over here to the lighting tab here. And if you don't see this, you can always come over here to window rendering and lighting settings here. But I'm gonna turn off this baked global illumination just for now. Ultimately, I think I'd want that if I'm going to publish the game. But for now, it's just causing the scene to slow down way too much. All right, I'll go back to the Inspector and let's give this a try. Let's see what happens. Ah, I think I want to move that up just a little bit more. Let me do this. Move it up to here something like that. Okay, so now I'm gonna hit play, and there we go, And let's go. Let's see what happens. Going kind of slow. Maybe it'll pick up speed here. Yeah, it's picking up speed a little bit. It goes, So yeah, we're gonna want toe Just the settings here, I think, but yeah, this is kind of cool. Uh, I think I want to adjust the camera so I can see ahead of me a little bit better, but yeah. Oh, let's go over this thing. Ah, yes. Oh, that's great. Okay, uh, let's adjust this again. I'm gonna turn off the game. All right? So if I come back over here to the car route, we can see the max torque years 300. If I want to increase the acceleration, I could take this upto like 3 54 100 And you can play with these whatever you want. You know, try different settings here to to get the feel that you want also for this vehicle. I don't think it should be just rear wheel drive. I think it should be all wheel drive because it's It's an all terrain vehicle. Right? So let's increase the acceleration with this Max Torque will changed all wheel drive. This Ah, natural frequency is how bouncy the shock absorbers are. And the damping ratio is how quickly they come back from the bouncing. So you can adjust these. However you like a swell, um, the masses how heavy the vehicle is. So I think maybe I'll change this to, ah, 1500. Let's do that. And the the Max angle here is is the turning radius. So how how tight of a turning radius it has. All right, let's give this a try again. I'll hit play, And here we go. Yeah, it's picked up a little bit. Well, I increased the acceleration, but also increased the mass a bit, too, but yeah. Oh, and I forgot to, um, change the camera. So let me do that. Turn the game off again. And the camera. I want to take this right here. This camera right here. Ah, let's scroll this down, actually, and choose the main camera. And then I want toe tilt it up just a bit. So let me just tilt that up like this. Let's try that. I'll hit play, and here we go again. And off we go. Yeah, let me turn. I'm gonna turn through some of this here, see what happens. Oh, yeah. You can see the ah. Tires going up and down. That's nice. Yes. So this is what you need to do is just go through this test environment, test it out. Course, go off road a bit if you want. And ah, see how all your settings are affecting everything on the ah, I mean, find an off road bid here. Ah, well, I'm going to get around the railings here. Bump off the railing. Yeah. Let's go. Let's go over here. See what happened. Uh, well Ah, I love it. Here we go. Yeah, this is doing pretty well. And as I said, you are gonna want to go through and try and and adjust all these settings the way you want them. Go ahead and turn the game off. And, of course, just play around and have fun, because in the end, this should just be a lot of fun.
124. 121 Conclusion: Well, thank you for joining me on this journey through Blender 2.8. Game vehicle creation. We've come a long way. We began the entire process with a single polygon plain, and we've gone through the three d modeling the UV mapping, creating a color I d text oring in substance painter and configuring the vehicle here in unity. I hope this course has been helpful for you. I know. I've certainly had fun creating it. It's just a joy for me to see something like this come to fruition to go all the way from beginning to end and come out with a playable vehicle. I really hope you take what you've learned here and take it to the next level. I'm looking forward to seeing your vehicles in games very soon. Well, thanks again for joining me. Check out my other courses and I hope to see you very soon. I'll take care
 Darrin Lile, Blender Foundation Certified Instructor