Transcripts
1. Course Overview: Welcome to Blender 3,
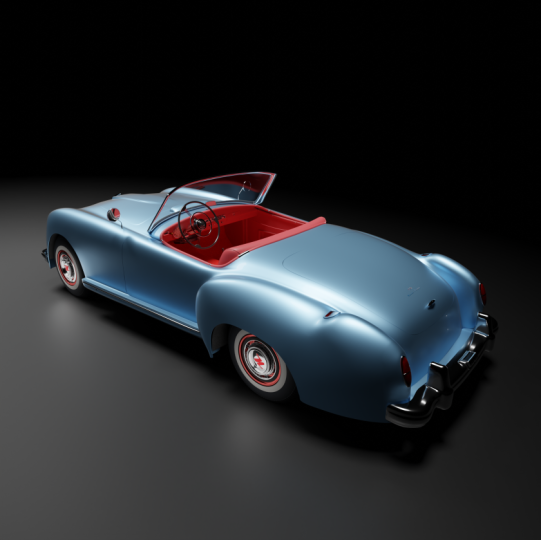
vintage car creation. I'm Daron Lyle and in this
course we will be creating this sweet little car,
1952 nationally Roadster. Now, even though we
will be ending up with a fairly complex model at
the end of the project. This really is an
introductory course. We'll be moving at a steady pace throughout the beginning
of the course. And as we go on, we'll begin to pick
up the speed a bit. I do assume a little bit of
experience with Blender, just being able to
navigate in the 3D view, move, rotate objects,
things like that. But I will always show
everything I'm doing and I'll also try and explain why
I'm doing what we're doing. The project files for the
course are available. You have access to all of
the blender scene files, the reference images, etc. If you ever have a problem,
you can always just open up the same blender file I'm using to get a better
sense of what we're doing. We'll begin the project by bringing in some
reference images here. In the next couple of videos, I'll show you my process for cutting up these images and
bringing them into Blender. Now I happen to use
Adobe Photoshop, but this can be done with any paint or photo
editing program. Once we bring in the
reference images, we then begin the
modeling of the car. And for the vast majority
of this project, we will be using blenders,
subdivision surface modifier. Throughout I'll be talking about my thought processes and strategies for creating
each of the objects here. Now once we're done
with the modeling, we'll move on to the materials. We'll use blenders
node editor to set up materials and
textures for the car. To get it ready for rendering. We'll go over how
to set up lights, use an HDR image, and render the scene using
the Cycles Render Engine. We'll talk about how
to animate the camera and how to bring those
animations into blenders, video sequence editor so that we can output a
video of our work. Forward all you will
only need Blender from the first polygon to the
final exported video. We will only use Blender
for the entire project. I'm looking forward
to getting started. I hope you are too. In the next couple of videos, let's take a look at how
we can prepare and bring our reference images here into Blender and set them up to
begin the modeling process.
2. Preparing the Reference Images: Before we begin modeling, let's set up our reference
images here in the 3D view. While we're modeling,
we can see the side, front, top, and back views. Now what I've done
is I've gone out to a website called
the blueprints.com. And you can see here
that I've found some images of a
Nash Healy Roadster. What we're gonna do is go
through the process of cutting these up and preparing
them to take into Blender. And you do not need to do this. These images are in the project
files already prepared. You can skip to the
next video and begin by bringing those images into
Blender and begin from there. Now I'll be using
Adobe Photoshop, but you can use any
paint program like Krita or GIMP or Corel paint, any paint program that
has multiple layers and you can copy and
paste will do just fine. I've seen many different
ways to do this, but this is the process I use. So I hope it'll be
helpful for you. All I've done is just downloaded the image and then I've
opened it up in Photoshop. So let's go to Adobe
Photoshop and click Open. And here is our
image right here. And I'll just open that. Now the way I begin is I
usually find the largest image, which clearly is this
one from the top. And begin with that, because what I'll
do is I'll cut this out and make this image be the resolution or the size of all the rest of
the images as well. So here, let me show
you what I mean. I'm gonna go over here
to the Marquee Tool and I will click and drag
a marquee around this. And let's then press Control C, and that will load that
selection into the clipboard. I'll then go to File New. And here's our clipboard
information here. I'll select that. And then let's click on Create. I'll just take this and move
this down here like that. Here is the size
of that marquee. Now with this here, I'll press control V and paste that image
into that frame. All right, so now let's
call this top view. Let's just call it top. And let's go do that with
another one of the images here. I'll click this tab over here, press Control D to deselect. And now let's bring
in the side view. I'll drag a marquee
around it. There we go. Press Control C. Click
this tab control V. There we go. Now the trick here
is to get this image to match the dimensions
of the one underneath it. So I'm going to select this one. Let's go ahead and give
it a name, call it side. And I'll come over
here to the move tool. Click on that, and
then I'll just press the arrow keys to move it over a bit so that we
can see through it. Let's come down here
and change our opacity. I'll just drag this down to, I don't know, 30 or 40 or so. Just so we can see if it's about the same length as the
one underneath it. So I'm going to move this
over a bit and move it down. Just I see that the edge of the bumpers here
looks like that's a pretty good place to measure. And yeah, it looks like it's about the right size,
so that's good. All right, so I will take the
opacity backup like that. We can move this
backup if we want. I'll just use the arrow key
and move it back up a bit. And I'll hit enter. Okay, so now we've got that one in place. Let's bring in another one. I want to go to this tab, press Control D. Go back to that Rectangular Marquee and click and drag here
for the front view, Let's bring this one in. Control C. Move to this tab
control V. And here we go. Now we've got to
figure out how big this should be and where
it should be placed. So let's change this to front. I'm also going to reduce the opacity for this
one temporarily. And let's go to the
Move tool over here. And I'll hit the arrow key and bring it down to the tires, line up pretty well. How about the top here
if we zoom in a bit? Yeah, the top of the
window is pretty well aligned as well as the
bottom of the tires. So this one looks
pretty good as well. I will move this backup. Let's come over here, turn
our opacity backup like that and I'm gonna
go ahead and hide the top and the side for now. Let's do that. Now let's come back
over to this tab and grab that final image, the one from the back. Press Control D to de-select. I'll hit the M key to
turn on the marquee tool. Unless than click and drag
this right here, Control C. Go back to here, control V. Now let's call this
back, and we'll take. The opacity down a bit so we can see the front view here as well. It looks like it's
a little bit off. So let's see what we
can do with this. I'll go back to the move tool. The tires are off a bit. Let's move these over. Move it back up. And it looks like it's
still a little off, even though this tire
is in alignment, this one is not. So let's move it. So it centers itself. It looks like it's just
a little bit small. Let me bring the opacity
up just a bit here. Let's see. The
sides are correct. The window seems okay, but the tires are off and that very well could be
the way the car is. Maybe the back tires are
actually set in a bit. Everything else looks
pretty good though. I think I'm going to
leave it the way it is. I'll just hit enter here. Let's zoom out a bit. And now what we can
do is go through the process of exporting each one of these
out individually. Let me take the opacity backup
for the back view here. And I'll turn these off and
just have the top view. Now, the thing
about the top view, we need to think about how
these images are aligned. There'll be properly aligned within the 3D view in Blender. When I'm working with images and setting up a side view here, I like it to be facing to the
left and we have that here. If we're going to have
this face to the left, then I happen to know that the top image needs
to be facing down. We're going to
need to turn this, but I can't turn it right
now because if I turn this image or this Canvas currently it will turn all
of the others as well. We're going to have to export
it out and then turn it. Let's give that a
try. First of all, I'll go ahead and do this
one and click File Export, Export As I will
export as a JPEG. And if I export it out, let's put it in the
reference images drawings. I've got a folder here
for the drawings. Let's call this Nash Healy top. And we go and that's
been exported. Let's then hide this
and go to the sideview. We'll do the same. We can
press Control Alt Shift W. Then we can export this once again can be called
nash Healy side. Save that. We will bring up the front
view Control Alt Shift, W, Export, select one
of these and then just change this to front. There we go. Then this one here, the back Control Alt
Shift W, export. And let's change this to
the back. There we go. Now that we've done that, we need to do one more thing. As I said, we need to
turn that top view. Now, I'm gonna save
this file as a PSD, as a Photoshop project. So I'm gonna come up
here to File Save. And I'll just call
this Nash Kelly. Orthographic views. I'll just do that. And then let's go to
File and Open and open up that top JPEG
that we just exported. Here it is. And now let's
turn it 90 degrees. So I'm gonna come
up here to image, image rotation, and we'll turn it 90 degrees
counterclockwise. There we go. Now what we need to
do is save this out. However, as I'm looking
at it in this direction, it looks like it's just a
little bit tilted this way. Let's test this out. I have my rulers turned on. You can see these around
the viewport here. All I've done is
gone to View Rulers. But once you have those rulers, you can click in here
and drag out guidelines. So I'll bring one and put it
right down the center here. Maybe it's got
snapping turned on. So let me go over here to
View and turn off snap. Then I'll hover over
that again and drag it over till it's about right
in the center of the car. And then I'm gonna click
and drag over here again. Put one over on this
side of the car, and then put one over on this side of the car
just to see and you can see once I do that, yeah. It's a little bit turned. You can see there's overlap
over here on this side. What we can do is
just come over here to the move tool and
use this to turn it. But to do that, we need to make this so
it isn't a background. We need to change this into a normal layer and
all we have to do is just double-click it and
click Okay. And now to layer. Now we can see our points
around our image here. And I think what I want to do is just turn this right here, just hover out here. Click and rotate that just
a little bit about that. Let's see how that
works. I'll hit Enter. You can see there's a
little bit of overlap here where the white
has been moved away. We can go ahead and add another
layer here, right here. Drag this down to the bottom. And with our color
at pure white, we can come over here to
the paint bucket tool and just click in this layer right here and fill
that with white. Alright, I'm going to press
Control Zero to zoom out. And here we go. All right, now I can come
over here and turn off the Canvas guides here. And now we can go ahead
and export this out. I'll come up here
to File Export, Export As, and
let's click Export. And we already have one
Nash Healy top here. Let's just call this
nationally top two. And that's the one we'll use when we take it into Blender. In the next video,
we will do that. We will open up Blender and bring these images
into our 3D view.
3. Setting up Reference Images in Blender: All right, Now it's time to bring those images here into Blender. Let's go ahead and hit the a key and hit Delete to delete those default objects. And then what I'd like to do is go to the view where the image is going to be. So let's say we begin with the front view. I'll press the one key on the number pad and that will take me to the front orthographic view here. Now that we're in this view, let's go ahead and bring in that image. So I'm going to press Shift a to open up the Add menu and then I'll come down and go to Image and reference. And then let's browse to the reference folder into the Drawings folder. And what I'll do is change our view here. I'll click this button right here so we can see the images. And since we're in the front orthographic view, let's bring in the front image. I'll select that click Load image in. There we go. Now if we tumble around, we can see there it is. Alright, now let's go ahead and bring in another one. Let's bring in the side view. And to do that, I'll hit the three key on the number pad and then press Shift a image reference and we'll find the side view JPEG image. And then we'll load that in as well. But actually, while we're here, I just want to point out that we have this setting here aligned to view checked. And that's why the image is actually aligning itself to the particular view port, wherein if we turn this off, the image would just appear flat on the ground plane. Here let me show you. I'll just click load and there it is flat on the ground plane. So if we don't have that checked, every image we bring in will be like this. So in press control Z and hit that three key to go back to the right orthographic view, shift a image reference, and let's grab that side1, turn on a line to view. And then we'll come down here and click Load image. There we go. So now we've got two of them in. That's good. Let's now go to the top view with the seven key on the number pad. Once again shift a image reference and let's be sure and choose that top to version two that has the car pointing downward. So I'll, oh, let's just move this side over here. Here we go. So I'll bring this one n. And now we can see we've got our images in here. I think first of all, let me just grab this one, that top view. I'll just click it and select it. And let's bring this down. I'll turn on the move tool here and click and drag and drag this down a ways. Now we can set it to a particular distance in the z-axis by pressing the End key. And over here in the item tab, you can see here we've drag that down negative 1.4 meters. So we could take that, let's say down to negative two. Let's do that. And then let's click on, say, the front view. And we're going to take this front view back toward the back of the car. And then let's click the side view and we'll take the x-axis here and drag this back as well. Now we can put these in specific distances to so in the x-axis we could take this and say make it negative three, and we can take the front and make this positive three in the y-axis, so we could move those back like that. Then let's take these two and let's drag them up. So let me hit the three key. And I want to drag this up. So this line here where the tires are, is the same as the ground plane here in the 3D view. So you can see it's kind of lined up with that. And we can get a more precise placement if we reduce the opacity of these. So say I select the side view and come over here to the object data properties. We can then turn on the opacity setting and click and drag and drag this down quite a bit. Maybe I'll take it down to 0.2. Let's try that. And then if I hit that three key on the number pad, I can now see through this to see exactly where I want to place that ground plane here, something like this. Let's, let's do that. All right, Let's do that same thing with the front view. I'll press the one key. And with this selected, I'll come up here and turn on the opacity setting, and let's just type in 0.2. And then I'll click and drag and the z-axis and just place that right where we want it to be. Okay. Now it's tumble around and might as well go ahead and select that top view. Turn on the opacity and type in 0.2 as well. Alright, so we have these so far. Let's go ahead and give them a name. This one we can call side, this one we can call front. Let's do that. And this one of course we can call top. All right, now we have one more to bring in, but before we do that, I want to take care of something here. If I tumbled around, you can see that even from the back, I can see the front of the car, and that's kinda confusing. In addition, we can see the image on the back of these and I don't think I want to do that. I want to select this image and only be able to see it from the front. So I'm going to click here, and that turns that off in the back. But we can see the front. And let's do that for these as well. I'm going to select this one. Turn on front. So now we can't see it from the back and make this one only visible from the front as well. All right, so we can go instead of two, the one key on the numpad for the front view, we can press Control 1 and go to the back view. Now, from this view, we can bring in the back view of the car. So let's press Shift a image and reference and then we will bring in the back of the car, the JPEG image, and then click load, and there it is. All right, so with this selected, let's once again turn on the opacity setting type and point 2. Now we can just grab this in the z-axis and drag it up so it sits right on this axis, right here. There we go. Now if we tumble around, we can see there it is. Let's move it back in the y. Let's type in negative three and the y axis over here. And then we want to turn off the back. Let's come over to the object data properties and we'll click on front here. And there we go. Now we've got all of our images in. So as we begin modelling the car, we can place our objects a little more precisely. The last thing I'll do here, oh, let me rename this. I'll change that. And then let's rename this collection. I'll just call this reference. There we go. And the last thing I want to do is ensure that I don't accidentally select this and hit G and move it out of place. So what Let's do is let's turn off the ability to select these in the 3D view. To do that, we can come over to the outliner. And if we pull this filter's menu down, you can see that we've got restriction toggles here, and only three of them are enabled. I want to enable this one here selectable. So let's click on that one. And now we have this new column of restriction toggles. Now if I come up here and turn off the ability to select anything that's in this collection. Now if I come out here and try and select anything, I can't select them at all. And I can still select them over here in the outliner. If I click on one, you can see it changes to the top view here or the front view, et cetera. But within the 3D view, I can't accidentally select them, move them, scale them, whatever, they're locked in place. All right, so now that we have our images here in the 3D view, in the next video, Let's begin modelling.
4. Beginning the Modeling: Well, when I begin modelling a project like this, I really like to try and begin with something simple, something easy, kind of ease me into the project. And then as time goes on, I'll look for things that are a little more complex. And by the time I'm getting towards the end, I've kinda warmed up and I feel like I'm better able to deal with complex parts of the project. So for me right now it looks like say this trunk is probably pretty easy. So let's work with that. To do that, I think I'll just begin with a polygon plane. I'll press Shift a mesh plane. And here we go. Let's press the seven key on the number pad. And currently if I try and select it, I can't because look at where it came in. It came in within the reference collections, so I'm not able to select it. So let's just click and drag that out to the main scene collection here. And now if I come over and click, I can select that now. All right, so I'll press Alt Z to turn on x-ray mode here. And let's just slide this up. Maybe I'll scale it down a bit like this to get it kind of in place. And there we go. There's the beginning of our car. Alright, I'm going to tab into edit mode and I want to split it down the middle. So then I can apply a mirror modifier. Let's press Control R to insert an edge loop. And if I hover over an edge, it will try and put that new edge perpendicular to it. So now that it's where I want it, I can click and then right-click to ensure that it goes right down the middle of the object. All right, Now I'm going to hit the three key to go to face mode. You can see those different views or selections up here, we've got vertex where we can select a point. We've got edge and face, and each one of these is the 12 or three key. So if I hit the three key on the keyboard, I can choose this face and I'll just hit Delete and choose delete faces. Now if I come over to the modifiers panel, I can pull this down and add a mirror modifier. And there we go. Now we've got a situation where say if I go back to vertex, select and select a point and hit the G key, if I move one side around, the other side comes along with it. Now one problem I have is if I take this point, I'm going to turn on the move manipulator here. If I take this point and pull it, it can separate and I don't want it to do that. I want anything that's on that center line to stay connected, to stay clipped together. And here we can turn on clipping. So it'll do that now if I select this point and try and pull it apart, I can't. And if I take this point and slam it back into the middle, now if I hit G or try and move it, I can't, I can't move it off that center line, so that's good. In addition, if we want to select anything over on this mirrored side, we can turn on the cage on the other side. Now you can see we can select a point over here as well as over here. And when you do, of course, the selection is still on this side. This is the only real side over here on the right. The other side is just the mirror. Alright, so now what I'm gonna do is just take some of these points and hit G and begin moving them into place. And I can kind of put them right there to get it a little closer to the shape of the trunk. But as you can see, it needs some work. We need a few more edges. So I'm going to press Control R. And I'm going to click and click again here. And now I have some points where I can select and hit G. And maybe I'll move this one here. And this I can move up into here. And you can see I'm just beginning to get a little bit more close to the shape of the trunk. Now is press Control R. And I'll scroll the mouse wheel, maybe just once and click here and click again. And now I can take these points and move these out just a bit to get us a little bit closer to the shape of the trunk. Now, if we tumble around, you can see that that polygon plane was created on the ground level. We don't yet have it in the right place from the side view. So let's hit the three key. Let's hit the a key to select all of those points. And let's move this up. Now we can get the R key and turn it a bit and bring that down some. So now we're giving it a little bit closer into place here. We can also go to the back view by pressing Control 1. Now we can begin taking a look at this and see how we're doing. If I want to move this down to about here, I'm trying to align the top. But now we can take these. I'm going to press Alt and click to select that row back here. And we can take these and just hit G and move these down here like this. We could maybe move this whole row of edges down as well. I can just click and drag those down. And then we can begin taking some of these in selecting and maybe hit G and move these down like this. So just moving things around trying to get them in place. So. Looks like it's conforming to the three-dimensional car that the images here represent. So I'm gonna tumble around again all Z to come out of x-ray mode. And that's not bad, That's looking pretty good. Let's come over to the side view and see it from here. And you know, what we should do is we should take a look at it in Quad View. Blenders. Quad view can be accessed by pressing Control Alt Q. And now for this one up here, we can tumble around and take a look at it here, but these are locked into the orthographic views. So this one here, you can't tumble around. If I hit middle mouse button and hold and drag, I can't tumble here. Not might be kind of nice to be able to see this from the back view currently, we can only see it from the front. I'm going to press Alt Z here. And even if we press Control 1, only this changes, right? That doesn't help us much. I want this to be the back view, at least temporarily, while we work on the trunk. To unlock these views, you can press the Enter key over here, come over to view. And if you come all the way down here to Quad View, you can turn off lock rotation. So I'll turn this off. Now. The End key here, if I come over and hover over this view, I can press Control 1. And now we're in the back view. That's pretty helpful. I like that. So let's tap back into edit mode and now we can begin taking some of these and maybe moving them up just a bit like this. Just a bit. Maybe move this one up a bit. So I'm just trying to curve this a little. So it may be conforms to what at least I think is the shape of that trunk. I'm going to pull this up, sum this up as well. There we go. Maybe I'll take these down just a bit as if it's curving down just a little here. There we go. And of course you can come to the back view or any of the views that would be helpful. And pull some points around here like this. Maybe I'll pull this down just a bit like this. And then we go. All right, let's take a look at it now in the 3D view again, I'm going to press Control Alt Q, and then I'll press Alt Z. And here we go. Here is the beginning of that trunk. Now, it's pretty blocky. We can of course, add a subdivision surface modifier to it and we can also smooth it. So to add a subdivision surface modifier, we can come up here to add modifier. Click on subdivision surface. And then let's take this viewport levels up to two here. And then we'll also turn on the cage here so we can see it when we tab into edit mode. And then finally, let's smooth this. We can right-click and choose Shade Smooth. And there we go. Now it's looking pretty good. All right, we can see that that's probably pretty close. Let's hit the seven key tab into edit mode. And now we can begin to move just a little bit more here we can move these points out to match the drawing just a little bit better now. Something like this. All right, and there we go. Now, the last thing we could do is change the material here in our viewport to get a sense of how it might look as paint on a car. And we can do that with our mat caps. And they are up here in these viewport shading choices. Up here we have a pull down. And here we can change the lighting and materials in the viewport to mat cap. And then if we click on this, we have our choices of what we want to use. And right here, this one right here is really good. This metal car paint mat cap is really good. So let's click on that. And now if we tumbled around, we get a really good sense of what it's going to look like with a shiny material on it. And we can use this to see if there's any dense or warps or any problem areas that we need to fix. So this is going to be helpful as we move forward. All right, Now that we've got our trunk in the next video, let's work on the hood.
5. Modeling the Hood: Before we start on the hood, let's just change the name of the trunk object. We've just got it as plane here, let's just call it trunk. And before we create our polygon plane for the hood, let's go ahead and select the scene collection at the top of the outliner. And now when we create a new object, it will go into that collection instead of the reference. All right, so let's press Shift a mesh plane and I think I'll change back to that studio lighting here. So now let's go to the top view with the seven key on the numpad. I'll press all z. And let's pull this forward. And then maybe shrink it down a little bit like this and get it in place about like that. And there we go. Now let's tab into edit mode and let's cut it in half. Let's press Control R and drop an edge loop down the center. I'll hit Enter two times to make sure I don't move that edge. And then I'll hit the three key and select this side. And let's hit Delete and delete faces. Now with this, let's go ahead and go to the Modifiers tab, Add Modifier and choose mirror. And let's also be sure and choose clipping here. And let's turn on the edit cage here. All right, so if I hit the one key to go to vertex mode, we can begin moving these points around. I can hit G and pull this up to here. And let's move this one over to here. So we're beginning to get that basic shape. Let's go to the side view, and let's hit the a key and let's bring this up so that the back is inline right over here. Now these points, of course, are not in line. I'll click and drag here. I've changed this from tweak to select box so I can click and drag. And then I'll use the move tool here. I'll drag this down maybe to there and maybe move this down just a little bit like that. So we're just beginning to get that basic shape. And of course we're going to need more edge loops to curve that. So let's go to the Quad View. Let's press Control Alt Q. So we can see these four different views. I'll tumble around here in the 3D view. And let's zoom in here so we can see the front and the side and the top. And let's begin adding some edge loops to kind of reshape this. It looks like we could grab this point and move this down a bit like this, right? Maybe move it out just a bit here. And there we go. And then let's add an edge loop. Now let's add an edge loop this way. First I'll press Control R and click two times. And then I'll come over here onto the side view and drag it up a bit so we get that curve going there. Let's do that again. Let's press Control R and drop that here. And then I'll click and drag and the z-axis and pull that up a bit. Now as we do this, we can begin moving these points around. So I'm going to hit G and move this over. And I'll move these over. So I'm just keeping an eye on the reference images here in each of the view ports that we never get too far out of alignment as we're adding new edge loops. Alright, I'm gonna go ahead and add one up here. And it doesn't look like we need to do too much here. I'll just bring that up a bit and bring this point down a bit over in the front view like this. And then let's begin adding some edge loops. This way as well. I'll press Control R and I'm just going to drop this right here and then use these points to kinda pull up. But it looks to me if I pull up like this, then I've got a problem here. So what Let's do is let's rotate this line of points from this point here. So instead of just pulling all of these up, Let's de-select this with Shift click and then select it again, shift click one more time. And notice that the color change just now white. And that means it's the last one that we've selected, and therefore it's the active component. And if we come up here to this pull down right here, this transform pivot point, you can see we've got an active element. Currently we're on median point, which is basically the center of the selected components. We can change this to active element. And now you can see our Move. Gizmo has moved to this point, right? We have it here, even though all of these are selected, our pivot point is now at the active element, which means we can come over here into the side view and hit the R key and rotate at that point, right? So I can rotate these up so we get a little bit more of a curve there. Maybe something like this. We could do that with the center row as well. I could press Alt, click here. Oh, it looks like this is the active point already, so that's good. I can press R and rotate here in the side view, and I'm rotating around the x-axis here. So I can maybe move that up a bit. So it's inline here and we're getting more of a curve there. I think I'll grab this one and move it up just a little bit to get it in line here. Alright, I think we're going to need more edges so we can have enough geometry to extrude this vent on the top of the hood. So what let's do it. Let's add a few more edge loops. I'm going to add one right down here, so we can have an edge at the bottom of that event right here. So I'll press Control R and click and maybe move this down just a bit like this. There we go. And then let's move it up to keep it in line with that curve. Move it up here. And then it looks like we need to move it down here and maybe pull these out. So once again, every time we do anything, every time we add anything, take a look at all our views and see how we're doing, see if anything needs to be adjusted. All right, it looks like these in here could be, we could maybe slide this along this edge. I'll hit G two times and slide that up. We could do the same thing here. Although we're going to be pulling these down, I think. And maybe we can line these up. I'll hit G two times to slide that vertex along that edge. And do that again here. And then let's go ahead and add that edge loop here, Control R and writing here, I'll drop one here. Looks like we're doing pretty well here. Just going to try and align these up a little bit better. Then maybe let's add an edge out here as well, Control R. And I'll do that one. This one we could maybe move up some. So let's shift select this point and then select it again with the Shift key. And then let's press R x, and let's rotate this up just a bit. We can also hold the Shift key down so it moves a little bit slower. Have a little bit more control over it as we rotate it. So there we go. And then it looks like we're just going to need to maybe move these around a bit. Make sure everything curves in the proper way. You may want to move these down a bit. So once again, keep an eye on all of your viewports. See how they're doing. Alright, now let's press Control Alt Q to come out of that quad view. And let's add a subdivision surface modifier to see how we're doing. I'll come up here to add modifier subdivision surface. I'll increase the viewport levels to two. And let's go back to the top view with the seven key. And now we can kind of see the curvature of what it's doing with that subdivision surface modifier. And now we can take these points and begin moving them so that curvature matches more closely to the reference drawing. So I can begin moving these around to get those in place a little bit better like this, something like that. And let's move these so we can see that these are aligned as well. Maybe I'll move these out some. Take this one, hit G, move it out a bit. So we're just trying to line up the edge of that smooth mesh. I'm going to hit G two times to move this just a bit. All right, let's take a look at it now. I'm going to press Alt Z. And let's also smooth it. I'll right-click and choose Shade Smooth. There we go. And yeah, that's looking pretty good actually, let's come up here to our Viewport Shading and change the mat cap and take a look at it that looks pretty smooth. We can also take a look at it with a different mad cap. There's a silver shiny one here. We could take a look at that. Yeah, I think that's looking pretty good. So in the next video we're going to try something a little different so that we can extrude up out of the hood, this vent right here. And one of the problems we can have when trying to do that is with it's smoothed when we extrude something up or in, it's going to distort the curvature of our object. And there's a great process to help with that using blenders shrink wrap tool. So in the next video, we'll work on that.
6. Extruding the Hood Vent: Now let's see what we can do
about this vent on the hood. I'll go ahead and change the
name of this, call it hood. And before we do anything, I'm going to duplicate this
with this selected list, press Shift D and then Enter. And that's created a duplicate
called hoods 000 001. Let's change the name of
this one and I'm going to call this smoothing mesh. And this is going
to be like a helper object that's going to help us smooth out
any imperfections and artifacts that
we might get when we are adding edge loops to
create this vent in the hood. So with this created, I'm just going to go
ahead and hide it by clicking on the icon here, and that will hide
it in the 3D view. Now we have our
hood object here. Let's begin working
on this vent now. So I'm going to hit
the period key on the number pad to
zoom in to the hood. And now I tumble
around this object. I'll change my Viewport
Shading back to studio. Let's go to the top view
and I'll hit the Tab key. And I'll also press
Alt Z to go to X-ray. Now we need to rearrange the geometry of this so that
we can extrude this up. So what I'm gonna do is just
basically take these points here and let's just slide them down a bit in
line with the drawing. If I just grabbed the y-axis
and drag it like this, it would look okay here, but if we tumbled around, when the cyber, you can
see it's pulled up a bit. So we want to slide it instead. I'm going to press Control Z. And you can see if I
hit G2 times and slide, it'll stay in line with
the shape of the object. So I'm going to hit G two times, slide this down a bit. And I will go ahead and grab the x-axis and
pull this out a bit. I may have to do some adjusting. In fact, why don't we press Control Alt Q and take
a look at it from here, I'm going to tumble around. And let's take a look
at it from the side, front and the top here. Alright, so we've got the
basic shape down here. Let's grab this point
and hit G two times, and I'll slide
that out to there. And let's do the same up here. Slide that out. So we're just basically getting that shape. And I'll hit G and slide this
one out just a bit as well. Well, I'll maybe
move it a little bit over in the x
axis like that. Alright, so we have that
basic shape in the geometry. And I'm pretty sure
that vent goes all the way to the back of the hood. In fact, we should
take a look at that. Let's bring in a couple of reference images to confirm
that that's what it is. I'm gonna come over here and
hover over this corner and click and drag down to
create a new window. And then let's, let's
do that one more time. I'm going to hover and click and drag down here like that. And I can grab this, let me just move this out so we can see this a
little bit better. And then I'm going to
change this window from a properties window
to an image editor. And then let's click
Image and open. And now we can browse to the
reference images folder. And I've got some photos in here that we can
take a look at. Yeah, if we open this up, let me bring this in. It really does look like it goes all the way to the end
there now doesn't it? To make this full screen, I'm going to press Control and Spacebar and then let's
take a look at it here. Yeah. It looks like it goes
pretty far back. Maybe not all the
way, but pretty far. So I think the way we
have it is probably good. I'll press Control Spacebar to minimize that window again. And now let's go ahead
and extrude this up. So I think I'll press Control Alt Q again to
get out of the Quad View. And then all Z to go
back to Solid View. And now, while it's
do is let's hit the three key and choose
these faces here, maybe even this one too. And let's extrude this up. If I hit E and pull this
up, some like this. Let's see how this works. Now, you can see that of course, this smoothing is trying to
round out the corners here. If we hit the Tab key to go to object mode, this
is what we have. So that's not exactly
what we want, right? Tab back into edit mode. So we're going to have to add some edge loops to try
and control that shape. First of all, I think what
I wanna do is go back here and we want to
collapse these down. So I'm going to hit
the one key and let's take this point
and this point, and let's merge these together. I'll hit the M key
and choose at last. And that merges those
points together. Now here, there's
a point in here. We can see it if we press Alt Z or we can come over and turn off the real time subdivision
display if we want to, let me twirl this up. And we, if we turn
this off here, now we can see that. So let's select this
point and this point, hit em and choose at last. All right, so we've
collapsed those down the way it kind of
connects there in the back. Now let's go to the side view
and do some adjusting here. I'll press all z. I've got the select box chosen over here so I can just click
and drag the points here. Let's do that and
let's bring this down. Maybe let's take this one
and bring this one down. And this one here. And then maybe I'll
bring these up just a little bit like this. So I really want it just
to kind of barely slant up and then down a bit to the
back of the hood like that. All right, let's
see how that looks. Okay. Now if we turn our
subdivision display back on, That's what we have so far. So where should we put the edge loops to
kinda tighten this up? I feel like we should first
move these down a bit, limiting it G2 times and move this down
just a little bit. And G2 times and move
this down just a bit so it isn't quite at
an angle like that. I can take this one
and move this over, hit G twice and slide that
over a bit like that. All right, Now let's
hit Control R and add an edge loop in here
and bring it up so it's kinda tight here. And then let's also
do that along here. What I first need to do is
take all of these I think, and just slide these away. So we have some room there, hit G2 times and
slide that up a bit. Do you like that? And then let's also press
Control R and add one in here. And we could add one
out here as well. And we go, maybe this
one could come in a bit. Let me hit G again two times
and slide that n like that. And then we should
extrude this in so we get that little hole there. So let's hit the three key, choose this face and this face. And then let's inset this. Instead of extruding with
the E key, Let's use inset. And to do that, we
can press the I key. I'll press I, and
then I'll push in a bit and look how
they split apart. So we don't want that. But if you look up at
the top of the 3D view, you can see a whole lot of
words up here and you can see boundary here, the B key. So if I have this like this, and before I click, I press the B key to
turn off the boundary. Now I have it like that and
that's more what we want. So I'm going to take
this and click here. Now that's looking pretty good, That's looking a
little bit better. Let's now extrude that in. I'll hit E and push in
a bit. And there we go. So we're getting a little
bit more like this, but we've got problems
down here now, definitely. So I'm going to turn off the subdivision display
once again right here. And what I need to do is
collapse these here as well, because we don't
want this rim it, it doesn't have a RAM
on the bottom of it. So I'll hit the one
key and I'm going to take this and this and hit the M key and choose to merge them at the last
vertex selected. So I'll click that here
and here, m at last. And this one, if I
merge it with this, we'll get a triangle and we
won't keep that edge there. So what we really
need to do is create a new edge right in here that
we can connect it up with. And I think the knife tool would be good to use with that. For the knife tool, we just press K. So we can press K hover over this
edge and click, hover over this edge. Click. And I'm going to
hover over this one. Click, move that out and
hit Enter. And there we go. Now we can collapse this
and this m and at last. All right, and then let's turn our subdivision
display back on. Okay, So that's cleaned up
the bottom there just a bit. We really need to
take this edge, I think right here, and just move it in a bit. Let's just slide this one. N hit G two times, and slide that in a bit, and that'll bend that n. That's pretty good. Let's take this one and hit G2
times and slide that in. Yeah, We're getting there. Okay. And even though this
is really thin, I'd like just a little bit
more of an edge on this. And I think we can do that with edge crease. Let's take a look. If I hit the two key
to go to edge mode, I'm just going to
select this edge, this edge and this edge. Let's try this. I'm going to bring
up the edges menu. You can come up here to edge
and you can see edge crease here or Shift E. So I'm
going to press Shift E. I'm going to move the
mouse just a bit. And that gives us a little bit more of an edge down there. Something like that. And then let's try
this one here. Click this edge, this
edge and this edge. And let's try this one. Shift E. And there we go.
Now we're getting a little bit more
of an edge there. Yeah, something like that. Okay. Let's tab back into object mode and We're
looking pretty good. We've got a little bit
of an artifact right at the base of the event there, we may be able to
press Control R and slide this in and clean that up just a
little bit like that. Tab back into object mode. Yeah, I think that's
actually pretty good. We may want to shrink
that face up inside here. Let me turn off the
subdivision here. So this face and this face, we may want to shrink
these up a bit. If we hit the S key, we can scale those in, maybe bring it down a bit, and even extrude back a
little bit more, I think ie, bring those back and then hit the S key and
scale in just a bit. Let's see how that works. Turn the subdivisions back on. And yeah, we're getting there. So now what we can do is
use that smoothing mesh to try and fix any artifacts or problems
that we might have here. And what I mean by that is if
we change our mat cap here, you can see now where we've
inserted these edge loops. You can see right
here and right here, we've got edges that
are so close together, they're beginning to cause
artifacts in the reflections. Let me come up here and go
to the other mat cap here. And here you can
see them as well. You can just barely
see that there, and barely see that there. So as the reflections happen, you're going to see that
in the body of the car. So we don't want those. We're going to need to
try and eliminate those. And that's what this smoothing
mesh is going to be four. So in the next video, we will use the
shrink wrap tool and our smoothing mesh to see if
we can clean this up a bit.
7. Using the Shrinkwrap Modifier for Smoothing: Well, our goal for
this video is to see if we can clean up some
of these artifacts here that we created
when we added those extra edge loops to kind
of tighten up those edges. So as I mentioned, we're going to be using
a shrink wrap modifier. Actually, before we do that, I realized now I didn't put
an image here in this window. Let me change this to an image editor and go
to images and open. And let's see if we can find in the reference image Photos. Just an image that will give us another
view of this vent. How about let's take a
look at this one here. Yeah, that's pretty
good. That gives us yet another viewpoint. All right, So our
task here is to use this smoothing mesh
to smooth this out. Let's go ahead and try that. What I'm gonna do
is first of all, I'll just twirl this up here. And then I'll add
a new modifier, the shrink wrap modifiers. Let's add that. And then our target will
be our smoothing mesh. So I'm going to click here and choose smoothing mash.
And there we go. And well, that's not real good because we flattened
the vent out. And in addition, we can still see a little bit of
these artifacts. Now, what I can do
to clean that up is just go over to
the smoothing mesh selected here in
the outliner and then increase the
subdivisions over here. Say we can increase
that up to four. So that cleans that up. You can see how we're going
to be able to clean up those tiny artifacts by shrink wrapping the object
to a smoother mesh. Now, that's all well and good. But what about the event? Well, for the vent, what we're gonna do is we're
going to say to Blender, I would like these points out here to be affected by the
shrink-wrapped modifier, but the points that
make up the vent, I don't want them
to be effective. So we need to kind of create a group of all the points
that are going to be affected by the shrink
wrap modifier and put that group writing here in
this vertex group field, say to Blender, I want the shrink wrap to only
affect what's in this group. So first of all, let's just
make a group with everything, with all the points in it. And then we'll remove the points that we do not
want to be in that group. All right, so with all
of these selected, I'm gonna come over to this object data properties
right here. Actually let me bring these up a bit so we can see
this a little bit better. And here is our vertex group. I'll just spin that
up and we can create a vertex group right here
by clicking the plus. And I'll rename this and
call this hood smoothing. Let's do that just so we
know what it is at a glance. Now with all of these selected, I'm just going to click Assign. Now, that really hasn't changed much because it was already
pulling on everything. Well, we need to do
now is to take all of those points that make up the vent and pull them
out of the group. So one way to do that is
just to select this edge. I'm going to Alt click this and Alt Shift click this,
and we hide this. Actually, let me
go back and turn off the subdivision
modifier for just a moment. And the shrink wrap as well. So we can kind of see
this a little bit better. There we go. So all I've done is selected this edge and this edge all
the way around the vent. And what I'm gonna do
is I'm going to just hide it with the H key. And then I'm going
to hover over one of the points of the vent
and hit the L key. And the L key is the
tool that allows us to select all
linked components. Now that we have all
of these selected, let's pull them out of
that vertex groups. So back here in the
object data properties, I'm just going to click remove. And there we go. Now let's bring back those points
that we've hidden. We can come up here
and go to Mesh, Show Hide, and we
can choose reveal, hidden or Alt H. I'll just click that here. Now let's give this a try again. Let's go back to our
modifiers panel. I'll turn on the subdivision
surface modifier. I'll turn on the shrink wrap
modifier and then let's go into this vertex group and
choose that hood smoothing. And there we go. Now you can see
we've smoothed this to get rid of those
artifacts here and here. But we're keeping what we've
extruded up with the event. Let's now come up here and go to our mat cap and
take a look at it. And that looks pretty good. Now we could of course take this and add more subdivisions. We can turn it up to 34, whatever we're getting a little
bit of an edge here at 4, but 3 is pretty good. Two's not bad as well. So that's our process for
fixing smoothing errors. When we have to
extrude a piece out or have edges very
close together, we're going to use this
shrink wrap modifier. Now we may not need it for
every part of the car, but I think it's
going to come in handy in a few other places. All right, In the next video, we'll begin working
on the front fender.
8. Beginning the Front Fender: To work on the front fender, I think I'm going to
bring in a new image. In fact, I don't think
I need both of these, so I'm going to right-click
here join areas, and move the mouse up to
eliminate that window. And for this window, let's go see if we can find
something that might work. This looks pretty
good right here. I'll open this one. And here we've got a pretty
good image of that fender. Now for this part of the car, I think I'm going to
use another process. I'm going to actually
extrude vertices to create the outline
of this fender. And then I'll join those
outlines together with polygons. So To begin, I think I better hide the
hood and the trunk. Let's go ahead and hide those. And then I'll begin again
with a polygon plane. I'll just press
Shift a mesh plane and I'll switch back
to studio lighting. And what I'm gonna do
is just begin with a single-point and I can
tab into edit mode here. And then once again,
use the merge tool to merge all of these points
down to one in the center. So I'll just hit the M
key and merge at center. And there we go. There's our one single
point right there. Well, Let's do is
go to the Quad View again, Control Alt Q. And here's our point. And here it is, here. So I'm just going to move it
forward and then move it up, some kind of move it
right to the bottom. I'm going to hit G and move
it right to the bottom, right around in here. I think this is the
bumper and this right here is the
fender right there. So I'm gonna move this
over to, I guess, line it up right with this
part of the car, right? Right down the center of
that curved fender here. Let's see where we are here. Okay, that looks pretty good. The only thing I may do is bring this image down
just a little bit. So I'm going to tab
back into object mode, go into the reference
collection, go to front. And in this object
data properties here, maybe I'll move this
down just a bit. Let's see if that
works right there. I'll try that. All right, so now
let's go back to the scene collection and I'll choose this
plane once again, which is actually a point now. And we'll tab into edit mode. Okay? So here is that
point right up here. And here it is here. So what I wanna do is just
begin extruding this up. And we can extrude by hitting E and then moving, et cetera. But we can also
extrude by pressing control and
right-clicking the mouse. So with this selected, I can press Control and click. And then I'll just begin clicking the right mouse
button as we move up. So I'm just holding
the control key down and clicking as we go here. So you can see it coming up here on the top
of the offender. And then control right-click, continue here in the side view. And I'm just going to follow
the line of the fender all the way down to
about right here. All right. Looks like I have couple of them that are
a little bit off here. I'll just bring him back. We go maybe this one
can come down a hair, so yeah, you can go through and just adjust them as needed. And you may be wondering, How did you know how many points to put in that line of vertices? Well, I didn't. That was,
that's just a guess. We're going to be
modifying it as we go. We may need to add edge loops, delete them, et cetera. So it's kind of a
guess right now. So don't worry too
much about that, just get that in
general path in. And then we want to
do one on the inside. So on this line right in
here, right up in here. So what I'll do is I'll
just take this point, press shift D and X, and then I'll move it
over to about right here. And we can begin again
doing that same thing. But this time we're going
to have it be a little bit closer in and a little bit lower here than the one we just did because it curves
down into the car here. All right. So with
that selected, I'll press Control
and right-click and go ahead and just try and put the same number
of vertices down for this one as we did
for the first one. And I'm going to
kind of angle it up here and you can see how
it kind of comes up. So this area here
is a little bit more shallow than
this area up front. So let's keep moving here. Actually, I need to
move these a bit. I think why don't I move
these over just a bit to try and follow the line of
the drawing up here. And if I haven't
mentioned it before, no drawing like this is
going to be perfect, is going to be exactly the
way the car actually is. We're always going to need to be doing some adjusting somewhere. Even if we get all of our points exactly on the lines of
the reference image, there's always going to
be room for adjustment. All right, let's
continue here in the side view
control, right-click. Keep going up here. And then I'll kind of
follow these right down to about here. Let's try this. There we go. Okay, So if we tumble around, you can see we've got
these two edges here. Now, I need to come
back and realign this. So let's in the top view, I'll just grab this and
move it over a bit. And I'm just moving them
over in the x-axis, so they follow that line
here from the top view. Let's do that here. And maybe this one right
here, and let's try that. All right, so we've
got those two. Let's do one more
along this side here. So once again, I'll come down
and I'll grab this point, Shift D and X and
move it over a bit. And then maybe I'll also hit G and move it up just
a bit like this. All right, Now I'm gonna
do this one a little bit lower than the one we just did. So it's going to come
along on the outside here. And we'll move it in just
a little bit like this. And we go, all right, Here we go again.
Control right-click. And let's try and put the same number of
vertices as we did before, right along through here. And this one, I'm going to take back pretty much straight. Looks like I'm going to have
to do some adjusting here. That's fine. Let's pull that up. I see one here I can pull up. And this one looks pretty good, just straight along that side. Now there's some work that
we're going to need to do here to adjust this. But for now we can go ahead
and add some geometry to it. So if we come in here
and maybe select these four points right
here and hit the F key. Now we create a face there. Then we could take these
points here and watch this. Let me go back to
Control Alt Q here. I'll go to that single view. And then all we have to do
with two points selected in that row of vertices there
is just hit the F key. And it'll just
build that geometry all the way, all the way back. And there we go. Now we can do that over here. I'll select this,
this, this, and this. Hit the F key. And we can do that
again. I'll just select two points here. And we just hit F and take that all the way back like that. So that's just a nice
process for getting the basic shape of a
curved object like that. Now in the next video, we'll add points to the curve of the fender here over the tire
and begin connecting those.
9. Continuing the Fender: Now let's work on this
fender here over the tire. What I'll do is I'll
go to the side view with the three key
on the number pad. And while I'm still
here in edit mode, I'll press Shift a and
notice the Add menu is a little bit different
and that's because we're actually adding one of these polygon meshes to
the existing object. So I want to create
a circle here, so I'll click that. And here it is. You
can see it there. And I'm going to turn it
in the y axis, 90 degrees. So I'll press RY 900 and
press the Enter key. And now if we go back
to that side view, we can hit G and move it over here a bit and scale it down. I'll hit the S key, and I'll hit the
period key to zoom in. And now we can kind of try and get it about the
right size for that. We'll well, on the fender here, so maybe something
about like this. Now we're going to have to
move some points of course, but I think this
looks pretty good. I'm going to press Alt
a to D select and then click and drag this
and delete these. Actually, I'm going
to keep this one I think right here
because I want to pull it back like that. So I'll delete these
delete vertices. And now we've got that edge
over the tire right there. Now we need to begin
connecting these up. And I just use the default
32 vertices on this circle. Not really knowing
how many we need, but we can kind of go through and see how
they're going to line up. And if we need to add or
subtract anything we can. So what I'll do here is take this one and
move it down a bit, maybe in discipline and
kinda move it over. And I'll take these
four vertices and on, hit the F key to create a face. Now, it's, well, one thing I need to do is move that edge over to where
it needs to be, right? So let's do that
control Z of an alt. Click here for this edge. And let's go to the front view
and let's move this over. That'll probably be
a good thing to do first. And there we go. Now let's turn this
around and let's take these here and hit the
F key. And there we go. All right, so now we've got
the beginnings of this. And what we can do
once again is we can just see how this
is going to work. It may not, but we can just see we can select those
two points and hit the F key and begin bringing these up and adds working
pretty well so far, right about here is
where it's going to need some extra
points, right? We're getting way too far off. So I'm going to press Control
Z and come back to here. So for this, let's say we need
to move these down a bit. So let's hit G and two times and drag these down
a bit like this. And I'm just going to
bring these and you may need to hit G and move them back in
line with the drawing, of course, something like this. So for here, we could take these two and we could
add a point here. There are a couple
of ways to do that. We could right-click
and choose sub-divide, and that will add a
point right in there. Let me show you another way. We can also let me hit
Control Z and remove that. We can also press
Control R as if we're adding an edge
loop and it'll add a point there and then
we can hit Enter. So either way, I'll add that right here and maybe
move this one over a bit. And then we can
take these two and hit F and maybe f again. There we go. And it looks like we
could just move these. I'll do that. I'll move this to here, move this to here. And now we've got the, so we're only going to be
able to go up so far here. So i'll, I'll select these two. Hit the F key here. And we could try one more, but I feel like we're
kinda push in it. We could, if we wanted to add
an edge loop through here. But I'm going to
press Control Z. And I feel like we could take this one away
and move this one up. Let's try it. I'll hit Delete and
let's dissolve vertices. And that will leave
that edge there. And if I hit G and move this up. So let's see how this works. At the F key. And there we go. So we've got the beginnings
of that fender now, it looks like this comes
out a little bit too much. I might push that in just a
bit, something like this. So once again, you got to look at it through a
whole lot of views. I'll press Control Alt Q. We can come around and
take a look at it. So from the side view,
that's not too bad, but from here you can see
it's kind of collapsing down. So we need to probably
pull these up a bit. And we may even add
an edge loop in here. But let's first work
on pulling these up at the top and rounding
it off a little more. So to do that, I want to scale this up, but I want to scale it, say from this point here. Currently if I select this
whole edge with Alt click, you can see the pivot point
is here and we come up here. We're currently on
active element. Usually the default
is median point, but when we were
working on the hood, we switched it over to active element and that's
really what we want. So I'm going to select that. And then once again,
I'm going to press Shift and click this, and shift and click again. And now this point is white, whereas the others are orange, and that is now the
active element. So now what we can do is
push this up just a bit. I'm going to press S
and Z and scale in the z-axis till it comes up just a little bit
more like this. And then we want to
do that with this one here, alt click, shift, click this and shift
click it again to make that the active
element s, z. And let's bring this up some. Here we go. And yeah, I think we need to
add an edge loop in here. So let's do that.
Let's press Control R. Click and click again. And now let's once again make this point the
active element s, z and scale up at
that like this. And I also may want to
turn it just a bit. I'm going to press the R key and rotate it out just a bit, s, z, bring it back
some so we get a little bit more
of a curve there. And then Alt click the
edge over the tire. Well, looks like I need to all Shift-click this part as well. And maybe I'll pull these out just a little bit like this. So we're just kinda
getting more of a if not smooth curve because
we haven't smooth it yet. A little bit more like
the drawing here. This one, I feel like I
should move over a bit. I'm going to hit G two times and slide over just a bit like this. This one. I don't really like
the tilt of that, what I did before. So I'm going to take it back
a little bit like this. And then S Z and bring
that backup like that. Yeah, and it looks
like we probably need one right in here too. So control our drop
that right in here. And let's take a
look at this one. Now we could probably do
the same thing with this. Make that point the
active element s, z. And let's bring it up just
a little bit like that. All right, so we have
some strangeness here with the line of
the geometry here. We need to work on that. But generally speaking, I think this is a
pretty good shape, at least from the front view. Let's take a look
at it from the top. Yeah, we could round this off
a little bit better here. So to do that, I'm going to press Control
Alt Q and come out of that and just go to
the top view here. And once again, we will make
this the active element. And we will scale on
the y-axis now SY, and pull this one
out just a bit. All right? Select this one, make this the active element
right back here. I could use this one, I guess let's do that. Yes. Why bring this one out? Same with this. Looks like I could do
all of this back here, all Shift-click, and then
let's select that point here. Oh, looks like I've got these selected. I don't want these. There we go. And let's pull this out in the y SY like that. And we'll do the
same thing here. Sy. So we're just trying to get that basic shape
from every angle. This I could probably
move in just a bit. Okay, so from the top view
it looks pretty good. Let's tumble around and see how it looks from
the front view. Looks pretty good here, and the side view
looks pretty good. So as I said, we're
going to need to adjust these so they're
a little bit straighter. So we can do that
pretty easily by just using the G key
two times again, hit G2 times and begin
sliding some of these around. Because you do want
to make your geometry fairly smooth so it
flows fairly well. And that can help avoid
dense and puckers. When we smooth it and when we
put a shiny material on it. So I'm just going to try and
get a few of these in place. Maybe move this one back a bit. So just general adjusting. And this is going
to have to happen. Every time we do anything, we're going to
have to go through some basic adjusting, I think. Now it looks like
this whole row got pushed down when I was
moving things around. So let me go back here. All Z and I'm just going to
take this and move this all the way up and move
it over inline there. That happens, Elise, it
happens to me quite a bit. All right. I'll take this and
move it back and that. So we're getting there,
we're doing pretty well. We could go ahead and add a subdivision surface modifier to see how this
is going to work. Let's do that. Come over here to
the modifiers panel. Add a subdivision surface. Let me move this guy
back down over here. There we go. Subdivision surface. Take it up. Two, I'll select it, and right-click it and choose
Shade Smooth. And we'd go. So now we can see a little
bit better what we need to do in certain places, right? We can tumble around, find areas that we
don't really like, like this area down here. I'm not a fan of this. And begin to kind of get the
shape that you want here. Maybe I'll pull this
back just a little bit. And some of this is going
to be easier to see what we do once we
get the bumper on. But for now this is pretty good. I'll just move some of
these down like that. Alright, so we're getting there, we've got little
indentations here. I'll come over and turn on
this edit cage right here, which we'll put the point right on the subdivided surface. And then we can see
the curve a little bit better as we move things around. And then we can
always come up too. Mat cap here. Turn that on, see
how we're looking. Yeah, I think a little bit more adjusting needs to be done, but it's looking pretty good. We can of course add a mirror modifier to this
Add Modifier, mirror. See it on the other side. And then we can bring
back the trunk and the hood and kinda see
where we are so far. All right, In the next video, we will continue on
this side fender and begin extruding on down
the side of the car.
10. Beginning the Side of the Car: All right, Well, let's
continue on the fender here and on into the
side of the car. I'll go back to the
studio lighting here and let's select this and
tap back into edit mode. And I think what
I'd like to do is before I try and
deal with this here, I'd like to extrude
these back first. And in fact, I think
I want to make these conform a
little bit better. I'll turn off the
subdivision surface for just a moment here. And let's just grab this and
move it down to about here. I feel like I almost
need another point. Like I want one here
for this edge here. And then I'd like one right
here to get that curves. So I think what I'll do is
just press Control R and click and then move
that into place here. Okay, so we've got that now what I'd like to do is just
begin extruding back. And I think I want to
extrude back these. I'm gonna press Control and click and then that
selects everything between the first selected
and the control click there. So it looks to me like this
is fairly flat down here. It may curve a little, and we'll deal with that when
we deal with this piece. But this looks pretty flat and straight and then begins to
curve up here at the top. So I think I'm going to
just take advantage of that and extrude this
back maybe to here, to this door here. So let's try that. I'm going to press E and y and just pull these
back to here. And then I'm going to
straighten this by pressing S, y and 0. And there we go. That's
straightened out now. And on a Pull it back
to about right here. We will continue taking this on back through the
edge of the door here. And then we're going to
come back and probably use our shrink-wrapped
tool to get things like the door and even
the front fender. So we're really creating
a smoothing mesh here. We may be able to use some of
it as our final car shell. But I really think most of this is probably going to
be the smoothing mesh. All right, so we've got those, I want to add 1234 edges here, maybe five, to connect this up. So let's try that. I'm going to press Control
R. Scroll the mouse wheel. And you can see in the bottom left-hand corner is how
many cuts you have. And I've got five here. So I'm going to hit Enter two times to drop them right there. And actually I'd like this to
be a little bit straighter. We can have it become straighter here with a function
of the loop cut tool. So I'll press Control
Z to try this again. And then this time I'm press
Control R. Scroll down until I get five cuts and
then I will click once. And now you can see up on top, you've got even off. So what I'm gonna do is I'm
going to press the E key. And then you can
see up at the top left it says flipped
and that is off. So I'm going to press the F
key and watch what happens. You can see how they
begin aligning to one side or the
other like this is aligned to the left side. This is aligned more
to the right side. So I'm going to go
with the right side. So I have one straight up
and down on the right. And then click. Now these go from being curved
here to follow this line, to being straight here
to follow this line. And this straight up and down, we'll continue back to here. Alright, so now
that we have that, let's try and connect these up and then work
with this curve. So I think we probably want
to move these points back. I think I probably just want
to delete these for now. These faces. So I'll hit Delete
and delete faces. And then maybe I could just take these and move
them back a hair here. Take these and move them back a hair, something like that. I could probably move
these down a bit as well. We'll do more in terms of the actual arc of the curve
here in just a minute. But let's get those in place. Okay? So now what we could do is begin to connect this up. So if we take, well, let's take these, these points here like this, and hit the F key and look at
how it's strangely colored. You see that? And that
tells me that we've got an issue that one part
of this mesh is flipped. And this probably happened
because we created these individual
edges point-by-point. So the way to figure
this out is to come up here to this
menu right here, the viewports overlay and
turn on face orientation. So if I click here like that, so the blue is good, the red is bad. So we have some faces here
that are turned inside out. This may not really matter because we may not
use a texture here, we may just use a material. But if you're going to
be applying textures and taking your 3D models out
to any other program, a game engine, any
other 3D system, you need to have
all of your faces, all of the normals facing
in the correct direction. So what I'm gonna
do is just go to face mode and alt click
and Alt Shift click between faces here and just select all of these
and this one here. And then let's go up to Mesh. Normals. Flip, and there we go. Now all the blue is facing in one direction outward and all
the red is facing inward. So that's good. Okay, now we can move on. Let's come back up
here to the overlays and turn off face orientation. And then I will just
select these two points. And let's hit the F key
again and close that off. Now, it's flat,
and we don't want that and we're going to need
it to connect up to here. So let's go ahead and add an
edge loop with Control R. And then I'm going to go to the front view and press all Z. And I'm going to take this,
I'm going to move it out. All right, and now I'm
going to slide it up. I'm going to hit G
and just move it up to be in-line with
these guys here. Let's see how that works. Alt Z again. And there we go. So now we're beginning to
get that curve down to here. Now I think we're going to need another edge loop in here. So I'll press Control
R and drop one here. And then we may be
able to pull this out as well just a little bit. I'll try that for now. And then we need to think about filling this in and how
we're gonna do that. It looks to me to do
that we're going to need another edge in
here, right in here. So I'm gonna go ahead and add that control R and
add that here. Now let's take these and
begin moving these back here. We can do this in
several different ways. We could extrude back over
here and merge points. We could extrude down like this. So maybe that's what I'll do. Maybe I'll hit E and
then I'll just pull down a bit and then pull out
until we get them in line. I'll press Alt Z in the
front view and kind of move this to where they're
kind of inline right there. And then we can merge
these points together. I can click this and this at the M key and choose to merge
at the last point selected. And these m at last. There we go. Now
let's try that again. This time I can do
it another way. We can try it another
way we could take these two and these two at the F key. And now we can just press
Control R and add an edge loop here and then combine or
merge these two like that. Now, how are we
going to do this? Because if I closed up this face here and then closed
up this face here, we would have a triangle. And I'm going to try and avoid triangles
because these points can come through as indentations
on the body of the car. So I'm going to try and
avoid triangles if I can. So let me undo this and we go. And what I can do is just
add another edge loop. So what I'll do is
I'll take this, alt, click this and I'll hit G2 times and slide this forward. So we kinda match up here. And then maybe I'll
take these right here. And I'll hit G2 times and
slide this over just a bit. And then let's add one in here. Now we should be able to
grab these four faces here. And then I guess we
can just select these two and hit F and F
and close that off. So we still have a point
here on the curve, which we didn't
with the triangle. But it is a quad, so I think we have a little
more control over it. Let's, let's tap back into object mode and
take a look at it. We should smooth this new part. So I'll right-click and choose Shade Smooth and that takes
care of that right there. Then let's go ahead and turn on the subdivision surface
modifier and take a look at it. It's not bad. There's a little bump
right along in here. And that's right in here. And I think it's because
these are so close together. So one thing we could do
here is control-click that, hit G2 times and slide this up. We could begin kind
of rearranging some of these to just
spread them out a bit. We could try that. And yeah, that's already
beginning to help. All right. So we've begun
creating the side of the car. In the next video, what Let's do is continue this on down and back to the
edge of the car door here.
11. Continuing with the Side: Well now let's work on extending this fender into the door here. But first of all, now that we're at the side view, I can kind of see that
I didn't really get this trunk in the right place. And this is why I try and
do the easy parts up front so that because I'm doing
them early in the process, I oftentimes tell it
to them correctly. And what I can do is just
go back and fix this. But if I began with a part of the car that
was more complex, it would be more complex to fix. So I'm just going to grab
this and move it up. And move this up. So it's just easier to fix the easy things rather
than the hard things, complex things. All right. Let's take a look here. Yeah, that looks a
little bit better. I might be able to pull
this up a little bit more. Let's try that. There we go. Something like that.
Yeah. Okay. That's good. Let's move on Now. I'm gonna go ahead and turn off the subdivision surface
for just a moment again. And then what needs
to happen is we need to extrude
this down to here. And if we extrude it bit by bit, say just to here, and then shrink it
down so it begins to angle down and then do it again and shrink
it down and again, it would get a
little tedious here. So what we can do is just
take this and go all the way to this point and then shrink it down and then insert
the edge loops. So let's hit E and y. And I'm going to drag
this back to here. And then once again with our
active element enabled here, we can shift select this, and then do that again. And now we can scale
from this point, I'll press Alt Z to see
through it and then S and Z. And let's scale down
to about right here. There we go. Now that we've got that angle, we can go ahead and
insert the edge loops. I'll press Control R and
insert five cuts here. That looks pretty good, that looks similar to the
sides of the other polygons. So I'll hit Enter two
times to drop those in. And there we go. Now one thing I didn't do and
I may need to redo this is I did not look at the
angle here from the top, and we should probably do that. Let's go ahead and
do that again. I'm going to press Control
Z and go back to here. And this time it looks like the angle's pretty
good along here. But then it begins to really angle in toward the
back of the car. So let's work on that now. I'll Alt click this. And so we need to do two scales. We need to do a scale in the
z and a scale in the x here. So let's go back to
the side view. Ie. Extend this here, like this. I'll hit the Y key to
constrain it to the y-axis. Bring it back to here. Shift-click this s, z
and scale down here. Now let's go to the top view. And it looks like the
interior here is. Okay. Let's shift click
this and this again. And then let's scale in, in the x Sx and bring
this in like this. Let's try that. Maybe a little bit farther. We could also take a look
at where this lands here. Alright, I think
that's pretty good. Now let's go back to the side view and let's take a look at adding those
edge loops Control R. And I'll insert five again. And there we go. All right, so now we've got our top
angling and let's take a look. And we've got the side here. Let's tab into edit mode and see if we can see any problems. Let's make sure it's smooth. And we go. Now right in here, it looks like there
is kind of a problem. She asked right here maybe. Well, I think that's more just it changing from
curved straight. Let's select it and go enable our subdivision surface in Yad that really takes
care of it. That's good. Now, before we begin to move on back into the
rear fender here, we've got some work to
do because that's once again a very interesting
collection of curves there. So we will work on
that in just a bit. Let's take a look at
connecting up or at least beginning to merge together the front fender and the hood. So to do that, I'm
going to actually hide the main hood here and bring
back the smoothing mesh. And I'm going to change
this from plane to fender just so we
know what that is. Now, let's take a look at
the smoothing mesh here. And defenders, I'll
hit the Tab key. And it looks like
we've got more edges in the fender than we do in this hood part here, and
that's understandable. He needed more for these curves
than we did for the hood. But what I'd like to do is actually try and
connect these up. So what I'm gonna do first of all is with these two selected. I want to join them,
but we need to make sure that the modifiers we have over here in
the modifier stack are actually the same
for each object. So if I select the fender, we've got a subdivision
and a mirror. And if I select this, we've got a mirror
and a subdivision. Now it should work fine, but I think what I'm
gonna do is just move this subdivision up like that. And that's a problem
because since we're subdividing the mesh first
and then applying the mirror, we're getting this
artifact here. So I can take this down like this and put the subdivision on the bottom and
that cleans that up, which then tells
me for the fender, I should take this subdivision and move it down
below the mirror. So the order of the modifiers
does make a difference. So now that we have
those in order, let's select the vendor,
shift, select this, the smoothing mesh for the hood, and then let's press
Control J to join them together into one
object, Control J. Now it's called smoothing
mesh because we added the fender into
the smoothing nash, which is fine, we'll go
ahead and leave that name. But now when we tab
into edit mode, they both go into edit mode, but now they're all one object. All right, let's take
a look at what we can do to connect these up. It seems to me that
we're going to need an edge through
here, right? Through here, like this. We're going to need an edge
through here. All right. We're going to need one probably
through here, maybe two. And then these two can hook
up right here and right here. All right, so we've got
these that can hook up. We've got these
that can connect. And we've got these
that can connect. And I think now I'm not
sure about this one here. If it's going to need
to connect with this, or if this is the one. But this particular
area has a lot of unique changes in
direction and stuff. So we may not be able to understand what we need
quite yet for this area. So let's take a look at this
and see what we can do. I'm gonna go ahead and turn off the subdivision surface
for just a moment. And for this one,
let's go ahead and add an edge loop
right along here. Alright, I could maybe take this and hit G two
times and slide it. So it's more in-line there. For this one, let's
add an edge loop here. Alright? For these it appears we need to, let's try it and see if it destroys the smoothness
of our object. Hopefully it will not. Let's scroll the mouse
wheel to get to. And there we go. And then it
looks like this one here. G slide just a bit, could line up with
this one here. And then what Let's
do is come back to the subdivisions here. And remember we've still got the viewport level at four
for the smoothing mesh, and that's really what we want. Let's bring back the hood and see if there
are any problems. I'm going to hide the smoothing
mesh for just a moment. And it doesn't appear
that there are really any problems by adding those
edges to the smoothing part. And that's good. That's
what we want to see. Okay, So let's go back
to the smoothing mesh. And now what we can do in the next video is begin
connecting these up. So we have a consistent
mesh throughout this area.
12. Connecting the Fender and Hood: Alright, now let's look at
how we can connect these up. Let me move this. We're going to be trying
to connect this area up. So what let's do first is let's just take a
look again at the edges. I'll tab into edit mode
and it looks pretty good. We've got them lined
up pretty well. But I think before
we do anything, I'm going to try and get
them a little bit more evenly spaced on the hood part. So I'll come up here to the
top view with the seven key. And let's, let's take this one here and hit G2 times and
move it back just a bit. Let's take this one and move it forward toward the front
of the car, just a hair. So I just want to get these a little bit more evenly
spaced. That's all. Just trying to keep the polygons generally the same size from one part of the
vehicle to the other. So something like that, That's a little
bit better there, a little bit more
evenly sized here. If you want, we can take a
couple of these and move them around a bit to have it
flow a little better. We can try that. Yeah, that looks
pretty good for now. Okay. So now what we can do is we can just begin
connecting these up. Once again, I'll turn off
the subdivisions over here. And we could probably just select this one here
and hit the F key. And then once again select
two points and then just hit the F key
and see how we do as it moves forward here. All right, I think
that'll work and then we need to
take a look at it. Let me hide the trunk
as it comes down here and around down
underneath the headlights. So maybe I will move this
down just a bit like this. Pull these down just a bit. And then let's begin
extruding down. I think we are going
to need to insert an edge loop here and
we'll see how that looks. I'm just getting
these so they kind of curve down toward
the fender here. All right, so now let's go to the Quad View Control Alt Q. And I'll tumble around here. And then let's begin
extruding these down. So I'll press all z so I can
see through the side here. And let's select this and
then Control click this. And these are the
ones we're going to extrude down for now. So let's hit E and bring
this down like this. I'm trying to curve it
along this path here. And then let's do
that one more time. E and pull this down like this. And we go, Okay, I may want to move one
or two of these out a bit just to conform to the
drawing a little bit better. Let's try this. Okay, something like that. And it looks like these
are pretty good here. You could maybe move
that up like okay, So we're just trying
to keep an eye on it in all of our views. And then we need to
connect this area up here. So I'm gonna press Alt Z
to go back to Solid View. And we're going to need
to connect this up. And this is where I
think we're going to need that extra edge here. So let's go ahead and press Control R and add
an edge in here. And I'll hit Enter twice
just to put it down the center because I'm not sure exactly where it should
go at this point in time. In addition, what
I'll do is maybe select these edges here. I'll select this edge and
this edge and this and this. And I want to bridge
the edge loops here. Oh, I can still tumble here. I shouldn't be able to do that. I do like to lock these off
because it can get confusing. I'm going to press the
Enter key and turn on lock rotation
for the Quad View. And now I can't tumble here
so that I think could help. All right, so I want to bridge these edge loops
under the edge menu. You've got bridge
edge loops here. Or you can press Control E to bring up the same menu here. And I'll choose bridge edge
loops. And there we go. And then once again, I'll press Control R and create
an edge loop right there. Go back to vertex mode
and this point here, Let's see if I hit G2
times yeah, there. So I will shift,
select this one, merge and merge those two points at the last one selected. All right, let's take a look at this, see how we're doing. I will press Control Alt Q. I'll tap back into object mode, and I'll also turn on the
subdivision surface modifier. Not bad, actually that isn't
too bad coming through here. We could take these points and slide them toward this area to get this edge a little bit sharper in here, we can try it. Let's just hit G
and pull this over. And I'm just going
to do each one individually, kind of like this. Each one maybe we'll move over a little bit
less than the last. So let me move this up
just a little tiny bit. Let's just see how this works. Yeah, that's not bad there. You can see that
edge right there. And we're going to have some
puckering and problems. Anytime you have the
subdivision surface on and you have an incomplete
mesh-like this, you're going to see
some puckering and warping of the mesh here at the end of it, and that's fine. Here. I could also maybe take this point and slide that over. Maybe slide this one over. And I'm going to
keep the edge around here because we're going to need that to create
the fender as well. We need to kind of
keep those in place, just like we did for the
hood, at least for now. Because ultimately
we are going to be using the smoothing mesh to create the exterior
parts of the car, just like we did with the hood. And that's kinda why I
wanted to do the hood first upfront just to
show you the process. But we will be duplicating
the various parts, the various external parts of the car off of this
smoothing mesh. And then once we do that, we'll be able to go back
and dissolve edges, move points, whatever
we want to do for the smoothing mesh to
get it smooth and even. And then those external parts of the car will conform
to that mesh. So ultimately, once
we get all the parts, the exterior parts
of the car created, it won't matter where
the edges are or where the points are in the smoothing mesh as
long as it looks good. Because as I said,
the other parts, the external parts
will conform to that. All right, let's move on and try and get this
front part created. So yeah, we just need to
come on around down here. I'm going to press
Control Alt Q, tumble around here
so we can see that. And then let's do this here. I will tab into edit
mode, press Alt Z. I think what Let's do is
continue this point down. I'm going to move this
out a bit like this. And then I'll turn off
the smoothing real quick. Now let's begin
extruding this out. Oh, I pulled that out
too far now to NIH. Let me bring that back here. There we go. All right. So I'm going to take
these and begin extruding them down around here. So let's hit E and pull
this out to about here. All right, and then we will
connect that point up. I'll hit G and
move it back some. So let's then click this
and that m at last. And maybe I'll begin taking these and moving
them back like this. Let's grab these again. Maybe I'll just
select this edge. I'll hit the two key and
select that edge and hit E and bring it down to about
here. There we go. Go back to vertex mode
with the one key, and let's merge these together. Now we can begin taking all of this stuff right in here
and extrude it over. What I'll do is just hit
E and pull out like this. Maybe I'll hit the X key to
conform it to the x-axis. I'm just going to pull
it right about to hear, first of all, and then I'll connect these
up right here. Like that. Hit the F key, so we
have that face in place. And then let us just take, well, maybe I'll grab this edge and hit G2 times and bring
this down just a bit. And then let's
take all of these. I'll press Control. And well, let me move this out a bit like this. There we go. And then let's just
select all of these. And what we can do is just hit E and bring them all
into the center. I'll hit E, bring
them into the center. I'll hit the X key to
conform it to the x-axis. And when we bring them in because we have
clipping turned on, they clipped together
and that's good. And now we can take
this part and move it out about like this. Let's bring it out
to about right here. Now we need to give
it more of a curve. So let's press Control R and click twice and
then bring this out. Like this. Control are
bringing this out. Control R. Let's
bring this out here. Maybe I'll bring this
out a little further. So I'm just trying to get
a nice curve here is all. At least from the perspective of the top view. Here we go. All right, I'm going to
press Control Alt Q, z, and let's take a look at it. All right, let's turn
on our subdivision. Yeah, so I think that's
pretty good for now. Then once again, there's
going to be things we need to adjust, but so much of it we're
not going to know what we need until we build the
exterior pieces, right? All right. There we go. We've got the beginnings
of the front of the car. I think now I'm going
to come in here and do a little more rounding
of these here. Let's do that. I'm going to pull forward
just a bit with each of these to try and conform to the drawing
a little bit better. It's a little more rounded
like that. Alright. Yeah, I think that'll work. Okay. Now in the next video, what we're gonna do is work
on this area right up here. And this is a little
more complex. It's going to get a little
tight in here as we try and turn this up
a bit right here, and then curve around
for the interior. But we're just going
to use pretty much the same kind of tools and
process we've been using. So we will work on that
in the next video.
13. Extending the Hood to the Cab: Now let's work on this
area right up here, where it kind of terminates at the cab or interior of
the car right in here. Let's work on that. Let's tap back into edit mode and I'm going to turn off the
subdivision surface again. And for this we
need to take a look at where we are up
here on the top. This is got to come back come back toward the
windshield here, but it doesn't just end here. It continues on beyond
the windshield. If we go to the side view, we can see that here,
this piece right here, this extends back
beyond the windshield. And you can kind of see
that in here, right there. Actually let me
see if I can find a another side view that might give us a little bit
more indication of this. This is a side view, although the resolution
isn't great on that, but I think that may be
the only one we have. So let's take a
look at this one. And what I'll do is I'll press Control Spacebar to
enlarge that window. And let's zoom in here. So you can kinda see
how it comes back, goes past the windshield and
then comes down into here. That's what we're
going to work on. We will place the windshield
on there a little bit later. Let's press Control Spacebar
to go back to here. I'll hit the seven key and let's select this and control-click this so we
get all of these edges. I think I'll go to the
Quad View Control Alt Q. And now we can see it
a little better here. So here's our side view. And let's just take
this and extrude. I'll hit E in the
side view and come back here and we're a little bit off in the side view,
but that's okay. I'm going to just continue
on with that line here. And then we're going to want to extrude probably
one more time here. I'll hit E and move
back about like this, right about here. And then I'm going to need
to pull some of these points back to get them in line
with that curve here. Something like this. Alright, so let's assume that that's kind of what we want. Now we're going to need to
continue this line right here, this vertex right here. Let's press Alt Z. So we're
going to need to continue that on through
here, back to here. So what Let's do is go
ahead and select that. And I want to be mindful
of our edges here. I don't want to change this one right now because that's telling Blender where that
curve is going to be when we turn on our
subdivision surface. So I think this is going
to line up with this. And this one is going to
line up with this edge. It looks like this edge
and this edge may line up. So I think I'm
probably going to need an edge right through here. Let's go ahead and do that. I'll drop one here. We can now maybe take these and just slide these
up a little bit. I kind of get them prepared
for connecting up. I'll go ahead and do that. I'm hitting G two times here. And those look pretty good here. I may take this one and move
this back a little bit like that just to get
them ready to go. Now it Let's do is let's
take this point and begin extruding back so that
we can connect these up. So what I'll do is I'll
hit E and pull this back. I want to pull it up
some kinda like this. I'm going to bring this
back and inline with these. I'm going to keep an eye on
it and all of my viewports. And I'll do that again.
I'm going to hit E and angle it up just a
bit here like this. Maybe into here. Get that in place. And I'll hit E and pull this up. And we go. And I'll hit E and pull this up so it lines up
right about there. Yeah, let's try that. So I'm just trying to
extend this edge up to follow along with
the existing mesh. You can see that here. Now, ultimately we
may remove this. We may actually
remove this or remove this edge or whatever in this smoothing mesh,
as I've said before. But for now we're
really trying to get these basic shapes in so that we can duplicate off
the actual offenders and doors, et cetera. So now that we've got these, Let's go ahead and fill
them in with faces. I'll just select
these two at the FK. Here we go, these to hit
the F key, and there we go. So now we've got those in place. I think I would like to change the path of this a
little bit more. So I pulled this back, but it looks like
at angles this way. So I better use the G key two times to kind of slide
this back like this. Quite that far. Let's go like that. Let's pull this
one back as well. I'm going to pull this
back in the y-axis so we get just a little
bit more of that curve. There. There we go. And let's take a look at this. Now let's tumble around. I'll press Control Alt Q, and let's tap into object mode. And yeah, we've got quite
a bit of an edge there. And that's because everything here is really so tight in here. So what I think I'll do is begin pulling some
of these up a bit. I don't think they need
to be quite this low. We can begin bringing these up. And I'm going to turn on the
subdivision surface as well. And I'll turn off the
edit cage so we can see the square richness of
the polygons as well as the smoothness of the
sub-divided mesh. And I just want to bring these up kind of into here like this. Let's try this. I'm going to bring them up
just a little bit and just want to see if I can get this area so it isn't
quite so tight. We don't need to bring
them up as much in here. We tap into object mode. Okay, I think we're
doing pretty well. Grab this and hit G2
times and pull that back. And I'm going to pull
this back as well. Let me turn the
edit cage back on. And yeah, I just want to bring these up just a little bit more. See if I can get it. So it is So that edge isn't
quite as sharp there. Yeah, it's still pulling
quite a bit though. And as I said, these areas here at the end
of the sub-divided mesh, it are always going to have
some sort of pulling or, or puckering or
something like that. Let me go to the side view here. All z. And yeah, these
are really pulling quite a bit here,
but that's okay. Once again, we will
be dealing with that once we begin
closing this off, giving them thickness,
things like that. All right, I'm going to
tumble around here all Z. Let's go back to object mode. Now, what we need
to think about as well is this piece right
up here, right up on top. Let's go to another image
to take a look at that. I'm going to maybe go back to this one here and let's
take a look at this. And I'm going to press
Control Spacebar. And you can see that
whereas this vent here really is extruded
out of the hood, is a part of the hood. This piece really looks like is just something that's
been placed on top. You can actually
see a seam there. So I think I'm going
to create this as a whole other object. So in the next video,
let's work on that.
14. Beginning the Back of the Car: Well, I'm gonna be
honest with you. I look here back at
the back fender of this car and I don't really see how
we're going to do this. I know we are going to
do it, but right now, I don't have fully in my head exactly how we're
going to create this curved piece right
here from scratch. So since I don't
know that there are a couple of strategies
that we can use sometimes for
this kind of thing. And I promise you, no matter how experienced you
get with Blender, they're going to be things
you come up against that you really don't know, at least at first glance how in the world you're
going to create it. But one strategy I
like to use is to try and create everything
around it first. So that when you finally
get to that area, you're not creating it from
scratch, from nothing. You're creating it out of, evolving it out of the structures
you've already created. So having said that, let's begin working on the
back area around the trunk, will create the outline of the cab here and then work
on this area in the back. So let's click here and drag, and let's bring in
another window. I'm going to go to
Image Editor here and then click Image and open. And let's go into the
reference folders, the photos, and there's
one right here, this one. Let's open up this one. Yeah, that helps us, I think. So this gives us kind of a
front three-quarter view of the bag vendor and the
back view as well. So I think this will
help as we get to it. Alright, so first of all, let's tab into edit mode
and take a look at this. And I think what I
wanna do is actually duplicate the trunk off and put it with the
smoothing mesh now, so let's do that. I'm going to come over here and enable the
view of the trunk. Let's click on it and
let's duplicate this. I'll press Shift D and enter. And then I'll hide
the trunk here. Now let's take this and this
and join them together. They both have a mirror and a subdivision surface
modifier on them. So that's good. So I will then select
the trunk 000 001, shift, select the smoothing
object and to join them, I'll press Control J. So that'll join those together
under the smoothing mesh. Alright, so if we tab into edit mode, this
is what we can see. So let's go to the top view and let me turn off the subdivision surface in
the 3D view here actually, you know, we could take
the viewport levels down to two as well. We don't need them that high
at four while we're working. So now I'll take, say, this vertex right here, and I'll go to the Quad
View Control Alt Q. And let's try and
get this area here. It looks to me like
it's a little low. Let me press Alt Z for X-ray. Yeah, let me take these here. And let's just move these up
just a little bit like this. Here we go. I guess I don't need that when it come
up quite so much. Now we go I just moved
him up just a little. Now I'm going to take this point and begin extruding along here. So if we hit E and
pull out to here, let's say maybe
move that in a bit. And I'll hit E and
go up to here. And this is pretty far off. Let's see what it looks like. If I hit E and go over to here, then e and bring it
together like that. So this one looks like
I could move it a bit. Let me do that. I'm going
to bring it in like this. There we go. All right. So that general shape there
of the interior or the cab. We could go ahead and
connect these up. I'll just take these here. Hit the F key, take these two and hit the F key
again, and there we go. So we've got those
connected now. So if I look at it
from the side view, I can see it looks a
little warped here. So let's just do a
little bit of adjusting. And we're always going
to have to do this, as we've said, just a
little bit here and there. Okay. Then what let's do this. Let's work on the line of
the car right along here from back here on the
inside of that vendor, all the way up to here. And I think I want to take
this from this point here. Let's take a look at this. I want to press
Control Alt Q again. And what should be the
line that we're going to take to the back of that fender. So I'm kinda thinking it should be here that
we take this back. So this point all the way
back to here, like this. And then it's going to
bulge out just a bit. Here. You can see that here. Alright, so let's give
that a try Control Alt Q. And let's go to the side view. And I'll just with
that point selected, I'll hit E and let's
go all the way down to say right about here. You can see how it's
indented here in the back. So maybe all the way
into here, like that. It looks pretty deep there. Alright, so now let's
in the top view, move this over so it's in
place here, like that. And now let's start adding some points with
Control R and click. And then I'll hit G and move
this up maybe to about here. And then let's hit Control
R. And let's move this one. Too bad here, let's say Control R. And let's move
this up to here. Maybe we'll put
one more in here. All right, now, that
looks pretty good. I'm going to move
these back like this. These look like they could
move out just a bit like this. Now can we connect these up? Let's go over to here, and I'll select these four
here and hit the F key. And then I'll select these two
and hit the F key as well. This. Now did that hookup in
the right way? It did not. I don't like how
that hooked up here. So 100 press Control Z, just to undo that. Now I think we could go ahead
and add an edge in here. Alright, let's press
Control Alt Q. Turn on our
subdivisions over here. That's tab into object mode. And remember we're going to get pulling around
here at the end of anything that's subdivided
like that and that's okay. But yeah, I think
that's pretty good in terms of this area back here. We may be able to do a little
bit of adjusting here, maybe bring that up a bit, but it actually looks
pretty good. Okay. All right, So now
has this given me any creative spark to
work on this area here? Well, not really. But I think we can. What I think we'll do in
the next video is take, say this area from here to here, and duplicate it and move it out along the center line here. And then curve it down
around in front here. So in the next video, Let's give that a try and see if we've made
any breakthroughs. So that's coming up next.
15. Starting the Rear Fender: Now let's work on that
curved area right in here. And before I think
I was thinking that this would be that
internal edge, that bottom of the crease, but now I'm not so sure. I don't think it's going to be. I don't think it should be. So I'm going to take this area and just move it up just a
little bit like this. So it isn't going to be the bottom of the trench
there of that crease. That's going to be
coming out of this. Well, let's give that a try. So what I wanna do is maybe
take these points here. And I'm going to go
to Control Alt Q. And I'm going to
duplicate them and bring them over just ever so slightly so they are the
bottom of that crease. I want to move these
over just a little bit. Like this and like this. Yeah, So now I'm going
to take these right here and maybe move this
over just a little. There we go. So I'm going to take
these now these points right here and duplicate it. Shift D. And I'll
pull them in the x. And then I'm going to
bring him down some, I'll click and drag and bring
these down just a hair. So there is the bottom
of that trench there. Now we can take this and began creating that loop
around down here like that. This, this right here, this loop right here. So let's do that. Let's hit E. Bring this up to here. We're going to need
to move these in the top view each time I think E and move this to here. Move it over in the x just a bit e. And now let's begin
turning these down like this. And I'm going to bring
this out some and E and bring this out some so
you can see what I'm doing. I'm kinda moving these toward the exterior
part of the door there. And I think I think we're
onto something here. Let's move these
toward that door. This is a really interesting
and tricky shape to get that I think
we can do it. I'm going to hit
E and move this. And I'm going to keep
going down here like this, trying to match up
each of these points. We may dissolve these
edges sooner or later, but for now I'm going to go
ahead and match them up. All right, So where's this one? This one could come out a
little bit more like this. And we go, okay, so now we've got this area here. And I think for now
what I'd like to do is go ahead and
connect these up. So this, Let's say let's hit F, and then let's start
bringing these up and just see how it looks. I'm going to select
these 2 first and then hit F and move
these up like this. And then let's do one more. I'll hit F here. Now, I'm going to tab
back into object mode, go to Control Alt Q to
get out of Quad View. And I'm going to turn
on the subdivisions. And it looks like
we're just going to have to bring these out a little bit more like they're not
quite lined up, right? So it looks like I
could take all of these and just bring them out a little
bit more like this. In fact, I think what
I'll do is go ahead and align them in the
x-axis with S x 0. And then I'll bring them out
a little bit more like this. Let's see how that does. Yeah, So that helps there. Okay, so I'll turn the
subdivisions off again, go back into edit mode. And now I can maybe move these
in just a bit like this. And then we need to
create a new edge around here for the top
part of the fender here. So let's do that. Let's Alt click this edge here
and Alt Shift click this. So now we have that
whole edge there. Let's Control Alt
Q for Quad View. And let's duplicate this
and move it out now. So Shift D and X and I'm
going to move it out. And maybe I will turn it a bit. Let's see, we're in active
element pivot mode here. So if I took this point up here, shift and shift click again, will rotate from that point. So I'll hit R and rotate it
back in just a little bit. You can see that top part is
still in the center here. Let me go back to the top. So that's in the center, right? And these could begin
coming out more like this. Let's do that. Kind of aiming this
way. And we go. And then we need to push
it forward a bit, right? This edge now needs
to be further up, I think then the crease was. So let's shift click this again. So we're now scaling from
the active element here. And let's press S and Y and skill that
forward just a bit. And I'll hold the Shift key
to slow down that movement, maybe something like this. I'll press Alt Z
so we can see it. Yeah, That's about right here. And then we need
to scale this up. So let me select this point here, Shift-click,
Shift-click again. And I'm going to scale
it up in the z as z. And move this up just
a bit like this to the where the drawing
is, something like this. I'll move this one back down. And then we can move
these up a bit. So let me tumble around and see where we are.
Yeah, we've got it. Grab these here. So I think these
could come up a bit. Let's see, I'll Alt click this, go back to the side view. Well that's not bad actually, it's up high enough. Up here. Could be higher along
here, couldn't it? Let's bring that up. And this one could be
up higher like this. Maybe we'll do that
with this one as well. Okay? And if we selected these, let me re-select this
point back here. I'll click this Shift-click. And there we go, get
that point in there. And I want to bring it
back just a little bit SY, and bring it back in just
a little bit like that. Maybe we could grab a few of these and bring these
back in like this. Okay, let's take a look at it. Tab back into object mode. The edges are a little
bit out of alignment. I can see that, but we could go ahead and connect them up and
see how it looks. Let's do that. First of all, I'll
take this and this, and this, these four and hit F. And then take these four here, hit F, and then take these
two and F backup to here. Let's take these four F. And then let's see if we
can bring these up like this, the F key and bring
these up like this. See if we can bring
it on around. Note we got to
close it off here. And then select these two again, F and bringing these all
the way around like this. And we go, we can
close up these. And we can close up the. So let's just see how
we're doing here. See what we need to do. Tab back into object mode. Let's turn on the subdivision
modifier and look at that. We're just beginning to get
that crease in there now this one looks bad and I think it's because we may
have flipped something, or we could right-click this
and choose Shade Smooth. And now I think there's a
problem that's come up to our viewport overlays
face orientation and yep, sure enough, that's flipped. So let's just take
these two faces, Mesh, normals and flip. And there we go. Now, I think let's
turn those back off. That's actually
doing pretty good. We're getting there.
Let's tab back in here. And I will Control R and
add a point right here. And then we'll select those, hit F. And we'll do these, F. And we'll do these here. And we go, we can
close those up. And then we're going to need
to insert some edges here. I can insert one right here and close these up here.
Let's do that. And then we will need to insert another one or get
rid of this one. Let's take a look at
where this one goes. Well, that one's fairly
important I think, because that helps create that shape on the front
of the fender there. So I don't think we
could lose that one. Could we lose this one? Now That's right up on the edge, right up on the front there. We can't lose that one. So we are probably going to need two edge loops or excuse me, one more in here. So I'll press Control R
and then add one in here. Let's hit F, select
these four and hit F. All right, let's
take a look at it. Feel like these are
awfully close together to get a nice curve. But we could try, we could take this control, click this and
move it out a bit. We can take this and hit
G2 times and slided of it. Maybe this as well. Slide that over sum. And this, and this and move it over toward
that fender like this. And we go, Let's
see how that works. Well, we're getting there. Actually, that's beginning to make me think that
we can do this. But you see what I mean, how you can begin
creating one part and as you move it and evolve
into that problem area, do you begin to see the issues? You begin to see the
structure of it in a new way. So in the next video, we're going to go ahead
and try and complete this and bring it on
around to the tire. Well, here on the fender.
16. Working on the Rear Fender: Well, now that we're here, that we've kind of built out everything around
this rear fender. Think I can see a path forward. And instead of actually extruding
this edge out and down, I think what I need to do
is duplicate this edge, bring it down around the tire. Well, get it in shape first and then connect it up with
the top of the fender. Now, one thing I should
probably take a look at, let me press Alt and click
this edge too selected. And I'm going to turn off the subdivision surface
view here in the 3D view. One thing I need to keep
in mind is that this here is actually this up here. All right, so these points here, I think, need to go
up a little bit more. Let me press Control Alt
Q so I can see them all, so I can select them
a little easier. And let me zoom in here. Me move this over to
this area right here. I'll bring this up just some rearranging of the windows here. And maybe I should begin bringing these up
a little bit more. I'm not sure. So because it looks like this area should
really be out right? Almost out to here. All right, let's take a look. Let me hit G and move this out. So I think I'm going to, wow, maybe I can
move it out to here. Let's take a look at this one. This one shouldn't be up
really any higher than this. But ultimately we're going
to have to extrude this up. I think. So. Maybe I don't need
it out so far right now. But for this one, it really should be clear
out to here, I think. So let's go ahead
and put that there. Let's take a look at
this Control Alt Q, z, and let's take a look at it. All right, I'm going to turn on the subdivisions again here. Yeah, I think that's what we need for that, so
let's go with that. So i've I've just
pulled those out. Now it Let's do is let's
go to the side view here. Let me select this edge. I'll click this edge here. And I just want to duplicate it and move it down to the tire. Well, so first of all, I'm going to change from active
element to median point. And then I'll press
shift D, Enter. Let's scale this in a
bit. And there we go. Now we've got something
that we can work with here. These points, I'm looking
at these right here. These two can go
right there for now. And then we need to
kind of build or move these to fit around this tire
well here, let's do that. I'm just selecting each one
of them hitting G and moving them to match the shape
here of the tire. Well, and it looks like we're going to have to
move these up quite a bit. So I'm going to just move these in quite a bit like this because we're
going to need more room. All right. So I've got
them pretty much in place. I think we may still need to
move things around a bit, but I'll change back to my move tool over
here on the left. I'll press Alt click. I'm probably gonna have
to move this out a bit. Let's go to that top
view with the seven key. And let's move this
out like this. And I think I'll flatten it, I'll press S x and 0
and flatten that up. And then let's bring it back. And maybe the R key and
turn this a bit like this. So it may not need
to be this flat, but I went ahead and flattened
it just to begin that. Let's maybe move it out. I'm going to move it out
a little bit farther than the drawing here. Let's turn it a bit. Okay, So we have that. Now. What we can do is then
go ahead and select this, this, this, and this, these four points
right down here, hit the F key and it looks
like we may be flipped again. Let me see. I select these two right
here and hit the F key. Well, there's really only
one way to find out. Let's go up to our
viewport overlays and click on face orientation. And now they're
correct there blue. So I think that's fine. All right, Let's
hit the F key again and let's go ahead
and go on around and see how they look. Not bad. Yeah, I think actually
that's pretty good. Let's go on around. I'll hit F, F and F. So let's work with that. And then so what
we need to do now is insert an edge loop
and kinda pull it out. So what let's do before we begin is let's
hide some of this. Will change from tweak
to select box here, and click and drag all of this. And then I'm just
going to hit the H key or you can come up
and go to Mesh, Show Hide and hide
selected here. So I'll hit the H
key to hide that. Now if we go to the back
view with control one, we can see it a
little bit better. All right, we can see that here. Okay, so let's now
press Control R. I'm going to hit the
Enter key two times. Go to the back view with
Control 1 and allright. So I think what
I'd like to do is, well, we do want to pull
it out a little bit. Let me go ahead and do that. I'll turn on the move tool and pull out just a
little bit in the x. And then I'd also like to select this and select it again to
make that are active element. And let's go to
active element here. And then let's go to Control
Alt Q or the top view. And I think I'd like to
rotate that out just a bit. Let's try this. I've still got the
back view up here, and I'll hit R and just
pull it out a little bit. Let's try this. Pulled
out a bit like that. Let's scale it in the y s. Why? I scale it out like that. Let's try this. Bring it back a little bit. Let's see, maybe we
should pull it out just a little bit like this. All right, let's
see how we're doing Control Alt Q, tumble around. And we've probably got
some point adjusting we could do here since
we scaled that back. But let's turn on subdivisions. Let's bring back the
rest of the car with mesh, Show, Hide, reveal, hidden, and we go and let's tap into object mode
and see how we're doing. So I think that's
actually pretty good. We're getting there, that's
the kind of thing we need. Now, there's some point
pulling we need to do here. But generally speaking, I think that's the kind
of thing we want. So let me grab this and I'm
going to pull out a bit. I'm also going to go up some. Let's select this for
the active element, press S and Z and
scale up a bit so we get a little bit more of
a curve there like that. We could also select
this point back here as the active element
and scale on the y. Just a little bit. I'm going to de-select this
one here and then press SY and move forward a bit so we get a little bit
more of a curve like that. Alright? Alright, let's see
how we're doing. Pretty good. I think this could
come out a bit. Just bring that out just
a little bit like this. This could still come
out a little bit more. So as I said,
there's work to do. But I think this is the
kind of thing we want. Yeah, actually look at that. Now I'll be darned. So we found a way that's good. I will also take a look
at this up at the top. Let's go to the top
view and writing here, we need to create this piece. It kinda comes up right here. So let's, let me grab the top of this here
so we can see it. And it looks like we
need to bring this up again now that
we've added that edge, it's pulled it down a bit. So we could grab
this and take it up toward where the drawing is. Select this and
bring it forward. Sy, hold the Shift key to make it go a
little slower. We go. So now I think in
the next video, let's work on this
piece right here, that little part where it
kinda turns up right here. You can see that
right back here, I'll press Control Space bar. You can see that right back
here, how it turns up. Let's work on that
in the next video. And then we'll plan our
next steps going forward.
17. Finishing the Back: Now that we have
this basic shape, we need to get it a little bit closer to the reference image. So if we go to the
side view here, we press Alt, Z and
tab into edit mode. We can see that the two
key to go to Edge mode, we can see that we're
a little bit off here on the top of
the fender here, but we're really often it
comes to this out here. So we need to deal with that and this little
bit that turns up. So let's start working on that. I'm going to tumble around
again and let's select, I'm just going to select these here up on top and see
if we can pull these up just a bit to get them in line with the reference
image up here. I'm just pull that up just
a little bit like this. Yeah, let's do that. And then I could just grab these two and maybe bring these up just a little bit just
to round that off some. Here we go. Now, back here. Ultimately these are
going to have to go all the way
back, aren't they? They really stick
out a little bit further than they are up on top. So if we go back
to the side view, Let's just going to hit G
and start moving this back. And maybe we could take
these and move these back down and move them
out here like this. Let's grab these right here. And let's move these
out like this. All right, so now
that we've done that, let's think about
this little turn up. It's not a turnip. It's, it's a, it's a piece
that turns up, Let's do that. I will tab into edit mode. Let's go to x-ray and
I think I need to take these points right here and just slide
them up a bit. I'm going to hit G2 times
and just slide it up. About like that. And we go, and then if we select
these two faces, now let's extrude these up. I'm going to turn off the subdivision surfaces for just a moment to
extrude these up. And so let's hit E and
then I'm going to press Z to move up in the z-axis and let's
just move up like this. Well, it didn't really,
I'll hit C again. There we go. And let's just
move it up to about here. And now we need to
collapse these points. Let's do that. Let's take this and this, press the M key at last
this and this m at last, this, and this m at last. Okay? So we've got that. Now let's turn our
subdivisions back on again, right over here. See how we're doing, okay, we've got this little indentation
or this little piece. And that's good.
Now let's just take this and I will
move it up to here. We can take this guy and
move it down like this. And we can begin
moving these up. Backup in place to looks
like they're okay. And we go all right. Let's take a look. All right, that's a similar kind of
shape that we have here. Once again, needs some work. It always needs some work. So I'm going to take these
two points and just, or maybe just this one. And hit G2 times and slide
it in and bring it up a bit. And when I'm doing back
here is I'm really allowing the subdivision surface to give us these curves
between these edges. Whereas up here are really
kinda drew them very close together to get that
curve back here, I'm really allowing that
subdivision surface modifier to give us that curve
and see how that works. All right, let's go back and
we're doing pretty good. I think let me grab this and
move it forward just a bit. And we go. Okay. Recall that this is not the final
exterior of the car. This is the smoothing
mesh and this will mainly be used underneath
to provide Smoothing. Let me turn up this to four over here and
see how it looks. All right. Maybe I'll bring this forward
just a bit like this. And we go, yeah, I think that's getting
there. So all right. So we have this now. What about the back? Back here? We probably should work on that for just a minute. Let's take this and
tab into edit mode. Let's take a look at it. I'll go to the top view. All right, that's pretty good. But we're going to need
to bring that down. Let me go to Control
Alt Q to the Quad View. And let's take a look at this. Maybe here I'll go
to the back view and let's hide the
front of the car again so we can see
it a little better. I'll just click and drag here and then hit the H
key to hide that. Now, we really
need to bring this down to where the
trunk should be here. So I will just Alt click, Use me, Alt Click Here we go. This and let's just bring
it straight down like this. And we go and this, we could probably
bring this up some because look at
this that needs to come up some just a bit
In this down here could probably come up some like this. I think what we should do
is bring this back and we should probably give it
another extrusion here. So we can get that curve
a little bit better. I'll select these and
let's extrude down E and bring this down
like that. There we go. Now we have it in line with the trunk and in line with
the trunk on the top. And we've got a better curve here now I think that's good. Let's try and extrude
this down one more time. Let's hit E and pull
this down, down to here. I'm going to turn off
the subdivisions for just a moment so we can
see it here without that. And I will scale it in
the z to flatten it up. So S, z and press the 0 key
to flatten that up and we go. All right, now let's
close that up. Let's see what we
can do about that. My guess is, is we
should take these here and flatten these. S is 0. Let's try that.
And then we could take this maybe and G2 times
and move it down a bit. Then we're going to need another edge loop in
here to connect up here. So I'll just add one right here. We'll see how that
does once we turn on our subdivision
surface modifier again. But I'm going to go ahead and
close these up like this. And like this. Let's see how that works. Okay, and let's turn it
on and see how it looks. All right, not too bad. Let's go to the side view. Take a look at it. All right, so we could maybe
slide this up just a little bit and fix that curve there. We might be able to take these three right here and
bring these down a bit. Because it can come
down about like that. And we go and this down here
could come down like that. And we could also probably add another edge loop
right down here to really kinda tightened
this area up a bit. And let me grab these
and bring these up so it just kind of
angles there like that. Okay, Let's take a look at it. Alright, I think that's
pretty good for now. We are going to have to do
some work pulling these out, I think, and rounding
this off a little bit. Let me bring back the
rest by going to mesh, Show, Hide, reveal, hidden. And so there we have the basic beginning of
the smoothing mesh. And we're going to have
to do some work to get it really to the point
that it's correct. But the good thing is, is we can do that underneath the actual exterior of the car. So we can create the
exterior of the car now. And we can shrink, wrap those pieces to
this and then we can move this around to get the
smoothing that we need. And the cool thing is 2, we can begin removing edge
loops here to get it smoother. So for example here let me just select this
edge and this edge. We don't really need
these edges, right? It isn't really
holding anything. We don't really need
this edge or this edge, or this edge isn't really
holding too much here. We could probably get rid
of this one and this one. And this one. And that's about it there
because they're not really holding anything,
any actual shape. But we didn't know that
in creating it, right? We don't know exactly how
many edges or vertices are going to be needed to get the shape that we want
when we first begin. So we could take these, we can just hit the X
key and dissolve edges. And there we go. Now, we've got a better
and smoother area in here and appear. In addition, we can
begin looking at Moving and spreading out
some of the edges in here. But what we'll do
is we'll do more of that after we get
the external pieces. So in the next video, we'll begin selecting faces, duplicating pieces off of this to get our external
parts of the car. And once they're shrink
wrapped to the smoothing mesh, we can add as many vertices, as many edges as we want. And really go crazy
with the modeling, because ultimately
it will always conform to the underlying
smoothing mesh. So let's start on that next.
18. Creating the Exterior Panels: Now I think we should just finish up doing a few things for the smoothing mesh and then begin adding the other
parts of the car. We already have the
hood and the trunk. The trunk if we bring
that back, yeah. We don't have it shrink
wrapped yet. We can do that. We can just select it. And let's throw
these up and go to Add Modifier shrink wrap. And we will end the target, choose that smoothing mesh. And there we go. Now
we have it conformed that just like we have the hood, we can bring this back and this is conformed to
the smoothing mesh. We hide that. We can see. Let me just bring this. Actually it looks like these points here aren't
quite smooth debt. Let me turn on the cage
for the smoothing mash. Yeah, it looks like I
forgot to add these points here because you see how
they kind of curve up. So let's add those real quick. Let me just select
this, this, and this. And then we'll go over to that hood smoothing
vertex group. Recall that we
created that to add the points that needed to be shrink wrap to the
smoothing mesh. So let's come back over to
our object data properties. Here's that hood
smoothing vertex group. With these selected, Let's
just click on Assign. And there we go. Now
they flattened down. Alright, so that's good. We've got our herd and
our trunk shrink wrapped. That's good. Let's go back to the smoothing
mesh real quick and just make sure there isn't
anything we want to do before we create
those other pieces. It looks to me like
there's a little bit of a warp right in here. And this is going
to happen a lot. You're going to find
little dimples and little dense in your mesh as you work on it
and that's fine. You just go through and do the work to try and
clean it up a bit. That's the way it works. I think I'd like to
maybe add or no, Let's take this edge here
and scale it in the z. So I'll press S, Z and press 0. And that will flatten
those in the z-axis. And then I can just
take these and drag them straight
down like that. All right. Um, I think we've got
it to the point where we could begin creating the
other parts of the car. So let's do that. Let's let's begin
working on this. Let's maybe duplicate
the door off, press Alt Z and go
to the side view. And all we need is just to gather the faces that are going to end up being the door
to select these faces. Let me go back and just
turn off the subdivisions for a moment and we can see
those a little bit better. So I want to just select all the faces that are going
to incorporate that door. And it looks to me like
I'm gonna hit the C key for circle select and
just click and drag. It looks to me like
it's these faces here. So I'm just going to grab
these and right-click and then tumble around here. And maybe I'll also grab
these faces here as well. So those are the basic
phases of the door, I think. So. Let's go ahead and
duplicate those off. To do that, I'll press
Shift D and then Enter. And then I'll hit the
P key and choose to separate this by selection.
So I'll click that. And then the smoothing mesh
000 001 is the one we want. I'll tab back into object mode, select that one, and
we'll call this door. All right, There's our door. I'll hide it and
let's work on say, the front fender area. So I'll tab into edit
mode once again, scroll to the top view. And for this, I'll
hit the C key. I think we're going to
want these faces here. I'll go ahead and take
these because we can always move these around or
add an edge loop as needed. And you hit the C key again. And I'll start selecting
these on down here, around the herd like this. And I'll select all
of these as well. There we go. We got a few down here, hit that C key and grab those. So this is going to be
our front fender area. However, if we go back to here, let me yeah, it continues
on back into here. So what I'm gonna do is just
select this area for now. It looks to me like
the front fenders and the back vendors could be connected around the
bottom of the door. Let's take a look at that. Let me go to this one
here, Control Spacebar. And yeah, look at that. We've got a continuous part. It looks like from the
front underneath the door. The back. But for now I'm just
going to extend it to this back vendor and we can connect those up if we need to. All right, So Control Spacebar. I'll grab this to here, right? Or maybe just to here. I'll grab it to here
and then this will be the rear fender area. Alright, so let's once again up. I missed one right here. Let's press shift D and enter, and then the P key and separate that duplicate by
selection. There we go. Tab back into object mode. Here it is smoothing
mesh 000 001, and we will call
this front fender. There we go. Now
let's grab the back. Let me go to the top view again. And let's take a look at this. Here's the trunk area. So let's press the C key again, and let's select
all of this area. And over to where the trunk is and on down here
as well. All right. Yes, so I'll hit the C key again and just select
these as well. And these, this. So I'm just trying to get
all of these selected. There we go. Yeah, that looks like the area around the trunk. That's good. So once again, shift D, Enter, press the P key
Separate by selection. Let's go back and this 001
will be the rear fender. Alright, now let's do a little
bit of organizing here. I'm going to join these areas
and pull this down a bit. And we go. And then in here let's create
a new collection. New collection, and
we'll call this one, would call it Nash Healy. And we go and we want to
take all of the pieces now. The trunk, the rear
fender, the hood, the front fenders, that door, and drag that into
our collection here. And now we can turn off the smoothing mesh
and see our parts. Or we can go back to this
smoothing mesh here. Now what let's do, I'm going to take the
smoothing mesh backup to four. And then what we'll do is for
each of these pieces, say, I'll Hi these for now, say let's work on the door. And what we can do
is hide the mesh. And we need to shrink wrap
this to that smoothing mesh. So let's add a modifier here, shrink wrap, and we'll
select smoothing mesh. Now that it's conformed to that, we can move things
around and get these points in place
now, however we like. So let's say I want
to just move this up. We can do that and
it's going to stay conformed to the
underlying mesh. I can move this over here. And so it really makes things a whole lot easier as you try and get these things in place to create the shape of
each of the body parts. Let me turn on the subdivided
cage here, like this. And then like down here, we could just add an edge loop. And we can do that. We don't even have
to worry about it. We can add an edge loop here. Because no matter what
we add within reason, I should say, our
object is going to stay conformed to
the smoothing mesh. So let me up here and I'm just going to begin
moving these into place. This, and begin moving this. And all of these need to
move into place here. So we can do that. Begin moving these to kind of curve this
around like this. Now it looks like
we're going to need to change the flow
of the mesh here. Then we could now work
on this area here. It looks to me like that
cuts right through there. So let's take a look at
how that would work. I'm going to turn on
the shrink wrap cage so we can see how
they're conforming here. And we go. And then it looks like
we really need to take an edge from
here over to here. I think I can press
the K key for the knife tool and click
here, here and here. And then I'll hit Enter. And now let's try and take these pieces away
and see how we do. Delete, delete faces. Maybe I'll bring it up a bit. And as I said, we can add
however many points we need. So I'll maybe add an
edge loop through here. Feel like I want to add
something right through here. There we go. So we're beginning to get there. We're beginning to get
that curved shape. That shape at the door here. Maybe I'll add an edge loop
here and see what happens. Pull it this way,
just a bit like this. You can see here
how it's beginning to poke out a bit that's probably being pulled toward
the curve of the offender. So we could move
that up just a bit, or we could even just
take that out completely. We can just hit X
and dissolve edges. And there we go. All right, so
you've got a lot of leeway as you're working
on these to get it just the way you need while it's still conforms to
that underlying mesh. All right, so there's
the beginnings of the door for the car. Ultimately, we will add a
little thickness to this. So just as an example, we could come in here and go
to our solidify modifier. We could turn on even
thickness only REM, and we could increase
the thickness, maybe the point 0, 2, you can see that there. And then we can also come into our object data
properties under normals and turn
that on and we get a nice sharp edge all
the way around there. So this is going
to be our process. Now we're going to go through
and try and work on this, will work on the other parts of the car and build up
our external pieces.
19. Conforming the Front Panels: Now let's work on
the front fender. I'll hide the door, bring the front fender back, and let's see what we need
to do to conform this. I'll hide the smoothing mash and let's go to the top
view and take a look. Well it looks like
what we could do is add an edge loop here, and that'll give us this
edge along the back here. So let's just
remove these faces. Delete faces. There we go. And we could turn on our subdivisions
here just to see how it looks and we can
bring back the hood. All right, so now what we
can do is we can come in and just begin getting these
aligned to each other. You can just move
these back a bit, hit the G key. And once again, this is
all just going to stay smoothed to that
underlying geometry. And we can move this out a
bit, move this out of it. So how far you want these
apart is up to you. I'm just going to begin with this like this and
just get these. So they're just a little
bit out like this. It looks like we could
adjust the herd as well. Maybe hit the G key and
move these down a bit. And we go back to the
front fender here. And maybe I'll bring
these down like this. Let's now do that over here. On the side. Let me bring
back the door here. We can work on this. I'll press Alt Z. What I could do is insert
an edge loop here, and that moves that point back. And then we could get rid of much of these here
that overlap the doors. So we go into face mode, we could maybe get rid of. Now let's hit the C key. These here and these. But I want to keep this one. All right, Let's delete
these delete faces. And let's go back
to the one key. And now we can begin moving these points to conform to
the door a little bit better. We may need to once again add
some edges and that's fine. We can do that. I'm going
to add one down here. Like this. Maybe
pull these up a bit. We're going to need
to add another one. I'll take these right here. All of these and hit S, z 0, and then pull them
down a bit like this. Yeah, it looks like we
need something here and we go and maybe something here. Oh, and I think one of
the problems I've been having is that I haven't had this shrink wrapped yet
to the smoothing mesh. So let's do that real quick. Add modifier shrink wrap, and let's choose
smoothing mesh and we go. So now we might have a little bit better time moving some of
these around a bit. There we go. Took a little work
but we got it. Drag that down. There we go. That's helping. And I'll tumble around
and let's see if we can get any of these in place. So it looks like I
might be able to take away these delete faces. And then let's move these back. And I want to turn on
the shrink wrap cage here so I can see through there. There we go. And I'm
going to slide this over and slide
this up like that. So we may not be able to get him perfect the first time out, but we're trying to just get close and see what
we can come up with. All right. Let's
take a look at it. Yeah, that's pretty good. What we could do is adjust some points here in the
underlying smoothing mesh. So let's hide the Nash Healy, bring back the
smoothing mesh and let's see what we can
do up here with this. Yeah, so we could we
could begin taking some of these and moving
these over a bit. I'm going to turn the
viewport down to two, so it's a little bit
easier to move around. So I'm just going to take these out just a little bit like this. Spread these apart just a bit. Maybe even bring
these out just a bit. I'll press G two times again. So that's all I'm doing is
just pressing G two times to slide these along
the existing edge. Because we don't want to
change the shape too much. But we do want to get a little bit more smoother
transitions in here. So I think that's
working out pretty well. Alright, so now we
can go back to here. And that smooths that out automatically because
they're shrink wrap to it. Let me take this and
move it over a bit. Here we go. Now we can
move it over a little bit. So you can see what, or at least I hope you can see the benefit of having that underlying
geometry that we can use to keep everything
smoothed while moving things around
and trying to get these so they fit together. I will try and add another edge loop in here
and see what happens. Not bad. Let me see what happens
if we move it back. Okay, We're getting
a little bit better. A little bit cleaner lines now. Yeah. So we're getting that. Okay. So we've got the door and the offender and the hood
pretty much in shape now. Now in the next video, Let's continue this process
and we will work on the back of the car to get it in place
and conform to the shape.
20. Finishing Conforming the Panels: Now let's work on conforming the rear fender to
the smoothing mesh. Let's bring back the rear
offenders and the trunk. And if I select
the fenders here, let's turn on the subdivision
surface modifier here. And let's add a
shrink wrap modifier. We shouldn't forget that again. Let's choose the smoothing
mesh in the target. There we go. And if we tab into edit mode, there's quite a bit
of a difference here. I don't know if I want to
pull these all the way up to here that p.sit stretching
the mesh quite a bit. Let's extrude these up. Let's just take these. Let me turn on the cage
for the shrink-wrap. And let's just hit
E and extrude these up like this and bring
it on up to here. And I'm gonna go. And then
let's add an edge loop here. We could then select these four and hit the F key
to create a face there. And then we could see if
we can begin bringing these in like this. Let's try this. Yeah, actually that
worked pretty well. Okay. Let's choose the trunk and well, let's turn on the
shrink-wrapped cage so it conforms to that. And how does that look? That looks okay. I feel like we need
one more edge. I'm going to add one here
and see what happens. Now let's grab this and move
it down a bit like this. That's not then. Okay. Let's come up here to the
top and see if we can conform these to the trunk
a little bit better. Let's just grab this
and move it down. About, Let's move
this back just a bit. So that's not too bad. All right, what about
this side here? Let's take a look at these. Well, we've got some
work to do, right? If we took all of this, I'll just Alt click
this and maybe hit the R key and rotate
it just a bit. Let's rotate it some
kind of angle it the way it is here, right? I'll press Alt Z and then let's begin moving these around. Maybe we move these a bit. Well, what we could do also, let's maybe just grab
these and move these back, Sam, I just I don't need
them right here, right now. And let's then take these
and move these out. Maybe we need an
edge right here. Yeah, that kinda helps there. Okay. And then let's just take a
look at each one of these. It looks pretty good. We could maybe close these
up a little bit better. Let's try this. Okay, Let's go up to the top. Actually, I hit the period
key to tumble around this. And then let's move these
in just a little bit. G and move this in. And we doing here G and I'll move this in just
a little bit like that. Alright, that looks pretty good, like it's conforming
pretty well to that. And then since this
and this are the same, or we think they're
all one object, right? I guess we could go ahead
and connect that up. Now let's take a look. Let me see what this is. Well, I'm going to
select these two objects and then hit the Tab key so we can see them
both in edit mode. Well, we could take this one, alt, click this and
move it down a bit. If we move it down too far, you can see we get some kind
of artifacts there over on the left-hand side so we don't want to
bring it down too far, but something like that. Now if I took these and
move them over here, maybe we can just
connect these up. Let's see. If I tap back into object mode, I can select this one and
then Shift click this one, and then let's join them
together with Control J. Now we've just got one object
must call these fenders. And we go. And then let's just
connect them up. I'll select this
one and this one, M, merge at center. Same thing here.
Same thing here. All right, so now we take this, move it back a bit. We've got that same
kind of problem here. Let's just see what
happens if we add edge loops over here. Does that help us at all? Or does it just make our
lives more difficult? Let's see. That's not bad. All right, tab back into object
mode. And there we go. We've got the
exterior pieces now created and conformed to that
underlying smoothing mesh. And if we go to our
mat caps that allows those reflections
to flow smoothly from one piece to
the other, right? There's no real differences
as we tumble around here. So that looks pretty
good. All right. Well, we've come a long way. I think in the next
part of the course, Let's begin working on the things like the
tires and the wheels, the bumpers, the headlights, just kind of getting
the various objects on the exterior of the
car in place so we can get a sense of the
scale and proportion of them before we begin
closing up the model. So in the next video, we will begin working on that.
21. Modeling the Grill Rim: All right, Well, I
think I feel like working on something
on the frontier. I don't know if I'm quite
ready to do the bumper. That looks like a
good deal of work. That's working on
something a little easier to have it just
this rim around the grill. Let's, let's work on that. I'll switch back to the studio. And let's take a look at
an image that we might be able to use for
this image open. Well, that's just
use this one here. That looks pretty good. Yeah, so let's press Control and Spacebar and
let's take a look at it. It looks pretty standard. It's hard to tell if it actually gets thicker here on the bottom. I don't know that it does. I think it's just this
part that's coming around. I think I'll just created as evenly spaced all
the way around as I can. And then this internal part
when we create the grill, maybe that will
add to that a bit. But let's go ahead
and work on it as is. I think what we should
do is get the shape of that opening a little bit
better on our smoothing nash. So we can't really
change things here. We can't change the shape of this really because if
I select this and hit G, we can't see, we can't
change the shape of it because it's shrink
wrap to that smoothing mesh. So let's turn on
the smoothing mesh. Turn off the car
collection for a bit. And here's where we can actually work on
the shape of that. So I'll press Alt Z, and it looks like we need
to move these up a bit. So I'll just take these and move them
up, kinda like this. Yeah, that looks pretty good. And then let's hit
G and move this. And so I'm just
going to try and get these generally in shape. You know, what I probably
should have done is get G2 times to move these. Let me try that. I'll hit G two times and
let's move those up. Yeah, just to try and stay in line with the shape that
we've already created here. I'll kinda do that
for all the others. This one doesn't
really work like that because of the two edges. So we need to just move that and then I'll
hit G two times here. And we should probably
move it to well, it's kinda hard to
tell, isn't that? How about right here, I think. Okay, so let's take a look. And we've got some artifacts here because they've been pushed so hard on that smoothing mesh. So we should be
able to maybe take these and just hit G and move these back some and then
slowly move them back down. You see if we push it, we get those artifacts. I'm just going to bring
them up and then slowly push him back down to just
that edge right there. And that cleans them
up a little bit. All right, so we've got
that general shape. Now it lists do is take this
edge and let's duplicate it, split it off as its own object, take the shrink wrap
modifier off of it, and then we can use that as
the base shape of this rim. So let's try that. First of all, I'm in
press shift D, Enter, then I'm going to hit P
and separate by selection. And then if we tap
back into object mode, Here's that new object. Let's call this grill REM. And let's take off the
shrink wrap modifier here. And there we go. So now we just need to do
a little bit of work to conform it back to
that general shape. Let me go to the
front view and we could probably take away some of these points
we don't really need. Maybe this one and this
one will de-select that. We probably don't
need these two. So I'll press Delete
and dissolve vertices. And we probably
don't need this one. Let's do the same here. That'll just make things
a little easier as we try and conform
this to the shape. I think I want it just to be barely on the inside and then we will extrude and scale
out to get the rim. So let's do that and
bring him in just a bit. So that's a little bit better in terms of the shape
from the front. Let's take a look at it from
the top with the seven key. And we could probably lined these up pretty well right
along the edge here. So I'll just move these
back until the right, lined up with that object there. And maybe I'll move it
out just a little bit now that it's conform
to that shape. And then let's hit
E and scale out. But I want to change the pivot
point to the median point. But when I do that, you can
see it's just over here. I need it right in the center. And it's over here because we're mirroring it over
to the other side. So this is the only real part of the mesh or the
edge over here. So we kinda need to apply the mirror so that we can
scale from the center itself. Let's try that. Let's apply the mirror
modifier over here. All we need to do is just pull
this down and click Apply. And then if we tap back into
edit mode and hit the a key, now we scale from this point, so let's hit E and
I'll press Enter, and then I'm going to hit
the S key and scale out just a little bit about
like this I think. And then I'm going to
scale up in the z, S, z. Let's do that. Scale out until it's just about the same width all
the way around. And looks like this
one could come out a bit o and there's a crease
here in the center. Maybe if we smooth
it, Let's try that. Shade Smooth. No, so what we've got here, let's go take a look at
our base orientation. And sure enough we've
got one side flipped. So let's select these faces and I'm just going
to select all of them and go up to Mesh. Normals recalculate outside, and that'll change
that all blue. And that should help. Let's turn off at okay, and that cleans up that
crease in the center. All right, so we've got this
now out the way we want it. Let's go back to
having it mirrored. Now, I'm going to press Alt Z, go to face mode, and let's just select this side. Delete faces. Now if we mirror it over
again, add modifier mirror. Let's take it up to
the top of the stack. Here. Turn on our cage,
turn on clipping. Now we've got it mirrored again. So whatever we do will
happen on both sides. All right, so with this, let me grab this edge all the way around and I'm
just going to move it back, just a smidge like this. Maybe grab these edges in
here and move them out a bit. So what I'm gonna do now is add a solidify
modifier to this. Let's do that. But
I'll select it. Add modifier,
solidify right here. And then, yeah,
look at that now we can just click and drag and the thickness field
and I'll just hold the Shift key down to pull
it back just a little. I'll turn on even thickness. And let's see how we're
doing here. Not bad. Here we go, Pull
it out like that. So we may be able to go through
and pull some points out to get it away from the front of the car
just a little bit. Have kind of an even
edge all the way around. We could add a couple of edges to sharpen that up
if we wanted to, maybe I'll just scroll the
mouse wheel and add two here. See how that looks. Yeah, that sharpens up
the edge just a bit. All right, so we've
got that grill ramen. In the next video, we'll continue working on
the front of the car.
22. Creating the Headlights: Now I realize as I've been
working on this rim here, this really isn't
a normal grill. If we go back to image open and go to our
reference images, we can see that the usual
grill is something like this. So I think we're
okay with this rim and then add another piece
around the headlights. Because if we go to
another one here, you can see that just
about every one of them has this other
kind of Grill. Let's take a look at
even this green one. There's another green one here that has this kind of grill. I think we're doing okay. The only thing I can see
different here with this girl, it's a little bit
thicker and wider and we can work on that
a little bit later. I just want to get all
the parts in currently. So let's work on the headlights. I've done a little
googling and I found a headlight that
look similar here. This isn't the exact same, but I think at least gives me a decent image here to work from to create
the headlights. So let's work on this. I'm going to hide the car and the reference images
as well right now. And we could begin this
with the cylinder, but I think it might be difficult
to get this curve here. So let's begin with a
sphere, a UV sphere. I'll press Shift
a mesh UV sphere. And let's just, well, let's just turn
it in the x-axis. I'll press RX 900
to turn it there. And we really only need
half a dose, I think. So if we go to the side view with the
three key on the numpad, and I'll press Alt Z
here in edit mode. And I guess I'll just begin
with taking this away. Let's just delete
this, delete faces. And then since the origin of
the object is still here, let's just scale in the y
and see if we can get yeah, something similar to that
light housing there, something kinda hard to tell, maybe something about like that. And then I'm going
to go ahead and add this piece right up front. Let's do that. I'll just select this
edge right here. And let's extrude
forward just a bit. I'll hit EY pull up
just a little bit. And it looks to me like it
kind of bends in just a hair. So I'll press E Y again and then maybe scale in just
a little like this. Let's try that. And then it looks like
it goes in a bit. So E S to scale in. And then I'll push
it back a bit, EY again and push back
just a bit like that and maybe scale it in just a
bit to kinda close it off. Now there is this
rim right here. Let's take a look at that. Maybe we could hit G2 times and slide this
back a little bit. And then we could use
the Bevel tool to expand this a bit
or split that edge and then extrude it in. Let's try that. If we press Control E, You can see bevel edges
here, or it's Control B. So let's do that control B. And I'll pull out a bit. And there we go. And
you can see here we've got number of
segments, just one. If we increase this, we can add more, but all
we need just that one. So then let's just extrude
that and let's hit E and S and scale that
in just a little bit. And I can do that because I've got median points selected here. Alright, so that's a pretty
good base object for this, I think let's add a
subdivision surface modifier. See how it looks. Let's increase the view
port subdivisions to two. And let's right-click on it
and choose Shade Smooth. Alright, so it's pretty good. We probably just need to hold a couple of edges like
this one up front. We could probably
just add an edge here and pull that
forward just a bit. And maybe these back here too. Let's add an edge here
and pull that in. And add an edge here and
pull that in just a bit. Let's see how that works. Yeah, I think that'll work. Now the headlight or the actual
glass here on the front. Well, let's actually begin
with another sphere. Let's just do that. Shift a mesh UV sphere. I'll pull this out,
we'll turn it again in the x-axis, RX 900. And once again,
let's just split it. I guess I could have
just used the one before, but that's okay. Let's get rid of this
side and delete faces. And then if we go back to
object mode, once again, we can scale on the y-axis
and a free press S scale in. Maybe we can get the kind of
curve of that lens there. Now let's try that. I'm going to bring it back. And let's scale it down a bit. Get it on the inside there. Maybe a little more.
Maybe I'll bring it out some scale it in a little more. See how we're doing here. Yeah, something like this maybe. And then what we
could do is just add it to this previous objects. So with this still selected, I'll just shift
click this and we could add this with Control J. And we go and then right-click
it and shade smooth. And let's see how
we're doing here. Yeah, I think that's all right. Let's tab into edit mode. I'm just going to hit
the L key over this. I'm just going to
pull it out to a little bit more like this. There we go. Okay. So there's a light. Let's change the name, let's call it a headlight. And we go, we'll drag it up into the Nash Healy collection, will unhide it, and
let's put it in place. First of all, we need
to spin it around. Let's press our z1 800. Spin that around. Let's go to the front view, all Z, and bring back
our reference images. There we go. Now let's scale it down and
put it in place right over here and see how it looks. I guess we could kind
of put it right. I didn't hear I think. All right. Let's take a look at
it from the side view. Bring it up, up to here. And let's take a look. Okay, so there we
have a headlight. Maybe that's out a
little bit too much. Let's bring it back a bit. Let me take a look
at it again with one of these images where
it was at Greenland. Here it is. Yeah. So it looks like it
comes out a little bit. And as I said, we're
going to have to redo or change the shape a bit on
that REM, but that's fine. Yeah, that looks pretty good. So now that that's there, Let's make sure the cursor
is in the center of the grid width shift S1
cursor to world origin. And then let's move
this origin of the object to that
cursor object, set origin, origin to 3D cursor. And once we've done that, we can mirror it over to
the other side because it's going to mirror around
the center of the object. So I'll click Add
Modifier, mirror. And there we go. All right, we've got our lights
in the next video. Let's see what we can do
with this grill here.
23. Grill Rim Redux: Well, now that we've
decided that this is going to be the grill
we're going to use. I think we need to go
back and redo this grill RAM that's just not
really working for me. So let's select this and I
guess let's just delete it. Let's just delete this, delete. And let's begin again. But this time instead
of grabbing the points around here that
we've moved by hand, Let's grab the
points around this. That's a little bit more
precise in its curve here. So let's tap into this and maybe I'll go to this
edge right here. I'll Alt click this
edge and let's use this to create
these other pieces, the grill RAM and also that little sphere or little
circle, I should say, around the light that then transitions into these bars
connecting in the middle. So let's try this. I'm going to go to the
front view, let's say. And what I'll do is I'll
duplicate this shift D Enter, and then let's split it off
into its own object again with the P key and
separate by selection. Now if we tap back
into object mode, we've got this right here. Let's rename this
and call it well, we'll call it grill REM again. That's what that'll be. And then I'll take this
and let's scale it up. So it's about where
the rim would be. So let me press O Z. Well, we can kind
of see it here. So what I'll do is I'll hit the S key and scale
out just a bit. And let's take a look. So maybe the rim goes
around right here. Let's try this like this. And we've still got a mirror modifier and a
subdivision surface modifier. Let's take that mirror modifier up to the top of the stack here. And we're going to
turn on clipping. And then what I'll do is just select half of this are
right about to here. And let's delete these. Let's delete, delete vertices. And then these are the ones
we're going to extrude toward the center to get
or to close off the rim. But before we do that, let's select this and make
this point right here, the active element
of our selection. And then come up here and make sure active element
is turned on. And we go. Now, let's go to the top view
and take a look at this. I want to tilt this. It looks to me like it
needs to be tilted back. Like the top is tilted back and the bottom
is pushed out a bit. So let's then rotate
around the x-axis. I'll press R x, and let's tilt this back
just a little bit more. Press Alt Z. Here we go. And then let's also tilt
it so it's going to aim. So it bends around here. So that would be
the z-axis, r, z. And let's tilt it like this. Yeah, So we've got it kind of
aiming this way. All right. Let's see how that looks here. So we've got it tilting
back on the top and toward the front on
the bottom and that kind of those the way
it looks here, right? I might be able to move it back just a little bit like this. All right, so now that we
have that basic shape, let's take these two points and let's extrude and pull
him toward the center. I'll hit E X, pull him toward the center
and they're going to clip here in the middle. And that's good. All right, now let's go
back to that top view. And let's begin moving this
forward to get that curve. So we want to move it forward
a bit like this, right? And we go, and are
we going to need another point in there or
is this going to be enough? It's not bad actually. The way it is now
I think I'm going to put one more point in there. Let's do that. I'll I'll well,
first let's turn on the cage for the mirror
and for the subdivisions. And then I'll just select these two points on
the top and the bottom. And let's just subdivide this. I'll right-click and
choose sub-divide, and I'll just add
this new point here. Let's just make sure we've
got a nice curve here. Not really smooth. Let's move this. Maybe I'll hit G two times and move this
back a little bit. Just try and get a
relatively nice curve here. Maybe I'll just move
these little tiny bit. Probably shouldn't
do it too much. I get a little
carried away here. And let's take a
look at that now. All right. I think that's pretty good and I think this is just a
little more precise than pulling it off of
this shape that we created by hand from
the fender here. All right, so now
that we have that, I think that's going
to work pretty well. Let's now select everything
and extrude out. But I want to change the pivot
point here back to media. And let's do that. And then let's just select these two points here to get a point or to get a pivot
point in the center. And let's move the 3D
cursor to this point. To snap the cursor, we can press Shift S to open
the snapping menu here, and we can use cursor to
selected or the two key. So I'll move it there. Now, when we select
all of these, instead of the pivot
point being here, we can change the pivot point
to being at the 3D cursor. All right, so now let's
try and extrude this out. I'll hit E and S. And let's
extrude out like this. And I better press Alt
Z so we can see it. So, all right, let's now press S and Z and
scale up in the z. And I don't know that we need
it this thick on the sides. So NSX and bring
that in like this. S z. So something like this, just
so we get it fairly even around here and let me
press S and X and get that. Now we're going to have to do
some pulling of the fender itself and we're gonna do
that with the smoothing mesh. But for now I just
want to get this generally in the
right place. Okay. So now we've got that. I'm going to turn off
the fenders right here. And now let's work
on it like this. So what I'll do here
is just extrude, I'll select everything and
let's just extrude forward. E and y. Two, pull
forward and the y-axis. Alright? And then let's add one more
edge loop here in the center. And let's pull this
forward like this. And maybe scale in
just a bit, tests, scale in bringing this
forward just a bit like this. Let's see how that works. Also. Let's smooth it. I'll right-click and
choose shade smooth. All right, so that
looks pretty good. I feel like it still
needs to be a little higher or wider in the z-axis. Maybe I'll press S
and Z and kinda pull that up a bit like this. Let's try that. Yeah, I think that
looks pretty good. The next thing we need to do is just conform defenders to this. But I don't want to
do these fenders. I want to use the
smoothing mesh, so let's turn that on. And maybe I'll turn
everything else off here in this Nash collection here and
just leave the grill rim. Now, we need to take this mesh and conform it
to what we just created. And then I think it'll be a
little bit more detailed, a little bit more precise. So I'll click this edge and
I think I'll remove it. Delete, dissolve edges,
go that helps there. Let's grab this edge and
let's move it back a bit. Let's change from 3D
cursor to median point. And I'll just bring it
back just a little bit. Tell it just begins to touch
that, something like that. Let's do the same with these. And I'm just going to go around and begin trying to
conform the mesh, the smoothing mesh to
the rim that we just created from the shape
based on the headlights. So sometimes you
can just go back and find a shape that
you know is correct or at least is more precise
than what you've done previously and then conform
everything to that. That's what we're doing here. So let's do that. These points here,
let me wait to deal with these points
until we get the top here. Let's take these and I
will move them forward. I'll take these
here and I'll move them forward until we
get about two there. De-select one, move it forward
till we get about to hear. De-select that. And I'm just moving them ever so gently to try and not lose that nice shape that we've
created for ourselves here. And I'm just going to try
and get these in place. So let me grab these and move
them forward just a bit. And then I'll start moving these down a little bit like this. Then de-select that. This one. Move that down just
a little bit at a time to try and
get them in place. All right. Looks like we have
a little work to do here. And let's see how
that looks now. Looks pretty good. I think we could work on
this area now over here. So maybe, oops, let me select
this point right in there. Let's see how far
we need to move it. All right, let's
just take a look and see how we're doing here. Actually that's not too bad. We've got maybe a little bit
of pulling right in here. Yeah, you can see
this point is kinda being pulled out
just a little bit. I might try and move one of these points just a little bit. Just so we can get
that in like that. Alright, and then
I may grab these here and pull these
back just a little bit. Try that. But let's take a look at how the underlying
vendors are doing. Let's turn off the
smoothing mesh, go back to the vendors and yeah, we've got some
work to do to move these into place, right? So we could take this now. And if we just move
these here to here, let's say these should just slide down along
that smoothing mesh. So I'll hit G and
pull down just a bit. And once again, we
just move these in bit by bit. Like this. Yeah, I think we're
doing pretty good. Let's bring back the other
part, the hood, headlights. And yeah, I think that rim there looks a lot better
than the previous one. I feel like it's
just more precise and a nicer curve to it. Alright, so in the next
video, but let's do, I'm going to press
Shift S1 to move that cursor back to the center. But in the next video, let's work on these bars
here and the emblem, and this rim around the light. So that's coming up next.
24. Modeling the Grill Bars and Emblem: To work on the bars for the
grill here in the center. Let's bring in another
couple of reference images. Actually be, let me
do a new window here. I'll just click and
drag down in a corner. And let's go to this menu and choose Image Editor
and image open. And let's see which photos
might help us here. Well, here's a front view. This one looks pretty good
to take a look at this. Yeah, let's look at this one. So I think we can do a
similar thing that we did with the REM for
these bars because there's also this
little rim that goes around the light between the light and the
grill RAM here. So let's go back to the headlights and let's grab a edge loop off of this again. So I'll just grab
this one once again. Let's press shift D, Enter, hit the P key to
separate by selection. And once again,
let's rename this, but this time let's
call this grill bars. There we go. And it looks to me like
this is tilted as well. Like it tilts a bit
towards the inside so that these bars can curve a
bit as well as the REMS. So once again, let's
do a similar thing, but we don't need to
delete half of them. I don't think Let's first of all scale them out
just a smidge. Now let's extrude it out a bit. The hit E and S, and I'm going to scale
out just a bit like this. And I'm going to go ahead
and overlap it just a little because when we add the
subdivision surface modifier, it's going to shrink it
up just a little bit. And then y, Let's do
is let's do that. Tilt, Let's turn it. So it has a similar
angle to the rim here. So in the top view I'll just hit the R key and turn it
just a smidge like this. Let's try this. All right, let's see how that looks. All right, and I may slide it over just a bit to get
it in the center here. Now that we've done that, let's connect them up. So down here, we've got a subdivision surface modifier
and a mirror modifier. So we should be able to
do this by selecting, say, this edge here and
maybe this edge here. Let's do that and let's extrude and bring
these into the center. So let me turn on the cages
for the two modifiers. And if we hit E and
X and pull these in, first of all, they do not clip, so we need to deal with that. Let's come down here and turn on clipping in the mirror modifier. And if we bring these in, they still don't come together. And that's because the mirror
modifier isn't on top. We need to move this up
to the top of the stack. So let's click here and
move it to the top. Now if we click and drag, those are clipped
together in the center. All right, that's good. Let's add an edge loop
in each of these, I'll press Control
R and hit Enter two times and control
are down here. Do the same thing. And then let's press Alt and
Shift click these two edges. And I'll hit G2 times
and slide them over. And I don't want
to go all the way, but just bringing them
over just enough to kind of sharpen up that
edge right here. Or maybe writing here. And we go. All right, let's
take a look Now. If we come back here. Well, we're going to have
to pull those out a bit. So actually before
I add that edge, I should really pull this
out to get that curve. Let's do that. I'm going to press
Control Z to delete that edge right here. And in doing that, I lost
the order of my modifiers. I mean, drag the mirror
backup. Here we go. So I just want to kind
of clean curve or a clean edge here while I'm
moving this from the top. So let's turn on the cages here. So now you can kinda
see where I need to go. This is angled and I need to kinda come up here like this. If I go too far and that's
That's a little too much, but right at about
like this maybe. All right. Let's take a look. Yeah, So that gives
us a little bit of that curve that
we're seeing here. It isn't quite as much
as the rim maybe, but I think that'll work. Let's let's take a look
at it one more time. I could pull out a
little bit more, but not a whole lot. Just in the way I've
angled these here. Now, perhaps we could
take all of these, find a point over
here, right here, and have that be the
active element and then turn it out a
little bit more. We can try that. Let's do that. So at this point now, with active element on, if I hit the R key, I can begin to move these
out just a bit like this. And maybe we go like this. And then we take this point and move them out just a little bit. Yeah, there we go. Okay. Now we could go ahead and add those edges to clean
up this in here. Let's do that. Control
are here, Control R here. And then let's take
these two, it G2 times. And let's slide these in. To clean up that edge just a
little bit, right in there. There we go. Okay,
Now we've got that. Let's add a little bit
of thickness to it. I'll come over here to the
modifier stack and let's add a solidify modifier to it. We'll choose even thickness, click and drag and
the thickness field and just pull back a bit. We don't need a whole lot, maybe something like that
because what we're gonna do is drag this above
the subdivisions. Let's do that. And then we get a nice curve. We're getting the subdivisions happening after the solidify
and that's kinda nice there. We could almost pull
this forward a bit. It looks like maybe the
whole thing, Let's see. Looks like we can pull
both the lights and the REMS forward some
I mean, the bars. Let's try that. I'm just going to bring
them forward in the y-axis. Maybe I'll just hit G and why? Bring them forward a bit. We could try that. And then maybe I'll bring
this forward just a bit Gy, something like that. Yeah, that's not bad. All right, so now let's
work on this emblem here. And I feel like I've got
a better image of this. Let me go to Image Open. And here we go. This one right here. Yeah, that's a
little bit better. So it's basically curved circle, kind of like the headlight lens. It's also got this kind
of welding gunk on it. I don't really like that. I don't know that I'll
try and replicate that. But let's, let's take one
of these headlight lenses. I'll tab into edit mode and
just press the L key here. And then let's duplicate this
shift D X. Pull that off. Let's separate it with
the P key by selection. And here it is. Here we could call this emblem. Let's do that. And if we select
it in object mode, we can remove the mirror
off in there and we'd go. And then let's take this. I'll go back to Edit mode and just move it
over to the center. Let's scale it down. If we select this edge outside, Let's try and work on
this area out here. So I'll hit E and S
and scale out a bit. Oh, it looks like we still
have active element on. Let me press Control
Z to go back. I'll change this back
to median point. And then let's
select that edge e s. Pull out just a
bit, try that again. And then pull it back some
0s and scale out a bit. And I'll pull this
back a little more. Turn on the cage for
the subdivisions. Let's scale in a bit. And maybe I can move the whole
thing out some, Let's see. Then let's select this back and move it
back a little bit. And maybe scale in some. Let's try that. And we go. All right, seems a
little too big for me. Inlets. Go back to Edit mode and
scale that down some. Yeah, it's not bad. Let's pull it back a little. I'm going to take
that origin point and move it back into the
center of this object, go to Object Set Origin,
origin to geometry. So now we scale it down. We can do that in object
mode and move it back a bit. Yeah, okay, and then we should
probably smooth the bars. I'll right-click and
click, shade smooth. All right, there we go. In the next video, Let's maybe
work on the on the bumper.
25. Creating the Front Bumper: All right. Now let's see what we can do
regarding this front bumper. Let me grab some new
reference images. One thing I'm noticing here is that if you take a look
at this reference image, these little vertical pieces on the bumper are on the
outside of the headlights. But if we take a
look at another one, say this one here, let's see if we can find
a more straight on view. Here. Let's take a look at this. They are pretty much in
line with the headlights. So who are we going to believe? It almost looks like they
used to be here, right. And they were pulled off, moved out, and then the
hole was filled in. So I don't know that this is the really the one we
want to take a look at. I think we need to go with this. So let me bring up another view. And let's take a look
at this one here. Well, no, that's
got that old grill. We don't want that one. How about this one here? Yeah, that looks pretty good. Okay. So how would we do this? I think, well, it's
due once again is just taken edge
off of the car. So we get that basic
shape of the car, then extrude it a couple times to bring it out
to be this shape. Let's give this a try. I will select the fenders here and let's tab
into edit mode. And maybe I'll just grab this edge right here.
Let's try this. Let's just press shift D and
enter to duplicate that. And then press the P key
and separate by selection. And then if we tap
back into object mode, we can see it here. Let's call this front bumper. Alright, so now let's take a look at what we
should do with it. If I go to the front
view and press all Z, we can see it here. It looks like it's a
little too curved up here. So let's press S z, kinda flatten it just a bit, give it a little bit
like that, let's say. And then we should move
it down just a little, I think, right to here. Alright, let's do that. And then maybe we should move it out just a
little bit if we grab that. Oh, it just slides. We don't want that. So let's either get rid of or apply
the shrink wrap modifier. Let's go ahead and apply it. So we have that curve
all baked down. Let's click the pull down
menu here and click Apply. And then we could just move
it out a bit here, like this. And we go. All right. So we have that. Do we have it on the bottom
of the bumper there? Yeah, we've got it pretty
much there at the bottom. Looks like we've got a few
more curves down here. Let's select this again, and let's press S and Z
and kind of scale it. I'll just move the mouse to
we get it a little more flat. There we go. That'll work. All right, Now that
we've got that, Let's duplicate this and bring it up to the top of
where the bumper should be. So let's press shift D. I'm just going to bring it
up here. Maybe like this. Grab these and I'll maybe
bring them forward a bit. Something like that. Let's see what that looks like. Maybe we should bring
these out just a bit. I'll Alt click and bring
those out a little bit. All right, so now that
we've got those in place, Let's take a look at
it from the front. Those top ones look like they may be a little bit too high. Let's bring them down
just a little bit. Okay? So, all right, so we've got these now. If we selected four points
over here, like that, if the F key, then once again, grab these two points and hit the F key and move
these in like that. Now I've got the
subdivisions on. Let me just take this
off for just a minute, just so we don't see
it in the viewport. And then we should
probably just select everything and extrude
out. Let's try that. Ey, bring it out. And how far should we bring it? Let's see, maybe maybe
to about right here. Feel like it's leaning forward
a little bit too much. We could just take
that top edge right along here and pull it back
just a smidge like this. Let's do that. And we could maybe even bring
these back a bit as well. Let's see how we're doing here. Looks pretty good. What happens if we turn on our subdivision surface
modifier over here? Well, it kind of collapses
as we would think it would. Why don't we tap into object mode and
right-click Shade Smooth. Let's do that. And so
what should we do now? We should probably
bring it out a little bit further, right? So maybe I'll select some faces right up
here on the front. And let's pull these
out just a little bit. So we get that, that we could give an edge
to the back, back here. So it's a little bit tighter
of an edge on the back. We could do that. And then we've got these, well, we've got the vertical pieces, but also we've got this little
rim in the middle here. And I think we need to extrude these vertical pieces
before we extrude the rim. Let's try that. So if this is our front view, it looks to me like we can take this edge right
here, alt click. We could bevel this edge and use that to extrude
these pieces out. So if we press Control E, You can see bevel edges
here or Control B. So let's do that control B. And I'm going to pull out
just a little bit like this. Maybe about like that. Let's see. Yeah, I think that's okay. Now we've got some faces
to extrude this out. So let's do that. Let's
just select this face here. And let's try and
extrude this out. Let's hit E and y and just pull this
straight out like this, maybe to about there. And then let's take this face and this face and
let's extrude this up. So let's press E and
Z. Pull this up. Let me hit the Z key
again. There we go. Pull that straight up. And we could maybe, we took a look at this. We'd probably need to turn this, or at least pull these
out just a bit like this. And we should probably
do that for all of this. And let me control
Z to undo that. And let's just pull all
of these out like this. So there are a little
more straight like that. Let's do that. And we could test this out, we can take these and press S and X and kind of
pull those in a bit. See how that looks. All right, Now what
Let's do is add these little edges or these
edges for the rim down here. So let's press Control R and add two edge loops in
here like that. And then let's take
these faces along here. I think that goes all the way, yeah, all the way around. And we want these faces here, and let's extrude these out. Let's try this EY and pull these out just
a little bit like that. Well, these parts in
here don't really blend in very well, right? We could maybe collapses, we could try and collapse these. So M at last, at last and see how that fades into there and that fades into
there a little bit better. I like that a little bit better. So let's do that. M at last. Merge at last. Okay? I like that a little bit better. Yeah, these up here
should go in, right? We should move that in. But we kind of need
an edge around here to give us this right
here. So let's try that. Let's see what happens here. Let's see how that looks. Well, it's going to be
interesting to see how it works when we put a chrome
material on it. I think some of this back
here got a little too flat. We should probably pull
some of these out. Like this. We could
even get G2 times and move some of these
and move them out a bit. So we get a little bit
cleaner edge there. Alright, let's
take a look at it. Well, not too bad. I think, I think it'll work
pretty well if we took all of these faces down here and flattened down,
let me try this. I'm going to take all of these. Yep, let's take all of these
and let's flatten them in the z-axis, S is 0. That could help there. And let's make sure
all the ones on the top are flat as well. So I'll take these. Es is z 0. Okay? And I feel like
the whole thing is just a little bit too thick. If I selected this whole
thing here and maybe hit Control Plus to extend the selection and do
some de-selecting around here it looks like alt
Shift de-select that. Alt Shift de-select that. Now maybe I could take
these in just a bit, S and X and scale in just a bit. This. Let's try that. Not bad. I could take these
edges here and maybe hit G2 times and
move them in a bit. So it's just a matter of kind of playing with it
until you can get the subdivision surface to look the way you
want it to look. Feel like these are a
little bit too flat. So let's take these
and hit S and Z and bring these in some that yeah, that helps. All right. So I think we're getting there. I think that's
pretty good for now. It may be something that
we need to readjust redo. But I think for now,
that's not bad. The only thing I really
see is that there's a curve on the front
of here that we're really not getting
because we don't have an edge right down
the center here. The problem is, is
if I create an edge down the center
here, we get that. So that's not exactly
what I'm hoping for. Let me just try
something here and take these and pull them
back and see if we get a little bit
of a curve there. A little bit. Actually, it's not terrible. Question mark. There we go. Maybe something like
that. Let's try this. Yeah, I think that actually, so I guess that edge
in there really does kinda make a difference. That's, that's okay. I'm going to take
this whole thing and pull it down just a bit, just a little bit like that. And let's take a look at
it with another mat cap. I'll switch to this silver one. And the silver one isn't
bad on that bumper. That may not be a bad way to go. Take a look at this. Yeah, that's a better
car paint one, but this one here
that kinda gives us a sense of what it
might begin to look like. And that's not too bad actually. So all right, let's
go with that for now. And in the next video. But let's do is let's work on these little guys right in here. That's going to
be an interesting challenge to try and get the fender to kind of bend
toward that rounded shape. It isn't something
that we can just create this and put
it on the top of. There's actual curvature in the fender to accept
that round light. So that's going to be
kind of interesting. We'll work on that
coming up next.
26. Modeling the Front Turn Signal: Alright, now let's work on this. I guess it's a turn
signal, right? And one thing that's
interesting for me is this little rim
around the fixture. It just there's a little
bit of a curve to the fender to accept that
little light fixtures. So I'd like to try and
replicate that if we can. So what I'm thinking is to
use a smoothing group, again, a vertex group like we did
for the vent on the hood, but for this little
area right here. So let's see what we
can do with that. I'm gonna go to the front
view and tab into edit mode. And I'll press Alt Z for X-ray. And it looks like Here's that light and it looks
like this point right here. Yeah, This point right here
looks like is what we want. So what I'm gonna do is
select these faces here. And then what Let's do
is just inset this. Let's inset with the I key here. There we go. Now what we need to do is
just pull this down to the point where we get the
basic shape of the light. But to do that, I want to delete these. I'm going to get
rid of these faces, so I'll just press Delete and
choose to delete the faces. And then I need to begin shrinking this down to
get this basic shape. So if I hit the S key, we can begin bringing this down. And maybe I'll slide it down a bit like this and then
press the Esc key again. And you can see it kinda begin to wiggle around the edges. And that's because of the
shrink wrap modifier. It's still shrink wrapped to the smoothing mesh,
but that's okay. We just need to kind of get these in the general
shape that we need. I'm just going to pull
them around like this. Just around the area in the reference image
that has the light. Like this. It isn't real pretty, but
we just need to get it generally in the right place and that's, that's all we need. So now what we can
do is select this, remove it from the
Smoothing Group. Well, we need to create
a smooth and group and then remove these from it. And then we're going
to use a tool here in Blender to create
a perfect circle. And then we'll extrude
out of that just a bit. So let's give this a try. First of all, actually
let me bring these up a little bit
so we can kind of see down here a
little bit better. And recall that this is
where the vertex group goes. So let's go over to the
object data properties here. And let's create a
new vertex group. I'll just click the plus, and let's call this fender Smoothing Group. Let's do that. And now what I'm gonna do is
just invert the selection. I can come up here
and go to select. And inverse is here, or we can press Control I, so I'll do that control eye. And now all of these
points I want to add to this Smoothing Group. Sign. There we go. Now, nothing
really happened because we don't have it here in this
vertex group field yet. So let's just click here and select this group and
look what happens. This goes in because it no longer is being shrink-wrapped
to that underlying mesh. All right, so that's good.
This is what we want. We now want to create
a circle of this. And we can do then if I press the Enter key here
and come over here, you can see I've got
a tab called Edit. And under edit, I've
got loop tools, and under that I've got circled. And you may be wondering, well how do I get this tab? Well, let's go over here
to Edit and Preferences. And under Add-ons, you can
come into the search field and type loop and you can
find the mesh loop tools. Now if I uncheck
this right here, you can see that
edit tab goes away. So all you need to do is
just add a check mark here. And then you'll
get this edit tab when you're in edit mode here. Now, what this will do for you, it'll give you all of
these extra tools when working with a polygon
mesh in edit mode. So for this circle, I can twirl this arrow down and we have some
extra settings here, but this is really
all we need to do. All we need to do is
just click this button here and look at that.
We've got a circle. Very nice. So now let's
move this out a bit. I'm going to press Alt
Z and I'm just going to move this out just a
little bit like this. Maybe rotated some. Let me bring it up a
little bit like that. So just try and get it in. So it's kind of aligned
to the mesh like this. And let's take a look at
it here in object mode. And that looks pretty good. I've, I've pulled it out,
so it's pretty close to being on the exterior
of the mesh here. All right, let's
see how big it is. It looks like it may be a
little bit too big, so let's. Shrink it down, just a hair. Well, this down some
something like this. Now it looks like I need
to pull it out just a bit. I'll do that. All right. Now what Let's do is just take this and let's
extrude this again. So I'll hit E and hit Enter. And now let's pull this
out just a little bit. Let's try this. I'm going to
bring this up just a bit. Kind of like this. Let's
see how this looks. All right, it looks okay, Let's see what happens if we add this to the Smoothing Group. Let's come back over to Object Data Properties
and click Assign. And now let's see
what we have here. Yeah, we could actually take
this edge here and turn it, move it out just a bit. Something like this.
Let's try this. There we go. So now we've got a little bit
of an artifact here. But I bet if we go back to the smoothing mesh will find that the
subdivisions sure enough, the viewport still at two. So we could take
that up to four. And that'll smooth it
a little bit more. All right, let's go
back to the vendors. So there's what I want to
just that little bit, right, just this little bit of a
curve there around that piece. Let's hit the S key and
scale in just a bit. And there we go. Let's try that. Yeah, That's kinda nice. Okay. Now let's work on creating
this thing to put in there. Let's go ahead and press
Control S and save our scene. And then I'm going to hide all of this over here
in the outliner. I'll hide the car
and the reference. Now let's just work on this. And I think what I need to do is use a cylinder to create this. Let's try that. I'm going to press
Shift a mesh cylinder and I'll take it down
from 32 sides to 16. Let's do that by tab into edit mode and select
this face up here. Let's just scale it down like that and bring
it down like this. So it's kind of this shape
here, kind of like that. Now, I don't need the
one on the bottom here. Let's just select that
and delete faces. Let's now create all the
little ridges in there. It looks like 1, 2, 3, 4, 5, 6. Well, let's go with 10. Let's go. So we've got five indentations, Misko with 10 edges, I'm going to press Control R
and scroll the mouse wheel. And if you look in the
bottom left-hand corner, you can see the number of cuts. So I'm going to do 10 cuts
and press Enter twice. And then I'm just going to
select every other edge here. Going down like
this. There we go. Now I'm going to scale these n, but I don't want to
scale them in the z. I want to scale them in
just the x and the y. So to turn off an axis, you use the Shift key. So I'm going to press the
Esc key and then press Shift Z to turn off the z-axis. And then I'm going
to pull these in a bit, kind of like that. Let's see how that works. And then I'll add a subdivision
surface modifier here. And let's increase the subdivision levels
in the viewport. I'll right-click Shade Smooth. Let's now put that object
origin at the base here I'll select this bottom
edge and press Shift S2 to bring that
cursor to that point. And then if we tap
back into object mode, we can move the origin
to that cursor, object, set origin, 3D cursor. Now we can play with how
tall this should be. I'll press S and Z and maybe
something about like that. Let's try that. I'll turn on the
subdivision cage over here. Maybe we need to scale some of these in just a bit
like this. There we go. And if we don't want these
little ridges up here, we can add one more edge loop
and pull it up like that. And we go. Alright, now let's work on
the little silver rim here. Maybe I could just
take this edge here. And well, let's just
duplicate this shift D Enter. I'll bring it up a
bit, scale it out. And let's begin from here. So I'll press E and S, bring it out, Some,
bring it down, just a little abs, bring it out. Bring
it down in the z. And maybe scale it in
just a bit like this. Let's maybe bring this one
out just a little bit more. Yeah, I like that. And we go I'll right-click again and choose
Shade Smooth outlets, select it and then do
that. And there we go. And maybe I'll
bring this one down just a little bit
more like that. Let's try that. Okay, so now we have
our turn signal light. Let's bring the car
back and the reference. And let's try and
put it in place. Rx 900. Here we go. Let's go to that front view. Scale it down, hit G and
bring it over to here. Where is it now? Oh, it's way back here. And let's bring it
up to the front. Hit the period key to zoom in. Let's scale it down and let's see if we can
fit this in here. So it looks like, well, it looks like if I
rotated a bit here. And let's go to the top view
and rotate it a bit here. And maybe scale it in a bit. Let's see what we can do here. All right, I'll bring
it out just a bit. Actually, what I'll do now that I have it turned
the way I want it. Let's change from global
to local transformation. And that changes the mood gizmos to be in line with the object. So let's do that. And I think that's pretty
good all the way around. And then so we
could do is select that bender, select this. And maybe we bring
it back a little bit and scale it
in just a little. Like so let's try that. Yeah, So we've got
this piece and then little curve coming
out of the vendor. I kinda like that. And this looks like
it's pretty good. Let me scale in the Z just to collapse this in
just a little bit. That, yeah, there we go. And then what Let's do
is let's take this, move the origin of the object
to the center of the grid. I'll move the cursor there
first with Shift S one. And then let's move the
object origin to 3D cursor. And then let's add a
mirror modifier, mirror. And we've got a problem here. It's sitting right out here. And that's because we need to apply the rotation and
the scale. Let's do that. Let's hit the End key and
go back to the Item tab. And you can see here that we've got values in the rotation here. And let's just, first of all, try and clear those. I'm going to change
from local to global. And then let's press Control a and choose to apply
the rotation. And there we go.
Now the rotation is all zeros and our object
is mirrored over properly. All right, so there we have
our front turn signal.
27. Using the Boolean Modifier: Now let's work on the
vent on top here. Let me, let's close up one
of these windows here. And then let's go to
Image open and let's find a image that has this little
vent here on the top. Yeah, let's, let's
take a look at this. So I think for this we could
begin with just a cube. Me see if there's an image with higher resolution for us here. Let's try this one. Not a whole lot
better, but yeah, I think we can see that
a little bit better. And the thing about this one Is it looks like it's
a piece on its own. A few of these images
have this little seal between the body and the van't and it is
a separate piece, so it isn't something
we really need to extrude out of the body. We can create it and
then put it on there. But it's gotta be
able to fit on. It's got to have that
particular curve that this has. So I think this is a good
opportunity to once again duplicate off the foundation that we need and
then go from there. So let's go to the top
view and press all z. And let's find some is here that we can use and maybe
just these here. Let's begin with
these and get it in the proper shape and
then go from there. So with this selected, let's press shift D, Enter. I'll press the P key
Separate by selection. And then let's come up here
and give it a new name. Now, we don't see
it here because it looks like it went into
our car group here. So let's change the name
and call this just vent. And let's do that. And we don't need a shrink wrap
modifier on it currently. So let's take that off. I'll turn off the
subdivisions and there we go. And now let's hide
everything else. Let's turn off everything
within this collection here. And there we go. When it looks like our turn
signals are hanging out here. So let's rename these. And I'll drag them
into that collection. And let's hide those.
Okay, so now we have this. Let's tab into edit mode
and select everything, and let's just move
it forward a bit. Maybe we could even take
these edges over here, slide them in a bit. So it's a little bit
closer to the actual size. I mean, hit the G key
and slide this over. And my move manipulator
is off axis. I've got it on normal here, so I'm going to
change it to global. Let's do that. Let's now extrude this up. I'll select all the
faces and let's just press E and Z and
pull this up a bit. Now, let me hit the Z key again. There we go. Let's do that. So we get that general shape. Let's grab this edge
right along here. Let's pull that
in. I'll just hit G2 times and kind of
pull that in sum. There we go. Let's also take the edges on
the back, back here. And let's pull those forward
and pull them down a bit. And maybe we can even take these and pull them down
just a little bit, pull it back sum. So we're just trying to
get that basic shape. All right, so now
let's just turn on our subdivision surface and
see how we're doing well, it's collapsed and that's
once again as expected. But what we can do is press Control R and begin to
add some edge loops. So let's add one and the
bottom here, like that. Now we're beginning
to get a little bit more of that curve there. We could take this edge here
and slide it in just a bit, or maybe even just
pull it in like this. Alright, we could add an
edge loop right up here. Pull that forward just a bit. There we go. We're
beginning to get that. Yeah, that's looking
pretty good. Now, the next thing
we should do is work on the vents here. And to do that, I think what we wanna do is use a Boolean modifier for that to cut those
shapes into there. But to do that, we
may need to apply the subdivision
surface modifier. Let's take a look and see
before we do anything. What I'll do first is
create a cube here. And I'm going to
scale it way down. And we're going to
get it in shape or the proper size of these
little slots here. So let me press S and
scale that in some. And then let's move this over. Let's get it down a little
bit more like this. I'm going to press Z
and then I'm going to bring this and maybe
drop this right in here. And about like this. Well, maybe a little bit
smaller. Let's do that. Move it over some we probably
should pull this forward. Let me do that. So it intersects with that vent. And then I'll press Shift D Z. Let's move this down a bit here. Actually what I think I'll
do is press Alt Z and then just press Z and go to wireframe so we can
see that there. And then let's press shift D
and X and move it over here. I'll scale it in the x. And then let's
also duplicate it. Shift D, Z and bring
it up like this. And let's see how
we're gonna do this. Sx like this. Let's see how this works. I'll press Z and
go back to solid. And let's see. I feel like we could
move these down a bit. We've got this curve here. And I'm not sure
whether I want to curve these or keep
them straight. And it's hard to tell. I feel like there
continue there. I feel like they're straight. But let's give this a try. I'm going to select all of these and to join them together. I'm going to press Control J. And we go, and we're
going to use these as the cutting object or
this one object with four pieces as our
cutting objects. So I'm going to change
the name of this and just temporarily
call it cutter. And now let's take this and let's add a Boolean
modifier here. Then for the object, Let's pull this down
and choose Cutter. Now we've got some
artifacts here, but let's see if we can clean
that up by going down to the normal section in our object data properties
and click on auto smooth. Let's see how that does.
Yeah, That's pretty good. Let's click and drag
on this field here so that we can make that edge
on top a little smoother. So I'll bring it up to maybe 40. Let's try that. All right. Let's come back down here. Let's see if we can bring the
mirror modifier down here. See what happens. Yeah, so
we get it over here as well. Alright. Now I can take this temporarily
and let's just hide this. And there we go. Now we've got that basic shape. Let's see how it looks
with the rest of the car. I'll bring all these back here and that doesn't
look too bad. I feel like we've got, I'm going to tab into edit
mode and move this down a bit. Now, we can turn
on our cage here for the Booleans and
we can see that now. And I may want to just pull
this down just a little bit. I'm not pulling the
cutter object down yet. It's tab back into object
mode and select that cutter. I can move this down
just a pet like this. Let's see how this works. And I'm just kind of
testing it with all the, with all the modifiers on it just to see how
it's going to look. That's not too bad actually, I think I'm gonna go
with that for now. And once again, we
are going to be doing a lot of adjusting and tweaking throughout
this entire process. And at the very end,
we're going to go through the whole thing
and see if there's anything we can do to adjust
and fix and clean up. So I'm just trying to
get everything in here. Let me select this again. And one thing I think
I want to do is get this edge again and
pull out a little bit. Yeah, something like that. Alright, so we've got
that piece in now. In the next video, let's work on let's work on our
rearview mirrors.
28. Using Blender's Path Tool: Well, now I'd like to add some rearview mirrors
on the sides here. And you may be noticing
that there are no rearview mirrors in
a reference images. Well, that's kind of an
interesting thing about this car. In all the reference
images that I have. Here's rearview
mirrors on this car, in this image on both sides. And I'm going to grab
this little program here. This is a program called
pure ref and allows you to drag reference images onto this panel so you can
see them all at once. And so here's that image
that I have over here. It has the mirrors on either side and you
can see they're kind of flat and it's got kind
of a thin stem here. And then you look at, say, this one over here. It's looks a little more rounded on the back and it's
back at the door, whereas this one over here
is up on the fenders. And then you look at this. This looks very similar to this, but it's back on the door. And there are a couple
of others in here too. In my reference images that I found that are little
bit different. So it looks to me like
this car was very customizable or that
people have added or subtracted things as
they've collected the car. Either way. I kind of like this right here. I like these two rearview
mirrors on each side, up on the fenders. I think that looks kinda cool. So I think I'm going
to work on that. Now of course you can
do anything you want. You can add any kind of rear view mirror
that you like or, or none at all, and that's fine. But for this project, I'm gonna go ahead
and work on this. So I think what I'll
do is just hide once again the car and
the reference images. And I'll choose the
scene collection so that anything I create will
go into that collection. And then let's work on this. So it looks to me like
it's just kind of a thin maybe a thin
pipe type thing up to the rear view mirror and then basically a circular mirror and a little extrusion
on the back. Let's see what we
can do with this. I think for the posterior, for the stem, I'll use a path. I'll go to the front view
with numpad 1 and let's press shift a curve and create
a path. And here we go. So all it is is just a line. And if we tap into it, we can see we've got
five points that we can move around
to create a curve. So I will press our 900
and turn it 90 degrees. I'll turn on the
move manipulator and move it up to
here, let's say. And then we can just work on moving these points around
and see if we can get, so if I took these and just
drag them over like this, I can get something like this. If we add a point
between these two here, I can right-click and
choose sub-divide, and then take this and
just move it down. I'll take this 1 here
and just move it down. We get a sharper edge there. We can also do that down
here, right-click sub-divide, and then I'll grab this
single point and move it up so we get more of a turn there for tab back into object mode. That's what we have so far. So this is kinda how we can create this small
pipe type stem here. Maybe I could remove this point. Let's try this delete
and delete vertices. We could take this and move it. Let's see how we're doing here. Okay, So we've got that. Maybe what we should
do is just go to the side view and let's
bring some of these forward. So let's take these like
this and see if we can kind of angle m
forward like this. I think I can delete this
point here. Let's do that. So we have that straight there. Let's add some thickness to it by coming over here to the
object data properties. And in here, if we go down to the geometry section
and scroll down, we've got a field called depth. And if I click and drag on this, see we can create
a tube from this. So maybe I want it to be
about like, let's try this. Let's say beyond grab
this and move it back. And I'll hit E and extrude this out just a
little bit like this. And I'll also add an extra
one in here because I just want to add a little
bend there at the top. So let's take this and
move it up like this. Okay, tab back into object
mode, and there we go. All right, so I'm just going to go to the top view
here and take a look at it. Let's get this a little
bit straighter. Like this. And maybe I'll put one Yeah, maybe I'll take this
and move it up to here. Yeah, let's do that. There we go. Okay, so
now that we have this, let's create that little circle, the actual mirror itself. I'll come over here,
press Shift a mesh, and let's use a cylinder. And we don't need 32 sides here, so I'll take it
down to maybe 16. And also instead of just one big face on
the top and the bottom, Let's turn them into triangle
fans. Let's do that. So if we tab into edit mode, we can see the triangles there. Okay, now I'm going to turn
it in the x-axis, RX 900. Let's scale it in the y SY, move it in like that, and let's kinda put
it in place here. I'll move this over. And let's put it
right about, well, it looks like it's offset, so it looks like it's
actually up here. Sum. So let's scale that up a bit. All right, Now let's add a subdivision surface
modifier to this and see if we can get it a little
bit more rounded like this. So I'll come back to
the modifiers panel, add modifier subdivision
surface right here. And let's increase
to turn on the cage. And right out here
on the outside, Let's add two edges. Control our scroll, the
mouse wheel, and click. And let's drop those there. And then let's take
these faces out here, an inset them to create
the mirror side. Now we don't really know exactly what it looks like back there, but, but I think we have a general idea of what
it should look like. So let's de-select everything, hit the C key and select these faces with the
circle select tool. And then I'll go ahead
and press the I key. And let's bring that
in just a little bit. And then I'm going
to extrude in. I'm going to hit E and y and push in just
a bit like this. And we go. And then
maybe I'll hit I and push in a little bit more like this.
And then we go. So we've got
something that looks kind of like a mirror there. Let's right-click it and
choose shade smooth. We could also select
that edge in there and maybe sharpen it a bit. Let's Alt click this
edge, press Shift E, and then drag that out a bit to increase the
edge crease there. Alright, yeah, that
looks pretty good. And then the back side, let's select these faces
as well back here. And we really need to pull down an extrusion down to here. So let's say, let's hit the
I key and push in some. And I'm going to bring
this down a bit like this. And then I'm gonna
do that again. I'm going to hit, I bring it in and push it down like this. And then we should
extrude that out. So e, y scale and a smidge EY bring that out and scale in a little bit
more, something like that. Let's tab into edit mode. Now we've got these
creases here. Let's just inset this
and bring it way in like that and that'll
reduce those creases a bit. Alright, that looks pretty good. We could also maybe select an edge back
here and crease this. Let me select this and then
I'll bring it down a bit. Let's bring this one down a bit. And maybe let's, well, we could just try and scale
it in. Let's do that. We can scale it down and get that edge a little
bit sharper there. Let's try that. There we go. Let's take a look. Yeah, I think that's
getting there. I'm going to move
this a bit like that. And then I feel like we
need to convert this to a polygon mesh to do a little
bit more tweaking on it. So let's hit the Z key
and go to wireframe. And if we do, we can see
that it's very dense. It has a lot of edges in there. And when we convert
it to a polygon mesh, we're going to get all of those edges and that's
just way too much. So let's go back down to our object data properties
here and scroll down. And we're going to change the resolution down here
under the bevel section. And we're also going to change this resolution preview up here. So currently it's at 12. Let's take this down and you
can see as I take it down, it reduces the amount of
edges that we're using there. And if I take it down to
one, it's pretty blocky. So let's bring it back
up, maybe to four. And then down here,
this resolution, if we reduce this, it reduces it around the
circumference of it. So let's take a
look then with z. And in solid mode. And yeah, I think that
looks pretty good, but without so much resolution. So let's try that. All right, so now what I'm
gonna do is select this and right-click it and choose
Convert to a mesh. And there we go. Now if we tap back
into edit mode, we can see now
we've got polygons. So what Let's do
is let's work on this a little bit down
here on the bottom, I'll select these faces
here and let's hit E and S and Shift Z and scale
these out like this. I'm looking at this right here. And then let's do
the same with these. Well actually what I wanna
do is just scale these out. I'm just going to press S, Shift Z and scale these
out like this, like that. And we go, So we're
kinda getting that. And then up here we should probably do something like that. Let's press Alt Z
so we can see it. And maybe up here
I'll just select these faces and just scale out. Let's see what happens here. Yeah, something like that. We just need something that
looks kind of like it's got a piece that's
connecting onto there. Okay, so, well,
let's do now is take this and apply it or add it to, join it to this object here. And when we do, it's going to acquire a subdivision
surface modifier, which will smooth all this up
and we'll see how it looks. So let's select this and
this and press Control J. And now it looks kind of gloppy. Think I'd like to delete
maybe these down here. Let's see. Yeah, I want to delete
these faces down here. Delete faces. And then let's try that again. Without these here we go. Delete faces. Okay, So that opens that
up a bit and that's good. And what about up here? Do we have an open one up here? Yeah. Let's now move the origin of this object
down here to this edge. Let's alt click this
edge and press Shift S2. And then let's move the
origin to the 3D cursor here. Now we can scale and move
and rotate from that point. All right, so now let's try and figure out where
we want to put it. Let's bring back the
car and I'm not sure. Let's bring it down like this. Bring it up here.
Let's bring it over to the side and bring
it up like this. And from here let's
scale it down. That looks a little bit too big, like a clown car. So let's scale this
down quite a bit. And we get something
about like that. Maybe it needs to come back toward the driver
just a little bit. Let's see. It's hard to know
from these pictures. Let's bring the pure ref panel back and let's take a look here. Let's look at this one. Yeah. It looks like it's just
past the back of the hood. All right. Let's
take a look at that. All right. So with
this in place, let's now mirror it
to the other side. What I'll do is just take
this object and set it to the 3D cursor,
the object origin. And then let's come over here, add modifier, mirror.
And there we go. Let's make sure with
the End key that our rotation is applied and there's a 90 degree
angle in the x, which really isn't going
to affect us very much. But I'll go ahead and press Control a and apply the
rotation just in case. All right. So there we've got
our rearview mirrors. So maybe in the next
couple of videos, let's start working
on the windshield.
29. Creating the Windshield with NURBS Surfaces: Okay, now let's work
on the windshield. Actually, before I do that, let me rename this. It looks like I need to
call this side mirror. And it looks like there's a little bit of a
curve on the back of these. Let me just quick
while we're here, go ahead and work on that. I think maybe it
just appears to me like this back part is
a little bit too flat, so I'm going to just select this with onclick
and then expand the selection with Control and numpad plus and expand
that out a bit. And then I just want to hold this press Control numpad
minus and then pull this, see what we can do there. And then let me grab this and move this back
just a bit like this. So let's see. Yeah, I just wanted that
little bit of a curve there, so it isn't quite so flat. And then also, I
think while I'm here, let me just add a little
bit more of an edge to these things down
here on the bumper. So I think maybe if we just
select this edge here, hit G2 times and slide it in, get that edge a
little bit tighter. And maybe this one too. So as we go through, we're just going to be seeing things that
we want to tweak, you know, as we, as we go along. And that's fine. All right, so I'm gonna
take the mirrors and drag them inside the
Nash Healy collection. And then we want to
work on the windshield. So for the windshield, I think what I wanna do is
actually use a NURBS surface. Now, NURBS surfaces on, let me press Shift
a and go to surface and nerves here all the NURBS
surfaces that we could use, curves, circles, surface
spheres, et cetera. And these can be good when
you want a nice smooth curve. And you may wonder,
well then why haven't you been using
them for all of this? Because they don't have the
control that polygons do. If it's just kinda of
a single curved sheet like the windshield here, a NURBS surface can be good, but they just don't have the
amount of control and tools, at least here in blender, that you do with polygons. So even though it would be
nice to have some sort of something that would
make these kind of curves a little easier to make. Nurbs surfaces are
not really the best when you want a
whole lot of detail. But as I said, for the windshield,
this might be good. So let me hide this
and bring back the reference images and let's build ourselves a
windshield here. I'm going to press Shift a and
go to surface nurbs curve. If we tab into edit mode, here are the points. They're kind of farther
out than the path we used. And a path is really
technically a NURBS surface. So there's a lot of similar tools down here in
the object data properties. But what I'd like to do
here is to come down to the active spline,
I believe, yeah, here under the act of
spline and under endpoint, let's add a checkmark
to the EU field here and that connects the
curve to the end point. So you can see if I uncheck it, it then disconnects
from the endpoints. So let's have that
selected while we work. I'm going to tab back into object mode and I'm
going to spin it around. I'll press R z 18
zeros so we get the curve generally that we have here with the windshield. And let me go to
the top view here. So let's tap into edit mode and select all the points there. And then we can just scale them down and began to
get that curve. Now, I think I'll just
move these forward a bit. Let me turn on the Move tool and move these forward
to about here. Then I'll just grab
these and move these in till we get that curve. So now let's go back
and let's bring it up. Let's, I'm going to tab
into edit mode and select a and just bring
this whole thing up. And we probably need to yeah, move these points down. So I'll select these. Bring him down like this. And we could probably
bring these up. We just need to get
these inline here. Felt like that. Let's see how we're doing. Well, I could pull these
out just a bit like this. And we could also add
a mirror modifier. So to do that, I'll just select two points
here and sub-divide. I'll right-click and
choose sub-divide. And then we could
select these two, hit the Delete key, delete vertices, and
then we just have half. We could come back
to our modifiers, panel, add modifier, and mirror. I'll come over here
and turn on clipping. And now we can move
these around to get these a little bit tighter here. And then let's go back over here to the side view and
we'll do a similar thing here. Alright, so we have our initial curve now that initial curve
of the windshield. Now what Let's do is tap back into edit mode, select
everything here. And I'm going to duplicate this and bring it up to the top. So Shift D, bring this up, put it right up here. And let's move
these around to get these in place like this. Go to the top view and select these and hit G and
move these around just a bit till we get
a nice curve here. Alright? So there we've got
our two curves that kind of define
the windshield. Now if we go into edit mode, hit the a key, we can just press the
F key and it will fill that with a
nice curve there. So that's the beauty of NURBS
surfaces is you can really, and if you took one of these, you can move it
around and really get a nice curve wherever
you move them, right? So that's kinda nice. But that's what we need
for our windshield. And let's now that we have the
whole surface and let's go through and make sure it's
exactly what we want. Let's move it around
a bit until we get everything just
the way we want. And I'm going to overlap a
bit onto the frame here. Kind of like this. Alright, so let's
take a look at it. How do we do? Well, I kinda want to move
these out just a bit. Maybe move these back
just a bit like this. Okay? All right, so there
is our NURBS surface. Now what we can do is
we can convert this to polygons the way we did
with the path tool. So once again, we
can come over here to the object data properties. And you can see here we have this resolution
preview u and v here. So if we hit the Z
key, go to wireframe, we can see that
that is going to be the mesh that we get when we
convert this to a polygon. So let's bring this
down a bit maybe to, to hear maybe the two here. Yeah, Let's see how this works. I think that's pretty good. So now I'll hit Z and
go back to Solid mode. If we take this nurbs
surface and convert it, I'll right-click and
choose Convert to a mesh. Now if we tab into edit
mode, there we go. We've got a nice smooth surface, but in polygons, and
that's kinda nice. So that's one way to create something like
a windshield here. And get a fairly nice
curve right up front.
30. Modeling the Windshield Frame: All right, Now let's
see if we can create that border around the window. And to do that, I think what we'll do is just duplicate this and then take the center faces out and have that be the border.
So let's try that. I'll first take this and maybe just duplicate it with
Shift D and enter. And oh, we need to name our
objects in the outliner. So let's call this frame. And we'll call this
one windshield. Now with the frame, Let's just scale this up. The pivot point is currently
in the center of the object, and we've got the pivot
is 3D cursor here. So let's just hit
the S key and scale this up just a little bit
and see where we are. It looks like it's coming
out a little bit out here. But we could probably,
maybe scale it or pull the edges out just
a bit here on top. So let me just select
this edge up here. And let's just hit G and pull
this up just a little bit. And I'll do the same down here. Let's just pull this down
just a little bit like this. All right, so now
that we have this, let's pull the frame
forward just a little bit, maybe pull it up just
a bit like this. Let's take a look
at it once again. Yes. So we've got a fairly even band around that windshield here. So all I've done is just duplicated it and
scale it up a bit. And now let's add a
few extra edge loops. I'll add one up here and maybe bring it up a
little bit like this. Let's add one down here
and add one over here. And then let's just delete these faces inside
here, like this. And you know, what we should
probably do is just delete this entire side because
I've added this. We're going to want to
mirror this over, aren't we? Let's go ahead and do that. I'll this whole
side here first and delete those faces and
then add a mirror. Turn on clipping. And now let's choose the
faces to delete, right? We've got a little
bit more even amount of faces on either side now. Alright, so now with that done, let's hit Delete
and delete faces. And there we go. Now we've got the beginnings of the border. It isn't quite in
the right shape yet, but let's add some
thickness to it first before we
do anything else, let's come over here
and go to add modifier. And this time we'll choose
a solidify modifier. So we'll click that and you can see how it's already
added thickness to it. Let's choose even thickness and then click and drag
in this field. And I'm going to hold
the Shift key as well. So we want to pull it out. So it's beyond that
windshield object, right? So that windshield object
isn't sticking out. You can see it right there. So I'm going to pull
it out beyond that. And then also, I'd like to fix the normals of
this or the smoothing. If we come over to the
object data properties, we can turn on auto smooth and that cleans that up quite a bit. All right, so now what
we could do is we can tab into edit mode and
these points here, if I select this point
and control-click this. So I'm going to hit G2 times
then and move that out just a bit to get
that frame there. And oops, let me select
this and Control. Click this. There we go. And hit G two
times and slide that up. That's a little bit
thinner, I think. So maybe I'll Take
it up to here. And let's take a look down here. I'll select this one
Control click this, it G2 times and maybe
be about like this. Let's try that. All right, Let's also add a subdivision surface modifier
to this right down here. And we can take this and pull it up or down in the stack
to see what we get. So if we take this and move it above the solidify
and we get that, we take it above the mirror, it'll break it in the center
so we don't wanna do that. But if we put it above the
solidify, That's not bad. We've got a little bit
of artifacts here. I think that's just
because we need to bring these out just a
little bit like that. And we go. And then what Let's do is
take these down here and extrude them down because
we've got this little piece right here that we
need to replicate. So maybe I'll take these points all the way
to here. Let's try this. And I'm going to extrude
them down like this, e and pull down like this,
something like that. And then yes, so we've got
that little piece there. We're going to need to
pull that around a bit, but let's bring back the car. And let's see how we're doing as to where it should
insert into the car. And it looks like I
could come up a bit. Let me see how we're
doing on the side. Yeah, we could maybe hit G and come up just a bit and
move forward just a bit. Like this. That. And then we could also take these and begin
moving these around. So if I hit G two times
again and slide that up. And then maybe to this one. And this one down in here. Let's try that. Move that like this. Yeah, so we've got that
kind of angled piece there. It looks like it could go
up a little bit higher. So let's see if we could
select this one here and hit G2 times
and slide that up. And then this one and
slide that up like that. There we go. So we're getting a little
bit more of an angle there. And then also I've seen in
another one of the images. Let's take a look
at this one here. This one's got a fairly
prominent weather stripping around it. We could do that here on
ours if we wanted to. We could take say, this edge right all
the way around. We could duplicate
that and create this weather stripping off
of that. Let's try it. Let's press shift D and enter and then P
separate by selection. And so this is now the
weather stripping. Let's call it that. With this, well, we could
do is select everything. Then we could, with
our pivot point here in the center
at the 3D cursor. We could extrude this
and scale it in. But the problem is, is we currently have a
solidify modifier on here. Let me show you what
happens if we hit Extrude with this on here we can
hit E and there it is. Look at that. That's pretty good. Let's press Control Z. And let's take this solidify
modifier alpha here. There we go. Let's try that again. Let's hit D, S and scale
in a bit like that. And maybe I'll just take
this edge and bring it up just a little
bit. Like this. I'll maybe I'll grab these
points all the way on top like this and kinda
pull them down just a bit. Let me do that in
the side view here. And I'll do the same over here. And we get a little
something like this. And then if we
select everything or actually if we just
go to object mode, Let's add a solidify
modifier to this right here. And then we could
extend this out. Let's click and drag and
the thickness field. Pull that back. Choose even
thickness. All right, and then we could
maybe pull this above the subdivision
surface modifier. Let's see what happens here. Yeah, Now we get a
little bit more of a rounded shape to it. There we go. So of course you can go through and adjust these
however you like. I mean, you can grab these, let's say and move him down a bit or move them out unlimited. Let's do that. Let's move
them out just a bit. And there we go. I'll select it and right-click
and shade smooth. And there we go. So now we've got a weather
stripping on our windshield. So in the next video,
Let's continue working on some of
these exterior pieces. Maybe the hood ornament
and the back bumper, and also these little
lights here at the back fender where this
curve up is right there. So we've got a few
more things to do coming up in the next videos.
31. Creating the Hood Ornament: Well, I think I'd like to work
in the hood ornament now, that looks like it
could be kinda fun. So I found a closer up
image of the hood ornament. Here it is. Let's open that up and let's
zoom in. And here we go. Now it's got a little, little tag or something on it. And I've looked at all the
other reference images and they do not have that, so I'm not going to put that on. I don't know exactly
what that is. It doesn't seem to be
a very common thing, so I'm going to
ignore that for now. All right, let's take a look
at how we can create this. I think what I'll do is
actually build it on the hood. It's in a particular place here. So let's maybe I'll find a point right
here in the middle. I'll take this point
right here and move the cursor to
it with Shift S2. And then if we create a queue, that's where it will come in. So shift a mesh tube and I'll take the size down to
maybe 0.1 meter over here. And there it is. So let's take off the
face on the bottom, I'll tab into edit
mode and just select that face and delete faces. And also, I guess I'll just scale it
down a little bit more. And maybe scale it in the x here and scale it in
the z with S and Z. So I'm just trying to get it
generally the right size. Looks like we need to
kind of bring it up some maybe tilted in
the eggs RX, like this. Slide it up here, so it's pretty
close to the hood. Oh, it looks like
I've got my cursor on more my pivot point
at the 3D cursor, I'm going to change that
to median point here. And we could also change to local mode for our
transform orientations. And then we can pull this up and move it around a little easier. I think RX, I'm going
to that in like that. So let's say that should be
about right there for now. Let's do that. And what I'll do is I'll tab
into edit mode. Let me select everything
and hit the period key is so our tumbles
centers around that. And let me split
it and mirror it. I think it'll be a little
bit easier if we do that. I'll hit Enter twice. Let's select this side, delete faces, and then we'll add a mirror modifier to this. Right here. There we go. We'll turn on clipping and I
think we're getting there. Okay, so now what
we need to do is begin getting it to
this shape here. So let me select
this face on top. I'll turn on the cage for the mirror and I'll
go to the side view. And I think I want to just
let me bring it down first. I'm gonna bring it down. And it looks like it kinda leans forward, you
know what I mean? It kinda leans
forward like that. And so maybe this edge
right here where we are now is that little
edge right down there. So let's then get e
and pull up a bit, and let's hit G and kind of angle it forward
again, like that. We're kind of off on the reference image
here, but that's okay. I don't think we
absolutely need that. From here. Let's take
this edge right here, right here, and move it in some. And let's also take this
edge and pull it up. So it kinda rounds
off the top there. And from here let's add another edge loop
here and bring it up. Something like this. Maybe I'll even grab
this point and just hit G2 times and slide it down. So it's a little
bit more circular there because I'd like to take
this and extrude it back. Alright, I'm gonna go back
to the side view here. And let's hit E and
pull out of it. I'll hit G, then. Maybe let's rotate it a bit. I'll hit the S key
scale in some, and then let's hit E,
pull out, click hit G. And let's fill it in like that. So let's, there we go. Maybe something like that. It looks like we
should probably take these edges and pull them up some it has more
of an arc to it. Let's see if we can do that. I'll hit G and bring
this up a bit. And let's hit G and bring
that up a bit like that. Maybe I'll take
these. I don't know. Let's bring him back
a little bit more. Try that. So I'm just trying to get
that general arc there. All right, so now what Let's do. And I bring this
forward just a bit. Looks like we could
bring that forward. So I'm just trying to
get it in shape before I add the subdivision
surface modifier to it. But I think it's about
time to do that. Let's see how that works. All right, so with
this selected, let's add a subdivision
surface modifier to it. I'll take it up to, to
turn on the cage here. I'll right-click it and
choose Shade Smooth. So we've got a general
shape like that up front. That's not bad. Back here, It's not
looking too good as it. So let's add an edge
loop back here. And then let's also work on
maybe the line underneath. So maybe we could take these points here and pull them down a
bit. Let's try that. I don't like that. So we get a little bit more of a circular thing in the back. We could of course
take some points and begin moving
them in like this. So just generally kind of
arranging the points with the subdivision surface
modifier on here to try and get these a little bit
more in the proper shape. Something like this. Maybe. Let's take a look
at it from the side. It looks like we could
maybe bring these up. All right. I think
we're getting there. I'd like to get
this little angle, this little triangle in here. From here, let's add one
more edge loops in here. Pull that forward just a bit. Yeah, I think that's nice. We could also maybe
pull this down. I'll hit G2 times. I want to pull that down some and add another
edge in here. Let's try that like this. Let's now draw out this
little triangle here. Let's try and do that
with our knife tool. Let's hit the K key
and select this point. And let's go to this point. And then let's just
click right here. Let's see how this works. And then I'll hit Enter. And now let's take
these two points and pull them in and
see if that gives us anything close to what
we're what we're looking for. Not bad. Actually. I'm not too sure about
taking this so far in, but maybe this one can
go in quite a bit. Let's try that. Yeah, that's a little bit better actually. Why don't we continue
this edge on around here. We've got an n gon. So I'm going to hit the
K key and click here, and click here and
then hit Enter. Kinda extend that on around. Yeah, I think that
helps a little bit. Maybe I'll bring
this back like this. You can see it kind
of angles in there. Alright, let's try that. I could bring this
back up a little bit. Let me try. Oh, it's going up there. Let me press the E key
and then the F key, and that will align it
to the edge down here. And let's do that. Click that. All right, let me hit the G key and pull
this up just a little bit. And I'll do the same
thing with this one. Just bring that up just
a little bit like that. Now the last thing I wanna do is add this little edge
right down here. And I don't want to do it with a subdivision surface
modifier on this. What I think I should
do is probably apply the modifier and then use that edge to create that little bevel along here. Now if we select this and hit the Z key and go to wireframe, you can see that there's the wireframe with
optimal display on. If we turn this off, That's what it's going
to look like when we apply this subdivision
surface modifier. Now, we could take the viewport levels down
and see how this looks. And it doesn't look great. But let's go over to our
Object Data Properties. And under this normals section, Let's turn that on and then
let's click and drag up and try and smooth out those
sharp edges. Let's see. That works. It's not bad. It's not great though, is it? Let's go back to the modifier
and turn this backup to. That's going to be a
little bit better, but it is going to be pretty
polygon intensive there. But I'm willing to do it
just to see how it looks. Let's give it a try. So the first thing
we need to do is apply the modifier at
the top of the stack. So I'm going to
click Apply here, and then I'll click Apply here. Alright, now let's
go in and you can see that really gave us
a lot of edges here. I'm going to select this edge. Let's say maybe, maybe this one, Let's try this one. And I'm going to bevel it
with controlled BY and I'll pull the mouse out just
a little bit like this. I'm going to click
and I'm going to add one more segment right in here. And you can see there it is. I'm going to Alt click it. And then I'm going
to scale it in with the S key like that. And there we go. Now we've got that edge there. Alright. So you may be wondering, how do they open the hood here? If we've got this thing so far back against
the hood like this, how do they open the hood? While I had that
very same question? And it turns out what
they do, Let me go. I'm going to go image open
and I've got an image here, Control Spacebar
and look at this. They actually turn it. That's how you
unlatched the hood. I guess you just turn this
and then open the hood. Pretty clever. Ha I thought
that was pretty cool. So let's go with that. I'm going to press
Shift S1 to move that cursor back to the center. We've got a hood ornament. In the next video, Let's begin working on
the rear bumper.
32. Beginning the Rear Bumper: Before we begin on
the rear bumper, I think we need to take
a look at the back of the car itself because I've noticed that I've got
a little bit more of a curve here then
the actual drawing, you can see how it comes
across a little more straight. And I can see that here
too in this photograph. So I think first of all, we need to deal with that. And to deal with that, we need to make adjustments to the smoothing mesh rather
than the actual car itself. Because if we adjust
the smoothing mesh, the car will come along. But before I do that, let me kind of arrange
the outliner here. I feel like we're getting
a little disorganized. So I'm going to take this windshield and just
copy it with Control C. And then I'm going to paste it into here called this
windshield stripping. And we'll call this windshield
frame here like that. And then we'll take
all of these and drag them up into the
Nash Healy collection. And this one here, what is this? Oh, that's the hood ornament. Let's call that hood
ornament. There we go. And let's drag
that up into here. Now it Let's do, is let's hide the car and
bring back the smoothing Nash. And let's take a look
at molding this back in here to the reference image
just a little bit better. So I'll tab into edit mode. And instead of just taking these and kind of moving
them around like this, Let's use the proportional
editing tool. And when we turn that on, if we hit the G key, we get this area of
influence that we can increase and decrease by
scrolling the mouse wheel. And then I'm also going to hit the Y key to constrain
it to the y-axis. And if we pull this back to about where we want
it to be and then scroll the mouse wheel out and see we can kinda pull back
those other areas as well. Maybe something about like
this. Let's try that. I'll tab back into object mode and let's
take a look at it. See how it looks.
Well, looks like it pulled a little
too much in here. Right. We we've just got these
little creases right there. I can just barely see that. So I'm going to undo
that real quick, like that and let's
try that again. I won't pull back
quite so much so GY and pull back to maybe, maybe about like this. And I guess I could extend
it out a little bit more. I just want to get it
a little bit closer to that area there and
one right about there. Let's say, let's
see how that looks. That reduce that line, but it's still there. I think maybe what I can do
is slide that over a bit. So let's hit G two
times and just let me turn off the
proportional editing tool here and then hit G two times and slide that
over just a little bit. So it's kind of halfway
between those two. And then let's take a look. Yeah, I think that kind of
smooth that up pretty well. So all I was looking
to do is just try and flatten that area out
just a little bit more. And we could pull these out
if we wanted to just a bit. We could try it. Let me just bring these out
just a little bit like that. And then we can bring knees
out just a little bit. So I don't want to
do too much here. Let's take a look at that. Yeah, actually,
let's go with that. So now that I've got the
smoothing mesh in place, if we bring back the car, it should conform
to that as well. And yeah, I think it does. So let's take a look at it yet. So that conforms
to that as well. Okay, so now what we could do Is also take a look
at the trunk here. And I think we need to re-establish how wide
we want it to be here. Because we've moved things
around just a little bit. And here with the car, I should be able just to
pull these up and it'll stay aligned to the
smoothing mesh. Yeah, that looks pretty good. Let's do that. Okay, so now we have that area a little bit more like the shape
that we want. Now we can begin working
on the rear bumper. So if I select, say an edge back here, I don't think I need these, but maybe just
these points here. Let's once again
duplicate these, split it off into
its own object, and use those to
begin the bumper. So I'll press Shift D and enter. I'll press the P key
Separate by selection. Let's tab back into object mode. And where is it? Let's find it in our
collection here. Here it is. Let's change this to instead of rear bumper
and front bumper. Let's call it bumper rear. And then let's call the
front bumper, bumper front. And then they will appear
one right after the other in our collection here
so we can kind of see them joined together, kinda like I did with the grill. And the windshield, we just put the type of the object
at the front of the name. So though kinda
grouped together. Alright, so here is the
beginnings of the rear bumper. Let's apply our shrink wrap. I'll click Apply. And then let's tab
into edit mode. Hit the a key. And let's pull these out and
see how we're doing here. So it looks to me like what we need to do is kind of
flatten this out just a bit. You can see that it kind of
curves around and then it goes a lot more straight
here, right along here. And then there's this
little panel just kinda placed right between the bumper and the trunk right in there. So we won't worry
about that right yet. But let's deal with the
bumper and it's shape here. So I believe what we could
do is just pull these out. Let me just take these and
pull these out like this. And then we could actually begin deleting a few of
these vertices. I could delete and then dissolve
these vertices in here. And that'll give us a little
bit more of that shape here. So maybe I can get
rid of this one. There we go. So maybe something like
this to begin with. And then here we could probably hit the E key and extend this on around like this or that part
of the bumper over there. All right. So now that
we have that and it's tumble around and see if
we can get it in place. We also may need
to flatten it up. I'm going to press Control
1 to go to the rear view. And let's press S, Z and 0 and maybe that'll
flatten that up a bit. And then let's press all z. And let's see where we can. Seems like it's
right about in here. Let's take a look
at the side view. Yeah. So maybe
right about in here is where the bumper begins. Now it seems to come out a
little bit further here. We could bring it out more. Let's try that. Let's see what happens
if we do that. Well then the back view isn't. So we got to kind of find a
happy medium between the two. Let's try that. Now what I'll do is just
duplicate this Shift D and then I'll press the Z key and
just bring it up like this. And then we can begin
filling these faces. So once again, we select
these at the F key, select these two,
and then just hit the F key on around like that. There we go. So now we
can select these faces, and let's try and
extrude them out E, y. And we'll bring him
out about like this. Let's go to the top
view just to see how we're doing and maybe, yeah, about like this, but we could also
add an edge back here to kind of pull this
back just a bit like this. And then maybe let's take the whole thing
and bring it back. So we're just trying to
get that basic shape. And maybe once again, I'll take some of these faces here and let's try and pull
them out just a little bit. Do we need to pull them out
any maybe a little bit. And maybe we can bring
this in. Here we go. So we're getting that
basic shape now. In addition, I'll
tab into object mode and right-click and
choose shade smooth. All right? And then we can also add some edge loops to kind of
tighten up this front area. I'll press Control R and maybe add two edge loops
here like that. Alright, so what we'll do
in the next video is we'll work on these little vertical
pieces of the bumper, as well as that rim
along the center.
33. Finishing the Rear Bumper: Now for the vertical
pieces here, Let's tab into edit mode and let's find some
edges that we can use. I'll press Control numpad
1 to go to the back view. And it looks like we
could use this edge, but I think we need
another one here. I'll press Control R. And let's drop that
right in there. Okay, so now let's take these
faces here and extrude out. And we can take, say these three here. And let's hit E and y. And let's just pull this
out just a little bit, maybe about like that. And then for these up here, Let's go ahead and grab these. And let's extrude these up. I'll hit E, and then let's just drag this straight up in
the z-axis like this. Not exactly sure how
tall those need to be, but we will take a look at the images here
in just a moment. I'm going to bring
these together a bit. Now let's go back
to that back view. And yeah, we're a
little too big here, so I'm going to Alt click
between two faces here, and then let's select
these faces along here. I'll do that. And let's just grab all of
these along here. And we're going to
bring these enzyme. We're going to Control 1, z, and let's press S and X and kinda scale
these in just a bit. And it looks like we
can bring them up a little bit higher
to now, doesn't it? So let's just make sure we're looking at the
right thing here. I'll z yeah, we
could probably bring these up just a little
bit more like this. There we go. And we should probably take this
face and bring it back. Well, we really need a
new edge loop in here. Let's press Control R and
drop an edge loop in here. And then we could bring
these back here like this, right in here. And also I think we need an
edge loop down the center, like this so we can
create a little bit more of a rounded look. Let's see if we can do that. I'll select these edges and these edges and
let's just pull them back a bit to see
if we can get rounded. Kind of look, something
like that maybe, and let's alt click this edge and maybe bring it
back a bit like this. So we're just beginning to
get that shape, I think. So let's see how
we're doing here. Yeah, I think we're
getting there. A couple of things I could do is bring these together
a little more, maybe S and X, two that we might
even be able to expand this area down here
just a bit. Let's try that. Scale these out in
the x just a little bit like that and
see how that works. So we're just trying to
work with that shape there. I think that's pretty good. One last thing is maybe we could try adding an edge loop here, kind of tightening that side up. And let's do that with
this side over here. Okay? And I think also I want
to take this edge. And let's move that out
just a bit like this. So it isn't quite such a, a sharp turn there. And then we need that
edge in the center there. Let's try that. We've already got
these edge loops here. Let's just use these
with an extrusion here. So I'll just hit E, y and pull these out
just a bit like this. And then let's once again collapse these points
like we did up front. M, merge at last and let's do
that with this one as well. And over here, merge at
last and here as well. Okay, so we've got that. Yeah, I think
that's pretty good. And then over here I feel like these kind of collapse
in just a bit. So we can take these
and maybe move them out just a little bit like this. Maybe these as well. Let's see how that works. Yeah, that works a
little bit better. Alright, so there we've
got a rear bumper. I feel like maybe these are
a little bit too flat here. So let's take these edges and I'm just going to pull
them down just a bit. I want to hit G two times and just slide them down
just a little bit. So we have more of a
rounded top there. And then I'm wondering now, as I see it from this side, I feel like that bumpers are usually more hollow than this, that they usually don't
have a backside to them. And I know we still have to put that plate in and we
are going to do that. But let me take a look and see if there's any
image here that gives us a sense of what the inside of the
bumper might look like. So here's a view from the
bottom of the vehicle and it does look like that that
bumper there is kinda hollow. Let's just see what
we can do with that. I'm going to press Shift H to hide all the unselected here. And you can also do
that with Object, Show, Hide, hide unselected
to bring them all back. Recall it's Alt H. But let's now take a look at the
back of this and maybe we could just try and remove some of these
faces here and the back. And I think I'll
leave these there. Let's get delete
and delete faces. And then what we could do is add a solidify modifier here. And then we could
choose even thickness. Click and drag in here. And I'm going to bring
it into here like this. So maybe we bring it
in about like this. Let's try that. So it just gets a hollow area but it has
some thickness to it. Let's try that. I'm going to press
Alt H and I will hide that smoothing mash and
that cutter object there. And let's see. Yeah, I feel like that's a
little bit better. I'm not sure if these parts
should be hollow as well. I will keep looking for
some reference images, but I think that looks
pretty good for now. We could also do that
on the front bumper. Let's press Shift H and come down here
and we could try it. So I will use the circle select tool to
select these faces down here. Let's make sure I didn't. I did accidentally
select a couple here. All right, Let's
hit delete faces and then we can add a
solidify modifier to that. So let's try this
for now and see, and I will continue looking
for reference images on this. But I think this is about
the way a bumper should be. So I'll press Alt H, hide the smoothing and
the cutter objects. All right, and there we go. We've got our bumpers. So I think we need to continue
moving forward with this. There's a handle that we could add to the back of the trunk. And also I'd like to maybe work on the windshield
frame a little bit more. I feel like we can adjust
that shape so it's a little closer to what we're seeing in the reference images. But then I'd like to work
on the tires and wheels. And from there we'll move on to the interior and
the under carriage.
34. Beginning the Tail Lights: Now let's work on the
rear lights here. I think what I'll do for this is a similar thing that we did
with this front turn signal. But I think what I'm
gonna do is create this piece first and then fit it on the fender by creating or deleting faces the
way we did with this. And then I'll try and
mold the bag vendor to the rear light
that we've created. So let's give that a try. I'm going to first just well, take everything
and just hide it. I'll just hide
everything and let's begin working on this
just on its own. And I think what I'll do is
just begin with a UV sphere. And let's take it down
to say 16 segments and 12 rings just to reduce
the poly count a bit. And then I think what I
should do is delete half. I'm just going to take
this part right back here and grab all of that and hit
Delete and delete faces. And then from here, what Let's do is let's try and scale this to get it
in the proper shape. So if I go to the
front view with numpad 1 and press S and X. Let's scale that in a bit till it's about the right shape. Something like that maybe. And let's go to the side
view and press S and Y, and let's scale this in. So it's maybe only
about that tall. Let's try that. From here. We could right-click it
and choose shade smooth. I'll wait to add a
subdivision surface modifier until we've done a
little bit more here. So for that rim, I think what I'll do
is take this edge. And as we've done before, I'm just going to press
Shift D and enter, and then press P and
separate by selection. And then let's tab back. And I'm going to change this to REM just for now so
I know what it is. And I will bring this out a bit. Let's say I'll tab
into edit mode and I think I'll scale
it in just a little bit. And what I'm gonna do is
then extrude this back. I think so I'll press E and S and kinda scale it
up just a little bit. And let's go to this
front view here and S and X and scaled out just a bit and I went out then
pull it back some. And then we need to do
that again, I think so. I'll press E and S, scale this out a smidge, scale it in the X
a little bit more, and then pull that back
again as well like this. So we get something like
that just to begin with. And then from here, let's take these edges here, this edge and Alt
Shift, click this edge. And let's bevel these, I'm going to press Control
E and bevel edges is here. So I'll click that and just pull these out just a
little bit to get something that we can use to create that bar across
the front there. And then I think before
I connect these, I will delete half
and mirror this over. So let's do that. Let's go to face mode and I'll just click and drag
these and delete these. And then let's add a mirror
modifier to this as well. Right here. Now we can go back into edit mode
and choose these, or I should say, this
edge right here. Well, let's turn on our cage
and also turn on clipping. So that when we extrude this out and pull it over,
it'll clipped together. So let's hit E and X and drag
that and clip it together. Now if we go to the top view, we can maybe pull this
out just a bit like this. I'll pull it out to
about like here, just a little bit farther out. And then we can press Control R and add
an edge loop here. Go back to that top
view and kind of pull it out a little
bit like that. Maybe add an edge right in here. Let's do that and
pull this out a bit. So I'm just trying to get that
basic curve around there. I think this one's
probably okay here. Let's pull this out just a bit. And probably one more back here. Let's do that. So I'll hit G and pull this
out a bit like that. Yeah, so we just
get this generally curved around that
red piece here. Alright, so we've got that. Let's now give it
some thickness. Let's add a solidify
modifier over here. Solidify right here. And then let's click and drag. Well I'll choose even thickness. And then let's
click and drag and pull that in just a bit. Something like this. Let's try that. And then do we need, I guess we do need a
subdivision surface modifier. Now so let's go ahead and add
that subdivision surface, and I'll select it and
right-click and shade smooth. And let's see how
we're doing here. It feels like we're
going to need to pull this out just
a little bit, right? So maybe I could actually
just scale this whole thing. Let's try that. Sx, scale it out just
a bit like this. Okay? And let's add a subdivision
surface modifier to the interior as well. That'll help a little bit. And then maybe I could
bring this up to two. And I'll bring this
up to two as well. Let's see how we're doing.
We're getting there. Feel like this interior part is just a little bit too tall. I'm going to press S
and Z and scale it in just a little bit like this. Okay, so I think we've got a basic shape that we
can live with here. I may take this edge and pull it out just a
little bit like this. Let's try that. If we really wanted to, we could add an edge in here. But let me go around here, let me do that like this. And here just to I'll
tighten those up. I don't think that destroyed the smoothness there
of the subdivision. That looks pretty
good. All right. In addition, we could also
come over here to the solidify and choose only rim. And that will just
reduce the amount of polygons on the back that
we aren't going to see. We don't really need
those there right. Now. I think we should
apply the modifiers here. We should apply the
mirror and the solidify before we begin trying to move it around and
put it in place. So I will come
over here and pull this down and apply the mirror. And then I will
apply the solidify. I'll actually turn on the cage so we can see that a
little bit better. Alright, So to add this
or put this on the car, we probably need
to move its origin to the very back of
the object here. So let's press Shift S2 to bring the cursor in line
with that selection. And then let's go
to object mode. We better select it and
then go to set origin, origin to 3D cursor. Now we can move that
around from that point. So let's bring our car back. And the reference image, I guess I will change the name here to call
this tail light. There we go. Now we need to spin it around. So our Z1A 800, and that spins that around. Oh, here's the
problem that we have. Actually, it's still two pieces. Let me undo this and let
me hide these again. One last thing here, Let's join these together. So we've got a subdivision
surface modifier here with two levels. This one as well. So we can take this and select that and then press Control
J to join those together. Now once I've done that,
I'm going to have to move that object origin. Let's do that. Set origin to
3D cursor, and there we go. So Let's try that once again. Let's bring these objects back, our Z 180. There we go. Now let's move it back and see if we can get
it in place here. I'll go to the side view, scale it down quite a bit. Let's move it over here. And let's tilt it and
see if we can get this in place and see what we need to do then in
terms of the rear fender, I'll press Control 1. Let's move this over here. And I hit the period
key to zoom in. And yeah, we're
going to need to do some work because we can see
into the back of it, right? We're going to need to
adjust this fender sum so that we don't see into it if we view it from
an oblique angle here. I'll pull this in
just a bit more. Let's see how we're doing here. Yet. We can still see into
it here, into the back. And we can see into it here. So we've got some work to do. It also could be, let's press Control 1, that it's just too big as well. So we could scale it down
a bit and also scale it in the x just a bit to make
it a little bit narrower. So let's try that. And I think that's probably
going to help a bit. Let's see how we're doing here. We can still see into
the back of here. And this isn't so bad, so it's not terrible, right? But we do want to adjust the fender a bit so we can't
see in to the back of it. And also you can see here that
we've got this little bit of a dimple here, right there, just like on the front
turn signal that I'm think I'd like to try and replicate
on the back as well. Alright, so in the next video, what list do is let's work on the fender and adjust
it to accept the light.
35. Finishing the Tail Lights: Before we start adjusting
the fender here, let me do a little bit
of adjustment here. I feel like this area here
is a little too rounded off. Maybe if we me turn on
the cage over here, and if we take some of these edges here and just
pull them back a little bit. And notice I'm in local
transformation orientation here, and I'm just going
to pull back and the y just a little bit. And then maybe grab these edges right here and just pull them back
just a little bit as well. Oh, I lost them. There we go. Alright. And pull these back just
a little bit as well, just so we tighten
that up a little bit. And then maybe we add just one
edge loop right down here. That'll kinda tighten
up those edges there. So let's try that. Yeah, I think that'll work. And then let's go
to our fender here. And once again, let's take these faces here just
like we did in the front. And let's inset these. Let's just hit I and inset
these and it's kinda ugly. And that's okay. And from here I think I'll
delete these faces here. And then we can
begin pulling these in toward the tail light here. I'm just going to take these
and begin moving them in, just hit G and, and move them toward
the light just a bit. And once again it's
continuing to keep it shrink wrapped to
that smoothing mesh. And just control
one and go to the, the back view here. Just begin moving these in a
little bit at a time to get them kind of arranged
around the light. That's all I really want. I don't want it to be
exact because I couldn't get it exact if I tried at the moment since it's
being shrink-wrapped. And then what we can do is we can try if we come over here to our vertex groups in the Object Data
Properties tab here, we could maybe take, well, we could take all of them, but maybe take them
one at a time and just remove them from the
Smoothing Group here. And then we begin
bringing these back down and putting them
in place around here. Now we're not going to
be able to get it to its final in place until we undo all of them or
remove all of them. But we take this one, let's say, and remove it. Now we can pull it
forward and move it over toward the tail
light here like that. And I'm just doing
one at a time, so it'll hold the other
ones en place as I do this. So remove, now we
can move it over, move it back a bit. So just trying to get these
in place, that's all. Maybe I'll move these down, this one down a bit. Okay, so now let's try this one. Remove that one, and let's
get this one in place. That maybe, Maybe I'll take
it up just a bit like this. Okay, how about this one here? Let's remove that and
put this one in place. So as I said, I'm just
doing one at a time. So the other ones are kinda
being held in place for now, like this, let's say. Okay, and then let's
try this one here. Remove. Let's pull it forward. Over here in the x. There we go. Let's try this one. And this one can
come over in the x, I guess, and forward in the y. And once again, I'm in
local transform here. And then this one, remove this
one and see where it goes. Well, it needs to come
back quite a bit. Okay, so now that we've got
these kind of in place, we can begin adjusting
these a little more. So once again, pulling out. Let's get this hidden
behind here, this back. And then let's work
on these over here. Let's pull this back a bit. Well this back a bit. Pull that forward a bit. And I want to tumble around
and see if I'm seeing inside this and it doesn't
look like I am, That's good. And let's move this one over. So I'm just trying to adjust the offender points
to accept the light. So it kind of feels
like it's been molded for this
particular object. And let me grab this
one and move this in and out like that. And then this one here. I do want that little kind of
an indentation on the top. Let's see if we can get it so it isn't quite so pronounced. I will select this here
and move this out. So here it is here. And let's move that up
and back in like this. And maybe down
just a little bit. And there we go. So then I can take
this one and hit G. Maybe I'll hit G2 times
and slide it up and down. So you can see I can
kinda pull that out just a bit like that. All right. So let's take a look. Yeah. So it's just beginning
to look like it's been molded to this shape and that's really all
I was hoping for. I'm gonna hit G2 times
and you can slide that in and back and see if
that'll change that a bit. But I think that's
actually not too bad. Let me just tumbled around here and see if I can see inside it. Yeah, I still can. So let me bring this out. This one could come up and out to a little bit like
that in the x-axis, pull it out so I can't
see inside there. Yeah, that's kinda
what I wanted there. So you can have
that little bit of an indentation up at the top. And it feels like it's been
formed around that shape. So now that we have that, let's mirror it over
to the other side. Let's move the cursor to the center of the
grid width shift S1. And then I'll move
the object origin to that 3D cursor object
set origin 3D cursor. And let's change to
global again here. And also we should
apply our rotation. Let's hit the End key. And yeah, look, we've got all kinds of values
in our rotation here. So let's press Control a
and apply the rotation. We now have all zeros. That's good. So now if we come back to the modifiers panel and add a mirror, there
it is over there. All right. So we've
got a tail lights. Let me hit the three key to
take a look at them here. Yeah, that looks like they're in a pretty good place there. Alright, And actually I didn't notice earlier that if
we go to the top view, trunk is kind of off. So while we're here, let's just go ahead
and adjust the trunk. I'm going to tab into edit mode and just grab these
three points. I'm just going to pull them back a bit. Just a little bit. So weren't just get close to the reference drawing
there and this one, if we pull back, oh, look at that, it clips over to that part of the object
there, but that's fine. I don't need it that far. I can get it right about there and it'll still
look pretty good. Let's do that. I'll tab back into object mode. And then if we come down here, we're going to need to
adjust defender as well. So we should probably take
this whole thing down, right, So we can have
room to bring this down. So I'll hit G two times and
let's slide down like this. Like that. Maybe grab this one and hit G2 times and slide
it down as well. And we go, now we can take these here and let's
bring these down. I'll hit G two times and slide
this down to about here. Let's grab this one and
hit G and pull it down. Let's pull this
one out like this, and let's try and
get these lined up. Now, what we should do
is maybe make these a little bit more even I'll hit G two times and slide this over. And let's do the same thing
here and slide these. So we're getting these spread
out a little bit more. Maybe I'll grab these and
hit G and pull these down. Here we go. So now
we can, I think, have a little more
leeway to pull these around like this and
get them in place. Alright, let's see. Yeah, I think that's a little
bit better for the trunk. I think it really does pull down a little
bit more like that. All right, I think
we're ready to work on these little
pieces right in here. So that's coming up next.
36. Modeling the Rear Fender Lights: All right, let's take a
look at these little guys. The lights that appear
to be right here on that curl on that turn up there. You can see a little
bit of that here. I'm going to find another image. I, let's see if we can find there's this one
here that this really, even though it's not very good, it seems to be about
the best one I have. So I think I'm
gonna go with this. And it looks to me like
it's kind of a rounded oh, it's almost like
a half circle and then a straight part that kinda bends over the fender here. So I'm thinking we
should probably select, say, these points here and let's move the cursor to
there with shift S2. And then when we
create a new object, it'll come in at the cursor. So let's begin with a circle, shift a mesh circle. And instead of 32, let's, let's cut
that in half to 16. And then I'll scale it down
and just click and drag in the radius field and scale
that down quite a bit. And we go my tab into edit mode. Now let's take a look at it. Let's see if it's even
close. I'll press all Z. So it looks like, well if we scaled in the x, we can kind of begin to
get that form like that. Maybe something like that. And then it needs to turn, it needs to just bend a bit. So let's take a look at that. We need to bend
this part up here. So to do that, let's just
take these two points here. Move the cursor to it
shifts us to once again. And then let's
change the cursor or the pivot point
to the 3D cursor. Now, we've been
pulling it down here, but we can also hit the period key to bring
up a pie menu here. And we can choose
3D cursor as well. And then if we select
all of these up here, go to the side view and hit R. We can turn these up like that. Alright, let's try that. And then let's move it down. Just move it back as
far as we can here. And then this part
right down here, I feel like it should
be between this point and this point, right? Like it. Where does it come across? Write it here now and I
kinda feel like it's here. Let's do it. Let's do it there. So what we can do is we
could go to the top view and select these and delete
them, delete vertices. And then we can take these two, maybe scale them out
in the x just a bit. And then we could connect
them up with the F key. And we go. And then just to add
a few more points, we could right-click, choose, subdivide, and then number of cuts we can take up to three. Let's try that. All right, so there we've got the basic shape of
that piece now, I think these probably need to come forward and these need
to bend around this, right? We need to have these kind
of going down like this. Maybe I'll change back to median point and kind of
been those down like that. And maybe we could, well, let's see, well,
let's take all of these. And maybe we can
change to normal, which would give us the angle a little bit better
to move that out, just a little bit like that. Let's see how that works. Okay, so we've got the
beginnings of that basic shape. I think. Well, let's do now is just a scale,
everything in. So with this selected, I'm going to move the
pivot point once again. I'm gonna change
this to global now. And then with this
pivot point in there, I'll just hit E and S. And let's scale in like this. See how we do. Not too bad. Let's go to the side view here. Maybe I could select
everything except these and pull them up just
a little bit like this. And then we probably
just need to extrude up. Let's try it. Let's hit
E. And I'm going to pull out like this in the direction
of the normals here. Maybe pull up about like that. All right, let's take a look. What have we got here? Okay, It's not terrible. I think I'd like to delete
any faces on the back. So with this selected list, press Shift H to
hide everything. And then let's take
these faces back here. I'll click between two of the basis and let's
delete these. So we have that open and back. That might help just
a little bit see, to bring everything back, I'll press Alt H and
then I'm going to hide the smoothing mesh and that
cutter object. And then. We should probably add a subdivision surface modifier and see how we're doing here. Before we do that
though, let me think. I want to just grab
these faces on the inside and scale them and just a little bit
more like this. All right, now let's add a subdivision surface
modifier here. And right-click and
choose Shade Smooth. And we've got some
issues, right? And that looks to me like
the direction of the normal. So let's come up here to the viewport overlays turn on
face orientation and yeah, sure enough, we've
got flipped polygon, so let's tab into edit
mode, select everything. And then let's come
up to Mesh normals and recalculate
outside or shift in. Either one. There we go. That looks a lot better. Now let's go back. Let's turn off face orientation. Let's take our Viewport
subdivision level up to two. And then we could begin adding edge loops to see if we can
tighten up these edges a bit. So maybe along here,
Let's try that. Yeah, that helps embed. Maybe we can add one
right along in here. That we may need
to pull these down just a bit so they intersect with the fender a
little bit better. So let's see what we
can do with that. I'll press Alt click here with this edge and then
Shift-click here. And let's try and pull
these down just a little bit like that. I'll also do the same
with these here. Let's pull these down. And maybe I'll pull
the whole thing down just a bit like that. All right, I think
we're intersecting with the fender pretty well now. Let's see if we can get
that inside piece here. So to do that, I think I want to use one
of these interior edges. So maybe this one
here. Let's try this. Let's press shift D, Enter, press the P key,
Separate by selection. And if we tap into object
mode, there it is there. And if we tap back
into edit mode, now, what we can do is
begin connecting these up. Now, we're going to want
it pretty low poly here. But to do that, we really need to connect
everything up and then remove or dissolve edges. So let's begin doing that. Let's take these here. And let's hit the F key. And then let's just select these two and hit the F key like that. Yeah, it looks like
now we're going to need a middle edge, so I'll drop one in
there and then we've got these quads up here
that we can fill. We can select these four
points on either side there. And then down here, we've got these
extra points here. Let's dissolve those,
dissolve vertices. And then we've got four
points that we can use to fill this area
here like this. Let's try that. And then
Let's take a look at it. It's got a nice curve there. Now, let's smooth it. Let's move that object
origin into the center of the geometry object set
origin, origin to geometry. And then let's scale
that out just a bit. I'll press S and scale it out. There we go. And that doesn't
look too bad. Actually. It looks like this down here
could maybe come up a bit. Maybe we could select this
edge down here and let's see. Yeah, there we go and
pull that up a bit. We could do that, but everything
else looks pretty good. So there we go, there, we've got that rim and then the object
for the light in there. And I think that'll
work pretty well. We've got a little bit
of intersecting here because this has so
fewer polys than this. So that's not going to match up exactly at least right now. Near the end, we may be able to increase the poly
count for the fenders. And then we'd be able to move those around just a
little bit better. But for now, what Let's do
is let's take this and this, and let's combine them together. Control J. And we go. And then we should
rename this object. Oh, it's in our
collection here again, we can rename it out here
by just pressing F2, and then we can call this, well, what should we call it? How about fender
light? Let's do that. And then let's take this object, move the origin to the
center of the grid. But first we have to
move the 3D cursor. So shift S1 to move that cursor to the
center of the grid. And let's come up here
to object set origin, origin to 3D cursor. Let's then come over
here and add a mirror. And there it is on
the other side. So there we go. Now we've got those pieces in the rear fender.
37. Creating the License Plate Light: Well, there are a few more
things in the back of the car that I think
I'd like to work on. Let's find a better image here. There's one down here. So we've got this handle
right on the trunk. We've got this little piece
right here on the bumper that I guess lights
up the license plate. And we've also got
over here we've got a a gas cap or door to
where the gas goes. So let's work on the thing on the bumper
right now, Let's do that. Let's find another
image of it though. Maybe I'll put two here. So let's do one here. I'll click here in the
corner and drag down. And let's create a new image
editor window right here. And I'll go to image and open. And let's find in the reference
images in the photos. This right here, there's a white version here that I
think that looks pretty good. That's a good view of it here. So what we wanna do is kind
of molded to the back bumper. It looks like there's just
a bit of a curve there. So we could do that, we could get that in shaped
like that by once again, extruding or excuse me, duplicating faces off of the bumper off of
the main object. So let's do that. Let's, let's, let's tap back into edit
mode here on the bumper. And let's just choose, say these faces here and the
bumper still has a mirror, a subdivision, and a
solidify modifier on it. We're probably not
going to need this solidifies, so we'll
take that off. Once we duplicate this, Let's press shift D and enter, and then press the P key and
separate it by selection. Once then tab back into object mode and select
that new object. As I said, we don't
need that solidify, so let's take that
away and I'll go ahead and turn off the view
of the subdivisions for now. So we just see those polygons. Let's give it a name
right up front. It looks like it's in our
car collection there. So let's just press
F2 and let's call this what license plate
light. Let's do that. We've also got our
tail light here. We can drag that into
that collection as well, just to clean that up a bit. And then let's try and get
this in a little bit more of a correct size here Let's go to the top view with numpad seven. And I will tab into edit mode. And let's just take these points here
and just drag a man. We can see that
piece right there. And maybe I'll pull
this forward a bit. And then let's take these
and pull that in like that. So it's just a little bit closer to the size of the
actual object. Let's press Control 1 and
go to the back of you. And yeah, this is pretty good. So something like that. Let's say, all right, if we then, well, let's select these and
let's pull these in a bit. And we could maybe select
this edge and pull this up. So it doesn't need to
be quite that far down. And so yeah, so we've
got something like this. Let's say we could
straighten these edges out. We could select each
one and press say SY 0 to flatten these
out a little bit more. Let's do that. Sy 0. And we could also do that
here with the x axis as x 0. Just to get those a
little bit flatter. I wonder if we need to do it in the z-axis to let's just
do that real quick. I just want to flatten
all these out. And I'll do that here as well. So with that selected, let's now just press Shift
H to hide everything. And let's just work on
it on its own here. First of all, I want to
see if it's been flipped. Did I flip it well, sure enough, yes, it
has been flipped. We should probably
take a look at the bumper to see if
it's flipped to right. Let's go to Mesh normals
Flip, let's do that. And I won't do the
bumper right now, but helped me remember
that we need to do that. Let's select these and I'll go back and I'll turn off
face orientation for now. And let's extrude
these up to get this little ridge right
here. Let's do that. Let's just hit E
and pull that up. And I think I'd
like to come down here to the object
data properties. And under normals, Let's
turn on auto smooth. That should help
clean it up a little bit so we can view it
a little bit better. And then I will
inset this to begin creating the part
that comes up here. So let's just hit I
and pull that in, and then let's hit the B key. You can see up at the top that
boundary is currently off. If I hit the B key again, it'll turn it on,
but I want that off. Like that. There we go. And then let's extrude
this up again. Let's hit E and pull that out. And how far do we want it? Well, maybe I'll pull
it out to about here. And then what we
can do is select this face and we could pull it out and up a bit
like this, right? So we're getting this
kind of area here. Maybe grab that and pull
it back a little bit more. Let's try it like that. Then. We should think about
these other parts. So here's the question. Do we want these
little ridges here? And also do we want the
little screen here? It's not a screen, I
guess it's a light. So we should probably have that, right. We should
probably do that. Let's do that. I'll just select this here. I'll go to the top
view and let's hit the I key again and inset this. So there's that
piece there, right? We can hit E and extrude
it down a bit like that. Alright, so we've got
that piece. That's fine. What about the
little ridges here? How, how hard do we
want to work on this? So let's what have we got here? We've got 12345. Is it six? Let's try and just do three on each
side. Let's do that. So if I insert an edge loop with Control R and scroll
the mouse wheel, Let's do six cuts. Over here. I'll hit
enter two times. And then how should we do this? Let's select two edges and let's hit S and X and kinda
scale a man like this, like this Sx and we're just
going to scale them in a bit. It looks to me like we could
try and extrude these here. Let's see how this works. These are kind of angling here. And I don't know if we
really want that to happen. We can take these and
slide them over a bit like this and kinda make
him a little straighter. I suppose we could
try that like this. I'm just pulling them
over in the x axis so they come out to be a
little bit straighter. And then we can take these and extrude these
here. Let's try that. So I'll just hit E and pull
out just a little bit. And then let's change to individual origins
because what I want to do is scale on the x-axis. And if I scale on the
x-axis currently press NSX, they'll all kinda
collapse together, right? Let's change the individual
origins so they will scale on the x for each
one individually Sx. And now we can pull them
in just a bit like that. Alright? Alright, so now that we've
got the basic shapes in, we can turn the subdivision
surface modifier back on and see how it looks. But before I do that, actually let me take the
faces down here away. I'm going to hit the C
key and just click and drag and select those and
hit Delete and delete faces. Just so we have a kind of a harder edge on
the bottom there. Alright, let's see how
this is going to look. It's gonna be kinda ugly when we first turn
on the subdivisions, but let's see, Here
we go. There we go. So yes, it is ugly. But there's some things
that we can do, I think, to clean this up or make the
edges a little bit sharper. Like we can come in here
and click and drag here, add edges here, and drag
that one down like that. So those are a little
bit tighter there. We could do a similar
thing down here, add an edge and bring that up. We could add an edge here
and bring that down a bit. It's not too bad. I wouldn't mind sharpening up these edges right along
here. So let's do that. Let's press Control R. Kinda tighten these up a bit. Something like that. That's not too bad. I mean, it's going to be fairly small and from a distance, which can help, of course. Let's turn this off real quick. And we could tighten up these corners by using
the crease tool. Let's turn this back on and press Control E and
use edge crease here. And that'll kinda bring
them down a bit like that. We could try that and see. Yeah, that gave us a little
bit more of an edge there. That's not bad, actually. Let's now come down here
to Object Data Properties. And let's drag the degrees here for the smoothing up because I want to clean
up these corners a bit, see if we can do that. Yeah, That kinda
cleans up the corners. If we take it over 60 or 65. We could also add
an edge in here and pull this up
a bit like that. That kinda tightens
that up a little bit. I like that. Yeah, Let's give this a try. I will bring back
everything else. I'll press Alt H and let's hide the smoothing and
the cutter objects. And there we go.
Let's see how that looks. We tumbled around. Oh, it's still sitting above
the bumper quite a bit. So let's bring it down,
maybe bring it back a bit like that. Yeah, so we could
then use some of these points here and just
bring them down just a bit. Maybe down like this, back a little bit. These are kind of too far in. Maybe we could actually
turn it a bit, say RX, and turn it
just a bit like this. And then bring it out
in up just a bit. And all right, so
in the next videos, let's work on the handle
for the trunk and also the gas cap or door
here on the back as well.
38. Creating the Trunk Latch: Now let's see how we might
create the trunk handle here. This is really,
these two are really the best images I have and
they're not very good. They're pretty pixelated
when we zoom in. So it's really hard to
tell what's going on here, but I think we can come up
with something that will work. Let's hide the car and
the reference images. And I'll go to the front
view with numpad 1. And I think what
we can do is begin with a cube for this top part, and then a cylinder
for the bottom, and then join them together. So I'll just press Shift a
mesh and bring in a cube. And let's scale it
down quite a bit. And I'm going to press Alt Z. And I think what I wanna do is just scale it down
about like this. I also want to split it
so we can mirror it over. So it's tab into edit mode and drop an edge loop
down the center. And then let's select this
side and delete faces. And then we can add a
mirror modifier here. Let's do that. There we go, and we'll turn on clipping
and the edit cage here. So now let's go to the top view and
maybe scale it in the y. That and then I want to extrude out to get the
handle on either side. So I think it actually let me, I think it probably is
something like this. I'm going to extrude
out this way. So let's grab these points. And I will hit E and pull out. And here I will maybe bring
it down just a little bit. Grab these points,
bring them up. Well, it's also take
a look at it here. Yeah, we need to
scale these in the y. Let's do that.
Something like that. Maybe I'll just hit the S
key and scale in a bit. And then I think I want to have just a little
bit of a turn here. It kind of looks
like it curves down. It's really hard to tell. So I'm just going to turn this. It hit the S key, turn it. And then let's hit E Again, hit the S key, turn it
and bring it down some. So I'm just trying to get a
little bit of a turn there. Let's see how that works. And then maybe I'll add
an extra edge loop right in here and bring
this up a little bit. So it just kind of
curves like that. All right, so let's
take a look at it here. Alright, I think
that's pretty good. I might take this and
scale it out just a bit. Just trying to go
something like that. And maybe even scale
this and let's try that. And there we go. All right, so we've got
maybe that basic shape. Let's pull it up
just a little bit here and then let's
begin working on the cylinder on the bottom. So I'll press Shift
a mesh cylinder. And for this we really
don't need 32 sides again have out and about
16, Let's do that. I don't need any polygons on the top and the
bottom currently. So I'll change this
from n gon to nothing. Let's do that. And then let's scale
it down quite a bit. And let's see what
we can do with this. So I think I'll want to
scale in the z like this. And then we can
scale it out a bit, scale it in the x, s and x, and then a tab into edit mode. And if we go to the
top view, yeah, that looks about right. Let's try that. And then from here, let's extrude N E S
and bring that in. And then maybe I'll scale on the x just to get it a
little more circular. Let's take a look at it here. Something like that. And then let's extrude it up and bring it up
some E, S scale. And again, let's bring
it up toward the handle, E and a z-axis. And then maybe we'll
do one more ES, bring this out easy and
taken up like that. And it looks like it's a
little bit big all around, so I'm just going to scale
it in some, bring it up. And maybe scale this up
just a bit like this. So just trying to get the Basic shapes here, That's all. I'll bring that up. And I will select
these faces here. And then we can scale these in without scaling in
the z by of course, pressing S Shift Z. But we also have a shrink
fatten tool down here. And you can see if
I hover over this, the shortcut key is Alt S. So what we can do
with these selected, we can press Alt S and
then we'll scale it just in the X and Y and we'll just kinda shrink
or fatten that. So there you go, a well-named tool, right? So let's grab these. We can do the same thing
down here if we want Alt S and bring those
in some, and we go. All right, let's
take a look at it. Feel like this may be too wide. And we'll try that. Maybe too tall. It's hard to tell
from these images. So maybe something like
that. Let's try that. For this, I'm going to add a subdivision surface modifier to it and see how it looks. It looks terrible. But I'm going to increase
this to tab into edit mode. And let's add some edge loops, maybe one down here
and one up here. And let's see how that does. That helps it. I'll right-click
and Shade Smooth. And then let's do
this down here. Let's also add a subdivision
surface modifier to this. Take it up two, I'll smooth it. And then let's begin
adding some edge loops in here just to hold these
edges just a bit. Maybe something like this. One down here. We can put one out
here and one in here, one in here, and maybe
one out here like this, and then one down here as well, just to kinda tightened
all of those edges. And then I think we also need something on the top here for
this little keyhole thing. Let's create something for that. I'm going to press
Shift a mesh cylinder. Once again, 16 sides
is fine I think. And I'll pull this up to here. And if we scale it in a bit
and bring it in like this, and we go, we could then extrude in these points
right up on top like this. And I just want to get
a little key slot. I don't want to do
anything too fancy here, just a little T slot that
kind of hints at that. So I'm going to press E and S and scale in a bent like this. And then I will take, say, these five vertices and press
S Y 0 and flatten them. And then pull them up like this. And take these five here, SY 0, and then pull those
up to here, let's say. And oh, let's change our
pivot point to median point. And then maybe we can scale these in the y a
little bit more like that and bring these in NSX, and let's do that. And then if we select this
whole thing and hit E, Z, we can scale down or
excuse me, extrude down. And then if we add a subdivision surface
modifier to this, it's going to be pretty ugly, but let's give it a try. First of all, smooth it, and then add that subdivision
surface modifier. And it's looking
pretty terrible there. But what we can do, let me turn on the cage here. We can take this edge and press Shift E and
crease that like that. And then Shift E for
these and these. And remember the edge menu is Control E and we have
that edge crease here. Alright? Alright. And then what we can do is
add a couple of edge loops, say one right down in here. And we could add one
out here as well. That, and press S Y and
scale that out a bit. So that just tightens up
those edges just a bit. All right, so we've got that. Now we need to combine
all these objects. So we've got a
subdivision of two. So division of two and a
mirror and a subdivision with two levels here. So we need to get them all the same before
we can join them. And really the only difference
here is the mirror. So why don't we just apply this. I'll pull this down
and click Apply. Then we should be
able to take all of these and join them
together with Control J. And let's change
the name of this. Let's call it trunk latch. And let's move our pivot
point to the center of the grid here with
objects set origin, origin to 3D cursor. And now we can
bring our car back. And let's see what we can
do to put it in place. Well, that's going to
be back here, right? We want it to be
right around here. Let's shrink it way down. And how far down do we want it? Well, let's go to the back
view with control one. And it looks like it would
be about right here. Maybe right here, let's say. And then let's press R and X RX. Turn it. Let's go in and see
how we're doing here. Yeah, let's do it
a little bit more. Oops, that's z.
Let's press R and X. There we go. Turn it like that. And then is it too big? I feel like it's a
little bit too big, so let's scale it down just
a bit like that. All right. Let's take a look at that. Yeah, so if we zoom in, we can see the little
keyhole there. I think it's fairly well, platelets changed from global to local transformation and then
we can pull this in or out. Maybe I'll pull it back in
just a little bit like that. There we go. All right. We've got a trunk latch. I'd mentioned earlier
that we might begin on the gas door, but I think I want
to work on that near the very end because we'll need to apply the
mirror modifier to work on this because
since it's only on one side, we don't want the
mirror modifier to be on or else we'll
have a gas door on both sides so we need to wait until we can apply
the mirror modifier. And there's still quite
a bit to do that. The mirror modifier would
be very useful for. So I think we're
going to wait on that until the very end. So what let's do in the next
video is let's start working on the tires and wheels and see what
we can do with those. So that's coming up next.
39. Beginning the Tires and Wheels: All right, well, let's put
some wheels on this thing. It's gone long enough
without them, I think. So. There's a couple of things I
need to make a decision on. And one is the hubcaps. Now, the drawing has
these very plain hubcaps. And if we go into the
reference images, we can see them in one
of these I think here. Let me press Control
and Spacebar. And there are the hubcaps that are in the
reference images. However, that's kinda boring. I'd kinda like to try something
else and what they have, they have some
other ones in here. Let me open this up and I
found a close-up of here. This one, Control
Spacebar and this one. Now this is a little
more interesting. It's going to be harder, but it's a little
more interesting. It's got basically
the wheel here, which I think on ours, I'll make Chrome
just like the rest. But it's got the wheel, then the hub cap. And the hub cap has some of
this intricate work here. And these little wires here, the spokes of the hub cap. And I think I'd like to
try and create these. So I may be condemning
myself too. Endless frustration here,
but I think we can do this. I think it's possible. Let me bring up another image of this same kind of hub cap here. Yes. So here's one that's similar. It's just a different
angle on it. So we can work with
that, I think. All right, so let's see
what we can do with this. I'm not gonna do the spokes
immediately for now, let's just create the wheel
or the tire and the wheel. And then we'll think about creating the spokes after that. So to begin the tireless, just press Shift a mesh cylinder and we don't need any cap fill, so I'll just change
it to nothing. And let's turn it in
the y-axis RY 900. And we go, and let's
go to the front view. I'll just hit the one
key on the numpad, press Alt Z, and let's
scale this down. I'm also going to change back to global here, and there we go. And I'll hit G and
move this over here. Let's scale it down a bit. Scale it in the x like this. Get it just inside
that tire there. Let's go to the side view and
see how we're doing here. Bring it over. Skill that out of it. Let's get it pretty much
the right size here. Maybe something about like this. Let's try this. And then let's go back
to the front view. And here I'm going to
scale this in and tell it's kind of inside
the tire like that. And then what Let's do is add an edge loop down the center and then add a mirror modifier. So let me hide the car. There we go. And let's tab into edit mode
and press Control R and drop an edge right down
the center like that. Then let's delete
one side alt Z. I'll hit the B key
for border select, or of course, you can just
click and drag right here. And I'll delete these faces and then let's add a
mirror modifier. And we don't see
it here because if I hit the End key and
go back to object mode, you can see that we've got that 90 degree turn here
and the Y that we just did, and that's why we can't see it. When we're trying
to mirror in the x, we need to apply
a rotation here. So I'm going to press Control
a and apply the rotation. And there it is, there. Alright, so let's
tab into edit mode. And I will turn on the
edit cage over here. Oh, and we better turn
on clipping as well. Let's do that. Now that we've got this here, we can select this edge and begin extruding out to get
the shape of the tires. So I think from here
I'm going to hit E X and pull out just
a bit like this. Maybe I'll scale in
just a little bit with the S key and then e, x. And let's scale
out a little more. And I'll hit the S
key here like this. And I've brought it out
a little bit wider. Then the tire here, I'll
move it over like that. There we go. And then
let's take a look at it. All right. We've got the
outer rim of the tire. Now we need to work
on this part here, this side of the tire. So to do that, I'm going to go to the quad
view with Control Alt Q. And let's take a
look at it here. So what I'll do is begin here in the side and I want to hit E and S and scale and like this. And then I'm going to
pull out here like this, just a little bit like that. And then let's do that again. Maybe I'll scale back
out just a little bit. There we go. Abs pull in some like bat
and pull out like that. Just a little bit. I'm going to hold the Shift
key down. There we go. And then E, S, and I'm gonna begin
pulling it in now. So let's move it
in some like this. And then let's do one more. Bring it in like this. And let's push it in like this. And we go, all right, Let's press Control Alt Q
to go out of Quad View. And there's the
beginning of our tire. Now let's work on that wheel, actual wheel that
the tires on here, this part right here. So to do that, I think what I'll do
is once again select an edge here and
duplicate it, Shift D. And then maybe I'll
pull it out just a bit and scale it out. Just a smidge,
something like that. And maybe even bring it down
a little bit like that. So it's kind of inside there. I'll press E and X and
bring it out like this. And then let's go
ahead and scale it in. Let's hit E and S Ludhiana bit just to get that little
edge right here. And then we want
to go in some TSO, E and X and push in and maybe even scale
in just a bit like this. There we go. And then we want this
part right in here. So let's hit E and
S scale in some. And let's push back
just a bit like this. And there we go. Maybe scale in a little more. So we're getting this part, the red part, right under here. And we can't really tell
what's going on back here, but we're going to have
to have something. So we need to have it
be fairly nondescript, but still have
something back there. So I'm going to hit E
and X and bring this in some scale in just a bit, and then it looks like
it comes back out. So we could do that. We can hit E and S scale
in, edX, pull out. And maybe scale in. And then we could hit E and
S and scale in like that. So we don't really know exactly what's
happening in there. But we do know we
need something. And in fact, what I should
probably do is just hit the L key here to select this and just split this
out as its own object. I didn't do that, so that hit the P key and separate
by selection. And now when we tap
into object mode, it's its own object. So let's give these some names. I'll hit F2 and we'll
call this wheel. And for this one I can hit
F2 and call this tire. And then we can actually
move these into the proper collection
from the 3D view as well. So you can select an object
in object mode and then press the Enter key and move it to the
collection that you want. So I'll just click here, right? And then you can select
the tire in object mode because of course when
you press M in edit mode, it brings up the merge tool. But here in object
mode it allows you to move an object
into a collection. So m and Nash Healy,
and there we go. All right, so let's bring back our car and
take a look at it. Now it's kind of ugly because
well, it could be smooth. Let's right-click Shade Smooth, and let's do that
with this as well. All right, And also we
could, if we wanted, we could add a subdivision
surface modifier to it. Here. And there we go. So that's that interior wheel. And if we wanted,
we could of course, add a few edge loops. Tighten up any edges that we
think we need to or want to. As I said, this is really just kind of filler back
here for the spoked wheels. So we may not really need a whole lot of anything in here, but we can just
clean that up a bit. And there we go. So there we've got
a wheel and a tire. In the next video,
let's take a look at creating the hub cap here. Before we work on the spokes.
40. Modeling the Hub Caps: Well, for the hub cap, I think we need to do
a couple of things. One is, I think we
need a new object, like a cylinder or a circle for this to begin
this center part. And then maybe for this ridge
right here on the outside, maybe we could actually
duplicate an edge off of the thing we just created,
off of the wheel here. So maybe if I Alt click
this edge, let's shift D, Enter and duplicate that
and then separate it out as its own object with the P key
and separate by selection. Now if we tap back into
object mode and select it, we can go ahead and remove the subdivision surface modifier
for now and the mirror, we don't need that. And let's just pull it
out and begin from here. So if we tab into
edit mode, well, I think we could, we could begin here and move in, and it looks like it has
a little ridge to it. So I think what I'll
do is I'll pull this back to it,
intersects with that. And let's hit E x
and then pull out a bit like that to get
that initial edge here. And then let's hit
E S and pull n sum. And we want this to
kind of bend up a bit, just a little bit, I think. So I'll hit ES again
and then let's pull this out in the x-axis
just a bit for that. Es, once again like that. And then let's go in e, x, bring that in a bit. And what do we think? Does it go straight back as
it it's just hard to know. We can barely see
a little bit here. So let's just take this back. How far can we go back? Well, let's go back to here
and then let's extrude again. And then I'll scale out
just a bit like that. I don't know. Let's see how that works. Something like that. Okay? And then for the inside, Let's move the cursor to this pivot point
here of the wheel. Let's press shift us
to, to move that there. And then when we
create a new object, it'll come in at the cursor. And well, before we do that, let's take another look
here. What do we think? I think maybe I'll
begin with a circle. Let's do that instead
of a cylinder, Let's press Shift a mesh circle. Let's keep it at 32 sides. Here it is here, but let's, instead of no fill, Let's change this to a triangle
fan so that will fill it, and it will fill it with
these triangles here. Alright, so let's now turn
it in the y-axis, RY 900. Let's pull it out of
it and scale it down. And I'll hit the three
key and the period key. And let's see how we're
doing in terms of the size. Feel like it's quite a
bit smaller than that. Let's take it down to
about, about here. And I'm looking at that inside circle right there,
where the n is. Let's go with that. We should probably
pull it back a bit, something like this. Because I'm going to come out here and let's come
out, we'll extrude out. But first, there's a
little curve there. Can you see that? Think there's
a little curve on that. So let's just add that
here while we're here. To do that, well, we can
do is use the inset tool. So I'll go to face mode and let's hit I and
bring that in a bit. And then I'll just pull out
a smidge with the x axis. And then let's hit I
and pull out a smudge. I should come up with
another word besides smidge, but I don't know
it is right now. And we'll pull this
one out just a bit. And then hit I and bring
this in like that. And we'll pull that
out just a little bit. There we go. So now we've got that
little bit of a curve. We could bring these out just
a little bit more. I think. Maybe let's select. I'm going to press Control plus Wellman control minus
I want these here. Bring these out
some, let's do that. Yes, so we're just
beginning to get this little tiny bit
of a curve to it. And I'll select these
with the C key, with the circle select tool
and just pull them out. It's a little bit more. All right, I think
that's good for now. Once we add a subdivision
surface modifier or just smooth it, I think it'll be a
whole lot better. Let's tab into edit mode, and now let's begin getting
all this stuff out here. It's going to come
out some, right? So let's hit E and X
and pull out a bit. Then I'll hit the S key and
scale out to bit like that. Alright, and then it
needs to go back out, so Extrude and hit the S key. And it looks like there's a
ridge or something there. So I'll hit E and
X and pull in ES, pull out a bit like this, maybe EX, and then let's
pull back out like that. And then let's get this
part with the ridges on it. Does that Leanne? No, I think that's
pretty straight. So E S Once again like that. Let's see how we're
doing on the size of it. Does that look okay? All right. Now let's start getting
this stuff back behind here and it's kinda
hard to tell what's going on. But it looks to me like there's two stair-step kind of levels
to this as it goes back. One for the front spokes and
one for the back spokes. So let's try and do that. I will hit E and X and
bring this back a bit. And then I think what I'll do is press E and S and scale n. And then you have
that should be okay, e x, push back a bit like that. And then let's do this again. Let's get this
ridge behind here. So E S scale out. Is that too much? Yeah, how about that? All right, and then let's
go back with E and X. Let's then press S
and scale in a bit. Maybe about to there. And then we'll go back
again with the Annex. And then out S. And how
far should we go here? Maybe I'll bring this
out to about here. Let's say kind of looks like the whole thing could
be bigger. Let me see. Yeah, it looks like it comes
out a little bit more. So let's just scale
the whole thing out just a little
bit more like this. See how that works. All right. Should it
go back now and well, maybe it could go back just
a little bit more like this. And then we can
probably take this and this and join them together. So let's press Control J. There we go. And then we could smooth them, right-click Shade
Smooth, and that's ugly. So let's come down to the
object data properties turn on auto smooth and that
cleans it up quite a bit. Now, I think we're going to need a subdivision surface
modifier for this. And the good thing is, is we're not planning on going outside of Blender for this, it's going to be finalized
and rendered here in Blender, so we don't have to
worry about keeping the poly count
super low as if we were going to be taking
it out for a game engine, but it's still quite high. Let's actually see how many
polygons we have here. If I come down here to this
bottom bar and right-click, you can see we've got this status bar and we've
got seen statistics, system memory, video memory. Actually, I'm gonna
come over here and right-click to get away
from this for a moment. And I think what we want
is seen statistics. If we turn this on now, we've got a lot of information down here on the
bottom right part of the user interface that
tells us how many faces, triangles, vertices, et
cetera, that we have. And we've got, in
terms of faces, we've got a 127
thousand polygons. And I'm okay with that. We're not going to
be taking this out, as I said to a game engine. So I'm not going to worry about keeping the polygon
extremely low. But I also don't want the poly count to get
extremely high either. Having said that, I
feel like then this could be smoothed and
add more detail to it. Think we're going
to overdo things if we add a subdivision surface
modifiers to the hubcaps, because as we add
subdivisions, we add polygons. But I'm gonna go
ahead and go back to the modifiers panel and add a subdivision
surface modifier here. I'll increase the
viewport levels to two. I'll turn on subdivision
cage here so we can see it a little bit better when
we tab into edit mode. And now it looks to me like I didn't add an extra
extrusion back here. I'm going to hit E and pulled
back in the x-axis here. I'll also press S and
scale in like bad. Let's see what we can do that. Okay, so now we can
go through and add edge loops to kind of tighten up corners where we
think we need to. So like down here I could
add an edge right here. I could add edges
along the side here. I'll add an edge here
and pull it out a bit. So now we've got tighter
edges along here and here. We've still got that kind
of slight curve in here, which I like, that's
good. For this. We could add an edge, say in here and extend
this out a bit like that. We could add edges. We could add edges
along in here. Let's see. How about if
we add two right in here. And that'll tighten this up. And in addition, we
could go through and add two and each of the, so I'll scroll the
mouse wheel and add to each of these like this. So we get those. Do we need these extra
edges right in here? Probably don't need them. But we could do i'm, I'm actually going to also
add some edges right in here. Can kind of pull out Just a bit like this to make these
a little bit sharper. We could also do the
same thing in here, add edges in here to make
these a little bit sharper. We wanted to. And so, okay, so this area in here, do we want to add these? What do we have? 123? Well,
we could add two more. Let's try this. We add two more in
here, like this, right? Then we go to edge mode
and we select this edge, this edge and this edge. And then we can bevel these with Control B and pull out a bit. And we don't have any edges in the center
there. That's good. So well we can do is once we
pull out just a little bit, say right about here, we can extrude in it e, x and push in just a bit. Now, what do we have here? Alright, that's not terrible, but we could also tighten up
those edges around these. So right in here and here, here, here, here and here, and maybe here, and let's
try that right there. Let's see how these work. So recall to crease these, we can press Shift E
and pull out a bit like this until we get edges that
we think we might like, maybe about like
that. Let's try that. Yeah, actually
that's pretty good. We got three edges there now. All right, so we have the
beginnings of our hub cap. Now we just need to go
through and add those spokes. So that's coming up next.
41. Beginning the Hub Cap Spokes: Now let's work on the spokes for the wheel or for the
hub cap, I should say. In fact, what we should
do is rename this, let's call it hubcaps. And the trunk latch could go back in the car
collection there. And I think what we should do
first is just create one of these little spokes here and then bring it over and
try and get it to size. And then we can duplicate it and create the little
x's and stuff. But I think first we
just need to create one of those and see
how it's looking. So let's come over
here and let's hide, well, let's hide the car and the reference
in the hubcaps. And then I'm going to
bring the cursor back to the center of the
grid with shift S1. And let's go to the
right orthographic view with the three key
on the number pad. And let's begin with a path. So I'll press shift
a curve path. And well, we can't see
it because there it is. So let's turn it in
the y-axis, RY 900. And then let's tab
into edit mode, and let's just bring this up. So it's about like this. Now, we need to get it to look kind of like this with
bent ends and at an angle. So let's just hit R and
turn it about like this. And then, well, we
could bring these down. Let's just move in the
y and the x or y or z, I should say, and bring
this down like this. And then maybe let's take this and let's hit G and bring
this down here like this. I'm just trying to get
it kind of angled here. And then we could also just take another one and bring
this down like this. So we're getting
kind of a bend here. Let's see how it looks. So something like that. I can bring this down. Let's add actually what I'll do is I'll just extrude this. Let's hit E and Z and
bring that down like this. So if we take a look at this, Let's tab into edit mode. Yeah, so we're beginning
to get that bend. Let's delete this one here. How's that look? We could move any one
of these in or out. So I'm just trying to get that turn there.
That's pretty good. Then we can do that up here. So if we're going
to do that again, Let's hit E and y and
pull that over like this. Let's hit E and Z and
pull that up like that. And we need another one. They're probably easy. Let me move these
out about like this. There we go,
something like that. And now bring these
down and this one up. Just so we have something
about like that. All right, so let's now give
it a tube-like structure. Let's select it and
go back down to our object data properties here. And if we scroll way down
to the bevel section, we can increase the depth here, just click and drag and oh, let's bring it out
about like this. Maybe, let's try that. Maybe a little bit thinner. And we can adjust
this a little more once we get it into
the hub cap area. So let's go ahead and do that. I will bring back the car and we're going to
have to bring this out a bit, scale it down quite a bit, and go back to that side view. Well, let's bring back
the hub cap here. I guess I can take
that hub cap and just drag it into the car collection. That'll be good. Let's bring this over here, scale it down quite a bit, and let's try and
put this in place. So it looks like it goes
inside here. All right. I'm going to bring it
back into here like that. Maybe just barely
inside here like this. Well, let's bring it
up here to begin with. Okay, so we have it
about like that. It looks like we need
to do some adjusting. And it also actually
looks like we need to increase the center
of this quite a bit. So let's do that. Let's just select this
tab into edit mode, and I'm just going to
press the L key and let's scale this up like this. I'm just looking at the distance
between these two here. And it looks like we just
needed to scale that up a bit. All right, so now
we've got that. Let's bring this forward
to about right here. And now we can adjust this so it fits a
little bit better. I'll tab into edit mode
and let's just grab these. And I'll bring them up. And I'll bring him back. Like that. Yes. So we just need them to be
Let's see how that looks. I might be able to just
delete these actually, let me try delete vertices. That kinda helps, I think. All right, so let's take
these and move them up a bit. And these, and move
these like this. Although now that
I took those out, I kind of lost that tight
bend there that we see here. So maybe I'll just take this and this and right-click
and sub-divide and then just select that. Let's bring it down. Yeah. Let's do that again. Right-click, sub-divide, grab that new one
and bring it up. So yeah, we're just
getting those enable us to get just a little bit more
of a sharp edge there. We can bring them
forward, I guess. Like This. And this one isn't
too bad up here. I think that's pretty good. Let's go with that for now. I'm going to move the origin to the center of this object. I'm going to go to Object
set origin to geometry. And then let's duplicate this
and spin it or mirror it. So I'll press shift D, Enter and then
let's mirror this. We of course have
our mirror modifier, but we can do that
here directly as well. We can just press
Control M and then press the key for the axis
we want to mirror in, which is the y-axis. I'll hit Y and then hit Enter. And there we go.
So now we've got a new one that's
been mirrored over. We should probably get these
so they aren't intersecting. So maybe if we took these
and pulled these out like that and maybe pulled these
out just a bit like that. We could get those
so they aren't quite intersecting like that. Right? Yeah, that works. Okay. I think I want
to bring these back a bit and maybe we can take one of these on this
one and pull them all back. Just a pill like that. Just so we have those crossing
without intersecting. So now let's work on the
smaller one up here. Let's take one of these. Maybe I'll just take this one, duplicate it, hit the X key
and let's move it back a bit. We could scale it down just a smidge like this and
move it up like that. Let's see what we can do here. We kind of need it to be
more like that, I think. So now we can tab into edit mode and just take
these and move them straight down and move that one straight up so they intersect
with the hub cap. And then let's duplicate this. Once again, let's do the same thing and move
this back and bet. So Shift D, Enter, Control M, Y, spin that. And there we go, there. Now we don't want them
to intersect either. I think I will take
this one and move it back just a bit like that. And then we could
take maybe these up here and move them forward
just a bit like that. Okay, so we have our bigger
and our smaller spokes. Now let's work on
converting them to a mesh. Now I probably should
have done this before I began duplicating, but we can go ahead
and do it here, I think for the
resolution preview and the bevel resolution, we need to bring these down. So I'm going to go
to wireframe mode, hit Z and go to wireframe. And you can see all of the
polygons that we have in here or that we will have in
here once we convert them. And we don't need this many. So I'm going to take
the resolution under the bevel section and
take it down to two. That's the resolution
around the circumference. Then let's go up here under shape and let's take
the resolution of this. I'll just drag it all the way
down to one and then start bringing it up and seeing
what we can live with here. So maybe 3. Let's try this. Yeah, I think that's fine. Can we take it down to two? Well, it gets a
little blocky there, so I'll take it up to three. There we go. All right, so let's do
the same thing here. Three, Enter and down to
this resolution in two. That's good. As I said, I should've done this before I began duplicating. But we can go through
and do it like this. Go back up here. This
was three, right? And three here. So each one of
these should be 32. If we hit Z and go to wireframe, which should be able to see
that they're pretty much similar resolutions now
and they are, That's good. All right, let's hit Z,
go back to Solid mode. Now that we've got these
the way we want them, let's convert them and
join them together. So I'll take this
one and this one. And let's press Control
J to join them. Let's hit F2 to give it a name. Let's call this spoke large. And then back here, this and this control J. Let's press F2 and we'll
call this spoke small. All right, Now we
have our two spokes. But from here we've
gotta figure out how to create all of these around
the outside of the hub cap. So in the next video, what we'll do is we will
use the array modifier to fairly quickly create all the spokes all
the way around.
42. Finishing the Spokes: Now let's see if we can create the spokes all the way
around the hub cap here. So to do that, we're going to need to
do a few things like move the origin of this object. And also we're going to
need to create an empty. And an empty is an object
that just has no surface, has no width or depth. It's just a single
point. That's all it is. It's empty of anything else
except that single point. And we're going to
need to do that. We're going to need to create
an empty writing here. And to do that, Let's move the 3D cursor to this
point with shift S2. Alright, so I've just
selected the hub cap and then brought that cursor
into the center of it. With that 3D cursor there, let's also take the origins of these objects and
put them in here. So I'm gonna come up here
to object set origin, origin to 3D cursor. And let's do the same
with the small one here. Set origin to 3D cursor. Okay, so we have these here. So when we rotate this
in the x-axis, our AKS, you can see you would go
around that point right there. Okay, So now that we've
got that in place, let's create an empty and it will come in where
that 3D cursor is. So I'll press Shift a empty. And we've got a lot of
different ones here. Let's just do a plain axes here. Alright, so there is our single point right
there, and that's it. That's, that's all
that object is. So let's give it a name. I'll press F2 and let's call
this spoke large array. And this is just a
temporary thing. We're going to delete
these when we're done. But I just need to know
which is which because I'm going to do this for
each one of the spokes. Now let's take that object there and let's hit the End key. And we currently have
values in the rotation. The scale is uniform, but I think I wanna go ahead
and apply that as well. So I'm going to press Control a and apply the rotation
and the scale. And then actually I'm going
to close this window. Let me join this here and then drag that up a bit so
we have more room over here. So now with this selected, I'll go to the modifiers panel
and add an array modifier. Now you can see what it's done. It's given us a duplicate
of this in the x axis. You can see the X factor here. If I click and drag, we can take this out
closer and farther there. In addition, I can increase the count and it will add
more and more to that. But I don't really
wanna do any of that. I don't want to have
a relative offset. I went to have an
offset with an object, with that empty object
that spoke large array. So I'm just going to click on the eyedropper and
then hover over that. And you can hover over it
over here too in the 3D view. But if we click on that, what we can do is select that
empty object and rotate it. So I'm going to hit
the three key to go to the right
orthographic view. And now if I just hit
the R key and rotate it, look at what happens
to our spoke. So now our, how many do we have? Let me go back
over to our array. We have a count of nine, so this is how many that's being created from that
original object, the number of duplicates. So I think I want 12
all the way around. Yeah, it looks
like there are 12. So let's for our
count, Let's put 11. So let's go back and
select that, empty it r. And here we go. We can just bring
this out like this. All the way to about, I'm about right there. I'm going to hold
the Shift key down. And that looks pretty
good right there, right? I think that's okay. All right. So let's go with that
for the large spokes. And then if we select
that small spoke, I think I want to turn
it just a bit like this. It looks like these are
in-between each other. Well, the way it is here, the small one is up at 12
o'clock here, but that's okay. I'm going to just move it over to the side here like that. And then we need to do the
same thing for this objects. So let's at the 3D cursor, create a new empty object with
Shift a empty plane axes. Let's call this
spoke small array. And then we want to add
an array modifier to this small spoke add modifier array. We want to turn off
relative offset. We want to apply the
rotation and scale, right? So let's do that, control
a rotation and scale. And then we want to come
down here to Object Offset. Click on the I dropped her and spoke small array right there. Now if we select that, let's turn it and
see what happens. And we'll hit the R key. And here we go. Well, we've only got one, right? Let's come back
over here and let's increase this count to 11. And there we go. Now
let's go back to that array, that small spoke, small array, empty object, and we'll hit R. And let's
see, we can do here. So I think it should probably
go right about there. All right, let's see. I'm going to hide the empty
objects here and here. And then I'll move the cursor back to the center of
the grid with shift S1. And there we go.
What do you think? Yeah, that's not
too bad actually. Yeah, I think that'll
work pretty well. So well let's do now is let's
take each one of these. Let's apply the array modifier. Let's join these together and then let's
duplicate the tire and wheels to the other wheel wells here just to see how
it's going to look, just to get a sense of it. So let's apply the
array modifier. But actually, before we do now, Let's think about converting
these two polygons. Because if we don't convert
these two polygons, then we're not going to be
able to join them together with the polygon hub cap, right? So let's do that first. So let's select
this right-click, convert to a mesh. And there we go. Now if we tab into edit mode, we can see there are
polygons and what it did, It went ahead and applied
that array modifier so we could convert
all of these at once. Now, we could, if we wanted
to take this modifier away, convert it to a mesh, and then reapply the modifier. But I don't know that there's
any real reason to do that. So this one here, Let's just once again, right-click convert to a mesh
that'll apply the array. And all of these
are now polygons. So let's take these, these Shift-click the
hubcaps Control J. And there we go. Now that's all an
object called hub cap, and that's in our Nash
Healy collection. Now let's take a
look at the wheel. The wheel has a subdivision
surface modifier. That's fine. And it has a mirror modifier. We really don't need a mirror
on it right now, do we? So let's just take that off. I'll just click the X and
we don't really need that. We'll build something in here when the time
comes for that. So now we've got these two objects with subdivision surface
modifiers on them. So let's take the wheel. Well, let's take the hub cap and the wheel and join them
together. Control J. And we'll just call
that, we'll write. And then at least
temporarily for now, I'm going to go ahead and
apply a mirror and add a subdivision surface
modifier to the tire just to see because I just want to
see how it's going to look. Ultimately, we may
not keep that, but let me just apply this. And then I'll add a
subdivision surface modifier. Yeah, That looks fine. And let's then add the wheel
to the tire Control J, and now it's an
object called tire. All right, so there we go. I'm going to move the origin to the center of the geometry. And there we go. Okay, Now, let's move these into place. As I said, we may not end up having all this joined together, but I just want to see
how it's going to look. And it's just
easier to duplicate and move when it's
all one object. So Shift D y. Let's move this over
here. There we go. And then what we could
do is take, well, we can take either of these
and mirror these over. So maybe what I'll do
is just take this one, move the origin
to the 3D cursor. Press shift D, Enter, Control M, hit the
X key and enter. And there we go. That notes over here. Now I'll move that object, origin back to the geometry Control 1 to go to
the other side. And I'll just press
shift D Y and we'll just move this back just to
see how it's going to look. Alright. There we go. Now we're getting there. Yeah, that looks kinda cool. I just wanted to see it. You know, at some point, damn, you want to begin to be able to see how things are
going to look. So we're getting there. All right, well, I think in the next section when I'd like to do is begin working
on the interior. And we're going to need to build some foundational
pieces in there. The seats, the dash,
things like that. And of course, the
interior of the doors, the floor, all of that. So in the next section
of the course, Let's begin working on that.
43. Modeling the Cab Trim: Now I did want to
mention that we will be creating the tire
treads for the tires, but we're going to be doing
that later in the project. We'll actually build one
of the treads and then use that array modifier again to wrap them all the
way around the tire, but for the interior. Now, let's create that rim
around the opening here. If we go in and look at
our reference images, you'll see that we've got here. Let's take a look at this one. I'm going to press
Control Spacebar. And you see we've got
this kind of padded rim around the shape of
the interior here. So let's go ahead
and work on that. And I think a path would probably be the way
to go for this. We can create a path of the same shape here
and then expanded out, expand the geometry out to get this kind of
circular feel to it. So let's work on that. What Let's do is let's hide let's hide the
windshield here, the frame, the weather
stripping, and the windshield. And let's just hit the
H key to hide those. And then let's see
from the top view, we could take a path and draw the shape around
the opening here. Let's try that. So what
I'll do is I'll just press Shift a curve and path. And then let's scale
this down quite a bit. Maybe something like this. I'll move it down to about
here where this is here, I'll press Alt Z and
let's tab into edit mode. And then just going to
take these two away. I'll delete vertices and let's then add a mirror
modifier to this. I'll come over here to add modifier mirror.
And there we go. So now if we tab into edit mode, we've got these points. We can see the path on
the other side, right? We can see that. So we can kind of see when we're getting to
the right points, right place as we
extrude this out. So now with this selected, let's hit E and
pull out like that. And I'm keeping an eye
over here as well. And then let's hit E
and come over to here. Maybe right about there. I'll put one there, one there, and one here. And then we could grab these and begin moving these out
just a bit, right? We can just kind of
get these in place. And then let's
select this again, hit E and move this
out like that. We could bring this, we could bring it right to here. Let's try that. And then
we need this curve here. So I'm going to hit E, E again and again and
again like that. And then we can select these
and begin trying to get this curve to match up
with that shape here. Kind of like that. And
now we hit E for that. E. And I'll hit one more here. Oh, and we don't have
clipping turned on. Let's do that. Let's come over here, turn on clipping in the mirror modifier, and then we should
be able to hit G. And now they clipped
together, there we go. All right, so we've got this
basic shape. That's good. But the problem is, is we've only done
it in one dimension. So we're going to
have to come over here and bring this up off
the grid floor, right? So let's tab into edit mode. Hit the a key and
let's bring this up. And I'll bring it
up to maybe right about here and try that. And then what we can do is
take these and I'll bring this down to here because we want to go on the
inside of the door here. So then we can take these and
bring these up like this. All right, about like this. And then I'll grab these and I'm just going to bring
these up to right here. And do the same with these. Same with these. Right? So I'm just
bringing each few up a little bit farther and
maybe something like this. Let's try this. Yeah, I like it like that. Okay, so we've got that. Now let's work on
this area over here. So I'll select these and
bring these up into here. And these up then like that. And let's see where do
we go here we go these. And just keep bringing him on
up to get that basic shape. Now we're going to
have to go through and do a bit of adjusting, of course, but this will
at least get us close. All right, so let's now begin
getting these in place. Let's tap back into object
mode and take a look at it. All z. So now as we tumble around, we can kinda see how
we're doing here. This doesn't look too bad here. I could maybe bring these
out just a little bit. Let me get the seven key again. We can maybe bring these out
just a little bit like this. And yeah, I think
that's pretty good. All right. Let's tumble around and see how we how we are doing
here. All right. I think that's pretty good. That looks pretty tight, pretty close to what we
want all the way around. So now we just have to do our same trick that we've
done before is just use the bevel section here in the object data
properties of that path. So we scroll down here and
under bevel we can then click and drag in the
depth field like this. And let's see how far, how big we want this. I'm thinking kind of like
this. Let's take a look at it. Yeah. So now the nice thing
about this is we can come through and we can begin
adjusting these as needed. So if we want to pull
some of these down a bit, we can, we can do that. All right, and let's see, we can come over here. Actually, this all
looks pretty good. It really doesn't look too bad. Okay? So since we've got that, let's just say we've got
it to where we want it. Now what Let's do is convert
it to a mesh and maybe we can add some of these
pieces on like this. So let's select it. And let's hit the
Z key and go to wireframe so we can
see the resolution. And it's once again
got a lot of polygons, or it would have a lot of
polygons if we converted it. Now, let's take this resolution
preview down to three. That's worked pretty
well for us so far. And down under the
bevel section, let's take this down to two. Let's do that. Now
let's go back. I'll hit Z, go back to solid. Let's take a look and
see what we think. Yeah, that's actually
that's not bad. We I think I can live with that. I'm going to take these down
just a little bit like that. Okay. And maybe back a bit, Let's see. Maybe just back a
little bit like this. Okay. Now what we can do is go
ahead and convert it. I'll right-click and
choose Convert to a mesh. And then if we tab into
edit mode, there we go. Okay, so now we've got
these, That's good. Let's work on this
guy right here. If I look at it to see if I, let's go to the top view
and take a look at it in, it looks to be like
maybe these in here. Let's take a look. I'll Alt
click between two faces here. Yeah, and it looks like it should be a little
bit wider than that. So I think what I'm gonna do is select the faces on either side. So I'm going to
press Control and the plus key on the numpad
to expand the selection. And then I'm going to
press shift D Enter. And let's split this off as its own object and press
the P key Separate by selection. And there we go. So now we have that. Now before we do anything, let's take these edges here
and let's bring these. And I'm going to hit
G two times and bring these in a bit like that. And I feel like this one could come in a
little bit like that. So I just felt that it was
a little bit wider than that initial collection
of polygons. Alright, so let's
now expand that a bit or even use the
solidify modifier. We could do that. Actually what I'll
do is I'll expand it with Alt S. Alt S, remember that's the
shrink fatten tool. And then bring it
out about like this. And then let's go back
to the modifiers panel. And let's add a
solidify modifier. And then we can click
and drag in here and expand that so we get a little
bit of thickness there. I'll click even thickness. Let's take a look at
it. It's a little ugly. We could come down here to our object data properties
turn on auto smooth and then drag that up
from 32 or like 50 or so. And I think ultimately
we will probably add a subdivision surface
modifier to that. But if I come back over here, we could add a mirror to it. Let's try that mirror. And there it is over
on the other side. All right, so we've got
the beginnings of this trim around the interior. In the next video, we'll maybe work on these
little pieces here. And let's also begin working
on the seats as well. So that's coming up next.
44. Beginning the Seats: Now let's see if we can create the seats for the interior here. I think we're going to probably
need another window here. Let's open a new one
and go to Image Editor. And let's find in our reference photos another
image for this seats. How about this one here? Let's take a look at this. I'll press Control Spacebar. And yeah, so I
think what we'll do is we'll probably create the
back here and the bottom, and we'll maybe add a
couple of these trim items. I'm not sure about
the center arm rest. I'm not sure we need that. But I think we can
do this curve here. Some of the trim and the
basic shape of the seeds. So let's give that a try. I'm going to press
Control Spacebar again. And so let's, I guess begin first of
all with the backseat. Let's do that. I'll press Shift a mesh cube
and let's scale this down. Bring it back into, why
bring it up into z. And I just want to get it
generally in shape here. Sy. Bringing this forward a bit, I think we better cut it
down the middle so we can use a mirror modifier
while we're doing this. So let's tab into edit
mode and press Control R. And I'm just going to
hit Enter two times to ensure that it goes
right down the center. And I'll switch to face
mode and all z for X-ray. And let's just delete
these faces here. And let's add a mirror
modifier right over here. And we'll turn on clipping, and I'll turn on the
cage here. Okay? So now that we've done that, we should be able to grab points and move
them around as we need. So let's say we grab these
points here and move these over to about yeah, it looks like it's
to about here. I'm just going to bring
that out like that. We could bring this
forward a bit. We can take this bottom edge down here and lean it forward a bit like that because
it looks like it's kind of leaning
forward there. We could maybe take these
and lead them back a bit. Let's go to the side view
here and take a look here. Yeah, So we could
lean these back a bit and these could
come up a bit to maybe we should press Control R and add an edge loop right down the center here. And then we could
take these points up top, here and here. And maybe move them up just
a little bit like this. So we're just trying to get
that basic shape is all. Let me move that
up. Some like this. I think we'll see where the bottom of the
seat needs to go here. All right. So at
this point in time, I think we should add a subdivision
surface modifier and just see how it's going to look. Let's do that. And then I'll
increase this to two. And I'll right-click and
choose Shade Smooth. And then let's now add
some edge loops like here. And I'll bring this up some. And we'll do that again
and take this down and maybe one vertically and
move this over like this. And then we're going
to need some in here to pull this back. So let's pull that
back a little bit. I'll click that and
pull this back. So I'm just now with the
subdivision surface modifier on going to try and
move some points around to get it
the way we want. So maybe these points in here could come forward
just a bit like this. Let's see. Yeah, looks like we've got kind of a curve there. I'll go ahead and
turn the Cajon now. And let's see what we have here. All right, We're getting there. I think I'd like to move these points out just a bit
here in the center like this. Alright? And it looks like we need
to bring things up a bit. Let me look at that
side view again. Yeah, we could maybe
bring these up. I'll Control click that
to connect those points. And let's move this up a bit. And maybe let's grab this
and move this up and back. So it kind of closes
that off a bit. Let's take a look here. Okay, I'll press Alt Z. We might want to
bring these back. Now let's take a look. So maybe bring these
back a little bit. And I'm just going
to select that one, control-click that to select that edge and bring
those back just a bit. Let's take a look now
from the side again. Yes, so I just want to get
that basic shape there. So I think we're good there. And let's see, what
else do we need here? I feel like they kind of bend in here for each of the seats. So for each of the
places where people sit. So maybe we could take this and kind of move it forward a bit. And maybe take these, I'll take this and
this down here. And let's move these back
just a bit like that. So I'm just using the
subdivision surface to pull and push areas to kinda
get that basic shape here. I think we're doing pretty good. Let me, I feel like I
might want to pull these back a little bit
more like that. Maybe a little too much. You never know. You gotta try it. All right. I think this is pretty good. I feel like though, that this
whole area right in here could come forward just a bit
like that. Let's try that. And then let's try and get
the bottom seat in here. Let's begin with a new cube. And let's scale it down and kinda put
it in place as well. I'll press S and Z and kind
of scale that down like that. I'm trying to keep it
in the center here until I add a mirror modifier. See how it's doing here. Okay, now let's go ahead
and go to the top view, see where we are. Yes. So this I think is about where that seat should
be. Let's do that. Let's tab into edit mode
and once again press Control R and drop an edge
loop right down the center. I'll press Enter to times there. Then let's delete this
part of the cube, delete faces, and then we'll
add a mirror modifier. Turn on clipping. And here we go.
Okay, so now let's grab this face here
and pull this out. And then let's add that
subdivision surface modifier. And once again go through
the process of just trying to get the basic
shape of the object. So let's add a
subdivision surface and take it up two,
I'll smooth it. And while the cage is off, Let's go ahead and add
some edge loops here. And add one down here. And of course we could turn off or excuse me, hide the car. We could do that for now. And let's get this in
the proper groups. So this end this. Oh, we should name these. Well, okay, let me call this cab trim and this right here. Ok. Just call it. Well, I don't really
know what that is. Kab trim ring, but I don't really know
what it is right now. I just want to get
them named and into that Nash Healy collection
so we can hide that. Alright, and then it
looks like we need an edge right along in
here to pull this back. It's got that little area that's curved for the gear shift. So let's see what we
can do with that. Let's grab these. And I'm just going to
bring this back like that. And we go, let's try that. Okay, and then we could take this and add another one here. We could try that. I feel like that's too far. Let's take these here and pull them back forward just a little bit like
that. And there we go. Okay. We might be able to pull
these in just a bit. Yeah, something like that. It almost looks like
the bottom here. Like this edge right here. And this edge could go back
a bit like this, right? It almost looks like we've
got kind of that here. We can take this edge, we can move it up a bit. Maybe this edge and
move it up a bit. We could add an edge
through the center here and maybe take these and move
these up a bit like this. Okay. All right. So that's kind of the basic
shape of the seats here. I feel like these could come
this could come up a bit. I'm just going to move
this up, see what happens. Maybe up and in like that. Alright, so now
that we have this, feel like we can
go through and add some of this piping here. So it looks a little
bit more like this. Maybe we could give that
a try with the Path Tool, the shrink wrap tool, and see what we can
come up with seedling, get anything that looks
somewhat similar to this. So let's work on that
in the next video.
45. Continuing the Seats: Now let's try and add some
of that typing on here. This is, this can be kinda
fun or it can be kind of tedious depending on
what you think is fun. I guess I'm going to
turn off the car here. And I'm going to press Shift
a and go to curve and path. And I will take this and I'll scale it down
quite a bit like this. And I'll bring it
back, kinda this back. I'm going to work on the
one in the back here, on the back of the seat here. And in fact, now that I'm looking at this
before I do this, I just feel like
this part right here isn't quite right
on our seat here. So I'm going to take, well no, I think I'll add an
edge loop here like this. And then that'll allow us to kinda pull that out just a bit. Maybe pull this one out, and maybe this one as well. So I just want to get
that kind of curve there. Something a little
bit closer to that. There we go. And also now that I look at it, I feel like this needs
to come down some. So this edge back here. And let's yeah, let's do that. I feel like this needs
to come down like that. Like it's angled just
a bit like that. And I'm like and then
maybe this one as well. I'll bring this down just a bit. So once again,
just continuing to do to make adjustments as we go. All right, so now
let's go back to that. And I will from
the top view here, maybe delete these two
vertices to lead vertices. And then let's add a mirror
modifier to this as well. I'll turn on clipping. And now at this point, let's go ahead and shrink
wrap it to that seat. So once again, let's add
a shrink wrap modifier. Use the eyedropper
to select that seat. And then let's also turn
this on right here. This will allow us
to have the piping be rounded instead of
flat against the seat. So I'm just going to
turn that on there. Now we can do is go back to our object
data properties here. And recall that we've got all these settings in
the path properties. So I'm just going
to bring these up a bit so we can see this. And if I recall, we had this at three, right? The resolution preview and
the bevel, we had two. And then I'll click
and drag on this. And that's not doing it here. So let's take this mirror
and drag it down below. And there we go. Now it's
giving us that tube there. So let's go back to our data properties and
let's go to bevel inlets. Hold the Shift key as we
click and drag in here. And I'll take that down
quite a bit like that. Let's go with 0.03 for now. So now that we've got that, we can take these and
begin extruding them out. So if I hit E x, I can begin bringing
these out like this. E x and they're going to
shrink wrap to that seat. Ex, I'm just going to continue pulling out
like this and it looks like we're going in the
wrong direction, doesn't it? So from here, we can
pull out a little bit. Let's see how looking here. I can take all of these and
drag them up like this. I could take some of
these and pull them down. So we're just going
to try and get these generally in place. And I will go ahead and hit E one more time and move
this out like that. Yeah, we may not be able to get that right on
the edge there yet. Maybe bring that down like that. So I'm really just
looking at the piping and not so much the
points in edit mode. Let's take this down
a bit like that. How are we doing here? This one right here is
a little problematic. Let me pull that down a bit. There we go. Alright, so
we've got that one there. That's not bad. Let's work on the ones
on the side here. Let's press shift a curve path. Let's bring it up. We should turn it
in the y RY 900. And let's bring it over
here and scale it way down. And we go and bring it up here and get it in
line with this. And I'll bring it down. I'll bring it down
to about right here. And let's see how this works. So once again, we have
these points here. I'm just going to go back to the modifiers panel for this
add modifier shrink wrap. And then with the eye
dropper, select the seat. And now let's see what
we can do with this. So I think what I'll
do first of all, it's just kinda turn it and
get it inline with this. So it's a little bit closer. There we go. Now as we take these, we can hit E and move
these up like this. And we can hit E, e, E and move these on up around
like this. And there we go. Now it isn't looking too good
on the surface right now. But if we come back to our
object data properties, and we increase the
devil just a bit. And we're going to have to change our resolution down here. Recall it's two down
here and three up here. And then we need to turn
this on right here. We go. That's a lot better. All right, we have it
inside the surface there. So what Let's do is
let's adjust our offset. Let's click and drag
and the offset and see if we can pull that out
just a bit like that. Yeah, that helps. All right. Now come down here and
let's extend this down. So I'll go back to the
side view and hit E and E and just begin pulling these down here as well like that. Okay? Now what let's do. Here we go, we can
move those over. Now let's get these here on
the edges and in the center. We also have one going
right down here, so we need to deal with that. Now. Don't wait. All right, Let's
tab into edit mode. And let's see if we
can find a point or an edge that will
allow us to do this. If we press Control R, we could add an edge
here and then maybe hit G two times
and pull this in. And let's take this and
move it back out to here. I need to pull these back so they're more straight like that. All right. And then what I'm
going to do is take, well, I'll take this edge
or this point and on back to this point
here, control-click those. And let's bevel this. We can press Control B and pull out just a
little bit like that. And then let's scroll
the mouse wheel just one time to add
an edge in there. And then it looks like I'm
going to need to move these. I'll hit G to move
these back a bit. So I just want this to
be more straight is all. And this one right here, well, I'm gonna go here. The center, this one
needs to go down. So I'm just going
to push this down a bit and see what happens. What does that do for us? Well, it's not bad actually. Okay. Let me take this and
move it forward just a bit. That and then we can place one of our
piping strips in here. Feel like I want
another edge in here. Let's just see and then
pull it up sum so we get that kind of roundedness there. And let's see how that works. That's not bad. I'm going to pull this
back some like that. Yeah, So we've got that
roundedness up front. And then we've got this
that we want to drop one of those paths
into there as well. So if you press shift a curve
path and we bring this up, Let's put this in here. Scale it down. I will scale it down like this
because I think I want to once again merit delete
these like that, add a mirror, and then let's
move it down to about here. We'll add a shrink wrap. Use the eye dropper, drop it onto there. Let's turn this on. We need to move that
mirror down below right? And then let's go back to our object data properties
three and here to here. And let's type in 0.03 in
here and see how we're doing. Yeah, okay, so I'll
tab into edit mode, hit the a key and
let's pull this. Oh, it's gonna be, it's
gonna be like that. So it's going to be a little difficult to
get that in there. There we go. Just had to
bring it down in the z axis. All right, so then let's take this and
begin extruding out. So let's hit E and X and I'm just going
to pull out like this. Like this. It looks
like we don't Yeah, we do need to go all
the way. Don't wait. So let me bring
this in like that. Let's hit E and X and bringing
this to sound like that. All, let's see how
we're doing here. Yeah, that's not bad. We've got that in that groove there. And I do need to
mention that a lot of this adjusting we're
doing here can be done in the final stages when we've converted all
the polygons, right? So we don't need to do all of it exactly like I don't have
these two exactly touching. That's because I can
wait until we have this converted to polygons to
actually connect those up. Alright, so what I'll do now is maybe these in the center here, this, this and this. So let's press shift a
curve path, bring it up. Oops, bring it up in the z. Let's do that. Turn it on 900. I'll scale it down quite a bit. And then let's put
these in place. Maybe there needs to be one
right in here, I think. Let's look at that. And let's bring this down. Maybe right in here. So it looks like we'll also
need one up here as well. But for now we can take
this and just mirror it to the other side and then duplicate it and put
it in the center. So let's try that. I'm going to, first of all shrink wrap it. Turn this on, use the
eyedropper to select the seat. Let's go back to the object data properties and set up our settings
in here with 32. And I'll 0.03 into here. And then let's see
how we're doing here. I'll tab into edit mode,
select all of these, and let's move these
back a bit like that. I could take this forward sum. And we're going to
have that issue that it's gonna kinda want to jump to the other part of
the mesh and that's fine. Once again, we can adjust
that once it's two polygons. Yeah, so it's just going
to jump here like that. And that's fine.
We'll deal with that. Let's take this and I'll
go to the side view and let's just select everything
and I'll turn it like this. So it's a little bit more in
line with what we want here. Like that. Now I'll
bring this back. Yeah, that's still going
to jump and that's fine. I'll get back to here. Let's take this one on back. There we go. Alright,
so now we've got this. Once again, we're
going to pull this to connect when we convert
it to polygons. But let's take this, move the origin to 3D cursor
in the center of the grid. Then we're going to add
a mirror modifier here. And it's way out here. And the problem is, we've got a 90 degree
turn in the z. So let's press Control a and apply the rotation. And
there it is over there. Now we should be able to
take this, duplicate it, shift D, enter tab into
edit mode to get the a key. And we slide this
over like this. And then we can take
these and move them back. I try and move it forward, but it's probably just going to snap like that and that's fine. We could also take these
up a bit if we wanted. Try that. Let's
see what happens. Or we could also try our offset
here in the shrink-wrap, we could click and
drag on the offset and bring that up just a
little bit like that. Alright, I'll pop these back. So there are those now. All right, so we're
getting there. We could go ahead and
mirror this one as well. I'll do that. Let's move that origin
first, set origin, origin to 3D cursor, and then add a mirror modifier. There it is down there. Let's press Control a and apply the rotation.
And there we go. So in the next video
I'll add these. And then we'll begin
seeing what we can do to finalize the seats
and get him in the car.
46. Continuing the Seats: Well, for the front
part of the trim, the trim on the front part
of the seed, I should say, right up here and
right along here. Let's go to the top view and let's just
create a new path, shift a curve path. And I think what I'm gonna do this time is actually scale this down and then move
it over here and we'll add a mirror
modifier to this. And then we'll have them
meet in the middle. Let me go to the front view
here and let's bring this up. Maybe to about right here. Alright, let's try that. And then I will go ahead and add a shrink wrap modifier here. Click on the eyedropper, click on the seat,
and there we go. Now let's tab into edit mode
and here are our points. So what Let's do is from here, let's add a mirror
modifier here. And I'll turn on clipping. And then we hit E and
begin moving this way. We should be able to have them
meet up on the other side. However, take a look at this. My origin is here at the
center of the object, and so it's mirroring
the opposite direction. What we need to do
is of course move this origin into the
center of the grid. That's because I moved that
up and over in object mode, if I would've hit the tab key and moved it up and
over in edit mode, that origin would've
stayed at the 3D cursor. Let's come up here to
object set origin, origin to 3D cursor. And now you can see it's
over here on the other side. Alright, now let's go
back to that top view. And let's keep hitting
E and move these around until they
come in contact. Right here. There we go. Okay, so now we've got that. Let's move it on around
this side as well. I'll just hit E and move
these around like this. I think I'll go all the way, all the way back like this. We go. Now I can maybe move these down. Let's take a look at this. I'm gonna hit a and
move these down a bit. Let's try that. Let's try that. Then. Let's give it some geometry. So it's that tube shape. Again. I'll go back to the
object data properties. And in this once again, let's put three here. Let's put two in the
resolution under the bevel section and then in the depth list type 0.03
and see what we get. And it's flat against that. Let's see what the problem is. Let's go over to the
modifiers panel. Well, the mirror
is on the bottom, but I didn't turn
this on right here. That apply on spine,
so let's do that. Okay, now we've got
that as a tube, but we may need to use the offset to pull
these out just a bit. Let's then use the offset here and pull out
just a little bit. I'm holding the Shift key down
as I click and drag that. All right, let's
take a look at it. Yeah, actually,
that's not too bad. I think I would like to
move these down out here. It travels down like this. And to do that, maybe
what we should do is just move the 3D cursor to here, shift S2, and then grab all of, grab all of these, I should say here. And then let's change our
pivot point to the 3D cursor. And now when we hit the R key, we can rotate these down
from that point like this. Maybe we want it to
be about like that. And maybe I'll drag this
down just a bit like that. Let's see how this works. Yeah, that seems to work
a little bit better. All right. So we've got
that, you know what? I'm not going to change these two polygons
until the very end of the process because
I want to be able to adjust this if needed
going forward. And it's going to
really bother me. If these are, are like this. What I'm gonna do, let me change back to
median point here. And I'm going to
tab into edit mode. And I'm gonna try and get
these a little bit closer because honestly it's
just gonna bother me. Let's, let's take this point. Let's hit E and y. And I'm going to bring
this forward and I know it's popping like that, but let's let's try and
fix this a little bit. I think if I moved
it down a bit, if I move it down
and then again, Let's move this forward
and move it down. I just feel like I can
do a little bit better. Maybe. Let me see how
we're doing up here. Feel like I can get it
just a little bit closer. I know it's not
that big of a deal, but it's going to
drive me crazy. There we go. Look at that. I just felt like that
would be driving me crazy if I couldn't get that connected
at least a little bit. Let me try this one down here. I'm gonna hit bx
and pull this out. And that's not going in
the right direction as it. So I'm gonna pull
it down in the z. There we go. I'm going to hit E and
pull it down in the z, a little bit more like that. All right. Let's see how that works. Yeah. So I just wanted to get it pulled down just
a little bit more. And so they'll connect. And this one real quick. Let's do this one. I'm determined to get to e. And then I'm gonna take
this and let's move this down, this down. And I'm gonna hit one more
time and move this down. All right, Now let's get
the ones going vertically. Let's do that. I'm gonna bring the cursor back to the center
of the grid with shift S1. And let's press
shift a curve path. I'll turn it in
the y-axis, RY 90. Here in the front view. Let's scale it down. And I'm gonna go
ahead and tab into edit mode and then
hit the a key. So I'll keep that origin in
the center of the grid there. And let's just hit CHI
and move these over a bit and then move it back
to about where we want it. And I will turn it. So it's kind of in
the right angle here. Something like this. Maybe I'll scale
it up a bit too. There we go. Let's try that. Come up here to the
modifiers panel. Click on shrink wrap, click the eyedropper,
click the seat. Let's see how we're doing here. Now let's go back to the
object data properties. We will once again type in
32 in our resolution fields, and then I'll type in 0.03 here. Let's see how we're doing. Well, first of all, it's flat, so let's click on
this to turn that on. Second while I will just hit the S key and scale up a bit. Let's try that. I'll pull this down. We go and then maybe
Can I pull this out? No. Looks like we're gonna
need to probably have more resolution in
there. Let's try that. I'm going to bring this
up until it comes out. And then let's hit Easy
and pull down like that. Easy. I'm just trying to
get enough resolution to go around that curve. They're easy. Let's pull that down like that. All right, let's see
how we're doing. Let's add a mirror
modifier to it right here. Then let's apply the rotation, of course control a
rotation. And there we go. Now for these over here, Let's take these and
let's duplicate it. Shift Enter, Let's tab into edit mode and
select everything so that that origin
stays in the center while we're moving
things in edit mode. And I'll move these over here. And it's looking kind
of ugly, isn't it? Let's see what we can do.
I'm gonna bring this down. I feel like we should move the whole thing
over a bit to here. Let's try that. I could probably remove
these down here. Let's try that. Delete vertices. Then maybe we can
just drag this down. Let's see how that works. Not bad, but it's still
kind of hiding in there. Let's move it back
until it comes out. And then let's hit DZ, pull down, easy,
pull down again. Let's try that. There we go. Now we got to do a little
bit of work here. All right. There's that we have it mirrored over here
on the other side. That's pretty good. I think I think I'm gonna go with that. And as I said, I'm going
to leave it all as is until near the very end in case we need to
do any adjusting. Alright, well, in
the next video, let's see if we can
do anything with that center arm rest.
47. Finishing the Seats: Let us I said let's see
what we can come up with for that center arm rest. It doesn't need to be
something real elaborate, but let's press Shift a mesh cube and I'm going
to scale this way down. I'll move it up into place here. Let's go to the side view
SY and scale that in a bit. Let's put it in place. And then I'll add a subdivision
surface modifier to it. Let's turn it RX. I'm just going to
turn it like this. And then I'm gonna change from global to local
transform orientation. And I can move it in
like this and scale it, say sc, scale it like this. So it's a little bit closer to the size and shape
that we want here. What I'll do is bring
this in about like that. I'm going to bring
it out a little bit wider and a little bit
taller than we need, because when I add a subdivision surface modifier is going to shrink up a bit. And also let's add an
edge down the center. Then I'm going to get rid of
this side and add a mirror. And just because it's
gonna be easier to deal with as we're doing this. Here's a mirror here, clipping. And then I'm going to add a subdivision surface
modifier to it. Turn it up to to
right-click Shade Smooth, and then let's tab
into edit mode. Now we should be able to maybe, let's move this a
little bit like this. There we go. Then let's
add a few edges here. Let's see if we can get
this to look a little bit more like the thing
in the picture here. Like this. Let's take this whole thing and then begin working with it and
begin scaling it up, press S and Z and let's
move it up a bit. I'm just, I just want to kind of fake it just a little bit. I'm gonna move this
back so it's just not quite intersecting there. Still is. Let me bring that out. Actually what I can do is add
an edge loop around here. Let's do that and bring
it forward just a bit. There we go. Now want
to move it back. And then right about
here is where I want it. Let's see. Yeah, actually,
that's not terrible. Let me take this and I'm
going to move it down. So we get a little bit
more of a curve there. Oh, we're not getting
a curve up here is the problem because
of this edge. Let me move that back
just a bit. At least. We've got a little bit more
of a curve up there now. Then what I'll do is there's this thing
right across here. Let's just work on
that real quick. Maybe we could turn this on. We could take this edge. Let's try this. So if I press shift D, enter separate by selection
and then we have this object. Now, I'm gonna apply
the mirror here. Then I could bring this down
in the local axis like this. It's about like that. Then I can tab into
edit mode and lit. Well, let's move the cursor to the center of
the geometry here, set origin, origin to geometry. And I'm gonna go ahead and scale this up just a little
bit like this. And then let's press easy. Move that down. About like that. Then I can right-click
Shade Smooth. Oh, we got a problem there. Let's look at our
face orientation. And sure enough
there is a problem. Let's go to Mesh normals, recalculate outside.
There we go. Then let's just add a
solidify modifier to it. Solidify that. Now we can just
bring that in a bit. Okay? We can maybe scale in the y just a little like that. Look at that. We've got at least a hint of that
center arm rest. All right. Let's bring the car back. There we are. Let's bring back
that windshield. Here it is here. Yeah. Look at that. We've got
seats and that's not bad. Now, as I said, I'm going to leave
all this as is, which means we've
got a whole lot of objects here in the outliner
and it's kind of a mess. What I'd like to do is
just select all of those, put them in their
own collection, at least temporarily, until
we do get to the part where we apply the modifiers and combine everything into
one object for that seat. To do that, let's just select everything here in the outliner. I'm just holding the Control key and selecting everything. Then here in the 3D view, let's press the M
key in object mode, and let's move to collection,
a new collection. We'll call it seats. And let's click. Okay. Now all of those objects went into a new
collection called seats. Now we have them cleaned up. But we didn't have
to go through and rename every single
one, at least for now. Alright, there we go. We've got our seats. In the next video,
we'll begin working on the other parts
of the interior.
48. Beginning the Dashboard: Well, the next thing Let's
work on is, well, really, I guess it's just
the other big piece here in the interior
of the car and that's the dashboard or the console or whatever you
want to call it in here. Let's open up a new image here. Let's see what we can find. There's one here, there's
a white one here, and a red one here. So let's open up
two windows here. Let's open this one up. Then Let's actually
pull this down. And let's open this one up here. Let's grab that other one, the red one here. So let's do that. Okay,
so we have these two. Now, it looks to me
like it's just kind of a foundational piece really for all this other stuff on here. It's got little bumps here, but I don't know that I'm
gonna deal with those. We don't really see
those a whole lot here. I may just put those
little knobs on there and not worry about
the little bump out there. But I think what we need to
do is deal with this first. A lot of times what
I'll do is if I see something that's gonna
be difficult on an object, let me open this up here. I will usually begin with that. So if I just created a kind of a cube and added a subdivision
surface modifier to it, then tried to get these
cylindrical areas here, that would be very difficult. I'm not sure how I do that. So what I would do I think is begin with these
cylindrical areas, get these in place and then
expand out from there. Let's take a look at
that other one here. Let's press Control
spacebar here. And in addition,
take a look at this. Not only do we have these
cylindrical pieces here, but we have this
cylindrical opening here for the steering wheel. In fact, what I'm thinking is that we really
need to begin with three cylinders too large and one small and
build off from there. Let's see what we
can do with that. I will hide most of this car, although I think I want
to keep this trim. Think I want to keep this. I'd like to move it
out of the collection. It's in into the
scene collection. So with this selected, if I could press the M key and say move to Scene Collection. And here it is,
here I've moved it out of that collection here. Let's hide the
seats, hide the car. I'll bring back the
reference images for a moment because
I need to be able to see where that
steering wheel is from here. Let's create a circle. I was thinking a
cylinder before, but now I'm thinking a circle. Let's do that. Let's press Shift a mesh circle. And instead of 32 sides, Let's take this down to 16 here. Then let's turn it RX 90. And then let's go to
the back view here. You can see the
steering wheel here. So I'm just going to
scale this down and hit G and move it over into
here, somewhere in here. If I hit the seven key, we can see here's the
steering wheel here. Maybe like that. Then we'll move it back into where kind of underneath
that trim there. Then one Let's do
is just duplicate this shift D X and we'll
move it over here. Let me make sure it's kind
of where we wanted to be. Here's that one. Here's that one. Yeah. Maybe I'll move it over just
a little bit like that. Control one to view it here. All right, The difficulty is, is that when we take
a look at this, I tend to want to
look at these things, the Chrome rimmed dials here, and that's not what
we want to look at. We want to look at the
part that it's on, this bigger part here all
the way, all the way.
49. Finishing the Dashboard Base: Well, let's continue
working on the dash now. I'll hit the period key
on the numpad to zoom in. And I think what I'd like to do is hide this cab
Trim real quick. And let's extend this up
just a little bit more. I think maybe I'll take these and begin flattening
these lists. Just press SY 0 and
bring these down. And I'm using y because I'm in the local transform
orientation, I can switch this to global for now while we work on this. Now that I've done
that it's s z is 0. So I need to be sure
and remember that. And I'll go ahead and
flatten these as well. Right up here is Z. Let's bring these
down and then we can go ahead and
extend these ups. So why don't I take this whole row here and
let's extend it up. Let's hit Easy and
pull it up like this. Then I'll scale it
out Sx and we'll connect these up right
out here like this. I'll select this one
and this one M at last, and this one as well. Okay, so we've got that basic
shape now, that's good. But we should do now is go
ahead and extend it off to the passenger side
and over here as well. And we can see that
if we zoom in here, it begins here, halfway
up and extends over. So that's the kind of thing
I want to do with this. So I'm gonna take this point
and control-click this point and hit Control one to go to
the back orthographic view. And then I'll just hit E and X and drag this all the
way over like this. Then let's do the
same thing over here. Let's take this one,
control-click this. Let's hit Next and move
that over here like this. Now we have something that
looks kind of like this. And I think it looks to me like these could be up a
little bit higher, maybe. Like the top of this circle
touches that top trim. Let's hit the a
key and let's just pull this up about like that. Let me try that. And then
I can bring these back, I guess, bring these back here. Bring these back here like this. Now that we've got
that basic shape, we can work on this
part down here where there's just a little
bit of a ridge right here. Let's think about that now. It appears to me first of
all that we're going to need this little edge,
this little rim. If we press Alt and
click this edge, and I'll press Alt, Shift click here, and
I'll Shift click here. That'll select that
entire bottom edge. And if we extrude this back, pull it back just a little bit. And then I think
it kind of angles down just a little
bit like this. Then here's the tricky part. It kind of curves back as the cylinder goes in
towards the floor board there. So the question is, how should we deal with that? And it could be that we
just need to basically rotate from here and
then scale as well. Let's think about this. I think that may be the way to go. Let's press Alt
click again here. And I'm going to de-select
these points here. I think it's just a matter of rotating this and scaling
it down from this point. All right, so before
I select that, let's move to 3D cursor. To this point right here. I've selected this
point and this point, and that puts that pivot
point in the center there. I'm gonna move the 3D
cursor there with shift S2. Then what we can do is
press Alt click here. And I think I'd
better de-select, de-select this point
and de-select this. Now let's go to the side view, and let's change our pivot
point to the 3D cursor. And let's see if this works. I'll hit R and we'll pull back. Then we'll scale
in the Z sc like this, something like that. Let's try that. Okay, I
think we're getting there. This is a little bit
out of alignment here. I could Alt click and Alt Shift click these two and
maybe move them up. I'll get G2 times and slide them up a
little bit like that. So we've got that kind of angle now I think they
need to curve more. Let's go back to that side
view and press Alt Z. And let's see if we can get
these to curve a little more. So I'm just going to drag select this point
and move them in. Drag select this. I better change it back to
median point. Here we go. And move these in and move
these in and move these in. I'm just trying to
get that a little bit of a curve there. Let's see if this works. Okay. Now let's take a look at it. Yeah, I think that's okay. I don't think we
need these to be quite as angled as they are. All right, so now what
we could do is once again take this point
and control-click this. And once again we extruded out. Let me hide the cab
trim extruded out this way to get the bottom
part of the dashboard. So let's try that. Ex, pull it out. Then we could scale
these in the x Sx 0 to flatten them and then
bring it over here like that. Then we can take these
two points right back here and then hit the F key, and that'll fill that in. All right, Let's come over
here and do the same thing. Let's click this
control-click this, press Control one to
go to the back view. And then let's hit
EX, drag these out, press Enter to flatten those, and then we move that to there. Now we take these two points, hit the F key and fill those in. All right. Let's take a look. Let's turn on the cab trim. Yeah. I think we're going
to need to bring this part up a bit in here. We can do that. If we take this edge up here
and we extrude that up, Let's see what happens. Easy. And let's bring it up like this. And it looks like then we need to take the whole thing back. So I'll select everything
and edit mode here and just bring the whole
thing back switch just inside that trim there. Then we've got these little bits sticking up a little
too high so we could just begin bringing these down to fit them
around the trim there. Maybe I'll go to
the front view with the one key and then we can
bring these down like this. I'm gonna bring
this down and over, and I'll just begin
bringing these points down so they kind of hide
behind the trim here. This let's come over here
and do that same thing. That looks pretty good right
there. And let's try that. Now. I think we may need to add a
little bit of something in here that goes back In this part where the
steering wheel is. So maybe we select a point and control-click and then
come on down like this. Actually, I guess
when you come on down to this point here. Now let's go to the side view and let's see if we can just extrude this back in
line with this here. If we hit E, Let's just
pull straight back like this. Let's try that. That gives us that gives
us some information there that we can see if
we're at an angle like this. All right, Now let's add that subdivision
surface modifier and see what we can do with it. It's gonna be ugly. I warn you. Here we go. Alright, so let's see
what we can do with this. Alright, it is ugly. Yep. But what I'm gonna do is first
of all, press Control R. And let's bring an edge in here. And let's also bring
an edge in here. Let's smooth it here. Then to clean this area up, what we can do is go
to face mode and I'm gonna hit the three key
and then I'll press the C key to go
to circle select. And let's just select
these two areas. And then let's insert them. I'll press I for NSSet
and move in just a bit. Then let's do that again. I, i, and I'm gonna bring them
down pretty small like that. There we go. So that cleans that
up quite a bit. All right, so there's a little bit of a kind
of an artifact here. I don't know if that
would be alleviated by going to Object
Data Properties, normals and turning on
auto smooth a little bit. It helped just a tiny
bit but not a lot. That's something to keep an
eye on as we move forward. But it very well could be that once we get these
other pieces in, that's gonna be pretty minimal, especially with the
material on it. But generally speaking, that's about what we
want for our dashboard. Let's bring everything
else back and just see how it looks. I'll bring back the collection
and the seats collection. I think that could
work once we get the steering wheel and all the dials and
everything on there, that's probably
going to work pretty well on the sides here. I'm not going to
finish this off. I'm going to leave it kind
of In back because that's a really good way to get a sharp edge over here without
adding more edge loops. If I can get away with
that once we build in the side panels and the interior of the
door and the floor. If we can keep that like that, that would be pretty good. We can always add geometry to the side and then add edge
loops to hold that corner. But if we can get away with it as is,
then that'll be good. Let's take some of these
and bring these down. Just to get these below
the dashboard here. It looks like we've got a couple over here to that
we can deal with. So continuing with
the larger portions of the interior here, Let's now in the
next video work on the floor and the walls just
kind of blocking those in so we can close up the
interior before we begin working on the details
that's coming up next.
50. Adding the Interior Floor: Well, for the floor
of the car down here, these are pretty good pictures that we can use right here. Let's take a look at this. Let me zoom in. It looks like it's really just kind
of a center hump here, probably covering the
axial. I would imagine. We've got a panel over here. I'm not going to go for all of this detail like
the pocket here. I'm not gonna do that,
but I do want to get this bottom piece below
the door as well. Let's take a look
at this one here. Yeah, This piece
right down here. I'd like to get this, so
I'd like to get the floor, this panel and that
bottom piece there, and so we can close that off. Let's see if we
can do that or at least begin that process. I think for the floor, I'm just going to go
with a polygon plane. Then let's just scale it down. Let me hit the seven key
on the numpad and Alt Z. And I'll just scale this
down a bit like this. It's just inside here. And then let's move it up. It looks like it's just
kinda right in here. I think. Something like that. Let's take a look at that. I'm gonna go ahead
and split it or delete half and then
mirror it over. So we only have to do
things on one side. So I'll delete
this half and then let's add a mirror
modifier over here. And I'll turn on
clipping and the cage. And let's see if what
we need to do here. I'm going to pull
it forward a bit. Alright, Let's now grab
these and move these in. Let's take this
whole edge up here. Let's move it back to about
where we think it should be. I think it comes the term happens just in
front of the door. So let's bring it
up to about here. Then let's go to the
side view and Alt Z. And let's with that
edge selected, let's hit E and pull up. I'm thinking about
this and maybe I'll just pull straight
up like that too. We aren't going to really close this off at this point in time. Ultimately will put
an undercarriage on here that we'll
close it all off. But for now, I think we want to extrude this part right in
here, that center hump. So if we press Control R and add an
edge loop right in here. And then maybe just
extrude this up. I'm going to add an
edge loop right here. And then let's select these faces and let's
extrude these up like this. And then maybe just grab that edge and bring
it down like that. Let's see how that works. Then let's go ahead and add a subdivision surface
modifier to it. Here we go. I'll take the levels up to two. I'll turn on the cage. Let's go ahead and
right-click and Shade Smooth. And then let's see how it looks. It looks like it's a
little too curvy here. So let's add an edge
loop in here, somewhere. About in here. Something like that. I think that'll work. All right. I might take this edge and
move it up just a little bit. Maybe these two, I'll hit G
two times and slide them up. We go just to get
a little more of a gradual transition there. I also think maybe
this whole edge could come up some here. Let's try this. I just want to bring
that up and kind of rounded off
just a little bit. Maybe that's too much.
I don't know. Then. Well, actually
that's not too bad. But let me try and edge right in here and
see how that works. Yeah, that kind of tightened
that up just a little bit. Should it be a little higher? Well, it's take a face
here and kind of pull up. I'm gonna let me take these
two faces and pull up a bit. Let's try that. All right, yeah, let's go with that and then we can come down here and let's add some edges
to tighten all this up. I'll press Control R
and add one over here. The back looks pretty good, but I guess we could
kind of go like this. The seat coming through really doesn't matter
because as I said, we're gonna close
off the bottom, so I'm not worried about that. Maybe let's add an edge up here that we've got the basics
of that down there. Let's now take a look at
this panel right here. As I said, I don't
want too much, I just want something there
to close that area off. So let's press Shift a
mesh cube this time. And for this, I think
what I want to do, I think all I really need
are this face and this face. All right. I don't think
I need anything else. Just these two faces. So what I'm gonna do is
with these two selected, I'll press Control I to
invert the selection and then hit Delete and delete
faces. And there we go. So now we've got that beginning
shape for that panel. Let's take it down and
find a place for it here. I'll scale it down. Maybe I'll just grab that
edge there. Move it in. Let's see how we're doing here. Maybe I'll take it down to here, move it into here. Yeah. So that actually is not a bad
place for it right there. Now with this, I can
just take that edge, that top edge here, and let's just drag that up. Drag that up until we think
we're never gonna see it. Let's just take
this edge now and just drag that back like that. We've just got that basic shape there and that's
all we need so far. Let's add some edge loops, maybe three edge loops here. Then we can take some of this and begin
moving them forward, kind of curving
around that door. It seems like that's
what it does. There. Will just adjust
these edges here. This is going to have, this is gonna be a prevalence. And let's move this
back in Like that. Each of these maybe move
these back in just a smidge. Then let's go ahead and add a subdivision surface
modifier to it. Over here. I'll take that up to, to
turn on the cage, smooth it. Now let's add some edge loops. I'm going to add one up
here, one down here. We could add one in here and
kind of bring that forward. Add one in here. We're beginning to get that
basic little panel there. Maybe I'll tighten up those
edges just a little bit. Then let's mirror it
over to the other side. Let's take this, move the origin to the 3D cursor
in the center of the grid. Let's add a mirror. There we go, and let's see
how we're doing over here. All right, Do we have any
rotation or anything? No, we're good. Okay. It almost seems like we could
move these edges up a bit, say take these points here and move them
forward just a little. And maybe even knees. Now it almost looks
like we can take these and bring them out a bit. We had D's. We could bring them out
a little more. I bet. Let's look at these here. Let's bring those out a bit. Kind of like that.
Now, once again, we're gonna have to
take these down. We've got to take
these down over here. But I think that's okay. Now let's work on this little bit right
here underneath the door. And I think that's just
going to be another cube. I think I'm just
going to press Shift a mesh cube and let's just build it as a
piece on its own. Once again, I think all we need is this face and this face. So Control. I delete faces and then we just scale it down and bring
it in, put it in place. Then I'm just going
to scale it in the y, and then we're going to just
rotate it into place here. If I move this back out
to where we want it, then I'll hit RZ and rotate
it just a bit like this. Then with this piece here, it almost looks like almost looks like the floor
could come down a bit. Now, as you put in each piece, of course you're going
to discover new things. Let's try this and then I
will take this floor and bring it down just a
little bit like that. And with this we could
actually add an edge. I'm going to put an edge down the center so that when
I press Control R, I can put an edge horizontally a little easier
and I'm gonna bring that up. And I see this right here. We could maybe press Control B and bevel
this just a little bit. Then we could hit Extrude EAX and take that
in just a bit like that. So we've got just
a little bit of a separation between
those two parts. Then since we have
everything else with a subdivision
surface modifier, I'll go ahead and add one here. We can now smooth it and we can add a few
edge loops here. Then we should go ahead and add some edges to this because
it's looking a little ugly. I'm gonna add one here, one here, one here. We go. Just to kind of
clean that up a bit. Alright, so there we've
got that little bit. Let's mirror it over. Once again. Let's take this move, the cursor or the origin, I should say, to the 3D cursor. And let's mirror this over. And it's a little bit candid, so we have some rotation here. Let's press Control a
and apply the rotation. And there we go. Now we've got those
basic shapes in for the floor that front. I don't know what
you'd call that. That's not a quarter panel, that's interior panel in this little ridge
below the door. Now, let's do in the
next video is let's work on the interior
panel for the doors. So that's coming up next.
51. Modeling the Interior Door Panel: To create the
interior of the door, I think what we need
to do is probably just begin with the
polygon plane again. We probably only need the door. Let's select the door and
let's move it out into the scene collection
as well as hit em, select Scene Collection. And now it's out here. We can hide these if we want. Let's now press
Shift a mesh plane and we want to turn it so the front of the polygon
is facing this way. If I pressed our y 90, it would turn that way. And let's see if we turn
on face orientation. Yeah, that's the wrong way. So I guess we can just spin
it in a z. Let's do that. Rz, 1 eighth 0. There we go. Then we can hit the N key
and apply our rotation. Control, a rotation. There we go. Now, let's turn off face orientation and start
putting this in place. I will move it over
a bit like this, get it kinda just
inside that trim there. We may need to turn it a bit, so it follows that a
little bit better. But let's see, maybe I'll press RZ and turn it just
a little bit like this. Then. Well, let's hide the seats right now and the car
and the reference. And then we've still got
these things over here. So let's give this a name and put them into their
proper collection. So this is going to be,
I'm going to hit F2. I'm gonna call this,
I'll just call it floor. And then let's hit M and move it into the nationally group. Let's take this. I'll hit F2 and let's just
call this interior panel. We go select the collection
is supposed to go in. Then this one, F2 dashboard. We go nationally. Now the trim here, I'll leave out
because we may want to hide and unhide this. And then also the door. I'm going to turn off
the real-time display of the mirror modifier so we can see this
from the side view. I'll hide the cab trim. Here we go. So now what we need to do is get this in
the proper shape. So I'm going to press
Control three to come over here to the left
orthographic view. And then I'll tab
into edit mode, hit the one key, and now we can just
hit G and move these points around until they're approximately
in the right place. We're not going to get
them perfect quite yet. If ever. Let's get that in place. There. Here we go. Okay. Now that we've done that, we should probably move
this trim in this panel out because I think we're quite a bit farther out than we were. We can also turn
off the solidify. We don't need that
right now on the door. I'll just get rid of that. Let's do this. Let's
come over here and go back to the Nash collection. And I want to bring out
this and this right here. Let's bring these out. I'll hit M and bring them
out to the scene collection. Now we can hide this again here. Alright, so yeah, it looks like we're going
to need to bring these out because I had put them
way over here by the door. The door of course
has thickness. That makes sense. I'm going to tab into edit mode, hit the a key and just
bring this out like that. Then for this here we
need to bring this out. So it's just right under that. I'll hit the Tab key, hit the a key and
bring this out. Now we're going to need
to rotate it, aren't we? Rz. Let's turn it a bit. And it should go underneath
that, shouldn't it? Right in there. Let's try that. Rz. Turn it just a little
bit like that. I'll press Control three again. Let's select that. And now we can begin inserting some edge loops to build
this interior panel. I think what we're
going to need is some edges around the outside of the door because we're
going to want to extrude these little guys out right along here, that trim. Let's press Control R and
bring that up to here. Control R. Let's take
one to the back. One down here on the bottom, and one over here in
the front like that. So there we have faces that will allow us to extrude
those out just a bit. And for this opening, Let's see what we
can do with this. I'm going to press Control R and we can switch between
one side or the other. If we hit the E key and
then hit the F key, we can flip back and
forth between being parallel to the bottom
edge and the top edge. So I kinda want to be parallel to the bottom edge, I believe. Let's put that there. Let's press Control R and add one right in
here, like that. Then we need to add one up here. I'll hit E and we'll try and flip it
than that doesn't really do anything, That's fine. So I'll maybe drop
this right about here. Let's hit Control R and I'll put this maybe
right back here. And then if I just
take this point, I can hit G two times and slide this forward a bit like this. Now we could also
take these and hit G2 times and slide these
forward like that. We could try that. Now let's just take this face here and let's extrude it in, set it to get this kind
of rim around the edge. And actually I think I'll
take these two points here and let me hit G2 times
and slide them back a bit. There we go. And I'll take these and bring
them back like that. Okay, so now let's take this, Let's hit the I key
and NSAID that. Now we could go ahead and just extrude that out. Let's do that. E and I'll push it in like that. Then we should probably add
an edge loop right in here. Here we go. So we can take this face and go straight down. I think this, I think there's
like a pocket in there. Now let's extrude
these phases out. So I'm going to
press Alt and click between two of the faces. Alt, shift between two
all the way around there. And then let's do
the same thing here, Alt Shift and there. So now let's just
extrude this out. I'm going to hit E and pull them out just a little bit like this. There we go. Now we've got
those all the way around. And now let's try a subdivision surface modifier
and see how that works. Add modifier,
subdivision surface. It's ugly. We'll say it's smooth it. And now let's see what we can do if we add some
edge loops in here. Let's press Control R and add some in
here. And over here. How about up top? On the bottom here? Let's try that. Alright, and then this, let's see what we
can do with this. Let's put one in here. One in here. See if that helps. Not bad, but I think we'd
better put an edge in here and an edge in here. And let's see how
that works better. I'm about right here
and right here. Let's try that. Not too mad. There's still this little
thing right around in here. We might be able to
insert an edge loop in here and pull that back
just a bit like that. Let's try that. Yeah, that clean
that up quite a bit. So then there's this down here and that's kind of ugly so, well, we could add two edges right in here and
see if that helps. Helps a bit. Now we need to mold this
to the shape of the door. Let's bring back that trim. We go. Then this area here. We really ought to kind of mold this a little
bit better like this. Just grab some of
these and slowly and gently move these up like this. Now let's also mold this here. I think I could probably
take these and turn on the proportional editing
tool here unless press G and then scroll
the mouse wheel down here. We can expand these out
just a bit like this. Maybe we could do the
same thing down here. Maybe up here as well. Now let's take a look at if we need to adjust that panel now, let's bring everything back. Let's take a look at it. Yeah, we could take this panel and bring this
forward just a bit. Then we could do a little bit of adjusting around the
door here, like this. Little by little. As I said, as you add each piece, you're going to see what the previous ones needed
in terms of placement. Let me select the door, bring it back, turn
the mirror back on, and then I'm gonna select this. Move the cursor. I'll press Shift S1 to make sure that cursor is in the
center of the grid. And then move the origin of
the object to the 3D cursor. Then let's add a
mirror modifier. We go, do we have our rotation? We've got a little
bit of rotation. We better apply the
rotation there. Let me select it. Apply the rotation. There we go. All right. So we've got that in. I feel like the top trim
should come down a bit. That's something that we
could do at a later time. But I think we're
getting there at least we've got that closed in now. We do need to close in
the back behind the seed, and I think we're gonna
do that with this. We'll just extrude that
up and close that off. So you can't see through
any openings here. But yeah, I think that's
looking pretty good. I'm really interested to see
how this is going to look once we begin putting
our materials on them. I'm getting kind of
excited for that. So in the next video, Let's begin working on
our steering wheel.
52. Beginning the Steering Wheel: All right, let's work
on the steering wheel. I think this looks kind
of interesting, actually. This picture is pretty good. I think I'll leave
this one here, but let's open up
another picture. There's one here. I think this would
probably help us. Yeah, let's take a look at that. So where to begin on
this particular object? I think what I'll do is begin with the main
steering wheel part. And then we've got these pieces here that
are a little strips. We've got little strips and
they connect this little, I'm going to call
it an extrusion because that's what we'll
be doing in Blender. I'm gonna call
that an extrusion. And then we've got this
little piece here. And it's got like
here, it's brown. This brown piece that goes down to there and
here it's black. Actually let me press
Control Spacebar and let's zoom in here. There's the main circle. Here's that piece that those
little strips connect to. It looks like they're flat. In other words, they're not like leaning forward
and leaning back. So that's good. Then there's this piece
in front of that, and then this up here. So let's begin with this, see what we can get of this, and then we'll go to
this and then let's begin with the
largest piece first. Do we need to clean up our outliner here?
Let's take a look. Well, we probably should, just to keep things
organized, Let's do that. So this one here. What is that? That's the interior door panel on call that
interior door panel. There's that what is this here? That's that door strips. So let's call it let's call
it interior door strip. Okay. Then we could probably
just move all of these things into
nationally collection. Let's do that. That
helps clean that up. But what about all
of these things? Let's let's put these things in a collection so they
don't just hang out here, Let's bring them back. I'll select them all. Then let's just press M, create a new collection and
we'll call it utilities. Let's do that because
they're kind of utilities. Click Okay, and that drops
them in that new collection there so that we can just
hide that if we want. Alright, so now everything's in the collection. That's good. I'm going to bring back
the reference images and I'll select this scene collection up top to create our
steering wheel. Now, I think this
is an opportunity to use the Turas primitive. Let's do that. I'm going to hide the seats and the car and leave the
reference images out. And let's press
Shift a mesh torus. Here we go. And then I'll bring
this panel out. Now how many sides
should we have? We've got 48 here. And if we take a look
at the steering wheel, it looks like these three
pieces are split on the thirds. So the amount of sides we would need
would probably have to be divisible by 348
is 16 times three. If we went to 32, no, that's not divisible by
three, we could do 36. Well, I'm gonna go ahead
and leave it at 48. Let's just do that. We know it's divisible
by three and it'll give some extra resolution because I really want this
to be very smooth. The major radius currently is the bigger one
that's at one meter. Let's click and drag
on the minor radius. And let's begin
bringing this down. I'm gonna hold the Shift key until it's about the right size. It's hard to know, of course, but let's go with, let's go with that for now. So mine, I've got
it 0.057 weekend. Adjust this a little bit later with the
shrink fat and tool, but for now that's
probably pretty good. I'll go ahead and smooth it. Now. I'd like to put it
in place just to see if we can get it
about the right size. So I'm gonna go to the
side view here and let's, I'll turn it about like that. Let's scale it down. Let's bring it up and
try and put it in place here just to get
it about the right size. I'll press Alt Z for X-ray
and let's scale this down. And I'm gonna put it
in the center of this, or at least try
right about there. I'm just looking at the
origin of the object here. And then I can rotate it and scale it up just a
little bit like that. Let's see how that works. Okay, so that could
be good there. Let's go to the back
view with control one. And let's move it over here. That's looking a little
bit too small there. Let's go to the front view with the one key on the numpad. It looks a little
small, they're too. Well, let's scale
it up a little bit. Then let's go to the top
view with the seven key. And let's take a look at this. I'm just going around to
the different views here, seeing what we can see. All right, let's try this. Let's try that for now. I think that's at least close. Let's bring back the car and
let's take a look at it. Does that now look
okay in the car? It seems big. But I guess it is pretty
big in the car here too, because this is
probably a car without power steering in
1952, I'm not sure. The larger steering wheels
helped with torque, so you could turn a
little bit easier. Well, that's not bad though.
Let's, let's go with that. Okay, So this is how
big we want it now. Do we want it this thick? And it almost seems like to me it's a little bit
thinner than this, so we should be able
to press Alt S now and then shrink or
fat and that up. So maybe hold the Shift key and let's bring it
down like that. That I think I'm gonna go
with that feels pretty good, at least pretty close to me. Now to create all of this, I think I need it to
be on a global axis, neither flat on the ground
or straight up and down. And I also want to remember that control one is the front of it. If I hit the one key, I'll be creating it from the backside, which isn't a terrible thing. We can just spin it around, but I'm just going to
try and remember that control one is the
one we want to use. Now I'm gonna hide the car. I'm going to hit the N key, and in the x-axis I've
got it about 60 degrees. And now I'm gonna, I'm gonna bring
this up to negative 90 here in the x-axis, and that will bring it up, straight up and down. Now Let's press Control one
to go to that front view. There we go. And I'll hide the reference now. Now I wanted to just figure out where to put these
things right here. These are gonna be little
extrusions that we can do. I need to figure out
where those are. But actually, first of all, let's create the basis
of that interior ring. And to do that, I can just grab an edge right in the center here, alt click here, control one back to the
back view and then Shift D, enter S and scale that in. So we get how big do we want it? That's actually not bad
about like this, let's say. Okay, so now we have this that we're going to be using
for that interior part. Now we can figure
out where we're going to put these
little extrusions. As I said, we did it
with 16 or excuse me, 48 divisible by three is 16. So if we put one of the extrusion is down
here on the bottom, then we should be
able to count up 16. And if it's 48, that'll
be 1213141516 right here. Therefore, right
over here as well. So those are the centers
of those extrusions then. All right, Then
having said that, let's come over here
and select a few faces, maybe let's select
four faces over here. Let's figure out where
we're gonna be over here. So it looks like right here. These four. Then we're going to want these four
down here, aren't we? Let's do that. All right. Now, I want to change from median point individual
origins so there'll be extruding along their
individual paths. And then let's just hit E. Push in like this. Like that. Let's try that. Let's add a subdivision
surface modifier to it. Take it up to, to turn on the edit cage tab back
into object mode. And yeah, there we go. Alright, so we've got
those little guys. We might be able to bring
them out even more. Let's try it. We've still got them selected. We're at individual origins. But I think now what I want
to do is go to median point. And I'm going to scale
these in the z and the x, but not the why. So let's press S, Shift Y. Let's see if we can bring these out just a little bit more. Yeah, about like
that. There we go. Now we've got those. Next task is this little guy, Let's start extruding this. So this currently needs to be a little bit in front
of this because they need to match up here. So I'll press the three key to go to the
side view, Alt Z. Let's move this up
just a bit like this. Then let's extrude back EY Like this and oh
dear look at that. We've got some problems
there until we, I'm still an x-ray mode. If I press Alt Z, we won't see those problems. But if I go back to x-ray mode, you can see that one of these is turned whereas
the others are inside. And actually this is the
one that is correct. We should probably
go with this one. What I'm gonna do is go back
to Solid mode with Alt Z. And let's go up here and
turn on face orientation. And yeah, I think we want to flip or have all of
this on the outside. We want to recalculate the
normal for the outside. Let's do that. I will press the L key to
select all of these. Go to Mesh. Normals recalculate
outside, and there we go. All right, let's turn
that back off. Now. I'm gonna go back to the
side view, press Alt Z. What I'll do is just make sure that this is about the width of the steering
wheel like this. Then we need to
extrude the ones out here that match up
with these extrusions. So let's go back to the
back view control one. It looks to me like, well, this and this are
about right. Yeah. So if this is 1213141516, I think that's correct. Okay. So now, now that we've
figured that out, we've got two faces wide here, but down here we need more. So let's maybe for now that's still not
going to be enough. How about six? Let's try this. Okay, so let's select six
faces along here like this. Then here's, let's see if
this is six along here. 123456. I've got six
faces on each of these. Once again, I want to go to individual origins and I'm going to extrude these up or
out, I should say E. And I'm gonna pull out
like this, like that. There we've got those
now I can smooth this again like that. For these. Now, I'm going to
extrude these out into why EY, about like that. I'm also going to
extrude these back in the y just to kind
of pull those out. That extrusion isn't right
up against an edge there. It has some breathing
room on either side. That is the first part
of our steering wheel. In the next video, we will work on
creating these strips and creating the rest of
this, what's brown here? This brown piece right there. We'll work on creating that. That's coming up next.
53. Continuing the Steering Wheel new: For this centerpiece, let's
go ahead and grab this here, and I'll just take
this edge right here. And let's hit E and S and
scale that in just a bit. And then ES and scale
that in like that. And I think that's all we
need for that right there. Because we're going to have this chrome part on top of that. Then for the back side, it looks like we
could just select this and begin scaling. And let's hit E and y and I'll bring it back a bit and
then scale in some. Then let's do that again, EY, and I'll bring
it back, scale in. Alright, so we've
got this right here. Now this part looks like
kind of angles in a bit. So let's hit EY, pull out just a bit. And why and bring that back. Maybe I'll do one more actually, I'll scale in a
bit here and then EY and bring this back
and scaling like this. Let's try that. Let's go with that. Then. These pieces here, these strips. What should we do with that? I think for those we
just need to create, well, just a polygon
plane I think would do. Let's try that. Let's press Shift a mesh plane. Here it is. Let's turn it in. The x-axis. Are X9 0, that's the wrong side, so I'll hit Enter
and then our z 180. I just want to spin
it around like that. Let's make sure. Yep,
that's the blue side. Okay. So now if we go back to the back view and I'll scale it down quite a bit and
let's move it up here. I think I just want to scale it in the ECS quite
a bit like this. It down pretty small here. And then I want to turn it. What direction? Well, I'll begin over here. How much should we turn it? Well, we could do is we could
hit R and the control key. And then as we turn it, it'll snap in five
degree increments. So if we came over here
and did 60 degrees, that looks pretty good. Let's scale that down
about like this. That may be getting a little bit too thin if I scale
it down anymore. So what Let's do is let's
change to local transformation. And now I can scale in the y inline with the
objects, so S and Y. And let's scale that in
just a bit like that. Then let's move it back here. And I'm gonna bring it
up to the front a bit. The front of this, because we're gonna want to
add some thickness to this. I'm just going to
bring it forward just a little bit in the z-axis. Let's now take this. Let me move this up
just a bit like this. And how many do we have here? 12345. Okay, so what we can do is
use the array modifier. Let's try that. Come down here to
add modifier array. And I'll move this up a
bit so we can see it. If we increase the
count, say to five, and if we click and drag on the Factor X field,
it goes that way. So we need to go negative. I'm going to drag it this way. Tell us about that. Is that about right? Let's see let's see
how that looks. It feels a little bit too
far apart for each one. Maybe let's move them a
little bit closer together. Let's try that. Then I'll move this
down a bit like this. Let's take a look at that. Yeah, I think
that's pretty good. So now how do we get these
over here on the other sides? Well, we could take this and we could move
the pivot point into the center and then rotate around there,
duplicate and rotate. So Well, let us do
is list select this. Now that gives us a pivot
point here in the center. And let's move the cursor
to that with shift S2. Then if we select this and change our pivot point up
here to the 3D cursor. Now if we duplicate, we can then rotate
it into place. But before we do that, I realized I said I want some thickness on
this, didn't I? So let's come down here and add a solidify modifier to that. Is that enough? No, I think we need
a little bit more. Let me turn on even thickness. I'll click and drag holding that shift key and just give it a little bit of thickness
back here. Like that. Let's see how that works. Yeah, that's all right. Now that we have that, now we can take
this, duplicate it. Let's do that shift and enter. Then we can rotate
this back this way. So if we turned it
60 degrees here, this is probably gonna be a 120. If you watch up here, you can see the angle of
rotation as we do this. So I'm gonna press R and
control and then look up in the top left-hand corner
and you can see the degrees. So I'm gonna bring it over
here to 120 and click. That looks like
it's pretty good. Alright, let's do
that one more time. Let's select this
control one to go to the back view, Shift,
Enter Control. And let's bring this
around a 120 degrees. There we go. I think I'd like to bring
these in just a little bit, so they're not quite as wide. What I'd like to
do is just bring these down just a little bit. I'll press the
three key and just select these faces here. And then let's change from
3D cursor to median point. And let's change from
global to normal. Now we should be
able to scale in this y-axis here
I'll press S and Y. Just bring these in like
this. Let's try that. Yeah, I think that's a little
bit better. Let's do that. I'm just going to grab
these and do each of these kind of like that. And since we have normal
transformation mode, we can always scale
in the y here. And I'll just bring these in
just a little bit like that. Let's do that over here as well. Select them all. Hit the period key
on the numpad, control one to go to
the back view and then SY and bring these in like that. Let's see how we did there. Yeah, I think that's
a little bit better. In the next video,
what let's do, Let's work on the next part
of this going forward, this chrome part
here, right here. And then we're going to
need to create these arms going out to this rim that
I believe is the horn. We'll work on that
coming up next.
54. More Work on the Steering Wheel: For this front center part
in the steering wheel. Let's well, let's just duplicate
off this guy right here. Let's just duplicate this
and begin it from that. I'll press Shift D and Y. And let's pull it out just
a little bit like that. Then let's split it
out as its own object. I'll press P and
separate by selection. And then if we tap into
object mode and select it, now we should be able to
begin extruding here. So I'm going to turn off the subdivision
surface modifier for just a moment while I do this and then I'm going to scale
that down just a little bit. It doesn't need to be. There we go quite that big. And then let's just begin extruding this forward
in the y-axis. So if I zoom in over here, let's see what we can see. I think there's
just an edge right here we need to get,
so let's do that. I'll hit EY and pull
that out in just a bit. Then let's hit E
and S and scale in just a smidge and then
bring that up again. Bring it to about here. Now I think we can
begin scaling in, so I'll press E S, pull that in just a bit, and then I'm gonna pull it out just a
little bit like that. So now we're to the black part. Let's begin on that. I'll press pull out just a bit. Scale in, and let's pull
this forward and the y, and let's do this
again now let's press bring that forward ES
scale in just a bit. Then let's pull
that out as well. Now for this part, I'm going to bring it down
just a little bit more. There we go. And now we want that silver part into
the black right there. Let's press EY and
bring that out. Scale in. Then I'm gonna take this in EY and
pull it in like this. And then I want to scale in, press ENS just a
little bit like that, just to give it
some space there. And then let's bring
this back out, extrude this back out
like this and the y-axis. Then I'm going to scale in
ES and pull out just a bit. And pull out again. And do the same thing
one more time I think. Then I'll collapse it. Oops, I didn't get it exactly in the y-axis when I pull that
out there, and there we go. And then I'm going to press M and merge into the
center of those points. There's that piece. Let's now turn on the subdivision
surface modifier here. It looks like we
got some problems there, but that's okay. We can tab into edit mode, hit the a key, and then we can press shift in. Recall if we go to Mesh normals recalculate
outside is shift in. So let's just do that. And there we go. That cleans that up pretty well. Alright, I'll smooth it. Then let's beginning adding a few edge loops
here to hold this. Something like that. Maybe. Something like that. Yeah, that helps. Let's do this one right here. Now we need some in here. Let's do one writing here. Then. We could do one here and
pull that in pretty tight. That maybe actually I'll bring one inside here, right in there. Then I'm going to scale it in just a little bit like this. And maybe this edge
to I could scale in. So just bringing these
in a little bit closer. That yeah, there we go. We've got that piece now. We should probably make
these holes right here. Let's turn off the
subdivision surface modifier again for a moment and let's tab into edit
mode and let's see what faces we
want to use for this. I would probably say
these right here. Those appear to be
pretty well centered. Let's take those and these. And these. Then let's scale these or
extrude these in a bit. So Let's switch back to
individual origins here. Then if we hit E and scale in, I can pull in like this. Let's try this. Here we go. We're gonna need some
edges in here, aren't we? So let me add one in here. I probably should have done extra extrusions while
we're at it in there, but while we had them all selected, you'll live and learn. All right, so now let's turn on the subdivision surface
modifier again. Those are kind of rounded. I'm going to leave them as is. I don't think that'll
be a problem. Now for the horn part here, this rim here, I
think what I'll do is just grab an edge out here. Let's do that. Alt click this one
here, control one. Let's press shift D and S. And let's scale this in
about like this, let's say. And then I'll pull it out. Let's go to the side view. And I think I want
to pull it out just a little bit in front of the holes where those
pieces will be coming out. Then let's separate it, press the P key and
separate it by selection. And there we go. Now we can tab into object
mode and select it. From here. Let's extrude it out. Let's press E S and just
extrude it out a bit like this. I'm looking down here. It looks like it's
kind of wide here. And then let's just hit the
a key and extrude it back. Let's hit EY and extrude
this pack like this. Now once again, we've
got problems here, but we know how to fix that. Let's press shift in. And there we go. I'll right-click
and shade smooth. Let's add a couple of edge
loops along the edge here, I'll scroll the mouse
wheel and add two. Let's do that inside
here as well. That it looks like it just
may be a little bit too wide. So I'm just going to tap
back into edit mode, hit the a key and press S and Y. Scale it down just a little bit. Let's try that.
Yeah, there we go. All right, Now the little things that are holding
it from those holes, Let's select this and let's use this to create
those other pieces. I'll press Shift D and I'm
gonna move this down like this and move it
forward like that. Then we could come over to our
modifiers panel and we can remove the array and
solidify modifiers here. Well, I'll at least remove
the array. Let's do that. We may want to solidify
here in a minute. I will bring this forward a bit. And now to get it in shape, Let's change back to local
transformation orientation. Now we can scale in the y. Kind of move this
into place here. Then let's scale
out in the x sx. Let's go out like this. And we go from the center of
here to the edge of here. We probably want to just
move these forward, angling forward just a bit. Now we should try
and get it in shape. And to do that, I think
I'm gonna go ahead and apply the solidify here. Then if we tab into edit mode, Let's add some edge loops. It looks like it's a little
bit wider here than here. So maybe we could scale
in the x with this. That maybe we could scale
in the x with this as well. Scale it out a bit. Then let's add an
edge loop here. And let's add one up here. Let's also add an
edge loop right down the center here like that. Now we should be
able to grab these, let's say, and scale
them in the X. And let's grab these and
scale these in the x. And maybe now I'll bring
these out more like this. Let's bring this
out more like that. Let's try this. Then. Let's also take
that one edge here. And I'm gonna bring that
up just a bit like this. We get an angle there. Now let's add that
subdivision surface modifier and see what else we need to do. So here we go, subdivision surface,
and I will smooth it. Let's see what we need to do. What we could do
down here is just remove these delete faces. We could remove those, that'll allow that
to open up a bit. And then we could also add an edge loop
down here like that. We could add one up here too. Like we need to grab this edge here and
pull it back a bit. And now doesn't it, we could
pull that back like that. We could also add an
edge or two along here. Let's do that. That kind of tightens
that up a little bit. Then what we could do to, we could select this edge here. Well, not all the way around.
I don't want to do that. Let me just select here. Here. Let's try that. Just want that front
edge, That's all I want. And then what lists do
is list press Control B, and let's bevel that
out, pulling that apart. And then let's add one more
segment here like that. We go, Let's see how that works. Yeah, so that gives us an
edge there on the front. Yeah, that's kinda nice. Let me grab one of these edges all the way around and I'm gonna move
it forward a bit. Just to kind of tighten
up that edge a bit. On the front. There we go. Yeah, that's looking
pretty good. Now what we can do
is take this and duplicate it and put it
around on the other ones. So let's press Control one
again to go to the back view. I'm gonna take this
and let's just, well, I'll change this back
to global and then I'll change our pivot point
back to 3D cursor. Now if we press Shift and Enter, I'm gonna hold the control
key down and spin it around a 120 degrees.
Let's do that again. Shift D enter our control and bring this down 120 degrees. Alright, let's see
how that works. I'll move the cursor with shift S1 back to the center of the grid just so we can
take a look at this. And yeah, I think that's
looking pretty good. All right, we've got the beginnings of
our steering wheel. In the next video, we want to continue back
down into the dash and then we'll join everything together and put it back in
place in the car.
55. Finishing the Steering Wheel: Now let's work on the back part of the steering wheel back here. I think this looks like
three different pieces here. And in fact, I've been using these circles are edges
with 48 vertices in them. I don't think I need to do
that with these back here. We can certainly reduce
the amount that we're using for these
pieces in the back. So with this selected, I'm going to press Shift S2
to move the cursor here. And let's create a new circle. To begin this chrome part here, I'll press Shift a mesh
circle and we've got, I've got 24 here. Let's go ahead and use that. That's half of what
we had before, so that should work out. All right, let's
turn it are X9 0, and I'll scale it
down quite a bit. And then go ahead and
tab into edit mode. And it looks like this is
a piece that's over this. So I'm gonna pull this forward and bring it down to
about right here. Let's begin extruding this back, this chrome part here. So I'll press EY and
let's bring this back up. I didn't hit the Y
key. Let's do that. There we go. Then let's scale in E, S, O, but I'm scaling from this 3D cursor
RNAi, let's not do that. I'm going to press
Control Z to undo that. And let's come back and
change our median point or our pivot point
to median point. Then from here,
let's go ahead and press E and S and scale
in just a bit like that. Then I think this kind
of tapers in just a bit. So if we press E and y and scaled or extruded
out like this, and then scaled in a bit. I think that's what
we're looking for there. Now let's add a subdivision
surface modifier to this. And I'll turn on the cage. Let's smooth it. There we go. And now let's just add a
few edge loops to kind of tighten these up here. And also it looks like it
should go in a bit here. Let's extrude this in a bit. I'll hit E and S and
pull that in just a little and then E and S and
scale it in a little more. So that closes that off. I feel like we could add
just a little bit more here. Let's try this. Yeah, that's just a little bit more
of an edge there. And then we want
this piece here, this little black piece. So I will take this
edge right here, duplicate it with Shift D, and then I'm going
to scale it up, bring it forward just a bit, hit the P key, separate it by selection. Let's then select that. And now we can use this to create that
little black piece. So I will just take this and hit D and extrude
this back like this. Let's then take these two
edges and extrude them in. Let me press the two key just
to select those two edges. Here. Shift-click. Then I'm going to scale them in. I'm going to extrude
and scale them in, but I do not want to
scale them in the y because that will collapse
them into the center. So let's exclude the
y-axis from our scale. So I'll press Shift Y to exclude that y-axis and
then scale in a bit like this. And maybe I'll do
one more shift. Why? Bring that in like that? Let's take a look. Okay, Shade Smooth. There we go. And then we want this
green piece here. And it looks to me like we could once again just take an edge, duplicate it, split it off. Then let's select it and
begin again with this one. I'm going to turn
off the display of the subdivision surface
modifier for just a moment. And then let's move this back, scale it down a bit. And I just want this
little piece. For that. I'll hit E and y and
let's bring this back. It looks like it
goes out just a bit, maybe ES In EY and then ES. Now we could just take
this straight back, I think EY, and let's pull
that straight back like that. Now we can smooth it. We can add a subdivision
surface modifier to it. We can also just
move it in a bit. Let me go back to median
point O. We are there. I'll just move the origin into the geometry here
so we can see it. I'm just going to
move that in just a little bit like that. I don't know that we need
this quite so close. Maybe move that back a bit. Maybe there's one in here. We could move forward
a bit like this. There we go. So it isn't
quite so tight there. That's probably nothing that
anyone is ever gonna see, but let's go ahead and do that. Let's also come to our viewport overlays and
turn on face orientation. And yeah, I kind
of suspected that. So let's tab into edit mode
here and press shift in. Then let's do the
same thing here. Select everything. Shift in. Oh, this one
to tab into edit mode. Shift in. There we go. Alright, just to make sure everything's the way
it's supposed to be. Now, I see here that I
didn't close this off. It looks like right here, this edge you can see in there. So let's fix that. Let's hit E S. I'm gonna scale in just a smudge and then I'm gonna
hit ES again and scale in farther,
about like that. So we can't accidentally
see in there. I mean, we're never gonna
be able to see in there, but just in case. All right, so now that we've got our steering wheel
pretty much done, Let's think about how we're
going to get it in place. I do see a little problem here. I'm gonna grab that and move
it out just a little bit. Actually speaking of that point, Let's move that 3D cursor
to this point, shift S2. And that's where we should probably put the
origin of all of this. All of this it looks like just has a subdivision
surface modifier on it. It looks like all of
these do accept this. I don't think I want to put a subdivision surface
modifier on this. I think I want to keep
that pretty sharp. So how to combine all
of this while still keeping these so they do not have a subdivision
surface modifier. Well, we could go
through and apply the subdivision surface modifier for every single thing in here, but I don't think I
want to do that either. What I think I'll do is
combine everything I can with the modifier
and then just parent these pieces here too,
that sub-divided object. Let's give that a
try. I'm going to select all of these pieces here. This and this. And then I think we want these and this front
piece right here. Let's join all of these
together with Control J. And then I'm going to
move the origin of all of this to this point here. Objects set origin,
origin to 3D cursor. So there's our origin point that we'll be able to rotate
and scale from that point. Now, let's give this a name. Let's press F2 and call
it steering wheel. These things here, let's
join them together. Since they all have
the same modifiers, we can join them together. And in fact, we could go
ahead and apply these. There's really no
reason to keep them on. I'm just going to go ahead
and do them individually. For each one here, just pulling the menu down and applying these for
all three of them. And apply here. Now we can take all of
these and press Control J. And then let's also move the origin of that to
the 3D cursor as well, just like the other object. There we go. Now, you can see that if
we select this and hit G, it'll move without the spokes. What we can do is
just select this and then parent this object
to the steering wheel. Let's give it a name for us. I don't think we've done that. Let's do that. Let's
hit enough to call this steering wheel spokes. And then we can select them, shift, select the
steering wheel, press Control P, which will
bring up the Parent menu and then choose to parent that to that object. There we go. Now if we select this and
hit G, it'll come along, we can hit R, it'll rotate with the steering
wheel and everything. The only thing we can't do is select the spokes
directly and hit G, then they will move out. So we don't want to do that. And you can see over
here in the outliner, here's our steering
wheel object, and underneath that is the
steering wheel spokes. It's been parented to that. You can also apparent by just dragging an object on
top of another object. All right, so let's now
put this in the car. I'll select this. Let's bring back
the car, the seats, the reference, and let's
go to that side view. Let's hit G and move this
into the center right there. And then let's just
hit R and rotate it. And I'm gonna change to local
transformation orientation. Pull this out just
a bit like this. And let's see how this
works. How does it look? Looks a little big. I'm gonna move the cursor to the center of the
grid with shift S1, I'll select another
object so we get that orange origin point out
of there for the time being. I just want to see
how does that look? I feel like it's a little big. Let me take a look here. Here. It is pretty big in the
car, I guess, isn't it? Well, we could take it, we could take it
and we could try and scale it down just a little bit like this. And then move it down
just a hair like that. And let's see how that works. Actually, that
looks pretty good. The only other thing
we can try, I guess, is I don't want it to be
exactly up and down like this. I mean, nobody ever leaves their steering wheel
exactly at 102. So I'm just going to
hit R and Z and turn it just a bit like this just
so it's not quite perfect. All right. Well, there we go. We've got our steering wheel. In the next video,
we'll continue working on the
interior of the car.
56. Adding Details to the Dash: Now I'd like to start working on some of the details on the dash. So let's take a look at
these dials or gauges. I just want to get
the basic frame in what's going on
underneath here. I'm not sure how we're
going to do that yet. It's probably going to
be just a texture and it probably won't be
exactly like this. But if we can find some sort of a texture that we can
put in there to make it look like there's something going on there
that would be good. But let's just work on this outer rim and that
kind of glass piece. I think what I'll do first is once again arranged
the outliner. Let's see what we have here. Well, we have the steering
wheel and we should put that in our
nationally collection. But if I just click and drag this into that collection,
watch what happens. I drag I dropped and it leaves this parented object
out of that collection. Now it's still parented to
the main steering wheel. If we hit G, you can see it's still moving around with it, but it's split it
up in the outliner. Now I can just click
here and drag it into that collection
and then we're fine. But I'm just going
to press Control Z just to go back a bit and
I just wanted to show you you can take one
of these and you can right-click and choose
Select hierarchy. That will then choose
everything underneath there, and that goes for
collections as well. Then you can drag
that whole thing into your collection that
you want it to go into. That's just a little
tip there. All right. Now I just want to take the
dashboard and move it out, so I'm gonna select it. And here in the 3D
view I'm gonna hit M and move it to the
scene collection. Now I've pulled it
these collections and I can just hide these. And we can work with this. Alright, so for these
round gauges here, I think what I'll
do is first of all, just select a point here
in the center and press Shift S2 and move
that cursor to it. Now when we bring
in a new object, it'll pop into there. So I think I'll just begin
once again with a circle, shift a mesh circle, and it's got 32 sides. Let's take it down to 24. That worked pretty well. And then I'm gonna tab into edit mode and with
everything selected, I'll press R X9 0. And then let's just scale it down to about where we
think it should be. I'm going to bring it
down about like this, maybe maybe a little bit
bigger, something like that. They are pretty big
there on the dash, so I'll try that, see if that will work. And so from here I'm
just gonna push back a little bit into there and then I'm gonna
bring it out in the y. I'll press. Before I do that, let me
change to global axis. So we are on the same page here. I'm going to press EY and bring this out
just a little bit. Then let's work on this
little piece right here. The S, I'll scale it in and
bring it out like this. Then let's go up with
this selected here. Let's pull this out. Does it tilt in
just a little bit? Maybe let's do that. Let's scale it in
just a little bit. And then I'll press E S, and let's bring it in just
a bit for an edge there. And then let's take it back in EY and I'm gonna go
back to about right. I don't know about right here. And now that I've done that, it looks like these
are just further out. So maybe I'll Alt click between two faces here and pull
this out some more. Just looks like it's a
little bit bigger there. Alright, and then now we can
take this edge down here. And let's just press
ES, scale in ES. And then I'll hit E. And let's press M and merge those at the
center. There we go. All right, so we've
got that basic shape. Let's go ahead and add a
subdivision surface modifier. Take it up to, to
turn on the cage. I'll smooth it. And let's just begin adding some edge loops and see if we
can get it into shape here. So maybe one down here, maybe one down here. We could probably put
one right in here. Let's try that. Maybe one back here. I'm going to write
back here just to give that just a little
bit of an edge there. Then I'm just going to
take this point here, move the cursor to it, shift S2, and then I'll duplicate this and
move it to the cursor. So let's press Shift and Enter. And then let's press Shift S. And we can choose
the number eight. Just click on
selection to cursor, and that will move
that duplicate over to the cursor. There. There we go. Now we've got these two. What should we do next? How about this little
guy right here? It looks like now that I'm
looking at the dashboard, it looks like, Oh look at this. It's pretty ugly. I'm kind of embarrassed
about this. Let's move this up. Clean this up just a bit here. That's pretty ugly. We may have to pull
them down again. If they're poking out
of the top of the dash. And these up here, we could make these a
little prettier as well, so it isn't looking
quite so gross. But let's now work
on this piece here. I think what I'll do for
this is actually hide everything and begin from
scratch with an empty 3D view. So let's move the
cursor back down to the center of the
grid with shift S1. Then I guess we
should name these. I'll just call them
dashboard gauges. And I think I'll just
combine them for now at least Let's select them
both and press Control J. And then I'm going to tab into edit mode and
select everything. So that's center pivot
point is right there. And then I'm gonna move the
cursor to it, shift S2. Now I can just move
the object origin to that 3D cursor and our origin of that
object will be there. Alright, so let's
give it a name. F2 dashboard gauges. I will go ahead and hide
these two things as well. Let's move that cursor back down to the center of
the grid width shift S1. And here we go. Let's just work on
this real quick. Let's begin with
this piece here. I'll just create a cylinder. Here. Let's take it down to
16 sides and lists, takeaway any of the cap fills, Let's choose nothing there. And then I'll scale it down. Let's begin working on this
this little piece here. I'm not sure what that
is supposed to do. I don't know if it matches
the roof or the hood or what. I'm not sure, but let's go ahead and just try
and create that. I'm looking at this
part right here now. Let's press S and scale out. And I'll bring this up a bit. Then easy. Bring that up. Maybe to about here. Like that. Then let's create this piece. It looks like what we could do is actually
create a sphere on the top here and then connect
it to this. Let's try that. I'm going to move
the cursor shift S2. And then let's create a
sphere here, shift a mesh. How about a UV sphere? Let's try that. That
cylinder that we first created with
16 sides, wasn't it? Then we could take the rings. I don't know. We could
take that down to eight. Let's try that. Okay, so
now let's scale this down. Let's go to the side view
and take a look at it here. I'm going to scale this
down and I think it's gonna be something about like this. So if we take this bottom part right
here and delete that. Now we could take these
faces here or these edges, I should say right along here. We could extrude these down, scale them in just a bit. Then we could connect them
with this piece here. So let's join these two
together, Control J. Then we can select this
edge and this edge and then press Control E and choose to bridge edge
loops. Here we go. Since we put 16 sides on
both of those pieces, they have the same number of edges so they should connect. Okay. What do we think? I
feel like I should take these up a
little bit like this. Then let's create
this piece here. We could create a circle here. Let's do that. I'm going to press
Shift S1 to bring it back to the center of
the grid that 3D cursor. And let's create a circle. And we could even
take this down to 16, I think let's do that. Then let's scale down like this. And if we just selected
these two, let's try this. I'm going to press S and X
and scale them in like that. And then if we selected
everything else, Control I to invert
the selection. Well actually I think
what I want to do is split this and mirror it. Because what I really
want is I want these and I want to
pull these like this. To get this outside here. I will, I will just
take these here. Delete them, delete vertices. Let's add a mirror here. Then we really need to mirror in the y-axis instead of the x. So let's turn on. Why turn-off x,
turn on clipping. Now we can drag these until we get it about
the way we want it. If I go to the top view, how far, how big
do we want this? Something like this maybe. Okay. Then if we
select everything, we could hit E and then scale
in just a bit like this. We could also bring these
in a little bit more. So select these, bring these in. If we select everything and
scale in the x, we get that. That's looking a little
bit more like that. I feel like I could move
these in a little bit more. Let's do that. Maybe something like that. Okay. Now let's go ahead and apply the mirror
modifier. Drag this up. I'll tab into edit mode,
select everything. I'm going to extrude down easy. Hit that z again. There we go. Now let's get rid of
these faces down here. We don't really need
these delete faces. We could take this edge right along here and fill
this with the F key. Try that. Then let's add a subdivision
surface modifier to this. In fact, let's join
everything here and here. Press Control J, add a
subdivision surface modifier. It's of course going to
be ugly, will smooth it. We could add an
edge here, up here. Then we could add an
edge down here too, I suppose like that. Then let's add a couple of
edges along here as well. So maybe one here, one here, one here,
and there we go. So we've got
something like that. Now, I think what I
want to do is take this and bring it down a bit. And then let's
grab an edge here. Take the cursor to that
point with shift S2. Move the origin to that
origin to 3D cursor. Now let's see if we
can put this in place. So it's bringing back the
dashboard and the gauges. Let's turn this
in the z, r z 90. We'll turn it in the x, are
X9 0 going the wrong way. So I'll press the minus key to make it negative
90 and enter. And then let's go to the
back view with control one. Let's scale this down. Move it up into here. Let us see how this
is gonna work. I would say something like this. Let's try that. Move it in here. See what we think. Not too bad. Ultimately, I think I'm
going to need to move this whole face and
everything like this up some just going
to need to move that up some quite a bit so it
doesn't intersect too soon. There we go. Yeah, I think that's all right. I think it's a little bit narrower than what
we're seeing here. But I think that's okay. We could add an edge
in here, I think. Make that a little tighter. Maybe take these faces here
and scale them in the z. I feel like it needs
to turn as well. So what I'm gonna do is
take this and turn it. I need it, I need that
pivot point back here. So let's move 3D cursor to
the origin with shift S2. Let's then select this and
change to our 3D cursor. And now we can press RZ
and rotate this like this, just a little bit like that. Maybe let's bring everything else back our seats and our car. And let's take a look at it. Yeah, So I think the final
thing I'd like to do is maybe make these
even bigger still. And know, they they
seem to go up to the top of that trim there. Let's do that.
Let's select those, go to individual origins. And then when we hit the S key, we can scale these
up individually. Scale them up just a bit, and then let's move them
up toward that trim there. They're a little bit
higher like that. Let's give that a try. See what we think. Yeah, there we go. We've
got our gauges and are strange latch that we don't really
know what it's for, but we got it there. All right, so in the
next video we'll begin working on other
parts of the dash.
57. Adding More Details to the Dash: Now let's work on some of
this stuff right in here. It looks like the radio and
some other things in here. And actually now that I'm looking at this from this angle, it looks like I
haven't moved these back out once I put
the door panels in. So with this selected, let me just go to Edit
mode and hit the a key. And I'm just going
to move this out a bit because you can see
it's kind of out here. I just want to move that
out a bit now that we have the inside
panel of the door. And in addition, that piece on the bottom there that
needs to move out as well. So I'm going to tab
into edit mode, hit the a key, and let's
pull that out as well. It should be right
about in there, I think. Yeah. Okay. That looks a little better. So once again, always
going back and adjusting and tweaking will be doing that for
the entire project. But this particular
thing right here, this particular panel,
Let's work on this. Well, before we do, let me give this a name, always cleaning up here, let me call this
dashboard latch. Once again, I don't know
exactly what that does, but that's what
we'll call it here. Let's take this and well, we'll keep these out of the main group and we'll
hide this group here. The hide the seats. In fact, we could take the seats
here and just drag them into the nationally
group. And there we go. So now we can work on this. Are there better images
of that part of the dash? Let's see what we've
got this one here. Let's take a look there. It is a better view. It's just not as crisp. It's kind of blurry. Do we have anything else here? We could take a look
at this one here. Well, that's got quite
a bit of resolution. We could work with that now, I'm not sure what
this is right there. I don't know what that is. Alright, I've used the
subdivision surface modifier quite a bit in this project. But for this, I want those
sharp edges on the corners, but still have kind of a rounded
edge all the way around. And for that I think I
can use the Bevel tool. So for this, I think
what Let's do is let's just begin with a
circle, mesh, circle. Let's try 16 sides here. Well, that may be a little
bit too blocky. Let's try 24. See how that worksheet. Let's try 24 here. I'm gonna turn it RX 90. And let's go to
the back view with control one and
I'll scale it down. And I'm just gonna try
and get one side of this. Let's scale it down
quite a bit here, and I'll tab into edit
mode and hit the one key. What I'm looking for here
is the ability to grab, well maybe something like
this and delete these, and then connect these up here. Let's see if we can do that. I think I'll just
hit the delete key here and delete vertices. Then I want to take these
and drag them this way. You can see I'm just making
the ends of this currently. So if I tab and it object mode, I can move that around. It's hard to see how close
it should be over here. Let me go back to
that other one. That other image here gives us a little bit of a sense of how close
this should be. Maybe I'll move it
about like that. Then what we could do is just select both of these
and bridge edge loops. And to do that we can press Control E and bridge edge loops. We can also come up here to the edge menu here
and ridge edge loops. If we do that,
that's what we get. That's kind of the basis
of that panel there. That's kind of what
I'm looking for there. Let's take it back a
little bit farther. I feel like maybe I could extend this out just
a little bit more. Let's grab these and bring them out just a little bit more. Maybe. Let's try that. Then I want to take
these edges all the way around. Let me
bring them out. So there we go. I want to go to Edge mode and
just Alt click this edge. And Alt Shift click all the
way around here like this. And then I want to extrude back. I'll just hit EY and
pull back like that. Alright, so there we've
got that basic plate. Now what I wanna
do is smooth it. Here. I'll right-click and
choose Shade Smooth. And let's go over to our object data properties and scroll down and turn
on auto smooth. Then what I'd like to do is
take these edges once again, all the way around. Oops, right here and here, all the way around there. And use the Bevel tool on these. So I'm going to press Control B. Pull out just a bit, scroll the mouse wheel
to add a few edges. All right. I think that's pretty good. Let's take a look at that. Yeah. Let's go with that for now. I used 24 sides where I probably could have used 32 to make this a
little bit smoother. But from out here, from a distance that's probably
not gonna be a problem. Now let's go ahead and create
one of these knobs here. So let me take this and move the origin to the
center of the geometry, and then press Shift S2
to move the cursor there. Now we can press Shift a
and create a cylinder here. For this, I probably will use a subdivision
surface modifier. So we could take
this down to 16. I want to change the
cap fill to nothing. And I'll take the radius down to 0.1 and the
depth down to point to. And that just reduces
the size just a bit. I'll press R X9 0
to scale it down. Then let's scale in the y. Just hit the S key
and scale it down. And let's see if we can get this about the size that we want it. I'm going to tab into edit mode, hit the one key, hit the a key. So we're selecting everything there and let's just scale it down to about what we
think it should be. Right in here. I'm thinking this is
the outside of it. It looks like it
kind of goes in. Let's go back to
that other image. Here. Let's see if we can see
what it's doing here. It looks like ridges here, but I don't know that
I want to do that. That could be just that. We're already using so
many polygons for this. I think I just want
that to be smooth. But let's, let's see what we can do for the backside of this. Maybe we can take this edge here and hit
E and S and scale in. And then maybe go back a bit. And then E and S and
scale in and then go EY and take it
back like that. I'm just creating something
that looks a bit like that. Then inside here,
Let's select this. We've got this thing
in the center. That's once again a lot of polygons for such a small thing. Let's hit E and S and scale in. Then e and y and bring
this back a bit. And then I'll just ES, and then let's just
merge these together. I'll extrude one more time and then press M and merge S center. So this is what we have so far. Let's now go ahead and add a subdivision surface
modifier to it. Here. Take it to, to turn on the cage.
I'll smooth it. Unless just add a
few edge loops here. I'll add two here
and scale in the y. That we could add
a few back here just to tighten up
these edges here. You press Shift S1
to move the cursor. And then I'll take this, looks like maybe scale
it up just a bit. Then let's press shift D and
X and move that over here. The other one. Let's go back to
that other image. I'll do that up here. This one we can kind of see. For these smaller ones. We could probably once again simplify those a bit as well. Let's, let's begin with
this one over here. Once again, it's got ridges on it that I don't
think I want to use. But let's bring the cursor
to here with shift S2. And then let's once again
press Shift a mesh circle. I'm gonna take this down to 16. Let's scale it down quite a bit. Turned it in the x are X9 0. Let's bring it out a bit. Scale it down, and
let's bring it over here about to where
we think it might be, like right in here. And then let's begin. I kinda want to just
create one of these and then duplicate them
and put them in place. I kinda want to maybe work
with this. Let's do that. Let's begin back here. I'll scale down quite a bit. Let's begin with one of these. Pull out just a bit like this. Then I think there's a stem
in there. It's hard to tell. I don't know. Let's just do, let's do
something like this. I'm gonna go like this. Then I'm gonna take this and scale it
out a bit like this. Then move it out, scale it up just a bit. Scale that out. Bring that forward. Sum. Then this
little center part. Let's select this scale, EY. Then I'm just going to
press E and S and scale in. And it looks like we
could actually push these in just a bit like this. And then E, S, and then I'll just hit em
and merge at the center. All right, so let's just take a look at what we've done here. Is this any way similar
to what we have here? I'm going to press
Control one again. It actually let me scale
it down just a bit. All right, let me, I'm
gonna go ahead and use the subdivision surface
modifier on this one as well. Smooth it. Now let's add some edge loops
here and see what we can do with those. To scale these out. Maybe add one in here. Like this. All right, let's see
how that worked. But I feel like that, that could come out a bit. Like we could scale
in the y, like that. Alright, so now let's
add a couple down here. Let's press shift D Z and bring this straight down to
about right here I think. And then these four I
want to deal with here. So Shift dx here, and then take these and
shift dx like this. Now let's see how
we're doing here. We could push these back until
they intersect like that. Try that. Feel like they
could all be a little bigger. Let's take them all here. Go up to individual origins. And here it looks like
we were already there. Hit the S key and scale them up. They scale up each individually. Let's try that. Now let's
do that with these. Alright, so there's more
to do here and here, and of course the radio and
this thing, whatever that is. But I think that's pretty good. Let's go back and bring back
the Nash Healy collection. It looks like yeah, it still looks to me like
those could even be bigger. Maybe once again, I'm
going to go through and select each
individual one of these. Let's just see,
I'm going to turn off this tool click here
so we can see them. Then I'm going to press
S and scale them up, all of them at the same
time just so we can kind of see them together. That's probably too big. Right? Come back about like that. Let's see. Yeah, I think
that's pretty good. Alright, so we have some of that detail there and the dash. In the next video, we'll
go ahead and continue on to try and finish this up.
58. Modeling the AM Radio: Now let's see what
we can do about this little AM radio right here. What should we do about that? Well, it looks like it
just kind of a plane like we did before
and then extrusions for the dial part
and the button part. So let's give that a try. I think I'll just maybe select these two right here and I'll hit the period key to zoom in. And I'll go back
to the move tool. And here in that pivot point, Let's move the 3D
cursor shift S2, and then It's just
create a polygon plane, shift a mesh plane. And I'll take it down to, let's take it down to 0.02. And that's a little
small, but that's okay. We can scale it up a bit. Then let's turn
it in the x-axis. Rx nine, looks like it's
going in the wrong direction. I'll press 0 and then hit the Minus key
to flip it around. There we go. And now let's hide
the car right here. Let's press Control
one and let's get this plane in about
the right size. So maybe if I scale down into z, and let's scale out in
the x, about like that. So let's say that's about
the size that we want. Maybe a little bit bigger
all the way around. There we go. Let's
try that. Then. What I'd like to do is just
add an edge loop here. I'll tab into edit mode control R. And let's just
add an edge loop. And I'm just going to pull it
out a little bit like this, just to get this angle here. Then once I do that, I think I'll Bevel that with
Control B and just pull that apart just a little bit like that because something
like that there. Now we could select the
edges all the way around. Actually, let's hit the
two key and press Alt click and still it's just get the edges all the way around. And then let's extrude back. I'll hit EY and let's just
pull that back like that. And then I'll just
hit the a key. And let's pull this
into that panel there. Let's now grab
this face up here. Let's hit the I key
to end, set it. Just a little bit like that. And then let's extrude
that in E and I'll just push that in until
it comes in right now, I don't want to go all
the way in like that. I'm just a little bit
like that I think. Then also let's extrude
in the bottom right here. But first let's
instead it as well. So I'm going to
press Control one so I can see it from
the front and hit the I key and just kind
of pull in about the same amount as I did before. Then let's extrude
in the y-axis, ie. I'll just push straight
back like that. And we could probably bring
it back in like this. Let's go ahead and add a subdivision surface modifier
and see how it works. I may want to make the edges
a little bit thicker here. While I'm here, let me press Alt and click between
two of those faces. And I think what I'm gonna
do is just press S and X and scale out a little bit. And I'll just press S and Z, scale out just a little bit
just to make those signs a little bit thicker like that. Okay, so now let's add that subdivision surface
modifier gear. Yikes. Let's smooth it. And I will turn the cage off for a moment to come in here and take a look at what
needs to be done. So let's maybe add
three here and scale out in the x, s and x. Maybe I'll start adding
them up in here. And up in here. Like this. I just want them kind of a
little more rounded is all. Actually that's not too
bad. Let's go with that. Maybe I will add an extra
edge loop right in here. Bring that in. Just a
little bit like that. Let's do that same
thing down here. Let's add one in here too. I'm going to add just
another one just to grab that edge so it's a little
bit tighter around there. Let's now add the buttons. And for the buttons there, let's just begin with the cube. And it's very big. So let's take it down to
instead of two meters. How about 0 to try that, that's a little bit
better. Let's do that. I'm gonna take the face
off at the back here, just delete faces there. And then let's just try and put this in
place and we'll use the array modifier to add the others here because
it looks like they're five, so I'll scale that
in just a bit. Let's scale it in
the Z Smith edge. Let's move it back in here. Like this. Hit the period key on the numpad
to frame it up. And I feel like I could just
take this and move it out. And it kind of looks to me
like it expands in the back. Let's see if that's the
way we want it to be. I feel like it kind
of expands like this. I could be wrong, but
let's try it like that. Then let's go ahead and add a subdivision surface edges there before we
turn that on here, because we've got the
nice rounded curves here, we want to capture that. And so from this, it's a little bit
tighter, isn't it? So let's press S and Z. Then, select these two S and X and scale those
out just a little bit. We can bring this forward, hit G2 times and
bring that forward. Some kind of tightens that
up a little bit more. We can bring them back. Let's see about how big
we want to do this. With this here, let's go ahead
and add an array modifier. It looks like I'm going to
bring this up some down here. We need five. We need to go in the negative x. So I'll click and drag
on this like that. We also probably need
this to be smaller. So I'm just gonna
hit the S key and scale that in just a little bit. Bring it over. Looks like we could scale
down just a little bit more like that and move
this over to here. Let's try that. Well
now we're not getting that expansion on the back there now that we've
pushed that in so much, maybe I'll pull it out in
just a little bit more. Let's tab into edit mode. And I want to take these two and move them
forward a bit like this. Let's try that. All right, so I think
that's pretty good for the radio now, this thing, I just
don't know what it is. Is it an ashtray? Is it a vent? I really haven't been able to figure it out
quite what it is. I'm going to assume that
it's an ashtray and we'll just go with that if you
can figure out what it is. Great, but let's work on
that in the next video, as well as the ignition key
hole that's coming up next.
59. More Details to the Dashboard: So as I said, I don't
really know what this is. I'm assuming it's an ashtray, but I think we can just
begin with a cylinder. Then if I select
these two objects to move the pivot point into, and I'm gonna press Shift
S2 to move the cursor here, press Shift a mash cylinder. I'm going to create a
cylinder with 16 sides. And let's take this
down to 0.1.2. I'm going to make the
cat fill a triangle fan. Let's scale it down. Let's turn it in the y, r, y 90. I'll scale it down a bit. Let's scale it in the
x-axis like this. Then I think what I'd like to
do is actually flatten it. Let's first of all
go to the side view and let's tab into edit
mode, press Alt Z. And let's just click and drag and delete half
of this right here. Then let's scale in the y SY. That. Now let's go back and let's bring
this back in like this. I will add two edges
in here like this, scale them out in
the x, like this. Now let's add a subdivision
surface modifier. Let's smooth it. Do
we take these faces back here on either
side like this? And do we insert these? Let's just press I and
scale in a bit. Then. Yeah, that kind of tightened up that edge
just a bit there. Then let's just push
it back a little bit. See what we can see there. I mean, that's about all I can
see what's going on there. There's this thing right there. I don't know what that is. Let's try and do that. If you can figure out what that is or finding other
pictures, that'd be awesome. But I don't know. I think for now I'm just
going to put a cube in there. Let's create a cube. Let's bring this out. I will delete the
backside again. Let's just scale it in the x. Scale it in the z. And
let's put it in there. Then just maybe tilt it. I'm going to tilt it like this. Take it in just a bit. Then I will take
this edge back here. Just drop it down like
this. Let's try that. And then I guess
I'm gonna need to add a subdivision surface
modifier, aren't I? Let's try it. It's ugly. Might just work. I'm gonna move this one over and add another
one in here like this. Then maybe scale this up a bit. And then I'll also add one back here just to see
how we're doing. There we go. So as I said, I don't really know what's happening there or what that is, but we can go ahead and add it. Now the fun part is to maybe
join all these together. We have this that
isn't smoothed. We don't have a
modifier on that. I guess that's fine. Actually, I'll take this and
join this together here. For the ignition. I think it's probably
just going to be a similar thing that we
did on that trunk latch. Let's just move the
cursor over here, shift S2 and I will
create another cylinder. This one, I don't want
any cat fills in it. And 16th probably fine. Let's press our
X9 0 and turn it. I'm gonna go back to
the front view with control one and tab
into edit mode. Let's scale it down and
move it into place here. I'm thinking right
around in here, maybe like it should
come over a bit. It looks like I can move
these over some too. I think we could
probably go like that. I'll take this edge and
move it back into the dash. And let's take this one
and move it out to here. Let's say if you like, it could be a little bit bigger. Scale out just a bit. All right, so now really
all we need to do is just some more extrusions,
scaling, et cetera. So I'll just press ENS. And let's we don't really need to put a whole
lot of detail into this. Then let's press E and S. And then for this I just
want to make that keyhole. Now. What we could do is switch back to
individual origins. And we could select these. And then select these here and press S
and scale those in. And then I can select these control click
to select all of those and then Shift
click and then Control click to select those. And I'll press S and X and let's scale those in until
they're pretty much flat. Now we switch back to
median point and press Sx and we can scale these
in about like that. Now if we selected them, actually, I think I'll scale
them down a little bit more. And then we can just
extrude back EY. Then we could close these
off just with the F key. I guess we could do that. There we go. So we've
got something that looks kind of like the ignition here. I'll add a subdivision. Let's smooth it. And then we could probably
just add an edge in here. We could select this
edge and press Shift E and add some crease to
that to sharpen those up. And then also add
an edge in here. We can add an edge out
here and pull that out. We could add an edge here. We could add one back here, I bet, like this
and maybe one here. Just to kind of
clean that up a bit, we get a little bit
of something that looks kind of like there's
an ignition there. Yeah. Let's let's go with that. Then. I think this center one here, I'm just going to
duplicate this. I'm just going to
duplicate this. Move it over in the
x and I'll maybe shrink it down just a
little bit like this. It's a little bit
different than those. And what I'll do is
just make this Chrome. I'll just make this one Chrome. And the other is black,
and that should do okay. Now, combining all of these, do I want to combine all
of this into one object? Probably, it'll just make it easier to deal
within the outliner. Let's do that. Let's
press Control J. And I need to apply that array modifier in there
or else it'll go away. So let's press
Control Z to go back, Let's select the buttons here. And if we take it above the
subdivision surface modifier, is there any change? No, there really isn't. So we can go ahead and bring it above the subdivision
surface modifier. It is recommended to apply
modifiers from the top down. So let's go ahead and pull
this down and apply that. Now we can take all of these that and join these
together with Control J. Now, what about this? Should I just leave that as is? It's still got this kind
of jagged edge around it. I wonder, should I go ahead and add a
subdivision to this? Let's see, subdivision surface. Take it up to two. That does clean that up, but we would have
to add edges on either side here to kind
of tighten that up. I know this is a
lot of polygons, but what that will do, well, that kind of cleans it up. And then we'll be
able to add this with this here, Control J. And now that's all one
piece, right there. Should we go ahead and
add all of these then to this object here and have
it just be all one piece. We could call it
dashboard details. We could do that or do
we wait and keep them separate for the
material process when we're adding materials. Well, let's go ahead
and join them together. And that'll just
be one object in our outliner that we
have to deal with. I'll press Control J. There we go. We've got
them all as one object. We can just hit F2. And let's call this, as I said, dashboard details. We go. Now we've got these four
objects for our dashboard. What Let's do now is maybe just take these and put them
all in their own groups, since they're all
called dashboard, let's select them all. And then out here
in the 3D view, Let's hit em, new collection. And I'll just call
these dashboard. There we go. Alright, so now they're all in that container or
that collection. Let's bring back the car. Let's take a look at everything,
see how we're doing. We can now take this
collection and drag it into the Nash
Haley collection. And if you wanted, you could go in and add new collections in here,
combining like objects. So if I hover over this and
press Control Spacebar, we can now see our outline
or a little bit better. If you wanted to, you
could do things like select the tires, all of these. And here in the outliner
you could press M and create a new collection
and call this tires. It would pop out of
that collection, but you can always
just take it and drag it back in there
without a problem. So if you wanted to, you can just create some
of your own collections. Maybe I'll hit M new collection,
call this windshield. It's just how you want to
organize your Outliner, but I would suggest
you do organize it, give it some sort of
logical organization. So as you go, you don't get completely
lost as to what is what and what you
still need to do. Because it can help you get a sense of what's been created, what still needs to be done. The basic overall
organization of your project.
60. Beginning the Glove Compartment: All right, well now let's work
on this glove compartment. It's going to pose a
couple of issues here. One is how do we get
that kind of hole in the dashboard that this door
object is going to fit into. Because I do like that
kind of rim around here that says this is a
door over and opening. I do want that. To do that, I think we need
to use a Boolean modifier. And the Boolean
modifier doesn't play real well with the
subdivision surface modifier, mainly because the
subserve modify or really needs quads or four-sided
polygons to work well. When you use the
Boolean modifier, you can get all kinds of guns or polygons with more
than four sides. So they don't really
work well together. Now we got around this
last time creating that windshield vent
because we never had to apply the
Boolean modifier. We put the subdivision on top, then the Boolean, and we
just left it that way. But for this, we're
going to need to use that Boolean cutter as
the glove compartment. And if we're going to need to
apply the Boolean modifier, we're also going to need to apply the subdivision
surface modifier. And when you do that,
that's permanent. There's no going back. So I think what I want to do first of all is
duplicate the dash. So we have a backup. If it doesn't work, if
something doesn't go well, we can always go back to the original and try something else. I'm going to press
Shift D and Enter. Then I'm going to
bring it out of the Nash Haley collection into
the main scene collection. I'll just press the M key
and choose Scene Collection. Here it is here. And I'm gonna call this
dashboard version two. Now, the old one we
need to hide away. So let's go into the
Nash Healy collection, into the dashboard collection in here is that original one, Let's call this dashboard
v1 version one. And let's hide it in
the viewport here, and hide it in the render
here so that it doesn't get in the way we're here
or when we're rendering, but it's here in case we
need to come back to it. Let's also bring out this object here, these
dashboard details. Let's hit the M key, choose Scene Collection, and
that brings that out here. I think now we have
what we need to begin. Let's go ahead and hide
the car collection here. Now, we do need to think
about how we're going to apply the subdivision
surface modifier. Are we going to do it at level two or level one or higher? You can go up even higher, but I don't think
we want to do that. That adds a whole
lot of polygons. How many polygons are we going
to have if we do two here? Well, let's see, Let's
hit the Z key go-to wireframe and let's turn
off optimal display. There you go. That's a lot of polygons. What happens if we
take it down to one? Well, that's fewer. If we go to 0 there it is there, but one is fewer and
fewer is usually better. But how does it look? Let's go back to
Solid mode here. It doesn't look great. So let's go to the object
data properties here. Go to our auto smooth
field and we can click and drag in this field
and take it up some and see how much
we can clean up. Well, cleaned it up a
bit, but not great. It's still not looking great. So I think I will go
ahead and use two. I'm gonna take it
back up to two. That's just a little cleaner. It is a whole lot of polygons, but let's go ahead
and do it because we're just going to be
rendering here in Blender. We're not going to
be taking this out to a game engine
or anything else. It's all gonna be
here in Blender. So having a few more
polygons just means we're gonna have to wait a little bit longer for the render to happen. One thing I do see here is that these polygons are pretty long and stretched and I don't
think we want that. That can make life difficult for the Boolean
modifier as well. So let's go back to Solid mode and let's
tab into edit mode. And let's add a few edges here. Maybe I'll scroll the
mouse wheel and add four. Let's try that. I'll click and click again. Let's see how do we do? Yeah, okay, and maybe
one over here too. These are kind of long
and stretched over here. Alright, so once
we've done that, if we hit the Z key and
go back to wireframe, you can see that we've still got these polygons that are
more rectangular, but They're not so long and stretch and I think
that can help. All right. We've made the decision
that we're going to go with two subdivision
levels here. Before we do that, we
also need to think about the depth of the object that
we're gonna be cutting into. Booleans really don't do
a great job of cutting into flat objects
that have no depth. We should probably deal
with that as well. I'll turn off the
subdivision display in the view port here. And let's tab into edit mode. And it looks like we should
probably take care of a couple of these points here. Yeah, these are once
again, not real pretty. It's gonna move
them around a bit. Then what Let's do is
take this outer edge. I'll press Alt, click, Alt, Shift click, all the way
around here like this. And over here, we're going
to extrude this back, so we have some depth to it. One thing here we could
probably de-select this and de-select this, these out here. So it's just two here. Then if we hit the three
key to go to the side view, we can hit E and
extrude back like this, kind of at the same
angle like that. Now this is why we de-selected these so that we could
just leave that open, select these two
and hit the F key. We just do that and that. All right, so we've done that, we've given it depth. But when we turn the subdivision surface modifier back on, it's kind of ugly. It's all deformed here, so we do need to add
an edge back here. Let's press Control R and
bring this forward a bit. Let's see how we're doing. Pretty good. Can we
bring it up a little bit more? A little bit? Yeah. Okay. I'll go ahead and add one
more back here as well. Okay, so we have our version two of the
dashboard in place. Now, let's now
apply the modifier. Here. Pull this down and click Apply. Now if we tab into edit mode, we have a lot of polygons, but we had to do it to make the kind of cut
that we want to do here. Now I want to make the door
of the glove compartment. So lets do is begin
with a polygon plane. Shift a mesh plane. Here we go. Let's turn it 90
degrees in the x. To do that, I can press R x
and hold the Control key. And then I'm gonna turn it
this way and keep an eye in the upper left-hand corner and bring it up to 90
degrees like that. There we go. Now let's just make sure we're pointing in the
correct direction. Yeah, we've got blue
there and read there. That's good. Now let's go to the back view with control one
and scale it down. And let's try and put
it in place here. This is going to be the door of the glove compartment
and we have it. It's pretty close here, so maybe something like this. Then let's tab into edit mode, hit the one key and
let's select these, maybe move them out just a bit. We can select these
points and move them up. Oops, let's pull
up in the z-axis. Here we go. Let's say
something like that. I will move it
quite a bit closer. Just move it in until it can
pull it out about like that. Then let's tab into edit mode. Let's select everything. And now we want to sub-divide it because with just one polygon, it isn't gonna be able to mold
to the shape of the dash. So let's right-click
choose sub-divide. And then over here in
the number of cuts, we can just bring
this up until we get a number that
we think will work. So maybe something like this. I've got six here
that should give it enough to be able
to mold to the dash. Then I want to make
these curves here. I don't want them too big. I want kind of a curve here and a small one
here on this corner. So just like we were
able to bevel edges, we can also bevel a vertex. So with this selected, we can come up here to
vertex and Bevel vertices. It's also shift Control B. So I'm gonna click there
and pull out and then scroll the mouse
wheel and maybe add, I don't know, about like this. Let's say, I'll click and
I've got six segments there. Then I will put a
little bevel on this. So I'll press Control
Shift and pull out a bit. I don't need this many, so let me scroll
the mouse wheel and bring it down pretty
small about like this. Let's say I only
have three here. Alright, now that
we've done that, let's shrink wrap it the dash. So with this selected
add modifier, shrink wrap, click the
eyedropper, click the dash. There we go. All right, so now we've got the basic shape of that
glove compartment. We can maybe tab into edit mode. Let's confirm it
with this cage here. Let's click that
and there we go. Can we scale this up
in the Z a little bit and then move it down some, maybe just a little. It isn't in bending
over this part here. We could maybe add
another edge loop here. Let's try that with Control
R, something like that. Yeah, and so that allows that to kind of curve
over that there. Alright, so now that we've got the basic shape of the door, Let's go ahead and apply this
shrink wrap modifier here. Now let's just pull it out. And there it is. We
can smooth it there. And now that's the base
that we're going to use to cut the hole in the dash. We will add thickness
to it and use the Boolean modifier coming
up in the next video.
61. Finishing the Glove Compartment: Now let's give this
glove compartment and door a bit of thickness so we can use it as
a Boolean cutter. So what I'm gonna do is
just tab into edit mode, hit the a key and I'm just going to extrude
it in the y-axis, just hit E and y. However, once I do this, I'm guessing that all these
are flipped the wrong way. Let's go over here. Face orientation and
yep, sure enough. So all we need to do is hit
the a key and recall that to recalculate outside is
shift in, and there we go. Alright, so let's turn that off. Here. I will turn on Auto Smooth, come over here to the
object data properties turn on auto smooth here and that
cleans that up quite a bit. Now, let's just take
this and move it in to the Dash about like this. Now let's select the dash. Add a Boolean modifier, click on the eyedropper, and click on the glove
compartment while the glove compartment is
currently called plane, let me hit Escape
and I wanted to change this glove compartment. Now I'll select the dash, click the eyedropper, and then select the
glove compartment. Now, What happened? Nothing really happened. How do we know if
anything happened? Well, we can kind of see
something going on back here. But one way to see it
actually happening in real-time is to change the
display of the cutter object. So with this selected, let's come over here to this
tab, the object properties. And if we scroll down, we've got a viewport display. And under here, if
we scroll down, we've got a display as field. We can click that and choose
wire. Now look at that. You can see it happening. If I pull it out, you can see it there. But push it in. You
can see it actually happening in real
time right there. All right, so we've got that happening there. That's good. We know it's actually working. Which means from here, we could go ahead and apply
that Boolean modifier. Let's go ahead and do it. Let's come over here, pull this down, click
Apply, and there we go. All right, now that
we've done that, let's take this, change our
view of it back to Solid. I'll scroll down, change
it from wired to textured. Now, we need to scale this down just a little bit, I think. So let's move that
object origin here, set origin, origin to geometry. And then let's scale it
down just a little bit. I'm going to hit the S key here. Caleb band, just a smidge. Let's see, Is that too much? Actually, that's not too bad. All right, the next
thing we can do is add this little handle or latch. Let's hide these
objects here and let's begin in a clean view-port here. I think. Well, Let's begin
with just a polygon plane, shift a mesh plane. I will scale it. Let's scale it in the y SY. Then it seems to me
like we should have a smaller edge here that we can extrude this little guy out. Let's press Control R. And I'm gonna scroll the mouse wheel and
add two edges here. And then I'm going to scale
on the x-axis like this. Then I'm going to extrude this edge here to get
this little curve. To do that, we could actually
use a new little tool, one that we haven't used yet. We could actually use instead
of the extrude region tool. We could click this and hold and then come down to
extrude cursor. What that's gonna do is
give us an extrusion. Every time we click
here in the side view, I'm just going to click, click, click, click,
click. There we go. That gives us kind of
a curved edge there. Now, before I do anything else, before I click anything else, I need to come back
to another tool, say the Move tool, because if I would've
clicked again, it would have been
extruded again. I can take this and move it back to extrude
region if I want. And then click back
on the Move tool. To get this little piece here. We should probably
scale these in. I'm gonna hit the seven
key to go to the top view. And maybe we should just select these here and
scale them in the x. Let's do that. Then I'll take
these two and scale these in the x just
a bit like this. Maybe this one here like this. I'll kinda pull that
back out there. Then if we're gonna do
this curve over here, we probably need two edges here. Then let's just take these and scale these out
in the x like this. There we go. Now that we have that, I think what I'll do is give it a little bit of
thickness by just Alt, clicking these edges
all the way around and Alt Shift click all
the way around here. So we have those edges selected. Oh, I used vertex select, so it's selected those
edges between two. Let me hit the two key
and do that again. I'll hit Alt a. There we go. Alt and Alt Shift click
all the way around here. So it only chooses
the outside edges. I didn't want any inside edges. All right, so let's
just hit E and Z and pull down like that. There we go. Now, we don't really need
to worry about anything down here because I don't think we're ever going to see that. So now let's add a
subdivision surface modifier. Let's maybe take it to
two, let's smooth it. We could add an edge loop
right along here, like that. And also we could maybe make these corners
a little bit sharper. We could just Alt
click these edges, Alt Shift click these four edges and we could give them a bit
of a crease with Shift E. Recall, if we stretch
out, there we go. Now let's take this and
try and put it in place. Let's bring back the glove
compartment and the dashboard. And let's move this up. It looks like I'm gonna
need to spin it around. So RZ 180. Then our X9 0 negative. There we go. Hit Enter. And let's scale it down
and put this in place. Hit S and let's
scale it down here. So maybe it's
something like this. Let's see what we think here. Yeah, I feel like it could
be a little bit bigger. Now we could also, for this little piece, you know what we could
do, we could just take this right over here. I'm going to de-select everything
and then hit the L key. And then let's just duplicate this shift dx and we
can pull it over here. It's always fine to cannibalize whatever you can from what
you've previously created. I'll hit the P key and
separate by selection. Now if we just select that and move the origin to the geometry, now we can bring this in
here, put it in here. Let's do that right about there. We need to bring it out, some. Select it. There it is. Let's bring it out like that. Alright, well,
we're getting close to finishing up the interior. I think. In the next video, Let's begin working on the
gear shift and the petals.
62. Modeling the Gas Pedal: Let's now start working on some things underneath the dash. And there's this thing here, this black thing, and I
don't know what it is. It doesn't appear to be here, but if you look at an, another image, there's one here. This one, you can see it here. This is actually a
pretty good picture of the gas pedal too. And we can kind of see the
gas pedal down here as well. So I think I will go ahead and create
this, whatever that is. I don't think it'll
be that hard to do. We can just create a cube that, and I'm gonna bring it up and take away this back face here, and let's delete that. Then let's scale it down quite a bit and
let's just try and put it in place generally
where we think it might go. Something like this
underneath the dash right? Then I think we're just
going to need to add a subdivision
surface modifier and then try and just
get it into shape. So let's go ahead and do that. Add subdivision
surface modifier here. I'll go ahead and smooth it. And then let's just
tab into edit mode. And I've left the
cage off for a moment just so I can see
where the points are, where the edges are going here. So I'm gonna try
and add edges here. We can probably take
this whole edge and move it in some like that. I think I want one
up here like this. Alright, so that's
generally getting there. I'm going to add an edge
down the center here. Then we could maybe select these edges and it looks
like it's got a curve to it. So I'm just going to
pull this forward some try and get a curve on it. Then there's lists
little ridge right here, and I think that's probably all we need once we get to that. So maybe let's take another
edge up here like this. And then let's grab this edge
here on press Alt click, and let's scale
it out like this. And I'll also pull this went out a little bit more like that. Then let's give it one
more edge up here. One more edge down here and kind of tighten that up there. What do we think? Yeah, something like that. I think that's all
we really need. I'm going to select this
and hit G2 times and just move it back a little bit so we get more of a curve there. Yeah, I think that's
probably all we need. It looks like it's
tilted though. So let's turn it in the x-axis RX and tilt
it like this maybe. And then let's move it back. It looks like it's
not quite that deep. So let me change to local transformation
orientation so I can scale on the y-axis here, make it a little bit shallower. Then I'll go back to global. Maybe pull it forward a bit. How far can we go? Well, we can't go that far. Okay, so maybe
something like that. Maybe a little bit wider. Sx and there we go. Alright, so something like that. I have no idea what it is, but let's go ahead
and go with that. Now let's look at the
gas pedal over here. This is a pretty good
view of it here. But we've got this
part here that I think is kind of angled. It has kind of an
elbow joint there. So let's see what we
can do with that. I think what I'll do is create this piece first,
the actual petals. So I'm gonna find
a place to drop that cursor into maybe right
here I'll press Shift S2. I've just selected that
edge there on the floor. Now let's go ahead and
create a polygon plane here. And I'll scale it
down quite a bit. Let's turn it in the x-axis. Once again, I'm
going to press RX and hold that control key down. And as I turn I'll keep
an eye on the degrees in the upper left-hand corner and take it up to
90 degrees there. And then let's scale it down
a bit, scale it in the x. So it's kind of like this. Alright, I'm gonna take it
down a little bit more. Scale it in the x
again, and there we go. All right, let's
try that for now. Now I'm going to
zoom into it with the period key on
the number pad. And let's add a few
edge loops here. I'll add five cuts here. And then we need to bring this up on the top so it
curves a bit here. Let me select these, click one and then Control
click to select that edge. And I'll bring it up like this. Then I'll de-select the
two on the outside, bring it up a little bit more. De-select the two on the outside and bring
that up like that. We just have a little
bit of a curve there. Maybe I could bring these
two down a bit like this. Now it looks like we've
got some ridges here. So for those, Let's go to edge mode and
select these edges. And then let's press Control B to bevel those edges
out a bit like this. And actually before I
extrude the edges out, Let's give it a
bit of thickness. I'm going to Alt click
and then Alt Shift click around here to select the
edge all the way around. And then let's just
extrude in the y-axis EY and pull that back
just a bit like that. Alright, now let's go ahead
and extrude this out. I'll just go to face
mode and let's just get, I'm going to select
every other one here. Then let's just extrude these
out in the y-axis, like so. Just give us a little bit of
hint of some ridges there. Now that we have that, Let's work on what's behind. It looks kind of
like an elbow joint. It looks like something
we could use the path to along the way we did for
the rear view mirrors. So let's work on that. Let's first of all, I'm going to hide everything. So we've got quite
a bit out here. So let's organize our outliner. This is the gas pedal. I'm gonna call this petal gas because they're going to
be other petals as well. Here's the glove
compartment. What is this? That's this thing. I don't
even know what to call that. Let's call it dash board under it's just that
thing under the dashboard. I don't know what that
is. How about this? What's this? Oh, that's the glove
compartment latch. So let me just take this here and I'm going to
copy this Control C, come up here, control V and paste that and
then LA TCH there. Now that we've got these, Let's put these back in
the dashboard collection. So let's select all of these, the M key and under
the Nash E Lee, Let's put these in
the dashboard there. Okay? Now if we hide this away, those will be hidden as well. So let's zoom in with the
period key on the numpad. And I'm going to put the cursor back in the center
of the grid with shift S1. And let's create a path, shift a curved path. Here it is here. I will turn it in
the z-axis, RZ 90. I'll scale it way down. Let's try and move it into
place here I'll go to the top view tab into edit
mode and let's move it. Oh, here it is. Over here. Let's hit the G key and
move this over to here. I wanted to come out of the
back of the petal here. And let's scale it
down quite a bit. Hit the G key, move it in here. Let's go to the side
view with the three key, and let's put this
back here like this. All right, so we've got that
coming out of the back now. Let's now get that
elbow joint in. I'll just select these and
pull them back a bit and then select these and bring these
to the side a bit like that. Then. Well, it's add
some points here. So I'm gonna select
this point, this point, this, and this, and then
right-click and sub-divide. And now we've added
some extra points. If I select this point here, let me go to that top
view with the seven key. I can just move
this down to here, so that's a little
bit tighter there. Well, I guess I need
one more in here. Let me do that like that. Move this in a
little bit closer. Take this move this in
a little bit closer. So I just wanted to get some slightly sharper edges there. That's all. Then let's add some
geometry to it. So once again here in the object data properties
and move this up a bit. If I recall, we used three and here down under the bevel
section we used to. And then I'll click
and drag in the depth and we can pull
that up just a bit, maybe something like that. See how that looks. Yeah, okay, that
looks pretty good. And then we need just this piece and this is all
pretty rough because this is very small and we're really never going to
be that close to it. But let's select this point and move the cursor
there with shift S2. And then I'll press
Shift a mesh cube. This is very big, so let's scale it way down. Once again, I'll take this base off the back because
we don't need that. Let's scale this down. And I'm just working
on this piece right here, that black piece. Scale it in the z. Maybe move
this over a bit like this. It looks like
there's a bolt there and something where the
elbow joint goes in. I'm not really sure if
I'm correct with that, but I think that's what I'll do. What I'll do is maybe
select this shift S2, shift a mesh, and I'll
use a UV sphere here. I'll take this down to 126
for the segments in rings, and I'll take the
radius down to 0.1. Well, how about 0.01? And we go and I will turn
it in the x-axis are X9 0. Then from this side view here, with the three key
on the numpad, I will go into X-Ray with Alt Z and I'll just select
these faces right here. Let's delete those. And then I'll take these edges
or this edge right here. Scale it in, move it in and
we've got a bolt. Here we go. I will move it
back over to here. Let's scale it down quite a bit. Maybe I'll scale it
in the y just a bit to flatten it, some like that. I can smooth it. Let's just put it right back
into here. There we go. So there's a bolt. Very rough, I know, but I think that's
all we'll need. Press Control one here,
put that right here, and then I think
what I'll do is just duplicate this and
put this right here. Let's just try that.
Yeah, why not? I'm going to take all of
these and join them together. Control J. Then I will move the origin of this to the very
back of this cube, shift S2 to move the
cursor object set origin, origin to 3D cursor to move
the origin to that point. Now what we can do
is we can bring everything back and see if
we can get it into place. So bring back the
nationally Collection. And let's see where
we are with this. So if I move it back, how far do we have to go? Well, okay, now I'm gonna turn it in the x-axis like this. Then move it back. Turn it in the x-axis
a little bit more. Is that too high though? Let me see how far we have to go down before it intersects. About like that, I think. Let me move it back. Alright, so let's now pull
this down and forward. And I just want to kind of get this right in place like this. Let's try that. Once again, it isn't
beautiful, I know, but as I said, we don't really need a
whole lot down here. It's going to be from a distance
a good deal of the time. Let's now see if I can
get it a little bit. I think it's a
little bit closer to the center pump here and let
me move that over like this. Then let's go ahead and just
combine it all together. Rotate this just a little
bit more like that. Now I want to convert this, it's still a path, so I'll right-click
convert to a mesh. If we tab into edit mode,
There's the geometry. Let's take this, this, and this, and let's
combine them all. Control J. I need to rename it
now I'll hit F2 and call it Pedal gas once again. And there we go. We've got
our gas pedal in there. I'll press Shift S1 just to move that cursor back to the
center of the grid. In the next video
we'll do is let to work on the other petals, the break and the
clutch and see if there's anything else under here that we might want to make.
63. Using the Spin Tool : For the brake pedal
and the clutch. I don't really know
which we should do here. We've got two different kinds. So what was the original? Who knows, but I guess just
going with the one I like, I like this particular one. So I'm gonna go ahead
and create this. I think I'll begin in a similar way that we
did with the gas pedal. I'll just find an edge
here that still selected. Move the cursor to
it with Shift S2. And then let's
just create a cube and try and put that in place. So maybe I'll take the
size here down to, let's try 0.1. See
how that works. Yeah, there we go. So what
do we think something? Let me see if we can get
something about like this. Maybe SY, bring that
in some second, needs to come forward a bit. It looks like it
may be out a little bit farther than the gas pedal. Then let me try and
bring this up a bit. Something like this,
I guess. There we go. So let's say let's say
something like that. Now I can't tell
if there's really a curve there or
if it's straight. I'm gonna go ahead
and go with straight just frankly because
it's easier. Let's tab into edit mode
and press Control R. And I'm going to add
quite a few edges. Maybe I'll add ten
here, Let's do that. And then it looks like
it goes on around. So let me go back to edge mode, and I don't want these to
be selected along here. I think what I'll
do is just select these like this with
Alt Shift click here. Let's be sure we only select the edges going horizontally. Then let's press Control B2, bevel those edges and
I'll pull them out. So I think we've got
something pretty even. There we go. And then I think I'll
just extrude these in. I'll hit E and then I'll
press the S key to scale in. And then I want to
turn off the z-axis. So Shift Z. Now we're only scaling
in the x and the y. And I'll pull these in just
a little bit like that. See how that works. All right, something like that. And then maybe we'll just
put a curve on the top. Let's see if we can do that. I'll press in control
are and maybe let's put in six cuts here. And then I'll just
select these points, are these edges,
excuse me, up here. And then let's just
begin pulling up. And then de-select the ones on the outside and pull up again. De-select these. And then one last time, I've got one selected here. Let me go back, de-select that and
deselect that. Now we pull these up. Here, we go. All right, so we've
got just a little bit of a curve on top there. And then let's think
about this on the back. So it looks to me like it's
just kind of this bent piece of metal that holds this
right here like this. It's like an L shape
with a curve there. So I think what we could do, actually, I think I'm
going to scale this out just a little bit like that. I think what we could do is use a tool that we haven't
used yet, an Arc tool. If we tab into edit mode, we've got this tool right here, excuse me, it's called spin. And we can use that
to extrude out a curve for this
piece right here. So to do that first, let's create a cube, shift a mesh cube, and then let's
scale it way down. I think. To work on this, I'm going to maybe hide
everything except the petals. Let's just turn off the
car collection here. There we go. I'll hit the period key
on the numpad to zoom in. And I think I just want
Cube about like this. It looks like it's a
little bit above center. Maybe something like this. Let's bring it down a bit. And I'm gonna bring
it over to one side. And then what Let's
do is just tab into edit mode and select just
this face right here. Now I'm gonna go to
the top view with the seven key on the numpad. And I'll go to wireframe as
well by pressing the Z key. Now, what this tool is going
to do is it's going to spin or extrude
around the 3D cursor. We need to put the
3D cursor about where we want that
bend to happen. I think we went that bend
to happen right over here. So to move this 3D
cursor to where we want, we can just come over here
and select the cursor there. And then when we click and drag. You can move the cursor
to where we want it. So let's say we
want that curve to happen right around in here. Alright, so now I'll go
back to the move tool. I'm going to pull this
out to about right here. Now, what we can
do is click this here and we get this
little curve right here. Now I can click and drag on this right here and
look at what happens. See how it's curving
around like that. So that's kind of what we want, but we don't want it to
go into the brake pedal. So down here in our
spin settings panel, we can do a few things. We can take the number
of extrusions down. Maybe I'll take it down to, let's say four for now. The angle isn't bad. I mean, we can change this. We can scroll up and increase
or decrease the angle, but frankly, angle
isn't too bad. We can type in 90
degrees here if we want. Now in this axis
field down here, let's try it in the x I'm
gonna click and drag. You can see as I do, I can move that around. So now it doesn't go
through the petal there. So that's the curve
that I was hoping for. Let's tumble around and now I just want to extrude
this straight out, but I don't want to accidentally
use this tool again, so I'm just going to come
back to the move tool. And there we go. I'll hit Z and go back to solid. And now I just want to
extrude back in the y-axis, so EY, and just pull
straight back like that. Alright, so now we've
got that bend there. Let me, I'm gonna pull this out just a little bit like this. And let's smooth it. Then we can go down to our
object data properties here. Turn on auto smooth, and that helps
quite a bit there. Alright, so I think
that's pretty good. Let's turn the car
back on and see. Yeah, that's not bad. The only thing I would say
is I wonder if I could bevel these edges
right along here. Let's try this. First of all, before I do, I'm going to hit the
N key and go back to object mode and take
a look at the scale. The scale is not uniform
and Bevel tool really uses the scale to expand that edge in an even way at a
45-degree angles. So we really need to
apply the scale here. So I'm going to press Control
a and apply the scale. Now I'll tab back into edit mode and let's press Control
B and pull out here. And then I will scroll
the mouse wheel a bit. Let's see what that looks like. Yeah, that's not bad. I'm gonna smooth it and let's turn on auto smooth
for this as well. Yeah, okay, so we've got just a little bit of a
bevel around the edge. I like that. Now let's combine
these two here. Control J. Then let's
just duplicate it. Shift DX and let's move it over. Now it seems to me like the clutches just a
little bit tilted. I like that it's not quite
the same as the break. So let's do that. I'm going to tab into edit
mode and hit the L key. And I'll press R and X and just we've got
something selected. Oh, we still got that
selected over there. Alright, ALT a to
deselect, hit the L key. And now I'm gonna press RX and tilt that just a
little bit like that. Also seems like it's a
little is it smaller? I'm not sure, but
maybe let's do that. Let's just scale it down
just a little bit like that. Yeah, and then I'll bring
it back some there, just to give some
differentiation between those two petals. All right, so we've
got those two. What about this little
guy right here? If I recall, from years ago, that was the button to toggle the brights for the
headlights on and off. Anyone remember that? But let's go ahead and
do that real quick. I think what I'll do first is
do a little clean up here. So we've got the petal gas. This is the break.
Let's change that. I'm going to call
it pedal brake. And then this one, that'll be pedal clutch. We go, Let's go ahead
and take these three. Hit the M key, create a new collection,
call it petals. Let's move those into there. Then we can just drag those into the nationally collection. All right, Now
that we have that, let's hide the car collection. Let's move the cursor back to the center of the
grid with shift S1. And let's create a cylinder. Here. Let's take it down
to 16 sides, no caps. And then let's scale it down and see what we
can do with this. So we'll take this
down about like this. We will scale it in a bit. And maybe let's hit E
and S and bring this in. I'll take it down a bit. Es, ES, and then I'll hit the M key to
merge at the center there. Maybe I'll put one more right here and just bring
that up like that. Now, for this, what
do we want to do? Well, it's underneath
the rug there. I don't know that we're
gonna get that detailed, but what I could do is just
hit ENS and bring this out. Maybe bring this up, extrude
and scale out like this. And then bring this
down like that. I'll put an edge right here as well and kind of bring that up. Alright, so we can smooth it. Um, do we need even a subdivision
surface modifier on that? Probably not. It's gonna be so small
and so far away. Let's call this petal brights. And let's see what we
can put it in place. Bring this up, scale
it down quite a bit. Let's go to the side view
here and press Alt Z. Let's move this into here. Turn it, scale it way down. And now let's go back in
and see where we are here. And let's move this over here. And I'll zoom in
with the period key. Maybe we should change from global to local transformation and then move it back
like this until we intersect with it
right about there. Let's press RX and turn
it a bit. There we go. All right, we've got
our petals in there. I'll go ahead and take this one, press the M key, and take it into the petals
collection right there. Alright, in the next video, Let's see what else we need
to do here in the interior.
64. Creating Details Under the Dash: Well, there are a
couple of other pieces under the dash that
I'd like to create, and one is this parking brake. I'm pretty sure
that's what this is. It looks like it's just kind
of a curved metal piece with a long cylinder going
back into the dash. So I think we can do that. Let's hide the car. And let's just
begin with a cube. And let's just try and
shape it from this. Maybe I'll scale it down a bit and let's just then
scale it in the x. And from here we can just add a subdivision surface
modifier and then begin trying to just get
the shape that we want. I'll go ahead and smooth it. And if we tab into
edit mode, oh, let me keep the cage
off here so we can see that unsmooth cage there. And maybe I'll just begin by giving it a little bit of thickness in the
back here like that. Then we probably need
an edge here so we can curve it kinda has that curve. We probably want to
scale this front down, so we have more
of a point there. We could maybe scale
this down a bit as well. Then if we go and look at
it from a side view here, we could maybe grab these points and just kind
of pull them down a bit. And maybe these we could
kind of give a curve there. Let's see how that works. Yeah, I think we're
getting there and then maybe one edge around the
side here. Let's try that. All right, yeah,
let's do that and then let me grab
these points in, scale them down
just a little more. Maybe it could be a little
bit thinner in the z as z. Let's look at it from the top. And maybe a little
thinner here to SY. Just bring that in a bit. Maybe I'll and you look
down a little more. Yeah, I think that's
really all we need. Then we've got a cylinder
kind of coming out of this. And I'm sure if we were to do this where it's
gonna be a closeup, we would want to extrude this
or have this all connected, but I don't think we need to. It's gonna be under the
dash, pretty small. So I think I'm not
going to worry about actually having
that be all connected. I'm just going to move
the cursor here and just create a whole new cylinder
to place in there. I'm going to create
a cylinder in edit mode with Shift a cylinder. And then we could reduce the number of sides
to maybe 12 here. And we got to also
make sure there is no cat fill on the
top or the bottom. And then we could
just scale this down. Kind of move this out like this. So we've got that. Let's go ahead and
smooth this as well. There we go. From here, I guess we could just take this, maybe scale it
down a little bit. Then let's add a
little edge to it. I'll press E and S and
then scale in a bit. Then DZ and pull down. And then we could
just add an edge loop here and add one here. And we go. And then I'll
scale that in a bit. Then let's just
scale that in ES, will then extrude that out that cylinder here
that goes back. We're not going to create any of the ridges on top or anything. Let's just add an edge
here and add an edge here. And then I'll select
this and press easy, pull it down a bit. And then let's go
ahead and just hit E and Z and pull that all
the way down like that. All right, so now
we've got this. We need to then
put it in the car. So let's bring the car back and let's spin it in the z-axis, r z 90 needs to
go the other way. So I'll hit the
Minus key and enter. And then our y 90. There we go. And let's oh no, that is, that would've been
the correct direction. Let me change to global here so I can see it a
little bit better. Alright, now let's spin
it in the Z RZ 180. There we go. Let's bring it down and
put it in place here. Let's scale it way down. Try and get it under
the dash here, I'll hit the period
key to zoom in. And let's move this
into about right here. Because like it needs to
be a little bit smaller. Maybe come up a little bit. Let's see what we
think it looks like. It's a little bit it comes out a little bit beyond the
frame of the door like that. What about the size there
and what do we think? I feel like it's a little big. Scale it down just a little
bit more. Let's see. Yeah, I think
that's pretty good. Alright, so let's make sure we've got this pulled
all the way back. I'll just drag this back
in the y-axis. Here we go. There's that piece. Yeah, I think that'll be
good just to have in there. I feel like one last thing
I want to do here is just select this and hit
the period key and move in. I just want to grab this one
edge and hit the G key two times and pull it down just a little more curved
there at the back. That's probably
about all we need. Now we need I think these
little things right in here. It's not difficult, they're
just a little tedious. But I think it'll really
help just to kind of fill in and have some stuff in here. I think that'll help
to do this one here. Let's just grab one
of these once again and kinda cannibalize
off of this. So I'll select that
with the L key, press shift D, Enter, and then let's just move
it down in the z-axis, then split it out with the P key and separate by selection. And then let's
select it and move that origin to the geometry. Now that we've got that, let's come over here
and put it in place. What do you think maybe right in here, something like that. And then what I want to do
is change it up just a bit. I want to make it
smooth on the front instead of having this piece. So I'm gonna go to face
mode and I'll just press the C key for circle select
and just click and drag here. Then I'll right-click to
get out of that tool and then press Control plus on the numpad to expand the
selection out like this. Then I'll delete these faces. And if we select this edge, I might want to pull it out again just a little
bit like that. And then let's just
hit E and S scale in. And then let's just
collapse these. I'll hit M and merge
them at the center. All right, so there
we've got that piece. I think maybe I want to
change it a little bit. Maybe I'll grab these edges
and pull them up a bit. Let's just change it
up a bit like this, just to have it be a
little bit different. Then for this back here, it looks like we probably
don't need these. And then I'll press
Control plus on the numpad and just bring
those two there like that. Yeah, Let's try that. I'll
delete it. Delete faces. Then I want this
whole thing here. Be a little bit
longer like that. Now that we've got that, we can select this edge
and just extrude it. I'll hit E, y and maybe one more EY and all the
way back, there we go. All right. We've got that. It looks like there's a little
piece that holds it there. We could try that. How far should that go out? That's not bad, maybe right
there. Let's try that. For this piece. What Let's do is create a circle and begin this
piece from this circle. I'll press Shift S2 to
bring the cursor to here. Shift a mesh circle. And let's take this
down to maybe only 12. And let's take the
radius down to 0.1. Here it is. So let's scale it down. Let's turn it in. The x are X9 0. We can scale it down
quite a bit and then bring it back into here. It's gonna be somewhere
back in here. And I'll scale it down, so it's just around that. And then let's just extrude out. So if we tab into edit mode, Let's just hit E S
and extrude out. And I'll do that again ES
and extrude out like that. Then we could just grab
these right around the top. Let's just extrude these up. Easy. There we go. We could probably
scale it in the Z. I'll press S z 0 to
flatten that up. We could probably add another
edge loop or two here. And I'll just take that and
drag that up into there. Now, what we can do
from here is extruded. I'm gonna hit the a key to
select everything and just hit EY and extrude
it out like that. I will add two edge
loops in here. And I'm gonna add two
edge loops inside here. That then let's just add a
subdivision surface modifier. Take it up to two. What do we think here? Yeah, something like that. We could we could actually
take these in here, I guess, and select those press
Control numpad plus. Then we could scale them
down a bit like that. There we go. Alright, so now we've got that. I guess we can take this and
this and join them together. And when we do it, we'll use the origin of
the last ones selected. So then if we press Control J, there's the origin there. Now we could tilt it because
it is tilted here, isn't it? So let's press RX and
tilt that back like that. See how that looks. All right, shift S1
to move the cursor. And then we need one more here. That thing right there. Let's cannibalize
this one more time. I will come in here
and just select this. I'm going to Alt click between two of the
faces here and press Control numpad plus and
expand the selection on back to here. And let's duplicate this
shift dx, move it over. And it looks like it may
be a little bit bigger. Let's bring that up some. And also it looks like it
may be a little bit longer. So let's do that. I'll select these
and grab those. And we should maybe change
to local transformation. And now I can drag
that back like that. Maybe bring it down a
little bit. Let's try that. And then what I can
do is maybe make this little thing
back here and I'm not sure what it is or how it looks, but we can try it easy, bring it back easy, a little bit more. And then I'm gonna scale out E, S and P S out a bit like this. Maybe not that much. Bring it forward, some bring
it out a bit like that. Then I guess go back. Let's try that easy
peasy scale in. Maybe easy again here. Let's try that and then
I'll scale this down. So maybe we could add one here. Let's try that. Okay, so
we've got that thing. Let's select it. Let me move the origin to it. Let's move the origin
to the geometry. Oh, I didn't split it out ever, so it's still all the same
object. Let's split that out. I'll press the P key and
separate that by selection. And then if we just
select that and move the origin to the geometry, we go and I can move the origin back to the geometry
on this one. Okay, so now where does this go? It looks like it goes right
up close to the dash. Maybe if I moved
it up into here. And then back a bit. Let's try this. Maybe something like that. And then we could just
take that edge back there. Easy and just drag that all
the way back like that. See how that works. Yeah, So that I think helps, that just helps give some
extra things in there. The AI just has no one
individual thing to focus on. So you've kinda get this
general sense that there's just a lot of things going on in there and
that's what we want. The next thing we should
do is try and just add a couple more
things in here. We've got the rearview
mirror here we can work on. And of course, the
gear shift here. In addition, there's this thing underneath the steering wheel. We can see it a little
bit better here. There's kind of a
black trim here and then this chrome piece that
sits underneath there. And I think that'd
be nice to have to kind of finish that
off right in here. So in the next video,
let's work on those.
65. Modeling the Rear View Mirror: Alright, What else
can we do here? Well, I think we can work on the rear-view mirror and also maybe we could
work on the gear shift, although I don't
think I'm gonna go with this particular style. I think it'll be more like this. But let's work on
the rearview mirror. Now. This one, I've looked
through some of these pictures and I think a better one to work with
would maybe be this one. So we've got this image
here from the front. And then that same silver
car we've got here, I think let's look at this. We've got it from two
different points of view here. Yeah, let's work on this. Now once again, before I began, I better clean up
the outliner here. So let's figure out
what these are. This is the parking
brake and then this is the knob
thing under there. So he didn't really
know what that is. How about we'll call this
knob under dash one. Let me copy that with Control C. And this one here we'll
call knob under dash two. I'll just paste that
with Control V. And then we can take
all of these and move them into the
main collection here. Let's do that. Then let's hide it and
work on this mirror. So I'll go ahead
and hide that here. This mirror, I think we should once again begin with a cube. I'll do that. I'm going to spin around here. I like to have the x-axis on
my right here as I model, It's just a thing. I don't know why. You certainly do not
need to do that. I'm going to scale this in, scale this out in
the x like this, and I'll go ahead and cut it. Let's do that right
down the center. And as we've done before, I'll just take one side, delete faces and then let's
add a mirror modifier here. Turn on clipping.
And here we go. I think what I want to
do here is first of all, maybe grab these edges right here and just
pull them in a bit. Let's try that.
Kind of like that. I feel like this then
can come out some. We may want to take this edge right here
and scale it in the z, kind of give it a little
bit of a curve there. We could take this front face here and we could inset this. We can hit the I key
and pull this in. And recall then we
could hit the B key to turn the boundary off and
bring that in like that. And then maybe we could
scale in the z like this. We go and then we could
extrude in from here. Let's hit E and
pull in a bit like that just to get that rim there. Then we're going to
need a few edges to hold all of this too. But actually as I look at this, it looks like this is curved on the back just a little bit. Let's add an edge
to the center here. And then just select this and
let's just pull this back. Just so we have
that in the back. Then let's add an
edge right up here. And maybe probably a
couple edges in here. Maybe one inside here like this. We may need to do more, but let's begin with that. All right, so let's now add a subdivision surface modifier. Take it up to two, and it's not bad. But I think we could maybe
use an edge writing here. Let's do that. I'm wondering if we need
an edge right down here. Like that. Let's take a look.
Let's smooth it. I'll right-click and
choose Shade Smooth. Do we need one? Do we need one up top
here? Let's just see. Well, I don't know. I almost feel like if we
took this edge right here, I just Alt click that edge. Let's move it in some fat. Maybe the same with
this. Let's try this. See how that works. Yeah, that looks a
little bit better. I think we could almost scale it out in the x just a little bit. This we have that
curve in the back. That's kind of nice. So let's go with that. All right, so now let's
go to the side view and let's move it up to about
where we think it should be. Then let's begin working on
this stem here on the bass. Let's create a new object here. Let's create a cylinder, and we don't need 32
sides. How about 12? Let's try that. I'll scale it down
and let's get it. I'm just looking at this
area right down here. Let's get this in place. So maybe it's about like this. I'll scale it down a bit. Move it down here. Alright, so now let's do is, let's just take this
top edge right here. I think I want to scale it in. Oh, I left the faces on it here on the
top and the bottom. Let's delete that. I'll just delete faces and I'll do that same
thing down here. I just forgot to
choose no cat fills. All right, so now let's press E and S and scale in just
a bit easy pull up. Let's scale in just
a bit like this. I'll scale in some. And then we need to
go up like this. And I'll also scale in a bit. I feel like it kind
of tapers in a bit. Then we could use
that spin tool again to get the bend
here. If we wanted. We could do that. We can choose the cursor over here and
drag it up like this. And then with this
edge selected, we could come over
here and choose spin. Now it's kinda flat here. It's not really going
the way we want it to, so we could just click
on it once here. And it's gonna be
ugly and that's okay. Let's take the steps
down to four again. And let's type in
94 the degrees. And it looks like we could maybe turn it in the x-axis this way. How about the z-axis? Yeah, the z-axis helps
if we take the z to 0, I think that will be good. Now we've got it
straight up and down. I've got negative one in
the x and 0 in the z here. Now we could take the y and maybe let's
expand this out just a bit. And maybe the Z, stretch that
forward a bit. There we go. Get that, something like that. Yeah, that's not bad. Then I want a little piece up
here that kind of sits back here as if it's like a
thing to accept that stem. So I'm going to press Shift D and Y and move
this out like this. Then needs to come out a little bit more like
that. There we go. Then what I want to do is just
I'm going to scale it in, so it's inside here. And then I'm gonna hit E, S and scale out like
that. Pull it out. Let's pull this out
a little bit more. I'll press Control
numpad plus to expand the selection and
let's pull that out to here. Scale it out some. And then I'm gonna hit EY and move that in
a bit like that. We have something like that
for it to kind of go into. Then on the bottom, Let's take a look at this. It looks like it has a more
rectangular plate there. So what we can do is we can
hit E and S and scale out. Maybe about like this. Then we can take the R, three vertices on
this side here. And then three on this side, we can change to
individual origins and scale in the y SY 0. There we go. We can do that same
thing over here. We can take these three. And we could press sx
0, kind of like that. Now we could maybe
scale in the x. Let me go back to median
point in scale in the x. So we Latin D's up. Then we could Alt,
Shift, click this, so we select that
whole edge all the way around and then
scale in the x. And then we have kind of a rectangular or square
kind of thing. We probably ought to take DES, I'll click and then
control-click sx 0. And let's do the same
thing over here. All right, so now
we've got that. Let's select that edge. Press easy and bring
that down like that. Now, I think we should add a subdivision surface
modifier to this and see if we can get it into shape before
we place it on the dash. So let's add a
subdivision surface. I will smooth it. Let's add a few edge loops here. So it looks like we
could do one here. One here. Like that. We could add one down here. Let's add one in
here, like this. All right, so we've got that. And then down here we should
probably add this here. Add this out here. Alright, so we've got that. Now. Let's take the object
origin and move it down. Here. Let's say shift
S2 to move that cursor. And then Object Set Origin, origin to 3D cursor. Let's now take this
and then select this and press Control J, o. We have a mirror modifier. Let's undo that. Before we join these, we need to apply that
mirror over here. There we go. Now we select this, select that Control J. We go by selecting the
stem or the base last, we ensure that that origin
stays there for the object. All right, now let's
give it a name. I'll call this rear view mirror. Let's bring back the car. Looks like we need to
spend it in the Z RZ 180. Let's scale it down. Let's bring it up and let's try and place it on the dash here. It's a little big. It's true. Let's scale this
down quite a bit. Where do we think it should go? Yeah, it looks like
it's about there. Maybe move it up just
a little bit there. Let's see how that looks. Like. It's a little smaller,
something like that. I feel like it should turn
a bit toward the driver. Let's take well,
what we can do is we can maybe take this edge and move the cursor to
it with Shift Into. Let's then select this object
with the L key and this, or this piece I should say. Let's then change our pivot
point to the 3D cursor. And now what we can do is
we can rotate it in the z. So if we press our Z, we can kinda turn it like this. Something like that. Let's see. How does it look on the
back now? Yeah, not bad. Okay. There we go. In the next video, let's
work on the gear shift. And if we have time, let's work on that piece that
we talked about earlier, back here at the back
of the steering wheel. That's coming up next.
66. Modeling the Gear Shift: For the gear shift, there are several different
styles in these pictures. I don't really know which one is more authentic
than the others. But I think I'm gonna go with just once again, the one I like. This one I like and there's a similar one in
here, I believe. Let's take a look in here. Something like this. So that gives us some
information about the top. But what about that
base of the gear shift? Let's see if we can find
anything that gives us a little bit more
information about the base. Well, this one's a
little bit better. I think maybe something
like that for the base and then something
like this for the top. We're going to combine the two. It looks like I could
take this rearview mirror and put this in the
nationally group. Then let's hide this away. The cursor is currently in
the center of the grid. Let's go ahead and
begin with a cylinder. Press Shift a mesh cylinder, and lifts takeaway, the
cat fills and let's make this say only 16
sides. Let's do that. Let's scale it down and
go to the side view here. And let's just tab into edit
mode and see what we can do. So I'm just going to select
this and move it down. I am not sure how many
times we need to do this. It looks like three. Let's give it a try. I'm going to hit
E S and scale in then E Z and bring
this up a bit. And then I'm going to do
this again and again on up, going in a little bit
further each time I think just E and
S, then e and z. So there's two of
those, maybe one more. Let's try that. Bringing
that up a little bit, extrude and scale out again. Bringing that up a
little bit more. Okay, so now we get
to the top here. I think there's this little
piece right up here on top. So I want to do that. Let's extrude and
scale up in the z. Then I want to scale in, I think pulled down here now. And scale in like that. So we get kind of a
closed-off area like that. Now let's add a subdivision
surface modifier. See what we can see. I'll smooth it and yes,
something like this. I think that's what we want. I may make it a
little bit taller. Let me change to
the 3D cursor here. So we scale from the 3D cursor, maybe something like that. I think I'll add an
edge right here to make that a little tighter. Also, I think maybe one in here to make
this a little tighter. Do we want to make any of these? Yeah, let's go ahead and add an edge loop or two
underneath each one of these, just to make that a
little bit tighter there. Okay? Then what we can
do is we could select some points up here and
press Control numpad plus and expand the
selection like this. And then to kind of bend it a bit because I don't
think it'll be right, straight up and down. Let's turn on the
proportional editing tool. I will change back
to median point. And then let's just
hit the R key and then scroll the mouse wheel out. So we expand this circle of
influence and then we can kind of tilt it just
a bit like this. And then we take this whole thing and move it
over just a bit like this. So maybe something like that. It's kind of bent, will have the gear shift
coming out at an angle here. Let's try that. Now
that we've done that, let's create another
cylinder here like this. Once again, we can
scale it way down. And for this I'm going
to get it really small. So it's kind of the
width of the stem here. And then let's just
scale it out in the Z. Maybe that could be a
little bit smaller. Then let's get this
thing right here. If I select just
these points up here. And then let's just
extrude this up. So let's just hit E and S Again. I'm gonna press easy
and pull up a bit. And, you know, for that
top part what we could do, oh, I still have proportional
editing turned on. Let's turn that off.
We could do is create a sphere with 16 sides and just put the
top half up there. Why don't we do
that? I'm going to move the cursor to this point, shift S2, press Shift a. And while this is in edit mode, I'll go ahead and create
a new object here. Let's take the number
of segments down to 16 and maybe the
number of rings down to In 12. Let's try that. And I'll take the
radius down to 0.1. There we go. Actually let me take
this down to eight and we don't need so
many rings there. Now let me move this up. Go to face mode and I will
select these and delete these. Then let's just grab all
of this and scale it down a bit and
move it down here. And yes, so why don't we just see why don't we
just take these here, move them back down like that. And then we take these alt Shift click and let's just
bridge edge loops here. In fact, I think maybe why
don't I go down to here, scale these in a bit
like this. There we go. Now let's try these. And then we can press Control E and choose bridge edge loops. And there we go. Okay, so now we've got that, although that top part does not look big enough or
this looks too big, I'm not sure which Alt click
between two of these faces. And let's use that shrink
fat into a with Alt S and then kinda bring this
down, something like that. That looks a little
bit better I think. Then I think I've just want
to scale the whole thing up. It's quite a bit bigger. Maybe we could take these points down here
and move these up a bit. Now let's add a subdivision
surface modifier. Let's add a few edge
loops to hold these like this. And maybe one. Here we go. Let's smooth it. And now let's see if we
can get it in place. I'm going to move the cursor down to this point
here with shift S2. Then I'll move the origin of
this object to that point, set origin to 3D cursor. But let me select it again. Set origin to 3D cursor again. There we go. Now when we select it and hit R, it'll turn from that point. So let's hit G. Move
this down like this. Are we want something like that? Maybe we could pull it out
just a little bit more. Move it over.
Something like that. All right, Now let's
combine the two, this and this control J. Let's now move the origin
down to the 3D cursor. I've already moved it to the center of the
grid with shift S1. We go. Now the whole thing
will scale from that point. Let's bring the car back and let's try and
get this in place. So it looks like it
needs to spin in the z 180 degrees our z1 AT. Then let's scale it
down. Move it in. If we needed to be a
little bit taller, like this, up a little bit more, and that's a little too big, so let's scale it down some back a little.
What do we think? Yeah, that's not bad actually. Maybe I'll scale it
down just a little bit. There we go. We've got our gear shift. Now if we wanted, we could adjust
the size of this. If you wanted to make this
part bigger or smaller, you could select this like this and use that
shrink fat and tool again with Alt S to kind of
make it bigger or smaller. But with that in place, Let's now take a look at this piece underneath
the steering wheel. To me, it kind of
looks like a cylinder. Right there. It's it's really hard to tell, but I think I will go ahead and go with a cylinder on that. So, well, Let's do is with tab into edit mode and
let's find an edge. Here's an edge right here. Let's take a look at that. Yeah, Let's use this
edge here to build that. A black ring there. That'll be shift D Enter. Let's press the P key and
separate by selection. And then if we tap
into object mode, let me see if I can select
it there it is right there. Now TAM back into edit mode
and let's select that thing. I'm going to scale it out
just a little bit there. Let's extrude it in the Z. I'm in local transform
orientation, so we should be able to extrude it along the angle
of this object here. So let's hit Easy and
extrude it back some. Then if we select
everything with the a key, we could extrude it. E and then Enter. And now we can use that shrink
fat and tool by pressing Alt S and kind of pulling
that out a bit like that. We could select everything and maybe scale it back in a bit. So we get just that ring there. Shade smooth on that. Now, this thing,
whatever that is, Let's find a point here. Bring the cursor to
it with Shift S2. Let's create a cylinder. Here. We've got 16 sides here. We could take it down to 12. We don't need that many. And let's take it down to 0.01 O into here to really
shrink it down some. And I'm going to make the
cat fills on the end. I'm going to make
those triangle fans. I think that might be
a little bit easier. Let's turn it in the
y-axis, quinine 0. We go Better change back
to global for this. Let's actually that doesn't
look too bad right there. If I scale that out
a bit like that, then we need something
to go up in there. So what Let's do is just create two edge loops here and scale them out
in the x like this. Then let's find a few faces in here that we can use
to extrude back. Let's do that. So I'll hit G and pull
those back into there. And also, what I'd like to do is delete those faces
that are in there. We don't need those,
so I'll just hit delete and delete faces. All right, so now
I'm going to scale that in just a little
bit like that. Okay? We should probably
add edge loops here. And here. We're probably going to
need an edge loop in here to hold this edge right? Now let's add a subdivision
surface modifier. Smooth it. All right, so there we go. I don't know, That
doesn't look great. It looks like there's maybe a little extrusion
here on the ends. Let's try and do that. I'm going to turn the cage
off here for just a minute and let's select
this with the C key. Then this over here
with the C key. Then let's extrude or
excuse me, Let's inset, Let's hit the I key and inset
that just a little bit. And then hit the I key
again and do that again. And then I'm going
to extrude out. So let's hit E and
then the S key, and then the X key to
scale out in the x. Let's do that again. Esx. There we go. And then let's inset this. I pull that in just a
little bit like that. Let's see how that worked. Let's try that. It's
kinda sticking out here. Let's scale the whole thing
down just a little bit. We go. Alright, so I'm not sure if that's what it's supposed to be or
even what that is. But I think just
having that in there is going to help in
here. Fill this in. I feel like I want
to make that or pull the steering
wheel up a bit. Let's take the steering wheel as well as all of these things. And I'm back in global here. I'm just going to
pull this whole thing up just a little bit. And then to fill in back there, I know we can't see this and I know it's not really a thing. Does this go all the way back into their I guess
it would, right. So let's just do that. Let's just take this whole thing back into the floorboard. Let's just grab
this edge and let's go back to local transformation. And I'll just hit easy. And we'll pull this all the way back into there like that. Let's see how that
works. All right. We've got the gear shift and the steering wheel thinking in continuing with the interior, I think we need to deal with these pieces
here on the door. I'm not sure what this
thing is connecting, but I've seen it in
a few of the images, so we'll go ahead and
add that as well.
67. Creating the Door Latch: For the door latch, I've found two images here that I think
it'd be pretty good. This one and this one here. The straps here on the
latch are a bit different, but I think I'll
choose this one here, since it's more like a tube. And frankly, that's just easier to do with the Path Tool because I think I'd like to use the path tool to get
that nice curve there. I think that's what
I'm going to choose. Let's work on this piece first. Let's also clean up
the outliner here. It looks like this
is our gear shift. I'll put that in the nationally group and
then this down here, Come down here in this, well, I'm not sure
where this went. Oh, it's probably in with
the steering wheel since we pulled that edge off
the steering wheel. But I'd like it to be with this. So one way to find
this in the outliner is just to hit the period key on the number pad as well here. So I'll just hit that and
then you can see that here. I think this, this
should go together. So actually all I'll do is I'll select this and then shift, click this, and then
press Control J. And that will pull it out
and put it with this object. Then what we can
do is rename this. So let's just call
this steering. We'll ring. Not sure what else to call that. And let's just drag that
into that collection there. Alright, so now that we've
got them all cleaned up, Let's hide that away and
let's begin on this. For this, let's maybe go
to the top view to begin. And I think since
this is kind of an elongated circle here, kind of an oval, Let's begin with a circle is
press Shift a mesh circle. And let's take the number of sides down to 12. Let's do that. And I'll take the radius
down to 0.1. There it is. Now let's just
delete part of it. Delete this half,
delete vertices. And now we can take this, move it out and let's add
a mirror modifier to it. There we go. I'm going to
turn on clipping here. Then we can just move this
back and forth until we kinda get a sense of maybe
how big it should be. I'm thinking
something like this. We can try that and
then we can take these two and extrude
them in the x-axis, EX, pull it into the
center and then they clip. Since we turned
on clipping here. Then let's just tap back into object mode and let's go
ahead and apply this. Pull this down and click Apply. All right, so we have that
basic shape for the outside. Now for the inside, what Let's do is let's
just take this and let's duplicate this Shift D
and then hit the S key. And let's just scale this
in like this, right? So we're gonna use
this in here for this. If we scale this
down quite a bit, tell us about the size we want in terms of the curves
here on the outside. Now we could take these
and we could just pull this over and maybe even just hit the G key and
pull it up like that. Grab these and bring
these down like this. Then maybe we could take this and just hit
G and kind of give it a little bit of a
bend there because we're going to add a subdivision
surface modifier to this. And it'll automatically
give us that curve. Now that we've got these two, Let's hit the L
key and I think I want to give it a bit of depth. I'm going to hit the period
key on the numpad to zoom in. And let's just pull
this up some like this. Then all we need to do is
just bridge these edges. So with this selected, I'm going to press Alt Shift
click and select this edge. And now we can press
Control E to go to the edges menu and use
bridge edge loops. And there we go. Now let's press Control R
and add an edge loop here. And let's kinda pull
this up like that. And then let's also
take this edge and press easy and extrude
this down like that. Now we've got that
basic shape here. And let's also maybe grab this edge here
with Alt click and hit Easy and pull this down
as well, something like that. Now we could add a subdivision surface modifier
and see how it looks. I'll go ahead and smooth it. And then we could add
some edge loops in here. So I'm gonna press Control R and add an edge
loop in here too. Tighten that up, and
let's do the same thing in here as well, like that. All right, now we've
got this piece. Let's now create
that latch here. And I think we could maybe use that spin tool again
to kind of get that. I think there's a 90
degree turn or something here that we could get
with that spin tool again. Let's go to the side view. And let's take this
and let's spin it. Let's press RX 90, and let's spend that like that. Then. Let's go ahead and
create a cube here, shift day mesh cube. Let's take it way down, Let's take it down to 0.01. That's pretty tiny. But we can still use it. I'm going to scale it out a bit. Scale it in the ECS. About like this. Let's move this back. I'm gonna go to the
side view here. Maybe scale it in the y a bit. Let's put this in
here about like this. Maybe up into here, like this. Okay, so now that
we've got that, let's select that face and
let's go to the side view. And we want to move this cursor. I'll come over here
and select cursor. We want to move this
to about here because we want that to
curve up like that. Now let's come over to the spin tool and
let's turn that on. Let's click this right here. And then let's see
what we can do. I've still got four steps here. Let me change the
angle to 90 degrees. Let's change the x to one, and let's change the Z to
0 and see how that works. Yeah, The x is good here. Let's try to Z for
the center and that kind of it holds
it up like that. That's not bad. Let's
work with the why. Yeah. I think IF I just
used this, That's not bad. I mean, once we get
out of this tool, we can move this forward so
it is in the right place. But I think that's
probably pretty good. Let's work with that. I'm gonna go back to
the move tool here. I'll hit the a key to
select everything and let's just pull this
forward like that. Now let's take a look at it. How do we do? Well,
that's not bad. Um, I think it could
be a little bit thinner in the x-axis like this. Maybe pull it back a bit. But yeah, that's pretty good. Let's take this face now unless just extrude it
straight up and pull that up. And we want it to be about o, about like that I think. And now let's get
this top piece. Let's zoom in here. What we could do is
just hit E and S, and let's scale out a bit. And let's scale in
the y SY like this. Then let's hit E
and pull up like this a little bit more and let's scale
out again like that. Yeah, Something
like that, I think. Alright, let's add a subdivision surface
modifier to it actually. Before I do that, let me split these two. I'm going to split
these two so that, so that when we insert
edge loops for this, they don't go and extend
onto this part as well. I think I just want to
select this edge right here. And now in vertex mode, I can come up here and go to
rip vertices or the V key. I'll just press V
and then Enter. Now if we just hover over
this and press the L key, you can see it's a
different piece now. It's been split off from those. Now if we add a subdivision
surface modifier to them, now we can add
edge loops without them extending to the
other part like that. Maybe I could go like this. For this part, I'll go
ahead and smooth it. And then for this part up here, I could say go like this and bring this
down here like this. This up here like this. And I could maybe just
put one here like that. And maybe one down the center
like this and then these I could pull up just a bit
like this. Be like that. Yeah, Something like that. So as I said, I just split those
off so I could put different amounts of edge loops on those two different parts. It looks like back here I
can delete some of these. I don't need all of these. I'll just select this
face here and press Control Notepad Plus,
and then delete. And delete faces. There we go. Now we've got that part. Now I could do a bit
of adjusting here. I can take this piece, it can scale it out, make it a little bit bigger. I could pull it down
a bit if I wanted. Now that those are
two separate pieces, we can adjust those
individually. All right, let's see
how this works now, I will combine these two. I'll take this piece and
this piece, press Control J. Alright, let's give this a name. I'll call this door latch. I think in the next video, what lists do is work
on putting it in place. And also will create
this piece right here. And this piece right here
that connects to the latch. So that's coming up next.
68. Finishing the Door Latch: To create this piece right here, we really don't have a
whole lot of information. So we're going to
have to come up with something that might look
something like that. I think what let's
do, first of all, is let's just move the cursor, say two right here. Let me go to edge mode and Alt, click that and then shift
S2 to move that there. Now, let's create
a cylinder here, and let's take the
size way down. First of all, let's just take
it down to maybe 12 sides and take it down
to 0.010.02 here. So it's pretty small and
I'll make sure it does not have any cap fills on it or any caps on the top
and the bottom. So now let's just
scale this out. Let's see if we
can get this into a size that we think
might work here. Then what we can do
is, first of all, let's scale it in the y SY, let's bring it in like that. Maybe we could
scale out in the x. Let's try that. And then we could take
these faces here. And maybe with the
proportional editing tool. Let's try this. Let's turn this on
here or we can hit the O key to turn
that on as well. Then let's scale in the Z sc and I'll scroll the
mouse wheel and let's just bring this down so it
looks something like that. Maybe like this. And then I'll turn it off
again with the O key. And then let's hit S and Z and
scaling a little bit more. All right, so that's kind of the beginnings of
that shape there. I think these edges
could come out a bit. This, yeah, let's do that. Now let's add a subdivision
surface modifier to it. See what happens. I'll smooth it. And let's also add
some thickness. I'll just use a
solidify modifier here. That may be a little
bit too much. Let's turn on even thickness
and click and drag in here. And I'm just going to bring
it in just a little bit. Maybe like that. Now, we could also play with the order here in
the modifier stack. So I could take that
subdivision and drag it down and see
what happens there. Yeah. Actually, that's not too bad. Let me go back to this, solidify and click and drag in here, and let's try and
change this a bit. So maybe something like that. Now we're going to have
to scale up again, I think, and move over a bit. But maybe something like
that. I kinda like that. Now it looks to me like
there's bolt or a pin, three of them here,
but I think I'm just gonna do one right in here. Let's put one right in there. So if I selected, say these two edges
impressed to shift S2. Now we could create a
new cylinder in here. Once again 12 sides, but this time I'll
add a triangle fan. Let's scale it up a bit. Turn it in the x are X9 0. And let's scale it out
in the Z, s and z. Then let's give it
a couple of edges, maybe like this and scale a
mountain the z like that. Then let's turn on the subdivision surface
modifier for that. See how that works. Alright, so let's smooth it. That's pretty small, so maybe we can take
it down like that. Yeah. We just have something
in there that kind of signifies it's holding
that strapped together. Alright, so we've got that. Let's combine all of this. Let's take this, this, this, and let's join these. Oh, before I do that though, I think I have an extra
modifier on here. Yeah, I've got this solidifies, so let's apply this. Here we go. Now everything should just have a subdivision surface modifier. So let's just select
everything. Press Control J. And then let's move that point, that origin to this
point right here, moving the cursor and then moving the origin to 3D cursor. Now let's take this
and put it in place. And then when it's in place, we'll create this
path just so we can see how big it's supposed to be. Alright, so let's
bring back the car. And let's bring it
up and let's turn it so I'm in local transformation, so I'll change it back to
global to put this in place, let's press RZ and I'm gonna hold the Control key and spin it around until I see 90 degrees up in the
left-hand corner there. And there we go. And
let's move it over, scale it down and
see if we can get it approximately in place. I think it's probably
something around here maybe. Still looks a little big. Zoom in and let's
pull this back. Maybe something like that. Let's take a look here. There's goes up over
this rim right here, and I don't think I've got the distance
currently to do that. It would have to
be way out here. Now I could move this panel out, but I've got it in such a place where it's not too bad here. So I've kind of boxed myself in and I've gone ahead and
converted this to polygons, it would've been a
whole lot easier to adjust if I'd kept it as a path. I think what I will do is
cheat just a bit and move this down and then move
this in like that. So it covers the
top of the panel. Not that trim. They're a little bit
of a mistake there. I kind of painted myself
into a corner there. So lesson learned here. Try and keep everything as adjustable as possible
until the very end. All right, so I've got this now. What I need to do
is create a path and string it up right
here. Let's do that. I'm going to, first of all, let's find a point where we
can move the cursor here. Maybe just this
point right here. Actually, I'll we've got this one selected on
the other side as well. Yeah, that's good. Let's select these two
and then shift us to. And there we go. There's the cursor right there
in the center of that pin. So let's now press
shift a curve path. For this. Let's
scale it down a bit. Let's turn it in
the z-axis, RZ 90. Then I'm going to
scale it down a bit. Let's move it into place. I will go ahead and tab into edit mode and move
this in edit mode. It's just easier to see. Let me scale it down
a bit to there. I'm gonna take this
one and move it into here. That goes into there. And then I think we wanted
to just take these three. And let's just pull this
down a bit like this. Then we could maybe pull
this one up a bit like this and maybe move it over
just a smidge like that. Let's see how that works. Yeah, I think
that's pretty good. Okay, Let's select it now and let's give
it some geometry. I'll come over here to the
object data properties panel. Once again, let's take this to three and this two down here. And then in the depth
field I'll click and drag and then I'll
hold the Shift key down. And let's drag this
up a bit like this. Let's see how that looks. That's okay. I think I want it to be
a little bit bigger. Maybe something like that. Alright, let's move that cursor and let's take a look at it. How does that look? That's not too bad. I feel like let's go take a look at
this point right here. I think we could
maybe take this, let's take this piece
and this piece and let's scale it up just a
little bit like this. Then move it over a bit. Maybe down some. And for this I think I
wanted to just scale it out in the x-axis. Let's try this Sx and
pull it out like this. All right. Yeah, that
goes in a little bit better than yeah, let's go with that. All right, so now what
we need to do is convert this to geometry to polygons. And we've already, we've already adjusted the
resolution here, so we won't have
too many polygons. I think. I'll go back to Solid
View with the Z key. And so let's select this and right-click and
convert to a mesh. And then with this
selected list, then shift click that
and we will press Control J to add that to that
object. And there we go. Alright, so that's
all one object. Now, let's move the origin of that object to the 3D cursor in the center of the
grid right here. I've already pressed
Shift S1 to do that. Let's now go up to the Object menu set
origin to 3D cursor. And then let's come over
to our modifiers panel, and let's add a mirror modifier. And it looks terrible. It's not going anywhere close
to where we want it to go. Alright, so let's hit the N key and take a look at it here. We can see that we've got value in the rotation in
two different fields. So I think that's what's
causing the problem. Let's take these back to 0. Let's press Control a
and apply the rotation. And there we go. Now it's
over on the other side. All right, We've
got that in there. That looks pretty good. In the next video, let's work on closing
up this area back here. You can see through here, we just need to get
something in here that kind of blends in that
isn't too distracting, but that closes this area off. So in the next video, we will take a look at that.
69. Finishing the Interior Modeling: Now let's work on filling in
this area behind the seat. We want something in here
that isn't distracting, that really won't draw
attention to itself, but we also want to
close this area off. Now, we can see over
here in these images, this one here has that kind of piping that we
did on the seats. But this one in here
doesn't seem too. So I'm gonna go with that. We don't have to do
more of that piping. I think all we really
need to do is just begin with a polygon
plane and then shape it to fit behind that seat with the cursor in
the center of the grid here, I'm going to press
Shift a mesh plane, and then let's turn it. I'm going to press R x
and hold the Control key down and turn it 90
degrees like this, keeping an eye on the upper
left-hand corner there. And then let's just move
it back here like this. And I better split it in half and add a mirror
modifier to this. I think it make our
lives a little easier. So I'll just press Control R and hit the Enter key two times, and then select this face, delete it, delete faces, and add a mirror here. I'll turn on clipping. There we go. Oh, and I'll also turn
on the cage here. So now we can see this here. Let's just scale it down
a bit and let's move it down into place and move it
down here behind that seat. I just wanted to come
right into here. I'll go ahead and tab into
edit mode and do it like this. I'll bring this down and
I'm just looking to get this point into that trim here. Something like that in there, but not sticking out. Then we can come down here, select this edge down here, and just bring this
up till it's around. Even with the floor here. As I've mentioned before, we're not going to
need to connect these up because we're going to put a simplified under carriage under here just to close
everything up. It won't be real detailed, but it's just something to
finish it off and close it up. Now that we've got
that in there, what we can do is take
this edge right here. And let's just move this forward and put
it in place here. I'm gonna move it until it's fitting about right
here with the door. Maybe move it back a little bit. And the door is slightly angled so we'll
have to angle this, but I'm just going to
move this down into here. About like this. I mean, you hit
the period key on the number pad to move in here. Alright, so we've got
that, let's say there. And down here, we want to
find that point there it is, Alt Z to go back. And I just want to move
this forward a bit. Maybe to the side. Now that we've got that, we will need to add
some edge loops to curve it around the
back seat here. So let's just press Control R and bring this straight
back like this. There we go. And then I can take this and take this
up into there. All right, Let's do
that again here. Let's just bring this back. I can take this one up and
maybe take it back in a bit. That looks like we could probably use
another one over here. So I'm going to press Control R, and I will bring it back
in this x-y plane here. If I click on this
little blue square, It's as if I'm turning
off the z-axis. So I'm just gonna click
and drag on this and kind of slide that out like that. Then let's bring this up. Maybe slide it back
a little bit more. All right, so we've
got enough in there, I think to curve it around. Probably what Let's
do now is add a subdivision surface modifier to get a nicer curve did that. So I'll go ahead and
do that over here. And go ahead and smooth it. Now let's do a little
bit more adjusting. We need to add some edge
loops to bring this up. Bring this down. And also I'll add one
in here and bring this forward here
like this, right? So we have that kind
of closed off there. Let's go through and see
what else we can see. It looks like this in here, could go back a bit. Let's do that like that. Then. It has this kind of thickness
to it here that sticks out. I kind of like that. So what we could do is let's add a solidify modifier to
this and see what happens. Let's come over
here and solidify. And I'll choose even thickness and I'm gonna click
and drag out a bit. Let's go this way. Pull this out just a
little bit like this. What does that do? I kind of like this
happening here. All right, We're getting there. I think what I could also do
is turn on only rim here. And when I do that, if
we come around here, you can see that
it's all one piece. If I turn on only rim, it just gives us
that trim around the edge and that's really all
we need for this, I think. Alright, there we go. I think we've got a little
bit of thickness there. It kind of closes that area off so you can't
really see in there. And I think that just helps
finish that area off. Now, another thing
I was thinking of, I don't know if we
should really do this. These have little rivets
around the trim on the door. And if we were actually
going to do this, let me just show you
what I would do and then you can decide if you
wanted to do it or not. Once again, it's going
to be a lot of polygons. But what I would do is
maybe just bring the cursor over here and
create a UV Sphere. Take it down to something
like 128 maybe. And let me bring it way
down here too, with 0.01. What I do is I think
we've done this before. I would just delete
half of it here. And then I would take this, scale it in the z, maybe take this edge right
here and bring it in just a little bit like that. Then I'd use this to create those little rivets all the way around so we can smooth it. We could also add a subdivision surface
modifier if we wanted. Then we could just turn this our y 90 and the minus key
to spin it around. And then we could scale it down and begin just putting
this in place. So maybe we put one over
here in the corner and then just duplicate it
and move it around. So it's all around this trim. Now, it would add more
polygons, of course, and we're already looking at
almost a million faces here. But we could just go like
this and begin just putting these around where we
wanted to along here. Place this right in
here, like that. Then we just begin pressing Shift D Y and moving them
on around like that. Now, as I said, this is just adding
a lot of polygons. And whether it's actually adding any great visual interests or benefit is it's
totally up to you. But I'm gonna go
ahead and do this. I will do this. I will
do this off camera. And I'll have these setup by the time we come back
for the next video. But I just wanted to let
you know I'm gonna do that. And then I'm going to
combine these with the door or join these objects
to the door here, to the interior door panel. And that will automatically mirror these over
to the other side. I will do that between
now and the next video. And then I think we
will have pretty much finished up the
interior of the car.
70. Modeling the Oil Pan: Well, now that we've got the
interior pretty much done, let's take a look at
the under carriage. And we're certainly not
going to put as much detail into this as we did the
interior here up on top. But I think we just
need to finish it off. The way I think I'd
like to do this is kind of look at
these images here. We've got two images here. Let me press Control Spacebar
and enlarge this one here, and this is the
front of the car. What I'd like to
do is look at what catches my eye and make
everything else just kind of a shapeless kind of black material that really doesn't draw
attention to itself. So for me that things that jump out when I look at this R, this piece right here, that kind of whitish
gray piece that to me looks like the
oil pan of the engine. And then the axle
here going back to the rear wheels,
the muffler here. So those are the
things that jump out at me as being of
visual interest. And let's take a look
at the other one here. Let me hover over this one. Let's take a look at this. Now this is the back
of the car and you can see back here it's
got this piece here, which I'm assuming
now I'm not sure. I'm assuming that
this is the gas tank. Here is the rear axle. This piece here attracts my eye. The axle, this going down
the center of the car. Those are the things that
my eye jumps to first, even this exhaust pipe
going all the way back. What I think I'll
do is maybe just do those pieces that kind
of attract the eye. Then just make everything else black and non-descript and
not worry too much about it. Because hopefully the main focus of this model isn't going
to be the underneath. Let's work on that. I'm going to press
Control Spacebar again. And so let's just begin
with the oil pan here. Let's do that. And actually in addition, I may do these
black braces here. You can see this one here
going from the front all the way back to just in
front of the rear tires. And then this brace
across here like this and maybe this one here. So I may add a couple
of those as well. But those don't really need
to be very detailed either. So as I said, let's work on the oil pan and see what we can
come up with that. Alright, so I'm gonna
hide the car here. And it looks like the cursor's already and the
center of the grid. So let's just begin
with a cube here. For now, let's just
begin up top here. I'm going to create
it like this and then flip it over when we
actually put it in place. Let's say it's splits the
Press SY, Let's do that. Let's say it's about like
this and I'll go ahead and delete this face down here
because we don't need it. Let's now bring this edge
down or excuse me, up, I should say here like this, this piece right here, let's put an edge loop right
down the center. Maybe it needs to come back
a little bit like this. I'm looking at this right here. And then let's drag it up. But before we do, let's get
another edge loop in here. And maybe one right in here. And then let's take this edge and just pull this out a bit. So we're getting
this right here. Then maybe I'll move
this forward just a bit. Then let's go ahead and add a subdivision surface modifier
to it and see what we get. Or should I add that
rim down here first, maybe let's do that. Let's go ahead and add this
rim all the way around. I'll press S and
scale out just a bit. Let's press SY and
scale it out this way. Then let's extrude it down
in the z axis like this. All right, so now
that we have that, let's go ahead and apply the subdivision surface
modifier to it, and I'll smooth it. Then we could begin adding a few edges to this
may be like this. Maybe like this. We could make all of these
a little bit tighter here. Maybe add one right here, and add one back here. Then we can maybe add, well, it looks like we might be able
to add one along in here. Like this. Let's see. Yeah, that's not too bad. Do we need one down
the center as well? Let's try that. See what we get. Yeah, that helps back here, but up here with these edges, we could probably move these
back in the x like this. Just to get that curve there. I'll select these and maybe from the top here
I'll move this out a bit. So we've got kind of a flat side back here and
a curved side up here. And maybe we could even take. This edge and pull
it down a bit. Maybe like this. Yes, So I think
we're getting there. I might take this edge
up a little bit more. Maybe move it this way. Some maybe actually take this edge and just
move it up a bit. Maybe see if I can get
a little bit more. We need this little piece here, that edge down there to
be a little bit sharper, I think like this. Down here, like this. So let's select maybe
this right here, and move the cursor
to it with Shift S2. And then let's go ahead
and create a cylinder and maybe I'll take this
down to just 12 sides. And also let's go with
a triangle fan here. Now if we take away that
bottom set of faces down here, I'll just press the
C key and paint that selection there
and delete that. Then let's just
scale in the z here. Scale this down quite a bit. And then I'm just going
to add a little bit of something underneath there. Like say ES, like this and
then easy like this maybe. Then I'll add a subdivision
surface modifier to it. Smooth it. And then
let's add say two here. One underneath here. How's that? Yeah, So let's put that
on there like that. Go to the top view and it looks like it's
a little bit smaller. And it kind of looks like it
fits on there at an angle. Maybe like this. And this. Let's try
that. All right. Maybe not quite as far out
like that. There we go. How about that? Okay, So now what Let's do
is create these little guys. And for those things
all the way around, we probably just
need a cylinder. I'm going to press
Shift a mesh cylinder. Let's once again
delete the bottom here with the C key and then we just need
to scale it way down. And maybe I will, since I'm going to add
all these together, I'm gonna go ahead and add that subdivision surface modifier
and give it an edge. So it holds it up
here like that. And then let's just
take this and put it all the way around here. So what we could do is we
could begin say up here, I'll move this into place. Scale it up just a bit. Let's put it in about like this. Then what we could do is we could move that
origin to the 3D cursor. Set Origin, origin to 3D cursor. Add a mirror modifier to it. And instead of going
along the x-axis, I'm gonna change
that to the y-axis. And now if I tab into edit
mode and hit the a key, now I can press shift D and duplicate this and move
it right around here, shift dx, kind of
like this here, and then Shift D
and I'll just move it around to about right here. Shift D. Let's move this. Yeah, I'll just put one
back here like this. And then let's take
this one here, Shift D, I'll move this around like this so we don't need
more along there. Okay, that looks pretty good. We can take that, we can
apply the mirror here. We could combine all of these. I'll take these and this
and this control J. We'll call this oil pan. Move the cursor or the origin
to this point right here, shift S2, and then we move
that origin. There we go. Now let's put it in place. Let's bring the car back. Let's press Control numpad seven to go to the bottom
orthographic view, we're going to need to
spin this in the x. So let's press RX1 80 and
that'll spin it over. And then it looks like this part here
goes toward the front. So I'm gonna press RZ and hold the Control key down
and go 90 degrees here. Let's scale it down
and see if we can put it here in the center
of the car here. Maybe something about like this. I'm going to bring it back. Maybe right about here, Let's say something like that. I'll go to the side view
and bring this up a bit so it fits right
under there. There we go. We've got our oil pan now we may need to adjust that up or down, front or back, whatever as
we get the other pieces in. But that just begins getting these various parts
under the car in place so we can see
what we need to do. In the next video. Let's
work on a bit more of this. Maybe we can work on the
center axle or the muffler. But either way, let's continue working on the under
carriage of the car.
71. Working on the Rear Axle: Continuing with the under
carriage of the car, Let's put these axles. Are this axle in real quick, Let's just select these two
and move the cursor there. And then what we could do is
just create a cylinder here. And let's take away
the cap fills. And let's turn it in
the y-axis, our y 90. Then we can scale it down. I'll press Control numpad seven
to go to the bottom view. And let's just scale this down and then scale it
out any x like this, you just get that in
place now it doesn't look like it's quite that thick. So we could scale this
in the x and the z, excuse me, the y and
the z and not the x. So to do that, we press Shift X to
turn off the x-axis. And now we can scale that down just a
little bit like that. And from here, let's also
placed this right here. So I think we can begin with a UV sphere for this part
here, Let's do that. Mesh UV sphere. And we don't need this
many sides or rings here. So maybe I'll take
this down to 168. Let's try that. We should
probably cut part of this off. Let's go to the side view
and I'll scale it down. Tab into edit mode. Let's go to face mode
and let's get rid of, Let's get rid of
all of this here. Let's delete faces here. And then we should be
able to, Let's see, this is the back of the car, so let's turn it in
the x-axis, our x. And I'll hold the
control key down until we take it to 90 degrees. We could scale it in the
y just a bit like that. And maybe let's scale it down and try and put
it in place here. So what do we think
something about like this big, let's try that. And then pull that up. We could move this
object to the 3D cursor. We could snap it to
the cursor by pressing Shift S and then eight
or selection to cursor, and that will get it right
in the center there. And then we can just
pull it back a bit. So maybe it's needs to be
about this big. Let's see. And then we could begin
extruding out these pieces here. Maybe if we move this
in a bit like this. Now we could take
this edge right here and we could hit E
S and scale that out. Uy and push that forward
a bit like that. And then let's scale
that in a bit like that. That's this part right here. We could just try
and smooth this without adding a subdivision
surface modifier. It isn't going to be that
important here on the bottom. Then we can come down to our
object data properties under normals and turn on auto smooth and we get a bit of
an edge around there. We could then add a few bolts. There's one here and
a few around there. We could do that. Let's press Shift a
and create a cylinder. Let's take this down to six sides and let's
give it a triangle fan. But we're going to need
to remove one of those. Let's come down here to the bottom and let's
just select these. I'll hit the C key and
paint the selection. And let's delete those faces. And then we could just
use this as our bolt. Now let's Turn it in the
x r x 90, wrong way. Hit the negative
key. There we go. Enter. Now we can bring this up. I'll hit the period
key on the numpad. And let's just take
this down quite a bit. We can use this as a bolt. I'll go to the back,
do with control one. And here we can see it here. Maybe I'll scale it
down a little more, turn it a bit like this. There we go. And then we can bring it in
and put it right in there. All right, so now
what we could do is just add a few more here. So why don't we
move the cursor to this point here so we
can rotate around this. Then we could begin duplicating this and rotating and
around the 3D cursor. So let's change our pivot point. To do that also, you can hit
the period key to bring up this pie menu and you can
change to the 3D cursor here. It's the same thing
as this menu here. Now that we have that
in the 3D cursor, let's just begin duplicating. We could press shift D RY. Now we're rotating around the y-axis here and
we could just hit the Control key and bring
it around 90 degrees here. We could bring it around 45, we could bring it around 30. Let's bring it at 30
degrees, like this. And then let's just
keep doing that. Ry. And another 30
degrees shift DRY. And another 30 degrees there
gives us those four there. And then what we could
do is we could just begin taking three of these
and keep moving them around. So we can take say these three, we can hit Shift DRY, hold that control
key and move it over until we hit 90 degrees. And there we go. Now we could do this again, but instead of using control, we can just type in 90 degrees. So we press Shift DRY 90, and there you go.
And then enter. Now for this, we
don't need one here, so let's take just
these two here. Press Shift, DRY 90. There we go. Now we've got
them all the way around. Alright, now let's work
on this piece here, and it's really similar to a
piece in the front as well. We could maybe do
a similar thing. I'm not going to
try and get all of this all extruded together, are joined together in this way. I'm just going to
create multiple pieces and place them where
they should be. What I'm gonna do
is just press Shift a mesh cylinder again. For this, I will
maybe create it with 12 sides and I will keep
a triangle fan on there. Let's scale it down. Let's press our X9 0. Let's move it back a bit here. So it looks like I created
this with 16 sides. Maybe I should do it like that. Yeah, let's do that so it fits on there a
little bit better. Let's do that. Shift a mesh cylinder
and then 16 sides. And there we go. Now let's scale it down. Turn it in the x. Now we can place this here. Alright, let's move
it back like this. Then I will take this back here. I'll go ahead and
delete these back here. Select all of those and
delete those faces. And then let's just select this edge and
I'll bring it back. Let's just get this
general shape. It's hard to know exactly
how it's supposed to be. But I'm going to bring
this back like this. And then I'll scale
this or extrude this back and then
scale it in some, maybe move that back
a little bit more and then let's
extrude and scale in. Oh, I've got the pivot
point at the 3D cursor, so that's why that's
coming in like that. Let me press Control Z. Let's do that. Let me move
that back to median point. And then let's hit E, S and scale and about like that. That's going to accept the
axial from the front here. And I can go ahead
and smooth this. And we could smooth this. Then I can place these
on here as well. So what we could do is maybe just add a couple
of edge loops here. I'm going to add two like this. Then I'll select
these faces here. Let's hit E, press
Enter, and then Alt S. And let's expand these
out just a bit like this. We could then do that
again over here if we wanted to create
two more edges here, scale them out in the x. We can him to here. And then select these two. Enter alt S. And let's expand these
out as well like that. We're just getting a little
bit of a sense of this here. Once again, it isn't exact, but just something to
fill that space there. I'll go ahead and turn
on auto smooth here. So we have a little
bit sharper edges. And we could even take this
and take this edge down like this, maybe 24. And then we get a hard
edge there while still maintaining some smoothness
on these other parts. And also while I'm here, I'll add a bolt there. Let's just grab
one of these here. Shift D y, and I'll
move this out, scale it out of it. Maybe scale it in and the y. Let's just put this in here. Maybe I will. Let's just take this in and then I'll just give it a little bit of an edge here. So ES, pull that out and
push that in like that. So we get just a little
bit of something there. Once again, I'll move
the cursor to that point and then move the origin to
that origin to 3D cursor. Then let's move this into where we think
it should be here. Maybe something like this. Turn it a bit so it
isn't exactly on-axis. Bring it in here. And let's tilt it around the
Z RZ, something like that. Change to local
transformation orientation. Or instead of pulling this down, just like we use the
period key for this menu, we can use the comma
key for this menu. So if I press the comma key, now I get this here, so I can change this from
global to local here. I can move this out in
the local z like that. And let's see what else
do we want to go with? How about let's turn it in the y RY just a bit
like that as well. Let's try that. Well, let's keep going
in this general vein. In the next video, we'll work on
connecting this up here and making some of these brace
pieces down here as well. So that's coming up
in the next video.
72. Continuing the Undercarriage: Continuing with
the undercarriage, I think first of
all, let's go ahead and combine this object. We've got a lot of cylinder
is over here in our outliner. So let's see, it's this and
on down to here, 12, right? Yeah. Then let's select this and this, and let's go ahead and
join these Control J. And when we do that, we lose her smoothing here. Let's come back to our object data properties
and turn on auto smooth here. And then let's just drag
that up just a little bit. There we go. Now we have that back. I'm going to change back to
global transform orientation. And let's press Control numpad seven and see
where we are here. Well, I think we should
probably go ahead and get this in and then connect
them with that center axle. And I think we can just take this and duplicate it
and move it over here. That's really, I'm really
trying to keep this low poly, low maintenance, etc. Down here. It's just more of
an impression than actual realistic details here. But let's take this
and let's just press shift D. And let's
move this back. And then I'll just
spin it around RZ 180. And let's put this in
place and maybe I'll scale it up just a
little bit like this. Let's try that. So that's kind of
hinting at this here. We could extend that
back a little more. We could maybe select
this edge here. And we could scale this
out and extend it back, maybe EY, like this, and then maybe scale that in. And then ES and scale
that in like that. So we just have it a little bit different than this piece here. Then if we select this
and this and then move the cursor to that
point with shift S2, we can then create a cylinder. Maybe take away
the end caps here, and we don't need 32, I'll just take it down
to maybe 12 sides. And we could turn this are X9 0 and then scale
it down a bit and then scale it in the y and just connect these
two up like this. Let's shrink it
down a little bit. Maybe I'll press S Shift Y. And now we're just going
to bring it in like this. Then we can take
this piece here. Maybe we could do
something with this. We could select these and hit E ES and scale
those in like that. Just to kinda close that off. And I'll smooth this
one right here. There we go. These are going to
have to come up. Some aren't they? This is
that adjustment and tweaking. I was talking about that
we're going to have to be doing the entire way
here. And that's fine. Let's take this and
let's just grab this point and move this up. Maybe we could move these up. I'm not sure how this is
all going to go together, but those are going to
need to be up just a bit. Now let's work on putting
some of these braces in these pieces here
we've got those long, let me press Control Spacebar
and let's take a look. So this long piece here, part of the chassis and then
these pieces going across, in this piece going across, I don't know if we can do
anything with these over here, but I think let's get
these in and these across here that will help just sell
what's going on in here. And we may want these pieces
coming through here as well. Let's see. And of course we're going
to need to work on this. So there's still a
good bit to do here. Let's go ahead and
create a cube here. We can scale it down. Let's move this up in
front so I don't know, let's see right up into here. You can see it
right up into here. Let's move that right
up here, pretty close. Let tab into edit mode, and let's grab this
face right here. Then let's just hit
G and move this all the way back to where
we think it should be. Back here. It looks like it goes into where the tires
are right here. Alright, so let's try that. How deep or how far
down should it go? It may need to go down about as far as the body of the car here. I think maybe I'm
just going to hit the S key and scale it down
just a little bit like that. And then let's come back to. This face down here and bring it back a
little more again. Let's also see where we are. Here. Yeah, that's pretty good. We have that piece in, however, it's coming through the
floor of the interior here. So we should probably take this face here and just
bring this down like this. There we go. Then we wanted on
the other side. So with the 3D cursor in
the center of the grid, I'll press Shift S1
just to make sure. And then let's move this object
origin to the 3D cursor. And then we can just
mirror this over. We could use a mirror
modifier over here, but what Let's do is
just duplicate it, press Shift D and enter. And then we can use
the mirror tool, which is just Control M. And you can also
see that over here, under object mirror
Control M here. So all we're gonna
do is just hit Control M. And then
we're going to tell blender what axis we want to mirror this in
which is the x-axis. So I'll press X and
then I'll hit Enter. It, just takes that duplicate and mirrors it around the
origin of the object. All right, so we've
got those in. What about these centerpieces? Let's take a look at this. So that's this up
here, right here. I don't think I need
the holes in it, but we could go ahead
and add one up here. Let's do that. I'll press Shift a
mesh cube once again. Let's scale it down. I'll type in 0.1. Then let's move it to where we
think it should be. I'm going to press S and
scale that down a bit. And I think it looks
to me it should be writing here like this. Let's just press Sx
and scale it out. Like this. It looks
like it goes over here. So I'm gonna go ahead and
just scale it out all the way Sx and go like that. Then we should probably
just put an edge down the center and then
mirror this over. So what we do on one side
happens on the other. So I'll do that. Apply a mirror modifier here. Then I think what I want to
do is add some edge loops. So if I add an edge loop here, let's say like that. Then I'll go ahead and add
another one over here. Now if I go to x-ray
mode and just select these and then scale in
the y. Let's try this. Get something like that. Okay? Then let's move it up into here. It's kind of underneath
there like that. Maybe I'll scale it in the z so it's a
little bit thinner. Then I just want to take
these centerpieces here. I'll Alt click between
two of the faces. And then now we can just
drag this down like this. We're getting
something like that. Maybe I'll add an edge
here and pull it back up. Like that. We get a little
bit more like that. Then let's take a look
at these back here. So this one is a similar one, except it looks like it
flares out even more. So we could probably just
take this and do that again, Let's press shift D and move
it down here near the back, but maybe writing
here, let's say. We could then take these
and move them in a bit. We could take all of
these and scale them out. Like this. We go, Let's see how
it's looking here. So for this, we could
move this up a bit. And then also take these
and move these in. So let's take this
edge right here, kind of slide this in. And then let's take these
faces and let's just pull them up so
we don't need him quite that load down there. All right. Then we should probably
have a couple of things going on in
between these two. Now there's all kinds of things happening and I don't want to get into the
nitty-gritty details there. But if we just added
some edge loops and did some extrusions that
would just give the hint that something is
going on in there. So I'm going to
press Control R and scroll the mouse
wheel a few times, maybe six cuts here. Let's do that and then
I'll scale them in the y. So they come a little
bit closer together and move them so they're
all in-between here. Now, let's see what
we can do here. I could maybe take these faces here and
hit E and then Enter, then press Alt S, and let's extrude these out. Then what we could do
is we could do two more in here and do a similar thing and hit enter alt S and kinda
shrink it in some, you can just kinda
play with getting some general details or
information in here. Enter alt S. Let's bring this out. Then
maybe I'll put one back here and do that same thing. E enter alt S, and we're just going to
bring that out like that. So we're just adding
a bit of greebles, just interesting
little tidbits that give the impression that there's something
going on in here. I'll take this one
and let's hit E, enter alt S, and let's
bring this one out as well. Something like that. We can do more of those, of course, but
that's good enough, I think for that, let's turn on auto smooth for these guys and maybe drag
it up just a little bit. There we go. So
we clean that up. Alright, so you kind of get the idea of what I'm doing here. I'm just trying to fill in. We'll do a couple more. Maybe I'll do the gas tank
and some connecting pieces up here between the two
tires you can see here. And of course maybe some
more agreeable type things along the back axle. But we'll continue with more
of that in the next video.
73. More Work on the Undercarriage: Let's now work on
this piece here that I'm relatively certain
is the gas tank, but I could certainly
be proven wrong. That's no problem. But let's go ahead and
get that piece in. I'm going to press
Shift a mesh cube. And let's scale it up a bit. And let's bring it down here
and try and get it in place. So it's about in
here, let's say. And we can scale
it out in the x. And maybe to about like this. We could scale it in the y. Something like that. Maybe. Let's see if it's poking out. It is poking out currently, but let's go ahead and add that subdivision
surface modifier and that might just help before
we begin adjusting that. I'll come over here and add
the subsurface modifier. Let's smooth it and let's go ahead and work on
cleaning this up a bit. So maybe let's take these
and scale them out. And let's add an edge loop here. Let's add edge loops here. And here. Feel like it's a
little too small now, so let's scale it up a bit. Maybe in the y. We could also select
faces along here. We could inset these. They may be, have a little
bit sharper edges there. So I'll press the I key
and scale in or inset in just a bit like that. Yeah, that kind of
Titans those up. And then for these straps here, we could use these edges here. Let me turn on the cage there. Let's just use this
edge and this edge. We could duplicate it. Then let's extrude ESX
and I'll pull these out. I can't do that because I'm
still on individual origins. So let's undo that for just a moment and then let's
go back to median point. Here we go. Now let's hit ESX and scale
these out just a bit. Now we've got a problem here. What do you think
is causing that? Well, take a look. Yeah, sure enough. So let's take these two. I'll press the L
key here and here, and let's recalculate the
normals on the outside. So let's press shift
in and there we go. That helped. Then let's extrude
them out just a bit. Let's press E and enter, and then let's press Alt S. And we can bring them out just a little bit like that.
Let's try that. Then we can smoothies again. And there we go. We've got those straps on there, but they're a
little bit too big. So let's just hit the L
key for each of these. Once again, maybe
individual origins. And let's scale those in
just a little bit too. Close that off. There
we go. All right. We've got the gas tank. Can we how far back can we take this or is
it already pushing two? It's already pushing through. So maybe we bring it down a bit. Let's try that just down
just a little bit like this. Then let's bring it back
just a little bit like this, see if that pushes through. Yeah, that does. All right. I'll put
it right about there. All right. So we've
got the gas tank in. What else do we want to do? Well, I think up
here in the front, we should probably put some sort of connecting
pieces up here. What that would be, I'm not exactly sure. I certainly don't want to do all these little details and everything that's
gonna be a lot. But what I see here is this triangular shape here
and a piece back here. And then these cylindrical
pieces going into the wheel. We may be able to fudge that. Let's see what we can do. I'm gonna take, well, I'm just going to press
Shift a and create a plane. And let's bring this in. And this will be
our triangle here. Let's scale this out like this. And then if we tab
into edit mode, maybe we can select
these two points, scale them in and bring
them in like this. Something like that. We could take these
points and Bevel those, recall that vertex, bevel
is here, Shift Control B. So I'll click that. And then let's move the mouse, scroll the mouse wheel. And we could add
something like that. And then let's just select everything and let's extrude it. I'll just bring it up. And I'm going to bring
it up in the z-axis to give it some thickness. And then just to make sure we haven't
flipped the normals, Let's select everything and
press shift in just to make sure we've got all the normals pointing toward the outside. And let's set the origin to the geometry and
just bring this up, right up into here, Let's say right up
on top of these. And then let's add a piece. Out here. Let's try this. I'll press Control seven again. And for this, I'll move
the cursor to here. Press Shift day. Let's create a cube. I'm bringing it up, and let's
scale it in the y a bit. And I just want to
maybe split this. Let me scale it up a bit and then I'll just split this here. Once again, we'll take one side, Delete it, will add a mirror modifier and
turn on clipping. And then let's grab one
face on one side here. Let's begin moving this over. So what it looks like to me is maybe this
comes over like this. And then let's go ahead and create that cylindrical object. And then we'll
connect these two. This needs, let me move the object origin
to this tire here. And then let's go ahead
and move the cursor to it. Create a new cylinder. We still got 12
sides. That's fine. Let's turn it. Ry 90. It's pretty big. And it's move it down here. Move it in, and this
little thing right here. What lets do? I just want to kind
of connect these two and not exactly sure. We could maybe take this, I feel like it kind of angles. We could maybe take this. We could hit E and
bring this down. Then we can move it over. Maybe what Let's do is bring this back
into here like this. Now in here I think I want to make two edge loops in here. I want to take this and
extrude it out there. Now. I think what I'm
gonna do is just take this piece and let's
just grab this. I will hit E and S and scale
it in the x, move it out. Here we go. The S, M. And at center, we've just
got this piece like this. It's not as I said, it's not certainly
isn't accurate, but it just hopefully
will give a sense of just there's something
going on down here. Let's take this
piece right here. Let's move the cursor to
the center of the grid. Let's move the origin
to that point to three. The cursor, I'm gonna
press Shift D, Enter, Control M and the X key
and then Enter and that will place the duplicate over their mirror it over
to the other side. Let's take it and smooth it. Same with this one. All right. We could
probably go to Object Data Properties and press Alt and click Auto Smooth. And that will turn
on auto smooth for both of them
at the same time. And then we can press
Alt and click this and drag that up and clean those up. Pressing Alt can allow you to change a setting for
multiple selected objects. Alright, let's see
what we've got here. Alright, well, as I
said, it's not perfect. But I'm just trying
to fill in here. And I think one of the
last pieces we need, it's kind of a polygon plane
to put under all of this, I'm going to press
Shift a mesh plane. We probably need to
flip this, right? Yep, so let's take this plane
and turn it in the x-axis, a 180 degrees RX1, 80. So we get blue on
the bottom here. And then what I want
to do is take this and just move it up,
which just barely. I'm gonna move it up. So it's kind of writing here, I think let's see
how that works. So actually know we can bring
it up a little bit more. Let's bring it up. Yeah. So I just want to kind of hide a lot of what's going
on in the inside here. Maybe like this,
something like that. We can pull it down
even more like this. But I lose these things. So I think maybe just
something like that. So we still get that
kind of axial down the center with a few of the things that
we created there. All right. So let's, yeah, I think this is the kind of
thing we want to do. So let me scaling the X, S and X and bring this in. And I will also bring this
up like this to here, where that wheel,
well is this one. Let's bring up to where
this begins here. Let me scale out in
the x just a bit. For this one, we can maybe
scale in just a bit. All right, so you can
see now we're going to extend this on up
into the wheel wells. And ultimately it's just
gonna be a little cleaner. You'll get kind of hints that there are things
going on here, but it won't be quite as
detailed as the real thing, but it's kind of like
an old Hot Wheels car. I don't know if you've
ever seen those. I used to have a ton of
them when I was a kid. But on the bottom they just make a molded plastic black under carriage with a bit
of detail here and there. Just to give you a sense that, that there's stuff
happening underneath. That's all we're looking for. In the next video. We'll extend this
out around along the wheel wells and to
the front and the back. And that will probably
be about all we'll do for the under
carriage until we're ready to clean up and make the final Inside
trim to the body.
74. Modeling the Wheel Wells: Now I think the more
challenging part of creating this under carriage
background, if you will, is the curve up, under the wheel wells up and to the fenders here because we can't just extend
it on straight. We got to kind of curve
it up around the tires. And that's kind of tricky. So what we can do here is
actually select an edge from the fender and use that to create that inside part
of the undercarriage. So let's do that. Let's maybe take this and
I'll control-click to here. Let's say, Let's just
duplicate this off. Let's press Shift T enter. Then let's split it off. I'll hit the P key and
choose by selection. And then we've got
this piece here. Now we need to come through and deal with all the modifiers. I think the shrink
wrap we want to go ahead and apply to
keep that curve. We don't need a subdivision
and the mirror. We can leave that on for now. Let's see how that works ultimately will
probably have to mirror this as well as we
connect it all together. So let's give this a try
with the mirror modifier on. Alright, so we've got these
now let's go ahead and just tab into edit mode and
select the whole thing. And let's just move it in
and then move it up a bit. I'll press Alt Z. Let's just move
this up into here. Maybe scale it in the
y a bit like that. Alright, so now
we've got basically the outline of that
internal fender. So now we can come in here and maybe I'll move
it out just a little bit. Let's see how far I can move
it before it comes through. So maybe about two
there, let's say. And then we can just, I'm going to press
Control numpad seven now to look at it
from the bottom view. And then let's just hit EX and extrude it over
to here like this. Let's do that also
for the back here, I'm going to tab back into object mode and select
that fender again. And let's select, well, let's go from here
to about here. Let's say, let's
just press shift D, enter p separate by selection. And once again,
let's select it and then deal with the
modifiers here. So let's apply the shrink wrap, remove the subdivision and we'll keep the mirror on there. Alright, so let's tab into
edit mode, and here we go. So now let's maybe bring
this up like this. Scale it in the y just a bit. Then let's bring
it in just so it's inside the vendor
here like that. Now that we've got
that, let's go ahead. I'm going to press Control
numpad seven again, and let's extrude this. So let's press EX and
pull this out into here. And then let's
straighten it with 0 and then enter so we can
just straighten that up there. All right, so now
we've got those two, that's good, but we need to
begin connecting them all up. So I think maybe let's go
back to this top one here. What I need to do is bring it
down in the z-axis, right? I think we're going to need to bring these in
a little bit more. Maybe let's see,
maybe bring them in. So they're just inside this area here or the wheel pieces here. And then let's just bring
these straight down. Let's extrude, Let's hit
Easy and pull them down. And then let's press S z 0. It isn't working
because we don't have median points selected. I'm still on individual
origins here. Let's switch that. Now
let's press S z 0. That should flatten that up. There we go. Maybe let's bring this up a bit and then let's
scale and move them in. Let's make sure the
mirror modifier has clipping turned on. Because what I wanna do
is just press EX and bring these over like this
and clip them together there. Now we can't move them apart. So it looks like we could, I'm gonna press Control numpad plus to expand that selection. And then let's just
bring this down. Yeah, it's already
pretty much there, right into there at
the oil pan there. Alright, let's go do that
same thing in the back. Now, Let's tab into edit
mode control numpad seven. And for this, let's go ahead and press easy and
bring this down. And then press S z 0
and flatten those up. And then let's pull it back up. Unless then connect
them from here. So EX, connect them together
there and there we go. So now we've got those fenders. The trig from here
is to connect them up to this part here, and that's just a polygon plane. Let's tab into edit mode
and let's just press Control R and add an edge
loop down the center here. Then once again, we'll
select one side, delete faces and then add
a mirror modifier to this. Turn on clipping,
and there we go. So now we've got a mirror
modifier on all of these. What we could do now is select
each piece, this, this, and this, and let's join
them altogether, Control J. Now if we tab into edit mode, we tab into edit mode
for all of them, then we can begin thinking about actually
connecting these up. Now it looks to me
like this piece right here needs to be completed here. If we take these
two and press EX and go all the way over. And then we could take these two here and merge
them together. Let's do that. Then. Let's go back over here. Do we have a similar
thing over here? Sure we do. Let's take these two press
EX and move these over here. Zoom in with the period
key on the numpad, and let's merge these
two together at last. There we go. We just trying to get all these cleaned up before we
connect them here. Then what Let's do is, well, it looks like we could connect these up pretty easily. It looks like all
we need to do is just add an edge
loop right in here. And then without
too much trouble, we could connect these up. But I think I'll first take
these and extrude them back in the Y E. Pull it
back to here, let's say. Then let's connect these two up. So with this selected, I can press Alt Shift
and select this edge. And then let's use our
bridge edge loop tool with Control E, bridge edge loops, and that'll
connect those up there. All right, so we've got that. Let's now come down here and see what we
need to do with this. This one is a little bit
different because we've got this extra bit here
and I don't think I well, I could connect them so they
come straight out like that. We could try it. I guess we do have the right
amount of edges. They're gonna come out like
this a little strangely. Well, let's try it.
Let's just see. I'll select this Alt Shift
select or click that. Let's press Control E
and bridge edge loops and see how that works. Alright, well, it connected it. It's true we've got some overlap with these
pieces here like the floor, the doors and things like that, and the back seat. So we'll need to
grab some edges and pull them down to cover that up. But I think we're doing
pretty well here. Let's come back up
to the front here, and let's select that piece. And let's see what we need
to do to finish this off. Let me hide this. I'm just going to select
this and hit the H key so we can see this a
little bit better. Well, it looks as
if for this area, we can maybe select this
ingest, extrude it forward. Let's try that EY and
pull it forward some, and I'm just going to
pull it out like this. Then we can begin. Maybe just pulling
some in like this. So grab this and move this in. Grab this and move this back. We've got a couple here. Let me grab these and move
these back. Move this back. So let's see how
we're doing here. Anything poking out? No, not really. That's pretty good. We may need to add an
edge loop or two up here to kind of get it
a little bit closer. But that's doing
pretty well so far. How about back here? Let's look at the back. I'm gonna select the gas tank and hit the H key and hide it. Then let's see
what we have here. Well, once again,
we can take all of this and we could
just extrude it back. Let's try that. Let's pull it back. And I'm gonna pull it
back into here like this. And then begin
pulling these back. Let's take this
and move it back. This and move it back into here. Maybe like this. Let's see how that
works. Once again, we may need to add
some edge loops and pull these out a bit, but I'm just trying to
get the rough shape here. Let's see if
anything's poking out. No, that's good. Okay. That's generally the kind of thing I want is
this piece right here. Let's go ahead and
smooth it. Here. Let's come down to our
object data properties and turn on auto smooth. There we go. We can, if we want, increase this to kind of takeaway some of the
sharp edges if we wanted, but that's actually
not too bad like that. Then let's bring back
those pieces that we hid. I'm going to press Alt
H to bring those back. Well, all right,
In the next video, let's work on finishing this up, cleaning up the outliner, getting ourselves
organized again before we move on to
the next section.
75. Finishing the Undercarriage: Continuing with the
under carriage, I think now what I'd like to do is maybe in here let's create a few edge loops so
I can push this area up into the car so we can
see more of the axle. Let's try that. Maybe I will add an edge
loop, maybe to here. Let's add two edge loops here. I'll take this one and hit
G2 times and slide it in. Then I'm going to add
an edge loop down here. And let's add an
edge loop up here. Let's see if we can do this. And then let's just take
this face right here. Let's just pull this
up just a little bit. See how far we can pull
it up before we begin to intersect with the floor. Yeah, there it is. Right. So maybe
right about here. We can pull it up
two right there. And that gives us a
little bit more of a view of the axial there. Now we could work on just beginning to hide
some of these things. So some of these
things like this, this is the floor. We could take some
of this like this, begin moving some
of these like this, and maybe moving them up a
bit so they kind of hide, get kind of tucked in up there and that's
underneath the seat. So we're not really seeing that. Also this the
interior back wall. We could select some of this and begin bringing
this up a bit. So we can just bring
this up like this, see if we can get
this up in there without losing too much in here. That's not bad there. Okay. We just need to go
through and begin kind of finding areas where we
can tweak a little bit. Maybe this can come up here
like that. Um, where else? Well, there's this what are
the interior door strip? Let's see what we have here. If I Alt click that edge, Let's see what we can
do if we just pull this up. Yeah, it's not bad. Maybe this and this
could be pulled up here. Did we destroy anything in here? Let's see. Now it looks okay and it
looks, oh, look at this. We've got this up coming through the floor so that needs
to come back down. We need to think about that. That may need to come
down with all of these. Well, or we could just make it thinner to, we could try that. I could take this. And let's just Alt click this. That selected it
all the way around. We don't want to do that. Maybe these here, like this. Then let's just take these
down a bit like that. Let us see how we
did down here now. Yeah, I don't think that
destroyed that too much. We can maybe move them up a bit. So once again, this is a time when we're just going through and we're doing the
adjusting and the tweaking. There's gonna be more of this. We'll have a whole
section I think, of tweaks and fixes. There's gonna be more. But ultimately this is just the kind of
thing we need to do. We need to go through and just figure out what needs
to be cleaned up, what needs to be closed up. And then ultimately
we're going to be combining objects like
we're gonna be combining, say, the chassis together here. We want to do that control J up. We have a mirror
modifier on these. Let's go through and apply
these, apply and apply. And then we can
take all of these, join them Control J. And we can call this
press F2 chassis. There we go. And we can begin going
through and doing that. So this right here, I'm gonna call under
carriage that ground. This up here. We can
combine all of these. Do we have a mirror here? Yes, we do. We could apply that. Combine these three objects, Control J and call this the
front axle, F2, front axle. Then we could take this
and this and these. We can combine all of these Control J and
call this main axle. Let's do that. F2 main axle. There we go. We could call this gas tank. Let's do that because I'm pretty sure that's what that is. This do we have this we have
this named and that's good. Here we go. We've got all of our pieces
pretty well named here. We can take all of those
and move them into. The nationally group. There's still more to do. Of course, we've got these
little pieces here that looks like that's the panel there. We could maybe move these up. They kind of hide up in there. While we're closing
things up like this. Let's go ahead and do that
right up here on the grill. We could take this
right here and move the cursor to
it with Shift S2. And let's just create
a polygon plane. And if I recall, for this, Let's take a
look at that grill again. Well, let's take a
look at this one here. It really looks like
it's hard to tell, but it looks like there's something back there you can't
really see in it at all. And I think it's
just there's black a black mesh or grid back there. So I think we could just go ahead and create a
polygon plane for that. Let's just press Shift a mesh plane and let's turn
it in the x-axis are X9 0. Let's scale it down. Let's get this in
place, the right size. I'll move it back to us just
behind this grill here. Then I better split it. I'll put an edge right
down the center again. Delete that face, and let's add a mirror modifier
and turn on clipping. Then we should be able
to then take these here. And let's move them out. And we can move them
back a bit like this. Then let's add a few edges. To bend that a bit. Let's maybe just add two. Now let's grab this
edge and pull it back until it's, yeah, that's fine. And what about this one here? There we go. Then down here. Press Alt Z. Yeah, that's in the proper
place down here, down here. Let's just extrude this forward. Let's hit EY and pull
this forward some. Maybe we bend it a bit. I'm just going to take
these and move them back. This. Then I'll Alt click
these and move them back in. So they kind of hide
themselves in here like that. And then let's add a subdivision
surface modifier to it. Let's see how that works. We go That helps pull that
edge and that's good. Then there are a couple of
things we need to do here. So let's move this back. Maybe these two, Let's move
these two back like this. Then we can smooth it. This edge down here is a little, let's kinda tighten
this up a bit, add an extra edge loop down. There. We go. We've
just got that, so it just kind of curves
along behind there. We'll just going to make that
black and that'll be it. There we go. Alright, so we've gone
a long way to begin sealing up the bottom
and the front here. I think in the next section, let's begin working on the
tires and the tire treads, as well as the interior wheels. That's coming up next.
76. Beginning the Tire Treads: Well, now I think I'd like
to work on the tire treads and we really don't have a whole lot of
information about it. We've got this
little trim around the edge of the tire
here in this photograph. But exactly what kind of tire treads there
were on these things. And would it even be an original tire by
now, I don't know. We're going to create
our own tire treads. The great thing
about tire treads is you can do them
however you want. You can make them as complicated
or simple as you like. I think I'm gonna go for
simple for this project, but I've got an image here. Let me hide the car here and I'm gonna go
to the front view. And I'm gonna bring
in a reference image. So I'm going to press
Shift a image reference and let's browse to
the reference photos. In here I've put a
tire tread image here. I've got one here that
I was thinking about. It's possible, but I'm going to go with this one for now here. If I tumble around, we can see it here because
we've got both orthographic and perspective checked over here in the object
data properties. And I'm just going to take
it and move it back a bit. And I'll turn on
the opacity setting and maybe take it down to this try point for just
so it isn't quite so bright. Alright, now I'll go back to the front view with numpad one. And what I'm gonna
do is just use this to draw out the tire
tread I want to use. Now, you can see that this tire tread pattern isn't symmetrical
down the center. But I'm going to go ahead
and try and make one that is symmetrical based
somewhat on this design, but I'm just using
this as a guide. I think what I'll do first is just create a polygon plane. Well, before I do that, let's change the name of this. I'm going to call
this tread reference. Then let's go ahead and
create a polygon plane. And if we tab into edit
mode and make sure we select everything here
in Vertex select, I'm going to just hit the M key and merge all of these
points into the center. So we just have 1 there and then I'll hit the
one key on the numpad. And now we can take this
point and hit G and move it. And we can begin to create some sort of tread pattern that we might want to use here. So I'm going to
hit E and move to here in E. And I'm just
going to draw this out. And as I said, it isn't
going to be exactly, I'm going to use
this image just as a guide and not
create it exactly. I'm gonna select these two
now and hit the F key. So now if I tab
into object mode, I just have this here. Let's select this and let's press shift D. And now I'm
gonna move this up here. I think, well, I think I'm going to create
these two here and then I'll move them
over so they're on this side of
that center line. So let me do that. Let's hit E and bring
this down here. And I'm just going to create a pattern right here like this, and then select these
two and hit the F key. Actually, I'll turn
off the manipulator there so we can see
a little bit better. And then let's press shift D. I'll move this to here and
then we continue on over here. So I'm just hitting E and creating this pattern
here like this. Then I'll select these two, hit the F key, and there we go. Now, I want to make sure
they're straight up and down or aligned to the z-axis. So with these two selected, I'm gonna select all the
other vertical edges here like this. Then let's go up to
individual origins. And now let's scale
these in the x-axis. So I'll hit S x 0 Enter. So now those are
straight up and down. Alright, so now that
I've got those, let me come back over to
our tread image here. Oh, I need to tap into object
mode before I can do that, let me select that again. Now we can see this in the
object data properties. I think I just want to
take this opacity down a little bit like this so I can see this a little bit better. So maybe let's try point to. Now. I'll tap back
into edit mode. And I think I want
to take these two here and just move them
over a bit like this. So they're on this
side of that axis. I'm just trying to create a symmetrical pattern here because frankly,
it's just easier. Just going to do something a little
easier for this project. We don't have to get into all the nitty-gritty details of creating this tread pattern. Now as I said, you can make your tire treads as complex
as you would like them to be. All right. So there is our tire treads. Let's go with that. So as I said, we have
them all on one side now. And I think now I'll
mirror them over. Let me hit the N key and
make sure we've got zeros in the rotation in one's in the scale fields here
and we do that's good. I'll come back over to our
mirror modifier and I'm going to just add a mirror
here like that. Now if you wanted to
change them a bit, if you wanted this side to go down a bit instead
of up like this, you could go ahead and
apply your mirror modifier. I'll do that. I'll come over here
and I'll click Apply. And then if we tab into
edit mode now we can just take these and move
them around like this. So we get that pattern
going down like that. If you wanted to do that. We've got that pattern there. Yeah, I think that'll
work just fine. Now from here what we
want to do is maybe tab into edit mode and let's
fill these with polygons. I'm gonna hide the tread
reference image there. And then what we can
do is just select two points here and hit
the F key like this. And I'm just going
to go through and create an edge through
each of these like this. Can do that pretty quick. Here we go. And then just select
everything and hit the F key, and that'll fill those in. That. Alright, now we need to take these and put them on our tire. So let's bring
back the car here. And let's select this
one tire and let's bring it out of that
nationally collection. I'll just hit em and choose Scene Collection and
that'll bring it out here. And then let's hide
the rest of the car. Now, two things. We can move the tire
into this area here, or we can move
these to the tire. I think I'll just move the
tire into the center again. So what Let's do is
let's just take, let's just hit the L key here. Let's move the cursor to
their right to that point. When we select these, then let's move the cursor or the origin to that
object set origin, origin to 3D cursor. There we go. Now we can do is we can move
the cursor into the center, and then we can snap the
object to the cursor. So let's press Shift S
selection to cursor. There we go. Alright, so now I'm gonna
select the object here. Let's tab into edit
mode and hit the a key. And I'm going to pull these out. And I'll go to the front orthographic view
and let's scale these down. I'm still on individual
origins aren't islets change to median point and
let's scale this down. And there is our
tire treads there. Maybe I'll scale them out a
little bit more like that. Let's see. There we go. So now let's move them
down into the center here. Let's move them back
a bit like this. If we go to the top view, we can kind of curve
them around if we want. So maybe we take, I'm going to press Alt Z so
we can select all of these. There we go. And I'll take these and
maybe move these back. And maybe take these
and move these back. We just have him a
little bit closer in. You might be able to
scale these in a bit. We go maybe move them
in a little bit more. So you can just adjust
these as you need here, like that. Alright. What Let's do in the next
video is go ahead and use that array modifier to duplicate and stretch the
treads on around the tire. And then once we do that, we'll join everything together and we'll have our tire treads. So that's coming up next.
77. Finishing the Tire Treads: Now to finish up
our tire treads, we're going to need to use the array modifier to create them all the
way around the tire. And that's the same thing we did with the spokes on
the wheels here. It's pretty much
the same process. Now I'm gonna change
this to treads. We know what that
is and also I think maybe I'll scale these in the z just a bit to make
them a little bit thinner. I'm looking here at
how thin these are. Maybe we do that. All right, so before we
create the array modifier, let's actually select the
edges all the way around here. For each one of these. I just want to
extrude into the tire so we have a bit of thickness. That's all I want. So let me grab these edges here. Now I'm just going to
hit E and extrude in. So EY, and let's push
this in like that. There we go. Now let's take this object. And this object already has its origin in the center of
the tire, and that's good. That's what we want. But recall we also
need another object to turn and rotate
the array around. So let's create another
empty shift a empty on, I'll do Plain Axes again. And let's call
this tread rotate, just so we know what that is. Then let's select
our tire treads and add an array modifier here. Now it's gonna go off
in the x-axis here. But we don't want that. We
don't want relative offset. We want an offset based on an
object based on that empty. So let's click on
the eyedropper, then click on the empty here. Now, if we take this
and rotate it, our x, you can see there's
our tire tread, but we only have two. I'm going to take this back. I'm going to press Control
Z to go back to here. And then I'm going to
select that tire tread. I'm gonna take this
count up pretty high. I tested it earlier and
I came up with a value of 96 for the count that
actually worked pretty well. Let's see if it
works again here. I'm gonna select that empty
and then I'm gonna hit RX. And slowly I'll hit
the shift key here. Take these around and let's
see if it's too much. Yeah, that's a bit
too much, isn't it? So they never quite
space out there. I'm going to press
Control Z and I'm going to go back
to the tire tread. And let's try let's try
64, something like that. Here we go again, RX
and let's go this way. There we go. They're beginning
to spread out a bit. Something like that. Feel like we could have our tire treads be a
little bit thinner. So let me choose the
tire treads and hit tab. And then I'll hit a and
let's press Z and let's, and make them a little
bit thinner like this. Let's try that. And then I'm going to back
this off just a bit, hit R and X and pull this
back some like this. And then I will select the tire treads and
let's increase. So we've got 64. I'm going to hit R
and X and back it up until they're about as far
apart as I want them to be. And I think about like that. That looks pretty good. Now that I've got that, I'll select the tire treads
and let's then increase this. I'm just going to keep
clicking here until it moves up into here. Let's see. There. That's pretty good. Okay. 92. I was pretty close. Right? There we go. There's
our tire treads. Now, we can do a
bit more to this. We can select our tire tread
and tab into edit mode, and we could maybe bevel
the outside edges. Let me tab back into object
mode and hit the End key. And we still got 0 in the rotation and one in the
scale, and that's good. So what we can do is come back
in here and in edge mode, Let's just select these edges once again all the way
around each of these. What we'll do is
we'll add a bit of a bevel around these edges just so they aren't
quite so sharp. Let's try this. And this one here like that. We've got all of those selected. Now let's press Control B. I'm going to pull out a bit. Then I'm going to scroll the mouse wheel and add a
couple of edges in here. Maybe something like that. Let's see how that works. Now if we smoothed that, we might be able to get a little bit different effect here. Ultimately, we're gonna
combine this with the tire, so we'll probably have
to be smooth at any way. But while we're here, let's go ahead and
see what we can do if we can get any
of this any smoother. And we can't because I
haven't smooth it yet. Let me right-click
and shade smooth. And now this should work
a little bit better. Yeah, so now we can increase the smoothing
here like that. And it looks like it looks
like we have a problem here, like we didn't get
one closed off here. So let me just select this
edge here and hit the F key. Metal, fill that. So yeah, Something
happened there. That's going to make that edge kind of sharp it
there and let me just bevel that hopefully that
didn't happen to yours. Yet. Everything else
looks pretty good. I'm going to select
this edge here. And let's see if we can adjust this so it's
a little bit better. Kind of want it to be out a little bit more like
this, let's say. And maybe this one as well. Let's try this. I'll select this edge and maybe pull this out a
little bit like that. There we go. Alright, so we're getting
there, this is good. Now what we need to do
is combine all of this. Well, let us do is let's
select the tire and let's take a look
at the modifiers. Currently it's got a subserve
modifier with two levels. And that's an awful
lot of polygons. If we hit the Z key and went to wireframe and turned
off optimal display, you can see that
that's the amount of polygons we've got in there. And that's a lot. What if we took this back to one? Let's see what happened. We took it back to one that
could reduce the poly count. A good deal actually. Let's take a look at
it in solid mode. And it really doesn't
look too bad at subdivision level one if we
take into two and then one, it really doesn't look too bad. So I'm thinking we
could go with one. And what I mean by that is applying the modifier
at level one. So let's go ahead and do that. I'm gonna pull this
down and click Apply. Now that means that this
is fully baked in there. There are no modifiers on that. And this over here, we need to apply our
array modifier now. So let's do that. Come over here, apply. Then we can combine these two. So this and this
and now Control J. Now we can play with this smoothing to get
this all the same. So let's come down here to our object data properties
turn on auto smooth, and let's see what
we can do with this. Actually, let me make
sure we're smooth here. I'll click shade smooth.
Okay, there we go. Now let's move this up and see if we can
clean this up a bit. I think I'll take
it up to about 85. I think that's pretty good. There are our tire treads and
you can see now why I say you can make these treads
as complex as you want, just depending on what you draw out at that beginning stage. Now that we've got this, Let's take this tire and move
it back to where we had it. I'm gonna take the
empty and delete that. We don't need that anymore. And then let's bring the car back and I can just move this
back to where we had it. So let's hit G and
move it back to here. And I'll bring it back out. Let's hit the one key, bring back the reference images, and I can bring this
over like this. We go, now these others, we could go ahead and get rid of these because we
don't need those. And I can take this. Maybe move it back here. Shift D. Let's move
it back to here. And we could also
take it in a bit, I think if I recall. Yeah, this is in just a bit. So we could take this in like that just a
bit. Here we go. And do we have it in too far? Maybe we do. I'll bring it out just
a little bit like that. Then we could take these to change our pivot point
to the 3D cursor. Now we could press
shift D, Enter, Control M and X, then Enter, and that will
mirror them over to the other side. There we go. Now we've got our tire treads.
78. Adding the Side Trim: All right, well,
we've pretty much got all the major pieces
in now for the car. From here on out, it's really just fixes, tweaks, adjustments, things like that, that just get us a little bit closer
to where we want to be, some of our adjustments. So we're going to be easier
once we get the colors on, once we add materials
and textures, things like ceiling
this up on the bottom. Now there is a way to add
color here in the 3D view. You can come up here to this, pull down the viewport shading, and you can change the color
from material to random. And that just puts
random colors on it so you can differentiate
between the parts. But sometimes it
doesn't work real well. Like if it were up to me, I'd want maybe this
green to not be as close to this screen
so I can tell them apart a little bit better, but it's pretty good. It works well if you like that. I'm really not a fan
of this and that's I guess why I haven't been
using it up to this point. But if this works for you, if this would be helpful, then please go
ahead and use that. I'm going to switch
back to material here. I think the first
adjustment I'd like to make is the trim on the side. You can see that here
in the reference image. And if we come over here
and go to a new image, let me see if we can find one. That's pretty good. Let me look at this one here. We've got this little
kind of Extrusion. We've got a chrome trim
and then we've got two little round things
that go on there. Let me see if I can find
something else here. Let's take a look at this. Yeah, this gives, I think,
a pretty good view of it. So what I want to do is just create something
that's like that. There's a couple of ways
that we could do that. We could go back to this smoothing mesh here in
our utilities collection. And we could redo this
smoothing mesh and then try and conform
the fenders to that. That's one way to do it. Another way to do it
is very similar to the way we created
the vent on the hood. And that is to remove certain vertices from
that vertex group, from that smoothing group
that we put in here. Let's select that hood. Yeah, we have that
hood smoothing here. We pull vertices out of that Smoothing
Group here and then extrude or do whatever
we need to do to create it directly
on the fenders mesh. I think that's the
way I'd like to go. I think that's the
way I'm leaning here. Really you could do it either
way and there are benefits, I think to both. But let's go with
removing vertices out of the Smoothing Group for the thunder and then try
and create it from that. So we've got our utilities or smoothing mesh hidden away here. We probably ought to clean up the outliner a bit before we begin this tread reference, we could put that
in our utilities. Let's do that for
the tires here. I think we had a tire
collection previously. Let's select these, hit em
and go into the Nash Healy. And sure enough, there's
our tires group. Let's go ahead and
add those to that. And then we should take this fender object and let's
move it out with the M key. Move it out to the
scene collection here, the main ones so we can
see it and then we can hide away our car and
the reference images. All right, so let's take a
look at what we have here. We've got a mirror modifier, a subdivision surface,
and a shrink wrap. I think what we need to do is pull these out here out
of that smoothing group. Let me turn off the
subsurface modifier here. And if we also take away the shrink wrap,
we can see it there. Alright, so what Let's do is
let's first adjust these. They've clearly gotten a
little out of alignment here. So let's select
this edge with Alt click and I'll change back
to median point here. Now let's just flatten
these in the z, so z 0 and that kind
of flattens those. And then let's bring back the reference image and
take a look at this. If we just bring this down, maybe something like that. We could also flatten
this one here while we're here we go. So we've kind of flatten that we might want to
bring this back. This looks okay, I
think. All right. So we've got those we can shrink wrap those
again like that. Yeah, I think that'll work. What Let's do now is let's take these out of our
Smoothing Group. In fact, I think we
may want to take this whole thing out as well. Well, not all of this, but this edge, this
edge over here. So let's do that. Let's select this whole thing. And then let's also select this. And this. I think I will hit the C key and middle mouse
button click and drag these to remove them
from that selection. Then let's remove these
from that Smoothing Group. I'll come back over here to
the object data properties. Here's that fender
Smoothing Group. Let's just click Remove,
and there we go. Now this, Let's
take this and this and let's smooth or
flattened these again, 0. Let's do that. Now that we've done that, let's begin working on
this piece right here. It's going to be tricky
to try and fit it in to this existing curve
like they have it here. And you can see it's not exactly perfect the way
they have it either. So now let's go ahead and
select these faces here. I'll just maybe
hit the C key and just click and drag and select
these all the way to here. And click and drag
and select those. Now let's just extrude this. Let's hit E. And I'm gonna
pull directly out like this. We go now, that's
pretty ugly, I know. And we're going to have to
work on things in here. But what Let's do
is let's turn on that subdivision surface
modifier here and let's see what we think I'm going to
right-click and shade smooth. I think we want to maybe take this edge and move it up
some and even move it in. And maybe I'll take this
edge and move it up some with G2 times like this. Although I don't think I
want all of these to move. This is the difficult part is knowing what needs to move
and what and what doesn't. But I think I want to keep
those from moving here. Let's move this up some
actually that's not too bad. I think we're getting there. Let me move this out
just a bit like this. Then. Yeah. And I know
that this is very ugly. We're going to have
to deal with this. But for now, I'm
looking up here. I think we might be
able to take this edge here and sharpen this a bit. For now, I'm gonna remove
that just so it's this here. Let's press Shift E
and bring that out. So it's kind of a little bit
tighter there like that. Then these over here, Let's see what we
can do with these. I'm going to click
this, this and this, and maybe this as well
in this press Shift E and tighten those up a bit
as well. We do in here. Yes, So I think that kind of
thing is what we want here. Let's now think about
some of these edges. Yeah, I do think we can
get rid of some of these. We don't need all of these, so let's take a
look at this one. Let me try dissolving this edge. We go, let me try dissolving this edge
here to dissolve edges. And maybe this one back here. Let's do that. I'm just
trying to get this so it is as smooth as possible here, and that looks pretty good. Now back here,
Let's take a look. As I said, this is ugly, but it very well could be that we need to take some of these out of that
Smoothing Group. Let's come back over to the object data properties
and click Remove. Yeah, and that brings
them out some. Then I'm going to
go ahead and delete these faces, delete bases here. Let's delete this face. So I'm just going to
have to rebuild this. I think that's always fun. I'm gonna take these
and delete these. And here we go. Let's remove these out
of the Smoothing Groups, so we have some
control of these. There we go. All right, now what do we need to do? Let me see about this one. Let me remove that one. Looks like that one's
already removed. Yeah. Okay. What do we need to do now? It looks like let me get rid of, let me remove these from the Smoothing Group as
well too down here. And we'd go, we have a little more control of those. You can see
what I'm doing. I'm just trying to find
the points that I need for this particular
connection to work. And I'm removing them from that smoothing group so that I have a little bit more
control over them. We need to get these to
connect up with each other. One of the problems I
see is that these don't really come out
enough like this. And also this edge here, I don't think we have a
correlation with this edge here. We may need to create an edge. What let's do at
the beginning here. So let's just see if we can
find some edges to connect. Like let me take these out of the Smoothing Group here
and move this down. So let's say we took this edge and this edge and connected them up
with the F key. To connect up here, we really need another edge
in here. Now don't we? Let's go ahead and do that. And then we could do this edge, this edge and this edge
and hit the F key. All right. Now as I said, it looks
like we're going to need another edge in here
to connect this up. Let's see, I'm
gonna remove this. And let's see if we can
add an edge right in here. And when we do,
Where does that go? It goes all the way back here. It's going to mess with our
shape around that tail light. And it's going to mess with our shape around here as well. But we can basically take all of these points and assign them to that Smoothing
Group to see what happens, Let's click Assign. That's going to be
strange in there. Let's click Remove there. We're going to want
to adjust that. But everything else looks
like it went in pretty well. Now that we've done that, we've got this edge right
here that we can use. So we've got these
four right here that we can hit F and
continue that on around. That's why we needed that edge. And then now we've got this, then now we've got this here. So we've connected that up. It isn't real pretty. But we can take this edge
right here and let's press Shift E and give
that a crease to kind of match what's
going on here. We're gonna need to do
some work, aren't we? Let's come in here and make
sure that all of these are removed from that
Smoothing Group. Oh, that one wasn't
and that's why it was given us troubles there. And we can move this out a bit. These are still a part of the Smoothing Group
and that's fine. Let's see what we got here. Yeah, actually, that's
not It's too bad. We may need to now take these and add them back
to the Smoothing Group. Click Assign. Let's
see how that worked. All right, How about
any back here? Let's assign those to
the Smoothing Group. Yeah, and then let's see what happens if we do this one here. Yeah, actually
that's not too bad. What about these in here? If we did these click Assign? Yeah, I don't like that. Let's not do that. I'll press Control Z here. I don't think we can add
another edge loop in here. But maybe we could hit G2
times and slide this a bit. Alright, so what Let's do
is end the next video. We'll bring back the
door and we'll see if we can adjust the door to
fit this curve here. Also, it appears that as we've pulled it off
the Smoothing Group, it's curved just a
little bit there. We may want to bring
that back in as well. But once we do that, we're gonna need to
get that Chrome strip on and these pieces on, these little circular pieces
that's coming up next.
79. Finishing the Side Trim: All right. I feel like it's a
little bit bent here, so let's bring back
that smoothing mesh. It'll be under Utilities here. I'm bringing all of
these back then, hide these and then just
bring that back there. I wanted to do that so
that when I come up here and go to x-ray view, I'll select the fenders and
let's tab into edit mode. I feel like I can see the
actual smoothing mesh here. In here. It's kind of difficult
to see. Here we go. This is a little bit easier. So I feel like the
backside of these should be analyzed with
the smoothing mesh here. Let me make sure I have
the right thing selected. Yeah, it looks like I do. Okay, so let's now go to that
top view and I just want to grab these and just begin
moving them in just a bit. Here. I'll move this in
just a little bit, this in just a little bit. So get those and
then up in here. Let's see what we can see here. So it looks like this here, can come in this sum
just trying to get it so it doesn't appear so bent out from the car
here. All right. Now, it looks to me like
something right here. There's a little bit
of a bulge right here. Maybe we could take this edge and assign it back to
the smoothing mesh. Let's try that. Yeah, I think that cleans
that up quite a bit. Now let's bring back the door. Go into our main group here. Let's see, here's the door. Well, what I need to
do is just pull that out of the nationally group. If I press M here
in the 3D view, I can't do that. But if I come over here, selected in the outliner
because it's been hidden away. I can press M and bring that out to the scene
collection there. Okay, so there it is. Let me twirl this up now. For this, I think
we're gonna need to maybe add just
one more edge here, extrude it down and bend it up or bend it
out just a bit here. Let me move this up. It like that. Then I will extrude easy, bring that down, and
then I want to take this out of that
Smoothing Group. In fact, I can't because there is no smoothing
group for the door. So let's go ahead
and create one. I'll select everything here. Create a new vertex group in
the object data properties. Let's give it a new name. I'll call it door smoothing. Let's assign everything to that. And then if we go back to
our shrink wrap modifier, we can choose the
vertex group here. Now, it didn't really change anything here
in the 3D view. That's good. It's just that now
we're able to take this row of edges and pull
them out of that group. So let's click Remove. And now that can come out a
bit and even up like this. So we can kind of
bring this up a bit and allow this to
come out a bit like this. Now that we've got that, let's go ahead and bring
the rest of the car back. And let's work on this
little chrome piece. And I think we could
just come in here. Look at this, we've
got this one. See if we can move
that over a bit. There we go. That helps. Let's now take this
edge right down here, maybe to here, or maybe
this one up here. Let's grab this to here. Let's say, let's use this
one to create that strip. So if we press shift
D and enter MSE, press the P key and split
that out as its own object. If we tap back into object
mode, we can select that. Now let's make sure it's
flat in the z-axis. We go and we do want to remove
it from the shrink wrap. We don't need that. I can just click the X. There we go. Now let's, we don't need
all of these points either. We can take away this point. I'll hit Delete and
dissolve vertices. And then if we take this, I'll press S z. Once again, just to make sure, Let's extrude this
in the z-axis, easy and bring it
down a bit like this. We go. Then let's extrude it out. I'll just hit the
a key and press EX and pull out just a
little bit like that. There we go. We have our strip. Now, it looks like we've
got some issues here. Once again, I'll go
ahead and smooth it, but yet look at that. So let's tab into edit
mode, hit the a key, and let's recalculate
everything to the outside by pressing
shift in, and there we go. That helps quite a bit. We've got that strip
now I think I want to add an edge loop
right down here. We go. This one is okay, I think. All right, so we've got that it's kind of out
from the car a bit. I think maybe if I
remove that back face, it might be a little bit better. So let's go to face mode
and just select all of these faces all the way
down here in the back. And let's delete faces. Here we go. Now if we select everything in edit mode and
bring it all back, try and get it right
up against that trim. There we go. We've got that. What about well, it looks like I should bring this
forward just a bit. I think so let's take this
face right here and just bring it forward in the
x-axis and then give us another edge
right down here. And back here as well. Better select this face
and bring it down. Add another edge right in here. There we go. All right, that's a
little bit better. Then we need these
guys down here, whatever these are
to create those. It looks like it's a screw, like it has a slot in it. Like it's been screwed on there. Let's see if we can find
another image of this. Let's take a look at this here. Yeah, it does look like
it's got a slot in it. Well, we could use
our Boolean modifier again, let's try that. I'm going to changed
the name here. Let's call this side trim. Let's do that and we can
take that up into their we'll take the fenders and the doors will
put that back in. Our group will turn
off the utilities. Then let's hide the
reference and the car. And now I just want
to create a cylinder. Let's create a cylinder here. We've got 32 sides and we've got an end gone for the caps. I think that'll be just fine. Let's select this face
here and delete it. Then. What let's do is use a cube. I'll just press Shift a cube. Let's scale this in. And let's use this to create the little slot in here,
something like this. Now we can select this, add a Boolean, then click the eyedropper
and click our cube. And there we go. Let's click
Apply and move that cube. There we've got our slots
so we can delete the cube. We can smooth it, come over to Object
Data Properties and turn on auto smooth. There we go. Then let's just take
this edge down here. I'm just going to move it in some and let's just scale it in, ES, scale this in and then easy and pull
that down like that. Alright, so now we've got that. We should probably flatten
this a little bit. It looks like it's a little
bit flatter than that. Now let's bring back
our car and let's pull it out and turn
it into y-axis RY 90. Now let's see if we
can put it in place. I'm gonna hit the Z key
and go to wireframe. And let's scale this
down quite a bit. It looks like closer to the
front here, maybe like this. Let's go back to Solid View. Yeah, that works pretty well. Let's hit x0 and move
that about like that. Let's try that. Let's bring
it into the trim here. Hit the period key on
the numpad to zoom in. Let's pull this out
a bit like this. I'm going to turn it a bit. I don't want it to be just
straight, horizontal. So let's press RX
and turn it a bit. Then let's also press shift
D and Y and move that back, back to back here, I think. Then let's turn
this a bit as well. So I'll press RX and just
turn that like that. They aren't exactly the same. We need to move this
in quite a bit. Now, don't worry, okay, Let's bring that in until
it comes into there. I'll select these two
and press Control J to join them together. Let's change our pivot
point to the 3D cursor. And then to duplicate and mirror them over
to the other side, we can press shift D, Enter, then Control M, and
then the x key, and then Enter, and that
will bring them over here. All right, so in the next video we'll continue doing
some more tweaks. I think what we ought
to do now is add a solidify modifier
to all of the pieces. The door, defender, the trunk, all the pieces of the
exterior body of the car. See how that works. Do some final adjustments there. Then we'll go to the back and the under carriage to do some adjustments
on those as well. That's coming up next.
80. Adding Thickness to the Car Body: Now I'd like to try and
add a little bit of thickness to the
body of the car. We may come across a
little bit of an issue here because as
we add thickness, this area may be a
little bit problematic. Let's see what we can do. I'm gonna select the fenders
and before I do anything, I'm going to come over to
the object data properties and turn on auto smooth. That actually cleans this
area up quite a bit. However, when we add a solidify, we're gonna be adding
it to faces that are pointing in very different
directions here, these are pointing in and
these are pointing back. So let's give it a try and see
if it's gonna work at all. At the very least,
we're going to have to keep it very thin. So let's come over
here and choose Add Modifier and
choose solidify. And you can see already
how it's kind of going in here because
of these faces here. As I said, we're going to
have to keep it pretty thin. Let's choose even
thickness here. And then I'm gonna
click and drag. And you can see as we
make it thicker here, it's just going to get uglier and uglier and we
don't want that. So I'm going to
take it way back. I'm going to hold the Shift key down and bring it
back until it's really just about as thin as we can get it. Something like that. I've got it down to 0.008 here. That just gives us
a little bit of thickness without causing
huge problems around in here. Alright, so we've got that. One thing I have noticed though. Let me go back here. One thing I did notice on this is if we take
a look at this, I'll press Control
Spacebar again. On many of these pictures, we've got this
little piece right down here underneath the trim. I don't think it's on our reference images because I really didn't see
that at the beginning. Yeah, you can see it isn't here. However I like it. I may give this a try, see if we can add this on here. So I'm gonna come in here and maybe select this
edge and this edge. And let's just extrude this straight down and
see what happens. So I'll press easy. Let's just bring
it down like this. Now. That's about right, but while it may be a
little bit too far down, but we really need to
emphasize that edge there, that line at the
bottom of the trim. So what we can do, we can do two things. I think one is use our crease tool to kind
of straighten that up. And then we can also market sharp to get a little bit
more of an edge there. So first of all, let me select this edge and then
Control click this. And let's press Shift E
for our edge crease tool. And actually if we then click, we've got this slider down here. We can slide it back and forth until we
get it the way we want it. So maybe we wanted
about like this. That helped a little bit. But then we could also
take that edge one more time and press Control E. And we could mark it as sharp so it ignores
our smoothing. So I'll click this. And now let's tap back into
object mode. And there we go. Now we've got a nice sharp
edge underneath there. Yeah, I just wanted that
little piece there. In fact, it almost
looks like I have it still too far down. Let's select that one more time and just move it back
up just a little bit. There we go. Yeah, I kinda
like that. All right. Let's take a look
at the trunk here. I think we need to add a little
bit of thickness to this. However, we don't have a whole
lot of resolution on this, and therefore, it's
getting kind of choppy around the curves here. So I think we need to before we add a solidify modifier to this, I think we may need to increase
the subdivisions on this. Let's go to the top view
and tab into edit mode. I'm just going to
select everything. And now I'll right-click
and choose sub-divide. Here we go. Now we've added
just one cut in here, and it's really given us
quite a bit more resolution, but it's added a
little issue here. Let's take a look at this. Let me go into X-ray. Hit the one key to
go to vertex mode. And this little point is being pulled out by this
part of the mesh. So let's just hit G
and move it back. There we go into place. Now I think I just need
to hit G and kind of get these points a little bit more in line with where
the trunk should be. So I'm just going to pull
these back a little bit. And see over here we could hit G and move
these out a bit. So we just probably need
to go through and do a little bit of adjusting now
with all these new points. Yeah, look at this here. Move that back in. All right, so once we get
these the way we like them, now we can come in and add
a bit more thickness to it. So oh, it looks like down here I could work on this and
we press Control one. And I'll hit G and
bring these down. And this here. Now that we've done
this, look at this here, it's got this jagged feel to it. And no matter where we move it, it still keeps that. So if you ever get that, but one thing you
can do is apply the shrink wrap modifier and
then just add a new one. Let's give that a try. Oftentimes that'll
clean this up. So I'll come over here
to the shrink wrap up, pull this down and I'll click
Apply. And there we go. And you can see that clean
that up quite a bit. Now let's just add a new one. Add modifier. Shrink wrap for the target will add it to that
smoothing mesh right here. Alright. Now you can see that
cleaned it up quite a bit. If I tab into edit mode here, Let's turn on the cage here. Now we can back to readjusting
some of these points. So if the smoothing mesh or if the shrink wrap
gets a little wonky, you can always apply it and
then add a new one to it. Now we can add a little
bit of thickness. So let's come over here to the object data properties
turn on auto smooth, and then let's add our
solidify modifier. There it is. Now we can choose even
thickness and click and drag in our thickness field
and maybe I'll push it in. So it's, I don't know, 0.04, something like
that. There we go. Overall, we're here. Let's take a look at
that point that we added back here around
the rear light. So yeah, we could let
me press Control one. We could adjust these to get these back the way we want them. Like this. Anytime you add an
edge like that, you're going to get
a little bit of movement from the
points around that. All right, so we've got that, we've got a little
bit of an issue here. We'll have to maybe
work on that. Once again, that
may be taken oh, well, we can just
pull it in like that. There we go. I was gonna say, uh,
we could also apply the shrink wrap again
and then add a new one, but that looks like
just moving it around. Seem to take care of that. How about the hood? Let's see if we can add a little bit of
thickness to this. This is kind of a difficult one because we've got this vent. If we, okay, First of all, let me go and turn
on auto smooth here. And when we do that, we get kind of a hard crease. Let me click and drag
and drag that up a bit, maybe to about 45 or so. So that gets that curve back. But once we add a solidify, we're gonna get some
weirdness here in this vent. So let's just try it and see. I'm going to choose
Add Modifier, solidify, even thickness. And yeah, we can, we've got some weirdness there. Ultimately, we may just want to select this edge all the way around and just extrude it down. And then we'd get a
little bit of thickness. So I'm going to go
ahead and remove this, solidify that one just didn't work on that
and that's fine. I also want to take a look at the corners or the
curves around here. And this two looks
a little jagged. If we tab into edit mode, we could maybe sub-divide
this a little more. Although if we do,
we're gonna get some weirdness up in here. It's kind of a balancing
act and this is what the fixes and tweaks portion
of this is all about. We're just trying to go
in and see if there are places that we can fix
that we can adjust. And if not, that's okay too. But let's go ahead and select everything and right-click
and choose sub-divide. We can begin adjusting these
and pulling these around. So it fits a little
better in here. Like this. We go, Let's see how that worked. Yeah, I think that
works pretty well. Now to add thickness, as I said, we can tab into
edit mode and alt click this edge all
the way around. And Alt Shift click up here
and down here as well. Then we could just extrude
this straight down. So to do that, I'm
just going to hit Easy and pull down just a
smidge, just a little bit. And actually before we do that, we're going to need to remove this from that Smoothing Group. Let's come over here to the
Object Data Properties. Click on remove,
and there we go. Now we can bring this
down just a little bit. Then let's do that again. Easy and pull down just
a little bit more. Now we're probably
going to have to use our edge crease along here. So let's try that. Once again, I'll
select this whole edge all the way around and
let's press Shift E. Bring that out a bit. And I'll click and then use
this slider here so you can see how I can pull it out
to the edge like this. Let's get it almost
all the way out. Here. We go. Yeah, that tightens
up that quite a bit. But look at what it did here. I didn't get this whole
piece here selected. Let me press Shift E
and pull that out. So that helps me click, yeah, we're at 0.95 there, but we've got this
little bit right here. I think we could probably
just solve that by taking these two and merging
them together. Let's just hit em
and merge at center. Then that cleans that up. All right, we're coming
along on our fixes and adjustments will keep on
plugging away in the next video.
81. Adjusting the Undercarriage and Bumper Plate: Alright, let's take a
look at the door now. Well, we do have
some things still poking out a bit
and that's fine. Oh, we've got that original
dashboard showing up again, so let's hide that away again. I'll just come up here
to the search field in the outliner and
type in dashboard. And here's that version one. Let's just hide that. There we go. That helps. Alright, I'll take that away. And we've still got just a little bit of a
thing sticking out here. It looks like we
could take this, maybe turn on the proportional
editing tool and press GZ. And I'll just pull
down just a little bit just to get that
out of there for now. All right. So the door What
should we do with the door? I think we could maybe do a
little bit of adjusting here. I've still got the
proportional editing tool on, which isn't a bad thing, I guess for this, Let's move these in a
little bit closer. Here. We go. Then let's go ahead and add
some thickness to this. Our auto smooth is
currently on, That's good. Let's go back to our modifiers and we'll
add a solidify here. Let's see what we
can do with this. Even thickness. It's going the wrong way. And then I'll hold the Shift key down and pull it in
just a bit like that. We've added thickness
to all of the body. Now let's work on the bottom, this under carriage piece here, I'll hit the seven key and
then we tab into edit mode. And now I just want to
begin moving these out. So they just kind
of connect with or come in contact with
the body of the car. So we just need to go
through and kind of seal up these as best we can. We may need to add an
edge there in the middle. But let's move this
out. Like this. Yeah, I think we're
going to need to add an edge writing here. Let's take this
and move this out. Maybe one more in here so we can take that point and
move it out a bit. And we still have a
mirror modifier on this. So that's going to help us
as we adjust one side here, it'll do it on the other side. I'll add an edge in here and
let's pull this out a bit. Maybe like that. What about these? How far
do we need to move these? Well, they could come
out quite a bit. Couldn't name, Let's do that. Then let's come down here and begin bringing
these out as well. We've got one here. We could almost add
an edge loop in here. Like right in here. We have something
to pull out here. And maybe even here like this. Then let's make
sure we're all the way out for these as well. I think we're going
to need to go back up to the front of the car. Do that right up here. Let's make sure we're extending out as far
as we can go in here. Alright, we've taken care
of the under carriage. There is a problem back here. We've got this big hole between the back of the
car and the bumper. And let's take a look at
what we should do with that. If we look at this here, we can see it's pretty
much just got a plate or a flat piece that fits between
the bumper and the car. They've even put an
antenna on this one. Let's see if we can find
an image of another one. Let's look at this one here. Yeah, same thing. We've got this just a
piece of fiber glass, metal, whatever right
here between those two. So let's create that real quick. Let's tab into edit
mode on the fender. And I guess we could just
grab this edge right here. I'll click this point and
then Control click this. And let's grab this edge duplicated off and
then use that to create this piece
because it needs to fit in here into that corner. All right, so let's
press shift D and enter. Now let's split this
out as its own object. Let's press the P key
and choose to separate. By selection. We tap back into object mode and select
that there we have it. Now we don't need to
solidify modifier on this, so I'll remove that. We could apply the shrink wrap. Let's click Apply here. Alright, so let's
tab into edit mode. Hit the a key, and let's
pull that out a bit. There it is. Now we just need
to extrude it out. Let's take this point to here, and let's extrude this out. I'll hit the seven
key now let's hit EY and let's pull
this out like this. And then we should
connect these up. So I'll select these four points here and hit the F
key. There we go. Now if we select
this edge out here, Let's hit E and Y again
and pull that out. And then let's scale it out. The x Sx, bring it out a bit. We could also just move
it in the X like that. Alright, so let's bin
that around that vendor. They're a bit like this. See how that looks. What do we think? Yeah, that's not bad. Actually. Let's give it one
more edge loop. I'm gonna give it an
edge loop right up here like this. There we go. That's pretty good. And then do we need to give
any thickness to that? I wonder if you can
see it up in here. I guess let's go
ahead and do that. Let's add a solidify
modifier to it. Let's make sure auto
smooth does on it is okay. Then let's just click
on even thickness. I think that'll be just fine. There we go. Alright. So we've closed up the bottom. We've closed that up there. Yeah, I think we're doing okay. In the next video, I'd like to work on the tires. I think I feel like they're
a little bit too thick. And we also need to add the part of the wheel that
goes on the inside as well. So let's work on
those coming up next.
82. Final Fixes for the Tires: Well, there are
several more tweaks and adjustments that
I'd like to do here. One of them is the tires
and I think for the tires, I've made them just a
bit too wide for what I'm seeing in the
images and here in the reference
drawings as well. So let's just grab one of
these tires and I'm gonna hit the M key and pull it out to
the main scene collection. So we have it out here. And then I'll hide the car and let's see what
we can do with this. What I'd like to do is just make this tire a little bit thinner. But what I've done is
I've made it difficult on myself because I've
applied all of the treads. So each one of these is
its own individual piece. Selecting them all
without selecting the wheel and the spokes
could be a little difficult. So let's give that a try. I'm going to go to the side
view with the three key. And I'll hit the a key
to select everything. And then I'll go to
wireframe with the Z key. And now I'm just going to hit the C key for circle select and then scroll the mouse wheel to make the selection a
little bit bigger. And then middle mouse
button click and drag and de-select everything
that's on the wheel here. And of course it kind of
bleeds over into the tire. Now that I've
de-selected the wheel, I'll hit Z and go back to solid. I can then just hover over
the tire and press the L key. And that'll select just
the tire and the treads. Alright, so now let's go
to the front view here I'll hit Z and wireframe again. And let's just scale in the
x Sx and let's get it down. So it's about as wide as we see it here in the
reference image. And maybe let me just see, yeah, I think
something like this. Then if we go to the side view, I may want to bring
the whole thing down here after we're done with this. But for now I think that is pretty good for the
width of the tyre. Now for the wheel, how do
we select all the wheel? Well, now that we have
just the tire selected, we can invert the selection. We can come up here and go to Select and invert or Control I, I'll just press Control I. There we go. Now, let's go back to Solid View and I
just want to move that. We'll back into where
the tire is like that. All right. There we go. So now we've got our tire a little bit thinner. I think that's going to help. And also we need to
fill in back here. What we should do
for that is probably take just this piece right here. I'll hit the L key, just this piece and then duplicate it and mirror it
over to the other side. So to do that, I first, I think when I move this 3D cursor into the
center of the tire, I can mirror around
the 3D cursor. All right, so let's
select the tire here, and that gives us a
pivot point right there. So let's press Shift S2, that brings the cursor there. Then let's select this
wheel with the L key. All right. Then let's change to have our pivot point B
around the 3D cursor. Or once again, we can just hit the period key and
then choose 3D cursor. Now let's mirror around this, but first we need
to duplicate it, Shift D and Enter. Then let's mirror
it in the x-axis, Control M, X, and then
Enter. And there we go. Since we're doing all
of this in edit mode, this is now a part of
this whole object. Let's go over here and I think I wanted
to just bring this down just a little bit,
kind of like this. And I know it's going to sit below the grid plane
here and that's okay. Let me just bring that
down right about there. Now we've got a good position, I think for the front tire. Let's move this back, duplicate it and move
it back in place the back tire to shift DY and we'll move this back here and try and place
it right in here. I still have the pivot
point at the 3D cursor. Let me change it back to median. And I just want to move this
so it's right about there. There we go. Okay. So we have those two tires. Let me select this
back tire press Control one to go
to the back view. And now let's move this into place where the back tire is. It's right about here. I think. Let's try that. I did do a little bit of reading to find out
that they actually did purposely put
the rear wheels in from the front wheels. It was actually a
feature and not a bug. So that's good. Now let's take these two and we'll first of all move the cursor into the
center of the grid, shift S1, and change
back to our 3D cursor. I'll hit the period key
and choose 3D cursor. And now let's once again
press Shift D and enter to duplicate Control M and
X to mirror them over. And then the Enter key. There we go. Now let's bring
everything else back. Here. We need to do some adjusting for the insides here and how these are going to fit onto the axles. Once again, I don't want
it to be real complicated, but we do need to just
take a look at that. Let's move these tires now back into the nationally group. There was a collection of
tires in there, I believe so. Let's hit the M key. Nash Healy tires. Now let's take a
look at these here. So let me zoom into this right here with the
period key on the numpad. And I think what I
can do maybe is just pull this in and let's
go back to median point. I could just pull that
straight in like that. That'll pretty much
cover that up. Well, it looks like it's we can kind of see
through it here. I want to get this aligned
to this to the wheel. I've put the tire and
wheel where I want it. I don't want to move that. What Let's do is move the cursor to this
point with shift S2. And then this piece right here, I want to center
that, that cursor. What we could do
is maybe tab into edit mode here and select
this point right here. Let's go to the side view and it's really
close. It really is. So let me just hit the L key to select just this piece here, and I'll hit G and I'm just
going to move it just by eye. I'm just going to move it right into the center
of the 3D cursor. It doesn't need to
be that precise, so I will do that. Then. What we can do is take this piece and duplicated
over to the other side. So let me de-select everything, hit the L key, select this, delete it, and then we'll move the cursor into the
center with shift S1. I'll take this up wrong one. I'll take this piece right here, hit the L key. Let's go back to 3D
cursor right here. And then let's press Shift
Enter, Control, Enter. And that'll put that
over on the other side, centered on that wheel
over there as well. All right. So we've got that we've
got the axles there. Let's go take a look at here, see what we can find over here. Now. These are a
little bit different. We could maybe smooth
this, I'm gonna, it can drag this
up because we had a little bit of faceting there. And let's just take this wheel now and I'm gonna select this edge and let's
just hit E and S, and let's scale in time
still on the 3D cursor. Let me undo this, and then let's change
back to median point. There we go. Now, let's grab this hit DNS, bring that in and we can
see how off we are here. So let's move the cursor to it. Then let's select the
axle tab into edit mode, and I'll just hit the L key
to select that whole thing. And then let's go
to our side view. And it looks like the 3D
cursor is off-center here because it looks like we have our old wheels here
are our old tires. I forgot to delete those. Let's come over here and go down to the tires and let's figure
out which ones are which. I need to delete these. My guess is that the
early ones are the ones, so this is the new one. Just tire without a number. And then my guess is
is that these yeah, these are the old ones here. I could delete tire one, tire too, entire three. And then these are the new
ones, the narrower ones. So let's do that right now. Now we can see our 3D cursor is in the
center here. That's good. Let's go back to that
axle that still selected. I'll press Alt Z and I just want to once again move this axle into the center there
and it looks like I have more than one
thing selected here. Let me just hit the L key again. Here. There we go. I'm just going to slide it
over tablets in the center. There. Doesn't need to be perfect, but just get it a
little bit closer. So once again here
I'll just take this tire away and let's move the cursor to the center
and I'll just mirror this one over now that
we've adjusted this. So let's change the pivot
point to 3D cursor. Then we'll press Shift Enter, Control, Enter, and that will pop that
over to the other side. All right, what else
do we want to do? Well, I think I've identified this guy is something
I'd like to work on. I think if I change, I want to change this
back to median point. And it looks like the origin is here in the center of the
grid and that's fine. That's because we have
a mirror on here. I think what Let's do is let's move this out once again from the car collection to the main collection here and
then let's hide this away. I think I'm just going to
apply these kind of as is. I think I want to
move this down just a little bit like this. Then let's just apply these
as is and see what happens. I'll click Apply here, and then I'll click
apply for the Boolean. And now if we tab
into edit mode, this is what we have. I think I'm gonna take away a good deal of the
faces on the bottom. I don't know that we
really need those. So once again, I'll just hit the C key and click
and drag down here to select faces
all the way along here. Let's get these here and let's just delete these and
see what happens. Delete faces. There we go. Yeah, that's not bad because
we just didn't need all of those faces on there just because we're
never gonna see them. So I'll bring back the
car and there we go. Let's take that back
in there and okay. We've got some more to do. I think I want to make
a few adjustments to the windshield and the dashboard and a couple of other things. So in the next video,
we'll continue with those.
83. Making More Adjustments and Fixes: Another thing I've noticed
is that the windshield isn't exactly the same shape
as what we see here. This has a little bit
more of a curve to it. It goes straight right here. So I think we can do a little bit more with this windshield. First of all, you can see the glass part of the
windshield poking through here, so probably need
to deal with that. Let's just add a subdivision
surface modifier to it and that'll just curve those edges so we don't see them in there. Now, for this, we could try
and redo it and reshape it. But I think we can get
close to this kind of a shape here by just adjusting
the modifier stack here. What Let's try is
let's try just moving the subdivision down
below the solidify. Yeah. So now we've got more
kind of a curve on it. Let me go over to the auto smooth and the
object data properties. I'm going to bring
this up. So we've got more of a kind
of a curve here. You can see that kind
of rounded edge here. Let's now go back to
the solidify and let's increase the thickness on that just a little
bit like that. Now, down here we can see this is a little bit
flatter than I have here and it's a little wider to how should we deal with that? I think let me first pull it
out of the car collection. I'll hit M and pull it out to the scene collection
and then hide the car. I think what we need to do is apply the top two
modifiers here. Because what I'd like
to do is spread out the bottom here you
can see how it's a little bit wider
here at the bottom. I think I'd like to
spread that out. And to do that, we're gonna need to apply those modifiers. So let's first of all apply
the mirror. I'll do that. Apply. And then let's
apply the solidify. Click here and apply this one. Naff we tab into edit mode. You can see we've got geometry here that I'm just going
to take away down here. We aren't going to see any of these faces since they go
into the body of the car. So let's just delete these. And there we go. Now we've got a
little more control over these edges here. Let's maybe take these edges. I'm gonna hit the period
key to zoom in a bit. We go, let's just
pull these out. I'm gonna take this and
kind of pull it like this. Just pull these out
like this and see if we can widen that up a bit. Let's give that a try. We're getting some
artifacts here, so I'll come back to the auto smooth and
drag that up a bit. All right, so now
we've got that, but it's a little bit too curvy now I think I need to add
an edge loop in here, maybe one right in here. Let's try this and
then I'm gonna take these points and
pull them forward. Let's hit G2 times and pull
these forward to make that a little bit sharper
there, like that. Then for this one back here, maybe we could just
use that edge crease. Let's try that shift E, and I'll pull out like this. And let's see what
we can get there. Well, that's a little harsh, It's a little too much, I think let me undo that. Control Z. Let me try once again,
I'm just going to click and then drag down here. Maybe something like this. Let's try that a
little bit better. I think what I'll
do is I'll undo that and I'll try and
add an edge loop. Let's see what happens here. Then take these two and hit G, and let's pull these
back like this. Yeah, I think that's
a little bit better. Let's take a look at
this edge down here. Let's grab this now. Let's maybe pull this out to get that more
straight line there. Just pull it out in the x and maybe hit the G key as well. Yeah, I feel like that's
just a little bit closer to what we're
seeing in the image here. Let me pull it out just
a little bit more. There we go. All right, so we've got that form now let's
bring everything else back and take a look if anything changed because
of this and yeah, some issues with this trim. Now, let's tab into edit mode and see what
we can do about this. I will select this
top piece here. And let's change from
global to normal so we can move along this axis here and
just bring that up a bit. Let's also do the
same over here. Grab this and just
move this over. Maybe grab this edge and
move it up into here. And also we could do
the same down here. So we could grab we can
grab these, I guess. And move these down. Alright, I think we're
doing pretty well. Oh, look in here. We've got the dashboard. We better deal
with this as well. So let's pull this out to
the obscene collection. Let's grab the windshield frame and drag that back
into the car group. And then let's hide the car and take a
look at the dashboard. So if you recall, we've got a lot of polygons on here that
we probably don't need. So I'm going to
Alt click between two faces here and let's press Control plus on the numpad
and make this selection here. Now, if we bring the car back, do we see any of the selection? Well, yeah, we can see that some of the selection in here, we probably don't
want to get rid of this area down in there. But everything else isn't bad. So if I press Control minus on the numpad a couple
of times to hide or to move that selection back. Then we go to the bottom
and press Alt Z. Yeah, we could remove some of this
down here, so let's do that. Let me hide the
car again, Alt Z, and let's use that
circle select tool again and middle
mouse button click and drag to deselect these. And let's open these up. This. We do not remove those. If we bring back our car here. Yeah, we can see that still on either side of the steering
wheel, so that's good. All right, so let's
just delete faces. There we go. So that gets
rid of some of those. Now we also need to deal
with this a little bit right in here is poking through. We don't want that. I'll tab into edit mode
and let's select a point. Let's turn on the proportional editing
tool and I'll hit GZ. Now we can begin bringing these in just a little
bit at a time here. Maybe let's do this here. Gz. I'm just trying not to destroy
this area in here as well. Let's GZ, bring this down. Let's take these down as well. Here. There we go. So we got those hidden
away and I don't think we destroyed the
shape of the dash. We may be able to take some of this and move them
up a bit. Let's try that. Cheesy and I'll scroll the
mouse wheel out just a bit. We can bring these up. Now, a couple of other things
I wanted to deal with. One was the turn signal. I feel like our turn signal here sticks out a
little bit too much. I'm going to go
ahead and tab into edit mode and zoom in with
the period key on the numpad. For this, I may be
able to just select, say, this edge right here. Maybe let me select this one
right in here, right there. Move the cursor to it, shift S2, and then I'll
just hit the L key here. And then let's change too. Normal transformation
orientation and that changes the axis to the object there,
the selected object. And I'll press Z.
And let's just, I forgot to change
to the 3D cursor. Hit the period key 3D
cursor. Here we go. Let's bring that in just
a little bit like that. I just felt like it was a
little bit too much was all. All right. There's a couple of other
things I think on the interior, I feel like this could
be a little bit. I feel like the gear
shift should be tilted more like this casing. Let me bring this out
M Scene Collection and I'll take the dashboard back
in and then let's hide that. I feel like this should be
tilted just a little bit more. So let's do that. I'm going to just
select this here. Change to median point. We could hit the R key up. I've still got the
proportional editing tool on. I could hit the O key
to turn that off there. I'll change back to
global and let's just press R. And I'm going
to tilt this like this. And then just move this
forward like that. Just so it's a little bit more inline with the
tilt of this here. I know it's a small thing, but it kind of bothered me. Let me move it forward just
a little bit more like that. There we go. All right. We got that. What else? I saw like
an artifact back here. Yeah, right here. Let me bring this out. Take the gear shift back
in there and hide it. This right in here. I feel like there's a
problem going on here. And it could be that we can
just move some points around. If I take these two
points and just move them in the X, right? Right, right about
there. There we go. That kind of cleans that up. I think the final things I
want to deal with are the trim here around the **** debt and then also the trim
on these seats. I feel like you can see how they're kind of pulled
out from the seat here. And also down here you can
see how this is pulled out. I want to deal with that. I also wanted to deal with kinda hard to
see from this image, but I want to deal with
these pieces right in here. So this right here at the
edge of the door frame, we need to split this trim and add a
little chrome piece here. So I think those two things are what I'd like to work
on in the next video. Once we do that, I think we're gonna be pretty much done with the modeling and we can begin
working on the materials. So that's coming up soon.
84. Finishing the Fixes and Adjustments: As I mentioned, I think I'd
like to see if I could make the trim on the seats a little bit closer to the actual seat. You can see here we've got
one that's sticking out here. I think what we
should do is apply the shrink wrap and then tab into edit mode and
adjust these points. So first of all, let's just drop this down
and click Apply here. And now if we tab
into edit mode, those points are closer in. Let's switch to median point and then we can just
begin bringing these in so they intersect
with the actual seat. So it's kind of tedious. But these are the little tweaks that need to be done at
the end of the process. And we've got a mirror
modifier on here, so it's happening on
the other side as well. So that's good. Let's bring this one in a little
bit like this. Maybe that in like that up here, it looks like it's kind of off. So let's maybe take
this and just hit E and pull straight
down like that. See if that helps that. Then where else did I see? Oh, down here. Here again, I'll apply the shrink wrap and tab into edit mode and begin moving these around to try and intersect with the seat
just a little bit better. All right. That helps pull those in a bit. That's good. We've got a
little piece right here. I mean, this is really
being pretty picky, but let's just apply
the shrink wrap here. And then if we tab
into edit mode, we have a little bit
more to work with here. I'll just bring that
back just a little bit. Yeah, that's about all
I really wanted there. I think that's pretty good, So that takes care of our seats. Now for this this trim, first of all, let's
take care of this. This is a little bit blocky. Maybe we could, in addition to the modifiers we have here, maybe we could add a
subdivision surface, take that up to two. And then let's tab
into edit mode. And I will just zoom in with the period
key on the numpad. And then let's just
add some edges to kind of tighten these up
here. Like this. Yeah, I think
that's pretty good. Now for this, these
pieces right here, I think what we need to do
is just split this and add a little thing on the
end for the chrome part. So I'm going to zoom in here with the period key and we've got an edge here. I'm going to create an edge right here, right
down the center. And let's create another one. Maybe right about in here. I'll move this one
about to here. Alright, so let's then
take this center edge. Let's bevel it with Control B. And let's pull this
out like this. So we have a little bit of space between these two like that. Then let's just
delete these faces. Delete faces. There we go. Now, we could take
each of these, I'm going to Alt click
these and then hit the F key to fill
these faces here. And then let's try and select these faces and then Alt
Shift click these faces. Let's extrude and then use that shrink fat and
tool to pull them out. So I'll hit E and enter and then Alt S for the
shrink fat and tool. And then let's just pull
them straight out like this. There we go. Now we could come over here to the object data
properties and turn on auto smooth and that
cleans that up. But we still need to
drag this up and kind of smooth out those edges
there like that. All right, that helps. Then we could do
that over here too. Let's just, so here's maybe
our center edge right here. And let's just
insert an edge here. And insert an edge here. Let's select this control B. Pull out, delete
these faces here. Then let's once again select
an edge and hit the F key. And do that over
here, the F key. Then we could select
these faces here. Let's hit E and enter,
and then Alt S. And let's pull these out
just a bit like this. See how that works. Yeah, So that may be
just enough for us to believe that there's
something there. I just realized that that
wasn't being mirrored over. I got so used to there being a mirror modifier on everything, but we can take care of that. Let's tab into edit mode, go to face mode, and I'm just gonna click
and drag here like this. Delete these faces. Then let's just add a mirror. Modifier here. Turn on clipping. We've got a little
bit of an issue here. Let's tab into edit mode and just select this
edge right here. I'll hit the two key and select
that edge with Alt click. Then we really just need to pull these and slam them
together like that. That should allow us to
clip those together. Let's see if we have
an issue upfront here. Let's zoom in over here. Node those are clipped,
so that's good. Now that we've
mirrored that over, we should see them over
here on the other side. And we do. All right. Well, there we go.
I think we are done with the
modeling of this car. As we add materials
and create textures, etc, we may find more
things that we need to do. I think one last
thing before we go on to the materials
is we should come up here and turn on face
orientation and take a look at it and make sure everything's
all blue and it's not. So we should go
through and fix these. We ought to take this, let me take this
piece right here, tab into edit mode. I will just select this piece
and then we should go up to Mesh normals and
flip like that. We go, if we select this, we can tab into edit mode, select everything
and press shift in. And that'll help with that. Let's do that with
each of these. So same thing here. Select everything shift in. And it looks like we've just
got these for every tire. Let's go through and
fix all of that. It looks like we've got
something flipped here. Let's take a look at that. Hit the a key, and
I'll press shift in to recalculate
outside. All right. What else? Well, we've got these pieces. The windshield is okay for now. I'm not sure until we get
the materials on whether we're going to need to add
thickness to this or not. But this piece right in here, we could let me just
select this right here. Yeah, This needs to
be taken care of. So I'm just going to hit the a key and press
shift in for this. And there we go. What else? O on the bottom here we've
got this this piece here. I'll tab into edit mode, hit the a key press shift in. Let's select this. Do the same here. Select everything shift in. What is this right in here? That is, oh, I think that's
this piece right here. We don't need to flip that because that's
just got one side. Ultimately, we may need
to add thickness to that. I'm not sure, but for
now I think it'll be fine. All right. I think we've got
our car pretty well. I spoke too soon. Look at this. Let's hit the a key shift in. There we go. Alright, I think we're doing
pretty well now. Let me go ahead
and turn this off. And now in the next section we'll begin adding
our materials.
85. Beginning to Add Materials: All right, Well, we finally
made it to the point where we can begin adding some
materials to the car. I think what I'll do is just
begin with one material, just the chrome material, and begin adding that to the various pieces
because we've got a lot of chrome
pieces around here. So let's just begin
doing that and get a sense of the general
process of adding materials. And then we'll kind of
branch off after that. To add a material, you can just select an object. I'm going to just hit
the period key here. And you can come down here to the material's property
panel right here. We can click New and then
give them material a name. I'll just call this chrome. Now we can't really
see anything. If we come over here, instead of the solid viewport shading, we can come over here to
the material preview. Click on that. And now we can get a sense of what the materials look like and not much has changed
from everything else here. What we can do,
I'm just going to bring this up a little bit so we have a little bit more
room down here like this. And if we scroll down, we can see a lot of settings
here for our material. For a chrome material, we really just need to bring the metallic all the way
up currently it's at 0. So I'm just going to
bring the metallic setting all the way up to 1. Now we're getting something
kind of like metal, but it isn't reflecting
a whole lot. So what I'm gonna do is take
the specular all the way down and the roughness all
the way down and there we go. Look at that now we've just got like a mirror on our bumper. And you can see
reflections in here. And that's one of the
main things we see for metallic reflective services
is the reflections. And you might wonder wealth, where are we getting
these reflections? And if we come over to
the shading tab up here, you can see here's that sphere, that image sphere that is giving us all those reflections. This is an HDRI, an HDR image, high
dynamic range. And this is part of the material preview
that's just giving us a preview of what the material may look like when
we do a render. It isn't exact, but it's close. If we come over here to the rendered viewport
shading and click on that, you can see that it's
not quite the same. We need to do a
little bit more in the rendered view to
get it to look right. But this material preview gives us a sense of what
it could look like. Now for me here in
the shading tab, I'm not a big fan of the HDRI being visible
in the background. Now, you can pull
this down here, the viewport shading menu. You can take the blur of this
image all the way to zeros. You can kind of see
what that image is. It's just a little country
road kind of image. But what I like to do is take the world opacity all
the way down to 0. So I don't see that image. We're still getting
the reflections here, but we just don't have that
image in the background. I prefer to work that way. You may be asking,
Okay, that's great, that's our material preview, but how do I get a sense of what it's going to look
like in the render. Well, if we come over here to the rendered viewport
shading and click on that, you can see that everything
is just this gray color. The reason why it's
this gray color is that everything in the
background is just gray. If we come over here to
the world properties here, you can see that in the
color slot, it's just gray. How do we put something else in the background here instead
of this dog gray color? Well, we can just click on this right here in
the color slot. We can bring in an
environment texture. If we click on that, you see we get this
really ugly pink color. And all this means when you see this ugly color in Blender, it just means
something is missing. Blender is just
trying to tell you. Something is missing in
what you're trying to do. And currently what is missing for us is the
environment texture. So let's come over
and click Open. And what I've done is
within this project folder, I've added a folder called HDRI. These are HDR images
from the blender clouds. So these are open
source and free to use. So I've put these here for
you to play with if you like. I'm just going to choose
this cloud layers HDR. And I will click Open Image. That brings that in. So you can see if
we tumble around, it's just an image in an image sphere of a
grassy field here. And that provides us some very nice realistic
reflections here in our Chrome. Now, once again,
I'm not a fan of having that image in the
background when I'm working. So what we can do is come up here to the
render properties, scroll down to the film section, and then turn on transparent. And that gives us these little checkerboard pattern
in the background. But I like that better than
having the image in here. All right, so now let's go back to the material properties here and we can play around with our chrome
material settings. So I think what I'd like to do is bring up the
roughness a bit. I'm gonna click
and drag on this. And if we bring it
all the way up, we just get this
kind of Matt Gray. But if we take it down, I'm gonna take it down a
bit and let's take it down. Well, maybe I'll
just type in 0.1. Let's try that 0.1. There we go. So it's reflective, but it isn't completely like a mirror. And of course we can make further adjustments as we go on. But at least for now as
we're assigning materials, this is gonna be just fine. So now we have this
object selected, and for this object we
have this material. If we select another object that's gonna have Chrome on it, say this trim right here. We can come over here and
pull this menu down and select from our
existing materials and material for this object. So we can click Chrome here and that will add that to that. And we can go through and do that for other objects as well. But also another way
to do that is we can select an object or
multiple objects, say this as well. Then we can shift
click an object that already has
a material on it. Link the material of
the last thing we selected to the other
objects selected as well. So with all of these selected, I'm gonna press Control L. That brings up the
link transfer menu. Now you can come up here to object link transfer
here as well, but I'll press
Control L. And now we can choose link materials
and watch what happens. It adds that same material to these other objects as well. So let's say we wanted to add that chrome material
to the rear bumper, this little thing,
the trunk latch. Let's do that. We've got
these three selected. Then we can shift
click the bumper. And now if we press Control
L and link materials, it adds it to those as well. So that's just a nice
process for adding a material around the object
in a fairly quick way. So we could say grab
this piece here and these Shift-click
the bumper again, Control L and link materials, and that will add the
material to those as well. Alright, in the next video, let's talk about our render
preview here in the 3D view, as well as continuing to add our chrome material
to other objects. So that's coming up next.
86. Assigning Multiple Materials to an Object: Well, we've taken a look
at the difference between the material preview and the
rendered viewport shading. One does look better
than the other. The material is good and the rendered shading
is a little bit better. But can we do even
better than that? Well, what we're using
here is the EV renderer. And if we come over here
to the render properties, we can see that the
render engine is EV, and this is a
real-time renderer. It's very good. It's very fast. But it doesn't bring the
kind of realism that the other render engine
that Blender has can do. So we can switch from
EV two cycles here, and we get a little bit
better of a render. Our shadows are better or
reflections are better. It's just a little
bit more realistic. However, if I
tumble around here, you can see it's not
quite keeping up. It's kind of blurred. And then when I quit you
can see the samples. Try and catch up here. It's rendering in there. And now it's done. Now if I tumble around again, it'll begin trying to
render it fully again. Here it goes, and now
it's done, right, so it takes a little
bit longer for the full image to render here in the 3D view as we're
tumbling around. But keep in mind
what it's doing here is using the CPU
of the computer, the central processing unit. We can change this
here to the GPU, to the graphics processing unit, the graphics card
of our computers. So by switch it to GPU compute. Now look how quickly it works. If I tumble and look up here, it's done. Tombow. It's done. It's moving a little
bit quicker right? Now if you're going to use this, you need to probably make a few adjustments up here
under Edit and Preferences. So let's take a look at
that here in preferences. If you go to system, you've got this Cycles
render devices. You can choose none, or cuda or optics are HIP. Now, if I choose this, you can see I do not have any
compatible GPUs for cuda, for optics, I do. Now, which one should you use? Well, I had to do a
little bit of Googling. And once you do, you can kind of figure out, okay, I've got Blender. I've got this particular
graphics card. Which one should I use? For me, I'm using optics because this is an actual
InVideo system. And I'm using an NVIDIA
G-force RTX 30 AD card. Then you can also add
your CPU into this. This really doesn't seem
to help at all for me. But honestly, you may need to just do a little bit of testing, do a little bit of Googling. Try and figure out which
card you have an a, which system may be best for
your particular computer. For me, this is what I've found, seems to provide
the best results and the fastest renders. Alright, right, I'm
gonna close this now. For a lot of my
material work here, I'm gonna be using
the rendered viewport shading with cycles
and GPU compute. Alright, so let's now
do a little bit more. I'm gonna come back to my
material properties panel here. And let's add some Chrome
to some other things. So for something like
this, for the headline, so I'm gonna tab into edit mode, hit the a key and then hit
the period key to zoom in. For something like this, I'm gonna first of all, in object mode, just assign that chrome material to
the whole thing here. Now of course, the
headlight part of this isn't going to be
using a chrome material. So I'm gonna tab into edit mode. And if you recall, I created this particular
object in two pieces. One is the headlight housing. So if I hit the L key
there it is there. The other is the headlight
up here or the lens. So I created those
in two pieces, that one object in two pieces, so that I could easily
just hit the L key and select a piece and
assign a new material to it. So now that I've got
this part selected, I'm gonna come over
here and create a new material slot
for this object. You can create multiple
material slots for a single object. I'm just going to
click the plus here. And then I'm gonna
create a new material. And then I'm gonna call this
new material just headlight. Once I've done that, I'm
just going to assign the selected vertices here to this material.
I'll click Assign. And there we go. Now if I tap back
into object mode, you can see that one object
has two materials on it. Now I'm not going to
worry about putting the lens texture on that
currently that'll come later. I'm just going through
and trying to put down the chrome material
wherever it may be needed. Now, for this piece over here, if I hit the period key, this is all one object. If you recall, if
I hit the L key. It's all one piece. For this, it's a little
bit different process. I'll first go ahead and add the chrome material for
the base material here. Then what Let's do is
let's select, say, these faces here and then press Control and
plus and expand the selection out until we want it to be
right about there. I think we can switch over to the material preview
and see if that helps any in what
we're seeing here. And then what Let's
do is let's assign a new material to these
selected vertices are faces. I'll once again for this object, create a new material slot. New to create a new material. And let's call it logo, because that's where we'll put
the logo and click Assign. And currently, the
logo material, just like the
headlight material, has these default
white settings. So we're just getting that color on those materials as well. All right, let's work
on this one Here. Tab into edit mode. I'll hit the a key,
the period key. And for this, I
think I created this into objects or two pieces
of the object as well. Let's hit the L key. You can see there's
an object here. If I hit the L key
or a piece there, and a piece here as well. So first of all, let's go to object mode, and let's just pull this down and select the
chrome material. We can add a new material slot. We'll give it a new
material and let's call this front turn signal. I'm not exactly sure what kind of material
will put on that, but we'll figure that out soon. And I'll just tab
into edit mode, hit the L key to select these
vertices, and click Assign. There we go. So now we've
got that object as well. Now we can go back
to the rendered view and take a look at it and
it looks pretty good there. Is there anything
else we can put? We could put the
material on this here. Let's select this
tab into edit mode. I'll zoom into it as well. And for this, let's pull down this menu and select Chrome. There we go. Now for
that inside part, I think I created
this in two pieces. Let's hit the L key here, and yet, I sure did. Now with this selected, let's click the plus over here. And let's give it a
new material and we'll call this it was this
rear brake light. Let's do that. And then click
Assign. And there we go. That's generally going to be our process to go
through and try and figure out what object needs a particular
type of material. And we can either
assign it directly or use Control L to
link the materials. In the next video, let's
work on the tires and wheels and begin adding Chrome
and other places as well.
87. Adding Materials to the Tires and Wheels: Let's now add some materials
to our tires and wheels. So I'm gonna tumble
around over here. And let's just select
the tire and Shift-click the bumper and press Control
L and choose link materials. And that adds that
Chrome to the tire. Well, that's not
quite what we want. So let's begin
adding a couple of other materials to this
tab into edit mode. And let's now change
our image up here to that close-up of
the tire wear it was that here we go right here. Let's open this one up. Yes. So this gives us a little
bit more information about what Material we might
want to put on this. I think I will go ahead and add that red to the wheel itself. So that's right in
here, I believe. If we hit the period key
and tumble around in here, we can also add that back here. Let's do that. So for this, let's go ahead and add
a new material slot. Oh, I still have the
bumper selected here. Let's tab back into
object mode and just select the tire so we don't accidentally do
anything to the bumper. Now I'll tap back in and we still have this selection here. Let's add a new material slot, give it a new material. And let's call this. We'll read. Let's click Assign here. So now that is that material. Now we don't have a color
on that material yet. So what we could do if we
scroll down here, we can, of course, click
the base color and change to whatever
color we want here. But what we can also do
is click this eyedropper. And since we have this
image window open, I can click the
eyedropper income right in here and hover over the red wheel and click that
and add that color in there. Now you may want to do
some adjusting here, make it darker or lighter or change the shade or whatever, and that's fine,
but that just gives you a quick base to work from. Now, it looks like it's a
little bit shinier than this. You can kind of see a
little glint there. So if we come down here and we take our metallic and
we drag it all the way up. We take the specular
intake it all the way down because
at least for me, specular highlights are good for things like plastics and rubber. Whereas the metallic is really
good for a metal surface. I'll now take the roughness and pull this down until we get a glint that's similar in here
to what we're seeing here. So that's kind of similar. We've got the roughness
down to 1.71.5. Maybe I'll just type in
0.15. Let's do that. Yeah, We've got just a
similar kind of glint there. Then for the tire itself. Let's tab into edit mode. And what we can do here is we can select everything,
hit the a key. Now we need to
deselect these areas. So what I'm gonna do
is go to wireframe. I'll press Control three
to go to the side view. Once again, I'm
just going to hit the C key and
middle mouse button click and drag and de-select
all the wheel area, that wheel and the spokes
and everything in there. Then I'll hit Z and
go back to solid. And then I'm just
going to hover over the wheel and hit the L key, and that'll select
the wheel there. Now I'm gonna go back to
the rendered preview. And let's give this
a new material. I'll create a new material slot. And for this I'll just create a new material
and call it Tire. Let's click Assign,
and there we go. Now let's, well, we could just
click the base color here, click the eyedropper,
and then click the tire. And that'll get us close. I'm gonna try with this to take the roughness all
the way down and then take the specular
down a bit like this. Let's try that. I may need to take the
roughness backup a bit. Let's try that. Kind of like that
and then I don't think it needs to be
quite that black. So I'm gonna come up here and bring this black
up a bit like this. So it isn't totally black. Try that. It's not bad. For now, that may be just fine. I'm going to bring it back
up a little bit more like this so we get a little
bit of color in there. Then we could bring the
roughness up a little bit more. Maybe I'll just type in 0.5
and specular 0.1 for here, for now. Let's try that. Now for the white walls, Let's tab into edit
mode and let's just select faces here and just
press Control plus and go out. How far should we go? We want to pretty big like that. Do we want them like that? And I think I'll go with that
for now. Let's try that. I'll just add a
new material slot. Create a new material, and let's call this white walls. And click Assign. There we go. Now, I think I'll take this white base color and
drag it up all the way. Then let's take the
specular down a bit. Let's try that. Maybe I'll type in
0.3 and what if we take the roughness
and all the way down? I'll just put this at
0.3 as well for now, let's, let's do that. Okay, so there are
tires, That's not bad. We've got the tire,
the white wall, the red wheel, and the
Chrome spoked hub caps. But we need to put all
that on the other tires. So why don't we just select
those other tires all around here and then
Shift-click this tire. And now we can press
Control L and link materials and look at
that. There's a problem. All it really does when we use Lync material is transfer
the base material, the material at the top
here that we created first. That doesn't really help us. So are we going to have to go
through each of these tires individually and recreate
what we did over here? Or are we going to
need to delete these three and then duplicate this
again all the way around. Well, the good thing is that the information about what
vertices are assigned to, what material are actually
stored within the object, within the data of the object. So that what we can do is
we can press Control L. And once we've linked
the materials, we can also link
the object data. And if we click
that, look at that. Now that's pretty sweet. Now we've got all of our tires and wheels
with materials on them. All right, in the next video, we'll begin working on adding
our chrome material to the various pieces on the interior that
need that as well.
88. Adding Materials to the Interior: Let's continue adding the chrome on the interior when we have the rendered viewport shading on the interiors in shadow here. And of course we could change to the material preview and see it a little bit brighter here, but we lose some of the
contrast in realism in here. So I'm just gonna go back to the Render do this is
just personal preference. You do. Certainly do
not have to do this. This is just something
I like to do here while I'm adding
materials because I like it to look as
realistic as possible while I'm adding materials
somehow for me, it's just a little
more satisfying. So I'm going to add an area light in here and just shine
this into the cockpit here, into the interior so we can
see it a little bit better. I'll press Shift a, go down to light and bring
in an area light. Here we go, I'll tumble down
and you can see it here. This is the direction of the
light, that orange line. So I'm just going to drag it
up and you can see it kind of lights it up already and
I'll just bring it back, I think, and then turn it, Let's turn it in the x-axis, RX, and I'll just turn
it a bit like this. Now it just gives us a
little bit more light while we're working in here
and adding our Chrome. So first of all, let's go and work on
the steering wheel. I'll hit the period
key to zoom in. And let's the ad overall material for the
steering wheel here. Let's just come over here. Click New and I'll just
call this steering wheel. Base. There we go. Now we can begin to
assign the chrome. And if we bring in
a new image here, we could find one that has a better view of
the steering wheel. So maybe let's go to this
one here and zoom in. Let's just hover over this
and press the L key here, here, here, and here. And let's assign a
new material slot. And let's just pull this down and choose chrome
and click Assign, and that adds Chrome to that. Now for these things, recall that this is
all one object that we then parented to
the steering wheel. Let's just pull this down
and choose our Chrome. Then for underneath here
I'm going to select this piece and hit the
period key and zoom in. And we could add chrome to this. Let's just pull this
down and add chrome. And then for this it's a little
bit different, isn't it? Let's zoom in. It looks like it's kind of a black rubber seal or something. So let's tab into edit mode. I'll select this. And let's create a
new material slot. Let's create a new
material unless call it black rubber. Here. And then let's click Assign. Now we could change the
material for this one. While this is selected, we can choose the base color and pull this down a bit
so it's a little bit, I don't want it to go
all the way black. I don't feel like anything in the real-world is completely
and utterly black. Maybe a black hole, I guess. That's about it. Then. Specular rough I could take the roughness
down just a bit. Yeah, something like that maybe. Alright, so we have that. There's also this piece here. Let's take a look at that. So if I tab into edit mode here, it looks like it's
this piece right here. So let's hit the L key. Let's then assign this to the chrome material.
Click Assign. There we go. And it looks like this
piece right below that is also black rubber. So let's hit the
L key with that, Let's create a new
material slot. And then we can just drop this down and choose
black rubber here. Then we can click
Assign. Here we go. All right, so we've got that. What else do we want to do? Well, this thing, Let's
take a look at this. If I hit the period
key and zoom in, Let's just go ahead and add
a chrome material to this. So I'll pull them in you
down and choose Chrome. Then we need to do
something with this here. Now, don't we? I'm not sure really
what that is. If it's a black piece, if it's shadow, I don't know. I think what I'll
do is just select this face in here and then hit Control Plus on the numpad. If I do it again, can we maybe I'll go
out to here, let's say, then let's create
a new material or a new material
slot, I should say, and then a new
material and let's call this material shadow. And what we'll do with this, I'll click Assign. What
we'll do with this. It's just create kind
of a dark color. That will be this kind of thing. We've got other places
where we could put this in the key holes is if
inside is shadowed. So let's try that and
see if that works. Then this piece here, I'm not sure if I'm
gonna want a black or a brown the way
they have it here. But let's select. A row of faces with
Alt click and then press Control Notepad Plus
and just expand this down. Maybe to pull it
back, maybe to here. Let's do that and
let's just call this. Since we don't really
know what we're going to use it for or
I don't know yet, I'm going to assign or
create a new material slot. Create a new material
and I'll just call this, this is some sort of a latch. So I'll just call
this latch knob. I don't really know what else that's going to be
at this point in time, and that's fine. You don't have to know
every single thing about every single material at this point in time.
That's no problem. Now for these right here, I'm gonna go ahead and assign the chrome material to these, pull this down and
choose Chrome. And then if we tab into
edit mode and I will select this row of faces and
Alt Shift click this row, and let's press Control Notepad
Plus and expand this out. And then let's give it
a new material slot and a new material, and we'll call these dash dials. Let's do that and click Assign. There'll be go. We don't really know or
I don't really know, as I said, What that's
going to be exactly. But I do know I want Chrome
around the outside there. I know I want Chrome for this here for the rear-view mirror. So let's just pull this
down and click Chrome, and that adds that to that. Now, for the actual mirror part, if we select this and zoom in, you can tab into
edit mode and grab some faces in here and then
click Control Notepad Plus. And let's expand these out now. For this, we could create
a whole new material. We could pull this down, create a new material. We can call it
mirror, like this. Then for this we could take the specular and the
roughness all the way down. Take the metallic
all the way up. Did I click Assign? I'm not sure. I click Assign. There we go. So now that is very
much a mirror. I guess we're going to want
that on these now, aren't we? Let's just hit the C key and select that and press the
period key and zoom in. And then I'll press
Control plus. And then let's create a new material slot and
pull this menu down. And we'll choose that mirror
material and click Assign, and that adds that there. Let's continue on in here now with this whole
piece on the dash, we probably need
a new image here. So let's click Image open. And what else do we want? Here we go. Let's try this one.
This looks pretty good. We get a pretty good sense
of the materials in here. We could begin with
this here, right here. Let's do that. I'll pull
this down and choose Chrome. Then if we hit the
period key and zoom in, right in here I was
talking about earlier. We could select this face
right here and press Control plus on the numpad to
expand the selection once. And then let's add a new
material slot and let's give it that shadow material
and click Assign. There we go. It just adds as if it's casting a shadow inside there
and we can't see in there. All right, now this over here, let's select this whole piece because I've made
this all one object. So let's just pull this down and choose the
chrome material. Now we can go in and figuring out what should be
that black plastic. We could probably use
the same black plastic for almost all of these. So let's just tab into edit mode and I will select
with the C key. I'll click here and here. And let's then add or expand the selection control
plus on the numpad. Can we do it one more time? Yeah, it looks like
we could. Okay. Now let's add a
new material slot. And we could really use a
black plastic material here. So let's try that
and click Assign. And then do we want
to go ahead and adjust the material settings for that black plastic? Why not? Let's go ahead, Let's
drag this down. Tim were about like this, maybe that's still a bit too
far or something like that. And then we can take the roughness down a
bit. Let's try that. And since these are
completely flat, it may be hard to
figure out what we need from the
settings over here. Let's select the
radio buttons here. Just click the L key for all of these and assign
that black plastic. Now we can see that
a little bit better. You can see that we've got these fairly sharp
specular highlights here, which is giving the
impression that it's a relatively shiny plastic. So we can come down and maybe take this roughness down a
little bit more like this. Let's try that. Maybe I'll type in 0.15 there. And we can try and take the
specular up a bit down. I'm gonna try 0.6.
Let's try that. And it may be a little bit too shiny once we get it
on the other things, but let's, let's give
it a try and see. For the knobs here, I'm gonna switch it back
over to the material view. And sometimes it's a
little bit easier to make selections when
we're in this view. I'm going to come in here. Well, I'll begin here,
I'll begin here. Let's select these. I'm going to press
Alt and Shift click. I do not want it here because this is going to be the
one that's all Chrome. I'm just going to select
faces for all of these now. And then I'm going
to press Control plus on the numpad and
expand these back, pretty far back to here. So just Control plus like this, all the way back to there because that's what I want
to be, the black plastic. And then I'm gonna need to maybe hit the C key
middle mouse button, click and drag and
deselect some of these. I think. Go. Do I want to Alt Shift, click these like that? Yeah, maybe I'll do that. Once again. See key, middle mouse, button, click and drag, and I'm just going to deselect these and then Alt Shift click these suggest deselecting
that front part. Now that we've got
all that selected and we could have done
them each one at a time, and that's fine either way. But I'm going to click Assign. Here we go. So now we've got those
in place and yeah, Now that we have
it on these that may be a little bit too shiny. Well, it's pretty shiny here. Let me just bring the specular back to
0.5. Let's do that. Then the last one for this
area will be this one. Let's just get this
one real quick. I will maybe select
this and then Control Plus out like this. Yeah, let's do that. Now Let's click Assign.
And there we go. All right, so we're coming
along assigning our materials. We've got more to
do underneath here. And also we can
add the Chrome and the black plastic to the
door latches as well. So that's coming up next.
89. Finishing the Chrome Material: Continuing with
adding the Chrome, Let's select the
gear shift here. And we could also add
black plastic to this to let's just add the
chrome material here. Let's just do that
for the whole thing. Then let's tab
into edit mode and weekend then select just
this top piece right here. Alt click between two
of the faces to select a face loop and
control numpad plus. And let's take this down to, let's, I'm gonna come
back up like that. Lets go about right there. And then I'll assign
that black plastic and I'll create a
new material slot. Grab that black plastic
and click Assign there. And then for all
of this down here, I'll just hit the L key. And let's just add a new
material slot and we'll create a new material and call this what gear shift casing,
something like that. Just so we know what that is and go ahead and click Assign. And then over here, you can see we've got
the parking brake here. Let's go ahead and add our
chrome material to this. Let's just pull this down. Click on Chrome. And I don't know that it goes, if the chrome goes
all the way back out, I think it looks to me like this whole area is a little
bit different Material, a different metal than
the Chrome Canada, same with the little button
to turn on the brights. So what I'm gonna do is let's just select
this piece right here, and let's give it
a new material, new material slot,
and a new material. And I'll just call this, let's just call this metal one. Because I don't really know if there's going to be others, but it isn't quite a Chrome. I'm just going to
click Assign here. And we'll have to work on
what that's going to be. Let me turn on the
material preview here so we can see this
a little bit better. And if we come down here, let's just add that
metal one to this. Now let's just see if we can
get it to be what we want. So I'm going to turn the
metallic all the way up and I'll turn the
specular all the way down. If I turn the roughness all the way down,
That's what we get. So I think I wish, I
want to bring it up. Maybe around 0.4. Let's try that for the
roughness. I'll do that. And that should give us a similar thing
over here as well. Yeah. Alright, let's
look at this here. The tab into edit mode. Oh, it looks like
it's mirrored over. So I'll come over
to this side here. And I'll just select one of these pieces and hit the
period key to zoom in. I guess let's go ahead and
just assign the Chrome to everything first here. And then we could grab this and assign that
black plastic to it. Let's create a new
material slot, drop this down and assign the black plastic.
So there's that. And then we could take
this part right here, hit the L key here and here. And let's create a
new material slot. Call this door latch strip. I'm not sure what that is, so let's just do that and
assign that material to that. Now we should be able
to do these in here. We've got metal and
Chrome and black plastic. Let's come in here and let's, let's zoom into this and
see what we can do here. For this. Well, let's tab into edit mode. And if I hit the L key, well that selects
everything there. Let me press Alt Shift and Alt Shift click here
to deselect these. Let's try this. This. Well, I can't really
assign anything until I have a base
material here. So first of all, let's just add the Chrome.
Let's just do that. And then now with
this still selected, I can create a new
material slot, select that black plastic, and then assign it to
what is already selected. There we go. And then we could
probably just select this. And do we have a black metal? We do not. Do we
want to do that? It looks kind of like a metal
here instead of a plastic. We could try that. Let's, let's do that. I'm going to create a
new material slot and create a new material
is call it black metal. For this, Let's take the
metallic all the way up. Why don't we go ahead
and assign it and I'll tap back into object mode. And then is this smooth? Let me right-click and
click shade smooth. Yeah, I think that helps. Then. Let's take the slider down
toward black here like this. And then let's take the
specular all the way down. And for this I'm
going to increase the roughness and we can't
really see that here. So I have to switch over
to the rendered view. And that's without
any roughness there. So let's drag it up. Let's just drag it up to
say 0.6. Let's do that. This over here. We could select this
and go ahead and choose just the black plastic for this. That'll work. Okay. We've got just a little bit
of a ridge there. I wonder if I want to
do that right now. Let me hit the C key and
select that and I'll zoom in. Let me hit the S key
and pull out a bit. Then let's just hit
E and pull out. What we can do there. Just add that little bit
of a ridge there. I'll switch over to
material and then maybe we can add an edge
loop right in here. Kind of like that. Let's see. Yeah,
So that gives it a little bit of something
that's kind of like that. I'll switch back
to the rendered. Is there anything else
that we can do while we're here that needs Chrome
or black plastic. You know what I
haven't done yet is that that keyhole back here. Let's take a look at this. We could add that shadow
material to this. However, if I recall, let's go back to
Solid View here. And I think if I recall, this piece is actually
separate piece. I'm going to hit the L key. Yes, so right in here, we would need to do
something right in here. Let me go back to
the modifiers panel and turn on the cage here. I think if we took this, we'll need to drag this up
into here. Let's do that. Let's change from
global to normal. And then let's click on that
y-axis and bring that up. It's in here. And then we can hit the F
key here and see it there. All right, so now that
we have that selected, I'm gonna press Control
plus on the numpad. Then if we go back
to our materials, I'll go back to
the rendered view. Let's go ahead and create
a new material slot. Pull this down and choose
that shadow material. Here we go. And click Assign. Just
so we have something in there that looks kind of like it goes in there and
there's a shadow in there. I think that'll help.
One thing we can do to we could try and put our black plastic on
this piece right here. See what happens if we do that
black plastic right there. Now, is that too much? Is that to do we need a new
black plastic that isn't quite as shiny as these things up here,
and I think we do. So instead of this, Let's go ahead and remove
this material slot. I'll click New and let's call
this black plastic dull. And I'll bring the base
color down toward the black. Then we could bring the
roughness down just a bit. That maybe take the specular up. Let's try that. Now.
One last thing I think I could do for this
video is these little guys, do you remember these these
little things right in here? We could select these and
add the Chrome to these. But instead of selecting
them individually, why don't we hit the a
key to select everything. And then I'll press Shift
L on the door here. And that will deselect everything
but the little rivets. So now that we've got those, Let's go ahead and add
the interior door here. I'll just click
New and let's just call this door interior. Then. Let's create a material slot. Pull this down, grab
that chrome material, and click Assign with
these still selected. We go. That gave us Chrome on those. And where they mirrored
over. Let's see. Yeah, they were mirrored over. That's good. All right. I think we've pretty much got the chrome material
everywhere we need it. There may be a
couple more places, but I think we can go ahead
and move on from here. Well, let's do now is let's
work on the red materials. And I think I am
gonna go ahead and go with the red on this. And we'll use this car here as the model for what
we're gonna do for ours. I'll make the interior read
the exterior silver, etc. So this will be our model. In the next video,
we'll begin working on more of this red interior.
90. Creating Textures for the Seats: For the interior
here I think let's, as I said, go ahead and
use this car as a model. To do that. We can just select the seat, create a new material. Let's call this red interior. And let's just sample the
color from this image again, let's click the base color, click the eyedropper and just sample a color right in there. And that's actually not
a bad place to begin. Now we could just take
these other pieces, like the arm rest and this
piece and then select the back and press Control
L and link materials. And we can just
go through and do that for all of
these if we wanted, we can just select
different objects and then select one that has a material and
then press Control L. So let's just do that. And maybe I'll grab these down here and shift click
that control L. And maybe these. Then that trim right along
here on the outside. Let's do that. And, you know, even
the interior doors, we could do the same
material there, I think let's do that. Let's select the door, select the seat, and link
the materials there. Let's also do that here. Let's, let's just
select this and this. And then we'll create
a new material slot. And let's grab that red
interior here and click Assign. And that just gives that
to all of those there. We should do it for the back
panel that we created here, Control L link materials. And actually this up here, that trim, right, That's
gonna be the same material. Let's do that. We go. Now we're going to
have to deal with these little chrome pieces, but we'll do that once we're
done with the red material. So here we are. It's actually not too bad. But the one thing I'd
like is some sort of some sort of a texture
in the highlights here. Let's see if we can
get the highlights a little bit closer to
what we're seeing up here. I'm going to scroll down to the specular
and the roughness. And what Let's do now
is let's just type in, I'm going to type in
0.4 for the roughness and maybe 0.5 for the specular. Just that's really close
to what we had originally. But I think that's gonna
be just fine for now as we try and add a little
texture onto this material. And one of the problems
I think we're going to come across is that the scale of these
different objects are going to be
fairly different. Let's go over to the shading tab and I'll show you what I mean. I'm gonna switch to
the rendered view and let's zoom in here
again like this. Okay? And I'm gonna take this
little guy and move it right over here
in the corner. So we have a little more
room here to play with. I'm gonna move
this over to here. And what I mean by the scale is if we
take a texture node, let's just press Shift a and
bring in a new texture node, say annoys texture and I'll, I'll drop that here. We could take this noise texture and just drag it straight into the base color just to see for a moment what it does. And you can see it's just got this kind of collection
of colors here. But take a look at the
difference in scale between say, the arm rest and this strap and the seats and even the
interior of the doors. The scale is a little bit
different for all of these, we could try another texture, see if we can find another one that might give us a
little bit about this. Voronoi, let's try this. I'm going to bring the
color into the base color. Okay, here we go. You can see with the door
here how this is stretched. And you can see
with the arm rest how much smaller it is
and it's stretched. And for all the
little strips here, how much bigger or
smaller the texture is. So we've got some
differences here among the objects that we're going to put this same material on. So we need to deal with that. Alright, I'm gonna delete the voronoi and bring that back. And what I'll do is let's first go in and apply our scale. So if we apply the scale
for all of these objects, that'll help all of our textures be the same size on
all the objects. Now another way to do this is to combine all of these
objects into one object, then apply the scale for that. But I don't really quite
want to do that yet. I still want to
have self-control over these various pieces. If we say select this piece on the bottom
here and we hit the N key. And Ricardo, when we take
a look at our scale, we can see that we've
got 0.27.27.08. So our scale is not uniform
among these fields, among the x, y, and z fields. Now if we apply the scale, I want to show you
what happens with this trim here on the seat. We select the seat. Right here. We press Control a, and we apply the scale. Now look what
happened. These things popped up away from the seat. This one popped up
away from the seat as well to kind of
move over a bit. So one of the problems
we're having, I'm going to press
Control Z now. One of the problems that
we're having is that these strips use the
shrink wrap modifier. And this shrink
wrap modifier uses the scale of the object to
figure out where it should go. Once we change the scale here, these things are thrown off. So what we can do
first of all is apply our shrink wrap modifier
for these various strips. Then once we apply the
scale for the seats, they won't be affected
and move around. So let's go ahead
and apply these. Here's one. It does not
have a shrink wrap. Okay, it looks like we
applied that one and that one we did this one here, we haven't applied, so let's
go ahead and apply that. And I'll just go through
all these others and apply the shrink wrap modifier for
each of these trim objects. Now if we take this object
and apply it scale, Control a, and apply the scale, those trim objects stay
put and that's good. Okay, Let's go over here and
take a look at the arm rest. I'm going to press Control
a and apply the scale for that and that
worked out, okay? But this one has got a solidify. If we apply the scale
for this and we may get some strangeness
because once again, many of the modifiers
here in Blender use the scale to figure out how
it should apply the modifier. If I apply the scale here, yeah, we get some
weirdness here. Let's come over here and choose even thickness and
click and drag. There we go. Something like that maybe. Yeah, that looks pretty good. We just had to reset
the thickness here. That's all over here. We could select the doors
and press Control a, and apply the scale. We could do that for
the seat back as well. Let's do that. Let's grab this trim
and let's do that. It is uniform, but I'll go ahead and apply the
scale here too. Now, what Let's do is let's add a little bit of
that noise texture in the highlights here. To do that, we can take
this factor slot right here and drop it into
the roughness socket. When we do, you can see it kind of changed a
bit. If I pull it out. You can see that it's added
just this little bit of differentiation
along the object sum is a little bit shinier
than the others. I'm going to increase
the scale here. And you can see as I do, that's what we get and
that's kind of what I want. I'm gonna take this,
say up to 20 here. And that's kinda what I want, but I want it to
be a lot smaller. And I could drag this
scale up and up and up. But I think what I want to
do is add another node out here that will allow me to
increase the scale for that. So what I'm gonna do is use an add-on in Blender called
the Node Wrangler. And if I hit the
N key over here, you can see I've got a tab right here called Node Wrangler. The way I got that
is by coming up here to Edit and Preferences, going to Add-ons, and
then searching for node. And there it is, Node Wrangler. And all you really have to do is just put a checkmark there. You can see when I take it away, that tab goes away and then if I add a checkmark
there, it comes back. That's all you gotta do. Go to add-ons, search for node, add the Node Wrangler. Alright, I'll close this
with this texture selected. I can come over here and
choose Add Texture setup. And when I do that, look at that, I get
some extra nodes here. And what I want to do
is change the texture coordinate from generated
to object in there. Now we can take the scale here. I'll just drag all three of
those and I'm gonna type in, I don't know, Let's try 20. Oh, look at that. So that's kind of nice there. We get that little bit of texture in there
in the highlights. So let me drag this. Let's take it down, Let's take it up to 30. Let's try that to
get an even smaller. How about 50? Let's try that. That gets it really tiny. So that's all I really want is something in the highlights. It gives a sense
that there's just some sort of texture
to the object. And maybe I'll try this at 40. Let's try that. Yeah.
Something like that. While we're here for this
trim as I mentioned, Let's go ahead and grab these
faces in here, right here. And then let's press Control numpad plus to expand
the selection. And then I want to select
this and this face here. Then let's go back to the material panel and I will add a new material slot here. And then let's pull
down this menu and add chrome and click Assign. Here we go. We've
got chrome there. And over here, let's
do the same thing. Let's do this. I'll hit the period
key to zoom in. And let's press
Control Notepad Plus. And then I'll add
these inside there. And then let's take
Chrome and click Assign. And there we go. So that gives us Chrome
on those little pieces. That looks nice. Maybe this one as well. Let's select that. Pull that down, select
Chrome, and there we go. Alright, well, in
the next video, Let's keep working on other
parts of the interior, continuing to add our materials.
91. Adding More Materials for the Interior: Continuing with our materials, I think right down here, these little pieces
that we just did, maybe these are a
little bit too blocky for the resolution of the
other parts of the interior. Maybe we should
add a subdivision surface modifier to this. I'm gonna go ahead and try it. Let's add one here. When we do that, really
pulls those out, but we can always add an edge loop in here and
bring that in like that. Intern on the cage here. We can really bring these in, tighten them up quite a bit, and then we could add, say, two or even three edge
loops along here. That'll tighten those up
a little bit like that. Let me see if I can take one
of these edges and move it in a little bit more
with the G key, with G2 times here. Just move those in just a little bit more like that. There we go. So now let's go do
that over here. Alright, so that cleans
that up just a little bit, helps it to look more
like everything else. Um, for the gear shift, we could go ahead and just add that black rubber to
this piece down here. Let's do that. Let's go back
to our materials panel here. And instead of
gear shift casing, I'll just pull this down and
choose that black rubber. There. There we go. Yeah, that looks pretty good. This over here, I think
now we've can pretty much say since we put
black plastic on this, we could put black
plastic on this as well. So instead of latched knob, Let's pull this down and choose
that black plastic there. All right. Then the steering wheel. I've got two images up here because I'm having
trouble deciding, do I want a silver dash like this or a red
dash like this? And I think the red
dashes with a white car, so maybe I go with the silver, but the silver car here
has a black floor, whereas here it's red. So I haven't really yet decided what I'm going to do there. But until then, let's
keep moving forward. We could take these and
add a material to this. I don't think it'd be
the same material here. But if we pull this down and went to that
red interior here, we could duplicate this right here and then altered a bit. So I'm gonna click
this right here, then call this red
interior panels. Let's do that now that's
a different material. And so if we go back to the shading tab and
take a look at it, you can see here's the
red interior panels. And if we select the seat, Here's the red interior, which means that
we could go ahead and just take all of these
here and delete them. Then that'll just
be the same color, but a slightly different
kind of look to it. It won't have all that extra
detail in the highlights. And we could also
just come in and maybe take the roughness
down just a bit. Maybe take it down to 0.3 just to make it a
little bit different. All right, so we have that. What about these down here? I'm going to tab into edit mode, hit the a key and
hit the period key. Let's zoom into this. So for this, I think we can add that red panels
material as well. Actually let me go back
to the layout view so we have a little bit
bigger the view here. I'll just come over here
and pull this down and choose that red interior panels. And then I think
we need something. We need a metallic thing here
on the top so we could use that other metal that
we created earlier. So let me go back to Solid View here and just Alt
click between two faces. And then let's just expand our selection with
Control numpad plus. And then we need to add
a new material slot. Pull this down, and let's choose that metal one and click Assign. And then we just
need to go back to the rendered preview and
take a look at that. Yeah, that just gives
us a metal that isn't quite as shiny as the Chrome. Now for our petals down here, Let's zoom in to this down here. We should probably go ahead and add something to this.
Oh, and look at this. We don't have a material
on this piece yet, either or, or the black
of the steering wheel. I kind of forgot
about that as well. Well, let's go ahead and work
on the steering wheel here. This is a little
bit different than. This here. Let me find that image that
we were working from before. Here. Let's take a look at this. This has some black in here, whereas this doesn't seem too. I like this a little bit better. Let's zoom in here and maybe I'll just select this area back here
and press Control. And then pad plus
looking at this here. And I think I just wanted
to go right to there. And that'll be
Chrome here. Assign. And then we've got a little
strip right in here, I think so maybe if I select
this and press Control plus, and then let's add
the Chrome to that. All right. Now we've got, I think all the Chrome on
the steering wheel. Now let's work on changing the material of
the steering wheel base. For this. I'll select this. And let's scroll down here. Let's first of all, make
it a little more black. So let's pull this down
pretty close to black. I don't want to go
all the way to black though like that there. Now, Let's take the
roughness down a bit. So we get a little bit shinier. How are we doing on
the specular here? If we bring the specular
up just a bit to kind of tighten up the
specular highlights here. So let's take that back to five. That was pretty good
and the roughness, but let's try 0.1,
see if it's too much. Maybe a little bit too much. Let's try 0.15. Yeah, something like that. So it's pretty new
pretty new looking. Maybe it's coming right
off the showroom floor, but that looks pretty good. That steering wheel
material there. Now let's go down and take
a look at those petals. I think for this we need
a rubber type material. Well, it looks like it's
kind of a plastic here. This looks more like
a rubber material. Let's go back to
that other one here. Let's take a look. Yes, So kinda like these
a little bit better. Let's begin with that. Let's just create a new material that we'll call this petals. We'll just make them
all the same material here for the base color. Once again, we'll
bring this down. So it's quite a bit darker
but more gray, I think. Maybe 0.5 on the roughness
and 0.3 on the specular. And maybe I could
also bring this, Let's maybe bring it
up a bit like this. All right, so now
let's just give these that same material. I'll just select
this one and press Control L and link
the materials. But now what I want to do is actually I'll bring this down a little bit more like this. Now what I want to do is change this metal piece back here. So let's take a look at that. And if I take this, and if I select this
and then press Control, Hi, I'm gonna turn the manipulator off by
clicking on this up here. Let's now give it a
new material slot and I'll just use that black metal. Let's try that. Yeah, that should be fine. I think that'll work. And these back here, Let's do the same thing. I'll select this and
then press Control. I add a new material slot, black metal and, and assign and then this one over
here, same thing. Control eye, black metal and
assign. And there we go. All right, so we've
got the petals now. I guess I need to
make a decision on the color of the dashboard. I guess this will work
pretty well. Let's try that. I'm going to select
the Dashboard. Click New Material,
call it dashboard. And let's just try and select a color with our
color picker here. Maybe I'll grab this. That's a little pinkish,
isn't it? Yeah. It's reflecting some of the red from the seats here
in the photograph. So actually let's take the
saturation all the way down, so that goes back
into the center. Now, I'll find kind of
silver gray right here. And then let's take
the metallic all the way up and the specular
all the way down. And then we could
increase or decrease the roughness to get it
the way we want it here. So maybe I'm gonna take
this up to 0.6 here. Then I'm gonna take
the color up toward white a little bit
more so it isn't quite as dark as that. Maybe something like that. All right. Let's add that
to the glove compartment. Here we go. Alright. Yeah, I think we're
getting there. Oh, you know what one
thing we could do also is Add Chrome to the
frame of the windshield. Let's do that. There we go. And we could add black rubber to that trim
around here as well. Let's just do that. We have that right here. Yeah, there we go. It's beginning to look
like a car interior.
92. Creating the Floor Texture: All right, well now let's
take a look at this floor. And I think I'd like just to
make some sort of a material that has this illusion of
a bumpy texture to it. I'm not going to get this
exactly the same here, but I'm just looking for
something that kind of hints at that kind of a texture. So let's go back to
the shading tab here. And I will go to
the Render View. And let's just create
with this floor selected. Let's just create
a new material. We can do it here or over here. And let's call it, let's just call it a floor. For this, I'd like some sort
of a carpet type thing. I'm gonna move this
back over here. I think Let's begin by trying to figure out what kind of a
noise texture that we want. We just took a look at the Voronoi texture in
the previous video. So let's just take
a look at that. I'll go to texture voronoi. And let's drop that here. And I'm going to bring the color into the base color here. And actually while I'm at it, I'll go ahead and
apply the scale. Once again, these are uniform, but I can also
press Control a and apply the scale and bring
them all back to one. So this may be a
way to get the kind of small texture that
we see on that carpet. We can take the scale up like this and bring it
down so it's smaller. But in fact, what let's do
first is let's bring in a noise texture because
these straight lines, I don't think we're going
to work well for a rug. So let's press Shift a texture and bring
in a noise texture. And from this, let's take the factor into the vector here. Let's try that. Yeah, that kind of
makes the lines a little less straight
and uniform. Okay? Then if we take the scale
for this up to ten, well that begins to
shrink that down. And let's go ahead and add that texture setup from the
Node Wrangler over here. So the Node Wrangler
tab is here. And the add texture,
if we hover over that, you can see that the
shortcut is Control T. So we can just select
that press Control T. And there we are. Now, do we get any
different kind of effect if we change
from generated to object? A little bit, yeah,
they're more uniform, I think let me yeah, I think I liked
the object texture coordinate here a
little bit better. Then let's use the
mapping node here, the scale to shrink
this down some. So I'm gonna click and
drag these three fields. And let's also type in
tin for the scale here. Alright, so now we're getting something a little
bit closer to, I think what we're after. What if I bring this randomness
down a bit like this? Let's see what happens. Yeah, that's not bad. Let me type in 0.5 here. What about the roughness here? What happens if I bring
this up and down? All right, well, let me type
in 0.6 here. Let's try that. And what about the detail? I'm gonna click and
drag on the detail. Yeah, that kind of adds a little bit more in-between them. So let's take the detail
up to ten as well. I'll just type that in. And then I think the edges on
this is a little bit sharp. Let's change our F1 under the Voronoi from
F1 to smooth F1. Yeah, and that makes it a
little bit more blurred, not as crisp on the edges. Now we've got to
deal with the color. Let's do that. For the color. I think the list
do is drop what's called a color ramp in here. And to do that, we can just press Shift a converter and color
ramp right here. We can drop this in, in-between these two and
it'll hook it right up. Now you can see
that our color for this is now driven by the
black and white here. What we can do is let's take this one, it's already selected. Let's click here and I'm going to grab the eyedropper
and just come over here and select a red color in the 3D
view port right here. I feel like it needs to
be a little bit brighter. I'm going to drag that
up, something like this. Now this one, Let's
do the same thing. I'm going to click
here, click here. And this one I wanted to
come down a little bit. I want to have this be a
little bit darker like this. You see what we're getting? We're getting kind of
a carpet pattern here. Let's try and take the
scale down a little more. Let's try and take it to 20. And that may be a little
bit too much there, although I don't know. Not too bad. Let me try 15. Let's go with 15 for now. Then. We also need to
give it some bump. So it looks a little
more three-dimensional. So what let's do. I'm going to hit the N
key to close that panel. And then I'm gonna
grab these two and hit the G key and just
move these over a bit. Now what I want to do is bring something into the
normal channel, which will give us a little bit more
three-dimensionality to this, as if some of it is poking up and some of
it is pushed down. Let's press Shift a and good a vector and
choose bump right here. Alright, I'm gonna
drop that right here. What we're gonna do is take this color, let
me bring this up. So we're gonna take this color into the
bump and then go from the normal socket here to the normal socket in the
principled BSD F right here. But the problem
with this is that a bump map is basically
a gray scale map. It uses black and white. We really need to convert this from color to black and white. So to do that, Let's
press Shift a. And we can go to converter and convert RGB to black
and white right here. So I'll take this
color into this color, this value into the height, and then take the
normal into the normal. And let's see what happened. Yeah, that gives us a little bit of a sense that there's
something going on there. Let's see if we can increase or decrease
the distance here. Maybe I'll take the
distance to five. Alright, that's giving us
something there that isn't bad. We can also invert it. We can click it so the dark parts come out
or the dark parts go in. Either way. I think what I will do is
go back to the scale fields in the mapping nodes
and let's try 20. Let's see what
happens when we take it down a little bit further. All right, I think
that's not bad. Let's also come over here. And let's take the
specular down quite a bit. Let's just maybe type in 0.1. The roughness I don't think
is really gonna be an issue. We could take it all the way up or I'll just type in, say 0.8. Let's try that. Now. What we could do is let's select the area light
that's in our scene. Let's twirl these up and
select the area light and maybe turn up the power from
10-watt to say 20 watts. Bring that up a bit. And then I'll select
the floor again. And let's see what we have here. Yeah, that's not bad. The last thing I
think I'll do is maybe make it a
little bit brighter. Let's come back over
here to the color ramp. Select this side, the
color note on this side. And let's take the
read up just a little bit more like
this. There we go. Alright, let's go back to the layout view and
see what we think. Yeah, I don't know if you can see we're just getting a sense that this particular material
has some texture to it. And it's just a different thing from all these other materials. All right, In the next video, Let's begin working on
applying some textures like we've got the headlights. We can find a headlight
texture and apply that here. We can apply the Nash logo
and we can see if we can find something for the
AM radio and the dials. In the next video, let's work on applying some of the textures
to the different pieces.
93. Adding Textures to the Radio and Dials: Now I'd like to work
on placing some of the textures like
the AM radio dial and the dials here on the dashboard and even the headlights,
those kinds of things. I'd like to place those in. And I'm thinking that
we're just going to use plain textures for those. And what I mean by that is
we'll just find an image and we'll UV map just
this portion here. And we'll map that
texture onto those faces. So let's give that a try. I'm gonna go over to the
UV Editing tab here first. I think what I want to
do first of all is just hover over here
and click and drag down in the corner to
create a new window. When I want to change
this from a UV editor to a shader editor just so we can see our node tree up in here. As we do this. Let's
go in and let's find those faces of the
radio right in here. I'm going to move this
down and Let's tab into edit mode and just
select these faces here. And it looks like maybe
I want to expand it out one more with control
numpad plus two there. Now I want to UV map this
because we're going to place our texture
over the UV map. Or actually more specifically, the way we're gonna do it for
these particular textures is we're going to place
our uv over the textures. So let's go ahead
and UV map this. I'm going to press the U
key with these selected. And we can just choose unwrap. And let's see how it looks. Yeah, that's not bad. Let me hit the a key
and I'll press R 90 and hit the minus key to
spin it around and hit Enter. There, I believe is how we want our UV map now it's a little bit warped because
of the subdivisions. And what we could do is we could just take something like this. We could go and select this and Control click this
and then we could just press sx z and straighten it out and then hit G and X and pull
it out like that. Hit S and Y and kind of
scale it up like that. So we can just begin
to kind of make this a little more uniform. So maybe over here, I'll press sx z and then
scale up in the Y SY. Like this. Move this out. We can go through and just
do this a couple of times. So maybe here, SY 0. And up here, I'll just
click here to here, SY 0. So I'm just going through and kind of straightening
these up a bit. That's all. I'll get these here with SY 0. Maybe we could do the
same with these here. I'm just going
through and hitting Sxy SY 0 to straighten these up. Here we go. Now let's go find that texture that we
want to use for this. And I've added a few to the reference images folder and let's go take
a look at them. I'm going to press Shift a. And I'm gonna bring
in an image texture here and drop that here. And let's click Open
and let's go browse to that reference folder photos. And I've got a couple
of images here. I've got one here. I think this May 1
be the best one. Let's go ahead and open this up and see what we
can do with this. Alright, so if we want to be
able to see it here and see how much we need
to adjust our UVs. What we can do is just
hook this up with the color socket
to the base color. And then let's go over to our material preview here
and we can see it there. The problem we have
right now is that this whole thing is being
applied to all of that object, all of the Chrome. And we don't want that. Let's unhook this. We need to create a material just for this
selection of polygons. So let's come over here
to the materials panel. Let's create a new
material slot. Let's call this, well, let's call them AM radio. And let's click Assign. Alright, so now whatever we
feed into this material, now this AM radio will only
appear on these faces. So let's try that again. Image, texture open. Let's go to that image
here and click Open Image. Now if we take this and
connect it to the base color, now it only affects those selected faces that we assign to this material slot. All right, so what I'm gonna
do is just hit the a key to select all of these UVs and scale these in a bit in the x. Maybe move it up in the y a bit. Scale it in and the y SY. Just try and get
it to fit in here. So all we see are those numbers. Let's see how that looks. Yeah, So we've got our numbers
there in the AM radio. What we could also do is
change the color a bit. Let's try and make that
a little more black. So what we can do is just take this image texture
and move it over. And we can add a node here that will allow us to control
some of the colors. So let's press Shift
a, go to Color. Let's use RGB curves and let's just drop
that right in there. It'll automatically hook it up. And then we can just
create a node right here by clicking and then we
can drag it up like this. It makes it too bright and we
can drag it down like that. And yeah, that kind
of helps right there. Now we can also maybe
take some of the blue out by selecting the blue tab here, creating a node and bringing
that blew up like this. Now let's bring it
down like this. There we go. Now that takes some of
that blue out of there. There we go. So now we have an AM radio. All right, let's take
a look at these here. Let's do the same thing
with these dials. What I'll do is select the dials and was
tab into edit mode. And we already have a material that these
faces are applied to, so we don't need
to create one like we did with the AM radio. This should work just fine. But let's see what
images we have. Let's press Shift a texture, image, texture, and
I'll drop that here. Click Open and let's go take a look at our reference images. And what I have is
this right here. I think this is kind of nice. So let's click Open here. If you don't see
them pop in here, you can always pull this menu down and choose
it directly here. Like that. Now we want to apply
these to these circles. So let's go ahead and press the UK with all
of these selected. Let's press U and unwrap. And there we go. Now,
which one is which? Well, it's drag this color over into the base colors so
we can see them here. Now. It looks as if they're
actually correct. This one seems to be this
here, so that's good. I'm just going to hit the L key. And for the time being,
I'm going to hit G and just move this out
of the way out here. Then I'm going to
zoom in here a bit and I'll deselect everything with Alt a and then
hit the L key. And let's hit G, and
let's move this in. So it's centered there
and you can see it here. I'll scale this in a bit. Then let's hit the
R key and turn it. Maybe something like that. Alright, let's see that. Alright, there we go. We got that one, I think. Now let's work on
the either one. Tab back into edit mode. Let's press Alt a to
de-select at the L key. And let's move this
one over here. Hit the G key and
move it over to what is hopefully the
center right there. And then let's scale that in. And then let's come over here
and see what it needs to. Two. So it looks like the water temp and the oil pressure needs
to be on the bottom. So let's hit the R key
and spend this over here. The water temp and the oil
pressure on the bottom here. Like that. Alright, there we go. How does that look?
That's not bad. Now, a couple of things we could change the color of
that once again, by bringing in a
RGB curves node, we could click there. And in the combined tab here
we could drop a point and we could click and drag and
drag it down to make it darker and drag at higher
to make it brighter. So let's make it a little
bit brighter like that. There we go. Now if we wanted, we can also make it
a little shinier by kind of cheating
it a little bit. We could drag up the
metallic here so we can take the roughness
all the way down. We could take the
specular down pretty low, and then we could drag the metallic up
just a bit until we get a little bit of reflection
in there like that. So it kind of gives
the impression that there's a reflective
surface on top of that. Yeah, there we go. Okay, so we've got our
textures here in the dash. Let's continue doing this for the headlights in
the next video.
94. Adding the Textures for the Headlights and Emblem: Well now let's add
some textures to our headlights up
here in the front. And maybe we could
also work on the logo to I'll go back to my
material preview right here. And let's select the light
and tab into edit mode. And once again, we
have a material slot and materials specifically for the part we want to
add a texture too. So that's good.
With this selected. Let's go ahead and
redo our UV map. You can see it came
with a UV map here, but that's not really
going to work for us. Let's press U and unwrap. And there we go. Now let's bring in the
image we want to use. I'll press Shift a
texture image texture, and let's drop that here. Let's click Open. Go to that reference
photos folder. And I've got a couple
of different ones here. I think I want to use
this one right here. The one with the plug
sticking out the back. This one is for a Ford. Probably shouldn't
use that with a Nash. This one I found is
just too bright. It kind of loses its detailed
in the brightness here. So let's try this one. I'll click Open Image,
and here we go. Now in bringing that image in, it kind of stretched
out our UV map. We can always just hit
you and unwrap and redo that and it'll go
back to being circular. But I'll take the color and
drag that into the base. And we can now see it here. And let's see if we
can scale this down. I'll hit the a key
and hit the S key, and let's scale it down until
we get it about like that. And maybe right in
here, right there. Tap back into object
mode and that's not bad. But the word here, the brand is kind
of at an angle. Let's see if we can get the R key and turn
this just a bit so it isn't quite so
tilted. Let's try that. Yeah, So that gets the lines
more vertical. That's good. Now we can of course come
over here or over here either way and take the roughness down. We can play with the specular
highlights if we want. We could also try metallic. We could click and drag this and see what we can
come up with here. We can get some reflection
in there if we wanted. Maybe we can type in 0.1 for the metallic and maybe
0.2 for the specular. That gives us something
that shines there. Now, one thing we might
take a look at here, and let's take a look at this. Over here on the other one. The word, the brand
here on the front is reversed and that's because
we're mirroring these over. To fix that. Well, we could do is apply the mirror and
then flip our UVs. Let's try that. With this selected,
I'm going to go ahead and just apply the mirror here. I think it's okay that
we applied at the bottom of the stack because these
two pieces are not touching. So let's just go ahead
and click Apply here. Now that's all one object. Now if we tab into edit
mode, you can see it there. However, what we
should do now is split this off into
its own object. So if we tab into
edit mode and I'm gonna hit the L key
for these two here. And let's hit P and
separate by selection. There we go. So now
this is its own object. So we've got headlight,
headlight zeros 01. So we could make this, we could hit the F2 key and make this headlight underscore left. And this one could
be if we hit F2, we could make this underscore
right? There we go. Just so we know what they are. This one here now we
need to flip the UVs. So I'm going to
tab into edit mode and select just this piece. Now if we press the S
and the X key and we begin scaling and
let me show you sex. If you look up in the
top left-hand corner of the UV editor there you can see the scale is going down
from one towards 0. Then as we cross, now it's into negative
0.1, negative 0.2, etc. I'm gonna hit Escape. Now, what that means is
we should be able to press S x negative
one and hit enter. Now we tap back into object mode and we can
see we've flipped it. And now the name on the front
is in the right direction. We go. Alright, we've
got headlights. What about this little
guy right here? The logo? Let's go back to our material. We've got a separate material
for that front part. If we select the logo here
and then click Select, it will just select that
piece, so that's what we want. That's good. I'm gonna hit the X key to remove the
headlight out of here. And then bring in that logo. Let's press Shift
a texture image. I'll drop that here. Let's click Open and
let's go find that image. We've got one here. We've got one here. So I really don't know
which one would be better. This one looks kind of faded
a bit as compared to this. Let's see what we
can do with this one here I'll click Open Image. Let's go ahead and add
it to the base color. Then let's come over
here and pull this menu down and find that
here, right there. There it is. Now, first we need
to UV map this. So with this selected over here, I'll hit you and unwrap. And there we go. Now hit the, a key
to select this, move it over here and
try and center it up. And then I'll hit the S
key and scale it in a bit. Now I better turn it. Let's hit R and see
if we can turn it so it's more straight
up and down like that. And then it looks to me like
the image is a little bit squished because it's
not exactly straight on. We could kind of
imitate that if we press S and X and we can
scale it out in the x. And then we can kind of
squish it in the y. Sy, squish it in the
why in just a bit. G1, move it up just a
little bit like that. All right, let's see
how we're doing. Let me see if I can get it
just a little bit bigger. It looks like I need
to turn it just a bit. We need it a little bit shinier. I think I'm gonna take the
roughness down and the specular down and let's try
to metallic, Let's do that. Then maybe a little bit more
specular. Let's try that. Something like that, just to give it a little bit more shine. It looks like if I
select the Chrome, that image is still in here in the Chrome where I
had hooked it up. I'm just going to delete that
texture node out of there. Alright, so we've got our front emblem
and the headlights. We've got our textures
on the interior here. Let's also go back
to the Layout tab, and let's just see
how it looks in the rendered view here. It doesn't look too bad in the rendered view
with an HDRI there, there may be other logos
that we could find. Maybe someday I'll actually
come across one of these cars and take a
photograph of that. But for now I think
that works pretty well. All right, we've got a
couple more textures that we could put on here and these little lights
back on the rear fender. But then I think we need
to begin to working on the actual paint of
the body of the car. Will begin working
on that coming up.
95. Making the Car Paint Material: Alright, let's go ahead
and work on the car paint. Now, one of the
things about this is we're never gonna get this to look exactly like it
does in the photograph. Mainly because a big
part of the way it looks here is because of the surrounding environment
and the lighting in it. And we're never gonna be able to replicate the
environment exactly. So it's never going to look
exactly the same here, but we can get it pretty close. I think. Another thing about car paint
is you can really go down the rabbit hole
in something like this and make it
very complicated. I'm not really looking to
do that for this project. I want to keep it fairly simple. So we're going to
just go over here to the shading tab here. I will go ahead and turn
on the render view. Let's bring in that image
over here in an image editor, the one that we were
just looking at here. Here it is right here. Just
so we have a reference. Alright, so first of all, we should go ahead and create a new material
is just click New actually were
in the hood object. And that's gonna get
this material too, but I'll go ahead
and choose fenders. And let's click New and
call this car paint. Then what we can do is just work on some of
the settings here. So let's zoom in here. First of all, let's take the
metallic all the way up. And we could select the trunk, door and hood and then
select the fenders and press Control L
and link materials so we get all of
those added there. Then let's take the
specular all the way down. We can adjust the
roughness a bit. We can bring this
down and we can take it all the way
down like that. But if we bring it
back up, Let's try. Well, I'll just
type in 0.4 here. Let's do that. Let's also come down here and let's turn on the clear coat. Let's just click and
drag this all the way up to one and add that. And that adds a
nice effect there. You know what we could
do to let me just select this guy right here, that little thing
behind the grill. And I'll give it a new material. Let's just give it that
shadow material for now. Where is it? There it is. Let's just put that in there. And maybe I'll take the specular down quite
a bit on that too. Let's just take that down
to 0.1. There we go. You can see for our viewport
render here there's some noise happening in
the shininess of the car. You can see that here. We can clean that
up a little bit by just turning on denoising
and the viewport. If we came over here to
the render properties, and under viewport, we
could turn on denoise here. It's already on in the render, but we can turn it on
here in the viewport. And you can see that
kinda cleans it up. Now it kind of makes it lag a little more when
we tumble around, but it is kind of nice how
it cleans that up there. Alright, so also we could
work on the base color. We can just drag this
down just a bit, make it a little bit darker. That right there,
that's really not bad. I mean, that's, that's
actually pretty good just with this BSD shader here. But one of the things
about a car paint is it has this funnel effect where the edges around your
direct line of sight are oftentimes a little darker than what you're
looking at directly. We can duplicate that here
with a layer weight node. So if we press Shift a and
I'm just going to click search and type in layer
and click Layer weight. Now we've got a funnel here. If we take this and just drag it straight into the
base color here, this is what we get. That's not quite what we want. What we can do is we can
actually bring in a color ramp. I'm going to press Shift a. And once again I'll click
Search and type in color, choose a color ramp. And let's take that friend
now into the factor slot, and then this color
into the base color. Now if we drag the
blend from here to total black to hear
complete white, you can see we can blend
between these two. I'll take this back to 0.5 here. And what I'm gonna
do is flip these. I'll just pull this down
and say flip color ramp. And there we go. So now we've got the black on this end here and
we can move this in. And you can see when
I bring this forward, how it's bringing that black
around our point of view. So our point of
view, he is here. If we tumble around like this, you can see now this is brighter and you
can see that we're bringing that in
around from the edges. So that's what a
friend Nell does and that's kind of what
we're seeing in here, but just not as prominent. So let's bring this back
a little bit like this, and let's also just bring
this color down. I'll click. And let's bring this down. I don't know, so
it's a little more gray rather than black. There we go. We can also adjust the blend. So if we take the
blend down a bit, maybe I'll just
type in 0.4 here. Let's try that. There we go. Now we can take this
and move it in or back so we get some of
that funnel effect here. Then also I feel like
we need a little bit more of a color in there. I'm gonna select this node here, the plain white one,
and click here. And I just want to move
it out toward the blue. Now, if we click and
drag on the saturation, you can see it moves it out
away from the center of that, of that color wheel. Then if you click on the hue, it moves it around the
color wheel so we can move it around till
we get a blue here. Maybe I'll bring this
down a little bit. We don't need it
quite that bright. This is just the value here. The hue spins it around. The saturation moves
to point out and back. And the value moves this
slider up and down. So now I'm gonna take
the saturation back a bit toward the center. Maybe I want it just to have a little bit of blue in
it, kind of like that. Let's try that. Once again, I know it isn't
exactly the way this is here, but I want it the way I wanted. We could take this
little guy up here and then link the
material to that as well. Here we go. All right, that's
looking pretty good. That's the way I want it. Here. We need this
guy right here. Let's select that and press Control L and link
materials here. As we do our test renders will be able to see if this
is really what we want. Let me go back to
the layout tab here. Yeah, that's not bad actually, while we're here, we could
do some adjusting as well. So if we go over to the materials and I'm just
going to bring this up a bit. If we go over to
the materials here, we can scroll down and
under the base color, we can twirl this down. Now we have those sliders
from that color ramp. If we twirl this down, we also have that blend
from the layer weight node. So we can actually do some
adjusting here as well. Maybe I don't want
quite as much blue so you can in here and I'll drag this saturation down just a
little bit more like this. Maybe I'll type in 0.2. Let's do that. Alright, well, I think
that's pretty good for now. We've still got more
to do on our textures. We've got this
front turn signal, the rear or the tail lights, and we've also got the
under carriage here. We need to add some
materials to that. In the next video, we will
continue working on those.
96. Creating a Glass Material: Well, I'd mentioned
that I went to work on the front turn signal and
the rear brake lights. But I think what I
want is some sort of transparent material
over another object. So we kinda get a sense that
there's something underneath their central gonna be working
on a transparent material. Let's go ahead and just
work on the glass here. And then we'll use a version of that for these on the
front and the back. Let's focus on the
glass for now. The good thing is
about the glass. If we go to our
materials panel here and we just click New and let's
just call this glass. The good thing is that here with the principal
BSD F shader, we can just come down here to transmission and click and drag. And there we already have a relatively
transparent materials, so that's pretty easy. But to get it the way we want, it might be a little
bit more work. Let's see. I'm gonna take the
specular setting all the way down and the roughness
all the way down. And now we can see
through it and we're getting some of the
reflections as well. However, it's kind of magnified. You can see that there's
a magnification to it. So that's one thing we're
going to have to deal with. The other thing we
need to deal with is that if we look through this, even though we can't see the
HDRI background out here, if we look through the
glass, we can see it. I don't mind it being
reflected in the glass, but I don't want to see
it if we look through it. And also if we look at our
reflections in here too, in the mirror, we can
see it through here to this right here is
a lot more complex. We may do a little cheat
for the mirrors here, but we're going to
have to actually do something when we look
through the glass. Those are the two things
we need to deal with. One is the magnification and two is seeing the HDRI
through the glass. First of all, to deal
with the magnification, I think all we need to do is just give it a bit of thickness. It's currently just a single polygon plane, kind of curved. And so it's giving us
that magnification. If we tab into edit
mode and hit the a key. And let's take a look
at the gizmo here. Yeah, we want to just
extrude it just the tiniest little bit
in the z-axis here. So let's just hit E and
push in just a little bit. And you can see
already we kind of cleaned up that
magnification issue there. If we tap into
object mode again, you can see, yeah, that kind of clean that up. That's good. Now we still have this
issue where we can see the HDRI through there. I think we're really
going to have to just use a different
kind of shaders. So let's go over here
into the shading tab. What we can do here is actually delete the principle
of BSD F and begin again. Let me click over to the
render preview here. So what Let's do is just select the principle of
BSD F and hit Delete. And now we don't have a
shader on there at all. So let's begin with a
transparent shader. I'll come in here to shader
and grab a transparent here. If we hook this straight up, we can see right through it. That's part of what we want, but we also want
some reflections. So let's grab a glossy
shader as well right here. We can drop that in. And I'm doing this so we
can have some control. We have a glass shader here. We can take a look at that. And if we hook this up, we have the same problem
here with the glass. So let me just press Control
Z and then delete that. And now we want to mix
between these two. So we want a mix shader. I'll press Shift a shader mix, and I'll drop that right here. And then let's take this
and plug that into there. And then we could probably
take this down pretty far. Let's take it down to save 0.1. And I think the last
thing we need to do is just take the roughness of this glossy shader all the way down to 0.
And there we go. Now we've got glass
that reflects the HDRI, but we don't see it when
we look through it. That's all we wanted there. Alright, so now that
we have this shader, well we can do now
is use this as a base for these things up here. Let me tab into edit
mode and hit the a key, and then I'll hit the period key on the numpad to zoom in. What I want for this, because let me show
you what happens if we just add that glass
shader to this. Let me go to our materials tab. We've got this
front turn signals selected here, this
material slot. Let's just change that. Let's just pull this down
and choose that glass. And now look what
happens. It just It becomes black, like we can see through it when we
look at it from the side, but we don't have
anything in here to view, so we need to put
something in there. What I'll do is just tab into edit mode and let's just
press shift D and enter. And let me hit the
T key to open up our tool panel over here
and click the move tool. And I'll change from
normal to global. And then I'm just gonna
take this duplicate and pull it back in here. And I'm going to scale
it in just a bit. And then let's give
it a new shader here. Let's add a new
material slot here. Let's give it a new
material and we'll call this a turn signal. Enter. We'll click Assign. Here we go. So now we can see that there. And out here, what I want to do is take this glass shader, but I want to modify it a bit. I don't want it to be
exactly like this, but if I make any
changes to this, I'm gonna change what we've
done on the windshield. So I'm gonna make a copy of it. And you can see currently that this glass material has two objects that
it is assigned to. They call it users, but it's really objects. So we've got the turn
signal and the windshield assigned or this material
assigned to those objects. To make a duplicate of this, I can just click on this too, but I have to be an object mode. Let me just hit
the tab key here. And now we can come
down and click on this to now you can see we've
got glass zeros 01. So this is a completely
separate material than the original glass. For this, I'll call
this turn signal outer. Whenever we go. For this one, I want to make
it not quite as transparent. So I'm going to bring the factor on the mix shader up a bit. Let's take it up. Let's
take it up to say 0.2. Then the roughness down
here on the glossy. I'd like to take this up
some let's take it up. I don't know. Let's
just try 0.1 for now. And then for the interior. Let's go over to here and
let's just change the color. But I'd like it to be a
little bit kind of yellowish. Kind of like this. Try this. Maybe if we go back here, Let's take this color and let's just bring it down just
a little bit like this. There we go. So it's just a
little bit darker. But we have that
kind of something inside to give it a
little bit of color. Let me bring this up
a little bit lighter. Yeah. Kind of like that. Just so we have
something there that looks like if you turn that on, it would be an orangeish
turn signal light. Yeah, let's do that. All right. So we've got our glass material
here and our turn signal. In the next video, let's
work on the tail lights.
97. Adding Materials to the Tail Lights: Well, for the rear
brake lights here, I don't think we have
to be as worried about seeing through it as we would say the glass
or even the turn signal. It's gonna be fairly opaque, but I still want to be able
to see through it a bit. So for this, let's call this material that's
on this white part here. Let's call this rear
brake light outer. Then what I'll do is tab
into edit mode and let's hit the L key here and let's duplicate this shift D Enter. And then I'm gonna push
this back just a little bit so it's inside there and maybe shrink it
down just a hair. It can tumble around
and see it there. And then let's give
this a new materials. So let's create a
new material slot. Let's give it a new material. We'll call it rear
brake light. Enter. And let's click Assign,
and there we go. Now if we select the outer, if we bring up the
transmission here like this, we can see through it. I'll tab back into object
mode here and then let's go ahead and work
on this inner one. While we can see through this, we may need to take the specular and the roughness down a
bit just to see through it. But now let's work on
this inner right here. For this, if we just take the base color and
go down to a red, you can see, we can see right
through that outer piece. But I wanted to have a little more interest than
just a plain red piece. So I kind of want to have it banded or with
stripes or something. So to do that, we can use a wave texture. If I press Shift a and
go to texture and wave, we can drop that in here. And if we hook this up
right to the base color, you can see that's what we get. We get stripes, which
is pretty nice. Let's select that
texture and recall if we look over here in
the Node Wrangler tab, that to add a texture setup
is Control T. Over here. If we select that, we
can press Control T. And there's our setup, let's use the object
texture coordinate and that changes how it looks just a little bit.
That's not bad. I might want to bring
the scale down a bit. Let's try maybe
something like this. Alright, now we need to put
a color in and to do that, we can use our color ramp. I'll go ahead and click
on Search type in color. There's our color ramp there. For this, for the two colors, we want them both to be
some sort of shade of red. So I'm going to drag
this down here. Maybe make this kind
of dark like this, and then this one here, Let's add a red here. Like this. Maybe a little bit
darker like that. Then maybe I'll drag it up
like that, see what I can get. Let's make this maybe
not quite as dark. Bring that up just a bit. Yeah. We got something in there in the background that you can
kind of see through there. Then let's work on
that front part. Now, let's go to the outer part. For this, I'd like it to have
some sort of, I don't know, a little bit more to it than just that plain
transparent piece there. So let's add a noise
texture to this. I'm going to press
Shift A Search noise, and let's choose
noise texture here. And if we take this and drag it into the base color,
this is what we get. So kind of a collection
of random things. You can kind of see them
moving around as I, as I adjust the scale there. Let's maybe put that at three. Let's just do that. Then let's also give
this a red texture. So I'll press Shift
A Search color ramp. Let's drop that in here. Once again, let's make
this kind of red here. And make this one red
as well, like this. Maybe let's bring this up a bit. So this is maybe a little
bit too dark here. Let's take the roughness down to 0.1 and let's lighten up
the colors quite a bit. Let me click here and
I'll bring this up a bit. Maybe this one here. Let's bring this
up a bit as well. There we go. Now you can
kind of see through it. You can see that underlying
texture underneath. There's some things
happening on the top there. And we get a little bit
of reflection as well. So that's kinda what I want to, something like that, maybe
a little bit brighter. Let's take a look at that enter and see if we can make this
a little brighter as well. So let's move this up a bit. Then let's move this
up a bit as well. A little bit brighter in there. Yeah, something like that. Then we could do pretty much the same thing
with this up here. We have the beginning of
it because if you recall, we use that rear
brake light texture on this piece as well. But this is the outer. We want, we want the
enter in there as well. So let's tab into edit mode, and let's select
this with the L key. Let's press shift D Enter. And I'm just going to move it
down a bit and back a bit. With that one selected. Let's go ahead and add
that new material here. Let's create a new
material slot. Pull this down. We can type in rear, and here's rear
brake light enter. So let's do that. And we're not really seeing
that texture underneath here. One of the reasons I think
that may be is because I switch this to object for
the texture coordinate, which means that it may be
correct for this object, but it may not be
correct for this object. To fix that I can either
make a duplicate of this Material and
then adjust it, or we can change it back to
generated and then see if we can adjust the scale so it'll
look okay on both objects. Let's try first generated. Let's just try this and see. Alright, so you can begin to
see that underneath there. Let me click Select, see if we can move it in or out. There it is there, you can just barely see it and I think we're intersecting with the
fender there as well. If I move that one out a bit, I'm gonna have to
select this one. Press Alt eight, click select
and move it out as well. Just so they both fit in there. Alright, now that we've
got them in place there, we can take a look at the
two and see how they look. Yes, so I think we can use the same material just with the generated
texture coordinate. And now we can kind of
play with this a bit so we could take the scale up on the wave texture
if we wanted and make them a little bit
smaller like that. Let's let's take it up to
four and see how that works. Yeah, we could do that. That seems to work pretty
well up here as well. Yeah, let's do that. Now while I'm here, I'm just seeing this little
piece right here. Once again, we can
do a little bit of adjusting right
here, right now. Maybe move this one
down just to get this. So it's not quite as it's not
sticking out quite as much. There. There we go. It looks okay over here. Once again, continuing to make adjustments even at
this late stage. Alright, so we have our tail lights done.
In the next video. Let's work on the
under carriage. Just add some basic
materials to all of this. Then we'll begin doing
a few test renders.
98. Creating the Materials for the Undercarriage: Now let's take a look at adding some materials to
the undercarriage. And just like the modeling only hinted at what
was under there. So our materials really only
need to be so detailed. I think I'm just going to move the area light down here and then rotate it in the x so we can kind of see it like this. Then I think what I
want to do is just give this main undercarriage
piece just a basic material. In fact, let's go over to
the shading tab to do this. And I'll move this over here. And let's turn on
the render preview, and let's just do that here. So with the
undercarriage selected, Let's just click New and we'll
call this under carriage. For this, I think all
we really need to do is just drag the base
color down a ways. Turn off the specular, turn on the metallic
all the way and drag the roughness
up a bit like this. Now, that's not bad. Let me take the color
back up a little bit. It doesn't need to be that dark. That's okay. But I'd like some sort of just a little bit
of a texture as if it's just kind
of a rough metal. Let's bring in an
image so we can kind of keep an
eye on what we're doing from the reference images. Let's just open
this up right here. It's just basically
a dark kind of rough material and I
think that's all we need to really shoot for here. So let's actually add
a noise texture here. Noise texture. And we'll add our
texture coordinate and mapping note by pressing Control T using
the Node Wrangler. Then let's once again
add a color ramp. I'll just search for color. We go unless take the
factor into the factor, and let's take the color
into the roughness here. And so we're beginning to get just a little bit of
differentiation in there. If we drag the
scale up and maybe let's take the
scale to ten here. We could take the scale in the mapping node
up to maybe 30. And let's see what we get. Yes, so we're getting a
little bit of texture there. One thing that we could do is apply the rotation and scale. Because the scale isn't uniform, we're getting the noise
kind of stretched here. So let's give that a try. Let's press Control a and
apply the rotation and scale. And that really only helped
so much because we're on generated if we switch over to the object
texture coordinate, yeah, that helps a little bit, makes the texture a
little bit more uniform. That's really, all
I really wanted was just something in there to give it a little bit of texture. Let's take the scale
down to five here. It's a little bit bigger. Yeah, let's do that. So then I'll just take
this and select the under carriage and press Control L
and link the materials here. And now once again, this object right here, it scale is off,
it isn't uniform. So let's apply that control a and apply the scale
and that helps there. We could also add
this to the axle. I'll select the axle
and then the frame and then Control L and
link materials to that. Yeah, that's actually
not too bad, but I think I'd like the axle to be a slightly
different color. It just appears like it is slightly different than the
rest of the undercarriage. So let's just click here
to make a copy of this. Click right here. And now let's just
call this axial. There we go. Now we can come in and
alter this just a bit. I'll just maybe
take the color up a bit like this so it
isn't quite as dark. We could change this black here from pure black and pull it up so it's
a little more gray? Yeah. Just a little bit different than the rest of the under
carriage there. The gas tank here, I think that's yet
another material. So let's just begin
from scratch on this. Let's just create
a new material, call it gas tank. And we can take this and
drag this down a bit. So it's a little bit
different color. We could also give it maybe
a little bit of brown. I'll just drag it
a little bit over. I mean, we're seeing a
little bit of brown there. I think to get a better
color like that. And we probably need some sort of noise texture on this too. But this time I
think I'll feed it directly into the base color. Let's try that. It's grab, that's a white noise. We want a noise texture
here and there we go. Let's just feed that straight into the base color
and see what we get. Well, we get all that. That's not quite what we want. Let's apply the scale control a, apply the scale.
Let's give this. A texture setup with
Control T Once again, and I'll change this from
generated to object. All right, now
we've got a little bit more kind of like this. So let's drop a color ramp in here so we can add
some color to it. That isn't all of that. Then what we could
do is take each one of these sliders are nodes on the color ramp and just grab the eyedropper tool and just click and pick up
some of these colors. So let's do this one now. Let's find a light
color like this. Then we could also drop
one in the center here. Let's click the plus, and let's find yet
another color here. Maybe something. If something up here like
this, Let's try that. Then we could play
with our scale. I'll take this up to say 20. That's too much. Let's try ten. Maybe
even five or two. There we go. And we can play with
the scale here. Let me take that down a bit. And I'm not real pleased
with this blue color. Let's take it over
to brown, some gray. Maybe. We can adjust the
roughness here, see what we can do with this. And the detail. Maybe take the detail up a bit. I think I'll start bringing these colors down
a little bit more. I'd like him a little
bit darker here. Maybe drag that up some. There we go. Maybe let's take
this one and make it just a little bit darker. And we'll drag that
this way. There we go. So we're getting
something a little bit more like that now, we could take the specular all the way down to the
metallic all the way up and take the
roughness and move it. Well, it was pretty good at
0.5, I guess, wasn't it? Alright, so that's
what we have for that. Let's make a new material
for those straps. Let's just hover over these. Press the L key to select
the straps and let's create a new material slot
and we'll Call this gas tank straps for this. Oh, well, let me click
Assign. There we go. For these. I guess we do a little
bit more like this. We could try that
wave texture again. Let's try that wave texture. Let's drag this into the color. Let's increase the scale. Kind of go like that. But you can see we're
getting some stripes. There was press Control T to set up our
texture coordinates. Let's try object coordinate
yet, That's pretty good. Now let's drop a color ramp in there and add a few colors
and see what we can do. So this one, let's just grab a color out
of here like this. This one, let's grab a color like this.
See how that works. Alright. I mean, honestly
that's not too bad. Let's maybe drag these up a bit and make them a little
bit darker like that. Then for this, we can take
the specular down a bit, increase the roughness
maybe to about 0.6. And then I'll bring
this up a bit so it isn't quite that
dark. There we go. So that's all, that's
all I wanted to just some basic materials with just a little bit of
interest to them. That's all. The oil pan here. Let's take a look at that. Let's find another image. Whereas that here we go. For this, we really
don't need a whole lot. We could create a new material, call it oil pan. And let's just take
our color here and grab this color and
see how that works. Well, that's not
exactly what we want. Let's bring it up
a bit like that. Then maybe we will, maybe we play with the color with a texture again as well. How about, how about
another type of texture? Let's bring in a
Voronoi texture again. Let's play with that. Press Control T. Let's use the object
coordinate system. I'm going to select
this and apply the rotation and scale with Control a and
rotation and scale. And let's just see what
it looks like here. Okay, so there it is. Let's take the scale
up quite a bit. Maybe something like that. Let's change it to smooth F1. And then let's add that
color ramp in here. Search for color
and drop that in. And then let's just
once again take these, grab that eyedropper. Let's find a fairly dark color
in here and go with that. And then this one, and let's find a fairly bright
color and go with that. Maybe that's not quite right, maybe bring that up a
little bit like that. So you can see what we've done. We've just kind of
use that texture, use that Voronoi texture
just to give it a little bit of dirt kind of hint that
it's dirty in there. We could take this and maybe
drag it up a little bit like this to make it a
little more defined. There we go. So yeah, that's
really all we need. I think we've got
this one right here. Let's take this, select
that under carriage main and press Control L
link materials. There. There we go. Now we've got the basics
of the under carriage. I'm not planning on anyone actually looking real
closely under here. And the last thing, it looks like the wheels
here are pretty shiny. We should probably
bring that down some. Yeah, let's do that. Let's come into our
materials panel here and let's just increase
the roughness a bit. Let's just take it up two. Let's try 0.4. Let's try
that. How does that look? Yeah, that's not quite
as shiny as it was. There we go. Alright, so now we've got the materials on the
under carriage as well. I think we're ready to
begin rendering this now. The next section, what Let's
do is just begin finalizing the car and then we'll set up a backdrop and begin
lighting and rendering. That's coming up next.
99. Getting the Car Ready for Rendering: Well, I think now we're
to the point where we can begin to think about rendering and start seeing
it in its final form. I don't think we need
this area like currently, so I'll just select it and hit Delete to get that
out of there for now. I think what I'd like to do
is try and clean up some of the blocky curves around the connections to the different
parts of the body here. To do that, I think
we're gonna need to increase the subdivisions. Let's just select the
body here and let's take a look at what we have
in the subdivisions. We've got 2s for both the
viewport and the Render. Now if we take a look at the smoothing mesh over here under our
utilities collection, if I click on that, we can see that we have a subdivision viewport
level of four, but a render of two. And if you recall, we tried
to keep the smoothing mesh at a higher subdivision level than the fenders and the
door in the hood, etc. If we're going to increase the
subdivisions for the body, we're going to need
to increase it by that same amount for
the smoothing mesh. If we select the
smoothing mesh here, let's take the viewport and
the renders up to five. That's going to give us a nice smooth mesh
underneath here. Now that means we can
take these things, the body of the car, and increase these three for both the viewport
and the render. So let's do that. Let's
take the and the trunk, get these up to
three and the doors, let's get these up
to three as well. Alright, and the fenders here. If we increase these three,
whoa, what happened? Look at that. We've got some serious issues
with our mesh. And what's happening
here is the edge of the offenders are smashed up right against the edge
of the smoothing mesh. This happens sometimes. So what I'm gonna
do is just take the fender object and
let's just move it out of our nationally
group here. I'll just hit M and move it to the scene collection
so it's out here. Then I'm gonna hide
the collection where everything else is. Now if we come in here, I'll go to Solid mode. We can see that these spikes are coming from the edges
of our fenders here. So let's tab into edit mode and let's grab this edge right along here and let me in
here and control-click here. So we have this
edge selected here. Then if we drag it down, you can see we're changing
it as we move it. And then once we get beyond that edge of the smoothing
mesh, it cleans up. If we drag it back
up, we see it. Drag it back down. So we want to just bring
it back up as close as we can without getting
any of those artifacts. All right. So there's the front and I thought I saw
some on the back here. Let's go ahead and
just move this up just in case if we move. Yeah, you can see it there. So if we move it around. Yeah. So let's just pull it up just a little bit before it
begins hitting the edge. There we go. Let's try that. All right, Let's bring everything
else back here. Go back to our render
preview and see that helps clean up these corners here or these curves that had that
kind of blocking this to them. That's kind of nice. All right. So we've got that cleaned up. Is there anything else that
might trip us up here? One thing that I can
see looking from the front is right in
here in the Event, feel like we shouldn't see
this piece right there. So let's just tab
into edit mode here and select these faces and
then control numpad plus. And then let's add that
shadow material to this. I'll create a new material slot. And let's just pull this down. Type in shadow. There we go and
then click Assign. And that just makes that a
little bit darker in there. As for these, these aren't bad. I don't mind that
we can see in them. If we really get right in
here, we can see in them. But when you're back here, I don't think that's
gonna be a problem. A couple of other things
I might want to take the headlight here and let's increase the metallic and maybe take the specular
all the way down here. Let's just try that. For this. The logo. It's not bad though I could
maybe take the specular down. Let's try just 0.1
here. Let's try that. That's not bad. Is there anything else here that we think we may
need to deal with? It's not bad. I think we're pretty good. There may be other
things as we actually begin to render the scene
that we need to take care of. But for now this is
looking pretty good. I'm gonna take the
fenders and drag them back up to the
nationally group. And I'll save the scene. Here we go. In the next video, Let's begin creating our backdrop and
setting up the lighting.
100. Setting Up the Interface for Rendering: Well, I think we're
ready to start at least doing a few test
renders of the car. I do want to mention that since the last video
I went in and I created these little black
weather stripping pieces here. And at the base of
the windshield here. I was just going back, looking through some of
the reference images and a few of them had that
and it looked kinda cool. So I figured I'd add that. Basically it's the same
process that I used for the black weather stripping around the
windshield here, just grab an edge
off of this piece, split it out as its own object, and then just move
it around until you get it in the
right place and shape. And I also used for the
weather stripping here, a mirror, a solidify, and a subdivision
for each of these. I just wanted to mention
that I did that. I didn't think it
needed its own video, but I just thought it
looked kinda cool. Alright, so what
I'm gonna do is set up a backdrop for the car. I think I just
want it in kind of a black background
on a dark surface. So the focus is really
on the car itself. This is just a way that I do this for these kinds of renders. There are obviously lots of different ways to go about it, but I just wanted to
show you how I did this. First of all, I'm
going to create a circle shift a
mesh circle here. And I'm going to give
it a triangle fan. Then what I'm gonna do is
take this and just grab the outside edges here and
just begin extruding them out. Just hit E S, extrude out ES and extrude that out and
just do this a few times so we get a flat
base for the car. He s and pull that
out like that. And maybe one more time I'll
pull that out like that. Then what I'm gonna
do is just begin moving these up and create a big flat bottom bowl
for the car to sit in. About. Es will go like this and then we'll
pull this up a bit. And then ES and pull this up so you can
see what I'm doing, just making a big bowl. What this will allow
us to have is some of the reflections of the HDRI
on the top of the car, but still have a
black background, ES, and I'm a scale-out again. Let's pull up some
so you can see kind of maybe something
about like that. And then I'll begin
bringing these in. Easy and I'm gonna
bring it up and then ES and bring
these in like this. And bring it in like that so we can adjust this as we need to. But for now I think that's
probably pretty good. And then let's give it a
subdivision surface modifier. Take it up two, I'll smooth
it. And there we go. Alright, so there's
our backdrop. Let's call this backdrop. We go or we can call it ground or whatever
you want to call it. Let's select the car
and zoom in again. Here we are in a
white background. I'm going to just select this
and go to the materials. Let's create a new
material for this. Let's call it backdrop as well. You recall I said
that there isn't anything in the world
that's completely black. Well, this is gonna
be an exception. I'm going to take this all
the way it down to black. There we go. Now we can of
course adjust the floor here. We can take the
specular down a bit, but we wanted to have
it a little bit. And there we go.
Let's just do 0.31. I have a little bit of
information there on the bottom. Then what I'll do
is I'm going to split the interface into
three windows here. I'll just go up
to the top corner here and click and
drag like this. I just need to press Alt Z here. And then I'm going
to click and drag up here in this corner and
drag this down like this. And let's change this
one to a shader editor. For now. We're gonna be switching
back and forth up here. And this one, we want this
one to be our camera view. But the problem is, is we don't yet have a camera in here. Let's take this and
I'm just going to drag this back up into the
nationally there. And then let's create a camera. Let's just select
our Scene Collection here so it drops into that. Shift a camera. There we go. So let's
just pull this up. There is our camera. Now I want it to be, Let's begin like this. To move this camera
to this view. We can come up here
to view a line views. And this align active camera to View Control Alt numpad 0. Let's give that a try. Let's press Control
Alt numpad 0. And there we go. The cameras now popped into this position. If we go over to our
camera properties here, we can see that the
focal length is 50 millimeter and that's
just a standard normal lens. That's kind of what our viewport
is usually, yes. We can. Tumble around and hit the
N key and come up here to View and see that
our focal length for our viewport is
at 50 millimeters. But for our camera
when we do a render, I think I'd like it
to be a little bit wider for the camera
properties over here. Let's take this to
30 millimeters. Let's do that. Now to switch back
to this camera view, we can hit the 0 key on the
numpad, and there we go. That's a little bit
more like I wanted, but I wanted to do
some adjusting here. I want to tweak the composition. And it can be hard to do just moving the camera
around like that. What we can do is we
can hit the N key. We can come over here and lock the camera to our viewport
as we tumble around. So if we click this, now you can see there's a red dashed line
around the camera. And as we tumble around, the camera moves
around like that. That's pretty good. But what I want to do is
have it over here. So I'm gonna turn this off
right here and close this. And then I'm gonna come over
here and hit the 0 key here. And I'm going to zoom in. Now. I'll hit the N key, good of view and choose
to lock this view, the camera or the
camera to this view, I should say here. All right, so let's
hit the N key now and we tumble around here. We tumble with the camera. But if we come over to
this view and tumble, we don't, right, so we can move around the scene
however we want here. But over here we can
control where the camera's going to
be. That's nice. And also to clean
up all of this, we don't need all of
this in the viewport. We can hit the T key to
close her tool panels. Then if I middle mouse button, click and drag and
drag this over, I can turn the gizmos off here, and I can turn the
overlays off here. So now we just have
our camera view here. So that's going to help us
as we work on our rendering. All right, maybe I'll zoom
in just a bit and turn this. So now we've got a fairly
well composed shot here. However, since we don't have any lights in the
scene currently, the only thing we
have is our HDRI. I liked the black background. I like how we're
getting a little bit of reflection and shadows
on the ground here. But we need to be
able to turn the HDRI and direct the light where
we want it. To do that. That's what this
window is for up here, we can go to our shader editor here and then change
from object to world that will show us
the node tree for that environment texture that we put in a while back here. In the world, we put that
cloud layers HDR image here. So that's the node
tree here for this. And to turn this, what
we can do is just use our basic node setup
from the Node Wrangler. Recall that if we hit the N
key and go to Node Wrangler, we've got our add texture setup with the shortcut of Control T. So we just select this texture press Control
T, and there we go. Now what we can do is click on the z axis for the
rotation here. Click and drag and
look what happens. We can change the direction
of the light of our HDRI. I can turn it around like this may be good at more
upfront. Lets see. Yeah, more like this. And maybe turn it so we get a little more information
on the side here like that. We have more light
now on the side here, we're at about 200 degrees here. Then let's go ahead and
actually add a light list, press Shift a light and
let's add a spotlight here. And then let's just drag it up. And we can see that here is the cone of that
spotlight right here. I'm going to zoom out
just a little bit here and let's take a look on the ground as we increase
the light from a spot. With this selected,
let's go over to our object data properties here. And let's change the power
from just ten watts, that's kind of dim. Let's change that to 1 thousand watts and
see what we have here. Alright, so we're getting a
little bit more information here now how about 2 thousand? Let's try that. Yeah, okay, So now that we've
got this on the ground, Let's see if we can change the spot size,
the angle of it. Let's take it down a
little bit like that. And you can see in the
rendered view that we're bringing that circle of
light down a bit like that. There we go. Then I'll move it a bit. Let's move it a bit
in the x-axis here, like this to center it more on the car from this angle here. There we go. I think that's a good beginning for
our render setup. In the next video, Let's go ahead and
start rendering a few images and
tweaking the lighting.
101. Rendering Images of the Car: Alright, well let's
try a render now. I've got my frame set up
pretty nicely over here. We've got a hint of the
spotlight around the car. I've got the HDRI spin around
the z-axis to 230 degrees. Let's try and do a
test render here. First of all, let's come over to the render properties
and recall that I've got the GPU compute
device selected here, and we're using cycles. And if we take a
look at the sampling section here, of course, there's the viewport settings here and the Render
Settings here. We've got two presets here, one preview, one final. And basically this is the preview here with
the denoise off. And if we choose final, now it's the exact same
as this down here. So these two sets of settings are just what
these presets are up here. So let's just change
the preview there. We've got that back. I had turned on de-noise
earlier, so that's fine. When we hit F12 will come up here to render Render
Image and F12, or Render Animation
is Control F12. When we hit F12, this is the settings that
it's going to be using to do the Render. Now for our purposes, everything else is fine. I'm not going to be
doing an animation here, so I don't need any motion blur. We've already changed our films setting too transparent here. It's not completely necessary anymore because we have
this big background in, but we'll just go ahead
and leave that as it is over here in the
output properties, we can see we've got a
resolution of 1920 by 1080, and that's just
standard HD resolution. If we click on the presets here, you can see that
we've got HDTV 1080. That's what this is here. If you're interested in
rendering out at four K to match the 16 by nine
ratio that we have here. The 4k UHD is also 16 by nine, but that's gonna take
longer to render. And for now while we're
doing our test renders, Let's just change this
100% here to 50%. So it won't take quite as
long to render an image. Alright, Well, let's
give this a try. We can come up here to the render menu and
choose render image, or we can just hit F12. And there we go. Now, look at what we have here. We've got our utilities
coming through in the render. So let's take a look at that. Close this. Recall that we've hidden
the utilities and the reference images away
in the Viewport here, but we haven't hidden
them in the render. So let's click this
and click this, and that will hide those
things in the render. All right, now let's give
it another trial. Hit F12. Here we go. Now it's beginning to render
up to our 4096 samples. And there we go. It took
almost eight seconds. So that's our process. That's how we can render
images of our scene. And once we get
one that we like, we can come up here to Image, Save and save it as a PNG here. Let's go ahead and create a folder in our
project here I'll click here to create a new folder and let's
just call this renders. We can just call
this render test 01. There we go. Now keep in mind that was
just half resolution here. So that isn't really
a final render. And now you can just
kinda go through and move the camera around here and find things that you want to render out
for your projects. So let's say we want
to render this out. Let's go ahead and test
this. I'll hit F12. Here we go. It's
going up to 4096. And there we are. This time we had
almost 12 seconds because there's just
more geometry here. For something like this, we
would probably want to add a light so that we could see
in here a little better. We could just add another area light the
way we did before. Let's just press Shift
a light and area. Let me move this over here. Area light here. And then we can bring this up. And now you can see it
affecting that already. And let's just move
it, move it up, sum. We could move it over a bit. And then you can take
this little yellow ball here and just grab it and drag it onto whatever you want
the light to point at. So let's give that a try. Yeah, that looks pretty good. And then we could maybe
take the area light, go to the light properties here and maybe take this
up to 20 Watts. Is that too much? And that's not bad. Now we could hit F12, give that a test. Now since we've
added another light, we've gone up to about 16 seconds. That
looks pretty good. So then if we wanted to do a final render of this
particular setup here, we could come back over
to our Output Settings, take the 50% all the way up
to 100, and then hit F12. It will now take up
the whole screen because it's just
a bigger image. And of course it'll take a
little longer to render. But that could be a final
render for our project here. Alright, this render
took about 52 seconds. We can now come up
here to Image Save. And maybe this is an
actual final render. So let's take this
and let's just call it render final 01, and then save that. There we go. So
that's the process, that's how you can go through and render images of the car. Now in the next few videos, we'll talk about
adding depth of field. Maybe a little star
glares on the highlights. And we can talk about animating the camera
around the car, putting together a
little video clip of different views of the car.
102. Using Depth of Field and Glare: Well, let's say
we want to render this with a shallow
depth of field. In other words, say we want to emphasize maybe the
hood ornament here, Let's zoom in to that
with the period key. And let's say we want
to kind of set it up like something like this. Let's maybe get it like
this. Let's try that. Let's say we want to kind of emphasize the hood
ornament and let everything else behind
it and maybe even in front of it
fall out of focus. Well, first of all, I'm
gonna take the spotlight. I think I'm just
going to select it. And here it is. Here you can see it reflected
in the window here. So maybe let's take
this and move it. So it isn't so directly
in the windshield. And maybe we could
then rotated in the y-axis RY and pull it back. Like that. Now we get it over here. Sometimes it's just
a matter of moving things around until you can
get it the way you want it. I'm gonna hit RX and
turn it like this. See how that does. Yeah, that makes it bright
but it doesn't give us a direct oval glare
in the windshield there. Let's just say we want to
emphasize this hood ornament. Now what we can do is we
can select the camera. In the camera properties, the object data properties
of the camera here. I'll twirl this up and we've got a depth of field panel here. And if we turn this on, you can see that
immediately things just fall out of focus here. And that's because
the focal distance is set at ten meters. Now we can click
and drag and move this so it's smaller,
we can move it. Let's try maybe to meters, Let's see how that works. It's kind of difficult
to figure out how far a particular object is away to know how to
set that distance. And we can use the
measure tool to measure exactly from one place to another or from the
camera to an object. But you know what? It's a lot easier if we use
this focus object here. So let's do that. Let's take this put ornament and let's tab into edit mode. And what I want to do is just select a point
right on here. And let's move the cursor
to it with Shift S2. And there it is right there. Now what we can do is create
an empty at that spot. So let's do that. Let's press Shift a empty
plane axes, and there it is. And let's just call this focus. There we go. Now we can use this object as the point that we're
going to focus on. If we select that
camera again here. In fact, you know what,
I'm just going to hit the S key and scale
that camera down a bit. It doesn't have any effect on the view through the camera. It just shrinks it down a
bit here in the viewport. Now if we have that
camera selected, we can come over here. We can click on the
eyedropper if we want. And then come over and click on the focus empty right here. And now that it's in there, look at that. It's in-focus. And you can see how
everything back here has fallen
out-of-focus a bit. And currently we're
using an f-stop of 2.8. And this tries to
generally approximate what the aperture on an
actual lens would be. If you had a particular
lens in mind, you could set up the number of blades in the
aperture, etcetera. But honestly it's just as good just to kind
of change this, to get the look that
you're shooting for here. This isn't bad. I mean, we could render this out. Let me take a look
at the output. I'll take the output
back down to 50%, just so it doesn't fill
the screen. I'll hit F12. And here we go. It's going to go through and do all the samples up to 4096. And then it will process
the depth of focus. And now we've got
the hood ornament in sharp focus and everything
else back here, a little blurred
and out-of-focus. So that can be a nice
addition to your renders. Now another thing we can do
is also add a little glare, little glare to the
highlights here. So let's close this and
let's work on that. To add glare, we're
actually going to need to use blenders composite
that's up here. That's another reason why I
created this window up here. We can change it from a shader
editor to a compositor. Then we can click on Use
nodes. And here we go. Now, the composite,
or by default has a render layers node
and a composite node. And for us to really be
able to see anything, we're also going to
need a viewer node. So let's just press Shift
a and search viewer. Here we go. Let's
drop that in here. Now we can also turn
on the backdrop here. Now we can't see anything in the backdrop because we
haven't used our viewer node. So let's just take the image, drag it into here
and there we are. Now, this composite or window has a little bit quirky in that. You can scroll the mouse wheel to zoom in and out
for the nodes, you can use the middle
mouse button to pan around. But how do you change the view of the image
in the backdrop? Well, as I said, it's
a little quirky. You actually use the V key
for some unknown reason. It's from a long time ago. I want to press Alt V to
zoom in and v to zoom out. And then you can
hold the Alt key and middle mouse button to
move that image around. This is just so you can kind
of see the effects of what you're doing here
in the composite or directly in this view. Keep in mind when we're
working with the composite or we're working with a
two-dimensional image, we're actually
changing the pixels of a two-dimensional image. It isn't like we're changing the quality or the
bounces of the lights in, In three-dimensions here
as we're doing here, this is just a
two-dimensional image. But what we can do is we can
add a little bit of glare. Let's do that. Let's press Shift
a and searched for glare and drop this in here and I'll just take
it and drop it in here. And it's currently going from the render layers to the
glare to the composite, but now we also need it
to go to the viewer. So let's just drag here and drop it right in there
and look at that. You can see we've got some
glare and it's a little much, Let's move these down here
and I'll take this and move this alt middle mouse button and maybe I'll hit the
V key or excuse me, Alt V to zoom in. You can see we've got these
fun little highlights. You can change the
number of streaks from four to say, five or six. You can do that here. We probably want to change
from medium to high. And also the threshold. So any pixels brighter than this threshold will
get a star glare. So we could take this up a bit. Let's say, let's take it to ten, see how that, that
reduces some of those. Let's take it up to 20. And that reduces him even more, but we've still got them here. We could take it up to
30 and see what happens. So that takes it away
from our hood ornaments. So I don't want that. Let's take it down to say 15. So we've got some here, a few up here and one there. Okay, so now that we have that, Let's hit F12 and
see what happens. Once again, it'll go through, render our samples here, do the denoising, and
then it'll add the glare. There we go. There's our glare now. It only took about 12
seconds. That's not bad. That's just two
other little tricks that you can add
to your renders, the depth of focus
and the glare. Alright, in the next video, let's take a look at
actually moving the camera, animating the camera
around the car.
103. Rendering an Animation: Well now let's work on animating the camera
around the car. For this, I think maybe I'd
like it to be I don't know. Maybe we'll begin
around here, let's say. Then just do a small subtle
camera move up and around. So it ends up kind of like that. Maybe we only want it to be
about five seconds long. We're currently running
at 24 frames per second. So ten seconds would be 245, seconds would be half
of that. So 120. So really we only
need 120 frames here. Let's then take the
end frame range here. The end of the
frame range to 120. And that reduces the
frame range here. We can take this little thing right here and click and drag, and that'll expand
that right there. Now we've got a 5
second time range. We've got the resolution at 50%. That's probably good since
this is just a test render. If we come over here to
the render settings, we should probably also change the render from
final to preview. So it's at 1024, just so we can move a little
quicker as we do this. When I render
something like this, I usually use two screens to
monitors to view everything. But for this we're gonna have to kinda squeeze everything in. So what I've done
is just brought in my Windows Task Manager here. And then I've opened up the
folder for my shot here. So I've got, we go back
to rendered frames here. I've got three folders that I've created in this
render frames folder. And our first shot, we'll go into this folder here. So all of our rendered frames, we'll go into this folder. Let me just move this out
a bit so we can see this. And I think we're gonna have to rearrange
the windows here. It's just getting a little
bit too claustrophobic. What Let's do is just
right-click here, choose join area and
just join this up here. This, I'll move over
to here. There we go. All right, so as
we render now we can see our GPU performance. We can look at the
CPU, the memory, etc. And sometimes you
can kind of see what the problem is if there is a
problem as you're rendering. And I'll bring this up. There we go so we can
see the whole frame. So let me first of all
adjust the spotlight here. I'm gonna select that
light and then I think when I want to do is just
move it back into the center. So I'm gonna hit the N key. For the x and y location,
I'll just type in 0. And for the x, y,
and z rotation, Let's type in 0 as well. And so that puts it over the
car a little bit better. And then I think, let's move it. Move it in the x-axis here. Try and centered on the car. Just a little bit better. Maybe I'll take this down some. So let's go back over
to the light panel and instead of 2
thousand, Let's try 1500. Yeah, that reduces it
just a little bit. And then let's also
take the size of the cone there down just a bit. It isn't quite so big. Maybe move it over just
a little like that, just to try and center
it up in the frame. First of all, I'll add a keyframe to this
camera position. I need to choose
the camera first and then let's hover
over this view. Let's hit the I key for
insert keyframe and choose to add keyframes for
the location and rotation. You can see how the
colors have changed here for both the location
and the rotation. And we have a keyframe here. Now let's move to the end of
the time range frame 120. And let's move the camera
to where we want it here. Say maybe something like
this. Let's try that. Then I'll press I
location and rotation. And there we have
our keyframe there. So as we scrub from
one to the other, you can see that's
our camera move. Now I think I want this to
be a little bit different. I'm gonna move it
this way like this. Let's begin here and
then I'm going to reset this key frame, I, location and rotation.
And there we go. So now let's try this. Yeah, so it just kind of comes
around a little bit more. So I actually want to come around a little bit
more like this. Let's try that. I'll hit I again,
location and rotation. And now let's take a look. There we go. I'm going
to hit play right here. Yeah, that's not bad. I think I want to maybe move away from it just a
little bit at frame 120. So I'm gonna move a little
bit farther away like this. There we go, I,
location and rotation. Let's try that again. I'll hit Play. There we go. Alright, so there's
our camera move a little bit bigger than I was
thinking, but that's okay. I'm also thinking
maybe right in here, say halfway, we
need to readjust. Maybe it's gonna be
something like this. Let's try this. And then I'll hit I and location
and rotation once again. Alright, so now we hit Play. It moves up like that. Over like that. All right,
yeah, let's go with that. Now that we have our keyframes, Let's come over and
go to the output. And you can see that the output currently is going to the
Temp folder on the C drive. So we want to change that
to that shot 01 folder. So I'm going to browse
to that rendered frames. And here it is right here, except there were going
to the correct folder. Now, Let's come over here to
the render settings again, we've got cycles for
the render engine. We're using GPU compute, and we've gone ahead and taken
the samples down to 1024, just so things will
move a little quicker. Alright, right, so the last
thing I need to do is press Control S and save my scene. And then as we said earlier, Render Animation is Control F12. So let's just hit Control F12. And here we go. As each frame is rendered, you'll be able to see
it pop in over here. And this is just
so we can monitor what is happening
during the rendering. We can open any one of these. I can just click on this and open it and
take a look at it. Oh, we've still got
our glare on here too, and our depth of field, I think what we can do is just make sure this
window is selected. Hit escape, and then close here. Let's try that again. I'm gonna come over to
the camera properties, turn off the depth of field. If we come over here to
the compositing tab, we can remove this
glare out of here. So I'll click that and delete it and take this image
and drag it into the composite and delete the
viewer as well. There we go. So now we don't have the
glare in there either. I'll go back to the layout tab. Let's save the scene once again. We could delete these
rendered images out of the shot one folder, but we do have
overwrite enabled, which means it will just overwrite over
each one of these. But I'll go ahead and just select all of
these and delete them. And then let's try again. Let's select this
window, Control F12. And here we go. That looks a little bit
better and it isn't taking as long because we're not dealing with the focus or the glare. You can see over here, the GPU working for every
frame as well as the CPU. You can also see each frame
going into the folder here. The good thing
about rendering in this way is that if
anything happens, say something happens on
frame 20, there's a problem. The computer crashes or we lose power or something freezes up. Our frames have still been
written to the hard drive. So we can just come back and
begin at the problem frame. So we just type in 24, the beginning frame of
our frame range and hit Control 12 again.
And off we go. Alright, I will let
this render go. And before the next video, I'll go ahead and make two more. We will take them into blenders
video sequence editor, and just edit them together
as a little video. And then render that out to
an MP4 that's coming up next.
104. Using the Video Sequence Editor: Well, since the last video, I think I overdid it. I went ahead and
did seven renders. I felt like the previous one was a little bit too
broad and I wanted to really zoom in and do closer
shots with smaller moves. So I rendered all of these
with the final preset here. Instead of preview,
I switched it over to final in the render settings. And over here in the output, I went ahead and drag
this backup to a 100%. So these are full resolution. The 1820s by 1080 renders. So let's go ahead and
bring these into Blender and see if we can put together a fun little video
clip of our car. To do that, we're going to use blenders Video Sequence Editor, and that isn't a normal tab up here when you
first opened Blender, but you can add that. You can come over here to the plus sign and
click on that and come down to video editing
and video editing here. This is our video
sequence editor and I'm currently we're at from
frame one to frame 120, so that's only five seconds. Let's say we want it to be, I don't know, closer to like
30 seconds or 20 seconds. Let's give it some
room to breathe here. Let's just type in 800
for the end frame. That can change of course, but let's just get that in here. And if I scroll out and you can see the frame range here now, the timeline, let me move
this over down here. And our process is going to be, we're going to bring those
image sequences that we rendered out in
here as video clips. Now we can view those
video clips over here. I can type in d slash and
go to the D Drive here. In this folder here you can see where I've put these here
in the rendered frames. Now we're not going to
bring the image sequences in directly here. Let's do that down here. So within the timeline, Let's press Shift a, and we want to bring
in an image sequence. So we click here and browse to our rendered frames folder. And let's just begin
with Shot Number one. Here. In this folder, we
just want to hit the a key and we can
choose what channel. We're going to put this in
here, channel 123, etc. So Maybe I'll try and put this in channel three like this. And then click Add Image strip. You can see it popped in here. Now if I hit the space
bar, there it is. It's running kind of slow here. It isn't fully at 24 frames per second until we come back
and play it again. It kind of has to cash into memory to be able to
play at that speed. And once we get a whole
bunch of clips in here, it may not keep that speed. Now one thing we can
do to help it play a little bit better
is if we come over here and scroll
all the way down to post-processing in our
pipelines settings, you can see we've got
sequencer and compositing. This is really what happens
when we render this out. Is it going to render
from the compositing or this area back here? Or is it going to render
from the video sequencer? You can turn this off for now and just leave sequencer on. And sometimes that helps. But it's really dependent on the computer and what
else is going on. Since I'm also recording
this as a video, that can slow it down
quite a bit as well. Alright, so we have one in here, we have that in here. Let's give it a fade. I'm gonna go back to
the beginning frame by pressing Shift and
the left arrow key. And then let's right-click on this choose fade and
let's choose fade in. And then we have
a fade in there. And if we open this window up, we can see that that fade
in is a 1 second fade in. But we can change that. We can just type in to here and that creates a 2 second fade in. Now if we play it, if
we hit the space bar, you can see it fades in that. But the problem is
shift left arrow. The problem is, is we've got this transparency here
and we really need black. So the way to get black in here instead of the transparency
is just to add a black frame. So let's press Shift a color. And if we click that, we bring in a black frame. We bring in just a
video clip of black. Now, to move this up without accidentally
moving it forward or back, I can hit G and we bring
it up in the y-axis. I'll drop that there. And then it looks like
if we go to here, right there, you can see, let me zoom in just a bit here. You can see that we didn't quite cover that whole
area of the fade. To extend the clip, you select just one side
of it or the other, and then hit the G key and
move it out like that. Now if you wanted to
actually move this clip, you would have to
select it in the middle somewhere to turn off
that white strip. And now if we hit G, we can move it around
as a whole clip. I'm going to bring it
back to frame one. And you can see
the beginning and the end frame here right at the beginning and
end of the clip. I'm gonna move it to frame one
and click and there we go. So now we go back
to the beginning and hit the Spacebar.
There we go. So we've got a fade in
at the beginning there. Now, the next one we
want to put in here. What I'd like to do
is create 1 second dissolves from one video to
the one clip to the other. The end clip here is at frame
991 second is 24 frames. We rendered these out at
24 frames per second. So half of that
would be 12 frames. So we want to go back 12 frames. It's kind of hard to see
what we're doing here. Why don't we change this? We could go to View and here
where it says Show seconds. We could turn this off. Now we just see the
frames up here. 99 minus ten is 89, then two more is 87. So there's 12 frames. Then let's bring in
our next clip shift. A image sequence will go
to a shot number two, let's say see what this is. Yeah, that looks pretty good. Let's hit the a key. Let's bring this in on
Channel four right here. All right, Let's click
Add Image, strip. There we go. Actually I'm only
2.5th and write because that 12 frames
is just from here, we need to go back
another 12 frames. Go back to 77, then
65, and there we go. So now I need to take this hit G and move it back to 75 there. Now we've got 24 frames
of overlap there. So to create our
first cross-fade, Let's select this and then this. And right-click Add Transition, cross. There it is. Now let's hit the space bar. And there we go. We've got a cross fade. That's kind of nice. Let's go back to the beginning Shift. Left Arrow key,
hit the space bar. And there we go. Now we've got our cross-fade.
Yeah, there we go. We've got two n. Let's now figure out
what framework on here. I'll select this, it's 194. So we want to go back 24 frames. That would be 0170. Am I doing the math right there? Let's press Shift a and
what do we want now? Let's see which
one do we want now let's look at shot three. Now I don't want that yet. How about four? Let's take a look at five. I think this is gonna
be the last shot. Now I don't want to go
straight to another interior, maybe this one.
Let's try this one. So I'll hit the a key and we want to bring this
into channel three. Now, channel three Add Image
Strip, and there we go. So now we take this and this and right-click Add
Transition cross. And now we've got a
cross fade to this. There we go. Okay. Now what's the next
one we want to put in here? Well, let's see, shift
a image sequence. Here we go. Let's try this one. I'll hit the a key. And this one's going to go into number four channel
for Add Image. And there we go. Now we can select this and this and right-click
Add Transition cross. Now this one doesn't
look as long as these. Let's take a look at this.
So with this selected, we look over here. And if we come down under time, let me move this right here. We can see that the
duration is only 18 frames. So what we can do is
we can take this one, click it in the
middle, hit G and move it and you see how that
crossfade extends. And I'll pull it
back to about here. Now if we just select that, we see it's 24 frames.
So that's pretty good. I might just take this and hit G and move it back
just a bit like that. All right, let's
take a look at that. Yeah, that's okay. They're okay. Yes. So let's go back
to the beginning and see if it'll play through. Let's press Shift Left arrow, hit the space bar and
let's take a look at it. Yeah, it isn't running as
fast as it could hear. It's actually pretty slow. But that's okay. We can kind of get a sense of how it's going to look here. Yeah. Okay, so we've got those
now in the next video, let's add the
remaining sequences, maybe even add some music, and then export it
out to a video.
105. Exporting Video File of the Animation: Well, before we bring
any more clips in, Let's give this a name. We can select one and
right-click and choose rename, or we can choose F2 and we
can just give it a new name. So this beginning one, if I recall, is the headlights. Let's go back to here. So this one is, let's just call
this interior left. And this one here is, let's just call this air vent. This one here. We'll call this interior. Right. Here we go. So we just have some sense of what we've brought in
and what we haven't. Alright, I'm gonna zoom out
a bit and move this over. And let's bring
something else in about maybe that one
from the rear going up. Let's try that.
Let's press Shift a image sequence.
Where was that? Here we go. I'm gonna hit the a key. We want to bring this
one into channel three. I think. We'll hit Image strip. So there we go. And let's take
these two and right-click, Add Transition and cross. Now, once again, isn't
the right length. We've only got 14 frames. So I'm going to take
this and let's hit G and move this back. Let's move it back ten frames. Let's try that. Select the cross again, and yeah, we're at
24 frames there. Alright, let's take a look
at that. Hit Spacebar. There's our cross
dissolve. All right. I think that's okay. Let's bring in another one. I think from here what
I want to do is bring in that shot of the rear fender. So let's press Shift
a image sequence. And where was that? Now, here we go. This one, I'll hit the a key. Maybe bring it into
channel for I think. Yeah, there we go.
Let's select these two and add a
crossfade transition. This is 25 frames
long. It's not bad. I'll just bring this one back, one G, bring it back one
frame, and there we go. So now that should
be 24, That's good. All right, Let's
hit the space bar. There we go. Then our last one, that one, Let's bring in that
image sequence. Here we go. Shot number five. Let's hit the a key
to select them all. I'll bring it into
channel five. Here we go. Oh, actually I wanted
down on channel three. Let's do that. I'll hit G
and bring it straight down. And we go. And let's select these two
and add a transition across. This is 29 frames, so I need to bring it back five, hit the cheeky,
bring it back five. And now if we select
it, that's 24 frames. Okay? So what have we got here? Well, we've got
our last one here. Let's hit the Spacebar. There's our fade. Then here is that final
shot of the car there. Now it just ends there. We could just extend that
to the end. Let's try that. I'll hit G and move this to 800. Once again, I just
selected one end, so it's highlighted there. And then you can move
that with the G key. So if we play this, then that'll just hold
that frame till the end. We should probably add some sort of a dissolve or
fade to black here. Let me just move this
over here again. Let's right-click and
choose fade, fade out. And this fade-out is
a 2 second fade out. Okay, let's try that. But we need another black here. We can just take this one, press shift D and move it
over here to frame 800 there. Then I'll grab this and
hit G and just move that back a bit so we'd be sure and get the black under
all of that fade. There we go. So let's go back
to the beginning and it won't play
through at full speed. But let's just hit
play and see if we can get a sense of how
it's going to look. There's our first
dissolve crossfade. We go There's the vent, the interior from the right. Yeah, that looks pretty
good. There's that one. The final fade here. There we go. And then it's going
to fade to black. Right there. Yeah.
Okay. Let me save it. Now what I'd like to do is
just bring in some music. I have some music I
can use for this, but I can't provide it to
you because of copyright, but you can find your own music
and add it to your video. I'm gonna go back to frame one. I'll press Shift a. And instead of image sequence, which bring in sound. And I will browse
to the folder here, and here's that one I have here, I'm just going to hit
Add sounds strip. Now it's pretty
big. By zoom out, you can see it's a
little too long. I'm going to just select this
end here and hit G and move it back to about 800 there. And zoom back in. Also, if I take
this and maybe I'll move it over here for now. If I select this, we can come over to the
side panel here under the strip tab and choose
display a waveform. And when we do that, we can see the waveform here. Now, I'm gonna go
ahead and play it. The picture won't stay
in sync with the sound. So we aren't really
going to get a sense of how it's going to look until we render it out
to a single video file. But you can kind of
get a sense of what the music is. We go. I found some music
that I don't know if it's from the same era, but it was kind of fun. Okay, I'm gonna go ahead and hit the space bar because
it's way out of sync. But what I do want to do is
fade out the audio as well. So I'm gonna select this
and right-click and fade, and then fade out. And I want to make
this pretty long. I'm going to think I'm gonna
take it to four seconds, so it takes a while for
the music to fade out. So I'll hit the space bar. Yeah, that's what I wanted. Okay, so now that we've got our images or our sequences
in here and the music. Let's go ahead and render it out to a video file so we can take a look and see how we did
to render a video file. I'm gonna come over here to the output section under
the Output Properties. And I'm gonna change
my file format from a PNG to an FFmpeg
video right here. Then under the encoding here, just spin that down. I'm going to choose mpeg
four from the list here. I'm gonna go with the
H.264 medium quality. And then under audio, I want to choose AAC
that we'll combine that audio and video into
one mpeg video file. Recall I turned off
the compositing, so we're only going to be rendering what is here
in the video sequencer. Now I need to select the output. So I'm gonna come up here to the output path and click here. And I'll go ahead and
just put it right here in the renders folder. Click Accept. Here we go. So now
all we need to do is just press Control F12. Here it goes. Now you can see it going
through each frame. As I said, it's building both the video and the
audio all in one file. Alright, it's been
through all 800 frames. Let's go ahead and
close this window. Then let's bring that video
file in and see how it looks. All right, here in the
renders folder, here it is. I'm just going to rename this. Let's just call it car video 01. And let's open it up
and see how it looks. Here we go. Look at that. Yeah, this is kind of fun. I like this. Well, there we go. That's kinda cool. I kind of want to see it again. Is that all right? Well, let's play it again one more
time. Here we go. There we go. Our finished rendered video.
106. Adding the "N" Logo To the Hub Caps: Well, it seems like no matter what project I'm working on, either big or small, I always forget something. And the thing that I've
forgotten this time is this little n logo
on the hub cap. I just forgot all about it. So let's take one more video and let's add this then
I think we'll be done. First of all, I'm
going to zoom in here and I'm gonna go to
the material preview. And I don't know if you recall, but a long time ago when
we were transferring our materials from one tire to the others, we linked them. And when you link them, you can't do things
to them individually. Like if I tried to take this
tire and apply the scale, Let's press Control a, apply the scale
and look at this. We've got an error cannot
apply to a multi-user object. That can be a problem
if we just want to add one thing to this
hub cap or this. But if we want to add
it to all of them, that may not be
such a bad thing. Now, I can't apply the scale. So when I UV map and it's
gonna look a little odd, but I think we can make it work. So I'm gonna come over here to the UV Editing tab and
let me close this. And I'll zoom in here. And I'll move this. I'm just going to try and
rearrange just a bit. Let's see what we have up here. Okay? So let's just begin with
this one right here. I'm going to go to the
side view and let's turn off the background here. Here. Let's turn that off. What I want to do is
just select this part, the hub cap, UV, map it and use that to
apply that in logo. What I'll do is, first
of all just tab into edit mode and I'm
just going to select, just going to hover over this chrome hub cap part
and press the L key here. No, I think right about
in here. There we go. I'm going to select
this part right here. And I want to UV map this. I think what I'll
do is just press U and smart UV project
and click Okay, and see there it is
kind of squished. And I can't apply to scale because they're
multi-user objects, but I want to use
that fact so that I only have to put the n on one of them and then
it'll be on all of them. So I'm kind of trying to
have it both ways here, but I'm gonna come over here to the smart UV project and just
click on Scale two bounds. And then I think I'm
gonna hit the a key and hit the G key and
move this out here. So now that we've got that, actually I think I better
do the whole thing. Let me select the whole
thing here and hit the a key over here and move everything
out of this 0 to one space. And then I just want that one piece where it was it here it is right
here at the L key. Hit G. And I just want
this piece right here. I'm gonna bring that up
into the 0 to one space. Alright, I'll hit
the period key and there is that area right
in the center there. I'm gonna hit S and X
and scale this out. And maybe I'll hit R and kinda turn it a bit
and hit S and X again. All right, so now
that I've done that, I want to ensure that this chrome material isn't the same as this chrome material. I don't want to accidentally put the n on everything else. So what I'm gonna do
is with this selected, with the tire selected, I'm gonna come up
here and I'm just going to click right here and call this chrome hub cap. Now when I do that, look at this over here. Same thing. If I come over here. Same thing. So because this is a multi-user object, as we saw, or all of these are, when I do something to one, it happens to them all. So now that we've done that, let's now select
that hub cap here. And we're going to do a
little bit of work on this. Let me select that. Okay, so now I'm gonna
open this up a bit. The first thing I'll do
is bring in that image. Let's bring in a
texture, image, texture. And I'll click on Open
and I'll browse to that graphic I've created
in the textures folder, I've got Nash and logo PNG. So let's click Open
and there it is. Now we do not want it to repeat, we only want it to
be a single image. So I'm gonna select clip. Now if we take this
and we just drag it straight into the base
color, this is what we get. That's not exactly
what we want, but Let's first of all take this and use our Node
Wrangler shortcut of Control T to add a texture setup with the UV
going into the vector here. Then what we need is a
couple of mics, RGB nodes. So I'm going to press Shift a and search for
mix and select M6 RGB. And then what we'll do is we'll take the color into
the color to here, the Alpha into the
factor slot here. Then we'll take
the color straight into the base color
and look at that. Now we have that in there. Now it's too big. Let's come over
here and pull this down and choose that
Nash in logo PNG. There it is. Then let's tab into edit mode and select everything
with the a key. Hit the two key here so we can see it a little bit better. And then I'm gonna press Sx. How about SY scale up
just a bit like this, and then hit the S
key and scale out. So you can see that
as we get bigger, the end gets smaller. So maybe something
about like this. Let's try that. Here we go. Alright, let's see
what we think. It's upside down. I mean, that's okay. This would be it
can be upside down, but for now I think
I'm going to turn it so it's right-side up so I can see the placement
of it a little bit better. Let's try that. Yeah, that's not bad. Let me make it a
little bit smaller, which means I'll scale this
UV island up a bit like that. There we go. Now we've got the
n on the hub cap. The problem is, if we take
a look at the actual one, Let's bring that in here
with an image editor. And actually I could just pull this down here and choose
that there. There we go. So it isn't as shiny as
the rest of the hub cap. And it's indented
just a little bit. To get those things happening. Let's first of all take
this and all I want to do, as I said, is just
create a new mix RGB. I'm just going to
select this and press shift D and bring
this down like this. And then I'm gonna take
the alpha and put it into the factor slot here. Then I'm gonna take
this color and take it into the roughness
right here. Now, the n isn't very shiny, but neither is the
rest of the hub cap. So what we can do is
this top color here. We can use this to adjust the
shininess of the hub cap. Here. Let's actually go to the rendered view here
to take a look at this. All right, so I'm going to turn this up like this so we can see the reflections and I'm
gonna pull the roughness off. There it is, That's what we're
trying to replicate there. So let's come over here to the roughness and then we
want to drag it down or up. So if we take it
all the way down, it becomes a mirror and we
want to bring it back up so we can just barely
see it right now. I'm going to drag it off the roughness and
then back on. Yeah. I think that looks pretty good. That's pretty similar
to what we had. And now that isn't
reflective of the way, the way we see it over here. So the last thing is
that indentation. Let's work on that. For that I think what we want
to do is add a bump node. Let me bring this down
here and I'll press Shift A Search and
I'll type in bump. And then let's also convert
that to black and white. So I'll type RGB in
the search field and bring in an RGB
to black and white. So the value is going
to go into the height. The color up here is going to go into the color right here. Then this is going to go into the normal socket
here, and there we go. Now we've got a little
indentation there. That's it. That's how to get that
in on our hub cap. Now, I'm gonna hit
Control S and save it. And here I will make this
a little bit bigger. So you can kind of
see this all in one. There we go. So that is the node tree for
the N logo on the hub cap. Now what let's do this, let's go back to the Layout tab. And now that we're
here, let's switch over to the rendered view right here. Now the problem is, is that they're all turned
in the exact same way. And if I turn one,
they will all turn. So what we're gonna do is we're
gonna take each of these, select each of the
tires and we're going to make them single
user objects. We select them all. And we come up here
to object relations. Make single user. We want to do it for the object and the data and the materials. All right, so here we go. Now, each one of these
is its own thing. Now we could take any one of these and just hit
our x and spin it. Now they're a little bit
different from each other, right? There we go. Lastly, remember that if you're going to render
this out again, say you want to make
a test render here, let me bring back the backdrop. Let's say you want to
make a test render? I'll go like this from here, from this point right here. Watch what happens
when I hit F12. It's black. Why is that? Well, it's because if we scroll down here to the
bottom of the output, the pipeline is set to sequencer and the
frame is at frame one. And if we go over to the
video sequence editor, you can see at frame
one we're in black. So we're just rendering from the sequencer here to render
here from the layout view. Just turn off the sequencer, turn on compositing
and you should be able to render
from this view. Now, another problem
can be that if you select your camera and you
have key frames in here, that can throw off where your camera is
rendering from as well. So you may need to
delete your keyframes if you want to move the camera around and render
some more images. But just keep that in mind. Compositing is
rendering from here, sequencer is rendering from
the video editing tab. There you go. Okay, I
think now we are done.
107. Conclusion: Well, thank you for joining me for this course as we've used Blender 3 to create a
1952 nationally Roadster. I really enjoy taking on a project like this
from beginning to end. Not only can it help improve
one's Blender skills, but I also feel like I learn more about the
object I'm creating. I've certainly acquired
a greater appreciation for this amazing car. I hope that the
tools and processes that we've covered
in this course will help give you the skills
and the confidence to create many wonderful blender
projects of your own. I look forward to
seeing them out there. So thank you again. Take care and see you soon.
 Darrin Lile, Blender Foundation Certified Instructor