Transcripts
1. Introduction to the class: Hello everyone and welcome to today's skill share class. In this class, you'll be able to learn how to color ON clips studio paint in five different ways. All you'll need is clipped studio paint and preferably a pen tablet or display tablet to be able to draw or color with 0s. In this program. This will be a beginners class, so you don't really need too much experience using clips studio paint. So let's get started.
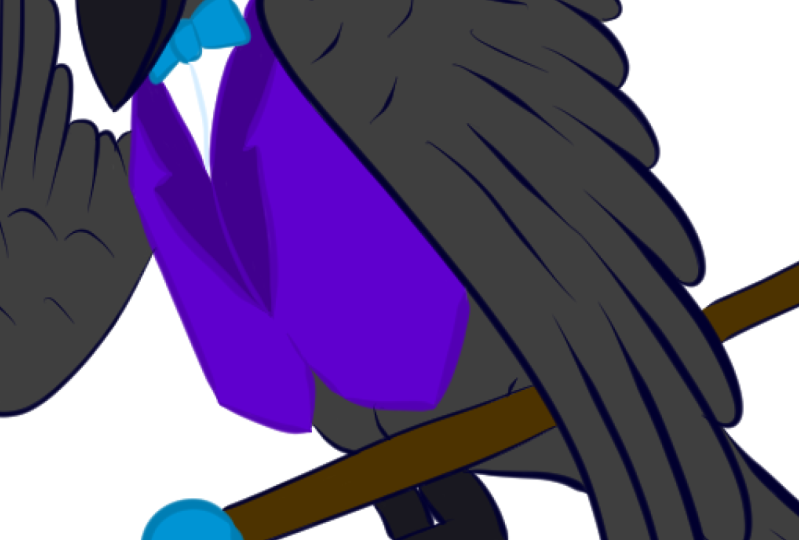
2. Free Hand Technique: Alright everyone. So this is the drawing that we will be coloring. I will be leaving this file in Eclipse studio paint format as well as photoshop format for you guys to be able to color it if you prefer to color this drawing. But if you have a drawing of your own that you would like to color, please feel free to do so. Alright, so we're going to try and color this in four different ways. And I'm sure we're all familiar with the first coloring technique. It's the one that most people think about when they want. And they don't really know any tips or tricks to do it faster. Alright, so the first thing that I would like to color as her skin, I'm going to do this by applying a technique that I feel everybody is familiar with. And probably all of you guys have tried to do before. And that is to simply use a marker or a pen. In my case, I'm going to use a marker and select a color that I would like to use for her skin. And just simply start painting away, just coloring the area and being careful to not color outside of the lines. This, It's pretty, a pretty good technique. It's straightforward, it's easy to do. But the downside of coloring this way is that sometimes you'll have very intricate shapes, you have to color. And so you will have to change the size of your brush constantly, as well as being very careful to not call there outside of the line. And even like that, sometimes we still color outside the lines. You will notice here that I don't really mind coloring outside the line when her skin touches the hair just because I know in my mind, the layer for the hare is going to be on top of the layer for her skim. Therefore, I don't really need to worry about coloring outside the lines for her skin's specifically. But again, this is something that we all do. It's easy to do, especially if we have big shapes. If they're not very intricate or the shape is not complex, it's just straightforward. We color and again, it's a good way of coloring, but it can be time consuming and sometimes it can be a little bit tedious. Imagine you have to color several objects that's going to get boring, or at least really, really tedious after a few hours of coloring. And this drawing specifically is kind of simple to draw to color, so we don't have to worry about it so much. We could color the entire piece like this by hand. But the idea here is to learn how to color in a way that makes our lives way easier. And that is my purpose with this class. So I'm going to finish coloring this. I'm going to speed it up a little bit and I'll see you when we're done. Well, everybody, we've finished coloring her skin. And this is the next tip that I like to mention for all of you who are, who are new to the program, if you don't really like how this colored looks or if you just want to change it. An easy way of doing this is simply to select the layer where you colored the object that you colored, and then lock that layer so that you can color on top of it without coloring outside of the color that you already applied. So in my case, I wanna make her skin a little bit more red, a little bit warmer, and also lighter. So I'm just going to go and color it. Has you can see there you go. Is already colored in a different color and I did not color outside of the shape. Perfect. Now, again, this is a good way of coloring. There's nothing wrong with it. And I encourage you guys to do it if you feel comfortable doing it. But the next type of coloring technique we're going to be using is going to help you guys so much. So I hope that you guys are ready to learn a new way of coloring faster and just easier. I'll see you on the next one.
3. Bucket Tool Technique: Okay, so now we're going to learn a very easy way of coloring. And I feel it's a way of coloring that just helps you save so much time. And if it's a tool that you guys can use, I definitely encourage you to use it. So when you first open clips you paint, you might want to go to the bucket tool, to the fill tool. And it might be selected like this with refer only to editing layer, which means that if you color whatever you want to color in a layer where the ink is not, It's going to color everything. As you can see, it's colored everything, but that's not what we want. We want to cover a specific areas of the drawing. So when I'm going to show you, is how to make it go simply inside of the objects that we want colour. For this though, we're going to select a refer other layers, which means it's going to take into consideration every other visible layer in your file to apply the color. So in this case, we want to hide the skin color because we have gone outside of all of the lines. And if I were to color their hair with this technique, and as you can see, it will color some parts, but the areas where the skin colour is applied, it won't color anything. So we don't wanna do that. And since we already coloured with the first technique and it's all over the place and side of the drawing. I'm going to hide that for a second. And I'm going to go ahead and color the hair with this technique. So I'm just going to apply the fill tool, but I'm going to change the color because that one's definitely not the hair color I want to give her. Alright. This is the one that I want to give her. So you're just simply click. And there you go. It's almost completely filled. And it did a great job out doing it. Now, there are a few things to take into consideration with this technique. First of all, if your ink is open and that, which means if you have a, let me show you an example. If you have a circle, but you don't close that circle, or if you have a shape and it's not close, what's going to happen is that is going to color outside of the inking that you did because it's open, which means it's not going to, you know, color it properly. Whereas if you color with all the lines closed like this, It's going to color inside the lines. So just make sure that your lines are always closed. Or if you don't want to close them and you still want to color it, something else that you can do is instead of closing it with a dark line that you don't want to do. You want to maybe look looser or something like that. You can grab the color that you originally planned on using and just simply draw a line where you want that color to, to stop. And then you can colour it like that. As you can see, that helped and I didn't even have to close my lines. Sometimes though, with certain colors that are really light, such as this one, it might not do the trick and you might have to. Well, with this one I did work with, sometimes it doesn't. So what you would like to do in this cases is instead of coloring in the same layer, of course, you're going to be coloring in a layer below your lines. So what you wanna do is you're going to grab a dark color that's going to help you close the shape. And then you're going to basically draw the shape completely so that it's closed. And then what you'll do is you will color inside of everything. And now you can lock this layer so that we can get rid of this dark line that you guys don't want to be there. So you can see that solves the problem pretty well. And I think now we don't have to worry about it at all. Alright, so that is a little tip for this technique. And there are a few more things that we have to take into consideration with this coloring technique. One is that it's not a perfect coloring technique, which means that even though it's going to color most of everything in your shape, there will be areas such as this one where you will have to go in and color it. And also as you can see, there will be a bit of space between the color and the lines. This is something that you can modify by simply, let me just erase this layer. So we can do this quickly by simply changing the color margin, which means the margin of error that's going to be applied to the bucket. Which means the more color margin you have, the less white space you're going to see in the color between the color and the line. Now you have to be careful with this one because if you go too far, this is what happens. So it's about finding a sweet spot depending on the thickness of your lines, depending on your style, on the panty used to draw certain things. So do you take this into consideration? And another thing is that sometimes it still won't be perfect, so you will still have to go ahead and possibly color a little bit uncertain areas. But I still think that even with that, it's still a pretty good technique. And it really does help, you know, color things without worrying too much. Alright, so as you can see, this looks pretty good. I like how the hair looks and the skin is already there, so that is amazing. Now we're going to go ahead and learn how to color with the next technique. So I'll see you on that one.
4. Selection Techniques: Okay guys, well we have our two coloring techniques down, and I think it's time to learn. The third one. The third one is pretty easy as well. And I really like using this one. And this one works especially well if your inking lines are all in one layer. So that this technique can take that into consideration. What we're going to be using is the wand. The magic wand, I guess I'm used to calling it because I used to use Photoshop a lot, but in here it's called outer select, okay, and we're going to choose the option of refered to editing layer only because we're going to go over, I'm going to hide this so that we can see this better. We're going to go over to our inking layer, which is this one, as you can see. And this tool would, it allows us to do, is to select specific areas within our ink and color those specific areas. Because this area is close, as easy for it to select it, which is really good for us, and it helps us select everything with 0s. Now, another thing we want to do if we're going to cover several areas with the same color, is we want to modify our selection because you guys will see that probably this tool for you is going to have new selection applied to it. What we want to do is have Add to selection applied to it because I want to cover this area with a certain color, but I also want to color that area with a certain color. And finally, I want to select wheel might have to zoom in. I also unselect this area. All right, for a certain color. Okay, perfect. So now that we've selected are areas, we have to go to a different layer to apply those colors because we don't want to color in the same layer as our ink. So this by itself, we can use it. And when you do the selection, you want to color with referred only to editing layers so that it colors more freely without taking into consideration the lines or anything like that. But something that you might encounter is that there will still be a bit of a white line outside of your inking lines and you don't want that. What you can do to remedy that is go to select and expand the selected area, which is going to go over a little bit between the inking lines and what you selected so that there can be no white space in your coloring. So I'm going to go with expansion with two pixels. Alright, I am going to click OK. Great. As you can see, it expanded a little bit. And now if we get really close, you'll see that the selection is also covering half of our inking lines. And that's going to help us a lot to avoid any whitespaces. Fantastic. So I don't really know what color I want to use for the dress. So I'm just gonna choose a random color and simply apply it there. And there we go. That is the way of coloring with our magic wand. Alright, so now we're going to do the fourth coloring technique. And I'm going to do this in this same video because it's a similar way of coloring because it also uses a selection tool. And this time we're going to be using the Lasso Tool. Alright, so for the lasso tool, this is where the brave ones, because I am I don't trust my hand, not shaking when I do selections, but a lot of people love this coloring technique. And I wanted to share with you because I don't want to leave you guys with that technique specifically. So what people like to do with this technique is they like to go really close into whatever area that you want to select. And they literally go over the inking lines with the selection. And one of the things that they like to do is just simply color this selection. Now, you don't have to select everything at once because that would be really hard to do. So what you wanna do is the same thing that you did with auto select in your lasso tool. You can go over to selection and select out to selection, which means that you can add more parts of this election so that you can do everything in different strokes and not just one single movement, which would be really hard to do. Alright, but here's a thing. What happens if you go select outside and now you have an area that you didn't want to color. Well, that is a problem and you don't wanna select everything again. So what do you do? Well, you go over to remove from selection, which is right here. And you simply remove the area that you don't want colored like that. Pretty easy. I see why people like this technique. I don't personally use it a lot, but if you guys want to experiment with it, I recommend that e2. So what I'm going to be doing now is I'm going to speed this up, color the sleeves, and I'll see you on the next class.
5. Earsing Technique: Alright everyone, this is our last coloring technique that we're going to apply. And it's one of the messiest once. It's one that I try to avoid using. But I know a lot of people like it as well and I don't want to hide it from you guys, so I want you to know how to do it. It's pretty simple and it's based on coloring freely, saving some time in the coloring department. Let me just select a colour real quick. Let's say I wanted to do this color again. Alright, so what can you do to color this area without having to select everything with the last tool or the magic wand and just select every single flower. Or being careful with not coloring outside the lines, et cetera, et cetera. Well, a lot of people like to simply go over this and color it like that. And it doesn't look very pretty. I don't personally like to do this, but some people do. And what they like to do is go over the entire piece like this with different layers. And then what they like to do is simply grab that erasing tool. And a lot of people feel like they have a lot of control with this technique in the, I prefer to use it. I've known from a lot of people that like to color like this. And they just go over it and start erasing everything. Sometimes they will simply erase the borders of where the line is. And then they will go over with a selection tool and erase everything else. So they might leave this like that and then go over to our lasso tool and just select everything. They don't want to erase it. Again, this is a technique that I don't personally enjoy using all that much, but I can see why some people like to do it. It's messy, yes. But does it work also? Yes. It does work. And I guess it's good that you guys know that it exists so that you can use it in the future if your heart desires. I'm just here to cheat, to teach you guys how to use different techniques. Alright? So that is the technique that they like to use and we're almost done coloring everything. I'm going to go ahead and finish this piece. And once it's done, I'm going to be showing it to you so that you guys can see how it looks with just simply flat colors. I am going to choose different colors from the ones that I showed you. This is ones I just chose quickly so that I could demonstrate the different techniques. But in the next section, I want to tell you about what the class project that's going to be. And I'm really excited for you guys to do this class project with me.
6. ClassProject: Okay guys, so this is the final look at the coloring that I did for this piece. I used all the different techniques that I showed you guys. And I use them for every single section of this drawing so that you guys can see that every single coloring technique works pretty well. And it's just a matter of finding the one that you like the most. Now this is definitely not a finished piece. This is the first part of a long road ahead of me for coloring in general, for my drawings. But I want you guys to see how it looks. I wanted you guys to see that you guys can do this very quickly, very easily in that coloring and clips studio paint is not hard at all. In fact, I would say that this program has been one of the most pleasant programs that I have discovered this year for our class project, what I want to ask you all is to simply color a drawing. You can choose to color this exact drawing and share with all of us in the class Products section. But you can also choose another drawing that you wanna color it yourself. It doesn't really matter which drawing you choose, as long as you use all the different techniques that we learned today and you share them with us because we all would love to see how you like to color. I hope that you guys do decide on doing this class product and I hope that you enjoyed this class. I hope that you enjoyed this time with me and I hope to see you very soon for another class on how to color and render a finished piece on clips studio paint. All right, I'll see you very soon. And good luck to everyone.
 Ariann Aguilar, Art Director & Illustrator