Transcripts
1. Introduction: Hello everyone and welcome to my Skillshare class. My name is Marianne, and today we're going to be learning about character pages and why are they so important for this class, all you need is your creativity. Lv use includes see you paint a wakeup into us to demo how to make a character page. But you can do this traditionally as well for the sketchbook. You can also do this with Florida Photoshop or any other drawing program that you use digitally. For this class, we'll be going over why our character pages so important. What to include in a character page, starting a character page, dressing your characters, choosing colors for your character, defining style, whether character page. And finally a class project. So let's get started.
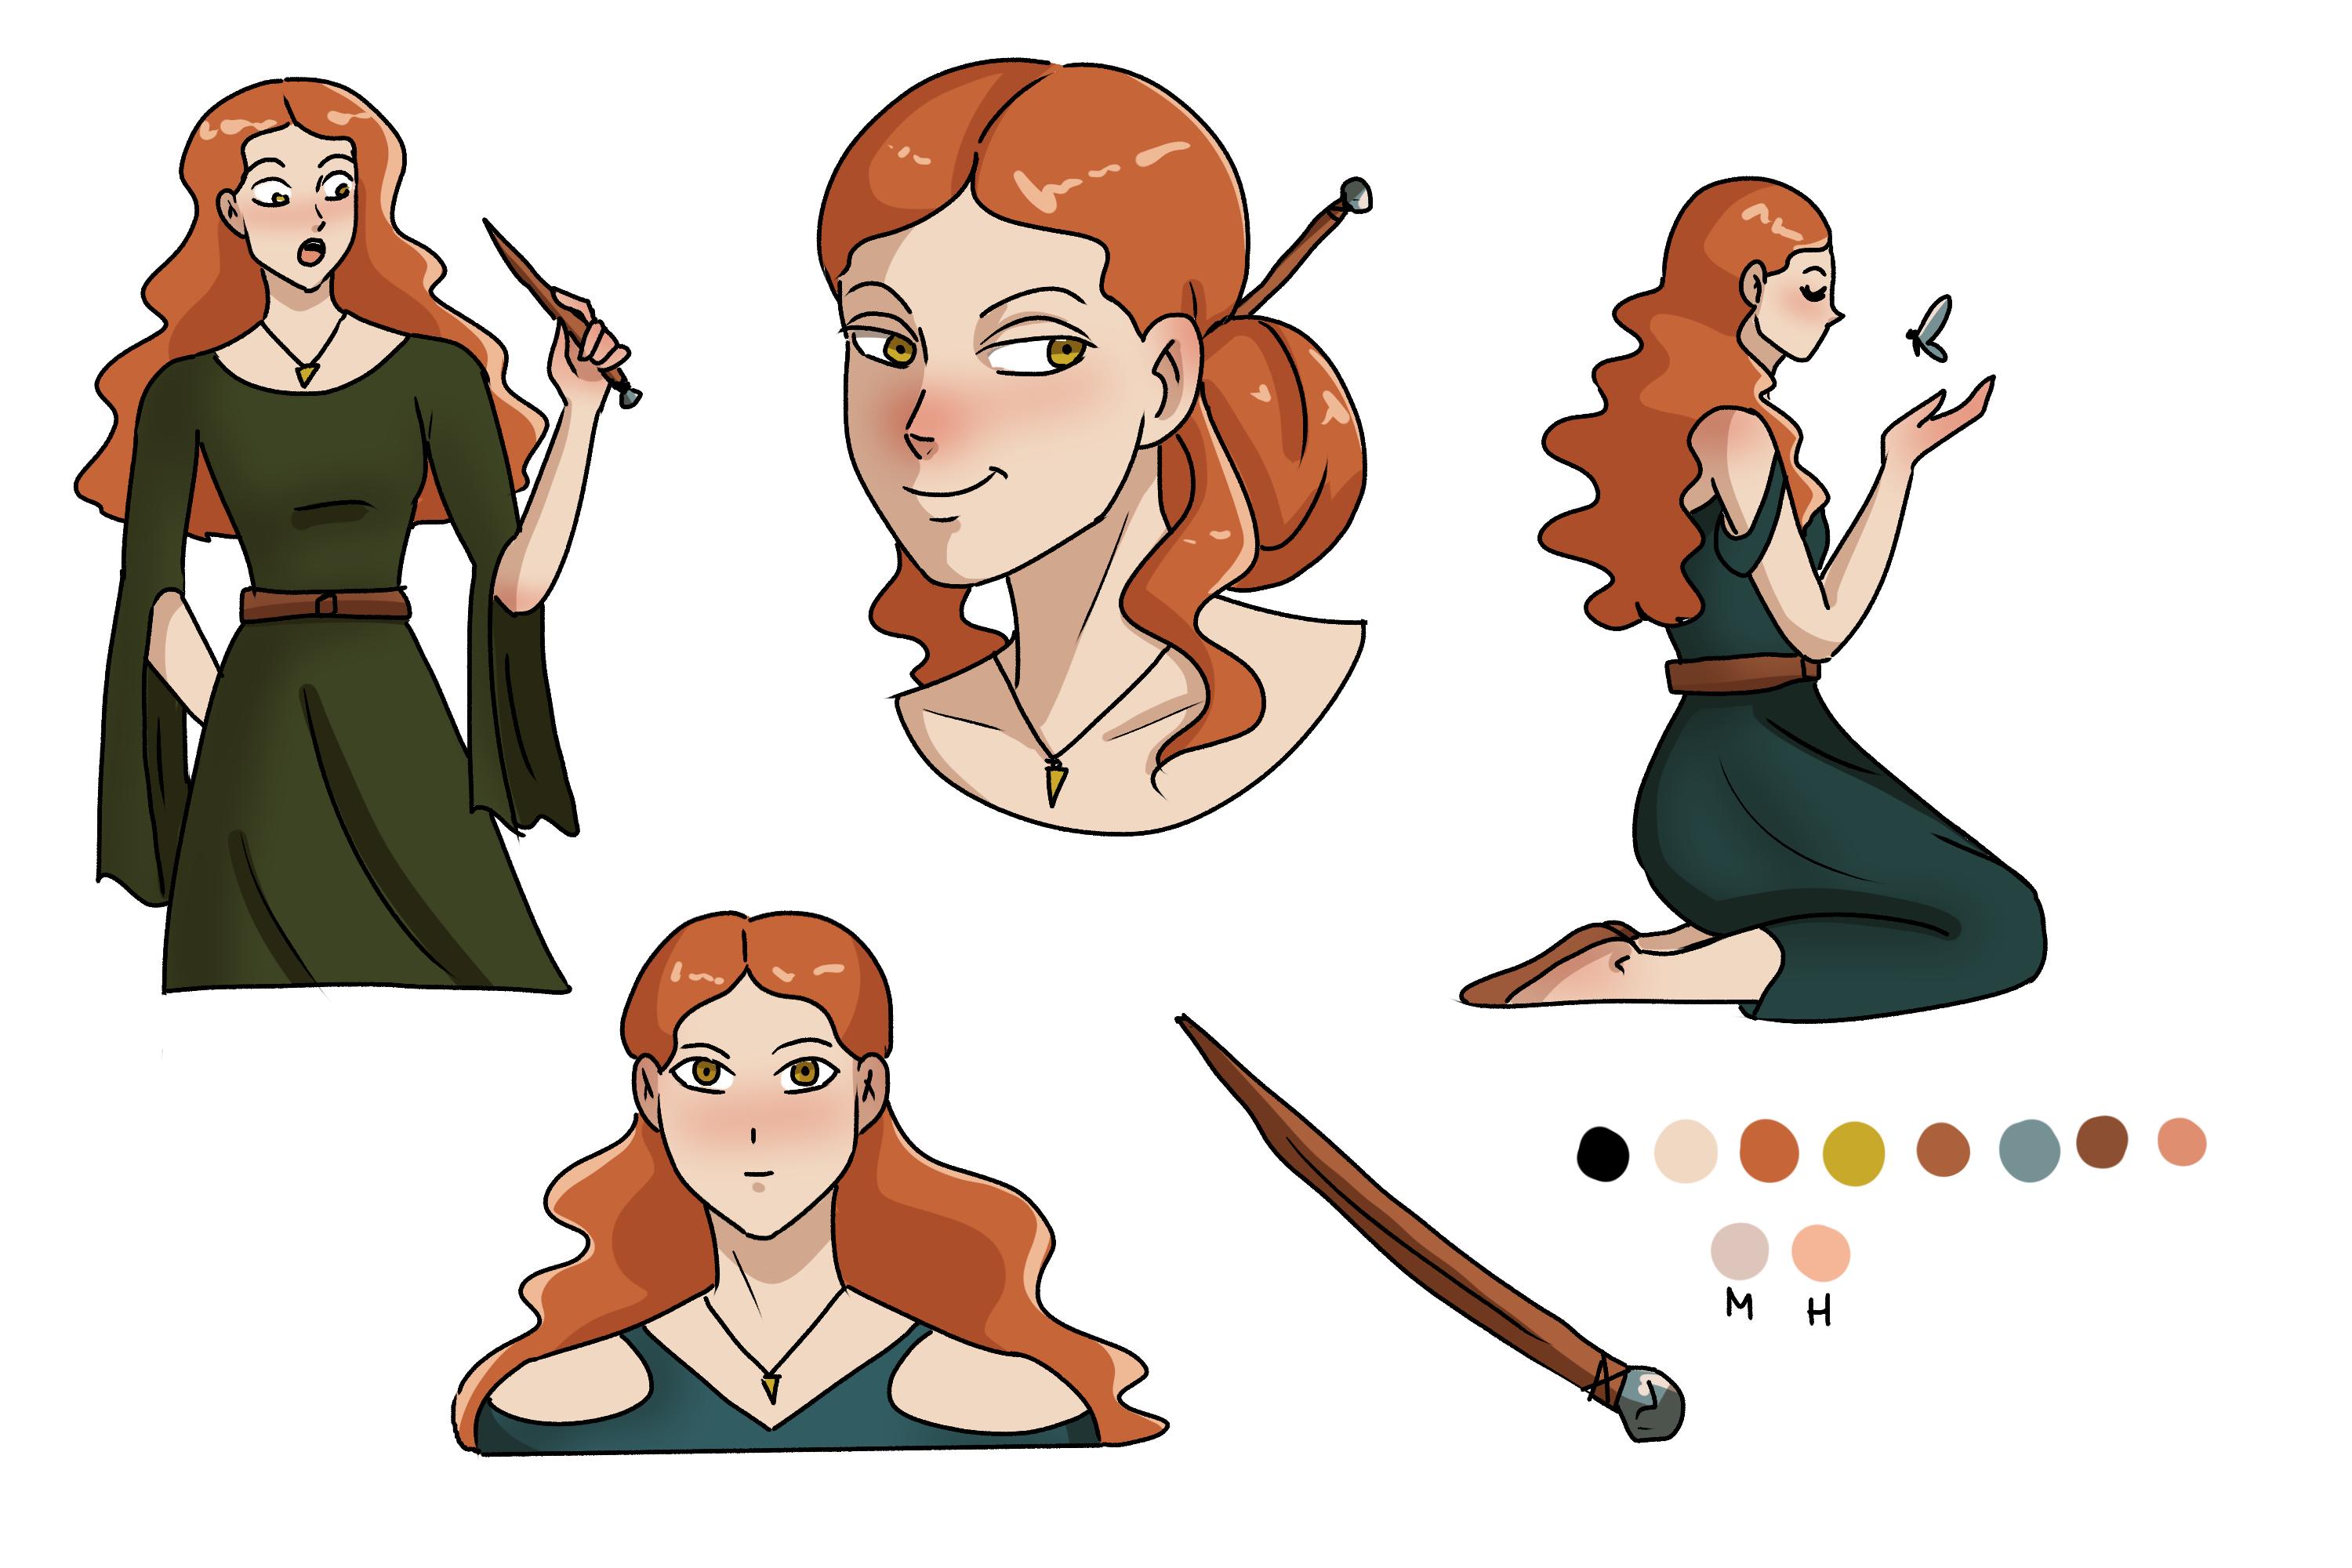
2. Why are character pages important & What to include?: Why our character pages important. When creating a character, you want to make sure you're able to visualize that character properly so that you can replicate them accurately every time you do so. Character pages are wonderful for this, as they serve as guides to properly draw the character you want to share with the world through your comics. Since we're not concerning ourselves with animation or 3D modelling, character sheets for comics don't particularly need to include turnarounds. But we do want to make sure we draw all of the repeating elements of our characters in this page because it'll work as a reference. For example, if your character is going to use a prop constantly, you can include that in your character page. If they have birth marks, a favorite watch, a sort of bag, a pet. Even at a two. You can include all of those. These are all the things you must include in your character page because they will all be repeating elements that you need to look back on every time you draw your character. Besides all of the visual elements of your character sheets, some people like to add a bit of texts within their character pages. Here are a few examples of character sheets I made where I added a likes, dislikes, age, and personality type of my characters. You can take the time to write a small description of them. Are thinking personality tests to define your characters essence a little bit better even before you start drawing your character beach. I also recommend adding the color palette as this is one of the most important elements that will keep your character consistent throughout your comic or you're sorry.
3. Starting a character page: Starting a character page, There's no right or wrong way to go about your character sheet as this is completely defined by your style and intentions with it. I'll be showing you my process now to give you some pointers and tips on how to make it so that you have a basis on which secrete yours. So before I even start my character page, I personally like to make a board so that I can visualize my character properly even before starting to draw them. For this Skillshare class, I'm going to be creating a forest, which so I wanted to take a few pictures here and there from Pinterest that will help me visualize what type of character I want to make. I've added some photos of people that I feel like look close to the character I want to create. I also saved some outfit ideas that I like to experiment on, and some color palettes as well as props like a want for my character. I'll be going back to this lot when dressing my character and choosing colors. But for now, this is just for me to get started. So I'm going to go over to Clip Studio Paint. And here's my file is completely blank. I'm going to start with a draft. And in this draft, I like to define or kind of poses and to even what kind of expressions I'm going to add into my character page. So what I like to do is I like to add maybe one or two drawings of my character where you can see the entire body or even just the mid body so that I can get a look at body type. And also if I'm going to be changing their clothes, their fashion style, and even if I'm not going to be changing their clothes, their outfit, that's going to be repeating throughout my comic or my story. I also like to add one or two expression shots so that I can get a better look at where their features stand within their face. Something else I think it's important to consider is, even though we're not doing turnarounds, if there's any element from the backside of the character, That's going to be hard for you to remember to draw properly every time. It's also good to include that in your character page. For example, in the character page I'm making, I wanted to make a close up drawing of the WAN she's going to use so that I can repeat it. Lee, draw it over and over again the same way so that it doesn't change too much whenever I'm drawing it. I also added a front view shot of her so that I can have a good understanding of her face without it being at any other angle other than frontal looking so that I can keep her features consistent every single time.
4. Dressing your Character: Dressing your character from the previous examples I showed you, you'll notice that some character pages have different outfits and some have the same one. This will entirely depend on your preference. Some people like to make outfits were their character uses only one outfit and some people like myself will change the character's outfit several times. If you're going to keep the outfit the same, this is perfect for you to define the elements that will make this outfit standouts. If you're going to change the outfits, this is a perfect place to find the fashion style of your character. Just remember, if you're going to keep the outfit the same throughout, you want to draw the outfit from front and back so that you can get a good understanding of it and so that you can reference it every single time you draw it. Remember the clothes that we wear? Say a lot about O. So you want to keep that in mind while giving your character their outfits. So while my character sheet is still in a drafting stage, this is a perfect moment for me to, to add the outfits that my character is going to wear. So for what you can see, I didn't really refine the drawings in the character sheet too much because for the purposes of this class, I don't feel like that is completely necessary, but you do have to keep in mind that character pages also work well if you are collaborating with somebody. So if you're going to be sharing this character page with somebody else, you definitely want to make sure that every element in your character page is defined properly and drawn in a way that makes it look refined.
5. Choosing colors for your Character: Choosing colors for your character. Now that we've drawn our character in our character sheet, it's time to choose the colors that we're going to be using consistently with our character. So you can do what I did and look for a color palette that you like for your character. Or you can think about what types of colors would best define the personality of your character or even the mood of your story. I'm going to go ahead and simply copy the colors that I saved. It's just earthy tones that I really enjoyed that I think would go really well with my character. I'm just going to copy those and paste them into my character sheet. And I know for a fact, one of the defining elements I want my character to have is that I want her to be a ginger, which from the forest. So I'm going to choose the colors that best describe the character I had in mind for this class. And I'm just going to simply color her accordingly. Something I want to mention when you're choosing colors for your characters is that colors are very defining of certain moods. Like blue is trustworthy and calm, but it can also be sad. Sometimes. Green can be lively, it can mean calming as well. But it can also be dull and boring. Red can be fiery, passionate, energetic, even, but it can also be associated with evil and so on and so forth. So you want to choose the colors according to the type of mood you want people to feel when they see your character, or just the type of personality you want to portray from that character. I want my character specifically to be very energetic and to stand out. That's why I chose a red color for her hair. So that's why I want her to be a ginger, but I'm also going to be choosing a lot of earthy and green tones just to ground her down. And to show you how she is somebody who's living a very rural life of very forest the type of life. And i'm, I'm sure that that's going to translate really well when I'm done choosing the colors. I'm also going to be making her really pale. Which to somebody who's looking at my character might just mean to them that this character them creating is not somebody who definitely lives and tropical climate. It's somebody that maybe just doesn't go out or that much, or maybe it's somebody who lives in a place where there isn't too much sun, like a forest in a northern part of the world. For the sake of this class, I'm definitely keeping everything pretty simplified, but you can go all in this part of the character page. You can run your, your character depending on the style that you want to go with. In the next and final part of our class, we're going to be going over defining style with our character page.
6. Defining style & Class Project: So what do I mean by defining a style with our character page? Let's say you haven't done any world-building. And the place where you're starting at is your character page. And let's say this is your first character from the story you want until, or the comic you want to create it. The way in which you render your character, the way in which you color them, the way in which you shade them, is definitely going to influence and define how your world is going to be looking from that point forward and how your other characters are going to be looking as well because you definitely want everything to be cohesive. So I'm going to be shading my character according to the type of story, in the type of style I want to portray for everybody to read on my comic, my story, or even just my illustrations in general, my concept art. Let's say I'll be doing some cell shading. But if you feel like you'd like to render your drawings and make them realistic looking. That is something that you can do, but do keep in mind that you're going to be replicating this character over and over again. And for a comic specifically, you might not want to complicate things for yourself and make your character extra complicated. Because you're already going to be doing hundreds and thousands of drawings of this character. So you want to do it in a way that yes, defines the character properly, defines your style properly, but also helps you not spend hours, extra hours drawing this character because you added maybe too many details or the type of rendering that you chose to do. It is extremely complicated. That's why I personally recommend cell shading and that's what we're going to be doing in this final part. For my character, that is a forest switch. I really enjoyed the earthy tones that I chose for her color palette. So I would very much like to use a bit more of those colors for the shading. I'm definitely going to choose a color from this color palette to be my base color for cell shading. And I'm going to read choosing another color from this palette to be my highlights. And like I said, this will depend entirely on your style. I feel like style is very subjective, so I don't want to tell you how to draw because this is not that type of class. And definitely you can do whatever feels right to you. I'm just going to be demoing this because I feel like this a good example and definitely a good sample if you're just starting. But like I said, you can make this as simple or as complicated as you'd like it to be. Alright, so now that I've defined my character style, I would really like to add the color palette that I'm going to be using for my character and get rid of this color palette that I pasted because I no longer need that. So I'm just going to hide this for a second. If you've seen my class on how to draw comics quickly, you'll know that you have the ability and Clip Studio Paint and in all other Mostly all other digital programs to create your own palettes. So that is something that I do recommend. If you're going to be doing this digitally, you can create your color palette and save it on whichever program that you're using. But if you don't have that possibility, then this is going to be working really well for you because you're going to be able to go back to this image several times when you're drawing your characters. So this will also depend on how you like to organize things and how you like to look at things that really define. It really depends on your style. There's no right or wrong way to do this either. But I'm going to be showing you how I would usually the fine my color palette. So I'm just going to grab a GIF and, or whichever pen has a 100 percent opacity and hence a 100 percent pressure. And I'm just going to be color picking the colors of my character. So what I like to do is I like to definitely start with the base colors that I'm going to be using. So the base color for the skin, which is this color, the base color of the hair. If there'll be repeating items on my character, I'll be using that color as well. So for example, the eyes and this necklace right here are the same color. So I can use that and put it in there. Then finally, the one and the ones colors which are also repeating. So the bond is this maroon color. And the stone that's at the bottom of the one of the wand is this bluish color. A few other elements that might be base colors are repeating colors, like I said. So for example, in this character, specifically, that character will always use this maroon looking belt. So I'm also going to add that color in here. Some people also like to add as base colors there, color that they're going to use for their lining. For the inking. In my case, I use black so it's not completely necessary, but I'm going to add it here nevertheless. And obviously white for the eyes that, that's what I chose. Some people do an off-white. So you can also add that of white to your base of base colors. And one more color that I think might be a base color for her specifically will be this pink color. So that colors the same color that I'm going to be using for her tongue, as well as that blush that I'm going to be giving her in her skin every time I colors skin. And now below that row, sometimes I like to add the shading colors. So the shading color that I decided to use as a multiply layer is this color right here. So I'm just going to add it below my colors. And I also chose this color for my highlights specifically for the hair. So I'm going to add that here. As a note. If I'm going to be somebody who forgets things pretty easily or if I know I'm going to be coming back to this after a long time is good to add M for a multiply and an H for highlights, just so that you know, those colors are not base colors I use normally, but that are colors that you use for the shading. And that'll depend on your cell again. So that'll be something that you have to figure out yourself. And also, if you'd like to, in this part, wherever you have free space for your character page, you can add the name of the character, their likes or dislikes and any other type of notes that you feel are important for your character page. But with this, you're basically done. There's not much else that you need to do unless you wanna go all out and maybe add turnarounds. Maybe you want to add a specific section for your character page where you want to add a lot of expressions like a sad expression and happy expression or any other thing that you feel is very important for you to have in detail, for you to come back to you in reference. But for the sake of an example, I think this is pretty okay, pretty good. And it's a good starting point for you guys to go now and do your own thing. So let's go over what the class project will be. The class project is pretty simple and self-explanatory. I'll be expecting you guys to try and create your very own character page. I would love for you guys to post it in the class project so that we can all look at it and for us to see how everybody is going to be completely different and how everybody's going to go about their character page differently. Maybe tell us a little bit about the story that you wanted to or the comic day you wanna do, or even just a little bit about the character that you created on your character page, I'm really interested to see what you come up with. And if you have any questions, please feel free to ask me all of the information and even the image that I created for this class is going to be below this class so that you can get to it and use it for reference. I'm going to be uploading the Clip Studio Paint file as well as a Photoshop file and just a JPEG so you guys can look at it and work with it if you want to tweak it or just use it as a base. Well, I can say is I wish you the best of luck and I hope that you enjoyed this class. And if you do, please feel free to rate me. I love to hear your thoughts and your comments as well as any feedback. And I'll be seeing you for the next class guys.
 Ariann Aguilar, Art Director & Illustrator