Transcripts
1. Welcome: Hello and welcome to another
beautiful painting class. In this class, you
will learn how to make this simple landscape
with acrylic paints. My name is George,
and I'll be guiding you through this
beautiful journey. Would over ten years experience
as a professional artist. Many exhibitions, both
group and solo shows, and with over 10
thousand students, both online and in-person, I've developed a very beautiful
method of teaching that focuses on having fun and
making a beautiful project. Who says painting needs
to be complicated. You only need two brushes and a few paints with a few
simple tricks and tips, you will create this wonderful
landscape in no time, you will learn so much
about creating foliage, making a wonderful sky, and some beautiful stones and
everything you will learn in this course can be applied
to many more paintings. Now let's get into
the exciting class.
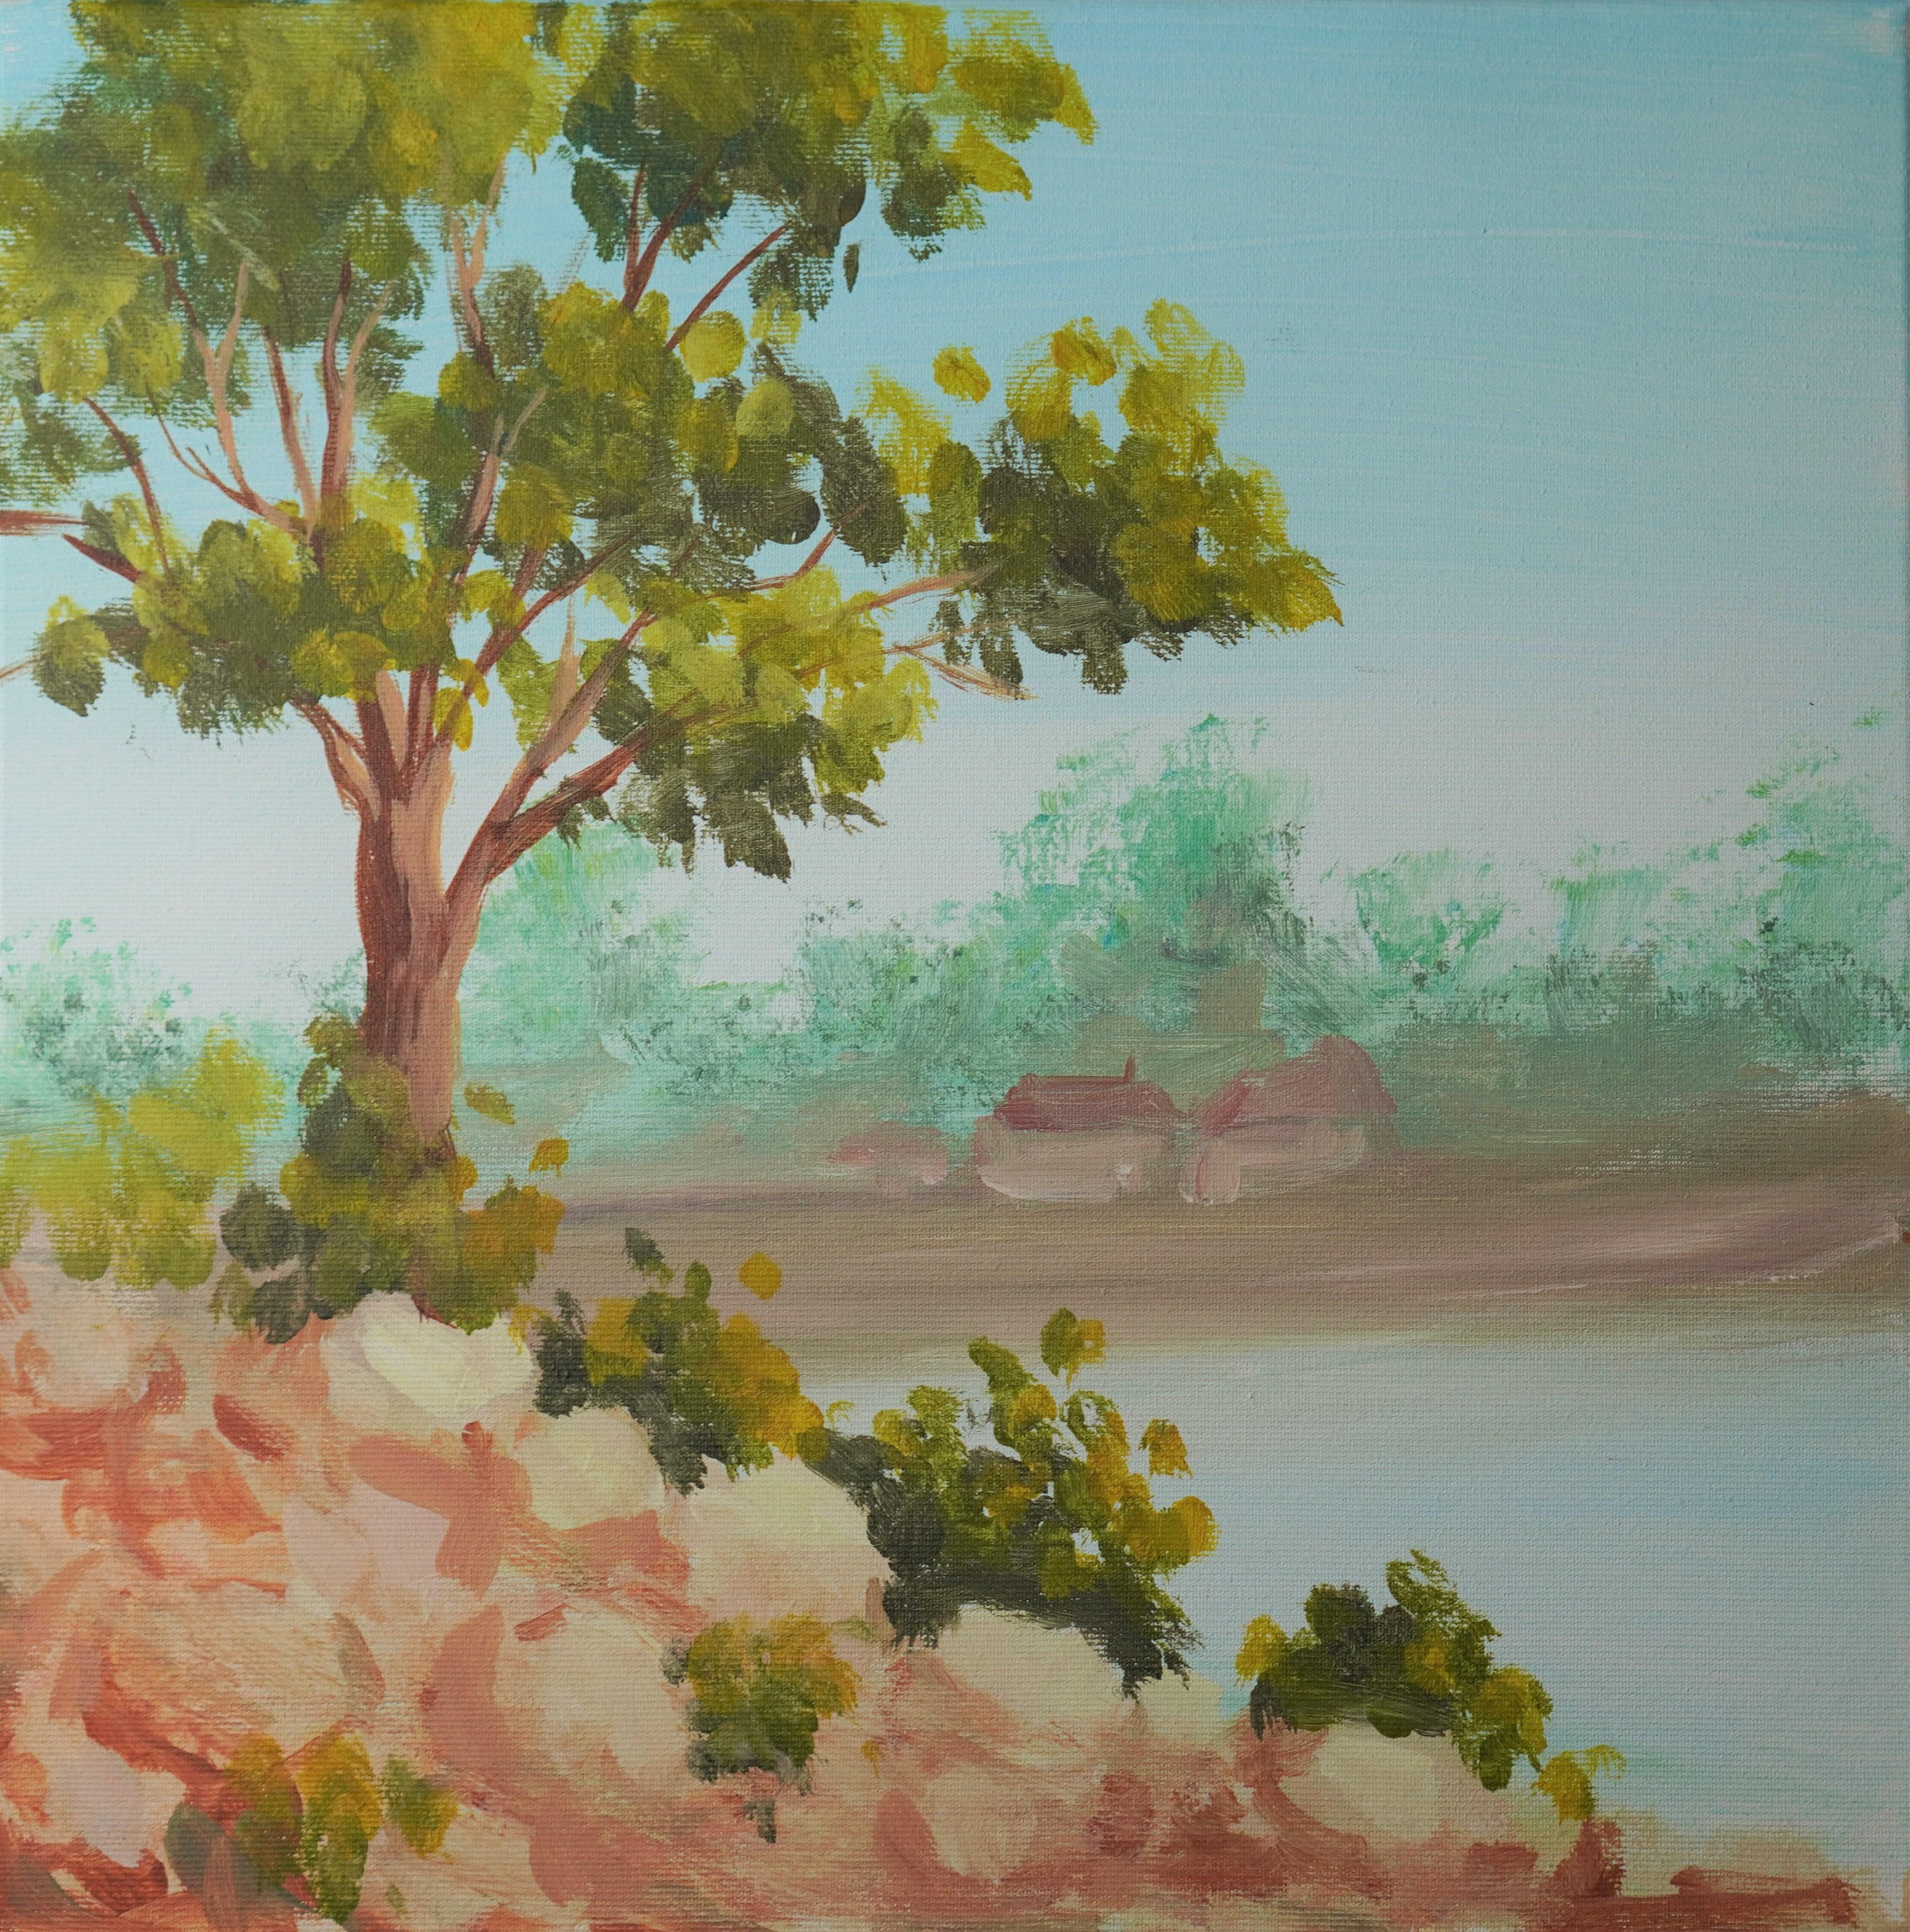
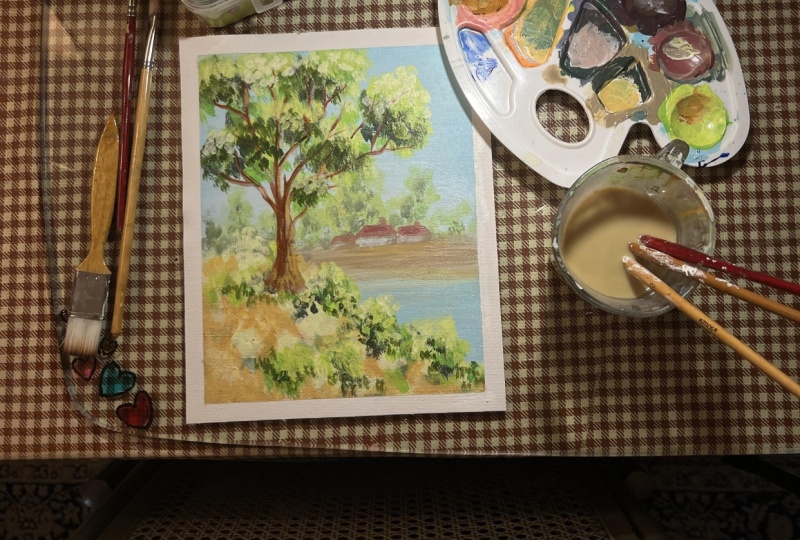
2. Materials: For this amazing class, you will need a few materials. Let's go into them now. You will need a canvas that
is 50 by 50 centimeters, a square canvas, and a big flat brush to cover
the canvas very fast. You will also need a small
round brush with a tip. This will be good for making foliage as well
as some textures. You will also need
a cup of water and a beautiful place
to put the colors. Speaking of the colors, you will need acrylic paint. This is Amsterdam acrylic
paints, brilliant blue. We'll also need
some carmine red, also Amsterdam and some
beautiful primary yellow. And of course the
wonderful white. This is titanium white and
some beautiful paper towels. And that's all you need to complete this beautiful course.
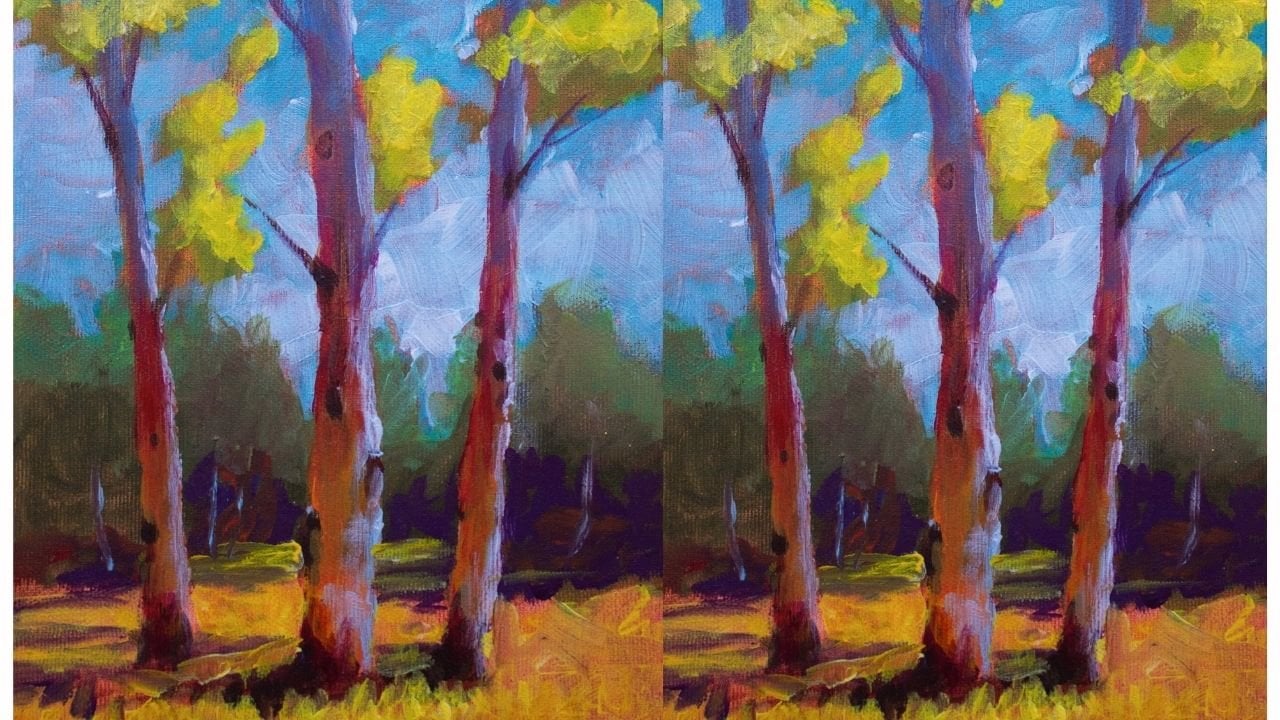
3. Sky and background trees: Welcome to the first step. In this one, you will be using only the big flat brush
together with some water, some blue, some yellow,
and some white, you will create a beautiful
sky, not only that, but using the corner
of the brush, you will also create
some distant trees. For the trees to create some
atmospheric perspective, they need to be painted
on the wet sky. This will blend the
color of the skies with the foliage and create
some wonderful textures. Now let's go into the step. Let's add some white
onto the plates, as well as some yellow. And of course, after the
yellow is on the plate, you can add some
brilliant blue to the left side of
the plate as well. Grabbing the big flat brush, taking some water, water
is quite important. Here. It will make the
paint be wet longer. Let's take some white and fill that brush with some white, just a tiny bit of blue
in order to create this wonderful blue in
the middle of the plate. And a tiny bit of yellow. Just a smaller part. Right in the middle. Let's see the color
and right below the middle section, the Canvas. Let's create some
beautiful textures, grabbing some more
of this paint and easily going with some
water onto the canvas, creating a wonderful gradient. Spreading that color from
left to right and grabbing the hairs if they fall off
the brush and at the top, Let's add some more color. Can start to see why the
big brush is so handy. Very fast and loose. In a few seconds you can
cover almost half the Canvas. Let's take some water and add
some of this paint lower, creating a base for the lake. Adding some more white in
the middle of the plate. Just a tiny bit more. With some white right in
the middle of the canvas, you can start to
layer and create the gradient even
more pronounced. Don't go too high or too low, just stick to the
middle and blend it into the wonderful sky. Can also go down a little
bit into the lake, grabbing some more white and layering another beautiful line of this gradient. Going higher, just a tiny
bit to have more paint. Just where the trees
will start to appear. In a few moments. Grabbing some blue and making a darker blue and adding it
at the top of the canvas. Blending exactly like your blended the white
with some water. Blending the app the top, creating this
wonderful transition in-between the
white and the blue. The more you blends, the softer the sky is. Don't go overboard
Just a few times. Let's grab some yellow and mix it over this wonderful blue. Just a tiny bit more and some blue to create darker green. For the 3s, a tiny
bit more yellow. And with the corner
of the brush, we're going to dab
and rotate the brush to create wonderful
frieze right over here. Try to focus on the edge, making them higher and lower, and rotating the brush in order to create
different textures. If you keep the brush
on a single side, it will create the same
stamp over and over. So they need to be a
tiny bit different. As you can see as
you go to the sides, the threes are a
little bit lighter. That's because the
color of the sky has entered into the brush. Let's brush the bottom side of the trees just to blend them
more with the background. And there you go with this
wonderful and easy step. In this step you've
learned how to make beautiful and easy gradients
with the big flat brush and how fun it is to
use it on its side to create wonderful
atmospheric perspective. By making some trees. You don't have to
over-complicate a sky with too many
clouds or textures. A simple gradients that you can make with
a big brush from left to right can be the perfect background
for a painting. And now let's go
into the next step.
4. Horizon line: In this step you will be using the big flat brush in order to create some shadows and a
ground for the trees to sit on. You will be doing that
by adding some red to the prolapse and making some
wonderful oranges as well. Now let's go into the step. At this stage, it doesn't matter if the paint is dry or wet. Let's grab the brush. It still has some blue
and some yellow into it, but it needs a bit more. So let's mix some on
the plate and also add some red to make that
color tiny bit darker. Not too much. Adding
some more yellow and seeing that color beautiful. Now on the right
side of the trees, the colors seems
tiny bit too dark, so let's mix it
in tiny bit more. On the right side of the trees, just at the bottom, you can create some
wonderful shadows. You can start to see from the left and a little bit lower. If your paint is still wet, it's easier to
integrate the shadows. Remember to blend
those bottom shadows a bit more by dragging the
brush from left to right. Taking the brush, taking
some wonderful red and some yellow to create
wonderful ground color. It still has some blue and some white from the
previous layers. This is how you integrate
colors into each other. Let's create this
wonderful horizon line just below the middle
section of the Canvas. Just go from left to right. Press quite hard in order
to blend those colors and create some wonderful
streaks of paints. Now, let's add some white because you don't
want to go too dark, way too fast to create
so much contrast. We need to keep
everything very light. Now with this white and some yellow on the darker
orange color, Let's create a highlight. Can start to see. It also feels like a
wonderful highlights. Let's grab some more color
and place it right on top at the intersection of the trees
with the ground going from left to right with the
corner of the brush. Let's make sense
some more highlight and make it a tiny
bit more yellow and drag another beautiful line over the first layer of paint. And there you go with
this step as well. This was a very easy
and simple one. By not cleaning the brush, you've integrated the sky
colors into the shadows as well as the ground
where the trees stay. You can start to
see how organic it feels and looks to
paint like this, you've also created a very
beautiful horizontal line to contrast with the
beautiful vertical trees. Now let's go into the next step.
5. Houses in the distance: In this one, you will be
using the round brush to create some wonderful
highlights on the ground. You will also create two beautiful houses
in the distance. Now, let's go into this step. You can start to see
the horizon line. It's a little bit angled so
we need to make it straight. Let's take some water
and a little bit of this paint and
make the distance a little bit more integrated
with a wash of this green. Preparing also the canvas in order to have some
water and some paint. So they play with
each other and create some wonderful waves at the bottom and
textures at the top, blending a little bit
more of these colors. And on the left, let's add some darker tones with some red and some yellow. It's beautiful. Orange. Let's add a roof just
over here in the middle. What a line and make it trapeze and blend it a little bit so it goes into the background
a tiny bit more. Let's take a highlight and
make a wall right beneath it. Just like this. Making a wonderful wall, just the beautiful
square rectangle. And taking some more of
that roof color and cutting this roof once again and on the right, making
another roof. And the small
chimney at the top, just a beautiful small line. The house needs a tiny bit
more highlight onto the wall, and the house on the right
needs this wall as well. Now for the roof, let's make it a little bit more angled and a tiny bit higher. Let's make another
beautiful house in the distance right over here. This one is a little
bit more blurred. And with this highlight
color from the walls, we can put it on the shore. And since the horizon line is a little bit
lower onto the left, Let's go higher and create a straighter line for
the horizon line. And now let's add a
little bit more color onto the ground with
this highlights. And there you go with
this step as well. By using a few light colors, you've integrated much more the ground with the
sky and the trees, also with some geometric forms. You've created some simple
houses in the distance. Now, let's go into
the next step.
6. Foreground boulders: Now for some wonderful rocks, Let's play with paint and understand how to
create them with the round brush and some
yellow as well as a tiny bit of red creating
this light, pastel yellow. Now, with this orange, we will create a beautiful
L that has a longer bottom, taking some white and creating
a wonderful highlights. And with this new
pastel light closing in the shape on top of the
L with angular motions. And as you go towards
the shadow part, you can turn the
brush and rotate it right where the shadow meets the highlight in order to create some beautiful textures and blend the two beautiful colors. Let's make a green. And just to add some
beautiful color variety, Let's add some green, right, where the shadow and the
highlight meet and make a few more rocks
very loose and fast. You can also take
the highlight and cut into the rock once again, as well as going on
to the other rocks, creating more and creating another beautiful rock
onto the bottom side. Let's have some shadow for it. Can start to see how
easy it is once you know the shape and let the brush rotate a little bit to create some beautiful
textures and angles. Let's take some more of this red and make a deeper shadow. And go and angle those
wonderful shadows onto the left hand bottom side of
the rocks, going even wider. Widths some highlights
and touching the rocks here and there to create more textures
and highlights. When creating rocks,
It's important to think of the
brush as a knife. You are cutting shapes in order to create sides of the rocks. Use an L-shaped
that is broken in order to create a nest
for the highlight. And as soon as you
touch that shadow, you can blend the
two colors together, creating nice and
beautiful mid-tone. Remember to focus on
angles and edges to create beautiful
faces for the rocks. You should also add some greens on top of the oranges in order to create some beautiful
harmony and color dynamics. And that's all you need to create some wonderful boulders. It's time for some
beautiful vibrant oranges. These will contrast so well with the background and the sky. And it will contrast with the foliage of the tree as well, because orange and green
are complimentary colors. Now, let's go into this
step with a clean, fresh plate, some white as well as some
blue on the mixing plate. Let's grab the round
brush, some water, mix, some white and a
tiny bit of blue, just to have a color
underneath everything. This is because the
painting is completely dry, so it needs a little bit of
a color of the sky just to contrast and make those
oranges more integrated. Let's grab this white
and spread it around. This is a good time
to blend the ground and make it more
horizontal as well, okay. And covering the bottom
side of the canvas, putting down the brush
and adding some yellow to the mixing plate
onto the right side. Going and adding some
red right next to it. With the brush having some white and some blue still on it. You can add some yellow
right over here. And some reds slowly
add yellow and red until you have this
wonderful creamy yellow. Look at how beautiful
this pastel yellow looks. Very light and color. And start with a big, beautiful Boulder
right over here. Look at how wonderful it
contrasts because of the blue in the background and going down and creating
some more textures. And going towards the corner, adding another bolder
just over here, right on the right side, as well as going onto the left and creating
a bigger shape, curving towards the left and right below
the horizon line. Taking some reds and
some white in order to create a more orangey
pastel color. And focusing on separating
some of those stones into smaller sections with
that beautiful sea or L shape, making a lighter
version of this yellow, orange and adding some
more stones below the shadows can also
add this highlights, since it's a little bit
different on the top as well. Now let's clean the
brush on the canvas on the left-hand side
and add a little bit more white to it in order to add another
highlight onto the top right where the
ground meets the stone. Focusing on the angles
going down towards the bottom of the
canvas and creating some more sides and highlights. Working from light to dark. This time, since it will create much more
interesting textures. Now going a little bit
more red and increasing the area of these stones towards the bottom
side of the canvas. Okay, taking some red and some yellow to make
it more orange, a more saturated orange. And let's focus on making these angles for the shadows
on each individual Stone. Think of them as round,
angular boulders. And another one right over here. And one on the left, rotate a little bit the brush to create some
interesting textures, right where the highlight
meets this new Middletown. Rounded, just like this, to create more
chaotic brush marks, just so they don't
seem like just angles taking some more reds and
mixing in some yellow, as well as a tiny
bit of blue just to make a darker brown. Taking some more red and
some more yellow and adding it just below the orange
you've just added. Don't worry if it's
too contrasty. You will blend it a bit more
with some lighter tones. And focusing on the intersection
in-between the stones, trying to find some small
lines just above them. And creating new
stones by focusing on that L shape and creating that nest for the
wonderful highlights. Now going on the Middle Stone and don't forget about the
corner and the right side. Going even closer because
the paint is still wet, it will pick up some of the color and it
will become lighter. Now let's take some water
and thin the paint. Let's clean a little
bit the brush. You can add this watery
shadow color, right, where it meets with the orange
and with the highlights, just so it blends
a little bit more. Don't go overboard. Just a tiny bit in order to
define that C or l line. Taking some blue and
mixing it in with this watery color to create
a beautiful green just to add some more color
variety right on the middle side of the stones as well as on the right
side of the stones, can start to see how
just a tiny bit of this new color
brings them to life. A little bit more blue
over this watery part and adding and focusing
on the bottom side edge. And there you go with this step. A lot of people when painting, they over-complicate things, but they don't need to be complicated in
order to look good with just a few brush marks and a little bit of technique. You can make beautiful style. And it has that painterly
feel because you've rotated the brush and
the paint was still wet. So those layers were
integrating with each other, creating beautiful and
luscious textures. Now, let's go into
the next step.
7. Highlights on boulders: Just to make the stones a
little bit more interesting, you will add some new highlights with a thicker layer of paint. Now let's go into this step. In order to have beautiful, crisp and vibrant colors, you need to clean
up the brush with some paper towels
and some water. Clean it very well. Take some white, find a
good nice area to mix them. Colors, grab some yellow, just a tiny amount of yellow, and the small, small
amount of blue. Once you've mixed
that color well, you can start to focus on
the top side of the stones. You can start to see
how light this color is and start integrating and cutting some of
these highlights. Remember to leave
the middle tones as well as the
shadows quite intact. Let's add another stone
in-between those two ones. And focus on the
beautiful sides, the right side of the boulders, taking some more
color and looking for some spaces where you can
make some smaller stones. Now another trick is to
roll the brush a little bit over the middle tones just to create more
interesting textures, as well as integrate
this color even more, creating a nicer transition. It can also drag the
brush a little bit over the paint just to make it more interesting and adding
some more highlights over the top, just like that. Taking some reds and
some white and mixing this beautiful pink just to add some more color
variety to the Stones. Perfect. And there you go with this wonderful
step as well.
8. Layer of foliage: But when painting, a lot of people struggle with
making organic textures, but of course, it doesn't
need to be that way. And in this exercise, you will learn how to make the best textures with the round brush and
acrylic paints. You'll also learn
about positioning and the layering of the highlights
on top of the shadows. Now let's go into the
exercise, of course, with the round beautiful
brush taking some yellow and some blue to make
a wonderful green, to cut the screen and
make it much more dark, we need to put some more
yellow and some more red into it just to make it darker
and more interesting. A very dark shadow color. And with the tip of the brush perpendicular
to the Canvas. Let's press down and make
some wonderful foliage. You can rotate the
brush in order to create different textures. Now, taking some
yellow and making a wonderful highlight color, this doesn't need to be perfect. And on the right side of this
side that has been created, let's put some highlights. You can start to
see how the colors mingled together in order to
create wonderful textures. Grabbing some more highlight and another beautiful tip you
can see right over here is that you have two zones
of highlights and shadows. Those mark two
different zones of the three and they create much
more interesting separation. Let's make them
more light version of this highlight in order to make even more
separation between the shadows and highlights. Remember the highlights
are not always on the edge. On the right. They also go a little
bit into the middle and they expand
towards the right. You can start to see on
the right side how dark those beautiful shadows are and how colorful
the midtones are, and how much they play
with the final highlights. Remember to put some water
onto the canvas board to use it for other exercises. There you go with this exercise. In this exercise you've
learned how to play with the round brush first
by making some shadows. When making these shadows, you need to avoid
making round shapes. You break down that roundness
by going a little bit to the side and creating
another pocket of leaves. And as you go towards the edge, the edge needs to
be very intricate. The more intricate, the
more beautiful it is. You need to also
keep this in mind for the mid tones
and the highlights. Also when creating those
shadows and mid tones, you need to tone it
down and don't put a lot of paint onto the canvas. And remember not to cover the whole area with the
shadow and the mid tone. You still need some spots for the highlights and you also
need some holes for the birds to fly through in regards to making organic textures is to work a little bit faster and have all the paint's still wet. Don't be afraid of wet paint. The trick is to only work
in the areas you want to change and keeps some of the
previous layers untouched. And that's all you need to know to make beautiful foliage. As you've seen
with the exercise, foliage is very simple. Now you will play with
some dark foliage, not only for the three, but also for some bushes. These are very easy things
to do with our round brush. Remember, you will need to leave space for the middle
tones and the highlights, so don't put too many shadows. Let's go into the step. Let's rotate this
wonderful plate. Let's grab the round
brush and clean it up. Grabbing some red and
some wonderful yellow, maybe a little bit more
yellow and some blue to create this great
shadowy green color, mixing in some more red
and some more yellow, just to make it quite dark. Now some blue to
make it more green. Whoops, too much reds. Let's add some more blue. It's okay because it will
create a dark, beautiful green. Now, let's go over here
on the right side of this folder and create some pushes, small
little textures. Now it's time to
focus on that edge. Just a little bit. Four or five touches. You've created a wonderful bush. Now right in-between
these two stones, you can create another one. Just over here. Now on the right, a smaller, wonderful patch of grass, a little bit higher, even though they
are not connected. Once the highlight and the
middle tone will be put there, it will look integrated. And going higher. Just a tiny bit. You can start to see the
inner side of the bush creates a very defined
contour against the stones. Now, let's go higher
and make another Bush just over here and lower. Making a wonderful patch. Maybe it's two clumped
up, but it's fine. That's why it's good to always leave some space for the birds. Let's cover this part a
bit more to connect it. Taking some more color and
focusing on the top side. And right in the middle
over here on the left side, creating a beautiful
interesting shape. You can see it's not round. It has many, many interesting edges going towards the right and making another
clump just right here. And crossing the middle
of the canvas just onto the right and making
another clump of leaves. These clumps don't need
to be very complicated. You can make them as
fast as you want. And taking some blue and some red and some yellow just
to make more color. And above just in the middle, making another area of foliage. You can start to see
how distant they are. This is because
you need space for the highlights and
the middle towns. And the hiring gets. You can add some more blue, some more yellow and make
this color once again, just to make it a tiny bit
darker onto the left side. Dabbing some more of
this wonderful color, playing around with the
brush to find another space. And once you found it, you can go fast and loose on the top corner,
creating some textures. Making a tiny bit more with the blue and the red
and some yellow. Okay? And going and adding
more color to this left side. Now it's time to
focus a little bit on the edges and make
them more varied. You can start to see how
separated it looks right now, but it will look very
close together by the end, since you have two
more layers of paint, add, the areas will increase. And there you go with
this step as well. Sometimes going faster is
better because it allows you to bypass the thinking mind and it lets you create some
organic texture. It's a wonderful
balance between having a few rules and going fast. In order to not think too much, you can start to see how
fun painting can be if you let go and embrace a
little bit of the chaos. Now let's go into the next step.
9. Placing the branches: In this exercise, you
will practice how to make some branches with the
beautiful round brush. This exercise focuses
on how to make small and thin lines
with a round brush. And now let's go
into the exercise. We have some colors over here, red, blue, yellow, and white. And with some water
on the round brush, Let's make a beautiful brown. It doesn't matter exactly
what color you use. Just making some quick
brown with some red, some blue and some yellow. And then with the
beautiful brush, you can go and make a line, rotate the brush just a tiny bit in order to create
this wonderful branch. Okay, now, going
on to the left and making another
branch on the left, it's very important
when creating branches to not divide them
at the same point. You can divide them
a little bit higher so they don't look like forks with each beautiful stroke trying to make them quite thin. And as they go down, they need to be thicker and
don't make them all round. Try to make them quite
angular as well. It's always beautiful to
have a beautiful mix between the round and straight branches. Let's mix up some highlights. And on the right side, just as you did
for the branches, you need to create a highlight. And of course with
this highlight, you will also create
some branches, maybe the light hits
them just a tiny bit. You can also change
the color in order to create a beautiful
warmer highlights. And as you can see, this is one of the tips. Whenever using the round brush, you can put it on
the plate and make a wonderful thinner tip in order to cut some beautiful highlights or branches wherever you want. Let's put some water on this. And after you've covered
all the canvas with water, Let's scrape it down with
the wonderful paper towels. Cleaning up the brush. And there you go with
this wonderful exercise. So when it comes to branches, you need a variety between
straight and curvy one. Not only that, but
you need to make sure whenever you
are taking paint, you also keep in mind to make a beautiful
tip on the brush. And also whenever
you divide them, try to not make a fork. Those are all the tips you need to make wonderful branches, like in the exercise now it's
time to make some branches. And the three, you first made the shadow
parts of the foliage in order to have the branches create this wonderful effect. Where do they seem like they
are in-between the layers? And now let's go and create
those wonderful branches. Grabbing the round
brush, straight up, grabbing some red and
some yellow to create a wonderful brown,
orangey color. Taking some water, making
it a tiny bit more blue, creating a dark brown. If it has more red
and more yellow, then it becomes a brown
instead of a green. Right above this wonderful bush, you can start to
lay in the tree. This can be a bit thicker. And on the right
side you can start to divide it into two branches, going higher and wiggling a little bit of the brush
and making a smaller, thinner branch just
going into the back, going and making a
straight branch onto the right side and going
longer with the first one. Now getting higher over this
shadow foliage and below it, just so it seems like it
passes through the foliage. Focusing on those
beautiful connections and going higher
with thinner lines. The higher you go, the
thinner are the lines. Now let's go in the
middle and try to connect the right side of the tree
with some wonderful branches. Don't go overboard, don't
create too many branches. Just a few. We'll indicate the
tree and making sure that it connects to the
bushes as well as the stones. Now let's divide this
branch a little bit more over here and
create another one, chest onto the right of it. Trying to connect the left
side as well to the three, making it a bit thicker. And dividing this
branch as well, just once or twice is enough to create a
beautiful branch. And let's dance a
little bit and find another spot for a
wonderful branch, maybe just over this foliage and connect it to the bigger
branch and higher. Just getting what another
branch in the middle. Don't worry, you can cover
some of the mistakes with the middle tones
and the highlights. There you go with
this step as well.
10. Second layer of foliage: What a fun step this will be. You will use the
round brush to create some beautiful and
colorful foliage. You will focus on those
middle tones and highlights to create great
looking textures, remember to rotate
the brush so it creates different looking dabs. Also, since the light
comes from the right side, of course the
highlights will be on the top right side
of the foliage. Now let's go into the step. Let's grab some paper
towels and clean the brush of this brown. Clean it very well. And then with some
yellow and some blue, creating a beautiful green. Taking some more yellow and
mixing it very well together, grab a tiny bit of reds, put it on the side,
and if you need, you can put in more until
it changes the green. So it's not so neon. Since this will be
the middle tone. Grab some water and start on the bushes right over here
to make some textures. On the right side look at how beautiful and vibrant
this color is already. It can also go over the
shadows a little bit. Okay. Going up and creating
some more dabs of paint, some more areas of
this Middletown. You can start to notice
how much separation it builds width the lake
and the background. Now going in the
middle and creating a few patches of this
wonderful Bush Color. And over the tree, just over here making
the bush bit more big. Taking some more
yellow or more blue, creating the same exact color. Maybe a little bit of red, just to cut that
intensity of the color. And going over the three. Now you can start
to see how it looks like the branches are going
in between the layers. Going higher and
going faster, Frank, to keep those spaces still open for the
birds to fly through. And on the right side, just going on the top right now. And on the right side, right near the edge. Just dabbing some of this color, grabbing some yellow
and mixing it in over this color and width, a tiny bit of red. Just a tiny bit. And you can start to see some wonderful new orange,
yellow highlights. Fair yellow with a touch of red just to cut that intensity out. And focusing a little bit
more on the brush marks, just barely touching and
using the brush to create some small dots here and
there on the bushes. Taking some more water and
some more paint and going up. You've taking the
water just so it blends a bit more with
the middle tones. Taking some more
yellow and going and adding this color over
the top of the middle tones. As you can see, the tree
starts to develop and it has less and less space empty. Now going on the top
and dabbing some of this color on the side of
the middle tone areas. Now going with some white
and a tiny bit of blue, mixing it in with this yellow to create an even
lighter highlight. And of course, even higher
on the areas of the tree. You can go with this color. Let's make another
beautiful Bush just over here on the left. Add this highlight on the bushes right next
to the tree as well. And there you go with this step. See how fun it is
to just let go and paint with a few simple rules to guide you in order to create wonderful foliate by playing with some vibrant
greens and yellows, you've created a beautiful
contrast between the sky and the
beautiful boulders. And you've separated
the foreground from the background even more by using a bigger
contrast between the dark parts of the
foliage and the highlights. Now let's go into
the final step.
11. Highlights for the tree : Can you believe that
this is the last step? Look how easy and
fun it was to create this wonderful painting
with just a few highlights on the trees you will
be finished and have a beautiful artwork to
hang or give as a gift. Now let's go into the step, grabbing the round
brush and cleaning it off with some paper towels. Taking some yellow and some red, making a beautiful orange and making it lighter
with some white, mixing it very well together. And on the right side
of the branches. And the three, you can make
a beautiful highlight. This is very easy. Just think of the highlight
as a smaller branch. Always remember to put
the tip of the brush on the plate to create
a wonderful side. You can also create
some lighter branches. These will look so
good and make the tree look more interesting. Okay? And going over here and making
another beautiful branch, as well as a highlight going higher and making
another branch just on the right and trying to make a thin highlights onto
the other branches. And wherever you see a space, you can add another
beautiful branch and extend the ones
you already have. Like for instance, on
this side, on the left, just going higher into the
foliage and in the middle, just slowly inching and
making them longer. Covering a little bit more of
the right side of the tree. You can add this color to
the stones a little bit more just to integrate some of this color back into the stones. And there you go.
You've done it. You've finished another
beautiful painting. You've learned so
much about letting go and having fun with painting. Thank you for being
part of this community. And if you are gracious enough, you can leave a review. See you in the next class.
 George-Daniel Tudorache, Together we will create amazing things.