Transcripts
1. Introduction : Hello everybody. I'm Sara Shuhdy. I am 40 years old. I have been knitting since
I was nine years old. Just from watching my mom, who's almost knit all the time. Till I finished my first sweater. Of course, it was the
sweater of my doll since this time, I
Was playing with Yarn until I
finished my college.by the way I'm a pharmacist. But my passion for knitting,
crocheting, and sewing. Increased more and more through
the days that made me improve my skills in each that allows me to teach
crocheting ,Knitting and sewing to my students. And upgrade their levels
some of them now are experts I'm happy to be here with you in Skillshare to share
my experience. In this class, we
will take a look at circular knitting,
As circular knitting. Is a wonderful step in
Your knitting journey. By learning circular Knitting
you will upgrade you're level. And by the end of this class, you will be able to
confidently knit in round. we'll not get to shaping or
complex patterns, just basics of circular knitting . This class is great
for students who know how to knit and purl and are familiar with basic
stitch pattern repeats. You will find the pattern and more in your class material. I'm so excited to
see what you make. Don't forget to
Share your photos. And of course you can
ask me any questions along away. In this class. You will learn how to cast on and join
in different ways, the magic loop method, switching in around
reading the chart. So let's get started.
2. Tips to Get Started: Hello again. During this class,
I will learn all of the skills needed
to make a project. I recommend watching lessons in order throughout the class, I will be working on knitting samples as well as
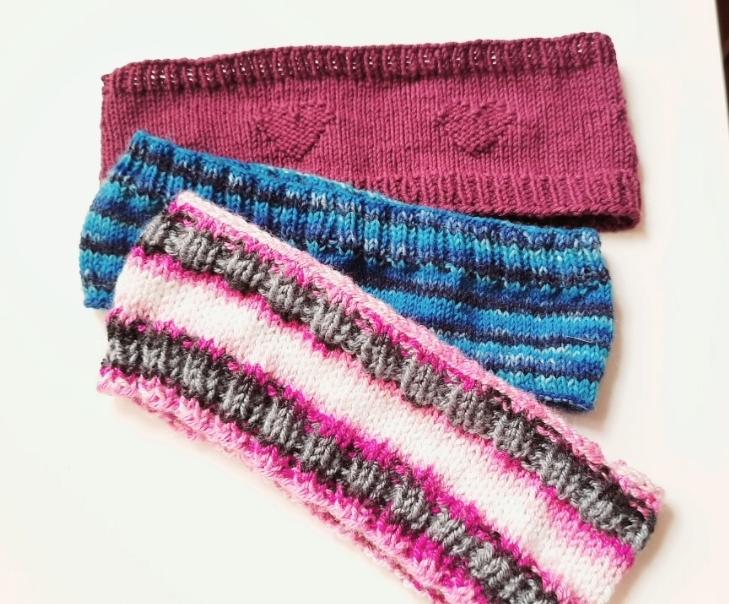
in the headband, which has the pattern in the class material I recommend to first start with bulk yarn as it is thicker
and easier to manage. Also, in a bulky yarn as a fewer stitches
that can be finished quickly. I recommend to practice .
Each technique first, then choose the one which
is comfortable to you, then start working your headband. It is super easy project that can be finished in one day. And you may wear it soon
after you finish it.
3. Long Tail Cast On: In this lesson, I will show you how to customize.
Took us two on. You can use any custom method you're comfortable with here, I will use the
longer tail method. It is probably the most common
costs to on that's used. It is easy, quick, and give a neat cost on each
in longer tail costume, gonna start with a longer tail. But be sure that the length of this tail is long enough to accommodate the number of
stitches you are gonna gusto to be sure
what lens you need, just make this system. This is the beginning
of the yarn. Great. Make ten yarn overs. Now, this is a length
of ten stitches. If you want 50 stitches, you want five times this lens goal that you
want to any stitches. I make a slipknot. In longer tail, you
have two strands. One is the longer tail and the
other is the working yarn, which is coming from
the ball of yarn. Grab these two strands and the whole do with the
bottom three fingers. Take your thumb, finger, index finger, and place it between the two
strands of yarn. You are going to separate
those two fingers like so. Then flip your hands. Now. You have the needle in the center between
the two strands. The two strands are
forming a V-shape. To make your first stitch, you have the outside, the strand coming from
your thumb finger in the inside trend of
your index finger. And now you are
going to start by coming from outside,
from underneath. Scoop up that strength
of yarn on your phone. So now you are going to go over and around the strength
of your index finger, over and around, come
up from underneath. And that strength
through the loop. Now, you are gonna drop
that loop of your thumb and then use your sum
to pull the slack out of the urn and
tighten it on the needle. Now, you will find
that your thumb in the correct position
for the next stitch. I will make one more for you. Go underneath this
trend of fewer, some finger to make a loop. This loop, then go
over and around this trend from the index
finger, then drop off. They are then tighten. Now you can see that
my stitches are free. Moving. Very easy. And this is the correct
amount of tension you want to have when you are
doing a long tail costume. So tension can really be an issue when you are costing
going to work in their own. If your cost is too tight, like here, it's two times. The first stitch here
is to start may have difficulty not only sliding the stitches on the
needle Tips itself, but when you are trying to slide stitches from the cable
up to the needle, here, as you see here. And also just on age may
not be elastic enough. When in the next lesson, I will show you two
different methods to join in the room. So see you in the next lesson.
4. Options To Join In The Round : In this lesson, I will show
you two different options. First option I'm going to show you is called regular join. To join, to work in their own. So here after we complete our number of stitches
in The Long Tail method, as you can see here. It is moved three. Now, we want the first
Acosta and stitch to the lowest cost onstage to
work in round before joining. Be sure that your stitches not twisted by laying your
needle on the table. And be sure that these little
bumps of the stitches are all in the same direction
and not twisted like that. Okay. So you're all in
the same direction. And now we're going to join our first cast on stitch to
the Lost Cause to stitch. It is very simple and easy. This is the first stitch. Great. Here you may use this as a marker for the
beginning of the round, or you may use as stitch marker. Now you can work
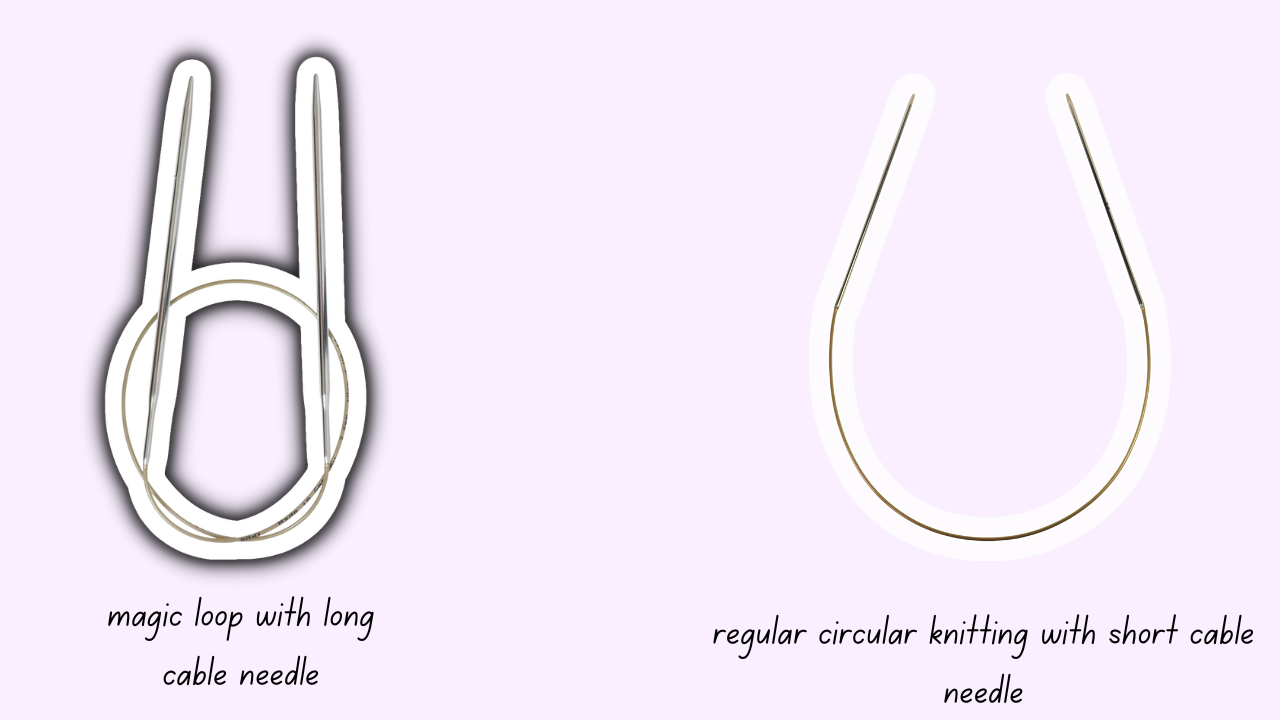
as in your pattern if it is knit stitch or listed in our project in this class, the head band, you may have their short cable circular need. And you may work as
this sample like that. If you don't have that
short cable needle, then it only cable needle. So you can't configure
your stitches like that. We will use another technique which is called
magic loop method. Okay, next lesson, we will
learn how to magic loop. The second, miss it
I'm going to show you is called swabbing the
first and last stitch. Here I have all my stitches. Costume Tomorrow is
circular needle. Now again, you are
going to make sure that your cost on
edge is not twisted. To swap the first
and last stitch you are going to
become your needle. And with your yard right needle, you are going to slip. The first stitch from
your left needle. Boo was like so. And then you are going to
backup the stitch underneath it and you are going to slip
it over that top stitch. But don't drop it
off the needle. And also be careful to not drop the stitch
that you are sleeping. Go over and it looks like this. Bird wise. Then the exists. Okay. So now you are going
to bless you are beginning. I want to stitch marker
and you are going to place it on your
right-hand needed. And now you are ready to start your first stitch
and start knitting. See you in the next lesson.
5. The Magical Magic Loop for Knitting in The Round: How to cost to own for
the magic loop method. So remember we are
gonna start with one extra long circular need
that's 32 inch or longer. So again, you are
going to cost to own all of your stitches. And then you are going to move those stitches the
center of the cable. Now you want your stitches
to be divided in half. So you will divide by two. So for this example, I have 14 stitches costume. So I'm going to
count seven here. And that's my halfway
work right there. So what I'm gonna do is
bend my cable like so. And current the severity, the two stitches of the two-halves and
pull the cable out. Now, this is your first loop for the magic loop
terms lightning moist stitches up onto the
adjacent needle tips like so. So now you have your two needles held parallel to each
other facing the right. And you're working, yarn is going to be on
the needle that is far from you or on top here. So before you pull your needle, you are going to position, you're working yarn according to what the first
stitch is going to be. So for my first stitch, it is going to be next stitch. So I am going to
go ahead and drag that over the top needle and
just kind of late in back. Now, if your first stitch
was burned stitch, you would just let that churn the angle in-between
the two needles and then also want to make sure that your cost on inch is not
twisted around dirty needles. So the little bumps from your
costume on each should line up on both needles on
the bottom. Like so. So now you are going to pull the needle out from
under the stitches. So I kind of hold onto those stitches
with my fingers so that cost on doesn't
get twisted around. And you are gonna
pull that needle out, but maintain your loop
on the left hand side. Now, you need to pull it out far enough so you can turn this the
needle back around. Because now you are
gonna use this needle to work across the first
all of your stitches. So I have got my needle
pulled out and I'm just going ahead and delete
my first stitch like so. Now give you the
working yarn a little. There. Go ahead and do work across the first half of my stitches. Once my first half is completed, you can go ahead and
drop the needle in your left hand and you
are going to rotate your work counter
clockwise, like so. So once again, the needle with you're working
yarn should be on top. And then you are going to go
ahead and pull the cable. Because you want to
slide the second half of your stitches back up onto
the needle tip. Like so. So you are gonna work is the second half the same way you work at
their first home, where you get your working
yarn in position if you are going in it and lay it across
the back and the walls, the needle out again. And now we're ready to start working the second
half of your stitches. So once you have completed your last stitch of
the second half, now you have completed
a full round. The way that can tell is
that your tail is now at the top of the needle
and that signals that you are at the beginning
of a new round. So to turn your work to
start the second row and distort the same way you
did with the second half. Slide your stitches. Here. On the needle position, you're working yarn to the back, then moves the needle
and then knit. The first. Here is the tail, so the second row
also is and so on. To have your tube here. This is your two. And so if the first
stitch is burden stitch, don't lay your yarn. Let it hang between
the two needles. And then put it
over your needle. And Berlioz and so on. Now when you are doing
the magic loop method, just to make sure and
watch your tension. Make sure you are
not pulling too tight on that working yarn. Or it is gonna be really
difficult to slide your stitches back from the cable
onto the needle Tips. And now, after you know the magic loop method
on long cable, circular needle and don't
short cable needle. Now you can begin your browser. Rectus the two methods
and choose what you are comfortable with and
which one will you choose? Okay, see you in the next class. Thank you.
6. Reading Charts in The Round : Now you are well equipped
for circular knitting. And no matter which
needed set who are using. In this lesson, we will
look at the chart and what to do when you stitch better
Nebraska cross or need. So when you net circularly, stuxnet stitch is
a breeze because you are just working
stitches every round. But what happens
with the statue? But now with the statue buttons, you may see patterns written out as row by row or round
by round instruction. But you also may see
them listed as a char. In circular knitting. Using the chart is much simpler than chart
for flattening. On circular knitting. Again, you are already
working right side routes, so you are always reading the chart from the same
direction for each row. That is right to left. So every row you work with be working
right to left, butt. With flat knitting, you
are basically going to be working right to left
on the right side rows. But then when you do wrong side, it is a little
trickier because you are going to be working
from left to right. Not only that, but you will also have to reverse
your stitches. Which means if you see
that the stitch or wrong, sorry, draws, you are
actually going to burn. And if you see an early stage, you are actually
going to be netting and you kind of have to work all that out in your head as you are working
with circular knitting. That's not an issue. That's why it is so much easier to work with the
charts in circular knitting. So now let's look
at our chart again. In a circular
knitting, the char, each row corresponds to written out through in
your stitch vector. Square corresponds to stitch. Now here you will see it key. And that just gives you a guide to what the
different symbols mean. An empty square like
so is an edge stitch and a little.in the middle
is at burly stitch. Whenever you have a new round, you are going to go
up on the chart. Also. You can tell on this chart
that this button has porch. And then for round
in one repeats, if you are working
with a stitcher vector that has a repeat and working
on a major clue method, you may want to divide
the stitches so that the repeat is not broken
over there. Magic loop. Example. If you have 66 stitches and sex, if you divide 66 by two, so you will have 33 stitches for each side of the reader
that would break the pattern. So in this case, you would divide your
stitches at 30 plus 36 so that you can keep your stitches so that you wanted to
break your butter. And now, stay tuned
for the next lesson.
7. Swatching for Knitting in The Round : An important thing to do
anytime when you are knitting, whether you are knitting
D-flat or circular, is to create a gauge
swatch gets refuse to the number of
stitches and rows there centimeter or where inch
using certain signs of yarn and certain size of needle gauge can vary
from person to person. So two letters using
the same yarn, the same needle size is get
different gauge measurements. But gauge can really make or
break your finished garment. And it is the only real way to estimate what the final
measurement of your garment. Now I know as an editor, it is tempting to cost just to start
knitting or bruising, but swatching really based off. So why can't we just
make a flat switch? But when we are knitting, stocking net stitch circularly, remember, we are
knitting every RAM, but if you were knitting, stocking it in fled, we would be knitting on the right side and burning
on the wrong side, toe. For most letters, your net and burn good tend to be
a little different. So when you are
working in their own, your tension will
be different too, because of the way you are moving your stitches
around the needle. So overall you're stuck
in a ditch gauge, be really slightly different
when working circular. So I have here two stock in it, watch, one down flat and
one bond circularly. They are both working
over the same number of stitches with the same yarn
on the same size needed, the stocky net,
swatch done, fled. The stitches are a little bit larger and looser than
one dawn circularly. But let me show you
the final measurement. My swatches down in the round
is about mine, about 9 cm, and the flat one about 10 cm, even though it is the same
yard and the same size needed. So that's why it is important to make a circular swatch
if you are working on. So let me show you
how to switch around. Here. Before
switching, I want to clear that I start my swatch. Any number of stitches plus six stitches over three for the starting and
three for the ending. And store two is three and ending with
three garter stitch. Also. The first three stitches, inverter and the lost
three stitches or in Garter stitch here to have this stuck in
it looks stitches. I do all my stitches in the
round in knitting stitch. To have a garter
stitch in round, you have to burn your stitches. These three rounds
are in Berlin stitch. Stitch. And these three
stitches are bird. And these three
stitches are awesome. Okay, now you can
measure your stitches or your gauge clearly at any
point in your swatch. If you forget to do your
garter stitch edges, you have to measure
your gauge from the center of your
swatch, not on edges. And now, let me show you
how to swatch in route.
8. To Swatch Circularly but in Flat: This method is called
the cheater swatch. Here we work in getting around, but it also similar
to working deflate. So here I have a swatch
that I have started. If you work in a
specific pattern, choose to work two or three
beats of the stitch pattern. So when I get the end of my row, I'm going to go ahead
and slide my swatch back to the other of the needle. So now we need to get our working yarn back to that front side of the needle again in order to start working. The next true. The way to do that is we just strand that yarn across
the back of our routes. Now, you need to make sure
that your strength is a little bit longer than what the final measurement of
viewers towards is gonna be. As wise, it is going to boil the edges and when
you go to measure it, so you are going to strained or floats your yarn
across the backside. And now you are ready to start. The neck is true. So this is the tricky part that you have to kind of hold that flew through that lens while
you make the first like so. And so that tRNA is gonna
be a little bit loose. When you go to the
end of that row, you are again going to slide your work back to the
other side of your knee. And then you can go ahead and
work across the next row. You just need to tug
on it like that. Float they honor across the back and continuing on
working that way. After you have finished
DOTs and bound off. This is what it looks like. So this is the front part
that you are gonna measure. And in the back far, as you can see, has all of these really
crazy looking good floats that run across this epoch. But you are also two nets like you're knitting deflect
without having to do magic loop method
and distill be letting your
right-side rules only. Which suits save you some time. Of course, there is another
method to do this watch, but this is the simplest way for you as a beginner
in circular knitting. So when you measure our
two or four inch section, just make sure it is close to that center as possible
cause your edges are probably gonna be
a lateral of gauge because of those strands
that run across the back. So making this watch, I know that it is a step
that's quite often skipped, but it is really important to have a successful
finished the garment. We do swatches to
determine our gauge, but also to preview
our stitches in our stitch pattern to make sure that our yarn is a good Fred, especially if we substituting
yarn in our button. Before measuring,
you need to make a quick plot by
either submerging in water or spraying it with
a water sprayer than dry the swatch by bracing it flat between two
layers of a towel. Now, don't hang this watch out or it might stretch
and be careful handling the edges so they
don't come on revealed after the Swatch has dried through the lay it
on a flat surface, and then your swatch will
be ready to measure. So once you have made
your circulares, watch and done the quick block, you want to measure and
determine the gauge or stitches per inch of
your stitch pattern. And now, after watching
the little calculation, so we will learn in the next
lesson how to calculate the number of stitches that
I need to start my brush.
9. The Only Math You Need : Hello again. In this lesson, we will talk about little tips
for measuring gages teach and how to calculate the number of stitches you
need to start your head band. Let's get started. So after blocking your swatch, when you are going to
measure your stage, it's the same as
infinite swatch. So be sure to count the V shapes when you
count that stitches. And now you get that
gauge in 10 cm or 4 ". You need now to measure
your head circumference. Measure your head like in
the sample of my doll. And now, let's get
started to calculate the number of stitches you
need to start your head band. As an example, if we say that
your head circumference is 55 cm and you stitch
gauge is in 1 cm. You have three stitches. So simply write your
numbers in this form. 1 cm with three stitches. So 55 cm contain
how many stitches? And do this simple equation, three times 55/1
equal 165 stitches. This is the number of
stitches you need to cast on to start
your head back with me in the next lesson to tell you tips for working
your head band.
10. Tips for Working The Headband: Hello everybody. In this lesson, I will tell
you some general tips to do. Your head band. First of all, your
urine position, size of needle tonight,
this headband, buttons and the styles you
choose to net your head band. And finally, the
homework you have to do. So let's get started. This step may seem
a little obvious, but it happens to me still, even to this day, you're working yarn should
be on your right hand. Need at all times, you may put down
your work and then pick it up again and find
that my working yarn is now on my left-hand
needed when that this means that your work
has turn it inside out. So you just need to work
back to the other week. You are ready now to go. Again. Start with a small size needle. Make your red edge that
gives your elastic. Be sure that your
stitches are not twisted. Then change to
larger needle size to work is the body
of your head band. Then again back
to the small size needed to make the
other each rib. Also. You may choose to donate
your head band all and rape. Or you may play with
colors like so. In this headband, I started
with rice stitch edge, then shifted to the heart, the button which is in
the class material. For your homework, work your
symbol head band with hurts, to be familiar with
reading and shorts. And even if you don't like working from a chart
with flat knitting, go ahead and Detroit using
them for circular knitting. And now, share your work. Post photos for your project.
11. Our Circular Knitting Journey: Congratulations, you did it. If you are watching this video, it means you have gone ahead and finish it and learning about circular knitting and
shared your project photo for the student project
tab below remember, we have all trying
to get better at this. So do not be shy, I know this class has
a lot of skills to excercise. And if there is one
thing I hope you take from this class
is the magic loop. I'm sure that's your
level now has been upgraded. Thank you for joining
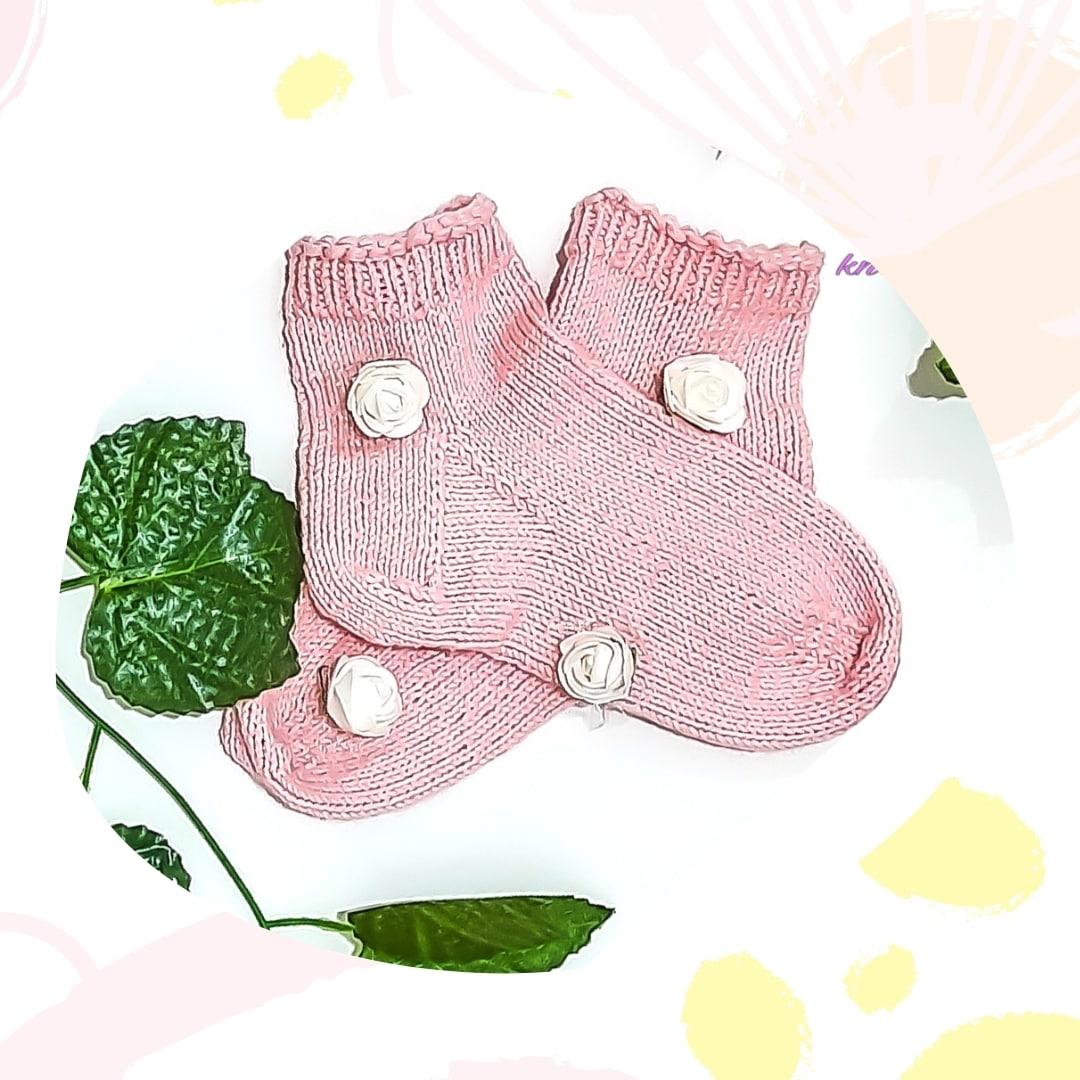
my class now you can enter the world of socks,gloves , cowls , hats and many other
and advanced projects. And I'm sure you'll
do the perfectly. Don't forget to
review this class. And if you liked this class, don't forget to
follow Me and now time to say Goodbye
.
 Sara Shuhdy, Where Yarn Meets Imagination