Color Changing Technique in Tapestry Crochet | Sara Shuhdy | Skillshare

Playback Speed


1.0x


  • 0.5x
  • 0.75x
  • 1x (Normal)
  • 1.25x
  • 1.5x
  • 1.75x
  • 2x

Color Changing Technique in Tapestry Crochet

teacher avatar Sara Shuhdy, Where Yarn Meets Imagination

Watch this class and thousands more

Get unlimited access to every class
Taught by industry leaders & working professionals
Topics include illustration, design, photography, and more

Watch this class and thousands more

Get unlimited access to every class
Taught by industry leaders & working professionals
Topics include illustration, design, photography, and more

Lessons in This Class

    • 1.

      Project Starter: Essential Tips & Tools

      7:40

    • 2.

      Color-Changing Mastery: Seamless Transitions

      6:11

    • 3.

      Gratitude and Showcasing Inspiring Projects

      1:41

  • --
  • Beginner level
  • Intermediate level
  • Advanced level
  • All levels

Community Generated

The level is determined by a majority opinion of students who have reviewed this class. The teacher's recommendation is shown until at least 5 student responses are collected.

192

Students

1

Projects

About This Class

 Tapestry crochet is the art of creating intricate and stunning designs with yarn. Join us on a remarkable journey into the world of tapestry crochet as we delve into this art. Whether you're a complete beginner or an experienced crocheter looking to enhance your skills, this comprehensive class is designed to take you from the easy fundamentals to the high levels of tapestry crochet mastery.

In this dynamic and interactive course, you will be with me. I am Sara Shuhdy who are passionate about tapestry crochet and dedicated to unlocking your creative potential. Through a series of hands-on projects, step-by-step demonstrations, and personalized guidance, you will develop a deep understanding of the techniques, tools, and principles that make tapestry crochet such a captivating art form.

Course Highlights:

* Introduction to Tapestry Crochet (Easy Level)

   - Discover many projects of tapestry crochet.

   - Learn about materials, yarn selection, and types of patterns

   - Master essential crochet stitches and techniques.

* Building Blocks of Tapestry Crochet (Intermediate level )

   - Explore the fundamentals of working with two colours.

   - Acquire skills in reading crochet charts and patterns.

   - Create geometric shapes and motifs using color-changing techniques.

* Advanced Tapestry Crochet Techniques (High Level)

   - Learn how to design and customize your tapestry crochet patterns.


* Finishing Touches and Embellishments

   - Discover various ways to finish your tapestry crochet projects professionally.


Whether you aspire to create intricate tapestry crochet garments, home decor items, or personalized gifts, this class will empower you with the knowledge, skills, and confidence to bring your imagination to life. Join our vibrant community of tapestry crochet enthusiasts and embark on an unforgettable journey of creativity and self-expression.

Note: This class is open to individuals of all skill levels, from beginners with basic crochet knowledge to experienced crocheters eager to expand their repertoire. 

Supplies and materials:

  • The best yarn for tapestry projects that its metrage in 100 gm weight is about 250 meters

And around this number 

You can crochet with one strand of the yarn using a stainless steel hook measured from 1.25mm to 1.4mm

Or you can choose to crochet with double strands using a stainless steel hook measured 2mm

  • Scissors, markers.
  • Piece of fabric cotton or satin and zipper.

Meet Your Teacher

Teacher Profile Image

Sara Shuhdy

Where Yarn Meets Imagination

Teacher

Hello Everybody, my name is Sara Shuhdy i am a pharmacist but my passion to knitting , crocheting and sewing is more than any thing in my life 

I have been knitting since I was 9 years old and now I am 40 years old ,these years built my experience and also I enrolled  in many classes some of them were official and others were online , all these experience allows me to teach knitting , crocheting and sewing to my students , some of them now are experts 

Here are some of my project that are the most close to my heart 


I like these socks so that I can not wear it ;)

My professional Amigurumi 

love it so so so much 

See full profile

Level: All Levels

Class Ratings

Expectations Met?
    Exceeded!
  • 0%
  • Yes
  • 0%
  • Somewhat
  • 0%
  • Not really
  • 0%

Why Join Skillshare?

Take award-winning Skillshare Original Classes

Each class has short lessons, hands-on projects

Your membership supports Skillshare teachers

Learn From Anywhere

Take classes on the go with the Skillshare app. Stream or download to watch on the plane, the subway, or wherever you learn best.

Transcripts

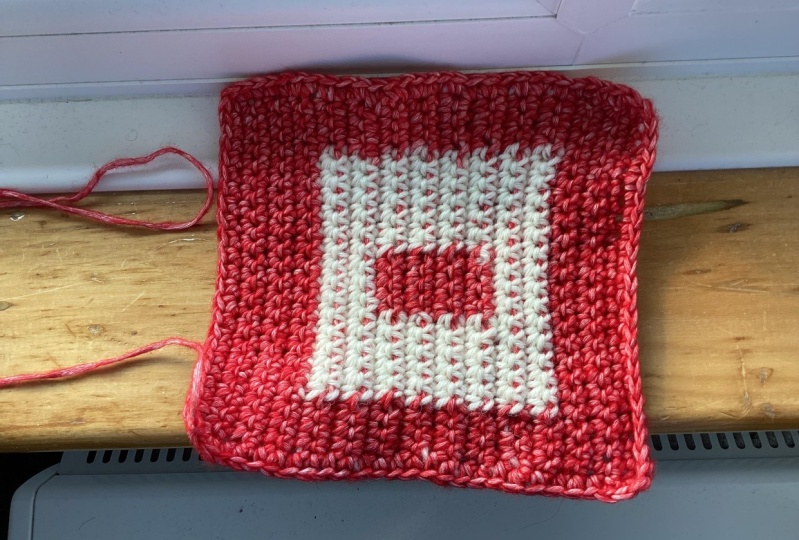
1. Project Starter: Essential Tips & Tools: Welcome viewers some important notes that I will explain during the tutorial. But I wanted to dedicate a separate video for them due to their significance. The first note, the starting chain is a chain that I will use two ends of the yarn for. You can make these ends in one color and you will have a chain in one color, or you can use two colors, as I did in the tutorial video, this is the crocheted case, and these are the starting chain stitches. By using two ends of the yarn, each end in a different color from the project colors, you can create a visually appealing chain. Of course, I will explain the specific technique in the upcoming lessons. Remember, practice is key. The more you practice changing colors and maintaining consistent tension, the more comfortable you will become with the process. Your speed and the skull will improve over time, leading to beautiful, multicolored crochet pieces. Second note I want to discuss here is about the blaze of the stitch we make, the single crochet in the back lobe, as you can see. Now the third node, there are two ends of the yarn when working crochet stitches, one end is the working yarn which you use to create the crush stitches. The other end is the carried yarn. To keep your work tidy, make sure to carry the yarn under your stitches, not over them, to ensure that the carried yarn is hidden and will not interfere with your pattern. After every five or six stitches, I tighten the carried N. If you notice here, I am working with two strengths of the same color. When I tighten the carried, I tighten each strength separately, holding the fabric between my thumb and index fingers before the five stitches. This is to avoid excessive tightening of the yarn compared to the rest of the row. If there are any increases from the carried on visible in the middle of the stitches, they will disappear when you tighten the yarn. Note that this tightening should be done after every five to six stitches and add the corners. It should be done after completing the corner, not too long after. To prevent the corner from shrinking the base. In this pattern, I started with the base and a few rows in the main color. Then a row in the second color. There in the following row, I made a stitch in the main color and stitch in the second color, resulting in this pattern. This is based on your choices and personal preferences. After finishing writing the word by the R, you can execute the same pattern, but in a mirrored way. That row with one stitch in the main color and one stitch in the second color, followed by a complete role in the second color. There are all personal preferences, and based on your plans for the project, remember that the most important thing is to enjoy the process. Crocheting is a relaxing and creative activity. Don't stress about mistakes. They are part of the learning process. Keep practicing and you will see improvement over time. Another important time is yarn tangling. If I randomly change the yarn every time, it results in annoying tangling which requires me to stop working and on tangles the yarn wasting time and energy. It is best to follow symbol and specific steps during work to avoid the problem of tangling. I will explain this during the work. Make sure to understand this point well. Another point is about the suitable yarn for such projects. It should be acrylic or pure cotton yarn without elasticity, which provides stability. For projects like bags, makeup bouches, and beencil cases, the yarn usually comes in 100 gram skins with approximately 350 meters of yarn, more or less letal. The recommended needle size is two millimeter and you work with two strengths of the yarn. Starting a chain should be made with 2.5 millimeter needle. Of course, you will need stitch markers and scissor and weaving needle. Final note, Some people make the back loop stitch by putting the yarn from underneath the needle, making a loop and completing the stitch. However, this method is not suitable for tabestry work because it will show the carried yarn on the front. The correct method is to blaze the needle from underneath the yarn, make a loop, and then complete the stitch. Now it is time for technique we will be using in the workshop. My advice to you is to practice this technique thoroughly before starting the project to ensure polished product. In the next video, we will dive into crucial aspects like presenting yarn, tingling, and mustering the back loop stitch. This will prepare you well for your crush journey at theater. 2. Color-Changing Mastery: Seamless Transitions: Welcome viewers. Let's see how to change the color. If the next stitch in the button is in a different color, I will not finish the stitch with the main color. Instead, the final step of the stitch will be with the new color like this. To make the stitch, we c it normally taking the main color or the carriage on along under the work. Here, I will change the yarn color back to the main color. The steps to change the color start from the previous stitch where you finish it with the new color. Make sure to leave the yarn in the direction of its skin. I left the second yarn in the front because its yarn skin is here in the front. I will take the yarn under the work and crochet the stitch normally. Here I will check the button and find that the net stitch is in the second color. I believe you have memorized the steps. Then I will start crocheting the required number of stitches as specified in the button. The net stitch in the same color will be finished with the same color. The next one is in the main color. Insert the needle into the back loop. Yarn over and bolaa loop here. I will switch the color. I will leave the yarn here in this direction because its yarn skin is here. I will make a loop and finish the stitch in this way. As shown in the button, there is a stitch in the second color, then a stitch in the main color, followed by three stitches in the second color, then three stitches in the main color, 12. For the third stitch, I will not finish it with the same color, but I will start the colors as I did before. Three Here I switch back to the main color and continue with the better. Always remember to check the buttern and the blend. Your color changes one stitch ahead. Heavy crusting. It is natural for the work to curve during crushing because you have stopped increasing. On the other hand, this curving is necessary as it provides the desired shaping for the project. If I always take the easiest way, which is blessing the forward each time, it will result in tangled arness. I will demonstrate this in front of you to emphasize the importance of blasing the yarn in the direction of its yarn skin Each time here I will crust a stitch in the main color and another in the second color to exhibit the demonstration of yarn entanglement. Placing the yarn forward each time may seem more comfortable for the crusetor, but it is not the correct method because it leads to tangling. As mentioned before, it is important to practice this technique to become proficient in changing colors. The stitches appear to be correct but there is tangled because I brought both the main and second colors forward each time without blessing them in their correct positions. This node is very important for organizing your work and future projects, especially when working with four or five different colors. Imagine the amount of tangling that can occur. It's messy. This node will save your energy and the briefing tangling completely. This Swatch is important for practice. I will provide you with a very simple pattern to practice changing colors. Once you understand the technique, you will muster it easily. It is simple but requires concentration in the beginning. Now get ready with me for the upcoming video. See you later. 3. Gratitude and Showcasing Inspiring Projects: And with that, we come to the joyful end with our grand adventure together. Congratulations, you have learned so much and now it's time to put your knowledge into action. Perfect, learn from mistakes, and keep growing Your potential is limitless and I believe in your ability to make the best broch. Thank you for being part of this learning journey. I came to it to see how you apply, what you have learned and achieve. Great thing, wishing you success as you put your knowledge into practice. Remember, this is only the beginning of our shared exploration. I encourage you to continue your journey until we meet again in the second level to explore further and keep pushing the boundaries of your knowledge and skills. And now, good boy.