Transcripts
1. Welcome & What You'll Learn: Hello and welcome. My name is Madeline from
Knitting house Square. Today in this class, we're
going to be knitting your first sweater,
just miniature sized. If you've ever wanted
to kit a sweater but felt intimidated by
garment construction, shaping, sleeves, or simply
the amount of time involved, this class is designed for you. Together, we're going
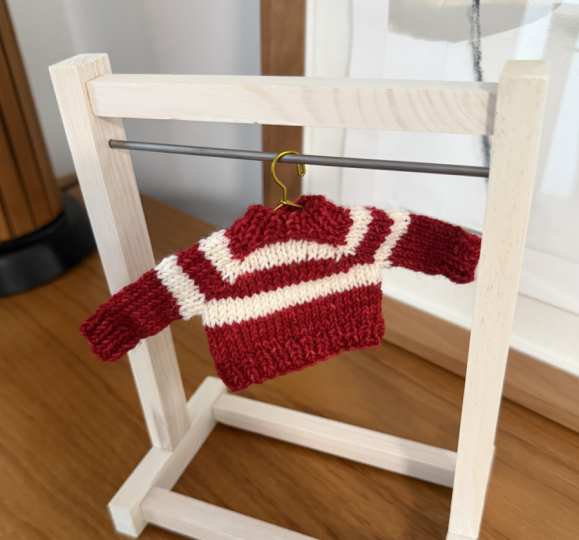
to be knitting one of these tiny top down
raglin sweaters. These make perfect little
projects for an ornament, a doll, or even just a keepsake. But the important thing
here is that all the skills you're learning to make
these miniature version can also be applied to making full size top down Ragland
seamless sweaters. By the end of this class, you'll understand how Ragland
sweaters are constructed. How increase rounds
shape the yoke, how sleeves are
separated from the body, and how a top down sweater comes together from
neckline to hem. My hope is that through
making this tiny project, you're going to find
that sweater knitting is not as mysterious
as it seems to be, and that it could be a
very approachable project. Now, in our class project, you're going to be making
your own tiny raglin or miniature raglin sweater.
There's different options. Here I have two little
striped versions and that'll be the version I'll be making in the video class with you. Or if you'd like to, you can also make a solid
option as well. This just adds a fun little
level of customization. This is also a
really fun project that you can make
with your scrap yard. These are all knit out of
sock weight or figuring weight yard and you don't
need much yardage at all. I would love to see your finished projects
in the gallery. When you finish making
your miniature sweater, please be sure to
upload a photo. That way we can see everyone's
colorful creations. Now before we get started, be sure to download the full written version
of the pattern in the class resources and
gather up your materials. That'll be the first thing I
go through in Lesson two is materials and also an overview of Ragland sweater construction. Grab your yarn and your kiting needles and let's get started.
2. Materials & Understanding Raglan Sweaters: The materials you're going
to need for this project include first up some
fingering weight or sock yarn. This is a nice project because if you have some
scraps available, you can definitely use
some scraps of your yarn. You only need around
30 to 33 yards to knit one of these
mini Ragland sweaters, which is equivalent to
about eight or 9 grams, not much yardage overall. I am going to knit a
little striped version just to show you how
that would work. Next up, I have my
kitting needle. We are going to knit
this using magic loop. That way we can
work in the round with a tiny circumference. I have a US two
knitting needle here, which would be a 2.75 millimeter
and it has a long cord, so it has about a 40 inch cord. Then I have a pair of scissors. I have a small tapestry needle. I have two pieces of again, fingering weight yarn for scrap. Each one of these is
about 12 " or 1 ft long. Then last up, if you want to make this into a
little cute ornament, I got these miniature
hangers off of Amazon, and I'll be sure to link to
all these supplies that I'm using in the resources
page for this class. Now, before we actually
start kitting, I want to take a few minutes
here to describe to you how a raglin sweater is
actually constructed. That way, as we go through
the steps of knitting, it'll feel much
less intimidating. Today, we'll be knitting a
top down raglin sweater, which means we'll
start at the neckline and work down towards
the body and sleeves. A raglin sweater is built
in four main sections, the front, the back,
and the two sleeves. These sections are
separated by what are called raglin lines
or increase lines. As we knit, we'll add stitches on either
side of those lines. Those increase rounds
gradually create the shape needed for
shoulders, chest and sleeves. You can think of
this essentially as increasing to create
a larger circle than taking that circle and
dividing it up into two sleeves and the center
portion of the sweater. At the beginning, the
sweater looks very small and doesn't
resemble clothing at all. But as we continue increasing, the yoke becomes wider and starts forming the upper
portion of the sweater. This top section is
called the yolk. The yoke includes the neckline, shoulders, and upper chest area. Once the yolk reaches
the right size, we'll separate the
sleeves and place them on hold on some waist yard. Once we place the
sleeves on waist yard, this is when the
sweater will really start looking like
an actual sweater. After the sleeves are
on their waist yard, we're going to knit through the body portion of the sweater. Then the last stap is to go back and pick up those
sleeves and knit those. The amazing thing about
Ragland sweater construction is that it makes it
so customizable. You have the ability
to adjust the length of the center portion of your sweater if you'd want
it shorter or longer. You have the ability to adjust the length of your sleeves. You even have the ability to adjust the number of
increases you want to work. That makes Raglin
sweaters so nice and customizable for every
different body shape. Even though we're
just working on a miniature sweater in this class, the same construction
techniques can be used when you go on to
knit a full size sweater. By the end of this class, you won't just have a mini sweater, you'll have a better
understanding of how ragland sweaters
are actually knit. Now in the next
lesson, we're going to get started with that cast.
3. Casting On & Setting Up the Raglan: The way Ragland
sweater is knit is, again, we start up
here at the neck line. First up, we're going to cast on our stitches and when we
cast on these stitches, we want to make sure the
stitches are nice and loose because we want the
neck line to stretch. The cast on method I'm going to use is the backward
loop cast on. Some other great alternatives
to use are things like the long tail cast on or the
German twisted cast on. Now we also have a really
small circumference here where we're going to be knitting to knit in the round. I'm going to be demonstrating
magic loop for you as well in case you aren't
familiar with that technique. Magic loop can also be a great thing to use
when you're knitting something like the sleeves of even a regular size sweater. Because then you'll
have a smaller circumference than
you would for, let's say, the main
body of the sweater. Because I have a white
background here and to make sure you can see the
stitches really clearly, I'm going to knit
the background of the sweater in my red yarn, and then I'm going to add in two little contrast stripes
in this white yarn. So first up, I'm going
to cast on to either one of my knitting needle points
a total of 24 stitches, make sure you're using a
stretchy cast on method. Once you have the 24
stitches cast on, first thing you need
to do to set up magic loop is grab onto all those stitches and then pull on your knitting needle so that the stitches end up on the cord. You now want to
divide them in half, I'm going to count in to my midpoint or 12 stitches
from either side. Once I find the midpoint, I'm going to stretch
out my work so I can see the cord
in the middle, fold the cord in half, and then slide each half of those stitches up to each one of the
kitting needle points. The way you want to hold
your knitting needles for magic loop to begin is you want your knitting needles going over towards the right, the points. Then you want to make sure your working yarn or your ball of yarn is coming out the
back knitting needle or the one further
away from you. If I look at my kiting
needles real quick here, I have the tail coming out the back and the ball of
yarn coming out the front, I actually want to flip them
over so that that switches. Now my working
yarn is coming out the back knitting needle or
the one further away from me. Next up, I want to make sure all of those cast
on bumps are going down towards the table and I don't have a twist at
that inner corner. I'm going to adjust these
so it's all going down towards the table. Perfect. Then the last thing I need
to do is I need to set up my yarn because the first stitch I'm going to be working
is a knit stitch. The way you want to
set up your yarn is you want to take your
working yarn in between your two knitting needles and then drape it over your
back knitting needle. What setting up
your yarn like that does is that prevents you from ending up with a yarn over accidentally at the
beginning of a round. Now I'm all set to
work my first round, as noted in the pattern, the first round is
a ribbing round. We're going to be
working knit one Pearl one ribbing all the way across the round over and over again for a
total of six rounds. The way you actually work in magic loop is you're
going to take your back knitting needle or the one with the working yarn coming out of it and you're going to pull that
towards the right, so those stitches
end up on the cord. You want to make sure
you still have plenty of cord over here on the
left hand side though. Then you're going to go right
into your first ditch on your front knitting needle,
however you need to work it. In our case, knit wise, I'm going to knit
that first stitch. The next up I need to pearl, so I'm going to bring my yarn to the front and I'm going
to pearl the next stitch. I'm going to continue
working knit one pearl one all the way across this
front knitting needle. You should finish
with a pearl stitch. When you finish, there's
going to be no stitches on the knitting needle
being held in your left hand and everything's
over here on the right. Now, we've worked across the
first half of our stitches. To finish the round,
we have to work across the second
half of our stitches. We're going to turn our knitting needle
with the stitches on it back so it points
over towards the right, and then we're going
to thread back in our second knitting needle. Now, you want to make
sure you set up again just like you did for the
first half of the stitches. At my knitting needle points going over towards the right, all of my bumps and my work is going down towards the table. My working yarn or the yarn
attached to my ball of yarn is coming out the back knitting needle or
the one further away from me. Now again, I'm going
to be starting with a knit stitch because I just finished
with the pearl. I'm going to take my
working yarn up in between my two knitting needles and drape it over my back
knitting needle. Again, I'm going to take
my back knitting needle. I'm going to pull it
towards the right, so the stitches end
up on the cord. Still plenty of cord
over here on the left, and I'm going to continue
my ribbing round. Knit one pearl one
across these stitches. Finishing with my
last pearl stitch. Now I'm going to take
my knitting needle, turn it over towards
the right again, and thread back in my second
knitting needle point. Everything I just did there, where I worked across one knitting needle,
turned my work, and worked across the
second knitting needle that made up one full
round of magic loop. I have to do exactly what I just did a total of six times. Now, just making sure I'm set up a grin to work my next round. I need my working arn coming out the back
knitting needle, both my kiting needle points going over towards the right, all the work coming out
down towards the table. Because again, I'm going to be starting off with
the knit stitch, I need my working arn
coming up in between my two knitting needles and draped over the back
knitting needle. Now I'm going to
continue until I finish the six rows
total of the ribbing. Then I'm going to
come back and I'll show you how we start working our increases for the yolk portion of the sweater. Right in here will
be our next lesson.
4. Raglan Increases: Now that we have
our neckline done, we're going to begin our
increases throughout the yolk. You'll notice the
way these increases work is we have a few stitches, then we have increases, then
we have the center stitches, increases, and a few stitches. That is the same
for both the front and the back of this sweater. This is the same way
the pattern is written. We're going to work
a few stitches, increase, work some more, increase, work some more, and then repeat that exact same pattern on the second half. This will also perfectly
line up with how we have our stitches divided
in half for magic loop. Now we're going to keep
on increasing further and further until we reach our
desired number of stitches. Once we reach that location, then we're going to
divide our work into the two sleeves and the
body of the sweater. The way we transition from the neckline to the body to
begin the increases is first, we're just going to start
with a regular knit round. I'm going to knit all the stitches on my
front knitting needle and all the stitches on
my back knitting needle to make up one full round. Again, because they're
knit stitches, you just want to make sure
your working art is coming up in between your two knitting needles and draped
over the back. I'm knitting this
whole first round. Round two is going to be our
actual first increase round. First up, it says knit two. These two stitches are
going to be essentially the shoulder of the sweater and what will eventually
become part of the arm? Knitting two. Then I'm working
a make one right. To work a make one right,
you're going to take your left knitting needle and you want to go into that bar that's between the stitch
you just worked and the one you're about
to work from back to front and pick up
that topmost bar. Then you want to knit into
the front of that bar. We're increasing one stitch. That increase is going to
later become part of the arm. Next up, it says, knit one. That's the center that makes up what appears to
be a seam here. And then we have
to make one left. M one left. We're just going the opposite
way through the bar. We're going through
the bar between the stitch we just worked
and the one we're about to work from front to back using our left knitting needle and we're knitting
into the back. That stitch is going to become part of the main
body of the sweater. Now we have to knit until
three stitches remain. We're working across
this center portion. We're going to increase
one stitch that will later become this body by
doing a make one right. Again, a make one
right, you go back to front using your left knitting
needle under the bar, and then you kit into the front. Then we work the
knit one stitch. Then we're going
to make one left. This new stitch that
we're increasing will eventually become
part of this sleeve. Make one left. We go
from front to back, knit into the back, and
then knit the final two. That took us across the
first half of our stitches. Now when we turn our work, we're going to work
the exact same thing across the second
half of the stitches. To show it here one more time. We're knitting two. These are again becoming part of the
shoulder and the sleeve. Make one right, going
from back to front, knitting into the
front of the bar, knit one, M one left, front to back, knit
into the back. That make one left will become part of the
body of the sweater, knitting across the
center stitches. We're knitting until
three stitches remain. Make one right, which will
become part of the body, back to front under the bar. Into the front. Knit one, M one left, front to back. Into the back. Then
knit the final two. I'm going to turn my work and re thread back in my
second knitting. Now that we've
worked the increases across both halves
of the stitches, what you can do
next if you'd like, is introduce in a stripe color. You can also just knit the whole sweater
all in one color. Whatever your preferences,
just for fun, I'm going to add
in a stripe here. I'm going to do the stripe
and the white yarn. After each increase round, there's just going to
be a plain knit round. I'm going to take a little
bit of my white yarn, thread it to the
inside of my work. I have a short tail here. I'm going to take
this white yarn and just knit all the way across both knitting needles
to make up round three. Now, round four is again
an increase round. You're going to notice that each one of the increased rounds, it increases the
number of stitches you're going to work
before you do an increase. Instead of just knitting two and then doing an increase
set of increases, you're going to knit
three this time. And over here, you're going to continue working
across the center until four stitches remain instead of until three
stitches remain. The reason for this is as we continue going row after
row round after round, the sweater is becoming larger. We're adding stitches
that will make up the sleeves and we're adding stitches that will make
up this body portion. The yk is going to keep on increasing as we go
round after round. Just to demonstrate this round, I'm going to do knit three Then make one right. I'm going to go
back to front under the bar, knit into
the front of the bar. Knit one, M one left, front to back, knit
into the back, it until four stitches remain. Make one right. Knit one, M one left. Then knit three. And repeat that exact same thing on the
second half of my stitches. Now that I've worked
that increase round, again, I'm going to work
a knit round after it. I'm going to continue working in the pattern all the way
up through round 11, which is a final knit round. Then in the next lesson, what I'm going to be demonstrating is how
we're going to divide our stitches to make up the two sleeves and the
body of the sweater. You can check to make sure
you're done by first making sure you finish with a knit round rather
than an increase round. When you're ready and
done all the rounds, you should have a
total of 64 stitches. Remember, we started with 24. You're going to end up with 64, that would be 32 stitches
on each knitting needle.
5. Separating the Sleeves: For this next step where we're going to
divide the stitches, you're going to
want your scissors, your waist yarn, and
your tapestry needle. First up, you want
to cut your yarn, and you want to cut
both the main color and the stripe if you're
working the striped version. I'm just going to
leave about an eight inch tail to weave in later and move those balls
of yarn to the side. The goal here is going to be to put one sleeve on
one piece of waste yarn, the other sleeve on the
second piece of waste yarn, and the main body portion to keep on the knitting needles. First up, I'm going
to take one piece of waste yarn and thread it
onto my tapestry needle. Now with that tapestry needle, I'm going to start
at the beginning of my round and I'm going to slip the first six stitches onto
this piece of waste yarn. I'm not working any
of the stitches. I'm just slipping each
one of them parlwise. First six put those over on the waist yarn. I'm going to take my tapestry
needle off of there. Now I want to slip these center 20 stitches onto my
other knitting needle. I'm going to take my
back knitting needle. I'm going to pull it
over towards the right, and I'm just going to slip
the next 20 stitches. After doing that, I should
have six stitches left. I'm going to take my next piece of piece of waste
yarn number two, thread it onto my
tapestry needle, and I'm going to pass
those final six stitches onto this piece of waste yarn. I can leave that one on
the tapestry needle. If I look across that piece of work that I just went across, I have six on a
piece of waste yarn, the center 20 still on
my knitting needles, and then the other six on the
other piece of waste yarn. Now I'm going to
turn my work thread back in my second
knitting needle. Now I want to start off with the same piece of
waste yarn that I was just using and I'm going to slip the next six stitches onto
that same piece of waste yarn. Now I can take the
tapestry needle off. I have 12 stitches total on
that one piece of wtyarn. I want to slip the
next 20 stitches, keep those on my
knitting needles. I'm going to take the
back knitting needle, pull it over towards the
right, and slip the next 20. Now I want to get these
last six stitches onto the first piece of waste yarn that I was
originally using. I find the easiest way to
do this is to continue slipping those six stitches onto the other knitting needle. Then take that piece
of waist yarn, but take the end that's closest to where that last
slip stitch is. Thread that onto your
tapestry needle. Then you want to go
now in this case, from left over towards the right to get those six stitches. Just make sure you
aren't twisting them at all as you're slipping them. On the waste yarn. Now over here on this
side, I also have, let me type that
up a little bit, one piece of waste
yarn with six and six. If I turn my work again, now I can thread back in my
second knitting needle point. Let's look at what we
have in total now. We have one sleeve
over here that's just being held on the waist yarn
with 12 stitches total. We have our center
portion of our sweater, which has 20 stitches on each knitting needle
or 40 stitches total. Then over here we have
our second sleeve, six stitches on either
side, 12 stitches total. Because we've left the main body portion on our
knitting needles, that's going to be the
portion that we knit next. We're going to knit up
through the body portion. We're going to work
some rows in plans Dc neet and then we're going to work a little bit of ribbing.
6. Knitting the Sweater Body: When working the body
portion of the sweater, first thing to keep in mind is if you're knitting
the stripes, you're going to want to join
with the striped color. If you're only
knitting in one color, just kit with the
same exact color you've been working before. I'm going to take
my striped color away and thread
it to the inside. Leave me about an
eight inch tail. Then I'm going to kit across
my front knitting needle. Knitting all 20 stitches. Before I turn my work
to begin the next half, I want to cast on two stitches to make up the underarm portion. The reason you want to cast on a few stitches is that actually helps prevent any holes from
forming in this underarm. The way you want to do this is using the backward loop method. I'm going to take
my working yarn, put my left hand behind it, grab onto with my
bottom through fingers, and then take my pointer
finger, go down below, up the front to the top, back behind down to the bottom,
up the front to the top, and then take my
knitting needle, go underneath that loop, slide it off of my finger
onto the knitting needle. I cast on one stitch. Now I want to take my
pointer finger again, go back behind down
to the bottom, up the front to
the top, slide off that loop on off of my finger
onto my knitting needle. Now I've cast on two. I can now turn my work and thread in
my second knitting needle. Make sure my working
yarn is coming up in between my two
knitting needles draped over the back, and now I'm going to knit
across these 20 stitches. Now again, before
I turn my work, I want to cast on two
more stitches using the backward loop method
for the other under arm. I'm going to take my left
hand behind my working yarn, grab onto with my
bottom three fingers, then loop it down below, up the front to the top, back
behind, down to the bottom, up the front to the top, slide that loop off of my finger
onto the knitting needle. Then take my pointer
finger again, go back behind down
to the bottom, up the front to the top, slide that loop off my finger
onto my knitting needle. Not cast on two, and I
can turn my work again. We've now worked the
body setup round. The repeat round that
we're going to work next is where we're just going to
knit over and over again. We just knit across the
front, knit across the back. That makes up one round. We want to work that knit
round a total of ten times. Now, if you are
working the stripe, you'll see we have
two rows right now in my stripe color way, which is white, and the
stripe is four rows total. I'm going to kit two
more rounds in white and then switch back to the red
for the remaining eight. I'm going to knit through this portion and then
I'll come back and I'll show you the last little ribbing and cast off for this body. Last step for the
body is going to be to work a little bit of
ribbing before we cast off. The ribbing again, just
like for the neckline, it's going to be knit
one Pearl one ribbing. I'm going to work knit one
Pearl one ribbing round after round for a
total of four rounds. Now that I finish those
four rounds of ribbing, I'm ready for the bind off. To bind off or cast
off my stitches, what I'm going to do is I'm
just going to work in pattern across the row and as I
reach each next stitch, I'm going to cast
off the previous. What I mean by working
in pattern is that any stitch in the ribbing
pattern that would be knit, I'm going to knit anyone that's a pearl, I'm
going to pearl. First off, I'm going to
knit the first stitch. Then I'm going to pearl
the second stitch. I'm going to use my left
knitting needle point to pass the previous one
up over and off. Next up in my ribbing, I have a knit stitch. I'm
going to knit one. Then take my left
knitting needle to slide my previous
up over and off. Next up in ribbing,
I have pearl. Going to pearl one, slide the
previous up over and off. I'm going to continue this
all the way across the round. You want to keep in
mind because this would theoretically be the bottom of a sweater you'd be wearing. You'd want to make sure you keep this bottom edge
nice and stretchy. You don't want to pull this cast on edge too tight at all. If you're unfamiliar
with magic loop two, I'll show you what happens
when I get over here to this corner and how I transition from one
side to the other. Okay. I'm going to pearl my final
stitch on the first half, slide the previous
stitch up over and off. Now I'm just going to turn
my work and thread back in my knitting
needle so that now the knitting needle has the
opposite side stitches on. When I look at my work now, I have one stitch on the knitting needle being
held in my right hand, left over from the
opposite side, and then all my new
stitches over here. Now I can just continue. I need to knit the next stitch. Slide the previous
stitch up over and off. Now I'm back in the regular
bind off all the way across. Once I reach the end, I'm going to pull my last loop larger, cut my yarn. You don't
need a long tail. I'm just going to leave
about 8 " here, so. Then thread that
through the final loop. Now that we've done the
body of the sweater, next up are the sleeves.
7. Picking Up & Knitting the Sleeves: The way the sleeves are
going to work is we're going to pick up the stitches
we have on waist yarn. We're going to work
across half of them, then work across the
other half and lastly, pick up two stitches from where on the body
of the sweater, we had cast on
those two stitches. We want to do this
for both sleeves. It doesn't actually matter which one you start with though. I'm just going to
start with this one over here and I'm going to start at essentially
the armpit area, and I'm going to go across
the first side and pick up six stitches from my waist yarn. Pull out the waist
yarn from those six. Then I'm going to slide those six ditches to the
opposite knitting needle point. Now I'm going to turn my work and I'm going to pick up
the next six ditches. Again, I'm going to slide
out my waist yarn now. When I look at my work, I'm
going to turn it again. I have my knitting needle points going over towards the right, and I have half of my stitches, six on each knitting
needle, divide it. Now what I want to
do is I want to join my yarn because I'm knitting
the striped version, I'm going to join it
with my white yarn, thread a tail to the inside of my work through the sleeve. First, I'm just
going to knit across the front knitting needle
for my setup round. Turn my work, thread back in
my second knitting needle, knit across this back
knitting needle. Now, before I turn
my work again, this is where I want to pick up two stitches from where I cast on for the
body of the sweater. What this is going to
do is this is going to help tighten up that underarm
and prevent any gaps. I'm going to use my
free knitting needle, look for where I cast
on those two stitches, and I'm just going to pick
up the topmost bar there, knit into one, and then the
one right next to it as well. Two. When I turn my work and thread back
in my knitting needle, now for my sleeve,
I'm going to have six stitches on one knitting needle and eight
stitches on the other. These stitches are going
to make up the sleeve. Again, when I'm
knitting the sleeve, I want to make sure
I'm keeping the stripe pattern if you're
doing the stripe. I've already done
two rows and white, so I'm going to knit
two more rosen white, and then I'm going to
switch to my main color. Now, I want to knit a
total of 13 rounds. I'm going to do two in white, and then the next 11 in red. Then last up, I'll finish
with a little bit of ribbing. I'm going to do again
the four rounds of ribbing and then cast off. Now I finished on
my first sleeve. One thing to mention
here real quick too, before I move on to show you the second sleeve real quick, is that typically
when you're knitting a raglan sweater that's
full size or adult size, you won't just plain knit round after round
for the sleeves, you'll have some
decreases involved. Where the decreases
will typically happen is they'll
typically happen on this under arm area and you'll typically have decrease rounds
where you're decreasing two times per round and
that's going to line up with that a seam that goes down
the center of the underarm. For our case, because
it's so tiny, we aren't adding
in any decreases. Now for the other sleeve, you're going to want to
do the exact same steps. We're going to start
at the armpit, pick up six stitches,
turn our work, pick up the next six stitches, divide for magic loop. And now for my first round, I'm going to break it the exact same way I did for
the other sleeve. I'm going to join my stripe
color, read it to the inside. Now I'm going to knit across my front knitting
needle, turn my work, knit across my back
knitting needle, and before I turn to
begin the next round, I'm going to pick up the two
stitches from the underarm. The whole rest of
the sleeve is again going to be exactly the
same as the other one. The next video, what I'm going to show you is how I finish my sweater by weaving in the ends and doing
a quick blocking.
8. Finishing Your Sweater: Now for our last step, we want
to take this sweater with all the ends hanging
out everywhere and turn into a nice
finished project. So I'm going to weave
in all my ends first, and I'm going to
weave them all into the inside of the sweater. I do tie knots in my knitting. Some people prefer not to. But anywhere that I have, where I have two
different colors joining, where I switch colors
and things like that, I'm going to tie a knot and then weave in the ends in
opposite directions. I also want to pay
close attention to my underarm and make sure that there's no
large gaps forming. If I do have a
larger gap forming, so I do have a bit of a
hole right there that might close up a little bit
when I weave in these ends, but I'm going to use
the nearest tail to help close that up as well. So I'll show you
my sweater after I finish and weaving in the ends and then I'll show
you the blocking. Now, I have all
my ends woven in, so my final step is blocking. The supplies you're
going to want to block, your mini sweater is
you're going to want a towel because
it's not very big, you don't need a
very large towel. Then you want a bowl with
some lukewarm water in it. If you want to as well, if
you have a little wool wash, you can also add a little
bit of wool wash to it. I'm going to take my
sweater, put it into my water and let that soak
for about 10 minutes or so. You want to squeeze
the excess water out, lay it down on your tail, and gently rolled up to get
the excess water out. Now just lay flat to dry.
9. Final Thoughts & Next Steps: Congratulations. You've now kick your first Raglin sweater. All the skills you've learned throughout this
class can be super helpful now when
you scale this up to a larger full size project. The different skills we learned included casting on
for the neckline, working those raglan increases, separating that yoke
that you've created into the individual sleeves
and the body of the sweater, weaving in our
ends, and blocking. I would love to
see your finished projects in the class gallery. Be sure to upload your finished
project in photo form. That way we can share everyone's colorful mini sweaters
that they've created, no matter whether you're
using it for an ornament, a gift topper, anything
that you'd like. Happy knitting, and I hope to see you in
another class soon.
 KnittingHouseSquare, Knit / Craft / Sew