Transcripts
1. Introduction: Hello, everyone, and
welcome back. My name is Madeline and I create
knitting and crafting content online here on Skillshare and also on my website, knittinghous
square.com. In today's video, what I'm
going to be showing you is how to read a knitting chart when you're working
in the round. So in my previous
Skillshare class, I had gone through how to read a knitting chart
for flat knitting, and today we're going to
be extending onto that, and I'm going to show
you how to kit this cow. Now, what's cool about this
cow is it's actually all knit completely from a chart. So we're going to take a chart. I'm going to show you first how to read the chart for when you're knitting in
the round because it will be different
than flat knitting. And once we go through
the basics of how to read a knitting chart for
in the round knitting, then we're going to apply those techniques to
knitting this project. Now, what's great about
this project is you really can knit it out
of any weight of yarn. So here I have a
worsted weight version, and then in the
video, I'll take you through an even bigger
bulky weight version. So, again, we're
going to start off by learning how to read a knitting
chart for flat knitting. Then we're gonna work a
little bit of ribbing, and then we're going
to go into alternating between knits and pearls. Then lastly, we're going to
introduce in the cables. And each one of the
different little repeats is going to be one of these diamond
shapes in your knitting. So I hope you enjoy
this tutorial. If you have any
questions, please feel free to leave
them down below. And let's get started
first with the materials.
2. Materials and Cast On: The materials I have in front
of me to start this project include a stitch
marker, a cable needle. A tapestry needle and then my
yarn and knitting needles. First up, I recommend
picking out your yarn. In this video, I'm going
to be showing it using a super bulky weight. I have a yarn with the label six or the number
six on the label. What you want to look
at once you pick out your yarn is the size knitting
needle that it recommends. This yarn recommends a
US 13 knitting needle. That is the knitting needle
size that I have here. In picking out your
knitting needle, you want a circular knitting
needle and you want it to have a cord
that's 24 " or less. That way, makes it a little bit simpler to knit in the round. Another example
of a project I've made is I've made the same cow. This one hasn't
been blocked yet, but this one is kit out
of a worsted weight yarn, I had a number
four on the label, and for that one, it recommended a US nine knitting needle. I just match the knitting needle to what the yarn recommend. I've put up here on the screen the yardage
requirements depending on the weight of
yarn you're using. If you're using
worsted weight yarn, you're going to want about
250 yards available, and if you're using
bulky weight yarn, you'll want about 180 yards. Once you have your
supplies in front of you, the first thing we're
going to do is we're going to cast on and
join in the round. Now first up, you want to decide how many stitches
you want to cast on the number of stitches will vary depending on how many repeats of the pattern
you want to do. So for example, if we look at one that I've
previously knit here, one of the repeats is just in between the little diamonds. One diamond here, that's
essentially one repeat of the pattern and each one of these diamonds is 24 stitches. No matter how many stitches
you're casting on, it has to be a multiple of 24. For my worsted
weight version here, I did a total of six repeats. I did six times 24
to get 144 stitches. Now that I'm using a
heavier weight of yarn, I'm going to do fewer repeats. I'm going to do four repeats of the 24 stitches and I'm going to cast on a total of 96 stitches. Now, you can use any
cast on method that you'd like as long as
it's a stretching method. What I'm going to use
is just a simple cast on method called the
backward loop cast on. It starts with a slip knot. For these circular
knitting needles, you can pick either
knitting needle to start casting onto. Then you just loop similar
to how you do a slip knot around your pointer finger to cast on additional stitches. Other great cast on methods
to use are something like the long tail cast on or
the German twisted cast on. If you're interested
in learning more specifically about
cast on methods, I have a whole video here on
Skill Share going through four simple cast on methods from beginner
all the way to advanced. I'll link that in the
project description below. Now, once you have your
number of stitches cast on, I'm going to show
you real quick how I join in the round and then we'll be ready to start our cable chart with that
cable pattern in the round. Once you've finish casting
on your 96 stitches, you want to get
one stitch marker ready and you want to put your knitting needle with your
working yarn coming out of it or the yarn attached to
your ball in your right hand, and then you want
your knitting needle that doesn't have the working
yarn coming out of it. For me, the way I
cast on, it just has my yarn tail over
here in my left hand. The first thing I want to do is I'm just going to lay it
down right like that, and I'm going to start over here where my working
art is coming out of, and I'm just going
to twist or untwist, whichever way you'd
like to think about it. All of those cast on bumps, they're facing down
towards the table. What this is going to do is it's going to help me make
sure that my work isn't twisted at all
anywhere around the round. And once you've verified that you've gotten any
twists that exist out, you're going to want to place your stitch marker on your knitting needle that
has the working yarn. Then what I'm going to do for now is I'm just
going to go right into my first stitch on my left knitting
needle knit wise, and I'm just going
to leave my knitting needle right there like that. That way, nothing becomes untwisted and I'm
just going to set that to the side so now we can introduce in
the cable chart.
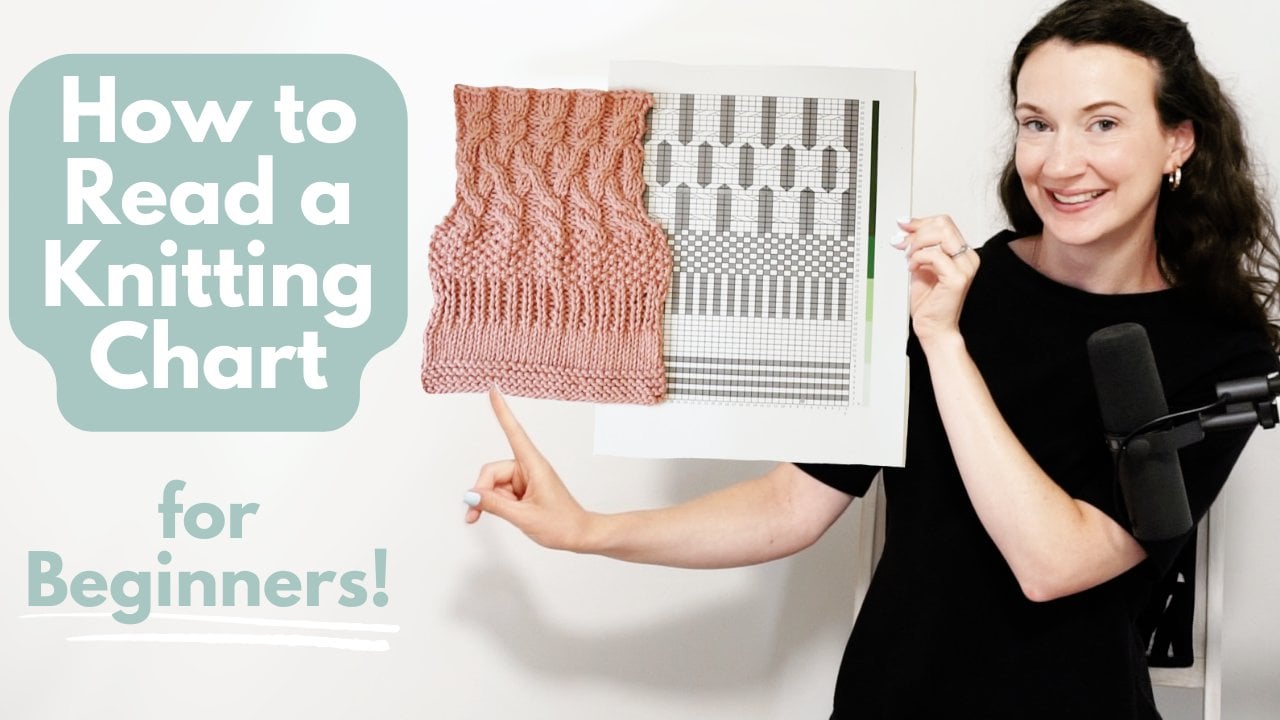
3. Reading a Knitting Chart in the Round: Now next up, before we actually begin
kitting the pattern, I'm just going to go
through a moment how you read a cable chart for
in the round knitting. So first thing to keep in mind, if you've previously
seen my reading a cable chart or just a chart in general for flat knitting, when you're kitting flat,
you would read the first row going from right
to left and then the second row going
from left to right. You're reading back and
forth between the rows. But when you're
knitting in the round, as we are with this pattern, you're actually knitting
every single round going from the right
over towards the left. For example, this first
ribbing repeat row, I'm going to read
from the right all the way over to the left. Then for my next round, I'm going to start
back up here at the right and I'm going to
read over towards the left. You're always reading
right to left and then each box that
represents one stitch. You'll notice the number of boxes we have going
across is 24. That's why we had to cast on
in multiples of 24 stitches. We're going to work
this 24 stitch repeat over and over again
all the way across the round. Next thing that's important, now that we know that
each box is one stitch, is what do the colors mean? Knitting a chart in the round is actually easier than kitting it flat because there's only one way to read each
one of these colors. A white box is going to be a knit stitch and a gray box is going
to be a pearl stitch. Essentially why that is is because when we're
knitting in the round, we're always working on the
right side of our work, so we don't have to
worry about right side versus wrong side because we're
always on the right side. Again, a white box
is a knit stitch, a gray box is a pearl stitch. If we look at this first round, the ribbing repeat row, what we have is a white
box then a gray box, a white box, then a gray box, over and over again
all the way across. All we're going to
be doing across this round if we pick up
our knitting once again, is we're going to be knitting, Knit one Pearl one ribbing
all the way across. I'm going to start off with my first stitch as a knit stitch, bring
my arm to the front. Next stitch is a pearl stitch. Knit one Pearl one. The chart only shows
it for 24 stitches. You want to do this 24 stitch repeat all the way
across your round, all the way until you come back and reach your
stitch marker again. Now this ribbing repeat row, you actually want
to do this over and over again a few times. I like to repeat this
ribbing repeat row until my work
measures about 1 ". That will vary depending on what weight of
yarn you're using. That may only be three rounds
or it could be five rounds. It depends on your
weight of yarn, but continue working
that ribbing repeat row. Knit one Pearl one
all the way across your round over and over again until your
work measures 1 ". Once you finish working, your ribbing for however
long you'd like, again, I recommend
about an inch. I'm going to go through and I'm going to highlight that
first row of the pattern. That way, I know I've
already completed that one. Now we're going to be
starting with row one of the pattern for row
one of the pattern, again, it's just a combination
of gray and white boxes. There are no cable stitches yet. The cable stitches are
going to be these ones that are larger boxes with
the diagonal lines. Looking at round one here, we have gray for the
first eight boxes, so we're pearling eight then we have white for
the next eight boxes. We're kitting eight and then we're pearling
the next eight. If you'd like to, if
you'd find it helpful, you can place a stitch
marker after each one of these repeats to
mark where each one of your sets of 24
stitches begins and ends. Again, all I'm going
to be doing here is I'm pearling eight,
knitting eight, then pearling eight,
and I'm repeating that 24 stitch repeat all
the way across my round. This round, I'm just going
to work one time also. I
4. Rounds 2 - 19: And so Round two, it has our first
cable stitch in it. First, looking at how we
set up before the cable stitch and I'll just point
with my cable needle here. We have eight gray boxes, so we're going to pearl eight, and then we're going to
work a cable stitch here. The way you tell how many
stitches a cable takes up total is you just count how
many boxes it spans across. Here, this cable stitch
goes across eight boxes. This is an eight stitch cable. Then the next thing you want
to figure out is whether you want to hold the stitches on your cable needle in the front
or the back of your work. So if you wanted to hold your stitches in the
front of your work, where you would
look is the bottom right corner of
the cable stitch, and you want to look at the diagonal line
coming out of that. You want to see does this
diagonal line go in front of the other shape or does it
go behind the other shape? If it goes in front
of the other shape, you'd want to hold
them in front. If it goes behind, you
want to hold them behind. In this case, this diagonal line coming out of the
bottom right corner, it goes behind this other shape. We want to hold the stitches
in the back of our work. Then how many stitches do we want to hold in
the back of our work? We want to count how
many boxes there are before the
other shape begins. Here we have one,
two, three, four. We want to take four stitches, hold them in the
back of our work. Then we're going to
knit because it's white the next four stitches on our left hand knitting needle and then we're going to
work those four stitches. Again, the back is also white, we're going to work
those four stitches knit wise that are being held
on our cable needle. Then last up, we have
eight more gray boxes, so we're going to pearl eight. First, let me work the
first four stitches here, eight stitches to get over
to where the cable goes in. Now again, I'm looking at the bottom right corner.
The line goes behind. I'm going to hold my cable
needle in the back of my work and how many
stitches is it going to be? It's going to be four stitches. I'm going to take the
next four stitches. For my left knitting needle, put them on my cable needle and hold it in the
back of my work. Then I have four stitches. It's a white box going in front, so I'm going to knit
those four stitches for my left knitting needle. Now, looking at what I do with those stitches
being held in the back, the back stitches
are also white, so I'm going to knit
the four stitches being held on my cable needle. When you look at your cable, your cable should
actually end up looking like what the pattern
looked like in the chart. If you look at this chart, we took four stitches behind
from the right to the left. That's exactly what we did here. We took four stitches behind going from the right
over towards the left, and then we took
four stitches in front going from the left
over towards the right. We took four stitches, we brought them from the
left towards the right. The way your cable shows up should match what the
chart symbol looks like. Then we're just going to
pearl eight stitches. You should be at
if you added them, your marker then to indicate where your next
repeat should begin. Now for my next set
of 24 stitches, I'm going to do the
exact same thing. I'm going to pearl eight,
work the exact same cable, put four stitches on
the cable needle, hold it in the back, knit four stitches from my left
hand knitting needle, then knit the four stitches on my cable needle and pearl eight. I'm going to continue that all
the way across this round. Now, the way this chart works is once we get into the cables, the cables are
actually only going to occur every other round. You'll notice now that we just worked a cable in Round two, the next round, there
are no cable stitches. It's only knits and pearls. Now again, for round three, we're just going to pearl eight, knit eight, and
then pearl eight. All the way across all the
repeats across the round. Now, next up on Round four, we're going to have two new cables that
we're introducing. First, what I want to look at is what do I have to work
before I get to the cable. Here I have six gray boxes. To start off, I'm just going to pearl my first six stitches
on my first repeat. Now my cable begins. Again, what do I want
to look at first? How many boxes total does
the whole thing take up? Here it takes up one, two, three, four, five, six boxes. It's six stitches total. Then if I look in the bottom
right corner of the box, I have a diagonal line and it's going behind the other shape. How many boxes does this
first portion take up? It takes up two boxes. I'm going to take two stitches, put them on my cable needle and hold it in the
back of my work. Now, next up, I have the main shape here and
this takes up four boxes, this box is white, I'm going to knit the
next four stitches that are on my left
knitting needle. Now, the stitches that I've been holding on my cable needle to go behind the background
of the shape is gray, so I need to pearl those two stitches that are being held on my cable needle. What did I do here? I took
four stitches in front, going from the
left to the right, four stitches in front, going from left to right,
and that was all white box. I knit those stitches, and then I took two stitches behind, going from the
right to the left. Te were my two
stitches I brought behind those stitches I
brought behind were gray, so I pearled those stitches. Now next up, if I look at the bottom right hand
corner of this box, again, this box total takes up six stitches and coming out of this bottom
right corner is one, two, three, four stitches and
this shape goes in front. I no longer have just the
diagonal line going behind. I have a whole
shape that goes in front coming out of this
bottom right corner. I want to take four stitches and hold them in the front of
my work on a cable needle. Now, next up, I have two stitches and these
are going behind, and these two stitches
have to be pearled. I'm going to pearl because
these two are gray, two stitches for my left
hand knitting needle. Pearl, pearl two. Then I have to go back
and I have to knit those four stitches
being held on my cable needle in
the front of my work. I what did we do in that stitch pattern? We took four stitches, four knit stitches
and we brought them in front going
from right to the left, and then we took two pearl
stitches going behind. Again, that behind
portion was gray, so we pearled those
two stitches. No matter really what
the cable looks like, you can always just look at the bottom right
corner and decide how many stitches there are coming out of the
bottom right corner, do you want to hold that
in the back of your work, if it's the diagonal
line going behind, or do you want to
hold in the front of your work if it's the
daga line going in front? Now I'm just going to
finish up this one repeat, so I'm going to pearl
the final six stitches. I'm going to continue working these 24 stitches for the rest of the repeats
across my round. Now, since row four
was a cable round, row five won't have
any cables in it. If we look at what
this ones showing us, we have six gray boxes. We're pearling six,
knitting four, pearling four, knitting four, then pearling six all the
way across the round. Now, next up on row six, there's the next cable
I want to show you. First up to get
over to that cable, I have to pearl six. Now when I look at this
next cable stitch, I want to count first how many boxes does it
take up in total. It takes up one, two, three, four boxes, so it's
a four stitch cable. If I look at the
bottom right corner, it goes behind the other shape, so I'm holding my
cable needle in back how many stitches am I holding
it back? The first two. I'm going to take two stitches on my cable needle, hold
it in the back of my work. Then if I look at the
other side of the cable, the remaining two stitches
of the four stitch cable, those are going in front and
I'm knitting both of them. I'm going to knit the
next two stitches for my left knitting needle. Then the ones going
behind, it's white behind. Those are going to
be knit stitches as well on my cable needle. Go to knit the two stitches
on my cable needle. Now in the middle, I
have four gray boxes, so I'm going to pearl four. For the cable on the
other side here, if I look at the
bottom right corner. Again, the whole cable
overall takes up four boxes. The bottom right corner,
this one actually goes in front and how many
stitches go in front, the first two stitches. I'm going to take two
stitches on my cable needle, hold them in the
front of my work. Then the ones going behind. This whole cable
stitch is all white. The ones going behind
are also knit stitches. I'm going to knit my
next two stitches for my left knitting needle, then the ones going
in front, again, it's a white box, so I'm going to knit
those two stitches. Then to finish off here, I'm going to pearl six. That's going to be the repeat. I continue working all the
way across this round six. Now, if you look
at the rounds that happened after round six, something like Round eight here, these are the same cable
stitches just placed in slightly different locations that you had down
here in Round four. You work those again
on round eight, then again on round 12, then again on round 16. Same thing goes for the
ones we were just working. They appear in round six. The exact same thing happens in slightly different locations
on round ten, 14, and 18. And just keep in mind that after you work each cable round, you're just working one
round where it's going to be a different combination
of pearls and knits. I'm going to continue
working all the way up through round 19. Then I'm going to
come back and show you what's special
about round 20, where we have to adjust
where stitch markers are in order to be able to
work this large cable stitch.
5. Rounds 20 - 39: Here's my work so far
and I've now made it all the way up
through round 19. Next up, we have round 20, and what you're going
to notice is that round 20 has some blank spaces
at the beginning. The reason for these blank
spaces at the beginning, and again, it's four stitches, is that the cable we're
going to want to do crosses between the
repeats of the pattern. We want to use the
last four stitches of one of our repeats and work those together with a cable of the first four stitches
of the next repeat. So when we start off this round, what we're actually
going to do is we're going to take our
first four stitches. Let me pass my
stitch marker first. I'm going to take my first
four stitches and I'm just going to slip them over to
my left knitting needle. That's just a special thing for the beginning of the round. The rest of the
round, wherever we have one repeat that ends and the next
repeat that begins, we're going to do a cable stitch across this stitch marker. Let me show you
what I mean there. First, I'm going to work
all these pearl stitches across the center here. Now I'm up to where there are four stitches remaining
before my stitch marker. I'm going to cable the next
eight stitches together. The cable I'm going to
do, I'm going to take the first four stitches and hold them on a cable needle
in the front of my work. I'm also going to take off my stitch marker
here for a moment. Then I'm going to knit
the next four stitches for my left hand
knitting needle. Before I knit the four stitches being held on my cable needle, I'm going to replace
my stitch marker, and now I'm going to knit the four stitches being
held on my cable needle. Now again, where I'm up to is now that I finish
that whole cable, I'm going to pearl all the way across until four stitches
before my stitch marker again. I'll show it to you
one more time here. Now I'm up to four stitches
before my stitch marker. I'm going to work
the cable again. I'm going to take the
first four stitches, hold them on my cable needle
in the front of my work, take off my stitch marker, knit the next four stitches
on my left knitting needle. Replace my stitch
marker and then knit the four stitches being
held on my cable needle. Now again, I'm just going
to continue pearling until I'm four stitches before my next stitch marker,
and I'm going to cable. I'm going to continue doing this all the way across my round until I get to four stitches before my beginning
of the round marker. At that location, I'll come back and I'll show you
again how we're going to start off or how we're going to end this round and
begin the next one. Now, I'm back at four stitches
before my beginning of the round and here we're going to work
the exact same cable. This round is actually
going to finish basically four stitches
into the next round. First up, same exact
cable as before. I'm going to take my
first four stitches, hold them on my cable needle
in the front of my work, take off my beginning of
the round stitch marker, knit the next four stitches,
my left knitting needle. Replace my beginning
of the round stitch marker and then knit the four stitches being
held on my cable needle. The round we just
worked is we just worked round 20 and I'm going
to highlight that one now. And where round 20
technically finishes, is it finishes four stitches
into the next round. When I look at the next round on my cable chart in Round 21, it starts off with
four knit stitches. Those four knit stitches are going to be the ones
we just worked. So you're going to have to skip those on the first repeat. Where am I going to
jump into the pattern? I'm going to jump into
the pattern right here on Stitch five
with pearling. Again, for this first repeat, we're going to skip over
the first four stitches, skip over these first four and just go right
into the pearling. I'm going to bring my
yarn to the front and pearl all the way across
these center stitches. Then at the end here,
I'm going to knit four before my stitch marker. Pass my stitch marker, and now for the next repeat, I do have those four stitches. I'm going to work the
kitting of the first four, pearling across the center. And then knitting the last four before my next stitch marker. That repeat, I can continue working all the way
across the round. It's just that first
little iteration across the beginning of the
round stitch marker where you've just skip those
first four stitches. Beyond this point,
looking at rounds 22, all the way up through 39, these are all cable
symbols that you've seen before on the lower
half of the pattern. You just want to
be careful because now they've switched sides. For instance, when we took four on our cable needle,
held it in front, that's now switched
over here from the left side of the pattern
to the right side of the pattern and same thing where we held two on our
cable needle and back. That's now switched from the
right side to the left side. Same thing with these
four stitch cables, they've switched sides. Pay attention to that as you're going up
through the pattern, and I'll come back and I'll show you how I finish off with the ribbing repeat row and the cast off all the
way up here at the top.
6. Finishing: And now I've gone all the way through Round 39 and I'm back at the
ribbing repeat row. For this one, there
are no cable stitches. We're back to just
knit one pearl one, all the way across the round, you're going to want to repeat this for the same number of rows you did down at the
bottom for your cast on. You cast on and then you worked
some ribbing repeat rows. You want to work that
exact same number across this top etch. First, let me get to
my stitch marker here. Again, this is just combinations of the white boxes
and gray boxes. It's going to kit one pearl
one all the way across the round and repeat that for the same number you
did for the cast on itch. After working my ribbing, the last step is
just to cast off. I'm going to remove
my stitch markers as I work across
this last round. When I cast off, I like
to do so in pattern. What that means is
I'm going to work each stitch as it
was worked below it. For example, I'm going
to start off by knitting the first stitch and then I'm going to
pearl the next stitch. Then the way I cast off is just a simple cast off
method where I take the previous stitch using
my left knitting needle, I pick it up and I slip
it up over and off. I just cast off one stitch. Now the repeat begins, and this is where you want to
just pay attention to what the pattern was for
that stitch previously. Next up, I'm going to knit one. Then I'm going to
slip the previous stitch up over and off. Then I have a pearl stitch,
so I'm going to pearl one. I'm going to slip
the previous stitch up over and off, back
to the knit stitch. I'm going to knit one, slip the previous stitch
up over and off. I'm going to continue doing this all the way across the round, again, removing the
stitch markers as I go. Now for this last stitch, I just loosen it up a little
bit, so it becomes larger. Now I'm going to cut my yarn leaving about an
eight inch tail. And then I thread the yarn
through that remaining stitch. Now, what I'm going to do real quick is I'm going to weave in my ends and then I'll show
you how I block my project. For blocking, what
I have in front of me is I have a bowl of water and it's just
lukewarm temperature and I have a little
bit of soap in there. I use just a little bit
of the Dn dish soap. I have a towel that
I can use to roll my finished project up in to
get the excess water out, and then I have one
of my projects here. All I'm going to do
is I'm going to take this and I'm going to
submerge it in the water. Now I'm going to leave that
there for about 15 minutes. Now that it's had
a while to soak, I'm just going to pick
it up and try and squeeze out as much of the
excess water as I can. Then I'm going to lay it on my towel and I'm going to
roll it up in the towel. Then I'm just going to squeeze to get as much of that
excess water out as I can. Once I've gotten as much of the excess water out as I can, you can see I got
quite a bit out, I'm going to take this and I position it exactly
how I want it to dry. I stretch it out anywhere it
needs to be stretched out. And now I'm going to take this and I'm going to
lay it flat to dry. I have a drying rack with a
mesh bottom, so I use that. You can also use they make
special drying mats for knitting that are those
foam flooring boards. You can use those as well. Just anything that
you can use to dry this on that has a
little bit of breathability. So I'm going to lay
this flat to dry, and then I'll come back and I'll show you the
finished product. Now that my projects
are all dry, I just wanted to pop back on here and show you
what they look like. This is my worsted weight
version after I've blocked it and I really like the size of the worsted
weight version. I'll show you it on here.
So it really makes a nice, perfect little size
for a single loop cow. The bulky weight version is just a little bit bigger or quite
a bit bit bigger here. So this is my bulky weight
version with the four repeats, and I love how this one
turned out, as well. If you have any comments,
be sure to leave them in the questions
portion of this video. And I hope to see you in my
next Skill Share tutorial. I'll see you next time.
 KnittingHouseSquare, Knit / Craft / Sew