Transcripts
1. 00 Introduction: Hi everyone, I'm Sara, and in this course I'm going
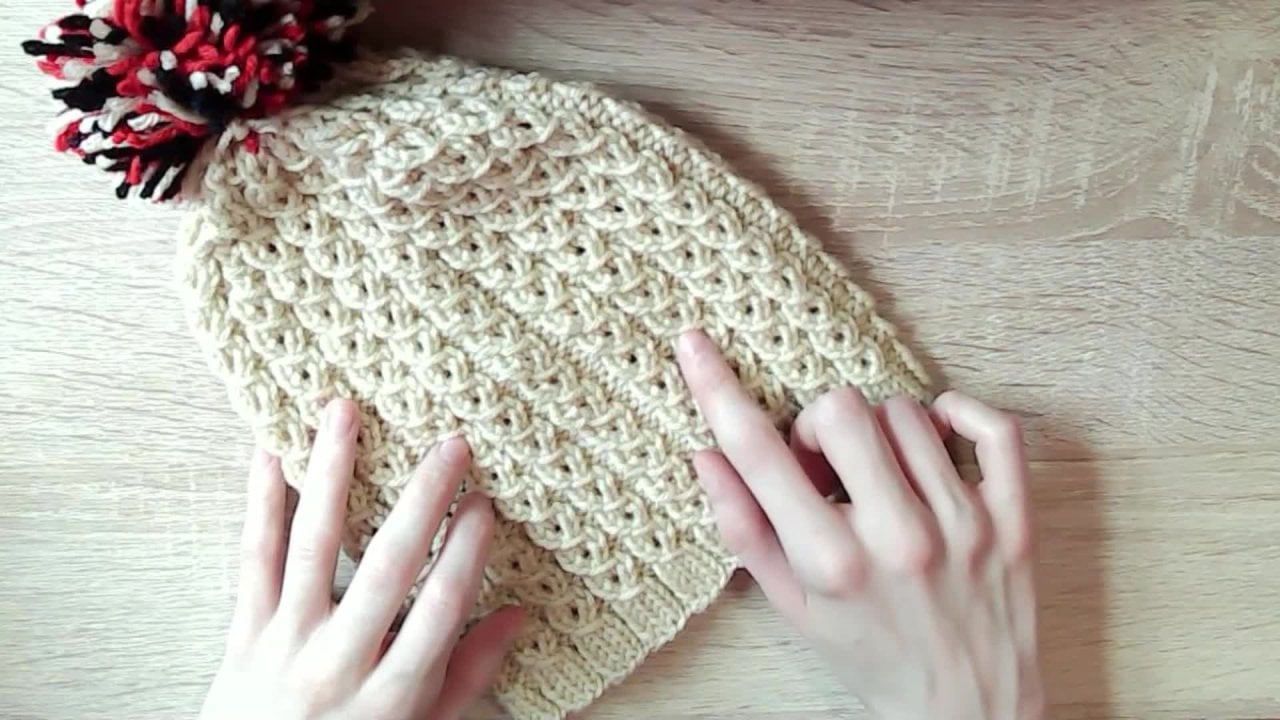
to be teaching you how to make this fisherman's rib scarf. It's a super thick
stretchy stitched, my favorite in the whole
world, plus it's reversible, which makes it great
for making AS scarf. So in this course,
you're going to already have to know how
to do a long tail cast on at knit and
Pearl stitch since this fisherman's rib is an alteration on the
one-by-one rubbing patterns. So if you know how to
do that, that is also really good and how to bind off. So if you don't know
how to do those yet, I already have courses here on Skillshare that you
can go check out and learn how to do all that
so that you can come back and make it this project. Other than that, I'm
going to be teaching you how to do the fisherman's rib, at least going back and forth on it, it's a
little bit differently. We're working all around,
so keep that in mind. It's sort of a A2 Rho pattern. And I'm going to be
teaching you how to pick up any stitches
that you might drop, since it can be a
little bit tricky as opposed to picking up normal
stitches in a knit stitch. And of course we'll
be going over how to weave in your ends. Once you're done as a well, be sure to leave a picture of your finished scarf in the project section of
the course along with any questions that you
have so that I can answer those and see your
lovely scarves. And let's get into
the first lesson.
2. 01 Project Materials: In this project, you're going
to need a bunch of wool in whatever color you want to use a set of one-sided needles. I am going to be using
5.5 millimeter lens, but up to you what
size you want to use, you will also need
a tapestry needle or when we're weaving and
ends pair of scissors, or after we're done binding on a crochet hook so that you
can pick up any stitches that you might drop a while going
through the pattern and flexible measuring
tape so that you can measure your work and make
sure that it is big enough. And those are all the
materials are going to need.
3. 02 Casting On Stitches: The first thing we need
to do with this pattern is cast on our stitches. We're going to be using
my favorite method which is the long tail cast on. You should already know how
to do this so we can measure out your wool and
we're just going to take one of our
needles to cast on. So we're just going to make our double-loop slip onto
our needle and they are working yarn over to pull that stitch slowly through and
just keep doing that. So make a loop on our
finger onto our hook and work it onto our
needle, like knitting. Just wanted to go
through that briefly in case you need a reminder. So that is how
we're going to get our stitches onto our needle. Usually I say cast on an
even number of stitches. In this case you
want an odd number. It'll make sense once
we start getting to the actual pattern,
an odd number. So I'm going to cast
on 31 stitches. So there are my 31 stitches. Again, if you want to
use a different number, you're using a different size
of needle or gauge of wool, then you can always use your flexible measuring
tape to measure that out. Just make sure that you have
an odd number of stitches. And keep in mind that this
is a very stretchy pattern. So it is going to end up
stretching it a wider than when you just have
your stitches on your needle or the
first cast on. So aim a little bit
short of what you actually want the width
of your garment to be.
4. 03 Foundation Row: That we have our
stitches on our needle. We need to put a foundation row. And this is actually
really, really simple. The only thing we're
gonna be doing, or this first row is we're going to note one and
we're gonna Pro what you've ever done
one-by-one ripping before you are very
familiar with this pattern. So really, really simple
or our foundation or just knit our first stitch and then perl our
second stitch and you're just going to continue on until you have done all
your stitches and you're going to end on a knit
stitch because of course we have an uneven
number of stitches. So that is what's going to
look like once you have your foundation row
all finished up. And now we're going to get into the actual two row pattern
of this fisherman's stitch.
5. 04 Fisherman's Rib Pattern: The first row of the
fishermen stitch. Now that we have our foundation done is going to basically follow the pattern of
the knit one Perl, one pattern that we did
for the foundation, but with a few
little differences that make it a little
bit more complex. So to start off for
this first row, we're going to start by Perlin, since we have our uneven set of numbers for the
foundation row, you ended with a knit stitch. So to match that pattern, we're going to Pearl
our first stitch, just a normal parallel stitch, easy-peasy for you
at this point, then we're going to a poll, are working yarn back over as
if we're going to knit now, instead of knitting
like we normally would, we're actually not going
to put our needle into the stitch that is on the needle on our left
or less dominant hand. Instead, we're going to put
our working needle through the knit stitch underneath our stitch that's on our needle. And then we're just
going to put our will over and knit as normal. So just knit as normal
and pull that stitch off. I know it might seem a little
scary when you first do it, but I swear it'll be fine. And that is how you're going to do all of the knit
stitches on this row. So we're going to
Pearl like normal. And then we're going to put our working on back
over as if to knit. We're not going to put our
needle into the stitch itself, but instead go into the knit
stitch underneath needle. And then just knit
as normal by putting our working yarn over and
pulling this edge off. And that is the pattern
that you're going to follow all the way through. So purlin, just a normal stitch and then
putting our needle in that knit stitch underneath
and then putting our yarn over as if
to knit normally. But we're going into that
stitch underneath of it. So let me just go
through the rest of this row so I can show you
how to turn around the work. You're going to end
off this row with a pearl stitch and then you're going to turn your work
over to start the next row. Now, what I like to do, because it can get a little bit complicated since we're going to have a knit stitch here to
go into that bottom stitch. I like to just knit this stitch. I just go into the normal stitch and then I pero the next one. Then on that third
stitch is when I start to knit into the
bottom stitch again. So not the one on my needle, but the one underneath
just like I did with the other row and
you're gonna continue that pattern for the whole row. So Perl and then knit into
the stitch underneath. Then when you get to the
end of your row again, you're just going to knit
that stitch as normal. So the two stitches on the end are just going to
be knitting and piling like normal as you alternate between
those two rows. And that is the basic
fishermen stitch. We're just going to repeat that pattern over
and over and over again until you get the length
of scarves that you want.
6. 05 Fixing Dropped Stitches: One of the scariest things that can happen to
you while doing the fishermen stitch is to actually drop us some
of your stitches. So you can see here
that we have all of these strings of wool. What do you even do
in this happens? Well, it's actually a lot
simpler than you might think. You'll want to find
your drop stitch. Make sure you're on the
side where you have your knit stitches so
that knit stitch is lining up with the stitch
that you dropped so you don't want to be where
the pearl stitches are. So if you have to flip your
work to make that happen, don't worry, it's fine. You're going to take your crochet hook and you're going to put it into the
dropped stitches. So you have that, you're
going to see that you have a couple of strings, just a few that you
need to deal with. Now the thing about this
stitches that you're going to have two strings, you have the two sets of wool. And that's because you are knitting into the bottom stitch. So you're actually knitting two stitches each
time you're knitting. So when you are
fixing your stitches, you're actually going
to have to pick up two sets of string of wool. And the trick is going to be getting them in the right order. So you're gonna
have to put two of these strings onto
your crochet hook. So you should have
your drops stitch and then two pieces of string that have
also been dropped. What you're gonna do is pull the third piece of wool
through the other two, which will make a knit stitch. Just like that and
it's completely fixed. So you're just going to do
that or each of the stages. So pick up to the strings. You might have to do some negotiating to figure out
which ones are in which order, but your pickup two of them, take the third piece of wool and pull it
through the other two. And that's your stitch. More time, pick up
two pieces of wool, take the third one and pull
it through the other two. And then you can put
your stitch back on your needle and just keep knitting
like nothing happened. And that's how you
pick up your stitches.
7. 06 Binding Off: Once you have your scarf to
the length that you want it, It's time to bind off the end. So this isn't going to
be any different from any other scarf that you might have done up to this point? Just a simple bind
off so that we keep this line nice and
flat at the top. So we're not going
to be binding off in any kind of pattern or
anything special like that. So what we're going
to do is take our empty needle and
knit two stitches. So that now we have two stitches on this needle
and then we're going to take our needle in our left-hand
or less dominant hand and pull the first
stitch that we knit. So put our needle into, pick up that stitch and
then with the firm hold, kind of keep that stitch tight. We're going to pull that stitch over the second one,
just like that. And then we're going to
knit the next stitch. So we're always going
to have two stitches on this empty needle. Then we're going to take
that first stitch and pull it over the second one. And you're just going
to continue that until you've bound off all of your
stitches except for one. So let me do that really quick. So now that you've completed binding off all your
stitches except for one, you're going to
take your scissors and cut off the end of it. Now make sure you give yourself
some length to the tail. Because when we're
weaving in those ends, it's gonna be a lot easier if you give yourself some room. So you're going to
cut that end off and then you're going to
pull the end through. I'll go into take my
stitch off Matrix, nice and big so I can
hold it and then just pull that end through
and tighten it. And that's how you
bind off your scarf.
8. 07 Weaving in Ends: Now that you have finished in, bound off the top of your scarf, it's time to start
weaving in our ends. And this can be a
little bit tricky because it's a bit
of a mixture between weaving in for a normal knit
stitch and for ribbing. If you've done that before,
it's kind of both come together because we have both rubbing and normal knitting. You're gonna take your
needle and put your end through so that we can start
a weaving in these ends. And then you're really going
to have to pay attention to what kind of
weaving you have. So we have two sections. We have these v's that stick up. Then we have the in-between
for the V parts. We're just going
to put our needle through both of those going
in behind the stitch. And then just pulling through
super simple at that one. And then for the
in-between is where we have our little loops. So if you've ever woven your
ends for a knit stitch, you're used to seeing
this little ridges. And we're gonna do the same
pattern for those ridges, just having to pick up
two stitches because remember that's part of
the fisherman's ribs. So we're gonna go through
two sets of those. Then. I like to go through There's
this little piece of wool right on the
edge of your rib. It's this part. So we have our v is here and then there's
a little section. And then we're going
to go through that and back through that one little
ridge that we went up through to begin with
a lot like weaving in your ends when you're
knitting and then repeat. So go through both
stitches for the V's and then go up through
two of those ridges. Then overthrew that little a stitch that you can see
that connects your viz and that interweaving
next to it and then back through the ridge that you originally went up through? That's how I weave in my ends. I'm not sure if it's the proper
way to do it or anything, but it's invisible
from both sides, which you'll need with
something like a scarf. So just repeat that
until you have it far enough in that you
can snip off the end, your scarf is all finished.
9. 08 Conclusion: Congratulations on finishing your fisherman's ribbed scarf. It really is one of my favorite stitches to
do because it's so warm and stretching
it and it just makes them really cozy scarf. So I hope that you enjoyed
going through that with me. Make sure that you leave a
picture of your finished scarf in the project section
so that I can see how it went for you and
include any kind of questions that you
might have a boat going through at this
pattern so that I can help you with
any of that as well. And be sure to check out some of my other courses
here on Skillshare. I add them regularly. So there'll be lots of
other projects around as a well for you to continue
with your knitting journey.
 Sarah Carswell, Fiber Artist