Transcripts
1. Introduction: Introduction to basket weaving. In this class, you
will learn how to make a rustic basket from plants
in your local environment. We will learn how to
forage for materials, prepare your sticks, and all the techniques to weave
your very own basket. Hello. My name is Laura Lamb. I write and record music, draw and make art, and I love sewing
clothes and toys. In my downtime, you'll find me walking and exploring
my natural landscape. I live in the garden of England, and I am surrounded by beauty by meadows, ponds, lakes, streams, agricultural land,
and my lovely allotment. I find that spending time
in nature and crafting with natural materials
settles my busy mind, and for me is an active
form of meditation. This class is for anyone who would like to
practice the art of slow living by learning
a wholesome craft. You don't need any
fancy equipment. Take this class, just scissors, and something to protect your hands from the
thorns on the plants. To complete your class project, you will find and
forage your materials, prepare them, and then weave your basket. I'll
see you in class,
2. About + What You Will Need: Welcome, and thank you for
signing up to take this css. There's a couple of simple
things you'll need. First of all, you need some
scissors or some sectres, to snip your plants, and then you'll
need something to protect your hands
from the thorns. I like to use a piece of
leather to protect my hands, but you also might have
some thick gardening gloves they would work well as well. Then we'll need to
go on a hunt to find the right materials
for our basket. In this class, I'm going
to demonstrate making two baskets, a miniature basket, which I made using stems
from the ugwert plant, and then a larger basket
used making brambles. These plants have been sourced from my village here in Kent. Both Mugua and brambles grow
abundantly here in the UK, and brambles can also be
found throughout the world. Saying that if brambles
don't grow in your region, you might like to
Google basket weaving and then your
country, for example, basket weaving India,
and you might find an alternative plant that would be suitable to use
for basket weaving. You're going to do your
own investigations to find plants that you think would be suitable for basket weaving. Just a disclaimer, please
do be careful and only handle plants that you know are safe to handle and
that aren't poisonous. I discovered that Mug work is perfect for making
miniature baskets, and I did that by
scouring my local area, and plants that I know
are safe to handle. I would take a stick and
just give it a little bend. And if it snapped straight
away, I knew it'd be no good. But the mug work had a nice
bend in it, so I thought, Oh, this might be
suitable for weaving, and when I trod on
my experiments, yes, it was. It made a beautiful With some of the materials
you use for basket weaving, you need to leave
them to season. For example, with hazel, you
need to leave it to season, which means you leave it
for a few months to dry, and then when it's
time to use it, you soak it in water or you
steam it to soften it again. This is because
certain materials shrink a lot when they dry. If you made a basket
out of hazel fresh, then the hazel would
shrink so much that it would warp and
cause your basket to become misshapen. Bramble is fantastic because it
doesn't shrink in that way, so you can use the materials
straight after you pick it, which makes it a fun and
easy material to use. And before we start
foraging for plants, let's have a little think about the purpose of our basket
that we're going to make. What is the purpose
of your basket? Is it a magical basket
to hold something intangible like songs
or prayers or ideas? Or is it a strong and
purposeful basket that you're going to use to pick fruit and vegetables
from your allotment? Depending on the
intention of your basket, that will affect the
materials that you choose and the way in which
you make your basket. Other lovely thing
to do when you make your basket is to learn about
the qualities of the plant, and as you weave the basket, you can let those qualities
infuse within yourself. For example, brambles
are covered in thorns. They grow in circles, in hoops, and they form protective
havens for wildlife. They also produce the
most delicious fruit. Made me think about boundaries
and how I can create protective boundaries so that I can produce my most
amazing fruit. And I don't think
it's a coincidence that after I made my basket, I was bold enough to say no
to a work opportunity that I knew that the person
I was going to work with would stress me out. So let the qualities of
bramble infuse within you. Mug Wort is a favorite
plant of mine. It's associated with
lucid dreaming, with intuition and
becoming your wild self. So for Mugwort, I made
a very, very small miniature basket
to hold my dreams. Now we know what we need and
we've got our intention. Let's go and forage
for some materials.
3. Foraging and Preparing Your Materials: Lesson, I will show you
how to find and forage brambles without getting
pricked by a thorn, and I will also show you how I foraged the mug work for
my miniature basket. I highly recommend weaving
with fresh materials. So setting aside time
that you can go and pick your brambles and then weave your basket all
within the same day. Because of the way I was doing this and that I was filming it, I ended up leaving
a couple of days between the starting of my basket and the
finishing of my basket. And that meant when I
got towards the end, particularly the rim making, I experienced some
snapping of my sticks, which was really frustrating. To save you from making
the same mistake, please do make your basket while your materials are fresh. If that isn't possible, the second best thing
is to soak them. If your brambles were picked
a couple of days ago, you could try soaking
them in a bath like this. But my best recommendation
is to work fresh. Another thing you need to
think about when foraging on materials is about how
thick the stems are. Watch this cars all the
way through to the end, so you can see the thickness
of the stems I use, but often the base stems are a little bit thicker
than the weaving stems. So when you're going out
foraging on materials, you want to make sure you
have enough thicker and thinner stems to
complete your project. Way brambles grow, they
reach out these very, very long tendrils,
which are very fine. So for the weaving, I like using the fine
tendrils at the end, and for the base, I used some
more of the thicker stems. Now, let's see a
demonstration of me picking brambles without
getting pricked. Welcome to the
Kentish Countryside. Here I am in front of
a big bramble bush all tangled in with nettles. I'm just going to pinch the end of the bramble
so I don't get pricked by a thorn and then snip it to the
desired length. Then I just run the leather up and down the
length of the stem, sometimes twisting as I go to remove all those
pesky thorns. Running it down
the length of it. Being careful to
not snap or damage the stem as you work as you
don to damage your materials. With the bigger thorns, sometimes I use a nail
to just break it off. We might like to leave
it nobly for character. It's up to you. There we go. A very nice, smooth stem. Now I will show you how I
forage for my mugwat stems. Here is some beautiful mugwat. Growing next to a horse field. Look at the interesting
shape of the leaves and how they have lovely,
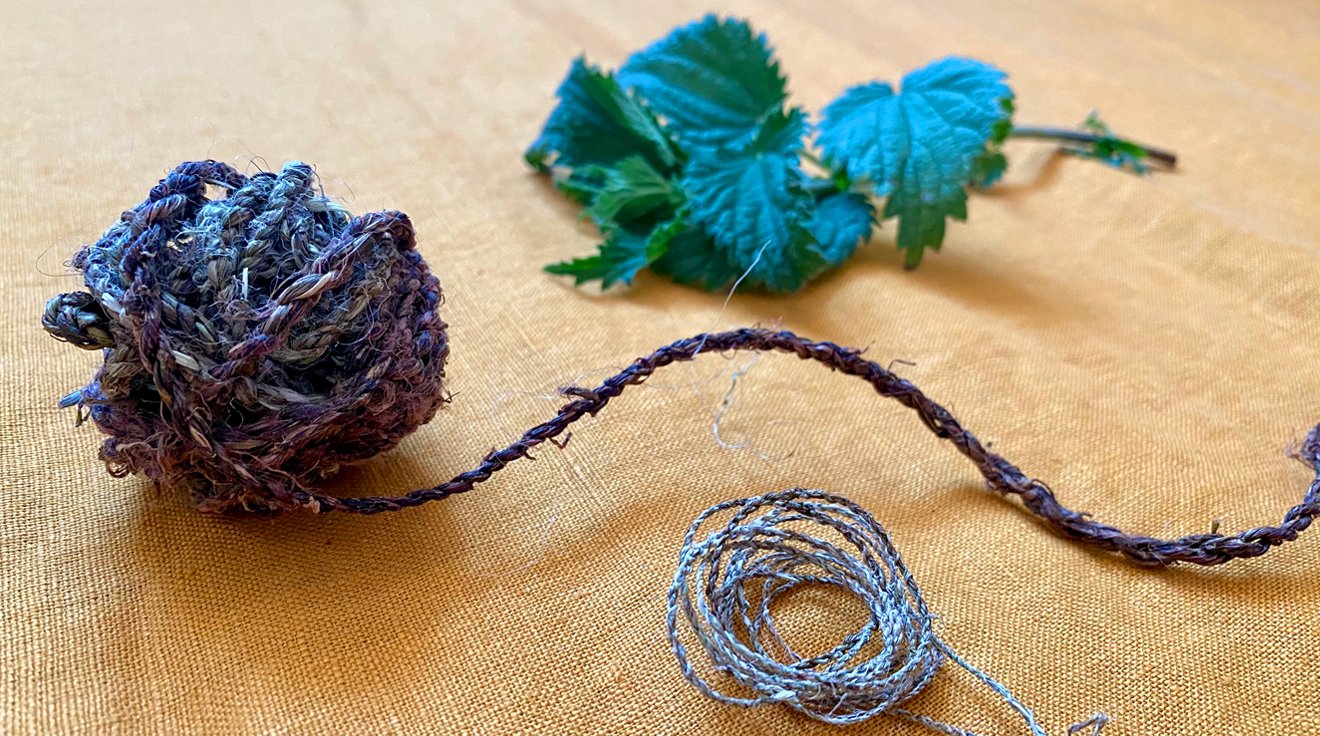
silky white underside. And the stems are stripy purple. It's early August when I'm filming this so
the gua is in flower. Look how tall it is. It's
actually taller than me. For my basket weaving, I just wanted to use these very thin stems for my
miniature basket. All I did is pick lots
of the thin stems off. Then when I took them home, I just removed all of
the leaves and flowers. The reason I did this at home is because I wanted to
collect those things. I love making get tea, and I also make gt smoke bundles for burning
the smoke in my home. The smaller bowl is
going to be used for tea and the bigger
bowl of leaves will be used to make a lovely bundle
to burn the fragrant smell. By the end of it,
you need a bundle of about ten, 15 stems. Then as a bonus, I've got all my extra herbs
for fun things. And a little disclaimer
here at the end, please be mindful when you
are foraging for materials. Here in the UK, Mugua, and bramble grow abundantly, so it's not possible
for me to over forage. But consider the
foragers code that you never take more than 50%
of a plant community, and you only take what you're
going to use for yourself. Now we've got materials. Let's get started with
the base of our basket.
4. Starting the Base - Tying in The Slath: Before we start making
the base of our basket, we need to decide how big a
basket we'd like to make. Our base stems run along
the base of the basket, so they will determine the
size of the final basket, and you'll need to make the
base stems a little bit longer because of the folding
over process at the end. For example, this
miniature basket measures 12 centimeters
around the base, but I used 20 centimeter stems, so I had enough to
fold over at the rim. Decide on the size
of your basket and then you want to
cut something a bit longer so that you're able to complete the folded
rim of the basket. Now, I will demonstrate making the base with ugwort
and with brambles. You can choose whether you
have six or eight base stems. I would say, if you're going
to make a larger basket, go for eight and a smaller
basket, go for six. Let's see how I made the base of my ugwort miniature basket. Are all my gut stems, and I've decided
I'm going to make my base lengths 20
centimeters long. I'm cutting my first piece as a measuring stick for
the rest of the stick. Now I'm going to pick out six
sticks of a similar width. All these sticks
are quite similar. Then just snipping off
that frazzled bit, and then I'm going to snip
all my matching sticks. In the end, I will
have six sticks of the same length and width. There we go. Now I need to split them into
two bunches of three. Like so, there's my
first bunch of three. I'm going to lie it this way. Then my other bunch of three, I'm going to lay it
in a cross like this. This is going to form our base. So here I am holding the
cross and then I've got a very fine piece of
stem to start binding, and I'm going to do what's
called tying in the sluth, which is doing a few twists around here to get
the base going. You might like to rewind
and watch this bit again to follow my hands as I
twist around the base. So I do about three
or four layers in this way to form
a strong base. There we go, that is finished
for my mug wort basket. Now let's see how I made the
base of my bramble basket. Repeating the same process
with these brambles. I'm cutting them all to
the same length and width. And in this case, I'm doing eight for the base. That is your choice.
You can choose eight sticks for
the base or six. And they are 74 centimeters long in this larger bramble basket. I think when you have eight, it's just slightly sturdier. That's why I went for eight
with the bramble basket. I'm doing the same method
that I did with Mug wat. I'm crossing them
over at the center. I've got two bunches of four, crossing them over
at the center, getting a finer piece of
bramble to start the weaving. As before, watch my
hands closely to see what I'm doing
to tie in the slath. But I'm just going round and round up and down to
secure the basin. But once you've got
your materials, you can copy along
and do it with me, so forming three or four
rows for a nice strong base. Keeping your jaw relaxed,
your shoulders relaxed. It can be easy to tense up when you're concentrating
on something new. So just saying soft in your
jaw and your shoulders. There we go, we have fs. I am not going to snip the end, so just leave your
long length there and you'll find out what
we're going to do. Net. Now we have our
base. Let's go to the next lesson where
we will basket.
5. Weaving the Basket: This lesson, I will demonstrate
weaving the basket. Pay attention to how fine the stems are that
I use for the weaving, and you can use
that as a guideline for the stems that
you go and pick. I will now demonstrate
with ugwort, bramble, and also to make
it really clear to see, I'll use two different
color threads so you can understand the criss
cross technique that I'm using for weaving. First of all, let's demonstrate with my miniature
mugwert basket. Here is my Mugwort base, and I've now got two thin
stems to start weaving. Basket. So just tucking that bit of the slug
out of the way, I will trim that later
when the baskets finished. Now what we want to
do is eventually, all these pieces will
separate and be evenly separated to form the web
like strands of the basket. And we do that by twisting
these two around. So I've got two stems there, and I've placed
them either side, and then I'm crossing
them as I go. So if you watch one of
the stems goes round and comes forward, and
the other one goes, back and they form a criss cross plat and separate
each one of the stems. As before with the
previous video, you might like to once you've
got your materials to hand, watch this again to
see what I'm doing. You can understand
this criss cross so one's coming forward, the other one's going
back of these two stems, and we keep twisting around. You'll notice I'm pushing and sliding the
stems in as well, so they're nice and tight to
the center of the basket. Separating those sticks, winding the stems
around, and carrying on. As before, just noticing
your shoulders, your jaw, your temples,
that you're not tensioning. Because when we're concentrating or learning something new, that's what we can do, and can actually make it
feel a bit more tiring. So make this a restful activity by finding
rest in your body. So I'm just carrying
on round and round in exactly
the same fashion. And once you've done one row, you just carry on until
those sticks run out, which that's nearly
happening here. Now, let's show a little
demonstration of me weaving my sturdier
bramble basket. Our brambles already had the tail that we
use for the slath. We only actually need
to add one more stem. We're going to line it up
with the previous one. Then all we're going to do is the same criss cross method that we just demonstrated
for the Mugu one. It's a little bit of a fiddle to find a comfortable
way to work. But once you've got
going with that, then all you need to do is pull this around
and criss cross. In the same fashion. As you do it, it will spread those base sticks apart. Evenly. You might like to
just keep an eye on that as you weave around the basket that
they're getting even. Now I will demonstrate using
different color threads, so it's really clear
what I'm doing. I've got an orange
and a white wool, so you can see the difference, one of them is
crossing to the front, the other is crossing
to the back, and I just criss cross, like so, and work my way
around those base sticks. This is my favorite part.
It's very meditative. Now, we've started
weaving our basket. Let's learn how we
can weave new sticks in and how to create the
shape of our basket.
6. Changing Sticks and Shaping the Basket: Lesson, we will change sticks, and we will also start
to shape our basket. First of all, I'll
demonstrate using thread. So you can clearly see
how I change sticks. Then I'll demonstrate with
bramble, and then finally, I'll demonstrate changing
sticks with Muga and also how I create
the shape of the basket. Let's get started with
demonstrating with thread. So I'm criss crossing my thread. Back and forth. In this example, both of my threads have
run out at the same time. Then what I would do is
I would just go back a few sticks to lock
the next row in. I would criss cross like this. And then it's much fiddlier
doing it with wool, but I wanted to demonstrate in this way, so you
can really see. Then I would lock
that last row in by just doing a few twists
over the previous row, and then just carry on the same. Da da da. And those tails just get left and they get snipped off when we
finish the basket. Imagining now that our
stems of different lengths. I think it's better
to work in this way. If you can find stems
of different lengths, then you don't have to do
that overlocking method, and there's a slightly
different method for extending your basket
as you travel around. So just imagining like this that we're criss
crossing criss crossing, demonstrating with the
orange and white again to really show that
criss cross method, and now the white
one has run out. So then in that case, all we do is we just place a
new stick in the same spot, crossed over and carry on
the same. Criss crossing. And I sometimes hold as I am there where where I'm
doing the changeover, so it doesn't loosen and fall. And now let's look at me changing sticks with
my bramble basket, my miniature mugwt basket, and also how I created the
curve shape of my basket. And now here's my bramble
basket as I work around. I'm going to show
you with brambles. So These two stems have run out. I'm going to go back
a couple and replace in with two new stems. And then carrying
on with the criss cross method and locking in that finished row. All of those will get
snipped off those tails. Don't worry about the tails now, just leave them there and we
will sort them out later. And now I'm showing it where
just one has finished, and now I've still
got one long tail and that short one has finished. Then I'm going to do what I did, and I'll just add in one new
stem over the other one. And Chris Cross like so. I think it's better when you
just replace one every time. Like I said, if you can find
stems of different lengths, then they shouldn't
end at the same time, then you can just
keep introducing one new stem as you go. Crisit Cross, C Kristie
Cross, keep on working. You'll see I'm also
shaping it as I go. I'm bringing the
sticks and I'm curving them as I work around. Demonstrating with Mug work
now at locking in the stems. And showing you this
technique of curving. All I'm doing as I work around just pushing the
stems a bit towards me and starting to create
that curve in the basket. That is up to you
and your own design of how soon you want to start curving and how tall you want
your basket to be. I think the best way to learn is just to get started
and get a feel for it. You'll see here I'm shaping
as I go around and then I'm sliding the next
row down as I go. Bringing all those base sticks towards me to form that curve. Let's go to the
next lesson where we will make the
rim of our basket.
7. Finishing the Rim: Lesson, I'm going
to show you how to make the rim of your basket. Just a little reminder here about working with
fresh materials. When you get to the end
and you bend the rim, this is when you're most
likely to experience snapping. And that's why it's really
important that if you can, that you weave all your basket and you do the rim all within the same day so
that your materials don't dry out and are
at risk of snapping. First of all, let
me demonstrate how I made the rim on
my mugwork basket. Here is my mugwork
basket nearly finished. So I'm just finishing off my last row criss
crossing to the end, and then I just
leave them there. Now that's secure,
then I take one of my base stems and I fold it
in between the next two, fold it in between the next two. I work all the way
around in this fashion, taking one of the base stems, folding it down and in. Like so. This is the part where you
can really risk snapping. That's why we need to
finish our baskets when our fibers are still fresh and not liable
to snap. Keep going. Then the tricky bit is when
you get to the last one, which in my case is this one, you just need to find a way of weaving it
in and hiding it. So it locks in that last one. Now you'll see all
the final base stems are locked in and
it's looking lovely. Now we just go
around and snip off all those tails and snip off
the tails of our base too. So you'll see that will
fold over or lovely. Now, let's demonstrate how I made the rim on my
bramble basket. So I finish my final
row on this basket, and that's just left loose. And then I am folding
over the base stem and threading it in between
the next two base stems. To we work our way all the way around and we get
back to the end, back to where we started, and that last stem needs
to bend and thread in somewhere because it needs
to lock the last one in. Finding a little gap and threading that
in and locking it. Like so. Very lovely. Then snipping off all
my little basket tails. Now the main shape of
our basket is complete, let's go and add a handle.
8. Adding a Handle - Braided, Single and Twisted: In this lesson, we will add
the handle to our basket. Take a moment to think about the purpose of your basket
when you choose the handle. The single strand basket
handle looks very, very pretty and delicate, but isn't very strong
if you actually want to use that handle
for carrying anything. If you're going to use your
basket for carrying anything, I do recommend using the
twisted or the braided handle. Also, you'll hear me
mention it a few times, but it's really all about making sure that when you insert the sticks for the handle
into the stem that you really weave it in and out so
that it forms a nice, sturdy and strong
connection to the basket. Now let's demonstrate the
three different types of handles you could
use for your basket. I've got three strands here
equal in width of length. First, I need to tuck
them in to my basket. Now, when you do this, depending on the purpose of your basket, you need to really weave
these three strands in a very secure way because you don't want these
strands to slip out later. Take your time to weave the three stems into
the structure of the basket. Then we just start plating them. If you've plaited hair before, this will be very easy, if not, just watch this demonstration
of me just taking the outer strand
and putting it into the middle and switching
from side to side. Once you've worked
out how long you like to make your
braided handle. Then you work to that point. Make your sticks
matching length, and then you need to
weave them in again. If you plan to carry this
basket with the handle, you really need to take care and attention here in how
you weave these in. This is a miniature basket, so it's just decorative,
so it's not so essential. It's not going to take
weight on the handle. Then once it's woven in, all we do is go and trim off all the excess tails so that our basket looks
beautiful, gorgeous. Here is this basket finished. Looking so sweet am miniature. Now for a single. The
single it's much easier. Wig, wiggly, wiggly,
the single strand in. Again, if it's going
to take weight, you really want to
secure this and weave it back and forth a few times
so it's really secure. And then weaving the other side. In this case, again, this is the miniature basket,
it's just decorative. I'm not so worried, it's
not going to take weight. It's more a basket
that's going to sit on the side and look than be used. But it still can
take its own weight. Here's this one
all finished with some mole and yarrow flowers. Absolutely gorgeous. Now let's show you twisted
using the bramble basket. First of all, I need
my starting stick. As I've mentioned a few times, if you want to take weight
on this, which in this case, I do, then I really need to weave it in back
and forth a few times. I have a confession to make
that this very handle you're watching make now did break off. That is because I was not
expecting to use this basket. I loved it so much, it became my allotment
picking basket. Then I was carrying
with it so regularly. I hadn't taken time to
really secure these in. It was more I thought this was just going to be a
decorative basket. What I would be doing.
Can you see this now I'm going up and
down and up and down? You just really want to weave it in if you want
it to be secure. Those are the two
bas sticks that really need to be secure
in there the same length. And then we get our
twisting stems, which might just be a little bit narrower in thickness
narrow and width. Here's my first one,
so I'm weaving it in. Again, all of these
twisting sticks add strength to the handle two. Take your time in really embedding them into the
structure of the basket so that they will help make
the handle strong. Now I do a loose round and
round the basket handle. Then when I get to the end, repeating the same technique
of winding it in in out in out to really add that
strength and keep it secure. There is my first
wind spiral done, and then now I'm
adding another stick. Again, securing it in, and then I'm just wrapping
it next to the previous one. You'll see this This stem
I'm using is quite narrow, so it's able to bend. It's also very malleable. This is fresh, just
picked a few hours ago. It's very bendy and
working very well. Then I'm again, taking
time to weave it in. But obviously, I
didn't quite do it enough because otherwise it
wouldn't have broken off. Like I said, it was planned
to be a decorative basket, but then it became a
functional basket. Really weaving in in out to get the strength for the
handle. There's two done. In this case, I decided that it needed more to add
to this twisted handle. You could just leave it
like that looks quite nice. But I wanted the whole thing
to be covered in twists. Now adding a third strand going next to the second strand. I need to weave that again. I in out to really
build strength. You see how I'm going
in from the middle and sort of threading it through like a needle and
thread and sewing it into the structure
of the basket. The more times it
weaves in and out, the stronger, it will
be structurally. Is it looking good now? I decide, I want to add one
more to finish off the twist. Again, pushing it in, sewing it back and forth
back and forth to get it in nice and strong into the
structure of the basket. Very lovely. And then tucking it in there to hide it
and to secure it. Then let's snip off
all these tails once we've definitely secured
them enough into the basket. Oh, hang on. Make sure you're
relaxed, draw shoulders. That was a bit
fiddly. Look at it. Sat amongst the brambles with a lovely, twisted
handle beautiful. Let's head to the next
lesson where we'll do our final touches
and say goodbye.
9. Final Touches and Goodbye: Come to the last
lesson of this class. So final touches is
really quite simple. All you need to do is do a
last check of your basket, spin it around from all angles, and snip off any of
those excess tails, making sure you look
inside the basket and on the outside of the
basket as you snip. Now your basket is finished. I would love to see a photo of your basket and hear about
the purpose of your basket. You can upload a photo
in the project section. And if you have any
questions or comments, please do head to
the discussions tab because I would
love to hear from you. It's time for goodbye. Thank you so much for taking this class. If you could take a
moment to leave a review, that would really
help me, and it helps new students
find the class. It doesn't need to
be a long review. You could just write a
sentence or two about my teaching style and what you enjoyed about
this class today. As I just said, please
do add a photo to the project section so I
can see what you've made. If you're going to
upload a social media, please tag me at
Laura Lamb hashtag while crafting with Laura. Go to my teacher page to find
out other classes I have on offer and to be first to hear
about new classes I load. Or my teacher page, also
find links to my Facebook, my Instagram, my YouTube, my music, and also
my e mail list. Sign up for my e mails,
I send out one or two e mails a month about what I'm making and what I'm learning. May the magical art of Wild
crafting bring more peace, purpose, intention, and
beauty into your life. Thanks so much for
watching. Bye.
 Laura Lamn, I light the Creative Spark