Transcripts
1. Class Introduction: Nettles were harvested by our
ancestors and used to make cloth and string for practical
uses like fishing nets. In this class, you will learn how to forage the best nettles, prepare your fiber, and
spin your own string. Hello. My name is Laura Lamb. I write and record music, draw and make art, and I love sewing
clothes and toys. In my downtime, you'll find me walking and exploring
my natural landscape. I find that spending time
in nature and crafting with natural materials
settles my busy mind, and for me is an active
form of meditation. Class is for anyone who would
like to practice the art of slow living by learning
a wholesome craft. You don't need any fancy
equipment to take this class, just nettles, scissors, and something to protect your
hands, so you don't get stung. To complete the class project, you will find and forage
your own nettles, process the fiber, and
spin your very own string. See you in class. Bye.
2. About this Class + What You Will Need: Welcome, and thank you so
much for taking this class. The first thing we need to do
is to locate some nettles. I live in Kent in the UK, and there is an abundance
of nettles here. They're growing
everywhere, so it's very, very easy for me to find. Nettles grow
throughout the world. So fingers crossed, they
grow in your country, but if they don't, there is
most likely another plant behave similarly to nettles that your ancestors would have
used to make string or cloth. If you go on Google and search plants for textiles and then
the name of your country. For example, plants
for textiles, India, if you do this, I'm sure you will come across a substitute plant
that you can use. Little disclaimer, if you're
going to go and hunt in your local region for plants that could be
used for textiles, please be very careful and make sure that you are only handling plants that are safe to
use and are not poisonous. Forage your nettles,
you will need a piece of leather or
some leather gloves. You might like to use a rock for cracking the stems
of your nettles, though that's not essential. You'll need scissors or some
secturs to cut the stems. The most important thing
you'll need is patience because this is a long and
slow process to make string. Let's get into the next lesson where we will start
foraging nettles.
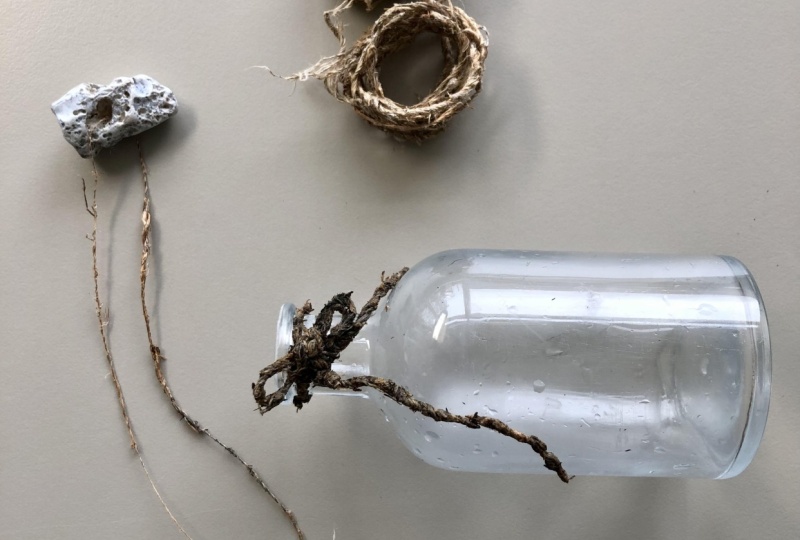
3. Foraging Nettles: This lesson, we are going to
go out foraging for nettles. Nettles are covered in stingers, including the leaves
and the stems, so please be careful
when you handle them. Over time, you'll develop
an eye for the kind of nettles that you're looking for that are best for fiber. I found that
actually you can use all nettles to make fiber, but the taller the better because the
more mature the plant, the more mature the fibers, ideally, you're looking for plants that are taller than you. And plants that the stem, the base of the stem is
thicker than a pencil. You want to snip
your plant right at the base as close to
the ground as possible, but without pulling
out the root, so just snip it
right at the base. Another little disclaimer here, please be mindful about how
much you forage nettles. Nettles grow so abundantly
here in the UK. I think it's very unlikely that you could over forage them. But the foragers code
is that you never take more than 50% of a
plant community, and you only take enough
you need for your own use. So bear that in mind when you
are foraging your nettles. Lovely way to show respect
to the plant before you pick it is to ask the
plant if you mind. Hello, nettle, Can I pick you to make some string?
Thank you very much. Let me show you how I safely snip and handle
nettles in this video. My scissors go out of shots. You can't see, but I'm reaching
right down, like I said, to the base of the
stem and snipping it as close to the
ground as possible. Welcome to the
Kentis Countryside. Got my scissors there
and my leather. So I snip the plant while pinching the plant
with the leather. And then I'm just going to rub all those tiny little needles off with the leather like so. Who don't snap it. Try and keep it straight.
Then when I take it home, I often just do one
last check because they really can catch you out
those pesky little needles. Now we've got some
sting free stems. Let's start to
prepare our fiber.
4. Preparing Fibres: This lesson, we are going to be separating the fibers from
the rest of the plant. The fibers run in lengths
on the outside of the stem, and we want to separate
those outside fibers from the inside woody bark. You can choose to separate your fibers when they're fresh, straight after
you've picked them, or you can also try
it when they're dry. I think it's fun to experiment which way works
best for yourself. I'm now going to
demonstrate for you, first of all, harvesting
some very young nettles, you still can get fibers
from young nettles, but you just won't get as much, and then after that,
we'll demonstrate harvesting some fiber from
some more mature nettles. So, when I'm harvesting the
fiber from the young nettles, I am going to use a rock. That's just one way to
crush the woody bark. I've also seen people
use their boots. So they dry out a big bunch of stems and they lay
them on the ground, and they stop their
boots, and that just helps crunch up the bark. But for the sake of this video, I'm going to use a
rock, and then I'm also going to use my bare hands. In more advanced textile
making, using nettles, you leave the nettles to t, which is another word for rot. And what you do in that there's many
different techniques. You can ret them in w or
in a barrel or in a pond, and basically you tie up your nettles and you leave
them in water and allow them to decompose
slightly so that the fibers break away more easily from the
rest of the plant. When you're making
string, you don't need to go through any advanced
processes like this. You can just peel it off
fresh or dried nettles. So let's get into
the demonstration. First of all,
harvesting fibers from young nettles that
I've let dry out. So I've got my needle
free stem here. Then what I'm doing here is
crushing my stem with a rock. I'm able to open it up. Just applying a bit of pressure. This can be done the
same with boots, as I mentioned in the
intro of this lesson. But for the sake of
this, I'm using a rock, and then you'll see I'll
now be able to open it. Then from there, I can just
peel the fibers off the edge. You see that's what they
look like all the fibers. I just carry on working the full length of the
plant in this way. You'll notice you
get a lot of fibers at the base of the stem at the woody base and then as it gets
close to the top, might be a bit trickier to get the fibers off or you might
not have many of them. This is what my fibers look like once they've
been peeled off. I can try and get
any extra bits as well. Don't want to waste any. I just peel it like this. And then carrying on more
breaking up of the stem with the rock and working my way all the way to the very
top of the stem. Until I have collected all
the fibers from the plant, so we don't waste anything. This is what it will
look like at the end. You've got all your
woody sticks on the left and your
fibers on the right. And now let's harvest
some mature nettles. I harvested the fiber straight after picking
these nettles. So here is the field next to me. You can see all these
lovely tall nettles growing next to the sheep. And then I spotted
down here where the farmer had trimmed
last year's nettles. So these lovely, thick, mature stems, and I thought it'd be fun
to give them a go. So in this method, I
didn't use a rock. I literally just snapped
them and they peeled very easily. Like so. You see how these fibers look slightly different
because they're fresh. Just checking any
extra woody bits, and I get them off like so. Then what I can do is
separate the fibers. If I've got a really big
or wide piece like that, I want to separate it
into thinner fibers, and you can do that with the
dry or the wet metal pieces. You've not got really
thick fibers to spin. You see I've split
that into about four, and now look how much longer the fibers are compared to the fresh stems or
about that long. These fibers are so long
from these mature stems. Now we have our
fibers removed from the plant and separated
into finer strands. We now just leave these to dry. I left mine on my window
sill and they were dry within 24 to 48 hours. Now our fibers are dry. Let's
head into the next lesson, where we will soften
and spin them.
5. Spinning Fibres: This lesson, we will soften our fibers to get
them ready to spin, and then we will go ahead and
start spinning our string. So here we have our dry fibers, and I'm just going
to roll them in my hands like so, using
a bit of pressure. And that will just remove any extra woody
bits of the stem. So it's up to you how
long you do this for. You can check when
you're finished when the little chips
stop falling off. You'll see here I ended up with a big pile of chips like so. Now I've got my softened fiber. I'm just soaking it in some
water to rehydrate it. Just take a moment. Just
pop it in like that, leave it for a minute or so. You can even rinse
it under the tap, and then you need to squeeze the moisture excess
moisture out. Look at this lovely
color. These nettles. The first batch I
got was so purple. Look at this lovely
purple color. I wonder if you could plant die with that purple
and it would come out. Now I've got some
of my wet fibers, we're going to start spinning. So we need to do
the first twist, which is where we just
do a loop like that. That is your first twist,
and then we carry on. I twist away from me, then bring that string over. Twist away from
me, bring it over, twist away from
me, bring it over. You'll notice that I still have some woody bits on my string. Obviously, I needed to soften and roll it in
my hands a bit longer. I don't think it's too
much of a problem. It just adds character, but if you want your
string really smooth, you might like to
roll it in your hands for a bit longer than I did. That is how I added a new fiber. Did you see me just slip in a new piece of
fiber in that way, just to keep making it longer. Oh, look at that. So pretty. Let's watch adding
a new fiber again. I let my string get thicker, which I thought was quite nice. All I do is I get a new thread, I place it where I'm twisting, and then I just carry on
the same and twist it. I started my string thin, and then I realized I
wanted it a bit thicker. As I carried on, my string started a bit thin
and got thicker. This is something you
can experiment with. There's no right or wrong, so you can try out
what you like. How thick you'd like
your string to be. Then when you get
to the end, you can fold the ends over like this so that your string doesn't suddenly get
really thin at the end. And that's a way of finishing. That is the way you
finish, you just twist it all the way to the end. It's very secure.
You don't need to do anything else to finish
off your string. Here it is. This is what ended after my first
session of spinning, and now I just need to
leave it to dry for a bit. Look at that. Lovely. See you in the next
lesson where we will discuss uses for our
string and say goodbye.
6. Uses for Your String + Goodbye: Lesson I'll show you where
my string has got to, my future plans, some ideas for things
that you could make, and then we'll say goodbye. So this is where my string
has got to right now. I carried on working with
it over a few weeks, and I plan to work on it more. So I just leave the
tail like this. And then when I want to add
more length to my string, I just wet the end that I'm working and then wet my fibers
as we did in the video, and then I can carry on adding to the length of my string. It looks really lovely that
the first lot of nettles I harvested were very
purply brown in color, and then later on, the nettles I found came
out on more green color. I've been pondering what
I can make with it. I thought it would be
really nice to use it for weaving and to weave
a bag or similar. I had to go crocheting with
it, but it's quite stiff, so unless you're going to
crochet a very loose open crochet style. I don't think
it's going to quite work. I also thought maybe it
could be used for macrome. I don't know how to do macrome, but I know there's plenty
of videos on here, and that could be a fun thing
to make with your string, maybe something to
hang a plant in. I also noticed when I harvested the mature nettles that I
started to find some very, very fine fibers and
I separated them, and I'm also simultaneously
spinning this very beautiful fine string. So I've got to come up with an idea of
what I will do with that. If you've got any ideas, please do post them in
the discussions tab. Another step for me is to do some more creative and
historical investigation. This is quite a new skill for me and I'm finding it so fun exploring and trying
out what I can do with it and how I
can use these fibers. I've also started to
do a bit of research historically into what
was made with this. I found this lovely diagram of some textiles that were
preserved in Denmark, showing a very loose
looped coiled technique that could be fun to have a go at making
something like that. Would love to see photos
of what you make, and I'd also love
to hear your ideas about what could be made
with these text stiles. You can post finish photos
in the project section, and there's also
the discussions tab where you can ask questions
and post comments. Now it's time to say goodbye. Thank you so much for
taking this class with me. Skillshare is all about
community, so let's connect. It would really help me
if you leave a review and it helps other
students find the class. If you've enjoyed my teaching style and you've
enjoyed learning, it doesn't matter if you haven't finished your cordage yet, but it's just lovely
for me to get feedback. On this class. As I said before, please do share a photo
in the project section, and you can also share
on social media, and please do tag
me at Laura Lamb, hashtag Wild
crafting with Laura. You can go to my teacher
page where you can see other classes
that I have on offer, and you'll be first to hear
about new classes, I load. On my teacher page, there's
also links to my YouTube, my Facebook, my Instagram, and also to my e mail list, where I send out e mails
a couple of times a month about what I'm making
and what I'm learning. May the magical art of Wild
crafting bring more patience, peace, intention, and
beauty into your life. Thank you. Goodbye.
 Laura Lamn, I light the Creative Spark