Transcripts
1. Introduction: Come and learn to hand sew this traditional
English smock with me. In this class, you'll
learn how to make your own smock shirt or
dress completely by hand. No sewing machine required. You'll learn what sewing
kit you'll need to buy, how to choose your fabric, how to measure yourself, how to cut your fabric, and all the sewing and smocking techniques you need to make
this beautiful garment. You can make it for yourself
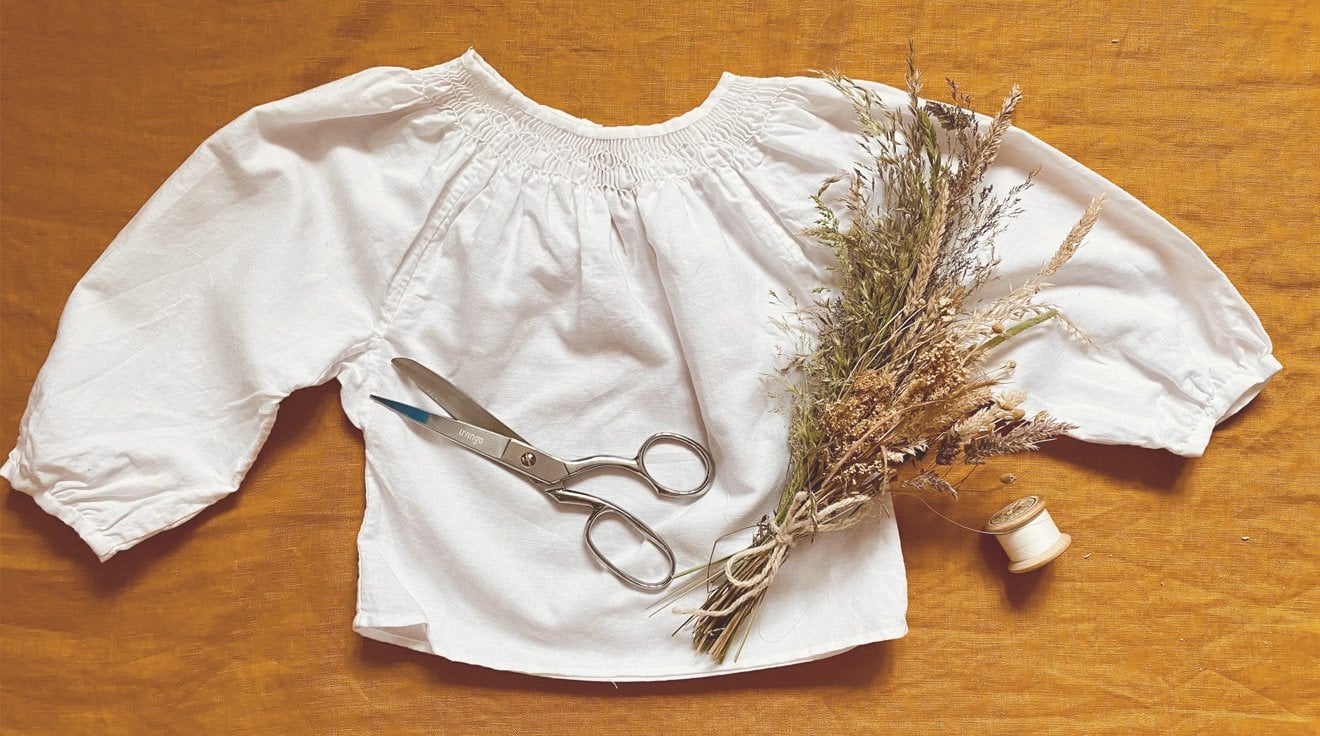
or for a little one. This gorgeous piece is inspired by the
traditional Sussex smock, which was worn in England in the good old days, but
I'm bringing it back. Hello. My name is Laura, and I am an English folk
singer and seamstress. I love sewing by hand. I make clothes for myself
and my little one, and I've also hand sewn
him a collection of toys. Sewing has brought me
so much peace and joy that I just have to share
it with my community. This class requires
no experience, all our ancestors sewed, so you might be surprised at how quickly you pick up
this peaceful skill. Right now, it's just lying dormant in your
ancestral memory. This class includes high
quality video close up, so it feels like you're
just sitting next to your grandmother
sewing together. Take this class, you'll need
a basic hand sewing kit, which is simple and affordable. When you learn to sew by hand, you learn a practical
art of slow living. Hand sewing helps you cultivate patients and enter
into a state of flow. This class is for anyone
who would love to hand sew a treasured garment for themselves or for
their little one. Let's get sewing,
see you in class,
2. Smock Construction Explained : So much for signing up
to take this class. This class is different from
my previous smocking class. In that class, I
taught you how to make a Penonian style smock. And in this class, I'm going
to teach you how to make a smock inspired by the
traditional Sussex smocks. So what we're going
to do is I'm going to explain the construction of the garment and talk
about why I love it, and that will give you even
more inspiration to get going and also help you understand how it's
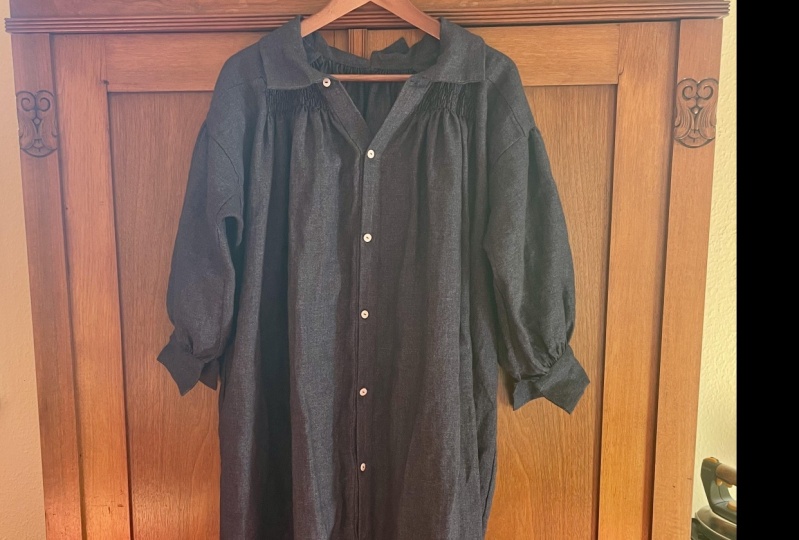
been constructed. Here is the smock
I made for my son, and I'm wearing my matching one. Let's talk about how
it's constructed. The first thing
that's interesting is there's a
rectangle panel here on the shoulders
that the front and the back of the garment
hang off like so. You'll see we've got
this rectangle panel here and the front and the
back sit nicely with that. Then we've got the lovely, heavily gathered shoulder here. The heavily gathered collar with the smocking and
a nice button up cuff. Them, the front and the
back is heavily gathered. So I've seen some
traditional smocks where they have this
smocking panel on the back, too, but to make
this a bit simpler, I've just done the
smocking on the front, and then it's just
gathered at the back. These smoking stitches, this
is called the wave stitch, and this is called outline
stitch, the straight line. We're using two different
kinds of smocking stitch. One of the things I love about smocks and I don't
understand why they don't do it in modern garments is
the gusset and the gusset means that you have free movement and space
for your body to breathe, and it just makes the
garment really comfortable. The button panel that's
along the front, and then we've hand
sewn wooden buttons along and then another interesting
feature is the collar. So the collar actually has an opening at the
back and the front, it's made out of two
pieces like this. Then the garment has been hemmed with a small
roll hem at the front. So now you understand a little bit about how
this has been constructed. I want to talk about why
I love hand sewing so much and why these garments
mean so much to me. So we live in the
age of fast fashion where clothes are bought for very cheaply and are
seen as a disposable thing. It means that people don't
treat it with respect and care and a lot is
ending up in landfill. When you make a garment
like this, you treasure it, you care for it, you
wash it with care, and you're willing to repair it. Also because it's so well made, it will last compared
to fast fashion, which is made just
to last a few wars. Another thing I really love
about sewing like this, it's my evening
wind down activity, and it's my reflective time. I might listen to a podcast
that inspires me or just listen to some music and
reflect on who I want to be, on the mother I want
to be, on who my son's becoming and just think about
our happy life together. And all of those stitches, all of those memories and
thoughts are sewn in. And this really becomes this
garment is alive and living. And you'd be surprised
how many people comment on this clothing because I think they can really notice it's something special. These garments really are
an expression of love, and wearing them
brings me so much joy. Now you have seen how this
garment is constructed, and I've talked a
little bit about why I love making them so much. Let's get into the
next class where we'll learn what you'll need
and best practice. I'll see you in the next lesson.
3. What You Need + Best Practice: We need and best practice. You'll find a list of
everything you'll need. If you scroll down, it's in
the project description. Also in the resources section, there's the smocking cheat
sheet and tips document, which includes what
you will need. To learn about the
basic sewing kit, head two lesson two of
the gathered skirt class. A few things to mention on
top of the basic sewing kit, things that you
need to consider. First of all, is the buttons. So I chose these wooden buttons, which I got from Etsy. I think when you
have wooden buttons, it compliments the
historical look. But just take a moment
to do some research, look for buttons, and choose some nice buttons
for your garment. Also, we're thinking about what color you
will embroider in. So, in my smock, I've chosen a contrasting color. I tried white, but to me, it sort of was too contrasting. So I chose a light blue, and I really like this. Sometimes they used to actually sew the same color
for the smocking, for example, white on white, which just creates
a more subtle look that's also very beautiful. Here's a shirt that I made where I embroidered
blue on blue, and I do really
love how it looks. But for these particular smocks, I chose the contrasting class will go through all the
steps to make this garment. If this is the first time you've ever sewn something like this, I recommend watching the
whole class through. So you can really
understand how it's made, visualize it in your mind, and then the next time through, you can sew along with me. This is now my sixth
class that lives here on skill share so that
I don't repeat myself. Sometimes I will reference
other sewing classes of mine, and you can find them
easily by clicking on my profile and you'll see all my other sewing
classes there. Make the most of the
resources section and download the two
documents that are there, which is the smocking
cheat sheet and tips and the smocking
measurements and calculations. You might like to
print them off, so you've got them alongside as you work through this class. I want to help you. So
if you do get stuck, please pop a question in the discussions comment
and I will help. Sometimes people ask
me how long it takes, and I've never really
calculated in time in hours, but I find that I give myself about six weeks to make
something like this, and I'm just sewing an
hour here and there. If you set aside
some dedicated time, you might sew it even quicker. Some other things to think about when you are hand sewing. Be patient with
yourself and be kind. When you're learning
a new skill, you are going to make mistakes. Be willing to unpick. Sometimes you have
to unpick your work, which can feel a
bit frustrating, but just know that you're
learning in the process. One of the obstacles, I
think to hand sewing is the hardest bit is the
measuring and the calculating. So to help yourself, make sure that you
choose a time to do the measuring and calculating
when you're feeling fresh. Hand sewing is a very
restorative evening activity, but the measuring
and the calculating just requires you being
switched on a bit more, so make sure you choose a time of day
that works for that. Follow the age old advice, measure twice, cut once. Sometimes I actually draw
everything out, I measure it, I plan it, and then I sleep on it, and I look
at it the next day. Because you're thinking
of so many elements, you might like to sleep on it and just run it
through in your mind, so don't make any mistakes
on that crucial part. To hold yourself accountable, you might like to tell me about your project in the
discussions tab. It's also nice to work
towards a specific deadline. I made these socks for
my son's third birthday, and as it approached, I made sure I spent
more time sewing so that I definitely made
them by the deadline. You hand sew, make sure
that you sit comfortably. When I first started, I find myself sort
of hunching over, and then you can hurt your back. So just take time to find a comfortable and
supported pose as you sew. The other thing is,
with hand sewing, you're using muscles
in your hands that you've not used before. So you might notice if you
do a lot of hand sewing that you feel a bit sore
and tense in certain areas. I recommend going
on YouTube and just searching hand yoga videos and
trying out some stretches, or maybe even just a simple
massage for your hands. That you're able to
continue sewing. Let's get to the next
lesson where we're going to measure ourselves
and choose fabric. See you in the next lesson.
4. Measuring and Choosing Fabric: Come to this lesson
where we're going to measure ourselves and
choose our fabric. The first thing you
need to think about is how you're going to measure. You can measure using your actual body or you can measure using
a reference garment. I actually like doing a bit of both and then checking
them against each other. When I made mine for my son
because he's 3-years-old and he won't be still
for more than 7 seconds, I had to purely use a reference
garment to measure it, and then once I'd roughly
constructed the garment, I could put it on
him, and actually, I've done a pretty good guess from using a reference garment. When you choose a
reference garment, you want to choose
something that already fits really well so that you can use that
to visualize your smock. Right now, I
recommend downloading the smocking measurements
and calculations document, and we can work through
it together step by step. To help you, I've included the measurements and
calculations for this smoc, which fits me at a Size 12, an English UK size 12, and this smok the
measurements for this, which fits my son
who is age three, and he's quite a tall
and big age three. So you will have the exact measurements
for these two smoks, which you might even
just like to copy paste if you know that
you're a similar size, or you can use it as
a bit of a check. So If you're, for
example, a UK size eight, you'll look at mine and
want to make sure that all your measurements are a
bit smaller, or for example, if it's for a 7-year-old child, you'll say, let's look at
Laura 3-year-old smock. A all my measurements bigger? Yes, they are. Okay.
I'm doing it right. Now let's run through each
of the measurements and how we take them for each
section of the smock. Starting with the
shoulder panel, measuring from the collar down to where I like the shoulder
gathering to start. Then measuring over the top of the shoulder for how wide the shoulder panel
will be this way. Now, imagining that,
just wearing a T shirt, get an idea of how you
just prepare with that. Just imagining it
would be like this, and then imagining the
over shoulder like this. Then using a
reference garment to measure the shoulder
panel for Bobby, starting at the
collar there and then down to where the drop
shoulder will be. Then going over this way to imagine how big the
panel will be this way. Now for the sleeve from where
the shoulder panel ends, all the way down to
where the cuff starts. We're not measuring the
full length of the sleeve, we're measuring up to where
the cuff starts like so. From the gathering, from where
the shoulder panel ends, all the way down to
where the cuff starts, get a friend to help
you with this one. Here I am imagining
it on my T shirt, so imagining the drop shoulder
and then holding it on my arm and measuring down to the point
where my cuff begins, leaving that gap of what I
would like my cuff to be. Then doing the same on
the reference garment. Imagining, the drop shoulder
is going to start here, measuring the length
of the sleeve, but I don't want
the whole length because I've got
to add the cuff. I'll come back a little bit and take this
measurement instead, a few centimeters from the end. You've got leave
space for the cuff. Now onto the sleeve.
Measuring around the arm as big and
wide as I want it, the wide the better when it comes to the width
of the sleeves. Now measuring the width
of the reference garment. I just go around it like this. See how wide, I would like
the sleeves to be probably adding more than the
reference garment because looking now, this is Bobby's smock
looking at how wide and gathered that sleeve
is real, as I said, a moment ago, the wide the
better when it comes to the sleeves. Now to the
front and the back. I just measure how wide I would like that smock to
be at the front. Like so. Then here I am
measuring the smock you can really see look how wide that front piece is really wide. Now looking at the
reference garments here's this reference
garment for Bobby, seeing how wide that
is at the front. You can measure from
the front or the back. You're just going from seam to seam to give you an idea of how gathered
and wide these smocks are. Here is Bobby's finished smock, and here is Bobby's jacket that's of the same
size effectively, but you want the smocks
really gathered. Now the length, we go from where the shoulder
panel ends at the front, and we measure all
the way down to how long we would
like our smock to be. Here I am with my T shirt, imagining just the same so, imagine where the
shoulder panel would be and then I hold
it all the way down. See how long I would like it. You could make it right
knee length if you like a long dress or
even ankle length. Now on to Bobby's,
imagining where the shoulder panel is
and then measuring down, and perhaps adding
a bit more length, so I've got a nice long smock. Now on to the gusts. With the gussets, I recommend
going to my documents and just copying the adult size of gusset and the
child size of gusset. If you've got a larger child, you might like to
choose a size in between the 3-year-old
smock and the adult smock. Now for the cuffs, the main thing I want to
remind you is you've got to think about this button
and the button hole. So keep those cuffs quite
loose when you measure and imagine that you are going to include a button and a
button hole in that. You also want how long you would like your
cuff to be like so. When we measure ourselves, we don't want it to be really
tight around our wrist, like this want to be
nice and loose and have space for that button
and button hole. Now using the
reference garments, I'm just going to
measure around. I'll probably add 4
centimeters onto that, so I've got space
for the button in the button hole before
I do my calculations, and then also the
length of the cuff. Now to the collar,
measuring loosely around the neck of how I'd
like my collar to be like so. Then onto the reference
garment, which is here. Yeah. Going around this, like so. That's how big we would
like our collar to be. Now to how long you'd
like your collar to be. With the sleeves, the wider
the better, with the color, I just think the longer
the better because measuring from the middle there to the collar because
when you fold them, you'll see like this, you
lose a bit of the collar. Even though the collar is 10 centimeters up
here actually only looks like it's 8 centimeters because you lose
a bit in the ses. Here's Bobby's
reference garment, which has got a
very small collar. I take that measurement
and just add on a bit for what I would like
my final collar to be. Here is Bobby's collar. Again, you see got
the same issue here that even though the
collar is 8 centimeters, when you fold it, like so, you lose two or 3 centimeters. That's why really just
add a bit more on. When it comes to the
length of the collar. In some of these socks, they really have
really long collars that go all the way
to the shoulder, which I absolutely love. There you go that's the
collar of Bobby Smock. Now to the button panel,
this is very simple, just looking at your
buttons and working out how wide you like your
button panel to be. Here's Bobby Smock measuring how wide I'd like it to be because Bobby's buttons are smaller, therefore, his panel is smaller. Look at the reference garment. This reference garment
has big buttons. So the size of the button determines the size
of the button panel. That's all our measuring. Okay, so now we've got
all our measurements. Let's run through this document. We're going to if you're going
to get your document out, we're going to go
through my Smock, and we're going to look at how
I took my measurements and I use those measurements to make the calculations for my pieces. So let's work through
that together. Now you'll have your
measurements filled in. We can now do the calculations to work out the pieces
that we need to cut out. First of all, we'll start
with our shoulder panel, we should have our measurement
from our neck to shoulder. I've written that in
shorthand n to S, and we should have our
over shoulder measurement, which for me is 14 centimeters. For this one, the calculation
is pretty simple. All we're doing is adding 2 centimeters to
each measurement for seam allowance because
we love having a 1 centimeter seam
allowance on each side. For measurement two, the sleeve, it's exactly the same. We have a 46 centimeter length in our sleeve and a
48 centimeter width. As with the last measurement, all we're going to do is add two centimeter seam
allowance to each, which gets us 48
by 50 centimeters. Now to the back, we
measured the back width as 68 centimeters and the back
length as 58 centimeters. This one is simple to. A we're doing is adding
the 2 centimeters to each. So we end up with 70
centimeters by 60 centimeters. Then for the next
measurement for the front, all we do is we take that
width and we split it in two. The way I normally do that is I cut out the exact same piece. Your front and your
back pieces should be exactly the same side size. And then all you do is you
slice down the middle. You'll see in my
final calculation. My back is 70 by 60 centimeters, but my front is 35
by 60 centimeters, so that's my back
piece cut in half. Now to the gusts. For my gussets, the final size
was 12 by 12 centimeters, and I added 2 centimeters
to each of these, so I had that seam
allowance for the gust, so it's 14 by 14
centimeter gusts. Now, these two are
where it gets a little more tricky, the cuff. I measured the width
of the cuff to be 29 centimeters and the
length to be 7 centimeters. Starting with the
length because that's a bit more of a
tricky calculation, we multiply that by two, and then we add 2 centimeters. We multiply it by two because we have the front and
the back of the cuff, the underside of the
cuff is there two, and then we have the 2
centimeters seam allowance. The final for that
is seven by two is 14 plus two is 16 centimeters, that's how long around it should be the
width of our cuff. Then to length, the
width of our cuff, and that one is
another simple one. So you just take your measurement
and add 2 centimeters. Just take a moment here to
remind you with the cuff. I just hope you've
added a little bit of room there because
remember we need space for the button
and the button hole. If you haven't,
you might like to add another 4 centimeters now, so you've definitely got space for that button and button hole. Now onto measurement
seven, the collar. This is a bit tricky
like the cuff when it comes to the width, and that is because we need to multiply it by
two and add two again. For the width, it was the final desired width
is 10 centimeters, so I'll multiply that
by two, that makes 20, and I add two, that's
22 centimeters. Then for the circumference, we add four for the
seam allowances, and then we divide it by two because we want two
collar pieces because there will be two collar pieces that we're
going to cut out. So 52 plus 4/2 equals
28 centimeters. I want two pieces, 28 centimeters by
22 centimeters, and finally the button panel. 3 centimeters wide, multiply
by the length of the front. You know how long the
front of your smock is, and then you know you want a three centimeter width final. For that, we need that
similar similar calculation that we did for the
cuff and the collar, we multiply it by
two and add two. We want it to be 3 centimeters, so we multiply three by two, make six, and add two
equals 8 centimeters. Before we complete this part, just to remind you
you can find all of these measurements
and calculations in the measurements and
calculations document, which I recommend downloading. Just having a look through the
measurements for my Smock, look through the measurements
for Bobby Smock. Breathe because it can be a bit overwhelming and a lot of numbers when you
first get to it. If you start to visualize
the smock in the mind, you will get it. Okay, great. When it comes to
choosing your fabric, there are some
things to consider, I recommend going
to lesson five of the gathered skirt class
where I go through all the things you
need to consider when choosing your fabric. But the main thing you
need to know is it needs to be a woven fabric, like a cotton, a linen,
these are corduroy. Although I love the look
of these corduroy jackets, I'm not sure if I'd
work with cardoy again because each one of
these little channels, when you chop it, these
tiny little balls. So my whole house, while I was in the
middle of this, was covered in tiny
little navy flex, which drove us a little bit mad. When you work with
linen and cotton, you don't have that experience. So I recommend, also, because of the way
these smocks are that you'd like a
heavier fabric. You'll find out
more in that lesson five class about different
weights of fabric, but because of the
way this sits, they were traditionally
made with a very, very heavy linen, you might consider getting
something like that. So now we know how to measure
and choose our fabric. I'll see you in the
next lesson where we will lay out, cut, and label.
5. Layout and Label: Come back. In this class, we're going to
learn out how we're going to lay out our pieces. We really want to be
economical and not wasteful. Traditionally, the
reason these are made out of rectangles
is because you didn't want to waste any of
this precious fabric that been woven by hand. What I do is I draw out a
cutting plan like this. You see, along the top here
is the width of my fabric, which once I'd washed,
it was 144 centimeters, and then the length
of my fabric. Then what I do is I lay out where all the
pieces are going to go. These are my two
sleeves and these are my two front and back pieces. It's not all
scientifically accurate, so the sleeves here look
longer than the body, which I don't think is true. The sleeves in the body
are about the same length. The other way it's really really good to do the
cutting plan is right. When you decide, I want my back piece to be
65 centimeters wide, but then you look
and you plan to lay out in your fabric
and say, hang on. 144/2 is 72
centimeters, actually, I can make my garment even wider because I think with
this style of garment, the wider and the puffier
the sleeves the better. This diagram shows this is the
two front and back pieces, which then I'll cut the
front piece in half. And then these are the sleeves, and then these are all
the other sections here. If your fabric has a direction, so like this corduroy is
in a certain direction, then make sure you
think about that when you do your cutting plan. I made the decision as
well for my cuffs to go this direction and for my
collars to go this direction. I've seen other people let the grain of the fabric
go a different way, so my shoulder pieces
go down like that. So you just got to make
those decisions as you cut head to lesson six of the gathered
skirt class to learn how to prepare
and cut your fabric. There's different techniques
for cutting fabric, depending on the
weight of your fabric, and I'll show you
how to do something called pulling a thread, which is actually what I
used to cut this corduroy. It's a way of making sure
you get nice straight lines. So now you have
measured yourself. You've made your calculations, you've bought your fabric, you've washed your fabric, you've cut out all your pieces. So now we are finally
ready to get sewing. I'll see you in the
next lesson where we will attach the button panel.
6. Attach Button Panels: Welcome to our first sewing
segment of this class, where we're going to
attach the button panels. What we're going to
do is we're going to attach this panel
here like this. In the video, you see me
do it on just one side, but you'll need
one for each side, for both your front sides of
the smock. Let's get sewing. Here's our button panel. We're going to fold it like so, and it will sandwich in the
front panel of our smock. Like so. To make
sure it's straight, we can first of all
just line it all up. I like to pop a pin at
the end or in my case a needle because I really try not to have too many
pins hanging around. I'm just scared
about dropping them. I'm folding it over by 1
centimeter all the way along. What's great about cordoys? Because you've naturally got that straight line
that you can follow. If you're using linen or cotton, you might
like to measure this, or you might even like to press this 1 centimeter seam all the way along so it
stays nice and neat. The first thing I'm
going to do here is a fastening knot to get started. You'll see for now, I've
just got one needle at the other end of
where I'm going. You might like one midway as well just to check as you go. Or if you're a big fan of pins, you might even like five
pins all the way along. There's many or as
little as you wish. So then I'm fastening the button panel to the front with the
first fastening knot. And then I just work my way along using what I
call a fell stitch. It's a bit like how we
do our flat fell scams. That's why I call
it fell stitch. Not sure if it that's what
it's officially called. But with the fell stitch, all I'm doing is I'm scooping up a tiny bit of the front panel, and then I'm going in at a slight angle and going into
the button panel like so. I just work that way
all the way along. Scooping in a tiny bit, going in at angle,
and pulling through. So this is what it
will look like. Oh, so neat and so straight, you could never get it that neat or that straight on a
machine, could you? Now we're getting
right to the end, and there's a few more
stitches left to go. I always like to do a
fastening knot at the end before I turn the fabric
over and do the other side. Flipping it. Then you can see the line from
where you stitched before. Is actually your choice here
about how big your seam is? It can be anywhere between
no 0.5 and one centimeters. That's what I recommend. You can see now that's going
to be sandwiched. I'm using the first
line of stitches, which we hopefully did very straight as a guideline for
heading back the other way. We find it's easier going back the other way because
you've already been concentrating very
hard hopefully on the first line, so
it's nice and straight. As always, relaxing shoulders, relaxing jaw, just
checking a posture, checking any tension, so that this hand sewing
is really restorative, that we're not tensing up, even though we're
learning something new, we're staying chill. So then working
all the way along, fastening knots at the end, and it will look just
like this, how beautiful. Then all we need to do is
the same on the other side. That step is complete. I'll see you in the next lesson.
7. Gather Front Panels: Back in this lesson,
we're going to add our gathering stitches to the front of the smock so we can choose the size of
our gathering panel. First thing to mention is
about your gathering stitches. So I used these lines of the corduroy to get even
stitches for my gathering. If you're not using corduroy, you might like to go to lesson 13 of my hand,
so a smock class. I've got another smocking
class on my skill share. And in that one, I show you how to to measure out your
gathering stitches. Saying that, I actually
think our ancestors wouldn't have used a
ruler in that way, and you could also
just try doing it by eye if you're
feeling brave. My stitches are approximately
5 millimeters each. Another thing to consider is how wide your smocking
panel will be. So first of all, let's talk about how wide my smocking panel
is on my smock. So just measuring how big
the smoking panel is. It's 19 centimeters wide
before I gathered it. And that means I left 14.5
centimeters here ungathered. And the 19 centimeters, once I smoked them
and gathered them, they gather down
to 7 centimeters. I did 10 centimeters of smoking. And now let's talk
about how wide the smoking panel
is on Bobby's smok. Okay. So on Bobby's, I gathered a 16
centimeter panel, and that meant that I left
just 5.5 centimeters. The 16 centimeters gathered
down to 8 centimeters. And this was 8 centimeters long. You might like to go on
Pinterest to get some ideas about how far down to
smock, how wide to smock. So now you've decided that. Let's get sewing. So here's my lovely front panel. I've marked on here how wide I'd like
my smocking panel to be, and also how long. I'm taking my gathering thread, which is in a contrasting color and cutting it to the
length of the panel. Then doing a big fat hairy knot by twist twist twist twist twist twist twist
towit twisting, and then pulling it through. Hey, walla. And then
we just stitch log. So conveniently, I'm doing two channels
of Cordoy per stitch. You can head to my other
smocking class to see other ways to measure your smocking dots as I discussed at the beginning. I've also just started
smoking a new shirt and I'm just trying not
even measuring it at all, just doing it completely by eye. Let's see how that goes. But the ordo is
fantastic because you can just see how
long each stitches. Now you can see my
nice even stitches. I've done one, two, three, four, five rows of smoking
of gathering stitches. Then you see, I've done six, two, three, I've done six. And then I bunch together
three rows, and I knock them. And that's just so that when it comes to
actually gathering, I just find it a
bit easier if you can pull a few rows in one. There we go. Matching
up both sides evenly to matching front panels both gathered up ready to go. That steps complete. I'll
see you in the next lesson.
8. Gather Stitch for Sleeve Shoulder: Lesson, we are going to do the gathering stitches
for our shoulder. To give you an idea, my
sleeve is gathered about 1.5, so this width plus half. And in Bobby's one, which is the one you're going
to watch me doing, I have chosen this measurement,
and I've doubled it. So you get this really lovely,
heavily gathered shoulder. I must admit that I prefer it double gathered.
Let's get sewing. On the left there, that's
the shoulder panel, and on the right is my sleeve. And for my son's smock, I'm going to really heavily
gather the shoulder, so it's going to be double. The width of the shoulder, I'm measuring that out twice. You can also do it 1.5. My smock was more like 1.5,
but this one is double. Once you've marked out, you're just double
checking the even there. And then running that
gathering stitch. Same All done. Got to do the same on
the other shoulder. That steps complete. I'll
see you in the next session.
9. Attach Shoulder Panel and Gather Back: Welcome back. In this lesson, we're going to attach
this shoulder panel to the front and to
the back of the smock, and we're also going to
gather the back of the smock. Let's get sewing. Attaching
shoulder to front panel. As always just taking a
moment to check in with your jaw, your
shoulders, temples. You've got through many
of the frustrating parts, the measuring and
cutting is the hardest. Now we're going to
use running stitch. This is our first step of actually fixing
our garment together, so we're starting with a
fastening knot as we always do. It's a 1 centimeter seam, and we're going to
run running stitch. You can also choose
backstitch if you prefer, but I always use running stitch for putting my
garments together. We're going to do that running stitch all the way up to where the
gathering starts. If you look, I'm just peeking underneath the
fabric every now and then to see where the
gathering starts. Let's just have a
look and we're nearly there. A few more stitches. Then a nice fastening knot. That's the front attached to
the shoulder on one side. And now we want to attach it
to the back piece as well. But before we do that, we need to do the gathering
stitch on the back piece. So we use, did you see me using my front
piece as a measuring? We want to gather the same amount so that the front and the back? I gather the same. So I'm measuring out the
same width of my smocking on my front panel times by two so that I can run
all the way along there? You see now I've done
a gathering stitch all the way along
that back panel. So now it's ready for me to attach the front panel
onto the shoulder like so. This is what it's
going to look like. I'm just going to
flip that round. As before, we do the running stitch all the way up to
where the gathering starts. So it'll look like this. Lovely. And then all we need to do is mirror that and repeat
on the other side. Okay, that steps complete. I'll see you in the next lesson.
10. Attach Gathered Shoulder: Lesson, we're going to attach
the gathered shoulder, so we're going to take this
part we've gathered here and attach it to our shoulder
panel. Let's get sewing. Here's where we were. We've got our shoulder panel attached
to the front and the back, and I'm going to mark
the halfway point on that shoulder panel. This is to help us
get even gathering. As well as that,
I'm going to take my sleeve that we've already run the
gathering stitch along, and I'm going to mark the
halfway point on that one, too. We can use that to
keep it all even. Then we fold by 1 centimeter, so I'm folding my
shoulder seam over. I'm just making sure I've
got that halfway point marked on because
once you fold it, you might lose it slightly also see here I really pinch it. It works with linen
and you can do quite a strong crease so that you can use
the crease as a ma. Lovely. Now we pull the
thread on the shoulder. That should gather exactly into that nice shoulder panel and that also on top of it like so. The way we do this is we
start with a fastening knot. Then I take where
the gathering ends. There's a mark there
from when we marked it out to draw the gathering on so that can help us
to find that point, and then we fasten that
with another knot. We've done 1 knot to attach
the thread to the fabric. Another knot to now
attach the sleeve. Then once we've got
that there, all we need to do is pull this nice and tight and then match up that halfway
point that we draw on our shoulder panel and the halfway point we
did on our sleeve, and that's when we need
a pin or in my case, using my gathering needle. To fix that together. Now we need to attach
this gathered panel. I do that by scooping
up one gather with my needle and then fixing
it, you'll see as we go. If you head back to my
gathered skirt class, I really do some
close up shots of gathering and how to
really get neat gathering. I do find this takes practice, and it can be easy at first
to either bunch it up too tight or make it too loose, and then there's a
already bunched up bit. It just takes time. So what I do is I scoop
a teeny tiny bit, I go under Just
reminding you now, just to drop your shoulders,
unclench your jaw. All those things can happen when we try to do something new, we can get a bit tense. Let's keep working our
way along scooping up a stitch and then attaching
that stitch to the shoulder. The first step is to. Can you see the green running
stitch running through? I use that as a guideline for where the gathering stitch should run at about half a
centimeter away from the edge, and then we want the
scene to be 1 centimeter. You can use that green
line as an indicator. I've worked all the way
to the halfway point, and now I'm going
to pin the end of the gathering to the
end of the shoulder, so we can carry
on just the same. Once that's pinned in like so, we just work exactly the same. Like I said, this does
take practice to get your gathers knifes and even. The fantastic thing about
hand sewing it so slow, so you can see your
mistakes as you go and then quickly unpick them
and give it another go. I carry on the same fashion, scooping up the
front of a gather and attaching it to the
shoulder and on and on and on and on with relaxed breathing. There we are. We've
got all the way to the end of this part. Just the last few stitches. There we go, and ending as always with a
nice fastening knot. Well done. So look
like this now. So you got your
front, of your smoke, your back of your smock, and then your gathered
shoulder attached. So this is what it
looks like this way. I haven't done the
other side yet, but you will need to mirror
exactly on the other side, attaching your other front side panel and your
other shoulder. Like so. That steps complete. I'll
see you in the next lesson.
11. Attach Gusset and Sides: Welcome back. In this lesson, we are going to sew our
gussets in like sew, and also sew the sides of our seams of our sleeves and
the sides of our garment. Let's get sewing. Starting
to really come together now. We're going to attach
our gusset here. So starting with attaching
it to the sleeve. We always leave a
1 centimeter gap at the end of each gusset. So I'm just measuring their
1 centimeter from the end. And then I'm going to
do running stitch. Again, your choice, you can
do backstitch, if you wish. I find a running stitch to be
perfectly strong for this. So I'm doing my fastening
1 centimeter from the end. I'm using my thumb to measure, you might like to use a
measuring dap, not a thumb. Relax shoulders, relax raw, working all the way along until there's a 1 centimeter
gap at the end again. Always with the gust leaving a one centimeters from the end. Now I'm flipping it
around and I'm going to attach the gust to the
side of the front panel. Now, I would say that this part of construction can
be bamboozling. Just follow it
through as you watch, and just rewatch
it, if necessary. Just go back to the
videos where I show you the garment so you can really
see how it's constructed. The first time I
attached a gust, I did it completely wrong, so it will just take
time to figure it out. They're all going all
the way down from the shoulder along the front
panel and along the gust. Always leaving that 1 centimeter gap at the end of the gust. Now I've got to the gust. Sometimes I do a knot here, and then I'm leaving that 1
centimeter gap at the end. Now the gusset has
been attached to one side to the sleeve and
one side to the front, and now we need to attach it to the other side of the
sleeve and the back, which you'll start to see it's
starting to come together. There it is attached to the
front and to the sleeve. Then now we need to attach it
to the back and the sleeve, and we do that by First of all, attaching the front and
the back of the garment. So we really are constructing
the garment right now. This is such a key video. So we're running from the front, from the bottom,
all the way along, that's my running stitch, going all the way to reach the gust. Now this is the point where we're attaching the
third side of the gust. So we're always leaving that
1 centimeter gap again. I've folded the gust in half, so you've got almost a point, and you just want to catch
the corner of it there. You see, so I'm
approaching it cautiously. Trying to think of a joke
of as one would approach, what kind of animal,
would you need to approach cautiously
a grizzly bear? We don't approach
a grizzly bear. We don't have bears
in England anymore. So right now I'm on the gusset. You see now, I'm just
coming up to it. So you'll see now it's getting really thick
because I got to go through all these layers in
that corner of the gusst. And I normally hear at
this point do a knot. So I'm going from attaching
the front and the back of the smock to now
turning to the gusset. So I'm at that corner point. I'm going to go back in and
run along the gusset now. Again, going all the way till there's 1
centimeter at the end. So this is really
coming together now. It might seem a bit confusing. When you get to
the end and see it all laid out, it
will make sense. So I've left that 1
centimeter gap at the end. And now that the
back of the sleeve. So if this is all
worked out right, this part here now, the sleeve, just these two 1
centimeter pieces should kiss so beautifully here, and then we join them together. This is the final
side of the gust, da da I've now gone all
the way along there. Now, that means I've got to the sleeve the
sleeves like a tube, you're just now going to
sew that tube together. After doing another fastening
knot at the corner of the gust because I find this is a high strain
piece of the garment, so it's really nice to
get that really secure. Coming and the M. That will now mean that we
are coming to the sleeve. Like I said, if you're finding this a little bit bamboozling, just once you've got all your pieces of cut and you're actually
working through this, just work through it with me. I'm now pinning the
sleeve tube together, to keep it nice and straight. I don't go off course. I'm going to work along
the sleeve about here, about 3 centimeters from the end because we want the sleeves
to open at the cuffs. Let's do a little knot there. There should now just be one
tiny bit that's still open. You go gus it fixed. But from the shoulder
to where the gust is, there's one tiny bit there
that's not been attached. So now we're just going to
fasten not attach that bit. This is what it will
look like at the end, your sleeve will be altogether. You have the gust here. This is the front
of the garment now. You can see it's like a
square sat in the armpit. My sleeve is open 3
centimeters at the end. It's looking like so. Okay, that step is complete. See you in the next lesson.
12. Prepare to Flat Fell: Come back in this lesson, we are going to
prepare to flat fell. Flat felling is a
style of seams, which means that the seams
are absolutely beautiful. They are almost hidden, and they're quite thick
and chunky as well, so I think they help with the
structure of the garment. You might find this a little bit confusing
when you first do it because I've chosen a way that I believe it's best to
fill in each direction. You can just follow
my instructions. Another thing to note is that because we have
these cuffs like so, we leave an opening at the end, so we flat fell to here, and then we do rolled openings so that we can then
attach these cuffs. Let's get in preparing to
flat fell. Let's get sewing. All these arrows indicate the direction in which
I'm going to flat fell. If the arrows pointing that way, it means it's going
to fold over like so. So just make a note of
the way these arrows are. That's the front of the smock, and then the arrows are
like so on the back. So you just need to
copy these arrows onto your garment like that.
So you're able to see. Then what that means is, you'll need to cut the other side. So because for example, on this bit, the right one
is going to fold over. I'm just cutting a little notch, and I'm going to cut this now
to be not 0.5 centimeters, 5 millimeters so that these flat fell seams
can go over it. I'm just using those
arrows as a guide marker. So I know which side to cut. As with a lot of this, the
first time you do this, it might seem confusing, follow it through as I do it. Just copying where my
arrows are and then cutting in the direction. This one is going to
fold over that way because the arrow is
pointing that way. Keep checking your
arrows as you cut. And you'll need to do all four sides of the gusset as well, checking the gusts
all folding outwards. You just need to
check that all of the undersides are cut so that it will fold over.
There's another one. Cutting in a little
notch and we're going to cut that one half of it off. That will fold over cutting the end of the end of the notch. Just checking over now, k. Have I cut half of the seam
off on all of these edges, using the arrow as
an indicator for which way I'm going
to flat fell it? Working over the whole garment, as was checking in with, shoulders, temples,
enjoying the process. It really is worth doing
this because then you just get such beautiful inside seams. In modern garments, they
just use an overlocker. Okay, here, this is
another step I do. I go and check the gusset
from the outside at this point and check if
it really is secure. You'll see this one corner
here is a little bit loose. So now I go back and I just do some more knots on the corner of
my gust because I really don't want
my gusts to start falling out in some of my earlier garments when I
first started making clothing. I didn't double
check this, and then I have to go and
repair it later. So it's really good
to get those gussets in nice and secure
at the corners. So once that's all secure and looking beautiful
from the outside, and you have done all
your flat felling, you've followed my arrows
and flat felled each one, then you're ready to go and
flat fell your garment. That step's complete. I'll
see you in the next lesson.
13. Flat Fell Seams: Welcome back. Here we are
flat felling our seams. The main thing to note with
flat felling is you always want to work on the side
that your hand is in, so I'm right handed, so I always flat fell the right side. So that means you
might need to turn your garment so that
you're always starting. So it's folded over
to the right side. And you'll notice
this in the video, I'll always be flat felling on the right. Let's get sewing. So starting at the
bottom of my garment, where the front
and the back meet. I'm doing a fastening knot. And you'll see now, this is
what flat feelings like. You fold the larger piece
over the smaller piece, and you get this
really lovely neat, but also kind of thick seam. I think it helps to even give structure to the garment
because the seams are so chunky, about smooth. You know, as I
mentioned before in the previous video
about overlockers, they're so sort of
scratchy and ugly. These are smooth and neat. We scoop a bit and
we scoop a bit, and we just work
all the way along. I love flat felling,
it's very soothing. You see now I've
reached the gusset, and the gust is folding out on all four sides when it
comes to flat felling. You just need to fold
over the corners, d ding like that. Folding that side,
folding that side. So our gusts is so lovely and neat from both
the outside and the inside. As we did when we first
attached the gusset, and we made sure we had
knots at the corner. You might like to add more knots as well when you flat fell the corners of your gust just
to keep it really secure. Checking him with jaw,
shoulders, temples, hips, enjoying the process of learning how to make
this beautiful garment. There's my fastening knots, getting that gust
on nice and secure, and then I'm going to carry on flat felling just the
same folding that over. There I've gone all the
way from the bottom, all the way along the gust, and now I'm going to
carry on upwards rest of the gust and up to reach
the shoulder panel. We don't flat fell
when it comes to the actual shoulder
panel because we've got a inner
shoulder panel, which we use to cover up all the stitches
on the shoulders. Now I'm going to
the sleeve opening. I've done the front
of the back, now I'm going to the sleeve opening. We do here what I call
a rolled opening. This is just to do a nice finish on these
edges of the seam. I do that by just rolling
that around like a so. You'll also see this rolled edge on my gathered skirt class, if you'd like to
see me doing that. On another garment,
you could head to the rolled opening on my
gathered skirt class. I'm just rolling it like that. This is quite a small
neat little seam. I don't know, it's maybe
three mill or five mill. So rolling it and stitching
all way along like so need to repeat the
same on the other side. So fastening not here. Rolling it open, and
attaching it on. Working all way to the end. And then now this bit is ready to the edge of the s then
we need to flat fell that. So now, we've done these
two rolled openings. Now we can flat f s. So we can work all the way from the gust where we were just finishing off
and start there. I'm just using the arrows as a guideline and just being slow and patient as you
work through all of this. I'm on this other corner of the gust here just about
to start on the sleeve. I'll probably do some more knots to get that really secure. And then I'll work all the way along Once I get
to this end bit, where the rolled opening
is a bit imperfect because it's one bits
rolling one way, one bits rolling the
other way, B s make a nice twist and they
meet up like that. You might just want to
do some extra stitches a bit like how we do at the gussets because
this is a part of the garment will get strain where you're putting
it on and off. You just might want to
do some extra stitches where you can round here, some knots to get
that nice and secure. Just looking for any
little bits poking out. Can you see the little
tiny bit poking out there? I'm going to go and just attach everything with knots and make it really secure. Working through to that bit with the annoying bit
that's poking out. We'll just tuck it under
go away, you cheeky bit. Go away, go away,
tucking it in with my needle and then just
sewing around that. So like I say, this
really is the benefit of hand sewing because
you can just get in there really detailed. Really neat and just fix
all these little glitches. I just don't think
you could ever make a smock with a machine. Just maybe the straight
lines, and that's about it. Because you just wouldn't
get that beautiful finish. So that nice twisted
edge is all done now looking lovely and neat. So do some fastening knots. Do Do Oh, we're going to even do some
more stitches, I think. Just really looking
at any bits that look fiddly and just sewing
them and knotting them. Make that thread
disappear like so. There's a few more edges
that need flat felling, so we just keep working
around where we need to go. I need to do the other
two sides of the gusset. So by the end, it
will look like this. Wow. So crisp and beautiful. So that's it from the inside. All the seams nice and chunky, yet smooth and beautiful. That step's complete. I'll
see you in the next lesson.
14. Attach Cuffs: Back in this lesson, we
are attaching the cuffs. This is another
creative decision. How much are you going
to smock your cuffs? I've just chosen
one waves stitch. I've also seen historical
garments where they have quite a large chunk smoked here. Just do some research and choose what you would
like your design to be. Same with the front
and the back panel, you might like to
go to lesson 13 of my other smoking class where I talk about the smoking dots. Now you've made your creative
decisions about how big your smoking panel is going
to be? Let's get sewing. So here is my sleeve with my rolled opening and
we need to gather it. I've drawn my mark here for
where I want to gather. I'm going to do nice
and even stitches using the cordoy as my marker. I'm doing two rows of
cordoy per stitch. It's nice and even. As discussed at the beginning of this video, it's your choice, how many rows of gathering
you want to do here. Oh. I just turning my
sleeve out the other way. I think it's easier to work the right way
round of the garment. My garments right way
around. That's a bit easier. I had it inside out before. There's my starting
point. I got my big knot, and then I work
all the way around and do a knot at the other end. Then it's your choice,
how many rows. You might just want to do
it like that and not smock it or you might want to do more. I actually did too many
rows and didn't use them. Have a look at
some other design. Now I'm halfway
marking the cuff. This is to get even gathering like we did
on the shoulders. I'm marking the halfway point on both sides of the cuff. So. And then the same on the sleeve. Just folding in half. You could also use a tape. I just find this is a
quick and easy way just by folding in half. You can see my four rows of gathering sit
shoved on there. I'm just going to pull them. Not all those four
rows together, find that easier to work that way as I did in the front panel, and then s on the other side. Pulling all four threads, and then knotting them. Check in my shoulders, jaw, temples, enjoying the process. Okay. That gives you an impression of
what it will look like when it's all gathered up. Taking our cuff,
folding it over, and as with the gussets, we're always working 1
centimeter from the end, ore your seam of choices. I think this is probably more
like 0.7 from the end and 0.7 folding it over and touch my fastening ready
to attach to the cuff. So there we are? You might like to
use a pencil to mark your seam length. I'm
just doing that here. Getting my folded over
cuff and attaching it. Noticing that bit
that's hanging over at the end that's going to be
folded under in a moment. That's the side of the s. Nice fastening knot to attach the two
together and then we work in a straight line like so until we get to the
gathering. There we go. Nice straight line. I
fold the seam as I go. Now we've got the
halfway point and the halfway point
our cuff that we've marked and using our pin, but in my case, a needle. I attach those two together. As with other gathering parts, this can be fiddly just to try and get them nice and even. You'll see here now that I spend a moment checking
that the seam is folded nicely at the length I've chosen about
0.7 mill for mine, just make it nice
and straight fold. Then just fiddling
with the gathering to get the gathering
nice and even. It's all bunched up one
place and loose another. Once I think I've got
it nice and even. Once I've got my seam
folded over nicely. I can start to work along in the fell stitch
method where I just scoop up one gather and
then attach it to the cuff. As with all of this, it takes a bit of practice to
get it nice and even. You might find the first
time, need to redo it. Learning curve, relaxed
shoulders, relax, relax temple. So working all the
way along like so, gather by gather, smock by
smock stitch by stitch. Until we make our way
to the halfway point. I've gone all the way along
here, take that needle out, and then we want to make
sure that our calf now with the no 0.7 mill at the end or the
1 centimeter wherever you've is attached to
the other opening. We just fix that there. We know how gathered our
next bit has got to be. Folding it over nicely. Again, just tightening up those gathering ones and
then evening them out. And folding over that
cuff seam again, getting it nice and straight. Stitch by stitch, working
all the way along. Eventually, then we'll finished all the gathering
and now we'll be at the point Sometimes I
attach the pin here, instead, I find it easier
as I work on the gathering. I finish the gathering there, take that away and then
work into the end. The fool in the fold. Lovely. Once you've done all
of that to the end, you'll be ready to turn it over. I find it so much easier
to do the other side. You've already really
concentrated on making it nice and straight and getting
your gathers even. Now we're just matching
it up on the other side. I put my needle in,
get out of the way, put out the way so
that you can reverse your garment so that
you can do the inside. There's my needle.
Take it out now. Dy. A thimble back on and folding
over this end now. Remember we need that bit
hanging over at the side, whether it's 0.7 or one or 0.5. Then we're doing
like a mirror image, matching these two together,
and then at the same time, we're going to tuck these
inner seams in now. So that those seams
can disappear. Oh, look at this,
starting to look globly, like a real cuff. I'm a real cf. I'm a real boy. Same bolding the seam as you go, you might like to iron the seam really flat
if that helps you. Following the stitches
from the other side, just makes it so much
easier doing this side. I'm going to now take out that top row of gathering
so we don't need it now. We've already
gathered that taking out that top row of gathering. Around nice and straight. Following the straight line. There you go. Dele D or I've
already done a little bit, and I just carry on carry on same way scooping up a
stitch and attaching it. Just measuring
that it's as I go, you might like to use
your tape to measure. Sometimes I draw a line on my seam just to check that
I'm getting and straight. Find your own way to
keep it straight, so getting all the
way to the end now. Then we need to do
the same as we did. I'm attaching it with a pin. Again, just so that I
don't go go off hay wire. I get to the end
getting excited because we're nearly at the finish
line of these cuffs. I've gone all way
to the end now. How lovely that's. What I need to do now is I
need to tuck in the two sides. I tuck like This is a point
when the cordoy is helpful. If you're using a heavy linen, you can use the grain of the fabric to help you
get a nice straight line. I can be a little bit fiddly, just fiddling around to get it so it looks really
nice and straight. Trusting your eye, and you can use your fingers
to press it flat. Once it's all pressed flat, then I think I've heard the term whip
stitch is it whipch, Fellstitch, whipit, you just attach these two
together, like so. I think I'm going to start
with a fastening knot. I do love when I switch
from one thing to another, just adding another knot, make it extra secure.
The random straight. Scoop a bit under a
bit fully working all the way along till we get to the
end and then we fast. Then we just repeat the
same on the other end. The other side of the cuff
was open like that too. We need to do the same. Making that piece of thread, disappear, put it through. Now I need to do the other one. Tuck in in the same fashion, tuck tuck, and so all
the way along there. That's all lovely and neat
two This part can be fiddly, just fiddling around so you get it really nice and straight, so just take your time and then use your
fingers to press it flat so it's nice and straight. Getting rid of any
random loose threads as well while we're
in this process. I've got a short piece of
thread to do this bit, so I'm going to start in
with a fastening knot and work exactly the same
as I did in the other one. Then when we get to the end
tying up with the knot. While I look at that say lovely. It's really starting now
to look like a jacket. If we turn it the right way, you'll just see how lovely
this is starting to look neat we just need to repeat the same
on the other side that we've got two
cuffs like so, which we're going to do
our buttons on soon. One side left undone and
there is a side that's finished looking lovely and starting to look like a jacket. That's what we need to do.
Really starting to take shape. That steps complete. I'll
see you in the next session.
15. Attach Collar: Back in this sesson, we are
going to attach the collar. The interesting thing you'll
notice about the collar. I mentioned it before
is that it opens at the front and the back. You can make the creative choice of how big your collar is. Obviously with Bobby
being a bit smaller, his collar is smaller and
mine sits about here, but I've also seen them having
very, very big collars. We attach the right collar
sew all the way around, so it attaches from the button panel and
goes all the way around, and then meets in the middle
with the other side of the collar and goes
around. Let's get sewing. So I've got my shoulder panel, and I'm going to mark
the halfway point on it. Because with our collar, we gather up the front and
gather up the back evenly. So the midway point of the
shoulder is the halfway point. Here's my collar, and I'm finding my halfway
point in this. You'll notice this is a theme
going all the way through. Always to keep things even, we always measure
the halfway point, and sometimes in some garments
like the gathered skirt, the quarter points to keep
our gathers nice and even. So the first step is to attach the collar to
the shoulder panel. As the gussets and other parts, we leave the 0.7 0.7
the seven millimeter or the 1 centimeter seam
at either end of the shoulders because that
bits going to tuck under. I'm just pinning
it here securely, and just make sure it's
really neat and even that we've got the two
halfway points matched up, the halfway point
of the cuff and the halfway point
of the shoulder. Now I'm just starting my thread off with
a fastening knot. And once these two are fastened, then I'll work
along with my seam, a nice straight line attaching the midway point of the
collar to the shoulder. So I've done one half of it, and then once I've reached that halfway point, carrying on. With our same felling stitch that we've used so many
times in this garment, just attaching that collar to the shoulder panel and
leaving your seam at the end. You'll notice I'm
not going all the way to the end of
the shoulder panel. I whether it's one centimeters
or 0.7 at the end. Okay. That is that
first step done. C attached to the shoulder. Then what we will be
doing is attaching one end of our collar
to the button panel. I'm folding it over both ways. I've folded it from the
side and from the end. Mike so it's folded under
there, folded under there. Now this is the part that's tricky about getting nice even gathering from the button panel all the way along
to the shoulder. I've tried various
techniques to get it even. You can measure
the distance from the front panel to the
shoulder panel and then from the shoulder panel to
the edge of the smocking, and work out if it needs to be half half or
similar, or just do it by I. Right now I'm just
doing it by I and matching up so that all the
gathers are nice and even. Or, like I said, you can
mark the halfway point, so the halfway point is where the shoulder meets the column. So that's He mines
4 centimeters, each bits there, 4 centimeters. So I can just pin that there, and then I at least know that
if I get those two halves, even then the whole
thing will be even. As with the cuffs, all we're
doing is gathering it up, taking a moment to make
sure the seams fold over at the same length and then making sure the stitches are even, and then I just
scoop up and under. You see, I've just
done it all the way up to the shoulder panel. I'm taking my pin now and then I'm going to
carry on along here. Again, just fiddle fiddling
to get it all nice and even. I working all the way to the end of the
gathering stitches and along the shoulder panel to
where your stitches end. So there's no gap now. That's all sealed up. You can see from the
front now it's starting to take some shape there, and you can get the
impression of what it will look like with all the
smocking gathered like so. Now we need to fold it over. Actually before that, we
need to attach to the back. We found the midway point at
the back and we need to fold it both ways again and it to
the midway point ing a pin. H As before, just taking a moment to get the gathers nice
and e and make sure that you've folded
the N and straight. You're working along with
gas and a nice straight. You see now we've gone all way from the front over
to the shoulder, and that's all straight and then we've gone
along the back. Now what we need
to do is just flip that collar and do
the other side. I'm starting from the mid back, which is where we finished. Then I'm going to fold that seam using the grain of the corduroy to get a nice
straight line that way, and then folding
this side to and sandwiching it in a
bit like we did with the cuff or with
the button panel, we're just sandwiching
the collar in. When changing direction,
adding another fastening knot, everything's really secure, coming through to
the other side. So you've got your stitches
you should be able to see from when you did the outside of the
collar so that the inside of the collar
can be nice and straight. Folding over as you go and
just working your way around. So you work around the
back of the smock, then to the shoulder panel, and then all the
way to the front. It's starting to look like this. Then we need to close
up our two ends like we did on the cuff. By taking a moment to fiddle and get it
all neat like that, seal it off, and we need
to do that on both sides. A nice fastening knot
when we've finished. Make that thread disappear into the collar by just threading it in
and pulling through. Okay. So there is on both sides, just got to seal
up that one now. It's all both sides, so your garment so start
to look like this. It's really starting to take
shape now with that collar. In the next lesson, we will
finally start smoking.
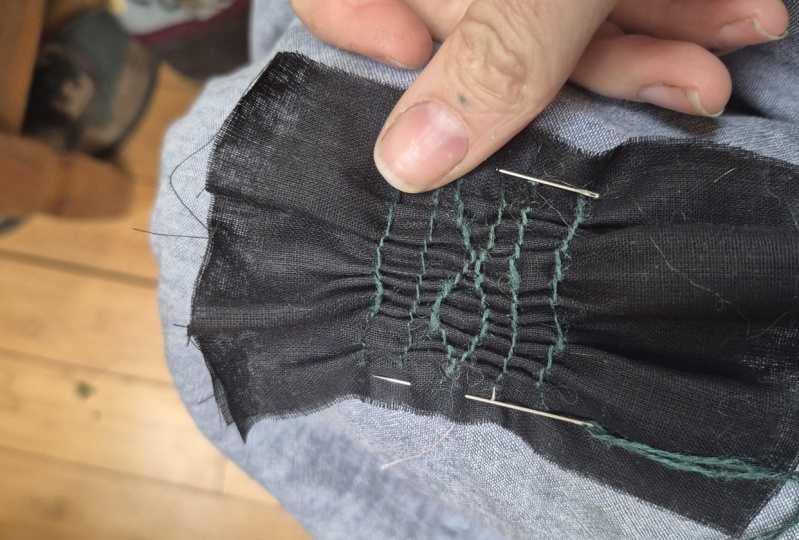
16. Smock Front Panel: In this lesson, the
smoking begins. Be patient with yourself. It is a new skill to learn. It's taken me a while to get
to the point where I feel confident that my outline stitch is always going to be neat, and my wave stitch, which is the Zig Za stitch,
is always going to be even. So just take time you
might even like to practice on a practice
piece of fabric. There's something I really find therapeutic about smoking
because it's counting. You'll notice that
I'm always counting the stitches makes
it quite meditative. Right. Let's get smoking. So you can see on
the right side, here's one I've done earlier, and we're going to
work on the left side. So we've bunched up three rows at a time
and knotted them, which just makes it easier to
pull our gathers into nice. Thinks sometimes people
call them tubes, the little sort of rows that you smock onto gathering
smocking tubes. So now I've got my
embroidery thread, and I've just got
the three threads rather than six that come on the DMC thread that I bought. I split it in a half, so
I've just got three threads. Smoothing it out, it doesn't
get all knotted as I go. Then I'm going to start
from the middle of my garment with a fastening
knot at the first row. You should have an idea in mind of the design you're going to do and with mine, I'm starting with an outline
stitch and then I'm going to do some wave stitches and then back to outline and
then back to wave, and that creates a nice
diamond and line pattern. That you can see here
on the other side. With the outline
stitch, you've got to choose the direction
you're going to do it, and I want to mirror
the other side. So I just double check the
other side so I can mirror it. I'm coming into the first tube. And this is a really key tip here that you really don't want to stitch any of that green thread because
then when you pull it out, it could get all tangled to
just be really careful to not pick up any of that green
thread as you're sewing. As always, checking
shoulders, checking jaw. That is our first stitch. We go at the top of the tube, we scoop it, and then
we come out under. You might be coming out on top depending on which
direction you're going. So I'm mirroring the other side. As you do this, you might initially be
a bit disappointed. Hang on this isn't very good or very straight
or anything, but it's not until you
really get to the end or until even you've
done a few rows, where it really
starts to feel like, Ah, this is starting
to look good now. So be patient with yourself
and working all the way along outline stitch to
the end of this row. Making sure I get
the tension right. That green thread
can be a bit pesky. Pulling it nice and tight
in between each stitch. Then when I get to the end, I need to do a little
knot to finish it off. That's my last
stitch on this row. Pesky green thread. Maybe it'd be good to sell tape it or something out the way. It does often annoy me. So now I'm going to do a, I'm going to do one more stitch, attach it to the end, and then it will be
time for the knot. So that's the last stitch. Ah, that stitch, is
a knot, there we go. We'll knot it in
now. Look, that's starting to look very nice. Mirroring the other side. If your stitches are
uneven, which can happen, you can fix them by going back over like this and just going
and pulling them tight. I'm scooping under the stitch
and just pulling it tight, and then the next one D D. Till all your stitches are even. Because when you first
do it, sometimes you end up doing a
few loose stitches, you can go back and
fix it like this. It is a bit fiddly. We'll give
a nice finish at the end. I'm just making sure
everything's all even and tight, pulling up that knot. That looks much
better to me now. So now I'm going to go, this
is my knot. Here we go. Keep talking about a
knot. Here's the knot. I'm right, that is
all fastened off now. So that is row one complete. Then I'm going to go back
through to the other side. And I'm going to do my
next line of smocking. I like to just very sneakily slide my thread under a few threads
so that it's hidden, but you really don't want it to come through on
the other side. Just make sure if you're
going to look from the top, you can't see these stitches. They're just picking up
tiny threads from the back, but you shouldn't see
it from the front. Coming back through. And now working back the
other direction. Pesky green threads,
get out of my way. I'm doing another knot
here again just so that it's nice and
secure to start, and then I'm going to work
back the other direction. Again, being very careful not to pick up any
green threads as I go. Just taking the very
front of that stitch, avoiding the green
thread at all costs. So scooping up the
front of the tube and pulling down and getting that
tension right as you go. S, pulling it, nice tension. Carry on. So there we go, all the way to the
end of that one. Nice fastening knot. And the n. Go away. Lovely. I've done two
rows of outline stitch. I'm going to make
that disappear, and then going to come
back the other row. Then we're getting on
to the wave stitch, which I'm going to
use two rows of wave stitch to create
a diamond shape. First of all, just making
this thread, this time, I'm going to make
the thread disappear into the button panel. Just the main thing
is that you want to move the thread down to the next row without it
showing from the front side. In this case because I've
got the button panel there, I can sn through that. So now I'm out on the next row, it's time for the wave stitch, which as with so much
of this project, it just takes a bit of
time to get it right. Because what you
do with outline, you're just going
straight along like that. But with this one,
every time you go down, you just go down
like a millimeter, so it creates the zigzag. I normally count. That
was stitch two, one, two, and then three, and then is the third one, coming out from under. Then on the fourth
one, which is now, one, two, what's wrong
with that, give a little. One, two, three, and then
now we're on stitch four. We should be midway
point between that row of gathering stitches and the
next outline stitch. Can you see now I'm coming
up from the top because I'm going to start heading back
in the other direction. I did one, two, three,
four, this direction, and then four now becomes
one, that was one, and now it's one, two, three, four, and tn. Notice now I'm coming
up this way, one, to Can you see that's
starting to be the first zig of our Zig sag. Now stitch four. This is the turning stitch,
four becomes one. I'm turning it, now it's
coming back the other way. That now becomes one, and then I go one, two, three, four, four becomes the point,
one, two, three, four, L so so. One, now that stitch
two. There we go. One, two, three, Number
four is the turning one. So rather than coming
at the bottom now, I'm going to come out at the So there's two zig zag and a zig, one, two, three, four, one, two, three, four, one,
two, three, four, I sometimes go back and
count them and check. It's very methodical.
It's really good. I found it's just so
helpful for my mind. I think smocking and hand sewing is really
help with stress because it just
gives me something very practical to focus on. Carrying on our next zag. We've done two zigs
and how on a ag. I think you get the feeling now, so this one's the turning ones, then it comes out the bottom. There we go. This is really
starting to take shape now. So I go all the way to the end. What's going on here? Oh,
too check if it's even, you can pull your
smocking gathering really tight and just
see how it looks. Now with this one, I just
turn it back on the front, and now I'm going back
in this direction. So I've done one,
two, three, four, so then again, one,
two, three, four. That's what's great
about the diamond one is you don't have to go
back under and hide it because you just literally turn the comment round and head
back in the other direction. One, two, three, four,
one, two, three, four. Coming back by that
deleted lead ad. It's almost like you're
mirroring the zig zag above you, so you can use that as a guide to check that
you're doing it right. I'm looking at the
top one, checking a, that I want you to line up with that to get a nice
even diamond stitch. Practice makes perfect,
relax shoulders, relax jaw, relax temples. No need to feel frustration.
We're just learning. There's also loads of videos on YouTube on this actual part, the wave and trellis stitch. You might like to watch
some more videos. See someone else do
it, might help you. There we go. That's one
row of diamonds done. And that is starting to look
very, very lovely, wow. So I decided to then
go on and do so, that's me just tting it off,
I think, finishing that row. Dear lady. Oh, yes, knotting off that diamond and making
that thread disappear. Good bye, cheeky thread. Then I decided this was all creative and
creative decisions. I decided I wanted
to do one more row of diamonds and one more
row of outline stitch. My final design goes
outline, outline, wave, wave, outline,
wave, wave, outline. You can work out your
own with what you like. There we go. Coming to the end of my final
outline stitch. It's really starting to
look like something. Like I said with this one
when you first start, you think, Oh, my gosh, this
doesn't even what is this. Then it starts to come
together and look lovely. Shoulders, jaw,
temples, practice makes perfect. Hips as well. Contents up in our feet, our hips, just making
this so relaxing. When we finish, my design
is finished on both sides. This is a satisfying
bit. You chop off all your gathering
stitches, D D do. And then you pull
it out and Wow. Oh, my goodness. I
just love this bit. Looks so nice now. It's really taking shape. You can see how
gorgeous that looks. Just noticing any
little threads here that need to be cleaned
up. Look at that. Wow. That front panel looks something and then repeating
the same on the other side. So we just cut off those threes on one side and then pull them out
from the other side. Lovely, be very careful not
to cut any of your smocking. Wow, look. See here I think I
caught a green sti. A bit of the green threads so just need to be
careful, pull it out. Wow, look at that. Gorgeous. Now our front panel smoked. Let's go and smock our cuffs.
17. Smock Cuffs: Back in the seste we are
going to smock the cuffs. In my design, I have just used one row of wave
stitch on the cuffs. Let's get sewing.
So here's our cuff. You'll see my buttons already
attached. Don't worry. We're going to do that
in a future lesson. So for now, we're
just focusing on the smocking of the cuff. We've already done
the front panel, so we've practiced, so this should be much easier
this time around. So we're just knotting it
here at the base of the cuff, make the The thread disappear under a few very
discrete stitches here, making sure that doesn't
show from the front, and then we're going to work
around with wave stitch. So you see, I've got quite a few rows of gathering stitch, and I could have done more. But I just decided
in the end for my design that I just wanted
one row of waves stitch. I thought that
looked really nice. I've seen it where people
have quite a long panel of smocking on the sleeves that
can look really nice too. It's totally up to
you in your design. So here I am just
doing the wave stitch. Remember, you just
count in fours, you go one, two, three, four, and then the 41 becomes
the turning one, when you turn it back
down. That's stitch three. You'll see now I've turned
it back down to stitch four, and then coming again so
that now becomes one. This is now two As I said
in the previous lesson, you might want to go on YouTube and type in wavetitch, smoking, just to see some
other people do it because the way you hold the fabric and
all these things make it easier or
harder for you. Lifting and twisting on
that one deletedly do. We've done one zig, one zag, and we just carry on
all the way along zig, zig zag, getting to the end. Out of the way you
pesky green threads, making sure that we don't ever sow the green
thread because that's when it's really
annoying, get out my way. To pull that through,
tightening up. Time for our knot. Pulling
that through through the loop, do a knot. That's our cuffs. That's much simpler than the front panels because
I've just decided on that one row of wave
sit which I think looks really nice just a little bit of detail on the sleeves, but not going mad. Making that disappear,
making sure you can't see it from the outside
of the garment. Then we're just going
to do a little knot that we're going to
hide in the cuff. There we go. Looking
very pretty. That steps complete. I'll
see you in the next lesson.
18. Hem: Come back. In this lesson, we are going to do the hem. So in this design, I've just done a very,
very small rolled hem. If you'd like to
try a wider hem, a bit of a chunkier hem, you can go to lesson 14 of
my gathered skirt class. Let's get sewing. So just taking any
loose threads, first of all, before I
start folding my hem. As with so much of this project, I'm just doing it by y, how much I'm going to fold it, but you might like to use a
tape and measure all out. The first thing
I'm going to do is just do a fastening knot. On the button panel
to get started. Then I'm just doing a
very small rolled hem so I'm just going to roll
it once, roll it again. Then once I'm attaching
that bit to that bit, I do like to do another knot, so this is starting
with 2 knots, really 1 knot, and then 2 knots. There's the second knot.
Then all I'm going to do is work along
straight with that fell stitch that I've
used so many times in this project and work
along nice and straight. As I mentioned before,
you might like to go to my gathered skirt class
where I sew a hem, I sew a slightly thicker hem. Can be quite nice, a bit
more of a statement hem. It's all to do with the
length of your coat or your smock as well and
how long you want it. You see now I've just worked
all the way around, like so. Nice and even, it looks so
lovely from the inside, and then flipping
it should be nice and straight from
the outside as well. If you try it and it's not
straight the first time, try pressing it before you
do it and so after pressing. That steps complete. I'll
see you in the next lesson.
19. Button holes: Welcome back in this
sess and we're going to do the buttons and
the button holes. So I actually went
and looked at some of my husband's garments to
see if there was a rule, and it seems that the buttons
are always on the right, and the button holes
are always on the left. Maybe because that's most
people are right handed. I'm not sure. Doesn't really matter,
but you can make that decision about which
side you have your buttons. And then the same, I
noticed on most garments, the button is on the
front of the cuff, and the button hole is on
the back. Let's get sewing. So there's our
lovely smoked cuff. And this is what we're
aiming for here. We've got our button, our button hole like sew. Lovely. So Let's
get going on that. First of all, we just need to measure where that
button is going to be. I might like to use
some other garments for reference about how far
in the button should be. Mine is for the center
of the button is 1 centimeter from
the end. I'm going. I want to obviously have the
two cuffs looking the same, so I'm going to recreate that going 1 centimeter
from the end here. Got my thimble. Got my button, looking like that's going
to be there, fantastic. First of all, just
as with all of this, always just starting with a fastening checking
I'm halfway. I want this button to
be exactly halfway on the cuff. Now that's there. Now we can just
start going round and round and round the button. Just adjusting the position. As you do it, just double
check now, matching them up, looking good. And
then going through. I'd say I do somewhere around
five stitches on each button hole that it
really is nice and secure. Then once you've done, I mean, some buttons just have two
holes, but these buttons, then you get a nice cross, round and round and round both directions,
about five stitches. Always kind of heading back to the center point of
where you came in. I it's starting to look good. Just keep going
round, round, round. Like that, it is
about five stitches. Okay. Once you've got enough stitches in
both directions, then it's time to fasten it off, which I normally do
at the back like so coming under a little
bit and doing a nice knot. Checking shoulders,
temple, posture, hips, staying nice and relaxed. Sets all fastened on
lovely, looking good. Now we need to do the whole
that this will go into. I draw a little mark with
my pencil where it will be. And then in this case, I'm going to use my scissors. You can also use a scalpel, which I'll use on
the front panel. So just do a little snip. And then you want to check. Oh, this always scares me. I don't want to cut
my lovely garment. The little snip, snipey snip. Check if you can fit the button in comfortably because obviously you want
to add some stitches, so the pole gets slightly
smaller I can't fit it in, so then I just make it a tiny
bit bigger, check it again. That can go in now, now I'm ready to do buttonhole stitch. As with other parts
of this class, you might want to go on YouTube and search hand
sewing buttonhole stitch to see an example of someone else doing it
because I must confess that doing Navy on Navy here makes
it a bit harder to see. I took me quite nice to do your button stitch in a contrast in color
to make it stand out, and for educational purposes, there are some videos on
YouTube where they're using a different color thread to
the color of the fabric, which makes it a bit easier
to see what's going on. Basically what I'm doing is a few millimeters
from the edge. I'm going through the hole, and then I pull through a loop as if I'm
going to do a knot, but then I pull down so the knot is in the
center of the button. I'll show you a few more,
so you know what I mean, I go in a few millimeters
from the edge. I come out the center
of the button hole. I loop through and I pull down this way so the knot is right at the
bottom and nice and straight. I keep working all the way along the edge in the same fashion
and the stitches want to be right next to each other
because we want this to prevent any fraying and to give a really nice neat button edge. The bit gets a bit trickier
and a bit hard to see where it's navy on navy is
this nice curved corner. You'll also find I
did a curved edge of a buttonhole stitch on my rolled opening of my
gathered skirt class. You might like to look at the rolled opening
of my gathered skirt class to see
what I'm doing here. But I'm basically working
in a horseshoe shape so that the buttonhole stitches come around in a horseshoe
shape around the top. Same, just keep pulling
the loop through and then pulling down towards the
center of the button hole. All the knots are in the
center of the button, forming a really secure and
hard wearing button hole. Pulling and through. Then once we've done that
horseshoe shape on one end. Then we just work back
the other way as we did. You'll see now I've
come to the other side. Now I'm doing the horse
shoe on the other end and then fastening in it all off with an ice
fastening knot. Really run out of thread
at the end there. Once you've finished, if you
see that there's any gaps, you might like to just
run around again with the buttonhole
stitch again just to really make sure that
you're not get any gaps. Yeah. You can see here
now this is looking really lovely and our
button fits securely. Lovely. Perfect. Look
at that. Beautiful. Now to our front panel, the first part is
to actually decide how the gap between
your buttons. Again, you might like to
use a reference garment that you like the button gaps. I tried out a few
different things. In the first attempt here, I tried gaps of 11 centimeters. You'll see me marking
that out now. This is the great
thing about this these marking talks I'm using, you can just rub it off easily with your thumb
and then start again. I recommend taking your time drawing out these button
hole marks so that you're really happy
with it because you can hold it up and get
a feel for how it looks. These were 11 centimeters apart. But once I did it and looked it, I just thought it really
needed five buttons, not four buttons, so I rub
them out. And start again. For this small garment for
my toddler for my son, I think an eight centimeter
gap look just right. Just take some time to work
out what looks right for you, depending on your
height, and your shape, and just look at other
garments to see what the gaps are between the
buttons on other garments. Once you feel happy
with your dots, Stand back and have a look
that looks nice to me. Then I can attach buttons at each one of those
points. There we go. I'm attaching five buttons at the front at equal distances. Once they are all attached, it's time now to make the
button holes along the front, and this is when I
need my scalpel. I line it all up, get
it nice and straight, and I mark my gap. As we did on the cuff, We will test it to see if the
button will fit snugly in. If it doesn't, then I use my scissors to snip it a
little bit bigger and test it. It's a bit of a fine art, this
one because we don't want the button hole too big and obviously we don't
want it too small, so you just need to fiddle
around to get it just right. Just be cautious
with how much you snip so you don't
make them too big, then your buttons
won't be secure. Then I carry on working. After I've done that hole, then I use my scalpel to make holes all the
way along the front. I'm going to now do
my second button, so lining it up. Use my scalpel. I don't think to be honest, I'm using this in the best
health and safety method. It probably better if
you've got a cutting board. When you slice, you're not
going to poke your finger. I'm just snipping it a bit bigger as I did
with the front one, and then I'm going
to test it and then just keep working
all the way down. Until all my buttons. Oh, that still
wasn't big enough. Le tiny bit. Keep just taking
like a millimeter off and then try again. Like I said, you really don't
want your button holes too big. Okay, looking good. So I just work on a way exactly the same
all the way down. And then I just need to rewind the video and do all
the button holes, stitch all the buttons. Until they're all even and
looking lovely like this. That steps complete. Next up, the inner shoulder.
20. Inner Shoulder: Back in this lesson,
we're going to reinforce the shoulders and
sew them from the other side, so the shoulders are very
strong. Let's get sewing. Here's the inside of
our smok and here is our inner shoulder
panel that we're going to use to cover
up all this mess. All this gathering, all these stitches under the shoulder, so the shoulders look
really nice and neat, and as well as that,
the shoulders are really strong and reinforced. This is about a 1
centimeter seam all the way around and we're just going to fold it in
all these places. Starting in this corner here, I've folded the seam
on both sides and done a fastening knot
and now I'm just joining this corner here. Then I'm going to work in that same stitch that we've done so many times
in this project, the fell stitch to
join that side. As with other parts, you
might like to make sure that this seam is folded evenly by measuring
it and pressing it. But I just do it
by e and as I go. I'm just attaching it
here with a fell stitch, working all way along. This is attaching to
the collar right now. Then turning to a
second side and now this is the gathering. I'm just going to
line it all up, get it nice and straight. Use the stitches
from previous parts of the project to help me
get a nice straight line. As with other parts
of the gathering, we scoop up one of the tube, one of the gathered tubes, and then just work
our way around. This is another nice moment
of working with Cordoy because you can really follow that straight line to get
a nice straight edge. I'm going all the way
out towards the shoulder checking in nice,
relaxed shoulders, relaxed jaw, hips, posture. Make sure you're sat nice and comfortable and not slouching. Now I'm going to use this panel just to tuck
in any other messy bits, and also, you might want to trim any loose threads that you spot. This bit here is
all a bit messy, so I'm just tucking that under. As I come to the shoulder, where I'm going to turn
and do the third side. I've got this corner
folded nicely and I'm t on this corner now
to do the final side, not the final side,
the third side. Okay, so that's two sides done, looking so nice and smart. Remember listening to
Steve Jobs talking about how he worked with his designers to make sure the inside of the laptops
are really beautiful, even though none of the
customers will see it. I like that with these socks. You can spend quite a long time making the inside look
really beautiful. It's just for you as the wearer, that it feels really nice and
you know that it's strong. We're going to work around
now the fourth side. Look at that. Just the last final few
stitches of this fourth side. Those gathered stitches. Then as always fastening
off with an ice, fastening knot at the end and making that
thread disappear. Pulling it through and snipping. Wow look at that. Beautiful. Our inner shoulder looks so good right now, and
there's the outside. That steps complete. I'll
see you in the next sesson, where we'll do our
finishing touches.
21. Finishing Touches: Come back well done for
making it this far. Now it's time for the
finishing touches, which involves tidying up, just noticing any lose threads, reinforcing where we need to
and pressing your garment. As we did with the
front smoking panels, we're just pulling out the smoking threads
on the sleeves. This is where you
really start to enjoy your hand work and see how beautifully it's come together. So both sides here, pulling those threads
out, Snip and pull. Are so satisfying. Love that. Beautiful. Now I'm just looking out for any
loose stray threads. There's a few here on this
cuff, on this sleeve. So just really carefully
snipping them off. Just checking over your garments so that the first
time you wear it, you don't walk around with
threads all hanging off you. I have been known
to do that before. Once you've checked over all the loose threads and just pick them all off and snip them. Then it's time for reinforcing if you feel there's any spot. So this is one spot that
I feel is really weak on this garment is at the back
center of the two collars. So when I initially
sewed it altogether, I don't feel like I really got in there and
made sure it was the two sides of the
collar were really secure. So what I'm doing here is
I'm just doing some knots to really not all the collar
is really securely in place. Because we attached the
front and back of one, the front and back
of the other, but we didn't attach them together, but now they're both together, it's worth just doing these stitches to
reinforce everything. Now I'm going back over to the other side
with more knots and just going to knot. It's really secure and
really neat and beautiful, so now over to the other
side, a few more knots. Knotting these two sides
together from knotting both the right collar and
the left collar together and knotting both the front
and the back of the collar. It's really really secure. After we've done
plenty of knots, we'll do one last knot to finish it off
and make that piece of thread disappear. As we do. Beautiful. And now for pressing. So this is another final touch that just makes your garment really pop and sing to
make it really crisp. So crisping up
those collars and. Everything's really neat and crisp. Nice tree edges. And then ironing out the
whole of the garment, front back arms all of it, so that you have this
look at that D D D D. Absolute beautiful. Appreciating all the detail, the cuffs, the smocking, these. Wow. Now your garment is finished
and looks so beautiful, let's go to the
final lesson where we'll say well
done, and goodbye. See you in the next lesson.
22. Goodbye and Well Done: Completed the class well done. If you have just
watched it through, and you haven't
actually started, now it's time to go
back to the beginning and actually get your
fabric and go go go. If you have completed
your garment, then well done and I
can't wait to see it, is a good time to
celebrate and reflect on the process. How
can you celebrate? Well, for me, I made these
for my son's birthday, so we wore them on the birthday and took lots of
photos and videos. You might like to do
something like that. It's also a really good time
to reflect on the process. Write down in your journal, what didn't work,
what did you learn? What would you do
differently next time? Every time I make a
garment, I learn something new and I can carry it
into my next design. So now we've celebrated and
reflected on the process. It's time to say goodbye. Thank you so much for taking
part in this class with me. Skillshare is all about
community, so let's connect. Remember, there's the
discussions tab where you can ask me any questions
or post any comments. I'd also really love to
see your finished smock. You can post that in
the project section. Or you might also like to add
it on social media and do tag me at Laura Lam hashtag
folk sewing with Laura. If you've enjoyed this class, please do take a moment
to leave a review. It really helps the
Skillshare algorithm, and it really helps
other students be able to find this class. To stay in touch, please do go to my teacher page
and follow me. That means you'll get notified with future classes I upload. You'll also find links there to my social media,
Facebook, Instagram, YouTube, and I do also
have an e mail list where I send out inspiring e
mails every once in a while. May the magical art of
sewing bring more intention, patience, peace, and
beauty into your life. Thank you so much. Goodbye.
 Laura Lamn, I light the Creative Spark