Transcripts
1. Class Intro / Simple Vector Illustration: Hi. My name is Aaron. I'm a graphic artist, and I teach at a couple
of junior colleges. I teach Adobe Illustrator
and Photoshop, and this is a project from my Adobe Illustrator class that I've been using
for years now, and I thought it would be fun to make this a skill share class. This is a beginner class. This will introduce
you to the program. Hopefully, this is a
way to get your feet wet within Adobe Illustrator. The project is going
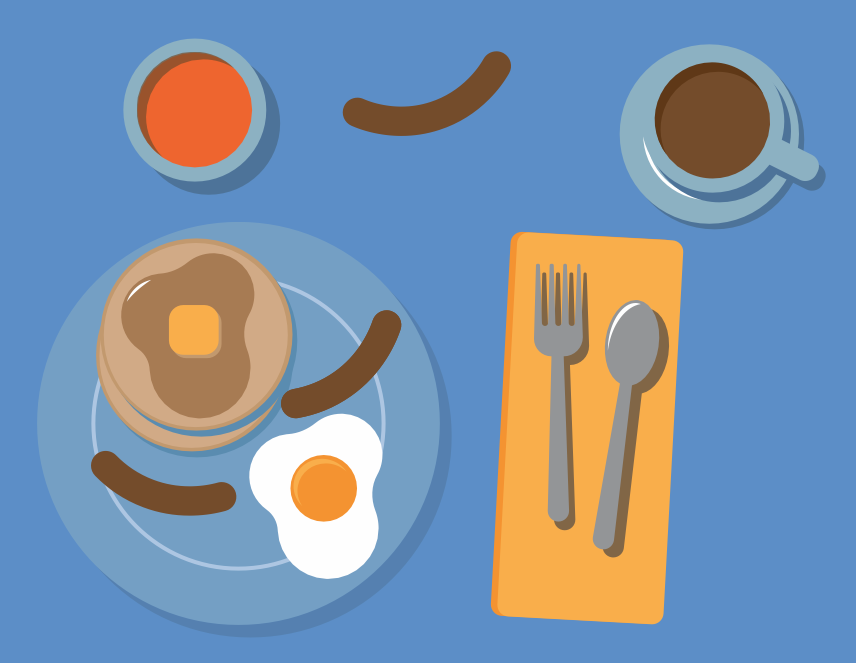
to be to create a vector illustration
of breakfast. Hopefully, this will also be a bit of a cultural
exchange because I did the quintessential
American breakfast where, you know, pancakes,
eggs, and coffee. And hopefully, since
you all are coming from all over the world and show me what you're
eating for breakfast. And if you just
simply want to copy exactly what I did,
that's perfectly fine. I hope you will
take this course, have some fun, and I really look forward to seeing
what you come up with.
2. The Project: Adobe Illustrator is
a vector program. And the project for
this class is to create a vector
illustration using simple tools within
Adobe Illustrator to create an overhead view
of breakfast, okay? So you can either follow along and do exactly what I
do here for my project, or you can show your creativity and do something a
little bit different. One of the other things
that I really am looking forward to is since this
is going out worldwide, basically, is to see what those of you from a different culture will
come up for your breakfast. So, again, the project
after you create it, you'll save the file as a PNG and you'll upload
that to the workspace. And I'll have
another video where I will show you exactly
how to do that.
3. What is a Vector Illustration?: So, what is the
difference between a vector illustration and a raster illustration or a
pixel based illustration? I'm going to show
you right here. So on this document, I have copies of here's
the original illustration. This is a vector graphic, and this one is a JPEG, okay? They look identical. But the thing is, if I
zoom in on this one, you'll see it doesn't
lose in quality. Those lines are just
as crisp as when, you know, as they
are zoomed out. I'm going to hit Command
Y to go to outline mode, and you can see this is
how it's constructed. All right? Now, I'm
going to move over, and don't worry if you don't understand everything
that I'm saying here. I just want to give you
a basic understanding of the difference between
a vector illustration and a raster or pixel based illustration because it's important to
understand that, so you'll know why you're
things are so different. Alright. So here is and
you can see here when I zoom in on the raster or
pixel based illustration. You can see it's made up of
a bunch of little squares. And the thing is, this one, I can blow
this up 1,000 times, and it will always
remain nice crisp and, you know, and sharp, okay? If I do the same thing with the raster base image,
it's not, obviously. Okay. But the thing is, I can take this
vector illustration and export it as a
very high resolution. And it will take much longer for this pixel based illustration to fall apart visually, okay? But the thing is, if I make
it a pixel based image, it's going to become a very, very large file, okay? All right. So here, I have
a couple of definitions of what a what a
vector graphic is. Okay, here, this is Wikipedia. It says, vector
graphics are a form of computer graphics in
which visual images are created directly from
geometric shapes defined on a Cartesian plane, such as points, lines,
curves, and polygons. All right. I have no clue
what Cartesian means. But it doesn't matter. I'm
not going to even bother. Here's one from Adobe where
they explain what it is. And it says, vector files
are images that are built by mathematical formulas that
establish points on a grid. Raster files are composed
of colored blocks, commonly referred to as pixels. Because they can infinitely adjust without
losing resolution, vector files are
more versatile for certain types of tasks
than raster files. The most common types
of vector files are, and then there's a
list right here. But the ones I see the most are, you know, the Adobe Illustrator, which are.ai, getting kind of confusing these days with
artificial intelligence. But hey, dot AI means here in this situation,
Adobe Illustrator. Sometimes you'll see
EPS, but more commonly, you'll see they
sometimes appear in PDF, but you'll see dot SVG, the scalable vector graphics. That's something
that is becoming more and more common these days. And just so you know, for this lesson or this class, all of this stuff that I'm
teaching you right here or explaining right
here is just for your own base knowledge, it's not really necessary to understand or
take this class. So you can just skip all of
this right now if you like. But anyway, here they're
showing a vector file, and then they're showing
a raster file, Okay? I like to think of
it. Well, actually, I'm going to come
back to this because say if I'm drawing here. I tend to think of
illustrator files, whoops, as building an
illustration, okay? And you build these
shapes and then you fill them with colors, okay? You'll connect lines
and things like that. Where as a master base file, I tend to think of
that more as drawing. Just one thing you can see
here is these look identical. But you hear when I
go into outline mode, and I'm doing that
by going up here, I'm using the key commands, but preview and
outline command y, control y on a PC. And when I have this
raster base image, it just turns into, you
know, has an x through it. And the vector file, it shows me all of all
of these little lines. So be aware of that.
Okay? Now, I'm going to open up a
photoshop file here. And this is the same file. But again, this is raster base. And typically, what I do in
a raster program is say, if I want to draw something,
I will, you know, paint on it like a paint brush, that kind of thing, okay? Whereas when I'm
working in a vector, software like Adobe Illustrator. I will build things by
using, you know, shapes. And there's this thing called the Pin tool that I
can click click click, I can make curves, and I can build the illustration this way. The pin tool has a bit
of a learning curve. So I'm going to try to avoid
using this most of the time. In this class. I'm going to show you other
ways to do this. Alright, so there's one more
thing I wanted to show you. And this is how I tend
to look at building art. Have you ever seen string art
where let me open up one. It's a little more simple. You'll see you'll
put the nails and they have these things
they call anchor points. And imagine you're
placing these nails, and then you're connecting
each of these nails. To make a shape, and then you will fill it with a color, okay? Sometimes that color
is a solid color, sometimes it's a gradation, but you will fill
it with a color, and you build these
on top of each other to make your illustration. And that's basically
why they're different. So it's a different way of thinking than the
traditional way of drawing. So keep that in mind. Again, all of this stuff is not really important for you to know
in order to do the work, but it's kind of nice to know.
4. Finding Reference Material: All right, now to get started, we're going to create a
mood board that kind of gives will help us get a color style and give us an idea of what we're
going to go for. And you can also get
some reference material of images that you want
that you want to be using. You can either shoot your
own or you can go to a place like Pexels or Pixabay or Unsplash and find
photographs there. Again, you can actually just go to the regular Internet
and find these since we will be drawing these
in such a way that we won't be violating
any copyrights. And these illustrations, these little drawings
that we'll be creating will be so simple that you
can mix and mingle without, you know, a lot of worry about the styles
being different. Because again, we're going to majorly simplify these images. All right, so first
thing I'm going to do is go to pexels.com. And this is just where I start. So you can go to any
of these others. And pixels is just
where I tend to start. I think the name is so short, it's easy to type in, but any of them will
get you what you need. And I'm going to type in food over head view and
see what we get. I'm going to, I like that peach. I'm not sure if I'm
going to use that, but I'm going to save it. You can download these. But since these are going
to really be so simple, I'm just going to take
some quick screenshots. It'll be a lot faster, and then I'll just dump these
in a folder and use those. Okay. And you can
download the files. Because we're not going
to even be tracing them because they're
going to be so simple. So again, I'm just going to
take some quick screenshots. But if you decide you
want to download them, all you really need
is a small file size. So I'm just going to click
right here, download, and it's going to
download the file, but I'm going to hit cancel. Now, if I want to
download a small file, I will click on the image, and then when I click here, it will give me that choice
to choose the file size. All right. So I'm going
to close out of that. Maybe I'll do
something like that. Mm. Blue berries, dates. Mm. Okay, we're going
to have donuts. And the only reason I'm
going to have donuts is because it's not that I
eat donuts for breakfast. Well, avocado is pretty too. I'm going to hit download. Whoops, that's not
what I want to do. I'm going to click on the image, and then I can cancel that because that's going to
be a large file size, and I'm going to click small
and download selected file. And. All right. Now, I got to get out of here. Fruit slices are always nice. Just because they're
kind of interesting. Waffles will be interesting. And we're going to be
doing breakfast items, but I'm just going to
go back to screenshots. It's just so much faster. And again, I don't what we're doing is so these
drawings are going to be so simple that we don't need high
quality images in any way, like the tomato
overhead. Blueberry. Alright, so Alright, pancakes. These look good. And again,
these are for reference. And actually, the images don't even need to
be overhead view, since these are just going
to be reference material, you should be able to visualize. I'm just going to
drag and drop that. Now, okay, I found an even
faster way to get these. That's it for bacon. Oh, it's the overhead view. I'm going to give up
on the overhead view. I'm just going to search for
things that I want bacon. There we go. These aren't
very all that appealing. But let's see, all we need, again, this is going
to be reference. So it doesn't need
to be Amazing. I actually like that one. These aren't great.
They're overcooked. They might be delicious, but they're overcooked. There we go. Sausage is going to be
an easy one to draw, that is, ink saudge. If Bacon's going to be a little more difficult. It's
going to take a. There we go. Again, this is
just reference material. Eggs, easy egg. This is going to probably be the All right. That's not
going well. There we go. There's one. Boom. This will probably be
the the eye catcher, the main piece in my
illustration egg. I'm going to grab that
the boiled egg sliced. Sometimes you just
need a pop of color. And again, this isn't
necessarily about what you eat. Oh toast, we need toast. It's about making
a pretty picture, and it'll communicate
that idea of breakfast. But it doesn't
necessarily have to be what you know, you actually eat. I'm going to try something else. I'm going to try
splash unsplash.com. Although I think they've
recently started adding in more paid things. So let's just see
what we get egg. Because one of the
things they typically start these out
where they're free, and then there we go. That's a good one. Eventually,
you have to pay for it. You know, they get their
business model started, and then after you know, at a point, they
need to make money. All right. Okay, so we have I think what I'm
going to go for in mine is pancake with
a square of butter. I haven't gotten coffee. I might just throw in an avocado slice on the
table just because it's pretty or an orange slice, depending on what colors I want egg and and I think what I might do is draw
a few more things extra as examples
of what you can do. Like I'm going to I think I have a waffle in
here somewhere, right? Okay, that's going to be a little extra thing
that I draw waffle. Okay, so this is
going to be my meal, pancakes with fried
egg, some bacon. And again, these are
just going to be my artistic blemishes blemishes, my artistic embellishments. Also, I want to add again, add some extra pieces
that we're going to just so I can show you how
to make different things. Toast. I'll just grab that one. Add that to the list of extras. But if you're taking this class and there's
something that you want to make and
you're struggling with it, message me, you know, and put it in the
comments somewhere. I'm not exactly sure
where it is offhand, but put it in the comments. I'll get the message, and
I will make you know, some extra videos if
there's things that you all need help learning how
to make. All right? Oh, coffee, a lot of these things you can
make from your memory, you know, but I
recommend at least looking at an example,
cup of coffee there. There we go. If you want
to do something like that, I'm going to throw
that in there, but I'm going to go with just this normal
looking thing here. The standard coffee with
the little bubbles in it. I want to do the bubbles. Let's see. Let me
see that again. Okay. And remember, we're
working with this with shapes, keeping it simple,
right, coffee. Oh, let's try tea. Okay. Tea might be interesting
being the Oh, tea pot. That could be fun. I don't know. I keep dragging. There we go. All right, silverware. Okay. Well, I'll grab that one. I want that a little bit larger because there's a
lot going on here. And. Let's try orange juice. Yeah. There we go. Oh, a bowl of cereal there, too. And I believe that's it. I'm going to put
the coffee up here. And typically, if you
go in a US diner, they'll have a, you know, usually give you get a glass
of orange juice with it. All right. So I think that's everything
and an orange juice can compliment my orange slice. I'm not sure. I'm not sure what I'm going to do here. All right. So this is these are the images
that I'm going to use for my mood board and all the moodboard slash
reference. All right.
5. Creating a Mood board: So now I'm going to open up a new Adobe
Illustrator document. I'm going to click right
here. It says New File. And I'm going to choose
a letter size document. I can always change
the size of it later. I'm going to make sure this
is horizontal, though. I'm going to click right here over here on
the right hand side. Okay. And I'm going to
change the name of this to brick fest plate. And I'm going to leave the
rest of the settings alone, and I'm going to choose Create. Okay, so the way I'm going
to start this out is I'm going to just dump
all those images here, at least the ones
that I want to use. I'm just going to drag and drop them while
that's kind of large. Let's see. I forgot
the screenshots were. I probably should
have gone with those. They'll be a lot smaller. Let's see. All right. So here are a couple
of the screenshots. Let's see how tiny those those work a little
better, just come in in here. Yeah, it's a little smaller, but it really doesn't matter. These are just reference
images or inspiration. So I'm going to drag
these down here. And scale them down. And while they're selected, all I have to do
is click on one of these little anchor points
in the corner right here, and I can scale it down. But I'm going to click
right here and drag across so that
everything is selected, and then I'm going to
click here on that dot, and I'm going to hold the shift key so it doesn't
distort things, okay? So shift key, and I want
these down nice, small size. I'm just going to click
here. And I am using the move tool that's this tool right here
to move these around, and I'm just going to
position everything. I can scale them up. Again, I'm holding the Shift key
as I scale them up, and these are just going to
be inspiration and reference. So this is my mood board, but it's off to the
side of my workspace. It's not like an official
official mood board. It's just kind of, you know, a little bit of inspiration. All right. What else do I need? I'm missing some pieces here. I'm going to reset my workspace. I don't know if your
workspace looks like this, I'm going to go workspace. Go to Window workspace, and I'm on the
Essentials Classic. And I'm going to hit
reset Essentials Classic. Okay. So now I'm going
to move that back over. I definitely want the avocado. Wow, that's large. I
go to scale that down. Again, I'm clicking
on the corner. I can click on the side as well. You see how it'll
distort that way, but if I hold the shift key, it distorts it, you
know, proportionately. And coffee definitely
want the coffee. Hang on. I'm going to click here to give myself a little more space so I
can see what's going on. Okay. We got the
pancakes, got the eggs, bacon, coffee, I'll scale it
down after I get in here. Maybe the orange slice and
probably the orange juice. These extras, I'm going
to need silverware. I'll just drag those in here, so I'll remember to
put them in here. I'm not going to trace them. This is, again, it's going
to be very stylized. All right. So I'm going to click Reposition T and I think
we are almost ready to go. Soon as I scale this down again, black arrow, the move tool. That's the direct selection
tool right there. So I'm going to hold the
shift key as I scale it down, click. Hold the shift key. Click. And again, I can do these multiples
at the same time. I click on this one and
I hold the shift key. I can click on that
cup of coffee, and then I hold the shift key. I'll add the shift key. I'll click on the button and
you'll see it's distorting, then I'll add the shift key, and I can scale it down. And always let go of
the mouse button first and then the shift key
or else it may distort. Okay. Okay. And this is my mood board. Now, I just want some
color inspiration. And I'll put that in
my mood board as well. All right.
6. Choosing a Color Scheme: Make sure you are saving
your file regularly. So I'm going to
just go File, Save. I've already given it a name. And you get this option. Do I want to save
this to the Cloud or do I want to save
this to my computer? If you're moving around a
lot, sometimes, you know, you go to work and
you might want to work on this or if you go to campus or school or something, and you want to play
around with it. I recommend saving to
the creative cloud. I personally always save
it to my computer unless I know that I'm going
to be using it. So I'm going to click
this button right here, save to your computer, and then I just pay attention
to where it's going, and it's going to save
this to my desktop. Actually, I'm working in that little folder
right here and save. And okay. All right. Now, I want to show you how you can get some color inspiration. You can do that from within
here under the color guide. But I'm going to show
you an easier way to get some color inspiration. And if you obvious and
assuming that you have a adobe subscription,
you can do this. If not, you can just grab. We're going to
find color themes, and I'm going to go
type in Adobe color. And hit Enter. And you get
this thing here, Adobe color. I'll click here. Okay. And
you may have to sign in. Mine already signed in. Or if you give it a couple, you know, 10 seconds or so, it may automatically
sign in for you if, you know, you signed in already. And this is Adobe color. And you see here, they have create Explore trends. There's some libraries, but
I'm going to go to Explore. I'll save this for another day, but you can create your
own color schemes. I'm just touching
on this briefly. These are like this is
analogous color scheme, which means the colors are, you know, side by side. Monochromatic. You know,
they're going this way, triadic and triadic is if you slice this
into three pieces. That's where these colors are you are coming from,
and you can change that. And I'm just going to
show you complimentary. Again, they're opposite each
other on the color wheel, and you just slide
this up and down. But again, I don't
want to get into this. This is getting a
little complicated. I usually just go to here
to explore and explore just gives you all of these different
premade color schemes. I'm going to type in trends
and see what we get. Okay, so these are
kind of interesting. And for these, you don't have to stick with
these color schemes. I just kind of use
this as a basis to get started or try to keep some color harmony
within the piece. If you repeatedly
use certain colors, you will have that
color harmony. I'm going to go back
to explore and see. And for this, you can save
it or you can just copy it. Let me hit next and
see what we get. Actually, you know what I want
to do right here up here, it says popular searches, summer neutral palette,
primary vapor wave. I'm afraid to click on that, but I'm going to click on it. Okay, this is not the
color scheme that I want. All right. I think
I'm going to type in. Let's see happy. I think what I'm going to do is type in
pastel and see what we get. Pastel. And I'll make that
the basis of my color theme, and then I can add pops
of color as needed. Actually, I'm not
crazy about these. Well, This might work. Alright, I'm going
to go with this one. I like this color scheme. And again, this is
going to be the base, and then I'll change the color of things to suit the food. Alright, so right here, I can click right here
and hit Add to library, and it will actually add it
to the illustrator library. But I'm trying to keep
everything simple. Um, I can like it and
download as a JPEG, right? So I'm going to do
this one, right? This is very easy to do. I'm going to click
download as a JPEG. And if you're not signed in,
it won't let you do that, and I'm going to save
it here and save. There we go. Another
way you can do this to save it is just
take a screenshot. I'm on a Mac, so I'm
just going to go hold Shift and command
and then tap four, and I get this loadal target. And then I can just
drag across there, and I'll get that color scheme. If you're on a Windows PC, I believe there's
something called snippet that you can use to
take a quick screenshot. All right? Okay, so again, you can always download
it. All right. So again, I'm
trying to keep this simple rather than getting
into too many tools. And from here, remember
I downloaded it, and here it is right here. I'm just going to drag and
drop it. Wow, that's big. The screenshot might have been the better choice
just because of the size. Wow, that's gargantuan. So I'm going to click
on that corner piece, hold the shift key. And so I'm clicking
on the corner, and you see it's
going to distort, but if I add the shift key, it'll scale it down nicely
and keep the proportions. All right, so that is my
completed mood board right here. And you can do this on a
separate document if you like, but I just like to
put it on the side, and then I can delete everything
once and once I'm done. If I want to keep a
copy just for backup, I can always click, take a picture of that,
take a screenshot. And if I need this later, I decide I want to come
back to it later. I can. But each of these images
is going to really make the file size the file size for this this drawing a bit larger. Anyway, the next video, we are going to get started. And I just want to
scale this down to fit, you know, in my computer window. So I'm going to click on
the magnifying glass tool, which is the Zoom tool,
and I can drag right, to zoom in, and drag
left to zoom out. And then I'll get that
just about right, and I'll go to the hand tool here and reposition everything, and I am ready to go. So I'll see you
in the next video when we start this illustration.
7. Creating a File: So let's get started. I'm
going to go down to my doc, and I'm going to open up
Adobe Illustrator 2024. Since I teach, I tend to keep
some of the older versions, if in case you were
wondering why I had three different
versions there. But anyway, we're in 2024, and I am going to click
New File right here. And from here, I'm going to choose a letter size document, but you can choose
any other type of document that you like. I'm going to click
right here for print, and there's A four, which
is another common size. I'm going to click
here to choose V all presets so we don't
see these templates. And you can see there's
other sizes here. So choose whatever size
you're comfortable with. Okay, so right here, you can see it says
preset details. I'm going to change
the name here. I'm going to call this food
now breakfast, drawing. And I'm going to choose
landscape orientation. And the rest of
these things here, the settings should be fine. So I'm going to hit Create.
8. Gotchas!!: In this short video,
I want to show you a few things
that I call gotchas, and how to get out of them. One quick thing is, say if you mess up
your workspace, you can always come up here to window and choose workspace. Right now we are working in the class Essentials
Classic workspace, and that's where I usually work. So just change to the
Essentials Classic workspace, and if it still is a mess, just hit reset essentials, and everything will go back. To its right place. Okay, now, another gotcha is the tab key on your keyboard. If you accidentally touch
that, the tools disappear. All you have to do is
hit the tab key again, and everything will come back. Okay? And also, if
you hit that tab key, you can still come up
to window workspace, Uh, and I'm on the classic essentials and
just hit reset essentials. And one thing you will not see reset essentials if you're not
on the essentials classic, you'll see reset whatever
work space you have chosen. And yours will look a
little different than mine because I have some
custom work spaces here. So I'm just going to
hit reset essentials. Boom, and it goes back. And the reason I tell you this is because it's very easy to accidentally hit
that tab key and not know what happened
to all your tools. If that happens, you can
always just hit Command S or Control S on your keyboard to save it and then
quit and reopen, and it'll come back if you
can't remember the other way. Another key that you may
accidentally hit is the F, F as in Frank. You hit that key, and it
changes the mode, okay? So, and I go right here after the third tap or
at the second tap, it goes into presentation mode, which is very nice
if you want to show someone the work
that you're working on. But just tap that F key, F in Frank, and it
will bring you back. It's three taps, you know, to cycle through the
different stages. And the one problem
here is, say, if you get to this point, there's no Essentials class. I mean, you know,
you can't go to the workspace from up here. So that's a little
bit of a problem. So just hit the F key, actually, or hit the tab key. The tab key brought
me back to here. So if I go to F and then tab, you know, hang on me, F, F. Everything is gone. I can still hit the tab key, and that'll bring me
back to this place. And then, you know, I
can always once I get to something that
looks presentable, tab, I can always go
to actually window, the thing up at the
top is no longer here. I can also access
workspace from over here. You see that little icon in the very upper
right hand corner. I click on that, and you can
see, you know, workspaces, essentials classic,
reset essentials, and, you know,
everything is there. Okay, so presentation mode, you lose that the
illustrator menu up here. So just try to remember
the FK, again, if you can't quit, make sure you save everything and reopen, and everything should
be normal again.
9. The Illustrator Workspace: All right. So this
is my art board. And if yours looks a little
different than mine, if you come up here
where it says Window. Here we see it says workspace if I come
down a little bit. And from here, you can choose
different work spaces. I have a number here
that I've created, but we're not going
to get into that, but you can see
there's essentials and essentials classic. I like to use
essentials classic, and I'll show you
the difference. Just take a look at the tools and you see the bar at the top. It's going to disappear.
So watch the tools and you'll just see how much
they kind of dwindle down. So this is the essentials
classic. This is the old way. I like to use it the old way, but I'm going to show you what your default might be here. If I come here where
it says Window, workspace, and then
I come over here. This window should look
a little bit different on yours because I've added
a few custom work spaces. We're not going to
get into that here, but you can customize
your workspace. Here, you can see it
says Essentials Classic. I'm going to change
this to essentials. So this is what
you're likely seeing. And you'll see here,
the tool there are significantly less
tools over here on the left hand side
of your workspace. And there's a options
bar that is missing. It's kind of redundant, but I've gotten
used to using that, and that's why I like
essentials classic. So I'm going to go
back to Window, workspace and choose
Essentials Classic. Now, to make sure we're
in the same spot, I'm going to reset my workspace. I'm going to go
window workspace, and then I'm going to choose
reset essentials classic. And this reset,
it just resets to we'll reset on whatever work
space you're working on. I'm going to hit reset
Essentials Classic. And you can see it just
close that window. So if you open your open the document and
Essentials Classic. You should have everything that looks exactly the same as mine. I once you choose
that workspace, if it still looks a
little different, reset the workspace, reset
the essentials classic. And the main difference, as you'll see there's
twice as many tools here. And up here, this is
called the Options bar. And the options bar changes when you choose different tools. But also, it's pretty redundant of what you'd see
here in the properties panel. But the old way, I'm just used
to using the options bar. And again, it will
show you most of these same tools here in
the properties panel, okay? So if you are working on a laptop with a
smaller workspace, you might feel more comfortable
using essentials classic. But the tools here
won't look exactly the same if you are using the
essentials workspace. But if you just feel much more comfortable working with
the essentials workspace. You'll see right here
there's these three dots. If you click there, you'll
be able to find any of those tools that are
missing right here, okay? So I'm going to unclick that, and then I'm going to go
back to Essentials Classic. So Window workspace,
Essentials Classic. Okay. So now we are
ready to get started.
10. Importing Images: So the first thing
we want to do is we are going to create
a colored background. And I'm going to go to my, I'm going to go to
that mood board that I created earlier. This will kind of set the
tone of what I'm doing, and I'm just going to play off of what I have
here. All right. So I'm just shrinking
this up a little bit. I forget, this is
a beginner course. I need to show you what I'm
doing here. I'm on a Mac. So what I'm going to
do here is click on that and I can just click
hold my finger on it, and drag and drop it, okay? And it's still selected. You'll notice it has that
X across the middle, and I can click on this
and I can scale it down. Right now, it's scaling,
but it's distorting. If I keep my finger on the mouse button and
I add the shift key, it will scale down
proportionately. And I just want it about
the size of the document. And I'm going to release
the mouse button first. Then I will release
the shift key. That's the order. You
can do it very quickly, but don't try to
lift your hands at the same time because often, what happens when you do that, If you scale it down and say, you see where my cursor is. It's kind of distorted. If I
left release the shift key. It does that, okay? So don't try to beat it, re release the mouse
first, then the shift key. All right, so I'm going
to move this over here. If you're on a Windows PC, I think you can still drag and
drop it into the document. But if you prefer, you
can also place the file. So you'll go to the
file mean you file. And then you'll work
your way to find the piece and you can
choose it from here, and I'm just going to
click that button place. And you'll see it
gives me the ability to either click and release
and drop it in place, or I can click and drag, and you see it's
maintaining scale, and I just scale it up or down to the proper
size, and I'm good. Okay, so I'm going
to delete that. I'm going to click here on
the application frame up in this area right here and
move that back into place.
11. Navigation in Illustrator: Okay. Now it's time to
get started drawing. I want this to fit
to the document. There's the magnifying
glass right here. If you'll notice, right here, I can click and drag
right and left, and it will scale up and down. Right to zoom in,
left to zoom out. And it will scale
in the direction, I mean, at the location
that I choose. So if I click here on
the avocado toast, I'll click right, drag right, and then drag left. No, that's blueberries
and toast and something. So you'll see if I zoom
in, I can just click. Now, if I want to zoom
out the other way, I can hold the option key
on my keyboard, hold it, and you see the cursor, the icon changes
to a minus sign, and then I click
and I can zoom out. The problem with
the scrubby zoom is when you click and
drag right and left, if you hold it too long, it starts to zoom
in automatically. You're like, Whoa, whoa, whoa. So if you use that scrubby
zoom where you click and drag left to zoom out or
drag right to zoom in, you'll need to do it quickly. Because, again, if
you click and hold, it just starts zooming in. So click drag, click drag. So that may take a little
practice. Click drag. Oops, I held it too long. All right, so I'm
going to zoom out. All right. Now, what
I like to do to get everything in the work space, so I can see
everything is I'll hit Command zero. All right? Or control zero on a PC.
I'm sorry about that. So Mac control Z. I mean, Command zero, and
everything fits. Okay? Now, I want to
move over to the right, you know, just a little bit. And right here,
you can see the I can click here and drag right
and left and move over. But for me, that's a
little bit cumbersome. It is hard to control. So I will hold the space bar. I'm holding the space bar, and I get the hand tool, okay? And now I can just
move it over so I can see everything
I need to see. Actually, I'm going to go
back to the magnifying tool, the Zoom tool and drag oops
drag left just a little bit. I went too far. Oh, boy. Whoa. Hang on. There we go. Space bar, I get the move tool, and I'm just going to
zoom in till it goes, and then I'll hold the space
bar and get the hand tool. But you can also click
on the hand tool. And if you want to use
the keyboard shortcuts, you'll see if I move my
cursor over that hand tool, there's a little H right there, and it's just telling me that the H is where is what I need
to do to get the hand tool. And on the magnifying
glass, it's z. So if I tap H on my keyboard,
I get the hand tool. I tap Z, I get the magnifier. Now, if I want to want
it to go to a minus, I hold the option key on a Mac, and I believe it's also called
the option key on a PC. All right. It's that simple.
12. The Rectangle Tool: Here is the rectangle tool.
There's a number of tools. I'm not going to get
into a lot of them. Most of the tools that
we're going to be working with are simple shapes. We'll play around with
the curvature tool. We might touch on the pin tool, but I'm not going to get into
it really heavily, okay? Alright, so this is
the rectangle tool. If you don't see it
look for one of these, the circle, this
rounded rectangle tool or one of these
other tools, okay? If you've been playing around,
you may have changed it, but we want the
rectangle tool, okay? And any of the tools
you'll see here, if it has that
little dot next to it means there are other
tools nested with it. And you can see
there's tons of these. Most of them have other tools
nested with them, okay? So, here, the curvature tool doesn't have anything nested with it, right? Not to be confused with
the pin tool. All right. So we're going to click right
here on the rectangle tool. And what you can do is you can click and drag and release, and you'll have a shape. So here I want to show you
how to select something. This is the black arrow and
the white arrow or more commonly known as
the selection tool and the direct selection tool. If you select this, right now, I'm only going to show you how
to use the selection tool. If I click on the black
arrow, the selection tool. If I click here, you see, I select this object,
and I can move it. Here I click on this one. Now I can click again,
and I can move it. If I click over here,
I'll deselect it. Okay? Sometimes you'll
hear me say, click away, and that just means
clicking a spot that's blank and you'll deselect it. So here I can select these. Another way I can select
things is by clicking away or clicking outside the shape and make sure I
don't click something else. I can click here, hold my
finger on the mouse button and drag over and
once it touches that, it will select that. Now, watch this. If I click
here and I can drag across, I'll select two objects. Notice is only touching. I don't have to encompass
the entire squares. So I'll release, boom, and now they're both
selected. Same thing here. I can come across that, and I'm touching part of
all three of these squares. I'll release, and now
they're selected. So now I can click again, and I can move them
as a group. Okay? Now, the direct selection
tool will behave differently. It goes into more specifically on the points
that you'll be selecting, but I'm going to
save that for later. For now, stick with the black arrow, and
you can't go wrong. Another thing that you can do is if I'm going to move
these down here. If I click on that, you see these little
anchor points here. If I click on these, I can click and I
can drag that out, I can click here,
I drag that up. And on this corner, I can, you know, change the
shape of this like this. Okay? So that's what
those anchor points are. So if you just want to move something, grab
it in the middle. If it doesn't have a fill. So if I come over here
and click fill with none, if I click in the middle, it's not going to select. The reason it's
selected there because I select that little
middle point. But normally, if I'll click, you're like, Yeah,
it's not selecting, but if I drag out
across that line, I selected it but then I go to pick it up and it's
not selecting. So since this is
filled with none, just to make that a
little more clear, I'm going to move it
up here. You can see. I just need to
select right on top of the line, the path, okay? I'll click, and now I
can move it around. And that's if it's
filled with none. This is my This is the fill, and this is the stroke. The fill fills it, and the stroke is
the outline, okay? And right now you see
there's a line through this, so there is no outline. So I'm going to click
right here on the fill. And then if I come
down here to this nu, you notice there's the
keyboard shortcut, which is a slash. I can just type slash
on the keyboard, and now it fills with n. This is one of those things that
can trip up someone who's new to Adobe Illustrator
is if you create a shape and it has no fill and it
has no fill in the stroke, you'll click away, and
it appears to vanish. It's still there. So if I click
out here and drag across, it touches it, okay? So I'll click here, drag across, and it will touch
it, and select it. Okay, so be aware of that. So if you make a shape and you release and you
go, where did it go? That's probably the
reason why there's no fill and no stroke
on the path, okay? So again, this is the path. And you can see the cursor is telling me the little
pink letters right there, it's telling me that
this is a path. And that's because
the reason I see the little symbol here is
because my smart guides are on. And if you don't see that, you can turn that on up
here. I'll go to view. And come down here and you
see Smart Guides is checked. If yours is not checked and
you want to see them on, you can just move
over the view and release on here and it
will be and it will be on. For now, I want them on, but I often turn them off. But right now, we're
going to stay right here. One thing I do want
to mention here is you'll notice if
I click on these, it will the color chip
here and that stroke, it will switch places. I can also click on
this little arrow here that says swap
fill and stroke, okay? Now, what these do is if I want to change
the color of this, say if I want the stroke to
fill with, I'll click here. So if I want to fill the
fill to be filled with, I have to click it and
move it to the top, and then I can
fill it with none. Okay? So I'm going
to do that again. I'm going to click on this
default colors, okay? Here, you can see I
can click here and I can swap the colors, okay? But I want to fill
this with none. So I need to make
sure it's on the top, so I have to click on it
and I fill with none. Now, if I want to
fill the stroke with none, I have
to click on it. It brings it to the top, and then I can fill
that with none. One more time, click
here, I can swap, or I can click on it, bring it to the front, and fill that with a.
Click on that one. Okay. So let's try this again. I'm going to hold the space bar. I'm going to reposition everything here so I
can see everything. Oh, and I still have that. So I'm going to click across. And suppose I want to fill this. Okay, so it's filled with none. So if I click and drag, it's not moving, okay? So if I click and drag across, I can move my cursor
right on top of it, and you can, whoops,
I missed it. Oh, I guess I did get it. And it's moving, and I can move it down here and I'll release, and you
can see it's there. But it's hard to see. Right now, if I go to view, you'll see
I am in I'm in preview mode. Well, actually, you
can't see that I'm in preview mode. It doesn't say. But right here, if I change
this to outline mode, you will see that line, okay? There we go. So now
I'm in outline mode. And one thing you'll notice our photograph just appears
as a box with an x in it. If I go to preview mode, you can see that
picture now. Okay? And you can see here
that you can't see this, but when we go oddly enough, when we go to outline mode, you can see this box. So if you lose something, you
can change your view if you make a shape and it has no feel or stroke,
you can change it. So I'm going to
click right here, and now I'm going to go
back to preview mode. And we're going to
add some color. There are a number of
different ways to add color, but I'm going to show you the
most direct way right now.
13. The Color Picker: There are a number of
different ways to add color, but I'm going to show you
the most direct way right now is you'll see the color
chip is filled with none. If I double click on
that, that's click click, it opens up the color picker, and I can choose my color. So if you look right here, this is a little circle. Okay? Right now, this
is filled with none. It will fill it with something once I hit the okay button. But before I increase the stroke on the width, it
would be filled with black. Actually, I'm going to hit okay because that is right
there that little thing, that's a circle, saying
that this is 100% black. I'm going to hit
okay. All right, I just want to add a q take a quick little break
from the video to show you something else here. So say if I draw this shape out. This is rectangle. And you can see if I click
away, it gets lost. It's filled with white, so I can still just click in the
middle and reselect it. But the quickest and
easiest way to get something so you
can see it is to hit the letter D on
the keyboard, okay? Right here, you'll see there and you can see it says
default fill and stroke, and D is right there. That's the shortcut. I just hit D. And boom, I have a white fill and a
black stroke around it. And that's the easiest, quickest way to get this
so you can see something. Now, back to what I
was saying before. Okay, so this is telling me that it's going
to fill with black, but I'm going to
move the cursor. And you'll notice the
moment that I move it, it registers that there
is now a fill, okay? So it's still all
the way down there, but I had to click on it, and then it instantly
fills, okay? So now, this is black and
say I want to make this red. I can slide this all the
way up. You can see. Or I can just click there, but I'm going to
go ahead and just keep sliding it up
until it goes to red. I can move it back down and
I can move it back up, okay? And this is called
the hue slider. Hue is another word
for color, okay? And this is just the pure color. Now, if I click here that you can see these two
little handles here, if I click those
and drag them up, I can change the color. And drag them down. Okay? Now, if I take
my cursor right here, and I click over here in the white area and I
change the hue slider. It's not going to
change the color. And the reason for
that is because black and white are technically
not colors, okay? So I slide that up and down. And this is something I'm going over this because it's
kind of important. You might open up
the color picker. It's white, and then you'll go, I want to make this red or blue, and you slide it up
to blue and hit, and you go, why isn't it blue? And the reason it's
not blue is because your color picker is you chose you know you
change the hue slider, but you need to slide this
the light, dark area here, you know, move out of
the white over into the hue into the
strong hue area, okay? And you can see right here, that's the new color, and down here is the old color. So you can see it was white, but now it's blue. Now, if I move that hue
slider up into purple, you can see now, it was white, but now it's purple. I hit. Now if I double click again,
you can see it's purple, and now I slide that hue
slider to the blue area. It's blue and purple, okay? Now, if I move it to the white, I can just move it to the dark. This is the light
and the dark of this particular hue, Okay? I'm not going to go
into any of these, but these are where you
can actually manually type in numbers to get a very
specific color if you want. But we'll save that
for another lesson. All right, so I'm
going to hit okay. And now we have our blue color.
14. Fill and Stroke: There are a number of
different ways to add color, but I'm going to show you
the most direct way right now is you'll see the color
chip is filled with none. If I double click on
that, that's click click, it opens up the color picker, and I can choose my color. So if you look right here, this is a little circle. Okay? Right now, this
is filled with none. It will fill it with something once I hit the okay button. But before I increase the stroke on the width, it
would be filled with black. Actually, I'm going to hit okay because that is right
there that little thing, that's a circle, saying
that this is 100% black. I'm going to hit
okay. All right, I just want to add a q take a quick little break
from the video to show you something else here. So say if I draw this shape out. This is rectangle. And you can see if I click
away, it gets lost. It's filled with white, so I can still just click in the
middle and reselect it. But the quickest and
easiest way to get something so you
can see it is to hit the letter D on
the keyboard, okay? Right here, you'll see there and you can see it says
default fill and stroke, and D is right there. That's the shortcut. I just hit D. And boom, I have a white fill and a
black stroke around it. And that's the easiest, quickest way to get this
so you can see something. Now, back to what I
was saying before. Okay, so this is telling me that it's going
to fill with black, but I'm going to
move the cursor. And you'll notice the
moment that I move it, it registers that there
is now a fill, okay? So it's still all
the way down there, but I had to click on it, and then it instantly
fills, okay? So now, this is black and
say I want to make this red. I can slide this all the
way up. You can see. Or I can just click there, but I'm going to
go ahead and just keep sliding it up
until it goes to red. I can move it back down and
I can move it back up, okay? And this is called
the hue slider. Hue is another word
for color, okay? And this is just the pure color. Now, if I click here that you can see these two
little handles here, if I click those
and drag them up, I can change the color. And drag them down. Okay? Now, if I take
my cursor right here, and I click over here in the white area and I
change the hue slider. It's not going to
change the color. And the reason for
that is because black and white are technically
not colors, okay? So I slide that up and down. And this is something I'm going over this because it's
kind of important. You might open up
the color picker. It's white, and then you'll go, I want to make this red or blue, and you slide it up
to blue and hit, and you go, why isn't it blue? And the reason it's
not blue is because your color picker is you chose you know you
change the hue slider, but you need to slide this
the light, dark area here, you know, move out of
the white over into the hue into the
strong hue area, okay? And you can see right here, that's the new color, and down here is the old color. So you can see it was white, but now it's blue. Now, if I move that hue
slider up into purple, you can see now, it was white, but now it's purple. I hit. Now if I double click again,
you can see it's purple, and now I slide that hue
slider to the blue area. It's blue and purple, okay? Now, if I move it to the white, I can just move it to the dark. This is the light
and the dark of this particular hue, Okay? I'm not going to go
into any of these, but these are where you
can actually manually type in numbers to get a very
specific color if you want. But we'll save that
for another lesson. All right, so I'm
going to hit okay. And now we have our blue color.
15. Reseting Workspace: And if ever you mess
up your artboard, say, if I tear this off, I move this over, I start closing
things and go, Oh, my gosh, I've wrecked
my workspace. I've even closed my tools.
Oh, no, what do I do? All I have to do is come up
here to Window workspace. And again, I'm on the
Essentials Classic. As you can see, I just hit
reset Essentials Classic, and everything comes right back. I should have told you
that a little sooner, but I don't think
anyone's messed up the artboard too much already, but that's how you
can get things back if you lose things.
16. Sampling Colors: Since I have my mood board here, and I have my color
samples here, I'm going to sample
that color, okay? So what I'm going
to do is come over to my eyedropper tool. So now we want to add sample this color here from
my color swatch. So I'm going to select. Again, I'm on the black arrow. I'm going to select
my rectangle. And then you'll
see right here is an eyedropper tool. I'm
going to click on that. Now, I'm going to move move that cursor all the way over
here to my color sample, and I'm going to click
on this darker blue. And boom, it's
sampled the color. All right? I'm going
to do that again. I'm going to hit
Command Z to undo it. And I'm going to come over here. I'm going to click on
the eye dropper tool, and then I'm going to come
over here and just click one time to sample
that color. All right. So now I want to make
this the background. I mean, you can see
the artboard is white. I can go into the preferences and change
the artboard color. But the problem with
that is changing the artboard color would only
change the artboard color. And if I print this out, it's still going to come out with the background being white. You know, if I put in a
piece of white paper, it's still going
to come out white. So we need to change the
background for this, right? So I'm going to click
here on the black arrow, and I'm going to
move this over to the corner of the artboard. And I'm going to go just
a little bit over, okay? So if I, you know,
export this out, it's going to go blue
all the way to the edge, if I save this as you know, a JPEG or something
to put on the web. All right. So now I'm going
to click here in the corner. And again, I'm on
the black arrow, and I'm going to drag
this all the way over to here. And I'm
going to release. Now, this is going to
be my background color. This is going to
be my table cloth. The only problem
that you may have with this is if you're
clicking on things, it may move around, so
we want to lock it. So I'm going to come here, where it says object. And then you see
right here, it says, Lock, and then we're going
to choose selection. And that way, we don't have to worry about
it moving around. But I'm going to
take it another step further to lock it down. We're going to work
on a separate layer. And that's because when you're
working an illustrator, if you unlock things, you tend to have to unlock them all if you use a
keyboard shortcut, and I don't want to have to keep locking and unlocking this. So again, I'm going
to go object, lock, and then choose selection. Okay? And it's locked. And how do I know it's
locked? Right there. It's showing me a little lock. If you don't see that
lock, don't worry. Just click on it and click
hold and try to drag, and if it moves, you
know it's locked. That actually is something
that's in this new one of the latest versions where it shows you
that it's locked. And you can change turn that on and off in the preference.
17. Working with Layers: Okay, so now, I'm going to
open up my layers panel. So if I come over
here and you'll see here's another
set of panels, these are just the same
as these panels here, but these are minimized. So if right here
that little chevron, I'll click and you'll see
now they're wide open, okay? If you're tight on space, you can keep them closed, or you can open them up, right? And that's just by clicking those little double
arrows there. Right now, I'm just going
to click right here, and that's the icon
for the layers panel, and that's what it looks like. And you'll see it
says Layer one, and you can see it looks blue. Let me make this a
little bit larger. I'm going to click here and
this is the flyout menu or the hamburger menu
as a lot of people call it because it
looks like a little, you know, bun with a
couple of things inside. All right, so I'm going
to click on that, and I'm going to
go panel options, and I'm going to choose large to show these icons a
little bit larger. And you can see it's
a little bit larger, so that may be helpful to you. You don't need to do that. Okay? Unless things
are too small for you. And depending on the
resolution of your computer, it yours may be much larger
or smaller than mine. All right. So this
is the background. And what I'm going to do here is double click on those words, and I'm going to call
that BG for background, and then I'm going
to hit the interkey. Okay? And I just like to label things so things
don't get confusing. All right? As you start
to build this out, there's going to be
lots of layers, right? So we're going to also want
to lock the whole layer down. I showed you how to
lock that there, but since this is going
to be a separate layer, we're going to go ahead and
lock the whole layer down. And you see this
area right here. All I have to do is
click and you see there is a little lock and
that means it's locked down. So not only have I lock this, you see is telling me I can't
draw or do anything here, and the same with this
with my mood board. Later, I'll need to unlock this and I can delete my mood board, but that's how that's working. And now that's locked. Now I need a layer to work on, okay? So what I'm going
to do here is come down here at the bottom
of the layers panel, and you'll see it says,
create a new layer and I'm going to
click. All right? There we go. Layer two. I'm going to double
click on that, and I'm going to
call this plate. I'm going to add
a few more things other than the plate here. But since the plate is there, that's sort of my background. Well, I may add the plate. And then everything
else, I think I'm just going to pile on
on top of the plate because we're going
to want to move those up and down in
the stacking order in the layers because the layers are sort of like
a deck of cards, and you can pull some out
and put it on top of others. So say if I drew something,
and I can't see it. You know, you can't see hang on. P. Okay, so I have
the tip of this pin, and it's stacked this way. If I turn it this way,
you can't see it. So if I make create something
and I can't see it, it might just be that it's
behind another object. So I have to move it on
top in the stacking order. And that's basically
what layers are about. All right, so I have
the plate layer, so I'm going to make a circle.
18. Making a Plate: Okay. So I'm going to come over here to my rectangle tool. I'm going to click and hold, and I'm going to choose
ellipse. I'm going to release. And now from here, I can
click and draw out a circle. And it's right. It's in the ellipse, but I'm
going to hold the shift key, and now it will constrain
it to a circle. And I have to decide the size. I think this is about
the size that I want because it'll
leave me enough space for a cup of coffee
and silverware, okay? So again, as we did before, I'm going to release
the mouse button first, then the shift key. And the shift key is to
make sure it constrains it so it stays a perfect circle. So again, release the
mouse button first, okay? Now I'm going to
release the shift key. You can go a lot
faster than that. I just want to demonstrate
because sometimes, again, I think I've
said this already, students will raise their hands, try to go quickly and let
them go at the same time, and it shifts because
the order was off. Alright, now we want to fill
this with a color, okay? I'm just going to
start out with white. I may change my mind
depending on how I build this out and how much actually 'cause I
like the fried egg. But the problem
that I'm going to have with a fried egg is when I go to when
I make the egg, it's going to there's not
going to be enough contrast, and it's just, you know,
it's going to blend. If they'll have a
white plate with a white egg on there,
it's going to blend in. So I need to make this
a little bit darker. In this project, I'm
trying to avoid lines. I think it has a nicer feel
when you remove those lines. So when you work
on your project, I hope you'll take the
time to remove the lines. But if you like lines, you just love
lines, that's fine, but try to be consistent. Don't do some lines
and some without, try to stick with your style throughout the
entire piece, okay? An occasional choice
to remove a line because it really
looks better is fine, but don't randomly leave a
line on, leave a line off. Okay? Alright, here we go. So we're going to
fill it with white. And I can double click
here on the color chip. And you see here it is, and I'm just going
to slide this over. Actually, I'm going
to make this gray. And I'm just going to
keep going, keep going. I kind of like that
bluish gray color. And I think that looks good. There should be enough contrast. So if I have a white
fried egg there, it should pop out
without a line. Now, I'm just going to
hit. And that is my plate. Now, I'm not going
to lock this one. But I'm still going
to make a new layer, and I'm just going
to call that food. I may eventually put silverware or a napkin or things
like that on this layer, but I might not. I'll probably just keep going. So I'm going to
make a new layer. So here in my layers panel, again, if it's not
open, it's right there. I can just click right here
and that'll open it up. And then down at the bottom
of the layers panel, there's a little plus symbol. And I click, create a new layer. And now I'm going
to come up here, double click on the words
and type food and enter. And now I'm ready to go.
19. Color Swatches: Alright. So, now it's time to
get into the nitty gritty. And we are going to actually
start drawing these items. I always hate the whole setting up part where it takes a while. And I'm sure you do too, especially if you don't
know the software, where you're trying to get used to it and get comfortable. But now we can start to
have a little fun here. And hopefully, you think
this is as fun as I do. Alright, so we have our plate. Actually, we're not going to get into too much fun right now. We still need to figure
out how to do this plate. Well, that was going
to be the plate, but we're going to
add some designs. I may or may not leave
those in the final design, but I want to show you how to do it in case you want to do it. Let's say you want you know, a lot of times plates
will have decoration. So we're going to add a simple
border around the outside, and we're going to
add an inner border. Of color there, as well, okay? So I'm going to make a
pink border on this. So I'm going to
select the plate. Again, I'm on my black arrow
and I click on the plate, and that part is very easy. I'm going to come over here
to my properties panel. Again, if you don't see
your properties panel, all you have to do is go up
here to see Window workspace, and then choose reset
Essentials Classic. If you don't see
Essentials Classic, change it to choose E Centrals classic and
then go Window workspace, reset sentrals classic, and you should have your properties
panel right here. You can move these
around and shift them. I can tear that off of there
if I want and put it back. But that takes a little bit
of a little bit more finesse. The easiest way is just to reset that workspace.
Alright, so here we go. Now, what I'm going
to do here is, again, I've selected
the plate. All right? Now I'm going to come over
here to my properties panel, and you see the fill it's
filled with this light gray. Now, what I'm going to do
here is choose stroke. You see stroke is the outline that goes around the
outside of the image. And I'm going to
click here. And these are my swatches panel. So if I click away,
I can click here, and it brings up what is
called the Swatches panel. I can also access the Swatches panel here.
I can click right there. And it's exactly the same thing. If I want to extend this, I can click down here, and also when it's short, I can click, you know, right here to go up and
down within that box. But I like to click here and drag that down to
extend that panel. But again, that's exactly the same thing that
you will see here. I'm going to close that by
clicking on the Chevron, and I'm going to
click right here. And what I actually want is the I'm going
to make this pink so it will go along with my original color
choices here, okay? So I'm going to click
away from that, well, let's make it pink
anyway, and I'll show you that. This is going to be overly pink. I'm going to click right
here on this magenta. And if I click away,
you can see it. Let me see to click away. You see that it is there, but it's hard to see with
the bounding box there. And now that it's selected, I'm going to come over here to the stroke here where
it says stroke, and I can click on
that arrow that goes up and increase the
width of that line. I can also click
here on this one, and I can choose, you know, the, how many points
do I want that line? And I'm going to go at six. The thing is, this
is too bright. You can see if I come over to the other side to the
bottom of my tool panel, I can see it right here. I'm going to click to
bring that to the top. One way I can double click
on this and eyeball it, but I wanted to match this
color here precisely. So just like we did before, I'm going to click on
the eyedropper tool. I'll click here, and then I'm going to come
here and click. This may not go well.
The problem is it's filling It's filling
with the entire color. So what I'm going to do here is I'm going to go
to my black arrow. I'm going to click
away. I forgot we got a few more technical things. I have a few more technical
things to show you before we get into the fun part. Okay, so I want to add this
color to my color swatches. Actually, I'm going
to add all of these colors to
my color swatches before we get going because this is making life
a little difficult. So if I open up my
color swatches, you can see my colors here, my color theme is not here. So I'm going to add these. So I'm going to click away, make sure nothing is selected. And then I'm going to
click here to bring the fill to the front, okay? Now, I'm going to click
on the Eyedropper tool and I'm going to click
on this pink color here. And you can see
the fill is here, the fill is showing it here. So now if I go to
my swatches panel, which is right here,
I'll open that up. And in the flyout menu, I can choose new swatch, okay. And it gives it here. It shows me that here, and I'm
just going to call this my Color one. Boom. And you can see here it is in
my swatches panel. So now I'm going to do that with the rest of these colors. I'm going to come down here. First, I need to click on
the black arrow, click away. Now I'm going to go back to the eye dropper and
click on this tan color. Okay? Now I'm going to go here. I'm going to choose
right click New Swatch, and I'm going to call this
my color two and hit. And you can see
how this is going. I'm going to click
on the next one. And then I'm going to
choose new swatch, and I'm going to call
this my color three. New Swatch. And lastly, Nose watch. My color five. Okay, so you can see all my
colors right here lined up. Now, just to make life a
little easier, so it's easier. I'm going to select all these. I'm going to click on that one. I'm going to hold the Shift
key on my keyboard and click click click click. And again, I'm holding
the Shift key. Now, I'm going to
come down here to this little folder icon, and it says New Color group, and I'm just going
to click on that, and I'm going to
call this Colors. You can name them whatever
you want, and I hit okay. And now my colors are down here and nice and
safe and sound. Alright. So now let's
get back to this plate. We've already put an
outline around this. So I'm going to go
to my black arrow. Now I'm going to
choose right here in the properties panel on the
opposite side of the screen. I'm going to click on
that outline stroke, and I'm going to
choose that first, my color one, pink. There we go. Okay. So now, I want to have. Now, we're going to get a
little more difficult here, because I want to have
that border on the inside. So we're going to learn
a couple more tools. And we're going to learn basically what we're
going to do is put another circle on top of another and then we're
going to align them, and then we're going to just
make that little outline, and then we're going
to group it all together so that it's one piece. I know that's a lot, but
it's not that big of a deal, but you can use these
same techniques to create other things. Alright, so I'm going to
click on the plate, okay? Hopefully you all are
not having any problems. Alright, so here we go.
Click on the plate. Now I'm going to go edit, copy because what we're doing is we're going to take a
copy of this plate and sort of put it up
on our pasteboard up here somewhere. So
I'm going to hit copy. If you cut it, it's
going to disappear, okay, just in case
you're wondering. So we're going to copy it.
Now, it makes a duplicate. Now I'm going to go edit paste. Okay. There is a
way if I hit paste. If I hit paste in place, it'll paste it in
exactly the same spot, but I also want to show
you another technique. You may know another way if you're familiar with
this to do things. I'm just trying to give you just one or two
ways to do things. I'm trying to keep it
simple. All right. So now I need to reduce
the size of this circle. Okay? So I'm going to move
this over here, okay? If snapping is on, you see
my smart guides are on. It's sort of snapping in place, and I know that that's
right in place. So now I want to scale
this down, okay? So if I scale this down, you can see it's distorting. So if I add the shift key, it locks it into a
perfect circle, okay? Now, what I'm going to
do here is I want to align these so that
this is centered, okay? Okay, so I've selected
the inner circle. Now I'm going to
hold the shift key, and then I'm going to click
on the larger circle. So they're now both selected. So, if I click here, I can move these both around
at the same time. If I click away, they
are separate, okay? So I'm going to hit
Command Z to undo that. Okay, so command Z twice. If you're on a PC, it would
be control Z twice, okay? Okay, so you can see there, oops, let me do that again. I'm going to hold the shift key and select that second circle. All right. So they're
both selected. That's how you can test it. Now, if you have the
options bar open, the options bar should
appear here because if you're in the w workspace
Essentials Classic, okay? So that options bar
should appear there. But if not, it appear over here in the properties
panel, okay? So you can see these
align tools right here and you see the
align tools here. That's the reason you
see the essentials. They don't have the
properties panel because it's not
necessary because much of it is redundant of what you will get in
the properties panel. Okay? So that's why I like this. But if you have a
very small screen, you might want this
extra real estate, and then you'll just work
with the properties panel. All right. So I'm going to align center both horizontally
and vertically. So horizontal align.
I'll click right here. And horizontal align. I mean, in vertical align.
I'll click here. Now they're centered right
on top of each other. I don't like that circle. I still think it's
a little too large. So I'm going to click
I'm going to click away, so it deselects everything, then I'm going to click
the inner circle. And then I'm going
to click here. I'm going to add the shift key and make that a little
bit smaller. Okay? Now I'm going to hold
the shift key again. I'm going to click on
that outer circle, and then I'm going to
realign horizontal. And vertical again. Now they're aligned right
on top of each other. Okay? Now, what I want to do here is I want to I'm
going to click away. I want this inner line to be the same thickness
as this outer line. So if I click on
that big circle, you'll see it says
it's six point. So if I click on
the inner circle, I can just come
right over here to the properties panel
and increase that with two six points.
There we go. Now, to get this plate to
move as a single item, I need to group them, okay? So I'm going to click
on the inner circle, hold the shift key and click
on the outer circle, okay? Now I need to group them. So I'm going to
go object, group. And they should behave as one, okay? So I'm going
to click away. Now you can see if I click, I can come back here
and they move as one. If by some chance you accidentally
chose the white arrow, the direct selection
tool, it negates that. So be careful, okay? We haven't gotten
into how to use the direct selection
tool yet because I'm trying to Let you play
around a little bit, and then I'll talk about
the difference between the selection tool and the
direct selection tool, okay? So, right now, I use the
direct selection tool, and I selected
that inner circle. So I need to click away, and I'm still on the direct
select on the selection tool. When I come back, you can see it moves this as a group, okay? So be careful that you do
not select the white arrow, the direct selection tool
until we know how to use it. All right. There we go.
So, we have a plate. Whoo. Okay, so next is
going to be the fried egg.
20. Egg / Pathfinder and Curvature Tool: Okay, so I'm going to click
away to deselect the plate. Now we need to make
this fried egg. The first thing I'm going to do. Again, remember we're
working with layers. Actually, I'm going to click
on my layers panel, okay? It's right here.
Click. Open it up. Often, I'd like to keep
the layers panel open, but I'm just going to
leave it here since this is the way the
work space is for now. I may change my mind later. So right here, I'm
going to click and drag downward to give me
a little bit more space. And you can see, plate is
right here, the plate layer. I'm going to lock it. If I click right here, It's
going to lock it. Now when I click, that
plate won't move. If I ever need to move it later, when I start moving things around and when I add a napkin, I think I'm going
to need to nudge it to the left. I'll do that. I'll unlock it, and I
can move it around. But for now, we're going to
lock it and work as it is. The first thing we're
going to work with is we're going to make
the white of the egg, since that's going
to be on the bottom. We can shift things
around if we needed to. But for now, we're
going to build things in order just to
keep things simple. All right, so I'm going to come over here to my tools panel. I'm going to click here on the rectangle tool
and choose and click holding my finger on the mouse button and
choose the Ellipse tool, okay? I'm going to release. And this egg, we
want to be white. Alright? So I'm
going to come over to my swatches panel and click. Actually, we can just
take this the easy way. You'll see how Here, over at the bottom
of the tools panel, it says it shows me the white fill and the black
stroke is the default. And you see right here, it says, D. Let me move away
and move back. There's a D at the end. That's telling me
that's the keystroke that will apply that. So I'm going to hit D on
my keyboard, D as in dog, no command, no control, D, and We have black
and white, okay? We're going to get rid of we're going to get rid of that
stroke in a little bit. So for now, we're just
going to go ahead and draw. Oh, so, here we go. So I'm going to click hold
out and draw out an egg. If it's a little off. If it's not a perfect
circle, that's okay, but I'm going to hold a
make a perfect circle here. But if it comes out
a little wonky, that's okay because
we're going to make some adjustments, right? So that's going to
be my fried egg. Okay. If you want pancakes, that can be a pancake because
these are going to be super stylized and now
you have a pancake. Alright. So the first
thing I want to do is get rid of
that black stroke. I'm going to zoom in, so I'm going to click on
the black I mean, on the magnifying glass. That's the Zoom tool,
and I can drag to the right or just hold and
it'll zoom in automatically. Alright, now I'm going to
go back to the black arrow. Now I want to get rid of
this black outline, okay? Want that to be
gone because again, when you have these
thick heavy black lines, it's really going to change
the look of the piece. And the style that I'm
after for my piece, is going to be no black lines. But if you decide that
you want black lines, I would recommend being
consistent throughout, so you don't mix the two styles. It's going to look kind of odd. Um, But it's the
choice is yours, but this is the way
I'm choosing to work. So I'm going to select that
the white of the egg here. I'm going to come over to my properties panel
right here on stroke, I'm going to click one time, click and release and choose this area right here
where it says none, the white box with the
red slash through it, boom, and now it's gone. Okay. Now, I told
you that we were going to touch on the
white arrow, okay? This is the selection tool. If I click it, I you know, everything, it
moves all at once. If I click these anchor points on the on this bounding box, it will distort it, okay? I'm going to hit command
Z to put that back, but you can see this
will change it, okay? But if I click on
the white arrow, the bounding box is
going to disappear. Okay. Now, you see we
have these anchor points. There's an anchor point
here and anchor point here, and you can see
this is the path. We can add more anchor points
and we can move these. So if I click here
in the center, it will move, okay? I can reposition it. But if I click on one
of these anchor points, I'm going to click
one time and release, and you see we have
these handles. You can adjust the handles. If I move out here, I can click on that handle. Woo. Okay. Same
with these handles. I can click one time
on that anchor point, and then I'll click on
that handle and okay. And the same here. Okay,
so this is a fried egg. I'm just going to
grab this thing. Whoops. All right. What I did is I
clicked right here and it stretch that out
really quickly. Be careful with that. Try to click right on the anchor point. And again, if you
make any mistakes, if anything goes wrong, just use the you know, hit undo Command Z, or control Z on a PC. All right. Now, this is the white portion of my fried egg. You can
play around with this. If you want to add more anchor
points, you can do that. If you know how to do that,
if you want to play around with curvature tool
or you know what? I'm going to do it. I hesitate to bring this in now,
but let's do it. You can just play around with those anchor points
and stop right here. But if you want to
be adventurous, come along for the adventure. You can click right here
on this tool right here. I'm not going to get
into it heavily, but this is the curvature tool. This is the Pin
Tools little brother or little sister, okay? Well, click on that. And you see the anchor points
changed, right? But say if I want extra points. I'm just going to click
here, I can move that. And if I want to
add another point, I can click and move
that out here and adjust it exactly how I want. Every time I click on that line, I can make adjustments. If I want to get rid of
any of these points, say I don't like the way
one of these points moves, I can click on it, and then
I'll hit the delete key. And it goes away,
okay? All right. So here we go. I'm going to add
that point back. Alright, so now we have
the whites of our eggs. Now we're going to add the yolk, and the yoke is going to
be pretty simple, okay? And again, I'm just clicking on those points and
shifting things around. Okay, now to do the yolk. The yoke is going to be easy. I'm going to click here
on the ellipse tool, and I'm going to click drag out, and I'm going to
hold the shift key to get a perfect circle. All right? And then when
I'm happy with that, I release release
the mouse first, the mouse button first,
and then the shift key, and it will remain a circle. Now, I'm going to come over
here to my appearance panel, and I'm going to choose Phil. I'm going to click one time,
and I think that color, one of these two yellows
or yellow oranges should work nicely for the yoke. Alright? Now, we want
to highlight on it. So I'm going to click here, drag out another circle, and I'm going to release
the mouse button first and then the shift button. And I'm going to give this
a nice white highlight. Is that okay? Yeah. All
right. Okay, there we go. So this is the egg yolk. Now, what I want to do is I'm going to click. I
think that's locked. Yeah. So I'm going to click away the blue area is locked
so I can click away. We can either stick
with this egg as is, or we can add more
complexity. All right. So I'm going to go with
this one for a simple egg. First, I'm going to click on that highlight, the white dot. I'm going to add the shift key. I'm going to hold the
shift key and click on the yolk and the
white of the egg. Now I'm going to go
to object group, or you see the key
command here is on the MC is Command
G on a PC will be Control G. You'll be
able to see it here in the menu to double check if
you ever wonder what it is. So here we go. Command G, and again, on a PC
Control G. Now, if that's all grouped
as one object, if I click away, I click on it, everything moves all the same. I'm going to click
away. I can move it, click away, move it. But remember, if I
use the white arrow, the direct selection tool, I can click away, and if I
click and drag on that circle, it's going to move it's going to break this thing apart. Okay? Now, watch this. If I click
on the direct selection. I mean, sorry, the selection
tool, the black arrow. If I click on it, It's
still a group, okay? So, be aware of that. So
I'm just going to hit a few undoes to get everything
back the way I had it. All right? All right.
So now we have an egg. Actually, now I'm going to show you that's one
version of an egg. Now I'm going to
show you how to do a more complicated
version of an egg. So I'm going to
take the same egg. I'm going to go edit copy. And then I'm going
to go edit, paste. Okay. So say I wanted to
do a shadow. All right. So I'm going to click
I'm going to click here, and I'm going to
ngroup it, okay? We grouped it so I can
go object Ungroup, okay? Now they're broken apart. If I grab these pieces with the selection tool,
they move around. They're separate now. All right. So I'm going to click
on that highlight, move it over here
for safe keeping. Now, I'm going to make
a little crescent moon here to add a bit of
a shadow for this. So I'm going to click on it. I'm going to go edit, copy. And then I'm going
to go edit, paste. Okay. And I'm going to move
it off to the side here. I'm going to hold the space bar, so I'll get the hand tool or you can click
on it right here, but by holding the space
bar, I can click drag, move this over, and then
release when I am done. Okay? So you see here how
the actual egg yolk here, there is a highlight right here, and then there's
this little shadow. So we're going to create
that little shadow, but I'm going to make
my shadows go from the upper left to
the bottom right, okay, in this direction here. All right. So I'm going to
duplicate this egg yolk again. I'm going to go edit,
copy. Edit paste. Okay. I'm going to change you don't need to change
the color to do this, but I'm just going to
change the color just so you can see the
difference, okay? And I'm going to
move this on top of this one and this circle. And what we're going to do is slice this top piece away from the bottom so then we'll have a little crescent
moon here, okay? Okay. So I'm going to
slice that from there, and we're going to use something
called the pathfinder. And if you do not
see the pathfinder, That's because I, you know, maybe you only have
one thing selected, I'm going to hold the shift key, and I'm going to select
that second circle. Boom. Now you can see, they're both selected and look over here at my
properties panel. This thing here says Pathfinder. And I used this for years and I never knew what
pathfinder meant. And I'm just going
to show you this, if I move my cursor over this, right here, you
see it says path. These are paths, and
these are anchor points. So you're finding new paths, I guess, when you do this. So All right. So both
of these are selected. Okay? Now, what I'm
going to do here is subtract this top
piece from the bottom, and it's easy enough to do here. I can just come over here.
The pathfinder, you see. The first one says, Unite. The second one says, minus. It says minus front, okay? So it's going to take that front piece from the bottom piece, and it should leave the
color on the bottom piece. And then this one is intersect, and this one is excluded. There are a few more. If I click on these three dots right here. The only one I use. These are repeating the
first four here, again. And the only one I usually
I use on a regular basis, maybe this one that says divide, but usually it's
just the first two, the join and subtract. All right. So I'm
going to hit subtract. And again, this is
exactly the same as that. So I'm going to go,
subtract, boom. Now we have a nice
crescent. All right. Now I can move this into place, and you can see
the colors match. And the easy way to fix
that is to click on the color chip here over at
the bottom of my tools panel. I'll just double click.
And I could just eyeball moving this
over just a little bit. And you can see now I have
a little bit darker color, and you can see this
is the in color, and right here is the start
color. And I just hit Okay. Now, I could just
fit that in there, but you'll notice
even on the egg. You see there's this dark area, and then there's a
lighter area across it. So I'm going to make this
a little bit smaller. And you can see here
on the bonding box, if I move my cursor
to the outside, here, I get this curve and I can rotate it. I'm
going to hit Can Z. Or I get that double
headed diagonal arrow, which means I can scale
this up or down, okay? So I'm going to move it here. I'm going to click
and start moving, and if I add the shift
key, it locks it. It constrains it so that it is, you know, it doesn't distort it. And when I get it about
the size that I want, I'll release the mouse button, then I can release
the shift key, and then I can click on
it and reposition it. And I think that looks good. I don't know how this
is going to work here, but I'm going to try
to do the same thing here with the egg yolk, okay? So I'm going to go edit copy. And edit paste. Okay. I'm going to paste it again, edit paste. Actually, I think I
hit paste in front, and that's why I landed in
the same spot. There we go. Okay. So there the two
of these things are. I want this to be
a bit of a shadow, and I know I have
some grays here, so I'm going to click right
here and I'm going to add a very faint gray,
something very light. And then I'm going
to drag this up, move it in the
place, and this is just going to be
a little shadow. Hopefully, this will work out. Maybe I'll make that
a little lighter. Okay. Here we go. So now I
need to select both of these. I'm going to click
on the top one. I'm going to hold the shift key, and I'm going to click
on the bottom one, and then we'll go over to the pathfinder and
we'll choose minus. Ooh. There we go. Now I'm going to click on
it, move it into place. And I think I'm going to scale
this down just a little. I'll click on that anchor
point, drag it in. I'll hold the shift key to
make sure it constrains it. And I think that looks good. And I still have this
highlight from up top. I'll just drag that into place. Let me zoom out and see how I feel about this.
Okay. I like it. Alright, so I'm going
to hold the shift key, and I'm going to
select all the rest of these pieces, okay? So I'm going to
click on this one first because it's smaller,
and then that one. An easier way. This is locked. Remember, we lock
the plate layer. I can just click
and drag across out here if the things are
locked and release, and I can select everything
that way as well. Or I don't even have to
go all the way as long as it touches on each of
them, it will select it. So, see, if I click
here, drag across, it's touching every
single piece release, and now I can go object group. Okay. Now, if I click away, I can move this one and
I can move this one. Now, at this point, it's up to you to decide, do you want to go with a nice simple design or do you want to go with a
more complicated design? It's up to you. I think I'm going to go with a little bit more complicated design. Or maybe I might duplicate my artboard and do
the more complicate, 'cause I kind of like
a more simple plate. Alright, so for now, I'm going to drag this
other egg off to the side of off of my artboard and
leave it on the side, in case I decide I want that. But for now, I have
completed my egg, and I will see you
in the next video.
21. Sausage / Outline Path: All right. So now we're
going to make a sausage. And if sausages bother you, let's just say it's it's a vegetable based
sausage. All right. Okay, so I'm going
to come over here to my to my tool bar here. And you see there's
this diagonal line. And this is my line
segment tool, okay? So we're going to
make a line segment. I'm just going to click here. You can see the egg
is still selected. It doesn't matter.
It'll deselect it once I start to make
this line segment. I'm just going to
click drag across, and that's about the
length that I want it. And I'll release.
Okay. The line, you can see there is nothing, there is no fill or stroke. So if I release if I click away, so if I go to the black arrow, I click away, it disappears. What you did or what
I did is still there. It just doesn't show up. So if I go to view
and I go to outline, you can see this
is just the shape, these are the lines, okay? And it is there. So I
can select it, okay? And then I'm going to
change my view again. I'm going to go view preview. And if you see
something that says GPU preview or something
like that, that's okay. Just put it on one of the views previews, and
you'll be good. But you can see it's
still selected. Now, an easy way to
make sure that I don't lose this is right
here, I want to fill this. I'm going to fill
it with a default. And remember, the default
keyboard shortcut is the letter D. So I'm just going to tap
D on my keyboard or I can click right here and you can see it fills it
with a black line. And when we're going
to bend this, okay? And when we bend it, it's
going to have a fill. So it's going to have the
fill and the stroke, okay? So we've used the line
segment tool to make a line. And again, I'm trying to ease
you into all of the tools. The curvature tool and the
pin tool are excellent tools, but they can be a
little confusing. So we're going to use them
a little little by little, and work our way into it, right? Okay, so I'm going to click
on the curvature tool, and you can see
there's this line attached to that line segment. But even though that rubber band is what I believe it's called, if I click right
here in the middle, you see I move the
cursor on top, it gives me a
little plus symbol, okay, when I get near the path. And when I click and hold, I'm going to hold and drag, And now I can add a curve to it. I'm just clicking
holding and dragging. And don't worry about
the white space. That white. So
when I click away, you can see that's
what it looks like, but that white
space is the fill. You see, we have the black
line and the white fill. So if the fill is on the
top here, right here. So if I click on fill with none, it gets rid of that, all right? Now, just so I don't have
this rubber band here. I'm going to click
on the black arrow. And now we have a
bounding box, okay? Because I do find that rubber band a little
irritating when it's there, and I don't need it. All right. So now I'm going to come
over to my properties panel. And just like we did before, we're going to increase
the width, okay? Increase the width
of that stroke. So here's the stroke, and
I can click until we get something that looks about the right thickness
for a link sausage, or I can click here
and choose one of these pre made widths, okay? I'm going to go down from there. That's a little When I get something that I'm happy
with, I'm going to stop. Right there looks good. Okay, so you probably
think that this doesn't look much
like a sausage. All right. So now we're going
to fill it with a color. I'm going to click
on the stroke color, and I'm going to choose one
of these brown colors, okay? Now, to get the rounded in, you don't have to do much work. All you have to do is
come here where it says, stroke, the words stroke. We're going to click on
it. Okay. I had to click away to close the color. Now, and then I click
here on stroke, so I had to click it
twice to select it. And right here, you
see where it says cap. If I click on that round cap, and the one in the middle, the top row, the
one in the middle, it gives me a nice round cap. And there we go.
We have a sausage. If I click away,
that is a sausage. Okay? Now, I'm going to show you a couple of things you can do to change this
up a little bit. Right now, you see
how I I click here, it's hard to select it, but I have to move
my cursor over that little path in the middle, and then I can select
it and move it around. Okay? So let's say we
can stick with this, and this is going to
be our finished piece. So I'm going to copy
this edit copy. And edit paste. But I want
to add a little more detail. So I'm going to move
this off to the side, and we'll just put
that over here. So if that's the
style that you're after you're done, okay? But I'm going to complicate
this a little bit more. I'm going to add
this little shadow. All right. So what
I'm going to do here is we're going
to duplicate this. I'm going to go
edit, copy again. Actually, we've
already copied it. It's still up in the pasteboard.
I haven't replaced it. So I'm just going to go edit, paste again, paste
and there it is. So this is going
to be the shadow. So I'm going to come to
where it says stroke. Click here in my
properties panel, choose a darker color, and then I'm going to
just reduce the size of this till I get something
that looks good. And then I can move
that into place. And maybe the bend
seems a little off. So I'm going to come over
to the curvature tool. And if I click here
at the end, hang on. Let me select it with
the black arrow first. And I'm going to come
to the curvature tool, and you see here are
the three points. And I know that rubber
band is annoying, but if I move right
on top of the point, I can reposition that and reposition that,
and it lines up. And then I'll go back
to the black arrow. And it deselects it. Now I'm going to click
here on the plate again. Everything in the
background is locked. Just drag across a little. It selects them both, and
then I can group these. Object Group. Okay. And now I
have the sausage, okay, a little bit more
complicated sausage. All right. So I'm not
real pleased with this. So what I'm going to do
is change this line, this shadow Object and group. Into a high light. So I'm
going to move that up here. I'm going to go back to my curvature tool and just sort of bend these
guys into place. Okay? Now, what I'm going to do is turn this
into a highlight. So I'm going to make sure I'm on the over here in
the tools panel. I'm going to make sure that
I have the stroke selected, and then I'm going to come over here to my swatches panel. Again, if you don't see it, you can toggle that open here, or you can just double click here in the
properties panel, actually. Is that lined up? Oh, hang on. This isn't
fitting. There we go. Okay, so what I'm going
to do here is click on that and choose
a lighter color. And this is going to be the
highlight on the sausages. So if I click on
I'm going to click on the white arrow
and then click away. Whoops. Click on the white
arrow and then click away. You can see now it looks
more like it's a highlight. But I'm still not
pleased with it. So what I'm going to
do is select it again. It doesn't matter if I go to the black arrow or the
white arrow at this point, and I'm going to thicken
that line up, okay? Now I'm going to go back to my curvature tool and curve that down because I'm just sort of tweaking these and
ignore the rubber band, you know, just act
like it's not there. I know it may be difficult. Alright. So now I'm going
to go to the again, the black arrow white
arrow doesn't matter. I'll click on that and
then I can click away. And now it's sort
of a highlight. But I want this to be a
little more interesting. So what I'm going to do is
select that line, okay? Now, watch this.
We're just going to erase part of the line, okay? And when I mean erase, it's going to erase
part of the path, okay? It's not going to
erase that stroke. So we're going to come
over here to our tool bar. And this is the eraser tool. You can see here it's saying it shows what
the quick key is, but I don't use it that much, so I typically don't remember
what that quick key is. So I'm going to
move it over here. And you can see right now
that's the size of the brush. And for what I want to do, it's a little too large. So I'm going to reduce
the size of that. Now, to reduce the
size of the brush, I'm going to use the
bracket key right here. To make this larger, I can use the tap the right bracket
key to make it larger, and I can tap the left bracket
key to make it smaller. Just make sure that the
eraser tool is selected. And that's about the
size that I want. I may do a couple of passes. Make sure that this
stroke that, you know, this line that's going to be
our highlight is selected, and I can run the brush
right through it, and you see it broke that line. And now I'm going to go across the bottom and do
the same thing. If I don't want this to stick. I'm going to do this,
but you can see I can break this or erase
on part of that, and it does something like that, but I'm going to hit
Command Z to undo it. And now, if I want to make this at maybe make this
just like it's a dot, I can trim a little
bit off of that line. Oops, I took too much. Then that's the problem
with erasing like this. If it gets too small, it
just makes it go away. But we can take this
with the white arrow. I'm going to click
away, and then I'm going to select just
this top bit here. I'm going to zoom in so I can
see what's going on here. And this anchor point, there's an anchor point
on the end on both ends. These are handles. This
adds to the curve. So this might be a
little confusing, but if you look very closely, you can see the two shapes
in the middle are circles, whereas the ones on the
ends are rectangle. And I'm just going to grab that outward rectangle
and just move that inward just a bit so that
this is almost like a circle. And then I'm going
to stop right there. Now, let's see what
this looks like. Okay. So that is how we can
add highlights to this. I am still not happy with this. So what I'm going to
do here is leave that. And what I'm going to
do here is I'm going to select the original line. If I can find it, I'm
going to go Command Y, or you can see, I'm
going to change my view view and go to outline. And that line is the
sausage. The main part. This is the highlight, okay? So I'm going to go back
here or Command Y. Control Y on a PC
into preview mode. Now, I need to change this
for what I want to do. And before I do
that, I'm going to duplicate this off to the side. And in case you're
wondering how I duplicate that rather
than going edit, selecting it, and
going, edit copy, and then edit paste. I'm on the black arrow. And by holding the I
can click on this. And by holding the option key, you see, I get that
double headed arrow. And when I get that
double headed arrow means it's going to duplicate, and I can just drag it
and it'll duplicate. So you can copy and paste
because this is one of those things that you may or may not feel
comfortable with, but just copying it the
other way is perfectly fine. But I just want you to know
so you'll see what I'm doing. You won't wonder what's
going on. All right. So now I have these two
versions of this sausage. I have to find that line. It's kind of difficult
to find that line. Now, what I'm going to do is
convert this to outlines. Right now, you can
see it's a stroke. I'm going to go Command Y. You see, there's the shape.
Now I'm going to go up here to object and choose path. Remember, those are the paths. And we're going to
choose outline stroke. And basically,
rather than having a thin line with that
stroke applied to it, we're going to just change it so that it is a shape. All right? Now, watch what happens
to the sausage. I made the outline, okay? Now, I'm going to
take this I hit undo. So now we're going to go
back in a preview mode, and we're going to
take a look at it. Now, nothing's going
to change here. You saw everything happen in, you know, in outline mode. So right now, I'm going
to go object path. And choose outline stroke. And you can see it almost
appeared as nothing happened. Nothing changed. Visually,
nothing changed, but structurally,
it changed, okay? So if I hit command y, you can see this sausage is different from
that one, okay? So again, visually, they
appear the same this way, you can see how they
are constructed. Now, if I want to
select this one, I have to find that
thin line to move it. Was this one, it's
like an outline. This is an outline now, and I can click
right in the middle. And it's a lot easier to select. But the other advantage
of this is if I want, I can go to my white arrow tool, the direct selection tool. And now, these are all
fresh new anchor points, and I can move these around and play around
with them that way. Alright, so I'm
going to hit undo. Okay, now, catch up to me. Make sure you're in this
spot where you have the sausage and
then it's outlined. Again, these are
different. Command Y. That's just a stroke, and
this one is like that. Control Y on a PC, and make sure you see that. Now, what we're going
to do is go to edit, copy or Command or Control C. Now instead of going
command V to paste it, because if I do that paste, it paste it in the
center of my artboard. I don't want that. I'm
going to hit undo. And what we're going to do
is go edit paste in place. And that means it
will paste it from the same location that
we copied it from. So paste in place. All right. Now the image has disappeared. And the reason for that
is it's covering over everything else we pasted it
and it appeared on the top. So I'm going to hit Command Z. We want this to be in
the exact same spot. Now, if I want to see
those highlights, I can go to object arrange and I can go Send backward and
note the key commands. I usually use those
key commands, but we're going to go send
backwards, which is command Right left bracket key, okay? And I'm sending it backwards
one step at a time. And on a PC, this would be
control left bracket key. All right? So you see
it went behind one, and I'm going to use
the key commands. Okay. Now, remember, we have two of these sausages they're
laid on top of each other. Now, what we're going to do is we're going to make a shadow. First, I'm going
to click on that. I'm going to click over here in the properties
panel on the color, and I'm going to
make that a darker color, a darker brown. Now we're going to go
back to that eraser tool, and we're going to
erase this out, okay? Now, this is going to take
a little bit of skill. So if you can't you don't
feel comfortable doing this, you can always skip this
step. It's not important. This is your style, and you can choose how much detail
you want in this or not. So I'm going to go
to my eraser tool. I um, hang on. I didn't click. There we go. And I'm going to
make this larger by using the right bracket key. And that looks like
a good size for me. So now what I'm going to do
is just come in here and erase the area
that I don't want. So it's going to
leave this shadow along the bottom,
because remember, we're going to have the
light is coming from the upper left to the
bottom right. All right? So, make sure it's selected and I'm going to click
and drag across. I know it's showing
that white area, but it's all going
to disappear once I release my finger
from this mouse button. I'm going to release. And you can see, that's
what's happening. Okay? So I'm just
going to come in here. And if you don't
have a steady hand, don't go all the
whoops I went too far. I'm going to undo it
and try that again. So if you make a mistake, just hit undo, okay? I can catch that bit there. I'm going to come across
here. And there we go. The only problem I'm having
with this is you can see it's not very clean looking. So what I'm going to
do is come over to my curvature tool and see if I can click on these
and raise that up, raise that one up. I'm going to double click, and
now you see it changed it. And now you can
see it changed it from a corner point to a curve. And one thing about
the curvature tool is you want to be careful because sometimes
when you click on an object with the curvature
tool, it does change it. It adds curves in
the places that you don't want to appear. But this seems
like it went okay. All right, so now I'm
going to click away, and let's see what
that looks like. I'm still not grooving on this. Oh, and another thing
that you want to be careful of is keeping
things consistent. You can see I'm starting to
add more detail into this. So because of that, it might start to require me to add more detail
to other things. So you don't want to go
too detailed or more detailed on one object than you are on another. All right. Okay, so I'm going to
hit Command Y so you can see what this
looks like, okay? And you can see, again, this is the old one is just a line. Now, so again, to clarify, I'm going to go to
the black arrow, and I'm going to click
on that dark area. You can see it's just
overlaid on that, and then there's a sausage
and the lines there. So I'm going to hit Command Z, command Z, and everything
is back into place. Okay. Now, I want to show you
something else you can do. If you use the
curvature tool and it wasn't quite coming
out just right, I want to show you another tool. I don't know if you
can see these are just a little bit
bumpy. I hit command. Why. Now, the other tool
I want to show you, and I'll show you this
later, and it'll be more. Well, I'll give a little demo. I'm going to come over here
to the I want a free hand. I want the pencil tool, okay? There's the pencil tool. And now, if I draw
this line here, you can see how bumpy that is. And if I come over here, there's this thing
if I click here, and you can see the Shaper
tool is the one on top. There's the pencil, and
then here's the smooth tool that the thing that looks like a little candy cane. All right. Now, if this is selected,
this line I made. Now, if I drag this
across that line, you can see it's
starting to change that line and starting
to smooth it out. Okay. So that's just to say if you make a line and it's
too bumpy or something, you don't like the way it looks, just run the smooth
tool across it. Actually, All right, so I'm
going to try this again. You can see, hang on. You see how many
points are in here and you see how
jaggy this looks. Now, if I use the
smooth tool on this, it may be a bit more
apparent what's happening. There you go. This is
a little more obvious. Even on that corner point, if I rub it enough, it will completely
smooth it out. Hang on. Maybe Hang on, there we go.
It's starting to curve. There we go. It's
taking a little bit. But you can see
how this went from a very jagged line into
a nice smooth line. Alright? So I'm going to delete these guys because
we don't need those. Now, the whole point
of that was to show that I'm not real
happy with that line there. So I'm going to go to the either the white
arrow to black arrow, actually, the white arrow, and I'm going to click
on that sausage. And you can see it's got
a lot of lines here. Now I'm going to click
on the smooth tool. And I don't want to go over here because I like
what it's doing here. I'm just going to
start right here, and you see it's removing
some of those lines, and it's smoothing
these other ones out. So now, it seems a little
smoother to me, okay? Now I'm going to click away. Alright. Now, one thing, another thing that's happening
is this is kind of dark. Rather than change the color
into something lighter, I'm just going to reduce
the opacity, okay? So I'm going to click
on that dark area, the shadow area, and come
over to my properties panel. And you can see
right here, it says, the opacity is at 100%. I'm going to change
that. I'm going to click here and then drag that down to about
I don't know, 50%. And just whatever
looks good to you. And then I can click away. And I think that looks nice. It's a little more subtle, and it's not too heavy handed. Actually, I can try this
on the highlights as well. Make sure you don't
click everything. I just want these highlights. And remember, these
are not outlined. These are just a stroke, so you may have to
find it, find it. It may be a little
more difficult. But if you go to
command, you know, into outline mode, it may be a little easier
to select those. So from here, I'm going
to drop the opacity. And I'm just going
to eyeball it, Okay, I think 70%, 75%
looks good to me. I'll click away. And
I think I like this. So now I'm going to drag across. Remember, I locked
up this plate. It was on a separate
layer and it's locked, so I can click and drag across
and select all of this. If by some chance you are accidentally picking
up other things, you can click on each object here and hold the shift key
and keep selecting. Sometimes you'll miss
it, and then you select all the pieces
till you get them, and then I can go Command G or object group or
Control G. And now, if I click away, as long
as I'm on the black arrow, everything moves as
a single object. Okay? Now I'm going
to get rid of this. I don't need that
anymore. All right. Okay, now I want to
duplicate this sausage. I'm going to go
Command or Control C, and Command V or Control V. And I don't
want to completely rotate this to a different
direction because now you see it messes up
the shadows, okay? So I'm just going
to rotate this. I hit Command Z a few
times to roll that back. And I'm just going to
rotate it just a little bit so that it looks
like they are, you know, they're on the plate, and the shadow is still moving in roughly
the same direction. And that's it with the sausages.
22. Pancake and Syrup / Opacity: Okay. Now, let's see what
are we going to do next. We're going to do pancakes next. Pancakes are easy. I'm
going to again, okay? So I'm going to
click on that egg, and now I'm going to select
the Ellipse tool here, click hold and choose Ellipse, and I'm just going to
click and drag that out, hold it till I get a
nice little circle. That looks like that's about the right size for a pancake. I'm now going to click on my swatches panel and
choose a nice brown. If I don't like the
colors that they have, I can change them like this. Maybe I'm looking at
this picture here. I'm going to make
this a little bit more a little bit more orange. Although if I go to orange, it almost seems
like it's blending in the value, you know, the intensity of the light
and dark is blending in a little too much with
the gray background. So I want to maybe keep
that a little darker, and I'm going to hit
okay. All right. Now for this, you can
see here on my pancake, on the pancakes, the edges
are a little lighter. So what I'm going to do is
go to the curvature tool. I'm going to click and
try to see who you see, I don't know if you
notice what happened since this was selected. When I clicked on it, it
started adding to that. So I'm going to click on the
black arrow, click away. Now I'm going to go back
to the curvature tool, and I'm going to just start
clicking on the inside. And later, I'm going
to come in here and adjust these points so that it's a little bit wobbly. And you see I can click in
those empty spots and add some points and just kind
of move them around. And if you like your pancake to look perfectly round
and nothing else, you don't have to
add this detail. It's totally up to you. Okay? Now, I'm happy with that. Now, what I'm going to do
is go to the white arrow, and I'm going to click on
that on the outside area. And I want to make this lighter. So rather than come to the
color swatches panel again, I'm just going to double
click right here and nudge that over till I get
something that I like. And I'm just going to go with
something kind of subtle. And hit Okay. Alright, so
now we have a pancake. I just need to
group it. I'm going to click on that top area. Hold the shift key and
click on the bottom, and I can hit Command G
or Control G on a PC. Now, if I click away, you can
see it moves all together. Alright. Now, just to sell
this a little bit more. If I look at, there is right. I was going to make a
pat of butter here, and there is a pat of
butter on my pancake. Without the pat of butter, it doesn't tell you that
this is a pancake, okay? When you put that
pat of butter on it, it says, I am a pancake. All right. So that's
going to be easy to do. And then we're going to
add some syrup. All right. So right now, I'm going to click on the
rectangle tool, okay? I could go with the
rounded rectangle tool, but it's kind of unnecessary, so I'm going to go with the
rectangle tool here, right? I'm going to draw out a square. I'm going to hold
the shift key so we make a nice perfect square. I'm going to come over to my color swatches and choose a nice yellow
color. I don't like that. That's a little too orange, and that's a little too
yellow. So I don't like this. So what I'm going to do
is double click on that, and I can adjust my hue slider, make that a little
bit more orange. And move this around
till I come up with something that I
like and hit okay. Now, that's a custom color. It's not in my swatches panel. If I decided that I
did want to save that, I could easily come right here. I'm in the Swatches panel, and then here's the flyout or hamburger menu as
some people call it. Click here and choose
New Swatch and just hit. And now you see there
is my custom color. It's slightly different
from that one, so you may not even notice. All right, so I'm
going to zoom in. And Hmm. So this is a little hard to see the anchor points and things. So I'm going to duplicate
this and make it a darker color so that all these
little objects stand out. There is a way to go in here
and change the colors here, but I don't want to throw of the anchor points on each layer, but I don't want to
throw too much at you. So here's a quick fix, alright? Now, once you can
see, and again, you can see them here, cancel. Hang on. You can see them here. They're just a little
harder to see. But if I click right here, you see these little
circles here. And if you look at the
arrow that I have here, it's showing me a curve. And that's telling me
that these are going to be a curve make curve lines. And I can click on
that and drag inward, even so much that it
becomes a circle. But we're just going
to come in and round those curves
just a little bit so that it takes the
edge off of that and makes this look more like
an actual butter pat. Again, I'm not going to
go into it right now, but you can round each of
these curves individually by using the white arrow
by selecting them. But we're not going to
get into that, right? So I'm going to hit
the delete key. I'm going to select this one, and I'm going to grab that corner and round
that butter pat. And just for kicks, I'm going to move my cursor to
the outside till I get those curved lines and
rotate it ever so slightly. All right. Now we
have the butter pet. Now we need some syrup. Alright, so I'm going to
click on the curvature tool, and I'm just going to click. And again, you'll get the
more you use this tool, the better get Whoo. Okay, that's the
easier to get to use. That's one way to
make the syrup. All right, but I'm going to
show you another way, okay? Just to show I can show
you something different. I'm going to click on
the Ellipse tool, okay? Click on the rectangle tool, choose the Ellipse tool, and I'm going to make a circle here. Okay. Actually, I'm going
to change the color of this so that it stands
out a little more. I'm going to make a circle.
This is going to be my syrup. You can also use
this to make clouds. You know, doing something like this is a good way
to make clouds. And now, I'm going to
use the black arrow, move these guys around. Maybe I'll just go with that as We'll just make a little
blot of syrup on the plate. So now I'm going to
select all of these. I'm going to click and then hold the shift key and select
all five of these circles. Then I'm going to come
over to my pathfinder. Again, it's in the
properties panel. And if by some strange
chance you clicked all of these and you don't see it
here in the properties panel, it's probably because
you are using the white arrow. I don't
know why it does that. If I click away, I'm
selecting the same objects. But no, it does give
me the pathfinder. Okay, I take it
back. Oh, I know. And if you do that and say you accidentally click on one of the anchor points, it
doesn't show you that. But there is a
path finder window and you can go and find it here, and it will do the same thing. But if that happens, just try to use the
black arrow. All right. Everything is selected now. Now I'm going to merge them all. So here, the very first object here in the Pathfinder
is Unite and boom. Okay? Now, here's going
to be the fun part. We're going to use those. I'm going to go to
the white arrow, and you see we have these
little curves right here. We're going to just
click on one of those and drag that upward uhouho It's not
letting me do this. Okay, the reason it's not
letting me do this is because probably right here, one of these things, it hits a point where it's just
locking me out and saying, you can't push that further. So we'll have to do
these individually. So I'm going to click on this
anchor point right here, and then I can drag
that. There we go. To whatever degree did I like. I'll click on this one
and drag that way. I don't know if you
noticed over here before it was showing
me a red line. And that was just its way
of saying it's maxed out. I don't know why it
maxed out there, but you can always do
them individually, okay? And if I was working
with a square, I could do the same thing
on a square and just select one corner point in
round one corner at a time. Okay, so I don't like the way this is going to
maxed out right here, I guess, because there is
an anchor point right here. So it maxed out. But we'll deal with it like
that. That's fine. Okay, so now we're
good with this one, and now we're going to
change the opacity. So I'm going to come here
and drop the opacity. Okay? That's it 38%. So I'm going to change this one as well
to match that one. Oh, no. I'm going to
brighten this up. Just use my eye till I get something that I like
because the problem that I'm having is the color is showing through this gray
and making this look gray. All right. So that looks good. Now, what I want to do is
send this behind the butter. So I'm going to go object
arrange and send backward. Or again, there's
the key command, the command left bracket. And it made it
behind the butter. Sometimes it will get behind. You have a lot of
things to go behind, so you might do it a few times, and you just have to
keep repeating it. But since we just
made the butter, it was the next thing in line. So that was not a problem. Alright, now we want
some highlights here. We're going to go back
to the curvature tool. And again, this is think
about this shiny syrup. And I'm going to
click at a line here. And then I'm going to first, I'm going to fill it with none, and I'm going to click
on that and make this. Since this is going
to be very shiny, I'm going to see what white
will look like in the stroke. So I'm here in the property
s panel and white. Now I'm going to
fatten that lineup. And you can see it has that
hard edge. I don't want that. So as we did before, we're going to
click on the words that say stroke right here, and we can change that cap to a round cap right
there, and there we go. And it looks a little bright, so I'm going to click here on the percentage on the opacity, and I'm going to make that 80%, and that looks good, and then I can do the same. If I want to make another
one of these lines, I have to click away,
so I'm going to click on the black arrow,
click on the background. Now I can go back to
the curvature tool, and I can add that shiny bit. All right? Now, I'm
going to click away. An easy way to click
away is to just hold the command key while I'm
on the curvature tool, and you say I get
the black arrow. Now I can click
in the background and deselect that and I
can continue clicking. Okay. Mmm. That's one problem that I have is now
this is no longer. It doesn't have the same
attributes as the other one. So what I'm going to do here is come over to the
eye dropper tool. It's still selected, and
if I click on this one, it will copy those same
attributes, just like that. Actually, this has I
want that percentage. So I'm going to go ahead
and click on this one. Boom. Now I'm going to
hold the command key and my and that eye dropper
changes to the black arrow. Click on that line, release and click on the eye. Oops, I missed it. I just keep clicking till I
get it because sometimes I clicked into sampling from the syrup, and I'll click again. And there we go. Okay. So now we have
pancakes and syrup. I'm not crazy about
that syrup, though. It looks off to me. Let me try. I'm going to hold the shift key and select these lines here. And I'm going to thin them
out, make them two points. That looks a little better. Now I'm going to
come over here with the curvature tool and see if I can add a little curvature
into the butter. I mean, a little shine
into the butter. That doesn't look right, so I'm going to
double click there. Double click there, and
that changes it to a line. But now this is a line, but all I have to do
is come in the inside, click and drag that out, and we have a nice little curve. And then I can readjust
these as needed. Okay. Now we have this
other spill of syrup, and I'm going to use
the ellipse tool and just make a nice
little circle there. And I want the fill to be inside to be white.
I'll just flip that. There we go. Oops. And you see, I'm trying to move it,
but it started rotating. So if you ever run
into that problem, you can just click
away, click on, you know, in the background, and then you can click on it, and you don't have to
worry about accidentally, you know, selecting,
rotating it, or doing something
you don't want to do. Alright, so now I'm
going to change that to 80% fill,
and there we go. Something I want to
try is I don't want to get too much into right
here, it says opacity. And you'll see here
it says normal. This is something
called blend mode. And blend mode changes the way the color will interact
with black, white or gray. But I don't want to
go into that now, but just trust me, we're going to change this to multiply. And you see how it made
that color a bit richer. Okay, so I'll save that for
another lesson explanation. You can always just Google it. You'll probably find a video on photoshop that'll be
explaining blend modes, but it just changes the way this interacts with colors with
the colors beneath it. Okay? So maybe it will make the white in the
image that you have disappear or make
the black disappear or we'll make the gray disappear
and some other things. But I don't want to get into it, but it just trust
me on this one. Let's change this one
to multiply as well, and it'll make it just
a little bit richer. So again, I'm going to come
over where it says stroke. No. Sorry. I'm going to come
to where it says opacity. And right here where
it says normal. You see, it highlights
it and says, blend mode. I'll click there and
choose multiply. And it. It became a little richer. One problem is because
there is an opacity here, and there is no opacity here. You're not getting
a true sense of, you know, the color because
gray is showing through. So I'm going to show
you a little cheat. What we can do is we can
copy the color by coming to the using the color chip and try to match
this color to that. Alright, so one problem that I'm going to have
with this color chip, I'm going to try to, no, no, no, no, no, no, no. Poo, to do two. Okay, so I have this little droplet that
I'm going to use here, and I'm going to try to
match it up with this. So if I click if I select it, and I click right here, it's selecting that,
but the problem is I have that multiply
mode and the opacity. So I'm going to
drop the opacity. I mean, crank the
opacity back up to 100%. And then I'm going to
change the multiply. The only bad thing is it doesn't readily show you that I've
changed the blend mode, so I'm going to put
this back to normal. So now what I'm going to do
is just try to eyeball it. I'm going to double
click on this, and I'm just going
to try to match that this color right
here to that color. And it's on the
orange, and let's see, Okay, see, it's going
live. So, there we go. It doesn't need to be perfect
because in real life, the color would actually
be showing through. So in a sense, it's more realistic to
have it look kind of gray. But I'm going to go with it. Maybe a little bit like that because even though
it's true, you know, it's an honest color portrayal, people might not get that's
what that this is still the same thing
that this is syrup if the color is
slightly different. And that looks good. It's not
100% perfectly matched up, but I think it works. All right. Now, on to
the color the next food,
23. Grouping Objects: Okay, so now I'm
going to click away. I think I'm going to
do a little jiggering of the objects here just to fix the
composition because it looks It looks a little
boring to me right now. So I'm going to click
right here and make sure, actually, let me click away. Okay, no, everything's
not grouped. So I'm going to click away, and I'm going to click
and drag across. And I think I have
all the pieces here. And now I can go object group. I'm going to grab this highlight
and the drip of syrup, and I'm going to
group that as well. And this time, I'm
just going to go Command Control G on a PC. Now, I can just sort of move these around and
play around with them. I think I'm going to make
this pancake a little bigger. I'm holding the
Shift key as I do this because you see as
it looks like right here, the way it looks is just kind of play because
everything's all the same, and there's nothing that sort, you know, really grabs me. So I'm going to drag
that out again, grabbing them by the anchor
point and dragging that out. I can move that over. And I'm just again, everything is grouped,
so I don't have to worry about things
falling apart. And you just got
to go by your gut feeling about how things look, how they fill that space. And I think This is
starting to work for me. But don't just drop
things in the place and just let them go. If it doesn't feel right
on that gut level, move it, push things around. If you move something
and you made it worse, and you're like, I liked it exactly back in the other space. Just hit the command Z button or control Z button and undo
it. And then keep playing. One thing that I am seeing with this pancake is this should
be a stack of pancakes. I have one pancake. All right. So what I'm going to do here
is I want to double click. I mean, I want to
copy this pancake. A problem, and I probably should have mentioned
this sooner. If I click here, I double
click on that pancake. On that group,
everything grays out, and I can't move anything. And what that is is I'm
going inside of the group. If I double click on the
background, I'm back out. And I'm going to double
click on the pancake. I'll double click out
here to go back out. And I'm going to double
click on the egg. Now you see everything
else is grayed out because I'm inside the egg, and I can move
these parts around. I'm gonna hit
Command Z, Coman z. Command Z, and I'm going
to double click outside. Now, I'm going to click
on one of these sausages. Double click, and I'm
inside of this sausage. And one thing to
notice up here in this bar underneath
the options bar, you'll see food and group. And this is the level of the level of where I've
gone into that group. So here you can see group. Now I can click on the food, and it brings me right back out. And then I take it
one more like here, if this wasn't locked it, I wouldn't move, but you
can see it's grade out. So I'm going to
click right here, just underneath the options bar. I'll click one more
time, and boom, everything is back to normal. So again, if you run into that problem,
if you double click, just double click
on the background, or just click one time in
this gray bar right here. If you really get stuck and you can't figure out how
to get out of it, just save the document, quit and reopen it, okay? So save the document. Actually, you don't
need to quit. Just save the document, close the document, and
then reopen it. And you should be able
to get out of it. But again, you're just
going inside the group, click on that gray
bar, and you're out.
24. Stacking Pancakes: All right. So now I want to make this look like a
stack of pancakes. So I'm going to zoom
in just a bit here. And what I'm going to do is duplicate this bottom pancake. So, you see, if I
click on that drag, I need to ngroup
this to get into it. But another way around this is if I double click to go inside
of it, I can click on it. Hang on. This was apparently
I grouped this before. So there's a group
inside of a group, so I'm going to
double click to get inside of that. Now
I can click on this. Now I'm going to go edit
copy or command C or Control C. And now I'm going to get out of the group by clicking in the gray bar, and now I can hit
Command V to paste it. And I'm going to click
away to double check. Okay, so you can see these
are separate objects. Now, what I'm going to do
is drop this pancake here. But before I do that, I'm
going to change the color. I'm going to double click on the color chip here at the
bottom of the tools panel, and I'm just going to make
this a little bit darker. I just wanted to stand
out, and I'm going to hit. Now I'm going to
go object arrange, send to bag. Now it's behind. All right. And I'm just going
to move that in a little. Now I'm going to do another one. Actually, this one, I'm just going to use that
little technique that I showed you earlier where
I click on the object. I hold the option key. Hang on. And you see I get the
double headed arrow, and I can just drag
out another one. So now we have the
pancake there, and now we have another
one here, and Hmm. I'm not sure that I'm
grooving on this, I think, 'cause it needs
to be a different color. So I'm going to
double click on that, maybe make this a little
bit lighter and hit okay. Now that works for
me because now I have a pancake here
and a pancake here. This might be one
of those times when you might have that urge to
play around with colors. I mean, with lines, but again, stay away from that
black outline. Like if I put a
black outline here, You know, it just
looks horrible. If I click away, that at least
to me, it looks terrible. It looks like a mistake. All right. So I'm going
to click on that. And if I want to select the
shape inside of a group, I can also just go to the
white arrow. I'll go there. Click. Now what I'm going
to do is change this to a line that is the same
color as the plate, and that will cut it out. It will define the shape. But without being very
distracting, right? So I'm going to click here, and I can come right here. This was the color that I use. Remember, it is one
of my safe colors that I colored the plate.
I'll click right there. And now you can see, I have a No, this wasn't. Alright, so what I'm going
to do is sample the color. I have it selected.
I'm going to come over here to the eyedropper tool, and I'm going to sample actually make sure that stroke is on top. Now I'm going to
sample that color, although I think it's going
to go pink. Yeah. All right. Mmm. I think what I need to
do is get away from this. I need to unlock the plate. I'm going to make a new color. And I'm going to sample it. So let me see. Color
sample the plate. Then I'm going to come over
to the swatches panel. I'm going to choose new swatch. And now I'm going to hit Okay. All right, so there's
the new swatch. So now I'm going to click
here using the white arrow. I can click on that pancake, and I can select that. Whoops is filling it. So now I have to remember
to come back over here, put the stroke on top. And now I can choose that
color swatch right there. And I'm going to
thicken this up, make this two points just
so it stands out a little. And then I'm going to do
the same to this one. I'm going to make
that same stroke and make that two points. And I'll do that last one too. I don't Yeah, actually,
I'm going to go for it. I'm going to click stroke and make that same color and
make that two points. It's good to always
be consistent. And now let's click away and see what that looks
like. So, whoops. It's not two points.
There we go. Two points. I'll click away. And now you can see it just
sort of adds this kind of funky little these
little lines here. It's not realistic because nothing's going to have
that white line around it, but I think it adds a
nice artistic element. Now I'm going to go
back to the black arrow and move this sausage
away because remember, on the white arrow, I'm going to be selecting pieces of it. And I just want this to stand out a little. Yeah. All right. And I like what's
happening there. And I'm going to click
away. All right. I'm happy with that. You
know what I'm going to do because I have
that line here. I may get a little
more artistic and put that same colored line
around these objects. You don't need to
do this if you say, Hey, look, I'm happy
with what I did. I'm going to stick with it. But I kind of like
that funky look that this has separating these
from the background. So, this one, I need to do
the same with this sausage, I'm not sure how this
is going to work. I'm going to go one, two, Hang on two points, and it's already blue. Hang on. Let me hit undo. See, the problem I'm
having with this one is it is I have some other
shapes on top. So what I'm going
to do here is undo this until it goes back to zero. Now, what I'm going
to do is copy that. I'm on the white arrow. I'm going to select
that background. Command C, Command V to paste it on top or
paste in place. Now I'm going to
fill this with none. So I'm going to flop that, so
now it's filled with none, and then I'm going to change the stroke to that
nice blue color, and I'm going to
crank that up to two, and there we go, and now it
cuts that line like that. And again, this is just some extra stylistic choices
that I'm making. You do not have to
do the same thing. But I'm going to do
the same thing here. One other way to do this is like this, you see, it's on top. Hang on. Let me go
to the black arrow. It's on top, and I need to
group those together again. So now it's a group
inside of a group. This one, I'm going to double
click to go inside of this. Now I'm going to click on that. Hang on. Let me go back. One, And I'm going to make sure. Okay, so it's there. I'm
going to go copy and paste. But I'm inside of the
group doing this. So it will I will remain
selected. So I'm for the fill. I'll click none.
And for the stroke, I will click that
nice blue color, and I'll crank that
up to two points. And now I'm good. Now since I went inside of the group to
do this when I click away, It remains inside, so I
don't have to group it. This is a group
inside of a group. This I went into the group
and made the changes. Now, one thing to be aware of. Again, I like the
look of this where it breaks these lines
as an artistic choice. But if I move them
over here, you know, I may or may not want to keep
those those lines, okay? So I'm going to hit undo, bring everything back, and I'm good to go to the next step.
25. Napkin / Round Rectangle Corners: Okay, so, next, what I want
to do is to create a napkin. So I'm going to toggle
open my layers panel here. And in order if I'm going
to make a napkin here now. So I'm going to zoom
out a little bit. And the napkin, I'm just going
to use the rectangle tool, click and drag that out. And I'm going to fill
this with a color. Just so this matches up, I'm going to go
with one of these colors for my color theme, so I'm going to select
my eye dropper tool and click there,
and I like that. Now I'm going to go
to the white arrow, and I'm just going to click
on one of these dots in the corner and drag that
in to round the corner. All right. Now from here, I'll just maybe move
that up a little bit, and I like it kind of rotated. Just to add a little make
it a little more dynamic. Maybe I'll reduce the height
of this just a little bit. Here we go. I like that. Now I want this to
go behind the plate. And if I go object arrange, send to back, it's
not going to go back. You know, it's on the
food layer, okay? So it's in the back here now, but I want it to go
behind the plate. So I have to come over here. So my layers panel is open. And I'm going to you can see, here's my food layer. So I want to put this
on the plate layer. So I'm going to select it. It's selected, and I'm
going to go edit cut. Or command C or control C, and now I need to unlock it
to put it on the plate layer. So I'm going to unlock that, select the plate layer, and I'll go edit
paste in place, okay? If I go paste, it'll paste it in the center
of the document, and I can reposition it. That's not a problem,
but I like to since I've already made that choice
of where it's going to go, I'll just put edit,
paste in place. Okay? Now, you see it's
on the plate layer. Now when I go object, arrange, send to back, it will go behind the plate. And now we are ready
to bring in the forks. I'm going to lock
that layer out. Okay.
26. Silverware / Pathfinder: Alright, so now we're going
to create a fork and a knife. Well, actually a spoon, as well. And these shouldn't
be too difficult, but we're going to be using
the pathfinder a bit more. And we're going to
mostly be working with just straight shapes. So I'm going to move my cursor over to
the rectangle tool, and I'm going to
click right here. Right now, actually, I'm going to build this on
top of the napkin, and we're going to build
this straight up and down. You see how I have
the napkin tilted, so hopefully that won't
throw anyone off. Alright, so I've selected
the rectangle tool, and you can see it's
telling me that it's not going to let me draw. And that's because I'm
on the wrong layer. If you notice my layers panel, I'm on the plate layer
and it's locked. So I need to select
the food layer, and you can see that goes away. Okay, so here this is we're
going to draw a fork, and it's going to be and
it's going to be simplified. So this portion right here, I feel like a doctor explaining something
important right now. But anyway, this portion right here is going to be a rectangle, and each of these prongs on the fork is going
to be a rectangle. And this piece here is
going to be a rectangle. We're going to manipulate
them a little bit, and then we're just going to
merge everything together. There's actually A couple
of ways you could do it. I think I'm going to show you the second way to do
it after we finish. The first way is
going to be additive. The second way is going
to be subtractive. All right. So rectangle tool, I'm going to click
and drag out a box. Again, that's the middle
portion of the fork. There's no color Oh, actually, there is color in it, and it's getting lost here
because it's the same color as my as my napkin. So I'm going to come over
here to my swatches panel, click on that, and I'm going to choose a darker color here. Actually, you can see it's selecting the it's changing
the color of the stroke. So I'm going to
click right here. I'm going to flip those colors, and then I'm going to fill that outside with that
stroke with none, and that stands out nicely. So that's the middle
part of the fork. Now I'm going to draw out another one of the prongs, okay? And don't worry that
there's not a point. We'll fix that later. Okay? Actually, we're not
going to put a point. Maybe I'll show you
how you can do that on the next version that we do. All right. So now we have the
fork with the first prong. Now the problem that I'm
going to have is you see it's not lined up with
the outside of the fork. So I'm going to just
move that inward, okay? Now I'm going to
hold the shift key. Again, I'm on the black arrow, and I'm going to click on on the bottom portion of the
fork or the base of the fork. And now, the prong and the
fork base are selected, and I'm going to come over to my properties panel
and select align left, and you see everything
aligned left. All right. Now I'm going
to duplicate this prong. Again, edit copy, edit, paste. And earlier, I did show you
how to hold the option key, and you get the double
headed arrow and you can drag out a copy. All right. So what I'm going to do
with this one is I'm going to put that here inside, you know, just to the left
of the base of the fork. If I move it out here and
I do this align right, it's going to shift over
away from the other one. So that's why it's
important to do it here. So I'm going to make
sure they're both selected and align right. Okay. Now we just
need a couple more. Here are the other two prongs. Okay. Now you can see
they're not even. So we're going to select
all four of the prongs. I'm just holding the Shift key. And then, again, I'm in
the essentials classic. So this Options bar is here, and I can choose the align
tools up here as well. I'm going to click to go up. Now they are aligned that way. All right, EZP Z. All right. Okay, so now I'm going to
drag out the handle, right? I'm just going to
move that down here. And one problem that I'm going to have is if I
align the center, it shifts the it
shifts the bottom. But we'll get to that later. So I'm going to bring this out. I'm going to stretch that out. And now we have the
base of the fork. I'm going to align
them. All right. Now, what I'm going to do
here is I want the base of this fork to be a
bit wider, okay? So I'm going to zoom in. Okay. Now we're going to
use this the white arrow, because right now
with the black arrow, I'm the selection tool. I control it by using
the bounding box. But if I use the direct selection tool or
the white arrow, I can control it by using selecting each of
these anchor points. And we're going to move
each of these points out so that it looks, you know, a bit wider
on the side. All right? Now, what I'm going to do here, I can use the scale
tool to do this. Or I can do it. I'm going to show you both
ways. All right. One quick easy way is to click
on that point right there. And then, here I want to
give the fork a wider base. So I'm going to click
here with a white arrow, click to select it, and then I can click that
anchor point there. Now I'm going to
tap to the right, using the arrow tool and I'm going to count one,
two, three, four, five, and then I can
click on the other side, click and go to the right, one, two, three, four, five. And this is just so
that it's symmetrical. I can use the I'm going to
show you another way 345, one, two, 345. I'm
just doing it. Now, if I come here, the other way, if
you've done that, I find that the easiest,
simplest way to do it. But if I click out
here and drag across, I've selected these
two anchor points. If you'll notice the anchor points up here are not selected. Now, if I come over
here to my scale tool, I can click on that, and then I'm going to
click anywhere, but I'm just going
to click right here, and drag to the right, and you can see it expands
it equally on both sides. So whichever way you're
more comfortable with, you know, go for it. Alright. So now I'm
going to move this down, I'll zoom out a little bit, and I'm going to merge these. So I'm going to
hold the shift key. I'm going to select
the base of the fork, and I'm going to go
to my pathfinder. And for some reason, the
pathfinder is not showing up. So I'm going to do this again. I'm going to click away, click, click, and now the
Pathfinder is showing. I'm not sure why it
didn't show up before. Now, so here, I'm
just going to click on the union to merge these two. And I'll click right there. Boom. There we go. So now
we can fix this alignment. I'm going to click
on that left prong, and I'm going to
hold the shift key and click on the
bottom of the fork, and then we'll align left, and everything should be
just the way it needs to be. All right. Now, I could
group these prongs, but I want to do something
a little bit different. So I'm going to click out here, drag across to
select everything. And then we're going to merge everything
using the pathfinder. Okay? Now, Now, if I
go to my white arrow, you see I get these
little circles. Hopefully, they will allow me to do all the
curving that I want. So I'm going to
click on one circle. They're all are selected, I'm going to drag out. And you see I have a nice
rounded corners on everything, and it's nice and
stylized, okay? If you decided at one point you wanted to make these
a little point here, we could use that same little
trick where you, you know, scaled each of these
things in inward, and then it would have
a bit of a point. But anyway, I'm happy
with that fork. I'm going to move
that right here. Now, I've made a
bit of a mistake. I wish I'd save that the handle of the
fork to use for my knife. But that's okay. I'm
going to copy that. Again, I'm just holding the
option key and dragging. And I'm going to
cut off the top. So I'm going to
make a rectangle. I come over here to
my rectangle tool, drawbox on top, and then I
can just subtract, okay? Make sure they're both
selected and subtract. All right. So now, and one thing I
want to point out, you'll just have to
keep switching tools. I'm using keyboard shortcuts. So say if I'm on the
rectangle tool right here, if I want to get back
to the black arrow, I can just hold the
command key and it changes back to the black
arrow on a PC control. So keep that in mind. All right. Okay, so now we have the This is
going to be our knife. And I can line that up
here, not crazy about that. I'm going to keep that
angle right here, but I'm going to click
here, let's see. And I'm going to drag that out to the I clicked
on the anchor point. I'm going to drag
that out so that it's going straight up and down. And then I can move this down. Actually, I'm going
to align it left. Oops, I hit the wrong button. A Lign left. All right. Now I'm going to click
and drag this upward And I can drag this over. And this is going to be
the head of the knife. Now, I'm going to hit I'm
using keyboard shortcuts. I hit A to get to
the white arrow. I can click and I can
drag that inward there. Hopefully, this will look
right. I'm not exactly sure. Actually, maybe I'll try to
bring that down like that. All right? Now, I'm going
to merge the two of these. I'm going to click
on the black arrow, hold the shift key,
and select the other. Again, I'm not getting
my pathfinder. If I can click away and re
select and get the Pathfinder, another way to do it is just go window and open the Pathfinder, and you know, it's
always there, okay? And boom, now they're merged. Now, I'm going to go
to my white arrow and click on one
of these circles, and I might be limited by this point here. Let's
see what we get. Mmm. That looks good, but I want this to
be rounded more, so I'm going to click out here. Remember my napkin is locked so I can click
out there and drag. If things aren't locked, I can always just go Command Y and click in this blank space to select it and it won't select it when I'm in
that outline mode. But anyway, I can click on this dot and do this
one individually. Just this one. Nothing else. It's going to lock out once that anchor point touches
the other one. But you can see I got a nice little curve
there. All right. This knife actually looks better than the or more
natural than the fork. The fork looks a little
stylized and fake. To make this look a
little more natural, I'm going to select the fork, and I'm going to click
drag across here. Grab that circle point. Actually, I'm going to click
hold the Shift key and select the other side and see
if I can round just these. And it's going to lock
out. There we go. But I think that matches
the knife a bit better. It looks a little more natural. Starting to look a little
like Bart Simpson. I'm going to hit undo and try
that again because I think I rounded those corners more
than I really wanted to. And I think that looks good. And I'm going to click
away. All right. Now, I promise to show you a different way to make a fork. One thing I do want to add to this is you can add
reflections to this, but I kind of like
leaving them totally flat because they almost sort of recede into
the background, bringing your attention
to the food on the plate. But if you want to add
reflections and play around with it, that's
perfectly fine. And I haven't thought
about how I would do that. Maybe I'd add a bit of,
you know, a line here. Usually, knives will have something that
separates the blade from the handle and maybe a reflection or
two here on these edges. But anyway, the way we
can do this fork or yeah, the fork subtractively, is I can draw that's the
head of the fork. And here, I'm going to draw
the entire head of the fork. This is going to be the base
of the fork. All right? Now, first thing I'm going
to do is select them, and I'm going to align center. Now I'm going to click
on the white arrow. I'm going to click and
drag across there. So just these two anchor
points are selected, I'm going to go to
the scale tool, and I'm just going to
click hold my finger on the mouse button
and drag to the right. Okay? Now, I'm going to
click on the rectangle tool, and these are going
to be the spines. Or the prongs, right? So I'm going to change
the color just so you can see the
difference here, right? So this is going to
be the hollow area. This is the empty space, okay? So I'm going to come across, drag across to make a new
copy and drag one more out. And again, I'm holding the
option key to do this. Now, this is going
to be a little more tricky because I want
these to be spaced out, but I have to kind of eyeball it here to make sure
they equally spaced. I guess a trick
would be, hang on. A good trick would be to make five and then
get ready the others. So I'm going to hold the
shift key. Actually, hang on. I need to ig these up
with the outer edge. This doesn't need to be
100% precise because I'm going to delete these
on the outside. Okay? So all five are selected. I'm going to align the top just so that they align
down here at the bottom. Okay. And right here
in my options bar, I want the space
between these to align, but I don't see it here. So I'm going to come over
to my properties panel, and you see these
three dots, okay? And you see Distribute
Spacing. All right. So I can click right here, the horizontal distribute
spacing and click. And you see it make sure
everything is nice and equal. Now I can click away and I can delete these
two on the outside. These were just there to
help me align everything. So now I'm going to
subtract these from the head of the fork and
everything should be good. So Pathfinder this time, rather than adding
will subtract. Alright. Now we're going to
do another little trick here. I'm going to go to
the white arrow. I'm going to drag across. Actually, I don't know if
this is going to work. I'm going to see if it'll
let me do these all at once. So I've clicked out
here, dragged across, so just these top of the tops
of the prongs are selected. I don't think this is going
to work. But let me go to the scale tool and I'm
going to drag to the right. You see, it's bending
everything in. Actually, I don't mind that. My goal initially was to
do something like that. And but if I do it this way, I just kind of have
to eyeball it. Okay. Hang on. So what I'm doing
here is I'm holding the command key to get
to the white arrow. I'll drag across, and then I can release and drag that in, hold the command key to
get to the white arrow, drag across to select
these two anchor points, release now I'm back
on the scale tool, and I can drag to the right. Now, another way to do this. Let me do this is I
can select these two. Now I'm going to double
click on the rectangle tool. And I want to scale
them horizontally. Let's just say 50%. And vertical I'll just leave
that at 100%. And I hit. And you can see, now
it's very precise. So I'm going to hold
the command key. And this is a little technical. Don't even worry about it. I find it most of the
time I just eyeball it. But if I was doing something a professional job and it
needed to be very precise, yeah, I would take the
time to do it this way. And I'm going to double click. And you see it. Remember what I did the last time I just hit. I'm holding the command
key or control key on a PC to get the white arrow, so I don't have have to go back. And if you're having trouble
with the key commands, just click on the white arrow. And again, then I drag across, and I'll double click,
and there it is. Boom. White arrow. Double click. Boom. Okay, now I want to
merge, actually, I need to center
these. A line center. Okay, now I'm going
to merge them using the pathfinder, okay? Now, I'm still on
the white arrow. Ideally, I'd like these
points to be closer, but we'll just go
with it as it is. And if I click right
here, I'll drag it. No, that's not
what I want to do. I'm going to click
right here, and I get one of these circles, and I can drag uh oh. The problem is they're
locking out very quickly because these points are really small.
But that's okay. If any of these I want
to soften these up here, I can click drag across
that anchor point. I'll hold the shift key, click
and drag across that one. And since the only
these two are selected, I can round these a lot nicer. Okay? All right. I got one more trick to
show you with this one. I'm going to change the color of this so that it
stands out against this blue and say I want to add a little bit
more shape in here. I can click on the m, I
want the curvature tool? It's easier to use, but I'm going to go with the pin tool. I'm going to click hold and you'll see within the pin tool, I haven't gone to the pin tool, and I'm trying to
avoid the pin tool because it is it has a
bit of a learning curve. So I'm trying to avoid it, okay? And if I move my cursor over
that line, actually, first, I'm going to go to
the white arrow, select now back to the pintol and when I move my
cursor there, No. Okay, there we go. When
I move my cursor there, you see when I come right here. It's very subtle. When I have the asterix, it's
going to make a new point. If I move it right here,
it gives me a plus symbol, and that's telling me that it is going to add a new point. And I can just click Boom. And then I'm going to move
over to the other side when I get that plus
symbol, boom, okay? They're slightly off, but I think I don't think it's
really going to matter much, but now I'm going to
click on the white arrow, drag across to select
these two anchor points. Go to the scale tool, and I'm going to drag inward. And now you can see we have a nice little shape right there. And now, let's see, if I go to the white arrow, they're not close enough
to let me round these out. So I'm going to go
ahead and click. I may change my mind and
come back away from this, but I'm going to double click on this with
the curvature tool. So now I've added
that, actually. I'm going to go
ahead and click on Oh, got to be careful with that. Let me undo that, although
I kind of like that. Oh, that's a nice shape. Oh. All right. I'm going to do that. But be careful, don't
you can't move them. If you want to move these anchor points to align
them ahead of time, you have to do it
ahead. Let me try this. White arrow, white arrow. I'm going to click drag across. So only these two anchor
points are selected. And then I'm going to come
up here to my align tool, and align them center, and boom, they are now aligned,
okay? Perfectly aligned. Now I can click away, and
that is another fork. I'm not crazy about this fork. It needs some refinement,
but let's see, if I'm on the white arrow, I'm going to click drag across. I'm going to zoom up so I don't accidentally
hit the wrong thing. I'm going to click on one
of these anchor points. Hold the shift key
so it doesn't move, and I can drag this up and down. And I'm holding the
shift key so it doesn't so I don't accidentally
bend it the wrong way. As long as I stay reasonably
close, it should be okay. Alright, so I'm just
going to toss that off to the side. Alright,
so here we are. We have the fork and knife. If we want to spoon, I think
you all can figure that out. I'm going to
duplicate this knife. I'm going to chop
the head off of the knife by using the
path finder and boom. Now I'll just go to the ellipse
tool and drag that out. I'm going to align them center. Let me go to the black arrow and align center horizontal boom, and I'm going to unite
these with the pathfinder, and now we have a spoon. Okay? And I'm just going to kind of a can I like
things just slightly askew just because I find it a little bit
more interesting. I'm not crazy about the size
of the head of this spoon, but I'm just going
to stick with it. So I don't spend too much time going back and forth. All right. Now, I am going to
make a cup of coffee.
27. Coffee: All right. Now, I am going to make a cup of
coffee. All right. So let's take a look
at this cup of coffee, and I chose this one right here specifically for this
because I like the bubbles. If you want to make the cup
of coffee, just a circle, add the handle to it, and then the brown
on the inside, a cup of coffee often
has no bubbles, but I just thought it added a little bit more visual
interest, adding the bubbles. But it also might be a problem because everything
else is so simple, and if I add bubbles in
here, it might look off. So I may change my mind on this as we're going. All right. So I'm going to put the
cup of coffee here. Although we have a
etiquette thing here. I think typically you'll put a cup of coffee over, you know, on the right side, I'm
going to break the rules for the visual visuals
on this piece here. All right. So we're
going to put the cup of coffee here. All right. Let's just say this is for a left handed person and We're going to
put this over here. All right. So I'm going to make that cup of coffee white, right? Now, to make the coffee,
I'm going to copy this. So edit copy or command
or Control C, copy. And I'm going to
paste this in place. Actually, say if I paste it
and it comes out over here, you can still just align
those quite easily. But first, I'm going
to change the color. That's going to be my coffee. Maybe a nice light roast. What I would do here as far
as light or dark is make that call depending on how else, you know, how your image looks. Like, right now, I think that nice dark roast is too heavy, and it's drawing my eye there. So I'm going to lighten that up. And you can always
change the color. But I'm going to go with
this color because I don't want it to match the
syrup. All right. Now, I can eyeball this
and try to line it up. But the easiest way is make sure I'm on the black
arrow. Hold the shift key. They're both selected,
and then I can align them by the top and align. Center or left, okay? Now they're perfectly aligned. Now I can click away because they're both
selected, click here, and here to scale it down, I can hold the shift key. Okay? Let me try this. So I can hold the shift key, but it'll scale down. But if I want it to scale and that'll make sure it
remains a circle. If I take my hand off
of the shift key, you see, it goes wonky, okay? So I'm going to
add the shift key, it makes a perfect circle. And now I'm going to
add the option key, okay, and it will
scale from the center. So then I can just
bring that out and I have a nice little mug, a. And now I'm going to release
on off the camera here. Hang on. Ooh. There
we go. There we go. It's off camera. I'm
going to release the mouse button
first, finger up. Now I can release these
other keys, okay? That's very crucial
because if I release the keys first or try to
release them at the same time, it may shift because I
didn't get the timing right. All right. So now
we have the coffee. Now, let me take a look at that. I'll save the foam for last. Let's put the handle
on there. Handle. We're going to do
the handle just like we did the sausage. We're going to come over here
to this line segment tool. I'm going to make the
handle down here. I'm going to click
drag that across. Okay. Release. Now, you can
see it has no fill or stroke. We need a stroke.
So I'm going to go over to my properties panel. Click on that and choose white. Now I'm going to
thicken that line up so that it matches the
width of the cup. And when I'm happy with that, I don't know if
you all remember. I give those of you think you remember a chance to get it, how to round the
edge of that handle. Okay, if you didn't,
no big deal, we're going to click
on the words stroke. Okay? And then we're going to come down here
to where it says CP, and we're going to click on round cap, the one
in the middle. Boom. Now, we have
a nice round cap. The problem that I'm having, and hopefully you
all can see this is the round part of this cap
is pushing into the coffee, so I'm going to shorten that. And I'm going to shorten this
handle just a little bit. There we go. Okay, now, this is actually a mug. And I'm going to stick
with this with a mug. But if you decide that you
want to have a proper, you know, like, a cup of tea, and you want to have the saucer, I think you can figure that out. Okay, so here we go.
And I think this works. We're almost finished with this. And I'm going to zoom
in a little bit. Now, let's figure out
how to do this coffee. I mean, the foam. All right. So The way I would do this is
I'm going to separate this. I'm going to copy this
hold the Option key, and the foam is kind
of that light tan. I may change my mind and go with something a little darker later depends on how the
visual balance of the image is working. Okay, so now I'm going to
go to my curvature tool. Okay. And again, I'm going to move it
over here so we can see that cup of coffee there. Oops. Hang on, while
we're doing this. There we go. Let me close
that path finder window. All right. So first thing I
need to do is click away. And now I can click in here,
and there's the first point. This is the curvature tool. And I'm just going to kind of click and just let
it see how it goes. The thing is, if you don't, the curvature tool isn't
doing what you want, after you click all the points
is when you can go back and move these points around and get them
exactly where you want. Okay, so this is
going to be the foam. Now, anyone have any ideas
how we're going to make this foam work on
the cup of coffee. Yes, that is right.
We are going to subtract this shape
from that shape. Let me change the color
just so you can see this. And I'm going to make sure
they're both selected, and I can subtract. Now, another way to do it
is I could simply match the color of this and it would visually serve the same purpose. I use the eye dropper here and that select the eye dropper
and sample the coffee. That serves the
exact same purpose. But I know I'm going
to select them both and use the pathfinder
and subtract. All right. So that way, if I decide to change the color
of the coffee later, it will automatically change. Alright, so this is
the same size as this, so I can just use the alig. I'm going to line them up
as best I can because it may shift when I
go to move this. So I'm going to go
command y, control y, and try to line these
up visually, okay? Whoops. It's a little hard to
select it in outline mode. And then you can see I
can line them up that way and command why. Now, if I really want to just make sure
these are selected, I'm going to click on
the coffee and the foam, and I can align center and align what's that
center Vertical? All right. So they're
lined up and actually, I need to group these I'll
save the grouping to last. Alright, now we need to
add some bubbles, okay? So the bubbles. I'm not going to worry about
cutting holes in this, but I'm just going to sample the eye dropper boom
and add a few bubbles. I'm not sure how many bubbles
I really want to add. And you'll see, I'm
clicking away when I drag these because
sometimes it's easy to accidentally click
on the click on the wrong, you know, like, if I
click here and drag, I may accidentally
click on one of these anchor points and start skewing this thing in a
way that I don't want. Hmm. All right. These bubbles, I'm not right here if I click, it's just going to it
may start rotating. But it seemed to work. Okay, now, let's
see if that does, those look like bubbles to me. I think that works. I kind of like that
little swirly thing that's going on
there in the middle. I don't know if I can get that
to happen, but let's see. I'm going to go to
the curvature tool. I'm going to click
here. I'm going to double click here
to get a point. I'm going to double click
here and double click here. Double click means we get
the nice pointy bits. Okay? Now I'm going to
go to the eye dropper, sample that color, go back
to the curvature tool, and I'm going to just
kind of curve that over. I'll click here. It
adds a nice curve. And now let's see if I
can line this back up. Actually, it's not. So
I'm going to click. And I'm just trying to match
the curve so that it works, and then I can drag that down. Maybe reposition
that a little bit. I'm not sure if I'm
crazy about this, but Maybe it works.
Maybe it doesn't. I'll leave it to
you if you decide you want to add that little
touch in there or not. But I just need to make
sure they lined up. No gaps here. I'll click on
the black arrow, click away. It's not quite right. You can see there's a gap here, and that doesn't line up. So I'm going to go to the
white arrow, click here. Line that up. Here,
there's a little handle. I can just click that and drag that down and
you can see it bends. If if you're not
comfortable with that, just go right back to
the curvature tool and add a new point, and you can just kind
of move these around. And if by some strange
chance you are covering over any
of these bubbles, you can just bring
them to front, okay? All right. Now, let me
see what this looks like. Mm, let me see what it looks. That's with and without. I think I kind of like it with. Alright, so I'm going
to click right here, drag all the way across
and group everything.
28. Shadows / Blend Modes: If you want to take
this to the next level, you can start adding little
shadows to this, as well. Like here, let me
unlock these layers. All right, I'm going
to duplicate that. I am going to fill that with the same colors
as the background, then I'm going to
double click and then just make that a little
bit darker, send it to back. Okay. The only problem is that shadow is
cutting into this. Now, earlier,
remember when we did that I talked about
the multiply. If I come over here to opacity, I can click on the word opacity, and then I come here
where it says, normal. And I'm going to click and
change that to multiply, and it will show through. It basically will make the
white disappear, okay? The white within the color. So you can see if
I zoom in here, you can see that napkin is
showing through, right there. Okay? That's what that's doing. Now I'm going to
click on that and reduce the opacity, let's say, 50%, and now it's a bit more
obvious what's happening. And if you want to go through and do more of
this sort of thing, you can, but I think I'm
going to go with the cup. Whoops, I never group these. I'm going to click on the black
arrow for the coffee cup. I'm going to group everything. Command G, Control G on a PC. Now I'm going to drag that off. I'm going to hold in the
option key to duplicate that. I'm going to move it down here. Now, I want this to be a shadow. So I'm going to double
click to go inside of this. If I just try to merge these, I believe I'm going
to lose that handle. So if I go to a path
finder, merge everything, see, I lost the handle
because it's a stroke. So I'm going to click
on that handle and hopefully remember
this object path. This is what we did
with the sausages, and I'm going to
choose outline stroke, and now it's a shape rather
than just a simple path. It's, you know, the
whole thing drawn out. Now, if I come across that, select everything, I
can merge everything, and now I'm going to
double click to get out of this group, you can see here. I'm inside of the group.
I'll just double click here, or I can click on the gray. Now I'm going to
cheat a little bit. I want to copy this shadow here. So I'm going to select
the eyedropper. I'm going to click on it. And now I can send
this to the back, so I'm going to go
object arrange. Send to back. And it's
behind the cup of coffee. I have a nice shadow. And I've applied a few shadows here, which I think work. Let me do one more. I'm going to go I copy
that napkin, eyedropper, sample, send it to B. I just use the key commands to do that. And I think that works. If you decide you
want to add more, I think it will help
for the realism, but to add it to the spoon. But I think it
works as is for me. But you can go in and
add shadows as you like. If I like using
the solid colors, but if you're happier, using gradations,
that's fine, too. But I haven't shown
you how to do that. But the gradation tool is here if you want to
play around with that.
29. Clean Up: Alright. Now, one of the
important things you want to do as far as presentation is, well, what I'm going to do
is hit File Save, alright? Make sure you're
saving regularly. But if this is my
final presentation, you want to clean
up your document. So I'm going to unlock
that background, get rid of my mood board and this extra stuff
off to the side. Now I can hit Command
zero on my keyboard. And I am good to go. And hang on. Let me close
that up. All right. Actually, I'm going to go
on a presentation mode. This is something that I usually teach right
in the beginning. If you touch on the tab key, you see it goes and it changes, it gets rid of your
keyboard shortcuts. So that's something
to be aware of. If you remember
the Gotcha video, if you hit the tab
key that cleans things up, gets rid of the menu, or I can tap the the FK, and I taped it again. And now we are in
presentation mode. So if you want to show your
finished piece off to, you know, someone
in the same room, you have a nice clean look. Anyway, I hope you
had fun with this, and I really look forward
to seeing what types of pieces and variations
you come up with. And since this is going
out to the world, I really am interesting
to see what other types of breakfasts that you
come up with that are, you know, non
American breakfasts. I'd love to see some, was it? Blood sausages and beans? Maybe a Danish, maybe. Hey, maybe you just like a
nice doughnut for breakfast. I'd love to see all
these things here, so please upload them. Don't be shy, and I look forward to seeing
what you do. Bye bye.
30. Save / Export Project: Now, once you've completed this, you'll need to save the file. So first, you'll want
to go File, Save, okay? Now, that's going to be
your reference file, your Adobe Illustrator file, the one that you can
use to edit, okay? You can go back if you decide I want to change
some things around. That's what you're
going to use. But in order to post to
the project area, you'll need to save it
as a ster file, okay, because this won't
show up if you just upload the Adobe
Illustrator file. So you'll need to export a copy. You choose the file menu. And choose port, and
then export S. Okay? And from here, you can choose
either P and G or a JPEG. The default is P and G.
Let's just go with that. And I'm going to
click right here where it says art boards. So as long as you line everything up here
in the art boards, it's going to export
it out perfectly. If you don't check artboards, if you have some things
off to the side, they may show up.
So make sure you Use artboards, especially if you have extra items
off to the side. It'll cut those out. All right. So I'm going to hit port, and you can see it says
breakfast drawing, and I'm going to hit port
for this assignment, right here, you can
change the resolution. You know, that's
the quality of it, how many pixels there are. And we're going to
go with 72 PPI. You can always come back
to the original file and save out a high resolution
version if you like. But I don't want to overwhelm the system by uploading
a file that's too large. So we're just going to go with 72 PPI. And you can see this is what the image is
going to look like. If you look at this
little image right here and it shows you something, you know, extra stuff. Maybe you did leave
something off to the side, just cancel and re export it and make sure
you check artboard. And it says the background
color is transparent. I'm just going to
put white, but there really isn't a background color. But this may make the file size just a
little bit smaller. And I'm going to hit.
And then from there, you'll just upload that
to the project area.
31. Upload Project: All right. So now that you've completed your illustration, and you've exported it
as either a JPEG or PNG, you can come here on the class
to projects and resources. So I'm just going to scroll down here to this bottom area, and you can see about et cetera, and projects and resources. And from here, you can see it says right here to
submit the project. And I'm going to
click right there. And right here, it says, upload image, and you can
see it says cover image. And it's kind of odd
when you upload it, it's going to upload it as, again, a cover image, and it will probably
crop the image. So I'm going to
click right here and choose upload the
image, and you can see, and then you can find
your image, you know, navigate to where
the image is saved, and I'm going to select it
and choose open right here. And you'll see, actually, this is pretty close to fitting with the
size that I chose. I can scale this up, but you can still see that it's cropping it
just a little bit. For me, I think
this would be fine, but for demonstration purposes, I'm going to show
you the next step. So say if you did
something that was vertical and it doesn't
fit in here properly, and it's being cropped
off, hit submit. And then you'll come down here
and you can add the image. Right here, you see where
it says, add more content. But before I do that, I'm
going to choose project title, and I'm just going to
put instructors demo, and I'll type here for
project description. If you want to let me
know if, you know, you had fun doing this or
you had any trouble with it, or if you want to
ask me to hey can you show me how to make a
waffle or something like that. You can put all that
kind of stuff in here. And I'll just say
here is my project. I hope you had fun. All right. So now I'm going to upload
the image a second time. I'm going to hit a
return here just to make that drop back, and I'm going to
click here image, select the exact same
image, because again, the first one was
a preview image. But you can see here,
it's showing full size. And I don't know
if you noticed it said the maximum size that you could send this is something like I believe 8 megabytes. So pay attention to the size. And other than that,
once you're done, right here, you can
make this project private or add some tags. I'm going to leave
both of those alone, and I'm going to hit this
button right here that says Publish. And I'm done.
32. Thanks for Taking the Class: Hi. Thank you for
taking the class. I hope you enjoyed yourself. And please, if there
are any comments or suggestions that you might
have, please let me know. Also, I hope that you uploaded your project
to the project area. I can't wait to see it. Anyway, once again, thank you, and I'll see you
in the next class.
 Aaron Porter, Illustrator