Transcripts
1. Introduction: Hello everybody.
If you never did the three D printing object and maybe you are curious to
know how you can do it. Maybe this is the perfect
tutorial for you. So I'm going to show
you from modeling until the printing of the
object, how you can do it.
2. Find the concept: I always have my keys dangling
everywhere in my pockets. In my hands,
sometimes I could get hurt the way they position
the selves in my pocket. I wanted to do something compact that keep
them all together. I can put it in my
hand like this, without the keys moving
every time or making noises. I have this idea of a container, like a little bag where
I can put my keys in. It will be open and all around to be closed
and protected, Almost like a guitar case. A guitar bag, if I draw it
here with a little detail. This is the circular part. This is the length of
the keys. The height. This part here from one
side, it will be open. This will be completely open. I leave also opening here, so I can put my small metal ring and I can add another element or
a set of other things. I leave this space for that. This way with this opening I can put the keys, slide them out. And slide them again back
in one and the other.
3. Learn about TPU - The Printed Material: I chose to print this object in thermoplastic polyuretan or TPU. And of course, if you
want the same results, you should also print
in the same material. It is a versatile and flexible, durable, and
resistant to impact. I research and I knew beforehand that I needed a flexible
material for this case. That was one of the main
reasons why I chose it. The other one is the look, I just love it and
I like its texture. For me, it has a modern look
and it has a nice feeling to the touch bear in mind that depending on the three D
printing on line surface, you can't change your
finish or its color. So you are very
limited in that sense. Now when modeling for
three D printing, and depending on the
material you choose, you have to be very careful when modeling your object in
three D. In this case, in our case, in three D, modeling in three D max. If you follow everything well, like I tell you in the videos, it will not have
problems in the modeling because I follow the
design guidelines. What is that and why? It's important when you decide
to export your model for three D printing in the online three D printing
service you choose, you should look for
the design guidelines. I have it here to show. For example, for this material, the TPU, we have the
design guidelines. The maximum volume that you can print with this
material as the values, and the minimum has
the values here. The other things that
we should look up to, it's the walls, the walls of the object you are doing
that you are modeling? Yes, always to be the
minimum 1 millimeter. As for the wires, they
also have a minimum of 1 millimeter for the details in the case that you will see. While we will
model, for example, we will not have engraved
but we have embossed details like the text, the
three stripes. Everything has to have the
minimum dimensions are. If you don't respect this, your three D printing
model will have problems. You will receive
your object like not corresponding at all with what we did in the
three D modeling. Some parts may be
broken or closed. It's very important
to follow along. But like I tell you
for this example, what we will do together
in this course, you will not have problems. I'm just warning you if
at the end of the di, if you want to try another material material
in the design guidelines, if that material demands you to change some of the dimensions of
the wall thickness, of the wires, of the details. Because if we look to another
material, for example for example PA Nylon 11, we see that the dimensions
are not the same. Once again as you see here the
support of well thickness, it's lower than the TPU. The details also, you can really have smaller details in
this type of material. But as I told you
in the beginning, I wanted to have a
flexible material. I wanted to have this
look for me, it's great.
4. Keys Dimensions: I'm pretty sure that you don't have the same exact
keys that I have, but the principle
stays the same. So I gather these three keys that I want to put together in the container and I get
overall volume of the keys. The little opening have to
be exactly in the same spot. Now to start drawing my technical drawing,
the basis of my three D, I have to start with the
biggest one of the keys and start drawing
around the silhouette. To extract the dimensions, I identify the two main shapes, the circle from
this left side and the rectangle from
the right side to the lengthy part of the key. I can now have the
dimension from here to the left side and the
radius of the circle here. I will then draw two lines from one side to
the other and also extract the dimension of the small opening
for the metal ring. Now with the ruler, you take all the dimensions you need
to have your references.
5. Guides and references to start the 3D Model : I'm going to show you
how you can do the three D. I'm using three D max. I have it installed
in my computer. If you already have it, great. If you don't have it you
can install version, free version for 30 days. You just have to
go to their site, auto desk site and
download the free trial. Once you install it and
you open the software, you have exactly what I
have showing you here. Depending on the measure
units you are using. In my case, I'm
using centimeters. But if you want to change that, you just have to come to
customize the unit set up. In my case, like I
told you, centimeters. And the system unit set
up also centimeters. If you want to change
to another system, you have other
possibilities like the standard of feet and
inches. You can customize it. Now that we have prepared
our key shareholder on paper and see all the dimensions
that we are going to do, let's start modeling
it in three D S max. So let's start by
the main shapes. I go here in the, in the panel, I choose planes. And I start with
the circle mine. He has like 2.5 diameter, he has 1.5 radius. Zoom in quickly. Just click
the z key on the keyboard. Now I choose this tool move. I go down here, right click. I center the circle
in my view part. Now I will do the rectangle
that has width of one and the length of 6.2 I go to the snap struggle. I leave it on the right click. I have to be sure
that I have to, these two boxes stick
and point in midpoint. Now that I drag my rectangle, the upper edge in the middle of the upper edge of the
circle, it goes right away. Automatically, I
have my two shapes. Let's change the n now. That's to the opening for the
entrance of the metal ring. Once again in the splines, I'll do it 0.7 until the start of the
center of the circle. I can leave the width like this. Now I can do the circle
that has a radius of 025. Now I can choose
everything group, I can change this
color to be visible. Fine modeling, everything
has the same color. Now let's start
modeling in three D.
6. Model the keychain: We started with the splines, now we pass to the
standard primitives. With a box, I will do
a box that will cover the width and the length
of my references. The larger has 2.5
and the length 7.2 The height I will leave at 0.75 The best is to come to this
other window change is default shading
to wire frame. Pick the lower hedge from the base and put
it again in the middle. Now we have our box that
we are going to shape. Let's save it. I'm going to divide my box into
several segments in height. I will give seven
segments in width, I will give five. Right click on the box, convert it to editable poly. Changed my selection to
vertex and I'm trying to match the basic shapes
I have down my box. Change this like this,
change this one here. I have a box here to
make the opening, a rectangle to make the opening. I can move this one
here and this one here. And I'll change the width to
match the width of my key. I will also change this and save. I can get out of my selection, come here and see if
everything is okay. First of all, I will start deleting the opening of
the metal ring here. So I can change this to default
shading and edge spaces. I'll have to delete
this one here and the opposite one deleted. Now I will start to using modifiers to shape
organically my box. I'll give it a modifier name
to smooth two iterations. If you want to move
like I'm doing now, you just have to click
to press the out key and press the middle
key of your mouse. You can rotate like this. My rectangles are not even, there's a modifier to do that, you can come and be back again. Topology. Give it a 1,200 200. Yes. Okay. It's more even. I can now start to delete
my openings for the key. So editable poly, if
you want to choose, like I'm doing now, you just have to
click one rectangle, one polygon, and the next
one, just besides it, you have to click two times with the control key of the keyboard. Press once again, you choose one and the next one
click two times. I want to erase just the ones
who stay selected for that. I will remove the ones that
I don't want to erase. With the out key pressed, we choose the ones that
you don't want to delete. So I don't know if I
delete this one here. Yes, maybe. And then I raise it.
7. Finalise the 3D model and add details: And then I raise it. Now I just have to
add the thickness. Normally you have
like you have to have at least 1
millimeter for that. I will choose the
modifier shell, the outermunt, 1 millimeter. Finally, I will
give another to go smooth two. There you go. This is where you put the key. This part here and this
part there is where you stretch when you need to
get one of the keys out. Let's add some details
to our objects. For example, a grip here and the initials of my studio
here, for example. You can put the
initials of your name, you can put a logo,
whatever you want. I start with Stop. Change my shading to default, maybe change the color to gray. I start by doing a box, that would be my grip. I will leave my segments
23.1 my height, 0.2 with 0.6 my length. Five, Okay, I'll give it a trible smooth modifier two n Well, position it. We'll copy and then I'll
copy this three more times. So with you press of key instance and three more. You have it there. We have our grip here now. I'll put the initials there, so I go back to the Spanelpines text
already written before. I will change the size to 1.5 I will extrude it. So back to the
panel and extrude. Yes. Let's leave it at 0.0 15. My text back to 131. I'll put it here. So I lower it like this. I verify that it's not
entering my shape. It's done. I can choose all the
objects and put it a gray and my key chain is done. I just have to hide
this, my references. I will extend the opening. I can hide these two modifiers. Choose the editable poly
and polygon method, and I will choose
exactly those ones here. It's better to change to edge faces so you can see the
polygons that you are erasing. I want to erase
exactly those ones. Then I come back again to
activate my modifiers. Now you select everything. Go to file export. You export it at the
SLT format stereo. Let, give it a name and save it. You can also change the format
of the name of the export. Leave this selected as it
is with the selected only. And click okay. Selected.
8. Export file and Choose an online printing service : I'll show you four
different ones that are used and they are perfectly
fine, whatever you choose. We have this one, G, W, you have Sculpt, you have a
Xometry, you have Shapeways. Well, I will print.
And this one here you will need to do to open an
account. I already did that. Then click on free instant. All the other ones work exactly in the same way
you get a free instant. Then you will give you the price and the different
materials you can choose. If you want to inform yourself with the different types
of materials you can use, you can go to their
material and finishes. You have exactly the same
for all the other ones. Material guide, services,
materials, materials here Also. In this case, I
already know that I want a flexible plastic, like a rubbery like material. For that, I will choose A. If you see the
description of TPU, it gives you a combination
of softness and flexibility. You have this texture. It's not completely
polish, but I like it. I will go with this
type of material, now we have to do
a free instant. We're going to click in the
free instant and we are going to download our file
that we just exported from. D, chose it, open it, and I'll wait for the
software to analyze it and give me a price of
how much it will cost, depending of the
material I will choose. At the end of this analysis, you have here the preview of the file that we
just downloaded. The price that will
cost to print it and the materials at our
disposal for this object, we can after
customize our choice. In my case, like I told you, I will print in TPU. One thing that I see
that it's not correct is that in this three D
printing online service, we download our objects in millimeters and we did
it in centimeters. We have to correct that. For this, we have to go
back two or three D, software modeling
software, and scale it ten times bigger
of what we exported. To correct this back
in three D max, I just have to choose
all my objects. Come to this icon here,
right click over it. We change the percentage to 1,000 Now we can go back to do exactly the
same thing as before. Export, choose where. I'm going to save my file
stereolital extension. I can give it a
different name now. And I'll save it back to the three D printing
online service. I will get a new quote. Of course the price will
change because it's a bigger file than the other one and now we have
the correct size. I can now choose
this one. Delete. Keep it the same material. Okay, and proceed
to the checkout. Depending on which date you
want to receive it faster. It will be expensive. I do it in the normal delay. I proceed to the checkout. If it's the first time you
are printing three D file, you have the codes they normally offering
for the first time. For example, for now you
have like welcome three D. You confirm you have a percentage reduction
of the total price. You then have to put your
address, the check out, give all your reference to
pay this and you complete your order and you
just wait for to receive the printed object.
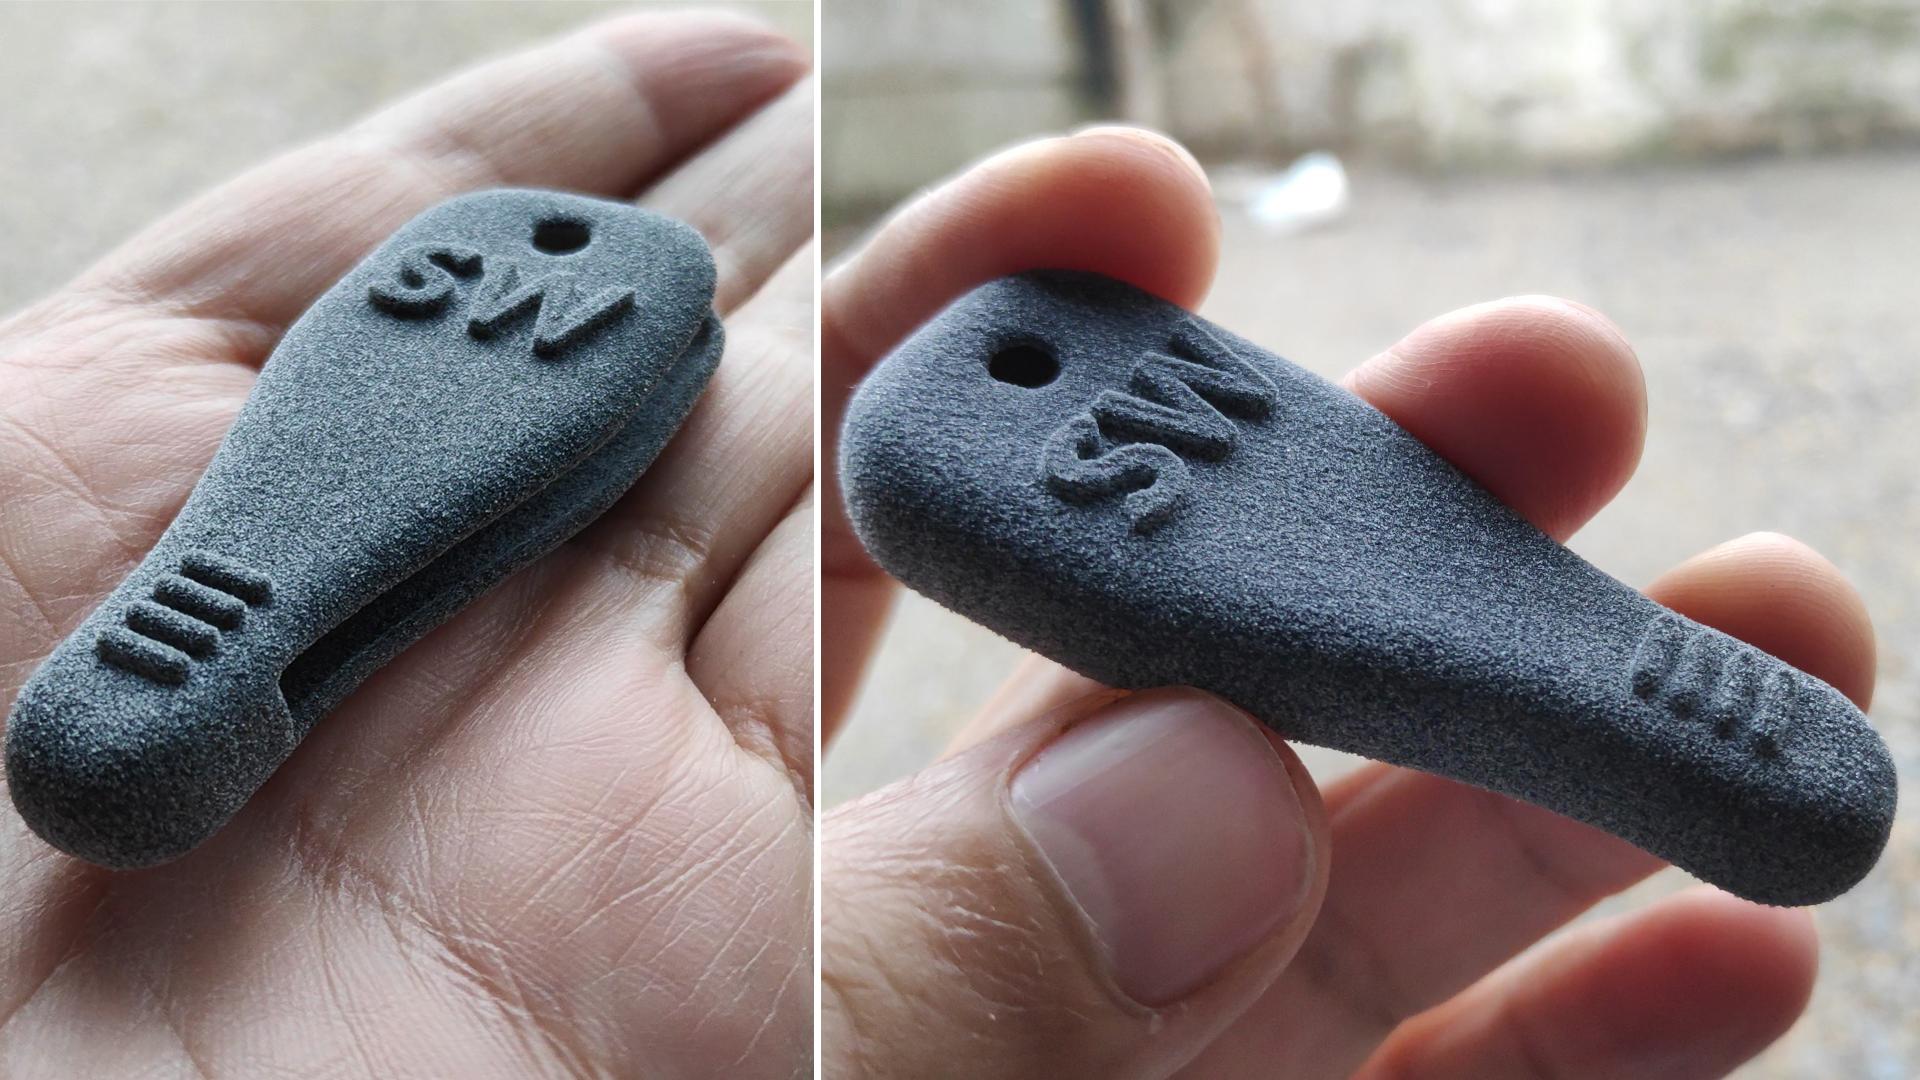
9. The Printed result: So this is a result, like I showed you the
beginning of the video, I waited impatiently for this to arrive and I'm pretty
happy with the results. I love this material, the texture, the details in it. It really has a really
modern look to it. I hope you enjoy this class and I can't wait to see
your own results. So don't forget to upload your own creations into the
class projects. Thank you.
 Studio Wander