Transcripts
1. Introduction: Hello everybody and
welcome to my channel. I will show you how to make the animation that you
just saw at the beginning. This tutorial is for all levels, but especially for everybody
that wants to make right away something with quality
in Unreal Engine five. Let's read our real project.
2. Install Unreal Engine: Lest install the software. For that you have to go to
the real engine.com site. Here you will have
access to all of the information about the
software and also the download, it's from here that
you do the download. To do the download,
just click here in this icon and it will
start downloading. Once that is done,
you need to do a login in this icon here. You will create a login to sign in to the
Epic Games lounger. You have to give
your e mail address and create your own password. Now let's just install
the lounger that we just downloaded from the
Unreal Engine.com site. I have it here. I'll
double click it. It will start the installation. I can now access the lounger
that I just installed. I came here by its name,
Epic Games Lounger. Now it will open
this new window. It's here that we access
our Unreal Engine software. In my case, I will show you what I already have installed. It's in the library that we
access the software here. In my case, I already
have three versions. The older 15.1 0.11
after that one, and the latest version
of Unreal Engine Five. In your case, you will not
have any of those installed, you'll have nothing installed. To do that, you just
have to click in this icon and engine versions, you click it here and he will
install the latest version. In my case, it appears the oldest version than
the ones I have here. Because there's no latest
version of the software, he will propose this
one to install. Then you just have to
click here, Installed. I will erase it. I will explain you quickly what these
different windows are. Right at the start, when you
open Epic Games Launcher, you are informed of the
advancement of the software. Also, you have and you have artists showcase,
showcasing their works. For example, this one here, Spanish cottages by the river
of an independent artist. Also you have the samples. This is great
because epic games, they give us different
projects where you can download and explore
the projects. Some of a lot of details, but it's awesome so you
can explore and learn these new techniques
presented in these projects. For example, Hillside
Sample, I download it. It's an architectural
representation project. If I click here, I will access. If you see here, it
changes to marketplace because it's a
marketplace where we can access different three
D projects and elements. Here it is the project for free. You can download,
you need to create, give it the direction
where you want to save it. And you will have
access to this project. Back to samples and
back to marketplace. Like I told you with
one of the samples here you have a projects
that you can search for. Some of them are free, but most of them are paid. But if you need a specific
thing for a project, you can gain a lot of time by searching here what you
need for your project. For example, if I need a car, I can just type car
and I will find different things
related to the subject. Back to the library. It's where we have the
versions of the software, but also where I have the thumbnails of my different
projects are already done. Also a vault where
I have the library of all the samples that I downloaded for free or I
bought in the marketplace. I will now start creating my project, have
different options. I can launch it here,
launch it here. But if I launch it here, be careful to choose the right versions
that you want to use. In my case, I have three
different versions. I have to choose the latest one. Now I'll have a
different window, pops up this window and real project browser
you at first. Recent projects, all the
projects that I'm working on. Area you have down here five different templates depending on what
you are working on. For example, if I'm starting
a new project, games, I already have a project with
a minimal contents in it. I don't have to start everything from scratch,
putting the lights, putting the ground,
putting the camera, the post process effects. It's a great way to save time and right away
start creating. In our case for discourse, we will use architecture. I will choose the
directory where I'm going to save my project. Let's two different folder I selected and I give a
name to my file I create. Before starting to show
you the interface, I just want to show you
now that we created the project in a
specific folder. You don't need to
pass by the launcher. For example, you can
right away go to the project folder
where I save it. Now I just have to
double click it. That's easy. See you
in the next chapter.
3. Prepare the 3D scene and the Light. Model the space.: We opened the Epic
lounger in the library. I will open, or I will launch, one of the versions of the
unreal project that I have. I will open the last one that
I already have installed, 5.3 0.1 You can also use the previous 15.2
0.1 and I will launch, I will use one of the templates that
you have in the left. For this case I will
use architecture a blank project and I will
save it in a chosen file. I'll give it a name,
smoke box for example. I create this template
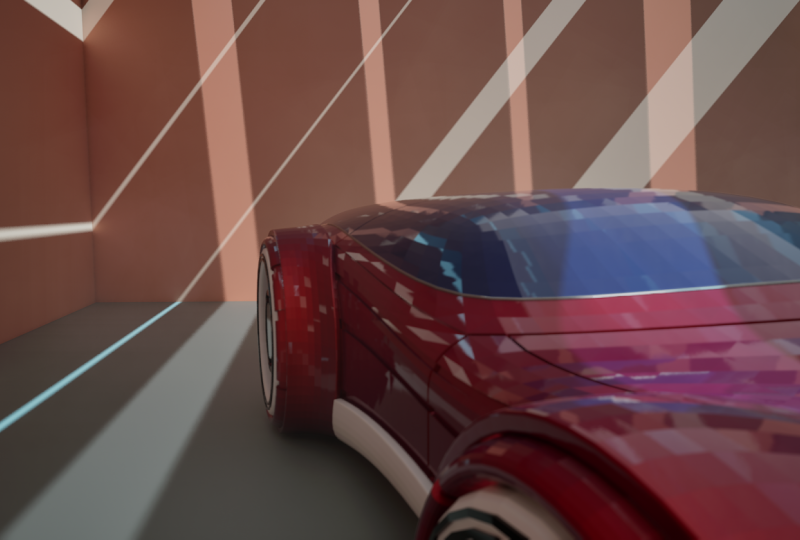
will allow you to start from a scene that already have some effects in it. Light cameras and a surface. Let's start by making our room, where we will put
our car inside. That will be our environment. So I can, I can leave
this object here. That will be our floor now. We'll change the site
to two by two by two. Okay, now I'll start adding the walls to our
scene. Can go here. Shapes cube. You see that the
cube is floating. If you want to quickly
head it to the floor exactly with the
base on the floor, you just click the end key. There you go. That's
position here, for example. It doesn't matter. I position it here and I'll
change the size to something like ten by 0.2, by four. Once again, key right away, it will stick to the floor, the other walls,
I'll copy this one. To copy this, you
just click Alt key. You drag in the axis that
you want. There you go. Then I will copy this one here. I will rotate this key here. I change the side to seven, so it will be once again. I copy this here. Now I can close my box with
this wall for the ceiling. I can also copy
one of the walls. I will rotate change
its side to 2.5, Move it back here. Copy another one here and
two others in the middle. So I had three chats
entering my box, change it side to one, okay. Now if I go inside, I will have three
openings to let my natural light inside
the box save your project. Don't forget in this project, I use assets that we can find in the
marketplace for free. If you want to access them, you go to the Epic Lounger
once again, marketplace. And you have the automative. Automative materials.
This file here, you can download it and
add it to the project. You also have sample, this one here if you don't want to waste time and
space in your disk. I already prepare the file
with the car and textures and even the lights and effects
that I use in this tutorial. You can find the link
down in the description, but please feel free to use any other assets that
you already have. Now, I will add the
card to my scene or any other object that you
want to use inside your box, and I go to content and
search for the name. Of the car. There it is. I would put it here. Let's first bookmark this view. We come here and you
choose bookmark set. Bookmark bookmark one. This way, every time we
click the number one key, the key number one, we can always come back to
this point of view to have a general look of what we
are doing with that set. Now we can create
the material that we're going to put everywhere
in the box. All the walls. So I can create a here, new material walls. I open this and I create a constant three vector in the nodes. I will put a constant,
a normal one. Now copy two others, and I put it in the specular and in the roughness
I change the color to something like this. These values, I keep this 11 and this 10.8 I save it and I create a material instance of this material and I add
it to all my walls. You can do it one
by one or you just choose all the objects. And then you come
back to the material and then you slide it over. It saves, now we can
go around the space. Click one and I go
back to the bookmark I set for my point of view. When you create a material, you always create
first the master. You have all these nodes that you can change
and add up to. Then you can convert
it to an instance like I did that presents
itself like this, a simpler look to it. It's also quicker to use instant materials way clean
and way quicker to render, just to give you an example, I can manipulate
this when I want, if I just convert it
into a parameter, for example, this is
the parameter of color. I create a parameter and
I'm going to save it. Now in the instance, I have a parameter of color, meaning that I create
an instance of the master material that now has a parameter
called color. If check this box now, I can in real time change
the color of my walls. Now let's change the
light in our scene. Then later on had
our fog effect. Let's start by
changing the light. Let's search for the sun, sky. I go to directional
light and lower to 1,500 Then you see the effect of auto exposure
even when it's dark. Comes up and put it out
again with a lot of light. We change that too, in
the post process volume, we go to exposure. And change this to manual
and put this in the value of 7.7 That seems okay for now. Now we are going to
create our effect. Let's make a new folder, Color effects, and inside I
will create a Niagara system. I choose the hanging particles, I finish, I call it Fog. I can open it. I will change some
characteristics, for example, in the
size of my particles. Before that, I will
add this to my scene. I will have what I just
created in our scene, so you can see it right away appearing the little
dots in our scene. And then I will change the shape location
from box to sphere. I leave the sphere
radius like this. I will change the
size of the area. You will cover ten for ten, the size of each particle. I will put it to 200 by 300. Okay, save it. Of course, it's not circles
that we want in our scene, we want something that
really looks like fog. For that, we have
to find a texture. We have to use a
texture that looks like fog in the engine. You will find a texture, if you search for smoke, you have this texture that
we are going to duplicate and change its name to white. Save all I can open it, I will just change the
clouds from black to white. For that, I can
erase this parameter here and connect this value of the particle color
to the multiply. Now we have white clouds. I go here back to the particle system with that new texture
selected actually. Now to add it to this window, it's still not
looking good because our texture as an
eight by eight count, so we have to change that here in the sub UV, we're going to put
eight by eight saves. Okay, it looks like it
looks better. Save it. Let's change our spawn rate because there's a weird way in which the texture
transforms itself. So we have to change
it in the spawn rate. The spawn rate, Let's
pass it to 500. Yes, looks better now, there's this weird
effect over here, so we have to go back
to the texture and change its plan
mode to heditive. Okay, that looks good. I see it. I can also add another
effect in the, in the particle update. Can add UV animation And change it to
normalize. That's okay. I can also change the offset, meaning that if I think
the fog is way high, I can lower is height. Going back to the shape
location in the offset modes, change it to default and
-50 for example. Okay. There are some real
weird cutting edges in some surfaces like
for example in the car. We can see it here, like cutting parts and here in the
walls in the floor also. To get rid of this, we have to go back
to the texture. We have to have a new
parameter called depth. Depth, fade, we just have to take this out with
the old key selected, you clicked with
the left mouth key. Then we put the clamp in the opacity node and this one back in the
opacity and shade. The distance to this
parameter mitigates where the fog meets an object, mitigates that cutting edges. I will save it now we
got rid of that effect.
4. Change the mood and the lighting in the scene. Create the effects.: Let's now change the
light in the mood of our scene to something a
little bit more dramatic. So I will start by heading some lights first,
erecting the light. Okay, Facing down, I will change its sides to something like 410 by 15. Sorry, 565. Okay. That's good. So this light will
accentuate the car. Try to put it in the center. There you go. I will
change its intensity. 500. Okay. I think that's okay. To make it on enough. The gizmo, the
gizmos you see here, I can hide them. You press key key on G. K off. So I will copy these lights parting
from the side. This one here, I will
change its color. Something like this. Also, I changed the
intensity back to 50. This way we have subtle
changes of color. This one is like gray, white. This one is blue. So this
contrast, it's cool. You can do whatever you
find it cooler for you. Let's save it back to our fog. Yes, also I can have a
little bit more effect by having this type of God rays effect also the light
coming from the ceiling. From these three openings, you see this rays coming out. We choose this
exponential light fog. You look for volometric fog, you see it now appearing
through the openings. We can also change our lights in the coming from the
outside in the sun sky, directional light,
I can put also a color can leave it like this. For now, I can change the sun positioning. So in the sun sky, I can change the
time of the day. I can leave. There you go. Okay, I'm just testing. You can leave it like this. I can have a new bookmark here so I can come back here
again the set bookmark. This one will be two key. We have first 1.2 We can also
change a little bit more the general light to have a dark mood going
back to the sun, sky. Try to change this. I like this. Yeah, something like this. I can also use some spot lights
to the front of the car, lower that tuition radios
and the outer corner also. And we copy this one
to the other side, just a bit more
intensity. Now it's good. I will now add the new camera, a close up to be used
in our final animation. I will put myself
here in front of the car like this. Like this. I will eye the fog
for now, save it. From here, I will
create a camera. I will be here,
create camera here. See a camera actor,
change its name. Front here, we still
in perspective view, so I want my window
to be the point of view of the camera, okay? Can be like this. And
I'm going to change its maybe current focal length. I want to open it way more to accentuate my
depth of field effect. Maybe like this. And I will adjust
my depth of field. Yes, Yes, something like this. It's cool. So we're right
in front of the car and we have the two
headlights in focus. This is good to
start going back. Okay. I'll say going
back to activate my fog. Okay. It's too wide. We have to maybe to change
something like for now. Right now we don't
see a lot of the fog. We just see like a dense fog. We don't see any movement. So maybe I will go back to my fog and change what can I do? Okay, I want it to open it. I want to open my fog for
now. It's very dense. Maybe I will add a
point attraction, a point attraction
force exactly this. As you can see here in the left, slowly condensing, I will put my attraction radius way
higher my point of attraction. If I exaggerate, for example, -900 you can see a whole opening and everything going
around this center. I'll put something like. Maybe -30 discrete. I'll save it K. Going back
to my point of view now, I can see my fog
which is very dense. Now we can see the movement here of the fog,
still very dense. Maybe I will change
it to location. I will put it way lower
in the point of view. Maybe ten? Yeah, Best better. I will also change
a little bit of the overhead light I think is
this one you have to give. Yeah, exactly. This
one here to add a little bit more detail to our point of
view to our scene. I'll save it. Let's organize
everything inside here. The smoke box Already
done it. Did it. Now the cameras, I can
erase this one here. And camera, let's now create the first sequence
From this first camera. We go to the content browser. Let's create a new file, new folder, And we are going to create a new
sequence at level sequence. Let's search for the
folder we just created. Let's call it first
sequence one. Let's in this sequence, in this movie editor, we are going to
animate or create our first sequence that will
have some animated elements. The camera, the lights, the fog. Let's head to this
timeline, the camera first. You can do that by just dragging the sequence
inside the timeline. You automatically have the camera cuts and the camera with the different
characteristics inside that we can change
anytime you want. The aperture, the foc, lathe, the transform for now, let's keep it like it is. One important thing is
that in the sequence, we need also to add
the effect of the fog. Otherwise, it won't
appear when we will render the
entire sequences. Let's strike our fog
effect here in the plus. Let's add Niagara
component again. Let's choose Niagara system
life cycle track and change this to desire G. This way, this effect will appear
when we will export our sequence to change to what we are seeing
here in the sequence. You can click the camera here and change
heres to cinematic. Okay, so we have our
first sequence done. I will just strike at this. We're here. Let's start by animating
a little bit of our camera. How can we do it? What we want to do is transform the position of the camera
from one point to another. In the part we
start by with zero. Let's save this first
create automatic key frame. Let's say the frame here and the frame there from one
frame at the beginning, another frame at the end. Clicking clicking
here individually will give us the possibility to change everything
at the same time. It's part of to put
your key frame in the transform and not in the location or
rotational scale. So here I can have a little bit, maybe in the acts, yes. So here, so it's very subtle. My movement is very subtle. I can also have like
a movement like this. What I'm doing, I'm zooming in. At the same time, I'm sliding
from right to the left. Feel free to do whatever
you want in each sequence. I'm just doing like really
small and discrete movements, but you can exaggerate
if you want.
5. Create several animated sequences and cameras. Adjust Light and Effects: I have my first sequence done. This can be my template
for the other ones that I'm going to do after this
one. Let's save this. I have my sequence there. I'm going to get out
of my point of view. I'm going to do another one. If I start by using
this point of view, I can duplicate this
camera, call it scythe. And I'm going to put myself, just change, sorry,
not this one. My current focal length. Now I have this other
camera side camera. Can we use the template
we just did with the other camera for
creating another sequence? Here, I will duplicate
this sequence, create a sequence to open it. I will replace my camera with the side one quickly. You can put this over here. Now I have the second. I will just drag my life cycle
to start a little earlier. Yes, like this, I will do
the same for the other one. I come back to this one
and I'll drag just enough for the effect to have time to charge before running
the sequence. Okay, this one here,
what I'm going to do, it may start the sequence a little bit to the left. Yes. Maybe start Kate transform
here, transform here. But I will start from the pack. Yeah, maybe here. So there you have to be sure that your movement
is constant and linear. We can select all these points
and change them to linear. And the same for these ones. We can do the same for
the other sequence. This one line like
this on linear save. The effects of the movement
and the animation that we do in the sequence will not affect the cameras that
we have in our scene. Because the cameras that
we have in our scene, they don't change the change. Once we put them
in the sequence, you can do whatever you want. With that change the focus, the positioning, change the focal length,
the depth of field. We can even change the
lights inside the sequence. I will do it with the solar sky. For example, I can come back to the first sequence,
activate the camera. I will make this light
change from side to side. The light responsible for the three lights
is the sunskyI'. Put it here. I will have solar time at the beginning stays
exactly like this. At the end it will change, change it to linear. We now have several
things moving. I can do the same for
the light that's above the car, for example, light. I will change its positioning. I don't have to transform here. So I will add it to the light. Add a key frame here, the key frame there. At the end, you will move once again. We can choose to have
a linear movement. We animated different
aspects of this shot. This animation stays
inside the sequence. If I go to my
sequence number two, my light stays the same, is waiting for me to give
a different animation. I will also my sunlight, so time I will maybe do a
different thing here. I will make it come
back to the where it was. There you go. I will create another camera. I will say this all before
I can close this one. I can duplicate the site one, call this one, change
it to the one I just. And change my focus
here. Save this. I will duplicate the
sequence, open it, delete my other cameras, and now put the one inside. I will raise these two key
frames, put another one, and start with almost no lights, change it to linear. I also moved my camera up. I was stopped by for this one. I'll also changed the
focus, the depth of field, so it's here, the
manual focus distance. I want it to be quicker, so I will start by heading. Maybe I will have
repeat the effect here. Starting okay and
finishing. Blurred out. I have to change
this back to auto and we have already
three sequences maybe. Let's do the last one where we can see the
car in its hall. Second, I will duplicate
the first one, okay, And create a camera from the side placate
and call it final. So we will end up
with this shot. Save. I will open
my last sequence. I will change cameras. I will, yes, I will
leave the top light. Also, maybe I will change the solar
time after this one. I will start by dragging the final camera he
will start with, you will start on focus and he will move
backwards backwards. So change this linear in my position. We can finish
outside the box, so oh, it's best to
leave it inside. And I will make it slide. I'll change the light also. I think the focus
will change it too. Yes, And back to focus. So start and focus. Focus again. Focus at the end.
6. Final Touches. Put it all Together. Final edit and Export film: Now that we have all
our sequences ready, the final step is
to export them. For that, we are going to
use the movie render before. I will just change this to linear, save it. To access the movie
render, just click here. Let's erase this
sequence inside. We will add all our jobs, all the sequences
that we just created. For that, we just have to search for all the sequences
that we created. Sequence 23, sequence four. This will render all
and every images that are inside of the
sequence one by one, and it will save it in the directory that we
want to save them. First, we have to configure
the parameters that are going to in which the
images will be exported. For this project, I
raised the Jpeg format. I will add the PNG lighter one. I will change my settings. Before that, I will just
add the antialiasing 216. This is the quality in which we are going to
render our images. Click on the Override,
antialiasing rend up warm frames. I will do a little bit more
to give time for my effects. To load the output, I will leave it at this format. Hd, I will add custom playback range, they all have until 150. I'll put here 150. Okay, that's okay. To end, we'll have to add also the command variables,
the console variables. This will guarantee
that each images are exported the best, in the best quality possible. For that, we have to have
several lines inside the console variable command
to start adding that. The console variables,
we have to go in the plus icon in
the console variables, we will have one by one fields
that we want to enhanced. You will find the text for each variable in the
real engined documents, I will leave the link in the
description and you have to copy and paste
these variables. You just have to copy and paste
this in your empty field. Each time you want to
add a new variable, you just click the plus icon. So let's start by doing it. I also have the directory in which I'm going to
save all my images, and I save this present
to use it later on. Safe, press and I
will put it inside the movie sequences safe. Okay, have everything prepared except I will change all
sequences for this preset, but for each one I will just change where I'm going to put. I also save the movie
Render settings, meaning that if I
want to come back to this movie render que with
all these the same sequences. I can also do that save
in the movie sequence. And I'll save it. Everything is prepared to render all my sequence in one action. So let's do it. Okay, Now that we have all
our sequences ready and done, if I go here to
where I saved them, so I have the first, second one, third
one, and so on. First I'm going
to do the edit in the free software
software you can download completely for free. In my case, I download
it for Windows platform. I installed it, its
name, it's open shot. I'm going to look for open shot. I open it, I'm going
to import files. I just have to choose the
first image of each sequence. You will right away. No, it will be a sequence
of images. You will accept? Yes. Now we have here
the first sequence. I can put it here,
I can put it in other here I have 12345 tracks. But I can put it here in track number three.
Doesn't matter. Now, I will do the same for
the other sequences two, I put it here, import the third one. Yes, and the last one come back four.
Choose the first one. Yes, I put it here. Now I just have to do the
export of this sequence. Head it altogether. I export the project
export video. I leave it with the
characteristics. I'm just going to change from HD 722 to this one. I choose where I'm going to save it and I can put it here, save it and I will
export and it's done. I can save my open
shot file if I want. Okay, and now I can verify
that the movie It's done going here, can
change the name. I open it and there
I have my sequence. If you want to do it
in after effects, I can also show
you after effects. Here I will start
composition From the sequences I choose the
first one automatically. It will also accept that
this is a sequence. You just leave it as it is. All these parameters
I imparted and I have the first sequence
done in the composition. I'm just going to change
the duration of my movie. I just have to import
the other sequences back to back to three. And you can save our, our after effects at it. And now I can exported
to media encoder. So I can choose the format in which I
was going to export. It will correspond
to the source, meaning that it will
have the same size that each image already has. I change the directory where
I'm going to save my file. Can do it here.
Movie after effects. I can now play, there you have it,
your movie, it's done. I gave you two ways in which you can head
it, your sequences. You have a free option
with Open Shot. There's so many
other free software you can do and edit
after effects for those who already have a
creative suite add up installed and you
have the possibility to do it with after effects. Let me just show you the one made with after
effects and there you go.
 Studio Wander