Transcripts
1. Intro: I first started working
with polymer clay when I had just
turned 13 years old. I quickly fell in
love with the medium. And now as a
self-taught sculptor with ten years of experience, I want to share all of
the information that I wish was available
to me years ago. If you are a complete beginner, this class will
guide you through everything you need to
know to get started. And even if you have some
experience with polymer clay, you can still learn
some new things to level up your skills. I'll be discussing how
to bake polymer clay, how different Brands compare, what tools you should buy
and loads of other tips and techniques that will come in handy for Clay Sculpting. And at the end of the class, I will walk you through
two different projects that you can try
out for practice. If you're interested in
purchasing clay supplies. All of the products
that you'll hear me mention can easily be found through the "About" section of this course by following
a single link. So let's get started.
2. What Is Polymer Clay?: What exactly is Polymer Clay? Polymer clay is a
versatile Sculpting medium that hardens when baked. Unlike air dry clays, polymer clay does not
have a time limit, which gives you the
freedom to take your time and
perfect your design. Not only is it
easy to work with, but it's also less messy
than traditional clays that require constant
moisture, like pottery Clay. One of the best things about
polymer clay is that it is non-toxic and completely safe
to use and bake at home. It has almost no smell and it won't give off
any harmful fumes. Once you've completed
your masterpiece, all you have to do is put it
in the oven to harden it. Unlike baking cookies or cakes, the Clay won't expand
or shrink in the oven. So your finished piece will
look just as you intended. And after hardening,
polymer clay is waterproof and perfect
for making dioramas, key chains, Jewelry
and so much more. All of these qualities make it a great choice for
Sculpting Beginners, professionals, kids, and
even the occasional artist
3. Different Brands: There are so many
different brands and types of polymer clay that are
available for purchase. Some of the most popular among crafters and artists are
Fimo professional, Fimo Soft, Sculpey Premo, Sculpey three, Kato,
Cernit, and Cosclay. I know that's quite a few. So let's get into the
differences between them. Starting off with
Fimo professional, this Clay is firm and strong. After conditioning,
it becomes easy to Sculpt with and it
holds detail well. This Clay is also known for
its strength after curing. Next, we have Fimo Soft. This Clay is just like
Fimo professional, but like the name
suggests, it is softer. Fimo professional is harder to get in the United States, but Fimo Soft is more
commonly available. Premo is widely available and it is a solid
option for Sculpting. Premo is easy to Condition and it's Firm enough to
easily Sculpt with, but it is also Soft enough that it won't
strain your hands. Next we have Sculpey three, this Clay as Soft
and conditioning. It can be extremely
easy because it's super malleable straight
out of the package. However, it is so
soft that it may even become sticky after getting
warmed up in your hands. So it might not be the
easiest to work with. This Clay, although popular, is known for being
somewhat weak after baking, and it may not be suitable for items that will be
handled frequently. Kato Polyclay is
another popular brand. This is a very Firm
Clay to Sculpt with, and it's similar to
Fimo professional in terms of strength
after baking. Kato is great other
than the odor, this is the only
Polymer Clay I've tried that has a strong smell. And the moment I opened
the plastic packaging, the smell filled the room. The scent is similar
to vinyl or plastic, and it doesn't immediately
go away after baking, but it does less than a bit. Another known brand is certain
it after conditioning, this clay is very soft. And like Sculpey three, this may be too soft to
Sculpt intricate Art. Although this Clay
is Soft while raw, it becomes very Firm and
durable after baking. The last Clay is Cosclay. This one that I have is
from their deco line. This is a relatively
new brand of polymer clay and
it's been around for a shorter time
than the others, but it quickly became popular
because of its flexibility. This Clay was formulated to be bendy and it claims to also be durable so that
you don't have to fear delicate pieces breaking
4. The Strongest Brand: I wanted to compare all
the Brands after baking. I conditioned everyone. Then I cut to pieces
from each type of clay so that I can
conduct a strength test. One piece was rolled to a thickness of a
quarter of an inch, which is a commonly
used measurement in Polymer Clay projects. The second pieces were
rolled to less than 1 mm thick to test how fragile the Clay becomes
when rolled thinly. I baked each of the
Clay rectangles according to their
individual instructions. Then to evaluate their strength, I attempted to snap
each piece by hand, starting with the thin Clay. The first piece I tested was
the Fimo professional. It felt decently
sturdy in my hands. And after nearly
folding it in half, I was able to get it to snap. Polymer Clay isn't really
meant to be rolled this thin. So I'm actually impressed because I expected
it to break earlier. Next, I tried the
Fimo Soft piece. It felt similar to the Fimo professional but
was easier to snap. After that I did Kato, this piece had resistance
to it and I had to apply more pressure than before to try and
fold it in half. Once I did, the piece broke. Then I moved onto the Sculpey clays and
I started with Premo. The thin piece was
sort of flexible. I could slightly bend
the piece and it would bounce back to
its original position. However, it was
easier to break than both the Fimo clays
and the Kato Clay. Next, I tried to Sculpey three. From experience with this Clay. I expected it to break easily, but I was surprised
that it broke before I even tried applying
much pressure to it. I wanted to see if it had any
flexibility like Premo did. And the corner
immediately snapped off. Without much of an attempt, I was able to break the Clay up into multiple little pieces. And even though this
piece is fully baked, it is extremely brittle. Then I tested Cosclay. As you would expect, this piece felt the most
flexible Out of all the Brands. It was bending and twisting
with almost no effort. It folded in half easily. However, when it did, the piece broke down the
middle and it happened so quietly and gently that I
didn't even notice efforts. Lastly, is Cernit. This thin little piece was
impressively strong and I was able to bend the piece quite
a bit without any problems. Eventually the piece did tear, but it didn't break or
snap like the others. Instead, it was
more of a ripping. Overall, this piece
performed the best out of all the thin pieces. Now for the thick pieces, we're going to go
in the same order, starting with Fimo
professional. This block of Clay
felt really tough. I tried to snap it
with all my might, but it wouldn't budge and I
was not able to break it. I then tried the Fimo Soft. Again. This piece was pretty identical to the
professional piece. The Clay was really hard
and I could not break it. Kato went the same. The piece felt
tough and there was no way for me to break
it with my hands alone. I then tried the
Sculpey Premo piece. I could get it to bend slightly when I put a
lot of pressure on it, but I could not get it to break. Other than being
a tad more bendy than the previous Clay, is. This piece also felt tough. Now for the Sculpey three Again, I was expecting this clay to be weaker than
all the others, but I wasn't sure
if I wouldn't be able to damage it
with just my hands. However, on my first try, I was able to break
the Clay in half. When it happened, it startled me because I couldn't
feel the Clay bending. Instead, it literally
just snapped. Next, I moved onto
the cost Clay. The closest thing I can compare the texture to Is an eraser. A slab of Cosclay this
thick isn't flexible per say, but it's got some bounce to it. The piece felt like it
was holding up well, but after a few tries, I was able to break it in half. Lastly came Cernit. It's similar to Kato and
Fimo professional. This piece felt like a rock in my hand and I was unable to do any damage because I wasn't able to break most
of the thick pieces. I decided to see how easily I could cut them with a blade. And I started with
Fimo professional. It was taking some time and I wasn't getting very
far through the piece, even though I was applying
as much pressure as I could, I left it and I moved
onto Fimo Soft. And I was able to cut into this much easier than
Fimo professional. Kato was similar
to professional, and although I was putting a
lot of pressure on my knife, it just wasn't going through
the piece all that much. Premo was fairly
easy to cut through, at least in comparison
to the others. It was slightly easier to
slice than the Fimo Soft. Then I tested Cernit. The Clay felt Firm and I had to press really
hard on the knife, but I was eventually
able to cut through it. And the piece I broke
off all at once. Unlike the Fimo
Soft and Premo, which also had a little
shavings or crumbly pieces. Based on my tests, Here's how I would rank
the Clay Brands in terms of overall
strength after baking. Kato polymer clay
is in first place. In a very close second, I put Fimo professional. Honestly, I might even
say that Kato and Fimo professional tie because they felt almost identical. In third place. Fourth place goes
to Fimo Soft. Fifth place goes to Sculpey. Premo, Cosclay comes
in sixth place. And finally in last place, I put Sculpey three. When picking
the brand you want to use. Please keep in mind that I am intentionally breaking
the Clay in these tests. And just because I was
able to eventually damage most Brands doesn't
mean that they won't hold up well
when used as a charm. The purpose of these tests is
to measure the strength of the clay by applying as
much force as possible. However, in daily use, the clay will not experience
this level of stress. And even the lower ranked Brands can be the perfect
choice for you. I'm about to get into what
brand of Clay you should buy. But first, let's quickly
discuss vegan polymer clay
5. Vegan Clay: At the time of filming
this video in 2023, Cosclay and Cernit. claim that their
products are vegan. Fimo and Sculpey
clays are not vegan. I'd like to point out that
many of these Clay Brands have changed their
formulas before and they may do so again
in the future. Also, questions have
been raised as to whether some of these Brands
are actually fully vegan. So if non vegan Clay is
a deal breaker for you, I'd recommend doing your own
research before purchasing just to be sure that you are actually getting
a vegan product.
6. How to Pick the Right Clay: With all of these different
Polymer Clay Brands and sub-brands, you may be wondering
which one you should use. I'm going to get into the brands that I use in just a moment. But first here are
my recommendations. If you are a charm maker, a Miniaturist or a
beginner, Sculpey Premo or Fimo Soft
should be a good choice. These Brands are pretty easy
to manipulate and shape, which makes them ideal for professional clay artists and those who are new to
working with polymer clay. They also hold detail well and they are durable
after baking. When making Jewelry and beads, it's important to choose a durable clay that can
withstand wear and tear. For best results, consider using Fimo professional, Kato, or
Cernit it as they are known, a further strength and
resistance to breakage. That being said,
Premo and Fimo Soft can also work
well for this. If you want to work
on large sculptures, Kato might be for you. This Brand is known
for its ability to hold fine details
and shapes well, which makes it a
great choice for larger and more
intricate sculptures. It's also one of the most durable polymer
clay Brands on the market. And it can handle
more weight and pressure without
breaking or cracking. As for kids, the brand you buy will mainly
depend on their age. For young children, you can buy Sculpey three or Fimo Kids, which basically just an even softer version of Fimo Soft. These two Brands
are really pliable, which makes them easy for
a little kid to work with. Kids who are a bit older, should be able to use a
Fimo Soft and Premo. But if those two
Brands feel to Firm, you could look into
Sculpey souffle. Sculpey souffle has
a consistency that is in-between Sculpey Primo
and Sculpey three. So it softer than Premo, but it is much
more durable after baking than Sculpey Three. Those are the brands
that I feel will work the best for
specific artists. But it is important to
note that there are many brands of polymer
clay available, and each one has its own unique qualities
and characteristics. Ultimately, the best Brand
for you will depend on your personal preferences and the type of project
you're working on. Everybody is going to
have a different brand that they feel the
most comfortable with. And the best way to
figure out what works for you is to actually try
out different Brands. If you can buy one block
of polymer clay from each brand that
you're intrigued by so that you can get
a feel for each one. It can also be helpful to see firsthand how they
compare one spake. As for my personal experience, I mainly create
Miniature food and after testing out different Brands
of Clay over the years, I've found that Fimo
Soft and Sculpey Premo work the best for me and I
use both on a daily basis. Almost every single
piece I Sculpt will be made out of one
of these two brands. I also keep around a few
different Sculpey three colors. And I have two main reasons
for buying this Clay. The first is that it comes in some really beautiful
colors that Premo and Fimo don't have. And the second reason is that I prefer to
use it when making fake frosting and icing because
Sculpey three is so soft, it's so much easier and quicker
to mix with liquid clay. So it saves me time and effort
7. Tools + Supplies: The absolute minimum needed for Polymer Clay Sculpting is
polymer clay and an oven. You do not need tools and extra materials to
start sculpting, but they can come in handy. Here are some basic
materials and supplies that I
use when I Sculpt. The first is a craft knife. This is my most essential tool and I use it every
time I work with Clay. You can also get
longer craft blades, which are helpful for cutting
clay on a larger scale. Both of these blades
can be very sharp, so you can always start out with a plastic knife if that
makes you more comfortable. Needle tools are another
thing that I use a lot. Needle tools can be used
for a variety of tasks, like poking holes in Clay, attaching small details, and
creating or carving designs. I mainly use them to
create texture on my bread and cake
terms by gently swirling the needle on
the surface of the clay. If you don't have a needle tool, you can use a toothpick
or a sewing pin instead. And they can produce
similar results. Is liquid polymer clay. Just like the name states, this product is a
liquid version of Clay and it needs to
be baked to cure. This material can
be used on its own, but it is more commonly used in conjunction
with polymer clay. Liquid clay can be used as glue when building
onto sculptures. And it can be used when you need your clay to be a
thinner consistency, like if you're making Clay frosting or if you want
to mimic melted butter. The brand I use most often is
translucent liquid Sculpey. TLS (translucent liquid Sculpey) looks white straight
out of the bottle, but it bakes translucent. Most brands sell clear or
translucent liquid Clay. And that is the color that I
find to be the most helpful. But liquid clay is also
sold in different colors. The other brands of
liquid clay that I use is Fimo liquid. Fimo liquid looks translucent
before and after baking, which can be really helpful. However, it can be
difficult to find. If you've live in
the United States, you probably won't be able
to find it in craft stores. I've also heard
rumors that it was discontinued and I can't get an official
confirmation for that, so I'm not sure if it's true, but either way you can still get a bottle if you buy one online. I purchased this one on Amazon, and I've also seen bottles
sold on Etsy and eBay. Another common tool is a Clay roller or an
acrylic rollers. These work just like
rolling pins, but smaller. It's straightforward and
you know how these work, but it's an important
tool for me to mention. You can also use them when conditioning your Clay
before sculpting. These are the tools and
materials that I consider basic, no matter what kind of
sculpting you plan to do, but additional materials
can be helpful. So here are some extra
tools and Supplies. The first is chalk pastels. Chalk pastels can
be brushed onto clay for a pop of color. And my favorite thing
to do with them is give Miniature
food, a baked look. To brush these onto Clay, I use a paintbrush or I'll use this inexpensive eye
shadow brush that I have. If you don't have chalk pastels, eye shadow is a
good alternative. Just make sure not to waste
any expensive makeup on this. There are many different
things that you can use to create quick texture. A paintbrush with
hard bristles or even a new clean
toothbrush can be used to create slightly
bumpy texture. I use this technique for the
majority of my food charm. Rough sandpaper will produce a similar pattern and it can be helpful for preserving texture while you work on
the opposite side. Another great way to
create texture is to take a piece of aluminum foil and
compress it into a ball, then roll this ball
over your clay. To me, this texture imitates natural
imperfections on food. And I like using it for things like Clay, cookies, and pizza. These are dotting tools. They come in different sizes and they can serve
many purposes. I like to use them
to create holes, texture, and find
smooth detailing. Blending tools are flexible
and made of silicone. They can be used to smooth out layers and create
extra structure. Another tool that helps me out
a ton is my pasta machine. Pasta machines can be used to
flatten and Condition Clay. They have multiple
thickness settings and you can count on them too quickly and
uniformly flatten your clay. This is a regular pasta machine, but I took the fenders off of it because my Clay kept
getting caught on them. And it's also much easier
to clean this way. In craft stores, you can
find Clay roller machines, which are the same thing, just more expensive and
typically lower-quality. I'd recommend avoiding them. And lastly, you can
get Clay cutters, cookie cutters,
and frosting tips. These can be used to get
perfect identical shapes, or they can be used to quickly replicate elements of real food
8. Don’t Know What Supplies to Start Out With?: All of that information
can be a bit overwhelming. So if you can't decide what type of Clay and
Supplies to get, here's what I recommend. Starting with Clay, I'd recommend
getting a sampler pack. Most Clay Brands sell them
and they aren't too pricey. Plus, you get to try
out a bunch of colors. This way you don't
have to buy a ton of individual blocks
of clay and you aren't getting so
much that you have to be committed to the
brand you're trying. You can buy a sampler pack from each Brand
you're interested in and test them out to see
which works best for you. If you don't want
to do all of that, you can also just buy
regular blocks of clay in the primary colors
and in black and white. Then you can mix more
colors using them. As for tools that
really depends on your Sculpting method and what kind of sculpting
you want to do. But if you really can't
decide what to get, all I'd recommend for now is
some kind of craft knife. And even that isn't
actually necessary. You can totally just Sculpt with your hands and
literally nothing else. As you progress through
your Sculpting journey, you'll come to realize
what kinds of tools would be helpful for your
unique process.
9. What to Sculpt On: Polymer Clay can stick
to some materials so you don't want to Sculpt
On just any surface. Ideally, you'll want
to work on something flat, smooth, and glossy. The first and most
easily available option is wax paper or parchment paper. They're inexpensive
and they can be disposed after every use, so you don't have to
worry as much about Dust. This is what I used
for many years when I first started working
with polymer clay. You can also use a polymer
clay mat or a silicone mat. These mats are non-stick, non slip and heat resistant. So you can put the whole
mat on a baking sheet and stick it in the oven when
you're ready to bake your Clay. Another option is to use a
piece of tempered glass. This is the surface that
I used the longest. It's solid and smooth, which makes it a
great choice for sculpting and liquid clay work. And it's pretty
easy to clean off. The main downside to this is that they can scratch easily, which can cause lines
and divots in your Clay. Also, please make sure that you are buying tempered glass. Tempered glass is stronger than regular glass and if it breaks, the pieces aren't
sharp and dangerous. I have a few pieces of glass that are all from
the same Brand, and I foolishly purchased
a new one last year, assuming that it
was also tempered, a shard of glass
ended up breaking off and slicing my
hand kinda bad. So please make sure to not
make that same mistake. After that glass incident, I was pretty traumatized, so I switched to ceramic tiles and it is now my new favorite
Out of all the options. Tiles are just a smooth and
easy to clean as glass, but they are sturdy, durable, and they do not scratch easily. As a bonus, they can
withstand high temperatures. So just like the mats, they can be placed in the oven. I use these small tiles, but they come in various sizes. Just make sure to
avoid tiles with a rough surface or design as they can leave
marks on your Clay
10. Where to Buy Clay & Supplies: There are many
places where you can buy Polymer Clay and Supplies. The first and most
common place to find Clay is in craft stores. Most craft stores carry various
brands of Clay and have an entire section dedicated
to polymer clay and tools. Michaels and Joann
fabrics are to craft stores that I can
always find polymer clay and you can also get supplies online through sites like Amazon and Etsy or directly through manufacturers websites
such as Sculpey. Though not all brands sell
on their own website. I've even seen polymer
clay in Walmart before, which can also be a
really good option.
11. How to Condition Clay: Some Clay Brands are softer Out of the
package than others. But regardless, all polymer clay needs to be conditioned
before use. Simply put, conditioning is
basically needing and warming up the clay so that it becomes more pliable and ready for use. Polymer clay is
essentially a mixture of PVC particles and a
liquid plasticizer. Conditioning helps to mix
these ingredients more evenly and create a
consistent texture. Conditioning also
removes air bubbles. Polymer clay can
sometimes contain air bubbles and you
can always see them. If you don't Condition the Clay, these air bubbles can create uneven textures or cause the
clay to crack during baking. To Condition polymer clay, flatten it out, then folded
in half and flatten. Again. You can use only
your hands for this or you can also use a roller
to make the job easier. Keep flattening and folding the clay until it becomes
easy to work with. You can also roll it
out into a snake and squish it around in-between your fingers until it softens. A pasta machine can also
be used to Condition Clay. This is especially helpful if you're working
with large amounts of clay or if conditioning puts too much strain
on your hands. To Condition Clay
with a pasta machine. Start by using your
hands or a roller to flatten your clay to about a quarter of an
inch in thickness. Then roll the flattened Clay through the widest setting
on your pasta machine. Fold the Clay and half
and place it through the pasta machine again with
the folded edge going in. First. Doing this will help prevent any
additional air bubbles. Repeat this step a few
more times until the Clay becomes softer. If you'd like. You can also gradually reduce
the width of the rollers on the pasta machine
and put the clay through each setting
several times. Keep rolling and
folding the clay until it becomes
smooth and elastic
12. Fixing Firm Clay: If your clay is too
firm or crumbly, it will be far too difficult
to condition it normally. Here are a few ways to
fix firm polymer clay. The first method involves oil. And for this, you can
use clay softener, baby oil, or mineral oil. I personally use baby
oil because it's inexpensive and always
available in stores. Start by chopping your
clay up into small pieces. This will help make the
distribution process quicker and more effective. At a few drops of your oil or softener and start
kneading the clay. It's easy to add too much oil. So don't add more unless
the clay isn't coming together yet or if it still isn't as soft as
you need it to be. Eventually your clay will become a good sculpting consistency
and you can now use it. The second method uses water. Water isn't considered
as effective as oil, but it can be used as well. To do this, follow the
same steps as before. Make sure to use
very little water because you can always add
more in a tiny amount, is enough to soften
the clay too much, we'll make it sticky and
difficult to sculpt with. The last method
uses liquid clay. Follow the exact same
steps here as well. The only difference is
that you can be a bit more liberal when
adding the liquid clay. You still want to be
wary of adding too much, but you'll need a
larger amount than you would with the
oil and water. When softening firm clay, your hands may get really messy, especially if
you're working with a substantial amount of
clay like I am here, I highly recommend wearing
disposable gloves for this because it can be difficult
to wash this off your hands. After any of these methods, your clay will be
ready to sculpt with, but you can also store
it for future use. And all you'll have to
do then is conditioned it just like you would
with any regular clay
13. Fixing Soft Clay: Just like crumbly Clay, If you're a Clay is too Soft, Sculpting can be challenging. Here are a few things you
can do to Firm it up. The first thing you can
do is stick your clay in the fridge or freezer
for a few minutes. Cooling the clay down will make it much easier
to work with. However, this is a short-term
solution and the Clay will warm up in your hands and become Soft again, fairly quick. If you want a
long-term solution, you can leach your Clay. Leaching is a process
that extracts excess plasticizers or
oils from the clay. To do this, take two pieces of printer paper and sandwich
the clay in-between them. Make sure to use white printer
paper for this as the ink from lined paper and colored paper can
transfer onto your clay. Roll it out as flat as you can, then leave the clay to sit for a few hours or
preferably overnight. You can even play
something heavy, like a book on top of it to make the process
go by quicker. A bunch of those extra
liquids will soak into the paper and your clay will
be much easier to work with. The only downside is that
leaching it can impact the texture of the
clay and it may be dryer or chalkier than normal, but it's still much easier to sculpt with than soft clay. Lastly, you can combine
your soft clay with some stiffer clay. If you want the color
to remain the same, use translucent clay for this. The firmer translucent clay will help the texture become
easier to work with. And as long as you don't add very large amounts
of translucent, the color will stay the same. Though it will likely look
lighter before baking. Add as much translucent clay as needed to achieve your
desired consistency, but avoid adding more
than your main Soft Clay. Adding too much may result in a less opaque color than normal
14. Ways to Color Clay: Polymer Clay is available
in all sorts of colors, but you can always just by
white Clay and mix your own. Here are a few ways to do that. One way you can Color Clay
is with chalk pastels. Oil pastels, and chalk
pastels often get confused and they react
differently with Clay. So make sure you're using chalk. Now, there are two
methods you can use to Color Clay
with chalk pastels. The first is to shave
your pastels down into a powder and combine
it with your Clay. These colors tend
to come out pale, so you may need to add a lot of the pastel to get
a stronger color. The biggest advantage
to this method is that afterwards you can Sculpt
with the Clay like normal. The second thing you can
do with chalk pastels is brushed them on
top of your clay. You can do this by brushing your paintbrush on
the pastel first, then onto your clay. Or to get a more
saturated color, you can shave the pastel down, then brush it on top. Brushing the pastels, as
opposed to mixing them in, will achieve a stronger color. And you don't have to
use as much chalk. But your piece
needs to be glazed after baking to
seal in the chalk. And depending on
what your sculpting, it may be difficult to
get a seamless look because you'll have to Sculpt
first, then add color. Acrylic paint is another thing
you can use to Color Clay. And just like with
chalk pastels, you can either mix
paint into your clay or you can paint in the
Clay. After baking. Mixing paint can work well, but it can possibly create
air bubbles that you likely won't notice until
after the clay bakes. And you can see how lumpy my
piece looks out of the oven. That being said, this
won't always happen and extra conditioning
could help prevent this. When it comes to painting
your Clay after baking, you'll likely need a few coats to achieve a spotless Color. And again, this will need to be glazed to protect the
paint from chipping. And lastly, you can add color to your Clay with alcohol inks. To do this, mix, a few drops of ink in with
your polymer clay. You may want to wear
gloves while doing this so that your hands
don't get status. Just for comparison. Here's how all of the different
methods and look together
15. Molds: If you create a lot of repeat
charms or charms that have a similar base, molds will save you so
much Sculpting time. You can purchase ready molds for polymer clay on sites
like Etsy and Amazon. But I've made almost every
single Clay mold that I have and I use easymold
putty to make them. This mold maker is
very simple to use. It dries pretty quick and the molds pickup
detail very well. The finished molds
are also oven safe, so the clay can be baked
directly inside of them. And you any kind of silicone
mold maker for clay. It doesn't have
to be this brand. If you want to learn how to
make your own custom molds. I have a course
here on Skillshare, all about how to make
different types of molds for both Polymer Clay
and resin. I also mentioned non
silicone options that you can use if you don't
have access to silicone
16. Removing Dust: Dust is inevitable and it can be a serious problem
when sculpting. But here are some ways
to minimize its impact. Firstly, you can prevent Dust by washing your hands before
you start sculpting. And it also helps to keep a bottle of hand
sanitizer near so that you can make sure
your hands are as clean as possible while working. Especially if you're alternating between colors or projects. Make sure that your
work surface and tools are all clean as well
by wiping them down. I also like to keep some
scrap Clay by while I work because it easily picks up
Dust and little bits of Clay. Another thing you can do is get an air purifier and have
that near your surface. Air purifiers filter the air and they can minimize a lot
of that pesky does. Even while following
all of these tips, some Dust may still get
into your clay if it does, the easiest way
to remove it from your unbaked Clay is to take a Q-tip and dip it
in a little bit of rubbing alcohol or acetone, then rub this over the
dust on your Clay. This will also help
remove any fingerprints. Ideally, you want to
do this before you add any texture or shading because the alcohol
can remove that stuff. I know this may sound
dangerous because alcohol is flammable and the Clay will
eventually go in the oven. But don't worry,
this is completely safe and it will
not start a fire. You don't want to be drown in your clay in rubbing alcohol. Instead, you just want to use enough to get the imperfections
out of your piece. Within a few seconds or minutes, the alcohol will evaporate and your Clay won't
look wet or shiny. At this point, it's safe
to put in the oven. If you've already
baked your Clay and there are some dust
or fingerprints on the surface to take a piece of fine sandpaper and file
where the dust is. This won't work for texture
charms or shaded pieces, but it will work really
great for smooth charms, especially if you add
glaze after sanding. Instead of glazing,
you can also go over a standard charm with
polishing paper. Polishing paper works similar
to sandpaper, only finer. To polish the Clay, Start with the most coarse paper and gradually work your
way up to the finer grids. Work in circular
motions and keep light pressure so that you
don't damage the clay surface. Once you've gone
through every grit, your Clay will have a beautiful polished finish
and it will feel super smooth
17. Findings: Findings are essentially
the parts and pieces that make up
a piece of jewelry. If you're interested in using polymer clay to make Jewelry, there are many
Jewelry findings that can be used to finish
off your pieces. Before we get into it, I want to quickly talk
about jewelry pliers. Jewelry pliers are
specialized pliers designed for use
in making Jewelry. These will be vital for cutting and putting together
different findings. And you'll need them for
many of the processes. I'm about to describe. The first step in turning a
Clay piece into Jewelry is to add an eye pin head
pin or eye screw. All three are made of
metal so they can be placed in your Clay
before baking. eye pins are the most popular
option because they are small and they already
come with a wire loop, which other findings can
easily be attached to. Because eye pins are smooth, they don't really
stick to the clay. So if you just poke
one into your charms, it will easily come
out after baking. To prevent this, I like to
cut my eye pins shorter and then bend the end of
the pin with my pliers. This will help hold
the eye pin in the Clay. As an extra step. Once the eye pin is
in your sculpture, you can place some clay on
the inside of the loop, right where it touches
your sculpture. Or if you're making
something with liquid clay, like Clay frosting, you can use some of it to
fill that tiny gap. Doing this will help
add extra structure. head pins, on the other hand have a flat metal edge on one side. This secures the
pin to the Clay. However, it means
that you have to create your own loop
on the other end, both to fully hold
the pin in place on your charm and so that it can be connected to other findings. You'll want to poke the head pin through the Clay before baking, but don't bend it
until it has baked. Once your piece has
fully baked and cooled, you can create a loop, cut the pin down to
a manageable size, and use some needle nose pliers to curl the pin into a loop. The third option is
to use an eye screw eye screws are a bit thicker
than eye pins and head pins, and their loop is
usually a bit larger. They're pretty
straightforward to use. All you have to do is screw it into the Clay before baking. After baking, you could
leave it the way it is. It's pretty sturdy, but if
someone were to unscrew it, it will come out. What I recommend doing is
to unscrew it after baking, put a little bit of superglue on it and screw it back
into your charm. The next step in making
Jewelry involves jump rings. Jump rings are small metal
rings that are used to connect different parts of a
piece of jewelry together. They come in various
sizes and metal finishes. To open and close jump rings, pulled them with two
pliers and twist one side away from you while twisting
the other one towards you. You can use jump rings to attach your charm to
anything you want. But I do want to point
out another helpful finding I love to use
alongside jump rings, and that is lobster clasps. Attaching a Clay piece
to a lobster clasp can make it super easy to clip the charm onto key chains, necklaces, and even Earrings. They come in many sizes, but I love these
really small ones. If you want to make Earrings, here's how you can do that. For dangly
earrings, just follow the instructions listed before for using jump rings and attach them to your
Earrings hooks. As for stud Earrings, you can buy earring posts in different sizes depending on
the size of your Clay piece. Because the metal is smooth, we need to prep the
Earrings before we can attach our Clay to do this, sandpaper to scratch up the
flat part of the posts. You can also use a craft
knife to scratch the metal, but be careful to not
accidentally hurt yourself. Now, we're going to work
on the clay portion. Make sure your
piece is baked and completely finished before
you start this step. Using your knife, gently score a few lines on the back
of your Clay piece. This is the side that will
be attached to the Earrings. Lastly, use some superglue or E6000 to attach the
clay to the earring posts. The scored lines on the
metal and the Clay will create a textured surface
for the glute to grip onto. And it will help
the Clay adhere to the metal posts so that
once the glue has dried, you don't have to worry about
the Clay piece falling off
18. Baking Clay: Once you've finished Sculpting, you'll want to
harden your piece. Let's talk about what to
bake Clay on temperatures and times and what to
bake polymer clay in. You can bake your
Clay on any sort of oven safe dish, sheet or tin. Some popular options
include baking pans, ceramic tiles, and
Clay baking cushions. Though, you may want
to make your decision based on the look
you're going for as the side of your clay
that touches the pan will look different depending
on what it's baked on. So Clay can be placed
directly on the baking pans, but it tends to stick and you'll get a much
better results if you line the pan with aluminum
foil or parchment paper. If you use parchment paper, the parts of the clay
that touch the paper will bake with no
obvious distinctions. As you can see, the back of
this piece looks the front, which wasn't touching the paper. However, when using
aluminum foil, the side of the clay that
touches the foil during baking will have a shiny finish. Similar to aluminum
foil clay that touches a ceramic surface while baking
will be smooth and shiny. The next choice won't
work for everyone, but you can use a
baking cushion. I got this one in a
Sculpey bead making kit, and it's made of a
soft cotton material. Baking cushions are
designed for use with rounder shapes
such as beads. But it can be used
for any project that requires a
non-flat surface. Placing round Clay on a flat surface can
create a flat spot. These, On the other hand, don't impact the shape
of the Clay as much. Because cushions
are compatible with round pieces baking
flat or 2D shapes on a cushion will cause the clay to become misshapen or uneven. So you definitely can't
bake just anything on them. I bake the majority of my Clay
charms on parchment paper. But if I want them to
be shiny on the back or if I'm planning to
glaze them anyways, then I'll use aluminum
foil or a ceramic tile. Then every once in
awhile when I'm making a really delicate
or round charm, I will bake it on a cushion. Now, let's discuss
temperatures and times. All Clay Brands will have their baking times and temperatures written
on the package. Make sure to preheat your
oven before putting the Clay in and make sure that you
follow the correct temperature. Most ovens have
temperature increments. So if you can't set your oven to the exact temperature
required for the Clay, choose the closest temperature possible below the
recommended temperature. For example, Cernit can
be baked at temperatures as high as 266 degrees Fahrenheit. My oven goes by
increments of five, so I would set it to
265 degrees Fahrenheit. As for times, you want to follow the directions
provided by the brand. But as long as your
temperature is correct, you don't have to worry too much about baking the
Clay for too long. In my experience, the only
time I've encountered issues with Clay burning is when I
set the temperature too high. The first Clay charm I
ever made burnt to a crisp because I didn't read the baking temperatures
for my Clay. I had it up too high and it Scorched the Clay within
a matter of minutes, even a couple of degrees higher
will discolor your Clay. These are two pieces
made with Fimo Clay. The one on the left, I baked at the recommended
temperature of 230 degrees, and the one on the right
was accidentally baked at 275 degrees Fahrenheit. Burning or discoloration
because of over baking has never
been a problem for me. I once accidentally
forgot a couple of small clay pieces in the
oven for nearly 2 h. I know that's reckless. Do not do that, but
none of the pieces burned or looked
discolored in any way. Also, I actually bake terms longer than the
required time because I usually Pre-baking
and Re-baking Clay multiple times during
my sculpting process. Pre-baking and Re-baking are really helpful for
Sculpting intricate pieces. And I'm going to
explain how they work in one of the
upcoming lessons. First, let's finish up what you need to know about baking. Polymer clay is meant
to be baked in an oven. You can use the same oven
that you use for food. Just make sure to
never have food and clay in the oven
at the same time. Some people prefer to
use toaster ovens when baking Clay because they're separate from the ones
you use for food, and they typically use less electricity than
a full-sized oven. However, toaster ovens aren't always accurate
with temperature. So if you choose to use one, you may want to get an oven
thermometer just to make sure that your clay is
baking, right temperature. Polymer clay has a slight smell when baking that
you might notice. It isn't dangerous
to breathe this end and most people won't
be bothered by it. But if you are
sensitive to smell, you might want to open a
window for ventilation. Once baked polymer clay
cools down and airs out, there will be no smell. Kato is the only Clay
I've ever noticed to have a lingering
smell days after baking, but it will eventually
go away as well.
19. Mixing Brands: Mixing different Brands of polymer clay may be challenging, but it is possible
to do successfully. In order to test this, I conducted two experiments. For the first, I
mixed equal amounts of Fimo Soft and Sculpey Premo. These two have different
baking temperatures. So I baked one piece of
this mixture at Fimo's recommended temperature of
230 degrees Fahrenheit. And I baked the other
one at Sculpey's temperature of 275
degrees Fahrenheit. As expected, the one baked
at a higher temperature. It looks slightly darker in color in comparison
to the other, but the difference
isn't that noticeable. I did a bend test
for both by applying a decent amount of pressure with my hands and they
both held up well, I don't believe
the difference in temperature impacted
strength here. For the second test, I want it to mix two different Brands that
bake at the same temperature. I mixed equal parts of Premo
and Cosclay because they both bake at 275 degrees Fahrenheit for the
same amount of time. After baking, I tested the structural
integrity of the piece, just like I did before. The piece had some
flexibility to it, probably from the Cosclay, but that didn't last long and the piece ended up
breaking very easily. Cosclay isn't as
strong as Premo. And combining them didn't
make for a sturdy clay. So just because to Brands bake at the same temperatures and times doesn't mean mixing them will necessarily be a good idea. Overall, I would say
that it's fine to Brands together as long as one isn't significantly
weaker than the other. If you aren't worried about
a slight change in color, then choose a temperature
that is in the middle of the recommended baking
temperatures for both brands. If you don't want the
color to be altered than follow the lower
baking temperature. And no matter what
Brands you use, you may want to test
a small amount of the mixture before using
it for a larger project, just to make sure that
the two brands of Clay are compatible
and do not cause any issues such as cracking
or other structural problems.
20. Pre-baking + Re-baking: Because polymer clay
doesn't really burn, you have the option to Pre-bake and Re-bake
while you work. Pre-baking is when you
bake your Clay for a short period of time so that
it isn't workable anymore, but still not baked
all the way through. The Clay will be hard enough
that you can hold it. And this way you can build onto it without
having to worry about smashing or destroying anything that you've already sculpted. Re-baking is when
you bake the Clay again after it has
already been baked. And you can do this as
many times as you need, so long as you bake the Clay at it's recommended temperature. I Pre-bake and Re-bake
pretty much every time I Sculpt because it makes the
process so much easier, especially if I'm layering
and creating texture. When using an oven, Pre-baking times will depend
on the size of your pieces. Most of my charms are
pretty small and the biggest I make are
about 1 " in length. And I Pre-bake and
re-bake everything that size or smaller
for ten to 15 min. You can also semi bake
your clay with a heat gun so that you don't have to keep turning your oven on and off. If you've never
heard of a heat gun, you can think of it as
a really hot hairdryer. You'll want to be careful
when using one around your charts because they get hot enough to scorch the Clay. For example, mine
blows out air that is 662 degrees Fahrenheit. So you'll want to keep it a
few inches away from the Clay and constantly keep it
moving in circular motions. The heat can also
impact surfaces underneath and around your clay. So place your sculpture
on a ceramic tile, silicone mat or
some other surface that won't be
impacted by the heat. If your clay is moving
around due to the air, you can use a needle tool or
pliers to hold it in place. Make sure not to
use your fingers or anything that can't
withstand the heat. Pre-baking and Re-baking
with a heat gun, we'll take a few minutes to do. And it won't be as solid
as when you use an oven, but it gets the
job done. For me. Pre-baking with a heat gun
usually takes 7-10 min, but I just keep heating the clay until it starts to look matte. Raw polymer clay has a slight sheen to it that
goes away when baking. So when the clay
starts to appear dull, you can assume that the
surface has baked enough. After that, let it cool, then lightly tap it to check if it's hard
enough to work with. If it isn't, you can heat it
up for a few more minutes. Once you've finished
working on your sculpture, you can ignore anytime it has already spent in the oven and bake it following the
official directions listed on your Clay. This ensures that it bakes
all the way through. When Pre-baking and Re-baking, your Clay may look a bit weird, especially if you're
working with a color that has translucent
mixed into it. Many colors look different
before and after baking. And because the piece hasn't
baked all the way through, it could look off. That being said, once you bake your piece completely
for the final time, the color should look normal
21. Glaze/Varnish: If you want to protect
your clay pieces, seal in chalk pastel
shading and paint, or give your artwork a
more professional look. Glaze and varnish are a
great way to do that. Here are a few
different types that you can use for your sculptures. The first is Matte glaze. Matte glaze is a type
of varnish that gives a flat or non-reflective
finished to the polymer clay, depending on the brand you use, it can look almost identical
to and glazed clay, which can be great if you
need to varnish a piece, but don't want it to
look any different. The next is satin glaze. Satin glaze has a Soft, semi glossy finish that
provides a subtle shine. This is my favorite
kind of glaze to use for food charms because it helps give them
some life without looking too much like plastic. Another popular option
is gloss glaze. Gloss glaze provides a
shiny reflective finish to your polymer clay pieces. It can also enhance
colors and details. The next choice is UV resin. Uv resin is a type of resin that hardens when exposed
to UV light. It's a popular choice
for sealing and protecting Polymer Clay
Jewelry as it creates a clear, durable coating that's resistant
to scratches and drops. It's perfect for when you want a glossy coating that will also provide a lot
of protection. Similarly, you can
also use epoxy. Epoxy is a two-part resin that
hardens when the two parts are mixed together and then left for a day or two to harden. Epoxy and UV resin are almost exactly the same other than
the way that they cure. Because epoxy takes much
more time to harden, it isn't as popular
for Clay as UV resin, but they produce
similar results. If you're interested in learning about UV resin and epoxy, as well as how to use them. I have an entire course all about that, that
you can check out
22. Storing Clay: Storing polymer clay
properly is important to prevent it from getting
dirty or becoming too hard. I typically leave open Clay in its original
packaging as long as the plastic wrapping
is still intact. But for colors that I've mixed or clay that I've used, most of. I transfer them to
small Ziploc bags or plastic containers. I really like using these disposable condiment
containers because the clay doesn't stick to them and I can reuse them
for different colors. If you live in a dry climate, you may notice that
your polymer clay dries out easily to prevent
this from happening, It's a good idea to
store your Clay in an airtight container
such as a Tupperware. This will help to retain the moisture and keep
the Clay pliable. Even if you don't
live somewhere dry, storing your Clay in an airtight container can be
a good precaution to take. Also, if you have young
children or pets, makes sure that your
clay is stored away and that you don't
have it lying around. Polymer clay is non-toxic,
but if ingested, it may cause an upset stomach, and it can be a choking hazard
23. Scrap Clay: When working with polymer clay, it's common to end up with leftover scraps that are too
small to use on their own. These scraps can be
frustrating to work with, but don't throw them away. Instead, every time
you end up with scrap, store them in a
plastic bag because there are several things
you can use them for. As mentioned earlier, you
can use these scraps to keep your hands and work
surface free from Dust. You can also use it to
get bits of clay off your hands when you're working
with different colors. Another thing I
love to do is use scrap Clay to make the original pieces
for my custom molds. Because I only use these
pieces to make molds. They don't need to be
visually appealing. And using scrap Clay for your molds means that you
don't have to worry about wasting your good clay in case the mold making
process goes wrong. Plus you save your
high-quality Clay for the final product. You can also use scrap Clay as a hidden base for the
bulk of your piece, then you can cover it with
a layer of regular clay. For example, these
cakes are made of scrap clay that I covered
with Clay frosting. It would be wasteful to use normal clay because
it won't show anyway. Or if you're scrap
Clay is free of dust. You can marble colors
together or with fresh Clay and use them
to create unique pieces.
24. Not Sure Where to Start: It might take some time to discover your own
personal Art style. If you're completely new
to Polymer Clay Sculpting, it's normal to feel overwhelmed and unsure where to start. I'd recommend starting
by making things you like or feel inspired by. This can be animals, food characters, literally
anything you want. It can take time to get
comfortable and confident with polymer clay and you'll enjoy the process much more if you
like what you're sculpting. You can also get all
sorts of ideas by looking at polymer clay
sculptures made by others. You can find these through Google Images and social media, but in my opinion, the best place to find
inspiration is Pinterest. Another good thing to do when you don't know
where to start is to work on easiest
sculptures and charms. Things that aren't too intricate or don't involve
too many details. Starting simple will help
build up your skill level and it will help you get an idea of what you prefer to Sculpt. If you want some easy
Sculpting practice, you can follow along
with the class projects
25. Brownie Project: We're going to work
on to class projects. One realistic food charm and one semi-realistic kawaii charm. I'll be mentioning
the exact colors and brands of clay
that I'm using. But you can follow along with any clay that you
have or want to use. Our first project is
the realistic charm. If you're interested in
creating Miniature food, brownies can be one of the
easiest places to start. To make a polymer clay brownie. You will need black and
brown clay, liquid Clay, a craft knife, and a needle
tool, pen or toothpick. Some optional materials are something to roll the
Clay Out With sandpaper, findings and glaze or varnish. For starters, we're going
to create the brownie color by mixing black and
brown clay together. If you want a fudgy
colored brownie, mix, one part black and
one part Brown. If you want a cakier and
lighter colored brownie, mix one part black and
two parts brown. I always go for the
fudgier look and I used one part black Premo
and one part Sculpey, three in the color chocolate. Once the Clay is mixed
all the way through, either flatten it a bit with your finger or use
something to roll it out. Use a craft knife to
cut out a square. And if you want to turn
this into a charm, you can now add an
eye pin or head pin. We're now going to
start adding texture. So if you have some sandpaper, you can place your
clay on top of it. This will help add texture to
the bottom of the brownie. If you don't have sandpaper or just don't want to
texture the bottom. You can skip this step
with a needle tool, lightly touch the surface of the Clay in circular motions. This will give the Clay
a crumbly appearance. You want to do this
on every side. I combined some more brown clay with a bit of that
leftover brownie color, and then I added some liquid
clay and mix them together. If the mixture is too thick, you can add more liquid clay. And if it looks too thin, you can add some
more polymer clay. You want to keep
mixing until there are no more lumps and it
resembles frosting. Now, gently frost the
top of the brownie. I like to spread the Clay frosting all the
way to the edges. Then I take my needle
tool and lightly draw a few diagonal
lines over the top. If you use sandpaper, now is the time to remove it from the bottom
of the brownie. You can carefully
bend the sandpaper and this will help the
Clay come off easier. Now, bake your Clay according to the instructions
on its packaging, I baked mine at 275
degrees for half an hour. After it had fully cooled down, I used satin glaze to coat the brownie
and the frosting. This step is solely for looks. So you can use any glaze you
want or no glaze at all. And lastly, once that has dried, you can add the findings
of your choosing. And now you're charm
is ready to be used
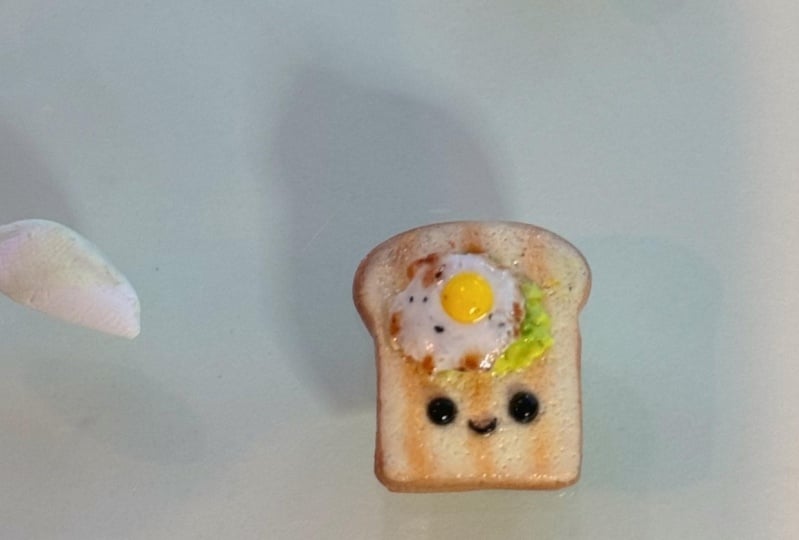
26. Kawaii Toast Project: For this next project, we're going to make a
kawaii avocado toast charm. Kawaii is a Japanese word
that basically means "cute" And these charms usually
have faces on them. I like to add some
realistic elements to my kawaii charms, but most people don't. So if you'd like a softer look, you can skip the
texturing steps. And if you don't want
to make a kawaii charm, you can still follow along by skipping the face altogether. For this project, you will
need white, yellow, green, and black Clay, chalk pastels, liquid clay, and a paintbrush. Optional materials include
translucent clay, sandpaper, find black glitter, glaze, Magic tape, and findings. For the bread, I mixed
one part white with a slightly less amount of translucent and a small
ball of yellow Clay. Translucent clay helps colors
look more like real food, because foods in real life
are rarely one solid color. Flatten and shape the clay
into a piece of bread. You can use tools to
help you out here, I used a large dotting
tool and my craft knife. Next, cover each side of the bread with a
piece of magic tape. The Magic tape helps protect
the clay from getting colored while we shaded the outside edges
to make the crust. Speaking of which, take some
brown colored chalk pastels or eye shadow and brush it
on the sides of the bread. If you don't have any tape, just be careful when
doing this so that you avoid getting Color anywhere
other than the sides. Now, gently peel off the
tape from both sides. Another cool thing about using tape is that it rips
off some of the clay, which gives your
Toast some texture. If you have some sandpaper, you can place the toast on
it so that the other side doesn't lose any of that texture while we
work on the front. Now press a dotting tool into the clay to create
holes for the eyes. If you want to turn this
into a charm later, use a needle tool
to make a hole at the top with a small paintbrush and some orangey
brown chalk pastels, make three toasted marks. You can now Pre-bake
the toast and doing so will make it
easier to build on it. I used a heat gun to do this, and it took around five-minutes
for the piece to become solid enough that I can touch it without
altering the shape. With a small amount
of satin glaze, I covered the Toast
marks and the crust. You usually want to
leave glazing as the last step in your
sculpting process. But sometimes I will glaze a
shaded piece halfway through my process so that
the chalk doesn't move around and
mess up my charm. As long as your glaze
is water-based, it is safe to put a glaze
charm in the oven later. Smashed avocado has more
than one shade of green. For the avocado portion, I used two colors, one pale green and
one pale yellow. And I mixed each of these
colors with some liquid clay. Then I layered the
two colors on top of the Toast with black Clay. I rolled to small
balls for the is, and I used some liquid
clay to help them stick With that same
black Clay, roll out a very thin snake of clay and cut a small piece to use for smile at a small amount of liquid clay to the bread so that the mouth has
something to stick to, then attach the smile. I like to form the smile
before placing it on the clay. Then afterwards I
make adjustments. I pre-baked with
my heat gun again. But again, Pre-baking
at this point is optional and you do
not have to do this. To make the egg flatten a
small amount of white clay. Then texture the outside
edges with a dotting tool. And use a dotting tool to
make a whole for the yolk. You can also poke
the insight a bit to make the whites look
more realistic. Once you've done that,
take some yellow clay for the yolk and place it in
the whole we made earlier. Shaved down some brown
and golden brown pastels. We're going to use these to
give the egg a fried Color. Most people take
a paint brush and brush the chalk pastel
onto the edges. And you can do that
if you'd like. But what I do is I add a little bit of
liquid clay to each. Then after mixing, I gently add bits of the mixture to
the edges of the Clay. I feel like this helps give a strong color without
ruining any of the texture. Now, back to the yolk, you can leave it as is, or you can make it look more realistic by mixing
some of that same yellow with liquid Clay and then gently layering
some of it on top. I then took some
translucent liquid clay and put a thin layer over
the white of the egg, being careful not to
touch the yellow. And you can use fine black
glitter for cracked pepper. If you don't have glitter, you can use bits of shaved
down black pastels. Use liquid Clay as glue and attach the egg to
the avocado layer. Once you're happy with
the way your toast looks, bake the whole piece. When the Clay has cooled,
you can glaze it. I used Sculpey satin glaze. And once that dried, I added some findings
and the charm is done
27. Final Thoughts + My Personal Progress: I really hope you learned some valuable information that you can apply when Sculpting, just like anything else, polymer clay is a process
and practice makes progress. The more you work on your skill, the better you'll get. So don't get discouraged if your first clay sculptures
don't look perfect yet. I've tried Sculpting lots of different things over the years, but food charms are what
I enjoy making the most. And that's what I
started focusing on. Working with polymer
clay is a fun and rewarding hobby
that anyone can enjoy. With practice and
experimentation, you can develop your own
unique style and create amazing projects that reflect your personal vision
and creativity. If you give one of the
class projects a shot, you can share it with everyone
by submitting a project. I'd love to see your creations. Again, all the materials
that I mentioned are linked in the "About"
section of this course. And if you have any questions
that were left unanswered, feel free to ask away in the discussions tab and I'll
do my best to answer them. If you'd like. You
can also check out my YouTube channel and my
other social media accounts. Thanks for making it
all the way to the end. And I hope you enjoyed