Transcripts
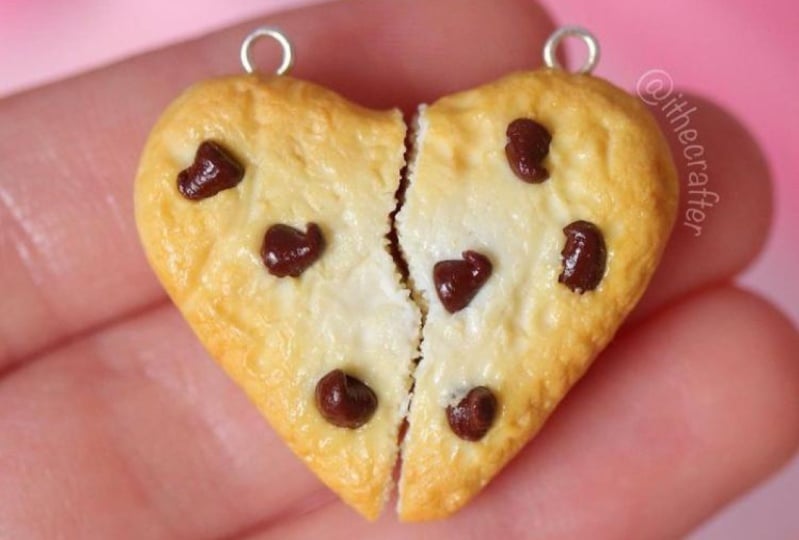
1. Welcome!: If you want to create art that
evokes excitement and awe, Miniatures are, in my biased
opinion, the best way to go. Hi, I'm Ia crafter. I'm a self taught
polymer clay sculptor with 11 years of experience. And in this class I'm
going to teach you how to sculpt ten different types
of bakery themed foods. By the end of this course, you will have learned
the skills it takes to make dense clay, mimic fluffy cakes,
chewy bagels, flaky pies, and so much more. If you're completely
new to polymer clay, I have an introduction
course that I highly recommend watching
before this one. But if you've got
the basics down and you're all set,
let's dive in.
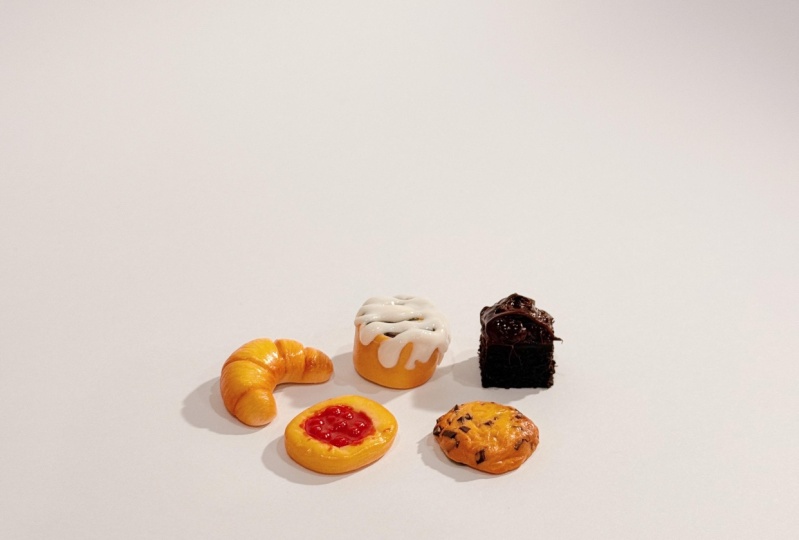
2. Color Mixing + Class Project: Your class project is to sculpt along with one of the
following lessons. And create your own
miniature treat. You can even use the
sculpting methods. You'll learn to make any
food of your choice. But before we get started, let's quickly talk about the
polymer clay you will need. The majority of baked
goods in this course will need to be sculpted using
a dough colored clay. I have yet to find a
brand of polymer clay that sells a color like
this. So I mix my own. I combine one part white, six parts translucent, and
a small amount of yellow. If you're curious, these are the exact brands and
colors that I use, but you do not have to
follow this exact ratio, and you can also use any
brand and shade of clay. I even highly recommend coming
up with your own mix using any colors or ratio that you'd like so that you can
achieve a customized look. This is just what I use and
what I personally like. Food in real life is rarely, ever completely opaque in color. This addition of the
translucent clay is very important for achieving
realistic miniature food. But if you don't
have any, you can just mix white and yellow clay. It'll look a bit different, but you can still attain
a similar result. Also, if you don't want
to mix your own clay, you can buy an off white
colored clay instead. I know that Femo sells a shade
called vanilla and sculpy. Primo has a color
called butter yellow. These two are more opaque
than my own dough color, but if you want a
consistent shade of polymer clay and you also want to cut down
on sculpting time, this could be a good
option for you. And now that we've gotten
our main clay taken care of, we can get into the sculpting.
3. Baguettes and Bread: The first thing
we're going to be sculpting is a loaf of bread. I'm going to be
making a baguette, but you can follow the
same techniques in this lesson to make any
shape with the dough colored clay we just mixed form the shape of whatever kind of bread you plan on sculpting. You can place this on top
of a piece of sandpaper, and then using a
hard bristled brush, make teeny tiny indents
all over the loaf. If you are sculpting
without the sandpaper, make sure to flip the bread over and apply the same
texture to the bottom. Next, I'd like to add
a light coating of yellowy orange chalk pastels
to the top of the baguette. To imitate bread scoring, take a few small pieces of aluminum foil and crumple
them up into skinny snakes. Press these into the
surface of the bread. Then with some
darker shaved down pastels color the
outside of the loaf. Use colors like yellow, orange, and orangey brown to
cover the whole thing. Then add darker
brown pastel dust to the areas of the bread that
would typically be crispier, like the very top of the loaf. And make sure to do this to
the bottom portion as well. Once you've finished
shading your piece, you can remove the foil. You can stop here, or you
could cut your bread into slices or parts if
you choose to do so. You'll want to texture the pail inside to create
the yeasty texture. I like to swirl
my needle tool in circular motions over
the surface of the clay. And then afterwards
with that same tool, I poke a few shallow
holes into the bread. Once you're happy with the way
it looks, you can bake it. And then with either
mat or satin glaze, brush a small amount
onto the outer part of the bread to seal in
the chalk pestel shading.
4. Croissants: Next up we are going to sculpt a miniature croissant
with your clay. Roll out a small log and then pinch the edges to make them
thinner than the middle. Once you've done that,
push these sides closer together to
make a C shape. Press the side of
your needle tool into the clay to make a
triangle in the center. Then add another line to both ends to make the clay
look like flaky pastry. Use a needle tool or a sewing pin to scratch
the surface of the clay. Make short sporadic lines in
each of the little sections. If you want the bottom
to be textured as well, you can create the same
texture on that side. Use yellow and orange
toned pastels for shading. Gently brush the color
onto the pastry with dabbing motions so that the texture doesn't
get distorted. With a smaller brush, I took some brown
chalk pastels and applied them only to the
top part of the croissant. When shading the bottom, don't grip the clay too hard
as that can ruin the shape. Instead, I like to rest it on
my fingers and stabilize it with my thumb now that the
piece has some color to it. All that's left is to
bake and glaze it. You can use any glaze
of your choice, but I would recommend using
either satin or gloss glaze because croissants
are very buttery and these two types of
varnish will mimic that.
5. Cinnamon Rolls: Make an easy cinnamon roll. First, start by
rolling out a log of your dough colored clay
and flattening it. This doesn't need to
be perfectly even, but if you'd like it to be, you can use a clay
roller to do this. Instead of your
fingers afterwards, flatten a thinner layer of brown clay and press it
onto the pale layer. This cinnamon layer doesn't have to be the same
width as the dough, but make sure that they
are the same length. Now, roll the clay into a swirl, press the bristles of a
coarse paint brush or a new toothbrush into the
clay to give it texture. Then brush chalk pastels over the outside to make the roll look as though
it has been baked. I like to add shading to
the bottom part as well, next to make the icing, combine translucent liquid
clay with white clay. At this point, you can go ahead and add the icing to the top. But before doing that, I like to pre bake the
cinnamon roll and then cover it with either satin or matt polymer clay glaze. This seals in the
Chuck Pestel shading so that none of it
discolors the white icing. Once the glaze has dried, you can add the icing to the
top and sides of the roll, bake the entire thing according to the
instructions on your clay. And once it has cooled, you can glaze the icing
with satin or gloss glaze.
6. Bagels: Last savory food
we're going to be sculpting in this
course is a bagel. Take a ball of clay
and press it down, while also rounding the edges so that the top is more
domed than flat. Use a ball tool or a large dotting tool to
make a hole in the center. Then with a craft knife, cut this piece down the middle. The shape might
get a bit smushed. If it does, use your fingers and your dotting tool to reshape it. Next, add some bready texture
with a hard bristled brush. It's helpful to do
this over a piece of sandpaper so that both sides get textured at the same time. But you can also just use your brush to texture
the whole thing. Now, add some shading to the
outer parts of the bagel. With some more
dough colored clay, I made some sesame seeds. You can replace
this with any other topping you'd like or
you can leave it plain. I added a very thin layer of translucent liquid sculpy to the top of the bagel
to make it stickier. And then I added a few
of the seeds on top of that to make cream cheese mix together
white polymer clay and translucent or liquid clay. You'll want this to be a thick but spreadable
consistency. Now, add this mixture
to the pail side. You can leave your
bagel in two parts and add the cream cheese
to the top half as well. Or you can sandwich the
two parts together. Carefully place the top onto the bottom half and
push down slightly, but not so much that
the cream cheese oozes. Then bake and glaze your
final piece or pieces.
7. Donuts: I'm going to show you a
few different doughnuts you can make with polymer clay. But feel free to change things up and make any
flavor of doughnut. The first one we're
going to make is a classic glazed doughnut. Take a ball of pale clay and flatten it while making sure
the edges stay rounded. Then with a dotting tool, create a hole in the center. Next, cut a thin strip from
a piece of magic tape. Stick this to the
center of the doughnut. Heavily shade the clay using
shaved down chalk pastels. Then remove the piece of tape. The tape should pull off some of the clay and create
a bit of texture. But that doesn't always happen, especially if your clay is firm. If your tape comes off
without creating texture, you can add some with
your needle tool, or you could just leave
it the way it is. Then if you'd like to
smooth out the harsh line, you can add a little more
pastel dust to the pale area of the doughnut to make the
decorating process easier. And to make sure the
shading stays in place. I like to pre bake my doughnuts and varnish them
before moving on. Now to make the
doughnut glaze mix white clay with some
translucent liquid clay. For this process, I highly recommend using a
liquid clay that looks the same before and
after baking like femodecogel. This way you'll know
that the glaze isn't too opaque and that the doughnut
can be seen underneath it. Use this mixture to
coat the entire thing. Then for baking, I like placing the doughnut on top
of a small piece of aluminum foil before
placing it on my baking sheet so that the
glaze doesn't make a mess. After baking, you can leave
the doughnut the way it is, or you can add some varnish
to make the glaze shiny. To make a chocolate
glazed doughnut, I mixed brown and
black clay together. Then I made a hole in the center and coated it with
the same white glaze. Lastly, I baked and
varnished it the same way I did for the
regular glazed doughnut to make a pink
sprinkled doughnut. Start by making the
actual doughnut, just like we did before. Then combine white and pink
clay with liquid clay. Use this to frost the
top of the doughnut. Take a few different colors of polymer clay and roll them
out into some thin snakes. Then cut each one into pieces. Place these sprinkles
on top of the icing. Then finish the piece by
baking and glazing it to make a jelly filled doughnut. Follow the same steps as before, but don't make a hole in
the center of the doughnut. Instead, after shading
the dough colored clay, use a dotting tool to mark
out an indent for the jelly. To make the jelly, combine liquid clay with shave
down chalk pastels. Add a little bit of this
mixture to the indent. Then bake the piece
with the jelly facing up so that it
doesn't spill out. I'm placing it in a
silicone mold for this, but you can also use aluminum foil to create
a stand to hold it up to make the powdered sugar shave down some white pastels, then apply some glaze to
the top of the doughnut. And before it gets
the chance to dry, add the powder to the
top after it dries. This powder will move
around if touched, and it can come
off pretty easily. Only use this for
miniatures that are meant to be looked
at rather than worn. If you want something that
will stay in place better, you can splatter the
top with white paint. Last glaze the jelly. The last doughnut we're going to make is a cinnamon twist. Roll out a snake of clay, then join the two ends together. Hold the loop with both
hands and twist a few times. Then place some tape around the doughnut and shade the clay to make the cinnamon
sugar mixture. Combine fine kraft sand with
shaved down chalk pastels. Then coat the entire
doughnut with some liquid clay and toss
it in the cinnamon sugar. All that's left to do is
bake the cinnamon twist.
8. Danish Pastries: The next thing we
are going to be sculpting is a Danish pastry. Flatten some clay into a
rounded square and place it on top of some rough sandpaper
with a dotting tool, create a cavity in the center. This space only needs to be deep enough to
encase the filling. There's no need to make
it too thin for texture. Crumple up a small ball of aluminum foil and roll it all
over the top of the clay. Just like we've done
in the past lessons. You'll want to brush yellow and orange toned chalk pastels over the pastry to
make it look baked. Again, with a
smaller paint brush, you can add some brown pastels to make some areas look crispy. This next step is optional,
but at this point, I like to pre bake my clay
and then glaze it so that the shading won't get into any of the icing that
we're going to add. Later on, I'm going to make
two different Danishes. For the first, I'm
making a cheese, Danish, And the filling
is extremely simple. Just add some pale yellow clay to the center of your pastry. You can also use some
translucent yellow clay to make a lemon Danish. And now for the more
detailed fillings, I'm going to be
making a cherry dish. But you can change up the colors depending on the fruit
you want to make. To make the actual cherries, I'm mixing translucent
and red clay together. Cut a bunch of
little pieces from this clay and roll
them into bowls. For the syrupy filling mix, shave down chalk pestels
with liquid clay. I'm combining red, orange, and brown to get a deep
cherry, red color. Add the clay balls
to the syrup and mix the two together so that
the cherries get coated. Then add the two
to the center of the Danish to make icing. Combine a small piece of white clay with
some liquid clay. Then drizzle this
over top your Danish. Afterwards, bake your
clay and add a varnish.
9. Cookies: In this lesson, I'm going
to show you four types of cookies that you can
sculpt with polymer clay. The first cookie
we're going to work on is a chocolate chip cookie. For the chocolate, you can
either make chips or chunks. To make chips, cut little
pieces of brown clay, then carefully shape
them into little cones. Once you're done, pre bake
these pieces before moving on. Chunks are much quicker
and easier to make. Just flatten a piece
of brown clay, then pre bake it in the oven for about 7 minutes after
the clay has cooled. Use a Kraft knife to cut
it into little pieces. Now to make the cookie, take some dough colored clay and add your chips or chunks to it. Mix the two together so that the chocolate gets distributed
throughout the dough. Then place your
clay onto a piece of sandpaper and texture
it with a ball of aluminum foil to make the cookie look as though
it has been in the oven. Brush it with shave
down chalk pastels. And keep the darkest
colors towards the edges. Add some shading to
the bottom as well. Once you're done, be sure to
bake and glaze the cookie. The next cookie we're going
to sculpt is a sugar cookie, but specifically
those frosted ones that you either love or hate, flatten a ball of clay so
that it is slightly domed, then texture it with a hard, bristled tool, like a
paintbrush or a new toothbrush. Combine white and pink clay with some liquid clay
to make frosting For sprinkles, roll
some colored clay out and cut some
very tiny pieces. Then gently place these sprinkles
on top of the frosting. Lastly, bake the cookie
and glaze the frosting. Now for a more intricate
version of a sugar cookie, we will be sculpting
some cut out cookies. First, flatten some
clay into a sheet. To get an even layer, you can either use a
pasta machine or you can rest your rolling tool
on two popsicle sticks. Now to cut out the cookies, you can use polymer clay cutters and really tiny cookie cutters. Or you could also
draw out a shape and cut it out with
your craft knife. Then transfer the cookies onto some sandpaper and texture
the top of each one. Now apply shading to the edges
and bottom of each cookie. Just like I've done in some
of the previous lessons, I'm pre baking the cookies and glazing them before
moving on so that the shading doesn't
transfer onto anything to make icing mix liquid clay with
shaved down chalk pastels. Or if you want a thicker icing, use small amounts of polymer
clay instead of the pastels. When choosing which one to make. Something to keep
in mind is that the pastel mixtures may
look darker after baking, depending on the brand of liquid clay you use
and your pastels. But clay mixtures
are more likely to look the same before
and after baking. When icing your cookies, you can get creative and add anything that is
clay and oven safe. For this snowman cookie, I sprinkled on some glitter
to mimic decorative sugar. Afterwards, bake your
cookies and glaze them. The last cookie we're
going to be making is a peanut butter blossom
to make a Hershey's kiss, form a rain drop shape
with some brown clay. Place this onto a surface
to make the bottom flat and then push the really thin part
down to make it droopy. Prebake this piece of
chocolate, and in the meantime, make the cookie color by
mixing together dough colored clay along with
some yellow and orange. I also added a little bit of brown to make the color darker. Flatten this clay into a circle, then texture it with
some crumpled up foil. Now, pour out some
fine white craft sand into a container. At this point, you'll
want to coat the cookie in liquid clay before
dipping it in the sand. Just like how we did in the doughnut lesson when
making the cinnamon twist. I forgot to do this,
but we can still salvage it at the
end with glaze. After that, take
your pre baked kiss, add a little bit of liquid
clay to the bottom, and press it into the cookie. Now all that's
left to do is bake the piece and then glaze
the Hershey's kiss. Because I forgot to use liquid
clay when adding the sand. I also added some
glaze to the cookie.
10. Cupcakes and Muffins: Cupcakes are some of my favorite
things to sculpt because you can get really creative
with how you decorate them. I'm going to teach you
the necessary techniques to make both cupcakes
and muffins, and in this lesson I'm
going to make one of each. A mold isn't necessary for this, and you can create the look of a cupcake liner by making indentse in your
clay with a pin. That being said,
a mold will make the sculpting process
so much easier, and I highly
recommend using one. You can buy polymer clay, cupcake molds on
sites like Etsy, but I am going to show you
how you can make your own. If you've never made a mold before and you'd like
to learn the basics, I have an entire course here on skill share all about how
to make your own molds. To make a cupcake mold, look for a small paint or
toothpaste cap that has ridges. If your cap is hollow
or has a gap in it, you can use some scrap clay
to fill in this space. Now all you have to
do is mold this cap. I'm using silicone putty to do this because my cap
is a little too long. I'm only covering about half
of it with the silicone. Leave your silicone to set and then you can
remove the paint cap. As long as your clay
isn't too soft, it shouldn't stick to anything, and you should be able to
remove it from the cap. Now that our mold is ready, we can start sculpting. I'm going to be making a
vanilla cupcake first. And to make the deep color, I'm combining my domic with a small amount of
yellow and orange clay. Fill the mold with this color, but leave some space at the top. Then take some translucent
clay and push it against the ridges of the mold while leaving
the center empty. Make sure to also press
the translucent clay down enough that it touches
the vanilla clay underneath. Afterwards, take that
same clay we used for the base and add it to the middle to create
a cupcake top. Now for texture dab a hard, bristled brush onto
the cake portion. Then use yellow and orange, brown pastels to shade the
outer edges of the cupcake. At this point, you can
continue sculpting, but I like to bake the clay, pop it out of the mold, and glaze the top so
that the shading stays put for the frosting. Mix white and translucent
clay together. Then take a star shaped
icing tip and push the clay through it using the back of a paintbrush
or needle tool, break off a piece and slightly
twist this rope of clay. Press the end onto your
cupcake and make a swirl. Then cut off the excess. And use a dotting tool
to smooth the edge. Roll various colors of clay out really thin and cut out
some little sprinkles. Place these all
over the frosting, then bake your cupcake
after it has cooled. Use paint to make the
bottom edges look darker. Once the paint dries, you can glaze your cupcake to make an unwrapped
blueberry muffin. Start by filling your mold with a substantial amount
of dough colored clay, dome the top of the clay, then apply some texture with a crumbled up ball of aluminum foil and a
hard bristled brush. Use orange and brown pastels
to add some shading, but leave the center pale. Pop the muffin out of the mold. Then use those
same chalk pastels to add color to the bottom. Place your piece
on some sandpaper, and then swirl a sewing pin over the surface
of the clay around the entire base to make the blueberries. I mixed blue and
black clay together. Then I added little bits of this mixture to the bottom
part of the muffin. Add a few balls to the top
of the muffin as well. To imitate the gooey
part of a muffin, mix some of this clay with
some translucent liquid clay, then add it to the blueberries. I also like to add some
to the cakey part of the muffin because berries usually bleed out
when they bake. After that, just bake
and glaze the peace.
11. Pumpkin Pie: In this lesson, I'm going
to walk you through the sculpting process
of three types of pies, pumpkin, apple, and cherry. But you can use the
same techniques for any kind of
filling that you want. The first one we are
going to work on will be a full
sized pumpkin pie. For starters, roll out a thin sheet of
dough colored clay. I'm using a few pieces of card stock to get an even layer. But you can also just
roll your clay through a pasta machine with a
small circular cutter. Cut out a circle from your clay. Now with a pumpkin pie color, roll out a much thicker piece
and cut out another circle. Then place your orange circle on top of the dough colored one. Roll out some more pale clay, the same thickness
as the first sheet. Then cut out a long
rectangle that is slightly wider than
the circular stack. Press this rectangle onto
the side of the pie. Then cut off the excess and blend the two
pale pieces together. They don't need to
be perfectly smooth, but make sure that there are no more gaps to
texture the crust. Use a crumpled up ball of foil. Then use a dotting tool
to crimp the edges and add some texture to the pumpkin part using
a hard bristle brush. After that, give the crust
color using chalk pastels with a Kraft knife or blade, cut out a few slices texture
the sides of the filling, just like we did
earlier for the top. Then for the crust texture, drag a pin through the surface of the clay to make
it look flaky. Repeat the same steps for your other slices and for
what's left of the pie. Lastly, bake all your
pieces and glaze them.
12. Single Slice Pies: For the remaining pies, we are going to sculpt
singular pieces, as the fillings can get messy. To make an apple pie, roll out a thin sheet of pale clay and cut
out a small circle. This will be our crust. Add some texture to this piece, and then some shading. After that, cut out a
triangle with the excess. Cut out another triangle
nearly the same size. Now go back to the
first triangle, flip it over to
the unshaded side and cut the wider parts off. Now fold this part upwards
to make the crust. Use this as an outline for your second triangle and
cut off any extra clay. Now, texture the sides
of both of these pieces. Using a pin or needle tool for the apples. Roll out a thin log of a
translucent yellowy color. Cut this in half, then cut each of these
into little apple slices. Combine liquid clay with some
brown and yellow pastels. Then add your apples
to this mixture. Afterwards, place your
filling inside the crust. Add your second
triangle on top and gently press the two
crust pieces together. Use a needle tool to create a few lines along the
edge of the crust. You can add some more shading
to this part if you'd like. Then bake and glaze the piece to make a cherry pie. I'm going to follow the
exact same steps as before. The only difference is
that I'm going to give the top of this pie a
lattice design to do that. Roll some dough colored clay to the same thickness as
your other crust piece. Then cut out loads of thin rectangles with these pieces. Weave a criss cross design, just like you would
with real pie dough. Now cut out a triangle by using the bottom crust
piece as a guide, then texture and
shade both pieces to make the cherries.
Cut some pieces out of translucent red clay and
roll them into balls. Add a bit of the same clay to some liquid clay and
mix the two together. Then combine this with the cherries and add this filling to the pie crust. Place the lattice design on top and then gently press
the edges together. Give the crust a
few vertical lines and some extra shading. If the filling moved
around or looks too empty, add a few more cherries once you're satisfied
with how it looks, bake and glaze your charm.
13. Cakes: Slices are pretty
simple to make and they make really cute
pieces of jewelry. To make the cake layers roll out a thick sheet of clay and
cut out some circles. If you want to give your
cake baked looking edges, roll out some tan or brown clay, really thin, and use
that same cutter to cut out two circles for
each layer of cake. Sandwich the cake layer in
between the two tan circles, then add a strip of tan clay to the edges for the
frosting layers. Cut out a thin circle of clay, then stack the cake
and frosting layers. At this point, if
you are planning on making only one slice of cake, you can cut it out, then place it on a
sheet of clay that is the same color and thickness
as your frosting layers. And cut out a piece to
go over top the slice. On the other hand, if you're
making a larger cake, cover all the layers
with this sheet of clay, then cut out your slices. Use a needle tool
to texture the cake by swirling it around
over the surface of the clay if you'd like. After you've textured
the entire area, you can add little bits
of clay to imitate, nuts, sprinkles and spices. Then prebake the
slices so that none of the texture ends up getting smushed during the next steps. In the meantime, to
make a creamy frosting, take some of that same
clay you used for the icing layers and mix
it with liquid clay. Once your slices
are done baking, use the frosting to
cover the icing layers. You can decorate the cake with anything that is
clay and oven safe. Then all that's
left to do is bake the slices one final
time and glaze them.
14. Final Thoughts: I hope you found this course
helpful and easy to follow. If you choose to sculpt
any of these baked goods, you can share your creation with everyone by
submitting a project. Also, I'd love to hear
what you think of the course and you can let
me know by leaving a review. Your feedback is
valuable and it plays a crucial role in shaping and improving
my future classes. If you want to see
more of my art, you can check out my social
media accounts where I regularly post content
about my sculptures. Thank you so much
for participating and I hope you enjoyed.
 I The Crafter, Sculptor & Content Creator