Transcripts
1. Intro to Leather Fashion Design: What's up everybody. My name is Vicki Rocco and I'm a fashion designer from New York specializing in leather fashions. I have been designing leather fashion since 2011 under my brand name Electric Warrior. I am really excited to share my skills with you in this class that's all about learning the basics of working with leather as a fashion design material. So if you're an experienced sewer and you just want to learn to work with a new material, or if you're somebody looking to broaden your range of fashion design skills, then this is a great class for you. Leather is a really great and fun material to work with, and I know that it can seem a little bit scary if you've never worked with it before, but this class is going to get you comfortable and confident enough with enough practice to start experimenting with it and incorporating it into your own fashion design. We're going to learn sewing leather and we're going to learn some basic design techniques, manipulations, and principles, which I will demonstrate to you and then you will practice and create a whole bunch of great samples. You can then keep those samples and refer back to them later and you can use them and apply them into fashion design as you move forward in your own way. You can continue taking my other classes and you'll see me there use this specific examples and apply them into actual garments and accessories. This class is just the beginning. Once you feel comfortable with working with leather, you're really going to open up new doors for your own creativity. I'm really excited to start this class and to share all my knowledge with you. Thanks for checking me out. See you in class.
2. Class Project: Throughout this class, I will be demonstrating to you a variety of manipulations and design techniques. With each lesson, you will be practicing the demonstrated approaches on scrap pieces of leather. Essentially you're going to be building your own library of leather fashion design techniques and you can refer back to this at anytime as you continue your journey into leather fashion design. Each practice sample you make will then neatly be mounted onto cardboard to create a clear and presentable display. You can then get really creative, you can mount these into a binder, you can put them on a larger piece of foam board, or however you want so that you can keep them and use them as a reference later. Make sure you share all your projects with the class as we go along.
3. Supplies: Let's talk about the supplies that you're going to need for this class. First and foremost, you're going to need some leather. I recommend sheep or lamb, something that's very thin and stretchy so that it can go through your sewing machine without any problems. You can refer to the supply list for links to all of the things that are on the list. But especially for the leather, you can find a whole skin of sheepskin in a relatively cheap price. Or, you can even go to a thrift store and you can look at some old leather garments that are thin and stretchy leather, and you can buy that and cut it up. One sheepskin should be more than enough. You can choose any color that you'd like. You're going to need to cut it into eight pieces, a little bit bigger than six inches by six inches. You can see that it's a little rough of a cutout, but we're going to trim everything down to be perfect later. Then you should also have some scraps leftover once you cut out all of your squares. Some of those scraps, we'll also be using. The next thing you're going to need is a light but sturdy backing material. Here, I'm using a cotton, just a nice woven cotton that has a little bit of a structure to it. You can use a thin piece of denim, you can cut up an old pair of jeans if you'd like, but just make sure that it's not stretchy, not like T-shirt material. You want something that has a little bit of structure to it. The next thing you're going to need is some rigid cardboard. I've just used cardboard from boxes from packages that I got. You want about six pieces cut neatly into six-by-six inch squares, perfectly squared. You're also going to need a couple of sheets of batting. You want to make sure that you have batting that comes in a sheet like this and not the loose batting that you would use to fill pillows. You can get this online, you can get this at the fabric store, and you only need a little bit. We're going to be using this for quilting. Also cut it roughly the same size as your leather. You are going to need an Exacto knife or a craft knife like this, with extra blades or blades that you can snap off because you want to keep your knife sharp at all times, and also a cutting mat, which is what I have down here. You're going to need a pair of fabric scissors. Any fabric scissors that you already have is fine. These are the Fiskars Razor Edge. I really recommend these because they're wonderful and sharp and great for cutting leather precisely. You're going to need a piece of card stock to use for stencils. As you can see, I've already cut my card stock into a star-shaped stencil, which we will be using throughout this class. I can use both versions. I can use the actual shape, and I can use the shape cut-out. You'll see me use it in different ways, but this is why you'll need card stock. You're going to need some leather glue. This is the Renia Aquilium 315. This is a water-based contact glue, and it's non-toxic, which is great, so you can use it in unventilated areas. You're going to need either a plastic knife or a brush, I love these little glue applicators that you can get on Amazon for applying your glue, a role of one-quarter inch double-sided tape, a ruler with a metal edge. I recommend these clear rulers because you can see right through them, with the grid lines, and. then you have the metal edge which you can place your blade and cut right along. You're going to need a chalk rolling marker, one like this, where it actually rolls to make the mark on the material. Can see here. Because we need to mark our leather but we need to be able to wipe it away, regular tailor's chalk will not work. You need a powdered chalk like this. You're going to need some polyester thread. Gutermann is great. Just make sure it's not cotton thread. Cotton will not be strong enough. Make sure it is polyester thread. You're going to need a small piece of sandpaper, or, I even use a nail file like this. That's just fine. A small piece of craft foam, which is optional. If you already have it in your stash, great, if not, don't worry, when we come to the lesson where we need the foam, I'll show you what else you can use. Some acrylic paint, anything that you already have in your stash is fine, whatever color you like. Of course, a paint brush for applying the paint, and some paint varnish of your choice. This is a Satin varnish. You can get glossy, you can get matte, just something to finish off over the layer of paint that you're going to be painting. Very important, you're going to need leather sewing needles, specifically, leather. Regular sewing needles have a different tip. Leather needles have a chisel tip to be able to go through the leather very easily. Optionally, you may need a Teflon sewing foot, which either your machine might already have come with one or you can order one as a separate attachment. The Teflon foot has a plastic underside which helps to grip the leather, but you'll test your machine out first and see if you even need this. You're going to need a bone folder, which is either made of bone or made of plastic. You're going to need some scrap paper, or cardboard, or something to cover your workspace when you're painting and gluing, just so that you don't get mess everywhere. Last but not least, you're going to need a sewing machine. Your regular home sawing machine is fine. I'm going to be using my singer home sewing machine and we're going to so the leather right on that.
4. Sewing Machine Set Up: Hey everyone. We are going to prepare our sewing machine to sew leather. First thing I'm going to need is my thread, which I'm using the glutamine 100 percent polyester thread. I'm using the color blue, choose any color that you'd like. Very importantly, my leather sewing needles, which you should keep some extras nearby because leather does dull out your needles rather quickly and you will be changing your needle probably more often than you're used to. I also have a Teflon foot just in case I need it, but I have my regular metal presser foot on my machine that I'm going to test out first. I've threaded my machine as normal. Nothing special when it comes to threading your machine, thread it as normal, thread the bobbin as normal. The only difference is I loosened my tension just a little bit because we don't want the stitches super tight. I just adjusted my tension like one or two notches to loosen it up from where it was. Additionally, you're going to want to do a straight stitch, only use a straight stitch with leather and you're going to want a pretty long stitch. The longest that my machine can do is 4.8, so I'm putting it on that. But if you can go to five or six, that would be great too. You just want to make sure your stitches are not too close together and too small, because you'll have trouble getting the leather through the machine and also stitches too close together can actually cause the leather to weaken and tear. Now we're going to do a couple of tests. I'm going to see if my regular machine foot will work and if I even need the Teflon foot, and you're going to need some scraps here. I have two scraps of the leather that I'm going to be using, one on top of the other, and then the backing fabric. This is because in the lessons you're going to be sewing through all of this thicknesses. We need to test out that our machine can handle this. I'm going to put it right under the foot, and when you're testing the scraps, don't start it all the way at the very end like you would if you were sewing a seam, I'm actually going to drop my needle somewhere around here, that'll just help the machine pull through the material a little easier, especially since we haven't glued or taped these layers together, which is what we would normally do when we're sewing leather. But these layers can move around if we don't tape or glue them down first, and we're not doing that, we're just testing straps. I've lowered my foot, I'm lowering my needle, and when you're sewing leather, do not force anything through. If your machine is telling you that it does not want the material, then don't force it. Never pull the leather from the back, you can tear or stretch the leather out and you can also ruin your machine. Just keep your hands, place them so that the materials don't move around and just let the machine do the work in pulling it through. Let's see how it goes. This looks just fine. My foot had no problem pulling it through the machine. It went through all layers, my stitches look really good and even, everything is held together very well. Now, if you pull it out and you notice some crunching or bunching, it could be that you need to adjust your tension a little bit more or make your stitch length a little bit longer. So you might end up going back and forth, making a few adjustments, putting it through the machine again and just seeing how it goes from there. I've established that I do not need my Teflon foot to sew the leather, but if your foot is sticking to the materials and it's not pulling it through at all, then I would highly suggest getting a Teflon foot. You should get one anyway, just because if you continue sewing with leather, you're going to need it eventually for something. Maybe get one anyway, and if you can use your normal foot, then go ahead and use it. The next combination we need to test out is a piece of our leather, two layers of our batting material, and a piece of our stabilizing material. Let's make another sandwich and just test it out the same way. The pieces are moving around a bit, so I'm just using my fingers to hold everything in place. That looks pretty good, really no issues here. The machine is all set up and we are ready to begin.
5. Painting: Hello everyone. For our first lesson, we're going to talk about painting on leather, and painting on leather is one of the simplest ways to customize a design. You can add a logo, you can add any graphic image or get as detailed as you want. You can paint directly onto the leather and we're going to do that by using stencils. So the materials and supplies that you need for this lesson are; one, piece of your leather, your ruler with the metal edge, your sandpaper or file, acrylic paint, and your paint varnish, a paintbrush, your craft knife or X-ACTO blade, chalk marker, stencil. It'll be helpful to have a piece of the cardboard that you cut out in the six-inch by six-inch square, and of course, the paper or the protective covering for your workspace. You can see that I have already set that up. I have it covering my mat so I don't get paint everywhere. The first thing that we're going to talk about is the use of stencils. Stencils are a great way to get a graphic perfectly onto the leather. You can trace them out onto the leather, or you can put them down onto the leather and paint the image and then lift the stencil away. I am choosing the shape of a star. A star is an easy shape to work with. It's a fun shape and you can choose whatever shape you like, but I recommend something straight and angular because that's going to be easier for you to cut and it's going to be easier for you to sew. Shapes with a lot of curves are a little bit harder to sew and get perfect. So unless you're an exquisite sower, you may want to choose an angular shape which will make your life a lot easier. Actually, if you haven't already cut your stencil, you can use your ruler and your knife to cut your stencil. You can print a shape from the computer and cut that out, draw it freehand, however you want to do it. I've already done that. Now I'm going to take my piece of leather and I'm actually just going to use the cardboard as a template so that I can trace a perfect square because we're going to trim the edges of this leather away later and I just want to have a perfect square visually so that I can work within that space. So I'm just placing my cardboard down, and I'm going to use my chalk marker, and I'm just going to trace the edges of the cardboard. The chalk is going to wipe away. You can see the chalk lines very faintly, which is fine because we're going to get rid of them later. I just want it there so that I can see where the approximate center of this leather is, and that's where I'm going to apply my stencil. I'm taking this version of my stencil and I'm placing it here and the reason I'm doing that is so that I can see the whole space and I can see the shape, and I can see where I want to place it within the space. Now, I'm going to use my chalk marker and I'm just going to trace the edges of my shape. I'm going to put the marker right up along the edge of the paper and because the paper is stiff, it doesn't move around. I'm going back and forth with the chalk marker just to make the line a little bit more visible for myself and hopefully, it will be visible for you as well. Here is the shape of the star. Now, next thing we need to do is we need to sand away some of the surface of this leather because the leather does have a finish on it and that can prevent the paint from properly adhering. You can use your nail file or you can use your light sandpaper and don't go too hard, we're just going to gently rub the surface of the area that we marked so that it helps to take the finish away. It will roughen the surface a little bit and that will help the paint to stick. If you are afraid of this method, you can even use a cotton swab with a little rubbing alcohol and just gently wipe a thin layer of that over the area as well. That will help to take the finish off of the leather. Some companies, such as Angelus, that sell paints specifically for leather, also offer a product called Leather Preparer and Deglazer, which is a liquid substance that you would rub into the area with a cotton swab and that would help to take the finish off of the leather as well. You can actually even see where I've rubbed. You can see that the weather is faded there, so that's a good sign. Next thing is we are going to get our paint and our paintbrush, and there's a few ways that you can start painting. You can either free-hand these lines and just paint within the shape. If you have a bit of masking tape, you can even tape the lines so that you have perfectly straight lines once you peel them away, but be careful because masking tape can sometimes pull away the surface of your leather so you always want to do a test first. Or you can do a method that I like to do, which is place the negative stencil down, and then you can brush the paint over the areas and lift it away. I'm taking my acrylic paint. I'm using red, I'm using a color that you can see on the leather. It might require a couple of coats. You could always do a test on a piece of leather before you begin to see how the leather is going to receive the paint and the opacity and whatnot. So you just paint this like you would paint anything and just take your time, no need to rush, and just know you want to be careful around the edges here because you might get paint underneath the edge a little bit, but just take your time. There's no need to rush and apply the paint. I'm just holding my stencil down with my hands. I have a lot of practice with this and the stencil is small enough, but if you're using a larger stencil, you may want to experiment with some masking tape to hold it down into place while you're painting. While the paint is still wet, I will lift away the stencil. cell way, the paint doesn't dry and the stencil ends up sticking to the leather. So you always want to remove it while it's wet, same with masking tape. You can see that my lines aren't perfect. I have a little bit of bleed right here, but it's no big deal. You could always take a cotton swab or your finger or whatever and just wipe it away. You can also see that because I'm using black leather, that the paint, yeah, it's there, but it's maybe not the level of opacity that you would want. So you would let it dry fully and then just paint over it as many times as you need in order to get it to the desired opacity. I'm going to let this dry and probably add another coat and I'll see you afterwards. I ended up doing about two more layers to get a nice full opacity there, and I let it dry. Now that the paint is dry, we can just take our finger and just rub away those chalk lines. The oils in your finger will help to get rid of the chalk and to also put some oil back into the leather in that area. You could also use a dry cotton bud for this or if you're having some trouble getting the powder away, you can just wet the tip of a cotton bud with a little bit of water. Or sometimes I'm bad and I will lick my finger and then rub it on the leather, whatever, it's all good. So now that I'm happy with the opacity, the paint is dry, I'm just going to use my varnish, and I'm going to paint a thin layer of varnish only over the areas where I had painted the leather. This is going to add a protective coating and also, depending on the varnish finish that you have, will either make it shiny or will make it matte, or in this case, will make it subtle. So it may not really change this much. I'm going to actually use this little piece of cardboard just as a pallet to apply my varnish. Since you only need to do a thin layer, a little bit goes a long way. I'm just starting with a little bit for now and I'm just going to put it on my paintbrush and if you've never worked with varnish before, you can see that it leaves a bluish tint when you first put it on the leather, but once it's dry, that becomes clear. So I'm just going to go right up to the edge, spread it out very thinly so that it dries quickly. There's no need to lay this on very thick, and just add this layer over it. I got a little bit out of the lines, no big deal. You're finished. That's it. Bam, first lesson done and you didn't even have to sew anything. Make sure that you post this to your class projects and show everybody what you decided to do for our painting.
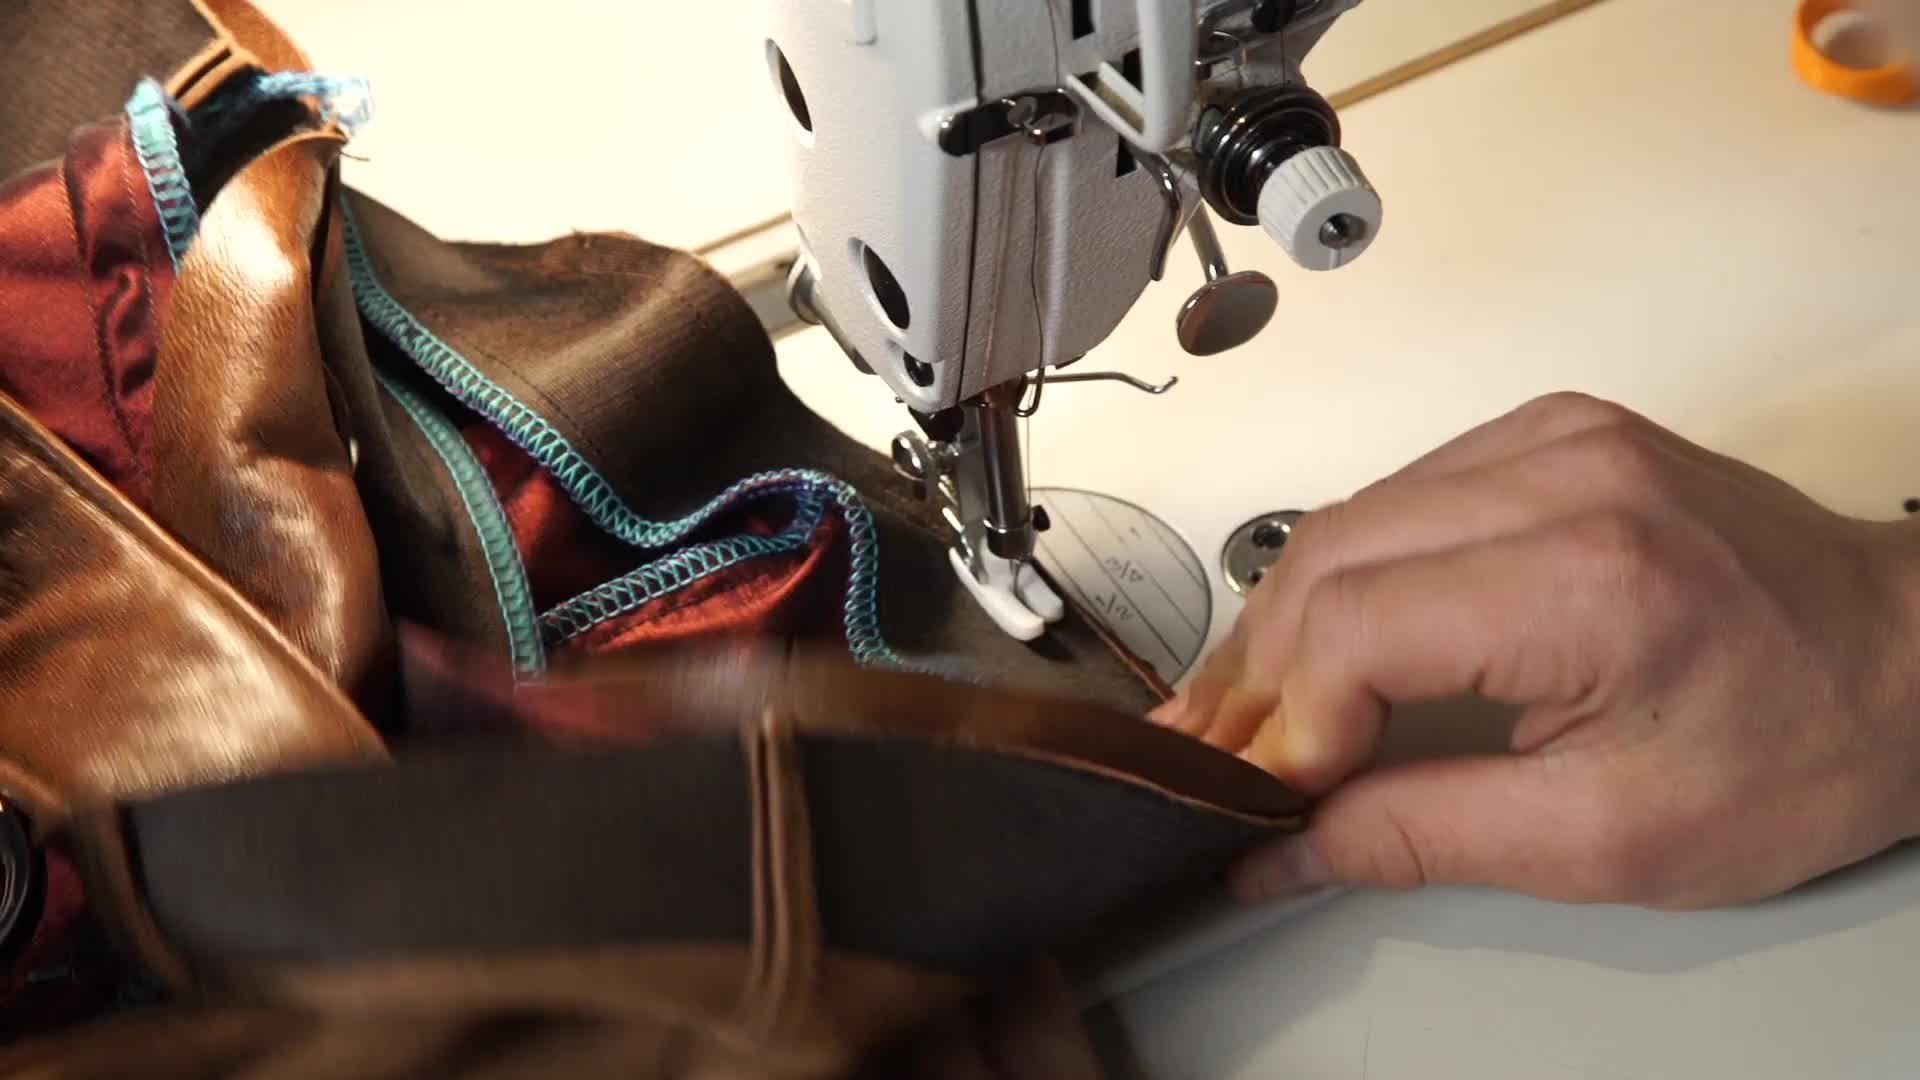
6. Appliqué: Hey everyone. In this next lesson, we are going to make an applique. An applique is basically a patch or a piece of leather that you will cut out in a certain shape. Then so on top of another piece of leather, you are applying it to the other piece of leather, hence the name applique. So for this lesson, you are going to need your leather. You're going to need a piece of your backing fabric. You're going to need another piece of leather to make your applique with. So the piece that you're going to cut out the shape to sow onto the other piece of leather. I have a scrap of silver, so I'm going to use that. But if you don't have a different color, what you can do is actually apply the last lesson of painting and you can paint a piece of leather a different color, and then use that to make your applique. You're also going to need your stencil, ruler, knife, chalk marker, glue, cutting mat, and piece of cardboard is helpful. To begin, I'm going to start with my piece of leather that I'm going to use to create the applique. I'm actually going to cut the shape out of this piece of leather, and my star piece should fit right on there just perfectly, and it does. Since my leather is silver, but my chalk is white, in this case, I'm actually going to turn the silver over, and I'm going to use a dark colored pen to mark the back. Otherwise, I'm not going to see the markings. Once you can see all of the markings, you can begin cutting it out. So something to keep in mind when you're cutting out your shape. I'm going to use my ruler and I'm going to place the metal edge right up along the line, and when you're cutting, you always want to start inward on your shape and cut away. You don't want to start up here and cut this way because you run the risk of cutting into the shape and we want to preserve the shape in here. I'm going to cut away from the shape around all of the edges. I start right in that point of the star, and then I just follow the metal edge all the way out, just like that. Take your time so that all of your edges are nice and clean and smooth, and all of your pieces of leather are separated once you cut. Remember to keep your blade sharp to get the best cut. So here is my piece ready to be applied. Now, next thing we want to do is take our piece of leather, and I actually chose this one because it has a little hole in it which is going to be perfect because we'll cover that up with the applique. So like we did in the last lesson, I'm just going to use my cardboard as a template so I can see the center and where I want to place the applique. Then once I do that, I'm going to take my stencil and I'm going to place it exactly where I want it and then trace that, and what you're doing is you're giving yourself a guideline of where you're going to place your glue because you don't want the glue on areas of the leather that don't need it, it can ruin the leather. You only want the glue to be where you need it to be. So there's my spot. Next thing we're going to do is we're going to use the glue to stick the applique to the leather. This is important because you really can't have these pieces moving around when you're trying to sell it, and this is actually the way that you keep it in place. So I'll start with my applique. I'm actually going to use my cardboard to keep my workspace clean, open my glue and give the glue a little bit of a stir. This glue is non-toxic, but it is what's called a contact glue. It means that both surfaces that you're trying to stick together need to have glue on them that is fully dried, and then once that glue is dried, it adheres to itself. So you want to take a little amount and spread a thin layer all over the applique, and I'm talking thin. If you're seeing gobs of glue, you have way too much glue, and you want this to dry as quickly as possible so that you can continue working. So keep it nice and thin, really spread it out, and a little bit goes a long way. So I'm just going to place my applique to the side while that dries. Then I'm going to take my leather piece and I'm going to very carefully only put glue right up to the line that we need the glue, and really spread it out. I love the specialist because you can dip the edge in and you can just run that flat edge right along the edge of your tracing line. So now I have the glue on my leather, I have the glue on my applique piece, and I'm going to let both of those completely dry and then come back and show you how to stick it on. A few minutes have passed and my glue is completely dry on both surfaces. You can touch it and it will feel tacky, and just to note, when you're applying, when you're sticking it down, if the piece is not sticking, it's because you either have not put enough glue or because you have not let your glue dry long enough. So make sure that it is completely dry and it is feeling slightly tacky. Now all we're going to do is take the one surface, place it down on the other surface inside the guidelines that we drew, and just take your time doing this and lining it up. This is not permanent, so if you make a mistake, you can peel it up. But just be careful because you can stretch the leather whenever you're peeling. So just be gentle, and then smooth it down. If there are any little remnants of glue around the edge and the chalk, just use your fingers and wipe that away. Now that this is all stuck down and secure, we are going to take this and we're going to take our backing material, and we are going to go over to the sewing machine. Here we are at the sewing machine and I hope that you can see everything okay from this angle, and so my sewing machine is already set up as we talked about in the machine setup portion of the class. I have my leather needle in, I have my polyester thread, and I have my stitch on the longest length, which for me is 4.8. We're going to take the piece of leather you have and the backing piece and just place the backing piece right in the center, and we're going to start sewing, and you're really just sewing a straight line close to the edge, right along the edge. This is where my stitch line is going to be, right along the edge. So it's just sewing a straight line, and you can start wherever you're comfortable. I'm starting at the inner point of the star, and I'm just going to put my presser foot down in this spot and lower my needle, get everything into position. Take your time getting it into position into the position that you want, and I'm just going to take my time and I'm going to stitch straight line, stop, lift my foot and pivot, and continue until I get to the end. Do not backstitch at the beginning and do not backstitch at the end. We're going to talk about a different way of finishing off the threads. Here we go. Wherever you feel you're getting too close to the edge, stop and use your hand wheel to get you to where you want to be so that you don't sow over because something to keep in mind when you're sewing leather is that once you put a hole in the leather with the needle, that's it, the whole is there. So just be careful, take your time and go slow. Just keep peeking that things are moving the way that they should, that things are in the position that you want them to be in, and because we glued everything down, nothing is moving around. Everything is staying right place. I don't think I mentioned the reason that you need the backing material, and that's because you need something to sew into. The sowing into the leather itself with the applique on top may be okay, but the backing material gives a little extra stability and something for your needle to really go into. So I just like to have that there to stabilize while I'm sewing. I'm reaching the point where I started. I'm just going to go right back up to that point, and not backstitch, I'm going to take my piece out of the machine. When you cut the thread, leave a long enough thread. Leave a pretty long thread, don't cut it too short. I have this much thread. I did a contrast color stitching in blue just so you can see it. So you can see all of my stitch lines. We'll check the back. Looks like everything caught fine. Now, what we're going to do is instead of having a backstitch there, we're actually going to tie off the threads, which makes the finish a little bit nicer, so you won't see any back stitching. We're actually going to pull these front threads to the back and tie them. All you have to do is flip it over and see these threads that are hanging, pull them until this little loop pops out for each one. See that loop, and when the loop pops out, pull it all the way through, and that will pull your front thread to the back and then just do it with the other one. You should have four threads in the back, and you can grab two threads and two threads and just tie them together a few times in a knot, so I'll just tie this about three times. Snip your threads. Then you can see on the front, this is my start and finish point, but there is no back stitching, so it just looks a little bit neater. So here is your applique all finished. So put this to the side, we'll mount it later, and don't forget to post this into your class project to show the other students what you've done.
7. Inlay: Hey, everyone. For our next lesson we're going to do what's called the inlay. It is very similar to applique, but it is actually the opposite. As we just did with applique, you cut out a piece and you sew it on top. With inlay, you actually cut out a window like this, and then you sew a piece of leather behind it. You need all the same supplies as the last lesson, which includes a piece of your leather, backing material, another piece of leather that's either a scrap in a different color or one that you can paint a different color. Your stencils, glue, chalk, knife, ruler, mat, and cardboard. Let's begin. First things first is that we're actually going to take the piece of leather and we are going to cut the shape out of this and create a window. Just as the other lessons, we are going to trace our cardboard to make the lines. Then just as the other lesson, we are going to trace the star or whatever shape you have right on to the center or position however you like. Now we're going to cut our shape out of this. From the last lesson with applique, we started on the inner point and cut outward because we wanted to preserve the shape in the center. But this time we actually want to preserve the outside of the shape. We're actually going to start on the outside and cut inward, this way we don't run the risk of cutting into this material. You should have enough practice by now with lining up your ruler and slicing. Our shape is cut out. You can clean up any lines that you see that aren't perfect, and you can discard the centerpiece. Now this is our window, and we're going to put our backing material behind this. Make sure that whatever piece of leather you're choosing to use as the backing is large enough that you'll have room to catch it when you sew around the edges. Clearly, you don't want your piece of leather to be the same size as this because then you can't stitch it to anything. Test it out, make sure that you can feel it underneath the areas that you want to sew, and we're actually now going to mark the lines on here because we need to put glue on the outer edges. We're going to put the glue on the outside here, and on here we're going to put glue on the back around there. Same deal as before with the glue. Just make sure that you apply thin layers to all surfaces and that you let it dry completely before you try sticking them together. I don't need to put glue all over the entire back of this. I just need to make sure I get glue. Most importantly, is closest to where your stitch line is going to be because you want to make sure that that's where everything is really held together. Then just drag it outwards. It doesn't have to be the exact same shape. The glue doesn't have to be the shape of your scrap there. You can actually trim the excess off later after it's been sewn on. Just make sure that you get it close up to the edge here so that everything really sticks. Make sure that you get these pointed areas too because those are all really important areas. Those are the areas that move around when you're trying to stitch. I'm going to continue adding glue to this and I'm going to let it dry completely, and then I'll come back and show you how to stick them together. My glue is now dry on both pieces. I just put my paper down because I don't want any residue from this piece to get onto my mat when I flip it over. Very similarly to the last lesson, we're going to place this window on top of this piece. We're just going to use the chalk lines as our guidelines when we place it down. Just take your time and you can lift the area of leather again if you do mess it up. But just like this, smooth it down and just use your finger or a cotton bud or whatever to wipe away any of those chalk lines. That looks pretty good so far, that looks pretty cool. One more thing that's a great trick to do before you start sewing. When it comes to inlay, I like to actually draw my sewing lines on because it's a little bit harder for me to judge just by the presser foot on the machine. It's actually easier for me to have a stitching line there that I know how far to stitch before I pivot. I just take my chalk marker. I actually have a small ruler here, which is really useful for this. I just do 1/8 of an inch away from the line, and I just make a stitch line, a guideline for myself. You don't have to do this, but I just really find this helpful to get a really good-looking even stitch all the way around the outside of the inlay. I actually use inlay a lot in my work. I think it is a really cool and dynamic way to add graphics into your work. You can do a lot of different things with inlay. You can make it really interesting. You can actually do combinations of inlay and applique together. When it comes to doing inlay, you can of course, use a matching thread. You can use a black thread on this leather so that you won't see the stitches as much. But then you can also use a contrasting color such as, you see the chalk as white. It would be cool to have white stitching there too, it just adds an extra element to the design and extra color in there. Now let's take our backing fabric and what we've created here and put them together, and I will meet you at the sewing machine. Back at the sewing machine, and here is our piece to be sewn. Same thing as before, we're just going to stitch straight lines along the lines that we drew, no backstitch. We're going to tie the threads off the same as last time. Don't want to go too far, so I always use my hand wheel at that last stitch. Okay, cool. Make sure you leave enough thread to tie off. If you get close here you can see all of my stitch lines. That looks pretty cool, I like the blue thread. Wipe away your chalk lines, tie off your threads, and make sure you share this in class projects, and then just put it to the side so we can mount it for later. But you have finished your inlay.
8. Quilting: We're moving on to the next lesson which is quilting. By this point in the game, you should have enough practice sewing to feel pretty confident because with quilting, we're going to be doing a lot more sewing on one piece. What you are going to need for this lesson is a piece of your leather, your layers of batting sheet, one piece of your backing material, your cardboard, stencil, ruler and chalk. Just like the other lessons, I've just used the piece of cardboard to make the template onto the leather which I've already drawn. I'm using a star for this and I've actually made a slightly smaller star than the one I've been working with. But when it comes to quilting, it's important to decide on the quilting design you want to do first. What we're going to end up doing is making a little sandwich with the leather, the batting, and the backing material. We're going to draw stitch lines in whatever pattern we want onto this leather. Bring it to the sewing machine and stitch it together and when we do that, it's going to create a 3D raised puffiness between the stitching lines. With quilting, you can get as elaborate as you'd like, but you can also keep it very simple. You could simply do just grid line squares across the whole piece. You can do diagonal, you can make diamonds or triangles. In this case, I'm going to continue working with my star-shaped just to show you a little bit more of an involved example. But for your first run, feel free to just keep it very simple. Just do square grid lines or something that you feel very comfortable sewing. To begin, I'm actually going to measure the center points of my square. With quilting, it's important usually for it to be symmetrical. I want to make sure that I'm starting in the center and working my way outwards so that I can be sure that by design is going to be symmetrical. We know that the square is six inches by six inches and I'm just going to use the marks on my mat to notch the centers. I'm going to do the same for the other axis. Now I know where my centers of everything are and I can line up my star accordingly. I can line up the center here, the center here, and then cross ways. What I'm going to do to create my quilting lines is I'm going to begin with this small star shape and I'm going to build outward from here. Your chalk is a really important tool in this lesson because you need to draw all of your stitch lines on so you can see them when you're stitching your quilting. There's my star and I was thinking about this before and I think I want to do some stitching lines going through the center of the star where the points go inward, like how a nautical star is. I'm actually going to grab my mini ruler just because it's easier for me to work with. If I'm defining the center as here, then I want to create points or lines coming from each of these points. I'm not really measuring perfectly, so mine might not be 100 percent even, but you'll get the idea. Do you see what I did here? I created these lines going into the center. Now, I'm deciding that I want to extend those lines all the way to the edges. These are going to become stitching lines for me. I'm actually going to just extend them out and I'm going to overdraw them into my margin and you might have to go back in as you're working and redefine some of your lines because you are going to lose some of them while you're rubbing and your hand rubs across it, your ruler rubs across it. Now what I want to do is I am choosing for this design to continue the star shape and just make it bigger and bigger. I'm going to use this line and I'm going to do half an inch just because if I were to make it smaller, I would be doing this lesson forever. I'm just going to do half an inch away from each of the lines of the shape, from the outside lines of the shape to create another larger star. You can see how I'm building from the center outward so that I hopefully might have symmetrical design. I'm not one for 100 percent accuracy, if you need this to be 100 percent accurate, take your time and really make sure you measure everything. I do like the way that looks. I think that looks pretty cool and then to just continue the idea of this design, I'm going to keep extending these lines out another half an inch. I'm going to keep doing that until I get to the end of my pattern. Now I've drawn all of the lines that I want to have in my pattern. You can see there's a lot of chalk here. There's a lot of lines, and some things are a little bit dusty. Just go through to your own satisfaction and redraw all of the lines. Make sure that you can see them because you're going to need them for stitching. You cannot stitch without them. Just know that some of them may get rubbed away while you're stitching. So when you're [inaudible] to the machine, you might have to go back in and just redraw some of your stitching lines. Now I want to make a note here because my example is a little bit unusual, but when you're stitching your quilting, you always want to start stitching from the inside and go outward. If you were to have plain grid lines, let's say like the grid lines here and this was your center line, you would want to start stitching at this line and then stitch the next line, the next line, and the next line, then come back and stitch this side. That will keep your fabric from moving over while you're stitching it because the fabric can actually migrate over. When I start stitching my design, I'm actually going to start with these lines and I'm going to start in the center and go out. Then when I do my star, I'm going to start with the center most star and work my way outwards. Let's take all of our materials, let's make our little sandwich, backing material on the bottom, then padding, and then your fabric leather on top and let's head over to the machine. Hello. When you are sewing your quilting, you absolutely want your machine to be on a long stitch for this. We're going through a lot of layers and so just make sure that you test some of these layers on a scrap before you even put it under the machine and you want to make sure that it goes through without any problems. Something you're going to need to keep in mind when sewing the quilting is you want to keep a good handle on your things. You want to really use your fingers to hold everything down and keep it in place. Because you have so many layers here, they can move around and also, you cannot pin leather, so you can't pin any of this down. You really have to rely on your hands to hold everything in place. I'm just going to lift my presser foot up as high as it will go. I'm going to start sewing from this center point outwards. I'm not going to do a back stitch because we'll tie the ends off and make it look nice. But I'm going to stitch way out over to the ends and I will do a back stitch at these very points when I meet these edges because we are going to be trimming this away and we don't want the thread to unravel. But for any points in the center, I will not make a back stitch. Here we go. Do not rush yourself. Take your time with this one and go slow. See how I've got my hands really spread out over everything? I'm just letting the machine do the work in pulling the materials through. When I get to that very end line, which I'm going to walk my machine down to, when I get there, that's where I'll place my back stitch. There's going to be a lot of maneuvering with this lesson. You're going to be cutting it a lot and putting it back into the machine. But just so you can see, there's my first stitch line, there's my back stitch. I'm going to start again from the center and work my way out. I got my first lines sewn in, my main lines and I tied off my threads in the back just to keep everything neat. But you can see here how starting in the center really helped anchor all of the material in place. Now I don't have to worry as much about it moving around and shifting while I'm sewing it. Now, if you were to be sewing a regular grid line where this line went from the top to the bottom and that was the center line, that's where you would start. You would start at the center line, but sew from top to bottom. Then the next line you would sew is the grid line from the opposite way and then work your way outward on each line. Because I have a shape in the middle, I'm actually going to now sew this star pivoting around each point. I'll start with the star in the center, and then I'll move and I'll get to the next star and sew that one, and then I'll sew the next line outward and so on until I get to the end. Let's see. I've gotten to the end and I think this looks awesome. I love this. I think this looks cool. The one thing though I would say is that it's maybe not as puffy as I would like. I think maybe I'd like a little more puff even though you can see the quilting for sure and you can feel it. I might add another layer of batting if my machine was able to handle it. Just always do what your machine can handle. Don't give it more than it can handle. But I actually also think that I would like to stitch the square border around the edge of this. I think that would look really nice. I'm just going to do that. The border looks really cool. I love that. It just holds the shape in place. I'm going to go through and trim off my threads and then I'm going to put this to the side and quilting lesson is finished. Make sure you share what you've done in your course projects. I'm looking forward to seeing what you come up with here.
9. Trapunto: Hopefully, you are still with me up to this point. If you are, that's awesome because we are going to move on to some more interesting and unconventional, I guess, techniques and manipulations, things that are a little bit more interesting. The next lesson here, we're going to do something called trapunto. The word trapunto is an Italian word meaning quilting. But in relation to leather, we're talking about when there is a raised design beneath the layer of leather. You guys have definitely seen this before, certain designers do this a lot on handbags. What you're going to need is a piece of your leather, a piece of your cardboard, your glue, and spatula, chalk, knife, bone folder, ruler, mat, your stencil, and if you have craft foam, great. I'd say two pieces about the size of your stencil, and if you don't have craft foam, just take a couple pieces of smaller leather scraps that you have. I'm actually going to use both of these together, but if you have one or the other, just use a couple of layers of either. First things first is it's important to know with trapunto that we have to use a hard surface to do it on. We can't put this on a soft backing fabric because what we're actually going to be doing is cutting out the shape from these scraps, placing, gluing it down onto the hard cardboard, and then taking this piece of leather and gluing it while stretching it over so that we can see the raised design underneath. First things first is you'll need to cut your shape out from your pieces of either scrap or foam. We're doing what's called soft trapunto, where we're using a soft material to create the shape beneath the leather. But you can actually do a version that's called hard trapunto and you can use something hard, you can use another piece of cardboard to make the shape underneath. You can use anything that's flat on the back, even if it has a rounded top, like a button, or you can use coins, or any little findings of jewelry shapes you can put beneath. You can make, if you have a logo that you want to use for your designing, you can maybe cut that logo out of either a craft foam, or card stock paper, cardboard, chipboard, and you can make your logo design raised beneath the leather. Something important to keep in mind though is that don't do too thin of a layer, or you really won't see it raised enough underneath the leather. Also, if you choose an item or a shape that's too bulbous, then you might not be able to get the leather to smooth down over it as well. Also, anything that has two small of detailed shapes, you might be using maybe a shape that has a lot of swirls on it, and there's a lot of small negative space in between the swirls, that could be really hard for you to define beneath the leather. You'll see what I'm talking about once we get to the smoothing action. Just cut out your shapes, I'm going to cut out the foam next, and then I'll meet you back. I've cut out my shapes one from foam and one from leather and they're pretty much the same size when you lay them on top of each other. Now I put down my paper because we're going to need to glue. I'm going to need to glue on the backsides of both of these shapes, I'm going to need to glue this entire surface of cardboard, and I'm going to need to glue this entire surface of the back of my leather. I've got glue on all of my surfaces and I let it dry. You want to make sure first of all to really get the entire surface, you don't want to skip any areas, have any little spots where there's not glue because you really want to make good contact on this technique so that you can really define the shape underneath the leather. The only way to do that is to get enough glue to make sure that everything's really sticking. I'm going to start off with my shapes, and I have glue on the back of here and I have glue on here, so I'm just going to stick this down where I want it. From that down, it's making great contact, give it a good press. Now I also want to stick this on this, but I need to put glue on the surface. Let's do that. This technique can just take a little while to get going because you do have to put glue on many surfaces, so get the glue on there, let that dry, and then we'll come back. My glue is all dry here, so I'm now going to stick this one on top, press it down. Now one more time we need to glue because we need to make sure there's glue on top of this. This portion of the gluing is where you want to be a little bit generous. Because what's important is that once we pull the piece of leather over this shape, we need to make sure that that leather gets down around the edges of this star to really define the shape of the star. I'm going to be a little more generous with the glue than I usually would, and I'm going to get right up to the edges of everything to those points so that when we put that piece of leather down over it, it really has something to stick to. It's a little bit more than we usually would put. Just make sure you let it dry very well, because as we know this is the contact glue, and if you don't let both surfaces dry enough, then they will not stick together. The glue is dry over my shape, on my cardboard, and on my leather piece. Now we can begin stretching and smoothing. Very simply, you're going to take your piece of leather, I got a little paper glued to mine, so I'm just going to peel that back. It's a little bit bigger which is what we want. I'm going to start here because I'm right-handed, so I'm going to be pulling with my right hand. But I'm just going to start, place the edge a little bit over the edge here and just smooth that edge down. Then you're going to pull the leather with your one hand while you use your other hand to smooth it over the shape and over the surface. Here we go. You want to pull and stretch the leather because it will thin it out over the areas of the shape, and that will help also to define the shape more, keep pulling, keep smoothing. If you do mess it up for any reason, you can pull it back a little bit because the glue is not permanent. But remember that anytime that you pull leather you can stretch it out of shape, so just be wary because it might get a little bit weird after that. Once you get it to the end, just give it a really good press everywhere, press it down. Now you can use your bone folder to really get close to those edges and to really give them a good press. Be careful not to cut into your leather with the bone folder, don't go too hard on these edges here because it can leave a permanent mark. I'm just placing the edge of the folder up along the edge of the shape and giving it a good press down. You can start to see that the shape is really becoming defined. Because we have glue right up to this edge here, it really stick down around the shape. This could take a little while, really work it until you get it how you want it. I don't think I had enough glue in this area, so you can see that the shape is not as well defined. You don't actually have to have a bone folder for this, or if the bone folder isn't giving you the right amount of detail or the right amount of shape, you can find whatever you have lying around. You can even use the edge of your chalk if you want to get into these areas and the shape matches up better for you, or whatever, you can use the back of a spoon to get in there and rub, whatever. That's looking pretty good, I'm pretty happy with this. You can definitely see the star underneath, I love that it's soft and that you can feel it. It's a low relief, which means that it's not popping out dramatically. But if you wanted the shape to be more defined and more dramatic, you could add multiple layers to your piece underneath, you can use a different material altogether to create a more raised effect. Once you're happy with your shape, you can just flip it over and just use your knife and trim off the excess leather from the back. I suck at this, I actually find using my scissors a little bit easier. Here's my trapunto. You may be wondering, I want to use this on an accessory, I want to make a handbag using trapunto but I don't want rigid piece of cardboard in my handbag. Yes, that's true. If you take my class on making a leather zip case, you will actually see me utilize a different material to execute trapunto. That is something that they call leather paper, but this is essentially a thin flexible material made of composite leather. It's little scraps of leather, leather pulp that they put together and then they flatten out and make a paper with it. This is durable but also flexible. If I were making a handbag and doing trapunto, I would apply the shape and the glue and everything onto this surface, stretch the leather over it, and then essentially still be able to saw this piece and it wouldn't be so stiff and rigid as the cardboard. Otherwise, you are finished with your trapunto. Make sure you post it so we can all see what you've done, and then just put this aside and we'll move on.
10. Slash & Turn: For this next lesson, we're going to be doing something really cool, something that's actually my favorite technique because I think it's the most interesting looking. It's something that I call slash and turn. Here's an example of slash and turn that I did. What we're going to be doing is slicing into the leather strips, turning them, gluing them down, and then stitching them down. It creates this really cool, to me it looks like snake bones or a snake. I think it's really cool. You can put it down the sleeve of a jacket, you can put it on the back of the jacket, you can put it on a strap like this, a belt. There's a lot of different things that you can do with this, so let's begin. You're going to need a piece of your leather, piece of your backing material. I'm using a second piece of leather. It's optional, you don't need it, but as you can see here, I had used a silver piece behind so that you get a really cool effect, but if you decide not to, then you'll just be able to see your backing material through the negative space. Also using my chalk, my blade, which should be extra sharp for this, glue, and my ruler, I'm actually going to be using some of my smaller rulers because they're a little bit easier, and just the cardboard for the template which I already drew. When it comes to this technique, you really must establish how wide you want your slashes to be. You can go as wide as this six-inch piece or you can bring it in a little bit, but I recommend that you do not leave less than one-quarter of an inch around the edge because you can't slash all the way up to the end because you'll just cut the piece of leather. You need something to be able to hold the ends in place. Don't go any less than a quarter of an inch. Also at the top and bottom, you want to leave a little bit, I'm going to leave an inch at the top and the bottom. What I'm going to do here is, first I'm going to mark an inch at the top and the bottom, and then I'm also going to mark one-quarter of an inch on either side. This area in here is what I'm going to be slashing. How thick you want the slashes is up to you. These are probably, let's see, one-quarter of an inch. These are actually three-eighth seven-inch, these slashes. You can do a quarter of an inch, you can do a half an inch. You could probably do wider slashes as long as your piece of leather is wider, the smaller and thinner your piece of leather is, the smaller and thinner your slashes should be because it's going to get too hard to turn the material. It works hand in hand with how wide your piece of leather is, how wide your slashes can be. I'll do the three-eighth seven-inch because I think that that is a good width. I'm just going to line it up and I'm going to draw a line every three-eighth seven-inch. Here are my lines and I'm just actually going to use my chalk to strike out these areas so I know that that's where I should stop cutting. Sometimes when there are so many lines marked, you can make the mistake of cutting a spot you don't want to cut. I'm going to cut from here to here across each of these lines and I'm just going to use my small metal ruler to do this because it's easier for me to handle but just use whatever you have. Definitely don't recommend using the scissor for this. I think you should use your blade because you'll get just a cleaner cut line. You can also see that sometimes you have trouble getting to the end, so if that's the case, you can just turn it around and come from the other side. Also, be careful that you don't go too far and cut over the line so this is another one of those cases, really anytime you're cutting leather, you should really just take your time. I cut off my slashes, and just a note, if you find that the leather's moving around a little too much while you're trying to cut, you could always take some masking tape and just tape down the ends of the leather and that'll help keep everything in place. Now I've cut all of my pieces and these are what we are going to end up turning and gluing down. Let's actually mark the center. Just visually, that'll be helpful to us and we know that the square is six inches wide, so here's three inches, here's three inches, and I'm just going to draw a line down the center. This is actually going to help us to know where we should put our glue. Because we don't want to put glue anywhere that we don't want it, so this line is going to be the line where we put glue and remember, we're not putting anything here or here, just on those slashes. At this time, you can take your other piece of leather if you have it and we're going to draw a line here and we're also going to add glue to this. Draw a tape line on it, stick down some tape like this and peel it back then matching the center lines, you would place your piece of leather over this, like this, and make sure it's all lined up and that you have enough here, and then you would go through each one of these and just flip it over and tape it, press it down onto the tape, and that's how you would stick it down. If you're doing the backing leather like I am, we're going to glue now, take your piece of leather with the slashes, your glue, and make sure you cover your workspace, and just dip the tip of your applicator, and remember, don't put glue where you don't want it, and just really just put a very thin strip of glue right there along that line. We only really need it there to hold the leather in place. We don't need to go crazy. Take your backing leather from here. I actually think my line is a little bit shifted over, so I'm just going to move it over a little. It's probably more central and just do the same thing. If you don't want to do the glue at all, you can definitely also do the tape method on this too. You can just use the tape here. But the reason that I use the glue is because I think it has a slightly better hold than the tape. Just let everything dry. My glue is fully dry on both surfaces. Now, we will place the backing leather here. We will line up with the central lines that we made, making sure that the backing material is behind everything that we're going to be slashing, and then we're going to turn and just stick everything down. Starting from the top, you can turn it away from you or you can turn it towards you, it's up to you. When you do this, you flip it over and you take the edge and you put it right up along the edge of the leather above it, and then just continue on. While you're doing this, you might notice some rippling or a little bit of pulling in the leather on the sides and that is completely normal because this is now, we're making a 3D effect here, now, this is really becoming a three-dimensional thing, so it's not going to be perfectly flat on the sides anymore. You can really start getting the effect here when you have a backing material behind it like this and a contrasting color, it really creates a great striking effect. Remember, if you don't have a contrasting piece of leather, you can paint a piece of leather. That's pretty much what we have. That looks pretty cool. We can take this, and we can take our backing material because you still want that extra stability when you're sewing, I like to have that extra stability and make a little sandwich and then we'll head over to the sewing machine. Here we are ready to sew. Before I came over to the machine, I actually took my ruler and chalk and I marked a sewing line straight down the center so that'll be easier for me to follow. Now, when you go to sew this, everything should stay in place, but in case this stuff starts to move around and these things start flipping the other way way you're trying to sew it, just go one at a time, flip them back over, use your hands to place them up against each other and just take your time and go slow like with everything else. I'm actually going to start sewing right here and I'm going to back-stitch and just straight down until I get to the end and then back-stitch when I get to the end. You can absolutely leave it like this and just have it floating out of the piece of material, or if you'd like, you can stitch around the edges like a quarter of an inch away just to solidify everything in place. I'm going to do that just because we're going to be mounting this and it'll hold together a little bit better, but if you are putting this on into a garment, say this is the back of a jacket, you don't need to stitch around this. You can just leave this so that it just is cut and is just floating in the center of the fabric. Really cool design feature. I'm really excited to see what you guys come up with this one. There are a lot of possibilities. Consider the possibilities with this. You don't have to do it straight across. You could actually even turn the leather on a diagonal and you could do it in a diamond shape this way where it's smaller at the top and then the slits get wider toward the center and then smaller again. This one's really fun because you could do some really interesting things with it. Practice it once just like this maybe, and then take some time and start experimenting with it in different shapes, in different forms, different widths. You could do say double this with one slice, but then turn it twice in two different areas. You can really do a lot of cool things with this. This is our last lesson at the sewing machine, so please make sure you share whatever you've done. I'm really looking forward to seeing it.
11. Rolled Tassel: We're going to make a leather tassel which I think is one of the cutest ways to dress up any leather project. We're going to make a relatively small tassel. But keep in mind, you can make it as long as you want, you can make it as fat as you want, it just depends on the size of your piece of leather. But we're still working with the six inch by six inch square template, which I've already traced here and that's what we're going to be doing just to make this quick and easy. Trace your template onto your leather which you'll need, piece of your leather. You'll need your blade and your cutting mat or your scissors, whichever one you prefer. You'll need your ruler, and you'll need your leather glue, your chalk. Something that's more helpful in this lesson which I didn't really mention in the supplies. But if you're interested in continuing to make things with leather, you should definitely pick up is leather and suede glue. There's actually, I use a few different brands. Here's Aleene's, here's Fiebing's. This is permanent glue, not like this. This one is like a tack glue that can come apart. This is if you want something to stick forever. In the case of making a tassel, you'll definitely want to hold it together forever. I do recommend getting this. If you don't have it right now, this is fine just for the example, but if you want to make tassels that stay together forever, definitely invest in some of this stuff. Also, a little bit of masking tape or painter's tape can help. That'll help hold everything together while it's drying. I'm actually going to cut out this perfect square. Here's my scrap. It doesn't have to be too thick. But you do want it to be a little bit long because we're actually going to be using it to create the loop for which you can use to wrap around a bag or a belt loop or whatever to keep the tassel on. You'll see in a moment what that means. I'm actually going to cut a clean edge along this piece. Then after that, I'm just going to cut a really thin one quarter with peace. I find it for me a little bit easier to use my scissor. You can mark out one-quarter of an inch with your chalk. But I'm honestly just going to eyeball it because that'll be quicker for me. This is going to become our strap loop, I would call it, our loop. This is going to become the actual tassel and what we need to do now is we need to establish the width of where we want our fringe to begin. We're actually going to be slicing most of this up into fringe. We need to establish a baseline of how thick we want before the fringe begins. That could be, I wouldn't recommend doing it under a half an inch. You can mark out a half an inch just to get an idea. There's a half an inch and then we would draw our fringe and slice it from there. If you thought that was maybe too thin and you want it a little bit of a thicker of a baseline, you could do one inch or you can do three-quarters of an inch. I actually like three-quarters of an inch, I think that's a really good place to start especially for such a short tassel. If you're doing a longer tassel, you can do a wider base for sure. But I would say that you probably don't want to go thicker than an inch. You want there to be a little bit of a base, and then you want the fringe. Now that we've established our baseline with the chalk, we're going to start drawing our fringe. I mean, you can do half an inch fringe if you want really thick pieces. You can do one eighth of an inch fringe if you want really thin and you feel like you can cut that. For me, that's a little bit difficult. I actually do one-quarter of an inch fringe. For me, that's the perfect amount, so perfect with the fringe. It's easy for me to cut. You just go along with your ruler and with your chalk mark every one-quarter of an inch until you get up to the end. I've marked out all of my chalk lines one quarter of an inch away and you can see that this last sliver here ended up being much less than a quarter of an inch. See that it didn't add up exactly to be perfectly even across. I'm just going to actually cut that little piece off. Every piece of fringe that I cut will be perfectly one-quarter of an inch wide. Now you're going to start cutting your fringe. It's up to you how you want to do it. You can use your knife with your ruler, place it up against each line, and then start from the demarcation line that you made and slice all the way down. Just make sure you have a super sharp blade because you really want to make sure you cut through it in one pass. Or if you're like me, you'll use your scissors. I feel I have a little bit more control with the scissors. You can just start from the bottom and work your way up and cut each piece of fringe all the way up to that demarcation line. We've set the first one free. Then just take your time e, specially if you have long fringe. If you do a really long tassel, it's going to take you a little while, so don't rush. Just take your time. I have set all of my fringe free and it looks really fun. Of course, you can leave the ends of the fringe blunt just like this. Sometimes what I like to do, which just makes it a little bit cooler is I take my knife and each one of these ends, I'll cut on an angle like this so that you get a cool little point. I've got all my fringe cut with all my little points cut. Now, we are going to flip it over and start putting it together. Actually, get your paper or your cardboard to protect your workspace. I'm just going to use this little piece of cardboard and get your strap and establish which side is going to be the inside of your tassel, that's going to get rolled inside. Doesn't matter. I'm just going to go with this side. This is actually where I'm going to attach my strap. I want to actually glue this into the innermost area of where we stopped the fringe all the way up to where that first bit of fringe starts, and all the way up to the end here. Just use your renia glue if that's what you have. But I'm using the permanent blue because I really want it to stick forever. This glue is really strong and you don't need that much. You want to keep it on the thin side. I'm just applying a little bit like this, sticking this down. Then applying onto this side and sticking the other side down to create a loop. The next thing is that we're actually going to roll this piece to create the tassel. This is where it comes into play about how wide your piece of leather is, depends will result in how fat and wide your tassel is going to be. The longer of a piece of leather you have this way, the more you're going to roll it, the fatter the tassel is going to be. I think between four and six inches is a good width because otherwise you end up with a really fat castle that just look silly. From where the loop is here, we're actually going to roll the leather that way and keep it tight on itself. We're not going to put any glue or anything yet. We're just going to roll it all the way into the end because we need to put marks where we want our glue. You also want to keep in mind that when you're rolling it, you want to keep the top of these even. See this? You want to make sure that every piece that you roll is in line with the next piece so that you get a nice even top. You can get an idea of what your tassel is going to look like. But anyway, if you're using the aquilim glue, we know it's a contact glue and I'll do that as an example just so you can follow along. We need to mark where we don't want glue to be. Wherever the piece of leather ends, that overlap, make a mark with your chalk in there. Then keep this piece here in your hand because you know this area here, you're going to mark it in so that you don't make a mistake. That's where you're not going to put glue. Because if you're using the aquilim contact glue, you don't want glue on the outside pieces of your tassel where it's going to show. If you are using the permanent leather glue, feel free to take this and put it all over this entire area on the back side, the whole thing, and then roll it up and that's it. But the renia glue because it's a contact glue and you need it on both pieces, we need to only put it where we need it to be. You're going to have to put it on the entire backside from the top all the way up to where the fringe begins. Don't actually put any on the fringe itself because you don't want the fringe to stick together, you want that to be all free and flowing. But the rest of the back up to that demarcation line. Then you flip it over and put it everywhere except that area that you marked with the chalk because that's the area of leather that's not going to be wrapped up inside, and that you're always going to be able to see. That's going to be the outside of your tassel. Now that the glue has dried, we are ready to roll the tassel, hence the name rolled tassel. Just flip it so the back side is off and you're just going to roll it the same way you did last time. But just this time, really take your time in making sure that you get a nice tight roll with a nice even edge all along the top. Just press it as you go. If you're using the permanent leather glue which does not dry right away, that's when I would take a tiny piece of painter's tape or masking tape and I would just put it over the seam and stick it down and just let it fully dry for a good like 24 hours. But with the renia, you don't really need that because it's dried right away. But it also is not a permanent bond, so just keep that in mind. Now you pretty much have your basic tassel. This is the loop that you would use to put it around something. Just for an example, we'll just use the bond folder and we'll pretend it's the strap of a bag or something. You would put the loop over it and then just pull the tassel through like that. Now it just hangs. Now you've completed all of your lessons and it's time to work on announcing everything. I'll see you-
12. Mounting the Samples: You've now completed all of your lessons, so great job doing that. Now, it's time to mount our work onto cardboard so that everything stays really well preserved and you can handle it and keep it nicely. You can see I've already done it with the painting sample. We're going to stick it down and we're going to trim the edges just to make everything nice and neat. What you'll need for the mounting project are all of your samples including your tassel, your pieces of cut cardboard, cutting mat, your craft knife. I'm actually going to use a cutting mill because I'm really not good at cutting with the craft knife. Many of you may already have this if you're a crafter or a sawer, and also your double-sided tape. The painting I've already done. The traponto, if you remember, we did the project right on the cardboard so that's already mounted. One at a time, go through each of your samples and just make sure all your threads or trend. If you have a lot of excess from all of the layers, you can go ahead and trim those a little more evenly so that it's going to be easier to handle. Very simply, all you're going to do is take one at a time, one piece of cardboard, one sample. Take your double stick tape and just put it on the four edges of the cardboard. Now take your sample. Some of these might still have the guidelines that you drew on them. If not, just loosely center it onto the cardboard. Then once you get it positioned in a way that you think looks good, just rub it down along the edges. Once that's in place, you can turn it over and you can use your knife, or your scissors, or your rotary cutter to just cut off the excess right along the edge of the cardboard. If you need to use a ruler and place the metal edge right up against that, you can do that. My cardboard is pretty thick, so I really don't need the ruler to help me line it up. Everything is nice and neat, and it looks really good. Go through and do that with all of your samples, and then we're going to talk more about the overall presentation. I've finished mounting all of my samples. You can see how this is just a better way to keep them and handle them and make sure that they stay really nice, and that nothing gets stretched out or messed up or even lost. I didn't mount the tassel though, and that's fine we don't really need to. Part of your final project is also being creative in the way that you end up presenting these and keeping them for yourself. Think about how you want to do that. That could be just mounting them all in one big piece of foam board, and you can always hang that up on your wall in your design room. You can put each one of these in a little picture frame if you wanted to make them into art and then hang them up in your design room. What I'm going to do is I'm actually going to put them into a binder. I have this craft study paper and I printed the names of each of the samples onto the paper. Now I'm just going to mount them right onto the paper and stick them into a binder. That'll be a great way for me to keep them and also add into the binder as I continue learning and going. I can add more samples that I create into the binder. I can add some inspirations that I want to maybe try with leather design and add those into the binder. So overall, it just can become a great source of reference for you. Here is my mother-design sample book, all finished. You can see how it's just now an easy reference to go through, flip through. Have a reminder of what you worked on. Have a reminder of how it's put together, how the finishes are done. I can just keep this stuck away on my shelf in my design room and pull it out at anytime and refer to it. This is really going to be a great tool for you moving forward if you're continuing leather design and just fashion design in general because you can continue to apply some of these techniques not just to leather, but to other fabrics as well.
13. Final Review: I really want to congratulate you on completing this course. It was definitely a lot to learn, it was a lot of work. But these are really important skills that you can take with you into your future as a fashion designer, whether you apply them to leather design or any other type of fashion design, these practices will really help get your creativity going. I really encourage you to continue experimenting with these design methods. Take what you've learned while making the samples and see what you can do with them. Push them a little bit further, try different types of leathers, try different ways of manipulating the fabrics, and just really see what you can do with it. I hope to see you in some of my other classes where we can take these same design principles and we can apply them into accessories or garments, and you can truly see how they can work within fashion design, and just really push your creativity to new limits. Thank you so much for taking my class. It's been really fun. Keep in touch. If you have any questions while you're doing any type of leather fashion design, you get stuck somewhere, or you want a little bit of advice, please reach out to me. It would really be my pleasure.
 Vicky Rocco, Leather Fashion Designer