Transcripts
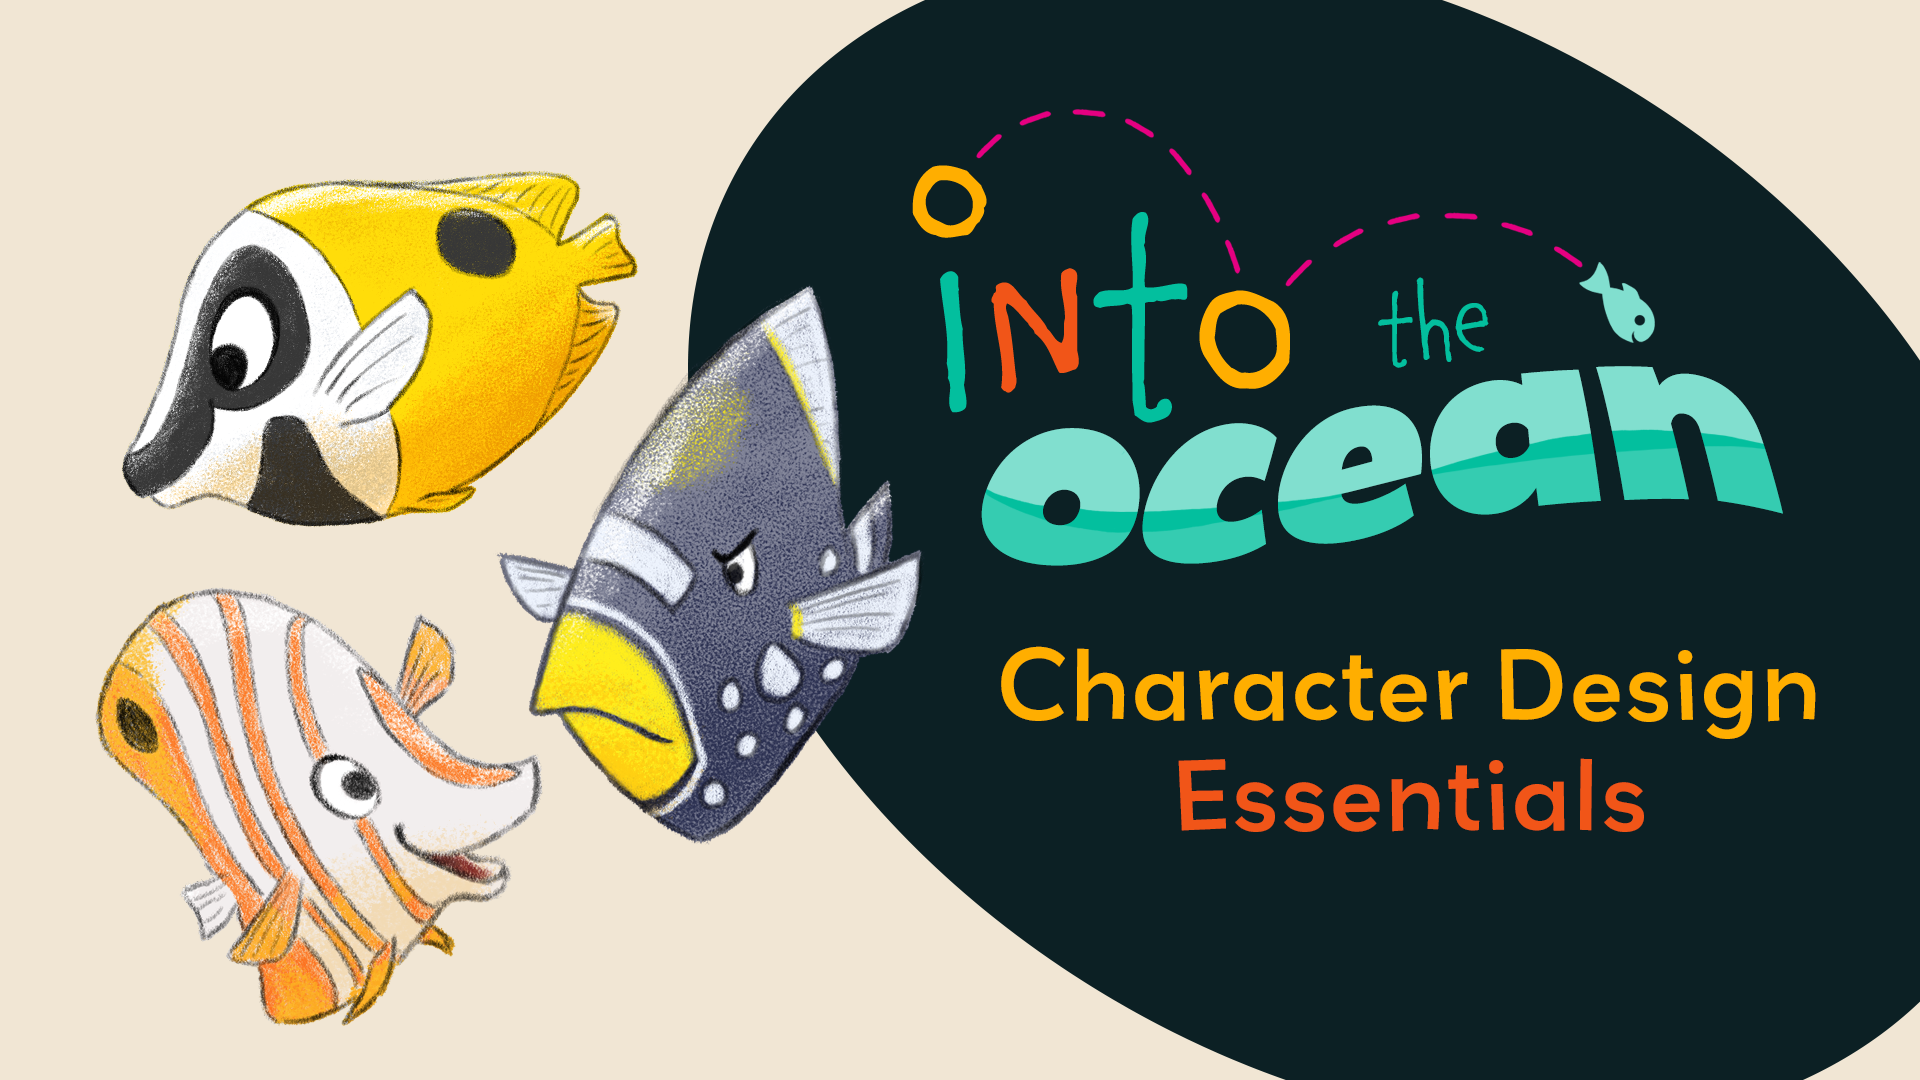
1. Introduction: Whether it's for animation or illustration, bringing your own original character designs to life is one one the most satisfying, creative things that we can do. This class we'll teach you these central skills you need to get started. Hello, I'm John [inaudible]. I'm an animator and animation director, and I have been working in children's television for the last 15 years. I've also had a love of nature for my entire life. When I'm not animating, one of the things that I most enjoy doing is drawing wildlife. When I was first learning to animate, I'd look at other people's character designs and just see, I didn't know how to do that, I can barely even draw, let alone design a character. I started to work in animation studios, animating characters designed by the people and as part of that was, I just really had this desire to start creating my own worlds and characters. My love of nature, firmly naturally turn into wildlife for inspiration. But when I started to draw animals, I had no idea how to actually translate what we're seeing in the real world into an appealing character design. Through many years of practice, I've now come to understand how a few, simple principles can really help to transform the qualitive character design. In this class, I'll share those principles with you. I'll then go and demonstrate exactly how I apply those principles was designing a number of unique tropical fish characters. Was fish may not seem an exciting places start, but quick and simple to draw and have an endless variety of different designs. By following along with the demonstrations and creating your own unique fish character, you'll gain knowledge that you can then apply to all other character designers. Now for the demonstrations in this class, I'll be drawing in a Photoshop, but this isn't a software specific class. The principles that are demonstrating universal and can be applied using any traditional or digital medium, in fact, you need nothing more than a pencil and something to draw on to get started. By the end of this class, you'll have a far great way understanding of how to approach character design and how to incorporate into your own illustration and animation projects into the future. Let's get started.
2. Class Overview: Hello, and welcome to the class. This class is broken down into two sections. The first section is more theoretical and that's where I'll discuss my prizes in character design using this seal illustration as an example. We'll start out by analyzing what we mean when we talk about characters. What are the key things that we need to think about from a story-telling point of view. We'll then move on to discuss research. Before we start to design anything, it's crucial to do our research. This is the time when we start to get to know our subject. We want to design a character based upon an animal and we want it to be believable. It's important to know as much as possible about the animal so that we can base what we're drawing upon reality. Finally, we can start to think about elements of design. Once we know how to draw an animal, we can start to apply design principles to come up with a variety of different designs, and I'll talk about how I approach that. In the second section of this class, I'll demonstrate how to apply those design principles as I walk you through designing a number of unique tropical fish characters. The main reason that I chose fish as the subject for this character design class is that that forms a quick and simple to draw even for complete beginners. That makes it easy to create endless variations. It's through that experimentation process that you can actually learn what works and what doesn't and come up with far more appealing designs. Now, as I'm demonstrating my own design process, you are of course free to follow along. But I'd also recommend is that you go out and find some of your own reference and start to apply what you're learning. Now, ultimately the whole point of this course is to get you feeling more confident and give you some of the skills and knowledge that you need to create your own original characters. For your class project, what I'd really love to see is how you've applied some of the principles that we discussed in this class to your own tropical fish designs. Now, if you're happy to share some of your process images on the way, that would be even better. Since the principles we're discussing here are universal, you really shouldn't feel at all constrained by medium. Whether you're working in Photoshop or Procreate, or maybe you're working in Watercolor, Graphite, or even Collage, I'm really excited to see what you come up with. My hope is that together we can create a colorful virtual aquarium in the project gallery. If you have any questions at all at any time, feel free to add them to the class discussion section where I'm always happy to help. Now that you have a clear idea of what we're going to be covering in the class, let's go ahead and jump into the next section where we're going to discuss exactly what we mean when we start talking about characters.
3. What is a Character?: What is a character? I like to think of a character as a participant in a story. When you're creating an animation or an illustration, what you're usually trying to do is tell a story. The more that your character is relatable, the easier it is for an audience member to connect with that character. Above all else, the most important question to ask is what do they want? The answer to that question will enable you to make far more specific decisions as you go about developing your character. When asking what do they want, there are usually going to be a number of different answers. In most stories, the character will probably have a single want or desire that drives the narrative forward but when it comes to scene-by-scene basis, they might have smaller wants or needs that are driven by the events that are unfolding around them. If we think of a seal chasing a fish, then we might automatically assume that that seal wants to eat the fish but for this illustration, I chose to make the seal appear more playful. In this case, the seal's want is simply to have a friend to play with. The fish on the other hand, behaves in a more instinctive fashion. Its want is simple. It wants to stay alive. Armed with this simple information, we now have a story. The seal wants a friend to play with, but the fish on the other hand doesn't understand and simply wants to get away. We have the essential elements for a chase to unfold but from a clarity of story point of view, we need to be very careful about the design of the character so that it supports that central narrative. We'll cover the specifics of those decisions later on in this course. As we try to define our character further, you might want to ask yourself a number of different questions. What's their personality type? How old are they? What's their physical makeup like? Where do they live? The answer to these questions starts to create a backstory for your character. It gives them a life. You may not be able to visually represent all of these different ideas within your character design but you may influence your pose choices or the movement in an animation with some of that information. Ultimately it's going to make your character far more unique. Once you understand the personality of your character and what it is that they want, it's time to start getting into understanding the physical traits of that character and it's that that we'll dive into more in the next lesson.
4. Know Your Subject: When I'm designing a character, one of the first things that I'll do is research. In fact, I'll probably start on the research before I've even fully fished out the story. The reason for that is so often the research that you do influences the story as you discover new things. What do I really mean by research? If I know, for example, that I would like to design a character based upon a seal, the first thing I'll do is start find out more about different species of seal. I may tend to books or online reference and I'll try to find out as much as I can about the animal. I'll look at what they eat, their behavior, where they live, their physical makeup. Based upon that research, I'll then pick a particular species, in this case, the common seal. I'll continue to learn as much as possible. Now the level to which you do this research will obviously depend upon the needs of your story and how much you already know about the particular animal. But often the more research I do, the more insights I get and I can feed that information back into both the story and the design process. As part of my research, I'll also begin to gather reference photos and video. If it's possible one practical to do so, then I'd like to see the animal for myself, either out in the wild or if necessary in a zoo or aquarium. You can get far more understanding of an animal if you can actually see it moving rather than just looking at a photograph. I try to photograph or film wildlife whenever possible. Because you never really know exactly when that information is going to be useful to you. Often when I'm planning an illustration, a simple search of my own archives will reveal a whole treasure trove of information. Unfortunately, it's not always possible to capture the perfect reference. For example, I took these photographs of a common seal at a sanctuary a number of years ago. As useful as they are for studying the animal, I knew that I wanted to depict the seal swimming underwater. In this case, I had little option but to look online for photo and video reference. Now something that's really important to be aware of as you're searching for information online, is that not everything is labeled correctly. Now, that's where it's really important to have done your research upfront and be familiar with the differences between different species. As I was searching for reference for this common seal, what I would often find in the search results were gray seals or even sea lions appearing. Once I've gathered my reference material, what I'll typically then do is start to sketch the animal based upon my reference. At this point, I'm not trying to design the character, but simply understand their anatomy, how they might move, and identify the essential elements which identify that particular species. Now the number of sketches that I might do will vary widely depending upon my existing knowledge of the particular animal or the complexity of it. But really I just continue sketching until I'm happy that I have a fair idea of how to draw the particular animal. Now the really important thing to note here is that I'm not going to produce an illustration based upon any of these particular images. In fact, it's really important if you haven't taken the images yourself not to end up copying, and we don't want to copy somebody else's work. Instead, what I'm trying to do is understand the construction of the animal so I can redraw it in any pose that I choose. Once I'm confident in drawing the animal, it's now finally time to introduce elements of design to the process. That's exactly what we're going to be discussing in the next lesson.
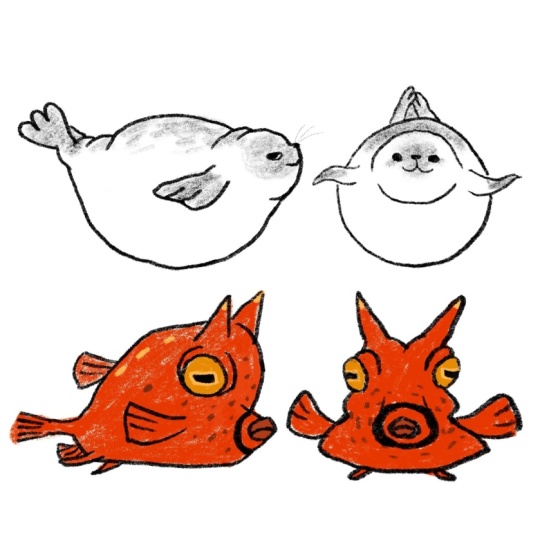
5. Design Principles: When I'm designing a character, one of the elements that I'm very conscious about are the relative proportions of the character. By breaking an animal down into a series of simple shapes which define its general construction, we can play with the relative proportions of those shapes to create unique and appealing designs. Something that is important to be aware of here is trying to avoid evenly split proportions. If each of the shapes is a similar size or things are too evenly spaced, the design will feel more generic and the audience will have a hard time knowing where they should focus their attention. Experiment with using a mixture of big, medium, and small shapes in your designs. This variety really helps to provide visual interest and improve the appeal of the design. When it comes to design, one of the principles that I found really helpful is that of shape language. Put simply, when we look at different shapes, they create different feelings based upon what we associate them with. A square might make us think of buildings, books, or bricks. It can feel strong, solid, safe and reliable. A triangle is a thorn or a knife blade. It's sharp, pointy, dangerous, but could also suggest energy or speed. A circle makes us think of a ball or the sun. It's a fun, bouncy, warm, and playful shape. As we construct our character. If we keep these basic associations in mind, they can help us to evoke a feeling in the audience simply through the shapes that we use. Now our entire character could be reduced to these simple shapes, but the association doesn't need to be that literal. Simply by using generally squarer, sharper, or more rounded forms in our designs can create the same associations. We can also play with expectations. We might intentionally choose to design a character using sharp angles to make them appear more threatening before revealing later in the story that they're actually a friendly character. As I was designing this seal, I was very conscious to use rounded forums wherever possible. Obviously, a seal is naturally a very rounded animal, but they do have sharp teeth and claws, which I reduced and rounded out to make them seem less threatening. If we look at the fish, you'll see that I've actually used far more triangular shapes. Again, this was a conscious decision. It introduces an element of speed to the design, but it was also more about creating contrast. Using sharper forms for the fish helps the seal to appear even softer and more rounded by comparison. Contrast is something that I like to use wherever possible in my designs and illustrations. Obviously, the contrasting shapes of the fish and seal help to reinforce the less threatening image of the seal. But the contrast of their forms also adds visual interest and appeal to the image. I've also used contrast elsewhere would have been very easy to create a single flowing curve from the seals head all the way through to the hind flippers. But I chose instead to keep things rounded at the front and introduce some straighter lines towards the rear. This both hints at the underlying anatomy, but also creates more visual interest. Wherever possible in character design, I'll aim to simplify details which might be distracting. In the case of this seal, this was mainly through the pattern. Common seals have spots which can vary quite widely. When designing the pattern for this seal, I was conscious to keep the contrast low and the pattern as simple as possible to avoid distraction whilst remaining true to the essence of the natural patterning. Something that I'm always very aware of in design is silhouette. This plays a heavy part in both my initial design process and in the posing of the character in a final illustration or animation. A strong silhouette is about readability. If you have a number of different characters in a story, having distinctive contrasting silhouettes helps the audience to instantly recognize a character even from a distance. At the level of an individual pose, a clear silhouette helps the audience to very quickly understand what is going on in an image. If we look once again at the seal, I was very conscious to ensure that each of the flippers is kept clear with the main body of the seal. The negative space that generated between the body and flippers ensures that the pose is still clear, even when seen only in silhouette. Now that you have some simple design tools to work with, we can start to put them into action by creating our own original fish characters. But before we dive into the drawing, it's important that we are using the same vocabularies we describe the various features of the fish. To help with that, we're going to cover some basic fish anatomy in the next lesson.
6. Fish Anatomy: Fish come in a massive array of different shapes, colors, and sizes. That's part of the reason that I've chosen to use them as a subject for this class demonstration. But regardless of their differences, once you start to really study fish, it becomes clear that they also have many features in common. To ensure that we're using the same terminology for the rest of this class, we're going to briefly break down the anatomy of this generalized fish. Now with the exception of a number of outliers such as eels or flatfish, most fish have very similar structure. They can easily be broken down into a head, body, and tail with various shapes and sizes. The confusion usually starts to occur when we start to look at the fins. That's what we're going to be discussing here. Not all fish have the same number of fins and their placement can vary. But this generalized example should give you a better understanding of what's typical. To start with, we have the dorsal fin or fins which are found on the top of the fish. Most fish have a single dorsal fin, but some may have two or three. The dorsal fin is primarily used for stabilization and to help prevent the fish from rolling. Next we have the caudal or tail fins. These are the fishes main source of propulsion. Underneath, towards the rib of the fish, we have the anal fin or fins. Again, similar to the dorsal fins, these are primarily used for stabilization and there can be more than one depending upon the species. The pelvic or ventral fins are found in a pad, low down and to either side of the fish. These can be thought of as the hind limbs of a fish. It's used to assist with going up and down, turning or stopping. Finally, we have the pectoral fins. These are again found in a pair on either side of the fish and can be thought of as the forelimbs. They're used for steering and occasionally for propulsion. While the size, shape, and number of these fins varies between fish species, some fish may not even have all types of fin. This simple structure does generally hold true for most fish and it's extremely helpful when analyzing reference to create your own character designs. Now that we have a basic idea of a generalized fish anatomy, we can start to put that information to use as we design our first fish character in the next lesson.
7. Butterflyfish - Shape Breakdown: Here we are in Photoshop. The first fish that we're going to be drawing is called the copperband butterflyfish or the beaked coral fish. Whilst I do have some reference images of my own of this fish, what I've decided to do is download a couple of images which were a bit more useful for us to break down from a site called Unsplash. Unsplash is a great place to go if you're looking for free to use reference images. The first thing I'm going to do, I've already got the reference loaded in and I'm just going to drop a pasty down a little bit so that we can draw over the top. What we want to do when we're first analyzing our reference is break down the basic shapes that we can see. As I'm breaking this down, the first thing I want to do is look at the basic shapes. We have this simple shape here, which defines the body. Then we can go ahead and add in our tail. Obviously something that's quite distinctive about the copperband butterflyfish, is it has this big section here at the front. We see it's dorsal fin, is actually really quite large at the top here, it's anal fin fits in at the back there. Down at the bottom we have pelvic fins. Then here on the side we have pectoral fins. Let's indicate the eye here at the front as well. Now that we have an idea of basic shapes of the body parts, I also try to analyze the reference to see if there's anything that's distinctive that I need to ensure that I keep in the final design. When we're looking at the copperband butterflyfish, obviously, the beak is quite a distinctive feature. We have this eye spot on the back here. Then obviously the markings. As you analyze more and more reference images, you'll realize that these stripes are all placed in the same place. We have a single stripe that always runs through the eye, one stripe that runs just in front of the pectoral fin, stripe towards the center of the back. Then this wider section at the back that's just broken up with this little patch of white in the middle. What you can't see from this top image, but you can just about pick out in the lower reference image, is there's also this little band that runs down the front of the nose. Now if we take a look at the lower image, what's interesting here is that the shapes are a little bit different. We actually have a shape here that's slightly more hexagonal in nature. Then we can add in our fins over the top. What's really interesting here is the way this fin is broken up at the top. This one gives us a better look at the pelvic fins down at the bottom here, even though the pectoral fin is turned towards us, so we get a less clear look at its shape. It's really helpful to analyze as many reference images as you can. It helps you to see exactly where the fish are similar and where they differ from each other. Then we have this beak shape on the front here. What I liked about these two reference images is the upper image is that bit more streamlined, whereas the image down at the bottom has slightly more angular shapes already. We've got this broken up dorsal fin up at the top here and some sharper lines. We can play with some of that as we start to design our own characters. The key reason for doing the shape breakdown in the first place is to get a clearer idea of the underlying structure of the fish that we can then push and pull to our advantage as we try to design our own characters. Now that I've identified all of those basic shapes, it becomes easy to redraw the fish. We can start out this basic shape. Add beak shape on the front here. Tail sticking at the back. Dorsal fin will run from this point at the top here, going around the back in anal fin comes out. It comes back in partway along the base here. We can add in our pelvic fin, our pectoral fin and our eye, and indicate that main section at the back there with this white band in the middle. This eye spot at the top. Then we run a single stripe through the eye. One more just in front of that pectoral fin. Then another stripe can run down the middle of the body here. We indicate the mouth, once we've roughed that in, we can obviously go ahead and clean that up if we choose to. One of the things that I found quite fascinating as I was doing my research for these drawings, is learning about the markings on the copperband butterflyfish. As I've already mentioned, one of the stripes runs right through the eye of the butterfly fish. Now, it's not just for decoration. There's a reason that it runs through the eye and that is to actually hide from predators exactly where the eye on the fish is. Camouflage, is it. In addition to that, the butterfly fish has the large eye spot at the back of its tail. Those two factors combined means that a predator doesn't actually know exactly where the fish's eye is and it doesn't know in which direction the fish is pointing. As it attacks, a predator expects the fish to swim off in one direction, but actually it will exit in the other direction, giving the butterfly fish far more turns of escape. I often discover little facts like this as I'm doing my research for my designs. Whilst it doesn't necessarily find its way into the actual character design, it can often find its way back into story. Is often these facts give you original ideas that you'd never would have come up with otherwise. Now that we're familiar with basic shapes and we can redraw the fish, we're going to move ahead into the next lesson, where we're going to start creating some original characters based upon that knowledge.
8. Butterflyfish - Initial Design: Now that we know how to draw a copperband butterflyfish, we're going to start playing around and having some fun with it. We can really do what we like with those basic shapes. For example, take that teardrop shape that we have and just really push it so it's a lot taller. Maybe we'll pop that tail low down in this case. I'm going to keep our beak also lay down here. Also that dorsal fin up, again of the top of this teardrop shape here. Maybe pull that up like that a little bit, keeping our fin low down. Go for a largish eye, that's big smile. Well, I quiet like to do with fish as I'm designing them is reduce the size of this pelvic fin. That way the pectoral fin becomes more of an arm shape, which can end up being a bit more appealing. Again, we'll keep these basic shapes in here that we're already familiar with. That eye spot doesn't necessarily have to be round, but it needs to be present. This narrow white band in here, one stripe down through the eye is going to come just ahead of those fins, and then we can put one centrally in this region back here. Just go ahead, click in, clean that up a little bit. You can see here that I'm trying to make sure that shapes like my tail are not perfectly symmetrical. If you have too much symmetry in your design, then it can become a lot less appealing. Quite pointy beak that I'm going for with this design, probably will change that some some of the others. I'm trying to also introduce mixture of straights here and curves as well. The variety can just again add to the appeal. Trying to make sure this stripe doesn't collide with that corner of the mouth too much. What you'll hopefully notice as I'm doing this cleanup drawing is that I'm not just trying to create cleaner lines, I'm also correcting the drawing as I go. Particularly this section at the back here, I felt that the lines were just too close to the tail. So I've just added a little bit more of a gap in there. I'm both trying to create smooth lines, separate my lines out nicely so everything's spaced well and fix elements of design as well as I go. You can see how I'm just adjusting the shape of this eye spot a little bit on the back as well. Just adding markings in on the tail and fin. There we are. Our first finished character design. Now we move on and explore some more variations in the next lesson.
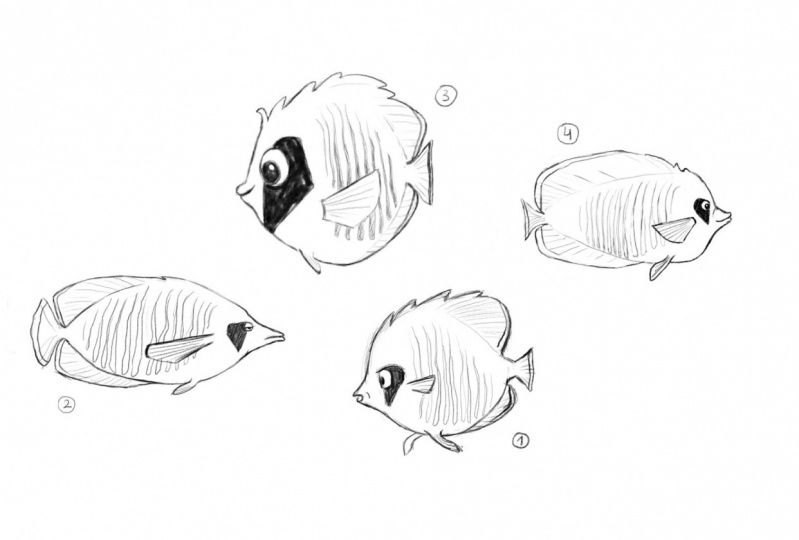
9. Butterflyfish - Design Variations: What I'm going to do now is try to vary things a little bit further. We just start out with a slightly squarer design. I'm just going to start out by roughing in the overall body shape and I'll maybe add a slightly squarer beak on the front of this one. Maybe make it a little bit chunkier as well to get a little bit of contrast to our previous pointed design. I think I'm going to have a slightly squarer tail on the back here as well. It's different to the reference, but we're just pushing the shapes to create a little bit of variety and appeal. Adding quite a large eye here as well. It's up to you how you draw your eyes. I tend to draw mine in a fairly similar way like this, but you can go with small, dot eyes or create something a bit more realistic if that's your choice and style. Adding in a larger pectoral fin and once again, a small pelvic fin. You can see here is I'm drawing the stripes. What I'm trying to do is actually mirror the overall body shape that I'm going for. I'm going for a squarer design. My eye spot's a bit squarer, and each of these stripes that I'm adding in is a little bit straighter from the previous design but I try to create a little bit more of a wave pattern going across the body. Something I found quite interesting about our second reference image was that hexagonal shape that we had for the main body. I think I'm going to start using that hexagonal shape as the basis for the next design. I'm just going to push the proportions a little bit further. Obviously something we just spoke about before when we were discussing principles of design. I had a larger beak up the front here. You can see already comparing this to that second reference image, how different the proportions are, even though we've got the same underlying shapes. Here with a smaller tail for contrast, and again, a nice, really big eye. Big eyes are often quite appealing, a nice big smiley mouth. Then again contrast in shapes. Thinking about big, medium, small shapes. I'm trying to add in a larger pectoral fin and start adding in the dorsal fin at the back here. Quite like that pointy shape that we've got out the back in that reference. The other thing that I really liked about that reference was that broken up dorsal fin at the top. It can create the impression of a spiky hair style for a younger character. If you only look at one reference image, like the one up at the top, you wouldn't actually be able to pick up on these little differences which can really add some extra appeal to your designs, some variety. Once again, just roughing in all of those markings. Thinking about where they lie, obviously. One through the eye, one in front of the pectoral fin, and that larger section at the back. Adding in the eye spot. Now, I think this design's ended up squared off quite a lot because most we started with that hexagonal shape, it's ended up a bit square. What I'm doing here is just going to try another variation where I just really push that hexagonal shape still further. Some slightly different proportions again. I'm going to start here. Smaller beak, nice small tail. In this case, I'm going with a smaller mouth. Just trying to create some variation in these designs. Once again, this small pelvic fin down at the bottom just helps our pectoral fin to stand out. This time I'm keeping my anal fin and dorsal fin quite small. As you can see here, I've not drawn in a separate dorsal fin, I'm just integrating it into my overall body shape so that I can maintain that hexagonal shape that I was going for. Just get some nice contrast to the squarer designs that we got beforehand. Here I'm wrapping these stripes around the body. Just adding in a little bit of extra detail to the form, cleaning it up slightly. I'm just going to again make use of that spiky hair style up at the top there. Really helps with the sense of creating a younger, cuter character. Slightly rounding some of those edges even if we're going with a sharper shape. Start with like a hexagonal shape, it Doesn't mean we can't soften some of the edges and still maintain the overall form. There we are. We have four designs now, all quite different from each other. But they're still all very identifiable as the Copperband Butterfly fish because we've maintained all of those core identifying features of the fish. We have that pointed beak, we have the large dorsal fin with the eye spots, and we have all of those stripes. I think we can still push things a little bit further. That's what we're going to try in the next lesson.
10. Butterflyfish - Pushing Designs: Once we know our basic shapes, it's very easy to start experimenting and creating something that's a little bit broader and see I can take that teardrop shape and really push it and maybe push out this beak as well. I have something that's a little bit sharp or more streamline perhaps. Maybe a small narrow tail, something that looks a little bit faster. We can use all the elements of our design to help with that and see this fin and making sure it's really quite pointed as well. Add in a nice big round eye. But I think we're going to cover this slightly grumpier looking fish here, add the expression there at the front as well to help with that. Just rounding out some of those edges. Again, just because we're drawing this sharp or faster looking fish doesn't mean that we can't have some soft corners in there as well. The oval shapes is still quite pointed. Just cleaning up a little over the top of my rough sketch. Still keeping things quite a little rough. We can always go over and clean this up properly later. Just adding in the details, adding in all the details on the fin. When I'm drawing my pattern as well, I'm still thinking about that general shape that I'm trying to create with the overall body. You can see this eye's bottom even creating a slightly more triangular shape in there. We can use our pattern as well to reinforce that. You can see we still got all of the main elements that make up the copperband butterflyfish. We have this beak out the front, we have the big dorsal fin. At the back that eye spot the same patterning, small tail sticking out at the back there. But already we've got something that is very different to these other designs over here. We can even push things to be a little bit more rounded as well. If we think about that teardrop shape, maybe it's actually a little bit fatter. We actually don't have much of a dorsal fin. We can almost make this into a bowl shape. Maybe have a much smaller beak shape down at the bottom here. This is quite a much younger baby-ish character. Again, we can mirror that rounded shape here with a fin. Still want that. Is the tail sticking out to the back? Not everything needs to be rounded even though I'm going with the rounded design, I can still have a slightly sharper tail at the back here. I have this overall more rounded shape. Pull this dorsal fin up a little bit more. Well, it's great big baby-ish forehead here. Put in the eye spot at the back. You can see, I'm being quite rough with my drawings here. I'm not trying to correct anything that's terribly pretty, is about exploring different ideas. Once we have something that we like, we can always redraw it. Now, up until now, obviously everything I've been drawing has been in full profile, and that's because for the most part, fish look far better in profile. They have a very distinctive silhouette. But once we start looking at them head on, they become a lot narrower. So we will actually end up having a shape that's far more like this, a fin sticking out of the side here. Little beak in there and we can indicate our eyes. What's great about having these stripes is we can obviously wrap them around the form here. It really helps when it comes to indicating how the body shape narrows at the top and the bottom. See these pelvic fin as well the pectoral comes to the side here. So I'm going to go ahead and create another design here. Again, just starting out with that teardrop shape. I'm going to go for a slightly softer, more rounded shape again here. With a nice large pointed beak. Big smile, and I think we'll add in another nice big round eye here. Really pushing the size of that quite a bit as time. A nice big sweeping dorsal fin at the top there. We've gone quite rounded at the top. So I think I'm going to try and straighten things off at the bottom here. It just gives us a bit more contrast. As we mentioned before, adding those straight lines on one side, curves on the other, just creates that contrasts which adds to the appeal. Just adding a small tail in here, again, contrasting with the big overall body shape. I need a bit more detail to my eye now. Again, just drawing over slightly tidying up the lines a little bit, adding that pelvic fin down at the bottom. Again, keep it nice and small so you don't detract from the pectoral fin, and in the eye spots and I'll get into adding the rest of the lines. You can see with my designs here, I'm not trying to create any clean, pretty drawings, I'm really just exploring things. We can always go in and redraw our favorite designs later. It's about the exploration phase and not getting worried about whether you're creating a nice drawing or not. So just finishing up this design here, and then I think we'll move on and explore a three-quarter view in the next lesson.
11. Butterflyfish - Three Quarter View: Once you understand how the fish looks from both the front and the side, you can start to think about drawing it in three-quarter view as well. I'm just starting out with the basic overall shape, trying to get that beak in there, and adding the eye in as well. Then just refining the shapes. I want it to feel obviously like it's a bit more pointed at the front there, and then I'm going to try and pull those fins back just a little bit to create a more pleasing shape. Add in the pectoral fin on the side, and then I'm just going to add one on the other side, make it look as if the fish is waving. If you can actually pose up your character sketches like this, it just really adds that bit more personality to the drawings. He's a happy fish, so give him a nice open mouth here. It must be small. Then add in a little tail at the back here. You can see I'm trying to think about that silhouette all the time. Avoiding having that tail crash into the pectoral fin on the side, just to make sure that everything will be read clearly. Again, with the pelvic fins down at the bottom there, just having the one poking out the far side, but not interfering with the mouth at all. Now the great thing about having a pattern like this on your characters is it really helps with defining the form. Just adding in these lines for the pattern just really helps bring it into three dimensions. We can just shape those lines to wrap around the thinner section of the fin up at the top and indicate the shape of the body as we go down the fish. Then it flattens out at the bottom. Add the eye spot on the back. Final stripe through the middle there. Just tidying things up slightly. I'm just thinking about all those elements of design as we do this. Making sure we've got that nice, clear silhouettes, contrast where possible. Adding in the details again there and just pushing that eye over to the side a little bit more just makes it feel like the fish is looking off in the direction that's waving. A little bit darker inside the mouth as well. Now we've only created a few different designs here, but hopefully, you can see the potential to go on and create even more variety just by pushing and pulling those shapes around. But rather than continuing with just one fish, I thought it'd be fun to move on and try out a new species in the next lesson.
12. Triggerfish - Shape Breakdown: The second fish that I've chosen to draw here is the clown triggerfish. It's quite a different looking fish to the copperband butterflyfish. It gives us some different shapes to play with. The first thing I'm going to do is just again, knock back that reference image, and then do a simple draw over of the basic shapes. What's interesting about the triggerfish is it has this diamond shape to it. We have this triangular format at the front here, and then another one here at the back. There's this short section here that then joins into the tail, which really fans out quite wide, has this nice arc to the back of it. Then when we look at the dorsal fin that sits on this back triangle here, it just runs down the back. Whereas the anal fin starts partway along that back section again, just a little bit squarer. Eyes sitting quite high up here, got the pectoral fin at the side. The pelvic fin's extremely hard to see, but you can just about pick out a hint of it a bit down at the bottom here. Again, you can see we've got all of our main fins that we look to in our fish anatomy section. Taking a look at the markings, you can see this very obvious marking around the front here, the yellow area around the mouth, with this extra white stripe around here. Very obvious, what's right around the top of the nose. We have this split along here, where down the bottom here we have these large circles. It's really quite fun to play with. Up at the top, we have this far more complicated squiggly pattern on the back here. You can see between the two different reference images that this pattern does vary a little bit. Say it's not important, stay to true to the exact nature of it, but we do have this yellow coloration on the top. You see obviously the tail is broken down into these bands. That gives us enough information to work with. We're now ready to go ahead and explore some designs in the next lesson.
13. Triggerfish - Designs: When we are creating designs for the copperband butterflyfish, we looked at pushing our shapes and proportions, but we didn't really explore things from a story point of view. Now, the clown triggerfish is notorious for being a somewhat aggressive fish. I thought it might be fun to see if we could explore creating a character that's a little bit more grumpy. I am going to start out here just by, again, pushing my shapes a little bit. Working with those two triangular shapes, but really pushing the height of them, adding this section in the back. Again, a really distinctive fan like tail as well, and then I'm going to sweep the dorsal fin back from the top of the head. It creates a nice smooth line which gives us a really clean set of art. Adding the anal fin in there, and obviously forgotten for a grumpy character needs to have a grumpy mouth. I'm going to also add in that yellow mocking around the outside to mirror the shape of that mouth just to really accentuate it. Then because we're having a bit of a grumpy character, I thought we go with the smaller eye on this one. It also helps to make the fish look a bit bigger as well. I mean that small eye, it's more imposing, and wrapping that white band around the nose. Keeping the pectoral fin really small in this case, just again for contrast because we've got a large body, a medium-size tail. Having that small pectoral fin on the side really helps with those contrasting shapes. Moving on to the pattern now and adding this circles it's something that's quite fun to play with. We don't have to be exact at all. You can see from the reference, both of the fish have a similar patterning, but one has much larger spots than the other. Just indicating that yellow marking up on the top there, that's something that we probably add in as we paint the fish in more detail. I'm just going through and cleaning things up a little bit now, sharpening up some of those lines, trying to make them a bit more defined. To clean around the mouth here, I just wanted to get slightly more interesting shape, still something that's smooth and flowing, but this feels like that bottom lip is rolled out a little bit there. Just really keeping that silhouette really nice and clean at the top as that dorsal fin runs out from the top to the back. Now we've finished that character, I think we'll go for something that has got a bit more contrast. We're going to again play with those triangular forms of the body. I'm really going to push it in the opposite direction this time, to See if we can create a faster and a more streamlined character. I've really pushed the contrast between the front and back triangle in this case, and also putting that fan-shaped tail out at the back, but having it directly connected to the body in this case. Again, the dorsal fin does run straight along the back, way to help push that streamline form, so we just got a real arrowhead design going on at the moment. With the pectoral fin, I'm just going to create and really show a triangular form again here pointing back along the body of the fish, so it really helps with that feeling of speed and aggression. Again, a slightly smaller eye, that will be this slightly grumpy aggressive eye. I'm trying to really get that grumpiness in the character and to add to that, obviously, getting the expression in the array helps. Again, running those yellow markings around the mouth really draws our eye to that expression. Just starting up a little bit here, so that it get a little bit more definition into the shape of that mouth, adding in that white stripe across the top of the nose, which is really distinctive, trying to have a bit of a variety of shapes sizes here. As soon as things get too even, they become more boring. Adding in that band to the tail again. There's lines following the form of the shape of the tail, and once again, indicating the markings on the top. As you can see, we've got two very different looking fish here, but it's still very identifiable as they clown trigger fish. We've got all of those same shapes just pushed into different proportions. I think once again, we're going to move on and create a three-quarter view in the next lesson.
14. Triggerfish - Three Quarter View: We're now going to create a three-quarter view of the clown triggerfish. Once again, I'm going to start out with the same basic forms that we defined when we are analyzing the reference. We have this diamond shape to start with. Going to indicate that really grumpy mouth at the front there. Triggerfish do have this really bad reputation. They've got these very sharp teeth, they are quite aggressive. It's really fun to play around with that within the character design. These are the things that you only find out about when you do your research beyond just looking for photos. Again, adding that slightly aggressive eye in there, and the pectoral fin out on the side. I'll run the dorsal fin off the top once again. [inaudible] the shape that that creates. Being in three-quarter view, I'm going to add the tail and head, but I'm just being really careful about my silhouette. I want to make sure that the tail and the pectoral fin out the side here are really very clear and readable. Adding in the pectoral fin on the other side as well. Once again, with the markings, having this stripe over the nose really helps with defining the form to wrap it around the shape of the fish. Now I'm going to add in some of the other markings, the circles down at the bottom, proceeding off into the distance and that [inaudible] pattern on top. Just tidying things up a little bit again. Wrapping that bottom [inaudible] underneath. Here you go. Once again, we've got three designs which are all easily identifiable as clown triggerfish because we're making use of all of those key features that we picked out when we were analyzing the reference. Now that we're finished with these designs, I think we'll move on and take a look at one more fish in the next lesson.
15. Rabbitfish - Shape Breakdown: The final fish that I've chosen to draw is the blotched foxface rabbitfish. It has quite different shapes again to the previous two fish, so we'll go ahead and break that down now. Once again, I'm just going to knock back the reference image and draw right at the top. You see we have this basic teardrop shape again here. Tail at the back in rounded forms. Then from the front we've got quite a straight angle coming down. Scoops underneath that. Pectoral fin is quite large. Dorsal fin runs straight down the back, wraps around the back in and the anal fin does exactly the same at the back here, but is extending a little bit further back. Then it's hard to make out the pelvic fin, but that sits in just around the bottom here. When we look at the markings, there's this obvious large blotch on the back here, hence the name. There's this black and white section at the front. We've got this nice curve that wraps around here. Black section at the top here, which masks out our eye, and then there's this black shape that wraps around just in front of the pectoral fin. Once again, now that we understand those basic shapes, we can start to draw our own fish. I'm going to start again with that teardrop shape that we found when we were analyzing the reference and run that dorsal fin off the top of it and wrap it around the back. Just trying to push it into a slightly more rounded form here. Adding the tail at the back, just pushing the proportions little bit off the tail, so you're going to see it's similar shape but much smaller in this case. Often again, just pulling it up a little bit at the back, so we have a more rounded form overall. Now, as we get down the nose, we want a bit of a straight coming down here, but I want to make it too straight. Adding our mouth and then skipping that curve underneath. Add in the pectoral fin. Again, using straights and curves there. Indicate our eye. Then we can start moving onto the markings. I'm going to define that white area first and add that blockchain on the back. Then we can start adding in the black bands. Now if you take a look at the reference over here, you can see there's this white section at the front of the nose. Actually, the black band just wraps up and around the eye here, and we can bring it down and tuck it in at the corner of the mouth. To be able to see our expression, we have to keep it clear of the mouth or make the shape flow with the mouth. We're going to add in the other black patch here on the side just in front of the pectoral fin and start to add in the markings on the fins here as well. There we are. We have our first design, but I think we can afford to push our proportions a little bit further on this one. That's what we'll explore in the next lesson.
16. Rabbitfish - Designs: What I'd like to do is try and create a really friendly-looking fish. Thinking back to what we were talking about earlier about shape language, what I'm going to try and do is round out this form a little bit further. Again, starting with the teardrop shape that we've identified, but I'm really trying to make it fall rounded than you see in the reference. Push our shapes further than we had with the previous design, have a slightly stubby nose here. Again, it helps to keep everything a bit more compact and rounded. Nice, big, small because I want a happy, friendly character. Again, skipping that line underneath the chin. Again we're going to go with the small tailbone, really going to push it even further this time. Really getting those contrasting shapes, really big body, small tail. Now we're going to sweep this dorsal fin down the back a bit more. Again, we're keeping the same shape that we've got in the reference, but really tucking in far closer to the body. So it still resembles the reference. But it's really creating a far more rounded design. A few markings there on the fins. Again, when we're trying to create a friendly character, nice big eyes really helps and nice large pupil here as well. Try and make it look as friendly as possible. Sound just slightly adjusting the shape of this nose. It's become quite rounded and really I like this slightly squared-off look at the reference. I'm trying to keep it resembling the reference or so, pushing our shapes a bit further. I'll move on to the pectoral fin. It was quite large actually in the reference. I'm going to keep that here but again, pushing my straights and curves and strike top curved underside of the contrast. I'll plot to the back, important for identifying the species, and now install on the markings at the front. As I'm drawing these markings in around the eye, what I'm trying to do is roughly mirror the shape of the eye so it accentuates the shape and it also gives us a sort of eyebrow there that if we were to animate the character, we could actually manipulate the shape of that marking and it helps to reinforce our expressions and just tie it here at the mouth, at the bottom there. I'm moving on to the markings down at the bottom. Obviously, this is a bit less room here but we can still tuck it in front of the pectoral fin. In the markings on the fin and just roughly shading in that black section as well. See how it looks colored. Again down at the bottom here. Here we are. So just tidying this up a little bit, but I think we could actually afford to even push this a little bit further, see how far we can go towards really rounding out this character. Get it looking as cute and friendly as we possibly can, we'll see how far we can depart from that reference while still creating a fish that's believable as being a Foxface rabbitfish. We're going to start out essentially with a bowl shape here and add in a really small nose at the front. We can keep it nice and happy and smiley. Just squaring off the nose just a little bit there to match what we're seeing in the reference as a mouth. Even though we're going through a more rounded character, we can still have some angles in there. The overall form will be rounded, but it doesn't mean that everything has to be rounded. I'm really pushing the tail this time, it's very small, so using some shapes that we have in the reference. The dorsal fin keep it very small. Tucked in around the back here and the same again with the anal fin. Then you can see I haven't drawn a perfect sphere here, got some angles in the shape as well. Destroying the eye here and once again, keeping it nice and large. You'll notice here as well I've actually drawn the eye fairly low down on the face, gives us this nice big forehead which really helps with creating younger or cuter-looking characters. Talking about the shape of the eye a little bit. Now I'm rounding out the pectoral fin here compared to the other designs. But you can see I'm not using a continuous curve. Instead, I'm using separate slightly curved lines to create a more definite angle change and form. I'm defining this front section of the fish and we can start working on the patch that runs around the eye. Again, I'm going to roughly mirror the shape of the eye itself so the one supports the other and bring it into the corner of that mouth. Really small space down at the bottom for the rest of the markings, but as long as the shape roughly matches, then it will still resemble the reference. I'm just adding in that block from the back as well. There's few more markings. I think once again, we're going to try and just break up that dorsal fin across the top there a little bit at least to create a more interesting hairstyle. I'm just adding in the pelvic fin down at the bottom as well. I'm keeping it nice and small. Make sure the mouth is obvious and a little cute small. Again, I'll just quickly add a little bit of shading around the eye on the eye patch, and down at the bottom here as well. As you can see, we've got three designs here, all of which resemble our reference, but with gradually more rounded forms as we've gone on and we pushed our shapes, pushed our shape language or proportions to create more interesting and appealing designs. Now that we've finished our sketches, we can move on and have a look at how to present our designs in the next lesson.
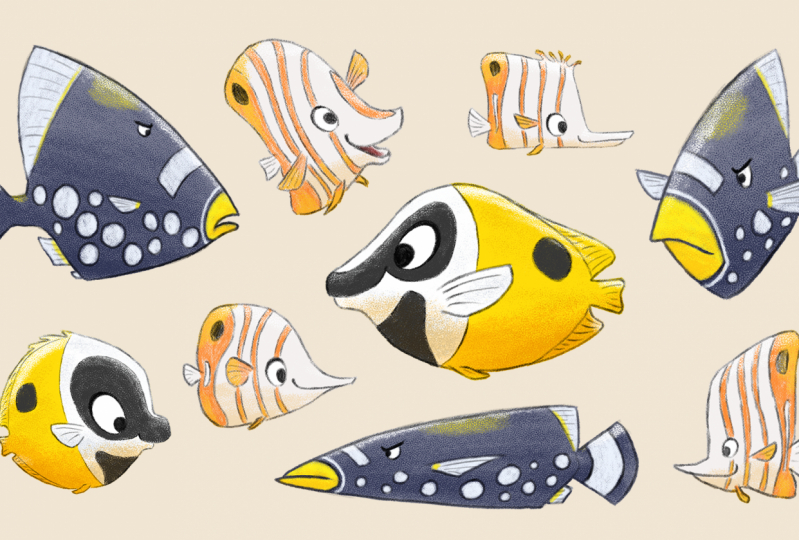
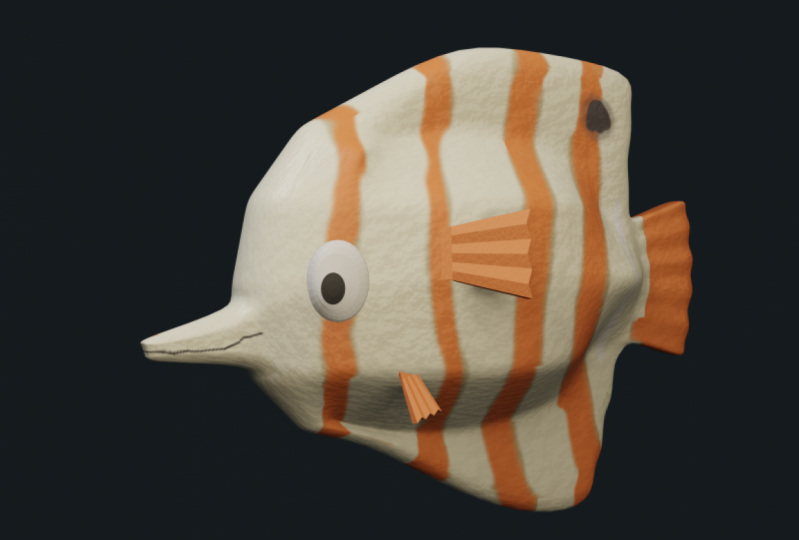
17. Presenting Your Designs: Once you are happy with your character sketches, what you do next will very much depend upon the intended use of the designs. It may be that you intend to develop one of the designs into a personal illustration. If that's the case, then a single simple sketch may be all that you need as a starting point to move on to a fully rendered illustration. If however, you need to show your designs to someone else for feedback or approval, then it's helpful to clean things up first. As you can see here, I've taken each of the sketches and have cleaned up the line work and applied some simple color. This helps to quickly visualize how final rendered illustration or 3D model might look. The process of adding color is obviously also part of the design process. My colors are fairly faithful to life in these cases. But if you're producing more stylized designs, then color variations may be something that you need to consider. Since the pectoral fins of many fish are actually transparent, I've made the choice in these cases to color the fins. It's a departure from reality, but really helps with adding a bit more character since we're able to use the fins as part of the pose and still see them clearly. How far you want to go with changes like this, is really down to personal taste or the start of the project that you're working on. One other thing that you might want to consider if you're sharing your designs for review or feedback is to add numbers to each drawing. It's far easier to refer to design number 3, for example, rather than talking about the second drawing from the right on the top row. Just taking these simple steps of cleaning up your drawings and presenting them with numbers, will make your work appear far more professional when sharing it with others. We're now coming to the end of the class. But I hope you'll join me in the next lesson where I'll share a few final thoughts.
18. Final Thoughts: Thank you so much for joining me in this class. I really hope you've enjoyed learning a bit more about character design and following along with my design process. If you haven't done so already, now is the time to start putting some new knowledge into practice by creating your own original tropical fish character design. Remember there really are no restrictions on this one. Use any medium that you choose and be as creative as you like. Just have fun with it. Once it's complete, don't forget to share it in the class project gallery. I'm really looking forward to seeing what you create. Finally, you may want to check out my profile page where you'll be able to find my other classes and learn a bit more about me. If you'd like to you can also follow me to be notified of every new class that I publish. Having the skills to design your own characters opens up whole new range of creative opportunities. I hope that this class has given you the knowledge and inspiration that you need to get started on your journey. Thanks again for taking this class and I really hope to see you again soon.
 John Knowles, Animation Director