Transcripts
1. Intro Painting a Bernedoodle with Watercolors: Hello, and welcome.
My name is Emily, and I am the artist behind
Emily Marie Watercolors. Welcome to my home studio
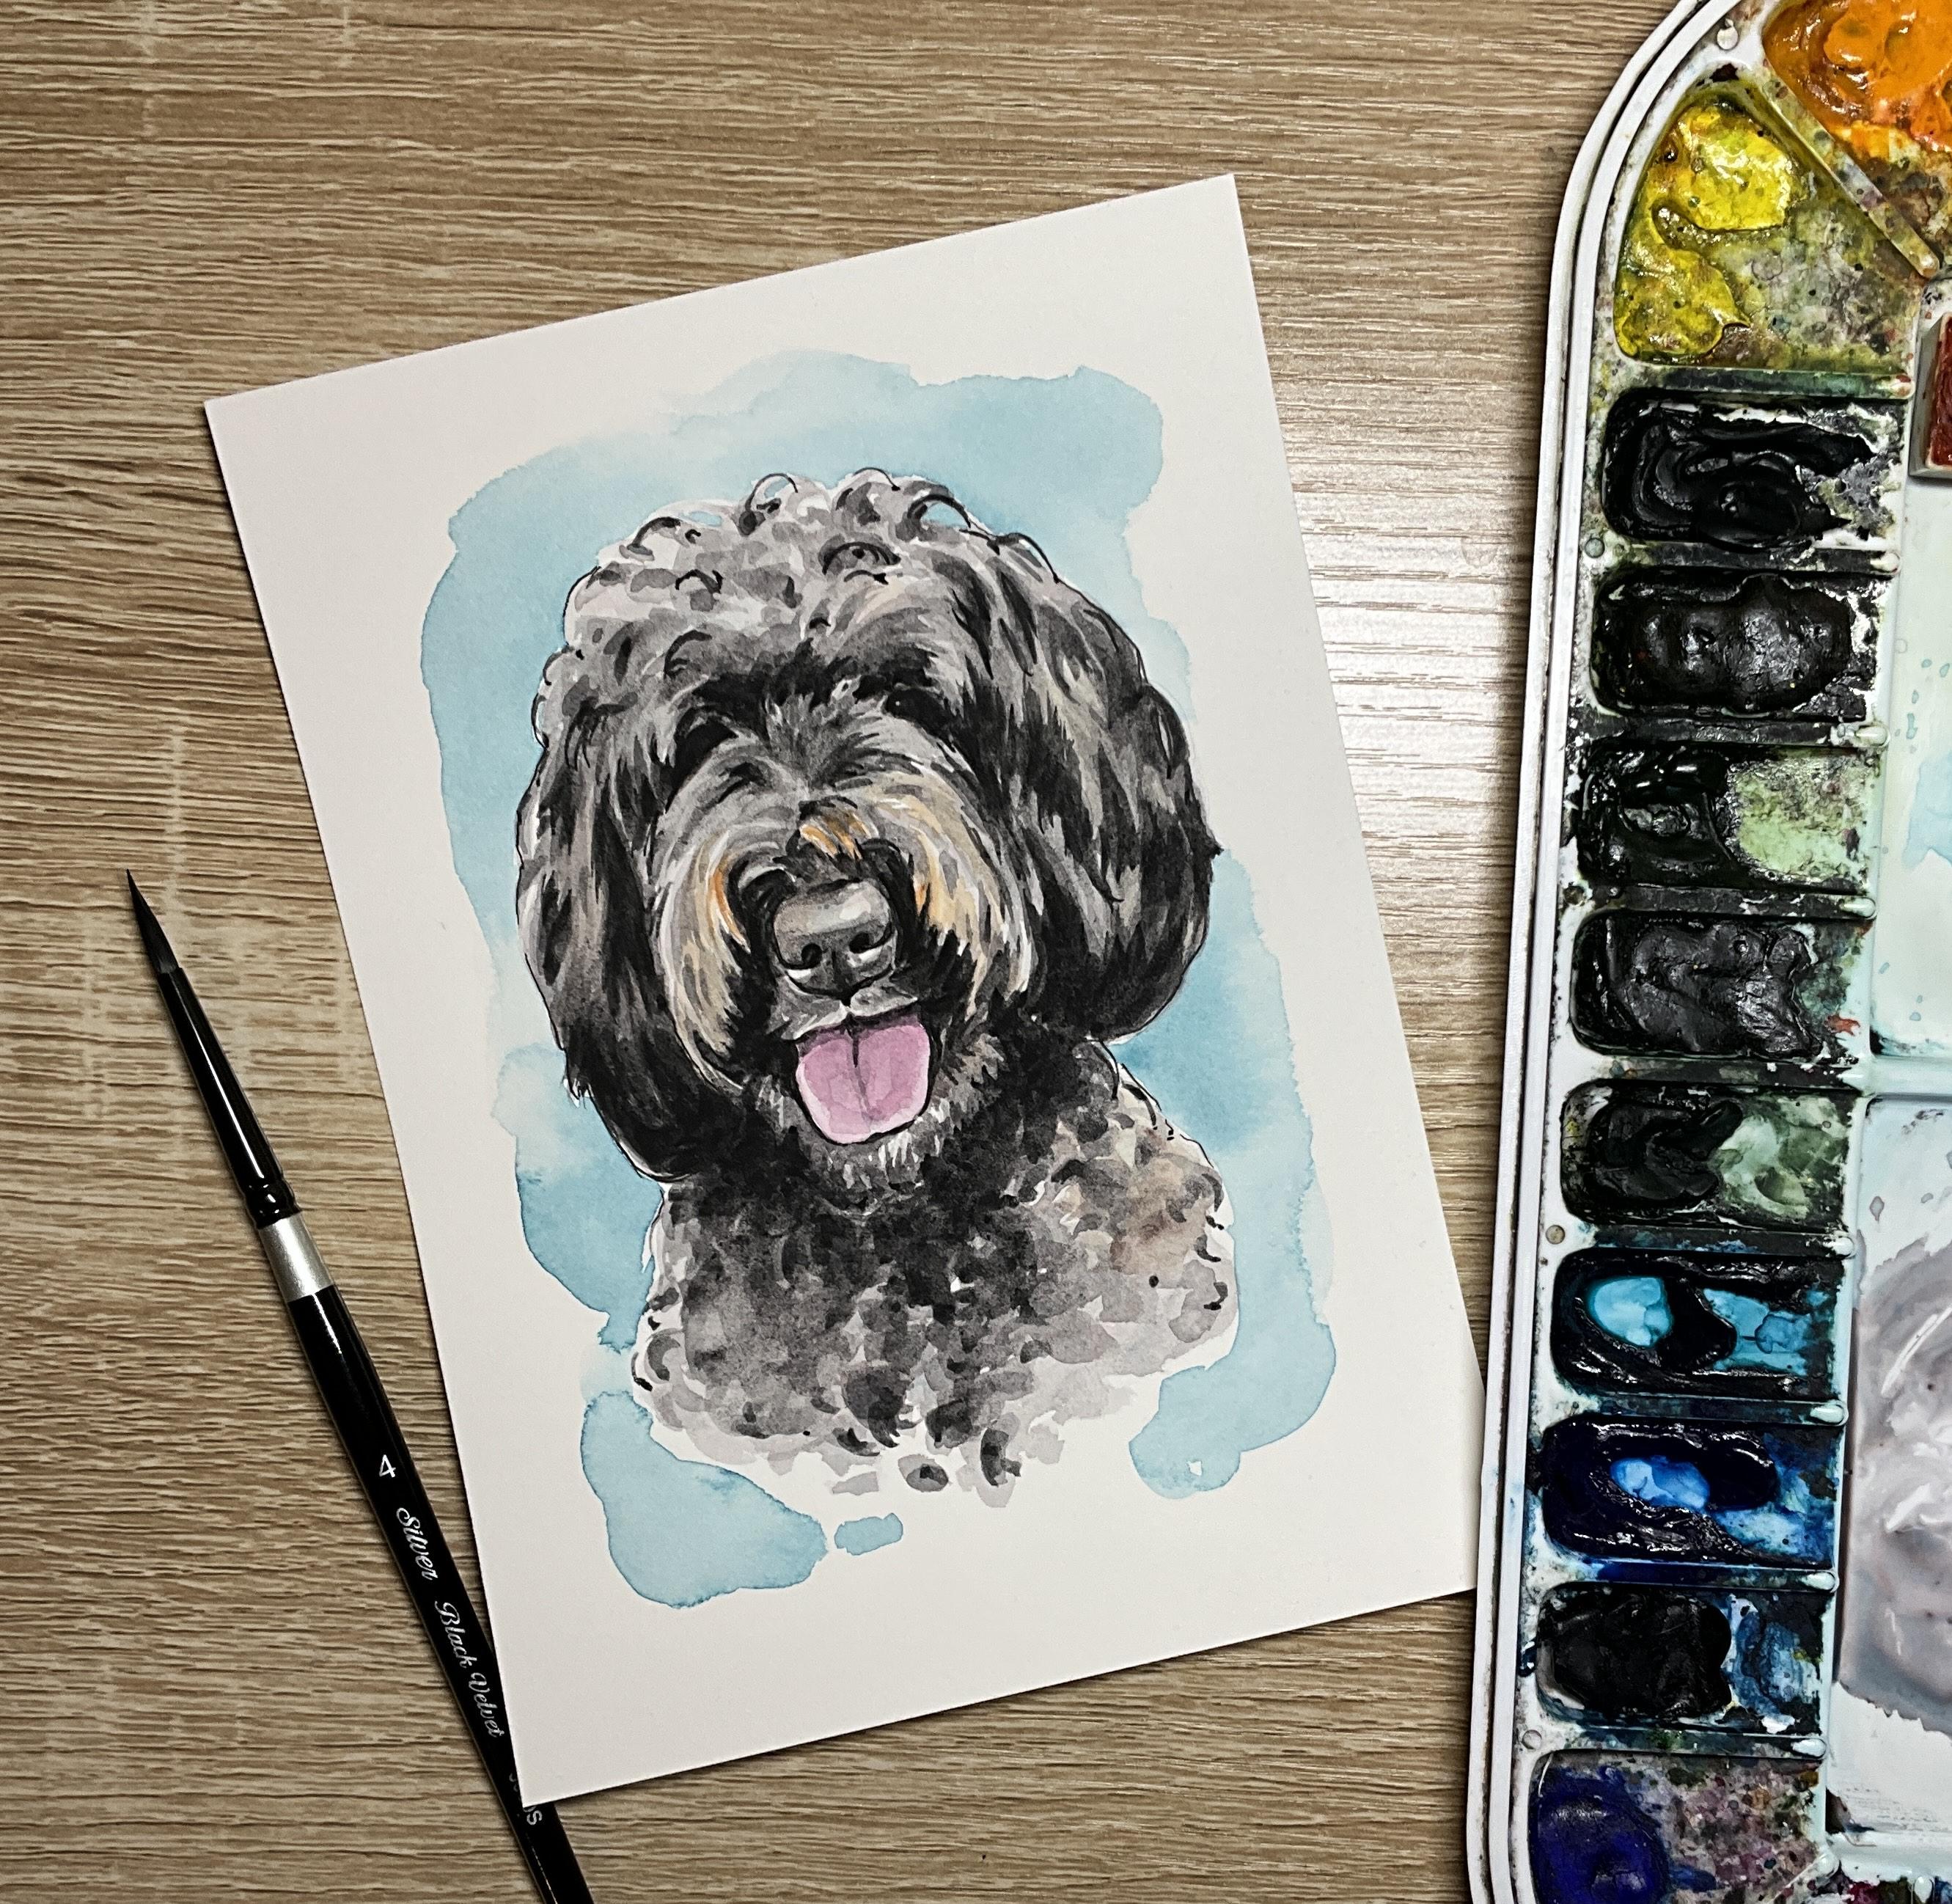
here in Madison, Wisconsin. In this Skillshare tutorial, you'll learn how to paint Peach, the Bernadodle
using watercolors. As a watercolor artist, I have found a passion for
painting pet portraits. If you already know the
basics of watercolor, painting pet portraits can
be a great way to turn your hobby into a part time
or even full time career. My style is characterized by adding details to
the mouth, nose, and eyes, but not
getting caught up in painting every
single hair or curl. In the resources tab, you can find tracing templates, color reference photos,
supplies guides, and color guides all for painting peaches,
the Burna doodle, or you can use your own doodle as a reference photo and
paint along with us. We'll start by painting a transparent first
layer of color. Then we'll pause to practice the two main curl
patterns that we can find in all doodle breeds. After practicing, these two patterns we'll continue
working on peach. We'll add a second and
then a third layer of gray to gradually build the darkness without
losing details. The last layer of black will
deepen the darkest of areas. We'll then look at
how to color correct your pup's fur by adding browns
to where you notice them, and then we'll look
at how to blend all these layers together
with a transparent glaze. We'll finish it all up with a
colorful background splash. As an added bonus, I've even included a quick guide with step by step pictures so that you have
an easy way to see how all these layers
come together. So grab your supplies, and let's get ready to paint. Don't forget to upload any
questions that you have, and I'll try my best to answer them along the way.
Let's get started.
2. Supplies: Alright, so let's
talk supplies for our Berna Doodle
watercolor project. The first thing we'll talk
about is our paper choice. So for watercolor paper, you'll notice in the video, I am painting on a
hot press paper. This is a soft, smooth surface. I do find that I like it for my pet portraits because I can
get quite a lot of detail. I can use a micron
pen at the end if I'd like I've just
gotten used to it. You can use hot press as well, or you're more than
welcome to use cold press paper if that's something that
you'd rather use. Just know that the
drying times might be slightly different for cold
press than for hot press. I do think hot press paper dries a little bit faster
than cold pressed. So you might have
to wait a little bit longer in
between your layers. I like to get the pads
of 140 pound paper, and then I actually cut them. Into four, five by sevens. Now, for the purpose
of this tutorial, I do suggest that you start with a five by seven or
around that small size and not go too much
larger for this, especially if it
is your first time painting curly haired dogs. The techniques with the curls can get a little
more challenging. So I always suggest test it out slightly smaller and then
work your way larger. So once you have your
paper choice and size, you can take your
tracing template, hold it against a
window or tracing box, and trace your outline. Of course, if you're
wanting to use your own dog as this tutorial, feel free to use
your own doodle. I am going to be showing how to paint a dark colored doodle, but the same kind of rules apply for lighter colored
doodles, as well. Once you have your
sketch on your paper, we're going to tape it onto either your desk or
onto a plastic board. This just keeps it stable and on one spot and keeps
it from warping. I'm using Kiwi Hub
watercolor tape. And then once we have
it all sketched out, you can use some masking
fluid if you would like. For the little tiny
highlights in the eyes, there are two little dots on your tracing template that you can add the smallest
highlight in the eye. This is just to kind of preserve a little section of the paper because we are going so dark. Sometimes it's helpful to keep a little bit of a
twinkle in the eye, and then you can always dull it down at the end if
it's too bright. Next, you're also going to need a scratch sheet of
watercolor paper. There is a section in the tutorial where we're
going to be practicing the different types of curl patterns that
you'll find in doodles. And so it's helpful to have
a slightly larger sheet. This is roughly eight
by ten to practice on. I do suggest that it is
the same texture and the same weight as
your final piece just so that you get a
little bit of practice using those techniques on
the same type of paper. This is also an Arches
Hot Press paper that I was doing
the practice run on let's also talk about your brushes and
about your paint selection. For brushes, I'll be using two different brushes
throughout the tutorial. They are both round brushes
made by Silver Limited. They're black velvet brushes. I have a size four
and a size six. You're welcome to use any round brushes that
you would like for this tutorial around
that same size. And as I mentioned
in the example, kind of the practice section, you might want to test out a few different types of round
brushes, different brands. Some brands of round brushes
come to a finer point. Others are a little
bit more rounded, and that might affect
particularly your curl pattern and the types of blobs that you make for
your curl pattern. So if it doesn't work well
with one type of brush, grab a different brand and see if it works
better for you. For paint selection, my palette, I'm using Daniel Smith colors. You can see a full list
of the exact colors that I'm using in the resources
tab of this class. I am using shadow violet
for all of my grays. It's a warm gray. You can
also use Pains gray for this. You can add a little bit of
brown to the Paynes gray. If your dog's for
leans more brown, you can add accent
colors to your gray just to change
the tone a little bit. I can lean a little bit more purple or a little
bit more blue. You can test it out and maybe test it out during
your practice round. You will also need some sort of pink or magenta
for the tongue. I'm using quinacrido magenta. You will also need a black. I'm using lunar black, which is from Daniel Smith. Lunar black and shadow violet are both granulating colors. So you will notice
a slight texture forming from that granulation. It's not necessary that you're using granulating colors
for the sutorial, but I do like how that
adds a little bit of extra texture to
my dog paintings. After my grays and my blacks, I'm also going to
be using a brown. It's a burnt orange
color for some of the burnt orange
highlights that you notice on peach around
the mustache area. If your dog also has some brown highlights
or brown sections, you might be interested in using a quinacridone
burnt orange. You might use a burnt sienna. Then you'll also
want an accent color if you want a colorful
splash in the background, so I decided to mix a blue
and a green to make a teal. At the very end of the tutorial, you'll notice that I'll
be using a micron pen, add a few little details. So I always suggest using a
sigma sakura p excuse me. So I suggest using a
sakura pigma micron pen. This is a size 01 or a 03, something that's a little
bit smaller if you'd like to add a few
details at the end. Paper towel and a
glass of water, and we're all ready
to get started. Let
3. First Layer of Nose, Tongue, and Fur: Alright, so we are
going to start with our very first layer of
the nose, tongue, and fur. So I'll start by painting the lightest colors that I see in peach, and that
would be the tongue. So I'm going to wet my palette and grab some
quinocradon magenta. This can be any sort of soft
pink that you have at home. I'm using a round size four
brush from silver Limited. This is a black velvet brush. I'm going to start with just
the first layer wet on dry. I want to make sure that this
tongue stays dry enough or stays wet enough for me to lift any sort of highlights
that I'm noticing. And so I'm moving fairly quickly just to get
the first layer down. And then I'll dry my
brush and lift up some highlights that I notice around the outer
edge of the tongue. Now, I always like to start by lifting some color
before I drop in any darker color
because I know that I want to lift the highlights
before it dries. If it's already too dry and
I don't have time to drop in any darker
quinacridom magenta along the roof of the mouth, I just skip this step. But I want to make sure that
I can lift a little bit of highlight around the edge of the tongue and give it a
little three dimensionality. Alright, for the first
layer of the nose, I'm going to mix
some shadow violet. This is a granulating color by Daniel Smith. It's a warm gray. So you can mix any
gray that you have or use any gray that you
have in your kit at home. If you want it a
little bit warmer, you can add some purple. You can also add
some brown tones if your burner Toodle
is a little browner. I'm going to keep the nose nice and wet for this first layer. And I want to make sure
that this first layer of color is fairly transparent. Now, I'm noticing two
very strong highlights along the bottom ridge
of the nostrils. And so I'm going to try my best to keep those two highlights open and clean so that I've got that paper
underneath shining through. Same thing as I did
with the tongue. When I finish that first layer, I'm going to dry my brush and lift a little bit of highlight
along the top of the nose. Now, because I'm working
with hot press paper, I usually don't have
time to drop in any darker shadows on the nose. So I always do my second layer is where I can drop in
some of those shadows. Alright, so I'm done with
the nose and the tongue. I'm not gonna worry
about the eyes. So I'm going to switch over
to a slightly larger brush. This is around size six, and I'll start with the
first layer of fur. This first layer,
of course, needs to be really nice and transparent. I'm still using shadow
violet for this first layer, and this first layer is meant to just get the color
down on the paper. I'm not worried about individual hairs at this
level, at this layer. The one thing I am
worried about is the edges of the head. So, along these outer
edges where I might see some individual
hairs kind of pop out from the ears or pop out
from the top of the head, I do want to add those details, but I'm not worried about any of the hairs on the
inside of the head. I'm also going to be
working in sections here, even though it's all
one layer of color. So you notice that
I'm filling in around the nozzle of the face, the muzzle there, and
filling in the ears first. I'm working with
hot press paper, so the color is going
to dry much faster. And so I'm still working in sections that make sense to me. So this left side
I'm working on. Now I'm working on the
muzzle itself by the nose. When I have these
brighter browns, or if you have white in
any of your Berna doodle, you're going to want
to try your best to keep a little bit of that paper open so that the white of the
paper can shine through. I'm leaving just a little like a strand or two of
where those browns are. I'm trying my best
to leave those open. If I don't leave
them open for brown, it's not a huge deal. But like I said, I'm trying
my best to kind of go around the head here in the sections in the
direction of the fur. When I come to the top of
the head here, once again, I'm going to paint
individual hairs that are coming out of
the top of the head. But anything on the
forehead or by the eyes, those kind of eyebrow
shapes that I see, I'm not worried about yet. I'm just trying to get that
first layer of color down. Alright, so I left a
little tuft of paper open on the left side
of the nose here. And so I'm going
to try my best to do the same with the right side. I'm noticing these
two little brown furs coming from the top of the nose. I'm gonna try my best to
keep the shape of that open. And then still painting the
underlayer of color here, that shadow violet along the
same shape of the nose here. So it's kind of curving
around the edge of the nose. Alright, so I think
this is where you can see these sections the best. So I sectioned it off to do the kind of the bottom
mustache on the right side, and now I'm coming back and now doing this upper right
section where the ear is. I enjoy sectioning it out. I think it helps me to
kind of think about my painting as I'm doing
this first layer of color. I know I have to be quick when I'm doing this first layer, but sectioning it out will give you a little
bit of a hard edge, so it gives you a
little guidance for your second and third and
fourth layers of color. Alright, so now that I've
got the left ear and the right ear and kind of
this upper mustache, now I'm going to work
on the lower jaw. I did try to define the
point of the bottom point of the ears a little bit more than what is shown in
the reference photo. You can notice on the left
side of the reference photo, the ear isn't quite
as rounded off. I do try to do this with some of the curly haired pets that I
work with just to make sure that it's very obvious
where the ears are and where the different
facial features are. For the bottom jaw
and the lower lip, I am trying my best to leave a little bit
of paper of that white along the bottom
of the tongue so that I'm noticing that
it's a little bit lighter there in the
bottom of the tongue. I'm only working down
towards where that chin is. Now I'm gonna fill in the
rest of the neck line. Now I'm using the edge
of my brush here for the neckline and for the body instead of
the tip of my brush. And that's important
because I don't want individual hairs to
show at all on the body. I want these kind
of tufts of fur. When I make these little tufts of fur and when I
come to the edge, I'm going to try to keep a little bit of paper
shining through. So there's little
almost blobs of paint instead of brush
strokes of paint. Now, I'm going to be going
over in the next step, how to do these curl techniques. So this is kind of your
first introduction to curl techniques using
the edge of your brush. Where to stop the neck line? I always like to paint my
neckline as very triangular. So you notice that I've
got the bottom point of the triangle is going to line
up with the tongue there. So when it mimics the tongue, you've got a really nice
flow to your painting. Instead of having
lower neckline being very U shaped or
rectangular shaped. I like to have it a little
bit more triangular so that it mimics the tongue.
4. Practicing Curl Patterns, Part 1: Alright, so now that
we're done with our first layer of rbnadodle, let's talk a little bit about the two hair types that you're going to notice
in any type of doodle. So, first off,
we're going to find straight hair straight
and kind of wavy, so it's going to
undulate like this. We'll find that in the
ears, in the eyebrows, above the eyes, and in this little mustache area
and around the mouth. You'll then also
find curly hair. The curls that you're going to notice are going to
be on the forehead, the chest, and neck, and then possibly on
the tops of the ears, depending on how
curly your doodle is. It's really important
that we recognize these two different
types of hair patterns, mainly because if
you're trying to do curly hair over the entire
face of your doodle, you might lose some definition around the mouth and the eyes. It's fairly similar. These two different types of hair curl patterns are fairly
similar for any doodle, whether it's a golden
doodle, a labradoodle, a Burna doodle, even
cockapoos are fairly similar. And so we're going to kind
of go over that right now. Now, as far as brush choices, I'm still using this
round size four brush. It's a black velvet
by Silver Limited. You're going to
want a round brush that holds quite a bit of water, but also comes to
a bit of a point. So when you're looking
at your rounded brushes, you might not want to choose a rounded brush that does
not come to a fine point. I know it's harder to see,
but this escota brush, it does come to a
little bit of a point, but it's definitely
not as tapered where my round size four,
it's more tapered. It comes more to a point. Try this technique out with multiple brushes
that you have at home if you're finding that it's more
challenging for you, maybe it's not so
much the techniques. Maybe it's more of
the brush choice. So we're going to start by using some shadow violet
mixed with water. I still want to practice this technique with a
very transparent color. And one of the things that
you're going to want to think about here is that you still want to use a very loaded brush. So I'm really loading up with as much liquid as I can get. For the straight
sections of my dog, I might tap it on the
side and not have quite as much because
for the straight hairs, we're gonna want to use more of the tip of our brush, okay? So obviously, this
is going to be very similar to anything
that you've already painted. Depending on your golden doodle, you can kind of undulate
those a little bit, so you can make them
a little bit wavy. But we're using mainly
the tip of our brush. When we're looking
at our curly hair, we're going to really
want to load up our brush with as much
liquid as we can. And instead of using
the point of our brush, we're going to use the
edge of our brush. So when we've got curly hair, we're tilting our brush
a little bit more. We're having it a little bit
more parallel to our paper. And we're wanting to leave
these kind of chunks of color on blobs of
color onto our paper. Now, when I'm
coming to the edge, say, the outer edge of my ear, I might tilt my brush up just a little bit so that those blobs get to be a little bit smaller. When I bend my brush more and it's more parallel to my paper, these blobs are going to
get a little bit bigger. Now, when we say blobs, we want to make sure that these blobs that we're painting, some of them are going to touch, others are going to leave
more space in between. Now, remember, we've got one solid color of gray
already on our paper, so it's not going to look quite as contrasted as what it
looks like right now. The difference that
you're going to want to make sure
that you don't do for the curly hair is you don't want to try to do curly blobs
with the tip of your brush. So if you've got too much of
a tip of your brush here, these curly sections
are going to look more like dots than blobs. The goal here is we want to
give the illusion of curls. And to do that, instead of painting each individual
curl that you see, we're wanting to give some
really inconsistent lightness coming through and these blobs being very kind of circular. And the circular blobs or the oval blobs are going to give the illusion
that there's curls there. So let's kind of
take a peek at what this might look like on a very, very rough sketch of a head. So I just use a pencil here
to draw a little circle, two little ears off the end, a circle where the muzzle is. I kind of filled in where the nose would be and the mouth, and then the neck line off the off by where the ears
are connected to the body. So when we look at where
our straight hair is, obviously, this is
going to be very rough. This I might not look like a
dog when you're practicing. The goal here is to really understand where these
two curl patterns are. When I look at where the
straight hair is gonna be, it's gonna be on my ears. So when I'm painting
the second layer, remember this is the
second layer of my ears, I'm going to start on
the top of these ears. And I like to kind of give some of these undulating lines. Remember I'm using
the tip of my brush, I might start at the top. And then once I kind of get
some of these lines going, then I'm gonna jump, and I'm going to jump to
the bottom of the ear. And then I'm gonna pull some of these undulating lines
from the bottom up. Now, you can have some of
these lines touching slightly, but the majority of these lines
are not going to connect. The other thing to think
about when you're thinking about painting ears here is that some of your
reference photos are gonna show all kinds of
crazy hair sticking out. You might need to edit these. So you might want to edit
the lower end of the ear here to make it a little bit more to kind of clean up
the edges a little bit. You can still have some
little sections coming out, but really the majority of the you want to be able to
see the ear shape, right? So if we were to try
that on this other ear, your ear can change. So your Dodo might have
straighter hair in the ears. It might have curler. This is kind of a medium in between. If you wanted it
to be straighter, of course, you would
start at the top, and you would pull instead of undulating and moving
them in S curves, you would have them a
little bit straighter. And you would have the clumps in the center be a little
bit straighter. And from the bottom up, you might still have them. You might have a few curves, but a lot of them are going to be a little bit straighter. So you notice that it's
already starting to look a little bit straighter
here for those ears. If you wanted them
extremely curly, then this is where the
inside and top of the ears, you could do a little
bit of those kind of curly blobs in this top
in this middle section. So you would have
these undulating, and then you would
add you could add a few little curly blobs.
In the center here. You might not have quite as
much undulation happening. You might leave it
a little bit more, a little bit more
area in the middle here to kind of do
these little blobs. But by adding those little
blobs in the center, it's gonna bring a
little bit more chaos to the ears and it'll look a little bit curlier.
Hopefully, that makes sense. Back to straight. So
we've checked out ears, what the straight pattern is
going to look like on ears. Now, when we look
at the eyebrows, the eyebrows are really
important to kind of show the structure of the eye. So if our eyes were here. Our eyebrows are really, really pronounced in any doodle. So when I'm painting
the eyebrows, I like to start in the center. And then I'm going to do something similar to what
I did with the ears, where I start in the center, and I'm going to pull in kind of the straight shape.
Up and around. And then I might stop, and I come to the outside edge where I can see those
eyebrows stopping, and then I'll start
from the bottom of where I see it stopping, and I'll kind of
start to pull up. The same kind of rules apply. I, um, I don't want all of these hairs to
be touching in the center. I want some of these hairs
to have space in between. And then, usually, underneath these hairs, it's going
to be really dark. So I know I kind of
painted over the eye. In our burner doodle that
we're painting right now, it is really dark,
around the eye. If you can see some of
the eye, of course, you're gonna leave the
eye and eyeball open, but you're gonna still
have that really nice big arch shape.
5. Practicing Curl Patterns, Part 2: Now, if you have an
image of your doodle, where you've got crazy eyebrows
and they're sticking out, and they're sticking
every which way, you can have some, like, little pieces
kind of sticking out. But overall, you're really
gonna want that shape, that arch shape.
To be prominent. So you will kind of have
to do a little bit of editing and to make sure that you can still
see the arch here. So I had some of these little
hairs kind of pop this way, and then I have the majority of these eyebrows coming
around the edge. A lot of the popping of these eyebrows happens
in the center here, where you've got some of these sections kind of pop in this way and then
around the eye. So, like I said, we just want
to make sure that we've got some straighter hairs
around the top. Now, this always is
happening when we're painting the eyebrows and
the mustache and mouth. We're negatively painting here. So we're leaving the lightest
of areas of the eyebrows, we're leaving not open. On the ears, we're
positively painting. Well, we're still
painting the shadows, and the highlights here in the center of the ears is
what you're leaving open. Alright, now for the so
we did the eyebrows. Now let's take a peek at the
mustache and the mouth area. A lot of doodles also
have a section here. They almost have, like,
a fountain coming from the center of
the nose around. And then the mustache here is going to end with
the mouth line. So we're going to keep a similar
shape of these eyebrows, and we're going to do
that on the nose section. The fountain area
might look different, depending on your doodle, but it's always going
to start the same where it'll start more or less
in the center of the nose, and it'll fountain on one side. So I'm going to
similar to the ears, I'm going to start
with this kind of shadow fountain up and around. I'm going to leave
some sections lighter. I'm not going to connect
all of these lines. It's going to be a little
bit darker around the nose. And then I'm going to
stop about midway and then come to the bottom of
the mustache and pull upward. So it's going to
be very similar to the ears to the straight
hairs on the ears. Now, along the bottom
of the mustache, it's usually going to where
I pull from the bottom up, I'm usually pulling
at the mouth line. So I come here along the bottom, and I'll pull some
of these hairs up. Notice that I'm not necessarily touching the top arch
with the bottom up. Some of them can touch. I don't want all of
them to touch, though, because otherwise it's going
to look a little bit more childish to have the bottom
always touch to the top. Of course, depending
on your pet, you might be able to notice some really unique curl patterns and some really unique hairs
that are sticking out here. You can try your best
to kind of keep those open and to highlight those. I'm just kind of
talking about the general the general
pattern here. So still using that tip of
my brush because this is more of the straight
sections of my pet. You can even though I'm painting these sections
a little bit straighter, you can still paint these
undulating straight lines if the section around your doodles
mouth is a lot curlier. But same thing.
Once I get to kind of this mid line, I stop. I go down to the mouth line, and now I'm going
to be pulling up. So I can kind of make these lines and kind of curl
these lines a little bit. And by kind of curling them
and making these little S, it's going to look a little bit curlier than the other side. This does take a
bit of practice. Um, of course. So if you're not getting
this the very first time you're doing
this, keep at it. The other thing to think
about when you are painting curl
patterns like this is sometimes sometimes we do need to kind of turn our brains off and go back to what we know. So when you're overwhelmed
with all the details of your own reference
photo at home, come back to where are
these basics and really try to include the basics and maybe not as many of the
crazy details that you see. Now, when we come to
the center section of the mustache,
where the mouth is, this is where it can
get to be a little bit more challenging because
we don't want to have, like, a Marko mustache where
it's like, very prominent. So here, we're going to
continue with the whole. I have some lines coming
from the nose down, and then a few of these
lines from the lip And then, of course, you're going to want the lip line to be a
little bit darker here. So it's usually the lower
lip that you can see. So the upper lip, I don't paint. I just paint the fur
from the upper lip. The lower lip is the one that
is a little bit thicker. The chin line here, usually you do see
these undulating, um, straight curls on the chin. And usually they do come to
a little bit of a point, so you can kind of undulate these lines a little bit more. But they still do kind of come to a point
in the chin here. Alright. Now that we have all of our kind of straight
slash undulating lines, now we can look at
where the curly is. For our curly sections,
in most doodles, it's in the forehead area here, which is why we
haven't painted that yet in the chest and the neck. And then we've already kind
of looked at in the ears, there could be some
undulating in the ears. For curl patterns,
I definitely really suggest that your color is a
little bit more transparent. So I am adding water, more water to this gray. It's gonna be a
lot darker around the eyes and around the
nose and around the mouth. On the forehead, it's
gonna be a lot lighter. So we don't want our curl
pattern to get too dark, because otherwise
it's gonna look off. This is kind of where
our highlight is. So now, up until now, I've been using the
tip of my brush. Now I'm wanting to
use the edge of my brush, even at times, I'm pushing as hard as
getting up to the metal, the feral of my brush. When I hit the
feral of the brush, it tends to splay
out these Oops. It tends to splay out
the bristles here. And so you get this edge around the blobs that's uneven, and I like that. I think it makes
it look curlier. So don't be afraid
to really press down hard even to the metal. Alright, so now to do the
curls on the top of the head, I'm going to always start where the curls are the darkest, which is going to be
towards the ears. So I'm loading up my brush. I do need quite a
lot of pigment. I start there, and then I'm going to just
make these blobs. From the outside edge, and I'm going to come into
the center of the head. When I come to the center, I'm going to lighten up
my touch a little bit, and so I'm going to lift up my brush so that these
blobs get to be a little bit smaller and hopefully a
little bit more transparent. Then I'll load my
brush up again. Start where these
blobs are going to be the darkest, which
is towards the ear. I make these kind of
shapes these weird shapes, these weird blobs, and then
I bring the blobs inward. As I bring them in, I kind of lighten up my touch. Now, if your color
stays wet enough, if your paper stays
wet enough here, you can always drop in some darker shadow violet or that violet color
along the edges, just to kind of give it a little bit dark more dark
along the edge. I think that was a little too
much, so I'm gonna lift it. This could also be done
with a second layer. So, if yours does
dry, don't worry. You can always do it
with a second layer. Now, I know I kind of went
into this whole space here. Usually, along this top edge, you are going to have
some little kind of sections of hair that
are sticking out. Just make sure that
you're keeping the overall shape of the head. And so you might
have to do again, you might have to do a little
bit of a haircut here so that you can still see where
the ears are coming out. You know, you can
give a little bit of those little kind of
fluffs coming out, but you still want that shape. So you might have
to do a little bit of a haircut as you're painting to kind of preserve
the shape of the head. You can also depending
on your pet, this section here along
the side of the head, where we haven't filled in yet, you could add a little
bit of curl pattern, so I can also add
a little bit of that those little blobs. That also helps. If depending
on how dark your pet is, you might just want that dark, especially where the ears
are connecting to the head. It might be a little
bit darker there. Now when we get into
the neck line here, that's also where we're going
to see this curl pattern, and that's where it's
going to be the most intense is along the neck line. So with our neck line, our shadow violet can be just a little bit darker if
you wanted it to be. We are going to do multiple
layers on our neck line, but the same rules apply
as the top of the head. We're gonna start with these curls where it's
going to be the darkest, which is always going to
be on the outer edges. The lightest is going
to be at the center. So once again, I'm holding
my brush a little bit more parallel to the paper so I
get the edge. And I come in. And this when I do curls, it actually is fairly quick. Um, if you try to spend too
much time making these curls, you'll actually find that
it's more challenging. I kind of tend to,
like, almost shake my fingers a little bit
so that these curls. It's almost like I had
too much caffeine. Really. It shakes it like
that so that I can get these really odd blobs and some space of that paper
that's shining through. I'll stop when I
get to the midline, just like I did with
the upper side, and I'll come to
this other edge. This is where it's the darkest. I'll start with
these little blobs. And then as I come
to the center, it's going to the space in
between these blobs might get a little bit lighter
or more space, sorry, in between the blobs. Now, I know I'm kind of
running out of space. Normally, I would have this a little bit more
of a triangular shape. The other thing
to think about is these blobs are gonna
come up to the chin, but I still want
to make sure that this chin is really
nice and defined. Because if I lose the
definition in the chin here, then suddenly, I like
lose the shape of my dog. Now, this is all one layer, so then when this dries, I would come back and then do the same thing for
my second layer of color so that I can then darken the curl pattern along the edges and make sure
that you can kind of see this curl pattern
with these blobs. Okay. I hope that
this has helped. If you are having a
hard time or if yours looks just completely ridiculous
afterwards, that's okay. This is just kind of off the top of our
head in our imagination, and we're just wanting to
practice where these straight versus curly hair patterns are. So now we're gonna take a
peek at these same patterns, but now with the second
layer of our Berna doodle.
6. Second Layer of Gray Fur, Part 1: Alright, so now we are ready for our second layer of gray, which is where we're
going to add all of these hair textures
that we just practiced. So I'm going to switch back
to my round size four brush. I had been using my larger
brush for the first layer, and now I'm going to mix my shadow violet gray for
my second layer of color. Now, it's really important
here that your second layer of color is not much darker than your first
layer, much more opaque. We still want it around
the same transparency. But because we're
adding a second layer onto what we've already painted, it's going to look darker. Now, I always like to
start in the ears. I like to start on the left ear because I'm right handed and I know that I won't accidentally lay my hand
on top of other things. I'm looking at where are my darkest shadows and where
are my lightest lights. And those lightest lights, I'm going to try
to pick a few of these hairs to paint negatively. I'm painting around
those lightest hairs and trying to keep those light. You'll notice I'm starting
on the top of the ear, and now I work from
the bottom up. I'm leaving some space
in between where I see that little
light section here. But I know that I am going to be coming over the same section. I'm going to be doing
another third layer, and then finalizing
it with black. So when I'm painting
really dark curls, I want to make sure that I
am doing this gradually. Alright, let's move on
now to the eye area. So just like we
talked about before, we've got some
prominent eyebrows. I notice there's
a lot lighter of eyebrow over the outer
edge of this eyebrow. So that's kind of what I'm
going to be focusing on here. Now, the eyes of my Berna
doodle are very, very dark. I am going to start in the
very center where the eye is. It's just completely dark. However, I did add that little highlight
of masking fluid in the beginning just to make sure that I knew
where the eye was. Then I'll start on
the outer edge, and I'll keep that little
highlight of the eyebrow. And as I move inward into that little center of
the eye, it gets darker. Now, what peaches here
doesn't have too much of highlight on the eyebrow
on the inside of the eye. It's mainly on the
outer edge of the eye, so that's where I'm going to
try to keep it the lightest. Alright, let's move
on to the right eye. So once we come to the center
in between the two eyes, there's a little tuft of hair that kind of sticks
up a little bit there. I'm going to try
to preserve that. And then it moves to an
arch on the right side. So I am kind of doing
this light fountain here around the top of the nose. Going to be very similar
on this right side. I do want to try to
keep the two eyes as even as symmetrical as I can, with just slight differences
if I'm noticing really, really slight differences
in the hairs, but I don't want to make the
two eyes overly different. So once again, it's very dark
in the center of the eye, and then we've got our little
eyebrows above the eyes. It's more it's lighter around the outside edge
of this eyebrow, so that's what I'm going
to try to preserve here. All right. Now in the
center of the forehead, that's kind of where
I'm seeing more curls, which will be more
of that curl pattern instead of the straight hair, so I'm going to
leave that. For now. I'll dot a little bit of this gray in where the darkest
areas of the eyes are. And now let's take a peek
at the forehead here. Now, remember, our curl pattern does kind of change
in the forehead. So this is where I'm using more of the edge of my brush and keeping these blobs
to be really random. My brush is quite
loaded with pigment. So you'll notice
that it might look a little bit darker on
some of these little dots. Along the very top of the head, I do notice a few more
curves and curls. So I'm trying to preserve
those curves and curls. But I'm doing my best to
kind of make these blobs so that I leave a little bit of that
underpainting to shine through. I also can lift up
any of these areas that got too dark
using a dry brush. And once I get to
this right side where the ear starts
to feel connected, that's where I kind of stop
with this curl pattern. Alright, so with these curls, I'm trying to add a
little bit more darkness to some of these curls, but realized very quickly that I was afraid of going
too dark too quickly. And so I'm drying
off my brush and lifting up that paint
that I just put down. I'm gonna let it dry thoroughly
and then take a peek at the next layer and see if I wanted to go darker
for this next layer. But like I said,
it's hard to go. You just don't want to
go too dark too quickly. So on the right
side of the face, we're going to do
now the right ear. I like to do the right ear before I do the
nose just so that I can kind of frame the nose
and that mustache area. Once again, I'm looking
at working on this up, starting at the bottom
and pulling upward, and then at the top
and pulling down. I'm looking at where some of these highlights in the
ears are of the hairs, but I'm also trying my best
to not be be stuck with that. And so, knowing that I can
change change it slightly. So I want to leave a little bit of highlights through
the ears here. I am working with a
slight S curve on my hair so that it does look a little bit
wavy through the ears here. And I'm keeping my paper towel handy in case I do need to
lift up and start over again. But working in this way, making sure that you're not overly blending at this point. So you'll notice
that up until now, I have not blended any
of these sections here. I'm leaving them really
nice and hard edges. The reason why we don't
want to overblend is because then the
minute that you start to blend these curls
or these curly hairs, you lose all the definition, and then it just
becomes a gradient. And we don't want
that. We can always correct and make the highlights
a little bit darker. But once we blend those edges, we lose the definition. So really make sure
you're not blending here. Alright, now let's take
a peek at the nose. Once again, we've got
this kind of fountain, like hair styles, hair
texture in the nose. So I'm going to start
in the center of the nose and kind of
work my way outward. I'll make sure that I'm leaving
some of these highlights. And the sections that I notice in the nose here that are brown. I'm gonna try my best
to keep those open.
7. Second Layer of Gray Fur, Part 2: Making my way to the upper lip, I'm noticing that the upper
lip is very dark and there's not much definition when it
comes to individual hairs. So the only thing that
I'm going to do for this upper lip is I'm
going to try to keep a slight highlight right where
the gray meets the tongue. So I have just the
littlest amount of that under painting, that light gray shining
through on that upper lip. Alright, so we're start with the same curl pattern as
we did for the forehead. So I'm loading up my
brush with my collar. I'm going to start on
the outer edge here, keeping a really, really
light touch with my brush, making these little blobs of color that I'm connecting
at random points. And trying my best to have
this be as sporadic as I can, if I overthink it, believe it
or not, it turns out worse. So I try to do this
fairly quickly. I also have decided not to
include the collar here. I thought it would kind of
detract from the painting, and the clients didn't really didn't really care if the
collar was in it or not. Once again, I am keeping with this overall triangular shape, and I'm doing a full
second layer here. The chest area is quite dark, so I will for sure
need to be doing a second or third and
possibly even a fourth layer of curls here as well. And then before it dries, you can always take a peek
at your reference photo. If you do notice any
highlights anywhere, you can always take
a paper towel or a dry brush and just lift up a little bit of highlight in the areas that
you're noticing. To curls are a little lighter. That's usually the easiest way to lighten up sections of curls.
8. Second Layer of Nose and Tongue: Alright, so now let's
add a second layer of that gray to the
nose and the tongue. So I know it looks like
I'm mixing up new gray. It's basically the same opacity as the second layer of
fur that I just painted. I just needed more paint. So let's take a peek
first at the nose. When we zoom in and
look at our nose, we are noticing
that the nostrils, of course, are the darkest. And then the whole
bottom section of the nose is the
darkest, as well. Now, I still am going to
preserve those highlights, those e highlights
under the nostrils. But the whole lower
section of the nose there is going to be painted with a second layer of
shadow violet gray. Then I'll take a peek
at the top of the nose. I'll add one line of
that shadow violet gray, then rinse my brush off and
gradually blend that down. I'm also noticing that top section of the nose is a
little too hard of an edge, so I'll blend that section
just slightly as well. Next, we'll go in and add
some shadow to the tongue. So I'm still using
that same gray and making a very
pronounced shadow at the top edge of the tongue and pulling a thin line down the
center of the tongue there. Now, I know there's a
lot. There's usually a lot of shadows going on in our pets tongues
on their pets tongues. You can notice more
linework more shadows. I tend to be a little bit more conservative when painting
shadows on the tongue. I find that if I try to add multiple shadows on the
center of the tongue, it ends up looking awkward
and just kind of too busy. And so the main
shadows at the top of the tongue and along the center line is what
I'm focusing on here.
9. Third Layer of Gray Fur: We'll continue to darken
up our Burna doodle, so we'll add a third
layer of gray to the fur. Now, I'm using around
the same opacity as the first two layers. It's just layered on
top of two layers, and so it's going to
automatically look darker. Remember the key here is
to not have your layers be too dark and to not
go too dark too quickly. You still want to see
the difference between the opacities at each
level at each layer, but it shouldn't be
a stark contrast. So I sped up this video
a little bit because it's going to be the
same techniques that I showed for the
second layer of fur. We're just doing it in
our darkest of areas. So I'm going to keep this third layer
concentrated to the ears, in the eyes around the nose
and mouth and in the chest. So I'm going to try to
keep the eyebrows light, the mustache, light, and the center of the forehead
a little bit lighter. And of course, remember,
at this stage, we're still not
blending our layers. We will work on blending those hard edges and kind of transitioning the
colors later on, but we're not worried about
blending at this stage.
10. Black Layer: Alright, so now we're
ready for our black layer. Now, you can also if you had wanted to add your browns
before the black layer, that's always a possibility. I call that color corrections. So sometimes you'll notice that I do color corrections
before the layer of black. This time, I decided to get
all of the intense colors, the darkness first and
then add my browns. Either way works, it's just
kind of whatever you prefer. When I do my black layer, I'm going to start with
my facial features first. So that would be the
eyes, nose and mouth. Because the eyes are just kind of hidden
in all that hair. I really want to make
sure that the details in my nose and my
mouth are spot on, and the hardest,
crispest of edges. So I'll start by outlining the nostrils in the
nose using that black. Now, I still have that
black watered down slightly so that I can lift it easily if
I make a mistake. I will also outline along
the bottom V of the nose, as well as that center
line of the nose. Now I notice there's
quite a big almost like a sailboat shadow there along the center
line of the nose, so I will add that as well. And then I'm adding in I added a little bit of water
to my brush and I'm adding in just a little bit of black at that bottom section of the nose. All right. Now I want
to make sure that the tongue is really
nice and pronounced. I'll add some black to the very top edge of the tongue there where it enters into the mouth and the roof of the mouth. I want to make sure that
that's the darkest. I'm also going to
slightly extend that mouth line there so
that it's really prominent. I give the slightest hint of an upward arch at the
end of the mouth there, and that slightly upward
arch at the edge of the mouth is going to give it kind of this
little smile smirk, even if it doesn't
show in the picture. Sometimes I like doing that because it just
gives a little hint that dog this pup was happy
when the picture was taken. The tongue is out,
the eyes are happy, so let's add lit a little
smirk to that mouth. Now I'm also going to add a
little bit of black around the outer edge of the tongue just to kind of
define it a little bit here. And so that it's
really nice and crisp. Now, with the black
layer and the fur, I am going to speed up
the video just slightly. It's the same exact techniques as we did for the
last two layers. But of course, this time
we're only looking at where are these the darkest
of my shadows. We want to be cautious of not over using black
when we're painting black dogs because too much black in our painting is going
to flatten the painting, and we don't want that. So we want to create depth using these other grays
and then adding our black where it
is the darkest. When I look at the mouth, I have the black
in kind of under where those brown
hairs are curled over, and then I'll have
darkest of blacks at the bottom of
both of the ears. I'll also have black, the darkest of blacks, where that ear is
connected to the head. And I can add a little bit more dimension to the ear and some of
the darkest sections. But overall, I want to
keep those highlights. When I look at the eyes, I want to make sure that that center of the
eye is the darkest. It's going to be
hidden by hair there. Obviously, the masking fluid is keeping that highlight light. I will probably take and
tone that highlight down, though, when I take
the masking fluid off. So we'll keep watching the video and see where exactly I'm adding
this black two. Once again, the black layer, I'm not blending the
edges of this layer, that will come in a later step. When I'm painting black
along the top of the nose, I want to make sure
that the darkest of darks is staying
close to the nose. I don't want too
many dark sections of fur along that upper bridge of the nose near
the eyes because, of course, that's where it's
going to be the lightest. So I want to keep the darkest of shades
around the nose area.
11. Color Corrections and Blending: Alright, so now we're
at the stage where we can think about
our color correction. So this is where I'm
adding any of the browns, the slight brown hues
that you might see. This is where you can also add blues if you're
noticing a blue tint, you can color
correct the tongue. I'm starting out
with adding some of these brown highlights to the tips of the hairs
around the nose. I'm using a quinacridone
burnt orange. You can also use a burnt sienna and really water down here. So we're looking
at mainly glazing. Which glazing is just
adding a little bit of color on top of a section
you've already painted. So you want to you want
the color to be present, but you don't want it
to be overpowering, which is why we're doing it at this stage and not in
the very beginning, because I find when you add brown in the very beginning
of your painting, before you have the
shadows and highlights, sometimes your brown
becomes too dark, too quick, and then it just
overpowers the whole piece. So I always like to add
these browns where you notice just the slightest hints at the end of my painting. I'm also going to see what
it looks like to add a very, very light glaze
of this brown to certain sections of the
ears and the neckline, wherever I'm noticing
kind of this brown tint. This obviously really depends on your own reference
photo and where you're noticing some brown tones, and then you can add a really transparent glaze over those sections just to kind of give it a
little pop of color. Then once I'm done
with my browns, I mix up a very transparent
quinocridone magenta and add another
layer to the tongue. I'm just adding a thicker edge along that outer
edge of the tongue, but still maintaining
the highlight along the outermost
edge of the tongue. So it's just to give just
a little bit more color to the tongue wherever I
see it a little bit darker. Alright, so we have made it to the step where
we are going to blend. So you have refrained from blending your layers until now. So you might notice that
some of your layers are looking a little
choppy almost. And so we're mixing
a water down black. I just added some water
to that lunar black, and I'm adding a glaze on top of sections that I want
to push back in space. So I started with the ear
on the right hand side. Now I'm coming to
the mustache area, and the kind of outer pieces that are sticking out that have the brown on them are closest to us. So everything else needs to
be pushed back in space, including that upper section of the fountain and kind of the lower sections
of the mustache. So I'm pushing that back in space by
adding a glaze on top. My glaze also helps to blend
those layers together. Now, I'm not blending
on purpose in any of those sections unless
I'm noticing that I need to. So you'll notice I'm not pushing my brush back
and forth and back and forth to blend because just
adding that extra layer, that glaze of lack of transparent black is going
to do that work for me. So I'm just looking
at where do I need? Where do I keep these
highlights and where do I need to push some of these
sections back in space? I'm also noticing that
the nose is a bit darker in my reference photo
than it is in my painting, so I am going to add a glaze of black over most of the nose. Even on top of these highlights. You'll notice I just left
a little tiny highlight in the upper right corner
just to keep the shape, but the rest of the nose I
kind of pushed back in space. All right. And then
after I finished blending out some of
those harsh edges, now I'm going back in and
adding just a little extra dark to the sections I'm noticing need to be
pushed a little darker. So I'm going to speed
up this section of the video so you
can take a peek at where I'm darkening some
of those darkest shadows. And lastly, I'm adding a few little wispy curls using this dark lunar black
at the top of the head, just to kind of emphasize those dark curls at
the top of the head. This is completely optional. If you're not enjoying
how this looks, you do not have to add this.
12. Colorful Splash and Final Details: Alright, so after adding
all the black details, I can add a colorful splash. Now, this step is optional. However, it is
something that can help bring a little bit more
color to your pet portraits. So I'm wetting the area
that I want to paint first, and then I'm dropping in some teal that I mixed up
with quite a lot of water. Since I've painted a very,
very dark burnadodle, I want to make sure that
the background color is nice and light and transparent so that it doesn't feel it doesn't make
the painting feel too heavy. Is why I decided to go
with something that's a little lighter and
airier like a teal. I've tried purples
in the background of burnadodles, and
I don't like it. I think it makes it look a
little bit too dark dark dark. When I am painting along the
top edge of my Burna doodle, where I've got
those little curls that are coming out and up, I can add a little bit of
that teal in the center of the curl just to make it look like it's coming up
and out of the head. All right, so I let my
painting dry overnight and I took off the taper on the
outside and the masking fluid, and now I'm ready for
my final details. The first thing I
notice right off the bat is that
the masking fluid, those little highlights in
the eyes is very bright, so I'm going to
dull that down with a little bit of water down gray. I can dull it down and still
keep it or if I prefer, I can just cover
it up completely and erase it as if there
aren't any highlights there. The next thing that I can
do this is always optional. If you're happy with how
your painting looks, this is not something
that you have to do, but it is always optional to add some crispness to certain areas of your painting by
using micron pen. A black micron pen
is waterproof. It's going to give you
those really fine edges. So sometimes with paintings that don't have a ton of detail, as far as in the eyes, nose and mouth, I'll add a little micron pen
around the nose and mouth just to make sure that your eyes
are focusing there. Sometimes I'll also use it around the outside
edge of my painting, not to completely
outline everything, but just to give little
accents here and there and to make the painting
look a little cleaner. And I'm going to come back
with a little bit more black to fill in
that left highlight. I wasn't really liking having
both highlights present. So I'm going to completely erase the left highlight by
adding black on top, and then I'll dim
that right highlight. I'll still keep the
right highlight, but it was just looking
a little too odd for me. So erasing one of
them and keeping the other was a good
kind of middle point.
 Emily Marie Watercolors, Watercolor Artist and Dog Lover