Transcripts
1. Welcome and Introduction : Hi, and welcome to my
new class Inky insect, seven days of dramatic
beetles and insect allen. In this class, you will
learn how to create vibrant and detailed
ink illustration of beautiful beetles and insect
using simple materials. This class is completely
beginner friendly. We'll mainly be using
fine liners and bras pin. But you don't even
need breastpins. You can create all
illustration using simple ballpoint pen, if
that's what you have. All the lesions are
recorded in real time, so you can follow along
with me step by step. At the end of the challenge, we'll also work on bonus project a large more detailed
Winged insect illustration to bring everything together. For the seven day challenge, I'll be uploading one project
each day. Hi, everyone. My name is Mihal. I'm an artist from India and a
skill seer teacher. On a skill sare I teach a variety of beginners
planting art classes, including oil pistol, gauze, watercolor and ink illustration. You can also find more of my work on my
Instagram and YouTube. We will begin this
class with the basics. Also use some of the essential pen and ink
illustration technique that we'll be using
in this class. Then I'll guide you through
an easy framework method that helps you construct
any insect with confidence. After that, we will move into our daily insect illustration, building skill and
consistency as we go. No fancy materials are required. I've used colored paper
for some of the project, but we can absolutely use
regular paper available to you. So join me in this
seven day challenge, and let's have fun experimenting
with dramatic beetles, expressive linework and
beautiful ink illustration. I'll see you in my class.
2. Class Project : For your class project,
you'll be creating seven detail ink illustration
using file and bras pin. You can create all
the sevens or you can create any one
of your favorite. You can also create the
bonus one, the largest one. I'll be uploading a video each
day for the class project. You can also upload your project in the project gallery each day, or you can just complete all the seven or eight project and then upload
them all at once. Feel free to experiment with
different seeps and sizes. And if you want to add
additional element, you can do that, too. You can follow my
exact reference or choose your own insect for
more personal challenge. You can also see
your practice sees. By the end of the 70s, you will have a cohesive
mini collection of bold, detailed
insect illustration. Once you complete your artwork, upload it to the
project gallery, I'd love to see your creations. So let's dive in
and start building your ink insect collection. Mm.
3. List of Supplies : For this class, you will
need very basic supplies, pencil and nails to do the
basic simple pencil sketching. In here, I'll be
using colored paper. So I've got this oil
pistil colored paper. Since I'm using loose seats, I'll be using the masking
tip to secure the paper. Tissue paper will come in handy to avoid
smudging of the color. I'll be using the fine liner, black and red fine liner
from Sakura micron. And to do the mean outlining, I'll be using the
Tombos breast pin. If you don't have the breastpin or if you don't want to use it, you can stick with
the fine liner and create all the project. These are not necessary. For the whites, I'll be using white colored pencil and I
have got the sakura jelly pin. White will come in handy, but if you don't have, you can also create
all the projects. You don't have to use it. Apart from this, these are additional supplies
that if you want, you can use, we have
got colored fine liner. I have got the colored gelpins,
colored ballpoint pins. A few rush paints, too. For this class, you don't
need all the fancy supplies. You can create all the project only using a simple
ballpoint paint. Blue, black and red
will do the work. And yeah, I'll be seeing
you in the next video.
4. Testing Supplies : Welcome to this
section. In here, I'll be showing you all
the supplies that I have. Mostly, I'll be using
the Tombos bras pin to do the main outlining. Since with this, I
can get a little bit more thicker and
bit more darker lines. So I'll be mostly using it to do the outlining for all
the beetles and the bugs. I'll also be using
the fine liner, Sakura micron fine liner. To make it a little
bit more thicker, I can just add two
or three lines. Apart from it, I'll also be using the red
colored fine liner. Then I have got this
white gelling pin. So it's not visible in here, but I'll be using it
on the colored paper. Let's use it on
top of the black. Using the black to
create hatching line. Adding the white on top of it. It's not working that
smoothly in here. But as you can see for our
project for the colored paper, I used lots of lines like this. I use lots of fine to create the background
in this manner. So if you have white jelly pin, the project will become more vibrant and more contrasting. Apart from it, if you want, you can use other
colored fine liner too. Like in here, I've got blue
and green colored one. If you want, you can
also use the gel pens. I have got a set of
tin colored gel pens. I won't be using it, but if you want, you
can also use those. So these are some of the
colored elpins that I have. Here's the green one. I won't be showing
you all the color. But you have got the rough idea. If you have gelpin
colored helpin, you can also use those
to do the outlining, add more detailing to make the projects more
colorful and vibrant. Apart from this, I also have got this normal ballpoint pen. I have got colored
ballpoint pen like this. You don't have to even use the fine liners and the breast pin. You can create all the
project only using the black and blue and the red
colored ballpoint pen. Here I've got green
colored ballpoint team. This one is brown. Here's the yellow
one. Light blue one. And here's the purple. So these are the tin colored
wallpoint pen that I have. If you want to transform
the project into color variations and if you have the supplies,
you can do that. I also have got the brass pants. So with this, the main
advantages is that I can create very thick
and thin lines like this, lines of varied thickness. I basically call this kind
of lines dynamic lines. I wouldn't be using
the brass pans, but if you want, you
can also use those. I also have this
yellow colored one. This is a little
bit more thicker and it has a little
bit of sparkles in it. Gray colored one. These are some of the supplies that I
have tasted in here. Feel free to use all your
supplies and check them. Feel free to see here
your track receipt in the project gallery. And with this, we are done
with testing our supplies. I'll be seeing you
in the next video.
5. Basics : Hi, and welcome to the basics. In here, I'll be
showing you some of the basic techniques that we'll
be using for our project. Moni I'll be using two or
three techniques, but in here, I'll be showing you six or
seven different techniques that you can use
for the project. Let's start with the hatching. For most of the project, I'll only be using the
hatching technique. So hatching is basically a seeding technique created
using parallel lines. The lines can be horizontal
vertical slantin. Here we have got
vertical hatching lines and horizontal hatching lines. And as I was mentioned, you
can also create this kind of slanted hatching
lines, lines at an angle. Apart from this,
I'll also be using this kind of broken
hatching lines. Simple hatching lines like this. Here's another variation of broken hatching line that I'll also be using to add a little
bit of texture like this. As you can see, these are
also broken hatching lines, but in here, I'm also wearing
the length of the lines. Some lines are larger,
some are smaller. This is the second example
of the broken hatching line. And as we mentioned, it's a seeding technique created
using parallel lines. We can create
seeding using this. Just by reducing the spacing
in between the lines, we can create darker regions. And here's another way in which I'll be using the
hatching technique. I'll be creating lines like
this to do the seeding. And apart from it, I'll also be using this way
to create seeding, adding rows upon rows
of lines on top of each other to do the seeding using
this hatching technique. So depending upon the project, we'll be using varieties of
the hatching techniques. And these are some
of the example. Next, we have got
cross-hatching. Cross-hatching basically
builds upon hatching. You can define cross-hatching as layering sets of parallel
lines in different direction. So these are two simple example of the cross-hatching,
for the first one, we use angled line, and in here, we use vertical
and horizontal line. And this one is a combination of angled line and the
vertical lines. Like the earlier one,
the hatching lines, you can also use this kind of broken hatching lines to
achieve this cross-hatching. And apart from that, like the
earlier hatching example, we can also achieve seeding
using the cross-hatching. For this example in here, I'm using vertical
and horizontal lines. To make the region darker, you just have to
add more lines or more vertical and
horizontal lines. In here, I'm aiming to make
the top left side darker, adding more lines in here to get a little bit
of darker region. So more cross-hatching
lines like this to achieve the sading. For one or two of the project, I'll be using the
cross-hatching, but mainly, I'll be
using the hatching. Here's another example. To get a little bit of rough texture for
some other section, I'll be using cross-hatching
in this manner. The lines were quite
closer to each other, thus giving a little
bit more dense feeling. Here's another example of using cross-hatching
to achieve seeding. Just add more lines to make the region a little bit darker. Once again, I'm aiming to make the upper left side bit darker, more lines on that side. This was our cross-hatching. Next, we have got curved lines. Mainly, I'll be using the
curve line to wrap around rounded forms or some of the specific parts of the
insects like its eyes, stomach or or any other
part of its body. As you can see in
here, I have created a very simple sketch
for its head. I'll be using the curb lines in this manner to add a little
bit of texture like this. And in here, I use a bit of broken hatching lines to
act as the curb lines. Here's another example. For the stomach
part of our insect, I'll be using this kind of
lines to do a little bit of sading here's another one. Using broken
cross-hatching lines and creating this
kind of curved lines. So these are just a
rough demonstration. Now let me show you how
I'll be mainly using it. For the conical sap of its body, the insect's body to give it a little bit of
three dimensional s. I'll be using cross-hatching or
hatching in this manner, following the curve scene or you can see the
contour of its body and giving it a little bit more dimensional by adding the
lines in this manner, as well as if required,
doing the seeding. Let me show you another example. In here, we have got
another cylindrical s. This time I'm
using broken lines. Using broken lines and doing a little bit of cross-hatching, following the curved seed of the cylindrical sea and making it a little bit darker
for the lower region. So you have got the rough
idea how we'll be using the curved lines along with the hatching and
cross-hatching technique. Now, how are we using
this in the class? So here's a simple
demonstration. So here we have
got insect sling, and to give it a little bit
of three dimensional same, I'm using simple hatching
lines like this, following the curve
se, a little bit of curve same since it's
not that much curve. So simply using hatching lines to give it a little
bit of more volume. Now to give it a little bit
more three dimensional sap. Here we are using curved lines. We'll be doing a little
bit of cross-hatching. I'll be making the upper
region bit darker, following the curved
sieve and making the upper region darker by
adding more lines in there. Now for this conical set, starting with the
vertical hatching lines, and then we have got
horizontal hatching lines that are a little bit curve following the curved seep of its feet. And for the remaining portion, we'll only be using
a little bit of hatching line and
doing the seeding. So this is how I'll be
using the curve lines. Next, we have got a stippling. Stippling basically use
dots to build seeding. With more dots, we can create darker area with fewer dots, we can create lighter area. In this case, no
lines are involved. For this one, in here, I used fewer dots to create lighter area and created
this spherical sea. Here's another
one. For this one, I decided to add more dots, more dots, and the spacing in between the dots matter too. For this one, as you can
see that spacing in between the dots is far less as
compared to the first one. Here I'm considering
that the line is falling from the
top right side. So the darker side is on
the bottom left side. In here, I'm aiming to make
it a little bit darker, and I'll also be
doing a little bit of seeding using this
stippling technique. So we are making
the lower region a little bit darker by
adding more dots in there. Oh. With this
stippling technique, we can create very
beautiful texture, so softness and subtle gradient. The main disadvantage with this technique is that
it takes a lot of time. So for most of the project,
I won't be adding it, but for only a small
section, I'll be using it. And with these, we are
done with the stippling. Next we have got
scribbling technique. This is a very loose overlapping free flowing
technique in which we use lines of irregular
sieves. Wow. For one of the project,
I'll be using it. With this scribbling,
you can provide energetic feel to
your illustrations. These kind of lines
are irregular and you can consider
them to be organic. For only one of the
project, I'll be using it because I don't have that
much control over it. Next, we have got scallops. And basically, scallops are repeated half circle
or wave like lines. Let me so use some of the
example of the scallops. I won't be using any scallops for our project,
but if you want, you can include the
different kind of escalops for the background or for some of the section of
the insect's body. And lastly, we have
got contrasting lines. This is a simple example
of contrasting line. I won't be using it.
You can use it for the background or for some of
the section of the project. In here, I'm using hatching
technique and creating this kind of lines that are facing in a
different direction. Apart from this, you
can also use thi, r thin lines to create
the contrasting lines. You can also use dark and light. By dark and light, I mean by wearing the spacing
innate in the lines. You can also use straight
and current lines to create contrasting lines. So feel free to experiment, and this is all for
this basic section. I'll be seeing you in
the next video. Okay.
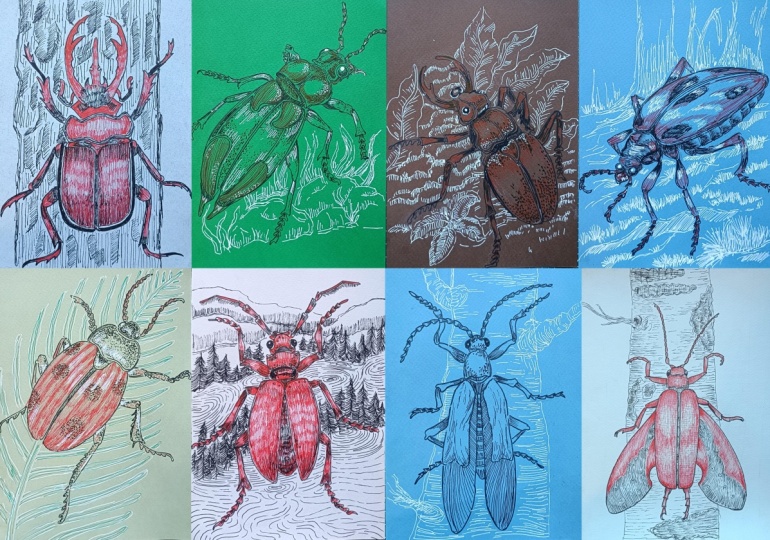
6. Insects : Welcome to this section in here, I'll be showing you how
I'll be creating most of the insects for this
project for this class. So these are all the
insects and the bugs and the beetles that we'll be
creating in this project. And for all the
projects in here, I use the simple guidelines
to create its body so that there will be
a little bit of uniformity for all the
project in this class. Basically for all the project, I'll be starting
with a simple lines. This line will determine the length for the
insect's body. And then I'll further
divide into more section, mostly four section, but if required, eight
or six sections. For the first two section, mostly I'll be creating its
head and the region below it. And then for the remaining
two or three section, I'll be creating the outline for the remaining portion
of its body like this. For this example in here, I use only the first section, and I further divide it
into different sections for different portions or
different parts of its body. And for the remaining portion, I use to create the rough
outlining for its body. But depending on the projects, I'll be wearing the
proportions a little bit. For all the projects, I'll be creating three pairs of feet. And to create curved insects, I'll be using this kind of curved lines to determine
its length and once again, dividing into
different sections, mostly four sections and using a simple guideline to create
the outline for its body. For curve insect, I'll also
be sewing some port in a bit spotty to give it a little bit of more
three dimensional seam. In this manner, I'll
be creating this kind of curved bodies for our insect. As for its head, mostly I'll
be creating this kind of see front pincers and the eyes on the sides creating
this kind of oval see for the eyes so that it's
a little bit bulgy eyes. Below its size, I'll be creating this kind of see for its head. This is just a simple example. I'll be wearing the sis
seeps for the insides. Now for its antenna, here's an example
of its antenna. This is a little bit detailed
variation of the antenna. Here's another one
using this kind of small sections to create the
outlining for its antenna. Apart from this, I'll
also be creating a few more variations
of the antenna. As for its feet,
here's an example. I'll be using this kind of
cylindrical sp or you can see conical cylindrical saves
to create its feed. Mostly, I'll be dividing into
three sections like this. So this will be the s for the
last portion of its body. Let's create one more
example of its feet, a little bit different
angle for its fin. For the last pair of feet, I'll mostly be creating
this kind of feet, a little bit bent like this. So this is how it'll
be creating its feet, its antenna, the front
portion of its head, pincers. And here's a simple example of the horn that
I'll be creating. For this too, I'll be making
a little bit of changes and also create other
variations for the horns. Let me show you a
few more example of the body pill
poison for our insect. Here we have got an oval one. This is a little bit
of polygonal seed for the body of the insect. And as for the
winged one, you can add the wings on the
sides of it body. And with these, we are done with some simple seeds for
the insect's body. I'll be seeing you
in the next video.
7. Azure Forest Climber : Welcome to Azure Forest Climber. In here, I'm using
blue colored paper, and I'll be using both white and black to create
our illustration. This is one of my
favorite from this class. So let's start with a
simple pencil sketching. Starting with a vertical line to determine the length
for our insect, I'll be dividing into
different sections so that we can easily create it. In here, I'm starting
with a simple sep, simple half oval seep
like this for its head. On both the sides, creating the smaller seeps for its eyes. And this will be his antennas. Now let's divide into
different sections, a total of four saxon
and I'll be using simple seeps to create
simple sketching for rest of its body. For the upper part in here, seen wind of half
oval see that we created for its was
a little bit larger. Now, for the remaining section, we'll be creating its
body and its wings. In here, creating this kind of bit conical see for
the rest of its body. This simple wings. You can start with this kind
of conical triangular sea to create a estimate for its body and then do
the remaining section. Extending the sides like this to create the outline
for its wings. Simple cap like
this for the wing. I'll only be creating its
body till the fourth section. And for this remaining section,
we have got the wings. Simple seep like
this for the wing. So this will be the
tail of our insect. And in the middle,
we'll be creating simple lines to
divide it further. Now let's do the outlining
for the insect sling. You can just follow
along with me. I'll be creating this kind of simple verson for its sling. Creating this kind of non
uniform cylindrical see for its leg and the feet. This is how we'll be creating its feet for some
of the section. As you can see, I created simple cylindrical see for other we have got
somewhat of conical see. Try to keep it
symmetrical and add the feet on the same
exact positions. You can vary the positioning of the remaining
section of its food, but to start with the same
position for its beginning. Now for the second
seat of its fin, for all the insects
in this class, I'll be dividing the foot
into different section. I'll be dividing the foot into
three different sections. Now for the last pair, making it a little bit more thicker. Same portion of its
feet in here or the leg in here will be
covered by its wings. This is going to a
simple pencil sketch. Now this is optional. If you want to follow along with me, you can create the
outline for the trees. Later on, I'll be using
the white jelly paint to do the outlining for the tree and add a little
bit of detailing. If you don't want, you can
create the insect in here. And with this, we are
done with the outlining. Now in here, I'm using the tombos bras ping
do the outlining, I'll be making some changes and adjustment as well as I'll be adding more
detailings to it. So for our antenna, we have got this kind of
bit conical see. Simple conical see for the entire section
for its antenna. Let's do the outlining for the second one. Let's
put the foot in here. I'll be doing the
outlining later on. Adding the antenna
on top in here. This is going to be our
outlining for the antenna. Now for the remaining section of its body, starting
with its head. Mostly, I'll be
using hatching lines and a little bit of a stippling. Mostly, I'll be
using hatching lines and a little bit of a stippling. Doing the outlining
just below its head, a little bit of hatching lines, simple smaller hatching lines. Now, for this portion, simple outlining like this. Let's do the outlining
first and then we'll be adding a little
bit more detailings. Here, if you want to create
a bit of dynamic lines, you can use bras
paints in that manner, you can make some of the
lines bit more thicker. In that way, you can easily create lines of
varied thickness. That's creating this kind of simple C for the remaining
portion of its foot. And with these, we had
done with this one. Let's do the same thing
for the second one, making this region a
little bit more thicker. Try to give the
symmetry in both. Now for the remaining
section of it, second foot. So this is a little
bit different as compared to the antenna. And with this, we end
with the second one now for the remaining section. Let's do the outlining
for its body, the flap that cover its wings. In here, I'll be using
simple hatching lines, bit curve hatching lines to
add the detailing later on. For the second one here instead of creating this
kind of bit broken lines, you can always create
clean and normal lines, uniform lines, but to add a little bit of moat
darrected to this, that's why I'm using this kind of broken lines to
do the outlining. And with this, we are
done with the outline. Now for the remaining
two pair of the feet. Now for this person,
the same kind of thing that we did for the
first pair of the foot. Moving on to the
foot on the right. And with these, we end
done with a second pair. In here, I'll be using the hatching lines to make it a little bit darker later on, continuing on, moving on to the meaning
portion of its body, doing the outlining
for its wings, doing the outlining
for the second wing. Put the wing in here,
I'll only be using simple hatching
lines to completely cover the entire
section of the wings. In here for this middle portion, dividing into different
section here too, I'll be using a little bit of hatching line and
doing the seeding. Couple lines this to divide
into different sections. Now for the last pair
of the legs in here. Doing the outlining for
the other side too. Now for the remaining section. Simple sap like this,
bit of conical sap, doing the same thing
in here on the side. Same number of joints like this. And with these we are done
with a simple outlining. If you want to do
the outlining of the tree using the black,
you can do that, too. Instead of the
black, I'll be using white jelly pen before
proceeding to add the jelly pen, using the eraser to lightly
release the pencil sketch, Ise that the ink has dried
up and apply light pressure, otherwise, the intensity of the ink will be
reduced a little bit. The whole video is in real time, so you can always
follow along with me. Let's create the background. In here, I'm using jelly
pen, white jelly pen. I'm going over the outline, the pencil outline
that we did earlier, and I'll also be
making a little bit of changes and
adjustment as required, starting with simple
outline for the trees. For the inside, I'll
be using a bit of broken and bit curved lines to add a little bit more detailing and a bit
of texture for me. I'll also be creating
two branches. This is going to be
our first branch. These are all optimal. If you don't want to create it, you can just leave
it simple and plain. For the branches
in here, simple, broken hatching lines like
this to add the texture. Now for the remaining
section of its branch, simple plain lines like this, simple hatching lines
like this to add detailing to make it a bit more detailed and
bit more textured. I'll also be making the
outline a little bit thicker. So I'll be adding two or
three lines later on. For the inside, I'll
be using this kind of simple broken
hatching lines to add a little bit of more textured
appearance for our tree. If you want to make it a
little bit more interesting, you can always use other colored paint to greet the trees. And if you don't want, you
can just leave it simple. Only the insect. This is our second branch,
creating the outline. Put the curved section
of the branch in here, creating this kind of curved
line, adding more lines. Following the canto,
the curved sweep of the branch adding
a few more lines. For the lower section
of the branch, make it a little bit more
darker by adding more lines, and for the upper
section, decrease the sizes and the
number of the lines. As I was mentioning,
making the outline bit thicker by
adding more lines. For all the remaining section, I'll be making the outlines
a bit more thicker and using simple hatching
lines like this, lines of varied length to add
more details to our tree. If you want to make it a
little bit more darker, you can always use
the cross-hatching. But mostly for all the
projects in this class, I'll only be using stippling
and simple hatching lines. Added kale fully in between the parts of
the insects body. Completely filling this smaller
region with simple lines, doing the same thing in here, adding a little
bit when it's fit, adding another line in
here for the outlining. As you can see, I'm not covering the entire section
with the simple lines, but I'm leaving a little bit of specs in between
the hatching lines. Here's our third and
the final branch. This is a little bit smaller. If you want to add more
branches, you can do that. If you want you can also create smaller trees in the background. Making this region
the curve part a little bit more darker
by adding more lines. Now for the remaining section
in here on the right side, we'll be doing the same thing that we did on the left side. But this side, I'll not be making the lines
bit more thicker. But if you want, you
can make the lines, the outline of the tree
a bit more thicker, like we did for our left side. The lines that I'm adding
are not all stream. Some of them are a little
bit curved like this, and I'm also wearing
the length of the lines as you can
see it clearly in here. Adding bit more
curved line in here. Adding it in between
the two wings. Now, add it a little bit more
of white wherever you think it's required or wherever you
are not satisfied with it. With these we have done
with the background the trees using the jelly pin. For the finer details in here, I'm using fine liner. So we have got Sakura
micron fine liner. For the wing, as I was mentioning,
simple hatching lines. In here, I'm creating this
kind of angled lines. And as I progress, I'll be changing the angle a little bit. For the lower region, I'll be creating some white
of vertical lines, dividing into
different sections. Make the lines a little bit more slanted and change its angle. So this is what I was saying, changing the angle and making the lines a little
bit of straighter. Now for the other section. And with these, we are
done with our first wing. We'll be doing the same
thing for the second one, creating this kind of angle,
simple hatching lines. Here, I'm not doing
anything additional, but if you want to
do a little bit of seeding, you can do that. You can add another layer
of lines on top of it. To make it a little
bit more darker, you can always use
the cross-hatching. You can also use a little bit of stippling to do a little bit of seeding dividing
into different section. You can also use a
little bit of stippling technique to make some of the
sections a bit more darker. Adding it on the other side. And with these, we add them
with our pair of wings. Now for the foot, as I was mentioning, simple
hatching lines like this. Also do a little bit of
sading near the edges. For all the smaller section,
a little bit of hatching. For the antenna too, simple
hatching lines like this. I'm just adding seven or
eight lines in here to make the regions the lower part a
little bit darker like this. It said, simple hatching
lines for the front part. Now in here, combination of hatching lines
and a stippling, starting with the
simple stippling dots. Later on, I'll also
be doing a little bit of hatching lines for its eyes, leaving a little bit of
white space in here, and then feeling the remaining
section with the black. Moving on to its second antenna, doing the same thing, simple
hatching lines like this. For its feet, same thing. Oh adding it on the lower side and doing simple
hatching lines like this. If you want to make it a
little bit more darker, you can do the hatching
lines on both the ends. Now for this portion in here, simple hatching lines to feel the remaining
section in here. For the upper side, too, a little bit of hatching lines. Now for this large portion, doing the hatching
lines on the top right side on the bottom left side, a little bit more hatching on the right side in here
for the second pair of E, the same kind of
simple hatching lines that we did for the first pair. Adding it for the
smaller saxon stew for this larger feet, a
little bit of seeding. So for the larger areas or
bit more broader areas, apart from the hatching,
also do a little bit of seeding to make that
region a bit more darker. Doing the remaining section, adding hatching lines for the
remaining section in here. And as I was mentioning for the flap that are
covering its wing, I'll be creating
simple hatching lines and a bit of broken hatching
lines following the seep. Just simple plain hatching lines like this to add a bit more detailing for our flaps that
are covering its wings. Following the seep and
creating this kind of lines. Adding more broken lines
like this in here, following the sane, doing the same thing on
the other side. For this project, I only
use black and white. For the other project,
I'll also be using red. Only three colors,
black, red and white. Apart from this, if you
want to use other colors, feel free to do that,
adding more hatching lines. If you want to do a
little bit of siding too, you can do that for the upper
end and the lower part. Simple hatching lines for
the remaining section of the two pair of feet that we have in here for the
smaller portions, adding the simple
hatching lines like this. And in here for the
middle portion, simple hatching lines and
a little bit of seeding. For all the section,
adding the hatching lines. And as I was mentioning, simple dots like this,
simple stippling dots. These are a little bit larger, adding more details in this fon, creating this kind
of simple oval saves or circular seep
for our insects. And with these, we are
done with our project. I hope you enjoyed
painting this. This is one of my favorite. Let me know which
colored people did you use and how your
insect turned out. And I'll be seeing you
in the next project.
8. Emerald Jewel Wanderer : Welcome to Emerald
Jewel Wanderer. For this project in here, I have used green colored paper. And I'll be using all
the three colors, black, red, and white. Let's start with a
simple curve line for the length of our insect. Instead of using curve line, you can also create
straight lines and create a straight
version for the insect. For this one and decided to
make it a little bit curve. I'll also be sewing some portion of its body, the side portion. Let's divide into
different section. In here, we have got a total
of four equal sections, dividing the first one into more section and the second one, two, In here, so for the first second
and the third section, I'll be creating its head. For the first section in here, I'll be creating very
small head for our insect. And for the next two section, I'll be creating the
region below its head, and for the remaining section, we'll be creating its body, its stomach, and wings. Very simple see like this
for the insect's head, oval C for its eye. A simple triangular
see like this, a little bit of curved
triangular seas adding antennas. So a little bit of small
antenna for this one, since we don't have that
much space in the front. Now for the remaining
section of its body. For the remaining section of its body just below its head. Give it a little bit
of three diamens look. Make it a little bit
curvy like this. Since the pencil sketch
is not that visible, you can just see
the reference mes in here and use
this as the guide. Dividing into two
different sections. For this section in here
in this middle region, just read a simple
and small I like see, and then for the
remaining section, we'll be creating its body. You can just consider it to
be elliptical see in here. Now for the remaining
portion of its body. I'll be creating the
wings too for this one. The wings will be folded. Making it a little bit bigger, you can consider that
I extended the size a little bit topany
whole of its body. This will be the
portion of its wings. This is going to be the
length of our insect. Now in here, I'll be
creating pair of six leg. Hitting two pair of the legs in here for the lower portion, and for the first pair, I'll be adding it
this beside its head. On this side, the left side, doing the same thing
on the right side. The legs on the left
side won't be visible that much since it will
be covered by its body. But in here on the right side, its whole legs will
be visible like this. Dividing the leaks into different section
to make it easier. For the lower section, as I showed you in the
demonstration video, I'll be creating a simple
bit of heart scene. This will be the
largest link in here. Make it a little
bit more thicker, the middle portion of it, and
this will be the final one. I'm not adding that much
detail here with the pencil, but when we'll be
doing the outline, we'll be making it more detail. Simple patterns and designs
in here for the wings flap. In here, too, creating
this kind of simple C, curved see like this,
somewhat of conical see. I'll be further dividing this
into different sections and then we'll be using
hatching as well as a stippling technique
to add the details. And with this, we
are done with a very simple sketching for our bug. Now, let's do the
outlining starting with its head for the eye
or the left side. Only a small portion
is visible like this. Now for this eye, we have got those bulgy
sphere like C for the eye. Dividing its side into
two different sections. As I mentioned, a small
section of its body will also be visible because we
are viewing it from the side. Adding a little bit
of detailing in this manner by using
hatching line, curved hatching line following
the contour of its head. For this side, I created a bit larger line but
in here on this side, a bit smaller line, more hatching lines for
the middle section. Later on, I'll also be using white to add a little
bit of hyaline. Let's do the outlining
for the antenna. Feel free to make
changes in adjustment to the s side as well as the basement of the
antenna if you want. Instead of creating
this kind of antenna, you can create any
other variations of it. You can create
other variations of it, outlining the second one. We are done with
the outlining for head, eyes and antenna. Now let's do the outlining
for this section in here. Make the seep a
little bit curvy. And for some of the section to draw a little bit
of more attenson, you can just use one or two. You can just use more lines to draw a little bit
more attension there. Here to dividing into two
different equal sections. Now, using a little bit of a stippling
technique like this, makes some of the region
a little bit darker. For the middle portion
of both the sides, I won't be adding any detailing. But for the remaining
section on the sides, I'll be adding
detailing either using stippling or broken
hatching lines. And here I'm using the hatching
lines to make the side a little bit darker.
Small dots like this. Adding a little bit more
detailing for its head too, small hatching lines
just beside the eyes, small stippling dots
just beside its eyes, doing the same thing
on the other side. I'll be adding a little bit more detailing or you can
say I'll be doing a little bit of siding on the right side to make the
side a little bit darker, but the left side will be
comparatively lighter. So specing matters in here. To make the region
a bit more darker, we'll be adding lines or
dots closer to each other. And to keep it lighter, we'll be increasing the spacing between
the lines or the dots. For the middle region in here, starting with a stippling,
small dots like this. Apart from this kind of
stippling using simple dots, I'll also be creating a little bit of
larger dot, not dot, but a bit larger lines to
use it at the stippling. With these we are done
with these two sections. I'll be adding a little bit
more detailing later on. For now, let's do
the outlining for this remaining
section of its body. To make it a little
bit more bolder, you can just increase the thickness of the line
or you can add two lines. Adding a little bit of detailing in the form of stippling dots. Let's do the outlining
for the feet in here. Simple cylindrical
seat like this. For this one, I
made a little bit of changes to the pencil sketch, and the final portion in here, I'm not able to create it. But if you have a piece, you can create the entire section. The front feet in here, a little bit of hatching and
a little bit of stippling, for this front feet in here. And since it's folded, the middle portion
is completely cut by its front portion and only a small portion
of the third part is visible like this. Now for the middle in here, Since this is also bent, I'll only be creating a very small section for
the middle portion. Using a little bit of
stippling as well as simple curved hatching lines to add details in this manner. Adding the finer
details in this manner. With these, we are
done with outlining, as well as adding
a little bit of detailing for all the
three legs on this side. It's to the remaining
section, outlining its body. Adding it in here,
the middle portion, dividing into two sections. So another line like this. Doing the outlining
for the designs that we have created
for the sign. You don't have to
create the same designs that I have created in here, feel free to make
changes and adjustments. You can create any other kind of patterns or designs
as you see fit. Outlining the last one. Using this kind of bit
broken curve line to add a little bit of more
characteristics to this design. I'll be dividing into
more section, so in here. Adding lines in here, following
the seep of the body, doing the same thing in here, simple line like this, a
little bit curved line, a little bit of
hatching beside it. Now for this section in
here, the part of its wing. Mostly, I'll be doing a
little bit of hatching. Doing a little bit of seeding using the
hatching technique, making these regions
a bit darker. Following the curved sip
of its size and doing a little bit of small
hatching in this manner. For the front portion of
its head, for its mouth. Simple stippling technique
like this, simple dots. Now let's do the outlining for the remaining portion for another three legs
that we have in here. Starting with doing
the outlining in here, feel free to make changes
and adjustment to the placement of the legs if you are not
satisfied with it. On this side, all three
legs will be visible. So we'll be making them a
little bit more detailed, comparatively more detailed than the legs on the left side. In here, I did a little
bit of stippling, as well as small hatching lines, broken hatching lines
for this somewhat of cylindrical sea combination of both stippling and
few hatching lines. Making this region
bit more darker, simple small hatching
lines like this, a little bit of seeding too. Read it secondly. These licks are comparatively thicker to its counterpart
on the left side. Using hatching line to give it a little bit of three
dimensional sea and to add a little bit more volume to
it for the middle portion, simple stippling dot as
well as few curved lines. Gritting pincer like see
at the end of the food. For the smaller portion, I'll
be using a little bit of stippling and if required,
a little bit of hatching. For the third in the final one. Using these kind of
curved hatching lines, a little bit of stippling. The middle portion in here, this kind of bit is a
regular cylindrical seat, simple broken lines, curved
broken lines like this. And the remaining
portion like this. So this is our rough
outline for the insect. We added a little
bit of detailing. I'll be adding a
lot of detailing. I'll be using red and white too. I see the ink has dried up and lightly as the pencil marks. I have divided this
project into two sections. This is the first part. In here, we'll only be adding the
detailing for our insect. And in the next part,
we'll be creating the background as well as add more detailing
using the white. For this section, I won't
be using any white, but for the next
section, we have got white and the background. I'll be using red to create
a lot of hatching lines, then I'll be using white to
add small stippling dot, as well as few
hatching lines for the middle section,
the front section, its head, a little
bit for the antenna, a little bit for its feet. With these, we are done with
erasing the pencil sketch. Now, let's continue with adding more detail for the insect
that we have created. In here, I'm going
in with the right. Following the curved
sweep of its body and creating hatching
lines like this, you can just follow
along with me, or if you want to create
any other kind of pattern on design or detailing,
you can do that, too. In here, as I progress, I increase the length, as you can see, a little bit of detailing on the
other side, too. Creating curved line like this. Now for this sign, once again, as I'm moving, I'm increasing
the sins of the lines. As I mentioned, I'll be making the right side a
little bit darker, comparatively darker than its counterpart
to the left sign. Me hatching lines in here, covering some of
the stipping dots that we created earlier. Even if you cover
the stippling dots, it will still be visible since we use black and black
is darker than the red. For the patterns or you can see the designs in here
on top of its body. I'll be just filling it with the array using the hatching line, a little bit of curb hatching lines and completely filling it. If you want to do a
little bit of seeding, you can do that. You can make the corner
on the sides more darker. Put this middle
portion the seed, completely filling it with
simple hatching lines, angled lines like
this for this one. Once again, curved
hatching lines, a little bit of curb
hatching lines like this. You can always use stippling, but it will take a lot of time, so I decided to use the hatching lines like
this, curb hatching lines. For this portion, the
part of its wing, completely filling it with
the simple hatching lines. Once again, creating
curved hatching lines and filling the entire
section with it. You don't have to stick with
the red only if you want, you can also include a
little bit of black. On top of this rad, you can
add a little bit of black. You can also use the
black to do hatching, or you can use black to do a little bit of
stippling technique. Apart from it, you can also use scribbling or cross-hatching
or other techniques. If you want to incorporate
that in your project. With these, you are
done with this one, doing the same thing in
here for the other sign, simple curved hatching
lines like this. You can always make it more darker by doing a little
bit of shading for the sides for its head, too, a little bit of
curved hatching line, comparatively smaller
lines like this, following the curved
sweep of its head. Front portion of its mouth, a small mouth that we have. Pull the parts of the antenna,
small hatching lines. Apart from it, I'll also
be adding white later on. Simple hatching lines like this for all the parts, all
the separate parts. Now, going back with
the black and adding a little bit of detail in
the form of stippling dots. Just using the stippling
dots and creating this kind of simple designs. You can consider it to be form of hatching stippling dots. So I'm creating a little bit of line like sap using
the stippling dots. Both the side just
beside the design, so you can see the
pattern we created, I'll be adding lots of dots or you can see stippling
dots like line. I'll be making some of the
section a bit more darker. For those section,
I'll be decreasing the gap in between the dots. You have got the rough
idea of what I mean. To make the on more darker, you have noticed add
the dots more closer to each other to make it
lighter or keep it lighter. You'll have to just increase the spacing in between the dots. And you don't have
to only stick with the stippling or the hatching. You can also include
other techniques. We have cross-hatching,
scribbling. You can also include
scallops or you can also include contrasting lines to
create pattern and design. For this reason in here, completely filling
with the black to create a clear separation in between different section. Adding it in here too,
creating clear separation. For this sign, same thing. Simple stippling dots like this. I'll be leaving
the middle spaces in here completely untouched. But for the remaining section,
just beside the pattern, you can see designs, I'll be adding stippling dots like it. Making this region a bit more
darker by adding more dot. And also, since earlier
we had few lines there, so this region looks
compartibly darker. Now for the bottom
portion in here, the same kind of lines. On top of it, I'll be adding white to add a little
bit of detailing. I'll be mostly creating
simple hatching lines. For some of the
section, I'll also be doing the stippling
using the bite, but for now, continuing on with the black and creating
simple stipping dots. Adding it for this portion. Now, for some
portion of its feet, a little bit of hatching
lines like this. In here, right now, I'm adding it for the smaller portions, small, simple hatching
lines like this. I'll only be covering up to here in this part
of the project, in this first part
of the project. And in the next video, we'll
be adding more details and creating the background. Oh.
9. Background with White : Welcome to the second
part of ML Joel wanderer, continuing on where
we left off in here. I'm starting with
the white, adding highlights for our
eyes of the insect. A little bit of
detailing or you can say highlights for some
section of its body. So using white to create
stippling dots to act as the highlight
so you can see a little bit of
reflection on its bony. Adding it in here on this side, a little bit for its
mouth, too in the front. For the pattern or you can
see the designs in here, following the curved seep and and creating stippling
dots like this. With this, we are
done with this one, doing the same thing in here for this one,
the second one. For the third one in here, I'll be adding it on both
sides like this. This is comparatively less. Put it on both sides, adding it in here
on the bottom side. For this portion of the wings, small hatching lines like this to add a little bit of
more detailing in here. This kind of hatching
lines with varied length, adding it on the other side
to the bottom portion. Doing the same thing in here, creating this kind of simple hatching lines with
varied length. This is optional if you are satisfied with how your
project turned out, or if you don't have white,
you don't have to do it. You can use the blue colour. You can use the red or
you can use the black. Now, adding a little bit
of detailing for the feet. Put some of the
portion of the feet just beside the joints, so you can see just
beside the edges. Simple small hatching
lines like this. So adding it for all the
sections of its feet. If you want, you can also
add for the smaller portion. A little bit of
detailing for its mouth. Now, for each individual
part of the antenna, a little bit of detailing using the simple hatching lines. And with these, we
had done with the white fo the part
of the insect body. Now, let's create
the background. Now, let's create the ground. This is option if you don't want to create
the background, you can just leave it
as its starting with a rough outlining
for the small rocks or you can see a rough
texture for the ground. In here, I'll be
creating this kind of larger grasses like this. Larger grasses like this, beside the insect's body, I would be caving the entire
section for the background. I'll be creating the
grasses just here. If you want, you can also create background for the other
side, the left side. In here, creating this kind
of rough ground or you can see small pebbles or rocks
that are present in here. Creating this kind
of smaller grasses in between it and adding a little bit of detailing using curved hatching lines
of varied length. Details just use this kind of curved hatching lines
of varied length. To make it more detailed, you can always use the
cross hatching to give it a little bit more
three dimensional seed and give it a little
bit more volume. You can create other kind of grathes that we have used
in our earlier project. A few more grasses in here. This creates this
kind of organic seeds for the grasses and add a little bit of
detailing in the form of carved hatching
lines or curved lines. Make some section of the outline bit more darker by adding two or three lines and then add more lines following
the seep of the rock. For this section, let's
make it a little bit more denser by using
more curved line, and then later on, I'll
be adding more grasses. On this side, if you
want, you can do that, but I'm not going to do that. For this section just
below its stomach, create smaller grasses and
will be completely filling. Since most portion of the
grass won't be visible, it will be covered
metal stomach, so only small lines like this to create a
resemblance of the grasses. Adding a few more
grasses here and there, you can add more grasses, more rocks, a little bit more
detail for the background, but I'm satisfied with it. And with these, we are done with this project,
Emerald Tel mandora. I hope you enjoyed
painting this. It was a little bit different
from all the other project, and I'll be seeing you
in the next project.
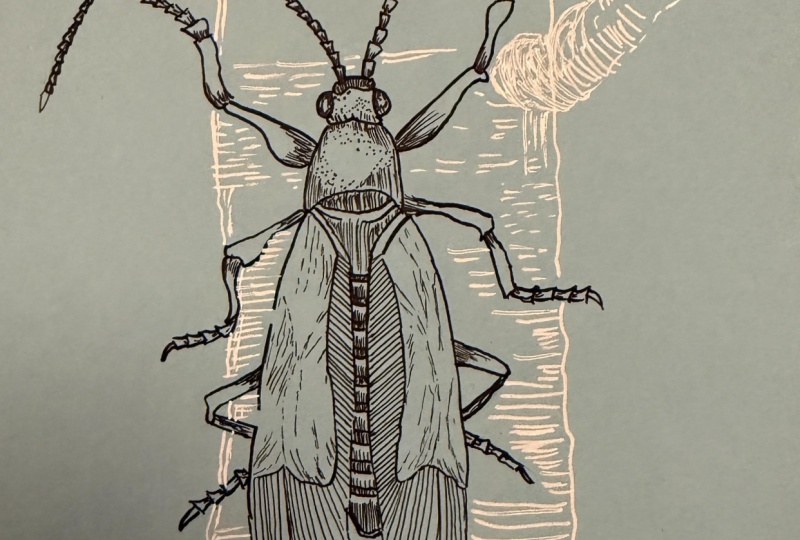
10. Crimson Timber Sentinel : Welcome to Crimson
Timber Sentinel. So this is one of my favorite
projects from this class, and this is one of the most detailed and most
vibrant project. In here, I'm using somewhat
of white colored people. So let's get started. I have included the
finished illustration on the bottom left side, so you can always use
it as a reference to make changes and
adjustment to your painting. And this project
involves a lot of steps, so the picture will
come in handy. Let's get started in here. I'm starting with a
simple vertical line to determine the length of its body, the length
of the betton. Feel free to make changes. If you want to make
it a bit larger. You can do that,
too. If you want to make it a bit smaller,
you can do that. As usual, we already dividing
into different sections. Start with dividing into
four equal section. For the first section in here, dividing into more section. In here, for the first
and second section, we'll be creating its head, somewhat of curved triangular seep like this for its head. On both the sides,
we'll be adding its eyes for the region
just below its head, creating this kind of
somewhat of rectangular see, but curved rectangular
seep like this. For most of the parts
of the insect's body, instead of creating
sharp this mostly we'll be creating somewhat of
curved seep like this. Now, for its head, I'll be creating
pincers in the antenna, and for the remaining section, we'll be creating large wings
before adding large wings, creating this kind of
simple ellipticals, simple elliptical seams,
creating its body. We have got large
wings for this one. The remaining three sections
that we have in here. Creating this kind
of curved seat for the remaining
portion of its body, its wings will be visible
and somewhat open. Creating this triangular
seam and in here, we'll be creating the main body in between this triangular seam. I decided to make it a
little bit more broader. Feel free to make it broader, longer, sorter as you see fit. Oh reducing the size a little bit. For the insights, I'll be
getting simple pattern like this. This is optional. If you don't want, you can
just simply divide it into different sections
or you can just keep it plain and simple. Let's add the detailing
for its head. Small pencils like this. Let's create its antenna. This is a little bit
detailed Antenna. Dividing the antenna
into three sections like this and for the remaining
section in here. In here, I'll be creating
appearance of here like texture for the antenna later on using the black color, as you can see, creating the same kind of antenna
on the left side. I'll be creating this
kind of texture. Now for the eyes, simple oval shape like this,
half oval save. Now let's create its legs. In here, we'll only
creating one pair of leg, and for the remaining section, we'll be creating
the other two pairs. So this reference image that I am included will
come in handy. Feel free to make changes in
adjustment to the C side as well as the placement
of the legs that we are creating in here. Creating another summat of conical cylindrical
see for its leg. And for the remaining
section of its leg, we'll be doing the
outlining later on and then we'll be
creating the seams. For the second per of the leg, a little bit more
thicker joints in here. Try to maintain the
symmetry on both the side. Creating the same
kind of seep in here for the second
portion of its leg. Plain and simple line like this. When we'll be using
the breastpin or the final liner to
do the outlining, then we'll be
redefining the sea. And finally, for the third and
the final pair of the leg, comparatively more thicker
than the second pier. Now for the second
part of its length, the length is
somewhat similar to the second pair of the
link that we have created. For the remaining section, this simple outline like this, we'll be adding the
detailing later on with the fine liner
or the breast pin. Feel free to make changes
in adjustment to the s. And this is going to be a simple
pencil skis for our project. In here, I'm using tombos
bras pin to do the outlining, starting with doing the
outlining for the pencil. As you can see in
the reference image, mostly I'll be using
the hatching line to do the coloring
for our beetle, as well as I also use curved lines a lot
for the background. In here, making the
antenna a little bit more detail for the upper
part of the antenna, making it a little bit thinner. Now, doing the outlining for the second one on the left side. Dividing into more
sexton like this. And later on, I'll be
creating hair like texture, but for now containing
one's head, adding a little bit of
detailing in this form, simple circular saves like this. Doing the outlining
for the eyes, we have got somewhat
of spherical sep or you can say bulgy eyes on both the sides outlining
this conical see, and in here, filling it with the simple hatching lines for
the poten below its head. Doing the outlining, making it a little bit more
three dimensional by making this line bit
more thicker like this, doing the same thing in
here just below its eyes. Now for the portion in here, simple polygonal seat or you can see a rectangular
seat like this. Let's do the outlining for the first pair of feet
that we have created, first pair of leg or feet. As you can see, I'm making some changes in
adjtent as required. I made this a little
bit more thicker and made it a little
bit more curvier. Now for the second section in
here, doing the outlining. And for the remaining section, creating the same
kind of outlining that we have used so far. And with these, we are
done with the first lay. Let's do the same thing
for the second one. Try to keep it symmetrical, creating the same kind
of see for this portion. And finally, the
last portion of leg. Same number of joint
slides, a total of five. And with these, we are done with our first pair of the leg. Increasing the thickness in
here a little bit like this. Let's start a little bit of
detailing for this portion. Simple stippling dots like this. Instead of using the dot to create the
stippling technique, I just created this kind
of small circular scene. Nulls to the outlining for
the remaining section. Doing the outlining
for the wings. Doing the outlining for
the second wing in here. Here, too, I'll be
using a little bit of black to add the detailing, but mostly I'll be adding
the red for this region. Boing over the outlines
that I have created. Using this kind of small
hatching lines to create a little bit of texture
outline for this section. Very simple and small
lines like this to create this kind of metaer
texture for the inside. Now I'll be dividing
into more sections like this using this kind
of simple hatching lines. As for the insights,
I'll be using combination of both red and
black to do the coloring. Adding more lines to make
it a little bit more different and clear separation between the different sections. Now, let's do the outlining for the second pair
of leg in here. Try to maintain the
symmetry for both the legs. The second part of the leg. As you can see the whole
idea in real time, so you can always
follow along with me, doing the outlining
for this portion. H. Now for the
remaining portion, the same kind of simple
shape like this, dividing it into a
total of five sections, doing the same thing in here, a total of five
section like this. And with these, we get done with our second pair of the leg. For the third and the final one, a little bit more figure as
compared to the second pair, but the length will
remain somewhat same, doing the outrunning
for the first and the second portion on
the right side too. Now for the remaining section. Oh In here, I decided to increase the
number of joints like this. Earlier we created four or five, but in here, we have six joints. Adding a little bit
more detailing in form of this kind of small
stippling dots, making the outline a
little bit more thicker, adding another line,
broken lines like this. And with these, we get with
a simple outlining for our Crimson tail sentinel insert that the ink has dried
up and lightly erase it. Apply light pressure
with the eraser to erase the pencil switch. Otherwise, the intensity of the ink will be
reduced a little bit. Removing the eraser's dust. This venue is divided
into two sections. This is the first section. In here, we'll mostly be doing the coloring
for our beetle. In the second part
of the project, we'll be creating
the background, going in with the Sakura
micron fine liner and creating and creating this
here texture for the antenna. Simple hatching lines like this. Using these simple
hatching lines to do a little bit
of siding too, making the ends of the lines a little bit more darker
by adding more lines. As for the remaining
parts of its antenna, doing a little bit
of hatching like this for all the three
sections that we have. As you can see, I've not added
it just beside the edges. I just added it a
little bit below it, a little bit of more
hatching lines like this. Now, for its head, a little bit of detailing
in form of this kind of simple and small
stippling dots, doing the same thing in here for the pencils that we created. More detailing in
form of stippling dot just below its second eye. Now for this region in here too, simple stippling dots like this beside the larger
dots that we created. Making the regions a
little bit more darker by adding stippling
dots in this manner. Now, adding it in here
for the upper side. A lot of simple, small
stippling dots like this. If you want, you can also
add a little bit for a sand. Now for the first
pair of the legs, simple hatching lines like this on both the sides of
the different sections. Adding the hatching lines for
the smaller sections tune. You've got the rough
idea how we'll be adding a detailing for all
the pair of the legs, doing the same thing in here, simple hatching lines like this. If you want to do a
little bit of seeding, you can do that. If you want to give it a
little bit more volume, you can always use you can always use the
cross-hatching technique. You can also use scribbling. Adding detailing for
the smaller sexton to. And with these, we are done with the first pair of the legs. As for the small region in here, creating this kind of simple
stippling dots like this. Instead of this, you can also create small
hatching lines, whatever you prefer,
adding more lines on both the sides to make the sides more darker like this. For this section, using hatching lines and
completely filling. More stippling dots like this, and we get done
with the upper part for the second pair of the line, the same kind of
simple hatching lines. Making the sections a little bit darker by adding
more hatching lines. For the remaining
section, the smaller portions for the
smaller sections like this, simple
hatching lines. Before adding the detailing
for the fourth line, I decided to do a little bit of detailing for the
middle portion. Simple hatching lines like this, rows upon rows of line like
this to add this kind of rougher texture for the middle portion for the third pair. And for this fifth line, simple hatching lines on
both the sides like this. For this section, too,
the same kind of lines. And for the remaining
smaller section, once again, simple
hatching lines. Let's do the same thing
for the other side. Adding the small
hatching lines for all the section of
the lane like this. And as I was mentioning,
you can always use the cross-hatching to give it a little bit of more
three dimensional look. You can use broken
cross-hatching lines to give it more dimension. Now for the last ling, the sixth one, small
hatching lines like this. These lines are a
little bit more denser as compared to the
first pair of the lane. But the smaller
sections in here, small hatching lines like this. Now, we are done with this
for the insides of the wings, a little bit of detailing. Simple hatching lines
like this to make some of the sexon a
little bit more darker. In here, I'm not applying
that much preset. So the intensity of
the ink is quite low. Just create this kind
of simple lines. Just create this kind
of simple lines, and you can easily create it by changing the
angle a little bit, adding it for the
upper side too. A little bit of seating using
the simple lines like this, adding it on the other side too, extending the lines a
little bit like this and making this region a
little bit more darker. And with these, we are done with a black fine liner for now. Now, going with
the red fine line. As you can clearly
see, we are going to use a lot of red fine liner, starting with the head, creating small hatching lines like this. Clear in small hatching
lines like this. But the entire
section will be just adding rows and rows
of hatching lines. For the regions near the sides and the edges will be making them a little bit more darker by adding more layers of
the red like this. Now for the second
section in here, the same kind of
simple hatching lines. Once again, we'll
be adding rows and rows of lines to make
some of the sections a little bit more
darker and to create a uniform distribution of
the red color in here, making this section more darker by adding another layer in here. These two sections are more
reddish for the antenna. Once again, using
the hatching lines. The spacing in between
the lines matter. And in here, the
spacing is very less. So the intensity of the
red is much higher. And with these, we are done with all the section
for the antenna, doing the same thing for
the first pair of lay, will be completely filling it. But for the sides or you can see the edges or the
joints near the leg, we are making it
a little bit more darker by adding more
lines like this. Put the small separate
portions like this, small hatching lines like this. And with these, we
are done with the coloring for the first leg. We'll be doing the coloring in this manner for all
the remaining legs. Doing the same thing for
the second leg and here. So I'll only be
covering up to here, the coloring of the
first two legs. Then we'll be continuing in the next part
of this project. Using the hatching lines to
do a little bit of seeding, making the edges
a little bit more darker. More lines like this. I'll only be covering up to here in this part
of the project. I'll be seeing in the next part.
11. Trees and Mountain : Continuing on where we left off, we have already colored
the upper part. Now, let's do the
coloring for the wings. Starting with simple
hatching lines like this. In here, I'll be adding layers and layers of hatching lines. The same kind of
hatching lines that I showed in the
demonstration video. As for the links, I'll be making some of the
section a little bit more darker by adding
more hatching lines and doing a little
bit of seeding. Like in here, on both the sides, I'll be doing a little bit of seeding and then hatching lines, making the regions a little bit more darker by adding more red. For the separate spot in here, a little bit of seeding
and hatching like this. So we are making the edges a little bit more darker
by adding more red there. And for this region in between its head and the remaining
portion of its body, doing a little bit of hatching. For this section, adding more lines to make it a
little bit more darker, adding the red on
other two sides too. Now for this leg in here,
more hatching lines, more hatching lines here, adding more red to
make it more darker, same kind of hatching
lines on both the sides. For this section, same
kind of hatching line for both the side and doing the same thing for all the
separate sections in here. If you want, you can also use a little bit of black
apart from the red. And continuing on
with the wings. Instead of using the
red, if you want, you can also use the green
colour or the blue colour, that will be interesting too. So in here, I'll
be adding rows and rows of hatching lines
on top of each other. And for the upper and
the lower section, we'll be making it
a little bit more darker by adding more line. And to achieve this in here, I'm maintaining a uniform
distance in between the lines, adding another row in here, overlaying it on top of the
black that we used earlier. For this region at the
bottom, adding more lines. Now let's make this
region more darker. So more hatching lines on top of this to make
it more darker. For the upper part two, I'll be adding more lines later on. But for now, continuing on with making this section
a bit more darker. A little bit of red
for the upper section. I'll be adding
more red later on, but for now, continuing
on with the other side. Doing the same thing,
simple hatching lines like this and we'll be adding multiple layers on
top of each other. Apart from this, if you want to make it a little
bit more darker, you can also do cross-hatching the wings of our bonus project, I'll be using cross-hatching, and that will give
it a little bit more dimenson and make it a
little bit more darker. Continuing on with adding
more hatching lines. Now for the bottom section, completely filling this
region with the red. Let's make it more darker by adding more lines
on top of this. More hatching lines like this. Extending it a
little bit more to make this a bit more
darker in here, doing the same thing
for this right wing. And as I was mentioning, a little bit for the
upper sextant too. A few rows of
hatching lines like this to make this a
little bit more darker. Now let's do the same thing for the remaining two legs that we have for the regions near
the body of the insect, adding more red to make it more darker and for the
remaining section, adding it near the joint. So a little bit more
red near the joint, and then hatching lines as for the separate small section, a little bit of seeding
and hatching lines. With these, we are
done with this leg, doing the same thing for
the last leg in here. Simple hatching lines like this, rows upon rows of
hatching lines. Small hatching lines like this and a little
bit of seeding. And with these, we are done with the coloring for all the
three players of the legs. We have got only a small
section in here for the middle, as well as a little bit
of coloring for the eyes. Using black fine liner and completely covering
this entire section. In here, I'm applying
very less pressure with the fine liner and I'm
adding it at an angle, so it's comparatively less dark. Making the bottom a
little bit darker. Now for this regions in here, so a little bit of hatching
lines like this to create a clear distincion between separate
parts of its body. To create a clear and
separate distinction between separate
parts of its body. Now going in with the red, a little bit of
red overlaying it on top of the blank
that we used earlier. I'm not going to add the
red for the entire section, but for some of the
sections like this, making the bottom
section a little bit more reddish, adding more line, adding more red in here, one more row of red in here. And with these, we are done with the coloring for this section. Now for the eyes, going
in with the black, leaving a little
bit of white piece, simple circular white is piece, and then feeling the remaining
section with the black, doing the same thing
for the second eye, a little bit of hedging
for the pencil. Now going back with the
red for the pencer, I forgot to add the
coloring for the I forgot to add the coloring
for this part of the antenna, adding a little bit
of red like this, adding the red for
the other antenna. And with these, we
are done with it. For this section, let's make
it a little bit more darker. Now add more red or
black wherever you think it's required till
you are satisfied with it. And with these, we are done with the coloring of our beetle. If you're satisfied
with your painting, you don't have to
do anything else, but if you want to
follow along with me, I'll be creating a background two or three simple mountain. Simple outlining
like this to create the resemblance for the
mountain in the background. Instead of creating this kind of terrain for the
mountain, if you want, you can create kind of you can create other kind of
outlines for the mountain. On instead of
mountain, you can only create the trees
and the foreground. And to clear separation between different
mountain in here, I'm using black hatching
lines like this. Same kind of hatching
lines that I did for the middle
portion of its body. So the intensity of the black in here is comparatively low. Also, I'm adding the black at an angle so that it won't
be that much darker. In here, I'm using
tissue paper to avoid smudging of the
color from my palm. Since we have used
lots of red in here, there is a chance that some of the red might get
smuged by my palm. I'm using the tissue
paper to avoid that. For all the three mountains
that I have created, I'll be adding the hatching
line in this manner, adding the hatching
lines in here in between the two antennas. Now for the third one, starting with the smaller
sizes SM progress, I'm increasing the
size like this, creating the outlining first, and then adding the lines on top of it, simple
hatching lines. Adding the simple
hatching line like this. Now, are we creating
simple trees. Making the outline a
little bit more distinct, so adding more lines to show a clear separon in between
different sections. So with these we add
them with the mountain. Now in here, are we creating multiple trees of varied length. Very simple trees like this. You can consider
it to be some kind of curd hatching lines
or scribbling technique, creating this kind
of simple seeds to create the resemblance
for the tree in here. These trees are quite
easy to create. You can create as many
trees as you want. You can vary the
seeds and the siges. And if you don't want
to add the trees, you can create this
simple spiral like pattern that I had created
in the foreground. This tree is
comparatively bigger. Let's add a few
more, one or two, simple lines like this,
adding it on the other side. And with these, we are done with the tree on the right side. Let's add a few
smaller one in here in between its leg and the head. Adding one more in here,
smaller tree like this. That's all for this
side. Let's add a few more trees
on the other side. Creating the outline. And now let's add multiple
trees in here. Instead of using the
black, if you want, you can also use
the blue or green. If you want to use the green, that will be more interesting. But in here, I won't be using any other colour on
black and the red. With these, we are done
with the first tree in here on the left side. Let's create a few
more. Simple lines like this to give the
seam to the tree. One more tree in here. You can add as many
trees as you want. And apart from this, if you want you can also use a
little bit of red. So simple hatching lines
on top of the black to give the trees a little
bit of red color. If you want, you can
experiment with that. Now carefully adding
the trees in here. And with these, we are done with the trees on the left side, making the distinction
more clear by adding a few more lines for the lower
section of the mountain. Now in here, I'll be creating simple spiral
patterns like this. For the fourth down,
we have this kind of simple seed curved lines. Instead of creating this kind of curved lines or spiral pattern, you can create you can create any other
designs or pattern. You can also use cross-hatching to give it a little
bit of mound depth. You can create small
grasses in the rocks that we have created in
our earlier projects. And you can experiment on your own and add additional
elements to this. But in here, I'll be
creating this kind of simple spiral like pattern
using curved lines. Doing the same thing
on the left side. Simple spiral like pattern
using curved lines. Here's another spalal
pattern on this side. It's adding the curved
lines like this, curved and broken lines. Extending the side of the
curved lines a little bit. Here, too, if you want,
you can use other color to create this kind of
pattern, you can use blue. That will be interesting. Adding the line beside its body. Now, I'll be creating
another row of trees, creating few vertical lines
for the length of the trees, as well as for the replacement. Now let's add volume to it
by adding lines like this, simple lines like this, adding
it on the other side too. So in here, we have created
four or five trees. If required, I'll be
adding a few more. These trees are
comparatively larger as compared to the earlier of
the trees that we created. We're continuing on with
creating multiple trees in here. And that's for the background, the spiral patterns that we have created earlier, what are
some of the sections. I'll be adding a few more
lines in between the trees. Adding the lines on
this side for the tree. We have got two more trees. Adding the lines for this one. These two are a bit smaller. Let's make it a bit larger,
extending the lines. Doing the same thing
for this tree, too, and now for the
empty region in here. Simple curved and
broken lines like this. Simple, curved and
broken lines like this. Now for the remaining
section in here, I won't be adding annual trees. I'll be creating
simple spiral pattern that we created earlier. But before doing that, let's add the trees on the left side. Creating vertical
lines to determine the length of the tree as
well as the placement. Add volume to the tree by
adding this kind of line, adding the lines on
the other side too. And for the remaining
sexton, as I mentioned, I'll be creating simple
spiral like pattern. Instead of it, if you want
to create a forest of trees, you can add multiple trees, rows and rows of tree
one after another, that will make it
a little bit more dramatic and more contrasting. I decided to do that, but it
would have taken more time, so I decided to just use this kind of simple
spiral like patterns. So now, let's continue on with the trees that we are
creating in here. Adding the lines for this tree. This will be our
final tree in here. Making it a little
bit more darker by adding another row
of lines like this, extending the sizes
of some of the trees. And with these, we are done with the second row of our tree. Adding a little bit more
detailing for this tree. Now, once again, creating simple spiral like pattern
using the curved lines, curved and broken
lines like this. In here, we are creating
some kind of flowing lines. And as I progress, I'll also be changing
the direction of the curvy lines like this. What I mean to say that I'll
be changing the flow of the lines Simple curved and broken
lines like this. This is somewhat similar
to curb hatching lines. Extending the line
on this side, too. So these two spirals
are met in here. Now, as I was mentioning, changing the direction
of the flow. Here I have changed
the direction, and as I progress, I'll be increasing the
spacing in between the line. Instead of it, if you
want to continue with the same kind of lines
that we have created, simple and curved line
with uniform distancing, you can continue with that, too, or you can just follow
along with me and add more randomness
to it by changing the direction of the flow or increasing or decreasing
the spacing in between the lines to
make it a little bit more dramatic and a
little bit more chaotic. Continuing on with
creating more lines, more broken and curved
lines like this. Now for this region,
too, as I progress, I'll also be increasing the
spacing in between the lines, changing the direction of the flow of the lines like this. Now we have got a small section, the masking tape so that we
can add the lines like this. Now continuing on adding more lines for the
remaining section. Simple curved broken
lines like this. Following the earlier contour and adding the lines like this. And with these, we are
mostly done with it. Add more lines wherever
you think it's required or where
the spacing is high. And with this, we are done with our project Crimson
Timber Sentinel. I hope you enjoyed
painting this. This is one of my
favorite from this class. Out of all the seven project, I have got three favorites, and this is one of them,
and I enjoyed painting it. Took a lot of time,
comparatively more time as compared to the
other, but it was worth it. I hope you have one painting it, and, yeah, I'll be seeing
you in the next project.
12. Frosted Forest Hunter : Welcome to Frosted
Forest hunter. In here for this project, I'm
using blue colored people, and I'll be using red,
black and white fine lines. Let's start with a simple
sketch creating this kind of bit curve line for the
length of our insect's body. I'll be dividing this curve seep into four different equal parts. At the front, I'll be creating
a bit of more larger head. So this is going to be our
rough outline for its head. Now dividing into four
different equal sections. In here, I'll be dividing inside into further
more section, but this is just a rough
guideline for its entire head. The whole video in real time, so you can always
follow along with me, creating large oval seeps
like this for its eyes. Also for this project,
the side portion of its body will be visible too. So we'll be trying to make it a little bit more three
dimensional and s, creating smaller
pinces in front of its side and smaller
antennas in here, a little bit of band
antennas like this. For the remaining
section of its body, for the remaining section, I'll only be creating its wings. Cutting into more section since I started with
the curved seeds. So for this left wing,
it will be completively softer and smaller as
compared to the right wing, extending the side of the
body a little bit more. Since we are trying to
make it a little bit more three dimenson
that's why I extended it, and we'll be also making it a
little bit curved later on. Now for the front, creating this kind of simple oval
seed and now extending it, creating this kind of hoical
seed for the front feet, for the front feet
of our insect. For this two, we'll be creating
three pair of the feeds. This is a little bit smaller. Now for the largest one, this is a little bit went and
extending it like this. For the other side, in here, only a small portion of
its feet will be visible. Most of it will be covered by its body. Here is
the second one. And this will be the third one. I'll be further dividing
its head later on when we'll be doing the
outlining using the fine liner. And this is going to a
simple pencil skeet. If you want to make
changes and adjustment, feel free to do that, starting with a tombosbaspin,
to do the outlining. You don't have to stick with a simple pencil sketch outline
that you have created, feel free to make
changes and adjustment. I'll be making the changes in adjustment wherever
it's required. For some of the sections, I'll be using this kind of lines to add a little bit more texture and make it a little
bit more rougher, moving on to its
remaining portion, doing the outlining
for the wings. For this project, I'll only
be using the hatching lines. I'll be using the hatching
lines to do the sading. Making the middle person a bit more darker by
adding more lines. Simple curved, broken
lines like this. Now for the front, the
same kind of lines, two or three lines to make
it a bit more detailed. Doing the same
thing for its eye. Now for the front of its
mouth, the pencils in here, smaller pincels and
for the antenna. So mostly for all the antennas, I'll be creating this
kind of outlining. Feel free to make changes in adjustment for the end of the antenna making it a
little bit more curve. Simple curved seep like this, simple conical heart like
seep for its antenna. Now for the first pair. Doing the outlining for this
conical cylindrical scene. Now for the remaining section, the same kind of outlining
that we did for its antenna. For the sections near its body, we'll be making it a bit
more darker later on by using hatching lines and
doing the seeding using that. For this one, it's
facing towards us. Now for the remaining section, same kind of simple outlining. In here, for the feed too, I'll be using red and black. Now for the remaining
portion of its body, it's the stomach, dividing
into different section. Here we'll also be using simple hatching lines
and doing the seeding. So this is how we are giving it a little bit more
three dimensional same for the third pair of
ling, doing the outlining. For this one, I'll also be using a little bit of white,
red, black and white. For the sides, I'll
be using red and black and for the middle,
a little bit of white. We are done with all the
three feats in here, a little bit of more
detailing for our wings. I'll be creating
simple pattern and designs using black,
red and white. Mostly, I'll be using
black to create the simple saves, oval saves. This is simple outline, and I'll be using hatching lines to make it a bit more darker. Instead of this, if you want to create pattern or design,
feel free to do that. Doing the outline for the
feeds in here on this side. Most of the portion of its
feet is covered by its body, so only a small section so only a small portion
is visible in here. Making the outlining
a bit more darker. Now, let's do a little
bit of reading, make some of the
regions more darker. So this is our simple outlining. If you want to make changes
adjustment, you can do that. Going in with the eraser to lightly erase the pencil sketch, then we'll be adding
more detailings. Int, the ink has dried up
and then use the eraser. For this project,
I'll also be creating a little bit more
detailed background. I'll only using white
to create trees, a little bit of
grasses in the front, small shrubs and bit
of texted ground. Now, going in with the red. In here, we'll be doing
the simple hatching lines. I'll be doing the hatching lines in batches that I saw to you. The other way in
which you can do the seeding using
the hatching lines. I'll be adding the
red in this manner for three or four
places on the wings. To make it a bit more
darker and do the seding, you can just add another
row of lines like this. As you can see, I'm only adding a little bit for the
outlined region. On top of this red, I'll be adding the
black later on. You can just follow
along with me or if you want to create
another pattern on designs using red
or if you don't want to use the red,
you can do both. Adding it in here, this beside this black dot that we have created for the edges in here, using this kind of
curve hatching line. In here, I added the red in somewhat of
symmetrical manner. Adding it near the
outline region, extending it a little bit. I'm using these hatching lines to do a little bit
of shading too. For the empty regions, I'll be using a little bit of white. On top of the black too, I'll be using a
little bit of white. And as I was mentioning,
I'll be using the red and the
black and the white for the feeds to so a little bit of
simple hatching lines. Do a little bit of
seeding near the joints. For all the feeds
in the antennas, I'll be adding the
red in this manner, a little bit of simple
hatching lines and a bit of seeding using
the hatching lines. For its heads, too,
I'll also be using hatching lines in here, making the corners a little
bit darker by adding more red to give its side a little bit more
three dimensional see. Let's do the hatching
lines in this manner, following the cont, the
curved contour of its head. Making a little bit more
darker, adding more lines. Now for the remaining
three feets, make the joints a
little bit more darker. Now for the first one in here. Making the sides a little
bit darker using red. Later on, I'll be
overlaying black on top of it, but still, you'll be able to see
a little bit of red, the remaining
portion of its feet, simple hatching lines like this. And for the antenna, a
little bit of seeding using the hatching lines for the
front part of its mouth, making it a little
bit more reddish. On top of it, I'll
also be overlaying a little bit of black
and white later on. We now continuing on with the remaining portion
of its antenna, using hatching lines and
creating this kind of bit bolder and darker
tricks with the red. We'll be doing the
same thing for the remaining
portion of its feet, making it a little
bit more darker. You can just add
more red like this. You don't have to even do
the hatching technique, add red like this
in this manner. For the last one,
doing the same thing, adding the red in this manner. If you want to add
the red for its body, the stomach, you can do that. And with these, I am done
with the red for now. Now going in with the
black. I'll be doing the simple hatching lines and doing a little bit of setting using that for the
outlines that we have created using the hatching
lines to completely fill it. If you want, you can
make it a little bit more darker by adding
more layers on top of it. You can also use cross hatching, completely filling this region. Now for the feed
so, I'll be adding the black in this manner,
opposite to the red. Also doing a little bit of
seating for the joints. And here adding it in between its head and the remaining
portion of its body. The simple pattern that we
created on the right side. Simple three rows
of hatching lines like this to make it
a bit more darker. Now for the last
completely feeling it, moving onto its head, adding
the lines in this manner, follow the contour
up its head and try to make it a little bit
more three dimension. Put the remaining
portion of its side, using the black and
following the curb saved of its head and adding
the lines in this manner, I'll also be using a little
bit of white later on. But for now, small
hatching lines like this, a bit of shading near
the outlined regions. Another row of lines like this. I left a little bit
of gap in between, making the sides a
bit more darker, adding more lines like this. The same thing in here,
a bit more outlining, making the outlines more
distinct by making it darker. Put the front in here, also adding the hatching lines, following into the curved side. And as I was mentoning for
the sides of the body, we'll be making it more darker, using hatching lines
and doing the seating, overlaying it on top of the red. You can still see the
visibility of the red, but mostly cover it with
the black like this. Make the joints a little
bit more darker and yeah, using hatching lines like this. Adding the hatching line in this manner and making
it a bit more darker. For the antinas in the
lower part of the feet, too, I'll be adding the blacks. For now, let's continue with the remaining portion.
It's stomach. Here, too, doing the seeding in this manner using the black. To give it a little bit of
more three dimensional shape, you can also use
the cross hatching. Make the outlines a bit more distinct, more lines in here. For this wet, the blacks near the joints, for
this region, too. Adding it in here
in between the red. Enough on all the smaller
regions like this. Small hatching lines
for the antenna stew, adding it just beside the red for the card portion
for the second one. For the remaining portion
of the two remaining legs, adding the black in this manner. To make it a little
bit more darker, you can just add more
lines like this. In here, I'm adding
it in this manner, another of black hatching lines, adding it a little bit more for the lower region like this. Make the outlines a bit
more darker to create clear separation and
distinction for the eyes, curved hatching lines like this. Overlaying a little bit of black on top of the d for its mouth. Making the eyes a
bit more darker, giving it a little bit more
three dimensional look by making the outlines more darker and making it a little bit curd
following the curves. Now, these are all
addisonal detail, trying to make this head
a little bit more curved and completely filling it with the hatching lines using
the seating technique. And with these, we are
done with the black far now going with the white, adding the white for the eyes, a little bit of white for
some of the sections in here, the empty species,
simple hatching lines, two or three rows of
hatching lines like this. So I'll be trying to keep it
a little bit of symmetrical like Also adding a little bit of white for the black portions. Put the head to a small
hatching line like this. And as I was mentoning for the feet in between
the red and the black, This is if you don't want to use the white for the feeds
and other details. You can just leave it as it is, adding more curved
lines following the curved per sign for
the upper part, for the front part in here. And with this, we are with the white for the insect's body. If you want you can also add a little bit of white
for its antenna. And now let's create
the background. I'll be using white to
create the background. If you want, you
can use the other colour feel free to do that. In here, I'll be creating a bit of rough taxed food the ground. I'll also be creating
patches of the grass and one or two trees in the
background, small grasses. In here, I'm just
creating this kind of curved outlines in the
front for the ground. On top of it, I'll also
be adding grasses. Let's do the upper
part first and then we'll be adding more
detailings for the foreground, creating outline for the tree. In here, I decided
to create two trees. This is the first one,
adding more lines like this, hatching lines to make the
lower part more darker. You can vary the thickness, length and the
sizes of the tree. If you don't want to create it, you can just leave it as it is more seatings to
make it more darker. Fleeting the outline for
the roots of the tree, the portion that is visible, the portion that is
visible in here. Adding it in between the insect. In here, I'll also be creating
larger grasses and small stems like this. These
are all optional. If you don't want to do this, you can just leave it as it. Simple scribbling lines like this to create the outlines
for the grasses and a little bit of detailing using this scribbling lines so you
can see the hatching lines. This is going to be
our second tree. What of same thickness
as the first one. It was hatching line or
scribbling in here to make the lower part
a bit more darker. I'm also adding a little bit
in here for the upper part, and this is our simple
background for the trees. In here, beside the tree,
small grasses like this. For the grounds, to make it a little bit
rough and textured, I'll only be using
this kind of lines. I'll also be adding
grasses in front. Is create this kind
of simple outlining like this to add a little bit of textured ground to create a little bit of textured
grown like this. For some of the section, you can also do the hatching
lines like this. Adding more lines like this. I'll be creating
this kind of simple. So this is how I'm
going to create grass. So patches of the
grass in between. Feel free to create other
variations of the grasses. You can also experiment with the sideles thickness as well as the placement
for the grasses. I'll be creating
simple patches of the grasses like this
for some of the regions. Apart from this
white, if you want, you can also use a
little bit of black to create another
patches of the grasses, you can use red to
create smaller flowers, making some of the grasses
bit more darker and adding it on top of the
outlines that we did earlier. Me texture, more detailing for the ground, bit larger grasses. Using hatching lines
in this manner to create larger
grasses in the front. If you want, you can also create small pebbles in the rocks, making the lower
part more darker, a bit of outlining
for our larger grass. Let's create a few more
patches of the grasses. The grasses in the front are a bit more denser
and bit more darker. One more patch of grass in here. Extending the side a little
bit more for this larger one. Simple lines like this to make the lower
region more darker, more detailing for the ground. This this additional retail
that I'm adding it for the ground more retailing
for the background too. If you want to add the stems for the trees, you
can do that, too. And with these, we add
in with our project. I hope you enjoyed
painting this. And I'll be seeing in the
next project Happy painting.
13. Crimson Forest Stag: Welcome to Consent
Forest Stack Project. In here, I'm using somewhat
of light blue colored paper, and I'll only using red and
black to do the coloring. Let's start with a
simple pencil sketch. Using this vertical line to determine the length
for our beetle. Now let's divide into
different section, a total of four equal section, starting with dividing
it at the middle, dividing it into
further two sections. If you want to make it bigger or smaller, feel
free to do that. Now, I'll be using
simple seats to create a rough outline for the
body of the beetle, creating this kind of bit curved trimolar seam for
the head of our beetle. Creating the head
of the beetle in here, below the first one. This will be the
head of the beetle, and I'll be creating a
total of three large horn. For the remaining
section in here, creating this kind of simple s. You can see this a little
bit of rectangular, bit of curved
rectangular seam Make the rectangular sep a little bit more bulged in here
at the middle. This is the upper part
for our beetles head. And for the remaining two sexons I'll be creating the
body for the beetle. Creating this kind
of curved sweep to create the simple
outlining for the wings. If you want to make it a little bit more broader,
you can do that. Now, extending the lines a little bit of curved
seep like this. A little bit of curved
seep like this for the remaining portion
of the beetle's body. If you want to add the wings on the sides, you can do that. Now in here, let's create the outlining rough
outlining for the horns. Starting with creating
this kind of curved seem. Now, let's add a little bit
more detailing for our horn, extending it a little bit more. As I progress, I'm
increasing the width of the horn, doing the
same thing in here. Instead of creating this kind of simple portion of the horn, if you want you can create
other variations for the horn. Small pencils on the side. I decided to create
one more horn in here. This is optional. If you don't want to use it,
you don't have to create it. Apart from this, I decided to add another set of pincers on the side using curved lines like this to create
outlining for the pincers. Extending the side a little bit. Now let's create the legs. As usual, I'll be creating
three pair of legs. Another curved
leave for the leg. Try to maintain the symmetry for the length of the legs
and the positioning, making it a little bit
broader near the joint. And in here, it's a
little bit thinner. Now for the remaining
portion if it's leg, for this one and decided to only divide the leg
into two sections. If you want, you
can divide it into three sections like
we did earlier. So this is going to be our
first pair of the leg. Let's do the second
and the third payer. Simple half oval
seeps like this. Conical seep like this. Here, I won't be dividing the
link into three sections. I'll only be using two sections. And we are done with this one, let's do the same thing
on the other side. This kind of somewhat
of conical see. Another curved see like this. When we are done with the
second pair of the link, let's do the third
and the final one. Another half oval see
like this on both sides. In here, I decided to extend
the length a little bit, making it a little bit longer, making this a little bit curves. So this is going to be
the remaining section of its body stoma, continuing on with the leg, a little bit more thicker
leg near the joint. For this one, I decide to
divide into three section. Instead of dividing
into three sexton, you can proceed you can
proceed with dividing due two sexton like we did earlier with the
other two pairs. The final part of it line. And with this, we are done with creating three
pairs of the lane. If you want to make
changes and adjustment, feel free to do that, connecting
these two part together. With these, we are done with
a simple pencil sketch. Now, going in with the breast
pain to do the outlining. In here, I'm using Tombos
breastpen to do the outlining, and I'll be creating simple
lines to do the outlining. If you want to use
other breastbins to create dynamic lines,
you can do that, too. But in here, I'm
aiming to create a little bit of
uniform outlining. And if required for
some of the sections, I'll be making some
adjustment and changes or overlying one line
on top of other one. Giving the horns a little
bit more definition, creating these kind
of curve lines to give it more dimension. The upper part, too, making
it a little bit more curved and giving a
little bit sharpness. Now, for the remaining
portion of the horn, doing the same thing
on the right side, outlining the horn like this. Now, for its side,
let's do the outline. In here, eyes won't be visible. If you want to create the eyes, you can create small
bulgy seep on the sides, but I won't be doing it. Doing the outlining for the additional pences
that we have created. In here, I made a little
bit of genius by extending it and giving it a little
bit more sharp edges. The middle person in here. Just going over
the pencil sketch and doing the outlining
using it as the reference. Now, let's do the
outlining for the leg. For the first pair of the leg. Giving it sharp
edges on the sides. The final portion of the lay. For this two, giving
it a little bit of sharp edges on the sides. Let's do the outlining
for the second one. For this project, I have
divided into two sections. This is the first
section in here. I'll only be doing the outline. And in the next section
of this project, we'll be doing the
coloring using the red, as well as creating
the background. For the background,
I'll be creating a simple large oden branch, not ooden branch, oden stem. And with this we turn with the outlining for the
first pair of the leg. Continuing on doing the
outlining for its main body, doing the outlining in here. Continuing on with doing
the outlining like this, following the curved see. Doing the outlining
for small oval seeps. Now, continuing on doing the outlining for the
second pair of the leg. Giving a little bit of more sharp edges on the
side like this. Doing the outlining
for this one, giving it more sharp
edges like this. And finally, doing the outlining for the third and
the final pair, adding the line
in here to create a car sepresi between two parts. So simpletrt line like this. Continuing on doing
the outlining for the remaining
portion of the leg, giving a little bit
of more sharp edges like this for the final
portion of its leg. Advertise, we are done with the outlining for all the
three pairs of the link. If you want, you
can add the eyes, small bulgy saves on the
sides. I won't be doing it. And in here, I made
a little bit of mistake two sides are
not that uniform. So later on, I'll be making a little bit of
adjustment for its body. For now, let's continue
with erasing it. Apply light pressure with
the erase it to remove it and ensure that
the ink has dried up, otherwise, we will get
smudges all over the paper. I'll only be covering up
to here in this section, and in the next
section, we'll be doing the coloring for our beetle as well as creating
the background. As I mentioned, for
the background, I'll be creating a huge string. So the beetle will be resting
on top of this huge string. I'll be seeing you in the
next part of this video.
14. Inking the Tree : Welcome to the second part
of the Crimson Forest Stag. So we'll be continuing
on where we left off. We have already created the outlining and erase
the pencil and sketch. Now, let's do the coloring here I'm directly
starting with the red, and as usual, I'll mostly using the hatching lines
to do the coloring. Let's start with the top for the horn in here for the horn. I'll be doing a little bit of uniform coloring for the
upper part of the horn. And for the remaining section, I'll be doing and for
the remaining section, I'll be doing simple
hatching lines, rows upon rows of
hatching lines. By adding more lines, I'm making it a little
bit more darker. So this is how we'll
be doing the coloring. So this is how we'll be doing the coloring for the
upper part of the horn. Now as I progress, I'll be
decreasing the intensity of the lines and doing this
kind of simple hatching, rows upon rows of
lines like this. Do the same thing in here. Apart from red, I'll
also be using the black. Feel free to make changes and adjustment to the
coloring and the process. Don't have to stick with only
using the hatching lines. If you want, you can also use scribbling cross-hatching
stippling. Continuing on with adding
more hatching lines, rows upon rows of
hatching lines like this. And in here in the middle,
I'll be using black. But before doing
that, let's bring the outlining a little bit
more crisper using red. So in here, following
the seep of the head, I'll be adding red like this. Wh completely filling
the entire section, the outline section following the seep of it set and now
completely filling it the red. I'm not doing any kind of
hatching or cross-hatching. I'm just completely filling
the insides with the red. Now for the pencils, a
little bit of red like this. And for the horn in here, making the upper portion
bit more darker. And for the remaining portion, a little bit of hatching
lines like this, rose upon rows of hatching line. As for the remaining section,
I'll be adding the black. I decided to extend it a little bit more
two simple oval seeps like this and completely
filling it with the red. This will be the coloring
for our head with the red. Now, moving on to the additional pincers that we have created, a little bit of red for the upper part and a little
bit more red in here. Now, we are done with the
red for the head for now, going in with our black here I'm applying medium
presser with the black and creating the lines
at an angle like this, a bit lighter side of the black. Also adding it for
the pincer in here. So this kind of lines
with the black and completely filling
the insights with it, here two rows upon rows
of lines like this. Instead of if you want to create any other kind of pattern or design or if you want to make it more darker,
you can do that. You can also use
cross-hatching or stippling. So feel free to add your
own personal touches to it, adding the black
for the additional princes that we have created, adding it on this side too. Now, I'll be using
this black to do a little bit more coloring
for some of the section. Basically, I'll be using to make some of the sections darker like this side the
sides of the legs. Adding it in here, making this region a little
bit more darker. If you want, you can also
add it on the other side, extending the size a
little bit by adding more hatching lines like
this for this region, too, making it comparatively more darker by
adding more lines. Now going in with the red and feeling the remaining
section of the legs, hatching simple hatching
lines like this. I'm not making some
of the regions darker by doing the seeding. If you want to do that,
you can do that in the same manner in which we did the coloring for the horn. Moving on to this line, adding the red in the same manner, simple hatching lines like this. And with these, we are
done with this line. Now, once again,
going back the black, creating an additional
outlining like this in here. Following this sap and
adding more lines. Let's make some of the
sections more darker. So another pair of lines
as well as feeling the remaining section with curved hatching lines like this. Following this heap and
adding the lines like this. Instead of this, if you want to completely cover it with the
black, you can do that, too. As for the insides, I'll be completely filling with the red. Simple hatching lines like this rose up nose of hatching line. I'm making the upper
and the lower part comparatively darker
by using sting. But for the remaining section, I'll be trying to
create a little bit of uniform texture like this. As you can see the upper
and the lower part is comparatively darker and the middle portion is
somewhat of uniform. Continuing on for the
remaining section. In here, I'll only making the upper part a bit
darker like this. For the remaining section, we have got simple hatching line, adding another row in here. So this is
comparatively lighter, making the sides a little bit more darker by adding more line, making the lower part more
darker by adding more lines and decreasing the squeezing in between the lines like this. And with this, we are done
with this middle portion. Now for this section in here, a little bit of red like this. Apart from the red, I'll
also adding the black, but later on, Mona, adding the red on
the sides like this. Going back with the black, I decided to make this
a little bit darker, a little bit of black in here. Now for this region in here, adding in between the reds, adding it on the side too. As you can see, I'm not applying heavy pressure with the black, going back with the red and
making the sides bit more darker. So more layer of red. Now, once again, going
back with the black and making some of the section
comparatively darker, same kind of thing that we
did for most of the legs. Adding it on one side like this. Doing the same
thing on the right. Adding it more black in, making it comparatively darker. Going back with the red and filling the remaining
portion like this. Simple hatching lines like this. If you want to do the
seeding, you can do that too. Adding it for the oval seeds. For the leg on the right, for
this final portion in here, little filling with the
red hatching lines. And we are done with the
second pier of the leg. Once again, going
back with the black. So I'll be going back and forth with the
black and the red, adding it in here for
the middle portion, simple hatching lines like this. This is how we'll be
doing the coloring for this middle portion in here for this portion,
creating another outline. And as I was mentioning, this portion is
not that uniform. So the sizes of this portion
are a little bit skewed, one side is a bit larger. I'll be using this kind of
outline to balance that. As you can see, I'm
adding more lines in here for this side to adding
more lines like this. Following the curved
shape of its body and adding lying like this
and for the side, completely filling
it with the black. Adding the black on
the other side too, completely covering this
entire section with the black. If you want to add
more black for the upper part, too,
you can do that. You can start with creating the outline and then
adding them black. I won't be doing it, but if you want to do that, feel
free to proceed. Completely filling it like this. And with these, we are done
with the black for the sides. Now, the remaining portion in here for the main
part of its body, simple hatching lines like this. So as you can see, I'm using this to do a
little bit of seeding. And by increasing the gapping in between the lines as well as applying light bracer I'm able to create this kind of
simple hatching lines, doing the same thing
on the side too. I'll also be creating few
lines in here at the bottom, not few lines, but the same kind of lines that we did
for the upper part. Using this black to create
this kind of hatching lines, a little bit of heading two. Let's do the same
thing on this side. Apart from this, if you
want to create any kind of pattern or designs using the
black, you can do that, too. A little bit more black
on the sides too, doing the same
thing on the side. And here too just beside
the middle section, extending lines a
little bit more. If you want to cover the entire section
with the black and add another layer of red on top of it, you
can do that, too. But I won't be
covering the entire section only up to here. And with this, I'm done
with the black for now. Now going in with the red and completely filling
the entire section, overlaying this red
on top of the black. I'll be adding rows upon
rows of red like this. In here, too, I'm applying comparatively less preserve with the red and adding it at an angle like this to make
it a little bit lighter. Instead of it, if you
want to make it darker, you can just add the red
in the normal manner that we have it for all the
other elements in here, making the lower region
a little bit more darker so more hatching
lines like this in here. The same thing in here
for the upper part, more hatching lines to make
it comparatively darker. And with these, we are
done with this side, do the same thing
on the other side, simple lines like this. Adding another row of
lines like this in here. So I'm just going to completely fill the remaining
portion with this red, and then we'll be
doing the coloring for the final pair of the lag. Now, for the bottom section, we'll be making it
comparatively darker, adding it just beside
the outline section. Now, more rows of red to
make it comparatively darker. One more row like this. Add more red till you are
satisfied with the composition. This was comparatively lighter, so I decided to add a little bit more red for this one, too. If you want to add a
little bit of more red for the upper part,
feel free to do that. Adding the blacks in here. For some of the section,
these are additional. I decide to make
them a little bit more reddish, adding
red like this. Continuing on with the black. We'll be doing the coloring in the same manner as we did for
the second pair of the leg a little bit of black for
some of the portions in here, just beside the joint for the sides of this portion
of its leg in here too, doing the same thing on
the leg on the right. Simple hatching lines
like this with the black. Now for the final portion, too, a little bit of black
in this manner, the black on the other side. And with these, we are done with the black for the final
pair of the ling. For the remaining portion, we'll be feeling it with the red. In here, I decided to make
it comparatively darker. For this section, simple
hatching lines like this. And adding it for the
final portion of its leg, comparatively more red, making it quite uniform and darker. Let's do the same thing
for this final one. Bring it in here for
the middle portion. Simple hatching lines like this, overlaying it on top
of the black tube. And for the final
portion of the leg. And with this, we are done
with the coloring for all the three pair
of the legs as well as the coloring
for our insect. You want to make
something adjustment, add more detailing,
you can do that, too. Let's create the background. In here, I'm using white to create the rough outlining
for the CP of the tree. Only a branch will
be visible in here. And since this is not
visible the white, I decided to switch
with the black, using the black to
create the outlining. So using the black to create the outlining for
the tree's branch. Simple line like this
a little bit curve. So this is going to be
the width of the branch. This is optional. If you
don't want to create it, you can just leave it as it is. To add a little bit of
text and pattern to it, I'm just creating these
kind of random lines. Besides this, I'll be
doing hatching lines, and for the remaining section, I'll just be filling
it with random lines. Instead of it, if you want to create other kind of
pattern or designs, feel free to experiment and add your own personal
touches to it. Doing the same thing
on the other side. For the tree, I won't
be using the red. I'll only using the black. But if you want to include the
red, you can do that, too. For the saps, I'll only
be adding this kind of simple hatching lines and doing a little bit of
setting like this. You can add this in Ai
mandala or at any angle. Or instead of this,
if you want to create other kind of pattern or
design, you can do that, too. But for now, I'll only me
creating this kind of lines. And as for the outline,
I'll be making it a little bit more
thicker later on. I'll be adding three
or four lines. But for now, I'll be continuing with creating hatching
lines like this. To give it a little bit of more texture, you can also use
cross-hatching lines. You can also use scribbling. But if you use
stippling in here, it's going to take
a lot of time. So I would suggest you not to use stippling for this tree. Adding the lines on the
sides too, like this. You can add more hatching
lines anywhere you want. You can add more hatching lines apart from the outline
section that we have did. So you don't have to
only add the lines just beside the outlines
that we have created. Feel free to add it anywhere. Adding it in here
between the two horns. You can also use these kind of lines to create the
shadows for the beaten. This process is going to
take a little bit of time. After doing this,
I'll be filling most of the regions
with the simple lines. Continuing on, I'll
be making this side, the right side
comparatively lighter, and the left side will
be comparatively darker. Adding it in here.
This tide its leg. A little bit just
below its body. We have got four
or five in here. In here, I also decrease
the razor a little bit. We have got darker, left side
and lighter, right side. As for the remaining portion, as I was saying, we cating
this kind of simple lines. Instead of this, if
you want to create the lines closer to each
other, you can do that, too. So in here, vicating this kind of spacing
in between the lines. I'm also wearing the
length of the lines. Adding it carefully in here in between the pencil and
the horns of the beetle. I'm just going to fill most of the section with
this kind of lines. Continuing on adding more lines. With these, we are done
with the upper part. For the remaining
portion in here, the lower part. Simple
lines like this. So we are halfway there
for the remaining section, completely filling it
with this kind of line. Adding it beside its leg. After doing this, I'll
be making the outline of the tree a little bit darker,
comparatively darker. Now we have got only a
small section in here, filling the lines in
here at the right. And with these, we are
done with the lines. Now, let's make the
outline a bit more darker. So more lines like
this. Apart from this, if you want to make it a
little bit more darker, insides of the tree,
you can do that, too. But I won't be adding any
additional lements or making it more darker.
I'm satisfied with it. Doing the outlining for the
right side of the tree. And we are done
with the outlining. And with these, we are
done with this project. I hope you enjoyed
painting this. This is somewhat similar
to the earlier project, and it was quite fun to paint. It took a little bit of time, but it turned out pretty good. And I'll be seeing you in the next project,
happy painting.
15. The Horned Monarch : Welcome to the Horn
Monarch Project. In here, I'm using
own colored paper. And since the pencil
sketch won't be visible if I have used the
normal pencil in here, I'm using white colored
pencil to create the outline. Here I've created an angle line to determine the
length for our beetle. Now let's divide
into more section. Start with dividing into
four equal sections, then we'll be
creating simple seats for different parts of its body. For the upper portion, I divided it into a few more sections. So in here, we'll have
its eyes in the head, and for the upper section, I'll be creating its horn, cutting this kind of little bit of curved see for its head. On the sides, I'll be adding the eyes and we'll
be trying to give it a three dimensional see so some portion of its body on the left side will be visible. The inner portion
will be visible. Creating another outline like this so the side
view of its head. Now let's create horn. Simple curved shape
for the horn. You can create any variation
or any kind of horn, but in here, I'll be creating a very simple variation
of horn like this. Apart from the
horn, I'll also be creating two pincers
in the front. Simple shape like this
for the front pincers. Adding oval see for the
eyes on the other side, only a small portion of the
eye is visible like this, a little bit more
detailing for the top of head for top of its head. Now let's create the
remaining portion of its body in here, a small triangular see. Let's create the
remaining portion, extending the line
a little bit more. A little bit of curved
seep like this. So you can consider
to be somewhat of bloated triangular bloated or curved triangular seep like this for the remaining
portion of its body. So this is going to be the
whole length of this better. Now I'll be creating
a pair of six leg. I'll be dividing the legs into
three different sections, and I'll be mostly using conical and cylindrical
shape to create the legs for our
first leg in here. This is the first portion. Second portion like this, another conical shape like this. And this is the third section
with sharp edges like this. The second one in here too, this kind of conical
or cylindrical seam. This is a little bit band, so creating the second
section for it. And the third and the final
one with the sap edges. And in here, we have got the
third and the final one. This will be comparatively
larger than the two, the second section of
its leg and third in the final one with the
curved edges like this. In here, too, most of the portion of this
leg is under its body, so only a small
section is visible in here. The other two legs. The other two legs will be bend. So only a small portion
of it will be visible, a small section
of the first part and a small section
of the second part. In here, I decided to make
the leg in the front, but it was not looking good, so I decided to
change the direction. Only a small section of
its leg will be visible in here underneath this
underneath the first one. And later on when I was
doing the outlining, I decided to make a little
bit more changes to the leg. So for now, just continuing now just continuing on with it. So this is going to
be our simple sketch. Let's do the outlining. In here, I'm using
tombosvers pin. And once I do the outlining, I'll erase the pencil mas. You don't have to stick with the outlines that you have created, feel free to make changes and adjustments as you see
fit or as required. Doing the outlining for the
horns that we have created. This division of his
trees on the section. So all the sections in
here for its head or you can see the fees going
over the outlines for them. The eye on the other side, creating this kind of bit
bulgy save for the eye, the front pincer,
two smaller ones. Make some of the section a little bit more darker by using two or three lines to create a clear distinction
between separate parts, doing the outlining for
the second horn in here. For this project, I'll mostly be using
broken hatching line as well as lots of stippling. I'll be using black, red and
white, all the three colors. Now, doing the outlining
for the remaining portion. And as I was mentioning,
make some of the section a bit more darker by adding
more lines like this. In here, I'll be using
blacked and white, all the three colors, using broken hatching
lines and stippling. Here too, I'll also be
using all the three colors. I'll be using
comparatively less white. Mostly, I'll be using
white to create reflection and so a
little bit of highlight, either using simple
hatching technique or simple stippling technique. For this section in
here, I just did a little bit of simple
hatching lines like this. Now for the pair of the
legs, the front one, make some of the seeps a
little bit more curvier, add more lines to make some of the section a
bit more distinct. The second section of its leg. Now, the curve and
the sharp edges that we have created in here. The same thing on
here, the second leg. And as you can see just beside the second
portion of its body, I sewed a little bit of
its inner portion of the body so that it will look a little bit more
three dimensional. Now for the largest part, the remaining
portion of its body, just going over the outline, dividing into two
section with this line, adding one more line, making
the lines a bit more darker. Now doing the outlining
on the other side. Small portion of
this will be visible on this side and filling
it with the black, simple hatching lines like this. Cut the final lay on this side. Making it a little
bit more curvier, adding more lines to give
it a little bit more depth. The second portion of
the leg and third in the final one with this kind
of outlining for the leg. I got lots of section in
here for this section. Now, the legs on the other side, just going over the outlines
that we have created. This is going to be
the second section. Different sections like
this for the third one. For the first leg in here, only a small section of the
second part is visible. Most of it will be covered by the second leg and its body. And as I was mentioning
for this one, I decided to make a
little bit of chin. So I decided to sew some of
the portion of its body. In here, I decided to create the front portion of
its leg like this. Now, most of the section of the third leg will be visible. The different section
at the last part. So this will be our simple
sketch for the horn monarch, a little bit of detailing
for some of the section for the eye making this
vision bit more curve, adding more lines
on the other side. So yeah, this is
our simple outline. Let's erase it lightly. Instead the inchas write up and lightly erase
the pencil marks. Since I use color pencil
to do the outlining, and the intensity of the ink is decreasing a little bit
when I'm erasing it. Later on, when I'll be adding the detailing and doing
the coloring for it, I'll be redoing the
outlining for some of the section to make them a bit more bolder and more darker, remove the erases dust, and erase the remaining
pencil sketch lines. Let's start with the background, and then we'll be doing
the coloring for A beetle. For the background,
I'll be creating two or three variations
of the plants and leaves. These are the first one,
so large leaves like this. Mostly, I'll be using
this kind of mid curve or you can see organic lines to
create seeds for our leaf. I'll be creating total
of six or seven leaves. We have already
created the midrib, the line that divides the
leaf into two section. And now let's create
lots of veins, adding the veins just
beside the midrib. If you want, you can also make some of the section of
the leaf bit more darker. You can redo the outlining
using two or three lines. Apart from adding this
vein beside the midrib, I'm also adding few veins on the edges of the
leaf like this. This is going to be
our second leaf, a little bit thinner version
of the leaf like this. Instead of creating
this kind of leaf, if you want to create
any other variation of the leaf, do that. You will also make this a
little bit more larger, bit smaller, bit more oval. So experiment on your own and add your own personal touches to the leaf and the background. The third leaf initially my plan was to sow that this
leaf is a little bit bend, but later on when I was
completing the project, I was not satisfied with it, so I converted into a full leaf. But for now, just considered that only half section
of the leaf is visible. Let's create our fourth leaf, adding it just beside its leg, two lines for the mid rubs, and the remaining section
using this kind of broken lines to create the remaining section for the leaf, adding multiple veins
near the mid drum. We have got four leaves in here. If required, I'll be adding
or creating few more. Let's create some
leaves in here. This is going to be
a bit larger leave the same kind of leaf,
but comparatively larger. Now, let's add lots of veins
just beside the mid rib. I'm also wearing the sizes of the veins that I'm creating, some are larger,
some are smaller. You can also use broken
lines to create the veins, or you can just
follow along with me and do the same thing
that I am doing. And as you soil the whole
meteor in real time. So you can always
join along with me. Now, let's create a little bit
of texture for the ground. I'll be dividing the ground
into different section, and then I'll be
using this kind of small hatching lines
to add texture. Simple small hatching
lines like this, and I'll be dividing the
ground into a lot of section. Create this kind of
different section using this bit of curb line, and just beside it on midw it, add this kind of
small hatching lines to add rougher texture
for the ground. So for most of the ground, I'll be adding this
kind of texture. Apart from this, you can also
create small rocks, stones, wooden planks and small grasses that we have created
in other project. Here, I decided to create
another variation of the leaf. So we have got a small plant
in here with four leaf. Using this kind of broken
lines to create the main stem. No main stem, this will be
the mid drips for the leaf, a total of four mid drip. Now using broken lines to create a rough outlining for
the seep of our leaf. We have got two more
leaves in here, still using the kind of broken
lines to do the outlining. Feel free to experiment
with the other variations, see, sizes, and
numbers of the leaf. Instead of four, you can
create three leaves or four or seven leaves
for the middle region, just filling it with
the hatching lines to make it quite darker. Now, let's add lots of veins. Adding the in just beside the mid drip and
near the edges too. So another hatching lines just beside the outline section. Make the outline bit more
darker by adding more lines. We'll be doing the
same thing for the remaining three leaves. We'll be adding lots of hatching
lines beside the midrip. Moving on to the third leave, adding the small hatching
lines near the mid rips. And I'll also be
adding lots of lines, lots of small hatching lines
near the edges of the leaf. And a little bit of more
hatching lines near the sides. Since we have smaller
leaves in here, I won't be able to add lots of hatching lines
on all the side. And with these, we are done with this plant with four leave. Now for the ground in here, creating a bit different
kind of texture. Broken lines like this to create rougher texture
for the ground. In here, once again, using hatching lines, simple
and small hatching lines like this to add
texture for the ground. Beside it leg, creating small divisions like this and we'll be adding
hatching lines, small hatching lines, a fully, adding it beside its
leg and its body. So the area surrounding
our beetle, I'll be covering
it entirely with the hatching lines and dividing the ground into
different sections. If you want to add more
leaves or more plants, feel free to do that.
I won't be doing that. Instead of it, I'll only be creating this kind of
texture for the ground. Simple curved lines and lots
and lots of hatching lines. Apart from the hatching
line, if you want, you can also use
the cross hatching to make those sections
a bit more darker. Now, in here, this
beside this thorn. So this region is quite empty. We'll be adding lots of
lines later on, but for now. Now, as I was mentioning
for this sleep, I was not satisfied with it, so creating the outline
for the other side as well as adding multiple
veins beside the midrib. A little bit more detailing for some of the
sections on the right, simple hatching
lines, or you can use a combination of
both curved lines and hatching lines
meaning there. Me detailing wherever you
think it's required or wherever you or wherever you
are not satisfied with it. More details in this form. And with this, we are done
with the background for now. I'll be adding a little bit
more detailing later on. But for now using the black, do a little bit of
detailing for the eater. Put some of the section
in here for the horn, using this kind of
broken hatching lines to make this a little
bit more darker, doing the same
thing for its head, using this kind of
bit curved lines, a little bit of hatching in here to give it a little
bit of textured head. For the pencils, using
curved hatching lines, making this quite darker. Yeah, in here on the
side of its sad. So for some of the section that are not looking that great, just go over the outlines,
make it more darker. Since when we erase
the pencil marks, it has lost some
of its intensity. For the leg in here, a
little bit of outlining, as well as a little bit of sading to make
this quite darker. The side person more
hatching line like this for the second leg, using this kind of
broken hatching lines and making the
region bit darker, doing the same thing for
the leg on the other side, a little bit of outlining,
small hatching lines. And yeah, make some of the section a bit
more darker by using this kind of hatching lines and redoing the outlining for
some of the sections. For the horn, a little
bit more retailing. Now for the third
pair of the leg, curved hatching lines like this for the upper
and the lower part, doing the same thing
on the other leg, more hatching lines and using the hatching lines to
do a little bit by making the region more darker
for the second section, and for the remaining
smaller section, more hatching lines for
this section of the feet, the curve and the sharp
edges that we created. Now for the larger
portion in here, using this kind of
stripling dots. So you can consider this
to be stippling dots or some kind of smaller
hatching lines, smaller broken hatching lines or a stippling dot,
whatever you prefer. So adding texture in this form using this kind
of smaller lines. Let's do the same thing in here. So this kind of broken
small hatching lines or you can consider it
to be stippling dots. Adding the texture
in this fan for this latter portion of its
body, the wings in here. Apart from this, I'll be
adding red and white later on. But for now, just use this and create this kind of texture
for the remaining section, extending the side
a little bit more, a little bit more
detailing in this fan. Also vary the length of
the lines that we are adding or the stippling
dots if you are using that. Some of the lines
will be a bit larger, others will be quite smaller. Make the lower regions a little bit more darker by
adding more dots, making this middle
portion bit darker, too. Now for the other
side, the same thing, wearing the length of the
lines as well as making the lower regions quite darker by adding more dots in there. Me detailing in this form. For this right side,
I'm making this a little bit more darker
and a bit more longer. I only be covering up to here in this section
of the video. And in the next section, I'll be adding a little
bit more detail for the foreground and using
red and the white. Redo the outlining for some of the section that have
lose its intensity. Yeah, that's all for this video, and I'll be seeing you in
the next part of this video.
16. Details with Red: And we go with the breast
paint for now going in with the fine liner on the other side of its feet and the other sides of its body. I'll be using this kind of hatching lines to add
detailings in this manner. I'm also towing a little bit of seeding the regions near the edges and the
curved portion, these are a little
bit more reddish in color by using the
seeding technique. You can also do the seeding in this manner with two or three
rows of the hatching lines, adding it in here for this
third feet on the right side. The regions near size using curved hatching lines like
this encircling the eyes. I'll be adding the
red for most of the section in which
I added the black. So you can just
follow along with me. Here. Instead of using
the stippling technique, I'm using the
hatching technique. I'm also wearing the lens
of the line like this. And to make the read a
little bit more visible, since we are using the
brown colored paper, I'm doing the seeding. To do the seeding, I'm
adding more lines. Now for this portion
in here, once again, as you can see, I'm using this, doing a little bit of seeding and hatching lines like this. You can just add rows and
rows of lines like this. Adding the lines
on the other side. Adding another row like this. If you want, you
can make some of the portion more reddish
by adding more lines. I forgot to add the
right for this feet. Small hatching lines like this. In here, too, small hatching lines overlaying
it on top of the black. And with these, we
are done with this. Now for the bottom
section in here, once again, hatching
lines like this. Add lots and lots of
hatching lines like this. Extending the sins of the hatching lines a
little bit like this. I'll also be using a little
bit of white later on. I'll be using white to do
the stippling technique. Now for the front portion
in here, using red, once again, we are using hatching technique and doing
a little bit of seeding. If you want, you can even
cover the entire portion with making the region closer to its mouth a bit more
nous by adding more lines. Now for this region,
the triangular see region that we have created, overlaying this red on top of the black hatching lines and completely
filling it like this. And with these, we
add another red. Now for this region, I was not satisfied with it, so I decided to add
more detailings in form of this kind of small
hatching lines to sew a clear distinction
between different pots and to add a little bit more
detailing for the ground. This is option. If you are
satisfied with your ground, you don't have to
add more detailing. A little bit more detailing
for some of the section. White for the highlight
for the eyes, making this curve set a
little bit more outlined. For the pin set too, a little bit of
reflection with white. Now, in here for this portion, a little bit of simple
stippling technique to add a little bit
more detailing. For the other portion two, I'll be using stippling like this. Simple stippling lines in
here for this portion two. Instead of using a
stippling technique, you can also use
smaller hatching lines that will be interesting too. A little bit more
detailing in this manner. And with these, we are
done with this project. This is one of my
favorites from this class. I hope you enjoyed
painting this. I had a lot of fun
painting this one, and I'll be seeing you in the next project.
Happy painting.
17. Pinewood Wanderer : Welcome to Pinewood Wanderer. In here for this project, I'm using light
olive colored paper, and I'll be using red, black and white colour
to do the coloring. Let's start with a
simple pencil sketch. In here, I'm starting with
this bit angled line. We'll be using this line as
the length for our beetle, dividing into four sections, starting with
dividing into middle. Now let's divide it further. Let's create a rough
outlining for the seep of our bug. This will be its head. Simple, simple, half oval
seep like this for its head. In here on the
both side, I'll be adding ice as well as antenna. This below its head, we have got another oval half
oval seeep like this. This is just a simple scape. When we'll be doing
the outlining, we'll be making some changes as well as defining a sap properly. Now, let's do the outlining
for the remaining section. For the remaining three section, we have got this simple
sap for its body. Doing the sketching on this side to make this a little
bit more curvier. So the right side is a
little bit more broader. Simple outlining like
this for the antenna. For this insective we'll be
creating a total of six legs. Simple outlining like
this for the leng. For the first part, we'll be
creating only a single pair. For the remaining section,
we'll be creating two pair. I'll be dividing the link into three different
sections like this. Just simply do a pencil
sketch like this. We'll be making some changes and adjustments and we'll
be doing the outlining. And this is going to be our
rough s for our beetle. This beetle is climbing on a leaf simple line like this
for the midrib of the leaf. Now going in with a brasbin
to do the outlining, I'm using Tombos breastpin starting with doing the
outlining for its head. Making the side a
little bit bulgy for its eyes on this side, creating oval s for the eye. If you want to create
pincer, you can create that, too, but in here, I decided to create a simple
seep like this. Now, let's do the outlining for its antenna using this
kind of curved line and creating this kind
of simple see and creating this kind of
simple see for the antenna. Doing the same
thing for this one. Simple curved lines like
this to create the antenna. For this project,
mostly, I'll be using the stippling, as
well as hatching. Mostly, I'll be
using black to do the stippling and red and white
to do the hatching lines. But for now, let's continue
on with doing the outlining. For some of the sections, I'll be adding two or three lines like this to create
a clear separation in between different section, as well as to make the outline
a little bit more darker. Doing the outlining for
the remaining portion. Now in here for the
middle portion, creating this kind
of simple same, dividing into two
different section with a simple straight line pair
of straight lines like this. Doing the outlining
for the other sign simple curved
line like this. Let's do the outlining for the pair of legs that
we have created. The whole Video agent real time, so you can always
follow along with me. And this video is divided
into two sections. This will be the first
part, and here we'll be doing the outlining and a
little bit of coloring. The first two section of
its leg is under its body, so it's not visible, only
the last portion is visible. So I created simple Cp like
this for the last portion. For the leg on the side, the entire section is visible, creating simple
outlining like this, creating this kind of sharp
edges for the middle section. And for the remaining
section, this kind of line, the same that we did
for the first lay, doing the outlining
for this one. A bit of conical seep like this. Now, making this a little
bit broader in here, adding sharp edges on the sides. Now for the remaining section, once again, creating
sharp edges like this. Instead of creating
this kind of SA edges, you can create the
other variation that we have created so far. Now for the last person making the SA edges a little
bit more curvier. The final leg on
this right side, Once again, creating
sar edges like this. Now for the last person making the Sarpedges a little
bit more curvier. Adding the leg on this side, only a small portion
is visible in here. Most of it is
covered by its body. The upper portion is
visible like this. And finally, this
one, for this one to most of it is
covered by its body. And with these, we are done with a simple outline for our insect. If you want to add a
little bit more detailing, you can do that, but I won't
be adding any more details. Let's erase the pencil sketch, and see that the
ink has dried up and lightly erase
the pencil sketch. I'll be I'm using
red for its antenna, a little bit for the leg and mostly a lot of
red for its wings. Apart from that, I'll be
using black for its head, the region below its head, and I'll be creating
simple circulars using the stippling technique. Now for the leaf in here, I decided to use the white to create the outlining
for the leaf. I'll be creating very simple variation of the leaf like this. Since it's not clearly
visible in here, I have included
the image in here, creating this kind of bit
curvy lines for the leaf. Instead of using white, you
can use any other color. You can use red, black, blue, or any other color. Continuing on with
creating this kind of cursy for the
remaining section. This is going to take a
little bit of time since we'll be covering
the entire section with this kind of leaf. As I'm progressing,
I'm increasing the sizes of the leaf a
little bit like this, creating the midrob here
for the remaining section, the bottom part, giving it a little bit of thickness by adding more line like this. Now continuing on with creating the leaves on both the sides. Adding it carefully in
here beside its leg. And we are done
with the left side, continuing on with
the right side. I'll also be adding one
more line in the middle. But for now, let's continue on with creating more
lines like this. The same kind of
outlining for the leaf. And as you progress, increase the size of
the leaf a little bit. I'll be creating seven
or eight more leaves, and then we'll be doing a
little bit more detailing. Let's add a few more
two or three leaves One more leaf in here. With these, we are done with a simple outlining for the leaf. Now in here, I'm
going with the black, and I'll be using and I'll be using this black
to do the stippling. So simple small dots like
this to do the stippling. I'll be making the upper and the lower part of the head
comparatively darker. And as for the middle sexion I'll be keeping it
simple and lighter. Instead of using the
stippling if you want to proceed with the hatching,
you can do that, too. But I decided to
use the stippling. Since this makes it look a
little bit more refreshing, continue on with creating
the stippling dots. Cutting a little
bit of more dots to make this region a
little bit more darker. For the ice, too, I'll be using a little bit of a stippling, but for now, using the
stippling dots for the antenna, simple and small dots like this. As you can clearly see
piecing matters a lot, the closer the dots are
the denser it will appear. The farther apart there,
the lighter it will appear. So depending upon that use
stippling in that manner. With these, we are done
with the first antenna, doing the same thing
for the second one, simple plain dots. And with these, we are done with the head and the antenna. Now for this section here too, I'll be making the upper
part comparatively darker, just below its head, as well the lower part and a little
bit for the right side. Simple stippling dots like this. And as I said
earlier, if you want, you can also use the
hatching technique or cross-hatching
technique that will save you a little bit of time. Simple plain dots like this. This project is going
to take a little bit of time since we'll be using a
lot of stippling technique. Later on, I'll also
be using a little bit of white to create a
little bit of reflection. On top of this black dots,
I'll be adding the white. I'll also be using a little
bit of white for the eyes, a little bit of
white for the head, as well as for the leg,
small hatching lines. Mostly, I'll be creating
hatching lines with the white. Adding the stippling dots in
this side on the right side. Now for the middle section, make it a little bit lighter by increasing the spacing
in between the dot. Creating more dots in
here on this side, on the left side, making
this comparatively darker. The bottom region two, I'll be making it comparatively darker. For now, continuing on
with this right side, making it darker by
adding more dots, decreasing the
spacing in between the dots to increase
the darkness. Lots and lots of dot to create
this stippling technique. Adding few more dots
for the upper region to make it comparatively darker. And yeah, with these, we are
done with the upper part, making the outlining a
little bit more clear. Now for its main
body, so in here, I'll be creating three or
four simple spherical sap. I'll be using the stippling
dots to create the same, starting with doing
the outlining for the spherical shape
or circular shape, and then we'll be
completely filling it with the stippling dots. Let's add one more in here. This is optional if you
don't want to do this, you can just use
the red later on. But if you want to
follow along with me, you can create this kind of dot. Apart from this, if you want
to create any other kind of dot or designs,
you can do that, too. So feel to add your
personal touches to it. And in here, we are going to completely fill it with the
stippling dots like this. You're done with the first
one. Let's do the second one. Of the spherical seeps that
we have created in here, I'll be trying to
keep the spacing on the distance and mint
top somewhat uniform. Adding lots and
lots of stippling dots to make it
comparatively darker. This would be fine. Now for
the third one in this side, not the entire section of this
circular seep is visible. For the top and the bottom, we have got semicircular seep. In the middle, we
have got circular see completely filling
the entire section with the stippling dots. And now for the other side, three more dots, three
more circular seams. So let's continue with creating
stippling dots in here. After this, I'll be
going in with the red. I'll be doing two
layerings of the red. First, I'll be using light pressure with
the red and completely filling the entire section
with the hatching lines, and then later on, I'll be adding another layer
of red on top of it. But with that, we'll be creating multiple single strips to add a little bit more detailing or you can see pattern on
top of the wings. Let's create the fifth one. Adding more dots to increase
the intensity a little bit. For this section two, I decided
to fill it with a black. Simple stippling dots
for this region. I'll be making the upper
part of this region comparatively darker and
for the remaining section, we'll be increasing the siecing and making it quite lighter. Let's make this region quite
darker by adding more dots. And with these, we are
done with this one. Now for the final
circular scene, we are going to completely fail it once again with
a stippling dot. With the stippling
dots can create very beautiful and very detailed and defined illustration. But the main disadvantage with the stippling technique is that it takes comparatively
more time. So that's why I decided to use stippling technique
for this last project. A lot of stippling technique. We use a stippling technique
for other projects, too, but we use
very lays of that. And with these we add in
with all the circulars here. Now, we'll be using a little bit of stippling technique
for the legs. For some of the section
near the main body, as well as near the joint, we'll be making
them quite darker by using stippling
techniques like this. And with these, we are done with the two legs on this side, moving onto the other
side. Same kind of thing. I pulse stippling knots
near the main body, as well as near the joints, as well as a little
bit near the edges. Now, adding it for
the second one, a little bit for the second one. Now for the third
and the final one, making this region more darker. Adding it in here too,
so near the edges, making this region quite darker. Adding more dots to
make it more darker. Adding it in here for
the small section too. Now moving on to the
left side and adding it and adding it in here
for the smaller section, simple small stippling dots. And for the final leg in here, making this region quite
darker near the edges. Adding more dots in here. I'll also be adding the smaller dots for
the lower section. Apart from it, I'll
also be using red. We'll be using the
red and creating more simple stippling dots
here beside the black, as well as a little bit of hatching lines with
the white later on. And with this, we enter with a stippling technique
for most of the section. And I'll only be covering up to here in this section
of the project. And in the next section, we'll be continuing on from here. So I'll be seeing you there.
18. Leaves with Green and White : Welcome to the second
part. We'll be continuing on where we left off. In here, let's start with the. Starting with the
simple and small hatching lines for the antenna. For all the sexton of
the antenna in here, creating this kind of small, simple hatching lines and
overlaying it on top of the black stippling dots
that we added earlier. Now for the legs in here. If you want, you can also
use the hatching lines, but I'll be using
both combination of both stripping
the hatching line. In here, right now, I'm
doing the stippling dot. For this section, doing the hatching lines,
simple hatching lines. So for the smaller regions, I'll be using the
hatching lines. For the larger regions, I'll be using simple stippling
dots like this, adding it in here for this link, adding a little bit
more for this line. Continuing on with adding the stippling dots
beside the black. For this portion, too,
for the upper part, adding more stripping
dots like this. Now for the remaining section, simple stippling dots like this. In here, as you can see,
I'm not adding that many stippling dots as
compared to the black, so add comparatively
less stippling dots with the red, adding
it for this one. And in here, if
you want, you can also use the stippling
dots like this. But this will take
a lot of time, so I won't be doing it. Instead of it, I'll be creating. Instead of it, I'll be using the hatching lines and I'll be creating this kind of strips, doing multiple layering to create a darker set up the red, and we'll be creating
this kind of strips. But if you want to
proceed in this manner, you can do that using this
kind of stippling dots. So this is just for a
demonstration purpose. I won't be doing it, but if you want to do it or
if you want to add your personal touches and create other variations of it,
you can do that, too. Oh creating hatching lines like this are at
larger hatching lines, and we are going to cover
most of the sections. So the lines that
we used earlier, the stripping dots that are
used for creating the lines, overlaying this red
on top of it and creating this kind of
larger hatching lines. To make it bit more darker, add more lines on
top of each other. Instead of creating
large light at one, you can create the line in this manner by
extending it like this. One more line in here on the sign. Creating multiple strips
like this for the side, we have got a total of four. So let's create lines in here. Since we have got
larger in here, we'll be trying to create a
total of five for the sign. Creating the second one. I find this comparatively easier
as compared to the one that we did earlier using
larger hatching lines. So instead of creating
larger hatching line, create this kind of
smaller lines and then extend it doing layers
and layers of the red. In that way, we can
create the lines much easier as well as we are
making the lines quite darker. So this is our third strip. Creating the fourth
one. Plan was to create a total of five, but I don't think that I have
that much squeeze in here. I'll be adding a little bit more detailing for the
inside later on, but for now, continuing on with adding the detailings
for the leg. Simple stippling
knots like this. Adding it beside the black. And as I mentioned, we are
adding it comparatively less. Adding it for the second one. And with these, we are
done with all the lengths, six pair of laying now
continuing on with the red. So as I mentioned for
the entire section, I'll be completely
filling out the red. For the strips that we create, I used two or three rows of the hatching lines to
make it to quite darker. But in here, we'll only
using a single layer. As you can see, I'm applying
medium preserve with it as well as I'm adding
the lines at an angle. So we have got comparatively lighter set of the red in here. Covering the entire section
with a red like this. I find it a little bit
easier to do the hatching in this manner rows and
s of hatching lines. In that manner, I'm
also adding a little bit more detailing in
the form of strips. What I mean is this the
regions where the two rows of the hatching line mi is
comparatively more darker. In that way we are
adding it more detailed. Now add more red wherever
you think it's required. You can make some of
the sexton more darker. You can make some of the
section a bit lighter. To make it a bit lighter, you
will have to just increase the intensity of the
region beside it. And with this, we are
done with the red in here for now going
in with the white, using the white
in here to create the mid for all the
leaves like this, simple curved simple
curved lines like this. So for all the
sections of the leaf, I'll be adding a
single line like this. If you want to add
the veins too, you can do that, but it would
be a little bit chaotic. I won't be doing it.
Adding it for all of them. Here, if you want to
do a little bit of hatching or stippling,
you can do that, too. You can make some of the suction of the leaf quite darker. With these, we are done
with the left side, doing the same thing
on the right side. Simple curved line like
this for the inside. Instead of a one, you can
also add two like this. For the larger and broader one. In here, I'm creating
two lines like this. Now carefully adding
this beside the insect. Oh And with this, we are
done with the leaf. Now. Let's add a little bit more detailing for the insect, a little bit of
hatching line on top of the red to sow the
reflexion like this. I'm adding the white in here for the lighter
sections of the red, and I'm also overlaying a little bit of white on
top of the black like this. A little bit at the
bottom section too. Simple small hatching
lines like this, a little bit of
reflection in here too. And making this
region a little bit lighter by adding
more white like this, simple, small hatching
lines like this. Now for the eye, simple, small dot like this,
a little bit in here. Now for the legs too.
Simple small hatching lines like this just beside the joints and near the insect's body. Adding it for the last one for the second section
of the leg, too. Comparatively larger
hatching lines like this. Now, adding more white whenever it's required for the leaf. And with these, we are
done with our project. This is how this
project turned out. So after completing
this, later on and decided to make it a little
bit more interesting, so I used a little
bit of green colour. This is optional.
If you don't want to do this, you don't
have to do this. And here, I'm using the
green colored fine liners. Ika microns, green
colored fine liner and adding a little bit of
detailing for the leaf, adding it just beside the white outlines that we did earlier. So I did this after
completing the project. I thought I have not used any other colored paint apart from the red, black,
and the white. So for this one, I added
the green like this. If you don't want to use this, you can just leave
it as it is simple, plain simple and plain white, or you can just
follow along with me and add the green
in this manner, three or four lines
for all the leaf, three or four lines for
each individual leaf. Or if you want to
make it more darker, you can just do hatching
you can just do cross hatching or hatching
with the green to make the leaves quite more distinct. Since we have got
lots of leaf in here, so this is going to take
a little bit of time. Now for the leaves in here at the bottom section
on the left side. And with these, we are done
with a leaf on the left side, adding the green for
the middle section. Now for all the leaves
on the right side. Adding three or four lines
like this for the inside. For the smaller and
the thinner leaves, add fewer lines for the larger and the broader leaves,
add more lines. Adding it carefully in here just beside its
leg and its body. Continuing on with
creating more lines. With these, we are almost done with all the leaves
with the green. We have got three or four
more leaves in here. Since the leaves are quite
broaden and a bit more larger, I'm adding comparatively
more lines. So if you want, you can
also do a little bit of hatching like this to make some of the section near the edges, bit more darker or
near the mid ribs, adding it for the final one. And with these, we are finally
done with our project. I hope you enjoyed
painting this, and I'll be seeing you in the next project,
happy painting.
19. Secret Winged Awakening Bonus: Welcome to the bonus
Project in here, we have got Secret
Wing Awakening. For this, I'm using light
blue colored paper, and this is a little bit
larger than E four CH paper. For all the project earlier, I used E two sich paper. So starting with
the vertical line to determine the
length for our insect. Dividing into four
equal sections. This will be a little
bit different in here, I'll be using cross-hatching. For all the project up til now, I don't have used the
cross-hatching, but for this one, I'll be using cross-hatching will be comparatively
more detailed, starting with a very
simple Sam for its head. This will be the upper
part of its head. Creating this kind of
bit curved oval see for the remaining section of
its head on the sides, I'll be creating its eyes. Simple see like
this for the eye. Let's create the antennas. For the antenna, I'll be
creating this kind of simple seat when I'll
be doing the outlining. For now, let's continue on
with the remaining section. For the remaining
section in here, the three section that we have, I'll be creating this kind of cylindrical see for its body. Feel free to experiment with different seeds and
sizes, but in here, I'll be creating
this kind of simple cylindrical see ultimate
conical at the bottom. This will be the wing
flaps on both the sides, I'll be creating the wings. Let's create the remaining
section for its antenna. For this one too, I'll be
creating pair of three legs, so a total of six leg. Creating the outlining for
the first pair of the leg. For all the pair of the legs, I'll be dividing into
three different sections. Try to keep it symmetrical
at both the legs at the same positions
and also try to insure that all the sections
are of equal length. Creating the rough outline
for the remaining section. Creating this kind of curves, we'll be adding the detailings
later on for the sections. I decided to make it a
little bit more cylindrical, so extending the
sides a little bit, making the division
a bit more distinct. Now for the second pair of the legs, this will be in here. And for the third
pair of the link, I'll be adding it at
the bottom for now continuing on with the
different sections of the ling. Creating the second
section in here. Adding the second section in here for the leg
in the right side, another curve line like this, we'll be adding the
detailing later on. Now for the wing. I'm creating this kind of wing,
simple wing like this. A little bit curve. These
wings are optional. If you don't want
to create the wing, you can just create the
body for our insect. And instead of creating
this kind of wing, if you want to create
any other variations for the wing, you
can do that, too. So this is going to be our
simple C for the wing, and here's our final
pair of the length. So we have got the final
pair at the bottom. This insect is
sitting at the tree, so rough outlining for the tree. For this project, I'll only be creating a single
tree like this. If you want to create
multiple trees in the background,
you can do that. I am just showing you
this as an example. I won't be creating
multiple trees. This is going to be
our pencil sketch for this project using
the tomba spurs pin to do the outlining,
starting with its head. This kind of oval set. Now let's do the outlining
for its Antenna. Creating this kind
of simple oval seeps for the entire antenna. Instead of creating
this kind of antenna, you can create any
other variations of the antenna that we
have created so far. And with this, we are
done with this one, doing the same thing
for the second one. Simple seeps like
this for the antenna. This is one of the largest
projects of this class. I divided this
into two sections. This is the first section. In the next section,
we'll be adding the background as well as doing a little bit
more coloring in here, we'll only be doing
the outline as well as a little bit of detailing
using the red and the black, doing the outlining
for this section, making it a bit more broader and more darker by
adding more lines, outlining for the eyes. Now let's do the outlining
for the first pair of laying for this section in here. And for the final
section in here, biting into three or
four sections like this, the last section, making
it a bit more curved and giving a little
bit of s edge. Let's do the same thing for
the second leg in here. For the second section in here. I was not able to record it, but this is how it turned
out the second line. Now for this portion
of its body, going with the pencil
screech that we have created for the
middle portion too, simple and straight
line like this. Creating this kind
of cylindrical sap, if you want to create
any other variation or any other kind of
sap, were to do that. Doing the outlining
for this side too. Now, let's do the outlining for the second pair of the legs, making this section a
little bit more broader. The second part of its length. And for the final part in here, creating this kind of
simple and small claw. Let's do the same thing in
here on the right side, making this region
a bit more broader. Now, doing the outlining for
the two remaining sections. As you can see, I'm
not sticking with the pencil case that I created, feel free to make changes in
adjustment as you see fit. The final part of its leg. Final pair of its
leg at the bottom. So this is a little
bit different from all the legs that we
have created in here. I divided into three
different section. This is the first
section, second one, and this is going
to be the third and the final one
that is visible. Most of it is
covered by its body. Only a small section
is visible in here. Now, let's do the
outlining for the wings. In here, I decided
to make a little bit of changes to the
angle of the wing. A little bit of
changes like this. I'm extending the side of the wing a little bit like this, doing the outlining for the remaining section of the wings. We'll be doing the same thing on this side, the right side, standing the side of the
wing a little bit like this, and now doing the outlining
for the remaining section. So with this we are done with a simple outlining
for the insect, adding a little bit of
black for its eyes. Now let's erase
the pencil sketch, and see that the
ink has dried up and lightly erase
the pencil marks. Removing the erasis dust. Now let's do the coloring in here. I'm starting
with the red. For the smaller sections
of the antennas, I'll only be using simple
hatching lines like this. So for all the smaller
and separate regions that we have created in here, adding the red in this manner. Instead of this, if you
want, you can also use the black or a combination
of red and black. Continuing on with
adding the red for the remaining section of
the antennas in here. Now for its head in here, following the curve shape of it and creating
the hatching line, a little bit of broken
hatching lines like this. Let's the
cross-hatching in here, adding another set of
line on top of it, following the curve set. So mostly for this insect, I'll only be using red. I'll be using a little bit
of black for only the wings, but for the remaining section, I'll only be using the red. In here, doing a
little bit of seeding, making the upper part
a little bit darker. Now for this
section, once again, creating the curved
line, following the curved shape of its head. Before doing that, I decided
to do the coloring for the first pair of the leg and
then we'll be coming back. So in here for the
smaller section, using this kind of
simple hatching line. For most of the
smaller sections, I'll only using
simple hatching lines for the broader and
thicker regions, I'll be using
cross-hatching lines to give it a little bit of
more three dimensional sap. For this region too, I
only use hatching lines and did a little bit of
seeding at the bottom section. But in here for this region, we'll be doing a little
bit of cross-hatching, creating simple lines like this, following the seed, a
bit curved lines now. Cross searching in here.
A little bit of seeding, making the upper region a
little bit more darker. And I'm adding the line in this manner following
the curve sea to give it a little bit more
three dimensional see continuing on with this section, reading this kind of bit broken and curved line following its s. Now another set of
hatching lines on top of it, and I'm following the s. So we'll be doing a
little bit of sading. I'll be making the left
side comparatively darker, more lines in here to make this darker and a little
bit in here too, making this region by making this region a little bit darker. Middle region is
comparatively lighter and the remaining sections are and the remaining sex are
on different sets of red. Removing a little bit
of pencil sketch, now continuing on
with the second leg. Here, too, I'll be
doing cross-hatching, now creating this kind of
line, horizontal lines, making this region
bit more darker, following the curve seat
and creating a little bit of creating this kind of three dimensional
look for this leg. For the remaining
section of the leg, once again, simple
hatching lines. For all the separate
sections in here, the four sections that we have, simple hatching lines like this. Well, let's do the same
thing for this pair of leg. So we are going to
use cross-hatching for all the three
secons in here, since this is comparatively more broader and more thicker. So starting with the
simple hatching lines and then we'll be conventing
into cross-hatching. For this second
two, I'll be using cross-hatching using this
kind of vertical lines. Now using this kind
of horizontal line. In this case, in here using
this kind of vertical lines. Making the side a little bit more darker by adding more red. And finally, in here, I'll be making the upper and the lower part
comparatively darker, adding the horizontal lines to achieve the cross
searching effect. Now, let's do the
coloring for the wing. I'll be dividing the wing
into different sections. So there will be a
total of three section. We'll have red, then black, and then red once again. This region, I'll
be adding the red. People hatching lines like this. For this one, I'll be using a combination of both hatching
lines and cross-hatching. For only a small section, I'll be using cross-hatching, but for the remaining section, I'll only be using
the hatching lines. Following this curve and
creating the lines like this, the upper part for the
upper region in which we added the lines earlier will be converted into
cross-hatching, and the remaining section
will have hatching lines. Instead of it, if
you want to convert the entire section into cross-hatching lines,
you can do that, too. We'll also be making some of
the sections quite darker. So I'll be adding more
lines later on for now. For now, let's completely fill the entire section with
the hatching lines. Now we are going to make some of the section quite darker, adding another line
in here to create a clear distinction between the different sections that
we are going to create. I'll be doing the
seeding later on. Let's create another section. This is going through the
third part of its wing, and in the middle portion,
I'll be adding the black. Is following the seep and
creating the hatching lines. For this section, I'll
be making the upper and the lower part quite darker
by doing the seeding. Now, going in with the black. I decided to create
simple pattern like this for the wing. Simple circular
seep like this and a single dot and a
single dot for inside. I'll be creating seven or
eight simple seeps like this. Simple circular seeps
with two or three lines and a single dot and a
single dot for the inside. If you don't want to create it, you don't have to do this. Now for the remaining section, I'll be using hatching
broken hatching lines like this and we'll be
completely filling it. Till now, I have not created any broken lines but for now, but from now onwards, I'll be
creating broken lines too. So broken hatching lines, and we are going to completely fill the entire section with it. Following the curve side and completely filling the
entire region with it. Instead of this
black, if you want to use other color,
you can do that, too. You can use red, you can use
blue, you can use green, or you can also use different
color combinations. So you can mix a little bit
of red or blue or black. Or you can also use a little bit of white for the middle region. You have got lots of choice. You can also add your
personal touches to it. Feel free to experiment and add your personal touches to the wing that we are
creating in here. I'll be adding more details in the form ofsting but for now, continuing on with the
remaining portion of its body. So for this portion, we'll be
using cross-hatching lines, starting with the
hatching lines. So this kind of mid broken
lines for both the sides, I'll be completely feeling with this kind of mid broken lines. All we making the upper and
the lower part quite darker. And also for the middle section, we'll be making it
comparatively darker, creating this kind of broken hatching line for
the entire section. Instead of creating
lines in this manner, you can create the lines in other manner that we
have created so far, you can just create rows
and rows of hatching lines. You can just follow
along with me and create this kind of larger
broken hatching lines. I'll be adding two or
three more in here. Now, as I was mentioning, we'll be making the upper
region a little bit darker. Before doing that, let's do a little bit of
cross-hatching, creating vertical, so creating horizontal lines like this. So these are horizontal
broken hatching lines. So continue on with creating this kind of broken hatching lines for the entire section. We'll be keeping the middle
portion a little bit lighter. We'll be keeping
the middle portion quite lighter and the
remaining section, upper, the lower and a little bit of medial and a little
bit of middle portion, darker, comparatively darker, but the remaining
will be lighter. I'm not able to
properly explain it, but you will see when we'll
be doing more detailing. For now, let's
continue with adding more broken hatching lines
for the remaining section. We have got only
a small section, so continuing on with adding more lines for the
remaining section in here. And with these, we are done with broken hatching lines
for this section. Now. Let's give it
a little bit of sading making the upper
region a bit more darker. Add more lines. Just add multiple lines and decrease the spacing in
between the lines. In here, too, this section
of the middle portion. A lot of lines to make
this region quite darker. Mostly, I'm using
the vertical lines to do the seeding in here. But if you want to include the horizontal line,
you can do that, too. Now moving on to
the bottom section. We are going to make the
bottom section mid darker too. Simple broken hatching lines like this, vertical
hatching lines. Let's add a few more lines
to make it more darker. So this is how we'll be doing
the coloring for the wing. I'll be adding a little bit
more detailing later on, but for now, let's
do the same thing for the second wing in here, second wing flap that we have, starting with the
vertical broken lines, vertical broken hatching
lines like this. So this process is going to take a little bit of
time since we have to create lots of vertical
and horizontal lines and then we'll have
to do the seeding. So be patient and continue on with creating more
lines like this. So we are more than halfway. I'll be creating three or
four more lines in here, then we'll be creating
the horizontal lines. And with these, we are done
with the vertical lines. Let's create the
horizontal line. Same kind of line.
You can create simple and plain
lines or you can create simple broken
lines like this. First, let's add this horizontal line
for the entire section, and then we'll be
doing the seeding. Continuing on with adding the horizontal line for
the remaining section. In here, if you want to create patterns or designs,
you can still do it. You can use the
darker side of the. You can use the black and create multiple spots
pattern or design, or you can just add more red to create simple
patterns and designs. So layers and layers
of red to create simple pattern and design
if you want to do that, or you can use other color, you can use blue
green to add designs. For now, I'm just continuing on with creating more
horizontal lines. And with these we are done
with the cross-hatching. Now let's do a little
bit of seeding. The same kind of
seeding, we are going to make the upper
region a little bit of middle portion and the
bottom section quite darker by adding more
hatching lines like this. I'll only be using the particle
lines to do the hatching, but if you want to include the horizontal lines,
you can do that, too. Sending the lines a little
bit on the right side. Now, let's make the middle
portion a little bit darker. Simple straight hatching lines like this for the
middle section too. In this region, a
little bit more darker. Try to maintain the
symmetricity of both the sides. Now, moving on to the
bottom section and trying to make it a
little bit more darker. For this section of the project, I'll only be
covering up to here, and in the next
section, we'll be doing the remaining coloring,
adding the background. So yeah, that's all
for this section. I'll be seeing in
the next video. Happy painting.
20. Scars on Tree: Continuing on where we left off, in here we are doing coloring
for the last pair of lay simple hatching
lines using red to create this kind of
simple hatching line and a little bit of shading
for the upper part, adding more lines to
make it a little bit darker for the
remaining two sections, simple plain hatching lines. Now for the last section
in here and with these, we are done with all the
three pairs of the lens. If you want, you can
do a little bit of seating for some of the
sections like this. Now, moving on to the wings, we'll be doing the coloring
in the same manner, starting with
creating the outline, simple outline for the region in which we'll be
adding the red. We'll be using both
hatching and cross hatching crosshatching
for the upper part and hatching for the
remaining section. Second outlining for the red. Now, let's add the lines. Try to see that both
are symmetrical. I'll start with
creating the lines. In here, I decided to start
with this smaller one. Simple curved line
following the seam. A little bit of seeding
for the outlining area. Now for the larger
one, starting with the large line large
edging lines like this. Read eight or 12
hatching lines in here. Now, making the outline
region a bit more darker, so more lines in here. And apart from that,
we are going to fill the remaining section with
this kind of hatching lines. Let's do a little bit of sading so making this
region bit darker. Lots and lots of red in here, doing the same
thing in here too. Now continuing on with
the hatching lines. For the upper sexon
we have got cross hatching and for the
remaining section in here, we have got hatching
lines like this, the same thing that we did for the first wing following the curb and adding hatching lines for the
remaining section. We'll be making the upper
part and the lower part a little bit more darker by
using more hatching lines. Making this lien a
little bit more darker, using it to do without lining. Now going in the black
and let's start with creating the simple design
or tency pattern that we created for the first winglet a simple black dot surrounded
by two circular seeps. I'll be creating ten to two
of this kind of seeps and then we'll be completely filling the entire section with
the black hatching lines. You want, you can add few
more, I'm satisfied with it. Following the seep of the wing, let's create lots
of hatching lines. Broken hatching
lines like this for the entire section here, if you want to convert those hatching lines
into cross hatching, you can do that, too,
but I won't be doing it. Continue on with filling the remaining section with the black broken hatching lines. Now filling the
remaining section with a cross hatching line. Here just beside the wings flap, I'll be doing a little
bit of seeding with the black and for
the lower secon too. So two sexton for the seeding. Now filling the
remaining section with the cross atching line, we have got only a
small section in here. More broken lines, and with
these, we are done with this. Add more lines wherever
you think it's required or wherever
the spacing is great. And with these, we are done with the black for the wings for now. Now for this region in here, the middle section, hatching simple hatching lines like this. Let's fill the entire
section with this. Here the applying medium presser with it and creating
this kind of bit lighter shade of the black
while doing the hatching. With these, we are done
with the coloring. We have to do the coloring
for one of the legs too. This section for this entire section will be doing the cross touching as we did as we
did for the on the left, making the upper region
and lower region a bit more darker by
adding more line. Now for the second
part, vertical lines now adding the
horizontal ones, a little bit of stating for the upper section to
make it quite darker. And for the third in
the final section. More lines like this. And with these, we are
done with all the legs. A little bit of seeding in here, as I was mentioning, doing
the same thing in here. Let's make this
region darker, too. So adding more lines. So adding more line to
make it quite darker, doing the same thing in here, making it quite darker for here. So once again, adding
more hatching lines in here to make this
region quite darker. And fin in here. So once again adding
more hatching lines to make it quite darker. And we'll also be making
the lower regions on the other side like this
a little bit radius. So my radius, I
mean more darker. Lots and lots of hatching lines to make this region
quite darker. And all the edges in here, too, a little bit of
sating like this, knowing the edges a little
bit more pronounced. Do the same thing
on the other side, nabbing on the right, making the edges a little bit more pronounced by doing
more sating like this. I'm just following the sep of the wing and adding
lots of line. The speecing between
the lines are quite close. Continuing on. Making this little
more darker by adding lots and lots
of lines in here. Then with these, we add them
with the red for the wings. Now, as I was
mentioning, using black, do a little bit of shading
here beside its body. Simple hatching line
following the curve, see. Do the same thing in
here at the bottom. Simple hatching lines
like this to make the lower region a
little bit darker. As compared to the red one, this is comparatively
less, but yeah, following the outline
side and adding lots of hatching lines to make
this region quite darker. With these, we are
done with this wing, doing the same thing with
a wing on the right, adding it just beside
the outline section and at the top and
at the bottom. Lots of hatching
lines like this. If you want to make
it more darker, you can do lots of
hatching lines. Following the sweep
of the lines that we added earlier and
creating this kind of smaller hatching lines and reducing the squeezing
in the lines, thus making this quite darker. Continuing on with
adding more lines. And with these, we are
done with the black. To avoid the
smudging of the ink, I'm using the tissue
paper below my palm. Now let's create the rough outlining for the
tree that we have. As I mentioned, I'll only
be creating a single tree, but if you want, you can
create multiple ones. Now let's do the outlining
in here on this side. This tree has got
only a single branch. If you want to add multiple
one, feel free to do that. Scar on the tree. I'll be
creating multiple scars of different seeps and sizes and orientations. This is optional. If you don't want to create it, you can just use
simple hatching lines to fill the entire section, or you can just follow
along with me and create this kind
of multiple scars. These are not that
much defined sin, but simple seeps like this. Apart from it, I'll be using lots and lots of hatching lines, curved hatching lines to add the texture for the
remaining part of the tree. Adding simple lines like this. Simple, small vertical
hatching lines like this. Doing the outlining
for this region with this kind of curve lines. And now we are going to fill your remaining section
with lots of black lines. So this kind of simple, small, broken line following
the curb sip of the tree instead of this, if you want to make
this quite darker, you can always use
the cross hatching. If you want to use
stippling here, I would advise you
not to use that since we have got a large tree and it
will take lots of time. So stick with using only
the hatching or cross hatching to create this kind
of text for the entire tree. In here for the branch, creating this kind of bit curved lines, somewhat of circular lines, and adding lots of it
to make this region quite darker,
comparatively darker. As for the branch, following the seep and creating this
kind of simple lines. Let's make this a
little bit more darker, adding more lines like Now continuing on here, I'm going to create another
scar, making this region, the outline region a
little bit more darker, not darker, but
creating this kind of line to make it a
little bit rougher. So this is going to be the scar in here too for
the inside region, simple broken curved
lines like this. And for the insides, just
create a few more scars like this and we'll be doing seeding using the small hatching lines. I'll be creating two or
three seeds like this. And for the remaining section, we are going to do
simple siding like this. I'll be creating a few more scars for the remaining section. But for now, continuing on with adding the hatching
line, simple hatching. Simple hatching lines like
this and doing the siding. Now, adding it in here too. And with these, we had done
with the scar in here. So this is the second kind of
scar that we have created. So you have you
can create either this one or the one that
we created earlier. Continuing on with
the left side, creating lots and lots of
hatching lines like this, small broken hatching lines. This process is going to
take a little bit of time. I think around eight
to 10 minutes, step it scent and just add
lots and lots of line, adding it beside its
leg, the front legs. Now in here beside
it's leg on this side, adding in between antennas to simple small hatching lines. Continuing on with
more hatching lines in here on the right side, adding a few more
hatching lines like this. Here's another scar
on the left side. This is comparatively smaller, so let's create one more. So a set of two scars in here. Since these are quite smaller, so I'll only be creating a
bit of rougher outlining and then doing the seeding for the inside using
simple hatching lines. Now in here, as you can see, just simple hatching
lines like this after doing the outlining
with curved lines. Completely filling the
entire region with this kind of hatching lines
and doing the seeding. And yeah, continue
on with adding the lines in between
the scars that we have created and for the
remaining section adding in between the
wing and the leg. Do the same thing
on the other side, the right side in between
the wing and its body. Now we have got a
small section in here. Simple broken hatching lines like this for the
entire section. Earlier I see it, it would take around eight to 10 minutes,
but I don't think so. I'll be completing this
within four to 5 minutes. We have got another scar
in here, bit larger scar. Before adding the
detailing in here, continuing on with creating more hatching lines
for the upper region. Continue on with this car? This will be a
little bit different from the first two
that we created. I'll be completely
filling it with simple hatching lines and
doing a little bit of sading. Rows and rows of
hatching lines to fill this scar that
we have created. In here, as you can see, I'm applying medium pressure with the black to create this
kind of bit lighter shade. Make it clearly distinct from the remaining
part of the tree. Make the outline more darker
by adding more lines, more rough and curvy
lines like this. And for the inside, doing another layer
of hatching lines, rows and rows of hatching lines to make this quite darker. More hatching lines
for the inside. And with these, we are
done with the Scar, continuing on with adding more hatching lines for
the remaining section. And with these, we are done
with the hatching lines. Add more hatching lines
wherever you think it's required or where there
is a lot of spacing. And as I was mentioning
that I'm going to make a little bit of
genius for the Scar. So I'm just simply
going to redefine the outline a little
bit by making it quite darker and
for the inside, lots of hatching lines
to make it quite darker, doing the same thing
for the second one. Making the outline a little bit more rougher by using
more curvy lines and making them quite darker by adding more hatching
lines for the inside. So with this, we are done with all the cards and the
texture for our dring. This are our final detail. I was not satisfied with the
darker shade of red in here, so I decided to make it a
little bit more darker. Once again, lots and lots of hatching lines to make
this region quite darker. Wherever I add it
earlier to make those region quite darker,
for the upper region, for the middle region, and
for the bottom region, we'll be adding
layers and layers of hatching lines like this
to make them quite darker. Adding it in here for
the bottom section, make this region quite darker. More hatching lines like this
to make this more darker. You can also do a little bit of horizontal lines to
make it quite darker, but I'll only be sticking
with simple vertical lines. Me lines wherever it's required to make it
comparatively darker. A little bit of
red for the wing, so a little bit of
crosshatching in here. Doing the same thing
in here on this wing on the right side,
crosshatching. Now, going back once again
with the black to make some of the regions of
the tree quite darker, hatching lines like
this where there was a lot of specing
in the lines. And yeah, with this, we are
done with our bonus project. This was the biggest
project from this class. And yeah, this is going to be our final painting
for this class. And I'll be seeing you in the
next venue. Happy painting.
21. Class Conclusion : Welcome to the conclusion video. This is the final
video of this class. Congratulations on
completing the inky insects. Over the past week,
we have built a bold collection of detailed
insect illustration. We practice structure,
symmetry, texture, and strong contrast using
hatching and cross hatching, along with stippling and
confident line work. Most importantly, we
sewed up consistently, and that's the real
artistic growth. I hope this challenge
help you feel more comfortable with
the fine liners, Bust pin and dramatic
sading technique. Keep experimenting with texture, line, and color combination to develop your own
signature style. Don't forget to
upload your projects. Share your favorite
piece in the gallery. If you enjoyed the class, consider leaving a review and following me for more
creative challenges. Thank you once again
for joining me, and I'll be seeing
you in my next class.
 Vishal Munshi