Transcripts
1. Introduction: Hello and welcome to my class Ink tens pencils for beginners. Have you always wondered what intense pencils
are all about? Are they just fancy
pencils with ink in them? Or you may never have heard of intense pencils
before until today, and you're super curious about what these
pencils are all about. And if the answer to any of these questions
and beyond is yes, then you're at the
right place because this class is perfect for you. We're going to start the
class off by quickly going through what ink
tense pencils are, their components, how they work, and what characteristics
they have. Going to then quickly move
on to the class supplies, and we'll go through
all the items that you're going to be
needing for this class. And then a matter of
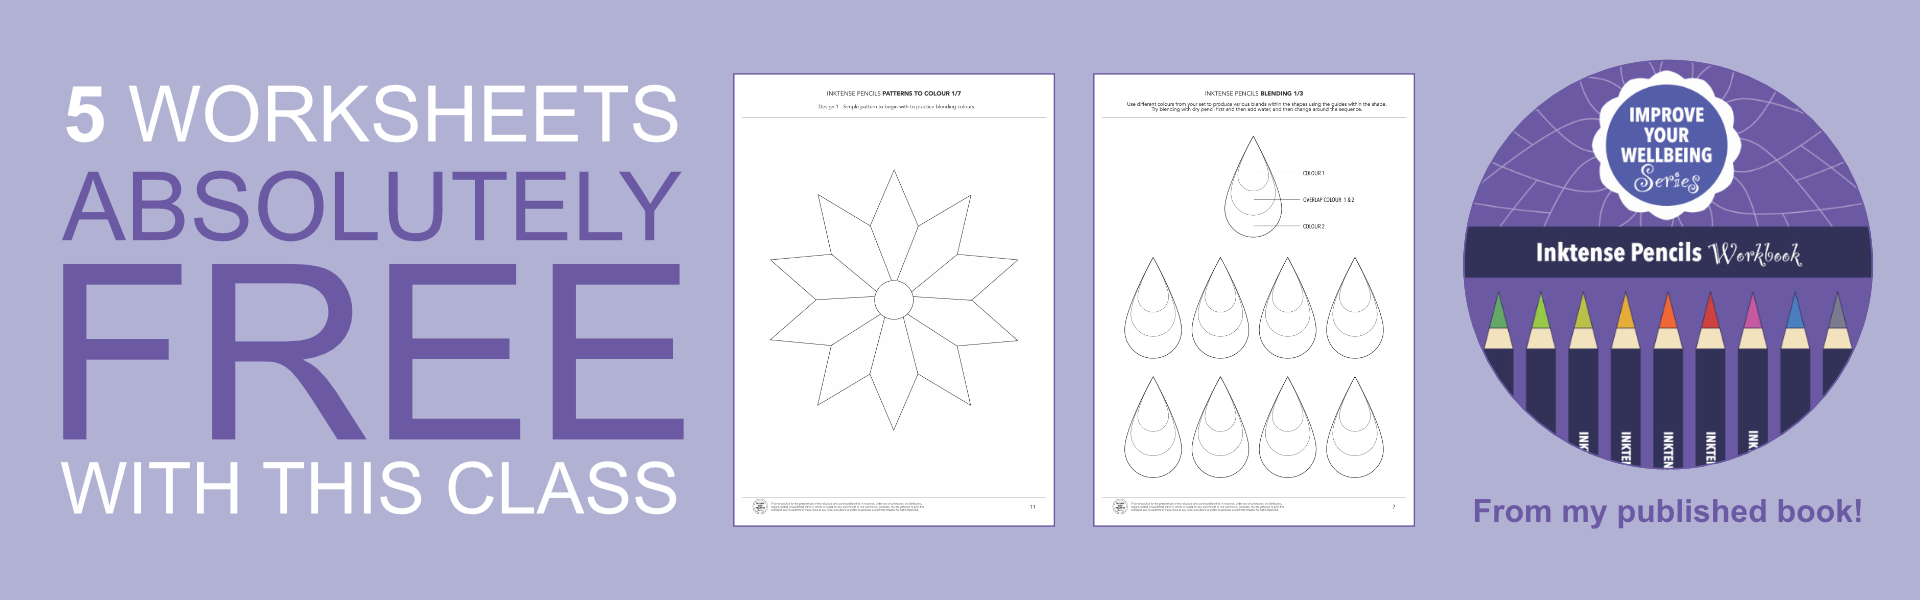
excitement to announce, I will be giving some
free worksheets that are available from my published
workbook on intense pencils. So if you've already got this
book, then that's great. Haven't not to worry because few pages from this workbook
will be made available, absolutely free, which
you can download, and I will indicate to you when you need to use them
throughout this class. We will begin by looking at the different
application methods on how to apply intense pencils, and we will explore the
various ways that this can be done to produce really
interesting and lovely effects. We will then work through one of the sheets on Blending
from my book that, again, is available
for download. That we can work out how to
create a beautiful blend with color and work alongside the lovely little features that you have on this worksheet. And then once you've done the application methods and the blending exercise worksheet, then you'll be ready
to start exploring that knowledge and really implementing it in a
beautiful pattern, which again, I'm going
to be making available from my book free for
you to download and use. And then finally,
we will explore a really interesting technique. Using these pencils
to produce a step by step sketch where
we will look at different methods
of how to create wonderful effects in
creating sketches, whether it be from
real life studies or whimsical in my own
personal whimsical style. And once you've completed all the class exercises and the complete
step by step sketch, you will be able to accumulate all those skills and those techniques that
you've learnt and really go ahead and
unleash that creativity of yours in producing your very
own beautiful class project. So what you're waiting for
grab yourself a nice drink, get yourself a nice treat, get comfy, get your ink
tints and pencil ready, let's get started
with the class.
2. Class Project: Okay. Welcome back. For your class project, all you need to do
is follow along with the exercises within
the lessons of this class. We're going to be looking
at the application method. We're going to be
looking at blending, using the exercise
sheets provided for you to download and
print from my book. And we're also
going to go through a lovely little pattern
that you can color in using those blending
and application methods. And then finally,
we're going to do a lovely little
sketchy style bit of artwork using these pencils. So follow along, give each one of those exercises a
go for your class project, and then you'll be
ready to explore and create your own
wonderful artwork. With these brilliant intense
pencils and that's it, then all you need to do is
upload your beautiful work, whether it be the exercises or the sketch or both of them, and also with your
artwork that you produce so that we
can all look at your wonderful experience
with these pencils and then also leave a lovely
review on the class so other students can find the
class and we can all enjoy this wonderful adventure using intense pencils, and that's it. That's all you need to do
for your class project. So now let's move on
with the next one.
3. What are Inktense Pencils: Okay, welcome back. Let's now start the class off by going through some of the basics of what ink tense pencils
are all about. Let's quickly go through them. What are ink tense pencils? These are highly pigmented, intensely vibrant
watercolor pencils that are permanent when
they're fully dry. They are pigment based, highly water soluble, create
ink like transparent washes. They're great for
layering, vibrant colors, instant dissolving,
and versatile for light or dark tones. The pencils are
wax based and have a four millimeter core
with a round barrel. In total, there are
99 pencil colors and one outliner pencil. 87% are light fast. Dilution with water may
affect light fastness. Intense antique white is
great for highlights. Or black paper art. Pencil, dipped ends, match the washed out colors,
not the dry cores. The outliner pencil is a non water soluble pencil for line and wash
drawings, and that's it. That's what this
pencil is all about. So let's quickly go through what you actually need in
the class and then we can start with the
fun stuff and start figuring out how we apply
these pencils to our paper.
4. Class Supplies: Ok Dokey, welcome back. Let's now quickly run through the basic class
supplies that you're going to need to follow along in this class before we start
doing the exciting stuff. So for this class, you'll be needing number
one, inktense pencils. Of course, this class is
all about intense pencils, so having some inktense pencils. Is absolutely a necessity
for you to do this class. Now, you don't need to have a huge set of intense pencils. You can maybe just have a
couple or maybe a small set. Again, these pencils come
in various set sizes. So if you've never
had these pencils before and you're thinking
about getting them, I would probably
say get yourself a nice small set to get yourself started with them to see whether you
like them or not. And if you like them, then
maybe go for the bigger sets. The set that I'm going to be using throughout this class is my original set of
24, which I bought. And some of the pencils are
actually missing from my set, so I'm just going
to try keeping it to some nice, basic colors. Number two, you're
going to be needing some sort of a watercolor
brush because we are going to be using
watercolor brushes for some of the application
methods that we go through. So any watercolor
brush will be great. If you have a small
tip watercolor brush, that would be fantastic rather than having something
that's too big and wide. And number three, you're
going to obviously need some water because these are effectively
watercolur pencils. Water, again, is absolutely necessary for their application. And number four, you're going
to be needing some paper. So I would recommend that you get yourself some
watercolor paper, decent quality is fine. You don't need the
super expensive 100% cotton watercolor paper. These pencils are
very versatile. They tend to work even
on non watercolor paper. But because we're going to
be adding water to them, it would be really
beneficial if you have watercolor paper or even a good quality
mixed media paper. In fact, I'm going to be using my mixed media paper
throughout this class. Grab yourself, your watercolor
or mixed media paper. Number five, these are just
some extra items that will help us along the way when we come to doing
some sketching. So any pencil will do a fine liner would be great just to add in some
details if you want. Then finally, number six, you would need some paper towels at hand just in case
you make a mess with your water or your
lovely intense pencil start smearing all
over the place. Paper towels just in case, and it would also be
good to have maybe a ruler and some washy tape
just to fix things down. But again, these are
just optional items. And last but not least, you're going to be
needing to print out the lovely worksheets that I'm going to provide
you from my book. So if you download
the PDFs and then print them out on whatever
size paper you want, they'll print on A four size. They should even print on
letter size, scale them up. In whichever setting you have on your printer to fit the page, I'm going to be using A five
size for the demonstration, if you don't have a
printer or you're not able to print the worksheets off, then just have them
on your screen, on your laptop or
computer or on your iPad, whatever you're
viewing the class on, have them open and maybe just trace them to draw something similar in terms
of the outlines of the worksheets so you have
something similar to follow. So that's it. So hopefully, you'll have all your
supplies ready. You'll have the worksheets printed out that we're
going to do for the application blending and
the lovely pattern design. And I know you're excited, but I'm going to tell
you to just calm down, get yourself a nice drink, to just get yourself all
set and nice and cozy, and now we can move on to the application method
and the exciting stuff. I'll see you on that one.
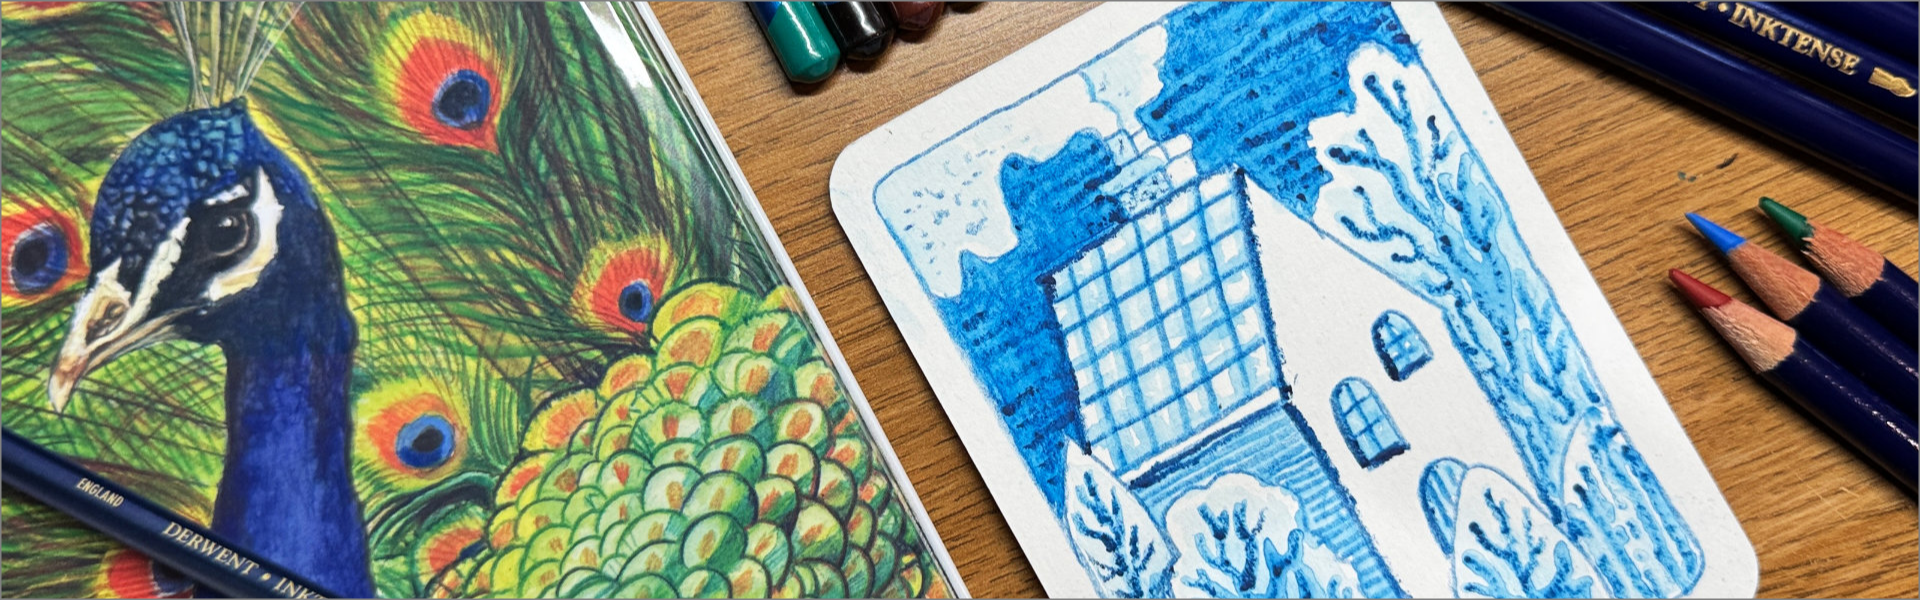
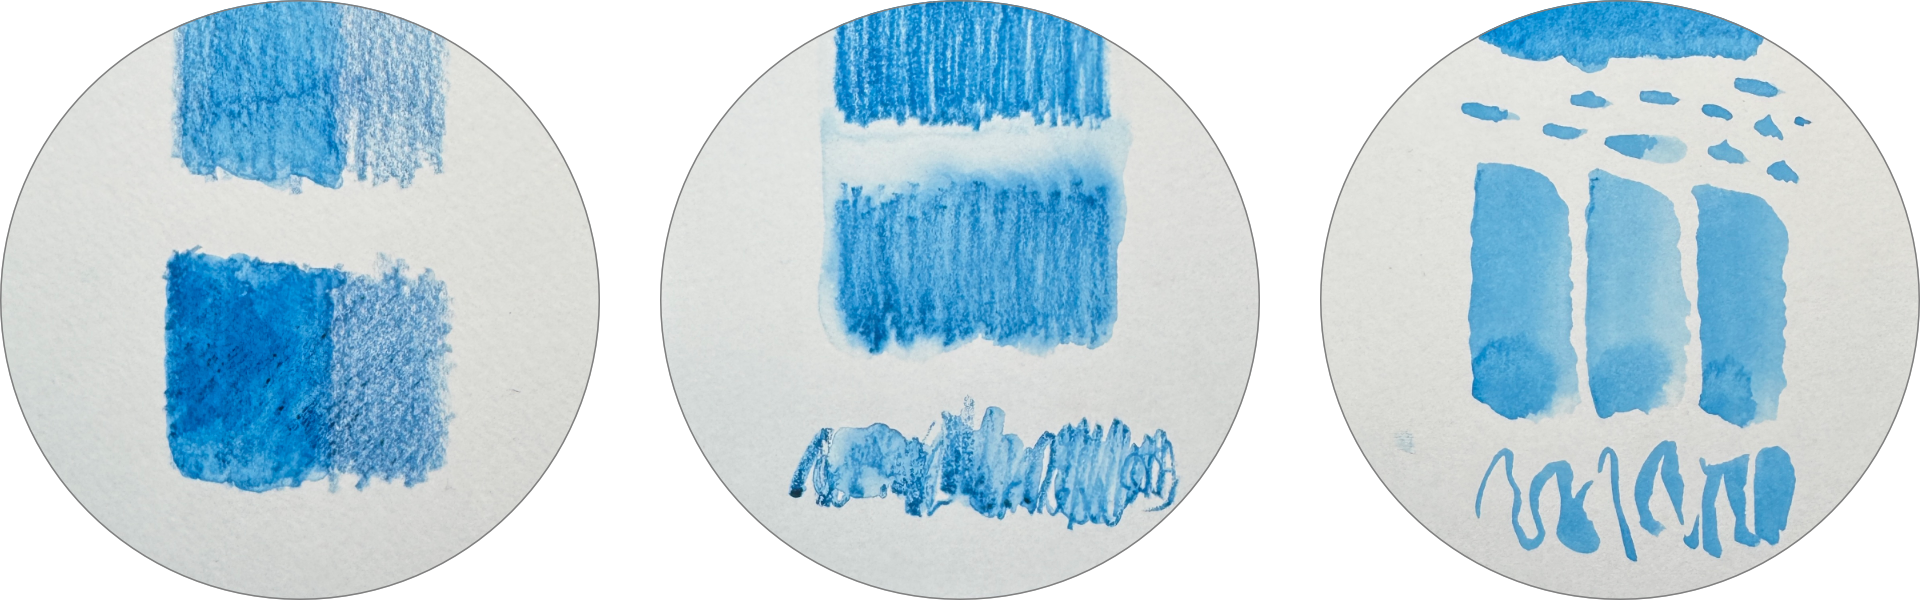
5. Application Method 1 - Dry First: Oh, that's a good
one, that, isn't it? Nice bit of ginger and tumeric fantastic and a
hint of lemon in that. What a great combination. Nothing like a
nice, lovely ginger tea on a cold, windy day. So I think we're ready
to start the class. So back. I was just enjoying my
ginger tea as usual. It's an absolutely horrible
day today, so much wind. You can probably hear
it in the background, and that's why I've got my nice, lovely stuff, shirpa
coat on over here. So let's get back to the class. Okay, okay. Now we're going
to do the exciting stuff. So I better get me
tea out of the way. Okay, oke. So let's get our
attention onto the table now. So you can see over
here, I've got some nice little cut out pieces of paper on the
middle of my table. And this is my lovely
mixed media paper that I love to use with
these intense pencils, and I've just cut them
in a nice convenient, small little shape like this. So get your paper ready. I'm going to just
take a sheet of this, move the others out of the way. So just a nice little
sheet of mixed media. And for this demonstration now, we're looking at the
application method. I'm going to use this lovely
color that I've got here. This one is called Ce blue, and the color code is 1200. So if you have this in your set, then grab hold of it if you want to follow with
the same color. And if you notice, my
pencil is nice and sharp. That's very important
ensure that you keep your pencils nice
and sharp because it just makes for better
control when you're applying them to your lovely drawings or your coloring in sessions, whatever you use them for, having a nice sharp point
is absolutely fantastic, and it will really,
really enhance your experience with using
these intense pencils. So grab your pencil, make sure it's nicely sharpened. And another thing, just to make sure that you're using a
good quality sharpener. I use this electric
sharpener here, which I've got
quite accustomed to over the last maybe
a couple of years. I never used to use
electric sharpeners, but there you go. We all advance, don't we
at some point in time, and I've never gone back. So I tend not to really use
my manual ones anymore, only unless I'm using
specific pencils. But get yourself
a good sharpener. I actually forgot to
mention that into supplies. So add that into
your supply list. So for the sharpener, just give them a nice little sharp and let's move
that out of the way. And we can start now. So the first application
method I'm going to go through is the dry first method. So we're going to look
at the dry first. I'm just going to hold
a pencil as it is, and I'm just going to
go ahead and create a nice lovely little swatch in the middle on the top
section of the paper. So just like that over there, and we papers moving all
over the table, isn't it? Let's sort that out. Let's
fix it onto the table. Okidoki, I've got my paper
fixed on really nicely with my lovely little blue
tack, and let's continue. So just with the pencil, all I'm going to do is add a nice little swatchy
swatch over here, just going up and down, using the sharp tip
of that pencil, just applying that
lovely color pigment onto the surface
just like you would do with a normal colored pencil, and you can see that the
color is so nice and vibrant. Nice pigment going on there. And it just looks
great as it is, you could just leave it
like that, couldn't you? But we're going to take
it to the next stage. We want to explore the versatility of these
wonderful pencils. So just like that, a nice little swatch over there, and I think that's about enough. What we've done there
is we've just got an initial layer of dry color. And then what I'm going to do
is I'm going to go in over here at this bottom
part of this paper, and I'm just going
to go ahead and do exactly what I did
with the one on top. Using this upward and
downward motion here, add this lovely little
swatch of color, just quickly getting that down, a couple of layers in
the same direction, and that looking fantastic. Then again, just
a little bit more on the top so that
they look similar. Just make sure that
they look similar so that we can compare and
contrast the results. Then what I'm going to do is I'm going to switch the direction. I'm going to go in a diagonal direction
on the bottom swatch. Just like this and
basically just adding another layer just to
intensify the actual pigment that's on the paper so that we can see what
difference we get with the intensity and the amount of actual color when
we go on dry first. So just like this in
a diagonal fashion, just adding a couple of
layers of that pigment, and I think that's
looking quite nice. You can see on the screen. We've got a darker swatch there and a slightly
lighter one there. So just going to
give it a bit of a blow. Fantastic stuff. So I'm going to put my
pencil to the side now, and now I'm going to get my
lovely watercolor brush. So I'm going to be using
my favorite brush here. This is the silver
black velvet brush. This is a number eight. I find that this
size is absolutely perfect for applying
water onto ink tents. So I'm just going to go ahead and I'm just
going to give it a nice drench in me
water like this, and then I'm going to tap
on the edge of my kind of container there to make sure
that the excess is off. And then let's just get
that out of the way. Now you can see that we've got a really nice drench going
there on that brush, and I think that is pretty much good for this first
application process. What you don't want is, you
don't want the water to be dripping off the brush so that you get water
all over the place. Just get the bristles nicely wet and then they can
hold in that moisture. Let's go in to this first swatch here and all I'm
going to do is I'm just going to lightly
glide that brush, which releases the water over this left edge,
and you can see, as soon as that water touches
the beautiful dry pigment, it starts melting away, giving us this wonderful ink
like effect, and that's it. So I'm not going
to overdrench it. I'm just going to leave
this section dry so that we can see what it looks
like dry and wet. Then again, I'm going
to give my brush a nice little rinse over here so that we
maintain the same amount and then just dip it in again and then give it
a nice little shaky shaky for the excess
so that we have a similar amount of water
because water control is always important when we're
using watercolor mediums like these intense pencils or just normal water
that's about the same. Then I'm going to go
ahead and I'm just going to do exactly what I did on top. So just like that, just going to make sure that
the water touches the dry bits onto that
swatch and you can see that it's just melting
away as soon as it touches it. Get the brush out of the
way now and you can see, as this is still wet, we've got a really lovely
intensity of color, a lot more in the bottom swatch where we had the extra layer, a lot less in the top,
but nevertheless, it's still very, very
intense and beautiful. So let's wait until
this dries and then we can see what
the final results look. Okay, okay now, our lovely
swatches are fully dry and you can see that they
look absolutely fantastic. What you got to remember
with this is that once these are fully dried
after you've applied them, once you've applied
the pigment dry and once you've put the water on
top and it's completely dry, they now become permanent. So if you add water on top to
try maneuvering it around, you won't be able to do this. And this is absolutely
great when you want to add and build
very subtle layers, just like you would do
in normal watercolors. So that's the results that
we get with the dry first, and then adding water, you can see it's a
completely different look from what it looks like
when it's just dry. And then, depending on the
intensity of the layers, you're going to get
slightly different results, but it looks
absolutely brilliant. So give that a try with your color ink tense pencils and see what results you get. And another way to
actually go ahead and use the colors that you have in your set is to
do a color swatch. So that's one of the first
things that I tend to do. I'm also going to give you a lovely downloadable color swatch sheet that you can use, so I'll just show
you in my book. Over here, so just
grab hold of my book. So with the book that I have, this is the digital
downloadable book that you can
purchase separately. Now, if you already have this, that's fantastic
because you can use this really to expand
on this class. But if you don't
have this, then I will also provide you with a nice little swatch sheet from this so I've got it usually
at the back over here. So I've got a nice swatch of these colored pencils that
I've got from my set of 24. Now, you might not
have the set of 24, so these colors and these codes might not
be relevant for you. However, if you have
a look on these, I've got each swatch as a
dry swatch and a wet swatch. So you'll be able to actually
get a zoom in on this. Quick little zoom
zoom in on this. Just like we did with
our exercise over here, we've got a wet swatch and
then we've got a dry one. With the sheet that
you'll be able to print, you can just do this, print it off and
you'll easily have these lovely little boxes and the relevant color code
that you can write in. And that will just give you
a nice little reference of all the colors that you have. Now, if you have the
24 swatch sheet, then I will provide you with the 24 set swatch just like I've got with
the actual names on them. If you haven't got the 24
set and you're thinking, Oh, this doesn't really work for me, then don't worry.
I've got you covered. I'm also going to be giving you a blank swatch sheet so that you can
actually go ahead and build in the colors that you
have and write in the names as you go along while
you're building your collection of
intense pencils. That's a bonus that we didn't
mention at the beginning, but I've just
decided I'm going to give it to you so I'm
going to give you this swatch sheet of the
24 and a blank one just because you are fantastic people and I want you to
enjoy this experience. Let's get back on to the second application method.
We've done the first one. Let's move on to the next one.
6. Application Method 2 - Wet First: Okay, welcome back. Let's now look at the second technique. So on my screen, I've got another lovely piece of paper,
just like I had before. On the left hand side, I've got the previous
technique that we did. So I'll just keep
that on the left for us to have a quick reference to. So that was the dry first
technique, application method. Now we're going to do the wet first technique
application method, not complicated at all. So for this one, we're going to have the same color pencil
that I used before. So I'll just put that to the side because we're
going to use that after so what we need to do is we need to grab
hold of our water. I'm just going to give my brush a nice little rinse there, and I'm going to make sure
that I've got a decent bit of water on the bristles of the
brush that's looking good. And now it's just
a case of applying our water to the paper first. And therefore, that's how we get that wet first method name. And so we're just
applying our lovely water onto the paper to create
a bit of a swishy swash. So just like that,
that's about enough. Let's quickly move
to the pencil now. You want to make sure that
you work quickly with this, otherwise the water is
going to dry and then we won't be able to get the
effect that we're after. What we're going to
do now is we're just going to get our
pencil as it is, and we're going to go ahead
and just create a swatch over that water and you can see that as soon as that pencil
touches the water, you're getting this lovely
ink flow of pigment, and that just looks
fantastic, doesn't it? So you can see the water
on the top section here has dried out
fairly quickly. So if we move on
to this section, where we've got more
water, you can see, we're getting much more
of a melty inky effect, just like that now.
Just look at that. Going backward and forward, I'm not using much
pressure at all. I'm just letting it just
glide over that water, and you can see we can get this wonderful vibrant
electric effect, isn't it? Fantastic there. And that's it. All we're
doing there is just adding our dry pencil on top of the
water solution on our paper. Now, do remember, try not
to use too much water. Otherwise, you're going to have all sorts of funky designs. But what you can do is
with this technique, if we just get some more water, we're just going to get
some water on the brush, if we just have a wet area here, so just a dot of
water down here, maybe a dot of water down
here and another one here. So just three random dots of water with some
space in between. If we do a little squiggle, you can see we're going
to get different results. Just like that, a little
squiggle of my line, and we get different results. Now, do you remember when you apply this dry pencil
onto the water, you're going to get the
actual end of that pencil, the tip of the
pencil to see if you can get a Zoomy zoom in on this. You can see over
here that the tip of the pencil gets worn
down really quickly. So do bear that in
mind when you're using this technique because if you press too hard onto the water, that tip is going
to get melty melty, and it's going to
create all sorts of funky tip point shapes at the end of your pencil so
do bear that one in mind. But again, it just works really nice doing a little
squiggle get this gorgeous, gorgeous textured inky effect, and I absolutely love it. We're going to explore more
of that when we come to doing our little
sketch later on. So that was technique
number two, wet first application method. So we've done two techniques. We've got one more to
do, and then we can start doing even more fun stuff. So let's move on
to that one next.
7. Application Method 3 - Swatch : Okay, welcome back.
Now we've got our final technique of
the application method. So on the screen here, again, I've got another sheet
of lovely paper, and I've moved my
other techniques onto the left so that
we can still see them. So on the top here, we've
got the dry first method. Then on the bottom, we've
got the wet first method, and it still a little bit
wet because I haven't waited for it to dry
because I'm so excited, so let's just carry on
with this final method. And this method I'm calling
pick from a swatch method. So simple words, nice
and easy to understand, and we can go ahead and do this. So I'm going to use
the same color again. I'm just going to make
sure that the tip is dry. So if your kind of tip of your pencil is a
little bit moist, wait until it dries, and then maybe just give it a little scratch on a blank
piece of paper like this. And I can see there that's just lovely dry pigment,
beautiful stuff. And then just move
that one to the side. What we're going to do is
we're going to first of all, we're going to create the swatch that we're
going to pick from. So I'm just going to go ahead
and I'm going to create a nice little dry swatch
of pigment just like this. I'm not going to use too much. I don't want to kind of spend too much time on this
method because it's just very simple and easy
to understand and use. So just like this, adding
in a bit of pigment, then maybe going in in
a different direction, just to make sure that we have another layer just to create a nice tense solution of color. Can move that now to the side, and now all I'm going to do
is grab hold of my water, give it a nice rinse on the
brush there, just like that, and then I'm going to
go straight in into this swat just like that with
a decent amount of water. I'm going to effectively just
melt this dry pigment away. So that we have a swatch of ink. Look at that. A nice
little swatch of ink. Now what I can do is
with the same brush, all I'm going to do is
lift that ink that I've created in this
solution and then just apply it onto
the dry paper there. Look at that.
Beautiful, isn't it? It's just like
you're using normal watercolor, just like that. Picking off that wet, melted solution
and just applying it onto our lovely dry paper. So just like this, whatever
we have left over here, it's going to go ahead, maybe just create some
squiggly, wiggly lines, and you can see we
have this wonderful, clean, lovely effect, pretty much just watercolor in this ink consistency and look. So that's it. So let's just move the brush
out of the way. So we've got this
wonderful third technique, and for the application methods, these are the three that
I'm going to stick to. So that's it for the
application method. Let's just now have a look
at all of them side by side. Okay, so on the
screen now we've got all of our lovely
application methods. On the left here,
we started off with the dry first method
worked out really nice with a couple of
different layer levels. Then we moved on to
the second method, which was the wet first method, and then we went on
with our dry pencil. Fantastic results there very, very different from
the first one. Then finally, we moved
on to the third method, which we called the pick
from the swatch method. That was the third one where you have the most cleanest and most water color like effect like you would with
normal watercolor paint. So give these three
methods a go again, use different colors, use the
same colors like I've done, and see what effects you get. This will just act as a nice warm up exercise for you to move on and start really expressing yourself with
this fantastic medium. So that's it for the
application method. Let's now move on
to the next one.
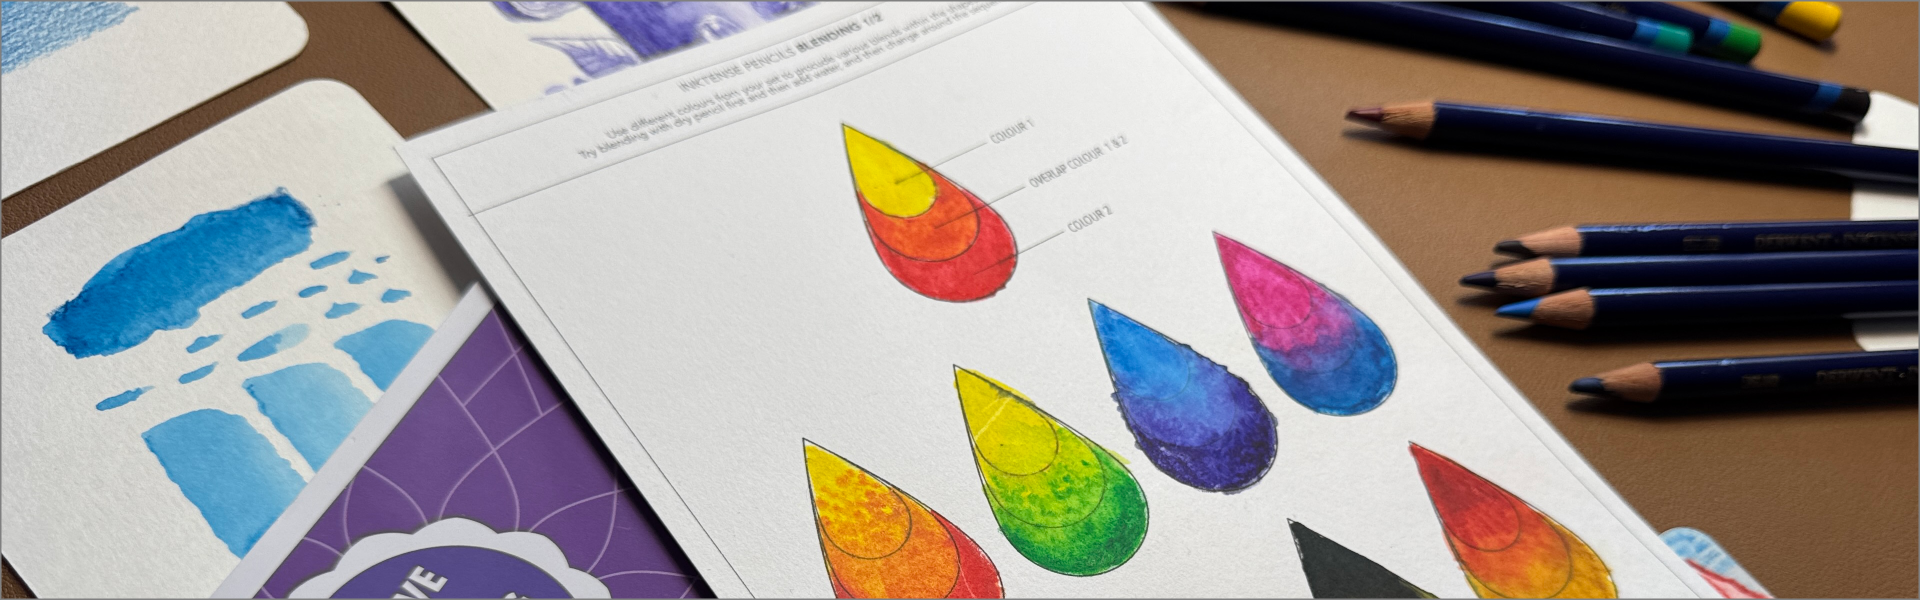
8. Blending Exercise: Oki Doke, welcome back. Let's now do some more
exciting stuff and look at how blending works with
these intense pencils. So on your screen over here, I've got a gorgeous
little printout of one of the worksheets from
my book that I've got that I've made available for you to download and print. So for this lesson and this
part of the exercises, you will be needing this sheet. So print it off on your printer in whichever
size format you like, and then you can follow along. Alternatively, as I mentioned before, if you don't have this, just draw a similar
shape like you've got on this from the PDF on your screen, and
you'll be good to go. So let's now move the
book out of the way. And what I've got is I've got the actual sheet printed off as a single
sheet, and again, all the sheets that
are available on the worksheet section in
resources of the class, you can print these off as many times as you like to practice all these techniques
and to really give yourself a focus on what
to do with these pencils. Let's have a quick
look at this sheet. So over here, we've got these lovely little
teardrop shapes, but they're not tears because
we don't want to cry, we want to enjoy ourselves. We want to enjoy this
lovely experience of intense pencils. We teardrops, I'm going
to call them raindrops, lovely, lovely
raindrops over here. So on this screen here, what I'm going to do is I'm
going to just do a zoom in. But basically, the
screen itself, I've got a bit of an instruction on the top of what
we're going to do, and then I've just got
a repeat pattern across the bottom in these lovely little rows that
you can practice on. So let's concentrate
on the top and get a lovely little Zoomy
zoom on that. Oki doke. So if we have a look at
this lovely little shape, I've divided the shape
into three parts. The first one is going
to be color number one. Then the second part
is the overlap color, and then the final part at the bottom is color number two. Basically, what
we're going to do is we're going to use
two different colors and blend them as we would
with normal colored pencils. So now the trickiest thing now is to decide which colors
we're going to use. So I think I'm going to go
for some nice warm colors. Let's grab hold of me color. Okay, so I've got my
lovely two colors here. I'll just read them out
which ones these are. I've got a lovely red
called poppy red, and the color code is 0400. So if you're going to use the
same colors that I've got, and if you've got
them in your set, then grab hold of them. And then the yellow color
that I've got here is this gorgeous sun
yellow color, 0200. Grab hold of two nice colors, a yellowish shade and a
reddish shade. We can start. Again, if you don't have the specific colors
that I've got, then just use something similar. Let's start off maybe
with the yellow. I'm just going to put that
pencil to the side there. All I'm going to do is
we're going to actually do the first application method, if you remember the
dry first method because that will probably
be easier to apply, but you can also use
the wet first method or the third method of
using the swatch first, but maybe do that at a later stage when you get a bit more comfortable
with blending colors. Let's now add in
color number one. All I'm going to do
is, I'm just going to go ahead and I'm going to add in my lovely yellow color into this lovely little
shape that I've got keeping it within
the bounds of the shape. If you go a bit over the shape, don't worry about it again, this is just practice
so that you get familiar with your beautiful
ink tense pencils. I think that's looking good, maybe adding in another
layer by going in a different direction just to
make sure we've got a good, saturated, nice bit of dry pigment on here before
we start applying any water. I think that will do for now and we'll just
move that on the side. Then let's get our
lovely red color. Then what we're going
to do is color in this bottom final section here. Again, I'm just going to go
in best I can in the shape. The size of what you print these worksheets will depend
how intricate you need to be with this coloring
in stage where we're basically just coloring in these elements of these shapes. I do recommend
maybe print them on an A four or a US letter
size just to have a slightly bigger
shape for you to color rather than have
something small like this, the only reason I do small
like this is because it's easy to demonstrate on the
screen so that you can see. But again, you like to do little detailed work like this
and spend your time on it, then go for it, do it as big
or as small as you want. I've just added that lovely
red, which looks fantastic. Move that to the side. Now what we're going to do is we're
going to get our water. Give me brush, a clean, make sure we've got clean
water on the brush, just like before, I'm
just going to give it a little wet and a drench. Then what I'm going to do is I'm going to go in and I'm going to start melting away
this first color. This yellow color here,
I'm just light tapping in that water onto the pigment there so that it become moist. Then what I'm going
to do is I'm going to quickly just drag it
in to this area here. That middle section,
we've got the white area. I'm just going to drag
it in into this section nicely without touching the red and then that looking great. Then quickly, I'm going
to clean my brush. And then with the same amount
of water on the brush, just nicely drenched, we're going to do the
same for the red, so we're just going
to wet that red over here and then just
bring it in like so, and then bringing it into
that yellow area that we had. And you can see
what's happening is, it's merging into the
color of the yellow, and we're getting a nice, lovely blendy blend of
color, aren't we? Look at that.
Fantastic, isn't it? Now, I'm not going to overdo it by really pressing
hard with the brush. It's just these light little dibby dabs that I'm doing just here just to demonstrate that we have now blended
the two colors, and we've got this
gorgeous overlap. So that's it. That's
all we need to do for this kind of
first demonstration. If we clean our brush again and maybe grab
hold of our color, we can actually do another
technique by applying the dry color first completely and then blending
over with the water. Let's do that one next. Oh, Gdoki, welcome back. So what we're going to
do now is we're going to wait for this to dry completely. And if you remember, we just
went in with the color in the top kind of area,
then in the bottom, and then we just merge them together by making the
lighter color blending to the mid section
and then just using little dibby dabs of our brush with the
darker tone color. Alternatively, what we can do is we can go in with
the same colors again and let's maybe work on
this one while that dries. What we can do is
we can just go in and literally just adding the color into the
top and mid sections completely dry before
we add any water. That's just another way
of applying this kind of blending technique and really using a different method. You don't have to do it
one or the other way. You can just mix and match
and see what results you get, whatever you're
comfortable with, and whatever different
methods you use, it's absolutely fine as long as you're comfortable in doing it and it doesn't
stress you out. The whole point of showing
you different ways of achieving similar results is so that you have some options. It's always good to have o. So just like that, I've added in the yellow into the
top and mid section. And then, again, with the red, I'm just going to go
ahead and start adding in my lovely red just like that
into the bottom section. And then I'm also going
to overlap it into this middle section as
well so that we have a nice complete
area of color you can see that as we're
overlapping the color, it's already started to
blend so you can expect to see very similar results
like we had up here. Just like that, maybe just
adding a little bit more. You don't have to be super neat. Just do it as quickly as you can so that you're not
spending too much time on it. It's just so you get a bit of a flavor of how to
blend these colors. Let's move that out
of the way now. Now let's get me water, so I'm just going to
clean me brush, and then all I'm going to
do is I'm going to go in straight onto that top
bit for this one now, I'm going to just go in the direction that
we started off in. So just like that
with the yellow, keeping it nice and clean, and then using the same brush, bringing it into this area, and just adding, light pressure, and then just like that, making sure we've
got moisture hitting all those dry area of
the paper and pigment, then again, just bringing
it in into the red, where we've got the pure
beautiful red, gorgeous color. That isn't it. And look how easy that was to
blend the colors. And again, these kind of
shapes that I've got, these are just guidelines. You can create your
own shapes and try using these
techniques to blend, and that just looks great. What I'm going to do now
is I'm going to clean my brush to make sure
there's no pigment on it, give it a nice little rinse. What I want to do is I actually want to dry out my brush now. I don't want to add
any excess water, and so I've just
got a little bit of paper towel over here, just put that to the side there. I'm just going to give my brush a nice dibby dab so there's not too much excess water on it. Then what I'm going
to do is, I'm just going to use the brush to very gently tap those areas just to make sure that we have a nice even coverage of that color and then
maybe go a little bit into this yellow so it blends in a little bit more and
it's effectively creating this speckled blending look compared to the one
that we had on top. Just like this, blending away those beautiful colors,
just like that. And it looks
absolutely fantastic. Give that a try, try using the
same colors that I've got, and then once it's
complete and fully dry, you'll be able to see the
results that you get. Then once you're
done, then you can go ahead and use different colors. So maybe use a blue and a
yellow to create a green or maybe just use
similar colors from the color wheel and just come
up with eight variations. If you get a zoom back on this, do a nice little
variation of colors, and I've actually
done one before where I've actually
gone ahead and just had a nice little play around using the same
template that I printed out. You can see you can get various results using
different colors that are within the
complimentary colors of the color wheel or complete opposite colors that
don't mix at all. Have a bit of fun. Fill it in, see how you go, go in
dry first completely, and then maybe go in section by section like
we did over here, dry and then dry
and then overlap it with some water and
see what results you get. I think that's a great
warm up starter exercise into the world of intense
pencils with blending. Give it a go, print it out, and I can't wait to see
the results that you get. So we can now move
on to the next one.
9. Pattern Colouring: Okay, welcome back.
Let's now use our lovely techniques
that we went through in the previous two lessons,
the application methods, and the blending exercises, and let's apply them to a beautiful little design that
we can color in and enjoy. Let me bring your attention
back onto the screen. Now. This is my book that
I've been talking about, and let's find ourselves
a nice pattern to color in from the
selection that I've got. We've done the
blending. And we've got some wonderful
patterns here, haven't we? So I'm going to make
this one available. We'll keep it nice and simple. So on your downloadable
section area in the resource sheet, get yourself this
pattern printed out. Try keeping it maybe medium size in your print
rather than having it too big because this is
your first attempt at using those techniques to
color in a particular shape. So I'm going to use this one and I'm going to do it straight
into my book over here. I'm not going to print it
out on a separate sheet. Let's go straight in. So the next thing
that we need to figure out is which colours
are we going to use? So let me go grab my
colors. Okay, okay. I've got my colors here now, so you can see in the tray, we've used these two before, so I want to use something
a little bit different. Maybe we go for a how
about a nice kind of shade of pink? I like that. That's a nice pinky color there, and then maybe some purple. And then maybe we might actually go ahead and use a little bit of this, actually. Yeah, let's use that
original yellow that we had. So I'm happy with
my choice there. You can use whichever
colors you want. It makes absolutely
no difference. But if you want to follow
along with what I'm doing, I'll just quickly mention what the colors are that I'm using. So that yellow was
the same one that we had in the previous lesson, the sun yellow, 0200. Then the next color I've got is this lovely pinkish shade. This one's called Fosha What a fantastic name
that for Shea, 0700. Then I've got this really
nice purple color that's called violet and it is 0800. I've got my three colors here, and then what I'm going to do is I'm going to
actually go ahead and start off in the middle
with my yellow color. Let's go ahead and
add a nice bit of yellow the center of this
floral symmetrical pattern. So just like that,
I'm just using these circular motions just to lay down that
beautiful pigment. Again, what I'm
going to do is make sure that I go in in
different directions to make sure that the actual pigment adheres to the
surface of the paper. This paper is the
multimedia paper that I've been using
throughout the class. But if you have some watercolor
paper to print this on, then that would be even better. I do prefer watercolor
paper to mixed media. But I tend to like to use this mixed media when I'm
putting these books together just so that it's a bit more practical and it kind of fits a bit better
in the printer. So just like that, I've
given that a nice color. And then what I'm going
to do is I'm going to go in to these areas, and I'm going to just add in
a little bit of this yellow on the edges so that we have
a little bit of variance. So just like this, if you concentrate on this first shape, bit of yellow there, the kind of bottom part
of that shape. Then I'm going to switch
to my pink color. So I've got that lovely
pink color there, and then I'm just going
to add in that pink, purply color over here. I don't want to do too much
overlapping with the dry like we did in the previous
lesson on the blending. I just want to keep the
colours separate and let them blend when
we add the water. So just like this,
I'm going to go ahead and do that for this one. And then at the tip of it, let's put our nice purple shade. So our purple color
right at the tip, nice dark lovely shade
of purple just there, and I think I'll just cover it all up so that we
don't have any whites. Sometimes it's nice
to leave a bit of white space just so that the colors merge
into each other. But the look that
I'm trying to go for is more of a completed look. So I'm going to
copy this kind of color sequence all the way across all of those
kind of shapes, and I'll see you
once that's done. H. Okay, okay. Now, what we've done
is we've filled in all of the kind of
shapes and elements, and you can see, I've
gone all over the lines. I've not been neat.
I've done it in a rush. But you do take
your time on this. I want to do this as quickly as I can so that I don't make you wait too much and get frustrated because you
want to jump straight in. So let's just carry on. So now what I'm
going to do is I'm going to get my brushy brush. Let's get a nice
clean on that brush. And I don't want to be
using too much water, so I'm going to
try getting rid of the excess by just kind of
scraping it on the end. We want a nice little
drench on there, but we don't want too
much that it kind of overpowers everything on
this piece of artwork. I'll see if we can
get a zoom zoom and get a bit closer up here. So just like that, that's
looking better, isn't it? So what I'm going to do is I'm
going to go in, and again, just going to do a
little bit of a dip on the brush again because
it was drying out. And I'm going to start with
the yellow section here. So you can see here, I'm going in with my brush onto
that yellow section, and I'm just giving it
a little bit of a wet, spreading it out,
and then I'm just going to start in into
the pink section there. Just like that, using
very gentle touch, I'm just effectively maneuvering that liquid over to that area, and then I'm just going
to start blending it in into the yellow, just like this,
bringing it down. Like so just with
a few dots here. It creates that beautiful
blend like we did in the blending exercise,
a couple of dots. Then I'm going to move upwards into the dry
section of the pink. I don't want to
become too muddy. I want to have a bit of a separation of color
and at the same time, maintain a beautiful blend. Just doing these little
dotted dots just like this. And that's fantastic. Getting all of the dry
pigment and then again, moving into this purple
area and the purple, this dark bluish violet color. This is very, very
deep and dominant. So what you want to do with this is if you're blending colors, you want to really blend your lighter color first
like I did with the yellow. Otherwise, the
dominant color is just going to overpower
if you haven't gauged how much you've got on your page in terms of the
pigment that you laid down, then it can be a little bit
overstimulating in terms of the color becoming too much and kind of blending
too much on the dark side. So just like this, again, and just doing this really, really quickly, you can take your time and keep
everything within the lines. And if you do find
that you've messed it up a little bit, don't worry. Carry on. Don't stop at
that stage, carry on. Complete your lovely
little painting of this pattern and just print a couple more out so
that you can practice. Practice makes perfect,
but we're not here to create perfect art we're
here to enjoy this lovely, lovely adventure and
experience and really, really enjoy that time we
spend with this medium. All I'm doing now is
while it all wet. Before it dries
out, I'm just going to start adding in a few more of those dots because my brush has a little bit
of that purple on it, so I'm just want to
bring it down like this, and that looks great,
doesn't it? Look at that. Look how beautiful that looks. It's gorgeous, vibrant,
lovely inky type of effect. And that's looking great. So I'm going to
let that dry now. And then what I'm
going to do is, I'm just going to repeat that all the way across,
all the way around. And once it's dried,
we can see what we can add on on the next stage.
So let's do that next. Ok doke. We've now added in the water on
these outside edges, and you can see it just
looks gorgeous, doesn't it? Look at that inky effect. It just looks fantastic. So I've got the middle part
that's still untouched. So what I'm gonna do is
I'm going to go ahead. In fact, let's do this now. Let's get our pencil, our pink color so
that sheer color, that funny sounding name. That color, what I'm going to do is, I'm just
going to go ahead. And as the edges of some of
the kind of elements are wet, I'm just going to go
ahead and just add in a nice kind of edge to the
inner part of this circle like so so that it has a bit of a separation from
those petal shapes that we've got just like that. Then I'm going to go in with my brush now, give
it a good drench, and then what I can
do is just add in a little bit of
water in the middle and as I turn the
brush like this, I'm just going to slightly touch the edge of that pink color, and what that'll do is
it'll start blending it in really nicely on the edge, and then let it merge into each other to create this
gorgeous, gorgeous effect. Look at that.
Beautiful, isn't it? Look how nice that looks. Beautiful, inky
watercolory pencils. That's what we call them
inky watercolory pencils. Fantastic. So what we're going to do now is we're
just going to wait until everything completely
dries and then see what the effect looks
like. So give that a go. Do it with the colors that I've got if you've got
them in your pack, do it with different colors, print a couple of these out so that you have a
different variant. Maybe once it's completely dry, use your darker colors. So if you're using the purple to just create some
patterns within it. So effectively, once it's dry, you're doing more layers of
dry details on but again, we can explore that more in your class project when
you come to doing it. I think, let's have a break now, maybe get myself a
nice a nice coffee or shall I have
another ginger tea? I think I'm going to
go for a coffee this time and treat myself to a cake while I watch this
painty inky stuff dry. I'll see you once that's done.
10. Pattern Outline: Okey doke. Welcome back. Now you can see on the screen, we've got a lovely bit
of dry color ink tints in that lovely
little design that we filled in with our
beautiful colors. So everything is nice and dry. We can leave it as it is. But I would actually add in another step and maybe do a
little bit of outlining work. Now, we're going to
look at outlining and sketching in the next lesson, but I thought it's just a good
idea to just add it in as an extra step so that you can experiment and see
what results you get. So I'm going to select that
purple color that I had, which I did on the edge
over here because that was my darkest color,
the violet color. And then all I'm going to
do is I'm just going to outline the lines of this shape, just to make it a little
bit more prominent and see how it affects the color
that we've already got on. Now, remember, the color that's dried is going to
be completely permanent, so you won't be able
to lift it off. That's one of the
unique characteristics of intense watercolor. So we should have a nice permanent layer
that we can build on top. So let's start off by just
outlining these edges. So maybe I'll start off
with this one on the top. It's easier for my angle. So I'll just bring this down
a little bit like this, maybe get a Zoomy zoom
in on the camera, and then all I'm going to
do is with my pencil and I've got to make
sure that it's a nice, decent, sharp tip. It's not too blunt.
Otherwise, this technique or this next stage won't work. So just with my pencil, I'm just going to go
ahead and lightly, outline the edge of my shape
like this, just like that, just to fill it in,
make it a little bit more prominent and add that
nice clean sharp line. Then I'm just going to
bring it down over here. All the way to the bottom, and you can see it added that nice bold line
to the actual shape, it just gives it a
bit more contrast. So if you compare it
with these others, I'll just bring the page up, compare it with these others, we have a nice bold outline, and that's all I'm going to do. But in addition to
this, what we can also do is add in some patterns. So from this point over here, all I'm going to do is
I'm just going to add in a nice little line that
goes up like this, not too hard, just pressing
with light pressure, and then maybe come up with some nice little curvy lines
that go out like this. This is just an addition
that you can do to add a bit more elements
to your design over here because the shape
we have is pretty basic, and you can see that's just added that wonderful
little pattern. What I'm going to
do is I'm going to repeat that pattern now on all of these elements
of this pattern here and then maybe in the middle
just adding a couple of dots just to give it a
bit more visual interest, and then I'll outline the
actual circle of the center. Let's quickly go ahead
and do that now. Ok doke. Now, you can see,
I've done that. Nice little outline to add a bit more contrast and a bit more kind of lift to
the actual overall design, and it looks really
nice, doesn't it? Now, you can take
this further and even add a little bit
of water to the lines. So if I just get my brush now, and I'll quickly show you this, you don't have to do this, but it's just something to note. So with my water, I just want to make
sure that I've got very minimum water
on my bristles, so I'm just going
to clear it off. We don't want to be using a lot of water for
this technique. We want to keep it really nice
and kind of semi drenched. And what I'm going to do here is all I'm going to do
is with my brush just lightly go over
some of these lines. And what that does is
it'll just darken them up. It'll melt that kind of dryness of the mark of that
intense pencil. And just like this, it just
adds that kind of harmony to the overall effect of
this lovely pencil. So just like that,
slightly wet it. The edge over here as well, maybe just add a little
bit on the edge. But again, don't
worry about this if you don't want to do
this or you think that, you know, I don't
want to ruin it by adding too much
water on me brush. This really is about
brush control. So give it a go, maybe, do one version with the
outlines and one version without and maybe add some water on those outlines to
see how they turn out. And then that way, it'll just give you
a nice idea practice to kind of really get familiar with what
you can and what you can't do with these
wonderful pencils. So I'm just going to quickly
go ahead and do that now, and then we can see what
results we achieve. Oki doke now I've just done a nice little kind of touch
of water on those outlines, and you can see it's
just enhanced it, that slightly kind of amount to just give it a
bit more contrast. In the middle, I put a little
bit more water on so that I can let it dry so it has a
slightly different effect. So give that a go. I think this is a
really nice technique to practice with these
intense pencils, and this will really give you that warm effect to get yourself ready for
your class project. So give it a go,
print out a couple of these sheets and try
out different colors, maybe add in some other patterns on top or just
leave it as it is. Practice. Don't rush it,
take your time with it. And that way, you'll build
that memory muscle and kind of practice of how
to use these pencils when it comes to
drawing something a bit more complex or even doing a more complex coloring in page from one of the designs
of this booklet. So let's now have a little
break and maybe go for a walk, have a little
relaxation while all the kind of water on this dries, and then we can move on
to the final kind of technique and style of
using these pencils. And then we're going to be ready for that lovely class project. So I'll see you on the next one.
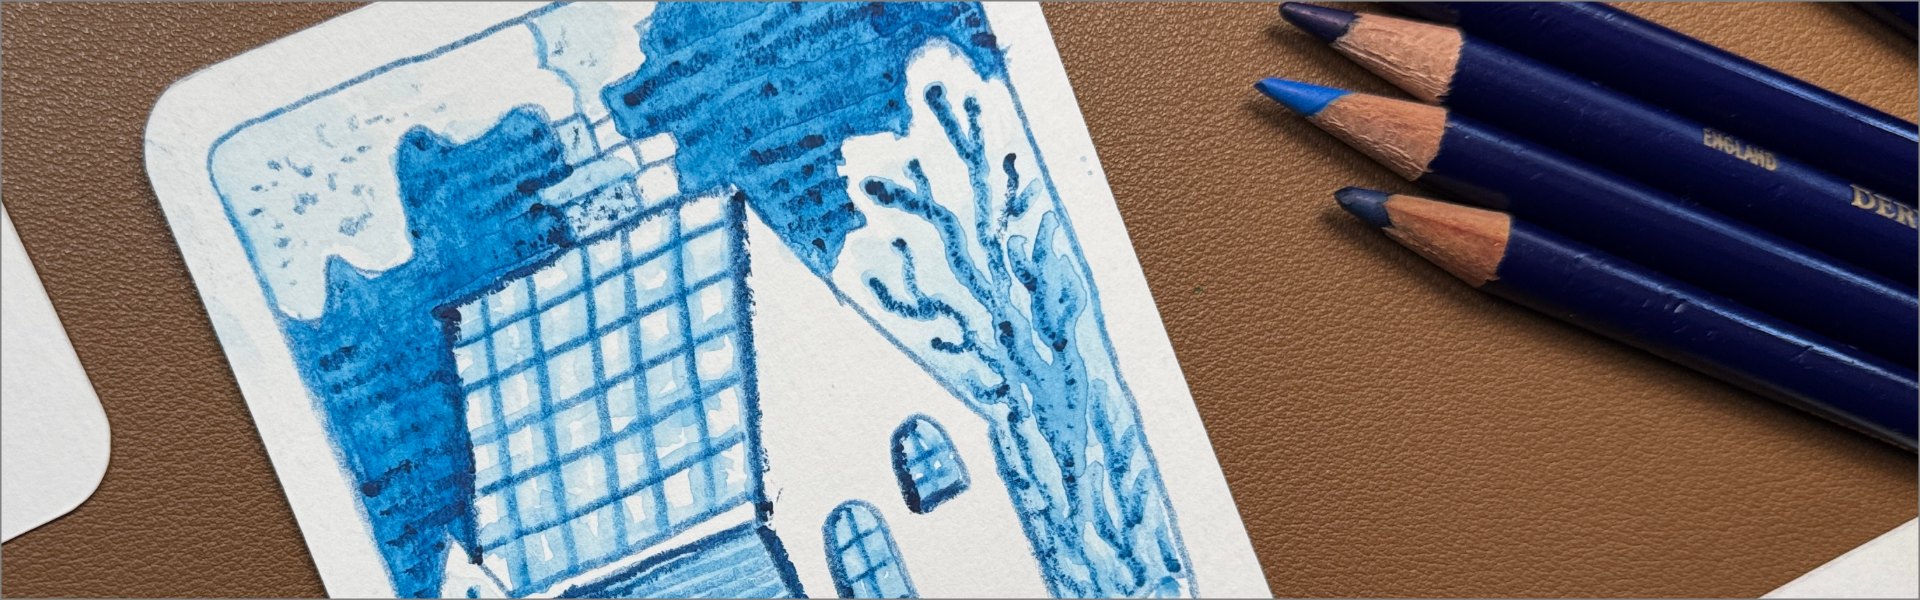
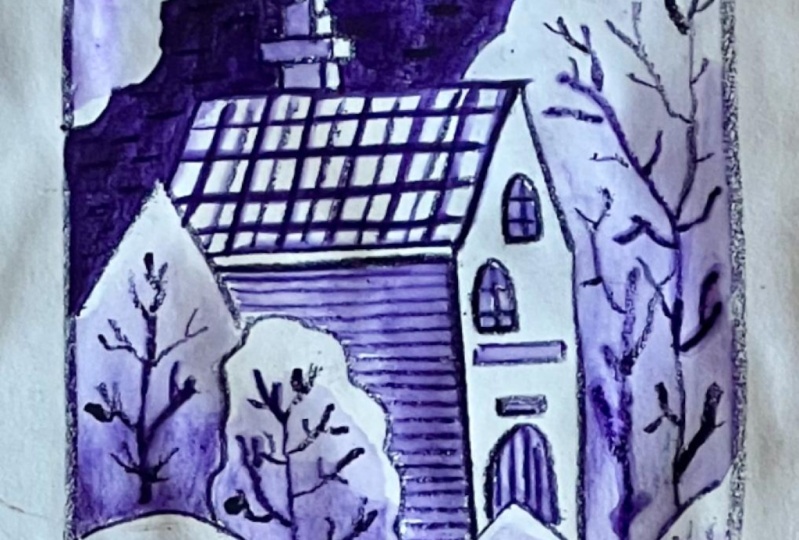
11. Sketching Technique: Doke. Welcome back. Let's now move on to
the final technique and method to explore another way of using these
wonderful pencils. So on the screen here, I've got myself my
nice little paper, that mixed media paper that I've used throughout the class, and grab yourself
maybe something similar like this or
whichever paper you're using. And if you want to follow along, then that's absolutely fine. Or watch this part of the class and watch the
complete thing and see how I come up with this
sketch and then maybe do it later on
entirely up to you. But I'm actually going to
grab myself another one of these cards because this one's got a bit of
a mark on them. We don't want to
mark on our card. No, we don't let's keep
that one for scrap. This one seems nice and clean. Fantastic. This is going to be a sketch that I produce with
my lovely ink tense pencil, and I'm going to use
one color for this. So if you grab
yourself a nice color, maybe a darker shade rather
than a lighter shade, you'll be able to see this type of effect that I'm
trying to achieve. So the color that I'm using is this wonderful sea blue
color, which is 1200. And this is the one I'm going to use throughout this
entire sketch. So on this, another
thing to note is that when you're practicing with these pencils, with
these techniques, try keeping your
sketches nice and small like this size
that I've got here rather than do something
really big and waste all that pigment and
then not be happy with it because this is
just effectively that trial and error and
learning experience stage. And then later on when
you become more familiar with the techniques and with
this medium in general, then you can explore and create some beautiful big artwork. So go small and steady and you will achieve better results
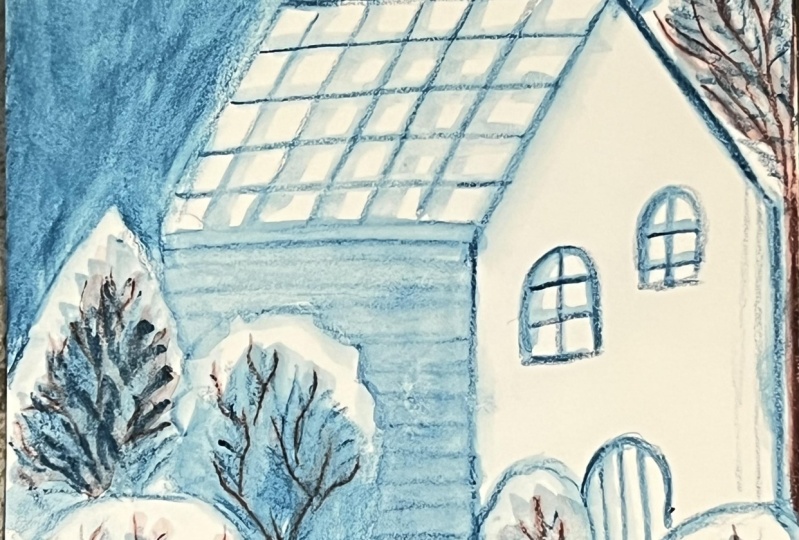
overall, let's get started. What I'm going to
do is I'm firstly going to just go
ahead and draw myself a nice little inner frame just so that we have a nice
complete frame on the outside. Just like this, I'm just
going to go ahead and follow the shape of that paper. Doesn't need to be accurate,
doesn't need to be straight. You don't even have to do
this part if you don't want. But I always like to do this. Even if the lines go
wonky, it doesn't matter. It just gives me a
nice focal point to work within with
my intense pencil. Just like that free
I've just gone ahead and drawn this
kind of inner border, nice and wonky,
so it's all good. Then what I'm going to
do is I'm going to go ahead and create
an outline sketch. So as usual, you know me. If you watch my
classes previously, I just love to do whimsical
style houses. Easy to do. So let's start, maybe have a
nice little shape over here, and maybe have one down here, something a little
bit different. Just drop in whichever
shapes you like to draw just to create this kind of foreground
area over here. And then maybe we have something
a little bit different nice bumpy curvy shape there and maybe another one
over here just like so. I think that's about it
for the main shapes. Let's draw in a nice
little housy house. For this one, I'm
just going to go ahead and do a line
across here like this and then let's create
the roof of our house. Keeping it super simple. We don't need to worry
about perspective, we don't need to
worry about anything. We just need to get
something down just to express ourselves with
this wonderful medium. Just like that, again,
it's not accurate. It doesn't matter.
Just go ahead and drop in a couple of lines to
create a nice little sketch. And that would be great. So maybe just drop in a little chimney over
here, just like so. Again, you don't need
too much detail. Keep it nice and simple with a little shot here,
maybe another one there, and then a bit of
smoky smoke just traveling up and on
the sides, like so. And then we could possibly
finish it off with another nice kind
of shape over here. And that's pretty
good for the outline. So I'll give you a chance
to do that outline again. All the kind of stages of this sketch will be available
in the resource sheet. So check that out. So let's now maybe add in a couple of
details for windows, maybe just drop in a window
here, just like that. Again, keeping it
to outline only. We're not doing any shading
or anything like that. Nice and simple, maybe
a little one over here, a little window on the side. Chilling out and
maybe just a edge of a door over here with a
couple of lines on the inside, and I think that's looking good. Now what I'm going to
do is I'm going to tilt me drawing on the side over here and drawing maybe some detailed lines for the tiles of the
roof just like this. Nice and simple, doesn't
have to be super accurate, it doesn't have to
be accurate at all. Just a kind of expression of a little illustration
will be absolutely fine. And then maybe just adding
some lines now over here. Actually, we'll
leave that as it is. Let's just throw in some
lines like this to create a bit of a crisscross pattern. Just so that we have
a little bit of variance of these
elements and shapes. Now, what I'm going to do
is I'm going to use again, same color again to start
filling in some of these areas. So this kind of background here, I'm just going to use the
upward and downward motion just to apply that pencil, very light pressure, not
pressing down at all. I'm effectively just
coloring in that space that we have for this kind of sky backdrop area, so just like. Up and down, just
using one layer of this color really nice and easy. Again, you don't have
to be super accurate. You don't have to fill in
every single part of that gap, fill it in the best you
can add in one layer, and that should
work really nicely. Just like that quickly, I'm just going to go ahead
and drop that in over here, so just like this, filling it in so that
we don't have too much of a kind variance from
a white background. We want to have contrast. That's really the key of any illustration contrast and
also in design principle, but let's leave that for another series looking
at graphic design. I might end up doing a series
just on graphic design. Anyway, let's get back
to intense pencils. So I've just filled that in one layer in the same direction. And then what I'm going to
do is I'm just going to do a tilti Tilti to
make it easy for me, and I'm going to add
in another layer now. So I'm going to add
in another layer. And if you remember in
the earlier classes where we looked difference between just adding one layer with the intense and
then adding another. That second layer always
gives a bit more vibrant, saturated finish once
you add water to it. And, you know, that's
what we're going to be doing, adding our water. We're not just going
to have a dry drawing. What's the point of having a dry pigment drawing if
you're going to be using these wonderful intense
watercolor style pencils? No point in that. No, there isn't. So
let's just carry on. And just like that, I'm
going to go ahead and add in that second layer by going
in the other direction. Nice and easy, fantastic stuff. Trying to get all
those gaps covered. But again, if you don't
cover all the gaps, it's not the end of the world. You can practice this
technique again and again as much as you like,
with different drawings, you don't have to use this kind of drawing that I've done, and that's about it. What I'm going to do next
is now very lightly, I'm just going to go ahead and coloring the bottom parts
of each of these shapes. So just like this,
I'm just adding in a little bit of color there, so not filling the whole shape, I'm just filling the
bottom part of it. And again, over here, just very lightly, only one
layer very, very light. We're not pressing
down hard at all, filling in the bottom
part of that shape. And then, again, over here, just filling in that bottom
part just like that. Important to leave the top areas white and uncolord with pigment. So just like this again here, and then quickly over here, just using the side
tip of that pencil. Circular motions
work great for this. So again, just like
that over here. And then we've got our
nice big shape just from the bottom area upwards so that we have a
bit of separation. You can see already it's
looking quite nice, isn't it? It is, indeed, right.
So that's it for that. And then what I'm going
to do is over here, I'm going to go ahead on this kind of side
part of the house. I'm just going to go ahead
and drop in some really, really thin lines
that are more closer together just to create a
little bit of a texture. Again, you don't
need to worry if your lines are going all
wonky, it's absolutely fine. It just adds to the effect of the overall style of the
illustration, and there we go. So we've got ourself a nice, lovely little
illustration that we've done with our ink tense pencil.
12. Adding Water: Okidoke. The next
stage now is that we put our pencil to the side
and let's get our water. So with the water, as we've been doing
throughout the class, we just need to give
our brush a clean, nice drench, and then
I'm going to just tap it on the edge so that we have a nice amount
of water in there. And then what I'm
going to do is just move that to the
side so you can see. Then I'm going to go ahead
and I'm going to start off by wetting this background
that we added in. I'm just going to go ahead
and add that water to it. Nicely in circular motions, and then just moving my
brush into that area, like so, and you can see it's just melting away
as we expect it to. And just like that,
looking fantastic. You can see didn't need to use too much water because we had two layers of
color on there. Just giving it that initial wet and then just like this,
following it through. Oh, and I got a
little silly spille not to worry with my finger. I'm just going to push it
back, and it's all good. So if you get a bit of a smudge going, don't worry about it. Everything can be fixed, and if it can't be fixed, just relax and carry on. So again, into this section now, I'm just going to
quickly go ahead and wet that section now just
like I did with this. You, that's all done. It's nice and wet. We can
wait for that to dry. But as we wait, we can start working on these other elements. So I'm just going
to make sure I get a nice clean on me brush. I don't want too much
pigment on me brush there. I'm just going to kind of, like, get the excess off this time, I don't want to use too much, and then let's now
work into the shape. So let's start off with
this shape on the left. So just like this,
what we're going to do is we're just going
to very gently and lightly just wet the actual area that we put that
pigment on the base. So just like this,
just wet that area, and then we're not going
to go into the white yet. What we're going to do is
we're just going to wet it. So as it remains wet, we're going to give our
brush a cleaning clean. So now we're going to
clean our brush so we just pick up normal water, normal clean water on our
brush, give it a tap. And then what we're going
to do is we're going to add that water now to
the white part first. So that white part area where
we didn't have any pigment, go to drag this water now into the pigment
area while it's wet. So it starts blending
in and creating this lovely tone effect from color to white,
just like that. Then with our brush,
we're just going to mix it in with circular motions. Try not using too much water. Otherwise, you're just
going to get a lot of pooling and we don't
want to get pulling. No, we don't just a bit of a
tibi tap on this white area. Important to leave
the edge white, it just adds that contrast. So just like this, beautiful
little color gradient going on over there,
and that's it. We'll let that marble up, and I'm going to repeat that now quickly for all these
other elements. So let's do that next. Make it okay. Now, you can see, I've
done that same kind of method to add in the color
to the base part first, and then with some clean water, going onto the white and
then just bringing it down so that it melts away
and blends beautifully. So it's always a
good idea to let the elements dry before you
move on to the next one. Otherwise, if you start
working onto the other parts, then you can get a bit
of a smudgy smudgy, and then you're not
going to be happy. So take a break, relax, and let's come back to it
once it's completely dry. I
13. Details Technique: Doke. Now we have a
nice dry on the page. So remember, these
intense pencils become permanent when
they're completely dry, so they won't re wet
what's underneath. So that's a great
advantage because then you can start adding
more texture on top, and that's what we're
going to end up doing towards the kind of final
parts of this sketch. So let's move on to
the next stage now, and for the next stage,
let's concentrate on maybe some of these details
that we've got on the house. So with my brush now,
I'm just going to again, give it a nice little rinse so that there's no
pigment left on it. Shake it off a little
bit on the side. Then let's now go
straight into the roof. With this now, we've got these lines and what we
don't want to do is just blend all this color
up so that it just looks like one flat color
like we have on the back. What we're going to do
is we're going to follow the direction of
the line like this. Just like this, I'm
just pressing down with my brush so that it spreads
it away from the line. It follows that same direction. You can see we're getting
this beautiful effect where we have kind
of these white areas in between them lines. So just pressing down,
but not too hard, just moving it in
that direction, not adding too much water. That kind of initial drench
of water will work fine. And then I'm just
going to turn it around like this so it's
easier for me to do. I'm going to go ahead and
do the same now on the top. I'm just going to
follow the direction of the lines going in that
crisscross pattern. And look at that, it just
creates this beautiful effect. So we are effectively sketching with ink
pencils, aren't we? Look at. Beautiful that now. I don't want to overdo it. I want to keep it like
that, so I'll just add in a little bit more
on this edge here, we've got this edge of the roof, maybe just drop in
a couple of lines to go over some of
those elements, just to enhance
them a little bit and just create this
crisscross pattern. Do it the way it works
comfortable for you. You don't need to follow the exact kind of procedure
that I'm doing here, just follow it along. Try keeping some of
those elements within these boxes white so that we have some variation and
a little bit of contrast. That's that part done. Let's now move on to this
area on the side. I'm just going to give
me brush a clean and get another nice little
bit of wet on the brush and just shake
it off on the side. So we've got a nice
bit of wet there. For this one, what I'm going to do is I'm
just going to go ahead and I'm just going
in that same direction, just cover up those lines
rather than following each line so that it looks slightly more prominent
over here and that's it. Just like that, gave
it a little bit of a wet in the areas where
there's not enough moisture, just maybe just dab a little bit of water on
there with the brush, but not to lose the
detail because if you keep adding more
brush strugs to it, your details are
going to get lost. So that's what I'm
trying to maintain here a nice little bit
of detail just to make sure we have
separation between this and this kind of roof
texture that we have. And that's it. What
I'm going to do next is do the same for the
windows and the door. So I'm just going to go ahead. I'm just going to follow
the outline of that shape, and I'm not too bothered whether the color completely
covers it up. In fact, I'm going to try doing by intentions
so just like this, I'm just going to add the tip of the brush to
effectively coloring that window without
losing the detail lines. You can see you can so
easily create this detailed watercolor look and
all you had to do was just do the drawing
and just slightly wet it. Afterwards, fantastic, isn't it? Again, with the
door, just following the lines and the water
will fill in the gaps. And look how easy that is. Beautiful stuff, three
different types of techniques already used to produce different results
with the same color. I bet you didn't think you could do that with the same color, but now you know you can and
I want you to give it a try. So let's now move on to maybe
the chimney area over here. So I'm going to
maybe just carry on using the same brush because it's going to
have some pigment. If you remember, one of the
techniques that we used in the application
process was to pick up the pigment that's
already on the paper. So effectively,
we're using all of those application methods
in this one little sketch. So just like that, whatever pigment is left on it, I'm just going to
use that to color the kind of gap
that we have here. I'm going to do the same
for this kind of top one. I'm just going to do
it on this left side. I'm going to leave
this right side white. And then on that one shoot, just have a little bit
of color on there. So just like that, looking good. And in this kind of smoky area, I'm just going to kind of spread whatever little bit of
pigment I've got left. It'll be nice and dilute
just onto the edges here, and then just down here, maybe wet some other
lines of that smoke area. And then we've got
this borderline here so you can pick up
some pigment from there. And that way, it's effectively giving you some pigment
on the paper already. So just like that, maybe pick up some more pigment pigment
from this edge over here and just bringing it in to use all that lovely
pigment that we have. And remember it's dry
there so we can wet it, and initially, it
will melt away. So that looking great. Maybe get a little bit more
pigment maybe and drag it in, but you can do it
however you want. So with this kind of corner
border that I've got, I might just bring some
of that pigment into it just to create
some separation, and I think that's
looking fantastic. So what we're going to do next is we're going to let
that all dry up and then we're going
to finish off with adding another one of the
techniques that we saw. So let's wait until that dries, and then let's get it. Okey doke, we've got a nice, dry, beautiful bit
of artwork there. So what I'm going to
do in this kind of final part is I'm going to
show you a technique that some people frown
upon because they think that it's not very
good for the pencil itself. I used to think that. But then I thought,
Do you know what? Let's just give it a go. You only live once
in this world, so why not enjoy it experiment. And I've found that it doesn't
do anything to the pencil. So let me tell you what this
technique is all about. So for this, you're going
to need your water, and we're going to use the
pencil as it is to wet it. So we're going to wet the
pencil direct with the water. Now, try avoiding dipping
the entire pencil in. So when you do dip
your pencil in, try just wetting the tip of it where the actual
pigment is rather than the wood area because sometimes
the wood area can get soft when it's moist and
it can start to split. So do do this very slowly
and take your time. So I'm just going to give it
a little bit of a dip there. And if the wood area gets
wet, don't worry about it. Again, this is just testing it out to see
what results we get and to really elaborate on all those different techniques that you can do with the pencil. So that tip is nice
and wet over there. I don't know if you can see
that properly on the camera. What I'm going to do now is I'm just going to go straight in and start drawing in some
beautiful lines. Look at that. So you've
got that wet tip. Now you've got this wet,
beautiful ink efectan't you? It's like you're drawing with ink using your ink tense pencil. So just like that, then it
dries off fairly quickly, so I'm going to give
it another dip into the water just to maintain
that kind of flow. And look at that.
Your kind of dry ink tense pencil has now become
an ink pencil now, hasn't it? And you've got this
beautiful flowing ink, and all I'm doing is just creating these beautiful
little patterns here, very nice and intricate and you can see how beautiful
that looks. Look at that gorgeous
stuff that, isn't it? So I'm going to do the
same now for all of these, I'm just going to keep dipping that intense pencil,
just the tip of it, and then I'm just going to
go ahead and just create these beautiful kind of little drawing lines to
add wonderful detail. And I just think it's
just a fantastic way to go ahead and use
your intense pencils. It just creates such a
dynamic kind of experience. Again, that's what
it's all about just enjoying this experience. I just love it how
that melted ink just applies to the paper. It just adds another
dimension to your experience and to your lovely artwork just
like this very gently, when it starts drying out, just give it another dip
into the water to keep it nice and moist and maybe we have some different
patterns over here, just some straight lines
coming up like that. Vary the patterns that you have. Again, we're dipping it again, our pencil, and it's
absolutely fantastic. I'm going to quickly go ahead and do the patterns
for all of these, and then we'll have a look
and see what results we get. Okay, Dokey there. We have it. Look how beautiful that looks. What a fantastic
technique to use. Just remember, once you've used this technique and
your kind of, like, pencil is nice and wet, let it dry naturally, put it on a bit of paper
towel on the side. Let it dry up before
you use it again. Otherwise, you're
going to have a mess. Onto your sheet, and then
you're not going to be happy. So let it completely dry, maybe just get rid of some of the excess with
some paper towel. So just like this very gently, very gently with a paper towel, give it a little dab. You don't want to press
too hard on the pigment. Otherwise, your pigments
going to come off, and you don't want to be
wasting your pigment. So just onto kind
of the wood area where you've got the wood, give it a nice little dib dab, and then just let that tip dry, put it on the side, and you'll be ready to use it once
it's completely dried out. But just look at that. Look
how beautiful that looks. Lovely little patterns
going on over there. Let's let this completely dry and then we'll see what
the results look like. But we can also maybe work on
some more texture work onto the kind of this sky area really to enhance
it while it dries. So I guess we could
probably do that now. Let's just give
this a turnaround like this as those
elements dry up. And then what we'll do is let's use that pencil
again while it's wet and maybe just drop in a
couple of lines like this, just a cross, just to
add in and wet it again. I'm just wetting
it with the water, just to add a little
bit more kind of texture to that sky, just to give it some more
visual interest like this. So you can see now
we're adding a lot more of that color
onto that sky area. Again, you don't
need to do this. I'm just showing you
this. And again, I just get really excited
with these wonderful, wonderful pencils and this
beautiful ink effect. You can't really get this
in pure water colour, this kind of ink effect. And that's what the advantage
of these pencils are. They have a finish of ink. So it looks like
you've done this in ink rather than in watercolor, and I absolutely love it. So just like that,
I'm just going to drag it across just like that. Just to add some more
texture elements to this overall piece over here. And you can use this now in
your beautiful illustration. You can use this in
your class project. You know, go enjoy yourself
with these techniques. I bet you didn't know
you could do this. You might have been like
me right at the beginning. As I said, I bought these pencils and I wasn't
really too happy with them. I couldn't really bothered using them because I found them
a little bit boring. But once I started to experiment I found that, you know what? These are just fantastic. So let's let that maybe dry up. And what we can do is we can also add a little
bit more contrast while we're using the wet pencil just like this onto this
kind of window area here. So just like that, I'm
just darkening it. Not going to wet the
pencil too much. I'm just going to darken these
kind of window sills here, and then the edge maybe darken the edge on the left
side, just like that. And then on the do, maybe just
darken that just like so, and then maybe darken this
kind of edge of this roof like this just to give it a nice natural kind of
rough, rugged look. And then that separation
line over here, you can just add in a little bit of that kind of semi
dry pencil there. That looks good, and then
maybe just finish it off by adding a bit of a
semi dry pencil there. Can see we're getting
more elements coming off that pigment and then maybe just on the edge very gently and lightly
while the edge is wet, just like this, make it look a little bit more interesting
rather than robotic. Bring it across like
that and then again, just a bit of an outline there, a couple of dots
for the chimney, maybe just throwing a couple
of texture dots there, texture dots over here and you can just carry on and on and on now,
You know what I'm like? Once I start, then I don't stop. Again, over here
maybe just adding in just a little bit more
darker elements like that. I think that's going to look good and then
maybe on the edge here, just clean it up a little bit and maybe just
adding a couple of dots where the
smoky smoke is just to get a bit more
texture over there. And I think I'm going to leave it at that because, you know, I'm going to be here all day and I'm just going
to keep adding and adding to it until it just
becomes an ink masterpiece. So that was the final kind of technique with these pencils. Hopefully, you would have given all the class
exercises a go. You've given the coloring page a go, those blending exercises, and then given lovely little
stylized sketcher go, and I can't wait to
see what you produce. So let's now move on to
what your class project is, and let's go through some other types of artworks
that are produced with these colored pencils to inspire you for
your class project.
14. Inspiration: It okay. So let's have
a look at some of the artwork that I've
produced so that you can be inspired for your class project. So let's have a
look on the table where I don't have anything,
but I shall show you. So here are a couple of designs that I've done
that were similar. This is the type of
things that I do. Again, you can draw
whatever you want. These intense pencils. The one that we did in the previous lesson was
this one over here, you can see, it's very similar
to my style of sketching. So do check that out and have a look and really
explore with the colors. I've done single
colour drawings, just to give you
that kind of access to what you can produce
just by using one color. Try it out with different
colors, one color, two, four, five, do a
complete painting with these intense pencils. But I would recommend
that you start practicing with
one color just so that you get familiar
with what you can achieve with these pencils. These were my kind of whimsical
house style sketches, which I absolutely love to do. Let's move these
onto the side now. And then the next one, I've got just some
very loose sketches over here so you
can see over here. These only took me about 5
minutes to do really loose, not thinking about them, abstract, making them
up as I go along. And you can see that you can experiment with
different colors, and the results are so vibrant and it's just such a
fun medium to use. So try it out with some loose sketching or
whatever you like. And then let's move on to maybe some kind of
studies from real life. So I've got this apple that I had that I was about to eat, and I thought,
Do you know what? Let's just quickly
give it a sketch, and I do like to draw fruit, especially when I do a bit of poetry. Yes, you heard me right. I do my own poetry, and I like to sketch while I do poetry because that's
what I like to do. So again, another
inspiration for you. Keep it loose. Keep it quick. Don't worry about details. Just add as you go along and just build up color
with beautiful pencils, try out those different
techniques that we use, dry first, wet first, dip the pencil in the water
if you really want to experiment and enjoy the process
and be very adventurous. So try that out. And again, that was just drawing
from kind of real life. But again, my kind of main
concept always is coming up with these whimsical style
sketches, mushroom houses. On this one, I've
used an orange, and I've used kind of like
a brown shade to go on top. So I've let the first layer dry, and then I've just gone in
with the dry pencil on top, and I've not bothered
wetting that second pencil. And you can see it achieves a
really, really nice result. And again, over here, we've got another
mushroom style house using the same technique that I used with the actual sketch that we did in the last lesson, very similar like that. And then let's just
quickly go through these. I've used one in a red, just kept it single color. And I just love doing these. And then, again, that
beautiful olive green color there, single colour design, using kind of details
on top wanted stride, coming up with texture, leaving some side of
it completely plain, so it looks like we've got
this beautiful light effect. Experiment with
this, try it out, work from imagination,
work from real life. That way, you'll really get a really nice experience using this pencil and it will
just encourage you to just pick up your pencil and go ahead and start sketching. You would have noticed I've used that same sized card throughout these sketches
that I did in this class, and I like to keep
it nice and small. I don't like to do massive
drawings or illustrations with this pencil or this
intense set that I have. That's entirely up to you if you like to draw big go for it. But again, I would recommend
that you start small, get familiar with this medium, and see what types of tips
and tricks you can do. Again, I've got a nice
purple version here. I really like that purple color. Then I've got this
sepia type color here. Again, just made these up
because it's what I like to do. Then over here, what I've
actually done here is I've gone ahead and use the same color like I did with this one. I'll just move these out of
the way so I can explain. So I used the same
sepia color over here. But what I did was I added
a layer of graphite on top. So to get that darker tone and shading and a little
bit of cross hatching, I added a three B
graphite pencil, so experiment with
other mediums. Again, we've not
really gone into experimenting with
other mediums. This was just kind of a
beginner's introduction to the specific
ink tense pencil. But once you've kind of got
the hang of using them, try it out with
mixing them graphite, maybe with normal colored
pencils or even ink, and I can't wait to see
some of the work that you produce because I
know you're going to produce some wonderful works. So they were just another
example of the type of things that I do with these
lovely pencils. And again, with
the pattern color from the exercise that we did, I've gone ahead and done
some coloring in myself. This is just so therapeutic
just to have something there, which you can just
color in to really get that first hand experience
of using these pencils. And again, I've
just come up with some little pattern designs on top in these patterns
that I've got. I've not done that one yet.
I've done this one here. So on this one, if I
just keep that open, you can see I've gone in
with the pure ink tints, and then I've used a fine
liner to go on top to outline. So again, using mixed mediums to really create that
wonderful, vibrant look. So that was a patterns. And finally, I'll
show you some of the sketches that I've
done in my sketchbook. For poetry, let's just
get a Zoom back on this. Maybe we do a class on
poetry and sketching. If that's what you
want to do, then leave a little discussion below, but we'll leave that
for another class. Over here, these are
sketches that I like to have with alongside my poetry in my sketchbook. So
this is all done. Ink tents and I actually
write down what I do these in ink tens
and then fountain pen, and then I even
gone ahead and used a normal colored
pencil to create some nice effect on
that kiwi over there. And then we've got this apple. Again, I've drawn all of
this from a real life image. I just draw while I've got the apple or the
kiwi on the table. I'm not looking
for real life kind of authentic realism,
hyperrealism. It's just more of a quick
little illustration just to kind of use the
mediums that I have, and it just kind of inspires
me for my poetry, as well. So that's the apple. And then I've got an
orange over here. Then a little strawberry, again, using mixed media, using the ink tints first,
getting the blends in there, then adding details with
ink and other mediums. It's just fantastic
how it works. And then we go on
to other things, and I think that's where
the sketchbook ends, but I will continue doing that, maybe explore it in
another class with you. So hopefully, this would have
given you some inspiration of the different types
of things that you can achieve with these wonderful, wonderful pencils, and now it's your turn to have a go at the exercises if you
haven't already had a go, do a bit of the coloring in, have a go at the blending,
the application methods, and then do a beautiful
little sketch with one color like we did
in the previous lesson. I can't wait to see
what you produce. I know it's going
to be fantastic. But again, on your
first attempt, if it's not what you expected, just keep going with it because just like
with everything, the more you practice, the more better you get at it. There's no right or
wrong way of doing art. This is just all about enjoying that process of for your mental well being
and for your health, I use art as a tool
to keep myself in a relaxed form and keep my well being
really at a good level. And that's what this class and all my other art
classes are about. So enjoy the process, and hopefully you would have
learned something from here, and I can't wait to
see what you produce. So do send all your
class projects and all the exercise
works that you've done, working progresses put them
onto the class gallery, send me a little message
so that we can all see your wonderful work and your experience with
this fantastic medium. That's it now. I'm going to let you get on with
your class project. I'm going to go for a
nice cup of tea and maybe get myself a nice
black forest gato. Yes, I do fancy a
black forest gato. I'm going to grab hold of
some desserts and treats and then we'll wrap the class
up with some fine thoughts.
15. Final Thoughts: Oki, welcome back. Let's just wrap up the class with
some final thoughts. Now, hopefully you would
have gone through all of the exercises and watch the
lessons within this class. You would have had
to go at coloring in that lovely pattern from the worksheets that you
downloaded and printed. And hopefully you've gone
through the step by step, lovely little sketch
that outlined the different techniques of applying these
wonderful pencils. And I really, really that you enjoyed this process,
you know I enjoyed it. I always enjoy anything to
do with art and especially teaching and giving
you this kind of experience that
you can follow along, it gives me absolute enjoyment, watching your beautiful work, your class projects, and your
kind of journey into art, and the overall enhanced
well being that is produced by this
wonderful journey of using traditional
mediums in art. Do check out my other classes
on art and illustrations. I've got so many on
skill share over here. So when you finish
this class and upload your class project to the
class project gallery, do leave a beautiful review
on the class so that other students can find the class and learn from
your experience as well. And then that will hopefully inspire you to work
on other mediums. You can work on one
medium and get really, really familiar with it. But the kind of
exploration value of art and traditional media is just so endless that once you've learned
the skills on one medium, you just naturally want to learn another medium and
then another one, and then you've gone ahead and learned 15 different mediums, and you've just created
this wonderful journey and experience for yourself in
this fantastic world of art. Do also follow me
on social media, on Instagram, on YouTube. I constantly release
classes on skill share. And again, if you
want to see my world of graphic design and illustration
on a day to day basis, then do follow me on
Instagram, YouTube, and also on skill share and give a nice little
discussion that we can talk about and learn
from each other. It's just such a
fantastic community this. I really enjoyed myself. I hope you enjoyed
the journey with me, and I can't wait to
see your wonderful, intense artwork in the
class project gallery. So thank you so
much for your time. Thank you so much for your
patience and your support. Your support means everything, especially for me on this brilliant skill
share platform and your support in all
my other platforms. And I really, really
appreciate what you do for me, and that motivates me
to produce more classes and just really enhance this
wonderful life that we have. And again, you're going to
have ups and downs in life. So really to bring that well being level to a
really nice level, bring art into your life, and let's talk and let's
communicate and let's encourage each other and
inspire each other in art. So again, thank you so much for your time. Thank
you for your help. Stay positive, stay happy. Don't stress, and hopefully
I'll see you in the next one. Take care of yourself and peace.
 Imran Mughal, Graphic Designer & Illustrator