Transcripts
1. Introduction: Hi, I'm Brandon,
and thank you for choosing my Inkscape
hyper drive, mastered the
fundamentals course. In this course, we'll be using Inkscape to learn
the fundamentals and Vector Graphics and how to use them to create amazing art. In case you haven't heard
of Inkscape before. It is a free and open source
vector graphics editor. And it is an excellent
alternative to paid vector software like
Adobe Illustrator, affinity Designer,
and Corel Draw. I'm currently at the
Inkscape homepage, which is located
at Inkscape.org. Here you can read much
more about Inkscape. And from here you can
also download and install Inkscape for various platforms
if you haven't already. At the time of
recording this video, the current version
of Inkscape is 1.2, released in May of 2022. And it's what I'll be using
throughout the course. I highly recommend
using Inkscape 1.2 or above for this course in
order to avoid any confusion, especially if you're
completely new to Inkscape. Okay, And although this is
a relatively short-course, it is quite comprehensive
as we'll be covering basic, intermediate, and
advanced topics. We'll begin with learning how to create manipulate shapes, paths, and text, how to use
patterns and gradients. And we'll learn
about the different methods we can use for arranging and aligning our
drawings, such as layers, snapping guides and grids were also learn all about
importing and exporting images. How to use the various tools are being scraped like
the tweak tool, the spray tool, and
the eraser tool. And we'll learn more
advanced topics like clipping and masking, creating custom
patterns, using filters and extensions and
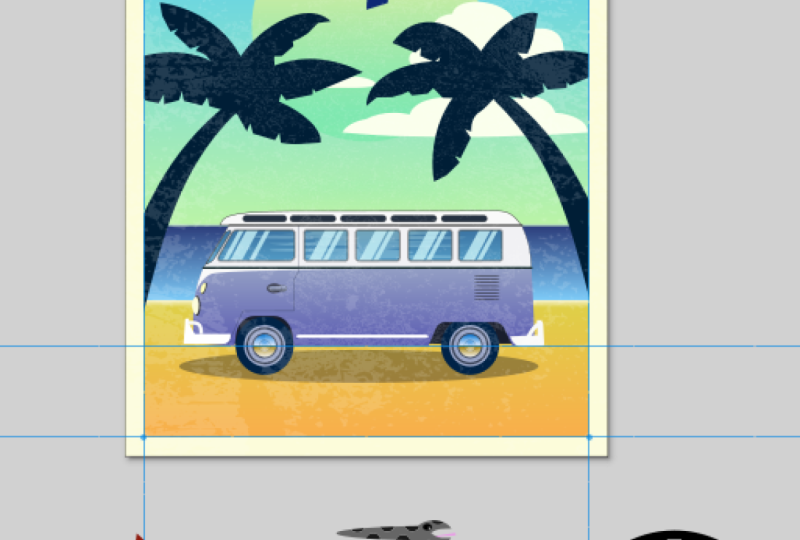
vectorizing images. To finish up the course, we'll use everything
we learned in a final project to create
a retro style posterior. Okay, I'm sure you're eager
to get started as I am. Let's go ahead and
running escape and start a new document. And in the next video we'll jump right in with a quick overview of escapes interface and how to navigate
around the canvas. See you there.
2. Quick Interface Overview: In this video, we'll quickly go over Inkscape interface and talk about how we
can do things like zoom and pan around the canvas. The canvas is this large area in the center of the window. And it's where we do
all of our drawing. The center of the Canvas, get this rectangular
area called the page. Although we're working
with vector graphics, which we can re-size it anytime
without loss in quality. It's still sometimes useful to constrain our drawings
to particular area. That's what the page is four, and we'll be using it
for this purpose when we create a poster at
the end of the course, if you want to change the
dimensions of the page, we can do so with the
document properties dialog. We can open by going up to the File menu and choosing
Document Properties. The Display tab
under front page. We can choose the format
of the page here, and it will change the
page straight away. The default format is A4. They can also give the page a custom width and height here. And we can change the pages
orientation. Over here. We can change the
color of the page and the color of its border. At the top here, we can change the display units used by the rulers at the top
and led to the canvas. The default is millimeters, but we can put it on something else like pixels if we want. We can go in and close
up this dialogue now to lead to the
canvas as the toolbox, which contains all the
tools we use for drawing, will be discussing most of
these throughout the course. In version 1.2, we can
re-size the toolbox. First bar above the roller
is the controls bar that's contains
functions pertaining to the tool we're currently using. We're using the leg
tool at the moment, which lets us select and transform objects. So
the control is bar. Now let's us do things
like select all objects, flip objects, and
reposition objects. These functions change as you
squish the different tools. The next bar up is
the command bar. Let's contains a lot of basic
commands like creating, opening and saving documents, undo and redo, copy, cut and paste, and some
different Zoom options. If you click one of
these six buttons here, it would duck a dialogue
over here on the right. This is the fill and
stroke dialogue, which gives us a
lot of control over things like the
colors of objects. Because see other dialogues
we click this arrow here, will be discussing many of
them throughout the course. We can close it out by
clicking the X here. At the top. We of course have the menus. The File menu lets us
do things like create new documents and open
existing documents, as well as save our document, import files into our document, and export our document to file formats that can be used
outside of Inkscape. The Edit menu deals with
things like copying and pasting and selecting objects. Under view, we have a
lot of Zoom options and orientation options. For the remaining menus will be discussing them a lot
throughout the course. If we click this arrow
all the way on the right, it gives you the snap controls, which let us snap parts of our drawings together
in many different ways. And we can actually
see many more options if you click Advanced Mode here. We'll be talking much more
about these a bit later. Before version 1 to the snap controls
were actually in a bar here on the
right of the canvas. At the bottom we have
the color palette, which gives us some
options for quickly changing the colors of objects. You can click these arrows at
the right for more colors. Under the color pelvis,
the status bar, which gives us information like what color is the
selected objects are using other information
about the selected objects, our mouse cursor position, and some options for zooming
and rotating the canvas. Another way we can zoom
is by holding the Control key and scrolling the
mouth swore up and down. And it's actually zooms in
and out around our cursor. To pan around the canvas. They can hold Control and
press the arrow keys. We can hold Shift and
scroll the mouse wheel. Or we can press down the mouse
wheel and move the mouse. Or we can hold down the
spacebar and move the mouse. Okay, that should
do it for a quick overview of the interface. Now we're ready
to start drawing, which we'll do in the next
video. See you there.
3. Draw Shapes: In this video, we'll
learn how to draw shapes using the shape tools. The shape tools are
these five tourists near the top of the toolbox. In this lesson, we'll cover
the squares and rectangles to the circle is
an ellipsis tool, the stars and polygon's
tool and the spiral tool. And we'll go over the 3D box to a bit later in the course. Let's start out with the
squares and rectangles tool, which has the shortcut R, has been dragging the canvas. We can create a rectangle. Hold control. We can constrain
the width to height ratio. If we drag close to
evenly down and right, we can create a perfect square. If I hold shift it was centered the object at the point
where he first clicked. And we can hold
Shift and Control to create a centered square. Let's release the mouse
to create the square. Once we do so, we have these
square handles at the top left and bottom right that
we can use to resize it. And again, we can hold Control
to constrain the ratio. We also have this
round handle at the top-right and we can use to round the corners
holding control. And with both brown handlers
by the same amount, it's made the
corners sharp again, because simply
bringing the handle is back to the top-right corner. Or we can press this button at the right, at the
controller's bar. If you go to the Select tool
at the top of the toolbox, which has the shortcut S. We can move the
object around and we can re-size it with
the various handles around the objects bounding box. Fewer shifts. It was scaled the other side by the
same proportion. If we click the object again, we get these handles
are the corners that we can use the
rotate the objects. Holy control us restrict
the angle of rotation. This actually rotates around the objects we're
testing center, which is denoted by
this cross here, the center of the object. We can move this if we want, then rotate around that point. We also get these handles on the sides a little
skewed the objects. We can hold Alt to
restrict the angle. If we click the object again, it goes back to
the scale handles. The color that's
filling the shape of our object is called
the fill color. And we can change it
by clicking one of the color swatches and the
color palette down here. If you wanted to turn
off the fill color, we can click this red X
all the way on the left. We can also put a border or
stroke around our objects. To do this, we hold shift
and click a color swatch. And to turn off the stroke, we can hold Shift
and click the red X. Let's press Control Z to undo
so it has a stroke again. If we look down here
in the status bar, you can see the objects
fill and stroke colors. And we can also see
a stroke width if we right-click this number because set the width is something else. Another thing we can
do down here is change the opacity of the object
to make it transparent. And with boxes like these, we can click inside them and scroll the mouse wheel
to change them easily. 100 is fully opaque. If you want much more control
over the colors of objects, we can use the fill
and stroke dialogue. To open it. We can either
click this button and the commands bar or we can go
to object, Fill and Stroke. Now the fill and stroke
dialogue is open over here. In the File tab, we have some different modes for
changing the fill color, cleaning, RGB, HSL, HSP, etc. The default is HSB mode, which lets us change the hue, the saturation, the value,
and the alpha channel. Alpha is similar to opacity, except we're only
affect the fill color. If we change the opacity in
the status bar like we did earlier or here at the bottom of the fill
and stroke dialogue, it will affect the opacity
of the entire object. Another thing we can do down here is good the
objects and blur. The stroke paint tab up here, we had the same options,
but for the stroke color. With the Alpha channel, we can
change the stroke opacity. And a stroke style tab. We can change the
width of the stroke. We can also change the units are something like
pixels if you want. Another thing we can do in here is changed the dashes
of the stroke. This box will change the
offset of the dashes. In Inkscape version 1.2, we can also customize
the dashes. This box. Each pair of numbers
separated by a space corresponds to the length of a dash followed by
the length of a gap. Next with markers, you can put things like arrows are the
corners of our objects. In version 1.2, we can
edit them as well. Okay, I'll turn these off and
also turn off the dashes. With join. You can change the appearance of the stroke at the corners. You can make them beveled. Rounded. Cap really only applies to objects that aren't
closed shapes. We'll discuss these when we
learn how to create paths. Finally, we can change the order in which the objects fill. Stroke and markers are drawn, such as stroke fill markers, stroke markers fill, etc. I'll set it back to the default
of fill stroke markers. Let's now move on to the
circles and ellipses tool here, which has the shortcut E. If we click and drag, we
can create an ellipse. Like with the squares
and rectangles tool hold Control will
constrain the ratio, which will let us
create perfect circles. And holding shift or sensory. We released the mouse, we get the square Handel
was for resizing it. We also get this
circular handle, which if we drag our salad, the ellipse we can use
to create segments. And if we drag
inside the ellipse, we can create arcs. To
make the ellipse whole. Again, we can click this button at the end
of the controls bar. And as you can see,
Inkscape Gibbs new objects, the same fill and
stroke information be used for the previous
object we created. And of course we can
change it if we want. The next shape tool we have is the stars and polygon's tool, which uses the asterisk
key as a shortcut. We activated, we
get the option up here to use either polygon
mode or star mode. Switch the polygon mode. Next we have a box for setting
the number of corners. We can also right-click in
here to see a few options. I'll go with six per a hexagon. Now we can click and
drag to create one. If you were to control, we can restrict the
angle of rotation. Okay, let's release. We just get this one
handle here that we can use a scale and
rotate the objects. We also have these rounded and randomized options
and the controls bar. Another way to change rounded as towards shift as we
drag the handle. This will let us
round the corners. Another way to change randomized is hold Alt as we
drag the handle. That's what randomize
the angles of the corners longer secrete
some weird shapes. If we switched the
star mode up here, it would change our
current polygon to a star. But we also have rounded
and randomized set. We can click this
button and then the control is part too quickly. We set all the settings
back to the defaults. This gives us the
five cornered star, which we can change if you want. Spoke ratio here, we first did the base radius to
tip radius ratio. If you want to start
to look more accurate, we can right-click
in here and choose the correct ratio for the
number of corners we're using. I'm using eight. So I'll go to the Arctic
gram option here. We can also use the stars handles to change
this book ratio. We're actually supposed to
get two handles for stars, but for some reason we have
to de-select it first, then select that again,
and now they both appear. We can also round the
corners by holding Shift and randomize
by holding out. Now switch to the Select
tool and select all of these objects by dragging
a selection box around them. Let's delete them by
pressing the Delete key. Alright, and the
last tool we will look at in this video is a spiral tool here,
which has this shortcut. I. Let's go ahead and click
and drag to create a spiral. Spiral, we can
change this number of turns or revolutions. We can also do this by dragging around the outside handle. And if you hold shift, we
can rotate and scale it. Next we can change
this diversions, which is the density of
this outer revolutions. One is uniform, less than one
makes the outside denser, and greater than one
makes the inside denser. We can also change
this by holding Alt as we drag the inner handle. Finally, we can change
this inner radius here, which we can also do by simply dragging around
this inner handle. With this button, we
can reset it all. If we look in the status bar, you can see that spiral is by default have a
stroke and no fill, but we can give it
a fill if you want. We can also change the stroke attributes or even turn it off. Okay, So that's how
we can create shapes. In the next video, we'll
talk about how to use the fill and stroke dialogue to apply patterns and
gradients to objects. We're actually going to
be using this dialogue very often do up the course. So we can leave it open. If it gets in the way, we can drag this
little bar here all the way to the right
to hide the dialogues. And we can drag it back to
the left to show them again. Okay, I'll see you
in the next video.
4. Apply Patterns & Gradients: In this video, we'll
talk about how to give our objects patterns
and gradients. If we create an object. Then look over
here the field tab of the fill and stroke dialogue. Besides the flat
fill color option we've been using so far, we also have these
four options here, which include linear gradient, radial gradient, mesh
gradient, and pattern. Let's start with pattern
here by clicking on it. And now our object
has a pattern fill the default being
stripes one-to-one. If we drop down this box, we have a lot of
patterns to choose from, such as checkerboard, different styles of polka
dots, and old paint. If we switch to the
node tool here, which we'll be
talking a lot more about in the next video. We'll get these
handles here that we can use the modified the pattern, the excellences movie. The square list is resize it. The circle Let's has rotated. In a later video, we'll discuss how we can create
our own patterns. For now, let's move
on to ingredients. The first gradient option
we have is linear gradient. Let's go ahead and click it. Okay, So the default
linear gradient as the original field
color going from fully opaque on the left are the objects to fully
transparent on the right. If we switch to the
gradient tool here, which we can also get to
by pressing the G key. You can select and
move these two stops at the ends of the
gradient line. And we can change their colors. If we select the
less stuff here. You can see that it's
alpha channel was on 0, making it transparent. We can bring this up if
we want the controls bar, we have options to reverse the
direction of the gradient. Anti-chains, the way in which
the gradient is repeated. If we set this to repeat it and move the steps
inside the object, we get this Chrome like
effect. With direct. We get these harsh lines
at the stops in version 1 to the reverse and repeat options are also available in the fill
and stroke dialogue. Another thing we
can do is insert a stop by double-clicking
on the gradient line. We could have also click this
button in the Control is bar or double-click the barn here and the fill
and stroke dialogue. Now we can move
these steps around, either in here or on
the object itself. And we can change the colors to delete a stop because
select it and press Delete. Led to the controls bar. We have options for creating
either a new linear gradient or new radio gradient. We can also set
whether it will affect the fill or the
stroke of the object. If we switch to the
stroke paint tab in the fill and stroke dialogue, you can see that we
have the same gradient options for the stroke. You can get a stroke,
a pattern as well. Let's create another object. Let's switch back to
the gradient tool. Now we can select the radio
gradient option up here. Then we can simply double-click the object to give it
a radial gradient. The default radial gradient has the fill color
fully opaque in the center and fully transparent at two
last stops at the top. And write these last stop share the same
color information. We can change their
lengths individually, but they always maintain a
90-degree angle between them. How do you control was
snapping or rotation? And holding Shift
and Control will let us change the lengths
of both lines together. We can also double-click a line which were added
stop on both lines. We changed the color of one, it will change the
color of the other. Let's go ahead and
delete these objects by switching to the select tool, then holding Shift and clicking the other objects added
to the selection. Let's press Delete. Let's now create another object. And the field type here. Let's click this button
and get the object and match gradient with the default mesh
gradient to get white at the top left and bottom
right at the objects. And the original fill color at the bottom left and top right. To edit image gradient, we use the mesh tool, which is located here
under the gradient tool. Now we can grab these
diamond handles at the corners and
move them around. We can also change their colors. We also have these
circular handle, so that has changed
the curvature of the lines between
the diamond handles. If we double-click a vertical
line, we can add rows. And we can move the
diamond handles and change the colors. If we double-click a horizontal
line, we can add columns. We actually have two
types of mesh gradients, as we can see here
in the controls bar. The other type is
kinda cool mesh. Let's create another
object for this. I'll go with a star this time. Then switch to the mesh tool. Choose conical measure up here, and double-click the star. Clinical Mesh Gradients
start at the center and move out similar to
radial gradients. We actually get several diamond handles here in the center. Like with normal meshes, we can double-click the lines
to add rows and columns. Okay, so that's how
we can give patterns and gradients are objects. I'll see you in the next video.
5. Draw Paths: In this video, we'll
learn about another type of object we can
create called paths. The most common way
to create paths is with the pen tool here, which has the shortcut B. If we start clicking
in the Canvas, we can create connected
line segments. Because snapped the angle
by holding Control. We can undo a segment
by pressing Control Z. Having a finished
creating the path, either by double-clicking in the Canvas or by right-clicking. If we look in the status bar, you can see that paths by default have a
stroke and no fill. But we can give it a fill if we want a size line segments, we can create bezier curves
segments with the pencil. To do this, we click
and drag on the canvas. Where we released the mouse. We get this curve. We can click and drag some
more to create more curves. We can also go back to creating lines segments by just clicking. And if we click and
drag hold shift, we can create a sharp corner. And another way to
finish creating a path as you click on
the starting point again. Now we have a closed path. Segments in a path are
connected by nodes. In order to see and
modify the nodes, we get to use the
node tool here. This twice a shortcut in. Now we can see the
nodes and we can move them around to change
the shape of the path. These nodes denoted
by diamonds are called Casper corner nodes. The ones that connect curves, segments like this one
had the circular handles that we can use to modify the
curvature of the segments. For the customers that
don't have handles. We can hold Shift and drag out from them to
get the handles. The nodes denoted bys
squares are called smooth nodes and they allow
us to create smooth curves. The handles of smooth nodes are co-linear and rotate together. If you want to change
the notes type, we have these four
buttons and controls par. With this point, we can turn
on node into a cusp annuity. This one turns it
into a smooth node. This button turns a note
into a symmetrical node, which is similar
to a smooth node, but as we change the length
of one of its handles, the other changes
by the same amount. The last type of node
we have is auto smooth, which is a type of smooth node that will attempt to maintain very smooth curves
at the node as we move it or in
surrounding nodes around. Another way to change
the nodes type is by holding Control
and clicking it, which was cycled
through the node types. We have some other
things we can do here in the control bar. For example, if we select
two or more nodes, we can join them together
with this button. This button we can break the
path of the selected node. Now we have an open path. The next button,
Let's has joined to end nodes with a line segment. With this one, we can
delete this segment. We can also insert nodes with
this button on the left. Or we can simply
double-click in a segment. To delete it, select the node. I can just press the Delete key. If we create an object
with the shape tool, Let's squish the node tool. You can see that we
don't have access to the objects nodes. We still just have
it scale handles. For a rectangle, It's
corner rounding handles. This is the main
difference between paths and shape objects. However, we do
have the option to change the shape
object into a path, which we can do either by
clicking this button in the control bar or by going
to path, object to path. Now we have access to as nodes and much more control
over its shape. That should do it for an
introduction to pads. The next couple of videos to learn how to use the
other two path creating tools or the pencil tool and the calligraphy tool.
See in the next one.
6. Draw Freehand: In this video, we'll
learn how to draw freehand pads with
the pencil tool. The pencil tool is located
here under the pin tool. And as shortcut is the
peaky, use the pencil tool. We simply click and
drag on the canvas. Now we're doing
freehand drawing. This tool is great
for sketching. To finish creating the path
we just released the mouse. We switched the node tool. You can see the nodes
that created the key, the path pretty accurate
to our mouse movement. Making the pencil tool, we had this smoothing option
in the controller's bar, which lets us control how smooth the past we create will be. If we set it to something low, the path will be very
accurate but not smooth. We'll have a lot of nodes. Setting it to
something very high. On the other hand, result in a very smooth but not
very accurate path. I'll put it back in
the default of ten. The smoothing setting
here actually only affects the path we create
actually change the setting. If you want a smoother NOPAT
we've already created. Because selected with
the Select tool. Think, go to Path Simplify, which has the
shortcut Control L. We can press Control L multiple times to keep
smoothing the path. If we squish the node tool, we can see it has fewer nodes
now In the pencil tool, another option we have appears to change the shape of the path. Here's what triangle
n looks like. We could change the size
of it with the scale box. Here's triangle L, which is basically the opposite
of triangle Wayne. Here's the lips for from clipboard with you
create another object. Then copied into our
clipboard with Control C. Now if we draw a path
with the pencil tool, use the outline and
the copied object to form the shape of the path. From clipboard is similar, but it would give us a fill
color instead of a stroke. Last applied would just use the last shape option. We chose. This back to none. These same shape options are actually also available
for the Pen tool. Okay, that's how we can
do free-hand drawing. See in the next video.
7. Do Calligraphy: In this video,
we'll continue with path creation by learning how to use their
calligraphy tool. The calligraphy tool is located here and it has the
keyboard shortcuts see, like with the pencil tool, to use the calligraphy tool, we click and drag on the canvas. Unlike with the
pencil tool, however, the path we create gets a
fill instead of a stroke. We can change the
color if we want. We can also give it a stroke
and the control is bar. We have some different
preset profiles. Inkscape provides for us, which we use different values for the other settings up here. We can also create our own
profiles with this button. With the width box, we can of course change the width
of the paths we create. For using a drawing tablet, we can toggle on this
button here to use the pressure of our pin
to change the width. Thinning here refers to
how the velocity over our mouse movement affects
the width of the path. A negative number will make
the path dinner when we move slowly and thicker when we spit out a positive number
has the opposite effect. Mask controls how much the
path lags behind the cursor. When it's high, we get a lot of lag or we can create
smoother paths. Angle refers to which angle
will give us a dennis path. It's on 30 by default. So if we draw it at
30 degree angle, the path will be the dentist. If we set it to 90, going
straight up or down, or give us a tennis path. And going left and right will
give us the thickest pen. Fixation refers to how closely the angles
setting is obeyed. The default of 90
is pretty high. So the angles setting
is obeyed pretty well. If we set it to 0, however, the width of the path will
stay the same regardless of which direction we move. With caps, we can change the appearance of the
ends of the path. The default is blind and we can make them more
or less rounded. This is actually similar
to the cap option we saw briefly in the stroke style tab with the fill and
stroke dialogue. If we go to the pen tool really
quick and create a path, then zoom in on one
of the n nodes. We can change the cap type here. Okay, back into calligraphy
tool. We have tremor. With this. We can create rough paths with the last setting wiggle, then create waves and curls. High settings for
wiggle or tremor will create a bunch of
nodes in our paths. I encourage you to now go
through all the presets and test them out and to maybe
even try creating your own. This tool is great for credit,
things like letters for fonts. I'll see in
the next video.
8. Path Operations: In this video, we'll
look at some of the operations we can
perform on paths. Let's get started by creating a few objects with
random colors. Let's give them no
stroke for now. Because path operations
are used on paths, we first need to select all of these objects and turn them into paths by going
to path, object to pair. The path operations are all
located in the path menu. The first one union will turn all the selected paths
into a single path. You can see by the
bounding box and the fact that they now
had the same color. This is all one object. Now, the color it chooses is the color of the object
with the lowest z order. We'll talk about the z order of objects and how to change
it later in the course. But for now the object we create first has a lowest order, which for me was the rectangle. If you go to the Node Tool, we can edit all of the
nodes of this path. Let's switch back to
the Select tool or press Control Z into the
objects are separate again. The next operation is
difference. With this. If we select two objects that
are overlapping like this, it will cut the top path
out of the bottom path. With the next operation
intersection, it will get rid of all parts of the paths that
aren't overlapping. They've been just the
overlapping parts remaining. Exclusion is basically
the opposite of intersection as it will cut out only the
overlapping parts. Division will cut
the overlapping part out of the bottom path. But I'll also leave that
part as a separate path. Cup path is similar
to the vision, but only works with strokes. So let's give these
objects as stroke verse. Now if we do cup path, you get the stroke at the
bottom path, cut into pieces. The next operation combined
is similar to a union, but with a couple
of differences. With union. If we have overlapping paths selected who are fused and
nose of those paths together. And we'll use the
colors of the path of the lowest z order. With combined, they won't fuse the nose of the overlapping
paths together, so we can still move them
apart with the node tool. It also takes the colors from the path with the
highest z order. To recombine some pads, we can break them
apart again by using the next operation, break apart. Now these are separate
objects again. Let's undo a few times
until the object of back to the way they were
before we combine them. Another thing break apart
does is if we have some closed in the areas
between paths like here, and we union them,
then do break apart. Will also fill in
the empty areas, will create new paths
in those areas as well. Inkscape version 1.2, we have a split path operation which is similar to break apart
except for one difference. That's first-time do one so that these objects
are union again. You can just create
another object here that isn't touching
the union path. Turn the objects into a path. Then select them both. Union
then then do split path. Like with break apart as
separated these two paths. But it didn't fill in
the empty area here. Next we have inset. This is a shrink,
this select paths by the same amount and
all sides of the pads. We can use the
shortcut Control plus the nine key at the top of the keyboard to do this repeatedly. The next operation,
outset does the opposite, making the paths larger. This has the shortcut Control plus a 0 key at the
top of the keyboard. Next we have dynamic offset. With this, if we select one
object and do dynamic offset, this wish the node tool, it gives us this handle
here that we can drag to increase or
decrease the offset. Want to turn this back
into a regular path. We can go to Path, Object Path. Now we can edit this nodes. The link to offset operation. We do the same as
dynamic offset, except it will keep
the original object. So if we make the offset bigger, we can change the
color and see that the original object is
still in the middle here. This is a good way to create
a border around an object. To solve this simplify
operation here, when we use it as smooth
and our free hand pads, the final operation reverse, reverse the direction
of a paths nodes. That's quite an open
path with the pen tool. Then let's go to the stroke style tab
in the fill and stroke dialogue and increase
the stroke width a bit. Let's give it some markers. Now if we go to Path, Reverse will change
the direction and location of the markers. Okay, That does it
for path operations. I invite you to try
all of these L and various paths until
you get the hang of them because they are extremely useful and we'll be using them a lot in the final project. In the next video, we'll talk about how to add Pet effects, two pads. See you there.
9. Path Effects: In this video,
we'll learn how to apply path effects two paths. Let's start by using
the Pen tool to create a path with some curves. To add path effects to a path, we have to use a path
effects dialogue, which we can open
by going into path, path effects near the bottom. And let's click this
plus button down here, which will bring up the life path effects
selector dialog. Here we can see all the
available paths effects. If we click the arrow
at the bottom of one, you can read about
what it does by hovering over the
Information icon. If we click on a path
effects icon, for example, spiral spine down here, we will add the paddle
effect to the path. And now we see spiral the
spine in this list here. A spiral spine path effect lets us create super
smooth curves. If we switch to the node tool
and move the nodes around, we can see that it keeps
the curves very smooth. We actually have the
spiral spine effect as a mode option in
the pen tool here. Changes to this mode and
creating a path will automatically add
the spiral spine, that effect to the path. The next mode here, B-spline, will add the B-spline
patch effect to the path. This path effect also lets us
create very smooth curves. And as you can see in the
pet effects dialogue, we also get some
extra parameters we can use to modify the resort. For example, we can change the
weight of the curves here. We can also choose to only apply changes to select the nodes. We can actually apply multiple paths effects to a single path. For example, we can click
the plus button and a dialogue and give this path a spiral spine
effect as well. Now we have both
effects in the list. We can turn them on or off with the eye icon next to them. We can change the order
with these arrow buttons, which will give us
different results. To delete a pet effects, we can click this button or to delete over
select the pads, pads effects, we can go to
Path Remove pet effects. Let's now create a shape object. Then turn it into a path by
going to Path, Object Path. And let's click the
plus button and bad effects dialog,
checkout Ben here. With bend. If we click this
first button in Ben path, we get this green line going across the
center of the path. We can drag this line
to bend the shape. We can also move these nodes
at the ends of the line. And if we drag this diamond
handle at the bottom left, you can change the
width of the path. Okay, let's remove Ben. Let's check out
another path effects. Let's go with corners
village slash chamfer. This effect lets us round or
beveled corners of a path. The default mode is
the Philip mood, which lets us round the corners. If we change this
radius value here, round all of the
corners of the path. With the node tool,
you can also use these diamond handles
of the corners to run a single corner. Or if we select multiple nodes, we can run multiple
corners together. Down here we have the
different modes. We can use. Inverse fill. It will invert the rounding. Chamfer will bevel the corners. We can use this box to change the number of steps that uses. Finally, Inverse chamfer
will invert the resort. Alright, let's look at
one more pass effect. Let's add it to the open path here that has no path effects. Let's choose pattern along path. For this one, we're also
going to need a shape. Let's go with a star and keep a pretty small change the color. Switches select tool,
trying to store into a path by going to path to path and copied into
our clipboard with Control C. Now select
the path here again. And in a pet effects dialogue, Let's get this last button
under patterns source. This will shape the path
using the shape we copied. We can also give it a
fill color if you want. The default mode and pattern copies here is single stretched, which causes the shape to be stretched along the entire path. Some other options, we have
our single repeated stretch. Repeated. We can also change things like the
spacing and offsets. If we switch to the Node Tool, where this handle here
for changing the width. However, as you can see, we don't have access to the
nodes of this path anymore. In order to get
access to the nodes, get to change the object
back into our normal path. This finalizes the path effect, causing it to disappear in
the path effects dialog list. Now we can modify the
nodes like normal. Alright, so those
are a few of the many pet defects we can use. I encourage you to try
all of these out and various paths and see what
you can come up with. Okay, I'll go ahead
and close out the path effects dialogue, and I'll see you the next video.
10. Practice: Fire Logo: For this practice activity, we're going to use
what we've learned so far to create a fire logo. To begin, let's go to the
circles and ellipses tool, hold Control and
create a large circle. Now we want to go to
the stroke paint tab, the fill and stroke dialogue
and give this a stroke. It doesn't matter what
the color is for now, as long as it's different
from the fill color. Then let's go to the
stroke style tab and make the stroke
width pretty thick. That should be good. Now we can go to the File tab and click the X here to
turn off the fill color. The next thing we want to
do is turn the stroke into a path so that we can perform
path operations on it. To do this, we can either go to the Node Tool and
click this button up here and the controls bar that says convert
strokes two paths. This is actually right next to the object to Pat
button we saw earlier. Or we can go to path,
stroke to path. Now we can see by the appearance
of the nodes that this is now a path for
the color of this. Let's make it a red
for the moment. By the way, it's definitely not necessary to use the
exact same colors I use. But in case you really want to, and easy way to do it
would be to type in the hexadecimal
value that you see here at the bottom
of my fill and stroke dialogue into
the same box on yours. Alright, now let's give
this a linear gradient. Let's switch to
the gradient tool. Bring the first step to the top. Hold control and bring the
other stuff to the bottom. Let's raise the alpha
channel of this top all the way up and make it a yellow. Okay, to draw the fire, we're going to use the
spiral mode of the pin tool. So switch the pin tool and changes the
spiral mode up here. As we learned before, we can use this mode to
create super smooth curves. To start, we want to click
somewhere near the bottom of this path and inside
the color of it. Then we can click up
here to create a curve. Now let's shift and click here
to create a customer node. Click down here to
create a curve. Shift. Click here for a custom node. Click here, Shift, click here, click shift, click,
click up here, and here. Now we want to bring it up
outside the circle path. Then Shift-click up here, click down here, Shift-click,
click, shift, click, click here, click
here, click here, click here, click down here, and click the first
again to close it off. Now we have a pretty
decent fire shape. But to make it even better, you can go to the Node tool and adjust the nodes
and curves a bit. Mainly want to make
sure this bottom curve doesn't go outside
of this circle path. Okay, we can turn off
the stroke of this by holding Shift and clicking
the red X down here. Let's give it a random
field color for the moment. The next thing we'll do is add some spacing between
the fire and the circle path by cutting an offset copy the fire
add the circle path here. As we learned in the video
about PET operations, we can create an
offset copy of a path by going to path link to offset. We can't see the offset copy at the moment because it's
underneath the main path. But we can go ahead and
make it a different color. And with the node tool active, you can see this diamond
handle at the top point here, which we can use the offset, the copy. That should
be enough spacing. The problem now however, is that we only want
to cut this part of the copy out of the circle path, not the parts down here. This means we need
to get rid of all but this part of the copy first. To do this, we can
go to the pen tool and set the mood back on Bezier. Then draw a path
around this area here. Now we get squished to
the Select tool hold shift and click the offset copy to add it to the selection. Then go to Path intersection. This leaves us with
just this part of the offset copy that was inside the path we
created with the pencil. And to cut this
out of the circle, you can always shift
and click the circle and go to path difference. Now we can select both
of these and turn them into a single path by
going to path union. Okay, one more thing we can do is cut out a part
of the bottom here. To do this, I switch
to the pen tool and put the mode back on spiral. Let's create another
small fire shape path. We want to start this one down here outside of everything. After we create the path, Let's go ahead and put
the mode up here back on Bezier for future videos. Now we can go to the Node tool and adjust the path
a bit if necessary. I'm going to switch
to the select tool and make this more centered. Right now we can select both of these paths and go
to path difference. Okay, that should do it
for a simple fire logo. See you next video.
11. Make Copies: In this video, we'll talk about the various ways we
can copy objects. If we create an object. One way to make copies
is with copy and paste. You can press control C to copy, control V to paste. The most common way to
make copies, however, is by duplicating to
duplicate an object, beginning to right-click
it and go to Duplicate. Or we can press Control D. Let's place the copy
directly on top of the objects. Another way to duplicate
this with a stamping. For this, we move the
object to where we want to copy and press the space bar. This allows us to
create fast copies. We can also step as we rotate. We make copies with
copy-paste or duplicating. The copies aren't connected to the original object in any way. So our free to re-size them
or change their colors. But we have a third
way of creating copies called cloning, which will force
the copies to share characteristics of
the original objects. To do this, we can
create an object thing, click this button in the
command spur or press O D. Now we have a clone
of the objects. If we change the
original object size, it will change the
clones size as well. And if we change the color, it will change the clones color. Works with the stroke as well. We can actually resize the
clone itself if you want. However, we can't
currently changes colors. If we did want to change
the clones colors, we first have to unset the
original objects colors. To do this, we
select the original thing in the third tab, Edit, Fill and Stroke dialogue. We had this question
mark button. This list is unset and
objects fill color. Now we can change the
clones fill color. We can actually do the
same with a stroke. If we set the original
objects colors again, however, the common Go back to copy and
original objects colors. We can also make multiple
clones of an object. If we don't want to
clone to be a cloning anymore, we can select it. Click this button in
the commands bar. That was a standalone object, and we can change
it however we want. It also won't be
affected if we change the original object height. That's how we can make copies of objects. See you next video.
12. Group Things Together: In this video, we'll
learn all about how to group objects together. Let's begin by creating
a few objects. To group these objects together,
we can select them all. Then either click
this button and the commands bar or press Control. G. Objects are now in a group, and as we can see with a single bounding box around them all, they're being treated
as one objects. This means we can
select them as one, move them as one, and transform them as one. Groups become extremely
useful when you start adding a bunch of
objects to our document. You can use groups
to easily select. For example, all of
the objects have a character's head and face and move them around together. If you want to modify it,
individual objects in a group, we can double-click one of the objects who
entered the group. Now we can select them,
modify them individually. To get back out of the group. We can either select an
object that is outside of the group or just double-click an empty
area in the Canvas. We can also have nested groups. So we can create another object. Hold shift and click this group
and group these together. Now we can enter
into the main group to get this child group. We can enter into
it to get out of both groups with a double-click the canvas once for each
group we're inside. To ungroup a group of objects, we can either click this
button and commands bar or press Shift Control G. Now we have this object
and this group separated. Every press Shift
Control G. Again, we have all of the
objects ungrouped. If we group all of these again, what's remove a particular
object from the group. We can enter into it. Then
right-click the objects. You go to pop selection
out of group. Now it's no longer a
part of the group. We can easily add a new object to a group by
entering the group. I think creating the objects. If we get out of the group, you can see that the new object
is part of the group. Okay, that's how we
can work with groups. See in the next video.
13. Sort Things: In this video, we'll
learn how to sort our drawings by changing
the z order of objects. Let's begin by
creating some objects. Let's make it so they
overlap each other. Now when we create objects, the one that we create first
has the lowest z order, which puts it at the bottom
of the stack of objects. And the one we created last has the highest the order,
which puts it on top. If you want to change the
z order of an object, we have these four buttons and controls bar for
the select tool. With the first one, which uses the home key as the shortcut, we can put the object above
all the other objects. This object is already
at the top though. This doesn't have any
invisible effect. But if we select
the bottom objects, we can use this button to bring it all the
way to the town. Next button, which
we can also do by pressing the page up key. We can move an object up
by one step at a time. The next button, which uses
page down, does the opposite. And the last button
with the N key is the shortcut says an object
all the way to the bottom. We can use these
buttons with multiple objects at a time as well. Now select all of these objects and group them with Control. G is create another
object overlapping the group with the object outside of the group selected. If we click the lower
selection one step button, it puts the oxygen
below the entire group. This is because as far as objects outside of
group are concerned, a group of objects
is a single object. If you want to
change the z order of an object within a group, we have to enter
the group first. Notice however, that even if we press the lower selection
to bottom button, the object in the group won't go below the object
outside the group. Okay, that's how we
can change the z order of objects. See in
the next video.
14. Practice: Snake Brush: For this practice activity
will learn how to create a snake brush for the
body of the snake. Let's go with a long
thin rectangle. Now we want to turn
this into a path by going to Path, Object Path. Next, switch the node tool and select these two
nodes on the left. Let's join them at
the mid point by clicking this button up
here in the control bar. Then let's turn it into a symmetric node
with this button. Now we can grab one
of these handles, hold Control, and drag
it towards the node. Because it's now
a symmetric node, the handles will stay
the same length. Muscle going to grab these
two nodes on the right, hold control and moving
to the right some more. Okay, for the head, let's create an
ellipse at the front. Making sure to cover the whole line segment here on the right. We can use these
circular handles to make an opening
here for the mouth. I'm going to turn this into
a path by going to Path, Object Path, which the node tool incurred these segments a bit. Now we can select both of
these paths and turn them into a single path by going to path union for the fill color,
I'll go with a green. Next, let's de-select the path. Let's switch to the
circles and ellipses tool. Choose black for the fill color and create an
ellipse for the eye. Let's click this button up here to make it a whole ellipse. Now we can squish this selector and reposition it if we want. Then let's duplicate
it with Control D. Make the duplicate white and shrink it down
while holding shift and control muscle going to
move it forward a bit. Now if we want, we can select these two I objects
and group them together with Control G. Okay, Next we can give our snake
some spots or something. For this, I'll create
an ellipse here. Use the color picker
tool to make it the same color as the body, then
make it a bit lighter. Now we can go to the
Select tool and duplicate this with Control D and
move it somewhere else. We can also readjust
the size a bit. Alice create some more of these. For this one, I'll press the lower one step button up here to put it beneath
the eye group. Okay, Now we want to cut
off all the parts of these ellipses that are
extending beyond the body. To do this, we can first
select them all by right-clicking and going
to Select Same Fill Color. Then turn them into a single
path by going to path union. Now we can select the body and duplicate it with Control D, then hold shift and
select the path of spots and go to
Path intersection. Next, saga, the snake at tongue
by going to the pen tool. Creating a path here like this. I'll turn off the stroke, give it a red fill. Use the node tool to adjust
the curves and notes a bit. Now we'll go to the Select
tool and click this lower to bottom button up here to send it
below everything. Okay, now we can select all of the snake objects and group
them together with Control G. We also want to copy the group into our clipboard
for pressing Control C, because it turns
this into a brush. We're going to be
using the bin from clipboard shapes setting
of the pencil tool. So after copying
it with Control C, switch to the pencil tool. Let's change shape appear
to bend from clipboard. We also want to set smoothing
here to something high, like 50 as having too
many nodes in the path. The snake look jagged. Alright, now we can go ahead
and create a wavy path and it will use the copied snake has a shape for the path. Everyone, we can
change the width of the path either with
a scale setting up here or by going to the new tool and dragging
this diamond handle. Having go back to the pencil
tool and create some more. We can also create
another version of our snake with different colors. For example, we can select
the original snake group, duplicate it with Control
D, and move it down here. Then double-click
the group to enter it and change the
colors of the paths. I'll go with a pink for
the body of this one, and a lighter pink
for the spots. Then to get out of the group, we can either
double-click the canvas or select an object
outside of the group. That's the group again, and copied into a
clipboard with Control C. Now when you use the pencil tool to create paths with
the pink snake. Alright, And one more thing
to note is that the bin from clipboard shape setting actually use the bin path effects. We can see this free open
the pet effects dialog. So after we have the snake
paths the way we want them, we can finalize the path
effects by selecting the objects and go into
path, object to path. Okay, that's how we can
create a snake brush. I encourage you to try this out by creating other brushes, like maybe a fire
brush or something. Alright, I'll see
in the next video.
15. Create Text: In this video, we'll
discuss how to create and work
with text objects. To create a text objects, use the text tool located here. This tool use the
keyboard shortcut T. Now we can click into
Canvas and start typing. You can also press the Enter
key to move down a line. If we switch the Select tool, we can easily resize the text. We have to hold control though routes it will distort the text. In the text tool. We can change things
like the font family, the font style,
and the font size. You can also change the
spacing between baselines. Baselines are lines that go across the bottom of the texts, but that ignore the tails of
letters like lowercase y's. Next, we can change the
alignment of the text. If we select one
or more letters. You can use these
two buttons here to create superscripts,
subscripts. With this box here, we have some spacing options. With this point, we can change the spacing between letters. This one will change the
spacing between whole words. The next box is for
horizontal kerning. Kerning is a spacing between individual or pairs of letters. So if we click
between two letters, you can change the
horizontal current in here. We can also change
the vertical Kearney. With this last box, we can rotate the character that's to the right
of the cursor. The last three buttons here, let us change the direction in which the characters
are written. Another way to create a text
object is to click and drag. This will create a
box. And as we type, the text stays within the box. You can resize the
box with this handle. Also an escape version 1.2. If we de-select
the texts objects, selected again with its x2, we now have this handle at
the top right that we can use the adjusted padding
between the text and the box. Another way to
edit a text object is with the text
name font dialog, which we can get to by clicking
this button command bar. Here we can set a
different font attributes. We get a preview
of it down here. If you want to give this
selected texts object are chosen attributes. To click the Apply button. In the Features tab, we have
some advanced settings. We can change the text tab, we can change the
text of the objects. With this, we get
automatic spell checking. We have to click Apply
to set the text. Okay, we can go in and
close up this dialog. Next video, we'll talk about some of the options we
have in the texts menu, as well as how to do things like modify individual letters. See you there.
16. More Text Features: In this video, we'll look
at a few more things we can do with texts objects. Let's first create
a text objects. Then switch to the select
tool and make it bigger. The first thing we're
going to look at in the text menu is put on path. For this, we're asked
me to create a pad, switch, the pen tool. Let's make sure I'm
busy a mode here. Let's create a path
with some curves. Helices like the texts
objects and the path. And go to text, put on pad. As you can see, this makes the text flow along
the shape of the path. We can select the text object
and go to the Text tool, which you can do easily by
double-clicking the objects. We can add more text and it
will follow along the path. The texts goes beyond the path. We won't be able to see it, but we can easily fix this
by resizing the path. If we move the path, the text moves with it. To remove the texts
from the path, we can either delete
the path or select the text objects
and go to texts. We move from pad. We can also
do this with shape objects. We can create an
ellipse, for example. Let's select it and
it's sex object. And put the texts
around the ellipse. We select the
Ellipse and turn it into a path by going to Path, Object Path reverses nodes. By going to Path Reverse. He'll put the texts on
the inside of the shape. If we turn off the
ellipsis, fill in, give it a stroke, will be
able to see the texts. We can rotate the path
to rotate the text. If you want to keep
the texts the way it is or remove it from the path. Because select the text
object and turn it into a path by going to
path, object to path. Now we're free to
delete the ellipse. Be aware though, that have to return a text
object into a path. We can no longer edit
it with the text tool. We can, however, now modify the node to the
individual letters. And this object is
actually a group of paths, with each letter being an
individual path and the group. So we can enter the
group or ungroup then they move and
resize each letter. This is great for
creating custom logos. Let's zoom out and create another text object
with a lot of texts and multiple lines. Let's resize it. Let's create another
shape as well. If we select the
texts object and the shape and go to text, flow into frame fluid the texts so that it stays within the
frame of this shape. We add more texts will
flow accordingly. We can also resize the frame. And Inkscape version 1.2. We get this handle
at the top right for adjusting the padding between
the text and the frame. Finally, another feature
we have in version 1.2 is this set subtraction
frame's option. For this, if we create
another object, let's give it a fill color
and turn off the stroke. This like the object and
this float text here. And go to text set
subtraction frames. Now when we move this
object on top of the texts, the texts will flow around it. We can re-size the
objects as well. Okay, that should do
it for texts objects. I'll see you in next video.
17. Use Layers: In this video, we'll
talk about how to use layers to arrange
our drawings. We first started document, we get one layer, which as we can see
in the status bar, is by default labeled layer one. In any objects we create
will be placed in later one. To add another layer, you can go to layer, a layer, which brings up this dialogue
where we can give it a name and choose whether
we want to place it above, below or as a sub layer,
the current layer. Let's go with above current for now and click the Add button. Now we can see in the
status bar that brown layer to any objects we create now
will be placed in layer two. And because they are
too is above layer one. If we select an object and layer one and try to move it to
the top with this button. It won't go above the
objects in layer two. If we create an
object in layer one, will stay below all the
objects and they are too. Let's now open the layers
and objects dialogue, which is located
in both the Layer menu and the Object menu. And here we can see a
list of all the layers, as well as the
objects inside them. If we hover over a
layer in the list, we can hide it and
we can lock it. If we lock, the
layer won't be able to move any of the
objects in that layer. We also can't create any
objects in a locked layer. We can hide and lock
objects as well. We can also show unlock
the current layer down here in the status bar. With these arrow
buttons over here in the Layers and
objects dialog. You can change the order
of objects within a layer. We can also change the
order of entire layers. We can add another layer
with this plus button. Let's make it a sub
layer, the current layer. Then draw some objects in it. If we now Hide Layer one, who also hide its sublayers. If you want to move a sub
layer out of a layer, you can simply drag
it out in a list. We can also change
the order of layers. This way. We can even move
objects into other layers. And we can make a
layer or a sub layer by dragging it on top
of another layer. If you right-click
a layer in the list and choose Delete layer, it would delete all the
objects in that later as well. Layers are grateful when we have foreground and background
elements in our drawings because they allow us
to keep the objects separated and we can lock
the background layer, preventing us from accidentally
moving things around in the background while we're
working on the foreground. We'll see this in
the final project. Alright, we can go
ahead and close out the layers and objects dialogue for now, and I'll
see you the next video.
18. Snap Things Together: In this video, we'll
learn how to use this tab controls to snap objects
together in different ways. Let's create a few
objects to get started. If foreign scheme version 1 to the snap controls are located in a bar and the right
side of the canvas. Now we can find them by clicking this arrow at the
top right here. At the moment, snapping
is disabled completely. And to enable it, you can either check this
enables snapping box, or you can click this button
here next to the arrow. By default, the snip control is pop-over is on simple mood. We had the bounding
box snapping, snapping options enabled. We can also enable
alignment snapping here, which is new to version 1. To see all of the
snap control options, we can click Advanced Mode here. The first section
here has options for snapping to the bounding
boxes of objects. Let's go ahead and
turn off the nodes and other points
options for now. We currently have snappy
two bounding box edges and bounding box
corners enabled. This means we can
take an object, snap one of the corners
of its bounding box to one of the edges have another
objects bounding box. We can also snap their
corners together with edge midpoints snapping
because snippet corner of an object's bounding box to the midpoints of the edges have another objects bounding box. And we can snap the
midpoints together. Centers here. Let's just snap to
the centrals of bounding boxes in
different ways. Let's now turn off bounding box snapping and turn
on nodes snapping. Pets here refers to
the actual path around an object with customers
snapping here enabled. We can snap the
customer would have an object's path to 0.7,
another object's path. We can also snap
customers to costumes. Smooth nodes, of
course, refers to the smoothness we get when we
create a path with curves. Now we can snap cusp
loads this moving nodes. Smooth news actually also refers to the quadrant
points of ellipses. So we can snap this
subjects cusp loads to the quadrant points of
the ellipse like this. With line midpoints enabled, you can snap to the midpoint
of our paths lines. For path intersections. If you overlap an object
with another one. Again, I'll snap to the
intersections of the objects. Perpendicular lines
lets us easily create lines that are perpendicular to parts of an object's path. And tangential line snapping lets us create tangent lines. Okay, let's turn
off all of these except paths and customer nodes. Let's enable other points
with object midpoints. Because snap to the midpoints of objects, object rotation centers. Let's just snap to the
rotation centers of objects. An object's rotational
center is by default, usually the same
as its midpoint. But if we select an object
and click it again, we can move this
rotation center. Now we can snap to that point. Text-based lines and anchors is of course protect subjects. So let's create a couple. Now we can snap an
object to a text objects baseline n is anchor. We can also set the anchors
are two texts objects together as well
as step of texts objects anchor to
another text objects baseline will be talking about masking and clipping
soon in the course. But basically they let us use objects to hide parts
of other objects. With these snapping options were able to snap to
the hidden parts. Alright, let's turn
off other points and move on to alignment. With alignment enabled as we move an object on the canvas. Now, we can see these lines coming from the object
to other objects, such as a line objects in different ways without
them having to touch. For example, we can align their centers or the center of one to the bottom of another. For the nodes in the
same path option. Because twist the node tool and align the note of a path with another node
of the same path. With same distances. You can duplicate an
object with Control D and move it over here and
duplicate it again. And as you move it
over here now we get lines in the
bottoms of the objects, letting us know when they have equal spacing between them. You do this vertically as well. Okay, let's turn off Alignment. Finally, we have grids, guidelines and page borders will be talking about grids and guidelines soon in the course. And page borders, Let's snap objects to that page
borders in different ways. The last thing we can do
in the pop-over switch back to simple mode here, whoever this also
resets the snapping to the defaults as we can see if we go back
to advanced mood. So if we change some things in here and want to
keep them that way, you have to leave it
on advanced mode. Alright, one more
thing about snapping is that if we hold shift as we move an object who
temporarily disable snapping. This is easier than
turning off snapping up here if we just want to
do it for one object. Okay, that's it for snapping.
So I'll see you next video.
19. Align & Distribute Things: In this video,
we'll learn how to align our objects
in different ways, using the Align and
Distribute dialogue. To open the Align and
Distribute dialogue, we can either click this
button and the commands bar, or we can go to Object, Align and Distribute at
the bottom of the menu. Now let's create a few
objects and see how we can use the align,
distribute dialogue. Let's create a path as well. Okay, and the aligned tab of the dialogue first have
the aligned section. And this section, we could do things like align
the left edges of objects and center them
vertically and horizontally. And the result we get
depends on what we choose and is relative to box where we choose here is referred to as the anchor with a default
of less selected, chosen, the object we select
last will be the anchor. And if we select the objects
with a selection box, less selective, refer to the object with the
highest z order. So now if we click this button, which aligns the right edges of the objects to the left
edge of the anchor. The anchor stays in place. Other objects move so that the right edges are aligned
with the anchors left edge. Similarly, we can
center them vertically, center them horizontally, and align their bottom measures. The anchor always remains
in the same position, which is first selected
as the anchor. It will go to the object that
has the lowest sea order. However, we can also select them individually by holding
Shift and clicking then will now choose the actual object we selected
first as the anchor. For biggest objects,
the top row of buttons would choose the object with the biggest
height as the anchor. The bottom row will choose the object with
the biggest width. We can also align with
the smallest object, with the page, with the whole drawing and
with the selection area. The two buttons at the end
here for texts objects. Let's first set the anchor
back to last selected. Let's create a couple
of texts objects. Let's make them bigger. Now we can align their anchors
and their baselines. Another thing we can
do here is treat the objects as a group by
toggling on this button. So for example, if
we set the anchor to page and select some objects, we can align to the
page in different ways. And the selected
objects will stay in the same position relative to the selection box as if the entire selection
is a single object. Let's turn off the
group bud for now. In the next section, distribute. We can add equal spacing between the objects
in different ways. For example, we can add
equal spacing between the centers horizontally
and vertically. And we can make
the vertical gaps between the objects equal. We also have options
for text objects. Also only the alliance section works with a relative to box. So we can go ahead
and set it back to the default of less selected. And the rearranged section. We can do things like
exchange the positions of objects based on their
selection order. We can randomize their positions
within a selection area. And we can unclip the
objects which will try to equalize the
distances between their edges and remove overlaps. We can make it so that
the selected objects bounding boxes don't overlap. We can also add some spacing
between our bounding boxes. If we select the path
and go to the Node tool, we get these align nose and
distributed nodes sections. With these we can
align distributor pads nodes in different ways. So if we select some or
all of the paths nodes, you can click this
button to align them in a horizontal line going through the anchor we choose
and relative to bucks. We can also align them on a
vertical line to the anchor. With the last two buttons, we can distribute the nodes
horizontally and vertically. If we switch back
to the Select tool, there's another
button up here at the top of the line section. With this, we can do
on Canvas alignment. Now if we select some objects, you click them once to
get the rotation handles. They click them again. We
get these alignment handles. If we click one of
the outside handles. We can line all of the objects
so that side or corner. If you hold shift and
click the handle, we can invert the alignment to the other side
of that handle. Clicking the inner Handel
was centrally the objects horizontally and holding Shift and clicking it will
essentially then vertically. Okay, let's go
ahead and turn this off before Inkscape version 1 to the functions and the
grid and circular tabs. We're actually in a
separate dialogue called the arrange dialogue, which used to be at the
bottom of the object menu. Anyway, with the grid tab, we can arrange objects
and rectangular grid. For this, Let's create some
random objects down here. Let's select them all. First we have these rows
and columns values. When we start changing
one of these, the other would change as
well in order to provide enough rows and columns to contain all of the
selected objects. Now if we click the
Arrange button down here, the objects get
arranged in a grid with the number of rows
and columns shown. When equal height
here is checked, it will make all of
the rows the same height as the tallest
selected objects. Turning it off, we'll
make each row the height of the tallest
object in that row. Similarly, equal width makes all the columns the same width as the widest selected objects. Turning it off makes
each column the width of the widest
object in that column. Under alignment,
we can change how the objects are aligned
to the grid cells. By default, they're
centered in the cells, but we can align them
to the top left corner, the bottom center, etc. Here we can make
it to the objects, fill up the entire
selection box. Or we can make us,
some spacing is added between each
row and or column. This is set by default
with 15 pixels of spacing between each row and each column for fit into selection box. If it spreads some
of these outs, some select them all. And click Arrange. There'll be arranged into a grid that fills up the entire
selection area. Okay, let's move on
to the circular tab. This tablets is arrange
objects surrounding the lips. By default, it will arrange them around the first
select the ellipse. Let's move this ellipse down
here and make it bigger. Let's change this
color. Let's hold shift and drag a selection
box around the other objects. And click arrange. The ellipse we selected first
stayed in place, and the other objects are
now arranged around it. Up here we can
choose which points the objects used to
attach to the ellipse. We can also arrange around
the less selected ellipse. Or we can use parameterized
to arrange them around an imaginary circle
that we define here. Finally, rotate objects
here is enabled by default. Why the objects have
also been rotated. If we turn this off and
undo all the arranging. Now when we click arrange, the objects won't
be rotated, right? That's how we can use the align, distribute dialogue, the
fill and stroke dialogue. And the alignment
should be dialogue or the two dialogues
we will use most often so we can leave
them both open. Okay, I'll see you next video.
20. Guides & Grids: In this video, we'll
discuss how to use guides and grids to
help with our drawing. Guides are useful for keeping our drawings lined up
and to create them, you can drag from the top ruler here to create a
horizontal guide. From the left ruler to
create a vertical guide. And from the corners to
create diagonal guidance. And now with snapping to
guidelines enabled down here, because Snap objects
to the guides. We can also use the
intersection of the guides for drawing paths. If you want to remove a guide, we can drag it back to
a ruler or to a corner. We also get a little circle
here on each of the guys, which is called as origin. When we drag the guide, the origin, we'll move
to the cursor position. If you want to
control, we can move the origin without
moving the guide. If you hold Shift, you can rotate them guide
around the origin. If we double-click the guide, we get this dialogue
where we can get the guy to label changes color, put his origin at a
specific location and give it a specific
rotation angle. We can also unlock the guide, which will prevent
us from moving it. If you want to lock
all the guides, you can click this lock here, the top-left corner
of the canvas. Now we can't move
any of the guides. You can click it
again to unlock them. Another thing we can
do is put guides around the page
by going to Edit, create guides around the page. Now we can easily give the page or background or something. And if you want to remove
all the guides at once, you can go to Edit,
Delete on guides. Us also delete all
these objects. Now let's move on to grids. If you go to view page grid, it'll give us a default
rectangular grid. Snapping to grids enabled here, we can snap to the grid
when we create objects, allowing us to draw
more accurately. If you want more
control over things like the grid cell size, we can open the
document properties dialog with this button
in the commands bar, then squish the Grades tab. Here, we can create a new rectangular grid or excellent lecture grade,
which we'll see in a bit. Down here. We can do things like
change the origin of the grid and change the
spacing of the grid lines. And actually the grids we
create have major lines and minor lines resumed out. We can only see the major lines. But if we zoom in a lot, you can see the minor lines. The minor lines are by default, are more transparent blue
than the major ones. We can change the colors
of the lines here, as well as the distance between the major lines. Over here. We can disable the grid. We can make an invisible
but still enabled. So we can still snap to it. So by default, we can only
snap to visible lines. This is why if we zoom back out, we can now only snap to
the major grid lines. If we turn off this snap to visible grid lines only option, however, now we can also
snap to minor lines. With this option, you can
use dots instead of lines. And here we can change how the grid is aligned
with the page. Let's go ahead and
delete this grid by clicking Remove here. Let's create an
axonometric grid. With axonometric grids. The lines are angled, allowing us to do
isometric drawing. Like with rectangular grids, because zoom in to see
the minor grid lines. We can also change the
angles of the lines. Okay, that's how we can
work with guides and grids. I'll go ahead and close out the Document
Properties dialogue, and I'll see you next video.
21. Practice: Rocket Logo: For this practice activity
will create a rocket logo. Let's start with the
background by switching to the circles and ellipses
tool holding control, and creating a large circle. Let's give it a dark blue fill. Now let's give it
a linear gradient. We, the first stop to the top. Hello control with the
other stops at the bottom. The alpha channel all the way up and give it a
lighter blue fill. Let's next fork and the rocket. First, let's create a long
ellipse over here for now and make it white. Next, let's cut off the
bottom of the ellipse. To do this, we can
switch to the pen tool. Click about right here, hold control and
click over here, then bring it around the
bottom and close it off. Now switch to the Select tool, hold shift and select
the ellipse and go to path difference. Next we can make the
top of the rocket more pointed by switching
to the Node Tool, slugging the top node, turning it into a symmetric
node with this button, then holding control and
dragging one of the handles in while making sure to
keep them horizontal. Muscle going to select
the two central nodes, hold control and
move them up a bit. I also turn on the
transformation handles with this button hold shift and drag out
one of the scale handles to spread
the nodes out a bit. Let's make the top
of the rocket red. To do this, we can
switch to the pen tool. Click about right here, hold control and
click over here. Then bring it around the
top and close it off. Let's turn off the
stroke of this pet by holding Shift and clicking the red X here
and give it a red fill. Now let's switch to
the Select tool. Select the rocket path, duplicate it with Control D, hold Shift and select
the red path and go to Path intersection. That's an x. Give the rocket as
circular window for this because
switched the circles, ellipses tool hold Control
and create a circle on here. Let's make it a dark gray. Now switch to the Select tool. Duplicate the circle
with Control D, make it a light blue. Then hold shift and
control and scale it down some Alice hold Shift and
select the other circle. Then the rocket path
go to the align, distribute dialogue and with less like the chosen
as the anchor, let's align them vertically. Next we can add some
fire to the bottom. First, I squish the squares and rectangles tool and create
a rectangle down here, overlapping the rocket, but not quite the same
width as the rocket. Let's make it the same dark gray as the part of the window. Now let's turn it into a
path by going to path, object to path, switch
to the Node Tool. Select the two bottom nodes. Hold shift and drag in
one of the skill handles. Next I switch to
the Select tool. Click this button up here to put the path below the rocket path. Then we'll shift and
select the rocket path and align them vertically. For the fire, because switched the circles ellipses tool and create an ellipse down here. Let's give it an orange pill. Let's turn it into a path
by going to object to path, switch to the Node Tool, select the bottom node and
turn it into a symmetric node. Hold Control and drag in
one of the handle is a bit. We can also hold Control
and drag the node down some switch the Select tool, duplicate the path
with Control D, give it a yellow fill. Then we'll shift and control
and scale it down some. Next week it's like both
of these fire paths. Click this button to put
them below everything. It's **** and select the rocket path and align them vertically. Let's get the racket,
some fins snakes. For this, we can
switch to the pen tool and create a
triangular path here. Let's turn off the stroke. Give it a red. Fill.
This wish the node tool. First, I'm going to select
this node at the left here and turn it into
a symmetric node. Then dragging the handles some also curve all the
segments a bit. That was switched
the select tool and move the fin to where we wanted to put a copy of this spin on the other
side of the rocket. First turn on Snapping,
then drop this down. Go to Advanced Mode and turn on Snapping
rotations centers here, L is click the fin to get the rotation handles
and snippets rotation center to
the rotation center of one of the windows circles. Now we can duplicate
the fin with Control D and click this button
to flip it horizontally, which will flip it on a line going through the
rotation center. Let's also add a
fin in this center. To help with this,
we can use guides as first click and drag
from the top ruler to create a horizontal guide, Let's snap it to the top of the bounding box of
one of the things. That is true, I got
another horizontal guide and snap it to the bottom
of the bounding box. Now switch to the squares
and rectangles tool. Snap to the top guide, then drag down into a
snaps to the bottom guide. And we can switch back
to the Select tool and drag the guides back to
the ruler to remove them. We can also turn off snapping. I'll just turn the
rectangle into a path. Let's switch to the Node Tool. Select the two left nodes, and click this button to
insert a node between them. Let's do the same for
the two right nodes. Now let's take the two top nodes and joined them together
with this button. Then turn it into
a symmetric node, hold control and dragging
the handles some. Let's do the same with
the two bottom nodes. For the center nodes,
Let's select them both. Turn them into smooth
nodes with this button. Hold Control and
drag them up a bit. We can also hold shift and drag the scale Handel was in
or out sum if we want, we can now turn off
this button to hide the transformation handles,
Nexus, switch, the Select tool, hold
shift and select the rocket path and align them vertically to finish
up the rocket, Let's make the whole right
half a darker shade. To do this, we can
turn on Snapping, switch to the pen tool. Snap to the cuspid at
the top of the rocket. Hold control and click down here outside the
bottom of the rocket. Then bring it around the
right side and close it off. Let's turn off the stroke. Make it black and give it
a low opacity like 15%. Ellis turn off snapping. Which the Select tool. Select all of the
rocket objects. Duplicate them with Control. D, turn them into a single
path I going to path union, hold Shift and select
the transparent path and go to Path intersection. Alright, now we can
select all of this in group them with Control G. Click it to get the
rotation handles, hold control, and rotate it clockwise into its horizontal. Then we can shrink it down
while holding Control. Put it about where we want
it on the background. Hold Shift and select
the background and align them horizontally. And if we want, we
can select just the rocket hold Shift and
Control and resize it. Now let's add some smoke coming out from the back of the rocket. To do this, we can
switch the circles and ellipses tool and create
an ellipse in here. Make it white with
a 100% opacity. And create some more
overlapping circles. I want to make sure
not to leave any gaps between the background and
the smoke and the left side. Now select all of the ellipses
and union them together. Then click this button to
put a blow the rocket. And we can resize it a bit if we want to remove the part of the smoke that's
outside the background, let's select the background and duplicate it with Control D, hold Shift and select the smoke and go to Path intersection. We're also going to
remove this part of the background so that it isn't
visible at the edge here. But first let's add a
curve title or slogan or something to the top of the
logo to do this as first, duplicate the background,
make it any color, then hold shift and
control and scale it down. So that'll switch to the text tool and
create a text object. I will type blast
off in all caps. We can choose whatever we
want for the font family, but I'll leave mine
on the default. I will however, set
the style to bold. In order to easily
center the text and the logo need to change the
alignment here too centered. Now switch to the Select
tool. Make the text white. Then we'll control
and scale it up. Next we can select
the text object and the circle here and go to text, put on path to center
the text at the top, because select just the circle, click it again to get the
rotation handles hold control, and rotated into that
sex is at the top. We can also resize this circle by holding Shift and control. Next, we can double-click
the text object to switch to the text tool and change some of these
settings if we like. I'll add some spacing
between the letters. Okay, where we had the
texts the way we wanted. We could turn it into a
path by going to path, object to path, then
delete the circle. To remove the part of the
background under the smoke. We can duplicate the
smoke with Control D, hold Shift and select
the background and go to path difference. Finally, we can add some
stars to the background. I'll switch to the stores
and polygon's tool, change corners to four, hold Control, create
a white star here. I'll switch to the select tool and add some different sizes, duplicates of the star
around the background. Okay, now we can
select everything and group them with Control G. And our rocket logo is finished. Thanks for watching, and
I'll see in the next video.
22. Import Images: In this video, we'll
learn how we can import images into our document. To import images,
we can actually copy and paste one
into our canvas. Or we can drag one from a
folder into our canvas. We can use the import dialog either by clicking
this button in the commands bar or by
going to File Import. Here we can browse
to the location of an image we want to import. If we drop them, this
pile of type box, we can see that we can
import all sorts of images, including Adobe Illustrator
and Corel Draw files. For this video, I'll import
this image of an apple. I've provided this image as
a downloadable resource in case you want to use the exact same image to follow along. But really you can use
any image you want. We can double-click it,
which will bring up this JPEG or bitmap image import dialog and this dialogue. We can choose whether
we want to embed the image or the image. If we embed the image, it will actually become
part of our document. This results in a larger
file size for our document, but also means we're
free to move or delete the original image file
without causing any problems. If we link the image,
on the other hand, we have to keep the image
file in the same location on our computer or Inkscape
won't be able to find it. Next time We tried to open a document that's
linked to the image. For the most part, I prefer
to just stick with him dead. We can also change things like image DPI and image
rendering mode. But I'll just go
ahead and click Okay. Now the image is
in our document. We can move it around, scale it, and rotate it just
like with any other objects. We can't however, change it into a path or modify the nodes because it's
not a vector image. And a later video, we'll see how we can vectorize an image. But for now, if we want, we can trace around
it with the pen tool. Okay, that's how we can
import images into Inkscape. Next, we'll learn how to export our drawings. See you there.
23. Export Drawings: In this video, we'll
learn how we can export our drawings and start using
them outside of Inkscape. Start by creating some objects. To export our drawings, you use the export dialogue, which we can open either
by clicking this button, the commands bar, or by
going to File export. The first tab we have
in here a single image. With this, any parts
of our drawing WE export will be placed
in a single image file. And our options are to export every object in our document, all the parts of our drawings
that are inside the page, all the objects
we have selected, we can define a custom
export area here. At the bottom here, we get a preview of what the export
an image will look like. We get this for each
of the export modes. As you can see in the page mood, the size of the export
an image will be proportional to the
size of the page. And any objects that
aren't fully inside the page will have parts cutoff. We also have this export
selected only option here. When this is off, it
will export all parts of the drawing that are
within the export area, regardless of whether or
not they are selected. If we check this, selected
objects won't be exploited. Another thing with this is that if we squish through
selection mode here, when this option is unchecked, to export this part of
the unselected objects that is inside this
selection box. If we check this, however, it won't export that part. And the image size section, which is available
for every mode, we can see and set the exact pixel size of the
exported image. This is helpful in case
we make our objects too big or too small
and the Canvas, and we want to make
the export an image a different size without having to re-size the
objects themselves. So if we want smaller images, for example, we can decrease the size of the
width or height here. And notice that is also changed the other value by
the same proportion. An easier way to do
this is by changing the DPI value here.
The default is 96. And if we want the image
to be half the size as the area we're exporting. Because simply change the DPI
to half of 96, which is 48. And because we're working
with vector graphics, we don't have to worry
about quality loss when changing the sizes. And the batch export tab, we can export multiple
images at once. With selection
mode, we can export each of the selected objects,
two separate images. With layers. We can export all
objects inside each layer. And with pages, we can export all objects inside each
page of our document. Creating multiple pages is a new feature of
Inkscape version 1.2. And we can do so with
the page tool here. At the bottom of the
export dialogue. You choose what format
we want to export to. Png is the default. We have a few other
options as well. We can also set a
location and file name for the image here.
Then we can export. Okay, that's how we can
export our documents. I'll go ahead and
close up this dialogue now. Now see in the next video.
24. Clipping & Masking: In this video,
we'll learn how to clip and mask our drawings. To start, we need to
create two objects. For clipping. We put
one object on top of another, select them both. Then either right-click and
choose Set clip or go to Object clip. Set clip. What this does is it
uses the top objects to clip out the parts of the bottom objects that are outside of it. This is treated as one object
so we can move it around, scale it, rotate it,
and change the color. Because the object I
clipped is a rectangle. I can go to the squares
or rectangles tool and still use the rectangles
handles to modify it. We can actually do this
with the node tool as well. Another thing we can
do with the new tool is click this button here
and the control is bar. Now we also get handles for
editing the object we used as the clip. To release the clip. You can either
right-click it and choose released clip or go to Object, Clipping,
release clipping. Now we have our
two objects back. We can also clip a
group of objects. So we can group both of these
together with Control G. Credit another object
on top of them. Select them all. And cyclic. Another thing we can
do is invert the clip. To do this, we go to Objects, clip, set, inverse clip. This is actually a path effects. If you open the path
effects dialog, I'm going to pat, pat effects. We can see this has the power clip-path effect attached to it. And we can enable or
disable the inverting. We can also clip images, how I import the image of
the apple we use previously. We can now draw a path
around the apple. Select the path and the image. Insert the clip. Now we have just the apple. Masking is similar to clipping, but with the addition
of transparency, the closer to black
the top object is, the more transparent
the bottom object will become closer to white
the more opaque. So for example, big release
the clip of this image. Now go ahead and
delete this path. Credit an object over the apple. Turn it black. Give it a linear gradient. Raised the alpha channel
the last step all the way up and change it to white. Hold shift and click the image. And either right-click and
choose Set mask or go to Object mask, set mask. So Eclipse the image. And the apple is going from
more transparent on the left, two more opaque on the right
has similar to clipping. If we switched the node tool. You can toggle on this
button and modify the mask. I'll turn both of these
backoff. To release the mask. We can either
right-click and choose Release Mask or go
to Object mask. Released mask. We can use an image
as the mask as well. For this our input, this
grayscale landscape image. I've included this image
as a downloadable resource so you can use it
to follow along. You can also use a
different image, but keep in mind that this works best with grayscale images. Okay, now let's create
an object to mask. Let's give it a different color. Let's raise the image to
the top with this button, select them both and set mask. We can also invert the mask
as first released the mask. Then let's do inverse
masking by going to object Mask, set inverse mask. Like what the inverse clipping, inverse masking
is a path effect. However, it doesn't
work straight away like inverse clipping does. To get it working,
we have to squish the path effects dialogue and check Invert Mask down here. Now it looks better with the mountains being
the more opaque parts. Homer thing about
clipping and masking is that if we blur a
clipped or mask objects, the blurring gets
clipped as well. However, if we group this first, it's not treated like
a normal objects. So if we blur it, it works
like with the normal objects. If we ungroup it, the blurring goes back
to being clipped. Okay, I'll see you next video.
25. Draw 3D Boxes: In this video, we'll
learn how to create 3D boxes with a 3D box tool. The 3D bucks towards
located here, and it has this shortcut X. We click and drag, you can start creating a box and perspective. Release the mouse. We get these vanishing points. The x axis vanishing point is at the center of
the pages left side. The z-axes point is
at the center of the right side and the y-axis
is by default parallel, so it goes off to infinity. If we drag this X in
the center of the box, it can move the box
and perspective have you can use the
handles of the corners to resize it along
the different axes. How do you control as it's
constrained the sizing? Let's create another box
inside the page this time. Notice that the
vanishing points are the same positions
as the other box. And if we move one of
the vanishing points and moves it for the
other box as well. If you only want to move
the vanishing point for our selected box, you can always shift before
dragging the vanishing point. If you hold Shift and
select the other boxes, well, because Snap they're vanishing points back together. And the controls bar, we can change the angles
of the lines on each axis, but only if they're parallel. We can make the others
parallel as well. Or make it so that none
of them are parallel. Now the y axis vanishing
point is way up here. If we squish the Select tool, you can move a box around without changing
its perspective. Also a 3D box objects. It's actually a group
of objects with each side being an
individual object. But instead of
double-clicking it to enter the group like
with a normal groups, you have to hold control
and click the box, which will let us select
individual sides. And we can re-size them, move them, and
change their colors. If you will control an odd because cycled through
the objects at that location and z order allowing us to select
the hidden sides. This actually works for
all types of objects, not just 3D boxes. We can still go back
to the 3D box tool and move this box
around in perspective. That's how we can
work with 3D boxes. See you in the next video.
26. Pick Colors: In this video, we'll
learn how we can use the color picker tool to
pick colors from the Canvas. First, let's create some objects and give them different colors. The color picker tool is
located here and it has the shortcut D. With this tool, if we have an object selected, we can click on any
color in the Canvas. It will change the
selected objects, fill color to that color, shift and click a color. It will set the selected objects stroke color to that color. If we all ought to choose the inverse of the picked
color as the fill color. We look at the color wheel here in the fill and stroke dialogue. The inverse of a color, it's just a color
that's on the opposite side of the color wheel holding Alt and shifts to set the stroke color
to the inverse color. In the control bar, we have two options
under opacity, Pitt can assign when peak is on the top Pig both the color and
the opacity that we click. When a sign is on
the picked opacity while some get applied to the
selected objects opacity. So right now, if we lowered
the opacity of one of these objects and other objects, switch to the color picker tool. It could be object
with transparency. The selected objects fill is now also partially transparent. But if we undo that
and turn off assign, think could be object
with transparency, the opacity of the selected
object doesn't get affected. The fill just gets the same hue, saturation, and value
as a color we picked. If we undo again
and turn off pig, click the transparent color, the selected objects opacity
also doesn't get affected. But now the fill color becomes the exact color the tool picked, which is this light blue, also assigned, doesn't work
unless pick is turned on. One more thing with
the color picker tool is that if we click and
drag over some colors, will set the selected
objects fill color to the average of the
colors under the tool. You can do the same
for the stroke by holding shift as we click and drag. I'll see you
in the next video.
27. Fill Empty Areas: In this video, we'll
learn how we can fill an empty areas between objects by using the
paint bucket tool. The Paint Bucket Tool is
located here and it has the shortcut you prefers
does create some objects. Let's make it so they have
an empty area between them. Like this. Now we can de-select everything, switched to the
paint bucket tool. Choose a color and click this empty area to fill
it with that color. This is actually a new path. We can also use the paint bucket tool to create a new path with a different color on
top of an existing objects. If we move it, you can see that it doesn't fill in the
parts where the object was being overlapped
by other objects. The controls bar for
the paint bucket tool, because sandwich channel we
want the tool to work with. If we set this to
red, for example, we can only fill an objects that have some red
in there coloring. We can't fill an
objects with no red. I'll undo and set this
back to visible colors. Next we have threshold. Let's change this object
to a different red than the other to de-select, switch back to the paint bucket
tool and choose a color. Right now if we click
one of these objects, it will only fill
in that object. However, if we undo, set the threshold
to something high, like 80, think like one of the objects will fill all of the red objects that are
touching it as well. Because giving the
tour high threshold makes it bleed the
objects are the same. Read our undo and set the threshold back
to the deep part of 15. The next setting is
grow, shrink. By. With this, we can make
the resulting path either larger or smaller. Next we have close gaps. Let's turn off snapping for now. And move this object so it's not quite touching the
top object anymore. Now let's de-select, switch to the paint bucket tool and
click in the empty area. Nothing happens at the moment
because of the gap here. We can try changing
the close gaps setting to fill it even
with a gap present. There we go. Finally, we have this
button that will reset all the settings,
the defaults. This would be a great
tool to use for quickly coloring parts of
a sketch or something. Okay, I'll see you next video.
28. Tweak & Sculpt Things: In this video, we'll learn
how to use the tweet tool, which is located
here in the toolbox. And as the shortcut W, first need to create
some objects. How credit couple
of small objects. Then I'll select them both
and stamp them a bunch of times by moving them to different locations and
pressing the space bar. The tweet tool only works
on selected objects. So let's select all of these. Now let's activate the tweak to the default mode we start
on is the move mode. With this mode, if
we click and start dragging any selected
object that comes within the orange circle around
our cursor will move in the direction in which we first started
moving their mouse. We can release the mouse button click and drag in a
different direction, move the objects
in that direction. The size of the
orange circle around our cursor depends on
this width setting here. The width is also
independent of Zoom. So zooming in or out as another way of
changing the width. Forced just refers
to how much of a force is applied to
the objects we touch. Alright, let's check out
the other modes we have. The second mode is move IN OUT. Clicking and dragging will cause the objects move
toward our cursor. Shift. However, what caused them to move away
from our cursor? Next we have the
move jitter mood. This will randomly scattered
the objects around. The next mode is scale. Normal dragging or
shrink the objects. And Shift dragging were enlarged in mode number five is rotate. With this, we can
rotate the objects either clockwise or
counterclockwise. If we hold Shift, then we have the duplicate
slash delete mode. No more dragging would
duplicate the objects we touch. If we squish the move
jitter mode here, because scattered them around. If you go back to the
duplicate slash delete mode, holding Shift, let's just
delete touched objects. Alright, the next
four modes we have here are four paths for use them on shape objects will automatically
turn them into pads. These modes are good
for sculpting objects. The first path mode is push. This will push parts of paths in whichever direction
we move the mouse. The next mode is shrink, grow. Normal dragging would
shrink the pads and Shift dragging
or make them grow. Next we have the
attract repel mode. Normal dragging will pull
the paths toward the cursor. Shift dragging, we'll
push them away. The final path mode is roughen. This will add a lot of
nodes to the paths and move the nodes around
to refine the shapes. It's also pretty CPU and sensitive and can easily
cause Inkscape to crash, so we have to be
careful with it. We can also lower
this fidelity setting here to create fewer nodes
with the path moves. The last three modes affect
the colors of the objects. The first one is paint mode. With this, we can
click a color in the pallet to apply
it to the tweet tool. Now as we drag over objects, their colors will start becoming closer to the tourists color. We can also set which color channels you want
to effect here. The next color mode is Jitter. This will randomly apply
colors to the objects. The final mood is blur. Normal dragging will
increase the blur of the objects and Shift
dragging or decreasing. Okay, That's how I
used the tweet tool. See you next video.
29. Spray Things Around: In this video, we'll learn
how to use the spray tool, which is located right here. It has the keyboard shortcut a. To use the tool we need
to create an object. And now with the
objects selected, let's activate this grade school with the spray toward does is it allows us
to quickly create copies of this selection
by clicking and dragging. If we change the width of the tool and the control is par. Because spray over a larger
area or smaller area. Like with a tweak tool, the width is
independent of Zoom. So zooming in or out is another
way to change the width. Mount here lets us change how many copies are created when we spray with rotation, which goes from 0 to 100, we can add a random
rotation to the copies. With scale, which also
goes from 0 to 100, we can add a random scale
amount to the companies. With scatter. If we add this set
to a large number, we also make the width large. The copies will be scattered
all around the tours width. If we set scattered to something
low, on the other hand, the copies will
stay pretty close together with a low scatter
and a lower focus here, the copies will stay near
the center of the tool. With a high focus. There were staying near
the edge of the tool. We said all these
back to the defaults. Let's also go ahead and delete all but one of these objects. This like the remaining objects, switch back to the
sprayed school. Next we have these
two toggle buttons here with, with the icons. When the OpenAI
button is turned on, we're able to spray in areas
that aren't transparent. So if we create a
large objects here, change the color, select
the other objects. Switch back to the spray tool. We can spray inside this object. If we turn this off, however, we won't be able
to spray in here. The closed eye button lets a
spray and transparent areas. This includes the empty
areas of the canvas. We turn it off, we
can't spray here. The next button or prevent
overlaps between colors. This only works if we have only one of the I
button is turned on. Let's leave just the OpenAI went on that when we spray in here, the copies won't overlap. They also won't overlap
the edges of this object. I'll turn this one back off and turn the closed
I've been back on. The next button also prevents
copies from overlapping. With this enabled big instead an offset between
the copies here. If we set it to something low, we're starting to get
some minor overlapping. Enabling this eyedropper button will let us change colors, have copies in different ways. For this, we need to create some different colored
objects together. Now let's get one of
these small objects here. Let's give it a stroke. Now let's switch back
to the sprayer tool. If we enable this
first new button, we get the color
of the copies will change to whatever the color
is underneath the tool. And by default, it picks from the center of the tool
with this point enabled. If we turn this off, now we will use an average of all the colors under the tool. This next button is similar, except this for the stroke color is pointing here will give us the inverse of the
color under the tool. This works for the
fill and the stroke. We also get this create
tower clones dialogue, which gives us some
more advanced options for creating clones
in different ways. I invite you to try
all of this out, but we can go and
close it out for now and turn these
buttons backoff. Finally, we have
some different modes here at the start of
the control is par. The mode that we've been
using is the copy mode. This creates duplicates
to the original object. Modifying the original object
doesn't modify the copies. The next mode, on the other
hand, is the clone mode. With this, who will create
clones of the original? If you modify the
original object, now, go modify the
clones as well. The next mode is path mode. We sprayed with this mode, it will turn all the
copies we create into a single path by performing a union PAT operation on them. The final mood is delete, which as the name suggests, allows us to delete copies. Okay, that's how we can
use the spray tool. I'll set mine back
to the default mode. Now see in the next video.
30. Erase Parts of Drawings: In this video, we'll
learn how to use the eraser tool to erase
parts of our drawings. Let's first create
some objects to erase. I'll create one object and stamp it around
with the space bar. We have any objects selected. The eraser tool will only
work on those objects. However, if we
deselect everything, we can use the eraser tool and all of the objects
in our Canvas. Alice activate the eraser tool, which is located here
and has the shortcut Shift E. And the
control is part. We have three modes
to choose from. The default mode,
delete is the simplest, and it lets us delete any
objects we touch with this red line after
we release the mouse. The second mode is
the cut-out mode. And unless I see
race just the parts of paths that we touch, it will also turn into paths and each shape objects we touch. With this mode. We also
get some settings up here. For example, we can change
the width of the red line without any, anything
over 0 omega. So dragging it towards slowly
will give us a thick line. And dragging it fast
gives us a thinner line. Negative numbers will
have the opposite effect. 0 will make the width the
same regardless of velocity. With caps, it can make
the ends of the line either blunt or rounded. Tremor were rough and
the edges of the line. Mass refers to how much the
line lags behind our cursor. Setting it to a high number
will make it like a lot, but it allows us to
get a smoother result. This toggle button here, make it through the
tool performance, the break apart
path operations on any paths that we
completely cut through. If we switch to the
Select tool right now and select one of the
paths that we cut through. You can see that this
is still one object. But if we de-select, switch back to the Eraser
tool and turn on this button. Now when we cut
through a path to break it apart into
separate paths. The last mode we have
is clipped mode. This is similar to
the cut-out mode, except it doesn't
actually cut the objects. Instead, it uses the line
to clip the objects. So if we right-click
this object now, you can release the
clip and then we have the original object and
the patho used to clip it. This mode allows us to work
with other types of objects, like imported images that
we can't turn into paths. So we can import an image, then use the clip mode
to erase out part of it. The cut-off mode, however, doesn't work on images. Okay, that's it for
the eraser tool. I'll put it back
down Delete mode, and I'll see you the next video.
31. Create Patterns: In this video,
we'll learn how to create our own patterns. As we learned back in the
video about drawing shapes. If we create a shape and go to the fill and
stroke dialogue, the Fill Tab and the
stroke paint tab. We have this point
and we can click to add a pattern to our objects. We can then select
from a list of patterns Inkscape
provides for us. If we squish the new tool, we can move the pattern
on the objects, scale it, and rotate it. Another thing we can do is see what objects that pattern uses by going to Object Pattern,
pattern to objects. For the cloth pattern, we now get this
repeatable image object. If you want to create
our own patterns, it's a pretty simple process. First we create the objects we want to use as the pattern. Then we select them
all and go to Object, Pattern, objects to pattern. This creates a pattern
using the objects we add selected then
creates a rectangle and applies that pattern to it. And the pattern is
placed in the list here. If we go to the new tool, we can modify the
pattern on the object. If we create another object, click the pattern
button in the fill and stroke dialogue
will automatically apply the new pattern to it. However, it makes the
pattern really big. Now, if we switch
to the node tool, we might have to zoom out to see all the handles
for the pattern. If you want to create
a striped pattern like the one Inkscape
provides for us, we can create a rectangle, duplicate it with Control D, turn-on snapping,
snap the duplicate to one side of the
other rectangle. Change the color, or even turn
off the color if you want. Then select them both. And
go to Object, Pattern. Objects pattern. Now we
have a striped pattern. For polka dot pattern, you can create a square, then a circle in the center. We can use the align
distribute dialogue to center these perfectly. If we want muscle going to turn off the
fill of this square, then being careful
not to de-select the square or else we won't
be able to select it again. Let's hold shift and
click the circle and turn them into a pattern. Now we have a polka dot
pattern with transparency. Okay, that's how we can
create patterns in Inkscape. I encourage you to try creating your own patterns, and I'll
see you the next video.
32. Apply Filters: In this video,
we'll learn how to apply filters to our objects. Filters are located
under the filter's menu. And as you can see, we
have a ton of them. So we'll just go over a
few of them in this video. First, let's create
some objects. We can also apply
filters to images. And we can apply filters to
multiple objects at once. So let's select them all.
And the bevel is category. It can make the
objects look like Milton jelly for example. Or give them a raise the border. The filters in the
lowest category could be useful for creating
things like buttons. Under blurs, we had
this blur option. Lets us add a Gaussian blur to objects like we can do in the
fill and stroke dialogue. Whoever this will bring
up the blurred dialogue. If we check live preview here, we can get the objects
different amounts of horizontal blur
and vertical blur. If you want to apply the
filter to the objects, we can click Apply or we can just click
Close to cancel it. Useful filter under
color is colorize. This lets us do things
like add lighting to objects and change the colors. As you can see,
this filter is more noticeable on image objects. Under distort, you can get the objects of
report appearance. We can also wrap
in the registers, film, grain, and the
image effects category. It's pretty useful for giving objects or grainy appearance. Under Image paint and draw. Cross engraving is
a useful filter for making images look like they
were drawn by hatching. In the overlays category, I often use the
noise fil filter, which lets us give
a grainy texture to objects in various ways. We can also change
the color of it. Under protrusions. They could do things like add fire around the
borders of objects. Here we didn't give them
an ink bleed appearance. With the scatter filters, we can make objects look
like cubes or like leaves, under Shadows and glows. You can get various types of shadows and close to objects. In the textures category, we can make objects
look like tree bark, like ink paint, or
like watercolor paint. We can also add multiple
filters to objects. Another thing to
note is that adding filters doesn't actually
change the original objects. So this object is still a
rectangle like a squished into squares and rectangles tool
and modify it like normal. If we wanted to remove filters
from selected objects, we can go to filters, remove filters at the bottom. I recommend trying out
all the filters and various objects. Let's
see what they give you. If you're feeling
really experimental, you can open the filter
Editor dialog here. We can modify an existing filter or even try creating your own. Anyway, that should
do it for this video. So I'll see you in the next one.
33. Apply Extensions: In this video, we'll
learn how to use extensions to enhance
our drawings. Extinctions are located
in the extension is menu, like with the filters.
We have a lot of them. So we just go over some of
the more useful ones here. The first extension
we'll look at is under the Generate from pet
category called interpolate. Interpolate lets us do
a linear interpolation between two or more paths. So first, let's create
a couple of objects. Let's make them
different colors. Let's select them both and turn them into paths by going
to path, object to path. Now let's go back to the
interpellate extension. Let's go ahead and check
live preview here. Alright, so we get a
group of new paths here that start out looking more
like the first object, can become more and more
like the second objects. The number of paths
that get created depends on this interpolation
steps value here. Also, the paths are
currently all using the color of the first
path we selected, but we can interpolate
the styles as well by checking this box for exponent. If it's lower than one, the new paths will become
more and more bunched up as they get closer to this
second path we selected. Setting exponent to a
number higher than one. We have the opposite effect. I'll set it back to
the default of one. We also have two different
interpolation methods we can try out here, which will give us
different results. This extension is actually
great for creating 3D texts. Let's click Apply
and Close this off. For now. Let's create
a text object. Let's make it bigger and
turn it into a path. Ungroup the paths, and
union them together. Now let's duplicate
it with Control D. Bring the duplicate down here and change the color. Let's select them both. And because we previously used the interpellate
extinction, you can just go to Extensions previous extinctions
settings to reopen the interpolate dialog,
check the preview. We can add some more
steps to make it smooth. Right? Now we have 3D text. And actually the
result depends on the order in which we
select the objects. So if we undo that, Let's select the
bottom object first, then hold shift and
click the top one. And we could just go to
Extensions, previous extension. This time. We get the top texts
object L Frank. Next in the modified path category extension
I use often is jitter nodes randomly shift the nodes of a path to
give it a rough wavy look. First, we'll need a path
with a lot of nodes. So what we can do is
we can create a shape, turn it into a path, squished to the Node Tool. Select all the nodes, and click this, Insert new nodes button in the Control
bar a few times. Now let's switch back
to the Select tool and go to Extensions, modify path, jitter nodes. Check live preview. Now we can go in here and play
around with the settings. You get different results. Okay, Next, and it takes category a useful
extension is Lorem Ipsum. This lets us create
placeholder text. We have a shape selected
like we do now, let me check live, preview your credit texts object
inside the shape. But if we de-select everything and go back to the
Lorem Ipsum dialogue. Who are fluid the
text inside the page. And we can change things like
the number of paragraphs, the number of sentences
per paragraph. Alright, so those
are just a few of the many extensions available
to us and Inkscape, like with filters, I encourage you to go through
and try them all out. There are many more useful ones besides the ones
we covered here. Okay, I'll see you next video.
34. Vectorize Images: In this video, we'll
learn how to use the Trace Bitmap dialogue
to vectorize an image. To start less important image. I'll use this apple image again, but feel free to
use any image you want. Let's make it bigger. Now with the image selected, let's go to Path Trace Bitmap. To open the Trace
Bitmap dialogue case, we have three tabs here. Single scan, multi-color,
and pixel art. Single scan will
produce a single path. Multicolor reproduce
a group of pads, letting us get a more
detailed results. And pixel art will, of course, that is vectorized pixel art as first see what we
have in single scan. So at the top we have
different detection modes. We can choose from.
Down at the bottom, you can see a preview
of the results. In escape version 1.2,
we had the option of making a preview
update automatically as we change the settings. If this gets too slow, we can turn it off and
just click update preview. Whenever we're ready
to see a preview. This is what the brightness
cut-off mode gives us. Basically vectorizes
the parts of the image that are darker than this
threshold value up here. You could change this
for different results. If you'd like what we
see, we can click Apply. And then we had this vectorized
version of the image. This is a single path. Let's delete it and
select the image again. Back in the Trace
Bitmap dialogue. The other detection modes
we have or edge detection, which will attempt to create
line art from the image. Color quantisation, which will separate the image by the number of colors
we choose here. These two auto trace
modes don't give us a preview, so we
have to click Apply. This one will make the path and dominant color of the image. Central line tracing is another option for
creating line art. Up with the mood back
on brightness steps. We also have the option to
invert the tracing result. This basically gives us the background with
the apple cut out. These details options
here as well. If we hover over them,
you can see what they do. Am I experienced the
resource of changing? These are very subtle, so I don't use them much myself. Finally, we have this User
assisted trace option here. This was called SiO x and previous versions
have Inkscape. And unless there's vectorized just a particular
part of an image, it's actually works better
in the multi-color tab. So let's go ahead
and switch to it. As you can see in the preview, multicolor lessons get much
more detailed results. However, is quite slower than a single scan because it
creates multiple paths. The number of paths it creates is what we choose
for scans here. So the minimum is eight paths. This is the result we get with
the brightness steps mood. Let's go ahead and click Apply. Okay, so here's the result. As we can see in the status bar, this is a group
of eight objects. You can double-click
the group to enter it and access the
individual paths. The next mode we have as colors. With this, we can get some
of the colors of the image. And the Tracy Grace is just a grayscale
version of colors. And auto trace here
is extremely slow and often causes Inkscape to
crash, so I won't try it now, some options we have
here are smooth, which will apply a Gaussian
blur to the resort, making a smoother, it's pretty difficult to see
the difference though. For stack. If we do the
trace without stack checked, there's some gaps in the pads making it somewhat transparent. With stack checked, it will
attempt to fill in the gaps. We move background here actually removes them
brightest path and the group. This is useful if the
image were using has a background that is close
to white, like this one. So if we click Apply, now we get just the apple
with the background removed. Finally, let's
check out the user assisted trace option here. With this, we can draw a path
over the part of the image we want to cut out and it
doesn't have to be perfect. Give the path that fill color. This is the path and the image. And click Apply. If we move the path
out of the way, we have just the
part of the image we drew the path around. This actually also as a white
background to the resort. So we can undo all of that. Select them both again. Then check remove background
before clicking Apply. Now removes the background. Okay, that's how we
can vectorize them, is just with the Trace
Bitmap dialogue. We'll see how we
can use this to add texture to our drawings
in the final project. I also encourage you to try this out with other images and to also try vectorizing some pixel art with
the pixel art sat. Be aware however, that this can create up to one path per pixel. So if you use any images
that are too large, it will be extremely slow. Alright, I'll see you
in the next video.
35. Poster Project Overview: Congratulations on making it to the final project
section of the course. In this section, we'll use
what we've learned throughout the course to create
a retro style poster. There'll be a lot of steps
to creating the poster. So we'll split it up into
several different videos. First, we'll work on
the background of the posterior by
giving it a sky, ocean, sand, and trees. After that, we'll
create the VW bus, also sometimes
called a hippie van, will then add some extra
details to the bus, including giving it a
pattern along this side. After we're finished
with the bus, will create some texts with a 3D look at the top
of the posterior. Finally, we'll use a couple
of different methods to add texture to the posterior
muscle going to provide the resorting SVG
file for each part so that you can
use them to follow along with the videos
if you'd like. Okay, I hope you're
ready to get started because in the next video
we'll jump right in. See you there.
36. Draw the Background: In this first video for
the poster project, we're going to create
the posters background. And to make things easier, who used the page as the
size of the background? If you want, you can always use the Document
Properties dialog to change the size of your page as well as make it landscape. But I'll leave mine as is. I will however, turn off the border so it
doesn't get in the way. We're also going
to use liters in this project to make it easier
to keep things separated. So let's open the layers
and objects dialog by going to Layer,
layers and objects. Let's first double-click
the label for later one. Let's name it background. Let's also add a sub layer to this layer by
clicking this button, making the position as
sub layer of current. Let's name is Skye. Okay, That's good
enough for now. We'll be adding more
layers as we go. So to begin with snapping
to page borders turned on with the sky layer selected. Let's create a rectangle
over the entire page. This is going to be for
the sky, of course. So let's switch to the
fill and stroke dialogue. Now give this a
desaturated cyan fill. Let's give it a linear gradient. Now let's switch to
the gradient tool. Drag the first step to
the top of the page. Then hold Control and drag the other staff to the
bottom of the page. Let's raise the alpha
channel all the way up. Now give this a
greenish yellow fill. Okay, Now let's create this son. I switch to the circle
is an ellipsis tool. Hold Control, and drag it
here to create a circle. Now make this yellow. Let's give us a linear gradient as well. Let's switch to
the gradient tool and put the opaque stop
at the top of the circle. Then we'll control and move the transparent stop down here. Let's make it a bit
less transparent. Okay, now let's switch
to the Select tool, hold shift and click this guy and go to the align and
distribute dialogue. And with less like the
chosen as the anchor. Let's align these vertically. Muscle went to hold control
and move this up a bit. We can also add some clouds
if we want the switch to the circles and ellipses tool and draw an ellipse
somewhere in here, but not too far down
because we want to be adding some water
and sand down here. Let's make it white. Now let's create some more ellipses
until we have a cloud shape. Let's turn off snapping for now. What the bottom of this
to be mostly flat. So let's switch to the pen tool and create a path
for the bottom. We can add a little bit
of curvature if we want. Then is bring it around
and close it off. Let's turn off the stroke
and make the fill white. Now we can select all of this and turn it into a single path. I go into path union. Let's lower the opacity a bit. Now we'll follow the same steps for a couple of more clouds. For the union operation, we can use the
shortcut Control Plus. Now let's switch the
layers and objects dialog. Let's add another
layer. You want this one to be above
the sky layer. Let's name it ocean. Alice
turn, snapping back on. Let's draw rectangle down here. We don't have to go all
the way to the bottom because we will be putting
some sand over this. Let's raise the
opacity all the way up and give it a dark blue fill. Now let's give it
a linear gradient. Let's bring the first
step to the top. This one to the bottom. Let's raise the alpha
channel all the way up. Make this a lighter blue. Alright, we also wanted to
create a thin rectangle up here that we can use to blend
in the ocean with this guy. Let's first turn
off path snapping and custom mode snapping. Think credit, then
rectangle here. Let's give it a linear gradient. For the first step,
Let's move it up here. Let's switch to the
color picker tool and make it the same color
as the sky in this area. Now, switch back to
the gradient tool, hold control and move the
other stuff down here. Not quite below the
bottom of the rectangle. Let's raise the Alpha
all the way up. We can also add some
paths in here for waves. Let's turn off the stroke. Make the fill white
and lower the opacity. So now let's create some more. If we go over the edge of the
page, like with these two, we can select the water objects and duplicate it with Control D, then hold shift and click one on the wave paths and go
to Path intersection. We can do the same
for the other one. Okay, now let's add
another layer above this. Let's call it sand. Does create a rectangle
overlapping the bottom of the ocean and going all the way to the
bottom of the page. Let's raise the
opacity all the way up and give it a
light brown fill. Like with the other parts. Let's give this a
linear gradient. We the first step to the top, the last top to the bottom. That's raised the
Alpha all the way up and make this
a slightly darker brown like we did with
the ocean and the sky. We also want to put
a rectangle here to blend the sand
in with the ocean. Let's give it a linear gradient. We the first step up here and make it the color
of the water here. But this time we can actually
make this closer to white. Now let's move the
other stuff near the bottom and make it the color of the sand here. Okay, one more thing we can
do with the background for now is add some palm trees. Let's add another layer
above this one called trees. Let's turn off snapping
for the moment. Switch to the pen tool and create a trunk coming up from
this side of the posterior. We can always shift the
credit customer node here. Click here, click
drag down here. Hold Shift again
and close it off. Let's turn off the
stroke. I'll give this a very dark blue fill. I'm also going to
switch to the node tool and reshape this a bit. I'll turn this
node into a smooth node by clicking this button, then adjust the curvature. Can now switch back
to the pen tool and create some leaves. Let's turn off the stroke and make the fill of the
same color as the trunk. Let's create a few more leaves. You can go in with
the select tool and adjust the
leaves if necessary. Okay, now let's select
all of the tree pieces. Let's group them with Control G. Now we can resize and
reposition the whole tree. Now let's duplicate the
tree with Control D. Press this button
and the control is barge or flip it horizontally, then move it over and tweak
the size and rotation. And we can also double-click it to
enter the group and change up the leaves some. So doesn't look too much
like the other tree. Finally, to hide the
parts of the trees that are extending
beyond the background. You can use clipping.
To do this. Let's first select
the other tree to get out of the
current tree group. Then it's turn snapping back on credit rectangle
over the whole page. You can make this
whatever color we want. Now is hold Shift and
click both trees. Then right-click and
choose Sutcliffe. I'm going to hold control and bring both trees
down just a bit. All right, that should do it for the background at the moment. The next video we'll draw
the bus. See you there.
37. Draw the Bus: In this video, we'll start
with the foreground of the posterior by drawing the VW bus. Begin, let's go to the
layers and objects dialogue. Make sure we're on
the background layer. Let's lock it so that
we don't accidentally create any objects inside
it or move things around. Alice create a new layer above the background layer
called foregrounding. Everyone to create a sub
layer in here called bus. Okay, to start creating the bus, let's first turn off snapping does create a long
rectangle in here. I'm going to change
the color just a bit. He wants to be able to
reshape this using its nodes. So let's turn it
into a path by going to Path, Object Path. Now switch to the node tool. First I'm going to double-click
here to add a new node. Then I'll hold Control and drag the top-left node
to the right a bit. Now I'll drag this
segment out to round it. We can adjust the
handles as well. Okay, Let's Brown
the bottom-right some which we can do with
the corners path effect. So let's go to
path, path effects. Then click the Add button
and choose corners. Finished last chamfer. Now let's drag up from
this node to round the corner. Okay,
That's your work. Let's turn it back
into a normal path by going to Path, Object Path. Let's now create
another rectangle overlapping the top
of this object. I'll make this a light grey. Hello squish the Select tool, duplicate the bottom
object with Control D, which shift and
click the rectangle and go to Path intersection. Actually want this to
curve down around here. So switch to the pen tool and
create a curved path here. Let's bring it back
around and close it off. Let's turn off the stroke. Make the fill the same
as the top objects. Then let's duplicate
the red object. Hold shift and click this one. And we can do an
intersection with the shortcut Control asterisk. Then it's like both of these and union them with control plus. Now squished to the Node Tool. Let's hold Control and click this node to turn
into a smooth node. And we can adjust
this sum if we want. Let's create another rectangle overlapping the top of this. Let's make it a darker gray. Then us to an intersection with this in a duplicate
of the path under it. Let's create yet another
rectangle up here and make it so it
comes down below the other objects, some. Let's make it the light gray. Now let's switch to the
selection tool and click the lower one step button here to put it below the
dark gray objects. Next, let's turn this
into a path which the Node Tool hold Control and drag the top-left
node to the right Sam, I'll drag the bottom left
node a bit more to the left. Let's also drag the top
right node to the left. Sum is create another
rectangle overlapping this. Let's make it a darker gray. Let's create one more
rectangle over this. We actually want to
make this one kind of tall because we'll be
cutting off some of it. Let's round the corners of this. Let's make it the light gray. Let's create another rectangle. We're starting near the
center of this one. Make it so it extends
beyond the bottom of it. Sharpen the corners
with this button. Let's make it a different color just so we can see
things better. I'll select both of these. Go to path difference. I'll bring this down some. Let's go to the Node tool
and adjust the nodes a bit. Hold control and
move these up some. Then I'll hold Control and
move this one to the right. More muscle going to
adjust this strip here. Now let's work on the tires. First, this object
is a little short. I think I'm going to
grab the three nodes at the bottom and drag them down. Some, wow, holy control. Okay, That's better. Now squishes circles
and ellipses, tool, hold Control and Shift and create a circle
about right here. Let's make this a darker
version of the buses. Read. Alice, duplicate this with
Control D, make it black. Then we'll control and
shift and shrink it down. So let's duplicate again, make it a dark gray. Streak it down. And we want to cut off the parts
of the first two circles that extend beyond the bus. So let's duplicate
the stars red path. Hold shift and click once on the circles and do
an intersection. Let's do the same for
the black circle. Now, duplicate the tire circle, make it the color of one of
these darker gray strips. Shrink it down. So
let's duplicate again. Pick this one, the
light gray color. Shrink it just a bit. Then
duplicate one more time, make it the middle gray.
Make it pretty small. Okay, now switch
to the pen tool. For this, we want
to enable snapping to object rotation centers here. Snap to the circles
rotation center. Hold control to get a
negative 75 degree angle. Click up here and right-click
to finish the path. Then a snap to this
end node here. Hold control to get a
negative 105 degree angle. Click here and
close off the path. Okay, Let's turn off the stroke, make the field of middle gray. You want to go to
the Select tool and click the path to get
the rotation handles. Then snap is rotation center to the circle is
rotation center. We can now duplicate
this hold Control and rotate it down four times. Let's keep doing
this until we add these shapes all the
way around the tire. Right now we can select all of the tire objects, group
them with Control, G, duplicate it, hold control,
and move it to the right. Let us work on the windows. Let's turn off snapping first. I'm going to create a
rounded rectangle up here. Now change the color to
the dark gray of the tire. Now making more centered. Now let's duplicate this. We're actually going to be
cutting this object out of the bus so that we can see
the ocean through the bus. But for now, I'll just make
it a light blue color. Let's insert this once by
going through path. Instead. I'll just create
another rectangle here, which will be for the
highlight of the window. Let's make the corners sharp, turn it white, and
lower the opacity. So let's rotate it
about 30 degrees. Let's duplicate this. Bring it to the right.
Squish the squares and rectangles tool,
make it a bit thinner. I'm going to select
both of these and make them more
centered on the window. Now let's duplicate
that blue piece here. Hold shift and click one
of the highlights and do an intersection
with Control asterisk. Let's do the same for
the other Highlight. Okay, let's group all of the
window objects together. Then duplicate it and
move it to the right. Well, holding control. Let's
do this a few more times. We're going to be cutting
off the end of this one. But first, let's select all of the windows and go to the line. This should be dialogue. And click this button to put equal horizontal
spacing between them. Now select just the last window here and ungroup it
with Shift Control G. And we can delete the
highlights for this one. Now let's duplicate this
part of the bus here. Hold shift and click
the blue objects and do an intersection
with Control asterisk. Let's do the same for the
other part of the window. Now turn the blue
object White and make it about 50% opacity.
Then it's duplicated. Zoom in some hold
shift and click the dark piece and do a
difference with Control minus. Let's duplicate
this piece again. Hold Shift and click
the bus object here and do a difference. Okay, now we have a window
here that we can see through. Let's do the same with
the other windows. Let's ungroup this
with Shift Control G. Make the blue object
white with 50% opacity. Duplicate it, and do a difference with the
objects beneath it. And again for the other object. Let's repeat for all
but the front window. For the front window
want to make it longer and follow along the curve of the
front of the bus. So first let's ungroup. It. Will need to create a
new border objects. So let's delete this one. To extend this path, we can add another path
to it with the pen tool. First, let's turn on
cusp nodes snapping. Snap to the cusp node here. Hold control and click over
here, then right-click that. Let's continue
creating this path by snapping to this end node. Snap to the cusp node down here. Hold control and
click over here. I think close off the path, like this path and the blue one. And do a union with control
plus to round these corners, Let's add the corners
path effects. Now switch to the node tool. Select these two nodes. Then drag one to
round them both. Okay, let's finalize the defects by going to path object to pad. Let's select both
highlight objects and move them to the left
while holding control. We can turn off
snapping for now. We can also duplicate this one and move it to the right a bit. Okay, Let's duplicate
the blue objects. Make it a dark gray color. Outset at once by going to path outset and click the lower one step button a few times until it's below
the blue objects. Let's pick the blue objects,
white, 50% opacity. Duplicate it. And do a difference
with the gray objects. Duplicate it again, and do a difference with
this part of the bus. Okay, This video is
getting pretty long, so we'll wait until
the next video to add some details to the bus and
make it look a bit nicer. See you there.
38. Add Details to the Bus: In this video, we'll
continue working on the bus by adding
some details to it. First, I'm going to
adjust a few things. I'll select this object here, then squished to the Node Tool. Grab this node and this node, hold control and bring
them up some more. I also feel like the tires
are a bit too small. So I'll select the front tire, hold Control and Shift
and make it bigger. Then I'll ungroup the pieces. Duplicate this part of the bus, Shift and click this object
and do an intersection. I'll do the same
with this piece. Now I'll group all of
the tire pieces again. Delete the back tire, duplicate the front tire or control, and move
it to the right. Okay. Now let's add
some darker windows to this top part of the bus. I want these to be
the same width as the inner part of
the other windows. So I'll select the
inner part of one of them and copy its width value. Now let's create
a rectangle here. Make it 100% opacity, and make it the same color as the border of the lower windows. Let's round the corners. Alice squish the select tool. Now paste the width value are copied into this
objects with box. Let's create duplicates of this for all but the back window. Let's now align these
with a lower windows. Because these two objects
are the same width, we can either align
their left edges, the right edges, or
center them vertically. Let's do the same
for the others. For this one, we want to
align the right edges. I'm actually going to
make this one a bit shorter by switching
to the squares and rectangles tool and dragging this handle to the right
while holding control. That looks better,
I think. Now we can select all of
these upper windows, hold control and move them
up or down if necessary. Hustle resizing this rectangle altered the rounding a bit. So let's go back
to the squares and rectangles tool and fix it. Next, let's get the
bus and bumpers. How to draw a rectangle here
around the corner somewhere. And now we want to cut
out a shape right here. So let's switch to the pen tool. Click about right
here, hold Control, click here, keep voting
control and click up here. Then bring it around
and close it off. Let's now switch
the Select tool, hold shift and click
the rectangle. Then do a difference
with Control minus. And we can go to
the Node tool and adjust the nodes of this
a bit if necessary. Now let's create another rounded rectangle for the back bumper. I'll make the corners
a bit less rounded. Let's turn this into
a path which we can do with this shortcut
Shift Control C, then switch to the Node Tool. Now, drag this bottom left
nodes to the right a bit. Maybe the top ones as well. We want to align the bottom
edges of the bumpers. So let's hold shift and
click the front bumper. Then in the align
distribute dialogue. Let's click this button to
align the bottom edges. I'll move both of
these up some as well. We can also give the
bus or headlight. I'll just create
an ellipse here. And I'll make it a yellow
color like the top of the sun. Next, create a pattern going
along the side of the bus. I'll go with the peace sign. First. I'll create
a circle over here. And the color doesn't
really matter since we'll be using this with a pattern of long
path path effect. So I'll just make it black. Now I'll duplicate this. Make it another
color so I can see it and scale it down while
holding Shift and Control. Then I'll do a difference
in these two circles with Control minus. Now I'll create a thin rectangle going through the center. I'll sharpen the
corners and make this black. Then I'll duplicate it. Rotate the duplicate 45
degrees, and move it down here. Let's align the right edge of this with the right edge
of the middle piece. Now I'll duplicate this piece. Flip it horizontally by
pressing the H key and a line is left edge with the left edge of
the middle piece. That's now a union. All of these straight pieces
together with control plus and center it
vertically with the circle. Then let's duplicate the circle. Hold shift and click this
part and go to Path division. Now we can delete all these
parts on the outside. There are also some small pieces sticking out at the ends. Select the remaining
parts and union them. Okay, let's shrink it
down to the size we want it copied into our
clipboard with Control C. Now we get squished
to the pen tool and credit curvy
path on the bus. Let's right-click
to finish the path. Now let's add the
pattern along path effect to this thing. Click this link to path and Clipboard button and change
pattern copies to repeat it. We can also add some spacing
between the symbols. Now I'll turn off the stroke, and I'll give this
an orange peel. You can ask twist the
node tool and play around the nose and curves
of this path if we want. Okay, when is how we want it? Let's finalize the effect by
going to Path, Object Path. Now we can delete this
simple object over here. Let's now add some lines in here to make it look like
the bus has doors. I'll just create a
rounded rectangle here. Make it the same color as this darker red piece
around the tire. Then I'll duplicate this whole control and
move it over here. I'll create another rectangle
down here for step. I'll make this the same color as the light gray parts of the bus. Let's also give
it a door handle. I'll create a small
rectangle here. Make it the darkest
gray. Duplicate it. Make it the lightest gray. And instead it.
Okay, one more thing we can do is give
the buses shadow. First, let's select
all of the bus objects and group them with Control G. Create a long thin
ellipse down here. Let's lower it below the bus. Make it black. And
give it a low opacity. Allocentric vertically
with the bus. Then is group these because center it vertically
with the page if we want. Okay, that's finally
do it for the bus. Next, we'll work on the
text. See you there.
39. Add Some Text: In this video, we'll add
some text to the posterior. I'll start by adding a
layer above the bus later. Let's call it text. Now let's activate the text
tool and click in the Canvas. I'll type the word simple
life on two separate lines. For the font family, we can use pretty much
whatever we want. But I'll go with Pacific because it has a retro feel to it. I will switch this Select Tool, hold control, and
scale this up a lot. Let's move it onto
the posterior. I want to move light bulb
here and to the right. So let's first turn
this into a path. Then ungroup the letters. Now let's select the letters for life and move them over here. Let's Union all of
the letters together. For the color. I'll
go with the color of the peace sign
pattern on the bus. I'll make it a bit
more yellow though. Let's now create an
outline for this. Let's duplicate it. Now make it the dark blue of the trees. Then let's move it
below the orange text. And outset it a few times with control plus a 0 key at
the top of the keyboard. Let's also get the
texts that 3D look, which we can do with the
interpellate extension. First, let's duplicate this path and bring it down
into the right. Send it to the bottom.
Let's hold shift and click the outline path and go to Extensions generate
from path interpolator. Here we want to
make sure we have duplicate and paths checked. And for interpolation steps, a high number like
40 should be good. Let's check the live preview. I think that looks pretty good. So I'll click Apply
and close this out. We can now delete these extra
paths we have selected. Now select this group
we just created, ungroup it in union
all of it together. Then send it below the text. I also want to close
in this part of the S because it's
a bit distracting. So I'll create a path over
this with a pin tool. Then our union it
with the other path. Okay, Now we can
hold Shift and click the text and group
these together, then resize it as needed. We can align it
vertically with the page. Alright, the texts has done. In the next video,
we're finished up a poster by adding some
textures. See you there.
40. Add Texture: In this final project video, we'll get the posters some
texture to make it look old. Before we do this though, let's create a border
for the posterior. First, let's go to the
layers and objects dialog, select the background layer, create a layer below
it called border. Let's turn snapping back on and create a rectangle
over the whole page. Let's outset it a bunch of times with control
plus the 0 key. Let's make it fully opaque.
Now give it a door. Yellowish fill can always get the Santa grainy texture
with the noise fil filter. First we need to unlock
the background layer. Then to show the objects
in the sand layer, Let's right-click
the main object down here and duplicate it. Now let's go to Filters,
overlays, noise fill. Let's check live preview, play with the settings until
we get something we like. Okay, that'll work.
But I want to squish the noise colored tab and
lower the Alpha channel. Awesome. Alright, I'll click
Apply and close this out. We actually want to make it
so the texture gets more transparent as it
gets farther from us. We can do this with
a linear gradient. This object actually already
has linear gradient. Let's switch to
the gradient tool, like the stop at the top. If we try to lower the alpha
channel of this stuff, however, you can see it also affects the gradient of
the object under it. So let's raise the alphabet gup. Then in the
ingredient list here, Let's click this plus
button at the bottom, which will create a duplicate
of this selected gradient. And let's select a duplicate. We can now change the stops without affecting the
other objects gradient. Now switch the select tool and adjust this
object's opacity sum. That should work.
It's a subtle effect, but I think it
looks pretty good. Now let's add a texture
on top of the whole posterior to give
it a grungy look. First, let's create a layer
above all the other layers. I'll just call it texture. Now let's import
a texture image. I'll go to this
aluminum texture here. I provided this image as a downloadable resource for any texture with a
scratchy look should work. Let's make this bigger.
Let's rotate it 90 degrees. Let's now vectorize this texture with the Trace Bitmap dialogue. We can adjust the
brightness threshold setting until we get
the result we want. I think that looks pretty good. So I'll click Apply
and close this out. Now I'll move the
texture path out of the way and delete the image. Let's turn off snapping and move the texture path onto the
posterior and adjust the size. Now if we hold Alt and click the texture over
the border objects, because select the
border objects. Let's duplicate it.
Then let's go to layer, moves selection to layer. Let's move it to
the texture layer. Now let's hold shift and click the texture and do an
intersection on these. Okay, Let's lower the
opacity of that texture. If we keep it black, it'll make the poster
look dirty and stained. And if you make it
white, it will look like the paint of the
posterior is fading away. I'll leave it for you to
decide which one you prefer, but I'll keep mine like this. Okay, that should do it for the posterior head
for this course. I hope you found everything we learned in this course useful, and I hope you feel
confident enough to use it all to create
your own artwork. You please, if you
have any questions, don't hesitate to ask. Thanks again for
choosing my course and I hope to see you
again in the future. Take care.
 Brandon Grant, Game Developer and Graphic Designer