Transcripts
1. Class Introduction: If you love using Inkscape
and you want to learn how to use it to convert images
into amazing works of art. And this is the class for you. We'll do this using
the incredibly useful Trace Bitmap feature. We'll begin with all the
unnecessary technical stuff, learning how a Trace Bitmap works, and what we
can do with it. After that, we'll
learn how we can apply Trace Bitmap to our work in several different ways by creating two sample projects. My name is Brandon and
I'm a graphic designer and video game developer
based in the USA. Throughout my career,
Inkscape has been the cornerstone of my work and through my
videos and courses, have been teaching
everything I know about Inkscape to thousands of
students have all levels. This class is for anyone with at least a basic knowledge of Inkscape who wants to take their skills to the next level. If that sounds like you, then I'll see you in class.
2. Class Project: Second half of this class, we'll be creating two
sample projects together. For each project, we'll
be using several images. Now provided a zip file
containing all of the images as a downloadable
resource in case you would like to use the same
ones to follow along. However, I encourage you to also try out everything with
a different images. And for your class project, you can either complete
one or both of the sample projects while
perhaps using different images, shapes, and, or colors. Or you can create your own
entirely unique illustration using what we learned
throughout the class. As for where to find images, I typically use either
pixabay.com or pexels.com. The images at both of these websites are
completely free to use for personal or commercial purposes and don't require any
kind of attribution. So you don't have to
worry about running into any copyright issues if
you use them in your work. When you're finished
with your project, don't forget to
submit it because I would love to see
what you come up with.
3. Trace Bitmap: Single Scan Tab: In order to use Trace Bitmap, we need to have an image
imported into our document. For demonstration, I'll be using this image of a dog on a beach. He could find this image in
the downloadable resources in case you would like to
use it to follow along. But of course you can use a different image if you'd like. Okay, so we next need to open
the Trace Bitmap dialogue. To do this, we can
either select the image, then go up to the path menu
and choose Trace Bitmap. Or we can right-click the image and choose Trace Bitmap in here. We now have the Trace Bitmap dialogue open here on the right. At the top of the dialogue, we have three tabs, single scan, multi-color,
and pixel art. In this section we'll
cover the single scan tab. Alright, so in the
single scan tab, we first have a
detection mode setting. The detection mode tells
Inkscape how to go about converting the selected
image into vector paths. E.g. the default detection
mode brightness cut off. He texts areas of the image that are darker
than the value of this threshold
setting and creates a path that encloses
those areas. We can see a preview of what the path will look
like down here. If you don't see
a preview, first, make sure you have
the image selected. Then either check live updates, which will automatically update the preview whenever we
change any of the settings, where could the
update Preview button here to manually
update the preview. Okay, so in the preview here, everything in black will
be included in the path. And as we can see that the
brightness cut-off mode, the darker part of the image is, the more likely it will be
included in the path and the more detail we have, right? And to create the path being click the Apply
button down here. After a short delay, it creates the path
on top of the image. As we can see, a basically removed all of the brightest
parts of the image, like the sky and the
white parts of the dog, and left us with just
the darkest parts, like the black parts of the dog, the dog's shadow, and the
dark parts of the ground. We can also see that this
is all a single path, which is actually the case for all convergence that we do
in this single scan tab. If we look down here
in the status bar, we can see that
the path consists of quite a lot of nodes. If you want to remove
some of the nodes, it can go up to the path
menu and choose simplify. This reduces the number
of nodes quite a bit, but it also reduces the
quality of the path. Alright, if we delete this path and select the image again, we can check out
some of the other settings we have in here. First, by changing
the threshold value, we can change how
much of the image gets included in the path. Next, we check
Invert image here, it will remove the darkest
parts of the image, leaving us with just
the brightest parts. We next have these three
settings on our details. With the speckles, we can
ignore small spots up to a particular size and the
image with smooth corners, we can smooth out
any sharp corners at the image might have
and will optimize. It will try to optimize
the path by joining together adjacent Bezier
curves segments in the path. I find that changing
these settings doesn't really resort in any
noticeable differences. So I usually just leave
them on the defaults. Finally, we have
User assisted trace. With this, we can
draw a path over just the part of the image
that we want to vectorize. And it will attempt to cut out everything else in the image. E.g. I. Can first go to the pencil and draw a
rough path around the dog. The path actually
needs a fill color in order for this
to work properly. So I just choose a
random one down here. Now if I go to the
Select tool and select both the
image and the path, then check User assisted trace
and give it a few seconds. We can now see it
cuts out pretty much everything but the dog. I can click Apply. Then delete this path I created. Now I have a tracing of
just the dog, right? I'll delete this path, select the image again and
uncheck User assisted trace I. Now let's take a look at
the other detection modes. First, edge detection
attempts to create a tracing of just the edges
of the objects in the image. We can use the edge
threshold setting to change the amount of
detail in the tracing. This could be useful
for converting simple images into pages
for a coloring book, e.g. next, color quantisation uses color changes in the image to determine how
to do the tracing, changing the colors setting here to give us quite
different results. The next detection
mode is auto trace. This one doesn't
show us a preview. The click Apply to
see what it does. This tends to give
us similar results, that brightness cut-off mode, except that gives the
path a fill color using a dominant
color from the image. With this mode, we
have two settings. We can change filter iterations
and error threshold. However, in my experience, changing them doesn't seem to have a noticeable difference. Finally, we have
central line tracing. This one also doesn't give us a preview. Swiftly click Apply. With complicated
images like this, the result of central
line tracing tends to be pretty weird and in my
opinion pretty useless. However, what this
mode works well with as line art images, e.g. if I use it on this line
drawing image of an elephant and does a pretty good job at converting the
lines into a path. It also gives the
path the stroke color instead of a fill color, unlike the other modes. Okay, I'll go back
to the dog image and in the next section, we'll take a look at
the multicolored tab.
4. Trace Bitmap: Multicolor Tab: With the multicolored tab, we can get results
that are much more closely match the
original image. Then we can get with
a single scan tab. This is because the options and the multicolored tab will perform multiple
scans of the image, creating a separate path for each scan and placing all of
the paths into our group. The number of paths
it creates is whatever value we choose
for the skin setting here, with a default value of eight, the tracing will be a group
consisting of eight paths. Like with a single scan, we have several detection
modes to choose from. The default mode
brightness steps separates the image
into different levels of brightness and
creates a path for each level as big as
see in the preview, even with the default
of eight scans, it gives us a pretty
detailed result. When we click the Apply button, we'll have to wait a bit longer than we did with single scan, since it's performing
multiple scans of the image. Here's the tracing. As we
can see in the status bar. This is a group of eight paths. We could double-click
the group to enter into it and access the
individual paths. With the brightness steps mode, we have paths that are
varying shades of gray. If we change the scan setting, we can increase or
decrease the number of paths and thus the amount
of detail and the tracing. The higher we go, the longer it will take to
perform the tracing. Under the scan setting, we have these three
checkboxes which like smooth, it will apply a Gaussian blur to the image before tracing, which will give us a slightly
smoother looking resort. With stack. It
says it will stack the scans on top of one
another instead of tiling. Then this is basically just an attempt to fill in
any gaps in the tracing, producing a resort with
fewer transparent areas. If you do the tracing again
without stack checked, we can see that the resort has quite a few areas that are
partially transparent. And if we do a tracing
with stack checked, there are fewer
transparent areas. It also tends to look cleaner. Finally, remove background here, removes the bottom-most path from the group
after the tracing. This is usually the
brightest part of the image. So this setting is mainly
useful for removing the background of an image
that has a white background. Next, we have the same
three details settings that we had for the
single scan tab, which again, don't really have a noticeable effect
on the resort. And we can also use
User assisted tracing, the multi-color tab. So e.g. I. Can draw a path
around the dog. The path that fill color. It's like both the
image and the path. And check User assisted trace. And it will give me a
tracing of just the dog. Okay, so that's the
brightness steps mood. The next move we have is colors. With this one, we can
actually get some of the colors from the
image and the tracing. Next we have agrees. This is similar to
brightness steps, except it tends to give
a higher-quality resort. For comparison. Here's the result with grays, and here's the result with
the brightness steps. Finally, we have auto trace. This one doesn't
give us a preview, so we have to click apply. However, this mode
can be extremely slow and will often
cause Inkscape. You freeze up unless we use
it only on very small images. I also find that it
gives me weird resorts. So I normally just
avoided altogether. He does it for the
multicolored tab. So next we'll take a look at
the final tab, pixel art.
5. Trace Bitmap: Pixel Art Tab: With a pixel art tab, we can factorize pixel art
or other small images. I say small because we will
use this tab to do a tracing. It will create one path for
each pixel in the image, then group all of
the paths together. This means that even tracing is a relatively small images can consist of
thousands of pads. And the more paths required, the longer it will take
to produce the tracing. For demonstration
purposes, I'll be using this pixel art
image of a light bulb. This image is pretty
small at only 100 pixels wide by
64 pixels high. This means that in total, the image has 6,400 pixels. So when I vectorize it, the result will consist
of 6,400 paths. Let's go ahead and click
Apply to see what we get. If we zoom in, I can see all the little square paths
that make up the tracing. We can see in the
status bar that has a group consisting
of 6,400 objects. We enter into the group, we can access the
individual squares. Okay, so let's take a
look at the settings we have in the pixel art tab. First, we have a
bunch of heuristics settings that we can change. I've tried different
values for all of these on a number of different
images and as far as I can, so they don't have any
noticeable effect on the resort. They might be used for,
for more detailed images. But then we run into
the problem and the image possibly
being too large, which can cause
Inkscape to freeze up. In any case, I encourage
you to try these out on different images and see what kinds of resource
you can get with them. Alright, And finally, we have
two options under outputs. Voronoi is the default
output option, and it's what gives
us the resort consisting of separate paths for every single pixel we
changed to be splines. It will combine
all adjacent pads that had the same color. For images like this, made up of only a few
different colors. Using these plants can give us a resort with much fewer paths. As we can see, the group now
only consist of 534 objects. Case that's how we use the
Trace Bitmap dialogue. And the next couple of sections, we'll see how we can
actually implement it in real-world projects and create some pretty cool
looking illustrations. See you there.
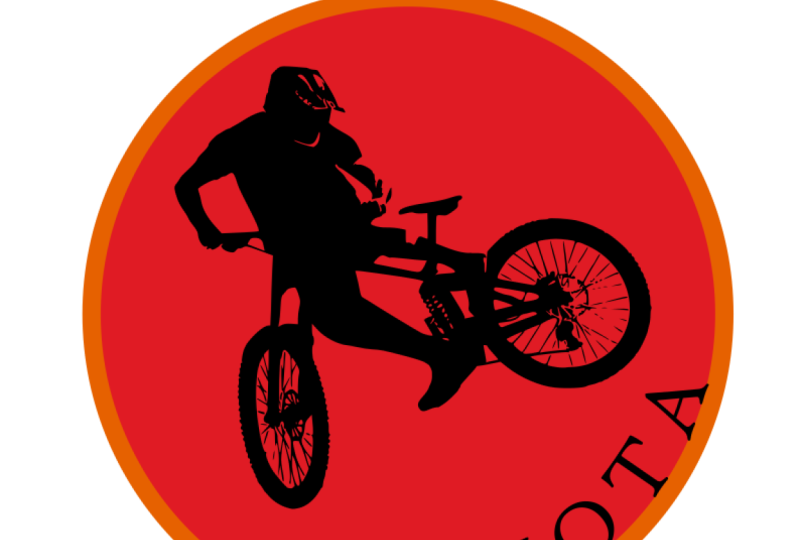
6. Sample Project: Sport Logo: For this sample project
or create a sport logo. In particular, I'll be
using this image of a skateboarder to create a
logo for a skateboard club. The main thing we're
looking for in the image is that the part of the
image that we want to keep stands out pretty well because
there's plenty of contrast between the skateboarder in this image and the
almost white sky. He'll be pretty easy to cut out. Alright, so I have the
image selected and then the Trace Bitmap dialogue
and back on the single scan SAB using the default
detection mode of brightness cutoff with
the default settings, the result looks okay, but I want to try to get as
much of the skateboarder and the tracing as possible without getting too
much of the background. To do this, I'll
start increasing the threshold setting and
I'm not going to worry about the detail of the
skateboarder because I'm actually going to make him a
fully solid color in a bit. Okay. It looks like
0.95 is about as high as I can go before everything
starts to mix together. It's now I'll click Apply
to get the tracing. I won't be needing
the image anymore, so I'll go ahead and delete it. Okay, What we want to do
next is removed everything in this path except the
object that we want to keep. To do this, we can first
go to the pen tool and create a path roughly
around the object. So I'll draw one around
the skateboarder. Then we can go to the Select
tool and select both paths. Then go up to the path menu
and choose intersection. Okay, next we want
to fill in and most of the empty areas in the path. In my case, I want to
fill in everything except for the part between
his arms and legs here. To do this, first go
to Path break apart. This gives me one big path with all the empty
parts filled in. And it also gives me a bunch of smaller pads where all of
the empty part used to be. So what I want to do
now is take this path where the empty area between his arms and legs used to be, and cut it out of the main
path by de-select everything, I guess like just the main
path and change its color. Now if I send it below
all the other paths, by clicking the lower
selection to bottom button, I can see all of
the smaller paths or dislike this path right here. Hold shift and
select the main path and go to path difference. I get this like all the
remaining paths and turn them into a single path
by going to path Union. Right now if we zoom in some, it might have a few
artifacts hanging out around the
outside of the path. To get rid of these, we can go to the Node tool and select all of the extra
nodes and delete them. All right, we can set
this aside for now. Let's work on the
rest of the logo. First, let's go to the
circles and ellipses tool while holding
down the control key. That's quite a
large circle here. And I'll make it
red for the moment. Next week I'll put the
brand name at the top of the logo and make it follow along the same curve
as the circle. To do this as first use the text tool to
create a text object. I'm going to type the
word shreds and all caps. For the font. I'll go with something that has nice thick letters,
like chunk 51. More thing we want to do up here is change the
alignment to center. This will make it easier to get the texts perfectly
centered in the logo. Alright, now we can go
to the Select tool as skeletal attacks while holding control to maintain the
width to height ratio. Alright, so to curve the text near the top of this circle, Let's first duplicate
the circle by right-clicking it and
choosing Duplicate. Let's make the duplicate
a different color. Let's shrink it down
while holding Shift and control to keep it
circular and centered. Can always hold Shift
and select the text, then go up to the text menu
and choose put on path. Now we can select just
the small circle and rotate it while holding control until the Texas
Central at the top. I'm also going to scale
the circle down a bit more or holding
Shift and Control. Alright, and at the moment, the letters and the texts
are a bit too close together to space them out. I'll select the texts objects, go to the text tool, click the spacing button up here and increase the spacing
between letters value. Does it work? Can always cut the text
out of the larger circle. To do this, we first need to
turn the texts object into a path by going to
path, object to path. This gives us a group of
paths which we need to ungroup by going
to Object Ungroup. Now we can turn the paths into a single path by
going to path union. Then we can hold
Shift and select the big circle and go
to path difference. We can go ahead and delete
the smaller circle. Now. Right? Now we can grab the tracing over here and bring it to
the top and clicking the race selection
to top Biden can we can position it where
we want it on the logo. Like we did with the texts. Let's cut the path
out of the circle by selecting both objects, going to path difference. Next, just to make it
clear that this is a logo for a skateboard club, I'll create another
text object with the word skateboard club
on two separate lines. For the font, I'll go to
something that contrasts nicely with chunk
five, like Verdana. Now similar to change
the alignment to center. Right? Now our scale up the text and put it at the
bottom of the logo. I want this to be vertically
aligned and the logo. So I select the text
object and the path, hoping that the align
distribute dialogue, Equity Center on
vertical axis button. A couple of more
things I want to do to the texts is add some spacing between the letters and add some spacing between
the baselines. So select just the text object
and go to the Text Tool. Now increase the spacing
between the baselines here. Then I'll drop down
the spacing box and add some spacing
between the letters. Alright, and to cut the
text out of the logo. First turn it into a path. Then ungroup the paths,
union them together. Select everything, go
to path difference. Another great use
of Trace Bitmap is for adding texture
to our drawing. To demonstrate this, I'll use this concrete wall image to
give my logo or grungy look. First with the image selected, I'll head back over to the
Trace Bitmap dialogue. Bring the threshold
down to around 0.4. Then click apply our resize this path to fit the logo. To cut away all the
extra parts of the path, I'm going to duplicate
the logo pad, hold Shift and select
the texture path and go to Path intersection. Next omega texture
path of light gray. Then I'll go over to the
fill and stroke dialogue. And at the bottom, I'll change
the blend mode to overlay. It can't really see
this on pure red. But if we change the
color of the logo, we can see that the
texture path of text, the color of the parts of
the logo underneath it. Using different
shades of gray for the texture path will give
us different results. Okay, and that's it
for the sport Logo. See you in the next section.
7. Sample Project: Paint Splatter Illustration: For this sample project, will use an image of
a flower along with a few ink splatter images to create a paint
splatter illustration. To start, let's go ahead
and create a rectangle to represent the background
of the illustration. Just make mine white for now. Can always grab
the flower image, head over to the Trace
Bitmap dialogue. This time we want to go to the multicolored tab and choose colors for the detection mode so that we can get some of
the colors in our tracing. If we take a look
at the preview, are currently only getting a few of the colors
in the tracing. To get more of the
colors, again, increase the number of scans. 13 looks pretty good. Let's go ahead and
turn on Smooth and stack to make the
quality a bit better. We also want to cut
out the background, leaving us with just the flower. You can use the User assisted
trace option for this. So first let's go
to the pen tool and draw a path roughly
around the flower. Let's give it a fill color. Select both the
path and the image. Check User assisted trace. Right now Let's click Apply.
Okay, So sometimes users as a trace will replace the
background with a white path. So what we can do is we can
first undo the tracing, select both the image
and the path again, and check remove
background here. Now if we click Apply, it will remove the white
background path for us. Alright, we can delete
this extra path now as well as the image. Now if we zoom in on
the flower tracing, we currently have a
darkish border around it. To help the flour blend in
with the splatters later, we can hide the border to do this as first
duplicate the tracing. As we learned earlier, the tracings we get with
a multi-colored tab or groups at pads. So let's go ahead and ungroup the duplicate by going
to Object Ungroup. Now let's turn these paths into a single path by
going to path union. Now we want to
insert this path a bit and use it to clip
the tracing underneath. First, let's make the
path of different colors so we'll be able
to see it better. Go to Path inset. Let's do it a few more times. Alright, and we also
want to fill in all the empty areas in
the path to do this week. First go-to path break
apart, then path union. Okay, now we can use
the path to clip the group by
selecting them both. Then going to
object, clip, clip. Now the border is mostly gone. Right Now let's go
ahead and raise it to the top and put it
on the background. Now let's work on the splitters. These are going to
be pretty easy to vectorize because they have
transparent backgrounds. So let's grab the first one. And this time we want to
be on a single scan tab with the brightness
cut-off mode chosen. We can adjust the
threshold if necessary, but I think it
already looks pretty good. So I'll click Apply. Alright, I'll move my path up
here and delete the image. We can bring the
path to the top, move it onto the flower, lower it one step to put
it below the flower. Now we can adjust
it however we want. For the color. I'll go
to the color picker tool and choose this peak
here on the flower. Now we can do the same for the
remaining splatter images. Okay, now we can grab everything but the background rectangle. Let's group it all together by right-clicking
and choosing group. Alright, now we can duplicate
the background rectangle. Hold Shift and select
the group and go to Object, clip Sutcliffe. Finally, I'll grab the
background rectangle and make it a lighter shade of
this tan color and the flower. That should do it for this
sample project and this class. So I'll see you in
the conclusion.
8. Conclusion: Congratulations on
completing this class and learning how
to use Inkscape. So Trace Bitmap feature to convert images into
illustrations. I use Trace Bitmap
quite often in my work, and I hope this class
inspires you to do the same. I also hope you enjoyed
the class and if you have any questions or suggestions,
please let me know. Thank you very much
for joining me. I hope to see you again soon.
 Brandon Grant, Game Developer and Graphic Designer