Transcripts
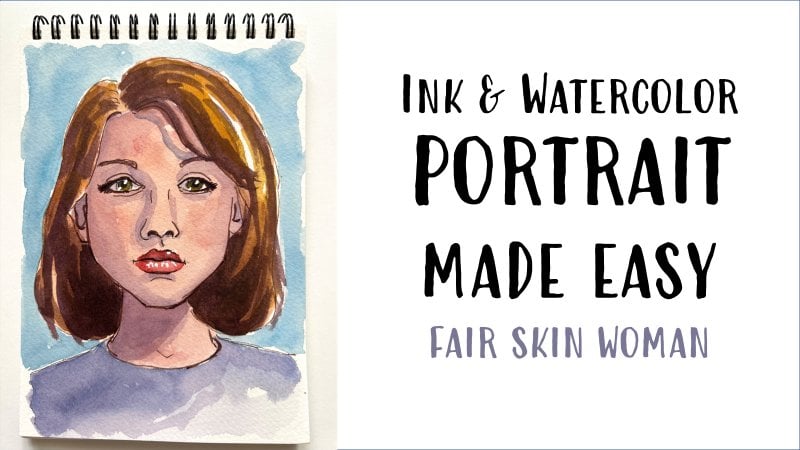
1. About the Class: My friends and welcome
back to my classes. Today we have a new
portrait class. Maybe you have taken my
first project clouds. It's a basic class. So with the girl's face, where I explained the
basic rules, today, we are learning new
tips and tricks for portraits because
we are painting together these beautiful girls. So we are adding
two more skills. We are learning how
to paint a smile, which is not so obvious. And we are learning how to
mix a darker skin tone. There are hundreds of
different skin tones. Each one has a
different skin tone. It's only with practice and
experimenting that you can learn how to mix the
correct scheme. Town. Paul chains can
be very daunting, but I'm taking you
step by step from the pencil phase with all the basic crews to
make a realistic portrait, to mixing the skin tone, darker skin in a very easy way. How to add shadow, how to add depth, and how to infuse life
through highlights and then adding
the little touches that make the difference. Hi, I'm Elizabeth thumb and
Italian watercolor artist. And I have a passion for sharing my experience
in watercolor. I am self-taught artists that anything that anyone can paint, if you find the right teacher
that explains you easily. Traits can be daunting. But today we're tackling
a new adventure in portrait and we
adding new skills. I hope you're curious
to take this class. I can't wait to paint with
you this new portrait. I hope I see you in the
next lesson where I explain you the very
basic supplies. It's easy. Don't be
scared of portraits. If it is explained in an
easy way is I like to do, you'll see it's going to
be very easy and very rewarding and a lot of fun
as well. Campaigned with me
2. Your Supplies: Let's now talk about supplies. For me, the most important
piece of supply is a paper. This paper is very high-quality
because it's 100%. Cotton paper is white. But you can also
use a mixture of a cotton cellulose or
even just cellulose. The important thing is that
it must say watercolor. Watercolor paper. It's very important
that it says, so the way this paper is
300 GSM per square meter. So be careful that
the weight must be at least these wage or slightly
below 250 is also nice, but three, GSM is ideal and it must absolutely
safe for watercolor. This paper is C p naught, which means cold press. And it has a slight texture, which is ideal for
this type of pottery. These brands is very fine, but there are many fine
brands of watercolor. Just make sure that you
use watercolor paper. This is very important. Then of course we need
some watercolors. I'm using these basic set with
colors that everyone has, not using fancy colors. The colors I'm using are yellow, ocher, burnt sienna,
permanent violet. So any purple you have, if you don't have purple, never mind, you just mix some red with some ultramarine blue. Then I'm using some
ultramarine blue and some red, or alizarin crimson,
any colder red. Then I'm using a
brown in this case, it's a burn to better, but you can use SAP
or if you prefer. He dies sei yellow ocher. Of course there's some yellow
ocher we will be using. Then we will also be using
some yellow for her shirt. So I'm using a mixing
an orange with yellow. I'm using cadmium yellow or
Indian yellow in this case. And the zealots and crimson, red and these darker red. And that's it for colors. What I do and I
suggest you to do. I always swatch my colors on a small card like this
set goes inside my set. So I certainly know where are the colors that
I'm looking for? These are the colors.
Very important brushes. For brushes also, please do
use the watercolor brushes. I'm using a mop brush, which is a brush that holds a lot of water for larger areas. And then some synthetic brush. This is also synthetic
round brush or with a finite T that allow
me more control. And they have lots
of spring itself. They will give me a lot of
control on what I'm painting. One bigger, one smaller
for smaller areas. Then we will also need a pencil. This is HB or to be
this is what I use. Use whichever you find
more comfortable for you. I don't think there is a rule. I use HB, but you can also use a softer
pencil if you prefer. An eraser and a pen. Be careful because for the pen, you must absolutely
use waterproof ink. It's delicate for
phantom pain because not all waterproof inks are
suitable for fountain pens. Maybe it's easier if
you use a waterproof, fine liner like this one. Pitt Artist Pen fine
liner by fiber cast it, I love this one.
It's dark sepia. I also use Browning here, I'll show it to you or use
a black pen like this. Uni-ball Eye Micro. This is my go-to black pen. Now I'm showing
you two inks that are waterproof and go into the fountain pen
without clogging it. This carbon ink by plotted on this one that
I'm using today. And they are tremendous. I buy it online from Germany. And this is brown sepia. You see Document Ink brown. And it is very, very nice. I just love using. I keep a buying and
remind these one. It's handmade ink
for fountain pens. But it's document mean ink. It means it's archival. It doesn't smudge when
you put water on it. Then of course, you will need a mixing space
for your paint, like these that I
bought in $1 store. Or maybe you can use
the mixing space that comes with your set. If you have 12 jars of water, this is where he was dead. You see, I leave them dirty so I know that they
will not be used for the kitchen because
I don't think it's a good idea to drink
or use them for food. So leave them and some kitchen paper for
your final details. And it will also
be very useful to have a white gel
pen like this one. This is uni-ball senior. There is also this brand, Jelly Roll by Sakura, which is also very nice. This is 08. I suggest
a number ten. This is brought, you
see broad I suggest broad tip then and brought it here is
you see the supplies. A very simple, not too fancy. And we can start
sketching naturally.
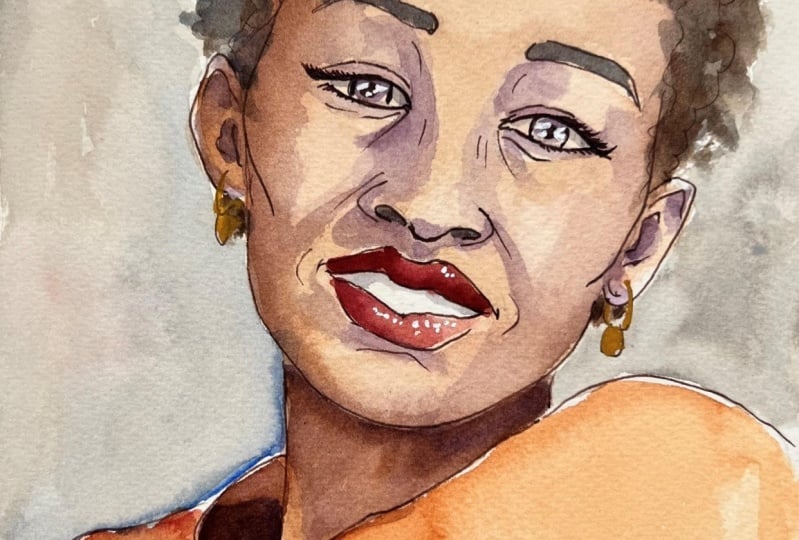
3. Pencil Sketch: Now we start by drawing a pencil sketch of
our reference image. In my portraits. I don't go for a resemblance,
perfect resemblance. I just use the reference
he meant as an inspiration and has a guide for placing
features and shadows. But I feel free
to change things. And if you want to draw a
perfect resembling portrait, you need to use other
techniques like tracing or using a light box. Or you can trace this face onto watercolor
paper against a window. But with not doing this, with learning how to draw
a portrait freehand. So the first thing, we place the top and bottom chin and top of the
head on the papers so I know that I will stay in this area
and I would draw an ANOVA, slightly larger on top and slightly narrower on, on the bottom, on the chin. Then we can change
this is just to occupy some space and be very live if you draw on watercolor
paper because we will have to erase these lines and something that we have to do very delicately on
watercolor paper. Otherwise, you can be here. You can use printer
paper and then you can against a window. You can trace your freehand
drawing, which is a method. So here you can erase
as much as you like. And watercolor
paper, you need to be slightly more careful. You can choose, you can either draw on printer paper and
then trace against a window. With data using daylight. You can draw directly
on watercolor paper. This is usually what I do, but I do either way, actually. Then I will put a symmetry
line like this one. I will put this line, which is exactly in the middle. We consider the hair as well. Here. And our eyes sit on top of this, and each eye occupies
one-fifth over her face. The distance between the eyes
is the same length of each. I will place one-fifth, one-fifth, one-fifth, and hear. Her eyes will go can
start throwing the eyes. The she's squinting. Now I'm using dark
lines so you can see, but UB, you need to be lighter. Same here. You can be kind
of geometric in this phase. Straight lines. Okay? Then you divide each
ion three equal parts. One part, one part, one part of the same here. Now symmetry is
important when you have a frontal portrait because
it's very obvious. So you need to be sure that
there is a certain symmetry. Doesn't have to be
perfect, of course. Then you place a line
in the center of this half and you will
have the nodes here. You put a V shape here. And then her nostrils. Be careful because hurt
nor streets arrive at the beginning of her
pupils see here and here. So we know that and the dark part, the whole of the
streets will arrive the corner more or less so here. And here she has the
wings of the nose. Same here. Symmetry is slightly more difficult
so you can tilt your drawing and you work
on a perfectly straight. And then here you have
the wings of her nose Let's divide in two parts. And here is the liner for mouse, which is open in a smile. So here you will
have her upper lip. This bridge is very short
because she's smiling. So here you have a V and then you place the corner of
her mouth and you see the corner of her mouth arrives in the center
of her pupils. So here and here. And xi has her mouth going
downwards like this. Okay? Here she has soft mouth,
soft, large leaps. She has beautiful mouth, very curvy, very soft. Here. And here she has
sort of v like this. And then like this. Can you see here she has a straight line
for the lower lip. Like this. Chain. Has some lines. Are high, eyebrows are
quiet, high interface. And then downwards
like this nice arch. We can always correct
symmetry and everything, both with ink and watercolor. Let's refine the
shape of her head. It has quite accentuated
see bones here. He or she has CBO going down. And then like this. And then more or less at
the height of a smile, it goes slowly lower actually
because she's smiling. Goes down like this. And here she has her chin. Same here. And then it goes down
towards for mouse here. And straight and then
towards slightly larger. Be very sketchy than her ears. They are attached
slightly lower. So the corner of her ear is at the eyes of her
eyes, so like this. And then here with
the narrow streets, here, can draw
some details here. Same here. The corner is
the same height as her eye. Like this. And draw some details. I think this thing she
has hearings. Okay. Maybe she has larger eyes,
slightly more elongated. Okay. And I wouldn't
change for hair. I'm not sure I like
these white hair, so we give her more
natural look here. That will draw her hair black
and more natural like this. Then she has her neck
going down and here also, but she has a
muscle tendon here. Her t-shirt goes like this. And then app because she has
a shoulder tilted like this. And here it goes. Or how the shoulder goes
down like this. Here. Of course these will
not be visible. And she has leaked like
this and like this. And circles also here, same. Like this. Okay. That's her. And this is slightly
asymmetrical, so we need to adjust this. Okay, Now let's go to our face and then
we erase the pencil
4. Ink Outline: You might want to
take a picture, a photo of your faces so that symmetry can be more visible if there is
a lack of symmetry. Here, for instance. Just you put it in front of you. I think is quite symmetrical. But here maybe we can slightly
adjusted, but that's okay. Let's go to ink. I will use my fountain pen, which contains water proof. But you can also
use a fine liner. I like to use the brown ink for my portraits
because it's softer. But of course, you can
use a black, fine liner. It's absolutely the same. Just watch out. It must absolutely
be waterproof. Southeastern option
is an option, and this is an option. I like to use brown, but you absolutely use
what you have. Okay. I like to start with
the eyes so that they are the focal point
of the whole face. For me. I would
try to do my best. She has like a
downward corner here, then here she's
squinting like this. And then be careful, this is the most difficult
part of the sketch, and afterwards it
will be much easier. Delete. And the lower lid as well. This line, this line
here also see a line. And I will put it
a high eyebrows. You can correct them
with watercolor later. Okay. Here she has her nouns. This is not exactly
V. Small, curvy. Streets are very thin. The bridge of her
nose here and here. I will not put lines here
because I'm mad at them later. They're not so busy. Volume women. Beautiful mouse. These very soft, the mouth. I'm not drawing the
face and this face. Not at all. Okay, here there is
this lovely arch. And here I have to
go up to the corner. You can stop. Before this is her chin chain. You need to be a little brave because you don't
want sketchy lines, you want crispy, clean lines. Always look at your
reference image. Every year's. Add some details. Launch so you don't
need to be so detailed just at something and
the earrings here. Then we'll add some lines here. Just a hint. This is nice line to add
because it means she's smiling. And that's it. We'll just invent her hair now. And I will put some curvy
lines to indicate girls. But then we can really
change these water color. Just an indication. Okay. Here we have her neck and we are almost finished. I will just add
pupils in the middle. Looks a bit crazy here. But the worry that she would be lovely
when we're finished. And that's it for
the ink drawing. Now, you must be sure
that your ink is dry. But weekend arrays,
take an eraser and arrays our pencil lines, and she would be much
nicer once we do that. So let's do it
5. Dark Skin Tone Underpainting: I start painting and
my camera was off. So it will redo the process for you because
they have used watercolor. It can be forgiving. I've used some paper
to call the paint. We redo this for you. But basically, I
take a mop brush, which is a larger brush
for larger areas. I will use a very washed down, burnt sienna for the under
painting of her face. And I would put this wash down. Burnt sienna everywhere
on her face, including the eyes,
except the teeth. The teeth, you leave them out. Just apply it freely, must be watered down because
the eyes are not brown, but they're not even
completely white. That's why we go with a
layer of burnt sienna, even the hair covered them because in any case
there will be darker. The mouse carefully
inside the ink. But even if you go out of
the ink is not a problem because you can always use some paper and
collect the mistakes. You see I have put it here. I need to add some ink because
there is a shoulder here. Here, you see? Okay, and now we take
advantage of the fact that the paper is wet and we take more burnt sienna and we applied on the side
of her face just to give some roundness
very carefully here on the chin. Below. These must be very light. So collect any bleeding. Here below the hair. Here. More sin than here because the light just always look
at your reference image. And that's it. And
we let these dry. And you can use a heating
tool or hairdryer for this. And I will do so. I'll see you later
when everything is dry
6. Add Shadows: We will add some shadow. To add shadow we need, if you use a smaller brush, I will use the round
brush number ten. Now, it's a synthetic brushes. It's stiffer so it
gives me more control. I will take some purple, add a touch of burnt
sienna just to give some continuity
and harmony. And don't worry, because purple, this purple which is
dioxazine violet, is the basic purple that
is in each or basic set. It has a huge drive shifts, so she will not be
purple, Don't worry. They add purple. When I see shadow. I watch my reference image. So around the face, especially on this side. You see that glazing over
burnt sienna and snot, purple on this side. Scene under the chin. And then I take some water
and that will blend these. I don't want hard lines. Here. It goes
slightly up here also below the mouth and the nose traits. We might have to darken know
Swiss with some brown ink. Here we have a cast
shadow of the nose. Then always use a touch of him. And I have some here, some shadow here on this side of the nose, like this below. Now I dry my pet, dry my brush. And all the league
to blend Alito, this side also under the hair
because it's cast shadow. Here is very thin shadow line. Even slightly more diluted
than we do with the Slater. Also have some shadow, just paint what I
see and I blend it. If you use cotton, paper, the blending
will be very easy. You know what? You can take some yellow ocher and you will use it on forehead. It helps blending and it adds
a nice color for variety. Here and there. Yeah. Here she has some shadow here on this lid and just blend it. I blend it. On this side. I soften these lines. Okay, Now the neck here I
have definitely shadow. So I put more purple. If it is too purple them
we can correct it with some burnt sienna or
with some yellow ocher, very dark under the chin. And then we pull it down
with some clean water. I this here. She has some light like this. Then when it dries,
which is to purple and you can like to
know is corrected. Let's let it dry this layer
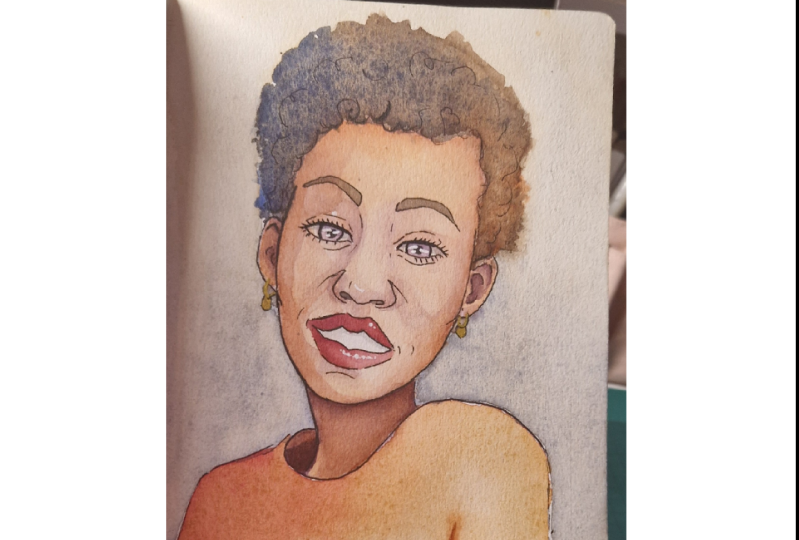
7. Lips, Hair, Eyes & Tee Shirt: Now we can add her hair and I will check again my mop
brush, bigger brush. And she has black
hair, not here, but I would like her to
be more natural looking. So we'll add black hat, but I will not use black. I will use ultramarine blue and some burnt amber or
sepia or any dark brown. You have that with
whichever in blue. And you get these dark. And you apply it with some criss-cross strokes to
give the idea of curly hair. You can add more
blue on this side, which is more in shadow and more brown. Or even a Tetris of burnt sienna on this
side of her face. More color. Here. Feel free to go out of the lines
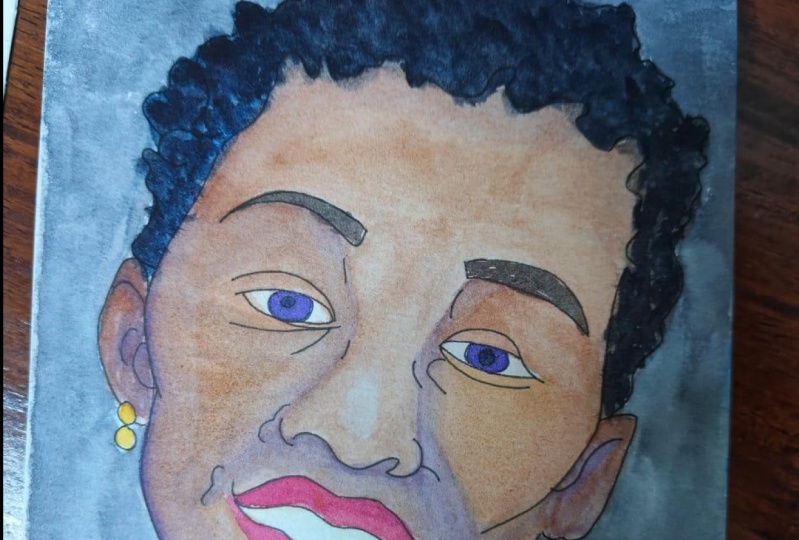
of the inclines. And that's it. That's the first layer for hair. Now, highs ice. You take a small small brush. And I like to make
her eyes power pole. It's a liberty that I take
very pretty purple eyes. So we just put on top like this. And then with some water, we pull it down and
we'll let this dry. Then you still use this small brush and you
take the hair color. It makes some more if
you don't have enough. And you can make her eyebrows. Okay. With the same darker. You put some color
under her nostrils. Be very careful here. Don't feel safe with the brush. You can use your pen. Ok. And now her lips for Lipson, we take some red, any red will do. I'm taking some
Alizarin crimson that I had and I will add some
touch of burnt sienna. I will put first wash
on her mouth here. Then I will put a second layer. Start from let us start from
left because it's going to be lighter on the
right-hand side. So I clean my brush and just
pull the color like this. And the upper lip is going
to be darker everywhere. So you carefully just
fill in the mouth. And then we will give some
volume to this mouth as well. And we can start
painting her shirt so everything dries
lovely and nicely. For her shirt, you can
choose any color you like. I think I will take
the red of her mouth. I will add some warm
yellow or any yellow. And then we have
a lovely orange. This orange we'll start
darker on this side. So we'll add some
luncheon as well here. At some yellow, some red. I like to mix directly on paper. So very painterly to
mix directly on paper. Just be careful here. I made a small
mistake but nothing. Something here. I'll just, uh, when you
were little coloring books, do remember, same thing. Touch of burnt sienna, red. This is a wonderful. And Tara and I like
to mix my oranges. Now you add more
yellow going towards the light and also more water, more yellow and more water. And you have a more
diluted yellow with yellowish version of this
wonderful burnt orange. I love mixing colors
directly on paper or making my own colors
by mixing what I had. The fun thing about watercolor. Also, I take some
birds and not pure, barely any water
you've seen that we put here around like this
and then slightly blended. I clean my brush and just
slowly blend it like this. Okay. I cannot some of the burnt
sienna that I have in mind. Rush. Yeah. Okay. And even some poor yellow here because
color variety is very important
in water color. Otherwise you have a flat wash. It's not nice. And we'll let this dry
and now we will finish her face details. Let's continue
8. Add Depth: The smaller brush that
we were using for, for Lipson, use some purple
for shadow like this. And we will put
shadow where I see, I see here, I see here, here. And here. Then I
blend it a neutron. It doesn't have to be perfect. Just the idea of
details and same here. You see, here I have a lot
of shadow here to here too. Then I planted. Okay. Now, still I think
channel where I see it. She has a very
strong shadow here. We put it and blend it. Don't worry if she
looks too purple. Xihuan. When we finished. Also here she has
very light shadow, so I watered down my purple. So that then reach
all the nodes. It's whiter.
Especially this part. Then here below she
has some more shadow. Blend it same here. Here. Here. Blend. Then she has some shallow. And now we need to put the
shadow below her eyelid. But we will not be
using purple because it's not against ground skin, so it will not be natural. We take some of the hair
color brown and blue, dilute it with a
thin brush and we draw a line just below her, late like this. Like this. Okay. Same thing with doing. Very, very thin below her upper lip and
slightly on this side. Now we add more color to her hair because the
watercolor dries so much lighter than I think I need to add
more color to her hair. So I take some of this brown, burnt amber or sepia and
some ultramarine blue. Just to darken it. And more, more strokes. So you get a variety. I add some more blue in some areas and more
brown and other areas, especially it was
light because it's warmer and they even add some
burnt sienna on this side. Here I give her volume
on the top here to here. On the sides of your face. Okay. That's lovely. Now we need to fix this
neck which is to purplish. And we'll just take
some burnt sienna. And I mix it with this residual of purple
or you just take it pure with a round brush
that gives me more control. And I will add it here so
that it's not too purplish. Same here. And then some water Towards the lower
part, it's less dark. Now we take some rows of red. Then we'll mix it with a
touch of yellow ocher. I like this picture. Very diluted. And we'll add some
on her cheeks. Even rosier, actually
less pitch and more definitely you
wrote here yeah. On her cheeks and at
the base of the neck, chin where she sunk. And I will blend it clean water and blend it. It's going to dry
very light to see, but it will give it
a color that I do. I can blended, I don't want any
harsh line here. And also you can use some of
these rows at the corners of her nose because that's
where blood vessels are. Then just very lightly blend. Okay. That's it. I believe it happened late. Okay. Now, I think she needs to be
to have an extra layer of burnt sienna to bring out more her beautiful skin tone
and unify everything. You see headlines, you
can still soft them. If you have good paper, will let you do it. Just make sure that
everything is dry. And then we will add an
extra layer of burnt sienna. You can use a hairdryer or heating tool to
speed up the process. You take my mop brush. Once again. I mix some burnt sienna and starting from side
towards the center, I will work my way like this. And now just water. Put my burnt sienna everywhere. Be careful. Everything must be very dry. Otherwise, I will
smudge everything. Now, you take some paper with your brush, will collect paint. What do you think you
need? More light like here and here. And here. Even with them, some paper you can collect directly with paper. Just to give some light. Like this. Here I have the
eye under the eyebrows, I have some hard lines.
I don't want them. Okay. Now we are going to
put more color on her upper lip because of shadow. So we'll take some red, the same red that I used
to find the corner. And I will add some purple and I have a darker
version of my read them. And very carefully,
this brush is too big, but I can manage,
especially here. We add some color, especially on the left
and on the lower part. Same here. On this
left-hand side. You see that immediately
she's becoming life. Okay. Now we're at the last
touches with the bulk. That's everything dry.
That's important.
9. Ink Details & Background: Now, with ink, we can
add some details. And white and brown ink. With white ink. If everything is well dry, I will add highlights. You see that her highlights
are very important. So they're almost like a lines. This same here. Highlights, bring
everything to life. And we finished the eyes
with some eyelashes, so I make a thicker
line on her upper late. Finish this line, of course. And I will add some
eyelashes like this. Okay? Same here. Showed here. Slightly longer in the corner. Okay. Same thing here. I tilt my drawing. And same here. Here. Okay. How pretty she is, right? Then we take once again
my white gel pen. And I will add some dots here. And there on the corner here. One dot or two. Okay? Now I need to add the
last watercolor touches, which are background and to reinforce shadows in some areas. Because when it dries, you see whether you
need further shadow, but I wouldn't touch it so much. We're almost finished.
The background, you can choose any
color you like. I like to use colors that
I have used in his poetry, so I will not choose
any new color. And I would like it. Neutral, muted backgrounds
so that she pops it, but I like to have a big round. It adds a lot. So I take my mop brush and I use this nice mixes
that we had for hair, mixed with some burnt
sienna, yellow, ocher, some blue because we need
some contrast like this. And I can, of course, tilt my drawing and the position that is more
comfortable for you. And you just go very
carefully around her. And with water, you pull
the paint and you act new colors like you can add some more yellow
ocher in some areas, just some column very
INT is important. Usually have darker here and lighter towards the higher part, but it's really not to rule. There are no rules in art. Phase. We usually something
you don't like. If the paper is wet, you can see corrected. Same. You go you make some more and you put some
blood cell when we put more of this blue
some yellow ocher? Yes. It's nice. Maybe some more blue? Yes. Carefully around her
ears and sweater. And it won't contrast
with her hair. So one, Just pull it with
water so it's very light. I will add some yellow
ocher here in there. You can also, when it's
to try some red in there. Just to use all the colors
that you have used. The small brushes for your
nice because the tip goes to a very fine, fine point. Okay, Now we will let this dry and then we'll come back for the final details on her face.
10. Final Touches: Now I got rid of the paper. I just think about my girlfriend
and I think she needs some more shadow in her ear. Saw purple here and
here, and here. And then just blend it slightly but not
too much otherwise, the dark doesn't work. And also need more shallow
in this part of her shirt, which will be
definitely in shadow. And also here, some burnt sienna on this part. Here. Just blend it. Clean water. I don't want
to touch her anymore. I could go on on her shirt, but I think that I just
like it like this. I can add her earrings actually, if you have some
golden metallic color, you can use that or you can
use just some yellow ocher. Just be sure that
everything is dry. You touch it with the
back of your finger to make sure I would just
dry just for a moment. That earring lot. Okay. You've seen I take some yellow ocher and I would
just draw her earrings. This will add some pure yellow. Same here. Yellow
ocher is opaque, so we cover what we have done before and add some brown here. She has hair because it's not so it's comprehensible disease. These as more eyelashes. I didn't see if I
hover eyelashes here. And there was easy. I think. I hope you had fun. And I hope you appreciated
this portrait. I'm sure you made a
wonderful project. Don't touch it any longer.
11. Wrap Up: Congratulations, you have
finished your portrait. I bet it wasn't as
difficult as you saw. It was at the beginning when
you started the lessons. And I can't wait to see it uploaded in
the project gallery. It really helps the
students to understand what type of results that
can achieve with this class. And also, it has me
giving you my feedback, what can be improved or an extra cheap but
for your project. And also, I'm asking you if
you could leave a review so that the class can be
discovered by new students. And also it has me understand what you like
more and what you'd like. Blades would be amazing
if you could leave a review and you
can get in touch with me on other
channels as well. I'm on Instagram mainly. If you post your
project on Instagram, please do tag me and
reach out for me so that I can posted in my stories. I'm really excited about this
stuff portrayed journey. Thanks, thanks a lot for
having taken my class. And I hope as you my next class. So Chow from Elizabeth travel
 Elisabetta Furcht, Anyone can paint!