Transcripts
1. About the Class: Hi everyone. I'm Elizabeth. I said
Dr. with a color. I'm convinced that
art is for everyone. Everyone can draw any
subject can be made easy. Break it down into small. Today we are tackling a subject that apparently
can be daunting. And it's a section together, woman's face into
income wash of color. And then we break it down
into small steps that will teach you all the tips and tricks to draw a bigger bubble. Yes, portraits can be daunting. If you don't know the rules. I would teach you how to run
this out and write down how to start sketching together. You will learn some new skills. I'm drawing this firstly,
you won't regret it.
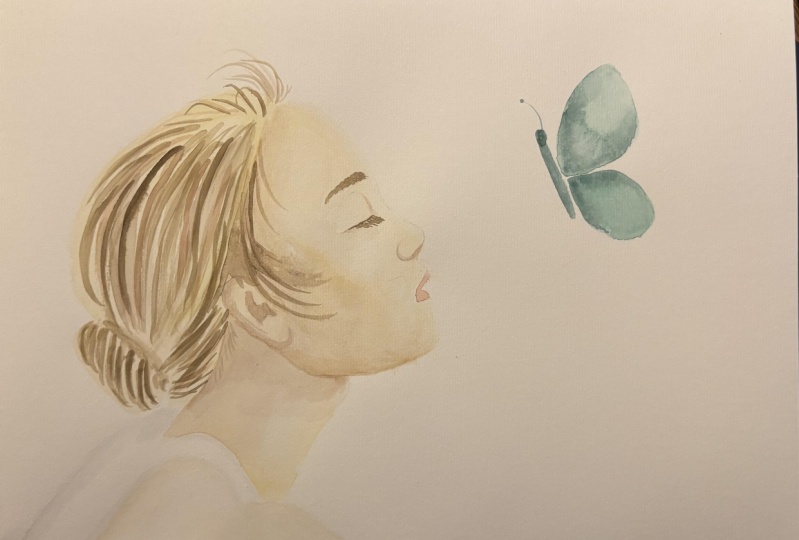
2. Project & Supplies: Your project will be
very simple and fun. We will sketch it together. These ink and
watercolor portrait. We will not be going for
precise resemblance, but we will concentrate on
basic rules of proportion. And where to place eyes, nose, ears to make a face believable. With the help of these
reference Semantria. You see it's not
sort of assembling, but it helps us place features
through a series of lines. I will teach you how. We will see. We will see where all
the shadows are so that we can paint
shadows accordingly. You will find this
reference image or in the materials in
an attached file. To paint this sketcher. I have used an A5,
a small sketchbook. It's a cotton one, doesn't have to be caught on, but the width cotton is easier, but it can be cellulose. The important thing is that
paper must be for watercolor. And this is the most
important piece of supplies that you need. This is a 300 GSM and
this is the right way to, for watercolor watercolor paper. Then of course, we will
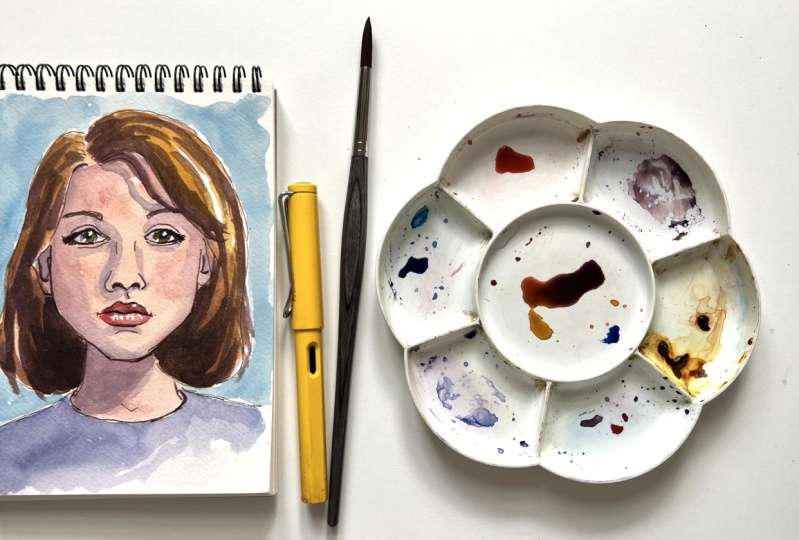
need some watercolor paint. I'm using this basic set. I always use a set like this for my classes because it's a typical set that
you can have it. This is artist grade. We will only use a limited palette that we
will be using a warm red, cadmium red or apparel Scarlett. We will be using yellow ocher. We will be using
cadmium, yellow, burnt sienna, purple,
and ultramarine blue. We will also be using some
phthalo blue for background. But of course you can change
the color if you prefer. So these are the colors
that we will be using, but of course you can change
colors if you prefer. Then we need some
watercolor brushes. I have a mop brush for larger areas like
background or face. A smaller one. Synthetic for more control, and an even smaller
one for smaller areas. Then we need a pencil for
sketching and an eraser. A pen. This is a fountain pen
with waterproof ink. You can also use black pen. This is sepia ink, but you can use a
black pen if you want. The important thing is that it must absolutely be waterproof. This is uni-ball Eye Micro
is perfectly waterproof. I use it a lot. I recommend this pen also. This is a fountain pen, but use only if you have waterproof ink and
a white gel pen. This is also very important. Then we will need a pallet to mix your
colors and mixing space. You can use a dish or
maybe your watercolor set comes with a
mixing space included. Then optional. You can use some paper, Artist's tape for
a crispy edges. And very useful. You can use a heating tool
or a hairdryer to speed up the drying process
between different layers. So let's solve for the supplies. And as you in the next
class for the fall.
3. Proportions and Pencil Sketch: We can see on the
reference image that I'm using the proportion that are
quite common in all phases. And that we can use to
start drawing believable. Women's face, not going for
resemblance in this class. So to start by drawing
an oval which is slightly larger on top. In the lower part. I'm sketching lightly, I hope
you can see on your screen. And here we have.
Then we draw a cross. And this helps for symmetry. Just across her eyes will be placed above
this central line. And we will divide this
lie in five parts. Now, divide this line
in five equal parts. And each part, which is
a fifth of the line. It's the same length of one eye, of the distance
between the eyes. And here we have the
shape of a normal mode. I'm following more
or less this girl, but not necessarily we just
learning the basic curves. So economic MOND, the simplicity of
this phase puts a lot of emphasis on symmetry. So we tried to be as
symmetrical as possible. Couldn't be a little
geometrical in the beginning. So you make sure
that it's correct. Then we divide this in half
and we place below this line. So half. Then another half. We placed a little v for
the nose and the nostrils. So start placing our features. And here we have more
or less at the half, we have her mouth. Here, we have the
upper link here, a soft curve for the lower lip and symporter
to the iris to place the irises here because
the leaves will finish more or
less at the pupil. You see, you see this? This is even narrower. We can Finish here, where the irises begin. This must be not a straight
line but just soft line. And here we have the
lower lip, the lower lip. And then we know
that you see here, if you go horizontally, you have the drop. Her jaw would be like this and then go
in towards the chin. You can be slightly
geometrical in this phase, straight lines, and then you can add
softness to this line. Here we have shadow. Once again, you divide
this, you make a cross. You divide in half. Above this line,
you place the eyes and the distance
between the eyes correspond to one eye and also roughly to the
distance to sides. Then you put it in half. You put her nose than in half. You place her lips because slightly make a longer
chain if you like. And the jaw is at the same height of the
coordinate of her mouth. Then we can place the ears. Hurt year, we'll start exactly
at the corner of her eye, goes up and then it goes
downwards and it will stop exactly at the
height of her nostrils. Can you see? Same here. All these lines and rules helps to make it believable face. We're not going for
resemblance in this class. We are going for a
believable, lovely face. Then her neck. I can put down shirt. And then we place her hair. Her hair we have would be a lovely surrounding
to her face. Here we have a partition, their separation between hair. And we can follow more
or less this type of style behind the neck trolley. And same here. More symmetrical
than in the picture. Here they are asymmetrical. I like to make them symmetrical, less over the eye. And here we put them
in front of the neck. Eyebrows are dedicate
cheese above the eyes. In men, they're
closer to the eyes, but in women they are
far away from the eye. And it's nice arch. And then we will have Apply
be below the eye, here. And over the eye cannot apply above the
eye and not apply. No streets. The nose. No streets. And you mentioned the
light coming from here. So we don't really see this. Okay? So maybe he can be
nicer if it is not worth. Here is that we're good. So now it's time to
outline with the hour.
4. Ink Outline: I can outline, we think, and I will start with hair, back to the ear,
which is feasible. And here simple lines. So it would see this
part of the year can also slightly
hint the hairs. Here we have the partition, the separation. Like this. Neck. Here we only see this. Her shirt barely can push it. A V here. Now, her I, I start from the left-hand side because I don't want to smudge. I'm right-handed. If you're left-handed, you can
start from the other side. And the eye is exactly
in the middle. And it occupies one-third, more or less of the eyes. So one-third, one-third,
one-third with the pupil inside. Now she looks a bit weird, but then when we're happy. But then when we add highlights, should we look
lovelier? Same here. Symmetry. This can be ticker. Tried to be a symmetrical or asymmetrical is
you can ply here, apply here, play here. Now her, now. You can also put some on
top of the nostril here. One line because
like it's from here, pupil, eyebrows, crew keep. That's what sketch is for. They can be kooky. Soft lines for the mouse. And the lower lip. I don't have to
finish the lines. I can live like this color. And we let the ink dry. And then we can erase
the pencil lines.
5. Mix Skin Tone : Let's start by mixing
our skin tone. I would take a mop brush
for this because we have quite a large area to feel
for mixing skin tone. It's quite easy.
Basically caucasian skin, which is like my skin now I'm saving ten because
I work in the garden, but it's a very light orange. So we can start by
mixing a warmer red. Any warmer red and the primary bread that
you have in your palette, like cadmium red
with parallel Greg, pyro, scarlet or vermilion. I will try to make small because we're going to need a lot. And if we don't like
the skin tones, we can always correct it. In next layer. And some yellow. I'm using yellow ocher. But you can use standard yellow. You can mix the primary
colors for your skin tone. Slightly more yellow. Don't be afraid to go too
dark because it goes much, much lighter when it dries. I'm just applying this
color to her face. And I can also go on her hair, which in any case is
going to be darker. Remember that light
is from here. So you can leave some highlights on this side of her hair. But we just go all
over her face, even the eyes because
the eyes are not really why they have a light color. This don't touch the shirt. Here. We let these dry, so this is
the base of our skin tone. You already see that
it's starting to dry and it looks
like a skin tone. You can use a hairdryer or a heating tool to
speed up the process.
6. Add Shadows: At this stage, we can also, while we wait for this to dry, we can also apply the
first layer for the shirt. We take the same
mop brush and dry. We'll mix some ultramarine blue with a touch of purple and a touch of
black if you have it. Too, darken and desaturate it. So ultramarine blue
with a touch of purple. And it's a true black. So it becomes too dark blue. And I start from the side
that is away from the light. So light is from here. And we carefully without
touching her neck, be careful. Otherwise it will bleed. We'll add some clean
water now just to go towards the light like this. But here below the hair, there will probably
be some shadows. Add some of my darker mix here. I'm going to let this dry. Now I take meets size. This is 12th round brush. And this is a synthetic brush that will help me
define and have more control on my
colors so I can start applying
shadow on her face. For shadow, I take some
purple. Don't be afraid. Purple has a very
large shifting, color shifting when it dries so thrice
much, much lighter. I can add just a hint of
yellow ocher to the saturated. So I have this purple are turned down but
dot should rush. So you have control. And I will start
applying shadow where I see it on my phase. On this side. And here. Here, I'm fiercely on
this side of her neck. And then we slammed blended. Also. On this side under the
head is this cast shadow. Okay. Then we have shadow here
on this side of the nose. Below her nose. Here. And here. Here we have some
shadow below the eyes. Slightly on this
side of the nose, slightly on both sides. Because the gifts
from this, now, I will slowly blend this
clean water or too much. Okay.
7. Lips, Eyes, Cheeks, Hair: When first the shadow
step for the face, I actually use the
side of the nose. Shadow for the hair. We take some burnt sienna. We mix it with some yellow
ocher because she's a she has dark ginger
hair. Blonde ginger. So we'll add a touch of our
red that we used on the face. So it's burnt sienna, yellow, ocher and touch of red. And we start putting
a base for her hair, the single strands yet, just the base. Then we will apply
strands and shadow. Same here. Leave some highlight. As we said here. Small touch of yellow ocher. On this side, it's going to be lighter because it's
towards the light. You can also put a touch
of cadmium yellow. For instance, while it is still wet or you
take some purple, same purple that we
used for the face. And you apply some
shadow, burned skin. So you get a darker value, darker shade of the same
sienna that we used. And you use this
combination of purple, it burnt sienna to draw. If it is, if it is dry, to draw some strands like this. Same here. Purple, burnt sienna. And here we have, of course, we're going to have shadow. This shadow is
going to be darker. I'm here also would
be in shadow. Now we let the, let the hair and try to other details
like eyes and lips. Now the first layer of leaps. We take the red that we use. For the warm red that
we use for our skin. We add a touch of these brown watered down because
we wanted quite pay. And we apply it. Starting from left hand
side where he's shadow. Some highlight here
and on the upper lip. Just the first lay completely my lips. Okay. Now it's time to add some
shadow below these late. This keeps roundness
and believability. So we take some of the
blue that we use for the shirt and we dilute
it with a smaller brush. If you prefer. We draw some shadow
below this upper lid. And also you can put shadow
on this side of the eye, which is round like
this from here. You will have some
shadow here and Also below the nostrils
can add more shadow. Like this. Yeah, yeah. You should also accentuate this shadow that you
see in the ears. And now we let these dry. I have used a heating
tool or you can use a hairdryer to speed
up the drying process. Okay. Now it's time to add some
color onto her cheeks. I take these diluted red and I applied on her
cheeks. I please. And also some here
because this part is sun kissed and kissed. It touched some, I
add some warmth. How blend it. Now, without what I
have seen our brush, we will add some
roundness to her lips. So we take the same red
and we add some purple. We get a darker red. I tried to use a
limited palette. And the upper lip is
going to be dark and the whole upper lip carefully. And also this side of her lip. And here you have that. Here it's a highlight. This okay. And this is her mouth. Now we can add a darker shadow below the which is
the darkest part. This is the color that
we used for the hair. You can use some color that
you used for your skin. And you add some you
add some purple. And you go, neither layer here exists because her darkest
part looks very purple here, but don't worry, it's not it's
not going to be so purple. I need to wait until it dries. But in the meantime,
while it dries, I cannot stress of hair. I will take my needle brush. I have a thin brush for details. This is a medium brush, strands of hair, not so thin. And I will mix a darker brown, purple and a touch of burnt
sienna, almost pure purple. And I wouldn't go relax into it. Shadow here. And then I want to go with
some strands like this. Same here. Strands. You can also draw some strengths that I have tied to this sort
of a helmet that we drew. It doesn't have to be a helmet. So you can also here let's try and hear her. Yeah. You can take the
same shadow color to accentuate shadow between
the lips on the upper lips. Like this. Not blended. Okay. Now her eyes Let's not
forget about her eyes. I think the smaller brush, I will give her green eyes. I have brown eyes, but my son, my husband, they're
all green eyes. So I love green eyes. What I will do, I will
take some cadmium yellow. And we'll add some
cadmium yellow here below in the
lower part of the eye. And then I'll take
some ultramarine blue and just touch up these. So they mix. Andrew, let them be the way you mix all by themselves and have some
lovely color variation. Okay, now we really let
these dry and then we come back for the last
layers for the shirt. And defense.
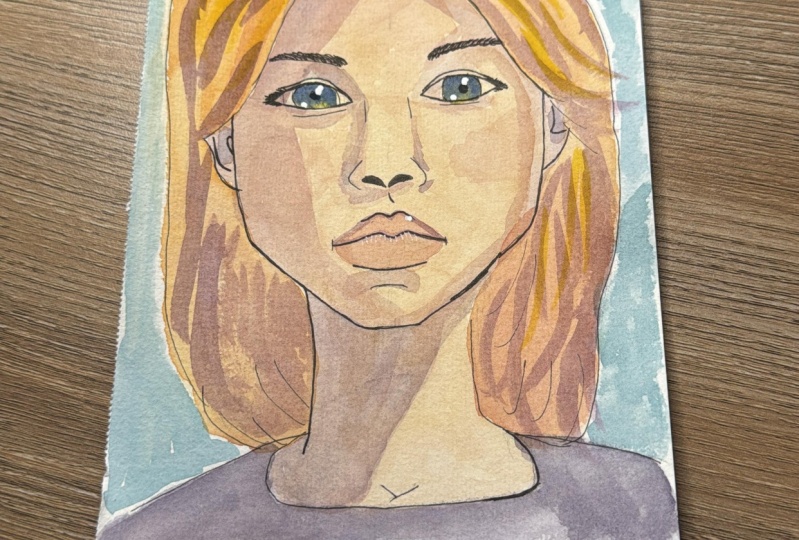
8. Correct Skin Tone & Add Background: Okay. It's sad, I
think she's to pay. So I'm mixing more yellow ocher and red and yellow ocher. And this time I'm adding a
touch of my ultramarine blue. So that will desaturate it. It gives a nice orangey brown, maybe some more because
it's never enough. I heard sometimes. As you were incredibly rich, don't be afraid to waste paint. So we have our touch of blue
that makes it a light brown. I take my coverage and I will just add a further
layer everywhere. I always do it for cars
that after the first layer, it's always to pay. You must think, I'm ruining her. Yes. No, you're not careful the eyes staff from the sides and go
towards the center. So the center, you
keep it light. Be very careful with
the eyes. This time. Fantastic. Now we let this dry. It's much more believable now. Now when it dries, you see the way you
need to add something. First of all, I think I
would like to mark with ink this max that we
have in the ears. And then I would like to
draw again her pupils. And I think that I'm adding some final
touches in water color. And first of all, I'd like to darken
the side of a shirt. So I take this darker
blue and I put a second, a second layer of purple and blue with a touch of
black to remember. And just like this, just let it dry. Hard edges can be really
nice on watercolor, on shadow for shadow. Then I can also take
these dark blue. And here I think we need some
more shadow on this side. Because when it dries, you see where it needs more shadow. And also we like to put some cadmium yellow on
her side of the hair, on this side over her hair. Because we have light
directly and yellow headset. To indicate light. I take some cadmium yellow
and digest glaze it on top. Yeah. I leave some white. Okay. I can add some
cadmium yellow. Not too much. Just
to show light. Now we can add a background and then the final
touches with ink. We could leave this. We could live the
sketch like this. But I really think that background's at a lot of
interests to two portraits. So what I'm choosing is completely different
color entities. Town or I use very much town
of law or primary blue, or you can use several million
or any other sky color. Because I think that
does sky color is the nicest against face. Will start from here
and just add it. In a messy man or so.
You may see manner. So it's more interesting. Just be messy. Be careful here not
to touch the hair. But then it would
be just missing. Because some color variation is, makes it more interesting. Touch with dots. Turn my face, so it's more practical for me. Upside down. Seizure. You see how nice it is against
the blue sky, this face. But I see that she
has strand here. So this is my burnt sienna, but then I take
some shadow color and then we'll
draw her shoulder. Yeah. For this. Yeah. Okay. Let this dry.
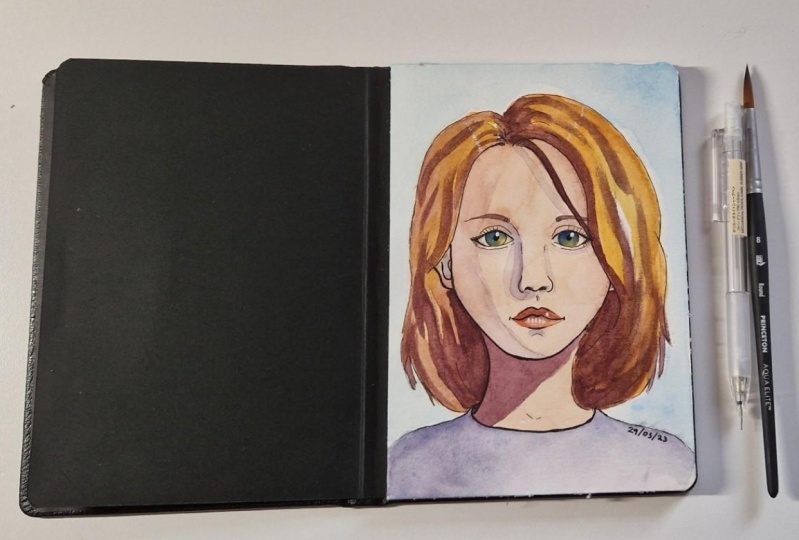
9. Final touches: Now everything is dry and my ink and a white gel pen and
dyad, my last touches. Okay, I'll start from ink and we'll darken some lines
that are thicker, like this one below upper lip, this one between lips. These the side of her face
is going to be in shadow. So everything that's
in shadow can be not much sooner. Then the last magic touches. You've changed the
white gel pen. And you are done
highlights to her face. Here. And here you
are a white dot. And you can exaggerate in
that one small dot here. This gives a lot of
life to her glaze. And also here, just
some lines like this. Make a fuller lip
and a dot here. Now we can also add
some eyelashes. They early with our pen. We elongate this line and
we February's same here. So her eyes become
even more beautiful. This also here. You can accentuate this line. Has thought she was
wearing makeup. This symmetry is important. So I just to further eyelashes in both eyes. This really gorgeous. Okay, I hope you liked it. We've done now with this
certainly just sketch. Now you know how to draw face and how to respect proportions. Ears, mouth, nose, eyes. It wasn't too
difficult, I think.
10. Wrap Up: I'm very happy that you
finish your project. And I will be very, very grateful if you could
upload your project in the gallery so that I can
give you my feedback. Thanks a lot for her
enjoying this class. And if you have appreciated it, I would be really elated. If you could leave
a review this week. I had my channel a lot and also other students to
discover the class. So I'm sure that you had fun
in sketching this woman. If you are interested in this learning path,
I will continue. The new class says
about the subject, and I would release a class about darker skins and
also how to sketch a man. So if you follow
me on Skillshare, you will not miss
my next classes. Also remember that
I'm on Instagram and you can connect with me
on this social platform. I will be very happy to post your projects in my stories that you find me under my name. Is that for them? So, thanks a lot. Once again, assume
our next classes.
 Elisabetta Furcht, Anyone can paint!