Transcripts
1. Introduction to Glass Marbles: Hi, I'm Elisa. They die in Italian with
a color that I have a passion for our
Sketch every day. I think that the practice is the secret for
successful artists. Today, I'm very excited to
introduce you to my new class, which is a very easy, but very FUN and
effective class. Because the result that
is very, very nice. We will be painting
some glass marbles, so it looks difficult. It's not at all. But you
will learn plenty of things. So with this class, because you will learn how light and shadow work with
the transplant objects. You will learn how to add highlights in
the end of shadows. But we will learn one
important thing that we haven't learned so
far in my classes, which is lagged and
shadow with glass, which is different from an
opaque object, is quite busy. So we will be painting not only light that crosses
the glass marbles, I, but also that heats the
opposite side of the marble. So the shadow is the
opposite of opaque objects. It will be very easy one. So we painted together
step-by-step, but you only need some
basic supplies are some Round objects that
you have around the house. Vibrant colours because
these project twice. Vibrant colours,
a lot of passion, some smiles and
can paint with me
2. Supplies for your Project: Let's start with Supplies. The first thing most important
piece of supply is Paper. You need some watercolor paper. You can use any paper,
cellulose or cotton. But it's important that
it is for watercolor. I will be using these
Fabriano 12th 64, which has the content of
cotton off 25 per cent, which is quite enough
for, for this project. Remember, it's better
if it is a sturdy. So these 300 GSM, It's an A4 size to
21 cm by 30 cm, so it's quite big, but you can make it
any size you like. Then you will need, of course, is summer watercolor. I'm using my Paul
Rubens palette. And this is paint that I have squeezed from
tubes everywhere. It's very easily, there are some very vibrant
colours because we will be using vibrant colours in this project, not muted ones. If you have a pallet or some colors that you
find particular, particularly vibrant,
go with those colours. We will be using
yellows, reds, blues. You can really choose what
color you will be using. It's your choice. Then we need some
watercolor brushes. I will be using some Round
Brushes are different sizes. This is also very
much your preference. Round Brushes are a master for this project, but this size, just keep a different sizes
at hand and you will use the one that you think that
that retailer is useful. It also depends very much
on the size of the paper. So the smaller the paper, the smaller the round brush. Then we need a pencil, glasses, small glasses of different
size to draw circles, or they can be all
the same size. I like to vary the size. Kitchen Paper to
glasses of water. I keep my jars very dirty. So I know this for paint because I painting the Kitchen
and I don't want them, these go into the dishwasher. So my family must know
that this is for painting. This is why I keep it
so that I use two jars, one for clean water than
one for dirty water. Then I have a spray water optional to reactivate
your paint. And last but not least, I Posca pen for the
final highlights. Or white goulash or a white
gel pen, if you perfect
3. Watercolor First Wash: Okay, I start placing my circles so I take the
glass and width depends. Two, I will place some rounds. I for instance, will
play place three rounds, not in a particular order. And another one, the beca
with the smaller glass. You can put even
more if you like. So we can maybe put one here. You can place many because you need to wait that
each layer dries. So if you put two more circles, it's easier to let them dry before you go back for Details. And one here. Okay? So this is all you
need for your Sketch. Now I take my medium brush and I start with the glass
marbles that it is on the top left because I'm
right-handed and they always paint this way so I
don't smudge when I move it. I don't smudge my glass marbles. If you are left-handed, you will start from here. We need to decide at this
point, the light source. I will put the
light sources here, which means that we
will have shadows here. And also we will have a darker glass
marbles on this side, and the lighter glass marbles on this side because
it's, it is transparent. If this was opaque, we would have a lighter side here and the darker side here. But with Glass is the opposite. We start because the
light crosses marble. We have a darker
side here and the lighter here because this
is where the light hits. Okay, so I will start by wetting my first marbles and
we'll leave it at none touched her circle
without water. So I will wet it. And why? If you don't
leave this circle, don't worry, we will add it
later with our white Wash U, but I will leave it here. It dry. While the paper
absorbed via the water. I will quickly
prepare some gray. We've my Ultramarin. I will take my ultramarine, mix it with some burnt sienna. This is my classic gray. Add more blue if you
think you need more Blue. And what I do for glass marbles, in the very end, I touch her, I add a touch of emerald green. These are too strong. So I add again some burnt
sienna and some Blue. Very watery. Continue until you find the perfect shade. You can try on a piece of
paper. Slightly more Blue. Okay. I think we are We have it. Okay. So very watery. Maybe it's too dry now, so I will wet it
again, leaving again. Try Round here, it's dry. And we drop the sum. Here. Dropped some gray. And now I can spread
it with my brush. Now I will dry my brush
and slightly shape it. Absorbed. So you leave
some white here. And then you continue
the process with the following, the
following circles. So I now, I am now
wetting the next one, leaving the tries circle and dropping these
greenish gray, absorbing the excess color. Towards the right-hand side. We speed up the process. For the next ones. You can take on this. You could also dry area
figure Kitchen Paper. So did you get some highlights? Okay, now we let this dry and then we come back
when it's trying
4. Watercolor Second Layer: Okay, now my rounds
today starting to look like Marbles
are almost dry. Maybe we should
wait a little more. But because we using much
more concentrated paint, I am confident that
it will not bleed. Okay. I start from the first
glass marbles on this side. And I would start with the some vibrant May
Green. This one. We draw sort of waiver, which should represent
my cat eyes. So you start with the
tip of your brush. Should be a very pointy brush. And then you make
a wave like this. Then you don't wait
for this to dry. And you take, for instance,
summer tunnel Blue. And you will put on this side another waves
lightly touching it. So they will bleed
into the other. Then you, with the
same Phtalo Blue, you draw these little stripe
always following the shape. But then once again, with the dry, with the green. I will here and here. Okay? You can just go as you
prefer, some more here. You can also reinforce
the sum. Here. Here. You can play a little wet on
wet on the cat eye shapes. Then point moves
to the next one. And for the next one, I will choose maybe
the same green. But we the different direction. And I will put some
yellow, some warm yellow. Just fight like this. Now I choose some
Hooker's green. And I will just drop
some here like this. And then we need ceased
with some yellow here. Here we are. Let's take, I always use one color from the previous glass
marbles and you did here. So I will use my dark
yellow and do my wave. The slide. We them, why their belly here. Now we take some, take some Scarlet, some Scarlet. And I wouldn't
touch it this time. I just will go side-by-side. But here we touch it. So I will have some, some games. I'm playing with shapes. You can refine the shape. You can drop some. Now, we go to the
following shape. I keep the red once again. And I will put
some blue with it. My Phtalo Blue and
some more red. Here. And I play with some blue again. See where I can put it here. I can darken. This one. Has made a mistake here, so I will try to fix
it with clean water. Although it's not so easy. But in any case we
will have shadow here, so it's not so important. Fix the shape here. That will also take since darker blue, for
instance, Ultramarin, to just play with one side. Okay. It's done. Now. Once
again, this dark blue. How will you this cat I
shaped dropped some more. On one side. I will take now the yellow, dangerous because it can turn
into Green, but it's okay. And on the site, okay. I will add some
orange on one side. Orange light orange
here to darken it. Same here. To separate the waste and something that
I don't like here. So I will fix this one. I would fix it with here. We covered it with this white becomes
purple here. Same here. Now we let everything dry
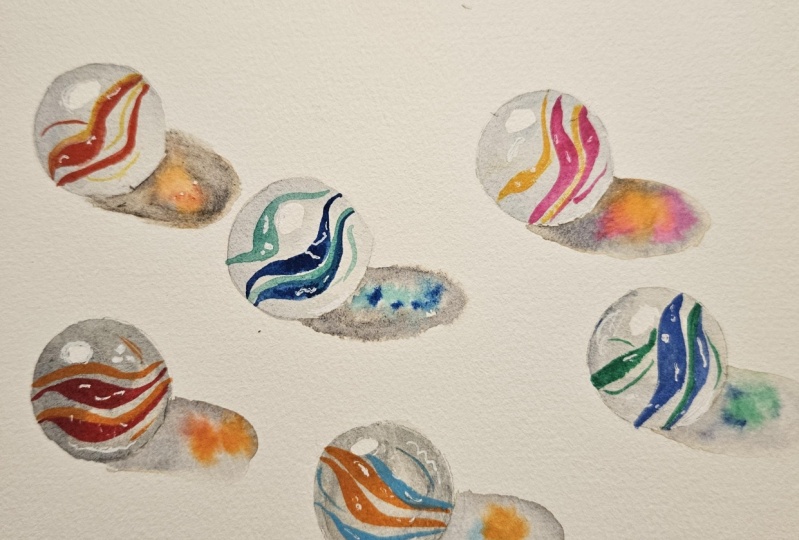
5. Shadows: Now although it's
not completely dry, not try at all
because we have five. My box. We can start from, from the first one which
is going to be dry. And then when we will
move to the last one, this will also be dry. So I have to mix the some of
my gray again for shadow. So I need some very darker gray. For very darker gray, I will take some purple, I will add some blue. I just mix the colors that
I have on my palette. While Blue. Now I need
some burnt sienna. Blue. So to have a dark,
dark actually. Ok. Now with some clean water, we draw an oval from here. This over. Be careful
not to touch her. This Marbles should be
completely dry. I think it is. You've just touch
the outside here. So the just touch the sides. And then you take some of your inner colour of
the cat eye color. For instance, some greener. And you drop it in the middle. Here, like this. Too much, I will drop them all. These gray on the sides. Below. Now that I have the gray, I will also put shadow, like a little slice of
shadow on this side. Okay. Now we go to the next Marbles. This one, I will wet an oval, doesn't have to be perfect. And then I will drop up
like this one on size. And then I can take some yellow
and drop it into center. That is easy. Some green as well. Same here. That she's one. I take my grade as I have mixed. You see, although the
paper is only 25%, cotton works very well
for this project. Some, I take some. Yeah, a lot in summarizer. Also. I can add I can add my
hint of shadow here. It wasn't completely
dry, this one. Okay. We will wait until this
dry and then perfect it. Go back. Now, this one. And last this one. Okay, if we, I
should turn green. Ok, now we let these dry now, and then we start adding they
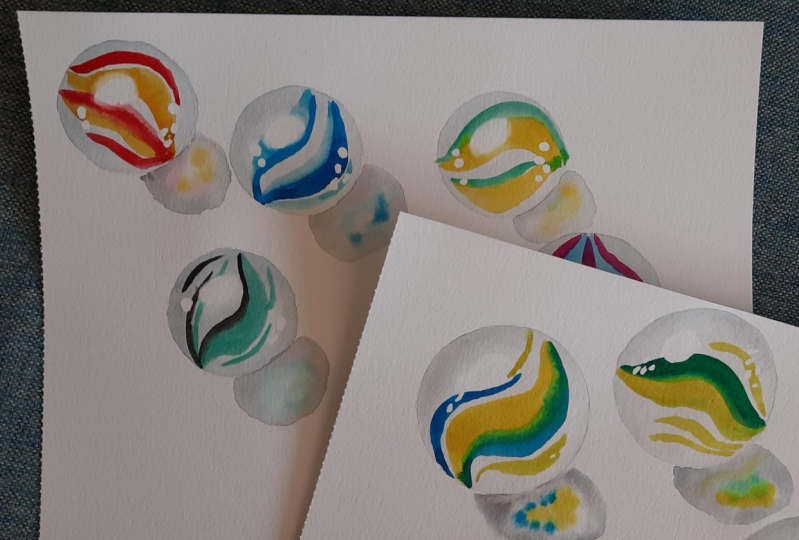
6. Final Details: Now we can see that the colours are drying and
you can have some dry shift, which means that they are
less vibrant once dry. So we can add some further
colour on the cat. I just don't enhance
the brightness. So I will add more of this beautiful
yellowish green here. And here. Then I can add some red here. The red has it very, very important right-shift snot, so vibrant once dry. Second layer of yellow as well. I can add some yellow here and also some Green here to balance here, and it's more yellow. And I would leave
this slide, please. This is the worst. So I really need to put some here because I don't
like it at all the way. Came out. Some low on the opposite side. Ultramarin Blue. Let me just now I'm happier. Okay. Wanted to let these dry? Will have my cell, but
we the heating tool. Okay. Now we must check if
we happy with our shadows. And I think that we can
slowly darken some parts. So I would take must
be completely dry. I have tried with
the heating tool just touchy to to make sure
with the back of your finger, never touch it with
your fingerprints, always with the back. Otherwise you risk
to leave a trace. So I take a Fine. Assign Russia. I take the gray that I
have used for shadow. I add a touch of emerald green. And we slowly
accentuated the SIP. And maybe one here. And these, I will blend it. And I do for all the marbles. Now we let these try again. Maybe we can add Shadow. You blend it. Now, we wait until disease dry. And we will add highlights
with our Posca pen
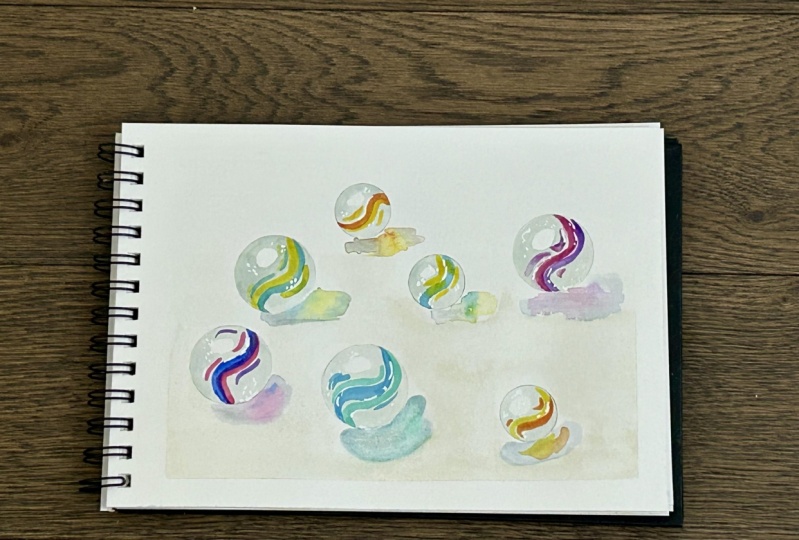
7. Highlights: Now, we need to add
some highlights here in this position
where we had our original white that
can be a little lost. Just need to shake it very well. Your Posca pen. Then you
press it. Here, it's okay. You're just stopped it. And then you can also find
around the shape here. Here. Here, we will have other
dots on this site. We need to find some dots
here against the cat. I otherwise wouldn't
show same here. Always follow a Round pattern. They don't have to be the
same in each marble in there. So the give a sense of something is not opaque enough. Let's see. Fine. Just sensor from now, I, I quite like it. I just erase my role
and I think I'm done.
8. Wrap Up: Hi. You have painted the glass
marbles with me step-by-step, but I hope you had fan
I'm sure your head phon, I hope that you upload your project in the
gallery so that other students can
see what they can accomplish with
these easy class. And I hope I see you
in my next class. Don't forget to tag
me on social media. If you upload your
projects on Instagram, you can find me under my name on Instagram,
elisabetta food. And thank you for having
taken this class with me. And I see You. Minutes, fell
 Elisabetta Furcht, Anyone can paint!