Transcripts
1. Welcome: Hi, Welcome to the
notion began to class. My name is Isabela September of a mixed engineer quoting create. And I use Notion basically for every day whether I'm
planning my content, writing scripts generally
creating more personal budget. And in this class, I'm going
to introduce you to this all in one amazing too cold notion. I will show you how to create your own template from
scratch using Notion. Whether you want to use Notion to manage a small business, create new content, and
manage your personal stuff. Notion is a great platform
to do all of that ball. And I believe your time is
the most vulnerable acid, so you got to use it wisely
instead of downloading multiple apps that are
designed to only do one thing, you can do it all notions. I mean, your to-do lists, you remind this
content scheduling. So if you're looking for
a tool that will help us more than the
process of organizing, planning your content, and
managing your personal stuff. We'll see you in the class.
2. Create Account: Welcome to the first lecture. The first thing we're
going to do within a goal street to Notion dot S4. This is the first
page you're going to see at the top you
can sit tailor their products downloads if you wanted to download notion for your Android UI for Mac
Windows as a Web Clipper, let's go straight to pricing. Yeah, you can see
these different price, tires and option. We have the personnel, which is what I use because
I'm a solo creator. This is where our also do personal money during
staff like my finances, I write my goals. This is where our
journal plan projects, develop courses pointing to all that good stuff with
this personnel plan, as an individual, it's
perfect for your ad. It's free. And we have the personal Pro that
is $4 per month, build annually, $5
billed monthly, everything in
personal plan you can see unlimited file uploads, unlimited gas that a diversion,
if you're a quantum, create a solo
content create with the personnel plan that
you will do just fine. As you can see, you'll
get unlimited pages and blocks were told to introduce you in
the next lecture, you can share with five guests. Let's say you have
a grocery list you want to share with your
Biden out or share, sit in, budget gold
with your partner. You can do that and you can sync across devices which
is on your mobile, your lab tool, your desktop. So what you're going to do now, you're going to hit
on PESTLE analysis. You select a get started. What I'm going to do, I'm
going to create a new current. It was a continue British. So you can see here it says it will just send you a
temporary sign-up code. Please check your inbox and
paste the sign-up code below. So real quick, I'm
going to shift my focus to the
second monitor to get the code or be
creating your account. No, You can start
writing your username. What should we call you? I'll say September password. Quanti knew, how are you
planning to use notion. It will streamline your setup
experience accordingly, either to collaborate
when your documents and projects or for myself, which is the personal
plants free for one person. For myself will do
take me denotion. The first thing you're
going to see is exactly this notion will gain
you if you're a new user. Another great feature of a notion is that
you have templates, but I wanted to show you how
to do this stuff you solve. You can always go
to the templates to figure out more notion tools, but we're going to
delete these pages. I want us to start from scratch. Won't be using any code. I will show you how I
use Notion personally, which is way simpler
than manual thing. Okay, So it will be developing
everything from scratch. Content planner, Kyle Linda, timelines, budgeting
years for personal use, creating to-do lists because I prefer organizing
everything using one app instead of having multiple apps whereby
afterload in logout. And in this class
you go on to see how powerful adding motion
to your workflow can be, and that's it for this lecture, I will see you in the next one.
3. Pages & Blocks: Welcome back. In this lecture we're
going to talk about blocks and pages in Notion, we worked with using
pages and blocks. For example, follow
my cursor and click Add Page over
year, read page. And within this page, we can add blocks. For example, if I
want to just write, we can just select
Empty with an icon and then it's just a
writing blank page. Let's go ahead and select Empty. Let's daily tasks. We can change the emoji icon. Let's search for work emoji. Now we have a blank page with
the icon within this page, we can add blocks. Yeah, you could see
there's an option to type and these are Plus icon
that keeps popping up. When you click this icon, you can use it to add
a block to this page. Let's select block. Here we have basic blocks. As you can see, you
can add text for your blogs who have page, for example, we have
this daily page. I can add another page in
it as a link, for example, when I click it and say
content for example, then I'm done with it. When I click page
again, these are Nava, a link that I can click and then we have a sub
page that way. Okay, let's delete it and
let's go again and say m2 with icon, select plus. Here you have to do
list template heading, which is large text, medium section heading,
smaller heading. We have table, bullet
list, number list, toggle this, but I
will show you how to use these in the
upcoming lecture. You can mention a person if you want someone to
get a notification, mentioned a page, date or
reminder, emojis in line. And those are in a line
blocks and we have database, database gives you full templates
that you can customize. We have the board view, what we'll use to
plan our content, TableView, gallery view,
and we have ListView. I normally use list
view to create a journaling page and
we have calendar view. My focus with this class is to simplify a notion
at the same time, make it useful for
day to day use. Follow my cursor again,
click on templates. Templates you get basically all kind of ways
you can use Notion. For example, you can
select the design task, a template here you can see you already have already
to edit template. You can just add it to your
own ligand we have executed, you have engineering, whatever
field you're working in. You can just select
the goal template and then you just add it
in, right, your goals. But what I will be doing now, I'll be giving you an
understanding of how to create these on your own so that
when using templates, you know how to edit
it to your liking. You not just limited
to using templates. So that's it for this lecture. I will see you in the next one, will be creating a
simple to-do list.
4. To Do List: Hey, welcome back. In this lecture we're
going to start creating a to-do list page. So the great thing about
Notion, like I said, you can do everything in one app instead of downloading one
extra effort to do list, one extra airfoil calendar, one extra F where you're bored, one app for budget. And you can do all these
things in one program. Let's go ahead and
select Add Page. I'm going to write
a daily tasks. Daily tasks. Great. Let's go ahead and delete this
one in great daily tasks. And let's go ahead
and add an icon. For daily tasks. Look for a note icon, which is an emoji. Select this Notepad,
let's make it look good. So let's go ahead to pixel and look for a royalty-free images. Now we our own Pexels.com. We're just going to
search for office. Now let's look for
something like note pad. Like a notepad or
great, I like this one. Let's download it.
It's done downloading. Add cover. As you can see over
here, hover over it and recover change cover. Notion has images that
you can use over here. Anything that you think
is related to the To-do or you just like it there, or you can just select
it over here as a cover. Let's select, Let's select the man in space
if you like that, you can just keep it as is. And then you can
reposition it by clicking reposition over
here to adjust it. Great. Saved position, that's great. Here you can see right after icon you have add
comment. On comment. You can add the, what
is the purpose of this daily task is things, things we will be focusing on or I will be focusing on whatever is the purpose
for the to-do list. And then you can say add mentioned someone
in your team will be updated weekly
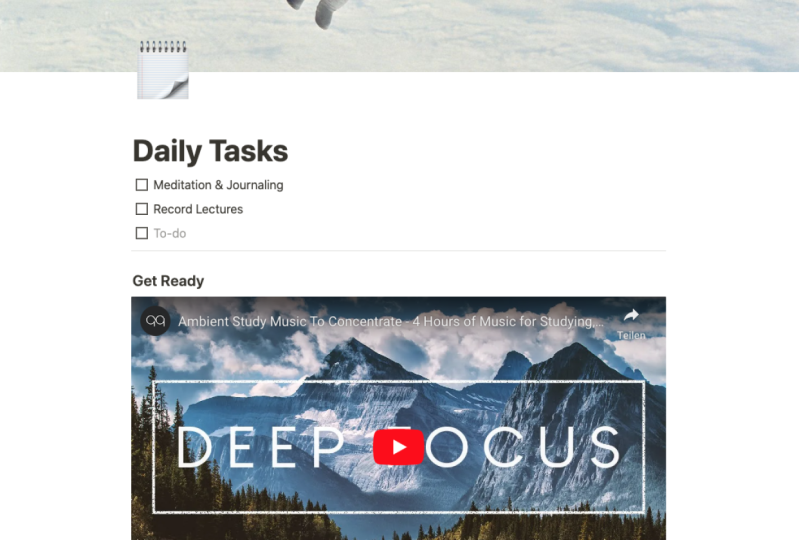
if that's the case. Great stuff. Now we
have daily task. These are the things
we will be focusing on to be updated weekly. Great, now it's time to add the to-do list
future we're gonna go to plus select to-do list. The first thing we're going
to do in the morning, we're going to check emails, for example, JM and meditation. Record lectures for example. And that is your to-do
list. What do you do? You just go in, check this for the day, check this, and
then you can just uncheck these at
the end of the day. And that's your to-do list. And you can do other
cool things with it. For example, I can add a divider here and just go to a divider. Great. Now I have divided this block. Let's say for example, there is a video would like
to watch in the morning, but pumps us up and
wanted to stay motivated. I didn't just say, good, ready and change
the text type two, head three, I don't
want a super huge one. And then we select
plus CO2 Media. Select the video, great. We can just paste the
video link there. So what I'm gonna do, I'm
gonna copy the video URL, copy video URL, and
say embed video. Now it's embedding the video. Great. So now we have daily task. We have check emails,
Jim motivation, whatever task for the day. And we have this video here already embedded, ready to go. Let us say if I liked towards this video every morning
now I can just hit play and watch this video
notion without going to YouTube and get distracted
by other videos suggestion, okay, and that is how I design
my to-do list in Notion. Obviously there's
so many ways you can make your pages interesting. But I feel like wait to do list. This is way more
interesting than most to-do apps out there. That is the power of notion. That's it for this lecture, I will see you in the next one.
5. Writing & Blogging: Welcome back. In this
lecture we're going to start creating a blank page where
you can write your blog, planning your web content. As you have seen that
there is a feature whereby you can add a page
within the page. That means you can add
different blog pages when your notion that you
just copy and paste the content where
you distribute. So what I'm gonna do now, I'm going to select Edit page. And right. And I'm going to select
Empty with icon. I'm going to search
for books on icon. Great. So what I'm gonna do, I'm gonna show you how to
create a blog page BC. We can start by saying
how to use Notion. And that's our heading. We're going to go to text. You just selected hover over
it and this toolbar popup. And you just select text, turned into heading and medium-sized heading,
great stuff. And here we can start writing notion for Chris, productive life and business. And the after the heading, let me add an image so
we're going to hit Plus, go to Image again. Go to Media, scroll
down, go to Media. Great. Upload an image. Let's use the node paid-in
laptop immediately. It's just shrink it
down a little bit. And here we can start writing
why notion is so cool, for example, we can
say one, right? Flexibility. As point number one, highlight that select Text. And we'll just make
it small heading, which is heading number three. You can click the hand
or you just click under the text and start
writing the cone day. And these also went
to a human features. You can change the
color of the text. You can make it bold, all that good stuff. And that is how you use
Notion for writing. That's it for this lecture.
6. Content Planner: Welcome back. In this lecture, we're going to start creating
a cone tend planner, let's say a county.
And of course create. You want to plan your
content whenever you have ideas you
want to board, you can submit things do, but at the very same
time, organize them. For example, maybe this one
is in q to be produced. This one has an editing, this one has been published. This is where this
lecture comes in. We're gonna go ahead
and select Add Page. Let's do YouTube plan. Youtube content of planner. I like to use the TVI. Couldn't see TV for YouTube. Boom. And we want to select plus. Scroll down and let's
select the board of view. As you can see, yeah, it says Select Data Source. What we're going to
do, we're going to select a new database. New database. As you can see here, you have a bit of
template already set up. It's showing you how it works. Not started in
progress, completed. This is no status. These are cards. We're going to be using these cards to play
in our content. For example, for the card one, we can rename it and say
our first YouTube video. To record audio. We have that as an idea, right? And then we can just
drag it to not start it. I can rename nodes started also. And black recorded. You can simply edit this one, but I like to do things
from scratch so that you know how to do things yourself. So what I'm going to do now, I'm going to hide the
North status group. As you can see, these
are groups recorded. That's a group in progress, that's a group completed,
That's a group. I'm gonna save this as my EQ. This is where write
down the ideas or improve your light. Improve your video lessons,
improve your video. That's the continent idea, occur within that code, you can just click on
the record better audio. Here you're going to
write this script. You can write pointers, things you want to talk
about on the video, all that good stuff, Let's say that tool at
the very same time, the page blog features
also apply here. So we can just select plus and select a bullet list
or numbered list, let's say number list. So point number 1.1, maybe we'll just do 0.1. Too. Great. We can just scratch this, delete all of this, instead of starting from
scratch all the time. Let's say there's sort of a
template that you followed. What we can do here,
as you can see here in this blank area, there is a please
enter to continue with an empty page or
create a template. What I can do here, I
can create a template. Great. This template is my
YouTube content format. I'm gonna show you how to use this content format grid stuff. We're going to start with
the preview of the video. Here we can write what will
be in the preview part where I end result, maybe I show the end result
of maybe the stamp preview, make it a heading. Three, make it large
and create some spaces. Say two. We introduce ourselves,
introduce yourself. Select that. Head. Number three. We say three, maybe it's in third row, row. Mated intro role with three also. The fourth will be
the main content, the main videos
that main content, that is the structure
or follow. So select. Text had three great stuff. Now that we have
that template in place, Gauguin select back. Now when I hit this card, I have the option to select
this YouTube content format. Instead of just selecting
empty page or new template. The credit that template, it's in my Notion now
underneath as a template. So what I can do now I can just select any card,
improve your audio. And here you can see
YouTube content format. I can just click this one. It loads and it gives
me that content format. I can just fill in
what I'm going to have as a preview on this video. What I'm going to have
as an introduction, what I'm going to say, I can write the script if I
want all that good stuff. And that is how you create templates in your
notion content plan. Let's go back to the
current plan now. As you can see here,
we have to write Q, the condemned steal an
idea, it's not recorded. And then we can rename
this as in production. But I wanted to delete these. I want to create
them from scratch. Delete them. Delete. Great to add another one. You can just hover
over this one. And adding new group
in production, add another group editing. To add a new card. We can just add this
new card in your video. Great. And then now it's
time to produce it. Just edit to my introduction. Let's say today is
my recording day. I will be patched breaches and Gandhian in production
that does add maybe these two videos I'm like These are gonna
be my main focus. And then when I'm
done recording them, I'm going to move them to
editing, them to editing. And then I can add
another croup uploaded. Boom, when I'm
done editing them, we can just move them into
this group which has uploaded, I know I'm done with those
videos in the queue, synchronous videos that
are still in planning. I haven't recorded them. Let's title this board
and say You tube. As you can see over year, we have some options you can open at this board
planner as a full-page, you can just click
on these two arrows. You have a full page. It makes it much easier
to edit this port, and here you have three dots. This is where you can
change the layout. For example, we have
the board view now, but we can change this
layout to another view. We can change it to a table. As you can see over there. Science datas uploaded, you can decide it's in
production or uploaded. Great. And we can trace the
same content board plane that to a timeline of block. As you can see these
flexibility here, just because you instead
it that block as a board, you can change it to at least you can change it to a gallery, you can change it to a calendar. Thus, the cool
thing about Notion, it's the flexibility of, let's say timeline because
I wanted to play in the coordinate based on dates and recording on certain days, I can just get the term
Ln viewed this way and select this arrow right next to air prayer so that
I can see the content. And to add it to maybe I went
to record it on the first, you just hover
over the timeline. I'm going to record
it on the fifth, maybe poem on the fifth. The record better audio recorded on the fifth
day and then boom, or maybe on the same
day, bomb, right? Yeah. You can just move it
across the timeline to change the dates of doing
or finishing the tasks. And we can go to the
three hours again, change properties. Basically you're going
to change one block to a different block
based on your needs. And that is how you will
plan content in Notion. I hope I didn't cause confusion with going
the extra mile. That's it for this lecture. I will see you in the next one.
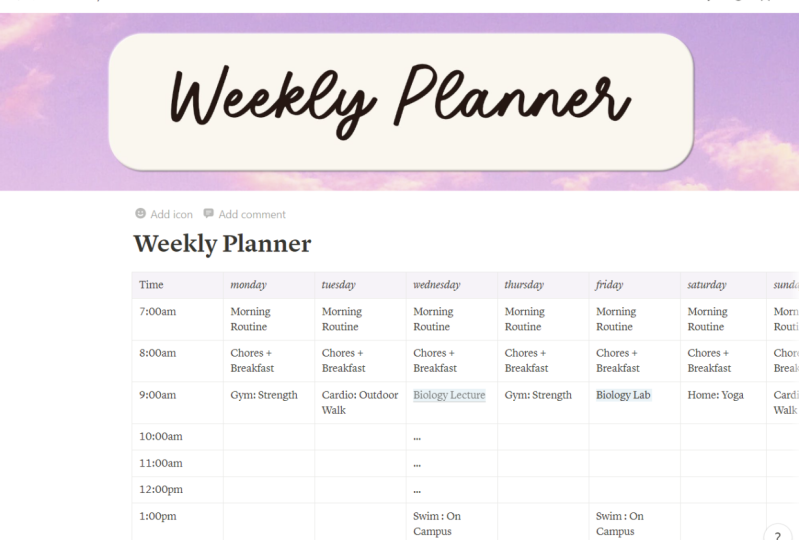
7. Weekly Time Table: Hey, welcome back.
In this lecture we're going to start creating a timetable notice ed page
and say weekly schedule. This is where we will
be planning what we'll be doing a ten during
the day at work, during the day, and
change the icon to time. And we're going to select plus. Under basic blocks,
we're going to use the TBL one select table. Now we have a table block care. So what I'm going to do now, I'm going to say time, alright, yeah, I'm
gonna write time. As you can see, these
popups right here. This is where you can
change if you want to make this a header row or not. So let's do that. Let's click this popup, make it a header row, no changes in color. It's different from
the other blocks. Great. You can do the same thing. Other option header column. So as a column now it's
different from other blocks. It makes sense. You just hover over
these six dots. Switch off as a
header coulomb switch on as a header column. That one will be time. Here we can write, let's
say you wake up at five AM, you can see five AM. And we say 7079 AM. Guess. You just click on the next
block and we say nine. Great. Now that we have r times
the following block column, I'm gonna make this one Monday. And I will say Monday. When I wake up, I
hydrate hydrate, shower, meditate maybe at seven, it's assumed time at nine AM. Sprague first, I'm not only limited to
these eight blocks, I can add other blocks, okay? As you can see to the right side you have click Add New Column, and below click Add New Column. Let's go to the right
one. Add new column. You can see, yeah, we can
say this one is our Tuesday, is going to still
doing the same thing. I'm going to select
Copy and Paste, select Jim copy and paste. Select breakfast. Copy and paste. As you can see, this is
a lot of time wasted. Instead of having this
column, it has a blank one. If I'm doing the same thing
on Monday and Tuesday, I can just select the
six dots over this one, which gives me the options. And select duplicate. It just duplicates Monday. And I will say this is Q. Stay. And do the same thing. Duplicate. That is Wednesday. Wednesday, maybe Wednesday. I don't go to gym. I take a break from Jim. And below we can add a new row. Let's add another row and say at ten AM we'll start working. Zeros 0 AM. We start working,
let's say for example, content creation on Monday
and Monday, or just copy it. Command C or control C, control V to paste. If both days I'm
creating content. And on Wednesday Let's say, for example, I'm doing research. Ten AM, I'll just say research. Grid stuff. You can add more days by
hitting the plus icon, add more rows by
hitting this plus icon. And that is how you create
your timetable using Notion. See you in the next lecture.
8. Thank You: We're done with the first
part of this class and in the next one we'll
cover generally and budgeting a broke it into
two modules so that it can be easy for you to
cool through the content. So have fun with no, she'll create something
at your unique tag to one template you like and
shade in the project section.
 Sabelo September, Music Producer, Content, Web Design