Transcripts
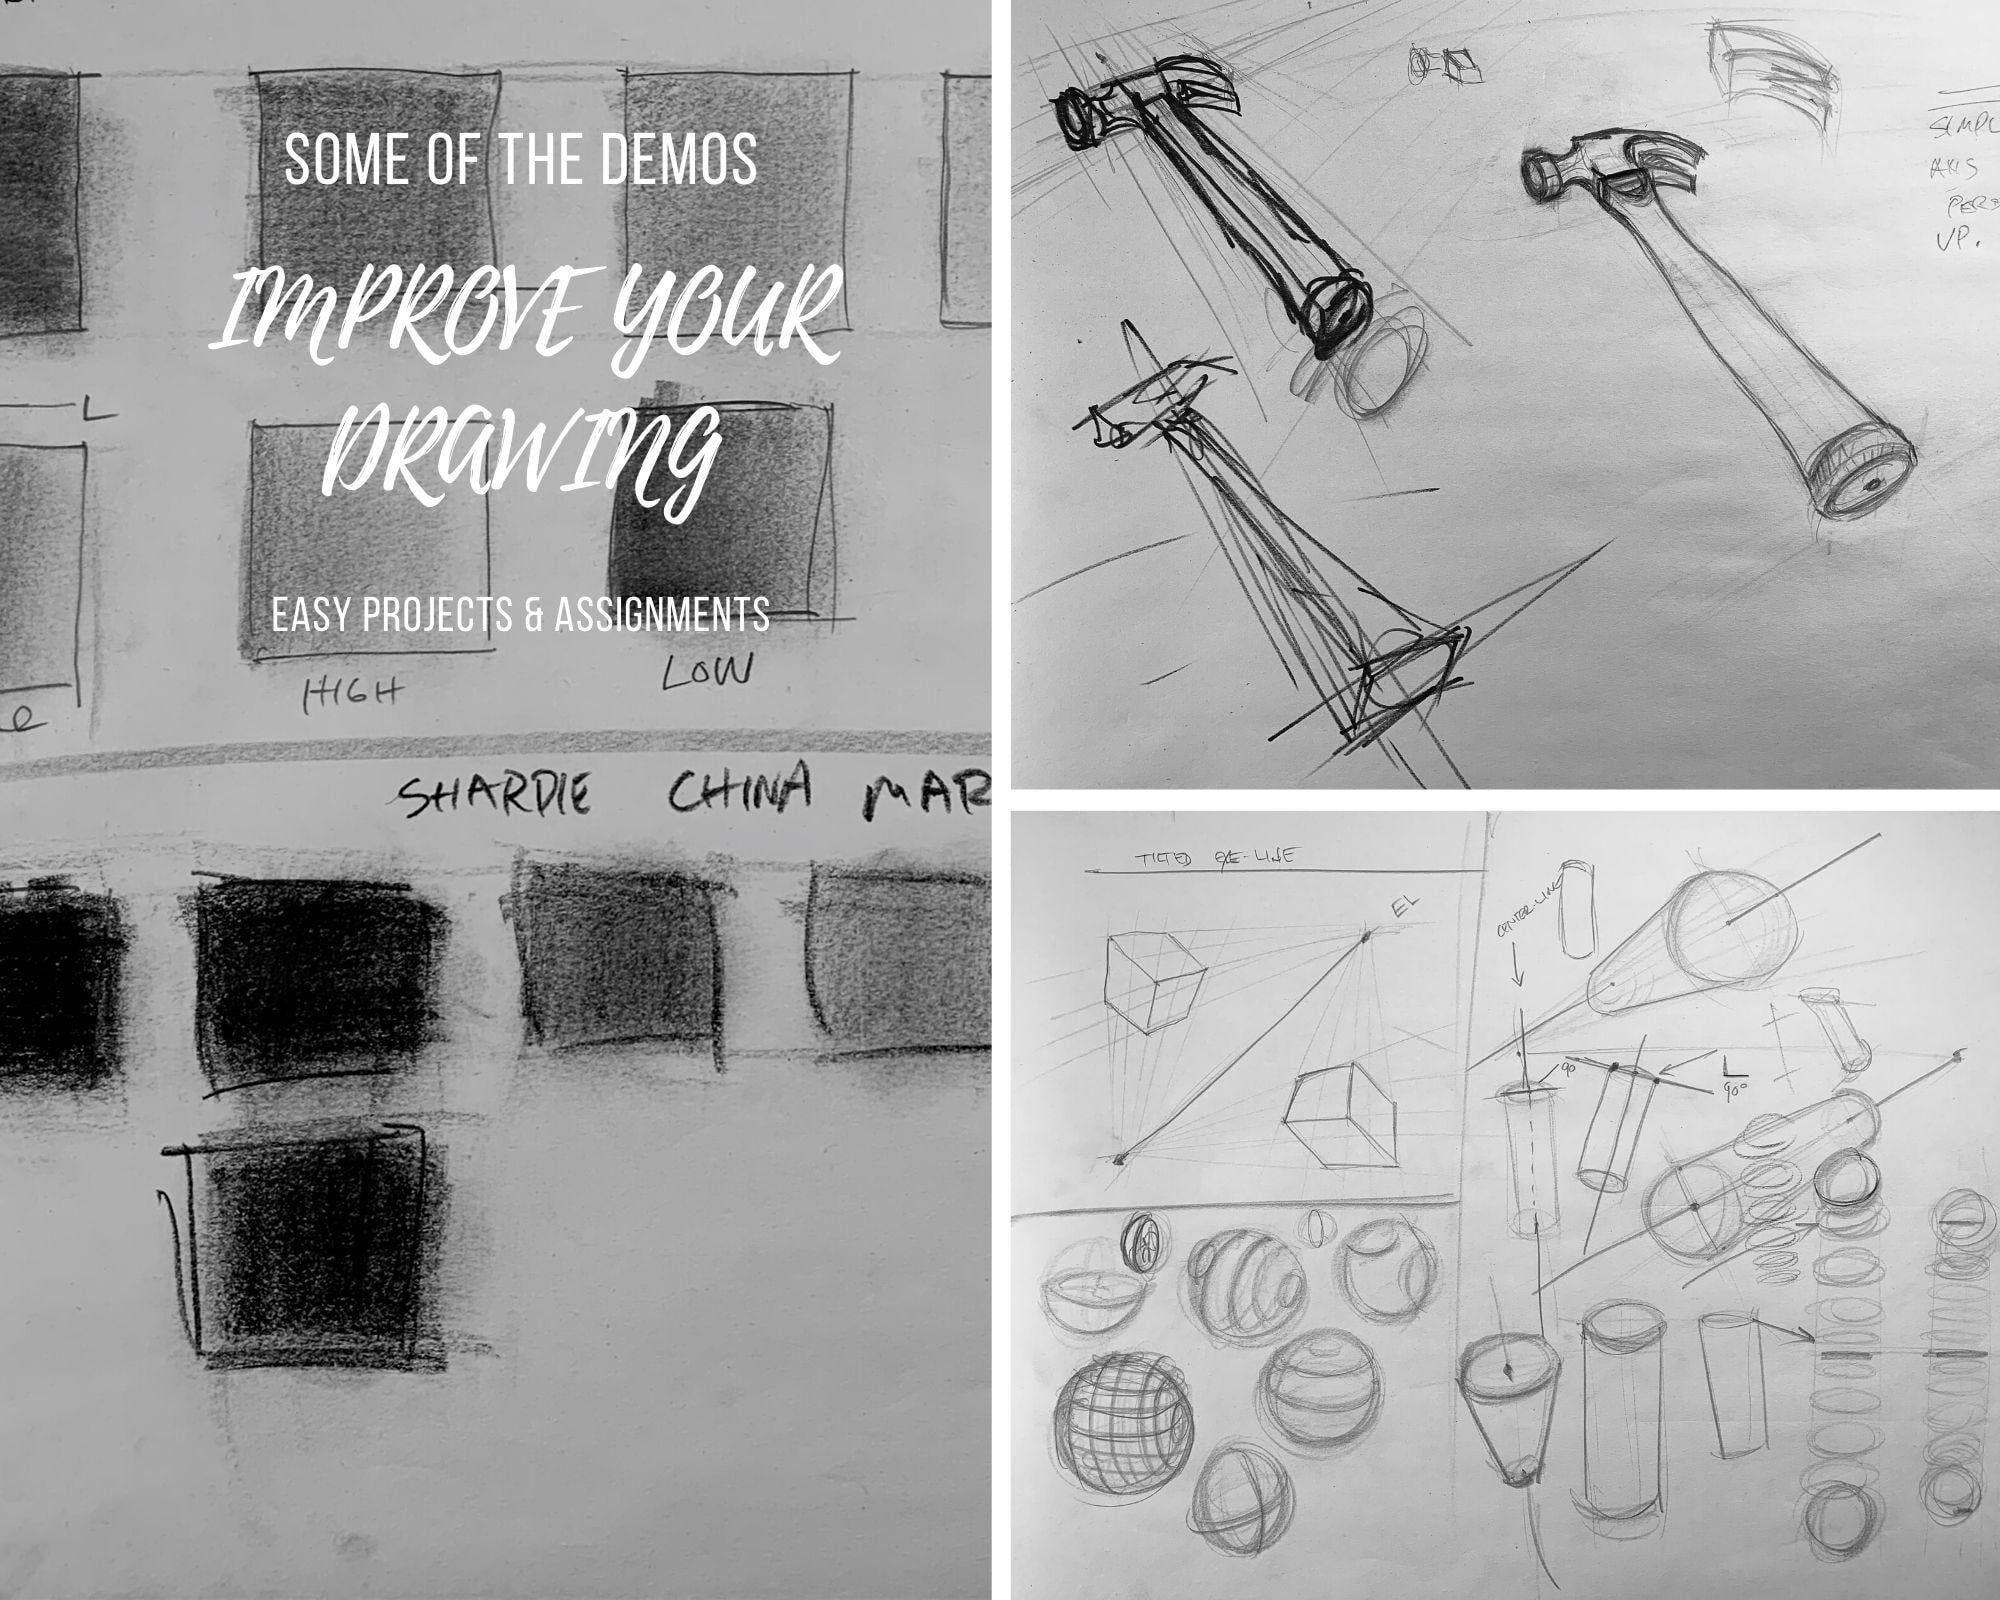
1. Intro: Welcome to the easy drawing exercises and techniques to improve your drawing skills course . In this class, you'll be introduced to a series of fun and easy exercises that will immediately improve your ability and desire to draw. As you may know, drawing is the gateway to making great art without good drawing skills. Your paintings in creative birth will become weak and unstable, and no matter how you're drawing is you want to constantly improve it. I highly recommend this class for all levels, but it is targeted at beginners, have won a reliable source and some good exercises to improve their skills. To make drawing fun, I will cover many skills, including and I coordination How to Hold the pencil, various line drawing techniques and exercises, shaving skills. How to draw basic two D and three D shapes, perspective, how to measure and a whole lot more. So if you are ready to improve your drawing skills, then let's get started. We will kick things off with some hand eye coordination exercises. I will see you on the inside. Thanks for watching
2. How To Use The Platform: In this video, I
just wanted to go over the Skillshare platform. I know some of you
know how to use it, but I know there are
many others that simply don't understand how
to create a project. How to add more photos, text, and things like that. What I will do now is pull up one of my classes on Skillshare. This may not be the
class you are learning, but it does have everything we need to cover what I wanted to share with
you in this video. This is my watercolor workout
basics and beyond class. And you've got the main
video here. Obviously. If you wanted to make
that video bigger, you can click that and the
top right hand corner, and that will enlarge the video if you want to reduce
that size again, come up here to the top
right-hand corner, click it. And that's going to bring up your navigation menu on
the right-hand side. Now if I hover over
the video with my mouse down here
on the lower left, you have play speed. For some reason you
wanted to slow things down or speed things up. You can always change the speed. Keep in mind if you do change, it just makes sure you
go back and set it to normal if you
want to, in fact, see at a normal speed, you can also rewind
things 15 seconds. If you're watching something
you wanted to see what happened within 15
seconds together, you can click that and
then I'll take you back. And now 1515 second increments. You can click it three
or four times and go back 45 seconds a minute,
whatever you want to do. If you want to make
a note of the video, you can click this little pen That's going to
bring up your note. And that's a good way to remind yourself if something
interesting happen there. And you just wanted to
sort of jot something down that sort of
clicked in your mind. This is your volume. So if it's CBC, this slash like I
have now lets you need to unmute it so you're not going to be able
to see the sound. If I click that now, I can now hear the video
if it were playing, this would be subtitles. So if you wanted to
have a subtitle and the various languages
here, you can do that. You may not like
having subtitles. You can put subtitles
off on the top of that. So if you don't
want to see them, That's how you get rid of them. Again, we can go full screen with that feature in the
lower right-hand corner. So if you wanted to see this and this largest
possible resolution, that is going to be
the option to do it. Okay, So again, that's that one. So that tells you a
little bit about how to navigate some of the
options on the video. Over here on the right. So long as you're in this mode, we can scroll down and
see the different videos. All videos that you
have watched all the way through should
have a checkmark. If you want to again,
get rid of that, you use this button in the top right-hand corner,
you can get rid of it. And then here we see it. Now down here, we
have some tabs. We have the About tab. So that's going to be the class
description that I added. I will often add other classes that you
may be interested in. So throughout the course, I may say if you want to learn more about how to
plan watercolor art, be shorter, checkout the link
in the class description, and that's gonna be right
here in the About tab. So if we scroll down, we can see all of
these are links to different classes I have. So that's a little bit
about the about page. Reviews are where you can see how awesome reviews that the
students left on the class. Here, our discussions, discussions are very
important because that's how I'm
going to notify you about each new lesson of
when they're available. You will see, if you scroll
down, you'll see discussions, you'll see where there's some
different things going on. This is important too. So if you have questions about the class or a
lesson you watched, then you can use this
discussions to get in touch with me and I'll try to respond
to you as soon as possible. You can also share links
and the discussions too. So if you have something
you want to show me, you can always link
it up and I'll be able to see it. Here. You see I can start
a conversation, I can ask a question up and
share project and so on. Speaking up projects,
if I go right here, this tells you a little
bit about the project. So here you'll see each lesson
has a project well almost, but the point is to get
involved and started doing the demos and projects
shared in this class. And here you can scroll down
and see all the students that are posting projects that there's one do
you want to explore? You can click on
that and just see what an awesome job the
students are doing, getting these different
projects and things done. Of course, you can
comment on these two. So over here on the
right-hand side, you can click on that. You can share a little feedbacks and encouragement,
whatever you want to do. If you look at my
project right here, you're going to see that I've got a detailed breakdown
of all my lessons here. So each time I post new
lessons in a class or a demo, I always break it
down and give you a really good description
of what's going on. Now you may want to
create a project. Now, since I already have one, are you going to see
that I don't have the option to make another one. But here is a class that
I don't have a project. You will see this green button
on the right-hand side. To create a project, all you have to do
is click on that. And that's going to bring
up your project option. Now the first thing you'll
see is a cover image. If you want to add
a cover image, just click on that and then
navigate to your image. So I'll just select one here. So I'll select this one. And then that's going
to upload the image. Once it's uploaded. I have the option here on
this slider right there to enlarge it and then
sort of move it around, however I want that to be seen. And once it's done,
click Submit. Again, this is just
the cover image. You can go ahead and add
a title and I'll say, awesome class by Robert. If I can spell that right, that would certainly
help. Description. Hey, took a three-week class
and here's what I did. Now if I hit Enter, That's going to bring the
cursor down here below. And then I can add an image. You see down here, you can see, you can have three options
to add more content. So if I click on image, I can add another image, so I can click on that and then you have to
give it a second. And then that's going
to upload the image. Now I can click Enter and you see I can write more content. I'm like, This is my
cool fish painting. Now, if I wanted to add a video or link and
maybe you're like, Hey, did you happen to see
this picture, whatever. You can double-click on a word and then you have a
link option here, and you can paste
the link in there. Just make sure you
hit the Check button to make it active. And now I can hit enter again
and then add more images. That's how you can
make your project. If you don't want anyone
to see your project, you can click this button
here to make it private. But once you're done,
very, very important, scroll back to the
top and hit Publish. And as soon as you
publish your project, that's going to be visible
for everyone to see. So that's publishing right now. I'm just going to
give it a moment, alright, and then there
it is, right there. So I just added my projects. So let's say you want
to edit your project, you click on that again. And now you come up here to
the top right-hand corner. You can click Edit, and now you can scroll down. Make sure you put the
cursor where you want it. So if I want the next image or the next video or whatever
to be below the fish. I can come down
here and click on the end of the
sentence, hit Enter. And now again, pull in my images or wherever it
is that I want to do. Again, make sure you hit
published when you're done. And then that's
going to save it. You just have to be patient
and let Skill Share save it. Another thing you may
want to do is share your project on social media. So you have this
Copy Project link. You can copy that and share
that wherever you wish. Over here on the right-hand
side, you can hard thing. So if someone did a project
that you really like, you can give it a heart. You can share a comment and say, those fish are amazing, and then hit posts and
that's going to share your comments with whoever
it is you're talking about. So again, just good
stuff to know. And I think if you learn how to use the projects
is very useful. And teachers can often
see them and hopefully they do and they can give you some feedback on
what you're doing. The last thing I want
to share with you is right here under the again, we've got about reviews, discussions, and then
project and resources. These resources
are downloadable. If the class has images,
resource images, whatever the case may be, you can click on the
link and that's going to download it to your device. So I hope this video helps you out and that you
understand a little bit more about how to navigate
the Skillshare platform. And then of course, the
courses that are taught there.
3. Basic Line Exercises - Part One: we're going to start this course with a few line exercises here. This is a great warm up to just get in the mood, but also to start to work on your handout coordination, how you hold your pencil, you're lying quality, the shape quality and so on. So I probably have talked too much already. So let's go ahead and just get started with the basic line. Now I am using an underhand grip. I do not recommend using a writing grip here. Your life is gonna be too dark, and we tend to work in this spanner underhand grip. Nice and loose. You can hold it back. He can hold it up. Whatever is comfortable to you again. Nice and loose. And we're working from the shoulder and we're not working from the wrist weaken. Do this sort of action. Maybe when we start shaving and things like that. So the idea is we want to create a series of lines s so basically, I just do a few lines here, just give you an idea. And what you want to do is think about adding some dots so I can add a series of dots here and I can work. I left to right, and I want to see if I can connect those dots. So I'm trying to hit each one you're going to find. You gonna be a little bit lower sometimes. Other times you'll be higher. Ah, but the goal again is to working on connecting the dots. All right, We've all done that before. Probably the other thing we can do is to not just get stuck working left to right. We also wanna work. Right toe left out is go right over these work right to left. You can vary the degree of pressure into the paper. So if you want to work on light lines, we can work on a light lines. If you want to go a little bit darker, weaken, go more pressure and even work a little bit darker line. So again, that's left to right and right to left. We also have top to bottom so we can do a few dots here to get going and I wanna work. You can see him way off starting to get it. All right, so that's top to bottom. Obviously we can work bottom to top. That's a little bit awkward angle. I would typically maybe rotate my board like that. But just so I keep it nice and square in the camera, I'll just use more of a side the side of my pencil. I was using just the tip like this, as I was drawing, but I could just use the side of my pencil here and still working from the elbow to connect them. I could go a little bit heavier on the last one, that is Ah, 1234 All right, so left to right, right to left, top to bottom, bottom to top. We also have diagonals. So if you want to do a series of diagonal dots here, we can work bottom to top and then also work top to bottom. So fun exercise you can do here just to work on some of your handout coordination, but also to work on some of the line quality. And the last one he may have guessed already is going to be working in a diagonal in the opposite direction so I can work. It's a little bit harder because I can't see the line, so I'm going to adjust my hand so I can see both dots. So if if the dot is underneath the hand, obviously it's hard to see, so you may have to rotate. But notice. I'm still working from the shoulder. Okay, I'm not working from the wrist or elbow. Everything is coming from the shoulder. Now. I'm going to adjust my hand and rotate a little bit on the opposite side of the camera and try to hit these dots, and that's a really weak point. I know, drawing from this angle from the past experiences. That's a tough angle for me, too, to get right. So anyway, that's a really good line. Exercise again, these air, eight directions you can work on and we bring that into the camera there to focus on lines , and obviously you don't have to connect the dots all the time. If you just want to practice your lines, your diagonals, you can do that, too. I couldn't do a slight diagonal. I can do a ah more extreme diagonal. Change the angle a little bit, but the key is to always change your directions, so you're working top to bottom bottom to top left to right and change it up because those are the main lines you're going to use to draw most of your forms. And the very last thing I'll mention here is working on the length of lines you can see. Everything is almost the same length here. I've got a few shorter lines, but you know, we can work on short lines in the same manner, right to left, left to right, rather right to left, top to bottom. And then we can work on loan lines when I work on long lines. It's kind of fun to do these dots and then try to connect him. We can see I'm way off. So I'm getting a little bit better as I go. And and of course, we can bring it right back the other way and obviously working with diagonals, we can do the same thing. Next thing we'll look at our ellipses. So we're going to do it in the same idea we could start. I'm gonna go right over some of these marks here. I can start with in a counterclockwise method. I can do smaller, larger, really big, and then also we want to think of angles so we can rotate the ellipse smaller, bigger rotate the opposite way still working in a counterclockwise manner. And now we can go clockwise. So instead of going you know this direction I can change it up. I'll just go right over here. And this just keeps you loose and flexible. Sole. You're when you're working, you can do it intuitively. You're not getting stuck into drawing things the same way. So, um, clockwise just doing some more vertical. And then I can do clockwise this way. So I got the lips moving in this access and draw a line and bring him right down that line thinner or more narrow, slightly bigger. So that gives us actually six directions. So we've got the clockwise counterclockwise, and then we have our diagonals and that And then, of course, we want to change the size. You can do some dark, keep some light. So I'm doing some dark. You can try to even sketch over a few to see how accurate you are, almost like connecting the dots. Make sure we work in both directions and again, a great exercise to get familiar with them. Um, with loosening your hand up, loosen your grip up working in various directions. Various angles. You can even draw dot couple of dots there to mark the top in the bottom. We can mark the sides just to test your ability to draw within a confined space.
4. Basic Line Exercises - Part Two: Now we will fill some squares. So the idea is we draw a few squares. I'll just draw Siri's here. Let's go all the way across. Do one more row. And what we want to do is shade the boxes. So we're gonna do it with the same idea, using the lines in different directions to remember we had eight directions. So we had top to bottom bottom top left to right, right to left diagonally. We had left to right or bottom to top them top to bottom. And then we had the opposite direction diagonally. All right, so we want to I'll just start with this one. And the goal is to try to shade in the box so we don't want to go too far, So we want to try. Keep the shaving in there Now draw one more, Roques. See, I'll probably need them. So that was top to bottom, not go bottom bottom to top. Now I can work the side or horizontal lines. So left to right, I'm going to come up on my point a little bit more, so I'm not using this broadside of my lead. And now I'll do right to left. See, I'm going over quite a bit there, so I could probably use a little bit of work. Then diagonal we have. I'll just Teoh bottom to top. You see him coming up short consistently on that corner, so I will try one more and I'll just do one more. I'll draw another. Siri's here best a little bit too big. So that was buying the top. Go top to bottom in the same direction and then screwed this up just a little bit. Here we went. Bottom a top top to bottom now changed direction. Some have to rotate with my body a little bit. And I'll go, um, bottom to top, as you can see. Pretty weak. That could go. I'll do one more. I could go bottom or top to bottom. Like so. Okay, so be sure to test that out. Trying in different directions. Um, if you're we have a desk job, you can come in there and do this stuff while you're on the phone, working with someone on hold or whatever you can do it sitting down on your couch. Maybe you're too tired to paint. You don't feel like breaking out all your materials. But you know, you want to do some art because you haven't done it all week and this is a really good way to keep your skills sharp. And I've even been in that position where I was too tired to break out all of my art stuff and I started doing these little exercises. And next thing you know, I'm up in my studio painting away. Now I'll create a series of rectangles and very long rectangles, as you can see, and what we want to do is work on some endurance. So if I want to go top to bottom again, make sure I'm in the camera. I try my best not to cover this up. And ideally, you know, you're looking for a consistency. You want a nice even line. So we don't want it to be dark at the top and then lighted the bottom. We want to use that same pressure throughout case we want to avoid that sort of thing. So that was top to bottom. Um, we'll go bottom to top. Want to try to stay in that rectangle is best possible again. This is this is like a workout. You really have toe. Keep your shoulder. Go on and stay lose to be finding you start to get really tight in your grip in your muscles and your shoulder. Then you're going to run out of steam. There is. You do this. Obviously we have our diagonals. Top to bottom now walking broke, go do the same thing. But do bottom to top that I could go top to bottom, switching it up bottom to top. Top to bottom. Obviously, we know we have the opposite direction. So we did this direction. I could go top to bottom, trying to remember the work from the shoulder. It's easy to do this in the wrist. Maybe got a little little bit of shaking on the camera there. I apologize. All right. So I'm getting my art cardio in here. Stamina. So you have that. So then we also have vertical idea, and we can start up here work left to right, right to left notice. I'm starting at the bottom of working up. As you would have guest. We have our diagonals, and I'll do this one top to bottom or right to left. That could do it left to right in the same direction, and we can bring that right on down and go the opposite way. So I'll work in this direction first. Now I'll go the opposite. Not very good. I work in this direction, so I do that one more time. Obviously, you can go right to left here, left to right, and just try to mix it up and try to again working, lined the consistency. And and in this case, there's a lot of, um, stamina going on. Just trying to get through these long rectangles. Try to find some of your weak points and work on them, okay?
5. Basic Line Exercises - Part Three: are this one will be all about gradations. So we want to very the tone. So we want to start or value. So we want to start dark, maybe and go light. It may be dark at the bottom and then light as it goes so I can start with the very 1st 1 solutions. Go ahead and top to bottom. I'll start dark and then in light. I need to go over twice. That's fine. But again, just using a series of lines. So I know we don't want to try to shade with the side of the pencil. We want to use lying to create it. We can use pressure into the paper to get a darker line. We can decrease the pressure. We can make lines closer together and we can spread them out. Ah, a few different ways. You can create gradations. Use that line Now. I will try, um, right to left, so I'll start dark and I'll go like and I'm using mawr pressure to create that great Asian . And of course I can go over that and maybe make it a little bit darker here and and easy as I go. No, I could go top to bottom or bottom to top create one. As you may know, I can start bottom to top and go right to left. Which I won't do that. I think you're starting to get the point. I can do some horizontal lines and again we got you can do right to left or left to right, right to left. Mix it up. Always tried to work on all the different variations so that you get You start to get comfortable and skilled and all the different angles because you're going to come up with a lot of different angles and positions and awkward lines. You will have to draw and shave eventually. So it's good to have this draftsmanship and drawing is all about draftsmanship of diagonals so we can work top to bottom and then dark toe light. I didn't do a great job on the light. I'm gonna do that one more time and then we can work. Ah, bottom to top. Do one more. Siri's here out is working in the opposite direction. So top to bottom, top to bottom. No, do that a little bit better. Like to get it smooth out right in here, so hopefully you can see how just these simple exercises line exercises can help you with understanding your drawing mechanics. You'll spot your weaknesses, and you also start to become better How you use your pencil. Now, do one more here and also wanted to mention this before I get out of here as well. So I'm gonna add these two ovals and then we'll get to it. You can work on your ability not on Lee. Draw and stay within a long rectangle shape like this, but you can. Also, we're going your ability to use value in a long range like that. It's easy to kind of go to light too soon, and then you'll lose your you'll lose your value scale, so you have to really use it very gradually. We're working with a long distance like this, and you could even use this idea on our ovals. And again, you can go in different directions. You can take that idea and working diagonally and keep it in that shape
6. Recap & Assignment: Let's just recap here. So you have your lines left to right, Right to left the vertical lines by on top top bottom diagonals. They had the idea of putting the dots down to connect the dots. We have short lines. We have really long lines. Then we can work with some basic ellipses. Small, medium, large, drawing them in different directions. Different access points that could be vertical. They could b'more Ah, horizontal. We can draw them left to right, right to left. We can do the diagonals and so on. We can draw the ovals inside renewable toe work on an idea of getting skilled with placing your pencil on there and working within a space and coming. And we had the idea of even putting dots down and drawing on the lips to connect those dots . And then we looked at this idea of using lines to shade in the boxes to stay within that shape again, working in different directions top bottom, bottom, top left, right and all that sort of fun stuff. And then we did our work out. But we did very long Siris of rectangles again using different directions. And then we did our great Asians, and you probably find some other ideas and ways. You can use these techniques to work on your basic line drawing skills, so that covers this lesson, and now it's your turn to give it a try. It's time to flex your drawing muscles. Philip. Several pages for the following exercises connect the dots exercises in all eight directions, the lips and overline exercise and all eight directions shading a box exercise and all four directions, shading a rectangle and oval exercise and four directions and then, lastly, shading with great Asian exercise and four directions have fun, and I hope this exercise helps you improve your basic drawing skills.
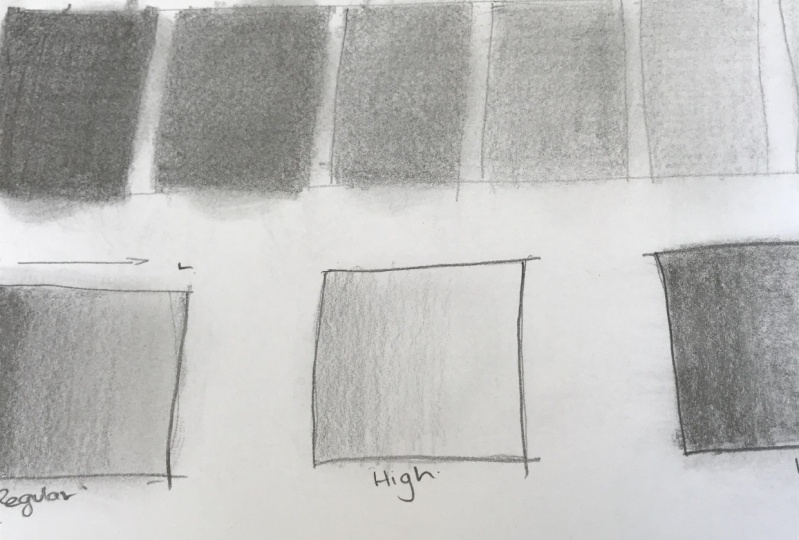
7. Tone & Value Exercises: all right. For this last time, we're going to look at a five value scale. I could just start with drawing some squares here. They will need to be too big. And what we're trying to do is getting a little bit of control over our value scales. All right. And what I mean by that is going to start dark and go to light. And this is basically the start of what we're going to be moving in into which is shading, which is going to give your object a three dimensional appearance. This is a six B and A six B is dark enough that I'll be able to get my darks down. And for the lighter ones, I would just use a very light pressure into the surface to get a lighter value. And again, this is all about getting controlled. How? Use the broadside of the pencil. So I'm not using the point as if I were drawing. I'm using the broadside and what we want to dio it. Just create a Siris of lines. And as I do this, I'm trying to avoid pressing too hard into the surface. So to get a darker I can you A crosshatch method like this? I can just simply keep going over it to get a darker. So for now, I'll leave that here. So how get my line around it to make it nice and neat here, for my light is the white or in this case, is print paper. So the gray of the paper. And so in between these, I have my mid value sucking going here. It's important to go gradual. It's easy to overshoot things and art. And even though we are conscious of it, uh, it still happens, and the same can be said for evening a drawing your painting. In this case, we're just simply adding value. That may be too dark, but I'm going to see first ad this value and maybe I'll stop in there and then I can move to our dark to middle tone here and see if I can get something in between these without getting too dark. I may have to fall back and get that darker. This is all about training your eyes. It's also understanding your materials, So in this case again, it's a six B. You may prefer drawing with a Kant a a piece of charcoal or whatever, but keep in mind that, you know each utensil is gonna be a little bit different. So you want to always get to know you're drawing materials just like a paint brush. Each paintbrush has its own characteristics, and you want Teoh know each one. So you understand the strength and weaknesses, so that's not bad. And what I can do now, if I just to smooth it out, I'll take a paper towel and this blend them out a little bit. It's pretty good. I think I can get this one a smidge darker. I'm a go over this one a little bit as, ah, get darker. And this one. Now I'm going to put a little more pressure into my surface. So, um, pressing into that a little bit harder than ah did before and that's working pretty good. I can lift a little bit of this. Maybe that's not too bad. Go one more on this one. Go a little bit darker on this. I'm pretty happy with that. All right. Next little exercise you can do. And this is very similar to what we did in the previous lesson. but we Dittemore with lines is do some greedy in boxes, so we'll go dark toe light. I can start here and then go to the white and it's a little bit different cause we're going to blend this out a little bit with our paper towel. And and again, it's not in the wrist when I'm doing this is from the shoulder, and we do these Grady INTs like this again. It's just more blended versus using just the lines. So we're trying to get a smooth transition from dark to light. Like the dark, however you want to look at it. So that was all with the graphite, as I mentioned before. Oh, graphite. And it's important to use some other materials like I mentioned before. So this is a China marker, and it's got the little string there you can pull off, and I like drawn with this. Occasionally, I'll pick it up and just mess with it. But for me to really understand how this works with my shading, then I want to experiment with this so I will do the same idea and maybe just do a Siri's a quick Siris of five again. I'll do him a little bit smaller. Now start. Obviously, we have our light here, so we're good. And then we're gonna have our dark here. This guitar shapes mapped out a little bit better for you, using the broad side again. I'm not trying to use everything at first, you know, I'm going to go over it in a series of lines here, back and forth. You can see I'm putting a lot more pressure into it here, really pushing that dark, and I can lift some of it. This is what's different material. So it's going to not blend quite a good as the graphite. And like, for example, you may enjoy doing charcoal. So if you like drawing with charcoal, then obviously you would want to work with that material just the same ways I'm doing here and want, You know, what puts another point I want to make is if you want it to be smooth, we want to avoid that if we can, where I just went a little bit too much pressure into the surface. And again, this is not about making things perfect. You know, I like to paint looses, you know, but having control over what you're doing. Having control over your materials is really the key to making that happen is when you you know when you paint, lose or draw loose. There are those moments where you can let things rip a little bit and get nice and loose. But it's still a a controlled ah method, and I end way to put things down so you always want to have is much control over your materials as possible. So that's not too bad. Obviously, I probably have peaked out right here. So for this material, though, that's not too shabby again. This is really hard to lift and blend, but not too good. Not too shabby, I would say. My weakest one definitely is this tone right here. So if I went back underneath of it and I'll push this up, so making sure we get it in this frame here, I could try that again. I'm not really that happy with it, and I want to working gradually where is darker than that one, but it doesn't get pushed to to that side too much. I can try Lift that maybe a little bit. See, I was too happy there. I'm gonna try to blend that out. That's not bad, actually. Right there, that's Ah, smidge, I think lighter than this. But again, I would go in here and say, This is my china marker and get to know a little bit that that's the key to doing this. And obviously you can do this with a four B. You can do it with an age be and try to see how far you can pushed these materials and manipulate him. I'm getting more control over him. That way, when you're drawing, you're more sensitive to really what's happening as you place put your material on to the canvas, okay? Or the paper in this case. So let's go back to this ingredient. So this just say this is a regular ingredient, so we're basically using or trying to capture that darkest dark. And then the light is light, and this could probably be a little more gradual in here on a little bit darker transition . And there something like that. All right, so let's say we have ah, high key painting so high keep aiming is basically where your darkest dark isn't really as dark as this. So I'm talking about that right there. That value on the end. Okay, so maybe our darkest dark might be in here somewhere, so it might be in this mid range. And then we get to a very light value, which is essentially the the probably though. The white of the canvas or the you may have it up pale yellow or pink or whatever, since we're just working with value here will stick to a gray scale. So they're very useful tip here because it's gonna teach you to be stingy. It's going to teach you. Do not use every dark that's within your range of materials. It's going to teach you to be, you know, somewhat stingy with how you use it. And then obviously we're going to keep it light. So noticed The range is a lot different here than it is here. All right, so we went to a low key drawing. Then perhaps the lightest light is gonna be over in here, so we're no longer using the white of the paper, so maybe the lowest is going to be here, and then we really get into these heavy darks so I can go over that again, so that would that would be low key. So, you know, very dark value drawing. Obviously, this would be that these were colors. This could be a painting theme or so on. But that's just using new materials a slightly different way, and you're manipulating the value of it in a slightly different way. Again, I go back to different materials, and you want to try these ideas with some of your other drawing materials so we can go with the gradual gradation. Something like that. Probably a little bit more here. These things don't layer great, but they can kind of get the job done. But it's, ah, something I enjoy working with. So So we'll say this is regular so we can go. Hi key, which will be really challenging. With this. We'll go high and then we can go obviously very low, which is probably what this one is best suited for. Something like that
8. Tone & Value Assignment: For this exercise, you will create a five value scale. Be sure to use a scale for each of your drawing materials so that you become more familiar with out each material works in its value range create a regular Grady Int Square. So in a regular Grady Int Square, you will use your darkest dark to the lightest light. Then you will create a low and high key ingredient square again. You want to do the Grady Int scale for all of your drawing materials. Feel free to use a paper towel or other material to blend your Grady int so that you get them nice and smooth. Good luck, and I hope this exercise helps your drawing skills.
9. Visual Components: All right. Now we're going to start to look at visual components, which is basically a fancy term for just understanding the choices we need to make for shapes and for shapes. Of course, we have two dimensional and three dimensional. Now, obviously, we live in a three dimensional world. The objects, the things, the buildings, the cars everything we see is three dimensional. But on the paper, it is two dimensional. The paper is flat. There is no depth. So we have to convey our subjects in a way that they appear to be three dimensional. There are several different ways we can do that. Um, in all of these ways are basically choices. Ah, we we can make. And some of those choices could be the shape. So what shape do we make? Something it can be value. So understanding we can add, ah, value to make something appear a specific way. And we talked about that in the previous lesson. There's also color now color. We are not going to discuss in this class because we're going to leave that more for a painting class. And this is more of a drawing class. But that is a choice we can make when trying to put our idea down on the paper. There is depth of field, so basically trying to create distance into the scenery, we can also look it away to use line, which is really still a shape and then, of course, Ah, tone and things like that. I mean, there are, you know, so many ideas we can use to do this. And these are just some of the more popular and common components we're going to you will use and the I use to create a drawing or painting. Now, for more advanced ideas we could take, let's say shape and we can use a basic shape against a more complex shape. That's an idea. So we take something very simple, put it against something complex to create contrast. Another way to think about that. Its something mawr realistic against something mawr abstract. I could also do ah, big against small organic against architectural and so on. Now the good news is allowed. These ideas you will do intuitively. So whenever you see something, say it's a cityscape, you're naturally going to create shapes that looks more architectural. You may be drawing a flower or a field of flowers, and those shapes could appear mawr organic. So again, a lot of this stuff will take care of itself. But there's still a lot of tools and methods we can use to manipulate things, to exaggerate or to play down certain aspects of our subject. But there are certain cases and situations that were going to struggle, but things were going to have to infuse into our subjects. Some of that would were that one of the main ones, we're going to deal with its form. So making things more three dimensional versus flat or two dimensional I'm getting the value place correctly is very challenging. Very, very hard to do that depth of field very hard to create depth in a painting who rescued this up. Another one would be proportion. Many. Many of us struggle with that. Even if you don't struggle with it, you will struggle with it from time to time. So again, these things here are extremely challenging. Some of the main tools you'll be using to get your ideas down will be lying and value. That's going to be your number one tool to create all of this So what I mean by that is you will use line to create your idea. And maybe my idea is a square you're going to use value to basically make that line and to something more believable to give it an appearance that it's three dimensional form. And obviously this shape this cube could represent anything. You may be drawing a figure walking down the street in the city and he has a suit on and maybe the sure that the figure is wearing Let me go and put a quick little scale in here. Maybe the shirt is white. So it has this value. Maybe the tie is blue. So has that value. Maybe the jacket is black, so we're dealing with that value and determining what the value is can be challenging. So you have to remember that our is an idea. So you have a feeling a connection to an idea, and you want to put that down on the paper or canvas. So even if you were taking something like this and you wanted to draw Ah, this tube of paint, you still have decisions to make. You have to give the proportions correct. You want to get the shapes correct. Obviously, the tube of paint can rotate towards you. They can rotate away from you. It can be in different angles. So there are a lot of value shapes and so on that even in a simple subject like that, involved decision making and making the right decisions to convey and capture the likeness of this simple subject. It's challenging. You have your work cut out for you. It's a set of muscles that has to be developed. And once you start developing them, I mean, you have to continue to work on to take this to the next level, this go ahead and start looking at some basic shapes that we can use to get our ideas down .
10. 2D & 3D Shapes: Okay, Some of the basic shapes were going through I work with here you have your circle, get your egg shape, chicken, egg, you get your to and we have our good old square or in this case would just call it a cube. And it's these shapes that we can start with because we can use them to create some pretty complex ideas by combining tweaking, adding form or three dimensional feel to it and so on. So a circle can also be looked at as a sphere. So if this were a, uh, two D, that's s all we have to make that three dimensional, we can take that circle idea and add that feeling of a shadow. Okay, so now that becomes more of a form. But not so much a shape. Same thing with the egg with the egg so we can rotate it and make it look different and space. So if we're looking at an egg straight on and we can do the same idea, give it a little shadow, we can make it into a three d form with a cylinder to wherever you want to call it, we can do the same thing, But if you were looking at that straight on, it may look more boxy so we can start to turn it look down on it. So we get more of that top view the little shadow on it and becomes more three dimensional . Same thing with are the say we start with the basics square on. We can make that three dimensional by starting to understand how these sides work and then had a little value to it. And now we have a three dimensional form. This cylinder can be tapered. It can start with the say of a wide top. They can come down. So in a case like this, we're dealing with a cone s. So that's going to appear differently. Obviously, it can be the opposite, so we can start narrow towards the top and it can get wider at the base. Now, the interesting thing about all of this, too, is the same we take our little cube here on that cube can obviously be more of a rectangular shape, so it could be taller. Doesn't have to be perfectly square again. A little value and it turns into a form. So there is the rectangle two d three D and taking the box. And we just look at a real example here of how we can take and have a top view. You could have a bottom view where the other side is moving away from you. The eye level we can be say above it. You can be below it, you can be to the right and left of it. It could be in this direction or however you know you want it and the same thing can be said for the tube. So if we look at that tube flat on, not much to it. But as the top comes to you, you start to create more of a perspective so he can see that's coming towards you moving away and now at top, moving away and down and in to space, so know your eye level. If you're looking at this, you can be below it. You can be on top of it so we can do all of that stuff by just understanding perspective, understanding your eye line and understanding the horizon line. So that's kind of what we're going to do here is break some of these basic shapes down into different perspectives. This using a simple vanishing point and some perspective, rules and guidelines. All right, so let's look to at this idea So we have our basic shapes, understanding some of the differences between when they're flat, two dimensional, or when there have more shape and a three dimensional form and is knowing what shapes were going to be working with. But if we take that and let's say we we'll call the shape Contour. I have a spell silhouette, but there we go in the silhouette, so we take our circle. There's not a whole lot we can do here because no matter how you take a sphere and turn it , if it's a it's like a baseball or basketball and it's perfectly round and has no markings on it to speak of, you can turn it, but it's going to look the same in space again. The only thing we can really do is to add a shadow, which is what I did over here, to give it a sense of shape, so that's going to bring out the three dimensional aspect of it. So the contour stays the same in the silhouette, pretty much stays roughly in the same or the same if we take this idea of a cube and we just pay attention to the edges So we're looking at that We can draw that something like this. And we can make that come towards us a little bit better on that corner. So the contour is going to go like that and you basically have your ends ends like this. Where these shape comes to an end. There would be one in here. There's one in there, one there, and then you have your corners. So corners are where the SE changes direction. So we go up, we have a corner and we change directions. So that would be, ah, corner, corner, corner, corner corner. So you start to get the point side side side. So if we look at the tube, it may go like this down and down. So as you know now that will be one of the ends. And so where this shape comes to an end, and then we have our corner. So if I just take a little red dot and mark those corners, it would look something like that. Obviously, the circle is the one oddball there because it doesn't have any corners, so it's a little more difficult to deal with. But in terms of interpreting any composition or drawing or in your subject becomes a little bit easier. Were these become a little bit trickier as you start to? I want the idea of drawing these things and for different perspective and viewpoints. But I want to point out, too, that the circle does have an end. It just goes all the way around it. Dis obviously no corners.
11. Perspective Using Basic Forms: we'll start with the box here for the Q. Have you wanna You wanna call it this? Put that in perspective. So to do that, we need two things you need your hi line and then a vanishing point. And obviously probably this one we're going to be using to S O V P. I will be your are vanishing point there. So this is going to represent our eye line and this dot will be our vanishing points. All right, so we're going to say you are looking down on the Cube, so it's gonna be sitting below the eye line, so if this is above it, you're looking up at it. I'm gonna say you're for this example. You're above it. Pushes draw a center line here. Let's say the corner okay, right here is in that area, and we can measure and they say we get the top. So all of these lines Bill right to that vanishing point on the right. So we need to make clarify that this is our VP and that this is our I line, and that means everything on this side is going in that direction. Now we need to established the side. So let's say our side is here, here and here. So we're starting to get see the shape of that cute. And in this corner, we'll go back toe are vanishing point and in this corner, we'll go back to our vanishing point. So we have our corner right in here corner corner. We have, ah, corner back in here, so we have that sort of shape going on. So I'll go ahead and make this slightly darker. Just the visible corners in lines or ends, I should say. And that's a good way to put this particular shape, a situation where we're dealing with perspective. So again, looking down on our box and now that you understand how the eye level and vanishing points work, so let's say the box is above the eye line, so then we can determine and we'll draw one more up here. So we have our vanishing points. We have our will make it this one a little bit smaller. I'll use this. Well, I'm here, so these are our sides. We'll follow that perspective down, and where this corner is, we need a line that goes to that vanishing point. So We're looking like that. I'm just going to do the contours first. All right, Very, very similar, Right. But now, if we look at the Contour, this one very similar. But now because it's above the eye line, we're looking at the bottom, and then we can see this corner visible there. All right, let's look at one more idea here. And so we've done, um, looking down, looking up. So we'll do a center line here, and let's say we do at eye level. So in that case office, do some perspective lines here. Not doing that very well. I'm just getting a few to choose from. I say we do something like that so we can use that and that as my starting point and that someone do this one a little bit larger. So we have our side, and we have our side. Remember our corners like so And these were the visible corners. If we wanted to draw the corners, we can't see there. Be one here. Remember, this is going to go back to that vanishing point in this is gonna vanish back to this point . So we have another one right there again. These are not visible. So if I were to I understand the contour of this. Remember that the contour is just the outside. Okay, that's it. So we're not dealing with anything internal or on the inside of that shape. So let's look at that. So I understand how that contour looks. Half are a draw. Just that front edge. It would look something like that. So again, this is our eye level. And then these are the finishing points. If I were to do this dash, what we can't see, they would look something like that. So come through. Like, so did that kind of poorly. So let me do that one more time, and we get my vanishing line for this corner back to that. So that's going to clean that up just a little bit. Here we go. That's what that would look like in space. I level. All right. I just wanted to label these, So we got above the eye line below the eye line. I'll make that I line a little more prominent there, okay? And then we have our middle version. So notice how again these air this island is running parallel, uh, level But we can tell that we could take him, run a finishing point or your eye line this or right in here. And we can run some perspective lines like that to our vanishing points. And we can get some really interesting shapes like that again. That's just using the same exact idea as we did before. It doesn't matter. Ammon draw through that a little bit better. So going above and beyond the edges a little bit. So again, this is our and we have our vanishing points. Now we're gonna look down on it, like so All right. So we got the total die line there, and obviously that that angle this island can be in so many different directions. But that just gives you an idea how you can work with that basic shape and tilted a little bit. And now let's just talk a little bit about the cylinder. All right? So we have that basic two dimensional shape, which is like this. So basically seeing that top slight curve on the bottom and that's it who say, want to put that in perspective so I can do the same idea. So we have our vanishing point here and we'll go here here so I can draw my ghost in a few of these. And they say it's moving back in this direction. I can draw my circle. I can say the end is roughly back in here. So finding Thean points, we can drawer center line here so that she is dividing the circle in half this way, and that's going to run perpendicular to the main center line, which I'll talk about in just a second here. And we have our edges, which is connect, and we'll go around and around here. I'm not going to add that one, but we'll talk a little bit about these thes shapes here. These circles in perspective in just a moment. But this will give you a general idea of how to get this thing moving in space. Um, then we have a situation where we are below it. So we have something like that, and we cannot say starting their circle right here, and then we can draw a bigger one here. I can come back like so, and the next thing I want to talk about is what is called the center line and that she is basically finding the center of the circle and there's one in here so we can just divide that and we can connect. So, uh, center line is helpful for understanding the direction of which way object is moving so moving towards you, we'll be going away from you. So let's look at these ellipses for a moment here. And But before I get into it, let's say you're looking slightly down on the cylinder. Okay, so we have Senator Lines center line. Always remember that your axis for the center line. So I'm talking about this line right there on Bumped is down just a little bit here. I'll just dash that for a second that you want this access that's moving left to right to intersect that in a 90 degree angle. Okay, so we want to avoid this. So he had to be no determine which direction or angle your cylinder is moving away from you , and then whatever angle that is Ah, you want these the top and bottom access points of these ovals to be perpendicular to it. So now I can just come in here and draw my sides and we'll say where we are below this one so we can see the bottom. So again, square perpendicular nine degree angle right here where they intersect. Okay, so in other words, what you don't want to do if you determine that your cylinder is moving off in this direction and then you start to draw your ellipses where you're the market from side to side, you find your widest point here. And then you tried to make that work. It's going to look off unless there is a slice off the top. But this perfectly square, like what we're dealing with, then you're gonna want these really square intersection points. Okay, you see here, Here. All right. So that's a good little rule to remember when you're drawing ellipses. Ah, good way to exercise. Um, or I should say, good exercise for this. If you draw a Siri's of these. So this say we start at the top, which will say our top is a perfect circle. I will say this is our middle, and this is our end, and we'll call that a perfect circle, and it's just mark our sides. Okay, so we want we're going to start with this idea that is flats. You can't really see the top of that. And then, as as it moves, it's going to end up in the circle. So we got a little bit a little bit more, a little bit more. Ah, lot more. And then we end up with our perfect circle. So I'll do one more of those. So I'll mark my sides. Well, Mark my and point here, make sure I'm in camera, so we'll start out with just a flat mark and we'll go slight, bigger, bigger and even bigger. So you start to see that scale. Bobby Lips is. So If I were to start to say what something like this, which is about right in there somewhere, I'm going to end with that same idea on the bottom. I can barely see the top. Then it's going to be very gradual if I'm way above it. It's not a perfect circle, though, maybe something like this, and it's moving down and space. So the last shape is just that circle. And again, that circle is really tough. There's not as much to work with as Anak actual, you know, square cylinder or something like that. But if we take a circle and we slice it so we can put a ring in that. So of course we can take it and put put it right here as well. So if I just darken that right there, that could be a tomato or something that are cut in half. Of course, um, we can use the idea, and this is just about trying to give it form, trying to give a direction. If I were to say, start with little oval here, um, I could do another bigger one another big one, And then do these Siri's off almost rings around it, but notice how I'm drawing through. Um, so that line I was gonna try draw this that line. The idea is I didn't oval around it. The the rings congee go again in the opposite directions. Let's say we want to add our Yes, I'm drawing through. Okay, so you can see those exterior rings right there. And of course, you can practice this idea to when you're drawing just cause it's a great tool to understand how to slice a circle. He will have to do that. You will may have ah still life there something going on? You had this object that has a very circular feel to it. And it has this, like, you know, notch taken out of it. So you were going to need to understand these rings and how they work. Maybe the notches over in here. So understanding the three dimensional feel of a disobey six sphere sometimes can easily you can understand a lot about understanding these little rings. So just try to do a series of this basic rings like this where you are. You know, I'm putting these little slices down perpendicular. We're rather horizontal and vertically, so you could be slicing a tomato. Dyson it Do you think of it, however you want to do it? You have all these concentric rings trying to do that where you're getting that feeling of the the back side. All right, so he knows how I'm drawing there, but on Lee want to see there? So that wraps around it. So whenever you're practicing the this idea, okay, don't draw to the edge. Try to envision it going around around backside. Even though it may be, they may not be visible in front. We know. Has that backside and being able to draw that is really important. We started getting into trying to give a two dimensional object or put a three dimensional object onto a flat surface like your paper.
12. Recap - Basic Shapes, Forms & Perspective: all right. Quick recap, basic shapes. So taking two dimensional circle, oval tube or cylinder square and turning them into a three dimensional object. That's what this lesson is all about. And we can do that through a few different ways. Perspective is one of them. Also, we're going to get into some other ideas off of using light and shadow. But drawing perspective is vital because pretty much everything is in perspective. Very few things you draw are going to be flat on, or you're going to be perfectly square to it. So the shapes again we took and had this idea of using just the contour line eso understanding the outside edge, knowing where the ends are and then knowing where the corners are. And then we took that basic que and we put in our eye line, which is vital for determining the perspective and also for locating the vanishing points. So we moved that above below the eye line, and then we get this basic drawing in the middle or at the eye line, so that was a good way to put that cube in perspective. Then we took the eye line and we tilted it So we gave it. Ah, slightly different vantage point, and now the shape is much more dynamic, and you can kind of again move that I line and different Anglos and explored experiment with that idea. And then we looked at the cylinder and taking that and moving it in different directions, using the same vanishing point idea So that Vanishing Point is going to give it that tapering look So we can also start to figure out where the center line is on the cylinder, and the center line is important to locate and understand the direction that the cylinder is moving. So you have to use your imagination to understand this at times. But again, it's going to play a big part in rendering and drawing your subjects. Also understanding that this 90 degree axis should needs to be there to draw accurate cylinders. So once you find your center line, then that oval or whatever the case may be for the top in the bottom, um, the width of that from side to side. So the widest angle or wet should has to be nine degree angle perpendicular to that center line, so we want to a view, avoid things that are skewed like that cause it's going to come out a little bit quirky. And then I gave you the exercise that you can try of using this kind of scale. So the middle being flat, and then we have our complete or full circle at the top and bottom, and then you can go over that and start with a slight oval or the lips rather and more, a larger a wider, wider and then so one. So you start to get in that feeling and in the habit of understanding how that's going to change as it moves in perspective, The last thing we talked about was taken this basic circle and then turning in to ah Mawr three dimensional object. And to do it, we're just using line. Obviously, we can add a shadow and things like that to give it a three dimensional feel. But for now, we're gonna work with the idea of just these rings concentric rings. And whenever you draw those in practice, um, remember to draw through. Don't just draw one side, draw your Siris of nobles. He can come back with darker lines to get a field for how that goes around a lot of times. What happens remembers. Remember, if you start to try to draw these rings the only draw to the edge being draw to it and then that looks very, very cut off, that the ring is actually going around that. And you want to get that continuation feeling an appearance so that your your subjects in your objects that you draw will have, ah, much more realistic feel to it. So, anyway, we can slice the circle in half as as a practice. Um, you know, we can slice the circle this way as well. I just by using the same idea. So I'm just going to make that a little bit darker. Remember, that could be a little orange or tomato ring or something. But that's, you know, good information, toe have and things you're going to rely on and need to understand as we move forward
13. Perspective Basic Shape Assignment: for your assignment. I want you to just do some imaginary shapes. They were going to do them in perspective so you can start with just simply adding a vanishing line. So we'll go here. Or rather, an eye line with two vanishing points and now distraught Siri's, Ah, lines that go across your paper like this. I mean, you may have to ADM. Or and just pick a spot. So let's just say this is your side. This is your front corner, and this is your other corner. And now take this corner and draw a line to the vanishing point. Take this corner and draw a line to the vanishing point, and then you can come back over it and draw your main edges that are visible. If you want to understand the hidden corners just or hidden lines or edges, rather just draw lines to those corners. And then you know this is going to go all the way around to right here to right here, and then you have your line there, so practicing these things will help you understand perspective and just get you accustomed to how this works and just doing it in a very random way like this is a good way just to practice it without getting too caught up. So let's say this is our front. So this will be our corner on this side. We draw that perspective line so this would actually come down like so. And then, of course, you want to do some at eye level so we can just go ahead and draw the main corner. I draw through. So draw beyond the corner, draw beyond the corner. Here, we can put your sides and and then this can be at eye level. And then I want you to take the eye line and tilt it like like I did. You can tilt it and this sort of direct degree or angle draw a Siri's vanishing points. Go and just pick a point that looks good. Ah, this is going to run down. We'll get your lying coming down. And then we pretty much have everything we need for what's visible. And so you're practicing the idea of how to use these lines in space. No, do one more just to make this a little more square, and that's going to run parallel. So all these lines will be pretty much parallel to some degree. They are going to go off with that perspective a little bit, and that gives you the idea of you know how to tweak that perspective a little bit and then just again to get used to using your eye line and vanishing points. So do fill up a page or two of just the cube working with that idea. Then we slide this over just a little bit. You're going to work with the cylinder and with the cylinder is kind of a two part exercise . Go ahead and make a grade first or a kind of a gradation of angles. So I'm going to start with a perfect circle, find the middle roughly, and then that's going to be flat on. So if you were dealing with the top of a cylinder that looked like that, it's basically going to look almost like a tall or a rectangle. There may be a slight indication of occur, but you're not dealing with much. Then make sure to keep it equal. Go ahead and add your sides and it doesn't have to be perfect. You could see that's you know we're doing this in a very sketchy manner, but we're very We're doing it with a purpose, so we know what we want to get out of it. So this would be any lips looking down on it. The next one is going to be slightly bigger. So I say bigger. I mean bigger from here to here versus here to here. So you see how they're getting stretched out to eventually become a complete circle. So now we'll do uneven, bigger one. We'll go bigger, even bigger still, until we get here and doing the course moving in both directions, like so. So that's Ah, again, a really good visual and exercise to understand these ellipses. Then I want you to draw a and he lips, but we're going to start to practice that center line. So say, for example, you have a cylinder and, well, let's just say this is your cylinder. It could be moving off in this direction, so your center line is going to be the direction that is. The cylinder is moving, so I could say the cylinder is moving off in that direction. So my lips this right here the top and bottom have to be perpendicular nine degree angle to the direction to the main center line. So remember, we do not want these things skewed unless it's not an even top and bottom. That would mean it would be getting sliced this way where it's not the top. Insides aren't and bottom aren't perpendicular to each other. And then what you can do is just start with the let any lips at the top and bottom there are perpendicular, and that's going to help you. So you contest it by this, finding the widest points of the lips. So if I just Drew and any lips in a random direction here, the same in this here in that direction. So the widest point from here to here is going to be the direction of that, the lips so that he lips is running this way. So that would mean my cylinder would have to be running like this. It may be running up this way or it could be running down. It doesn't matter. So I would want to make sure my direction is perpendicular to this, creating four equal quadrants so equal all of these quadrants are equal. That means Ma and this see, lips could be moving away from us. So I would put this he lips in that direction again, perpendicular to this. So find your wife. Why this points? Make sure you perpendicular. If this were incorrect, it would be something like this. If I had marked my why does points you can see it's not perpendicular to that line And then I could just simply connect the sides, and then I would have that idea of a decently drawn cylinder in space. So then you can just practice drawing the cylinder with your vent. Uh, I lines again. I can just kind of make this random. It doesn't need to be anything specific so I can to save draw. So and maybe I want to use this line right here, coming down as my center line so I can draw my cylinder perpendicular to that line, and I can come down here, draw a smaller one, and then that's going to give me that sort of shape. And again, you want to practice this in a few different directions. Let's say I picked this one, so I draw my perpendicular line. I draw my cylinder or my lips perpendicular for equal quadrants. And maybe it comes way down here. Something like that. Lastly, is just working with the idea of a circle. I know. We you know, we talked a little bit about that egg shaped to want to get, um or end of that, as as this course moves on. But for now, we're going to take that basic circle I want you get used to drawing those concentric rings , so just start with to You can start with one here, and then you can start with one here, and we're trying to give it that feeling of form and shape. We can draw another circle, and then we can draw Siris of concentric rings starting, and we'll do this one mawr horizontal, something like that. So if I were to just dark in these little bit member goes around the form, we get it. We want that sort of feeling with our concentric rings. And then our edge may come around like, so we can do those vertically like that. And then we can do a few of, um where we're getting that feeling of dicing that tomato. We're slicing it this way and we're slicing it that way. We have that sort of feeling going on finishes up with okay, and that's just feeling the shape, trying to really understand that it's not flat. It's circular versus just simply a flat shape, some more three dimensional. So that's gonna be your exercise. Fill up several sheets, just practice, practice. Practice these things until they become more natural to you. And that should certainly help you with understanding, perspective and drawing perspective, just using some simple shapes.
14. Tips For Measuring: So now we're going to talk about measuring, and to do that, we're going to use our pencil or he may even have a paint brush in your hand. Now this particular tool is useful because we can gauge the length and relationships of lengths within our subject. To do that. There are a few things we want to remember and or to get those distances and lengths mawr accurate. First thing I'm going to talk about is your elbow and wrist. You want to make sure you keep them locked, and the reason why is it will keep the distance from your eyes to the device consistently. The same when you start to bend than that distance from your eyes to your pencil change that will alter what you're measuring drastically so form or accurate measurements. Be sure the arm is out ahead of you. Obviously, elbow and wrist are locked. The next thing I'll talk about is your eyes. So I like to squint my left eye, and that's because I'm using my right arm to measure. So squint my left eye and now your head is going to lean towards that shoulder. So I am basically looking down the barrel of that arm. So if I turn slightly, you'll see how that works. And this is useful because again it gives you a consistent distance. And the reason why is when your head is in the middle of your shoulders, you start to move your arms up and down, left and right. Then the distance to the end of the pencil is going to change when your head is over your shoulder thing. You're using this. Then you're more likely to have an accurate measurement because the distance from your shoulder to your pencil or even the end of your hand is going to stay the same. So when I lean, you can see I'm over the shoulder, and that gives me a better chance. You have an accurate measurement now. The next thing I'll talk about is getting a general idea how long something ISS. So, for example, if I'm know I'm measuring something very long or very wide, I'm going to just hold it up and just look at what I'm measuring and get a general idea from the tip of my pencil to roughly where my index finger is, just get a feel for Where is that? So I'll try to get the top and bottom mark there. From here. I was zero end using the methods I taught you. And then I will use my thumb as a way to find the bottom of what I'm measuring. So the top or tip Amman device is going to line up with the top. What I'm measuring from their I will keep the pencil study and then use my thumb to slot up and down to find the bottom of it. And then once I find that distance, then I can use it to measure against other proportions and lengths on my subject. And that can start to compare the relationships of things to better understand the length of something how it fits with them, a subject. We're going to talk about that a bit more in just a moment, but last thing I'll talk about is angles. We can use this pencil as a measuring tool to understand how something is leaning the angle of an arm, the axis of a particular shape. And then once we know what it is, then we can transfer that to our paper or canvas. So now that you have a better idea of how to use your drawing utensil or paintbrush as a measuring device. You have a few good tips on how to make this a reliable source of information for measuring height with length and Ingles. Here's a quick recap of the things we covered in this video.
15. Coffee Cup Demo: Okay, I'm going to start with the coffee cup here, and the first thing I want to do is look at it, Determine what shapes are best used to draw this. I am using an HB pencil. So I have a really hard lead, and it's going to give me some light lines so I can determine that a cylinder will be best used to just broke in the overall shape of it. Obviously, I have some ovals for the opening of the cup. Also had this curve shape of the handle, which looks like 1/2 of ah, heart. Um, obviously the basis smaller and the axis is vertical. So if I want to go ahead and draw the axis, I could do something like this. Now I got a few options. Obviously, I have, ah, large sheet of paper here, so I'm not confined to where I want to draw it. But if I were that, I would may want to mark the top in the bottom. So, in other words, if I'm trying to fit this coffee cup on an 11 by 14 canvas No, I want that coffee cup to be maybe in this area, I'm going to mark the top and mark the bottom and that way, then, from here I can at new sketch everything in. So and then these have to be a rough mark because things have to kind of lineup proportionately Teoh to make it happen. So in other words, I can start to work that put my cup in, and then I may find that, you know, I need to push it down just a little bit or push it up a little bit to fit it. Ah, in that space. But for now, I'm dealing with again a larger sheet of paper. I'm just sketching. So again I'm not trying to fit it within a frame. So I'm just going to mark the top. And now what I would do is use my pencil to measure the cup. And what I'm looking for mainly is how wide the top is compared to the overall height of the cup. The largest distance I see is the height, so I'm going to get that distance first. Let's just say I want that cup and to be right in here somewhere, so that's my overall distance or height. Now the width of the top is about 2/3 or 3/4. Roughly how measure? One more time. It's about 2/3 the height of the cup. So I can kind of take that. This is my bottom and this is my top. Then I can take that distance and then go up a little bit about 1/3. Well, I'm sorry. This is 3/4. So if I If I divided this and 2/4 I could just get 1/2 mark and here and then I'm going to measure down about right in there. Hold that roughly in the middle, and that's going to give me my overall with. And of course, I can check that once I'm done. So I've got my with and that's pretty good. It might be a little bit too wide, so I can kind of come in here and do this. The next thing I want to do is I want to understand how wide this oval is. I've got the width. All right, I've got this. I want a new that the height of it. So how far down is that? Common? So again, I'm going. Teoh, use my pencil and then try to get a reference to the cup. So I know that this the height of that oval is about five in five increments to the cup. So if I did 1234 it's probably going to be roughly in here. So in that area, and now I've got the bottom and the top, and I have my vertical access point. So I'm right in there and no, my oval is going to be perpendicular. Okay, so they're there is that square that we need that perpendicular angle to draw our oval. So now I can just Ruffin that shape. Now I'm going to use my pencil again to find the angle of the sides so I can hold it up to my image, angle it, bring it down. And I know that is coming down. And here So there is a slight tapering of that going on. And now I'm just going to double check my height. Thanks from happy with it. It's coming up a little late, but I think it needs to be down and here so I can take this oval and transfer right here, and that's going to give me my base. So now I've got the mean cup in there, and I know I have a handle and that handle starts down in the bottom. And then, roughly in here, the handle itself is basically a rectangle like this, but it has depth to it, so it has a wit that is thin, but it's something like this. So it's a strip of material like that. So it's not a spaghetti noodle. I have to recognize the volume of that. And then as this thing bends and it bends in perspective, we're going to see the width this very, very thin with of it, come down like so and then we're going to start to see this part on the top. It's gonna curl down, and that's going to run in perspective. So this the line for the top and the bottom. If I draw the coffee cup again, real small here, actually, just use this one. I want to imagine these perspective lines that was going like this, and then this one's going like that a little less of an angle. So they're running. It's attaching to the cup. With that perspective, you have to recognize that so then we could determine that the that edge connects down here . It wraps up and then connects here roughly. And then you can see the side of it, come up and around and then connect here and then it's wrapping and start to see it curl underneath and then wrap here. So whenever I'm attaching, this has this kind of wide space here. I want to recognize how it connects to that cup and roughly, you know, we've gotta have that half a heart. But if I used my pencil to measure is just and measuring the distance from the inside of the cup to the widest part of the inside of that little half heart, there's just bigger than the overall height of that oval. So the edge of the cup roughly in here is my white is point. So if I have my starting point down in here, I know this is going going to curl up around, and then it's coming down. And here and again, if I draw a parallel line, I want these to be even, and now I can indicate a little bit of wit there, and this curls down and then this is going to come up. Go wonder. Come up in around again. These perspective lines are going just like that, and there is going to hit the cup and then move on now. Have a little bit of width here to that cup. So again, it's not a paper cup. It's not super thin there, some volume to the thickness. I want to capture that real quick, so I can just But, you know, you start to see it on the sides, so we start to see it here. But then, as the as it goes back, we're going to lose it because it's in perspective and we're gonna see it on the sides. And then it's going to again, Lou lose it because it's in perspective and you're going to see a thin volume there in the front. So I think if I indicated here and here, I'll be fine. And then this kind of blend, um, and Joinem there, and we'll get into some shading here in a second or in a later lesson. Rather, remember what I said about drawing through with these oboes so we don't want the bottom of the cup to meet like that. You have to imagine that oval on the bottom going around, so it's going to start to curve around that shape. I think a lot of artists kind of cut it off right there too much. I get that feeling that curving around and then that side takes over. Now just fix this up. You see the width of that a little bit. It kind of gets a little bit fatter right there. Obviously that there's there's a tapering going on and we'll get that later when we start to shaded a little bit and this will taper a little bit more like so and that's ah, good way to employ some of the ideas we talked about for basic household object, and we'll leave that right here and then we'll go to another one.
16. Tube Of Paint Demo: We've got our tube of paint, and obviously we can use that cylinder even though we know that tube is coming here. If I'm looking at it from the side, this is our top, their lead. And it's kind of flaring out like this and then from the side to is kind of chubby. And then it tapers because I've squeezed the pain out of it from at the bottom a little bit . So it comes and that squeezes and it's kind of flat. So what I'll do first is just fine. My tube. I could go ahead and mark the top, mark the bottom, and then I want to figure out how wide is this, and it's pretty easy, you know, whenever you get your measurement and I'm just going to measure the width of that tube, and then what I'll do is use that that length. I'll go up the tube in increments to figure out how many of these are en this tube. So I've got three for almost five. So if I said okay, I have almost five and I started Let's say roughly I'm going to draw my access line, which is vertical. Let's say if I started roughly in here and I did one, 234 then that's probably gonna be a little bit too wide. So I can kind of come in a little bit and say, OK, let's see where we're at now. And I've got one, 234 thoughts that that's going to give me a better set up than the original mark I made. Now this top flares out a little bit. So if I draw my if I go ahead and draw my tube like so I can say roughly about 1/3 of the way up or so it starts to flare out so I could do this to create that flare, and then it starts a little bit higher on this side. But then that top starts to come down and it bends roughly just before half way. So if this is my halfway line or my middle axis there right before that, it starts to bend down. So I get that change of direction there, and then that corner comes up short so it comes up about right there. It moves out and then back in. And then this moves off this way and So then we were starting to see a little bit of that crease, that bending it right in here and then that's going to be our corner right there. So that's working pretty good. Now the bottom is an oval and that oval is the same. Find my center line. It's about half the width of everything. So if I bring the sides down, I'm going to say it's roughly in there. If this is my bottom that I know my oval is something like that, it's got some depth to it so I can draw another one or some volume to it and from there, if flares out so we have that sort of shape, then we can see there's another oval here. So be from here to here so I can draw another oval to get that sort of shape and then on the side there somewhere I squeeze the paint. It kind of goes in and out, so it's a little bit you regular and so I don't want that to be perfect. We have something like that. Now we have some rings so we have a little ring and here where says Brilliant blue, we have another little oval and here. But let's say you know, it's easy to make things too big. So what I will do is try to find the center of the tube using my pencil. I can hold it, so I'm going to get the overall height of it in the center so I can measure double check. It's a little bit Oh, better so the center doesn't have much to it, but if I start to dissect where all of this is, that's going to be And here. So we got that little you Trek symbol and these the writing on on this goes along that perspective of beautiful. So if I took that writing and just put it in an imaginary ring, it's going to curve with the volume of that tube, and we got a couple of ah rows of writing. We have another one, and so on. Now, as I get to the top, it's getting closer to my eye level. So those rings, I'm gonna change a little bit. Someone start to follow the volume of that on this side. So I have a ring here and a ring there, and that's where we're getting ah this information on the bottom of the two. You can see this is following that. But then it changes to this, and then we have one more roughly in here where we're getting the heavy body acrylics. So that's a nice little something that think about there when you're drawing these tubes. But we have, ah, little more information to put in, and we've got this action. But what I did is I left out the neck of that tube of that tops. I'm going to cheat a little bit here, so I've got my neck. I know I haven't oval here and a noble here. So what I want to do is create the top of that, too. We can see that wrapping around. So it's coming around. It's like so he can see the volume of that shape, and then that top is a little bit tapered. And then we can use one of these sketchy lines, like created there. Then, of course, we have ridges in the air and everything else. We won't worry too much about those details. All right, so So we got the label, the writing we've got, um, more writing. We get the debt and it here and so that gives us a tube of paint, and we're going to work with that a little bit more later on.
17. Hammer Demo: Alright, starting with my age be we got the hammer. This is gonna be a little more difficult. We have a lot more shapes to deal with. Quite a bit more perspective and things like that. So let's just look at it for a second and forget that it's a hammer and this try to understand what's going on. So I look at this, we basically have this perspective that's moving off this way. So we have all of these vanishing lines that are going like that. So this was our vanishing point, like so so are our access line or eye line for this, For the most part, we can just say is right here. So this would be our access line, the main line, and then all of these are moving off in this direction. So that's your perspective. So again, starting wide here, moving off this way and then moving off that way. So if we take that idea and to see all right, well, it's just put this in a A box for a second this Just follow these access lines. Then we can say that's ah, box. It looks something like this. Okay, I'll go over that with Sharpie, like so from there. On top of that, there's another box and we'll say this is more of a rectangular box. So it's a little bit longer comes out again, following those perspective lines there. So it has a width and a length, the say roughly and here and then the end is roughly And here. So you say we're dealing with something like that. And then, you know, if you just use that idea, you can taper this, get our little flare in. You can put your little oval in there, put your claws coming down, put your round handle in their papers. Tapers tapers like so and so that's a quick sketch of it. But you know, we can do a better job, because what that does it doesn't capture the true perspective of it, cause we didn't really measure everything out. But that's just the gist of what we want to do. So let's just take that idea. And this was followed the this same thing. Sums want those in perspective lines. I'm going to say my bottom is here. So you see him is drawing some random perspective lines there to help me out. I want to say the length of this thing is again using my pencil as my guide. We're gonna say it ends about writing here, and then that's going to give me my overall length of my handle. So just the wooden parts. I'm not I'm not really doing the claw yet. Klaus gonna be up in here. So now what I would do is try to find the middle of that handle And here somewhere and now want that's going to help me with all of these little nuances as I get into it. And now want to find the length of this rectangle in here and that overall length IHS again Using my pencil as my guide is about 1/3 of this. So I've got 123 slips Too big. Someone go. 123 That's too big. We'll go a little bit shorter Here. We got 123 still a little too big and we'll go 123 That's pretty good. So I can say that my overall length of the claw and everything is right in here. So if I were to get that idea of drawing that box or that rectangle as a starting point that I can take these vanishing points and do something like this. This lawn here, these come down and this is just going to be and then this is going to flare out. So we have this. Actually, it's probably a little too long, so it's probably more in there, and then this is going to change. So that's going to flare out this way. And then that's going to flare back out that way towards our claw, which I'm not gonna do quite yet. So again, this flares up. Okay, so it's not a perfect shape like this. So these flare up like that. So as a approaches our the head of the hammer here, it gets wider. So we had that little subtle thing happening. So I want to get that on both sides in the bottom. So we get this sort of thing, and then I can go ahead and draw my basic shape here for my hammer or the head of the hammer, some getting trying to follow those perspective lines, and then I'll put that oval right in there. I know it's got a little more whipped through it. someone go a little bit bigger and here, quit back, tapers down, comes out. All this tapers in All right, that sort of thing. Now this claw can be drawn as, like, a few different ways. I want to decide how we want to do it, to say it's a box for a second. So the box is something like this, and then it comes out, but occurs so that box curves. But then it also gets skinny, so we have that sort of thing going on. We can draw a middle line, and then these besides, And then we have the wit. Sorry for the bomb, so that would come down. These would meet. I kind of like that idea. So let's let's see how that would work. So again, perspective lines. And let's say our box is in here. Obviously, it's going to curve down. Probably started that a little bit too. Hi, So we're in here, find that center point this claw comes in, comes down and then we have the volume of it there, so that's pretty good. I'm happy with that. For now, we had this little nuance here, the center line so that it's going to come down. There's your apex of the curve here. It's going to follow that, and then it's going to taper. So if we took this oval and here again, that's our center, that's our center and we follow our perspective lines. You have another one here. It's going to taper in. This tube is wider here, and then it gets narrow, slightly wider and then narrows, so it would be nice to capture that. So we'll get the narrow, wider narrows when I push that up a little bit more. So there's our handle or they won't get ahold it. Something like that. This one comes around again. It's going to follow that perspective, so it's going to come out sooner. Over here, there's brings air going like that comes in and now, So now I can take a slightly darker see if this will go over nicely. Yeah, I think it will take a slightly darker led here and we can start to chisel, end some of these contours and lines. Get that change of direction. This is where change. Sorry for the bump. I got you again and we come down. We do have some with here. You're going to see that on this side. So that's going to go in a little bit, claw. You see the inside of that there. So, you know, using basically the same ideas we've talked about before. Do you get slightly more complex shape? But you can easily see how this is. Ah, very valuable tool Teoh Work with and just, um, dealing with basic shapes like that is an easy way to do it. Using perspective to capture the movement and direction are some of the main tools you're going to need and some of the only tools you'll need to master basic drawn techniques. And that's what we're all here to Dio is, too. It's gonna erase some of the EEC kind of see a little more clearly. Um, here we go. I'm just going to race that and go over it again one more time, But again, all right, so again, basic shapes to create slightly more complex subject here. But you'll start to see how working with these will easily train you to keep things simple . Always always looked for that that main access line of the big shape which which direction is it moving understand your perspective, understand those vanishing points and trying to get that overall feeling of the gesture of what the object is actually doing. I mean, that's that's what you have to do. And I showed you how I did that right there with a quick Sharpie markers. Okay, well, what do I have here is not a hammer? No, it's his cylinder or can be this tube that's running off in perspective, So it's running off this way. It's running off this way. There is my access line. This build is built around that, and that's just taking time. Teoh. Know what you're drawn? Teoh, Understand what it is and then execute as I look at this. I mean, there's definitely some changes like I could make bringing this down, bringing that up, things like that. That's all right. That's all part of learning part of growing. But you're gonna find there's mistakes in different ways, and you're gonna find that there are mistakes when you draw these things. No one is exempt from that. So go back, correct him, understand what you did wrong. But for the most part, I think this gives you a good guideline into how you can create these more complex subjects on Give them good perspective, good proportions. Ah, good shapes and discern overall good beginning to understanding drawing.
18. [NEW] Hammer Shading Demo: Okay, so But I have Here is my hammer drawing, and I'm going to trace over it and just doing it so I can get a little bit cleaner surface to show my shaving. And this wanted to show you how I was doing it. And so now you know what's going on. So I'm probably will just go ahead and speed through this because there's really no point in covering all the details that I have covered already. So I'll leave the camera on. And then now I'll que a little music and again speed through it, okay? And I'll do this for every single one. I'm going the same exact way. This is just really thin drawing paper that allows me to trace. It is durable enough that I can certainly shade on it if I need to a race. It can handle that as well. So for the shading, um, I'll use basically the same techniques we've already talked about, so we can kind of use this hatching type of method, and I can use pressure into the paper to get a darker and then let off to go lighter. We've got this idea of just lines like that, Maiken smudge it, But I probably won't smudge it with this particular paper. So anyway, I'll use, but just basically, whatever comes to mind, I'm just going to kind of clean up some of these edges. Um, and we've got this kind of other little shape happening here and that one more there, So I like to do is tried to identify Ah, the darkest dark. I think that's always a really good starting point. Um, And that kind of work from there, what I'm not going to do is get into a lot of the details. So this hammer has a grip that has a pattern in it? Probably. So the hammer doesn't slide out when you're using it. If your hands were sweating or something, but I'm not gonna worry about all those details. I'm just going to kind of keep it simple. I can see on this side it's got some reflected light coming in there, kind of bouncing off the paper back up into the hammer. So I'm probably not gonna worry a lot about that either. Make this handle a little bit skinnier here. That's going to give it the illusion that it's a little bit longer as well. All right, So, again, identifying the darkest dark there's a lot of it. So I've got this little bevel action. I'm going to use this kind of back and forth action. So just that kind of gets back to the triangles, The rectangles rather that we used squares where we're kind of working within that square. But it's not a square. Obviously, it's more of a of a rounded shape. I'm still using the same techniques. I'm going to use it my strokes in different directions. So it's gonna be fairly loose when I'm done. But, you know, I hope that it, um, captures what I want. And that's the feeling of a hammer with a little bit of depth and dimension to it, you know, make that a little bit skinnier, too. We've got the shadow coming off this way. So with the light coming here, you're never gonna get that band of light kind of coming through here hitting the grip. We got a little bit of light, kind of, you know, hitting different little edges on the metal. It's kind of hitting right in here. Pretty good to kind of shiny and it kind of comes out along here and then we've got a little more reflected light there. So the dark is part. It's gonna be right in here. I'm gonna go a little bit later. I'm gonna try to get maybe a little feeling of that reflected light something. Work it. Of course it's a black handle is well, so that's going to a tribute to the darker value in general. I'm just gonna carry that right on over. I know this is going to be in light, but carry that value over into the right side. As I get into this part of the handle. The right edge. It's a little bit darker, and then it cut tapers down and to it's kind of dark value in here. And then it, um, increases in value as it goes away from the late. So right here we start picking up that reflected light bouncing light. However you want to call it kind of running along underneath that handle, and then we have another band of light and hitting the top here a little bit of value here , and I'm gonna make it a little bit darker here, as it turns away from the light again. We're getting reflected light up into the base, the bottom here as well. So now I can get back through, make this a little bit darker. See, I'm working my strokes back and forth, some diagonal, some linear, that kind of follow along the shape of the handle so very dark in here. I'm gonna get a little value going in there first because I can see a little bit of bounce light in the air, and it really just blends in with the shadow. I will make that shadow a little bit later in the hammer. Self typically wears closer to the object that will be a little bit darker. The shadow. You can't really see it on this one. Oh, I got a little bit of reflection and working in here probably gonna be the lightest value on the hammer. Leave a little reflection there and a little bit here. Bounce light as well from the light surface and then getting darker, getting some balance late on the tip of that hammer as well. So something like that is really dark on this part. And we've got a little something like that so I'll leave a little sliver of light. Kind of hitting the edge of the claw or the, I guess, is the head of the hammer. I'm going to run that kind of base value through it. Um, you see, a little bit darker, perhaps inside that claw ever so slightly, though. And dark underneath the claw here darker were top of it. Something like that. So bounce like, kind of fades in here. I can make this a little more gradual. This great nation on may be I'll go a smidge. Dark her Here. Here's we've got a shadow moving off on this one. All right, so that's my hammer.
19. [NEW] Coffee Cup Shading Demo: All right, let's do There are coffee cup now. And with this sort of surface, you're going to get a lot of reflections. Things love that nature. I'm going to keep it very simple. Okay, we're gonna do some basic shading and not try to capture every single detail. Alright, so, um, it's not gonna be a foot of realistic thing. So, looking at it, I think it's important to identify your darkest darks, which will be in here on the handle, possibly right under the edge where it meets the shadow. The lightest lights will be, um, you know, definitely right in here. There's a strip coming down the cup. We've got a white band, and here on the inside edge of the cup, the handle is catching. Lighten here. So what I may have to do is I'll see how it progresses, but may have to come back in and use ah, white pencil or charcoal or may just erase it all, See, as I go, Ok, um, got a pretty dark band. And here and then so one. So we got a light source is kind of coming down, like so, hitting the top edge, illuminating. Um a lot of this. We're just making it in light, the top edge of the cup. So anyway, that's where I'll go with it. Um, and we'll just start with some of the darker darks. And as we get down into here, um, we start to see how that gets a little bit later and then a little bit darker as it goes off into that corner here. We're getting pretty dark again that we do have, Ah, dark band coming down here like so. And then this gets a little bit later as it comes around and right where it's going to meet the shadow right here or the light. It's going to get a little bit darker again, okay? And then it starts to fade. Or we get a great Asian into our light, lighter areas. This is where it's gonna be lightest. So that's this is all in late here. So we're getting that sort of thing. Come back in here, probably want and go this direction kind of keeping and line with that curvature of the cup . So working these lines like this Fine. Now you can add the dark on the handle like so it's getting a little bit of a cash shadow here. Little great Asian as it comes up a little bit darker under as a curls underneath. And that's good. Add my darker value to the inside of the cup, and I could just kind of keep it like this if I want That way is somewhat consistent as it starts to get to the light. Add to that cash shadow there that's going to get a great Asian all the way to this band of reflection. Most so we have a cast shadow kind of moving off in the distance here is hitting, hitting this wall and then kind of running up running up the wall here. So I'm just going to do It's gonna be dark earlier near the cup and then as it moves away, is going to fade. I'm going to use the opportunity to get a little bit of this light back moving inside. Handle here again, kind of getting that a little bit later, using pressure as I get closer to the cup and decreasing that pressure as I move away, we'll see how it does with some white charcoal. So again, I don't know how this is going to respond. And as you can see, not very well, pretty weak paper. I can try to lift a little bit of this, and now I'll come back in here right here. There's a little edge at work and then almost see the underneath it. A little handle there. That's pretty good. We got a little bit of, ah, shadow gradation happening here along that edge. Um, it's gonna be really dark in here, cause that's what's closest to that light hitting that cup. And then again, all right, so that's pretty good for this one. I'll see you in the next one.
20. [NEW] Paint Tube Shading Demo: all right. You know the drill. So, uh, not gonna worry about a lot of details. It's gonna worry about the core shapes and And just try to understand, you know, the object itself. So a tube of paint, you know, you're exactly what it says it is, right? It's a tube, and it's gonna come down. So when a tube. But it with this tube is kind of dynamic causes round, right, so we're getting should say shade on this side, and I'll kind of draw it like this. But then it starts to kind of taper and into a very flat shape where where it ends. So it has volume like a tube in the middle and tours it cap here. But then as we get here, flattens into, you know, a very thin shape because it's, um it's been squeezed. So that's kind of what I'm after. So I've got this a little bit strong here, So we've got our corner and, you know, it's bent down, so all right, so So I can shade this part when I was alluding to there like a tube, but I'll pay attention to some of the details. I'm not gonna worry about doing a lot of it, cause I want to get the gist of it kind of the mean goal. Underneath this, it's in shadow. So you got a light source coming at it. Like so, the darkest one of the darkest darks is right in there. And then we have this kind of creasing here, which gets kind of dark over in here, gets kind of dark. This band, which is probably a little bit small I'll make that a little bit wider has come a mid tone in general. Um, so it's gonna be a little bit darker on this side. There's another light band here, and then this This is all white. As we get to the middle, there's, ah, fancy design and all going on, which I'm not gonna worry about. And we have some writing and here, which again, I'm just going to kind of scribble that in because it doesn't really matter. And then we had this palette. Um, that is dark. It's pretty consistent all the way around. I know. We've got, uh, the logo. When there I'll just leave a few little something in there again. That's not the point. of this do a foot of realistic drawing. We get in here, we have another band that's got a dent in it. So it's little bit darker. And then it comes around into the light here on the cap, darker on this side. And then once it hits the light, just want to get a little bit later. This silver underneath obviously a little bit darker. And there are cash shadow again. It gets darker as we get to the object and the lighter as it moves away. So I think you back in here now. And perhaps I can make this band a little bit darker if I want to. I can go in here and maybe at the feeling of, ah, distribute crinkles and things of that nature going on, but and we're not gonna worry too much about that. Okay, so that's kind of the idea for shaving this one. Man, I hope this helped you guys out a little bit. And if you want to get in the here and we find your details getting here within a racer, if you wanted, um, you catch the light on this little the lip. Uh, cap all that stuff, but just trying to get the big picture and and I think I pretty much got it with this one.
 ROBERT JOYNER, Make Art Fun