Transcripts
1. Overview: Hi there. I'm Robert Joyner. I'm a full time artist and have been for over 15 years, and I'm thrilled to bring getting started drawing the human figure course to you together, you and me will learn to draw the human figure using a series of very simple and basic ideas. So if you can draw a circle, a square or a rectangle that you are more than qualified to get started right now and again , this course is aimed at complete beginners. No experience needed. We will start from the very beginning of drawing the human figure and work through it step by stuff. First, you will learn a series of basic two dimensional and three dimensional shapes and forms. Then you will learn to turn these forms and shapes in various positions and perspectives, and this is essential for capturing the illusion of depth on a two dimensional surface. Once you are comfortable with that, we will then turn to some of the masters like Michelangelo and Raphael. You have a look at some of their figure drawings and studies and see how they incorporated these basic shapes and volumes in their figure drawing. Of course, I would be doing a series of lectures and demos along the way. I encourage you to always have your paper and pencil ready and draw along with me. This will ensure that you get the most out of your online learning experience. Section two is dedicated to body parts. Here. You will learn how to use these basic three D shapes to draw very sophisticated and complex body structures, and the final section is dedicated to proportions. We will look at both the female and male bodies, and we will look at the front, back and profile views Together. These lessons will give you a salad foundation for drawing the human figure. You will gain a tremendous amount of knowledge and confidence if you can master drawing the human body. Everything else becomes very easy. To make this course even better, have a series of assignments for you to complete. Now this is not homework, but of course, if you want to really learn to dive in deep and master human figure drawing, you'll want to complete these assignments not just once, but several times. All images I use in this course are available for you to download as well plus I've included some additional figures that you can use as a reference as you move forward and practice on your own. So I hope you're ready for a major upgrade to your creative skills and to learn some valuable drawing techniques. I'll see you on the inside. Thanks for watching.
2. About This Course: welcome to the first section here. There's a lot of content in this introduction. We'll talk about gesture and structure the two parts to this wonderful process. We're going to break those down, and I'll give you a lot more information about how to use each one for your figure drawing . And then we'll talk about conceptualizing those ideas on how to take those forms and make them perfectly vertical. How to lean them, how to tilt them in space so that we started to get the feel for how to make a two dimensional drawing more three dimensional drawing, so it has a little bit of perspective to it. We're also going to talk about the pencil test. The pencil test is very important. It's an easy method for understanding how the form is sitting in space. So as long as you have a pencil and paper there or a pencil in your hand, you can use that to quickly determine a lot of information about the human figure. So a wonderful tool you're gonna want to use throughout this figure drawing course. I will also do complete demonstration. So the first series of lessons it's a lot of lecturing. But there's a lot of tips and things I'm sharing with you. And then I'll show you how the Masters, you some of these ideas in their artworks and we'll take a look at some wonderful artwork from the Masters. And then there's an assignment. So this is where you roll your sleeves up. He put these ideas to the test, and then I'll wrap up this first section by showing you my version of the assignment. And that's a wonderful way to get Mawr out of this online learning experience. So once you do your assignment, then you can go watch my take on it, and it gives you something to compare your work to. It doesn't mean that what you did is incorrect, or that what I did is correct. It's just something that you can look at and say, Oh, well, no, I like how Robert is using this or that. Or maybe hey, I didn't really get much out of what Robert did there. I kind of like my take on it better, and that's perfectly fine. So collectively, you have a wonderful assortment of different learning tools, and together it's just going to give you a really good start to your figure drawing process . So now we're going to kick things off with understanding that two basic ideas you're going to use and that's the gesture and structure.
3. How To Use The Platform: In this video, I
just wanted to go over the Skillshare platform. I know some of you
know how to use it, but I know there are
many others that simply don't understand how
to create a project. How to add more photos, text, and things like that. What I will do now is pull up one of my classes on Skillshare. This may not be the
class you are learning, but it does have everything we need to cover what I wanted to share with
you in this video. This is my watercolor workout
basics and beyond class. And you've got the main
video here. Obviously. If you wanted to make
that video bigger, you can click that and the
top right hand corner, and that will enlarge the video if you want to reduce
that size again, come up here to the top
right-hand corner, click it. And that's going to bring up your navigation menu on
the right-hand side. Now if I hover over
the video with my mouse down here
on the lower left, you have play speed. For some reason you
wanted to slow things down or speed things up. You can always change the speed. Keep in mind if you do change, it just makes sure you
go back and set it to normal if you
want to, in fact, see at a normal speed, you can also rewind
things 15 seconds. If you're watching something
you wanted to see what happened within 15
seconds together, you can click that and
then I'll take you back. And now 1515 second increments. You can click it three
or four times and go back 45 seconds a minute,
whatever you want to do. If you want to make
a note of the video, you can click this little pen That's going to
bring up your note. And that's a good way to remind yourself if something
interesting happen there. And you just wanted to
sort of jot something down that sort of
clicked in your mind. This is your volume. So if it's CBC, this slash like I
have now lets you need to unmute it so you're not going to be able
to see the sound. If I click that now, I can now hear the video
if it were playing, this would be subtitles. So if you wanted to
have a subtitle and the various languages
here, you can do that. You may not like
having subtitles. You can put subtitles
off on the top of that. So if you don't
want to see them, That's how you get rid of them. Again, we can go full screen with that feature in the
lower right-hand corner. So if you wanted to see this and this largest
possible resolution, that is going to be
the option to do it. Okay, So again, that's that one. So that tells you a
little bit about how to navigate some of the
options on the video. Over here on the right. So long as you're in this mode, we can scroll down and
see the different videos. All videos that you
have watched all the way through should
have a checkmark. If you want to again,
get rid of that, you use this button in the top right-hand corner,
you can get rid of it. And then here we see it. Now down here, we
have some tabs. We have the About tab. So that's going to be the class
description that I added. I will often add other classes that you
may be interested in. So throughout the course, I may say if you want to learn more about how to
plan watercolor art, be shorter, checkout the link
in the class description, and that's gonna be right
here in the About tab. So if we scroll down, we can see all of
these are links to different classes I have. So that's a little bit
about the about page. Reviews are where you can see how awesome reviews that the
students left on the class. Here, our discussions, discussions are very
important because that's how I'm
going to notify you about each new lesson of
when they're available. You will see, if you scroll
down, you'll see discussions, you'll see where there's some
different things going on. This is important too. So if you have questions about the class or a
lesson you watched, then you can use this
discussions to get in touch with me and I'll try to respond
to you as soon as possible. You can also share links
and the discussions too. So if you have something
you want to show me, you can always link
it up and I'll be able to see it. Here. You see I can start
a conversation, I can ask a question up and
share project and so on. Speaking up projects,
if I go right here, this tells you a little
bit about the project. So here you'll see each lesson
has a project well almost, but the point is to get
involved and started doing the demos and projects
shared in this class. And here you can scroll down
and see all the students that are posting projects that there's one do
you want to explore? You can click on
that and just see what an awesome job the
students are doing, getting these different
projects and things done. Of course, you can
comment on these two. So over here on the
right-hand side, you can click on that. You can share a little feedbacks and encouragement,
whatever you want to do. If you look at my
project right here, you're going to see that I've got a detailed breakdown
of all my lessons here. So each time I post new
lessons in a class or a demo, I always break it
down and give you a really good description
of what's going on. Now you may want to
create a project. Now, since I already have one, are you going to see
that I don't have the option to make another one. But here is a class that
I don't have a project. You will see this green button
on the right-hand side. To create a project, all you have to do
is click on that. And that's going to bring
up your project option. Now the first thing you'll
see is a cover image. If you want to add
a cover image, just click on that and then
navigate to your image. So I'll just select one here. So I'll select this one. And then that's going
to upload the image. Once it's uploaded. I have the option here on
this slider right there to enlarge it and then
sort of move it around, however I want that to be seen. And once it's done,
click Submit. Again, this is just
the cover image. You can go ahead and add
a title and I'll say, awesome class by Robert. If I can spell that right, that would certainly
help. Description. Hey, took a three-week class
and here's what I did. Now if I hit Enter, That's going to bring the
cursor down here below. And then I can add an image. You see down here, you can see, you can have three options
to add more content. So if I click on image, I can add another image, so I can click on that and then you have to
give it a second. And then that's going
to upload the image. Now I can click Enter and you see I can write more content. I'm like, This is my
cool fish painting. Now, if I wanted to add a video or link and
maybe you're like, Hey, did you happen to see
this picture, whatever. You can double-click on a word and then you have a
link option here, and you can paste
the link in there. Just make sure you
hit the Check button to make it active. And now I can hit enter again
and then add more images. That's how you can
make your project. If you don't want anyone
to see your project, you can click this button
here to make it private. But once you're done,
very, very important, scroll back to the
top and hit Publish. And as soon as you
publish your project, that's going to be visible
for everyone to see. So that's publishing right now. I'm just going to
give it a moment, alright, and then there
it is, right there. So I just added my projects. So let's say you want
to edit your project, you click on that again. And now you come up here to
the top right-hand corner. You can click Edit, and now you can scroll down. Make sure you put the
cursor where you want it. So if I want the next image or the next video or whatever
to be below the fish. I can come down
here and click on the end of the
sentence, hit Enter. And now again, pull in my images or wherever it
is that I want to do. Again, make sure you hit
published when you're done. And then that's
going to save it. You just have to be patient
and let Skill Share save it. Another thing you may
want to do is share your project on social media. So you have this
Copy Project link. You can copy that and share
that wherever you wish. Over here on the right-hand
side, you can hard thing. So if someone did a project
that you really like, you can give it a heart. You can share a comment and say, those fish are amazing, and then hit posts and
that's going to share your comments with whoever
it is you're talking about. So again, just good
stuff to know. And I think if you learn how to use the projects
is very useful. And teachers can often
see them and hopefully they do and they can give you some feedback on
what you're doing. The last thing I want
to share with you is right here under the again, we've got about reviews, discussions, and then
project and resources. These resources
are downloadable. If the class has images,
resource images, whatever the case may be, you can click on the
link and that's going to download it to your device. So I hope this video helps you out and that you
understand a little bit more about how to navigate
the Skillshare platform. And then of course, the
courses that are taught there.
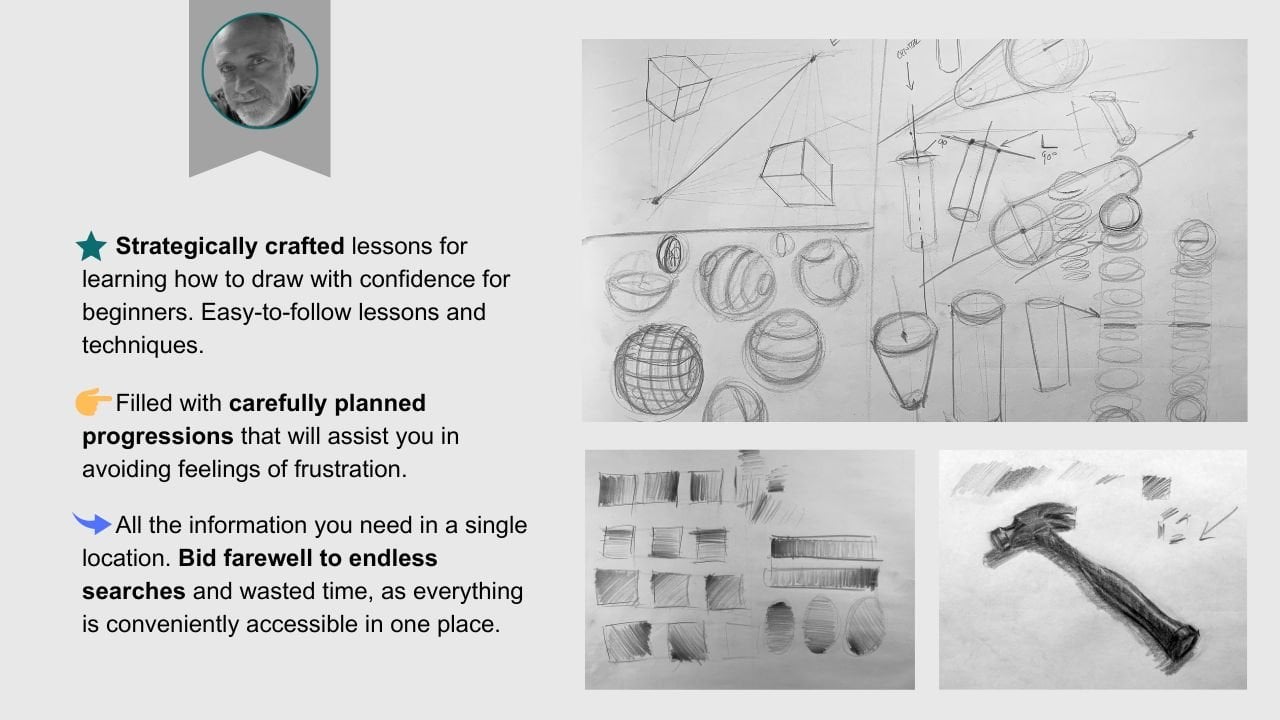
4. Introduction To Gesture & Structure: well before we dive into the course. I think it's important to get on the same page with terminology with, But I feel is kind of the core view I take on art. So let's just start right there for a second. So you know, all all art is really your ideas. Um, I say that because when you really start to break down, painting or drawing doesn't matter. Art In general, you're only doing symbolism, so you can't really paint a hand because the hand only exists in real life. It's attached to my arm, and that's it. So I can, however, draw the idea of a hand. So, in a sense, everything we do with somewhat abstract eso in it's done through symbolism. And when we start to move through this course, we're going to kind of break this down into two groups. So we had the structure on. Then you have what's called the gesture, and everyone interprets structure and gesture a little bit differently. They may use them a little bit differently, so, but again, this over on the same page throughout this course, I'm going to break down what they are to me and what you can expect moving forward so that you know exactly where I'm coming from. So structure well, im you could think about as the the parts are the pieces of things. So if you were to think about a Christmas tree, for example, um, and it's sitting in your living room or wherever it could be there there may be, you know, a stand that's kind of holding the tree. It's the trees coming up and then the trees sitting there and we had the symbol of a tree on. Then it may have a star on it, so that's apart. That's apart. The trees apart has all these different ornaments and so one. So all of these little parts and pieces make up the whole of the Christmas tree. You can think if you were, if we relate that to the figure, you know, I could have an arm, but I also you know, the arm is made up of the upper arm of the lower arm. The risk, the hand, the fingers Ah ah, thumb and so one. So I think you kind of understand where I'm coming from. So this would be parts the pieces and so on. Okay, So gesture then would be basically how these things connect and relate to each other. Gesture is what kind of is kind of like the secret sauce that holds everything together. So if we think about this as the how they connect, um, you know how you know it's composed and that's going to hopefully kind of break this down into two major components off drawing, but also of your whole ideas? Um, in general, structure tends to be a little bit easier. Um, it's pretty quick, you know, just to get your ideas down and to look at things separately individually. So the gesture, then, is typically more difficult because things have to flow. The different parts and pieces have to connect to one another one another, and they have the connect, connect and relate to each other. So the shapes how the, you know, forearm joins the wrists. How the risk joins the base of the hand, how the base of the hand, the fingers joined the base of the hand and so on. So things have to flow rhythmically, aesthetically, and so one. So the gesture tends to be a more difficult part of the process. So that's kind of something you never going to work on and talk about as we move forward. Um, so also, with, ah, structure, they we have two different ways we can look at at this in terms of shapes, you have two dimensional shapes, and then we have, um, three dimensional shapes. So if you think about that idea, you could have a square, a circle rectangle. Um, the problem with two dimensional shapes is they don't really give you a lot of information . They're very they tend to be very flat and they don't give you direction. And they don't give you volume, which we're going to talk about in just a second when you start to look at three dimensional shapes. Now we're getting a sense of, you know, form. You're getting a sense of the volume, and you're also getting a sense of direction. Some shapes have mawr information than others. I'm so, for example, you know this idea of a square turned into a cube and the way I, through the perspective here, starts to give us volume direction. And so one, um, a circle we can turn into a sphere. But the only really way to do that would be to come in here and add some shaving. Um, And then, you know, that would start to give us a feeling of, ah, of a form. Um, the idea of this rectangle that could be turned into a tube, Of course, the tube can go in many different directions and so on. And so we start looking at in comparing these two, then you start to say, Okay, well, I can start to see that the direction I can start to see an access point can start to also see the volume of it, which is more effective. So that's the three dimensional shapes are really what we're going to focus on in this, of course, um, two dimensional shapes again lack a lot of what we need. Now we may use at some point ah, sphere and oval or egg shape as a surrogate form, but know that it's on Lee a placeholder for further development. So getting your ideas down quickly is the key to drawing. But having a library of forms and shapes and volumes is the best way to do that. So we're going to you again. You talk about that three d You may hear me refer to all of these as, ah, volume. You may hear me refer to it as a mass. Ah, you may hear me refer to it as a form. All of that is exactly what these shapes will start to do for you. Um so the gesture again is the relationships of all these parts and how they connect to each other, as I alluded to earlier. And it's also kind of how they're composed, which is important, but to if you were to say, think about a painting. So when you're dealing with a painting, are you dealing with color? And so therefore color has to have color harmony. So if you start to put in this really chromatic red and then everything else around it is tonal or gray or great out, then that red may not work as effectively. It may work better and be more harmonious if that red were toned down and not sold. Chromatic so very intense red surrounded by a bunch of great chromatic Hughes isn't going to look very good simply because it's not. You put it down without any consideration of the whole So my gesture is kind of that you're trying to look at how everything connects, and that's very, very difficult when you start to draw the human figure and probably one of the the biggest challenges. And that's why I again I feel gesture is the most important part. Once we get the gesture down of what but the composition is what the figure is doing the feeling of it. Then we can start to break it down into the parts and pieces, but getting the whole to look solid, pleasing aesthetically, um, pleasing, I should say, then that's the hard part. So, um, the process, you know that you want to choose when you're drawing the figure should always be simple. So basically, when we start to build this course and you start to move forward, we're gonna start with these very simple ideas. Um, so you may have one simple idea, and then we'll add the next the next and the next, and so one. And the reason we want to build things, um, slowly, is that if if you start to find yourself going astray or you start to see things going south and simply not working Well, then we can always kind of backtrack to the previous steps to see where we went wrong. So you can think about this is kind of like layers were stacking on top of each other. Um, so that's something to think about. Um, another thing out, kind of want to talk about is style. So style is something that comes, you know, much later. You know, the best way to achieve style. Where do you want to be realistic or photo realistic. I should say, maybe you want to be more expressive. Maybe you want to you what you are to be very loose. You want things to be exaggerated, more abstract. All of that style, the different styles. And you can look at our history for that, from Picasso to Renoir to whoever, Um, the style that you use for your idea doesn't really matter cause it's all built upon the foundation. And that's why this part of learning and so important, because it's going to give you the freedom to use Teoh infuse your style. So when you start to think about your art, um, he started to think about the finished product before you learned the foundational principles, then you're kind of getting way ahead of yourself. And that's typically where I think most beginners fail is that they are perhaps impressed or influence by a particular artist, and they go right for that in product. So that artist has probably gone through many of these stages of building their foundation through structure, gesture, whatever route they took to get where they are, Um, but that development, that work they did to build that foundation has allowed them to achieve a style that looks pleasing and is desirable. And, you know, in this day and age, when we're dealing with the Internet, social media, Pinterest instagram, so on where were so influenced by what others were doing? Because everything is accessible now and for a beginner, that's good. But it can also be bad because we get to a point where you know, we're like, OK, I just want to copy, but this style of art that and again, this comes way after all of this. So years of building the foundation, um, are going to start to reveal a style that's natural and uncomfortable for you, but without the structure, without the gesture and without having some knowledge, then the style is only simply going to fall apart and caused mawr disharmony than harmony. When you start to understand the process, you start to build things more gradually and you're going to see that the style will actually come very naturally. And when things fall apart, you have you know how to go back and backtrack and bring things together. So that's just an introduction real quick into the idea of art and what aren't really is. And remember, we can't really paint. We can't really paint a Christmas tree. We can only paint the parts of a Christmas tree, the gesture of a Christmas tree in the symbol of the tree. And the more the more of, ah, the more the better catalogue you have of shapes on, the more you understand about looking and observing these shapes of your subjects and then interpreting them, putting them down on the page, hiding the different parts, connect and flow to each other. Ah, that that's going to be the key to making your symbols and your ideas um, mawr effective, and in the end you'll be more successful doing it. So that's the introduction part and now we're going to kind of breakdown a little bit more of the shapes and this three dimensional idea and then talk a little bit more about the the kind of the gist of this course and what's behind it with this whole structure in a gesture idea.
5. Structure Basics: All right, let's move on and kind of break this down a little bit more and going to elaborate a little more on structure. And we've determined that structure is mawr effective. If we use ah three d form, okay. And we've also determined that structure equals the parts and the parts again, we want to make it mawr three D. So three dimensional and parts okay, that that's what we're dealing with There is this other part of structure that's going to become more important. And that's going to be perspective. And don't stress out. I know perspective can be breaking out a calculator, doing the math and all those things, but we're going to simplify it in this course and make things easy. But perspective is certainly something that we will have to consider, right? So we've looked at three basic shapes so far, and so let's look at those again. So we have the circle. All right, we have this idea of a tube, and then we had this idea of a cube. Um, so in this case, we're starting to see some of the perspective already, uh, in this little cute, um, we're starting to see direction and so on. But is with these three shapes right here, these three forms that we can almost draw anything. And this is the simplification part that I was alluding to earlier. The key to drawing the key to learning is to simplify the process so you don't become overwhelmed now. The key also is, um, being able to draw over the form. So in other words, if if I were to say, Take this idea of a tube so that's let's look at we just write that down so we don't forget . So we'll say no movement over the forms again. That's the key. So if we take this idea of a circle, we can turn that into an egg. So what to say, over or noble. So we'll say that has this sort of shape. And again, this is just a modified circle. So what you're dealing with is a contour. So in other words, um, when we look at this, you're only moving your eyes only moving around the contour. So if you not even short a contour is the contour, there would be the edge of a shape, form, object or whatever. So if I take that same idea and will use the say this tube now only draw it like this. So again, we're only seeing the contour. So I want you to move over the form that I need to start adding this sort of direction. Okay, so now, now you're starting to move not only around the form, but you're moving over the form, all right, bouncing back and forth. And that's that's much more effective then this sort of thing. And we say, if you were to look at the figure, um, you know, we have a silhouette, right? You have a silhouette of your head, neck, shoulders, arms and so one. So you have this sort of thing, and that doesn't really give you anything other than a flat rendering of the figure. So it's on Lee. When Ah, we start breaking this down into forms, um, that we start understanding direction, we start understanding volume, and it starts to take on ah, much different meaning. So that's just kind of a quick look in comparison to how the form is interpreted through a contour. How you look at it versus how you looking at it here and the thing about it is a lot of the information about a figure is located on the edges. Um, so we have to start to investigate kind of what's happening in here so that we can start to get this idea of a more sophisticated three dimensional structure parts into the figure. All right, taking this a step further and really just to bring clarity to what I am after here, I'm just so again we're on the same page, And you know exactly what what we're getting at here is that structure is simply movement over the form. Okay, movement over the form and not around the form. Okay, so we're not looking for this. We're looking for this. So this idea is what we're doing. And we're going to avoid that idea for reasons I've explained. Ah. And then also, for reasons I haven't yet shared with you, So when you're way are working this way again, we're talking about three D parts, very a catalogue of shapes. So 123 But again, these can be modified. Um, and I'll get to that in a minute. Um, what that does is that helps to construct things. So what? You're doing when you're in this structure phase is you're basically trying to come up with ways to construct or lay in. You're your idea, and and you want to start to look at things differently. And I think when I say that I'm talking about what I mentioned earlier. No, I don't want you to draw a form. I want you to come up with a shape that represents the forearm. So again, that could be a tube. Um, And the reason why is and to a lot of this is kind of like sculpting. So when you're a sculptor, you're thinking mawr about form. So you know the different sides of it, the volume of it, and you're thinking over the form and not the contour of it. Because that's a a good way to think about how this sort of idea, because you're you're always looking for You're the best possible route. And the reason why is and the reason we simplify things, even like taking these three shapes is it's because we can again have a simple method. Okay, Everything that we do, we want to. At this stage, we reduce it, we simplify it, and we do that because is quick, we could easily say Okay, I see that pose. Now, this is what I'm going to use. And you can put those ideas down in a matter of seconds. Months, you're more fluid and you're experienced. So if something is not right, then or if is correct, then you can take it further. But you can also redesign it or reconstructive quickly. And that's that's key. Okay, so we start to do contours and you start to do all this other rendering and sophisticated things. Um, in the beginning, and then you get to a point where you invested this time and you go, Oh, my gosh. I mean, this is the gesture there. Everything is completely off. Then It takes a lot more work to go back and redesign it. When you're dealing with these very simple shapes and you're laying things and quickly, then Tennessee. Okay, well, you know, I can take this to tweak it, twist it, make it shorter, make it longer. I can make this circle into a Mormon oval or the next shape or whatever. And you could redesign it fast on the fly and also that the other thing is, Ah, you can exaggerate or are animated, which is a very, very important once we get into the gesture. In other words, if he had this figure, I think we can see me here. We can and he say This figure is kind of hunched over and you know, this leg is maybe bent, and this one's here. You may say, Well, I don't know that that's that's a little bit stiff. So maybe you want toe animate that mawr so we can bring the figure over. You can thrust this leg out and weaken. Thrust this one forward, and we can kind of make the figure appear as though there's a lot more going on them. Then what is actually there. And that's important, too, because you know, you're the way you animate things and the the movement of it. The story behind it often times needs to be animated or exaggerated. And again, having the simplified method behind you, um, will allow you to construct things to lay him in and to give you this feeling of movement over the form, and you can get your ideas down quicker. If there's ideas don't work, you can redesign them. Ah, and if they do work, or perhaps you want to add more to it, then you can animate it and make more of it in a very fast way. And that's something that is very important for figure drawing because it's so easy to get locked into unnecessary details or to copy what you see. And then you end up with this very stiff wooden looking figure. Okay, the last thing I want to touch on, um for this particular piece of paper anyway is characteristic Very important from that. All the forms that we use have a or represent the character or characteristic of what of what it is we're trying to say. So if if you take for example, ah forearm So what kind of use this right here? You may say in the simplest form that we can use the tube. I'm going to say this is the top of the forearm. This would be the bottom or what to say, the wrist. So giving you something to think about now you may a development of that or something more characteristic, may say, Well, it seems like that narrows as it goes to the wrist and you would be right. So you could say a good development would be taking that idea and saying This is more characteristic of the forearm because it is the tends to get wider here and narrows. And now, if we start to look at the sides of a forearm, another characteristic or development, maybe to say, Well, let's kind of see this muscle or I don't really have a prominent muscle having been working out. Sorry about that. But let's say a development, maybe to start with a new novel. Ah, and then it tapers here. And then maybe as it gets to the base, it turns into this box like form. Okay, so it kind of gets very square, um, towards the wrist. Ah, and then it goes out into a tube, and it kind of goes around these muscles and maybe even kind of has this idea of a combat bows a little bit, so that could be uneven mawr, um, further development or characteristic of what we're doing. So that shape could Look, I'll do this with a pencil. So it's a little bit cleaner. Could start with this sort of idea coming down, then it gets to this very box, like, ah, subject. And then it kind of goes back out on Maybe we can see down for this example into it. Okay, so maybe this, um, would be more characteristic again of that forearm. So these are the These are the things we're going to try to start to develop as we move forward, breaking the body down and into parts like we talked about right with the structure. Ah, and then coming up with this simplified method of construction so that we can lay things in quickly. If it's a problem, we can redesign it. And of course, in the end, we wanted to be interesting to look at, and a lot of times that means, you know, we want that to be slightly exaggerated, but it also again, we need that characteristic quality that's important. If you start with something that's too generic for forearm that say, then then you have more work to do. You got a lot more steps to jump through until you get to something that is probably mawr suited for that. In other words, if you were trying to sculpt ahead, even you start out with this big things like this. Now, you know, you've got a chisel, chisel, chisel, chisel and do all of this work until you finally get to a point where it starts to look. They're like an actual head, so you got a lot to do. So what we're trying to do is to eliminate unnecessary steps and get to a point where we've got ah, these wonderful, simplified volumes to lay in and construct our parts of the gesture, okay?
6. Gesture Basics: all right. So I told you were going to kind of work things kind of back and forth. So we'll talk a little bit of structure, a little bit of gesture and then so on. So I think it's important to mix and mingle. So again, this one will cover a little bit of the gesture ideas, and then we can start to bounce back. So again, gesture. We talked earlier, and I mentioned that is basically how things connect and relate to each other. So if structure is movement, um, over the form, then we can kind of think about gesture or I'm sorry, if structure I'm not sure if I said this correctly. If structure is movement over the form, not around the form over the form them again, we can think about gesture as movement between. So the hand s so we have the say, the upper arm. I'll put that down here. How that connects what's between to the forearm. The risk connects to the hand. So you know those connections and how the parts relate to each other between the forms, the different parts, right? The upper arm, lower arm hand. That's what we're dealing with here a gesture. A lot of times, um, we can look at it. That's kind of the the long axis of things. So if I had no my arm out to the side and while I was kind of holding it in a very limp way from the shoulder, Then maybe the upper arm would kind of sagged down. Maybe I would want, um, from the elbow to kind of raise my forearm up a little bit and then I'll just kind of dropped my wrist. So we kind of have this s curve when we think about that. So that could be along axis of that particular or a long of that particular movement. So that again would be the upper arm lower arm. We'll call that hand. So again, taking those three parts and creating a long axis or gesture line to use to indicate that entire movement. That's the idea. So if you think about it, gesture can simply be the long axis. So when you say we take a tube, for example, So I want everyone draws a tube differently. But what I like to do is look at the axis. So what? Which way would that, too be moving in space and we can draw the to so we draw on edge. Maybe that could be an axis so that that can be a line that represents the middle. It can be one of the contours or the outside edges. In this case, just just say it's on outside edge. I can draw the other side. I draw on end here, and I can draw on end here. Now, remember that still two d eso to make this into a three the okay, I need to go around and then develop those ends. Ah, little bit stronger. So I could kind of maybe say, um, we have this sort of thing. Okay, so now that becomes a tube and has direction, But it also represents this idea of a long axis. We're probably gonna want to develop that a little more fluidly and perhaps more organically. Right now, I'm going to go off topic just a little bit. But it's going to hopefully make sense to you. So gesture, in my opinion, is But when things are alive, they generally will are made up of whether they're very fluid to say so. I want to say they're very fluid and typically they're made up of water. Right? Eso they're very watery. So when we think of a tree, our bodies on apple things on a tree, um, things in nature, right? They are all made up of water and they are very fluid. So they I say fluid. We can think of that as being curved, graceful or organic looking. If that's the case, so we can say they're somewhat graceful, they're curved, so on. So we have this sort of idea now with gesture and that you know, if we were to say if we were looking at a building Ah, very tall skyscraper, let me have gesture. Maybe this kind of very tall object reaching for the sky coming down towards us. And we have this. But this is not alive. Obviously, you know, they tend to to be much stiffer in nature. Then let's say something that is tall like a treat. So a tree kind of has these beautiful curves retail. Now you may interpret these curves through a straight line, so that kind of gets us back to structure, which I'll talk about in a second. But it's underneath it all. It's very flowy, very curved and somewhat graceful. So if we were to take that idea and let's go back to the gesture here and we've started to find our access point and let's say this again could represent upper arm forearm or whatever and we get our kind of Maine long access line, it's very flowy. We can get our next one here and now we can draw all of this stuff so that, um, becomes a little more lifelike. So it tends to be a little more live than let's say, something that's very straight and stiff. That tends to be a little more man made things that are no manmade or very box, like usually, ah, house a building, Ah, car and so one. So if you had another arm that say, I took this idea and that say, the upper arm and lower arm are moving in the same direction, so say they're kind of moving out like this. But then once we get to the wrist, it changes. So we had this kind of arm. That's kind of to say this is the shoulder. Um, it's kind of hanging out, and then is coming down Mawr when it gets to the wrist and it changes direction so you could have this almost esque her like this. But this, from the shoulder to the risks, could be interpreted through one organic shape and then curves back towards the hand. So this could be one, and this could be too. So if you have a lag, this kind of going out from the hips here, uh, and then the leg bends of the knee on, then the foot straightened out, so that could be something even like that again, you would have a curve here. Maybe on that could even go into this so we could interpret that is one. And then the foot comes out in a slightly different curves. So that is a way of thinking a little bit about gesture as well. Trying to understand, you know the idea of things being very fluid, because again it's all made up of water. Water tends to flow. Look at the how water flows down a creek or whatever. It's very, you know, goes back and forth over rocks very smoothly and gracefully, and things again tend to weave back and forth and a curved nature. If it's if it's if it's alive. So again, another idea. We can start to add on to, um, the gesture. And that's again very important as we start to develop these ideas of the two structure and gesture categories or ideas that we're going to use for this figure drawing process.
7. Gesture Basics Part 2: Okay, so if we look at uh huh you know these ideas and we're kind of on the same page here. We've got this curved idea. Things are live. Things are fluid, graceful, that so on. Then we get to a point where you want you want to say, if you making error, Um, which way do you want it to go? You're going to make mistakes and drawing. Um, none of us are perfect. And through this journey, you're going to do things well. You want to do things that need improvement and so on. So if you're going to make a mistake, in my opinion, you're better off to make things too curved versus being too straight. And really it's, you know, it gets down to mistakes, and how you push your ideas becomes start your style. So things become stylized. I'm not saying they don't need improvement, but, you know, if you look at some of the great artists, um, and all of them have a stylized way of doing things. Some artists really want dark shadows. So when they paint, they really pushed that idea. Michelangelo figures were very heroic and muscular and had strength. You know so. And he just used those ideas and used his way of drawing and seeing and even look as a mistake. I mean, perhaps the figure wasn't that muscular and so on, but he kept feeding that idea and was consistent. So again, if you're going to make mistakes, it's better off to be two curved versus being too straight. And I think you're going to find that that kind of keeps you in line a little bit and will make the your figures. Ah, little more lifelike and a little more graceful and dynamic. Um, So, for example, and sometimes to I guess I should say that, um, I'll just say, um, no, um, more curved. All right, that's good. Eso, um, and two straight. And we'll say these air, you know, mistakes s 02 straight. Maybe not good. Now, that doesn't say that. Um, you will come across something that is very stiff. So if you're looking at the same ah, soldier or something and he stand in there at attention Arms to the side, legs down. And here you have your drill, sergeant there in your face, grilling you. Um, then you know these figures tend to be very stiff and where these poses tend to be very stiff in nature. But again, that's just looking at it straight on access straight up and down, Looking at the front of the face could be the back of the body to now. But once that figure starts to turn even a little bit so it starts to look left a little bit, you know? Then you know you're going to start to notice curves, so you know, the you're gonna see a curve through the upper body shape. You see ah, more of a curve through the legs and it's going to become You're gonna see some of the curfew here. So, in other words, the face of this figure may have a center line here. So you're dealing with symmetry. Mom, you have a nose, eyes, mouth. So you know, these air very much symmetrical here. But as that face turns on, that center line comes over here. Then are you going to start to see how these features curb around this? So it's going to start to take on on that more curved Uhm I'm alive gesture. So I'm not saying that. No, you simply cannot use a straight line, Some poses and some instances may call for that. But But typically, when things start to rotate and you're not dealing with symmetry anymore than it's going to start to take on a curved uh, look. All right, So I'm thinking we're getting close to this part of gesture. Um, where we're getting up to speed with what we have covered so far in structure. Um, but if I had to some up gesture, um, I would say, make it curved. It's very important. I'll kind of go over this. Maybe with a blue that will stand out which it didn't I should left it orange, but again make it curved. And if you remember, right, or if you But we're to kind of remind you here structure is really dealing with corners, which we're going to elaborate on more. So you kind of had these two things you can compare and balance back and forth. Hopefully, um, you're starting to get a better feel for the to just structure, gesture and what they mean in general. And then, of course, we're going to know slowly, as I done start to relate them and apply it to figure drawing
8. Forms: all right. This kind of developed these this idea here. So we've determined that gesture. It's curves. We know that structure equals corners. So this is the kind of the big idea we're going to use moving forward here. We've also determined that, um, for structure. Now we're going over over the form and not around the floor. So what I want to do is just take this, um, idea of a circle, and that's his vows. Perfect of a circle is our draw. And I know I could go around it, Um, and over it. Oh, something like that. And we start to look at this and say Well, that it's really hard to determine the structure of this. I mean, this could represent a beach ball. This could represent a steel ball, anything. But we don't really know what direction is going or any sort of relationship it has in space. So let's take another shape so we can start to kind of break that down a little bit. And let's say we we have this kind of egg like shape like this. And now what we're dealing with is something that has ah, long axis. Okay, so if we draw the long axis from here to here, that's going to be shorter than what's here to here. So this shape is giving us form and position. So it's giving us ah, form in a position. Okay, has given us an axis. So we now know that is leaning here. And we have a slight. And we could also use this as our access as opposed to this. What's really if you divide this and half? I mean, all of these are equal, so it doesn't really give us the same amount of information that the egg like shape gives us. All right, so let's take this idea and develop it a little bit more. And to do that, we're going to bring back the other shapes we've talked about. So we'll take the same ideas a tube. So I'll get my axis very similar to this. And remember going Teoh draw the ends. And again we get back to this idea. Ah, having, uh, the long axis line eso from here to here. OK, so this gives us a direction, and then we have the side to side. Okay, so we're getting this from here to here We can also look at that from, you know, here to here was giving us this. So this is giving us a little more information than this. So the egg shaped gives us a direction along through the long axis because of a slight lean . But that's only really giving us one particular side. So what? I mean by that, um, if we draw the axis line here or shots say it's giving us one corner, so we in the corner isn't on the inside, so it's right here. Where were these? Intersect. So right in there. So that that's it and what this is doing. Um, so it's basically coming down, and then we're getting this wrapping feeling, So we're seeing not only this side, but we're seeing underneath it now, and we're seeing how it goes down here. So this is giving us to. So if we develop that a little bit more so I can kind of bring in You're the axis line. Keep this very simple. I'm not going to try to be fancy with the cube at this point. And this comes down, down, down. Okay, so now, um, this gives us three. So we have this direction. Right? So that's one then. We're also getting this so very summer to this. So this is coming down and then is wrapping around. Okay, so that's too. But it's also giving us this one. So we know this sort of information now. So we're getting this is giving us a tilt. This is giving us a tilt. Now, this is giving us a tilt. Plus is leaning leaning away from us when we know that? Because we can see the volume in the bottom of that tube. Okay, So that that's where we get the to on then This one is giving us one to three. So we're starting to get mawr information from that. We're getting more corners, and the corners are important for structure. And that's something we need to keep in mind as we move forward and we start to select shapes to do a certain job. Also, you know, this is kind of go back to this one. Um, the circle doesn't mean much to us until we can relate other things to it. So, in other words, um, if this was sitting here, I told you it was a steel ball then I don't have a lot and it's sitting on the table. I don't have a lot of information there now. If I were to draw the tabletop, then you're like, OK, well, I see. I'm starting to see this more now and then maybe there's another smaller ball behind it or something in the background. Then then you're starting to see no size. You have something something else to compare it to and related to in space. So this becomes a little more, has a little more meaning and a little more structure to it, because now we kind of see where it is and space. But these air pretty useful on their own. And they tell us a lot without using any other shapes to to help give it relationships right? So, again, this doesn't give us much information. It only gives us information once we start putting other things around it. Now we're on top of the ball looking down on it. It's larger than this one, and so on. When we start making the egg shape now, we can determine a lean because we have an access point. Okay, so we have one particular length. That's longer than the other on. And we can determine ah which way is leaning So the egg can be leaning this way or that way or in a combination of ways, it can be this way as well. Now, when we start to use the tube now we can start to see ah, lean, but also a tilt. So now, because we can see the bottom, it's tilting away from us. And of course, I can exaggerate that a little bit too. So if I were to put a little bit of perspective into it, um, I can make I can make it more dynamic. So that is we can now see the tapering of that tube as it moves into the distance. Okay, um, again, 12 corners. But with the Cube, obviously we're seeing a lot more. So now we're seeing that extra dimension, which is right here. So now we're seeing the look, the lean, the tilt. But also, um, you the volume of it, that health How? Um, I think that may be so like, let's say, if you were drawing a torso and that torso was leaning away from you, then it may look something like that. So this will be the side of the body here. This would kind of connecting to the abdomen. So here you would have you know, that Chester pectoral muscles, ab muscles and so on. And then maybe you have a head back here, so that's giving us again Mawr more information and dimension. And, you know, with drawing the figure, you're going to be dealing with some very dynamic poses. Figures are going to be lying down. They're gonna be standing up, they're gonna be leaning, tilting and so on. So lean. And then a tilt is again how that's moving forward towards you or away from you in space. So if you think about it, this starts to give us position. Um, and we kind of touched on this earlier perspective your equals position? Well, they're very similar. And when we start looking at perspective, and this is something you should definitely study if you appreciate fine art, um I mean, there is a certain amount of math that goes behind it, and then we start you get station point, Spanish ing points, horizon lines and so on, so it really can develop into, um, something very massive, but again, we're going to simplify that. So when we simplify it, we're simply going Teoh, look at the position of things, and when you start looking at the position of things we're going to focus on to, we're breaking down into two parts. So basically, it's going to be the position off the the model that say so would say of the form for now. So where is that At what you know. And then, of course, it's going to also matter a lot about, um, your we're on, see our position relative to the model. So are you standing up there looking down or you down? Looking up in the model model Up on stage is a model on the floor, your own stage and so one. And those things are important because you know where you're standing and looking at. The model is going to have a lot to do with the perspective in the position you're going to be drawing. And obviously the viewer that is looking at your drawings is going to be sharing the same vantage point, the same position as you are, and those are the things that you're trying to convey to your viewers. So now I'll get a fresh sheet of paper and we'll start to break down this idea. But we're going to do it just kind of using a pencil or even this. Just say this marker right here.
9. Forms With Perspective Part 1: all right before I cracked forward, I want to remind you that you know the best way to understand any of this stuff once you really start sinking your teeth into it and we started advancing into the drawings and examples that I will do for you is, of course, you know these air basic ideas, but you still have to practice them a lot, and I know that's kind of preaching to you a little bit, but the more you start to develop these ideas and work with them on your own, the more you go back and watch some of these videos, especially the ones that sometimes seem challenging to you or more challenging. Ah, the better you're going to understand it and the better you're going to interpret it and then therefore, implement it into your drawing process. So I just want to know, make you understand that these things need to be viewed several times, and you, of course, you'll have to practice them quite a bit to make them your own and to really understand it to the point where you can walk up to a beginner artists and explain some of these things to them on your own. All right, so let's look now. Look at this idea of structure. So we talked about this before, so structure equals form plus positions. I mean, we talked about forms that say you we have this tube idea has a center line. It comes down once you start drawing nipples than we understand theirs. Allene perhaps is leaning away from us because we can see the bottom. And so one. We had this idea of, ah box type thing and we could do the same thing. Now we know we can do this on. And now we have a side because we can see the side here to get our nipples, get a 3/4 view and so one so form plus ah, position. And remember, position has to key things. You have to understand a mess. The position of the form. You can think about that as the position of the model. And of course, the model will be broken down, will be broken down and two forms, which is what we're doing. And then the position of you, the artist are you. Your position also is the position of the audience. So they're looking at things from your vantage point. I know nothing to take all of this to the next level. We have to start to look at, um, this idea of perspective and I taught mentioned it before, but we're going to kind of elaborate on some of that now and the way it was explained to me , and I think the best way to really describe it. Let's say you're standing here looking at looking up at this huge or just looking at this huge building. I mean, bump that up a little bit more. Um, and when you stand here, whether you're looking down, up or whatever, and you're standing in this upright position and you're the same in this case, you're looking straight ahead. You, your you have a certain high level. You take that I level with you wherever you turn and look. So the difference between eye level let's say the horizon line is if you're standing out in the landscape, you can see far enough and you're looking straight ahead. I mean, your eye level and the horizon line will be the same. But obviously, if you stay in there at that same landscape instead of looking down or straight ahead. You start looking down or up and obviously the horizon lines not going to go with you. It's either going to go below your eye level or above your eye level, depending on which way you're looking up or down. So let's say you're looking dead ahead. So in that case, your new the things that are eye level to you will be straight. Okay, so let's say, for example, this building has a series of windows. Okay, So these windows as they go, what are going to become mawr exaggerated que in terms of the curve. So basically, where you're seeing here, I level those windows will almost appear Where should appear somewhat straight now, as this next row of windows you start seeing here, then they're going to become more curved and even more curved. So they're going to take on much different look and then everything below you is going to start to curve the opposite direction. Okay? And I can feel it all that end. But I won't worry about it. Hopefully you kind of get the point. So again I level things that are curved around this form will appear straight again below it. We're dealing with this above it that we're dealing with that. Okay, we get way up here and things look, you know, very, very curved. Okay, so you had this idea of these curves and then again, this idea of eye level again, I'll say, We'll say this is ah, level. So that's something very important you want to start to. I have to kind of implement into your drawing. So we start drawing features and the body is leaning away from you. And you may have these too symmetrical body parts and say, like the nipple, so that nip those dimples aren't gonna be placed if you're looking up at the figure. So where were we can see the bottom here and we can see the bottom here. So we started looking up in this kind of round form. Then we know that's gonna go like that. Even the shoulder line and the different features will start to you start matching the hips , different things, and that's gonna have to go around that form in a way that reflects your position. So that's something about perspective and a quick lesson about some of the ideas we're going to start to use as we move forward. So the next step, you know, to kind of build on this idea because this is a very vertical building. So it's sitting, let's say on flat ground and it's not leaning or not leaning, but it's not tilting in any direction. So it's not tilting away from you. It's not tilting towards you a very vertical position. So remember the the pencil test now and for this one, I'll just use this for a second. So if you take something like this, he hold it directly out in front of you. Um, you hold this line right here at eye level. So look, move my right eye over my right shoulder, looked down my right arm and look at that mark. And again, I'm holding that. Basically, come on, arm out. I'll get my holding it up a little bit and there's my pen. So I want to hold that mark of that pen at eye level. Okay? And now I start to move my arm up, so I kind of start to take my arm up here with the pen. So we know holding that that mark right there at eye level That that 10. That mark on the pen, it's probably going to be straight. All right, I'm just gonna put yell for eye level. So there we go. But when we hold it up here, it's going to change, Okay? That that same object, I was going to look different now, but because we're going to start to see the bottom. So you gonna start to see the bottom? I'm gonna do it very crudely and simply here. Ah, And then when we get to the top, that's that Arc is going to change, right? So it's gonna look like that. So if you're looking up here, the bottom of the pen is below eye level, so you can start to see that. And then, of course, the mark on that pen changes to it goes flat, which is here, right high level to a curve. And that's just moving it, Um, up, up. And let's say down, you know, down. Obviously, if we take it and we hold it down, then I'll do this and blue just so we know we take our arm, we move it down, we're holding that pen vertical. So it's not leaning or tilting away from us in any way. It's still perfectly vertical like so. So when we start to get to this position now, it's going to change. Now we're going to start to see the top of the pen and the bottom of it will look like this . And then that curb of the camp, I'm going to start to look like that. And so those are the things that we were going to start to have to understand. Moving forward. Now, if you're sitting here or standing there, okay, and you're holding that pen and now this. Say you take it up. Not only are you holding it up above your eye level, but you're not holding vertical anymore. You're now leaning it. Okay, so you're taking the pen. That is what Somewhat vertical. And we're leaning it away from us. So now it's going to get even more interesting because now the lean is going to allow you to see Mawr off the bottom. So if this were here, so now, as I lean, notice how much more exaggerated that ISS. So it's not just above you, slightly is now leaning away from you, so That means there's going to be, um, or of this going on. So you may see, um, that much of the bottom and then is moving away from you in perspective. And then this will be exaggerated to You'll have a much greater arc and a much greater are there. Okay, so you're starting to see Well, actually, the pen will start to appear shorter and again. You'll start to get mawr visibility of the bottom. And obviously, when you take the same thing and you hold your arm down and let's say you lean it away again, away from you here, then you're essentially doing the same thing. So it's just going to be the opposite. So again you would see a lot more of the bottom, and it's going to lean. Lean away from you with all of these arcs are going to be more exaggerated. And you know, these shapes here are gonna be more exaggerated. So that's just something to keep in mind as you move forward. And obviously, you know, if you're holding the pen out in front of you, just eye level and then you tilt it. It's the same thing, so if you held your arm out and then you lean this, then you're still dealing. You're still dealing with the same thing, and and that probably should have been angled up a little bit more. But that's OK. It's the same idea. That's just something that adds a little more complex city to it. But again, we're trying to develop these more complex ideas. Are you using a very simple method? So that's just adding a little bit of again a little bit of perspective to the situation, understanding your eye level and understanding how, um, arcs certain shapes. Things like that change as a lean and tilt away from you and, of course, how they are impacted, you know, through that I level. So let's say this is kind of heading down this way. So you know that I will be moving down. You're seeing the bottom here, and the top is moving away from you. So you're really start to I see it and exaggerated, exaggerated arch, as opposed to something more subtle like this when it is perfectly vertical. All right,
10. Forms With Perspective Part 2: okay. Just when you thought you were done, there's one more version of this. So we've got this very vertical thing happening, right? All these And then we have this one. We're things where you're taking it and you're turning away from you. What happens? Let me move this over a little bit. What happens if you're standing there? Hold your pen and let's say you're holding it up now instead of the pen leaning away from you. What happens when it starts to lean back at you? So, basically, you're taking this. You're moving up above your eye level. Remember, your eye level is really there. Ah, and then you're starting to You're looking up at it, though, so your eye level kind of goes with you, but still you're taking it. And now, instead of doing this, we do this. So we start to move it this way. And what's gonna happen eventually, is this going to go from this sort of idea? As it rotates back, it's going to start to flatten out and cancel, cancel out this sort of thing, and then eventually it's going to start to take on a different one. So let's say this is leaning Mawr extreme like this. Then you would probably have something that where instead of seeing the bottom, remember this You're going to start to see the top, so it may get to a point where it's here and you start seeing the top of it. And then as the bottom moves away from you again, you know you're going to get this sort of thing. So obviously the same is gonna happen here as you hold it away and you turn it towards yourself again. You know, it's going to do the same exact thing, so you start to see how that works. So if this were the top of the pen, they would look like this. And the bottom is curving away from you so you can see the top of the pen now. And if you hold it up below you and you start to move it, then obviously it's the same thing. You're going to start to see the top of the pen and then you know it's going to move. The that's going to move. The bottom's going to move away from you in space, noticed to when things start to tilt away. from you. They paper a little bit. Okay. So and the more things tilt away from you Ah, the more they taper. So if you're getting an extreme tilt, it may look something like this And you really get that feeling, you know, that is moving away from you in space. And then, as as that lessons a little bit, it may taper less. Uh And then, of course, maybe even less again. So that feeling of the illusion of depth is what you're trying to create. So again, do these pencil tests because their role easy to do. And it's going to help you start to understand a little bit of what you need to know about perspective. And of course, these ideas were going to relate in layer on top of our figure drawing. Now I want to get back to this for a second, and even in this can apply to all of these. Whether you're standing here holding it vertically up above, um, here, holding up or down and it's tilting doesn't matter. Um, the thing I want to kind of go back here and talk about is I level from my level things or straight So in other words, if you were to take this pen idea and you're holding it up and instead of it leaning the top of it leaning away from you, you have it leaning back. You get to a point again. Where that curve starts to level out, you may be able to see the bottom, but we end up with this kind of almost flat, um, shape. So that's no longer a form, is it? Remember, early on we talked and mentioned that a shape is different than a form because of form Has this idea of going over the form over the form over the form, this sort of thing. This we feel like we're going around it. Okay, So if you if you're in a situation where this is coming back towards you and it looks flat , um, I say pick one or the other. So either pick something that has a little bit of underneath, lean or pick something like this. So try to avoid this situation. Even if you look at our looking at it, use like man, that's just I can really see that she is straight on. You know, you're better off to go here. We're here because it's a much mawr dynamic, um, and pose or form to look at than if things are straight. So if you're going to pick, if you're going to goof up, goof up with one of these versus goofing up with something that is stiff and it doesn't have ah form, it doesn't have volume, you know, in the idea of moving around the form versus again like this. So we want things that are interesting to look at and more dynamic. So just know when you make an error or if you're in a position where you need to make changes, air one way or the other and pick a side and then go for it. Okay, so hopefully some really good ideas here you can start to implement, and your figure drawings were going to again. Layer these on top of what we're doing. But just remember, you know, things that are vertical. If you're above it, you can kind of see on top of it. But you can only see a little sliver. Um, again, all of these may become gnome or exaggerated curves. So we start with a subtle curve as that kind of moves down that may become were exaggerated . Ah, when things were tilting, eso at the top of this right here was tilting towards you. You're gonna have ah, much greater view of that. OK, so you're going to see ah lot Mawr of this side. Um, and it's going to move away from you. So we got that sort of thing now to exaggerate that even mawr. And to make that more dynamic, we can use this tapering idea. So because the bottom is moving away from you and the top is moving towards you, um, things get a little bit smaller as they move away. Okay, so So we're dealing with that sort of thing, and that shows, and that is now has a lean to it, doesn't it? So if I want to draw this idea without the lean, then I could just make it more vertical like this. Okay, so I'm kind of getting this here, so this can get the idea down to, but I just think this is more dynamic with the tapering of the edges. And of course, we taper too much. Then you may get on top of it a little bit too much and it may look a little bit too short . But again we will measure and kind of do different things as we move forward to make sure we don't know error too much.
11. Simple But Characteristic: All right, let's talk a little bit, Maura, about some construction ideas. And I guess to do that let's just say we are dealing with some. Let me bump this down a little bit. Go. So remember, structure is all about trying to keep it simple. So simple forms. But, you know, we wanted to be I want that to be characteristic and one of the I guess at some point, um, you have to decide. Ah, form. You kind of go to form on. So, you know, we all probably will have our opinions on what that should be. But for me and what you'll see, you'll see me use a lot his idea of a tube again. This is a very straight tube, and as you know, um, it's more of a structure than it is a gesture I remember. Gesture tends to flow and curve a little bit more structure. Sometimes, you know, has more corners, and so on. Eso This idea of a tube is wonderful. You can give us an access, they can give us a few sides, and we can get our around the form construction lines. So, for example, um, let's say we're drawing an arm, so I'll do this more with the gesture line. So let's say I kind of go to the inside. Now let me do this with my worn out pin here. I want that to be a little more sweeping, so that arm is coming down. I find the width of it, something like this, so that may start out a little bit whiter, then taper as it gets towards the elbow. So let's say that is, um, slightly above our eye level so we can get our over the form lines, do a great job that needs to be more parallel with each other. And then we have our forearm. That maybe is well, that's a sweeping back this way. So there's Anel bow eso weaken. Say this overlaps a little bit. So you see the overlapping of shapes and lines that's perfectly normal and very useful. So let's say we can extend this to so that too. I mean, that could come down farther than you think it needs to be until you figure out exactly. You know where the, you know corners are, and then we've got our forearm. All right. Moving out. This way so that that works pretty well. All right, so that's the beauty of this is it gets gets a lot of information in there in one pot. Okay, So what I mean by that is you may have a deltoid, the deltoid. Maybe a little more egg shape. You may have a bicep. You may have. Ah. Ah. Muscle here in the forearm as well. So you have all of these egg shapes. All of it kind of is consolidated. End of these two ideas of a tube. Um, and then, you know, once you get this nice flowing, too in these nice rhythm through here, didn't we can come in here. Maybe an ad. I'll go a little bit actually darker here, so we can we can add a deltoid. Maybe this egg shape. It was a little bit bigger. We have a mussel there. Maybe we have ah, kind of longer muscle there in the form. And maybe this, you know, kind of gets the price up. Maybe we get the bicep here. Um, so then we start getting all of these kind of eggs within that nice flowing curve of the arm without disrupting it a little bit again. Getting this idea down this gesture down quickly is the key on, um and it's a much better alternative, in my opinion. Ah. Then looking at the arm and saying Okay, well, I see I see the X shape of the of the deltoid. And then you see this egg shaped of the bicep Oh, not come down here and I see the forearm. And then next thing you know, you have this sort of rhythm going on, and it's a little bit bumpy and it doesn't flow as nicely as you hope it would do. And so that can be a little bit of a challenge. Plus, you're having to draw a bunch of forms sometimes to get where you want to go. And that's why I kind of like this idea of the tube, because again, you can encompass a lot of information into one and is somewhat versatile, and it's very gestural, so it helps to create that nice flow that curving action through the different body parts. So let's look at the the box for a second. So you have talked about and then box doesn't have to be straightened stiff, so let's I mean the box Come, bulge. Things really running out of ink. The box can bold on the ends. And it can curve, you know, so that we can have ah, this sort of thing. So that doesn't have to be stiff. You can bow, uh, and so on. And I know this particular form, as I've mentioned, is very useful because it gives us more corners. But the problem is, when you're trying to relate this to certain body features and body parts, it may be very difficult. Um, and that's because you have this interior line right here. So, for example, let's say this is a figure that's lying down. Maybe there's an arm coming down on, and they're just kind of relaxing on the floor. Okay, Uh, so you may see that the center line, you know, maybe something like this. And we know we've got the nipples, something like that. And you have to decide when you're looking at a figure this in this pose like, where is this corner wannabe? A lot of times, that's very, very hard to find. And you say, Well, where does it go up here? Where does it go down here? so trying to find those corners is a challenge. So my idea is and my theory is ah, tube could do the same thing so you can take that tube. So find the length, right, we can find them the width on. Then we can kind of start to put these sort of blinds them so that tube sometimes can do the same thing. And then you have your center line. You figure out where everything is on then if you have to start to modify this and at a corner, then you can. So, like this were our center line down our figure. He started with this idea of a tube you can put these nipples in. They could say, Well, you know, maybe right here, I'm going to modify that tube and pull Make it in two from this straight angle, so kind of tweaking it as you go. But the wonderful thing I think about a tube is it's pretty easy to bow and and away from you. So, uh, let's say, for example, you had this to that's coming here. Maybe it's going there, See that? And they say This is the shoulder area. We have a center line coming down here. So we're like this. See that? The bottom half of that can blow away from you. And then, um, the top half goes in a completely different direction. So you're getting this kind of curl effect. And, of course, um, we can use that in the opposite way, too, so it can kind of bow away from you. Uh, and then it can start to come towards you so we can do something like this. Leave that's center line, actually, move this. An airline in here. This So we're getting this kind of bend. Where is coming towards us? Here is going on, you know, kind of away from us, though eventually it'll level off, and that's going to start to occur this way. Now, obviously, that's very exaggerated. Um, but it's pretty useful that way. That's why it's really effective and very versatile for figure drawing. But again, when you're dealing with this sort of thing, you're dealing with a box. I mean, there may be certain features or certain pose where you just can you can locate the majority of those corners pretty quickly. Say Okay, I can see you know, the you know the side of the risk you here or here where I can see this kind of box looking shape. And I just think that's probably best use to describe the bend or whatever is happening in that body and that, and that's fine. But again, I still feel that the tube is a great way again to get that simple yet characteristic idea down. And then you can always come back and even modify it slightly if you need Teoh. And I guess the tricky part is we know we can't exactly make a figure out of just nothing but tubes, but then just look like a worm on the page. So eventually you're going to have to add and render the drawing with more details, and that becomes the challenge. And obviously, if you're dealing with, say, a figure, we can put the your nipples on it here, something like that, and then, like, Well, it's kind of bowed out from us. So now we're starting to get you're the shoulders, you know, the rib cage, and then you start adding, we got you know, the hips, the buttocks, and so all of these kind of egg shapes, and I'll actually do this with something a little bit darker. Um, so we started doing all of this, your arms. So it starts to lose that flowy. I feel, um, and that that can happen. But it is. You still have a much better chance and retaining this idea of Ah, um, you know, smooth gesture. If you start with something as organic as you possibly can eso through structure, we're thinking about structure. You know, I guess my my thought is, um, try to use as much of the gesture qualities as you possibly can. And again, that's that's why I like the tube because it retains a little bit of that, then, obviously, when we start to render, we just want to keep in mind that we don't want to disrupt that nice flow. So that's just kind of something to keep in mind because it was so easy to start out with his nice tube. And then the next thing you know, you're putting all these jacket marks all over it, and then it just becomes you're very robotic, very stiff and and it loses the flow. So, um, just something there to keep in mind as you go as we start again to layer. I know this is a lot of lecturing going on, you probably chomping at the bit to get going. But I think once we start, you start absorbing this information you start to grasp, you know that idea structure and then know that you want Teoh retain as you to create structure that you want to retain as much and include, you know, I should say to I think you can still see that, that you wouldn't know much of that gesture as possible throughout the process. I mean, that's that's going to be, of course, the challenge A Z, you move forward. And of course, we're going to know I'll do a lot of demonstrations and we'll talk about these issues moving forward. So the I guess the last thing I'll se on this if you're if we get back to that idea of you're characteristic a lot of times, the model will bring some months, some character to the table as well. Every subject you paint or draw whether sir figure a barn one old Chevy, they'll have a certain characteristic to it. So, um, if you're drawing this very heroic, um, muscular figure we can use. You're these very thick. Both of my running out now ago, I wanted something a little bit darker. Bear with me so we can use these No ideas of these very thick, muscular limbs. And that kind of represents that strength and your girth. Everything of the strong, you know, biceps or something. And if you're dealing with the subject, um, you know, that is, um, not as muscular than obviously. We can make things appear. Ah, less muscular mawr thin and so on. So that's kind of Ah, just again. Something to keep in mind as you move forward. Some different ideas on structure. Um, kind of maintaining gesture through the structure process of giving you some a few things to kind of watch out for again. I don't want to say this is absolutely happy How you need to do it. It's just some suggestions. And something's Teoh. Keep in mind, um, as you as we move over. Okay?
12. Pencil Method: I think for this demo, and to get this point across, I'm going to use my king size Sharpie only because it's I think work is easier for you to see. Ah, this light value against his dark. Of course, it's, ah much bigger. Uh, so anyway, if if this is what I call like and what some instructors use as the, um, the pencil test and it's no different than what I've already shared with you about the tube . So we know the tube. If you just look at the contour, doesn't tell you much. But once you start adding the ends and you start adding you going, you start going over the form, then things change them. Now we start to understand the lean and the tilt of it, and so this is basically what we're doing. But the reason I'm sharing this with you is because typically when you're drawing, you may not be drawing with a Sharpie. You may be drawing with ah, pencil even this kind of very generic pencil here and they haven't eraser. So the eraser is this kind of shiny cap against here. Some some pencils are they may have sides to him. But even still, there's a band or some sort of branding on it that gives you this idea of something going around the form on this case courses the cap, the cap and so on. If you have a pencil that is doesn't happen. Happens to be very generic. A doesn't have anything. You can always wrap a piece of tape around it if it's long as the tape is. Obviously, Kant has a contrast to the pencil color. But anyway, so, if I were to hold this up to the camera here and it's very flat, then obviously that we could use that idea to draw this. Now if I were to take that and now bring it towards you. So notice the line right here at the bottom of the cat where you could look at the silver part. Doesn't matter. So as I take this towards you Okay, that is that is going to change from a straight line. Okay, so I'll make this a little bit bigger. Taller? I should say that's a This represents the cap and we do this exercise one more time. So now that is changing. So that straight line becomes a curved lines. You're getting that. You're also starting to see the top of it. You're starting to see this. So now he can get in here and say, OK, using my cap or my drawing device, I can determine that I'm getting this sort of lean okay, coming towards me. Um, so that's coming towards you now. Obviously it goes away so it can go away in an extreme way so you can get away, like just like this. So you're basically taking that and trying to determine which way is going now that that's forward and back So well say, that's actually leaning forward. So that's coming towards us. And in this case, leaning back, he can see that is moving in a complete opposite direction. So this is moving back this way. So we're starting to see the bottom is moving away from us and a Mork extreme manner than say what? It was moving towards us here. So we're getting this sort of thing. So this is moving away. Obviously we could get a lean to so with a lean, we're getting this so we could determine that is leaning because we can look at the angle of this. So, for example, if Howard and it's not really moving away from you, so it's only leaning left and right. And here it's leaning and moving away. So I'm going to get to that in a second. So here, would you say, is going like this so I can look at this angle and go. There we go. So we start to quickly get down a particular lean of it just by using our pencil. In this case, I know I'm using a Sharpie, but just know it doesn't matter and obviously weaken go the opposite way as well. Okay, now progressing forward here. Um, I alluded to this a second ago, so we've got the leaning or the leaning Rather now we want to think about the tilting and the leaning. So if we have, this would indicate a lean okay. And then these this is a tilting, right, because tilting um, Elene is left and right. Maybe. And then a tilting is where things are moving away from you or towards you. So let's say if we want to capture a lean and its hilt. Okay. So you can take this. We can lean it and then we can tilt it. So now we know, based on two things. So we've got this idea where the cap is moving, the changes moving left to right. But then we also are starting to notice the ring moving in that direction so we can match those angles and determine that we're getting this sort of idea. So we're getting a combination of all of it. And of course, we can do this extreme that we can do this like this. What? You're getting these extreme angles, where the base, the bottom of it's really exaggerated. And then that top is, you know, barely visible. All right, so we got that sort of thing happening. So using this as a demonstration and showing you these ideas is one part one. But part two is you. You use this as you're trying to determine the lean and tilt of a particular pose. So, for example, I'm right handed. So when I'm if I'm going to use this, I'm going to take this with the capital and obviously, because that's what I need to measure. But that's a pencil would hold it like this. And since I'm right handed, um I'm going to shut my left eye. Keep in my right eye open. I'm going to hold this out and basically excuse me for the bump. Lean that left or right and try to find the angle that say off a torso. So if my model is leaning the say to the left and I can take this, hold it right in front of my over my right shoulder, and I'm looking down my right arm all the way down to my device. And now I can lean that left until I find the angle. You know, that axis line of the torso And then basically, if I determine and I could do it like this since this is black and if I determine now, hold this up to the image of the model. So if I had the image of, say, on a screen or whatever, basically holding that up to the screen, I'm looking at it and I'm trying to find that lean. And now what I do is I just take that directly down to my paper. And typically when I'm drawing, I would probably be at an easel, or I would have my board a little more perpendicular to me so that I'm not drawing down. But basically I would take that angle once I find it and I transfer it to the paper. So I'm going to go to my smaller mind. So this is my access line that Okay, well, that's That's the center eso coming right down the body here. And then I can kind of put my sides that like that. Now that's a lean. But let's say the say also that the torso is tilting as well. So maybe the motto is leaning away from us, bringing the lower body and the legs perhaps closer to us, moving the head farther away and bringing the abs closer to us. So I'm trying to get a feeling of not only a lean but a tilt, and then I can start to determine. Two are using this and just trying to feel the tilt off that. So if I say okay, well, the model is moving away in this direction. I can start to get these over the form lines. I know that's very dark. I use this one because it's not really is running out of ink, and I can put these light lines in. But then, you know, I can start to put in other forms. So, you know, this were the, you know, the pec muscles. This could be coming down to the navel and so on, but basically getting these cross forms where that's starting to give me the feeling of the torso leaning away from me. So again, a lot of instructors call this, you know, um, a pencil test, and that's perfectly fine. You can call it whatever you want. Um, but basically kind of looking using your drawing device as a measuring tool away, too determined. Ah, the form in position. So when we look at foreign position, you know, again, we're trying to figure out some of the structure ideas off the of the pose and whatever it is we're trying to draw, so that that may be very helpful. Um, and you know, the you're the lean coming down in the upper body kind of moving away. But we had this kind of lean, and then maybe you start getting into adding these other other parts. The body where, um, you get the lower body in, you get a leg in there, and you know it starts to no take shape once you get the other parts in there. But again, I think a very useful tool to use when you're drawing. Um, just anything with a line like that, You may have a dedicated small stick, um, with a piece of tape on it, whatever it may be. And just again right handed. So I take this and I move it. Basically, I want this pen in this case right over my right shoulder. Um, I'm looking over my right shoulder with my left eye closed, so looking only with my right eye. And then once I find no the lean and the tilt, I could just take that right down to the paper and transfer that information. So if I were to talk a little bit about what we learned in gesture and apply it to even something as crude as this, um, and start to relieve a little bit to the figure if we were If you were looking to see if the torso, for example, and would just I'll just do a simple structure here form. Let's say this represents the torso. All right, So you have you know, that Pec muscles or something in here on and then at the top of your rib cage. Um, there's a little notch. Okay? Can almost run your finger up the center in between your, um, the rib cage there, say, the middle of the rib cage all the way up. You'll feel a little not right here. And he come down to the bottom of the rib cage. There's let's call these Eiffel Process again, Another little indentation for most people there. And then we come down again. We have the naval when we come down again, and then we would get to like, the pubic bone area. So basically, if we start relating this tube to a figure, we're gonna start to come up with, um, like landmarks, different things. And again, we're going to talk about this more later. I'm just kind of getting ahead of myself a little bit even. But I think it is kind of staying on topic with what I'm about to say have said about the figure in this lean is that we start getting these points that lineup when we're dealing with this very stiff vertical position, which we know we don't want I mean, we've already determined that structure is good and structure involves corners. That's fine. But if we wanted to kind of take this idea of using your No, this pencil pan, I know it's a pendulum will say the pencil task your lean in, lean in your tilting you're finding it and you're putting it down in this very straight way . Um, but then what you can do is start saying, okay, if I know there's a notch and we're looking at the torso here. So this represents the torso for now. And there's a notch right up in here and the bottom there's another landmark. And then we know that the naval is here, and then perhaps the pubic bone is here. Okay, so we we can start to determine that. Okay, I want to refine this line. I can find the angle using the same methods to hold this out to the image of rotating, tilting, leaning whatever I gotta do and then looking at the angle from here to here. So basically from this point to this point and say OK, that's that's pretty spot on, and then I can say Well, as I get from these I, Floyd to the belly button. Okay, Is changing its going mawr here. So now I can say Ok, well, that's coming here. And then maybe as it gets to the pelvis area. Ah, and to the bottom of the sea, The crotch area. Ah, it's kind of way over here. So the the angle starts here in a very crude way. But then I can see it goes here and then here, here. So I start to see these points, and I started to say, Ok, well, I've got this this this and this. So again I starts to curb, so it will start to kind of get this very organic curved back in it. So again, when you're dealing with structure, you may have to start with this very crude way and again, that's just kind of getting your idea down. And then as you refine it ah, you will determine that. Okay, well, it's actually Mawr, um or like like this. So you say Okay. Once I started bringing in gesture that I know I'm dealing with something that is ah, slightly mawr curved. But again, you're gonna need some or information about figures and body parts and things like that to , um to bring that forward to the next layer. But I just wanted to point that out now and kind of tie in a little bit of the structure, Um, the gesture into this whole idea of using the pencil and also give you a little bit of a tease into using a little bit of anatomy there, I guess Teoh find the more specific relationships between along that line and but will end up being like more of a curve.
13. Facing, Leaning, Tilting Rotating: Let's break down some or ideas on drawing the figure, and we pull this down a little bit. Okay, so let's say we're gonna have some facing positions here. We stand here. Let's say you're standing at the mirror in the morning and you're brushing your teeth. It's a very upright ah position. So you're probably square to the mirror. You're brushing your teeth, coming your hair, whatever. Let's say you're standing at the water cooler. You're talking to your coworker. You're standing here in a very straight upright position. Let's say you go home, you wanna study some anatomy of figure books and chances are you're getting these figures in a very stiff upright, standing there with nothing very dynamic going on with their body. So we started dealing with poses, though, and professional models and trying to capture sitting position, different things. You're going to come up up against poses that really aren't like this. So we, even though we spend the majority of our life in these and we see the majority of our life in this sort of, you know, stiff, upright position, Um, in reality, we start drawing what? Whatever you're doing. Character animation just express the figure, paintings, Whatever you want to do with this figure drawing course, then chances are they're gonna be very different than what you're seeing here and what I explained. So in other words, you may have a situation where you know, the lower body is in profile. So the figure No, mate. Maybe standing aside to you like this. Okay, so this is just your typical side position, but maybe the upper body starts to rotate towards you. Okay, so they were getting Assad position here. But then this upper body is rotating, and then we end up with almost a front view here, so and that's kind of what's happening with a lot of things. So you're getting these subtle twists, turns, leans, tilts, and we need to start. Teoh, take some of these basic shapes and we need to apply them to a figure again. This is just going to be a quick breakdown. I'm not going to cover every single thing you need to know here about dealing with different facing positions, but they were going to talk a lot more about it as we move forward. But I want to introduce this idea to you. So let's say, for example, and I think in order to really understand it, let's say down the center, let me draw this a little bit bigger. So let's say this is our head, neck, upper body and here Ah, lower body here. Now we have the arms, which don't really matter right now. So down. If you followed, took your fingers and ran down the center of your neck, he would come down to this little notches called the Super Sternal Notch set the very, very top middle of the rib cage. So we have that. And so we come down again. They grabbed this one and we get another. We follow the sternum down the center of the rib cage, and we get another little kind of notch or depression. There in the body that's called the Seifried process. They line up. We follow that down again, we get to the naval area of the belly button. If we come down even more, we can get down to what's called the pubic bone, which typically don't see unless you're dealing with a nude, include figure so collectively, um, through on the front of the body, were getting this center line. All right now on the back of the body is basically the same thing. So we have to say Arms, upper body again. That doesn't really matter if it's clothed or unclothed now. So let's say if you took your hand your fingers bring it down the back of your neck. You'll get what's called the C seven most of the seventh cervical vertebrae. Now you can see the spine because you know the meat you know of in the flesh on each side of the body here kind of go out. So the spine is slightly in and it comes down. I got your lump, your Jurassic Arch, and here the lumbar lower back of the spine. And then we get into the pelvis area. So again we have this vertical line. We can call it a landmark whatever. But you're going to use these center lines very important. Under this was kind of leaning a little bit. But as you move forward and you're going to compare like you know, this upper line may be moving here when you start to line up those points and from here to here maybe going on this so Eventually you're going to compare some of these landmarks to each other and the relationships of what they have to each other. But for now, just know that these things exist. Now the beauty of this idea because you have a certain amount of space, you have a certain amount of space from the center here and from the center here. So it's a woman and two. And of course, it's the same on the back. So you're going whenever you're dealing with a dynamic pose, we want to look at these center lines and there'll be a ton of other landmarks to we talk about. But just to kind of simplify things and get you going, you're going to compare and determine how much space you see on either side of that center line. Okay, so and that's going to help you, um, understand and draw some of these dynamic twists that we talked about. So remember the say we have a figure that the lower body is like in this profile position within. The figure decides to rotate this way on. We're starting to get almost a 3/4 view. So the figures now looking at us through the upper body. So we want to be able to capture that. And it's not easy to do. You may see it and you understand it. Visual leave. But once you start to draw it, then you like. Okay, I can do that and you start growing it, and then it is kind of unwinds and you end up with this very Undine Amick wooden, stiff looking figure. So that's safe. For example, um, we had again this idea of understanding the space from the middle left Middle right. And let's say we were dealing with a back pose, and this figure is kind of like Ben over. Okay, so we have a situation where the figures been over here. And let's say this is my center line. Now I put a bunch there several lines just so Aiken have options and now decide which mom works best. Now, what I like to do and what I've been taught what really works well for me is to look at the what side has less space. So in other words, I'm dealing with a situation where no, I'm in it like a 3/4 view so I can see less of this side and mawr of that side. So I'll go to the side that has less space. Okay, so let's say it again. This is my spine coming up and around. Okay, so all kind of determined how much space is here now? I'm not looking at the upper body, so the upper body is is over here. So if I were to draw the lats on, I'm gonna talk about that in a second. Let's say that upper body is in there, So I'm gonna come way down here by the waist and say, Okay, I can see that I've got about that much space from the from the spine. Teoh here. And what I will do is I'll draw that all the way up. Now come down, come across to the other side and determine how much space see there. And then I'll draw again how much space I see there and then from here. Um, you know, you may not know, like how long that tube should be like, should it be longer, shorter or so on. And then what I like to do is come to the short side. Okay? So basically, when you're dealing with a situation like this. You have one side over here that stretched. Okay. And over here, you're dealing with one side that's pinched. Okay, then what I do is I come over here and I try to look at this space. So I'm looking at how much where everything is here. So if I look at this side now, C Okay, I've got this coming this way. I can see that. I've got a pinch. I can see this waste coming down. And I could see this leg coming out and that can look at this angle here and go. OK, then. I've got the upper body starting to flare out here. Then all of a sudden, I've got the shoulder girdle area here. And so what that's going to do is make it much easier. So I'm not gonna come on this side to, like, start to understand the the length of the tube. I'll come over here once I understand where my tube is, and then I'll start to say, OK, what What's this angle look like? And then I'll get my pinch here, and that's going to help me determine. Ah, were the top of that tube is all right. I know this is a lot of information coming at you. Don't Don't split it be because we're going to talk about it more. I'm so that the rotation of that to maybe here and then as it gets to the bottom, maybe it starts to move away from us. So we're getting that sort of thing. Okay, so hopefully that starts to make sense. So basically, um, what I'm trying to get you to avoid doing is like coming in here starting with shoulders. And so it was really wide. And then you get down here and it starts to kind of fattened up or or loosen or get to narrow and you start to lose is very dynamic pose. So again, you're gonna find that center line, whether it's the front or the back. Get that angle in there, get that curve, and then measure here to hear how much is on the thin side, the more narrow side, and then draw lines straight up. Don't try to go out to the shoulders. Don't try to do anything else and then come back over here. Determine how much space you see here. How much space is from the center line to the right again. Draw straight up and then you can come back and find the pence. You know, where is this pinch happening? So basically, what you're trying to do is draw first, draw this tube like this, that's that's first and foremost. And then you're separating. Your separating the shoulder girdle area from the lower body could see the shoulder girdle area you can look at this is like an inverted V almost. I mean, it's more dynamic than that. But let's say I started, like, really saying Okay, well, this is working good. I can start to get in here and kind of place this shoulder girdle area here and maybe on this side, we're not seeing as much. So is doing this. And then, you know, maybe this arm is moving away from us out in space with hand flowing over. And then this arm, you know, was moving. I can kind of Look, now I've got my pension, please. And I've got all of this happening. I can start to see that I could start to, you know, place my leg and I can see the arm comes down and here. So then, you know, I could easily come in here and start placing the tubes, you know, for the arm. And then I've got my spine going up. So I know pretty much, you know, where all of this? You know, the head. All of these things start to kind of fall into place a little bit better. So again, we know we're going to talk about these things a lot more. But you know, it's important. I'm going to say take of this green and kind of mark, that shoulder girdle area that sits on top. And then now we've got that pitch happening. Once you make that read, and then we've got that stretch eso that's going to start to help you simplify. And then that's always the key, right? I mean, we always want to create and develop an easy way to approach figure drawing. And this, to me, is a really good way to ah start to use some of these ideas. And then, of course, things maybe need to be changed. They may need to be exaggerated and so on. So I think this is ah, really good starting point for using some of these simple shapes. And again, this is nothing more than a tube, a nen voted triangle and so on and then using this idea of, ah, direction in the tubes. Um, now, of course, we're dealing with a dynamic facing positions where there is a slight twist, you know, in the body and so on. And again, this is all about getting your eye Downes quickly, fluidly on, then so that you can say, OK, that works, that doesn't work or what on whatever. And then, you know, we could move on, make changes and so on. But this again is a good idea, something to think about and I think is a very useful way to to lay in some of these more dynamic poses. So you're going to find that as you move in, whether you're drawing figures or whatever, but as you continue your drawing ah, career or creative endeavor facing it isn't a problem. It's not a big deal. You only really dealing with a two dimensional thing. The leaning leaning back and forth isn't a big deal, because that is just simply again deli with two dimensions. Uh, you know, the problem happens. Ah, when we start dealing with this idea of, ah, tilt when things are moving towards you from a two dimensional surface or away from you, and trying to capture that on a two dimensional surface is always going to be the challenge in your figure drawing or any drawing or painting. And we have tohave. There are some ideas and some techniques to do that in your landscape. Painter has much more of a challenge because they're trying to create miles sometimes and miles of perspective, whereas figure drawers. You know, we're dealing with feet inches sometimes, so we know it's less of a challenge, but it's still very, very difficult to do. So again. You know, these things were going to elaborate on as we as we move forward and we're going to continue to develop tools, continue to develop your vision and things like that to move forward and then strengthen and develop a lot more of these techniques
14. Connecting Line: So, um, one more idea here, I'll share with you and then we'll look at some of the Masters work, see if we could identify some of the things I've shared with you in their drawings. Perhaps even in a painting I haven't really decided but on. Then we'll move into some demonstrations and then you'll have an assignment. So you have to start to get ready to get busy. So gesture. I want to elaborate on this. So again, we're kind of bouncing back and forth here. Um, kind of pull that down. Somebody go up here a little bit. So gesture is, you know, there's this term that artists use and kind of are synonymous with. Gesture is the fundamental design line, so we'll say abbreviate to make this faster. And then also it's the connecting line. And that's super super important because things always kind of come back to the gesture line and you'll see once you start getting into the drawing aspect of this, how easy it is to lose it, and we end up completely forgetting about it as we started drawing. So let's say, for example, and I did a little thing like this before about this. Do it again real quick. Let's say you have this arm that's coming down and you're like, Man, I'm really feeling you The gesture of this arm and I got it. Weaken. Put thes over the form ideas there, Um, and then I know that's very light. I'll try to make that a little bit darker lead of you get another Sharpie, which I will. So there's your beautiful flowing gesture. And then, of course, you get in here. And like I mentioned before, you start throwing the shoulder of ice up, trysts up and all this other stuff and the gesture is completely lost. So you know, we come up and we do all this sort of detail rendering shading. And then that's where the thing and there's no consideration to the original gesture line. So basically, we've lost the idea that it's the fundamental design line that you're going to use, and it's also the connecting line. I think there's a few analogies here I could use. Let's say you you're looking at, you know, maybe in space or something, or your way out looking at this curve of the earth, and there is a notion eso that ocean. The water is kind of flowing around that curve. Uh, you know, you may get a wave and, you know, make rest or whatever, but it's still keeping and form and keeping in line to the curve of the earth. So that's one thing to think about. Let's say if you've taken my had drawing human head beginner head rowing course, Um, we've got this basic idea. Uh, we're gonna have to go with this one. I know you guys can't see that. We kind of had this to say basic shape of the head. And if the front of the face is here So we had the forehead, you may come out a little bit with the bone structure, and then it comes in for the eyes right there and then, you know, it may go back out for the nose, and then maybe where the lips are, it's out beyond this area. But then it comes back in, and then we have the chin that wraps around and goes back. And then, of course, we have the hair structure and all that stuff. So what's happening is, um, you know, this is coming down out beyond what could be considered our main gesture line for the mask of a face. It's coming back in this touching. It's coming back out. How and is touching again, and it is coming back out and the check and go off down here or whatever, just depending on the model. So we're coming back and we're touching that, right? We're touching that, and that's giving us that connecting line that I'm talking about. And that's what we have to keep in mind as we move forward again, make it real bumpy, and all of a sudden you get this huge wave is cresting wave and it still it comes back and it follows that curve. So those are the things that typically happen when we start piling on structure. Um, we tend to to miss out on this, and that's why I want you to keep in mind that beautiful connecting line so that when you start rendering things you we can go away from it a little bit. But then you come back to it. But don't trying out Teoh, you know, invade it and then come way out and invade it and kind of stay in line with that beautiful gesture. That's that's the ultimate goal. No, as you we started layering because imagine if you're going a full blown painting, you start out with this very light gesture drawing. You may add a certain amount of details on it. Next thing you know, you're adding color. You're adding details. You're adding highlights and different things that could be in the eyes on the nose. And, you know, the end result is it's usually very broken and disconnected from your original gesture. And that's that's what you're trying to avoid but never were developing this kind of core figure drawing. Okay, so let's do another example then of on arm. So let's say the arm is bending back and c we got this way and maybe this is our elbow. Okay, so the we got this sort of action going on, so we know this represents our main gesture line. Right? So whenever we're trying to figure out the gesture line, we're always trying to go to the longest. Her the longest points. So from going from the elbow way up here to the shoulder, and I know this forearm probably gonna start right in here then this becomes the longest line. I'm going to elaborate on that in a second. So again, let's say I get to the phase where I'm adding a shoulder so the shoulder is coming down, and then maybe I'm seeing the trysts up, come out a little bit and then back into the elbow, which may know, bend down. So basically, it's kind of like this wave where, yeah, it breaks away from it. But hopefully my gesture line. It's close enough that a lot of this sort of thing will break away. Come back, touch it, come back, touch it and so want. So this beautiful gesture becomes sort of it like a home base for things to go on. You will come back. You'll connect with it. You'll break away a little bit. If you have two, you'll come back and you'll connect with you can take a leg and kind of break it down the same way. So if you had a say, a profile view, you can say you know it's coming down. Maybe it's arm or taper a little bit whiter. He decided to do that so we get down here towards the knee or whatever. Um, so this this is our to and our gesture, you know me, maybe curving something like this. That's our gesture line. And then, of course, you know that a leg. So I'm going to kind of shade all of this in, but a leg has a lot of flesh, a lot of muscle. And so let's say this is the front of the leg. So you have a muscle that comes out, and then maybe it comes in towards the knee and it straightens out. So you may have something like this and the back of the leg. You may have a hamstring, It straightens out. And then, you know, we hit that gesture, and then it comes out again with the calf, and then, you know, maybe in here it starts to curve like that. So again, um, it's all going to break away from it in place, is gonna come back and touch it. And then so one. And of course, some legs may come out obviously a little bit more, So you could have some hamstrings or I'm sorry. Muscles in the front that come out like this. Go win and you may have some ham strings that come out and come in Mawr than worker vicious . You may have some calves that bulge out here. Eso it. It doesn't matter. Um, but you're you're always trying to keep in mind this idea of the main overall gesture. I'm going to bump that up a little bit so you can see what's going on. So I mentioned the longest curve of the longest, Um, line is what you're shooting for, for your main gesture line. So if we kind of took that idea of, you know, the arm right here, this would be the shoulder trysts up elbow in this saying the shoulders coming in here it could be a bicep, but basically that this line here may maybe this law So from here to here, But from this line to this to yell bow, maybe the greater line for that pose and typically is the outside yourself from the outside to the elbow was longer from the inside to the inside of the arm or elbow. So where the forearm stars so typically that's going to be your longest curved. Let's say you're looking ward thinking about an upper body. So the upper body a lot of times, we'll tell you, too. So let's say your you're dealing with oppose and let's say, for example, the figure is leaning this way. So we had this sort of thing. Ah, and we have the center line say, coming up here. So it's a slight 3/4 view. So the spine is heading here. Maybe the chin is raised and the figure is looking back on. The hair's falling this way, and maybe the arms were dropped. But when we look at this side, we know this side is going to be creased because we talked about that earlier. Three. This is going to be the stretch side. Okay, so that's going to have ah much greater curve, okay. And what you're trying to do is again you're going to eliminate all of this shoulder girdle area we're in. Simplify that and we're going to try to find the longest point from here to here. And we can't even capture ah lot of the lower body or the pelvis area in here as well. But then on the crease side, you're gonna have all these different, you know, increases and lumps and things bulging. And here So what you're trying to do is get the happy medium, right? So you're trying to kind of average all these out and say, OK, well, I can kind of see that my longest sustained curve is here, and then my shortest is here. So this is where we're going to kind of measure things out. And this is where we're going to find, um, you know, our longest curve to create that beautiful, long gesture. So that's going in that case to be right there, so it doesn't matter. You condone, um that what pose it is or the say it's from the back. You know, this is all the same, so we know that you're gonna have different points. So I talked about the super sternal notch life. We process the naval from the pelvis, all that stuff we kind of touched on. But they're from the back. It's the same thing. And from the side, you kind of have the same deal. So if if the the figures keeled over here, let's say you can see a slight 3/4 view so we can see some of this back and over here because this is stretched. Then we know this is going to be pinched. So you may have some creasing going on in here. Maybe the arms hanging down, um, head hanging down or whatever. We could even say Maybe this leg is coming forward out here. And this, like, is going back, whatever the case may be. So what you're trying to do again is determined where that longest gesture line is. So you want you get that long flow here all the way out and then and here again, where we have different creases full with different things, you're simply going to take all of this stuff kind of average it out, find that happy medium and, um, and draw. You're to been there. So you're you're gonna have things that move no, away from that a little bit. Maybe I will come back in touch it. And so one, you have things that kind of bulge Move away from it. Here. It may come into it here in a bold move away, but we always come back to that gesture line. All right, so those are the things you're trying to find, um, from a profile view, it's really no different. Um, so if you had a figure standing here in profile, that figure may be leaning towards you may be bending, Let's say is bending backwards. So it's just gonna be thinner, right? Then with a 3/4 view. So say that neck is going back. Chin is going back. Arms, arms, everything kind of flowing back. So again, you kind of find this the front of the body coming down and then you're gonna have this side of the body again. The birth things are there bunching up, um, and different things. So you kind of find again that happy medium, the average here and you get here. But your main jet long gesture line is from here to here. That's what you want to capture right there. You find that center point, you measure your distance here. And, of course, on this side, you can really start to where the for that pinches. You can start to get your measurements so you can start to figure out a with the thinnest point is here glues or bunching up here, arms going back and so on. But that's that's kind of what you're what you're dealing with. So we had the trunk of the body. I mean, you can really bulk a lot of information into a tube idea with the bulk of the body, and you can really simplify things quickly and easily. So that's that's kind of what you're after. And and hopefully this gives you some more things to sink your teeth into as we get ready to move forward into some of the demonstrations.
15. Longest Sustained Curve: Some of the goal here is to always look for the longest sustained curve whenever you're trying to develop these gesture lines. Ah, Chou Jih, Before about looking at the torso, I showed you a version of the legs. If we were to break that down, even showed you the arms. I mean, the arms, typically that tries up the back of the arm is going to give you that longest curve. Um, the forearm you can see here, Um, you know this from risk to he elbow. That's my longest sustained curve. This tends to be the inside tends to be a little bit bumpier. So if you look at the leg, let's say from the back view, we have this kind of thing coming down. So this just draw a curve first and I'll explain it. So let's say it's coming something like this down towards the knee, okay. And then we get to the calf. So let's just look at the upper leg first. So I'm going to say, um, this will be the outside. So again, a a back view of the leg. Ah, this would be the inside, and then this would be the outside so this we determine that this is our longest sustained curve. And we do that because when you start looking and if you take some time and you should look at the leg you had these thighs and different things that come out and here, and they kind of come back, they bump, and then maybe it goes down and to the knee where things may get a little bit straighter and here. But if this were the outside, that would be like a muscle tissue, that sort of thing. And we get to the need to make straight now on the inside. Things tend to be a little bit bumpier, Um, and again, you know, it may come up to a situation where you feel the inside. I works better for you, and that's fine. But you know, the inside you'll have a muscle that comes out, you know, come back in. And then it may bold back out again where the knee connects. So you'll basically have that sort of rhythm going on with the inside of the leg. Um, so for me, I would try to get out here as much as I could, you know, and create that to and then add minus two. It s so when you're dealing with the inside like this, you have a bump, you know, comes in, it goes back out. You're just trying to get the happy medium. You know, you're just trying to kind of look at this and go, OK, maybe right in here is about where I want to place that and knowing that I'm gonna have to come back and I'll refine that later on. That's that's perfectly normal. I mean, that's that's what it's all about. Um, so then we started looking at the outside of the leg from a back view like this. Now then what you're gonna find again is that here is going to come in and it's going to go back out. So let me get one of these pens. So I'm going to do the outside contours. So we kind of come back out nice and smooth pretty much, and then it kind of has a gradual taper towards the ankle. Now on the inside, um, it's going to get a little bit bumpier, so it tends to kind of come in a little bit here. This muscle tends to be shorter on this side. So we get this sort of thing, then it kind of comes back in, and then it may kind of go out towards the hourglass shape towards the ankle, but ankle bone. So again, taking those ideas in mind, I would say, Get your longest sustained curve in there, right, And here and no, let the inside kind of again find that happy medium. And you get your tube in there and then knowing that, okay, I'm gonna have to probably come back. Add this little bit of meat here and it may flare out a little bit and there and then come back in. So again, this is a shorter muscle. By most and most counts. This tends to be a longer muscle. So, you know, that would be to me. You're the primary line, and then where your longest curved. So that's kind of some things and some ideas that think about as we get into mawr figure drawing. I started. We started doing demonstrations. We're obviously going to be touching on this. I'm going to be pointing out different things, different situations, but I think collectively what we've covered so far you should start to hound, be building a really nice base for figure drawing. Now it should be fired up and kind of see that. Hey, this thing's approachable is simple. I could do this and again in to do it with simple shapes is the key.
16. Master's Analysis; Gesture & Structure: All right, let's have a look at this one. First we have point out a few ideas and then we'll kind of go from there. Eso The first thing I want to mention is all of these. We won't even look at these mawr. Finished sketches were Just look down here and just start looking at all these curves. All of these wonderful curves as a way of just kind of getting those if he was loosening up or what's going on. The I believe this is a Raffaele. I believe I'm wrong. Correct me, but just kind of getting ready for all of this. And look, a even this idea of going around the form to get that movement in that volume of the upper leg. Those are the things that are very important. These are the things we're going to focus on because these are the things that I'm teaching right now, and we're gonna move through some of these basic ideas and then go to some or in a more advanced off. But for now, I just feel all of that her that's happening whenever you start studying these drawings, whether their masters or contemporary artists or whatever. Um, you pay attention to how you know what's underneath it. If you can find these drones like this that are unfinished their sketches, they're working out ideas. And that's wonderful. Because then you can really get a sense For what? The artist, the tools they use to get what they wanted to do. So when you start looking at, um, say the baby here, you can start to feel some of these kind of egg shapes that are going on another egg shape . You know, Right, Mayor, for the lower leg, you can feel kind of kind of longer egg shape here because that is moving away from us. This is moving towards us. If we go around the form, we can see the volume in the direction of that within was drawn. And this moving away again. We can kind of look over here and see some of these lines here. How that volume I was kind of moving away from us in space. And then that leg goes away, we can see no the circle all the way around in that arm. We could see this nice curve going all the way down through that nice sweeping flowing curve and how it meets, you know, this curve that could even go right up into the arm right up into that forearm. And then this all breaks down and that's curvy through the forearm and so on. So, you know, very muscular, you know, at this point, but things things would be softened up, especially once you start getting these curves and cheeks on what? Not of the head and kind of see loose indication of where the side of that face would be seeing these curves move right down the face of the baby. There again, this is kind of moving, um, away in space, this moving away in space. But yeah, really good to try to recreate some of these things sometimes as well. Again seeing this, um, everything putting put together through eggs, curves, very flowing lines again. Looking at this curve, you can see that line coming through the shoulder through the neck rather down to the shoulder, down through the arm and, you know, even echoing that off to the side there on the head. So head is looking down, right? That means that too, um, idea could be effective as well. it was looking down. You may get back to this. Um well, let's just keep it simple. Let's just take the idea that this is a curved feature of the head and we're seeing how that curve lines up all the way. So the eye sockets, how they kind of go away disappear, come back, knows the mouth, all of that. And you can see the construction line there, that layout line, you know, getting that initial curve and and now again, disappearing through the eyes. But the main points all kind of echoing that curved feeling. And look at this one right here that this curve the center line coming down, he can just see how the head line through the eyes, nose, mouth and even Chen underneath the chin. All kind of plays that up. So we start to really feel the curved volume of that shape. So I think a really good example to start with, I believe this is a whole buying. So, um, much more muscular, um, and Bumpy, like I mentioned before. But let's just look, for example, at some of these curves here moving through the legs, moving through okay, around the form around the form. Um, let's look at the upper body. So we put that to buy D in here, moving away from us there and then bending and then kind of moving away from us here. So it's got that nice art. But look at these. How everything lines up on that. These curved lines as a move down. Look how some of these muscles and different features support that idea. There was always a note. There's some sort of subtle mark that's made these things can break away from it. Come back to it. Breakaway, come back and a little bit strong there. But we can just see the bumpy rod here. I do think we we look at some of the underlying look at this two coming right towards us, really trying to feel that arm moving towards us and kind of moving off to the side here but really seeing these kind of flowing movements. And then, of course, once the muscle's or late over, it's, um, the much more bumpy for this for this style. They hold binds pulling off here. But look at this head against construction lines going around around in the center line coming down in here, head way back for the ear, way back here on the side of that body. So again, another really good example. I think of some of the ideas we've been working with and talking about another whole bind and what I want to pay attention. Mostly, here is a look at these raw marks down in here. I'm You can see, Even though the style is bumpy, I do think these less detailed and finished sketch work in some of these places. You can see those curved, initial thoughts, and then everything is related over that. The detail is, um is later over through the muscle. So a lot that's covered up. But I think you start to see some of these ideas. Um, well, yeah. I mean, you see the curve through here fruit here, looking through the back. That, too coming up has a twist in the body there. So he took your shoulders, this idea of a tube really bending so the would come down and that sometimes all you need to get a twist down is that curved access point. And, you know, once you start laying in the details saying arm breaking away here, Bending down? Yeah, this arm extending up and back over I saw you need still that you could take de mystify a twist in the body sometimes by simply understanding or using this idea of a center line or curved center line. Well, so I developed a little bit more. So again, you can see this shoulder coming down again. You could see that s curve off switch colors, um, s curve coming down and then back here, right, That represents the center line. But front back, my man. He had this wide shoulder girl area, and we're looking at it from an angle. But so basically, you can, um, indicate twist in the body by just kind of using that simple idea of of the curved or the s curve. Right. So that could be anything this could be, um this could be the lower body leg out here, moving this way. So, leg, maybe moving away from us here. And then maybe we're getting the upper body. And here, So arm, arm up you had. And so this back I would be getting hidden something like that. Shoulder I nipple nipple. And then starting to now morph into the back here. So sometimes that's all you need just at, ah, basic idea. A little trick up your sleeve to fuel twist through the body bubble bubble. We will talk about this, you know, a lot more in detail later on. But anyway, that's moving on now, and we'll look at this one. So, um, great flowing curves here from Raphael. I mean, just look at the curve, and then you've got all these volume lines supporting the movement around it, showing direction again, egg lots of eggs in this one. But, um, how this one? You can start way up here, and the line may stop writing here, but you can see the shading how they're certain. There's always something that artists try to do to indicate that. So the subtle movement through the center line, the belly button, the line, the sternum coming up the net, feeling those eggs that big curve around the bat from the flowing lines, very water, like flowing through the hair, very sweeping and organic and curvy. We took the volume of, say, almost an egg shaped here and how we get that movement around the egg right for the facial feature so the eyes nose mouth can. So if I take that away, we could start to see all of these subtle curves into that suggested heavily and then it may disappear. But then they always kind of come right back and, um, into the artists, working out some of the details and the rendering again movement around that volume. But they're done with very curved, sweeping lines. Ah, very volumetric is well to support the center lines to support the movement around the form . Our last one man just pretty much the same thing. I mean, we could even come right down here. Teoh this one and look at these kind of curves that are just kind of put on the paper. Um, but never really finished followed through with anything. But just who knows? It could have been a warmup mark or whatever, but just everything done with these curves, even though again the rendering and the finish detail work, Maybe, Ah, bit bumpy on the outside, the contour. We can see how and let's say are two maybe went down here. Um, but look at how all of this detail you'll start to see it now good packs underneath on the all start to echo the movement, the direction, the sternum, a little something here, the belly button and so on to reinforce that access that center line. I'm a box construction almost here to get that face in the mask of that feast your weight in the back here, Seacon start to see that change. I talked about that and the drawn the human head course and won't get much into that. But because certainly see some of that box construction evidence. Looking at the curves all the way down that leg and supporting the movements and more of a diagonal way, but still in the general direction is that the volume is moving. In this case, knees bent is moving away from us. I'm here we can see is moving more towards us. Has been back here, and it's coming right at you almost. And we can see through the shading how allow that supports that idea. So, you know, if you really look at this unfinished arm and those curves used Tulley, all that stuff in are the main things we want to search for now. Because if you just get in here, like God is one of the copy this contour. Then you can copy the contour. But unless you know, um, how what's underneath at all, Then you have a hard time really doing these things on your own, then your force just to copy things. Look at this. Almost box construction. I talked about that again in my head drawing class where you had the cheeks. Why this part? This is all moving into the side of the body. This kind of being the front of the body, you know, coming through here, front. And then and then we get the side, you know, here. So again, box construction tubes, eggs, uh, ovals, all of these ideas on and simple shapes, curves and corners, right? The help us put our figures down. I mean, that's the key. And that's what I wanted you to take away from looking at the Masters.
17. Drawing Tips: All right. So if the 1st 1 I'm going to do a back pose here, but a few things, these could be reminders also, uh, just some good advice, I think to when you're getting started. Eso I've talked a little bit about landmarks. Um, so whenever you're I'll come over here, uh, starting with something especially new. You can always start with this vertical line and there, this is late. I'm gonna draw a little bit later. Um, I'm getting away from my sharpies and my markers. And this is a prisma color pc. Non 45 kind of a brownish red. Um, and this is just some decent drawing paper. Pretty smooth, but I'll leave a link and informational materials in the material section. So when you're starting with a line of vertical line like that on what you can do, it started to line up some of those landmarks. No, When you're dealing with a back, you may not have as many as the front of the torso, and I've talked about that earlier. So the front of the torso they had that the pit of the neck or the super sternal notch. Um, so this is the head net coming down shoulders. So the pit of the neck right there the super sternal notch come down to the typhoid, Come down to the navel, Come down to pubic bone almost the bottom of that crotch area. So all of these points line up, so in the back, though, we don't have as much. But there's no there's any light source whatsoever. We can always look at the spine how it moves down the back so the spine tends to be a little impression or indentation. Um, and then they're the flesh kind of goes up and mounds over each side, so that creates a little bit of a shadow. So if I were to use his vertical line idea and then I could just take my pencil, hold it up to the model and get and say, this is the middle of the spine. So if this is the back of the head now, So if are spying comes down here and again, this is a not a very dynamic pose. These are legs. Um, then I'm gonna measure the angle of that spine and I'm gonna use a vertical line is reference. I'm not gonna hold my pencil up and try to match the angle of the spine. I'm going to just hold it up vertically and try to see right down the middle. Okay, so this is the point I'm looking at right there. So if I hold that up to the middle of the spine there, I can see how the angle my longest sustained curve, which is on the left side here, relates to that straight line. So again, what I'm doing is I'm holding it here, and what I'm seeing is that longest sustained curve is moving out like this. So again, that's a really good reference point to try. You can, even if you want, draw this kind of across idea. And that cross idea can be the point on the shoulders. So if this were the again the back So this is the back of the head. Net comes down, the trapezius muscles come out in the front. You had these clavicles that come out and there's bony landmarks right in there where the shoulder starts and the trapezius muscles. He's all connect right here. So these bony landmarks are visible from the back to now. Whenever the arms were raised. You don't see the bony landmarks so much. But what you see are these creases where the deltoid trapezius muscle and all of these connect. So what you can do is again hold your pencil up along the shoulder and I'm wholly I'm not holding in an angle. I'm just holding it perfectly. Horizontal was best I can right along the shoulder line. And what that does is that helps me hash out and find the angle of that shoulder. So again, all I think, pretty good tips and trying to understand the relative angle of things are using this. Another thing I wanted to point out is this right here. So you see that corner So all of these lay in line. So whenever you're you're start you're drawing. You're going to see me do this in a second. Ah, you want to keep things fairly light. So I'm not putting in a really dark line, Okay, if you do that in the beginning, by the time you actually get things ironed out and you get it where you want, you're gonna have a super dark line, and it's gonna be a little bit confusing about where your decisions are. So by starting out light, I could do several. You see, do several curves that indicate maybe the longest sustained curve. And then I can decide later on which one works best, doesn't need to be here, doesn't need to be in And so one Then as I make my decision, then I can make things a little bit darker as I go. So we're gonna start light, start with several lines. I'll go beyond the corner. So if you know your corner is in that area, we want to shoot past it, Okay? And then that way you can come out. Come in later and you put your round corner or whatever did you want to put in? Ah, the other thing is the direction that I'm holding my pencil. So if I want to draw ah, line that's coming down an angle in a lot of times I will hold that in the direction I'm going. So in other words, from drawing a line like this, I try not to do that because what happens is you get what's called a broadside of the lead . I'm sorry. That was a little bit blurry. There you get the broad side of the lead. And so that line becomes mawr. Come becomes a little bit thicker, so hold it in the direction I'm going slightly down towards the paper. Then that's going to give me a little bit thinner line toe work with. And as I go this direction, um, and it doesn't matter how you do it, you can hold it like this. It can hold it like this. Whatever is comfortable for you. I would avoid using this kind of tripod looking like you're writing a letter because s going to give you a much darker line. So, you know, use this kind of underhand grip. So again like this, you can do it like that again. And then as I changed directions, though, notice how I'm not going in this direction anymore. I'm actually going to go with the direction of the line and again making several and now decide leader, which one works best and there will be plenty of other other tips like this as we go. But just keep those in mind as you move forward. And now what I would do is begin my first demo
18. Demo 1: so getting back pose here this for the sake of understanding how to develop this vertical and horizontal line, I'll just use that in this vertical line Will represent, let's say, the top in the middle of her back. So right, right in here. So what I can do now is again hold it up in this direction and then get a feel for that angle list for a second. And that's going to give me a rough idea where that corner is. And again, I'm not trying to make the best the final decision right now, Everything I do is gonna be light, and I have to assume it's going to need adjustments. I don't try to nail it. I just try to do the best I can to get it as accurate as I possibly can. Okay, so now over shooting the corner, I'm not coming to where I think it starts. I'm gonna go past it, um, and then adjust it later. So I have a curve like this and again, that's my longest sustained curve. That's the main gesture line. We always want to think about that. Now I can come to the right side and I know. And trying to feel that volume, right? Trying to feel that tube bending and that's that's what I'm after. So on this side, I'm going to pay attention to this. That curve I'm not remember. I know that side has my pinch I know is getting You're getting that wrinkled look here. Okay, so that I know that's going on. Remember, your, um, that longest sustained. This short side is gonna hash is gonna kind of split that difference. Okay, so I'm not trying to invade that. I want to come in a little bit and then add plus sign here. We're gonna add this when we start to refine it. Okay? So very important that we understand that. And now I can start to look at the page. And as I look at the page, I'm trying to figure out while don't have enough room to put the arm. Do I have enough room to come down and do the legs? I do now. I'm not gonna worry a lot about the arms and this one, but what I'm gonna do is slide this down just a little bit so that I have room to do a little more of that arm going up, but again, like I'm not gonna do the entire arm. Anyway, I'm gonna focus more on this tour Selves. All right? So I have something that's pretty good. And now I can get to this center line. The center line is that spine moving up the back? So what I'm going to dio again is come right to this point and here, right to that pinch, I'm going to try to figure out and look at these angles now, and so would I have is, you know, something like this. And then, um, as this gets in here, we have something like that. So that gives me a good idea of that pinch. And here, then I can go right around that tube, um, and get to the other side, and we know that's aside. That's gonna have that stretch. So as I go around that pinch, I can now look at this space. That center line, which was right in here, you know? How does that how much space is from here to here? I'm gonna draw a parallel line right there. Okay. So, parallel. I'm gonna make that a little bit darker to that. And then we can add that flesh on top of it. We can add the flesh on top of it on both sides. So that gives me that spine. Now, this on top of the you know, the shoulders are gonna be roughly in here again. This is kind of moving back this way, and I can see the spine is coming down and probably ending about rate. And there again, it's not. I don't have to get that perfect right now. Yeah, on Lee. Need to get it close, and then I can iron it out a little bit later. So again, shoulders. And now, at this point, what I like to do on what I think is Burke best is to figure out what this head is doing. So this had, basically, is getting tucked a little bit, so the arms were raised. So what's happening? What happens up here in the shoulder girdle area is, um you have these trapezius muscles. Okay, So the back of the head and we're gonna talk about this as we move forward. This is the again, the back of the head. There's trapezius. Muscles attach way up here and then they come down into the neck so that sits in front of everything else. And then this is your neck in the front. You may see a little bit of that face here, too. And then that's the skull goes up in around That kind of goes out to those clavicles I was talking about. So you know, when you're looking at what I'm looking at, this sort of thing, I kind of envisioning, you know, there's trapezius. Muscle is going up, and then you have the head again. I don't need to get it perfect. I'm only trying to get these light lines you to figure out roughly where that head is. Some would say, Well, that's basically taking my best guess. So I have this the from the mask of the face, the face coming down, and then the skull, which is very round on the back, like so. And then again, those trapped muscles go here. They're going to extend out towards the clavicles known. Then we have our deltoids and different things happening along and here. So that's helping me place that. And I can say, well, does that work pretty good and also I'm going to start to look kind of pay attention to that volume and also acknowledge near that, you know, the head. It's slightly tucked, slightly tucked and then here. And I can kind of put that ear right in there. And then then so I can start to pay attention to this space. So just like the pinch on this side, there's a pinch happening here with this arm being raised up and all of the deltoids and the trapezius muscle coming in here all I asked me in pennst so I can go right to this side once I'm happy with, you know, the head and look at that. Look, look at these angles and try to get my best guess in again. I'm not going to worry about all of that right now, but that arm is going up, basically our deltoids moving down towards the body. You're gonna have that debt right in there where the arm is raised again. Arm going up and then so on. So this Now I can start to kind of iron things out a little bit more as I get down. So that's helping me get to make better decisions. So as I kind of get my torso right, then I can start to leg in, um, near the head, get the position of the head. If I wanted to, I could have started with the head and then moved to the torso. Um, I'm going to go over that mawr later on in the demos, but you gotta start somewhere. So then again, this arm is coming out, and this arm is moving slightly away from us. And here again, looking at these angles and getting that longest sustained curve this way. Very subtle. Curve out. And then I don't need to figure out where the end is now. I don't need to worry about that, and then it's coming back in. So as I get down into here, I can now look at the back and use my pencil again. I'm gonna go along the spine. So what I want to do that can start kind of break the spying down in sections. Um, so up in here, you have we come down the back of the neck. You have the, um, cervical vertebrae. So the that's all going to come down, and then right, we get to the bottom. There's a little protrusion there, and and that's gonna be the C seven. So the seventh cervical vertebrae, you can't always see it, and you can't see it. One this, um, model. But what I like to do is kind of, but it gives me an idea of where the top of that spine and the server on the seventh cervical vertebrae start. So what I do is I try to look at break it down into sections. So from here to here, we have this through asic arch. And then you had the lumbar. So you kind of have these three sections of the spine. So I'll do is I'll kind of go in and use my pencil again and try to get a feel for how they change. So even though, you know, I kind of started with this kind of curve, this s curve type of thing I can now say Okay, well, from here to here, um, it's kind of changing in this direction, and that again is a lot darker than I would normally draw. I'm just trying to make things visible for you. As I get to the bottom, I can see there is that tension here, and then it curves back in there. You can see I started here, right? Came way over here. Here. But I think in here is roughly about where the end of that spine will be. And then here we had this kind of sacred triangle which I won't get much into because I don't really need that right now. But that's going to help me start to get my curves for the next part of the body so I can get in here. And, you know, I could make a oval. I could do whatever I want. I can just come up in here, figure out where everything is lying up, and then do my longest sustained curve for my leg, which is coming down. And here I can get the inside of that. And now I can figure out the direction. So the direction is is moving towards me. So it is coming like this and then on this side, you know that No. Is wrapping around and then down. So that leg is actually moving away from us here as a move down. So anyway, I think for for the first, um, go I don't think needs to be any much more than this. I think for now, I think we've got some more good information to look at, hopefully giving you some more tips. Um, you can start to use, and then I'm obviously going to do quite a few more demos, so I'll continue to share these ideas as we move forward. So anyway, um, Demo one. Done. Let's move on to the next one.
19. Demo 2: All right, let's do a front pose here, and you're the main thing I want to talk about before I get into this one is we always want to be empathetic to what the model is feeling and doing. I think that's really important. Um, so that you don't get caught copying what you think you see. So what are to start here and just black out some of these gestures and structure lines without being empathetic to the model than I may miss out on the story? I may miss out on this beautiful interpretation of what it is I'm trying to say. My idea. So being empathetic to the model simply means trying to get inside what that model is feeling versus what you're seeing. So when that model was standing there, new legs apart, Um, the way pushed into the left hip kind of the, um the middle into the belly button, the rib cage, the shoulders kind of pulling in and kind of back a little bit so that you know, the the pelvis and all of that is kind of thrust forward a little bit, um, so it's kind of like Khan caved, and then through the upper body and then pushes out towards the hips and that weight getting pushed up into that, the left side, the left hip of the model and in the hands of the arms wrapped up and over the head. So really feeling that pose and and trying to get a sense of what the model was feeling is important because if you can capture that, then the end result is it's going to be more effective. Ah, then simply trying to do something that comes up a little bit short. It doesn't really capture that that moment, that energy, that feeling Ah, good way to do that is just to take the pose yourself. So to stand here, since this is a standing pose and try Teoh, I'll do this. You can't see me. But just standing here, pushing that hip out unease so much straight maybe especially that left one and then pulling the upper body back and then tucking the chin and the hands over the head. So that's important. Very important aspect of drawing the figure because in the end we want something that is perhaps a little bit bigger than what's there versus something that's very timid and comes across maybe a little wooden or stiff. So again, if you're going to error, be sure to know which side you want to error on. And in my case, I want to err on the side of being too much too exaggerated versus being too stiff. All right, So again, using the techniques we talked about so again, there's gonna be light lines. Be a little bit hard to see it first. I notice I'm doing several lines. Come back and I say, OK, what where is the inside of that? So I've got a little pinch going on. But maybe even before I do that, I want to locate a rough idea of the top of that curve. So to do that, sometimes it means trying to understand the angles. So the angles, well, they say the shoulders in this case because the arms are raised, we can use the armpits. So if I look at the arm pits, there is a slight angle here like that. So maybe I could just kind of get a rough idea of of that angle here and then coming to the inside and try to capture again I'm not. I'm not copying the contour here because I know that Contour has flesh. It has the shoulder girdle area that's coming out here. It's got the hips. So I'm trying to find that happy medium that I know I'm going to have to add flesh and anatomy to. So now, if we determine that the angle of the shoulders or roughly like this than typically when you come down to the pelvis, it's gonna have a contra angle to it. So if you have an angle like this through the upper body and chances are you'll have an angle opposing that through the pelvis, and a lot of times you can use landmarks. So if you put the belt around the waist here you have these bony landmarks in the front that protrude right here. I won't get into too much anatomy here. I want to keep it fairly. Keep our ideas fairly simple. But we have your pelvis. You have these spines, the Ely Axe. This is all called the iliac crest, where those band bony landmarks are. So the iliac spines go up and then back to the back. So that bony landmark right there if he had that belt on, it would kind of go around that bony landmark. So I can kind of again take my pencil, hold it up to the model, and then bring that angle down on. And I have an idea of kind of where that IHS So anyway, I'm going to come down and finish my tube. So the tube is kind of interesting to me because, you know, it kind of has this movement Ah, here around the form. And it still has that movement coming down. And then, you know, it's kind of keeping that consistent. It's just kind of s curving Ah, down the through the pelvis here. So if I say the shoulders are the armpits or roughly in here, um, then I can say All right, I'm gonna get a rough idea of the pinch now, So I'm gonna come outside the tube. So let's say I'm roughly in here. I can start to make sure I've got that angle rough. Then, um, let me talk about that. Like when I'm looking at this that say we have a curve that's like this. So if I were to put the centre a centre in here. Let's say like that. You'll see everything is equal almost, you know, to the outside edge. So when you're doing curbs, a lot of times you're better off toe have things that are not as symmetrical. So now there we have, ah, more interesting curve to look at because it changes. So it kind of starts here and then it changes. So even if I see something that's kind of like a C, I'm going to try to find a way to make sure that it's not even right. So I want to come in. Maybe it starts more dramatic here and then a long gates here. Okay, so it's not. It's not a perfect, um, access or center, you know, distance away from the center. So we're trying to avoid again that evenness. Alright, so I've got that kind of roughed in. I know I've got flesh on this side. Uh, so that's let's now start to look at some some of the other ideas, which is to say, the center line and their center line kind of snakes in here is well, so if I were to and we talked about this earlier where you had these certain landmarks. So with the very if you take your fingers, he run it down your throat, your neck, the front of her neck. You'll come down to the top of your rib cage. There's a little notch that's remember, That's the super sternal notch. The super sternal notch starts to get in the top of the rib cage. If we come down the middle of your rib cage, you have the sternum. And then the base of that sternum isn't kind of an indentation. And if you press hard enough, it may feel a little bit weird or queasy or whatever. But that is his Eiffel process. So from there from his iPhone process, we can come down to the navel. So we have the belly button area. If we come down again, we get what's called the pubic bone, which is down here near the bottom of the pelvis. So we've got these kind of interesting landmarks we can use. So if I were to get a rough idea where the center is, I'm gonna say it favors the right hand side. I'm gonna say it kind of comes down here, um, and then starts to work back this way. So again, we have a little more over here, like so but now from landmark to landmark. So from the super sternal notch to those I foid I can take my pencil again and look at the model and try to get a feel for that angle. So in this case, this super sternal notch is slightly to the left of it. So it's not a perfectly vertical vertical line is kind of coming down like this. And then from his Iife boy to the belly button, you know, I'm coming down like this and then down to the the pelvis, the pubic bone rather I'm down in here, so I'm starting to get a sense now where all of these things are. So if I were to get this volume line around the form Okay, um, this is getting into the waste, right? So I take that belly button, take this circular learning around and here I can start to see were the You're the hips go out. And then we start to get this volume this almost angled line structure line through the leg and then I can start to see the leg. How is joining in a tube. So we had this tube. Now, um, coming down and here through the leg, and then we've got this other tube moving away, so I don't want to map that out quite yet. I don't want to get ahead of myself. All right, So if we have determined some of these landmarks, then I can get up here and start with the head. So the head is tuck, that chin is tucked down. So if I were to follow this curve up, that would probably take us into the back of the head. So we've got the neck here at the top of the spine, moving into the back of the head. So the head, a lot of times I like to make ah simplify as well, so we can basically I'm used this idea of a tube like that. And so and the beauty of this is again we have direction. So if you put the center line in, we have this. We can always add a little bit more back there if we need to. Um and then we have these curved lines that go around the form right. In this case, we will be using facial features. So this is coming down, and then it gets up to the forehead, the hairline, and here and then it starts to move back. So what kind of putting that idea in a tube may work pretty good. There's another simple idea for the head, and again, we're going to break all of this down. I'm just thrown some ideas out some quick thoughts about well, my demonstration here that are coming to mind. And then we're gonna get into this in much greater detail. So if another idea would be the up upside down sale, So if you had a sailboat amassed Ah, and then this is your your sale, we can take that idea. I kind of talked about this. I did a quick little sketch for you. I forget exactly which lesson it waas where I used this mask of the face So the forehead comes out, eye socket comes in, you know, knows, comes out, lips her out chin and so on. So you can use that to you can just kind of lay this in as quick as you want. Remember? Ah, simple yet characteristic. So if I want to use that idea of a sale. I can come up here and again use that quick feeling. Now, whenever you're drawing, I do want to point out, you know, get those edges crisscrossing. Okay? So if you think that sale, um, needs to be end here, go past that a little bit and then bring that top down Maura's. Well, so and then you can always come back and refine the corners and curb, um, or whatever you want to do, but make sure your corners overlap a little bit. Um, now I can get my center line in. I can kind of get kind of the volumes of that had we can start to locate the ear and so on . So we got the head at the top connected. Now, obviously, there are some muscles different things going on, Better going to help us. So in the back of the head, the traps connect, they'll come down and out here, that's what you're seeing on this side. It's a little more concealed. So we only seen a bits and piece of it. And then we got some muscles and different things happening, which I won't get into. Ah, so now, um we can start to decide if this is something that's working. So as we get into the say, the belly button here, um, coming down. So this is coming towards us so we can do our volume line. We can bring that around. We know, um, that that's roughly where that waste it's coming in. And then we're seeing the form in the shape of that leg, the meat of the buttocks and all of that getting pushed out. And here, then this is where all of the leg two begins so we can start to look for the curve. The longest sustained curve so kind of coming towards us. Ah, and then away from us on this side, same thing. So if it's coming in here getting pushed out, and then this is probably coming around and that leg, the back of the leg is starting there, and this side is coming around on the opposite side. Um, we've got that. The bony landmarks here, if you want to know, indicate those that that's always good to kind of give yourself a feeling of where those air at. But then we're starting to see that change in direction and that kind of, Ah, getting a little more structure and getting a little more, Ah, volume as we go. So So this leg is really moving down and then out we're getting this. And then, of course, now we have other things to consider. Um, we got that deltoid coming up. Kind of wrapping the tube of the arm. Um, I like to start right there were all that pelvis or the clavicles, which, again, clavicle was come up. That's where all this arm sockets stuff starts. Well, we got the tube of the arm here is moving away from us. Um, and so on. So but notice. You know, I didn't, um I wasn't trying to map out the obvious things. Um, you know, the breast that you know, the different parts that I think a lot of people would go to right away. And then, you know, you end up, move losing, um, end up losing the whole gesture in the whole movement of what we're trying to do here. And that's to create Ah, a nice, uh, construction, a nice gesture, nice construction and kind of feeling that pull up through there and that. That's that's the important part s O b. Start mapping out details a lot of times. If you start going for those obvious things, then you're gonna miss the more important story. Um, and feeling of the pose again, This this tube is actually coming towards us a little bit again, Feeling that space between the head trying to get a sense for that negative space happening there, Um, angle of the arm, right angle of that tube as it moves slightly towards us and then here is moving away from us. So they were able to see that sort of idea. And then all this flesh and different things wrap around those body parts. Then we can kind of coming here once we're happy with it, we can You start to round things off and you render it a little more accurately so and I almost kind of feel like that tube is moving away from us. And where I'll look at it, that's that's good. You know that these are the things that we want to that are important. I want to start to pay attention to things you know we've discussed and you know, eventually all of this will start to fall in the police. You know, the more information you get and we've got a lot of things to discuss. A lot of, ah content coming your way. So I think for now I don't wrap up this demo and then I'll do one more.
20. Demo 3: All right, let's do 1/3 pose. I've done something similar to this before, but I thought I would go ahead and bring an image up now. And we can look at how these gesture and structure ideas work. And for for this one, um, I think I'll start with a little bit different body part, and I'm throwing these ideas out at you. Now. I know it's just a demonstration. I'm on Lee kind of dipping the toes into, um, gesture or figure drawing and what your about to do for yourself. But I'm also trying to trickle in different things, different tools and methods. You can use that as an instructor. I try not to limit you and confined you. I want to open you up. Two more ideas, and some of the things I've shared with you to this point may not connect with you. They may. You may already have a better idea that you like, or maybe you think it's interesting, but you know it probably needs to be developed, so you have to work on it. Or maybe it's a better idea than what you already have. Or maybe you have no idea at all, And so any idea is a good idea, but eventually you're going to. If you pursue figure drawing, you'll probably research it. You'll find other artists have different techniques, and, you know, I'm constantly doing that. I like to find a good instructors, good artist, and learn from them because that's that's what it's all about. So in this course, and I'm giving you things, you a starting point, something can sink your teeth into, and then eventually you'll take these ideas and run with it. So anyway, if ah, I've talked about the head and, ah before up to this point, I've kind of just worked with the torso of putting that Toobin. Oh, so what some artists like to do and with some poses, this is what I like to do to with many poses. Let's start with the head. And so if we look at the mask of the face, let's say so. I'll come over. Start this one about Ray here. I confined that angle so I can kind of do this sort idea, and then I look at the top of that head and again, looking at that angle, I can draw something like that and then we can get into, um the kind of point corners down here where it comes down to the chin. Obviously, there's a die gastric plane. There's the back of the skull, There's the neck, and there's some different things happening there. But for the most part, um, And what I'm alluding to here is that using this is a starting point sometimes could be very useful. So here I can get in here and say, OK, well, in the back of the head is here, I can start to curb that around a little bit. I can see the, um maybe the eye socket isn't here. I've got the cheek kind of concealing everything else. And then we we have underneath all this die gastric plane, which, you know, I'll talk about a little bit moving forward. And then we've got the ear really close to the front of the face here and maybe even closer . So then we have all this volume here for the neck in the back of the head. So it's kind of starting, but that gives you a good idea. Now, once you get this in, um, again, we've got ah, this kind of wrapping around die gastric plane. Then I can get in here and say, Well, I see the shoulders now on the shoulders were almost, um, overlapping a little bit that neck and that head and they're moving down like this. And now I can start to lay in a center line if I wanted to, But in this case, I'm going to go to the longest sustained Kerr. I'm gonna follow that up all the way to the point. I'm using my pencil as an axis to find that axis line of the curve, and I don't care where it ends. Okay, I'm just going to do several. And if I wanted to, I can kind of turn my pencil in the direction that's moving versus being to the side. I get a little bit sloppy. Sometimes my lines get chunky because I'm perpendicular to my line, you may find, and sometimes I find it's it's a little bit easier in a little bit cleaner line to do this . And then I could come over here to the right hand side and look at the tube and say, Well, that tube maybe bends like this. All right, so we've got the tube running away from us. And then as it gets to the waistline in here, it starts to change direction and move down. But for now, I'll just kind of want to focus more on this back area. So now, looking at the space, I'm not gonna look up here the shoulders anymore. I'm gonna come down here, um, and try to find that center line. So that center line favours there's more space here, right? There's more space here to here than here to here. So then I'm going to follow that all the way up, Some staying parallel with my longest sustained curve staying parallel here. So I'm getting that simple tube idea. Um, so then I could even say, Well, that's just maybe for this pose. Um, Aiken, bring that tube down in here and say, Well, that this is maybe where the this kind of eggs sheep starts to form for almost a circle, even for the pelvis and the buttocks. So we start to get with glutes and we start to get this. So now let's let's not go too far. So the point is, um you know, sometimes you'll have to or you don't want to move away from something too far so that the whole idea of putting more structure end to this face area, but was to simply get more detailed information so that I can place the gesture of the back . I'm now, once I get into here, I can start to use my pencil again and start to find these angles. So now it's moving down in here, and then we get to the base of the back would be roughly in here. Um, so now, looking at the short side or the arse, just say the ah pinch. So again, this is our pence right in there. I can start to look at that angle and get a feel cable. If I have, I have the mask of the face here. I can see that the shoulder line, this is all looking pretty good. I like that angle. I'm happy with it. Um, I can say that, you know, that's going to start right in here. And then we have that the shoulder girdle area which is coming up, and then we have the arm coming down and then back towards the body. So all this is the one. This little bit of detail work is helping me find that pinch. So roughly I can say All right, I'm going to do it light, You know, it may not be correct. I may not be happy with where that sat, so I'm going to try to find that angle. Ah, and then I can look at the next angle, which is this leg. So this leg is beautiful gesture kind of coming down in this direction and then moving back . Um, that could get back up here, say, if caves this something that is working out. So let's follow. And I want that to that crease right there to follow that form around because that's going to make make it more impressive and were given more continuity. So that's my stretch right here. And then this starts to come around and we can see that coming down and here, and I can start to see the bottom of the glutes again. I'm not trying to making a permanent decision here. I'm not convinced that that's were out exactly where I wanted to go. Um, I'm giving the leg here a little more volume. I'm moving it up from where it waas and I can see that is moving. That beautiful curve is moving down Now. Here's an interesting thing. So I can take that curve and curve it all the way down here. But then I have to decide. Um, some intersections, maybe suited for just a long curve. Other intersections may merit a a corner, so I may have to come down with the leg here and then have this corner idea. So where there's a corner, there's a where there's a sharper change in direction. There's a corner, Ah, where things are subtle that say, in the arm that's coming up over here. So the upper arm the forearm down to the hand that maybe find with just a long curve. Or maybe where this hand this arm here is sweeping over and then changing directions and going towards the leg. Maybe in here I'll want a corner. Maybe you decide that it's a curve. OK, again, that that's totally, um, up to the you know the artist, the viewer. But just know that those air some decisions that eventually you'll you'll want to. Mom, you'll have to make moving forward. So again, this leg is concealed because you can't see it and is moving out this way. This leg is moving down that to so again getting that long gesture line and then finding that inside. Then we can come in there, an ad flesh to that. But following that gesture line and then in here, maybe I want to decide that, you know, the curve is moving like this. Okay, so I get that movement here, and actually, the tube is moving towards us. So I want that sort of volume. And then this leg, of course. Um, moving down. Put here. You can see where this arm, which is basically connecting right here is a tube here. Now I'm looking at that space. Am I happy with that space right now? I think that's that's working. Fine. So the arm wrapping here, um, flesh to the outside, coming in, touching it. And then we can see the stretch right through there and then curving around and then this arm attaching in here, um, I would just do a long flowing tube gesture line way out there. So and then once you get all of this, the trapezius muscle, all of this is getting attached to the back of the head. And here their muscles are coming up. They're attaching. Now we've got the ear face, die gastric playing that could come in here and start got the, you know, the eye socket. All of that is ah, good information toe. Have we got the hairline? And once you know all he gets, start adding all of this stuff, which is a much easier to add. Um Then things start to take shape a little bit more so, But that shoulder girdle. So you know, again, you know it's all about you're finding the gesture not getting ahead of yourself and taking your time, you know, working a little bit at a time. Use your good judgment. That's that's important to sew up in here. We got the sacrum triangle roughly, and here a lot of times your eyes, you know, are pretty accurate. I mean, they can do a lot of the heavy lifting for you. Of course. You know you have different methods, different tools to help, you know, check. Check your work. That way you don't get too far ahead of yourself. So I'm bringing that knee down and I'm looking at this distance here, bringing this down. I'm thinking that probably should end more in there. So not committing right Not committing until you feel you got a good feel, a sense of the pose, and so wants. That's what this is all about. Simple characteristic. And this time showed you just starting with the head and then getting that structurally, having that loose idea to begin with a sale. Ah, and then locating features coming around that form, finding the head, getting that right and then say, Okay, where does it go from here? So you get that solidified and then you go to your next gesture, your next gesture, and follow that the ideas that we've shared that's basically what this DIMOs all about. Okay. And again and trying to enlighten you and give you, um, as much information as I can and then, you know, eventually will you'll be getting into this stuff and doing it yourself.
21. Practice Reel Assignment: and welcome to your first assignment. You will have a series of four images. Each image is four minutes long. You will have a notification when there were 20 seconds left that will sound something like this. You know, when you hear that sound, wrap things up and get ready to move to the next one. Now, as you move through each pose, you may need more time, and that's perfectly fine. Simply pause a video and take his much time. As you need. Remember the this is practice. We're not trying to create finish rendered figure studies or drawings. Actually, I would prefer that you didn't do that. Break things down. Practice that tube of the torso, find that long gesture line, come back to the shorter lot outside and find that happy medium line. Then go back and add the center line. Remember to compare how much is on the left side and the right side of that center line. If it's especially if it's a 3/4 view on and then go to that pinch side and see if you can find the angle of the pinch, that right there is a lot to take in. If you're beginning figure drawing. And again, if you're not happy with it, do it again. Do it again. Do it again. Understand the lean, the tilt, all those subtle things that we talked about in these lessons. And I've covered a lot of content. So I recommend you do this assignment. Look at what you The idea that air sticking So the ones that are really kind of your moving forward with and then maybe go back and browse some of your notes if you're taking them. Or look at some of the other videos and watch him again and see if there is any detail on technique there that you have forgotten about. Sometimes you can just look at the studies and the art that I I'm sharing with each lesson . And just look at my my art in the demonstration that I did. And just looking at the image sometimes will remind you of certain things that you're like , Oh, man, I remember that I want to go back and try that and then hit play again and try it again and just focus on that for me. My take on the assignment. I'm going to focus on the torso and then the head. I'm not going to attach the head to the torso. Maybe I will. Maybe I won't. But my my fat thought is I would just use that tube idea for the torso and then maybe try a few of those construction ideas for the head to lay out that gesture line from the keystone to the bottom below the bottom lip and try to find that gesture and build around that so that those are the things that are really important breaking things down, breaking things down for parts. He may want to try an arm. You may want to try a leg and so one. So again, don't put pressure on yourself to do beautiful finish figure studies. This is about doing bits and pieces, and I think if you take it that way, are you going to get more out of it? And you're going to be working mawr from a student learning perspective. Been trying to say, Hey, it's time for me to do something finished and awesome, and that's going to kind of cloud the learning process. Okay, so again, four minutes long, the first pose will begin Now. Good luck. I look forward to seeing what you do
22. Roberts Take; Practice Reel Assignment: All right. Welcome to my take on the practice. Real. I remember. This is just I'm doing this. Just so you have something to compare your work to. I'm also to share my ideas and hopefully shed a little more laying on. Would I feel this assignment is about now? I mentioned this in the introduction to the assignment. I'm not trying to draw finish figure studies here. I'm not trying to focus on details. I'm trying to search for ideas, different things that I've shared with you about drawing the figure I'm gonna do parts and pieces I want to explore. There are some obvious things that I want to do. I've talked about the longest sustained curve trying to find that beautiful, organic, life infused line of a living form like that. So I wanted search for that. But if that's not there, that I may go to something more boxy, something more structural. But I'm always considering, you know, the position I'm in the position of the models in I'm trying to capture any sort of perspective. Lean tilt. So one that's happening. I'm the first time around. When you do an exercise like this, I'm also very aware from experience that it's very cerebral. So I'm going to be conscious of trying to use the ideas I've learned. So the brain is engaged. Nothing is really natural at this point. Everything is has to be thought off and put down. Now if I understand this that I know that the first take is always going to be probably the most challenging. If I come back, I do this exercise again. Then it's still cerebral but have a little bit of experience to work with. So I get a little more comfortable and maybe are more apt to explore and treat the exercise for what it should be. If I do it 1/3 4th and fifth time, that imagine that once I get all of that experience Mommy and there's attempts. Now I have more ideas because at first I'm probably stuck with one idea. Then I'm Mawr app on the 2nd 3rd or fourth time to try something different, to look different, to explore it in a different way. So remember this. I mean it's only 45 minute poses, but it really represents a tremendous learning opportunity for those that aren't that don't simply want to scratch the surface of figure drawing. You really want to dive in and do something? I'm special. You want to get beyond the basics beyond mediocrity, and you want to take these ideas and make them your own. So that's going to mean you have to go above and beyond. Just a one minute session. OK, so that's my pep talk. Now that I've said that, I'll go ahead and get started with the first pose, keeping in mind that I'm trying to put myself in, that I'm just started. I just started figure drawing. And I want to treat this exercise as I'm getting my feet wet and just simply using the ideas I've shared, all right, so I'll start with the longest sustained curve because I feel like that's probably the most important part of this. So I'll just go to the outside of that body, and I can use my pencil to figure out that lean if I want and do something like this. Now that I had that I can look at the the the lean of the pelvis area, I can look at the shoulders so the shoulders have a ah slightly in like this, a noticed home drawing past those corners. And then once I get that, then I can come in here and look at that other side. Try to figure out that with okay, if I get it wrong the first time, which I probably will I know I can always come back and correct it. Now, I don't know where these are going to end. I mean, they could end anywhere down here. So for now, they're just lying there. Just something there to get me started. So once I have the top of the shoulders and here, then I can come down and start to look at the center line center line. Um, is favoring the right hand side. Now, I don't want to look up here in the shoulders. Okay? I'm going to look down here near the waist and then take that line and run it straight up like this. Now, I can add flesh to that. So that's a pretty good start. Now I want to say, Well, what which way is that tube moving so down here? Um, it's moving away, thus leveling off. And then it's moving back away here. So there is at feeling of this happening. So moving away the top because the head is leaning way over here and looking out that way, arms or raise. And then the body is coming down this way. So that tube is bulging a little bit towards the center. So now that I have that I can look at, um, they're coming down here in that the center of the spine and looking at that curve now trying to look at the pit of the neck on where? How does that come down to the rib cage? And how does that come down towards the naval? And then what does it do from the naval down to? Ah, the that pubic bone in here. So I'm seeing these sort of tangents or these sort of this sort of breakdown with that. So now that have kind of this idea worked out, Um, I can look at the pinch side. So let's say on that pitch is just above my belly button. And here now I can come in and get my It's a very, very subtle pinch, but it's there and then I can get get that angle and then I can get this nice stretch going across the body on the opposite side. Um, so that's all pretty good. Then I could come over here towards Ah, the head. And now, if I have a little bit of time left, which I do, I can explore drawn that head. And I know that this is light. Um, and you can probably barely see it, but I always recommend, of course, you draw light, so I'm running out of time here, but I'll just kind of use a little bit of time to figure out this head. Maybe I want to use a tube. And then I want to draw my that gesture line right down the middle to figure that out, that to wraps around and then the year is back here on the side of that tube and so on. So I'm at a time I'll move onto the next one. Maybe I want to start with head so I can get this idea of a slight egg shape. Um, and then I can see a little bit of the left side of that face and the year and then I can see how that neck it was a very athletic looking male is coming down. And then we had the shoulder area up in here. So if I want to figure out where that center line is coming down the skull, it's probably coming down like this. Okay, so we're getting maybe that sort of shape with the head and because these shoulders are tucked, either come in, probably up in here so I can play with that idea. Maybe I want to try that again. I wasn't that satisfied with it, so I could get my egg down. Um, I can see you're the head wraps around and here, So I want again put that year in, OK, just just needs to be a little sliver of a near here. Not can see. Now there is a pinch. There's a pension here in that neck because the head is stretched. The neck is stretched on that side because that shoulder and this arm are pulling that over so I can move that year down a little bit and get you know, that sort of feeling kind of work with that hair line a little bit, that sort of thing. Now I can move to the torso and get this figure out that access may be in the shoulders. And now get that really long sustained curve trying to figure out that angle, do several lines. Um, And now I can figure out the width of it again. I want to kind of get that feeling of a big, bulky male, very muscular here. Getting that big sweep looks pretty even. But I think this side has a little less space. Come over here and say the tube is running this way, and then again, is running away from us a little bit. Here, come over here and try to figure out this angle here. And we have that pitch. And then down towards the waste this waste this hip is pulled up a little bit because of the stretch through the upper body, that shoulder girdle area really wrapping around this way. So again, all good information. Now, Aiken, say I want to. Now look at that arm, um, as a tube coming towards me. So that tube, I get the feeling of that arm coming here. And then again Ah, very muscular. So how can I represent Ah, that muscular feel of that? To which way is that? longest gesture, Uh, longest sustained curve. Maybe in here. So I'm getting that sort of thing. Maybe I want to work with the forearm. Which direction is that going? Where's my longest sustained curve? Which way is that tube moving so again, just bouncing around here using the entire sheet of the paper. Um, so let's say I want to use the tube idea again when I work a little bit with the face on this one, so I'll try it again. Feel that angle. So using my pencil to get that longest sustained curve. So I'm going to use this to buy idea for the face so that mask of a face moving down it's a very short tube, all right, because it's it's in perspective. That head is moving away from us, so I'll make sure that, too, is characteristic of what I'm trying to see. Then I'm seeing the neck, um, pull down from it. I can see on this side is joining way up here because of the perspective I'm going on with that in that year is towards the top of the head. So that skull really getting kind of cropped off there and now I can start to map out, um, underneath the chin that coming down stern oak lighter. Mastery this big muscle coming down towards the pit of the neck on this side. Um, I'm starting to see now, the angle of that arm going up and the angle of these shoulders going this way. I can't even move that tear up a little bit more. Then I can get the's curved lines over the tube to represent underneath, um, the skull underneath the chin. Okay, so then I could get my hairline in all of that stuff. And no, it will start to take a little more shape. But again, just now, using all of these things at my disposal that we've talked about, Maybe I didn't like that idea. Maybe I want to get this feeling of the longest gesture line here, and then get the feeling of that box. So I've got the mask of the face here. Clearly, I'm seeing under that that box. Okay, so probably seen it more like this. And then that box runs back here. Everything is parallel, You know, they all all of these run together, um so features I come back here to the side and put that ear and now confined the curves on top of that, buying the chin right in here, Um, start mapping out the neck, doing different things. So pretty much at a time you can see my focus. There was the head out. That was a very challenging angle, I think trying to capture that was interesting. And perhaps, um, you know, all eventually noticed that you know something maybe I need to focus on, so All right, moving on. Um, I'll bump this over a little bit, so maybe I want to try this box idea. So this box coming down, but it's gonna be a nor Ganic looking box, so it's gonna come down here on I can see the side of that body, but that longest sustained curve, which is probably where I should have started here. So now I can see that the top of that box is going here, and then that that corner tangents what's going to be hard finding that interior tangents? Tough. So if I say you know, this characteristic of this model is gonna be nice and lean, I can kind of get the outside and now for the the interior. I can maybe look at that hip bone right here on. Say that that could be until your line of that box. But before I do that, maybe I want to come over here and find my center line again. That belly button is way over here, and then we can, but I'm gonna use that all the way up. Now. The belly button may not be there when I'm done, it could be up here. Could be down here again. I don't know where delete the length of any of these. I have no idea at this point, so I'm going to work at a certain a certain area and then kind of work my way down to us. I'm gonna start up here and then I'll get back to it. So let's say you know, my shoulders air almost straight and here and then that side of the box is in here. In that box is curving. It's coming down. I've decided that, um that the side comes right down maybe to that bone right there. And then I can start to come over here on the box on draw my lines that airbending with the box. If I compare this bone to the other bone on the opposite side, I'm getting that sort of an angle. So in here. So it's safe. This is where that angle was going to be that I knew. My belly button is roughly up in here. I go up there, I find the bottom of the rib cage. I'll come up here and I find the pit of the neck there from the pit of the neck. I can start to map out the head, the neck and other features building off of that box. Maybe once I get down in here towards the belly button, I can follow that all the way down a big stretch to that, um, to the pubic area in here. And then maybe once I figure that out. So if I've got that's a the top of the rib cage here in this air or the bottom of the rib cage was coming down to that belly button and here, okay, and then is moving back and a really strong angle from here to here. So maybe that bend needs to be a little more prominent in here, because you can really see that thrust back. So if I again use that idea of drawing these lines over, I can see the hip hips. Are that bony mark here, here. So looking at the relationships, moving that line back and here and then maybe from here, where I'm seeing this crease I want to draw. Ah, this oval, it was kind of egg shaped. And here and then I can start to say, Well, this is my bone where the hip line is or the we just call that the belt belt line for now in that leg. Aiken kind of build off of that and bring that leg right down towards us. So this is all good, different ideas. And maybe I like that. I want to work on that mawr. Maybe I want to start with the X shape of the hip on and then build this box off of it. Build this this sort of thing. So again, kind of working with different ideas, but basically all in the name of the same thing, trying to explore different shapes, different ideas again. That leg will be moving way back here away from us. So, anyway, I think that's hopefully some good things. So to think about again if you were considering even trying to not just begin figure drawing. But you really want to, you know, make a go with this and do a lot with it, then go back and do it again. Work on different body parts, work for each figure. Try to, um, map out and refine the ones you already have. Go back and look at the lessons again and try to look at things that you probably have for gotten. That's that's the winner attitude. That's the new the people. The ones of those of you that are making those strides are going to get the most out of this stuff. So the first time around again, you're going to get a little bit, but not nearly as much as if you go back and do it again and again and again. Okay, so I hope you enjoyed the demo and I'll see you guys in the next one
23. Body Part: Head: okay, It's time to look at the different parts of the body, and we'll start with the head. And that's because with figure drawing a lot of times the body, we say torso, pelvis, arms, limbs, whatever you know, everything kind of relates to the head. So if you draw the body for sometimes and then draw the head last like it's just kind of stuck on, it doesn't really flow that well. I mean, not always. Some artists can pull that off pretty well, But if you get the head I found, if you give the head positioned, you get it, Um, in space. So you get the gesture, you get the form, you get the structure right. Ah, then it's easy to relate everything else, too. That's easy to add. The torso. Um, it's easy to add the limbs off the torso type of thing. So I can also look at as if you're having a conversation with someone. Typically, you would look at that person in the eyes first. So you someone walks up to you today. What's going on? Um, we're not gonna look at the feet, the hands or anything like that. You're gonna look in their eyes and just looking like a the face and look at what's going on. Um, if you're talking with someone they've looked down or away from you, then you feel like, Well, they're not paying attention to you again. I think people visually connect to the head first, the eyes that they're visible and then kind of go off. From there you were painting a city scape or landscape. They may search around and try toe connect with the human figure first, no matter how small it may be, and then they may go off and look at something else. But for the most part, I think there are always kind of searching for that. Um, you know, if you have taken other figure courses and things, they'll say, Well, you know the steward, a gesture line, you'll do these kind of flowy near gesture lines and they'll stick the head on top. And then you basically had this balloon looking thing kind of floating through the air, and there's no really attachment or any any sort of connection to what's going on. So, um, you should be familiar with this, but you're the two steps we've been talking about discussing in detail have have been the same two steps you know about and that let's make a showman camera here. Um, so we had the gesture and the structure. You should know this by now. It's That's the two step price at process with gesture. We're looking for that long axis curved axis. If it's available, it's not. Start always there start always going to jump out at you and say, Here I am. But it is there. You want to use it, um, with structure, obviously we're dealing with boxes were dealing with corners and we're dealing with, um, other things. So, um, if you start to think about the head and we started dividing that up Ah, the gesture line, we could say, runs right down the middle of the head. So let's say I go ahead and draw or create this simple shape. Okay, members all about simplicity so we can do this sort of X shape, so that could be it. Now with the two step process, though, remember, we want that gesture line first. Then we can build around that so often times where I like to do Let's find that gesture line. So if you're dealing with a situation where the figure is looking directly at use, there was not a 3/4 view. The head isn't turned in any direction away from you. The gesture lines going to come right down the center and I'll come over here and kind of demonstrate what I mean. Um, if and then I'll tell you why. So they say we have that idea of the of the sale, Okay. And in that sale, we had that egg shape for the skull, and we're gonna talk about this in just a second. So basically, um, remember that the forehead, all of this kind of goes off of that main gesture line right there. And then it comes back the eye socket and it bumps it and the neck nose goes away. It comes back, it'll bump it. We had the lips come back, come near it. And then we had the bottom lip, which bumps it right here. And then the chain goes around. So these two points right here, that's considered like the keystone. All right, so if you we're to follow that forehead bone down into this area where you're basically right Um, And here now, what kind of pull that out? They call that little part. So kind of going in and touching. Um, it's kind of like a keystone. Okay, So was shaped from the front, Maybe something like this. Okay, this would be your eye sockets kind of going in, and the nose starts to come back out. So that's that's an important part. And then where it comes back in and touches, but the bottom lip comes in and touches that gesture line again, that's going to be the important second mark that you want to understand. So when you're looking, let's say at the front of the face, um, so this would be one, and this would be to So now if if I say this is my gesture line there Okay, so right here and then I can start to draw this egg shaped and some people from, ah, front view. So what to say from view who often times developed that into the same pill shape, Um, where they may come down to the chin and they'll try to find the bottom of that chin, and they may square that off a little bit or you may get up in here and start to turn this into mawr of this capsule shape. So again, this is our gesture line here and now we're building these very simple shapes around that. So you have this sort of idea, Um, from a profile view, which I just did for you. I'll do it again. I think one of the most effective shapes is that sale. Because now you can get this shape in when they can do an X shape in here for the skull. Now, remember, when you do this, we don't want to crop top of the head off. So you want this to go up slightly up combat? So this again if you start to crop the head off, So let's say I do another one now instead of bringing it up and back to say I bring it down . Okay. Now, the eggs going to fit in here like this, and you're gonna end up with us smushed a smush looking head so that that could be a problem. Um, and obviously you don't want to go too far up, and then then it'll look like an alien. Okay, so? So we don't want any of that so slightly up and back and then down. So whenever you're you're dealing with something like this, um, you can kind of tried again. You find find those points, you know where it's coming off. So where this bright below that egg you're gonna find? This is where that forehead would turn in and this would be that keystone area, and then the nose builds off of it. Upper lip, bottom lip. And then we had that chin. So I never I'm laying out ahead, and I have something that may be a side view sometimes, you know, using that sort of idea, um works pretty well with getting my position. Right. So that's just some basic ideas you can use. Ah, when dealing with the head. So again, gesture first. Always looked for that long access line. Um, if his curved curve it Okay, try to get that in there, and, you know, the egg shaped for the front is good. If you want something a little bit more sophisticated, you can even, um used that pill shaped. So come a little more straight on the sides and then your egg at the bottom in the top again. All building all. All that is building off that gesture mine and so gesture again for the head from a profile view sauce A side, um is going to go up and back. Okay, So up I'm back and then we're coming down on the front of the face. So that's going to help you with those quick lay ins and that the mess again, that's kind of over. After when we're doing these figure drawings, we get these quick ways of putting that gesture down, and then we can start developing it and and so on.
24. Master's Analysis; Head Part One: Welcome to the demo. This one I'll work with. Actually, I'm gonna go with a whole buying here. So pretty straightforward. Easy beginning. We can kind of start right here. I'll kind of point out a few things. That's that keystone shape that's so important underneath the lip Here, it would be the next point. So if this were a 3/4 view, your matching you're trying to find those points on the face. You get that gesture line, you come to the skinny side, try to figure out how much space is there on. Then we can kind of go on. So I'll get to them. Warren. A 3/4 view. But I wanted to point that out to you in this. We got the main gesture line, though, for this one is just coming straight down the middle. Okay, so right down in here, Obviously, we're dealing with an egg shape so that egg shape I can change colors here. That might be a little helpful. So standing against something with contrast that Ah, gray eso got the ear in the air here and they're getting hidden. Uh, that oh, egg shaped coming down. Obviously. Here, um, it's kind of interesting to If we start to look at some of these colors were some of these shapes that I've kind of talked about before. You can start to see, like, maybe even a suggestion of a pill shape. So right here we were starts to get a little more on narrow. No, we get the hair here, but we got a little bit of a straight here. Ah, little bit of a straight there. So it kind of suggests, um, you know that we're getting a little bit of this going on and getting away from something that's too circular. So getting that kind of street and then also the chin, we're seeing a little bit of that as well. Another thing is kind of interesting to so even though we have the hat that's cropping the head off and we've got some trim or some scenes or something here, look at these very soft symbols on the hat. So coming around another one here, um, the almost lying up the bottoms with where the top of that noble would be. So it's kind of suggesting where the top of that is and that keeps the head from looking like it's just completely cut off. So having that little bit of something up there right kind of says OK, well, that I can kind of see where that would go. And artists are very good at dawn that even though things are hidden, concealed, um, perhaps even turned away from you. Eso simply not visible than those things they will suit will suggest it through other features and things like that. So the cheekbones here being the widest part of the front of the face here, really, of any part of the face less coming down, and we haven't talked much about it. But we got the eyes roughly about halfway knows, and then you can see the corners of the mouth track nicely. So this may dip down. We kind of get back to that straight line where everything is kind of tracking pretty nicely here, Shin. So again of not too much there to talk about, but I think I wanted just to remind you of some things and then ah, we can kind of elaborate on some of these more vertical and stiff facial proportions later on Branzino here, um, dealing with a little more of a sophisticated view, something that's gonna have a little more gesture to it. So any time we confined that curve that long, longest sustained curve, that's what we're after. So again, I'm going to point out Keystone, We can see the shading underneath the lip there. So there we are. If you follow that center right, own up. We're getting a little bit of shaving here and perhaps, um, some hair to even help us right in there. Finish that center line so we can It will be here to where the cheek is here. That white is part. Um, this was our the side I've been come to the narrow part over here right in there. And perhaps we can get the gesture line for the left hand side. So basically, you know, if we if we look at the tracking now, so this way. So we're saying this is the front of the face. So the base of the nose tip of the nose, um, corner to corner, as long as the model isn't, um and some sort of ah smirk or making ah shape or suggestion with their mouth where one side is different than the other. They should all track the corners, the bottom lip, the bottom of the chin. I'm should all track nicely if we look at the top of the head even. And here we're seeing some of that, even up into that hair and all that stuff. Kind of echoing that these features like the bone here coming off of that seeing a little bit here, cheeks here, um, so, starting in the eyes moving and in perspective on this side flesh, that sort of thing. So the idea on if I just turned this into a box, even and it's following that feeling of Okay, the center line is here. Maybe I need to move that. And on wine that up and then feeling that angle through the eyes coming up here for the forehead, the nose, the tip, the base corner to corner bottom lip Chen all kind of tracking, right? So nowhere on that side of the box do you get this going up this going this way and that going this way and these awkward angle. So you kind of get this flow here, Um, so very important to point that out, you know? And then all of these features in the base of the nose, which is like a triangle all getting built off of that. So moving back to that keystone and where it's flaring out, um, top of the lip, corner to corner. You know, seeing how there's less space here and more on this side, just like there's less space here and more space here you put the sockets sockets. Obviously, we got that bone coming around cheekbone, all that stuff. So this represents on the front of that box, and then it starts to move back, so we're underneath it. So if we were to continue that angle back, put in the ear and we know that skull, Look at that. The curve and the turn of the hair. Um, maybe suggesting where the back of that school is there and then the neck joining way up here and coming down That's your pit of the neck. Could the sterner Clyde of Mastoi is moving up towards the back of the here so that hair even indicates loosely where suggests where that here is so that skull is moving up and back like that. Everything is getting built off of perhaps a box idea like this. So this is moving back and again, All of this is going to track. So once you, um, you start to find these angles, try to keep all of that consistent underneath. It doesn't matter of those lines air in the perfect spot or not, because you can always change him. So there's your box idea. Um, you know, there's your chin here underneath. Suggested there. Next, Um, we got the subtle little hatching slightly darker, where that could be going up and a meeting the front of that here. And we've got this wonderful, um, all the way down to the pit of the neck again, that skull going up and back around that box like that. So then we can carve it out. We can start to carve it out from there and get all the details. The rounded, more rounded shapes, um, die gastric clean underneath and all that you've got. You know, this hairline, all these things that are kind of flowing, But underneath it, all you know is you know that idea, uh, that kind of box construction working off that gesture line. So in there. So that's that's a good look at, um, this branzino. Let's have a look at this. Fetch in. So another 3/4 view. Let's take the idea of, um, a sale. So finding again that gesture that point in there and there and then trying to get that gesture of that's almost a vertical gesture there. Then we can start to track angle. The corner here is we can't see, but we can. We can see this. We can see this. And then we can look up here to the top of the skull to see where the shading is, where that starts where this starts, and then we can start to figure it out. Look at the space. No. Come to the short side right here and try to determine how much is on that side on. And then we can come over here, do something similar. A rule, real light. So here to here, then here to hear granted, things will be added and subtracted. But that's the idea where after on, then we can start to lay in Ah, these lines could be the tip of the nose base of the nose mouth. Um, al corner to corner here, chin um, and Once we we start to figure that out, we can almost come, right, Teoh Here. Let's come right to this. Say this corner. So that's moving in to say like this to that corner. Um, and then we can start to figure out that angle. So remember, that goes up and back, OK? We don't want to bring that down because you're gonna cut off the top of the head. Eso get rid of that. So up and back aan den we can start to figure out you know where that sale is. You know that back part And here, and that's going to help us start to locate the corners. And now that is moving back this way. So we're getting that slight angle here, and then we know all of this now is tracking back. And here we could get that ear. We know the bait. That skull is slightly bigger in the back, and and now we're kind of on our way and weaken do our sockets, You know, if you want. And here, maybe bring that out a little bit. Um, you know, Rudy that knows that coming out from the center so that tip more out here and then going back towards that keystone right in there, Moving up, Um, see that jaws coming in front and then will be here, like, so, so down around here. So, um, we can see under. So you basically are taking this idea of that sale and you're making it three dimensional. So we're doing this and then, you know, once we add the skull, we render things out. It's going to change a little bit, but that's just a really good starting point for all that. And then once you put in the hair and this wraps and starts to go into the front of that from plane and then back around and then we've got that bonnet on different things happening, and here we've got the back of the neck. We can see a slight indication of that hourglass. But then because of the torque, um, we're seeing the gastric plane in here. And then right here, we've got that sterner Clyde of Master Wade. And because we have the costume coming down coming down, that's all. Getting lost, hair flowing back here and all that stuff. So I mean how Just having a look at some of these ideas and trying Teoh, map it out and just make a little more sense out of everything.
25. Master's Analysis; Head Part Two: so another fetch in here. Similar thing. Ah, a little more of an extreme 3/4 view. But we can still see all of these key points. Map it out. Find that gesture line that longest curve here. And we don't have much on this side. It all. So all these features that you're seeing, the nose, the meat of that lip, all of that is getting built off of that gesture line eso with the gesture line coming down . Ah, sliver, sliver of the opposite side. Um, come down and here and say we've got a lot more on that side. Now we can start to look at the angles. Okay, track it. Okay. Middle, the middle base of the nose lips, Sen. Okay. So we can carry. And if you don't get the line right, you can always move it. You can take it down. You can move it up. You can erase that. You can start again. So don't be afraid to put the marks down like you see it again. Skull moving up and back. Okay. So up, up and back here. So once we find no, say the top of the forehead. Senator lining gesture line cup coming up, Moving back. Um, get the chin here. Um oh. Kind of moving back in that area. And then once we know that's okay. If this is the front in the front of the face, then we can say, you know, this is the side. So moving back here, we can start to locate the ear again. If it's too big, too small, don't worry about it. You can always change it. So kind of looking down a little bit here through the eye sockets. That's probably a little too heavy to script Lee. So try it again. So, um, probably more in here and then down through here like that, So I can kind of take some of those features, move him down a little bit. Um, so ear towards the back of the head, we get that nice feminine neck going on. Not too skinny, though we don't want to make it to. Then again, the chin tracking this way. And all of these features are kind of building off of the front of that face. So, sockets, you come in here and add the hairline again. That center line that mean gesture line. Sorry, for the move coming up. You can see that little strand of hair almost suggesting that center line kind of draping. And now it's kind of falling on the side of the face. And here, if we get that skull, we don't get that perfect. That's okay. We can all of the hair. A lot of times will even make up for some of our errors. So again, corner of the mouth. So, yeah, you know, just all the same. Same stuff here. And this Trying to break it down for you a little bit more, moving that socket over a little bit so that we start to let's get a little more information there about how to use some of these. I mean, you could also, um, you start with that box idea. You find that. Find that gesture, find those angles, okay. And built build on top of that, that box center line. You find your eyes, those everything again, tracks. Once you find the I come to the side of the box here, you figure out where that school is. Sure. What happened there. You get rid of it again. A skull moving up and back. So I kind of cut that off a little bit too much. So here, neck chin coming down. And so what? So again, just working with these simple things, Um, simple shapes, simple construction ideas and getting the feeling down And then again, coming here and add the hair, all those things, and it will start to play out a little bit better sockets, eye sockets. Got these nice cheekbones and so on. So that's just kind of using the box. So all right, so that again, looking at the masters work, trying to examine it, trying to extract mawr information out of it, trying to see how these things work, how other artists who use them and all of this and is in the name of helping us understand that even more so we can start applying these ideas to our drawings. All right, so we have another van dyke here. Believe it is again, some of these air hard to identify, but this just again pay attention, obviously, to the head and some of the neck. So from a side, remember? And all these air side slightly 3/4 inside views, and they're all tilted away from us. So you see, the top of the skulls are moving away. All except for this one down here in the corner. And this Look at the neck and the hourglass figure hourglass idea. So again, if we had the mask of the face coming down head moving back up and back something like this , then the neck, Um and we are put our egg shape here and that, you know, the neck is an hourglass. It was attaching up here to the base of the skull to the dye gastric plane and so on. So that's the hourglass. And, of course, in the front is coming down to the pit of the neck and then attaching towards here. But you can see that here, even though we have the Adam's apple and all that, um, gonna see this basic idea of the hourglass again, attaching up here to the base of the skull and here is coming a little lower, like so to see these lines and hear trying to feel the stretch of that net this way. So that tube I'm really bending over and it's for shortened to because it's leaning away from us. But, um, now let's look at that sale shape so we can see that right in here from here, all the way down to there, we can see that construction line was put in. Adjust your line on. Then Everything is built off of that, right? That's kind of interesting. And almost see that all the way through this was a little bit looser, but you can see it running up the news here and then around that chin again. Thing is getting built off of that. The head goes up in back, okay? And that a mask of the face comes down, a mask of the face comes down. So once you find that angle, Okay, once you understand this, um and that's that's the relative angle to say we're working with. Then that would be a right angle here, But we know what goes up and back. So if you're using this kind of gesture line that, say, I'll go over here and you know, your gesture line is here. That would be a right angle that would be chopping the head off. So we know that skull goes up and back relative to that. So it goes here and you can see that and all of these. So that's our angle. Get near the top up and back. So just something to keep in mind as you move forward. Very important, because beginners tend to chop off the top of the head on, make it too short. So here is a little bit too circular. I mean, I would think that he's actually come back a little bit. Probably in here. Maybe that was a correction. And that ear would sit back a little bit. Um, so with this sort of perspective, All right, so this say, I'm going to take this, for example, and we know the angle. It is roughly like this. I'm gonna box it out. So if I did a lying for her eyes the bay, the root of the knows where the nose right here meets the mask of the face down here. Teoh here, Um, and we start connecting these construction lines. We know the angle is roughly in here, so the eyes gonna be pushed towards the top. All of these features when we scrunched a little bit and we can see that where that chin is coming around, that's all kind of matching. That angle. And then so once Once we find that, make that a little bit wider. Once we find that, then we can do this box construction. And I know with this box construction the head. Sometimes that skull will get a little bit cropped off. But that's okay. We're gonna fix that. And the renderings. Let's say the box comes back like this. All right, so all of these run parallel to each other, and then we can take from the corner of this I and run a line parallel with this one now, okay, All of these run the same. So right up in here is gonna be the airline. And this sort of perspective, um, it's gonna be towards the top of the head. And then, you know, we can round out that skull, and we know that skull, and just below that here on, then your neck begins and all that stuff, so this would be rounded going up towards the ear. And then, if I were to add it neck, maybe that will come down in here like this. So you'll see that all over here. We don't have an ear on this one because it's hidden but weaken. I feel these construction lines feel these angles. Oh, switch colors. And once we know the angle, we can come back and you'll see that here is ah, pretty well lined up with that. So this were your eye socket. All that's getting built off knows whatever. So Eisen here we draw that line back on. You know, that's roughly where your ear sits. So when the head, you know, skewed a little bit, then Orleans or tilted, I should say away from us. Then it's gonna favor the top of the head a little bit. And obviously, if the top of the head was facing you than the ear would get pushed down. But it's all relative to finding the lines, these construction lines for the eyes and everything. So anyway, I think some good pointers air for the head and neck.
26. Body Part: Neck & Torso: So look at the neck and the deck is really just a tube. I'll actually I'll do this in three different colors. Just say we have, Ah, thick neck mail the neck even bulge out a little bit. Um, you have this idea of a tube you could have average, you know, coming in slightly in here. Average male average, maybe. Ah, muscular female. Have a baby female young infant. Things like that where maybe even that neck may become a little bit thinner for more narrow , so that can easily be broken down into a basic tube shaped. We'll talk a little bit. Um, we're joins. But basically, if you think I alluded to this earlier, just follow the straight down the neck. Basically what's called the pit of the neck, except for simple terms. Um, super sternal notch for those that are, well, more nerdy and want that information. Uh, so So that's from a front view from a side view. I'll just kind of bump over here again, this top of this head moving up and back. Um, and then that skull is going to come around right? This will come up. You may have the ear back in here. So that's gonna change. Gonna come round chin, all of this. The chin, the jaw, all that sits in front of that year on. Then the head comes around the skull rather than right up in here where you had this egg shaped. That's basically where the next the back of the next starts on and then in the front is in here. But you're going to be dealing with this hourglass looking shape from the side. Um, So again, don't join the neck too low down here. It's going to give the back of the head of funny shape dont come in too far or is going to get too skinny again. The model will allow times tell you, if you were looking for this landmark, Um, And here there you are again. This is going to be higher in the back. Ah, there it is in the front. So you kind of had this again on our glass sort of shape versus this tube shaped. So that's pretty simple stuff. Um, you may get to a 3/4 view or an awkward view where you're not sure which one to use, but, you know, you're We'll cover some of that stuff as we move forward. Um, so let's look at the are the rib cage. So the rib cage can be looked at as a on egg. So you could easily do this, this upside down egg, you know, or something like this for the rib cage. It can easily be a tube. Something like that. It could be a pickle barrel. So maybe bulging out a little bit. Um, like, so? So again, I'll make that a little bit darker. We get this bulge, it could be a box. Again. The box is going to present. Um, it's gonna be a little more difficult for because you again you have this interior corner, this interior line that sometimes is very hard to locate. Um, these these shapes tend to be, um, longer. Okay. So longer in the are wife. Okay, so the gesture lime. Um, here. So the box really draw that? Very well. Would be slightly taller, more of a rectangle. So something like that again, we're dealing with all right. Rib cage only. And I think the beauty of this again is we get to this simple idea, and that's that's the key. So it doesn't matter if you have a front side or 3/4 view. So if you were dealing with, say, a 3/4 view like this, we could draw that gesture line this way around the egg. Um, you know, you throw your nipples in the air and you got that, Um, the your center line could be here again. We Diogo around the form. You can have something like that in the course. Um, same can be said for the pickle barrel. So, um, all that works, obviously for the box, Um, that would be turned or skewed a little bit, but we had to stick. Let's see a straight on just for comparison. That's fine, too. So again, um, all different shapes you can use very easily. Um, for the rib cage and the waste just extends off of that. So if you were what? Same in here. The waste. We just come down a little more. So it would again just be an extension. Um, extension here and so on. So come down a little bit more and we have our waistline. Um, you know, may you may curve out. You know, if this were the center line, um, rib cage coming down, whatever. And then coming down to the belly button and then maybe curving back out towards the pelvis . But all kind of easy shapes we can use for that, um, and then we get into Ah, the hips and make sure I'm one camera here. I think I have room to squeeze that end. So for the hips, we had, um, some again, a variety of shapes you can use, and what I'm trying to do is give you more than enough information. But this, too give you some options because you may like this idea of a bulging pickle barrel, you know, for the torso. But for some reason, um, that may not work for another view or another model. So you have a variety of things and tools that you can use depending on what you're seeing at the moment or what you're feeling and so on. So I just try toe, give you as much as I can there, All right. So you can think of a So now we're gonna again move down to the pelvis area. Um, so we can look at several shapes here, so I'll say, um, it would just call this hips pelvis area a bulging box. So we have bulging box idea we can use, um, this idea of a tube, but turned on its side. Something like that. Very effective, even like a miniskirt can be very effective. The mini skirt can be turned into a box. I'm so you could take your this and turn that into a box as well. Three dimensional form again dealing with that interior line, though that could be a little bit challenging. And the beauty of all of this is, um, these things can be modified, obviously, So we can come in here to say this bulging box, locate the say, the center, they'll in some cheeks and leg muscles coming off slightly wider. And we've got the front that can return into, or the back of the waist area the pelvis rather. Then we can also ah, you know, turn this sort of shape and to the same thing. You know, it just doesn't matter. That can be you know, the front. So in the leg to be the leg coming off. Crease here. Crease hair on then. This is all kind of moving up into your belly button in different areas. So a 3/4 view. So maybe you're seeing Mawr, um, of the side of that leg, like so, um and, you know, again, all very useful easy ideas to use the beauty of this to let's say we went with this miniskirt idea so we can draw this sort of shape and from there things attached. You can even use a tube for the entire rib cage in the pelvis area. So we'll just call this, you know, the entire lower section. So you're combining the waste right rib cage only on. And then we added the waste just an extension, basically through all of this. And but if you took and added and combined those that's a into a tube, then you know anything can happen. We can take. We could take this. They're located. This air center line is here and we can see that is our kind of crotch area leg. Maybe this leg is coming off. That leg is moving off this way, and from there we've got this tube and maybe the tube. It's just going straight up work for right now. So again, and then then it has a twist to it. You can come in here and we're gonna talk about this later. Add this twist through the body and you can easily create a twist off of that. Um, so this could be paying it. This is the front of the body. Um, more say this is the back of the body. So this could be the glutes right here, moving off twist. So now this upper body is twisting, so you're starting to see more of the shoulder arm here That can Also, if you use this tube idea and again that two, we can easily add a twist to about using that s curve. But let's say you want to create more of a lean. So say, now, the upper body, that tube is doing this. So now we can get ah, that sort of thing connected. So hopefully you can see how I'm just using these ideas. You're very simple gesture and structure ideas. We can easily do some very dynamic poses. And what the majority of what you're going to be doing, it will be very dynamic. So very rarely are you going to no, do things that air straight on. We will eventually do proportions and things like that where we may do this very, uh, stiff figure, Just kind of standing here. But, you know, we're only trying to mark out proportions on, but then once we get to and that's going to give us kind of, ah, general model a general reference that we can use when we start to get into I'm more difficult poses. So anyway, that just again gives you some various ideas on DSA. Simplifying the had the torso for the torso. You could think about it as you know, two parts. You know, you've got this rib cage, uh, thing coming down. And then we had this kind of teacup looking shape of the pelvis is very, very complex, but again, but we're going to take all of that. Either use a tube weaken modified into two parts. We can keep it one. And then that's going to morph right into whatever idea you may see fit. Uh huh. So let's say we have a tube like this, and maybe for this particular pose, you're like, Well, I really want to use this sideways to buy idea for the hips. That gives me my leg, this legs branching off and so on. So and then because they will ask my center line. Um, I can see kind of this triangle shape for the head. And then, you know, we can start to map things out a little more clearly. Arms we've already talked about. That's just tubes, tubes, tubes all the way for the limbs. And then we just can't tackled the head neck, rib cage waste and the pelvis, giving you again as many options as I can.
27. Master's Analysis: Torso Part One: Okay, So I believe this is a Van Dyke. Please correct me, if that's all. So let's let's look at, um we change the capacity here a little bit. I think that I work pretty good and bump that back just a little bit more so the connections. So the head to the shoulder, shoulders to the torso and so on. That's what we want to start paying attention to. How do these nice big gestures of each part flow into one another and so on? I like to start with the head. If you feel once you get into this, you like to start with the torso, whatever works for you, then that's fine. But I am going to build all for that. I feel like once I get that placed, then everything relates to it. So let's talk about that. Um, so the mask right here for that face, that's your gesture line right there. Then from here, you can do a lot of things once you understand that. You know that head is moving up and back. So we talked about the mask of the face and the top heads up and back. OK, so it doesn't just head back because that's going to cut the head off and doesn't head back and down because that's gonna chop this top of the head office. Well, so if you're dealing with a right angle here, that's not what you want. So you don't want that, Are you want something that goes slightly up? Okay, so once we figure out that this is our angle and I'll just do that street, then we know this has to go up and back. Okay? So you want it greater than that 90. And that's what's happening here. So we get that gesture line, we can map that back, and then you can do whatever you want. You can add that egg shape which looks like that's what was done here. Ah, Then we can start looking at the chin so that Shan is giving you this indication. So that tells you, um, that we could see the features of the face. They're running like this. They're running and basically, um, this angle, Um, but we can't. But that would if you could see through again. That's kind of what what you would be seeing there this bone would come up and You probably have the ear roughly in there, but we can't see it because of the hairline. But we can see that little bold right there in the hair. And so that helps us to locate. Ah, and envision, perhaps, what isn't there. So again, artists like to use indications. Other body parts, subtle things, too. Fill in the blanks. If we talk about filling in the blanks, we can even look at this hair again. Top of the head. And look how all of that shading right in here. Okay, Right in there is done purposely intentionally to help us. You can see how these curls come around and they kind of flow in touch where the top of that or the main shape of that skull would be. And then our net comes up. We can even see a slight shape there that helps us connect that neck in space. To that shape, we could even see something right in there. So there's our connections. So from there we had the shoulder lines. Everything flows, but what's connecting it knows this neck. But inside the neck now we had that spine. And here there's also the trapezius muscles which go up in here is well underneath the neck underneath the skin on. Then they start to flare out here and our shoulder line comes across. But that's your connection to that to the torso. So I'm gonna work more with the rib cage. Now I'm going to find that gesture line. Okay, So that nice gesture right in here. We can see that rib cage there. We can feel it in here is well, so we can say pretty easily that this is where all that would be. Now again, we're not going to go. We're not going to go to the shoulders. We're not going to go to all this flesh. And the LAT muscles were gonna go right to the hip, so down in here and down in here and try to find that waste and then make that tube there. And then we could go to the narrow side, were less space and try to find that center line that spying that goes up. So that's that's the feeling we want. And so I could add a little bit Mawr here and then if I wanted to, doesn't matter. But that would give us that tube and here and then all that's connected to the waist. Eso the waste moving down is getting pinched. There is getting stretched here. But remember, remember that. You know, if this did that bad, if this is our tube Ah, for they are rib cage, then that just that waste is just going to be an extension of that. So all color that waste blue and there and we can make the rib cage. In this case, were the upper body here A little more orange, and then we get into the hips. So with the hips, um, we can do the skirt idea. We can do this kind of bulging box. Eso bulging, bulging, bulging. Right, That works pretty good. So it's not just a straight box, okay? We're dealing with a bulging box, a pillow or something like that. And here and then once we add that center line, and that gives us a position that gives us a feeling of looking down on it, I am being over top of it if we start to add the sides, which we will. But for now, um, we've got this shape of the head, skull, chin, that line right there is so important. It helps you see just enough of that feeling of the front of the face that you can start to determine, um, where all these features were looking and pointing and facing so spine curving, curving, changing direction here, changing direction there and probably even changing direction. Their case were articulating that into more of a structures were taking this Esseker. And we're going to say, Okay, it's coming down. Ah, changing direction, changing direction and then changing direction. So that's going to give us that feeling. How that how dynamic all of that is I could even make that tube a little bit bigger. So, So waste extending. We got this feeling of the bulging box and then these legs are getting built all for that and moving away from us. Hedging All right in there. So, um, I think that's pretty good for this one. Um, I think we can kind of move on. And then let's look at another, another example, and we'll talk about some different ideas. And again, I could interpret this many different ways. Um, this is just one idea or several ideas I used to help me fit in these ideas of gesture and structure. All right, here we have ah year. See? No Guo er, see, I know. So obviously we've got some head neck and now we've got some torso waste and pelvis. So let's look at a little bit. Let's start with the head. I do think the head is important because I think the body works all for that so we can see . Even though we have a bearded fella here, we've got that shape again, up and back. Um, you can see even details. I'll erase up for a second right here. The details in that beard almost suggest where that chin line is as it comes up. But this is kind of do this sort of shape, and then I can ag it out like this, and we're not getting much of the neck. But we can see a little bit of that trapezius muscle and again follow the feeling of that hair that flow and you can see right in here. That's almost indicates a subtle indication of where how that neck is getting bent, then flows up towards the back of that, um, skull. We're not getting much of the ear. But all these construction line to the eyes and everything all flow nicely, so that's going to attach to the torso. Let's just say the rib cage. So down here is the pit of the neck, so that spine can It comes up so that neck would come down, attacks in here on this side. That would be, let's say, our tube. We're getting that side view so we can assume even though we can't see the left side of the neck, there is an hourglass feel. Let's now join and then from here way get that longest sustained curve. So again, we don't know how far it's going that way. That's going to come up. We're not going to flesh out and try to use the shoulder and the pec muscle in all of that . We're just gonna find that longest sustained curve and run it up over here. Same thing. We're not gonna worry about all of this. Okay, the bumps. I'm gonna find the waist down in here and then run it up, and then that's gonna help us determine on how that's working. So that's kind of moving away from us a little bit here you see the thrust and the push in this section of the body, and then this moves away from us. This moves away from us here. The angle of those shoulders are in here. We got that sort of angle going on. So if we look at that, you know, that's our shoulder line. We've got interesting to If he'd look at this point to this point, this one is slightly farther that way. So that if you just drew a straight line, you may look something like that. That would be easy to do this and that one. But it's actually moving. If he did the pen testing lined up and try to get a happy medium angle for that, uh, gesture line, it would look something like this, you know? So this kind of have to pay attention to the things a little bit. So that neck joining and then the mask of the head is looking up this way. So again, um, now we could come down to the waist again. We can see the center line here, um, coming up and then from the pit of the neck. So from the pit of the neck to right there. That's life would process the bottom of the rib cage. We follow the sternum, we can see that angle is changing here, and then it's coming down here. And then it's curving, even war there. So it's like the shoulders air rotated away from us. So that's going to push that gesture line really here. But we can't look up top, right? You don't want to look up top for your gesture line. You want to come down here and figure out where it's that. So if I say okay, well, that's the middle. And then now I'm just going to run that up down the middle for a second. But then once you start getting your details and when you start working with the more subtleties and getting these more of a structure to it, you could say, Well, really, that pit of the neck is in here, and then from here is kind of moving this way, and then it's moving and you may not know how far it goes yet, and then it comes here and then is moving towards the center here. So looking along that gesture curve and then plotting out those points is a good way to get a zeroed in, but again, we don't know. So again, I don't know how far all of this goes down. Um, so the way to do that is you want to come down and this figure out, you know where the pit of that neck is down and here. So that's coming down. Shoulder's going out. Schiller is going out and you get a rough idea of where this construction line is for, Let's say, the chest nipples. Even we could even get a little bit higher and say the nipples. And then we get the construction line down here for the Naval. Now this is getting stretched, and this is getting pulled, so that's going to skew it a little bit. There's some perspective going on so we can see down. And here, roughly that could be, um, the Naval and again that that could be wrong. And that's fine. That may be off right now, and it typically is. So if we come over here and we say all right, well, this is our shoulder area. Our arm is moving off this way on. Then we can start to say all right, Well, that's that's something that works. So what? This is our arm here, Uh, and this is moving towards us. Then we can say I Where is this angle right here? Because that's important right there on. Then we can start to match things up. We can say, maybe it comes in here. And then this fleshes out there. We've got all this bunching going on with the skin, so this could be coming down, no bunching and then moving out this way. So that starts to look right. And that's looking pretty good, Then then you can start flushing out everything else. So we've got the curve here on the head. May have to get raised a little bit. So kind of building off that neck, the same thing over here. You get this going on once you understand that you know your creases, and here you you draw that volume around it. Typically, that's where you really see that stretch. Unless you're dealing with a perspective, all that flesh is off of it. All those bumps and then we get down to the waist. So if we know the rib cage say is roughly in here, okay? And the rib cage would come down All of this stuff we got the naval, so our waste is getting built off of that. All that waste is nothing but, ah, an extension So we can draw that extension down and here for the waste. And then we can decide what to use for the hips, pelvis, and you've got plenty of ideas. The pelvis probably is going to end, and here we can't see it because the knee is hiding it. So in Plus, we have the clothing, all everything that's going on. But we can see by that and the twist in the body. You know, that hip the pelvis area is probably gonna be roughly in here. So then we can kind of create on this bulging idea of like, um, box a bulging box on. We know that this is coming down, maybe genitals in there, and maybe that would be a little too generous. They're so you take off a little bit. And here. So we got the bulging idea again. This is probably starting back in here genitals and here, cause that's our center line. So bulging, bulging center line in there and again that leg is coming over this way. So that could be how we flush that out. And then from here, we just kind of find our center line. We get a rough idea. We can look at the side here that's getting the arm is coming down. Get a rough feeling for the angles on. Then you can start attaching, you know, the legs, the tubes. Oh, and so one I want to get ahead of myself. But that's one idea. Um, we could also turn that into this sideways to okay again, Boeing a little bit, right? Something like this to get that again, find that center line genitals, and then the leg is gonna attach up in here, and then we can start to find those points. Um, so I think again, just taking this one, breaking it down. We can break this down 10 different ways and come up with 10 different ideas. This is just one idea using some of the ICT, the theories and shapes, basic structure, basic gesture, things that we have talked about
28. Master's Analysis: Torso Part Two: So a reclining pose here, I'm going to start with the neck head in the neck, rather. Um, just look at how that relates to the rest of the body. Everything flows there. So with this sort of pose, we can see that neck. Well, first of all, we can feel the chin getting tucked down in here. We can see that reflected in the neck as it goes down like this. And over here we can see an indication of some of that bunching that's going on. So So the neck. Then we got Actually, this is the what I should have done. Let me try that again. Just to set a good example is good of this long side. It's almost vertical, right? So we're getting that come around to this side like so granted, the in the shoulders. I want you getting a line about like that. So this is starting to flare off basically because the trapezius muscles are back of the head. Let's get back to the mask of the face and here so we can see that ear right there. And that's a really good indication to that. The head and the mask of that face. It is really down because you're not seeing much of the front of the face. So you're only getting about that much. And as we follow that up, we can know what's going to go up and back. But I think we're better off to turn that into an egg shaped. So we're getting something like that. So the mask turning it and to up and over. OK, we don't want to crop it off here because that would not look very good. And you would sense that the model is getting the head cut off there. So the other year, if we came across the skull, it would be over in here somewhere, but obviously getting hidden because of the perspective. So that's the sort of thing we're looking at. If we look at that center line coming up and over that skull down and here, then we could say those trip trapezius muscles this size will be a little more relaxed and pinched and here, But so all of that's getting bunched up, you know, and then we've got that shoulder believed or that shoulder muscle coming up there. But this this look at how, um how this attach is now. So how that neck which we can't really see a lot again because we can see a good portion over here. I've got a little bit of a mess over here, so let me tidy that up. Um, so we can kind of get, you know, the pinch. All that is getting pinched in here. So this is getting stretched. But then it's kind of blending into that trapezius muscle that's coming down. And here this was getting the size bunch the size getting over. My neck is coming down, and then it's going to attach you write it right in here to that rib cage. So good thing you can do sometimes I'm is used that Coke bottle method. So basically getting that pinch up and around and like, we look at this the longest gesture line for the entire lower body listing that that's what we're dealing with. And we can will be here to Assad that slightly pinched and we have that now we're gonna try to run that almost parallel with the other body, but and we're not gonna pay attention again to all of this near the bumps or not, we don't. I don't want to be concerned about that. Come right down here through the waist. This is what we're looking at to find that center line, and we can see it's favoring this side. So that's coming right on up. Okay. Now, if we were to take that a little further, we can find some points. So maybe the top of the neck and here to the base, and we can see it changing directions now and then moving from here to here and then from here to here and then down in here. So we're seeing the dynamic structure, straight lines of that pose of that spine. So if I just put some dots there, you know where those things are changing directions? Um, maybe that would help. So you can get in that gesture line beginning that longer. Longest gesture line. Excuse me, We can get in that center, but then obviously things may change. So maybe up towards the neck is here, and then maybe see, it's here that is coming down, you know, and then going back up and then, you know, changing off into the hips. So that's very common to see that but I think it's important to get that simplified gesture and then kind of break it down. So kind of getting back to that coke bottle theory. So if I mean switch so good to hear. So if you wanted to join it, say that neck is coming down and then we can just kind of burden of flared over like this and then join it like this, and then we can flared over and join it like that. I mean, granted, you wanna have a little bit of work to do to put the shoulder girdle on everything over, But sometimes it's nice to see it this way or imagine it this way, even if even draw it this way. Um, because I may help you understand that flow, you know how how that shape and that Coke bottle is working together as a unit. You know, the neck, you know, in that shoulder, and then you can come back. You want ad on top of that? So anyhow, um, again, um, kind of going away from us, and then that kind of levels out, and we're getting a little bit of this happening, so I'm gonna have talked about that waste being an extension of here. The rib cage probably is more in here. So let me switch to a black near the rib cage is gonna be roughly, you know, up in up in here somewhere. So the waste is coming down in here, and then we get to you Almost is bulging kind of box idea. Hello. We could think of a hello, something real fluffy like that. And then once we had that, we can figure out we're seeing Mawr this side of the hip, the side here. So we can kind of make this little, um, oval shape and here to indicate you know where the decreases on Then we can start to join things. The tube is that socket is right here where the leg joins. And so I don't want to get much into that because we don't really need it right now. So that's one thing, of course, is that we're always paying attention to the angles of the shoulders like this. And we got the hips moving slightly down like this. So let's do one more layer over top of that for one second. I can get it so that the big sweeping movements here. You can look at a few different ways. We can look at it as this sort of sweep. Uh, you almost end to that sort of idea. You're getting this rhythm like this, and then, you know, the hips, all that coming down like that. So you got a big sweep. And here and this is looking at the big picture, right? Looking at rhythm and things we know we haven't talked much about. But I just want to point these things out and more advanced class. We'll start talking about those. So if I do this over the model big rhythm like this and against, if you can find these movements again coming and it's sweeping around and then back down, game down, No, around and over. Right? So do something. Think about again. I'm not going to elaborate on that sort of stuff. And again, we can break this down many different ways. You can use that idea the tube. And here. Hamma access. Very good. Got that. Joining the waste again here on. Then we can do all of this. So on. So All right, that's that. All right, let's do one more, and I'm going to make this a little bit bigger. Maybe not that big. Sorry about that. And I mean, pull this down. Okay, So the interesting thing here is we're dealing with a clothed figure, and we can't see a lot of the landmarks have been talking about. And you want to come to this position, you're going to have a figure. Maybe you want to clothed figures, costumed, whatever. But the other thing interesting is, even if she wasn't, you'd had this shoulder in this arm that are blocking everything. And obviously, because we have clothing, we can't see a lot of the information that we may need to construct it. But we do know where these things exist. Now we have Hopefully you'll have a certain amount of knowledge and, uh, skill awareness of where some of these things happen now. So, like, we take the keystone, the bottom of the lip, obviously, the face is a mask or anything. So we don't have that issue here. So we have that. And then we know that, um, that's gonna come up on who knows? The school could be here. It could be here. Could be here could be here. I'm going to get something that's close, because I know once I get that hair on there that's going to make up for any error, that's that's not a huge problem. So we had this angle by the lips on your need, the chin. So that's telling us again a lot of what we need to know. Excuse me about the angle and we're seeing under that box. So we're seeing this sort of thing now it may flare out, however, you want to interpret it on the die gastric plane underneath and then the next starts to meet it here. So we had this construction idea We can use that we know now and to help us lay out and find some of these key parts. So again the eyes are on the front, and then we get to the side so all of this would represent the side of this three dimensional mask that I'm building. So we find that angle and we come down to the side and that's gonna be can see the bottom of the year. And there's some subtle indications with the hair and things not tell us, you know where that here could be the top. It just suggests things. So if we get that jawline in there and we know the ear sits behind that jawline, they were pretty good. Then we could start to make some better estimates on the back of the skull and here and then we know that neck is going to join up high, and then we can start Teoh, get the front. So all that is helpful. So again we can see a little bit of a curve in here that the pit of the neck is roughly probably in here. But we can see that little indication of the curve. And here, with that neck is starting to join. And then coming around towards the back is going to join a little bit higher. So that chin is probably a little bit too. Hyleas Eircom down. And here something like that. So and now we get to this point where the next, where things need to join So we know we can see a little indication of a center line right there, right in there. Okay, That shadow. And that's a slight feeling of a center line here. So the longest sustained curb in this case. So this neck follow this is coming down. That longest sustained curve could easily be the say in here. Now, that may not be right. And maybe here, here, here or whatever. I'm gonna give it my best guess, and then I could come back and correct it. That neck is almost moving away from us slightly anyway, So the shoulder is coming over here and we take that our that bottle coke bottle idea and we say Okay, with this could be coming in here, and then she's sitting at a piano or something. So we kind of know this is kind increasing somewhere in here where the hips are in the legs that's probably coming down. And here in somewhere again, we don't really know 100% where So again, we had this idea of that Coke bottle like this and the arm is coming over and all that's getting concealed anyway. But I still think we need to know a little bit about where that is, so we can start to make some ideas with this piece of art here. We can almost see this fold in the course we can see the bottom of the leg. So we feel like things are starting to happen. And here and that fabrics getting pushed out. But we did our tube to buy idea like this and our center line. We can see a little bit of that pinch or crunch side there so we can take the pit of the neck, come down maybe in here would be are in your nipple line coming down to the navel, Um, in here and then coming down. Probably that bottom the pelvis would be maybe in here. So all of this on this side, I'm just gonna do a little tube here. Sideways, too. Could be the, you know, the hips, pelvis. Maybe our our waste could be in here. And then, you know, everything else is starting to I feel a little bit better again. We're just trying to make some guesses and then based on what we know, and then we can refine things. So this is just using some of the tools we have, um, the things we know about and to and also dealing with a much more difficult ah situation here where we can't see, but we have Ah, phew. clues and we can see the neck. We see how it joins. We can see the other side of the body on. We can get this idea of a coke bottle coming down and just basically, um, rapping Let me switch. Okay, so we have something like this, Okay. Next from the net, coming down a little bit farther than the back. And we got this kind of cook bottle thing happening up. Sure. Why did that? And the kind of flaring out. Ah, I think I'm pressing down too hard on my board. Wacky. Try it again. Again. The coke bottle. And we know it's getting bent in here, and we probably got some bunching going on and here with the skin, that would probably be, you know, the other side of that tube If we wanted to use that idea, it can be a pillow, um, wherever you want. And then maybe that center line, the legs would be in here. So they're going in the crotch area, and we're trying to just kind of feel our way around again. That's getting hidden. So we know that like Legos joining here, this shoulder is coming coming at us so that clavicle coming out shoulder coming down and kind of in front of everything else. And then we can kind of start to flesh out a few other things. Hands so on. But so anyway, um, again, dealing with a difficult situation. But hopefully you able to get some points and some ideas on how to handle these things and kind of getting a feeling for how things are starting to join and all that stuff.
29. Demo One: All right. Welcome to the demo. So head and torso neck thinking about the connections? How to How does that head flow with neck has a neck fit into the torso, working with simple yet characteristic ideas? Gesture. If there's a corner and that corner is best used to describe what's going on, then we can get into some structure, some more boxy ideas and things like that. So standing pose again. I'd like to start with that head. Get that neck. We can see the front of the face there. Here, like that. I know this is pretty light. Um, I'll go a little bit darker, but that point we can figure out the shoulder angle. So we have a slight angle here, something like this. And once I find that and again, we get that ponytail and stuff like that, all of that's just kind of blocking what's going on with the shoulders. But I can see from shoulder to shoulder. There is at a slight angle. Now I'm not gonna come out here to the shoulder blade. I'm going to come in here and get that gesture again. The gesture may stop here at LA me Stop here? I don't know. So I'll just do my best guess and just get something that works. Come to that interior and get that interior. And then we can come Teoh side, that has at least on it. I know we've talked about this before, but kind of following through with all of my thoughts. So that's going to give us a general idea of what's going on with the torso. I remember the Coke bottle idea. We can always take the top of the Coke bottle. Weaken flared out. We can join it to what's happening with the lower body. I mean, that's always there. And then you can just add the shoulder girdle area. So now what I like to do is think about the spine so the spine is coming up. I can start to see there is definitely a change of direction. So where the spine is coming up here? It was wrapping around, and then there is a vertical. There's always tends to be a section of that spine that's vertical, so I can use that pencil test. Hold it vertically to the opposed to the model to try to find that vertical section and I think it's wrapping around and about right in here. I'm seeing that vertical section and then it's coming down. And here And how does it come down here Does come down there? I don't really know yet. So I just kind of do my best guess. And then I'll come over here to where the neck is, and I can see we have that trapezius muscle and then we get into the shoulder area here. The arm is raised up, so that's going to lift that up a little bit. This side is bending around and then you can't really see the shoulder there. If I just come over here and then I could draw the tube. So this tube is really coming towards us. I'm not gonna do a lot with it. I just want to find it so I can get that armpit right in here on, then that can in a wrap around here. And then we've got that shoulder girdle area in there. Now I know I've got the side of the body here that's visible on, So once I get all of this, then you know it's easy to find that curve come to the short side come to the side that doesn't has lesson. And then weaken, weaken, Start. Teoh, find those angles right there. And the hand comes up here like so So we've got that going on. And then I can continue that side over here. And then when we get to this side, I could see that change of direction. This is what I was talking about. So that's a corner. So I can come over here and put that corner in. So right in there. Now, is that corner here? Is that there? I don't really know yet. I'm gonna make my best guess, and then we want Let's get back to the side, Um, so I can see the armpit here. So if I carried over here, that's roughly where it is. I mean, from a little bit off, That's okay. I can add a little bit flesh embodied through here, and I can start to make the compression side now, in here again. We know we have that being bag effect. Okay, where that's getting pinched. That's getting stretched over here, so we know we can. We can make that and then we're good to go. So that kind of captures this pinch. And then we see that spine moving back in this way towards the center, and then it moves down. But if we get back to that rib cage, we can say that rib cages roughly right in there are moving this way. And then we have we can add that waste on to it, and then we get into the hips. So for that hips, I can easily use the idea of a skirt. So something like that again, this is the kind of long side over here I can see now that you know that probably needs to go up mawr And here. So I was a little bit low. Once I get the base of that spine, what we hear make my best guess. Um, with a gluteal cleft. Here, do something like that. I got the leg coming down this cheek going up, And then again, we know we can see the side of that leg a little bit, and then this is moving down. This is moving down. So So basically, for this, you know, I think the key take away is going to be use those sometimes yet to use small details, shoulder all this to find the armpit. And then once you find it, then you can get the big ideas. You can start to kind of zero when on where some of those are, Uh and that's very helpful. And again using some of those simple yet basic ideas. Ah, to map things out and then that gives you Ah, I think a good starting point for a lot of this connect connection ideas. And then, you know, once you start adding the hairline, you know, the ponytail, all of this stuff, and then the character, the we started getting a lot more information and things start, Teoh come to life a little bit, And even with these designs, you can get in here. And if you want to add a common nice contour there, um, you know, maybe in here just just so everything is not so sketchy and loose. And that's of course, perfectly fine. So that's one idea for this one
30. Demo Two: eso This one is a front pose. A little bit different model is slightly 3/4 to So, um, again start with that head. So using the pencil test, I can see the You're the angle of the mask of the face on that sale upside down sale something like this. Once I get that, I'm happy with it. I can add a little bit of that skull in there that egg shaped. And once I get that that I know not got that neck coming off in an angle here, See, that's that head is not only leaning, but there is also a slight tilt. So once I and hopefully you remember this idea of taking the pencil test to leave and then to find that tilt so lean and then tilt to find that so I know that has a tilt slightly like that away from us. And that's exactly why we can see underneath that chin. So if I just kind of map out where those eyes are nos mouth I can get to that chin. And once I see that, that I can pull, we hear and see. Okay. With that years, gonna be favor the top of the head because of the perspective. So I'm gonna have something like this, and then we can start to see that Chen go to it. We can see that sterner Clyde of Mastoi almost coming down a vertical, but slightly over here and again. Is that pit of the neck here? Here, here, here. I don't know. I'll make my best guess and say it's roughly here so that no chan is coming down here on the opposite side. And then that we got that neck coming down here. So that's again using those simple ideas, um, thinking about some of the smaller details as well to map it out, and then we get down in here where the shoulders are. I think a good way to do that. Um, is going to be too. I'm gonna map out a little bit of this. We have the nose. Okay. We could see underneath that knows, a little bit, um, lips and all that stuff. All right. So that chin this angle from here to here. So that pinch side. So how does that look? And I think we've got something like this. I can come out here and start to find that shoulder, and that's going to help me with everything else. So now I can see how that necklace fit. And then we've got the pit of that neck and here and then we could see that clavicle coming off here way out to the side, and that's going to give me a really good feeling for where this shoulder is, and then I can start to map it out. So come over here to the stretch side and say, OK, well, I've got something like this that could come over here to the pitch side. I know if the shoulder is roughly here, I'm OK with that. I've got little obstruction there with the breast, but I know that armpit, you know, is roughly And here come over here is probably roughly and here. So if I come down from there, All of this, incidentally, is moving slightly away from us. That's gonna level off and start to move down this way. So that's gonna be, ah, something to know something good to note. But again, you don't try to get these things perfect. I'm do a couple of lines. That's fine. But getting back to this side. I want to feel where that curve is. I'm drawing through the breast. I'm not going around it. I'm drawing through it. Getting this. I can compare that to the vertical of the arm coming down. So this arm is coming down slightly this way so I could do something like this again. Just comparing. Comparing all always. They're using that vertical test to my advantage. So the spine I can see is coming down is pretty much dead center. So I'll just gonna use this as my starting point. And then once I find the pit of the neck again using that pencil test, try to find ah, the change from here to the bottom of the rib cage to the naval too, the pubic bone. So roughly from here to here, it's almost vertical. And then then it starts to change direction. So something like that. So if this is the arm pit and here and I'm pretty happy with that, um I can see there's perspectives. All of this is coming down like so and, uh, curving, so I can compare the nipple. So the nipples, you know, have that sort of angle going on so I can kind of locate those. And that's that's a good indicator on that helps you feel what's happening through the upper body. That helps me locate this point here and that I know what started to change, direction to go, to hear to that naval. I'll draw the naval like this. Eso give it that little bit of ah, stretch that is pulling and then is wrapping back around here. So even though was going off this way, you got that sort of thing come going on. Let's get back up here. So we got that armpit and we knew the side of that body. We can see a little bit of it and it's coming down again. That's gonna be the your rib cage. And there we've got that waste. There's a little bit of ah pinch here, but because of the way that opposes going, we're not seeing the skin bunch up. But then we can come around. We can see that change of direction again. So we have this and then this. So this is coming around again. I'll make my best guess. So this is coming around. I'm gonna say we have this and then we can always come back and round it. That gives me that corner. We come around this side, we can see the stretch happening in here. I can say that bottom is roughly there. Now you see the stretch, and then we can see that oblique kind of coming around here. And then we've got the skirt. That skirt idea could be moving up in here. I think that works pretty good and something like that. So So you know, hopefully again. Are you starting toe? See how some of these all this fits together? It works together in that shoulder. This arm hard to tell. That arm coming towards us is going away from us. Sometimes. If you don't know, you're better off to make a decision. Say it's coming towards us. No one that is going away coming towards that. So again, once you coming here and put the hairline and then this could be wrong. That could come up short. But that's OK, because once once you put the hairline in there, uh, you know it's going to make up for a lot of mistakes. So that's OK. Sterner. Quite a mastery coming down. The lovely landmark there again, we can see the sides getting pushed away from us. Get that. Try trapezius muscle back there and so on. I don't want to get ahead of myself, but yeah, So another good example. There. We can see that center coming down and here and getting that nice change in direction. Oblique. Um, And that getting eventually pulled in that direction. So all right. So that a wrap up that one will do one more.
31. Demo Three: Let's see. So with this one, it's going team or of a side pose, and that's kind of interesting. We haven't really worked a lot with that. So let's talk about some of the ideas we can use that we know. And then what kind of go from there? Someone slide this over. Well, I don't have a lot of room. What is go with it. So the head, I think the head is a very important part again to connect in. So you find that angle. Find that gesture once you're happy with it. Then you know this is not a writing all. It's going to go up and back. We'll go with something like that. And then we got the finish up upside down sale and go with something like this. We can see underneath that chan a little bit, and then we have the neck so we can see that neck is that tube is really getting pinched there. I mean, so we're really feeling that action with that tube. So we know if this is the back of the head egg shaped, um, we can start to, you know, find that ear again. If if you if it's a little bit here a little bit here, you get it wrong. That's okay. You can always come back and correct it later. So we're going to just figure out where that is. I'm gonna bump it back a little bit. That's the back of the skull. We know that neck is connecting here, but it's getting bunched up so we can get that being bag. Look, and then we get to this shoulder the shoulder is gonna present. There's my gesture line for the front of the neck. Sorry about that. I kind of forgot about it. Um, so if this is the pit of the neck in here, then we've got that gesture of the body coming way out and down. But that shoulder is going to present a problem because now we can't see anything that we can't see what's happening with the back. And it's hard to gauge what what to do. So if we are pretty confident with the ear, we can look at the bunch of the neck and then we can say that shoulder do an egg shaped for that shoulder, and then that's coming out to a triangle. If I use that pencil test. I can see that angle is roughly here. Now, maybe here, maybe here, maybe here. I don't know you. I'm gonna do my best guess to locate that. So that's coming out here. So that's going to give me a feeling of where that shoulder is. I can look at the angle of the head, the angle of the shoulder. So right there in that pinch to feel that out, and then I can see that the tube of the arm is moving off this way. So that's gonna help me, uh, locate where that armpit is so right in here. And I've got that chest, uh, up in here, and then I can see that I can start to roll that around two here and again, I come back to that armpit try. I'm not getting getting all this flesh in the back. I'm not getting all of that. I'm coming to that side. And I'm trying to feel, um this trying to look at that space and get that sort of thing. So again, shoulders connecting to the arm. So that's coming out like so A slight angle this way again. It's looking at space now and here, comparing angles and this is coming out to about here. And then again, you may go here, Here, here. We don't know yet. Then I could come back here to the pit of the neck. I start making some a little bit looking at details, um, to help me, Matt things out. So pitted the neck, chest wrapping around, coming back. And then, um, that's connecting to the shoulder, which is getting pulled down. Now I'm starting to see, you know, the back a little bit cleaner. We're starting to see this pinch coming around like so and then wrapping around this way. So we're getting using the details to help us find everything else. Then right in here, we can just use almost an egg shape to find that big stretch over here. And there's wrapping around, uh, so we can kind of see that crease there, then coming around. It's got a dent there because it's getting bunched up. Then we've got the other cheek that could go to the other side. So, you know, once you start getting the have been to the lags back in here, exert doing all of this stuff then it's going to start to come together a little bit for you. But again, I'm not. This is not a full body pose. I'm just trying to get you some of these ideas and things we talked about. So, you know, with this one starting with the head. Um, we know we attached the neck with this tube from there. I had to add a feeling good look at some details in that shoulder on. And that shoulder helped me, um, place, you know, this triangle that the pecs on which was important. And from there I was able to find the, you know, the other parts of the body and continue on. But again, you know, we added the you're the hairline. All that stuff, you know, begins to take shape a little bit more and come around, and you add some of these details. Sometimes it's nice to get a couple of contours in there, so that everything this doesn't look too no stick figure here so I can find some of these contours so on. But so yeah, you know, just, um, working with the same thing. Even though this is difficult. Even though we had this shoulder, That was, Ah, a bit of a problem. I think we were still able to map everything out and get the feeling of that pose there. So all right, three examples for you and now it's time to move on.
32. Body Part: Arms & Shoulders: All right, let's talk about the arms. And I touched on this a little bit earlier, but I think it's good to Can I rehash some of this? Make sure we I understand completely how this works. So for the arms, all that say, you know, this is the upper arm coming down. And then we had that switch. Forearms, swings that way. So we have upper arm, um, maybe coming down towards us, um, in the forearm, swing in this way, and then maybe a little bit wider. There. On this, um, is our elbow curve, Kurt, you may ask why Why is it drawn that way? Why did we interpret that way? And that's because, um, first of all, if you draw the opposite way, that that just doesn't look right. Right. Once you start seeing this and like, I don't know, that just doesn't feel comfortable and you would be 100% correct. The next thing is, you just have to start to understand that there are basically several no tests things we can use to determine, um, different positions, for example, that let's say we we had this idea on the same, um, where the elbow becomes our guide kind of this solution to placing these curves. So when the elbow Thomas facing down So here we are, so was down. Ah, Then you're going to have this feeling that it's swinging up and when the elbow is facing up, so I will draw kind of the opposite. So let's say we have the upper arm here growing up in this way. All right, then, to say the forearm is here, coming this way. So we have elbow. I'll make that a little bit darker trysts up. We get the bottom of the arm there. Then we have this form coming in. Uh, like so I'm someone the elbow. So again, down the elbow here is up. So when the elbow was up, notice how all of this is now swinging down. Case we're getting that sort of thing. So that's a good kind of a simple idea to use, so you'll have poses where maybe the figure is standing there. Maybe the head is face to you. Um, he's kind of wrap this way on. The legs could be out here, and I know this arm is lifted way up here and down and Maybe this one. It's swinging across the body. So in that case, this elbow on this would be the top of the head knows, you know, that sort of thing. Kind of looking bent over towards you. So, shoulders. So this elbow right here, you can see is up. So in that case, you're getting that sort of flow, okay? And this arm is wrapping around, so it's down. Okay, so was wrapping that way. So that's a good kind of guide to help you. Now there are cases when you know you may have this very stiff vertical pose. No, just not dealing with a very dynamic ah, position. So in that case, let's go ahead and draw something here and say, we've got the shoulder line in the arm like we were just standing there and your vertical so again, centerline just and you have this your shoulders just out to the side and they're dropping straight down. So you're almost pressing your upper arm and your elbow against your body. So your very stiff position. In that case, you're going to see that Bice up. So a lot lot of this, um, sort of you from the upper arm is going to appear straight when that happens. If you draw that way, that would be perfectly fine. But straight lines don't flow very well, and we try to avoid them if we can. But notice if you're standing there in this position elbows upper arm tucked against your body when you get to the elbow or the lower arm that they tend to flare out. Okay, so we kind of give back to the curve idea. And so there are a naturally curve this way away from the body. So again, that's something to keep in mind. The back would be the same way, the back view. So let's say they have shoulders or we have our torso. There's our spine. Perfectly vertical, um, arms coming straight down, very, very straight. And then that's going to curve out this way from the elbow so you'll start to see that sort of thing again here that would appear a little bit street. So now, of course, you're going to get into situations that are, um, even a little bit different where maybe you can't see that elbow or you can't see that elbow. So the arm, you know, is either rotated where slightly here or maybe even here or here. So things aren't as obvious as what we have in that case, if this let's say we have another arm here and, um And I guess you know what you think about is if this is the elbow, so we're getting a little bit of the top of that arm, but the elbow favors. Uh, okay, so it's not favoring down because it's is mawr towards the top, it is the bottom. And in that case, you're going to get that sort of flow. It's gonna flow down. And again, you may see where the elbow isn't again in the opposite way. I'm so is here, and the elbow may be in this direction, and in that case, you know it's going to flow up. Okay, so, depending on the rotation of whether or not that elbow is either here, so in that case you can almost start to see that cur, or if it's here and again, you can start to see it go out the other way. So just trying to get a feel for which side that elbow favors. In this case, it's obviously to the top in this case there was favoring the bottom. So this revisit this idea? Um, if you start to include certain things to say, you have the shoulder muscle there kind of bulging out, then that's going to sometimes help you with suggesting that curve a little bit. So just kind of playing with certain body parts, adding them may help to know, start to indicate. And, um, integrate, you know, infused that sort of sort of curve idea. So and the tricky thing is about arms. It's not like the upper body. So you if we had this upper body here in the pit of the neck, you know, the bottom of the rib cages I foid there, the naval, the crotch area. You had these wonderful landmarks, and there's a lot of symmetry, um, here, legs, arms and so on. So there's a We have a lot of ideas and different things to help us, but with the with the arms and that there's not a natural division there, so we don't have the luxury of a spying in different things. I give us that center axis because the arms are very asymmetrical that way. So often times is kind of hard to determine the flow and the bend the curve, if you will, the gesture curve because we don't have that sort of you're landmarks to kind of guide us. But these there's just some good things to keep in mind. There's a few more points I want to make here. All right, let's take this a little bit further and then I think we'll have ah lot of what we need for on the arms. The The idea here is that you know, when weaken, find a curve you know you want. I mean, that's basically what we're trying to do when we're drawing the figure. Um, but there are these cases where you're going to have a straight side. Maybe I'll just use my red. So you had this straight side, and then perhaps you confined are using like I did here with the shoulder muscle, this curved side. So let's let's elaborate on that a little bit because they're basically No. Three ideas with like a curving tube. We're talking about the arm, so let's just kind of kind of stay there. So, like, let's say, Frieda's did a regular tube a straight tube. Obviously no curve where everything is straight. So again we try to avoid that at all costs. Even if we don't see it, we try to put it there, put something that is curved so we make it up. So let's talk about like these three types of curves you can think about. He could have this one where everything is curving the same so that we have curve. Maybe that's the outside. I will go a little darker. Ah, that's the inside. Okay, so we have this this right, everything's fairly even. And of course, we put our center gesture line. If you want to add that it would look something like that so equal on. And then there's this other idea where something made taper eso You'll maybe, Ah, forearm, you know. So it is curved on the outside and then it's a little bit meatier here, a little bit of wider, and it tapers. So this one is curving. This one is tapering. But in the end you have this sort of curve. But the gesture line what kind of be the middle? So it would kind of split the difference, right? Usually just come right down here. You can get a gesture line from that and let me bump this up just a little bit more. So we'll call that Taper and this other idea of where you may have Ah, few extreme looking curves. So maybe, Ah, this one is curving on this side a little bit, and then over here, you know, is curving a lot. So you're getting this sort of that sort of thing. So, um, again, you would just basically say, this has very little or no curve, and this one is curving. Okay, so you're getting this sort of thing, So Ah. Ah, gesture line. You know, maybe something like that. If you were splitting the difference, and then I guess there's always near that kind of something similar, right as what we did here. So where you have straight something like this and then maybe like that on next are notorious for this. So when the head starts to lean, you know, left right starts to tilt, no wave towards you and these angles, you may start to notice this, um, where, you know, maybe both sides of the neck are moving, you know, harmoniously. Okay. And then maybe you get the idea of one side is moving a little more straight, and this one seems to be kind of bunched up or doing something slightly different. And then, of course, it could be, you know, something completely opposite where no, this side no is moving, you know, in this angle and this side disappears a little more straight. Okay, so all kind of things that are gonna happen things, situations you're going, Teoh notice. And, you know, you want to pay attention to it a little bit so you can articulate the curves because, you know, just like, um, we talked about with that forearm. No. Is tapering upper arm maybe a little more even next. Tend to be, um that there you got a dynamic pose you're going to see Ah, a tapering or probably one side that may seem a little bit curved. Or, you know, this. I could even kind of start to straighten out a little bit. So anyway, I think that kind of your brakes would break things down a little bit and hopefully give you a little bit of insight into working with the arm kind of scattered some tips in general. Some general tips about tubes pay attention to the elbow test. Aziz, you start to draw the arms. Remember, You know you want to get probably a lot of poses where their elbows you may not be able to see it, and you have to kind of start to visualize where that's at understanding if it's facing elbows, facing more up or down and so on. So anyway, that's that. And I'll see you guys in some analysis where we look at some of the masters and how they used are these ideas.
33. Masters analysis arms shoulders 1 HD 1080p: So here we have. Ah, leave us upon Tor Mo and ah selected this one because it's it's got some obstruction. So whenever we see the arm on that arm is raised up, Um, and it's in front of the torso, so there's some This is it makes it a little bit obscure, right? So it's hard to see the connections, and it's hard to maybe a little more difficult to add the arm in space. So what I want to do is use this idea as kind of a building point. So we're gonna build that arm and shoulder on top of this, and then we're going to get into that shoulder girdle area as we move through and dissect some of the Masters. So if we go to the pinch side on, this is kind of more of a twist, even, uh, I would say that's more on this over here. Then, as we get to the gesture, that's gonna be something like this. The gesture of that is coming up. We can get that coke bottle idea something like this right through the neck. If that works for you and then you know, we're not really even getting much of a pinch, are we? I mean, it's just like I said, it's more of a twist even as we get in here, This kind of comes mawr towards us, Okay, So that it's kind of switching positions so that upper body is torso is kind of twisting away, and then so on. So we've got that egg shape of the head again. This joining we could even curl that a little bit. Mawr even flared out, right? Something like that, and then bring it down when we've got that waste, have a bulging waste spare tire bulging box How we want to look at it attaching to, um, this rib cage in here that's getting a little bit crunched and so on. So that's that's what we want to build on top of. So, you know, we had this sort of idea, this sort of structure, structure and gesture moving here again. We can add the flesh. We can add the bumps over top of it, but that's not really gonna matter a whole lot. So we with this neck we know what's coming down in the pit. The pit of the neck is probably roughly in here and we can see that center line coming down and then kind of changing directions as admit hits that enable and move. So that center line coming down in here kind of bumping out and then down so again for the next, probably roughly in the air when you that clavicle was coming towards us and then, um, at the end of that clavicle is going to be the deltoids. So if I did a straight view here, neck on that shoulder line roughly like this So we come down the center of that neck to the pit. Also the super sternal notch if you're if you want the technical anatomical term, so then we have our clavicle was moving off at the end of the clavicles. We had the deltoid muscles. I mean, that could be, um you know, the that. The arm is raised, but it's only raised the safe from here, you know, to hear. Okay, so they say, Ah, put an arm and put another one and put another one. Okay, so it is anywhere in here. Typically, you're not going to see a huge change in that clavicle. So this right here, but once we get above. So must be once that showed that arm gets up in here, here and here. And that clavicle is going to change. And that's going to start to move up with that. Tell Delta witness all of that is going to be moving in unison. So that is going to swing. I'm gonna talk about that a little bit more. We get to the back, I'm gonna talk about that, Maury, Even we look at the front with the arm raised, so that's kind of important to know. But the pain in the neck is important. I think this is whenever you're thinking about the shoulder girdle area, the deltoids, which is basically where the arms began. So if I did a deltoid here next shape, I will say the arm is moving off. This way it's going to attach to that deltoid. You can think of the deltoid as this kind of egg shape with a tail like that. Okay, so if I did it my egg shape, a little tail and everything's attaching, our elbow could be here. There are tapering tube, um, for the forearm. And then our hand could just be Ah, you know a mitten? Um, something like that thumb. All right. So getting back to this sort of center line for our face, which has obviously been a race there on. And then we got the nipple. So all of this is tracking pretty good along the front. And then again, we start to see that twist, and then things change a little bit. So when we look at that deltoid, we know that clavicle is coming up. We can't see it towards the end. And then that deltoid is wrapping around. So there's our egg shape, and then we can see that arm, the tube of the upper arm, which is really unless you're dealing with a very muscular male. Typically, you don't even have to taper that a whole lot. I would recommend using this idea of Ah, just ah, tube. That's kind of moving evenly. Um, you know that then if you want to come in here and add, you know that and a little tricep or whatever on top of that, I mean, that's fine. So this comes in and then again, weaken, draw a little egg shape right there for delta way. In this case, eyes moving, and our deltoid is wrapping here. The gesture of their arm, the upper arm like this. If you wanted that snake with or little tail idea on the deltoid at a little more structure , we could do something like that. And then that tube is wrapping away from us. And then when we get to our corner again, I wouldn't recommend measuring a whole lot in here. He would want to just draw that line out that nice gesture, uh, and then get a rough idea. You know, you look at the rough idea where this is, You can get a rough idea where that tapering tube is. And then once you start to place it and you get a close, then we can come back in here to this crease to the short side, and we can get a better feeling of where, right there, where that ISS and then we can come back in and refine. Uh so that's kind of how that works. You can see. Yeah, I wouldn't recommend separating the upper arm and lower arms, like if this were the upper arm coming down, I would draw through that corner and that will come over here and draw the tapering to like this. So and then, if you're bringing that tube down, take it all the way down to the corner and then this one can join into it like that. Oftentimes what happens is they will will lose that corner and then we'll start the forearm over here. And then you have all this space that's just kind of left alone. So some sometimes. And I've I've learned like this to have taking courses where, um it was taught to kind of like, OK, let's just give the upper arm and then, you know, we'll get the lower arm like this and then we'll add the elbow. And the problem is typically this this is either is usually too much. And then he end up having this kind of really long looking forearm or upper arm or forearm and just kind of awkward. Somewhat. My thought is just take ticket all the way to the corner. Um, like this And then, you know, you wanna avoid having that kind of weird gap sometimes. So now whenever we we got our tubes and here we are tube tapering tube again. We can kind of just treat this right now as this kind of mitten. Um, notice? No, we got a nice, round, almost like shape gesture for that, uh, hand. And then we've got this kind of triangle shape for the thumb. But I'll get back to that a little bit, and then these lat muscles here, they wrap around that. That's all part of that shoulder girdle area they're gonna wrap around and come up here to the armpit and then the front of the shoulder girl area. Um, it's attaching in the armpit, but also it goes up and around the shoulder, and I'm gonna show that another angle. But if we kind of were looking at the front of the shoulder girdle area and let me switch to another color here for a second, I'll see if this works so again in front of the shoulder girdle area, the chest that's coming up like this so that's coming up on this side, and we're gonna talk about that in just a second. So again, this is the back and then wrapping around, Um and we're gonna again talk about that in a minute. But I think for the most part, what I'm trying to get you to do is draw through. So always. In my opinion, if you're dealing with something, you try to feel out what the head is doing. So in this case, that gesture is kind of Phil Ting up a little bit like this and kind of going back. And we get a little bit of the stretch of the neck there and get that main idea are going in through the upper body, the head, neck and torso. Ah, and then you can get in here. You find that center line in this case, you know, it's gonna come down to the belly button. It's switching directions and coming here, you get that waste in there and then we can start to no fine our egg shape of the shoulder , and then you find your mean gesture line of the arms and then come to that short side. If you want, measure those angles, try to get a sense, and then you can get that tapering tube here. And we just do that little mitten thing going on for the hand for now. And, uh, and things start to connect and flow so and then from here. We can start to think more boxy if we want, we can start to look at the front, you know, and then the side and find some corners and different things like that. But, um, anyway, I think, um, for this little study, that's fine. Let's go on to the next one. All right, so with this one, um, again, we're dealing. But that same idea as, um you know that shoulders wrapping around in front like that. So, um, working and working with something like this, You know, we can still see a little bit of this front, so we know we can still see that gesture line of the shoulders, and we can start to make out some of that shoulder girdle area. But again, we do have some obscurities because we have this shoulder wrapping around. So again, you know, finding that a gesture line here. Um, and probably even you want to start with the the gesture line of the face. We can come to this thin side if you want. Then get something like that. Get our egg shape and back of the skull. Got Are here all of this tracking through the eyes a little bit of a tuck in here. So in front of the shoulders, so had kind, like looking, eyes looking slightly, slightly down. Probably we could see that curve of the neck probably getting pinched underneath. And will a race some of this. And just so we can see that neck for a second so you can see that try again, see a little bit of that neck, and we can see a little bit of that being bag twisting. Idea through. That's we got the gesture. Get the pinch side, and then we can get, um, the rest of this kind of drawn over it again. So chin and and here, moving up. All right, so we're coming down now. We can see a little bit of that coming down the neck to the pit. So that's the pit of the neck from there. We know the clavicles kind of go out here, and then that's gonna be roughly where those shoulders began. But, you know, finishing off this tube idea so we know that this comes down, we can again come to this. Forget all of this stuff, remember? Come right down to that waste. Bring it up and then we can see this sort of idea with the chest. And then we've got that s curve going on like this. It was coming down, and then it's twisting so that upper body is twisting quite a bit. So this box is facing mawr. Let's say like this. So this is the sign as we get to that lower box that's twisting. Um, it's saying kind of like this. Okay, so we're getting that side here. We could probably see down into that a little bit, and we may even be able to see up in that silo. All that. And so that center line kind of coming down s curving. And then I see maybe like this, right? If you want to put a gesture line through that and then you add, see that you know some of the gesture on top of that. Even so, the shoulder girdle area shoulders moving up. This would be the arm torso. So we're kind of applying all of that shoulder girdle area to to with the arm again. All of this is getting hidden a little bit by this big shoulder, and then this tube moving down and then across and then on the side. You know, we've got these legs moving towards us, so it's just kind of an interesting way to look at it. And that's how we want to see things. I'm sometimes just trying to look at them or on a structure level. So you're seeing corners can be more effective, Um, and just feeling it out right? Feeling it out, trying to get the twist in the shape of everything and again the shoulder coming across. So curving mawr this way, right? Probably more of an angle on that box. So that would raise that shoulder up. You know that we can add the bumps twists leg coming off this side like coming off this side center line. Dropping the shoulders egg on this shop is really that shoulder girdle area that we can see . And then we see that this head it's tilted down and coming back towards us. So that's giving that rap in the net. So anyway, um, so finding this tube idea coming down, then we can see this is changing directions, and so we can get that kind of a bulging box. So if you follow that down you know that crotch? No, that is gonna be roughly in here. So that waste Well, I'm sorry. The, um So we have our rib cage coming in here, all right. Our waste. And here getting pinched. And then we can add that bulging box idea on top of that way. So that would actually come here and again that you're seeing that size. You really want to put that corner in sometimes. But that could be a little bit tough to do, because it's hard to find that interior corner. And then, uh So again, let's go back to the pit of the neck down to super sternal Notch. From there, we're seeing that big twists or getting a big change in direction to the naval. Ah, and then right on down to that the center, the bottom, probably of that pelvises in here. We want to turn that into a tube and then run that towards us. That's fine. I don't want to get to sidetracks. I've already done that. I want to try to focus more on the arms. So, um, shoulder girdle area coming down. We can see all of this is tracking tracking, um, and then it's starting to change. But all of this shoulder girdle area this is getting hidden his own top. We can see a little bit of that back shoulder girl area here. We can come back to the end of that clavicle and we can do this. This is that little snake with a tail. We can almost see that shape really nicely there. Let me go back. So there it is. Snake with a or uh huh snake with a tail. So a on egg. There there's our elbow. So we know that swinging down, uh, I would say as moving towards us like so Ah, And then we've got the tapering tube idea here that's moving away from us clearly that there's going to be the end of the armpit. And here and then we're seeing a little bit of the bulge coming in through the back there on this side. You know, the shoulder girl area is in front of the of the actual deltoid, So here's in front, But here is them back. So we're seeing that arm pit area. This is all hanging in front. And then that dealt what is coming down. And then the arm is joining behind all of this To that Delta weighed coming down like this . This is almost can be a two by four. So we're seeing the front of that Bice up and in the side of that vice up, almost seeing that here to, um, let me switch. And this is all analysis. This is all just kind of breaking things down a little bit. I'm just so we can understand things a little bit better and come up with more ideas, mawr. Interesting ways to do things. Sometimes just having a good visual and doing this sort of stuff will make you look and make you see and observed. And sometimes that's that's important. So anyway, um, again, tracking, tracking, and then hear that twist is taking over. So you wait, that's that.
34. Masters analysis arms shoulders 3 HD 1080p: Okay, So, shoulder girl area, I'm gonna focus really on some transitions here. I've already alluded to some of this, but I think this just look at a few more examples and maybe they will strengthen what I've taught you and then also shed some light on some other ideas you could possibly use. So again, it's all about the transitions. So it's not just knowing how to draw one body, part or two, or all of them isn't gonna help you and joining them. So the key is always the transitions. How does the head flow into the neck, neck into the torso and so on? So in this case, we up top. We've got almost a profile view clearly with this figure. Upton. I'm focused on the figure in the middle right here and clearly, um, that shoulder comes up and over. So if you were to think about, just look at some of the main gestures. So we've got the gesture of the face coming down the middle that Shan probably is hidden beneath that shoulder. There. We can put that egg shape for the face. We can see the pinch happening in that neck because the head is tilting over and and back a little bit to our right on and then. So if that neck is getting pinched like this and chances are that side of the neck is feeling that pool. So that's getting that. Ah, so this is getting pinched than we know this. It's feeling that stretch. So even though we can't see it, we have to know that that exists. So we want to get Can I draw through the figure sometimes. So being able to draw through that and get down, just say the pit of the neck and here on then from there because, well, if this is a profile view, I'll do. I guess you're long gesture can be here and then we can do this sort of gesture here or it can bulge out. We can stop it right there, the rib cage so we can do a bulge. Ah, bulge. And we could do that kind of pickle barrel idea with the rib or with the upper body or the rib cage. So now we know that neck is coming down. It's probably joining back here, Um, and we take some of the ideas we know um so we can come in here. We can't see the center line here, but we can see the shoulder coming across the face so we can get in there and lay out that oval. So if I do the head So we got leaning back with that gesture, um, we got the ear. So we know that's kind of wrapping down that neck is going to be getting pinched here, there, stretch on that side. So make that a little bit more exaggerated. So ear gesture. And then again, that neck getting stretched coming down to Lucy the pit of the net can hear in that clavicle or the collarbone thing would be coming out towards that shoulder in there. So we know from there we can get that access so we can pay. Our access is running, or the lien is running like this on. And then we can do this pickle barrel in that sort of angle. And again, we can't see all of this because that shoulder is obstructing everything. So that shoulder is coming around now. But now that we have that we have this, we don't have a center line. Okay? That senator lying we can't see. We can't see the back. We can't see it down the front. So we'll do our best guess they are for the neck. You know, we've got this idea of the pickle barrel, and we can just say maybe roughly in there somewhere. So now we can come in here and say, Well, if this is our ear, this is our neck getting pinched. And then we can start to see this action of where this idea of this oval actually coming across the face and we know that that's going to reach back around. We've got that shoulder blade. So that shoulder blade we can we can see a little bit of that right in there is getting pulled in that direction. So we know that shoulder blade is getting pulled there, and that egg shape is coming here across the face. So this is actually moving like this and then like that, Um, And then if we start breaking that down, um, we can make that tube so that tube is moving towards us. So if we know that's happening, and then we can get our gesture in, and then we can make that move towards us. Ah, but it's for shorten. Very, very short because it's moving. Tour, uh, where is moving towards us but also tour, um, in a way that is getting for shorten. And then we get this bend of the elbow so that elbow is right in the middle, isn't it? Right there. So if the elbows there, it's hard to really feel any sort of gesture there. So we make our best guess, and we can taper it to a tapering tube on both sides, bring it in and then out in space. So we're getting that sort of thing again. We haven't flushed it all out. We don't know where all these muscles are yet. We're keeping this. Ah, very, very simple idea. Now we know the back of that shoulder. The shoulder blade is going down and reaching back towards the spine, and we can see underneath that shoulder that deltoid. So we're getting that now if we follow that front now and we get this the front of the pickle barrel, So in here we can see the feeling of this nipple and that nipple. So we know that is tracking roughly like this. Eso If we can say our armpit. He knows in there we come down and do make our best guess at our nipple. Then we know now that that nipple, all of that, can be associate ID with the, um the front of the shoulder, the whole shoulder girdle area. So I'm going just going to erase that for a second, and we can see that right here. So that's getting pulled up. And then that's just a contour line. So if this is our contour line, um, coming down, there's our connection there to that shoulder girdle area, and we know that's coming up, getting pulled up and then around that shoulder here, and we just want to be aware of that. And then we're seeing this whole triangle section of the back. Okay, so all of this makes up what's happening through that shoulder girdle area in a kind of a complex pose like this, and we can come in and we can get the biceps, triceps and all that stuff. Um, so all of that, sitting on top of that rib cage, isn't it? So if we know our rib cage, we can look at this, you know, we use that pickle barrel idea for that rib cage. We know all of that sitting on that rib cage so that it's just something we want to acknowledge. Um, and just try to pay attention to Saul that's wrapping up and over. No, so that all of this is coming up and over that so that that arm that tube, it's connecting into that deltoid so that X shape here and those muscles are coming up and over. So you're getting that sort of thing. So if you had a towel rack, this is the end of the towel rack and you take your towel. Um, you hang over that rack. That's kind of what's happening there. Ah, with that muscle like that, that's coming up and over. So just something to keep in mind and again understanding that shoulder girdle area takes a little bit of time. But, you know, we got we got a focus on it, so if we look here, we can see that those muscles reaching up right there. So that's your This is your deltoid muscle coming up in around and then these muscles are coming up and then joining the party and coming up in around so we can see those, um, construction lines and how that artist was working on getting the end. So all of this here again, feeling that shoulder girdle area, connect up and back. All of these are just bumps. So all that, and then the rib cage is just that egg shape. So if I shaded what's in front and part of that shoulder and shoulder girdle area, you got that. And then, you know, all the rib cage, all that rib cage stuff, and here so you would have shoulder and the probably right in here even I would say that's that's gonna b'more of that shoulder girdle. And then these air your pec muscles reaching up. And this is coming in front. This is coming in front and out of all of that. So we're Look over here. Same thing, right? So we got the arm here, show it, Deltoid, going up in around at probably our shoulder blade in here, chest attaching here and then reaching up in around. And then your rib cage is in there. We got rib cage and then all part of our deltoids and shoulder girdle area going up in around. And so if we look at this one from the back view, same thing, so stretch here. So that's our gesture line. So that mask of the face, um, probably tucked right. Probably tucked in here. So are you. See that shoulder line coming across weaken? Just simplify that into a little arc. We can get our main gesture line. We can come to the waist on the short side. Bring that on up. Uh, this is our center line coming down, and here we can say, now, that's moving away from us. This is moving away from us. So that sort of thing. So if we wanted layout, um, that shoulder girdle area, um, the arms air down. So probably that shoulder girdle area and here and then and here. So probably seeing a little bit of the volume on it here and probably seeing a little bit of it there. The shoulder, that egg shape and here can't really make it out there. Um, but we can see that shoulder muscle they're kind of wrapping. And then the arm moving away from us underneath all that V shape. So, like, think of like a the hood of a cobra. It was explained to me one time, very well going like that. So let the lat muscles basically coming down. So if we were looking at that back of the head neck years again, the back of the head shoulder line, you're spying coming down. So the safe from the front your clavicles came out about right here and the you have shoulder muscles or shoulder or deltoids, I should say, Ah, so on. So if he did your tube for your body, say something like this. So if we know those deltoids are roughly in here and the arms are hanging this a straight down so we're not getting much. And then, of course, at the forearms they tend to bow out a little bit. So that v the lat muscle new comes down and here. So this was our rib cage. Maybe the bottom could be cut off a little bit here that the lat muscles kind of run down that back like this and they ve out like that. Okay, so we have that nice V shape. Ah, muscular male. It could be even bigger, more feminine or less muscular. It may be more or less of that so more subtle So we can see that lat muscle here and all of this shoulder blades moving like that. And shortly these lattes kind of come up towards the armpit. His arm would probably come in front and here and then we have that the deltoid muscle joining in and here And then again, we've got the tube of the arm connecting Sorry, do that bad like this and moving in such a direction. And then from here, we're not seeing much of the front girdle area just here. We're not getting a lot of that. And then this is again all all your rib cage here. So again, just thinking about those transitions. I know this wasn't a lot about the arms, but I'm trying to focus a little bit on that shoulder girdle area. You can think of it as you know, the football player. So it's a tube of our body neck had shoulders right coming out the shoulder. The football player comes in and then places these big shoulder pads. You're on top of that body. And that's kind of how you want to think about it, because that whole shoulder girdle area works independently, Um, of the rib cage and And what? Not So it's just important to know how that works. And now we'll look at, Ah, another one, but we'll focus a little bit more on the arms.
35. Masters analysis arms shoulders 4 HD 1080p: Okay, so let's have a look at this shoulder girl area from the front and tried. Teoh make some decisions and some estimations on how all this works and attach is how one part flows into the next. So starting with the main gesture, Aiken want to do the AG can do the act and then throw in the gesture so we can do this idea of a structure. Um, bring that down a little bit and there's our gesture. And here the neck is coming down and attaching. Then we can run the Coke bottle idea if you want, or you want to come over here playing, we'll get our main gesture here for the alongside from there, Come over here to the waist. Bring that up. We can pretty much see that's curling away, leveling off and then curling away. And here, um, so again, coming to the short side, finding that line and then taking that up. So that's giving us the flow. Um, And again, if you like that coke bottle idea, we can we can can finish that all like that. Um, you can even run down, however you want to do it. So also the corners. That top of that head is probably in here. So it's starting to change directions and move back chin again. Tracking lines, all that stuff we talked about so back behind the head and then we get that is trapezius muscles connecting more relaxed here as it moves out. There is the pit of the neck right in there when the arm is raised. Okay, that's going to rays with it. So it's gonna go right out here to where the deltoids start. You can see here is more relaxed, that shoulder and arm or more relaxed. So it's going to go this direction. So that's why we're getting that angle through the shoulders. So in here. So again, if, um, if we had the neck coming down, like so you can see no, that Chen are getting dropping down, Then coming back up the ear back of the skull, top of the head and here and then changing directions as it moves down. Push that tear up a little bit. All right, So, again neck, we can see that a little bit of the neck under on this side again. We got the angle of the shoulders we can see, you know, the pit of the neck. And here this arm is raised. So that's going to take that clavicle up. This arm is leveled off more here. Ah, switch colors. Um, just help out here. So if we were to kind of find that little spot on the back where the trapezius muscles connect, they're coming down, and then we're starting to see them on the front here. They're more relaxed when the arm is raised, so they kind of bow and bend a little more and they sag a little bit. So we're getting that now. Let me switch colors. So again, clavicle was coming out here attaching, attaching, so that that gives out gives us a really good, I think understanding hopefully of, um, just the head feeling that head in space and how everything is flowing in connecting to one another. Now, the things we want to be important think about here. So which has come down the breast or the breastbone to this kind of rough. I rough idea where that breastbone ends. So at that point, um, you know, that's where that rib cage is going to be out into that kind of roof like shape. Okay, so coming down, like so some people like to arch it, whatever works for you, but I'm just kind of point these things out here. So again, kind of coming down here, and we can if I wanted to fill in everything else that I have here, I can get that gesture line, and then I can kind of get a feel for this. And then I can start to lay in that egg shape, and there, and then we're we're going to start to see how that works. So rib cage, right? And there, um And then from here, we're starting to pinpoint certain landmarks. So if this is the bottom of the breastbone or the start of sternum, we can start to locate some key areas. So an all male would just say we have a nipple here, a nipple there and that shoulder girdle area. OK, so for thinking about the rib cage being underneath, and I'll just kind of shade this for now. And then I'm going to pick a green. So we see this shoulder, the front of the shoulder girdle area that's going to wrap along that's going to wrap on the rib cage here and attach to a about that corner roughly in here, and from there is going to break free. That's gonna break free and then move up. In this case, you can see it stretching and going up in around that arm. Okay, So if I were drawing that here, that would go up and then wrap around that arm and the deltoid so on the relaxed side is still breaking free. Okay? Still breaking free, but tens of just kind of bunch. And then stop. But most people feel like is that the armpit? But again, that arm were raised and that would wrap around, and then you would see everything behind. So let know the lats, maybe even some of that, um, the bone for the shoulder blades, that sort of thing. But it's important to know that so again, in a relaxed position is just here. They tend to bunch up like this, um, and then the shoulder is gonna wrap up in around that. So basically, if I were drawing this the way I see it here, that shoulder muscle is still going up in around that in a relaxed position and then just chilling this relaxing here and so wants all of this again sits in front. So I'll switch back to a dark here so again it will have the illusion of just kind of relaxing and here But underneath it all that's going to wrap around that shoulder. But I just really don't see it unless the arm is raised. So again here, attaching, attaching, and then here, CEO attached to the front. And then once the arm is raised, its going to wrap up in around and then you'll see the Delta weight and all that stuff. So the arm to with the arm, um, kind of connecting him and moving out. We can see the elbow. We can see this arch. We can see that lime, nice corner and so on. There's a corner here, too. So where the shoulders where this comes out. We've got a corner here. So a change in direction where that happens. So a structure line. So this is armpit in here where we're seeing, too. There's our shoulder on the outside. Um, should we were on the outside here, um, and then the tube of the arm connecting so if our shoulder CR shoulder comes down in here so that egg shaped then between the arms going to connect there. Now we can't see the elbow, the elbows dead center right there. So, in that case, uh, again, that's gonna be where maybe one case where it will look a little more straight. I do think you're better off to try to find a curve. You can use the idea of that shoulder muscle bulging out sometimes to give you that sort of look and make it make it straight on the inside like so. And then once we get two in here, it's going to have it could curve, you know, here, depending on how the hand is turned or rotated. So coming to this pinch side again, looking at the space angles, that sort of thing, we can find this sort of stuff to kind of refine things a little bit. So running that all the way to the end, all the way to the end and so on. So anyway, um, just some things again to keep in mind about that shoulder girdle area. Hopefully you're getting a little bit better feel for how that fits if it were a female, Um, you, then the breast would just kind of lay here only there, but the muscles would look would still work the same. So all of this, um, they tend to attach the rib cage, maybe a little bit lower on. Then it would still get affected here as we see that pull up into the shoulder. And here it would just look a little more relaxed and probably cover up, even maybe some of that armpit. But that's that profile view. Slight 3/4 view so we can see center line little space there. And then, of course, we've got that. So I thought this was interesting because we know we've got we were sorry, hopefully starting to understand a little bit more about the shoulder girdle area. How this collarbone clavicle where we want to call it. You could see that curve. Slight indication of a curve going to the pit of that next there. So when you're dealing with a side view like this, um, it's hard to see that corner. So we know that, you know, this sort of feeling of the collarbone coming out is going to connect to that Delta weighed . And then from there, you know, you could wrap it around and get a little bit of a corner there. I'm just taking feel, um, the corners of the body a little bit. So from the front, it's easier because you have this going on the shoulders, the arms coming down and breaking here. So this was the tube center of our body neck. Had again. We get we get these sharp changing directions about with this sort of pose. You don't because we're getting this egg shape of the deltoid. We're not really seeing those corners. Um, so but we can see a little bit. We can see the pit of the neck is here, so that's gonna be the front that clavicle clavicle comes around to about right in there. Um, and we know I then to that clavicle, that's that's our cue to get busy with the deltoid where things began. You can see it, um, kind of drawn out here where joins, and then all of this starts to begin. I noticed to these little bumps back there, they're not just random bumps, are they? You know, now that back here, this protrusion right in the air has a lot to do with those shoulder blades. So the shoulder blades coming in and joining the party right in that corner on those hands are that arm and everything that shoulders is kind of pushed behind, and that's making that back pinch a little bit. Eso viewer. Just stand here or sit there and then move your elbows behind your body. You'll feel that pinching happening through that upper back now if the figure was Mawr slumping. So let's say the figure was maybe Or let's just say that figure could be sitting in that angle. So I get the tube, maybe running away from us here. I'll get the neck gesture the face. When did Israel loosely here? So you can kind of get to the point we could do that Coke bottle idea. Um, coming down here so long. So they say that the shoulder, um, neck So So let's say I clavicle was coming up. We couldn't see quite as much of the front of the body, and that shoulder is right in here. And let's say that arm was mawr relaxed. So you see that shoulder we can put the little tail on it if you want coming down here, Um, in that case, I'll just do I just do a little mask of a face here. Just so we kind of you know where I'm at? In that case, you would still see a lump. You would. You still see a slight indication of that collarbone and then moving towards the corner of that connection. And then we see the corner coming from the front here, and we've got the chest muscles coming down, perhaps in here and then moving up towards the armpit. So we have that sort of thing happening. Um, but again, you're going to see a subtle bump there for that shoulder blade. But then as this arm let me get a different color. So as that shoulder swings back and maybe the arm, of course, would be taking it. Maybe that's too much, because now the entire shoulder blade would be obscured. So this is swinging back something like this. Then you're going to see this shoulder blade, get even more pinched. So you're going to Seymour of a bump there? So if I were to highlight that now or take a darker again, this sort of thing for that skin will go around it and then level off. But, you know, underneath this is getting pushed back and bunched up and to the arm swinging back. And that's kind of what's happening right here. So the arm is going back a little bit. It's gonna push that shoulder blade out, and you wanna see a little bit of that action. Um, so we know that sternum. So this is the pit of the neck. You can come down that center line if we wanna lay in the gesture, we can lay in this long side again. That's in the way. Okay, we know that arm is in the way, but to get the gesture line of the face given to the back of the skull there, here, this is gonna be more pinched. Ah, here. So maybe more stretch there, and then we can transition that right into our little coke bottle there, and it looks something like that. So we got our center line coming down and here and we know that pec muscle is attached to that rib cage. And here we can see the rib cage here, but just do our little oval. That's our oval for our egg shape of the rib cage. I'm going to make that a lighter tone here, and then I'll make the screen. So again, shoulder girdle coming down, attaching. We can see a little bit of it on this side going right to that armpit. But it looks like it goes to that armpit, but it comes up and that kind of wraps around and goes down into that part of the arm. So all of this shoulder girdle, there's your little V little tail on the oval of the deltoid. All of this would be shoulder girdle in the back. And we're not getting much of that lettuce. That lat muscle. We're not seeing much of that kind of cobra action are going on. So again, kind of coming down resting in here. And they're moving. Attaching to that rib cage, like so in our arm. Nice. Easy tube. We'll find that gesture. Find that gesture. Nice corner. And there are tapering tube here, moving away from us, moving away from us some. Sometimes you may want to the end of your arm to draw little s, and that helps you connect that hand a little bit. Um, And then you have an idea Where, uh, put your mitten and we could just make a little cup there. Whatever for the fingers for now. So little by little getting things mapped out, a little bit cleaner. And hopefully you understand a little bit mawr about that shoulder girdle area.
36. Masters analysis arms shoulders 5 HD 1080p: all right. Just looking at the firm. That shoulder, shoulder, girdle area a little bit mawr and would talk a little bit about the arms. How it all connects again. We could look at that gesture moving up through here. We can get that egg shape. You can see that. Lovely, lovely bend through all of that. But did the structure gesture? We can see a little bit of this. So here. And then we get that bend right there. So bunching up over here. Nice stretch over there. Um, and all of this shoulder line getting brought up in here, But the beauty of this is that lovely. No gesture there. Here and then back down. So you're getting this some rhythm here, rhythm here and then back down. Um, sometimes seeing that big picture really helps. All right, so again, um, looking at all of this. So these feature that tube, if this were tube that will be heading away from us, that's kind of what we're seeing here, Uh, in that in the head. And then we can get the angle of the shoulders. I can come in here on the wide side, which I was pretty close. I can get to my, ah, other side here, do something like this. And now we can come to this thin side, figure that out and run that straight own up, even though we know it's not quite going to be accurate. So the pit of the neck down in here, we know that clavicle was getting braised a little bit here and really going right towards that pinch. And then this one is a little more relaxed moving off this way. So right in there is gonna be that shoulder. Ah, And here on then the arm moving off and then moving off this way, like so, um, so looking at the pit of the neck roughly in here, we can almost track that straight down, uh, to get of his life, we process or the bottom of that rib cage. And we know that rib cage is right in here. So and we're getting a little bit of the side of the body there. So this upper body, his lower body, is moving towards us, it caves in, and then I feel like it still moves towards us. Even at the top of the bodies were getting this sort of thing changing and then moving towards us a little more dramatically there. But this just scare neck in so far neck is getting pinched here. We can see that shoulder is getting bunched right in here. Um, and now we could come down here. You can get a rough idea. Ah, where this whole shoulder girdle thing is going on. So if we know our trapezius muscle is in here, we can see that clavicle moving off this way. Perhaps mawr up like this, and we know that other shoulder is dropped down and here so we could do that. Egg shaped. We knew all of that's getting camouflaged or covered. But for now, we can do this. I can come back to this side, get a feel for that. Armpit is is wrong. I can always go back and change it. So that's following that rib cage. We can see that stretch. And then this is all lower body, which I won't worry about. Um, so we know now that this is going to attach in here, and then when we get that nice pool up into that shoulder. So if this were ah, towel rack you can come in and then hang your towel over that rat. Thanks. It was draping over that, and that's what's happening here. So getting pulled, this is going up and then I, Delta weighed is getting that mass size shoulder girl, front shoulder girdle. Moving, connecting and moving up and over over here is different because it is getting bunched up a little bit. And we're getting this arm pit area here. That shoulder is moving down. That deltoid is wrapping around and then moving down with that arm, and then the arm is getting hidden again because the forearm is coming out. But we can see that rib cage right in there. We see that change of direction and so one but so that tapering tube here are moving towards us. And then we've got that hip getting pushed out there, and everything kind of flows from there. So that leg is coming in front, Um, probably moving towards us. But again, this is getting a little bit off topic, so I'll let that one out kind of rest there. So this tube is our bar right here. Eso moving out and we can come to the short side. Figure out roughly where this is. Get our get our tapering, tapering tube here. I'm gonna clean that up a little bit. Makes I thought I waas All right. So, um so tapering tube and coming to the short side Trying to get a feel for that, um, space. So there's our tapering to for the forearm. Pretty sure that's coming towards us. Ah, that say this is moving away and it's hanging over a branch or whatever. Um, we see a little bit of that lat muscle back there right back in there, kind of connecting and moving down. So, yeah, we can see the effects of that. Ah, hope of that shoulder girdle area. So again, I want to make the opacity a little bit weaker and maybe a touch back there. So rib cage and then our arms, of course, getting that. The neck is coming in front. Delta weighed. So there it is. So there is our arm attaching coming out. And then we get that tapering tube here and then that hand kind of draping over whatever, um shoulder girl area. So arm really getting tucked back into here? We can't really tell much about it. It's like is really moving out to the side. I'm gonna say more towards us here, and then we can just do that idea of ah little mitten. But remember, you can always kind of and that gesture with a curve. So we come in and do that sort of idea, and then we know we can make it a little more boxy later on the fingers, going out everything. So very how, um, I think that's pretty good for this one. I think. You know, I think we've covered a lot of ground with these masters analysis. And so now let me do a few demonstrations for you.
37. Arm: Demo One: all right. So standing pose here and again. We can start, I think, raid there with Lane in a quick feeling of the head. I'm not going to do much more than just at it in there, just for the sake of being able to connect everything else. So again, the ear towards the top got that neck coming down. But that neck, um, really is moving away from us. So it almost gets, you know, it's bending right. It's bending and leaning, leaning left, tilting back in a very slight angle. But it's there. Then we can get the angle of those eyes. So the eyes, nose, mouth and then that chin all track andan. All of this new moves off of it again here. And then we're seeing a little top of the skull as getting cropped off a little bit. So it's coming around, and then this neck is joining and then coming back towards us like this. So again, um sterner Clyde, um, asteroid underneath NEC connecting. And then we've got this muscle. The sterner Clyde of mastery coming down from the back of the ear, which is basically like a tube coming down, are so that gets the head and there we kind of get a feeling for that lean. I'm now I can do this shoulder line. I know the clavicles were getting pulled up towards the shoulders and then the shoulder one deltoid is here with that arm moving up and out this way, so getting I can see the elbow. So I know I want that tube action like this. Now again, coming to the outside, getting a feel, my best guess on where that corner should be. Then I can come to the inside and feel if that's correct. And for the most part, I think that is I think we can kind of work with this sort of action. So we map out that hair that's gonna put us about where we need to be, and then that mitten for now, kind of curling over the head. So I think all of this works pretty good again. This is our corner coming out this way, and we're pretty good on now to get the rest of this. We know that that's going to wrap around that towel rack. Then this is coming down in front like that. Um, now, if This is our shoulder line. I want to get in here and just give you a feeling this is moving away, coming straight and then moving away. So we're getting a little bit of that bold coming towards us right through here. And then I'll help me lay in that rib cage idea. So the egg through here, um, and then we can kind of map out this arm, which is moving a little bit farther away from us the body than this arm. This arm is moving a little more up. This arm is moving out away from us. Maybe even more so. Like this. Now, this is a tricky thing. When the arm, let's see my bump this down, make sure we've got it all come down around here. So when the arm this is our elbow, this is our upper arm. So when the arm is the say out of 90 or greater, and this would obviously be the forearm bending and various positions here. So in any of these, we're gonna have a nice, sharp corner there. Okay? Now, when the arm starts to move, less than 90 so moving back this way and we'll go ahead and do our tube and say is moving back towards the arm here. So look what happens when we find that corner so it gets gets off. You know, we know that's way too long for the upper arm. So what we have to do is find two corners basically so far, forearm is coming down and hear the say, then weaken, find the corner. Ah, and then kind of make a double corner. So it's going to come or like, um, se one to Okay. And then all of this is gonna be wadded up and bunched up right here, and then we can kind of join things a little bit cleaner like that, versus having all of that excess. So that's kind of what's happening here. So if I got this working pretty good, then I confined this angle and again, we know that's that's too far. Um, and this is coming down and here. So I would say this is, you know, still kind of moving away from us, so I'll say upper arm coming up in here again. We confined that double corner, so this will come down. We can round it off here. Here and then back down again. You will see all of that skin bunching up and then moving towards that wrist. So that risk. And here, let's say, upper arm And then we've got that kind of mitten idea. We could really see that gesture right through the occur on the alongside. And then we've got the fingers kind of curling like so really moving down that neck like that, and then this thumb and here, so neck trap. And now we can get that feeling of that deltoid going up and then back under here. So we knew that arm is getting connected properly. That's our forearm, and we're good to go. So now we come down to the pit of the neck here. So we got this happening. We've got our, um the sternum, which is coming down and here, and all of that is still moving off this way. So that's moving angle, angle angle. It's really not until we get to that naval that things correct and go more vertical. So all of this we can see is moving towards the centre. We're here. We've got more space over there and hear. This kind of tends to be equal in there. So if we can again find the neck, we know that deltoid is coming down, and then we know we have that trap muscle and here, rapping over that towel rack. Ah, and then we've got that extra flesh. And here, So that's armpit trapeze or traps in the back. And then we can get to right in here to lay out the breast. So we know this is all coming down. Um, so a slight pull up towards, um, that deltoid and we're pretty in pretty good shape there. We can see a little more that pull on this side, but yeah, that's we want toe. Really feel that pool there. So that's all they're working pretty good. Um, and then I think for this one, it covers a lot of bases. Um, I think we covered a few extra pointers. Ah, this hairline will be coming down that side of the face into the sideburn and then around. So, you know, once you start adding all of this than it starts to look a little bit better, but we're not gonna render things too much. Um, again, getting that trap muscle here and then we can add extra flesh feeling the outside that rib cage here and getting a stretch even in that area. So So a little bit tricky with that arm. But now you have a better idea on how you can handle that, and that will wrap up this one.
38. Arm: Demo Two: All right. So starting with the I should start with head. And I just kind of do this role easy to start with. Kind of a egg shape here. I can even make that more of a ball or circle, and then do the mask of the face. Chen, you can see that neck coming down. And then we got more of the back of the head. Okay, so that's pretty good. We can see the front of the face and here the ear there. Now, that point things can connect, but because this ah, shoulder on this side, the arm is reaching up. Then I would like to give the shoulders more of an angle like this just to kind of support that idea. Also, um, we've got some options and how How we can do this so I can just start with this thinking this is nothing but a profile view. So if I use that coke bottle idea of the neck would come down and then it would move right into that gesture, this coke bottle would come down on and then move right into that as well. And then this would all be the front of the body, so I'm connected and that shoulder is the problem. So the shoulder on this problem and on this side, it's kind of blocking everything so we can see over here if this if this representative spying the sternum coming down. So our rib cage and saying here I can move that up a little bit and here, um, than that shoulder is kind of blocking everything else. So it's one of those poses that you're going to come across and we have to kind of deal with it. So for now, this is Treat this like a profile, though, and we're gonna say, Let's just say this is moving back down towards us and here. So there is our rib cage. I can say that the pecs Okay, the chest muscles right in here and then moving up. And then again, this is our shoulder line. So this is gonna be the pit of the neck right in here. We know this is going to be moving up, and here and then this is moving at us like that, and then one must be getting here. Then that's where that shoulder starts to take over and here. But we know that arm is moving in this direction. So what I can do is create an egg that's moving in that direction. So the access point longest, it's from there to there. And then we know that the arm is going to join almost like a drum stick. But then that that is eventually that back of that muscle was going to go up in around kind of like that towel rack where this is hanging down over that bar. So that drumstick idea like that, so are Here's your chicken and there's your stick. So this is our deltoid in here, and then we know we can get that gesture line moving out of it. I'll come right to that outside to figure out where that corner is that I can come back to the inside. Say Okay, this this is our deltoid again. Remember that idea of the egg with a tail? That's kind of what you're you have here. You have the egg with that tail here and again, we can see that arm like that. Um, then we can start to make some guesses. Not even guess is just some predict, you know, good decisions on where that end so that this is the arm coming out. Then we can say that corner is roughly right in there. So this is going to be that arm pit. And here and then we've got that back coming in here. And then we can start to look at these angles a little bit closer, like so. So that's gonna work pretty good. Now on this side again. We treated this Ah, lot like just a profile views to remember the coke bottle here. And then if we were to get down in here, that this is our rib cage, then this would be the lower body. But if we kind of get that nipple, let's say we add that nipple, Um, right in here and here, then we can start to build that triangle that we talked about. So the front of that rib that front So a nipple nipple. It all connects here and then moves up in a way towards that armpit. And that's what's happening. So we're connected here, and then you can see this is moving freely up towards and then wrapping around, joining that deltoid, and we can see that side of the deltoid there and then moving back here in the church. That trap muscle on the back. I'm moving out towards there. So tube corner moving towards us here. I'm sorry. That's the wrong way moving towards us. And then we get to the mitten idea. So now come over here and again. I make my best guess. I say that arm using the gesture side first, which I almost didn't dio and we got that deltoid. And here a lot of that's getting cropped off. The deltoid is actually starting back here like so. And then that tube moving off this way make our best guess at that tapering triangle or tapering tube here. And I think that's all working pretty good. Here's our corner. I could even take that out a little bit. And here, So this is all in front and this is all in back because of the perspective. Don't pull that down a little bit so we don't get cropped out. So then we kind of get to the wrist and then we can see that gesture of the hand moving like this that curl. We've got fingertips and this is curling under and then We've got the palm of that thumb and there, and we come down here and I can get the gesture of this and then the thumb here. And we can complete that kind of mitten idea for now. So I'm going to clean this up. So here, but that vice up, we can see that. Nice bulge. They're moving around, and we can see that wrapping sensation there. Um, and that's good. So from here, um, then we get the stomach and all that stuff so we could do hairline trap shoulder really? Coming out towards us here. All right, so I think that's pretty good for this one. Um, me get that ear really close to the front of the head, like so forehead. You can do that little hairline if you want, and then moving off. So anyway, so I think that, um, smooth this out pretty good. And then I feel like we can now move on to some bigger and better things.
39. Legs & Feet: are we gonna work with the legs? So let's say, um so we have a starting point that the legs attach to that the pelvis area, the hips, and I'll do a couple of examples here. So let's say we have, ah, more boxy version. Maybe that's the front. So it's a front, and then maybe we have a more of a skirt here. Man will say, this is the back. Um, also, um, we need to think a little bit about that profile view. So let's, um, do a couple of that's what we could do. This kind of egg shaped for the profile. Something like that. Noticed the access point on May be more boxy version of that again noticed the access point . This more circular version works pretty good for the mail. You may find this more boxy version. It works better for female. Remember, the skirt tends to work a little bit better for the female where this kind of bulging box may look good for the male, but again, each model each pose will be a little bit different. But these are just some of the starting points I will use. Now. The legs um attach? No, obviously through the pelvis. Um, And what a common mistake artists will do. And if you remember, right, we've got Let me kind of go back to this for a second. So I want to just explain that for a moment. So if we're dealing with ah, profile view here and again, let's just say this is front and back. So from a profile, the rib cage tends to tilt like this. So I have a slight angle here and where the pelvis will counter here so the legs would be coming off. Legs will be coming all like So here you have the spine coming up, attaching to the neck and then the skull. Okay, so these counter balance each other and you'll start to see that a little bit more. Um, what once you understand it and that's why so from a standing position profile, this is tilted back a little bit of counterbalances. What's going on up top? Just so you know, the spine curves doesn't it goes down. This is your Jurassic Arch and here the lumbar and then down into the say chrome. And here something like that. So getting back to the legs. We need to figure out how to attach the legs. Where to join them. If we go back to a nearly hour lesson, I talked about the arms. So if this were the upper arm and this for the lower arm So the upper arm, we have that tube, all right. And then we come out here to the outside corner and we find that angle okay? That it may have to move this way. May have to move that way. We don't really know, but let's say for we've nailed it is here and then that becomes more of a tapering tube. And I bring that up because we're gonna use a very similar connection point for the legs, and we're going to use basically the same idea. So if if I were to look at some other examples of before I even get into the legs So again , this and this what? That's true. You can easily see that. And what I mean by that is, let's say you you don't join them and you don't really join the corners this way. So let's say, for example, this is your upper arm, and now you come down here you get well, I'm gonna do my lower arm. You do this other tube, Are you gonna do that a little bit better here and then you have all this avoided space? Um, and I've seen it taught this way. I've started that way now drawn in this way. But what happens is now you have to come in here and do this third part of the arm of some people Call that a joint. But then the problem there is, um from here to here, it tends to be off. Okay, So that the proportions are very hard to get to correct their hard to see that way. Whereas if you have that corner, I hear you say Okay, well, this is this is the length I'm dealing with. This is my corner than then. You have something more substantial, a little more reliable to go from. So always kind of. Consider that when you're dealing with those joints of the arms and the legs. Another thing artists like to do enough seeing is the miter, so they'll come in here and this is my upper arm. Now I'm going to do this sort of angled and then I'll do this here. But you're still dealing with that kind of awkward space, and you don't have ah reliable corner to work with. So I really avoid I would avoid doing those options. So this to me is a much better example and more reliable source. So let's say let's go to this profile view then and say, Well, how does that help our hips and connect our legs? I'm so like, let's say this leg was raised, Um, so you would just come to this outside corner and remember inside corners, they're hard to see. Okay, so if I just put my forearm down my arm down, you can see that corner. So this were start to bend. You started to get in here, things bunch up, they walked up. And it's really hard to get ah, something reliable to use. But when you come to this outside corner, then it's easier to see that sort of corner, so that would make this the inside corner. The lag tends to attach when, especially when is raised, like this up in here somewhere. Okay, so we can come right up here towards the top of the pelvis, and we can attach that leg that that could be moving in any direction. Okay, so we're getting that sort of connection here, and it's gonna move in. Even that's gonna come in to there and a work right off that. So this would be the same, like So? So we don't want it down here. We don't want it to high income just down from the top, and that works pretty good. So now what about the on the back view? And we need to kind of start to figure that out. So the back for you again, we're going to kind of use that same thing. So if the safe, for example, that's, let's say, this figure here, a standing at attention. So feet together, legs together, Um, you know that sort of thing. So when those inside the legs tend to hit each other, that will cause a little bit extra bulge to the outside is pushing those flesh and muscles out water a little bit. But even still, you can come up in here in this area and you could start to draw your legs so you can come down like this and the inside the leg tends to be a little bit straighter. Okay, so we have the sort of full thigh part, top of the leg, and then it tapers. So it was coming more narrow here and wider here, So this would be an ideal connection point. Sometimes in the legs or together like that. And again, this may depend on the model. It could go up even higher. And here, Okay. But you know, anywhere in here is good. We get too low. And that's when things start to look a little bit awkward. So again, tapering tube. I'll just kind of do that so you can see it nice and wide. That's one of the choices, wasn't it? If you remember, right, that tapering tube and make kind of bow out come in like this. And that's exactly what we're dealing with with that upper leg. Now it may bulge. The inside that leg may bulge in certain places, and I'll talk about that in a second. So if we were looking at this side, that leg obviously and it was standing at attention, we're dealing with the same thing again. We can start here. We can start here anywhere in there tends to work pretty good. Now, if this leg kicked out to the side, then we come a little bit lower, so we kind of want to come and there somewhere. And so that leg would look something like that. And again, it may be moving away from us. So here and then here, but notice the tapering still happening there. Um, so that's kind of Ah, good. Good points and some good information there about connecting the legs were to connect them some things to avoid. Always look for that outside corner, Um, and that sort of connection, And then we can get the rest of we can get the inside later. So what happens when the legs were dealing with a front view? It's the same thing. They're still going to connect here. We're here. And what if one leg is moving towards you and one leg is moving away from you? So it's the same thing, though. So you would still have this leg here joining and may join a little bit lower. Did dis depending? So let's say it comes down in here. And then the say this is like that. So this leg again could be moving towards you, and then this leg could be moving away from you. So getting that feeling of the tapering and the connection points and we'll get our little rings there to help us with the movement. Um, so going down to the lower legs, it kind of still holds true everything we've talked about. So this tends to be straight, and this will bulge out for the calf and then back in down through the foot again. We may see all these shapes, so you may have a calf muscle. Um, this may come in, and then you have the ankle bones, which is the mallee. Oh, sis. So the mallee Asus tends to be like this. So on the inside, it will be a little bit higher on the outside. Ah, you're dealing with a little bit lower. So it has a slight angle like that, and that's good to know, because, um, that's gonna help you determine if you're dealing with more of a profile orm or of a, um, front or back view. Now again, you're gonna have bulges. So it may. It may bulge in out here, and they will come back, come back in touch when you get to this calf muscle. Actually, it may. And may I'll actually, I'll use a little bit bigger marker here. So again, this make come in. And then it may bulge out there. And then you may see another subtle bold for the calf muscle here. And then we'll come in and bullets out again and so on here, you know, they're bold, get straight and a bold, and it will go down. And then we have that bullet there. So this is tends to be a little bit bumpier where this tends to be a little bit cleaner, and those calf muscles are probably a little bit overdone. But that's OK. Probably see the other side. Um, would would work fine. Just like this. And eso no, this this side obviously would have high ankle low ankle, so it would be the opposite, right? Like this, I think again there. So this would be pushing out to the side if you remember, right, A little bit lower connection. Um, so if we look at those shapes, though, So if we look at this, um, I'll just add it right here. So we have a smaller, bold here. So it's smaller, like so, so that would represent the calf. And this is the upper leg, so they tend to make up this sort of be a B shape from the back and from the profile view What? I think I will bump this up a little bit. Here. It's a little bit different. So let's say we have our to start with a box, like so. So are our connection points a little bit longer, so it tends to be a little bit longer, a little bit shorter, like so So our connection points again up in here a little bit higher. So we don't want to come down here when I come up short, So we're gonna come higher and we're dealing with a tapering tube on the back. It tends to bow in a little bit. You may get a little bump there on the hamstrings, but you may have something like this. And if it's too full, we can take a little bit of that all but for making the point. I'm gonna go with something like this, and then the back tends to be full and then on the knee. Oh, the lower leg tends to get fen. I'm gonna bump that up a little bit more and then we know this leg. This comes down into this triangular shape and we got a little ankle bone there. So there's our shape again, fools then that is running out of ink on me. So full then and then we get the opposite. So we get that s curve and then in the front, so tapering to still to a tapering to. But if you notice if you look at this and that swing, it tends to be an s. So if we look at our two options B and s okay, so these air really good things to keep in mind. So again you can see the mallee Assis, this sort of thing. Then you know you're dealing with probably a B sort of shape for the legs. You can see more of a profile of you like this. Then you may be dealing with an s. So again, let me bump that up. I'm losing it. So now what happens when the leg lifts? So if this, like other leg is bending up, it's the same thing. So you come down here to that outside corner. If you can see it like so maybe so more straight on. Then it tapers that we have that sort of thing and we get out, we get to this outside corner and it tends to Bo in a little bit like that. Or more straight. I'm a bunch up in here, but we get our s curve, we get our triangle, and we're pretty good to go there. But the connection points tend to be about the same. Coming out full, then s here our triangle. So, um, a lot of people like the same, you know? Ah, full thigh from the side. And a tension tends to help connection points like so, um, so those those I think are some just good pointers to think about for the legs and all right, so some good pointers there so far for the legs. Just a few reminders. A lot of what we talked about here is structure, right. Um and that's we need to We have to talk about those things. But but also remember that the gesture equals the fundamental design line. A very important so here. If we were to break this arm down. This would be G one. So we'll call that gesture one. Ah, gesture to is the outside. If I were to add a hand to this here, maybe that hand is cupping under and then that that would be g three. And that is so important. I mean, those remember that this sort of idea is the connecting, uh, the connecting lines, the things that absolutely want to be on the surface. And I just say this has AZM or of ah, of a reminder just to so you don't lose your way. Um, as you start working with the structure ideas, so always think about you know, the gestures 12 right, And then build your structure on top of that. And there are times when we don't really have a good gesture to start with, and we may have to start with a boxy idea. So maybe we're seeing this, uh, this arm, and for some reason, we just absolutely do not see any sort of curve. And we want to start with this idea of a boxy beginning. But once you figure it out, once you understand what it is you're drawing, then you know you're always going to come back and put that gesture on top of it. Try to find, um, that sort of movement in it. So anyway, I just wanted to throw that out there. It's so easy to forget it. But gesture, um is always going to help you ring true, um, to stay Maurin lines with the drawing with the proportions and things like that. So, anyway, I think that's pretty good. Now, let's go ahead and look at some masters and see how they, um perhaps implemented some of these ideas.
40. Master's Analysis: Legs & Feet Part One: Okay, let's focus on the legs first. And then we're gonna look at some feet and ask you be a little more information there. So if I'm going to again attach the legs to the hips, we have to assume and know that all of this is done. OK, so we'll just assume this is here. We've got our waste mapped out, and now we're getting to this bulging box sort of idea again. If you want to articulate that in the other way, then that's That's fine. Ah, Generals in there. And now we can see right right in here that we've got the bulging box and that is hinging. I'll go read here, right in there. And so that's Ah, clear inside corner there like that so that they were coming off here. We're getting something like that over here. It tends to flow mawr with that. Okay, so it's getting that sort of feeling so hinging a little bit higher. And here now, if we take that away Ah, you may say, Well, I don't know. This is kind of, you know, we've got the obliques or ways coming around and here, but if we really look at that flow. Okay, Just that gesture of that outside. You can see it is hinging way up here, and this room is hinging down here. And that's cause again, this one's coming out to the side. This one is probably coming straight down, right? We can see that over here, too. So on the female, um, again, me, we can do Maurer of the we'll get over here to this layer. We'll say, this is We can do our little skirt like so you can see that outside that leg is hinging. You would take that skirt up a little bit, way up top way up here and then where it's bet and coming out here. Okay, The hinge point is much lower. So the main thing you want to avoid in a situation is where you have, like, a little end table. And then we had these posts, you know, they were coming down and supporting the table. That's kind of a mechanical thing. So that's supporting the weight of the table, the posts. Um, and we know that the legs do that. The legs have to functions of the legs. I have to support the weight of all of this, but it also has to give us look emotion. So the locomotion and the ability to to move band and henge and do different things, sometimes very quickly, sometimes very slowly, Mom has has toe happen to. So, um, look, the locomotion is part of that purpose, and so they're very powerful. That's why you'll see no, really strong, sturdy muscles on the legs like that. They obviously provide a lot of support and a lot of movement throughout our lives. So that's let's do another one here. And would you stay right on top or stay right with this? Um, these two images, for now, they will give us everything we need. So the tibia, we're going to look down here, Um, and we can see the shading happening right in here, coming down to the ankle bone into the hell. So the shinbone, maybe you look at a skeleton, they bow just like that. I'm so, um, all of this these egg shapes are built on top of that, so they're just muscle. So it's important to know that. And here we can see this curve coming down so that tibia would go this way and again we got the ovals, these egg shapes. Maybe they're built on top of that. Um, that's why from a profile view like that, you're seeing that sharp bone, that tibia. But if we look at that overall rhythm or the gesture, call it to keep it simple. So we got that big sweeping movement here again. We've got the bump, the bump, a bump, the bump here, a bump and then another bump. Here, um, we've got this Almost we have a bump in a bump, but really that can be articulated by this is straight. And then we've got that sort of movement. So I'll take this away for a second and bring this back. But we can again bring that down, and we can almost bring that straight down with the tibia. So there's our there's RB so straight and then back out here and straight on the inside and we got, um, do the same thing here. You just want to map that out. Even as a bow like this, we got the tapering to pretty much through here so straight again we get that tapering to here. Here, joining this one. Ah, say this one is moving more towards us. And then we got our straight straight line there with our be out here. So there's our be here, like I got two different colors. Sorry about that. And of course, we could do the same thing on the opposite side. So we're seeing a little more clearly here the name on the wrong layer. So we'll go here. And I was a little much so again there and there seeing this green that little more straight again. If you look at that tibia, we can see the shading right in there. You can almost bring that down or bullet with its We got again are tapering tube tapering to ah, hinging way up here once again here we can see the shading on that that tube coming towards us. Eso we're getting this and this and then down and then we can come back had structure to that gesture so that that's what we're looking for again had the eggs at the eggs and we can add our bumps, all that stuff, but important to see the lags where they attach and that, to me, is a pretty good example. All right, so with this one, I believe a Raphael. A lot of interesting things to look out at here. But let's go with what we know again can find all these gestures, all that stuff, all that would have been done. And then we get to this bulging box idea, I think works pretty well for this one. Um, and we can see again this feeling of joining high, this feeling of straight you can see the curve here, and we can articulate that Libya. Tabula, I'm sorry. Right down through here tibia. I'm sorry, but I've been saying that incorrectly. And we can see where enjoying is a little bit lower here. Gesture. And then we're seeing that feeling of that straight on this side and here. So this one Sorry, coming towards us and then moving away come back and at our eggs. You know, the structure, the bumps, the bombs, the bombs. You've been one down here and then going going down that foot. So ah, here on this figure again, we can find our gestures and the outside corner. That's just actually this guitar. Let's get our hips in their first. That hip from the side is probably gonna be a little more narrow. So dealing with more of a profile view something like that could have done an oval. And we're articulating from that back corner. But that's going to be the inside. So we can come over here up high on that box and grab that one. Um, and then grabbed this one for our corners. It's a curve curve. Ah, And then we can come in here and curve this one. So we've got a curve tens, a curb on the top here. And then, um and then we can get that s curve here, and this tends to even bow like that. Let me make that a little bit cleaner. And my racer is not full opacity here. We'll get back to my brush. All right, so here and then again, articulating and moving like that. So S B. We can see those ankles. If this were extending down, we were probably see that foot like that. So we will see that ankle probably a little too low in here. So I think again, a couple of examples there of how that works. If you were, I think curious how the legs attached. Hopefully this gives you a little more information about how these flow. And now I'm gonna talk about that foot a little bit. So I think to do that must look right here. Now, I just want to articulate that a little bit more. I think I've said that too many times. I'll use a different word. I want to create a little bit better structure for that foot. So we've talked about this idea of a triangle, so we know in the back of this leg curves, but then it pushes out of that hell. Okay, so this is the front of the foot. It's kind of a wedge. We know this kind of bows in, and then we have our our ankle and here, and so the whenever you get to the back of the foot like that, if you were, think about, um, that he'll is basically, if I'm gonna put this in a more of a perspective is kind of going, you know, something like this. And in the front of that wedge goes in. So this this is the Achilles tendon in here, So right through there. And so you'll see that kind of bow or curve and then we get to that wedge. You can think of that wedge simply as a box like that. Some like to draw it more of a triangle wedge. So Achille is going up, or a triangle like this, which is either one's fine, either one. And then as this foot as the front of this shin tibia comes down, you'll see it kind of just curls out. So it will end with a slight curl This way, Sometimes you'll even see another little, um, curve. And then you'll start to get the ski slope. Okay, so that the wedge of that foot here so you can think of that as you know this. So that's your This is your Achilles coming back towards that wedge eso this foot going forward. So this is your shin coming down like so it'll curl again. You may even see another little articulation like that, and then it will start to get this sort of sloping into the wedge, the front of the foot, and then this is kind of where your toes are. Um, so that's get that little bit higher. We got the ski slope, the wedge, and then your toes. So again, I mean that that is Bill Botanist design. So that's all the way to this body coming down and goes back into that hell and then distributes a lot of times the weight over that foot. So that foot, you can do a lot, a lot of different ways, but let's just start with this simple tube. So this is the top of our foot. Uh, and that tube could taper so it could taper into this Ah, smaller tube. So we can go something like this, and then it will get wider. So in other words, But what if we cut that tube in half like this and then it goes back and then slightly up like this? So we have taper, and then again it's going to round out. So that's not too bad. So ah, tube, basically. So we just start with the base, say something like this for now and then This is ah, very thin Ah, part of the tube. And then appear it's higher. So it goes like this and then it tapers down. You can think about it like that if you want to go with something more round and I'm going to talk about the bottom of the foot in a second. Or we could go with something a little more boxing like this, so that would work. Fine. So but free, out of the toes to that, you know, the toes would come out and be an extension of that. The If we look at the bottom of the foot, um, you're going to notice that, you know, is drawn a lot of times like this, right? But what I like to do is kind of wedge it out a little bit because it's really hard to find that curve a lot of times on the foot. But in the big toe is a little bit longer, so that's just kind of box it. So let's say we had that Ah, little bit of a wedge idea, and then this is the big toe. And then these are the little toes. The big toe comes off, it tends to move in a little bit. And then these little toes, like you know, you can almost just put one long triangle and then just make your marks like that, and that works. Okay, so if this were the bottom of your foot. Maybe something like that would work. And then again, these This is your views of your toes, Um, so that so let's have another look at a feat, and we'll look at some different positions and we'll come up with some other structure ideas to try to figure those out. And so it will give you a little more insight into how to draw them. Even though, um, like everything else we've done, we're just we're just trying to find gesture. We're trying to find some simple yet characteristic ideas of how to put them down so we can render a more finished drawing over top of this there just again, just placeholders.
41. Master's Analysis: Legs & Feet Part Two: All right, let's go back to this one. And I wanted to just elaborate a little bit on the feet and just some of the shapes you can use. Um, this Look at the this one right here and again this this tube kind of going down on away from us like so. And then it's going to get rounded as it gets towards that base. And again, we've got ah, say a tube, for example of just coming off of that so we can feel that corner. Ah, maybe right in here. And that's coming towards us. So we can kind of make this kind of squash looking tube, But notice this ray here. So we've got actually, let me let me make that a little bit Hail. So I kind of go like this. So the wedge. So here, Teoh here. And we're seeing it here too. The big toe. And then these get pushed back. And that's the articulation and the gesture. I'm talking a little bit of bounce s. So this is you know, this could be coming down, and we can see the shading here trying to render it mawr more flat. Okay, so we don't see these big sweeping, um, then the shading. We're not seeing this. It's more like this just to indicate and suggest the flatness that that has as it approaches the toes. So basically, what you have is if we cropped off the toes and here I won't make that a little bit bigger . Something like that. And I mean, actually clean that up just a little bit with an eraser. All right, so again that to moving towards us. And so really, if you were to think about that tube kind of smashed a little bit and kind of cut right flat on the bottom, art on top, it could even cut away a little bit in here. So the modification may look something like that. So in that big toe comes out, do a little egg shaped, and these other toes tend to the 2nd 1 tends to be a little bit bigger, and these other ones just kind of hide behind it. So you'll get this look of, like, the big toe and then the next toe right, and then you'll get that wedge and all of these just get hidden behind. Like so again, that would almost be cropped like that. And that's kind of what was talking about. We were looking at the bottom of that foot and this would be of the big toe side. We kind of get this little wedge here and then this. Ah, wedges back a little bit. Make that a little bit longer. Like so So then again, that big toe comes out, then it kind of moves towards the other toe, the smaller toes, and then these just kind of do that sort of thing. So and we'll see again once we see that on the other foot as well. So we can see this feeling of a tube almost so I'm looking right in here. So we use that idea of the tube kind of smashed flat on the bottom. So we're kind of getting half of that. And then as we get to the ends of the toes right here, the base of the tours where they start that gets very flat. So in here, and then it goes up. So this has more volume, and then this tends to taper down so kind of a complex shape. But it's just some of the architecture of the body you'll want to start to pay attention to . So if you were drawing that out, he could take a few different ideas. If he liked the idea of the box, he could almost say this here is roughly the side of the box. I'm gonna shave that like this, going down to that hell the hell again isn't straight. It pushes back like this into that wedge. And then when you get to the top of that foot, um, it's going to wedge out this way and then come down with it like that. So that would be the top of the foot. So coming out and then going back this way, and then I'm gonna just crop off the toes so it would basically given it to me. Here, try again. So cropping off the toes, keeping it simple like this is what you have. And then if you add the toes again, you would have the big toe and then all these other toes kind of wedging towards it. So maybe how? Um but I guess the main thing is always think about the architecture of it. As I mentioned before, Achilles heel back of the foot. Um, if you're looking at the outside of that wedge, it would maybe be working something like this if you wanted that boxy idea. Ah Xin coming down curling and then you'll see that sort of our articulation and movement if it's, you know, the top of the foot. And again, this, This may be the outside. You would still see a little bit of that wedge like that and then paying attention to how that he'll pushes back, like so, the semi ideas you can think about with your toes, your feet, understanding how they join again. If we look at the outside of this leg coming down, you'll see a slight hint of that outside ankle bone. And then, you know this starts to move out here. On the outside, it's coming down joining. You'll see the bump of the ankle and kind of these little and this sort of idea where curls curls a little bit, and then it goes down into the into that wedge of the foot. I do that one more time big toe getting pushed back, so this would be that side he'll getting pushed back slightly. The egg shaped going on in here and and the toe kind of moving in. And these kind of getting hidden in here so side, side and then our top plane, But important to show those planes, you know, if when they're visible, very important structure. And it was really help. You start to show your different perspectives and different things that are going on. So ankle would probably down in here. All right, so that's pretty good for the legs and feet. Master analysis. I'll do some demonstrations for you.
42. Leg Demo One: and again, starting with that, we can find that angle. If you want through the hips, move it up a little bit and then I can find my skirt and you find that center line pretty much running right up right up through here. It's really more genital is so I can do a little circle there if I want. That's fine. So coming off up here. Hi. Ah, tapering tube here. Uh, just kind of say that's moving away from a slightly. So it's to be Arnie curving again. We can see the tibia here, and we can make that nice and skinny here, so following that gesture. So this this would be our tapering tube. So with that idea of a street in this, So when you get that curve and then right into this ankle bone so we can kind of bring that rain to the ankle, this can curve into the, uh, ankle as well. So if you remember right, it's a little bit lower on the outside. But perspective can throw you off sometimes, depending on if you're above the foot below the foot or whatever, Let's just get it in here. And then we can say that foot. Um, it's coming towards us so we can see it. We want to get that feeling of the wedge. So is tapering, um as it gets to the bottom and it's up higher here so that that's the feeling. You know, we want to try to capture in terms of a structure. So if I bring that down and just get this, give the angle. So it's just that foot is moving towards us, and then it's coming around to that big toe like so I can even get a feeling of the height of those toes like so. And then we want to capture Know that height here as it meets the ankle. Okay, Now, on this one, this leg is gonna join a little bit lower, so down and here somewhere and kind of moving away from us this way. So we were with our tapering tube. We could see this needs a little bit lower, and so I can go. And this is more, almost more of a side view. I could even go so and then straight like that. So it kind of bowing in. And then I could cap find the front of that. Me And here. So I'm seeing this sort of action. So, Aiken, box that out? If I need to box it out, and then we've got that calf and here and tapering down this way, and then this foot is heading off this way, we can kind of just make make this into a wedge. Remember a transition. Kind of bringing that down. And don't just stop it Maybe flared out a little bit here, and then we can bring that top down, and we can see that wedge happening to that front foot here. Um, So when you're looking at this, we're also seeing the arch of that foot and here, and we can see that slight wedges that goes to the back. This would be, you know, the side of that wedge to the side of that wedge coming down like this all the way to the toes and then out like that. And we can see how that flattens and goes up that ski slope here. And then it disappears because we have that shin in the lower leg. Coming right up. We can add a little bit. Come back to that gesture. I'm moving down. In a way, it's fine. This is coming in front. We kind of come back to that gesture. And that's the back of the cheek moving away from us in there. So that crotch and here, um, moving. You can see that moving right towards that leg. That would be the getting into the hips, pelvis and that sort of thing. We wanted Teoh Flushing to add a little something to it. We can get a little bulge there, bring it back to that gesture, bring it out again. And then we have our knee. And here we can see that tibia and here and we can add a little bit on the inside. We had a little bit on the outside. Bring it down into the ankle. The hell and so on. So going away. Same thing here we can add a little bit. Then bring it down. We can add a little bit and bring it down. And here, see how that straightens out a little bit and then goes back down. All right. So I think a couple of decent examples there of the lower legs, upper legs, the connection points, working with that foot a little bit more. And I think we're ready to move on
43. Leg Demo Two: All right, do. Ah. Couple of leg demos. First ones a back view. So again we could start with the bulging box. I think for this one, I'll use that idea. We've got a slight, um, angle this way so I can make the element that a little bit smaller, so don't run out of paper. Like so, um, I would say that middle favors the side. So we have more on this side. Less on this side. Um, So So we're clear. Um, I can start with that standing leg either or doesn't matter. Um, I think the standing leg will be fine again. We're gonna come way up here and then bring that straight. Owned down the nice curve straight. Say that NIH is roughly in here. So it's going straight now and the on the right, And then we've got another curve here, and then we have that. Ah, straight in here. We aren't really seeing that. We're seeing that calf back in here. Um, so I'm going to add that. So let's say far leg comes down, straightens out, have another curve here, a little bit of a calf and then straight so I can kind of feel around that calf a little bit. That's all I'm doing when we get down to the leg or the foot. Um, I can start to wedge that out. But for now, what I want to do is make sure that I get the right distance. So I think to do that, um I want to I can add a little bit of flesh and here coming down and then we get Teoh the straight. I mean, it bulges out right there with that knee is in this section, so that's pretty good. And we know on this side will be more of a straight. So that's helping me find that knee, and that's going to help me find that lower leg. And here again, calf, I say this leg is kind of moving down slightly away from us, like so I'm so calf and then down. So it's not best I'm going to say that box of that hell is roughly here. I like that idea of a wedge. So we get that feeling of the triangle of the foot right there, we'll make sure capture that. So I got that Achilles moving up in here. We can add that little extra bump in there if you need to, and they were seeing that foot move off to the side. Now when we get down to the bottom, when we start kind of refining this a little bit finding those contours, I think it's good to get down here and just flair. Flair it out a little bit. In other words, don't bring it in and just stop it were that Foot starts if you bring it in and just flared out a little bit. A lot of times that will help with the transition, so it should be a little bit higher. So maybe in the air. So we got that wedge of the back of the foot, and then this is gonna be the side of the foot. And where this flares out, often times you'll see another one. You'll see another one like this, and then it will go off and down into the wedge of the front of the foot's. It will start a flat now and here like that. So you're kind of dealing with this and then that. All right, so that's pretty good there. Now, looking using the pencil test, I can find the angle and the angle is moving off. That's probably a little bit too much again about in the middle. So this is joining a little higher. This is joining a little lower. So finding that angle and then coming down straight on the inside, so tapering like so And I would say moving away from us if I'm looking at that, the knees, they're almost even with this one slightly higher. If I draw a line straight over, I'm gonna come to the inside now and just try to feel that V. That's working pretty good. But because this knee is in this angle Ah, that need joins different. This this is this angle. So that knee is here. So obviously they're gonna the knees or the knee sockets and need joints are going to be have to run parallel consistent with the angle of the leg. So we're getting any joint like this, and then this one continues to move out this way. So now if I look down the bottom of this foot, there's a slight angle like that. Okay, so this is gonna be the bottom of that foot, and here. So now, if I know that from then I can come in here. Maybe I want to do my gesture line here out. And then I can start getting my wedge of the foot, which we're seeing a little bit of that bottom and then flare out like that and that Achilles or that, um, cornerstone is here and then moving up so that Morrison is there, and we're seeing that that almost nice gesture of that going into the foot like that. So we're seeing that gesture on the inside, too. So that kind of following that tube like feeling going around, we can see that bump on the ankle as a joins. We can add that flesh if we want ST and then back out, um, back in back out, and then back out around that calf. And when we get to that calf, you can almost see that calf muscle is that tube is coming down. So this is my calf muscle in that tube is coming down. It's almost better to wrap that calf muscle like that. And that kind of shows the direction that leg is heading more so than here. So we look at this leg on we can say That's kind of moving down like this. And around that leg where this one, we kind of see a slightly different connection cause that leg almost is moving towards us like that. And this would be a much smoother transition like that. Smooth there, and we kind of curve all that out. We can see that gesture down into the foot, the toe on, and then this would be the bottom of the foot there also going up into the knee hamstrings and so on, so
44. Proportions Part One: all right now we're going to work with some proportions. I'll start with a female and I'll start with a front view before I get into it. I know that this is more of a general model. It's so difficult, if not impossible, to come up with a one particular set of proportions that works for everybody on the planet . Some people are tall. Some people are sure some people are why some people are narrow. Some people were more Linke than others. Eso you know everything is going to change. No two people are the same, but it's good to have a general idea of proportions. And what that does that gives you something to compare other models imposes two. So having something to compare to is much better than to go to draw a pose and to have to start with nothing. So anyway, this is kind of crack into it here. So let's say we have our head, so our head is kind of that egg shape like this. And then we had that gesture line coming down the middle. Azzam's you get it right. It doesn't matter if you want to draw the gesture line first and then draw the egg. That's fine. So that's going to give. Give us our main shape if we come down halfway on top of the head to the chin. And this does not count the hair, so you may have hair. Ah, Bond. All this other stuff going on, You want to really Just think about the top of the skull to the chin halfway and here. That's gonna be the eyes. Yes, we have that just above the eyes. We have, of course, the eyebrows. If we take the distance from the eyes to the chin and we divide that in half again, that's gonna be the root of the nose, not the tip of the nose, but the root of the nose. So if I were to come over here and we work to do this, they are upside down sale. And then I can kind of quickly get in this figure here so that forehead is coming off and this comes in where the eye sockets are and then comes back out, and then it comes back in and touches. So that's what I'm talking about right there. So right here is the root of the knows that we're working with here, and then we come down halfway again. We're gonna be roughly where the bottom lip is. And I'm talking about the bottom of the bottom lip so the lip will come out and here, back out. So that bottom lip right there is what we're talking about. And then we've got the middle and then the top like that. So these are all pretty good proportions. So Ah, Then again, halfway here, halfway here. Okay, so that's all that will give us a general Ah, model there, I guess, to choose work with for the head. Now, I want to talk about something here real quick. If you're going to make a mistake on the egg shape, you're better off to make the mistake on top. Then you are the bottom. So if this is my egg shape, I put too much on the bottom. We could see that looks pretty weird. Where is my start? On top. And I get to narrow down here. But this is way too wide. That's okay. Because once you come in here and put you your hairline in ah, little bun or whatever, then it still rings pretty true. Where is down here? Um, it's gonna look a little bit odd. Now, if you're drawing a cartoon character or something like that again, maybe that will work pretty good. But this is going to ring a little more true when you're done and you have a chance to make up for it when you do the hair. Also, if you're if you've got your egg shape here and your got your center line now you're better off to, um, error with more chin. So if your if your line is a little high, that's okay, But your line is a little low then, then all of your features on your face will tend to get smashed in there, and then you have this really large forehead, whereas if you if it's too high, then you'll just have a little bit longer chin. And again, if that forehead looks a little bit cropped off for a little bit short change, you can always add a little bit of hair. So, uh, again, a little bit wider here is OK, but you want to watch out for this one so we don't We don't want to do that. If it's a little bit higher than halfway. That's okay, because we can deal with a little bit longer, chin. And we can make up for that, Um, mistake, um, by adding a little hair in. But if if it's too low, then all of this gets smashed in, and then this whole area just gets thrown completely off, so we want to watch out for that. Now I'm getting to the ears. This is the eyes. And here on the ears are going to start out on the side of the head like this. Okay, I'll just put little ovals there right now. And so the tops will start here, and they tend to come down to about where the bottom of the noses in there. You can kind of check your own proportions. You can check yourself in the mirror, but the bottoms of the years tend to kind of lineup okay with their now, The tricky thing here is whenever he add the ears to that shape right here, they tend to kind, just stick out and look a little bit funny. And so what you want to do is add a little bit to the back of that skull. I'm going to grab a little bit thinner pen here and I'm going to add. So this is our ears. I'm gonna add a little bit of skull to the back here like that. And that way I've got the front of the skull and then I've got the back there. I'm so it's just good to have a little bit of extra on on that once you add the ears. So excuse the move there, and I'll just kind of add a little rim around that as a reminder. Now it looks like she's wearing headphones. That's okay. So we've talked a little bit about the proportions and different things again. You can come in here and ad Ah, a little hairline can come out. It could be a little bun back here or whatever, and we're all pretty. We're all good to go there. So I think we've got that covered. So the net comes down a little bit thinner on the female. I'd like to just curve them out a little bit like that. The shoulder line is gonna be about right here. So if you're looking for a good measurement, So if you come down the center line down here on the pill. The next gonna be about right there. We call it the Super Sternal Notch or some people just very generic kind of ah, more common term for the neck there. If you're looking for a measurement, I begin to say 1/3 of the head. So if you come down, it became ill. Be here. Top of the skull, Not not the hairline to the chin. And we get about 1/3. Um so from the chin down here is roughly about where that shoulder line is, so that again equals about 1/3 of that head. Okay, but again, if you find the pit of the neck that's going to give you a good I I got good rule to kind of go with their No, the again. My net comes down and just kind of curls out there. You don't really need to connect that, because now you can. We can start to work with that torso. We're going to attach it using the muscles in the back, the trapezius muscles. So bring that center line down again. I don't know how far that comes yet, but I just kind of extended down, and we've got that waste wide to So the waste fly tube we can say is roughly in here. Now, we're not worried about that shoulder girdle area. OK, so we're not worried about how wide the deltoids go going to come down here and look at that waste wide action. So up here, um, that may curl. So let me get this sort of thing like that. So we got that tube going on, and then it's gonna curl back the other way what you talk about in a second, and now I can get in here and add our trapezius muscles, which kind of just go and back of the neck out to roughly where those points are in here. So we have that now if we come down another third. So let's say we come down this call this 1/3. Rather, I'm gonna extend this over in here so something like this, and we'll call this 1/3. So the pit of the neck to the top of the head again. That does not include a hairstyle. But if we take that measurement and we come down again, that's going to give us roughly where that rib cages. So if we again take this, come down roughly in here, that will give us the bottom off that egg shape. So if we were to add that egg shape of the ribs, we're gonna say that's roughly in there. And then from there we know the waste will start. But if we add another third, let's just say I'll extend this over So we'll take that Uh huh. And do it again and I'll go up about right there. That's gonna be roughly where the bottom of the pelvis area. So right in there so kind of using these thirds works pretty well. Once you start mapping, once you find this, then you can kind of hit these points pretty quickly. Okay, so it Now, if you want to locate the breasts and here you can go with the top of the head to the chin so we can go without the hairline again. So we say roughly in here to the bottom of the chin to this point, that's gonna be roughly a game where the breast line and now that that could change if you have a full busted woman or something like that that can vary quite a bit. So we have, um and noticed the angle. I'm doing that at two. Okay, so I'm not doing it vertical like the head, so we don't have a vertical axis. This is running mawr like that. So if I break that down real quick, if you look at the skull, so I kind of take this idea again, Maybe I'll do it over here. Since we have room, we'll do the head. So we got that back of the skull and in the front. So the spine little curve. OK, so this is all your a cervical vertebrae in here, connecting. And then it's going to get into this drastic arch, so that's going to curve around this way. So that rib cage sits right in there. Um, and the angle the axis is here. So if we were to kind of come down to that sternum were the typhoid process, it will kind of cut down. Ah, and then back this way. But again, the access is there, and that's just kind of fitting into this area here. We'll get into that, um, lumbar region and then getting down to the sacrum so that the hips are like this. Okay, Someone you're when you're looking at the figure straight on vertical pose, just like this. Um, and you were to put place this pen to say right there on this part of the body, it's gonna look very flat, so you're not really going to see a tremendous difference, but it is going to move slightly away from you like this. Um, So again, if you held it here, it may be vertical, but it's tilting away from you slightly in space. So when we look at this rib cage, I said, just draw my art arches there for the rib cage. That's actually kind of tilting back. Okay? And that's why they draw these. They're not straight up and down, and that's because they're there on this angle. They're on their own, that ray there. So they're going to look as if there kind of moving away from you slightly and they're resting on that. The volume of that. So this is more of a tube, um, sort of structure. And then as we get to this part of the body, if you were to take the pen and they say, Hold it right in here now And this is assuming you don't have a lot of extra weight on you and then it's going to start to level out. So basically you have, for the upper body is tilting away from you slightly, and then as we get down to the middle of the body is flat. And then as we get to the bottom of the body, it's going till this way. So we're getting We're getting this. We're getting one, two, and then three. So there's some perspective going on there. And that's why, um, I drawn this way just to kind of help with that. So again, ahead roughly ahead to the A length, Let me get that right. Roughly in here from the chin, here is the nipple line. We take that down again, roughly in here, that's gonna be the naval. So that's going to give you your belly button. And here and then if you wanted to do another head, we got here here, and that should really from the belly button again to about here should be another head, so you can do that too. So this from well, I think That's pretty good. I don't think we need to elaborate on that anymore. Um, this is going to be your waist, so your waist area tends to be right in here. Okay, So that's that to him. This is where things if you're looking dead on this, may even start to move that way, um, away from you here. And then it may start to level out, and then they'll start to move in the opposite direction here because of this sort of action. Um, if you're going to mess up, you're better off, I think to go a little bit short here, then long, but that will give us, um, some good proportions to use for the upper body, like so. And then we can bring that vertical line straight down. And here Another thing I want to mention is that idea of the coke bottle. If you were, I want to connect the neck to the rest of it. You certainly could. You could take this neck if he wanted. I'm actually I will do that in orange. Actually, I'll do that in green. He's already have it. So this neck switch back to orange, I just I don't want to conflict with this. So that net could come down. Remember the coke bottle and around like this that's coming a waste wide tube, if you remember right from the very beginning. The good old days of this course there's your coke bottle again, moving away from us coming down down away from us. Okay, so there it is, coming back. But again, if you wanted to stop him here, bring it out, find your pit of the neck, and then come out there. That's all perfectly fine.
45. Proportions Part Two: all right. Time to get some legs. So what we will do. So if this is the top right here of the pubic area, then will come down to heads so we can come down again from the top one to so one to So maybe a little bit higher in here. So that would be the knees. So the knees would fit the same rate right in there somewhere. But that looks a little bit too short. You can always bump it down a little bit better off to have a little bit too much, then. Uh, not enough. And again, we remember the This is our skirt, uh, coming down like this. Remember, the bow moving, moving away, moving away tends to level out, Come up in here that we get our tapering tube. Something like that. If we come down another two heads second, just kind of measure. Measure that. So roughly in here would be the bottom of the feet in that section so you can take your pick. You can make this these calves more, you know, angular, or we can just kind of curve them down. Um, so that would be a little bit straighter here, you know, at the knees and then coming down. And then we have our feet. I mean, what would just keep it simple for now again, that always seems a little short. That might be a little bit light there. Sony's calves. I'll bring it down just about here. These just like that. So this would be our on our toes and their ankles. So that would be again two heads, and as always, we're not doing anything with the hairline. It's just simply chin to top of the head. That's Ah, pretty good rule of thumb there. I remember these air from our little shapes here. You know, the have a little bit of dimension, the wedge of the foot. If you're going to err, I'd like to kind of mention this once in a while. Also, knees, calves. Um, you're always better off to give it, um, a little bit too much down here. So if you have your head here a little bit longer, neck is okay a little bit longer. Even rib cage waistline. That's okay. If you're gonna make something a little bit shorter in the hip area pelvis, sometimes that's better to go a little bit lighter than it is longer, A little bit longer in the legs, a little bit longer. Upper lower leg. There is, um that's that's not gonna hurt anything. It's when things get crunched that it tends to look a little bit awkward. So now we get to the arms. So if this is the bottom of our rib cage, and here and you just think about these is being equal to equal, equal, equal or enough you wanted Teoh make that third all the way down. That's fine. Um, so the bottom of that rib cage is typically where the upper arm and elbow. So if this is our shoulder line, remember, we don't the shoulder from a front view like that. We had that corner going on, so we don't want around that too much. So if we find that intersection or that point right there, we can bring that upper arm straight down. You know, if you hold your arms out to the side, they tend to lean out just a little bit getting pushed out by the rib cage. But before I add that I just kind of go around our form here So this is our here. We got waste hips, pelvis, upper, lower, like so if you wanted to add that rooftop, fine. And then this is gonna be the corner there I'm talking about. Remember, this is kind of ah, tube. That tends to just kind of come down almost straight, like so. So we can kind of get right in there maybe a little bit lower product. That rib cage is probably be a little bit lower down here or something like that again. Look at that corner. And don't round that too much. And I don't start to look awkward. You're better off to make sure you can get this on camera. Yes, this is my head. So that's my shoulder, my trapezius muscle coming down. You want that sort of corner and not like that. So for the lower arm, we have the same distance. So from the shoulder to the elbow, um, right on down, um, to here. So we have, and that can swing out a little bit. So if this were the arm, remember, that's when a price come out a little bit. So again, that same distance say, from here to roughly here is going to be the forearm plus the base of the hand. So if this is from elbow to the risk plus this part of the hand so we're not putting the fingers in and we're not cropping in it off at the wrist. So again, from elbow to the knuckles, um, and then what you can do is just kind of put a bulging box type of thing here. If you want to, you can add a thumb and some fingers, but so we can do that on both sides. Remember, these air forearms tend to be a little more triangular or tapering tube or something like that. And incidentally, if you really pay attention, let's say to this rib cage that rib cages like a three before ratio. So basically, ah, you want always to be a little bit longer, um, okay than it is wide. Okay, so you want you always want this section, and here I kind of have ah little bit longer than wide ratio that tends to work pretty well
46. Proportions Part Three: So that's that. I think that will give us what we need in general. Maybe a little more little rounder and in the face, things like that versus the male. So let's go ahead and do that. So let's go over here and our get our mail going so we can start with the head egg shape. Um, we can even make it slightly more of a pill shape. So a little longer through here on, we can make that Chen a little more chiseled if you want versus rounded. Sometimes I gives ah, a little bit stronger. Masculine. Look, with that skull, we come down halfway. All this is the same. Get our gesture line in before I forget. So that's probably a little bit too low. So that would have squished everything you want. Those eyes up here. Eyebrows halfway bait the nose and that, remember, is the base of the nose. The route where meets skin, not the tip. Halfway bottom lip. They were rocking and rolling the neck. If we come down here, if we come out to the sides, remember that a female tends to have a little bit more of a narrow neck. The mail that could be a little bit wider and right away that starts to feel a little more masculine. We can put our ears and remember, we can give it a little extra skull once we get those years and just to kind of give it that a little more volume in the back. And then once you put your hairstyle on all that stuff, it's it's fine. Prop most more than likely. So we come down here to the pit of the neck. That could be our shoulder line. The mail can be a little bit whiter and the shoulders versus the female, and that's it all works pretty good. Some some bring this down, tapered it a little bit, and then we'll get our trapezius muscles here, coming out to the sign when that may even be be a little bit strong, um, too much on those trapezius muscles. So in there Rukh age, all this is the same eso. Once we start find in the top of the head and bringing that down, all of this is going to stay roughly the same. Um, if we get our tube in and we can just kind of focus more on the rib cage in here. Remember, that's going to move back a little bit. So you kind of get placed wide tube, something like that. Maybe bring this sought out a little bit, That's all that's going on. Kind of ring True what we were He talked about the nipples. Remember the head. So one head height roughly. And here, that's gonna be the nipple line from a favor that top a little bit here. Not gonna hang down quite a low, but, um, we can kind of they're not going to go out as wide. They're not gonna sit as wide on the male just because they're more attached to Ah, that rib cage area or these 10 to not be the same. So again, it's our rib cage. And here, take that center line all the way down like that is fine for now. Eso we've got the waistline always in here. The mail. Sometimes you will have that extra a little love handle there so you can even bulge it out if you want. Ah, And here sometimes even more. But again, this distance from here to here tends to be less than what we have over here. So from so I decide again, all these proportions are the same. But if we have the love handles there, when we come down and get your belly button and then we get down to the pubic area on the pubic area or the pelvis, we can do this kind of bulging box if you want. You know, this probably made that a little bit too wide. So let's do something like that. So again, rib cage, bulging box, um, genitals. And here and we come to the top of the genitals. And remember, it's two heads all that roughly stays the same. So we can kind of get this teardrop starting higher. That's fine all the way down. So that sort of thing, I get to come down again. Same length to the bottom of the foot, and we've got our toes, our ankles, and then make that even more chiseled, Um, square for the mail on. And so that, um, this shape in here again. As I mentioned, I said a little more of a teardrop shape. Um, let me kind of go over that for a second. We'll get our center line in Nis feet. And for the female, I'm kind of bounce back a little bit. Let me bump this up a smidge. So this one just started a little bit lower. If we look at where men 10 to collect. Ah, a little extra weight. It tends to be right here. Women tend to get it down in here, so this shape sometimes can be more of a diamond out to here. So what kind of come out to here and then back down? It's so actually use a little green here, so and this is again just general stuff, So women tend to collect it here. Men tend to collect it there. So just observation. Something to think about their the shoulders, all of this other stuff. We get our waste wide tube pit of the neck out. All of this. You know, we got our three of the arms coming out. All that's going to stay the same bottom of that rib cage again. We come down to roughly down in here a little, maybe even a little bit lower. You got that lower arm tapering tube, and that's gonna be to the knuckles, fingers, thumb, and so on. So that's again, Um, if you want to, it's a male. We can make it a little bit bulkier through the arms. Sometimes that is, ah, distinguishing difference. And I'll just give this one in real quick can. We can make that little bit bulkier. And once we get to the shading and adding all the extra stuff, that's gonna help bring it, um, to a lot more finished state there. But yes, so very much near the same. There are some subtle differences you can think about, Um, but in general, you know, a little bit wider neck, maybe a little bit more of a chiseled jaw, versus more around it features. It's again. Not always the case, but that is the male proportions.
47. Profile Proportions: All right, so let's talk a little bit about the profile view, and it's the proportions. And all this stuff doesn't change at all, is the exact same. So if I do, I just carry some of these right on over. We can start to lay that out. I can't even carry over the pit of the neck when the that right down here to the bottom of the rib cage. Waste that'll be the front of ways, and then we eventually will do the back of that waste. So this will give me a good feeling for how this works. But for the for the head in a profile on, we can start with that upside down sale, remember, slightly up and back, this sort of thing. Then from here, if you want to around that off, that's fine lifetimes. Once you add hair and all that stuff, that'll that tends to kind of work itself out. But let's just for this demo. I'll just add the back of the skull again. That egg shape, um, going slightly up as a reminder. And then if we come down here to the bottom of the chin right here, it tends to go back a little bit. And that's the dye gastric plane. So if you're sometimes if you a little bit older a little bit heavier, that tends to come down in here. So we lose that. And what that does that gives, you know, the face, a little volume. So it doesn't just look like a mask. Ah, Halloween mask. But you'll have that. And then this is our less air neck, and here in the front, that's gonna come just slightly short of the pit of the neck so we can get down there on at you. Pretend that we got a little bit of straightness here under the chin and then we have this . That's where the net comes down and we can bring it down even a little bit further to that pit of the neck. There. No talk about that second Now, on the back of the skull, where all of this meat actually we all do. First, is math out this to this? So if we go about half way and here and then we find our center line right, the center line tends to be about right. There were all that intersects the egg. All of this. That's about where that ear IHS so that in most cases it may sit a little bit a little bit higher, so we'll get something like that for the ear. So again, this would be to say, if you remember, right, forehead comes out so that I socket knows mouth. And then this is the Shannon here. So we had that of the jawline will give up in here in front and no end in front of that here. Don't take it to the ear or behind the ear. So that will give you some good reference there. And then right back here, where this is is about where the back of that school is of the back of the neck. I'm sorry, we have a little more of an hourglass now. No, that this is our pit, the pair, The net. So and this is also the top of the rib cage. So this is about where that rib cage starts. So in the back, the you have seven cervical vertebrae. And here the 7th 1 If you reach back behind your neck, you'll feel a protrusion right there. That's considered the C seven or seven cervical vertebrae. That's about that's where your thorough ASIC arch began. So this is a the top of that spine. And then there's a V. There's an angle right there, and it's important to get that angle. If you were weren't wearing this like a T shirt, that's about where that T shirts going to sit if you had a collard shirt is going to come up here. So if you again think about that T shirt line, that's how it ISS. And oftentimes what happens is artists or, you know, beginners will. Either you drop this down and here, or they'll bring it down way down and here and then they'll start to curve it. But actually, it starts to curve, Um, a little bit higher where this drastic arch is. So the Jurassic art starts to bend around this way, something to keep in mind. Now we get into the rib cage so the bottom of that rib cage is in here. So from the side, remember, we talked a little bit about how the upper body let me grab the orange. So when we start looking at the rib cage, this will tend to move away from you. And then as we get into this area, it'll flatten out, and then it will start to move that way, and that may be a little bit hard to see. So that's running out of ink. Okay, so I'll grab this blue again around straight and then around this way, and I bring that up because this this is where things get a little bit tricky, a little bit interesting for the upper body. So if we were to use some of those ideas we talked about in here, we can use that idea of the like a bulging box. We can just simply use an egg shape, whatever you want to do. But just know that from here to here, it's going to bulge out that way. So make sure now I'm just going to use an egg shaped here. Make sure when you put in that egg shape that you account for that for that angle, the access line running this way. So we carried the nipple over. That's gonna be roughly in there. It may even be sitting about right there, and so it's going to come out. So where that nipple line is, it's gonna come down a little bit more about right in here. Uh, so if you just followed the sternum down so that's coming right down the center to the end of the rib cage, you're gonna feel a bulge out a little bit more, and then it will start to change direction and kind of flatten out. So again, we had this angle of the neck at the top of that rib cage and then I know the spine is going to be wrapping around that action there so the arms will be swinging back here, which we will get in a second. So that rib cage, if we bring that over roughly and here, that's where it's going to start to change direction a little bit. Sometimes you can just I've alluded to it a few times, so I'll come over here for a second. So this is the front view of the rib cage. When we get that acts the center line, then we can do these arches like a rooftop. Some people like to round them. That's fine. Whatever. Whatever works for you, so from the side, you're going to see that, and then it's going to kind of round out or level out and then move towards the back and then kind of move up and around. So so again, it'll round. However you want to do it, come back and down, level out, and then move backing up this way. So that's your rib cage again from here. Um, you know, we can kind of pull that down through the waist area, and that's where we get into you bring that up just a little bit and here and we can start to move the opposite way. So we're going to get that a little bit of a bulging box if you want. You can do on egg shape something like that. Whatever works. But look at the back and I'll clean this up a little bit then that's going to tend around there. So you have this Thor ASIC arch, and that's your lumbar part of the spine. If you were to look at these love handles, they tend to that. This was your rib cage coming down that they tend to be about in here something like that. And then all of this will just again come down, and then it kind of worked back down to the pelvis area and then your legs start to come in front here with a female allowed. This kind of stays the same. The one differences whenever you that say, we actually let me stick with the mail and I'll talk about a few subtle differences with the female, but with the legs, Um, with a male and you're this tends to be, Ah, a little more rounded so we can kind of get in here and do this. And then from there you'll have Ah, the legs coming down here again. We can swing up high and then come down to the knee and here and then I remember, can take that s curve if you want. Like that and then right into that foot back into that hell, we got the wedge of that foot ankle like so, Um, and again, if you were to look, let these blue lines perspective lines straight curving, that's gonna be this this and then ultimately this. Now we get to the arms. So remember, the pit of the neck is where the clavicle start or the collarbone, and that will come out to that deltoid. So it become. Find the pit of that neck and we come out about right in there. That's roughly where that deltoid is going to start right in here, something like that on. I can make it more here and then swing that arm back. So if this if this is our elbow line and I swing that arm back a little bit, that's gonna stop short, because it's again. If I take that distance and swing it, that's what we're dealing with. So if I come down here and just kind of swing it like this, that's kind of what's happening. So I can swing that arm back like this again. I can take the same distance from, um, the elbow through the base of that hand and bring it right down. And here is gonna be a little bit light because we were short here and then we can get that tapering tube and then we've got based on that hand and then so on. So the armpit, it would be roughly in here. I'll go to a little bit darker. So again, collarbone, shoulder, coming back, back tapering tube. Here there's our distance. There's our fingers, thumb and whatever and I'll bump that up just a little bit so you can see the bottom of those feet. So those were some ah kind of carry over lines and information there for the male profile view.
48. Profile Proportions Part Two: So I mentioned a few subtle differences with the female, but for the most part, I mean, we talked about the roundness in the face with a little bit of extra weight here. What? You're really not gonna be able to see um, been a profile view? So So we, um But, you know, this is coming out. I want make sure I get this change in direction. And this is moving off towards the pelvis. Hourglass, the but for the female. Um, basically, you just want to make sure, um that you get the obvious things. I mentioned the the male here in this section, Um, they tend to be a little bit rounder on debt. Works a little bit better. So with the female, you can simply take this how to start with the with the head. So I'll just kind of lay it out real quick. Pit of the neck. I'll just come down here to the rib cage. That's our waste. This is our pelvis area. Um, well, just again make this as quick as possible. The gastric neck and this is the back of the skull. We can find all those half way points again. once you put the bond and all that stuff. So the period that net comes down, So all that changes si seven. So remember that next starts a lot lower in the front and, um, higher in the back and then that come around. We can also use that coke bottle idea. But in this case, the coke bottle is gonna be a little bit, uh, distorted. So it may look coming down like this. We got the neck coming down. So again, something like that. But I'll just keep it consistent. So we know we have this Ah, rib cage. All of this stays the same of coming around. And then once we get into that rib cage, that's where things will start to change a little bit. Look at that drastic arch. And again, we have our arms moving back here. Obviously, if our peck line is here, it made it tends to be a little bit lower on the female. And then now you'll get the breast hanging down there like so Okay, so that's that's one key difference. And then the other is a very, very subtle thing. So if you look at where the hips are, uh, typically again. This is our egg this way straight according in action. And we could go a little bit thinner and a little more boxy here, and then that's gonna push it out a little bit more. We just make it a little bit fuller. And then that led the legs, come off that corner like so And then all of this kind of stays the same tapering. That's about it. Um, again, if you're building that, that the features of the face, all that's kind of coming off and so on. But so, yeah, just a few subtle changes there, I would say. Just using this. Maybe more boxy idea and then getting this a little bit cleaner. And then other than that, the same things we talked about. Maybe a little bit thinner for the tubes, construction and obviously the hairline. All of that's going to play a role in helping make those decisions as well. Me. Look at that triangular foot and we're good to go
49. Proportions Back View Part One: Let's talk a little bit about the back proportions and I'll start. Ah, I'm going to a series of little shapes here, and then I'll explain what's going on, you know? Okay. And then I'm going to carry that over for a second. Here, bear with me. So there's our upside down sale. I can do our egg shape against lately. Up. We can do all these proportions. Weaken. Do the eyes, the ears di gastric plane, neck. We know that neck joins up here like so I could even do the front of the face of the front of the fees. We're dealing with something like this, and we've got our eye line roughly halfway, and then we know we have our chin. And here, um, years Once we add that, you know, we want to add a little bit more to the back of that skull, our net comes down and we get to the pit of the neck down here so we can draw a shoulder line. So the same. That's moving down little bits. Well, I'm gonna cheat a little bit. Someone move that up. Let's just kind of do something like that. The pit of that neck right here. So from the front, we know we have these lazy muscles, that kind of the trapezius muscles, and they're actually on the back, But we can see him from the front. And if this were are back for you, which it is, um then that's gonna be the trapezius muscles. Connect him. But let's this is the pit Which of the of the neck which we can't see from the back that's going to come out. And what's gonna happen is these muscles, the trapezius muscles right here, which are again visible from the front, basically are attached to the base of the skull right there. So pretty much in here and then they're going to move out towards the corners as we talked about. So they're gonna be up in there like that. Good. No, you're gonna be able to see. So that trip easiest muscle. I'll do a dot, dot, dot, dot that. So that's from the back. You see a sliver of that neck right there and then a little bit of that face to. So if we look at this line, that's going to be a little bit of that neck here And then we get into the face, which is all right here, okay? And that's what you're seeing right there. So that gray right there notice has a subtle curve that kind of goes down because you're only seeing kind of the back of that jaw and then moves towards your chin. And then again, we have our ears sitting out like this, and we can add a little bit to the top of that skull once we get those ears in there. So it's important to see that layering happening whenever you're you're doing this. And if you they were to come over here and add that collarbone on and then that that's where your shoulder starts, that trapezius muscle, it was connecting back here and then moving right towards that, connect him back there and then moving right towards it'll flare out a little bit on the back because it tends to be a little more rounded like that, moving around that shoulder. And then, of course, this would be the green of the neck. And then you get into you get into that face at jawline and here and then you also have Sorry, that would be this would be actually Gray. And then this would be our kind of green in there. So interesting how all that works in space and how it changes a little bit as we get to the sides and and what's visible and all that stuff from different angles. All right, now we can add our center line if we want. I should have already added that, but, ah, I got a little sidetracked with teaching these layers, and we have this waste wide tube so that can kind of come down and here, you hear. And if you were to know Cilla, but the body both front and back, they would look the same. Um, so obviously, with a back view, there's gonna be some subtle differences, but for the most part, the proportions are gonna be exactly the same. So if we know coming down here to the pit of the neck, how much you if you remember right, this is our shoulder line. That pit the net can be slightly below that sometimes, because this is our clavicle is moving up in back slightly towards the shoulders. We also talked about this. So the, um, the C seven which is right here, where ah, the cervical vertebrae end. And then we get into the drastic arch which moves down in here and then down. And here is the pit of the neck. Okay, so we get this, So from the back, a back view, um, that's going to change a little bit. So if this is are the pit the neck, um, then we have to account for the rib cage, which we talked about as moving. You know, say something. Let me go in. And my third. So let's say that this distance from here to here from here to here so that that's gonna add that rib cage. And then, of course, our our waste is going to be in here. So if we were to think about that angle on and we were to look at, let's say the rib cage and I'll kind of come over here and do that. We've got that we can just start with the next shape if you want, remember, moves back. If this is the pit of the neck, then moves up and back to here, and then we get this, that we get this access point and then remember, it changes directions roughly in here. Eso from the front view. That's going to be about where that a roof line begin. So these are all your ribs, and that's basically lining up so that I'll change that. You're basically seeing that from the side, and then all of this will This can kind of move back and then down. And then we've got this. So again, we're looking from here to here, and we cut off the top like this, and we made an oval, so this would be the front. And then that would be the back, because we can see down in to that space from the front view because of that angle. So that's what's happening. So we know this pushes out, and then those rib cage is going to that's going to change direction and then move back that way, like that pen starting to get a little weak on me here. So now from the reason I mentioned that is because that C seven is gonna be a little bit higher. So what I like to do I'm thinking about these lines is take that up a little bit, and here and that's going to give that illusion of a slightly higher rib cage in the back. Now, here's where things get a little bit interesting. So this will come down so we get that threat so this will kind of push out right in there. But then once you get past the shoulder bleeds which were sitting about right here, then it starts to level off and then change directions. So what, We're going to get that sort of pushing out here and then leveling off and here. So when you're looking at that on this say we lightly put in our our shoulder blades. So we know they're kind of like moving off towards that connection. So that is moving away from us. I'll go back to my green here, so I'm not sure you're gonna be able to see that. Let me get to a blue so that that will move on. That's out of ink. Let me go with my red again, moving away from us. And now, once we get down in here, it will start to move straight, and then it will start to move slightly in as we get to this waste area. Okay, so then you're going to get kind of this action here as it moves into the waste. And then if that weren't confusing enough, so we'll go something like straight. So that's where it starts to straighten. And then it starts to move in. Right? And it was straightened out again and then moved out this way as it moves into the pelvis. So again, we have the shoulder bleeds, kind of running roughly parallel with our center line out towards the corners again, these lines moving this way away from us, it will start to level off, right, and then move en, and then it will start to level off again and then move towards us, so that will start to curve back towards the viewer. So if we add our other third so again, we've got our how to say equal equal, and we'll add one more. This is gonna end up a little bit bigger. So I got here to here. So what kind of bring that down in there and then we'll add one more. And there I know this is running out of ink, but I think it's still pretty good for what I need. So now, once we get into the pelvis, that's going to start moving towards us like this. So it's kind of like, ah, way level and then back in this way and then level and then back out like that, so out and and so one so kind of interesting and complex how all of that works.
50. Proportions Back View Part Two: All right. So if we were to just clean this up a little bit, I'm gonna say this. I'll go with a little bit bigger pen. So again, uh, this would be the movement, um, or to say, the rib cage. And here we know that's kind of moving like that leveling off and then we get into our waste. So if you're doing a female, that could be a little bit thinner. And here, if you're doing a male and maybe a little bit whiter and then we get into the, um, hips, we could do that skirt idea and here, So if if our hips and again, you know, from the back, we don't have ah lot of the complex structures that the front hat give us so we don't have the belly, we don't have the crotch area, so we're getting that fullness of the hips. So if you were to take the space through the hips and I just kind of round this out a little bit so we see that rib cage, we see the waste and we see this coming towards us. So we take this distance from here to here for the hips we divide it in half and they go slightly above it. That's gonna be the crease through the glutes there, so that can just kind of move off. Like so again, if we're dealing with ah, female, we can come out to a little more of a triangle here, and then bring that right on down to the knees. Now with the upper body. We know that crotch we talked about that crotch, which is roughly in there. So that was to head, so became if we know that the head is roughly here and I can't measure just the ball, OK, I've got account for the chin and the top of the skull. So if we came down from the top of that crotch 12 then we know those legs and the knees are roughly in here. We can't see him from the backside, come out a little more of a triangular shape and then bring it down here for the female like so and then this is gonna be our knees. And then again, I can come down. I'm a bump that up just a little bit. I could come down to more heads so I can say 12 and here and let that go up a little bit. I'm going to readjust my camera all right now, but I think we can get everything in That's going to be, ah, where our feet are. So from the back we have our heels is still very much a triangular shape. We can go out and in now and and them kind of back out a little bit. So that will give us some good proportions to work with from the back. Some good things to think about again. We could come right to this corner, bring our arms down. So we've talked about that. If you remember right when it come down to the bottom of that rib cage that can move in whatever direction you want to get a nice, nice corner slightly rounded later on. If he wants to render that that way on, then we can come down again. Same distance and we can get the palm's remember right. We'll go back looking more time, bottom of the pelvis right here that will give us this, Then we can. So the pelvis is the wrist. Plus that part of the hand we can do our thumbs and we're good to go. If you add your hairline little bun, everything will start to come together a little bit. So with the mail, I mean, really, the only key differences is you may have a little bit wire shoulders like we talked about. So if I did that real quick a little bit smaller so we could do the ball of the head. We know we have that The trapezius muscle was here. I'll get the shoulder line. So traps moving here, we got side of the face. Oh, are the neck rather So the traps air coming down. And we can make that a little bit meteor, if you will. And then we've got the side of the face here, and then we have our ears, and then we can add a little bit here. So maybe a little bit broader in the shoulders get our waistline. There are two rather. And here all that's gonna work the same. So going up, levelling off after the shoulder bleeds, shoulder blades moving out towards our corners, so leveling off and then moving away from us, then leveling off and then moving towards us typically so If this were the bottom of our rib cage, we could do that little egg shape here. This would be our waste. We could do a little more of a bulging box, something like that. All this stays the same and go slightly more than half way in the waste. So if this is coming down from the back view, this is our hips way. May tend to get a little more Wait here for the male, as opposed to maybe a little bit leaner for the female. Ah, and then it kind of goes out like this down to the legs. So we get Ah, again. Males tend to hold a little bit more weight there and we can go a little bit again, wider, no wider through their shoulders. So we're adding a little bit there may be, and then we can go a little bit thicker through the arms, adding a little bit more, a little more meat there if you want. But the most part, that's pretty much the key difference. And then with the hips, we tend to be a little more rounded through here and down where women again, they they tend to come down and here and hold that weight about where that third is down in that area. So you may see something like this heels, and we're good to go Palm's fingers. So if I were just to highlight that a little bit just for the sake of knowing, so that's a key difference. That's a key difference. A little bit whiter, a little bit thicker in the neck, and then we get a little more rounded here versus that kind of triangle shape there.
51. ProportionsWith Skeleton: looking at these skeletons. What we want to start to pay attention to now is where some of these components are that we've talked about. And we've mentioned the sternum and the clavicles, different things. But it's actually just take a moment to appreciate where these are on the body using the skeleton. And then we can do some drawing over exercises here just to show you how this works. And speaking of, draw over, let's just go ahead and first indicate or show you how this Coke bottle works. Now, to make that happen, ignore the clavicles with clavicles. Are these bones right? They're they're coming out from the top of the sternum right here and there, curving out towards that shoulder. So all that's connected in there. So we're gonna pretend that doesn't exist. All right, so we're all going to to focus on this rib cage. So right in here. All right. So flaring out, they noticed if we come straight down, that's more or less even with the pelvis. So the pelvis is gonna be right in here, you know, kind of all map that out a little bit cleaner as we go, and we're using that cook bottle idea again. Weaken. Take that. And flair. That's probably a little bit too wide. We can bring that right up into the neck, and we can put the top of that cook, but alone right there. So basically, that's going to help you, I think with trying to envision excuse me exactly what you're doing. So we talk about we start to draw that this idea of a coke bottle and you're trying to figure out Well, what the heck is it? What am I trying to encompass here? That's basically what it is. So now you have a better visual of where that is on the body. Now we can break that down into four sections. So we had the neck, right? We had the rib cage, the waste, and then the pelvis. Okay, so our neck we know connects. Um, if this is, let me kind of back up. If right here, put a little dot That said the top of that sternum. So the sternum is this big, wide bone right here of running down the middle of the rib cage. So right in here is the pit of the neck, and that's the unit assess for the clavicle. Start. They move out on each side. But this is going to be the pit of the neck. And roughly that's a good idea or good spot for the top of those shoulders. So right in there. So that's why we use that. So that's gonna give us this part. And we know now that basically at the super sternal notch, that's where the top of the rib cages. So I'm going to remove all this in a second and notice how we draw that. It's at an angle. So I just didn't take it and draw a straight line. Actually, I drew this sort of shape because you can see down into it. Remember when we when we map out, this is your face and the neck from the side? And we had this die gastric plane coming underneath. And then that net comes down to here to that point right in there. Okay, that's roughly where that superstar that the pit of the neck is right here. But this is the this V I'm talking about. So if you look it back here again, we got that coke bottle. And so that right there is the seventh cervical vertebrae. Okay, so that's coming in. And you'll always see that little bulge whenever you're whenever you see a figure from the side. And of course you can see it on yourself too. So we're getting that and here and this is where that opening is right in there for that rib cage. So that's what we're looking at right there. So if this is our neck one, so that's one part. So this is to so the two would cover the rib cage, have an egg form, but we're going to cut the bottom off that egg. We're gonna cut the top off that egg and get that opening, and we bring it down, and then we get these the rooftop. So that's that's the kind of thing we're dealing with. But whenever we whenever I have, whenever I'm teaching this, I'm teaching you just to isolate that rib cage in here because that's going to lead us into the waste. So that's our third. And then we get into this bulging box skirt. However you want to look at that here. So the genitalia, all of that stuff is roughly in here and then we get to, Ah, the limbs of the legs or whatever. So, uh, notice you are center line to know people up a one to come in here, and I'll change colors and I'll try to get a decent center line moving down. And so that's that center line that we use often times when we're trying to figure out you know how that body is turning. So your belly button your navel that say, maybe roughly in this section, and then we can start to map out all of these points here. So, um, so kind of important to have something to relate that could bottle, too. Um, visually. And hopefully, by seeing some of this anatomy, it will help you a little bit to kind of break that down. Um, so now you can kind of maybe start to get a better feel for some of those proportions. Kind of how they connect and so on. So, um, this vertical line coming down the body is blue vertical line there, So let me go back to black for a second. So this right there, notice from the front how we talked about that. Remember? I talked about the access point of that rib cage. And here I talked about the axis. Ah, this shape. Okay, so that's that's what we're dealing with. And hopefully you can see that just with his quick little draw overs. So we start talking about, um, perspective and dealing with the differences between, like a vertical view like this where you're straight on and there's absolutely no rotation through that upper body. So you're seeing that flat. But that figure starts to turn your it's immediately going to go from a straight line to a much more curved line and let me change colors. Once again, eso is going that, and I'll actually go back to that blue. That would make more sense. So again, I'm gonna draw over this and now from the side. If we just focus on where that super sternal notch is the pit of the neck, this these this is the curve that you're gonna be dealing with may so back more will start to straighten out here, and then it's going to start to move back here. If I did that egg shape, we got something like that. So there's your access. There is your axis I noticed to the volume of that rib cage so it's much longer then it is wide, so we know it tends to come down a little bit more than it is left to right and waken deter that curve of the spine. So I'm gonna go back to Blue. Some look over here to the back view here, we'll bring that straight down. So from a straight back view there again, the spine looks like is completely straight. But then as we I'm a good to, ah, reddish orange here. But then, as that figure turns, we know that spying starts up in here. It's gonna curve around. And actually, I did that really bad because I didn't account for the shoulder girdle area. Someone a guy didn't go in the middle. So we see that curve through here and then back around, and that's your sake room right there. So that's gonna join at kind of the base of that pelvis. But you can see these nice curves happening here toe offset the weight of the body. There's a lot of weight happening that spying has to kind of lug all that stuff around. Um, so we talked about the curves of the legs. So again they would start in here and we can see how they move in so we can see how that could easily give you that because they're there. If we looked at that point here and then point there, you can see how they kind of come in at the knees. You can join them up high. And this is your tibia. Okay, That shin bone right here. And that's a very prominent bone. And that's why a lot of times, um, you're going to see that in the front from the front view, and it's going like, really protrude and give you that kind of V that's on this side really skinny. So if we did our bulge here and then bring it down like that, then you know that's gonna look straight straight from here to here. And then this will bulge a little bit more because there's an extra bone over there, plus the movement from the need to the foot. So that's that. How we can see a little bit too, of the elevation of this foot. So the hell coming down. We can probably make it out a little bit better here. So is moving back to that hell. And then we see the thickness up in here and then how it tapers and flattens out as it moves towards a foot. So we're getting a lot more volume up in here through that bones through the bones. Um, these are your ankle bones here, kind of protruding right like that. And now we can look, take a moment to appreciate that shoulder girdle area. So let's start with the back this time. So here are the triangular shoulder bleeds. I noticed from the side how they had that feeling of wrapping around that corner to here. So if we had a top view, remember what I said. So that was your skull from the top. So you're a bird flying over those clavicles moved back towards the middle, back in here Towards that shoulder, the shoulder blades sit and here and in here, wrapping around the volume of that body. So they are not straight like that. And you're kind of seeing a little bit of that here. So you're getting that sort of perspective like that? Um, if you were to add the that V kind of that cobra under the Cobra idea they would that would kind of wrap around and here out tours that shoulder line. So if we added a a neck down to the pit, that's gonna be roughly that shoulder line. So we got something like that so that neck would come down. We got the that breast bone right here. The sternum coming down right there, ending at the bottom of that rib cage there from the front. That's gonna be the lifeway process. And this is your super sternal notch pit of the neck. And then all that moves out to that corner. Okay, so this is all the shoulder girdle area. Before I get into that, I do want before I forget. I should say that that's that all important corner that we have right there on the corner of that shoulder. And again, we can't see that from a side view. Okay, It's just it's not visible here, but on this from view is playing the sea. And obviously we're getting that corner here. So that's a nice structure. Tohave when you can use it. That corner helps us to see there was changing directions. Where were the side. Sometimes it's really hard to see that change in direction through the arms because you're it's a much more subtle thing, but Corner is very, very important, but it's getting back to the shoulder girl area. Um, again, we got that V kind of coming down the hood of the Cobra, and then if we start to look at the back of the skull and here, that's where these trapezius muscles are going to come out and flare out this way towards that corner eso from the front. Obviously, we're only seeing that, and from the back, we know they're connecting here and they're coming down. And then they're moving towards that corner like that and then that next, if we were adding a little flesh to the neck, we would see something like this. So from a side, we're getting a lot more. And from the front, obviously we're getting more. But that neck really doesn't have anything to do with that shoulder girdle area, doesn't it? But it's good to isolate it. You know, it's good to just know how that is different and where that breaks away, and this would be kind of the front of the face there. We can see a little bit of that in that jaw, but it's just important to them where that isolates. So if we get back to this back view so that trapezius muscle combined with our shoulder bleeds and these muscles moving down to the back that, um the latte, the laddie, the lats back and hear these muscles kind of working down towards the middle of the back We're not going to get too deep into that for this beginner course. And then we have our shoulders. Ah, and here and that's kind of an egg shape. And we know, um, through these back muscles, they even reach up and then around to that. Okay, so if I shade all of that in, I'm going right over those shoulder blades for now. But know that those shoulder blades are an integral part of that, um, that shoulder girdle area very, very important part. And they do a ton of work, and so are these lattes. He's last to a ton of work to move those shoulders up and down with the arms up and down and all that. So from a front view, it's not quite as complicated, is it? So we have our our packs in here, and then we know they attach to they're the pec muscles are attached in here and they move independently and then go up and around that most people think they ended the armpit right here. But there there is actually a very complex set of muscles and will actually move up in around and connect to that shoulder. So this is roughly how old that works on the inside. And a lot of times when we're drawing were only most artists only pay attention to the outside to the contours. But it's important that you make these internal connections knowing what is on the interior eyes more important sometimes in the exterior and knowing how this stuff works. So these are packed muscles and kind here. They start to detach and move. They'll move towards the armpit. So if this is a relaxed pose, then that's probably all you'll see. But when this arm starts to raise, that's when all of this will really start to become very noticeable. So just know that they are there the entire time. They're just sometimes less prominent. So that's a very important look, and I think something you're gonna need to know. So if we bring those pecs down and here they start to move up, been back around towards that shoulder, and those lattes moved down that back and there. And so from that front view, you can probably start to see that analogy off the shoulder pads happening there, wrapping around and fitting over top of all that. That's kind of how it works. Um, so again, I'm gonna make that point, and I'm want to bring back that coke bottle for a second to, um, knowing I'll say this again and then I will move on. Now, let's see, um, how things work. Interior is huge and much, much more important. Then the exterior. So the interior is understanding these connections, these simple but characteristic connections, these ideas of how we can take all of this complex stuff and used an idea like the coke bottle, we're going to simply use a waste wide tube. So if we use that waste wide tube, um, it would be coming up, same with and here, then on top of that, now we'll actually do another layer real quick. Just so you can see how that works without all the other stuff. Drone on it so that waste waste wide to straight up. And we're keeping this very simple. So up top we know we can see in to that waist wide to and on top of that, that's actually moving away from us. Excuse me like that, straighten and then moving away from us. On top of that, um, you can build your shoulder line, and then you can connect into that shoulder line with your neck, your trapezius muscles, whatever you want to do, and start mapping out the head. Um, get your mixture. You know, find that center line we talked about always measuring from the from the thin side. But since this is a vertical pose very centered and his heart, you don't really get that so you can build it that way, too. So, using that to buy idea, finding your center line. So maybe there's a little bit less over here, um, and then connecting that shoulder line so that would be maybe shoulders out here, and then he can connect your your neck, your head, whatever, whatever that may be doing and space um, maybe looking a little more towards us and then working from there. I mean, that's perfectly fine. And then you can get in there and, you know, find your rib cage. You can break it down, find your waist, everything else. But you can work with that idea to the coke bottle idea. I think I'm finding for me, especially. It works. I just like the connections on. I like being able to simplify all of this because, um, it's one piece that you can twist, turn, bend and do a lot with, and it really helps you with getting the big idea down. So this yo fine at this toward but the torso, hips and necker do one are really helping you see the entire post. So if you can give that part right, then you can always come back, add your limbs and then at ahead on top and whatever perspective it may be. And you can probably get ah, good or somewhat accurate depiction of what that model or figure is doing in that given time. So all right, well, I think that's good enough for now, so hopefully it gives you a little more insight on what's happening underneath the skin and don't get caught drawing these contours like I'm doing now. You have to dig a lot deeper, get underneath, make those simple yet characteristic volumes, shapes, gestures, structures, and that's gonna help you get much better results.
52. Body Parts Summary: You know, I'm gonna circle back now and do a little recap, but also do a little bit of clean up, making sure that these pieces that we're talking about are starting to fit together and this nice, lovely, the concept of figure drawing them, trying to lay out for you here, I think to do it out. Um, that's Let's just start with a profile. Uh, view here. So it's, um I'm not gonna go into how I'm drawing this because we've already discussed a lot of this . I know that's out of you, but I'll ah bump you up a little bit here, something like that. And we're not gonna work with the entire figure, so not a problem. All right, so we'll pretend. Will pretend this arm is something like that Will swing this arm up. OK, so a quick little profile there. So the process very important to revisit this, um, it's it's going back and forth between gesture structure, and once you figure that out, we get the next one gesture structure. And once we figure that one out, we go gesture, structure and on. And so you're bouncing back and forth. So what? I mean by that is, let's say, for example, you know, I like to start with the head. So they had to Me, um, says a lot, and I like to connect things from the head out. So if this is gesture one, Okay, right here, then what I may have to do in order to do gesture to is to get in here and do some structure, so I may need to Okay. I need to add the skull. Oh, I don't want to use blue me use orange. Sorry about that. So I'm gonna add the skull. I may have to give the died gastric playing. That may have to figure out where this ear is. All this. I may need to connect the neck down here and then figure out where that neckline is. So the collar I had to do a lot of work there, didn't. So, in order to complete Ah, this first gesture, I had to go back and add quite a bit of structure. Right. So what that means is this if you're if we go back to this beanbag idea or something like that, um, you're going to notice that in order to really make this work. I mean, you want to go to that longest gesture line. So in this case, this was my longest gesture line for the head. If I'm working with the torso, I may think that that longest, longest gesture line is there or the torso. I may be able to include the rib cage, waste and hips in my next one, but that's the longest gesture line because I'm going from here to here to remember if we did that tube in that tube curbs like this. So it bends eso the gesture line or the longest gesture line is from here to hell. Or you can also call that the ah, long axis. Okay, longest access from here to here. Not not here to here. So we're trying to find the longest axis for that main gesture line. So I'll keep that consistent and I'll use my blue. So in that case, you would be here, That case it would be there now, when we get to the shortest side or the side that's getting pinched, I notice all of this. So it's a lot more work to get all of that done. I did this in one movement, pretty much one line, one line, that kinda and capsule that kind of incorporated a lot of information. So, for example, if I came over here and said, There is my longest gesture line and I'm going to include several parts here, Um, then it's going to include you know, that 123 But then once you start breaking into structure, it will include a lot of information. But the longer the gesture line you can get, the more simplified the process becomes. So it's much easier if you can incorporate things into one versus trying to do here. Um, and then maybe here and then you gotta waste you've got to deal with. And so one eso like the same thing for the arm. If I come over here with my arm, I say, Well, there's a been there. So maybe I want to do 12 or you can say, Well, the bends pretty gradual. I could just do one and then maybe one more for the hand. So any time you can get several parts and to a gesture, you're better off. If you can't and that's fine. You'll have to break things down a little bit more, but this kind of go back to this thing right here. So basically, if you look at gesture and it's just kind of compare him real quick and then we look at structure, I'm gonna find that gesture is simple. Boom. One big line. One. Nice, sweeping, curved line. There's there's there's always a bulge. There's always something that is stretching and bulging out. Uh, and it's It's always con vets so bro, always getting that sort of shape Now, if we look at structure, um, it's more complex. There's a lot more happening in there. Mishcon Cave, meaning? We're getting the pinch so we can call this stretch. That's fine. And we can call that pinch. Ah, and then also, I guess it would be binding, right? So we have this sort of thing going on back and forth between these. So when you're looking at ah, kind of a longest your longest access line so that say, we're right here in that longest access line, there's a lot of stuff going on, like I just mentioned right here. So the longest axis line and I'll just go long axis here for a second there's gonna be a stretch like we just talked about. There's going to be a pinch like we just talked about. So there it is one, and I want to make that a little bit darker on this would be that nice stretch. And there and then there's also there. There can also be a twist when other courses and, like figure drawing cross processes and ideas when typically when there they use this kind of longest access line or longest, I'll just say Gesture line. Even they're generally they are like incorporating, um, kind of all of these movements into one. So when I'm talking about gesture line, I'm trying to when they may even simplify Amore saying, Okay, this is my head, You're the head flows down through the body and then out my leg here and then they'll come back and Abbvie's my mother access lines. So you have your primary access line typically, and then you have these other supporting access lines. You know that maybe arms or whatever she had the Siris of lines but I try to do is apply the gesture mawr to a specific body part, and then I use structure to kind of break that down and to find the corners and the volume . So that's what that's what this does. So if you look at a gesture, my gesture is just simply giving you this nice, curved line. But it is also limited because it's very two dimensional. Okay, cause you're going, uh, up and down, typically. Or you may be going left to right where as a structure line is going over the form, so that's three dimensional. I talked about that before the structure. If you remember, we move over form. And I talked about that when we started doing these kind of directional ideas with our tube . So you know, in the pencil tests and trying to get the depth of things as it moves away from you as they lean so on. So it's important to to know that you know, a gesture is just one sweeping movement, very two dimensional, whereas the structure part of it is more three dimensional, because it's actually these bends. And these folds are kind of giving you that illusion of where things are going right dot, dot, dot, dot, dot, dot. Even though we do fold me, not go all the way across. It gives you that feeling of things have volume. So whenever you're thinking about this stuff, you try to break down the body parts and each main body part. No, it will have a gesture to it. And if you're lucky, you may be able to combine several body parts. He grabbed his gray. I think that may stand out. So this would be, um, the idea of Okay, we have Ah, we have a gesture there. Maybe we have a gesture. There may be maybe over here we get lucky and we get all of it. And then we have another one coming down here. Then we have another one, and then we have another one, and so want. So that's that's kind of what we're after when we do this. So remember the the gestures are the curves, and the structures are the corners. If things become too curvy and there's a curve everywhere, and there's not enough corners than the figure will start to look very rubbery and kind of very soft. Whereas if we get too many corners, too much structure, then a lot of times it starts to look too stiff. so we're always trying to balance it out. So always keep that mind. And of course, that would all of this would apply to your arms. So if your arms are coming out, maybe you get here on the side where there's a bend down. So I need let me get my blue. So I need this idea of, you know, one to and the structure. The inside part is going to come in here. So we have our armpit coming down here, and then we have our corners. We got figure out where all of this is, and then we gotta figure out the direction. And then we get to our hand and maybe the hand is bending backwards. So then we say, OK, that's that's another. That's another one here. So that becomes our gesture, and then we can get in here and at our structure to it. So that's that's the the balancing act that you're trying to pull off with. This, you know, inside of it, you now have a lot of information inside each body part. We have a lot of information out. You have a lot more ah than where you started. So you have your we have that rib cage weaken separate from here to here to your waist. We come down here and get your hips in the air, and then we can get you know, these lovely straight hamstrings. Remember, our legs join up here. So now you know, you can almost see how each body part can easily start to break down into this bulge. So one body, one bulge per body part so that you're dealing with the head again. Let me grab my blue, which snuck under the board again. Your head could There's your one right. Maybe you decide that. Well, this is good, but I really need this this neck and this foal coming around for my next gesture. Okay, that's your to maybe coming down through the chest. You need another one. So that's your three. Maybe you need another one here for this one and this one and this one. So you would just kind of go on down the line and again, try to always remember things have to connect. Okay. So whenever wherever you figure out, you know where this first gesture is? I recommend. Okay, well, let's get in here now. and this Put some structure to it. Now, this is your second structure. It's okay. Well, this is where it's at. I need to go here. Here. You get that rib cage, you get the breast. Whatever you gotta do to figure it out. Maybe it's the arm. You know. You gotta figure out next, getting here and go. OK, well, this is They're one curve down to the waist, and then you want another gesture for the buttocks or the hips. So you're getting here, Put your gesture in it. Will find that rib cage, find all these lines and find these folds. Find out where all of this thes angles are. And then once you're happy with that, you come on down to the next one all the way down to you, figure you figure all this stuff out. And, of course, along the way you're dividing things right. You're dividing things into simple volumes. So we have that box idea. Don't. We can always use that that sort of idea we can always use, of course, the tube, all of these, and we can combine them. We can combine the tubes into a box into whatever. Whatever We need to get our idea down to get the big picture down. But the bouncing back from place to place from from one to the next is what's important. And as you get more intuitive as you start to work quickly and fluidly, I mean you're going to get a better grasp for proportions. You're going to start to say, Okay, I've been doing this for a year. I have seen a reclining pose I've seen oppose that has this sort of thing. You can get in there and quickly lay out your gestures and say, All right, well, that's no, that's That's my face and and that's the back. And this is the leg coming down and then you can come back in and start mapping out everything else pretty quickly because you've got that experience. So okay, that's my Coke bottle. I'm gonna come down here and you can see the But everything is fitting within those gestures. And you know, now that that's that's what's important. You're using that idea. And I talked about that with the Masters to how you get these kind of big No. 123 sort of things and and then inside of that, Do they come back in and they start You're putting in, you know, those corners. But everything kind of stays within, um, that big sweeping movement from body part to body part and things flow. But that overall curving gesture is the dominant movement flow of that structure. OK, so I gave you an example of what that looks like. Let's say this leg, um, was bending out and you decided to kind of do this curve like this, and that starts to look too curvy for you, thinking like my own, that I really need mawr more structure there than come over here and you'll find that corner. I'm actually go blue here because my orange is running out and you find it, so you you add that corner in there and you can always come back and miter that a little bit, but that's gonna help you out. And then you could come down here. Maybe, you know, this is your next curve, and this is all looking to flowy for you again. You you find that corner and you take it out. So that's just something. And again, if it looks, starts looking too boxy, then find that curve within it on things. When there's a joint, generally there's like there's a curve to or there's a there's a joint. Oftentimes that's where you can look for a corner. There doesn't always have to be a corner, and there is not there. There'll be plenty of cases where there isn't one, and there And if it's that corner, so subtle. Then again, maybe you're better off doing that one big thing. And so you can kind of simplify the process again. If things start leaning one too strong, one way or the other, then make that switch go back and find weaken at a curve to soften it up, go back and find where you can add a corner to make it a little bit more structural.
53. Proportions Demo One: all right. And this demo, I'm going to talk about a little different scenario you'll probably come up with. I mean, this is all in the name of proportions and trying to use proportions to our advantage. But in reality, things poses or dynamic models have hair. Um, and that's what we have in this position in this particular situation. So we've got his lovely standing pose, which is kind of somewhat flat. I mean, we have a slight 3/4 view because one shoulder is closer to us. One hip is closer to us, and so one. But the hair is presenting problems because for me, I like to start with head. I like to build out from that once I know what the head is doing, where it's looking, wears turning, how it's leaning, tilting and so on. Then I can kind of make the neck, and then I can attach everything to the torso from there. But again, I'm in trouble because I've got a bunch of hair there. But I can look at it and say, OK, well, she's not looking down. She's not looking up. She's basically looking off straight so I can make my best guess. Okay, so there's my the mask. So there's G one. OK, there is my sale. There is my skull. There's my neck. Back of the neck. There is my ear, and we're off to the races. OK, so G one right there. Okay. Everything is gonna build out from there. Okay? And even though I couldn't see it, um, and it was hidden. I can pretty much make it out. Now. I know the shoulder is up, so this shoulder is down, and then this one is up slightly, so the shoulders are in this sort of position. So I've got that trap coming down to the shoulder. That's probably over in here, and then this shoulder is going to be raised. That arm is gonna be raised. And front off all of that. So that gesture is coming up this way, Okay? And then wrapping back around that head. So this would be G one. That will be G two. Okay, that's the structure line. Okay. Trying to figure out that angle is the structure, and that's going to help me with this angle down here. They're opposing angles. Okay, that's going right up into the deltoid. okay, that tries up. Or the trapezius muscle. This is getting dropped down into this one. Okay, that gesture of this arm is moving off this way, But maybe I want to kind of feel out this torso first. So I've got the torso, which is basically moving off like this. So waste y tube coming down like this. And then we get a sharp change in direction as we come back this way. So that's moving off this way. Straighten and then moving off that way. All right, So if that's working pretty good and I'm happy with that, then I can look at the shoulder again. I know that shoulder is going up here. Arm is here. There's another gesture or I didn't even mention that one. So g to G three, um, G four. So now Ah, what we have is faras proportions. We know the head top of the head to the pit of the neck, which we can't see, can we, But for pretty happy with all of this, we can say that that's faces may be moving in here, neck coming down. So the pit of the neck is probably roughly in there, so that's a thirst. So 1/3 to the top of the head from here to here. So I come down to another third, and there that's gonna be the bottom of the rib cage. So we know that rib cage is something like that. Okay, that's going to give us our waste, which is starting to move in two directions or something like that. All right, so now if I did another third, that's going to come down to the bottom of the the pelvis area. So if I did ah ah, good. That's going to give us the bomb of that pelvis again. So that's our skirt. Something like this. Now I can come back in and add some structure before I get ahead of myself. So let's get this shoulder. So this shoulder, we've got this trap coming up in here joining that shoulder when that shoulder blade, we can see that curling down and then up like this. Okay, so we're seeing that reach for that. And then that's pushing all of this out. And we could see the breast there as arrest on the front shoulder blade or the rib cage and then getting pulled up towards that armpit. And here, Um, so that's all Rib cage. We know that changes direction, and we get a big stretch, and here it comes out, and then we get into our legs. Um, so that's going okay, There's our other shoulder moving in this direction so I can kind of come in here and get this gesture. Okay? Make my best guests at the corner, and I'll come to the inside. Okay, Well, that's the thickness. Must say that's moving towards us ever so slightly. Here. Maybe I want to add a little bit of V here. This shoulder blade is probably ah, a little more straight like this where this one's moving away from that center line. So let's go and do that. Center lines. That neck is coming down, moving out. We know the center line. The waste is roughly about right here. So then it changes direction. This is our vertical about right in here. And then it changes direction and moves off this way. Okay. And then we get into this like that. Okay, so that's gonna be this is gonna be are being bag right? Get increased. And here and a big stretch on this side. Okay? And then this is starting to move down towards the glutes here. So something like that. So I'll come to this inside now, Andi, feel this space out. Is that working pretty good? So something like that. Now, I'll say this is moving towards us here. So we got the hand. So we got the palm roughly in here, so that moving like so there there are crease tapering tube as that moved towards us. Here's our elbow weaken, round that tricep and so on. And that's all kind of connecting to that shoulder, which I think all that's good. So palm change. And then we get into the legs so that his curve is happening here. We can see our little triangle up in here, right up in there. Up in there. Our little dense down the glute here, the crease. This side is more relaxed like this, and this is more straight like that. So this leg is coming joining way up here. So this is our straight like this. We know the front, his way over and there We can't really see it. We could say this is moving away from us like so and then we can get the front or the calf . Something like that. Um, again, this is our stretch. And here, dropping down and then this leg joining high, dropping down. You see that? Me And then coming down here, there's our wedge moving out. So that's pretty much what I wanted to show you in this one. So whenever you know, you don't have, um the corners and all of the information that you're a custom to have in. Generally, you still have enough there to get the job done. So sometimes you have to know, use your imagination, Um, and just kind of what you know about the human figure to piece it in. But once you kind of get started and you kind of get on a roll and you find the same, like in this case, you know, that feeling in the location and size of that creamy, um, this whole skull, Then I was able to kind of take off from there, and I use some of the proportion ideas that I have learned and fill in the blanks, so to speak. And, um, that's gonna happen. I mean, this, this sort of this sort of thing. And this is why I'm showing you so that you're not completely in the dark. You're not like, Well, what good is the proportions? If you know I can't see him. Um, that's because if you know, a little bit or if you confined just something to work with, you may not start here. You may start with the tube here you may store Just say that you may start. Have to start with the tube like this and you may start Torno need my center line and the this. Now I can get my skirt idea now confined this He may work out from from this point out Ah, and then say OK, well, if 1/3 is from, you know, the pet of the neck, which maybe isn't here down to, you know, the bottom of the rib cage, baby confined that. And then you confined your other third and you can come up here on then get everything else laid in. So in whatever case, though, you know you're gonna have to make adjustments and make some decisions based on things you can't always see. So just kind of keep that in mind as you go and hopefully this demo will help you out
54. Proportions Demo Two: All right, welcome to the demo and this one. We're dealing with a lot of perspective, and this is how it's going to be. I mean, this is the reality. Ah, figure drawing because, uh, typically ah, model and figure are is in a dynamic pose. So there's a twist. There's a lean. There's, ah, tilt, all types of stuff and with perspective. You're dealing with an arm or leg that's coming towards you. Got another one that's moving away from you. And it's not easy because you're dealing with four shortening, Um, limbs will look longer. Limbs will look shorter, depending on which way they're coming and which way they are facing you. So it's, um, something we're gonna have to contend with. So when you learn anatomy, learn proportions and things like that is given to you in this very flat, um, pose. And typically again, you don't really draw figures in a flat pose because they're they're turned to you and they're in a 3/4 position or something like that. But you have to start there, and we know anatomy proportions are no even with me drawing the parts of the body, they're done in a way that is. Ah, it will give you a general model, something to compare things to. And it's your start. And that's much better than beginning a drawing process with nothing or starting with zero . So anyway, I say this to you because the process I'm sharing with you in this course where you basically are finding a gesture and then add structure to it until you're comfortable and the move onto your next gesture. So that sort of process is helpful because it's not only going to help you there, draw the different parts and keep things fluid and somewhat Kirby to the best of your ability. But it's also going to help you with the checks and balances of things. So when you get into situations like I'm going to do now, um, kind of going back and forth with the gesture structure going to the outside to find the longest sustained curve coming back to the inside to find, to check your accuracy, to link, to see if your proportions and things like that measure up correctly. Okay, so that's the way I want to demonstrate here. Probably won't do the entire body, but I'll do enough of it to kind of get the point across here. So let's start with the face. All save my angles like this. I can do my sale. I'm going to be drawing a little bit later. So there is my skull on the head. It's kind of tilting down so we can see the top of that head a little bit If you look at the eyes, the eyes were tracking this way, the nose tip of the nose, even though we can't see it. But if you look closely, you can kind of make those things out. And there's our Chen. So Oh, that's kind of looking down. We have are here and here and in the skull is wrapping like this. So that center line, that main gesture line right there is coming up wrapping around like that's we're seeing a little sliver of that other side. So what? Once you're once I'm comfortable with this, um, that I can add the neck and move on to the shoulders so the shoulders, I can use my pencil test, find the angle, and from there I can decide what I want to do. Do I want to go to if this is, uh, G one that we knew, All of that is structure one. All right, Right in here. So if my G two is gonna be the tube that I can come through and figure out how to do that so that is basically moving towards us. So it's somewhat vertical here. If you really look at the angle of that spine, it's about like that. So I think it's be easy to do it something like this on give it too much of an angle. So what I'm gonna do is just come waste wide down in here and then curve it out this way. So we know this is coming towards us, and then it's starting pretty much going away from us, the entire towards us the entire way. So that works pretty good. I've got a sliver of the left hand side here, Not much. Okay, so if that works pretty good, I'm happy with that. That can start to map things out. So I've got my spine, which I'm going to just draw in. Just so you kind of see no understand my thoughts. So that's near the top of the spine. The the sea. You have seven vertebrae here. The cervical vertebrae are here and then is curving down cake, curving down and changing direction at sea seven and then coming down to the spine. Typically, this would be an arch, but because of the angle and the position of the body, it's flattening out a little bit. And then when we get down to the waist, it's starting to curve and then make its way down towards the Coxes cock six, which is down in here. Okay, So if I'm understand that, then I can start to say, you know, if this is my spying coming up back here on the side and then wrapping here, I can come to the conclusion that were these, um, traps used trapezius muscles that come off the back of the neck that we talked about are right in there. So we're getting something like that. And then from there, you know, it's moving right towards the shoulders, the connection to the shoulders, and again, it's all in perspective because that shoulders coming towards us so we don't have the luxury of having a corner there. Um, it like we would if it were a front view. Okay, so that trap will be coming down, connecting here at the shoulders, and and then our corners would be right there. So when the when you're excuse me for the bump. So we have something like this, Obviously, um, it's gonna look skewed because we don't have that corner. But let's say we add this idea or add the Dell toy, so we know. That's kind of like that chicken that drumstick. So we had that deltoid wrapping and that bicep connecting. So we have that going on, and that's probably bulging a little bit too much in there. So what I'm going to do is add this arm, so I'll get the gesture of the arm moving towards us here. Okay. So we can see that that arm is coming at us like this. I'll make my best guess at a corner here. So there is my next gesture, so g two g three. Okay, I'm putting this in tow. Help me find this arm. So I come now to the inside, and I'm starting to look at the space from here to here in the relationships of everything . So I know now that that forearm probably is a little This is way too long for a foreshortened arm. So that forearm really is about right in here. So that gesture of the outside gesture here was all I need to come in quite a bit there. And now I can look at this lovely corner here. How that's moving off. Ah, and then taking over into the palm of the hand here. So again, that kind of gets to what I was alluding to earlier. And that's, um, understanding the system, the checks and balances. Um, And now that I have this, I feel a lot more comfortable coming over here and adding the rest of this. So I know the new the breast, or now that's about right in here near that elbow. So that's my elbow. I know this is kind of coming in here. I can get my rib cage, and then from the rib cage, the rib cage is pretty much vertical there. And then it's starting to change direction into that stretch. Okay, so that's the back, back, back, Um, and coming down in here now I get to this shoulder. So that's my trap. Right here. Blown basically coming down and getting foreshortened a little bit. And then we get in to the latte and then mainly from off this way. So now I can come in and look at the angle so that that arm is moving not quite the same as this one. So this arm is down. Uh, here and then this arms kind of sagging down a little bit. So I want that direction to be something like this. And then again, I'll make my best guess at that. But before I do that, I'll probably coming here say, Well, let's add if this is my spine coming down, I know that's very dark. I normally wouldn't draw that dark, but I want you guys to see what's going on. Okay, that's that's the sliver of the back. And then we can see that little bit of a triangle action for that side. And then we've got this side. Now, if I were flushing this out, I would bring that, um, trysts up here, up towards the armpit, and that would get that little curl down right there. And that lets you know there's a plane change to all of this. Here become separate that that helps with defining the back that little curl right there are. So now that I've got this a little bit better mapped out, I feel better about it. Okay? I can get this gesture here. Okay? I've got my elbow now. I'll come back to the inside. So if this is my shoulder here now, I can look at this space. I'm looking at the inside this right here, and I'll get to the wrist, and I'm saying, Okay, well, that's pretty good. Um, I think I'm pretty happy with that. So, Aiken, finish this and then, um you know, all of that is obviously moving away from us. So, Aiken, finish out the price up, there's our shoulder, and then that's foreshortened. Okay, so all of that is gonna look very small, but that's the four shortening happening. They're happening. So that's the kind of the checks and balances that this system will give you. And, you know, you kind of rinse and repeat all the way through. Okay, so this comes down. We know the rib cage is stopping, and here. All right, we can see that we got the waste, and then we've got the leg happening. in here. I could do an egg shape for the legs. Something like that. I'm getting here at my gesture. Connect up high. So I know this is where that pelvises and here I can see that leg is connecting way up in there and moving towards us. And then I come down to the back of the leg. I get my street, like, sit this and again. We know that's coming towards us like that. And so these are the things you know you want to be concerned with. If you know this is your you know, the hip you got the other side that we can make out here again, we can get the angle. We know that's moving away from us. And we come right here to the inside, right? Right in here. And And we find that angle, okay? And that's going to keep us true and more consistent as you move forward. So and I know all of this stuff I know looks very robotic, you know, here in the face. But once you add the hairline and all of these things, you know, start to you look a little bit cleaner and it'll add the character and even gender, sometimes to your figure. So you don't Don't get too concerned. Um, if things look robotic at this stage because rendering is something you know that will help with a lot of that stuff. Kind of bring give him or, um, meaning and definition. And yeah, I think if we if we work along these lines and you use that system like I'm explaining to you, um, things will start to come together, and that was just a little bit too strong. So I'm looking at the distance from here to here. I'm thinking that that's probably a little bit too thick. It's like getting here and change that a little bit until I'm happy with it. So anyway, just add a few contours now, and, uh, the other hand, just kind of you can do this gesture line coming out to the fingers, got the palm finger going up so on. But anyhow, I'll stop right there, and hopefully you got a better grasp on the reality of what you're going to be dealing with . But you also you have mawr confidence. Um, how this system is going to help keep you, um in line even when it seems like, um, you can't rely on these generic ideas and measurements that we've talked about, even anatomy, because I'm when the body starts tweaking, conforming, moving away from you and all that stuff, um, it's going to look a lot different. You can't. You can rely on those things to a certain degree, but for the most part, ah, you're gonna have to have another system in place to help along the way and one last thing like, look at these. Like, these are my structure lines of the tube. So it gave me that feeling that the tube was coming towards us. But look how the creases in the body here the wrinkles look how they follow that, um, that direction of the tube. And look how the skin Bunches up, and it helps to support that idea. So you gonna find, um, you know, and we talked about that when we did the masters to we looked at some of the masters drawings. How they will use certain body parts and different things, um, to indicate volume and structure and to kind of keep you moving around that form. Okay. And that's what this sort of stuff does. It keeps you moving around the form a little bit
55. Final Assignment Practice Reel: all right. It's your turn to give it a shot. And this assignment, you will do a series of four figures. Each poses six minutes long. Now, don't get caught up in trying to do the entire figure. If you have time and you completed, that's that's good for you. But the point is you want to break it down into parts, maybe the head, the neck, the torso, maybe the arms in the shoulders, maybe the foot and the lower leg. So whatever you feel you have time to do. That's what you want to do. The key is don't rush. If you need more time, feel free to pause. And what you want to do is just get on a nice rhythm. Think about what you want to focus on. Obviously, I've shared a lot of information with you in this course, So you have a lot to choose from. Okay. When there are 20 seconds left, you you will hear a notification that sounds like this on that way, you can start to wrap up your current pose and then get ready for the next one. Now, I encourage you to do this assignment several times as often as you can. If you get past the beginner burnout a figure drawing, then you're gonna want to start to focus on your weaknesses. All of us will have certain strengths. Things that come natural and easy to us. While other things will be a little more challenging. Always think about that. We begin your session. So if there are things that you know you need to focus on, make that your focus for each one. Okay. Good luck. I look forward to seeing what you dio.
56. Roberts Take Part 1: welcome to the final assignment, and this is my version of the practice riel. I will focus on the same thing. I encourage you to do it because we all have strengths and weaknesses, and it's always best to slow down if you get on a roll. If you want, you know, and you can feel that things are going very well, then you can take on the entire figure, and that's perfectly fine. But if you're like everyone else, then typically you would want to slow down and just take part by part and just let it flow . So when you're doing these practice Rios lifetimes, if we get in the habit of like, let's say, starting with the head, the knack down to the torso in your own, a timed the say of six minute posed like we have here, then you'll get so far and then certain parts will would never get attention. So, like, for example, if I like to start with the head, the neck, the torso, maybe the arms, and then next thing you know, I'm out of time and I never get a chance to focus on the waist, hips, the legs and so on. So bounce around a little bit, spread the love around, focus on his various body parts, and don't feel like you ever have to do something complete. You're better off to do parts and studies and focus on the week weaknesses. Then you are sometimes to do a complete drawing. And then if you feel good and you know you're confident about how things were going, then go back and do the rial and make the focus on getting through the entire figure. But when you're learning, you want to absorb bits and pieces versus trying to put everything together. All right, so that's my advice. That's what I will focus on. And I'll start with number one here. And if you're curious, I'm using a ah, super color number two soft Corin Dosh number. I believe it's 3888 Right, So let's see here. I'm gonna focus on that, um, the torso here so really tough to say where the stretches, but we could see the right side has ah, a bend in it. So I kind of get this curb. I'll go to the inside, do something like that. Now bleed this upper body You know, all of this is kind of moving towards us and here and their levels off and then move starts to move away from us like this. So that's moving there, and then this comes back towards us, I'll find that center line. So something like that. All right, so that's going pretty good. Now, I can maybe get the rib cage in there. So the rib cage, because the body is leaning like this, the rib cage is going to go with it. So once I find that center line, I've got my rib cage here. I know that this side, I'm is going to have less of the rib cage over here and then this side, and that's because the sternum is right. Here's is following that center line. So I get to the pit of the neck and here I'm not saying Well, maybe I want to focus on how those clavicles are going out with shoulder, and then we can see how this one is raised going back towards that shoulder. So our shoulder line is going just like that. This shoulder here is coming towards us so that egg shape will be like that And then this one's going away from us at that sort of clip. And this one, I would say, is going a little more down this way. Now, as I join that arm, I want to follow the direction that is moving. So if this is, you know, the shoulder coming up, you can see where that. Right. So let's see here. I'm gonna focus on that, Um, the torso here so really tough to say where the stretches, But we could see the right side has ah, a bend in it. So I kind of get this curb. I'll go to the inside, do something like that. Now bleed this upper body. You know, all of this is kind of moving towards us and here and their levels off and then move starts to move away from us like this. So that's moving there, and then this comes back towards us, I'll find that center line. So something like that. All right, so that's going pretty good. Now, I can maybe get the rib cage in there. So the rib cage, because the body is leaning like this, the rib cage is going to go with it. So once I find that center line. I've got my rib cage here. I know that this side, I'm is going to have less of the rib cage over here and then this side, and that's because the sternum is right. Here's is following that center line. So I get to the pit of the neck and here I'm not saying Well, maybe I want to focus on how those clavicles are going out with shoulder. And then we could see how this one is raised going back towards that shoulder. So our shoulder line is going just like that. This shoulder here is coming towards us so that egg shape will be like that. And then this one's going away from us at that sort of clip. And this one, I would say, is going a little more down this way. Now, as I join that arm, I want to follow the direction that is moving. So if this is, you know, the shoulder coming up, you can see where that arm is joining here, and I can get my next gesture in here. Okay, so again, all of that's moving towards us. I'll make my nest next best guess at the elbow and hear someone say, roughly in there I can do a tapering tube like that. And now I've come to the inside. That's hard to do the inside because I don't really have all the information yet, so I can do my trap muscle here. I know that neck is kind of getting pushed back a little bit, and I'll just kind of get the mask of this face in the air just just to help me with the space in here. It looks to me like this arm, it's for shorten. So I need to really shorten the direction of this. I know we didn't talk a lot about four shortening. Ah, in this demo or in the Siri's. But that's gonna be something we take on next. So this is our the gesture of the hand coming out towards us. There could be either the fingers kind of curling overrate there, and then we have that coming towards us. So this coming towards us and this is coming down and towards us in here. So now if I follow that deltoid, um, we kind of get to this arm pit area and here, So add a little bit of flesh to this. And then we get the oh wolves here for the X shape, and I can look at the direction of this. So if I look at the nipple on this side and then it's gonna follow the direction of the lines so the lines are moving like this, it's gonna follow and track all of that. And this was getting pulled up and back into this muscle. So if we look at this, what's happening back here? This is getting pulled up. So this is getting pulled down. This is getting pinched up, and then we can see that trap muscle going away from us like that. So this is our sternum. And here this is the pit of the neck, right? A bit of the neck. And here you see the muscles heading out towards the ear. The sterner Clyde of Master Wade's. We can see, uh, underneath the chin. Right. See all of that. So now this is my sternum. And here I will follow that down to the belly button and here enable and then track it down to the bottom of the pelvis. So again, all of this is getting pulled up towards the armpit. I can add a little bit here. You hear my, uh, signal there to get going? So we got the tummy, the waste, and then I can get this skirt idea. So the angle of all of this, this is this way. That's going to be that way most of the time. All right, so what? This pause right there. All right, On this one, I'll work with, um, work with that arm, actually won't work with legs a little bit. So let's go with the skirt idea. We'll bump it up a little bit. The direction is down and here, coming down pretty much straight. So we have something like that. Our tummy line is in here. Okay, so it's gonna favor this side and over in here. So this is our bottom of the pubic area or the crotch area. We had this, and now I'll refine that angle a little bit. We know over in here, all of that's getting creased, but notice how these lines follow the direction of the two. Whichever way that would be going. Now, this leg as attach is up here and moves towards us. There's our gesture. So if you're curious, this would be a gesture here, then on this side. This side's getting this kind is laying down in this getting stretched too. So this is kind of Ah, I will say this is a gesture here. This could be a gesture here if you're trying to figure out where the gesture is for the pelvis. Really hard to say so now. But take your pick. Really? So this is coming towards us like that? Okay, so these directions, that would be in this way. So we get to the knee and then we can take our pick again. We can go to the outside if you want, or the inside. It doesn't really matter, so I'll go to the outside. So this is the direction of our upper leg. This leg is bending and moving away from us a little bit. So quite a bit of four shortening happening with this leg as it moves back in a way. So this is moving away from us here. And then we had this leg which is moving towards us to OK, so this one underneath moving towards us there, there's a me a little bit lower and then again, moving back towards that foot. So getting here that can tape her up, wrapping around, getting that sort of feeling This is moving down and towards the attachment here. Okay, so stretch coming up. I can get this big gesture coming this way again. Navel curving. So there's are kind of centerline following this. We know in here all that's getting pinched, right? And then we can look at that inside and here. Look it, look at that angle and here, try to measure it out. All right, So enable kind of working backwards here little bit based on what we've done, but this works perfectly fine. So sternum again Look at the angles of the breasts and here. Okay, so kind of laying back on the rib cage on. And this one is kind of getting affected by gravity a little bit more over in here, So pulling up into the shoulder. So, uh, shoulder over and here. Now, this will be the gesture of the arm here, coming down, coming down and towards us slightly like this and then coming forward again on the forearm for shortened. So all of this will appear very short corner and looking at the space that forearm probably needs ago up in there, right and then that hand for shorten as well, and it's putting a little impact on that shoulder.
57. Roberts Take Part 2: so a standing pose here, I'll go and start with the mask of the face. So I got my upside down sale, which is my method of choice. Um, you can see underneath a little bit ear net, maybe a little more angled down so I can add the eye socket and knows I want to add a little more information. You've been coming here and at a hairline. I want to feel that out. Okay, So neck they put in the neck and here. Okay, angle of the shoulders. Air relatively square flat. Um, from here, this clavicle was getting raised up to this shoulder, which is getting raised. Then over here are the shoulder is extending out. Okay, It was getting out here, and we've got this pull down towards the breast area. So our arm kind of moving out in a way and then bending heading back towards the head. It's all come to this inside right in here. I can say the shoulder is in there. That distance is pretty good here. And we got our tapering tube. This is one of those situations where two point turn would be why so 12 on the elbow and then move that back towards the head. Wrist. All that's kind of playing with hair there, something like that. So that's moving away, moving away. Um, now I can get into so we have shoulder one again neck shoulder to I can do a gesture here, moving towards us for short and really, really moving where this has a nice little clip there and then moving towards the hair here . So gesture, gesture and then for shortened and then the hand up in here. All right, so now I can feel out the next gesture and here waste wide tube waste. Why? Tube center about Even So this is coming down there. Is my your armpit right in there. So the upper body moving away from us a little bit. I confined the angles of the nipples there of God breast here pressed. They're all getting pulled up, so I can emphasize that by just there may be giving that feeling that the direction of the nipples are getting pulled up with it. Now, I can add a little flesh on this side, so I know my rib cage is in here. There's my waist the size going to be short. A rib cage. See? Started Clyde of Master Way Going to that here. Well, that's gonna be hair we get. Ah, kind of cool up here. The wraparound with the deltoid wrapping around and here, Um, Now the direction is going down here towards our naval and then from the naval starting a curve back this way to the crotch. Okay, so we're getting when I stretch in here, okay? And then we get into our skirt area. So the angle is here, and then this size, getting that big push out like that. So our center has about dead on in here. I can do that. A bump this up just a little bit, and then I'll join the leg. Kind of moving down over. Gonna get this feeling of the tummy down in here. Kind of pulling and growing up in around besides, more relaxed. All right, so on this one, uh, start, Um, let's start with this arm. I'm gonna focus on that. So I've got the deltoid with the direction moving this way. Um, and I've got this biceps. That deltoid is a good example of that kind of tail, You know that war X shape of the tail and then that vice up. You can see the connection here as that tail comes around. They moved down towards that Bice up. So the gesture of the arm really hard to tell pretty straight. So I will curve it down this way slightly somewhat. Put the gesture here, and then curve this away from us like that. We'll get to the elbow again. Hard to tell. I'm gonna bend it and bring it down slightly towards us this way. And I get to the hand wrist. Um, it'll just flatten out because we can really see that's supporting that body weight. I'm now we've got this big trap muscle so I can create this feeling of the angle line through the shoulders again. We know that clavicle is moving off towards it. The clavicle on this side is moving back towards this way, and then we have our other shoulder. It's a little more relaxed and moving here, so I get to the pit of the neck feeling that angle. And now if I know this is my, uh, gonna be the armpit in this area, I can get my gesture, uh, for the lower body or the torso. Something like that center line favoring this side. So this will all be the latte coming down and then bending, and then eventually, kind of going off towards that tummy. So, Peter, the neck eso the sternum coming down and here, not changing directions much. So coming here. So if this is our rib cage here, we know this is all getting pulled up here. So there's a nipple nipple on this side. So this is all kind of attached, and this is kind of free to move up. So moving down now, feeling out this angle and here space between here and here. And, uh, this is moving towards us away from us a little bit different than what the picture is giving us. And then again, trapped that we know that neck is kind of bending back a little bit supporting that head. Wait. So this coming down in the rib cage here and get increased. And here So you see those folds coming around to the tummy. So the sternum, but down to the belly button the naval area and then down to our crotch over it Here. Okay, so all That's kind of a tummy. Nice crease there. And then we get into, uh, the shoulder and here, So really pretty weak corner. So I'll just kind around that for now. This is very straight. Um, so, you know, we got a little bit of, ah, shape here from the delta, way to the bys, Up. I'll run it towards us just a little bit here, and then I'll run it towards us. Ah, as it crosses over the leg and here, So that's kind of coming towards us as well. So again, coming around the rib cage and here waste. And then all of this is going to be are bulging box and there, So that's gonna wrap around That's coming towards us right to the knee. And then, you know, it'll bend here as a move back towards the foot. All right, well, that will take care of my demo again. Um, I would encourage you to go back, Do it again. Do it again, do it again, focus on different parts, and, um, then every once in a while, we feel good about it. Go back and try toe, go through the same thing. But if you need more time, and you're drawing the entire pose. Never hesitate to pause the video, But ultimately, if you can use the six minutes and layout, you'll be able to work a little more fluidly. Get in here, Say all right. You know, Brooke, with my head, OK, there is my direction, and you'll be ableto eventually do these really quick gestures. I was talking a lot through it, trying to work with you. Well, my thought process teaching. But if I wanted to do that and really feel it out, I could work pretty quickly and try toe, get that nice loose gesture in there. Remember, keeping a loose is the key, um, keeping it fluid. And that way, you're not ending up with a very wooden, you know, stiff looking figure, all right?
 ROBERT JOYNER, Make Art Fun