Transcripts
1. Introduction: Are you an artist
seeking to master the creation of loose
and abstract style art? Welcome to Loosen up and paint a transformative
online course designed to unleash
your creativity and elevate your
artistic expression. In this course, you will
learn to use progressions as a powerful tool to understand
how time impacts your art, emphasizing the importance
of drawing subjects convincingly before
transitioning to a loose and expressive style? The focus is on the
imperative process of constructing subjects first, making it easier for you to deconstruct them in your
expressive artworks. With Loosen and paint, you'll embark on a journey of self expression through art. Learning to let go
of perfection and embrace the freedom of
abstract and Lose styles. Join the Loosen up and paint course and unleash the
artist within you. Let's embark on this
creative journey together. I hope to see you on the inside.
2. Materials: Just a few comments about
materials before we dive in. I'm going to be using graphite and 70 pound drawing paper. And then for the
painting process of it, I am going to be using heavy body acrylics
on 90 pound paper. Feel free to use whatever
mediums you prefer. If you like drawing
with markers, if you enjoy doing it digitally,
that's perfectly fine. If you enjoy painting
with pastels, oils, whatever medium you like, then I would suggest
that you use that, even if it's water color. This is a very versatile class so you can use whichever
medium you like. Now, once I get to
the painting process, I'm going to go over
the colors I use, and so we'll discuss that in a little more detail earlier. And of course, the same
applies to brushes. If you have certain
brushes you're accustomed to
using, that's fine. I feel like you can use
any brush you prefer and paint on whatever
scale you like as well. And you should do perfectly
fine so long as you follow the basic idea
of progressions. So that's enough about
materials for now. Let's get started
with the drawing.
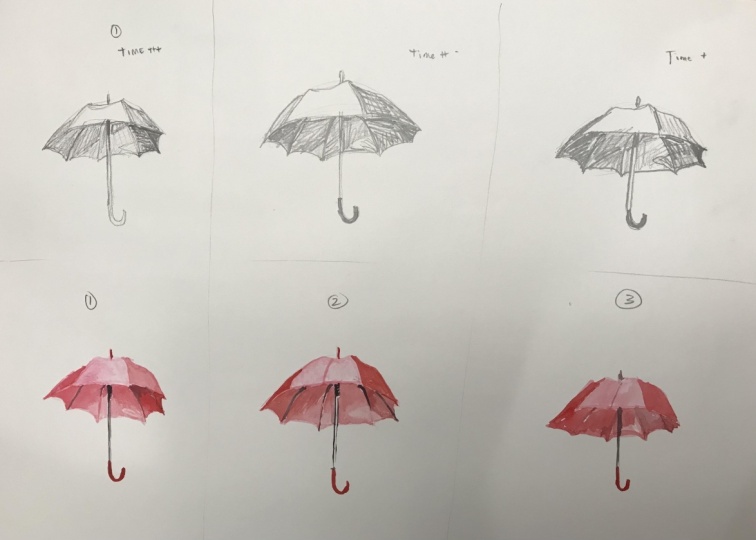
3. Drawing Progressions: In this very first progression, I'll start with a
very simple subject. But first, I'm just going
to lay out some columns. So this will have three columns, and then two rows. The first row on
top will be used for the subject and
I'm about to draw now. Then the second row will be for the slightly more
advanced subject. The paper is roughly
18 " by 18 ". It is 90 pound drawing paper. Feel free to use whatever
paper you have on hand. However, I would recommend
that it's not too small, so we want a little bit
of room to draw here. And then, of course, we don't
want it too big either. So something like a
medium sized piece of paper should do just fine. Also avoid really thin paper. A 70 90 pound paper
should do just fine. Now you can see the subject up on the screen, bottom right. And the first thing I'll do
is start with a direction. So for this one, the axis
line is going a diagonal, and so I'll find that angle. That is the longest line. And then I can
determine the width of that basically what will be a
rectangle in the beginning. And then I can start to add a few other shapes such as the triangle towards
the tip of the pencil. And again, not looking at
details this early on, just locating some basic
lines, some basic shapes. So here, just doing the eraser, and then the clamp that basically holds
that to the pencil. Now I can get in there
and find the lines. So this is not a round pencil that has a certain shape to it. I can locate the lead. And then once I have that close. Then I can start to
look at some details. So there's some
little grooves and some little pinches
and whatnot in the metal that sort of holds that to the eraser
and the pencil. But just a few details, we don't need a ton
of information here, just a little bit
so that we know and we understand how to draw
this particular subject. So in progression one, we want to make sure that
we take time to look and see some of the details that make up the subject
that give it its character. We want to latch onto those, and then draw them
to our best ability. Now, again, I wouldn't recommend drawing
every subtle nuance. We don't need quite that much information
in the beginning, but we just want to make sure we had the skills to draw it. And note that this
very first progression is going to take a
little more time. In the time area, I just added three pluses. Now, for the second progression, because we've already
taken time to draw the subject a more
cleanly and accurately, we're going to only use
two thirds of that time. Now, obviously, we can give
and take a little bit. It doesn't have to be precise, but the whole idea here is we've taken time
to look at it. We understand more about
it because we've drawn it with a little more
detail and time. And now for the
second progression, we should be able to do
it a little more quickly. Doing it more quickly
means that you're not going to have the
same accuracy as we did in the first one or
the amount of information in detail because we're only
using two thirds of the time. So that's the whole idea. As we go from left to right, things will get a little bit looser and perhaps
even more gestural. We're looking for that
loose gestural drawing, which I'll try to execute
in this third progression. By only using a third of the time as I did
in the beginning. Now, the only reason I can
draw it this quickly and still come up with
what looks like a pencil is because I did
the first progression. I know something about the
subject now. I see it. I'm familiar enough with it that I can quickly lay this out. That's what makes these
progressions so nice. Now, notice that because progression three
was done so quickly. I'm going to give
it a three pluses on the looseness scale. Because I use more time
in progression two, it's not quite as
loose as three, but then obviously with
the first progression, there's only a little bit
of loose quality to it because I use more time to
draw it more accurately. I hope that this demo gives you a good idea of how
progressions work, and now let's take
on another subject.
4. Drawing Progressions with Chair: As promised, we're
going to take on a slightly more
advanced subject. And this one I'm
going to do a chair. Now, when you're
drawing any subject, we're always going to think
about shapes and forms. What is the most
practical shape to use? In this case, we can
think of a vertical cube. And what I mean by
that is you take a rectangle and we're going
to add some sides to it. I'm always trying to locate
the longest lines first. In this case, I'm just using the back of the chair,
the left hand side, and then the corner of that
chair that's closest to us. And then I'm looking at the leg or the corner
on the right hand side. If I just focus on the bottom of the chair and where those
legs hit the ground, and just study those angles, where does one leg where is one leg in
relationship to the other? And I try to look, again, lightly indicate that
angle on the paper. And notice too that I'm not drawing everything real heavy, so I'm not pressing
into the paper. So even though I'm drawing
with an ink pen right here, I'm still using light
pressure into the surface. If I were really knuckling down and drawing firmly
into the surface, then that's going
to make it a little more difficult to
make these changes. I'm a very imperfect drawer. I think everyone has
a certain degree of accuracy and ability. So I know the first pass. I'm going to make some errors. So here I'm trying to
lengthen the legs. So basically, I had that the chair or where you sit on the chair a
little bit too low. So I'm having to extend
the legs a little bit. And that's why you
want to draw a little bit lighter
on the first pass. Now, as I mentioned earlier in the previous
demonstration, this first particular
progression is all about teaching me to look and
observe my subject. What are some of the
characteristics of it? Can I draw this somewhat accurately in a
believable manner? Do I have the skills to draw
this in a nice, clean way? If I didn't, then
I think I would pause right here
before I went to any second or third
progression or certainly before I went into a painting to understand my
subject a little bit better. The idea of progressions
is not just to get us into this loose
gestural drawing, but it's also good
to help us identify where our shortcomings are
when it comes to drawing. So that's basically what
I'm doing right now. So my first pass was a little
bit off in certain areas. I was able to clean
that up a little bit, and now notice that I'm
going into this stage of the drawing with a little more
pressure into the surface, and that's going to give me
a little bit darker line. It's going to give it a
more of a clean finish. Then once I'm done, then I can determine, am I ready to take
this to a stage two? And for my idea of how
accurate something should be. I think I'm in good shape here. Again, there's your
little time ledger there. So whenever I do this next one, I want to use two
thirds of the time. But remember, no
pun intended here. I am drawing on the experience
that I have in stage one. So because I took
the time to observe, and I was able to identify some areas that I wasn't quite
seeing things correctly. That I sort of
addressed those issues, and now, in theory, I should be able to draw
this a little bit quicker and yet still capture
the feeling of a chair. And obviously, because it's
the second progression, I'm only using two thirds of the time.'s not going
to be as accurate. But again, that stage one helps me move through it
a little bit quicker. So some of the things I learned, the memory of it, the muscle memory of it, things like that are starting
to pay some dividends, and yes, it's still not perfect. The legs look a
little bit short. Underneath, but at the end of the day,
it's still a chair. So now I'm going to use, again, only a third of the time that I did in that
first progression, and I'm moving through
this really quickly. I'm letting the
pencil or the pen rather hit the
surface of the paper, and I'm not taking it off. I'm pretty much sort of like
running that pen across the paper and trying to do this in a nice,
loose gestural way. In a believable way as well. And when we start
to look and compare the differences
between these chairs, they're very noticeable. But again, I don't think
I could do number three, as well as drawing
now in a nice, confident way unless I had
stage one under my belt.
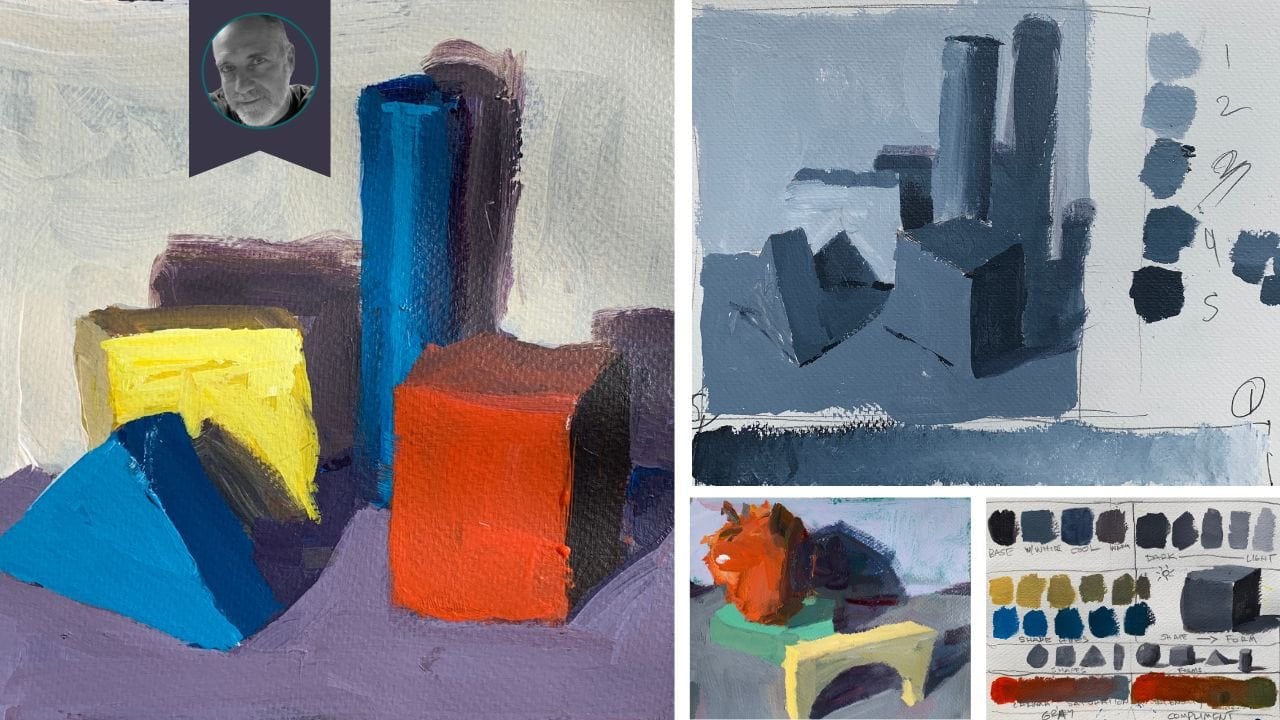
5. Progressions with Painting: Okay. Let's go over
some materials that I will use to paint
this simple subject. These are all heavy
body acrylics. I have titanium
white, burnt sienna, yellow Ochre, ultramarine
blue, vermilion red, and then some cadmium,
yellow light, and just a synthetic square
brush to begin with. You can do this in pastel, watercolor, whatever
floats your boat. I'm just going to establish
a base color to the pencil. Now, obviously, we're
painting this time. So what I want to do is spend
a little more time here. And not so much try to do a
perfect color matching thing, but it's more about trying
to capture a likeness. If you were to observe this
little sketch I'm doing here, you would say, Oh, well, obviously, that's a pencil. That's all I'm doing. In
addition to that, you know, I wanted to have a
feeling of depth, so I wanted to look
somewhat three dimensional. So that means I need to add
some light and shadow to it, and that's very
important as well. So understanding values,
making sure I can to decide on which sort of value to use where
so that again, when it comes to doing
the say more quickly, I had that experience
to draw on. Here just a little bit of
shadow into that clasp, and again, you know, the color I chose for that sort of clamp that holds
the eraser to the pencil is more of a peach cream color in the actual drawing has
that gold copperih look, and I'm not too
concerned about that. I've given myself a
little bit of leniency. However, if you're
someone who's more of a stickler for those
things, then be my guest. You can capture as many of
these accuracies as you want. Because I'm somewhat
of a loose painter. I prefer just to get
the gist of things. So I figure as long as I've got the general idea and
it looks believable, then I'm okay with that. You know, I can get over the fact that
things aren't perfect. So again, continuing
this whole idea of adding some light and shadow to the pencil
and some highlights. And once I get this close to
what I feel is acceptable, then I can move in
with a cast shadow. So the cast shadow
will really sell the idea that this pencil has some light and shadow to it, which you can see here. Now, I'm just going
to soften the edge of that shadow with my finger. And lleno, that's okay with me. Up close, it probably
looks kind of choppy. But as I moved back
away from the pencil, I felt like the whole
thing you know, was coming together nicely,
so it held together. I'll try to capture a few
ridges in with that clamp. And I'm going to let
that dry a little bit. And then as that dries, I'm going to go ahead and move into the second progression. Now, notice the same ideas with drawing apply with
these progressions. So we want to move
through it more quickly. So we're going to use about two thirds of the time
as we did in the first one. To get the pencil on the paper with a little
bit of accuracy. But clearly because we
are moving quickly, we don't have time for the
same amount of precision. So there are going to be more imperfections
because of it. And this is the beauty
of this exercise. It teaches you to slow down
to observe your subject before you start to paint
it in a loose manner. So as I alluded to earlier, we want to be able to construct it before
we deconstruct it. But as I moved
through the painting, everything that I did in
progression one is, I know, is helping me in the
second progression, as far as colors, you know, as far as the shape, as far as getting the whole
idea down of a pencil, you know, we can start to explore a little
bit with colors. We can start to manipulate colors and values a little more. But because we are in this kind of beginning
stages of progressions. I'm going to keep the
whole idea fairly simple. But you can imagine
how much fun this would be if you're opening up to like collaging and you
give yourself more ideas, more techniques to use to get the subject down versus
just paint and brush, we could use collage paper. X media. We can draw and
paint on our subjects. So This is a good idea, a good way to explore
your subjects. It's going to expose
any weaknesses again that you may
have in your drawing, maybe even in your values, how well you see values, how well you paint values. And then of course, if you
want to get loose with it, you have a great
opportunity here to do it in a way that
gives you more confidence. And in the end, it's
going to give you a really good foundation for
painting abstract style art.
6. Progressions with Painting a Chair: Last but not least
is our lovely chair. Again, this very
first progression, I'll take my time,
try to capture. There's more subtleties
and nuances of the chair. I'm still not a stickler for trying to get
perfect colors. I focus a little more on values. But again, the idea of these progressions
is very versatile. You can render it toever degree of representational quality
that you see fit. I'm going to get the gist
in this very first one, which is going to
allow me to really zoom through that
second progression. Once I get this base
color down for the chair, I'll start to move quickly
into the shadow portion of it. Now, if for some reason, your subject doesn't have
great light and shadow, put the light source coming for whatever
direction you think makes most sense and then just use that as your guide for
painting light and shadows. I'm going to use my light
source coming from the right. So that's going to
give the inside and outside of these
legs and chairs. Features, give a shadow. And again, I'm not
trying to look at the most perfect
shadow color that I need for the chair and trying to match what
I see in the image. Again, I'm just getting something that's going to
get me in the ballpark, and I'm okay with that. Here going with a little
bit lighter value. So I want to catch
a little bit of light hitting the chair
in a few different ways. So obviously, the front of this chair is going
to be in light. The back of that chair will get a little bit
of light as well. And just trying to
accentuate some of the light hitting the
front part of the chair. And if I don't paint it
perfect, that's okay. Again, you have to sort of decide what
standards you want. All right. So I reposition
the paper a little bit. I felt like I was squeezing us off the page there
or off the camera. I'll add one more shadow here to the left hand
side of this chair. And then I think we'll
be ready to move on. So since I already have a
dark value on my brush, I'm just going to use that. And because I had that
experience from progression one, I sort of know where
these shadows are. I have a good feeling for it. So I'm cracking forward
here without a drawing without too much
hesitation basically, and that's okay, because that's what helps give it that loose
care free quality to it. Painting quickly is very much a part of being able
to paint very loosely. If the whole idea of the time
and the amount of time you use is very important to
understand in this course, has a very large and profound
impact on your results. So you have to be able to
be okay with imperfections. That is something that
you'll have to allow yourself to get away
with and know that, hey, I know I can slow down and paint this thing
a little more accurately. But I'm not worried about that. I know there's going
to be imperfections because of how I'm
going to approach it. And that's sort of
part of the deal. With painting loose is
knowing you're going to not be able to do
things perfectly, but isn't that the whole
idea of painting loose? If the whole idea was to capture every single
subtle detail, then obviously painting loose really wouldn't be possible. So you can see,
it's very chunky, very imperfect, as I was talking about earlier,
but it works. At the end of the day, it is a chair, just as much as the first
progression is a chair. So is the second,
and so is the third. Okay, so that's that. I hope you enjoyed it.
7. Recap and Projects: Congratulations on
finishing the course. I hope that you are
able to latch on to some good ideas that
will help you loosen up. Also, that will help you
understand the importance of being able to draw and
paint somewhat accurately, so the construction phase is
important to deconstruct it. Remember that also gets you very familiar with the subject. You're taking time to notice the detail, some subtle nuances, and then that's going to pay huge dividends when you go to paint it and draw
it more expressively. Now, as a reminder, SkillShare offers
student projects. That's a great
opportunity to share your work with me and
the community here. I will tune in to scale
share every other day or so, and I'm always perusing
the class projects. If you have questions,
comments, whatever, please leave them
in those projects, and I'll be sure to
respond promptly. I want to thank you again
for your time and support. I'll be posting new classes very soon on how to loosen up, paint more expressively and to break away from
tight rigid art. I hope to see you then. Bye.
 ROBERT JOYNER, Make Art Fun