Transcripts
1. Introduction: Welcome to illustrate if
oil painting in procreate. Now, when we think
about illustrating, most people right away
think about watercolor, perhaps ink, some
pastel colored pencils. But old painting
you can also use to create beautiful
illustrations. And that is what
this class is about. We're gonna create an
illustration together. We're going to create a
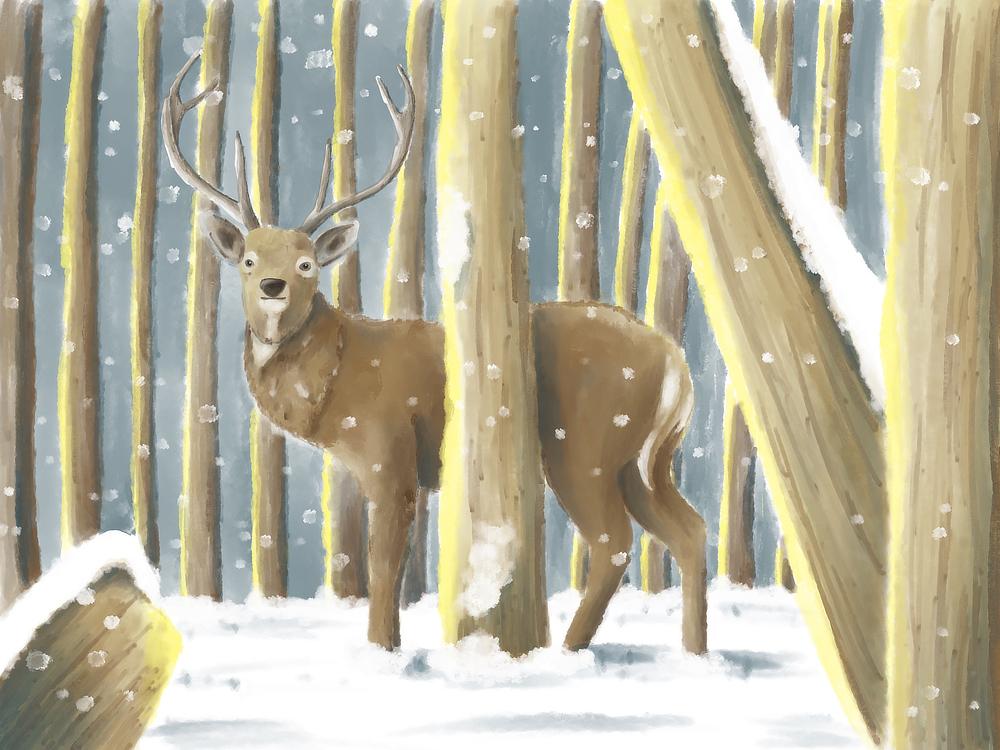
winter scene in a forest, some snow falling down. Just a nice scene
to create together. But we're not going to create
ultra realistic scene. No, we're gonna create illustration where you can
clearly recognize everything. But you just could put this
illustration right into a children's book or magazine or whatever you
want to put it in that way. In this class, we want
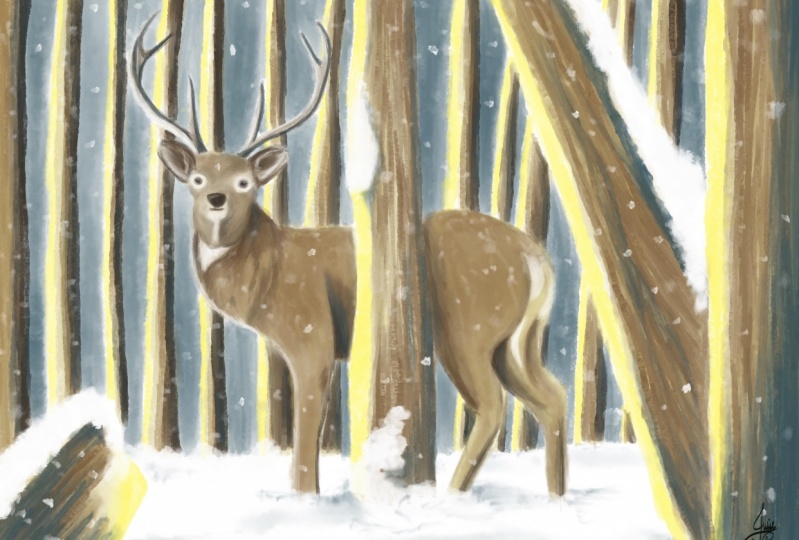
to do two challenges. The first one is create an
illustration that is lifelike, not realistic, but also not
like the cute cuddly figures. It'll keep it
somewhat realistic. So that's the first challenge. The second challenge
we want to do is use the bare essentials of procreate to create
this illustration. Not confuse with the tricks, lights, tricks, special brushes. We're going to keep
it all to a minimum. Just use some brushes
and our supplies. I have a sketch ready. What you can also use your
own sketch if you wanted to. And there's a color palette. That's it. We're gonna just simulate old painting together as
if we were all painting. What we're doing it
on digital or five on her iPad in Procreate
to challenges, create a semi
realistic illustration and mimicking or
painting in procreate. Alright, well, I don't
know what's USA more. I think I'm gonna stop him fingers just to dive
into the next lesson, we're gonna have some
fun illustrating together with oil
paint in Procreate.
2. Using the Supplies: Before we start the lessons, let me walk you
through the resources that I've attached
to this lesson. And to find them, you go to Skillshare and do it in
your Safari browser. That's the best on your iPad. And find this class, of course, illustrative oil
painting and tap on the project and
resources on the video, scroll a little bit down
and you see resources five of them as a brush, as a swatch. That's the sketch.
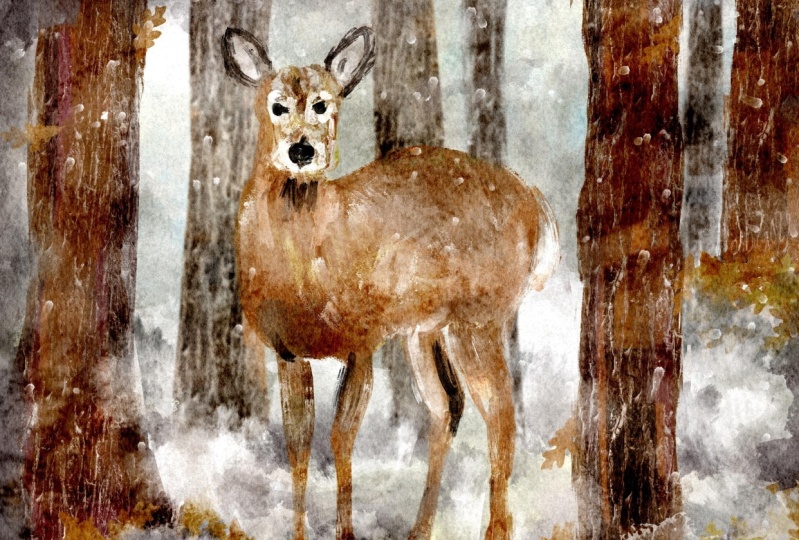
There's a photo of a deer and there's
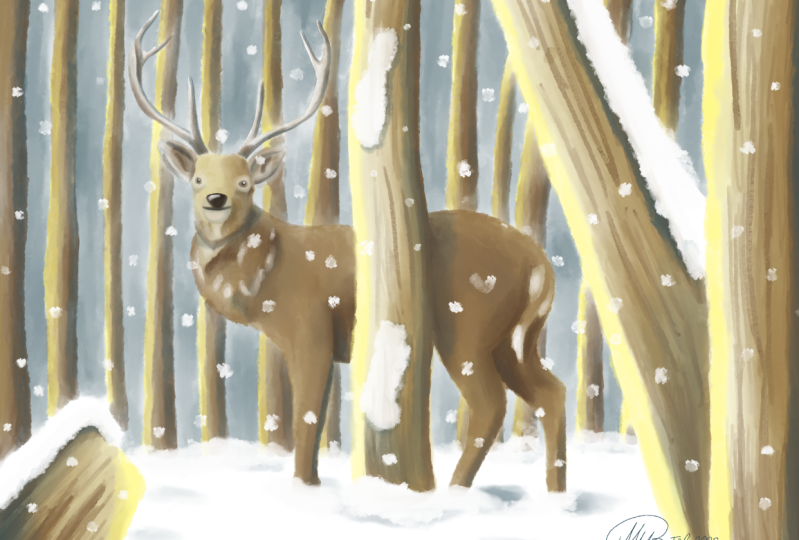
the finished projects. Now if you know how to
get this into Procreate, I would say just skip this lesson and continue
with the first lesson. If you want to sketch
yourself though, then here's a photo of the dip. There also is the finished
painting for a reference, when you're painting yourself. To get the brushes in Procreate, you just tap on the
ABB or brush set. Now you get a new
window. It asks you to download. Download it. Wait for a little while,
he see little arrow. It's just made an animation
press on the arrow. And there you will
see the brush set. And what you're gonna
do is tap on it, then it brings you
to your iPad files. And what you can do
best IS tip on tap on that little square up
there so that you get all these things here and you see files recent press on it. There's the brush
set and what you do here is click on it. It is automatically
import it to Procreate. And if you go to your brushes, the top one now should be an ABB oil set and I
got a couple of them, but that should be on the top. That's for the brushes. Let me go back to Safari. Safari, there it is. And let's do the same
with the swatches. What you're gonna do, tap on it. And it brings you to
New down to new window. It says, do you
want to download? Yes, I do want to download. You wait for the
animation to stop. Press on it. You see here went to
illustration oil. And then the swatches
just click on it. It takes you again
to your files, click on recent, and there you have the winter illustration. Swatches. You press on it, it
imports it automatically. To find this, you
press on the column, go to your palate. So if you're in the disk, go to the palace and
go all the way down. Depending on how many you have. And there you see these
swatches and what you can do is tap on the three
arrows set as default. And now you're set
and ready to paint. All right, Let's get the
reference into Procreate. Again, we'll go back to
the Skillshare page, illustration, oil dot Procreate. You click on that one. It asks you if you
want to download. Yes, you do want to download. You wait for the
animation to be ready. And now we see it here. Just tap on it. It's importing it. Go to your gallery. And now the first one should be this new drawing,
just my sketch. Alright. Let's go to the, if
you want to download, let's say these two
would be going the same. So I'm doing the
reference for you. You tap on the reference. It asked you to download a few. Now I choose few. You could download
it, but I will just choose to choose few. Then you get too few it
what you can do now, you just take your
finger, you press on it. There's little menu and
it says add to photos. And now it should
be in your gallery. And if you go to your gallery, the newest picture should
be this their picture. Alright, that's it. That's how to get
resources into procreate. If you need that there, that exactly goes the same. You just press on it. It asks you if you want
to download a few, I prefer to feud. And there's the photo
of the deer and you do exactly the same press on it and say add to photos and your set. All right, that's it. Now you've got all the
resources in procreate, and you can move to
the first lesson. We're gonna start
painting together.
3. Creating the Underpainting: Since I've made the sketch
already for this painting, we can dive in it right away. Now if you want to make
the sketch yourself, of course you can do so. That's why I included the
reference of the dip and I'll show you how to
get that reference into your Procreate first. All right, Now minus here
of course already the day. But if you want
to draw yourself, what you can do is you
can tap the wrench. You can go to Canvas and
you can say reference. That will bring the reference
of the whole picture. But instead we want an image. You click on image. You say import image. It brings you to your
camera, your photos, and you just look
for the DA that you have downloaded from
the reference photos. Now if you press slide here, that corner, you can enlarge it. You can zoom in, zoom out, and you could draw now
the Deir yourself. All right, Now I'm
gonna hide that again because I don't need it. I've got the day here. Now. You've only got a sketch. That's all we have. And what are we gonna do?
I'm gonna do a new layer, but I want this sketch layer. I want it on top of everything. I'm going to move it on top by holding it and
then moving it. And we want to lock
it. For locking. I'm going to slide to the
left. We're gonna say Lock. Now that helps me
to prevent to draw, to paint in this case actually, for excellent, on this day. I've got this new layer now, I don't want this to be layered. So I'm going to tap on it. I'm gonna say Rename. I'm going to call this layer
the deer on the painting. And I'm giving it numbers. Let me give it a number, let me call it one. And that is on the painting. There you go. It's recognizes the
word on the painting. That's where I'm gonna start. Now. To start, we've got all these brushes and
if it was all as well, you have this ABB oil brushes that you need that and you see
a number of brushes in it. And we're going to
limit ourselves to a couple of brushes. We're only going to
use a few brushes. We're going to start with
simply with the round brush. With the round brush,
what I'm gonna do, I'm gonna give the deer
and underpainting. When your own painting, the underpainting that shows
fruit through the rest, that is the base of where
you're painting on. This will be the base color. Now normally what you
would do in oil painting, you would do the whole canvas, give it a color,
but we're going to do that slightly different. We're gonna do this in stages. We're gonna do today the trees, and then we're gonna
do the background. That is because these brushes are a little bit transparent, so a little bit not
totally opaque, so you see what's under it, coming through it again. So that is why we
want to start this slightly different
because we are going to use a dark background
and I don't want it to come through
the trees and the deer. We do it a little bit different. We start with the
deer on the painting. For that we need a color, of course, we have to
winter illustration in O. That is the palette
we're going to use. I'm gonna say disk, and here's all these colors. Now what I've done, I've
arranged them nicely and colors. This for there, the trees, and then for the background
and some extra colors and rest screen just to get
them nicely into rows, I'm going to just start
with the first column. That's what Is it, a bit of an umber color. I'm going to paint
the whole day, But notice is notice
endless or his staghorn, depending on what
you want to call it. Alright, now let's start with this book or stack,
whatever you call it. I'm just keep on
calling it Idiom. All right. I've got my opacity on a 100%, I've got the science
on, let's say 5%. And let's see if that
works well for this. Works well for the heads and
I'm just going to paint in the whole head as this spot, they're just give some color. Now I see I've gone a
little bit outside of it, so I'm gonna make use of eraser. Now, in oil painting, you can actually erase your oil, but it's gonna be a
smelly process with cloths and smelly
stuff in procreate. This is a lot easier. All right, I'm going to enlarge the brush a bit to about 7%. I'm gonna do the rest of the
body with this oil brushes. If I press really firm, you get a really strong color. And if I then press lightly, you can spread it around. Like that. So I'm not pressing really firm, I'm just pressing this lightly. I want a nice column. And I don't really
care if this is an even color or a bit messy. That's fine. Since we're
going to paint over it. If you have it a little bit, some nuances in column that
comes through later on. And it looks pretty nice
to, let me do it here. Do the legs. There we go a little bit
there. Let's check here. It's nice a bit
outside. Erase that. Alright, do the back-end of pressing a little bit harder and then
spreading my paint out. This is just the underpainting. We're just going to block in
what they call each area so that we know exactly where are we going to paint on later on. I'm picking a light color
on purpose because that saves me later on some work
with adding highlights. So whatever we're
going to paint on, this will be darker. And if we don't paint
on certain areas, we just preserve
this light color and have our
highlights right away. Make it ourselves a bit easy. Well, I've done there. Let's do it is going back to my color palette and
we're going to pick the second color,
that gray color. And I'm using this
gray color for it. I want to go back to that 5, 4%. You go, That's one ear. Second ear. Then I'm gonna do its antlers or the staghorn,
same round brush. But I'm picking
the third column. Let me just go in color by
color up the third color. I'm going to lower this brush to about 2% because
these endless aren't. Fig, that's large S. The rest is. And I'm gonna paint
that in lightly. There we go. Let me start it just at the top. If I need to do a
small spot like this, I'm just pressing a
little bit less firm. That will be there. If I hide the sketch, you get the deer already see that is that is really a dear, let me get this sketch back. All right, That's
the first step. The next step we're gonna do, we're gonna do these trees. We do the front teeth. The bacteria is
giving them both, each their own layer so
that we don't mess up. Alright, let's do that. Now I've got these
in a nice layer. I don't want to
miss this layer up, so I'm going to add a layer. I'm going to add
a layer above it, and I'm starting with
the front trees. So let me call this layer too. I'm calling this just trees. The painting. Let me
spell that right. And there you go. Trees on the painting. The front trees, so these
go in front of the deer. I'm keeping this layer above the deer so that it
actually goes in front. The front trees are the stream, this tree and the stream. Now as you noticed
on this front trees, there's actually some snow on
the little one in the site. To stump is some snow. The victory has some snow on
it to what we're gonna do. We're actually not going
to paint the snow. We're going to paint
all around it, filled it all in with color. And then by itself, the snow will appear. There's a term for that and that is called negative painting. By painting all around it
and not the subject itself. You paint actually
the negative part, they call it the positive
part from parts, what you want to really show
that appears by itself. All right, The three, we're gonna pick the same brush. We're going to stick
with the round brush. We're going to get
a different color. We're going to start
with the highlight, picking really bright yellow. What we're going to do
with the bright yellow. Now the stream, let's pretend I light comes
from this side. So that would mean that
this side is yellow, this side and a
little bit not here. Do you Bright would be the snow, but around here that will
be a little bit of light. I'm starting with this one. What do I have sizes too small? Let's go to about 5%. That's good. I'm painting in yellow, just around the edge
where I want it. There you go. Can go a
little bit over the deer. That is not a problem.
And the same here. I'm going to add that
yellow right there, but not too much outside. I'm going to do that
with the street to give it some nice yellow. There you go. And the width
doesn't really matter. You could feel redo the
whole tree if you wanted to, but we're not gonna do that. This part two here, I want some yellow right there. Alright. I'm gonna go back to the color. I want to pick the next
color, that light brown. I'm going to use this
for the front trees. The under painting
color might want to go slightly larger,
seven per cent. To save some time. At the end. Away from the light, you can press a
little bit harder, but then the rest, hardly
pressing very lightly. And I'm blending in the
yellow a little bit. As you can see, with
that other color. Get a nice transition from
the darker to lighter. A little bit here. And there you go. I was almost the
same color as that. There are still
slightly different. Let's do this one too. Now here I got to pay attention. I actually don't want
to paint on my snow. And if they do that
a little bit, Um, I just erase it a
little bit again. I want to have some
stronger colors here. And then I'm gonna
go lighter here, blending that yellow
a little bit. There we go. Good little bit around here. And now we're gonna do this part pressing firm at
the beginning and then easing of the
pressure and letting this all blend in nicely. There we go. A little
bit of widest snowing. Snowing. Yeah, it is going
to snow, but not yet. A little bit of white is
still showing through. That is not a problem
since it is snowy scene. Now here the dark part
will be here where the snow is casting a
shadow onto the tree. And the rest were gonna
do lighter again, blended in a little bit. And there you go. That would be from trees. Now we're gonna do the bacteria
is to add another layer. I'm going to call
that still trees. I'm gonna give that number. Free. Trees on the painting. Got to give that
actually the same name. But I want this under the deer. Because the deer is of course, in front of those trees. We're going to start
here the same. I'm going to pick that yellow. I'm gonna do it where there
is the light, but I got it. Go a little bit thinner
to free percent. I'm gonna come for two per cent. This first trees here, this tree and this tree, this tree is in front of
this three overlapping it. So there will be
no highlight here. But there is highlight
on this one. I'm going to go
for free percent. That makes it a bit
easier and quicker. There you go. I'm only gonna do
that one tree and the two trees that are
overlapping each other. At least I'm gonna
talk you food apart the rest of speeding up
because you just don't want me to see me paint
every tree most likely. And you can do that yourself. Principle is the same. Start at the highlight
and the darker parts. Alright, let me do
demonstrate that one tree. While actually free trees, I've got my highlight
in for the first three. The next color,
I'm going to pick the first color that is that
dark color for the tree. So the second row,
the third column. And that is my dark traditions trees are in the back
and I want them dark. And getting some dark trees. I'm going to create
some nice contrast. And what I'm doing
is basically the same as with the auditory. I'm pressing hard at the end. And then I'm just easing of the pressure and blending
in the highlight nicely. We go close up a little bit. Undermine. Do another line. Behind this day you go. That's my back of the trees. Blend this in a little
bit nicer so that I don't have too many
white gaps in this one. There you go. Now seeing that looks
already like a nice tree. See simple scene. What we're going
to add of course more with now these two here, what I'm gonna do
with the vector 31 is overshadowed by the other one because
its in France. I'm gonna do this one
really dark. There you go. The one in front. I'm actually gonna do slightly lighter with lighter
pressure painting. I want to blend them
in a little bit. Actually, no whites. There you go. That's what I'm
gonna do with these trees. Now the rest of the trees, I'm
gonna do exactly the same, but I'm gonna speak
that part up. We've got this. As you can see, you need to pay a
little bit of tension where the trees go,
where they don't go. I made some mistakes,
so I had to erase that. But it's all nice Now here
also there whether there is don't go through today
but may create it like this. Now let's hide
that sketch again. And what we're getting is
this nice back painting. We're going to check
it and as you can see, some of the snow here. And this is NO2. It's already actually
appearing a little bit. I just want to check on these where it's behind the stack. And just a little bit on these edges there get a
nice smooth transition where I don't want
these white spots. So between the deer
and the trees, I'm just painting in
that a little bit here to getting a nicer transition
here to a little bit. There, a little bit. See here. Careful that I don't go too much
behind it there. If I go behind the DRC, you're getting that
all through it. You seeing that very strong because the DEA color is quite light. But there you go. There it is Good. We're gonna do, I'm gonna
do the same with the ears. So I'm going to go
back to the deer. I'm going back to
that gray color. I'm going to just blend this in a little
bit with the head here to there you go, so that these don't seem
separated from the rest. And we might do the same with
the endless too little bit. They're blended in a little. While this one is
quite nice, right? We're just going to
keep it like this. Maybe do while I'm on the dare. Get that first light dear color. Added a little bit right there. So that's, you don't have
that white spot there either. Now click, that looks nicely and that already starts to
look like a painting. We're not going to fill
in the background. So for that I'm going
to add a new layer. And I'm going to slide that
layer totally on the bottom. And I'm going to
call that layer. That's number four then. And that is just gonna
be the background. And I don't need on the
painting background is fine. For the background
unwanted my sketch back. I want to see too about where I'm gonna do
the background. For the background, I'm going
to pick a different brush. I'm going to pick the oil
depth one, this brush. I want to pick a
different column. And that is that first
color on the third row. That's blueish. It's still blue, pretty
much darker blue color. And I'm going to
paint the background. Now, if I'm going to paint it just lets me put that on large. We can show them on
the right layer. And if I'm going to
paint like this, you see what happens. The whole deer and the
trees get that same color. I don't want that. I don't want to spend
erasing all the time. So I'm just going to paint
that in really nicely. Not that big. There we go. If I go under the dark part
of the tree, I don't mind, but I don't want to go under
the highlight of the tree. I want to make sure I'm
not painting on my snow. There you go. There you go. And the rest. That
is okay, good. That is what I'm gonna
do with all of these. I'm just going to fill
in all these parts. And then once I'm done
with that, I'll be back. Yeah. I'm gonna speak that
part up because that is obvious what I'm
gonna do. All right. I'm speeding this part up to That's my background. Let me hide my sketch for a moment and let's
see how it looks. It looks pretty
nice, it doesn't it? Let's see here some whites. Let's make sure we go. They're a little bit just correcting a little
bit of my mistakes here a little bit carefully
down that I'm not messing up my whites, whites know my highlights
here a little bit under it to very lightly. I don't want to have
these white parts, although later on we can correct that though with the paint we're going
to put over it. But for the rest, I'm pretty happy with
this little bit here. Indefinitely. Little bit there too. There we go. Now, that's what my
painting so far. It looks like now leaving that background quite
rough as it is. And you now already can see the nice contrast between
the background to really back the trees and the trees in front and
a little bit of the deer. Now when we're going to paint in the rest and gift these
different colors, the DA will stand out
more than it does now. Of course, as you can see, of course now the snow already, pretty much without even
painting anything of snow, we really cut that
hint of snow already. Okay, well, that's
it for this lesson. We've got our background ready. In the next lesson, we're going to paint that
they're created really nicely. Make it a nice day
with nice colors, give him his eyes, and so on. Just create a beautiful stack. All right, I'll see you
in the next lesson.
4. Painting the Deer: Ready for the next lesson? Well, I am, so let's get
right into this lesson. We're going to paint the deer. Now, what we're doing, we're creating an
illustration or a painting, painted illustration,
illustrator for the paint. However you want to say that I'm going to go super accurate. We don't want to have
a realistic while, we do want to have a
semi realistic scene, but it isn't illustration. You leave some 2D imagination. You don't fill in every detail. Just got to be a
nice representation of the snow in the forest. All right, but we're
gonna work on a dare. For that. We're going to a
new layer and we're going to do that above
the underpainting. The underpainting is under it. So we're going to
paint above it. We're going to do go to layers, add a new layer. I'm gonna give this a new name. I think we're on number
five. Yes, we are. Five would be simply the
dare stack or the book, whatever you want to call it. We're going to paint this dear. We're going to start
with the body duty is do the answers. Let's see. What we're gonna do
is we're going to stay with that round brush. We're going to go back
to the round brush, the paint round brush. I've kept that one. The color. What do we need? We're going to work
with two colors. We're going to work with a
light column and a dark color. Those colors, we've used
these first three color, the deer, the ear,
and the endless. We're going to use
this color first, sort of fourth column,
lighter brown. And then we're going
to add a dark brown, more to which the
umber kind of color. But we're gonna start
with this brown. We're just going to
paint the deer again, but we're going to make sure we keep the highlights a
little bit where we want them. The first thing I'm gonna do is bring back the sketch so I can really see what I'm gonna do and we'll start
with the head. Let's see, I'm going to
go through about 5%. And I want to start
at this side, press quite hard here, and then ease of the pressure
and paint this in nicely. It creates those tones
as I'm doing here. Now you get already right away. You can see this idea, light to dark, lighter
here, darker down. Around here, it's pretty dark. So I'm going to
blend that in dark. The top part here, little bit less dark under here. I want some color
but not too dark. And later on we're going to fill that in with different colors. I'm just painting this part in. I might go slightly larger
for this part, about 8%. Pressing a bit harder around
their blending it in nicely. I get this nice deep color that stands out from the rest and then they'll
stand down, doesn't it? Let's see. Careful with
that big brush around here. I'm gonna do the
back first here. That is nice and dark. And then when I'm getting away from tree to tree will cost, of course, its shadow onto
the deer. Around here. I'm gonna go the pressure riddle with might go darker here. Later on I'm gonna worry about adding these
highlights now, not the highlights, but
adding these shadow parts. You can go quite
rough with this. I want to smear it
out a little bit to get a nice blends,
a nice texture. We're gonna go for 4%. Want to go paint down here, slightly darker there. Around the edge, a little bit. There. I want to do
dislike to the two legs. Here we go. That's that first part now. A little bit more
in his neck there. See, I've got some white there. Want to get rid of that? Alright, his ears. I'm going to do
basically the same. I'm going to touch
this part and I'm going to try not to
touch the other part, but this painting in a little
bit of that same color, but not really pressing
hot, just like that. Get a little hint of brown
in it here to spreading it nicely out. There you go. Okay, so that's the first layer
of my color on the day or the next thing we're
gonna do is I'm going to mix in the dark color. We're going to mix in a
second color with the team. And for that, we're going
to pick that fifth color. That brown to which the gray, we're going to change
brushes to oil, gosh, I want to set it
to, what is it done? 14, Thirteen, 14%. That's nice. I'm going to just add some
spots here and there. And do this really roughly. Create a little bit
of the texture in the Deir with the darker parts where it is dare
to, on the hair. On the hair too a little bit. Maybe around this
leg a little bit. Just create some interesting
texture with this color. I'm gonna do that with the
ears to smaller to around 5%. A little bit at
the darker parts. And a little bit there too. With this same brush, we're going back to
that fourth color. At first color I put on there. Well, not the light
color, but the brown. And I'm going to just need
a bigger against 14, 15%. And I'm going to do that, mixed it in a little bit nicer, and create a little bit of
texture here and there you go. Alright? Now I've gone outside of the, there you go, that's better. Okay. I'm gonna
leave it like this. I'm going to go for
the next thing. I'm going to add some
of the light colors. Notice deer has some light
paths around the tail there, there, around the
tip of his two. And around here is
light and around his mouth there's some lighter
parts to you in his eyes. I'm going to bring those in. I might just use the same brush. I'm gonna pick that
lightest color first. Later on we're gonna
work with white, but for now, let's
pick this color 7%. And I'm going to add
that not as too big. Let's go for 5, 4%. That's good. We're going to add that
light color there. I want to add that
light color here and around his mouth there. And around his eyes. I want that color to there to there. Around the
bottom of the tail to. The next thing we're gonna
do is we're going to work on these atlas, the stack horns. Let's do that. I'm going
back to the round brush, I need some control. This dish is nice, gives me a light texture, but not really much control. So I'm going back
to the round brush. I'm going to use that same
darker color. I used. The deer. Want to make sure
this is two per cent. Yeah, that is good and I'm
going to add in let's do big, Let's go to the
one-percent for this one. I'm gonna go at
the dark side and then I'm gonna submit
it into the light side. There you go. Here too. At the bottom. Smeared it in nicely to get that nice color
blended in a little bit. Her2 might do that around here. And let us do that. Ground here to the bottom. Smear it out a little bit. Let's go with
stronger there too. All right, that's looking
nice now we need it here to create a nice
transition there. This needs to be darker. This is part of the hormone that goes
in front of the rest. But still want a little bit
of color more right there. But this, I want to be darker. We go blend that a little bit. Nice thing about these brushes. The pressure, and you can blend in really nicely, press hard. You get a nice color. All right, I want this edge
to be slightly stronger. Later on we're going to
add a really dark color to be most of it. Let's see a little bit
around here still. All right. I'm happy with this. Well,
we're getting there. We're almost done. We're gonna do next
is we're going to add the shadow parts and
we're going to add those really white parts around his eyes and where
the tail parts are. We gonna do that now? Now normally what you would do for the darker parts
and the highlights, you would add another layer. I can multiply layer
for shadows and overlay or one of these light layers for the Lightboard, we're
not gonna do that. We're simulating oil painting without adding all these tricks. Now we're working in layers. That's what you do
with all play into. You put down a layer, you wait till it's
dry and then you can put in a nice layer above it and it doesn't
influence the layer below it. With watercolor, that's
a different matter. If you put down a layer, put it on the next layer, that will influence,
but with oil paints, because it's dry, it
will not do that. So we're making use of
the layer principle, but we're not using tricks you would normally
use in Procreate. We have to paint in dark parts. All right, now with this
one, What's your painting? So the paint is not right. We can nicely blend
in a dark color. What we're gonna do for that is, we're gonna go back to
that all your dish. We're going to pick
that really dark brown almost at the
end, not that one. This one is really, really dark, but we're not
using this one. I think today. We're going to add some
really dark parts. Now let's see how large
is the brush for 5%. Nice. Now let's
see. Around here. Here would be definitely
some shadows. So we're painting some shadow. And now we're blending it in by easing of the pressure nicely. I wanted there to look at now you get some nice dark
parts right away. I wanted a little bit
here too, not too much. Around here, the tail behind it till I want
it to be darker. This is darker. But then I want to blend it in with the rest of easing
of the pressure. To get this nice transition, I'm going to do the
same here to this dark. But then blend it in really
nicely with the rest down here to blend in nicely. Again, I'm not worrying if I
skip some parts like here, I skipped the part that just creates a nice tone
and a nice texture. I'm not worrying
about that too much. Blending this in a little
bit more. There you go. Now round here. Back part. I do. That's a little bit blended in. I don't like this plot
blended in a little bit more. Now, what a tree is gonna be? A dark line and
honest select two. And I'm just blending
it in with the rest. Now I might get a bigger
brush for this one. Let's go to 10%. Then the blends in
nicer down we go. Alright, and add some more. Stronger. There you go. Now you get this nice DRC
with nice dark parts. This part will be pretty dark. But up there it will be a
lot less dark here too. Now let's go back to
the smaller brush, 4%, 3, 4% percent. To do it right there. Now, there's a lag behind it. Let's add that leg
to it like that. Now you get two different legs. We're going to add a little
bit more shadow there. All right, I want some shadow
around this, his color. And let's add blend in a little bit shadow,
color, nuance there. To get some interest. That's blend this in. A little bit nicer to. There you go, you get
a bit of a color idea. I might do that here too. And definitely back of his neck. Blend this in a
little bit nicer. I want the darker color, slightly here to there you go. That's looking nice, doesn't it? Now around his mouth. Might want to add just a
little bit of a darker tone. There is, ear is not as high. And I want some little bit there around this
part of his eye, not too much. There you go. Let's see. I want this part to be slightly
darker and around here, I want some dark tones to, now we're getting a nice blend. Now. I think this is too light, so I'm very lightly
adding some color here. Let's see how this looks good, doesn't it? Little bit here. It's randomly. Go down, might go some good. Alright, now his
ears, Let's see. Little bit. That's too big. We're going for this brush, but I'm going to 2% this part. I want some shadow there. And I want some shadow there, but makes sure I blend in
nicely here to around there. And I want some here.
And around there. That's nice since
I'm on that I'm going all the way down to 1%. I'm going to add a little bit of a line down here too to make this really stand out from
the rest shadow line, just a little bit of a
shadow line that will help the endless stand
out really nicely. Then you go around here
to add a darker color, a little bit. Blended in, nicer. Good. There too. All right, some small random strokes here, and let's not do it here. Let's keep it like this. Alright, that's that,
that's the dark part. Now the next thing I'm gonna do, we're gonna go to that
white color here. With the same brush, bit larger CO2 above 3%. I'm going to add the white
and where I wanted y to be. I want this to be more white
but not really wide, wide. So that is why I'm
blending that color. Led light brown
that is under it, adding some white
and then mixing that in to get that nice color. I'm not getting white, white, but I'm still getting
a light color. That's what we're gonna do that around the ice
to a little bit. Around here to there you go. That is nice, same
around the tail. Mixing in a little bit of white to make it a
white-tailed deer. Now we've got the species, but it's not really
species, is it? Good? What I'm gonna do here? I'm going to add just
a little bit around here to get this a
little bit more playful. Adding too much just
some white spots here and there to make
it more interesting. Now let's hide that sketch. Look at the Deir and
say Look at that. That looks nice except for this. This doesn't really
look really nice. Blend this in a
little bit better. Blend this in a little
bit better too. There you go. We need to add the eyes and the nose
to get some more definition. But this looks pretty nice,
nice illustrated painting. We're stopping here
in this lesson. Next lesson, I'm going
to add a little bit of definition to the d. And then we're gonna
add this ice and a nose and do something on the AS2. We welcome that. Alright, do that in
the next lesson. If you haven't done this, then create the deer. Once you've done with the dear, I'll see you in the next lesson.
5. Eyes, Ears, Nose and Mouth: Welcome to the next lesson. We're going to work on the ice. Denotes the DEA needs a little bit of a mouth to
of course, for the air. If he doesn't have a mouth
can't eat in the winter, that's not good for them. But first we're going to add
a little bit more definition to the deer itself. And then we're
gonna work on that. I own those eyes and the rest. All right, Let's start. Alright, we're gonna do a
little bit around here. Go into debts. First color again. This one not the first, not that light, but
the first color here. And I'm going to add in here
a little bit with debts. Steel cup, the dash, we've set it, set it on 2%. I want a little bit off halfs around here. Just a little bit hint
off around the back to just a little hint off, not something that is accurate. So as you can see
it, I got rather quick but more a hint off hairs here to a little bit more. Get that to a little bit nicer. All right, There we go. Do that around here
a little bit too. But just very lightly,
fairly roughly. I'm not going to do anymore. What I want to do is going back to that really dark color. I want to add a little
bit of a line here. Still want to do the same here. Slightly darker, the pec off. And I want that too. Now that is much better. Now I like it a lot better. Do that around there
too, a little bit. We want to dope. Let's see. Under here, I want to add a
little bit of that shape. Let's bring back
that sketch, right? And little bit of that
head shape Back again. Make that more clear where that goes and
whether it doesn't go. I do that here too. There you go. Let's see. That is a little bit better, a little bit shadow in here. I want a little bit there. Let's hide the sketch, right, That's better Now we're getting the shape of the
head a lot better. I don't like the part here. I'm going back to
the original Cola, that light's going to just
blend in a little bit there. Some highlights just
a little bit here, around here at the sketch.
Now that's better. Now we're getting a little
bit for better shape. All right. Well,
we've got that there, that there is staring
into nothing. So let's add the ice. Let's bring back the sketch. And for that we're going to do a new layer because I don't want that color to
mix in with the rest. So now we're pretending that
the other layers are dry. I'm going to rename
that will be layer six and then I'm going to call
that simply ice and the rest, just saving myself some typing. Alright, for that,
we're going to use a round brush because
I wanted to begin, I want some control. I don't want this to be a mess. I'm picking a round brush. 2%, no, one to 2%. Let's keep it on one per cent wouldn't need that
black color now, yes, we are going to
use the black color. I said we might not use it, but we are going to use it. I'm just going to paint
this in a little bit. And then in the middle
and we're gonna do stronger so around it. Grayish. And then in the middle
of the pupil itself, I'm going to add dark color. Doing the same. Kind of
add black in the middle. Going to create that. I now see, there you
go. That looks better. Here. We're going to do a little bit
of shadow around here too. And on the bottom two, we're going to do exactly
the same around here. I might create a little bit of a blank spots there in
the middle here too, that you go, going
back to that 1%, let's do the mouth. I'm not gonna do to
mouth like this much. Drawing in the mouth. Think I'm going to
keep it like that. Co2, 2%. And I'm going to
draw in them nos. I want them to be nice
and dark. There we go. All right, Let's check. That is nice. Look now
we are having a deer. Definitely a lot better. Let's go to 1% and make the top of the nose nicer
than what it is here. And make denotes a bit wider. Rounder day you go. Let's check these ice raw. Think we're okay with that. All right. There you go. That's how we finish out there. Let's finish it yet, Let's do it a little bit. Now let's pick the white. Go to denote. Want some highlights. Mixing in a little bit of white. They're mixing it up
again day you go rounds. Mix it in nicely
highlighted part. And I'm going to
make some little bit of highlights in the eyes
to make them lightly. There you go. Just do that. Bit more here. Two nice mouth. Let me correct that
mouth a little bit. Make them wide, larger, free percent, and add
definitely some white. Some of these parts day you go to is nice and
white. That's good. Except for 2% here, some light. Really at the bottom of
the tube, some more white. Now or having a nice deal, I'm going to stop
with this deer. My dear is nice, so I'm not
gonna touch it anymore. All right. When you like something, just don't touch it anymore. Or what you can do. If you still want to
experiment with something, you just add a layer above
it, start experimenting. If it all goes wrong. Often lost, you just delete
that layer, erase it, and start over again or just
abandoned the experiment. All right, That's it. At least that's it for today. Of course, we're going
to work on those trees. We'll do that in
the next lesson.
6. The Trees: Welcome back. We're gonna work on the trees. Let's start with the front trees first and then do the
trees in the back. But we're doing the front, reach to the front trees
needs some attention. But we don't want
to make them too to details so that they
take away from the deer, were bringing a nuance between those front
trees and the D. Alright, let's give
that a try now. For that we're gonna need, of course, a new layer. We're gonna do that layer above the trees on the
painting obviously. And I'm going to rename that, that will be later number seven, I'm just gonna call
that front trees. There it is, right? If you added our new layer and let's see what
shall we start? Let's start with this one here. What we're gonna do
is we're going to use a flat brush for this and that creates some
nice texture in it. So the oil paint flat
brush, that one. We're going to start
with a light brown and then put a dark
brown on top of it. Some, add some details. So let's start with
that light brown. Let's go to the,
not to the brushes. Let's go to the palate.
This is the trees. We've used these three, so the light prime Brown
would be this color. Let's see how largest mine, 2%, I can tell you
that is too small. I wanted a larger. And let's see, we've got 6% now. I could do six per
cent, definitely. All right, good. I'm going to start
with this one. Now. We're going to paint in
this color and I'm gonna do this nice and rough. But I'm going to make
sure that of course, I'm keeping my snow. I'm gonna make my strokes and then blend this in a little bit. There we go. And I want this
highlights to stay there. I'm gonna do it
like this and this. I want to be nice stroke to more angled under the
angle going with the tree. Creating those strokes,
that would be that one. I'm going to do the same
on the street to the back. I'm going to add
stock strong strokes. And then what I'm
going to the front, I'm going to paint it in nicely, blend it in nicely. Now at the bottom, I want
definitely some more to get a nice definition of
the Tracy and that works nice here to some strong colors. Then blending it in nicely might keep some of that highlighted color here too. You can do this quite roughly because then the tree
gets really nice bark. We're going to add detail. But we're gonna, I'm
gonna just leave my tree except for here. Basically nicely like
that. There you go. I might just make sure
I'll add some strokes, nice long strokes there. Alright, I'm gonna do this tree. This is the easy one. Those strokes ready? Now, I want to ease
off my pressure. Blending those strokes. Landed in there a
little bit too. As the same as swifter there. If you're happy, you're happy with it. And I'm
happy with this. I just don't want to do much
on this because I wanted to steer to get the
most of the attention. But I still want some nice
tree and we're going to bring in some definition
with a darker color. For sure. Here. This needs
that dark color too. Easy enough right there. I want to make sure I've got
the dark color right here to want to keep that
highlighted color behind it. Now I'm going to just
bring those strokes straight again
with long strokes. Having any pressure. Like there we go. I need some here too. Definitely. I did etch here. Long, nice long strokes to create that bark effects, right? I like that. Now. I need
some more around this edge. Definitely. There we go. Now I like that. That
will be my first step. Let's see what I want here. Probably slightly
darker. This one. There you go. I like that a little bit better. Make it a bit more interesting. So it wouldn't be
the first step, the second step we're gonna do, we're gonna go to that three
dark color, that dark brown. We're going to use
the same brush. What are we going
to lower it? 2%? Let's give it a try. Now want
to bring in some details. With details, what I mean is simply demonstrated
on this tree again. Now, the first thing I want, of course, is where the snow is. A little bit of darker
brown here too. We're going to add some shadow to it later on,
but there you go. And you can see that the snow is really starting to come out. With this one we're gonna
do is you're going to add some random strokes like this and create just some
definition in the tree. Good. Gonna do the same
right here on the back, adding it really dark color and then getting some definition. And I could go with 1% to
even get some thinner lines. What I'm liking it like this, I'm doing a stroke and
then I'm easing of the pressure and blend it
in a little bit better. Very simple way. To create some bark. Get the idea of a buck. You don't need to paint. Every piece of bark,
every little shadow, every little piece you can
see here works really well. You get the idea that has
some nice bark going on. Now this one is upfront. So what I'm gonna
do with this one, I'm going to do it
a little bit more and get rid of these
spots at the ends, blending them in a little bit. Let that one go all the way up. Another one going
all the way up. Get rid of those. Now that is much nicer. Get rid of those points. Okay? This one is nice,
this one is nice. Let me do this one. Same principle. We're going to add some
dark color at the Edge. By adding the dark
color at the edge, you get the idea also that
the tree has some shape. It's not straight anymore, but it has some rounded forms. Going to again, some of that
definition in the book. Strokes. All right. I think I'll leave it like that. Don't want to go around an edge. So I'm adding some more here. Nice. I'm gonna do
the same right here. Let it snow, make
it slightly darker. Really simple. There we go. Good enough. Let's do a few small ones. Oddly pressing here, adding
some really small ones. Stay, you go under, I don't like this one.
I like it better. Now the BOC has the trees
get some bark like this. The attention states
on the deer also because of the slightly
darker color that is used. So we get some nice contrast. Now we need to do
the back trees. I want them to be
slightly darker. Get a little bit
of definition to. I don't want to leave
them rough like this. So let's do those trees too. We're going to add a new layer. That of course goes under the
underpainting of the trees. No, not under on top of it. I'm adding a new layer saying plus there,
I'm renaming it. What am I on? On number eight? Yes. I'm calling that the factories. There you go. That
is under the rest. So under the deer,
under these trees, but still need to pay attention what I'm doing. I
want to do the same. I'm going to use the same brush, the same flat brush. I'm gonna do the vectors, but as you probably notice. It's getting dark here. That's because it actually
started to snow here. Not much. Just a light snow. It's going to stay
like in this picture, but it is like a little bit
of wet snow coming down. And I even see
people passing by, the rain coats and
everything on. You notice that two probably in the video of slightly darker. I think I've adjusted
the light enough so that we can continue.
Let's do that. Okay, So we're going
to do, do back trees. Now, we've added that new layer. We're going to use exactly
the same flat brush. We're going to use
the same colors too. We're gonna go for
that light color first and paint in a
little bit of these trees. I'm going to start right here. I might need a
little bit of a 4%, and we're gonna do that lightly. I'm not pressing
hard with this one. I want to have that color
blending in a little bit. Just want this tree to have a little bit more
color than it has now. There you go. I like that. With this tree. I want the color
to lightly in it. I wanted to make sure that that base color is
still in there. Bottom color, and
I'll make sure I'm not gonna go over my snow. Alright, what I'm gonna do, I'm gonna do these two trees. This tree here demonstrated
this tree and the rest. Of course I'm going
to speed up again. All right. I've
got this trip now. Yes. I'm like, that
is the eraser. I don't want that. All right. Let me adjust that some very lightly
adding this color in. Want to make sure I keep
some of that highlight too, but blended in a
little bit more. Now I'm going to the
darker color again. And on the back, I'm
going to add some of that darker color here at
the bottom a little bit. Then at the back a little bit. To get some definition
in the trees. There you go. And add some random
strokes here and there. And that's all I'm gonna
do with this tree. This tree here on front. I'm keeping the color it is, but the back tree. I'm going to add that
dark, nice color. Later on we're going to create shadow line to make sure you really see that this
is a different tree. Get my eraser back again. Okay. That's it. And I'm gonna do that basically
with all of these trees, but I'm gonna speed
that process up. I'll see you back when
I'm done with this. Pretty much done. Like this part here. Same here. Definition of the tree here too. All right, good. Now I've got these nice three. So we've got some nice
trees in the back, some nice trees in the front. And I cut this dear
standing out nicely. We're going to work some more
on this in the next lesson. In the next lesson
we're going to add the final touch you
students painting snow at some of the darker
shadow to it to in the hole. And then finish this
painting together. Alright, I will see you
in the next lesson.
7. Adding the final Details: This is gonna be
the last lesson. We're going to add
our final details. We're going to look a
little bit on the snow, add some snow to it, and we're going to
add some shadow, brings some darker parts in it. Little bit more definition, simulating more of the
light shadow effect and then completing
this painting. All right, let's start. Or should I say, that's finish? We've got this now I'm
pretty happy with all of it. It looks quite nice,
nice illustration. I just wanted to work
on that snow for that we're going to have
a layer above everything. And I'm going to call that layer surprisingly snow of course. Let's call it 88
will be the snow. What I'm gonna do for
that, I'm going to opt traditionally pick
that white color. Now most of us know
is there already. And only we need some definition later on here we do that with shadow because we're not actually really
painting the snow. But let's pick the oldest brush. Let's see, I want this
one or that one for that. I've got the white color. I got a layer on top
of it and I want to have some snowflakes
falling down, but I also want to work a
little bit on the edges of the snow and make them
slightly more nice. I like this here. I
wasn't going to do. Let me see it is unfree percent. Let's see if that
is good for this. What I'm gonna do
first, a little bit, these edges away, some
of the mistakes I made. Now at the bottom here. I want this to go a bit further. And now it starts to look nicely like snow at the
bottoms of these trees. I want that snow effect too. And I might just go a
little bit launch if 5% and just add just a little
bit of an edge of snow. That looks just a
bit more natural. My pileup some snow. Careful at the deer layer under it so that this
line that I have, that obvious line goes away. Piling it up right there to see. And now you get that
nice snow effect. Piling it up a
little bit here too. Just a little there. And now it looks way more
natural, except for here. We're doing that
at the Deir stew. Right now he's very much
standing in the snow. And I want to do that on
this tree to this tree, I want to do few things. Let's add that snow first. Let's have that snow
piling up slightly more. There we go. What I want I want some snow actually
on the street. Like that, maybe a
little bit around here. There we go. Now we get a more
natural look on the fade this out a little bit. Let's add the ash
of snow here too. Good. There, just a little bit. This is pretty okay. I would say strongly.
There you go. Now that's the snow. I'm happy with that.
Happy with this. We're gonna leave it like this. Next thing we're gonna
do under the snow, we're going to add a layer of shadow and I'm going to call that shadowed and of course,
number nine, shadow. I'm going to stick
to the same brushes, should have picked
another brush. Now I'm going to go for the
dash brush, for the shadows. I'm going to use the dash brush. And I want this color, the last color on
the bottom row, that is a nice
indigo like color. And I want to add
some shadow here. I'm going to stop right here. Let's see, it is on, probably wanted on 2%. What I'm gonna do
under the snow, that's too small,
Let's go for 4%. That's better. I'm going to add
some shadow here. Faded out nicely. There you go. I'm going to start with that. We're gonna do the same here
on the street. Snow here. I'm just going to add a
little bit of shadow. I'll make this bigger.
Let's go for 7%. Let's add some shadow
for the tree to. That's good, right? While I'm on, I'm gonna
do this snow here. Going back to that 4%, adding a layer of shadow, but making sure fading
it out a little bit. There you go. Now you get
that nice snow effect C, not doing it under snow, really doing it under
the snow in this case. I've cut that. No parts. Let's go for the deer. I want the two. I'm going
to about five per cent. Now bigger, Let's go
for 78, 8% percent. Painting in a little
bit of shadow here. Make sure you faded out. Shadow on this part of the leg. Now do this casting
a nice shadow. I want to do the same here. I want some shadow
of easily there. All right, I won't this tree here have some more
shut-out around the bottom and also a little
bit around the back here. But I'm not pressing too hard. So I don't want it to same
strength S on the deer. Here in the day of the back leg. I'm going to add
that shadow too. And might do a little bit here. Just a hint there. That's too much of a hint. Let's remove that right now. Do I want that here? Perhaps a little bit. I want to sum in the
ODE That's too much. I got to lower
this brush. Go 4%. I want a little bit
in the ear here. I want someone, this
handler on the bottom. I want some on the end here too. Let's see where do
I want some more? I want some on the face here. Let's go for the
back here first. Make sure this is nicely
blended in with the rest. And add a little bit
of shadow there too. Now I want some on
this side of the face. Now we're getting some
depth to nice depth. Let's do some on this back
leg here that you indeed, the idea There's
a leg back there. What will only do
the street too? We're adding a
shadow line, right? That make a nice definition between dose to
transitioning it. And now you have that idea, front and back three, alright. Theoretically you
could do a little bit snow, snow shadow, I mean, around here we're
going to add snow in a minute. Bec trees, they can use that. Sure. You can see, I'm
not really worried about being accurate or not. I want that to be dark or too, that's part of the tree. Here to here too. I want them there.
And even there. Good. Now let's make it
larger again, 9%. I'm going to do District paint, some shadow on it. Going to do no, that's no good. The same with
distri right there. Making sure it's not
coming, becoming too dark. So we'll will take
away the snow effects. All right, and just
want a little bit more. I think that is quite a
nice except for this one. As add some shadow
on this one too, to enhance the light effect
we have here. Let's do much. Bring it back. Nice, Good. There you go. We're almost done. We need some snow, but we also need some
shadow on the floor, on the ground to make sure this is starting to look
like snow on the ground. Let's do that. Snow on the ground. We need that because
now it's looking like one big white thing and it is not 1 third of fish
least some shadow. Let's see what do I have here? Let's go for 7%, same brush. Now, the light comes from here. So the D would be
casting obviously some shadow and I'm
just going to paint some lines in like this. Under this shadow, the tree
HER2, around here too. There you go. And now see that
already improves that whole bit right away. Let's do just a little bit of random strokes here and there you go. Now it definitely looks like snow see a little bit of touch. That improves the whole
thing right away. Might darken this where the
actual deer is a little bit. And to strengthen that
a little bit more, may want to have some
dark on the hair too. There we go. Now, that looks
a lot better right away. Okay. Now we just need snow, so we're going to go
back to the snow. We're going to use the same
pitch brush should we use? Going back to the
old depth brush? First of all, we're gonna
go back to the white, going to the oil depth
brush we've used. Let me see how large is it? I wanted to, I guess 2%. Let's give it a try. I want some snow falling
and there you go. Yes. Right. Press slider, press harder. That is not right. Let's go for free percent. For even that's
check for is good. We're having some snow falling. Just make sure you keep
this a little bit random. We go. That looks nice, doesn't it? Just a little bit more. Now some big flakes. And we go on here a little bit. Yes, we should have some here to get the idea snow is
falling and we need some. That tree hopefully forgot that. Happy, happy. I'm happy with it. I'm very happy with it. One thing, the last thing I
want to change his handler, I'm going back to
the shadow layer, going back to that shadow color, going to the round
brush, I would say, make it a smallest possible
and add a little bit of a shadow line right here too. Around this edge. Going up here, but also adding
shadow line there. Fading this one
out a little bit. There we go. I think
that is a lot better. I'm gonna do that
for the ear to hear. A little bit of a
shadow also inside the air to bring just a
little bit of like it. They're not that one. Don't want it needs
to go right under it. There you go. That too much. That's too much. Let's
remove that one. Let's not do that. Wait, studies. I got to blend it in proline. Get the brush back
larger, carefully, right? Blended away. Here to blending it in. That's fine, That's better. All right. I think I might
just leave it like this. Happy with a line there. That's it. We're gonna stop. We're going to
leave it like this. Alright. We're done painting. One more thing left,
that is the project. And I'll explain about
that in the next lesson. I'll see you in the last lesson. Lesson just discussing
the project. See you then.
8. The Project: Welcome to the last
video, the projects, it's not really lesson,
but the projects, what we're gonna do
for the project. Well, I would say paint
this illustration. If you want a real challenge, instead of using my sketch, you could do your own
sketch of the deer. Even the difference
there if you wanted to, are used to want to supply. And then start painting of
this, follow the steps. But make sure you're not using the tricks we can
use for the snow, you could use a
special snow brush. Just dividend in one go. No, just pretend we're
really painting with brushes as if we're traditional
painting on a digital device. That is the challenge.
Challenge, do that. No tricks. Just simply using the basics of procreate and create a
beautiful illustration with it. And as you can see, once you get a little bit the hang
of these techniques, you can create something really
pretty once you're done, post it so that we can all see it and enjoy what
you're creating. And thank you for being
with me in this class. You may want to follow
me because I'm posting more procreate class in the future and there are
already more in my profile. So checkout my profile does more to learn,
more oil painting, but also illustrating,
sketching, some various things you
can do in Procreate. Alright, thanks again, and I hope to see you in
another class of mine.
 Benjamin A, Art Teacher, illustrator Art by Benjamin