Transcripts
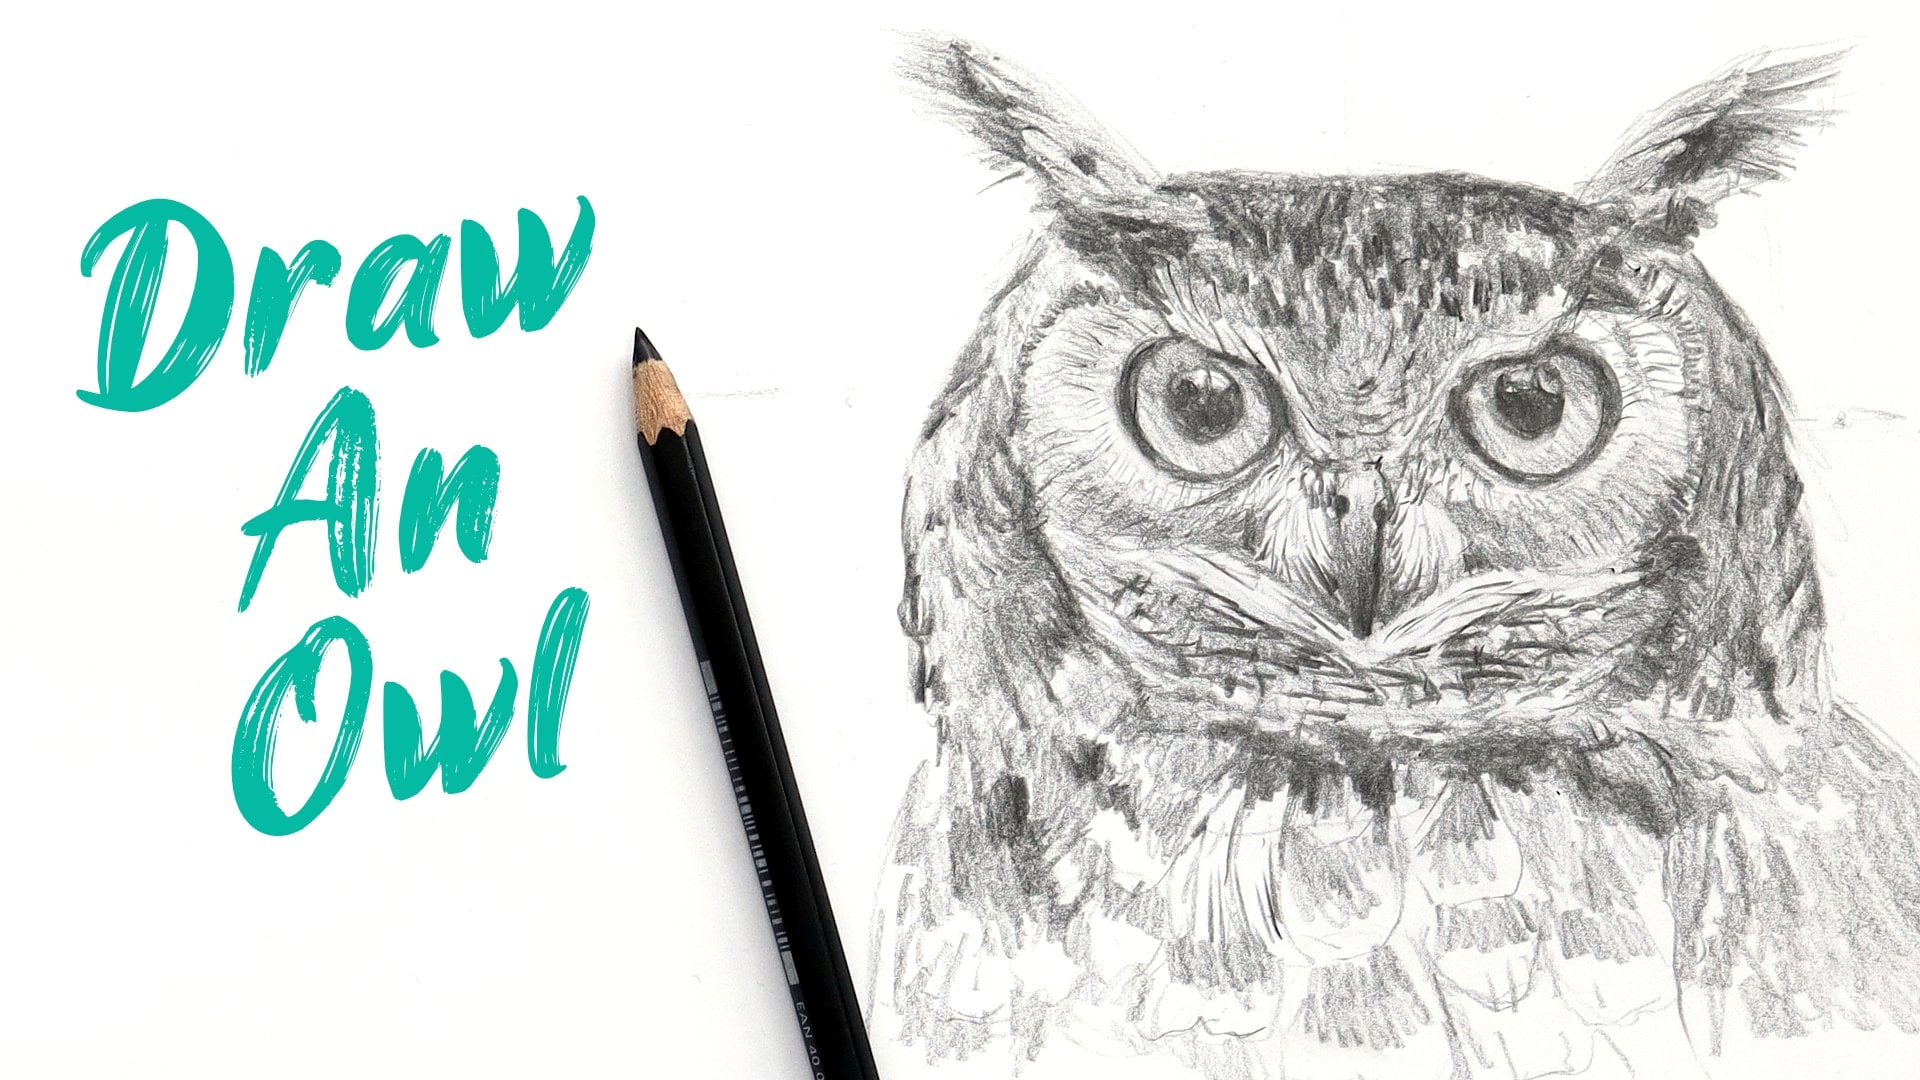
1. Introduction: Hi, I'm Emily from the
pizza room online. I'm an artist from
New Zealand and I teach online drawing class. In this lesson,
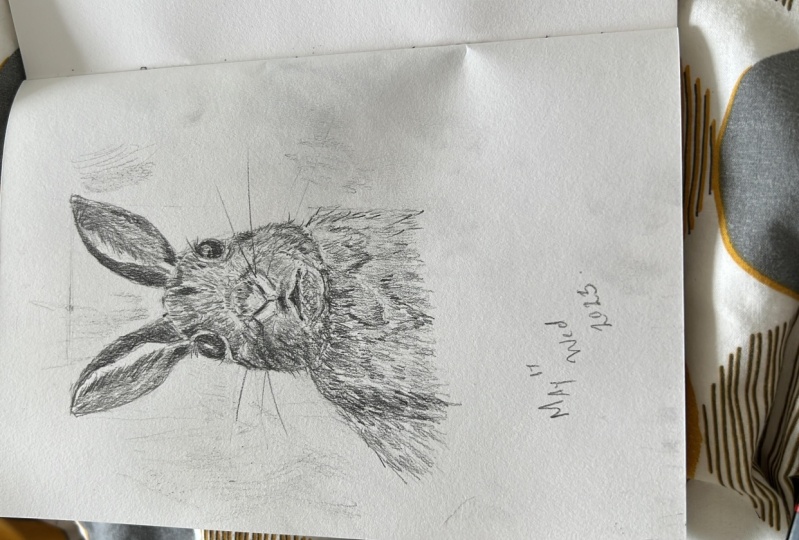
we're going to draw this little guy or girl. And we're going to
go back to some of the basic drawing
skills, focus on those. We're going to look at
finding simple shapes. We're going to look at measuring
proportions and shading. And when we come to
the shading stage, we're going to pay
particular attention to preserving white values. And we'll talk a
little bit more about that when we get to that stage. It's gonna be a fun
little drawing. So if you want to join
and go grab yourself a cup of tea and get
your sketchbook, and we'll get started.
2. Materials: These are the materials
I'm going to be using. You need an HB pencil just to start with
into sketch with. I'm using this one here. It's a little bit darker, but
it just means that you can see what I'm doing
on the screen. And then a to B pencil as well
when it comes to shading, this is a Tombow Mono pencil. These ones are quite dark
and soft, which I like. You need an eraser of some kind. I've just got a
patio erase it if you've got something like this, like a mono zero Tombow,
Mono Zero Eraser. And these are really good for just cleaning up any
of those white areas. Like I said, we're gonna be
focusing on preserving white. Trying to keep the white
area is nice and clean. Once we get to the shading
stage in or of course, you need to sketch book as well.
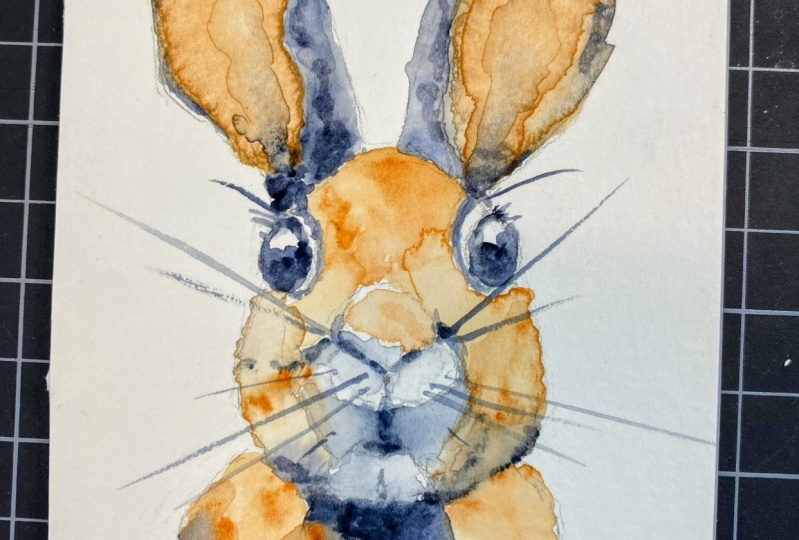
3. Finding Shapes & Proportions Before We Start: This is the photo that
we're going to be drawing. And I've got it here
in black and white. So this is what it
looks like in color, but it's always good to simplify things if we're drawing in black
and white anyway, drawing with pencil into black and white so we can
really see those white values. Now you see around
the nose of the here and around
the eyes as well. And then down the
right-hand side, there's some quite light areas compared to everywhere else. And that's what
we're going to make sure we have in our drawing. At the end. I'm going to divide
my page up into two. And I'll use this
side to show you some techniques and the
side to do the drawing. You can see it's about
the size of my hand. So this is an A4 size page. It's about I think
it's 8.5 by 11 ". I'm just doing half of it. So if you are doing
an A4 size page, then maybe just sort of
keep it in the center. Don't get too big. Just because I want this
to be a fun drawing. I don't want you to
spend hours on it. And we're also going to treat
this drawing as a sketch. So it's maybe going to
be a little bit looser than drawing that you would
spend a lot more time on. But I think that's nice. We can see, see how much we can get into this drawing in
a short amount of time. And use our max to create some energy and create some
texture and some food. But the very first thing
we're going to need to do is take a look at some
of the proportions. And I'll draw on
the screen here. Let's make it a
little bit bigger. We're going to focus on the
heat and we'll be looking specifically at this shape here. And then obviously the
ears as well as shapes. Then we can put in
some of the body, but we might not go
all the way down. And it's up to you how far you take this drawing afterwards. So if we have a look at those shapes that we've got there, and think about the
proportion and think about, think about the width
versus the height of their main shape of the face. So we draw a straight
line through here and try to find
the cross-section. It's probably about there, I think maybe a little
bit lower down actually. Right in the middle of the nose, I think, which is a
good thing to note. We think about this height
compared to this width. Even just looking at
it, we can see that the height is longer
than the width. Let's see if we can compare it. I'm going to take
their width again. And then just using the
magic of the iPad here, I'm going to spin it around. Can you see that it is just a little bit
shorter than the height, the width, and spinning it around to line up with
that height line. And you can see where
it comes up to. Now. It comes up to here. It's a tricky one
to measure light, to actually say of
it as four-fifths. Maybe it is four-fifths. But I'd just be aware that the width is shorter
than the height, but it's not a huge
amount shorter, it's just a little bit shorter. That's one thing we can measure. The other thing we can measure
for our proportion is we can compare the height of the face to where the
ears come up too. So we're looking
at this line here. And how does that compare
to the height of the face? And let's do the same thing. We're going to do all this
in our drawing in a moment. So don't worry if you're
getting a little bit confused. But what I just measured
there was this distance here. And you can see
compared to the length of the face is about three-quarters the
length of the face. So these are the
main things we're going to put it
into our drawing. We're going to put those
green simple shapes. And then we're gonna put
in some simple proportions measuring the width and
the height of the face. And then we'll compare
that to those ears. How high up those ears camp? It's about all we need to do for the proportion side of things.
4. Lets Start Drawing: Please get started
on our drawing before we even start
measuring the proportions. The first thing is to decide how big your drawing is going to be. And this might change,
but just to make sure you're gonna get
those ears on there, you're not going to
go off the top of the page would be a good idea to make a mark at the top we
want the ears to go to. And then a mark where you want the bottom of the head to go to. And remember what we
found that this length of the years was about three-quarters
length of the face. So we could even
just take a guess. He would be halfway. So if we take a guess at the top of the heat
is going to be and just make sure you've got
a bit of breathing room up here in case we need to take those
ears up a little bit further. Let's go heat input
in this simple shape. I always like to just put
in a sketch to start with. So I'm looking at it so slightly triangle shape at the top. And then it slightly
triangle shape here as well. And I can already see that
mine is way too skinny. I'm just going to adjust
it a little bit and then we'll do some
measurements and just check. It's bring those
measurements back up again. We've got the shape of the face there and you remember that the height and the width
across the center. So halfway down this line,
we're not too different. The width was, I guess about
four-fifths of the height. Width across the center. And here's the height. And I think mine's pretty good. I might just bring my head
down just a little bit. You can also just eyeball
that shape that I've drawn in green and compare
it to your drawing. So look at the photograph, look at your drawing,
look at your foot. Look at the photograph.
Look at your drawing. Try and get that, those proportions
that white just by simply comparing
with your eye. This is just a way to check. So I'm pretty happy with it. We can change this later. And also, if it's not
exactly accurate, we're drawing an animal. It could be that you end up
with a here that's a little bit chubby or a little
bit skinny in its okay, so let's put in the top
of the ears here where we think the top of the
ears is going to be and just cheap
those measurements. Remember that one there? You can see that the
top of the ears, it's about three-quarters
the length of the face. So if I take the
length of the face here and then just compare that. And I think that's
pretty much right. What I've got, maybe they could
actually come down just a little bit with three-quarters,
it's about halfway. Three-quarters might
be about, about here. The reason we're not using a
ruler to do this is because we wanted to be able to
make this drawing as big or as small as we want to. And I'm using a ruler
just sort of gets in the way sometimes makes
things a little bit confusing. You've got lots of
numbers to deal with. This way, we're just
dealing with widths and heights in comparing
them to each other. So I'm gonna make the
top of my ears there. You heard of that one? Next we're going to have a
look at some of the angles. You can see them there with the green line will
put in the ears. And we'll also check sum of the angles in
this face as well. And we can start to put
the features of the face.
5. Finding Angles: We're going to start putting
in some of the angles in, even for the curved
part of the face, this sort of rounded
cheeks and things we're going to put in angles in this because angles are
a lot easier for us to see into measure. And curves can get a
little bit out of hand. Sometimes we think of
things as being round. If you look at those
chubby cheeks, they look like
they're quite round, but there are some
angles in them. And if we just go ahead
and draw something round, you might end up
with bubbly cheeks, which is okay if
you're doing a cartoon or an illustration and you
want to exaggerate it. But these classes mostly on drawing realistically
or observation, not necessarily hyperreal or
some, or anything like that. But just being able to sketch
something fairly quickly from life or from a photograph and get something
that's quite accurate. So let's have a look
at the face and will get better and then
we'll put the ears. And so we've got
the general shape. Let's have a look at some of
the more specific angles. We've got. Angle here is pretty
much straight. This one here, they are
on a slight upturn. Then we've got this one. And then ignoring the eyes, we've got this one. On this side might
not be symmetrical. It's pretty similar, I
think that one in this one. And then when we get to
the top of the head here, you see that even
though I've drawn this, this shape is a
general shape and I've drawn the peak of
the head centered. It's actually a
little bit different. The angle on each
side is differences, that one and then this one, maybe a little one
across the top. Let's make sure
we've got this shape and obviously across the
bottom here as well. Also it looks a
bit like a curve. We're going to draw
it as a straight line across the bottom. Coming here. Here. As you do this, if you feel like your proportions
aren't quite right, go ahead and adjust
those as you draw. Sometimes when you're
actually drawing and looking at it a
length of an angle, you might, it might just feel like something
is not quite right. I think this one up here is slightly more
sloped. In this one. I'm still using just sketching
max in a very light. You could do the
line several times. I'm drawing quite dark so
you can see it better if you can try keep those as
light as possible. I can get rid of this simple
shape that we had down here. And let's start to
put in the ears now. So we've got those angles
of the head and we can mark along those angles where we think the
ears start and stop. So the one on this side starts here on one side and then
it comes up to about here. I'm looking for the smack. It looks so cool the
air in this one. And then on the other side, we can do the same thing. So it looking for this
one and this mark here. I'm going to bring that photo
up a little bit bigger. Now, there we go. So once
we've got these Macs in, then we can write on the
angle they're being. We can put in the
angles of the ears. And there's a couple of
things we can look for. We can look for the edge
angles. Let's put those in. Just looking for
anywhere I can see a straight line is a bit of a curve just as we
come up with top. But maybe here is
quite straight. And they're going
to the other side. Then very straight there. And then this one's
a little bit tricky is it's pretty
curved around here. That's kind of difficult
to draw straight lines. We can just leave that part. Maybe just look at the first, very first angles of
the curve like that. So we've got that
angle, but we could also think about, well, what's the general angle, almost like a cross-section
going through the ear. It might be the best thing to put into first
because in weekend, put everything else around it. Remember they coming up to here, up to that line that we put in? They are on the same
angle. They look like they're pretty much
on the same angle. One coming up via
look at its shape and between a V-shape, triangle shape, one
coming up here. And then one thing
we can check is if we draw a line from
here all the way down, straight in the same on the other side and
line all the way down. You see that they're quite
far outside the face. And I'm wondering if mine a little bit closer
now That's right. So if I draw a line
down from there and a line down from here. Key thing is just to make sure
they're outside the face. And the top of the
ears is coming to a point that lines up
outside the face here. And then we can start
to put these angles. And we can put in this
one here, in this one. And it's going to be useful
because we can look at that v-shape between them to switch your eye
to this shape. If you've printed the photo out, it's useful to have
it on the side here. And then you can just really
quickly flick your eye between the two little
bit like you would be doing if you're looking at the screen now flicking your eye between my drawing
and the photograph, and I'd recommend that rather than just drawing
off the screen. But if you don't have
any other option, we don't have a printer
or another screen to put precisely than just drawing up the screens completely fine. As long as you're practicing,
That's the main thing. I'm putting these
angles, I'm keeping them as straight lines. If you haven't done a
lot of sketching before, might feel strange. This is the one that's got
that very curved path. Put a net one and
that one in the end, I can bring this curve around. This one. I've got a little bit skinny. So something's gone
wrong either with this angle or maybe, maybe it's this angle. Look at that triangle
shape and near ones, okay. They can even look at the
triangle shape in here. It comes out a little bit more. Maybe I've just got
this one too high. I think I think I've got a
crooked line at along the top. That's making it a lot longer. Now is the time as
you're doing these, these angles and
measurements that to figure out what
needs to be changed, try not to just be
lazy and go, Oh, that'll do because
it's going to be much easier to change now
than it is later.
6. Drawing The Face: Okay, Let's put in some of the facial features and then we're gonna go to
the next stage, which is a sketching
and rounding off some of these really strong angles. If we bring back the
cross-section here, you can see the nose is
pretty much straight. Smith bang in the middle of that cross-section
that we had, make sure your cross-section does cross it the halfway point. It might have changed
a little bit as you were doing the
sketching in your angles. So this should be
halfway down the face, in halfway across the face. And then we can just start to lightly sketch in their nose. It's got a V shape down here. Again, angles, one angle
and another angle. We can look at
where the mouth is compared to the cross-section or take away the
lines in a moment, but we'll just put in
some markers here. Might be a little bit
low down actually, let's take away those lines just so we can see a little
bit more clearly. Now, we've got the nose and
it's got angled up the side, straight angles,
and then it's got that nice button
curve around the top. When we come to put in
these other features here, it's good to just take a measurement from
what we've already got. We've got from here to here. And then think about we
the bottom of the noses. And it's about from here to hear the
bottom of the nose should be halfway so much it actually be a
little bit bigger. And then we can have a look from the bottom of the nose
to the bottom of the chin. This a little bit like when
you do human faces as well. You see where the mouth is. It's about halfway to
from here to here. Halfway is going
to be the mouth. I'm just looking at
this nose and I'm looking at the
sides of the face, told you we were gonna do as much as we can at this
stage to get things right. We're looking at it
from every angle. And let's have a
look at the sides of the nose and then go out
to the sides of the face. You see those spaces. We've got space, space here. And then we've got
the nose and then we're going to space there. In the photograph, the spaces on either side
of the nose or smaller? Just slightly smaller
than the nose itself. Maybe the issue maybe they're pretty close
to being the same, but in my drawing, the spaces on the sides
here a little bit bigger. I need to make sure I've
got it even more like that. I think I
underestimated the size of the nose when I put it there. I mean, you could do all
these measurements first before you put it
in the features. But I kinda like to just
get something down. And then we've got
something to respond to it. Make sure you get those
straight lines there. Okay. And then we've got this
comes down to a bit, down to a little bit
of a point here. And then we've got the
mouth is going to go here. The angle's slightly different
on each side and I think this is C might be right. So if I put it in the
bottom of the mouth, two angles there. Yeah, that's probably
okay for the chin. I think there's a bit
of an angle here. And an angle here. It's going to come up to meet
the corner of the mouth. We've got the line going
from the nose to the mouth. We've got these white areas. So these white areas are quite important and we're going
to try and preserve them. What can I try and
keep them white? So take a good look at them and look at the angles.
Something like that. And then on the other side comes up to about
the midway point. Something like that. Now we can put in the eyes, now we've got
something that looks a little bit strange right now. Maybe it looks a little bit like a pig or some weird creature. Better, it's going
to come together when we put in the shading. So have a look at
the eyes and look at where they line up on
the side of the face. He's the bottom of the eye. Here's the top of the eye. We're just looking for the
black part on the other side, bottom of the eye. Top of the eye. And it looks like they pretty much line up with each other. But what we're going to
pay attention to as we're, they overlap with the
nose and the ears. This one here, she
comes up a little bit. In the bottom of it is in line
with the top of the nose. So this is where we've
got the nose wrong. Everything else. These
other measurements that we put in there
gonna be wrong as well. And I'm going to put it in
a straight angle there, comes straight down and
then it comes out that way. And same with the other side. Let's just line them
up on an angle here. Straight down. And then I'll just get
rid of those lines. You can see the angle at
the bottom of the i2. And then the eyeball itself actually comes out a little bit. And even though we
know that it's round, look at those strong angles. There is an angle
coming out this way. There's an angle
coming down this way. Then on this side, this
one is a bit rounded, but we can think about
the angle that the curves starts it and the
other end as well. And didn't care if it off. And we've got some
more white areas here. So let's put those in. Just putting in their
shape of white. Try to keep your lines light. And if you're watching someone
who's drawing quite dark, you might've started
drawing dark as well, but do try and keep
things as light as you can so that they're
easy to rub out. What else do we need to add? And we need to add
in the rest of the ears and then will
be pretty much done. And we can just soften off some of some of the corners
that we've got. This angle here and
on other side here. This is almost like a
bit of a nice curve. Maybe a very slight S-curve
on that side as well. But these angles
really important look at with a lineup with the eye. Should be on a bit of a slope and then little bit of an east. And then on this side, okay, and look at where it
lines up with the eye or maybe where it lines
up with the nose. If we draw a line straight down, lines up with the
side of the nose. So at this point, if
you found that there was something that wasn't
lining up, you know, you did this and
came way over here. Means that, you know,
is might be too big or something you've got to
make a decision about. Well, first of all,
can you change it? Do you want to change it? And what's the best
thing to change? So it could be that
you just shift your nose in a little bit
and it might make it a bit longer than it is
wide. It's not a big deal. If you've got your face
out of proportion, you've missed something in. You can see now that it's
way too long, way to fit. But you've got all these
really nice angles in here and you're happy
with all of those thin, maybe used to just go with it. So we don't want to be lazy. But we also don't want
this to be frustrating. And you can take some creative license
with your drawing too. We can call it artistic license. Creative license. Where as long as you're happy
with what you're doing, then that's the best thing. Even if you're not happy
with what you're doing. I'd encourage you to stick this out because
every drawing is a learning process and
sometimes you don't realize what you've
learned until after you've done the drawer. And you can also do
a drawing twice, you do it along with me, and then download the photograph and have a go at
doing it on your own. And you should have learnt something that's a little bit
like muscle memory as well. Once you've done something, once you've got a much clearer idea of how to do it and what
sort of max to make as well. I'm just getting rid of visa, these cross-sections and
the lines that I don't need, anything we've missed. We can put it on the sides of the body and it's pretty easy. There's an angle coming here. And then you can see it's
pretty close to the in line with the side of the face with a body comes
down on this side, maybe a slight slope here. On this side, it comes
out a little bit further and look at where
it lines up with the year. That shoulder comes out here and then maybe down
again and then out again. We could also bring
this line down here. Can you see that dark patch? But we'll do a bit more when we come to the shading stage.
7. Adding Natural Lines: Okay, so we're gonna do now is we are going to just round
off some of these marks. If you're happy
with your angles. Take a look at the photograph, change things if you need to. So looking at this
and just saying that this angle was slowed
down a little bit. So I can correct it. So I'm looking at
the photograph is I go around this drawing now. I'm not just sticking to my
lines that I put down first. If you do have
really dark lines, then before you do this stage, you could just erase
them a little bit. We've got those sharp corners. They're not going to disrupt
your drawing too much. We can put in these
nice curves here. Looking at the drawing and looking at the
photograph again. Trying to make
corrections as you go. And try not to think about
it too much at this stage, this is really
about observation. So you're looking,
you're drawing, you're looking, you're drawing. Try to keep looking
as much as you can. Your eye should be
flipping back and forth the whole time so
that your hand is essentially Recording
exactly what you see without you having to
think too much about it. I'm just creating that
mouth a little bit. It's got a bit of a point there. And I'm just going to take
another look at the nose. I think I didn't think it
was a little bit too wide, but I think what it might be, it just needs the
stronger angles. And here, and here I'm almost getting a
little bit rounded. It's rounded on the top. And that sort of brought the
sides and just a little bit.
8. Quick Review: I hope you're happy with your
drawing at this stage and we'll move on to shading
in just a moment. I'm pretty happy with mine. You could do a review
of mine if you want to. If we bring up this
photo gap graph again, just to have a look, flick
your eye between the two. That's really good.
Exercise to do is to look at someone else's
work and what can you see? That is not quite right. I can see a couple of things. So the main thing for me
that it stands out as I think I've made the ears
just a little bit too small. I've drawn this
side-by-side with the photograph so
I could even just draw a line across here. And I think these, when we get to this photograph, the ears are just
slightly above it. And draw a line
from here across. Maybe it said the four-year
does a little bit too high. Could come down
just a little bit. And the other thing I could
see is something here. Looks like it's not quite right. I think he's another
angle in there. So feel free to analyze my
drawing and then have a look, good look at your drawing before we move on to the next stage, you keep flicking your
eye back-and-forth. Go grab yourself a drink
or something or just hit the stretch and then come
back and hit Refresh luck. If you are happy with it, all
reasonably happy with it, then we'll move on. I know some artists,
including me, I can always see something
that can be improved. He could say that you never
happy with it, better. It's some point we've got to
move on to the next step.
9. Shading Technique: The next step is to
bring in some shading. We're going to look for some
shapes of light and dark. We've already found the light
areas, the white areas. And then we're going to shade, we'll think about maybe
55 values to use. Squint your eyes in. This would just be
very quick process, but it's squint your eyes and
look for the darkest parts. I can see a dark
shape down here. And we're actually just
drawing those shapes. And there's definitely the
stack shaped down here. The E is up here,
dark, quiet, dark, and near this the
white fluffy bits, it will get to a dark shape. Here. It comes around. And next to the nose there
It's quite dark too. Now you can see a little bit of the change in the food
where the snout is, so that would be a
good thing to mark. And two, so this
area here is snout. You can see where it joins
onto those white part. Then joins onto the
corner of the mouth. Here. She's quite an angle here. And then we've got
this big dark part underneath the mouth. And you see the little
light area here in here. That is going to show up. We should pretty map
that out actually, but it's going to
show up when we put it in this dark
area underneath. So that dark here is quite
important to mark it out. Alright, just be
something like that, almost like a bib. When we come to put
in the shading, I always like to think
about five shading values. And if you've done some
of my other classes, you might have
done this already, but think about how large you can shade with
your HB pencil. And then how dark you can shade. You could use a darker
pencil for this. So if you find that
you're doing this and you can only get a middle gray. Then I'd switched to a to B
pencil for the darker values. And then trying to
find a middle value. It's going back-and-forth. Something in-between these two. And then something
in-between these two might take a little
bit of layering. In something
in-between these two. I'm just using a scribbling Mac and that's what we're
going to use for this. Like I said, we're going to
keep this really sketchy. We're going to block out
some of those areas. And then we can once we
blocked out the main areas and we can come in
with some Fmax. And for that we're just going
to use this flicking Mac. It's using the wrist and just putting your pizza down for
looking up, looking up, looking up, looking down. But we don't want them to
be all uniform like pet because when you look
at the photograph, they go into kind of like they sort of go in
different directions. Sometimes. We're
really looking for the darker parts underneath the lighter parts of for when we're drawing
these flicking Mac. So I'll show you on
the photograph here. You can see this area in here. If you look with
the darker parts, are the parts that are underneath tufts of maybe
a few inside the tuffs. So that's essentially
what we're doing when we're doing
these dark marks. We're not drawing the
figure on the top. We're drawing the spaces
between the food, the shadows underneath the food. We're going to have our shading will be shading like this boost, shading out some just
some loose series of lights and darks. And then we can come in over top inputting those nice
little patch here. The shading is really
going to create the main value of the food. And then these are
just going to show it. But if the texture
and the passion, I have a practice of
there just shading down an even layer
of shading in, in bringing over some of those ******* Max
trying to help them. Not all straight up and down, but slightly random directions. This always difficult
to do is to get something that looks natural and random because we're not,
that's not the way we work. We're trying to do
something with intention. There's someone else
you just got to let go a little bit and just flip around your your hand move. Without too much control.
10. Adding Loose Shading: Okay, Let's bring
in the shading max. Looking for the light areas, the very white areas,
we're going to preserve those and
keep them white. Everything else is
going to be shaded and just very light value. Maybe like a now shading scale. Maybe it's just a number
one or number two. If we get these numbers very light, everything
except white. I know there's a few little
white toughs in here, but if we keep this
nice and loose, then it's gonna be a
bit of light coming through our shading
maps. You see him. So following the
direction a little bit of the face and of the food that I can see. Same down here. Keep this side quite light. Then we can do, I can
number two through here. I'm using my pencil on its side and you see the very broad maps. My pizza was getting
a little bit blunt. But this kind of good
because it means you carry out quite a bit of
ground quite quickly. And the scene, so
they just scribbling, following the direction
of the fear again. The ears are a
little bit different because they have much, much finer food
instead of velvety. And we don't want so much
detail in those years. So for these ones here, and it's put a layer in them, but we're going to be a
little bit more careful. I might even use my Tooby
pencil because it's a lot softer, less max. The thing to be aware of as
these white areas in here, which we didn't
really mapped out. We're gonna do those with fear a little bit
like these max, but we want to keep
that area light. Shading everything around that same on this side,
keep that area. The fluffy white
fear is going to be keep it light and then
shade and everything else. Keep a nice light touch
with your pencil. And while we're here, let's
go ahead and shade in these parts of the ears, they can be a darker value, may be a number, number three or number
four on our shading scale. I forgot to mention this
in the materials section, but if you have a tissue that will be really
useful for these soft areas, don't do it all over the place. The two reasons we want
to keep the texture, but also when you
do this, it does. Sometimes depending
on your paper, it can gamut up a little bit, rubs in the graphite into
the tooth of the paper. And it can be difficult
to layer over top. So don't push
really, really hard. It's just getting your finger
underneath it and just very lightly giving
it a quick smudge. My lines were very, very young, dark to start with, and I'm just going to
push those back a little bit because there are no
outlines around those ears. So we can build it up a
lot darker if we want to. Later on, we'll see how the
rest of the face looks. We've got this number one or
number two value in here. And now we're going
to shade in, say, a number three or four value in those dark areas
that we mapped out. And hopefully you
can still see those, but even if you can is
still a good exercise to map them out first so you
become aware of them. So remember we had
this one coming down the side of the face here. Actually let's shade in this part I forgot
about this path. You can just lightly and we can put on the stack. So following the duration
of the food comes right up to the eye using
flicking max. Flicking max or slightly
scribbling wax. And then we can do the same on. It's not too dark on here, but it's a little
bit darker than what we've got here. This dark part that comes up
around the top of the eye. So I'm scribbling,
but as I scribble my eye back to the photo
constantly to make sure I'm shading in the
right place a little bit darker here, down here. And then we've got this
part under the chin. So we'll do this in then. We will, I think we'll put
the features and after that, then we can come back
and just balance out these values and make
sure we've got them in the right place and into
a bit more work on this, we can just quite
bluntly shade this in. We're going to have
different styles of shading. So yours might look
different to mine. I like a lot of Max. I like a lot of energy. As long as you get the values in the right place,
it'll still work. With any kind of math
that you're making. Down here is quite dark and then it goes slightly
different directions. So move outwards a
little bit for this one, bit darker and a bit, and
we'll go through and add some even darker values soon.
11. Completing the Eyes Etc: This week on the features. So if we do the eyes, the very, very dark, so I'm using it to VP ensue
and I'm just going to outline it white area. So I know where to shade up to. He find anything that doesn't quite fit or isn't
quite right here, you can see if you can change it without too much trouble. What I've noticed here is this should overlap that
eyeball a little bit. I think this angle is not right. I just put that in now
and it's incorrect. You can see it
comes out like this so that it overlaps the
eyeball a little bit. Now I've got a big dark
mark in my white area. Just use Tombow. Mono eraser is really
good for that. Those little areas. Maybe it's a little
bit straighter here. And you can see there's a
slightly lighter area in there. So the whole thing is
going to be a gray. But then we want to preserve
this little pad here. It's kinda like two little
ovals, squares shapes. And then we can put it in
the dark around those. So that's a reflection on the, I bet, that side of
the faces and shadows. So the reflection is quite dark and maybe even a bit darker
than what I've got it. It's a bit too bright, so I'll
just shade over top of it. We'll go, you didn't
do the other eye. This one's got a much
brighter reflection in it. It is white, so I'm going
to draw around there. And then it's got a
light gray area here. So watch and in light gray, right up to the top is light
gray shading the whole thing light gray except
the white highlight. Then we can go around there. Make sure you keep the
light gray at the top. Maybe drawing the shape
that you can see of black. So my outlining
their black shape, making a few changes
so I can see that the eyeball should
come in a little bit. In past the age of the face, there made a slight change. And that's where the whole time, even when you've got
this base layer down, you're looking at back
at the photograph. You never just coloring
in your drawing. Because the more you
look at the photograph, the more you work
with the subject, the more you're going to see this dark up here, we've
got some eyelashes, but I'm just going to put
in that little dark area just like the bulk
of the eyelashes. And probably the same
on the side here. It's been added to see. Okay, let's move on to the nose. Now you can see around
the top of the nose and the photo, it's very light. Mine is quite dark because of my outlines from
sketching docket for you. And so I've just
got rid of that. I'm going to use my HB pencil. Will the equivalent of an HB
pencil because it's shopper. I mentioned you've got
a nice sharp pencil and we're just going
to shade this in, but we're going to shade
it in with little flicks. I'm trying to keep
that light area at the top of the nose. There it is there. Little flicks following
it, darker pattern. And then everything else is going to be little
flicks as well that I get rid of that dot
right in the middle of it. But much lighter flicks
outwards a little bit, a little bit like you're
falling around the clock face. Little flux in. Then we can
zoom in a little bit here. We can go into the details
a little bit more. Look for where's light and dark, it's darker on this side. There's also a triangle here that looks a
little bit darker. So it start from
the bottom here, wake up and make
it a bit darker. Still little flicks. Make this side a
little bit darker, but of a scribble for that side. And then we've got this shape in there that's gotta be darker. And then you can see along
the side here it's a bit light and then a bit dark. It's really focusing on the
light and the dark parts. If anything is too bright, like it's a little
bit too white. And here I'm just going to
shade over top very lightly. Because not actually
white, It's a light gray but it's not wide. And then we'll
have little flecks on the outside of the nose too. And it should be darker
than the top of the nose. You see how the top of
the nose around here is light and in slightly
darker on the opposite, on the other side of it is going to help push the nose
forward just a little bit. On the side here
is quite dark too. And over here is quite dark. So I'm just putting some of these little marks were going to do more of this later. But just while we're working
on the nose, who knows, we'll put them in there, make
it stand out a little bit. And we can work on the mouth
while we're here as well. Look at this dark area down here underneath the
white part is going to really make the white
part standout thing about the type of line. It's a little bit
thick through here. And then this is
quite soft shading. So I'm using my
pencil on its side, little small circles to get a nice soft area in there
and same on the other side. But top of the lip or the top lip there is a little light line
coming down it. But as the light gray, this is where I might
need my darker paint. So just to bring in a
darker value over top. And it's bringing the lips. Seen during the lips. It's weird talking about lips on it. On a rabbit. The mouth. So it's dark but it's not a straight dark line or heavy
dark line can be down here. It's quite soft. Little bit fury. Need this pattern here
is also quite soft. Small circles. And it blends a little
bit into that chin. Keep using this pencil because
it is very soft down here. You can't see all those
strong fear, max. But the whole thing is actually great except for maybe here. At the moment I've still
got some white in here, but there's actually in shadow because of the rest of the face. Overhanging should
actually be a gray. And then underneath here, let's go ahead and
put in some of these darks because it's going to make the chin
pop out a little bit. Make sure you don't have
any hard lines anyway. So I'm drawing a line in here, but I'm making it a bit scraggly
because this is fluffy. This pad on top of
this dark area.
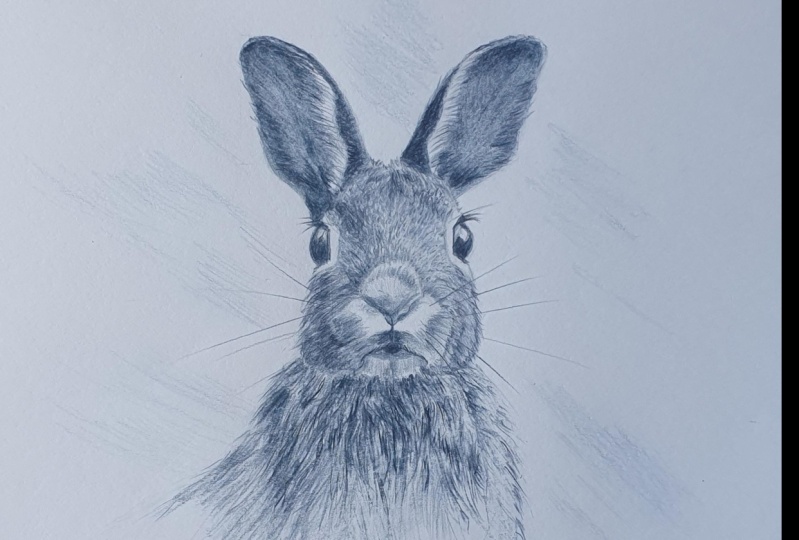
12. Sketching The Fur: Okay, I think we're
starting to get there, so that's the main
features of the face. Now we just got to really
work on the fear and getting these white areas
to really stand out. The moment when you compare
it to the photograph. They stand out in the
photograph because of all the gray around them. But in our drawing
or my drawing, it's still quite light. So we're going to balance
out the values now. Let's go ahead and start
adding in some more food max. And this is where we're
going to add our flicking, especially down here to
get those toughs of food. Also around the
side of the face, There's some tufts of
fear or some layers of fear up through
the face here. It's more just like
little short marks. Just look at the
direction that they're going and follow that. Tried to follow the
form of the face. If you can't see the direction that they're going sensitive, bringing that up and over. And then I'll do the
same on this side. So it's getting a
little bit blunt. I don't know if you've seen these pencils before,
but some of them. I didn't discover this until
a long time after, right? I owned it. Some of them have a little pencil
sharpener in the end. Only fit these particular lids. That is really handy. Nice sharp pencil. Keep looking at the photograph. I can see a bit of light here, so I'm just going to leave, leave a steep of light and then move over to the opposite
other side of it. And it's quite light up
here too near the ear. Spring in a bit of
tack on the ear to bring out the
lighter part up here. So we're not just coloring
in, we still observing, always observing, following the form of
the face around here. And then as we come around
the side of the face here, we can tidy up this a
little bit and months just scribble at the moment. But I can bring in
some soft shading because we can't see so
much of the food here. And then I can bring in some, some dark areas underneath
or around the snout. It's going to push the
snout forward a little bit. You see that line there
in the photograph. It's dark, it's a bit uneven. And then there's another
one beyond that as well. And then out here on the
edge is actually quite dark. And this time we might
flick out once a bit. And it's quite dark here under the eye. And then light again. Why we're doing these
dark flicking max here, Let's bring in
these eyelashes to, so I'm just going to start in that top part and then there's a big one that
comes out like that. And then here's just
a few smaller ones who joined together. You can shade over top
of the not quite right. Let's bring in some dark here. You can see this
side of the face compared to this
side of the face. So we tidy it up.
We edited syntax. Now this side is actually
quite a bit darker. So we're going to
treat it the same way, but then we can just bring over some blanket shading over
the top if we need to, to make it a lot darker. It's bringing out soft
shading around here. Thinking about how
dark it is compared to whites will compared to
middle gray, It's quite dark. So I'm going to build it up
more than the opposite side. Flick your eye between
the two sides, this one and this one. In the photo. This one's Dhaka. In need around that snout. We're going to bring in now flipping max very dark in there. Dark line around here, and then it's dark
all the way up here, and it's gray in here. Let's put these little flux
and get that gray value in following the direction
that they go in the photo, right up to the white area, preserving the white area. Now we can go to town
on this dark part here. Tried to really try
to see the shapes. And what shapes can you see
on this side of the snout? And then there's a tuft. What's the shape you can see
on other side of that tuft? In the same thing on
the side of the face, we've got those dark
flux coming out. Really quite a dark
line coming up here. Scribbling, align. Hopefully you're
seeing how you can use these scribbly marks
to create something that looks like it's natural. It's very to soften off some of the edges so
you don't have hard edges. That's quite hard here. But I could just kinda
scribble over that age. Break it up a little bit. A few dark parts in here. If you flux like we
were doing over here. We're going to finish
this up fairly quickly. You could spend a lot of time on all these different
areas in these flux, but I can't keep saying
through this video, this is more about sketching, getting something
down quite quickly. So we're just gonna
go through in just a blanket shade out anything that
needs to be darker. So I'm going over top of
the fear and the textures. I'm letting them show through. I'm making this side
of the face DACA. There shouldn't be any
white on this side of the face except for
up through here. And just over here
should be quite dark. Try to, try to keep it loose
marks so that you have the shading or the textures from underneath showing through. But we want to darken
the whole thing up. This part here is to light needs to be lighter
than what's around it, but it's nice to just be pushed back a little bit like that. What's going on here needs
to be much darker here, right out to the side
of the face, I think. Have a look, see
where you might need some darker values through here. Probably a little bit
darker, just a little bit.
13. How To Draw The Ear Fluffies: Obviously we need to darken
up the ears of it as well. So we need to do these
flux in here too. So if you think about what value you want to
be inside the year, it's probably going to
be something like that. Which means we're
going to have to darken this up a bit to, but once you've got that value, if you shade it in
along that edge of where the white
fluffy isn't going to be and need to create
the white fluffy. Use the same kind of
value, not pushing hard. But we're going to flip in from net value into
this white area. Following the direction
that they go. In the photo, you
see how that creates a fluffy look at
one's very fluffy. It's probably a
bit too white and here compared to the photo. So I could just keep
going over top of that era if I want
to push it back or you might decide
you want really, really fluffy ears.
It pretty cute. And then we can just
shade in the wrist. There's some details
in there to the veins. If you want to put
those in, you can. But sometimes I find
things like that, like the lines of
veins or wrinkles. She's been quite a bit of
time thinking about the value and the quality of the line now sick or how thin and softer, dark they can just look a
bit like surface decoration. Look a little bit strange
and take your eye away from the form,
flatten out the form. Going over a little bit darker here you can see it's
a bit of a change of value there and a bit of
a change at the top here. It comes out this side and then underneath the EMS curve
over a little bit too here. Is this dark part down here. Since about the
value we want there and on this side is
going to be much darker. And then I'll go ahead
and speed up this year. You can work on your own one.
14. Finishing The Ears: So just finishing up these ears, it'd be good to
have a sharp pencil and just go around
this top edge here. Even though using a sharp
pencil you can shade that line in that little dark patch there and then there's
a bit here too. If you have a soft pencil, this one is a to B, and it
keeps blunt very quickly. Then you can tune
your pizza around at times to find another angle. You'll see me doing
that quite often. It's just just turning my pencil when I can
feel it's getting bland. And I might just turn it and use it as almost like a different
corner of the lead. Save having to sharpen
it constantly. Nina up here as well
to sketching a nice sharp each of the
nice clean edge. And it's actually a little
bit lighter just here. Then it is further
in on the ear. And it may be dark area using
your shop Pizza as well. It's a bit of a lighter
each around the top here. Let's see if you can create this just with
some soft shading. At the moment, I've got this dark area in this light area, and they don't really
blend together. There's two things I could do. Ideally you shade, shade and the missing value
between these two. You're creating a bridge
between the values. Small circles as a
good way to do that. The other way in I'm
always reluctant to, to demonstrate this just in
case we will go a bit crazy, but comes with a warning
as use your tissue. And just very lightly. A couple of Rob. So ideally from the dark area, just pulling into the
light area a little bit. He didn't take that and
go on to the light area. You can end up with
a big dark MOC and it's easy to
get carried away. So that's why I'm
worried about that. But if you've got
some self-control, then go for it.
15. Finishing The Fur: So a little bit of
width down to here. And then there's not much more
to do except just a bit of balancing and I'll speed
through some of this work, but just to make sure you know how to treat it
and how to use this, what we were doing before. We've got these shaded areas. Now we want to look
at these tuffs. So there's one That's what it
comes down and around here, this one here, you see
that sort of shape. There's one lower down as well, but that's the one we're
going to focus on is this tuft in this tuft. And we're going to create those
just by flicking our max. Starting up here, looking at the shape
of the tuft and then just creating some of
those bigger flux. It's quite dark, one near
the direction that they go and not flicking over
the whole thing, I'm just flicking underneath it. That Tufte area means maybe a little bit
on the side here because it's a bit
darker on this side. And then we join it
up with the dark area here and bring the dark area down a bit further
with some flicks. There's a few little
tufts over this side. Can you see those as like a
triangle shape between them? So we don't have
to do every single little detail in here, but we can just pick out some areas that we
can see clearly. So this tuft and this one here, and this one will need a
little bit more shading on the other side of it. And maybe inside at a few flux
as well. Those two toughs. And then also over here, the one to maybe, maybe you can see 34
or five little toughs that you can focus on. Look at the value there on the top there like a dark gray, but then they have that darker
value flicking out from underneath to create the
separation between the foods. And coming down here,
there's a few more. You see, I've just created, I've chosen two and
then I've created another one in it creates
a bit of a pattern. You can continue that pattern. You could look at
the photograph in, maybe be a little bit more
accurate if you want to, but I'm really just
focusing on this area. And then everything
else will just kind of come down here, sort of faded out a little bit. Maybe a little clumps of flux. This part here definitely
needs to be darker and you can see underneath
the chin There's quite dark, so I'll just shade at the top, make that a dark gray. And then I'm just
gonna go through and keep working on this area. In this area, I won't
spend too much time. This needs to go darker though, much darker in this needs to go Dhaka in as I shade
those in dark, I'm also just going to add it in a few little clumps every so often to create
that seems to have the formation of the food. So you go here and do yours, and then we'll be
just about finished.
16. Final Touches: I just treated
that very loosely. I haven't actually finished it. I don't want to
spend too much time when we could be
doing other things. Just a couple of notes
about this as this and long for that you can see quite
clearly here long white ones. So you could put into
long dark strokes which would be like the
either side of the light. Or you could shade it in. If you've got one or zero, you can create some long strokes like that and there's
some darker food just on the side here. A little bit like around
the side of the face. In down the bottom
here you can just sort of let things fade out. There are some grasses and stuff coming up in the
full photograph. If you decide to work on it, then you could bring those in. So let's just say two more things they
don't want to cover. One is the background and the other thing is
these light areas. So we've got these light areas. Some of them have a little
bit of gray in them, so this side is slightly darker. If you want to push
that back a little bit, you can just helps create the dark side and left side of the face and give it that form. And maybe this one here as well. And also the moment they've got quite hard edges
to them on my one. So what you can do is if
you've got a dashed line, get rid of that for a staff. But just create some
softness and they're each little bit of blurriness with the side
of your soft pencil. Maybe a to B pencil. So it's not so hard edged. These little corners of
the mouth to add in here. Any, anywhere else where
it just feels a bit hash. We forgot this dark
path through here too. But anyway, where it
feels a bit hash, just go through and just to
soften it off a little bit with some shading,
very soft shading. And very last thing, make sure you've got
the dark lines and we want them says dark
here, we'll dot points. And we do this in most of the classes, we do
some balancing. Sees squinting at
the photograph, squinting at your drawing. When you squint
at the photograph where the lightest areas, find those in your drawing,
make sure they're there. When you squint at
the photograph where the darkest areas and find
those in your drawing. So I need some more
darker around the nose, a few little dark areas
that I've not put in. And then squint at your
drawing and look for, look at where the
light areas are. And then have a look
at the photograph or those same light areas
in the photograph. I've got some lighter
areas up here. They stand out to me, not lighter than the photograph. So what I need to do is
just push them back. A little bit. Same up here. Squint at your drawing. Look for the darkest areas. Are they in the photograph? I think most of the darks I've got an hour in the photograph. There's probably a
few that are actually missing in my drawing. Around here needs
to be a bit darker. So you can keep playing
around with this and maybe take a break and come back and do a little
bit more work on it. But the very last thing, sorry, There's two last
things that we need to do. We need to add in
these whiskers. So they are actually
would note before that will do the
background. The background. Just to create a bit of this smokiness you can see
in the background is just a deep the field effects
from the camera that I'm using my pencil, even at four or a,
six B would be fine. Putting in some shading there using the side of it
as much as I can. Really soft so we don't
want any pointed max. And thus we want to have
nice softmax like that. Putting in some of those areas. Maybe you could look
at the photograph and see where you can see them. Maybe the bushes and
things in the background. Bit darker on this side. Getting a tissue and
this time this is all we're gonna do in
the background so you can really give it a good scrub. Sorry if I'm shaking the camera. Just to blend it
out, you don't want any texture there really. Just to give a bit of
atmosphere in the background. And if it's not enough, then
you just add a bit more. Maybe it needs a bit more around here and the side of the face, be careful not to smudge your, your bernie. You
see the difference. Just setting something
in the background. Does it makes it look like this? There is a background
these deep from there. Brings the rabbit
forward a little bit and makes the whole page, the drawing, not just
the subject, the door. And then the whiskers. I just see this little
white patch here. I'm just gonna get
rid of this nice sharp dark pencil for this one. And you'll be quite confident with this
that we're going to be making long
strokes like that. And they might go a little
bit wonky like they wanted. Probably the faster you do them. Maybe to painting
on your control, maybe the faster you do them, the straighter they will be. So just maybe have
a little practice. So yeah, they fade out. So you want to push head
or reasonably had and then bring the pizza across
the paper in off. So crossing off to get that nice point at the end so you don't get
something like this. Let's have a go a little bit lighter
than what I did there. So we start from here and we're going to go just like that. One direction will probably
feel awkward to you. And maybe make some a little
bit lighter, some darker. There's a few that coming
out from the cheek here in this slide. These are really dark
when I'm not going to make it too dark though. Is little ones coming out from under the eye and above the eye, which we didn't put it
in yet, on the air. And a few tuffs here. This one is a couple more in the EBIT you can choose,
just get some in there. Hopefully you don't go too crazy and have a big hard line. We don't want them to just
really fresh in light. So if you're a bit worried,
maybe just do it a couple on each side and
see what they like. Don't go overboard.
17. Summary: I hope you enjoyed this lesson. I think it's quite
a fun one to do. We started off with those shapes and the proportion and we spent quite a bit of time on it. And that is important if
you want to get a likeness. And then we worked on the sketch and then we
built up for our shading just with some really
simple shading shapes or value shapes. And then we worked
with a texture on top. And remember, our focus was on preserving the white areas, making sure we've got those
in the dark areas around them to get that contrast and to really push things out over all. Just remember that
this was a sketch and the aim was to do
something quite quickly. Hopefully you've got
something that you like and the ESM energy in it. And hopefully you
learned something. That's the most important thing. And what I'm trying to
do with these instances, to give you something
to practice that, but also to bring
your awareness to something new that might be missing in your practice
or a new skill set. Thanks very much for joining
me and I hope to see you again in another
sketch club tutorial. I'll see you next time.
 Emily Armstrong, The Pencil Room Online