Transcripts
1. Introduction: Hi, I'm Emily. I'm an artist and an art teacher
from New Zealand. In this tutorial, we are
going to draw an owl. I have this photograph here that we're
going to work from. And there are a couple of
things we're going to focus on. We'll have a look at how
to use simple shapes to start off a
drawing using squares and triangles before building up on top of those basic shapes. And also, we'll be
focusing on how to create different types of feathers are different
textures of feathers. There's some fluffy types of feathers around the
face and then there's also some feathers for the
body that are quite different. And we'll be looking
at how to get those differences
through and mark making.
2. Materials: Let's take a look
at the materials. You're going to need
your sketchbook. You'll need a couple
of different pencils. Always a good idea to
have a light pencil for sketching an HB pencil, or even a to H pencil, which is very light. And then to have a darker
pencil for shading, say a two or a four B pencil. You'll see me using the same
pencil all the way along. And it's just because
I'll be drawing a little bit darker so
that you can see it. I'm using a Staedtler
Mars Lumigrow if black pencil for
this one in it's for B, It's almost like a
black colored pencil, but you can erase it quite
easily like a regular pencil. Just shows up a little
bit better on the video. Then you need an eraser. I've got a potty eraser. Any kind of eraser is fine. I've also got my
Tombow Mono Zero, which I'm a big fan of. And this is just really
good for creating some of the highlights in
the theaters and also just for
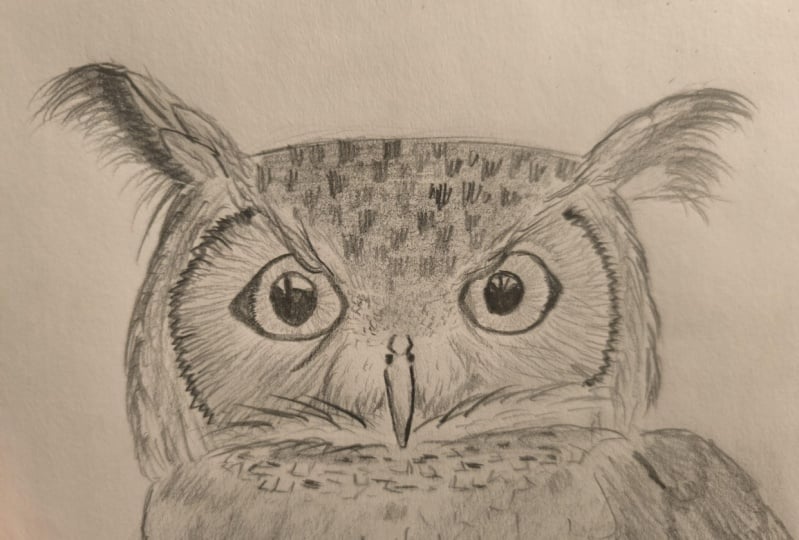
correcting any edges, this is the photograph that we're going to be
drawing from here. And I've got the photograph available for you to download. You might not need to
download it for this one, it's quite clear on screen and I'll make it a little
bit bigger later on as well. But I have provided a photograph
that has the full body. So you wanted to go on after this exercise and have a go at doing the whole
thing you could. We're just going to
focus on the here, just because the body is all very similar in
terms of texture. And you'd be able to carry that on your own time if you
decided that you wanted to. I'm also chosen
just the head and the face because we're
going to try to capture that quite intense stare of the L and spend a
lot of time on that. So rather than on the rest
of the body of the cell.
3. Seeing Simple Shapes: We're going to start with
drawing simple shapes, and we'll have a look
at the photograph in a moment to identify those. And then over here on
this side of the page, I'm going to do some
further practice later on once we've
got the basic shapes, we'll try out some
different features. So I'm just going to cut off a little bit of my page here. Just maybe a third of my page. And it's a bit hard
to see on the screen. But you might want
to do the same and just haven't urea
to practice on or have another page in
your sketchbook that you can practice some
different phenotypes. And then once we've done that, we'll bring those
phenotypes into our drawing and add them to L, L basic drawing plan that we will already
have figured out. So let's have a look
at the photograph. We're going to zoom
in and we're going to break it down
into simple shapes. The first thing we're
going to put down is the shape of
the head overall. And we'll, we'll
do that so we can figure out some proportions. So it's a good idea to start
with the biggest shapes, the most simple shapes, and then start adding
in the detail. I want you to take a look at
this photograph now and see if you can figure out what's
the main shape of the head. What would you call that? A circle? Is it a square? Is it something else? But a basic shape? And then see if you can find some other shapes
in there as well. Obviously the eyes, circles, they're probably the thing
that stands out the most. But there's also the
patterns of the fetus. The patterns that they
create all the groups have different fetus can also
form shapes as well. When I look at the main
shape of the head, I see it's almost like
a rectangle shape. Got a flat bottom here in
quite flat at the top. And they may be curved
around the side. So it's maybe it's a little
bit more like a dome. That's the first
shape we're going to put down and we'll use that shape to make sure we've
got the right proportions. So we'll look for the width and the height and compare
those to each other. And then we're going
to add in the shape of my shape of the face. And if you look on
either side of the face, you can see some darker fetus there that create
a bit of a line. We're going to head in an oval shape like this for
the main part of the face. And then a couple of triangles shapes we
can see in there. There's this triangle
shape here that comes above each eye and then extends out to those feathers
on the top of the head, which will look a
little bit like ears. And then there's also
this triangle shape here is also the shape of the
feelers around the eyes. Maybe a little bit
like a leaf shape or how would you describe that? Maybe like a teardrop
shape on its side. And then we've got
obviously the circle. So the eyes and the
circles are the pupils. Start with these main shapes. And then once we've got
the main shapes and we will go through each one of those shapes and
refine them a little bit. So if you look at the
circles of the eyes, they're not completely circular. That we start off with
simple shapes first, just to get something
down on the page.
4. Drawing Simple Shapes: We wanted to get something down on the page to start with. And it's why we use
these bigger shapes. Let's put down some, just some guidelines
for where we think the head is going to go to the width of it and
also the height of it. And you might want
to draw a rectangle. Fist. Doesn't matter how big you
make it wouldn't go to, but it could just
because you've got so much more work to fill
in all of the fine details. Minds, probably a little bit smaller than the
length of my hand, but quite big hands as well. So we need to figure out
the width and the height of this box rather than just assuming we've got to
create the first time. So here's the width
and the height. If I bring the iPad over
here so you can see it. If I take this height, if I take a measurement
of that height. So what I'm doing is
I'm holding my pencil along the line of the
height and you could do this on the photograph
if you printed it out, but otherwise, you
just watch me do it. So there's the height and I'm using my fingers as a marker. That's the length of
the height there. And then I'm going to compare
it to the width and just hold my finger here is a bit of markers, so we've got one, height fits in one and maybe
a little bit over a half. Let's try that again. Yeah, it's a little
bit more than half. I know it's not
completely accurate, but this the easiest way
I can think about it. So what I'm gonna do
here is take this here. This is the height that I've
got my rectangle so far. And I need to make sure
that it fits a one in a bit more than half into
the widths. So there's one. I've probably got that
right straight off, but say your side of
your rectangles in here, that would mean you'd have to
extend it out a little bit. So the height should fit one at least one-and-a-half
times into the widths, one-and-a-half and need
just a little bit more. So you can get that in
there first if you want to. You could even put in
that cross-section near, but we're not going to
need it for much else. So it's really just
whatever suits you. Once we've got that and we can make sure we've
got the correct shape. Rectangle again. But we noticed before that it's a little bit more
like a dome shape. So what I'm gonna do is just
cut off the corners here. We can change all of
this later as well. The main thing is that the proportions are
pretty accurate. If you get the shape of the
head a little bit out there, it's easy enough to
adjust later on. And then we're going to
bring in this oval shape of the face itself. So I'm going to wear, I guess the brow line would be here and leaving a bit of
space underneath the dome. If you draw your overwinter
and it's really crooked, don't worry about
rubbing it out. So we draw really
light to start with. And hopefully you are
using a light pencil or using a dark pencil in
a very light manner. With not much pressure. We draw a light at the start. So then you can just
go around it again. And eventually you mold it into the shape that
you are happy with. And just be aware
that my drawing on that photograph there is a
little bit crooked as well. So let me take away those lines. Curves down a little bit here, more like this on each side. Again, we can change it
later if we need to. I'm going to bring
up the photograph a little bit bigger
on the screen now. And the next thing we're
gonna do is add in the eyes. And if I drew a straight
line through the eyes, we can see that it's a
bit above halfway there, halfway point between
here and here. So the halfway point is
probably about here. And it's a little
bit above halfway. From here to here,
we find halfway. We got a little bit above that. It's quite close to
that top line there. And then draw a line through there and it's where
the eyes are gonna go. If you have trouble
getting things straight, you can always put a
little dot here and a little dot on the side,
and a little dot here. And use that as a guide
to sketch a line across. And then we can put in the eyes. Now, we can just sort of
take a guess to start with, and it's what I'm going to do. One. But what I want to draw
your attention to is how much space is on
either side of the ice. So we've got the
sky. In this one. If we look in-between the eyes and we draw
a circle there, it's pretty much the same size, is that the two actual eyes? And then if we draw
another circle on the side and another
one on this side, they're about the
same size as well, maybe slightly different, but this is what we're
going to use as a guide. And I can see if I
put a circle and here it would be too small. Which means I've
got to move my eyes outwards just a little bit. Maybe make them a
little bit bigger. So it should be
able to fit 12345 across the another way to
do this would be miserable. If you don't want to put
circles all over your page. Would be to just sort
of draw a line like this for where you think
your eye's going to go in and make sure you've got
enough space on this side, no space between them. Enough space on this idea. You might need to make
some little adjustments. And I like to just use
really loose circles first, putting in those eyes
for drawing any circles. Takes a little bit
of practice to get this rhythm going
to get a circle. If you find it difficult, then you can always just
sketch them around like this. And just keep switching around until you get
a circular shape. I can see that mine are coming
right up to that line of the face and probably
not supposed to. So there might be
something I need to adjust a little bit later on, maybe bring the heat
up a little bit further out a little bit. But we'll see, we'll
see how this goes. We can always make adjustments. Let's get rid of all
of those eyes there. Now we're going to put it
in this triangle shape that comes down above the ice. And this point here, it looked before and
that was about halfway. So here's the bottom of
the head. Top of the head. And the halfway point is, unlike the base of the triangle, is a triangle with the
bottom of it cut off. And then we can bring an angle. I'm just going to
go slightly over the eye and go out this way in an angle
out this way here. So you could just take a guess. Or you could think about, um, angle they're facing in terms of how far away it is from zero. So if this is zero, then this could be
maybe 40 degrees. You could think about
it on a clock face. So if this is 12th
and this is nine, maybe it's like midway, 10-11, whatever works for you. Same with this one out here. I'll draw them on the
photograph so you can see them. I think this one
might need to come down just a little bit. You see me adjusting
things a lot. A lot of what drawing is about
changing things as you go. About responding to
what you have down. First, we've got
net triangle shape and let's go ahead
and put in the beak. And we can see the
beak comes down. It doesn't come all the way down to the bottom of the head. It's maybe about here, is past halfway down. And I'm just going
to draw that as a triangle with a bit
of a curve to it. We can look at that in
more detail later on. But we want to put
this in because the unjust underneath that, we've got this other triangle. Let's have a look and see
if it's the same angles. So triangle we've already
done, it's pretty close. Maybe just a little
bit shallower. So not like this.
Maybe just a little bit further tilted downwards. Also got the shape of that
patch around the eyes. And it starts in here and it's going to come
down and join up to that triangle and then go around the side
of the face and up. This one starts right in here. Down. Just a little bit wonky
along this line here. But we can keep it as a
general shape for now, and it comes up around here. If I take those lines away, you can see that shape formed by a particular type of feeder. These fetuses come all the way out like this,
all the way around. Very fine fevers. And once we've got a little bit more down on this drawing here, then we're going to
have a practice of how to draw the
different types of fee that so we can see
what else can we add here? We can add in this patch
and this part here. So almost like he's
got a, an upside down. I'm mustache or maybe a goatee, and we could call it a goatee. Just underneath his beak there. He's put in the shape
of these feathers that come up along the, above the top of the head
there a little bit like ears. And why I would do is figure
out the starting pointers. Do this start here,
do they start here? And where does it
line up with the eye? If we draw a line down,
that's where they staff. We draw a line straight down. Lines up a little bit to
the side of the center of the eye so that the other
one might be the same. Well, it might be a
little bit different. That's pretty about the same. So the other one's going
to start about here. And then we can draw a
shape up, up and over. And we're just about ready to start putting in
a bit more detail. And when we do that, we're going to fix
up this line here. It's not completely straight. It sort of comes up and around. And just leave that for now. While we add in the
pupils of the eyes, you can see the whole
pupil look at the space around the pupil that the
yellow part of the eye, to try and figure out the placement of the
pupil and how big it is. This keeping in mind
that we're also going to be thickening
up this line here around the
outside of the eye. If you feel that your
eye is too small, then we can thicken it
out on the outside. I think mine is probably
a little bit too big, so I'm going to thicken
a thicker line on the inside when we go to
make it a little bit darker. So those are about basic shapes. Make sure you've got your
proportions correct. The height versus the width. And that you've got
the general shapes and just put in the shape
of the head there. Ideally, these will be
really light minds, a little bit darker than I would normally draw for the stage. You could make it pretty
much invisible light, only visible to yourself
using a to H pencil. And that way you don't
have to use an eraser. You can just keep building
up on top of those lines in these very light lines
eventually just disappear.
5. Sketching Natural Looking Lines: They start adding a
little bit more detail. Now we're going to go over
some of these shapes and find the subtle changes in them rather than looking at them
as just simple shapes. So I said we were going
to change this line here. Let's do that first. That's going to give
him the expression. I'm just softening that
line off a little bit. And then I'm going to
really look at the shape. So it sort of comes up. It's a bit of a curve and
then it starts to come over the eye a little bit before it goes back up
and another bit of a curve, something like that. And then the same on this side. One might need to be a
little bit wider, I think, comes up over another
slight curve here. This is all going to be fetus. We don't really need
to even define it partly it just this
top part here. If we have a look at, go back to the beak and
really look at the shape. You see those nostrils
and near this I get dark hole on either
side of the beak. And then it comes
down quite thin. I'm going to refine the
shape around the eyes. Minds a little bit
thick, just here, it needs to be a
little bit thinner. Keep these really light because
when we do the feathers, we don't want to have any
hard outlines around here. Maybe here is okay
because there's a dark line in the
photograph anyway. Have a look at it, its shape. And make sure you've
got the shape. You can see in the photograph. Draw it there for you now. Just getting rid of the lines
that I don't need anymore. And then moving over to
the other one again, have a look at the photograph. See what you can see there. Enjoy the shape in more detail. There's simple shapes
are really just to place it to put something
down on the page, figuring out our proportions before we look at
them more closely. Once we put on these finer
details like we're doing now. More accurate shapes. And that's when we
start to see in the expression coming
through, which is good. There's these little puffy parts here which are quite fluffy. And I'm just very lightly putting a circle or oval
shape around those. I don't want to make it too dark even for the
demonstration because those feathers are white and we don't want any dark
lines in there. We only want dark lines around the outside to make
the white standout. I'll show you how
to do that soon. Now I'm going to have
a look at the sides of the face and make sure
I've got that right. I think this one needs to come out a little bit more like this. And this one, he has got
a couple of angles in it. Maybe one. And then straight down here, all these little things just
change the expression with the character of the drawing and make it a little
bit more accurate when you're drawing it out. As long as you kept the
main things in there. Those big eyes and these
filters at the top and the beak is going to
look like an owl. So don't worry too much. But if you want me to
draw a particular l, then these fine, uh, how these more subtle details are the things you want
to pay attention to. The shape of the face, shape to the side of the heat, and in the shape of
the face as well. It's quite a straight
line across here. We're going to feed this
coming down here so we don't want anything
too dark that we can't erase because we want to soften it off
before we put the feathers and I'm pretty happy with it. I'm just going to bring
this part down here. She's a bit of a line there. Some different
feeders are formed. In the end, I'm going
to bring a little bit of the body down the side here. I'll just show you the
other side of the body. You see that side of
the body there comes over a little bit slightly
turned to the side. If you have a look at
the full photograph. We're only focusing on the head in this part of the tutorial. He said a little bit
more detail to the eyes. Look at the shape of the eyes, try to get that right and also have a look at
this pupil here. Both the pupils can see
the highlights and near. So I'm just drawing
a jaggedy line, identifying the pattern. I'm going to leave
white and then actually let's go ahead
and just shade this. And as long as you're happy with the size and the
placement of the pupils, very lightly shade that and
the same on this side here, that pupil comes quite
close to that eyebrow, going to call it an eyebrow. And you see the
highlight there again. Doesn't have to be too accurate, but it does have
to be at the top. Shade that and we
can have a look at the shape of the
outline around the ISS. It's different as
it goes around. It's quite thick and it comes
around and gets thinner. We could do this two ways. You could either just
shade your way around and look at it as you go and think about where it's thicker
and where it's thinner. Do that for this one, it's
quite thin down the bottom. Thicker around the side here. Thicker at the top.
Or if you want to, you could actually draw in that both sides of the outline. Again, thinking
about where it gets thin, air, it gets thick. And then you can
just shade that in the pupil with the
what do you call it, the iris of the
eye is not White, so we need to shade
that and just very lightly it's yellow,
so it's a light color. We're building up a
bit of shading now, but it's really just like
a base coat of shading. Let's add some shading
into the beak. There's no white there, maybe a little bit
of a highlight here. You could leave white
if you want to, but it gets darker
down the bottom. Then I think everything else will do when we do the feathers. So we're going to
start putting in some different patterns
and then we can add some shading over
top of we need to get rid of any of
the white areas. Hopefully you've got
something in it as looking like an owl,
at least like an hour. Maybe looking a little
bit like this L here. Maybe something I haven't
quite got it right yet. But a lot of this will come together when we put
the fetus and as well, I think maybe the beak might
be not quite wide enough. Or maybe it's a
little bit too long. That's probably a sexually. But let's move on to theaters.
6. Practice Different Types Of Feathers: So there are few different types that I want to show you
in a be really good to have a practice of these
before you go ahead and put them in your drawing. These, these figures that
go around the eye, here, they are very fine and you
see they move around the eye. If you're moving
around the clock face. And there's a few
layers of them, and then they get very
dark around the outside. You can see the same thing
happening on the site here. We're going to do those types of Hitler's using
a flicking motion. It's really good one
for coordination, moving around in the clock face. So we'll do something like that. A first layer a little
bit lighter than this. And then we can
do another layer. And then we can
put another layer. And then we can do those
ones around the outside, not flicking but just
a scribbly line. So that's one type of feather. The other type is
that fluffy area around the beak
here, here and here. That's like as mustache. And to do that, we've
got those shapes. We want those
shapes to be white. What we're actually going to
be doing is starting from the outside, flicking in. So that we all must create like a feathered edge to it and it makes the inside
look like it's white. When you bring a
few little ones in near as well, very lightly. But it's really
important to have those dark paths down
the bottom here. We have another go
of that one here. This one curves around a little
bit so we can have a few, few flicking mask
going like that. Darker part up here in a few lines going
through it as well. But mostly we'll be shading
around the white part, be some other feeders and things that we can hit and
around the Earth, It's going to make
the white stand out. So there's this type, this type, another type we can do the
triangle area under the beak. It's quite similar to this one, but we'll be using lines that
go across like this here. It's always a good idea to
change the size of them, change the weight of them, how dark or how light they are. Still using flicking
motions to get a good flit rather than
just flicking your risk, you could maybe use
your whole hand. Those ones we'll be
going across like that. And again, there'll be
dark on either side and that's going to bring
out the white areas. We've got the ones
just underneath it. These ones here sticking
out towards us. So if we look really closely, we might be able to
see like a kind of a triangle shaped
like this, like this. We're really just seeing
the end of the Feather. Keep that in mind. Mostly what we're going to be
drawing is straight lines, short, straight lines
on different levels. These ones here, I usually
do a couple of strokes for each one just so it
looks nice and natural. And then we can put in a few of the upper-right lines
or the triangle parts. But we don't want to put in all of them because
you don't want it to look too unnatural. So maybe just a few
little upstrokes. We'll be adding some shading
over top of these as well. So maybe just some
plain shading or there might be some areas
where we shade and a little bit darker and
eventually start to get this illusion of
pattern happening. What have we got? We've got
1234, we got one more type. And I'll do that one up here in this main feathers on the body. So these feathers, these ones are a little bit spread apart as quite hard to see some
really defined one's. Probably the clearest
one would be, let's see a few here. This one here. And there's some below that you'll be able to see if you've printed the photograph out. But generally speaking, the
feathers are actually shaped, the alphas like this. So I have this darker pattern
here, the light at the tip. And then they dock to the
further along the feeder. We can't see all of that. We can really just
see the top of it. And just looking at those
maps that I've made there, we're going to just create
a type of a pattern. So it'd be some fetus like this. Maybe a few layers of them. You see my line is kind
of scratchy and broken, so I'm not drawing something
like this because it's going to look too unnatural. So it just changed the
pressure of your pizza. So it might be a
little bit heavier down the bottom
and then a little bit lighter or a little bit
wobbly, doesn't matter. And then we can
add some shading. I see they're lighter
at the top of the darker is they go in
towards the body. There's one more
type of filter that we can do kind of
relates to these ones. But these are the
ones around the head. And they very tightly
formed around the head. And so rather than actually
defining the field shapes, we're just going to be shading
some patterns like this. If you have a look
at the photograph, you can see it's all quite dark around the top of the head, but you can see a few
little light edges or spaces between the feathers. Something like this. If there's too many white
gaps in there, then again, we just shade at the top to
tone it down a little bit. I'm really trying not to get something
that's too uniform. So if you're working slowly
and with a lot of control, you're gonna get
something that looks like a wallpaper pattern. We want to keep it
really natural. So just like a scribble, scribble using the side
of the pencil bit. Scribble up and down,
screw up and down. And it's also at the
top of the head. It's not the main
focus of the drawing, so it can afford to be a little bit messy
and a little bit looser. There's a lot of
fitness to practice. The main ones, this one
here, this one here, and then these ones here probably we need to practice
all of them really. But if you haven't quite
gotten, don't worry, we're going to practice them
in our drawing here as well.
7. Drawing The Feathers Around The Eyes: Right, here we go. You're going to need
a nice sharp pencil to start with because we're gonna be doing these feather
patterns around the eyes. Start over the side and it's
just get something going, keep it quite light. Remember, we're
moving around like a clock face using the tip of the pencil to be
a nice fine mac. They're quite white in there. And the way we can create that is by adding some shading to this area later. Looking at the photograph
if you can see it clearly. Or just following that
clock face pattern around. A lot of drawing animals, feathers and food is just creating a pattern and
repeating that pattern. An issue during hyper
realistically, Of course, in which case you have to pay attention to every
single one of these. And we don't have time for that. So we've got the basic pattern. I'm going to come in here
a little bit darker. Now I'm looking
for the dark areas and just adding another
layer over top. And then if we want
to water it and some very light shading
just to get rid of any white where we don't
want any white. There's no white up here. It's very light but no white. And then we can also add
in these darker ones. Little bit more like a
scribble, scribbling Mac. It's a bit of a darker
line that comes down here to you've got the photograph
there with you in. You can zoom in. Then as you go through this, you might add in some of
these finer details like this map that comes
under the eye. A little bit more shading in here to make this part
standout as white. So I'm going to shade around it. Okay, Let's move over
to the other side. Pretty much the same. Moving around like a clock face. Looking max, quite short and then coming out and
doing the next layer. One more layer. You pizza was getting blunt. They may be tuning it
around a little bit will help you find another, another part of the pizza that has a bit more of a point on it. And then shading and the areas that we don't
want to have any, any white showing through. This area around the
eye is quite white. It's very fine white feathers. We need to shade around that to make the white area stand out. We've got this
darker area around and we can bring in
that scribbling Mac. You could use small flux if you want to go all the way
round with small flux, better find it just
as easy to use this scribble in again, if you don't see
any small details, It's a little bit of
a dark area there. In here, right in close to
the corners of the eye. The feathers are actually
coming towards us. So what we can really see is just a few dark
marks between them. We can't really see that the flick or the length
of the whole feeder. In saving this one.
It says feathers. Let's move on to this fluffy little mustache
on either side of its beak. And remember, we're going to effectively just
draw the outside, well the gaps between
those fingers. So I'm looking at
the direction they go in and then I'm drawing the dark spaces in-between them. And then maybe bring just a
few light lines inside there to make it not completely
like a flat white shape. Same on this side, look at the
direction that they go in. Start down here and it's
this dark pot next to the beak and flick up in, in a way around
nice sharp pencil. It's quite dark and here we can flicking from
that area as well. And actually the nostrils adapt to put those in right now. And we can flick in from
that dark area too. In just a few lines in there. We get that sense
that they're fluffy, white and quite fluffy. Put a little bit of dark
underneath here as well. So any dark that you put around that white area is going
to help define it. But we don't want to
put too much just we, we see it in the photograph
little bit over here as well. Because I've put
these shaded areas and the beaks disappeared
a little bit. So let's go ahead
and darken that up. It's got a line along one side. And then this area down
here is all quite dark. It's light on the top
with a light comes down and then it hits
the top of it and then the beat curious over
and not so much light is reaching this area
towards the bottom of it. So that's why it's darker. And then you get the sense
that it's curving over. It's quite dark right
down here at the base.
8. More Feathers: Now pupil is going
to have to go much darker in the lines
around the eyes. But let's keep going
with the feathers. We're gonna do these ones here, move our way down, and then we'll come back
up to the top of the head. So these ones here makes sure
your pencil sharp again, and we're just going
to flick a few across in some underneath it. And then I just need a couple more in their
little light ones. And then same going the
opposite direction. This direction here is probably less natural for
you. If you are left-handed. You can go up or you can go download whatever feels right. And you can also turn your page around just to get
the right angle. And that's all we
need to do there. And then remember
these ones underneath, they're going to come down
over this line a little bit. It's a little bit
fluffy down here. So let's just put in
a few fluffy max, just underneath
that line you see those white fluffy parts
just at the bottom. These max here again to
make this part above it. What? Then we can start
putting in some lines, come across, sort of change
direction a little bit. Maybe move up this way. So try to look at the general direction that they move in. These are basically layers
upon layers of fetus. Fetus this l will all
else really don't they? You think about it, all these
different types of feeders. And then we're gonna put in
just a few upstrokes to show that they are features that are moving in towards the body. And then we could also maybe try and see a pattern of dark. So the little dark splotches
that you can see in there. How do they occur? Some coming out. The side here. Maybe a few little
triangle shapes. Same on this side.
Look for the patterns. Definitely dark underneath it. White triangle. This sort
of broken patches of dark. They're not in any kind of line. And then there's a
few coming upwards. You see every mark I make, It's kind of like a little little scribble or two or three lines over
top of each other. So they're not getting
anything that looks like a straight line because it's just going
to flatten everything out. At the moment. All looks really white. If you squint at the
photograph, this part is white. This part is maybe
like a light gray, so we're going to
shade all of that. If you want it to be
really particular with us than maybe shading and the direction of the fetus might create a little
bit more texture. But otherwise you can just
block in that shading. Let me see now this is
starting to become white, which is what we want. And same as up here
around the eyes, around the side of the face. There some dark areas,
it's quite soft. The fetus is quite soft here, so I don't want it sharp a Mac. Using the side of the pencil to get a nice soft shading max. And when I do this, I can, recognizing that that is the pattern that I can see that it's dark
around the sides, but as I do it, I'm flicking
my eyes to the photograph. So you can see I've lived
a bit of a gap here. And that's because in the photograph I can see that
that dark lines are stops. And then it starts again. You're always trying to
look at the photograph. Flicking your eye back and
forth just as a reminder, I'm trying to pick up some
of those small details. Let's move to the top of the
head in this is where we're going to use that lock. This one here. Well,
this one here, sorry, that's a wallpaper Mac. We want one that it
looks a bit more natural, but more scribbling. You can see these two tones
in the top of the head. And you might want to
make it a little bit of a guideline there as to where the dark parts
are going to come down to maybe something like that. And name, we're just going
to create that pattern. I don't worry about the fetus, it come up to the ears. They're just leave those
for now. Start at the back. You're gonna be smaller
the back and then you're to get a little bit
bigger as we come forward. A little bit more
defined as we come forward to about here. You want a little bit
more of a clear pattern. What I'm trying to do is leave those white areas in between. And they're not
actually white in the photograph there like
a really light brown, but they provide the pattern. You could flip your
eye to that area. I can see there's a lighter pop. It comes up through the
center here so I can try and Leave that light. If I keep looking
at the photograph and noticing those
little things, I want to try and incorporate
those into the drawing. Maybe to change
direction sometimes, so they're not all just
pointing downwards as well. Just going give mine
a little bit darker. And then we can shade in an area where we've got
maybe too much white. Push it back a little bit. And also shading
this lighter area. So I'm gonna do it
in the same manner. If you have a look
this eyebrow area, it's it's very light
and wipes that I want to leave that and just shade in an Apache
sort of a minor. One of those light brown parts. Maybe bring a little bit of
the stock through the down. There's a few feathers
that you can see that sort of pointing out towards us. So we can just see the
spaces in between them. Like little curves. Coming down the side
of the face is very similar to the top
of the head here. Which is going to create
a very soft pattern. Sides of the face and not as important as the
center of the face. So we don't actually want a really strong
sharp max in there. Nice and soft. I'm looking at the
direction that they go in. They sort of start to
curve around in income a little bit towards
the bottom of the face. And then it's a bit
darker along the each. But as a broken line
of dark coffee, this maybe a few flicking out in the same on this side. Most of this drawing,
as you can see, is done with the texture
of these feathers. I'm not doing a lot of
drawing of the details, but mostly shading the
details are using Mac making a few bits of white in here. And I'm just going to
ever so lightly shade over top with my pencil
right on its side. Nice and loosely so that they become gray
rather than white. Anyone this part
and this part to be white in the
highlight of the eyes.
9. Finish The Eyes: Speaking of the
eyes, let's go in and make these a lot darker. Now, if you haven't
already done that, everything else is pretty much accurate in
terms of contrast, but these eyes need to be black. Leaving the white highlight. You could draw around the
outside first so you get a nice clean edge and
then just color it in. It's breaking up the
highlights a little bit. This one here was a little bit to just too much of a big shape. You can see a few black lines in between that whole shape there. And then the dark line
around the outside as well. Doc and they have another look again and identify where it's
thick and thin. So even though we've got
a base layer down there, we don't want to always
just be coloring and we want to keep checking the
reference photograph. Keep flicking your eye to it. The more you work on a
drawing and the more you refer to the
reference photograph, the more you're going to see
until you just you just, I guess your eyesight or your, um, your focus so you
clarity gets a little bit. I said fatigued and you
can't see anything really. And then you've gotta
go take a break. There's a bit of a
shadow across the eye. So the top part of the iris is darker than the bottom part.
10. Draw The Head Feathers: Let's move on to the feathers
on the top of the head. And then we've got
the body to do. And then we'll just have
a look at how we can make any corrections if we need
to review without drawing. What I want to really define as this line that
comes across here. But I only wanna do that by
looking for the dark areas. So if you feel as
if flick up here, and then it gets
quite dark here, using that flicking
motion to shade in that darker part so that they
look like dark feathers. If we look at the
part at the top, you'll see on this
side it is light, like a shape of light
there and there's a few other shapes that you can actually clearly see in there. So I'm going to draw those in. And then all of this is like
soft, fluffy, dark Phoebus. Using my pizza want aside. Just looking at the direction
they go and they go that way and then they get
a little bit shorter. Change direction slightly and there's a couple that stick out. And they come all
the way down here. They're not dark enough yet, but I've gotten that nice soft quality to the end of them. And then I can go in and darken up the inside part of them. Nice ones here are light brown. Shade them in gray, and then bring back any
details you want to see. There's a darker part here. My pizza was getting a little
bit blunt, but also drawn. If you've, you have
a blunt pencil, be a good idea to sharpen it. Because they do want to
start doing some of these, adding in some fine
lines at the same time. You see I just added
a few fine lines over the top to show
those few that shapes. Just going to define
this shape here of dark. You see that in the photograph. Units of jaggedy line. And then there's
also this line of dark that comes across here. And then down and it is made
up of individual feeders. Just darken up some
of those feelings. Maybe a few sharp lines near to show that it's a few feelers. And then we're going to
come over to this one here. Again, it's light along the top section of that area
That's going to be lighter. And mean, it looks dark,
soft feathers sit, come out using my pencil on its side looking at the
direction, flicking it. Nice soft Mac. Maybe made this one a
little bit too long. Doesn't matter. It's a field
that comes out from here. And another one in there is a light part here and then
everything else is dark. Identify those lighter parts. And then just kind of shade
around them but keep it soft. Flicking area, they're
soft each to those max. And then again, when we come around here, it's quite dark. It is quite dark
underneath here. Part of it is made up by
the outline of the eye. I can do the insane
as this one as well. And then as you come up
here, this dark shape. So when I outline it, I'm
using a jaggedy mark. I'm not drawing straight lines. We want to keep it
feathery looking. It comes up to their shape
around the eye is quite dark. Beer. Maybe a few pointed
max is coming up this way to show that if
you feed those in there.
11. Sketch The Body Feathers: Okay, We're gonna do a
few feelers on the body in the way that assessment. I can already see that when
I look at this overall, it's a little bit gray. I definitely need to define
some areas a little bit more. But let's bring in
some of these fevers. If you want to follow
the actual field is that you can see then you
might just be using a Mac, kinda like what we did here, but a lot softer and going
light and then going dark. So you'd be doing the whole
thing just with shading. And then you can see
the next one is light. And then his dark again. Then there's light. Then it's really dark over here. What I was looking at
is this light area. And there's a dark area, then there's a lighter
area than the dark area. Little light area. Will you
go back the other way and put dark and the incident light. But another way to do it would be to just take the
general idea of the fetus. Little bit like these here. And draw in some of the
main shapes you can see. So I can see some coming
just under the beak here, its direction and then some
curving around like this. And some coming down. That kinda gives it
a bit of character. And then we can just draw
in some feathery shapes and then treat them
like this here. So the light at the tip
and then the Docker. So this is the tip of one
is going to be darker, up-close Nick and light at the tip and then
the one underneath it, it's gonna be dark. And then light here and then the one underneath
it is going to be dark. And then light and just going to keep
working in that minute. So it's up to you. If
you want to follow the photograph
completely, then you can. I'm just following
little parts of it. So definitely following these curved ones that come around. I think may give the photograph a little
bit of character. But then I'm going
back to the pattern. This here you might feel
like it needs to be perfect, but it really doesn't
matter that much. In comparison to the face. The face is what we're drawing. This. I could have it. I could leave it like this
and it would still look okay, maybe just have a
few more over here. Because this first part here
creates the illusion that the rest of this would be covered in the same
types of feathers and the brain makes up the
rest of those details. The wing starts to
come down here. So all of this would
be a bit darker. I don't want to make
it as dark as it is in photograph is actually black
in the photograph here, but that's going to take
attention away from the face. So just to summarize
these fevers, there's two ways you can do it. You can go through the
feathers if you've got photograph or you can see it clearly on screen and
just work your way. Light, dark, light,
dark as you see them. Or you could define some shapes, maybe from what you see or otherwise just that
general shape of the fetus and make them darker at the part that's going into the body and then
the lighter at the tip. I'm still even though I'm
doing it like everything else, I'm still looking
at the photograph. So especially when
I come over here, I'm looking for
where it's darker, just shading it in very
loosely and scribbly. And then having a
few lighter parts for the tips of the fetus. Bit of shading underneath
those to define them. It's probably all I'm
gonna do for the body. If you've got the
full photograph, you can keep going further down. I don't actually know who
took this photograph. That was really hard to try
and find the original source. So it's not a really great
high-quality photograph. So you may not
have a lot of like printing it out and
getting great detail. Anyway. Next we're going to have
a look at our photograph, have a look at our
drawing and just see where we need to
make some adjustments.
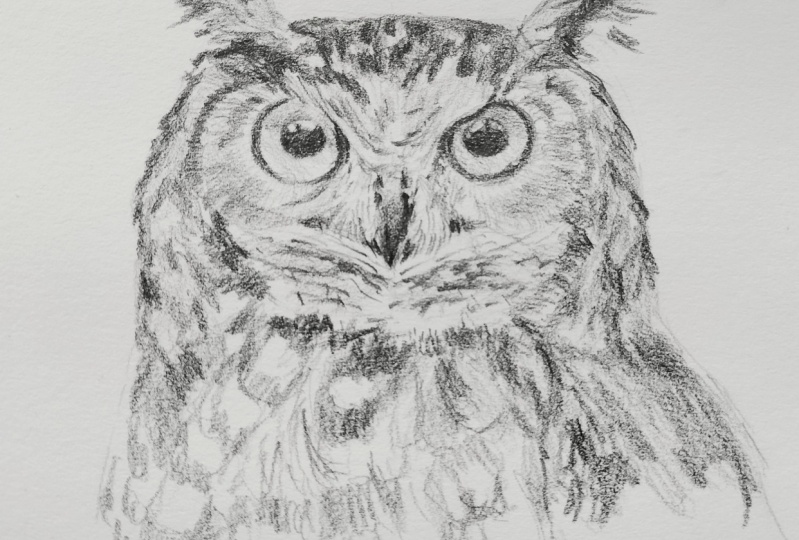
12. Check The Shapes In Your Drawing: Let's start by
looking at the shape. Have a look at the
shape of yours. Have a look at the shape
of the photograph and see if there's anything you
think you need to tidy up. I feel like this is
a bit weird up here. So I'm just going to, some of it might be because of
the light and the dark, but I'm just going to change
the shape of it slightly. It's quite flat along the top and straighten it
out a little bit. Side is pretty good. Looking at the shapes of the
feathers around the eyes, the shapes of it
but triangle but under the beak in I think my needs to be a
little bit thinner, so I'm just going to bring
it a little bit more shading here up a little bit more. On this side. We'll look at the shape around the eyebrow area above the eyes. Make sure their shapes create Fifi this just coming down
here on the side of the beak. Not part of it, fluffy
part it just above it. I've got a bit of a hard
line here that was just left over from when I was
painting the drawing. So I'm just gonna
get rid of that. Just bringing it rough,
but the shading.
13. Check The Values In Your Drawing: So that's the shape. It's a little bit of
a line across here, needs to come side of the face here needs to come
around a little bit more. The next thing to do
is have a look at your values and think about what is light,
what it's dark. Mine overall is quite light compared to the
photograph and a lot more dark in the photograph. And I'm not worried
about that down here. In particular, underneath
the face here, it's very dark and by not
having that in my drawing, I don't get that nice
light area there. So I'm going to
come in with some darker values under here. I'm going to stick
with the idea of the fetus pattern
on the feathers. That's really made it stand out. I think maybe some of these feet listening to come down
a little bit further. I could actually draw in
some feathery shapes. And then just looking
at the pattern. This needs to come up a little bit more actually this dark area and need a few more lines coming across in this area. This was again to make
it a little bit darker. What else in your drawing
needs to be DACA? Well, what else am I
drawing needs to be darker. Maybe you can look at my
drawing and compare it to the photograph
and think about what needs to be darker. So these light areas around the eye are getting
a little bit lost. So I can bring some
darker shading just around the outside of
those species under here. Sides of the face definitely
needs to be darker. At the moment they
look like they're the same value as this
path around the eye. But in the photograph overall,
they definitely darker. So I need to put
some more shading in here and I'm going
to try and keep it. The same kind of pattern. Fetus. If you've got a
good pattern down or 3D, then maybe just
shading over top. There's going to be enough, but mine is not quite dark
enough for my patterns, so I think it would
just disappear. Bringing those darker parts
around the side of the face there, around the
side of the heat. There's a few lines
that start to come in. If in doubt, use a scribbly pattern and just look at the direction that the
feathers are going in. And then the side needs
to be even upset. It's made a big difference, really made the face
stand out a lot more. Side was there needs to be
darker, scribbly pattern, but also trying to pick up a few little details as
I do the pattern, I'm flicking my eye
to the photograph. You can see it's
dark around here. Fetus come inwards. Few. Fetus you can
see down here, dark patch in here, which I'm just
going to fade out. And he has all kind
of a bit blurry. You can't really see a lot, but it's darker
around that area. You might have gotten a little
bit over during feelers. We're shading theaters by now. And that's okay. You can stop this
whenever you want, really, it's up to you how much detail you want
to put into it. I'm just going to
sharpen my pencil and put a few more sharp marks around the place and I think
we'll probably be finished. One more thing I noticed
when I was sharpening my pencil is this area
here is to light. Again, if I compare
it with other parts, especially this part
around the eye, it's really light
around the eye. This is not really much darker. It should be light here. That's important
just above the eyes. But to bring that
out and to bring this area into the correct
relative tonal value, I just need to bring
some shading over the top here document
all alphabet. Bringing the white area out. Make sure it's not
too obvious a line. So you might want
to bring in a few, a few feather a year is with these sharp pencil flicking max. And then now that
I've darkened knit, this is not as dark
by comparison. I need to go in and
really darken that up. There's the black of the ear, so that should be
about the same. Can fade it out a little bit because it's at the
back of the heat, but I want to bring
definitely some darker. And around here, I go
to shop a pizza now, which is nice too, because it's good to have some contrast between the soft
areas and then you bring some sharp periods
over top as well. I forgot to do this part here. I think I'm actually going
to look at this one. There's not a lot of detail in the photograph,
but this one here, you can see that there's some
feathers and it's quite, quite a cool look for
effect we can create. So I've drawn some fetus there and then I'm just going
to shade those in. Define the edges of them
with it. Dark shadow. Got a few white
patches here and here. So I just need to fix
those up a little bit. If you've seen any other
tutorials of mine, you know that we usually
do a review at the end. That's kind of what
we're doing now. But you can look for all the dark areas
and the photograph, What's the darkest era you
can see in the photograph? For me, the things that draw my attention apart from the
eyes of this part here, in these parts here, I need to make sure that
those are in my drawing. And then what are
the lightest parts that draw your attention
in the photograph? Squint your eyes if you need to. Make sure you've got
those in your photograph. So this part here and around the eyes maybe means this pupil needs to be
a little bit docket. But you're also
looking for areas in your drawing that
are really light. That when you look at the
photograph then not light. So trying to find that the
parts it should be liked. But we're also looking
at our drawing independently and thinking, what's the lightest
part in our drawing? For me now it's
probably in here. And then looking
at the photograph, is it the lightest pad
and the photograph, this is one of the
lightest parts, but around here might
be a little bit lighter on the rim of the eye. And here I think I've lost
a little bit of the light. I've got a bit too much, got a bit carried away with
the flicking lines in there. This tool here is
really good too, if you want to bring
back some texture, some light, but also some
texture within that light. So I could go around, It's
not particularly sharp, but I could go around and just bring out a few light
areas around the eye if I need to or anywhere else, maybe along here I think I'm missing a
little bit of that. Goatee. Just the
tiniest little thing makes a big difference
in this part here. And see what's missing
in my drawing. A little part of it here, that dotted line that goes
around the face. But this is dark patch in here. When I put that in, again, it's going to make this
white part stand out.
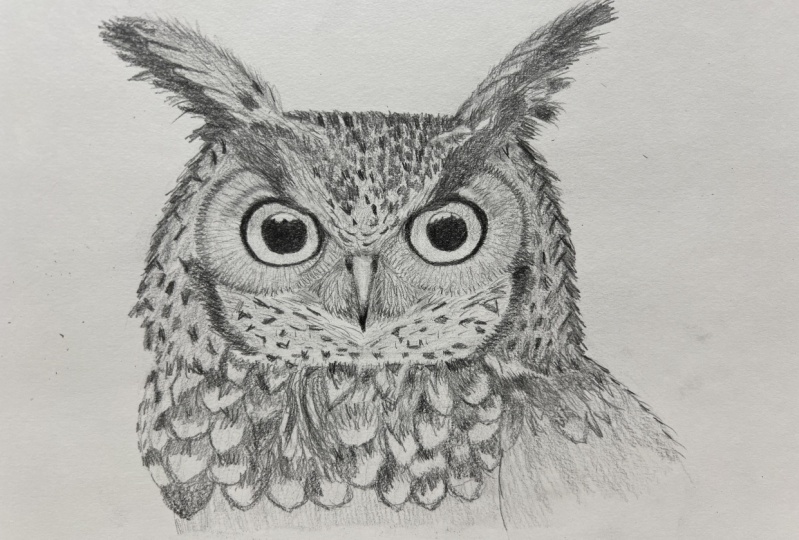
14. Summary: Is it finished? Not quite sure yet. It's probably a few little
things I need to correct. White and dark areas
that shouldn't be there. Something I haven't
quite got it right about the eyes in, I think what it is, the pupil is a
little bit too low down and maybe not
quite the right shape. So I guess if I really
wanted to quick that I could come come in with
this potty eraser. Oh sorry, this pen eraser. And create the shape and just
move it up a little bit. That one looks better
than this one now ready? Move my highlights up
a little bit as well. There's a few things
that I can see that arch correct
with my drawing. But this is also
an exercise that, or a sketch class. It is more about Linnaeus and different techniques for
creating different textures. So I hope that is something
that you've gotten out of it. You've learned how to make
soft, fluffy, fluffy feathers, fluffy feathers and some
of those long fine of feathers around the eyes as well using a really
nice sharp pencil. We also use those simple
shapes right at the start of our drawing to try and put
something down on the paper, figured out the proportions
first and the angles first. Before we start refining
those shapes and looking for the subtle details in the ages of those shapes. And then of course we edit
our further details over top into our review at the end where we just checked
for lights and darks. I hope you enjoyed it. Remember if you want
to this the photograph of the full hour. So you could have
a go at drawing the whole owl or even just taking your drawing that
you've got here and just extending it down a little bit by looking at some
of the feathers. You could use the same
techniques for drawing of any hour or any
other boots and effect. So thank you very much for
joining me and I hope to see you again in another
sketch club tutorial.
 Emily Armstrong, The Pencil Room Online