Transcripts
1. Introduction: [MUSIC] Hi, I'm Emily. I'm an artist and an art
teacher from New Zealand. In this class, I'll take
you through my process for drawing a realistic nose. I think the nose is probably the hardest pitch
of the face to draw because there are so few
outlines and shapes to rely on. Most of the drawing
happens with the shading. This lesson focuses
on how to catch up the lightness of
a particular nose. We'll be drawing from a
photograph and using techniques that identify the unique
shape of the nose. First, we'll take a quick
look at the parts of the nose and do some
useful warm-up drawing exercises to make sure you're comfortable with the shading
skills we're going to need. Then we'll work through
simple steps to find the correct structure
of the nose before using detailed shading to
create the 3D form of the nose. This class is
suitable for people with basic drawing skills such as sketching simple shapes and shading a range of tonal values. However, if you are a beginner
and you like a challenge, then I'm sure you will learn
a lot from this class too. Let's get started. [MUSIC]
2. Materials: Materials. You can use a range
of pencils from 2H to 6B to sketch and shade
with for this project. You'll need to be
able to achieve light middle and
dark tonal values, so you could use a
light pencil like a 2H to start your
drawing and for light shading and then use a 2B or 4B pencil when you're
ready add darker shading. You may also like to
use a cotton bud or a Q-tip or a paper towel to blend in and smooth
out your shading. Any paper suitable for
drawing on will do. Just keep in mind that
the texture of the paper will affect the appearance
of your drawing. Paper with a fine texture is more forgiving
than smooth paper, but the texture will show
up through your shading. I'm using regular
sketchbook paper which has a slight texture, and it does show
up in the shading. If you have a tablet you
could also use this class to draw a nose using digital
media like Procreate.
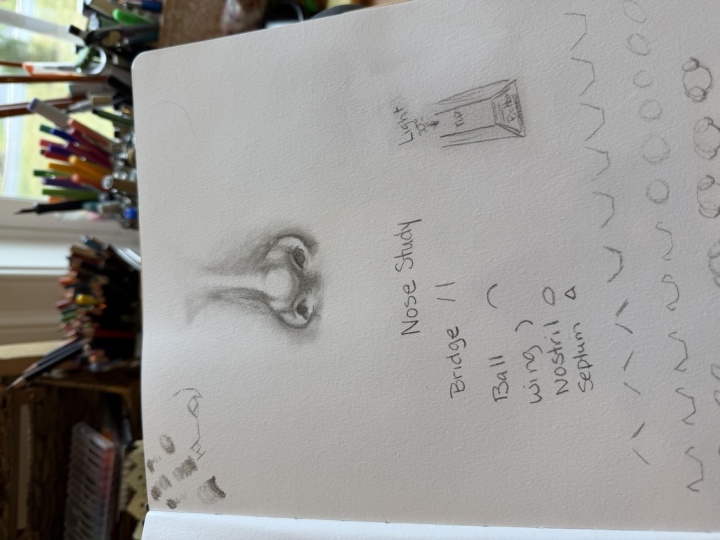
3. Basic Anatomy & A 3D View: Let's take a look at the
anatomy of the nose. The parts of the nose
I'll be referring to in this lesson are the
bridge of the nose, which is the hard bony surface running down the
top of the nose. At the bottom of the bridge
is the ball of the nose. That's the roundish shape
that sticks out the most. Then we have the nostrils, which I'm sure you
are familiar with. The wings of the nose
on either side of the nostrils and the septum, which is the wall that runs
between the two nostrils. Think of the nose as a
three-dimensional shape. It has four main
surfaces or planes. The top, the bottom, and the two sides. The direction that the
light is coming from will affect how light or
dark each surfaces. In a normal situation
where the light is coming from above
the top surface, that is the bridge of the nose, will be the lightest because the light is falling
directly on it. Either side of the
nose will be light, but not as light
as the top plane because the light doesn't hit the sides directly like it does the
bridge of the nose. The bottom surface
of the nose where the septum is faces the ground. Because it's facing
away from the light, it will be in shadow. It's really important
to look for these four planes
when you're shading. Think about where the light
is coming from and which planes are facing the light
and which ones are in shadow.
4. Warm Up Exercise: Before we start drawing, I've come up with two sets
of drawing exercises. The first set is simply
to get your hand and your eye warmed up and working
together in coordination. These exercises will warm up
your hand and get you used to the kind of max we will
be making in this lesson. Sketch lines at a 45-degree angle
alternating the direction. Notice how I use a light
loose sketching action, sometimes going
back over my line a few times to define the angle. Now sketch a horizontal
center line and then join an angled
line onto each side. This is how we might draw
the point of the nose. The part that sticks out. And we're drawing it using
only straight lines. Take this a step
further in this time, add a hook to shape
on each side. This is how we could draw the nostrils using
straight lines. They don't have to be
exactly the same every time. You can change the angles. If you like. This,
keep it loose. And light in sketchy. Now sketch small circles. Keep your lines fluid. Notice how my entire
hand is moving. It's not stuck in one place, but it moves with my pencil. Sketch oval-shaped ellipses
at a 45-degree angle. And then reverse the angle. We're gonna put these
circular shapes together now. Draw a circle and then
add an oval to each side, leaning into the circle so
that it's slightly overlaps. This is how we might draw
a nose using ellipses. You can use a darker line now to define enjoin the bottom
edge of the ellipsis, forming a nose shape.
5. Practice Your Shading Skills: The second set of exercises covers shading
techniques that are important for creating
smooth layers of shading with no hard edges, which is what we need
to be able to do to get a realistic result when
we're drawing a nose. Hold your pencil a
little bit further back than usual and
move it from side to side in a shading motion with very little
pressure on the page. As you move across the page, gradually increase the pressure. If your pencil, the idea is
to control the pressure. To achieve a smooth tonal
scale from light to dark. Start off with light pressure, light Tmax, and slowly increase the pressure
of your pencil. Marks become darker and darker. Try this out several times, trying to get a nice
smooth transition from light to dark. You might find in overhand
grip of your pencil allows you to shade lighter
marks with less pressure. Try some different grips and
see what works best for you. Try holding your pencil a little bit further back
as well and just resting the tip of the pencil on the paper as you move
it back and forth. Next, shade a small area using very light pressure and moving your pencil in small
circular motions. Keep layering your
circular max to gain coverage until there are
no whitespaces lift. If you don't control the light
pressure of your pencil, you'll get dark scribbles. The aim is to build up
layers of pencil using this circular motion until
you have a nice flat, even coverage of
pencil on the paper. Now try using this technique
to shade a simple sphere, shade a circular area, all to the same
light tonal value. Remember to use a
circular shading motion thing. Gradually add layers of pencil to the bottom
part of that circle, increasing the pressure to create a
three-dimensional shape. The control of the pressure of your pencil is what
is important here. If you go too dark, too soon, you'll
end up with this. There's a clear divide between the first layer in
the second layer. In steed tried to integrate the layers with soft pressure, blending one layer into another. This next exercise is similar. Shade a circular
areas so that it is all one even light tonal value. Then starting from the center, increase the pressure and moving outwards decrease
the pressure of your pencil so that you're shading fades out into
the layer beneath. If you notice any hard edges
tried to blend them into the layer below by controlling the pressure
of your shading. Keep using that circular
motion to avoid hard lines. Finally, create a shading scale similar to the very
first ones that we did. However, this time start
with a light layer of shading by vigorously moving
your pencil back and forth. Use your pencil at an angle so that you're shading with
the side of the pencil. If you shade with the
side of the pencil, you can cover more ground and you get a softmax so you
avoid creating hard lines. Then go back over
the same layer at one end with a
slightly darker tone. But as you move across, gradually lessen the
pressure of your pencil to fade it out to
the layer below. Repeat this until you have a
gradient from light shading, too dark shading with no obvious lines between
the different values. Be patient and take your time to build up these gradual layers. If you rush it. And it looks like this. Try again working on
the first layer and shading until there are no white spaces between your marks. Build up darker layers
and the same way, patients in
controlling the pencil of your pencil on the page. A key to getting this
gradient effect.
6. Introduction To Drawing Project: Now, we are ready to get
started on our drawing. You can download
the photograph from the resource section of this class on the
Skillshare website. Print this off or have
it visible onscreen, and then follow along
with me as we work through the four steps
to complete the drawing. Take a break whenever
you need to, especially if you find
yourself getting too critical with your drawing
or if you're rushing ahead, and then you can come
back to the drawing when you have a calm focus.
7. Four Step Drawing Process: We will follow the
four-step drawing process. First step is structure; mapping out the particular
nose we're drawing by finding its specific angles. Second step is sketching, where we add organic
lines and shapes. The third step is
blocking and shading two tonal values to identify the highlights
and the shadows. The last step is
building detail. Building up smooth gradations of shading and refining
the details.
8. Drawing Project Step 1: Finding The Structure: The curve of the
ball of the nose can be defined by three angles. The base of the ball is
usually a horizontal line. And then there's an angle at
each side as it curves up. The shape of the nostrils can also be drawn using
straight lines, often with four angles. Sometimes the nostrils might
appear square shaped or diamond shaped when you draw
them using straight lines. The wings of the nose
can be drawn using two main angles to
show the curved shape. One angle at the
bottom of the curve, and one angle at the top. The sides of the nose
can also be drawn in as n goes to Ed structure. However, it's important to keep these lines very
light as most of this area around the
top of the nose will be defined using only shading. Will start with a
quick practice run, drawing a diagram
of the structure of the nose up here in the
corner of the page. And this is to help get L brain used to what
we're looking at. Give it a bit of processing time before we start on
the real drawing. Start with the three angles that make up the
ball of the nose. And as you draw them, you're looking at
the photograph, trying to gauge the angle
with your eye in taking your time to sketch
lightly with your pencil. Then look for the
shape of the nostrils. If I'm using straight lines, the nostril on the right-hand
side kind of looks like a diamond
shape on its side. And then when I
look at the nostril on the left-hand side, it's also a diamond shape, but it's more like an
upright diamond shape. What I see might be slightly different to what
you see as well. So just do your best to break those shapes with the nostrils
down into straight lines. Now sketching the two angles
of the wing of the nose. And you're going to have
to take a bit of a guess at how far away from
the nostrils it is. You might draw a line from
the nostril to the edge of the wing of the nose to
gauge that distance. And repeat for the wing on
the other side of the nose. Gauge the distance
away from the nostril, and then draw in the angle
at the base of the curve. And then also draw in the
angle at the top of the curve. If you need to make changes, then it's really
important that you do. So don't just go with
your first draft, but have another look
and see if there's anything that needs to be
corrected at the stage. And probably will
change again as you go. That's just the
nature of drawing. You put down a mark
and then you've got something to respond to. Have a look for any
other structural lines that you can find. So I can see a line on the
side of the ball of the nose. And I'm drawing that and
then trying to figure out the shape of the nose
up along the bridge. What shapes in what
angles can you see? It's okay to not be quite sure about that right
now as well because it is a difficult area to define in a lot of that will
come with our shading. You can also add in the
line underneath the nose. That's at the base of the septum where the nose
joins onto the face. Now we're ready to start
our final drawing. Make sure it's about two inches high so that you've got enough space to put
in some detail. But that is not so big
that you're having to spin days shading this thing. And go ahead and follow the same steps that we did for our quick
practice diagram. Put on the ball of the nose with three angles and then start
to put in the nostrils. You can draw a line across from the top of each nostril and see if that's on a
horizontal line. It's important when you
do this that you're not copying your first diagram. That you're actually looking at the photograph and drawing
the structure again. Now that we've had a little bit of time to get used to it. It'll be a little bit
easier to see those angles. You can also draw a line
that connects the bottom of the nostrils and see if they
are in a straight line. I'm gauging the distance between the nostrils and the
wings of the nose just by drawing a very
light line across it and running my eye across
it at the same time. We want to find
the two key angles of the wing of the nose, the top angle in
the bottom angle. And if you want to add in an
angle or a line that joins those two up in the middle of that curve,
then you can do that. Sometimes it depends
on how big the noses in how wide the curve is. We want to use this stage to
sketch and anything that is structural that's
going to help us place the rest of
the drawing on top. If you're drawing
a light enough, you should be able to make
corrections as you go. If you see something
that needs correcting, just draw over top
of your lines. You might have
noticed that I spend some time with my pencil just hovering above the paper or moving from 1 to another
without drawing. And that's my way of
gauging distances. As I'm looking at
the photograph, I'm moving my pencil around
as I make visual calculations about angles and distances and shapes before putting
them down on paper. And it's something you
might like to try to have a guess at where the
highlight of the nose starts. And I'm drawing in the shape of the
highlight of the nose, that light line that runs up it has a way of finding
the bridge of the nose. And that top surface or
top plane of the nose.
9. Step 2: Sketch Simple Shapes: Step two is sketching. Once the structure of the
nose has been mapped out, we can go ahead and sketch out the shape of the nose over top. Adding in the three ellipses of the nose brings a more
natural shape to it. And we can look again at
the shape of the nostrils. Remember to keep your
sketching lines very light, especially up along
the sides of the nose. Now that we have the
structure of the nose down, we can start to bring some
more organic shape to it. Have a look for the ellipse
of the bowl of the nose. Try to see this
in the photograph first and then sketch
it into your drawing. And the same with the two narrow ellipses that create the form of
the wings of the nose. This is just going
to help give our nose some more organic shape. Then you can also go through and curve off some of those angles. We were using straight
lines and angles to find the correct
degree of a curve. And now we can go over
and just move those out. You always want to be looking
back at your photograph. So even though you've already mapped out these curves
with straight lines, look at your photograph
as you draw over top of the structure because you
may see something different. Before we go into shading, you could start to sketch in some of the light
and dark areas. Can you see where the shadow of the bottom plane of the nose comes up onto the
ball of the nose. I'm sketching around that shape. It may be useful to sketch a vertical line up through
the center of the nose. And think about where the different elements sit in relation to this center line. When I do this, I can see that the highlight along the nose
is not right in the middle, but it's slightly off
center to the left. See if you can find some kind of shape for the sides of the nose. And it's hard for me to tell you exactly what
to draw because it's such a subtle area that what I see might be different
to what you see. How can you define
the side of the nose? Weird. Does the side of
the nose start and stop? Draw this very lightly? Because when we put our shading and we want those
lines to disappear.
10. Step 3: Blocking Basic Tonal Values: Step three is blocking in. We're going to bring
in some shading now. Shading in everything
except the white areas. It's the highlight along the bridge and the
ball of the nose. Before you start shading, erase any lines that you think
are going to be too dark. We don't want to have dark lines anywhere on the nose really, except perhaps around the top of the nostrils because those are going to be shaded in black. If you have a putty eraser, you can just dab lightly over your lines to push them
back a little bit. I've lightly sketched
in the shape of the bottom plane of the nose. Have a look and see if there are any other shadow areas that you can sketch and very lightly, just to help identify where
you're going to be shading. A shadow tone is an area on either side of the
wings of the nose and also the area
underneath the nose. If you can see in the shapes of tonal value on the
sides of the nose, you could sketch those into, but don't worry if you
find that difficult, just leave it blank for now. Once you've very
lightly sketched out all of your highlights shapes
and your shadow shapes. Then you can start to block
in one base layer of shading. We're shading everything except the highlight on the nose. I'm using very
light pressure with my pencil and using a
back-and-forth motion, I find this is the
quickest way to get a nice light and even
covering of shading. If you find that you're shading
is quite dark and you're having trouble keeping
the pressure light, then you might need to
switch to a lighter pencil. You could also try holding your pencil a little
bit further towards the back and just resting the tip of your
pencil on the paper. You'll see that I'm shading
over all of my sketch lines. I'm not coloring in sections. I'm just putting down a
base layer of shading. Once you've got that
light layer of shading, and then you can
come in and block in your shadow areas just with
one darker tonal value. And it doesn't have to be the
correct tone at this stage. It's really just to mark it and identify it so
we know where it is. Remember those four
planes of the nose. We've got a top plane, the two side planes
and the bottom plane. Think about where the
light is coming from. In this photograph,
the light looks like it's coming from above. Which means that the
lightest Surface will be that bridge of the nose that runs down across the
ball of the nose. And the darker surface will be the bottom plane of the nose, the part of the nose that is
facing towards the ground. Go ahead and shade in
the bottom plane of the nose with a
darker tonal value. Notice that this tonal value I'm using for the
shadows is still only maybe a middle
gray at the most. We can always go
darker later on. But this step is just to
identify where our highlights, our mid tones in our shadow
areas are going to be. Because those tonal values
are what you need to create. The illusion of
three-dimensions.
11. Step 4: Building Detail: We're up to step four, which is building detail. We've gone through the
other steps quite quickly, but the state is the one
that's going to take the most time and the most
amount of careful attention. If you need to take a break, then feel free to do that and then come back
with fresh eyes. In this state, we're
going to build up gradual layers of shading. And what we're
trying to achieve is a nice seamless gradation from our light tones
to our dark tones. If you have a look at the
photograph of the nose, there's not really
any edges except maybe around the wings of the nose and also
around the nostrils. I'm starting with the nostrils because they're easy to define. We can see them quite clearly. If you have a close look at the nostrils and the photograph, you'll see that the upper
edge of the shape of the nostrils is
quite a sharp each, and so I can use a sharp line. But as you come towards the bottom of the
shape of the nostril, the edge is very soft, so I need to adjust my
shading to make sure it just fades out a little
bit as it comes towards the lighter area. Use a sharp line to define
top edge of the nostril. Looking again at the shape to make sure you've
got it correct. And then shade in the shape. And as you come towards
the bottom of the shape, allow your pencil pressure
to fade out the shading a little bit so that you get that nice soft edge
at the bottom. Blocking in some of the
shadow of the philtrum. Now the groove between the two columns are the
philtrum just beneath the nose. And also adding in some shading on either side of the
wings of the nose. These dark areas of
the easiest to see. Quite often I'll
start with those. And then you can
start to work on the more subtle details
around the ball of the nose and going up
the sides of the nose. Just taking my time now
to do a few checks. And if you see something that
isn't quite right thing, that's really important
to correct it now, because it's only
gonna get harder to correct it as we go
on with our shading. I'm just looking at
that shape underneath the left hand wing of the nose and making sure
I've got that correct. Before I add in the rest
of the shading there. In this state, we want to
balance out our tonal values. And that means having a
range from white to black. And trying to get to all those gray tones
in-between in the right order. And the way you do this is by comparing one area to another. If I have a look at the
black tone of the nostrils, I can then look at this area of the bottom plane of
the nose and think about how does that relate? Is it much, much lighter or
is it more like a dark gray? And if you're
struggling with it, with finding the tonal values, then try squinting at
the photograph as well. And as soon as you squint
to the photograph, you'll see the
nostrils really stand out as a dark shadow. But then next thing to stand out is that bottom
plane of the nose. I'll focus is on building
gradual layers of tonal value so that they look like they merged
seamlessly with each other. And the way we do that
is by building up layers gradually and using very
light pressure of the pencil. Try to blend each layer that you put down into the
layer underneath it. You can see here I'm feathering around the edge of the shadow, underneath the nose and
around the ball of the nose, so that I don't have
any hard edges. This is with its circular motion of shading might
be really useful to creating small circles
with your pencil. As you go around in each, we want to blend a
dark tonal value into a lighter tonal value. The key is really the
pressure of your pencil. So like I said, if you find
that you're shading is coming out just too
dark and too obvious. Then hold your pencil
further at the back and barely touch the
paper is you shade. Takes a lot of time and a lot of patients, but it will pay off. If you can stick to this. If you get frustrated, then it's best to take a break and then come back
and have another go. If you have a look
at the edge of the highlight along the nose, it's not a hard
line near either. So I'm just using my
potty eraser to soften off the edge and to get rid
of any of those sketch. Max, it I might've histo head
coming through underneath. If you have a look at the
cheek on the left-hand side, you can see a bit of the
cheek theater and it's quiet, well-lit, which
makes me think that the light source is
coming from above, but also slightly from
the left-hand side. And this helps me to see that the left-hand
side of the nose is slightly lighter than the
right-hand side of the nose. We started this step with just three tonal values to highlight the mid tone in
the, in the shadow area. And as you start to put
in more tonal values, more half-tones in-between
those three main values. You should see the form starting to pop out from the page. If you want to, you
could at this stage, bring in a cotton bud
or a paper towel or a blending stump and just smooth out some
of your shading Max. I think it's really important
that you do most of the work with your gradual
layers of shading. And don't rely on these blending tools because
if you use them too much, you can end up with just a
big gray blob on the page. If you haven't used one before, then do a bit of a taste somewhere on the
side of your page, put a bit of shading
down or maybe even on the diagram there off
the planes of the nose. If you've drawn there with
me and just see what happens when you use something like
a cotton bed over the top. Try not to use your finger. You don't have very much
control with your finger and it also puts a lot of
oils onto the page. The only time I'd
use my fingers if I was drawing with Chaco. When you're using a
cotton bud or similar, just use very, very
light pressure. It's like when we're
building up the shading, we're using super
light pressure. We can use our
blending tools with really light pressure
as well just to avoid doing anything
too drastic. If you look closely
at my drawing, even after using that, there's still some landmarks
and the air in some energy. I don't want to
smooth it out into nothing and just have a look. Lifeless. But I mean, that's a personal choice
that's up to you. If you were really interested
in hyper-realistic drawing, then you might want to do a bit more blending and see
how smooth you can get it. Personally, I like
my drawings today, a little bit more life,
a little bit of energy.
12. Step 4 Cont: Adding Black Points: I'm switching to a
darker pencil now. It's a for B pencil. And I'm going to pretty much go through the same process that
we've just been through. But now we're really focusing on balancing out the tonal values. The nostrils. I can
see quite clearly in the photo that they
are going to be black. So I'm shading those in
with my four B pencil, but taking care to keep
it sharp line at the top. And that's soft edge at the bottom of the shape
and the nostrils. Once you put in that black
point of the nostrils, you'll probably see
that everything else now feels a
little bit too light, and this is where the balancing
of the tones comes in. We need to build up
those tonal values in relation to black. Have a look for the
lightest areas in the photograph and
see if they're the same in your drawing.
Will vice versa. Maybe you look for the
lightest areas and new drawing and then check
them against the photograph. When I look at the lightest
areas in my drawing, I have highlight along
the top of the nose and then I've got
these two light areas underneath the nostrils. Here. If I have a look
at the photograph, they are light but they
definitely not white, so I need to block those
in a little bit more. And then have a
look at the darkest parts in the photograph. Remember, you can squint
if you need to and see how they compare to the darkest parts
and you're drawing. So the nostrils, the
wings of the nose, and also the bottom
plane of the nose. I need to add some
more shading to the bottom plane of the nose because there's not
enough contrast between the bottom
plane of the nose and the other three
planes of the nose. Notice that vertical line that curves up around the bottom of the ball of the nose is like a crease between two
pieces of cartilage. But it's really subtle. So building up with
very careful shading, you have a look at the
two sides of the nose. The shadow on the right
side of the nose around the wing is darker than the shadow on the left
side of the nose. And same with this
soft shadow line that goes around the
ball of the nose. You really want to work to blend that into the layers underneath. From this point on, we're
really trying to pick up on any subtle details or changes that we can see
in the tonal values. So keep flicking your eye between the photograph
and the drawing. You might want to
work methodically. We start from one side
of the nose and work across or from the bottom
of the nose and work up. In all the time
you are comparing tonal values to each other. Should this path be darker
or lighter than another Pat? Can you see that really fine. Highlight just
above each nostril. I'm adding it and just using
the point of a potty eraser. Adding a little
bit more blending. Now I'm really just
blending the edges of the drawing where they meet
the white of the paper. And just make sure
when you're using your blending tools that you're using something that's clean. Mine doesn't look
that clean bed. I have turned it around
and it pulled a bit of the cotton wool off it so
that I have a clean surface. Otherwise, what you're
doing is you're taking the graphite that's
on the cotton bed and you're just pushing
it into the paper and you risk making it
darker than you want. If you do find that you've shaded a little bit
too dark in one area. You can use a potty eraser to
very carefully Deb against the paper and lift
up a little bit of that graphite rather than
rubbing it all away. We're just about at the
end of this drawing. But what I'm
noticing now is that the nostrils in my drawing
are about the same size. We now look at the photograph. I can see the one on the
right is actually bigger. So it's not an ideal
time to make changes. But I do want you to
strive for accuracy. So if you see something
that needs to be changed, don't just ignore it
and just go, oh yeah, that'll do with trying
to capture the likeness of this particular
nose and later on of whatever
portraits we draw. So it's an important
skill to practice. Making those corrections. In this case is not
too difficult because the nostrils are the darkest
part of the drawing, so I can easily put them in over the top of my drawing
if I need to. If I had to make them smaller, that might be a little bit
more difficult because i'd, I'd have to be
trying to erase it really dark tonal value. So this one here
on the right needs to be just a little bit bigger. If you're making corrections, keep referring back
to the photograph. It's not enough to just
look at this and go. It needs to be bigger and draw
what I think it should be. I need to look again at the photograph and
redraw what I see. I'll make those corrections now. When you think you're
drawing might be finished, take a bit of time to just
lean back from it and have the photograph there
inflict your eye back and forth between the drawing
and the photograph. Focusing on details. Look at the shapes or the angles that we looked
at at the very start. Find those again
in the photograph and see how they compare
to your drawing. Squint your eyes and
look for highlights, shapes and shadow shapes. And see if you have
those same tonal values or tonal relationships
in your drawing. And it's always a really
good idea to take a break and then come back a bit
later or even the next day. And do that again, just flick your eye between the two the drawing in
the photograph. And chances are you probably see something that you didn't see before because
you're a little bit too close to the drawing. When you're in the middle of it. You can also turn the drawing upside down into the photograph or upside down together
and compare them that way. And that gives you a
really new perspective, one that we're not
used to in sometimes. That helps you to pick out inconsistencies
that you wouldn't notice when you have
them up the right way. Remember I mentioned that
the light might be coming from above and
slightly to the left. If you have a look at the space just underneath the nostrils, and you see that the space under the left-hand nostrils slightly lighter than the space underneath
the right-hand nostril. It's receiving a
little bit more light, so make sure that's
reflected in your drawing. I'll focus in the system
has been building up soft, gradual layers of tonal
value and shading. So just take a look
at your drawing now and see if you've
achieved that. Are there any areas
that need to be softened off a
little bit where you might have a hard edge and
there's no hard edge and the photograph shoes your pencil really lightly to figure
out those edges and to blend in one layer to
another if it needs it. You could also use
a potty eraser very carefully just to blend
in some of the edges. But be careful that
you're not taking away too much of your hard work. I hope that you've enjoyed
working through this drawing with me in that you've
got some good results. There is another nose
tutorial that you can follow along with
after this video. And then there's two more noses to practice with
in your own time. If you struggled with this one, then try to take it
easy on yourself. And just remember it's not about whether you like
a drawing or not. It's about just doing the
work in the practice. And the more you practice, the better you're going to get. With each drawing,
you're going to improve in some small way. It may not be something that
you're consciously aware of, but just some of
those skills that are absorbed into your subconscious, particularly the
observation skills. And that's why it's so important to just keep on practicing
and doing the work.
13. Summary: Thanks for taking this class
on drawing a realistic nose. You can share your drawing in the project section and I'd be happy to give
you some feedback. Drawing a nose is
difficult and it requires patience and careful
observation of tonal values, so well done for
completing the project. With each practice,
you'll get better at staying focused in
really seeing the angle, shapes, and tonal values
of what you're drawing. In the resources section, you'll find another page of noses that you can
practice with to keep improving those
important drawing skills.
 Emily Armstrong, The Pencil Room Online