Transcripts
1. Introduction: Hi, I'm Emily Armstrong. I'm an office in a teacher. Welcome to my studio Pizzeria. Teaching during is my passion, and I take the approach of giving you the skills that you need to be up to draw anything that you choose rather than teaching you how to George. Just one particular thing. Accuracy and proportion so important. If you want to learn how to draw realistic in this class, we look at the technical skills for measuring proportion from a photograph.
2. Tools & Materials: for this. First you need your sketchbook, and you need to pencils a lighter pencil in a darker pencil. So for the lighter pencil, I suggest using a to H and for the dark a pencil. I suggest using A to B. You also need a photograph of at least two objects. The reason we're using a photograph is it eliminates the difficulty of dips and three dimensional space at this stage. I'm gonna be using this photograph here, and you're welcome to use this to make sure it's available to you somewhere down below underneath the videos. If you'd like to photograph your own objects, that's completely fine. Just make sure that their planes simple objects with no extraneous detail or too much packaging. We really want to focus on the shapes in this class.
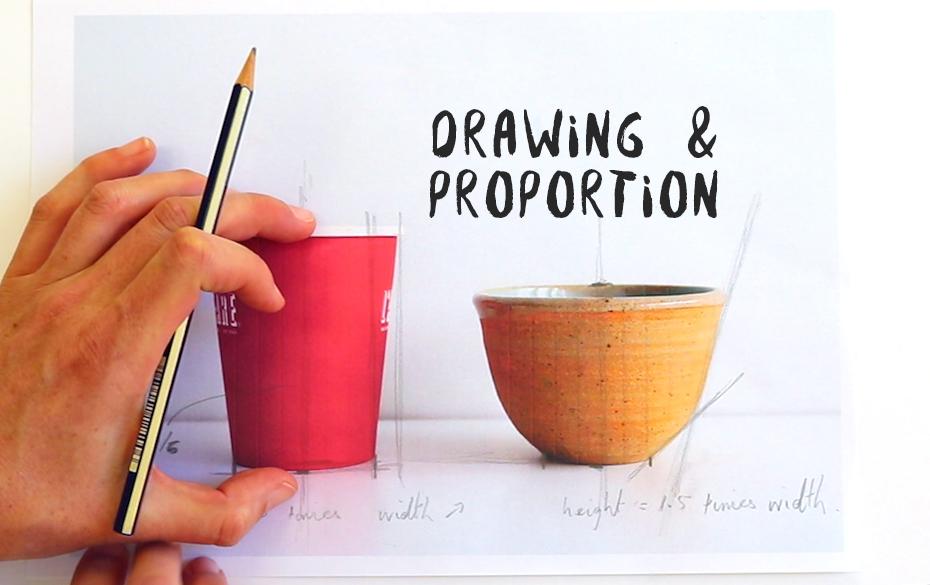
3. Project : for your project. I encourage you to create a skeleton during that shows your process and execution of measuring proportion. So don't be afraid to include written notes on your drawing as well. Sometimes it's a really good way to remember your process if you want to go back and refresh your memory. I printed out a cheap copy of their photograph, and I'm going to draw directly on this to show you how to measure three things. And they are the width and the height angles and points it lineup. This is a very technical exercise, and I wouldn't often approach a during from this way, but I really want to show you how I think about proportion. We know measuring things that aim here is not to produce a finished drawing, but to sketch an accurate framework is an initial plane for a drawing, so don't worry about trying to make it look really pretty
4. Exercise - How To Measure: I'm going to start with a very quick exercise just to show you how to use your pencil as a measuring tool. We're going to compere the woods in the height off a shape. When we start to think about measuring, it's really important not to think in terms of centimeters and inches. Instead, we want to think in terms of comparing pats. So is one pat half the size of another part? Is it 3/4 the size, or is it twice the size of something else so we can think infractions? But we don't want to be thinking and centimeters or inches. Otherwise we will get confused. It's really about the proportion off our subject matter. And in getting that same relative proportion into our drawing, I'm going to draw a simple shape on my piece of paper. You can draw the same one, or you could draw something different. I encourage you to do this along with me in real time, so I have this rectangle here and I have a width, and then I also have a height and what I would normally do when im sketching out my initial during IHS, I would measure the height along the scene to line off the object. So I'm just going to sketch in a quick seem to line three my shape to use my pencil as a measuring tool. I line up the end of my pencil with the end of what I want to measure, and I want to start by measuring the width at the base of my object. So I'm going to line the end of my pinto up with one end off this line here, and then I'm going to use my other hand. I'm going to take my forefinger in my thumb, and I'm going to use that to mark the point with the other range lies along my pencil. So this here is the width of this shape, and instead of thinking okay, it's about three centimeters. I'm going to take this with, and I'm going to compare it with the height off my shape. So I've got the with fear. I'm going to turn this around, keeping the same measurement, and I'm going to see how many times it fits along that seem to line into the height I'm using this finger. Here is a marking tour, so that's one time, and I would say that it's a bit more than half but its list in 3/4. So it's one and to foods. So what I've learned is that the height of the shape is one and 2/3. The width height equals one and 2/3 the woods. So if I didn't want to redraw the shape at a smaller or biggest size, but with the same proportions, it doesn't matter what size I started. I might decide to George about this big, or I might decide to draw it this big. Whatever size I decide to draw it, it needs to have the same relative proportions, so the height needs to be one into third times the width. So in this little one that I've drawn here, I can take my wits measurement. It's very small. That's one, and it's to foods I make a Mac via for my height, I have the height measuring one and 2/3 times the base or the with. So this here is the same proportion. Is this If I want to draw it much bigger, doesn't need a watch size. I make my first Mac. This is my width. I know that the high it has to be one and 2/3 times the woods. If I'm wanting to copy this or just sketch out a seem to line, I'm going to take my width measurement and I'm going to mark out my heart at one and 2/3 this with measurement one, and that's 2/3. And I know these sides constant their parallel with each of my page, the vertical lines so I can rely on them to be straight. So this shape here end the shape. Here are exactly the same proportion is this shape. The comparison between the width and the height are exactly the same. In all three of these shapes, the height is one in 2/3 times the width, and this is how we're going to approach measuring objects as well.
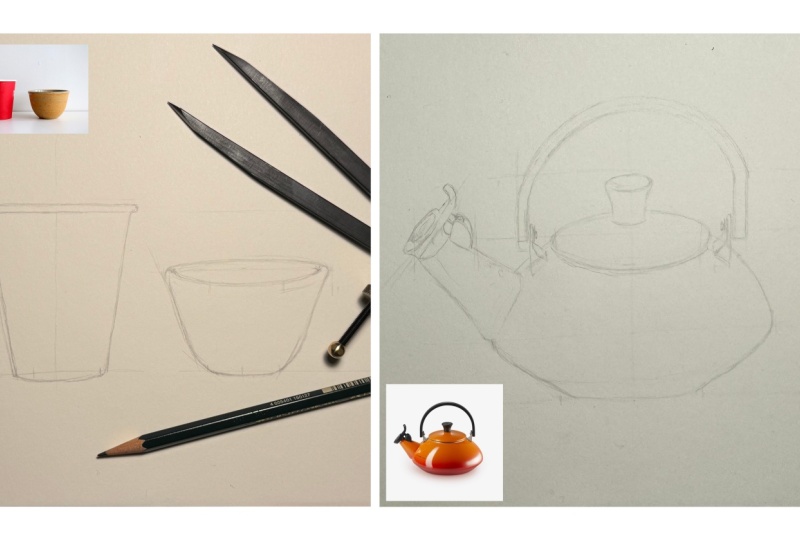
5. Measuring Proportion Part 1: it starts with this first object first thing, I'm going to do so Measure the width and compare it to the height. And then I will stacks my during over here on my page. Well, just make a market here so you can see what I'm measuring. I'm going to measure the bottom with off the object, and then I'm going to compare that to my height. So I'm just going to draw a seem to line through the object ID. Usually measure the height through the center. Let's take our first measurements. I'm going to line the tip of my Penis. So up with one end off the line, I went to Misha and then I'm going to use my finger or my thumb sometimes both whatever you find most comfortable to mark the other end of that measurement. So this here is the width of my first object. I'm then going to turn that around, and I'm going to see how many times it fits into the height of the object is one time and looks like 1/2. So 1.5 times what I've just learned is that the height of this object is 1.5 times the widths one in 1/2 times the woods. I'm going to come over here in draw what I've just learned about my proportions, and it doesn't matter what size I decide to draw this object I could draw. It's really big record your it really small. Whatever size I decided to make that First Mac. I just need to make sure that the height is 1.5 times the with. I'll keep my drawing fairly small so I can fit everything in. It's going to be smaller than the original. If you're doing this exercise, you might be filling up your whole page, which is great. That's my woods. I'll draw a center line through here, and what we learned was the height through the center is 1.5 times the width. So to find that height, I'm taking the woods and I'm measuring along my center line 1.5 times one and 1/2 and then I've got my heart. So the bottom with in the height and now in the same proportion as they are in my object, the next part I want to measure is the woods along the top, and I'm just going to take a little bit of a guess, and I tend to work fairly intuitively and then go back and check my measurements. You might be someone who wants to get everything really detailed and measured out first, and it's fine. I'm going to use my initial measurement, which was the base off the first object, and I'm going to take that and compare it to the width along the top. It's just maxed it out so you can see it. The words from the base fits one to, I'd say, two in 1/4 times into the width at the top. Let's see how mine CompuServe. It is my base in my estimate. Is that the woods at the top one to, and I think I'm probably pretty spot on to that mark there. If I wasn't, I could just extend this line on either side. A little bit will bring in on either side a little bit. The next thing I want to show you how to measure is angles. So instead of trying to draw this curve, we can look at the angle that the curve goes up. It and these two parts of this curve there's two angles. Is this one, And this this one here, it's Look at this one. First. We always compute angles to the horizontal line, usually the line about pencil, and it's because the horizontal line is always constant. We can rely on it. This year would be 90 degrees. 45 degrees is probably about this. I'd say this is just below 45 degrees. I'm going Teoh Macon estimate in states, 40 degrees. So what that means is, when I Jordan and go up here and again, I'm just making a bit of a guess. I need to check that. The single is also about 40 degrees. That would be 45 this is just a little bit less, which is what I want. And I know that the subject is pretty uniforms, so each side is going to be the same, and then I'm going to find this other angle here. In this time, I'm going to compare it to a vertical line. A vertical line is constant in its reliable Let's see how many degrees we think this angle might be. It's 45. That would be 22 a half. I'm going to take a guess and say it's about 15. So this also has to be about 15. Another way we couldn't do it. If you're working from photographs, is to take that measurement and see if you can actually transpose there over here. That can give you a good visual idea off the angle. And then we're just going to join those lines up in this one again. It's going to be exactly the same as this one. So what we're creating is a skeleton drawing. We're using construction lines. He straight construction lines and was sketching with a light pencil. I'm using a darker pencil. It's an HB, its not too dark, but I'm using that just to show you the during so you can see it.
6. Measuring Proportion Part 2: next it is toe ed in our second object, but the thing is, we don't know exactly where to place us. How far away is it from our first object? We can measure that by going back to our initial unit of measurement, which is the base of the first object, and we can see how many times it fits into the space between two objects. I'm going to say it's one and 1/2 times the distance between the second object, and the first object is 1.5 times the base of the first object. I hope you're following me here. I know it's tricky stuff. It's like doing myths, which US artists often aren't very inclined to do. It is the bait based measurement, my wit's measurement. I need to measure 1.5 times that with measurement to find where the next object starts and they both Are they on a straight line? It's have a look. This object just sits slightly below this first object. Here. Let's find the measurement of the space here, and to do that, I'm going to go back to my first unit of measurement, the base of the first object. And the reason I do that is because I don't want to have different degrees of error. If I take a mission, it from here and compare it. And then I take a measurement from somewhere else and compare that to another place You start. Tiu have these tiny imagines of era, and I'm already dealing with having big fingers and trying to get accuracy, so I want to keep it as consistent as I can. So I'm coming back to this initial measurement unit of measurement we call it. This is the width of my first object. How many times does it fit into the woods of my second object? One in the food times. So over here I take my base from my first object. The second object needs to be one in 1/3 times. Next thing I would measure is thes two angles. I know they're both going to be the same because it's a man made object. It's just draw that out so we can get a good visual of it, and we compare angles to the horizontal or vertical so that use of vertical for this one, I'm going to line it up with the start of the Anglo up here, and I'm just going to tell my paint so into it matches the angle of the side of the cup. It's not much at all. I'd say I always think about were 45 degrees. Is that sorry? That's about 45 degrees. It's probably maybe 10 degrees. Well, I need to do is make sure that I had the same angle in my jury and again I mentioned before that I tend to work quite intuitively. So I might even just sketch these in first and kind of have a look at them and see what I think. And then I might measure them again, go from the vertical to the angle, get a really good feel for So I got my sides and But I don't know how high this coffee cuppers. So to do that, I'm going to go back to my initial measurement, and I'm going to see how many times my width off the first object fits into the height of the second object, and I always measure that through the middle. So I'm just sketching in a center line here, measuring from here to here take outwits measurement first unit of measurement, one that fits one two in a little bit of very technical measurement. If I was to make that more exact, I would say that it's two in the sixth. So this here has to fit two in the sixth times into this height. Let's do that one to, and I'm just going to say into a little bit. What I have now is I have the height in the woods off both my objects and their proportionately relative to the height and the width in my subject matter. So now that we've got the skeleton drawing down, we can use lining up points as a way to just check out accuracy. One point we could line up would be the height of this object and were it into six with our second object. It say that's about halfway off the height of the second object. The height of this object here into six, about 3/4 of the way up the second object. So we can just double check and see, have I got my proportions accurate? This is about halfway, so yeah, I'd say it's pretty close. I might be slightly off, but I'm pretty happy with it that the top of this first object into six, about 3/4 of the way through the second object.
7. Adding Curves: The last step is to start adding in some curves and we've measured out the angles off these curves here. We can, if we want to get technical, also measure out the angles off the curves at the base off both these objects, and they're very, very subtle. And what I usually look for is the straight line. So the curves at the bottom of these objects will always have a section that is actually pretty straight before it starts to curve up. So from about 1/4 of the way in on each side, it's straight and then it starts to curve up on each side. And we could get really technical and kind of measure that angle without paintsil, comparing it to the horizontal line. I tend to when it's just settle like that just to work intuitively and sketching it in as a straight line. First, I'm using quite a dark pencil so that you can see what I'm doing. But ideally, I'd be using a lighter pencil when I could adjust that fairly easily. If I got it wrong and this one here, I've drawn over it, so it's hard to see, but it's straight for about this distance and in its steps, this curve up just very slightly. So most of it is straight, and then it starts to curve up again. I'm drawing those in with straight lines. There's also a curve here and again. I'm going to look for the straight line. How far along does it stay straight? And it's most of it is actually straight. This is the back lips, so I'm just going to take a guess at the front Look of the cuff. I could get technical, and I could take my based measurement and see what fraction off my based measurement. The distance between the back lip and the front lip is so it might be a six. They're in eighth of something like that, but I'm again. I'm working intuitively with this one, and it's mostly straight on the top and the bed cliff. And then it just us to curve slightly up, and I'm drawing those straight lines. No curves at the stage, maybe a slight curve here. She I think it's pretty straight the angle that that photograph was taken. It's pretty much straight across. So now that I've sketched my curves and with straight lines. I've measured the angles. Then I can go through and I can start to just round these off. Just were those two straight lines meet same up here? Same here taking those angles. And I'm just softening off the edges to get the correct curve. Same here. And then I could just add in a little bit of Daito this but of the line here with the Glazers coming over the top. And it's also this line here, and I can go over the line, said, I'm really happy with and just dark in the mouth.
8. Summary: I hope it's given you an insight into the way that I measure proportion using heightened with angles and lining up points. And it is very technical. It kind of goes against the creative nature of arch in. Like I mentioned, I tend to work very intuitively, so use a mixture. I'll start to sketch. But then I'll go back and check my proportions, especially if there's something that I can't quite get right. I'll use my I will use my pencil. Is it talk to chick those measurements and then translate those into my during. If you wanting to take these skills into the real world into three D space, the principle was the same. You use your pencil as a measuring tool. Make sure your arm is outstretched in your elbow is always straight in. The reason for that is that you always want the pencil the same distance away from your eye . If you are taking measurements like this and in taking measurements like this, you're going to get distortion. If you're taking your with you, line the top of your pinto up with side off, one within the new slide your thumb across to meet the other side of the width, natural width measurement and a few measuring points. That lineup You're always keeping your pencil vertical or horizontal because those always constant we know we can rely on the vertical in the horizontal to measure against. If you have any questions, please do ask. I know it's a tricky subject, and it's easy to get confused about it. Sometimes I still get confused about it, so please ask questions, and I hope to see your project soon. Happy drawing.
 Emily Armstrong, The Pencil Room Online