Transcripts
1. Introduction: Hello, my name is Ian and I am going to be your instructor throughout this course as we learn how to shape any object in three simple steps. I'm a self-taught artists with a focus on oil painting. Creating art from a young age, I understand what concepts truly transformed my work and brought my skills to the next level. In this course, I will teach what I believe to be one of the most important skills in our shading. I will break down the process slowly so you have a complete understanding. We will begin this course by learning the basics of shading and how to place value on simple forms. After, we will learn our three steps to shading any object. By the end of this course, you'll be able to identify basic objects within complex images, how to sketch planes, and how to properly place values. The lessons learned from this course are beneficial for anyone who is looking to turn in their sketches into realistic drawings. Are you ready to learn the steps and join me in part one?
2. Art 101: Basics of Shading: Hello, my name is Ian and I am going to be your instructor as we learn how to shade any object in three simple steps. Before diving in, I would like to review the basics of shadings. We have a firm understanding moving into step one. Let's begin by reviewing shading. What is shading? Shading is a technique used to create the illusion of depth in a two-dimensional subject. Let's take, for instance, this two-dimensional circle. How do we turn this two-dimensional circle into a three-dimensional sphere? We do this by creating the illusion of form or by adding values. Values are how light or how dark color is and are most easily observed in grayscale. This is why it's sometimes more easy to identify the highlights and low lights and a photo when you turn it to black and white. Here on the left, we have what is called a five-step value scale. This scale is going to bring you from absolute black all the way to pure white and just five steps. Now, on the right, you can see we have the same value scale, except the five steps have been blended together. This is what we call a blended value scale. Now, let's speak a little bit more about the terms I've listed next, each value. First we have to highlight. The highlight is the point of intense brightness. This value is found on the part of your subject that is closest to the light source. Next, we have the midtone. This value is the transitional space from our highlight into our shadow. Next, we have reflected light. This is the light that is reflected onto an object from the surface it sets on. If this sphere or to flow and absolute darkness, you would find a smooth transition from your highlight all the way around the sphere to your shadow. However, because his fears sitting on a white surface, part of that LE is going to bounce off of, on, off of the surface and back onto your subject. Next, we have our core shadow. This is the darkest part of the shadow, least affected by reflected light. It may also be considered the place where light and shadow mean. Lastly, we have our cast a shadow. This is the shadow and object casts on another surface by blocking the London. Now that we've learned the five different types of values, it's time we put our knowledge to the test. You can feel free to come back to these terms at any point throughout the course. Let's practice by identifying the five values we previously learned on this picture of a nose. I've listed the five values below for your reference. I'm now going to pause for a few moments as we think where each value goes. I would like you to note that there are many different places that you can identify some of the values. Feel free to pause if you'd like more time. Great. Now let's check out the answers and locate each of the five values on the snows. We can easily identify the highlight by recognizing which part of our subject is closest to our light source. I'm sure we're all familiar with what a nose looks like. So we all know that the tip of the nodes is going to come out the farthest and will be closest to our light source. Next we have our midtone. The mid tone, like I mentioned previously, can also be referred to as a transitional area between the highlight in the core shadow. As you can see, we have the high lay at the tip of the nose, what the core shadow lying around and up the bridge. The midtone is going to fill the gap between our highlight and our core shadow. Next, we have our core shadow. The core shadow can be found around the tip of the nose in places that are not receiving direct alight. Next, we have our cast a shadow, which are pieces of our subjects that are blocked from the light source. As you can see, I've identified the inside of the nostrils as our cast shadow. This is because the body of the nose blocks all light from getting inside the nostrils. Lastly, we have reflected light. I've identified the reflected light values above the nostrils. The light you see here is bouncing off of our subjects tuplet. Now join me in part two as we learn how to place value on simple forms.
3. Art 101: Value on Forms: Welcome to part two of our course. And this part we will learn how to place value on simple forms. Let's begin by identifying the five simple shapes. We have a cube, cone, sphere, cylinder, and the pyramid. One simplified. All objects are made up of one or a combination of these basic shapes. Learning to shade the form of these basic shapes is essential to understanding the form of more complex objects. We can begin understanding these forms by learning how light falls across them. Let's begin with the cube. The cube has a flat surface. The planes have defined edges, so changes in value are distinct. The cone has planes that radiate from its peak all the way to the base with a flat surface underneath, lay in shadow wrap around this form. The sphere is a completely rounded form. The planes are laid out like latitude and longitude lines you see on a globe. There are no sharp changes in the form, so values are blended smoothly. A cylinder has planes that moves straight up and down with a flat surface on the top and the bottom. Lastly, the pyramid takes characteristics from both the cone and the cube. Having defined edges that radiate from the top with a flat surface on the bottom. Now that we have an understanding of how these basic shapes interact with light, let's look at a visual example. Here we have our five basic shapes. The first step to accurately shading them is to add in their planes. Next, we want to locate the light source represented by this happy little sun. It may be helpful for you to draw in the direction of the light towards the each shape before adding in the phi values. Now that we've located our light source and added in our planes, we can accurately place in our values. Here are the same shapes with the values listed. Now, join me in step one, where we will learn how to identify simple shapes within our subject.
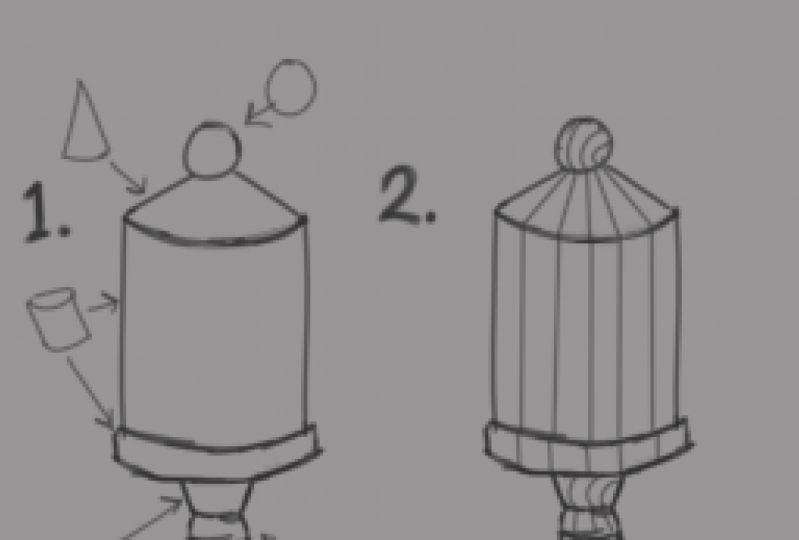
4. Step 1: Welcome to step one, finding the shapes. In this step, we will learn how to find simple shapes within our subject. Now that we've learned how to locate values and accurately place lay on three-dimensional shapes. It's time we learned how to find these shapes within our subjects. This will be our first step of three to shading any object. When you look at a pencil, you do not think of it as its individual parts, lead, wood, and any racer. You think of it as only a pencil. Let's take this process and reverse it. Now we do want to look at our subject as all of those individual parts lead wood and an eraser. Through finding those individual parts, we can see the smaller shapes that make it o. Once we learn this mindset, we can see even the most complex of images are not as intimidating as we think. Let's take for example, this pencil. The head of this pencil is actually just a cone. The body, a cylinder. The metal part or a for rule, also a cylinder. And lastly, the eraser is also a cylinder. Now, looking at our pencil, we see it comes down to two basic shapes, as cylinder and a cone. Now that we've identified the shapes within our subject, we're able to make sense of how light interacts with each part. For our pencil, all we have to do is refer back to our notes on how light interacts with a cylinder and a colon. Now join me in step two, where we will learn how to add the planes to our simple shapes.
5. Step 2: Welcome to step two and step one, we learned how to identify basic shapes within our image. In this step, we will learn how to add the planes to our simple shapes. To begin, I've converted our pencil image into the basic shapes we identified in step one. The first move to accurately placing values is adding planes to our simple shapes. Eventually you'll be able to mentally see these planes, but for now it's best to block them in. Make sure to draw them on lately as they are just guides for you. Now, permanent marks on the shape. Let's start with the cone shape, that is the tip of our pencil. Remember, the planes on a cone GO from its peak to the bees. Next, let's add the planes onto the body of our pencil. Remembered the planes on a cylinder go from one base to the other. Following up the pencil, let's add our planes to the rule. Lastly, we can add our planes to the eraser, following the same rules as the last two cylinders. Top of the eraser. Also the base of our cylinder is a flat surface, so we will not be adding any planes there. Join me in step three, where we will learn how to add our values.
6. Step 3: Welcome to Step three, adding the values. So far we have identified the basic shapes within our subject and sketched out our planes. Our next step is blocking in our values. To accurately place our values, we must first locate the light source. I have placed a list of the five values on the bottom left corner for your reference. Let's begin by identifying the highlight. At this point, we have not yet decided the light sources placement in relation to our subject. Where we identify the highlight is going to show which part of our subject is closest to the light source. I will use this plane here as our highlight. Next, we may identify the midtone. The midtone is our transitional space from highlight to low late. Because we've already identified our highlight, we know that the midtone must go on both planes to the left and the right. Following the rules of a cylinder, we know the body is a rounded form. This means as we move further away from our highlight, our planes began to get darker. This makes it easier for us to identify our core shadow, which is placed on the plane not receiving any direct light. Next, we may add in the cast shadow. This is going to be the part of our surface blocked from the light source by our subject. Lastly, we have the reflected light I've added in the arrows to show the way that our Les is bouncing off of our surface and back on to the subject. After blending, I would normally go in and place a small highlight closer to the tip of the pencil to represent our reflected light. And now here we are and accurately shaded pencil ready to be blended using any technique or tool. Looking back at our process, we began by identifying the basic shapes within our pencil, then moved on to sketching on our planes. And finished by using our knowledge of how light interacts with shapes to correctly locate and dry and our values. You may use this three-step process on any object or image you'd like. Eventually, you'll begin to see complex images as a combination of smaller shapes. For now, we can practice our new knowledge on any item within reach.
7. Demonstration + Review: Hello, welcome to the review section of this course. In this section we will use the three-step system we just learned to create accurately sheeted lamp. To draw this lamp, I began with step number one, finding the basic shapes. The base of our lamp is a half sphere. So it will be taking the characteristics of a sphere. Following up the lamp. The support Beam is an elongated cube, so it has defined edges with sharp changes in value. Connecting the support beam and the arm is what looks to be a sphere, but it's actually a cylinder. If you think of the mobility a lamp has, it is not free to move 360 degrees, but only up and down. The angle that we see the lamp shows us the base or side of the cylinder. The arm of the lamp is the same shape as a support beam and elongated cube. Lastly, we have the head of the lamp. Because the tip of the lamp had his rounded, it may throw some people off from recognizing it as a cone. However, once you observe the light wraps around the head with an open base, you can link its characteristics to a cone. Lastly, we have the light bulb. Although it is barely sticking out, the light bulb is in the form of a sphere. After completing step one, we are able to move on to step number two, drawing the planes. Referring back to our previous notes on how planes are drawn in on each shape, we can easily add in the lines. Remember, the sides of a Cuban cylinder are flat so they appear as one plane. Now that we added the planes to our shapes, it is time to move into step number three, adding the values. We begin this doubt by identifying our light source. I always like to add a few lines to show the direction of light. After identifying the light source, we must use it to place our highlight. Where we place our highlight gives positioning to our light source and subject. After identifying the highlight, we're able to move on to the midtone. The midtone goes on both sides of the highlight, since it is a transitional value that brings together the highlight and the core shadow. Next to our mid tone, we can shade in our core shadow. Once we add in our highlight midtone and core shadow, it becomes much clearer how our object is positioned in reference to the light source. The positioning of our subject is extremely important when adding in the cast shadow, you may follow the lines you drew in from our light source to see which part of the object is being blocked from receiving light. Lastly, we add in our reflected light. Now we have an accurately shaded lamp following the three-step system. Joined me in the next part of the course to find out agreed assignment that can allow you to practice these steps at home.
8. Assignment: Thank you so much for joining me on today's course. If you've made it this far, I hope that you've been able to learn something new. The best way to strengthening your art skills is through practice. You can practice by trying out this three-step process yourself. Start by finding any household object and continue by following our three-step process. By the end, you will have brought your subject to life. You can always come back to this course to review the steps. Again. Thank you. I hope to see you soon on another course.
 Ian VonderHaff, Educate. Example. Engage.