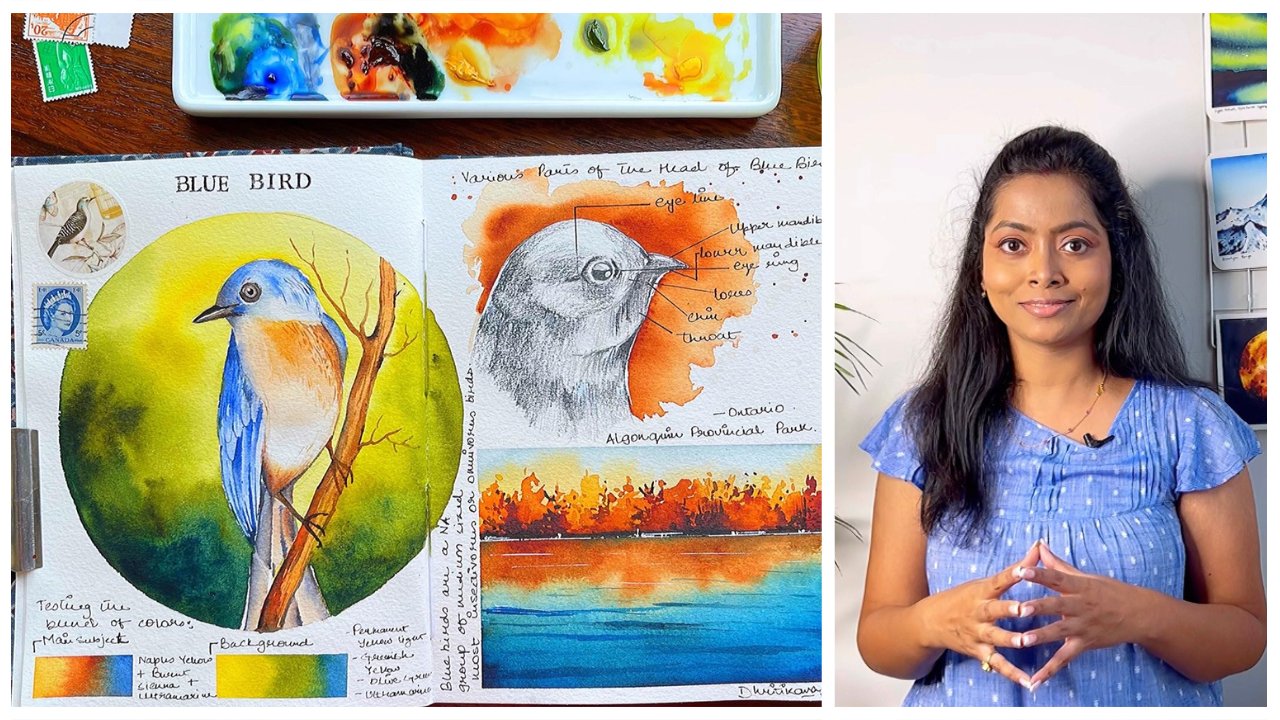
Transcripts
1. Introduction Around the World in 80 days: Did you ever try to visualize a three-dimensional
subject and recreate it on a paper which is two-dimensional
with the hair bulb, shape value and perspective. If you have gone around the city to do this and still
have to pay to do it. Then this class is for you. We're going to paint around
the world in 80 days. Are Travis get CDs which covers 20 destination and Ag paintings. Hey guys, I am not an
artist instructor, a mother of business owner, and a Skillshare H0 from. We will start by understanding
how to go about it. The second would be the medial. Secondly, for a meeting
all the paintings, I would be using a
sketchbook from my bosses. You can go ahead and hook
that is available with you. Even have any kind of an A5 equal sized
paper for completing. This class is not about just drawing maps or
painting buildings, adding a few human beings
or making monuments. Going beyond that, like adding those smaller sketches coat
your particular subjects, like aeroplane or doing a
pencil shading, sketching, etc. All of this put together
makes the class more special and it would help you to practically paint
anything under the sun. We are going to paint
smaller objects like coffee mugs for
painting some animals, some goods, as well as
anything that you also can. You would like to take a note
of it on your sketchbook. Once you are done with
this travel series, you will have a
beautiful experience, as well as you can
pressure the sketchbook that you are keeping
for yourself. We progress through our lessons. We will even go on the
location as well as paint. The exact monuments are captured the subject
that we want. So without any further ado, let's start off with
our first lesson.
2. How to go about the Class: How to go about the class. This is very important
for each pound of meat might be super excited to
actually go to look like this. But then I steps that I
would like you to follow. One is that I am not going to use more than two
nitrogens and people 100%. This is very important for all of you as we proceed
with washes, I want it to dry off
pretty. That's a plus. Then next step would be to go ahead with an easy
and simple drawing, which is the big one in
New York that is all about making the map
and the small car. Once we are done and
set with the identity, we would go head with
a few basic steps, like understanding
their perspective. What is horizon line, what does vanishing point? You have one-point
perspective or 2 perspective. Once the perspective, we would move on to Brooklyn Bridge at various other destinations that I want you to paint along
with me in New York. Do not, do not go away
leaving New York because every four days we're going to step into another
new destination. After New York B would be
traveling to France Gately, then nasal fossa, you were
off as the last two issue. So stay tuned.
3. Travel Series Materials Required: Let's just discuss
what all we need for completing this
whole Travis series. There is lot of things that
I might be discussing. Everything is not
important as well as VBA have some options that I would be giving
you so that you will not have this
overwhelming feeling. Okay, either. You can have 185 GSM
Arches watercolor paper. This is cold press paper
and it is converted into our beautiful sketch book. You'll see over here. I have used it. I'm in this particular
sketch book belongs to vibrant parcels and I'm using it from them. Now. You can also use 200 GSM paper, that is Fabriano or any
other 200 GSM paper, but try to use a 100% cotton. That's really, really important. I have kept some Posca markers. These are the markers which I need when I'm
being things small, small people are
smart, smart details. But do make sure if you
are not having this, then you can go ahead
with any other kind of goulash or acrylic markers
to that doesn't matter. So whatever is available
with you is good to go. I have kept some colored fence. It's not that we
are going to use all of it in the
first row itself. Now, this is the colored
pen that I got from mapped it for around 700 rupees
that I have $10 So in India. But you can also have what, EPA colored pens that is
available in your place. You might not also
use the colored pens. You can have followed whatever suits you,
you can use that. Now the brushes.
Brushes, is this a size two and size eight brush? These are the two major
brushes that I would be using. Along with it have a 0
size brush for yourself. I have a pencil, for my pencil sketches. I have a scale. High. It is. So now you can have this eraser for
erasing the lines. These are optional. I would say no, size four brush is good to have. And this is again size
two brush if you want. I'm not very happy with
the tip of this brush. Like I am not always
very happy with the tip of the size two is four
down versatile brush, and hence I keep
this polar brush. So this becomes an
optional brushwork. A wash brush is again,
a good to have. It's not that. So majorly, you would be working with
only these three brushes. The others remain as
optional brushes. If you have it, you can take it or in case you do not have it, we're fine. Now, that's most important
aspect of travel is traveling as much less things you can carry, try
to carry them. That is called masking fluid. Now, this masking fluid
is from row stroke and this is the Ph Martin's
bleed proof white. Now I use it in many places
where I am unable to deliver. You will need bold signal. White marker doesn't
work sometimes, and that's where I use the
fans are of two types. One is salami pen that I have. This is not waterproof. The UNI Panther I
have is waterproof. And this is a pigment in. So either you can have this
if you are less confident, you can have this if you're
more confident so that you don't smash up the areas
about the pencils. Now many of you have asked me what kind of pencils. I have. A lot of pencils from
Facebook castles on this. There are six of them. It
starts from HB and goes to AB. But if you are
having or two before P6 be that's good to go. Okay, For the pencils you need. Shop now. Now so these are, this is the sharpener that
I'm going to use. Along with it. I have already told you about the Posca markers
and about this one. I need two jars of water. Do jars of water is really
important for our watercolor. And there's a tissue that I
keep really handy for myself. The colors. I have a
beautiful stamp set. It has an a to Z number. These are good to have. It's not that you need
to have it by your side. Always. I was telling you
about the colors. I have a variety of
colors with me too. We need all of these colors. No, I will tell you about ten to 12 basic colors
or even less so the basic colors that you need for completing
the painting, whatever I use for my paintings, you can replace it with the colors that we have
already discussed. Okay, I guess this is it. From the perspective
of our materials. We will go ahead and
work on the next part, which is majorly the colors. The last thing is
this from past, and it's very important
for drawings, I mean the so-called etc. You can also use any other
kind of circular like this. Of course, a masking
tape is good to have. So that is another thing
which I wanted to say. Finally, we can move
on to the next one. I'm going to tell
you about the talus, which are the most important for this traveling
series. So sketches.
4. Color Palette: Let us discuss all
the colors that they need for completing
this province. Get CDs. These are going to be the basic colors and beetle
has some add-on values. First is the Naples yellow. This is going to be one of the most important colors
for the whole series. Along with it, I will
use some scenario, yellow or any other yellow
that is available with you. Like try to have Indian yellow
or yellow that is better. Lemon yellow. I would ask you to go with these two shapes more compared
to the lemon yellow shape. The next shape that
we're going to use is something that is red. And let's just go ahead and add the debt
from the warm family. There will be some
additional shapes which are discussed once we are onto our first
part of the painting. Or the sheets status. Your brown. Oh, okay. I know some of the darker
values of your brown, which is more SEO brown sepia. Now we will have blue and I'm going to go ahead with
Winsor blue or yellow, blue, whatever is
available with you, these two colors,
or CAC, amnesic. Then you have your ultramarine. Ultramarine has
been used for many of my paintings and this gives, this is again a beautiful
blue that I'm going to use from the blue family. Last darker shade. Either you can use integral or you can go ahead
with Payne's gray. I would leave that Up to you. You can make it lighter
by using any of them. In the greens level
have bright yellow, green or yellow, green. Whatever is available with you. Go head went along with it. We will have our olive green. And once we have applied
the qualifying legal pad, when I take gain or any other thing that
is available with you. So it can be any of
the darker screen that is available on your
ballot for future layers. So this is the dark green
that I'm going to use. And you can see that there
are only a few colors. That comes. I promised you that
we would be using. There are about 11 colors
that I have told you. Along with it. There are some good
too loud balance which is majorly like an orange. This is your good to have, as I have told you, it is your men's orange. Then another one would be
your bank, or Carmine, which we will use
are red violet, which we are going to
use when we are going to paint things and
France, some violet. And I would like to, to have another color by side, which is from the blue family. It is a very, very light blue, which I have been used. It is royal blue
to other sheets, which I would say
it's good to have. One is your cobalt green pan. Just had these other two colors which you need for the
Statue of Liberty. So this is basically some additional colors that as I have told you,
it's good to have. These are majorly the colors which we would be
walking around with. There is not much of a difference in terms
of the painting that we would be doing and
the changes in the color. Wherever there is an
additional change are, you can actually go ahead
and do some other sheets. I would go ahead and add it. There will be something
called as footnotes, small quick videos about
the genes and follow about different goulash
fellows which we can use in case you do not
have Posca markers. They are small, small bite-size lesson which a
one-minute, two-minute. You can, of course, go ahead, check them out before you
head in any of your painting. And that would be a good way for you to decide what color
you want to go head. But I am giving you a very, very gendered view of all
the colors along with it. Later on, I would
provide you with a PDF version of all the colors
that you have over here. And what is that meet? That is the pigment
that has been used. Now, each and every
color that I'm using is from a different
company, like Naples. Yellow is from your scenario. Then your scenario,
yellow is from scenario to read is
from Winsor and Newton. The brown is from incident. The Van **** brown is from Magellan Mission
Gold, your Vince. So blue again from Insert. And Newton yard from French ultramarine is again
from incident Newton, the Payne's gray is from
Magellan Mission Gold. Then the bright yellow green
is from your scenario. And the next is olivine is again from
Magellan Mission Gold. The green, which has
been like the green, is from Magellan Mission Gold. The cobalt green is, or you can even go with
the cobalt turquoise. This column you will often find with Magellan Mission Gold. A little quiz from the
Winsor drove, of course do. Orange of course is
the name in itself. It has been said on into
the next is my red valid? And it is again from
your medulla machine. Also, if you have a brightly lit Magellan Mission Gold Rush, blue is from scenario. So I am using a mix of
colors from various brands. But again, I always emphasize whatever
is available with you. You go ahead with that. I will give you the exact
name with along with it later on as we progress
through the videos.
6. New York Day 1 Part 1: During the olden days, we were pretty much unaware
of the Internet and it was not there altogether
and we do not have a GPS to track things, soils, even look at the maps. And hence the maps which we
had to see on our hands. So they're very paper maps and every place that
you used to visit, we had to refer to
those maps or else ask people where exactly
can the goal? If you have a particular
destination in mind, you might go on the street, which you see on the map. So the guidance that we used to get was only through
those maps, right? And I just wanted to hold
that old thing in my hand. And the first important aspect when I'm setting up an
itinerary is the MAP. Map is not only important
for a particular place, but it really tells the story where exactly
you plan to wizard. You can practically
laid down on the map, provide an AI coronary just
the way we would be doing. Now you can see that
I'm drawing the map. Now this is an
absolute random map that I caught on Google. And you can also get
one of the ovaries, simple maps from online. Rather than going
ahead with the map, in particular from penny off these copyright free websites
like Pixabay or Unsplash. I would leave that up to you. How you decided. I'm doing a very light sketch or with
my pencil for this map, I'm leaving out the areas where I have to paint the water. Rest of the area is
practically your land. And this is 185 GSM
watercolor paper, as I've already told you. And I'm going ahead
with the A5 size. As it is given in
the materials tool, you can use any other size
that is available with you. Bigger the better, I would say. So in case you have
an A4 size sheet, go ahead and use it. You can use a part of
it or one page of it to practically draw
this entire layout that we would be doing. Now for your I would
say this sketch book, there are many layouts
that are available. I don't go by any
particular layout that I have in my mind. Sometimes I like to go head, varies randomly without
using any tapes, etc. Use both sides of the
sketchbook together. If I get them middle page. There are times where
I do not do that. I like to tape down my paper. And as I have told you,
this is one effect. Gsm arches, a 100% cotton paper, usually a 100% cotton paper. If you use washi
tape on top of it, it doesn't tear it off. Don't go for the masking tape
because that usually has this ability to
tear off your paper if your paper is wet while you are in a very humid climate, right now I'm in a
pretty humid climate that is in Kolkata. And one of the reasons of using these good washi tape is this, this whole thing of reducing my humidity and keeping
my paper absolutely safe. We are here to make mistakes. So there are times where you would make your mistakes
and it's perfectly fine. Go ahead, make your mistakes. It's not going to be a
perfect sketch book. Sketchbooks are not
meant to be perfect. You will do your
experimentation over there, whatever you like,
you would be fun. That's how we always keep a sketchbook handy
for ourselves. Okay, I think I'm good to go. I am already almost
done with the sketch. You can follow me. You can even refer to the
photograph which I have already added to the resources section so that it's easier for you. I'm using a big brush right now. This is a wash brush. Do I would be using it only for this particular painting
because I want really, really less water on my paper. And I'm going to just throw some colors and I do not
want it to move a lot. That's one of the
reasons I have used this particular brush because if you have lots
and lots of water, which makes like
puddles of water, there, it becomes difficult. Another thing that I wanted
to tell you when we are glaring and we are using
more offline wash. At that point in time, it becomes a bit
difficult to work with the very strong or 300 GSM or 600 GSM paper
at that point in time, you really need a
lot of time for it to do practically it, becoming more and more dryer
at that point in time. And you are at a
particular location, you were to just
paint your heart out. I think for those
adventurous activities, you should go ahead
with a lighter people. This is the first
met that I'd really want to break amongst us that 300 GSM is really not the ultimate paper that you can use for your
travel sketches. If you are going ahead
with two or three washes, which are not that heavy washes. I think of a 185 GSM or a
200 GSM is good enough. Going ahead with my
burnt sienna first and then some amount
of my olive green or any kind of yellow green
that is available with you. Yellow green is more
on the brighter side. So that's one of the
reasons I have asked you to just go ahead with
all agree, okay? Once you have added
this equilibrium, make sure that you
are adding it in the spaces where it is
more on the greener side. You are not adding
on the brown part. Now what I have practically
done as the brown part is majorly the building areas or the areas which
are more of land, whereas the other areas
which are more green like any box or any
particular forest area, I have kept it as green
going with my blue. Now, the blue that I have
taken is royal blue. It's prompt scenario. You can also go head with any
other blew off your choice. Like surrealism, blue. Blue is pretty light. And you can also
go ahead with it. Though every company has got or particular pigment that it uses for
surrealism, blue. You can go ahead
with the lightest, really am blue for this
part of the water area. I am using only lighter shades right now as you
observe me doing it. Lighter shades is very
important for our first wash. We just want to see that
the colors are there. But we do not really want to actually finalize the painting
at this point in time. For adding the depth, we will go ahead with
the second layer. The third layer,
I am just adding this blue in few of the areas where there
is river or sea. That's how we go about it. Once we are done with this, let the paper dry
off completely. And once it is completely dry, we will go ahead
with the next year. The current shader or the current particular color that I'm using is burnt sienna. Along with burnt sienna, either use some amount
of my Van **** brown. Now, these are the two colors that I wouldn't be
mixing and adding it. You can also use CPR if you are more happy with that color. But I am really happy
with the Van **** brown. This is a small
experiment which I did with my brush and
it tactically failed, so no need of using it. These kinds of
experiments you will keep doing and you
do not need to always feel sad
about it that you did not exactly get
what you want it. So those kind of things keep happening and it's
perfectly okay. By the way, the speed
of the video is 1.5 x as I told you earlier. So do make sure to pause at
whatever point you want to. I'm using my size two brush and I'm mixing the colors now, if you very well see, now size two brush really helps
me to mix the color well. You can also go ahead with a larger size brush,
size four brush, which you will observe me
of course using it later on in many parts of our
sketching exercises. Along with it, we are trying to add more depth
into the greener areas. So I would even switch to
more darker green color. You can see that the
base layer is getting covered up completely
and absolutely fine. If you want, you can also
keep the base layer. But for me it is more
about covering it up as I feel the base layer
was really, really light. And I would like to
cover it up with or darker value compared to
what I would like to use. My like, you can of course use the whites of the paper in many areas where it is required, but wherever it is not required, you can go ahead and cover
it up with the second layer. Now layering in this perspective becomes really,
really important. You can go head width as
many layers as you want. But for our low GSM paper, you might be good with
only two or three layers, rather than going ahead with 56 or seven days that you
can do in a 300 GSM paper. That's particularly
my way of operating. But you can always, always experiment and then decide what you would
really like to work. And go ahead with one. So this burnt sienna is added
to your means, your box. And I'm even mixing some amount of my green
with my burnt sienna. I'm switching my brush wherever I feel it is okay to switch. This is one thing you
always do not need to go slow if you are more confident
in the larger areas, please go ahead and switch
to larger size brush. As I said, you do not need to stick to a particular
size of brush. Brush size always depends
on the type of paper that you are using
for your painting. I practically always tell you
to use travel sketchbook. Because sketchbook,
like treasures. Yes. In few places
you might go wrong, but most of the areas you
would see that you would love. Once you finish off
the sketch book, it's like a treasure for you. I really want to do all my paintings on this
particular sketch book itself. But then might be a possibility that there
would be some overran. As I feel that there are a few bonus lessons which I really want to give. And of course, the bonus lesson will occupy
a bit of space compared to if we are not doing those
bonus lessons? Oh, yes. I guess so. Whatever
is best job, you can go ahead and do it. If you really want
to do it on sheets, please go ahead and
do it on sheets. I like to use the sketch
books from vibrant puzzles. That really helps me
to practically get some beautiful colors as well as it comes with the arches. 185 GSM paper, or even
Fabriano 200 GSM paper. Whatever best you want you
can decide for yourself. Take it. You can also go ahead with having me
loose sketch books, so everything is good. So yeah, I'm cool with
anyone that you like. I would prefer,
as I've told you, you guys to be attempting, all these paintings are no
sketchbook, if possible. Going with some of
the areas again, where I feel the shades
are really, really light. Yeah, that's absolutely okay. It has dried up almost done. We are just adding
one more layer. You see how easy it is to
keep adding the layers and still not impact
your painting at all, rather than sticking to
only 300 GSM very alike. So much hell-bent on using
that as starting out. But over time, you
can always understand what works best for you in
terms of paper color, etc. You always do not
need to use or invest on absolutely high-end papers. You can also go head
width of something that is not very great. Sometimes I like to splatter, but what I feel, this
plateaus make it really big. So I like to touch it
in few of the areas, like adding those browns. You will see how I do it. This is not the best way
what I can tell you. So I have tried to
three times as I really wanted to show you that I really don't like
these bigger dots. So I would go head with
some smaller dots by touching my brush to the paper. And you can really see how much difference it
makes to the painting. While I am just
making the edges a bit more softer
with my damp brush, you can see how I am doing as I do not want it to be hard. So yes, so going ahead
with the damp brush, then even adding
some darker values towards the bottom area. You will see how I start
on naming a few of these areas with and those all things are coming
in the meanwhile, you can keep painting
along with me. There will be a small
yellow taxi that I would be painting in this session. Of course, you can consider
it as a bonus lesson or you can consider it as
just a part of itinerary. It can be your day to orals. You can also do it along with
this particular painting. Though. I have kept it path-wise, part one and part two, as I wanted you guys to turn this whole section
in one single page. So going with a
bit more brown as you absorb and some green
in few of the areas. It really helps to
add that depth. Some of the areas I'm
covering with the brown wherever I think that it was not completely green on the map. There were some
particular browns too. So yeah, you can always
go ahead and cover it exactly the way you observe
me doing it right now. I would go ahead
and add some music, as it is, pretty much
a repetitive process. And I've explained
it earlier too. So you can copy. You can just go ahead and
keep painting along with me. Touching my brush to just
add these smaller dots. Guess. You really saw that? Well, I really like to
touch it on a wet surface. That way what happens is
that the colors to spread well and the Lucas also
soft as I always like. Hence, that's the
best way I would say that I like to add
these smaller drops of the darker shade
of brown that is practically your CPR or any other shade like
Van **** brown, which I'm currently using. This map I think,
looks great now, two of the paths are
already done and we have to finish up
the other two paths. As I have told you, you can continue with it. Some of the areas as you see, I am adding some darker
values to create the tip. Has we have done audio and it's pretty much a
repetitive process, so yes, So you might sometimes
feel that okay, it seems to be same, but overall, when
you finish this map, I can tell you you will
treasure it completely. The depth that you
create with the blue, we'll add the life
into this map. It's going to be amazing. So just wait for the final one. There you see the final
outcome, it's easy. That's one of the reasons I
took it as the first attempt. You should not be feeling
overwhelmed at this time and space as well as we have done good amount of concepts
and terms of perspective. Though, I would be breaking
up the perspective into various areas and we would
be practicing it further. Now, I would say perspective is something
that you need to get correct or else the whole painting will
never fall in place. There are many people who
might have seen the painting. They, they make amazingly well. But particularly perspective
doesn't work well. The whole painting, it
doesn't fall in place. That's why I am
stressing so much on the perspective part for urban sketching, traveling, etc. I have myself made
so many mistakes. It took me yours for this
kind of learning hand. Really coming to you guys
with this kind of a class is practically very
overwhelming, even for me. As I always feel, it's pretty much a difficult
subject to attempt. And teaching everything in one single class is
pretty much a challenge. So, yes, I have taken
up the challenge and I am going to work it
out. Along with you. We all will be learning
something new. We all will be making
our own mistakes. So be ready for your mistakes. It's absolutely fine to
make those mistakes. And if your map doesn't
look exactly like New York, then queens and other
spaces like Manhattan, etc. It's cool. You will never get to
understand that much. Once the whole map is done, I can tell you that
I have seen it. My map is also not
superbly exact. It's something closer to
what I have seen on Google. So, yes. Just go fearlessly when you attempt to urban sketching that
something or travel sketching. That's something which I
have learned over time. If you are too scared of it, you might be in a position
to not be happy with it. Whereas if you are going
fearlessly in an around it, working through it, you
would be super happy and super grateful once
you're painting is done. Okay. I guess something
more to add on. Some brown, some
greens here and there. Once it is done, we will go back to our
pencil sketch and you will see how beautifully
we can work it out. I use my damp brush to blend the colors
with the background. It's a great way to do it. I have been using it for
many of my paintings, see, few of the places
might not blend well. That's okay. Absolutely fine. But most of the areas were blend and you would be happy
with the final outcome. That's how I see it. Adding some more greens and then blending it as you
have seen me doing it, I think the top part looks a bit lighter compared to
what we usually paint. Let's see if we need to add more layers or if we
have to add more colors. That's also okay. We will go ahead and do
what as we progress. It's a process and you have
to enjoy this process. It will not come on one
single day, so be ready. You will face a
bit of challenges, I must say, but yes, you will be happy once you complete the whole of the
parts of the painting. So as I have told you, adding some darker values. So this darker value just add so much love for him to the fifth thing that
I can't tell you, It's like highlights
that you see. And has I've told you some
dots here and there, CPR, etc. Just to show the darker, lighter areas or there are
some other specific parts. Some of the areas
would be darker, some of the areas
would be lighter. That's how it appears on a map. And I would like to
keep it that way. Simple, easy. And yet very, very
I would say very, very happy to see
how it is turning. Okay, going ahead
with a darker value. Now. Now this taco
value can be a mix of Prussian blue and royal blue
that you have added orals. It can be surrealism
blue and indigo orals. It can be all mixed
off your surrealism, blue and Payne's gray. It can be a mix of your
cobalt blue, indigo, any blue that you
have on the palette, I think it's good to go. You do not need to particularly purchase
anything for this. We have already applied
the lighter value, only the darker value near the land area needs to be added. I usually go in and around the land area for
the darker values. Because that's where we
need to show the depth. And a few of the areas
within the ocean, I drop some few drops of blue. This process of adding
blue is very interesting. It's not that we
are going to add the darker values in and around every thing
that we observe. And then few of the
areas we would even take it towards the bottom. Yes. That's how we go about it. As you observe me doing it, you would be really happy. And I am really excited
to see how it turns out. Finally, something that
I really like to do is to see how a
painting finishes off. And we do not even
have any tape, etc, in and around it. Still. The painting looks so much nicer
without those tapes. You always do not need to get that perfect, perfect thing. There are times where we can work out with
whatever we have. You can go with a tape. You might not go with the tape. You can do whatever you
like to go head width. This is something that I always believing that whatever
you have, go with it. And you can see how beautiful the whole thing's thing
actually comes together. It is amazing. It's amazing to see how a blank sheet of paper
completely turns into something so beautiful and you as creators
to have that power. So use it to your real, I mean, use it as much as possible to create the pinky or hot out. I hope that this class is really a guidance
for you guys too. Just go out and paint
in this part of my country or wherever I am living currently, it is raining. But I have CDs plants to go ahead and paint in
November, December. So I would really, really like you guys to do some of these sketches are absolutely going at
a particular location. We will have those
kinds of sessions. I would even tell you
how was my experience working at a
particular location? What all other
necessities that you need to carry in
those locations. Over here we are just doing
some x classroom exercises. And slowly the will, of course, move out
to paint outdoors. So those are the
aspects that we will, of course cover as we
progress in our journey. Right now, it might not
be the best thing to do. We have to first get
on our tracks and understand it a
bit more before we work out on all
of those aspects. Fine. So I guess this is it. We have to keep working
with two brushes now. One is our blending brush, and another is our
smaller brush. Smaller brushes to create those variations of tonal
values and your water. And the blending
brush really helps to blend it with the background. Some of the areas you see are with darker values
in and around better. Some of the areas. We are just blending it with our blending brush
to make it look more original because every area will not have the
equal amount of debt. So do not try to add that in all the areas that looks a bit more artificial as
nature is not perfect. There are so many imperfections. And if you have
those imperfections even in your painting, you can practically nail it. This part of the video is
focused on the painting part. And once this painting
part is done, we would move on
to the next part, which is majorly about
eight to ten minutes. That would be focusing on
how to name these areas. That's something which I really
like you guys to go ahead and see if there
are few lines that we would be drawing
for the tracks, etc, that you see
for the major roads. So all you can do with pencil. If you do not like
to use the pencil, you can use some green pen. I have got the set of different
pens from mapped and it's pretty simple that
we go ahead with those pens to mark a few areas
when it isn't necessary, but it is mostly
transparent in nature. So wherever we need the trucks, so loosen kind of thing. I always go ahead with
my Posca markers. You can have Posca marker. You can have any
other acrylic marker that is available with you. Even any kind of wash
is also good to go. We will have multiple kinds of things that we
would be using. This is something
that I would say. We will not only have the bare minimum
materials required that I would let you know right now
before few of the paintings, I will even tell you some of the materials that you can get, or if you already have it, you can use it for
those paintings. Those are basically
the bonus lesson that I have dropped
it for you all, which is a bit
different from Dan only painting with
your watercolors? Yeah. I mean, like ink and wash. Watercolors is something
that we all have been doing. But drawing, painting, something different really
makes a lot more difference. Okay, now it looks
a bit twisted. I didn't know why. It just began like this. I think absolutely straight but going with the flow
sometimes you don't know, I don't even get to realize whether my sketchbook
is straight up, not really unhappy with how
it looks now, but pardon me. I can't do much over here. I'm sincere apology. So you have to observe
it in this way only. And in the next
video, of course, you will see it as
it was earlier. I'm just creating a
bit more depth as you see with some indigo and
selenium, blue, orange. So blue and indigo, any of these colors
are good to go. You can go head around. Hey, get the way it looks now.
7. New York Day 1 Part 2: So yoga is part two of
the map for the New York. And I am right now just marking of Hugh of these lines
with my graphite pencil. You can also do it with
any gray pen or any kind of other taco graphite pencil, whatever is available with you in case you want
it to be permanent. I think Penn is a better option. Whereas if you are
wanting to be temporary, then you can of course, go ahead with this pencil marks. You can change it later on or you want to change
anything in it. Yeah. I mean, these
are basically lighter lines where
you basically denote the blocks or the roads which
are there in the streets, et cetera, are denoted
by it's practically or rough idea of where
your location is. I'm not tying trying to detail everything that I see over here. It's few details
that are Manning and few lines here and there with joints and some
of the lines or even imaginary that I'd
just add it on my own. Yeah. It's not that
everything has to be absolutely accurate
and absolutely the way you observe on the map. I feel one thing
about watercolors is the freedom to change
it to molded Casper, what you think is the best. I am not here to actually
tell you that you have to make exact copies of
everything that you absorb, everything that you see. It's mostly whatever you think is the best or the way
you want to mold it. Go head to make it your own and then work it
out for yourself. That's how you usually work on any small aspect of watercolor paintings or any outdoor sketching
that you are doing. The main intent of the
painting should remain, whereas you can draw everything, but paint only what you think should take the
whole of the focus. I will tell you much more
in detail once we go ahead with the perspective
part of our areas. This is just the day one and
it's majorly simple bot, the next term one that you will observe me doing
it is perspective. Before you move on to D2. As I want you guys
to understand, perspective a bit
more in detail. What is horizon line? How do you can have the eyeline? What everything that is there, how you have to take it
to one single point, which is the vanishing point. Everything I would be
telling you how you decide and how you do it slowly and
steadily as we progress, we would make things
more difficult. As well as there will be some or the other structures
which are very simple. So overall it's going to be
an experience where you will have each and every kind
of detail coming in. Complex as well as simple. That's how you make up
the whole sketchbook. It's not about making it
absolutely difficult everywhere. I even like to paint a cup of coffee from Starbucks because that's what it's
famous over there. So it's something that is close to you that
tells your own story. You should add it
to your sketchbook. You cannot draw those
because I just feel that US's great when it
comes to breads. And I have always loved the brands that I
use to get there. When I was there. I was there a few
years back and I know that they have
best of the breads. So I would love to paint across. So I would love to print a cup of coffee
with a crossover. So that used to be my breakfast. That's something which I
love to paint for myself. It's an experience that you actually feel a new paint
that on your sketchbook. I always say it's your story. You have to tell your own story. Hi, I'm over here to
guide you through this process of
telling the story. I'm telling my own story and
I am painting along with it. You can have your
own story and you can practically make
tweaks to that. Over here, we are going to actually learn through
a lot of concepts, whether it be watercolors, whether it be lining wash, whether it be clarified marks, whether it be pen, anything that you think you haven't tried out,
monochrome, etc. Everything we would be doing
in this particular exercise, we will even paint the national flower of any
particular destination. Because I just feel that
all these things to attract me and I love to add
it to my sketchbook. Maybe a flag for any
particular destination. So all of the people be covering about 20 destinations
altogether. And all of these destination
will tell their own story. I am basically using
two kinds of paints. One is the Lemmy
pen that I have and another one is my unit and pen. Now, either you can
have a waterproof pen or you can have ulama pen. Exactly the way I'm using. That doesn't have any
waterproofing, can it? It has the normal link, whatever you are
more comfortable with that you should be using. If you think waterproofing is a better option
to go ahead with, please go ahead with the
bot proofing for yourself. And in case you think that
Lemmy pen can solve better, you can of course have any kind of gel pen that is
available in the market. Any option is called. You do not need to go ahead and have been for doing
this painting. Yeah. That's what I always say that nothing is really,
really important. Whatever resources
or whatever fans, etc, you have available
with yourself, use that for the painting. I'm going ahead and just
marking exactly where the places are like Manhattan
and Brooklyn, Queens. Everything I'm
just marking that. I mean, you can even
mark the airports as well as the ocean
exactly where it is. I'm still marking a few more
areas which is important. And making it a bit more detail. That really helps to make
the map looks more nicer, I would say yes and later
if you're not lying, etc, chatbot, I
have also mapped. So I guess that is it. You can always
step back and then only had done the
lines are wrong. Any kind of details
that you want to name. If either a D or Manhattan city or either it be some
river or some motion, whatever you think is necessary. Only mug dose. You can take your
time to decide on it. Then market. Yes, I
guess that is it. I want to just do a smaller arrow and then say that this is the
north part hospital, the map. You always get these signs
which are given on the map. So you can also make it more realistic by hiding
these to your painting. Of course, as I always say, realism is not the perspective
that we are looking into. Orientalism is not
what we are here for. It's just the final outcome that we are more interested in. Now I think this
looks fantastic. I would go ahead and
make us more yellow taxi because yellow taxis
are very famous and New York and I really want to add that flavor
to this painting. Though you might see
that the taxi shapes, size, etc, would change to a
large extent as we progress. Guys through this
entire 80 days, you will see a lot of improvement
even in your sketching, the first year would be a
bit different and would take a long time compared to when you are there on the 18th day. All these gays are
broken up into smaller lessons because
these are not very simple, as I always say, urban sketching has not
been the simplest of all. It takes a while to get there. It takes some kind of
an understanding and stole is Cadbury Viva have more difficult
things coming in. So hanging there
wherever you feel that this is becoming really, really tough, I can tell you it would become simple
as we progress. There are few simpler
exercises and there are a few difficult
exercises. So it's a mix. That you can observe and don't give up at
any point in time. That's the only thing
which I can say even while I was
drawing this taxi, was not very sure of that whether I can get
it correct or not. I'm not so much into
cars, et cetera, but I really wanted to do
it and want and desire to do is something that really helped me to
go ahead and do it. It was not what I
really like to pay. I really do on a regular basis. But once I actually
painted this taxi, the next destination is France. And when you reach there, you will see me
making them a prompt. That was not who actually, I can imagine myself doing in
such a short span of time. It's just a regular practice, the regular exercises that
I have been attempting, which really helped
me to break up this whole aircraft into
smaller bits and parts. You will see how we
just make a circle. And from that circle
it turns into an oval, and from that, it turns into
a full-fledged aircraft. It's the way you
break up a subject, it's the way you are not
scared of any subject. And then you get that
confidence of painting. Anything that you
see under the sun. The whole of this
class is going to build that confidence
in you hand. Not to say that you are giving up it up at any point in time. That's something which
I want to tell you. Just go ahead and paint whatever you can,
howsoever you can, whatever you feel
is working for you, do that if it's even not
working still attempted. The more you attend, the more you would understand
on the perspective part, and the more you understand
on the perspective fat, the lightened shadow effect, etcetera will also kick
in in the next painting, which is majorly about
Brooklyn Bridge. Once we are done with
the Brooklyn Bridge, we would move on to
the Central Park of view from the Central Park. And then we are going to move on to the
Statue of Liberty. The Statue of Liberty
has two parts to it. One is the Statue of
Liberty and another part was majorly your touch. And this part was not intended to do it or I'd never intended to do it
the way you see over here. And I never, ever did
pencil shading, etc. But I got some basics to write from a few videos
that I watched and I tried I attempted that one single painting two to three times and
it just worked out. It's all about the confidence
that your burden yourself, approaching any
subject, might become more easier as you build up
that confidence in yourself. So, yes, this class is
going to move that in you. And that's most
important for any, any painting that you attempt. It's all in you should
have the desire to create. Rest is history. I can tell you, I am in each one of us who wanted to create, just created. That's it. There's nothing
else that goes in. One important aspect of
choosing only A5 size papers. I did not want to. That feeling of
being overwhelmed. That's one of the reasons in few parts you'll
see that I would be using both sides of the paper and it becomes an
A4 size altogether. So you can paint it on an
A4 size orals. Go ahead. Whether A5 size
paper that you have, that A5 size paper is
perfect for these paintings. We are going to paint more. Right now. There will be few paintings which
would be picker, and I've told you that we would
do it on a metal plate so that you get that a full-size
think for yourself. Yeah. But maximum
size that we are looking through till
now is the A4 size. I'm not going to overwhelm you with bigger
and bigger sizes. As well as you know, I like to fill up the
sketchbook with variety of things that
I observe and that I see in our particular place. So whereas I am not sure
how you look into it, but that's how I always
love to add some time. So it's all about even
adding few cows into your painting or
maybe chickens, hens, swans, or any animals
that you see, any books that you see
for a particular place, you absorb a few birds
and you paint them. Whatever you see,
whatever you observed, bring it to life, bring
it to your sketchbook. And that's the special thing
that you make for yourself. And all of you. I have been
stretching or stressing on this fact that you should have a sketch
book by your side. I want you guys to
treasure the sketchbook. That's something which I
always look forward to. You should treasure sketchbook. You should keep a
sketchbook buyer's side, as it really helps
you to get through a particular painting easily as well as it has so much more to, more to actually give you. On the first day, you might
be absolutely different compared to the fourth or the fifth day when you
ask them that painting, I have variety of
sketchbooks with myself. Some of them are floral, some of them are
all about painting. Your urban sketching is all
about adding mountains. Everything that you see
is from the sketchbooks. And sketchbooks sharing
really not only helps me to understand
the subject matter, but I can save more
paper to why I say that. I use both sides of the paper, had both sides of
the paper really helps me to gather
that much confidence. Also, if I'm wasting one part of it, It's absolutely fine. I'm using the backside
of it at all. These peoples are not moving, evolving, get something which
I don't like for myself. Yeah, So this should be
there together with you. You should be in a
position to treasure it. Yes, yes, that's that's it. And now let's move
on to the painting. Yes, I have divided the car
into two equal halves and off you can see I'm sorry, it's just the heat because of which I had
to turn on the fan. And that's the reason
of this problem. But anyway, let's continue
with our journey. It's a small car
that you see me. I didn't divide it into two
equal halves and then I just added the back-off of the car as well as the
front half of the car. This is a simple and
easy approach which I have taken for this
part of the painting. And you can also
see that I'm just trying to meet some
square boxes, etc. I will tell you much more in
detail about the cars as we move into our future
destinations? Yes, there will be
a lot of costs that we would be painting and
we would be drawing. This is just a bonus
that you can see on the worst stuff because
we had to fill up the page, but something it just
looks so empty and I did not want to add just to color
swatches on the first page. So it absolutely
randomly I wanted to, I decided that I would
be adding a car. That's the randomness which
I bring to the table. We do, yes, a lot, a lot of randomness and lot of interesting
things going on. If you see a small thing in perspective which I want
to show you is that these lines will become broader and broader
as they approach towards me or as they approach towards
the bottom of the paper. This is something that I
need to tell you as you move away or has it
reaches the bottom, it would become
broader and broader. Dots, whatever you see towards far off are
closer to each other. And whatever is closer to you are you are
seeing new to you. Those are more I mean, they, they occupy more space
there at more distance. And that's one of the
aspect of perspective.
8. New York Day 1 Part 3: So guys, as you all know that any day is practically
spread over two days. Over here, I have divided
the entire page into three videos as I felt that that's the best
way to go about it. Hence, some new can, of course, spread
it over two days. You can make one part. That is the map on one of the days and
the other day you can attempt this smaller part of
painting the yellow taxi. I would leave that up to you. I do not want you guys to be overwhelmed with the
complete situation. It might look really overwhelming
at this point in time, but believe me, once
you start doing it, you will get a
hang of it and you will understand how
to go about it. You can always adjust
the speed of the video depending on at what
speed you want to see it. I am right now going ahead
with my Naples yellow. Naples yellow is
one of the colors that I loved to go ahead with. And you can also use this color, a lighter wash during
the initial part. Then as you progress, you can of course, make some darker washes. It's always great to go about
the Docker pods late in the later part of the video or in the later part
of the painting, I must say why I say this. The first wash is like it
gives us so much confidence. If it's lighter, we can go ahead with as many layers as we want, rather than there's less chance of going back and watercolors, that's something which
I have always realized. And when you are working
with lower GSM paper, picking up the colors or rope. If you are not having a 100% cotton paper than
picking up the colors, etc, might become
more difficult. In those cases, I
always say that COVID the lighter washes
and as you progress, you can always add
more layers to it. It looks absolutely stunning. And so this whole
part is majorly about your line and wash. Line and
wash can be one single wash, it can be two washes,
it can be three washes. Lyman wash to an extent I am
not following completely. It's majorly of combination, or you can say it's more of a hybrid compared to
what we have learned in line and wash. Now the only align and wash that
I have learned in my olden days was actually going ahead and outlining
the whole thing and then adding the colors. Whereas the hybrid model
that I am going to actually follow through what
the entire series is soft, adding a few layers, and then going ahead
with your pen to add the darker color, to add the highlights. It can be with a white pen, it can be with a black pen. V would be majorly using black, but in many of the parts, and I am completely not following
the traditional method. I would say. I really
like to add on my own, and it's more of a hybrid
model as I told you earlier, it's not going to be just
following each and every line. It's just highlighting a
few places and feeding or just leaving a few
places absolutely empty. Highlighting a few
places just to make it look more stronger, adding the depth that you
want to the painting or at a particular depth to an
object that you are paying, whatever you are doing, just adding the depth becomes really important in that space. I think this is it that I want to say about the
line and watch part because over here you get more offline wash compared to all your that you
have done in the Maps. And that's one of the reasons I wanted to include it over here. The traditional method
is of course different and there might be one
or two paintings that we would do absolutely In the traditional method where
we would be using on drawing ink to even do the line
and wash. Maybe for a floral or maybe for
a small house, etc. We will, we will, we will learn a lot about perspective fonts. We start doing it
as we progress. In the next lesson
that you see for day two before you
go ahead with data, there are four to five
important aspects of perspective which
I would teach you. And that really
is very important for anyone who wants to do or travel sketching
or a plane here, it's basically a
step-by-step method where you first understand
about proportions. You'll understand about the major four to five
concepts of perspective. How you want to adopt
your drawing style, how you work on the location, how you can practically
loosen it up so everything you do not
need to go by line, etc. Even for perspective, you
have various various aspects. Like there's a single-point
perspective or there is a two-point perspective,
how do you go about it? So the initial part,
when I'm introducing, I would be only introducing
these two concepts, which is single-point
perspective and two-point perspective. As we progress, you
will see more of vanishing points and how
everything works out. We will go to Italy, Viva, go to France. We will go to different places to experiment with all this. I always feel very
strongly that you should experiment and you should understand all
these proportions, scales, your perspective, then various concepts by using
it and by working on it. It's always an office job. I think you get sick. Yes, I believe on it. I feel that you just need
to learn that concept, move ahead and then work on it. Similarly, we will
be drawing cars, we would be drawing
various people. We will draw everything
possible in through this, some of the lessons and I will
even teach you how to draw the location may be once we are done with the first
few sketches, after four or five destination, once we reach India, or maybe seven or eight
destination must be regionally. I would go around the city, myself pond will teach you how I paint in and
around the city. That's something which I really
want you guys to pick up. And it's, it's great. Once you start doing it, you will understand how
beautifully you can paint. You can adapt to the conditions and what are
the challenges that you face. So once you are painting
and the location, It's a great idea to paint
with the photographs, but painting and the
location is something that is absolutely very, very different compared to, it's a different experience
altogether as I always say, compared to if you were
drawing one photographs. Okay. I guess this is it. And let me go ahead with
this particular painting. You have already
added two layers. One was with the first layer, that is the Naples yellow, and then you will mix
it with some more yellow to get the second
layer a bit more darker. Not as it, I'm creating various
values within this space. You can see I'm not great at painting gas and it's
absolutely okay. I go with my confidence. Believe me, the next
time we pink cast, you will see how
different it is and how beautifully you can practically
paint each and every car. I will break it
down for you guys. There will be a lesson
coming up very soon. Do not, do not think that anything will be left
out in the whole series. You will get human beings, you will have people, you
will have drawing styles. You will cover
everything that I know. At least I would try to add whatever I have anology
on to you guys. Okay, In the meanwhile, you can see that I'm just
creating various values. I am creating smaller, darker, and darker areas
and lighter areas. This is very important to understand that
there are light and shadows and light and
shadows practically pads that kind of a
flavor to your painting. Everything should not look flat. You should always change the values to an
extent possible. Can you JVC, how
simple the palate is, mostly yellow and the
black or the Payne's gray, whatever is available with you. I would prefer black. That's absolutely fine. In case you do not have Payne's
gray. This can work with. For even our smaller windows, we have for various values. I hope things pressing on this fact that we would
be working on with values and this is something
that I'd really like to do. It really gives an
edge to your painting. And since this is not about doing a lots
and lots of wash, so yes, to get the depth, I think I always like to add layers and it helps me to bring that out in every painting going ahead and adding
some darker values. As you. So for right now, we are handling the plaques. And this is basically for the j cross I that I love
to add always, always. So going ahead and adding it, alternatively, it
is a flat wash. I'm going ahead and
adding there will be a small shadow of the car. We have to keep in
mind that we even add that for this painting, there was no particular
photograph that I referred to. Again, this is something that I want to tell you
every time you will not be referring to
photograph whatever you see on their audio
will be painting that that spot is very important for every
painting that you do. Okay, going ahead and just finishing this
jaywalking could pick more. Once this part is done, we will just finish off this one with some green
sand with some more blue. So for the top or whether there would be
highlights with our pen. So keep following it and
I think it will get it. It's pretty simple, easy. And there is nothing
much in terms of explanation that
I have over here except the highlights
that we would be adding. It's time for applying the black pen marks
and for highlighting. Yes, that's the
best part. I feel. I always loved doing
this to showcase the most important
parts of through this. And I hope that you
will also like it. Once you do this, it's a very small, easy exercise, as I told you, if even the proportions of
the card don't fit that, okay, Just try to adapt it
and fill up your sketch book. Everything will not work. The vest as you want. Therefore, do not always
look for perfection. Whatever you can do, whatever you can get is
best to just stick by it. I think this is one of the best ways to go about
for any kind of painting. And few of the ideas
you have to highlight, few of the areas keep it as is. I use a very small scale. You can also use any other smaller version
of scale if you have, if you have any kind
of round scale, are the scales which
have been rich, rich, which are smaller in size. It's even better, you know, what happens is
for smaller parts, you can of course use them rather than using
these bigger scales. I would leave that
decision up to you, how you go about it. No best way or bad
way, no good way. It's whatever works
best for you. Go with that. Go with the flow. Sketch books are all about
going with the flow. Whatever you feel is good, whatever you want to capture, capture that and work it out. This one is, of course simple. As I told you. I am highlighting a few areas and few of the areas I would
be doing with my blue. You will observe how I add it. Now I did take some indigo. For the shadows and
that's absolutely okay. Any of you can take
those shadows. Any of you will make
those shadows as it is under your car, that you weren't
getting the shadows. So those small, small aspects, you know, add up a lot. That's why I always say that. The more you paint like shadows, the more realistic or
at least the more, I would say interesting the
whole composition becomes. The composition is
not about creating a full composition
where people, etc. It's all about capturing
even a small object and just adding it to
your painting process, or just to add it
to whatever you think can work out on
our sketch book page, I experiment with everything
as I've told you, whether it be Starbucks
coffee mug or anything, off my choice, I will cut out
anything that is possible. So I leave that
decision up to you. There will be times where
I will just provide you photographs from my
own travel journey. And you will see that how that photograph really
changes to accommodate painting and CDC every
time I don't need to contribute in a way that
I get the best out of it. Some here and there. Few of the important
aspects captured. Two of the important aspects
are taken care of and rest. I would leave as
simple as I want, adding some white
highlights now, white highlights
will not be seen much because most of the
areas are in yellow. So only in few of
the areas where you think the white
highlights can be seen? Yes, you can add it over there. And oppose this. We will make our
beautiful itinerary. I am so excited about adding that itinerary
do will be will not be covering all the all
the various itinerary that you see over here. We will only be covering
a few of them because every destination
we are going to paint for things over there. And then we will
move on over here. It was the map.
Then we went ahead with the Brooklyn Bridge,
then the Central Park. And the last one is the Statue of Liberty
as well as the touch. So the whole put
together becomes four. And I do not want
you guys to get overboard with any kind of a situation or just feel
that it's too overwhelming, as I have already
told you earlier in all the mike all the
wild where we have these various things
and getting added on. Fine. I guess this
looks absolutely okay. Towards the top area, I would like to
add the itinerary. I will take a small black strip where I would like to write as ordinary and then go ahead
with this particular place. Okay, let's just keep adding a few more black ones
and then I will get back. I did a wet the surface of vet and now I'm adding the blue. This can be your Winsor blue or any other blue like
cobalt blue, etc. For the clouds area. And the rest would be in green. You can add the olive green, you can add a yellow green. It is just a portion of it
where I want to show the tree. So that's for which we
have to do for this part. The Greenville truly adds
that interesting aspect, as I always say, to
any kind of painting. Hence, I love to add that even for this particular painting, going with some of the darker
values of green posters. Once I add the darker
value of green, you will see that there
is good amount of change in terms of the values
that we are adding. Some of these
pieces are lighter, some of the spaces are darker. It is still wet and we
are going ahead with the size two brush to add
these small, small dots. Once the paper is dry, we will go ahead and add
these small, small branches. I'm using my size two brush from silver black velvet now
you can also go ahead with any other size two brush like we were using the scatter brush. It's just at the
tip of this brushes are sharper than
what I was using. So if you have polar, you can even use Paula Abdul, I will not say that you have to or need to own
all these brushes, so just whatever is
available with you see, I have already changed my
brush to size to versatile. I guess. That's from a SCADA. You can have any
other brushes of your choice and just had
these moral and bigger dots. We'll make it look
more organic and to show the variations
of your leaves, some of them will be darker and some of
them will be lighter. That's it. Now, once
this part is done, we have to just decide on the itinerary and
add that itinerary. You might have a
different itinerary compared to what I have. That's absolutely okay. You can have your own I'll
write those itineraries, hiding the last few details
and then it is done. Just a few lines here and there. Then once those lines are added, the I guess it would
look more complete. Okay, cool. Somebody who's tense, you
know, something, you'll paint. Sometimes we just
get carried away so much with the painting
that we keep adding small, small, small, small things. But we all should know
where to stop hand. That's one important aspect
for any kind of painting. We should know how to stop, where to stop or else it would
be a big problem later on. Hence, knowing where
to start as very, very important as I always say. Okay, I guess we
need to write down a few more things and then
this page is completely done. I hope you have enjoyed the first day of
our New York visit. We are going to paint
a lot more hand. The next destination, as I've already told
you, is France. So there's so much
to see through. We will be covering France, we would be covering Italy, we would be covering Istanbul,
Indonesia, India, Africa. There is this so much
that is coming up in the next few days so you get to non everything
under the sun. That's the best part about
keeping these sketchbooks. Okay, let's continue doing it
and then have a final look. I hope you are super
proud about this. I have the staff and I'm using
it for writing New York.
9. One Point Perspective: Guys, so we would be talking
about one-point perspective. That's what you see over here. What I want to say
is that there are three kinds of one-point
perspective that you will find. The first one is you have to note where it's
a horizon life. So my horizon line, this line over here, whether any cube or any
building that you look into. You will see there
are four points from which your horizon
line will move. This is one of the points, this is one of the bikes. This is another point and
there's another point. Now, when you are seeing
it from the front. That is, when we are seeing this particular statue of
liberty from the front, these two lines will never
merge into each other. And that's one important aspect which you see in all these, none of these lines are
merging into each other. So there are three cases
that I usually see. Whether you put it on the left, whether you put it on the right. That's how it is. One is that the
vanishing point is not there on the
plane of the paper. So if you add these, these will suck their thumb
over the newspapers scale. And you try to mark this, so it will come somewhere on
the vanishing point, okay? When you try to see all of them, you would be in a position
to note that they all are coming on the
vanishing point line, that is on the horizon line. Whereas there are times where they do not come and
they're outside the plane. There will be many
times where you will find this occurring when
you are painting paintings, or when you are painting
cubed, et cetera. There might be multiple vanishing
points to which we will discuss later on how the
two-point perspective box, etc. So all of that, I am
not right now touching. It's a very simple thing that we are understanding over here. This is the first case
where it is not lying on the horizon line
within the plane. Now when it is lying within
the plane, supposedly there, my building is extended
towards the left and I see all the lights are
moving towards the left. Here. This is your horizon line on this is the
plane of the paper. And when it moves you will
have three lanes, etc. You can have different
types of windows coming in. Nicollet very much
to this point. If you're trying to even draw, you have to make sure that
these lines are like this. And then accordingly
you can draw all your sketches off
the windows, etc. This is again the point where
these two are not meeting. None of these lines
are meeting each other as we are seeing
it from the front. We go to the third one here. The horizon line is over here and I'm extending
on the right. It is similar to this one,
just though differences. The horizon line is somewhere a bit shifted
towards the top. You can place the horizon
line wherever you want. But when you want
making buildings, you should make sure
that the top area is more slanted towards
the vanishing point, whereas this area would be shorter compared
to the top area. That's how we usually
absorbed the buildings. Though there might be some difference from what
you have observed over here, as well as there will
be times where we are absorbing it from
the side angle. And you will see
that the van data two vanishing points which are occurring on the
same horizon line. So those multiple
vanishing points where you have 2
perspective will also come up in the next TO session or maybe venue or
doing the France. I would go ahead and
introduce that concept. But for this one, I would say if you will
keep it as very simple, which is 1 perspective, hope you will like
how we go about. This is just a very, very soft outlook
of how you can work through this whole sketch and
this part of the painting.
10. New York Day 2 Part 1: Hi guys. We are back on day two. Right now. We would be paying, taking the Statue of Liberty. If you see on the
left-hand side, I have the statue
of your body and I'm dividing the
subject or to scale. Now, this is very important for you guys to understand
that we have to call base or divide the
subjects into broken parts. One part is where we are going to paint
the Statue of Liberty. And the second part is the
other one which is majorly go, holding part of the
statue of liberty. So whatever or the part is lower half and the top part
of the statue of liberty, which is in green, would
be the upper part. And I am again trying to divide the lower part
into two equal halves. One part would be majorly
your from top half, and another part would
be your bottom half. Even in the bottom half, you might have to divide
it into two equal halves. As you are sure that this painting is
majorly based on lines. Something that I always
need to tell you is drawing is a base. But simplifying the
drawing is very important. Always when you see a
subject do not get guy heat away or do not feel that
this is really tough. How do I manage it? It's just that if you can break the subject up to the
scale at the Canvas stand, how you can add the whole
lines, gesture of it. Everything will fall in place. It's just a breakup
that is very important. And drawing it becomes a very, very important aspect in it. I have tried to simplify
it to the fullest. If you see, I'm even
trying to see how much is the left side
that I need to extend. It is approximately the same. What I see towards the top, odd and even on the right, I'm trying to mock
the same area. We are going ahead with. The help of our scale. Free camera might be
the best in this case. But I know that you guys
are big nose and we should not have this
overwhelming feeling of how to go about any painting. Hence, I always prefer whatever resources we have
available with ourselves, we should use it to the fullest, like a scale pencil eraser, whatever you have it. And then go ahead and
try adding these lines. Now, the other lines
that you see are pretty much as I observe in the paper. I am going to use it as such. It's not that you have to
measure each and everything are few things you would just add as you observe a few things. So you have to just
measure and add it. Again. The big thing that
you do is approximate one. We are not trying to go to realism completely
and add everything that is completely
details and go with every centimeter
millimeter difference or understand how to add all that centimeters
and millimeters. No, That's what we're
not going to do. We're just trying to war
with an approximation and understanding that we
have about the sketch. That's it. Has you progress. You will understand
that everything that you are fainting is not going
to be exactly the same. It would be similar to
what you want to depict? Yes. I think that's that's
what I wanted to mean. And do not get disheartened at any point in
time on do not feel the complexity that
how we go about painting just simplify and just think that you would be in
a position to manage it. It's easy. Many people
have already done it. It's nothing new that
you are doing it. So if they can do it, you can also do it. Yes. It's just a bit of
practice that you need and understanding
how to break it up, as I say, on a scale basis. Okay, going ahead, there are so many lines that I'm adding. So go ahead and add these
lines. Keep working. Sorry, my hair has
come and get me. And I still continue working with these smaller,
smaller details. As you go through
the left hand side, there is a small
idea of perspective, which I want to tell you. The lines on the
left that now I am trying to draw will need
to one single point, which is called as
the vanishing point. This is majorly my horizon line. Over here. Only this one
single-point perspective is important and unique to learn that two-point perspective will come as we progress through the other
parts of the painting. Vanishing point, I think, is a very, very
important concept. And the more you understand it, the better it is, we will
have more of, I would say, ideas as well as motor oil
paintings and sketches, where you will get an option to practically experiment with
the vanishing point more. So I will have those kinds of
sketches to coming in which will give you a major idea and amend your big toe also
into your painting. How you add this vanishing
point pretty easily. I have been telling you
about the scale, okay? Now what do you mean
by exactly the scale? It is majorly the size of the object that
you are trying to make in relation to
your surroundings. And that's how you
measure your scale. It can be like the height of a car or the
height of people, how much it is in comparison
to the height of a car. So these kinds of examples
we will explore to understand the scale of a
subject more as we progress. Over here, right now, we are majorly focusing on the proportions as well as the one single
vanishing point. As I have told you in
terms of perspective, it is, everything
is very mechanical. If you see, we are
drawing the major, major lines that we
observe in the painting. I'm basically in the
sketching of the picture. If you observe that those are the major lines that are
Sketch and rest, I leave it. I am not going to actually go through each and every
small detail that absorbed. You can practically draw everything that you
observe part over here. What we have to concentrate on is exactly what
have to paint. I am not going to paint a very detailed that I
observe over there. This one aspect of drawing
is very important. You can draw anything
that you'd like, what you exactly paint
and what you exactly want to show to your spectator becomes the main key or
becomes the main show for any travel sketch or
any kind of your drum, clean air, or any kind of the monuments
that you are making, everything that you do. This one important whole point becomes very, very important. And believe me, if
you follow this, what you really want
to detail and what you really want to show
to your spectator. I can tell you you are going to name each and every
painting that you make. The line that we draw for
our sketching, that is, the middle line is not the best to her where we
actually add the statue. We should understand that every line that you
make will not turn out into one single point which would help you to hold
the whole painting together. You might have to draw
a few more lines. I am right now struggling
with the face. And believe me, it's not
that I only struggle. There are times where
I have to understand that this did not
go as per my idea. And sometimes I just don't doubt and try to first
focus on the structure, the structure of
Statue of Liberty. Because anyways,
you see the face from all real far point. And that's one of the reason you have to actually add very, very less amount of
details into it. Hence, trying to
add the details on the broader parts is most
important at this point. Hence, I am focusing
on that part. There are three or
four major lines when I make the
Statue of Liberty. And you can also just
follow along and draw this. Once you are done
with the drawing, it would become really
easy for us to paint. Why I say this has, you already know that
the details are set. We have to just go
along and paint. Now, there are a lot of
lines and lots of layers, but we will be doing, which is absolutely okay. As we progress, you will
understand that layering becomes a great aspect of showing the depth into the
painting the more you lay, the more depth that it creates. Now, this is again, one more aspect and it even helps us to show
light and shadow. So if you are going out and
want to paint the shadows, you can first add one layer
which is really liked and go with the shadows which
are darker in learning. Or you can go with
a darker values of that particular shape tool
for creating those shadows. So these are the smaller
aspects of shading painting, or you can tell that these are the important
aspects of learning. This is 185 GSM paper, as you already know, and that's one of the reason
is my dry out faster. You will see how I
struggled a bit with my sky Next when I
start painting it. But that's absolutely fine because over here we are just
having very light washes. Light washes do not demand a lot of colors to be added on. One or two or 4 trillion cartoon you see to being added on. So it becomes easier for
anyone to walk around it. Fine. I guess this
looks so perfect. And then let's just do the rest of the
sketch that is left. Once you are done
with the sketch, I will help you to add the smaller box on the
left and on the right. As well as we will have one or two smaller buildings that we observe on the right. This is a simple, easy as well as you can practically loan one single perspective
through this painting. That's very important when
you go to perspective. And other part is the
proportions and scale, which becomes very easy when
you ask them this painting, you have to restrict yourself to the proportions
that you have decided. You cannot go beyond that. That's for sure you cannot do. So. Yes. If you follow the proportions that
you've set for yourself, you would be in a position
to nail this painting. As I said, that the
sketching is the base. Once you are done with the sketching and your
confidence at the sketching, believe me, painting is
nothing painting part. Yes. We have to spend more time on it because there is chi there is some bottom reverted or
whatever is there. That's fine. We're not going into
detail of that, but every single thing
needs to be looked into compared to if you weren't
done with a grid sketch, it becomes very easy
to add the colors. That's something which I have always call this kept
in mind when I work. And you see it has been, I mean, an eye-opener for me a while
back where I was struggling with these cityscapes or these kinds of
monuments and planar, everything I was struggling
with like a few years back. And when this one single thing I kept in mind that
the proportion scale, the drawing should be perfect. And then you can any
painting of choice. Okay, that's, I think the
height of the older now. So let's move on to
the next lesson now.
11. New York Day 2 Part 2: Okay guys, it's time
for the final thing, and it is all about painting. Now, I know you guys are
set with the sketching. You have done excellent,
but you're sketching, but so believe me, when we start with the painting, you will be amazed yourself how beautifully the
colors move around, how beautifully you
get the final outcome. Before I go ahead and
with anything right now, I would ask you to first to wet the entire surface for
the sky left-hand side, I would pick up complex
because I do not want a lot of sky colors to flow over there as I want
to paint the torch. And I'm starting
with Winsor blue. This is a beautiful color. If you have this color perfect. If you do not have, you can even use Taylor Blue oral so you can use cobalt blue, whatever blue you have
available with you. It is just the sky that
you have to paint. I'm dropping some colors. The speed of the video is 1.5 x. So you can adjust the speed wherever you
think it is necessary, or you can even stop
wherever you think. You want to stop and go head
and painter bit by bit, picking up the colors
in few of the areas. Now, I would go head and had some colors towards
the bottom part. If you're seeing right now, I'm struggling as the parties
hold very, very dry off. So I have gone ahead with
home paid off my brush, and then blended the
color over there. That's how I always do it. If it's not wet enough to just use a
damp brush to blend it. Once you are done
with this part, Hi, I'm using some amount
of my Prussian blue. Now, if you do not have this Prussian blue,
it's absolutely fine. Mix some amount of your indigo with the color that
you have already applied and catcoq value, which is different than
what you have applied. That's something which
I always say that the ghetto value that is different from what
you have applied. This is really important. The sky is very simple in and around the
Statue of Liberty. I'm adding the sky. I'm not going to add it
at each and every place. The sky is not exactly same as what you have absorbed
in the photograph. I do tweak the skies
to an extent possible, but that can be a
reference point. You're painting coal waste. So go ahead, use it
for your reference. But do not go by it completely. As there are few things
which we will do a bit differently compared to the photograph that you
observe in the painting. Okay. I guess this
look so great. Let me go head hand just some
amount of the blue color, even towards the
bottom right-hand side so that it looks more even like your paper dry off then had some amount of your royal
blue for the water area. Now, royal blue is a very
light color from seemingly, or if you do not
have this color, go with civilian blue. The lighter shade of surrealism blue can work
well for this part. I think these are the options. So for the blue that
you can use orals, any light blue that is available on your palette is good to go, even the sky color
that you have applied. If you want to go ahead with the same colors, that's
absolutely fine. Just to like the value
of that will work. Which means that more of water and less of
pigments into it. Just adding some darker
values towards the top. This is either the Winsor blue
that you can take photos, you can go ahead
with heartwarming. Now, ultramarine is one of the beautiful and the most
favorite color of mine. But as you, as I've told you also that in granulate
more hand side like to use it less
cell compared to the other sheets that I
had for the water area. I've used or damp brush to make the bottom area a bit
more lighter for the water. And in and around it. I am now going ahead and
using the darker blue. Now, this blue, of course, can be any shape that is
available on your palate. The top area is, of course, tried off and we will go with yellowish green.
For this area. I have mixed some amount of
my yellow into the green. That is your yellow green. And I think that's one of the reasons this color
is more lighter. And the yellow that I have taken is practically Sennelier, yellow or yellow, whatever is
available on your palette. Now adding some more
yellow if you absorb and green to make the shape. It's simple. If you see, you can always make
the shapes that you observe any person using. It's just that the
shade that you make might be off a bit change than what you absorb right now because the pigments that
each and every company uses for their particular
shade is a bit different. And that's one of the reasons in India might be bit
different than Magellan. Magellan might be a bit
different than insulin Newton. So these are the things that you will observe as you go head. One thing, try to use only
artist grade pigments. Artists grade pigments. So if you use will
give that glow. Your painting as you are
working on a 185 GSM paper, if you are not using artist crepe pigments and only going ahead with
student grade pigment, it might not be the
best thing to do. That. That's all hi Can Save because it will
turn way lighter. You know, we cannot do go with multiple washes on
this kind of a paper, which is, I'm going ahead with n washes or four
washes or five washes. The people will give up at 1 in time and which
we really do not want. This paper is really amazing
for two or three washes. And you should try to
go ahead with that. I have ordered the
values of green and I have added it
towards the right, towards the left side. Along with it, I'm
taking cobalt green. So there are 34 kinds of green that you
get in the market. One is the cobalt dream
is to have tailored, of course you can add
a bit of white in it and you will get a color that is something
similar to this. Whereas if you have other
colors like Verizon blue, then cobalt green, turquoise, they might be quite similar to what you might
have to add a bit of white into it to get a color that is
lighter like this one. I am going ahead with very, very light wash if
you see this as more of water in it and
less of color in it. Wherever. I think that I
want more lighter colors, I would go ahead and just add
some water in that space. Now water really helps the
colors to move around. They will really move from
this case where you want it to move and that's how you can make the
space more lighter. Okay. I guess this
is a color that we wanted and now I would go
ahead with my Naples yellow. You have to add a
lot of water into your Naples yellow while
you add to your painting. It's a very simple process of
addition of Naples yellow. Now since I'm going ahead with some very, very light wash, I will cover the entire space
TO there is a top area, which is also in cobalt green. But when I come back to what I tried to add the cobalt green, I would be in a
position to the width. So that's a mistake
which I did initially, but it did not The backfire or it did not come
back to me as the wash was so light that it did not make much of a difference when you
added or any other color. Now this is the first step after the first
year to practically can't say that you will
have the best outcome. Believe me, there are times where we give up
after the first year, and that's one thing
which I always say to everyone who have had a meeting with me or
who have any kind of workshops I'm giving
them who have been my students and never give
up on your first year. It's nothing. When you start adding
your layer two, layer three, layer four, you get to understand how
the painting is turning. So I'm using my darkest
value of green. Either it be when I say green or either it be any other
green off your choice. That's absolutely okay. Whatever is available
on your palette, the colors that we have
discussed, you know, we are using almost
all the colors that we have used during
our color palette. There are major colors Sarah, always say you should own, and those are the
colors which you can use for all your paintings. Though, each and every
painting comes with their own challenges or
may require a few sheets, which usually we do not
get to see commonly, like here there is cobalt green, which you usually do
not use very often. Those are the things. So I guess you might feel a bit lost. But you can, of course, search for yourself how you
can make the cobalt green. Here. I cannot really go head and work with
the color mixing pad, but I would add a small video later on in the
footnotes section where we will see
how we can go ahead and make the cobalt
painting of this part. I'm using my size
two brush for making the smallest strokes everywhere and wherever I want to blend it, I'm using my blending
brush for those aliens. Few of the areas I change
the value as you see, even when I keep
adding the colors, I do change the value
to a large extent, some of the areas, I don't
add any colors altogether. That's how I like to keep it. It's time for the second layer
on the Statue of Liberty. We are going ahead
with one shade darker with the
cobalt green or her, I said blue as I have told you, any color you can choose and start adding it
to your painting. Once you are adding or make sure that you're not
covering the whole area, who are only covering a few
spaces where it's important. And you make few strokes like these lines along the sketches that you have already done. Everything, as I say, doesn't need to be perfect. It has to be few areas
which are darker. It has to be Q areas
which are vital. That's how we go about it. There is no best way you can say the way we have to paint it. It's just one of the
ways in which we paint. Now I'm adding the cobalt green to the place that
I have told you. Or else it can be
even turquoise. You can add white
into your turquoise and get a color that is
similar to this one. Fine. Once you added the
colors to most of the areas. So go ahead and even
added on the book part. Let the band dry off completely. Once it is dry it off, we will go ahead with the brown and then
come back to the spot. Okay, I think I would add
some of my burnt sienna into the palette and start adding smaller lines
towards the bottom area. Now this is a very
interesting part over here. If you see, now you keep adding
these lines and you will practically blend it with the
same brush that you also, this piece is really small. That's one of the reasons
you have to be more. When you add two colors, though, if they even spread to go next space, it's perfectly fine. You can always use a tissue
and pick up the Congress. Something that I want to
tell you as a trick is, when you are less confident
about adding the colors, go ahead with the darker spaces. Now, the darker spaces you
always know will be darker. So there is no way
you will go wrong and the painting becomes
bit more darker, or the spaces become more dark. You can always go ahead
and add one more layer, even on the lighter parts. So that's one trick which
I have been using for many of my paintings
and I really like to even share
it with everyone. It's easy and it's done Very nice flow that
you absorb over here. Okay? One thing is adding a few more
lines here and there, just continue with the process. This over here. I don't think there's much of explanation that I need to do. It's just simple colors that we are adding
on the darker side, which is towards the left and the lighter side
is on the right. That's the only thing which we follow when we
add the columns. Going ahead with my brown again. Now, if you see on the left-hand side I have
gone with a flat wash, whereas when I'm going
towards the right side, I am finding bit by bit back area is under the light and that's
one of the reasons. So I'm going. Altering the values
over there compared to what I have done
on the left side. This is it, I guess it's just more about altering
the values and getting exactly the painting
that you want to do. I don't find anything
more complex. I would say it's all about
how you perceive it. If you can perceive it, well, if you know, if your basics of
perspective scale is right, I don't think that you can
go wrong with anything. It's just a basic drawing
which has to be correct. You're just adding the colors. Painting. Of course,
anyone can do it. If you have a bit
of a knowledge. I think you can
need any banking. So this is what I'm here to tell you how to work through
the perspective part, through the sketching part, to the drawing part more. And I feel that that's really the base of any
kind of painting though. We are always good with the
bad that we have to sketch, we have to throw, and then we have to go
ahead with painting. But if you can have a bit of
patients with this painting, I can tell you the painting is just 30% of what the
major part wholesalers, so the sketching and drawing, everything will work on its own. We are going to add some darker values of green
now in few of the ideas, as I always say, that
you should give your people the time to dry
off on it as 185 GSM. That's one of the reasons
when you move in and around, like you are completing one part and then
moving to the next, the first part becomes
salty, dry it off. That's the best way you can
actually avoid all the time you have to give for paper to dry off and come back
again and then camping. That's one of the reasons the painting becomes quite easy. And you can quickly do
it rather than waiting for quite some time on a 300 GSM paper and then
again getting back. So this is one thing
that I really liked about painting on one AD
five-year assembly plant. That's one of the
reasons I have been seen to each one of you because
we will be working in there. So it's important
to go ahead with 185 GSM rather than 300 years. Going ahead with the
somewhat darker value. This is very simple. You know, at every space I
will not be adding this. Going with some of
the darkest value. It is something like
Van **** brown, whereas a very light version of Van **** brown that I'm
using for hunting tool. This part of the painting, lots and lots of water
and less of a Nike brown. If you do not have
been **** came down, you can always go ahead
with your sepia now, but NCPA, you have to add some amount of your
bones here and now so that you get a
color that is similar to what you observe right now. Okay, I guess I would go ahead and make some more
lines with my brush. So this is the third year that
practically we are adding. And I think I'm still happy to see how the painting is turning up slowly and steadily. I give the painting the time. It takes some do not
rush to not hurry up. It is already a lot of effort that has gone in
to this painting. It's just about 60% to 70 per
cent you are already done, which is the last few minutes. Iqr, which is all about 2025
minutes that you observe, or maybe 30 minutes
max that you have to wait for the
painting to complete. And in that majority of the part is all
about adding lines, adding those black things. Live washer, something that
I have been very vocal about in many of my other paintings
to now live in wash. One part is that you are going ahead with the adding lines
and then with the wash part. Whereas over here, I like to
do the wash simultaneously, which is how I go about it. It's like that you are not adding the black
ink in the beginning, whereas you are
adding it later on. Whereas in the lightened, the pen and wash, what you usually see
is so pen and wash, you will see this ink. Coming in first and
then the wash welcome. So this is more
of a hybrid model where we are adding
the black pen, then the white ink, etc, everything towards the end. Rather than adding all that highlights towards
the beginning. Okay, going with
the darkest value. Now this is the fourth layer
here, believe me guys, the more Eulalia
you're painting, the better outcome
you will have. So that's something which I
have also launched with time. It's not that it comes
with the first row. And it takes a while
to understand when you are working with
lesser GSM paper, as I have told you earlier, you need to go with major. What she says dries
up very, very fast. So that's something you
need to keep in mind. But along with it makes sure that you're not getting
any hard edges because hard edges will make
the painting look absolutely. Not that great. I mean, if you have this
guy which is so soft, Why do you want to go with
hard edges of the sky? That's something
which I don't like or I particularly
don't prefer hand. That's one reason I always, always use arches paper
or Fabriano paper. Both of these papers
are very good to use. Even the Fabriano 200 GSM
if you plan to use it, please go ahead with that. That's one of my own
favorite papers to use. Finally, I think we are going to add a few more dots here and
there with the ductus value. Every time when I'm
adding these lines, they are not same or
they are not equal. And that's something which ideally want to tell you
that don't make it equal, make it broken in some
places and make it more straight or make it
more longer in few places. That's the only thing. I guess. There's less
to explain right now. As I progress, I
can only tell you that slowly and steadily you will get a hang of
it slowly and steadily. Even know everything that you paint will become
easier for you. It's just the first
one that we were doing and it is not
a very easy one. I will tell you once you are done with the painting, please, please make yourself
feel good about it. You have attempted
something which is tough. It's not an easy one hand. You have practically nailed it. Whatever you have done is the best that you could do today. At least, you might have
to actually paint it. Again. That's absolutely I get this painting two
times myself before coming up with final painting
because it is not so easy. And I do get that point. The whole of travel
sketching or the whole of this part has never
been easy to anyone. It's just that we want to break it more and more and breaking it
makes it more easier. That's the only way
what I can say that I always tried to break as much as possible
for each one of you. Everything that you paint, because that really helps you to go through smallest steps, easier steps, and progress
with your watercolor journey. Here we are. We have to add the darkest value and a
lot of quotes that I have. I am going ahead with potato
turquoise from sending via. You can also go ahead
with Taylor Greene. If you do not have the state or turquoise, that's
absolutely okay. Something similar to
it as good to go. I am painting the darkest
value you have seen. This is the third day
or that we are going ahead and adding
every time I lead, I tell you that this might
be the last layer or this might be Next clear or etc. So this is something
that I have learned. As I've told you, the light and shadow works only
when you layer it. And that's one of the
reasons we have been doing this part more often with
this kind of a painting. Once you finish it, you will be very proud of it. That's all I can say right now. Adding the shadows, you
will keep adding it. And then let's work
on the top part, where we have to paint
the face as well as we have to add smaller
yellow light on the torch. Time to add some
ripples or lines. Now, how do you depict the rebel set is majorly
the lines that you paint, which will give called Lakoff ripples into
the water area. Going ahead and adding
these lines are all very, very easy and simple way. I am just hiding simply few of the
areas I'm breaking it up for you are not happy with
the brush that you have. Go ahead with the smaller brush that would give you
more confidence. And that would really help you to add these colors
in a better way. I'm picking up the
scene darker value of the color that I have
used for the sky area. It is simple, easy. Believe me, you can go head
with any way that you want. You do not need much of worked
through horn, this one. It's just going with the flow, as I always say. And then add the darkest
value towards the top area. Going with my Lamy pen. Now, if you do not
have this pen, please use any gel pen that
you have available with you. And then keep adding these lines as you
observe me doing for the darker spaces that we
want to add to our painting. Now these lines are
basically the highlights as well as they are the
basics of your painting. Be frank when you are
adding these lines, it helps to show the exact
structure of the painting in a better way or the exact structure of a drawing that you have
done in a better way. But as I told you, this is a hybrid between an
ink and wash over where you have ink throughout the painting and then you can go
for a light wash. So this is majorly or
hybrid in-between. Now, this ink can,
is water soluble. Therefore, if you
add water to it, it will become soluble completely and you
might smudge it. So if you are not very
confident about it, go ahead with permanent markers. They are better off at
this point in time. Once you are more
confident with them, then you can go ahead with this. I'm adding some more lines now with my pen in fewer behaviors. So as you see, it's
more of ink and wash. Right now it's whole inking can embed I'm going
to apply and make the highlights give the
structure possible outlook. And this will highlight the structure as I've
already told you. It's just a few lines
here and there, and that's all. Okay. Let's add some lines on the tackled values
of even the Statue of Liberty in view of the spaces where we live to the word. Then once we are
done with this part, we will try to add some
people into the painting. Now how do we add people? It's a very simple way. You will have to use
a Posca marker or a Gua Sha or anything that
is quite opaque in nature. And small, small dots here and there
as you saw me doing it. Then now again, a simple
process of finding a few lines. So with the help of
your pen, that's all. It's some really simple
just that though. I think it's within us
that we want to complicate a subject or we want to practically ease out on
any subject that we pink. This, I have realized over time. Then I started off with any of these sketches are used
too complicated so much. It used to take at least
four or five hours of my time when I
started making it. As per what I explained
it to you nowadays, it hardly took
anytime. It of course. I'm not saying that it
will not take any time, but it would take about 1.51
plus ty was tagged max, which I think all of us can give if we are even spreading
it over to the process, you can give that much
time to finish it off knowing the fact
that this is not such an easy process and travel sketching has never been easy
to any one of us. It takes a while to get a handle third time,
don't understand it. Therefore, we need to
dedicate some more time to it compared to any other subject
that we want to be good. This is something which I
have realized and I have practically worked hard
enough on that part. Although what you see right now is yours of work that
has gone into it. But all I can tell
you is that you will be in a position to
do it very, very well. I'm using my Gelly
Roll white pen for adding these highlights. Now, it is majorly on the darker areas where
I want to show it. Once we are done with this part, I have already told you we
will be adding the people. Okay, It's time to now
go ahead and start adding the whites
came to our statue, as well as you have seen me adding it in a few other paths. This is the Jelly Roll
pen that I've been using. And you can also use
Posca markers if you have for white or any other acrylic marker which
is there in white. Those are the markers
that can always be used for your paintings or for
adding any kind of highlights. Guys, now, if you see the whole painting
has taken a shape. Whatever details are we are adding right now is
practically it's true. It is just to make the
painting look more. I mean, it's technically it
would look more beautiful. That's how I would like to see. The structure, highlights. Everything is already set. The perspective
seems to be fine. Hand, I'm going ahead
with Posca markers, as I did tell you earlier. Now, this has Hey,
bucolic in Canada. So I'm just making some lines. It's random lines with a few
of my colors that I have. And once I have added
these smaller lines, I would go ahead and change
the color to yellow. You see how I am
altering the colors. And after alteration
of these colors, you will absorb
even other colors coming in light,
blue, purple, etc. Because most of the people
where different kinds of shades and I really love to add this kind of additions
to any of the paintings. It's just that few
people are standing far away and you just
get to see the address. That's it. And I had the head and just add
the legs. That's it. You don't need to define
anything more for this. But that's one of the most easy and beautiful
as well as amusing parts. I would say you have
depicted everything, but you did not need
to do much in this. So yeah, I guess that's good. Go ahead and keep adding
until you are satisfied, but don't go overboard with it. Just like when we
have galaxies guy, we keep adding the
stars, stars and stars. So that's not how we go
about in this place. It's just the head as well as the legs that
we need to show. That's fine. And then have a
final look at the painting. I'm pretty sure you will
fall in love with it. You will literally love how the whole painting
has shaped up. There is a bonus lesson with it. High would be releasing that
lesson day after tomorrow. And you can paint along with me. There is pencil sketch, which is the need. And it would be of course, again 1.5 XP that I would
be adding this video too. But I guess you will like to
add something like this to any of your paintings because not only it
shows the detail, but it really helps
you to bring out something more rather than
only your watercolors. Finally, you guys saw the
painting has shaped up and I'm so proud of how
it looks right now. I think that you guys have
also need your painting. It's just that there might be one or two attempts
that you might need. But I can tell you this
is a real easy one. It's just that you have to
know that you have to work on April which can take two
to three washes. That's it. Few highlights with Ben. And you are all set. I hope that you have enjoyed this lesson and I'm coming up
with the bonus lesson next, as I've told you,
the bonus lesson would be off much
more used to you. As we have less exposure to
the drawings that we do. Add something that
I really like to teach us how to draw
and how to sketch. Because practically
that is the base for all our paintings. And this whole structure, or this whole class structure, is based on the idea of drawing, sketching, and then painting. Hence, I think this
particular exercise would really help you to go.
12. New York Day 3 Part 1 : So we had the tree of New York and today
we are going to paint the Brooklyn Bridge time. Oh, I promised you
the bonus lesson. And of course it's
a bonus lesson, so you will get it
as a bonus students. After the Brooklyn Bridge, we will do our view
from Central Park. That's how we go about it. Now, this is a 2
perspective, but frankly, I really did not want to introduce it so
quickly to you guys. But as we progress
in this journey, I know it is important
to even known the two-point
perspective over here. I am not going to tell
you how to work on the one-point perspective
as you have already noted, and you already have seen how the one-point
perspective works. On the left-hand side, there is a one-point
perspective. And when you have to draw
on the right-hand side, there is another one-point
perspective which works. That's one of the
reasons setup dole. It's not two-point perspective. I would give you some of
the ways in which you can, of course, work through
the two-point perspective. But right now, let's go ahead
and just add a few lines. You know, the base, the grid part of
drawing any bridges or painting branches,
it's pretty flat. And these are just
based on a few lines. If you can get those
lines correctly, then there is no problem. You will get your final painting quit the left-hand side of the bridge that I'm making that as the slanting line which you see from the
left to the right, they will converge towards one
single point on the right, whereas on the left, and it's not on the paper plane. That's the best part.
I have been telling you this that sometimes you will not find the lines
converging on the paper. And there are times like
this which happens where you will not see these lines
converging on the paper, but when they go out of the paper plane,
they are converging. So this is one of
those areas where you can very well absorbed
the lines are not converging to one single point
within the paper plane. Once this part is done, we would go ahead and just start adding the other
lines of the bridge. This bridge has got a
very nice shadow in it. And that's one of the
reasons I did choose this one for my painting because the shadows really
look amazing in the spot and how to color mixed or shadows,
how to paint it. That's one of the things
which I really love to teach coal-based the
light and shadow effect. I hope you're going to enjoy it, but in the meanwhile, try to just draw along with me. See the drawing is
not very tough. I can tell you that it's just lines and you're
making those lines, but they have both the scale. That's another great
part of this painting. We are not going to use our free hand drawing
lines, though. Most of the others
still the same and they draw it
freely with the hands. But over here, there
will be a lot of overwhelming feeling
if he started doing all that right away. We will continue to do what during our
last few days where we might go ahead and draw a vague
feeling with our hands, those things, so you can
always look into the future, a handout, make it for yourself that I will leave it for now. I'm going ahead and just drawing these inner side of the bridge, you see these
beautiful structures that is inside and the
people pass through that. So these are kind of gates, are open areas so to
which two people walk. Last time when a visitor at Brooklyn Bridge Street
was in around 2017. And really it was so beautiful. It was mesmerizing. And hence, I just wanted to add it to my At this time I wanted
to really paint that. At that time I was not
into painting much. And I just went like a tourist, had a look at it and came
back when I painted. Now I can relate to
it so much more. The huge bridge that saw how mesmerizing it is to paint with your own hands and make
it look so beautiful. You know, capturing whatever you see is something that
I can't tell you how beautiful it is and how much memory is it can get back to you
when you finish it or when you go to a
place and want to just go ahead and paint
anything that you want. You have the power and use
yourself you want to create or that kind of power
gardening nurtured. That's what I say. Your
intent should be to create. And rest. Everything will fall in place. Believe me, guys,
everything falls in place. You do not need to
practically learn everything. I have learned. I have literally struggled
for so many years before. I feel that I can give
a class like this where you can come and
learn something from me. It takes a while. I will not deny it, but if you are at it, you will surely get through it. And this class is surely a guidance to whatever
you want to think. Yeah, I might not
be reaching your right now the angles from
which you should sit, what you should see, and how you should think
and rethink will come when you are progressing
through these lessons, we would go ahead and even not go on the location
and paint some things. So those kinds of experiences
are also coming in. It's just that we
are trying to build in a base for our
future lessons. And if you attempt these
sketches and painting, I think that's more than an app. You should not eat meat, you should not try to get everything perfect at
everything amazing. That's what is not the intent
of the class any time. What you have to learn as the sketching is the
base for any painting, the drawing becomes a very, very important in this. And hence, you should focus on the drawing part called lot more before you
step onto painting. You know, patients is
the key and patients in something that you really
need for any urban sketching. And as you progress
through the ears, these catching
will become quick. I really remember
I used to take for five hours for one urban
sketching when I started it out. Now it has come
down to 1.51 hours. And maybe as we progress
through the lessons, you will observe that
this timeline is producing more in
this one or that we can construct a whole
structure painted and just like get it done. It's all about the practice
and knowing the right things. I must say that knowing
the fact that you are going wrong somewhere in the perspective is
very important. Knowing the fact that you are not going to
add everything that you see in the photograph is something that we
should always focus on. I have never thought that I
would be capturing everything that I see and I do alter the
photos to a large extent. The wipe off the painting is basically fall season or you can say autumn season at that time. And what I would be painting is more of the green areas, etc. Therefore, there is always
a gap which are absorbed. But I like to do it my way and I like to add those
greens into my painting. This is it. I think that's what I
wanted to tell you. If this bridge looks
difficult to you, then I can tell you you
would be absolutely rewarded in the section where we would be
covering France, another section of France, you will see a lot of easy paths coming in as you have already experienced
more difficult parts. And I have even introduced watercolor inks or sketching things in that part. And I would love you guys
to have a look at it. It's one of the, I
think it's one of the most beautiful
parts that you can. Of course, go ahead and check out and try to
paint on your own. There's so much more
to learn than we are using a car loadings
are drawing in some, it's not similar to how
we paint with our colors. And there are a lot but things that you have
to keep in your mind, then you start painting
or drawing it. Anyways, I'm going to introduce that later in the latest stages. So that's not right
now, get diverted. And as I've told you, this is two-point perspective. As such, whenever
you are drawing the readings and believe me, there is not only
two-point perspective, there are multiple points
perspective which you will get. It is one side of this,
one side of that. And then you will have
multiple vanishing points to all of that. All of that I think that I
do not want to introduce right now and I do not want to make things more complex away. You just allow to sketch through the
structures that you observe. The structure is,
as I've told you, it's not tough, it's
going to be simple. And most of the areas, of course has some trees and also we will
draw those twins. I guess now I'm pretty
much a good width, or how does this toning up? And I think I will not too much of a change over here with this structure is almost ready. We would go ahead and just add some more finishing
lines and get done with. Few more lines that we
need to add for the top or the bottom of the bridge, which is practically holding it. This is the ropes and the line's not you need to make
things are the major ones. Some man, you know, I may go wrong. And yes, there are
times I do go wrong, but sometimes I do even change
it as far my requirement, like over here,
it's bit different, whereas when I added
to my painting, I would see it a bit
more differently. It is not going to
change anything much, but it's just how I want
to add it to my painting. You will not even find
any change when you see it separately compared
to the one that you love. So right now, okay,
on the left side, as well as on the right side, you need to add all the lines. Once these lines are done and
have a look at the sketch, do remember that
the main structure lies in the middle and
rest or whatever you, the structure that
you are drawing on the left as well
as on the right. Those are just Tom to support the main structure
which is a nonmetal. It's not exactly in the middle, It's a bit on the right side. I usually don't place some
main much of a structure in the middle
because that really doesn't give us very good vibe. That reading that, that is
not the best way to actually place your object when you
are having a look at it. But sometimes you
know the photos, etc, or wherever you are
at the location, you would like to
do it that way. So it's not that it's like these are a few
rules that you should always follow compared to
you not following them. Okay, I guess this is it. Let's move on to the next lesson where
we will paint them.
13. New York Day 3 Part 2: Let's go ahead and
apply some water towards the top area or two with this guy area and then start
adding the blue color. Now, many of you might be
confused with the blue color. It can be Windsor
blue and a bit of ultramarine in it for the sky. But you can use any other color of your choice for the sky, there is no best color that you have to go ahead
and use, as I always say. So you can also go ahead and
use the royal blue color. That also looks perfect
for the sky area. These are few of my own go-to colors which
are used for my sky. Arrest. Whatever is available
on your palette. Go ahead. But that, That's how I always see the colors that we
use for in our painting. Okay, I'm taking it
a bit below and then we will start with the bridge wants this part is
completely dried off. It's time to start adding
the colors to your building. And I usually like to
use my bone sienna, and I mix it with a
bit of yellow to make it look more lighter in shade. I had this yellow all your thumb from the last painting
and I just used it. It was the first painting
that we did about maps. So yes, I had a term that I am adding the colors and then just taking off all the
extra things into the water and using the
water for the blending. I do this very often than ever. I need to add the colors
for the first layer, it's important to go ahead with the darkest value that you, whatever you want to
apply and then you can add more than
one water, two, even on the paper to make
it more and more light, that's the great
way to work around. I feel this is very strongly
that you don't need to always go head and keep painting everything at
that point in time. You can just use water, even on the paper for
blending your colors, for making it lighter, for even making the colors look more lighter in shade compared to what it
should look like. So that's, that's very great way to
actually say that watercolors, the main work is not
of the pigments. The main workers for the
water that you add them better water you can apply the better understanding
you have about your water. The veteran outcome you will
have. Yeah, pretty much. It's all stuff you might
not have discovered it. Or if you are new
to watercolors, you don't know about this. But frankly speaking,
that's what goes into watercolors when
you work with it. Going ahead and adding the
colors here and there. If you see sometimes
I add a bit of darker value and then I
bid bit of lighter value. Now, I always order
the values so that it shows up the wear
and tear anywhere, whether it be bridged, whether it'd be any
kind of monuments, buildings whatsoever it is, it should show that
wear and tear and that were in there
is very important. Time to add some
darker values fit with my size two, brush
that I would go ahead and add it very simply. I go with the darker
part over here, and then I am using
my size two brush as the painting is very small compared to like it's
an A5 size painting. If you see, it's not a very huge painting
that we are doing. Seed, the more bigger
we go in terms of the size of the
paper from a five, the longer it might
take for us right now. But you will see that we
will work on A4 size paper. This part of the
bridge that we would be painting on an A4 size paper. So I will use both the sides of the paper
for doing that bridge. Those kinds of things
are going to happen. And the major part that I want to tell you over here is to create the shadows. The reference image, of course, I've uploaded in the
resources section. So please go ahead
and have a look at the resources section
for the reference image. If you see, I just walk around
with two shades over here. One is the brown that
I'm walking around with. Another one is the dark color. It is my Van ****
brown or else you can also go head with any dark shade of brown
that is available with you. Whether it'd be CPR, whether it be any
brown shade of it, like you get, you can go
ahead with any shape. But the major intent of painting this part
over here is to show you how to mix the
colors and how to alter the values even within the place where
you are painting. It's simple, easy, just that
sometimes we are not aware of it and we just don't know
how to work around with it. If you see my first layer, once it got dried off, I have started adding
the darkest value. Adding the darkest value is like going with
the boldest moves. If it goes wrong, it goes wrong, but if it
goes right, Oh my God, the kind of final
outcome that you get would be super
remains to see that. Going ahead with,
again, the darker part. Another thing that I wanted
to tell you, what's that? I'm even mixing some amount of my indigo or else you can also go ahead
with Payne's gray. These are two colors
that I always go head, but when I am painting old buildings or whenever
I have to paint rocks, this is something that I
really, really love to do. Fine. I guess. This is it, blending it with
some brown color. Now, this brown
color is very pretty and it's from PWC
that I'm using it. Though there are
other sheets which I use from when sin and Newton, and that has been my
go-to color for so long. But when I was
introduced to PwC, I just felt that this color looks better than the ones
that I've been using. It's just a personal choice. You might find it good. You might find that I'm not as good as you see me using it. So it's all, it's
all perspective again about how you
see your own colors. And that's something which I always say that it's
all about perspective. Okay, you see me using my brush to create those beautiful shadows
and it's simple, easy. And I'm just creating that line. I like to create that line
as a guidance for myself, how I have to go about this. But the beauty is we have
created the first layer so light that whenever
we are adding those shadows there,
so well-defined. And you can practically
see that this is the one that you would like
to add this up. This is one part of it when you go to this drawing, it's not, I know I'm jumping the topic, but when you are working
with those things. I can tell you we are, we will work with
only monochrome. And that particular painting
you will fall in love with. One is, the structure
is pretty simple in terms of how you
want to go about it. We will just create
a quick structure and then we will start
adding the colors. But more than that, it's working with
one single color and that one single color for your travels catching is something that is less explored. And I really feel like
you guys should try to do that when we are working
through the France part. And that is it. I mean, I am super excited to introduce you guys to
so many different mediums. It's a mixed media class where we get introduced
to so many mediums, but not using them together
in one single painting. That's why I did
not need from you. Yeah. I don't do those things consciously
keeping the fact that I know I would be using
inside would be using many more things
like markers, et cetera. When we are going ahead with
so many things together, we have to always keep in mind that we will not
make any mistakes. We will not mix so many mediums that it becomes so confused. Initially, I will introduce
its sole slowly to you guys, every small, small
thing and believe me, you will fall in love with it. Be there at me. I'm telling you each and every day is going to
get better from here. Well, I can see right now
is whatever you would be doing would be pretty
much a repetitive, an iterative process because
it takes a while to add all the colors for
the building to work through the major
shapes and sizes. Therefore, I would ask
you to go ahead and keep adding all the
colors along with me. Do not try to get away with
any step and be there. Have the patients. I can tell
you this would be one of your best paintings because the Tyler shadows that
we created over here, we haven't done it ten date. And this would be one of the standout paintings
that you will have. So let's just keep
adding all the colors. I use my size two
brush pretty often in this sketch series altogether
because I have sizes, size two which are
to travel brushes. And they are one of my
favorite travel brushes, which I have been using. Though. I want to own a few more good travel
brushes in future. But this is what I
have and sometimes I just go with what
I do on myself. As every time I do
not like to spend our money on buying new
things or buying new brushes. It will happen over time. I give it the time when I
need it, I will surely byte. In the meanwhile, I'm
mixing up the colors. This is a very important aspect. If you see I'm using some brown. Sometimes I'm using
the darkest value which is majorly
your Payne's gray. I will have this coming in. So well, some pair, the wear and tear off, this particular
building is shown up so clearly and so few
places and ductile values, few places and lighter values. That's how I like
to go about it. You know, the basic structure is already done To be frank, during the first
15 to 20 minutes, you practically do
not need to do much. In this case, it's just one part that you
want to walk around with. Once this part is done, the whole basis set, if this part comes out exactly
the way that you observe, frankly, once you
add the second, third layer, everything
will fall in place. So I would ask you to hold on. And if you are getting
this or if you are here, painting this part makes
sure that you get at least the darker and the
lighter value contrast. Well, That's it. Once the contrast or set, everything will
make its own way. I'm switching my
brush and now it is the thinnest
brush that I have. This is for making the lines. Though. I was not very
happy with how it went. I don't know why
I could not work. Very innovative, very
thin, thin line weight. I could not work. And I was a bit
disappointed though, once the whole painting was
done with the lines that I made to afford the
top area below, which is basically the lines
for the string. It's septum. And somehow it did
not come out or well, and therefore I did change it on my brush to my Princeton. It is the liner brush by
Princeton Aqua light. So you will see that
I would be using that brush and during
my next few paintings. So when we are in
France, though, these, these brushes new
order a bit sometimes, and I usually stick to the same number of brushes
which I've been using. It's just a change in the number or the change in the liner brush
which I would be using. That's the only thing that I do. Okay. But making it better, I feel now you can see most
of the things have dried up. We are going ahead with them more and more details,
but that's starting. The initial part usually sets through during the
first few minutes only. What you are left out. Over here is majorly
all those small, small aspects of painting, which is how bad detailing, how about adding
the shadows are, but adding the highlights, et cetera, et cetera, et cetera, How bad term like there's a light shade of green
which you have added now, there will be two mode shapes that you've come through on it. So those are the
aspects that you will concentrate on maybe
as we progress. Because the structure was set during the initial
part, the drawing. You get the drawing correct? You can get everything
correct then was the major colors that you had
to add, which is also done. Only smallest part that is left, right now is to add those small, small windows on
the left-hand side. Add those lines which would define the bridge
in a better way. And few of the areas I'm adding the darker values
met my liner brush. This was just to make the
contrast a bit more better. I will add two smaller
dots and smaller lines for the top area where you have
to make it look like stones. And that's how we go about this. We have to add those stone kind of structure or the texture. It's very important. That's one of the reasons I keep adding these smaller dots. And somebody says I don't
like it and I just blend it. Those things do happen, guys. Believe me, it's not a perfect thing when you
continue working on it, you will figure out
a lot more things that you could have done better, that you would have done better. As we progress
through the journey, you will do better than better. Yeah, I you know, when I made the airplane, I was never sure that I put one day go ahead and
fade at aircraft. That's what I cannot even
believe about myself. But yes, I did it. I did it after lots of practice. I did it after lots and lots of experiments, failed
experiments, etc. But it's easy. It's just that the intent of
creating should be there. Add that intent of working through whatever comes your way is very important. It's not about getting
the perfect outcome, as I always, always say, never try to achieve perfection. You will not be in a position to achieve it through
the use of practice, through the time that
you worked through, through these 80 days, you would be in a position
to get the best outcome. You believe me today or not. But once you are done
with these 80 days, you will figure out that
you have improved and Tampa long way through all your paintings
that you have done. I did tell you
earlier that we will have one more darker
value of green coming in. And I really like to add
that for my paintings. It sets the tone and the
mood very correctly. If you go ahead with
multiple layers, it would help you to show the various values
in a better way as, as this is one effect
GSM, I have told you, you do not have the
option to walk around on one particular layer for
a longer period of time. And I feel that is
better when you are when you want quick washes, when you want to walk through
the layers pretty quickly. So in those aspects, I think this is one of the
perfect way to experiment. Going more bolder with my
painting, the shadows. Now, all the shadows
of the left side of the building is
falling on the ground. And that's one of the
reasons I'm using my brush. Few of the places I'm leaving
the same as what it was. And I might have to go ahead and change the brush
while I go towards the top because we have
to add the thinner lines. And right now it should be size two brush that you
should use for those lines. Okay, I guess this looks so
pretty much how I wanted it. And therefore, we
will now go ahead and just add the darkest values. Even on the right side, the building has lot of windows. On those windows needs to have those nights
passing through it and that light which
is passing through what actually is creating
the shadows, even non giving those shadows
a better view. I must say. There's one good way to get
a darker value of green. And it is mixing some amount
of blue into the green that you already have
on your palette and get those darker values. Add one or two drops here
and there, and that's it. It is done. We would go head. Now on the bridge. We will go back to the bridge, start painting the bridge again. Few of the areas
wherever we need. And then we will start
with the definition, defining the last few things. So which is very
important with the pen, as well as what the
white highlight though. That's, that's what I
look forward very much. The structure is set. What you can add more is something that
you have to always decide using my size two silver
black velvet brush so you can go ahead with any size two brush
for this part. You do not need to go with self-absorbed velvet brush for
this part of the painting. That's absolutely fine. Whatever you have
available with you, it's size to write. Sometimes I do auto
my brushes as I see, and then just go ahead with the I would say strokes
that I want. That's it. Okay. Hiding the darker
values and for the, for the left-hand
side of the building. And once you have
added this taco value, they will be the whites that we would go ahead
and add the highlight. Now, if you do not
have the highlighter, then you can go ahead
with wash or those. You can also go ahead with
any kind of acrylic markers. These are something which you
can have answered option. Or even the titanium white, which you get in watercolors, is opaque in nature. And if you are using
the titanium white, you will get these
highlights pretty easily. Whenever you are
making the highlights, try to make it with
the liner brush. If you are not having
the pen with yourself. That's something which I
would like to tell you, creating some structure
extras for the ground. And once these
textures are done, we will make one or two lines. So just to show that there is a one-point perspective
which is dead over here. What happens is the
lines which you see on the road or else so
how do I explain it? It is majorly the few parts
that you'll see on the road. Wherever you are standing
and you see a road, it would converge to one
single point far off. If you're standing
even on a ground, you have to show
these lines as I make it right now to make it work as if the
vanishing point is in the horizon and or else it's
somewhere above the horizon. So vanishing point
can be anywhere. There are multiple vanishing
points, as I've told you. If you see the bridge has
two vanishing points, then for this part of
the other structure, that is the left-hand side of the building that has
no vanishing point. The major part that you have for the bottom area will have, that is the ground that will have another
vanishing point. This is basically the
tiles that you have on the roads or any kind of structures that
you see on the road, you have to add those months Marty shows on those lines to show it that it is meeting to one single point. Yeah. I guess. Now it's time to add the black pen over here. I have very less thing
I would say to explain. It's just that few of
the areas where I feel I need one more slit
of light value. I just go ahead with my brush. Size two and just
add that layer. That is important. I think the whole painting
looks pretty organic. It looks as if it's the same structure which we have absorbed
in a photograph. So it's pretty much show them how it it was in the photograph. We have made it the exact way the background buildings
will come up later on. And I'm not much worried about
it as it is the background and we will have just some light shades coming
in over there. I am now defining each and
every line that we did draw. This is something
that I really look forward to when I am
completing the painting. This is the point where
I exactly know that I don't have much
time left right now. Once I am done with this spot, I would be very
close to completion. And that's what the
whole thing. But still. Guys on throughout
this entire painting, I have added a lot
of music because of the simple thing
that there is more of an iterative process
which I am explaining not only from the first or the D1. This is the same kind of things that we
have done earlier. That's one of the reasons
I have tried to add more music so that you guys can seriously enjoy that time that I'm
giving back to you. And you can also focus
on your painting rather than listening
to me all throughout. Yeah, this is you need to focus, you need to see,
you need to paint. So there is a lot of work
that goes on on that. And I practically can't take
away all the time from you. I would always say
try to absolve. First how I'm going about
approaching the subject. Because the approach
becomes very important. Every painting has got
its own unique approach. Each and every artists have got their own unique approach. Someone likes to go ahead with lighter value fast and few of them meeting like to go
ahead with just two layers, going with quite a dark value first time and then
going ahead with one more layer to just
make it look more detail. That's, there are many times or there's just go ahead
with two washes too. So these are the things
that you will get to learn as you progress
through your journey. It's not that every
time it would be as you observe or
as my approaches, that's the best approach. Maybe you might get
your own approach as you progress and that
might be the best for you, or that might not be
the best for you. You might figure out
something else as you progress through
a few more days. So it's all about time and effort that you'll
continue adding to your things and that
you continue giving to any hobby or anything
that you'd like to do. If you can dedicate time, I can tell you it is
going to be the water. Very, very rewarding when I still think about
my initial days, I still think how
much a knife I was. So while I always used to keep painting and thinking
the master artists, how they get along so well, how they can make
the structures, how they define the shadows, how all of this works so well. Now when I see myself, I'm like, okay, I can also set
the basics very well. I can add those shadows. I can add those
slides may not be the exact way that they
are doing because all of us have got a different style and that
style needs to be intact. There is a voice that every
artist has and you will know this unit style of that particular artist by observing the painting
that they have done. So overall, when when someone asked me
that how we should progress, how we would figure
out that voice. It takes a while, it will
come to you very well. You keep experiment, experimenting
with various styles. And then there will be a blend, one single style, which
would be your own. And that style is
practically your own voice. So you have to experiment. Experiment is something
that you need to do. You need to practice,
you need to experiment. These things will only come
once we're done with that, but, okay, I guess so
how this looks so great. So now let's just
continue working on it. And I would just tell you when we have
to add more people. So penny of you might be
thinking that I have been stressing so much
about how to draw, how to sketch and
do those things. But majorly, there are lines that I have told you, you
need to focus on. So what do you mean
by these lines? This is something that I need to tell you a bit
more in detail. It is all about generic
shapes and sizes. So over here, if you see the generic shape is
like a rectangle, but it is elongated
towards the bottom. So which is how I see the structure of the bridge that
majorly comes through. But this rectangle
is more like a cube. And that's one of the reasons we are saying that it
has 2 perspective. So something that I
would like you guys to understand is how the
basic shape works. Is it a triangle that is there, is a circle that is, that, is it a squared that is there, or is it a rectangle
that's there? So if you can get these basic
shapes and sizes, well, you wouldn't be in a position
to actually understand how the whole thing should work. I would give you a better
example as we progress. And I would even add some
nodes in future so that you exactly know how we have worked through
these structures, up through, through
these entire structures. If I introduce a lot
of things right now, what happens is we
do get confused and that's one of
the reasons I'm trying to keep it
more and more simple. As we progress, you will
get to learn a lot, lot, lots and lots
of more things. I'm using my Mac pen right
now. It's the brown pen. I would be mocking a few areas
with the brown. That's it. It's not that I always
need these pens, etc. It's just in few of the places where I think it's
important, I just use them. That's all. You may
even skip this part. That's absolutely okay. If you want to go ahead
and skip this part, It's time to work around
with the Posca markers. Again, let's paint
some beautiful people and I like to add
these opaque markers. So over here, you
can go ahead with goulash or even
acrylics is fine. You just need to add a
bit here and that's it. So do not think much when you are going
ahead and adding it. It's just the opaque
thing that you need for these from
these markers. That's one of the reasons
I am using these. Even kidding. So it can elect markers
are good to go. You can even use that. You can use Bosch, you can use any other
medium of your choice, which will give this opacity. I would say though head and
the legs of the people. And that's it you need to do for this part of the painting. Once you are done
with the people, but you would see it's easy to paint people
within a composition. It's just that you
have to measure them, diopter know the scale at
which you want to add them. If your scale is correct, your painting will have
the people like over here. It's a very simple way. We are adding people
because we are not going ahead with a
very huge scale for painting the people and making all the details
over here at some, very simply the approach it. But there are times
where we will have more complex things coming
up on those complex things may have to be treated
very differently compared to what we have
done over here. Okay. I guess this is it.
Let's go ahead and had some more highlights and few
of the places and post that we have to add the buildings
in the background, which you might can I both
have multiple forgotten, we had completely taken
away by the bridge, by the building that
we are painting. So I guess that's what
is the next step. Once you have added a very
light wash for the building, it's important to just show
a few lines that they have. These structures
of windows, etc. That's it. And a few of the places these touch cloth and darker
values becomes very, very important for
the background ones. I think I am pretty happy
with how it has turned out. Let's have a final look at it
and be proud of ourselves.
14. New York Bonus Lesson: For everyone who
might have taught at drawing and
sketching can be tough. I think this bonus
lesson is for you. He'll basically,
I'm going to give you the tips to sketch, which is majorly how to just
approach your subject first. Divide the subjects into few basic shapes like
rectangles, square, circle, etc. Over here it's mostly
rectangle that you beloved. So the second is how to break your main subject into
simple shapes and then draw the hand
which has stopped. So let's first break the
torch into all gone. Once we are done
with the cone part, divide the hand holding the
torch into two basic shapes, which is rhombus and rectangle. There are two
rhombus and there is one rectangle along
the diagonal. You have placed your finger. This is it. This is the max that you need to do before you start sketching. Now, I have taken 14
centimeter for my painting. And within that 14 centimeter, I would divide it into
seven hours into seven. Or else you can also go ahead and take it as ten centimeter, five centimeter, and
five centimeter. That's half how I decide
that half would be my top area of the torch and then the bottom area of the
torch would be the last half, as I did tell you earlier, going ahead and
marking about 2.3 centimeter on the left and
2.3 centimeter on the right. This is how the whole of my sketch is divided into
centimeters, et cetera. But frankly speaking,
I do not like to tell you about
the centimeter. I like to tell you about how
to approach your subject, how to divide it into
various shapes and sizes so that you can approach any subject of your choice
in the similar way, going ahead and making a
small oval looking circle. And then I'm just marking
one single point on top. Every detail that I mark, you will observe
that ICU pretty so. I stepped back and
relax and then I start adding the whole of
the video is real time, which is one of the best
parts for this painting. Hand, the sketching process. Basically we are doing
mostly sketching and it is all pencil sketching
that you have over here. I did not detail out
all the sketching details that you need because you just
need a basic pencil. You'll need of your drawing. Drawing pencils like HSV-2
before B6, B and AB. Now these are the four or five different types of pencils for shading that you need if you do not have that, do not worry. This part is not about
the shading part, are not about getting
the perfect torch, are getting the best
Statue of Liberty hand. We're over here to discuss how exactly you can approach a
subject for your sketch. And that is my bonus
lesson for this New York, but we are left
out with one part that I very well know and I will be discussing
that on Monday. But many of you came
to me and wanted to know how I divide
my basic sketch into various centimeters or
various shapes and sizes. And that's something
which I wanted to discuss. As, I think. All of you are a bit overwhelmed
with the subjects that you have painted till date
and somewhere or the other. I don't feel that that's the best way to
approach anything. If you are fearing something
and if you're fair, skin tracing, that's not the best way you have
to go without any fear. And this lesson is going to
help you to achieve that. Okay? Going very slowly through each and every part
you can see I'm making small, small laugh kind of structures. Now, this is just various easy, simple details that I
want to add on the torch. You will see these when
you are trying to draw it. It has somewhat like
this kind of features. I will not say I've
exactly done it. Well. I always say
I'm not trying to exactly copy the photo that I'm watching or exactly
copy what I see. I tried to interpret
it and painted or make it in the way that I
feel is the best for me, are I simplify it
further and then do it. So this is also in the similar
way that I have done it. So you don't need to worry much while you
approach this process. It's just that you have to trust me and be
with the process. I can tell you it's real time. You will find this painting
to be amazing and you will, you also be very satisfied once you are done
with the painting. Now, cancel. I think I would go head and just to give you the time
to absorb everything, draw along with me and have this final sketch
ready for yourself. It's time to make the flame. Now, if you observe, I go away slowly. File, I add these lines. It's low approach
as I always say, you do not need to go
fast whether you are sketching or whether you
are painting over here, defining each and every
structure is very important, as I have told you. It's important to
understand where exactly and how
exactly you want to place each can everything proportions becomes one of
the most important parts. Plan. That's one of
the reasons when I was initially trying
to tell you how to divide your upper
structure into various kinds of rectangles and
the Lewis structure into one single cone. Even the hand weeded divided
into three equal parts, almost, almost equal
parts, I would say why? Because one part is
you're from the top area, which is practically a square. The next part of a rectangle, because along the diagonal you
have to place your finger. And the next two
parts, a rhombus. Of course, those rhombus are
not of equal size and shape, but you have to just put all of this together into these
basic shapes and sizes. It's always great to put those
basic shapes and sizes on top of the cone before you start adding the structure
of the hand. That would really help you to guide you through
the entire process. And I hope you find this
catching way more easier compared to what you have picked struggling
with till date. I know each of these
lessons have not been very, very easy to get
that completely. Therefore, this would be
more refreshing for each one of you and this lesson, once you are done with it, you will get a better idea about how to even divide
your structure into various shapes and
sizes would be even giving the
various shapes and sizes for the view or
from the Central Park, what we would be drawing. And it is what we would be
observing from the front. So this might be one of
the quite easy lessons. I think the painting
part is pretty simple, as I've always told you. The major part would
be the sketching part. Sketching part is
the most challenging for everyone who has tried or wanted to try urban sketching
or even traveled sketching. Even if you have not tried these kind of
structures, shapes, and sizes, It's a good exercise to go ahead and sketch in
each and every destination. I am trying to put up
one simple sketch for every destination so that by the time you're done
with 20 destination, you will have a few sketches, so much ready biocides
that you can go ahead and check them out before you
approach any other subject. Or if you were
trying to approach any subject king becomes
pretty easier for you. Okay, so for the cone area as
well as for the hand area, these two are something
which you will love being very
simultaneously and that's one of the reasons I bet
try to explain it to them beforehand only how to
actually overlap it. Okay. You will see that I did
cool free hand on the spot. But you can, of course, go ahead with the guidance
that I've given you. You can also download
one photograph from the resource area. When I did break it down
into further details, there are steps
that has given to you and how you approach
the final painting. They are the same
photo so that I have shown you of initially, but yes, you have that guidance or given off and then rest. I guess this painting looks something that
is very amazing to me. And this was really
difficult for me. I'm not a person who does
sketches very often, but I have started adding
it to many of my paintings. And seriously, I am falling
in love with it completely. This whole thing of painting, sketching together,
adding your markers, using join gangs and whatnot. It just makes everything looks so aesthetically
beautiful and nice as well as it's got
different approach that you take towards
urban sketching. Now, urban sketching
or travel sketching, or you say plein air, you can do it in any
style of your choice. That's something which I have taught and I did even
try to explore myself. That's where everything I am sharing with you guys that try, try all of this with
your own style. Try to develop your own style, which so many different things that you learn
from the class. Because the more you
develop your own style, the better would be
your own artist voice. And you will get to know what
you want to try out better. Whether it be your pencil sketching or whether
it be your shading, whether it'd be charcoal,
whether it'd be anything else that you have
thought to try out. I guess this is simple, easy, always be
told by everyone. But somehow we don't
get to understand that and somehow we don't absorb it. It doesn't go in well with us. But when it does, I think it's some new
favorite thing that we do. Okay, I guess this is done now and let's just continue
working on the hand. Once we're done with the hand, I will guide you through
the entire shading process. That is something
which is not tough, but it just needs a
bit of experience in terms of how you go about
shading the entire part. I am not going to blend it a lot that I have thought about. I'm just keeping it pretty easy, simple as someone would
like to keep it that way. It's it's my thought process. You can of course, go ahead and shade it if you really
want to do that. But I do not want to
do that for sure. And that's one of the reasons
I have told that I would keep it pretty easy
and simple going. Okay, I guess this looks great. Now let's just make
it a bit more detail. I didn't I'm going ahead with my six feet or you can also
go ahead with your full beat. That's up to you what
pencil you want to use. This is just a very, very simple shading
that I'm doing. Sometimes I'm applying
very light hand, since I'm going ahead and
applying more pressure, It's all about
applying pressures to get those darker
and lighter values. Changing the values becomes
very important and more than, more than the value, et cetera. I would like to
tell you it's not about the various
pencil that you want. You might even go ahead and apply some amount of pressure to get the lighter value from four beats off and
upper value from four pizza. So it's all, it all depends
on what pencil you want. It doesn't depend on
what pencil you own or it's immediately about
the intent to sketch, the intent to draw. And that's where the whole
idea of painting real-time. As I really want you guys to understand that it doesn't
take a lot of time. It just needs that intent. It just needs, needs that kind of thought process
of approaching a particular lesson
in a way which is very beneficial
for each one of you. Practically, believe me,
if you can draw well, your whole painting
will fall in place irrespective of the painting that or the painting
part that you attempt, because they're
drawing is perfect. And when you are
drawing is perfect, the painting part
automatically becomes perfect. There is no way
you can go wrong. There are, even if you go
wrong to an extent over there, it would not practically
change a lot into your painting possession, I would say on the whole
painting session will be more, I would say easier or free flowing when
you have the sketch, absolutely ready biocides and you are so satisfied
with your sketch. I guess this is it that
I wanted to convey. I want you guys to
just go along with me, see where I'm applying more pressure and where I am
just releasing the pressure. If you see right
now on the sides, I did apply a lot of pressure. And while I was coming
towards the bottom, I did release the pressure. That's how I go about it. Few of the things
as I've told you, I do not keep the same and
I change it to an extent. Still, it looks like the same. So it doesn't matter. You don't need to paint or draw exactly the same things and it should be
something similar. It should be able to reflect what you want to see as a story. I always like to write something about the particular monument or about the particular
place that I'm visiting or that I
want to capture. And that's one of the reasons I have even added it over here. There will be few lights
that I would be adding at the end about this particular
statue of liberty. So over here guys, there's a main catch that I
want to tell you. Over here. You will observe that I have
already added the sketch, some amount of some amount of shading towards
the bottom side. And now I'm approaching
the top side, which makes it a
bit tough because everywhere you will see
these marks coming up. And hence the easiest
way to go about this, go ahead and place the
tracing paper this way, and then start
approaching your subject. This is one of the major aspects of my sketching or
drawing and shading. When I do it, it helps me
to prevent smudging as well as giving those dark marks and few of the other
areas which I want to keep it white and simple. I think these are the easy ways to protect as well as once
I'm done with this part, I go ahead and just keep
tracing paper on top of it. The tracing paper
really helps to save the sketching part to come over the other part of the painting. Yeah, that's that's
how I go about. I'm adding some
darker shades and few of the areas and
some lighter shade. This is very, very intuitive. I'm telling you it's
not how I see it, it's not how I want to do it. It's just that I have to
fill up these areas with a few structures
as well as shapes, sizes, and I go very random, even with the shading part, only those structures that
have learned to define, I define it very well
with my pencil rest. Most of the structures are very, very random and the shading
is also pretty random. In this case. It's time to work on the
light part of the torso. When we were drawing and painting the whole
Statue of Liberty, the whole composition,
there was hardly any yellow like that I added on
top of it and that's it. But over here, it's going
to be more than that. We are going ahead and
adding some darker values and few of the areas and
lighter values and other areas. You'll see even while I go
ahead and had the shadows, the shadows are darker in few places and the shadows
are lighter and few places. The darker areas seem
to be coming up well, while it is towards
the bottom area. And fewer barriers
towards the top, of course, are even darker. So yes, there are darker and lighter values
that I add to make it look beautiful as well as organic as well as it
gives so much more. I would say depth
into your painting. Light and shadows
is something that you should always
look forward to. It not only gives a
depth to your painting, but it all hallways speaks
about you in how much, I think breadth and length you understand your subject and to what extent you have gone to show those contrasting shapes, sizes, as well as the different
contrasts for painting. It's, it's something that you understand in depth and you can practically show it to your, to the people whom you go ahead and any
spectator who sees it, you would be if he or she would be very happy to see
those contrasts. And that contrast really makes a lot of difference
to your painting. Time to go with the final thing. I'm discuss the pen that I'm using, dependence from Lemmy. And I'm going ahead
and just adding those darker values that I always love to add
for the painting. Yes. You should always, always go ahead and add
these darker values wherever it is needed.
Slowly, steadily. You will observe that I'm adding these darker values keeps even much more depth
to your painting and it gives a finished
look to your painting compared to what it is
with only the pencil. But you can also go ahead
and add some white quash. But right now, we are not going ahead with that approach
pilot would tell you how you can do that
even in the future lessons. So there's a lot that I've
packed for the future lessons. And practically if you
were there with me, if you are painting
along with me, you will see so much more coming up through this whole series. I hope you have enjoyed
all these lessons that we did try to
work on till now. Each and everything is detailed
and realtime over here, which gives you an
opportunity to paint along. There's nothing that you
need to stop and work with. It's all simply going ahead with your wet with your understanding
and just painting it. You're painting a
lot of that's that's what I always say.
Thank you at all. You don't need to think much venue approaching
the subject. It's about what do you
think works best for you. Make it work for yourself. Adding some more highlights
and few of the areas. And then I think I'm good to go. I would just add some writing as I love to see a story about
the place where I visit. So a few lines about
the place with make things look so nice. Every place that you visit, you should have a story of your own that you should put up. That's all. See you
in the next lesson very soon in the day
four of the yolk.
15. New York Day 4 Part 1: Hi, We're on D4 of New York and it's going to be
a rap for New York. After this, we are going
ahead with France. Next time. There are lots of beautiful
paintings or we think that. So I have taken a really easy sketch
and this one has well, as it is, at one speed, I would be drawing
two parallel lines. And the hard the towers
that you are observing, it is the view from
the Central Park hand below that there is going
to be some amount of flora, fauna, or the trees
that you can see. The reflection of the trees
will fall into the water. This is the whole
composition and there is not much
complexity in it. It's just that you need to
draw these two parallel lines. Well, and on the left side of
both these parallel lines, once you make the tower, you have to decide that they are practically to rectangle boxes, to rectangular boxes being
done in a simple way. And once you make these
two rectangular boxes, you have to just go towards the top area and
breaking it a bit more. Everything that you
absorb needs to be broken into really
simple shapes and sizes, as I have told you last time. So try to absorb what are the major shapes and
sizes in your melodies. And if you can get through
those major shapes and sizes, I think the rest is easy and everything is going to
fall in place in that way. I'm making the same measurements on the left as well
as on the right. Cough, this line that pays
appearing on the left side. As well as I would go ahead and start adding some
longer lines above kit. You can observe me doing
this pretty easily. You have to take the
similar, I would say, the number or the practical
proportions that you have taken for this painting
needs to be same to the one that you
would be adding, even for the right side. You guys to be frank over here, there is not much
which I can explain. It. Just start date
are a few lines. Detail lines and shapes
would be only adding once we are on to the
painting directly. Rather than it's only defining the basic
shapes and sizes, as I always tell you, either it is a
rectangle or either there is some roof on
the top of the building. There is some kind of any structure on
top of the building. All these things we just
decided in this case, rest main part that we
are going to add to our painting is going to
happen in the next cool. Then we are directly
painting for this tower. And I practically
like to keep it that way because of the
simple fact that. You need to only understand
the shapes and sizes. If you can understand the
shapes and sizes, the rest. Whether it be your small
things like Windows or some kind of a tank that you
see on top of a building, like water tank on
top of a building, or simple things
like a flag, etc. This can always be
adjusted at the last call. You do not need to, right now figure all this out. What you need to figure out is what are the shapes and sizes of the major structures that you are adding
to your composition. Composition is the major, I would say, important
part of this painting. And over here the composition was only about adding vertex. We're not adding people. So the scale of the
people, proportions, etc, is not an issue at all. It's just a building
that matters most. I guess. This is it. Now, we will go ahead
with a few lines and structures,
whatever is necessary. I don't have much to
explain over here. Rather than I think
you should just go ahead and follow how we continue to add these lines and then some other structures on the right as well
as on the left. Time spirit, I do
not continue or do not paint one single
building. I do. Go ahead and start with the other building on the
right or on the left hand, then come back to the main building that we were painting. This is part and parcel
of how you paint. There is no best way, I would say to add. I mean, it's not reading,
of course it's adding the whole thing off your sketch, but still, you will
sometimes go differently. That differently is
absolutely fine. It's absolutely random. If nature can be random, then we can also be random
in few ways though this is not nature altogether,
it's urban sketching. But urban sketching
done in your own way is not exactly how you absorb all
the structures, et cetera. I think the major lines shape
you have already defined. It's just some small enhancement or improvement which you are doing in your easiest
way possible. So I don't think that there
is much of difference that it would make to
your whole composition or painting in that way. Last two or three minutes
is all about finishing the parts that you have added on the left
side, I'm again, I didn't want more
building and I do not care much about the
details as I've told you, even though I'm
not thinking about how do I go about
adding the lines, etc. It will happen, it would come over time when we
approach the subject. So over here, has
this caused polio? Simple lines, shapes, etc. I'm iterating it again
and again because many of you might go
into the details. And really details is not what
we are looking forward to. It easing out a few areas, whichever I think is
not necessary right now and rest keeping it as is. Once we are done with this part, we will go ahead and just
start adding the sky. We will work on the sky first, then on the bottom water area, as well as though few parts
of the fluoride, cetera. And then we are working
in various layers. As you already know, there are two or
three washes that we do and then finally come
up with the painting, our papers, 185 GSM. That's one of the
reasons we do not go ahead with multiple layers. That's one thing
which I want to tell you that do not try to
go ahead with very, very heavy washes on
this kind of a paper. It might be more irritating in that case because you will not
get exactly what you want. Hence, try to go ahead with only three or four layers max, and don't try to go simply
easy on each and every part. I think that's it I
wanted to convey. Let me meet you in the
next part where we are going to paint the entire
structure and composition.
16. New York Day 4 Part 2 : So guys, it's time
to paint the sky. The sky is going to be
very pretty for us. It's going to be all in blue as we have done the left one. Again, I would be
mixing both the colors that is in your Winsor, blue along with
your ultramarine. Or else you can also
go ahead with Taylor blue mixed with you
are automating. These are the two
basic colors that I really like to go head
width when this kind of a painting actually whom
I do because it's simple, easy, and I'm not thinking much about how do I go about this? Because It's not about making something that
is like a masterpiece. It's just a very simple, straight loan and
simple standalone kind of a view that we have from the Central Park and a cross it. I just see this kind of building and I'm just so
happy when I see this. I want to just capture that essence of the
painting is to sit, go very well about our
thinking and painted. If you see the real-time
video of the sketching, I think that would
really help you. This part of the
painting is very simple, as I've always told you. I'm mixing some amount of
art from marine and then adding it towards the
top area of the sky, just to differentiate
the values of the color. And it really adds on that prettiness to your
painting. I guess. I have been pretty vocal about
the fact that every time you're sketching is basically the base for any of
your urban sketching. Or if you do travel sketching, if you're sketching
comes out well, I think the rest
of the things will automatically fall in place. It's not about the
painting really that with few brushstrokes
also you can get it, but getting the proportions and the structure well is what
I would always focus on. There are many more
exercises where we are going to learn about
two-point perspective, as well as how do we work with only monochrome single
colors all put together? It's going to be
something that you will enjoy as we reach
towards future lessons. I guess I would
go head with some green now towards
the bottom area, and then mixing with the blue that I already have
on my palette. The green is for the
foliage that we have seen, is there towards the top area. And once we are done
with that foliage part, we would go head and
let the paper dry off. Once the paper is dry off, I think it's great to go head though with the
other parts of the painting. As I've told you, it's
a simple painting. It's A5 size. You do not need to think
much when you paint. You get are only a few
aspects that is important. I'm placing small
tape underneath as I want the colors to flow
towards the bottom area, whatever do its job had
very quickly it dries off. You will not even understand before before even realizing
it dries up completely. That's the best part
of the painting. And I would go ahead
and start adding a few more lines wherever
I feel it is necessary. It's time to add some of the Naples yellow
to the building. Few of the areas, of course, I would be painting very, very light wash of
Naples yellow and few of the areas I would
keeping it has such. I will mix some amount of
that and a bit of brown in it to give a very light wash again to the other
side of the building. As well as add some blue
towards the top area. You see on the whole of
the painting right now is with a very light
wash that I have added. Everything is kept
really simple. As well as if you are
going to the left side of the building fever
again at a very, very light wash in that too. So that when we are going ahead with the darker values,
it's easier for us. I am adding some amount of my Payne's gray and the
system very light wash of the Payne's
gray that we have. So once you add
the Payne's gray, you will get to understand
that the whole of the painting looks
very nice as such, as well as the top part, I am adding some
amount of red into it or else you can also go
ahead with a red brown. That's okay. And this is not it? Yes. The bottom area, you will need to add some
yellow green models. You can also go ahead
with the olive green. Once you add the
yellow-green and the olive green
basic bottom part, we will have some darker values. On the right side, I am blending it with
a bit of yellow in it. The yellow of course, is normal scenario yellow or you can also go head
with Indian yellow. Those are the two
colors that are always prefer for my yellow. And it looks very nice when
you add these foliage. Okay, I guess this is it. This looks nice. And I would go ahead with next layer for
all the other parts. In the meanwhile, I guess next year that we add
will have more of browns. And you should be aware of the fact that adding
the brown will make the building look
more organic as well as I'm not going to
add it to all the parts. So if you are doing a flat wash, even in the second layer, it doesn't go work well. You have to have few darker and lighter areas so that we can show the
contrast in a better way. You can continue working
with your brown and you can console how I am
painting. This one. The left side of
the second building is darker in value
as you can see, the shadow of the
left side building falling on the right side. And that's one of the reasons I have added the
darker shade over there. I guess so these are
small, small who answers? If you keep that in mind, it can really work
wonders for you guys. So this is one thing that you guys should always absorbed
when you are painting. Going ahead again with the
darker value of brown, I have added some amount
of Van **** brown in it, now blending it with some water. Every time water will
come to your rescue when you are working
with watercolors. This is something that I
have learned over the years. Watercolors really, really
change the way you work. And it is so quick
and fast, you know, the kind of results
that you get from watercolors is
seriously amazing. And they all work out very well. At the end, going with
some more darker values. And the other line based areas which you have already added, those lines, go ahead with
those areas and paint it. I am going with my size
two brush for these areas, you can also use a size one, size two brush depending on the area of the paper
that you are using. And you can add these smaller, smaller details over here. You know, adding
the smaller details really doesn't matter much kids, the secondary or that you
were going ahead with. Few of the areas, go ahead and add
those darker values and few of the areas
just leave as it is. There is nothing that is
actually going to compare you. Or you can practically
paint the exact photo, what you also have, even
those in the similar way. But as per my understanding, it's not about painting
the exact thing. It's all about letting
it, letting it flow. Whenever you are
letting it flow it. One angle to always
also nervous. Even to know that you
need to have patients for watercolors and
travel sketching. Guess you need a
lot more patients than if you are working with a very simple
landscape painting or else you're going with
any floral painting. This requires not only
a lot of practice, but it also requests
lot of patients. And if you are ready to eradicate that
amount of patients, I think that's it. Your intent to create hand having that patients to walk
around with the colors, as well as making the sketch. You can always go
ahead with into paths, which I always used to do all you're going with
the first part, which is all about sketching. And in the second part
where we add the colors, it's not about getting
that perfect sketch, that perfect color,
that perfect thing. It was all about liking my creativity flow
and stolen steadily. You will even figure
out the style and the ways in which
you want to paint. I have been creating this
pretty often even in my old your odds where
I was teaching you. And I feel this is one of the most important factors which you should always
look forward to. The more you practice, the more you experiment, the better would be your
understanding about subjects, about how to approach a
subject that's most important. I feel well have added the windows and
the smaller lines, whatever was tinkered with your size two brush handle with your we are here to
now paint the foliage. The folding is something that I really like
to paint always. It brings in so much of
depth into the painting, as well as the pupil that it adds is practically
uncomparable. Once you are good
with the other party, any ways are the parts
you will detail with pen, etc, where you do not need to think much about
what you are doing. It's just that you have
to relate your drum. I would say how you think
about the process and how you let your creativity flow
is what is most important. And that's one of
the reasons I have chosen are easy
concept and this one, you can just see it from the
front and then just talk. Hide it in terms of
adding the colors. In terms of adding the darker
and the lighter value. I do not always teach
everything which is tough. It's also about having an
approach to your subject hand, approach to a subject or
breaking your subject into various parts is one of the
most important aspects. Going ahead with the darkest
value towards the top. And as I blend it
towards the bottom, I will mix more of
color and water. What really makes a lot and lot of difference
to our painting. And it really orders the
value to an extent that you can practically absorb a
lot of contrast and depth. Using the green and
brown color for the bottom part of the
branches color for the leaves and foliage that
you see with the liner brush. Now, I have gone
ahead and changed the liner brush in
the future cases. Somehow I was not very
happy with how it works. Ten PSI think of change
because very much important. Again, adding some more lines with the help of
my size two brush. I'm blending it a
bit and then again, painting with my liner brush. Yes. So this seems very, very pretty and I am super happy with how it is
turning up every time. It's simple, yet very
interesting interests in how you continuously paint and how you can
change your values, how you continuously
improve after 80 days, I'm pretty sure about that. You would be so happy with how the whole thing has changed. You as a person,
how you perceive your photos now
and how you paint. We will even walk around with the smaller, smaller sketches. As we progress through each
and every destination you will see there are
different kinds of sketches which are coming up in New York. Devin Moore of buildings, etc. That's one of the reasons
we have captured those. Whereas when you move more towards the France
and then Greece, we will have doors, we will have flow rules, we will have all these
coming up pretty fast. And those you might be
more interested in, but this one really helps to
set the context initially. This contexts can act as a base for your
future paintings. Those paintings you
might find pretty easy compared to what you are
right now, attempting. Going with some darker
values of brown and then adding the darkest
value in the building. Again, I have mixed
some amount of my Payne's Gray Oral
so you can also go ahead with your vendor. I kept out whatever
is available. You can use that. Now I must say it's
mostly about detailing. It's like adding those
shadows into the water. It's finding those small, small lines is just to make it look more organic data
tuples in the water. And it's the moving
water that you can see. Of course, I'm not going
to add a lot of ripples. The broader ones
would be towards the bottom and thinner
ones to the top. I'm using my size
two brush to add these ripples at once
this part is done, we will go ahead and move to the retailing
part of the building. Now building detailing part is something that I really,
really want to do. And as such, I want to
tell you how easy it is to detail few of the
ideas you will see. I just feel absolutely that num and add the darker values. It's not about thinking
which lung to approach on, how to approach
on, just go away. Now randomly add these
contrast to your buildings and that's it you will see it will work for you on its own. I will add some
yellow for few of the brighter areas
or the warm sites, as I've always told you, I like to add the yellow for the warm parts of the building. And once you have
added this yellow, just make sure that you go
ahead with your brown pen now, if you do not have a
brown pen, It's okay. You don't need to use
the brown pen at all. Just go ahead with the
black that you have with yourself and start
marking on the brown pen. In this case really helps to
actually address a few of the areas where I think it is necessary to add
the darker values. As well as I do not want to go ahead with the darkest
value right away. That's one of the
reasons I have taken this brown mapped pen for myself and gone ahead with
a few lines of the areas you might not even
see the lines are properly. That's the best part. You know, when you have the
lines with the brown pen that everywhere you do not want
things to be even seen. That's how I always say that whenever you are going
ahead with Orlando value, which you do not want
to be seen always. In those points. I think these kinds of
pens are really helpful. Though. I always give
you an option that go ahead with a darker
value of the black pen, etc, whatever you have
available, but you also have, you can also use gel pen if you do not have any of
these options available. Okay, going ahead
with the top area now and just adding some
more lines over there. You will see alternatively, usage of these black pen tool. It's okay. I mean, we
keep ordering between different colors and
different pens as well as it is just to
create that depth, that intensity as well as
those outlines really help to see you through the entire
painting in a better way. I'm now going ahead with my white marker and
just adding a line. I will go ahead with
my Vitamix Clavel. Use my blue and yellow
markers to yes, just to add a bit of highlight. I think those markers
are really work well. Entities, areas, and
you can also work with those markers
if you are having it or else go ahead
and use just the work, white and the black pen, whatever is available with you. And in case you have cosh, of course you can
go ahead and use coach with a very
thin liner brush. And I think that will also
work well in this case, I'm using my Posca marker
and adding the blue line. Wherever I can add a few
dots here and there, with the help of my scale, I like to use the scale
in all these cases. See when you are starting out, I would never ask you to go
ahead freehand completely. That's kind of impossible
to work through. And that's one of the reasons I always say go ahead
with the scale, the way it is
available with you. Never tried to push
yourself too hard. You have to be
gentle to yourself and let your creativity flow. If you are trying to
restrict yourself or if you are trying to
push yourself too hard, then this might not be the best-case scenario
even for your creativity. Take it easy, take
it very light. It's an easy combination. It's an easy composition. Everything is pretty simple. It's just that you have
to go with confidence. There is nothing
much that can stop you in making these paintings. And once you have a full
sketchbook ready for yourself, you will actually know how
pretty it is altogether. So try to build that first-time. Do not judge yourself only with the first tier or the second
layer one sentence down, try to finish off
an entire painting and then have a look at it. I'm pretty sure about it. Once you are done with
the full painting, you will be very
proud of yourself. So those are the most
important aspects which are always like to highlight in any
kind of a painting. It's easy to get
demotivated and not work. In a few areas where
you think you should have done well or this could
have turned out better. Try not to compare yourself. Be motivated, and just go ahead and paint the
extent you can. Do not, do not push us up. One of the reasons
I have divided each and every lesson
into two parts. One is your sketching and
another is your painting. Sketching for this one is absolutely real time so that you guys can sketch
along with me. I'm painting is 1.5 speed, as I've told you, so you can stop it at any
point in time. Change the speed of the
video or rose pink alone. Stop the video again, paint along like that.
You can also do. The third option, which I
always say is to exercise. Go ahead. Do not try to jump on. Just see how hanging off your
instructor is working out. Once you have the view of how they're working
out at any speed, you can watch a video, then analyze it and start working on. That becomes a very, very easy and beautiful approach because that way you can not
only save a lot of time, but also have the
best of the outcome. This is one of the approaches
when I used to do it, okay, So still I
do the same thing. I watch a video very
quickly, maybe ten, few minutes, whatever
be the highest fee. Just to understand how
the structure works, how the sketch works, and how the final outcome is. And then I start adding my painting or that I start
working on it altogether. So that's an approach
also which you can always use Play-Doh. Go ahead and add some
loose branches on the right-hand side
towards the top, heavier hand, then
just make the stem. As you observe me. And these branches
are based simple. I am going up totally random, three or four branches
here and there. And we will make
some loose leaves. But before we make
the loose leaf, so we will go ahead and add some white highlights into
the building to lose leaves, etc, are basically the last
portion of the painting, and I'm pretty sure about it. Once you do that, most most of the painting is complete and there's not
much that is left. In this case. We'll
be back wetted. We need to make the
lips and the main bag. You can just listen to the
music and let's take long. Let's make some loose leaves. I'm going ahead with
a yellow green and then with some of
my olive green mix. Once I have taken
that onto my brush, I will just keep adding
it on the top part, on the top right
side of the tree. And along with it,
I will now have some darker values in
my size two brush. Once I have the darker value, you will see how the colors
bleed into each other. It's loosely saw something that you do not need to
even detail a bit. That's the simplest way you can go about in this
painting, I think. Okay, I guess this
looks perfect now, we will just let
it dry as well as just to go ahead and add one
or two drops here and there, just to show those leaves, as well as our
highlights that is left that can have a
look at the painting, remove the tape and just mark the colors which you have used for the whole
of the painting. I sometimes like to
add a color chart in my painting and I
would be doing it even now for one of my
France paintings that we are going
to attempt, yes. There is a bridge that you are going to paint along with me. It's a pretty easy one, but I think you will really like it when you paint
that one with me. O key of this looks perfect. Let's have a look at it. I'm waiting to have
a final look at. It's already done To be frank. It's just here and there but
of lines and that's all. You can even remove
the tape right now. Go ahead and just mark the
talents that are used.
17. France Day 1 Part 1: So guys, here we are
on the one of France. Yes, we would be
drawing I filled out, but before we go ahead and paint the Eiffel tower that
you see on the left. I would like to
tell you something about the first page
of our sketch book. The first page of my sketchbook, cough, particular travels CDs. I try to make it as
interesting as possible. Which means not only
having the main details like your Eiffel Tower or
how particular painting, but also trying to add
something more than that. Like over here, we will
be drawing an aeroplane. And for the aeroplane, I am going ahead and trying to take a measurement
of a circle. Now, the circle is probably around two centimeter
that you see. I'm adding it with the
help of my campus. Once I have added the so-called, I would go ahead and
extended towards the top. Towards the bottom,
you will see that breaking of particular
photograph came too easy and smaller steps is way better than just
trying to paint it. All of a sudden, what happens is when we
observe something, we just don't know
how to approach it. As I always say, the approach for the
aeroplane is very different than what we usually do for
any other buildings, etc. Over here, you will absorb that. I'm trying to make an oval, which is mainly an X-shaped. And even towards the bottom, I would extend it a bit. I am drawing a middle
line for this one so that it's easier
for me to draw that. We'll sketch. So once this part is ready, you can say the extension towards the top and extension
towards the bottom. We'll get the whole of
the piece together. K, Let's now again
divide it further. If you observe, I have
been pretty vocal of how I go about the
Henning sketch, as well as this is
completely real time. If you are painting
along with me, you would exactly know
how I work towards it. Every time when I
observe something, I just see that how I
can break it further, is it basic shape, size, etc. While we're here, I
figured out that in the center there is
a kind of a circle that I can make handfuls that
I can extend it on the top, as well as to which the bottom. Dividing your main subject into smaller pieces
becomes very important. Okay, I think I have said
n alpha-bar, this one. Let's just keep sketching it. And I will let you know
once we have to extend it towards the bottom as
well as on the sides, it is time for us to make small, small windows that you
see and console on the left side of
those sketch part. As you know, that we have to sketch the entire flight hand, it will take some time. It would be about
15 to 20 minutes. You would need for
the entire sketch. Guy says, I always
say sketch is your basic for any urban sketching
or any travel sketching, anything that you want to do without much of hassle in
your future painting part, I would say the sketch
is the main part. If you can get your
sketch correct, which takes about 15 to 20
minutes on an average for any outside drawn sketch
that you are doing, you will get your
painting effect within the next
20 to 30 minutes. Overall, it's an exercise of one hour max for each of the
series that we are doing. If you were trying to do
it on an A5 size people, I can tell you that you will be successful within an art to actually nail the
whole of the painting. We are working on
a 185 GSM paper, which makes it even more easier for the layers to dry
off pretty quickly. Sometimes it even happens
for me that I'm working on one part and the other part is quality data and dried up. On top of that, I can go
ahead with my second layer. So this way, you know, not only I go ahead
and save some time, but also have the best
outcome for myself. Just adding some more lines. If you observe that there
are lines towards the top. Everything that you
observe on a flight will not be exactly same as
we add on a painting. Now there are some differences which will always remain hand. That is also because
every artist is different and we're not here to create an engineering drawing. That's for sure what
we're trying to create a something which looks
creative and beautiful. The creativity is all it
takes and it is within you. You have to find the creativity
with a new, believe me. The creativity that
you bring from within yourself is what is
always required. Going ahead and
adding one more line here and there wherever
it is necessary as I observe it on the sketch or as adsorbed on the
photograph on the left side. Now, this photograph
is also taken from a copyright free website. So I have been particularly
taking photos from pixel then from Unsplash and
few other websites. Have been using them very often for almost all
of my paintings. So whatever you see over
here is copyright-free. Yes, there might be few
of the paintings which I do it from other spaces, which I might not be
even sharing with you, but those are pretty easy things that we would be painting. You can follow along with me and I'm pretty sure about
it. You can name it. Okay. I guess it's time
to make the wheels. I am not perfect. Believe me, I am really
not perfect at drawing. It's so much of a hassle for
me to draw these things. It takes so much of
a far from my end. I am most of the time
a landscape artist who has found interest in travel sketching and urban
sketching in plain air, etc. Now, if you have an interest, you would love to develop
it into your hobby. And that's something
which I do always. I have started loving this piece so much
that I really want to give love myself into an artist who can
see anything and paint. That's where my
whole intent lies. And it's not that I don't love,
like painting landscapes. I still do like painting
landscapes a lot. But my love for
travel, sketching, or anything that I see also from a photograph is something
that I can't think of. Myself and Susie, that's that's
where my whole Lovelace. So yes, you'll see most
of it coming through. Okay, I will keep
adding the wheel. You observe this very closely
on your screen, guys. I would ask you to observe it
on a bigger screen that is either your iPad or your laptop or any other
bigger screen that you have. Because they are
small details in this painting and you might go ahead and mess them
out if you want not absorbing it on
a bigger screen. When you are on solving
something from the front. That is not much of
her work in terms of whether it is three-dimensional
or four-dimensional, these kind of things
don't come across. You can only make it
two-dimensional as well as when you want to make
it two dimensional, it should be in a way that it practically delivers the intent. It is that we have to
make a flight over here, which is going to France, which is taking you to France. That's the basic belief which
I have on this painting. That's why we are doing this. We would write down a bit about
France and this painting, as well as I would add a few colors towards
the bottom area where I am going to add the shapes that I've been
using for this painting. It's pretty simple
as I always say. It's just that the fear of not being able to draw
something that you observe, believe me, it's just
internal fear that we have. If you can get over it, you can draw anything. Anyway, and there is
nothing that can stop you. Okay. I guess. I'm good. Yeah, you might find
a bit of problem. That's okay. We might not
get the best of the sketch. We will see what's the best
that I can do about it. It's okay, right.
Everyone makes a bit of mistake here and there and we
can always fix it later on. That's never a problem. I would go ahead and
add two lines towards the bottom area where
exactly the wings of the flight or the wings
of the aeroplane lives. And once you make the wing, there will be these two smaller
wheels on the back side, as well as these
round structures that we have to go ahead and
make two, What's the area? After all this is done? Yes, there is a bit of a
background that you observe, which is mainly your mountains, but I would turn it
into a bit of green. I like the greens that get
added within a painting. So yes, adding a bit of green
will be nice. In this case. Make some slamming lines on the left as well
as on the right, on the extension of the wings. And once you have added
these extensions, you have to even make
it a bit more products. And smaller two circles
as I have told you that you need to meet
in the front KTM. Whenever you are seeing
this photograph, you will see that every thing is converging to one single point
and with ease, which is into the
painting and that is a vanishing point
which I always see. It might be a bit difficult for you to right now absorb it, but I can tell you as you Thank you will understand
it in a better way. I'm almost done
with the wing spot. Once you are done
with the wings, you have to make
the wheel status in the background as well as
draw the horizon line. Now horizon line is basically not much important
over here to be frank, but it helps to define the base as well as the
sky in a better way. So adding a horizon line
would be helpful in that way, as well as it really
helps to basically differentiate between your line as well as it adds a bit more
depth into the painting. I feel those are the
important parts because of which I am adding the
horizon line in this case, because I'm not sure
exactly if I can go through the vanishing point from the middle point of
the horizon line, that's what I do not think that how it works in this case, there are multiple
lines that I have to add as well as in
every painting, you will not only have
one vanishing point, I have been telling
you about this. There might be multiple
vanishing points, two, though, in this one we have only
one single vanishing point, that is towards the middle part. If you point and then extend it on the left as well as
on the right, the lines. You can see that there will be only one vanishing point
that you would reach. This, this imagination of one vanishing point
and how you do it. It might be a bit
tough right away. But as we progress through
many of the paintings, you can understand how the
vanishing point works. I will be helping you out with the two-dimensional
figures pair. We will have to point to a cube which has two
different vanishing points. As well as you will have
a two-dimensional figure, in this case, a
three-dimensional finger too. So those are the aspects
which I am going to cover photo in the
soft France session. In every session
that we go ahead, sometimes we will
be covering skills, sometimes we would be
covering Proportions. Sometimes you would be covering
a bit more about drawing. How do you go about and
what you practically choose to elaborate and what you do not
choose to elaborate. So those are the aspects which I would be
discussing a lot more. Do the front part
is not so easy. I'm telling you beforehand there at two paintings
which are very easy. The first one, I would say is the next one that I'm going
to paint along with you. It is one of the bridges and it is an old bridge
that we are going to paint. The next one would be
your Eiffel Tower. Both of them are not traceable, but the bridge is really
simple because it doesn't require any kind of an understanding much from the
perspective point of view. So yes, that is not much of requirements
anyone can try and attempted only we would be working majorly on
the painting aspect. And there is a lot
of stuff that I've covered in terms of the
painting paths. We have used. Things like Posca markers, white, Jelly Roll pen, how to layer your painting, as well as how to add more
depth to your painting. So those are the aspects
that I've covered had, I think that would be a great exercise for
each one of you. I'm pretty much done
with the sketch. You can observe it that we
are right now on the runway. And we will also look very
much done in a few minutes. Yes, Guys. That's how it is. Now a major structure
is already set. We are not trying to
change it over here much. And I think it's just
that my people is longer. And that's one of the reasons
I'm extending it a bit more towards the bottom compared to I could have lifted the same, similar way if I would
have had four more. Because sketchbook
or I would have had a landscape died
of a sketchbook. I am literally not thinking of owning a landscape
scheduled because I just feel that that would give me the exact time of paintings which I need for this class. So I have gotten to get one, which can be a comparison
to how we have been working on this one and how it can be
approached in another way. So there I think Paul, that way it would
be a good approach and a good way to look into it. Yes, there are so many
sketchbooks and now I own and sold many paintings
in each one of them. Overall, I think as I am progressing
through this journey, not only there is an improvement in the sketching
that you would observe, there would be even an easy way to paint that you will observe. There are not much that we are going to work on in
terms of the painting part. There will be few
paintings where we are doing monochrome
or there will be few paintings where we are
just going ahead very randomly with adding the paints to any bleeding or
anything like that. Sign, just using your Pen tool, go ahead and demonstrate
most of the areas. Overall. I guess it's
more of a practice from the sketch perspective right now because you are
building the base bus. But as you progress
through the pace, there will be lot of painting experiments
that we would be doing. The whole grease part is more about capturing the
beauty of grease on various loads and loads of painting in that compared
to less of sketching. And sketching is also very easy being broken down into
very, very simple parts. Right now, we will go ahead and just add lots of
water and sky area. Going with my size eight brush
practically, to be frank, I'm thinking of purchasing
a size two brush as my people is not very small and I feel that
size brush will be a bit more faster and the whole of the painting
will fall together quickly. Okay. This is 1.5 feet from the time
you have started painting, as I have told you that the
sketching was for your time. Whereas the painting part is 1.5 x going ahead
with the Winsor blue, as well as ultramarine. Those are two of my favorite
colors for the sky. You have already seen it. And now it's all about adding
those colors to my sky with a very simple way of adding the left and the
right side of the painting. It's always old. It has been based
simple to be frank. It's just that I sometimes go ahead and add a bit of
lighter values to like. You can see this royal blue. I have told you that high keep color-code this
royal blue from scenario. It's very, very light. If you do not have this color, please go ahead with a very light shade of surrealism blue. That's something
which is comparable to the toilet view
which I am using. You can go ahead and use mass
black for the bottom area. It's a very, very watery. Make sure that I'm
adding rights now. My paper is already wet. So going ahead with very light wash with my largest
brush and you know, the largest brush
really helps to add the lightest tonal
values in the first wash. The first wash is all about
the lighter or tonal values. And I have been very
creative about this process pretty often than we have
approached your subject. There is not much of a change
that I do in this case. So simple process of just
filling up the spaces, whatever you see, since
the paper is white, I would be using a lot of white. For this guy. You
will observe that I literally leaps so much
of carrier in white. I'm using my wash. Or you
can even go ahead and use this white intense shade
and add it to the top area. I told you that the flight to me doesn't look
absolutely perfect. I would change it when
I am going ahead with my secondary or when I am
going ahead with my painting, going with the lightest
shade of the blue as of now. And then I would even add
the darker values slowly. I like to keep it simple as
there is a lot of the way in which I can come back if I am adding very lighter
tonal values for now. And then, of course, it gives a lot more chance to add the darker
values as we progress. Time to add some ultramarine. Yeah, it's one of my favorite
colors and I have been using it so often in many
of my other paintings too. So, yes, I am using my size two SCADA Paula brush to add
this color to my painting. Well, that is a very
beautiful brush and I have been using it not
only for watercolors, even for wash, even for gouache, this comes very handy. It is a very stable and
strong brush, I must say. If you anytime often get to see or get to use
this brush, do try it out. Or even if you are planning to actually invest on something, I think Paula would be a good choice for
you to try it out. They are not very expensive. So I guess you can
always give it a try. I am even hiding the
same kind of color to the bottom area and
leaving some parts in white. Actually, that is
not the white part. It's majorly the
yellow part that I have to go ahead
and add later on. Simply go ahead and
add the colors. The various blues that
you have are from Maine and royal blue as well as the Windsor Blue other
colors which I'm using. If you do not have been so blue, you can also use Taylor blue. That's another
option which you can always go ahead and explore
if you do not have payload, do try the cupboard. As you approach the bottom area, please use your Payne's
gray or else you can also go ahead and use your indigo. These are the two colors
that you can always use. First, use a bit of
darker pigments can, then you can wash your brush, use the water in your brush for adding the lighter values. It's always great to
progress from the sites, but the darker values
aren't in the middle. You can always keep lighter in a second time or whenever
you are coming back. In the second layer, you can add the darker values towards the bottom or
wherever it is needed. I slowly progress even not to the other areas of the aircraft. These are the styles and then I would even go ahead
with the wings as well as towards the bottom here
where I have the tires. So those are the wings, etc. So everything will
have some other, other color added onto it. And on whether people
keep in mind that the white of the paper needs
to be used properly. I always use the
white of the paper. It's very nice to use
the white for yourself. Just go ahead and use the
white wherever you can, because that's the color
that is available with you, without anything you can use it. So those kind of aspects, going with a second layer, if you can see I am using
my art Romain that I did earlier and using it on the left side as well
as on the right side. The darker value I'm adding on the left side and then I'm blending it towards
the right side. Always choose one area where
you want to add the shadows, another area which you want
to keep it toward dark. Whereas if you observe
this flight properly, the middle ear
looks more darker, whereas the side
looks more lighter. I like slowly, you can
go ahead and do that. I've also added in
the similar way, just observe and keep
painting along with me. Do make sure whenever
you are adding any lines or adding any
darker or lighter values, you keep yourself motivated. Yes guys, never know, like your patients die. That's something I always, always say that if you have patients you will be in a
position to nail this painting. There's nothing that is
difficult than this painting. It might take awhile initially, but once you are done
with these days, I can tell you you
can near any kind of a painting that you want
to paint or go ahead with. It's something that I have
learned or what time. It is difficult to initially, but later on it
becomes the easiest. Picking up the colors
wherever I feel it is necessary and using my
larger brush to do that. No, I have started
adding the next year for my aircraft and
few of the ideas I have not added any first layer. Majorly for the smaller
areas like background where there is a hill or theirself dreamed
that I wanted to add. It's a very, very small patch. That's one of the reasons I have all left it out in this case. As well as for the views to. So, yes, I think that's
more random for me, but if you want to really
follow a particular step, go with the first half, first layer, and then you can go ahead with
the second layer. That way you will
be more sorted out. But to be frank, I do not follow exactly the way I try to see all the areas
are done in the first year. If you have the bits here
and there, I left out, I will cover it up, then I am
doing the second year two. That way not only I
save a lot of time, but that way I even try to try to leave some
nest type for many of the areas where I think it is necessary to give lesser time compared to some of the areas where it means more longer
time for it to dry. So smaller areas will
need lesser time, like I have told the mountains. Whereas the other areas, like the whole of the flight or the clouds would need a
lot more time to dry off. That's one of the
reasons we have the approach that first compared to the smaller areas
which are still left out, maybe we will continue
working on it as we progress. I think the darkest value. Now, though, once I am
adding the darkest value, you can also factor. I would choose the darker
side on the left-hand side because those are
those shadow areas that I've chosen for myself. Now, this is something
that I always do when I am looking on any
kind of a painting part. Maybe it's always
on the similar way. Sometimes you may observe in
the photograph the light and shadows working a
bit differently compared to when we
added on the painting. Yes. There is nothing much that you can say I will actually
work on the scale, etc. How you define the shadows
for any object, how, how exactly it falls
on the people, and how you should absorb it. So those all things will also
come and later you might enjoy those sessions more compared to what you
will do right now. That's one of the
reasons to keep them separate and to give you guys are like not
getting overwhelmed with the feeling that everything is bombarded it at one single face. That's one of the reasons I
have kept it slow and steady. We would be approaching it going with the
yellow green shade. It is more of yellow
leaf rather than green. Yes. I'm on the background have told you whenever they're
smaller pieces left, I approach it as we progress. So once I have added this color, I would go head with
a darker value. I have added the
darker value of green. And even for the runaway, I will, I'm in bondage. I will hide the yellow. Towards the bottom area, this is majorly decennalia
yellow or Indian yellow or any other yellow that is
available with you. Use that. For this area, we will
be adding more of pen and white dome marking
pens like as we progress. Now if you have Posca marker, That's the best in case you
do not have past karma, whatever is available with you, like your goulash or
anything else you can use it for making
those areas going ahead again with
the darkest value or for this for showing the shadow of the aircraft when it approaches
towards the bottom. Using my black pen to
add the darker values. It's majorly to create
that depth into the painting and few of the
areas I like to keep it dark. I will continue adding this
as we progress further. I am using my scale
to add these lines. It is more closer view compared to what you did also video. So go ahead and keep adding these lines as you
also need to wing it. Okay. I guess this
looks pretty much fine. And let's move forward with the other parts
where we have to add, even though black lines, adding more of black lines towards the top
area where we are defining the windows as well as some other parts
of the wheel. So yes, it's simple, easy, and you have to
continue doing it. It's more of an
iterative process, but I have told you
that it would be simple once you are done
with the sketch part? Yes, sketch part is
longer and it takes a lot more time compared to
the painting part. You would be very happy once we're done
with this painting. Believe me, once you are done, you would be proud
of yourself that you have near this part
of the painting. Okay, I guess this looks cool. And let's continue to add a few stamp marks
where it says France. Guess I am excited to add
those marks to the painting. That's the best part when
I make my first page, it's the most
exciting part for me. I hope that you do get to understand each and every
part more in detail. I would take you through way more different kinds of
paintings like painting or door, window vase as we
progress to Greece and there will be more of
towers coming up in Istanbul. We will move to Egypt and
even to the Asian side. But once we cover the Europe part in a
bit more detail, yes, I guess some wood
that's all long before I tell you
what to not do much. That's leaving your
patients, okay? I think I have told
you a lot verdict, but this is domain key. If you want to know
what makes your dish. Great. Salt. Yeah,
pan for painting. It's patients. So both of them are really neat. Everything do great. So yes, I, I am very, very happy and nice to see that this has
turned out so well. It's not exactly like the
photograph that you saw. And I am happy that it's not
exactly like the photograph. I always like to
take an inspiration, not create an exact copy. Let's just write the names of the major sheets that we
have used for the painting. Blue, ultramarine than your
indigo or else Payne's gray, the olive green which you also
18. France Day 1 Part 2: Hi guys. I'm so excited to
be back on this session. It is our D2 are practically, you can say the one which
is more extended hand. Of course, if it's France, we think of Paris and
pass means Eiffel Tower. How can we let go
of Eiffel Tower? We are going ahead
with the I forgot. Well, first, I have taken about seven
centimeters right now. And you can see that I am first drawing a line
where I am in total taking 14 centimeter
and then I am breaking up that voting centimeter
into four equal halves. That is 3.53.53.53.5. It is realtime sketching, as I have told you and rest
of the paths of course, is 1.5 x, which is
more of your painting. I will just go head and
try to see how high will really make this look more equal as it is a
structure which is man-made, hence, that are less
anomalies that luminous, which you can figure
it out in this. Hence, we have to go
in a way which is easy as well as you are not overwhelmed with
Kenny of the situation. Frankly, this is one of
the easiest paintings. It might take a bit too long and you might be wondering why I have gone ahead on a paper and then painting on a board. So what happened
as I tried to do this on my sketchbook hand, I did spoil the page. So I just thought that it would be a good idea to try
it on a separate paper. Then just to get on
top of the page, sketch book page,
which I already have, because there is no point letting go off a particular beautiful page of a sketchbook. And if I can't do it
on the same page, let's choose to auto
now the patients that I hope that
really makes sense. And that is another painting. First, you will observe as
we move to Greece, Milos, you will see that
that is also done on another page and I did
stick it later on. These are part of the puzzle
which I also can see. Everyone makes mistakes
and I do the same. So that's perfectly fine. Okay, going ahead and
marking the middle. And you can see that I
have gone to the top hand, Denmark cause small part there. Similarly, I would go
towards lower part, which is about seven plus 3.5 centimeters
and 10.5 centimeters. I go there. And then I
mark of four centimeters, which is majorly
two centimeter on the left and two
centimeter on the right. I have given you the
exact calculation of how I'm going about the
whole of the painting. It's just that there are a
few aspects of painting over here which I am truly doing
with the help of my scale. Why many of you might tell
me that you should go freehand and why we're
doing it like this. But if you ask me when
you were starting out, it's difficult to initially
get a whole hang of the painting thoroughly
with your hand and sketch it as this. So in that case, I always like you guys to take care of any resource that
is available with you. Whether it be a scale
or whether it be any other item that
you'd like to use. For me, I have taken
help of a scale as well as I would use it further in
many of my other paintings. Still we are more, I would say it really. We are more pro at sketching
and painting at data. Maybe I would leave
it at that point. You can see very easily, I am going ahead and
marking my lines. I can do it when it is
towards the interior. Yes, I'm marking two lines and when it is
towards the exterior, I am marking only
one single line. That's the only change or odd, That's the only
difference which you see rest everything
remains sink. In the similar way. I would mark the lines even
towards the top area. There's an optional dot
v would be drawing hand. I'm mocking up two lines again from the interior
on the left hand, then again joining it to the integer part only
on the right side. If you see, I'm not
starting with the most stocked with a line
which is absolutely insane. I'm starting with
the line which is one above the line that
I have drawn inside. So that's how I go about it. You can see that the Eiffel
Tower is coming pretty well. It's called Love, You know, sometimes in our head how
we put everything together. When I tried this
for the first time, I was so it was so intense, I was so tensed. How do I go about it, how do I paint it, and how this would
come together? And they were so many
different thought processes. It was the first time I
was trying NOT IN hence a is pointless because it
was all there in my mind. That's one of the
reasons I always say, if you can think
that you can paint, you will be in a
position to paint it. How can someone paint the same thing in the
second go very easily. It's not that I have changed, the thought process has
changed all of a sudden. It's, you may say, it, the thought process has changed all of a sudden and I have literally told my mind
that this can be done. There is no stopping. Therefore, that's one way to always try out too difficult
things which you can solve. And CDC speaking, you can paint the Eiffel Tower in
many ways as possible. I would take an attempt
at this once more. Again, as I feel that
I can do much more than this and I can paint
it in a better way. It's just what they think and what I want to put together. And so that way I
will say that this is something I want to try
again and again and again. Seriously guys,
the more you try, the more you understand the
painting, the better it is. France is not going
to be very easy. But believe me, all the
lessons and Greece that we're coming up with is 30
to 45 minutes, almost. Practically, you can
nail every painting. Everything would be real time so that you guys can
paint along with me. And even the painting
part would be realtime. So I would really, really ask you guys to
get it along on France. And if you are finding
it even a bit difficult, don't get overwhelmed
with that feeling. Just tries on the grease spot and I'm pretty sure about it. You complete it. Let us just extend the lines on both the sides
as you observe, as there is a route
that is coming in and on the left as
well as on the right. I would go ahead and
add these two lines. These two lines will
meet on a horizon line, or you can say add a point which is more like added distance. And it is the vanishing point that you observe on the paper. So there is a vanishing
point and you can very well market
with your pencil. It is somewhere
inside the paper. And you can, if you extend both of these stable meet
to one single point, That's what term I say
would be your job. One dimension kind of figure
that you would like Sketch. And this is not exactly
how I would say there is two-point perspective
and all this is majorly one-point perspective
that I'm taking to account. The next painting
that we would be doing or the next
one that we would be adding is more about
the two-dimension. And even the bridge
that you would be doing tomorrow is
not two-dimensional, it is one dimensional. The last day of France is majorly two-dimensional
structure that you would be adding and CDC, you need lots of insights
into wet in terms of how you actually work alone for two
dimensional, stuff like that. Okay, I think nevertheless, let's carry on with
the sketching. And most of the sketching
is done to be frank. There is only some
amount of sketch which were just needs
a bit of change here. And then I'm just
going ahead and adding those few lines into the sketch. This is just the
details that I want to add for this part
of the structure. It's easy, simple. I hope that this
time you would be going by the exact
stroke exactly. I mean, in centimeters, what I've told you, the
different dimension. But you can also go ahead with a bigger paper or smaller paper. And depending on the paper size, you can seriously changed
the dimension that would, that I would leave it
up to you over here. I'm going with an A5 size paper. And accordingly, you can go with the dimension
that I've given. In case you are going with an A6 size paper or you're
going with an A4 size paper, you dimension for
sure is going to change and you might
have to see what, what suits you the best or
how you want to go about it. Just remember one thing that
you have to divide this into four equal parts
and there should be some space even below where you would be drawing that road. So that's it. I guess this makes
it more complete. And I would now just
add some more details, as I have said even earlier. Then once I have
added those details, we will start with
the painting part. I would be adding a few lines. Now as it goes on though, I filled out well back, this is not a necessary step since most of you
are starting out. So I just thought that
it would be a good idea to go ahead and add
these lines initially, it would be a guideline
when you start painting. So that way, I think you can also go ahead and add these
lines for your benefit. Once these lines are added, it would be easier to go in and around it or even go over
it to paint this area. Thanks over here. I
have less to explain. That's one of the reasons I
have just left it as is and I just want you guys to follow along and just sketch
along with me. These are more of details
which I am adding practically, our basic structure
is already set. We could have gone ahead with this even in the later stages. And that's one of
the reasons I am not actually giving lot of importance at this
stage to this part. But yes, Having said that, you should always go ahead and add these details
for the later part. As I do understand that most of you maybe big nose or
maybe starting out, or even at your
intermediate stage, it's always good to have the guidelines absolutely
ready with yourself. And when it comes at
the painting stage, what happens is the sketch is basically your framework
and that framework really guide you through the entire process of
the final outcome. And that final
outcome is so much dependent on your
initial sketch pad. That's one of the reasons I
always say that sketchpad is the most important aspect
of a painting initially. If you can get the sketch, well, your final outcome
of the painting is nowhere going to go wrong. And I guess that does it, which I wanted to
share with you guys. Let's keep sketching. This part. Wants to sketch part is ready. We will move on to the painting. I think. Now it's almost time
for the paints. I would have a beautiful
evening sky for my Paris, this looks stunning
as an ivory tower. And frankly speaking, when
I was recording the lesson, I was not sure that
I wouldn't be in a position to actually paint. I felt hour and shadows in
such a short span of time, really speaking a
few years back, I never thought that I would be doing these kinds of
problems sketching, and I was never, never confident about all this. It was so much less in
terms of confidence that I had through this
entire painting process. I was always so much into
the normal landscape and other aspects of watercolors that I never thought that
this can be one of the major, major parts that can seriously make you fall in love with watercolors even more? No, it's not about
only watercolors. That's the best part about
doing up travel sketch. I have tried exploring so much more in terms of
doing pencil sketch, doing pencil sketch, and
doing using paints over it, going ahead with things. As well as we would be working with even
watercolor pixels. This is something I would have
never thought to explore. All your, if I
wouldn't have taken up this whole challenge of
80 days around the world. And seriously speaking, if
you go about these 80 days, you will find something or
the other that interests you. Whether it'd be sketching, whether it be drawing,
whether it be painting, whether it be anything else in terms of understanding
the perspective, how to put everything together, you will have something or
the other that you will make. And that would make you fall
in love with this series. The series is so much curated
for everyone who wants to give travel sketching
or try and CDC speaking. Travels catching is something that I have always
fallen in love with and I seriously want people to also
explore this part. Travel sketching has so
much to offer us in terms of the colors right now we have applied the orange
towards the bottom area, and then we have gone
ahead with the blue. The blue is majorly
your non-trained blue or you can
also go ahead with ultramarine and it
makes your Winsor blue. These are the two colors
that I have gone ahead with. I always go with the lighter shades
initially and then I add the darker shades like purple
or dark blue. Green, blue. So these are how I go
about for my sky area. What you can do for the Eiffel
Tower if you are not so confident about keeping
that space well for you, just mask it out. Masking out what
really gives you a lot of help in this case. And right now, I'm adding some yellow
onto my backgrounds. You can see the yellow that
I'm adding to my background is very bright and vibrant and
I really like it that way. I have always been a person who loves to work
with vibrant colors. It's only through the series that I understood
that there are, there is locked that lies
even lighter shades and even subtle and sober shades
are these shades would say, which was never my take. You know, I have always been
a person who can paint, who can fall in love
with the colors, who can worked through the
vibrant shades that you can CDC only find in major treaty of the paintings
which are landscape and, or the florals, some something that I have always loved
to walk around with. But over time, I feel
that over these years I've fallen in love with the things that I never
thought I would be painting. And one of those is this
beautiful structure of Paris. I think this is the love that I have now for painting
these beautiful structures. And then around the world, they are something
that attracts me, that really puts
me towards them. Going ahead with
my smaller brush and adding these
small, small clouds. These clouds are
really simple to add. You know, what happens is when you have lots of
water in your brush, the clouds become broader
and they usually spill over. Whereas if you are going ahead with a thinner brush
and you take off all the extra liquid
on your liquid means water on your
tissue and then applied, they will give you thin
and beautiful clouds which you really want
for your painting. Going ahead and add these clouds wherever
it is necessary. I told you the colors
that I'm adding, so there is nothing much that has to be done
only I would say that I would be
adding some amount of royal blue into the clouds. And you will see
how I keep adding those royal blue color as well as the royal blue has a
bit of opacity in it, which really adds that kind
of a flavor to the painting. I will make a darker shade
that as Elon three in blue and some amount of my other
darker shade that is pulpal. Once I have that, I would make these
kinds of marks. But before I make
these kinds of marks, make sure that you have taken
all the extra fluid onto your tissue and then only
you apply it on the paper. That's how I go about it. It's a very easy process and do go over only the spaces
which are still wet. Don't try to go with
the spaces which are dry because that would lead to a
lot more disaster that were truly lead
to a lot of problems? Yes. And few places
where I feel that I have added more colors
than I require. I would take off the extra part with the
help of my damp brush. I really like this
part of picking up the colors with the
help of their damp brush. And you can use it for any of
your future paintings too. But makes sure that you blend
it where do not make it in a way that it looks just
out of the box completely. Yes, this is the place
where it has to blend and we need those soft,
beautiful clouds. So those soft clouds
will only come together if we have all of this coming on top of the wet sheet rather than coming in on top
of the dryer sheet. That's something you should be very aware of when you paint. Okay. Well, I did tell you
about the masking part. I have done that myself and I did mask out some of the
area towards the top and towards the
side so that I do not go ahead and
make any mistakes where I keep my colors
onto the sky area. Key. I guess this looks perfect. Does car looks fine? I'm so happy with how it has come out and now I will go ahead and add some blue color into the sky part wherever I
feel it doesn't necessary. And then blend it with my blending brush that
has size two only. So that no one gets to
understand that this is calculated Arctic compared to when it was like
the initial part? Yes, that's that's how
it is going to be. Simple, easy. I hope that
you are following along. It's just that the sketch
bought was a bit longer compared to when we are going
ahead with those Skype at. The sky part is really simple. It's just the way you want to apply your colors on the clouds. And frankly speaking from here, even though I felt
hour as well as the other parts will
be absolutely simple. It's just that we are going ahead with some
yellow, as it is, the bright yellow which I want to add for
the Eiffel Tower. And then going ahead with
the lightest shade later on. So all of those can be handled as we progress in our painting. It's just that I am right now adding the
colors a bit slowly. I told you this is
my second painting. Sometimes what happens
is even if you try to near your paintings,
it doesn't happen. And I did spoil one paper, so I have very, very skeptical about
spoiling this B2. Hence, I'm going slower than it. But I would say the
thought process of You're not being able to nail it practically
kills the whole farm. If you can see VC thing that
you can nailed painting, you can make it
happen for yourself. I have added been
sienna and yellow to the top part
and now I'm going ahead with the darker values for the bottom areas as it
has the evening time. And you will see more
of the darker values for the road as well as
for the other parts. Make sure that you are going ahead with the blue part first. And then if you need the
darker values at those two, you're from I'm into the
broader areas which you'll see. But if you are not
confident right now that whether you will be in a
position to get those darker, lighter, whatever
values you want. Just go with a very, very simple wash As you
also can me doing it. And later on we can of course, go ahead and add the
darker values of whether it'd be Payne's gray
or whether it be indigo, whatever you want to add. I'm mixing some amount of my browns and to the
blues that I had. And going with the side areas of cool part for my
billing, it is simple, easy, and as I have
told you there is, this is not a rocket science, it's just a very simple
way of attaining the best of the outcome that
you really want to. It's just that there are a few
things which you should be more aware of while you do
this kind of sketching. That is, one part would be that you are going
ahead and adding those browns as
well as go mixing the colors as we did for
our Brooklyn Bridge. And mixing those
colors become very, very important whether
it be lighter, whether it be darker
shades, you know, when the whole painting
dries up and then you will see how much
change it comes. So go home pub, beautiful. Your whole painting turns up. I guess now is the time where I feel that the bottom part
should be dark enough. So yes, I have gone
ahead and added some more darker browns
into what I am mixing the colors always when it is the site areas and all where I do not need to define much. Over here. I just go ahead and add the colors and I'm very, very random and easy manner. Simple and easy, darker
brown for the foliage. You can go ahead with
the Van **** brown or any other brand
that is available with you for the foliage part, if it is the darkest brown that is not available with you, mix some burnt sienna with the blue that you have
and then you will get the darker color that you
want for the background. I guess that's it. And I would go ahead with the
other values of the shades. You can very well see that there is some
brown which is there, and I am just adding
some color to them. But to the Eiffel tower, yes, Eiffel Tower is something that I have fallen in love with now. And I'm going with
my size two brush. So this is the
brush from a SCADA. It is the worst at our brush. But I must say that Apollo gives a better outcome in
that way as it is more stable and it gives lines which are absolutely
straight or IM, more, more well-versed with the polar part compared
to these paths. So I guess that would be something that I can
recommend you in case you aren't anytime willing to purchase some of the
SCADA travel brushes than the polar would be
the one that would be in your suggestion
list from my end. So yes, go ahead and try
out the polar series. That's amazing. And I myself, I'm
always trying out 123 new brushes and
recommending you guys about it. That it is helpful for
you guys to try out. Rather than buying
everything like this. You can go head and only try
out the ones that is needed. Fine. I guess this is it. Let's just go ahead and add the lines wherever
it isn't necessary. I already have the
guideline ready with me, so it is pretty easy for me to go with that bought by building. I am just going with a very, very random color
that is prompt. I will try to make it like I will auto
between these places. So just pardon me for that. There are times where I
just go with my mind. I don't think about like
there's no mine than it, whether it's just the flow and it's just a creativity that really helps me to channel all my energy into something that I really want to
create from my heart. This is from my hand and this really is something that
I did fall in love with. Eventually, it was not initially
that I really liked it, but has added progress
with the painting. I like that more and more. It's all about adding
more and more lines, whatever brush you're
more comfortable with, where you can say that it can help you to
paint very well. I think those, That's
the brush you should use for the stage where who
weren't handing those lines. You need to go very far with
the painting and you have to actually go with the colors or veto way where you are more
comfortable with time. Discomfort only
comes when you have worked with a brush for a
longer period of time and you are more aware of how it works and you should be more
comfortable working with. This is something that I
have realized over time that there might be many brushes that are available
in the market. But if you want not very well-versed or
you are not happy, or you have not painted with it. You might not be in a
position to nail that. But the ones that you
have already added on, the ones that you
have already used, or you want to use whatever. Those might be the ones which
new fond love it. Okay. I guess I would just go ahead and add
these smaller lines. Now, once I have added
these smaller lines, then I would just try and hide these small,
small Trump chose. It's just the guidelines
that I have already added and I have told you that
I'm going to paint over it using my yellow
posca marker to add these small and
simple lines as well as some of the windows
into the background. But eating something that
I have realized this, the Posca markers can be
used in variety of phase. So there is no one
particular way of using the Posca markers. It's just many ways
in which it can be used and you can
practically nil it. I just have one set
of Posca markers. And if you do not have these Posca markers,
that's absolutely fine. You may have some
amount of wash. If it's white, quash out
a bit of yellow in it and you can get to a color that
is similar to this one. It would give you that
opaque opacity which you really need for
unlike kind of painting. I'm going with my white pen
right now to just show, give these buildings are shaped and similar kind of
buildings will be there. So some of them will be in black and few rid of the
bugs will be in white. That's, that's it. I hope that it's easy for
you now to progress. Our whole painting has
already taken a shape. It's just the last
few minutes where we are going ahead and
adding a lot more detail. And this TTL part is very, very important, I must say, because this really
creates a lot of depth into your painting
and the darker and the lighter values
which you have been adding to your
painting or the kind of blend that I'm
creating because I have this lamb is soluble water. The paint or ink that that is there in the lobby pen is something that
is water-soluble. So yes, I can go with my brush
and then blend it a bit. So this really helps me to
have a great outcome later on. Okay, good. I guess this is it. I would just continue
working on it. Please do keep adding
these lines with the pen. With the white pen
that you have, Jelly Roll pen, et cetera. If you do not have
these Posca markers, you can use the quotient
as I've told you. And I am going with my black pen to add some more
windows as well as some, some lines for creating the
depth as I have told you. So it's the same process, just Iterative more
and more hands. So you might find it a
bit, a bit repetitive. Of course. Be around,
we're almost done. Seriously, It's just last
few minutes and I don't want you guys to lose your patients at
this point in time, you have created a
beautiful painting. And if you are here, if you have worked
along till now, I think that you can nail any on the painting that you
would be doing posters. This one was not
easy, believe me, when I tried it, it was once a failure and then
only I got this true. But the second attempt, I am already in love it. So yes, something that
I want to tell you. Listen to your inner voice, listen to the voice that
wants to guide you. That really wants you to create and never
give up on one shot because the first one did not turn up exactly
the way you want it. So the second one might
not even be the same way. So the thought processes
of costs wrong. If you try twice, you might be the best outcome that you would have
thought. It would be. Loads and loads of lines are dropping in as
well as I am using my size two brush to even
blend it in a few places. This is how it goes about
throughout the painting now. So there's less to explain.
Just follow along. As I've told you earlier on, we would be adding
more darker values towards the interior side, whereas to the exterior side
it would be more lighter. You can even make it really
dark if you want that, that I would leave it up to you. You can add some of your darker brown so that
you have to work less in terms of adding
the black marks on black pen marks when
you are at this stage. So that kind of a
decision you can always choose for yourself
what you want to add. But for me, I tried to add the pen and then
went ahead with a bit of my brush to blend it in a few areas where I
think it is necessary. Going towards the top a
and now I'm just blending it with the third
darkest brown yes, Towards they needed
but most of this area is with the black pen marks
that we would be covering. So yes, that's that's how we
are going about this spot. As well as we have a bit
of blue from the sky, which we did miss out initially. So I am adding that blue
into the metal part, going with my black pen now
and then blending it again, you can see that this
is a water-soluble ink. That's one of the reasons
I can take this chance. Or else you have
to go ahead with any of your darker value
of brown or black. So to do this, making
these smaller lines just for our Eiffel Tower
and then num, I guess so. This looks so perfect Now, I don't know what
to explain more. I think of most of the
things I've told you. It's just few finishing areas
which I think as of now, to make it look more
beautiful, more detail, I must say, details is something that I always love to add. But seriously speaking, and it's so very difficult
kind of a structure. I don't like to
make it difficult. It should be treated in a
way that you find it easy. This is something that
I have learned over time that the difficult
structures can be made easy. And you will find that
the more as you progress into the last part of France. So painting where we are doing
a very complex painting, but in a very, very
simple and easy manner. Frankly speaking, that's one of the challenges that I took for myself that if we can really get something
that is closer to it, but I guess we could. And how you can simplify subject is something that I
wondered teach you there. Do not get afraid of what you see or do not have
that fear in you. Just go about, just let your creativity flow and
whatever be the outcome. Just enjoy the process. Processes. Something that I
have always launched should be enjoyed because if you are
not enjoying the process, frankly, you are not
enjoying the final painting. All the main thing will never be a masterpieces every day that I paint is
not a masterpiece. Every day that you
will paint well on peer masterpiece and
everyday is not the same. So there will be
these which are top, there will be these that
are easy and hence, just try to follow along
whatever you can do. That's absolutely fine. After adding
everything that I see, I want to go ahead with some darker value
for the bottom part, which is majorly my road. And hence I am going ahead
with my Payne's gray to add the darkest whacking
onto the road which I am missing for the knights. And hence, you can also do the same orange leave it as is if you really
like it this way. But I think I would go with
those dark colors that I love to add for my road
when it is the night. Okay. I guess this is it. We will
just remove the tape hand. Go ahead and have a look
at the final painting. You can do it on
your sketchbook now, eyespots my sketchbook,
that's one of the reasons I did over
here and I pasted it. But I would really encourage you to directly do it
on your sketchbook. I think you can seriously, seriously nail it all. I guess this is it. I hope that you are falling in love with
the city of Paris, and this is one of the exceptional paintings
that you might have done. Turnip. So tap your
box and just feel so proud of yourself and
have a final look at it. We motivated v will be due when the next
painting very soon. So that would be our
drawn from France.
19. France Day 2 Part 1: Hi guys. So we are on day two of France and it is
a pontoon bridge. This is a giant bridge that
was constructed around 19 BC to carry water to
the city of nemesis, or what the Grand River
in Southern France. It is listed as unesco World
Heritage Site Three times of the lines to 47 Nieto Huck. And the structure was damaged
in the fifth century, but it got restored in 1743. So overall it has
got a great history. These where the few
lines which I did pick up and wrote it down. I love to tell stories coming to the places
where I visit. And this is a very simple story, but it's a nice one. Always knowing
about the cultural, always knowing about the
place from whatever you are. Painting is a great exercise and it helps you to even know
the places in a better way, the culture, the food and
everything in a better way. So why not go ahead and just
start drawing this bridge? The bridge drawing is
going to be real time. As you see, I would be
working on A4 size paper. Quite what it means is that I am practically
using both sides of an A5 paper and having
to A5 size people, which makes cell A4 size paper. And then I'm going
ahead with my scale. Just see absorbed
on the left side, I have the photograph as well
as I will add it even in the video or above
so that you do not have any kind of issues
while you are drawing it. I'm just trying to measure
what is the structure. So the top part is
practically onetime wolf. The two paths, these arches, arches basically is two times and then the top part
is one part of that, so it's 1 third, you can say, if you are
putting that up our Shan, the top small small
holes part together. So yes, that's how
I measured it. And then it's practically, you can say 2.5 times, or if you take five times and then divide it into
five equal halves, the middle part, you can
take it as two parts. On the bottom part again
is too far on the top part again as one part of it. So it's five parts. If you divide it to
endorphin, it's a very, very rough estimate
of cost that I do. It's not that I am the best in terms of estimate or the
perspective that you see. But there is a lot of
practice and effort that has gone behind how I
paint or how I draw. So as per my understanding, this is the kind of perspective. This is the kind of
measurement scale that you should try
to have for yourself. And I would go ahead and
remove it a bit because I don't think that
you guys can see practically the whole
of my sketchbook. So let's go ahead and take
the sketchbook in the middle. You can, of course,
see the photograph on the top side of this video. And I would request you
guys to please have a look hale of full size screen, which means either
an iPad or you can go ahead and see it
on a computer screen. So anything can do, but you have to go
head with one of that. That would be helpful
in this case. I guess. That's great. And
as I've told you, I am going ahead and just
adding these fewer lines now. Go ahead, go ahead, add
these lines along with me. And once you are done
with these lines, we will start adding
the mountains. On the left,
practically they are hills and as well
as on the right, we will add these rocks, which is in the foreground. Now over here, you know, the time that you would
take for finalizing your details of the sketch is more compared to
what you come up. Has a skeleton on the sketch. A skeleton or the framework, I always say is the sketch, but sometimes there's a lot
to do in the details can, which means individually
drawing all these arches, which might take a bit more
time compared to if he could have gone ahead
with something more flat. Hence, it would take some
time as I've told you. So b along with me,
it's simple, easy, it's just that there
is a bit of effort in terms of working
around with these lines, walking around with the
Payne's paper and everything. As well as there's a lot in the details of these
arches at CDC, they might look very easy. When I actually saw
this photograph, I was so happy to
see that this is something which is really easy, but there was so much
in the painting part. And then I realized that it might not be the best
thing that I chose. Having said that, it's
practically easy. Okay? So the easy
part is Nowag going, but it's just that it
will take you a bit more time compared to what
you might expect. Otherwise. Going ahead
with these smaller, small, small, small, small
circles, keep adding them. I will get back to you once. I think that there
are more details. So in terms of sketch
that you need to. And of course, over here, now, you haven't touched your
two-point perspective. We have only touched
one-point perspective though we'll have worked around
with two-point perspective, but I have not introduced you formally to two-point
perspective. I would be doing that tomorrow for our thoughts
sketch of France. And hence, I would
like you guys to go ahead and just draw this one. It will be a good stimulating
exercise for all of you. When you go to the
Thought day or when you go to a bit more tougher day compared to what you
observe over here, it would be really easy for you. Happily even the third day, what we are doing with the
incus is not much tough. When we go to the
fourth day where there is that is something
that I would say. I never thought that I would be introducing so
quickly to you guys. But it is simple, easy, lot of drawing, lot of sketching, and you
are done more of sketching. I would say painting is
the least in that maybe this 1015 minutes is
all about the painting and the rest is all about
sketching, drawing, shading. And yes, there are a lot of concepts that I'd like to introduce and what all
I do in my sketchbook. I love you guys to
explore all of that. I hope you're enjoying it and it would be more and more
interesting as we progress. I know you guys have started drawing these arches
and these artists really takes some good amount
of time. When you draw it. Initially, you might,
as I told you, I even thought
that it could take less time and I would be
done with this so quickly. But that was not the real case. When I went ahead and
I started drawing, I got to know that yes, It takes a while for
getting these correctly, as well as drawing this correctly is something
that's very important. If you can draw this well, I think painting will
never be a difficult part. Can, you can practically
nil even the painting part. Okay. I guess that is it. What I wanted to explain you. Let us move forward and let us keeps catching
all the parts. Wherever I need to intervene, I would go ahead
and let you know. In case you are done with
the top part of the arches, I think the bottom part
is more easier and I would say has there
are less number of edges compared
to the top part. When I was going ahead with
the top part, you know, one thing that I should
have kept in mind is just to understand where I need to exactly
monk these arches. And I just went
without any plant. Whereas I think if I would have planned a bit differently, which is just mocking the areas where I want to add the arches. It would have been
pretty easy for me to go ahead and draw them quickly rather than
waiting and then drawing it, then adding the
details and all of it. But it's always a learning
and CDC speaking. It's not that I have
painted this one volume, so it took me some time to
get the full part of it. And whenever you are also
trying out any new for graph, what happens is
sometimes you might think that this might
come off very quickly, but it takes a while. So never give up.
In the meantime, try to be motivated
and keep yourself energetic as well as the thing that you can seriously name it. This is not a rocket science. I always say art is
something that you can pick up and it's
only about practice. Factors makes a lot
of improvement. You might not be the perfect. See, no one is perfect. You can be perfect
in your own way. And I feel that's the beauty
about the final outcome. Always try to enjoy the
process that you go through. Try to learn through
the process. There is so much of
learning that you can have through the entire
process that even thinking about the final
outcome just doesn't work in these kinds of things where you have
to actually work a lot, even on the sketch part and then move on to
the painting part. Sometimes if we do not get the desired outcome
v are broken. That's what I don t
want for any one of you should keep
yourself motivated and continue working on
anything and everything that you feel is great
and you should attempt. So that's it. I guess I would go ahead and continue working on this
piece in terms of the sketch. Last four to five minutes left, I would ask you guys
to go ahead and finalize it as I am doing
it. If you are happy. Top part itself, do not go
ahead and erase as much. It's just that I was not really happy with
how it came off. So I have it in
few of the paths. And yes, it is quite a lot. But I never mind doing it. I always feel that the
structure, if it's correct, if even it takes much longer
than what is expected, I feel the final outcome is
going to be good itself. You don't need to worry at
all about the final outcome. If your initial base or initial framework is not
exactly how you want, then your final outcome, of course is going to be shaky. Do, do not really want
that to happen to you. So I think that is it. What I want to convey. Again, I will go ahead
and leave it over here. See you where once I need to add any further points are
where I think that it's important to let you
know the intricacies or some important points
where hub which I feel I have missed till now. We're done now. So let's go ahead and
start with our painting, but I'm pretty sure about it. You can do this and you have
already done this wealth. So do not worry to go with the confidence and you can Frankie names as well.
20. France Day 2 Part 2: We are now on day two, and right now I am
going ahead and adding some water on the
top part of the sky idea. The whole of the video is
at 1.5 speed, but you can, of course, go ahead and adjust the speed as
per your requirement. Okay, I have taken
some of my royal blue. Royal blue is from Sennelier. And I have added towards
the top part of the sky. Once I have added it towards the top part of the sky area, I'm going ahead with whom mix of Windsor blue and
royal blue ones. This mixes. Ready? Hi, am going to add it with the help of
my size two brush, as well as pick it
up in a few places, but they had both my size eight or whatever you are using. So for me it's size eight brush. I can of course, adjust them number or the
use of bigger size brush. It all depends upon
the size of the paper. Now since we are going ahead
with an A4 size paper, which is double the
size of E five. What you might have already
seen that I have been using. I think of this, this kind of sky and all is okay with the size of
brush that we're using. Going ahead though, with some of the other parts
where I am adding my brown to the area of the bridge and then
mixing it with some blue. Now, this is to add more
depth to the sky area. You can of course, go
ahead and do this. And in a few places if I sometimes don't like,
I just pick it up. There are times where I sometimes don't like
something which I apply, and sometimes I do keep it the way I have added it to
the top part of the sky, going with some
more darker value and the paper is too wet. It is 185 GSM Arches
paper which I am using. And frankly speaking, I'm very happy with the whole
process, how it is turning up. I hope you guys
can also try this. So people which is of lower GSM has the all
give very good outcome. Most of them, at least
I have tried out the Fabriano and Arches
paper, 100% cotton. That's the only requirement which I feel that you
should look forward to. Orals. Your people will not be wet for the required amount
of time which we need. As I've told you that, I sometimes don't
like what I paint and hence I pick up the
colors and then again, add a bit of the darker values and the areas where I want to, okay, I guess this is it. I would now go ahead and add some colors to the
bottom part of the painting, which is majorly the water. And the water is also blue, which is a great thing. So whatever is blue on the top gets reflected
in towards the bottom. But do remember
that the left part of the mountain area
is some non blue. It is more of greens. Hence, some of
those greens will, of course get reflected
in the water. And when those dreams get
reflected in the water, you have to add those
ripples in the green part, or else you have to add the green within this blue that you work
currently adding. Now, I am using some
amount of my horizon, blue or cobalt green
blue that you have seen. This is a beautiful blue
that I have been using, but in case you
do not have this, you can go ahead with any other blue that is
available on your palette. It's just that this blue is very pretty and that's one of the reasons I have
been using it. Using some yellow green
to add to the water area. Once I have added this
yellow-green high, we'll go ahead and blend it
with the help of my brush. Now, some of the parts needs to be improved
further and wins. This part becomes more blue. You will understand how
the depth will work. We are working in
layers as always, and this is just the first layer that we are adding
onto the water. Mostly you would have seen that this guy remains the same way. We're not going ahead
with a lot of layers, whereas the other parts, whether it be your bridge, whether it be your rocks, whether it be the other parts like foliage or any
other kind of buildings. You will see that we have
gone ahead with players. In the meantime, I
know that my paper is still wet and I can
add some lines. So using the tip of my size eight brush
to add these lines. I did go ahead with a very
light wash initially. And over that I'm going with this darker color to
add these ripples. Ripples actually make water I feel like as if it is moving. And I think that is a
very important process for qualifies to
show. Along with it. You can absorb that. I'm adding my darker value of green in few of the areas
where it is necessary. I guess this looks
pretty perfect to me. Going with some more
greens in the other areas. And once this part is done, we will let the paper
dry off before we touch the few areas of the bridge. I'm using some amount of indigo and indigo is a color
or Payne's gray is the color that I've
told you I would be using pretty often
for my paintings. Time to add some blue
within the arches. Now, the edges of
costs have this gap. This gap is pretty
much reflective of this type that you
have painted earlier. In the top area, it's easy to go ahead
with a flat wash of blue that would
really help you to just define the
cases easily as well as it would not keep the
people white altogether, which we really don't
want for this part. For this part of the painting. You can see far
behind the arches. And these arches are only, only the places where there are arches that goes areas
needs to be in blue. So you have to be a bit more careful while you are
applying the blue. The whole process of these smaller application is a bit longer, as I've told you. Frankly, the whole
painting is very easy. It's just a bedtime
taking the sketches easy. The painting is very simple. It's just that there is some amount of time
requirement for this different parts of the areas that you see
the painting right now, naming, these are the simple
stuff that you need to add and you need to make rest. I think you would be very happy once the final
painting is done. I've gone ahead and apply the sum amount of Naples
yellow and guests. I think you can change
the Z and light. That's also because
it's already evening. And hence you can see this
change of light happening. But I guess it's good and still you can get those
either colors properly. So let's go ahead with some
yellow and apply it on the left part of
the mountain hand. I would go ahead
and start adding these colors just in
a very random way. I would go ahead and add it to make it look beautiful and nice. I would simply go with my flow. And in few of the places, I will add some darker values and few of the places
some lighter values. I always keep
altering the values. Though you might not be in a
position to see it entirely, but yes, when we are doing the rocks
on the right-hand side, you can see very minute that there are changes
and there are alteration in the color's going with the Naples yellow again over here with a mix of brown in it, allowing that to dry
off a bit temporarily, I can say now this is not
exactly a lot of dry. That is. So the colors are moving
around to a lot extent. And just that I'm going
with my size two brush. Sometimes I use my
size two brush, which is from Paula,
have a SCADA. And sometimes I go ahead with
this brush for my painting. It is just an alternative
that I keep doing. Everything remains the same. Okay, some amount of burnt
sienna on the brush. And let's start
adding the colors to our arches and to the
bridge that we're making. I'm pretty sure about it. You will fall in love
with the bridge has well, as this whole painting, one citizen, as I've told you, it is easy, simple, yet very, very interesting. You know, there is so much
coffin than the painting. You will create. So many things like
whether it be reflection, whether it be Rob's, whether it be
creating the foliage, then the building itself. Still. It's a
complete composition, yet not really tough, which you can't nail it. So go ahead, keep
yourself motivated. It just a bit time taking. You can, of course do it on
a smaller size paper and that could really need lesser amount of time
in case you are. I'm crunch kind of a situation with sometimes really
happens to each one of us. That's one of the ways to
practically deal with time in case you have lesser amount of time with
you available with you. As most of us have resumed work and this is the kind
of hobby that we have. So that's another
way to keep going at your pace and have a good outcome and make things
which are really pretty. I hope that you're enjoying this travel series
as there is so much to learn and so
much to look forward to. I myself. Forward to each and every day. So to so that I can come, go ahead and upload these
videos for you all. Not only you are attending
these 80 days along with it, I'm learning so much
in terms of how to simplify whatever I see from my perspective so that
you guys can also adopt that and use it
for your own paintings. This is something that
we do learn over time. Simplifying whatever
you see is not easy. It takes a while to understand. And once you start
understanding it, where to stress on and
when not to stress on, it really improves your full understanding
of perspective. Or whether you say it is about
urban sketching clean air, or directly painting
from photographs. Everything put together,
you will find it so interesting that it is totally falling in love with going ahead with
some more areas. This has size two brush. That's one of the
reasons who are taking so much amount of time
to paint these arches. We do not want to go in into this blue area which
we did paint audio. So yes, go a bit slower, but it would be interesting,
it would be nice. One thing that I have
learned over time and I have stressed even in
my earlier videos, if you're joining me plus
time with this video. So I would again
stress a bond that is, try to have lot of patients with your watercolors as well as with the travels
catching thought for sure. Because this is not going
to be a very easy task. It takes a while to understand. I can try to simplify
the process always, but there are steps that
you need to follow, whether it be dividing a particular day into
two equal parts, like first day you do
with the first part, which is majorly the drawing, and then you go ahead
with the painting part. All of this does take some
time and you have to give it that amount of time which it needs so that
whatever you paint, it comes out as
the best for you. I would say that everything
do lawn is a process. Like over here, you are
altering the colors. Sometimes you are
going ahead with the lighter values
and sometimes you're going ahead with
the darker values. Overall. You are just trying
to go with the flow, taking some water and going with very,
very random strokes. I am not even thinking
how I want to apply it. Sometimes when I need the
darkest value of the green, I co-head with the
darker skin called the, add some blue into it. I will get the
green that I want. I have kept a few
whitespaces knowingly. Why? As I want to go ahead with
my greens into those spaces, I would say that this
part of the green is not. You will just go
ahead and add it. You have to alter
the shades of green. And that's where the whole
intent of the painting lies. I have told you that the
painting process is a bit longer because of these smaller
steps that we are taking. Adding some dots here and there, you can just follow along. And I think you would be
in a position to learn it. I have told you the
mixed soft blue and the green for getting
the darker values of green. You can use any green that is
available on your palette. There is no
particular green that I've thought about
while I am having this, I'm mixing it on the palate and getting the
colors on my own. Few of the areas I am
adding some smaller dots. Some of the areas of
course is wet so it is easier for me to go
ahead with the sheets. And some of the areas
are already of dried-up. Penn State are only few dots here and there which
are higher than. The browns for
showing the trees. Of course, it's not
very close to us. Hence, we have to make sure that there are only few
lines which showed them. Test. This case more towards the front part for
what you can say. It is in my
foregrounds because of which have two
naked in a way that it looks more attractive as
well as it looks more GPA. That's something I need to take care of while I'm painting. Right side of the trees, left side, you can
go as you want. It's just that you need
to keep in mind that there will be few darker areas and lighter areas. Over here. We are blending the yellow
with some of our light green. And then I would be adding
them all up, sent to work. Everything is right now wet. That's one of the reasons
my paints are spreading. As well as I would be adding the darker value of
green as I progress. This looks really pretty for me. So I would go head with some
blue to make it more darker. As you from us, you will
see with the progress, there are a lot of
things coming up. I do alter between the left side and the
right side as I want. The shadows, reflection, you can say mostly to come
out really well. The water is something
that I always focus on and I really wanted
to look original, or you can say to look
more detailed and nicer. It is more in the foregrounds rather than being
in the background. And adding the reflection
is one part of our process which really
requires some understanding. If it is greens off the off the particular
plants that we see, we need to add those directly
onto the water area. You can't go differently
in those areas. And that's something you need to keep in mind while
you were doing this. So these are small, small aspects which pie would always go
ahead and highlight. I can tell you these
can help you even in your future projects that
you were planning to paint. Inside of the arches
will be darker as well as I'm adding some
shadows even in the rock. You can see that I even go
with the dry brush technique. Dry brush is nothing but taking all the water out onto
your tissue and then just going ahead with the
dry brush to make these kinds of lines or to make these kinds of x
shows basically, these textures can be used for many of your mountain paintings, for your wooden areas, for your rocks,
for old buildings. These, this is
something that I have used very often in
many of my paintings. And they look so. I can't tell you. It's a way to practically go ahead and name Lady of your paintings that
you plan to paint. It's a great way to
actually show the texture, the wound down areas, as well as some of the
paths which are more rocky or which harm more
into the darker sides, or else they're more into
the lightest lights. Anything you can show off
by using these textures. Using my blending brush
to blend a few areas. Going randomly with
my darker green. I think that I would go
head with a bit more darker green and few of the areas wherever
it is necessary. And then Huldah, my other parts, which is majorly the browns. The Browns will practically show the trees and
that's what I want. It is majorly bushes that
we want in this area. I have kept this area
genuinely white, as I've told you earlier, I wanted to talk in this foliage and hence
I kept it white. I'm picking up some
of the colors. You know that this
technique is great. Just wash all the extra
paint from your brush, can lift up the colors from
whatever place you wanted. I think the branches
to the trees. But you can see now the foregrounds are lifted
off in such a great way. Back to our background
are majorly the whole of the bridge. That is not our main focus
which we want to paint. It looks way more dull. So we have to go head with
more layers into wet, as well as add more
depth into it. This is one thing that
you will find very often. Sometimes when this happens, you can seriously See that you need to add
more depth point. You need to add more
layers into it. Go ahead and do it, because that would really help your pay thing
to stand out. And I have absorbed it over time that sometimes just adding
two layers doesn't block. It needs three or four layers. And your paper is good
enough to take it if you are using a 100% cotton, 185 to 200 GSM paper, I think. These kinds of paintings
you can kneel, absolutely, there is
no problem at all. I'm using a liner brush
for all these arts. And it's very easy, simple as I've told you, going ahead with 12 blue
lines here and there. Once that part is done, I will just hide some more
lines towards the bottom area. Okay, the branches looked fine. Now it's time to go ahead with some more depth
as I have told you earlier. So let's do that. Guys here. It's more of an
iterative process where we are going
with the balance. We are slowly adding the depth. That is nothing much
to be explained. It's just a mix of
burnt sienna and Van **** kept down or
else you can also use some amount of your integral
into your brown to create the color and keep adding
these two together. Top part, I would come back to this part once we have
to actually add the pen, that is the black pen marks or we have to add
some highlights. Those are the areas where
I want to guide you more over here,
it's simple, easy. Go ahead and keep adding
all these details. While you can observe that I am adding a lot of
lines, lot of browns, because I just feel
that I did not add the required amount of pigment which was needed for
the painting initially. And therefore, it's
always good to come back and layers rather than doing
it at the first school. What happens in the first voice? Sometimes we are not
confident enough for we go ahead with the layer
that we're not sure of. And if it is Taco lifting
up or taking it off, once it is dry
becomes really tough. When it is wet in case you
want to lift it up still, it's easier compared to if
it becomes drier. Okay. I guess on the left side, the top you can see
the photograph. By the way, I
forgot to add it in the initial part where we
were drawing or sketching. But you can surely go ahead and downloaded from
the resource section and use it for your sketching
part as well as over here, I have already shown at
that on the left top side, though it might not be exact. I'm not here to always
paint exactly the same. I have told this
pretty often audio. I always try to make it my own painting rather than going
ahead with what I see. I do not try to copy
exactly the same things. There are times
where I go ahead and change it a bit so that it is my composition rather than in
pain painted directly from a photograph Can looks exactly the same
like the photograph. That's what I have never
approached anything with. I tried to see the subject. Can you use it as well as walk around
with it in my own way? And you can make your
painting my phone in any of the
composition your own. In the similar vein. Here, there are different kinds of techniques that I have been discussing and I
would be discussing many more techniques
as we progress. It's only for your own benefit. You will understand that. Not only it's important to
understand the techniques, but it's important to work with various mediums
that you see. And these mediums
can seriously help you to nail a lot of
your paintings even in future Some days are where we do not want to paint
with watercolors and we might only like to go ahead with any of the pencil
sketching or any of the face, two shades, whatever you
want to, markers, et cetera. I think on those
days It's always a good exercise
to go ahead with. What you want to
walk around with. You should be more vigilant with lot of mediums
or you should be well-versed with a
few mediums that you want to use
though it's great to have one important medium or one common medium
like over here, or we're working mostly
with watercolors, but why not watercolor pencils. Watercolor pencils can also help to create a
lot of textures, lot of backgrounds, etc. These are smaller aspects
which I'm going to touch upon and I hope they can also help you in your
future projects. This is my favorite part
of the painting when I exactly know that I
have to come to Penn, hand highlights now,
it really helps me to gain that confidence that almost I'm done
with the painting. It's only a few parts where
I'm adding these lines. And once I had these lines, my whole painting is coming too. Life altogether, I am
using a 0.3 or uni-ball, as I have told you
earlier, though, you can use fountain
pen, laminae, etc.. Anything can work
fine on this paper. So you can go ahead with
any pen of your choice. You can even go ahead with normal gel pen if that
is available with you. Okay. Adding some more lines
here and there and wherever it is necessary
to add those highlights, go ahead and use it. Sometimes I do break these lines rather than
going with the flow. That's the way I
like to add it so that I can show the wear
and tear theory properly, as well as there are points
where I just leave empty. I do not like to put
the lines in total. Few of the times I just
break it so that they look more original and the
highlights look more real. I would say. Once we have done with
the black highlights, we will go ahead with
the white highlights and add it in view of the places wherever we think
it is necessarily majorly, just to show the difference between the actual foliate
as well as the water. It's a great way to separate it by adding
these highlights. I'm using my Posca
marker yellow just to add a few dots here and there. You can also use your
gouache to do this. It's any opaque medium
you can use to do this. Okay, Even on the right side, we will go ahead and add these
kind of dots, four dots. Here. Adding the white highlight
in a few places. I'm having a final
look at the painting. I think you are
pretty happy with how hindered not
do sign your name, as well as some Adam, exactly the place where
you what you have fainted. I think the name of the place or the name of
the particular monument, whatever you are painting
is very important. Even if you have figured out just to Cafe which
you want to paint, name that cafe,
where exactly it is. And all these freely
gives you how you have progress in your
pool of these paintings. I can tell you it's a progress. It might be a slow progress, but you would be in a
position to Neil Cole, the paintings, believe me guys, today, you just carry
on with these 80 days. Once you are done
with the 80 days, you can see this DC, how much you have
changed in terms of your painting and
how much you have prompt rest with
the understanding and with the knowledge
of the pigs. Okay. Just adding a shade of
what all either use. The first is my yellow. It can be scenario yellow
or yellow that you have 2s. Then it's the Naples yellow, it's burnt sienna,
the Van **** brown, or any other darker shade of
brown that you have used, as well as indigo. That's very, very important. Along with it, yes, the color of the sky, which is majorly
your Winsor blue or darker shade of blue, which you have used, along with the royal blue that I did particularly used
for the lighter shade. You can also go ahead
with surrealism, blue, as I've told you.
21. France Day 3 Part 1: Hi guys. We are onto our
D3 and I'm very excited to introduce this
lesson to you as this is all about painting
with watercolor ink. What we will do, we will go with our base light wash of
the same corner paper. Do make sure that the
ink is not to staining. So I have added a lot
of water into it so that it doesn't get
absorbed very quickly. And I do not get
these kinds of marks. This is one thing that I
always want to tell you. The sketch Caines
do have convey Hi, amount of steaming mess or
while you're working on it, one way to work
with it is to apply some water on the people and then go ahead with
the ink audience. If you are working the
way I am doing right now, use lot of water along with your coordinate
change that you have. Sketching and then
use it on the paper. That is pretty easier way to
work it out as well as you will not get any kind of drive marks that
you usually see. So I think this is the most important aspect of
income using your sketching, I think that's one
thing you should always keep in mind
while you're using it. And other thing is these sketching to get dried
up in the fountain pen. If you do not take
them off very quickly, though, you might be seeing
me using it in the Army pen, but I do wash it off
or I do take off all the extra ink from my
from the pen altogether row. Once I'm done with the painting, there's a chance that it might
spoil my pen altogether. So if you are using any
kind of fountain pen, make sure that you do this step. Audience. You can also use it in your dip pen that
defend would be very easier for you to handle that way or get
going with all very, very rough sketch right? Now, you can just mark these two lines or three lines that you
observe initially, which is horizontal, and then there are vertical
lines that I'm mounting. Horizontal and vertical lines
put together can make up these small and
beautiful love painting. Though I say it is
more because it has done on an A5 size paper. But if you are planning to do it even
on a bigger size paper, it's always a good
approach entity. You can even do it on a smaller size people like a postcard or
something like that, which you want to send
across to your friend in a different city or in a
different place altogether. It's always a nice gesture to do these kinds
of small smile. I think these are
very small aspects, but they end up making
it really huge. Okay, I guess I
would do right now, leave you with the fact that Let's keep adding
these smaller lines. Do not try to go head and
do everything right now, if you are unable to
understand all these slides, just go and add a few. Once you make this and once
you make your next painting, you would be in a
position to actually manage any kind of these
buildings on your own. It's just a practice session
that we're doing right now. And believe me, the more
you understand are, the more you are excited to paint these kind of
monochrome paintings, the easier it will
be even to handle any kind of a painting
that you do in future. Every time you do not
need to have a lot of colors with you to actually
go ahead and paint. Here we would be using only
two definite kinds of colors. One is this blue, and another one is the
black king that I have. I am not going ahead with a blacking in total
because I do not like to use it if
I would have had an indigo and it would
have been better, but whatever, I had
tried to use it to the best possible extent and hope you will also like it. The whole of the
sketching is real time. That's one of the reasons it's taking some good amount of time. And that's the speed at
which actually I dropped. So you can reduce the speed. You can even increase the speed, whatever works best for you. You can go ahead and do that, as well as watching. Why do you continue drawing? I would like to
actually take a bit of your time to explain
about drawings. Drawings are majorly
water-based medium. Meat from various plants and many kinds of
Mendel colorants. That's one of the reasons
I've been telling you that these are way more, I would say staining
because they have a higher staining compared to any other kind of
watercolor that we use. Any given ink me
way in tone due to the purity and concentration
of its ingredients. So there can be various
tones that you can make just like monochrome
painting where you can actually they read
the various level of the tonal value depending on the concentration of
the ink that you chose. Now, here the blue is not
very high in terms of the, I would say the staining
ness that I want. Hence, I would be using a bit of black to mix
Senate and use it. Historically the
inside have been used are brown then reddish
brown, gray, black. But nowadays they are available in various different colors. And that's one of
the reasons you have seen me taking only
these two colors, whereas I have about eight
colors available with me, we will be using a few
of them even in future. We all know that watercolors
are usually made out of two to three ingredients. Like you have the pigment, then you have the binder, and then you have
some additives, pillows, whatever
it is available. Whereas when you go to ink, there is a different
aspect to it. We have pigments,
we have reasons, we have boxes, and we even
have Heritage Center. So there is a different
way to use it. I would say that
the light fastness, as well as the staining
nice that you get in ink is very different than what you usually get in a watercolor. That's one of the reasons while
you are working with ink, you have to be way more cautious
about the properties of the king compared to what you usually walk around and
watercolor paintings. Why we are talking more about
things I would like to tell you a bit about pen
and ink drawing on. Now why I say this? It's not that you
are using the ink in the best way or in the
same way as you would have liked to use it like
using a black pen on a white paper used for hatching drawing and so many other
things you do with that. But over here we are doing a hybrid model where we are
working with the sketch pink to create different values for a particular painting. And I would like to introduce a few
techniques over here itself. Like, I would like to tell you that the pen and
ink drawing techniques, there are different tools and materials that
you might need. But in this particular series, we are going ahead with the black ink as well as only the blue ink to
create all of this. Now, most of the ink and
pen drawing that you might have seen is usually completed in a black and
white kind of a surface. And that's what the artists chooses to even
create the contrast. Now, if you see
about gradations, yes, it's very difficult to create those kind of gradations. That's one of the reasons when I say about this hybrid model, we would be even in
a position to create those gradations because of the ink that we would be
using with our brush. Whereas if you were only using a pen for this
particular technique, then you might not
be in a position to create all those kinds of gradations that you
would like to see. Now techniques when you only
work with pen and paper. There are techniques
like hatching, crosshatching, random
lines, and siblings. Now, I am not here
to exactly tell you all these
various techniques, or I'm not here to practically introduce you to all the
techniques right now. We are going to do
it as we progress. But I am basically
introducing you to this technique when using
the pen altogether. And I think all of
these techniques, when you start using it, you will understand that
they have a way better use or they can be
used in a very, very easy and nice way compared to what we haven't been doing. And literally it can take us to so many different
level of painting. When you start losing
the fountain pen as a bank and you only
add highlights, it's not the best
tools that I can say. Whereas if you are
using your pen, even for your sketching, even for your painting and all the other techniques
that you have, then it's the best combination
of a hybrid model. Hybrid model can create
a voice of your own. And that's the voice
which I really want each one of you to
figure out for yourself. So, yes, I think that's the final aim of all the
paintings that we are doing. Finding your voice
with watercolor, finding a worst thing, finding a voice, but whatever
medium you are using, I am only helping you to enjoy the process and to let you know all the steps that
we use in the process. Everything else is upon you, how you use it, how you want that doubt. I think that is what
I want to tell you. In the meanwhile, you can
continue adding this arch, you can continue
adding this lines. I would not take much of
your time over here anymore. We will move on to the next lesson where we are
going to discuss each and every step of how to use
this new tuple medium, which is sketching for adding
the colors to our painting. One thing that I
need to tell us, the variation of the colors might not be the best if
you are not using indigo. But if you are well-versed
with the watercolor world, I would ask you to work
with watercolors itself. Pre-check already one color or just take one color
and you can use it over your for creating all the values for creating everything
that you see. Rather than going ahead and
jumping onto a new medium, bright, opaque, you
can fall short. Take all the knowledge that I am trying to share right now. Whenever you think
you are reading, you can purchase one
small sketching and see for yourself how
it can work for you. That's all from my end. So let's just continue
adding these lines. Let's just create the first
layer of our drawing. As I always say, drawing is the framework
for any painting and it practically paves the
way for our final placing. Be easy, going, really
easy on destroying. It's an easy drawings. So you do not need to work much. It's just these lines that
takes a while for you to understand and it might
be a bit tough right now, looking into it, overall,
as you progress, you will find more and
more beauty in it, as well as you will
start enjoying it. You know, I always think about the journey
wherever I visit places, whether it be of
the each location, whether it be a mountainside, whatever place I'm going, I just think about the fact how beautiful
the roads would be. You know, every
road trip gives me so much more happiness as
I can pick up such small, small things, people
walking on the road, how their colors are changing. I mean to say how
the dress colors as, as well as how the pattern of what they wear changes
according to the climate, according to the places. Not only them, their food
habits also changes along with the kind of books that
you'll find also James, plants, animals, everything that kind of houses
that you see over there. It's very different than
what you see in the plane. So wherever you are going to try to absorb,
emit around you, there's so much of excitement that lies
in and around you. You will not even feel
that you are uninspired. There's so much of inspiration
that's lying around us at how can we even
forget that there is so much of food
that you can pay? Seafood is a grid. Motivation in any kind of space. If you have some good food that will cause brings a
smile on your face. And that's where I say that you should use it for your drawing. You should use it
for your painting. You should use you
should eat it also. Yeah, but it can of course, be painted with the help
of your watercolors or with various other mediums
that I can introduce you to. This particular series. This particular series
is a genuine effort from mine to help you not only become more of the sketch
part and be more well-versed, but the sketch part,
but also to introduce you to as many
mediums as possible. And you can pick and choose what medium
you like the most. It's not about that you have only been introduced
to watercolors. You have to work
with watercolors. You can also work
with pen and ink. You can even work
with coolest shoe, can even work with any
other mediums that you see another person using it,
like watercolor, pencils. Or you can work
with ink and wash. Whatever way you find that practically
nil your paintings. Go ahead and use that for
your own numb painting. I guess that's it.
What I want to say and I'm telling you that I would be leaving you
with this thought. But yes, there has been so
much to share that I love to express what I want to tell you to these each
and every lesson. Meet you in the next session, where we will start adding the colors to this
Institut de France. One of the world-famous and students that's
there in France, and I have written a
few lines about it. I would share it in
terms of a story. Next, in the next lesson
where we are going to paint it back and meet your way soon.
22. France Day 3 Part 2: Guys, so we will work it
out with light and shadow. So this is not the best example of light and shadows altogether. This is more of a monochrome
painting that we are doing. Though the blue
that I had is not a Nico and hence I
had to go ahead with another color that is
majorly your black to create the various
different types of values and the painting. Once I have created the values
and becomes more easier for me to actually have a
final look at the painting. Each and every painting, whether you do it
with sketching, whether you do it with
your normal watercolors, needs various different
type of values. If you do not create bamboos, you cannot actually
give the light and shadows are the other kinds of impacts that you usually
see in a painting. Those kinds of things can
only be seen once you create these values
in a particular area. I'm going with a really
flat wash as you absorb. The stateliness on the
paper is pretty high. That's one of the
reasons I have to quickly apply the color, though this is the
Winsor and Newton ink. If you have any other input, do you need to test it on the paper before you go ahead
and paint around with it. This is something that
high up absorbed over time that if you have
a particular ink, you will need to go
ahead and test it. Every ink is very different compared to what
you have called. You use Git and they have got various
different properties. You can see how
the light fosters, you can see how as the
sameness you can go ahead and also how it
applies on the paper. How the values of
the color difference and all of it you can only understand once you start
using it on your own. Thanks to everyone who has not applied any kind of
sketching on who has locked. I use jump, any kind
of sketching before, and you only have
watercolors, please go ahead. Let your watercolors
create these kind of values and you would be
in a position to neglect. You practically do not need
these inks, et cetera. It's just my way to introduce
you to various mediums. And that's one of the reasons I am experimenting
with all of these. The medium is never the
change in the painting, or it never actually gives the
real life to the painting. What medium you use, how you actually
paint, doesn't matter. What matters is how is the structure of the painting
that you have created and how you are going
ahead and using your values to walk around. I think this is what I
have understood and I would like you guys to also
have standing on the same. Okay. I guess I would now go
ahead and leave it to you. I am working with
the darker values, totally settled with
the size two brush. I don't have much to explain
in this particular lesson. To be frank, I
would go head with the different kind
of fountain pens or even add colors in
the fountain pens one. So this layer is
particularly done. Now, you need to empty
your fountain pen for sure once you are done
with the painting. Because these paints are really sticky and they sometimes for your fountain
pens completely. That's one of the reasons I
do drain out the entire link. You can fill up really
less ink initially and then only go head
with your painting. That's also another
way to the word, I think all these
fountain pens to have these options of using less. I think if you want to
save on their part, I think that's I had
to explain it to you. Meet you very soon
when we are when I have to explain you something more that I feel
is very important. You can see me going in
the third layer right now where I'm using the
darker value of this blue to create the various colors of the shapes which we want
to win in the painting. And I'm using my size two brush. That's one of the
reasons this is a bit lengthier compared
to what we have earlier done during our
discussion session. It was pretty simple because we had to just go ahead
with a pencil sketch, but now it's more about
the coloring phase. And we are going ahead with the colors and dealing
with the columns more. Has to be applied. Different
values are asked me apply different layers to our sketch. You will understand how the whole law painting
is coming together. This is something which I
have understood over time that the whole painting
doesn't come together at one. It takes a while to get the
whole thing thing together. And sometimes, you
know what happened. We just leave it in-between
when we're not feeling good or we do not like to actually go ahead
with the painting. But there are many
occasions where I have seen that the whole
thing then clearly it looks beautiful once we have completed the painting
after applying those tears. Because in this particular case, I cannot say that till you are done with the Fontan man
highlights and everything, you will get the
final result easy. It takes a while and it takes
a bit of understanding to how how you can produce
a final outcome. I guess that's important. Do not leave it in the middle, as I always say, try to paint the whole painting and then decide for yourself, even if you like it or not. Finally, if you even
don't like something, try to get the process with. So understand the
process like processes. Something that I always say
if you understand where you can get the final
outcome, very easy. Now, if you get the
final outcome easy, what happens is that
you can always Neil, any future projects of your own. And practically all these
projects are done in a way that you can finally get through your own photo on
your own paintings, sit at a particular
location and paint. Guys, if you do not
have a fountain pen, you can also go
ahead with a dip pen or else you can also
go head to toe with any of your jaw thinner
brushes to create these various values of colors that you see
right now on a pump. It's a simple painting,
just tacked down. You have to create
these kinds of manuals. And that's what makes
the whole painting really interesting in this bond. I think I'm finally
happy with how it is turning up and you can see that it's becoming more, I would say, easy to
understand the structure. Now, come back to what it
was when we started off. You can see my struggle
with the pen. That's okay. Sometimes what happens
is that the earlier the ink was a bit sticky
and that's one of the reasons it just
takes some time to flow. And it did not spoil
my pan altogether, but do make sure that
you remove these things. That's very, very important. I've been saying this again and again because I
do not want you guys to actually spoil anything of
this kind in terms of the pen, that's really expensive and I don't want you
guys to spoil it. Okay. I guess I am particularly very happy with
how this is starting up. So let's continue with our painting and we'll see
how the final outcome.
23. France - Day 4: It's time to paint
on the payoff phase. And this is going to be
very, very interesting. Lots of sketching, lot soft. You can say shading,
drawing, etcetera. Vaguely less than
Mount of watercolors. Watercolors is just to
lock your shading, etc. What you have done. Let's start. Acetals are already the time to
draw the structure. Whenever I'm drawing
the structure, I take one thing at a time. The first is, where does the main line of
the structure lies? I would put it just straight
across how I see it. This is the major backbone of your structure and it should
be around 12 centimeter. Once we have added
this 12 centimeter, I would go ahead and add around
7.5 centimeter across it. If I am going towards
the left bottom side, it would be around
8.5 centimeter. That's how I go about it. If I have to be more specific, I would say that
these measurements will not matter much
in the long run. These measurements are
just to give you an idea of how to progress with
this particular painting. Once you are aware of
how to go about it, you can yourself make your own measurements and
understand how to go about it. I would even let you know how exactly measure
with the help of my pencil in case
I have to draw any of these urban sketching
or any of these monuments. It becomes a way more easier if you want to wing
with your pencil. As we progress, we would step
into all those things and I will actually help you to understand each one
of them in detail. I have even uploaded this photo
in the resources section, so please go ahead and download the photo
for your reference. In case you want to know more about two-point
perspective, which we have used over here, you can go ahead and check out the class follows of autumn, and it is life on Skillshare. I have explained
one-point perspective as well as two-point
perspective. I will even include a
lesson going forward before we go ahead and
check out the next part, which is the grease one. Before I do that, there will be a smaller part about
the perspective, two-point perspective and
how we go about making these lines Just follow
as we go head over here. It is 1.5 speed, which I have used in
this particular video. So wherever you think
you have to slow down to stop and follow it, you can even adjust the speed of the
video in case you are watching on a small
screen that is your mobile from the
top right hand corner. And in case you are watching
on the bigger screen, like a laptop or an iPad, you can just adjusted from
the bottom left-hand corner, that you can always decrease the speed or
increase the speed, whatever is better for you. I would request you to watch
it pretty quickly first and then go ahead and start
with the whole of the sketch. The sketch will fall
in place very easily as we are going ahead
with some major lines. Once we are done with
these major lines, you will see that there
are only some scribbles which I would be doing for making this monument
come to life. Every time. We do
not need to always go into details of
each and every part. Some of the details can be done even with simple
scribbles off pencil. And it would practically show like what you can see over here. I'm now breaking these details
into some smaller boxes, whether it be rectangles, square lines, ox, etc. All these smaller shapes
and sizes that we are adding right now will practically define the
whole of the structure. As I have always told you, the whole structure
is all about lines, about smaller details of how you worked through
various shapes and sizes. Now, each and every shape, whether it be a so-called, whether it be a semicircle, whether it be a straight line, will contribute towards making this whole painting
come to life. I think I do not have much
to explain over here. We have to go ahead and
just keep getting at it. Make those lines,
make those hawks. And then there would
be a stage where we have to start adding a
lot of pencil marks. I, in terms of the scribbles
that you make so that the whole painting looks like what you observe
on the left side, which is majorly a photograph. I am going to go a bit on the vintage look that I
want to give to the paper, though, it's not
vintage, absolutely. We are going ahead and adding some details can
view of the paths for watercolors and the rest
of the paths we will leave it as it comes
up in the drawing. Drawing is the major part
of this whole painting. The better you can actually add the lines
with your scale. I think the better would be
your painting altogether. So you do not need to mentally think much
while you paint. Go ahead and start
adding these lines, these arcs as you
observe me doing it. And then make these
smaller lines, etc. It is as per what I am observing on the photograph
on the left hand side. So your observation
power should increase more and more in this
particular painting as we are going ahead
and adding most of the important lines from the left of the photo to into our picture right into our
fitting that we are doing. It's not complex, I would say, but it requires
lot more patients. If you have some time, I would request you to break it. One is to just draw
the major structure. And the second
would be to go into the shading part and then some
parts of the water column. One important aspect of watercolor is to
lock your shading. Now, you can lock your shading by applying watercolors, orals. You can also go ahead with
this play that is available in the market for practically
locking your shading. The next way, how I secure
the drawing or the shading, which I do is add a small tracing paper on top
of it and keep it like that. But I just wanted to go a bit differently in this
case and thought to add a layer of
watercolor on top of it so that my graphite months
get locked completely. And I think it worked very well for this
particular painting, as we have more of sepia brown
into this whole painting. And I guess that's
what makes it stand out from all the rest of the paintings which
we have done to date. It's time to scribble. Now. We will scribble,
scribble, scribble, scribble, lots of scribbling
that I would pay doing. Even there will be darker marks. Or you can say, you can use to B or a freebie pencil for adding
these dark shades for darker areas into each of these smaller boxes
which you observe. I'm just going ahead and
making some random lines and scribbling to add those
smallest, smallest structure. I'm practically not detailing
anything over there. That's the beauty. You always do not
need to add lots of details or painted
exactly over here. We're not focusing on realism, as I always say, watercolor is more random
and I love to keep the randomness always
intact. That's one way. I always deal with watercolors. And I think you can also
take it as it comes. So it would be a
great way to go head and learn the beauty of how to tackle this
medium in a better way. You notice medium has so
much to offer always, every time it's not about going ahead with lots of
colors and painting. It's a lot about layering,
lot about sketching. And sometimes it's more about
just locking the colors that you have or just locking the graphite monks
that you have added. There is something
new in each of the painting that we
are doing till now. And when we go to Greece, you saw the first page
is very different. We will be drawing
a flag on Greece. Along with it there is a
small kid from Santorini, which I have added. So those two will practically make up
the whole of the page. It's not a long session that you are going to have increase
because lot of florals, lot of doors, windows, etc, which I have added in
that particular series. Lot to learn. But in a very easy
and I think very, very easy approach that you
can take for all of that. Shadows, lights, etc, is something that
I have always loved. And we are going to explore
that can grease thoroughly. Let's come back and
let's keep adding some darker lines
to our middle part. As you observe
mean doing it over in my particular painting. One thing that I
must tell you is that till now it's a sketch. And you can observe that there are many places where the graphite
marks are moving. And I really do not want that my hands matches
the graphite marks. So I have gone ahead and added one tracing
paper for myself. I would request each
one of you to add this tracing paper while
you draw this gate. Few of the areas where I'm
adding my graphite max, it's really dark and few of the areas I am
keeping it lighter. It's all how I observe it
in the photo, everywhere. If you add the darker marks, there will not be the values
that you can observe. Now, every painting, you
have to change the value, whether it be you
are working with a particular color like
we did on the right side, or else you are working with
any of your pencil colors. Whatever you are working with, we mostly work on the values and that values really make
up all of our painting. I think that's one
thing You bet you need to always keep in mind
while you are drawing, shading, painting, doing
anything of creativity, at least in this space. Just go ahead and create values. And dark values is
definitely going to add a lot of depth
to your painting. Now, the depth in a way, I would say that few of the parts where there
are darker values kept could show that there is lot
of structure that's there. For this particular
photograph, you can see, whereas if you are adding
the lighter values, it's more of walls, etc. That you can also, hence some going that way would
really practically change your approach as well as your understanding for this
whole of the monument, which we aren't going to
draw an attempt right now. I am not saying at all
that this is tough, but it is made out of lines. And any one of us can
draw lines and arcs. If you can draw lines and arcs, I think this is going to be
one of the simplest for you. It's just that there is
lot of details into wet, which we are scribbling or which you have to add
the darker values. You can go ahead with six
B pencil. For B pencil. I just went ahead with the
same pencil which I had. So it took some
more time for me, but I did not want to
break the continuity. And so many of you have
asked me that whether you can use the
same to be pencil, which is available with you
for drawing and shading, etc. So this was just an
experiment for each one of you who really like all of us do not have
all the resources and each one of us who do
not have these resources, there should be some way we can approach the whole
of the painting. I think this was one of the
most important ways we could approach the painting and I wanted to do it for all of you. I hope with this small effort is something that
you also get it. And every time, every painting that you do is not about the
resources that you have. It's all about the
intent of creativity. And I feel each one of you whosoever is attempting
this painting. I think you were creative.
You are beautiful. And whatever you do, you'd be in a position to get something that is
called helped to you. At least there will be some
learning in the process. And for sure you
are going to have, are definitely better
outcome as you progress. You can use this learning in
any of your future projects, which I guess is something that is amazing for watercolors. Watercolors, the more you learn, the better you can approach it even in
your future paintings, you get to understand that this particular way you
can go ahead and approach for any floral or for any other building or
for any other people, anything you can do. It's all about approach. I always say that whatever has been my
learning till date, I have been using it in
many of my paintings pan. The whole of my style has been evolving a lot over the years. I will not never denied the fact that the
style continuously evolves and you will see so many of us painting
with our own style, that style is evolving. You do not see a
vast difference. Maybe over the years you can
still see that difference, but most of us continue
to evolve very, very, in a very, very simple and easy way. And these are very small steps which are practically
not visible, but they make up the whole of your watercolor portfolio
or the pay things, etc.. And it adds so much in terms of learning
for each one of us. Believe me guys, this
structure which I'm adding on the left is
completely random. I do not go by whatever
I observe on the left. It's just that I saw that
there are some whites that are there there and there are some dark spaces
which are there. I have used my
graphite pencil to add those tasks and to add
those lights. That's it. What I have done for
this particular part, adding this shape, size, etc. Nothing is difficult. As I always say, everything is simple, easy. It's just the attempt
and the intent which you need for the painting. Okay. As I progress, I would leaf over here because there's
not much to explain. It's just small shapes and sizes as I have
already told you, I would meet you
where I need to add more structure or we need to work a lot with the watercolors. That's where I think I
have a lot more to add on. I will continue to add
some of these lines. And when I'm approaching
this smaller part, you will also see that
some of the middle part, I would leave in white. And while I go
towards the bottom, I will also make
it a bit darker, again, some kind of scribbling. But in a way that it shows that there is a
structure that can be seen going ahead and adding some lines for the structure
on the right side. As we have added
on the left side. I have kept this at the last for the France series because
this one is not very simple, but it is not very tough kiddo. So I can always tell you, it's all about how you go about the initial part
of adding the structure. If you are structure
and lines are fine, I think you can
nail this painting. Absolutely, because there's
so much of less painting. There is only some sketching
that we are doing. And you can see mostly
it's scribbling. If you can get the drawing part. Well, it's practically kneeling your whole of the
urban sketching part. I've been sketching or any other sketching under location or even sketching your monuments involves a lot of sketching, a lots and lots of pencil, lots and lots of drawing
onto your paper. This is something which we do
not like to do when we are in our initial days or when we are starting
with our journey. But as you progress, you will understand
the importance of drawing, sketching, etc. As I have realized
over the years, I am now working as an
artist for quite sometime. And what I have seen in my whole of the carrier is the more you want to
progress as an artist, the more you want to involve more portfolios under you
or more subjects under you, whether it be florals,
whether it be birds, whether it be plants, any kind of composition, urban sketching, human beings, you need to have a hold
on your sketching. The more you understand
how the proportions, how the scale, how your whole of the
structure comes to life. I think that's the
best way you can. Have called on any subject
that you want to paint, because every subject involves lots and lots of sketching. Even if you see trees, you can practically go ahead
and add a lot of scribbling, lot of shading into it. It's just that we're not
in a habit of doing it. That's one of the
reasons we love to add the darker, lighter values. And we have been talking so much about values
for watercolors. But if you see pencil drawing, there are again lot of
values that we add. It's darker or lighter
shades, shading, going over one kind of pencil lines and then
again going over it. Or else just blowing with
your six before B pencil, like we did for the light
of our Statue of Liberty. I think that is again, one great example of sketching. That was a very smaller
piece which we did together. And this one of course, is a bigger piece and you
have to work go way more over in this one compared to
the one that we did earlier. The left side is almost ready. You have to work on
the right-hand side. And once you are done
with the right-hand side, I think most of the
sketching is done. I am going ahead absolutely
with my freehand, but you can use your scale. I always say this. So many of the artists have audio told me that you
should go freehand, etc. I think that works well when
you are already experienced. If you are just starting out, it's great to go
ahead with the scale. You will get all your
proportions correct. But slowly, steadily as we move forward in this
whole of the CVs, I think I would like to
actually go ahead with the pencil itself and tell you how to use it to the
proportion scale, etc, and get a wall
painting correctly. This is it. Let's move on and let's keep
doing our sketching. Some bushes and trees in the background with
some darker values. You will see that I am keeping the tracing paper on
my site anywhere, wherever I feel there's a need, I will use it to my advantage. It's time to add
the watercolors. Now, watercolors is
practically being taken for locking the whole pot. So drawing that we
have done till now, I am going ahead with some
amount of my Naples yellow and brown using my flat brush to add it quickly
onto the painting. Always try to go head with the brush from the top
towards the bottom. I do not want the pencil
marks to be all over. That's one of the reasons
I have kept it that way. Going with some
darker value of from, which is majorly of a Nike brown sepia or any other
dark brown that you have. I am going over the darker background
which we have added. And then I'm just adding some of the darker shades in few of the places where there
are darker marks. Now, the colors that you
are adding right now, we'll go one sheet or to shade lighter compared to what
you were adding over here. Always keep that
in mind while you add any of the colors
to your painting. Adding the darker value of
CPR for the bottom area so that most of the
painting comes to life. Now, you can easily see how we have used watercolor
to our advantage, not overcrowding it anywhere, as well as even going
ahead with lighter, darker values or wherever possible to make the
painting come to life. The top part is still wet. That's the best thing. I'm going with my
thinnest brush right now and adding some of my
leaves to the trees. It's amazing the way
watercolors is spreading and there is very less water
right now on the top area. If there is puddle of water, you know, there will
be lot of spreading. There is less water, there could be very, very less amount of spreading. That really makes up the
whole of the painting. So much important right now. Okay, I guess some lines
for hiding the trees. And these lines
are going to help you to define a few
of the areas where I think there should
be some more focus that we have still not done. The whole painting has
dried off right now, and you can absolutely see that it is one or
two shades lighter. It is one or two shade lighter. You are using an
artist grade pigment if eight is three to four shade lighter and you have to go ahead again and paint over it. Then it is student
grade watercolor. That's one of the
reasons I always say go ahead with artist
grade watercolor. Because artist grade watercolor, frankly can really get your bending Kandula
very, very quickly. You do not need to go ahead
with multiple washes. You can seriously avoid
lot of overworking. It is bit more expensive compared to what you
had used till now. So I think you might have to think once or twice before
you go ahead and buy it. But one good set of
watercolor can frankly add so much more into your
watercolor journey. It becomes way more
easier that way. Your work becomes
way more lesser. And sometimes when you paint, even with one single layer, you'll get the exact
outcome that you want. Whole of the painting is locked. Now, in terms of
the graphite marks, you will not see that
the graphite monks is coming into your hands
or anywhere else. I am dropping in some of my paints urine there
as dots, bigger marks. That's it for
defining the trees. As well as view of the
areas where I think I need to add the darker values
into the monument. I would go head and
had with my sepia. You can also use when I came
down, as I have told you, these are two of the options
over here that can be used. Time to add some marks. So with my pen going
with my unit and pen, this is a waterproof
pen that I have. This is what a proof is a proof pigment that you
use for adding these lines. But you can also go ahead with any other pen that
is available with you, like laminae, etc., or any other gel pen
that's available with you. As I always say, you do not need the resources, is just the indent going with some of the
lines here and there. This is 0.3 tip
size, which I have. You can also go ahead with
0.5 if you do not have 0.3. Absolutely. Okay. I think that can also
serve the purpose. It's just about
adding a few lines. We will go ahead with
the white pen to add the lighter values
in few of the places. And hopefully that can be of great use to each one of you because it would practically
show how the whites, blacks, all the
other watercolors, pencil shading, everything
can work together. It's not about having only one single thing
to your advantage. Every, each and
everything that you have can work in your
advantage always. I hope you have
enjoyed this lesson. This is one of the experiments that I've always wanted to share with you. And hopefully you
guys do like it completely and are in a
position to share your outcome. I am waiting to see all your outcomes in
the project section, please go ahead and upload it. I can see your daily projects. You can even pin
me on Instagram. I would love to share it back
on the Instagram handle. Can't wait to share everything that I have in Greece
and Italy coming next, in during this month, there are about 20 destinations which we are going to cover and we have already
covered New York, France. Next is going to be
Greece and Italy. Hopefully, once you can get a hang over the
Greece and Italy, it would become way
more easier to go to Southeast Asian
countries and cherish the beauty of flora and fauna
that we have over here, along with some of the buildings that
we want to add them. I guess this is it. I hope you have enjoyed
the lesson completely. Do drop in any discussion points which you have in the
discussion section, I would be in all I would
be more than happy to practically give an answer to all your questions
that you see. I am using a unit and 0.7 MM pen over your form
marking all the white parts. You can also use quash for this and then have a final look at the painting,
remove the tape. I guess this is going to
be something that is very, very different from whatever you have attempted to date hand. You're going to
love it completed.
24. Greece Day 1 Part 1: D1 or Greece. And I'm super excited to
share this journey with you. Greece's one of the most
beautiful destinations in the complete series I feel. And you will see as you
continue painting with me, as you continue
exploring it with me. The first hole of the cell
part is about sketching. So whenever you are
sketching like this, go ahead, whether on 8 cm. Now, what I have
realized over time is that this whole painting
can practically take the whole part of your page rather than ordering it on the
upper side like I did. You can even go
ahead and utilize your full-page for drawing
this gate of sand, or it's one of the most beautiful
paintings and it's evening. This is sunset time. And sunsets have been
my personal favorites. Date. You have already
seen so many sunsets from my side and there
are other classes to where I have
painted only sunsets. So this is going to be
also very, very special. More than it being special, I would say this
has the sense of softness and the colors that we would be using
to be really soft. That soft effect, which we
really need for a sunset, is something that I have tried to implement
through this painting. And I hope that you can
also experience the same. I would be sharing this
photograph with you, so do not worry. Go ahead and start
drawing these lines. Practically I have
taken around 8 cm. You can go head and
the proportions, as for your page, now, it isn't the upper
half that I have added it and I would be even sharing the full page or the full blown photograph
of this page are together. The part that we
would be drawing at the end don't add
towards the bottom. I'm not going to
share it because it's just an add-on as I told you, I added this part initially and then some part and the bottom was left empty, which I wanted to fill up and nothing better
than a floral God. Yes, it was a wooden floor
God that I added on. I have just taken a small
margin on both the sides. And now what I'm doing is I'm dividing it into
three equal halves. So if you see this
gate in between, there are two arches. And for that arch, what we're going to do is
take three separate paths at equal distance from
each other that would thoroughly define
the whole of the painting. It's very simple. Right now. We are going ahead and
adding a few parallel lines. Now these parallel
lines are going to practically define the
interior part of the bell, which you can also from
the right-hand side. Hey, each and every
bell when you see on the right part there is a small interior
line and we need to also draw that along with it. We need to make those
smaller arches on the top. We are going to go
ahead and define middle line on top of which
the arches will stand. Step-by-step.
Approaching a subject will make it way more easier. This time, the
sketches real time, as well as the painting part, will be absolutely real-time. Which would mean that it might take a bit more time
compared to what we have done. But you will get an absolute, Chris, we often approaching
the whole of the painting. Let's just define
these smaller arches, as I have told you. And then we will start adding some of the lines
for the top area. We are again going to the
bottom area and there we are going to have smaller
lines in the inferior part. Again in the interior part, you can see towards the bottom also that there is
an interior line. It's a wall, and the
wall is two-dimensional. We have to show this to
dimension over here. And that's one of the reasons. So even if it is
standing in front of us, treat, we will have a
two-dimension anger toward. I am now defining the structure a bit more
where I know that there are some walls on the
left is a part of it, which is towards the left bit more compared to
what it is interior. So there is an exterior
part of it which goes a bit away and that is unimpeded part of it that
I also need to define. Once I have defined all this, I need to go ahead and make the top area
like we're doing now. As we progress through
this composition, I want to say that
every composition or every subject photo that you see or considered
for yourself. Think about the elements
and the principle of the composition,
exactly like this. There is a sunset,
it's a soft sunset. And we have pub AND gate of Santorini where
you want to focus. We are not focusing
on the sunset at all. We are going to make it in the background and it's
going to be solved. Whereas the gate, we
are going to rely more. And whatever principles that you have learned to date
about the composition, who should apply to this one? And along with it, there is an intuitive sense
that you have always, when you approach a painting. And that's what I always
try to even add on that. This intuitive painting
which you do is practically the
voice of an artist. And whenever, even if I have to paint supposedly
any white walls, I will add some blue in it. It's an intuitive way
of seeing the wall, which is white but
still up until glue and it can practically make a whole lot of
difference next to it. Each and every week of a
project or subject is very, very important and
you can practically nil anything when you
approach it that way. Why did you consider
adding shapes? I have been very
vocal about shapes, can sizes in this
whole of the series. If you have particular
shapes and minds, supposedly it being rectangular, it being Socolow, it
being triangle, etc. What these shapes suggest, there's a lot of energy. Now, whenever you are
making parallel lines, what is suggested is
calmness and the painting, it brings a lot of stability. So if you are making some
horizontal straight lines, if you are making some
vertical straight lines, which means that there is no commonness that you have
added to the painting. Whereas when you are
adding any slumping lines, any arches like that, it defines lot of energy. Using any diagonal lines
actually adds life to your work. Using arches, using these
diagonal lines makes the whole painting
looks more dynamic. And if you see the subject from someone else's perspective, they might feel that this
painting has a lot of light and life minute
compared to if you are only going ahead and
adding some straight lines. Now, let's understand how
to classify these shapes. Geometric shapes suggest a sense of order precision
than predictability. While free form of
shapes suggests to inform informal approach, like it's relaxing its freedom. And all those types of energy
comes from more informal, or three kinds of shapes
and sizes that you want to ask when you are adding
lines on your own. That is, when it
becomes more informal. And that brings out a
lot of artistic view from your perspective
compared to if you're going ahead
and using scale. That's the difference
that you always absorbed when you are using a scale and when
you are going freehand. The next part is the natural free-form
shapes like clouds, trees, puddles, fruits,
vegetables, people. These are more of the shapes that I can
always find in nature. It's readily available. Whereas there are
some geometric shapes and sizes which are
made by human beings. Like if you have any bridge, if you have any welding, if you have any kind of tower or if you
have any railroads, anything that you also can
see which is made by humans, those have more off
pattern in it and those have more of panel
lines or triangles, goes, lines,
rectangles, squares. All of these shapes
are more invert in it compared to when you are observing nature that has more free flow of
shapes and sizes. It can occur in any
shape and size compared to if you are going ahead
and in compression. So putting together, I
think an orgy of shapes, sizes, etcetera depends on
what you want to paint. If you were painting
subjects like florals, etc, those have more energy. Whereas if you are adding
more buildings, etc, and adding a
two-dimensional subject toward where there
are more diagonals, toward where there are more. Ok Stuart, that has got more life and energy
to your painting. Something that I want to
really help you open up. A lot of possibilities
for yourself is your painting and
painting with infusion. Now thinking with intuition is not following all the rules
that we have discussed. And now, that doesn't
mean that you do not need to follow the rules of perspective or you do
not need to follow the rule of all this. I mean, the golden rule where you place your
subject somewhere, where you have to go ahead and
see how this object looks. I mentioned offer
it and all of it. I understand that those are the basic aspects
of your painting. But along with that, there are a few things
like every time you decide to practically
paint something, it's like opening your
doors to something new. And that when you do, you are practically, may be deviated a bit
from the actual plan. Now, the plan for this
painting might be to go ahead and paint
the foreground. Amazingly and not to paint
a background so well, but this decision
of going ahead and emphasizing more on the
foreground so rather than on the background
is taken by me. And when I'm taking
this decision, but I always consider is the intuition with
which I may go. Your backgrounds are more
interesting when you have all of these wet
on wet techniques, then you have sunsets and all. But what you want
to emphasize on in travel kind of CDS becomes most important at
this point in time. For me, whenever you are
picking up that brush, whenever you are choosing
that splattering or whenever you are actually
even choosing the colors, adding those lines, you are
going by your education. It's not that you are
going by any rule or following any book as cells that has been
suggested to you. It's all what you see. It's all how you open
your eyes towards this particular
part of sketching. And that's what gets reflected in your pink
thing altogether. So whenever you are looking forward to paint something like this to make sure that you are opening up all the
possibilities. You can even try out
the backgrounds more strongly and see for yourself that that looks better or not. In case you are going ahead
with a sunset kind of a you, if you have an
interesting background, do pick that up compared to
if you are doubtful ground. Those are the aspects that
you should always look forward to wherever you
are painting today. While we are actually sketching, I wanted to go ahead and tell you all of
this because these are really of utmost importance in our travels gets series if
you can get these points. Well, I think that most of the parts
that you are drawing, painting, or learning in the process will become
way more easier. And that's what I'm here for. I want to make this process
of learning way more easier for you compared to if you
are learning all by yourself. We're almost on the verge
of finishing this part. We will go ahead and
just add our washi tape. In the areas where
we want to mark. This washi tape
practically defines our differentiates the top part
compared to the bottom part. Not even you can go
without washi tape, but I'd like to go with washi
tape on the right and on the bottom because that really
helps me to define that. I want to sustain myself or I want to practically go ahead and have the subject contained in this
particular space, only. This kind of illustration, I think I always do for myself. And that's the way I go here, do it now you can also
go ahead and just draw a line like I'm doing
and keep it up to that. There are chances
sometimes we go overboard and we add the veins even ahead of where we have
defined all these lines. Those things don't happen
when you additive. It's a very small thing
that you have to do. By the way, this tape
is from fibrin parcels and it's amazing to work with it in case you are finding it difficult
to find a good washi tape. I think this one really solves well on any kind of
watercolor paper. Finally, I want to tell you that always stay open
to possibilities. There is no guarantee that you will achieve something
as you have planned. For watercolor painting. The only guarantee that you practically have
is that you will get some back closer
to what you have planned in case you
haven't learned anything, then it's a possibility that you might end up in a
ditch call together. So planning is always good. But don't restrict yourself or don't beat up yourself
with the idea that you have planned something
and you did not arrive at it altogether is a
nebulous process. And there are lot sell
prices on the way. So accept whatever the
final destination is. Do not restrict yourself
to only what you have decided and what you want to be your
acceptable limits. Just accept whatever comes in. So let's just go ahead and paint the whole lawn gate
of Santorini num.
25. Greece Day 1 Part 2: Let's go ahead and
go with the sky. I will add some water
onto the sky aid here, as well as make it absolutely
clear wash. Of course, the left side, you can see
there's no masking tape. I would leave it as-is, let the watercolors
flow and interact. That's something which I
have learned over time. The term watercolors
seems to suggest that your water has a major role whenever you are doing any
kind of full painting. If you are working only with
wet on dry and if you are working only with
wet-on-wet, at the end, the results would be
individually there, but it would not be what you should have
done with watercolors. Watercolors is a
great medium and there are endless
possibilities in this medium. Therefore, always make
sure that water has a very active role
whenever you are painting. One of the reasons for
adding wet on wet, wet on dry to each kind
of painting is the same. Once we are done with
the first layer, you will always see
that I go ahead and add a second layer as well. There is another thing
which you will learn in this particular painting
is how to paint white. Always, whenever you
are painting whites, you do not need to keep that particular part
of the painting white. As is. You can have
shadows into it. You can have some
light into what? All of that put together will make the whole of the
painting come to life. One thing you need
to keep in mind is that this is a very soft sunset. When you have a
real soft sunset, go head with some
vomiting on Valmy. Neon green needs a lot of
difference to your painting. And then towards the top, you can go ahead and
add some of the blues. I currently use, Naples yellow. Naples yellow is one of
the colors which I have completely fallen in love
with over the past few years. I can be using this
yellow for my sky. In so many paintings. I have a sunset series
where you can see that Naples yellow has been
extensively used. That is 21 days of sunset. If you go ahead
and check it out, you will watch short fall in love with this color even more. Going ahead with some more of the Naples yellow and
then adding the blue. You can see the blue is also pretty light
that I'm adding. You can use any kind of a
cobalt you orals go ahead and mix some amount of
your surrealism blue with your royal blue. Now the royal blue, of course, I have already told you
it's a color that I have been using, even audio. And entree in blue,
royal blue, surrealism, blue, ultramarine,
Prussian blue. These are most of
the colors which I have been using very often. But every shade that
you make code that you add to the painting right now needs to be
lighter in value. As we progress. You can always go ahead
and add darker values. I think some amount of violet. And once we have
added this pilot, the whole painting will
look more seamless. I have sprayed water
in the school, which means this pitfall, wet on wet technique
that we are exploring. Here whenever I am
adding the colors, I do not think much about where and how the
colors will spread. I just continue adding
the colors slowly, steadily watercolor do its job. So greater wetness flows
into lesser wetness. That's the rule of watercolors. Whenever you have more water
in a particular place, can you have less water
in another place? The more water will flow
into the less water. Or else, if you have more
pigments that is there in a particular area and that has
a lot of water also in it. It would automatically flow
into the area which is already having some
water on top of it. You do not need to do anything. In that case, water will do its job and your pigments
will spread on its own. We will be extensively using
glazing in this process. Now, many of you
might not be aware on placing as a process,
what is pleasing? Pleasing is basically
let it now, if there is a
particular painting which is lacking some
amount of character in it, it's not that energetic core. It's lacking some mood in it. The feel of the painting
is not positive. You can go head, can add another layer
on top of the colors, that is quality dry. The most important
aspect of adding another layer to your painting is your first layer
should be dry enough. This is highly used in any kind of a floral
painting whenever you are adding wet on dry
method can be very, very tricky process
because you are placing your wet layer pain
score with the paints that you have already
added to your painting. It is quite important to apply
the second layer quickly. And whenever you are
applying the second layer, do make sure that you
are not overworking. If you are trying to blues
up with one single layer, that might not be possible. We are doing lot of layers
for this part of the glazing. Right now, I am applying
some non-trained blue yes. Going out of the way. We were discussing glazing, but just wanted to make sure that you get the colors right. If you do not have
in daunting blue, go ahead with ultramarine or any other color that is
available on your palette. This is a background wash. And as I always say backgrounds, what this particular
painting is not so important compared to the final painting
that we are going to add. Getting back to the glazing part which we were discussing, you are darkening of few
areas in your painting. Whenever you are going ahead and darkening a few areas
and you're painting, it means that you are allowing your viewer to concentrate and focus on that particular area compared to the other adult
parts that you have added. So that's the main
aim of any kind of a painting where you are adding the glazing factor
or learning factor, how to practically
go ahead hand, divert the attention
of your viewers into a few parts of the painting which
are most important. I would like to explain another concept called
as fading out of color. Now, this is also called
last pulling out of color or pulling off,
softening an edge. There are lots of
ways to define it. And many people say it. We're in a different perspective
or in a different way. This important concept I'm going to use once we have glazing. Now, I would be using a mixed
or a hybrid of glazing, as well as fading out
of whatever do was. Initially, I will
add one layer of color to the gate that
you see of Santorini. And once I have added
that color to this gate, I would go ahead with
another layer on top of it. Now that clear, I would
even keep one brush, which could be a
blending brush warming, which would help me to
fade out the color. And another brush would be
adding the shadow to it. How does this, the term
pulling out or pulling off colors is also physically meaning that you
are moving out the color from a darker value to the lightest value,
that is your water. Now, water means that you have the transparency of
the sheet altogether. Whatever be the color that
is 40 there on the people. Whether you have
applied the first-year, whether you have applied
second layer, etc. It would become the same. Shade has what you have already, but what you actually observed. First, the direction in which you should apply the water that will pull out the color
is very, very important. If you are adding your
paints in a vertical manner, you have to also apply your blending brush
in a vertical manner. That would really help to blend your colors smoothly and
evenly on top of the paper. Let me put it a bit
more in a simple way to fade out or practically
to pull off in color, you must apply water to the edge of the paint where
you have already added, which you have already
added with the brush. Now what happens is the brush which doesn't
have anything to offer, so it has to be less tamp compared to the paints
that you have already added. That would really help to
evenly fade out your colors. I think this will really help you even in any of
your future paintings. Practically this is one of the techniques that I
have learned and I have practically used to
it over and over again for many of
my paintings stand. It is something
that I have loved. I use it very often. It is great to be frank. I'm going ahead
with a very light wash off your Prussian blue. Now you can also use
indigo in this case, some of the areas
are more darker as you see for my first period. And some of the
areas are the colors that I applied for the
gate is of course, lighter compared to
the background colors which I have already applied. I would be going ahead
with the glazing layers as you have already seen me saying through the
whole of this part completely that
there is a lot of glazing that we would
be doing in this part. I think I'm pretty happy with how the colors have faded out. It has moved out.
It's of course not the same fading effect of
pulling epic that I'm saying. It's basically the lighter and the darker shades
of the color which you apply on any offer
building infrastructure because every building
weathers over time. Whatever you go ahead
and also of anything, it has to be more weathered. With arrows range, there
are stairs, sunlight, the colors that you
that is applied on these buildings go through all these weathering criterias. And because of the weathering, there will be some of the other areas which would
be darker and lighter. You should also take that into account when you
are working through your watercolors
off any buildings that you want to showcase. Now when starting with my glazing and it's with
a darker value of indigo. Going ahead with mine is
called a size six brush. This is one of my
favorite brushes. I have been using
it very frequently. It is a SCADA optimal brush. You can find it. I think in India, it's thought very
readily available, but outside India, I
think you would be in a position to now get it. Well. And it has got such a
nice beautiful that it comes very handy whenever you are painting any
kind of buildings, adding some more darker values and few of the
areas as you also. And then you can even
play some of the colors I always remove from my brush when I go ahead and add
the darker values. Light and shadows
is very important. And this painting and always try to add the light and
shadows as you observe. I would be even uploading
the photograph that you can see for your reference. And then decide for yourself if you want to change
it in any way or you find it to be a bit more darker somewhere you
want to add darker values. Another thing for
white buildings is to make sure that your first-year
is really, really light. Because your second
layer is going to come in and your toddler
is also going to come in, which means that your
values will become darker as we progress compared to what you
have already applied. Now, I'm hiding the
blending brush. You see how I'm softening
up the edge. This board. I was going ahead and
describing to you, when we come onto
the first part, we're just spreading
out the colors. Guys from here on what I
have really less to explain. You can go ahead and just
follow how I think only in a few areas where we
are changing the colors or I want to change the
values of the columns. How I go ahead and add it. Those are the areas I think I would like to
describe a bit more. And I'm keeping it
simple for you. Go ahead and just watch
and follow how I paint. That's, that's I think is the
main important area to see. It is rear them absolutely. So you will not
have any problems. You can paint along with me. It's a simple, easy, very, very slowly, very slow paced, I would say altogether. That would really help you to
even have real insight into how we are adding all the colors are really how much time I also need for a
particular painting. I practically needed
about an hour for this painting, sketching, as well as the full
full-blown painting, except the part where I had
to really dry it off, etc. So it is not that we
get it very quickly, it takes a while even for us. So I think that's it. Let's continue working on it and we're going to use all the techniques
that we have discussed. Nothing new that
you are going to see in this whole of the part. So next. One thing that I need to
explain it to you was that whenever you are moving
into various values, whatever is your first value, you will see that you
are spreading it on a larger area menu of glazing and adding
the second layer, it would be on a smaller area
compared to what you have already applied your paints on when you are on
the third layer, which we are doing right now, this would be on a way
more smaller area. So keep this in mind
whenever you are painting, it would really
help you and guide you in the process of
whole of the painting. It's a step-by-step process. You have a larger
area, you cover it. Then you go to the areas
where you want to focus on. And those are the glazing parts. Once you have
glazed those paths, you go ahead and add another layer of
glazing on lingering, whatever you want to say. Putting more focus on a
few areas which you Vega, you really want to
draw the whole of the attention of your spectator. Let's add some of the
browns now onto the bells. And once we have
added the brown, so I would go head and just
had a small string below it. This brown is of course, any kind of Van **** brown
or the darker value of Brown though it can be even
burnt, umber, burnt sienna. You can mix a bit
of a darker values of indigo into your burnt sienna and get a color like this. You see my whole
palette on the top. Though, there are a
lot of colors in it, but I have not been using more
than three to four shades. That's something I always
keep in mind not to add a lot of shades
into my painting. I'm going with the
flow is important, but do make sure that you
are not just in the flow so much that you practically lose the focus of
the whole painting. Focus is most important. And patients, if you have patients in
a watercolor painting, you can nail any
of your paintings. And I have observed over time, the more you focus on anything, the better would
be your results. There is a small flag
that we would be drawing, and many of you might
think that that's more flight will not take us more than 10 min or 12 min, but Practically it did take about 24 min and it
had a lot of layers. We posted sketch it, and then we added a phosphate. We went ahead with
the second layer of glazing and then
the third layer of some amount of black
and white pen mouse wherever it is necessary,
finishing it off. So everything takes time
and everything builds on. Never lose hope in
between a painting. Because you have practically not developed that
painting altogether. You are in the phase
of developing it. So yes, I guess that's
all I wanted to explain your with your I hope you
are enjoying this lesson. There is a lot to take away
from this particular lesson. From the sketching part
to the painting part. Everything that you have learned
over here would be very, very necessary even for
our future paintings. Time to make some black lines. It's more about finishing off the foregrounds
and then working on the background data
layer of mountain said we have to work on
for our backgrounds. It would be with burnt sienna
and then darker values. So letting means so
going ahead with two different values so that the darker
value is possible, I would be adding
the darker value on top of the lighter value. This has been the
way we go ahead and paint for the entire time. I think that's how I have been painting for
a long, long time. Okay. I guess there is no way
I can see that we go back. That is adding the darker value and then the lighter values. That really doesn't work. Because in watercolors,
it has to be the lightest value first and then goes to
the Dr. standing. There is no way you
can return back in watercolors once
color is applied, this very less
chance that you can lift it off entirely
from the paper. So keeping this in mind
as a rule of thumb. I think the salt small steps are so important in a
watercolor journey. Watercolors doesn't come very
handy to each one of us. It takes awhile to
get a hang of it. You know, initially
when I was a kid, I was never sure of how to go
ahead and work it out with watercolors because I was so dreaded had I was using
those cartridge sheets. They were never great for
spreading out the colors. And that was one of the reasons I was more inclined
towards posture colors. Also colors where something
that was like goulash. And it is somewhere in-between
goulash and watercolors. If you have layers, Huffpost to color added on, on your portrait sheet, you can practically
get a great outcome. Whereas watercolors,
whenever I tried off, it practically backfired a lot. So once I, once I started getting a hang of
watercolors few years back, I got to understand that this is such a beautiful
medium when you walk, walk on a normal part and
drag paper or home, normal. Watercolor paper. You can get the best
from the results. There's nothing that can
stop you from doing it. I guess. This is it. And let's continue
working on it. There is less, very less time
that is left altogether. So final touches. Again, I'm using
the technique of layering for the watery area. And once I have added up each and every layer
for the water area, we will go ahead and start
painting our drum mountains. So again, the
mountain that I have to add is in the
foreground, though. I put up, left it here. When I saw the video later on, I felt like it could
have been left. But since the photograph
had foreground mountain, which is they are all
in the background, but comparative hits a bit
towards the foreground. So i2 added it. Going with some
lines for the water, shows that it has some
amount of movement in it. And because of that movement, you do not see all the
reflection into the water for your areas like
mountains, etc. Next hop will finally
look at it and I'm pretty sure that he was super
proud of how you have that. It has told you that
you can make it on the entire page rather than only focusing on the top
part like-kind. So I had to practically
walk around even with wooden cart
in the background. While you go towards
the bottom media, those things needed to be done. But I just want to keep it
more simple for you guys. You guys have just
started exploring watercolors were in
your sketchbook. And I think this part is most important and that
way to make things simple and to look at
it in a simple way. Most of the, I think the New York part was a
bit more complex compared to what we are right now
doing in our watercolors. So for Greece. So yes, that's it. Let's continue
enjoying the process and I will be uploading the flag by tomorrow itself so that you can complete your
first page quickly for Greece.
26. Greece Day 2 Blue door: Hi guys. Vr on the second
day or paintings and on any. Santorini is one of the most
beautiful places in Greece. And I know many of you might have come across
some beautiful doors, windows, and some vases. Read again, et cetera. We are just trying to have quick approach towards how
to paint a beautiful door. I would be using my scale. And so to do this, yeah, many of you might
think of that we cannot use scale when we
are stocking out, are we? So draw straight lines? But as for my understanding, as an artist who has been working for quite some time now, I can say whatever tools
makes your work easier, use them for your paintings. This is basically
a kind of a hack which God make our
lives more ECM, as well as it provides us with much more confidence,
has a big norm. We have this problem
of not being confident enough and losing. At some point in
time, our patients, patients is one of the
most important aspects in watercolors. And I might have
I created earlier also in many of my classes and many of
my audio paintings. And particularly if you are going through any kind
of an urban sketching, believe me, it took me
hours to get to a place. What you see right now, I take a small and
quick challenges of working through ten days for urban sketching or going ahead and just practicing urban
sketching for a few days, maybe a PDM painting. Because this is
something where you need a lot more practice
than any other owner. Maybe whether you say in a
flow rules or you can even say it is some kind of
other areas of landscape. Yeah, This needs to be more improvement as well as you need to concentrate
much more of this case. I hope you can go ahead and follow exactly how I
am drawing my lines. I'm taking some good
amount of time. Whatever you see right
now is real time. And in real time it took
me around 38 to 40 min, except the drying time
that I might have given. So that's how we work. But urban sketching, what happens as you complete the sky, you come to the buildings, etc. And then you can even
make the bottom here, usually around 30 to 40 min is quite good enough for
completing an urban sketching, which is an Audi A5 size. Either non tonight if
you are going ahead with bigger size paper
that you might need more time and that's
absolutely okay. So go ahead and start adding all these lines wherever
it is necessary. Once you are done
with these lines, we will start with
watercolor part. Now, colors, I've
already told you that I have a lot of colors
in my palette. And here also we would be
using quite some amount. Either you can have cobalt teal, which is a very important color, or cobalt green or
turquoise blue. These are the colors that I'm looking forward to
in your palette. If you don't have that, just mix a bit of turquoise
with some amount of white to get a color that
you see on the door. Now, that is just a base
layer which we need. And then on top of
it we are going ahead with any blue of choice. So the evil choice of two
is up to you and hence, you don't need to worry much
going with flora, plant. So it's not exactly a tree, it's a flower and usually
these are bougainvillea. So go ahead and add, I'm again going to get
just a very rough outline and sketch up the tree. How you want to click Set, as well as a few lines
which I met crowding. And this is asphalt, the vanishing point,
which we know. Vanishing point is older lines
meet to a single point on the plane of the
paper or outside the plane of the people are
somewhere in the middle. It doesn't matter,
but they all have to move to one single
point beyond horizon. Within Horizon,
anything is possible, but yeah, it has to meet
the one single point. So that's the idea
for vanishing point. And you can now go ahead
and start with you I'm going ahead and
applying some water on the area which is in
and around the door. Of course, I will be going with my lightest
value at this moment. And I'm using my Naples yellow. This Naples yellow is
from sending good, but you need to go head and try any other Naples
yellow off your choice. Because Naples yellow is
usually opaque in nature. And if you apply it
in or huge quantity, what happens is that you
will find that many of the areas where
you want to paint will become floor or
something like that. I have also added this kind
of a lesson which is much more easier about a window in
one of my earlier classes, which is all about
sketchbook practice. If you want to go ahead
and check that out, that's also a great
idea to start out. Of course, there were a
lot of days in it and it was one of the days
where I painted that. So go ahead and go
check that out. It's a beautiful green
window which we added. They're going with some of
our Naples yellow more. And I link that into
the background. Once I have added
this Naples yellow, you will see that
the people will try one shade lighter
than what you see, right? And hence, going with
some amount of hours. Or Sennelier, orange
is the best idea. You can also go
ahead with colors, right? When I'm done. I'm very happy with the color
of quinacridone rose say, or something that is closer
to quinacridone coral. These are two of the
most beautiful colors which I have from Daniel Smith. And you can have a
fantastic outcome. The paper is wet and hence, whenever you touch your brush to the paper, they
will become blue. All the beauty lies
in the yoga is that is basically the
background of our flora. Of course, we have
to go ahead and add another layer on top of it. Layers has a lot of, I would say, beauty in it. I have experienced it. We more closely in the florals. You will see a
floral class coming up very soon where
we have only work in layers and the beauty goes and layers you can also
work on 185 GSM people. Actually, this is, of course, the scene gotten people
hundred per cent. That's something which
you cannot forget. How many papers are great, but what happens in a
handmade paper to see are not of equal distribution
as well as some. You will not find your paints spreading
equally to both the people. That's one of the reasons I am not a very big fan
of handmade papers. Having said that, if you
are one of the persons who has that as the best
option available with you, please go ahead and use it. The second part that we have right now is adding
another layer of plurals. Of course, at this
point in time, the paper is still wet because of which they
will again become known. We will add some amount of pink. Now, this pink also
depends on whether you can go ahead and use
compost or para, or you want to use
any kind of pink. Once you have added this thing, go with the darkest value
that is some amount of open. Okay. Going with our beautiful and
the most I mean, all waited. I would say the blue door that many of you have asked
me earlier also to go ahead and keep on
tutorial on this is Cobalt Teal or
cobalt turquoise, whatever you want to see. This color is
something like that. And again, some blue door. If you do not have this color, you can go ahead
and mix some bit of turquoise with some
amount of your tailbone. And once you get her color
that is tailored to voice, I think that is great to use. You can also use
Taylor turquoise if you have that with you. I guess some mixing a bit of
blue would be a great idea. So go ahead and mix some
amount of Edo royal blue or you can also mix any blue
that is available with you. I am really not concerned
about the colors right now. What you are using, what we are more concerned
about is the mixing. If you see at some places, I am going ahead and
keeping it lighter. And in some places I'm
going ahead and making it darker along with
mixing one shape. Now, this is the Mitchell
RT that we show as an artist as you progress in
your journey of watercolors. If you please tell
that need to have the same amount of
concentration of pigments or they do not need
to have a flat flush door. I am lot in fever
or flat washes, but for urban sketching, I've tried to keep it more Hanging and more loose. Right now, I am
going ahead door and completing on few videos
which is still awake. This is basically
our first wash, and our first wash is complete. I always like to go with the
one wash and then again, now with our second wash stall, there are times where
there is overlap. Maybe I'm completing a particular area
with first question, second wash, and then I
move to another area. Those are the times where I have to actually
correct myself. It's always a good idea
to complete the whole of the area and go with
your first wash and then go into your second
toward 466 is not much. Usually in urban sketching, we go with two or three layers, whereas in florals you can go
up to seven or eight years. Depends upon you, how you want to shape up the whole
of the painting. All keep going with one
of my darker values. You can use burnt umber or less. You can also go
ahead and use CPR. And other option is
spent like a brown. Now a few of the areas, of course have to
be darker in value. I'm using one of my
smallest brushes, that is size two brush. And then blending it
with more of water high keep always two jars
of water handy with myself. And specifically whenever
I'm doing of neurons as well as urban sketching, you can see DCC, how important it is as we progress through
the entire painting. Okay, blending it, blending it, and learning it along with it, you will see the
values keep changing. There is a wear and
tear of any building or any particular
area that you want. So now, if you are watching
it from a distance, of course it doesn't matter. But if you are
watching it flows, you need to actually go ahead
and capture those things. You can capture it by
altering the values of the painting into the painting
when you add the colors. Now, what do we
mean by values as many of you might be, new, values is basically one
single color and you create the front intensity
of that color on the people. You mix of water, or you reduce the amount of pigments is one and the same
thing. As you progress. You can have few of the
areas where there is more of water and lots of
pigments and fewer barriers, but that is more
pigment and less water. That's how we practically
go ahead and change it. I did allow my paper to dry completely before going
ahead with the next year. Now, this is the blue. I'm mixing some amount of
my ultramarine as well as some amount of my blue statistic
available with you guys. I'm not concerned about what is the blue that particularly
you are using. You can even use cobalt
blue, ultramarine, make some amount of
Indonesian law and tort, or even use only non-zero. It's all about
creating the shadows. If you want into
creating the shadows, we just need to have a light
mix of it as a beginner. And we always say that go with a lighter mix and
then blend or few of the areas that you
also with me or DOM tree on here though blooms, I like to just blend that area. I do not want to go
head and right away put a lot of blue
into it that will make the whole painting
look more messy. We tried to keep it beautiful, resize, as well as less messy. That's how I always go about it. I love to use only a few colors, but this particular painting
can be done with that. I have many other
monochrome paintings, etc, in classes which you
can go and rapport, limited palette exercises, everything that you want to see, go ahead and check them out. I think that you would
be more than happy to just have a look at it? Oh, I think I'm happy with
how it's turning out. Adding another layer, or
you can say just mixing some amount of my taco blue into it and creating what I want, which is majorly the shadows. Again, I'm altering the value. Even in the shadows. There will be a difference
in the intensity. Because the background
that is majorly your door has a lot of difference in
terms of intensity, right? So we have to show it
even in our painting. Great, let's continue with this approach and keep
adding the colors I'm really slow at
this point in time. I'm building up my painting. You will need to be slow
and watercolors do I say it for 14 min,
whatever Peter time. But believe me, that is more
to test your patients and you need to be patient and out for any kind of
watercolor painting. I'm picking up
some random thing. Of course you can go ahead
with random color because we do not want to have anything exact whatever is available on your palette as good to go with the design of rosy or any kind
of pink that is available. Not every brand has got a
different name of their pains. So go ahead and check it out. Whatever is available with you. Go with that. Now, making some dots
and making some lines, these are random lines that I am trying to make
hazardous foliage. And foliage is always
pretty random. Even though florals that we are absorbing is from a distance. And I'm not trying to put much of an effort to make us not
realistic as I've told you, I want to keep it loose. Isi has full as so. Make it look beautiful. By keeping handling. Go ahead and add some bubbles. Once I'm done with the purple, I will add some
amount of my dream. Now the green of course, would be the lightest
value in this case right? Now, you can go with any
kind of olive green that's available with you
or yellow, green. I would leave that
decision up to you because the lightest
value and then go in with some of your darkest
value may be some mix of yoga like a green as well as all the green would be great
for this purpose. Okay, added in queue up
the places as thoughts. I am not going to get off right away because I just
want to see how it works. I'm not trying to
hide it everywhere. I would slowly progress. As I say, slow progress
has great for watercolors. That doesn't mean you have to give up at this point in time or just thought I would take
take a break, come back. That's the best. That's
one of the reasons we have this thing of
working in layers. Working in layers gives us the required amount of time that we need for any painting. And hence, I really loved
that aspect of watercolors. I've changed my brush now
because the smallest one, which is majorly my
size two, brush. And once I'm done with these smaller dots
which I need for drums, some of the detailing, I would go ahead and start
adding the brown color for the bottom ETL off plant. Of course, going with
those smallest brush, you can go with any kind of brush off your choice size one, size two, but that's the maximum you
should go ahead with. I'm using my liner brush
that makes it more easier to create this random, or I would say the crooked lines that
I need even for Audrey. Finally, I guess it's time to add more and more details
into the painting. Frankly, you're painting has
shaped up to a great extent. Now. There are some
amount of your shadows, even from the tree
which you need to make. And then some more details that you would add for the
painting That's sick. Once those things aren't done, then we are good to go
ahead with our genre. Other parts of the painting, the bark or the brown part
of this plant is still wet. That's what I'm going ahead. Adding some amount of my
darkest value of town, which is majorly my
paint I came down, I've told you the
other options as CPM or even burnt umber, whatever is available with you, a little bit of black into your phone number to
get a darker value. All those things. I would leave
that up to you and create some random lines
for the branches. I hope you can see it
clearly right now. My painting area. And it is, it is very simple. The lead me at this
point and now you're, have already won the battle of things that you need to
organize and you are done I did some greens of the
grasses and mixing it with the lighter and the darker value
as you saw me doing it. Right? Now. Of course, the shadow is still
pending and I would be adding a shadow
even up to three. It would be majorly
in the blood. But before we do that, let's just fix the
door a bit more. We will go ahead and start
adding a few lines into the door area wherever we don't make those
lines actually, it helps us to highlight a
few areas when we are adding the darker value compared to the kind of flat wash
that you also right away. Take any blue of course
all of your choice, you can go head directly
with the indoor three, if it is available
with you orals, you can make some
bit of capital value may be Payne's gray
into your ultramarine, blue and some amount of
Payne's gray to get a color. Stein, you can
even go ahead with cobalt blue plus payne's gray. So you have lots and
lots of options. Believe me, it's
just the intent of painting and the
colors brushes is never show stopper for
any kind of painting. Yes, definitely, I would say people is very, very important. And whenever you are going ahead and using any sketchbook, I would always prefer
you to go with any kind of bookmaker who
is speaking 100% cotton, Arches, Fabriano, or home, or any people like nano, etc. So these are 100% cotton paper. You can go with one any GSM, you can go ahead with 300 GSM, but go with good paper. I would not prefer purchasing
or handmade paper do. If you say that's what
the pocket has vomiting, you can always do that. But going with a good paper
is something that I always, always look forward
to a new short. Also look forward to
that kind of thing. Adding some more lines and
areas where it is necessary, as I did tell you, for the total area with any ten brush of
your choice size, font size zero, whatever
is available with you. And keep making these slides. Time to work on some
more fine details. And this is majorly though, door area, which I am directing. I'm going ahead with the
darkest value of brown for the ski area and then blending
it with the background. The darkest value, of course, as I have told you
and a lot of times, it can even brands
even Nike down is my go-to color and
frankly speaking is one of my most
beautiful shapes that I've always referred to. It's, it's amazing. I mean, whenever I've used it, it is one of my go-to and the best kind of shade
that I can refer to any one of you adding some more color
towards the top area. And once I have added the color, I will go and blend it
with the lightest value. Of course, I'm using my blending brush as
the thinnest brush. I don't want any
kind of mistakes at this stage because of which
I followed this pattern. Though, you can go ahead and use a bit more thicker brush if you are more confident
with the painting. But being a bit conservative is always a
good idea at this moment, you are already almost done
with the painting and I don't want you guys to make any
mistakes at this point in time. Andy, I guess it's time
for the blue side. I did tell you earlier, you can go ahead with any
kind of tool of your choice. I am not thinking
much about this, but one bit darker in
value as this is Shadow. Many of you might like
to use even black, but as I always say, I am not a very big fan of luck. And I use it really less
in any of my paintings. I have been using pretty
less amount of blood in all my paintings still data. Frankly, the palette
has changed. For me. Now. I use only about 18 colors and all the eating colors
which I have been using, I didn't not even eating, it's around 16 colors
that are used. Do not have any kind
of plant can add. I use Payne's gray. It has a bit of blue
in it and that's where I love to work with. Okay, I guess happy
that I am keeping some loose points like this and keep adding the values
wherever it is necessary. Values into the blending
as well as the shadows. Fine. I guess. I'm happy
with how it works and now let's have a look
at the final outcome. Of course, the bottom area, land and approach towards it. How do we add the blacksmith, some amount of lines, etc. He's still pending.
We will be doing it and finishing it off. Of course, there is lot
of ads if suboxone, but that's how it works
in a watercolor painting. Bending, bending, and in
the areas where it isn't necessarily giving it
beautiful look and feel. I know Greece, it
was bending of light from pretty old times and I had these paintings
already done. But somehow I did not have
the courage and I was on very confident about uploading
it at that point in time. But now I feel more
comfortable and there will be wardrobe in things
coming up very soon, though it would be more on a monthly basis that
we will do this. I will keep you informed
or through my host to you guys and just
follow the e-mails that comes that you've
come across from me, you will get more updates about the next destination
that we are going. We have just covered about four to five destinations and there is a lot
like a select, we are going to cover
20 destinations. So we will have small
and quick mini marathons on a regular basis. Join me anytime you want. There will be giveaways too. And we try to keep ourselves motivated for painting any kind of urban sketching. Okay, go ahead and now make some lines wherever
it is necessary. Right now, the
paper is wet hands, your lines will become. So using online on brushes. Very important at
this point in time. Again, the rulers
same whenever it is, even though line or the area. I mean the floor is not seen because ADD people will
cooperate and pure alias, so we'll be more worn out compared to the other
areas that you'll see. That kind of approach you should always keep in mind
while you paint. Okay? Some cracks here and
there and then blended the cracks is very
important for from, your know, what I mean. Whenever we have
an outside wall, what happens is that
there is a name that a storm that is heat. Summarize all of that put
together puts a lot of pressure and you can't keep painting and every,
every season. So usually it has been painted Edo your or maybe
once in two years, depending on the owner
of a particular house. And whenever you watch it, you might not have the best. The world. Showing up. Going with my liner
now and adding the lines wherever it is
necessary to break the lines. Also, in a few areas, I am not going ahead with
straight lines in every area. Whenever you see breaking
the line is one of the keys. And going with a broken line is something that I
always say is important. I don't like to
add lines to show all great detail and more
realism into my painting. I keep it loose as I always say, my urban sketching
is quite loose and pipeline to make it more loose as we progress in our journey. So keep adding these lines
wherever it is necessary. And then we will add
some white lines to light lines will be again in few of the areas that is
majorly the highlights. You can use a Posca marker
or as you can also go with the 59 Mcal that
you see from my hand. But sometimes what happens is that they become more lighter. What I am using as
a 59 MC over here. The Posca markers of
course give great lines. Continue working on it and then See how it turns out. I am super excited to watch
this painting of us guys. Believe me, this is so close to my heart and this blue door has kept my heart
in love with it. I'm happy enough
with that for very, very long time and
I still love it. But I have another painting
in my mind which is majorly like a swan now who is swimming in
a river and in the bag. Now we have this urban
sketching part going on. There is not that has happened
and I would love to share all of it even with you guys adding more and more content. Or I would say most subjects into this urban
sketching is my idea. And I hope you guys
enjoyed that part too. Because the more you
can diversify it, the better would be unloading. I would say continue. And then let's remove the tape and have a
look at a painting. I can't wait for
this project to tag me on your Instagram
stories to eat, watercolor, illustration,
dark matter, do not forget to upload your projects in
the project gallery. I would love to have
a look at them, as well as compete on the audio paintings that
would really give you much better hang
of how to progress in this painting and the
future paintings together. The future paintings, I plan to keep it more simple because many of you might find it tough
when you're starting it out. Though there is a
detail process, progress, It's a good idea. I know it is. It is not so easy to get a hang of urban sketching
and it takes a while. There's a beautiful glue on the door that
you get absorbed. Now, hello, on the background, which is majorly your wall, and everything is
standing out altogether. It shows that the tree is a bit. It's not just sent to your wall. And you can see, oh, good shadow over there. I'm just adding one or
two lines here and there. So do not put up with all that. Some lines and some
crosses the floor area. And I'm fine. All right. I'm super, super excited to see this or we don't
know for each one of you
27. Greece Day 3 The Flowering Pot: So guys, we add on day three, and this particular painting is also a lot to do with how we
create light and shadows. I know the blue door was also concentrated on
the same subject, which is light and shadows. And we are again
going ahead with another painting on
flight and shadows. This is one area which
can frankly actually help you in all of your urban
sketching painting. Though, I would say that
there are a few things that I would like to discuss
maybe as we go forward. Once this particularly Greece
part is over about how to go about working on
your light and shadows, rather than just
simply going ahead and adding it wherever you
think it is a possibility. So we have to always
see the light source. If the light sources
towards the right, then you will get the
shadows towards the left. That is usually what we are doing in Porto popping things. But if the light keeps changing the direction or you are at a
particular location, then you might have to
go head and just see how you take it forward as
the light keeps changing. So you might have to just click a picture and work it around. For, you know, for yourself. We do not want to have
a different outcome. What's the likely
changing actually at a, at a place where you
are working on to get them all key family, I'm drawing a few lines. It is easy. On the corner
of our particular, there is a small pot. And in the small pot we have a few beautiful bougainvillea us. So we are going to again paint very, very
simple, flowered. That's all we're going to paint. Simple, easy. And I guess you will be
in a position to nail it. It's a real small, less than about 25 to 28 min max that you
would take two painters. So just keep along with me. Let's start with the middle
line and make a tea. Once you have made this t, you have to go ahead and extend the line and understand what is the middle point of your body that you want
to go ahead and take. Once you decide the middle
point of the part that you want to go ahead and
walk around with. It would become even
more easier for you, just joining or pure lines. And once you join those
lines, you went down. After I've added the board, the one most important
aspect is to add the tree. Now, another point is to really want to
be tailored for me. At this point, I want to
keep it absolutely lose. I go with my gut as
well as intuition. How I want to place my
flowers on top of it. Let's go ahead and start adding some water on
top of the paper. Now, this is an A5
size sketchbook which you guys are up solving. So it is made out of arches. One effect, GSM April, as you guys know, I am not using any 300 years and people for the whole
of the series. And it is great because
we really don't need it in any of our
watercolor paintings, which you, so you can
say urban sketching. Practically it's a waste
of not only people, but it's also a waste of
resources in terms of money, as well as procurement, etc. If you are going to
help with 300 years since I am taking
all lighter value, which is majorly my orange. And then you can use any orange or career
choice and dropping it. Ok. You alias. Once I have dropped this
orange and a few areas, I would go ahead and start adding something
as well as sample. Of course, the whole of the
tree has to come together. As I have said, that I will
keep it loose and hanging. Even in the last painting, I will follow the same pattern in this particular painting. That is not much in
terms of, I would say, understanding the
only simple aspect that you need to
understand keys the like, as well as its shadows. Some darker values, which
is majorly my purple. I have used three colors We write it for my
last painting to some orange since the pink
and then support a few drops, urine that we're not
trying to add a lot of drops at each point currently. And I'm picking one of the
darker values of glue down. Many of you have asked
me which flew to use, how to use at home. Believe me, there is no good rule or there is no
given tool of losing the flu. Any blue that works for you. You can make some bit of Payne's gray into the
aquamarine, all those. You can go ahead and
take some open into the loop and then add the
colors the way I imagine. For me, the shadows have to
be only in the darker colors. Last one we did only do and we're mixing
a fluid with some hopeful to get operator sheet and to make it a bit
more interesting, believe me, as you progress
with the watercolor journey, you will understand how
to mix your colors and the mix of colors,
frankly, the side, the whole painting
to a great extent, how to apply the colors and how the blending
happens on the paper is something that helps us to really gauge to
a painting well, as well as have a
good final outcome. The majority of the painting
also comes exactly that way. Just in the similar
way we left in our last fluid or painting
D will be working. Many of the areas
where there will be only white color and the areas where there
will be only blue collar. White collar and blue color will actually decide the whole
of cocaine. To be frank. You are not going to add
any color for your wall. It's just lighter value of
blue or only the shadows because this is a white wall and p are going to use the
white of the paper. Using the white of
the paper is always a great approach for any kind
of painting that you do. Because by using the
white of the paper, you are frankly into something where you
are not trying to paint every part of our
painting or you're not trying to apply colors on whole of the surface that
is available to you. And it also makes
you more efficient. As an artist, you do not
need to paint each file. Hence, you save a lot of time and you can complete
these paintings pretty more quickly and
more interestingly, along with it, you will have
beautiful final outcome. So all of it put together
US evening time, you are having a better outcome. You have more maturity
as an artist. You have frankly got all create great sense of understanding in
terms of watercolor. So overall, all
these put together, you will be very happy one sum to start adding
your colors on the paper. Okay, let's continue with
our water. Over here. It is, I'm sorry. The water and paint
more seawater. In watercolors, you paint
with water as I always say. Hence, water comes
earlier than colors. Always remember this UP more with water,
less with pigments. If you have started working more with water and
less with pigments, you have already
cracked watercolors. And you're partnering
with that medium. Believe me, when you start
partnering with that medium, the medium shows you
so much more love. You will not only fall
in love with the medium, you are so much more
attracted to the medium, you frankly fall
in love with it. That's, that's where
it finally goes. Okay, time to add some of
the values of the darker, as well as I would say, this is more to do
with the second layer. The second layer is on top of the colors which we have
added for our bougainvillea. Along with it, you should always note that
we're not going to cover the entire space where we have added the first layer. It would be only a few dots, some bigger and smaller
dots, some mix of it. And that's how we are going to continue working
with bougainvillea. Think before you
apply any talents, this is something that
I see for what colors, because there is very less
room to come back and hence, thinking and then applying
always gives you more space. Understand, as well as the magic which you
have been waiting for. Family and in some of my
lighter value of green, and once I have added the
lighter value of green, it's time to add some more
darker value of green. Now you can go with
yellow, green, or you can go with
any other live stream that is available
with you. Meet me. I will not prefer at this stage, I would say greenish yellow or else you can
directly go with olive green and add a bit
of yellow in it to get or green that is closer
to what you also, right now. You can also go ahead with
sap green for that matter. And that's also
upgrade follow to actually understand
as well as pink. Continuing with some more my dark colors,
you are embarrassed. I mean, dropping a few dots
here and that always helps. I do not like to
cover the entire ETL. And we mean it more loose hanging as I've
told you already are, also is my idea. You are adding
shadows in the abs, some like the darker places, which means that what
is kept supposedly you have kept the
board on the shadow is warming at a
particular place. Anything that you
find just under the ball will be up taco value and as it
goes away from it, it will become a
bit more lighter. I frankly can't explain it
in great detail right now. But I think lightened
shadow is something that really needs to be taught in a way
more bigger class. And it has way more greater
importance in watercolors, in laurels and sketching
and everything that you do. There is no one particular part where I can say it
doesn't have any news, always has a great,
You still need. I have found multiple uses
of it in my own knocked. Paintings. Continue
working with the blues. As you see I take make, sometimes I'm adding
the darker values and then I just blend
it with some water so that way you can
always continue working with the blues as
well as blended, blended. Keep bugging, legal syntax. We don't want to actually go ahead and paint
the entirety here. That's never been the intent. Know what we have to paint
just in the beginning. You can work on the
bougainvillea because that's our primary subject
and its shadows. All everything that you do in the background is frankly
setting up the background. Hence, we have spent more time
while we did aid our home. Bougainvillea, as
well as now again, we will spend some
more time on the bond, the lightest from the light. And hence you will have the darker value of
the plot on the left. As we progress towards the
right side of the plot, you have to blend it
a bit with water, just exactly the wave. Wash your brush and then let the colors
become more lighter. Because once you
wash your brushes still something mental
actin your brush, you can always go ahead and work with that
kind of a pigment. The whites of the people
is very important, as I see at every point in time, wherever you are working
with particular painting. Now it's time to add
some darker shade, all the shadows. Though. Nice way. There's support which
is kept because applying plot this because the area would be
absolutely dark whenever you aren't going ahead
and painting this caveat, make sure that you get
a real dark value. Lightened shade, darker, and lighter value contrast will
not come out really well. And so covering this area with our darker values is
very, very important. Continue working with it. You have, or the sum of the areas where you
have applied the blue. Now I'm going to just
near the bottom, add the darker values. Now, this is very, very important step, as I say Though, what is lighter than what you have
on the outside? Carlo, which is the darker blue because of the
shadows which we see. It is a corner case, and hence, there will be more of
shadows coming up. You need to continue working
with it as you absorb me doing it so that the
contrast is well shown. So this is something that
I always say is very important when you'll continue
on the light and shadow. Why do you continue working
with this painting? I need to tell you one
important aspect or ignored, or any artist you need to be
patient with watercolors. Watercolors is a place where you need more
and more patients. If you don't have patients
or you are losing patients, just get up, take a break, and then come back
to the painting. Because what usually
happens is if we lose our patients can be just end up screwing the whole of the world that we
have done earlier. What you might be observing
I'm doing in 30 min, might not work out
just in 30 min. It might take 45
or 15 min for you, but that doesn't mean that you have to just think about it. Okay. I have to do something
which is time-bound. Take two breaks. If
you are working. Maybe when you are from
getting up in the morning, taking a coffee break, you can just draw for ten, 15 min, come back
in the evening, have your layer one, and then maybe do
the second layer. The next thing, that's
absolutely fine. You work it out
in four sessions. Believe me, the more
sessions you take might've been taught
me like 78 sessions, but the two-three
sessions that you take, it gives you all
your perspective when you come back
to the painting. I have done that many times
in my journey of watercolors. And if you do it, believe me, you will have a much, much better outcome later on. I'm doing some branches. So these branches of course, is majorly don't
grounds which we are adding going ahead and
adding some more branches, urine there, continue
walking through it. And once you are
done with some of the loose branches that you
do on the top of the areas. Doesn't just a
detainee who had with the thinnest brush that is available with you
at this moment. Finishing Well for painting
there are only DTI, which is that we have
to work at an hour with our job in black
and white band, some highlights, et cetera here, and that's what
we're going to do. So continue with your
drum portion off. White as I say. Let's just make some more of these loops,
branches hanging here. Finally, it's time to
add some black box. This is majorly the highlight which I really liked
what in any of my paintings it
helps you to define the shape of an object
or any kind of, I would say Bill
names, et cetera. I do not add it everywhere as
well as I make it broken so that that is no continuity in at it walks like a highlight. There's more definition to
the object that you make This is frankly, and on the third layer that
I'm adding anything to show that there's more definition as
well as you can see, that we are having some kind of shadows even on
top of the layer, which makes it look like a walk. You're creating practically
three-dimensional lot two dimensions would
then just normal paper. It's one plane, but you are creating the vision
or you're creating. It is a two-dimensional
object or something like a three-dimension
that you add to any place or anything
that you paid. Scientists speaking
when we talk about dimension, it is not easy. It takes a lot of time to understand how to go
for dimension and how to make it more realistic
at this point in time. Do I say that we want
to keep it loose, but that has to be
some dimension. There has to be some kind of intent to show those ****
insurance and you're painting, the painting will look
absolutely flat and we did not want a flat
painting any or flower. I've been sketching some white wash and you can go ahead with any kind of titanium
white wash or white collar that
can help you to get some lines and highlight. Let's have a look at the piping. Do upload the project and
the project gallery orals, go ahead and just add it
in your Instagram stories, age, etc, so that I
can insured bank on my stories and looking
forward to each one of them.
 Dhritikana Nath, Watercolor Artist and Instructor