Transcripts
1. Introduction: Hi guys and welcome. My name is Mary Marina, and I am so excited guys to be here because I'm
about to share with you how to make this beautiful
toads back this course, we're going to focus more on
how to draft the pattern, how to sew the inside pocket, and also constructed
the whole tote bag. If you are a beginner
and you've never really drafted a
bag parent before. Don't worry, this course
is definitely for you. Every detail will be
provided in our lessons. And by the end of this course, you will definitely on
your own tote bag or a travelling bag with
your own sense of style. So guys, I really cannot wait to start the
first lesson with you. So see you on the first lesson.
2. Tools and Materials.: Okay guys, welcome. So as for the tools that
we're going to need is the Caesars and
the measuring tape. So in redrafting our pattern, we're going to be using
more of the interests. You're going to need
a marker or a pencil. And we're going to
need a straight ruler, including our needle. So over here, I've got my universal needle to
actually saw the bag. Then we are going to
need a domestic machine. This is simple machine
for a beginner. So we're going to be using
more of a straight stitch. Then make sure that you
have a zipper foot. So we're going to be using this foot when we
attach the zip. The last thing of
course we're going to need is a pattern paper. So now let's go ahead and
talk about materials. So over here I've got all the materials
that we're going to need and I'm going to
start with the facing. So the first thing
that we're going to be using is going to
be the hard one. And I'm going to take
out a piece or remove a piece over here so that I can just show you guys this side is
actually a shiny part, which way the glue is. And the other side is method. So you need this hard facing to get that stability
onto your bag. And then you're going to choose any fabric of your choice. Over here, I'm using
a very soft Canvas. And that's the reason
why we need to use the facing followed
by our lining. So my lining, we're going to
need at least 1 yd or 1 m of lining to cover the
inside of our back. So we're going to need
to zip the smaller one and also the big
one or the longer one. So as for the small one, we are going to use it for
the inside pocket zip. And then the longer one, of course we're going to
use it to close our bag. The last thing that we're
going to need, of course, is a strip that we're going
to use for the bank handle. So this is the one
that I do have. It's very easy to actually use. And I really love the fact
that it's very strong. Two guys, these are all the materials
we're going to need. So see you on the other lesson.
3. Pattern drafting: Hi guys. So right now
we're going to draft the pattern and I'm going
to be using my facing. So we're going to start by
marking the length of our bag, which is 23.5 ". So the next thing is
to mark the length, the width, sorry, the width
of our bag is 17.5 ". Once we are done, I am
going to go ahead and fold this shape or this rectangle, and I'm going to
fold it into half. Once we're done
folding it into half, we are going to go ahead
and create square of around 1.5 " by 1.5 inch. So once I'm done,
I'm going to do the same thing onto
the other side. Moving on to the top of the bag, I'm going to go in by half of an inch and creates a
marking right there. Then I am going to
create a connect this point all the way down to the
top of the bottom square. Ones creating that makin. You also want to do the same
thing on to the other side. Now it's time to cut out or
trim off the bag pattern. So guys, once we are done, we are going to
take this pattern and cut out onto the fabric. So since I dropped into my
bag pattern onto the facing, I'm just going to take
the pattern and a clue, the facing on the wrong
side of the fabric. Then take it into
the ironing board. Once we are done, I am going to go through
that bottom square and creates 1 cm seam allowance. Once we are done creating
the 1 cm seam allowance, we just went to cut
out the excess fabric. So guys, once we're
done doing so, we went to go ahead and
carriage the excess fabric around the main body of the bag. So now we went ahead and
I cut it to the pockets lining of around
12 or by 10.5 ". And then when I am done, I went ahead to use
the main body of the bag to cut out the
inside lining also. So guys, these are all
the pattern pieces that we're going to need. So see you on the next lesson.
4. Attaching pocket lining and inside zip: Okay guys, so now
we want to go ahead and attach our inside
pocket lining. So what I'm going to do is
to take the main lining and fold it into half just to create a notch right in the center. And then right on that line, I am going to just mark
3.5. " going down. Right. The making of 3.5, I am going to create a marking their rights
on that makin. I am going to just
connected all the way to that center notch
that we've created. Now take your pockets lining
and place it under the 3.5 Mach and then just go
ahead and pin down the lining. Now on the pockets lining, I am going to mark a
one-and-a-half inch. From that marking, I am going to create a straight line across. The next thing is to
take our short zip and I am going to create a notch
right at the center. Once we are done creating
a notch on the zip, we went to go ahead and place it right on the center line. Then I am going to create a notch or a mocking right
after the zipper metal. And also in front
of the zipper head, I am going to create a marking that is going to be the length
of my zipper pocket. So now we want to
create the width. So the width of this
zipper pocket is going to be 1 cm wide. And this is going to create
a rectangular shape. So once you're done
creating the market, going to go ahead and mark
a straight line across. And this, as you can see, this is this rectangular shape that I've been talking about. So right inside the shape
you want to create now, a triangle, the small
triangles right on the inside. And then this is
how it will look. Now we went to go ahead and take it into the same machine. And so around the shape. This is how it looks
as soon as we're done sewing on top of this
rectangular shape. So the next thing that
I'm going to do is to create a center line
of which I am going to create an opening to turn the pocket lining on the inside. So once you've created
this into line, I'm going to go ahead
and repeat open. So as for the triangles that you've created right
at the coordinates, you want to make sure that
you cut through them also, but make sure that you don't
cut through the scene. You just want to
cut around them, but not through the scene. So this is how it will look. The next thing once
you're done doing this, we went to go ahead and turn
our lining onto the insight. And there you go guys, our pockets lining is complete. The next thing is
to insert the zip. So this is how our lining
would look right at the back. So taking my smaller
zip or the short zip, you went to make sure
that you place it right behind our lining. And the zipper teeth must
be in-between the opening. So I'm going to go ahead and try to pin the zip so
that it doesn't move around as we're going
to solve it onto the lining. Once I am done painting
this zipper down, I'm going to go ahead and take
it to the sewing machine. And so around it. I'm still using a
regular food over here. So I am going to
just go ahead with a straight stitch
right around the zip. And there we go guys. Once we are done
attaching the zip, the last thing that we need
to do is to close the pocket. So right at the back you
need to fall to the pocket, the right sides, it's
shown on the screen. And then go ahead
and pin it down. Once you're done painting
this lining done, we need to go ahead and saw a straight stitch to
close the pocket. So guys, our pocket
is almost done. So now I'm just going to
go ahead and test it out, open up this small zip, and insert my marker, my pencil, including my keys. And I really love the
way it turned out. It holds the weight perfectly. So the next thing is to attach
this lining onto the bank. See you on the next lesson.
5. Assembling the bag with lining.: So guys, we are going
to go ahead and attach the handles on the bag. So what I'm going to
do first is to find the center point on the top. And I'm just going to create a mocking right on the center. Once I'm done placing
the peony right on the center next to it. I am going to mark around 3 " from the center point,
we're going to make 3 ". And also onto the other side, I'm also going to make
3 " and insert a pin. So guys, the length
of my bag is going to be 27 " and I'm going to cut two of the strips so that I can attach
it on the front and the back part of my bag
on that three inch mark, that's where we actually
going to pin this belt. And when you do so, please make sure that
the belt doesn't twist. Now once we are done, we take this into the sewing machine. And so a straight stitch, this is just to
reinforce the belt, not to move around or
to come out easily. Now, once we are
done doing this on both sides is time for
us to attach the lining. So underlining, I am
going to take the lining and I'm going to make sure that the fabric is facing
the right side. So at first, we need to attach the zip and
the zipper teeth, make sure that they are facing the right side of
the main fabric. So I'm going to start
by painting this down. When you reach the end, please make sure that
you leave around 1 " right at the end of the zip. So when you do so, you're going to solve all the
way up to that 1 " point. So guys, I went ahead to
change my regular food to a zipper foot in order
for us to attach the zip. So when you do so the zip, please make sure again
that you only end that 1 " point that
we have mapped. Now once we had done, it's time for us to
attach the lining of which is placing the lining right sides facing the
main body of the fabric. Then go ahead and take this
into this sewing machine. And there we go,
guys, this is how it looks once we're complete. So the next thing guys, is to do a top stitch on
the inside of the lining. This is to prevent the lining to be caught
in between the zip. So I want to go ahead and take it into the sewing machine. And so a is inside
straight stitch. Now we are done on this side. The next thing is to close
the other side of our bag. So why do we going to do now is also make sure that you
fold the bag in half, right sides facing as
shown on the screen. Make sure also that
the zipper teeth are facing their correct
side of the fabric. Now you want to
do the same thing like you did on the other side. Go ahead and so the zipper first before
attaching the lining. So guys, once you had
done a touching the zip, so the next thing
that you want to do, again is fold the lining. So when you fold the lining, make sure that it's the
right sides facing. And you went to take it
to the sewing machine, but at first you went to
pin it down and then go ahead and take it into
the sewing machine. There we go, guys. We are almost done
serving our bag. The next thing is
to close the sides. So I'm going to just
go ahead and open up the zip and tenders
the right side. So now, once we've turned
this the right side, we want to do the same thing like we did on the other side. Go ahead and do a top
stitch on the lining. So guys, we are done as hatching
the lining into the bag. The next thing is
to close the sides. So as you can see here, I am turning in the
bag the wrong side, and make sure that the zip is out of the way as we're
going to solve the sides. So you went to
take this bag onto the sewing machine and so a straight stitch
right on the sides. And as for the
lining on one side, make sure that you
leave an opening so as to turn the
bag the right side. So now guys, we need to
close the bottom of the bag. So what I'm going
to do is to open up this square and then take
it into the sewing machine. And so a straight stitch. And remember that we did leave around 1 cm seam allowance. So you want to use
that in order to close the bottom
part of the bag? There we go, guys. Once we have closed all the
corners of our bag, is time to use that opening underlining to turn our
back on the correct side. And there we go, guys, I would tote bag is
almost complete. And I really loved the
way it turned out. I'm trying to close the zip. And there we go. I really loved the way it
looks on both sides. So the next thing that we
need to do, of course, is to close that tiny opening
we have on the inside. So we went to just go ahead and so a straight stitch just to close this opening and
the bag will be complete.
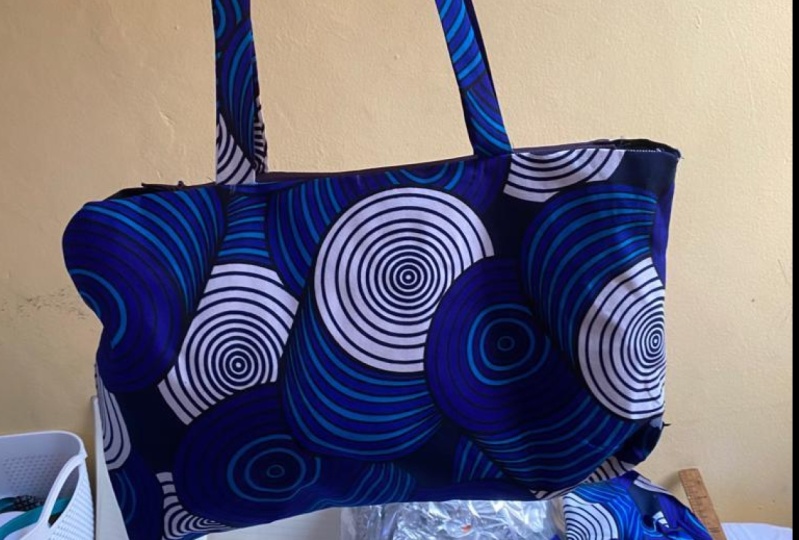
6. Conclusion.: Congratulations if you have reached this part
of your lesson, because you now own a tote bag. So over here, as you can see, it has an inside of pocket zip. I really enjoyed making
this project and that's why I went ahead and
added another one. As you can see, a love the way it turned out with a fabric. So guys, I hope you enjoy making this project
as much as I did. So as for me. See
you on the next one. Bye.
 Mary Murinyu, Fashion Designer