Transcripts
1. Introduction: All know creating a strong visual brand
is essential, right? But what's even more
crucial is keeping that brand consistent across
everything we produce. Brand consistency is how people recognize and remember your
brand or your business. In this video, we're diving
deep into the Canva brandkit. I'll show you what they
are, how to set them up, and how to turn them into your secret weapon for always designing on
brand. Let's go.
2. What are Canva Brand Kits?: Okay, so I'm going to answer the second question
first because often, I start tutorial and
then people realize, Oh, this picture
is for pro only. So I prefer to be straightforward
this time and let you know that there are
two different versions of the Canva Brankit. There is the full extended
version that you can do everything basically that
Bankits have been thought for. That is for Canva Pro and
Canva for teams users. So Canva paid user E. Then you have Brand
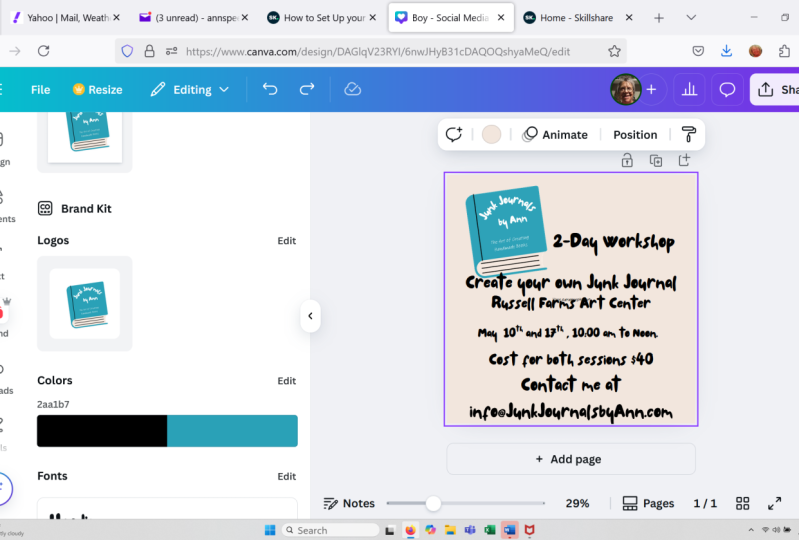
kit for free users. So I'm here in my
other Canva account, my Canva free account. If I go to my brands
tab right here, you will see the simplified
version of Brankt. So here it is. I can only have one Bankit as a Canva free user, and that brankt is
kind of locked. It's limited in
its functionality. You see? I cannot add logos. For example, if I
want to add one, I will be prompted to upgrade to Canva P. The only thing you can do really with a free brankt is to set three brand colors. You see, I can choose
three different here, but if you wish to
add a fourth color, again, you will be prompted
to upgrade to CanavaP. So not super convenient. I mean, having three
customized color is nice, but, I mean, no fonts, no images, no logos. That's a bit harsh. So again, if you are a free user and you're
watching this tutorial, there is some value for you. First, because you will
get a better understanding of everything you would get
if you decide to upgrade. But also, I have a hack at the end of the video that
will show you how to create pretty much a complete brankit
that you will be able to use in Canva without
needing to upgrade. So stick around for
that. Alright, so now I can answer the second
part of the question, which is actually what
are the brand kits.
3. Fundamental Brand Assets: Branchits are a
central hub where Canva will allow you to collect together all of your
brand's assets. Well, think of it this
way. Your Canva Bankit holds everything your
brand needs to look good, to look fresh, to
basically be that brand. So that is my best
definition of the Bankit, a central hub where
all your design asset can live all in the same place. But enough talking
about the brankt, let me show you what
it looks like right here in my Canva
for Teams account. So this is my team
run the account. We are team of ten people
using this account. But this would look similar
for a CanavaP account, even if you are the only user of the Pro account with any
paid Cannava account. So in order to find
the brand kit, you need to head over your
brand icon right here from the homepage and
make sure you are on the first tab that
says brand Kits. It says kits in plural
because Canva allows you to add multiple brand kits
in your paid account. Here I have eight
different brankits. My strategy when it comes to creating more
brankits is that every design project or
every project that I start, I tend to create a new brandkit. So you will see, for example, Bankits for some of my courses, the DL E course, the
Chat GPT course, the Canva for social
media course. Every time I start in course, I would start a branket. So inside such branket you will find the
brand colors for, for example, the slides, you will find the
thumbnail of the course. You will find the font
and font hierarchy, some photos that my team can use when they
edit the video, some elements, some assets, icons, et cetera, et cetera. So I like to yeah, create new brankits for
every single course. Then we have our team's Bankit, the more serious stuff
where our brand, Team Rondi actually lives. So the main one being this one, Team Rundi slide so from here, let me quickly show
you what you can actually include in
a Canva Branket. The first thing is logos. In order to add your logo, simply click on
the Add New button right here and you can
upload your new logos. What I like about this
is that Canva also allows you to create
guidelines for your team. So these guidelines will help your team make
the right decision. For example, you have two
versions of your logo. Let's say you have
this one right here, which is kind of like a squared or rounded logo, this one, which is more like a bar so you could leave some
guidelines on when to use the square logo and when to use the bar
logo, for example. So these guidelines
could be included here. You have 500 characters to
do, so if you save them, people will see these
guidelines directly into the object panel
when they are on the design area in
the editor of Canva. Show that to you in a minute. So the first thing you
can add to your brand kit is all of your
brand's logos. Okay? When you scroll down, you
will see a different section, section about your colors. So colors are very important
for branding, obviously. So by default, you will have only one row or one
color palette here, but you can add more
color palettes. I don't know exactly how many, but I've never run
out of color palette. Each palette can
have a multitude, like an infinite
choice of colors. Typically, a color palette
would be comprised of three to five,
sometimes six colors. I like to decline my color
palettes as my primary colors, neutrals, then you can create all of your secondary tertiary, et cetera, et cetera. Here, we decided to go for
shades, so shades of blue, shades of pink, shades of red, orange, green, et cetera. So we take our main colors
and we decline them, so we have more and
more and more options when we use color. Up to you. The thing you need to
remember is that you can create a multitude of palettes that all have
infinite number of colors. All right. Then if you scroll
down, you have your fonts. Again, you can add different
fonts for your titles, subtitles, heading,
subheading, section header. And you can delete
some of these sections if you don't think you
will be using them. So in order to set
them up, simply select or click on the title, the title hierarchy,
and change your font. You can decide to
go bold, italic. You can decide on the size
and obviously the font name as not going to mess with this because this is
our team's brandkit. If you continue to scroll down, you'll find a brand
voice section. And I'm going to show you
how that works in a second, when I'm using a real
case when I'm creating a new brandkit based
on a specific brand. So a few minutes of
patience for that. Next, you have your photos, very similar to your logo. You can add photos here. So here I just
decided to add all of my courses thumb you
have your graphics. So here we have decided
to add some background, some elements that we use for our brands or the
little patterns, elements, lines, and stuff. And then you have
a last section, which is your icons. When you click on
the add New button, Canva now lets you
add a link folder. So you can actually link all of these assets or you can
link your brandkit to a specific folder
you have in Canva that may contain more
of these elements. And then your team that
can access that brandkit will have access to
that folder in my case, right here, in all of
my Canva projects, I have a folder called elements that contains all
sorts of elements. So I could link
that to my brankit. I just need to change the sharing access of that
folder in order to do so.
4. How to set up your Brand Kit: Alright. Enough talking. Let's get into a
real life project. And let me show you how I would create a brandkit from scratch. Okay? So I'm going to go back to my brand kit page right here, and all I'm going
to do is to simply click on the add new
button right here. My brandkit is going to
be a Skillshare brankit. Recently became a top
teacher on Skillshare. So I am going to be creating more branded content
about Skillshare. And for that, I
would love to have a Skillshare branket in
my collection of branket. So the first thing, I'm going to give
this brankt a name, okay? Skillshare, let's go. Before I start
creating my brand kit, I want to show you
the brand assets that Skillshare actually shares with its instructors or influencers that create
content about the platform. So what you see
here is basically Skillshare brand assets with
a section with their logos, different version of the
logo, some print version, some digital version, different
formats of the logos. Then I have the color palette. Okay, so primary, secondary, even the tertiary color palette. Then I have some info
on the fonts, okay? Primary font some
are Google fonts, some are Adobe fonts, some are GT fonts. So let's see if I can
download all of that. I have some templates and yeah, save zone indication
and guidelines. Right here, we have
some video and cards, so little animated swiggles and lines and stuff like that. And then we have some videos that are actually
screen recording. They show you how
to properly record your screen when you're
showing Skillshare, the platform, the so
this is what we have. So what I'm going to do is
to grab that information, put that in my new
Skillshare brandkit in Canva so that I can use the Skillshare
brand whenever I need to and when
I design in Canva.
5. What else can you add to your Brand Kit: So, let's go. First thing
is that I'm going to decide which logos I actually want to add to my
brandkit, you see? So this one, definitely, I'm gonna download
it. This one as well. Skillshare for teams. Yeah, why not download
this as well? Then we have versions of the
logos with the trademark the T don't necessarily
N. Good enough. That's a good start. I can now start adding the
logos right here. They should be in my downloads. Yes, they are right here. So secondary primary logo. Let's start with the primary. Okay? I have a bunch of
different versions right here. Yeah. Okay, primary logo
green. You know what? I'm going to add
the whole thing, and I can always delete
them afterwards. So there you go. I see
the different things. So some of them are all white, some of them are all
white in vector, PNG, SBG, that's vector. Okay. So yeah, perfect. These are all of the squared. I guess, so I probably
need to add a bit more. So up ron more logos.
Okay. All right. Go back. To my download here, I have the secondary logos
in digital right here. I'm going to go with these types so many logos that
Skillshare provides. So I'm guessing
this is too much, but you're better
safe than sorry. It's better to have more when you are setting up
your brandkit and then trim them down to
what you actually really use and really
need in your designs. Alright, so I'm going
to quickly delete the ones I don't need and keep, I would say, four to
six different logos. Right, I've decided to keep
these ten logos right here. The primary logo being this one. And also, what I
did, I only kept the SVGs over the PNG format. So SVG is the vector format, which means no matter
how much I stretch them, they should not use in quality. So that's why I kept the
SVG versions over the PNG. If you have luxury of having all of these
formats, go for SVG. Me quickly split my
screen into two here. There you go. So I
can work faster. So this is my Canva account. This is the brand kit or the brand assets
provided by Skillshare. I've done all of the logos. Let's move on to the color
sections right here. Okay, so similarly,
I'm going to scroll down right here on the
left side, my Canva. Kit. So let's create the primary colors
first, primary colors. So you can rename your sections, your color palette,
which I love. Okay, so let's go
for the first color, and you see you
can either type in the hex code or
even the CMYK code. So if I click on this
color right here, I should have these code. You see, I have the code. I can copy it, just simply come back here and paste that color. Okay? So I have the
exact same color as in the Skillshare
guidelines right here. Create the second color. Okay? So this black right here, let me double check.
This is pure black. Yes, it is pure black. So your pure black right
here is very easy. You go to the corner like
any of the lower corners. It should be all zeros, and that is your pure black. Okay, so I can close that and see if they
have other colors. I would have thought they had
also white. You know what? I'm going to add pure
white right here. So pure white is the
opposite of black only Fs. Okay? And there you go. So
that's my first color palette. That's my primary color palette. Add a secondary palette. So secondary palette, add a
custom palette. All right. And I'm going to name
it secondary colors. So I remain consistent with the primary and
secondary colors. So secondary colors, we
have this navy right here. Going to copy the hex code
and simply paste it here. Okay. That's the first one. Next color will be let's go for the gray right
here. I have 3 grays. Okay, so this one right here, go copy this code,
paste it here. And I'm going to speed
up the video because this process is a
little bit repetitive. One thing I would like
to show you is that each of the colors can
actually be renamed. Sometimes colors have
names like here, we have green, navy violet. So the colors
actually had a name, so I could probably
rename them accordingly. So green. This one is
going to be black. The way I rename them
simply double click or you can use a little pencil icon
right here. This is white. Now, this is the Navy, and then this is my
gray one, two, three. Okay. So gray one, this one is gray. Two and gray three. There you go. So I have
all my grays here. Then the last color palette I should create is the tertiary, which is the bright
colors right here. So I have one, two, three, four. Okay. Alright, I'm done with my color palettes. Now let's move
down to the fonts. Okay? So you see the
font section right here. I'm going to go a bit faster because the process is
pretty much the same. So I'm going to select
my fonts here and see what I can actually find
by default in Canva. My guess is that I will find
the two Google fonts ones, these two DMSuns and Laura, which are the secondary funds. Okay? And the Adobe
font and the GT fonts, I won't be able to download that because they
are probably paid. Funds. So yeah, I'm going to focus on these
two right here. But I want to show you that
with a paid Canva account, you can add custom fonts. You see, you can manage
your uploaded fonts. You can click on that button right here and choose a font on your computer and upload it if it's not yet in Canva. Okay? So that's how you upload
a custom font in Canva, but you need a paid
account for that. So I'm going to focus on
these two other fonts, DM Suns and Laura. Okay? Let's see for my title, for example, if Canva
has these fonts. So DM DMSans is here. So I'm going to go for the bold. And yeah, I'm going to
bump up the size of this to maybe 72 bolded DMSans. Okay, great. I'm going
to validate that. And now you see my title
hierarchy is going to be by default DM sans
bolded in size 72. And now for the body, I'm going to use this other
font, Laura right here. Let's see if they
have it. Pretty sure they do because I've
used that before. So, Laura, there you go. Laura regular in size 30. I think 32 is good,
body perfect. Okay, the other ones, I don't feel like I need
them so much right now, so cannot delete them, but I don't think they will
show if I don't set them up. So I'm going to stick with this. Alright, what else do I have? I have some video templates
and some brand videos. Unfortunately,
Canva doesn't allow us to upload video
assets so far, only photos,
graphics, and icons. But there is another
button right here that says brand voice. And I think this part
is pretty interesting. I can now collapse this
window right here. Don't need this anymore. But I want to show you what
brand voice is all about. Here, we can give Canvas
specific guidelines to describe our brand voice
using Canvas magic writes. Before I set up
that brand voice, let me show you what magic
Ride is and what it does. So you see this little
magic button right here, the quick action button. The first button
you should see to pro feature as well
is magic write. So if I click here, I
can prompt, for example, write a hook for a
video tutorial about Canva brankits. I'm
going to generate that. Canva should generate a little
hook and discover how to elevate your brand's visual
identity effortlessly with Canva brand this tutorial will unlock the
secrets to creating cohesive and professional
looking designs that resonate with your audience,
etcetera, etcetera. Now, let me show you
something you can do to force magic writ to write more like your brand,
your brand's voice. So coming back to my Skillshare
brand kit right here, if I scroll the way
down to brand voice, I can add a description of
my brand voice right here. Okay? I have 500
characters to do so. So what I suggest
you do in order to define your brand's
voice or in my case, I'm using Skillshare
brand, okay? So how can I know
Skillshare brand voice? Well, I decided to go
check out their blog. So skillshare.com slash Blog. I am in the news section, and I'm just going to find an article written
by Skillshare. You see, Skillshare
as the author. Let click on this
one, introducing the live sessions on Skillshare. And I'm going to copy
everything on this page. So I'm going to control,
see everything here, and then I'm going to head
over to hATGPTGodol hATGPT. Going to paste that
thing right here. It's a big chunk of text, okay? So I could probably delete long series of things that
will not be useful for me. I'm going to start the
first sentence here. Add a few spaces by holding my ships key so I don't launch the prompt because I do have a prompt for you
to use right here. So I'm going to copy that
prompt and paste it here, and the prompt goes like this. Analyze the tone of voice of this brand and define it into details using precise adjectives of what it is and
what it is not. Ask me additional questions if you feel like you
need more insights into the brand voice after
analyzing this piece of texto. I want to make sure
CHAPT will ask me more question if it doesn't
have enough information. Description of the
brand voice should not be longer than 500 characters. Remember that's Canvas
limit in the brand kit. And then obviously, you
paste the rest of your text. So I can write here sample text, column, and that's it. I have enough with this. This section is
tailored for Okay, so I'm going to delete
all of this right here, which I don't think is useful. Run this prompt and
see what ChaGPT can come up with in terms of description of
that tone of voice. Let's see. The tone of voice for this brand can be
described as this. Engaging and encouraging,
it creates excitement and enthusiasm about the
creative process and learning opportunities. Inclusive and
community oriented. It emphasizes a sense of
belonging and community, inviting participation, interaction among like
minded individuals. Clear and informative. The language is straightforward
and easy to understand, providing detailed and
practical information. Supportive and inspirational. It motivates and supports
creative in their journey, offering inspiration
and practical steps to achieve their goals. But it's not overly
formal or technical, it's not distant or detached. It's not vague or ambiguous. That's great. So I'm
going to go copy this. Hopefully, it's not more
than 500 characters. It is. So I'm going to start by deleting all of
the spaces here. Alright, so I cannot fit the whole thing here
with my 500 characters. So what I could do
simply come back to Chat GPT and ask it to make sure your description
of the brand voice is no longer than
500 characters. Okay. Should understand that and rewrite the whole thing
in less characters. Okay, so got it
here. There you go. Okay, so I'm going to
use this one right here, face that instead of this
one, and now it should work. The brand voice is
engaging and encouraging, creating excitement
about creative learning. It's inclusive and
community oriented, fostering a sense of
belonging and interaction. The tone is clear
and informative, offering practical,
detailed guidance. It's supportive
and inspirational, motivating creative to
achieve their goals. It's not overly formal,
technical, distance, Perfect. I love how HAGPT can always shorten or lengthen
any pieces of text. Now, I've saved that. So now, this is saved
as my brand voice. Okay? So what I can do is to
go back to my magic write, asking it to write
a hook for my video and see if it can come up
with something any better. All right. So for
that, coming back to magic write right here, make this full screen
and find magic write. There you go. So my prompt was write a hook for a video
tutorial about Canva. Banket and voice. And now I can see if I
can add my custom voice. I'm going to click again
on custom voice, like so. And I have the message
that this brankit doesn't have a voice
because I'm still here, if I'm correct, in my
team run this brankt. So if I click on CO, I should be able to find my
Skillshare branchetT one. So select that branket and now I should have my custom
voice. There you go. Custom voice. We generate this answer, and here is my new hook. Unlock the full potential of your brand with Canvas Bankit. Join us as we guide
you through creating a cohesive and stunning
brand identity making every design effortlessly
consistent and uniquely yours. Ready to elevate your brand
game, let's get started. Now, this is way less boring than the previous hook that
was generated with Canvas. So I consider this a success. So that's in a nutshell, how you use your brand voice. You have to set it up in
your brankt, save that, and now you can use
it whenever you are prompting Canvas AI or
Canvas magic right. Now, that was pretty
cool, kind of fun.
6. How to use your Brand Kits while designing: Alright, now that we
have set up our brankt, I want to show you what
it's good for, like, how to use your
brankit while you are designing in
the Canva editor. The brand kit and having
all of your assets in one central
place is so useful. It will save you so much time. So let me just give you a few of the use cases of a first, let's imagine you have circles. You have a bunch of
different circles on your page and you need these
circles to be on brand. Well, the first
thing is that when you generate a new circle, I'm using the key, the shortcut C on my keyboard, it will create that circle
in my primary color, the first color in
my brand kit, okay? So if I go to my brand, you see this green right
here is the primary color. So if you don't have
your brand kit set up, this will come as the last
color you've used in Canva, I guess. So this is
the first thing. If you want to
change the color of that just click on
your color button, and you should see right
here your brand kit's name. So that is Skillshare. If I click the drop down arrow,
I can choose another one. I'm good with Skillshare. And now I have all of my different color
palettes, my primary, secondary, and tertiary, which I didn't
modify yet the name. At my fingertips,
they are right here. So if I need a red
circle, a blue, and a yellow, I can simply
go and fetch these colors. If you don't have a brankit, you will have to go and
select the color picker or the color button right here and change the hex code manually, which could be a time sucker. I just adds extra
step extra clicks to your creative process. So that's the first
thing colors very easily to get access
to your brand colors. Also, you see all of
your colors right here. You could very easily style
a template or layout. So if I go to the design step, go and choose a layout, let's say I use this layout right here with a
page like this, like an agenda and five points, then I come back to my brand. I could shuffle, let's
say I want to use my primary palette. I
could shuffle that. And you see it will
basically apply my brands colors to this
specific works with layout. It works with templates as well. So if you choose a template
instead of a layout, let's say, let's use this template right here that I used in the previous tutorial. Let's go for this
page right here. So you select it. Go to
your brand tab right here. And now let's say you want
to shuffle these colors. Well, very easily, you
can do that as well. You can make sure
this page is going to be using only the
colors in your branket. So that's what it
does for colors. You can do the same
for fonts, okay? So for example, this
big title right here, I could make that on brand. So if I want to do that,
I can just click on that textbox and then click
on my font button right here, and I should see right
here my brand color. So if I scroll down a bit, I see my brand kit
name right here. You see the brand icon, like the co kind of palette. So that is my brankit and you see the first
one right here, DMSans is my brand, font that I chose that
I set in my brandkit. So you will need to adapt
the size a little bit. If you want this to fit. You can go all caps or not, and you can change
everything pretty much like if you want
to use the second font, the Laura, for example,
do that as well. And just like that, apply your brand font to
everything on your template. So you can also use the
copy style button to set your brand font
everywhere on your design. So red, yellow, orange.
Okay, so there you go. That's how you actually use your brandkit from
within the design area. There's so many other
things you can do, okay. From here, you can add
your brand photos in, switch to another
brandkit of ours. Main brankt our team
run for the slide, this one, select this brandkit. I want to show you how all
of these logos, for example, if I want to add this
logo, for example, to our page that you go, I
can simply click on the logo. It's right here. It's
always going to be available for me right
here. What else? Like the photos that we have, if I need to add the thumbnail of a specific
course, then you go. I have it handy right here. Similarly for my
graphics and my icons everything that I need right
here at my fingertips. Okay? So again, having your brand kit setup
is really shortcut. Like, it saves you
so much time and it allows you to always
design on brand. If you stick with these colors, if you stick with
these fonts and these pre approved visual, you will always design on brand. And this will strengthen the brand identity
because people will be exposed to
a consistent brand. Like, repeatedly, the
messaging will be consistent makes sense so
that people can remember it. It will reinforce
your brand identity.
7. Complete Brand Kit with a Free Canva account: Alright, we are getting closer to the end of this tutorial. If you are Canva free user, I promised you a hack on how to create a
complete branchet with everything that I
showed you that is available for the P
branket or Teams branket. There is a way you can do that
without having to upgrade. It's not as convenient
as it will not show in such a structured manner in
your branket in the editor, where you can create a document. And I'm going to show
you a shortcut to do that to gather all of these brand assets and information and attributes
into a single document. Okay? I'm talking about,
of course, a Canva. So let me show you how
you would do that. Just from the homepage, click on the Templates
tab right here. And the keyword you
are going to search for is brand board. Okay? So brand board. There you go. Brand board. You should see a bunch of
different brand identity, brand kits or brand guidelines. Like, so I don't know exactly how those are called,
but in Canva, brand board seems to be the
key so obviously a lot of these templates will
be pro templates only. But me, I have created
three ones that I believe are well designed that you could be
using right now. So I'm going to
present them to you. The first one is this one. You
see, it's a free template. You can totally use
that as a free user. So this one, it has a big
header for your logo, then another space right here
for a variant of your logo, a little bit of
brand strategies, your brand colors, your fonts, and some brand imagery. This is a very cool template. You can obviously update this document with
your brand assets. And instead of brand strategies, you could have a
little blurb about your brand voice right here. And I think this could very well replace a brand kit if
you are a free user. Now, let me show you two
more. There is this one. It has a more like tech dark
theme kind of vibe to it. But it has all of
the information, the logos and their variations, the colors, primary and
secondary, some gradients. Sometimes brands use gradients, custom gradients, the fonts. With a little bit
of explanation or, you see these bubble
speech open this. So you can see some guidelines here and some tips
on how to use them. So this one also
completely free. A few graphics or elements
have been pasted there. So that's another great
option for you guys. And then the third
one that I have selected for you is
this one right here, more like a feminine
vibe, this one, floral, more abstract shapes,
different, more vibrant colors, but still has these tips and extra information that you
can add to your brand board. Let your team know
how to use it. So similar kind of structure. So these three templates will be linked in the
description for you to use. Alright, I am almost done. I believe you can see the value of having
a canva for teams or Canva pro account
because it really brings you the whole bang of
the brand kit right there. You can create it in Canva and use it directly
in the editor. Thank you for investing
in your Canva education. Thank you for doing it with
us. We appreciate that.
 Ronny Hermosa, Your Go-To Canva Guru